

Page 1
Page 2
Page 3

FCC COMPLIANCE STATEMENT FOR AMERICAN USERS
This equipment has been tested and found to comply with the limits for a class B digital
device, pursuant to Part 15 of the FCC Rules. These limits arc designed to provide
reasonable protection against harmful interference in a residential installation. This
equipment generates, uses and can radiate radio frequency energy and, if not installed
and used in accordance with the instructions, may cause harmful interference to radio or
television reception, which can be determined by turning the equipment off and on. The
user is encouragcd to try to correct the interference by one or more of the following
measures:
•
Reorient or relocate the receiving antenna
•
Increase the separation between the equipment and receiver
•
Connect the equipment into an outlet on a circuit different from that to which the
rccciver is conncctcd
•
Consult the dealer or an experienced radio/TV technician for help.
The connection of a non-shielded printer interface cable to this printer will invalidate the
FCC Certification of this device and may cause interference levels which exceed the limits
cstablishcd by the FCC for this equipment. If this equipment has more than one intcrfacc
connector, do not lcavc cables connected to unused interfaces.
This digital apparajtus does not exceed the Class B limits for radio noise emissions from
digital apparatus as set out in the radio interference regulations of the Canadian
Department of Communications.
Le présent appareil numérique n'émct pas de bruits radioéletriques dépassant lcs limites
applicables aux appareils numériques de Classe B prescrites dans le réglcment sur lc
brouillagc radioélectriqucs édicté par le Ministére des Communications du Canada.
All rights reserved. No part of this publication may be reproduced, stored in a retrieval
system, or transmitted, in any form or by any means, mechanical, photocopying, recording,
or otherwise, without the prior written permission of Epson America, Inc. No patent liability
is assumed with respect to the use of the information contained herein. While every
precaution has been taken in the preparation of this book, Epson America, Inc. assumes no
responsibility for errors or omissions. Neither is any liability assumed for damages resulting
from the use of the information contained herein.
Epson America, Inc. shall not be liable against any damages or problems arising from the use of
any options other than those designated as Original Epson Products by Seiko Epson Corporation.
Epson and Epson ESC/P arc registered trademarks of Seiko Epson Corporation.
General Notice: Other product names used herein are for identification purposes only and may
be trademarks of their respective companies.
WARNING
FOR CANADIAN USERS
Copyright © 1990 by Epson America, Inc.
Torrance, California
ii
Page 4

IMPORTANT SAFETY INSTRUCTIONS
1.
Read all of these instructions and save them for later reference.
2.
Follow all warnings and instructions marked on the product.
3.
Unplug this product from the wall outlet before cleaning. Do not
use liquid cleaners or aerosol cleaners. Use a damp cloth for
cleaning the outside of the unit.
4.
Do not use this product near water.
5.
Do not place this product on an unstable cart, stand, or table.
The product may fall,, causing serious damage to the product.
6.
Slots and openings in the cabinet and the back or bottom are
provided for ventilation; to ensure reliable operation of the
product and to protect it from overheating, these openings must
not be blocked or covered. The openings should never be
blocked by placing the product on a bed, sofa, rug, or other
similar surface. This product should never be placed near or
over a radiator or heat register. This product should not be
placed in a built-in installation unless proper ventilation is
provided.
7.
This product should be operated from the type of power source
indicated on the marking label. If you are not sure of the type of
power available, consult your dealer or local power company.
8.
This product is equipped with a 3-wire grounding-type plug, a
plug having a third (grounding) pin. This plug will only fit into
a grounding-type power outlet. This is a safety feature. If you
are unable to insert the plug into the outlet, contact your
electrician to replace your obsolete outlet. Do not defeat the
purpose of the grounding-type plug.
9.
Do not locate this product where the cord will be walked on.
iii
Page 5

10. If an extension cord is used with this product, make sure that the
total of the ampere ratings on the products plugged into the
extension cord do not exceed the extension cord ampere rating.
Also, make sure that the total of all products plugged into the
wall outlet does not exceed 15 amperes.
11. Never push objects of any kind into this product through cabinet
slots, as they may touch dangerous voltage points or short out
parts that could result in a risk of fire or electric shock. Never
spill liquid of any kind on the product.
12. Except as specifically explained in the User’s Manual, do not
attempt to service this product yourself. Opening or removing
those covers that are marked “Do Not Remove” may expose you
to dangerous voltage points or other risks. Refer all servicing in
those compartments to service personnel.
13. Unplug this product from the wall outlet and refer servicing to
qualified service personnel under the following conditions:
A. When the power cord or plug is damaged or frayed.
B.
If liquid has been spilled into the product.
C.
If the product has been exposed to rain or water.
D.
If the product does not operate normally when the operating
instructions are followed. Adjust only those controls that
are covered by the operating instructions, since improper
adjustment of other controls may result in damage and will
often require extensive work by a qualified technician to
restore the product to normal operation.
E.
If the product has been dropped or the cabinet has been
damaged.
F.
If the product exhibits a distinct change in performance,
indicating a need for service.
iv
Page 6

Contents
Introduction
Features ..........................................
Options and Supplies ..............................
About This Manual ................................
Where To Get Help ................................
Ink Jet Printer Precautions
..........................
Chapter 1 Setting Up the Printer
Choosing a Place for the Printer
.....................
Unpacking the Printer .............................
Removing the Protective Materials
Checking the Parts
...............................
................
Carrying the Printer .............................
Assembling the Printer ............................
Attaching the Printer Cover
Installing the Extension Tray
Installing the Output Tray
Installing the Paper Support.
Installing the Ink Cartridge
......................
.....................
........................
.....................
.......................
Plugging in the Printer ...........................
Your Printer’s Components
.........................
Front View .....................................
BackView ......................................
Left Side View ..................................
Charging the Ink Feeding System.
Loading Paper to Print a Self Test.
...................
...................
Printing the Self Test. ..............................
If the Self Test Doesn’t Print.
Connecting the Printer to Your Computer
Connecting the Parallel Interface
......................
............
..................
1
1
2
4
5
6
1-1
1-2
1-4
1-6
1-10
1-11
1-14
1-14
1-15
1-16
1-17
1-17
1-21
1-22
1-22
1-24
1-25
1-27
1-29
1-38
1-42
1-43
1-44
V
Page 7

Connecting the Serial Interface
Using Your Printer with Software
Selecting the Best Printer Mode.
How Your Printer Works
.........................
....................
...................
...................
1-46
1-49
1-49
1-50
Chapter 2 Using the Printer
The Control Panel
The Display
Indicator Lights
.................................
.................................... 2-2
.................................
Buttons ........................................
SelecType Overview
Using SelecType
SelecType Menus and Options
HP Emulation Mode Menus
LQ/FX Emulation Mode Menus.
...............................
................................
...................... 2-8
......................
..................
Chapter 3 Paper Handling
Choosing Paper
Loading Paper
............ ..
....................................
Loading Paper into the Paper Tray.
Loading Paper Manually
.........................
.................... 3-2
................
Chapter 4 Options
Using Font Cards.
Compatible Font Cards.
Caring for Font Cards.
Inserting a Font Card
.................................
..........................
........................... 4-2
............................
Selecting a Font With Your Application Program
Selecting a Font With SelecType
Removing a Font Card
...........................
Recovering From a Card Error
...................
....................
....
2-1
2-2
2-3
2-4
2-6
2-8
2-9
2-23
3-1
3-4
3-4
3-16
4-1
4-2
4-2
4-3
4-5
4-5
4-7
4-8
vi
Page 8

Using a Memory Board.
............................ 4-10
Installing a Memory Board
Checking the Memory Board.
Using Interface Boards
............................. 4-16
Installing an Interface Board
Setting up Your System
.......................
.....................
......................
4-10
4-15
4-17
.......................... 4-22
Chapter 5 Maintenance and Transportation
Cleaning the Printer
Cleaning the Print Head.
Running the Cleaning Cycle
Cleaning the Paper Path.
Replacing the Ink Cartridge.
Transporting the Printer.
...............................
...........................
......................
...........................
........................
...........................
Chapter 6 Troubleshooting
Status and Error Messages
..........................
The Messages ...................................
Problems and Solutions
Power Supply.
....................................
Paper Feeding Problems.
Clearing a Paper Jam.
............................ 6-8
...........................
..............................
TestPrint .........................................
Printing Problems
Problems With Graphics
SelecType Problems
Paper Handling
Options
Data Dump Mode
..........................................
.................................
...........................
...............................
...................................
.................................
5-1
5-2
5-4
5-5
5-6
5-7
5-11
6-1
6-2
6-2
6-10
6-11
6-13
6-18
6-19
6-26
6-28
6-30
6-35
6-38
vii
Page 9

Chapter 7 Technical Specifications
Printer Specifications
Printing
........................................
Resident Fonts
Paper Delivery
Paper..
........................................
Printable Area
............................................
Ink
Mechanical
Electrical
.....................................
.......................................
Controller Hardware
Environment.
Interface Specifications.
Parallel Interface
Serial Interface
Initialization
......................................
Default Settings in HP Emulation Mode
..............................
..................................
..................................
..................................
............................
...................................
............................
................................
..................................
............
Default Settings in LQ and FX Emulation Mode
.....
7-1
7-2
7-2
7-2
7-3
7-5
7-8
7-14
7-15
7-16
7-17
7-18
7-19
7-19
7-23
7-26
7-27
7-29
Appendix A
HP Emulation Mode
Resident Fonts
Symbol Sets
LQ and FX Emulation Mode
Resident Fonts
Resident Fonts and Symbol Sets
....................
..................................
....................................
......................
..................................
Character Sets. ..................................
Converting Hexadecimal Numbers to Decimals
viii
.......
A-1
A-2
A-2
A-3
A-12
A-12
A-13
A-17
Page 10

Appendix B
Available Printer Modes.
Setting the Printer Mode With SelecType
Printer Driver Information.
Fonts and Font Cartridges
HP Emulation
Unique Features
Command Summary for HP Emulation
EPI-4000 and HP Command Differences.
Job Control Commands
Cursor Positioning
Font Selection.
Modes and Commands
...........................
...........
.......................
........................
.....................................
.................................
..............
...........
..........................
..............................
..................................
Font Management ...............................
Soft Font Creation
Graphics..
Macros
.....................................
.........................................
Programming Aids
Command Summary for LQ/FX Emulation
EPI-4000 and LQ/FX Command Differences
Printer Operation.
Data Control.
Vertical Motion
Horizontal Motion.
Overall Printing Style
Print Size and Character Width.
Print Enhancement
Word Processing
Character Tables
User-defined Characters.
Graphics..
.....................................
...............................
..............................
...........
........
...............................
...................................
.................................
..............................
............................
...................
..............................
..............................
................................
.........................
B-1
B-2
B-2
B-2
B-3
B-4
B-4
B-5
B-5
B-6
B-9
B-10
B-16
B-16
B-17
B-19
B-19
B-20
B-20
B-24
B-24
B-25
B-26
B-27
B-28
B-28
B-29
B-29
B-30
B-30
Glossary
Index
ix
Page 11

Introduction
The Epson® EPI-4000 combines high performance and reliability
with a wide range of features. The EPI-4000 uses ink jet technology
for fast, quiet, high-quality printing. A powerful processor drives
the EPI-4000’s imaging system, allowing it to compose an entire
page in internal memory before printing.
Features
In addition to the high-quality printing and ease of operation
you’d expect from an Epson printer, these features make using
the EPI-4000 a snap:
Flexible paper handling so you can choose from 13 popular
paper sizes, including 11 x 17-inch ledger size.
300 dpi for crisp, clear printing
A convenient control panel for control over almost every printer
feature, from font selection to interface configuration.
Access to the wide selection of exclusive Epson fonts.
Two card slots for adding optional font cards.
TM
HP LaserJet series II
great variety of software written for Hewlett Packard® printers.
emulation gives you easy access to the
Two Epson ESC/P® emulation modes for compatibility with the
many software applications written for Epson 9-pin and 24-pin
printers.
A large selection of international symbol sets to print with the
letters, characters, and symbols of various languages.
0.5 megabytes (MB) of MM built-in, expandable to 2.5 MB for
graphics printing.
Introduction 1
Page 12

Introduction
l The ability to print up to two letter size pages or one ledger size
page of text per minute.
l Two built-in interfaces: Centronics
®
parallel and RS-232C.
Options and Supplies
Many options are available to enhance your EN-4000 printer. For
detailed information on the installation and use of these options, see
Chapter 4.
Font cards
Optional font cards are available from your Epson dealer. These
cards contain additional fonts to supplement the internal fonts
resident in your printer.
Memory expansion board
Increase your printer memory from 0.5 MB of RAM to a total of
2.5 MB with a memory expansion board. More memory means
faster printing for complex pages.
Introduction
2
Page 13
Introduction
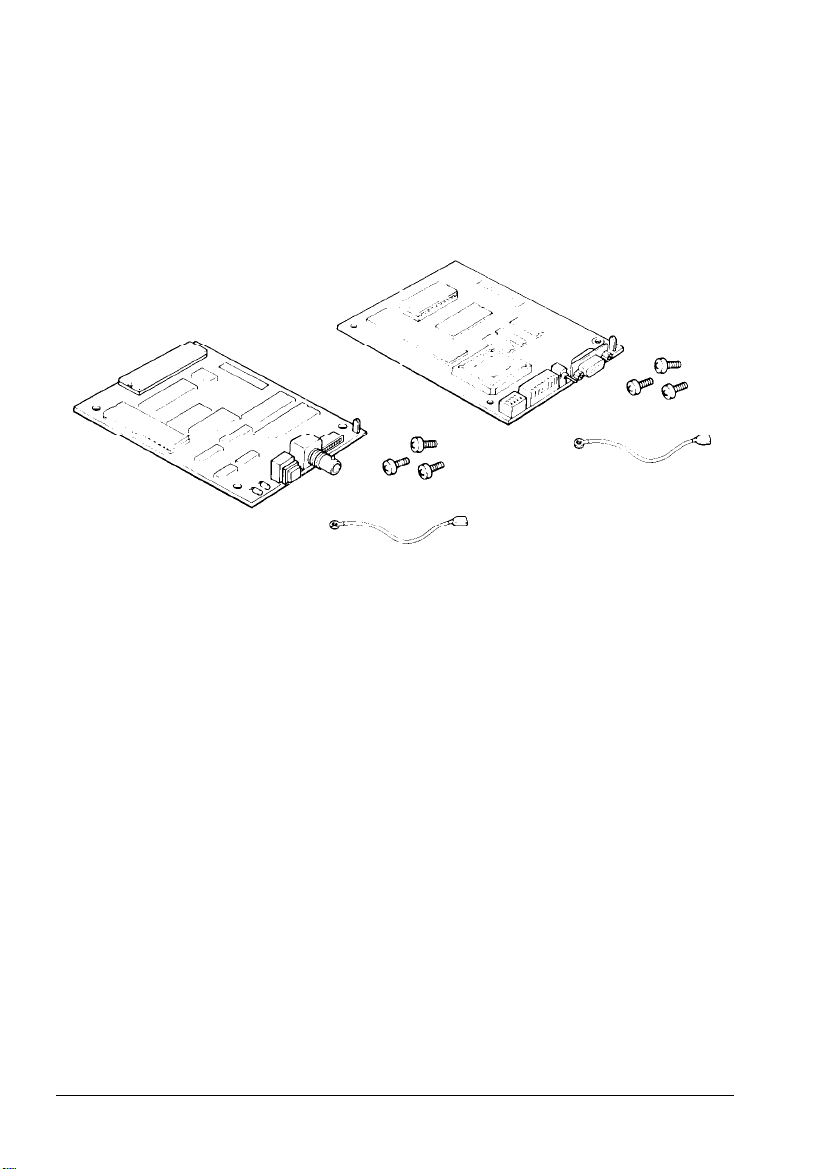
Coax and Twinax interface boards
These two interfaces let you use the EPI-4000 as a local system
printer for an IBM® mainframe or minicomputer. You can install the
boards quickly and easily inside the printer without any additional
hardware.
IEEE interface board
The IEEE-488 interface offers standardized connections, trouble-free
operation, and the ability to connect computers, printers, and other
devices on the same line to share data freely.
Serial interface boards
These interfaces are required if you need an interface that conforms
to the Current Loop standard instead of RS-232C. These interfaces
also provide a combination of these features: X-on/X-off data
communications protocol and loopback self test modes.
Introduction 3
Page 14

Introduction
About This Manual
This user’s manual provides fully illustrated, step-by-step
instructions on setting up and operating your Epson EN-4000
printer.
Finding your way around
Chapter 1 contains information on unpacking, setting up,
testing, and connecting the printer. Be sure to read and follow
these instructions first.
Chapters 2 and 3 cover general printer operation and paper
handling. This important information is necessary for the dayto-day operation of your printer.
Chapter 4 shows you how to get the most from your printer
using font cards, extended memory, and the optional interface
boards.
If the printer does not operate properly or the printed results are
not what you expect, see Chapter 6 for troubleshooting tips.
Other chapters contain information on printer maintenance and
specifications. The appendixes contain explanations of printer
modes as well as a summary of printer commands, tables of
available symbol sets, and character samples. You will also find
an index and a glossary of printer terms.
At the back of this manual is a handy Quick Reference card
showing all SelecType menus and options for easy use
whenever you use SelecType.
Introduction
4
Page 15
introduction
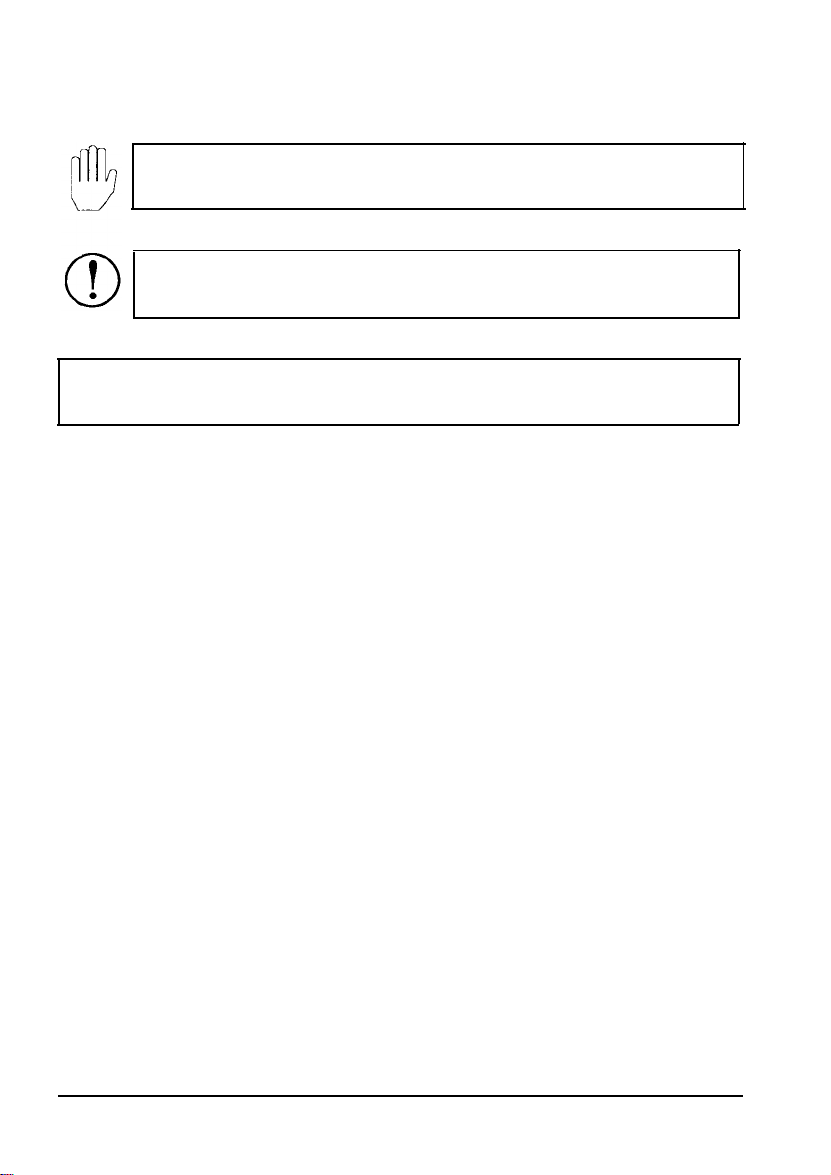
Conventions used in this manual
WARNINGS must be followed carefully to avoid damage
CAUTIONS should be followed carefully to ensure that
your printer operates correctly.
Notes contain important information and useful tips on the
Where to Get Help
Customer support and service for Epson products are provided by a
network of authorized Epson dealers and Customer Care Centers
throughout the United States. Epson America provides product
information and support to its dealers and Customer Care Centers.
Therefore, we ask that you contact the business where you
purchased your Epson product to request assistance. If the people
there do not have the answer to your question, they can obtain it
through our dealer support program.
Epson is confident that this policy will provide you with the
assistance you need.
Call the Epson Consumer Information Center at l-800-922-8911 for
the following:
l The location of your nearest Epson dealer
l The location of your nearest Customer Care Center
l Information on Epson User Groups.
To locate or purchase accessories or supplies, contact your nearest
Epson dealer or call l-800-873-7766.
Introduction 5
Page 16

Introduction
Ink Jet Printer Precautions
The EPI-4000 uses ink jet technology. Even if you are familiar with
other types of printers, please read and observe the following
precautions to ensure safe, efficient operation.
•
Never put your hand inside the printer while it is printing.
•
Cartridge ink contains propyl alcohol. If the ink comes in contact
with your skin, wash immediately with soap and water. If ink
gets in your eyes, flush them immediately with plenty of water.
•
If ink accidentally gets on any part of the printing mechanism,
wipe it off with a clean, damp cloth.
•
Store ink cartridges in a cool, dry place out of direct sunlight. Do
not store cartridges at excessively high or below freezing
temperatures.
•
Keep ink cartridges out of the reach of children.
•
Do not use an ink cartridge after the labeled expiration date. Ink
cartridges cannot be refilled; do not take them apart.
•
Never remove an ink cartridge while the printer is on line or
while it is printing.
•
Always follow these steps to turn off the printer: Press ON LINE
to set the printer off line. Wait three seconds; then turn the
printer power switch off. You must wait three seconds after you
press ON LINE to ensure that the print head is safely capped at
the left side of the printer.
•
If you want to transport the printer, make sure the print head is
safely capped, as described above. Remove the ink cartridge
before you move the printer to a new location.
•
Never turn the printer on or off unless an ink cartridge is
installed.
•
Do not turn off the printer while it is printing. The print head
may not cap properly, resulting
in faster ink consumption.
6 Introduction
Page 17

Introduction
l If you must turn the printer off in the midst of printing, first
press ON LINE to set the printer off line, wait three seconds, and
then turn the power off.
l The EPI-4000 uses an electric heater to dry the ink as the page is
released to the output tray. For best print quality, do not touch
the finished page until the printer completes delivery to the
output tray.
l The paper output slot at the back of the printer may become
warm during printing. This is because of the electric heater used
to dry the ink and is no cause for concern.
l When you turn on the printer after a long period of disuse, you
may notice a peculiar smell. This is normal; there is no cause for
concern.
Introduction 7
Page 18

Chapter 1
Setting Up the Printer
Choosing a Place for the Printer ...........................................
Unpacking
Removing
Checking the Parts................................................................
Carrying the Printer .............................................................
Assembling
Attaching the Printer Cover..
Installing the Extension Tray
Installing the Output Tray
Installing the Paper Support
Installing the Ink Cartridge..
Plugging in the Printer ........................................................
Your Printer’s Components
Charging the Ink Feeding System .............................................
Loading Paper to Print a Self Test ..........................................
the
Printer.. ............................................................
the
Protective Materials..
the
Printer ............................................................
.............................................. 1-14
..............................................
..................................................
...............................................
...............................................
......................................
..................................
1-2
1-4
1-6
1-10
1-11
1-14
1-15
1-16
1-17
1-17
1-21
1-22
1-27
1-29
Printing the Self Test .....................................................................
Connecting the Printer to Your Computer
Connecting the Parallel Interface
Connecting the Serial Interface.. .........................................
Using Your Printer with Software ................................
.......................................
...........................
Setting Up the Printer
1-38
1-43
1-44
1-46
1-49
1-1
Page 19

Choosing a Place for the Printer
There are several important things to consider when selecting a
place to set up your printer. Keep the following in mind:
l Leave enough room around the printer to allow easy operation
and maintenance and unrestricted flow of air. The illustrations
below show how much space is required.
1-2
Setting Up the Printer
Page 20
Choosing a Place for the Printer
Place the printer on a. flat, hard, stable surface. A soft surface,
such as a carpeted area, blocks the ventilation slots and may
cause overheating.
Place the printer close enough to the computer for the printer
cable to reach.
Use a grounded outlet with three holes to match the plug on the
printer. Do not use an adapter plug.
WARNING:
l Avoid locations that are subject to direct sunlight,
excessive heat:, moisture, or dust.
l Avoid electrical outlets controlled by wall switches or
automatic timers. Power interruptions can wipe out
information in your computer memory and in your
printer memory.
l Avoid using outlets that share a circuit with large
motors or other appliances that might disturb the
power supply.
l Keep the entire computer system away from potential
sources of electromagnetic interference such as
loudspeakers or the base units of cordless telephones.
Setting Up the Printer
1-3
Page 21

Unpacking the Printer
Carefully unpack the main carton. At the top of the carton you’ll
find an accessory box containing several printer components. Under
this box is the printer itself, protected by white packing material.
The illustration below shows how your printer is packaged.
1-4
Setting Up the Printer
Page 22
Unpacking the Printer
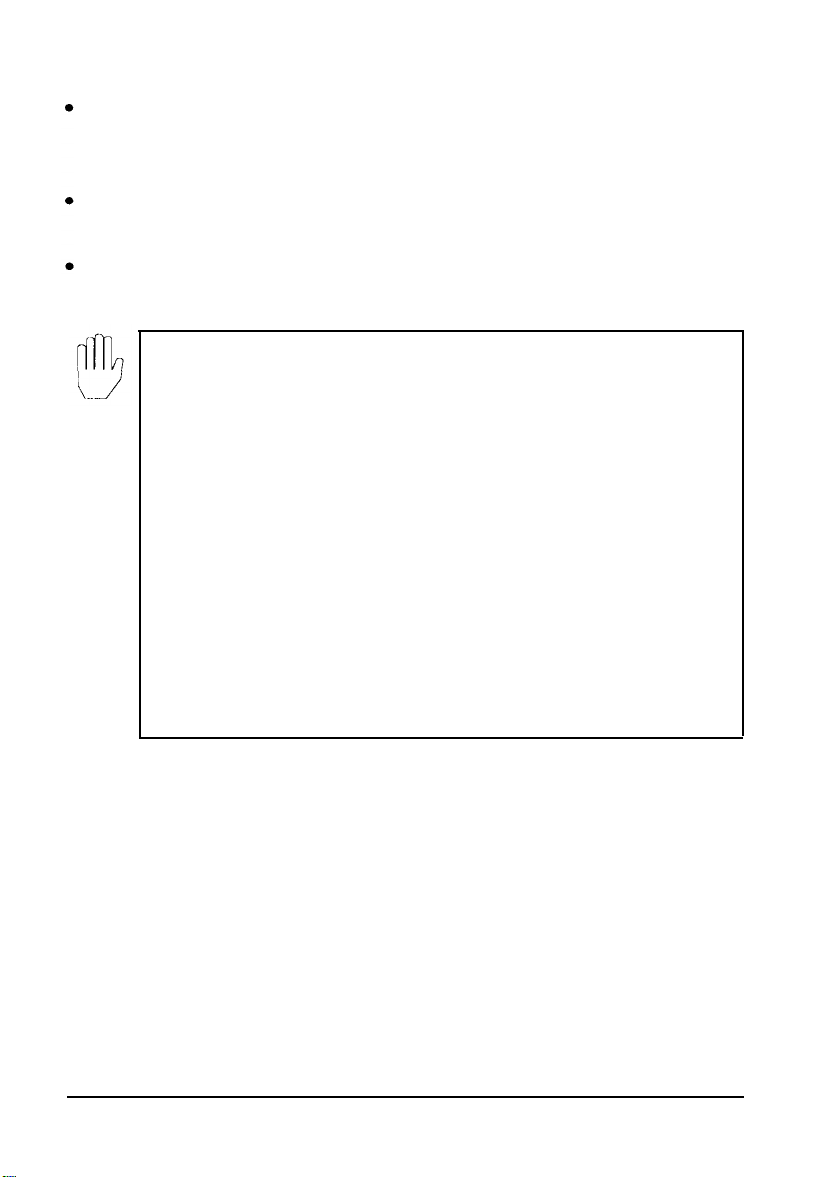
1.
Remove the printer from the large carton and set it on a flat,
stable surface. You may need someone to help you lift it.
2.
Remove the printer from the plastic bag. Then remove each
shock prevention tape as shown below.
Setting Up the Printer
1-5
Page 23

Unpacking the Printer
Removing the Protective Materials
The EN-4000 is protected during shipping by a screw, a locking
bracket, a protective sheet, and white foam packing materials.
Except for the white packing material inside the paper tray, you
must remove these items before you can turn on your printer. Save
all protective materials in case you need to transport your printer.
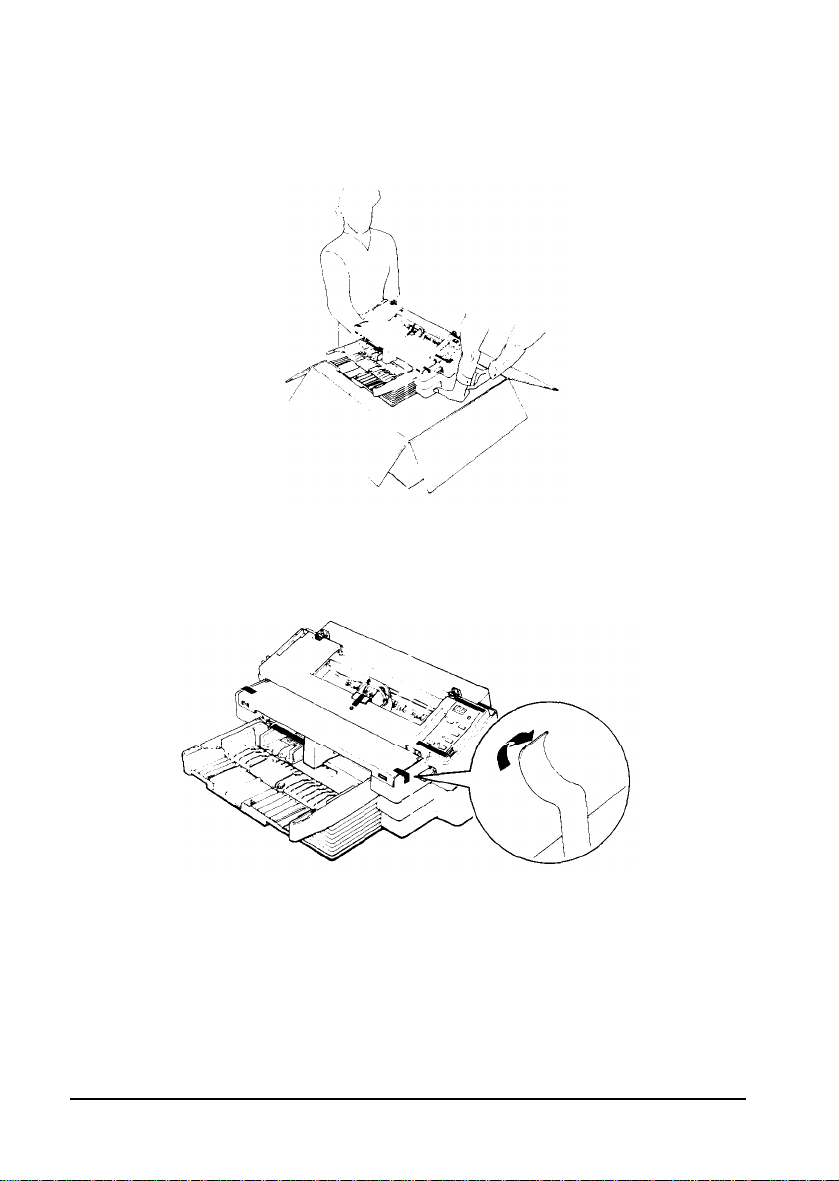
1.
Remove the protective material from the print head’s flexible
band.
2.
Use a coin to remove the screw, as shown below.
1-6
Setting Up the Printer
Page 24
Unpacking the Printer
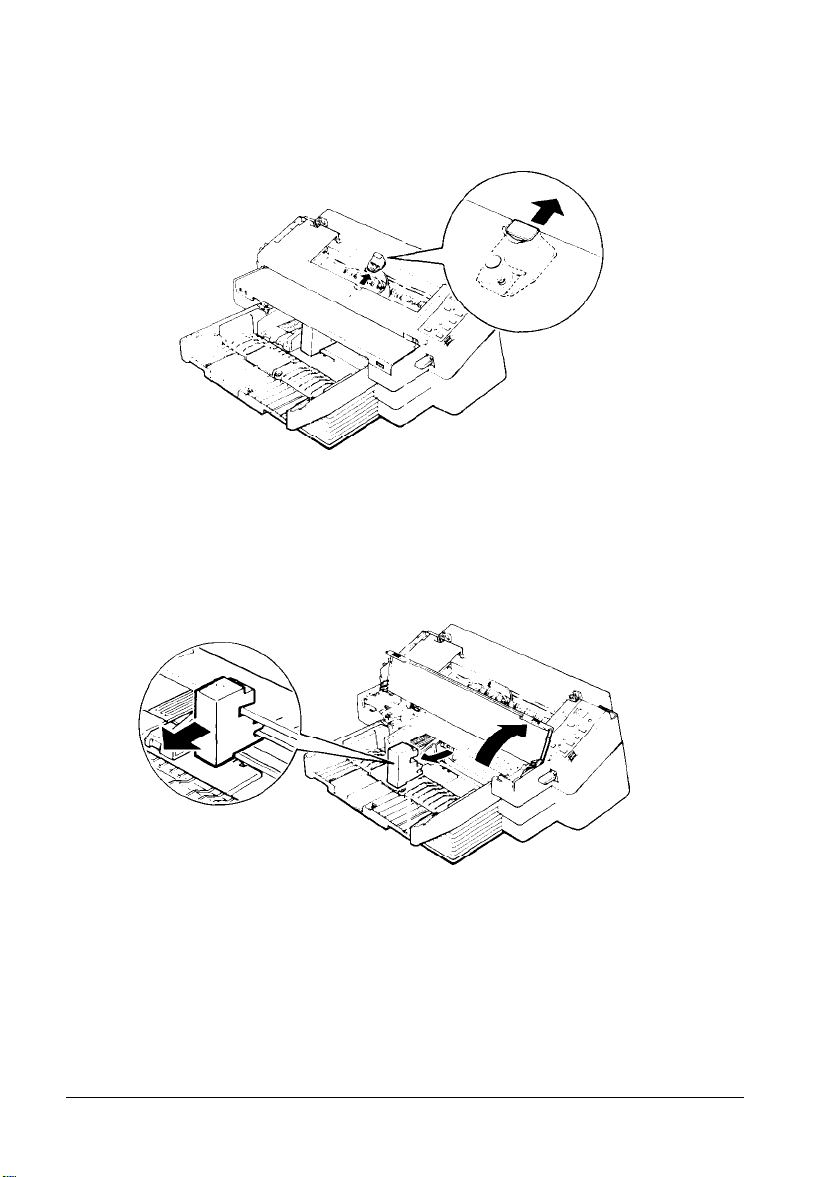
3. Remove the locking bracket.
4.
Lift the paper feeder cover and remove the white packing
material from the center of the paper tray, as shown below.
Setting Up the Printer
1-7
Page 25
Unpacking the Printer
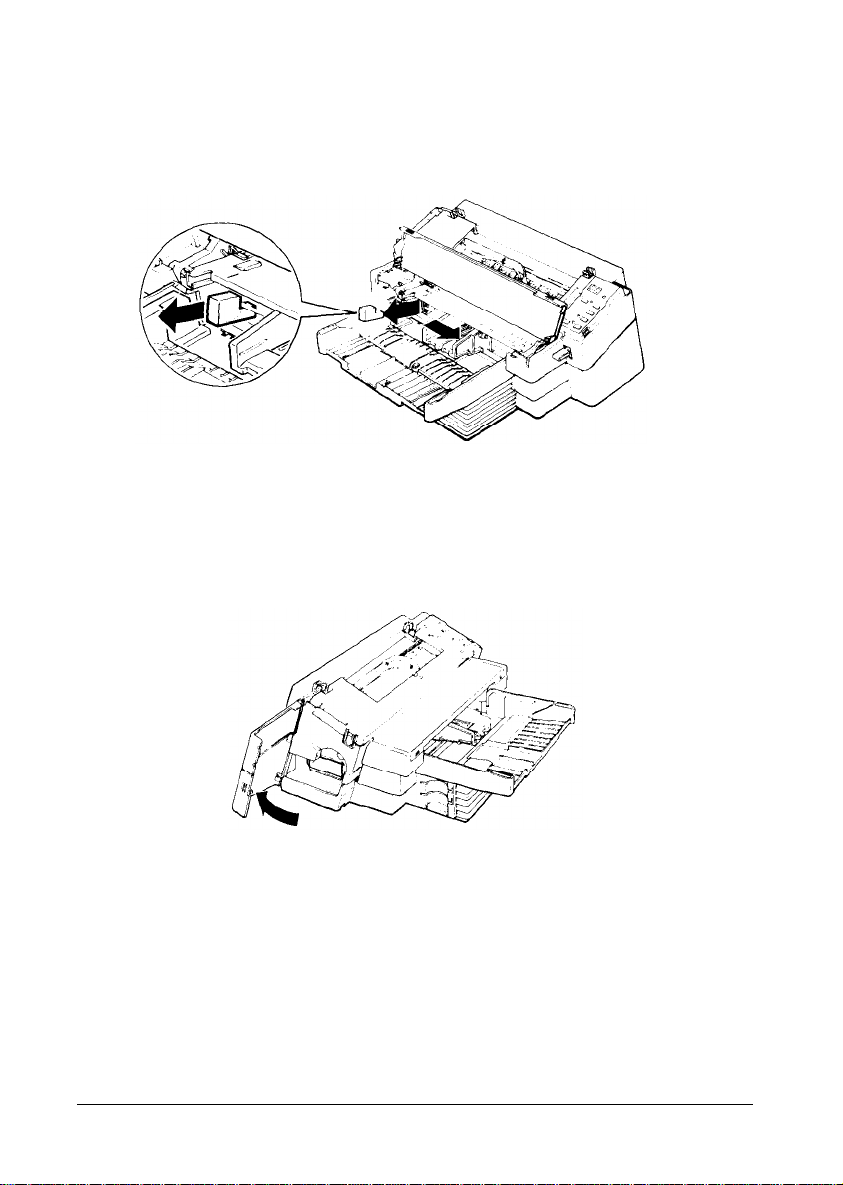
5.
Move both paper guides to the right; then remove the packing
material as shown below.
6.
Open the ink cartridge compartment cover.
1-8
Setting Up the Printer
Page 26
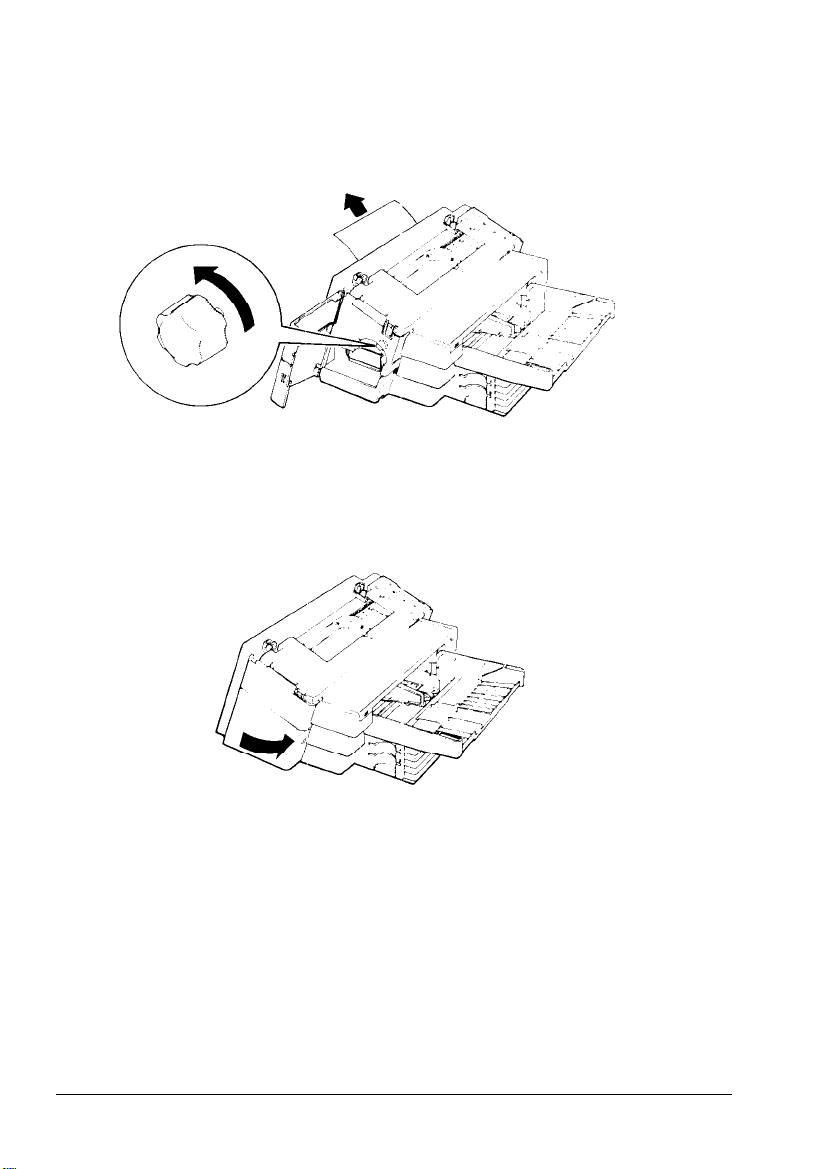
Unpacking the Printer
7.
Turn the knob counter-clockwise until the printer ejects the
protective sheet through the back of the printer.
8.
Close the ink cartridge compartment cover and the paper feeder
cover.
Setting Up the Printer
1-9
Page 27
Unpacking the Printer
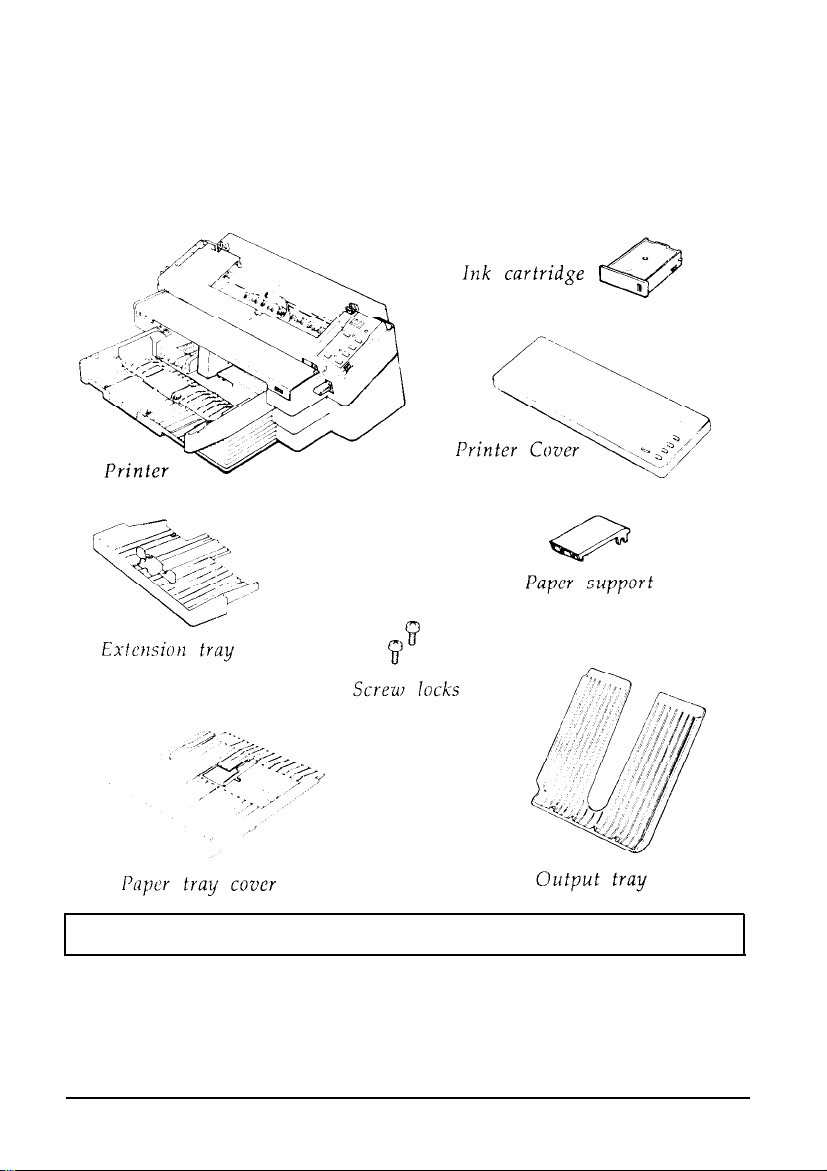
Checking the Parts
As you unpack your printer, check that you have all the parts
shown below, and that none have been damaged during
transportation.
Note: A cleaning brush is also included with your printer.
After removing the parts, save all the packaging materials in case
you need to transport your printer.
1-10
Setting Up the Printer
Page 28
Unpacking the Printer
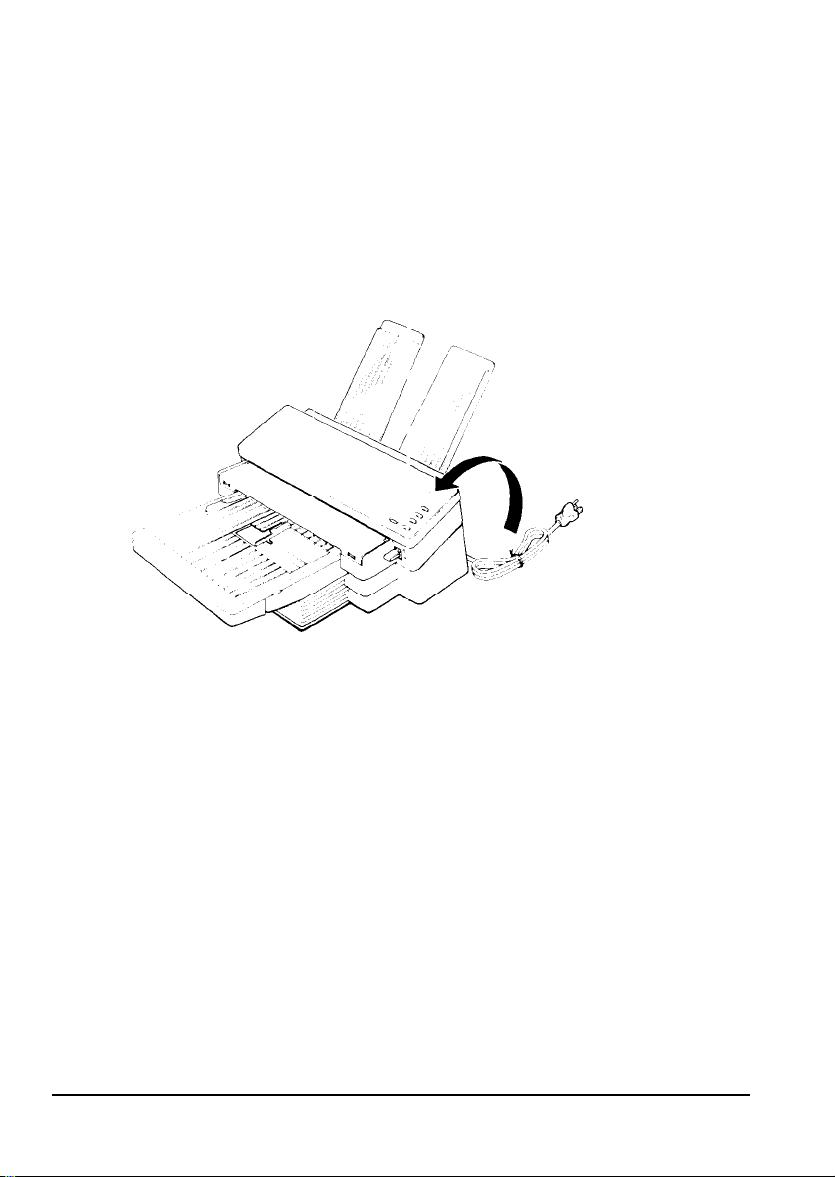
Carrying the Printer
EPI-4000 printer design differs from that of other printers. When
you need to carry the printer, follow these precautions to avoid
damage:
1.
Wind the printer cord in a coil, secure the coil, and place it on
top of the printer as shown below.
Setting Up the Printer
1-11
Page 29
Unpacking the Printer
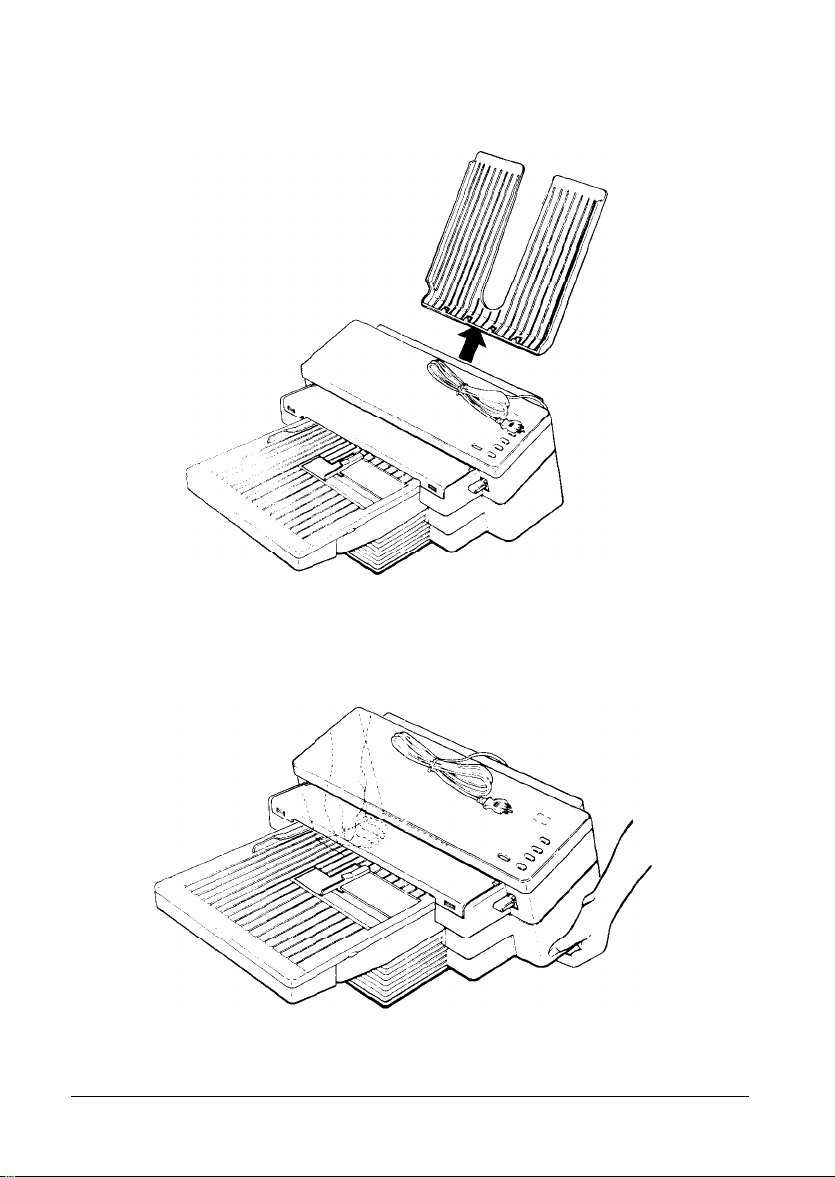
2. Remove the output tray.
3.
Grasp the printer as shown below. You may need someone to
help you lift it.
1-12
Setting Up the Printer
Page 30
CAUTION: Never pick up the printer by grasping the
parts indicated in the illustration below. Because they’re
not designed to bear the weight of the printer, you may
damage them or your printer.
Setting Up the Printer
1-13
Page 31

Assembling the Printer
The next step is to install a few important parts.
Attaching the Printer Cover
1.
Insert the mounting pins on the printer cover into the mounting
brackets at the top of the printer. Press firmly until the cover
clicks into place.
1-14
Setting Up the Printer
Page 32

Assembling the Printer
Installing the Extension Tray
You can pull out the extension tray as needed to hold paper that is
longer than the paper tray.
Hold the extension tray in your right hand and align the two
1.
tabs at the bottom over the slots in the paper tray, as shown
below.
Place your left hand on the extension tray and push down
2.
lightly with both hands while sliding the tray forward.
Setting Up the Printer
1-15
Page 33

Assembling the Printer
Installing the Output Tray
The output tray receives printed pages and envelopes.
1.
Hold the output tray as shown below.
2.
Insert the tray firmly into place.
1-16
Setting Up the Printer
Page 34

Assembling the Printer
Installing the Paper Support
Place the paper support on the metal ledge between the two
1.
paper guides, and lower the end of the support into place as
shown below.
Installing the Ink Cartridge
The printer’s ink cartridge is completely self contained, so it’s easy
to install and remove. Replacement ink cartridges (S020003) are
available from your Epson dealer.
WARNING: Cartridge ink may cause irritation to your
skin or eyes. If ink gets in your eyes, flush them with
water. When you handle an ink cartridge, wash any traces
of ink from your skin with soap and water. Keep
cartridges out of the reach of children. Do not take ink
cartridges apart.
Setting
Up the
Printer
1-17
Page 35

Assembling
the
Printer
Follow the steps below to install the ink cartridge:
1.
Open the ink cartridge compartment cover, as shown.
WARNING: Never install or remove an ink cartridge
when the printer is on line. Always set the printer off line
(press ON LINE to turn the indicator light off) and make
sure the print head is capped at the left side of the printer
before removing or replacing the ink cartridge.
1-18
Setting Up the Printer
Page 36

Assembling the Printer
2.
Hold the cartridge with your thumb over the raised triangle at
one end. Insert the end opposite the triangle into the ink
compartment, as shown below. The ink level indicator should be
in the lower right corner.
3.
Push the cartridge gently into the compartment until you feel it
contact the back of the compartment and you hear it snap into
place.
Setting Up the Printer
1-19
Page 37

Assembling the Printer
Close the ink compartment cover.
4.
Note: Each ink cartridge contains enough ink to print up to 1000
average letter size pages. Pages with graphics or dense text use
more ink. The first ink cartridge you install may print fewer
pages because some of the ink is used to fill the ink feeding
system.
When to replace a cartridge
The indicator lever at the end of each cartridge shows you when it’s
time to replace the cartridge. The lever moves from F (full) to E
(empty) as the ink is used. See Chapter 5 for more information on
replacing an ink cartridge.
1-20
Setting Up the Printer
Page 38

Assembling the Printer
Plugging in the Printer
Now that your printer is fully assembled, follow the steps below to
connect it to an electrical outlet.
1.
Make sure the power switch, located at the right rear of the
printer, is turned off. (It is off when the O is visible, as shown
below.)
2.
Plug the power cable into a properly grounded electrical outlet.
Setting Up the Printer
1-21
Page 39

Your Printer’s Components
The EPI-4000 printer is designed to make all the features easy to use.
This section introduces the parts of the EPI-4000 so that you can
easily find them as you load and test your printer.
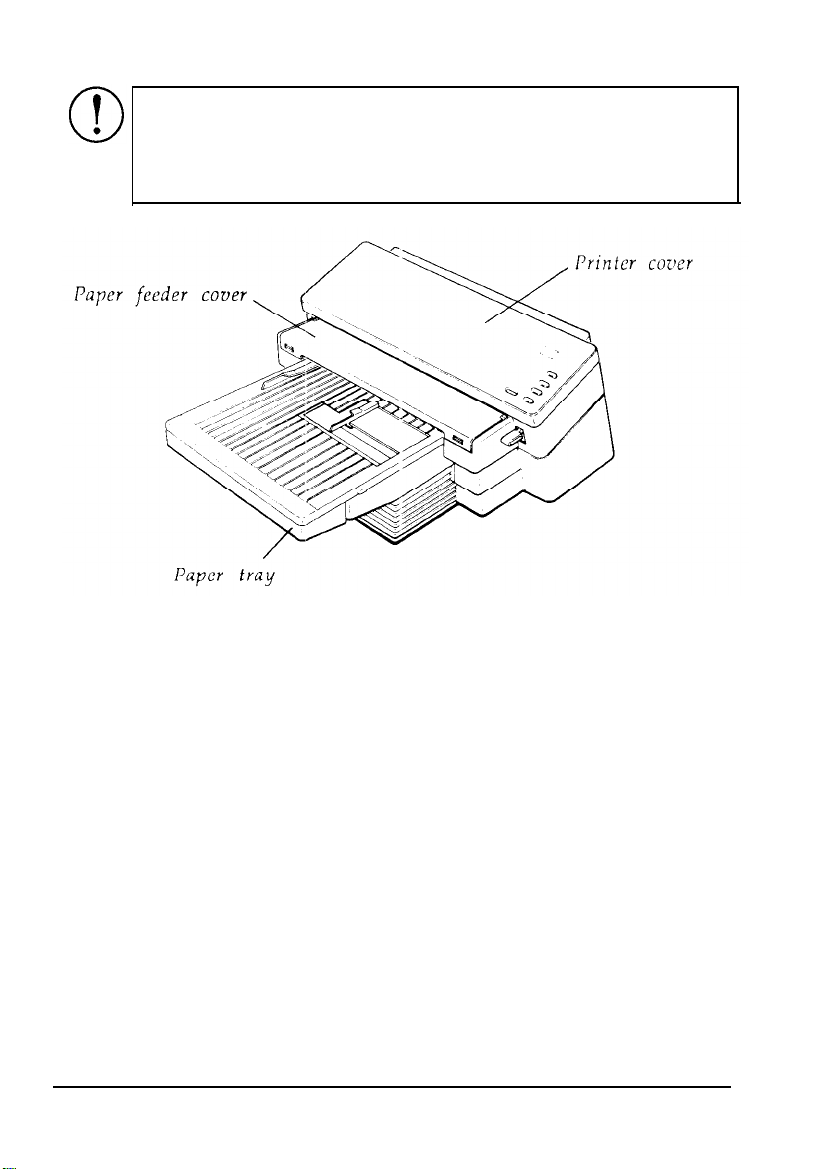
Front View
When you look at your EPI-4000 printer from the front, you can see
most of the design features.
1-22
Setting Up the Printer
Page 40

Your Printer’s Components
The paper fray holds stacks of paper and feeds them automatically
through the printer.
The paper tray cover protects your paper supply. You can also use the
paper guides to print a single sheet or envelope without changing the
paper inside the paper tray.
The paper feeder cover protects the feeding mechanism that carries
paper through the printer. You lift this cover to find the envelope
lever used to print envelopes. You can also see the envelope guide
used to align envelopes when you print envelopes one at a time.
You lift or lower the paper release lever to set the printer feeding
mechanism for automatic or manual feeding. Read more about
paper handling in Chapter 3.
The printer cover reduces noise while the EN-4000 prints.
On the right side of the printer cover is the control panel, where the
most common printing tasks are controlled. See Chapter 2 for a
complete description of the buttons, lights, and display.
The output tray receives printed pages and envelopes.
Setting Up the Printer
1-23
Page 41
Your Printer's Components
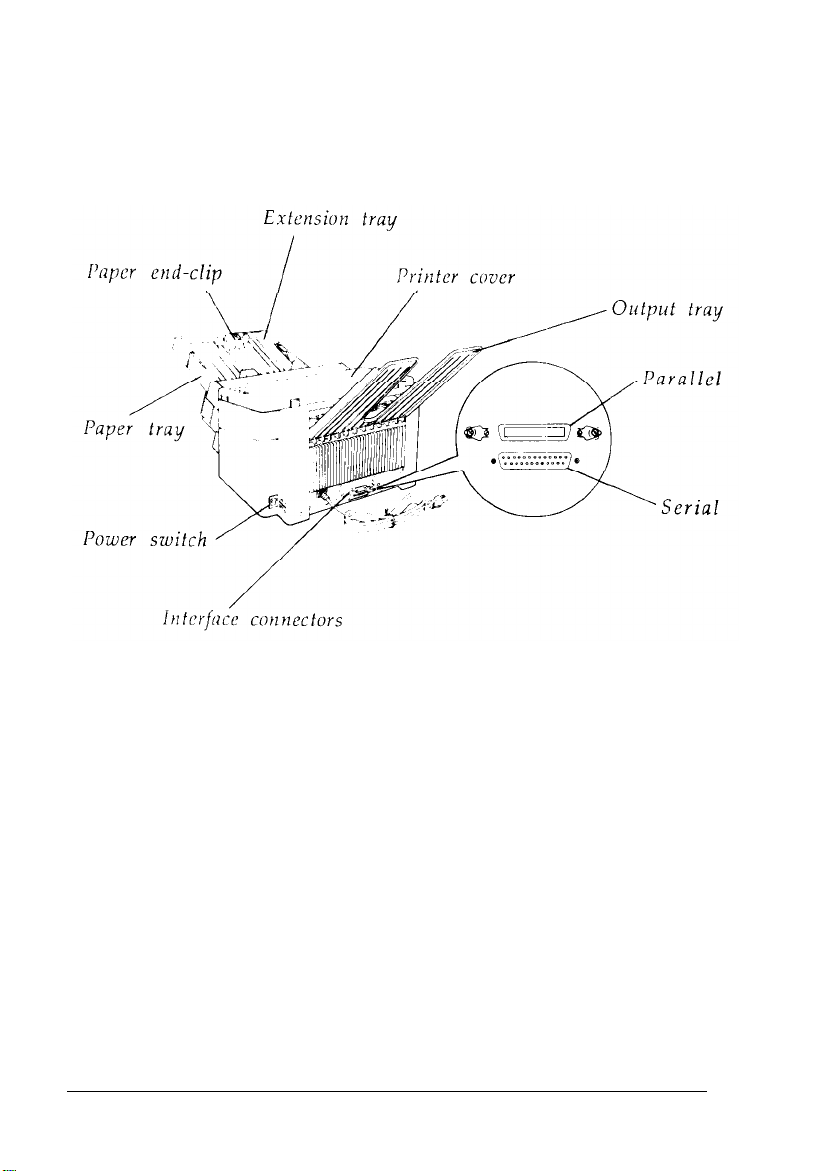
Back View
The illustration below shows the printer from the back with the
paper cover off.
Inside the paper tray, you see the paper-end clip, which you can adjust
to hold the paper stack in place.
You can pull out the extension tray to accommodate long sheets of
paper. See Chapter 3 for information about loading paper.
You use the power switch, located at the rear, to turn the printer on
and off.
1-24
Setting Up the Printer
Page 42
Your Printer’s Components
You connect your printer to your computer by connecting a cable to
one of the two interface connectors at the center rear of your printer.
The upper connector is for the parallel interface, and the lower
connector is for the serial interface. Connecting the EPI-4000 to your
computer is covered later in this chapter.
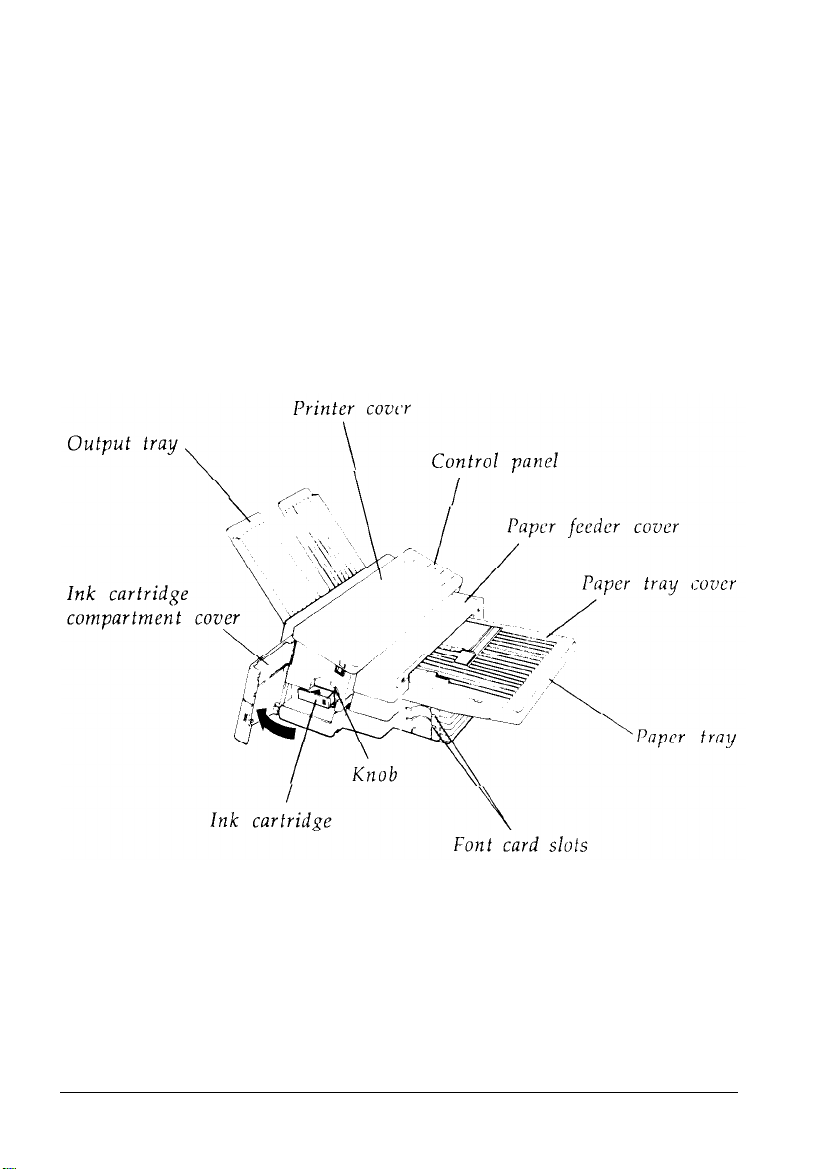
Left Side View
The left side of the printer, as shown below, includes slots for
optional font cards, the ink supply, and a knob for clearing paper
jams.
Setting Up the Printer
1-25
Page 43

Your Printer’s Components
On the left side of the printer just below the paper tray, you see two
font card slots used to insert optional font cards. See Chapter 4 for
information about optional font cards.
Open the ink cartridge compartment cover to see the ink cartridge
compartment, where you install your printer’s ink cartridges.
Inside the ink cartridge compartment, just above the cartridge, is a
knob that you turn to remove jammed paper.
WARNING: Follow these steps whenever you turn
your printer:
1. Press ON LINE to set the printer off line.
2. Wait three seconds; then turn off the printer.
This process allows the printer to cap the print head
1-26
Setting Up the Printer
Page 44

Charging the Ink Feeding System
You need to charge the ink feeding system only once, the first time
you set up your printer. You do not need to repeat this step, even if
you move the printer to a new location and set it up again. Follow
these steps to charge the ink feeding system:
1.
Make sure the printer is turned off and the ink cartridge is
installed.
Setting Up the Printer
1-27
Page 45

Charging the Ink Feeding System
2.
Hold down the RESET button while you turn on the printer.
During charging, the display reads IC and then the ink charging
countdown appears on the display. When the cycle is complete,
both the display and the ON LINE indicator light go off.
Note: You do not need to charge the ink feeding system when
you replace an ink cartridge.
1-28
Setting Up the Printer
Page 46

Loading Paper to Print a Self Test
Now that you’ve assembled, set up, and plugged in your printer,
you’re probably anxious to see it print. Follow the instructions
below to load standard letter size paper to print the self test.
Chapter 3 describes how to load 11 x 17-inch (ledger or B) size and
other different paper sizes.
Note: You do not need to connect the printer to your computer to
run the self test.
1.
Make sure the printer is off line. If not, press ON LINE to set the
printer off line.
Setting Up the Printer
1-29
Page 47

Loading Paper to Print a Self Test
2. Press MANUAL FEED. The MANUAL FEED light goes on.
1-30
Setting Up the Printer
Page 48

3.
Open the paper feeder cover.
Setting Up the Printer
1-31
Page 49

Loading Paper to Print a Self Test
Move the envelope lever to the single-sheet position.
4.
Close the paper feeder cover.
5.
1-32
Setting Up the Printer
Page 50

Loading Paper to Print a Self Test
6.
Move the paper release lever to the single-sheet position.
7.
Open the paper tray cover. Squeeze the tab on the paper-end
clip and slide it toward you until the clip rests against the end of
the paper tray.
Setting Up the Printer
1-33
Page 51

Loading Paper to Print a Self Test
Move the left paper guide until it clicks into place at the left side
8.
of the paper tray.
Move the right paper guide to roughly match the width of your
9.
paper.
1-34
Setting Up the Printer
Page 52

Loading Paper to Print a Self Test
10. Move the paper support so it is centered between the paper
guides.
11. Take a stack of letter size paper, fan it, and then tap the edges
against a flat surface to even the stack.
CAUTION: The paper stack should be no higher than the
on the left paper guide to avoid
causing a paper jam.
Setting Up the Printer
1-35
Page 53

Loading Paper to Print a Self Test
12. Insert the stack of paper between the left and right paper guides.
Press down a little on the edge of the paper that enters the
printer first. Then push the stack in gently as far as it will go;
next adjust the right paper guide so it rests lightly against the
paper stack.
13. Slide the paper-end clip until it fits lightly against the end of the
stack.
1-36
Setting Up the Printer
Page 54

Loading Paper to Print a Self Test
CAUTION: Be sure to set the paper-end clip lightly
against the end of the paper to avoid paper feeding
14. Put the cover back over the paper tray.
high humidity can cause poor print quality.
Now you’re ready to print the self test.
Setting Up the Printer
1-37
Page 55

Printing the Self Test
Once you have loaded letter size paper, follow the instructions
below to print the self test.
1.
Press ON LINE to set the printer off line.
2.
Open the printer cover and press SelecType to enter SelecType
mode.
3.
Press MENU several times to change the left digit to 8.
1-38
Setting Up the Printer
Page 56

Printing the Self Test
4.
Press or to change the right digit to 1. Your display should
read 81.
5.
Press SET. The display reads Co.
Setting Up the Printer
1-39
Page 57

Printing the Self Test
6.
Close the printer cover. The display reads PE.
CAUTION: Be sure to close the printer cover when you
want to print. If you press the SET button when the printer
cover is open, the printer loads the paper but cannot print
until the printer cover is closed.
1-40
Setting Up the Printer
Page 58

Printing the Self Test
7.
Press MANUAL FEED. The MANUAL FEED light goes off.
8.
Press ON LINE. The display reads
self test.
SP
and your printer begins the
The self test is a one-page printout. When the printer is finished
printing the self test, it sends the page to the output tray. A sample
of the self test output is shown below.
Setting Up the Printer
1-41
Page 59

Printing the Self Test
If the Self Test Doesn’t Print
The most likely cause of a failed test is either a problem with the
print head or a mistake in the SelecType panel settings. If the self
test does not print properly, check the points below.
l If the paper jams, the display reads PJ. If you see this message,
turn off the printer and remove the paper jam according to the
section on clearing a paper jam in Chapter 6. Then load the
paper again, as described earlier in this chapter.
l If the printer does not print or stops printing and the display
reads IE, the ink cartridge may not be installed or may be
installed incorrectly. Reinstall the cartridge as described earlier
in this chapter.
l
If the display reads 81 but nothing prints, you may not have
pressed the SET button hard enough. Press SET again. The
printer beeps as you press this button.
l
If the printer cover is open, the printer cannot print. Close the
printer cover.
l
If the print is faint or uneven, the ink delivery system may not
be charged with ink. Follow the steps under Charging the Ink
Delivery System earlier in this chapter. If you have charged the
printer, follow the cleaning procedure described in Chapter 5.
l
If the printout has a blurred appearance, you may be printing on
the wrong side of the paper or you may be using the wrong type
of paper. Try the other side of the paper; then, if necessary, see
Chapter 3 for information on choosing paper.
If you’ve checked all the points mentioned above and the printer
still does not print the self test correctly, contact your Epson dealer
for assistance.
1-42
Setting Up the Printer
Page 60

Connecting the Printer to Your Computer
Your EPI-4000 has two separate interface connections: a parallel
interface and an RS-232C compatible serial interface. If you are
unsure which one your computer requires, check your computer
manual.
The EPI-4000 is set up at the factory for parallel communication. If
your computer has a parallel interface and you have a suitable
shielded cable, you can connect to most computers immediately.
Just follow the steps under Connecting the Parallel Interface, below.
If you need to use the serial interface, be sure to change the
SelecType setting as described in Chapter 2 before you connect the
serial interface. If you have a computer that requires a different type
of interface, use one of the optional interfaces described in Chapter 4.
Setting Up the Printer
1-43
Page 61

Connecting the Printer to Your Computer
Connecting the Parallel Interface
To use the printer’s standard parallel interface, connect a shielded
parallel interface cable as described below.
1.
Make sure that both your computer and printer are turned off.
2.
Plug the cable connector securely into the parallel connector of
the printer.
1-44
Setting Up the Printer
Page 62

Connecting the Printer to Your Computer
3. Squeeze the wire clips together until they lock
side of the connector.
Note: If your cable has a ground wire, use a screwdriver to attach
it to the ground screw directly beneath the interface connector.
Setting Up the Printer
1-45
Page 63
Connecting the Printer to Your Computer
4.
Plug the other end of the cable into the computer. If there is a
ground wire at the computer end of the cable, use a screwdriver
to attach it to the ground connector of the computer.
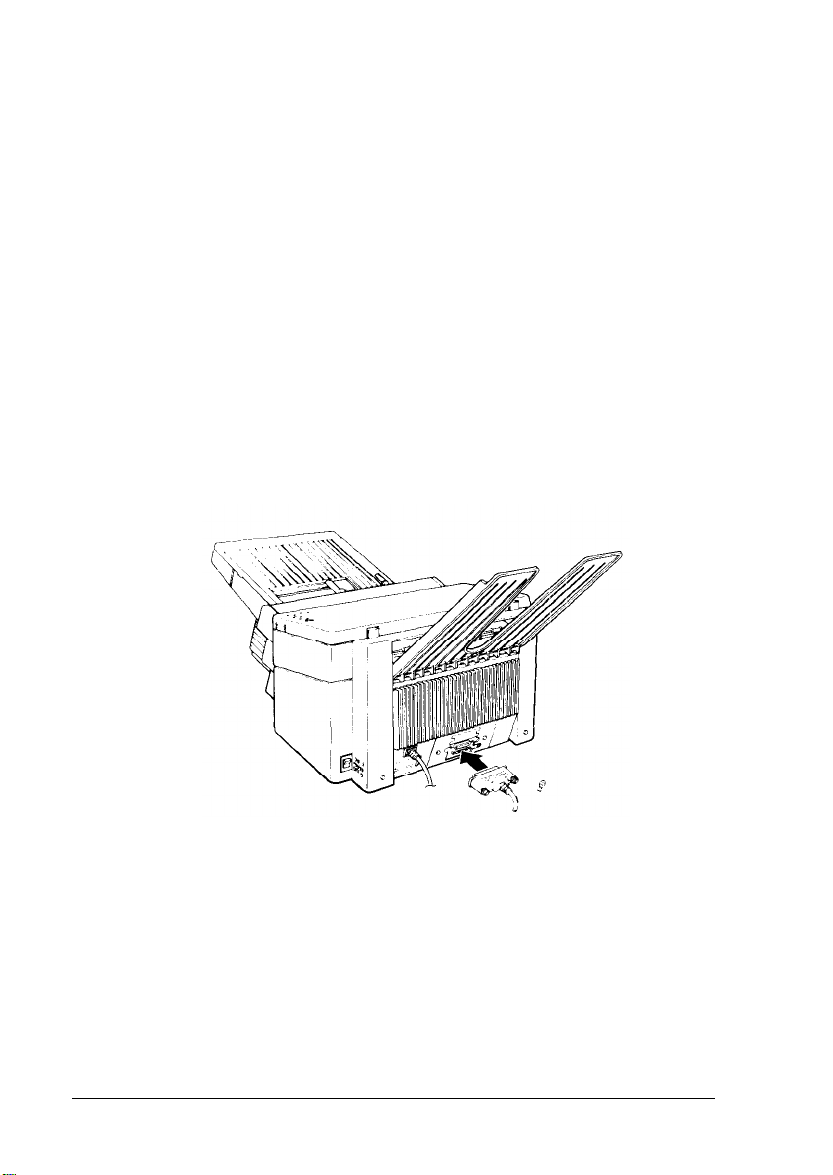
Connecting the Serial Interface
If you use the EPI-4000’s serial interface, use a properly shielded
cable and make sure it is the correct one for your computer. Before
following the steps below to connect the serial interface, change the
interface setting using the SelecType interface menu, as described in
Chapter 2.
1.
Make sure that both your computer and printer are turned off.
2.
Plug the connector of the cable securely into the serial port of the
printer.
1-46
Setting Up the Printer
Page 64

Connecting the Printer to Your Computer
3.
Use a screwdriver to secure the cable by tightening the screw on
each side of the connector.
Setting Up the Printer
1-47
Page 65

Connecting the Printer to Your Computer
Note:
•
If the screws that come with the cable do not fit into the
screw locks of the printer’s interface connector, replace
your screws with the extra ones provided with the printer.
•
If your cable has a ground wire, use a screwdriver to
attach it to the ground connector to the right of the interface
connector.
4.
Plug the other end of the cable into the computer. If there is a
ground wire at the end of the cable, attach it to the ground
connector of the computer.
1-48
Setting Up the Printer
Page 66

Using Your Printer with Software
Now that you’ve set up the EPI-4000 printer and are more familiar
with its operation, start using it with your application programs.
Most applications programs let you specify the type of printer you
are using so that the program can take full advantage of the
printer’s features. Many of these programs provide an installation or
setup menu that presents a list of printers to choose from.
If your program has a printer selection menu, follow the instructions
below to get the best performance from your EPI-4000 printer.
Selecting the Best Printer Mode
The EPI-4000 has three printer modes, also called emulations. It is
factory set to LaserJet series II emulation mode and this factory
setting gives you the fullest range of features. Simply leave the
printer in HP emulation mode and choose one of the printers below
from your program’s setup menu. They are listed in order of
preference.
HP LaserJet series II
HP LaserJet Plus
HP LaserJet 500
HP LaserJet
TM
TM
TM
TM
or HP LaserJet 2000
TM
Note: If you use 11 x 17-inch (ledger or B) size paper for most of
your printing jobs, choose the HP LaserJet 2000. For more about
HP emulation mode, see Appendix B.
Setting Up the Printer
1-49
Page 67

Using Your Printer with Software
If none of the printers listed above are available from your program,
use the Epson LQ or FX mode. If you use LQ or FX mode, choose
one of the following printers (listed in order of preference).
LQ Mode
LQ-1050/850
SQ-2500
LQ-2500
LQ-1000/800 (expanded ESC/P)
LQ-500/510
LQ-1500 (with version 2 ROM)
LQ printer
If none of these printers are listed among your program’s options,
choose the first available of the following: EX, JX, LX, RX, MX,
Epson printer, Standard printer, or Draft printer.
How Your Printer Prints
When you print a document, the data for the document is
temporarily stored in the printer’s memory. The printer’s memory
contains data from the time it receives a print command until it
finishes the last page of the print job.
If the print mechanism is not moving during a print job, the printer
may be composing a page in memory. It may take a few minutes to
image a complex page or graphics before printing it.
FX Mode
FX-1050/850
FX-286e/86e
FX-286/185/85
FX-100/80
FX printer
If you don’t know whether a print job is complete, look at the
display. If the display reads FF, the print job is not finished and the
printer’s memory contains data.
If you want to stop a print job before it has finished and clear the
printer’s memory, cancel the print job using your application
program and then press RESET to reset the printer.
1-50
Setting Up the Printer
Page 68

Chapter 2
Using the Printer
Control
The
The Display
Indicator Lights..
Buttons
Panel
.....................................................................
........................................................................... 2-2
..................................................................
.....................................
.............................................
2-2
2-3
2-4
SelecType Overview
Using SelecType
..................
.................................................................
SelecType Menus and Options
HP Emulation Mode Menus
LQ/FX Emulation Mode Menus
.............................................
..............................................
...............................................
........................................
2-6
2-8
2-8
2-9
2-23
Using the Printer 2-1
Page 69

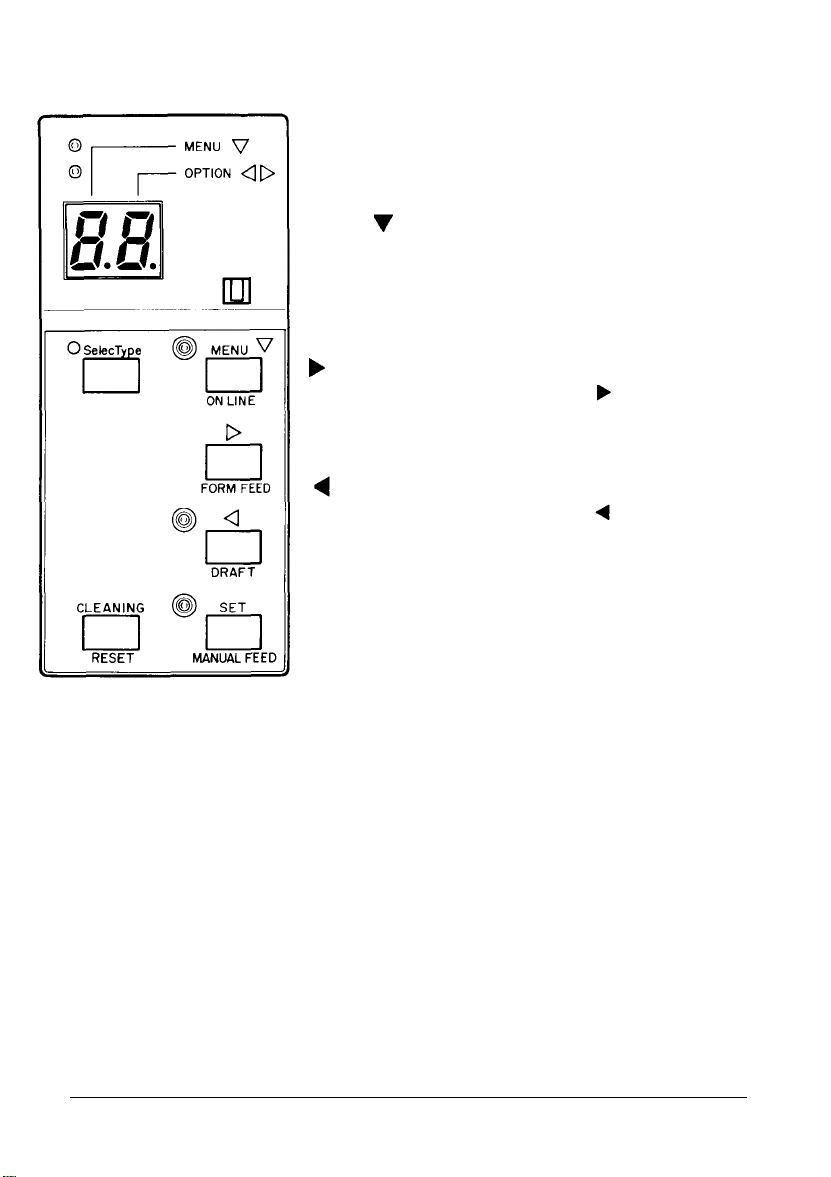
The Control Panel
The EPI-4000 control panel consists of three elements: a light
emitting diode (LED) display, indicator lights, and buttons. The
lights and display show you the status of the printer. You use the
buttons to control printer settings and paper handling functions.
The Display
The display shows either the printer’s current status (including
maintenance and error messages) or printer settings.
2-2
Using the Printer
Page 70

Indicator Lights
The Control Panel
POWER
On when the printer is turned on and
power is supplied.
READY
On when the printer is ready to accept
data. This light flickers when data is
received.
ON LINE
On when the printer can receive and print
data from the computer.
DRAFT
On when draft printing mode is selected
Off when letter quality mode is selected.
MANUAL FEED
On when the paper feeder mechanism is in
the manual feed position.
SelecType
On when SelecType mode is active. This
light is visible only when the printer cover
is open.
Using the printer 2-3
Page 71

The Control Panel
Buttons
Most of the buttons have more than one name and. function,
depending on whether the printer cover is open or closed and what
mode the printer is in. The following section describes the functions
of the buttons when the cover is closed.
ON LINE
Controls the printer’s on line/off line
status. When the printer is on line, the
ON LINE light is on and the printer can
receive and print data from the computer.
Press this button to switch between on line
and off line status.
FORM FEED
When the printer is off line, press FORM
FEED to print any data stored in the printer
memory and eject a single sheet of paper.
DRAFT
Controls whether printing is in draft or
letter quality mode. Because letter quality is
the default mode, the printer is
turned on the DRAFT light is off. Press this
button to switch between draft and letter
quality printing. If you press DRAFT during
printing, the draft mode begins with the
next page printed.
2-4
Use this button to choose unidirectional
printing for higher print quality. With the
printer off line, press DRAFT for more than 3
seconds to enter unidirectional mode. The
printer is factory-set for bidirectional
printing so you must set the printer each
time you turn it on to enable this mode.
Using the Printer
Page 72

The Control Panel
MANUAL FEED
Ordinarily, this light is off and paper feeds
automatically from the paper tray. When
you want to feed paper manually, set the
printer off line and press this button. When
you want to print on contimuous paper,
press MANUAL FEED to release the paper in
the paper tray.
RESET
When the printer is off line and no data is
in memory, press RESET once to cancel any
settings made by printer commands and to
cancel draft printing and manual feed
modes, if they are selected. Hold this button
down for 5 or more seconds to reset all
printer settings to factory settings. (The
printer cannot be reset with this button if it
was set off line by a fatal error.)
Note: If you want to stop the printer while it is printing, cancel
the print job using your application program and then press
RESET to reset the printer.
When the printer cover is open, the five buttons described above
have a different shape and two sets of labels. Their functions,
however, are the same as long as you are not in SelecType mode
(whenever the SelecType light is off). You can also see a sixth button,
Select Type, which is only visible when the printer cover is open.
SelecType functions for each button are explained in the next
section.
If you use the parallel interface and print on letter size paper, you
may not need to use SelecType except to run the status sheet or self
test.
Using the Printer
2-5
Page 73

SelecType Overview
The SelecType feature gives you a simple means to control your
printer. When you lift the printer cover and use the SelecType panel,
you can control most of the printer’s functions-from the simplest to
the most complex.
Use SelecType’s menu-based system to do the following:
l Change your printer configuration without adjusting any DIP
switches
l Select most font or print options without entering software
commands.
You don’t have to learn everything about SelecType to use your
printer, but a basic understanding of the menu structure and the
SelecType panel helps you control the most common functions
quickly.
When you are in SelecType mode, the left digit of the display shows
a number or letter corresponding to one of SelecType’s 16 menus.
The right digit of the display shows a number or letter
corresponding to an option for that menu. See your Quick Reference
card for complete tables of SelecType menus and options.
SelecType panel buttons and their functions are listed below. Lift
the printer cover to reach the SelecType panel.
2-6
Using the Printer
Page 74
SelecType Overview
SelecType
Press this button to enter or exit SelecType.
If SelecType mode is active, the SelecType
light is on.
MENU
When the SelecType light is on, press this
button to increase the menu (left) digit of
the display. This moves you down the list
of menus.
When SelecType is on, press to increase
the option (right) digit of the display. Use
this to select the desired option.
When SelecType is on, press to decrease
the option (right) digit of the display. Use
this to select the desired option.
SET
When SelecType is on, press SET to save the
option setting shown on the display.
CLEANING
When SelecType is on, press CLEANING to
automatically clean the print head.
Using the Printer 2-7
Page 75

SelecType Overview
Using SelecType
Follow these steps to use SelecType:
1.
Press ON LINE to set the printer off line and lift the printer cover.
2.
Press SelecType to enter SelecType mode.
3.
Press MENU to choose the menu digit.
4.
Press or to select the option digit.
Note: If you move past the number or digit you want while
pressing MENU, or keep pressing the button until the digit
you want reappears.
5.
Verify your choice on the display.
6.
Press SET to save the new setting.
CAUTION: A new setting does not take effect until you
save it by pressing SET. Be sure to always press SET after
you change a setting.
SelecType Menus and Options
This section lists all menus and options available when you use
SelecType. Most menus and options are the same whether you’re
working in HP, LQ, or FX emulation mode. Four of the menus,
however, have a different function when your printer is set for LQ
or FX emulation mode. These four LQ/FX menus are listed later in
this chapter. See the Quick Reference card for tables of HP, LQ and
FX emulation mode menus and options.
2-8
Using the Printer
Page 76
HP Emulation Mode Menus
SelecType Menus and Options
Menu
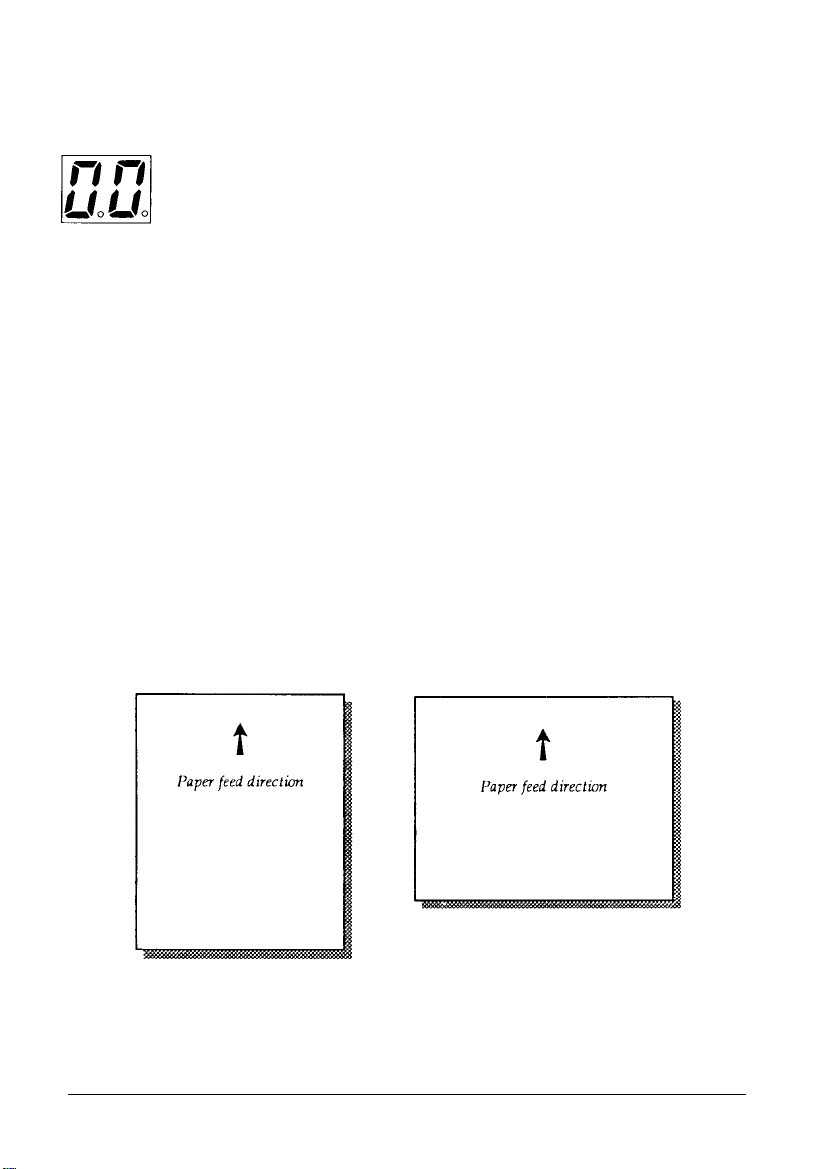
Because the EPI-4000 prints on a wide variety of paper sizes, the
paper size menu includes 15 options. The factory default setting is
00: letter size paper. See Chapter 7 for precise dimensions of each
paper size.
If you want to use any paper other than standard letter size paper,
use the paper size menu to change your setting to match the size of
paper you load into the printer.
As you look at the table below to find the setting you need, notice
that there are two settings for letter size and A4 paper. You can load
these two types of paper in either portrait position (with the width
of the paper inserted into the printer first) or in landscape position
(with the length of the paper inserted into the printer first). Use
landscape position when you need a wider printing space for
spreadsheets, graphics, or tables. Examples of portrait and
landscape paper position are shown below.
0:
Paper Size
Portrait position
Landscape position
Using the Printer 2-9
Page 77

SelecType Menus and Options
Option
0
1
2
3
4
5
6
7
8
9
A
B
C
D
Note: Envelopes can be loaded in landscape position only. If you are using FX
emulation mode, you cannot select DL-size envelopes.
Setting
Letter size (8 1/2 in. x 11 in.)
Legal size (8 1/2 in. x 14 in.)
Executive size (7 1/4 in. x 10 1/2 in.)
B (ledger) size (11 in. x 17 in.)
Letter size, landscape (11 in. x 8 1/2 in.)
A4 size (8 1/4 in. x 11 3/4 in.)
A3 size (11 3/4 in. x 16 1/2 in.)
A4 size, landscape (11 3/4 in. x 8 1/4
#10 envelope (9 1/2 in. x 4 1/8 in.)
in.)
#6 envelope (6 1/2 in. x 3 5/8 in.)
DL envelope (8.7 in. x 4.3 in.)
11" length continuous (12 in x 11 in.)
12" length continuous paper (12 in. x 12 in.)
8.5" length continuous paper (12 in. x 8 1/2 in.)
A4 size continuous paper (9 1/4 in. x 11 3/4 in.)
Menu 1: Printing Orientation
You can set your printer to print across the width of the page
(portrait orientation), or across the length of the page (landscape
orientation). The factory default setting is 10: portrait.
Option
0
1
2-10
Using the Printer
Setting
Portrait
Landscape
Page 78

SelecType Menus and Options
The illustration below shows printing in portrait and landscape
orientation.
Portrait orientation
Menu 2: Font Source
Landscape orientation
Use the font source menu to specify one of four possible sources of
fonts: your printer’s internal fonts, fonts on a font card in slot A,
fonts on a font card in slot B, or fonts you have downloaded to the
printer’s memory from your computer. The factory default setting is
20: internal.
Because the internal fonts are built-in to your computer at the
factory, option 0 is always available. The other option numbers may
or may not appear, depending on whether or not you have inserted
a font card into slot A or B or have actually downloaded fonts from
your application. The symbol set menu setting may change when
you change the font source option.
Opt ion
0
1
2
3
Setting
Internal
Slot A
Slot B
Downloaded
Using the Printer
2-11
Page 79

SelecType Menus and Options
Menu 3: Font Number
Use the options on this menu to choose the specific font you want to
use. The options available on this menu change depending on the
setting of the font source menu. For example, if the font source
menu setting is 21,
and you insert a font card in slot A, the font
number options for this menu reflect the fonts available on the card.
The symbol set may change when you change the font number
option. Listed below are those options available when the font
source menu is set to the printer’s internal fonts. The factory default
setting is 30: Courier Upright.
Option
0
2
4
Setting
Courier Upright
Courier Bold
Line Printer
A sample printout using the printer’s internal fonts is shown below:
0 COURIER
2 COURIER BOLD
4 LINE PRINTER
ABCDEFGHIJabcdefghij0l23!"#$%&'()*+,-./
ABCDEFGHIJabcdefghijOl23!"#$%&'()*+,-./
ABCDEFGHIJabcdefghij0123!#$%&‘()*+,-./
2-12
Using the Printer
Page 80

SelecType Menus and Options
Note: When you use a font from an optional font card, select the
font number listed on the card. If you download two or more
fonts to the printer’s memory, you must use software commands
to choose the font number.
Menu 4: Symbol Set
The default setting for this menu is suitable for most applications in
the USA. You may want to change the symbol set setting if you are
using a language other than English. See the tables in Appendix A
for a list of all characters in each symbol set. The factory default
setting is SO: Roman-8.
Opt ion
0
1
2
3
4
5
6
7
8
9
A ISO 6 (ASCII)
B
C
D
E
Setting
Roman-8
IBM-US
IBM-DN (Danish/Norwegian)
ISO 4 (United Kingdom)
ISO 21 (German)
ISO 69 (French)
ISO 15 (Italian)
ISO 60 (Norwegian 1)
ISO 11 (Swedish)
ISO 17 (Spanish)
ISO 16 (Portuguese)
ISO 14 (JIS ASCII)
ISO (Latin 1)
Legal
Using the Printer
2-13
Page 81
SelecType Menus and Options
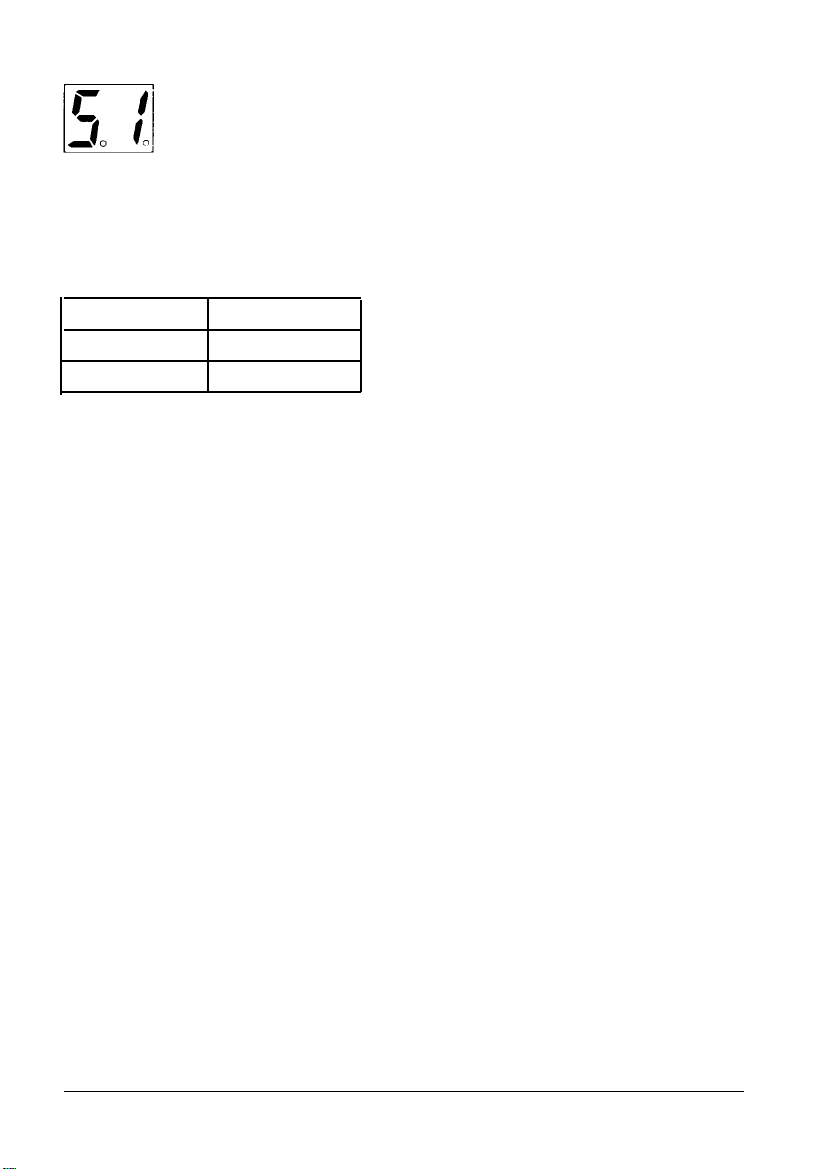
Menu 5: Auto Continue
The setting for the auto continue menu determines whether a page
continues to print after certain errors occur. To make the printer
stop when an error occurs, set auto continue to off. The factory
setting is 51: on.
Option Setting
0
1
Off
On
Setting auto continue on or off determines what the printer does
when one of the following errors occurs:
Paper size error (PS)
If the printer is set for a size of paper different from the size loaded
in the paper tray, a paper size error occurs. The display reads PS
and the printer goes off line.
When auto continue is off:
•
If the auto continue menu is set to off (50), you can press
MANUAL FEED to recover from the paper size error. Your printer
ejects the paper and goes off line. Then you can change the
paper to the same size as the SelecType setting. Press ON LINE to
print on the correct size of paper.
•
If you want to continue printing on the original, off-size paper,
just press ON LINE. Your printer will print on that paper;
however, some data may be lost if the paper size is narrower
than the SelecType size setting.
2-14
Using the Printer
Page 82

SelecType Menus and Options
When auto continue is on:
l If the auto continue menu is set to on, printing resumes one
second after the PS error occurs. When printing resumes, you
may lose data if the actual paper size is narrower than the
SelecType paper size setting.
Buffer Overflow Error (b0 or bF)
When the printer’s memory cannot hold all the data for a page, or
the downloaded font or macros take up too much memory, a buffer
overflow error occurs. When this happens, the printer goes off line
and the display reads b0 or bF.
When auto continue is off:
•
If you want to continue printing, press ON LINE. Your printer
prints the page of data in its memory but some data may be lost.
If an HP LaserJet series II printer receives the complete data, it
prints the amount of data in the memory and ejects the paper.
However, the EN-4000 prints it, receives the next data in the
correct position, and then resumes printing. For this reason, in
many cases you can still print a full page image, even with
limited memory.
When auto continue is on:
•
Printing resumes automatically after a buffer overflow error.
Using the Printer 2-15
Page 83

SelecType Menus and Options
Menu 6: Automatic Margins
When this menu is on, the printer leaves a margin between the last
printable line on one page and the first printable line on the next
page. Most software applications take care of your top and bottom
margins for you and control when the printer skips to a new page,
so you may never need to change this menu. The factory default
setting is 61: on. If you set the menu to off, no top or bottom margin
is established.
Option Setting
0
1
Off
On
Note: Whenever this menu is changed, the top margin and text
length are reset to their default values.
Menu 7: Lines Per Page
This menu sets a fixed number of lines to be printed on a page. It
also changes the line spacing. This setting is affected by the current
paper size, orientation, and font settings. The factory setting for the
number of lines is 60.
Changing the setting for this menu is completely different from
other SelecType menus. The following steps explain how to change
the setting for this menu.
1.
Press ON LINE to set the printer off line.
2.
Press SelecType to enter SelecType mode.
2-16
Using the Printer
Page 84

SelecType Menus and Options
3.
Press MENU to change the left digit of the display to 7. This is the
lines per page menu.
4.
Press SET. The display flashes the current setting.
5.
Press or to increase or decrease the setting (unlike other
settings, this changes both digits).
When the number of lines you want appears on the display,
6.
press SET to save the setting.
The maximum number of lines that can be printed on a page
changes according to paper size, orientation, and font (as well as
margins you may have set with your application program). The
display will not show a number higher than this maximum. If you
continue to press or beyond the maximum number of lines, the
display returns to 00. Setting the number of lines to 00 sets the line
spacing to 1/6 inches. If you use printer commands or your
application program to set the number of lines to more than 99, the
display reads when you enter SelecType and select this menu.
It is usually best to leave the lines per page setting at 60 and use
your application programs to set the top and bottom margins.
Using the Printer
2-17
Page 85

SelecType Menus and Options
Menu 8: Status Sheet/Self Test
Use this menu to print a status sheet or a self test. The self test is a
one-page sample showing output from your printer. It lets you
check printer operation without sending a print job from your
computer.
The status sheet is a report containing information on your printer
configuration and SelecType settings and print samples of the
available fonts. The status sheet makes an excellent SelecType menu
and is a handy way to check all of your settings. The factory setting
is PO: Status sheet.
Option
0
1
Note: Only letter or
sheets or self tests.
Your printout
Setting
Status sheet
Self test
A4 size paper should be used to print status
Other sizes of paper cause a paper size error.
may also be incomplete if you use paper smaller
than letter size.
Choose the status sheet or self test option and press SET (to save the
setting). Close the printer cover. When the status sheet or self test is
finished printing, the printer goes off line automatically. A sample
of the self test is shown below.
./0123456789:;
/0123456789:;
0123456789:;
123456789:;
<=>?@ABCDEFGHIJKLMNOPQRSTUVW
<=>?@ABCDEFGHIJKLMNOPQRSTUVWX
<=>?@ABCDEFGHIJKLMNOPQRSTUVWXY
<=>?@ABCDEFGHIJKLMNOPQRSTUVWXYZ
23456789:;<=>?@ABCDEFGHIJKLMNOPQRSTUVWXYZ[
3456789:; <=>?@ABCDEFGHIJKLMNOPQRSTUVWXYZ[\
456789:;<=>?@ABCDEFGHIJKLMNOPQRSTUVWXYZ[\]
2-18
Using the Printer
Page 86

SelecType Menus and Options
Menu 9: Printer Mode
The printer mode menu has three options: HP LaserJet series II
emulation, Epson LQ-2500 emulation, and Epson FX-850/1050
emulation. The factory setting is 90: HP emulation mode. For best
results, leave this setting at HP emulation mode and choose the HP
LaserJet series II printer in your application program setup.
Option
0
1
2
I 3
Setting
HP LaserJet series II emulation
Epson LQ-2500 emulation
Epson FX-85011050 emulation
(Reserved)
Note: Option 3 is reserved for future IC emulation cards. When
these cards become available from Epson you can use the mode
by inserting the card in slot A and setting this menu to 93.
Menu A: Auto Line Feed
In most cases, this menu should remain at its factory setting A0: off
If lines print on top of one another, set auto line feed to A 1: on
Option
0
1
Setting
Off
On
Using the Printer 2-19
Page 87

SelecType Menus and Options
Menu b: Interface
This menu gives you two options for the interface setting: parallel or
serial. The factory setting is b0: parallel interface. If you choose to
install an optional interface board, make sure this menu is set to
parallel whether the board is for a serial or parallel interface. ‘This is
because all optional interface boards use the printer’s internal
parallel connections. The serial option is for use with the printer’s
internal RS-232C serial interface only.
Option
0
1
Setting
Parallel interface
Serial interface (RS-232C)
Menu C: Baud Rate
This menu appears only after you set the RS-232C serial interface
option. You can use this menu to select a baud rate for serial
communications. See your computer manual and software
documentation for the proper setting. The factory setting with the
RS-232C interface is C0: 19,200 baud.
Option
0
1
2
3
4
5
6
Setting
19200
9600
4800
2400
1200
600
300
2-20
Using the Printer
Page 88

SelecType Menus and Options
Menu d: Word length
This menu appears only if you set the RS-232C serial interface
option. You can select a word length for serial communications from
two options: 8-bit word length or 7-bit word length. See your
computer manual and software documentation for the proper
setting. The factory setting with RS-232C is d0: 8-bit word length.
Option
0
1
Setting
8-bit word length
7-bit word length
Menu E: Parity
This menu appears only after you set the RS-232C serial interface
option. It gives you parity options for serial communications. See
your computer manual and software documentation for the proper
setting. The factory setting with the RS-232C interface is
Option
0
1
2
Setting
None
Odd parity
Even parity
E0: none.
Using the Printer 2-21
Page 89

SelecType Menus and Options
Menu F: X-on/ X-off
This menu appears only after you have set the RS-232C serial
interface option. See your computer manual and software
documentation for the proper setting. The factory setting with the
RS-232C interface is
F1 :
enable.
Option
0
1
Setting
Disable
Enable
2-22
Using the Printer
Page 90

SelecType Menus and Options
LQ/FX Emulation Mode Menus
The menus in this section are available only if your printer is set to
LQ or FX emulation mode. See the Quick Reference card for a
complete table of LQ/FX emulation mode menus and options.
LQ/FX Menu 2: Condensed Print
If you are using LQ or FX mode and you choose condensed print,
characters are printed at about 60% of their normal width. The
actual amount of reduction may differ if the default character
spacing (10 cpi) has been changed. Also, some character spacings, 15
cpi for example, are already condensed and cannot be reduced
further. The factory default setting is 20: off.
Opt ion
0
1
Setting
Off
On
This is 10 CPI printing.
This is condensed 10 CPI printing.
This is 12 CPI printing.
This is condensed 12 CPI printing.
Using the Printer 2-23
Page 91

SelecType Menus and Options
LQ/FX Menu 3: Typeface
The typeface menu available when you use LQ or FX mode displays
the options listed below. Other options are available if you install
optional font cards. The factory setting is 30: Courier.
Option
0
1
Courier
Courier Bold
Prestige
Prestige
Setting
Courier
Prestige
ABCDEFGHIJabcdefghij0123!"#$%&'()*+,-./
ABCDEFGHIJabcdefghij0l23!"#$%&'()*+,-./
ABCDEFGHIJabcdefghij0123!"#$%&'()*+,-./
2-24
Using the Printer
Page 92

SelecType Menus and Options
LQ/FX Menu 4: Extended Graphics
When you use LQ or FX mode, the factory setting for this menu is
40: Epson Extended Graphics character table. In most cases you
leave this menu at its default setting.
The Extended Graphics table includes international characters,
Greek characters, and mathematical symbols, as well as graphic
characters for printing lines, comers, and shaded areas. If the font
you are using contains italic characters, you can print italic
characters without changing the setting to the Italic character table.
If the font you are using does not contain italic characters, you
cannot print italics, even if you choose the Italic character table.
If you want to print a downloaded character set, change the menu
setting to 42.
See Appendix A for sample text of both character tables.
Option Setting
0
1
2
Epson Extended Graphics character table
Italic character table
Download character set
Using the Printer 2-25
Page 93

SelecType Menus and Options
Menu 5: Country (LQ/FX)
The country menu supports 13 international character sets. The
factory default setting is 50: USA and works with most application
programs. You may want to change the country menu setting if you
are using a language other than English.
Option
0
1
2
3
4
5
6
7
8
9
A
b
C
Setting
USA
France
Germany
United Kingdom
Denmark
Sweden
Italy
Spain
Japan
Norway
Denmark 2
Spain 2
Latin America
2-26
Using the Printer
Page 94

SelecType Menus and Options
LQ/FX Menu 6: Automatic Margins
If your printer is set for LQ or FX emulation, this menu is valid only
when you are printing on continuous paper using the optional push
tractor unit. When this menu is on, the printer leaves a margin
between the last printed line on one page and the first printable line
on the next page. Most software applications take care of your top
and bottom margins and control when the printer skips to a new
page, so you should keep this menu at the factory default setting.
Set automatic margins on only if your application program does not
control the margins. For more details, see the manual included with
the optional pull tractor. The factory setting is 60: off.
Option
0
1
When you are using LQ or FX mode, you can set the number of lines
per page using this menu. The number of lines per page is
calculated based on a line spacing of l/6 inch, regardless of the
current line space setting. The maximum number changes according
to the current paper size and the orientation. The factory setting is
62 lines.
If you want to change the lines per page setting, follow the steps
under Menu 7 in the section on HP emulation mode menus.
Setting
Off
On
Menu 7: Lines Per Page (LQ/FX)
Using the Printer
2-27
Page 95

Chapter 3
Paper Handling
Choosing Paper
Loading Paper
Loading Paper into the Paper Tray..
Loading Paper Manually
. . . . . . . . . . . . . . . . . . . . . . . . . . . . . . . . . . . . . . . . . . . . . . . . . . . . . . . . . . . . . . . . . . . . . . . . .
...........................................................................
.....................................................
..................................
3-2
3-4
3-4
3-16
Paper Handling 3-1
Page 96

Choosing Paper
The EPI-4000 is a plain paper printer designed to print on most
commonly available types of single-sheet paper and envelopes. The
type of paper you use, however, directly affects the quality of the
printing. For best printing results, use high-quality, 17 to 24 lb.
cotton bond or sulfite paper. Paper made for plain-paper copiers is
also a good choice. The EPI-4000 can also print on other types of
standard office paper, including memo sheets, letterhead, and paper
for non-impact printers. Most correspondence quality paper works
well in the EPI-4000. For best printing results on envelopes, use 12 to
24 lb. plain, bond, or air mail envelopes.
With ink jet printers such as the EPI-4000, you need to select paper
of the proper absorbency. On paper that is too absorbent, the ink
may bleed slightly and produce blurred characters. On paper that is
not absorbent enough, the ink may take too long to dry and smear
easily.
The finish and thickness of the paper is also important. Do not use
paper that has either a raw, rough finish or a slick, coated finish.
Also avoid paper that is too thick or too thin. Use smooth paper for
best results.
The printing quality may be affected by which side of the paper you
print on. On most paper one side of the paper produces better
printing results than the other.
Before you buy paper in large quantities, it is best to test a few
sheets in the printer. Also test any envelopes you plan to use with
the EPI-4000.
Note: The printing quality on envelopes may be irregular because
different parts of an envelope have different thicknesses.
3-2
Paper Handling
Page 97

Choosing Paper
To test paper in the printer, load a single sheet from the package,
run the self test as described in Chapter 1, and look at the results.
Next load another sheet with the opposite side facing up and run
the self test again. Check to see which side gives you the best
printing quality.
See Chapter 7 for detailed specifications on the paper you can use
with the EPI-4000.
Note: Ink jet printers are particularly sensitive to the condition of
your paper. Keep your unused paper in in its original packaging
material and store it in a cool, dry place. Adverse storage
conditions, such as high temperature or humidity, can harm your
paper supply and decrease the printing quality.
Paper Handling
3-3
Page 98

Loading Paper
The EPI-4000 can print on a wide range of paper and envelope sizes,
including letter, legal, and ledger size paper, and #6, #10, and DL
size envelopes. The printer’s default (factory) paper size setting is
letter size, so you can use single sheets of letter size paper without
changing the paper size setting. To use envelopes or other sizes of
single sheet paper, you need to change the paper size. For a list of
the paper and envelope sizes you can use with the EPI-4000 or to
change the paper size, see the section on the SelecType paper size
menu in Chapter 2.
The EPI-4000 can also print pages in either of two orientations.
Portrait (or vertical) orientation, the more common setting, prints
across the page’s width. You use portrait orientation for printing
letters and other pages of text. Landscape (or horizontal) orientation
prints across the page’s length. Landscape orientation provides a
wider printing space for spreadsheets, graphics, and tables. The
default (factory-set) orientation is portrait. For more information on
portrait and landscape orientation or to select landscape orientation,
see the section on the SelecType printing orientation menu in
Chapter 2.
Note: This chapter tells you how to choose and load single-sheet
paper and envelopes. If you install the optional push tractor, the
printer can also print on continuous paper. The optional push
tractor comes with its own manual. For information on paper you
can use with the tractor and for instructions on how to load paper
onto the tractor, see the push tractor manual.
Loading Paper into the Paper Tray
The paper tray holds up to 150 sheets of paper or up to 30
envelopes. To load paper or envelopes into the tray, follow these
steps.
3-4
Paper Handling
Page 99

Loading Paper
1.
Press ON LINE to set the printer off line. The ON LINE light goes
off. Then press MANUAL FEED to lower the pressure bar in the
paper tray. The MANUAL FEED light goes on.
2.
Open the paper feeder cover, as shown below.
3.
Move the envelope lever to the envelope position, as shown
below. Then close the paper feeder cover.
Paper Handling
3-5
Page 100

Loading Paper
4.
Make sure the paper release lever is up, as shown below.
5.
Remove the paper tray cover.
3-6
Paper Handling
 Loading...