


®
EPSON
VGA Utilities Guide
This manual is printed on recycled paper and is
l00% recyclable.

IMPORTANT NOTICE
DISCLAIMER OF WARRANTY
Epson America makes no representations or warranties, either express or implied, by or
with respect to anything in this manual, and shall not be liable for any implied warranties
of merchantability and fitness for a particular purpose or for any indirect, special or
consequential damages. Some states do not allow the exclusion of incidental or
consequential damages, so this exclusion may not apply to you.
COPYRIGHT NOTICE
All rights reserved.
system, or transmitted, in any form or by any means,
photocopying, recording, otherwise,
America, Inc. No patent liability is assumed with respect to the use of information
contained herein. Nor is any liability assumed for damages resulting from the use of the
information contained herein. Further, this publication and features described herein are
subject to change without notice.
Epson is
General notice: Other product names used herein are for identification purposes only and
may be trademarks of their respective companies.
a registered trademark of Seiko Epson Corporation.
No
part
of this publication may be reproduced, stored in a retrieval
without the prior written permission of Epson
TRADEMARKS
electronic, mechanical
Copyright © 1993 by Epson America, Inc.
Torrance,Califomia 400195000
ii

Contents
Introduction
Installing Drivers and Utilities
Using the INSTALL Program
AutoDesk Products
Installing the Drivers
Configuring Your Auto Desk VGA Environment
Using FASTACAD.BAT
Configuring VGA Colors
Configuring AutoCAD, Versions 9,10,11
Configuring AutoCAD, Version 12
Configuring AutoShade with RenderMan
Configuring AutoDesk 3D Studio
Framework II
Copying Framework II Drivers.
Installing the Drivers
Framework III
GEM,Version 3.x
Creating a GEM Driver Pack
Installing the Drivers
Configuring GEM for the New Drivers
IBM OS/2, Version 2.0
Installing the Drivers
Configuring OS/2 for the VGA Drivers
Lotus l-2-3 or Symphony, Version 2.x
Lotus l-2-3,Version 3.x
Microsoft Windows, Version 3.0
Installing the Drivers
Configuring the Drivers
Modifying the SYSTEM.INI FiIe
Microsoft Windows, Version 3.1
Installing the Drivers
Configuring the Drivers
.............................
...................
...................
.........................
.....................
....................
...................
.............
..............
.............................
...............
.....................
............................
..........................
.................
.....................
.......................
.....................
..............
.......................
..................
.....................
....................
...............
..................
.....................
....................
.....
.........
.........
...........
...........
1
5
6
8
10
10
11
11
13
14
15
16
17
18
18
20
22
22
23
24
25
25
26
28
29
31
31
32
34
35
35
36

MicrosoftWord,VersionS.O
....................
PCad .................................
Ventura Publisher
VersaCAD386
VersaCAD 2D
WordPerfect,VersionS.O
WordPerfect, Version 5.1
WordStar
...............................
VGAUtilities
CLMODE
SetRES
..............................
..........................
............................
............................
......................
......................
............................
............................
37
39
40
42
43
45
46
47
48
48
52
iv

The Utility diskettes included with your system contain special
VGA (video graphics array) drivers and utilities for your
computer’s built-in VGA adapter. This booklet describes how
to install and use these drivers and utilities.
Since software programs can run on different types of display
adapters with different types of monitors, the VGA drivers
identify your display adapter and monitor for the software.
These drivers are files your software uses to communicate with
your display adapter and monitor.
A utility is a program that supports the processes of a
computer. The utilities on your diskettes let you change the
screen resolution and enhance your system operation by
controlling the screen refresh rate or setting various video
modes. You can also use the CLMODE utility to see how much
video memory is installed in your computer.
Your computer’s built-in VGA adapter is 100% compatible with
IBM VGA. This adapter allows you to use the computer with
Epson®VGA monitors, other brands of VGA monitors, and
VGA compatible, multifrequency monitors that use analog
input. The drivers and utilities described in this guide work
with any of these monitors.
Standard VGA monitors display resolutions up to 640 x 480,
and you do not need to install the drivers or utilities for your
monitor to operate properly with your application programs at
this resolution. Also, your system supports the VESA standard
1.20. If you have programs that use VESA, install the VESA
drivers that came with these programs.
VGA Utilities 1

However, you need to install these drivers if you want to use
resolutions over 640 x 480 or take advantage of the following
special features:
Interlaced and non-interlaced resolutions up to 1024 x 768
in graphics modes with up to 16.8 million colors in
640 x 480 resolutions; check the table on page 3 for
resolutions and colors supported for your applications
132-column text mode in 16 colors
High speed video memory interface
16-bit data path to video memory and hardware registers
Video adapter control of graphics cursor movement.
Note
You can use Epson’s VGA drivers and utilities only with the
computer’s built-in VGA adapter. If you have installed an
optional display adapter card, use
the drivers
and
documentation that came with it.
These programs are designed for systems running MS-DOS
or OS/2. If you are using another operating system, see the
documentation that came with it for information about the
VGA drivers you can use.
Your computer comes with either 512KB or 1MB of video
memory installed on the system board. If your system has
512KB, you can upgrade the video memory to 1MB by
installing four additional video memory chips. (See Chapter 2
of the
User’s
Guide for installation instructions.) The resolutions
your system can support for each application depend on the
size of your video memory.
2 VGA Utilities
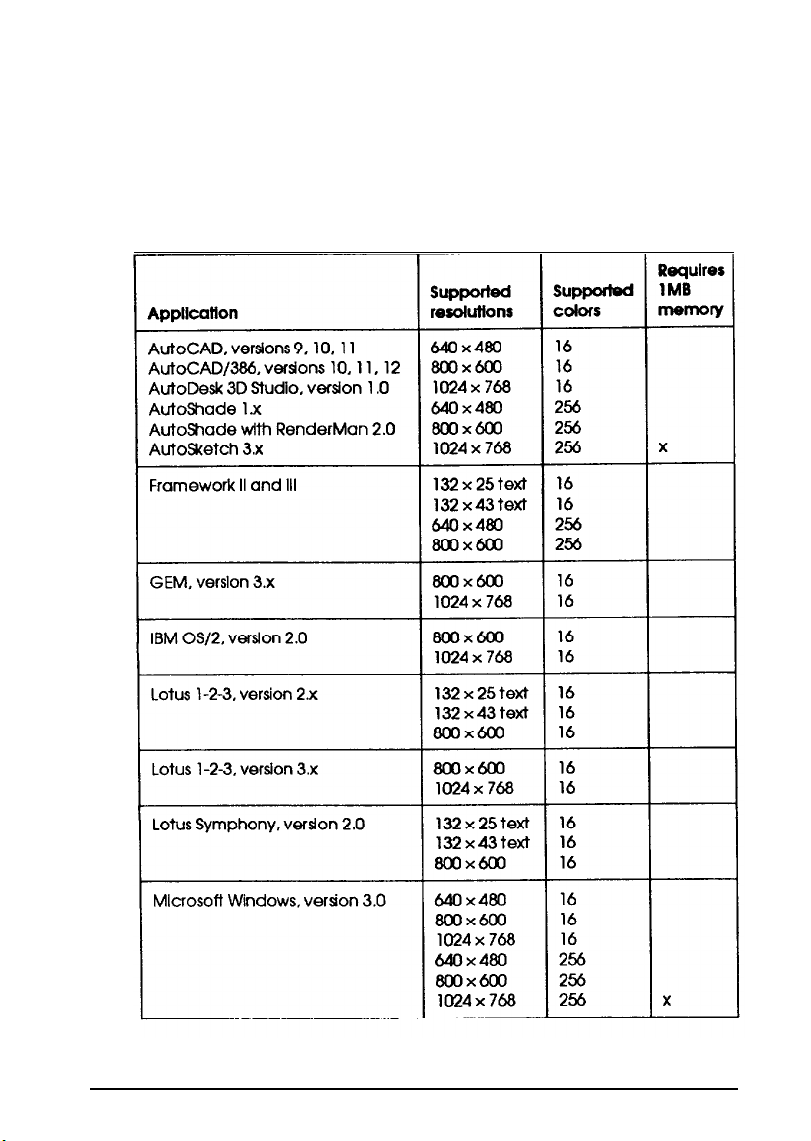
The following table lists the applications for which high
resolution VGA drivers are provided, as well as the supported
resolutions and colors for each application. Those drivers
requiring 1MB of video memory are identified in the last
column.
Supported applications
VGA Utilities 3
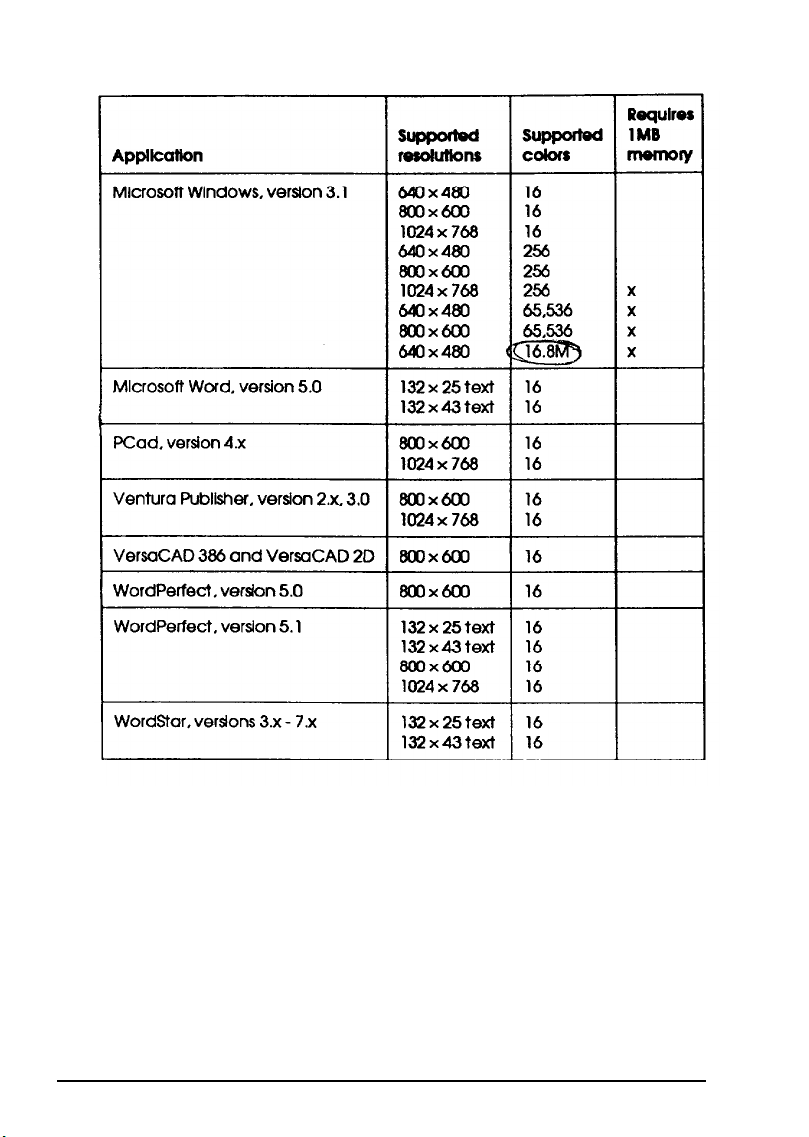
Supported applications (Continued)
In addition to the drivers for the applications listed above, the
Utility diskettes include INSTALL programs to help you install
the drivers on your hard disk.
The Utility 1 diskette contains VGA drivers for MS-DOS based
applications. The Utility 2 diskette contains drivers and utilities
for Windows 3.0 and 3.1. The Utility 3 diskette contains VGA
drivers and utilities for the OS/2 environment.
4 VGA Utilities

You’ll also find the following utility programs:
CLMODE
SetRES.
The CLMODE utility allows you to see the amount of video
memory you have installed, determine the video modes you
want to use, and change the vertical refresh rates. The SetRES
utility allows you to change your screen resolutions from
within the Windows environment.
You may want to install these utilities even if you are not
installing any of the VGA drivers. See page 48 for more
information.
Installing Drivers and
The information in this guide is organized alphabetically by
application program or operating environment. To install a
particular driver, look up your application or environment in
the table of contents; then turn to the appropriate section for
instructions. When you are instructed to run the INSTALL
program, see the section below.
Note
Each of the Epson VGA drivers is designed to work with a
specific version of software. Make sure the driver you select
is compatible with the version of software you are using, or
you may get unpredictable results.
Utilities
VGA Utilities 5
Using the INSTALL Program
The INSTALL program on your Utility 1 diskette provides an
easy way to install the VGA drivers and utilities for your
MS-DOS based applications. You can choose to install of the
drivers at once or select individual sets of drivers to install.
Note
You do not need to use the INSTALL program on the
Utility 1 diskette to install the 0S/2 and Windows drivers.
See “IBM OS/2, Version 2.0” on page 25 or “Microsoft
Windows, Version 3.0” on page 31 for installation
instructions for these drivers.
Follow these steps to run INSTALL:
1.
Insert the Utility 1 diskette in drive A.
2.
Type
A:
and press to log onto drive A.
3.
Type the following and press to start the installation
program:
INSTALL
You see the Cirrus Logic copyright screen.
4.
Press . The INSTALL program prompts you to select
the drive where you want to install the drivers.
5.
Press again to accept the default or use the arrow keys
to move the cursor to the drive you want to select and press
6 VGA Utilities
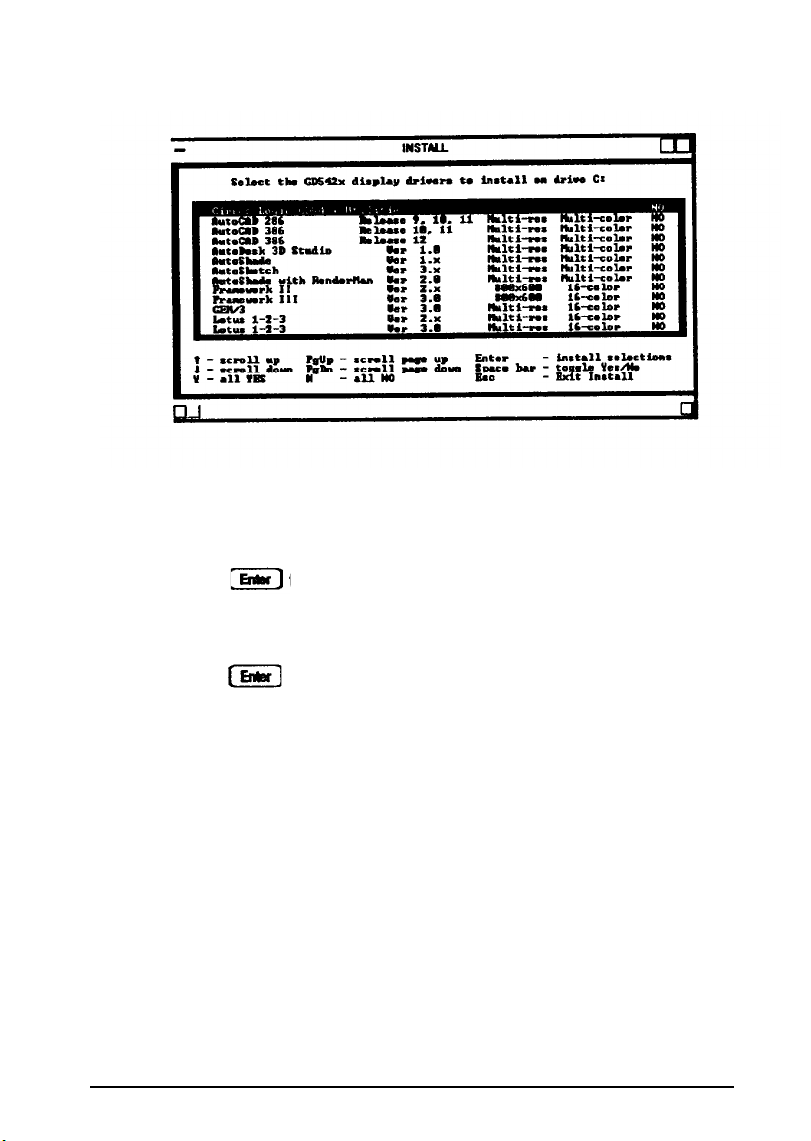
You see this driver selection screen:
6. Use the arrow keys to highlight the
7.
Press the space bar to mark the driver for installation.
8.
Press to install your selections. As
driver
you want to select.
the programcopies
each of the drivers you selected, it displays default
directories for each application.
9.
Press to accept the default or delete the displayed
directory and type the directory containing your
application. If the file or directory already exists, the
INSTALL program asks you if you want to copy the new
drivers over existing files.
As the INSTALL program copies the drivers, it displays the
files it is copying. When all the selected drivers are
installed, you see the following prompt:
The
GD5422
display drivers installation
is complete.
Press
10. Press a
any
key to continue...
key to return to your operating system.
VGA Utilities 7

AutoDesk Products
The Utility 1 diskette includes VGA drivers for the following
AutoDesk programs:
AutoCAD and AutoCAD/
AutoShade
AutoShade with RenderMan
AutoSketch
3DStudio.
The AutoDesk drivers are fast display list drivers (DLDs) that
accelerate the redraw, pan, and zoom functions of AutoDesk
products. The drivers support extended VGA modes in 16 and
256
colors. If you have 1MB of video memory, these drivers
support resolutions of 1024 x 768 in 256 colors. (See the table on
page 3 for supported resolutions, colors, and memory
requirements for AutoDesk products.)
Your system comes with two sets of display list drivers: the
DLD386-VGA and the DLD-VGA. The table below lists the
capabilities supported by each driver set; you can use it to
determine which one you want to install.
8 VGA Utilities
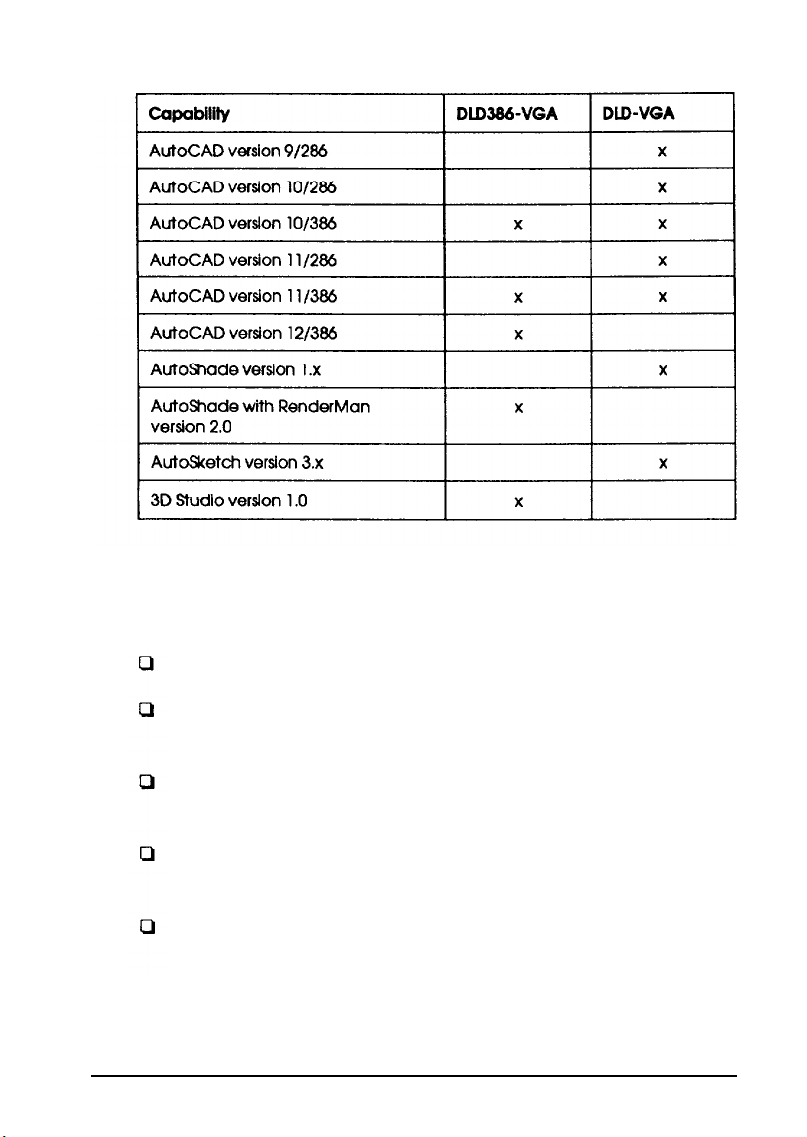
AutoCAD driver set capabilities
You need to perform several steps to use your VGA drivers
with your AutoDesk programs. Each of these steps are
described in more detail in the following sections.
Install the drivers using the INSTALL program
Configure your environment using the DLDSETUP
program
Execute the FASTACAD.BAT file before you start your
AutoDesk application
Configure the driver for the colors you want using
COLORl6.EXE and COLOR256.EXE
Reconfigure your AutoDesk applications using the
appropriate display device.
VGA Utilities 9

Installing the Drivers
If you have not already installed your AutoDesk product,
follow the instructions in your AutoDesk documentation to
install it. Select a standard VGA driver and make sure the
application is functioning properly before you install these
drivers.
Note
The AutoDesk drivers share memory with AutoCAD. If you
notice significant hard disk activity while you are using the
AutoDesk drivers, you probably need to install additional
RAM.
To install the drivers, run the INSTALL program, described on
page 6, to copy the AutoDesk drivers to your hard disk.
Select the drivers that correspond to the AutoDesk products
you are using.
Configuring Your AutoDesk VGA Environment
Follow these steps to configure your AutoDesk environment
using the DLDSETUP program:
1.
Log on to the directory where you’ve stored your AutoDesk
drivers.
2.
Type DLDSETUP and press The program displays a
welcome screen for DLDSETUP.
3.
Press any key, then follow the instructions on the screen to
select the options you want to use.
When you respond to the final prompt, the program creates
the file FASTACAD.BAT in your current directory.
10 VGA Utilities

Using
FASTACAD. BAT
You need to run the FASTACAD.BAT file before you start your
AutoDesk application.
YOU can type
F
ASTACAD
and press
before you run the application for the first time.
You can also modify your AUTOEXEC.BAT file so that it
automatically runs FASTACAD. For MS-DOS 3.2 or earlier,
place the command “FASTACAD” as the last command in your
AUTOEXEC.BAT file and make sure the directory containing
FASTACAD is in your path. For later versions of MS-DOS, use
the command “CALL FASTACAD” anywhere in the
AUTOEXEC.BAT file.
You can also place the commands within the FASTACAD file
directly into your AUTOEXEC.BAT file or include them in a
batch file which also starts your AutoDesk application.
Configuring VGA Colors
You can modify all your screen colors, including menu colors,
text colors, dialog box colors, and drawing colors using the
CustomColors utilities COLOR16.EXE and COLOR256.EXE.
These utilities are on your Utility 1 diskette.
CustomColors allows you to select the colors you want to
display in your AutoDesk product using a simulated screen,
complete with all possible objects.
Note
You must run DLDSETUP before you can configure your
VGA colors.
VGA Utilities 11
Follow these steps to set up the colors you want your AutoDesk
product to display on your monitor:
1.
Log onto your AutoDesk product program directory.
2.
Type
COLOR16
COLOR256
to define colors for 256-color mode. You see a
to define colors for N-color mode or type
screen simulating the AutoDesk application screen. The
menu at the bottom of the screen indicates the functions
you can perform within this utility.
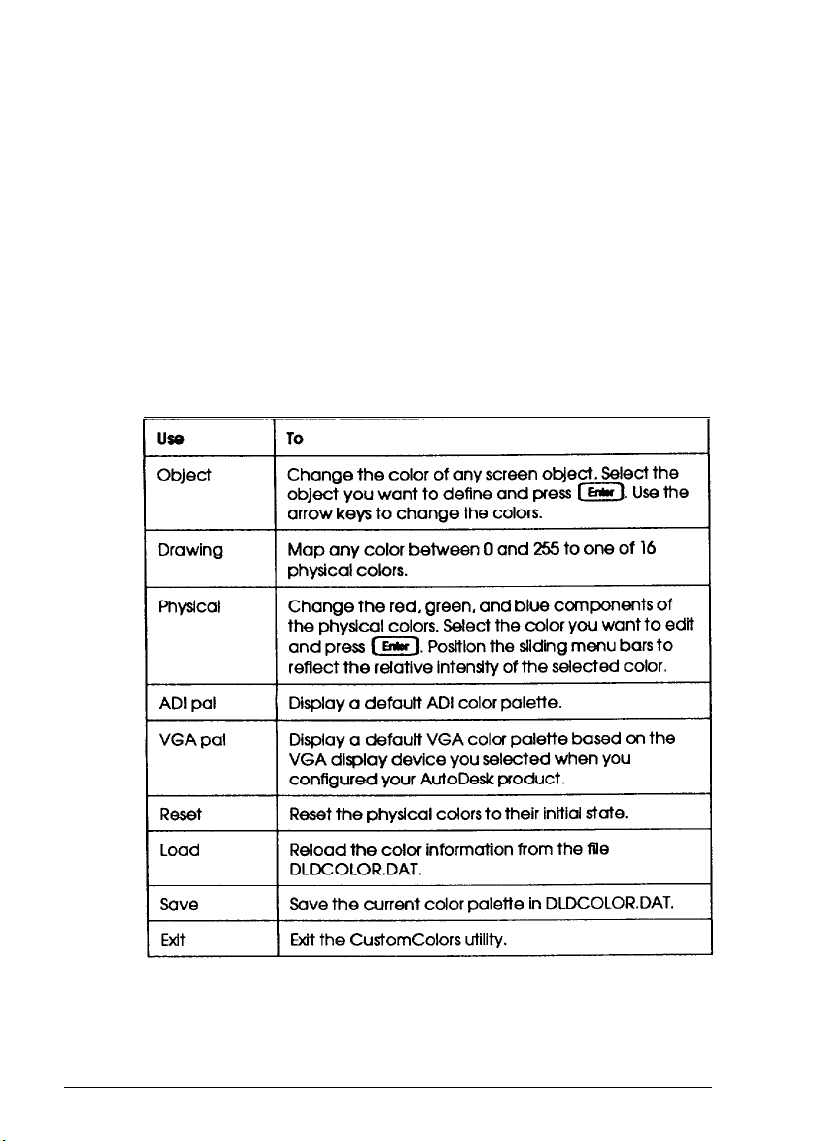
3.
Use the table below to set your AutoDesk application colors.
Defining AutoDesk application colors
12 VGA Utilities
When you select Save from the menu, the program creates the
file DLDCOLOR.DAT in your AutoDesk program directory.
Configuring AutoCAD, Versions 9, 10, 11
The first time you use AutoCAD with a DLD-VGA driver, you
must change the AutoCAD display device configuration.
Follow these steps:
1.
Select option 5,
2. Select option 3, Configure Video Display.
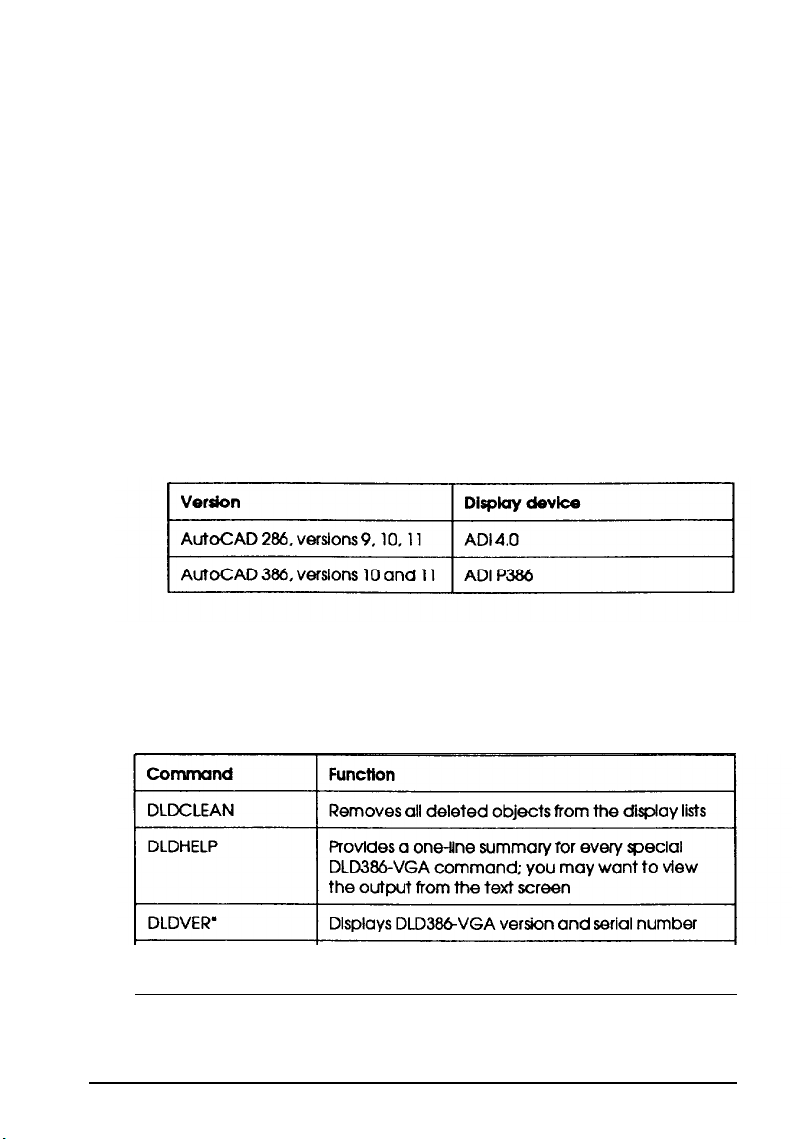
3.
Select one of the following display devices:
AutoCAD configuration display devices
Once you have configured AutoCAD, you can use AutoCAD
commands to better control display list processing, as shown in
the following table.
Configure
AutoCAD from the main menu.
DLD commands
DLDDLMODE
VGA Utilities 13

DLD commands (continued)
l
These commands work only with AutoCAD 386.
Configuring
When you install the VGA drivers for AutoCAD, version 12,
there are a few extra steps you have to perform after you run
AUTOCAD,
Version 12
DLDSETUP:
1.
Log onto the directory where you started DLDSETUP.
2.
Copy the file DLDVGA.EXP to RCPANA.EXP.
3.
Copy the file DLDVGA256.EXP to RCPANA1.EXP.
14 VGA Utilities

4.
Use an editor that can save files in ASCII format to edit the
FASTACAD.BAT file. Change all occurrences of
DLDVGA.EXP to RCPANA.EXP. Also change any
occurrences of DLDVG256.EXP to RCPANAl .EXP.
5.
Add the DLD software to your ACADDRV environment. For
example, if your AutoCAD is installed in the C:\ACAD
directory and the DLD386-VGA files are installed in
C:\ACAD386, type the following command and press
SET ACADDRV=C:\ACAD\DRV;C:
\ACAD386;
If you’re using a batch file to start AutoCAD, also change the
SET command line in your batch file.
6.
Configure your AutoCAD, version 12, by selecting
DLD386-VGA as your display device.
Configuring AutoShade with RenderMan
The first time you use AutoShade with a DLD386VGA driver,
you must follow these steps to change the display device
configuration:
1.
Log onto the AutoShade program directory.
2.
Type the following and press to start the AutoShade
program:
SHADE /R
3. Select P386 AutoDesk Device Interface as the display
driver.
4. Select P386 AutoDesk Device Interface as the
rendering driver.
VGA Utilities 15

5.
If you are running the display and rendering screen on the
same monitor, select Single Monitor.
Configuring AutoDesk 3D Studio
Before you can use 3D Studio, you’ll need to edit the 3DS.SET
file in your 3DS directory. Follow these steps:
1.
Make a copy of the original 3DS.SET file and name the copy
3DS.OLD.
2.
Use a text editor or word processing program that can save a
file in ASCII format to edit the 3DS.SET file.
3.
Remove the semicolon in front of the DEFAULT-DISPLAY
line and change the text to the following:
DEFAULT-DISPLAY=RCPADI
4.
Remove the semicolon in front of the MAIN-DISPLAY line
and change the text to the following:
MAIN-DISPLAY=RCPADI
5.
If you selected the 256 color driver, remove the semicolon in
front of the MATERIAL-DISPLAY line and change the text
to the following:
MATERIAL-DISPLAY=RCPADI
6.
Save this file as an ASCII file.
16 VGA Utilities

Framework II
The following table lists the driver filenames for the available
Framework II text and graphics resolutions.
Framework II driver files
Filename
AVGAFW2 1. SC
AVGAFW22.SC
AVGAFW23.SC
AVGAFW24.SC
AVGAFW25.SC 800 x 600 graphics
Desktop format
132x25
132x43
132x25
132x43 800X600
Zoom format
640X480
640x480
800X600
800X600
If you have not yet installed Framework II, follow the
instructions in your Framework II documentation to install it
with a standard VGA display driver.
Framework II requires that you install drivers from the root
directory of a diskette. To install the drivers for Framework II,
you’ll need to do the following:
Copy the files to the root directory of a diskette
Install the drivers using the Framework II Setup program.
VGA Utilities 17

Copying Framework II Drivers
Follow these steps to copy the Framework drivers to the root
directory of a diskette:
1.
Use the INSTALL program on the Utility
described on page 6 to copy the drivers to the diskette.
When the program prompts you to supply a drive and
directory, type a directory on your hard disk where you can
easily locate them to copy them to a diskette; for example:
C : \TEMP
2.
Select the Framework Il drivers and respond to the prompts
as they appear on the screen. The program displays the
names of the drivers as it copies them to your hard disk.
3.
Insert a formatted diskette in drive A.
4.
Use the MS-DOS COPY command to copy the drivers from
your hard disk to the root directory of the diskette in drive
A; for example:
COPY C:\TEMP\AVGAFW2*.SC A:\
1 diskette
as
Installing the Drivers
Follow these steps to install the Framework II drivers:
1.
Log onto your Framework II program directory.
2.
Type
SETUP
program.
3.
At the Welcome menu, select
setup program and press
4.
Select Current directory and press
18 VGA Utilities
and press to run the Framework II Setup
All other uses of the

5.
When
press
you see the
main
menu, select
Configuration
and
From the change config
6.
Hardware
Then select Screen Driver
7.
Select I want to enter my own driver filename
8.
and press
uration menu, select Primary
and press
and press
Type
9.
the filename of the driver you want to use and press
(The table above lists the driver filenames. Make
sure you include the. SC extension.)
10. Type M to return to the main menu.
11. At the
mainmenu, select Save All
New
Settings
and
press
12. You see a prompt instructing you to insert your Setup
diskette in drive A. Instead, insert the diskette containing
the drivers on the root directory.
13. Press
the space bar. The Setup program saves the current
configuration.
14. Select option ( 2 ) to copy the files to your hard disk, then
press any key.
VGA Utilities 19

Framework III
The table below lists the driver filenames for the available
Framework III text and graphics resolutions.
Framework III driver files
If you have not yet installed Framework III, follow the
instructions in your Framework III documentation to install it
with a standard VGA display driver. Then follow these steps to
install the new drivers:
1.
Run the INSTALL program, described on page 6, to copy
the Framework III drivers to your hard disk. INSTALL
allows you to copy the drivers to your Framework III
program directory.
Log onto your Framework III directory.
2.
Type SETUPFW and press to run the Framework III
3.
Setup program.
4.
At the Welcome menu, select
setup program and press
5.
Select Current directory and press
6.
20 VGA Utilities
All other uses of the

7.
From the configuration options menu, select Hardware and
press
8.
Then select Screen Driver and press
9. Select The screen driver
here
and press
I
need isn't listed
10. Select I want to enter my own driver filename
and press
11.
Type the filename of the
driver you want
to use and press
(The table above lists the driver filenames. Make
sure you include the SC extension.)
12. Type M to return to the main menu.
13. At the main menu,
selectsave All New Settings
and
press
14.
When you
find your Drivers Disk?,
see On which disk drive will Setup
type c and press
15. Select option (2) to save the new settings in your FWSETUP
file.
VGA Utilities 21

GEM, Version 3.x
The table below lists the driver filenames for the resolutions
available for GEM.
GEM driver files
Filename
SDA600.VGA
SDA768.VGA
Resolution
800X600
1024 x
768
If you have not yet installed GEM, follow the instructions in
your GEM documentation to install it with the standard EGA
(IBM Enhanced Card and 16-Color Display) driver.
GEM requires that you install drivers from the root directory of
a diskette in drive A. To install the drivers for GEM, you’ll need
to do the following:
Create a GEM driver pack
Install the drivers using the INSTALL program
Configure GEM for your new driver.
Creating a GEM Driver Pack
Follow these steps to create a GEM driver pack:
1.
Insert a blank diskette in drive A.
2.
Format the disk using the MS-DOS FORMAT command.
You’ll see a prompt for the volume label.
3.
Type the following volume label name and press :
GEM DRIVRPK
22 VGA Utilities

4.
Use the MS-DOS COPY command to copy the following files
from the GEM/3 system master diskette to the GEM
DRIVRPK diskette you just formatted:
GEMVDI.EXE
MDGEM? . SYS
Installing the Drivers
Follow these steps to install the drivers onto your GEM driver
pack diskette:
1.
Insert the Utility 1 diskette in drive A.
2.
Follow the instructions on page 6 to run the INSTALL
program. When it prompts you to select a drive and
directory, type a directory on your hard disk where you can
easily locate the files to copy them to a diskette; for example:
C:\TEMP
3.
Select the GEM/3 driver from the list of display drivers and
respond to the prompts as they appear on the screen. The
program displays the names of the drivers as it copies them
to your hard disk.
4.
Insert your GEM DRIVRPK diskette in drive A.
5.
Use the MS-DOS COPY co
your hard disk to the root directory of the diskette in drive
A; for example:
COPY C:\TEMP\*.* A:\
mmand
to copy the drivers from
VGA Utilities 23

Configuring GEM for the New Drivers
Follow these steps to configure GEM to use the new VGA
drivers:
1.
Insert the GEM/3 System Master Disk in drive A.
2.
Log onto drive A.
Type the following and press to start the GEM/3
3.
Setup program:
GEMSETUP
4.
Follow the instructions on the screen until you see
Change existing configuration.
5.
Select
OTHER (DRIVER PACK
).
You’ll be prompted to
insert a screen driver into drive A.
Insert the GEM DRIVRPK diskette you created in drive A.
6.
You’ll see the two drivers listed below:
Cirrus Logic VGA 16 Color 800 x 600
Cirrus Logic VGA 16 Color 1024 x 768
7.
From this list, select the driver you want to use.
Follow the instructions on the screen to complete the
8.
installation.
24 VGA Utilities

IBM OS/2, Version 2.0
The OS/2 2.0 driver supports 800 x 600, 16-color resolution and
1024 x 768, 16-color resolution.
lnstalling the Drivers
If you have not yet installed OS/2, follow the instructions in
your OS/2 documentation to install it. Configure OS/2 for a
standard VGA monitor. Then follow these steps to install the
driven
1.
In OS/2, open a DOS session by opening the DOS Pull Screen
icon from the OS/2 Command Prompts folder located in
the OS/2 System folder.
2.
At the DOS prompt,
3.
Type the following command and press
COPY
DISPLAY.DLL IBMVGA.DLL /B
4.
Return to your OS/2 desktop.
type CD \OS2\DLL
and press
5.
Insert the Utility 3 diskette in drive A.
6.
Open the Device Driver Install icon in the System Setup
folder located in the OS/2 System folder.
VGA Utilities 25

7.
Select
INSTALL from theOS/22.0 Device Driver
window. You see the following list of drivers:
See your monitor’s documentation to determine its
capabilities.
8.
Select the driver you want from the list and select OK
9.
Select Exit, then Yes.
Configuring OS/2 for the VGA Drivers
Installation
Follow these steps to configure OS/2
1.
Open the OS/2 System Editor icon from the Productivity
folder located in the OS/2 System folder.
Select Open from the File menu.
2.
Select CONFIG.SYS from
3.
Select
4.
5.
6.
26 VGA Utilities
Find from
Type VVGA.
does
not use
Select the Wrap option.
the Edit
SYS
in the
the
Case sensitive option.
for your drivers:
the root directory.
menu.
Find: edit box. Make sure your search

7. Select Find.
8.
When you see
9.
Highlight the comman
WGA. SYS
, select cancel.
d
line and select copy from the Edit
menu.
10.
Insert another line at the end of this command line.
11. Select Paste from the Edit menu to copy the previous
command line.
12. Type
13. Change WGA . sYs in the new comman
REM
at the beginning of the original command line.
d line to
CLVSVGA. SYS.
14. Select save from the File menu.
15.
Exit the editor.
When you restart your system, it uses the new drivers.
VGA Utilities 27

Lotus I-2-3 or Symphony, Version 2.x
The drivers for version 2.x of Lotus l-2-3 support the text
modes and graphics resolutions listed in the table below.
Lotus 1-2-3 or Symphony, version 2.x driver files
Filename
TC132X25.DRV
TC132X43.DRV
AVGAGR.DRV
Resolution
132 x 25, 16-color text
132 x 43, 16-color text
800 x 600, 16color graphics
If you have not yet installed Lotus l-2-3 or Symphony, follow
the instructions in your Lotus documentation to install it. Then
follow these steps to install the drivers:
Run the INSTALL program, described on page 6, to copy
1.
the Lotus drivers to the Lotus program directory on your
hard disk.
2.
Log onto your Lotus program directory.
Type INSTALL and press to run the Lotus installation
3.
program.
4.
From the main menu, select
Thenselect
5.
Add new drivers to library
Advanced
options
and press
and press
When the program finishes adding drivers to the library,
6.
select Modify current driver set and press
Select Text display to
7.
Graphics
and press
28 VGA Utilities
display
modify the text mode or
to modify the graphics resolution
8.
Select the driver you want to install from the displayed list
and press .
Select Return
9.
At
10.
11.
the Installation menu, select Save
At the prompt type,
to menu and press
changes.
the name
you
want to use
set and press
Exit the Lotus Install program.
12.
13.
When you start Lotus l-2-3 or Symphony, type 123 or
SYMPHONY,
followed by the name of the driver set you
want to use, and then press
lotus 1-2-3, Version 3.x
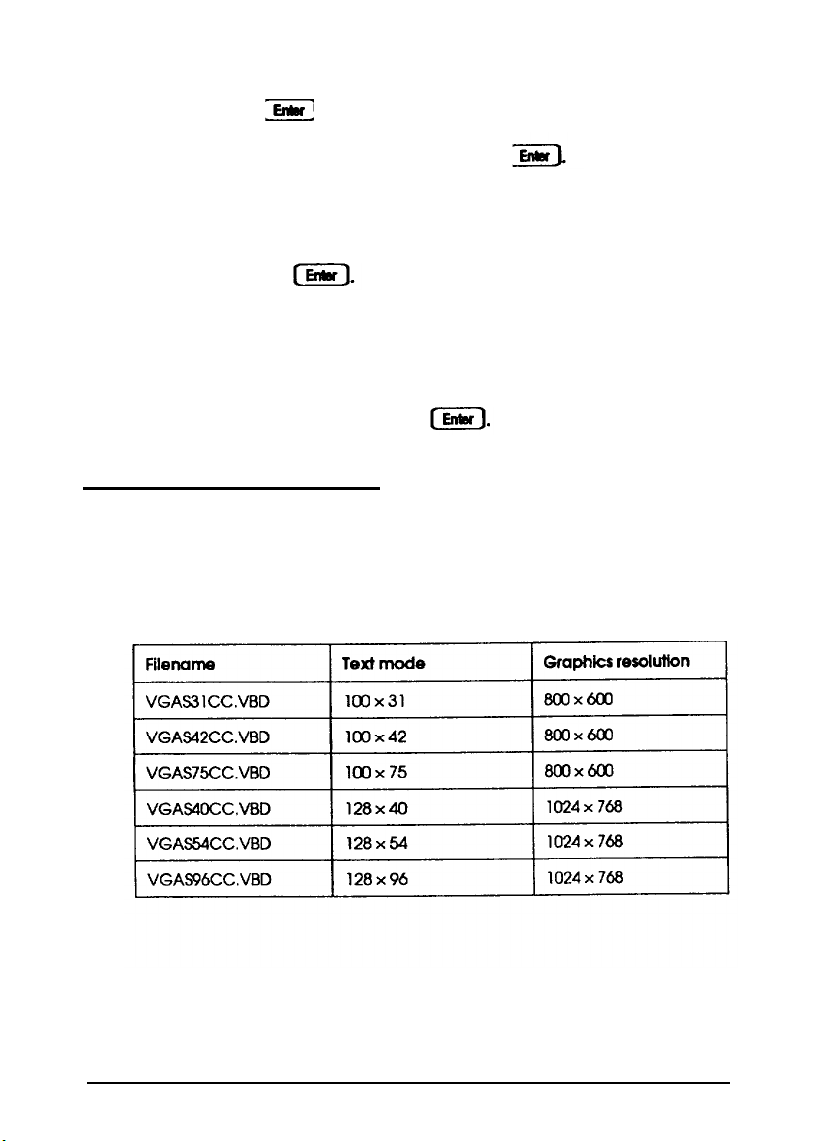
The table below lists the driver filenames for the text modes
and graphics resolutions available for lotus 1-2-3, version 3.X.
Lotus 1-2-3, version 3.x driver files
for the driver
VGA Utilities 29

If you have not yet installed Lotus l-2-3, follow the instructions
in your Lotus documentation to install it. Then follow these
steps to insyall the drivers:
1.2.Log onto your Lotus program directory.
Type the following and press to rename the
INSTALL.DDF file:
RENAME INSTALL.DDF INSTALL.OLD
Run the INSTALL program on the Utility 1 diskette, as
3.
described on page 6, to copy the Lotus l-2-3, Version 3.x
driver files to the LOTUS3x program directory on your
hard disk.
Log onto your Lotus program directory again.
4.
Type INSTALL and press to run the Lotus installation
5.
program.
Select
6.
Change selected equipment
and press .
7.
Selecteither
DCF to modify
Select Change Video Display
8.
You see a list of choices for the display types provided with
the l-2-3 distribution package as weII as the drivers you
copied from the Utility 1 diskette.
30 VGA Utilities
Modify
Current
DCF or Choose another
and press
and press .

9.
Select the l00-column (800 x 600 resolution) or the
128-column (1024 x 768 resolution) display you want and
press .
10. You see a list of different spreadsheet screen resolutions.
Select one of the following
want to use and press
drivers for the resolutions you
:
GD542x 100 Column Display (800 x 600
resolution)
GD542x 128 Column Display (1024 x 768
resolution)
11. Select
Save Changes
and press
Microsoft Windows, Version 3.0
If you have not yet installed Windows 3.0, follow the
instructions in your Windows documentation to install it with
the standard VGA driver. Then use the instructions in the
following sections to install the new drivers.
Installing the Drives
You must
on the Utility 2 diskette and the Windows Setup program.
Follow these steps:
1.
2.
3.
install
Within Windows, select
the drivers using both the INSTALL program
Run from
the file
Program Manager.
Insert the
Type the following command and select
Utility 2 diskette in drive A.
OK
menu in the
or press
A:\INSTALL
VGA Utilities 31

4.
When the INSTALL program asks you to identify your
Windows directory, press to accept the default or
delete the default and type the path for your Windows
directory.
5.
Select OK
or press The program copies the Windows
drivers and the SetRES utility to the program directory and
creates a SetRES utility icon in your Windows program
manager.
6.
When you see the message telling you that the drivers and
utility were successfully added, select
OK
or press
Nate
You’ll need to use the Utility 2 diskette again when you
configure Windows 3.0 to use the drivers.
Configuring the Drivers
Once you have used the INSTALL program to copy the drivers
to your Windows program directory, follow these steps to
configure the drivers:
1.
End your Windows session and exit to MSDOS.
2.
Log onto your Windows program directory.
3.
Type
SETUP
4.
At the System Information screen, select
5.
From the Display menu, select
provided by a hardware manufacturer)
6.
The program prompts you to insert your display driver
diskette in drive A. Insert the Utility 2 diskette in drive A.
32 VGA Utilities
and press
Other (Requires disk
Display
and press
and press

7.
Type the following path
to
display the Windows 3.0 drivers
and press
A: \WIN30
You see a list of available drivers and their resolutions:
Cirrus 54xx v1.1, Multi-res 16 colors
Cirrus 54xx v1.1, Multi-res 256
8.
Select the driver you want and press
9.
The Setup program prompts you to insert the Cirrus Logic
colors
GD5422 Windows 3.x Fonts Diskette. Keep the Utility 2
diskette in drive A, but enter the path for the system
subdirectory on the diskette, as in this example:
A: \SYSTEN
10.
As you continue with the setup process, you’ll see a prompt
to insert the Cirrus Logic GD5422 Windows 3.0 Driver
Diskette. Keep the Utility 2 diskette in drive A, type the
following path, and press :
A:\WIN30
11. After the program has copied the files, select the option
Accept the configuration shown above
and press
. You’ll see a prompt asking if the Setup program can
update your CONFIG.SYS file or your CONFIG.WIN file or
if it should make no changes.
12. Select
No changes
and press
VGA Utilities 33

Modifying the SYSTEM.INl
File
You can configure the VGA drivers for Windows 3.0 by
changing your SYSTEM.INI file. Once you have changed the
file, you can use the SetRES utility, described on page 52, to
change your resolution.
Follow these steps to change your SYSTEM.INI file:
1.
Use a text editor or word processing program that can save
a file in ASCII format to edit the SYSTEM.INI file
2.
Find (
CLVGA]
in the SYSTEM.INI file. If a [CLVGA] section
is not in the file, you must add one to the end of the file.
Use the following table to edit your SYSTEM.INI file. Locate
the resolution you want in the left column, then enter the
text from either the X-color column or the 256-color
column, depending on the driver you selected when you
configured the drivers.
Windows 3.0 VGA driver configurations
3.
Save the file in text-only format as you exit the program.
When you restart Windows, you
you want using the SetRES utility, described on page 52.
34 VGA Utilities
can
select the resolutions

Microsoff Windows, Version 3. 1
You must install the VGA drivers for Windows 3.1 using both
the INSTALL program on the Utility 2 diskette and the
Windows Setup program.
Installing the Drivers
If you have not yet installed Windows 3.1, follow the
instructions in your Windows documentation to install it. Select
VGA as the default display device. Then follow these steps to
install the new drivers:
1.
Within Windows, select Run from the file menu in the
Program Manager.
2.
Insert the Utility 2 diskette in drive A.
3.
Type the following command and select
A:\INSTALL
4.
When the INSTALL program asks you to identify your
Windows directory, press to accept the default or
delete the default and type the path for your Windows
directory.
OK
or press
5.
Select
OK
or press The program copies the Windows
drivers and the SetRES utility to the program directory and
creates a SetRES utility icon in your Windows program
manager.
6.
When you see the message telling you that the drivers and
utility were successfully added, select
OK
or press .
VGA Utilities 35

Configuring the Drivers
Once you have used the INSTALL program to copy the drivers
to your Windows program directory, follow these steps to
configure the drivers:
1.
Open the Windows Setup icon.
2. Select options.
3. Select change system settings.
4. Select Display.
5.
From the Display menu, select
provided by a hardware manufacturer).
6.
When the program prompts you to insert your display driver
diskette and displays the path A : \, insert the Utility 2
diskette and press
You see a list of drivers:
Other (Requires disk
7.
Select the driver
you
want
able to use the SetRES utility, select cirrus
Multi-Resolution.
36 VGA Utilities
and press If you want to be
542x

8. When you see Accept the configuration as shown
above, press
9.
Follow the rest of the instructions on the screen and in your
Windows documentation to complete the installation.
To change your VGA resolution, you can run the Setup
program from within Windows or you can run the SetRES
utility described on page 52. To use the SetRES utility, however,
be sure you have selected the MultiResolution driver from
the Windows Setup program.
Microsoft Word, Version 5.0
The driver for Word 5.0 supplied with your computer supports
both high resolution text and graphics.
If you have not yet installed Word 5.0, follow the instructions in
your Word documentation to install it with the standard VGA
driver. Then follow these steps to install the new driver:
1.
Run the INSTALL program, described on page 6, to copy the
driver file to the Word program directory on your hard
disk.
2.
Type
WORD
and press to start Word.
3. Select Options.
4. Highlight the display mode option.
5.
Press to see a list of display modes. The table below
lists the available options and the display modes they
produce.
VGA Utilities 37
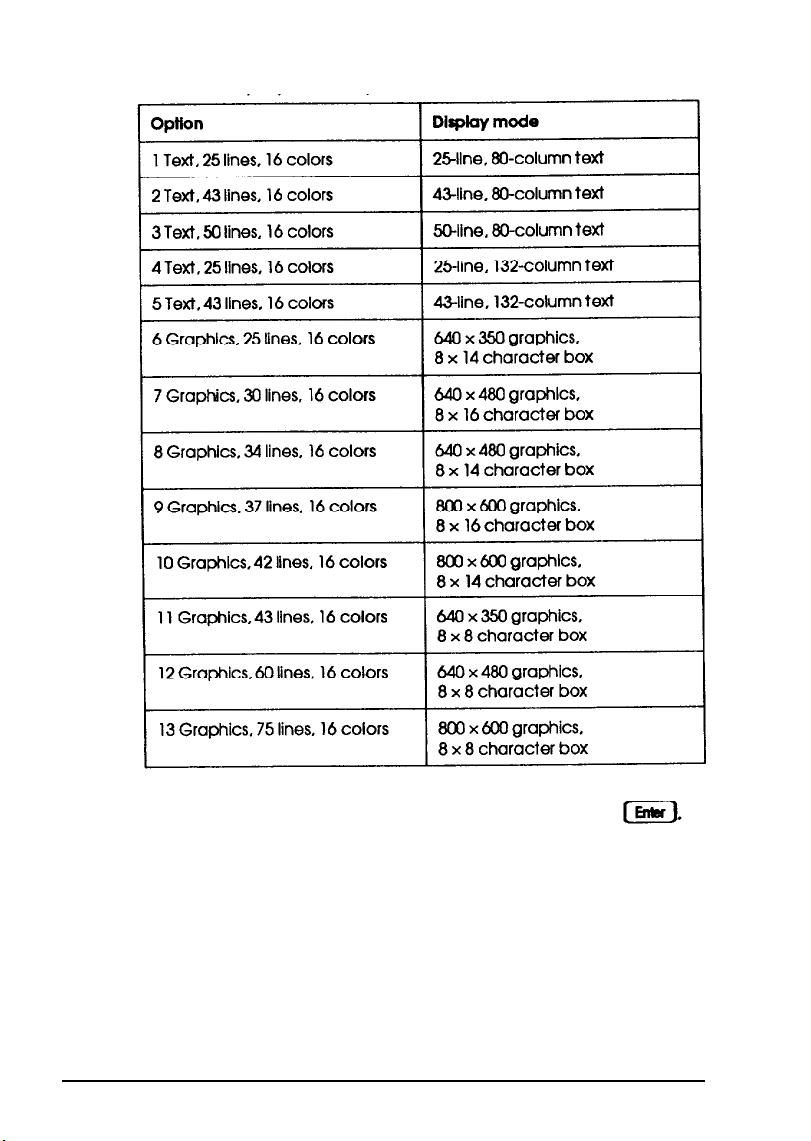
Word 5.0 display mode options
6.
Highlight the resolution you want to use and press .
Word returns to the editing screen using the display mode
you selected.
38 VGA Utilities

PCad
Drivers for PCad are available in the resolutions shown in the
table below.
PCad driver files
Filename
D800.DRV
D1024.DRV
Resolution
800 x 600. 16 colors
1024 x 768, 16 colors
If you have not yet installed PCad, follow the instructions in
your PCad documentation to install it with the IBM VGA
640 x 400, E-color resolution. Then follow these steps to install
the new drivers:
1.
Run the INSTALL program, described on page 6, to copy
the driver files to the PCad program directory on your hard
disk.
2.
Log onto your PCad program directory.
3.
Type the following and press to make a backup copy
of your PCADDRV.SYS file before you modify it:
COPY PCADDRV.SYS PCADDRV.OLD
4.
Use a text editor or word processing program that can save a
file in ASCII format to edit the PCADDRV.SYS file. Change
the driver filename listed in the DISPLAY command line to
the name of the driver file you want to use. (See the table
above for the filenames.)
For example, if you want to install the 800 x 600 driver and
you used the default pathnames when you installed PCad,
change the command line to look like this:
DISPLAY C:\PCAD\DRV\DBOO.DRV
VGA Utilities 39

5.
Save
the file in text-only format as you exit the program.
Ventura Publisher
The table below lists the available resolutions for Ventura
Publisher.
Ventura Publisher driver files
Filename Resolution
SDA600.VGA
DSA768.VGA
800 x 600, 16 colors
1024 x 768, 16 colors
If you have not yet installed Ventura Publisher, follow the
instructions in your Ventura documentation to install it,
specifying the Hercules driver. Then follow these steps to
install the new drivers:
1.
Run the INSTALL program, described on page 6, to copy the
drivers.
2.
Ventura Publisher requires that you install drivers from the
root directory of a diskette in drive A. When the INSTALL
program prompts you to select a drive and directory, type a
directory on your hard disk where you can easily locate the
drivers to copy them to a diskette; for example:
C : \TEMP
3.
Select the Ventura Publisher driver from the list of display
drivers and respond to the prompts as they appear on the
screen. The program displays the names of the drivers as it
copies them to your hard disk.
4.
Insert a formatted diskette in drive A.
40 VGA Utilities

5.
Use the MS-DOS COPY command to copy the drivers from
your hard disk to the root directory of the diskette in drive
A; for example:
COPY C:\TEMP\*.*
6.
Log onto drive A.
7.
Type the following and press :
A:\
VPDRV2-0
8.
Respond to the prompts as they appear on the screen.
9.
When you see the list of available drivers, select the driver
you want to install:
Cirrus Logic VGA 800x600 16 of 256K
colors
or
greys
Cirrus Logic VGA 1024x768 16 of 256K
colors or greys
Ventura Publisher is now configured for the selected screen
resolution and 16-color graphics.
VGA Utilities 41

-VersaCAD 386
If you have not yet installed VersaCAD 386, follow the
instructions in your VersaCAD documentation to instaIl it, then
use these steps to install the VGA drivers:
1.
Run the INSTALL program, described on page 6, to copy
the driver files into your VersaCAD program directory.
2.
Log onto your VersaCAD program directory.
3.
Type the following and press :
AVGAP.EXE
This co
mmand
loads a protected-mode TSR driver for
VersaCAD 386. When it is loaded, you see this message:
GD540x/GD542x 800x600x16 (protected
mode) graphics driver installed.
Version 1.00 Interrupt 6B Hex
Copyright 1992
by
Cirrus Logic Inc. All
rights reserved.
4.
Make a copy of the original VersaCAD 386 configuration file,
ENVIRO
5.
Use a text editor or word processing program that can save a
file in ASCII format to edit the
.CFG,and name the copy
E
NVIRO
ENVIRO.OLD.
.
CFG
file. Add the
following statements at the end of the screen parameters
section:
42 VGA Utilities

6.
Type
ENVIRO
.
EXE
and press . You’ll see a
configuration menu.
7. Select [S] Screen Configuration.
8.
Press the space bar or until you see the following:
Cirrus Logic GD54Ox, GD542x, 800x600
9.
Press to accept this option.
10. Continue pressing until you see the following
message across the bottom of the screen:
[N) Next Menu [X) Exit [exc] Aborts all
change.
11. PressX.
When you run VersaCAD 386, the program uses the 800 x 600
resolution in 16-color mode.
VersaCAD 2D
If you have not yet installed VersaCAD 2D, follow the
instructions in your VersaCAD documentation to install it, then
use these steps to install the VGA drivers:
1.
Run the INSTALL program, described on page 6, to copy
the driver files into your VersaCAD program directory.
2.
Log onto your VersaCAD program directory.
VGA Utilities 43

3.
Type the following and press
AVGA2D.EXE
This command loads a protected-mode TSR driver for
VersaCAD 2D. When the program is loaded, you see this
message:
4.
Make a copy of the original VersaCAD 2D configuration file,
ENVIRO.CFG,
5.
Use a text editor or word processing program that can save a
file in ASCII format to edit the
and name the copy
ENVIRO
ENVIRO.OLD.
. CFG
file. Add the
following statements at the end of the screen parameters
section:
6.
Type
ENVIRO.
configuration menu.
7.
Select
[S] Screen Configuration.
8.
Press
Cirrus Logic GD540x, GD542x, 800x600
44 VGA Utilities
EXE and press . You’ll see a
the space bar or until you see the following:
9.
Press to accept this option.
10. Continue pressing until you see the following
message across the bottom of the screen:
[N] Next Menu [X] Exit [exc] Aborts all
change.
11. PressX.
When you run VersaCAD 2D, the program uses the 800 x 600
resolution in X-color mode.
WordPerfect, Version 5.0
The WordPerfect 5.0 driver can run the program in 800 x 600,
16-color graphics mode.
If you have not yet installed WordPerfect 5.0, follow the
instructions in your WordPerfect documentation to install it.
Then follow these steps to install the new driver:
1.
Run the INSTALL program, described on page 6, to
the driver files to the WP driver subdirectory on your hard
disk.
copy
2.
Log onto your WordPerfect program directory.
Type WP
3.
4.
Hold down and press to display the Setup menu.
Select Display.
5.
At the Display menu, select
6.
and press to start WordPerfect.
Graphics
Screen Type.
VGA Utilities 45

7.
Select the following driver:
GD542X
8.
Press to exit. Your selection is saved and used for the
print preview and graphics functions of WordPerfect.
WordPerfect, Version 5. 1
The WordPerfect 5.1 drivers can run the program in the
following resolutions:
800 x 600, 16-color graphics
1024 x 768, 16-color graphics
132 x 25, 16-color or monochrome text
132 x 43, 16-color or monochrome text.
If you have not yet installed WordPerfect 5.1, follow the
instructions in your WordPerfect documentation to install it
with the 16X-color VGA screen type. Then follow these steps to
install the new drivers:
1.
Run the INSTALL program, described on page 6, to copy
the driver files to the WordPerfect program directory on
your hard disk.
2.
Start WordPerfect as you normally do.
3.
Hold down and press to display the Setup menu.
4. Select Display.
5. Select Graphics Screen Type.
46 VGA Utilities

6.
Select one of the following drivers:
GD542x 1024 x 768
GD542x 800 x 600
7. Now select Text Screen Type.
8.
Select one of the following text modes:
GD542x color text mode
GD542x monochrome text mode
9.
Then select one of the following resolutions:
132 x 25
132 x 43
10. Press to exit. Your selection is saved and used for
displaying text and the print preview and graphics
functions of WordPerfect.
WordStar
The WordStar driver supports 132-column text in 16 colors.
If you have not yet installed WordStar, follow the instructions
in your WordStar documentation to install it, then use these
steps to install the VGA drivers:
1.
Run the INSTALL program, described on page 6, to copy
the driver files to your WordStar program directory.
2.
Log onto your WordStar program directory.
3.
Make a copy of the original WordStar file FONTID.CTL and
name the copy FONTID.OLD.
VGA Utilities 47

4.
Use a text editor or word processing program that can save a
file in ASCII format to edit the FONTID.CTL file. Change
the CRT-TYPE line in this file to the following:
CRT-TYPE=CL800.WGD
When you start WordStar, the program uses the display driver
in the page preview mode.
VGA Utilities
Your system comes with the following VGA utilities:
CLMODE sets various standard and extended video modes
SetRES sets resolutions, font sizes, and colors for Windows
applications.
The CLMODE utility allows you to define the type of monitor
you are using and to set the video modes supported by the
VGA adapter. This utility also determines the vertical refresh
rates available with your monitor.
lnstalling CLMODE
Follow these steps to install CLMODE on your hard disk:
1.
Insert the Utility 1 diskette in drive A.
2.
Log onto drive A.
3.
Type the following command and press :
INSTALL
48 VGA Utilities

4. Select cirrusLogic GD5422 Utilities.
The INSTALL program copies the CLMODE utility into the
directory C:\CLUTIL.
Using CLMODE
You can use the CLMODE utility either from the CLMODE
window available in MS-DOS or by typing CLMODE
command options at the command prompt.
CLMODE Window
To use the CLMODE window, type CLMODE at the command
prompt. The screen displays the available menu options. If
need help using the utility, select
Help.
The utility provides
you
help information on the following functions:
Monitor type
Video modes
Mouse
Keyboard
CLMODE utility (About).
To exit the CLMODE utility, hold down and press
or select Exit.
CLMODE Commands
At the command prompt, you can set the monitor type, the
video mode and the refresh rate using CLMODE commands.
CLMODE commands have the following format:
CLMODE
[ [modenuml [+*-I [m[montyp)) refresh))
VGA Utilities 49

The CLMODE command options have the following meanings:
C/MODE options
If you
want to select
mode 3 with high VGA refresh for a Super
VGA monitor, for example, you would type the following at
the command prompt and press :
CLMODE 3+ m2+
Type s as a command line option to display the current
CLMODE
settings.
50 VGA Utilities

The following table lists common monitor types you can use for
the montype option.
CLMODE monitor types
VGA Utilities 51

The SetRES utility allows you to change the screen resolution,
the number of screen colors and the font size for Windows 3.x
applications.
Before you can use the SetRES utility, you must install the
Windows VGA drivers as described on pages 31 and 35. As the
INSTALL program copies the drivers, it also installs the SetRES
utility in your Windows program directory and creates a
SetRES utility icon in your Windows program manager.
To start the SetRES utility, open the SetRES icon. You see the
following screen:
Select the resolution, font size, and number of colors you want
to use and select
OK
or press .
If you don’t know the video modes available on your system,
use the CLMODE utility to see your options.
Once you have changed options using the SetRES utility, you
need to restart Windows for the new settings to take effect.
52 VGA Utilities
 Loading...