

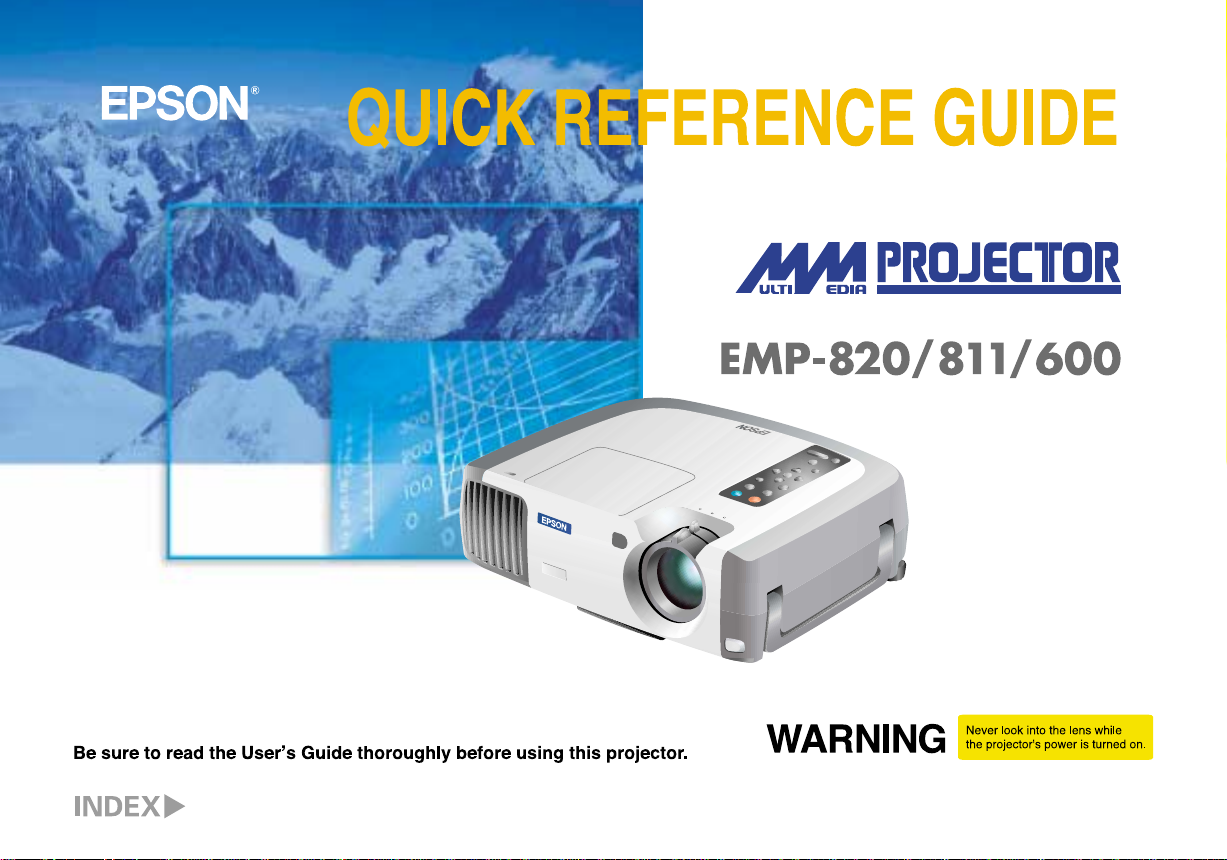
Page 1
Page 2
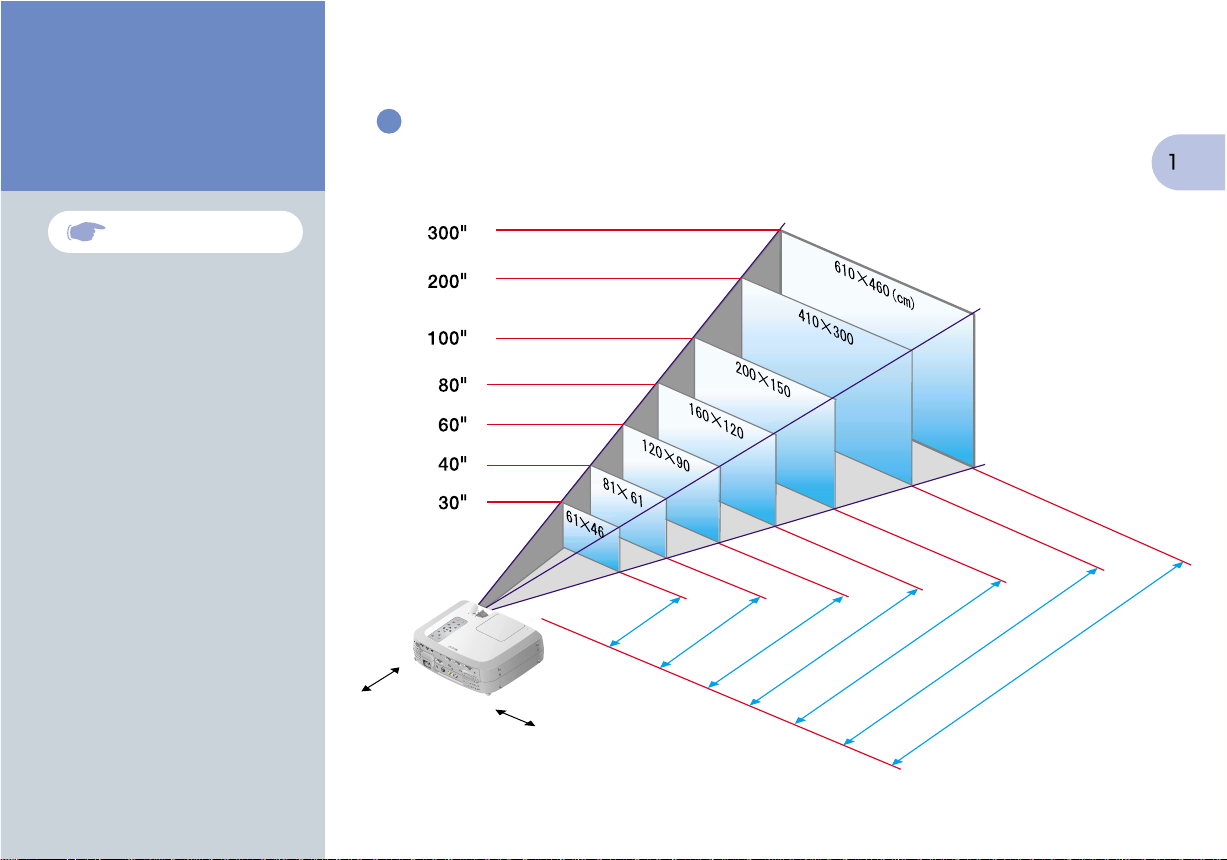
Setting Up
Page 18 of User's Guide
Adjust the distance between the projector and
the screen until the desired image size is obtained.
screen size
projection distance
20 cm*
(7.9 inches)
0.9–1.1
20 cm*
(3.0–3.6)
1.2–1.6
(3.9–5.2)
1.8–2.4
(5.9–7.9)
(7.9 inches)
* When installing against a wall, leave a space of
about 20 cm (7.9 inches) between the projector and the wall.
2.5–3.2
(8.2–10.5)
3.1–4.1
(10.2–13.5)
6.1–8.3
(20.0–27.2)
9.2–12.4 m
(30.2–40.7 ft.)
Page 3

* Turn off the power for both the projector and the other equipment before connecting them.
Connections
Pages 19--34 of User's Guide
Tip
You may need to use an optional
adapter or purchase a separate adapter
to connect the computer to the projector,
depending on the shape of the
computer's monitor port.
If connecting component video source
(such as a DVD player), you can use the
optional component video cable to
connect the source to the Computer
2/Component Video port at the rear of
the projector.
Connecting to a Computer
To computer's
monitor port
Computer cable (accessory)
Connecting to a Video Source
Video port (yellow)
To video output port (yellow)
To audio output L port (white)
To audio output R port (red)
Computer 2/Component Video port
Audio L port (white)
Setting Up /
Connections
A/V cable (accessory)
Audio R port (red)
Page 4
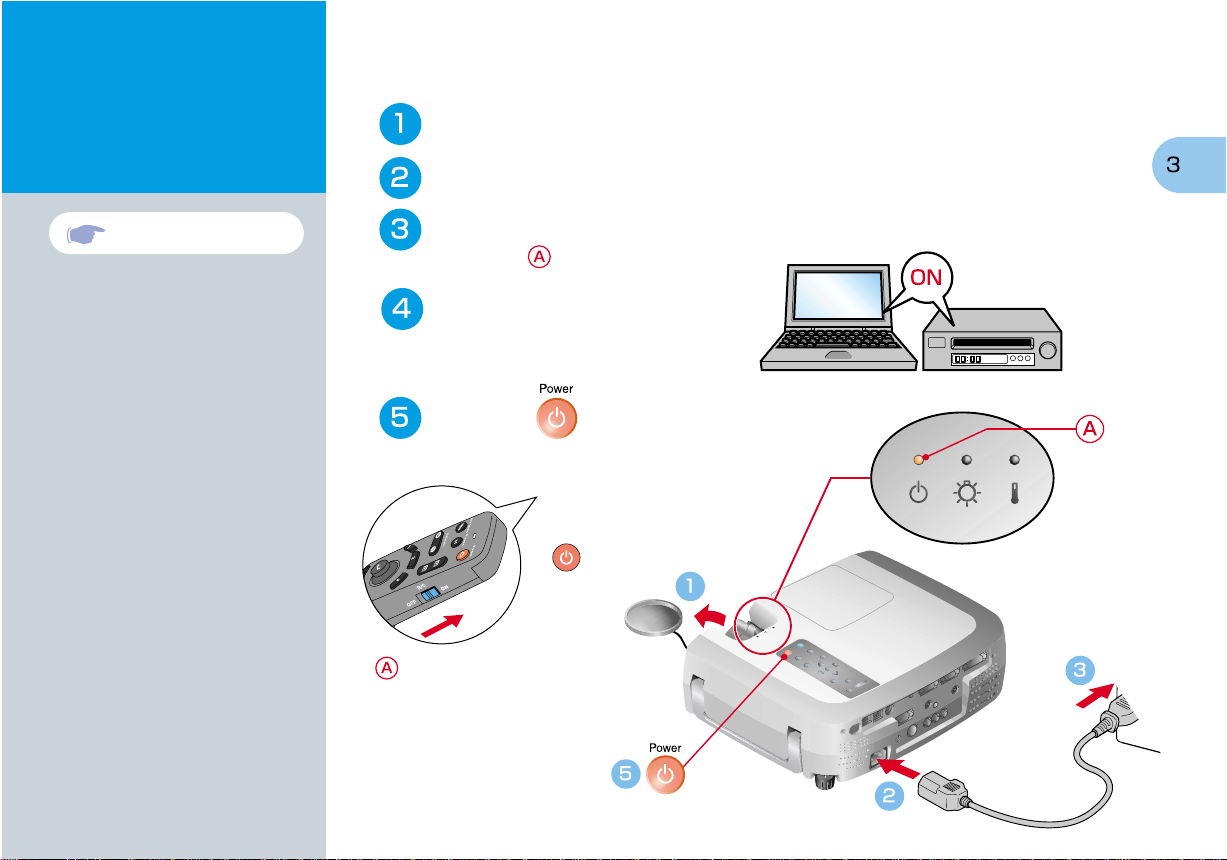
Projecting
Remove the lens cover.
Connect the power cord to the projector.
Pages 36--38 of User's Guide
Connect the power cord to an electrical outlet.
The indicator will light orange.
Turn on the power for the
input source.
In the case of a VCR, press the PLAY button.
Press the button to turn on the
projector's power.
If using the remote control, set
the R/C switch to the ON
position and then press the
button.
will start flashing green and
projection will start.
(Warm-up in progress)
Operation
indicator
Page 5
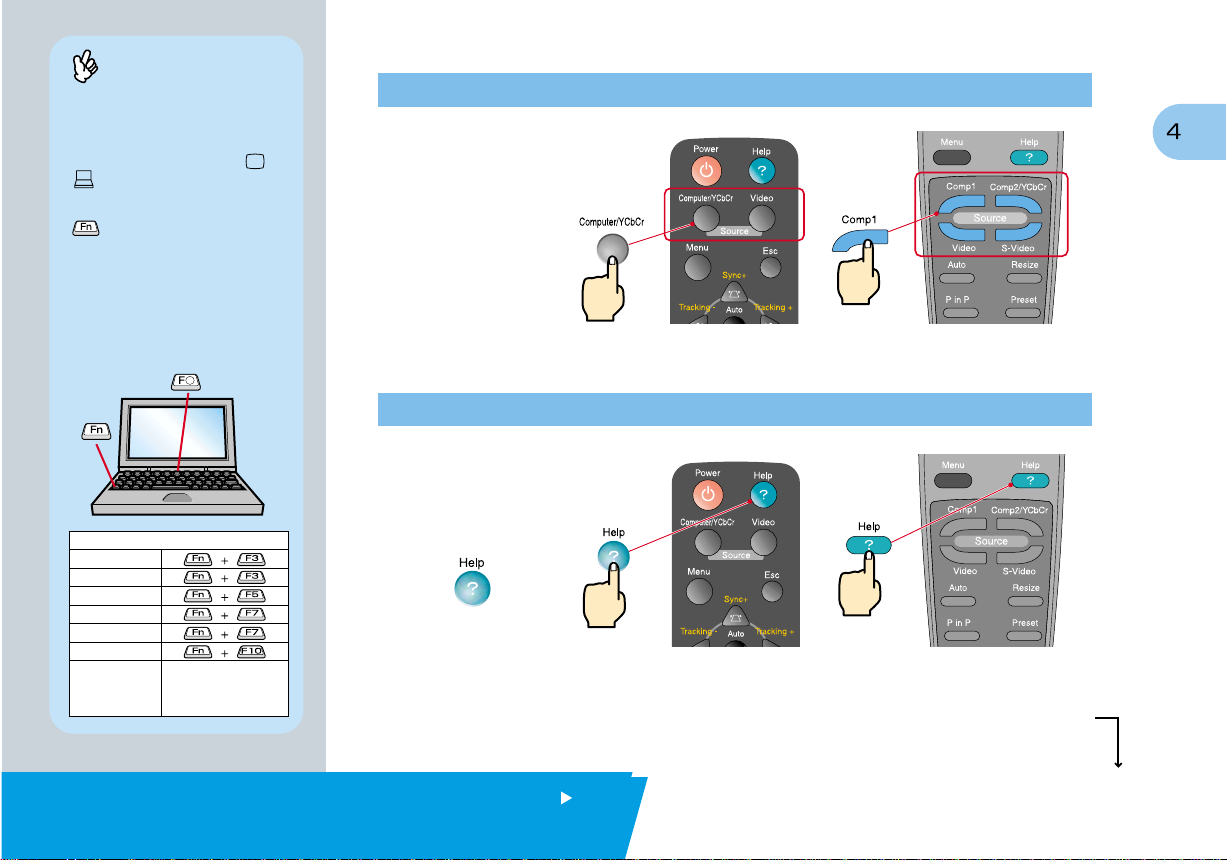
Tip
If a laptop computer or a computer with a
LCD screen has been connected to the
projector, you may need to change the
output destination for video signals
depending on the computer keys ( or
) or the computer's settings. The
output destination can normally be
changed by holding down the computer's
key and pressing one of the
Function keys.
Once the source has been changed, after
a short wait the projector will start
projecting. If the output has been
changed to external output, only the
external output should be used.
For details, refer to the documentation
provided with your computer.
If images do not appear ...
Change the input
signal.
Projector Remote Control
If you have other problems ...
Refer to the online
Examples of changing output
NEC
Panasonic
TOSHIBA
IBM
SONY
FUJITSU
Macintosh
After restarting the computer,
change the Control Panel
monitor and sound settings
so that Mirroring is active.
Help information.
Press , and
then follow the
instructions.
Projector Remote Control
* Refer to Troubleshooting.
Projecting
Page 6

Adjustment
Pages 41,42 and 46 of
User's Guide
Tip
If you change the projection angle, you
may get keystone distortion in the
images. You can use the , ,
and buttons on the projector's
control panel to correct keystone
distortion.
See page 7.
Adjusting the projection angle
You can adjust the amount of extension for the front adjustable foot to adjust the projection angle.
The angle can be adjusted horizontally within a range of approximately 10˚.
10˚
Front adjustable foot
Foot adjust button
Adjusting the image size and focus
Focus adjustment
Image size adjustment
Turn to Wide to increase the size
Turn to Tele to reduce the size
10˚
Page 7

Automatically adjusting computer images to the
optimum settings
Press on the projector's control panel or on the remote control. The tracking,
display position and synchronization will be automatically adjusted.
Projector Remote Control
Other adjustments
Press on the projector's control panel or on the remote control. The setting menu will be displayed on
the projection screen, and you can then adjust settings such as brightness, contrast and sharpness.
Using the on-screen menus
Main menu Projector Remote control
Projector Remote Control
Move
left
Select
Move up
Move down
Return
Move
right
Move
down
Move
left
Move
Select
Return
up
Move
right
Adjustment /
Turning Off the Projector
Page 8

Adjustment
Correcting keystone distortion
Page 44 of User's Guide
Tip
When keystone correction is carried
out, the projected image will become
smaller.
The keystone correction settings are
memorized, so that if you change the
position or angle of the projector, you may
need to readjust the keystone correction
settings.
To return an altered keystone correction
setting to the factory default setting, do
the following.
To restore the vertical keystone correction
to the default setting: While holding down
the button, press the button for
1 second or more.
To restore the horizontal keystone
correction to the default setting: While
holding down the button, press the
button for 1 second or more.
If the images become uneven in
appearance after keystone correction is
carried out, decrease the Sharpness
setting.
If the images have keystone distortion ...
Press on the projector's control panel to correct the keystone distortion.
Correction in
vertical direction
Correction in
horizontal direction
If using both horizontal and vertical keystone correction,
carry out in the following order.
1 . With the front adjustable foot retracted, set the projector so that it is fully horizontal.
2 . Extend the front adjustable foot to adjust the angle as necessary.
3 . Adjust the vertical keystone distortion until both sides of the picture are vertical.
4 . Adjust the horizontal keystone distortion until the top and bottom edges of the picture are both horizontal.
Page 9

Turning Off
the Projector
Turn off the power for the equipment connected
to the projector.
Page 39 of User's Guide
Press the button twice to turn off the
projector's power.
will start flashing orange. (Cool-down in progress/approx. 2 minutes)
Check that is lit steadily with an orange color,
and then disconnect the power cord.
If the power cord is disconnected while is still flashing orange, it may cause problems with
projector operation.
* Set the R/C switch on the remote control to the OFF position.
Operation indicator
Adjustment /
Turning Off the Projector
Page 10

Functions for
Enhancing Projection
Wireless mouse function
Page 25 of User's Guide
Tip
When using the remote control as a
wireless mouse, you need to connect
the projector as follows.
Mouse/USB port
Mouse cable
(accessory)
Use a USB cable to connect the
projector to the USB port of a
computer.
Incorrect operation or malfunctions
may result if you connect the PS/2
mouse cable while the power is still
tuned on.
Use only the accessory mouse
cable provided, otherwise the
wireless mouse function may not
operate correctly.
Mouse/USB port
This projector is equipped with a variety of useful functions
for enhancing projection.
Refer to the corresponding pages of the User's Guide for
details on each function.
Using the remote control for one-person presentations
The remote control can be used to carry out the same functions as left-clicking and right-clicking mouse buttons
on a computer. You can use the remote control to control the computer's mouse pointer from a distance.
Mouse pointer movement
Tilt the button in the direction you want
the mouse pointer to go.
Moving forward or back through
pages in PowerPoint files
* For a USB connection
To return to the
previous page
To go to the
next page
Mouse clicks
For left clicks: Press [Left]
For right clicks: Press [Right/Esc]
Page 11

Effect function
Page 58 of User's Guide
Tip
By pressing any button other than the
above, the stamps, spotlights and
bars used for decoration disappear.
Enhancing presentation materials
Press . Press .
A pointer icon appears on the
screen. The type of icon changes
to one of three icons each time
the button is pressed.
Tilt the button to move the
pointer icon.
Press the button to stamp
the pointer icon on the screen.
Press .
A spotlight appears on the
screen. The size of the spotlight
changes to one of three sizes
each time the button is
pressed.
Tilt the button to move the
spotlight.
A bar (straight line) appears on
the screen.
The type of bar changes each
time the button is pressed.
Tilt the button to move the
bar.
Functions for
Enhancing Projection
Page 12

Functions for
Enlarging part of projected images
Enhancing Projection
E-Zoom function
Page 56 of User's Guide
Tip
After enlarging part of the image,
you can tilt the button to scroll
around the image.
To cancel the enlargement effect,
press the button.
Press the button on the remote control.
A cross will appear in the center of the image being projected.
Tilt the button on the remote control to move the cross to the area of the image to be enlarged.
Press .
Press the side of the button.
The area of the image centering
on the cross will be enlarged.
Enlargement ratio
You can press the
side of the button to
reduce the size of the
enlarged area.
Cross
Page 13

A/V Mute function
Page 52 of User's Guide
Momentarily turning off images and sound
The A/V Mute function momentarily pauses the image and sound, and displays either a blank blue
or black screen or the user's logo screen. It can be used when you do not want to show viewers
details of operations such as selecting different files when computer images are being projected.
Press .
First press the button, select "Setting" and then "A/V Mute". Then select the type of screen to be displayed
when projection is being stopped. The following choices are available. The default setting is the black screen.
Press once more.
Projection of the images and sound will be restarted.
If you use this function while projecting moving images, the images and sound will still continue to be
played back, and you cannot return to the point where the A/V Mute function was activated.
Functions for
Enhancing Projection
Page 14

Troubleshooting
Viewing the Online Help
This projector is provided with an online help function which can be used when you have a
problem using the projector.
Page 78 of User's Guide
Press .
Select the item to view.
Press the buttons on
the projector's control panel.
Or tilt the button on the
remote control.
Accept the selected item.
Press the buttons on the
projector's control panel.
Or press the button on the
remote control.
The selected item will appear
on the screen.
Projector Remote Control
Page 15

Page 80 of User's Guide
Checking the Indicators
The projector is equipped with indicators that alert you to problems with projector operation.
The following tables show what the indicators mean and how to remedy problems that they indicate.
Lamp
Operation
indicator
indicator
Indicator status Problem and remedy
Standby condition.
Projection starts when the button
is pressed.
Cool-down in progress.
After approximately 2 minutes, the projector
switches to the standby condition
(the indicator lights orange).
Projecting in progress.
Warm-up in progress.
After warm-up is complete, projection
will start when a video signal is input.
Internal problem.
Stop using the projector and ask for
projector to be repaired. *1
Temperature
indicator
lit flashing
Indicator status Problem and remedy
This can happen when the power cord was
disconnected from the electrical outlet
before the cool-down period had finished the
last time the projector was turned off.
Wait about 2 minutes. After about 2 minutes,
disconnect the power plug and remove the
lamp. After checking if the lamp is broken,
reinstall it and then and then reinsert the
power plug.
Check that the lamp is properly installed
and the lamp cover is closed.
Or, replace the lamp with a new one. *2
Lamp will soon need to be replaced.
Replace the lamp as soon as possible. *2
The appearance of the operation indicator
at this time will vary depending on the status
of the projector.
High temperature inside projector (overheating).
The lamp will turn off automatically and
projection will stop. Wait for about 5 minutes
without operating the projector. After 5 minutes
have elapsed, disconnect the power plug and
then re-insert it.
High-speed cooling in progress.
If the internal temperature rises any higher,
projection will stop.
Check that the air inlet and exhaust vents are clear
and that the indoor temperature is not too high.
*1
If an indicator is showing a status which does not appear in the
previous tables, contact your dealer or the nearest address provided at
“International Warranty Conditions” in Safety Instructions/World-Wide
Warranty Terms included in the package.
*2
Contact your dealer for a spare lamp.
Troubleshooting
Page 16

Printed on 100% recycled paper.
Printed in Japan
402520700E
02.03-.2A(C05)
 Loading...