

Page 1
Quick Reference Guide
Quick Reference Guide
Be sure to read the accompanying User's Guide
before using the projector.
WARNING
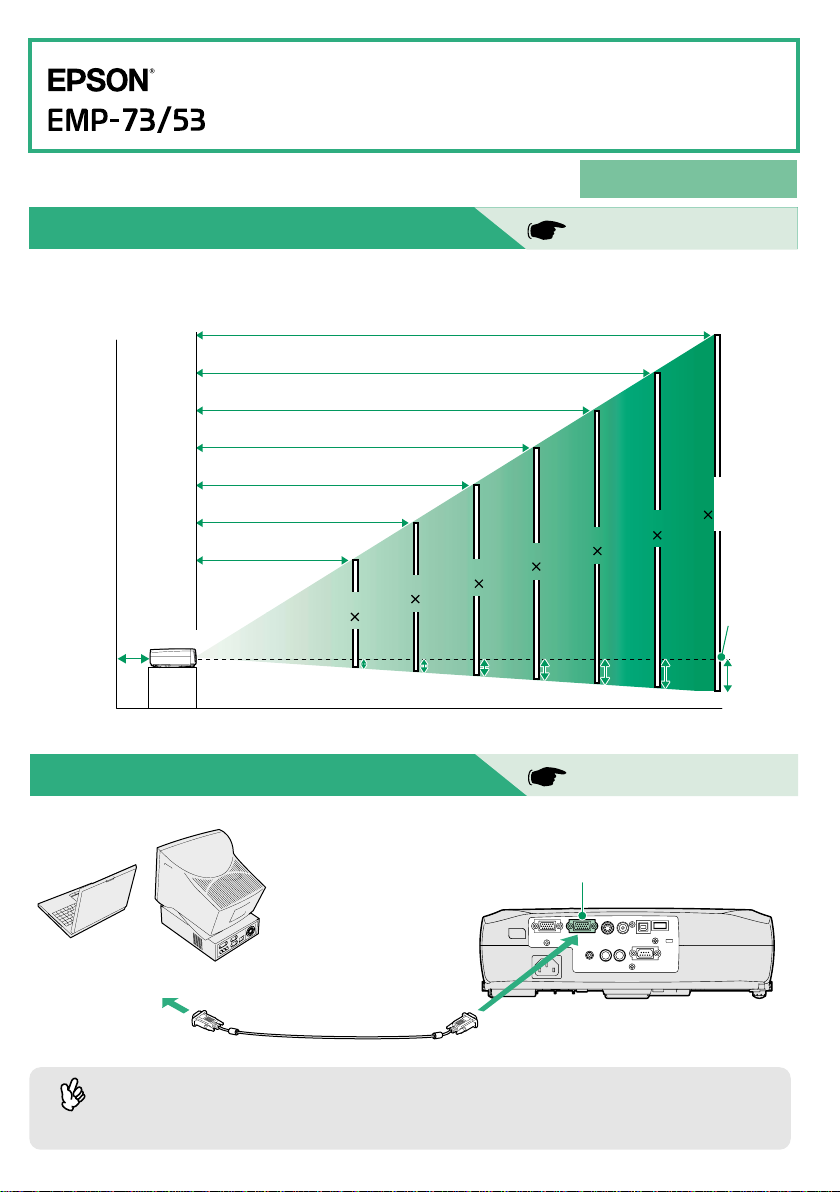
Adjusting the Image Size
The size of the projected image is basically determined by the distance from the lens to the screen.
The values should be used as a guide for setting up the projector.
916
–
1050 cm (30.1–34.4 ft.)
610 – 699 (20.0–22.9)
–
349 (10.0–11.4)
304
243 – 278 (8.0–9.1)
181
–
208 (5.9–6.8)
120 – 138 (3.9–4.5)
89 – 103 (2.9–3.4)
40
(81 61)
30
20 cm
(7.9 in.)*
Distance from centre of
lens to bottom edge of screen
* When installing against a wall, leave about 20 cm (7.9 in.) between the projector and the wall.
(61 46)
4
(1.6)6(2.2)8(3.3)
60
(120 90)
(160 120)
Do not look into the lens while
the projector's power is turned on.
User's Guide
"Screen Size and Projection Distance"
Screen size
300"
(610 460 cm)
200
(410 300)
100
(200 150)
80
11
(4.4)
14
(5.5)
28
(10.9)
Centre of
lens
42 cm
(16.4 in.)
Connecting to a Computer
Turn off the power for both the projector and the computer before connecting them.
Computer/Component
Video port (blue)
To computer
monitor port
The computer cable supplied with the projector may not match the monitor port on some
computers. In such cases, you will need to purchase a separate adapter.
Tip
Computer cable
(accessory)
User's Guide
"Connecting to a Computer"
Page 2
Connecting to a Video Source
User's Guide
"Connecting to a Video Source"
Turn off the power for both the projector and the video source before connecting them.
When connecting to a video
source with an S-Video
output port
To S-Video
output port
S-Video cable (commercially-available)
Audio 2 port
To video
output port
yellow
white
yellow
white
S-Video port
Video port (yellow)
To audio
output port
red
A/V cable
(accessory)
red
When connecting to a video
source with a video output port
* To output sound from the video equipment through the projector's built-in speaker, connect the video
equipment and the projector with the accessory A/V cable (white/red).
If connecting a component video source (such as a DVD player), you can use the optional
component video cable to connect the source to the Computer/Component Video port at the
rear of the projector.
Tip
Preparation before Projecting
Power indicator
1
User's Guide
"Turning On the Projector"
3
2
5
Remove the lens cover.
1
Insert the projector's power cable into
2
the projector.
Insert the power cable into an earthed
3
electrical outlet.
The Power indicator will light orange.
Turn on the power for the signal input
4
source.
For video equipment, press [Play] to start
playback.
Press to turn on the projector's
5
power.
The Power indicator will flash green, and
projection will then start (warm-up in
progress).
Tip
If no images are projected, change the
input signal.
Page upPage down
Power
S-Video/Video
Computer
Color Mode
Freeze
A/V Mute
Menu
E-Zoom
Projector Remote control
If connecting to a computer with a built-in
monitor, or to a laptop computer, you
may need to change the output
destination using the buttons or setting
menus.
User's Guide "Turning On the Power and
Projecting Images"
Page 3

Adjustments
Adjusting the image angle
While pressing the foot adjust buttons at either side, lift up the
front of the projector.
When the desired angle is obtained, release the foot adjust
buttons.
User's Guide
"Adjusting the Screen Image"
Adjusting the image
size and focus
Fine adjustments to
image size
Turn the zoom ring to adjust the
image size.
Turn to the "W" side to increase
the image size, and turn to the "T"
size to reduce the image size.
Front adjustable feet
When the projector is tilted, it will cause keystone distortion to
appear in the image, but this distortion can be corrected using the
automatic keystone correction function as long as the vertical
angle of tilt is within a range of approximately 15˚. If you would like
to make further minor adjustments to the effects of automatic
keystone correction, use [keystone] on the projector's control
panel.
The following adjustments can also be made.
Automatic setup (only when computer images are projected)
Tip
User's Guide "Adjusting Computer Images"
When projecting computer images, the input signals are detected automatically and
adjusted so that the optimum images are projected. If the results of automatic adjustment
are not satisfactory, individual settings can also be adjusted manually using the menus.
Other adjustments User's Guide "Using the Configuration Menu Functions"
Press [Menu] on the remote control to display the configuration menu. You can use the
configuration menu functions to adjust setting such as brightness, contrast and colour.
Foot adjust button
Turning Off the Projector
Turn off the power for all sources connected to
1
the projector.
Press twice to turn off the power.
2
The Power indicator will flash orange (cool-down in
progress/about 20 seconds).
Adjusting the focus
Turn the focus ring to adjust the
focus.
User's Guide
"Turning Off the Projector"
Power indicator
Operating problems
may occur if the power
cable is disconnected
while the Power
indicator is flashing
orange.
Check that the Power indicator lights orange,
3
and then disconnect the power cable from the
electrical outlet.
Page 4

Useful Functions
Colour mode
selection
The following six preset types of colour mode can be selected by
pressing [Color Mode] on the remote control.
• sRGB • Normal • Meeting
User's Guide
"Selecting the
Colour Mode"
• Presentation • Theatre • Game
A/V Mute
Automatic
Setup
Troubleshooting
Playback of images and sound can be momentarily paused and then
resumed each time [A/V Mute] on the remote control is pressed.
Automatic setup detects the status of the signals coming from the
connected computer, and automatically adjusts these signals so that
the optimum images can be obtained.
User's Guide
"Troubleshooting"
User's Guide
"A/V Mute"
User's Guide
"Adjusting
Computer Images"
Using the help function
Press on the projector's control panel.
1
Select the item to view.
2
Press [ ] (or the [ ] and [ ] on the remote control).
Accept the selection.
3
Press [Enter] on the control panel or on the remote control.
The help contents will then be displayed.
4
To clear the display, press on the control panel.
Help Menu
Help for the image
Help for the sound
Language selection (Language)
If the suggested solution in Help doesn't solve the
problem, unplug the power from the wall outlet and contact
your local dealer.
[ ]: Enter[ ]: Select [ ]: Exit
Checking the indicators
These indicators alert you to problems with projector operation. The following tables show what the
indicators mean and how to remedy problems that they indicate.
Refer to "When Having Some Trouble" in the
Power indicator
Status Problem and remedy
Lit Flashing
Standby condition
The power cable should only be
Orange
disconnected in this condition.
Projection starts when you press
.
Cool-down in progress
Orange
The projector changes to
standby (indicator lights orange)
after about 20 seconds.
Green
Projection in progress
Warm-up in progress
Green
After warm-up finishes,
projection starts when an image
signal is input.
Printed in Japan
02.10-2.5A(C05)
404064300E
User's Guide
for further details.
(Warning) indicator
Status Problem and remedy
High temperature inside projector (overheating)
The lamp will turn off automatically and projection will
Red
stop. Wait for about 5 minutes, unplug the power
cable and then plug it back in again. Then press
to turn the projector back on.
Red
Lamp problem
(0.5-second
intervals)
Remove the lamp and check if it is broken. If the lamp
is not broken, reinsert it. If the lamp is broken replace
by a new lamp, or contact your local dealer for further
advise. *1
Red
Internal problem
(1-second
intervals)
Orange
Stop using the projector and send it for service. *2
High-speed cooling in progress. If the temperature
rises too high again, projection will stop automatically.
Check that the air filter and air exhaust vent are clear,
and that the internal room temperature is not too high.
*1 Contact your dealer for a spare lamp.
For repairs, contact your dealer or the nearest address provided at
*2
"International Warranty Conditions" in
Warranty Terms
.
Safety Instructions/World-Wide
Lit Flashing
 Loading...