

Page 1
English
Français
Deutsch
User's Guide
User's Guide
Guide de l'utilisateur
Benutzerhandbuch
Page 2

Page 3

EasyMP User’s Guide
English
English
Page 4
Manual Structure and Use of This Manual
♦
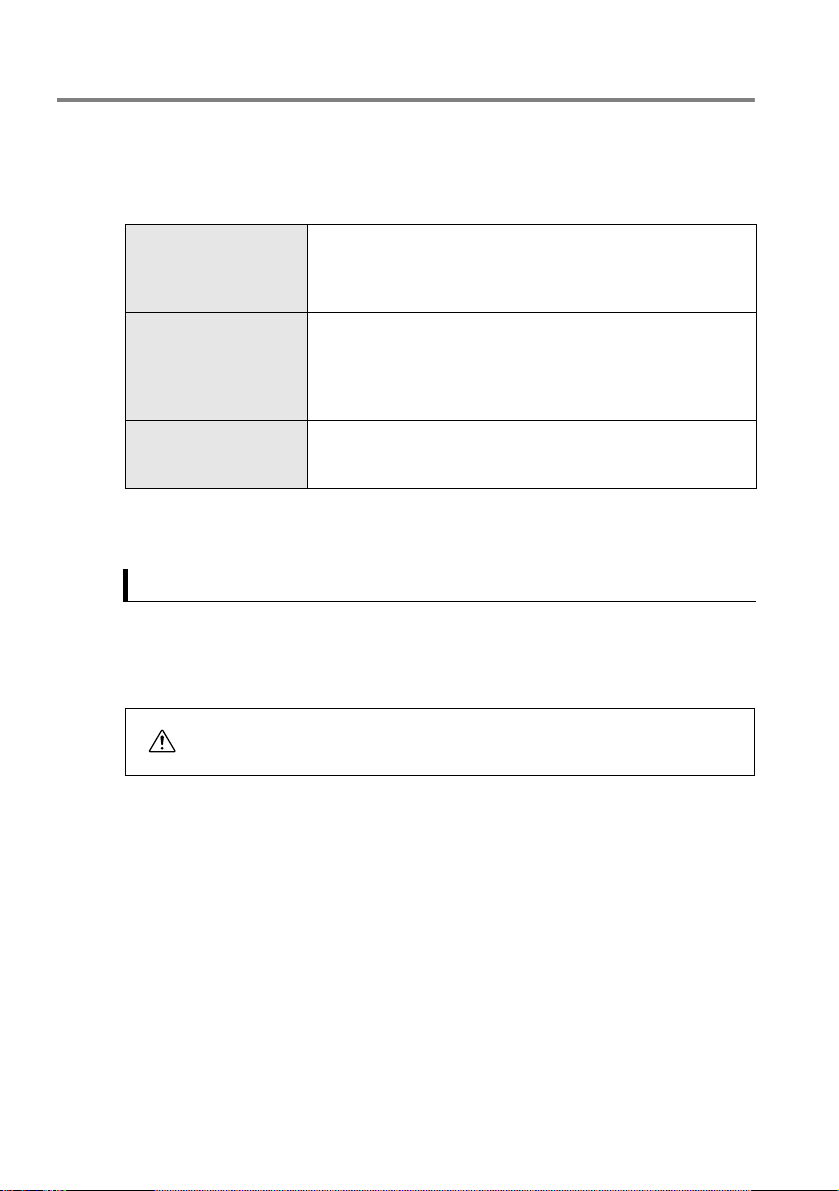
Manual Structure
This product comes with three manuals. The description of each manual is as follows. Please read
the appropriate manual according to the function to be used.
Safety Instructions/WorldWide Warranty Terms
EMP-715/505 Owner’s
Manual
EasyMP User’s Guide
(this manual)
♦
Meanings of Symbols in This Document
Safety Symbol
The safety symbol used in this document indicates cautions on how to operate the product safely in
order to prevent injury to the user and others, and to prevent property damage. The symbol and its
meaning are described below. Please read these safety precautions thoroughly before proceeding to
the main text of this manual.
This manual contains information on using the projector safely, and
also includes World-Wide Warranty Terms and a Troubleshooting
check sheet.
Be sure to read this manual thoroughly before using the projector.
This manual describes the installation procedure, and basic usage
and connection method when the projector is connected to a
computer or video equipment. It describes the items to check when
images are not projected properly, as well as how to change the lamp
and perform the maintenance procedure.
This manual describes the functions of EasyMP, as installed in the
projector, and how to use the "EasyMP Software" supplied with the
projector.
This symbol indicates that the operation may cause bodily injury or
Caution
2
- Manual Structure and Use of This Manual
property damage if the product is not handled properly, without
following the accompanying safety precaution.
Page 5

General Information Symbols
Point
Memo
[
Button Name
See Page
]
This indicates restrictions or other related important information.
Be sure to read thoroughly.
This indicates helpful information that the user should know.
This indicates a button name displayed on the operation panel,
remote control or screen.
Example: [Enter]
This indicates a reference to related information.
Others
The terms "this product" and "this projector" refer to the projector itself or, in some cases, the
projector and its accessories.
English
Manual Structure and Use of This Manual -
3
Page 6
Safety Precautions
Please read the following "Safety Precautions" so that you can use this projector safely and
correctly.
Caution
• Do not unplug the power cord while EasyMP operations are in progress (e.g., while switching
between images, or while the operation indicator of the card slot is lit in orange). Otherwise,
the projector may be damaged or may not be able to switch to the EasyMP screen.
• Do not remove the memory card while data is being written to it (e.g., immediately after
screen capture, or while the operation indicator of the card slot is lit in orange). Otherwise, the
memory card or the data stored on the card may be damaged.
* For more information on the operation of the projector, refer to the "Safety Instructions" in "Safety
Instructions/World-Wide Warranty Terms" included in the package.
4
- Safety Precautions
Page 7

Contents
Manual Structure and Use of This Manual 2
Manual Structure .................................................................. 2
Meanings of Symbols in This Document .............................. 2
Safety Precautions 4
Contents 5
Introduction to Functions 7
Before Using This Product 9
Operation Environment 10
Computers That Can Run EasyMP Software .................... 10
Memory Cards That Can Be Used ..................................... 10
Removing and Inserting the Memory Card 11
How to Remove the Memory Card ..................................... 11
How to Insert the Memory Card ......................................... 12
How to Remove the CompactFlash Card
From the PC Card Adapter ................................................ 13
How to Insert the CompactFlash Card
Into the PC Card Adapter ................................................... 13
English
Installing/Uninstalling the EasyMP Software 14
Installation .......................................................................... 14
Uninstallion ........................................................................ 15
Starting the EasyMP Software 16
Starting EasyMP ................................................................ 16
Operating EasyMP ............................................................. 17
Exiting from EasyMP .......................................................... 17
Preparation for Presentation 19
Contents -
5
Page 8

Files That Can Be Merged Into a Scenario File 20
Creating Scenarios (EMP SlideMaker) 21
Creating Scenarios ............................................................ 21
What Do You Do When... ................................................... 27
Sending Scenarios ............................................................. 30
Giving Presentations 33
Projecting Scenarios and Files (EasyMP) 34
Projecting Scenarios .......................................................... 34
Operations During Presentation ......................................... 35
Editing Scenarios ............................................................... 36
Displaying Files .................................................................. 38
Setting the Display Conditions ........................................... 42
Advanced Use 45
Connecting the Projector With the Computer
Using a USB Cable 46
Conditions of Computers That Can Be Connected ............ 46
Connecting the Projector to the Computer
and Installing the USB Driver ............................................. 47
Accessing the Memory Card from the Computer ...............48
Appendix 49
When a Problem Occurs 50
Index 53
6
- Contents
Page 9
Introduction to Functions
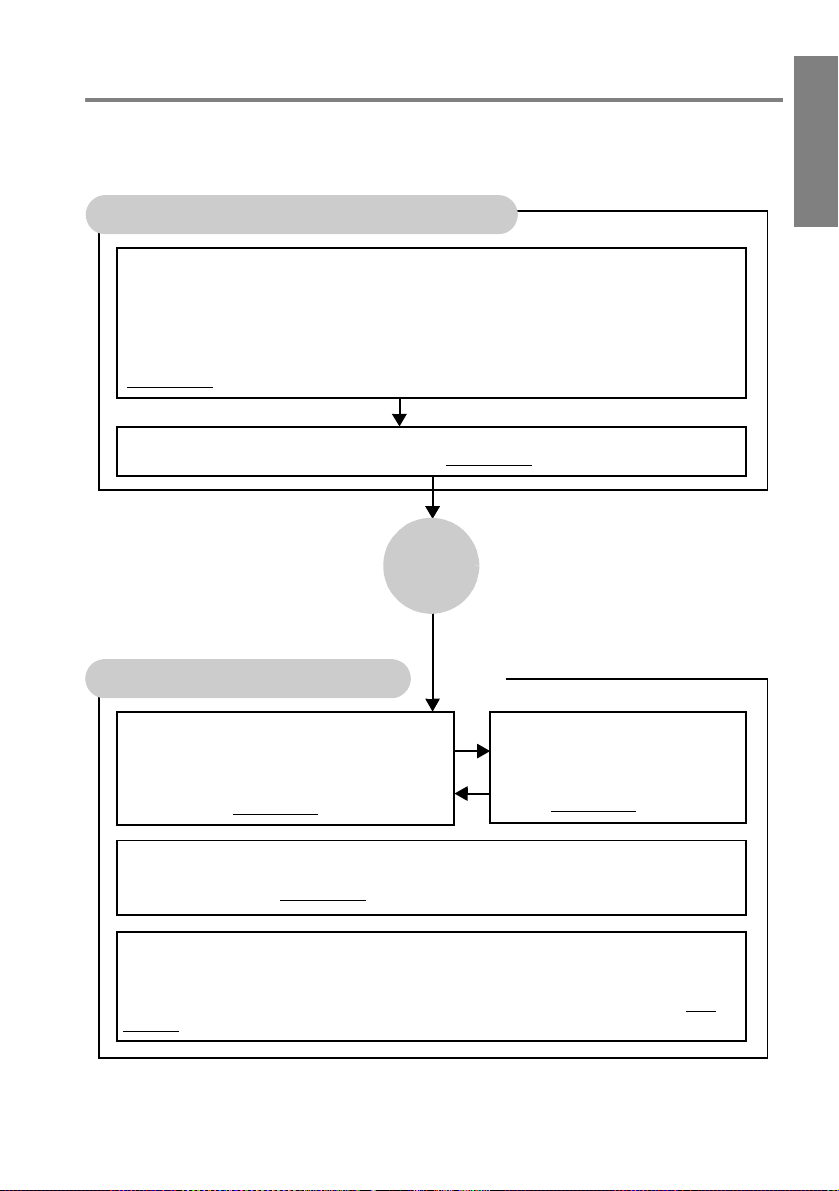
The EasyMP functions are divided into the projector’s EasyMP functions and the auxiliary EMP
SlideMaker functions. The details of each function group and the flow of operation are shown
below.
Computer (EMP SlideMaker)
Creating a Scenario
In the same way that film slides can be arranged, specific slides from a PowerPoint file and
image files that you wish to project can be extracted, arranged in the desired order, and stored
together in a single file. This file is called a "scenario". Since the extraction and rearrangement
of the desired pages can be done without editing the original files, presentation materials can be
prepared easily and efficiently according to the audience and purpose of the presentation.
(see page 21)
Sending a Scenario
Created scenarios are stored on the memory card. (see page 30)
Memory
Card
English
Projector (EasyMP)
Projecting a Scenario
The scenario sent to the memory card can be
projected, which allows the presentation to be
made using only the projector, without connecting
it to a computer. (see page 34)
Previewing Image Files
The image files stored on the memory card can be projected directly without connecting the
projector to a computer. (see page 39)
Previewing Folders
The image files stored in a folder of the memory card can be projected either in a list view or one
by one in sequence. For example, photos can be projected one after another, as with a slide
projector, by inserting a memory card in which photos from a digital camera are stored. (see
page 40)
Editing a Scenario
The order in which scenario pages
are projected can be changed, and
specified scenario pages can be
hidden. (see page 36)
Introduction to Functions -
7
Page 10

8
- Introduction to Functions
Page 11

Before Using This Product
This section describes the preparation required for the use of EasyMP, in addition
to its basic operations.
Operation Environment .........................................................................10
Removing and Inserting the Memory Card ........................................... 11
Installing/Uninstalling the EasyMP Software .......................................14
Starting the EasyMP Software...............................................................16
English
Page 12
Operation Environment
♦
Computers That Can Run EasyMP Software
In order to create scenarios, the computer must have the EasyMP Software installed. The computer
must satisfy the following requirements in order to run the EasyMP Software.
Operating system Computer running Windows 95/98/NT4.0/Me/2000*
CPU Pentium 166MHz or faster (Pentium II 300MHz or faster
Memory size 32MB or more (96MB or more recommended)
Hard disk space 12MB or more
Display Resolution of VGA (640 x 480) or more
*Macintosh computers are not supported.
♦
Memory Cards That Can Be Used
This product comes with an 8 MB CompactFlash card and a PC card adapter for mounting the card
in the card slot of the projector.
If more memory cards are required, be sure to use the following ATA-compatible TYPE II memory
cards.
• CompactFlash card (A PC card adapter is required in order to mount the card.)
• ATA flash card
• Memory Stick (A PC card adapter is required in order to mount the card.)
• SmartMedia (A PC card adapter is required in order to mount the card.)
• Microdrive (A PC card adapter is required in order to mount the card.)
recommended)
10
- Operation Environment
Page 13

Removing and Inserting the Memory Card
A memory card (i.e., a CompactFlash card inserted into the PC card adapter) has already been
inserted in the card slot of this projector.
The memory card functions as a storage device for this projector, just like the hard disk of the
computer. Files can be copied and moved onto this memory card, and scenarios created using
EMP SlideMaker can be stored on it.
This section describes how to remove and insert the memory card supplied with this product.
When using commercially sold memory cards, refer to the instruction manual provided with the
memory card. For information on how the memory card can be inserted into and removed from
the computer’s PC card slot, refer to the instruction manual provided with the computer.
♦
How to Remove the Memory Card
Point
Do not remove the memory card while the operation indicator is lit in orange or a scenario is
•
being projected.
• After removing the memory card, insert a supplied dummy card into the card slot to prevent
the entry of dust.
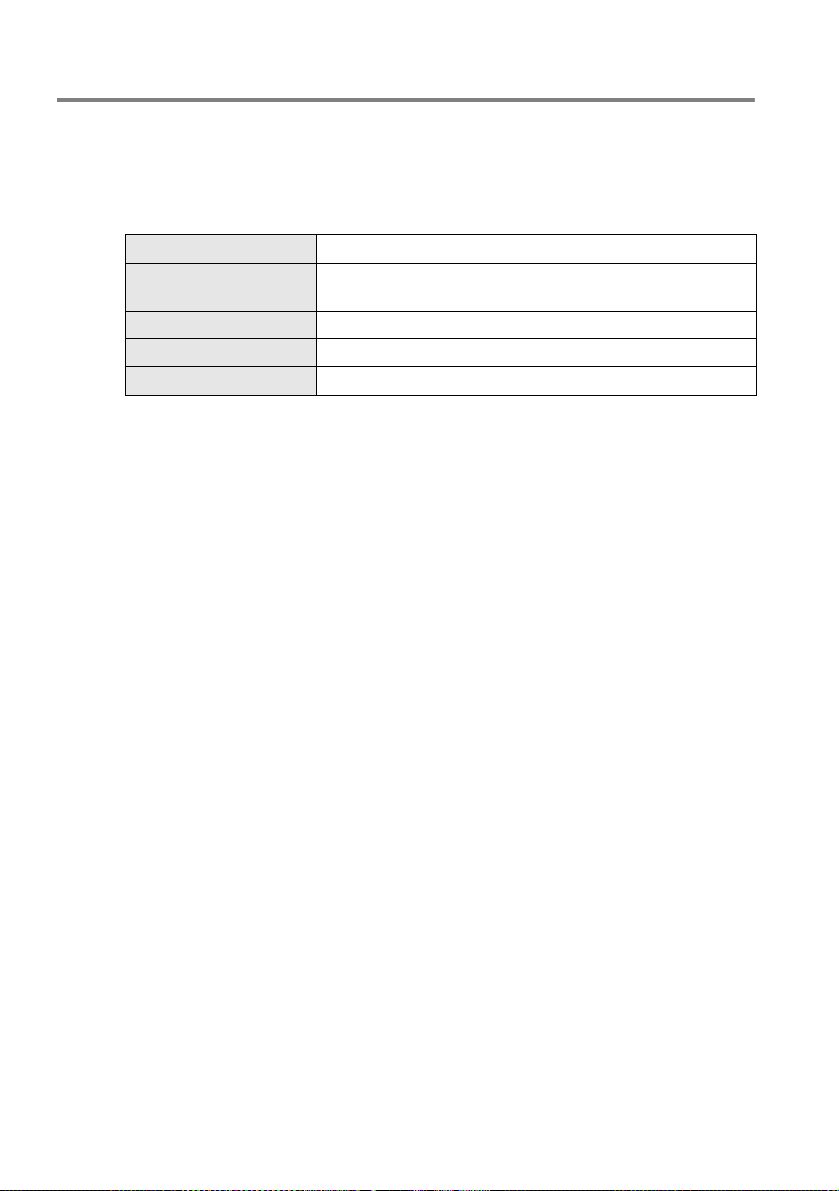
Press the eject button, located below the card slot.
1
The eject button pops out.
English
Eject button
Removing and Inserting the Memory Card -
11
Page 14
Press down the eject button again.
2
The memory card pops out. Pull the memory card straight out.
If the eject button is still out, press it in again.
3
Since the eject button can easily break if it is left out, be sure to push it back in to prevent
damage to the button.
♦
How to Insert the Memory Card
Point
If the memory card is inserted backwards, it cannot be fully inserted. Do not attempt to insert
•
it forcibly.
• The operation indicator of the projector’s card slot shows the current status as follows.
Off: The memory card is not being accessed or one has not been inserted.
Lit in orange: Accessing (Do not remove the memory card.)
Lit in red: A memory card that cannot be used has been inserted.
• The projector can recognize memory cards in FAT12/16 format.
• Depending on the SmartMedia used, it may malfunction if an attempt is made to write data to
it while the SmartMedia is write-protected. Do not write-protect SmartMedia.
12
- Removing and Inserting the Memory Card
Page 15
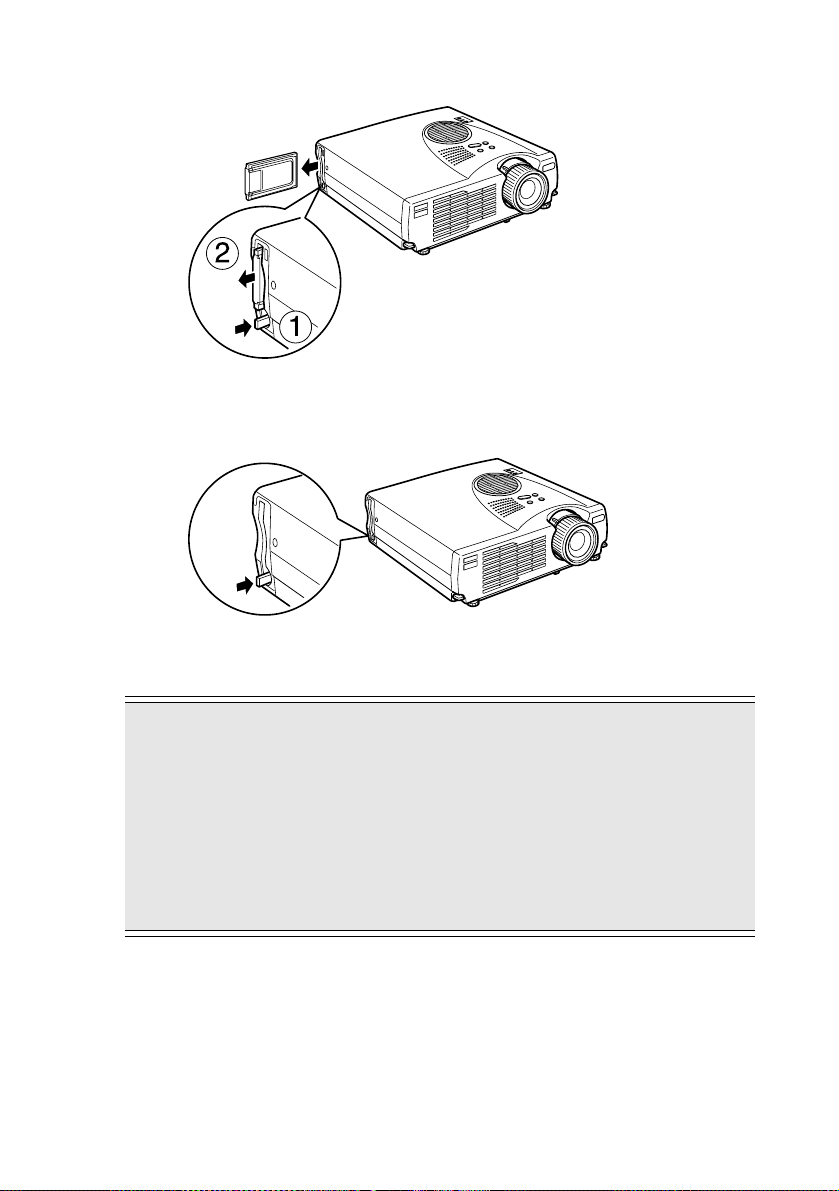
Insert the memory card into the card slot of the projector, with the EPSON logo on the PC card
adapter facing toward the back of the projector. Insert it fully.
Insert the memory card horizontally into the card slot of the projector, with the EPSON logo
on the PC card adapter facing toward the back of the projector.
♦
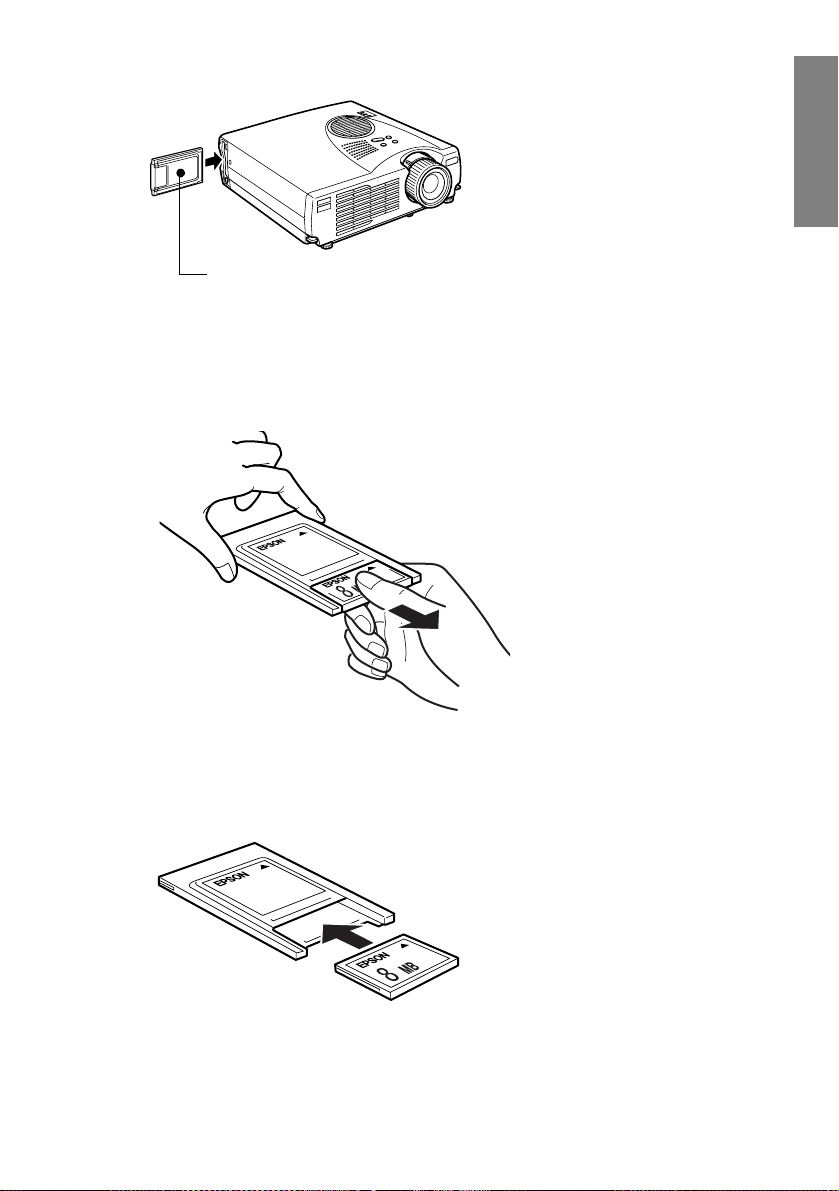
How to Remove the CompactFlash Card From
the PC Card Adapter
Hold the CompactFlash card as shown below, and pull it out from the PC card adapter.
English
♦
How to Insert the CompactFlash Card Into the
PC Card Adapter
With the EPSON logo facing upward, insert the CompactFlash card into the PC card adapter.
Removing and Inserting the Memory Card -
13
Page 16
Installing/Uninstalling the EasyMP Software
When an installation is performed, EMP SlideMaker is installed.
♦
Installation
Before performing an installation, close all application programs.
Start Windows and insert the "EasyMP Software" CD-ROM, supplied with the
1
projector.
The SETUP program will automatically start up.
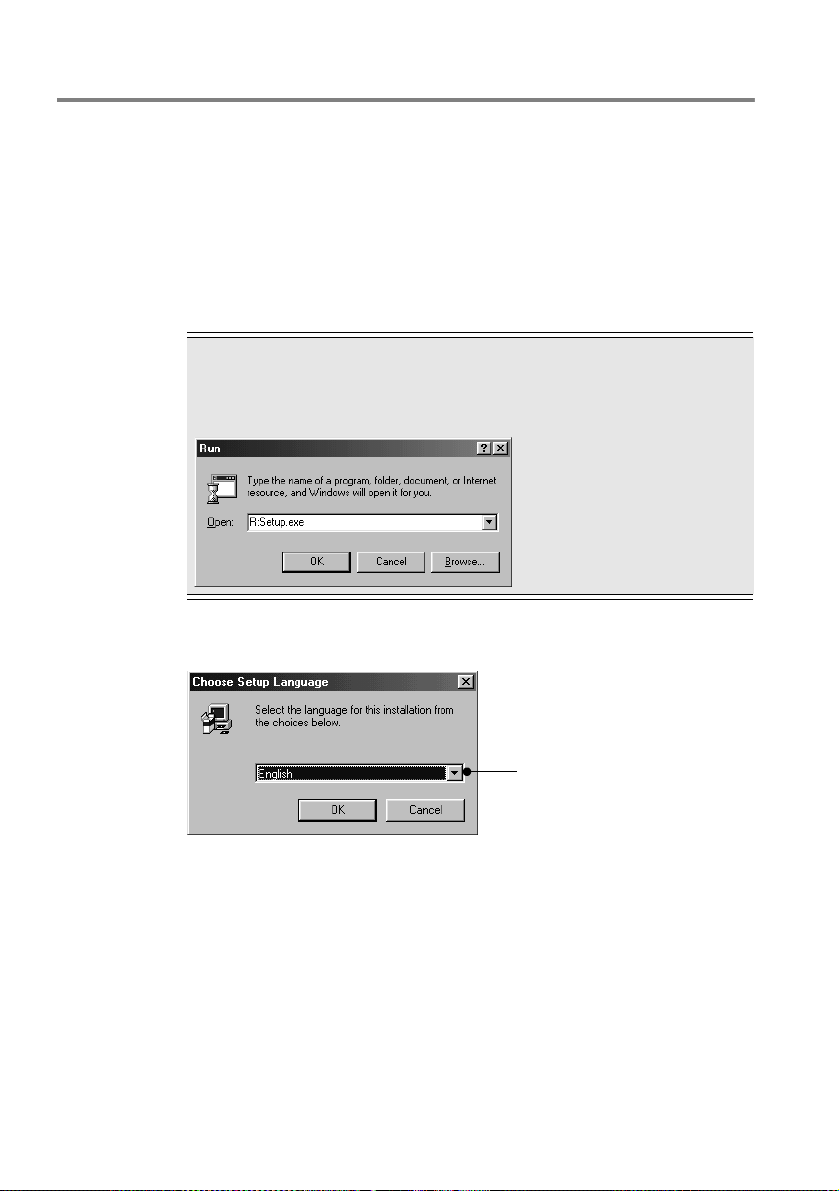
Point
If the SETUP program does not start up, click [Start], then select [Run] to open the
"Run" dialog box. In the Open box, enter the location of the "EasyMP Software" CDROM. Specify "Drive name of CD-ROM:\SETUP.exe". Then, click the [OK] button.
Select the language, and then click the [OK] button.
2
The installation will start. Follow the instructions that appear on the screen.
14
- Installing/Uninstalling the EasyMP Software
Select the language to be used in
the EMP SlideMaker screen
displays.
Page 17

♦
Uninstallion
To delete the EasyMP Software in Windows, select [My Computer], [Control Panel], then
[Add/Remove Programs]. Next, select "EMP SlideMaker" and click the [Add/Remove]
button.
Point
Even after EMP SlideMaker has been uninstalled, the EMP SlideMaker folder is not deleted.
Make sure that the EMP SlideMaker folder does not contain any required scenario files, and
then delete it if it is unnecessary.
English
Installing/Uninstalling the EasyMP Software -
15
Page 18
Starting the EasyMP Software
When the power to the projector is turned off while EasyMP is running, EasyMP’s file-list screen
appears the next time the power is turned on.
If the projector was being used through a computer or video equipment, start EasyMP according
to the following procedure.
♦
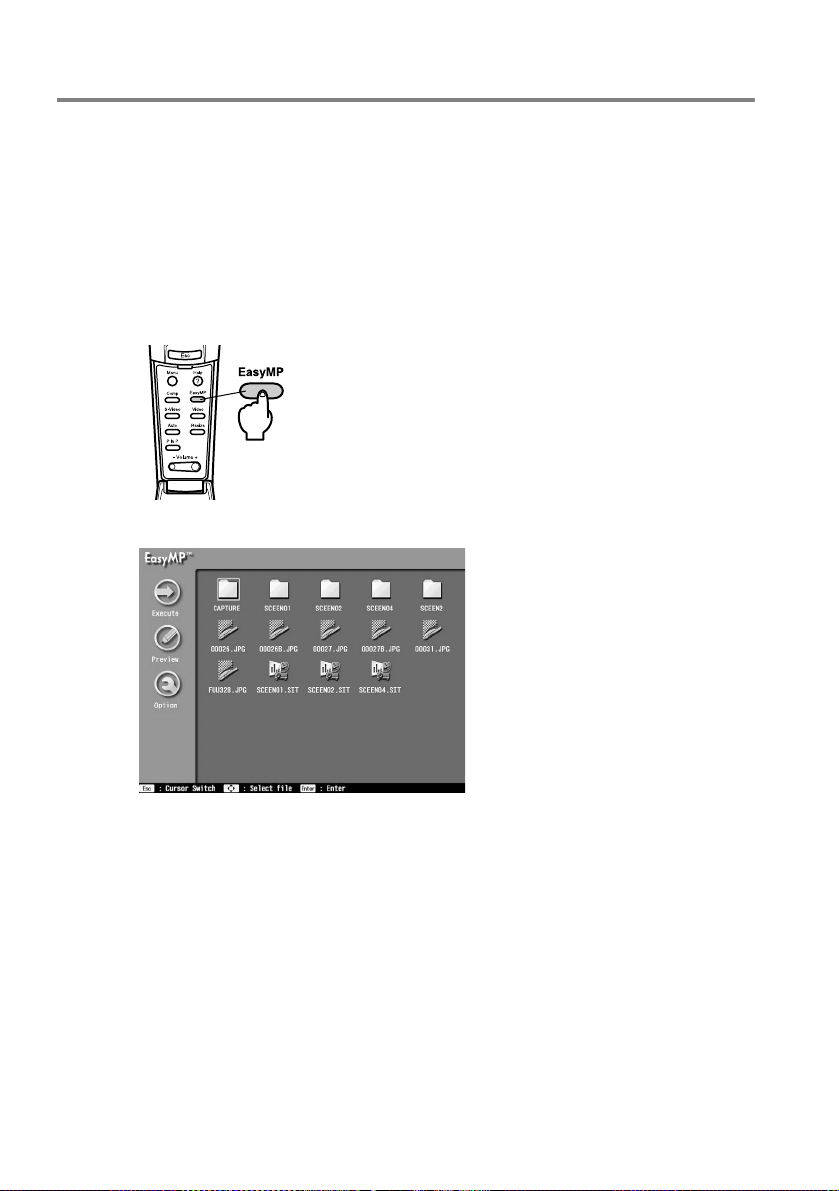
Starting EasyMP
When the [EasyMP] button of the remote control is pressed while the projector is on, EasyMP
starts up and the EasyMP file-list screen appears.
EasyMP file-list screen
16
- Starting the EasyMP Software
Page 19

Point
If a memory card is not inserted, the message "There is no memory card." is displayed and
•
the EasyMP functions cannot be used.
• If a scenario with an autorun setting is stored on a memory card, the projection of that
scenario will start once the power to the projector is turned on.
• Even when the projector is displaying images from another image source (computer or video
equipment), once a memory card storing a scenario with an autorun setting is inserted, the
screen display of the projector automatically changes to the EasyMP screen and the scenario
on the memory card is projected.
• You can select the display of the EasyMP screen from the following languages: English,
Japanese, French, German, Italian, Spanish, Portuguese, Chinese and Korean. Change the
display language by selecting [Advanced], then [Language] from the setup menu of the
projector’s main unit. (Refer to "Menu Operation" in the Owner’s Manual for the projector.)
♦
Operating EasyMP
With EasyMP running, this projector’s remote control functions as the input device. The basic
operations of the input device are as follows:
• Moving the pointer
When the [Enter] button of the remote control is tilted up, down, right or left, as with tracking
points, the cursor on the EasyMP screen moves in that direction.
• Selecting and executing a function
When the cursor is positioned on an icon on the screen and the [Enter] button of the remote
control is pressed, the function assigned to the selected icon will be executed.
♦
Exiting from EasyMP
There is no concept of exiting from EasyMP. To switch to another image source such as a video,
just press the appropriate input-source button on the remote control. This can even be done while
running EasyMP. To end the projection, press the [Power] button on the remote control or on the
projector’s operation panel twice, even while EasyMP is being used. The power to the projector
will then be turned off.
English
Starting the EasyMP Software -
17
Page 20

Page 21

Preparation for Presentation
This section describes the procedures for creating scenarios and sending them to
the personal computer so that they can be used for presentation.
Files That Can Be Merged Into a Scenario File ....................................20
Creating Scenarios (EMP SlideMaker) .................................................21
English
Page 22

Files That Can Be Merged Into a Scenario File
Any of the following file types can be merged into a single file and used as a scenario.
Type File type (extension) Remark
Microsoft PowerPoint .ppt PowerPoint 97 (SR-2 or later)/2000
.bmp, .dib BMP/DIB
Image
Point
All effects set in the [Slide Show] menu of PowerPoint become invalid. However, the same settings for
[Slide Transition] and [Hide Slide] can be performed when scenarios are created using EMP
SlideMaker.
.jpg
Any version is fine. However, files in the
CMYK color mode format or the progressive
format cannot be projected.
20
- Files That Can Be Merged Into a Scenario File
Page 23
Creating Scenarios (EMP SlideMaker)
A file that has been created and saved by merging PowerPoint and image files, then arranging the
images in the order of projection is referred to as a "scenario". A scenario is created using EMP
SlideMaker. With EMP SlideMaker, the desired images can be extracted, rearranged, and used to
prepare presentation materials easily and efficiently without editing the source files. The created
scenarios can be projected using the EasyMP functions of the projector. (see page 34)
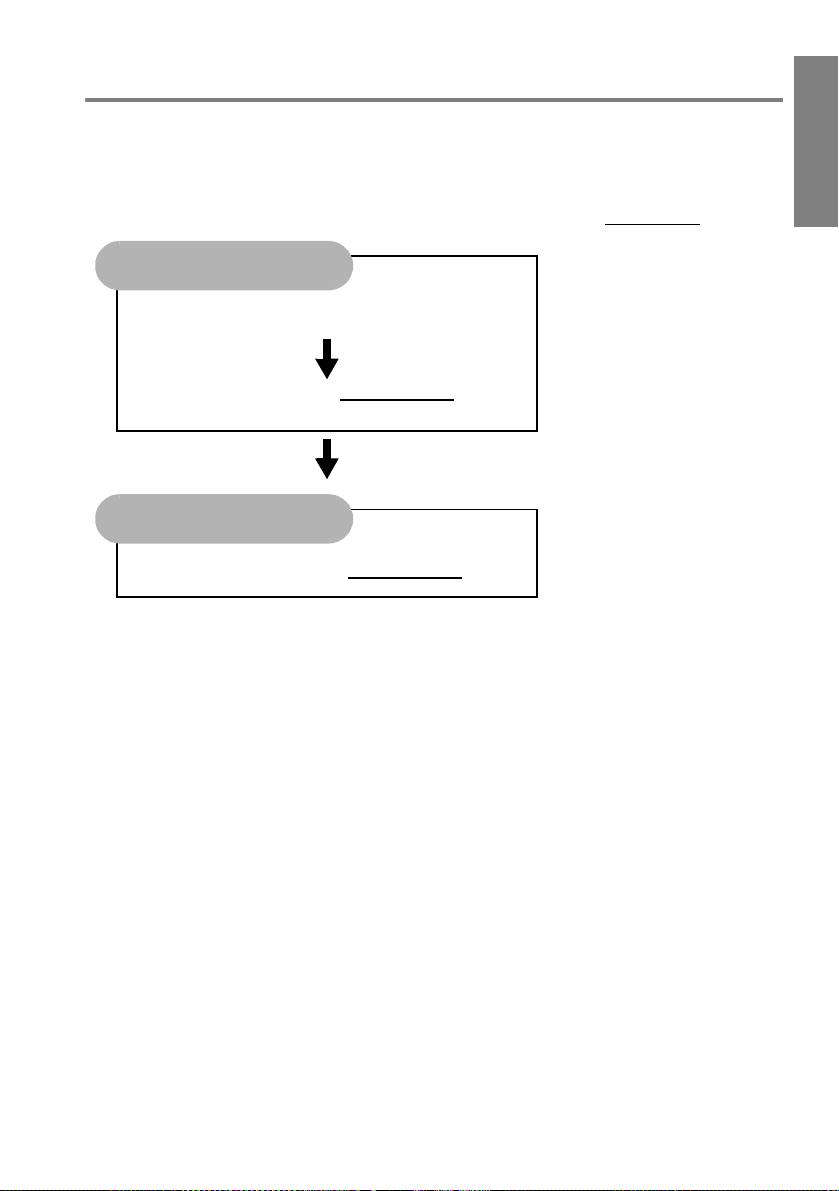
EMP SlideMaker
Create Scenarios
On the computer
Send Scenarios (see page 30)
EasyMP
With the projector
Project Scenarios (see page 34)
♦
Creating Scenarios
Be aware of the following items before creating a scenario.
• In advance, create the source files (e.g., the PowerPoint data and the image files) that will be
merged into the scenario.
• Files other than those listed in "Files That Can Be Merged Into a Scenario File" on the previous
page cannot be used.
• Please note that the scenarios to be created with EMP SlideMaker are not compatible with
scenarios created with EMP Scenario of the EMP-8150/8150NL.
English
Start Windows on the computer, and then click [Start], and select [Programs],
1
[EMP SlideMaker], then [EMP SlideMaker] from the Start menu.
EMP SlideMaker will start up.
Select the [File] menu, then [New].
2
The "Scenario Settings" dialog box is displayed.
Creating Scenarios (EMP SlideMaker) -
21
Page 24
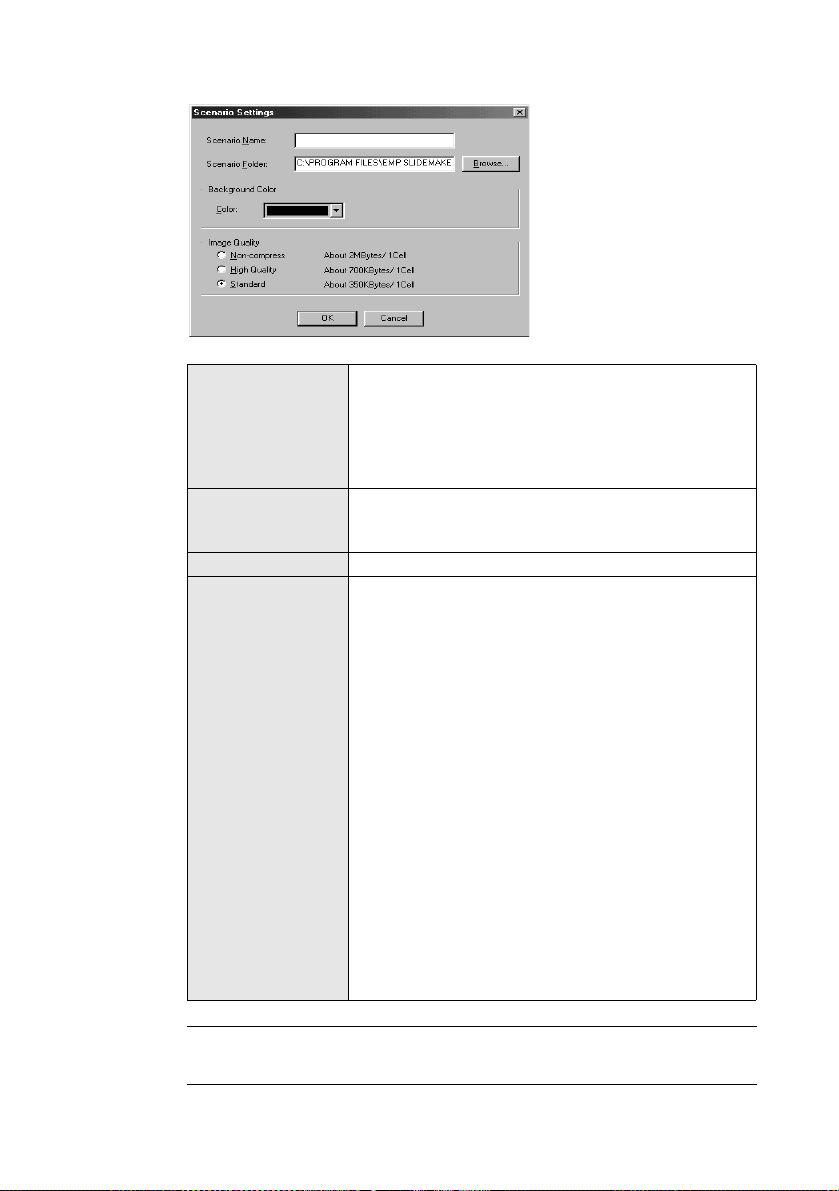
Specify the desired scenario settings while referring to the table below, and then click
3
the [OK] button.
Scenario Name The scenario name is used as the file name of the scenario to
be created, as well as the name of the scenario folder. A
scenario name must be entered, and it must be within 127
characters, including the directory of the scenario folder
described below. Uppercase letters and numbers can be
entered.
Scenario Folder Specify where to create the scenario folder that will be used
Background Color Select the background color of the image data in the scenario.
Image Quality EMP SlideMaker converts each page of a PowerPoint file into
while creating the scenario. A scenario folder will be created
in the directory specified here.
an image file, then stores it. Under "Image Quality", select the
image quality to be used during conversion into image files. If
[Non-compress] is selected, the image in each cell is
stored as an image file in BMP format. Images in BMP format
can be projected at high quality, but the file size will be large
since they are not compressed. Also, it takes more time to
project them as compared with the [Standard] image
quality. Of all the settings, the [Non-compress] image
quality achieves image projection at the highest quality. When
either [Standard] or [High Quality] is selected, the image
in each cell will be stored as an image file in JPEG format. A
JPEG file with a higher compression ratio will have a poorer
image quality. However, the file size is smaller as compared
with images in the BMP format. Compared with the
[Standard] setting, image quality will be higher if [High
Quality] is selected because of the lower compression ratio.
If a JPEG file is directly incorporated into a scenario, any of
the above image quality settings will become invalid for that
image, and the compression ratio of the original file will be
used.
Memo
Any setting can be changed by selecting the [File] menu, then [Property].
22
- Creating Scenarios (EMP SlideMaker)
Page 25

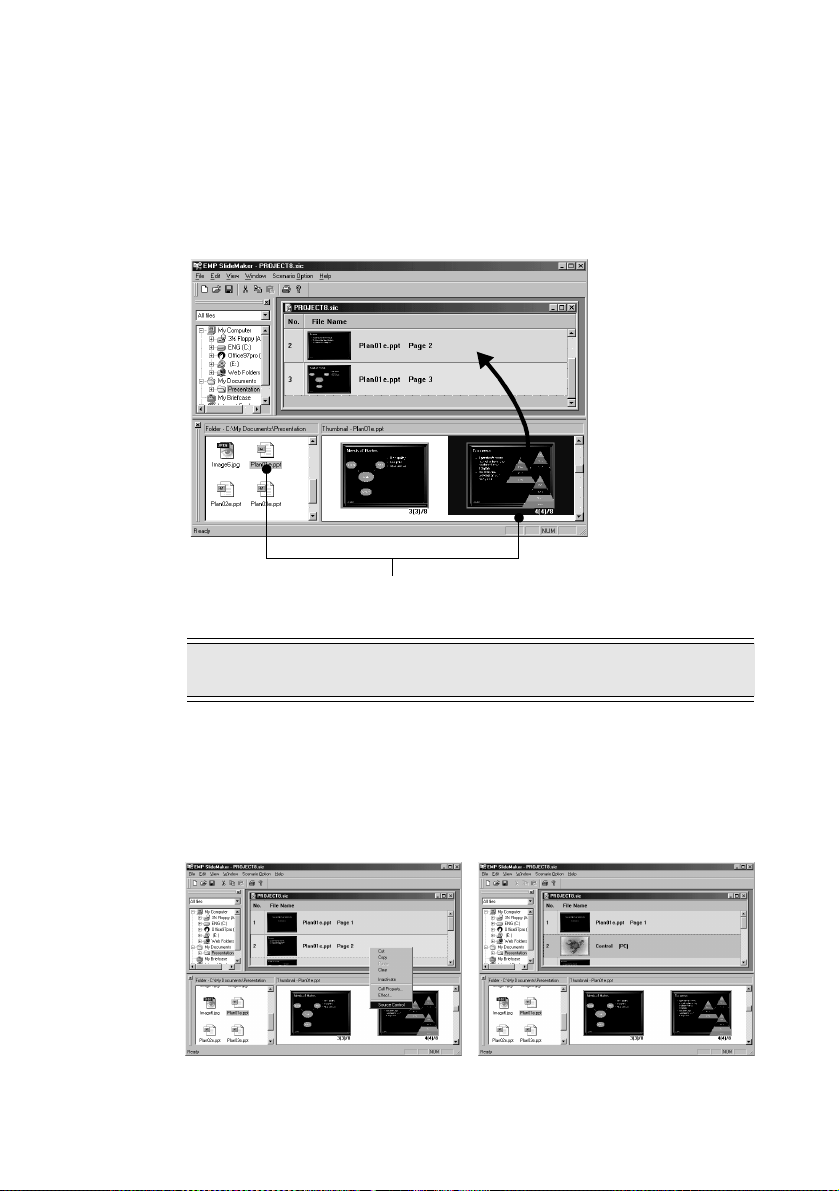
Select a file to be used for the scenario.
4
In the folder window, click the desired folder. The files in the selected folder are listed.
In the file window, double-click the icon of the desired file. The selected file is displayed
in the scenario window.
In the case of a PowerPoint file, click the file’s icon. All pages of the PowerPoint file are
displayed in the thumbnail window. Double-click the thumbnail of the desired page. The
selected page will be displayed in the scenario window. To use all pages of a single
PowerPoint file for a scenario, double-click the desired PowerPoint file icon in the file
window.
Folder window Scenario window
Cell
File window Thumbnail window
English
Point
If PowerPoint is not installed in the computer being used, thumbnails cannot be
displayed.
Creating Scenarios (EMP SlideMaker) -
23
Page 26
Complete the scenario by adding or deleting a file or pages and rearranging their order.
5
The contents displayed in the scenario window are projected sequentially from the top
when they are projected using EasyMP.
To add a file or page, click the cell below the one to be added. After the color of that cell
changes to yellow, double-click the file or page to be added.
To delete a file or page, right-click the cell to be deleted. Select [Cut] in the menu
(shortcut menu) that appears.
To change the order, drag & drop the cell to be moved within the scenario window. Or,
display the shortcut menu, select [Cut], and then select [Paste].
To add, drag & drop the desired file or page into the
scenario window.
Point
Multiple files or thumbnails cannot be pasted into a scenario simultaneously.
To switch to another image source, such as a computer or video cassette recorder, while
6
projecting the scenario, right-click on the cell where you want to switch the input source
and select [Insert Source Control].
The control cell that switches the display will appear. Control cell (default : computer
image) is displayed when inserting, but it can be changed using [Cell Properties] in the
shortcut menu.
24
- Creating Scenarios (EMP SlideMaker)
Page 27
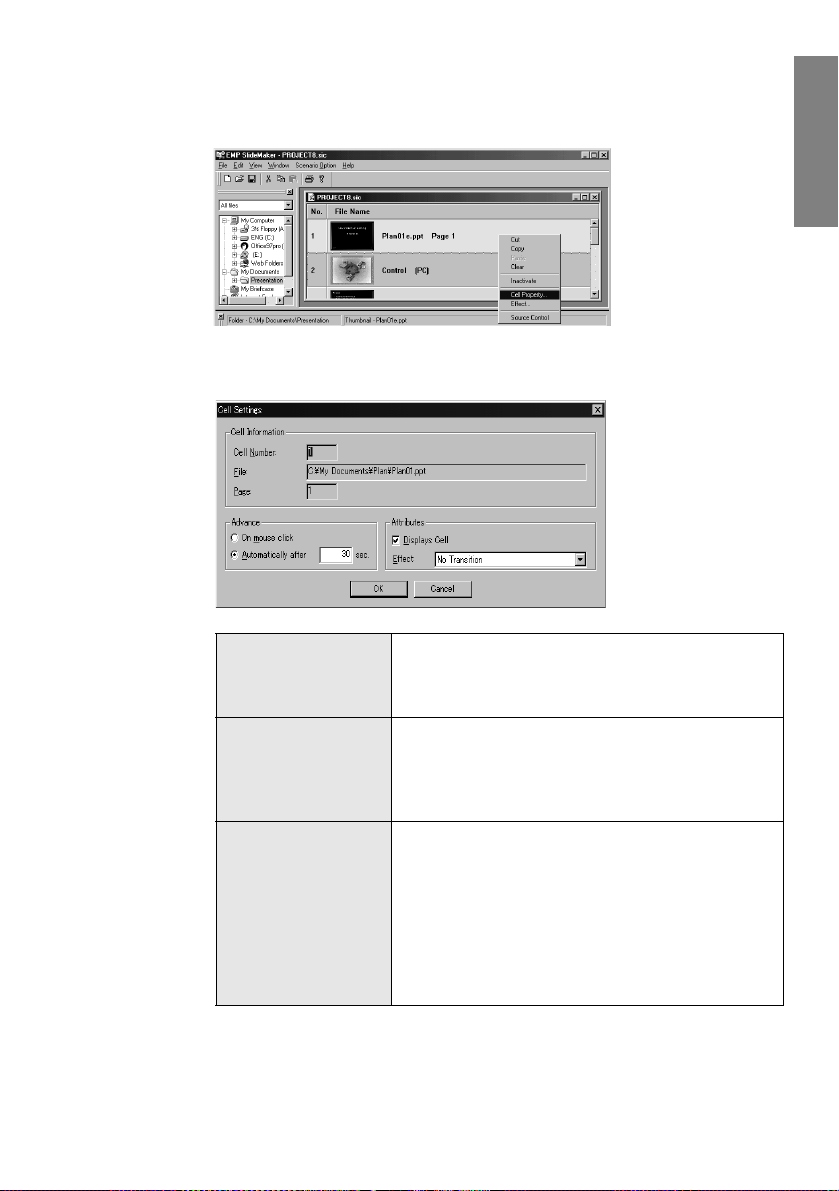
To change the projection time for a scenario page or to add display effects, right-click
7
the desired cell and select [Cell Properties].
To apply the same setting to multiple cells, select each cell while holding down the
[Shift] or [Ctrl] key on the keyboard, and then right-click and select [Cell Properties].
The "Cell Settings" dialog box is displayed. Specify the desired settings while referring
8
to the table below, and then click the [OK] button.
English
Advance The projection time can be set between 1 and 1800
seconds. In manual mode, the page can be switched by
pressing the [Enter] button on the remote control when
projecting.
Displays Cell When this is checked, the corresponding cells are
displayed. When unchecked, cells are hidden and a
prohibitive symbol is attached to them. (The same setting
can also be performed by selecting [Show (Hide)] in the
menu that appears after right-clicking the cell.)
Effect Effects can be applied when switching screens during
projection in the same way that they are performed with
PowerPoint’s slide-transition effect. The following are
some examples of effects. Display effects can be specified
for multiple cells at the same time. To select multiple cells,
click each cell while holding down the [Shift] or [Ctrl] key
on the keyboard.
Slide In/Out: Switches screens from left or right.
Box Wipe In/Out: Switches screens from outside or inside.
Creating Scenarios (EMP SlideMaker) -
25
Page 28

When the scenario is completed, select the [File] menu, then [Save].
9
The scenario is saved.
To save a scenario using another scenario name, select [Save As] and enter a new
scenario name.
Point
When a scenario is saved, a file named "scenario name.sic" as well as the JPG and
PNG data of each screen image is saved in the scenario folder.
Memo
See Help for each function of the EMP SlideMaker menu.
26
- Creating Scenarios (EMP SlideMaker)
Page 29
♦
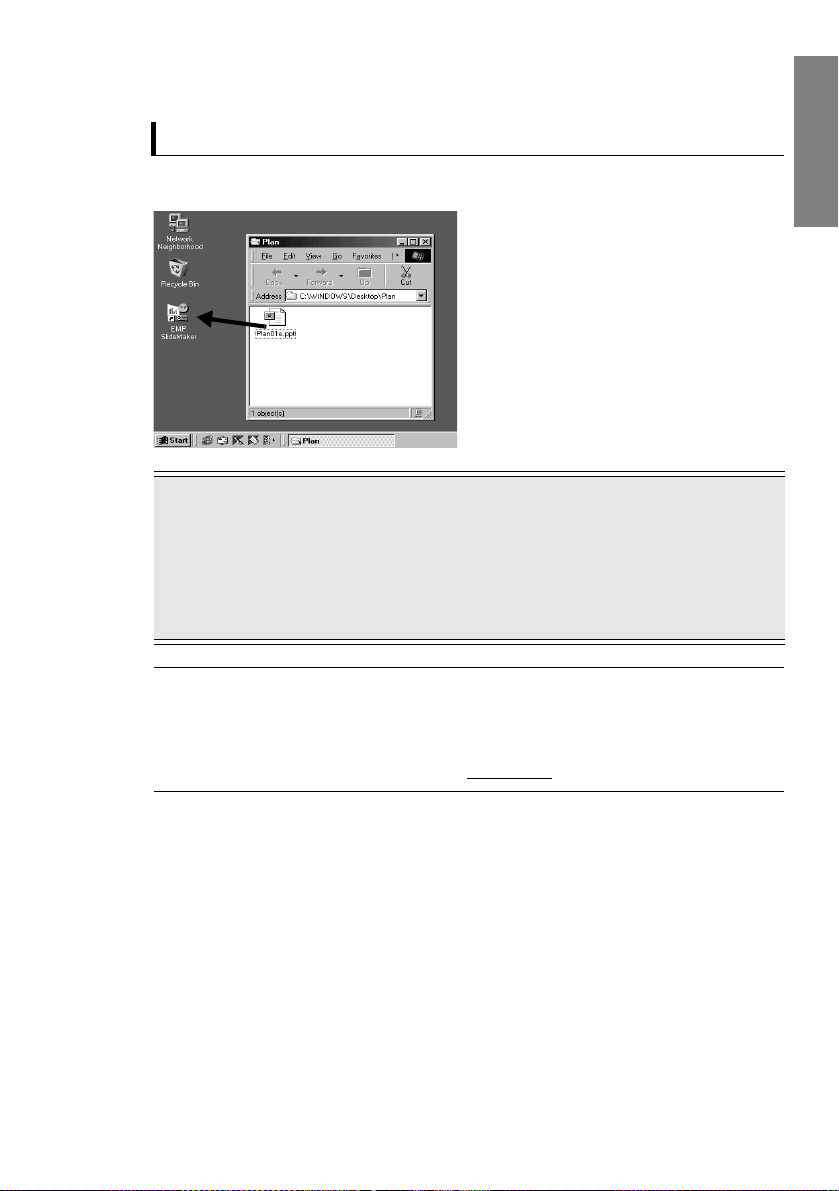
What Do You Do When...
Creating Scenarios Simply
To create a scenario simply from a single PowerPoint file, just drag & drop the PowerPoint file
icon onto the EMP SlideMaker program icon, located on the desktop.
Point
If multiple PowerPoint files are selected and dragged & dropped onto the EMP SlideMaker
•
program icon, a scenario will be created from the single file selected by the pointer. Scenarios
will not be created from any of the other files.
• If a simplified scenario has been created, the scenario will be created from all pages in the
specified PowerPoint file. Hide any pages that you do not wish to project using [Cell
Properties] after creating the simplified scenario.
Memo
The created scenario will be named "SCNxxxx" (where "xxxx" are numbers). The image
quality of the scenario is set to [Standard]. The image quality can be changed in the "Scenario
Settings" dialog box displayed by selecting the [File] menu, then [Property]. For more details
on image quality, refer to "Creating Scenarios" (see page 21)
English
Creating Scenarios (EMP SlideMaker) -
27
Page 30
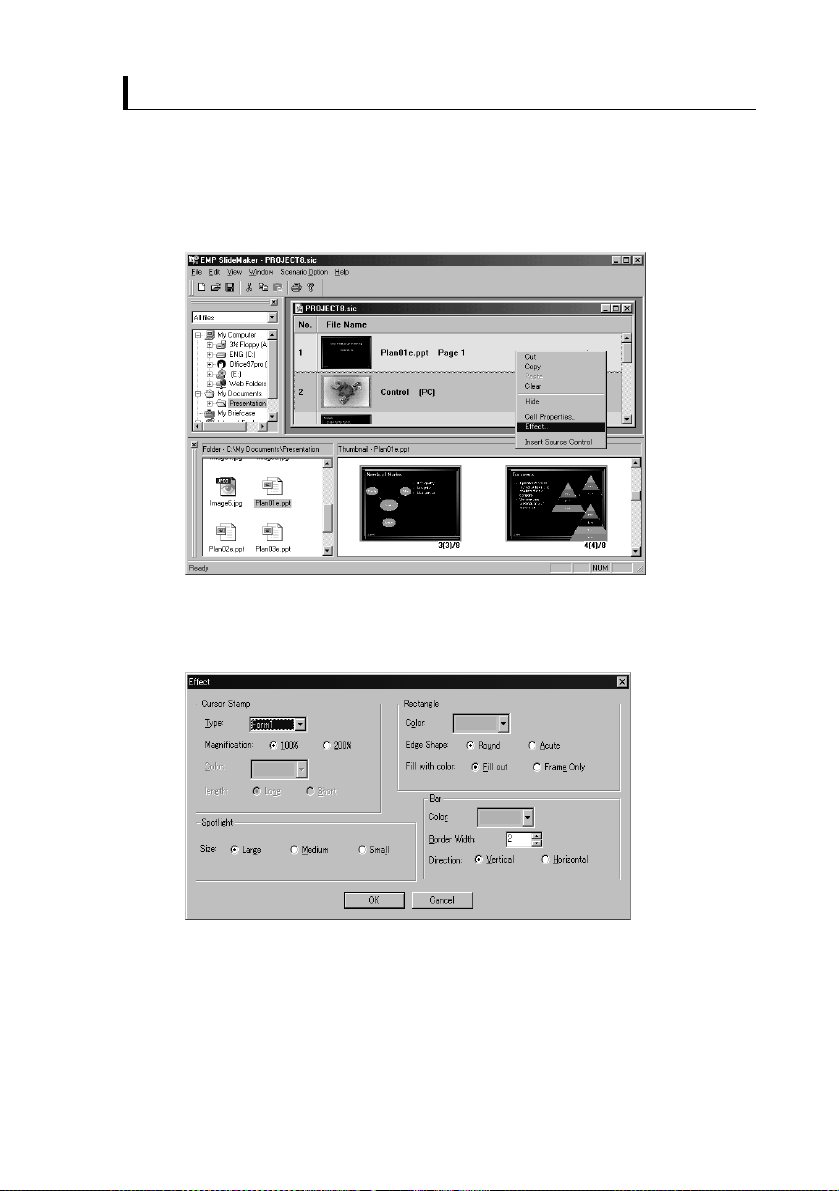
Setting Effects
Effects, such as pointing to a projected image with a stamp or bar, cannot be performed while a
scenario is being projected only by pressing the [1] through [4] buttons on the remote control.
However, if the effects for the desired screen image are set while creating the scenario, the effects
are available during scenario projection.
Right-click the cell for which you want to set effects, and then select [Effect].
1
The "Effect" dialog box is displayed. The same settings are available by selecting
2
[Effect] in the menu for the projector’s main unit. Specify the desired settings while
referring to the following table, and then click the [OK] button.
28
- Creating Scenarios (EMP SlideMaker)
Page 31

[Cursor Stamp] Specify the form of the cursor/stamp displayed when the [1]
button on the remote control is pressed while a scenario is
being projected.
Form1: Form2: Form3: Form4:
Form5: Form6: Form7: Form8:
[Rectangle] Specify the edge shape and color of the rectangle displayed
when the [2] button on the remote control is pressed while a
scenario is being projected.
[Spotlight] Specify the size of the spotlight displayed when the [3] button
on the remote control is pressed while a scenario is being
projected. When a spotlight is used, only a part of the image is
brightened and the rest is darkened.
[Bar] Specify the shape and other properties of the bar (line)
displayed when the [4] button on the remote control is pressed
while a scenario is being projected.
Memo
• For a more detailed explanation of the use of the "Effect" function during
projection, refer to the Instruction Manual of the projector.
• When the [5] button on the remote control is pressed, all of the displayed effects
(i.e., cursor/stamp, rectangle, spotlight and bar) disappear.
When the [Esc] button on the remote control is pressed, the "Effect" function is
canceled.
Handling Scenario Files Created in Previous Versions
English
When you try to open a scenario file created with a previous version of EMP SlideMaker, the
message "Do you want to convert the scenario?" appears.
Click [Ye s ] to convert and open the scenario file in the Version 1.10 format.
Once scenario files in previous versions have been converted into the Version 1.10 format, the
image quality is set to [Standard] and cannot be changed.
Please note that after scenario files are converted into the Version 1.10 format, they cannot be
opened using previous versions of EMP SlideMaker.
Creating Scenarios (EMP SlideMaker) -
29
Page 32

♦
Sending Scenarios
To project a scenario with a projector, it must be sent to a memory card using the "Send Scenario"
function of EMP SlideMaker.
Specify the memory card inserted in the card drive of the computer as the destination.
While sending a scenario, it can be set to project automatically when EasyMP is started, or to
project repeatedly. The function used to automatically project scenarios is called "Autorun".
Point
Created scenarios cannot be sent unless they are saved using either the "Save" or "Save As"
•
function.
• Once a scenario is sent to a memory card, it is saved as a scenario file named "scenario
name.sit". A folder with the same name as the scenario file will be created into which screen
images converted into image files according to the image quality setting will be saved. These
.sit files cannot be edited using EMP SlideMaker.
Insert a memory card into the computer.
1
If a card adapter is required, place the memory card in the card adapter and insert it into
the computer.
Select [Scenario Option], then [Send Scenario].
2
A dialog box for specifying the destination drive will appear. Select the drive in which
3
the memory card is inserted, and then click the [OK] button.
30
- Creating Scenarios (EMP SlideMaker)
Page 33

When a confirmation message is displayed, click the [OK] button.
4
When the transmission is complete, a message asking whether or not to specify the
5
Autorun settings appears. To select the Autorun or repeat settings, click the [Ye s ]
button and proceed to the next step. If the Autorun and repeat settings are not be
specified, click the [No] button to finish.
Change the settings and click the [OK] button.
6
All scenario files stored on the memory card will be displayed in the scenario file list at
the left.
To automatically project a scenario when EasyMP is started, set up Autorun by selecting
the desired scenario from the scenario file list, then clicking the [>>] button. The
scenario for which Autorun has been set up will be displayed in the Autorun scenario file
list at the right.
To repeatedly project a scenario from the beginning, set up repeat projection by selecting
the desired scenario from the scenario file list, then putting a check mark beside
[Revive].
English
Memo
The Autorun settings can also be specified by selecting [Scenario Option], then
[Edit Autorun] before sending a scenario.
Creating Scenarios (EMP SlideMaker) -
31
Page 34

Point
The Autorun settings cannot be specified using the projector.
•
• If two or more files have been set up for Autorun, they will be projected in the
order that they are registered in the Autorun scenario file list.
Insert the memory card to which the scenarios have been sent, and project the scenarios
7
using the EasyMP functions. (see page 34)
32
- Creating Scenarios (EMP SlideMaker)
Page 35

Giving Presentations
The section explains how to project scenarios and files sent to memory cards in the
projector.
Projecting Scenarios and Files (EasyMP).............................................. 34
English
Page 36

Projecting Scenarios and Files (EasyMP)
Use the EasyMP functions to project scenarios and files that have been sent to the memory card
of the projector.
EasyMP has two main functions: the "Scenario" function, which is used for projecting scenarios,
and the "Preview" function, which is used for projecting files.
♦
Projecting Scenarios
Each scenario to be projected must be saved to a memory card in advance. For details, refer to
"Sending Scenarios" (see page 30)
Memo
Scenarios can also be set for autorun and repeated projection. (see page 30)
Start up EasyMP by pressing the [EasyMP] button on the remote control.
1
The EasyMP file list is projected, showing the contents of the memory card inserted in
the projector.
By tilting the [Enter] button on the remote control, move the cursor to position it on the
2
scenario file to be projected, and then press the [Enter] button.
The selected scenario is projected. After all images in the scenario are projected, the
display automatically returns to the file list. If repeated projection has been set,
projection is restarted from the beginning of the scenario.
You can proceed to the next screen, return to the previous screen, or stop the projection
while a scenario is being projected. (see page 35)
.
34
- Projecting Scenarios and Files (EasyMP)
Scenario file
Page 37

Point
If [Insert Source Control] is specified for the scenario file and the source is
•
changed, pressing the [EasyMP] button stops the projection of the inserted source
image and projects the rest of the scenario file.
• The page order of a scenario and whether to show or hide pages within a scenario
can also be specified with [Edit Scenario]. (see page 36)
♦
Operations During Presentation
The following operations can be performed while a scenario or file is being projected.
English
Slide Transition Press the [Enter] button to proceed to the next screen.
Stop Projection When the [EasyMP] button is pressed, the message "Do you want to
The following functions of the projector’s main unit can also be used in the same manner when a
scenario or file is being projected using EasyMP.
Pause (Freeze) Each time the [Freeze] button on the remote control is pressed, the
A/V Mute Each time the [A/V Mute] button on the remote control is pressed, the
Zoom Image Hold down the larger side of the [E-Zoom] button on the remote
Press the [Esc] button to return to the previous screen.
stop projection?" is displayed. Press the [Enter] button to stop. Press
the [Esc] button to continue projection.
projection is paused/restarted.
projection and sound are stopped/restarted.
If a user logo has been specified through the setting menu of the
projector’s main unit, the logo is displayed while the image and sound
are stopped.
control to enlarge the image being projected while keeping the same
screen size. The zoom ratio is displayed in the lower-right area of the
screen. When the desired zoom size is obtained, release the button. If
the area you want to view is not displayed, tilt the [Enter] button on the
remote control and scroll the image.
Conversely, hold down the smaller side of the [E-Zoom] button on the
remote control to make the image smaller.
Point
If [Insert Source Control] is specified for the scenario file, you cannot display the next
screen using the [Enter] button or return to the previous screen using the [Esc] button while the
source is being switched.
Projecting Scenarios and Files (EasyMP) -
35
Page 38

♦
Editing Scenarios
It is possible to change the page order of a scenario file stored on the memory card in the projector,
and specify whether each of the pages are to be displayed or hidden.
Position the cursor on the scenario to be edited, and then press the [Esc] button on
1
the remote control.
When selecting the file, the menu on the left side is enabled.
Position the cursor on the [Edit Scenario] icon, and then press the [Enter] button on
2
the remote control.
[
Edit Scenario
The following edit screen appears. Specify the order of pages in the scenario file, as well
3
as whether to display or hide the page.
To change the order of images, position the cursor on the desired screen image, and then
press the [Enter] button on the remote control. Next, move the cursor to the desired
destination, and then press the [Enter] button on the remote control.
] icon
Select a screen image Select the destination
36
- Projecting Scenarios and Files (EasyMP)
Page 39

To hide a page, position the cursor on the desired screen image, and then press the [Esc]
button on the remote control. Next, position the cursor on the [Display/Hide] icon, and
then press the [Enter] button on the remote control.
[
Display/Hide
"Hide" symbol
When editing is complete, position the cursor on the [Return] icon, and then press the
4
[Enter] button on the remote control.
The scenario is saved with the changes, and the file list is displayed.
To cancel the changes to the scenario, position the cursor on the [Cancel] icon, and
then press the [Enter] button on the remote control.
Memo
If the cursor is positioned on the [Execute] icon and the [Enter] button on the
remote control is pressed, the scenario is saved with the edited contents and projection
starts.
] icon
English
Projecting Scenarios and Files (EasyMP) -
37
Page 40

♦
Displaying Files
The image files saved on the memory card can be displayed using EasyMP’s "Preview" function.
The following two preview modes are available:
• Preview of a single image file
This preview mode projects the contents of a single image file.
• Preview of the list of image files in the folder
This preview mode projects a list of all image files in the folder, or projects one image file at a
time.
Files That Can Be Projected With the "Preview" Function
The following image files can be projected using the "Preview" function:
• JPG files saved using the "Capture" function*
• JPG and BMP files saved during scenario creation
• Bitmap (BMP) files of SXGA (1280 x 1024) or less
• JPG files of SXGA (1280 x 1024) or less (excluding certain special JPG formats)
* The "Capture" function can be executed by selecting [Capture], then [Image Capture] in
the projector’s [Setting] menu.
Point
Only 24-bit color BMP files can be previewed. Files of 256 colors cannot be projected
•
properly.
• JPG files that were saved with a digital camera or other software may not be projected.
• Files with the extension "JPEG" cannot be projected.
• If the compression ratio is high, images may not be projected clearly due to the
characteristics of JPG files.
38
- Projecting Scenarios and Files (EasyMP)
Page 41

Previewing Image Files
Start up EasyMP by pressing the [EasyMP] button on the remote control.
1
The EasyMP file list is projected, showing the contents of the memory card inserted in
the projector.
Memo
When manipulating files in the memory card from a computer via a USB connection,
the display is updated to the latest contents by pressing the [EasyMP] button.
Position the cursor on the image file to be previewed, and then press the [Enter] button
2
on the remote control.
The contents of the selected image file will be projected.
English
Image file to be
previewed
Projecting Scenarios and Files (EasyMP) -
39
Page 42

Memo
Position the cursor on the desired file, and then press the [Esc] button on the remote
control to preview the image file. Or, position the cursor on the [Execute] icon and
press the [Enter] button on the remote control to preview the image file.
To return to the file list, press the [Esc] or [Enter] button on the remote control.
3
Previewing the List of Image Files in the Folder
The image files stored in a folder can be previewed as a list, or enlarged and projected one by one
in sequence.
Memo
Display conditions such as repeated projection and the screen switching time can be specified.
(see page 42)
Start up EasyMP by pressing the [EasyMP] button on the remote control.
1
The EasyMP file list is projected, showing the contents of the memory card inserted in
the projector.
Position the cursor on the folder containing the image file to be previewed, and then
2
press the [Esc] button on the remote control.
While the folder is being selected, the cursor moves to the menu at the left.
Point
When a scenario folder is selected, the list of image files for the scenario contained in
the selected folder can be previewed.
40
- Projecting Scenarios and Files (EasyMP)
Page 43

Position the cursor on the [Preview] icon, and then press the [Enter] button on the
3
remote control.
A list of images in the folder appears.
Point
If files that cannot be projected exist, they are displayed with the file icon.
To sequentially preview images by enlarging them one by one, press the [Esc] button on
4
the remote control, position the cursor on the [Execute] icon, and then press the
[Enter] button on the remote control.
An enlarged view of the first image appears. While in enlarged preview, you can display
the next image file, return to the previous image file, or cancel the enlarged preview. (see
page 35)
English
[
Execute
Projecting Scenarios and Files (EasyMP) -
] icon
41
Page 44

♦
Setting the Display Conditions
You can specify the display conditions for scenario projection and image file list preview. The
display conditions that can be set include repeated projection, screen switching time, display order
and background color.
Position the cursor on the scenario file or folder for which the display conditions are
1
to be set, and then press the [Esc] button on the remote control.
While the scenario file or folder is being selected, the cursor moves to the menu at the
left.
Position the cursor on the [Option] icon, and then press the [Enter] button on the
2
remote control.
The "Display Condition Settings" screen appears.
[
] icon
Option
42
- Projecting Scenarios and Files (EasyMP)
Page 45

Specify the desired settings.
3
Position the cursor on the display condition to be changed, and then press the [Enter]
button on the remote control to select the setting.
By positioning the cursor on the [Execute] icon and pressing the [Enter] button, you
can preview the scenario file or the image file in the folder.
English
[
Execute
The details of each display condition are listed below.
Re-execute Sets whether or not scenario projection and enlarged
Screen switching time Sets the time before advancing to the next screen. If "Not
Display order Sets the order of display.
Select background color Sets the background color to be displayed.
preview of image files in a folder are to be performed
repeatedly. If a scenario file is selected, only this item is
displayed.
specified", press the [Enter] button on the remote control to
proceed.
] icon
Projecting Scenarios and Files (EasyMP) -
43
Page 46

Page 47

Advanced Use
This section explains how to connect the projector with the computer using a USB
cable.
Connecting the Projector With the Computer Using a USB Cable .......46
English
Page 48

Connecting the Projector With the Computer Using a USB Cable
The projector and a personal computer can be connected using the USB cable supplied with the
projector, so that the contents of the memory card inserted in the projector can be accessed from
the computer.
♦
Conditions of Computers That Can Be Connected
Computers running Windows 98/Me/2000*
*Macintosh computers are not supported.
To connect a computer to the projector using a USB cable in order to access the memory card in
the projector, the USB driver must be installed in the computer being used. The USB driver to be
installed depends on the operating system used, as described below:
• When Windows 98 is used
While referring to "Connecting the Projector to the Computer and Installing the USB Driver"
(see page 47)
with the projector.
• When Windows Me is used
Install either the standard USB driver provided with the operating system or the USB driver
contained in the "EasyMP Software" CD-ROM supplied with the projector. If the standard USB
driver provided with the operating system has already been installed, it is not necessary to install
a USB driver. Simply connect the projector to the computer.
• When Windows 2000 is used
Install the standard USB driver provided with the operating system. The USB driver contained
in the "EasyMP Software" CD-ROM supplied with the projector cannot be used.
, install the USB driver contained in the "EasyMP Software" CD-ROM supplied
46
- Connecting the Projector With the Computer Using a USB Cable
Page 49

♦
Connecting the Projector to the Computer and
Installing the USB Driver
Connect the projector and the personal computer using the USB cable supplied
1
with the projector.
If the USB cable is connected while power to both the projector and the personal
computer is on, the "Add New Hardware" wizard starts up. In this case, proceed to step
4.
Mouse/Com
If the projector’s power has not been turned on, turn it on.
2
If the computer’s power has not been turned on, turn it on and start Windows.
3
The "Add New Hardware" wizard starts up.
Quit the "Add New Hardware" wizard by clicking the [Cancel] button.
4
Insert the "EasyMP Software" CD-ROM into the CD-ROM drive of the computer.
5
The SETUP program starts up.
Click the [Cancel] button to exit the SETUP program.
6
English
Click [Start], and then select [Run].
7
The "Run" dialog box appears.
In the Open box, enter "(CD-ROM drive name): \USB-
8
Driver\Win98\language\Disk1\Setup", and then click the [OK] button.
The installation starts. Follow the instructions that appear on the screen.
Memo
To uninstall, start up "Program Files\EasyMPun.exe".
Connecting the Projector With the Computer Using a USB Cable -
47
Page 50

♦
Accessing the Memory Card from the Computer
Once the projector is connected to the computer using the supplied USB cable and the required
USB driver has been installed according to the procedures described above, the memory card
inserted in the projector is displayed as one of the drives of the computer and can then be accessed
from the personal computer.
Start up EasyMP by pressing the [EasyMP] button on the remote control.
1
The EasyMP file list is projected, showing the contents of the memory card inserted in
the projector.
Double-click [My Computer] on the desktop.
2
The [My Computer] window appears.
The memory card appears as a "Removable disk".
3
File manipulations, such as copying and moving, can be performed in the same way as
for normal file manipulations in Windows.
48
- Connecting the Projector With the Computer Using a USB Cable
Page 51

Appendix
This appendix describes problems that may occur during operation of the projector,
along with the corrective actions to be taken.
When a Problem Occurs ........................................................................ 50
Index ...................................................................................................... 53
English
Page 52

When a Problem Occurs
The following describes problems that may occur when scenarios or image files are projected and
when EMP SlideMaker is used. Refer to this section when a problem occurs.
No Image Is Projected
● Check whether or not an EasyMP image has been properly
selected.
Press the [Source] button on the projector’s main unit (or the
[EasyMP] button on the remote control) to switch to an EasyMP image.
Refer to "Projecting Scenarios and Files (EasyMP)" (see page 34)
"No signal" is displayed.
● Check whether or not a memory card is inserted.
Insert a memory card into the card slot (in the projector’s main unit).
"No memory card" is
displayed.
● Check whether or not files that cannot be displayed are stored in
the memory card.
Files that can be displayed by EasyMP include scenario files (.sit),
JPEG files (.JPG) and bitmap files (.BMP). Other file formats cannot be
used.
"No displayable files" is
displayed.
"No files" is displayed.
* JPEG files with the file extension "JPEG" can be recognized as JPEG files in Windows.
However, they cannot be recognized by EasyMP. Therefor e, change the file extension of
JPEG files to "JPG" or "jpg".
● Check whether or not the specified file has been deleted.
If the contents of a memory card have been overwritten from the PC via
a USB connection, the contents of the file list being displayed may
differ from the contents of the memory card. Press the [EasyMP] button
to update the file display.
50
- When a Problem Occurs
Page 53

"Display not possible" is
displayed.
"This size cannot be
displayed" is displayed.
"Insufficient image file
colors" is displayed.
● Check whether or not a grayscale JPEG image has been specified.
EasyMP cannot display grayscale JPEG images.
● Check whether or not a progressive JPEG image has been specified.
EasyMP cannot display progressive JPEG images.
● Check whether or not the specified file is damaged.
The contents of a JPEG or bitmap file may be invalid. Files containing
images taken by some types of digital cameras or files processed by
some types of software may not be used, and therefore, the images in
these files may not be displayed.
● Check whether or not a JPEG image with a resolution exceeding
SXGA (1280 x 1024) is specified.
JPEG or bitmap files with resolutions exceeding SXGA (1280 x 1024)
cannot be displayed. Adjust the resolution using EMP SlideMaker or
another utility.
● Check whether or not a bitmap other than one of 24-bit colors is
specified.
Bitmaps (256 colors, 16 colors, etc.) of other than 24-bit colors cannot
be displayed. Change them to bitmaps of 24-bit colors.
● Check whether or not the memory card’s capacity is full.
If there is not enough space to save any more files, make more space
available by deleting unnecessary files.
English
"File cannot be save" is
displayed.
"Capture failed" is
displayed.
● Check whether or not an image capture was attempted while the
projector was connected to the computer via a USB connection.
Images cannot be captured while connected via USB. Disconnect the
USB cable.
When a Problem Occurs -
51
Page 54

Problems When EasyMP Is Used
● Images are abnormal (corrupted).
Some JPEG images cannot be displayed normally, depending on the
resolution. If they are not displayed normally, adjust the resolution so
that the number of vertical lines is set to a multiple of eight pixels and
the number of horizontal lines is set to a multiple of 16 or 32 pixels. This
problem should not occur with scenario files created using EMP
SlideMaker and general-resolution types (VGA or XGA).
Problems When the EasyMP Software Is Used
● PowerPoint files (.ppt) are not displayed in the File window.
Files created using PowerPoint 95 or files saved in PowerPoint 95
format cannot be edited using the EasyMP Software. Save such files in
PowerPoint 97 or PowerPoint 2000 first before using them.
● PowerPoint files (.ppt) cannot be pasted into a scenario, or
thumbnails cannot be displayed.
MS-Office’s JPEG Converter may not have been installed. Display the
"Graphic Filter" option of "Converters and Filters" from the Office 97
Installer, select all or select the JPEG filter, and then install the JPEG
Converter. (For Office 2000, the JPEG Filter is included in the standard
installation.)
● Created scenario files cannot be edited.
Scenario files (.sit) transferred to a memory card cannot be edited again
using the EasyMP Software. To edit them, use the scenario data (.sic)
saved temporarily by the EasyMP Software.
Point
If a problem persists, disconnect the projector’s power supply cord from the power outlet, and
contact your dealer or nearest address provided at “International Warranty Conditions” in
“Safety Instructions/World-Wide Warranty Terms” included in the package.
52
- When a Problem Occurs
Page 55

Index
A
A/V Mute 35
ATA flash card
Autorun
10
17, 30
B
Bar 29
BMP
20
C
Cell 24
CMYK color mode format
CompactFlash card
Convert
Cursor Stamp
29
10
29
D
DIB 20
E
Effect 25, 28
EMP SlideMaker
E-Zoom
35
21
F
20
J
JPG 20
M
Memory card 10
Memory stick
Microdrive
10
10
N
Non-compress 22
O
Operation indicator 12
P
Pause 35
PC card adapter
PowerPoint
Preview
Progressive format
34
20
10,
20
R
Rectangle 29
Repeat settings
31
English
13
File-list screen 16
35
Freeze
H
High Quality 22
I
Image Quality 22
Installation
14
S
Scenario 21, 34
Send Scenario
SmartMedia
Spotlight
Standard
29
22
10
T
Thumbnail 23
30
Index -
53
Page 56

U
Uninstallion 15
46
USB
Z
Zoom Image 35
54
- Index
Page 57

EasyMP Guide de I’utilisateur
Français
Français
Page 58

Structure générale des manuels et utilisation du présent manuel
♦
Structure des manuels
Ce produit est accompagné de trois manuels. La description de chaque manuel est donnée ci-après.
Veuillez lire le manuel se rapportant à la fonction à utiliser.
Consignes de sécurité /
Conditions d’application
de la garantie
internationale
Manuel d'utilisation de
l'EMP-715/505
Manuel d'utilisateur
d'EasyMP (ce manuel)
♦
Signification des pictogrammes figurant dans
ce document
Ce manuel explique comment utiliser votre projecteur en toute
sécurité, et comment obtenir, si nécessaire, un service après-vente ou
une assistance technique ; vous y trouverez aussi une check-list de
dépannage.
Lisez ce manuel attentivement avant d'utiliser votre projecteur.
Ce manuel explique comment installer le projecteur ; il donne
également des informations sur l'utilisation élémentaire du
projecteur et sa méthode de raccordement à un ordinateur ou à un
appareil vidéo. Il présente les contrôles à effectuer lorsque les
images sont mal projetées et explique comment changer la lampe et
procéder à l'entretien du projecteur.
Ce manuel décrit les fonctions d'EasyMP installées dans le
projecteur et explique comment utiliser le logiciel “EasyMP
Software” livré avec le projecteur.
Pictogramme de sécurité
Le pictogramme de sécurité utilisé dans ce document indique les précautions à prendre pour
exploiter le produit en toute sécurité et éviter ainsi tout dommage corporel ou matériel. Le
pictogramme et sa signification sont décrits plus bas. Veuillez lire attentivement ces consignes de
sécurité avant de passer à la partie principale du manuel.
Ce pictogramme indique que la mauvaise manipulation du produit et le
Attention
56
- Structure générale des manuels et utilisation du présent manuel
non-respect des consignes de sécurité qui l'accompagnent risquent de
provoquer des dommages corporels ou matériels.
Page 59

Pictogrammes d'information générale
Remarque
Note
[
Nom de bouton
Voi r p a ge
]
Donne des restrictions ou autres points apparentés importants.
Veuillez lire attentivement.
Donne à l'utilisateur des informations utiles.
Indique le nom d'un bouton ou d'une touche figurant sur le
panneau de commande, la télécommande ou l'écran.
Exemple : [Enter]
Renvoie à des informations apparentées.
Divers
Les expressions "ce produit" et "ce projecteur" désigne le projecteur lui-même ou, dans certains
cas, le projecteur et ses accessoires.
Français
Structure générale des manuels et utilisation du présent manuel -
57
Page 60

Consignes de sécurité
Prière de lire les "Consignes de sécurité" ci-après de manière à manipuler le projecteur
correctement et en toute sécurité.
Attention
• Ne débranchez pas le cordon d'alimentation pendant que des opérations EasyMP sont en cours
(ex. pendant le passage d'une image à une autre ou quand le témoin de fonctionnement du
logement pour carte est allumé en orange). Sinon, le projecteur risque d'être endommagé ou de
ne plus pouvoir passer à l'écran EasyMP.
• Ne retirez pas la carte mémoire pendant l'écriture de données sur celle-ci (ex. immédiatement
après une saisie d'écran ou quand le témoin de fonctionnement du logement pour carte est
allumé en orange). Sinon, la carte mémoire ou les données mémorisées sur la carte risquent
d'être endommagées.
* Pour plus d'informations sur le fonctionnement du projecteur, veuillez vous reporter aux "Consignes de
sécurité" des "Consignes de sécurité/ Conditions d'application de la garantie internationale" fournis avec
l'appareil.
58
- Consignes de sécurité
Page 61

Table des matières
Structure générale des manuels
et utilisation du présent manuel 56
Structure des manuels ....................................................... 56
Signification des pictogrammes
figurant dans ce document ................................................. 56
Consignes de sécurité 58
Table des matières 59
Présentation des fonctions 61
Avant d'utiliser l’appareil 63
Configuration requise 64
Ordinateurs pouvant exécuter EasyMP Software ............. 64
Cartes mémoire pouvant être utilisées .............................. 64
Retrait et insertion de la carte mémoire 65
Retrait de la carte mémoire ................................................ 65
Insertion de la carte mémoire ............................................ 66
Retrait de la carte CompactFlash
de l'adaptateur pour cartes PC .......................................... 67
Insertion de la carte CompactFlash
dans l'adaptateur pour cartes PC ...................................... 67
Installation et désinstallation d' EasyMP Software 68
Installation .......................................................................... 68
Désinstallation .................................................................... 69
Français
Démarrage d'EasyMP Software 70
Démarrage d' EasyMP ....................................................... 70
Utilisation d'EasyMP .......................................................... 71
Quitter EasyMP .................................................................. 71
Table des matières -
59
Page 62

Préparation en vue d'une présentation 73
Fichiers pouvant être fusionnés
en un fichier de scénario 74
Création d'un scénario (EMP SlideMaker) 75
Création d'un scénario ....................................................... 75
Conseils utiles .................................................................... 81
Envoi d'un scénario ............................................................ 84
Réalisation d'une présentation 87
Projection de scénarios et de fichiers (EasyMP) 88
Projection d'un scénario ..................................................... 88
Opérations possibles pendant la présentation ................... 89
Modification d'un scénario .................................................. 90
Affichage des fichiers ......................................................... 92
Définition des conditions d'affichage .................................. 96
Paramétrage avancé 99
Raccordement du projecteur à un ordinateur
à l'aide d'un câble USB 100
Ordinateurs pouvant être raccordés ................................ 100
Raccordement du projecteur à l'ordinateur
et installation du pilote USB ............................................. 101
Accès à la carte mémoire depuis l'ordinateur ..................102
Annexe 103
Types de problèmes rencontrés 104
Index 107
60
- Table des matières
Page 63

Présentation des fonctions
Les fonctions d'EasyMP comprennent les fonctions EasyMP du projecteur et les fonctions
auxiliaires EMP SlideMaker. Les deux groupes de fonctions et leur schéma fonctionnel sont
décrits ci-après.
Ordinateur (EMP SlideMaker)
Création d'un scénario
Tout comme on peut classer des diapositives de film, il est possible d'extraire, de disposer selon
un ordre particulier et de mémoriser dans un seul fichier des diapositives particulières provenant
d'un fichier PowerPoint et des fichiers d'image en vue de leur projection. Ce fichier s'appelle un
"scénario". L'extraction et la redisposition des pages souhaitées pouvant s'effectuer sans éditer
les fichiers d'origine, la présentation des matériaux à projeter peut se faire aisément et en toute
efficacité en fonction de l'audience et de l'objectif visé par la présentation.
(voir page 75)
Envoi d'un scénario
Les scénarios créés sont mémorisés dans la carte mémoire (voir page 84)
Carte
mémoire
.
Français
Projecteur (EasyMP)
Projection d'un scénario
Le scénario envoyé à la carte mémoire peut être
projeté, ce qui permet de n'utiliser que le
projecteur pour effectuer la présentation sans
avoir à le raccorder à un ordinateur. (voir page 88)
Aperçu des fichiers d'image
Les fichiers d'image stockés sur la carte mémoire peuvent être projetés directement sans avoir à
raccorder le projecteur à un ordinateur. (voir page 93)
Aperçu des dossiers
Les fichiers d'image stockés dans un dossier de la carte mémoire peuvent être projetés soit sous
la forme d'une liste , soit les uns après les autres. Il est possible, par exemple, de projeter des
photos les unes après les autres, comme avec un projecteur de diapositives, en insérant une carte
mémoire contenant des photos prises par une caméra numérique. (voir page 94)
Modification d'un scénario
L'ordre dans lequel les pages d'un
scénario sont projetées peut être
modifié. Il est également possible de
peut masquer certaines pages d'un
scénario. (voir page 90)
Présentation des fonctions -
61
Page 64

62
- Présentation des fonctions
Page 65

Avant d'utiliser l’appareil
Cette section explique la préparation nécessaire pour utiliser EasyMP et présente
ses fonctions élémentaires.
Configuration requise ............................................................................ 64
Retrait et insertion de la carte mémoire................................................. 65
Installation et désinstallation d' EasyMP Software................................ 68
Démarrage d'EasyMP Software............................................................. 70
Français
Page 66

Configuration requise
♦
Ordinateurs pouvant exécuter EasyMP
Software
Pour créer des scénarios, le logiciel EasyMP Software doit être installé sur l'ordinateur. Ce dernier
doit avoir les caractéristiques minimales ci-après pour pouvoir exécuter le logiciel EasyMP
Software.
Système d'exploitation Ordinateur fonctionnant sous les plates-formes Windows 95/98/
NT4.0/Me/2000*
Unité centrale Pentium 166MHz ou plus rapide (Pentium II 300MHz ou plus
recommandé)
Capacité mémoire
disponible
Espace disque disponible 12Mo ou plus
Affichage Résolution VGA (640 x 480) ou plus
*Les ordinateurs Macintosh ne sont pas pris en charge.
♦
Cartes mémoire pouvant être utilisées
Ce produit est livré avec une carte CompactFlash 8 Mo et un adaptateur pour cartes PC permettant
d'installer la carte dans l'emplacement pour carte du projecteur.
S'il faut davantage de cartes mémoires, veillez à utiliser les cartes mémoires de TYPE II
compatibles ATA suivantes :
• Carte CompactFlash (il faut un adaptateur pour cartes PC pour monter la carte)
• Carte flash ATA
• Barre de mémoire (il faut un adaptateur pour cartes PC pour monter la carte)
• Smart Média (il faut un adaptateur pour cartes PC pour monter la carte)
• Micro-unité (il faut un adaptateur pour cartes PC pour monter la carte)
32Mo ou plus (96Mo ou plus recommandé)
64
- Configuration requise
Page 67

Retrait et insertion de la carte mémoire
L’emplacement pour carte de ce projecteur contient déjà une carte mémoire (autrement dit, une
carte CompactFlash insérée dans l'adaptateur pour cartes PC).
La carte mémoire joue le rôle de dispositif de stockage du projecteur, tout comme le disque dur
d'un ordinateur. Il est possible de copier et de déplacer des fichiers sur cette carte mémoire ainsi
que d’y stocker des scénarios créés avec EMP SlideMaker.
Cette section explique comment retirer et insérer la carte mémoire livrée avec cet appareil. Lors
de l'utilisation de cartes mémoire vendues dans le commerce, veuillez vous reporter à la notice
accompagnant la carte mémoire. Pour plus de détails sur l'insertion et le retrait de la carte
mémoire dans le logement pour cartes PC de l'ordinateur, veuillez vous reporter au manuel
d'utilisateur de l'ordinateur.
♦
Retrait de la carte mémoire
Remarque
Ne retirez pas la carte mémoire si le témoin de fonctionnement est allumé en orange ou s'il y
•
a un scénario en cours de projection.
• Après avoir retiré la carte mémoire, insérez la fausse carte fournie avec l’appareil dans
l'emplacement pour carte afin d’éviter toute pénétration de poussière.
Appuyez sur le bouton d'éjection, au-dessous de l'emplacement pour carte.
1
Le bouton d'éjection sort.
Français
Bouton d'éjection
Retrait et insertion de la carte mémoire -
65
Page 68

Appuyez de nouveau sur le bouton d'éjection.
2
La carte mémoire sort. Sortez la carte mémoire de manière à l'horizontal.
Si le bouton d'éjection est toujours sorti, appuyez à nouveau dessus.
3
Le bouton d'éjection pourrait se rompre facilement s'il était laissé dans sa position sortie,
assurez-vous donc de bien le ré-enfoncer afin d’éviter de l'endommager.
♦
Insertion de la carte mémoire
Remarque
Si la carte mémoire est insérée par l'arrière, elle ne pourra pas s'enfoncer complètement. Ne
•
tentez pas de l'insérer en forçant.
• Le témoin de fonctionnement de l'emplacement pour carte du projecteur indique l'état actuel
comme suit :
Eteint :Pas d'accès à la carte mémoire ou pas de carte mémoire insérée.
Allumé en orange :Accès en cours (ne retirez pas la carte mémoire).
Allumé en rouge :Impossible d'utiliser la carte mémoire insérée.
• Le projecteur reconnaît les cartes mémoire de format FAT12/16.
• En fonction du Smart Média utilisé, il peut y avoir un risque de mauvais fonctionnement en
cas de tentative d'écriture de données alors que le Smart Média est protégé en écriture. Ne
protégez pas le Smart Média en écriture.
66
- Retrait et insertion de la carte mémoire
Page 69

Insérer la carte mémoire dans l'emplacement pour carte du projecteur, le logo EPSON sur
l'adaptateur pour cartes PC dirigé vers l'arrière du projecteur. Insérez-la complètement.
Insérez la carte mémoire horizontalement dans l'emplacement pour car te du projecteur, le
logo EPSON sur l'adaptateur pour cartes PC dirigé vers l'arrière du projecteur.
♦
Retrait de la carte CompactFlash de
l'adaptateur pour cartes PC
Tenez la carte CompactFlash comme sur l'illustration ci-dessous et retirez-la de l'adaptateur pour
cartes PC.
Français
♦
Insertion de la carte CompactFlash dans
l'adaptateur pour cartes PC
Insérez la carte CompactFlash dans l'adaptateur pour cartes PC, le logo EPSON dirigé vers le haut.
Retrait et insertion de la carte mémoire -
67
Page 70

Installation et désinstallation d' EasyMP Software
Lors de l'exécution d'une installation, EMP SlideMaker est également installé.
♦
Installation
Ava nt d'e x écuter l'installation, fermez tous les programmes d'application.
Démarrez Windows et insérez le CD-ROM "EasyMP Software" livré avec le
1
projecteur. Le programme d'installation démarre automatiquement.
Remarque
Si le programme d'installation ne démarre pas, cliquez sur [Démarrer] et
sélectionner [Exécuter] pour ouvrir la boîte de dialogue "Exécuter". Dans la zone
Ouvrir, entrez l'emplacement du CD-ROM "EasyMP Software". Indiquez "Nom
d'unité du CD-ROM:\SETUP.exe". Cliquez sur ensuite le bouton [OK].
Sélectionnez la langue et cliquez sur le bouton [OK].
2
L'installation commence. Suivez les instructions affichées à l'écran.
68
- Installation et désinstallation d' EasyMP Software
Sélectionnez la langue à utiliser
pour les affichages d'écran EMP
SlideMaker.
Page 71

♦
Désinstallation
Pour désinstaller EasyMP Software dans Windows, sélectionnez [Poste de travail], [Panneau
de configuration] puis [Ajout/Suppression de programmes]. Sélectionnez ensuite "EMP
SlideMaker" et cliquez sur le bouton [Ajouter/Supprimer].
Remarque
Même après la désinstallation d'EMP SlideMaker, le dossier EMP SlideMaker n'est pas
supprimé. Veillez à ce que le dossier EMP SlideMaker ne contienne aucun fichier de scénario
dont vous pourriez avoir besoin et supprimez-le s'il est inutile.
Français
Installation et désinstallation d' EasyMP Software -
69
Page 72

Démarrage d'EasyMP Software
Si l'alimentation du projecteur est coupée alors qu'EasyMP est en marche, l'écran EasyMP
d'affichage de la liste des fichiers apparaîtra lors de la prochaine mise sous tension.
Si le projecteur était utilisé par le biais d'un ordinateur ou d'un appareil vidéo, démarrez EasyMP
comme suit.
♦
Démarrage d' EasyMP
Quand le projecteur est sous tension, appuyez sur la touche [EasyMP] de la télécommande pour
démarrer EasyMP. L'écran EasyMP d'affichage de la liste des fichiers apparaît.
Ecran EasyMPd'affichage de la liste des fichiers
70
- Démarrage d'EasyMP Software
Page 73

Remarque
S'il n'y a pas de carte mémoire insérée, le message "Il n'y a pas de carte mémoire" apparaît et
•
il est impossible d'utiliser les fonctions d'EasyMP.
• Si la carte mémoire contient un scénario à exécution automatique, celui-ci se déclenchera dès
la mise sous tension du projecteur.
• Même si le projecteur affiche des images provenant d'une autre source d'images (ordinateur
ou appareil vidéo), une fois qu'une carte mémoire contenant un scénario à exécution
automatique est insérée, l'affichage du projecteur passe automatiquement à l'écran EasyMP et
le scénario de la carte mémoire est projeté.
• L'affichage de l'écran EasyMP peut se faire dans les langues suivantes : Anglais, Japonais,
Français, Allemand, Italien, Espagnol, Portugais, Chinois et Coréen. Pour modifier la langue,
sélectionnez [Avan cé] puis [Langue] dans le menu de configuration du projecteur (voir la
rubrique "Utilisation des menus" dans le manuel d'utilisateur du projecteur).
♦
Utilisation d'EasyMP
LorsqueEasyMP est en marche, la télécommande de projecteur sert de dispositif d'entrée. Le
fonctionnement élémentaire du dispositif d'entrée est le suivant :
• Déplacement du pointeur
Inclinez la touche [Enter] de la télécommande vers le haut, le bas, la droite ou la gauche comme
avec une boule roulante pour déplacer dans la même direction le curseur sur l'écran EasyMP.
• Sélection et exécution d'une fonction
Si vous placez le curseur sur une icône de l'écran et enfoncez la touche [Enter] de la
télécommande, la fonction associée à l'icône sélectionnée s’exécute.
♦
Quitter EasyMP
Il n'y a pas à proprement parler de fonction permettant de quitter EasyMP. Pour passer à une autre
source d'images, comme une source vidéo par exemple, il vous suffit d’appuyer sur le bouton de la
télécommande se rapportant à la source souhaitée. Cette opération peut se faire tout en exécutant
EasyMP. Pour mettre fin à la projection, appuyez sur la touche [Power] de la télécommande ou
deux fois sur le panneau de commande du projecteur même si EasyMP est en cours d'utilisation.
L'alimentation du projecteur est alors coupée.
Français
Démarrage d'EasyMP Software -
71
Page 74

Page 75

Préparation en vue d'une présentation
Cette section explique comment créer des scénarios et les envoyer à un PC pour
pouvoir les utiliser dans une présentation.
Fichiers pouvant être fusionnés en un fichier de scénario .....................74
Création d'un scénario (EMP SlideMaker)............................................ 75
Français
Page 76

Fichiers pouvant être fusionnés en un fichier de scénario
Il est possible d’utiliser indifféremment les types de fichiers suivants et de les fusionner pour en
faire un seul fichier servant de scénario.
Type Type de fichier (extension) Remarque
Microsoft PowerPoint .ppt PowerPoint 97 (SR-2 ou ultérieur)/2000
.bmp, .dib BMP/DIB
Image
Remarque
Tous les effets définis dans le menu [Diaporama] de PowerPoint deviennent caducs. Cependant, les
mêmes paramètres choisis pour les options [Transition] et [Masquer diapositive(s)] peuvent être
exécutés lorsque les scénarios sont créés avec EMP SlideMaker.
.jpg
Toutes les versions conviennent. Cependant, il
est impossible de projeter des images de format
mode couleur CMYK ou de format progressif.
74
- Fichiers pouvant être fusionnés en un fichier de scénario
Page 77

Création d'un scénario (EMP SlideMaker)
Un "scénario" est un fichier créé et enregistré par la fusion de fichiers PowerPoint et de fichiers
d'image, dont les images ont été disposées selon l'ordre de projection. Vous pouvez créer un
scénario à l’aide de EMP SlideMaker. Avec EMP SlideMaker, il est possible d'extraire les images
souhaitées, de les réorganiser et de les utiliser pour préparer le matériel de présentation
simplement et en toute efficacité, sans éditer les fichiers source. La projection du scénario créé
peut se faire avec les fonctions EasyMP du projecteur. (voir page 88)
EMP SlideMaker
Créer un scénario
Sur l'ordinateur
Envoyer un scénario (voir page 84)
EasyMP
Avec le projecteur
Projeter un scénario (voir page 88)
♦
Création d'un scénario
Ava n t d e créer un scénario, veuillez prendre connaissance des points suivants.
• Créez à l'avance les fichiers source (ex. les données PowerPoint et les fichiers d'image) qui
seront fusionnés pour former un scénario.
• Il est impossible d'utiliser des fichiers autres que les fichiers répertoriés à la rubrique "Fichiers
pouvant être fusionnés en un fichier de scénario".
• Veuillez noter que les scénarios créés avec EMP SlideMaker sont incompatibles avec ceux créés
en utilisant la fonction EMP Scenario de l'EMP-8150/8150NL.
Démarrez Windows sur l'ordinateur et cliquez sur [Démarrer], sélectionnez
1
[Programmes], [EMP SlideMaker] puis [EMP SlideMaker] dans le menu
Démarrer.
EMP SlideMaker démarre.
Français
Sélectionnez le menu [Fichier] puis [Nouveau].
2
La boîte de dialogue "Paramètres du scénario" apparaît.
Création d'un scénario (EMP SlideMaker) -
75
Page 78

Définissez les paramètres de scénario souhaités en vous reportant au tableau ci-dessous
3
puis cliquez sur le bouton [OK].
Nom du scénario Le nom du scénario sert de nom au fichier du scénario à créer
ainsi qu’au dossier de scénario. Il faut entrer un nom de
scénario d'au maximum 127 caractères, répertoire du dossier
de scénario compris (voir ci-dessous). Il est possible d’entrer
des lettres majuscules et des chiffres.
Dossier de scénario Donnez le nom du dossier où sera placé le scénario créé. Le
Couleur du fond Sélectionnez la couleur du fond des données d'image figurant
Qualité de l'image EMP SlideMaker convertit chaque page d'un fichier
dossier de scénario sera créé dans le répertoire indiqué ici.
dans le scénario.
PowerPoint en un fichier d'image puis mémorise le fichier.
Dans "Qualité de l'image", sélectionnez la qualité de l'image à
utiliser lors de la conversion en fichiers d'image. Si [Sans
compression] est sélectionné, l'image dans chaque cellule
est stockée sous forme de fichier d'image en format BMP. Les
images projetées en format BMP sont de haute qualité mais la
taille du fichier sera importante puisque les images ne sont
pas compressées. De plus, la projection de ces images prend
plus de temps par rapport à celle des images de qualité
[Standard]. De toutes les options, la qualité d'image [Sans
compression] permet d'obtenir la plus haute qualité
d'image projetée. Si [Standard] ou [Haute qualité] est
sélectionné, l'image dans chaque cellule est stockée sous la
forme d'un fichier d'image en format JPEG. Une image JPEG
ayant un taux de compression élevé donnera une mauvaise
qualité d'image. Par contre, la taille du fichier est plus petite
que celle du fichier contenant des images en format BMP. La
qualité des images est meilleure avec [Haute qualité]
qu'avec [Standard] car le taux de compression est moindre.
L'incorporation directe d'un fichier JPEG dans un scénario
rend caducs les paramètres de qualité d'image ci-dessus. Le
taux de compression utilisé est celui du fichier d'origine.
Note
Pour modifier un paramètre quelconque, sélectionnez [Fichier] puis [Propriété].
76
- Création d'un scénario (EMP SlideMaker)
Page 79

Sélectionnez un fichier à utiliser dans le scénario.
4
Dans la fenêtre des dossiers, cliquez sur le dossier souhaité. La liste des fichiers contenus
dans le dossier sélectionné apparaît.
Dans la fenêtre des fichiers, double-cliquez sur l'icône du fichier souhaité. Le fichier
sélectionné apparaît dans la fenêtre du scénario.
Dans le cas d'un fichier PowerPoint, cliquez sur l'icône du fichier. Toutes les pages du
fichier PowerPoint apparaissent dans la fenêtre des vues miniatures. Double-cliquez sur
la vue miniature de la page souhaitée. La page sélectionnée apparaît dans la fenêtre du
scénario. Pour incorporer toutes les pages d'un fichier PowerPoint dans un scénario,
double-cliquez, dans la fenêtre des fichiers, sur l'icône du fichier PowerPoint souhaité.
Fenêtre des dossiers Fenêtre du scénario
Cellule
Fenêtre des fichiers Fenêtre des vues miniatures
Français
Remarque
Si PowerPoint n'est pas installé sur l'ordinateur utilisé, il est impossible d'afficher les
vues miniatures.
Création d'un scénario (EMP SlideMaker) -
77
Page 80

Terminez le scénario en ajoutant ou en supprimant un fichier ou des pages et en
5
redéfinissant l'ordre de leur projection.
Au moment de la projection avec EasyMP, les images sont affichées les unes après les
autres en partant du haut dans l'ordre dans lequel elles figurent dans la fenêtre du
scénario.
Pour ajouter un fichier ou une page, cliquez sur la cellule juste au-dessous de celle qu'il
faut ajouter. Quand la couleur de cette cellule passe au jaune, double-cliquez sur le
fichier ou la page à ajouter.
Pour supprimer un fichier ou une page, cliquez à droite sur la cellule à supprimer.
Sélectionnez [Couper] dans le menu (contextuel) qui apparaît.
Pour modifier l'ordre, faites glisser la cellule à déplacer et déposez-la à l’endroit souhaité
dans la fenêtre du scénario. Ou, faites apparaître le menu contextuel, sélectionnez
[Couper] puis [Coller].
Pour ajouter, faire glisser le fichier ou la page
souhaitée et le déposer dans la fenêtre du scénario.
Remarque
Il est impossible de coller simultanément plusieurs fichiers ou vues miniatures dans
un scénario.
78
- Création d'un scénario (EMP SlideMaker)
Page 81

Pour passer à une autre source d'image, comme un ordinateur ou un magnétoscope,
6
tout en projetant le scénario, cliquez à droite sur la cellule qui doit passer à la nouvelle
source d'entrée et sélectionnez [Contrôle de la source d'insertion].
La cellule de contrôle de la nouvelle source apparaît. Cellule de commande (défault:
images d'ordinateur) apparaît à l'insertion mais l'affichage peut être modifié avec l'option
[Propriétés de la cellule] dans le menu contextuel.
Pour modifier la durée de projection d'une page de scénario ou pour ajouter des effets,
7
cliquez à droite sur la cellule souhaitée et sélectionnez [Propriétés de la cellule].
Pour appliquer le même paramétrage à plusieurs cellules, sélectionnez chaque cellule
tout en maintenant enfoncée la touche [Maj] ou [Ctrl] du clavier puis cliquez à droite et
sélectionnez [Propriétés de la cellule].
Français
La boîte de dialogue "Paramètres cellule" apparaît. Définissez les paramètres souhaités
8
en vous reportant au tableau ci-dessous puis cliquez sur le bouton [OK].
Ava ncé La durée de projection peut être définie entre 1 et 1800
secondes. En mode manuel, il est possible de passer d'une
page à l'autre en appuyant sur la touche [Enter] de la
télécommande en cours de projection.
Création d'un scénario (EMP SlideMaker) -
79
Page 82

Activer la cellule Quand cette case est cochée, la cellule correspondante est
Effet Les effets peuvent, à l’image des effets de transition entre
Quand le scénario est terminé, sélectionnez le menu [Fichier] puis [Enregistrer].
9
Le scénario est enregistré.
Pour enregistrer un scénario sous un autre nom, sélectionnez [Enregistrer sous] et
entrez le nom du scénario.
affichée. Quand elle est décochée, la cellule est masquée et
un symbole d'interdiction y est associé (vous pouvez
également modifier ce paramètre en sélectionnant [Activer
(Désactiver)] dans le menu qui apparaît en cliquant à
droite la cellule).
diapositives dans PowerPoint, s'appliquer au passage d'un
écran à un autre durant une projection. Voici quelques
exemples d'effets. Les effets d'affichage peuvent être
définis pour plusieurs cellules à la fois. Pour sélectionner
plusieurs cellules, cliquez sur chaque cellule tout en
maintenant enfoncée la touche [Maj] ou [Ctrl] du clavier.
Balayage gauche/droite : Passe d'un écran à l'autre depuis la
gauche ou la droite.
Découvrir vers l'extérieur/l'intérieur : Passe d'un écran à
l'autre en partant de l'extérieur ou de l'intérieur.
Remarque
Lorsque vous enregistrez un scénario, le fichier "nom de scénario.sic" et les données
JPG et PNG de chaque image d'écran sont enregistrés dans le dossier de scénario.
Note
Voir l'aide pour avoir plus de détails sur chaque fonction du menu EMP SlideMaker.
80
- Création d'un scénario (EMP SlideMaker)
Page 83

♦
Conseils utiles
Création d'un scénario simplifié
Pour créer un scénario simplifié à partir d'un fichier PowerPoint, il suffit de faire glisser l'icône du
fichier PowerPoint et de la déposer sur l'icône du programme EMP SlideMaker, sur le bureau.
Remarque
Si vous tentez de sélectionner plusieurs fichiers PowerPoint pour les faire glisser et les
•
déposer sur l'icône de programme EMP SlideMaker, seul le premier fichier sélectionné par le
pointeur sera utilisé pour créer le scénario. Aucun autre fichier ne sera incorporé dans le
scénario créé.
• Le scénario simplifié est créé à partir de toutes les pages du fichier PowerPoint sélectionné.
Masquer les pages qui ne sont pas à projeter en utilisant l'option [Propriétés de la cellule]
après avoir créé le scénario simplifié.
Français
Note
Le scénario créé recevra le nom "SCNxxxx" ( "xxxx" sont des nombres). La qualité des images
du scénario est [Standard]. Pour modifier la qualité de l'image, utilisez la boîte de dialogue
"Paramètres du scénario" en sélectionnant le menu [Fichier] puis [Propriété]. Pour plus de
détails sur la qualité de l'image, voir "Création d'un scénario" (voir page 75)
Création d'un scénario (EMP SlideMaker) -
.
81
Page 84

Définition des effets
Vous ne pouvez exécuter les effets (comme le pointage de l'image projetée avec un tampon ou une
barre) qu’en appuyant sur les touches [1] à [4] de la télécommande. Cependant, si les effets pour
l'image souhaitée sont définis au moment de la création du scénario, ils sont disponibles quand
vous projetez le scénario.
Cliquez à droite sur la cellule pour laquelle il faut définir des effets et sélectionnez
1
[Effet].
La boîte de dialogue "Effet" apparaît. Il est possible d’effectuer le même paramétrage
2
en sélectionnant [Effet] dans le menu du projecteur. Définissez les paramètres souhaités
en vous reportant au tableau ci-dessous puis cliquez sur le bouton [OK].
82
- Création d'un scénario (EMP SlideMaker)
Page 85

[Curseur Tampon] Indiquez la forme que doit prendre le curseur/tampon quand la
touche [1] de la télécommande est enfoncée tandis qu'un
scénario est projeté.
Forme 1 : Forme 2 : Forme 3 : Forme 4 :
Forme 5 : Forme 6 : Forme 7 : Forme 8 :
[Rectangle] Indiquez le profil des bords et la couleur que doit prendre le
rectangle quand la touche [2] de la télécommande est
enfoncée tandis qu'un scénario est projeté.
[Spot] Indiquez la taille que doit prendre le spot quand la touche [3]
de la télécommande est enfoncée tandis qu'un scénario est
projeté. Avec l'utilisation du spot, seule une partie de l'image
est éclaircie tandis que le reste est assombri.
[Barre] Indiquez la forme et autres propriétés que doit prendre la barre
(ligne) quand la touche [4] de la télécommande est enfoncée
tandis qu'un scénario est projeté.
Note
• Pour une explication plus détaillée de l'utilisation de la fonction "Effet" en cours de
projection, veuillez vous reporter au manuel d'utilisation du projecteur.
• Si vous enfoncez la touche [5] de la télécommande, tous les effets affichés (ex.
curseur/tampon, rectangle, spot et barre) disparaissent.
Si vous enfoncez la touche [Esc] de la télécommande, vous annulez la fonction
"Effet".
Utilisation de fichiers de scénario créés dans des versions antérieures
Français
Si vous tentez d’ouvrir un fichier de scénario créé avec une version antérieure d'EMP SlideMaker,
le message "Convertir le scénario ?" apparaît.
Cliquez sur [Oui] pour convertir le fichier de scénario et l'ouvrir au format de la version 1.10.
Une fois qu'un fichier de scénario d'une version antérieure a été converti en format de version 1.10,
la qualité des images devient [Standard] et ne peut plus être modifiée.
Veuillez noter qu'après avoir converti un fichier de scénario au format de version 1.10, ce fichier ne
peut plus être ouvert à l'aide des versions antérieures d'EMP SlideMaker.
Création d'un scénario (EMP SlideMaker) -
83
Page 86

♦
Envoi d'un scénario
Pour projeter un scénario avec un projecteur, il faut l'envoyer à une carte mémoire en utilisant la
fonction "Envoyer le scénario" d'EMP SlideMaker.
Indiquez comme destination la carte mémoire insérée dans le lecteur de cartes de l'ordinateur.
Lorsque vous envoyez un scénario, vous pouvez définir la projection automatique de ce scénario
dès le démarrage d'EasyMP ou choisir une projection répétée. La fonction de projection
automatique des scénarios s'appelle "ExécutionAuto".
Remarque
Il est impossible d'envoyer un scénario créé qui n'a pas été enregistré avec la fonction
•
"Enregistrer" ou "Enregistrer sous".
• Une fois un scénario envoyé à une carte mémoire, il est enregistré sous le nom de scénario
"nom de scénario.sit". Un dossier du même nom que le fichier de scénario est créé dans
lequel seront enregistrées les images d'écran converties en fichiers d'image en fonction du
paramètre de qualité d'image choisi. L'édition de ces fichiers .sit est impossible avec EMP
SlideMaker.
Insérer une carte mémoire dans l'ordinateur.
1
Si un adaptateur pour cartes est nécessaire, placez la carte mémoire dans l'adaptateur et
insérez ce dernier dans l'ordinateur.
Sélectionnez [Option scénario] puis [Envoyer le scénario].
2
La boîte de dialogue qui apparaît permet de sélectionner le lecteur destinataire du
3
scénario. Sélectionnez le lecteur dans lequel la carte mémoire est insérée et cliquez sur le
bouton [OK].
84
- Création d'un scénario (EMP SlideMaker)
Page 87

Un message de confirmation apparaît. Cliquez sur le bouton [OK].
4
Quand la transmission est terminée, un message demande si oui ou non l'exécution
5
automatique doit être sélectionnée et éditée. Pour sélectionner l'exécution automatique
ou la répétition, cliquez sur le bouton [Oui] et passez à l'étape suivante. Pour ne pas
sélectionner l'exécution automatique ou la répétition, cliquez sur le bouton [Non] pour
terminer.
Modifiez les paramètres et cliquez sur le bouton [OK].
6
Tous les fichiers de scénario stockés sur la carte mémoire figureront dans la liste des
scénarios à gauche.
Pour projeter automatiquement un scénario au démarrage d'EasyMP, définissez son
exécution automatique (Autorun) en sélectionnant le scénario en question dans la liste
des scénarios puis cliquez sur le bouton [>>]. Le scénario choisi figurera dans la liste des
scénarios Autorun à droite.
Pour projeter un scénario à plusieurs reprises à partir du début, définissez la projection
répétée en sélectionnant le scénario en question dans la liste des scénarios puis placez
une coche à côté de la case [Rappeler].
Français
Création d'un scénario (EMP SlideMaker) -
85
Page 88

Note
Pour choisir l'exécution automatique, il est également possible de sélectionner
[Option scénario ] puis [Modifier ExécutionAuto] avant d'envoyer le scénario.
Remarque
L'exécution automatique ne peut être définie en utilisant le projecteur.
•
• S'il y deux ou plusieurs scénarios à exécution automatique, leur projection se fera
dans l'ordre dans lequel ils ont été enregistrés dans la liste des scénarios Autorun.
Insérez la carte mémoire qui a reçu les scénarios et utiliser les fonctions "EasyMP"
7
pour projeter les scénarios (voir page 88)
86
- Création d'un scénario (EMP SlideMaker)
Page 89

Réalisation d'une présentation
Cette section explique comment projeter des fichiers et des scénarios transmis à la
carte mémoire du projecteur.
Projection de scénarios et de fichiers (EasyMP) ...................................88
Français
Page 90

Projection de scénarios et de fichiers (EasyMP)
Vous pouvez projeter des scénarios et des fichiers envoyés à la carte mémoire du projecteur à
l’aide des fonctions EasyMP.
EasyMP comporte deux fonctions principales : la fonction "Scénario", pour la projection de
scénarios, et la fonction "Aperçu", pour la projection de fichiers.
♦
Projection d'un scénario
Chaque scénario à projeter doit être enregistré à l'avance dans une carte mémoire. Pour plus de
détails, veuillez vous reporter à la rubrique "Envoi d'un scénario" (voir page 84)
Note
Les scénarios peuvent aussi être paramétrés en exécution automatique ou projection répétée.
(voir page 84)
Démarrez EasyMP en appuyant sur la touche [EasyMP] de la télécommande.
1
La liste des fichiers EasyMP apparaît, dans laquelle figure le contenu de la carte
mémoire insérée dans le projecteur.
En inclinant la touche [Enter] de la télécommande, amenez le curseur sur le scénario à
2
projeter et appuyez sur la touche [Enter].
Le scénario sélectionné est projeté. Une fois que toutes les images du scénario ont été
projetées, l'affichage revient automatiquement à la liste des fichiers. Si la projection
répétée a été choisie, la projection reprend au début du scénario.
Vous pouvez, en cours de projection d'un scénario, passer à l'écran suivant, revenir à
l'écran précédent ou arrêter la projection. (voir page 89)
.
88
- Projection de scénarios et de fichiers (EasyMP)
Fichier de scénario
Page 91

Remarque
Si vous devez procéder à un [Contrôle de la source d'insertion] pour le
•
fichier de scénario et que la source est modifiée, appuyez sur la touche [EasyMP]
pour arrêter la projection de la source d'image insérée et pour projeter le reste du
fichier de scénario.
• L'option [Mod. scénario] permet d'indiquer quel est l'ordre des pages d'un
scénario et s'il faut afficher ou masquer les pages. (voir page 90)
♦
Opérations possibles pendant la présentation
Il est possible d'effectuer les opérations suivantes lors de la projection d'un scénario ou d'un fichier.
Transition entre
diapositives
Arrêt de la projection Quand la touche [EasyMP] est enfoncée, le message "Ok pour quitter
Vous pouvez également utiliser de la même manière les fonctions suivantes du projecteur lors de la
projection d'un scénario ou d'un fichier avec EasyMP.
Pause (Freeze) Quand vous enfoncez la touche [Freeze] de la télécommande, la
A/V Mute Quand vous enfoncez la touche [A/V Mute] de la télécommande, la
Zoom Enfoncez le plus grand côté de la touche [E-Zoom] de la
Appuyez sur la touche [Enter] pour passer à l'écran suivant.
Appuyez sur la touche [Esc] pour revenir à l'écran précédent.
?" apparaît. Appuyez sur la touche [Enter] pour arrêter. Appuyez sur la
touche [Esc] pour poursuivre la projection.
projection est arrêtée/relancée.
projection et le son sont arrêtés/relancés.
Si un logo utilisateur a été défini par l'intermédiaire du menu
[Réglage] du projecteur, ce logo s’affiche lorsque l'image et le son
sont interrompus.
télécommande pour agrandir l'image en conservant la taille d'écran. Le
rapport de zoom est affiché en bas à droite de l'écran. Quand la taille de
zoom souhaitée est obtenue, relâchez la touche. Si la partie que vous
désirez voir n'est pas affichée, inclinez la touche [Enter] de la
télécommande pour faire défiler l'image.
Inversement, enfoncez le plus petit côté de la touche [E-Zoom] de la
télécommande pour réduire la taille de l'image.
Remarque
Si vous devez procéder à un [Contrôle de la source d'insertion] pour le fichier de scénario,
les touches [Enter] et [Esc] ne permettent plus de passer à l'écran suivant ou de revenir à l'écran
précédent pendant que la source est modifiée.
Français
Projection de scénarios et de fichiers (EasyMP) -
89
Page 92

♦
Modification d'un scénario
Il est possible de modifier l'ordre des pages d'un scénario stocké sur la carte mémoire du projecteur
et de choisir d'affiche ou de masquer chaque page du scénario.
Placez le curseur sur le scénario à modifier et appuyez sur la touche [Esc] de la
1
télécommande.
Quand vous sélectionnez le fichier, le menu à gauche est activé.
Placez le curseur sur l'icône [Mod. scénario] et appuyez sur la touche [Enter] de la
2
télécommande.
Icône [
Mod. scénario
L'écran d'édition ci-après apparaît. Indiquez l'ordre des pages du fichier de scénario et
3
précisez pour chaque page si elle doit être affichée ou cachée.
Pour modifier l'ordre des images, placez le curseur sur l'image souhaitée et appuyez sur
la touche [Enter] de la télécommande. Amenez ensuite le curseur à l'emplacement où
doit se trouver l'image et appuyez sur la touche [Enter] de la télécommande.
]
Sélection d'une image Sélection de la destination
90
- Projection de scénarios et de fichiers (EasyMP)
Page 93

Pour cacher une page, placez le curseur sur l'image souhaitée et appuyez sur la touche
[Esc] de la télécommande. Placez ensuite le curseur sur l'icône [Affich/Cach.] et
appuyez sur la touche [Enter] de la télécommande.
Icône [
Affich/Cach.
Symbole "Cacher"
Quand l'édition est terminée, placez le curseur sur l'icône [Retour] et appuyez sur la
4
touche [Enter] de la télécommande.
Les modifications apportées au scénario sont enregistrées et la liste des fichiers apparaît.
Pour annuler les modifications apportées au scénario, placez le curseur sur l'icône
[Annuler] et appuyez sur la touche [Enter] de la télécommande.
Note
Si le curseur est placé sur l'icône [Exécuter] et que la touche [Enter] de la
télécommande est enfoncée, le scénario est enregistré avec les modifications
effectuées et la projection commence.
]
Français
Projection de scénarios et de fichiers (EasyMP) -
91
Page 94

♦
Affichage des fichiers
Les fichiers d'image enregistrés sur la carte mémoire peuvent être affichés avec la fonction
"Aperçu" d'EasyMP.
Voici les deux modes d'aperçu disponibles :
• Aperçu d'un seul fichier d'image
Ce mode d'aperçu projette le contenu d'un seul fichier d'image.
• Aperçu de la liste des fichiers d'image du dossier
Ce mode d'aperçu projette une liste de tous les fichiers d'image du dossier ou seul un fichier
d'image à la fois.
Fichiers pouvant être projetés avec la fonction "Aperçu"
Voici les fichiers d'image qui peuvent être projetés avec la fonction "Aperçu" :
• Fichiers JPG enregistrés avec la fonction "Capture"*
• Fichiers JPG et BMP enregistrés pendant la création d'un scénario
• Fichiers Bitmap (BMP) de résolution SXGA (1280 x 1024) ou moins
• Fichiers JPG de résolution SXGA (1280 x 1024) ou moins (sauf certains formats JPG spéciaux)
* Pour exécuter la fonction "Capture", sélectionnez [Capture] puis [Capture d'image] dans le
menu du projecteur.
Remarque
Seuls les fichiers BMP couleur 24 bits peuvent être visualisés en mode aperçu. Les fichiers
•
de 256 couleurs ne peuvent pas être projetés correctement.
• Les fichiers JPG enregistrés à l'aide d'une caméra numérique ou autre logiciel ne peuvent pas
être projetés.
• Les fichiers d'extension "JPEG" ne peuvent pas être projetés.
• Si le taux de compression est élevé, les images risquent de ne pas être projetées clairement du
fait des caractéristiques des fichiers JPG.
92
- Projection de scénarios et de fichiers (EasyMP)
Page 95

Aperçu des fichiers d'image
Démarrer EasyMP en appuyant sur la touche [EasyMP] de la télécommande.
1
La liste des fichiers EasyMP apparaît, dans laquelle figure le contenu de la carte
mémoire insérée dans le projecteur.
Note
Lorsque vous manipulez des fichiers de la carte mémoire depuis un ordinateur via une
connexion USB, l'actualisation de l'affichage se fait en appuyant sur la touche
[EasyMP].
Placez le curseur sur le fichier d'image à visualiser et appuyez sur la touche [Enter] de
2
la télécommande.
Le contenu du fichier d'image sélectionné est projeté.
Français
Fichier image à visualiser
en mode aperçu
Projection de scénarios et de fichiers (EasyMP) -
93
Page 96

Note
Pour visualiser le fichier d'image, vous pouvez placer le curseur sur le fichier souhaité
et appuyer sur la touche [Esc] de la télécommande. Vous pouvez aussi placer le
curseur sur l'icône [Exécuter] et appuyer sur la touche [Enter] de la télécommande.
Pour revenir à la liste des fichiers, appuyez sur la touche [Esc] or [Enter] de la
3
télécommande.
Aperçu de la liste des fichiers d'image du dossier
Vous pouvez visualiser les fichiers d'image d'un dossier peuvent être visualisés sous la forme d'une
liste ou les agrandir et les projeter un par un.
Note
Il est possible de spécifier des conditions d'affichage comme la projection répétée et la
fréquence de défilement des écrans. (voir page 96)
Démarrez EasyMP en appuyant sur la touche [EasyMP] de la télécommande.
1
La liste des fichiers EasyMP apparaît, dans laquelle figure le contenu de la carte
mémoire insérée dans le projecteur.
Placez le curseur sur le dossier contenant le fichier d'image à visualiser et appuyez sur
2
la touche [Esc] de la télécommande.
Lorsque vous sélectionnez le dossier, le curseur se déplace sur le menu à gauche.
Remarque
Si vous sélectionnez un dossier de scénario, vous pouvez visualiser la liste des fichiers
d'image du scénario contenu dans le dossier sélectionné.
94
- Projection de scénarios et de fichiers (EasyMP)
Page 97

Placez le curseur sur l'icône [Aperçu] et appuyez sur la touche [Enter] de la
3
télécommande.
La liste des images du dossier apparaît.
Remarque
Si certains fichiers ne peuvent pas être projetés, leur affichage se fait avec l'icône
[Fichier].
Pour visualiser les images les unes après les autres en les agrandissant une à une,
4
appuyez sur la touche [Esc] de la télécommande, placez le curseur sur l'icône
[Exécuter] et appuyez sur la touche [Enter] de la télécommande.
Une vue agrandie de la première image apparaît. En mode aperçu agrandi, il est possible
de passer à l'affichage du fichier d'image suivant, revenir au fichier d'image précédent ou
annuler l'aperçu agrandi. (voir page 89)
Français
Icône [
Exécuter
Projection de scénarios et de fichiers (EasyMP) -
]
95
Page 98

♦
Définition des conditions d'affichage
Il est possible de définir certaines conditions d'affichage pour la projection de scénario et l'aperçu
de la liste des fichiers d'image. Ces conditions d'affichage sont la projection répétée, la fréquence
de défilement des écrans, l'ordre de l'affichage et la couleur de fond.
Placez le curseur sur le fichier ou le dossier de scénario pour lequel vous souhaitez
1
définir des conditions d'affichage et appuyez sur la touche [Esc] de la
télécommande.
Quand vous sélectionnez le fichier ou dossier de scénario, le curseur se déplace sur le
menu à gauche.
Placez le curseur sur l'icône [Option] et appuyez sur la touche [Enter] de la
2
télécommande.
L'écran "Paramètres d'affichage" apparaît.
96
- Projection de scénarios et de fichiers (EasyMP)
Icône [
Option
]
Page 99

Défnir les paramètres souhaités.
3
Placez le curseur sur la condition d'affichage à modifier et appuyez sur la touche [Enter]
de la télécommande pour sélectionner le paramètre.
Pour visualiser le fichier de scénario ou le fichier d'image du dossier, placez le curseur
sur l'icône [Exécuter] et appuyez sur la touche [Enter].
Icône [
Exécuter
Les conditions d'affichage sont expliquées dans le tableau ci-dessous :
Re-exécuter Précise si oui ou non la projection du scénario ou l'aperçu
Fréquence de défilement Définit le temps écoulé avant de passer à l'écran suivant. Si
Ordre d'affichage Définit la manière dont est ordonné l'affichage.
Couleur de fond Définit la couleur de fond de l'affichage.
agrandi des fichiers d'images d'un dossier est exécuté de
manière répétitive. Si vous avez sélectionné un fichier de
scénario, seule cette option s’affiche.
la fréquence est "Non spécifié", appuyez sur la touche
[Enter] de la télécommande pour passer à l'écran suivant.
]
Français
Projection de scénarios et de fichiers (EasyMP) -
97
Page 100

 Loading...