


无线 LAN 快速
连接指南
简体中文
产品随附的无线 LAN 组件
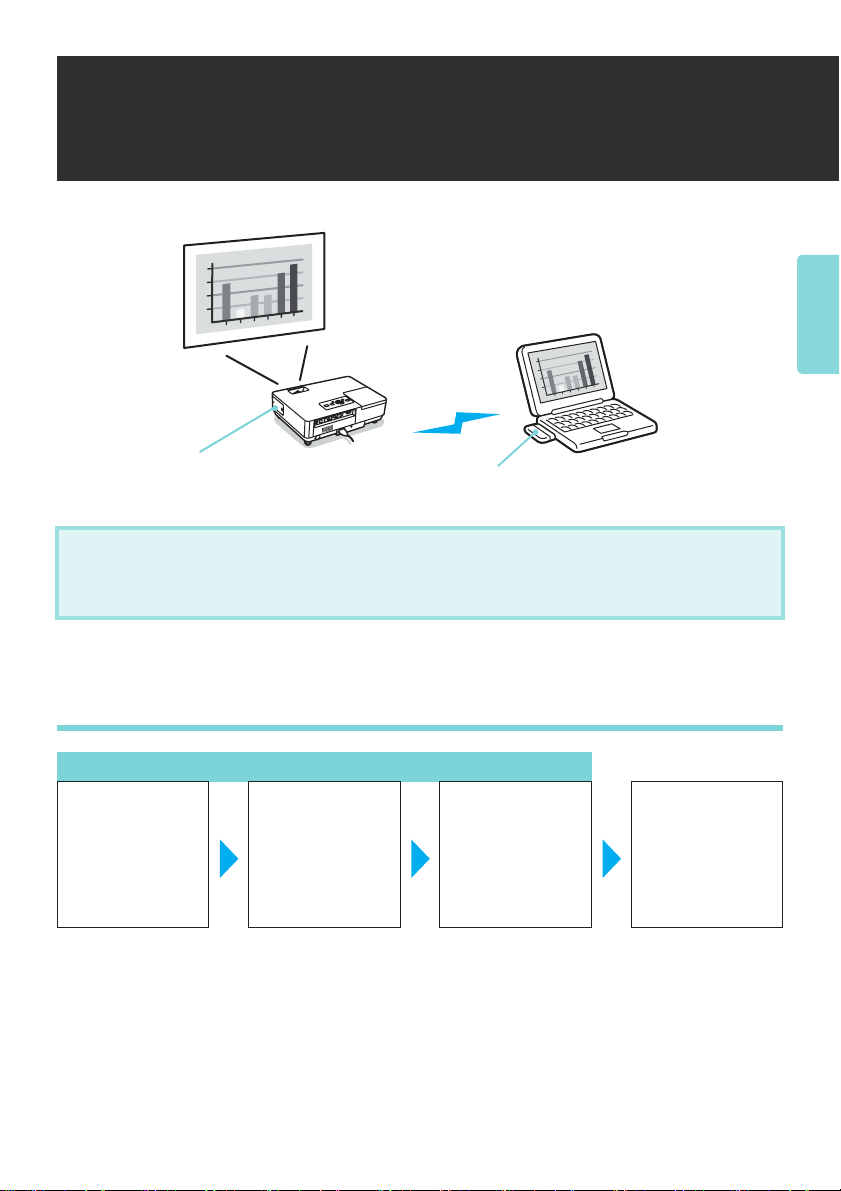
本手册说明如何使用 EMP NS Connection 的 “快速连接”。
使用 “快速连接”,您可以通过无线 LAN 将计算机轻松连接到投影仪,并从计算机投影
图像。
Wi-Fi 兼容的无线 LAN 卡 /
启用无线 LAN 的计算机
连接前的准备工作
仅用于第一次连接
在要连接的计算
机上安装 EMP NS
Connection
s “安装 EMP
NS Connection”
第 2 页
将计算机置于无
线 LAN 连接状态
s “将计算机置
于无线 LAN 连接
状态”第 4 页
在投影仪中安装
无线 LAN 组件
s “安装无线
LAN 组件”第 5
页
从计算机启动
EMP NS
Connection 并连接
到投影仪
s “连接”第 5
页
1

准备计算机
要通过 EMP NS Connection 将投影仪与计算机相连接,需要在计算机上进行下列设置。
v 安装 EMP NS Connection
v 将计算机置于无线 LAN 连接状态
安装 EMP NS Connection
在计算机上安装 EMP NS Connection。 EMP NS Connection 随“EPSON Projector Software for
Meeting & Presentation”光盘一起提供。 EMP NS Connection 包括通过网络连接将计算机与投
影仪相连接的功能,还包括使用多屏幕显示 * 时所必需的 “EPSON 虚拟显示器”驱动程
序。
除 EMP NS Connection 外,“EPSON Projector Software for Meeting & Presentation”光盘中还
提供下列软件。
v EMP SlideMaker2
此软件用于创建演示脚本。 可以使用 PC Free 通过投影仪投影所创建的脚本。 此软件不能
在 Macintosh 中使用。
v EMP Monitor
此软件用于通过计算机远程监视和控制投影仪状态。 此软件不能在 Macintosh 中使用。
* 使用多屏幕显示,可以使用一台计算机通过多台投影仪投影多个图像。 对于 Macintosh,不
需要 “EPSON 虚拟显示器”驱动程序。
■ 安装说明
注意
v 对于 Windows 2000、 XP 或 Vista,只能由以管理员身份登录的用户执行安装。
v 在开始安装前先关闭所有运行的应用程序。
v 不能使用早于版本 2.2 的 EMP NS Connection 连接到投影仪。请安装 “EPSON Projector
Software for Meeting & Presentation”光盘中提供的 EMP NS Connection 版本 2.3。
步骤
对于 Windows
A 打开计算机。
2
B 将“EPSON Projector Software for Meeting & Presentation”光盘插入计算机。
安装程序会自动启动。
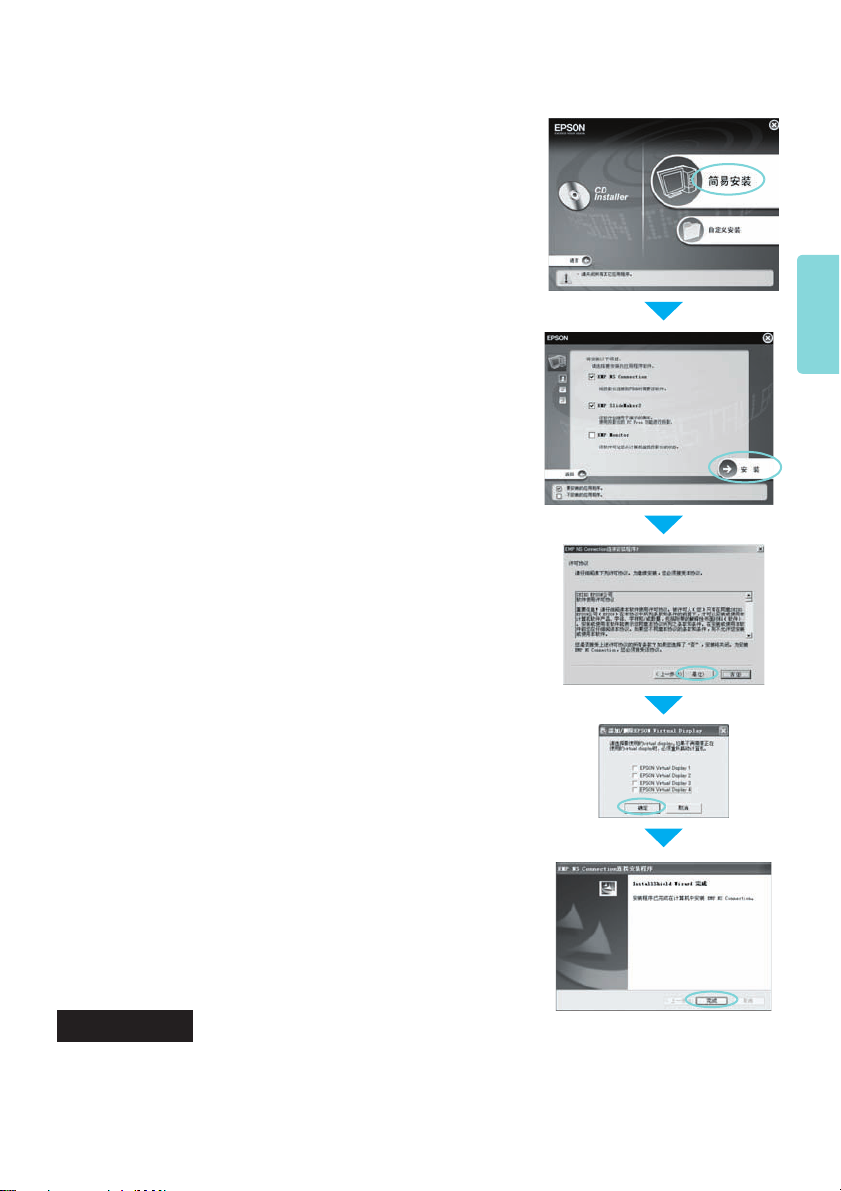
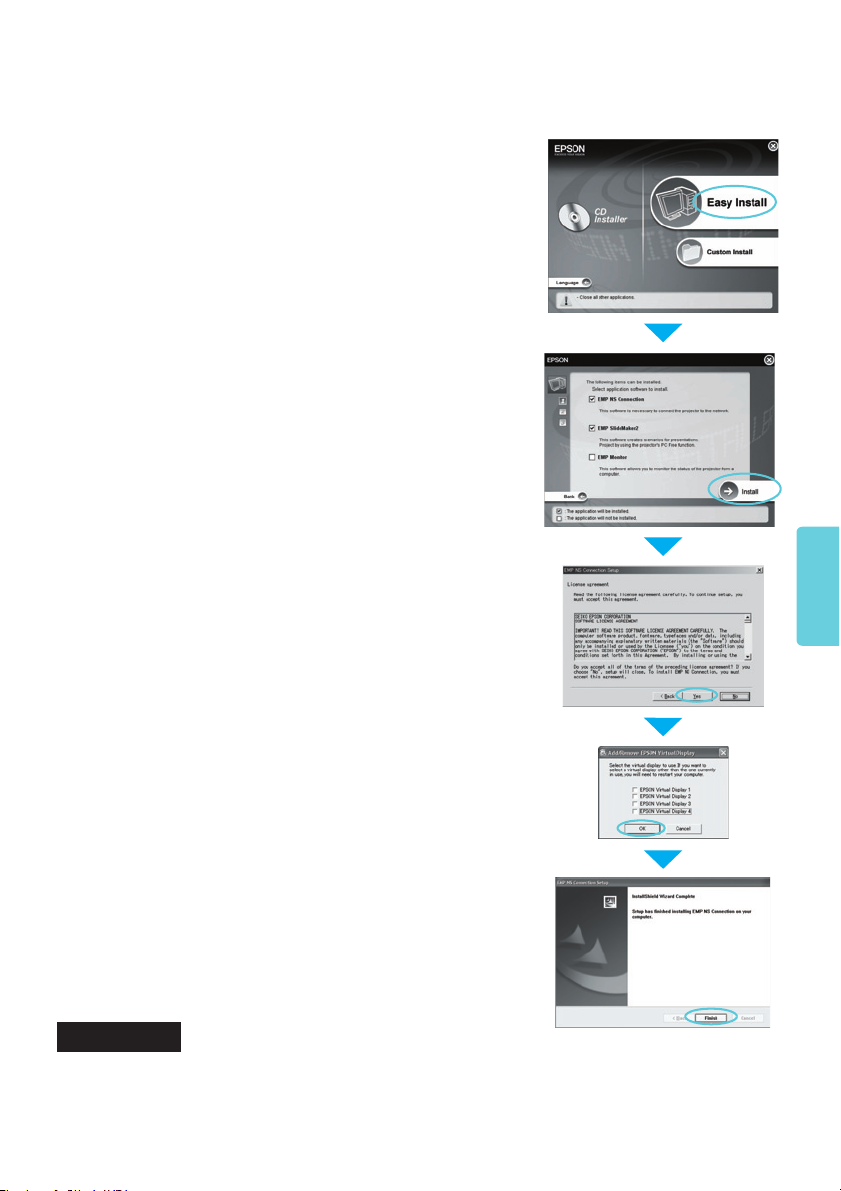
C 单击 “简易安装”。
要单独安装软件,请选择 “自定义安装”。 要更改软件
显示的语言,请单击 “语言”。
D 检查要安装的应用程序,然后单击 “安装”。
E 显示许可协议屏幕时,单击 “是”。
简体中文
F 显示“添加 / 删除 EPSON Virtual Display”屏幕时,单
击 “确定”。
要使用多屏幕显示,需要安装 “EPSON Virtual
Display”。 如果不希望立即安装,可以稍后进行。
s EasyMP 操作说明书
G 单击 “完成”完成安装。
选定的软件,如 “EMP SlideMaker2”和 “EMP
Monitor”,会按顺序安装。
对于 Macintosh
要开始安装,双击 “EPSON”窗口中的 “Installer for Mac OS X”图标。 显示许可协
议屏幕时,选择 “继续”。 单击 “完成”完成安装。
3
■ 对于下列情况
v 不自动开始安装 (仅限 Windows)
选择 “开始” - “运行”,然后在 “运行”对话框中键入光盘驱动器的盘符,后面紧跟
“:\EPsetup.exe”,然后单击 “确定”。
v 卸载
对于 Windows
选择 “开始” - “设置” - “控制面板” - “添加 - 删除程序”或 “添加或删除程序”,
然后删除 “EMP NS Connection”。
对于 Macintosh
从 “应用程序”中删除 “EMP NS Connection”文件夹。
将计算机置于无线 LAN 连接状态
对于 Windows
使用 LAN 卡附带的实用程序软件对计算机进行设定。 有关实用程序软件的更多信息,
请参阅无线 LAN 卡附带的使用说明书。
对于 Macintosh
设定网络端口和通信状态。 有关设定通信状态的更多详情,请参阅计算机或 AirPort 卡的
使用说明书。
步骤
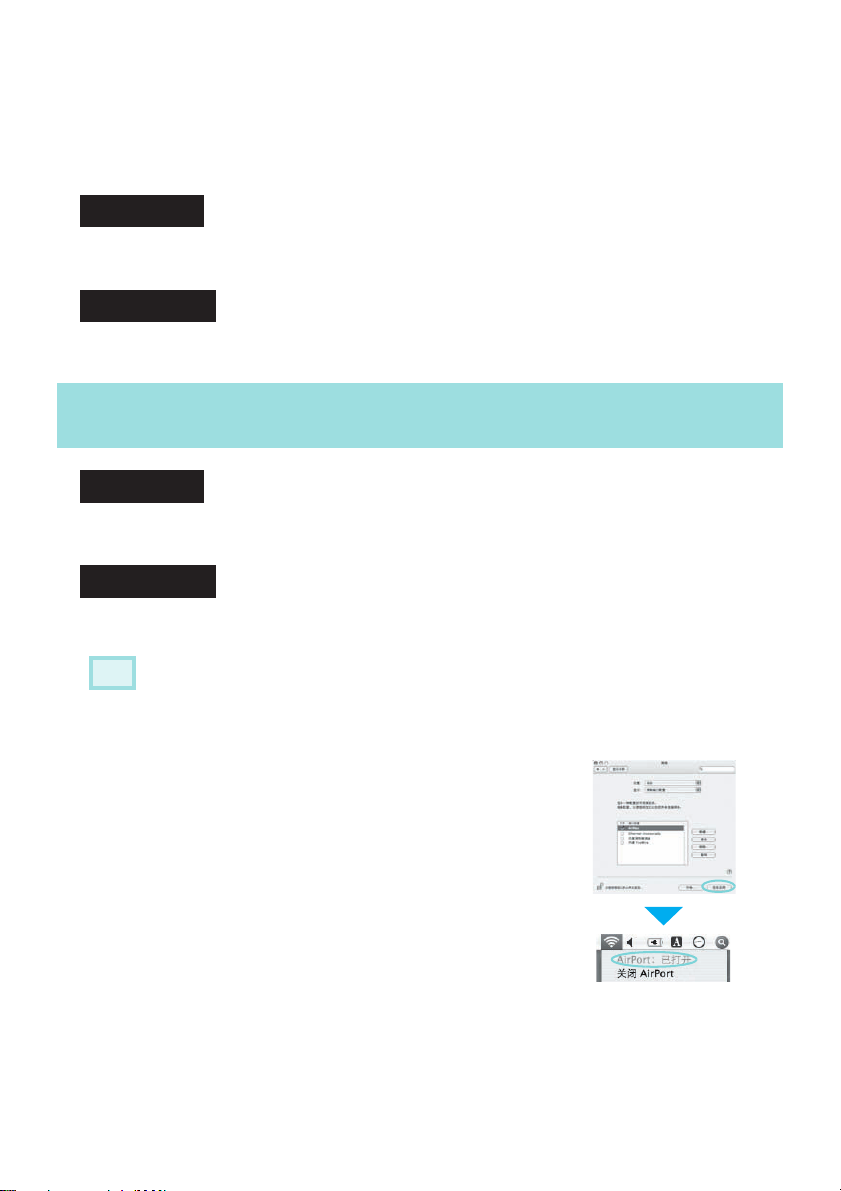
A 从 Apple 菜单中选择 “系统预置” - “网络”。
此时显示网络设置屏幕。
B 在 “端口配置”中选择使用的端口并单击 “现在应
用”。
C 关闭屏幕。
D 单击计算机屏幕右上角的通信图标,并检查是否如
下显示。
AirPort:已打开
可以与无线 LAN 相连。
4
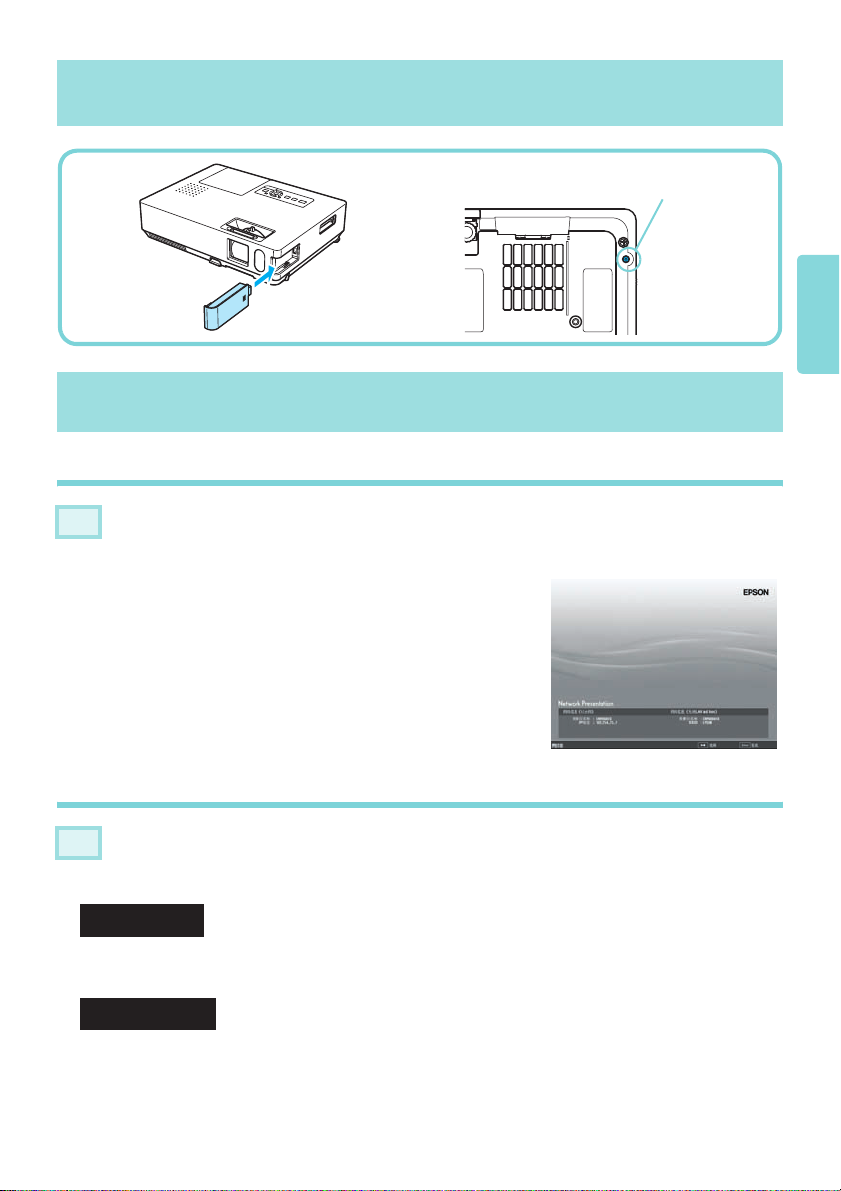
安装无线 LAN 组件
连接
操作投影仪
步骤
A
按下遥控器上的 [Power] 按钮打开电源。
B 按下遥控器上的 [EasyMP] 按钮。
此时会显示待机屏幕。
为了避免发生丢失等情况,请确保使用附带
的螺丝钉将无线 LAN 组件固定到适当位置。
简体中文
操作计算机
步骤
A
启动 EMP NS Connection。
对于 Windows
选择 “开始” - “程序”(或 “所有程序”) - “EPSON Projector” - “EMP NS
Connection”。
对于 Macintosh
双击安装 EMP NS Connection 的硬盘中的 “程序”文件夹,然后双击 EMP NS
Connection 图标。
5
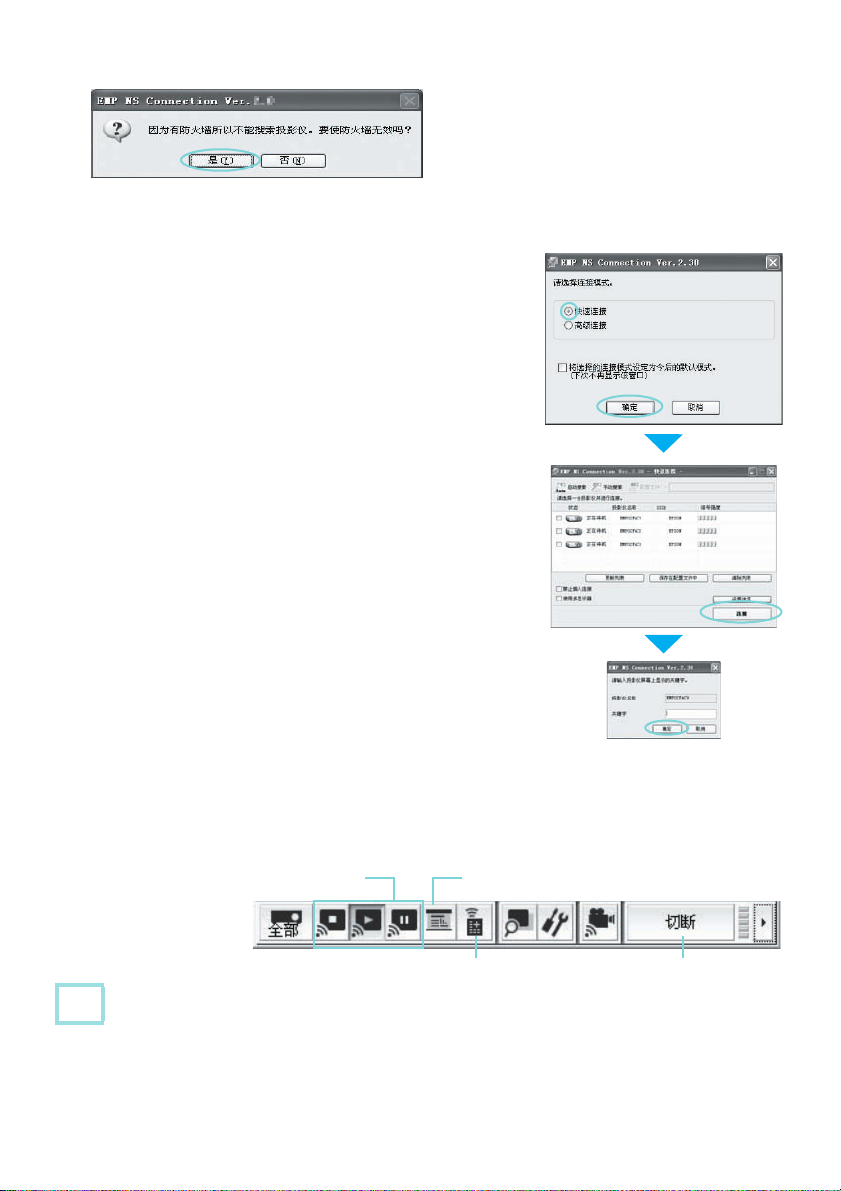
■ 如果显示下列屏幕 (Windows 和 Macintosh)
单击 “是”。 为 EMP NS Connection 创建一
个防火墙例外。
B 选择 “快速连接”并单击 “确定”。
显示投影仪的搜索结果。 要始终使用 “快速连接”连
接,选择 “将选择的连接模式设定为今后的默认模
式”。
C 选择要连接的投影仪,然后单击 “连接”。
如果 SSID 配置匹配,则最多可以同时连接四台投影
仪。 如果要连接的投影仪未显示在搜索结果中,请单击
“自动搜索”。 搜索需要 30 秒钟。
D 从投影仪将投影仪关键词设定为 “开”时,将显示关键
词输入屏幕。 输入 EasyMP 待机屏幕上显示的关键词,
然后单击 “确定”。
连接完成后,即投影计算机屏幕。 EMP NS Connection
工具条显示在计算机屏幕上。 可以使用此工具条操作投
影仪、进行设定和断开网络连接。 s EasyMP 操作说
明书
静止 / 显示 / 停止投影
(连接到投影仪时)
要点
若要更换演示人员或不间断地连接到另一台计算机,请启动您想连接的计算机中的 EMP NS
Connection。 当前连接的计算机被断开,并连接到正尝试连接的计算机上。
6
仅投影 PowerPoint 幻灯片 (演示模式)
投影仪控制
切断
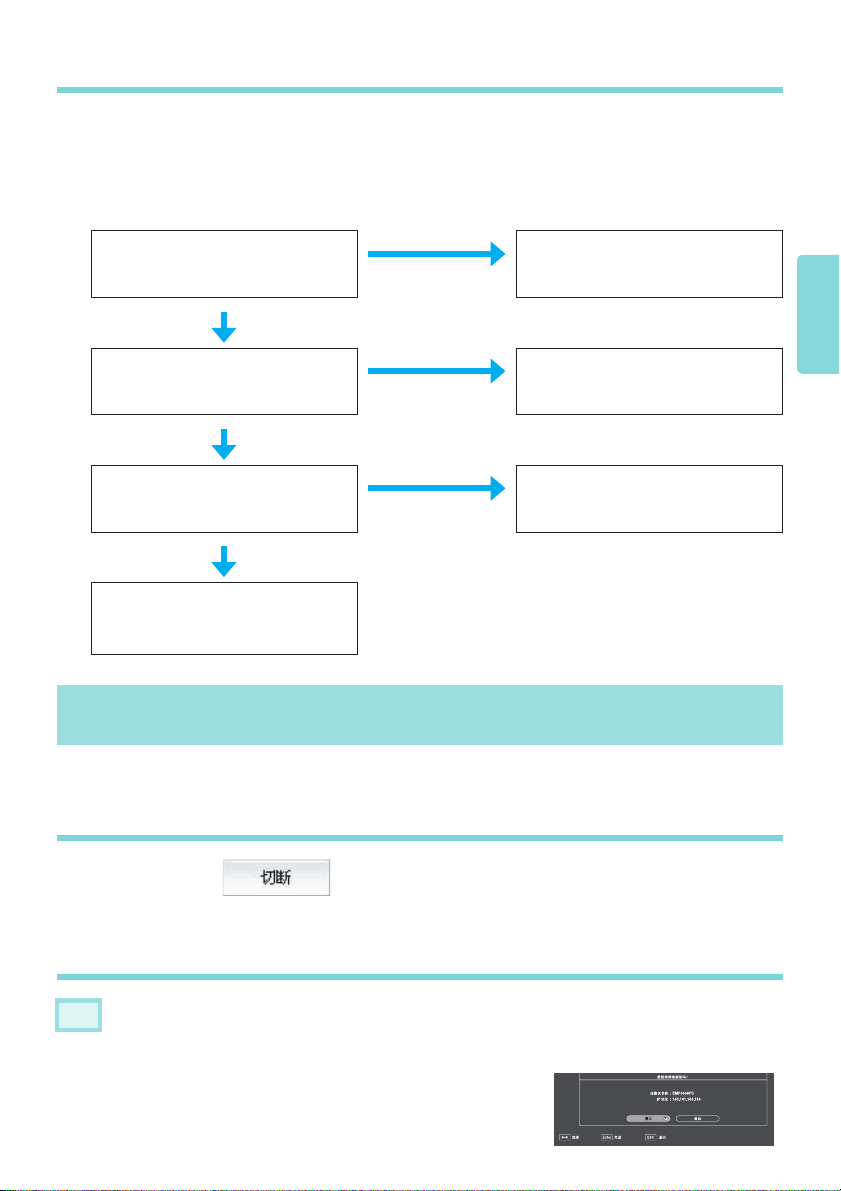
未找到目标投影仪时
操作 1 重新启动计算机。
操作 2 检查是否将投影仪网络设置设为 “快速连接模式”。 s 使用说明书 “网络设
置菜单”
操作 3 如果操作 1 和操作 2 无效,请检查以下情况。 (如果断开了连接,请检查以下
情况。)
无线 LAN 组件上的指示灯是否
闪烁?
闪烁
不闪烁
重新安装无线 LAN 组件。
使用的是否为商业防火墙软件? 在所使用的防火墙软件中为 EMP
NS Connection 创建防火墙例外。
关闭该实用程序,然后重新启动
EMP NS Connection。
否
是否正从计算机的无线 LAN 组
件操作任何附带的实用程序?
否
联系当地经销商或支持和服务手
册中提供的邻近地址。s Epson
投影仪联系人列表 (文档光盘)
是
是
断开连接
有两种方法可用来断开投影仪与计算机的连接。
从计算机断开
单击工具条上的 。
简体中文
从投影仪断开
步骤
A
按下遥控器上的 [Esc] 按钮。
B 选择 “退出”,并按下遥控器上的 [Enter] 按钮。
7
关于 EasyMP 功能
使用 EasyMP 可扩大投影仪的使用范围。
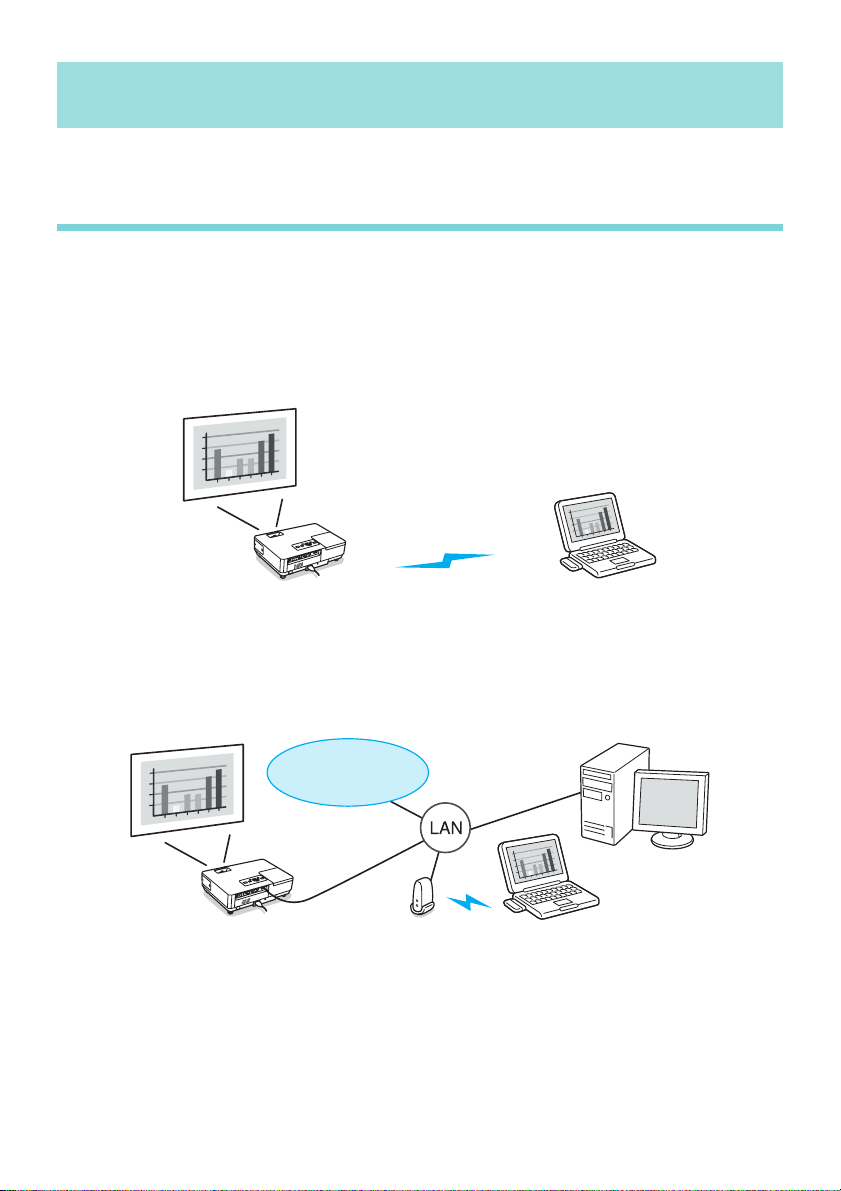
通过网络连接投影仪和计算机 (EMP NS Connection)
■ 快速连接模式和高级连接模式
有两种方法 (“快速连接”和 “高级连接”)可用于通过 EMP NS Connection 将投影仪与计
算机相连接。 根据需要选择最合适的连接方法。
v 快速连接模式
通过快速连接模式可将投影仪和计算机轻松连接到无线 LAN,无需进行任何复杂网络设
置。
• 这意味着您甚至可以在电缆无法达到的远程位置进行投影。
• 在完成简单操作之后进行投影。
v 高级连接模式
通过高级连接模式可连接到现有网络。
• 可以在会议室打开并投影位于另一个房间中的计算机上的文件。
• 可以使用互联网。
• 可以通过计算机监视和控制网络上的投影仪。
互联网
8
■ EMP NS Connection 的主要功能
有关每个功能的详细信息,请参阅 EasyMP 操作说明书。
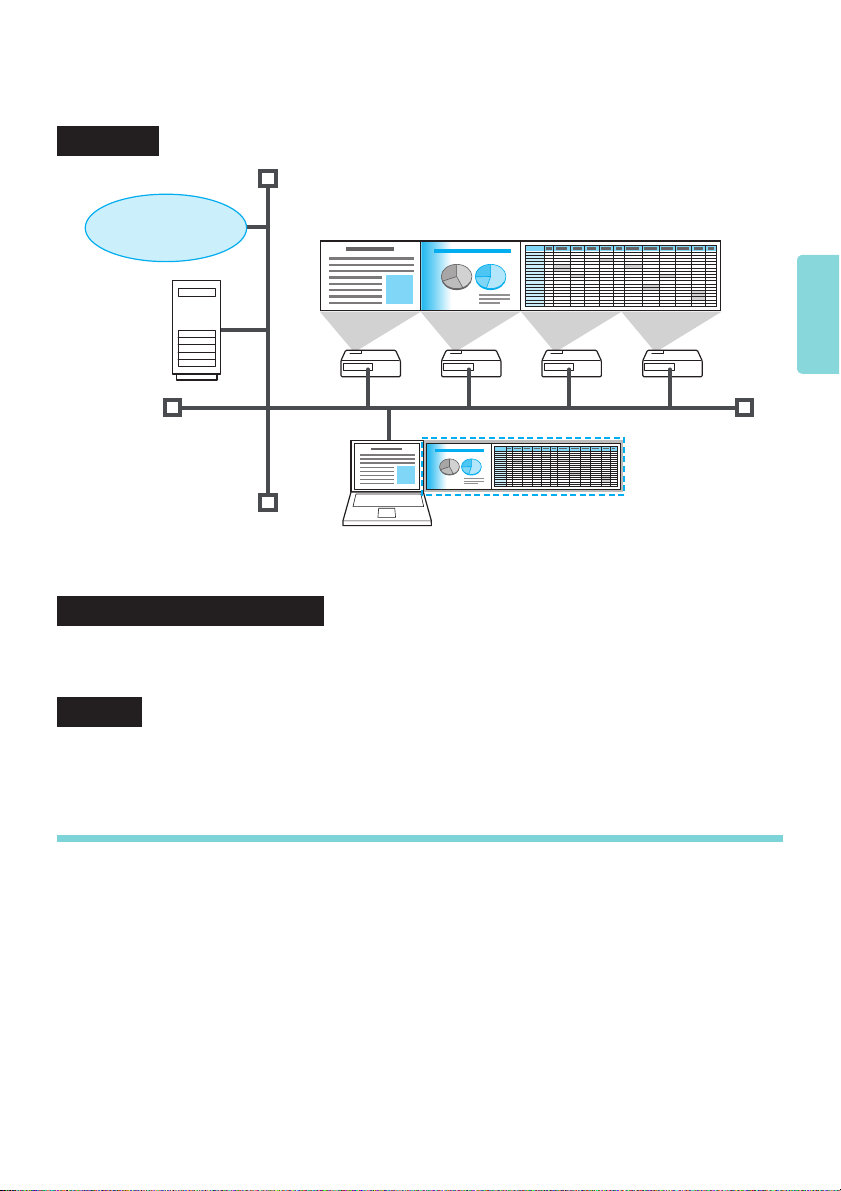
多屏幕显示
互联网
您可以使用一台计算机通过多达四台投影仪投影不同的图像。 这样便可以通过一台计算机将
报告等材料投影为全景画面。
视频文件传送 (视频播放模式)
使用视频播放模式时,可以流畅地投影并播放在计算机上由另一个应用程序播放的视频。 由
于在播放过程中音频也被同步传送,因此您不需要使用音频电缆连接计算机和投影仪。
简体中文
演示模式
在计算机上执行 PowerPoint 幻灯片放映并投影。 在演示前进行准备期间以及在不执行幻灯片
放映时,通过投影黑屏幕可实现美观的演示效果。
不使用计算机投影 (PC Free)
v 可以投影保存在 USB 闪存和 CompactFlash 卡上的图像和视频。
v 可以在不使用计算机的情况下投影 PowerPoint 幻灯片,方法是使用 EMP SlideMaker2 将
PowerPoint 文件转换为脚本格式,然后将其保存到 USB 闪存或 CompactFlash 卡。
9
使用无线 LAN 时的注意事项
连接到兼容的无线 LAN 卡和接入点的条件
随附的无线 LAN 组件可连接到符合 IEEE 802.11g 和 802.11b 的以下产品。
v 无线 LAN 卡
v 带有内置无线 LAN 功能的计算机
v 接入点
但是,您无法为使用 IEEE 802.11g 电脑的无线 LAN 设备进行 ad hoc 连接。有关无线 LAN 设
备的详情,请参阅规格。
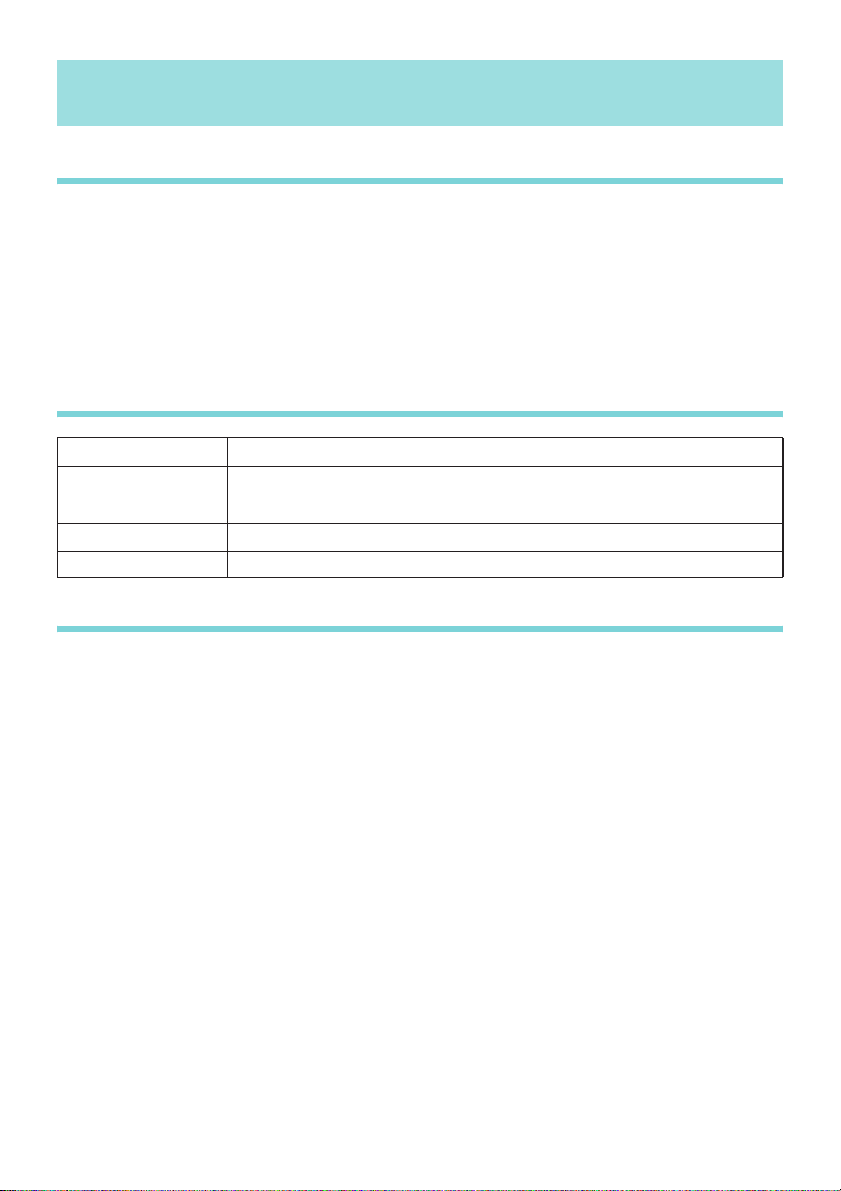
随附的无线 LAN 组件规格
频率范围
调制
潜在干扰范围
频率变化限度 可使用所有波段,并且可以避免 “经许可”和 “未经许可”的波段。
IEEE 802.11b/g: 2.4 GHz 波段 (1 到 11 Ch),
IEEE 802.11b :DS-SS
IEEE 802.11g :OFDM
小于 20 m
电磁安全注意事项
使用随附的无线 LAN 组件时,请注意以下几点。
v 可能会对心脏起搏器造成电磁干扰并引起故障。在使用之前,请确保不发生电磁干扰。
v 可能会对敏感医疗设备造成电磁干扰并引起故障。在使用之前,请确保不发生电磁干扰。
v 不要在微波炉附近使用。无线通信可能会被微波炉产生的电磁干扰中断。
v 有些国家可能会限制在飞机上使用本产品。应对当地法规进行了解后方可使用本产品。
10

频率使用注意事项
本投影仪提供的无线 LAN 卡的频率波段为 2.4 GHz/5 GHz。此波段还用于工业、科学和医疗
设备,如微波炉和用在工厂生产线的移动设备识别 (RF-ID) 系统 (经许可的建筑物无线电站
和未经许可的指定低功率无线电站)。
在使用无线 LAN 卡之前,请确保附近没有用于移动设备识别的无线电站或指定低功率无线
电站建筑物。如果该无线 LAN 卡会对用于移动设备识别的无线电站建筑物造成电磁干扰,
请立即停止使用并停止产生电磁场。
如果该无线 LAN 卡对用于移动设备识别的特殊低功率无线电站造成电磁干扰或引起类似问
题,请联系当地经销商或支持和服务手册中提供的邻近地址。 s Epson 投影仪联系人列表
(文档光盘)
国际旅行注意事项
无线 LAN 组件遵照购买国家的规格。
无线 LAN 组件的设计遵照购买国家的信道和频率限制。如果在购买国家之外使用此无线
LAN 组件,请联系当地经销商了解详细信息。
无线电讯法法规
无线电讯法禁止以下行为。
v 修改和拆卸 (包括天线)
v 揭除符合标准的标签
简体中文
11

使用无线 LAN 时的安全注意事项
(有关客户权利 (维护隐私)的重要信息)
使用无线 LAN 而不是 LAN 电缆的优点是:由于使用无线电信号交换信息,因此只要设备在
无线电信号的范围内,就可以方便地连接到网络上。
这种技术的缺点在于,在一定范围内,电磁信号可以穿过障碍物 (如墙壁),因此如果在某
种程度上未能执行安全对策,可能会发生以下类似问题。
v 通信数据会被截取
第三方可能会在未经授权的情况下接收无线传输,并可能从这些传输中获取个人信息
(如 ID、密码或信用卡号)或截取个人电子邮件的内容。
v 对网络的未授权访问
第三方可能会在未经许可的情况下访问个人或公司内部网络并实施以下任意活动。
• 获取个人数据或其他秘密信息 (信息泄漏)
• 假装其他用户并发送不当数据 (假冒)
• 重写被截取数据的内容并重新发送 (伪造)
• 带入可能导致数据丢失或系统崩溃的计算机病毒 (损坏)
起初,因无线 LAN 产品的安全相关设定和使用该产品而产生此类问题的可能性有所降低,
因为无线 LAN 卡和接入点具有处理这些问题的安全措施。我们建议您在使用本产品之前根
据自己的判断进行安全设定、承担全部责任并完全理解若不进行任何安全设定可能会发生的
问题。
12
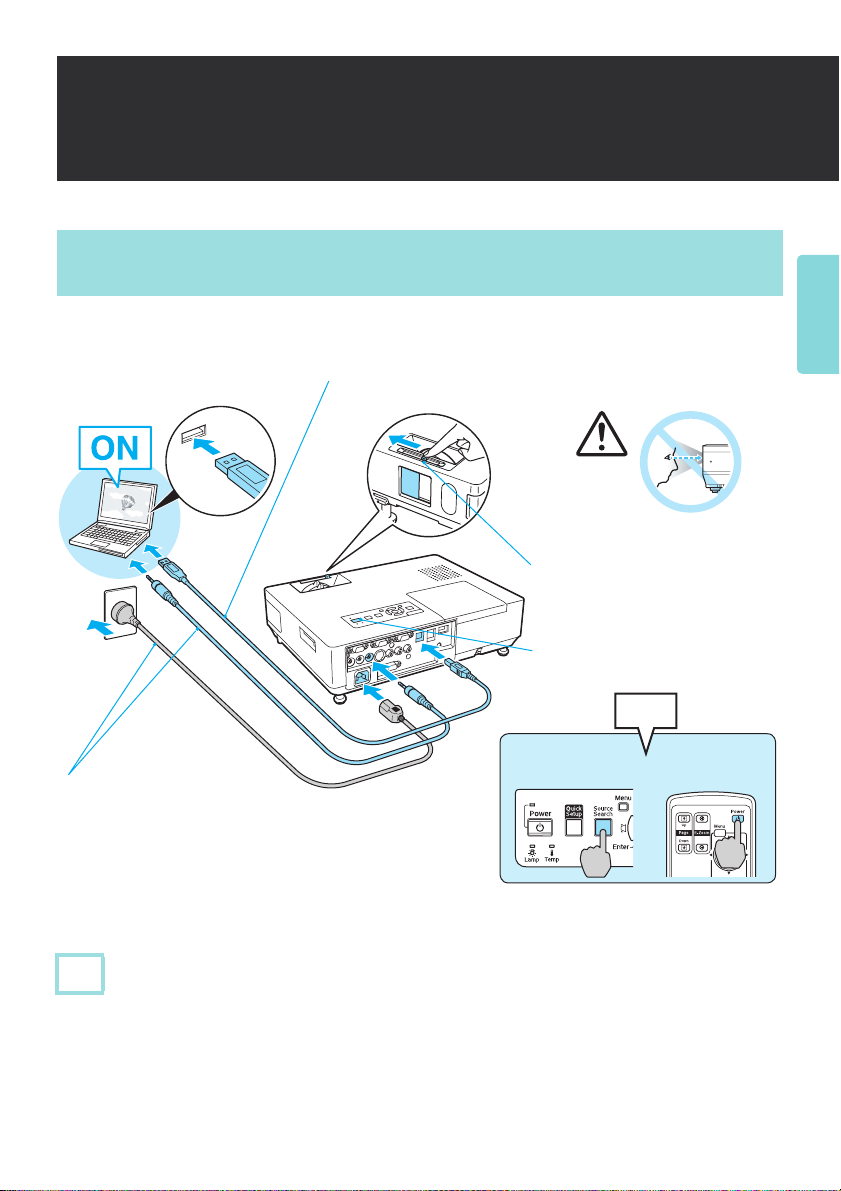
USB Display 连接指南
使用 USB 电缆进行连接 (Windows)
一旦使用投影仪附带的 USB 电缆连接 EMP-1825 投影仪和计算机,您就能投影图像。
A 打开计算机。
B 连接电源线。要输出音频时
请连接音频电缆。
• USB 电缆 (随附)
• 音频电缆 (市售)
• 电源线 (随附)
E 连接 USB 电缆。
简体中文
D 打开 A/V 无声滑盖。
C 打开投影机。
哔
使用控制面板 使用遥控器
注意
v 请勿通过 USB 集线器进行连接,直接连接投影仪和计算机。
v 如果计算机的 USB 标准是 USB 1.1,则图像质量和传送速率会下降。我们建议您使用支持
USB 2.0 的计算机。
13

第一次连接计算机
v 当通过 USB 电缆连接投影仪和计算机时,驱动程序将自动开始安装。安装约需 30 秒钟。
v 如果要取消安装,选择 “许可协议屏幕”上的 “拒绝”。
v 如果应用程序不自动启动,请双击 “我的电脑” - “EPSON_PJ_UD” -
“EMP_UD.EXE”。
在 Windows Vista 中
安装 USB Display 时会出现 “Windows 安全”对话框。请务必选择 “始终安装此驱动程
序软件”以继续安装。
* 打开计算机和投影仪的电源。
断开连接
v 拔掉 USB 线即可断开投影仪。
v 无需使用 Windows 中的 “安全删除硬件”功能。
Windows Vista 中注意事项
v 如果您的电脑已经安装了 USB Display,则应在将您的电脑升级至 Windows Vista 之前先
卸载 USB Display。
v Windows Vista 显示出 “用户帐户控制”对话框。在对话框显示时,投影仪继续将图像投
影在 “用户帐户控制”对话框正前侧的位置上。
v 受您的电脑配置和应用程序的影响,投影仪可能无法显示图像。请从 Epson 的主页 http://
www.epson.com 访问您当地的 Epson 主页,以了解进一步的信息。
卸载驱动程序时
选择 “开始菜单” - “EPSON USB 显示器” - “删除 EPSON USB 显示器”。
14

简体中文
15

16

無線 LAN 快速 連接說明書
本產品隨附的無線 LAN 組件
本說明書將說明如何使用 EMP NS Connection 的 “快速連接”。
“快速連接”可讓您輕易地透過無線 LAN 將電腦連接至投影機,並從電腦投影映像。
Wi-Fi 相容無線 LAN 卡 /
啟用無線 LAN 的電腦
連接前之步驟
僅限首次連接
在要連接的電腦
上安裝 EMP NS
Connection
s “安裝 EMP
NS Connection”
第 18 頁
將電腦設定為無
線 LAN 連接狀態
s “將電腦設定
為無線 LAN 連接
狀態”第 20 頁
在投影機中安裝
無線 LAN 組件
s “安裝無線
LAN 組件”第 21
頁
從電腦啟動 EMP
NS Connection 並
連接至投影機
s “連接”第 21
頁
繁體中文
17

預備電腦
如使用 EMP NS Connection 連接投影機和電腦,您需要在電腦上進行以下設定。
v 安裝 EMP NS Connection
v 將其設定為無線 LAN 連接狀態
安裝 EMP NS Connection
在電腦上安裝 EMP NS Connection。“ EPSON Projector Software for Meeting & Presentation”
光碟上隨附 EMP NS Connection。 EMP NS Connection 提供透過網路連接來連接電腦與投影機
的功能,其中包括使用多功能顯示屏顯示 * 時所需要的 “EPSON 虛擬顯示器”驅動程式。
除了 EMP NS Connection 之外,“EPSON Projector Software for Meeting & Presentation”光碟
還隨附以下軟體。
v EMP SlideMaker2
建立簡報腳本的軟體。 您可以用 PC Free 投影您從投影機所建立的腳本。 本軟體無法在
Macintosh 上使用。
v EMP Monitor
從電腦遠端監視和控制投影機狀態的軟體。 本軟體無法在 Macintosh 上使用。
* 使用多功能顯示屏顯示時,可以用一台電腦從多個投影機來投影多個映像。 在 Macintosh 中
不需要 “EPSON 虛擬顯示器”驅動程式。
■ 安裝指示
注意
v 對於 Windows 2000、XP 或 Vista,只有登錄為管理員的使用者才能執行安裝。
v 開始安裝前請關閉所有執行中的應用程式。
v 您無法連接至 EMP NS Connection 版本 2.2 之前版本的投影機。請安裝“EPSON Projector
Software for Meeting & Presentation”光碟所隨附的 EMP NS Connection 版本 2.3。
步驟
對於 Windows
A 打開電腦。
18

B 將“ EPSON Projector Software for Meeting & Presentation”光碟插入電腦。
從語言選擇畫面選擇語言。以下畫面會以簡體中文顯
示。
C 按一下 “簡易安裝”。
若要單獨安裝軟體,請選擇 “自定義安裝”。 若要變更
軟體的顯示語言,請按一下 “語言”。
D 勾選要安裝的應用程式,然後按一下 “安裝”。
E 當顯示許可協議畫面時,按一下 “是”。
繁體中文
F 顯示 “添加 / 刪除 EPSON Virtual Display”畫面時,按
一下 “確定”。
若要使用多功能顯示屏顯示,您必須設定 “EPSON
Virtual Display”。 如果不想馬上設定,可以稍待再進行
設定。s EasyMP 操作說明書
G 按一下 “完成”以完成安裝。
依序安裝選擇的軟體,如 “EMP SlideMaker2”和
“EMP Monitor”。
對於 Macintosh
若要開始安裝,請按兩下 “EPSON”視窗中的 “Installer for Mac OS X”圖標。 顯示
許可協議畫面時,選擇 “繼續”。 按一下 “完成”以完成安裝。
19

■ 案例如下
v 未自動開始安裝 (只限 Windows)
選擇 “開始” - “執行”,然後在 “執行”對話方塊中輸入光碟機的字母以及
“:\EPsetup.exe”,然後再按一下 “確定”。
v 解除安裝
對於 Windows
選擇 “開始” - “設定” - “控制台” - “新增 - 移除程式”或 “新增或移除程式”,然
後移除 “EMP NS Connection”。
對於 Macintosh
從 “應用程式”中刪除 “EMP NS Connection”文件夾。
將電腦設定為無線 LAN 連接狀態
對於 Windows
使用 LAN 卡隨附的實用軟件以進行電腦設定。 有關實用軟件的更多資料,請參閱無線
LAN 卡所隨附的使用說明書。
對於 Macintosh
設定網路端口和通訊狀態。 有關設定通訊狀態的更多詳情,請參閱電腦或 AirPort 卡的使
用說明書。
步驟
20
A 從 Apple 選單,選擇 “系統預置” - “網路”。
顯示網路設定畫面。
B 選擇 “傳輸埠配置”中所使用的端口,然後按一下
“立即套用”。
C 關閉畫面。
D 按一下電腦畫面右上方的通訊圖標,然後檢查下列
所顯示的畫面。
AirPort:已啟用
您可以使用無線 LAN 連接。

安裝無線 LAN 組件
連接
操作投影機
步驟
A
按遙控器上的 [Power] 鈕打開電源。
B 按遙控器上的 [EasyMP] 鈕。
顯示待機畫面。
為避免遺失等情況,請務必使用隨附的螺絲
固定。
繁體中文
操作電腦
步驟
A
啟動 EMP NS Connection。
對於 Windows
選擇 “開始” - “程式” ( 或 “程式集” ) - “EPSON Projector” - “EMP NS
Connection”。
對於 Macintosh
按兩下安裝 EMP NS Connection 的硬盤光碟機的 “程式”文件夾,然後按兩下 EMP
NS Connection 圖標。
21

■ 如顯示以下畫面 (Windows 和 Macintosh)
請按一下 “是”。 創建 EMP NS Connection
防火牆時例外。
B 選擇 “快速連接”,並按一下 “確定”。
顯示投影機查找結果。 若要永遠使用 “快速連接”進行
連接,請選擇 “將選擇的連接模式設定為今後的默認模
式”。
C 選擇您想連接的投影機,然後按一下 “連接”。
如果 SSID 配置匹配,您最多可以同時連接四台投影
機。 如果搜尋結果中未顯示您要連接的投影機,請按一
下“自動搜索”。 搜尋需要約 30 秒的時間。
D 當將投影機關鍵詞設定為 “開”時,會顯示關鍵詞輸入
畫面。 輸入在 EasyMP 待機畫面上所顯示的關鍵詞,然
後按一下 “確定”。
當完成連接時,會投影出電腦螢幕。 EMP NS
Connection 工具列會顯示在電腦螢幕上。 使用此工具列
操作投影機、進行設定和中斷網路連接。s EasyMP 操
作說明書
凍結 / 顯示 / 停止投影
(連接至投影機時)
要點
當轉換講者,或欲從另一台電腦繼續連接時,請在您想要連接的電腦上啟動 EMP NS
Connection。 目前連接的電腦中斷,並連接到正嘗試連接的電腦上。
22
只投影 PowerPoint 幻燈片 (演示模式)
投影機控制
切斷

找不到目標投影機時
動作 1 重新啟動電腦。
動作 2 檢查投影機網路設定是否設定為 “快速連接”。s 使用說明書 “網路設定選
單”
動作 3 如果動作 1 和 2 沒有幫助,請檢查以下各項。 (如果連接中斷,請檢查以下各
項。)
無線 LAN 組件上的指示燈是否
閃爍?
閃爍
未閃爍
重新安裝無線 LAN 組件。
您是否正在使用市售防火牆軟
體?
否
是否有任何隨附實用軟件在電腦
的無線 LAN 組件上操作?
否
請與您當地的經銷商或按照支援
與服務說明書中所提供的最近地
址聯絡。s Epson 投影機聯絡清
單 (文件光碟)
中斷
中斷投影機與電腦的連接有兩種方法。
中斷與電腦的連接
在工具條上按一下 。
是
是
使用防火牆軟體創建 EMP NS
Connection 防火牆時例外。
關閉實用軟件,然後重新啟動
EMP NS Connection。
繁體中文
中斷與投影機的連接
步驟
A
按遙控器上的 [Esc] 鈕。
B 選擇 “退出”,然後按遙控器上的 [Enter] 鈕。
23

關於 EasyMP 功能
使用 EasyMP 以擴大可使用投影機的範圍。
透過網路連接投影機與電腦 (EMP NS Connection)
■ 快速連接模式和高級連接模式
使用 EMP NS Connection 連接投影機和電腦有兩種方法 (“快速連接”和 “高級連接”)。
選擇最符合您需求的方法。
v 快速連接模式
快速連接模式是一種不用進行複雜的網路設定,便可輕易地將投影機和電腦連接至無線
LAN 的方法。
• 這代表您甚至可以投影到纜線長度不能達到的遠處。
• 進行簡易操作後投影。
v 高級連接模式
高級連接模式是一種連接至現有網路的方法。
• 您可以在會議室開啟並投影在其他房間電腦中的檔案。
• 您可以使用網際網路。
• 您可以從電腦監視和控制網路上的投影機。
24
網際網路

■ EMP NS Connection 主要功能
有關每個功能的詳情,請參閱 EasyMP 操作說明書。
多功能顯示屏顯示
網際網路
您可以從一台電腦投影不同映像至最多四台投影機。 這樣可以讓您從一台電腦將報告或其他
映像作橫向螢幕投影。
視頻檔案傳送 (視頻播放模式)
使用視頻播放模式,電腦上播放的視頻可透過其他應用程式流暢地投影與播放。 因為在播放
時也同步傳送音頻,因此您不需用音頻纜線連接電腦和投影機。
繁體中文
演示模式
在電腦上執行 PowerPoint 幻燈片並投影。 您可在準備簡報時,或在未執行幻燈片之前投影黑
螢幕,使你的簡報更顯時髦。
不使用電腦投影 (PC Free)
v 您可以投影儲存在 USB 記憶體和 CompactFlash 卡上的映像和視頻。
v 您可以不使用電腦投影 PowerPoint 幻燈片,而是用 EMP SlideMaker2 將 PowerPoint 檔案
轉換為腳本格式,然後儲存到 USB 記憶體或 CompactFlash 卡上。
25

使用無線 LAN 時的要點
連接至相容無線 LAN 卡和接入點的條件
隨附的無線 LAN 組件可連接至符合 IEEE 802.11g、802.11b 及 802.11a 的以下產品。
v 無線 LAN 卡
v 配備內置無線 LAN 功能的電腦
v 接入點
但是,您會無法對連接 IEEE 802.11g 電腦的無線 LAN 設備進行 ad hoc 連接。有關無線 LAN
設備的詳情,請參閱規格。
隨附的無線 LAN 組件規格
頻率範圍
調整
可能的受干擾範圍
頻率改變的限度 可以使用任何頻帶,並且可以避免 “經許可”及 “未經許可”頻帶。
* 您只能使用高級連接連接至 5.3 GHz 頻帶 (W53)。
IEEE 802.11b/g: 2.4 GHz 頻帶 (1 至 11 頻),
IEEE 802.11a: 5.2 GHz 頻帶 (W52),5.3 GHz 頻帶 (W53)*
IEEE 802.11b :DS-SS
IEEE 802.11a/g:OFDM
少於 20 m
電磁安全注意事項
使用隨附的無線 LAN 組件時注意以下幾點。
v 可能對起搏器產生電磁干擾及造成功能失常。使用前,確保不會出現電磁干擾。
v 可能對敏感的醫療設備產生電磁干擾及造成功能失常。使用前,確保不會出現電磁干擾。
v 切勿在微波爐附近使用。無線通訊可能會受微波爐產生的電磁干擾影響。
v 在某些國家可能禁止在飛機上使用此產品。使用此產品時需要按照當地規則作出適當的注
意。
26

頻率使用注意事項
包含在投影機內的無線 LAN 卡的頻率帶是 2.4 GHz/5 GHz。此頻帶同樣使用在工業、科學及
醫療設備,如微波爐及在工廠生產線上使用的行動設備識別 (RF-ID)系統 (經許可的建築
物無線電站及未經許可的指定低功率無線電站)。
使用無線 LAN 卡前,請檢查附近沒有行動設備識別的無線電站或指定低功率無線電站建築
物。如果此無線 LAN 卡對行動設備識別的無線電站建築物作出了電磁干擾,請立刻停止使
用及停止電磁場的產生。
如果此無線 LAN 卡對特殊的作為行動設備識別的低功率無線電站產生電磁干擾或製造相似
問題,請與您當地的經銷商或按照支援與服務說明書中所提供的最近地址聯絡 s Epson 投
影機聯絡清單 (文件光碟)。
國際旅遊注意事項
無線 LAN 組件符合購買國家的規格。
無線 LAN 組件的設計是為了符合使用國家的頻道及頻率限制。如果在購買國家以外使用無
線 LAN 組件,請洽詢當地的經銷商以獲得更多資料。
無線電報法案法規
以下的法案受無線電報法案所禁止。
v 修改及拆卸 (包括天線)
v 移除符合規格的標籤
v IEEE 802.11a (5 GHz 頻帶)外部使用
繁體中文
27

使用無線 LAN 時有關安全的要點
(有關消費者權益的重要資料 (保留隱私))
透過 LAN 纜線使用無線 LAN 的好處是,因為使用射頻信號交換資料,如果您處於射頻信號
的範圍內,可以輕易地連接至網路。
在某個範圍內它的缺點是,如果不採用某些安全措施,電磁信號可以穿越牆壁等障礙物,因
此可能發生以下問題。
v 通訊數據會被截獲
第三方在未經驗證下可能接收到無線傳輸,而且他們可以從這些傳輸中獲取個人資料,例
如身份證號碼、密碼或信用卡號碼,或者他們能夠截獲個人的電郵信息。
v 沒有驗證下接入網路
第三方可能在未經許可下接入個人或公司內部網路,並且執行以下任何一項活動。
• 擷取個人數據或其他秘密資料 (資料洩漏)
• 假裝作另一位用戶並且發送不適當的數據 (模仿)
• 覆寫被截取的數據內容並重新發送 (偽造)
• 引入會造成數據遺失或系統當機的電腦病毒 (破壞)
最初,透過有關無線 LAN 產品安全的設定,和使用產品而發生這些問題的可能性會減少,
這是由於無線 LAN 卡和接入點有處理這些問題的安全措施。我們建議您在使用本產品之前
透過自己個人的判斷進行安全設定,並且假設負有完全責任,以及完全明白如果沒有進行任
何安全設定可能會發生問題。
28

USB Display 連接說明書
使用 USB 纜線連接 (Windows)
一旦使用投影機附帶的 USB 纜線連接 EMP-1825 投影機和電腦,您就能投影映像。
A 打開電腦。
B 連接電源線。要輸出音頻時
請連接音頻纜線。
• USB 纜線 (隨附)
• 音頻纜線 (市售)
• 電源線 (隨附)
E 連接 USB 纜線。
繁體中文
D 打開 A/V 無聲滑蓋。
C 打開投影機。
咇
使用控制面板 使用遙控器
注意
v 切勿透過 USB 集線器連接,直接連接投影機及電腦。
v 當電腦的 USB 標準為 USB 1.1 時,會降低畫質及傳送速度。 建議使用配備 USB 2.0 的電
腦。
29

首次連接電腦
v 當透過 USB 纜線連接投影機及電腦時,驅動程式會自動開始安裝。安裝約需 30 秒鐘。
v 如果您要取消安裝,請在 “授權合約畫面”上選擇 “拒絕”。
v 如果應用程式未自動啟動,按兩下 “我的電腦” - “EPSON_PJ_UD” -
“EMP_UD.EXE”。
在 Windows Vista 中
安裝 USB Display 時,將會顯示 “Windows 安全”對話方塊。請確認選取 “始終安裝此
驅動程序軟件”以繼續。
* 打開電腦及投影機的電源。
切斷
v 只需拔除 USB 纜線,即可切斷投影機的連接。
v 無需使用 Windows 中的 “安全地移除硬體”功能。
Windows Vista 中注意事項
v 如果您的電腦已安裝 USB Display,請在將您的電腦升級為 Windows Vista 之前,先行解除
安裝 USB Display。
v Windows Vista 的作業系統將會顯示 “用戶帳戶控制”對話方塊。顯示對話方塊時,投影
機將會持續投影 “用戶帳戶控制”對話方塊出現前的影像。
v 隨您的電腦環境與應用程式軟體而異,投影機有可能會無法顯示影像。請從 Epson 首頁
http://www.epson.com 前往您所在位置的 Epson 網站,以取得進一步的資訊。
當解除安裝驅動程式
選擇 “開始選單” - “EPSON USB Display” - “刪除 EPSON USB Display”。
30

繁體中文
31

32

Wireless LAN Quick
Connection Guide
Wireless LAN unit supplied with the product
This guide explains how to use "Quick Connection" for EMP NS Connection.
"Quick Connection" allows you to easily connect a computer to the projector via wireless
LAN, and project images from the computer.
Wi-Fi compliant wireless LAN card/
Wireless LAN enabled computer
Steps Before Connecting
First time only
Installing EMP NS
Connection on the
computer to be
connected
s "Installing
EMP NS
Connection" p.34
Putting the
computer into
wireless LAN
connection status
s "Putting the
Computer into
Wireless LAN
Connection Status"
p.36
Installing the
wireless LAN unit
in the projector
s "Installing the
Wireless LAN
Unit" p.37
Starting EMP NS
Connection from
the computer and
connecting to the
projector
s "Connecting"
p.37
English
33

Preparing the Computer
With EMP NS Connection, to connect the projector and the computer you need to make the
following settings on the computer.
v Installing EMP NS Connection
v Put it into wireless LAN connection status
Installing EMP NS Connection
Install EMP NS Connection on the computer. EMP NS Connection is supplied on the
"EPSON Projector Software for Meeting & Presentation" CD-ROM. EMP NS Connection
includes a function to connect the computer and the projector over a network connection,
and also includes the "EPSON Virtual Display" driver necessary to use Multi-screen
display*.
As well as EMP NS Connection, the following software are also supplied on the "EPSON
Projector Software for Meeting & Presentation" CD-ROM.
v EMP SlideMaker2
Software for creating scenarios for presentations. You can project the scenarios that you create
from the projector by using PC Free. This software cannot be used on a Macintosh.
v EMP Monitor
Software for remotely monitoring and controlling the status of the projector from the computer.
This software cannot be used on a Macintosh.
*With Multi-screen display, you can project multiple images from multiple projectors using one
computer. You do not need the "EPSON Virtual Display " driver for Macintosh.
■ Installation instructions
Attention
v For Windows 2000, XP, or Vista, installation can only be carried out by a user logged on as an
administrator.
v Close all running applications before beginning installation.
v You cannot connect to the projector with versions earlier than EMP NS Connection Ver.2.2.
Install EMP NS Connection Ver.2.3 supplied on the "EPSON Projector Software for Meeting &
Presentation" CD-ROM.
Procedure
For Windows
A Turn the computer on.
34
B Insert the "EPSON Projector Software for Meeting & Presentation" CD-ROM into
the computer.
The installer starts automatically.
C Click "Easy Install".
To install software individually, select "Custom Install". To
change the language in which the software is displayed, click
"Language".
D Check the applications to be installed, and then
click "Install".
E When the License Agreement screen is displayed,
click "Yes".
English
F When the "Add and Remove EPSON Virtual
Display" screen is displayed, click "OK".
To use Multi-screen display you need to setup "EPSON
Virtual Display". If you do not want to set it up now, you can
do so later. s EasyMP Operation Guide
G Click "Finish" to complete the installation.
Selected software, such as "EMP SlideMaker2" and "EMP
Monitor", is installed sequentially.
For Macintosh
To start installation, double-click the "Installer for Mac OS X" icon in the "EPSON"
window. When the License Agreement screen is displayed, select "Continue". Click
"Finish" to complete the installation.
35

■ In cases like these
v Installing does not start automatically (Windows only)
Select "Start" - "Run", and then in the "Run" dialog box type the letter for your CD-ROM
drive followed by ":\EPsetup.exe" and then click "OK".
v Uninstalling
For Windows
Select "Start" - "Settings" - "Control Panel" - "Add-Remove Programs" or "Add or
Remove Programs" and then remove "EMP NS Connection".
For Macintosh
From "Applications" delete the "EMP NS Connection" folder.
Putting the Computer into Wireless LAN Connection Status
For Windows
Make settings for the computer by using the utility software supplied with the LAN card.
For more information on the utility software, see the User's Guide supplied with your
wireless LAN card.
For Macintosh
Set the network port and communication status. For more details on setting the
communication status, see the user's guides for your computer or the AirPort card.
Procedure
36
A From the Apple menu, select "System Preferences" - "Network".
The network settings screen is displayed.
B Select the port used in "Port Configurations"
and click "Apply Now".
C Close the screen.
D Click the communication icon at the top right of
the computer's screen, and check that the
following is displayed.
AirPort: On
You can connect with a Wireless LAN.

Installing the Wireless LAN Unit
To avoid losing it and so on, make sure you
fix it in place with the screw supplied.
Connecting
Operating the Projector
Procedure
A
Press the [Power] button on the remote control to turn the power on.
B Press the [EasyMP] button on the remote control.
The standby screen is displayed.
English
Operating the Computer
Procedure
A
Start EMP NS Connection.
For Windows
Select "Start" - "Programs" (or "All Programs") - "EPSON Projector" - "EMP NS
Connection".
For Macintosh
Double-click the "Applications" folder of the hard drive volume in which EMP NS
Connection is installed, and then double-click the EMP NS Connection icon.
37

■ If the following screen is displayed (Windows and Macintosh)
Click "Yes". A firewall exception is created for
EMP NS Connection.
B Select "Quick Connection Mode" and click "OK".
The projector search results are displayed. To always
connect using "Quick Connection Mode", select "Make the
connection mode selected the default setting".
C Select the projector you want to connect to, and
then click "Connect".
If the SSID configuration matches, you can connect up to
four projectors at the same time. If the projector you want to
connect to is not displayed in the search results, click
"Automatic search". The search takes about 30 seconds.
D When Projector Keyword is set to "On" from the
projector, the keyword entry screen is displayed.
Enter the keyword displayed on the EasyMP
standby screen, and then click "OK".
When the connection is complete, the computer's screen is
projected. The EMP NS Connection toolbar is displayed on
the computer screen. Use this toolbar to operate the projector
and make settings, and to disconnect the network
connection. s EasyMP Operation Guide
Freezing/Displaying/Stopping projection
(While connected to the projector)
Tip
When changing presenters and so on, and when continuously connecting from another computer,
start EMP NS Connection from the computer you want to connect. The computer that is currently
connected is disconnected, and the computer that is trying to connect now is connected.
38
Projecting only a PowerPoint Slideshow
(Presentation Mode)
Projector control
Disconnect

When The Target Projector is Not Found
Action 1. Restart the computer.
Action 2. Check if the projector network settings are set to "Quick Connection
Mode". s User's Guide "Network Settings Menu"
Action 3. Check the following if actions 1 and 2 do not help. (If it is disconnected,
check the following.)
Is the indicator on the wireless
LAN unit flashing?
Flashing
Not flashing
Reinstall the wireless LAN unit.
Are you using commercially
available firewall software?
No
Are any of the supplied utilities
operating from the computer's
wireless LAN unit?
No
Contact your local dealer or the nearest address provided
in the Support and Service Guide. s Epson Projector
Contact List(Document CD-ROM)
Yes
Yes
Create a firewall exception for
EMP NS Connection in the firewall
software you are using.
Close the utility and restart EMP
NS Connection.
Disconnecting
There are two methods of disconnecting the projector and the computer.
Disconnecting from the Computer
Click on the toolbar.
Disconnecting from the Projector
English
Procedure
A
Press the [Esc] button on the remote control.
B Select "Exit", and then press the [Enter] button on
the remote control.
39

Regarding EasyMP Functions
Using EasyMP opens up a huge range of situations in which the projector can be used.
Connecting the Projector and a Computer over a Network (EMP NS Connection)
■ Quick Connection Mode and Advanced Connection Mode
There are two methods ("Quick Connection" and "Advanced Connection") of connecting the
projector and a computer by using EMP NS Connection. Select the best one to suit your needs.
v Quick Connection Mode
Quick Connection Mode is a method of connecting the projector and a computer easily to a
wireless LAN without making any complex network settings.
• This means you can even project in remote locations where
the cable is not long enough to reach.
• Project after making simple operations.
v Advanced Connection Mode
Advanced Connection Mode is a method of connecting to an existing network.
40
• From a conference room, you can open and project a file on a computer in another room.
• You can use the Internet.
• You can monitor and control projectors on a network from the computer.
Internet

■ EMP NS Connection main functions
See the EasyMP Operation Guide for details on each function.
Multi-screen display
Internet
You can project a different image from up to four projectors from one computer. This allows you to
project a report and so on as a landscape screen from one computer.
Movie file transfer (Movie Sending Mode)
By using Movie Sending Mode, video being played back on the computer by another application can
be projected and played back smoothly. Because audio is also transferred simultaneously during
playback, you do not need to connect the computer and the projector with an audio cable.
English
Presentation Mode
Execute a PowerPoint Slideshow on the computer and project. You can give stylish presentations by
projecting a black screen while you are making preparations before the presentation and so on, and
when not executing the Slideshow.
Projecting Without a Computer (PC Free)
v You can project images and videos saved on a USB memory and CompactFlash card.
v You can project PowerPoint Slideshow without a computer by converting the PowerPoint file into
a Scenario format with EMP SlideMaker2, and then savin g it to a USB me mory or C ompactFl ash
card.
41

Notes When Using a Wireless LAN
Conditions for Connecting to Compatible Wireless LAN Cards and Access Points
The supplied wireless LAN unit can be connected to the following products in accordance
with IEEE 802.11g, 802.11b, and 802.11a.
v Wireless LAN card
v Computers with a built-in wireless LAN function
v Access points
However, you are unlikely to be able to make an ad hoc connection for wireless LAN equipment used
with a computer in IEEE 802.11g. For details on wireless LAN equipment see the specifications.
Supplied Wireless LAN Unit Specifications
Frequency Range
Modulation
Potential
Interference Range
Propriety of
Frequency Change
*You can only connect to the 5.3 GHz band (W53) using Advanced Connection.
IEEE 802.11b/g: 2.4 GHz band (1 to 11 Ch),
IEEE 802.11a: 5.2 GHz band (W52), 5.3 GHz band (W53)*
IEEE 802.11b : DS-SS
IEEE 802.11a/g : OFDM
Less than 20 m
Can use all bands, and can avoid "licensed" and "unlicensed" bands.
Electromagnetic Safety Precautions
Be aware of the following points when using the supplied wireless LAN unit.
v May exert electromagnetic interference on, and cause malfunction of, cardiac pacemakers. Before
use, ensure that electromagnetic interference does not occur.
v May exert electromagnetic interference on, and cause malfunction of, sensitive medical
equipment. Before use, ensure that electromagneti c interference does not occur.
v Do not use near microwave ovens. Wireless communication may be interrupted by
electromagnetic interference generated by microwave ovens.
v Use of this product on aircraft may be restricted in some countries. Use of this product is based on
due diligence with regard to regulations.
42

Frequency Use Precautions
The frequency band for the wireless LAN card that is included with the projector is 2.4 GHz/
5 GHz. This band is also used for industrial, scientific, and medical devices such as
microwave ovens and mobile unit identification (RF-ID) systems (licenced premises radio
stations and unlicenced specified low-power radio stations) used in factory production lines.
Before using the wireless LAN card, check that there are no radio stations for mobile unit
identification or specified low-power radio station premises nearby. In the event that this
wireless LAN card should interfere electromagnetically with the premises of a radio station
used for mobile unit recognition, cease use immediately and stop generating the
electromagnetic field.
Contact your local dealer or the nearest address provided in the Support and Service Guide
s Epson Projector Contact List (Document CD-ROM) if this wireless LAN card interferes
electromagnetically with a special low-power radio station used for mobile unit identification
or causes similar problems.
International Travel Precautions
Wireless LAN units are based on the specifications of the country of purchase.
The wireless LAN unit is designed to conform to the channel and frequency limits of the
country it is intended to be used in. If the wireless LAN unit is used outside the country of
purchase, check with a local dealer for more information.
Wireless Telegraphy Act Regulations
The following acts are prohibited by the Wireless Telegraphy Act.
v Modifying and disassembling (including the antenna)
v Removing the label of conformance
v IEEE 802.11a (5 GHz band) external use
English
43

Notes on Security when Using Wireless LANs
(Important information on customer rights (maintaining privacy))
The advantage of using a wireless LAN over a LAN cable is that, because information is
exchanged using radio signals, you can easily connect to the network if you are within range
of the radio signals.
A disadvantage of this is that within a certain range, the electromagnetic signals can pass
through barriers such as walls, so that if security countermeasures are not implemented in
some way, problems such as the following may occur.
v Communicated data can be intercepted
A third party may be able to receive wireless transmissions without authorisation, and they could
obtain personal information from these transmissions such as IDs, passwords, or credit card
numbers, or they could intercept the contents of personal e-mail messages.
v Unauthorised access to the network
A third party could access an individual or intra-company network without permission and carry
out any of the following activities.
• Retrieve personal data or other secret information (information leakage)
• Pose as another user and send inappropriate data (impersonation)
• Overwrite the contents of intercepted data and resend it (falsification)
• Introduce a computer virus which could cause data loss or system crashes (damage)
Initially, the possibility that such problems could occur through settings concerning the security of
the wireless LAN product and by using the product are decreased, because the wireless LAN card
and the access point have security measures to deal with these problems. We recommend that you use
this product after making security settings using your own judgment and assuming full responsibility,
and with your full understanding of problems that may occur if you do not make any security
settings.
44

USB Display Connection
Guide
Connecting with a USB cable (Windows)
You can project images as soon as you connect the EMP-1825 projector and the computer
using the USB cable supplied with the projector.
A Turn the computer on.
B Connect the power cable.
Connect an audio cable
when outputting audio.
• USB cable(supplied)
• Audio cable(commercially available)
• Power cable(supplied)
E Connect the USB cable.
D Open the A/V mute slide.
C Turn the projector on.
Using the
control panel
English
Beep
Using the
remote control
Attention
v Do not connect via a USB Hub, connect the projector and the computer directly.
v The picture quality and the transfer rate decrease when the computer's USB standard is USB 1.1.
We recommend using USB 2.0 with the computer.
45

Connecting a computer for the first time
v When the projector and the computer are connected via a USB cable, the driver automatically
starts to install. It takes about 30 seconds for the installation.
v If you want to cancel installation, select "Decline" on the "License Agreement Screen".
v If the application does not start automatically, double-click "My Computer" -"EPSON_PJ_UD" -
"EMP_UDSE.EXE".
Disconnecting
v The projector can be disconnected simply by disconnecting the USB cable.
v There is no need to use the "Safely Remove Hardware" feature in Windows.
Precautions in Windows Vista
v If your computer has USB Display installed, uninstall USB Display before upgrading your
computer to Windows Vista.
v The "User Account Control" dialog box is displayed by the OS in Windows Vista. While the
dialog box is displayed, the projector keeps projecting the image at the point right before the
"User Account Control" dialog box has appeared.
v Depending on your computer environment and application software, the projector may not be able
to display images. Please access the Epson website of your location from the Epson homepage
http://www.epson.com for further information.
When uninstalling the driver
Select "Start Menu" - "EPSON USB Display" - "Delete EPSON USB Display".
46

47
English

48


 Loading...