

Page 1

Operation Guide
1
Page 2

Contents
2
Overview of EMP NS Connection
Two connection modes..............................................................................5
Quick Connection Mode....................................................................................... 5
Advanced Connection Mode ................................................................................ 5
Steps up to the making of an EMP NS connection .................................6
Using the main screen of EMP NS Connection .......................................7
Wireless LAN Security Countermeasures................................................9
Using the Toolbar .....................................................................................10
Icon Names and Functions ................................................................................ 10
Convenient EMP NS Connection Functions
Projecting Only a PowerPoint Slideshow (Presentation Mode)...........13
Projecting Movies from a Computer (Movie Sending Mode)................14
Supported file types ...........................................................................................14
Playing back a movie ......................................................................................... 14
Using Multi-Screen Display .....................................................................16
Example of Adjusting the Virtual Display ........................................................... 16
Procedure before using the Multi-screen Display Function................................17
Setting the Virtual Display .................................................................................. 18
Allocating the image to be projected.................................................................. 23
The allocated image is projected ....................................................................... 23
Connecting to a projector on a different sub-net
Connecting to a projector on a different sub-net ..................................26
Searching by Specifying the IP Address and Projector Name
(For "Advanced Connection Mode" only) ..............................................27
Performing a search with a profile..........................................................28
Making a Profile ................................................................................................. 28
Searching by Specifying a Profile ...................................................................... 30
Managing a Profile ............................................................................................. 31
Using a Computer to Set Up, Monitor and Control
Projectors
Changing Settings Using a Web Browser (Web Control)..................... 38
Displaying Web Control ..................................................................................... 38
Projector Setup .................................................................................................. 38
Using the Mail Notification Function to Report Problems ...................39
Setting Mail Notification Function ...................................................................... 39
If a Problem Notification is Sent by Mail ............................................................ 39
Management Using SNMP.......................................................................40
Presentations Using PC Free
Files that can be Projected Using PC Free, and Saving.......................42
Files that can be Projected Using PC Free........................................................ 42
PC Free Examples............................................................................................. 43
PC Free Basic Operations ....................................................................... 44
Starting and Closing PC Free ............................................................................ 44
Guide Mode and Quick Mode ............................................................................ 47
PC Free Basic Operations ................................................................................. 48
Rotating the Image ............................................................................................ 49
Projecting Scenarios ............................................................................... 50
Preparing a Scenario ......................................................................................... 50
Playing a Scenario............................................................................................. 50
Operating During a Presentation ....................................................................... 51
Projecting image and movie files ........................................................... 52
Projecting Images/Movies................................................................................. 52
Projecting all Image and Movie Files in a Folder in Sequence (Slideshow) ...... 53
Setting Image and Movie File Display Conditions and Operation
Mode.......................................................................................................... 55
Setting the EMP NS Connection Operation
Setting the EMP NS Connection Environment ......................................34
General settings Tab..........................................................................................34
Adjust Performance Tab .................................................................................... 36
Page 3

Contents
Preparing a Scenario (Using EMP SlideMaker2)
Scenario Summary ...................................................................................57
Files that Can be Included in Scenarios.................................................58
Turning a PowerPoint File into a Scenario ............................................59
Converting all files in a single operation without starting up
SlideMaker2...............................................................................................60
Starting up SlideMaker2 and converting files........................................62
Setting Scenario Properties ............................................................................... 62
Including PowerPoint Files in Scenarios............................................................ 64
Including Image and Movie Files in Scenarios................................................... 67
Editing a Scenario .............................................................................................. 68
Sending Scenarios ...................................................................................70
Cases Like These .....................................................................................72
Checking the Projection Scenario Status from a Computer............................... 72
Setting Animations ............................................................................................. 73
Setting the Slide Animation ................................................................................ 73
Appendix
Connection Limitations............................................................................76
Supported Resolutions.......................................................................................76
Display Color......................................................................................................76
Number of Connecting ....................................................................................... 76
Others ................................................................................................................76
Troubleshooting .......................................................................................77
Glossary ....................................................................................................85
3
Page 4

Overview of EMP NS Connection
This chapter provides an overview of EMP NS Connection.
Two connection modes........................................ 5
• Quick Connection Mode.....................................................5
• Advanced Connection Mode ..............................................5
Steps up to the making of
an EMP NS connection......................................... 6
Using the main screen of
EMP NS Connection ............................................. 7
Wireless LAN Security Countermeasures.......... 9
Using the Toolbar ............................................... 10
• Icon Names and Functions ...............................................10
Page 5
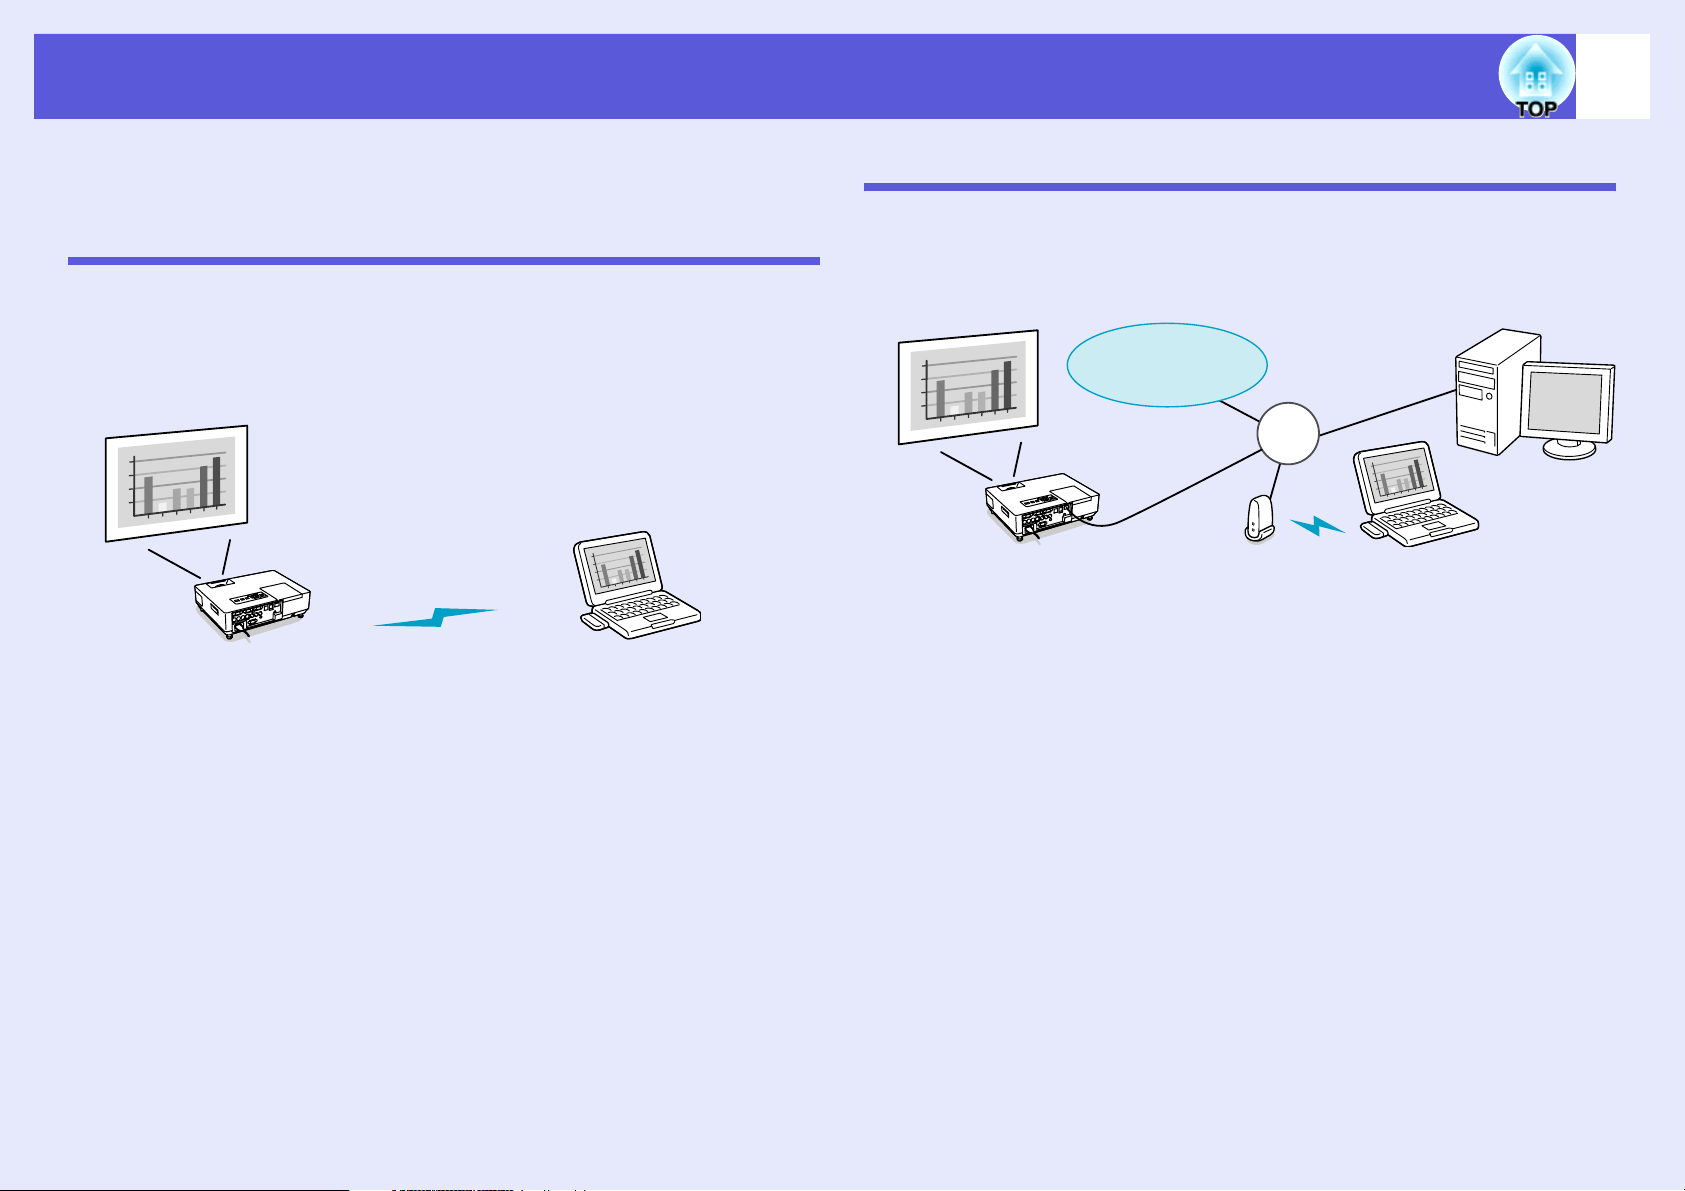
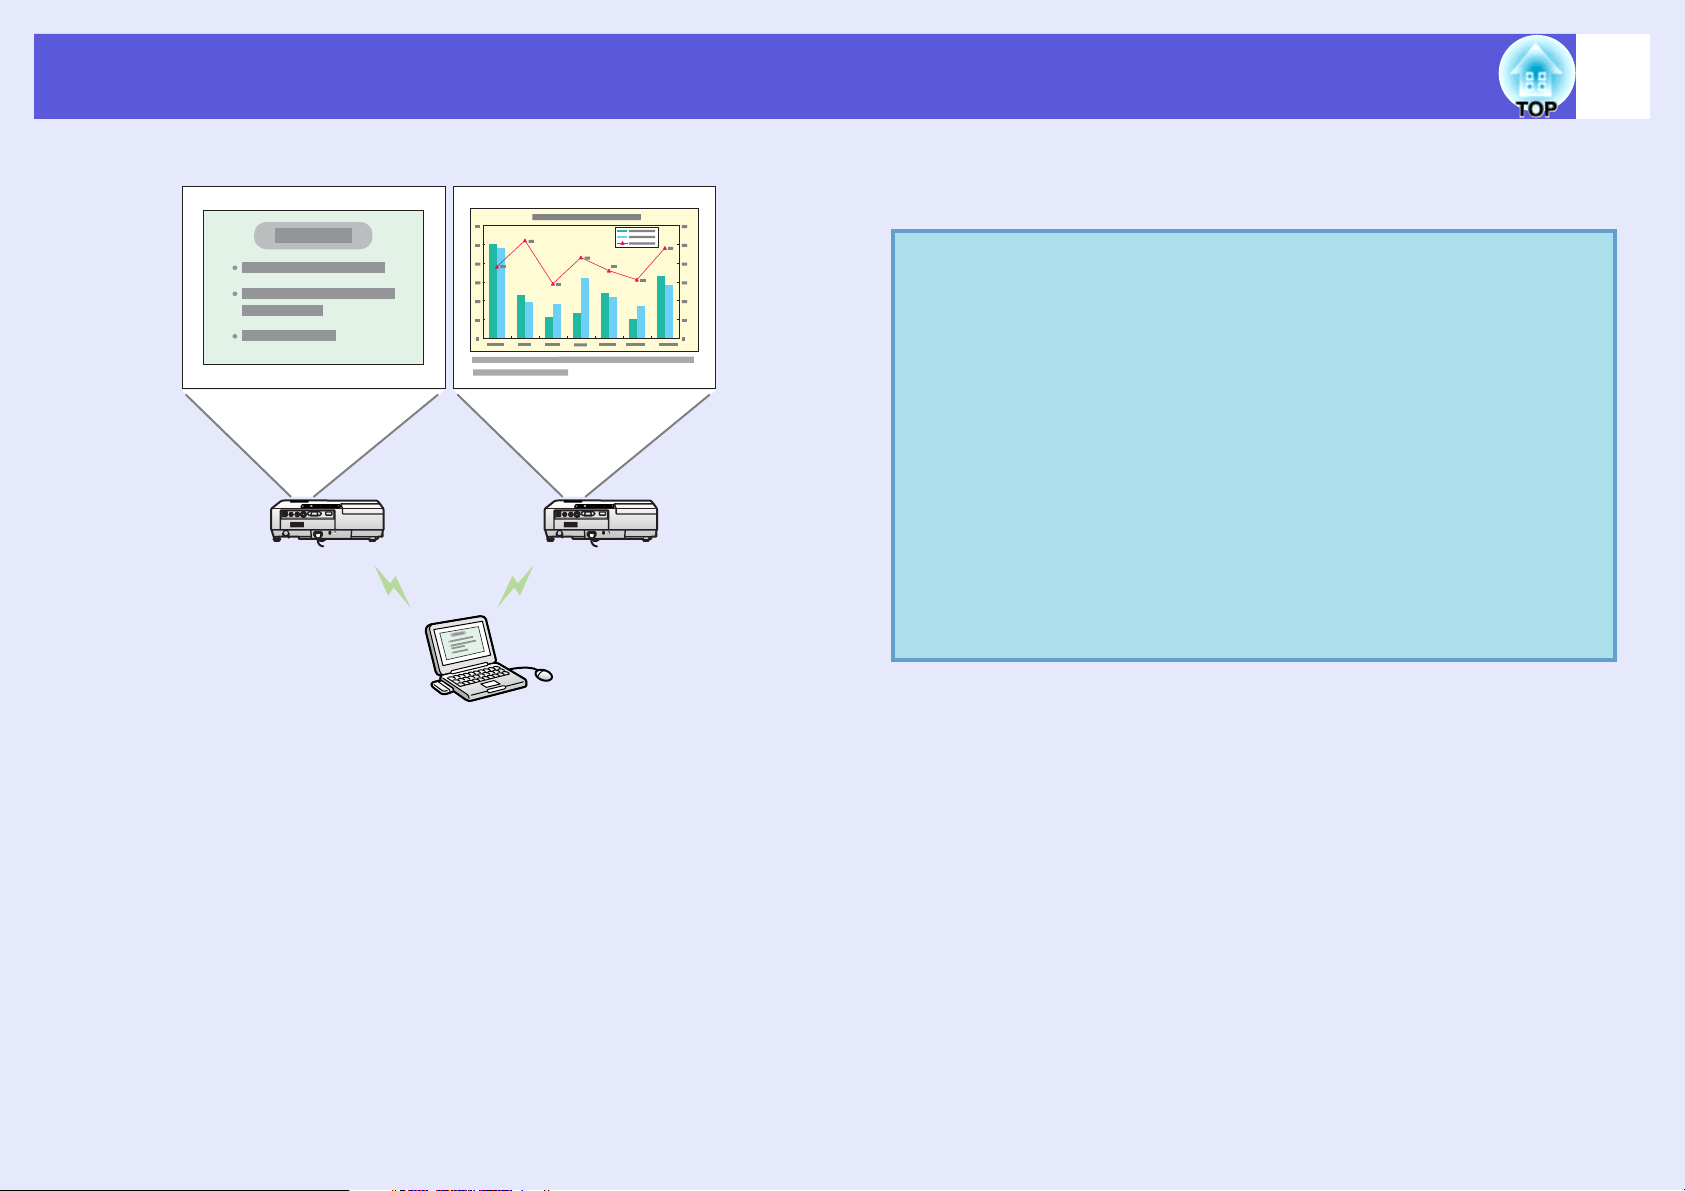
Two connection modes
5
EMP NS Connection supports two connection modes, namely, "Quick
Connection Mode" and "Advanced Connection Mode".
Quick Connection Mode
• With an ad hoc connection, because the projector’s SSID is temporarily
assigned to the computer, you do not have to perform any setup
operations from the computer.
• After the computer has been cut off, its network settings automatically
return to their original state.
Advanced Connection Mode
• With an infrastructure connection, the connection is made to an existing
network system.
• This type of connection is used when you want to open and project the
contents of a file over a network, share the projector, or apply security.
Internet
LAN
Page 6

Steps up to the making of an EMP NS connection
The steps leading up to the creation of an EMP NS connection between the computer and the projector are the same in both "Quick Connection
Mode" and "Advanced Connection Mode".
For details on the procedure, see the example of setting up a connection in "Quick Connection Mode" in the Wireless LAN Quick Connection
Guide, provided separately.
This explains the steps to be taken to establish a connection, while also covering the settings to be made in "Advanced Connection Mode".
6
Preparing the Computer
• Install EMP NS Connection on the
computer to be connected.
• Enable the setup of a network
connection.
Preparing the Projector
The projector incorporates the same
wireless LAN unit.
Establish connection and start projection
Start EMP NS Connection on the computer and then establish a connection with the projector.
The following convenient functions are provided to help users with meetings and presentations
• Multi-Screen Display s p.16
• Movie Sending Mode s p.14
• Presentation Modes p.13
Advanced Connection Mode Settings
When using a wired LAN with a Macintosh computer, set "AirPort Off" in the communication state.
AirPort Off
Connection is not possible with the wireless LAN
• When using a wired LAN to establish the network connection, install the optional Ethernet unit to the projector
and connect the projector using the likes of a commercially available network cable and hub.
• Make the network settings for the projector. sUser's Guide "Network Menu (EMP-1715/1705 Only)"
• Distribution function
The screen being displayed by a remote computer can be simultaneously displayed by up to four projectors with corresponding
SSID.
• Switching function
With the meeting switching function and assuming that EMP NS Connection has been installed on all the computers, the
participants can take turns and project their own images, without the need to swap cables.
q
For details on the restrictions imposed on the projection of computer images over a connection with EMP NS Connection, such as the
s
compatible resolution and display colors, see "Connection Limitations".
p.76
Page 7

Using the main screen of EMP NS Connection
7
When EMP NS Connection is started, the following screen is
displayed. The operation of each button or menu item is described in
the following table.
When the system has been started in "Quick Connection Mode".
When the system has been started in "Advanced Connection Mode".
Automatic search In "Quick Connection Mode", a search is made for a
projector based on the SSID. In "Advanced Connection
Mode", you can search for available projectors on the
network system that the computer is connected to.
Manual search In "Quick Connection Mode", a search is made for the
projector having the SSID selected from a list. In
"Advanced Connection Mode", you can search for a
projector based on a specified IP address or projector
name.
Profile You can search for a projector on the network using a
profile saved with "Save profile".s p.28
Status The state of an identified projector is indicated using
one of the following six icons.
Standby Busy
Busy
(Disable
interrupt
connection)
Searching Not found.
Currently in use
by another
applicaton
The status of a projector with a check mark is
.
In "Quick Connection Mode", a check mark appears
only against those projectors with the same SSID.
For a projector that is both in the status and
checked, clicking "Connect" causes the previously
connected computer to be disconnected, and a new
connection to be established with your computer.
indicates that the projector is currently
displaying the Configuration menu. Once the
Configuration menu has been cleared, you can retry
search and establish a connection.
Page 8

Using the main screen of EMP NS Connection
is displayed to indicate a search for a specified
projector or a profile-based search.
is displayed when a projector cannot be found as
a result of a search for an IP address.
Projector name The projector’s name is displayed.
IP address
(only for "Advanced
Connection Mode")
SSID
(only for "Quick
Connection Mode")
Display
(When "Use multidisplay" is checked)
Update information
(only for "Quick
Connection Mode")
Save profile Saves the results of a search for projectors on the
Clear list Deletes the currently displayed list of projectors.
Disable interrupt
connection
Use multi-display Select this when using the Multi-screen display
Set options You can set the environment, such as the processing
Connect A projector can be clicked once you place a check
The projector’s IP address is displayed.
The projector’s SSID is displayed.
When "Use multi-display" is checked, select the
number of the display to use.s p.23
Updates the status of those projectors displayed in the
list.
network as a profile. s p.28
Select this to prevent an interrupt connection by other
computers while a connection is established.
function. When this is selected, "Display layout" and
"Display properties" are displayed at the bottom of the
screen. Multi-screen display s p.16
method, when EMP NS Connection is started. For
option settings, see s p.34
mark against it. Whenever connection with a projector
is possible, a toolbar is displayed.
8
Page 9

Wireless LAN Security Countermeasures
One of the advantages of using a wireless LAN is that it is possible to
communicate easily if you are within the range of the electromagnetic
waves, because with a wireless LAN data is exchanged through
electromagnetic waves.
On the other hand, since electromagnetic waves extend through
obstacles such as walls, the content of the communication can be
intercepted, and the network can be breached without using any
special tools if security is not set.
To prevent these problems, the projector is provided with the following
security functions.
• Data encryption
Encode and transmit data. Even if data is intercepted, it cannot be
deciphered. Whenever you establish a connection in "Quick
Connection Mode" you should always encrypt your data. s p.34
• Connection limitation (Authentication)
A users name and a password are registered in advance, which
means that only the registered wireless port can connect to the
network and prevents unauthorized third parties from connecting to
the network. The projector supports this setting when using a
wireless LAN in "Advanced Connection Mode" to establish a
connection. sUser's Guide "Network Menu (EMP-1715/1705 Only)"
9
Page 10
Using the Toolbar
10
The toolbar is displayed on the computer screen after EMP NS
Connection is started and the connection with the projector is
established. This toolbar allows you to control and make settings for
the projector being used.
Icon Names and Functions
Select target projector
It is possible to specify one particular projector when you want to use to
the toolbar to control that projector, despite the distribution function or
multi-screen display being used to project images from multiple
connected projectors. The indication below the icon indicates that
control of that projector is possible.
"ALL" indicates that all of the connected projectors can be controlled.
For example, when "1, 3" is displayed, projectors No. 1 and No. 3 can be
controlled.
Clicking causes the following screen to be displayed.
Indicates the projection
status of the projector.
Indicates the projection status of the projector.
Stop Show Pause
Presentation Mode Movie Sending Mode
Stop
Stops projection of computer images while connecting to the projector.
While projection is stopped, a black screen is projected. While audio is
being output from a projector, the audio cannot be stopped. To stop the
audio, or to display a blue screen or a user-registered logo while
projection is stopped, use the A/V mute function.
Show
Also, stop or pause is canceled.
Pause
Pauses projection of computer images when connected to the projector.
The image at the point it was paused is projected. While audio is being
output from a projector, the audio cannot be paused.
Presentation Mode
When a PowerPoint Slideshow is being presented, project only the
Slideshow images. When the Slideshow is not being presented, a black
screen is projected. s p.13
Projector control
While the projector is connected to the network, the unit’s "AV Mute",
"Switch PC source" and "Switch video source" functions can be
controlled from both the remote control and the projector’s operating
panel.
Indicates the number of an assigned projector. When control
of a specific projector has been set up, indicates the number
of the projector that can be controlled from the toolbar.
Select the projector to be controlled.
Page 11

Using the Toolbar
11
Clicking causes the following toolbar to be displayed.
Switch video source
A/V Mute
Switch PC source
A/V Mute
Operation using this toolbar is the same as when using the
remote control. sUser's Guide "Remote Control"
Switch PC source
Each time this is clicked, the image is switched between that
being received from the computer connected to the input
terminal and that from the computer connected through the
EMP NS Connection.
Switch video source
This switches to the image input from equipment connected to
the projector’s video input or S-video input port.
Screen Preview
Displays the multi-screen preview screen.
Set options
Transmission performance during the transfer of computer images can
be adjusted. s p.34
Movie Sending Mode
Used to immediately play back a movie file. s p.14
Disconnect
Disconnects the connection to the projector. s Wireless LAN Quick
Connection Guide
Signal intensity
This is displayed when the connection is made in the "Quick Connection
mode". As the signal strength increases, so does the number of lit
indicators.
Switch toolbar display
The toolbar display is switched as follows. The toolbar display remains
as is until next switched.
Full
Normal
Screen Preview
Clicking this causes a preview of the display with the settings
you have made to appear. Clicking each display causes each
preview window to be enlarged to full-screen.
Simple
Page 12

Convenient EMP NS Connection Functions
This section explains those functions that may be useful during meetings or when making a presentation, such as the ability to send a
movie file directly to a projector for playback ("Movie Sending Mode") or that which allows you to send images to multiple projectors from a
single computer ("Multi-Screen Display").
Projecting Only a PowerPoint Slideshow
(Presentation Mode) ........................................... 13
Projecting Movies from a Computer
(Movie Sending Mode)........................................ 14
• Supported file types ..........................................................14
• Playing back a movie ........................................................14
Using Multi-Screen Display ............................... 16
• Example of Adjusting the Virtual Display ..................... 16
• Procedure before using the Multi-screen Display
Function............................................................................. 17
• Setting the Virtual Display .............................................. 18
Enable the virtual display driver (Windows only)......................... 18
Virtual display arrangement........................................................... 18
• Allocating the image to be projected .............................. 23
• The allocated image is projected ..................................... 23
Page 13

Projecting Only a PowerPoint Slideshow (Presentation Mode)
In Presentation Mode, only when performing a PowerPoint Slideshow
on a computer, the images are displayed. This is useful when you only
want to display the Slideshow.
In addition to PowerPoint, Keynote is compatible with Presentation
Mode with the Macintosh.
Procedure
13
A
B
C
If necessary, select another projector to be
controlled.s p.10
Click the button on the toolbar.
Presentation Mode begins.
When in Presentation Mode, click the button
again to exit Presentation Mode.
Page 14

Projecting Movies from a Computer (Movie Sending Mode)
14
In Movie Sending Mode, movie files can be sent directly to a projector.
As a result, a movie can be projected much more smoother than when
it is being sent from an application running on a PC.
Also, because the audio is sent at the same time as the video, there is
no need for an audio cable between the computer and the projector.
When you select multiple files, they are played back repeatedly and in
sequence.
• Movie Sending Mode is valid for one projector only. It is
q
not possible to apply Movie Sending Mode to more than
one projector.
• Depending on the communication method and the
available reception, the image and sound may skip or stall.
Supported file types
The file types supported by Movie Sending Mode are listed in the
following table.
File type
(extension)
.mpg MPEG2
The reproducible audio format is MPEG1 Layer 1/
2. Linear PCM and AC-3 audio cannot be played
back. MPEG contents with no sound can be played
back.
Notes
Playing back a movie
Procedure
A
B
C
Click the button on the toolbar.
The projector selection screen is displayed.
Select the destination projector for Movie Sending
and click the "OK" button.
The "Movie Sending Mode" screen appears.
Click the "Select file" button.
Files to which DRM (Digital Rights Management) is applied
cannot be projected.
Page 15
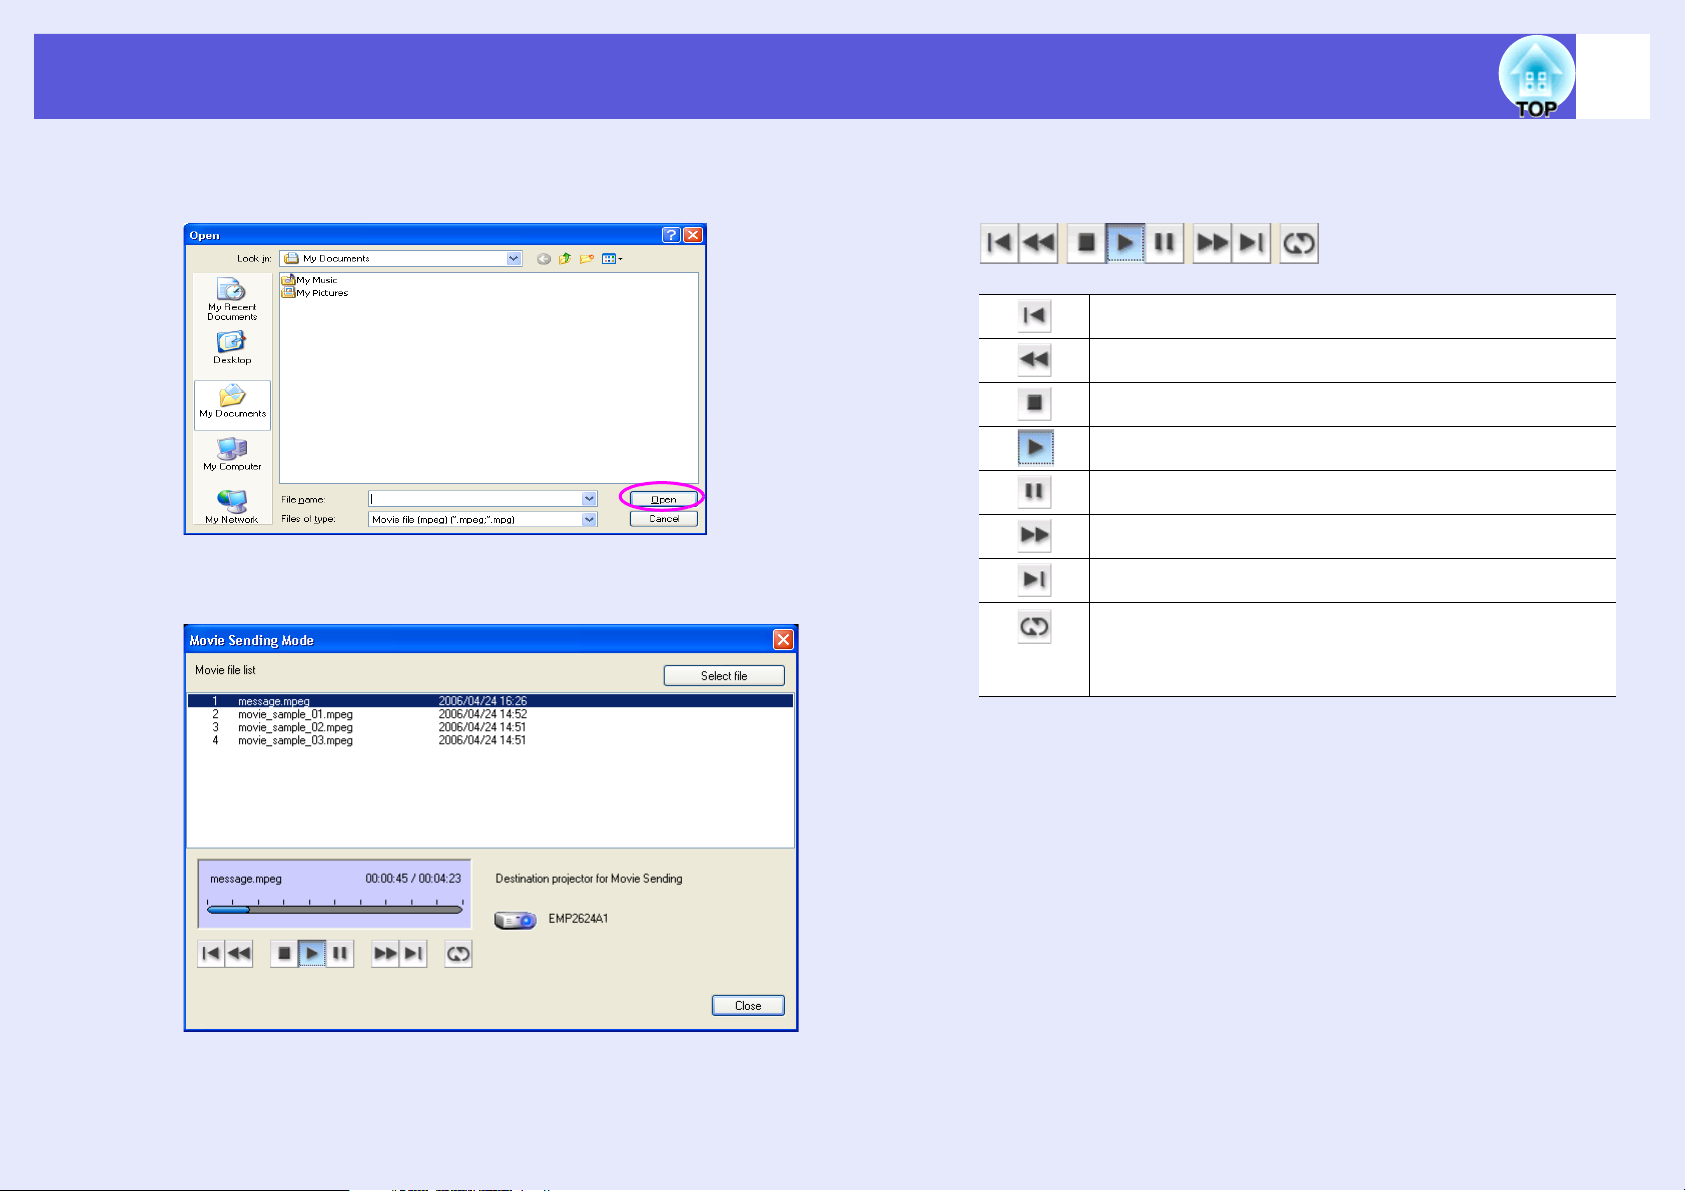
Projecting Movies from a Computer (Movie Sending Mode)
15
D
Select the movie file you want to play back and then
click the "Open" button.
The "Movie Sending Mode" screen reappears. The file you
selected is added to the movie file list.
E
F
Use the operation buttons below to play and stop
the movie files.
Plays back from the beginning of the file that is playing.
Quickly rewinds the file that is playing.
Stops play back.
Plays back the file.
Pauses play back.
Quickly fast-forwards the file that is playing.
Plays back from the beginning of the next file.
Repeatedly plays back the file list in order. When there are
multiple files in the list, it is not possible to repeatedly
play back only some of those files.
Click the "Close" button to end Movie Sending
Mode.
Page 16

Using Multi-Screen Display
16
Multi-screen display mode allows you to project different images from
multiple projectors that are connected to a single computer.
With Windows, multiple virtual displays can be set in the computer,
and each image can be projected by the projector. This function is not
available with Windows Vista due to restrictions in the Windows Vista
specifications.
For the Macintosh, an external monitor must be connected to the
computer to enable the use of the multi-screen display function.
Whereas the above explanation has referred to "virtual display", in the
case of the Macintosh, the operation relates to the screens displayed
on the physically connected monitor.
Example of Adjusting the Virtual Display
By arranging the virtual display allocation, you can project only the image
that you want to show when making a presentation or project different
images from left to right.
Arrangement example 1
Actual monitor
image
Virtual display
Image of virtual
display 1
Image of virtual
display 2
Actual monitor
image
Actual monitor PowerPoint file
Virtual display Excel file
Image of virtual
display
Page 17

Using Multi-Screen Display
17
Arrangement example 2
Actual monitor
image
Image of virtual
display
Procedure before using the Multi-screen Display Function
1. Adjusting the Virtual Display
s p.18
2. Allocating the image to be
projected s p.23
3. The allocated image is projected
s p.23
In a Windows environment, enable
the virtual display driver as
necessary. And, for both Windows
and the Macintosh, set up the virtual
display arrangement.
Open the file to be projected, and
then move the screen to the virtual
display according to the actual
projection arrangement.
Allocate a virtual display number to
a projector that is connected through
the network, and then start
projection.
Actual monitor PowerPoint file presenter tools
Virtual display Slideshow using a PowerPoint file
Page 18

Using Multi-Screen Display
18
Setting the Virtual Display
The following explains how to allocate the computer image using
arrangement example 1 on page 16.
f Enable the virtual display driver (Windows only)
Enable the virtual display driver. Those users listed below do not have to
perform this operation. Perform the "Virtual display arrangement"
(Windows), or "Virtual display arrangement" (Macintosh). s p.18
•Those users who have enabled virtual displays installing EMP NS
Connection.
•Those users who are using Macintosh computers.
Procedure
A
Start Windows on the computer, then select "Start" "Programs" (or "All Programs") - "EPSON
Projector" - "Add/Remove Epson Virtual Display".
The "Add/Remove EPSON Virtual Display" screen is displayed.
Place a check mark against the virtual display to be used.
Up to four monitors can be added. In this case, a single virtual
display is to be used, so select one. When, for example, using three
projectors, such that you have to set multiple virtual displays, only
select as many displays as is necessary.
Any one of the displays can be selected.
B
f Virtual display arrangement
After starting EMP NS Connection, the setting up of the virtual displays
varies between Windows and the Macintosh. The procedures are
explained separately, below.
For Windows, follow the procedure below.
For the Macintosh, go to s p.21.
Procedure
For Windows
A
Click the "OK" button.
When you click "OK", the drivers for the virtual display are
enabled. At this point, it is normal for the display to flicker. Wait
for the "Add/Remove Epson Virtual Display" screen to close.
To start EMP NS Connection, select "Start" "Programs" (or "All Programs") - "EPSON
Projector" - "EMP NS Connection".
Page 19

Using Multi-Screen Display
19
B
C
Select the "Use multi-display" check box.
"Display layout" and "Display properties" buttons are added at the
bottom of the screen.
Click the "Display properties" button.
D
Click the "Settings" tab.
The "Display Properties" screen will be displayed.
Page 20

Using Multi-Screen Display
20
E
Drag the displayed monitor icon and place it where
desired.
Here, the actual monitor (1) is placed on the left, while the virtual
monitor (3) is placed on the right.
When the PC has multiple display output terminals, the numbers
assigned to the virtual terminals will be sequential to those of the
physical terminals.
F
When the monitor icon appears as follows, a virtual display is
connected.
31
Click the "OK" button. The "Display Properties"
screen closes.
Up to this point, the virtual display layout has been fixed.
Go to s p.23.
q
• When an external monitor is connected as a secondary
monitor, the image for that screen cannot be projected.
• Depending on the hardware, the number of the secondary
monitor may be other than "2". When the monitor icon is
displayed on the screen, click the icon and confirm that
the monitor type shown under "Display" is other than
"secondary".
Page 21

Using Multi-Screen Display
21
For Macintosh
A
B
Start EMP NS Connection. Double-click the
"Applications" folder of the hard drive volume in
which EMP NS Connection is installed, and then
double-click the EMP NS Connection icon. EMP NS
Connection starts.
Select "Advanced Connection Mode" and then perform startup.
The "Advanced Connection Mode" screen is displayed.
Select the "Use multi-display" check box.
C
Click the "Display preferences" button.
The display setting screen is displayed.
"Display layout" and "Display preferences" buttons are added at
the bottom of the screen.
Page 22

Using Multi-Screen Display
22
D
E
Click the "Arrangement" button.
Deselect Mirror Displays.
F
G
Drag the displayed monitor icon and place it where
desired.
Close the display setting screen.
Up to this point, the screen layout has been fixed.
Go to s p.23.
Page 23
Using Multi-Screen Display
23
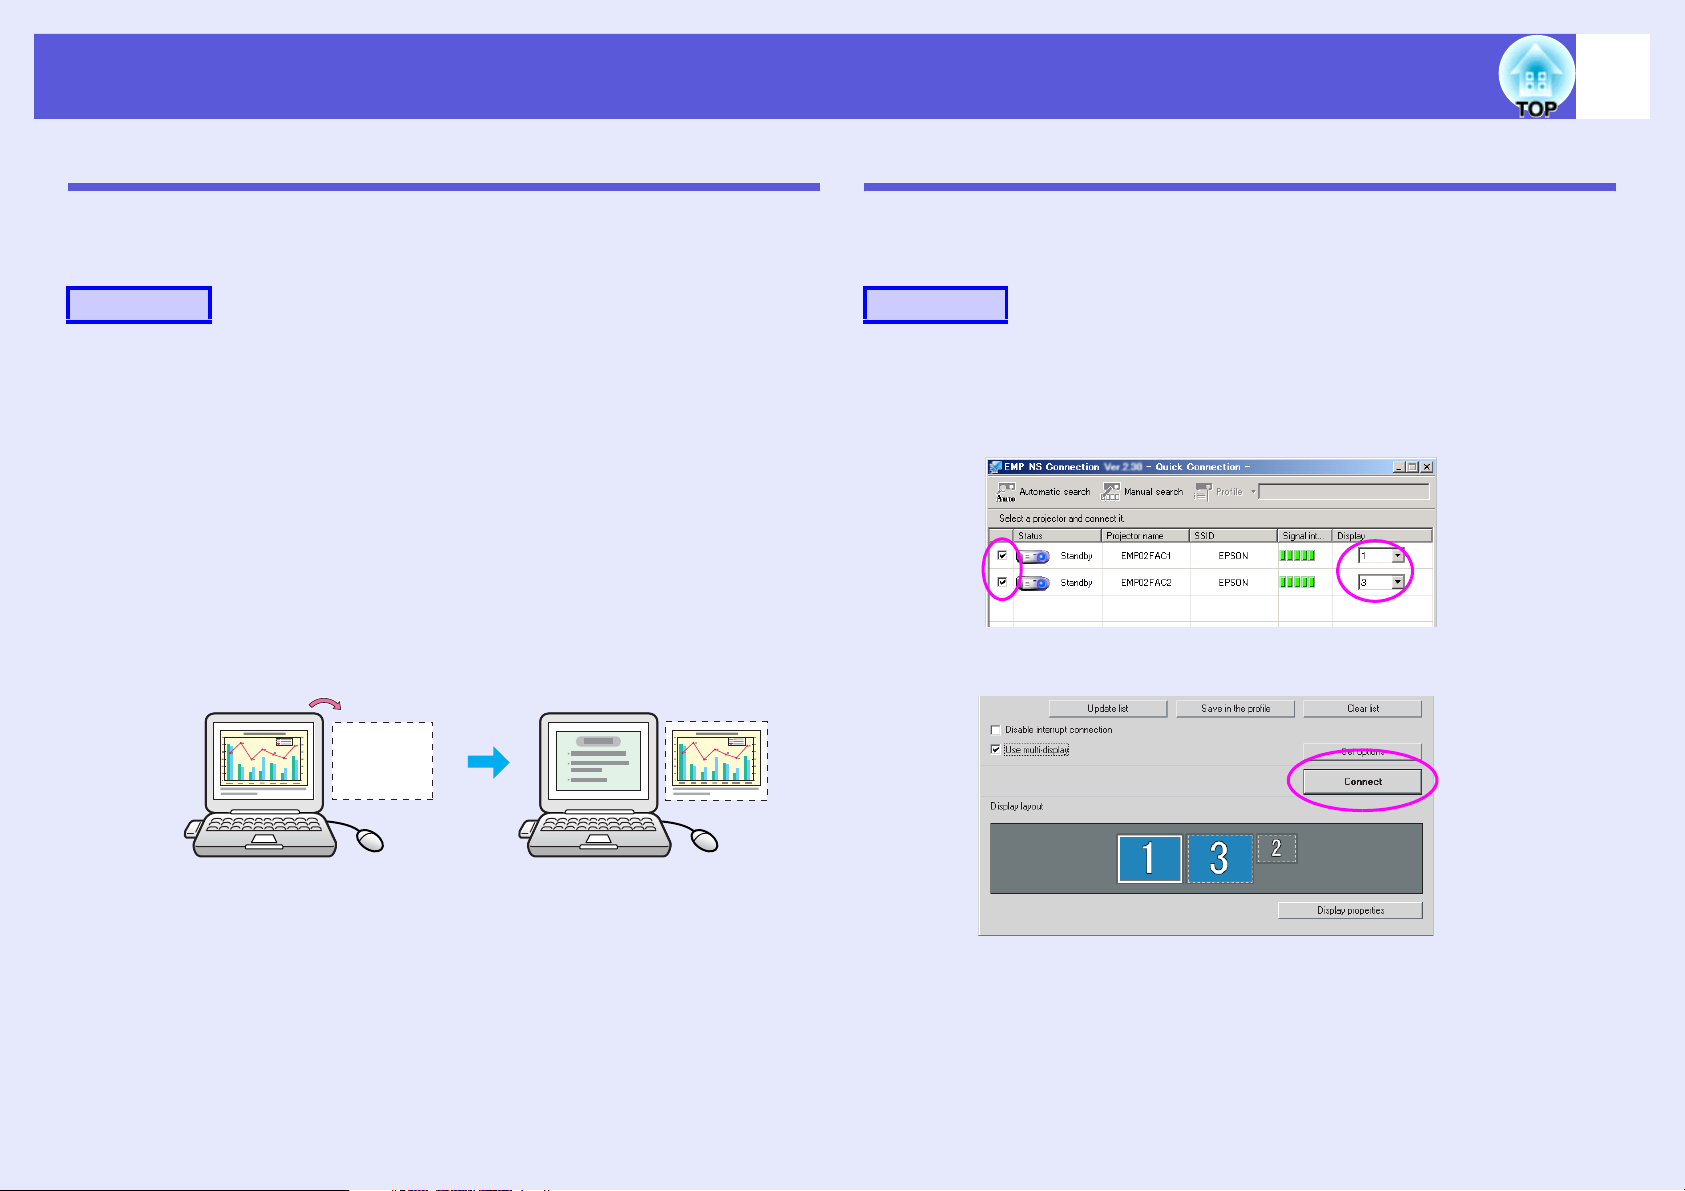
Allocating the image to be projected
The following explains how to allocate the computer image using
arrangement example 1 on page 16.
Procedure Procedure
A
B
Open the file to be projected.
For arrangement example 1 on page 16, open the PowerPoint file
and Excel file.
Drag the window to the desired virtual display
monitor, and allocate it where the image is to be
projected.
In the example in which the PowerPoint and Excel files are opened,
drag the Excel window to the right until it can no longer be seen.
As a result, the PowerPoint window appears on the actual monitor,
while the Excel window appears on the virtual display on the right.
The allocated image is projected
The following explains how to allocate the computer image using
arrangement example 1 on page 16.
A
B
Select the number of the virtual display to allocate
to "Display", and set which image to be projected
from which projector.
Click the "Connect" button.
Page 24
Using Multi-Screen Display
24
The image allocated to each projector is projected.
In a Windows environment, you cannot view the image being sent
to a virtual display on the computer. To adjust the image on the
virtual display, you must do so while viewing the projected image.
To perform mouse-based operations on the virtual display, move
the mouse pointer in the direction of the virtual display, such that
the pointer appears on the virtual display.
C
q
To terminate multi-screen display, click
"Disconnect" on the toolbar.
• In a Windows environment, if the virtual display driver has
been enabled such that the mouse pointer can be moved
outside the limits of the screen, there may be occasions
when you lose track of the location of the pointer. When
you are not using a virtual display, clear the check mark
against the under "Add/Remove EPSON Virtual Display",
such that the mouse pointer cannot be moved outside the
limits of the screen. To subsequently use multi-screen
display again, again place a check mark against the
required display under "Add/Remove EPSON Virtual
Display".
s
To clear a check mark, see the following.
• You can adjust each projector’s color tone.
s
User's Guide "Adjusting Colour for Several Projectors
(Multi-Screen Colour Adjustment)"
p.18
Page 25

Connecting to a projector on a different sub-net
This chapter explains how to connect a computer to a projector on a different sub-net via a wired LAN or a wireless LAN access
point on an existing network system.
Connecting to a projector on a different
sub-net................................................................. 26
Searching by Specifying the IP Address and
Projector Name (For "Advanced Connection
Mode" only) ......................................................... 27
Performing a search with a profile.................... 28
• Making a Profile................................................................28
• Searching by Specifying a Profile ....................................30
• Managing a Profile............................................................31
Page 26

Connecting to a projector on a different sub-net
By default, this application only searches for projectors on the same
sub-net as the computer. Therefore, even if you perform a search for
projectors on the network, one on a different sub-net will not be found.
You can, however, identify and connect to a projector on a different
sub-net, as follows.
• Specify either an IP address or projector name and perform a
search.
The IP address can be input directly. Also, provided the name of the
connected server has been registered on the DNS server, you
perform a search simply by inputting that name.s p.27
• Performing a search based on a profile
Once you have performed a search for a projector on a different subnet by specifying either an IP address or a projector name, you can
save the search as a profile with an easy-to-remember name, and
then use that profile whenever you subsequently want to search for a
projector on a different sub-net.s p.28
If a search fails to find a projector, the most likely causes
q
are as follows. Proceed as appropriate, depending on the
cause of the failure.
For both Windows and the Macintosh
• The wireless LAN signal is either out of range or weak.
Check whether there is anything that could be interfering
with the signal.
For the Macintosh
• "AirPort: On" is not set, or an appropriate access point is
not selected.
Check whether AirPort is set to "On". Or, check whether
an appropriate access has been selected.
26
Page 27

Searching by Specifying the IP Address and Projector Name (For "Advanced Connection Mode" only)
27
In the following explanations, unless otherwise noted, Windows screen
shots are used.
You see a similar screen even when using Macintosh.
Procedure
A
Click "Manual search" on the EMP NS Connection
projector selection screen.
B
q
Enter the IP address or the projector name for the
projector you want to connect to, and click the "OK"
button.
The results of the search are shown on the EMP NS Connection
projector selection screen.
Assuming that the desired projector has been found by the search,
select that projector and then click the "Connect" button to
establish a connection.
When you will always be using that projector, save the search as a
profile, such that you do not have to specify the relevant details
every time you perform a search.s p.28
When you use "Manual search" in "Quick Connection
Mode", you can specify the SSID. When there are a lot of
projectors you can narrow the search field by using SSID.
Page 28

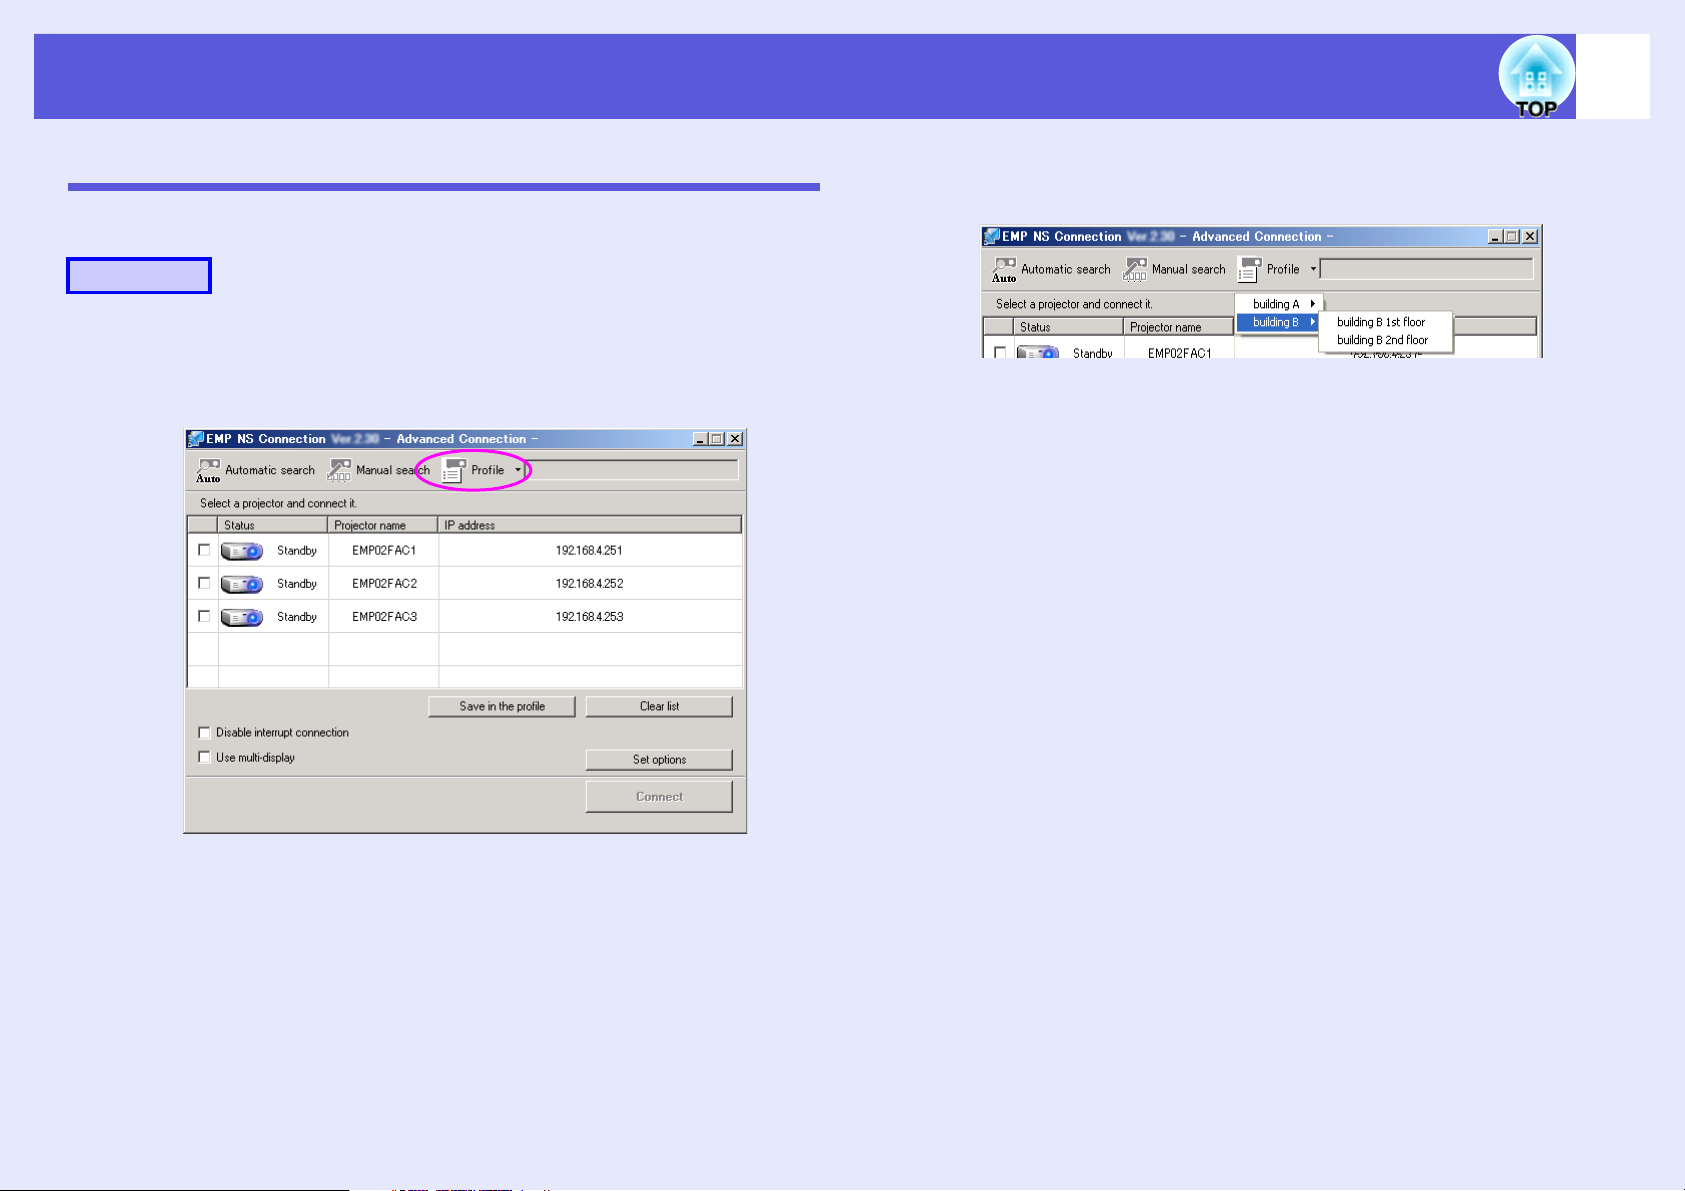
Performing a search with a profile
28
You can save a search for a frequently used projector as a profile. A
"profile" is a file containing all of the information pertaining to a given
projector, such as the projector name, its IP address, and SSID. By
specifying that profile whenever you subsequently perform a search,
the search will be performed using the saved IP address and projector
name. For example, by creating a group of profiles for each place
where a projector is setup and managing them with folders, the target
projector can be found quickly.
Location A
Location B
Location D
Location C
This section explains how to create and edit a profile.
Location A
Location B
Floor 1
Floor 2
Floor 3
Making a Profile
Profiles are made by saving searched results.
For details on how to edit a previously saved profile, see "Managing a
Profile". s p.31
For details on how to locate a projector on a different sub-net, see
"Searching by Specifying the IP Address and Projector Name (For
"Advanced Connection Mode" only)". s p.27
Procedure
A
When the projector is displayed on the EMP NS
Connection projector selection screen, click the
"Save in the profile" button.
The "Save in the profile" screen is displayed.
Page 29

Performing a search with a profile
29
B
For Windows
Enter a profile name and then click the "Add"
button.
Projector information is registered in the profile
If you have previously saved a profile, you are prompted to confirm
whether that profile can be overwritten. To save a profile with a
different name, select "Save as". If you have created a folder for a
profile, the following screens are displayed. After entering the
profile name and selecting the save destination, click the "Add"
button.
For Macintosh
For details on how to create a folder for a profile, see
q
"Managing a Profile".
s
p.31
Page 30
Performing a search with a profile
30
Searching by Specifying a Profile
You can search by specifying the profile you created.
Procedure
A
Click "Profile" on the EMP NS Connection projector
selection screen.
If no profile is registered, you cannot select "Profile".
B
From the menu that is displayed, select the
projector you want to connect to.
The search results are displayed on the EMP NS Connection
projector selection screen.
Provided the target projector has been identified, select that
projector, and then click "Connect" to establish a connection.
Page 31

Performing a search with a profile
31
Managing a Profile
You can change the name and the hierarchical structure of the profile.
Procedure
A
B
Click the "Set options" button on the EMP NS
Connection’s main screen.
The configuration screen is displayed.
Click the "Edit profile" button.
C
Edit the contents registered in the profile.
: Indicates a folder.
: Indicates a profile.
The profile management screen is displayed.
Page 32

Performing a search with a profile
Profile
Item Function
Profile You can display the registered profile. You can manage
it by creating a folder. You can change the order of the
profile or the folder by dragging & dropping.
Copy You can copy the profile. The copied profile is saved in
the same folder as the original with the same name.
Delete You can delete the profile and the folder.
Rename You can display the rename dialog box and rename the
folder or the profile. You can enter up to 32 characters
in the rename dialog box.
Create folder You can create a new folder.
Export You can export a profile, as well as import and use a
profile.
Import Used when you want to want to read and use an
exported profile.
Information on selected profile
Item Function
IP Address or
Projector Name
Delete You can delete the projector information. When all
You can display the projector information registered in
the profile.
projector information is deleted, the profile is also
deleted.
32
D
Click "OK".
Save and close the profile management screen.
Page 33

Setting the EMP NS Connection Operation
You can set the environment, such as the processing method, when EMP NS Connection is started.
Setting the EMP NS Connection
Environment........................................................ 34
• General settings Tab .........................................................34
• Adjust Performance Tab ..................................................36
Page 34

Setting the EMP NS Connection Environment
34
You can set the environment, such as the processing method, when
EMP NS Connection is started.
Call the option settings from the EMP NS Connection's main screen.
Procedure
A
Click the "Set options" button on the EMP NS
Connection main screen.
General settings Tab
B
The "Set options" screen is displayed.
Set each of the items.
Confirm the details of the set items in the next step. After you have
made all the required settings, click the "OK" button to close the
"Set options" screen.
Page 35

Setting the EMP NS Connection Environment
35
Use full-screen
video transfer
Encrypt
communications
Display
Connection Mode
Selection window
on startup
Search method on
startup
Edit profile The "Edit profile" dialog box is displayed. s p.31
Switch LAN Windows only
Windows only (excluding Windows Vista)
When displaying Windows Media Player in full screen,
select the "Use full-screen video transfer" checkbox. If,
however, you feel that the video is jerky, set "Do not
use full-screen video transfer".
Encode and transmit data. Even if data is intercepted, it
cannot be deciphered.
When using "Quick Connection Mode", always set
"Encrypt".
Set whether or not the "Quick Connection Mode"/
"Advanced Connection Mode" screen is displayed
when EMP NS Connection is started.
When the startup method is already determined, do not
select the "Display Connection Mode window on
startup" checkbox.
Select one of the following methods to search the
projector that is to be performed when EMP NS
Connection is started.
"Automatic search on startup"
"Specify search method after startup"
"Search with the last network configuration"
The "Switch LAN" dialog box is displayed. This is
used when it is necessary to switch the network adapter
to be used for a search when a computer has multiple
adapters.
By default, all of the network adapters are used to
perform a search. For example, when a wired LAN is
always used as the connection method, select
"Ethernet".
Page 36

Setting the EMP NS Connection Environment
Adjust Performance Tab
36
Performance
adjustment slider
Transfer layered
window
When you click on the toolbar, only the Adjust
q
performance tab is displayed.
The performance can be set to "Fast", "Normal", and
"Fine".
Set to "Fast" when movie projections are interrupted.
Windows only
Set whether or not to transfer a layered window.
The layered window is in use when contents such as
messages displayed on the computer are not projected
by the projector. Set this to "Send" to display them on
the projector.
Page 37

Using a Computer to Set Up, Monitor and Control Projectors
This chapter describes how to use a computer that is connected to the network to change projector settings and to
control the projector.
Changing Settings Using a Web Browser
(Web Control) ...................................................... 38
• Displaying Web Control ...................................................38
Entering the IP address of the projector .........................................38
• Projector Setup..................................................................38
Items in the configuration menu that cannot be set by
the web browser.........................................................................38
Using the Mail Notification Function to Report
Problems ............................................................. 39
• Setting Mail Notification Function ..................................39
• If a Problem Notification is Sent by Mail .......................39
Management Using SNMP ................................. 40
Page 38

Changing Settings Using a Web Browser (Web Control)
38
You can set up and control the projector from a computer by using the
Web browser of a computer that is connected to the projector via a
network. Setup and control operations can be performed remotely if
this function is used. In addition, since you can use the computers
keyboard, entering characters required for the setup is easier.
Use Microsoft Internet Explorer 6.0 or later as the Web browser. If
using a Macintosh, you can also use Safari. If, however, you are using
Safari under Macintosh 10.2.8, some of the Web control radio buttons
may not display properly.
Setup and control with a Web browser are possible if set to
q
"Network ON" in the "Extended" menu of the projector’s
configuration menu, even if the projector is in standby
mode (when the power is off).
Displaying Web Control
Display Web control with the following procedure.
If your Web browser is set up to connect via a proxy server,
q
Web control cannot be displayed. To use the Web control,
you need to make network connection settings with other
than a proxy server.
Procedure
A
B
Start the Web browser on the computer.
Enter the IP address of the projector in the address
bar of the Web browser, and press the [Enter] key on
the computer’s keyboard.
Web Control is displayed.
Projector Setup
You can set items that are usually set in the projector’s configuration
menu. The contents set are reflected in the configuration menu.
f Items in the configuration menu that cannot be set by the
web browser
All items in the configuration menu can be set with the exception of the
following items.
• "Settings" - "Pointer Shape", "EasyMP Audio Out"
• Registering a user’s logo using "Extended" - "User’s Logo"
• "Extended" - "Operation" - "High Altitude Mode"
• "Extended" - "Link21L", "Language"
• "Reset" - "Reset All", "Reset Lamp Hours"
f Entering the IP address of the projector
Web control can be opened by specifying the IP address of the projector
as follows when using "Advanced Connection Mode".
The items available on each menu are the same as the configuration menu
of the projector.
sUser’s Guide "List of Functions"
sUser’s Guide "Network Menu (EMP-1715/1705 Only)"
The "MAC Address" is not displayed.
Page 39

Using the Mail Notification Function to Report Problems
39
By setting the mail notification function from network settings in the
configuration menu, notification messages will be sent to preset e-mail
addresses when a problem or warning occurs with a projector. This
will enable the operator to be notified of problems with projectors even
at locations away from the projectors.
• Up to a maximum of three notification destinations
q
(addresses) can be recorded, and notification messages
can be sent to all three destinations at once.
• If a projector develops a critical problem and suddenly
stops working, it may not be able to send a message
notifying an operator of the problem.
• Setup and control with a Web browser are possible if set to
"Network ON" in the "Extended" menu of the projector’s
configuration menu, even if the projector is in standby
mode (when the power is off).
Setting Mail Notification Function
Select "Mail" from network settings in the projector’s configuration menu
and set the mail notification function. sUser's Guide "Network Menu
(EMP-1715/1705 Only)" "Mail Menu"
Also, confirm the following points.
• Network settings have been made to allow the projector and computer to
connect via a wireless LAN in the "Advanced Connection Mode" or the
wired LAN unit.
sUser’s Guide "Network Menu (EMP-1715/1705 Only)" "Mail Menu"
If a Problem Notification is Sent by Mail
When the mail notification function is set to "On" and the projector enters
an abnormal/warning state, the following mail is sent.
Subject: EPSON Projector
First line: The projector name of the projector where the abnormality
occurs
Second line: The IP address set for the projector where the abnormality
occurs
Third line and on: Details of the abnormality
The details of the abnormality are described one by one, one line at a time.
The following table explains the details shown in the message.
For details on dealing with abnormalities/warnings, see sUser’s Guide
"Reading the Indicators".
Item Details shown
Internal error An internal error has occurred.
Fan related error A fan error has occurred.
Sensor error A sensor error has occurred.
Lamp timer failure Lamp failure has occurred.
Lamp out A lamp error has occurred.
Lamp cover is open. The lamp cover is open.
Internal temperature
error
High-speed cooling
in progress
Lamp replacement
notification
No-signal No Signal
The (+) or (-) at the beginning of the sentence
(+): An error has occurred in the projector
(-): An error in the projector has been dealt with
A high temperature error has occurred. (Overheating)
A high temperature warning has occurred.
It is time to replace the lamp.
No image signal is being input to the projector. Check
the connection status for the projector and that the power
supply for the connected equipment is turned on.
Page 40

Management Using SNMP
By setting SNMP in the EasyMP network setting, notification
messages will be sent to preset e-mail addresses when a problem or
warning occurs with a projector. This is useful when controlling
projectors centrally at a point distant from them.
• SNMP should be managed by a network administrator or
q
To set SNMP, select "SNMP" from network settings on the projector’s
configuration menu.s User's Guide "Network Menu (EMP-1715/1705
Only)" "SNMP Menu"
someone who is familiar with the network.
• The SNMP function to monitor the projector requires
SNMP Manager to be installed on the computer.
• The managing function using SNMP cannot be used via a
wireless LAN in the "Quick Connection Mode".
• Up to two destination IP addresses can be saved.
40
Page 41

Presentations Using PC Free
This chapter explains scenarios made with EMP SlideMaker2 and how to project image and movie files using PC Free.
Files that can be Projected Using PC Free,
and Saving........................................................... 42
• Files that can be Projected Using PC Free .....................42
• PC Free Examples.............................................................43
Projecting images stored in USB storage .......................................43
Slideshow using a PowerPoint file stored on the computer ........... 43
PC Free Basic Operations.................................. 44
• Starting and Closing PC Free ..........................................44
Starting PC Free .............................................................................44
Closing PC Free..............................................................................46
• Guide Mode and Quick Mode..........................................47
• PC Free Basic Operations ................................................48
• Rotating the Image............................................................49
Projecting Scenarios ..........................................50
• Preparing a Scenario........................................................ 50
• Playing a Scenario ............................................................ 50
• Operating During a Presentation.................................... 51
Projecting image and movie files ......................52
•Projecting Images/Movies............................................... 52
• Projecting all Image and Movie Files in a Folder in
Sequence (Slideshow) ....................................................... 53
Setting Image and Movie File Display
Conditions and Operation Mode........................55
Page 42

Files that can be Projected Using PC Free, and Saving
42
You can use PC Free to project files stored in digital cameras and
USB storage devices.
USB storage devices that incorporate security functions
q
The following files can be projected using PC Free.
sometimes cannot be used.
Files that can be Projected Using PC Free
Type
Scenario .sit These are scenario files created using SlideMaker2.
Image .bmp Cannot project images with a resolution greater
File type
(extension)
You can convert PowerPoint files as they are or
create scenarios by combining images and movie
files. For instructions on creating a scenario, see
s p.50.
You can also play audio (.wav) files set as BGM at
the time of scenario creation.
You can also project scenarios created using the
EMP SlideMaker that is supplied with the EMP1825/1815/1715/1705/7950/7850/765/755/745/
737, ELP-735/715/505.
than 1024 x 768.
.gif Cannot project images with a resolution greater
than 1024 x 768.
.jpg Cannot project images in CMYK color format,
progressive mode, and with a resolution greater
than 8192 x 6144.
.png Cannot project images with a resolution greater
than 1024 x 768.
Notes
Type
Movie .mpg MPEG2
DPOFg .mrk For DPOF version 1.10, only files named
File type
(extension)
Notes
The reproducible audio format is MPEG1 Layer 1/
2. Linear PCM and AC-3 audio cannot be played
back. MPEG contents with no sound can be played
back.
AUTPLAYx.mrk (where x is a number between 0
to 9) can be projected.
• Files to which DRM (Digital Rights Management) is
q
applied cannot be projected.
• JPEG files with the extension ".jpeg" and MPEG files
with the extension ".mpeg" cannot be projected.
• When projecting JPEG files, the image will not be
projected clearly if compression is set too high.
• If you use a USB storage device with a slow access speed
when playing back movies and scenarios with BGM (when
transmitting at higher bit rates), the movie files may not
play back correctly or the sound may skip or not be output.
When using a USB hard disk, we recommend using an AC
adaptor power supply.
• When projecting images or movies in media, use a USB
MultiCard Reader connected to the projector. The
projector does not support media formatted on some file
systems. If you have trouble with projecting, use media
formatted under Windows.
• Format the media using the FAT16/32 file system.
Page 43

Files that can be Projected Using PC Free, and Saving
43
PC Free Examples
f Projecting images stored in USB storage
mpg
bmp
gif
jpg
png
Image and movie files can be played back using either of the following
two methods. One movie can be sent to the projector while another
application is displayed on the computer’s screen.
fExample 1: Prepare multiple images and project them
continuously (Slideshow) s p.53
fExample 2: Select image files and movie files one at a time and
project it s p.55
f Slideshow using a PowerPoint file stored on the
computer
Using EMP SlideMaker2, convert the PowerPoint file into scenario
format. If that is then stored into USB memory, then you can project a
PowerPoint Slideshow without the need for a computer.
PowerPoint
file
The playback method for the file to be projected can be set as follows at
conversion.
fExample 1: Convert a PowerPoint file into a scenario and project it
s"Turning a PowerPoint File into a Scenario" p.59
s"Projecting Scenarios" p.50
Convert
Scenario file
Save to USB
storage device
fExample 2: Set presentation to automatic playback (autorun)
s"Sending Scenarios" p.70
fExample 3: Project presentation with BGM s p.62
Page 44

PC Free Basic Operations
44
PC Free lets you play back and project image files from a digital
camera, and scenarios, image files, and movie files in a USB storage
device.
This section explains the basic operation of PC Free.
Starting and Closing PC Free
f Starting PC Free
Procedure
A
Connect one of the following devices to the
projector.
• Digital Cameras or USB Storage sUser's Guide "Connecting
USB Devices (EMP-1715/1705 Only)"
• USB MultiCard Reader (when a memory card is inserted)
sUser's Guide "Connecting USB Devices (EMP-1715/1705
Only)"
B
Press the [EasyMP] button on the remote control.
Then, the EasyMP standby screen is displayed.
When multiple USB storage devices are connected, multiple icons
of USB storage device are displayed on the standby screen.
Page 45

PC Free Basic Operations
45
C
Tilt the [h] button on the remote control to move the
cursor to the icon for the projection target, and then
press the [Enter] button.
PC Free will start and display the contents of the USB storage
device.
JPEG files and MPEG files are displayed as thumbnails (file
contents are displayed as small images). Other files or folders are
displayed as icons.
Files that cannot be displayed as thumbnails are displayed as the
following icons.
Icon File Type Icon File Type
Scenario file JPEG file
Digital camera format PNG file
MPEG file Electronic certificate file
BMP file
GIF file
Page 46

PC Free Basic Operations
• If the USB storage device contains a scenario that is set
q
for autorun, this scenario will be played back as the
highest priority. If you want to stop it from playing back,
press the [Esc] button on the remote control.
• If the digital camera and USB storage device is connected
to the projector, the following screen is displayed.
f Closing PC Free
Procedure
A
Tilt the [h] button on the remote control up to
position the cursor on the "Exit" button.
46
• Some JPEG files may be displayed as icons instead of
thumbnails. In this event, a file icon is displayed.
B
Press the [Enter] button on the remote control.
PC Free shuts down and the next standby screen is displayed.
Page 47

PC Free Basic Operations
47
C
q
After turning off the power supply to the digital
camera or the USB storage device, disconnect it
from the projector’s USB Type A port.
If you leave the USB storage device connected when you
close PC Free and the EasyMP standby screen is displayed,
disconnect the USB storage device and reconnect it before
starting PC Free again.
Guide Mode and Quick Mode
In Guide Mode, when the folder and the file are selected, the sub menu to
specify the next operation is displayed.
In Quick Mode, file projection starts immediately without displaying the
sub menu. When the folder is selected, the folder opens.
"Guide Mode" is the default setting. In Guide Mode and Quick Mode, the
following operations differ.
When a folder is selected and the [Enter] button is pressed
For Guide Mode For Quick Mode
The following sub menus are displayed. The folder opens.
Open Folder
Play Slideshow s p.53
Options s p.55
When a file is selected and the [Enter] button is pressed
For Guide Mode For Quick Mode
Depending on the file type, one of he
following sub menus is displayed.
The file starts to play back.
View Image s p.52
Play Movie s p.52
Play Scenario s p.50
To set the operation mode, see "Setting Image and Movie File Display
Conditions and Operation Mode". s p.55
Page 48

PC Free Basic Operations
48
PC Free Basic Operations
There are two modes, Guide Mode and Quick Mode, for playing back
files by PC Free. In Quick Mode, the file starts to play back immediately.
The following describes the procedures for playing scenarios, images, and
movies using Guide Mode.
Procedure
A
q
Tilt the [h] button on the remote control to position
the cursor on the file or folder you want to access.
Cursor
If all files and folders cannot be displayed at the same time
in the current window, press the [
control or move the cursor to the "Next page" button and
press the [Enter] button on the remote control.
To return to the previous screen, press the [
remote control, or position the cursor on the "Previous
page" button and press the [Enter] button on the remote
control.
[
] button on the remote
]
] button on the
B
C
When a folder is selected
Open Folder Opens a folder and displays the files within the folder. Select
Play
Slideshow
Options Displays the options setting screen. Sets the Slideshow
Press the [Enter] button on the remote control.
The sub menu is displayed.
Sub Menu
Select the target item from the display menu and
press the [Enter] button on the remote control.
"Return" on the screen that opened and press the [Enter]
button to return to the previous screen.
Plays the image or movie files in the folder in order. s p.53
operation for image files and movie files in sequence. s p.55
Page 49

PC Free Basic Operations
Rotating the Image
You can rotate JPEG images in 90° increments when playing them with
PC Free. The rotating function is also available during the Slideshow.
Rotate JPEG images in the following way.
Procedure
49
A
B
Play images or scenarios in JPEG format, or
perform a Slideshow.
To play JPEG images s p.52
To play scenarios s p.50
To play Slideshows s p.53
While projecting a JPEG image, tilt the [h] button on
the remote control to the left or right.
The image rotates when the [h] button is tilted in a certain
direction as shown below.
Right
Left
Right Left
Left
Left
Right
Right
Page 50

Projecting Scenarios
50
This section describes the method for playing scenarios stored in a
USB storage device, and the operations during scenario playback.
Preparing a Scenario
Create the scenario beforehand by using EMP SlideMaker2, and then
transfer it to the USB storage device connected to the projector by using
the "Send Scenario" function. s p.70
While transferring the scenario you can set autorun and
q
Playing a Scenario
Procedure
A
continuous play.
Start PC Free. s p.44
The contents of the USB storage device are displayed.
s
p.70
C
D
Press the [Enter] button on the remote control.
Scenario file
If "Advance" is set to "Automatically after", once
play has reached the end, it returns to the file list
screen. If "Repeat" is selected, the scenario is
repeated from the beginning.
See "Operating During a Presentation" for how to operate the
scenario when "Advance" is set to "On mouse click", and how to
stop and cancel.
B
Tilt the [h] button on the remote control up to
position the cursor on the target scenario folder.
q
• You can rotate JPEG format images in the scenario while
they are being projected.
• The movie files that are included in scenarios can be fastforwarded, rewound and paused during playback.
• The slide changing time for scenarios can be set using the
"Advance" command in EMP SlideMaker2.
s
p.49
s
s
p.74
p.53
Page 51

Projecting Scenarios
Operating During a Presentation
The following operations using the remote control are possible while
playing a scenario.
51
Screen
Switching
Stopping
Playing
Proceed to the next screen by pressing [Enter] or []].
Return to the previous screen by pressing [[].
The message "Do you want to quit playing the scenario?" is
displayed when you press the "Esc" button. Close by selecting
the "Exit" button and pressing the [Enter] button. Continue
playback by selecting the "Return" button and pressing the
[Enter] button.
The following functions of the projector can be used when projecting a
scenario or image file with PC Free.
• Freeze • A/V Mute • E-Zoom
For details concerning each function sUser's Guide "Freezing the Image
(Freeze)", "Hiding the Image and Sound Temporarily (A/V Mute)",
"Enlarging Part of the Image (E-Zoom)"
Page 52

Projecting image and movie files
52
Image files from a digital camera and image files and movie files
stored in a USB storage device can be projected using PC Free by
either of the following two methods.
• Projecting image and movie files
This is a function to project single files.
• Sequential projection of image and movie files in a folder
(Slideshow).
This is a function for projecting the file contents of a folder in order,
one file at a time.
Attention
The USB storage device is accessed frequently when playing back
movie files. Do not disconnect the USB storage device at this time.
PC Free may not operate correctly.
Projecting Images/Movies
Procedure
C
Press the [Enter] button on the remote control.
In Quick Mode, the image or movie starts to play back. In Guide
Mode, the sub menu is displayed and you can select "View Image"
or "Play Movie", and then press the [Enter] button. The image or
movie starts to play back.
Image file
A
B
Start PC Free. s p.44
The content of the connected digital camera or USB storage device
is displayed.
Tilt the [h] button on the remote control to position
the cursor on the image file or movie file to be
projected.
Page 53

Projecting image and movie files
53
D
q
To return to the file list screen, take the following
operation.
• While projecting an image: Press the [Esc] button on the remote
control.
• While projecting movie: Press the [Esc] button, select "Exit" in
the screen displayed then press the
[Enter] button.
• JPEG format images can be rotated during projection.
s
p.49
• You can make the following operations using the remote
control while playing movie files.
Fast-forward: Tilt the [
Rewind: Tilt the [
Freeze (Pause): Tilt the [
Three fast-forward/rewind speeds are available, and the
speed changes each time the button is pressed.
To return to normal playback, press the [Enter] button.
Audio is not output while fast-forwarding, rewinding, or
pausing is in progress.
h] button to the right
h] button to the left
h] button down
Projecting all Image and Movie Files in a Folder in Sequence (Slideshow)
You can project the image and movie files in a folder in sequence, one at a
time. This function is called "Slideshow". Perform the Slideshow by the
following procedure.
You can set display conditions, such as projecting
q
Procedure
A
B
repeatedly and adding effects to the display when files are
being switched. To change the movie files and image files
automatically when you run Slideshow, set the screen
switching time in the PC Free option menu to anything
s
other than "No". Default setting: "No"
Start PC Free. s p.44
The content of the connected digital camera or USB storage device
is displayed.
To select the content, tilt the [h] button on the
remote control to position the cursor on the folder
that you want to perform the Slideshow then press
the [Enter] button.
In Quick Mode, a file list in the folder is displayed.
In Guide Mode, select "Open Folder" in the sub menu displayed,
and press the [Enter] button.
p.55
Page 54

Projecting image and movie files
54
C
q
Select "Slideshow" from the bottom of the screen
by tilting the [h] button on the remote control, then
press the [Enter] button.
The Slideshow will be performed and the image and movie files in
the folder will be projected in sequence one at a time.
When the last file is projected, the file list will be displayed again
automatically. If you set "Continuous Play" to "ON" in the Options
window, projection will start from the beginning again when the end
is reached. s p.55
Just as with a scenario, you can proceed to the next screen, return
to the previous screen, or stop playback during projection of a
Slideshow. s"Operating During a Presentation" p.51
If the screen switching time setting has been set to "No",
the files will not change automatically when you run a
]
Slideshow. Press the [Enter] or [
control to continue to the next file.
] button on the remote
Page 55

Setting Image and Movie File Display Conditions and Operation Mode
55
You can set the display conditions and operation mode for playing
back image or movie files as a Slideshow in PC Free.
Procedure
A
B
Tilt the [h] button on the remote control to position
the cursor on the folder where display conditions
are to be set.
Set each of the items.
Enable settings by positioning the cursor on the target item and
pressing the [Enter] button on the remote control.
Details of the items are given below.
C
Display order You can set the order of the files to be displayed.
You can select sorting of the files into either file
name order or revision date order.
Continuous
Play
Screen
switching time
Effect This sets the transition effects between files.
Tilt the [h] button on the remote control up to
position the cursor on the "OK" button, and then
press the [Enter] button.
The settings are applied.
If you do not want to apply the settings, position the cursor on the
"Cancel" button and press the [Enter] button.
You can determine whether to repeat the Slideshow.
You can set the time for a single file to be displayed
when running a Slideshow. You can set a time
between 0 and 60 s. When you set 0 sec (No
Transition), auto play is disabled.
Page 56

Preparing a Scenario (Using EMP SlideMaker2)
This chapter describes how to create and send scenario.
Scenario Summary ............................................. 57
Files that Can be Included in Scenarios........... 58
Turning a PowerPoint File into a Scenario....... 59
Converting all files in a single operation
without starting up SlideMaker2 ....................... 60
Starting up SlideMaker2 and
converting files ................................................... 62
Scenario creation procedure ...........................................................62
• Setting Scenario Properties ..............................................62
• Including PowerPoint Files in Scenarios ........................64
Including all slides in a PowerPoint file.........................................65
Including only selected slides while checking thumbnails ............67
• Including Image and Movie Files in Scenarios...............67
• Editing a Scenario .............................................................68
Sending Scenarios..............................................70
Cases Like These ................................................72
• Checking the Projection Scenario Status
from a Computer .............................................................. 72
• Setting Animations ........................................................... 73
• Setting the Slide Animation ............................................. 73
Adding files and slides ...................................................................68
Deleting a slide...............................................................................69
Changing the order of slides...........................................................69
Page 57

Scenario Summary
57
A scenario is a combination of PowerPoint, image, and movie files,
arranged in a projection order and saved as a single file, created with
EMP SlideMaker2.
Making a scenario allows you to easily and efficiently prepare
presentation material by extracting the necessary parts of files, and
arranging them in order without editing the original files.
Converting all files in
a single operation
without starting up
SlideMaker2
Starting up SlideMaker2 and converting files
PowerPoint
file
Scenario file
For Connection of USB storage devices sUser's Guide "Connecting
USB Devices (EMP-1715/1705 Only)"
EMP SlideMaker2 should be installed into the computer.
q
For details on installing EMP SlideMaker2
s
Wireless
LAN Quick Connection Guide "Installing EasyMP
Software"
Creating PowerPoint files, image files, and
movie files.
EMP SlideMaker2
There are two ways of using EMP
SlideMaker2 to convert a PowerPoint
presentation into a scenario.
• On the desktop, drag the EMP SlideMaker2
icon and drop it on the PowerPoint file.
Conversion startss p.64
• Starting up SlideMaker2 and converting
files. s p.62
From a computer
From a computer
Transfer the created scenarios to store them on a USB storage device
connected to the computer. Then, connect the USB storage device to
the projector so that you can use the projector's PCFree function to
project the scenario.
Sending Scenarios s p.70
PC Free
Projecting Scenarios s p.50
From the projector
Page 58

Files that Can be Included in Scenarios
58
Any of the following file types can be combined into a single file to
create a scenario.
Type
PowerPoint .ppt Microsoft PowerPoint 2000/2002/
Image .bmp Cannot reproduce images with a
Movie .mpg MPEG2-PS
Audio .wav PCM, 22.05/44.1/48.0 kHz, 8/16 bit
File Type
(Extension)
2003
.pptx Microsoft PowerPoint 2007
resolution greater than 1024 x 768.
.jpg Any version. However, CMYK color
formats and progressive formats
cannot be played back.
Movies that exceed a maximum size
of 720 x 576 or are not in the same
format as a DVD (sequence header
arranged for each GOP) cannot be
played back.
The reproducible audio format is
MPEG1 Layer 2. Linear PCM and
AC-3 audio cannot be played back.
Notes
• The following slide transition effects and animation
q
settings in the PowerPoint "Slideshow" menu are reflected
in a scenario.
•Fly •Blinds •Box
•Checkerboard •Crawl •Dissolve
•Peek •Random Bars •Spiral
•Split •Stretch •Strips
•Swivel •Wipe •Zoom
Effects for screen transitions other than those mentioned
above are converted to "Cut", and animation is converted
s
to "Animation Rules (Default: Cut)".
p.73
• In the event that the image and movie files in the table on
the left are to be played back as file units, they need not be
made into scenarios. After saving the file to a USB storage
device, direct playback and projection with PC Free are
possible by connecting the USB storage device to the
s
projector.
The following table indicates whether scenarios created by the
included software of other projectors can be opened by EMP
SlideMaker2 of this projector.
p.52
Projector Software
EMP-1815/1825
EMP-1715/1705
EMP-7950/7850
EMP-835
EMP-765/755/745/737
ELP-735
ELP-8150/8150NL EMP Scenario Cannot
ELP-715/505 EMP SlideMaker Cannot
EMP SlideMaker2
Can be Opened with this
Projector’s EMP SlideMaker2
Can
Page 59

Turning a PowerPoint File into a Scenario
59
PowerPoint files can be converted to scenarios by the following four
methods.When you want to use a PowerPoint file as is, use either
method 1 or 2.
1 Batch conversion without starting EMP SlideMaker2
All of the slides in a PowerPoint presentation can be batch-converted into
a scenario.s"Converting all files in a single operation without starting up
SlideMaker2" p.60
2 Include a PowerPoint file from the file list
After the PowerPoint files have been batch converted to create scenarios,
an image or movie file can then be converted to create another scenario.
s"Starting up SlideMaker2 and converting files" p.62
3 Include only the slides you want from the thumbnails
Select only the PowerPoint slides you need and then convert them to a
scenario. s p.62
• When creating scenarios with methods 1 to 2, the
q
following animations set in PowerPoint are also reflected
in the scenario.
•Fly •Blinds •Box
•Checkerboard •Crawl •Dissolve
•Peek •Random Bars •Spiral
•Split •Stretch •Strips
•Swivel •Wipe •Zoom
• Animations other than those mentioned above are
replaced by the animations in "Animation Rules (Default:
s
Cut)".
p.73
• The picture quality for scenarios created with method 1 is
"Normal" from a possible, "Highest Quality", "High
Quality", and "Normal". When you want to create a
scenario with a high image quality, use methods 2 to 3.
The following table shows the differences among methods 1 to 3.
Image Quality
1 "Normal" fixed Reflected Continuous
2 Select from "Highest
Quality", "High Quality" and
"Normal"
3 Select from "Highest
Quality", "High Quality" and
"Normal"
Animation
Reflection
Reflected Continuous
Not reflected Operating later
Send Scenario
operation
operation
*1
*1
*2
*1 When scenario creation is complete, the "Send Scenario" screen is
automatically displayed.
*2 After creating the scenario, perform "Send Scenario" s p.70.
Page 60

Converting all files in a single operation without starting up SlideMaker2
60
The following explains how a scenario can be created easily, without
starting EMP SlideMaker2.
• Note that the following is not possible if EMP
q
Procedure
A
B
SlideMaker2 has been started. Close EMP SlideMaker2
first.
• After the scenarios have been incorporated, they will
include the animation set with PowerPoint. When
projecting with PCFree, this animation will be
s
enabled.
Connect the USB storage device that contains the
scenario to the computer.
Drag & drop the PowerPoint file icon to the program
icon of EMP SlideMaker2 on the desktop.
Note that, in this case, it is not possible to select multiple
PowerPoint files and convert them as a batch.Select only one file
for conversion.
p.59
C
D
Check the message and click the "Continue" button.
Check the message and click the "Start" button.
It starts converting the file to a scenario. The Slideshow is
displayed during conversion.
If you stop the Slideshow midway, the scenario closes without
being created.
EMP SlideMaker2 starts.
E
Once the Slideshow reaches the end, click the
screen.
The scenario transfer destination dialog box is displayed.
Page 61

Converting all files in a single operation without starting up SlideMaker2
61
F
q
Select the drive and the folder where the USB
storage is connected and click the "OK" button.
Go to procedure 3 of s p.70.
Scenarios made by dragging & dropping are automatically
named "Scnxxxx" (where xxxx is a number).
Page 62

Starting up SlideMaker2 and converting files
62
Verify the following points before creating a scenario.
• The data to be combined to create a scenario, such as PowerPoint,
image and movie files, must be created in advance.
• Only file types listed under "Files that Can be Included in Scenarios"
can be used. s p.58
f Scenario creation procedure
Scenarios are created with the following procedure.
Start EMP SlideMaker2 and set the scenario properties
(such as scenario name, background color, and
image quality). s p.62
Include the files to be used in the scenario.
s"Including PowerPoint Files in Scenarios" p.64
s"Including Image and Movie Files in Scenarios" p.67
Setting Scenario Properties
Procedure
A
B
Start Windows on the computer, then select "Start" "Programs" (or "All Programs") - "EPSON Projector"
- "EMP SlideMaker2".
EMP SlideMaker2 starts, and the scenario properties are displayed.
Enter each of the items with reference to the
following table, then click the "OK" button.
Sort the included files into the desired order to
complete the scenario. s p.68
Once the scenario has been created, carry out the steps in
q
"Send Scenario".
s
p.70
Page 63

Starting up SlideMaker2 and converting files
Scenario Name Enter the file name for the created scenario. Be
sure to enter the file name. The file name can
consist of up to 8 uppercase alphabetic characters
and numerals. Limit the total number of
characters of the file name and the directory
name for the scenario folder to 127 or less.
Scenario Folder Specify where to create the scenario folder to be
used while creating the scenario. The name of the
scenario folder will be the same as the name of
the scenario.
Configure BGM If you would like to play BGM during the
scenario, check the box. The audio file (WAVE
format) selection window is displayed if this is
selected. On this window, select the file to be
used as BGM.
After selecting the audio file, play the file by clicking
the " " button on the right.
Stop playback by clicking the " " button.
Background
Color
Image Quality With EMP SlideMaker2, each slide in a
Selects the background color for image data in
the scenario.
PowerPoint file will be converted into a JPEG
file and saved. This item lets you select the image
quality when the slides are converted to JPEG
files.
You can select the quality from "Highest image
quality", "High Quality" and "Standard". If you
select "Standard", the quality will be lower
compared to other settings. "Highest image
quality" and "High Quality" are recommended.
If JPEG files have been included directly into a
scenario, this setting will be ignored and the
JPEG file will be projected with its original
image quality.
q
63
The setting details can be changed in the "File" "Properties" menu of EMP SlideMaker2.
Page 64

Starting up SlideMaker2 and converting files
64
The following window will be displayed.
Folder window
Scenario window
This window is used to
create scenarios.
Cell
A scenario is made up of
a series of single slides
called cells.
Animation check
window
Thumbnail window
Preview thumbnail images of the file that is clicked on in the file window.
Including PowerPoint Files in Scenarios
PowerPoint files can be included into scenarios with the following two
methods.The person including the files into a scenario can release an
animation set in the PowerPoint presentation.
• Batch Including PowerPoint Files s p.65
After the scenarios have been incorporated, they will include the
animation set with PowerPoint. When projecting with PCFree, this
animation will be enabled.
• Including only selected slides when checking thumbnails
If you include only a selection of slides, the animation settings that have
been made using PowerPoint are ignored. s p.67
Movie files included in a PowerPoint file cannot be played
q
back on the scenario. Movie files must be individually
converted to scenarios.
File window
The files in the folder that is selected in the folder window appear here.
Refer to the EMP SlideMaker2 help for details on the EMP
q
SlideMaker2 menu functions.
Page 65

Starting up SlideMaker2 and converting files
65
q
.JPG: Cells with PowerPoint
animation settings that have been
ignored
.EMA: Cells with PowerPoint
animation settings that have been
retained
Animation check window
• Thumbnails cannot be displayed if PowerPoint is not
installed on your computer.
• Although animations can be set in the properties window
of EMP SlideMaker2, animations set in advance in the
PowerPoint file operate more smoothly when played in the
scenario. To set animations in PowerPoint slides, we
recommend you set them in the PowerPoint file itself. If
you want to make animation settings for images, or if you
want to add animation settings to slides that lost their
animation settings when they were included in the
scenario, make the settings in the properties window of
s
EMP SlideMaker2.
p.74
f Including all slides in a PowerPoint file
Drag & Drop the PowerPoint file in the file window to the scenario
window to create a scenario. When scenario creation is complete, the
"Send Scenario" screen is automatically displayed and the scenario can be
transferred.
When slides are included with this method, animation set in PowerPoint
remains effective.
Procedure
A
B
C
D
Connect the USB storage device that contains the
scenario to the computer.
Start Windows on the computer, then select "Start" "Programs" (or "All Programs") - "EPSON
Projector" - "EMP SlideMaker2".
EMP SlideMaker2 starts, and the scenario properties are displayed.
Set the scenario properties. s p.62
Select the folder containing the target PowerPoint
file in the folder window.
Page 66

Starting up SlideMaker2 and converting files
66
E
F
Drag & drop the PowerPoint file from the file window
to the scenario window.
Or, double-click the target PowerPoint file icon in the file window.
Check the message and click the "Continue" button.
G
H
I
Check the message and click the "Start" button.
The conversion to a scenario starts and the Slideshow is performed
automatically.
If the [Esc] key on the keyboard is pressed during the Slideshow,
the Slideshow is canceled. In that case, the scenario closes before it
can be created.
When the Slideshow ends, click the screen.
The dialog box to specify the transfer destination of the scenario is
displayed.
Select the drive and the folder where the USB
storage is connected and click the "OK" button.
q
Go to procedure 3 of s p.70.
When creating a scenario with only one PowerPoint file,
you can do that easily by a drag and drop operation.
s
p.60
Page 67

Starting up SlideMaker2 and converting files
67
f Including only selected slides while checking thumbnails
Use the following procedure to include only selected slides from a
PowerPoint file into a scenario. Note that when this method is used to
include the slides, any animations that have been set using PowerPoint
will be lost.
Procedure
A
B
Click the target PowerPoint file icon in the file
window.
Double-click the thumbnails that you want to
include into the scenario.
The selected slides will be displayed in the scenario window.
To select more than one slide and include them all at once,
(1) Click the additional slides one at a time in the thumbnail
window.
All slides that you click will be selected.
If you click a slide that is already selected, it becomes
unselected.
(2) Once all the target slides have been selected, drag one of the
selected slides into the scenario window and drop it at the place
where it is to be added.
All of the selected slides will then be added to the scenario.
Go to procedure 3 of "Sending Scenarios"s p.70.
Including Image and Movie Files in Scenarios
Image files and movie files can be included into a scenario.
Folder window
Scenario window
Thumbnail window
File window
Procedure
A
Click the target folder in the folder window.
The files that are contained in the folder will be displayed as a list
in the file window.
B
Click the icon of the image file in the file window.
The contents of the image file are displayed in the thumbnail
window.
In the case of a movie file, an icon will be displayed in the
thumbnail window.
Page 68

Starting up SlideMaker2 and converting files
68
C
D
q
Double-click the icon of the target image file in the
file window.
The selected file is displayed in the scenario window and it is
included into the scenario.
To batch add more than one file, hold down the [Ctrl]
key on the keyboard while clicking the files icons to
be added. Once all the files to be added have been
selected, drag one of the selected files into the
scenario window and drop it at the place where it is
to be added.
All of the selected files will then be added to the scenario.
To unselect all of the selected files, click the white area
outside the icon.
Editing a Scenario
With PC Free, the scenarios in the scenario window are handled in order,
starting from the top.
You can add and delete slides and files from a scenario or change their
order to edit the scenario.
f Adding files and slides
Procedure
Drag files that are displayed in the file window or
PowerPoint slides that are displayed in the thumbnail
window into the scenario window and drop them in the
place where they are to be added.
You can drag and drop the target files or slides to add them to
the scenario window.
The newly changed scenario will be transferred.
Go to procedure 3 s p.70.
Page 69

Starting up SlideMaker2 and converting files
f Deleting a slide
Procedure
Right-click in the cell to be deleted and then select "Clear"
or "Cut" from the shortcut menu.
f Changing the order of slides
Procedure
Drag & drop a cell in the scenario window to change the
order of cells.
You can also display the shortcut menu, select "Cut" and
then select "Paste".
The newly changed scenario will be transferred.
Go to procedure 3 s p.70.
69
Page 70

Sending Scenarios
70
To project a created scenario by the projector, send the scenario to a
USB storage device using "Send Scenario" in EMP SlideMaker2.
Specify a USB hard disk drive or a USB storage device that is
connected to the computer’s USB port as the destination.
It is also possible to set automatic projection and continuous projection
of a scenario at projector startup. The automatic projection function is
called "autorun".
• When "Send Scenario" is performed, the scenario file is
q
saved in the destination under the name "Scenario
name.sit". Also, a folder with the same name as the
scenario is created and each screen is converted to image
files and saved according to image quality. However, in PC
Free a folder with the same name as the scenario is not
displayed.
• If you perform "Send Scenario" without saving, a folder
with the same name as the scenario name and a "scenario
name.sit" file are created in the scenario folder. Each
screen is converted to image files and saved in the created
folder according to the image quality.
B
C
A dialog box to specify the destination drive is
displayed. Select the drive and the folder where the
USB storage is connected and click the "OK"
button.
When a confirmation message is displayed, click
the "OK" button.
It is sent to the scenario destination selected.
Procedure
A
Once the scenario is complete, connect a USB
storage device to the computer, and then select
"Scenario Options" - "Send Scenario".
Page 71

Sending Scenarios
71
D
When transfer is complete, a message is displayed
confirming whether to perform autorun setup. If you
want to set autorun, click the "OK" button and
continue to the next procedure. Otherwise, click the
"Cancel" button to close.
All scenario files within the destination drive are displayed in the
scenario list on the left in the format "Folder name/File name".
q
F
G
When projecting a scenario repeatedly
To start projecting from the first scenario again once projection of
all scenarios in the "Autorun Scenario List" is complete, select
"Revive".
• Autorun can also be set by selecting "Scenario Option" "Edit Autorun".
• Autorun setting cannot be specified in the EasyMP’s PC
Free.
• If there are two or more files set for autorun, they are
played back in order from the top on the "Autorun
Scenario List".
When the scenario for autorun is set, click the "OK"
button.
Remove the USB storage device from the computer.
See the computer’s user’s guide for the removal method.
E
When using autorun
To set a scenario to run automatically when the projector power is
turned on, click the target scenario name in the scenario list, and
click the " " button.
The scenario is displayed in the autorun scenario list on the right
and set as an autorun file.
A scenario file in a folder with deep hierarchy or with a long folder
name cannot be selected.
H
After finishing transferring your scenario, connect
the USB storage device to the projector and start
projection using PC Free. s p.50
Page 72
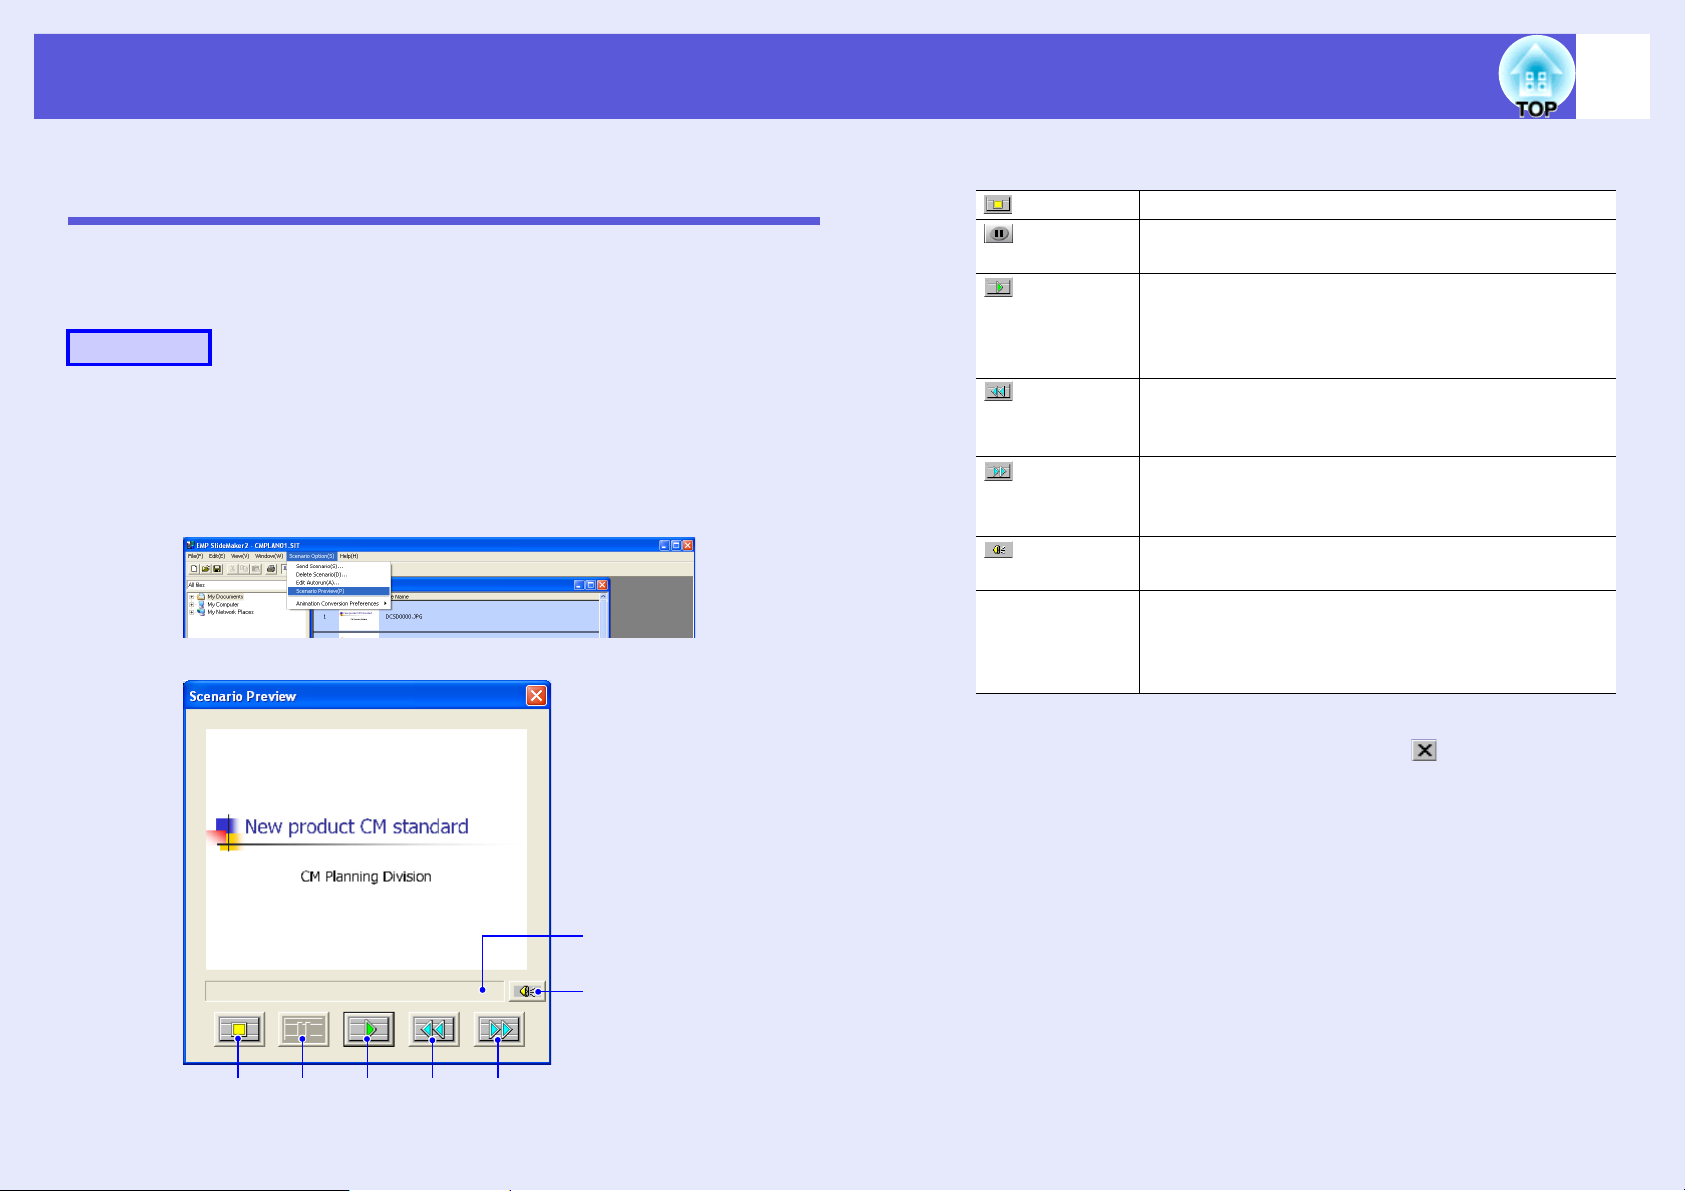
Cases Like These
72
Checking the Projection Scenario Status from a Computer
You can check on a computer how a created scenario is played back on a
projector by using PC Free. All of the structural elements of the scenario
such as images, animation, BGM, can be played.
Procedure
A
B
Open the scenario you want to check in EMP
SlideMaker2.
Select "Scenario Options" - "Scenario Preview".
The "Scenario Preview" screen is displayed.
The following table shows the functions of each button.
Stop Stops playback and returns to the first slide.
Pause Pauses the slides when "Automatically after" is
selected for "Advance". s p.74
Play Starts the scenario preview. Also, this restarts
stopped or paused scenarios. The following slide is
displayed when "On mouse click" is set for
"Advance". s p.74
Rewind Returns to the previous slide or returns to the screen
previous to the animation performance. The
animation effects are not performed upon return.
Fast-
forward
Volume Performs volume control. Adjusts the volume of
Status bar Displays the progress of the scenario on a bar. At
Proceeds to the next slide or shows the screen after
animation performance. At this time the animation
effects are not performed.
BGM.
first there is no bar display, and then the bar extends
from left to right as the scenario progresses. The
scenario ends at the right hand side of the bar.
Play
C
Status bar
Volume
RewindPause
Fast-forwardStop
After you finish checking, click the " " button at the
top right of the window to close the scenario
preview screen.
Page 73

Cases Like These
73
Setting Animations
The following PowerPoint animations are reflected in a scenario as well.
Fly Blinds Box Checkerboard
Crawl Dissolve Peek Random Bars
Spiral Split Stretch Strips
Swivel Wipe Zoom
You can set which animations replace those not mentioned above
(Default: Cut).
Procedure
A
B
C
Start EMP SlideMaker2.
Click the "Cancel" button if screen properties is displayed.
Select "Scenario Option" - "Animation Conversion
Preferences".
Select the set animation.
Setting the Slide Animation
With EMP SlideMaker2, you can set effects similar to the animation
effects of PowerPoint for each cell in the scenario. You can project the
slides that retain the animation set in PowerPoint by setting projection
time or animation for each divided scene.In this case, right-click the target
animation in the animation check window and click "Cell Properties".
If animations set in PowerPoint in advance are included in
q
Procedure
A
a scenario, the animations operate smoothly during
scenario playback. To set animations in PowerPoint slides,
we recommend you set them in the PowerPoint file itself. If
you want to make animation settings for image files, or if
you want to add animation settings to slides that lost their
animation settings when they were included in the scenario,
add the settings using the following method.
Right-click in the target cell or the animation, and
select "Cell Properties".
When making the same settings for multiple cells or animations,
select multiple cells by holding down the [Shift] key or the [Ctrl]
key on the keyboard, right-click and then select "Cell Properties".
Cell
Page 74

Cases Like These
Animation
Advance When "Automatically after" is selected, you can set
the switching time from 0 to 1800 seconds.When
"On mouse click" is selected, switch slides by
pressing the []] or [[] buttons on the remote
control during projection.
Animation
Effects
You can specify the effects to use during screen
transition.
Select the "Direction" depending on the animation
selected.
The following are examples of the effects.
Fly: The image changes from the direction
specified.
Box In: The image changes from the inside.
74
B
The "Properties" screen is displayed. Set each of
the items with reference to the following table, and
then click the "OK" button.
Page 75

Appendix
Connection Limitations...................................... 76
• Supported Resolutions......................................................76
• Display Color .....................................................................76
• Number of Connecting......................................................76
• Others.................................................................................76
Troubleshooting ................................................. 77
Glossary .............................................................. 85
Page 76

Connection Limitations
76
When projecting computer images during execution of EMP NS
Connection, the following restrictions apply. Confirm these points.
Supported Resolutions
The following computer screen resolutions can be projected. For the
following resolutions, the image can be projected as it is on the computer
screen. You cannot connect to a computer with a resolution higher than
UXGA.
• VGA (640 x 480)
• SVGA (800 x 600)
• XGA (1024 x 768)
• SXGA (1280 x 960)
• SXGA (1280 x 1024)
• SXGA+ (1400 x 1050)
• UXGA (1600 x 1200)
* Supported resolutions when multi-screen display function is on.
When the following messages are displayed, connect after setting the
computer’s resolution to SXGA or less.
One or more connected projectors do not support resolutions greater than
SXGA. Reduce the screen resolution and reconnect.
If a computer with a special screen size is used where the ratio of height
and width is not represented, a screen resolution closest to the width is
selected from the list of seven above.
In this case, in wide screen the horizontal margins are projected, in narrow
screen the empty vertical margins are black.
*
*
*
*
Display Color
The number of colors for computer screens can be projected.
Windows Macintosh
16-bit color About 32,000 colors (16-bit)
24-bit color 32-bit color About 16.7 million colors (32-bit)
The operational guarantee for multi-screen display is 16-bit and 32-bit
color.
Number of Connecting
You can connect up to four projectors to one computer and project
simultaneously.
You cannot connect multiple computers to one projector simultaneously.
Others
• If the transmission speed of the wireless LAN is low, the network might
be cut off easily even if you connect and shut down at surprising times.
• Audio is not transmitted.
• When videos are played back, they do not play back as smoothly as
when displayed on the computer.
• Applications that use part of DirectX functions may not be displayed
correctly. (Windows only)
• Cannot project full screen MS-DOS prompts. (Windows only)
• There are times when the image on the computer screen and the image
projected by the projector may not match exactly.
Page 77

Troubleshooting
If any of the following problems occur, refer to the pages given for
each problem.
Problems concerning EasyMP
f Suddenly changes to the EasyMP screen s p.78
f When a connection is made using EMP NS Connection, the
projected image remains as is, and a connection cannot be
made from another computer.
f The projector is not found when EMP NS Connection is
started
s p.79
f Cannot connect in "Advanced Connection Mode" or wired
LAN connection
s p.80
f The Slideshow cannot be displayed on the desired display
when the multi-screen display function is being executed.
s p.80
f Applications are no longer displayed from the computer's
screen when the multi-screen display function is executed.
s p.80
s p.78
77
Problems concerning watch and control by EMP
Monitor
f Mail is not sent even if an
abnormality occurs in the
projector
f Cannot control or monitor the
projector with EMP Monitor
s p.84
f Error message when starting up EMP Monitor s p.84
s p.83
f The mouse cursor is not displayed on the computer's
screen.
s p.80
f The image and sound for movies with EMP NS Connection
are not displayed, the image is slow to appear, or either the
video or audio stop
s p.81
f When a connection is made using EMP NS Connection, a
PowerPoint Slideshow cannot be started
s p.81
f When a connection has been made using EMP NS
Connection, the screen will not be refreshed when using an
Office application.
s p.81
f Cannot specify files with EMP SlideMaker2 s p.81
f
Error message when starting up EMP NS Connection
s
p.82
f Error message when starting up EMP SlideMaker2 s p.83
Page 78

Troubleshooting
f Suddenly changes to the EasyMP screen
ERR at the bottom left of the screen: Check the numbers and make the following remedies.
ERR Number Error Meaning Remedy
2,50,53,245,-103 Failed to startup EasyMP. Turn the power for the projector off and then back on again.
51,52,100 Failed to process EasyMP. When using EMP NS Connection, reconnect EMP NS Connection.
When using a USB display, reconnect the USB cable.
-101 Communication was cut off from the access point. Check the access point operation.
-102,-105 Wireless communication is unstable. Check the situation of network traffic, and reconnect EMP NS
Connection after waiting for a while.
f When a connection is made using EMP NS Connection, the projected image remains as is, and a connection cannot be made from another
computer.
Check Remedy
Did the presenter leave the conference room without
cutting off the network connection?
With EMP NS Connection, the connection with the computer that was previously connected can be cut off
when another computer tries to connect with the projector, and it connects with the computer that is trying to
connect.
Therefore, when a projector keyword is not set for the projector, or if you know the projector keyword, you
can cut off the current connection and, if you perform a connection operation, you can connect to the
projector.
When a projector keyword is set for the projector, if you do not know the projector keyword, cut off
projection from the projector and reconnect. To cut off connection from the projector, press the [Esc] button
on the remote control, select "Close" from the close menu and press the [Enter] button on the remote control.
When it cuts off, you can connect from the target computer.
s Wireless LAN Quick Connection Guide
78
Page 79

Troubleshooting
f The projector is not found when EMP NS Connection is started
Check Remedy
Is the wireless LAN unit connected? Check that the wireless LAN unit is securely connected.
For Wireless LAN
Is the projector’s configuration menu open? While the configuration menu is displayed, network connection becomes invalid. Close the configuration
menu and return to the EasyMP screen.
Are the computer’s LAN card and the built-in LAN
function available?
Is the SSID the same as that of the access point? Set an SSID that is different from that of the access point. s User’s Guide "Network Menu (EMP-1715/
Quick Connection Mode
Is the DHCP function for wired LAN turned ON? Turn OFF the DHCP function for wired LAN from the EasyMP’s configuration menu. s User’s Guide
Quick Connection Mode
Check that LAN is valid by checking "Control Panel" - "System" in the device manager and so on.
1705 Only)"
"Network Menu (EMP-1715/1705 Only)"
79
Was the network adapter used selected correctly with
EMP NS Connection?
For wireless LAN connection, is the wireless LAN
setting enabled when the computer is in power save
mode?
Are there any obstacles between the access point and
the computer or projector?
For Wireless LAN
Is the computer’s wireless LAN electromagnetic wave
set to low?
Does the wireless LAN conform to 802.11g, 802.11b,
or 802.11a?
Is the firewall turned off, or has the firewall been
registered as an exception?
For Wireless LAN
Is the network cable connected correctly? Check that the network cable is connected correctly. Reconnect it if it is not connected or not connected
For Wired LAN
If the computer has multiple LAN environments, it cannot connect unless the network adapter used with EMP
NS Connection is selected correctly. Start EMP NS Connection and go to "Configuration" - "Switch LAN"
(Windows), or "Configuration" - "Network Configuration" (Macintosh) and select the network adapter used.
Enable the wireless LAN.
Sometimes the electromagnetic wave situation prevents the projector from being found in a search. Check for
any obstacles between the access point and the computer or projector, and change their position to improve
the electromagnetic wave situation.
Set the electromagnetic wave strength to maximum.
It is only compatible with standards g, 802.11b, and 802.11a, and not with other standards such as 802.11.
When you do not wish to turn off the firewall or register the firewall as an exception, make the necessary
settings to open the ports.
The ports used by EMP NS Connection are 3260, 3261, and 3629.
properly.
Page 80

Troubleshooting
f Cannot connect in "Advanced Connection Mode" or wired LAN connection
Check Remedy
Is the SSID setting different. Set the computer, the access point, and the projector to the same SSID. s User’s Guide "Network Menu
(EMP-1715/1705 Only)"
Is the same WEP key set? When selecting WEP from "Security", set the access point, the computer, and the projector to the same WEP
key. s User’s Guide "Network Menu (EMP-1715/1705 Only)"
Are the connection denial functions, such as MAC
address restrictions and port restrictions, set correctly
at the access point?
Are the IP address, the subnet mask, and the gateway
address for the access point and the projector set
correctly?
Are the access point and the projector’s subnet
different?
Set the projector to allow connections from the access point.
When not using a DHCP, adjust each setting. s User’s Guide "Network Menu (EMP-1715/1705 Only)"
Select "Manual search" from EMP NS Connection, specify the IP address, and connect. s p.26
f The Slideshow cannot be displayed on the desired display when the multi-screen display function is being executed.
Check Remedy
Are you using PowerPoint 2002 or an earlier version? To set and use two or more virtual displays, use PowerPoint 2003, or limit the number of virtual displays to
For Windows
one before displaying the Slideshow.
80
f Applications are no longer displayed from the computer's screen when the multi-screen display function is executed.
Check Remedy
Is another application running on the virtual display? When EPSON Virtual Display is installed, another application sometimes runs on the virtual display. In this
For Windows
case, set "EPSON VirtualDisplay" to "Off" at "Screen properties".
f The mouse cursor is not displayed on the computer's screen.
Check Remedy
Is EPSON Virtual Display installed? The mouse cursor was moved onto the virtual display. Move the mouse until the mouse cursor is displayed.
For Windows
Page 81

Troubleshooting
f The image and sound for movies with EMP NS Connection are not displayed, the image is slow to appear, or either the video or audio stop
Check Remedy
Did you try to play back movies with Media Player or
try to operate the screen saver preview?
Is WEP encryption effective, or are multiple projectors
connected?
Have you enabled DHCP? When DHCP is set in "Advanced Connection Mode" or wired LAN connection, if a DHCP server that can be
Was EMP NS Connection started while a movie was
playing, or were the resolution and color number
changed?
For Macintosh
Depending on the computer, the movie play back screen in Media Player may not be displayed, and the
screen saver preview may not be displayed normally.
The display speed decreases when WEP encryption is effective or multiple projectors are connected.
connected to is not found, it takes time to enter EasyMP standby status.
When playing back movies, start EMP NS Connection first before starting play back. If EMP NS Connection
is started during movie play back and the display screen resolution and color number are changed, in this case
move the movie playback window, minimize it, or resize it and so on.
81
Is wireless LAN 802.11g/b being used in "Quick
Connection Mode"?
Depending on the electromagnetic wave environment, there are times when the image and sound for movies
may stop. When using the movie sending function, use "Advanced Connection Mode" or wireless LAN
802.11a in "Quick Connection Mode".
f When a connection is made using EMP NS Connection, a PowerPoint Slideshow cannot be started
Check Remedy
Was EMP NS Connection started while PowerPoint
was starting?
For Windows
When making a connecting with EMP NS Connection, make sure you close PowerPoint first. Slideshow
might not run if connecting while it is started.
f When a connection has been made using EMP NS Connection, the screen will not be refreshed when using an Office application.
Check Remedy
Is the mouse moved continuously? When you stop moving the mouse cursor, the screen is updated. If the screen does not update quickly, stop
moving the mouse cursor.
f Cannot specify files with EMP SlideMaker2
Check Remedy
Is a PowerPoint file (.ppt) with a PowerPoint 95/97
format being used?
If a PowerPoint file (.ppt) cannot be included in a
scenario, or it cannot be displayed as a thumbnail, is
the Microsoft Office JPEG converter installed?
Files created with PowerPoint 95/97 and files saved in PowerPoint 95/97 format cannot be edited with EMP
SlideMaker2. You can use after saving with PowerPoint 2000/2002/2003. s p.58
Install the JPEG converter. See the Microsoft Office User’s Guide for details on installing the JPEG converter.
Page 82

Troubleshooting
f Error message when starting up EMP NS Connection
Check Remedy
Failed to connect to the projector. Try to connect again. If it still does not connect, check the network settings on the computer and the network
settings for the projector’s EasyMP.
For details on the network settings to be made on the projector, see s User’s Guide"Network Menu (EMP-
1715/1705 Only)".
The keyword does not match. Check how it is
displayed by the projector, and enter the correct
keyword.
The selected projector is busy. Do you want to
continue the connection process?
Failed to reset EMP NS Connection. Restart EMP NS Connection. If the message still appears, uninstall and then reinstall EMP NS Connection.
Cannot connect because the keyword was wrong. When connecting to a projector for which a projector keyword has been set, the wrong keyword is entered.
Failed to acquire network adaptor information. Check the following point.
One or more connected projectors do not support
resolutions greater than SXGA. Reduce the screen
resolution and reconnect.
There are projectors that do not respond. You cannot connect to multiple projectors simultaneously. Check the network settings on the computer and
Enter the keyword displayed in the projector. Check the projector’s keyword displayed on the EasyMP screen, and enter the projector’s keyword.
Check the projector’s keyword displayed on the EasyMP screen, and enter the projector’s keyword.
You tried to connect to a projector that is connected to another computer.
When the "Yes" button is clicked, it connects to the projector. The connection between the projector and the
other computer is cut off.
When the "No" button is clicked, it does not connect to the projector.
The connection between the projector and the other computer is maintained.
s Wireless LAN Quick Connection Guide - "Installing EasyMP Software"
Check the keyword that is displayed on the projector’s connection standby screen. After the connection is cut
off and then reconnected, enter the projector keyword on the keyword entry screen that is displayed.
s Wireless LAN Quick Connection Guide
• Is a network adaptor installed on the computer?
• Is the driver for the network adaptor used installed on the computer?
After checking, restart the computer and connect again.
If you still cannot connect, check the following.
Check the network settings on the computer and the network settings on the projector.
For details on the network settings to be made on the projector, see s User’s Guide"Network Menu (EMP-
1715/1705 Only)".
There is an ELP-735 projector in the connection destination. Change the computer’s screen resolution to
SXGA (1280 x 1024) or less.
the network settings for the projector’s EasyMP.
For details on the network settings to be made on the projector, see s User’s Guide"Network Menu (EMP-
1715/1705 Only)".
82
Page 83

Troubleshooting
Check Remedy
When the computer is started, is the connection to the
wireless LAN made manually?
Quick Connection Mode
Connect the Wireless LAN manually.
f Error message when starting up EMP SlideMaker2
Check Remedy
** .SIT is already registered.
(** Scenario file name)
Because the folder hierarchy is deep, the scenario file
cannot be selected.
Insufficient storage capacity on the disk. Insufficient storage capacity in the drive to transfer scenario, cannot transfer the scenario. Make space in the
** An invalid path is included.
(** the path name that includes the scenario file
name)
** The disk became full during accessing.
(** the path name that includes the scenario file
name)
The specified document cannot be opened. The PowerPoint file you are trying to add to the scenario is corrupted or cannot be used because it is
Specify a different name or a different directory A file with this name already exists. Change the scenario name and then save.
Scenario files that have already been added to "Autorun Scenario List" cannot be added again. s p.70
Because the hierarchy of the folder with the scenario file added to "Autorun Scenario List" is deep, it cannot
be selected. Change the destination for sending the target scenario file. s p.70
drive so that the scenario can be sent by deleting any unnecessary files.
The path for the file to be opened was not found. Because of the following.
The scenario file was moved to another folder since it was last saved with EMP SlideMaker2.
The folder name containing the scenario file was changed since it was last saved with EMP SlideMaker2.
The scenario file you are trying to open was deleted.
Select File - Open and open the target scenario file, or search for it by using the Windows search function and
so on.
Insufficient storage capacity in the drive containing the work folder, cannot save the scenario file. Make space
in the drive containing the work folder so that the scenario file can be saved by deleting any unnecessary files.
incorrect. Use another PowerPoint file.
83
f Mail is not sent even if an abnormality occurs in the projector
Check Remedy
Is the wireless LAN unit connected? Check that the wireless LAN unit is securely connected.
Is the network connect setting correct? Check the projector’s network settings. s User’s Guide "Network Menu (EMP-1715/1705 Only)"
Is "Standby Mode" set to "Network On"? To use the mail notification function when the projector is in standby, set "Network On" in "Standby Mode"
from the configuration menu. s User’s Guide "Extended Menu"
Did a fatal abnormality occur and the projector come
to a sudden stop?
When the projector comes to a sudden stop, mail cannot be sent.
If, after checking the projector, the abnormal state continues, contact your local dealer or the nearest address
provided in the World-Wide Warranty Terms. s Inquiries
Page 84

Troubleshooting
Check Remedy
Is power being supplied to the projector? Check that your electrical outlet or power source is functioning correctly.
Is the network cable connected correctly? Check that the network cable is connected correctly. Reconnect it if it is not connected or not connected
For Wired LAN
properly.
f Cannot control or monitor the projector with EMP Monitor
Check Remedy
Is the wireless LAN unit connected? Check that the wireless LAN unit is securely connected.
For Wireless LAN
Is the network connect setting correct? Check the projector’s network settings. s User’s Guide "Network Menu (EMP-1715/1705 Only)"
Is EMP Monitor correctly installed in the computer? Uninstall and then reinstall EMP Monitor.
Are all of the projectors that you want to monitor and
control registered to the projector list?
Is "Standby Mode" set to "Network On"? To use the mail notification function when the projector is in standby, set "Network On" in "Standby Mode"
Is power being supplied to the projector? Check that your electrical outlet or power source is functioning correctly.
Is the network cable connected correctly? Check that the network cable is connected correctly. Reconnect it if it is not connected or not connected
For Wired LAN
Register them to the projector list. sEMP Monitor Operation Guide "Registering and deleting projectors for
monitoring"
from the configuration menu. s User’s Guide "Extended Menu"
properly.
84
f Error message when starting up EMP Monitor
Check Remedy
The password is incorrect. The wrong password was entered. Enter the correct password. If you forget the password, start "Network
Settings" in "Network" from the configuration menu, and check "Web Control Password" in "Basic Settings".
Cannot connect to the projector for the IP address
that was entered.
Check whether the network settings for the projector you want to connect to, the wired LAN or "Advanced
Connection Mode (wireless LAN)" are the settings that are used.When "Quick Connection Mode" is selected
from "Wireless LAN", the setting is changed to "Advanced Connection Mode".
Next, check the "IP Address" for the "Wired LAN" or the "Wireless LAN" and register the "IP Address"
manually. s EMP Monitor Operation Guide "Registering and deleting projectors for monitoring"
If it still does not connect, check the network settings on the computer and the network settings for the
projector.
For network settings, s Wireless LAN Quick Connection Guide
Page 85

Glossary
This section explains easily terms that are used with the projector and difficult terms that are not explained in the text of this guide. For details,
refer to other commercially available publications.
DPOF An abbreviation of Digital Print Order Format, this is a format for recording information (photos that you want to print, number of copies,
and so on) to print photos taken with a digital camera in recording media such as memory cards.
DVI An abbreviation of Digital Visual Interface, this is the standard by which video signals are transmitted digitally.
DVI is the standard not only for computers, but also for digital home appliances to be able to transfer images with a resolution greater
than DFP, and there is also an encryption function in the digital signal.
MAC address An abbreviation of Media Access Control. The MAC address is an ID number unique to each network adaptor. A unique number is
assigned to each network adaptor, and data is transmitted between network adaptors based on this identification.
NDIS An abbreviation of Network Driver Interface Specification, this is the standard specification of network drivers to use network cards such
as wireless LAN cards set by the Microsoft Company and so on. It provides communication protocols for OS, software, and drivers to
communicate, as well as communication protocol regulations for drivers and network cards.
RADIUS Server "RADIUS" is an abbreviation of Remote Authentication Dial-In User Service, this is a protocol that starts wireless LAN and is used for
authentication by a variety of network services. A RADIUS server with an authentication server that uses RADIUS performs
authentication for access to a wireless LAN access point with information such as user name and password. When a RADIUS server is
used, user information does not need to be individually registered for each access point even when there are multiple wireless LAN access
points, and the access point and the users can be controlled.
SVGA A type of video signal with a resolution of 800 (horizontal) x 600 (vertical) dots that is used by IBM PC/AT-compatible computers.
SXGA A type of video signal with a resolution of 1,280 (horizontal) x 1,024 (vertical) dots that is used by IBM PC/AT-compatible computers.
USB An abbreviation of Universal Serial Bus, this is an interface to connect relatively low-speed peripherals between computers.
UXGA A type of video signal with a resolution of 1,600 (horizontal) x 1,200 (vertical) dots that is used by IBM PC/AT-compatible computers.
VGA A type of video signal with a resolution of 640 (horizontal) x 480 (vertical) dots that is used by IBM PC/AT-compatible computers.
XGA A type of video signal with a resolution of 1,024 (horizontal) x 768 (vertical) dots that is used by IBM PC/AT-compatible computers.
Ad hoc A method of wireless LAN connection that communicates with wireless LAN clients without using an access point. It is not possible to
communicate with two or more devices simultaneously.
Virtual display The screen for one computer is output to multiple displays. A large virtual screen can be created by using multiple displays.
Channel Communication speeds drop if there are too many devices performing wireless communication by using the same frequency. In this case,
interference from other wireless LANs can be avoided by setting a different wireless channel for each wireless LAN network.
Authentication server A server to perform user authentication. When an authentication server is used, user information management and user authentication
operations are unified. Also, because the authentication server often provides an advanced authentication method, it is also effective as a
security countermeasure.
85
Page 86

86
All rights reserved. No part of this publication may be reproduced, stored
in a retrieval system, or transmitted in any form or by any means,
electronic, mechanical, photocopying, recording, or otherwise, without the
prior written permission of Seiko Epson Corporation. No patent liability is
assumed with respect to the use of the information contained herein.
Neither is any liability assumed for damages resulting from the use of the
information contained herein.
Neither Seiko Epson Corporation nor its affiliates shall be liable to the
purchaser of this product or third parties for damages, losses, costs, or
expenses incurred by the purchaser or third parties as a result of: accident,
misuse, or abuse of this product or unauthorized modifications, repairs, or
alterations to this product, or (excluding the U.S.) failure to strictly
comply with Seiko Epson Corporation’s operating and maintenance
instructions.
Seiko Epson Corporation shall not be liable against any damages or
problems arising from the use of any options or any consumable products
other than those designated as Original Epson Products or Epson
Approved Products by Seiko Epson Corporation.
The contents of this guide may be changed or updated without further
notice.
Illustrations and screens used in this publication may differ from actual
illustrations and screens.
General Notice:
EasyMP is a trademark of Seiko Epson Corporation.
Macintosh, Mac, and iMac are trademarks of Apple Inc.
IBM is a registered trademark of International Business Machines
Corporation.
Windows, WindowsNT, Windows Vista and PowerPoint are either
registered trademarks or trademarks of Microsoft Corporation in the U.S
and/or other countries.
Dolby is a trademark of Dolby Laboratories.
Cisco Systems is a registered trademark of Cisco Systems Inc. in the
United States of America and other countries.
Pixelworks and DNX are trademarks of Pixelworks Inc.
Portions of this software are based in part on the work of the Independent
JPEG Group.
This product includes RSA BSAFE® Cryptographic software from RSA
Security Inc.
RSA and BSAFE are either registered trademarks or trademarks of RSA
Security Inc. in the United States and/or other countries. RSA Security
Inc. All rights reserved.
This product includes
TOSHIBA INFORMATION SYSTEMS CORPORATION.
NetNucleus
SYSTEMS CORPORATION in the Japan.
Other product names used herein are also for identification purposes only
and may be trademarks of their respective owners. Epson disclaims any
and all rights in those marks.
is a registered trademark of TOSHIBA INFORMATION
NetNucleus
®
WPA
Cryptographic software from
SEIKO EPSON CORPORATION 2007. All rights reserved.
©
Page 87

87
Copyright:
Microsoft product screen shot(s) reprinted with permission from
Microsoft Corporation.
Software Copyright:
This product uses free software as well as software to which this company
holds the rights.
The following is information on the free software used by this product.
1. LGPL
(1) This company uses free software for this product under the terms of
the GNU LESSER General Public License Version 2, June 1991
(henceforth "LGPL") or later versions.
You can see the full text of the LGPL on the following Web sites.
[LGPL]http://www.gnu.org/licenses/lgpl.html
This company, under the terms of the LGPL, discloses the source
code for the free software used in this product based on the LGPL.
Contact the support personnel as provided in the Epson Projector
Contact list to reproduce, modify, and/or distribute the free software
concerned.
Please follow the conditions of the LGPL when reproducing,
modifying, and/or distributing the free software concerned.
Also, the free software concerned is offered "as is" with no
guarantee or warranty what so ever. The term guarantee includes,
but is not limited to, appropriate commercialization, business
potential, purpose of use, and does not infringe on third person
rights (including, but not limited to, patent rights, copyrights, and
trade secrets).
the free software concerned) do not influence the conditions of the
guarantee (written guarantee) issued by this company.
(3) The free software included in this product under the terms of the
LGPL as well as the author are disclosed in the source code
indicated in (1).
2. Other free software
As well as the free software used under the terms of the LGPL, this
company also uses the following free software for this product.
Hereafter, each author, the conditions, and so on are described in the
original. Furthermore, there is no guarantee for free software because of
the characteristics of the free software that has already used in this
product; any problems in this product (including problems that originate
with the free software concerned) do not influence the conditions of the
guarantee (written guarantee) issued by this company.
(1) libpng
Copyright © 1998-2004 Glenn Randers-Pehrson
Copyright © 1996-1997 Andreas Dilger
Copyright © 1995-1996 Guy Eric Schalnat, Group 42, Inc.
(2) zlib
Copyright © 1995-2003 Jean-loup Gailly and Mark Adler
(2) As shown in the above mentioned (1), under the terms of the LGPL,
there is no guarantee for the free software included in this product;
any problems in this product (including problems that originate with
Page 88

88
GNU GENERAL PUBLIC LICENSE
Version 2, June 1991
CopyrightZ 1989, 1991 Free Software Foundation, Inc., 51 Franklin Street,
Fifth Floor, Boston, MA 02110-1301 USA Everyone is permitted to copy and
distribute verbatim copies of this license document, but changing it is not
allowed.
Preamble
The licenses for most software are designed to take away your freedom to
share and change it. By contrast, the GNU General Public License is intended
to guarantee your freedom to share and change free software--to make sure
the software is free for all its users. This General Public License applies to
most of the Free Software Foundation's software and to any other program
whose authors commit to using it. (Some other Free Software Foundation
software is covered by the GNU Lesser General Public License instead.) You
can apply it to your programs, too.
When we speak of free software, we are referring to freedom, not price. Our
General Public Licenses are designed to make sure that you have the freedom
to distribute copies of free software (and charge for this service if you wish),
that you receive source code or can get it if you want it, that you can change
the software or use pieces of it in new free programs; and that you know you
can do these things.
We protect your rights with two steps: (1) copyright the software, and (2)
offer you this license which gives you legal permission to copy, distribute
and/or modify the software.
Also, for each author's protection and ours, we want to make certain that
everyone understands that there is no warranty for this free software. If the
software is modified by someone else and passed on, we want its recipients to
know that what they have is not the original, so that any problems introduced
by others will not reflect on the original authors' reputations.
Finally, any free program is threatened constantly by software patents. We
wish to avoid the danger that redistributors of a free program will individually
obtain patent licenses, in effect making the program proprietary. To prevent
this, we have made it clear that any patent must be licensed for everyone's
free use or not licensed at all.
The precise terms and conditions for copying, distribution and modification
follow.
To protect your rights, we need to make restrictions that forbid anyone to
deny you these rights or to ask you to surrender the rights. These restrictions
translate to certain responsibilities for you if you distribute copies of the
software, or if you modify it.
For example, if you distribute copies of such a program, whether gratis or
for a fee, you must give the recipients all the rights that you have. You must
make sure that they, too, receive or can get the source code. And you must
show them these terms so they know their rights.
Page 89

89
GNU GENERAL PUBLIC LICENSE TERMS AND CONDITIONS FOR
COPYING, DISTRIBUTION AND MODIFICATION
0. This License applies to any program or other work which contains a
notice placed by the copyright holder saying it may be distributed under
the terms of this General Public License. The "Program", below, refers to
any such program or work, and a "work based on the Program" means
either the Program or any derivative work under copyright law: that is to
say, a work containing the Program or a portion of it, either verbatim or
with modifications and/or translated into another language. (Hereinafter,
translation is included without limitation in the term "modification".)
Each licensee is addressed as "you".
Activities other than copying, distribution and modification are not covered
by this License; they are outside its scope. The act of running the Program is
not restricted, and the output from the Program is covered only if its contents
constitute a work based on the Program (independent of having been made by
running the Program). Whether that is true depends on what the Program
does.
1. You may copy and distribute verbatim copies of the Program's source
code as you receive it, in any medium, provided that you conspicuously
and appropriately publish on each copy an appropriate copyright notice
and disclaimer of warranty; keep intact all the notices that refer to this
License and to the absence of any warranty; and give any other recipients
of the Program a copy of this License along with the Program.
You may charge a fee for the physical act of transferring a copy, and you may
at your option offer warranty protection in exchange for a fee.
2. You may modify your copy or copies of the Program or any portion of it,
thus forming a work based on the Program, and copy and distribute such
modifications or work under the terms of Section 1 above, provided that
you also meet all of these conditions:
a) You must cause the modified files to carry prominent notices stating
that you changed the files and the date of any change.
b) You must cause any work that you distribute or publish, that in whole
or in part contains or is derived from the Program or any part thereof,
to be licensed as a whole at no charge to all third parties under the
terms of this License.
c) If the modified program normally reads commands interactively
when run, you must cause it, when started running for such
interactive use in the most ordinary way, to print or display an
announcement including an appropriate copyright notice and a notice
that there is no warranty (or else, saying that you provide a warranty)
and that users may redistribute the program under these conditions,
and telling the user how to view a copy of this License. (Exception: if
the Program itself is interactive but does not normally print such an
announcement, your work based on the Program is not required to
print an announcement.)
These requirements apply to the modified work as a whole. If identifiable
sections of that work are not derived from the Program, and can be reasonably
considered independent and separate works in themselves, then this License,
and its terms, do not apply to those sections when you distribute them as
separate works. But when you distribute the same sections as part of a whole
which is a work based on the Program, the distribution of the whole must be
on the terms of this License, whose permissions for other licensees extend to
the entire whole, and thus to each and every part regardless of who wrote it.
Thus, it is not the intent of this section to claim rights or contest your rights to
work written entirely by you; rather, the intent is to exercise the right to
control the distribution of derivative or collective works based on the
Program.
In addition, mere aggregation of another work not based on the Program with
the Program (or with a work based on the Program) on a volume of a storage
or distribution medium does not bring the other work under the scope of this
License.
Page 90

90
3. You may copy and distribute the Program (or a work based on it, under
Section 2) in object code or executable form under the terms of Sections
1 and 2 above provided that you also do one of the following:
a) Accompany it with the complete corresponding machine-readable
source code, which must be distributed under the terms of Sections 1
and 2 above on a medium customarily used for software interchange;
or,
b) Accompany it with a written offer, valid for at least three years, to
give any third party, for a charge no more than your cost of physically
performing source distribution, a complete machine-readable copy of
the corresponding source code, to be distributed under the terms of
Sections 1 and 2 above on a medium customarily used for software
interchange; or,
c) Accompany it with the information you received as to the offer to
distribute corresponding source code. (This alternative is allowed
only for noncommercial distribution and only if you received the
program in object code or executable form with such an offer, in
accord with Subsection b above.)
The source code for a work means the preferred form of the work for making
modifications to it. For an executable work, complete source code means all
the source code for all modules it contains, plus any associated interface
definition files, plus the scripts used to control compilation and installation of
the executable. However, as a special exception, the source code distributed
need not include anything that is normally distributed (in either source or
binary form) with the major components (compiler, kernel, and so on) of the
operating system on which the executable runs, unless that component itself
accompanies the executable.
If distribution of executable or object code is made by offering access to copy
from a designated place, then offering equivalent access to copy the source
code from the same place counts as distribution of the source code, even
though third parties are not compelled to copy the source along with the
object code.
4. You may not copy, modify, sublicense, or distribute the Program except
as expressly provided under this License. Any attempt otherwise to copy,
modify, sublicense or distribute the Program is void, and will
automatically terminate your rights under this License. However, parties
who have received copies, or rights, from you under this License will not
have their licenses terminated so long as such parties remain in full
compliance.
5. You are not required to accept this License, since you have not signed it.
However, nothing else grants you permission to modify or distribute the
Program or its derivative works. These actions are prohibited by law if
you do not accept this License. Therefore, by modifying or distributing
the Program (or any work based on the Program), you indicate your
acceptance of this License to do so, and all its terms and conditions for
copying, distributing or modifying the Program or works based on it.
6. Each time you redistribute the Program (or any work based on the
Program), the recipient automatically receives a license from the original
licensor to copy, distribute or modify the Program subject to these terms
and conditions. You may not impose any further restrictions on the
recipients' exercise of the rights granted herein. You are not responsible
for enforcing compliance by third parties to this License.
7. If, as a consequence of a court judgment or allegation of patent
infringement or for any other reason (not limited to patent issues),
conditions are imposed on you (whether by court order, agreement or
otherwise) that contradict the conditions of this License, they do not
excuse you from the conditions of this License. If you cannot distribute
so as to satisfy simultaneously your obligations under this License and
any other pertinent obligations, then as a consequence you may not
distribute the Program at all. For example, if a patent license would not
permit royalty-free redistribution of the Program by all those who receive
Page 91

91
copies directly or indirectly through you, then the only way you could
satisfy both it and this License would be to refrain entirely from
distribution of the Program.
If any portion of this section is held invalid or unenforceable under any
particular circumstance, the balance of the section is intended to apply and the
section as a whole is intended to apply in other circumstances.
It is not the purpose of this section to induce you to infringe any patents or
other property right claims or to contest validity of any such claims; this
section has the sole purpose of protecting the integrity of the free software
distribution system, which is implemented by public license practices. Many
people have made generous contributions to the wide range of software
distributed through that system in reliance on consistent application of that
system; it is up to the author/donor to decide if he or she is willing to
distribute software through any other system and a licensee cannot impose
that choice.
This section is intended to make thoroughly clear what is believed to be a
consequence of the rest of this License.
8. If the distribution and/or use of the Program is restricted in certain
countries either by patents or by copyrighted interfaces, the original
copyright holder who places the Program under this License may add an
explicit geographical distribution limitation excluding those countries, so
that distribution is permitted only in or among countries not thus
excluded. In such case, this License incorporates the limitation as if
written in the body of this License.
version", you have the option of following the terms and conditions either of
that version or of any later version published by the Free Software
Foundation. If the Program does not specify a version number of this License,
you may choose any version ever published by the Free Software Foundation.
10. If you wish to incorporate parts of the Program into other free programs
whose distribution conditions are different, write to the author to ask for
permission. For software which is copyrighted by the Free Software
Foundation, write to the Free Software Foundation; we sometimes make
exceptions for this. Our decision will be guided by the two goals of
preserving the free status of all derivatives of our free software and of
promoting the sharing and reuse of software generally.
9. The Free Software Foundation may publish revised and/or new versions
of the General Public License from time to time. Such new versions will
be similar in spirit to the present version, but may differ in detail to
address new problems or concerns.
Each version is given a distinguishing version number. If the Program
specifies a version number of this License which applies to it and "any later
Page 92

92
NO WARRANTY
11. BECAUSE THE PROGRAM IS LICENSED FREE OF CHARGE,
THERE IS NO WARRANTY FOR THE PROGRAM, TO THE
EXTENT PERMITTED BY APPLICABLE LAW. EXCEPT WHEN
OTHERWISE STATED IN WRITING THE COPYRIGHT HOLDERS
AND/OR OTHER PARTIES PROVIDE THE PROGRAM "AS IS"
WITHOUT WARRANTY OF ANY KIND, EITHER EXPRESSED OR
IMPLIED, INCLUDING, BUT NOT LIMITED TO, THE IMPLIED
WARRANTIES OF MERCHANTABILITY AND FITNESS FOR A
PARTICULAR PURPOSE. THE ENTIRE RISK AS TO THE
QUALITY AND PERFORMANCE OF THE PROGRAM IS WITH
YOU. SHOULD THE PROGRAM PROVE DEFECTIVE, YOU
ASSUME THE COST OF ALL NECESSARY SERVICING, REPAIR
OR CORRECTION.
12. IN NO EVENT UNLESS REQUIRED BY APPLICABLE LAW OR
AGREED TO IN WRITING WILL ANY COPYRIGHT HOLDER, OR
ANY OTHER PARTY WHO MAY MODIFY AND/OR
REDISTRIBUTE THE PROGRAM AS PERMITTED ABOVE, BE
LIABLE TO YOU FOR DAMAGES, INCLUDING ANY GENERAL,
SPECIAL, INCIDENTAL OR CONSEQUENTIAL DAMAGES
ARISING OUT OF THE USE OR INABILITY TO USE THE
PROGRAM (INCLUDING BUT NOT LIMITED TO LOSS OF DATA
OR DATA BEING RENDERED INACCURATE OR LOSSES
SUSTAINED BY YOU OR THIRD PARTIES OR A FAILURE OF THE
PROGRAM TO OPERATE WITH ANY OTHER PROGRAMS), EVEN
IF SUCH HOLDER OR OTHER PARTY HAS BEEN ADVISED OF
THE POSSIBILITY OF SUCH DAMAGES.
END OF TERMS AND CONDITIONS
How to Apply These Terms to Your New Programs
If you develop a new program, and you want it to be of the greatest possible
use to the public, the best way to achieve this is to make it free software
which everyone can redistribute and change under these terms.
To do so, attach the following notices to the program. It is safest to attach
them to the start of each source file to most effectively convey the exclusion
of warranty; and each file should have at least the "copyright" line and a
pointer to where the full notice is found.
<one line to give the program's name and a brief idea of what it does.>
CopyrightZ <year> <name of author>
This program is free software; you can redistribute it and/or modify it
under the terms of the GNU General Public License as published by the
Free Software Foundation; either version 2 of the License, or (at your
option) any later version.
This program is distributed in the hope that it will be useful, but
WITHOUT ANY WARRANTY; without even the implied warranty of
MERCHANTABILITY or FITNESS FOR A PARTICULAR PURPOSE.
See the GNU General Public License for more details.
You should have received a copy of the GNU General Public License
along with this program; if not, write to the Free Software Foundation,
Inc., 51 Franklin Street, Fifth Floor, Boston, MA 02110-1301 USA.
Also add information on how to contact you by electronic and paper mail.
If the program is interactive, make it output a short notice like this when it
starts in an interactive mode:
Gnomovision version 69, CopyrightZ year name of author Gnomovision
comes with ABSOLUTELY NO WARRANTY; for details type `show w'.
This is free software, and you are welcome to redistribute it under certain
conditions; type `show c' for details.
Page 93

93
The hypothetical commands `show w' and `show c' should show the
appropriate parts of the General Public License. Of course, the commands
you use may be called something other than `show w' and `show c'; they
could even be mouse-clicks or menu items--whatever suits your program.
You should also get your employer (if you work as a programmer) or your
school, if any, to sign a "copyright disclaimer" for the program, if necessary.
Here is a sample; alter the names:
Yoyodyne, Inc., hereby disclaims all copyright interest in the program
`Gnomovision' (which makes passes at compilers) written by James
Hacker.
<signature of Ty Coon>, 1 April 1989
Ty Coon, President of Vice
This General Public License does not permit incorporating your program into
proprietary programs. If your program is a subroutine library, you may
consider it more useful to permit linking proprietary applications with the
library. If this is what you want to do, use the GNU Lesser General Public
License instead of this License.
GNU LESSER GENERAL PUBLIC LICENSE
Version 2.1, February 1999
CopyrightZ 1991, 1999 Free Software Foundation, Inc. 51 Franklin Street,
Fifth Floor, Boston, MA 02110-1301 USA Everyone is permitted to copy and
distribute verbatim copies of this license document, but changing it is not
allowed.
[This is the first released version of the Lesser GPL. It also counts as the
successor of the GNU Library Public License, version 2, hence the version
number 2.1.]
Preamble
The licenses for most software are designed to take away your freedom to
share and change it. By contrast, the GNU General Public Licenses are
intended to guarantee your freedom to share and change free software--to
make sure the software is free for all its users.
This license, the Lesser General Public License, applies to some specially
designated software packages--typically libraries--of the Free Software
Foundation and other authors who decide to use it. You can use it too, but we
suggest you first think carefully about whether this license or the ordinary
General Public License is the better strategy to use in any particular case,
based on the explanations below.
When we speak of free software, we are referring to freedom of use, not
price. Our General Public Licenses are designed to make sure that you have
the freedom to distribute copies of free software (and charge for this service if
you wish); that you receive source code or can get it if you want it; that you
can change the software and use pieces of it in new free programs; and that
you are informed that you can do these things.
To protect your rights, we need to make restrictions that forbid distributors
to deny you these rights or to ask you to surrender these rights. These
restrictions translate to certain responsibilities for you if you distribute copies
of the library or if you modify it.
Page 94

94
For example, if you distribute copies of the library, whether gratis or for a
fee, you must give the recipients all the rights that we gave you. You must
make sure that they, too, receive or can get the source code. If you link other
code with the library, you must provide complete object files to the recipients,
so that they can relink them with the library after making changes to the
library and recompiling it. And you must show them these terms so they
know their rights.
We protect your rights with a two-step method: (1) we copyright the library,
and (2) we offer you this license, which gives you legal permission to copy,
distribute and/or modify the library.
To protect each distributor, we want to make it very clear that there is no
warranty for the free library. Also, if the library is modified by someone else
and passed on, the recipients should know that what they have is not the
original version, so that the original author's reputation will not be affected by
problems that might be introduced by others.
Finally, software patents pose a constant threat to the existence of any free
program. We wish to make sure that a company cannot effectively restrict the
users of a free program by obtaining a restrictive license from a patent holder.
Therefore, we insist that any patent license obtained for a version of the
library must be consistent with the full freedom of use specified in this
license.
Most GNU software, including some libraries, is covered by the ordinary
GNU General Public License. This license, the GNU Lesser General Public
License, applies to certain designated libraries, and is quite different from the
ordinary General Public License. We use this license for certain libraries in
order to permit linking those libraries into non-free programs.
When a program is linked with a library, whether statically or using a shared
library, the combination of the two is legally speaking a combined work, a
derivative of the original library. The ordinary General Public License
therefore permits such linking only if the entire combination fits its criteria of
freedom. The Lesser General Public License permits more lax criteria for
linking other code with the library.
We call this license the "Lesser" General Public License because it does
Less to protect the user's freedom than the ordinary General Public License. It
also provides other free software developers Less of an advantage over
competing non-free programs. These disadvantages are the reason we use the
ordinary General Public License for many libraries. However, the Lesser
license provides advantages in certain special circumstances.
For example, on rare occasions, there may be a special need to encourage
the widest possible use of a certain library, so that it becomes a de-facto
standard. To achieve this, non-free programs must be allowed to use the
library. A more frequent case is that a free library does the same job as widely
used non-free libraries. In this case, there is little to gain by limiting the free
library to free software only, so we use the Lesser General Public License.
In other cases, permission to use a particular library in non-free programs
enables a greater number of people to use a large body of free software. For
example, permission to use the GNU C Library in non-free programs enables
many more people to use the whole GNU operating system, as well as its
variant, the GNU/Linux operating system.
Although the Lesser General Public License is Less protective of the users'
freedom, it does ensure that the user of a program that is linked with the
Library has the freedom and the wherewithal to run that program using a
modified version of the Library.
The precise terms and conditions for copying, distribution and modification
follow. Pay close attention to the difference between a "work based on the
library" and a "work that uses the library". The former contains code derived
from the library, whereas the latter must be combined with the library in order
to run.
Page 95

95
GNU LESSER GENERAL PUBLIC LICENSE TERMS AND
CONDITIONS FOR COPYING,
DISTRIBUTION AND MODIFICATION
0. This License Agreement applies to any software library or other program
which contains a notice placed by the copyright holder or other
authorized party saying it may be distributed under the terms of this
Lesser General Public License (also called "this License"). Each licensee
is addressed as "you".
A "library" means a collection of software functions and/or data prepared so
as to be conveniently linked with application programs (which use some of
those functions and data) to form executables.
The "Library", below, refers to any such software library or work which has
been distributed under these terms. A "work based on the Library" means
either the Library or any derivative work under copyright law: that is to say, a
work containing the Library or a portion of it, either verbatim or with
modifications and/or translated straightforwardly into another language.
(Hereinafter, translation is included without limitation in the term
"modification".)
"Source code" for a work means the preferred form of the work for making
modifications to it. For a library, complete source code means all the source
code for all modules it contains, plus any associated interface definition files,
plus the scripts used to control compilation and installation of the library.
copyright notice and disclaimer of warranty; keep intact all the notices
that refer to this License and to the absence of any warranty; and
distribute a copy of this License along with the Library.
You may charge a fee for the physical act of transferring a copy, and you
may at your option offer warranty protection in exchange for a fee.
2. You may modify your copy or copies of the Library or any portion of it,
thus forming a work based on the Library, and copy and distribute such
modifications or work under the terms of Section 1 above, provided that
you also meet all of these conditions:
a) The modified work must itself be a software library.
b) You must cause the files modified to carry prominent notices stating
that you changed the files and the date of any change.
c) You must cause the whole of the work to be licensed at no charge to
all third parties under the terms of this License.
d) If a facility in the modified Library refers to a function or a table of
data to be supplied by an application program that uses the facility,
other than as an argument passed when the facility is invoked, then
you must make a good faith effort to ensure that, in the event an
application does not supply such function or table, the facility still
operates, and performs whatever part of its purpose remains
meaningful.
Activities other than copying, distribution and modification are not covered
by this License; they are outside its scope. The act of running a program using
the Library is not restricted, and output from such a program is covered only
if its contents constitute a work based on the Library (independent of the use
of the Library in a tool for writing it). Whether that is true depends on what
the Library does and what the program that uses the Library does.
1. You may copy and distribute verbatim copies of the Library's complete
source code as you receive it, in any medium, provided that you
conspicuously and appropriately publish on each copy an appropriate
(For example, a function in a library to compute square roots has a
purpose that is entirely well-defined independent of the application.
Therefore, Subsection 2d requires that any application-supplied function
or table used by this function must be optional: if the application does
not supply it, the square root function must still compute square roots.)
These requirements apply to the modified work as a whole. If identifiable
sections of that work are not derived from the Library, and can be reasonably
considered independent and separate works in themselves, then this License,
Page 96

96
and its terms, do not apply to those sections when you distribute them as
separate works. But when you distribute the same sections as part of a whole
which is a work based on the Library, the distribution of the whole must be on
the terms of this License, whose permissions for other licensees extend to the
entire whole, and thus to each and every part regardless of who wrote it.
Thus, it is not the intent of this section to claim rights or contest your rights to
work written entirely by you; rather, the intent is to exercise the right to
control the distribution of derivative or collective works based on the Library.
In addition, mere aggregation of another work not based on the Library with
the Library (or with a work based on the Library) on a volume of a storage or
distribution medium does not bring the other work under the scope of this
License.
3. You may opt to apply the terms of the ordinary GNU General Public
License instead of this License to a given copy of the Library. To do this,
you must alter all the notices that refer to this License, so that they refer
to the ordinary GNU General Public License, version 2, instead of to this
License. (If a newer version than version 2 of the ordinary GNU General
Public License has appeared, then you can specify that version instead if
you wish.) Do not make any other change in these notices.
Once this change is made in a given copy, it is irreversible for that copy, so
the ordinary GNU General Public License applies to all subsequent copies
and derivative works made from that copy.
This option is useful when you wish to copy part of the code of the Library
into a program that is not a library.
4. You may copy and distribute the Library (or a portion or derivative of it,
under Section 2) in object code or executable form under the terms of
Sections 1 and 2 above provided that you accompany it with the
complete corresponding machine-readable source code, which must be
distributed under the terms of Sections 1 and 2 above on a medium
customarily used for software interchange.
If distribution of object code is made by offering access to copy from a
designated place, then offering equivalent access to copy the source code
from the same place satisfies the requirement to distribute the source code,
even though third parties are not compelled to copy the source along with the
object code.
5. A program that contains no derivative of any portion of the Library, but is
designed to work with the Library by being compiled or linked with it, is
called a "work that uses the Library". Such a work, in isolation, is not a
derivative work of the Library, and therefore falls outside the scope of
this License.
However, linking a "work that uses the Library" with the Library creates an
executable that is a derivative of the Library (because it contains portions of
the Library), rather than a "work that uses the library". The executable is
therefore covered by this License. Section 6 states terms for distribution of
such executables.
When a "work that uses the Library" uses material from a header file that is
part of the Library, the object code for the work may be a derivative work of
the Library even though the source code is not. Whether this is true is
especially significant if the work can be linked without the Library, or if the
work is itself a library. The threshold for this to be true is not precisely
defined by law.
If such an object file uses only numerical parameters, data structure layouts
and accessors, and small macros and small inline functions (ten lines or less
in length), then the use of the object file is unrestricted, regardless of whether
it is legally a derivative work. (Executables containing this object code plus
portions of the Library will still fall under Section 6.)
Otherwise, if the work is a derivative of the Library, you may distribute the
object code for the work under the terms of Section 6. Any executables
containing that work also fall under Section 6, whether or not they are linked
directly with the Library itself.
Page 97

97
6. As an exception to the Sections above, you may also combine or link a
"work that uses the Library" with the Library to produce a work
containing portions of the Library, and distribute that work under terms
of your choice, provided that the terms permit modification of the work
for the customer's own use and reverse engineering for debugging such
modifications.
You must give prominent notice with each copy of the work that the Library
is used in it and that the Library and its use are covered by this License. You
must supply a copy of this License. If the work during execution displays
copyright notices, you must include the copyright notice for the Library
among them, as well as a reference directing the user to the copy of this
License. Also, you must do one of these things:
a) Accompany the work with the complete corresponding machine-
readable source code for the Library including whatever changes
were used in the work (which must be distributed under Sections 1
and 2 above); and, if the work is an executable linked with the
Library, with the complete machine-readable "work that uses the
Library", as object code and/or source code, so that the user can
modify the Library and then relink to produce a modified executable
containing the modified Library. (It is understood that the user who
changes the contents of definitions files in the Library will not
necessarily be able to recompile the application to use the modified
definitions.)
b) Use a suitable shared library mechanism for linking with the Library.
A suitable mechanism is one that (1) uses at run time a copy of the
library already present on the user's computer system, rather than
copying library functions into the executable, and (2) will operate
properly with a modified version of the library, if the user installs
one, as long as the modified version is interface-compatible with the
version that the work was made with.
c) Accompany the work with a written offer, valid for at least three
years, to give the same user the materials specified in Subsection 6a,
above, for a charge no more than the cost of performing this
distribution.
d) If distribution of the work is made by offering access to copy from a
designated place, offer equivalent access to copy the above specified
materials from the same place.
e) Verify that the user has already received a copy of these materials or
that you have already sent this user a copy.
For an executable, the required form of the "work that uses the Library"
must include any data and utility programs needed for reproducing the
executable from it. However, as a special exception, the materials to be
distributed need not include anything that is normally distributed (in either
source or binary form) with the major components (compiler, kernel, and so
on) of the operating system on which the executable runs, unless that
component itself accompanies the executable.
It may happen that this requirement contradicts the license restrictions of
other proprietary libraries that do not normally accompany the operating
system. Such a contradiction means you cannot use both them and the Library
together in an executable that you distribute.
7. You may place library facilities that are a work based on the Library
side-by-side in a single library together with other library facilities not
covered by this License, and distribute such a combined library, provided
that the separate distribution of the work based on the Library and of the
other library facilities is otherwise permitted, and provided that you do
these two things:
a) Accompany the combined library with a copy of the same work based
on the Library, uncombined with any other library facilities. This
must be distributed under the terms of the Sections above.
Page 98

98
b) Give prominent notice with the combined library of the fact that part
of it is a work based on the Library, and explaining where to find the
accompanying uncombined form of the same work.
8. You may not copy, modify, sublicense, link with, or distribute the Library
except as expressly provided under this License. Any attempt otherwise
to copy, modify, sublicense, link with, or distribute the Library is void,
and will automatically terminate your rights under this License.
However, parties who have received copies, or rights, from you under
this License will not have their licenses terminated so long as such
parties remain in full compliance.
9. You are not required to accept this License, since you have not signed it.
However, nothing else grants you permission to modify or distribute the
Library or its derivative works. These actions are prohibited by law if
you do not accept this License. Therefore, by modifying or distributing
the Library (or any work based on the Library), you indicate your
acceptance of this License to do so, and all its terms and conditions for
copying, distributing or modifying the Library or works based on it.
10. Each time you redistribute the Library (or any work based on the
Library), the recipient automatically receives a license from the original
licensor to copy, distribute, link with or modify the Library subject to
these terms and conditions. You may not impose any further restrictions
on the recipients' exercise of the rights granted herein. You are not
responsible for enforcing compliance by third parties with this License.
11. If, as a consequence of a court judgment or allegation of patent
infringement or for any other reason (not limited to patent issues),
conditions are imposed on you (whether by court order, agreement or
otherwise) that contradict the conditions of this License, they do not
excuse you from the conditions of this License. If you cannot distribute
so as to satisfy simultaneously your obligations under this License and
any other pertinent obligations, then as a consequence you may not
distribute the Library at all. For example, if a patent license would not
permit royalty-free redistribution of the Library by all those who receive
copies directly or indirectly through you, then the only way you could
satisfy both it and this License would be to refrain entirely from
distribution of the Library.
If any portion of this section is held invalid or unenforceable under any
particular circumstance, the balance of the section is intended to apply, and
the section as a whole is intended to apply in other circumstances.
It is not the purpose of this section to induce you to infringe any patents or
other property right claims or to contest validity of any such claims; this
section has the sole purpose of protecting the integrity of the free software
distribution system which is implemented by public license practices. Many
people have made generous contributions to the wide range of software
distributed through that system in reliance on consistent application of that
system; it is up to the author/donor to decide if he or she is willing to
distribute software through any other system and a licensee cannot impose
that choice.
This section is intended to make thoroughly clear what is believed to be a
consequence of the rest of this License.
12. If the distribution and/or use of the Library is restricted in certain
countries either by patents or by copyrighted interfaces, the original
copyright holder who places the Library under this License may add an
explicit geographical distribution limitation excluding those countries, so
that distribution is permitted only in or among countries not thus
excluded. In such case, this License incorporates the limitation as if
written in the body of this License.
13. The Free Software Foundation may publish revised and/or new versions
of the Lesser General Public License from time to time. Such new
versions will be similar in spirit to the present version, but may differ in
detail to address new problems or concerns.
Page 99

99
Each version is given a distinguishing version number. If the Library specifies
a version number of this License which applies to it and "any later version",
you have the option of following the terms and conditions either of that
version or of any later version published by the Free Software Foundation. If
the Library does not specify a license version number, you may choose any
version ever published by the Free Software Foundation.
14. If you wish to incorporate parts of the Library into other free programs
whose distribution conditions are incompatible with these, write to the
author to ask for permission. For software which is copyrighted by the
Free Software Foundation, write to the Free Software Foundation; we
sometimes make exceptions for this. Our decision will be guided by the
two goals of preserving the free status of all derivatives of our free
software and of promoting the sharing and reuse of software generally.
NO WARRANTY
15. BECAUSE THE LIBRARY IS LICENSED FREE OF CHARGE,
THERE IS NO WARRANTY FOR THE LIBRARY, TO THE EXTENT
PERMITTED BY APPLICABLE LAW. EXCEPT WHEN OTHERWISE
STATED IN WRITING THE COPYRIGHT HOLDERS AND/OR
OTHER PARTIES PROVIDE THE LIBRARY "AS IS" WITHOUT
WARRANTY OF ANY KIND, EITHER EXPRESSED OR IMPLIED,
INCLUDING, BUT NOT LIMITED TO, THE IMPLIED
WARRANTIES OF MERCHANTABILITY AND FITNESS FOR A
PARTICULAR PURPOSE. THE ENTIRE RISK AS TO THE
QUALITY AND PERFORMANCE OF THE LIBRARY IS WITH YOU.
SHOULD THE LIBRARY PROVE DEFECTIVE, YOU ASSUME THE
COST OF ALL NECESSARY SERVICING, REPAIR OR
CORRECTION.
16. IN NO EVENT UNLESS REQUIRED BY APPLICABLE LAW OR
AGREED TO IN WRITING WILL ANY COPYRIGHT HOLDER, OR
ANY OTHER PARTY WHO MAY MODIFY AND/OR
REDISTRIBUTE THE LIBRARY AS PERMITTED ABOVE, BE
LIABLE TO YOU FOR DAMAGES, INCLUDING ANY GENERAL,
SPECIAL, INCIDENTAL OR CONSEQUENTIAL DAMAGES
ARISING OUT OF THE USE OR INABILITY TO USE THE
LIBRARY (INCLUDING BUT NOT LIMITED TO LOSS OF DATA
OR DATA BEING RENDERED INACCURATE OR LOSSES
SUSTAINED BY YOU OR THIRD PARTIES OR A FAILURE OF THE
LIBRARY TO OPERATE WITH ANY OTHER SOFTWARE), EVEN
IF SUCH HOLDER OR OTHER PARTY HAS BEEN ADVISED OF
THE POSSIBILITY OF SUCH DAMAGES.
Page 100

100
END OF TERMS AND CONDITIONS
How to Apply These Terms to Your New Libraries
If you develop a new library, and you want it to be of the greatest possible
use to the public, we recommend making it free software that everyone can
redistribute and change. You can do so by permitting redistribution under
these terms (or, alternatively, under the terms of the ordinary General Public
License).
To apply these terms, attach the following notices to the library. It is safest
to attach them to the start of each source file to most effectively convey the
exclusion of warranty; and each file should have at least the "copyright" line
and a pointer to where the full notice is found.
<one line to give the library's name and a brief idea of what it does.>
CopyrightZ <year> <name of author>
This library is free software; you can redistribute it and/or modify it
under the terms of the GNU Lesser General Public License as published
by the Free Software Foundation; either version 2.1 of the License, or (at
your option) any later version.
This library is distributed in the hope that it will be useful, but
WITHOUT ANY WARRANTY; without even the implied warranty of
MERCHANTABILITY or FITNESS FOR A PARTICULAR PURPOSE.
See the GNU Lesser General Public License for more details.
Also add information on how to contact you by electronic and paper mail.
You should also get your employer (if you work as a programmer) or your
school, if any, to sign a "copyright disclaimer" for the library, if necessary.
Here is a sample; alter the names:
Yoyodyne, Inc., hereby disclaims all copyright interest in the library
`Frob' (a library for tweaking knobs) written by James Random Hacker.
<signature of Ty Coon>, 1 April 1990
Ty Coon, President of Vice
That's all there is to it!
You should have received a copy of the GNU Lesser General Public
License along with this library; if not, write to the Free Software
Foundation, Inc., 51 Franklin Street, Fifth Floor, Boston, MA 021101301 USA
 Loading...