

Page 1

Network Guide
NPD4257-00 EN
Page 2

Epson Network Guide
Copyright and Trademarks
No part of this publication may be reproduced, stored in a retrieval system, or transmitted in any form or by any means,
mechanical, photocopying, recording, or otherwise, without the prior written permission of Seiko Epson Corporation. No
patent liability is assumed with respect to the use of the information contained herein. Neither is any liability assumed for
damages resulting from the use of the information contained herein.
Neither Seiko Epson Corporation nor its affiliates shall be liable to the purchaser of this product or third parties for damages,
losses, costs, or expenses incurred by purchaser or third parties as a result of: accident, misuse, or abuse of this product or
unauthorized modifications, repairs, or alterations to this product, or (excluding the U.S.) failure to strictly comply with Seiko
Epson Corporation’s operating and maintenance instructions.
Seiko Epson Corporation and its affiliates shall not be liable against any damages or problems arising from the use of any options
or any consumable products other than those designated as Original Epson Products or Epson Approved Products by Seiko
Epson Corporation.
Features Zoran Corporation Integrated Print System (IPS) for print language emulation.
NEST Office Kit Copyright © 1996, Novell, Inc. All rights reserved.
A part of the ICC Profile contained within this product was created by Gretag Macbeth ProfileMaker. Gretag Macbeth is the
registered trademark of Gretag Macbeth Holding AG Logo. ProfileMaker is a trademark of LOGO GmbH.
IBM and PS/2 are registered trademarks of International Business Machines Corporation.
Microsoft
Apple
Apple Chancery, Chicago, Geneva, Hoefler Text, Monaco and New York are trademarks or registered trademarks of Apple,
Inc.
EPSON and EPSON ESC/P are registered trademarks and EPSON AcuLaser and EPSON ESC/P 2 are trademarks of Seiko Epson
Corporation.
Monotype is a trademark of Monotype Imaging, Inc. registered in the United States Patent and Trademark Office and may be
registered in certain jurisdictions.
The UFST
printer devices.
MicroType
significantly reduce font file sizes.
, Windows®, and Windows Vista® are registered trademarks of Microsoft Corporation.
®
, Macintosh®, Mac®, Mac OS®, AppleTalk®, and Bonjour® are registered trademarks of Apple, Inc.
®
(Universal Font Scaling Technology™) product is Monotype Imaging’s scalable font rendering subsystem for
®
font compression technology from Monotype Imaging works with the UFST® font rendering subsystem to
®
Monotype Imaging’s MicroType
CG Omega, CG Times, Garamond Antiqua, Garamond Halbfett, Garamond Kursiv, Garamond Halbfett Kursiv are trademarks
of Monotype Imaging, Inc. and may be registered in certain jurisdictions.
font format is a MicroType-compressed font format.
®
Copyright and Trademarks 2
Page 3

Epson Network Guide
Scalable type outlines are licensed from Monotype Imaging, Inc.
Albertus, Arial, Coronet, Gillsans, and Times New Roman are trademarks of The Monotype Corporation registered in the
United States Patent and Trademark Office and may be registered in certain jurisdictions.
ITC Avant Garde Gothic, ITC Bookman, ITC Zapf-Chancery, and ITC ZapfDingbats are trademarks of International Typeface
Corporation registered in the United States Patent and Trademark Office and may be registered in certain jurisdictions.
Clarendon, Helvetica, Palatino, Times and Univers are registered trademarks of Heidelberger Druckmaschinen AG, which may
be registered in certain jurisdictions, exclusively licensed through Linotype Library GmbH, a wholly owned subsidiary of
Heidelberger Druckmaschinen AG.
Wingdings is a registered trademark of Microsoft Corporation in the United States and other countries.
Marigold is a trademark of Arthur Baker and may be registered in some jurisdictions.
Antique Olive is a trademark of Marcel Olive and may be registered in certain jurisdictions.
HP and HP LaserJet are registered trademarks of the Hewlett-Packard Company.
PCL is a registered trademark of Hewlett-Packard Company.
Adobe, the Adobe logo and PostScript3 are trademarks of Adobe Systems Incorporated, which may be registered in certain
jurisdictions.
CompactFlash is a trademark of SanDisk Corporation, registered in the United States and other countries.
This product includes software developed by the University of California, Berkeley, and its contributors.
This product includes RSA BSAFE
RSA, BSAFE are either registered trademarks or trademarks of RSA Security Inc. in the United States and/or other countries.
RSA Security Inc. All rights reserved.
General Notice: Other product names used herein are for identification purposes only and may be trademarks of their respective
owners. Epson disclaims any and all rights in those marks.
Copyright © 2010 Seiko Epson Corporation. All rights reserved.
Cryptographic software from RSA Security Inc.
®
Copyright and Trademarks 3
Page 4

Epson Network Guide
Contents
Safety Instructions
Warnings, Cautions, and Notes............................................................ 8
Chapter 1 Introduction
About Your Printer...................................................................... 9
About This Guide....................................................................... 9
Operating Environment................................................................. 10
For users of printers supporting NetWare queue-based printing........................... 10
For users of printers not supporting NetWare queue-based printing. . ...................... 12
Inkjet printers/Large format inkjet printers............................................. 13
Features of the Network Interface......................................................... 13
Network Interface Operation............................................................. 14
Status light........................................................................ 14
Network connector................................................................. 15
About the Software..................................................................... 15
Terms and Concepts.................................................................... 16
Chapter 2 How To
Overview............................................................................. 18
Selecting a Printing Method.............................................................. 19
Printing from Windows............................................................. 19
Printing from Macintosh............................................................ 19
Features of the Printing Methods..................................................... 20
Installing Components on Your Computer................................................. 22
About Installing Components on Your Computer....................................... 22
Windows 7/Vista/Server 2008........................................................ 22
Windows XP...................................................................... 24
Windows Me/98 ................................................................... 26
Windows Server 2003. .............................................................. 28
Windows 2000. . . . . . . . . . . . . . . . . . . . . . . . . . . . . . . . . . . . . . . . . . . . . . . . . . . . . . . . . . . . . . . . . . . . . 29
Windows NT 4.0................................................................... 31
Macintosh........................................................................ 34
Contents 4
Page 5

Epson Network Guide
Setting Up the Network Interface......................................................... 35
Connecting the Network Interface to the Network....................................... 35
Configuring the Network Interface (For Windows Users)................................. 36
Configuring the Network Interface (For Macintosh Users)................................ 37
Installing the Printer Driver.............................................................. 39
About Installing the Printer Driver.................................................... 39
Windows 7/Vista/Server 2008........................................................ 39
Windows XP...................................................................... 44
Windows Me/98................................................................... 49
Windows Server 2003. .............................................................. 51
Windows 2000. . . . . . . . . . . . . . . . . . . . . . . . . . . . . . . . . . . . . . . . . . . . . . . . . . . . . . . . . . . . . . . . . . . . . 56
Windows NT 4.0................................................................... 61
Macintosh........................................................................ 63
Settings for NetWare Users.............................................................. 65
Overview......................................................................... 65
Configuring the Network Interface.................................................... 65
Chapter 3 Network Software
EpsonNet Config for Windows. .......................................................... 82
About EpsonNet Config............................................................. 82
System Requirements............................................................... 82
Installing EpsonNet Config.......................................................... 83
Accessing the EpsonNet Config User’s Guide........................................... 83
EpsonNet Config for Macintosh.......................................................... 84
About EpsonNet Config............................................................. 84
System Requirements............................................................... 84
Installing EpsonNet Config.......................................................... 84
Accessing the EpsonNet Config User’s Guide........................................... 85
EpsonNet Config with Web Browser...................................................... 85
About EpsonNet Config............................................................. 85
Configuring the Network Interface Using Web-Based EpsonNet Config..................... 86
Opening Screen.................................................................... 90
EpsonNet Print........................................................................ 92
About EpsonNet Print.............................................................. 92
System Requirements............................................................... 92
Installing EpsonNet Print............................................................ 93
For Windows 7/Vista/XP/Server 2008/Server 2003/2000/NT 4.0 Users. . . . . . . . . . . . . . . . . . . . . . 93
For Windows Me/98/95 Users....................................................... 100
Contents 5
Page 6

Epson Network Guide
Configuring the Printer Port........................................................ 105
Chapter 4 Troubleshooting
General Problems..................................................................... 108
Cannot configure the network interface or cannot print from the network.................. 108
Cannot print even if you have assigned the IP address to the computer and the printer........ 108
Unable to start EpsonNet Config..................................................... 108
The message “EpsonNet Config cannot be used because no network is installed.” appears when
you start EpsonNet Config........................................................ 109
The message “Could not complete communicating configuration data” appears when you send
settings to the network interface.. . . . . . . ........................................... 109
Unable to start EpsonNet Config with Web Browser..................................... 109
The Model Name and IP Address do not appear in the EpsonNet Config dialog box.......... 110
An extra account is generated when using the dial-up network. ........................... 110
Problems Specific to Your Network Environment .......................................... 110
Windows Me/98 environment....................................................... 110
Windows 2000/NT environment.................................................... 111
Macintosh environment............................................................ 112
NetWare environment............................................................. 112
Printing a Network Status Sheet......................................................... 113
Printing a Network Status Sheet (Large Format Inkjet Printers)............................... 114
Initializing Your Printer................................................................ 115
Reformatting the Hard Disk Drive....................................................... 115
Chapter 5 Tips for Administrator
Setting an IP Address on the Printer’s Control Panel........................................ 116
Network Menu................................................................... 117
AUX Menu...................................................................... 118
Setting an IP Address on the Printer’s Control Panel (Large Format Inkjet Printers).............. 119
Network Setup Menu.............................................................. 121
Instructions on Using a Dial-Up Router................................................... 121
Function of Universal Plug and Play...................................................... 122
Uninstalling Software.................................................................. 122
Windows 7/Vista/Server 2008....................................................... 122
Windows XP/Server 2003.......................................................... 123
Windows Me/98/95/2000/NT 4.0. . . . . . . . . . . . . . . . . . . . . . . . . . . . . . . . . . . . . . . . . . . . . . . . . . . . 123
Contents 6
Page 7

Epson Network Guide
Macintosh....................................................................... 123
Appendix A Software License Terms
Open Source Software Licenses.......................................................... 124
Bonjour......................................................................... 124
Other Software Licenses................................................................ 131
Info-ZIP copyright and license...................................................... 131
Index
Contents 7
Page 8

Safety Instructions
Warnings, Cautions, and Notes
Warnings
w
must be followed carefully to avoid bodily injury.
Cautions
c
must be observed to avoid damage to your equipment.
Notes
contain important information and useful tips on the operation of your printer.
Epson Network Guide
Safety Instructions 8
Page 9

Epson Network Guide
Chapter 1
Introduction
About Your Printer
Your printer has a built-in Ethernet interface and can connect anywhere on your network using
10Base-T or 100Base-TX. (On some models, 1000Base-T is also supported.) The built-in Ethernet
interface, which is called the network interface in this manual, automatically selects the correct
standard when it connects to a network. In addition, it supports and automatically selects the IEEE
802.2, IEEE 802.3, Ethernet II, and Ethernet SNAP network protocols.
Because the network interface supports multiple protocols and automatically detects protocols on
your network, you can print from Microsoft
Windows® and Apple® Macintosh® applications.
®
Use the Software Disc to easily configure the network interface for use on the TCP/IP network and
install the printer driver. You can use the printer on the TCP/IP network at once.
If you want to configure the network interface for protocols such as TCP/IP, NetWare, NetBEUI,
AppleTalk
product, to quickly and easily configure the network interface to use those protocols.
Note:
❏ The EpsonNet Config utility configures the network interface to work only with protocols that exist
on your network. This does not imply that you can use all of the above-mentioned protocols on your
network or operating system. The protocols that the network interface can use may vary depending
on the operating system and the network configuration.
❏ Some printers do not support NetWare queue-based printing. See the manual shipped with your
printer for details.
, IPP, and SNMP, use EpsonNet Config, the configuration utility provided with your
®
About This Guide
This Network Guide contains information about using the network interface on a network. It includes
how to set up the network interface, install the configuration software, and modify network settings of
your printer and computers.
For information about your printer, see your User’s Guide.
Introduction 9
Page 10

Epson Network Guide
Note:
❏ To read the online guide, you must have Adobe Reader or Adobe Acrobat Reader installed on your
computer.
❏ This guide is written for network administrators, and many of the steps included here require
detailed network knowledge and administrator rights.
❏ The term “network administrator” refers to the person responsible for maintaining the network.
“Administrator” is synonymous with “Supervisor” in this guide.
❏ The term “network interface” refers to the built-in Ethernet interface of the printer in this guide.
❏ Some screen shots in this guide may list a printer name other than your printer. This difference does
not alter the instructions.
❏ The supported operating systems are different depending on the printer. See your printer’s User’s
Guide for the supported operating systems.
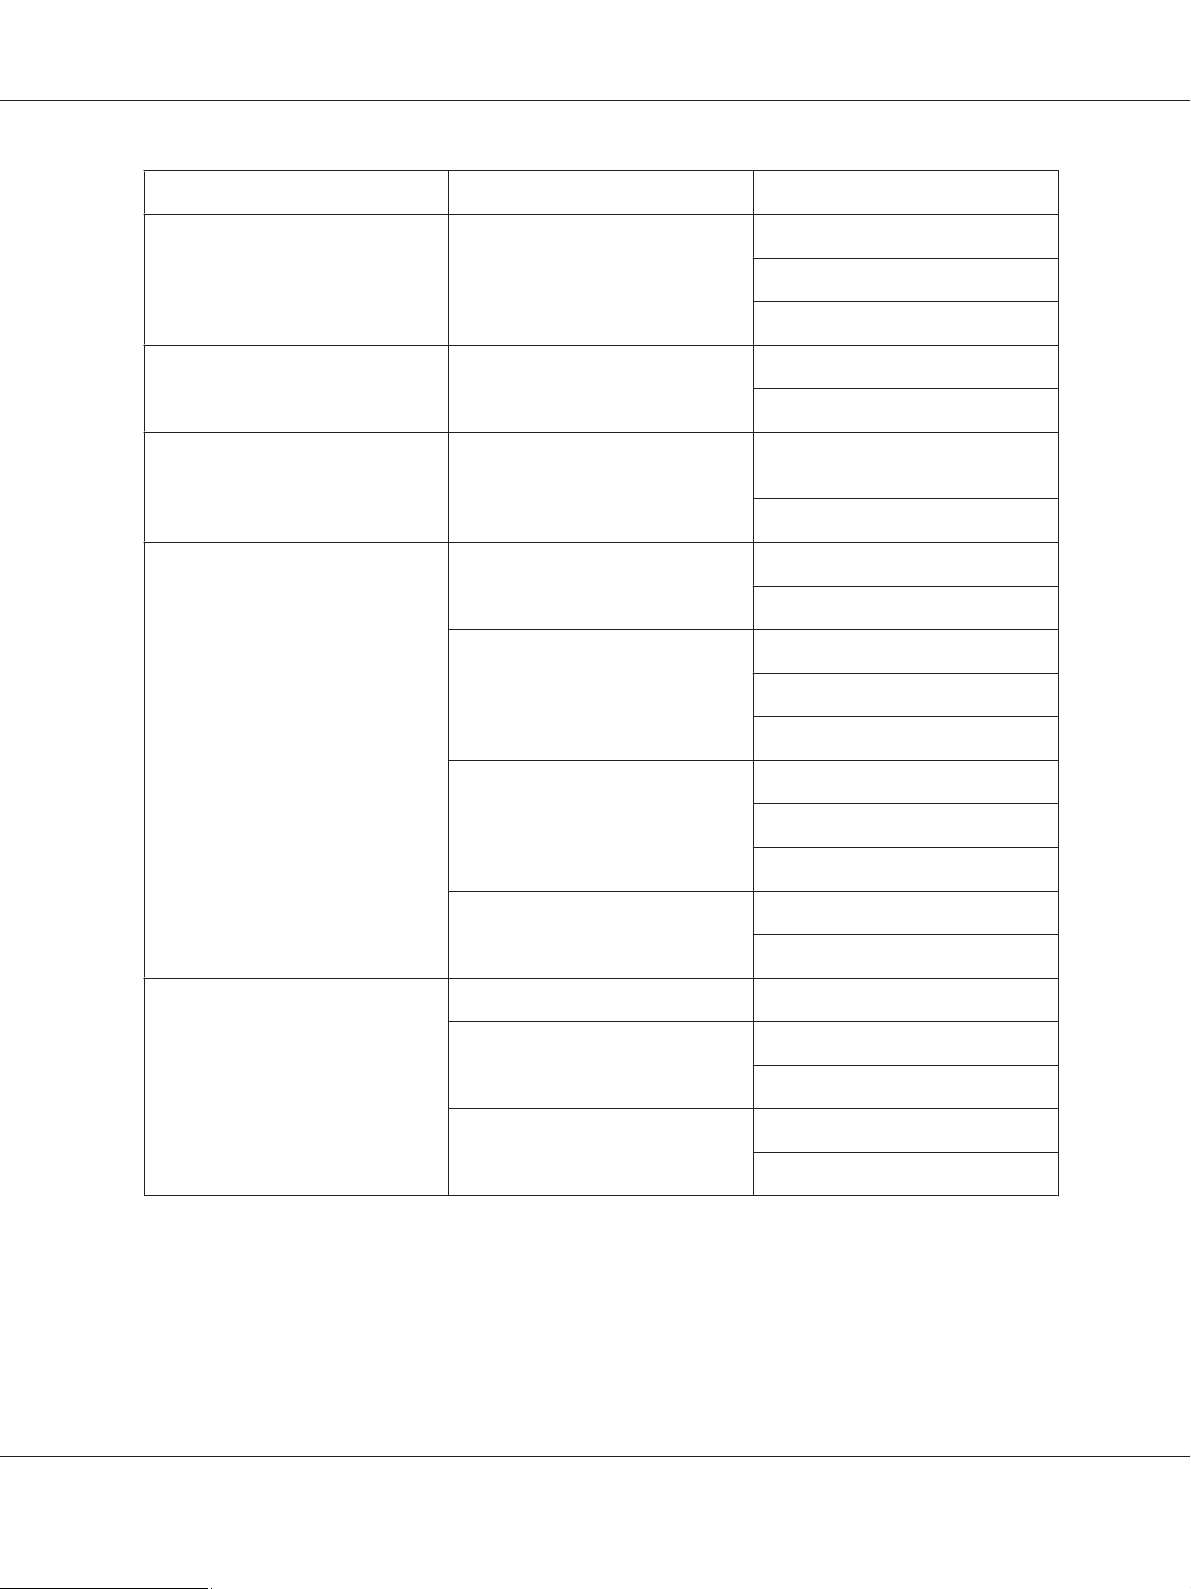
Operating Environment
The network interface supports the following environments.
For users of printers supporting NetWare queue-based printing
OS Version Protocol
Windows 7
Windows Vista
Windows XP (Home, Professional)
Windows Server 2008
Windows Server 2003
Windows 2000 (Professional,
Server)
- TCP/IP (using LPR, Standard TCP/IP
Port, or EpsonNet Print)
IPP
- TCP/IP (using LPR, Standard TCP/IP
Port, or EpsonNet Print)
IPP
NetBEUI
Introduction 10
Page 11
Epson Network Guide
OS Version Protocol
Windows Me - TCP/IP (using EpsonNet Print)
IPP
NetBEUI
Windows 98
Windows 98 SE
Windows NT 4.0 with Service Pack 5
or higher
Macintosh Mac OS X 10.5 Bonjour
Mac OS X 10.4 Bonjour
Mac OS X 10.2.4 or later Rendezvous
Mac OS X 10.2 or later TCP/IP
- TCP/IP (using EpsonNet Print)
NetBEUI
- TCP/IP (using LPR or EpsonNet
Print)
NetBEUI
TCP/IP
TCP/IP
AppleTalk
TCP/IP
AppleTalk
AppleTalk
NetWare 3.x Bindery mode
4.x/IntranetWare NDS mode
Bindery emulation mode
5.x/6.x NDS Queue-based print system
NDPS
Note:
❏ Only the Intel version of Windows NT is supported.
❏ If you use the printer in a dial-up router environment, you must set an IP address for the printer.
Make sure the IP address is suitable for the segment; incorrect IP address may generate unexpected
dial-up.
Introduction 11
Page 12

Epson Network Guide
For users of printers not supporting NetWare queue-based printing
OS Version Protocol
Windows 7
Windows Vista
Windows XP (Home, Professional)
Windows Server 2008
Windows Server 2003
Windows 2000 (Professional,
Server)
Windows Me - TCP/IP (using EpsonNet Print)
Windows 98
Windows 98 SE
Windows NT 4.0 with Service Pack 5
or higher
- TCP/IP (using LPR, Standard TCP/IP
Port, or EpsonNet Print)
IPP
- TCP/IP (using LPR, Standard TCP/IP
Port, or EpsonNet Print)
IPP
NetBEUI
IPP
NetBEUI
- TCP/IP (using EpsonNet Print)
NetBEUI
- TCP/IP (using LPR or EpsonNet
Print)
NetBEUI
Macintosh Mac OS X 10.5 Bonjour
TCP/IP
Mac OS X 10.4 Bonjour
TCP/IP
AppleTalk
Mac OS X 10.2.4 or later Rendezvous
TCP/IP
AppleTalk
Mac OS X 10.2 or later TCP/IP
AppleTalk
Introduction 12
Page 13

Epson Network Guide
OS Version Protocol
NetWare 5.x/6.x NDPS
Note:
❏ Only the Intel version of Windows NT is supported.
❏ If you use the printer in a dial-up router environment, you must set an IP address for the printer.
Make sure the IP address is suitable for the segment; incorrect IP address may generate unexpected
dial-up.
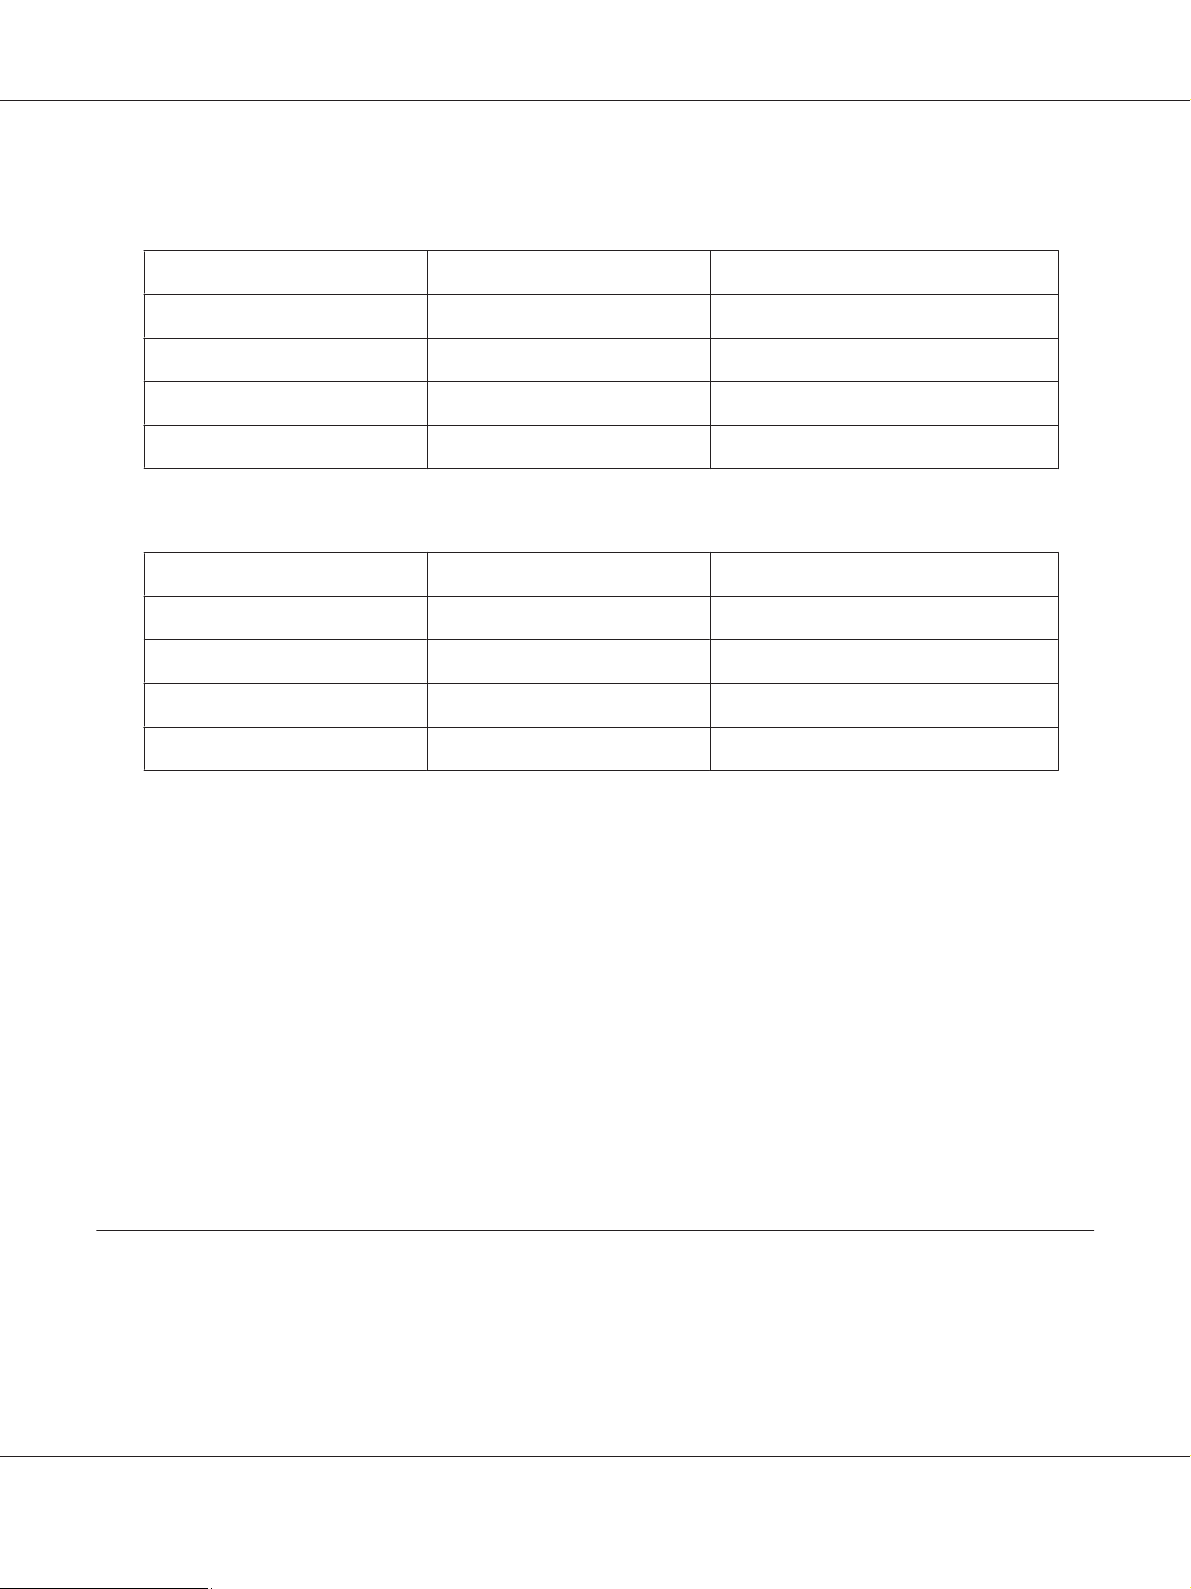
Inkjet printers/Large format inkjet printers
OS Version Protocol
Windows 7
Windows Vista
Windows XP (Home, Professional)
Windows 2000 (Professional,
Server)
Macintosh Mac OS X 10.5 Bonjour
Mac OS X 10.4 Bonjour
Mac OS X 10.2.8 or later Rendezvous
* IPP and AppleTalk are not supported on some models.
- TCP/IP (using LPR, Standard TCP/IP
Port, or EpsonNet Print)
IPP*
TCP/IP
TCP/IP
AppleTalk*
TCP/IP
AppleTalk*
Features of the Network Interface
❏ Connects your Epson printer using a built-in Ethernet interface, which is called the network
interface in this manual, to the network.
Introduction 13
Page 14

Epson Network Guide
❏ Supports multiple protocols, such as TCP/IP, NetWare, NetBEUI, AppleTalk, and IPP.
❏ Supports both 10Base-T and 100Base-TX. (On some models, 1000Base-T is also supported.)
❏ Supports DHCP.
❏ Supports Automatic Private IP Addressing (APIPA) that assigns an IP address automatically to
the network interface even if there is no DHCP server on the network.
❏ Supports the Dynamic DNS function.
❏ Supports SNMP and MIB.
❏ Supports SNTP (Simple Network Time Protocol).
❏ Supports Rendezvous on Mac OS X 10.2.4 or later.
❏ Supports Bonjour on Mac OS X 10.4 or later.
Network Interface Operation
Status light
The indicator lights provide you with important information on the operations of the network
interface.
Laser printers
Status light Data light Network Status
Off Green Ready (10 M link)
Off Green (Flashing) Receiving packets (10 M link)
Orange Green Ready (100 M link)
Orange Green (Flashing) Receiving packets (100 M link)
Introduction 14
Page 15
Epson Network Guide
Inkjet printers/Large format inkjet printers (Models that do not support 1000 Mbps
communication)
Status light Data light Network Status
Green Yellow Ready (10 M link)
Green Yellow (Flashing) Receiving packets (10 M link)
Red Yellow Ready (100 M link)
Red Yellow (Flashing) Receiving packets (100 M link)
Large format inkjet printers (Models that support 1000 Mbps communication)
Status light Data light Network Status
Red Yellow Ready (100 M link)
Red Yellow (Flashing) Receiving packets (100 M link)
Green Yellow Ready (1000 M link)
Green Yellow (Flashing) Receiving packets (1000 M link)
Network connector
RJ-45 connector: This connector is used to connect an Ethernet cable to a network. You can use this
cable for both 10Base-T and 100Base-TX. (On some models, 1000Base-T is also supported.)
Caution:
c
You must use the following shielded twisted-pair cable to connect the network interface to a
network.
❏ Category-5 or higher for the 10Base-T or 100Base-TX connection
❏ Category-5e or higher for the 1000Base-T connection
About the Software
The Software Disc provided with your printer includes the following network software.
Introduction 15
Page 16

Epson Network Guide
Note:
The software provided varies depending on your printer model.
❏ EpsonNet Config for Windows is a Windows-based configuration utility for administrators that
allows you to configure the network interface for various protocols such as TCP/IP, NetWare, MS
Network, AppleTalk, IPP, and SNMP. See “EpsonNet Config for Windows” on page 82.
❏ EpsonNet Config for Macintosh is a Macintosh-based configuration utility for administrators
that allows you to configure the network interface for TCP/IP, AppleTalk, and IPP. See “EpsonNet
Config for Macintosh” on page 84.
❏ EpsonNet Config with Web Browser is a Web-based configuration utility that allows you to
configure the network interface for TCP/IP, NetWare, MS Network, AppleTalk, IPP, and SNMP.
See “EpsonNet Config with Web Browser” on page 85.
❏ EpsonNet Print is a utility that enables TCP/IP printing for Windows. (Windows 7/Vista/XP/
Server 2008/Server 2003/2000/NT 4.0 also support OS standard LPR printing.) See “EpsonNet
Print” on page 92.
Terms and Concepts
Configuration -- a prepared set of conditions for proper operation of a device. Configuring the
network interface is to prepare it to work with protocols available on a network.
DHCP -- a dynamic host configuration protocol. It is a protocol that assigns dynamic IP addresses to
devices on a network.
EtherTalk -- the communication protocol of AppleTalk governing Ethernet transmissions
ftp -- a TCP/IP application protocol for file transfer
lpd -- a TCP/IP remote printing protocol application
Print queue -- a location where a print job is stored as a file, until the network interface sends the job to
the assigned printer
Protocol -- a rule that controls how data or information is exchanged through a network. Computers
and software cannot communicate with each other using different protocols.
Remote printer -- a shared printer connected elsewhere on the network, but under the control of a
NetWare print server
Introduction 16
Page 17

Epson Network Guide
TCP/IP -- Transmission Control Protocol/Internet Protocol, a layer of protocols that provides
communication between nodes on a network
SSL -- Secure Sockets Layer, a security protocol for transmitting data between a web server and a
browser
Introduction 17
Page 18

Epson Network Guide
Chapter 2
How To
Overview
This section describes the general procedure on how to set up the network interface for use on a
network.
1. Check the network interface operation.
Check the functions and operations of the network interface, such as status lights and RJ-45
connector. See “Network Interface Operation” on page 14 for details.
2. Select a printing method.
Select a printing method appropriate for your network environment and operating system. If you
are not sure, see “Printing from Windows” on page 19 or “Printing from Macintosh” on page
19 for details.
3. Install the necessary components on your computer.
Make sure the necessary components (such as TCP/IP, NetBEUI, etc.) are installed on the
computer, and network settings (such as IP address, subnet mask, etc.) of the computer is set. See
“About Installing Components on Your Computer” on page 22 for details.
4. Connect the network interface to the network.
Connect the network interface to the network. See “Connecting the Network Interface to the
Network” on page 35 for details.
5. Configure the network interface and install the printer driver.
See “Configuring the Network Interface (For Windows Users)” on page 36 or “Configuring the
Network Interface (For Macintosh Users)” on page 37 for details.
6. If necessary, configure the network settings of the network interface using EpsonNet Config.
Configure the network interface for TCP/IP, AppleTalk, MS Network, etc. using EpsonNet
Config. For Windows users, see “About EpsonNet Config” on page 82. For Macintosh users, see
“About EpsonNet Config” on page 84.
How To 18
Page 19

Epson Network Guide
Selecting a Printing Method
Printing from Windows
Check if there is a Windows 7/Vista/XP/Server 2008/Server 2003/2000/NT print server on your
network, and then use the suggestions below.
Note:
Only the recommended printing methods are introduced here. See “Features of the Printing Methods” on
page 20 for information on additional methods.
If no Windows 7/Vista/XP/Server 2008/Server 2003/2000/NT print server exists
Use a printing method appropriate to your operating system:
❏ For Windows Me/98
We recommend TCP/IP printing via EpsonNet Print. See “About EpsonNet Print” on page
92.
❏ For Windows 7/Vista/XP/Server 2008/Server 2003/2000/NT
We recommend TCP/IP printing via LPR. See “Windows 7/Vista/Server 2008” on page 39,
“Windows XP” on page 44, “Windows Server 2003” on page 51, “Windows 2000” on page 56,
or “Windows NT 4.0” on page 61.
If a Windows 7/Vista/XP/Server 2008/Server 2003/2000/NT print server exists
On the server, set the printer to connect with LPR and turn it into a shared printer. Your clients can
then print to this shared printer.
Printing from Macintosh
Mac OS X 10.5
❏ Bonjour
❏ EPSON TCP/IP
Mac OS X 10.4
❏ Bonjour
How To 19
Page 20

❏ EPSON TCP/IP
❏ EPSON AppleTalk
Mac OS X 10.2.4 or later
❏ Rendezvous
❏ EPSON TCP/IP
❏ EPSON AppleTalk
Mac OS X 10.2 or later
❏ EPSON TCP/IP
❏ EPSON AppleTalk
Epson Network Guide
Features of the Printing Methods
This section describes features of the printing methods available for you to choose.
LPR (TCP/IP) printing
Advantages
❏ No computer as a network interface is required.
❏ No special utility for Windows 7/Vista/XP/Server 2008/Server 2003/2000/NT is required.
❏ You can see the printer status using EPSON Status Monitor.
❏ For Windows 7/Vista/XP/Server 2008/Server 2003/2000/NT, you can create a print log using the
event viewer.
❏ You can print via a router.
Disadvantages
❏ You need to set up TCP/IP.
❏ For Windows Me/98, EpsonNet Print must be installed on all computers to use for printing.
How To 20
Page 21

Epson Network Guide
Internet printing
Advantages
❏ No proxy server (computer) is required.
❏ You can print to the printer over the Internet.
Disadvantages
❏ EPSON Status Monitor cannot be used.
❏ TCP/IP and DNS settings are required.
❏ For Windows 7/Vista/XP/Server 2008/Server 2003/2000, you cannot share the Internet printer.
Microsoft Network Shared printing
Advantages
❏ Easy to set up (IP address is not required if NetBEUI protocol is installed).
❏ No computer as a network interface is required.
❏ No special print utility is required.
Disadvantages
❏ EPSON Status Monitor cannot be used.
❏ You cannot print via a router.
❏ It takes a longer time to start printing because more time is required to search for a network
printer.
How To 21
Page 22

Epson Network Guide
Installing Components on Your Computer
About Installing Components on Your Computer
Before configuring the network interface and printing from the computer, you need to install the
necessary components (such as TCP/IP, NetBEUI, etc.) and assign an IP address and subnet mask for
your computer, depending on the printing method you want to use. See the section in this chapter
appropriate for your operating system.
Note:
❏ The Windows operating system CD-ROM may be required during the installation.
❏ When using TCP/IP or IPP for printing, you need to set the IP address, the subnet mask, and the
default gateway of the computer.
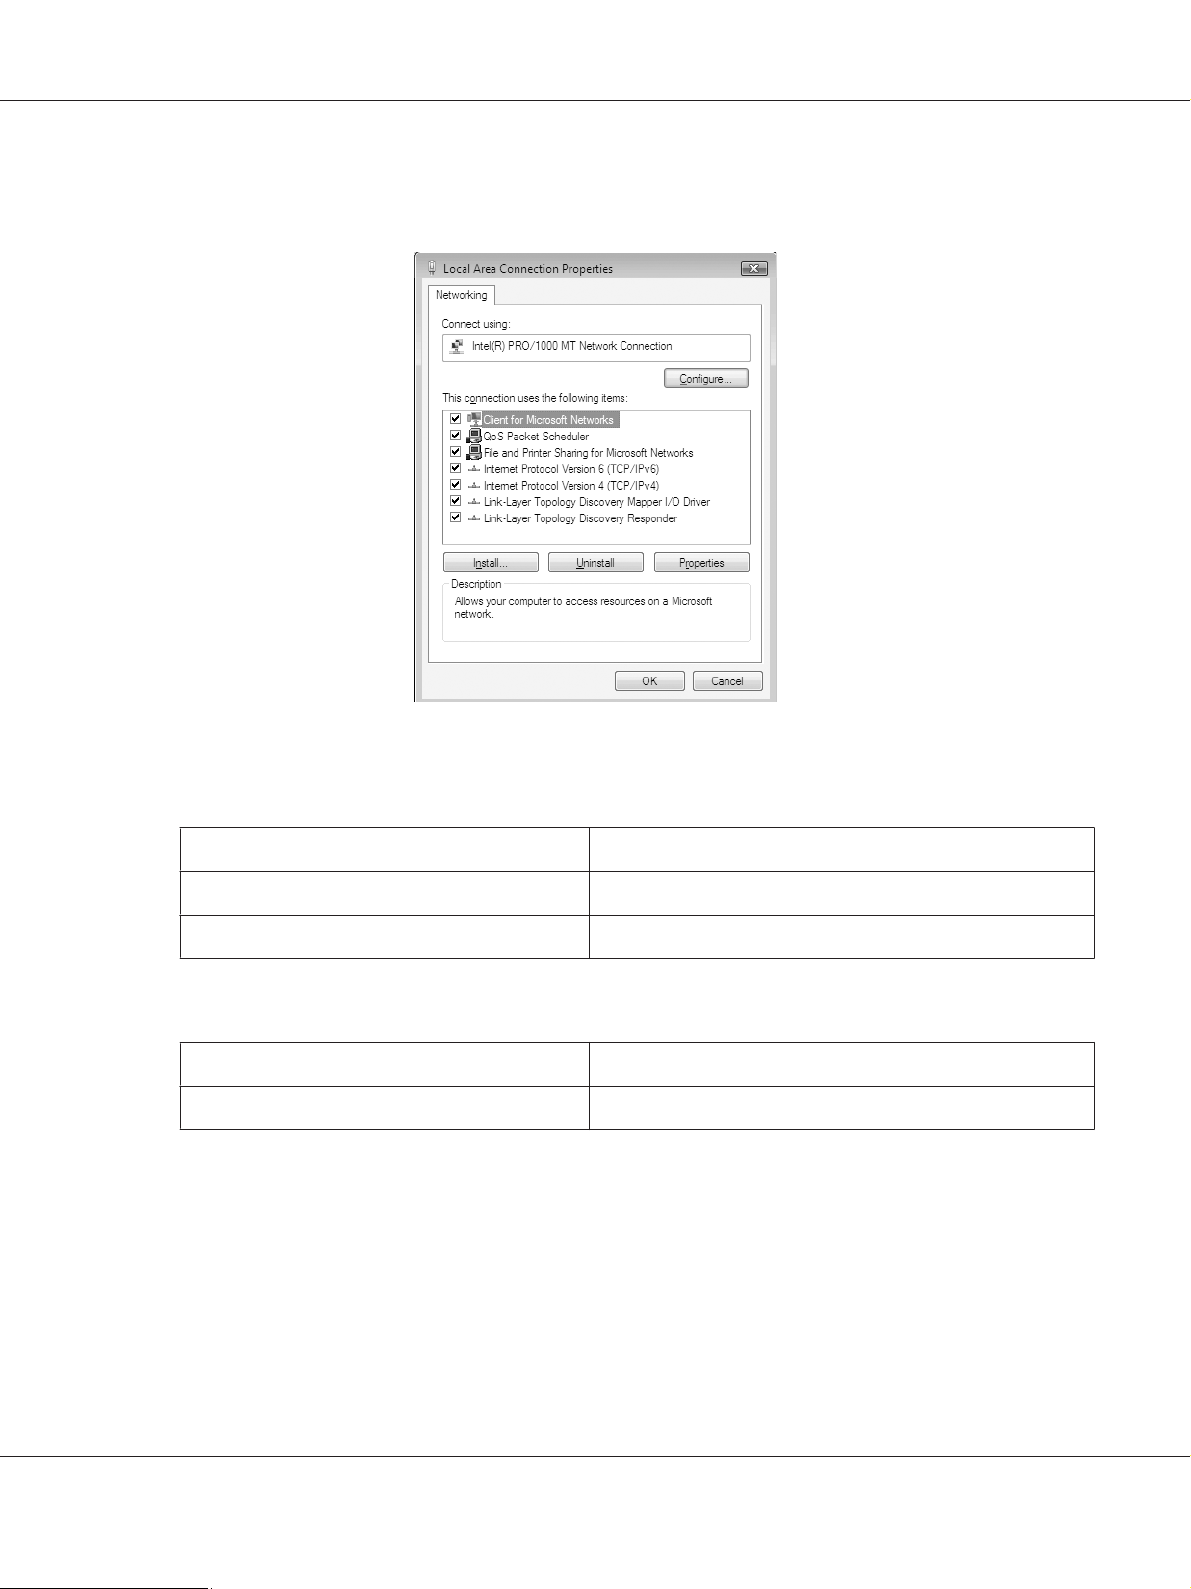
Windows 7/Vista/Server 2008
Use the following procedure to install the necessary components.
1. Click Start, click Control Panel, and then click View network status and tasks or double-click
Network and Sharing Center.
2. Click Local Area Connection (Windows 7), or View Status (Windows Vista/Server 2008), and
then click the Properties button.
Note:
If the User Account Control screen appears, click the Yes or Continue button.
How To 22
Page 23
Epson Network Guide
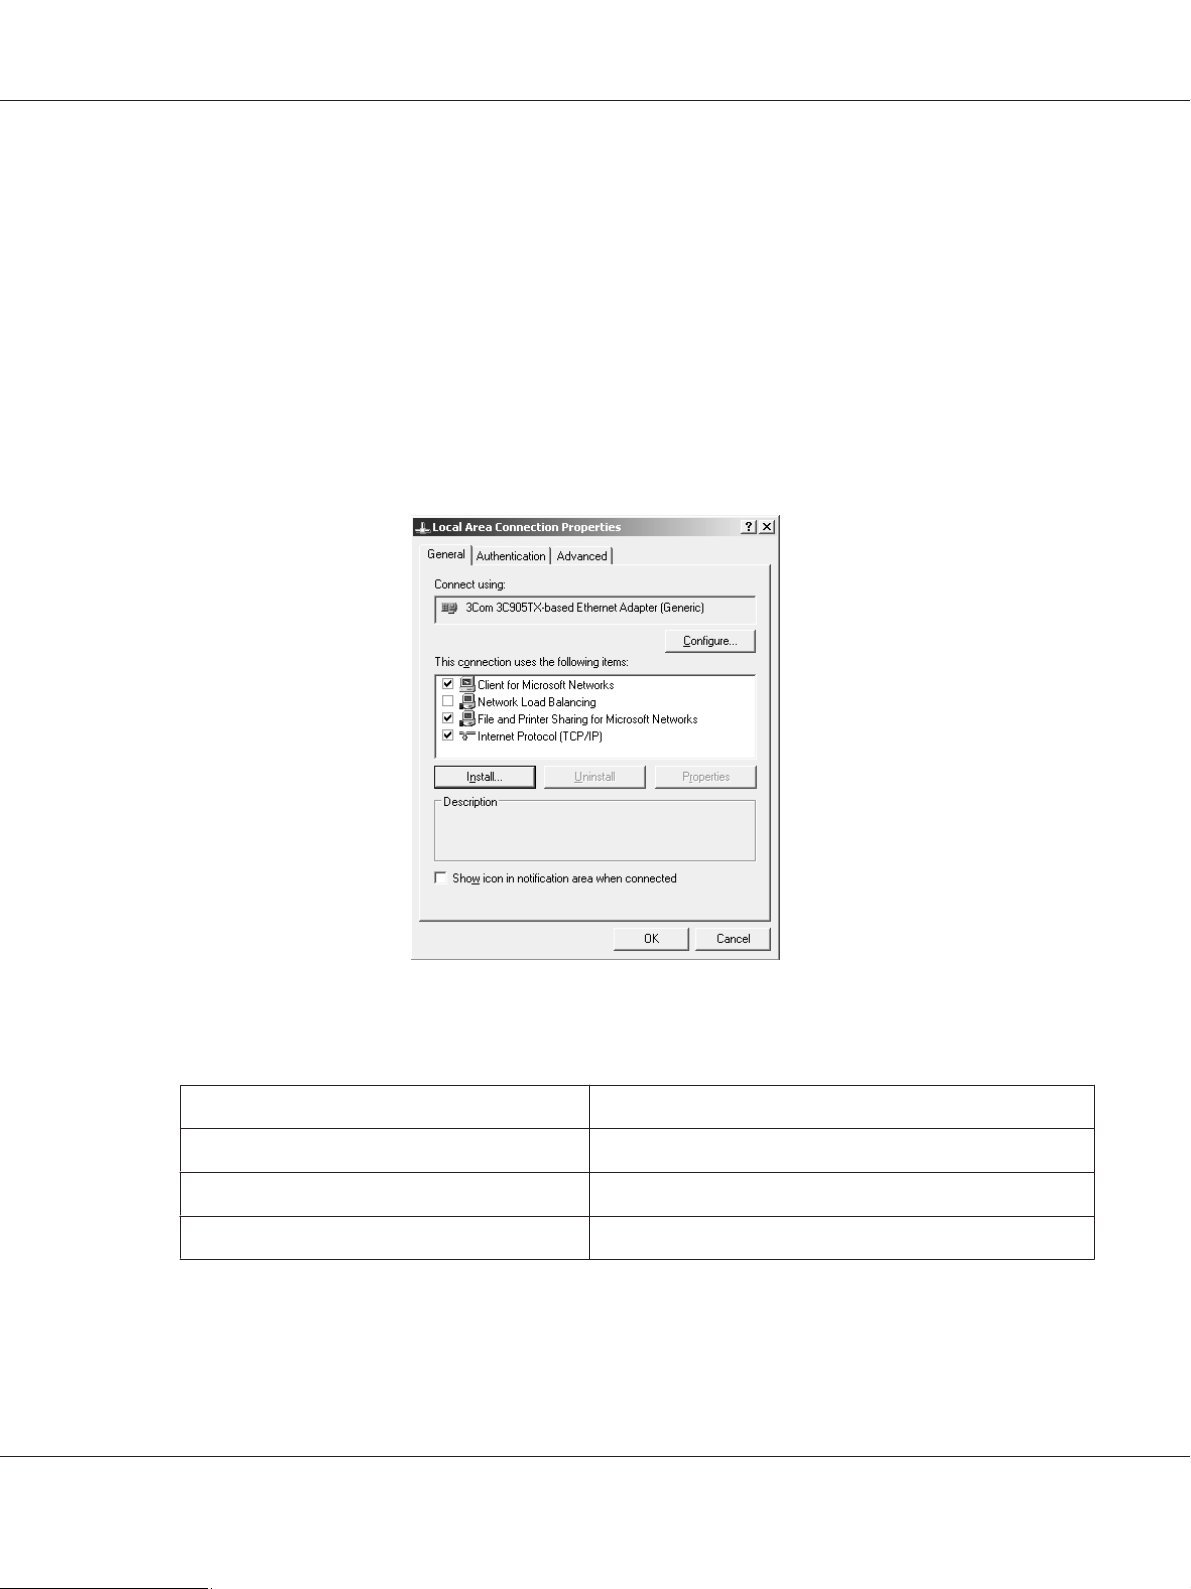
3. Check if the following necessary components are in the list. If they are already installed, go to the
next chapter.
The following table lists the components required for configuring the network interface with
EpsonNet Config.
EpsonNet Config’s setting screens Necessary components
TCP/IP, AppleTalk, IPP, SNMP (IP trap) Internet Protocol (TCP/IP)
MS Network Internet Protocol (TCP/IP)
The following table lists the components required for network printing.
Printing method Necessary components
LPR or Internet printing Internet Protocol (TCP/IP)
4. If the necessary components are not in the list, click Install to install them, as described below.
For LPR or Internet printing:
Internet Protocol (TCP/IP) is installed by default. You cannot add or delete it.
How To 23
Page 24
Epson Network Guide
5. For LPR or Internet printing:
Double-click Internet Protocol Version 4 (TCP/IPv4) on the Local Area Connection Properties
dialog box to open the Internet Protocols Version 4 (TCP/IPv4) Properties dialog box. Set the IP
address, the subnet mask, etc. and then click OK.
6. Restart the computer.
The necessary components are now installed. Go to the section “Connecting the Network Interface to
the Network” on page 35.
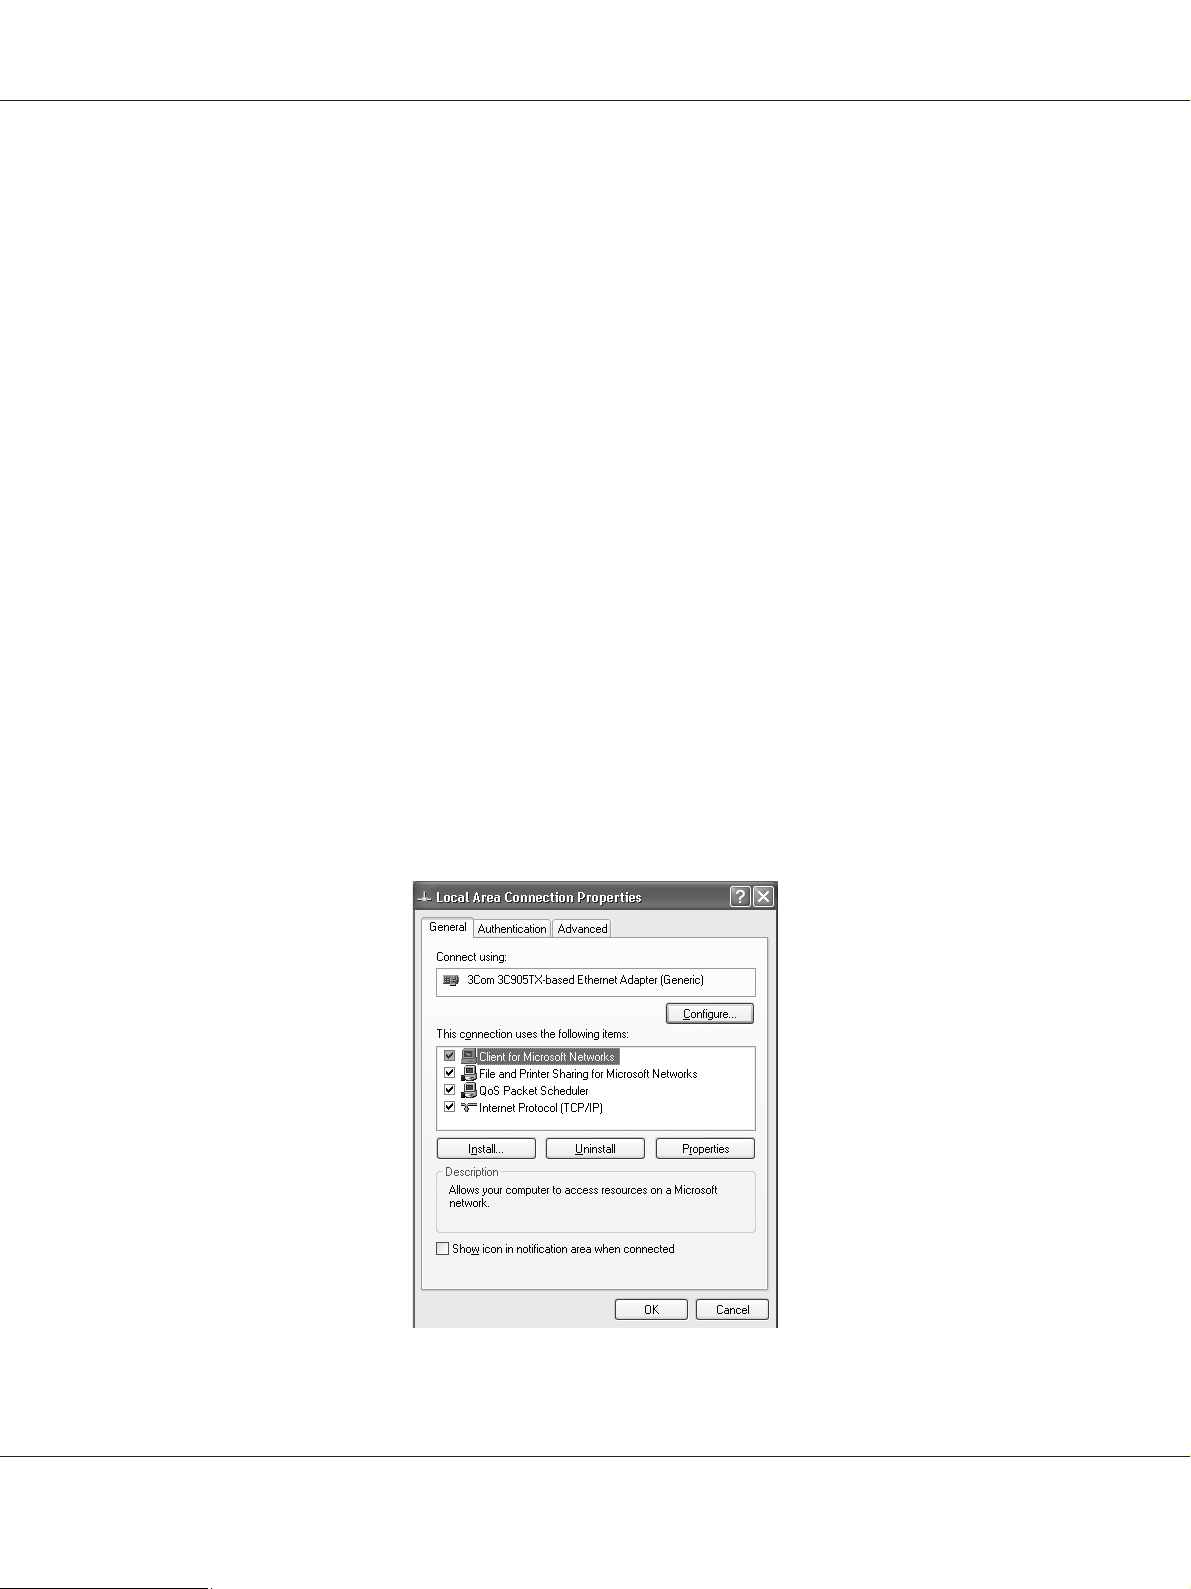
Windows XP
For Windows XP, use the following procedure to install the necessary components.
1. Click Start, highlight Control Panel, and then click Network and Internet Connections.
Select Network Connections.
2. Under LAN or High-Speed Internet, click the Local Area Connection icon.
3. Under Network Tasks, click Change settings of this connection.
4. Check if the following necessary components are in the list. If they are already installed, go to the
next chapter.
How To 24
Page 25
Epson Network Guide
The following table lists the components required for configuring the network interface with
EpsonNet Config.
EpsonNet Config’s setting screens Necessary components
TCP/IP, AppleTalk, IPP, SNMP (IP trap) Internet Protocol (TCP/IP)
MS Network Internet Protocol (TCP/IP)
NetWare, SNMP (IPX trap)* Latest Novell Client downloaded from the Novell Web site
* Only for printers supporting NetWare queue-based printing
The following table lists the components required for network printing.
Printing method Necessary components
LPR or Internet printing Internet Protocol (TCP/IP)
Microsoft Network Shared printing TCP/IP or NetBEUI
Client for Microsoft Networks
Printing via NetWare server Latest Novell Client downloaded from the Novell Web site
5. If the necessary components are not in the list, click Install to install them, as described below.
For LPR or Internet printing:
Internet Protocol (TCP/IP) is installed by default. You cannot add or delete it.
For Microsoft Network Shared printing:
Select Client and then click Add. Select Client for Microsoft Networks and then click OK.
For printing via NetWare server:
Download the latest Novell Client from the Novell Web site and install it on the computer. Also, be
sure to install either IP or IPX. See the Novell Web site for detailed information.
6. For LPR, Internet, Microsoft Network Shared printing:
Double-click Internet Protocol (TCP/IP) on the Local Area Connection Properties dialog box to
open the Internet Protocols (TCP/IP) Properties dialog box. Set the IP address, the subnet mask,
etc. and then click OK.
7. Restart the computer.
The necessary components are now installed. Go to the section “Connecting the Network Interface to
the Network” on page 35.
How To 25
Page 26

Epson Network Guide
Windows Me/98
For Windows Me/98, use the following procedure to install the necessary components.
1. Click Start, point to Settings, and then select Control Panel.
2. Double-click the Network icon. Check if the following necessary components are in the list of
installed network components on the Configuration menu. If they are already installed, go to the
next chapter.
The following table lists the components required for configuring the network interface with
EpsonNet Config.
EpsonNet Config’s setting screens Necessary components
TCP/IP, AppleTalk, IPP, SNMP (IP trap) TCP/IP
MS Network NetBEUI or TCP/IP
NetWare, SNMP (IPX trap)* Latest Novell Client downloaded from the Novell Web site
* Only for printers supporting NetWare queue-based printing
How To 26
Page 27
Epson Network Guide
Note for users of printers supporting NetWare queue-based printing:
Do not run Novell Client for Windows 95/98 version 3.00 and Novell Client for Windows NT version
4.50 when using the following modes: NetWare 3.x/4.x Bindery Print Server mode, NetWare 3.x
Remote Printer mode, NetWare 4.x Bindery Remote Printer mode, and NetWare 4.x/5.x NDS
Remote Printer mode.
The following table lists the components required for network printing.
Printing method Necessary components
LPR or Internet printing TCP/IP
Microsoft Network Shared printing TCP/IP or NetBEUI
Client for Microsoft Networks
Printing via NetWare server Latest Novell Client downloaded from the Novell Web site
3. If the necessary components are not in the list, click Add to install them, as described below.
For LPR or Internet printing:
Select Protocol and then click Add. Select Microsoft from the Manufacturers list and TCP/IP
from the Network Protocols list. Then click OK.
For Microsoft Network Shared printing:
To use TCP/IP, see the description described earlier to install TCP/IP.
To use NetBEUI, select Protocol and then click Add. Select Microsoft from the Manufacturers
list and NetBEUI from the Network Protocols list. Then click OK.
Select Client and then click Add. Select Microsoft from the Manufacturers list and Client for
Microsoft Networks from the Network Clients list. Then click OK.
For printing via NetWare server:
Download the latest Novell Client from the Novell Web site and install it on the computer. Also, be
sure to install either IP or IPX. See the Novell Web site for detailed information.
4. For LPR, Internet, Microsoft Network Shared printing:
Double-click TCP/IP on the Configuration menu to open the TCP/IP Properties dialog box. Set
the IP address, the subnet mask, etc. and then click OK.
5. Restart the computer.
The necessary components are now installed. Go to the section “Connecting the Network Interface to
the Network” on page 35.
How To 27
Page 28
Epson Network Guide
Windows Server 2003
For Windows Server 2003, use the following procedure to install the necessary components.
1. Click Start, point to Control Panel, and then select Network Connections. Click Local Area
Connections.
2. Click the Properties button.
3. Check if the following necessary components are in the list. If they are already installed, go to the
next chapter.
The following table lists the components required for configuring the network interface with
EpsonNet Config.
EpsonNet Config’s setting screens Necessary components
TCP/IP, AppleTalk, IPP, SNMP (IP trap) Internet Protocol (TCP/IP)
MS Network Internet Protocol (TCP/IP)
NetWare, SNMP (IPX trap)* Latest Novell Client downloaded from the Novell Web site
* Only for printers supporting NetWare queue-based printing
The following table lists the components required for network printing.
How To 28
Page 29

Epson Network Guide
Printing method Necessary components
LPR or Internet printing Internet Protocol (TCP/IP)
Microsoft Network Shared printing TCP/IP or NetBEUI
Client for Microsoft Networks
Printing via NetWare server Latest Novell Client downloaded from the Novell Web site
4. If the necessary components are not in the list, click Install to install them, as described below.
For LPR or Internet printing:
Internet Protocol (TCP/IP) is installed by default. You cannot add or delete it.
For Microsoft Network Shared printing:
Select Client and then click Add. Select Client for Microsoft Networks and then click OK.
For printing via NetWare server:
Download the latest Novell Client from the Novell Web site and install it on the computer. Also, be
sure to install either IP or IPX. See the Novell Web site for detailed information.
5. For LPR, Internet, Microsoft Network Shared printing:
Double-click Internet Protocol (TCP/IP) on the Local Area Connection Properties dialog box to
open the Internet Protocols (TCP/IP) Properties dialog box. Set the IP address, the subnet mask,
etc. and then click OK.
6. Restart the computer.
The necessary components are now installed. Go to the section “Connecting the Network Interface to
the Network” on page 35.
Windows 2000
For Windows 2000, use the following procedure to install the necessary components.
1. Click Start, point to Settings, and then select Network and Dial-up Connections. The
Network and Dial-up Connections screen appears.
2. Right-click the desired network connection and then select Properties.
How To 29
Page 30
Epson Network Guide
3. Check if the following necessary components are in the list. If they are already installed, go to the
next chapter.
The following table lists the components required for configuring the network interface with
EpsonNet Config.
EpsonNet Config’s setting screens Necessary components
TCP/IP, AppleTalk, IPP, SNMP (IP trap) Internet Protocol (TCP/IP)
MS Network NetBEUI or Internet Protocol (TCP/IP)
NetWare, SNMP (IPX trap)* Latest Novell Client downloaded from the Novell Web site
* Only for printers supporting NetWare queue-based printing
Note for users of printers supporting NetWare queue-based printing:
Do not run Novell Client for Windows 95/98 version 3.00 and Novell Client for Windows NT version
4.50 when using the following modes: NetWare 3.x/4.x Bindery Print Server mode, NetWare 3.x
Remote Printer mode, NetWare 4.x Bindery Remote Printer mode, and NetWare 4.x/5.x NDS
Remote Printer mode.
The following table lists the components required for network printing.
Printing method Necessary components
LPR or Internet printing Internet Protocol (TCP/IP)
How To 30
Page 31

Epson Network Guide
Printing method Necessary components
Microsoft Network Shared printing Internet Protocol (TCP/IP) or NetBEUI
Client for Microsoft Networks
Printing via NetWare server Latest Novell Client downloaded from the Novell Web site
4. If the necessary components are not in the list, click Install to install them, as described below.
For LPR or Internet printing:
Select Protocol and then click Add. In the Select Network Protocol dialog box, select Internet
Protocol (TCP/IP) and then click OK.
For Microsoft Network Shared printing:
To use Internet Protocol, see the description described earlier to install Internet Protocol (TCP/
IP).
To use NetBEUI, select Protocol and then click Add. Select NetBEUI P rotocol and then click OK.
Select Client and then click Add. Select Client for Microsoft Networks and then click OK.
For printing via NetWare server:
Download the latest Novell Client from the Novell Web site and install it on the computer. Also, be
sure to install either IP or IPX. See the Novell Web site for detailed information.
5. For LPR, Internet, Microsoft Network Shared printing:
Double-click Internet Protocol (TCP/IP) on the Configuration menu to open the TCP/IP
Properties dialog box. Set the IP address, the subnet mask, etc. and then click OK.
6. Restart the computer.
The necessary components are now installed. Go to the section “Connecting the Network Interface to
the Network” on page 35.
Windows NT 4.0
For Windows NT 4.0, use the following procedure to install the necessary components.
1. Click Start, point to Settings, and then select Control Panel.
2. Double-click the Network icon in the Control Panel.
How To 31
Page 32

Epson Network Guide
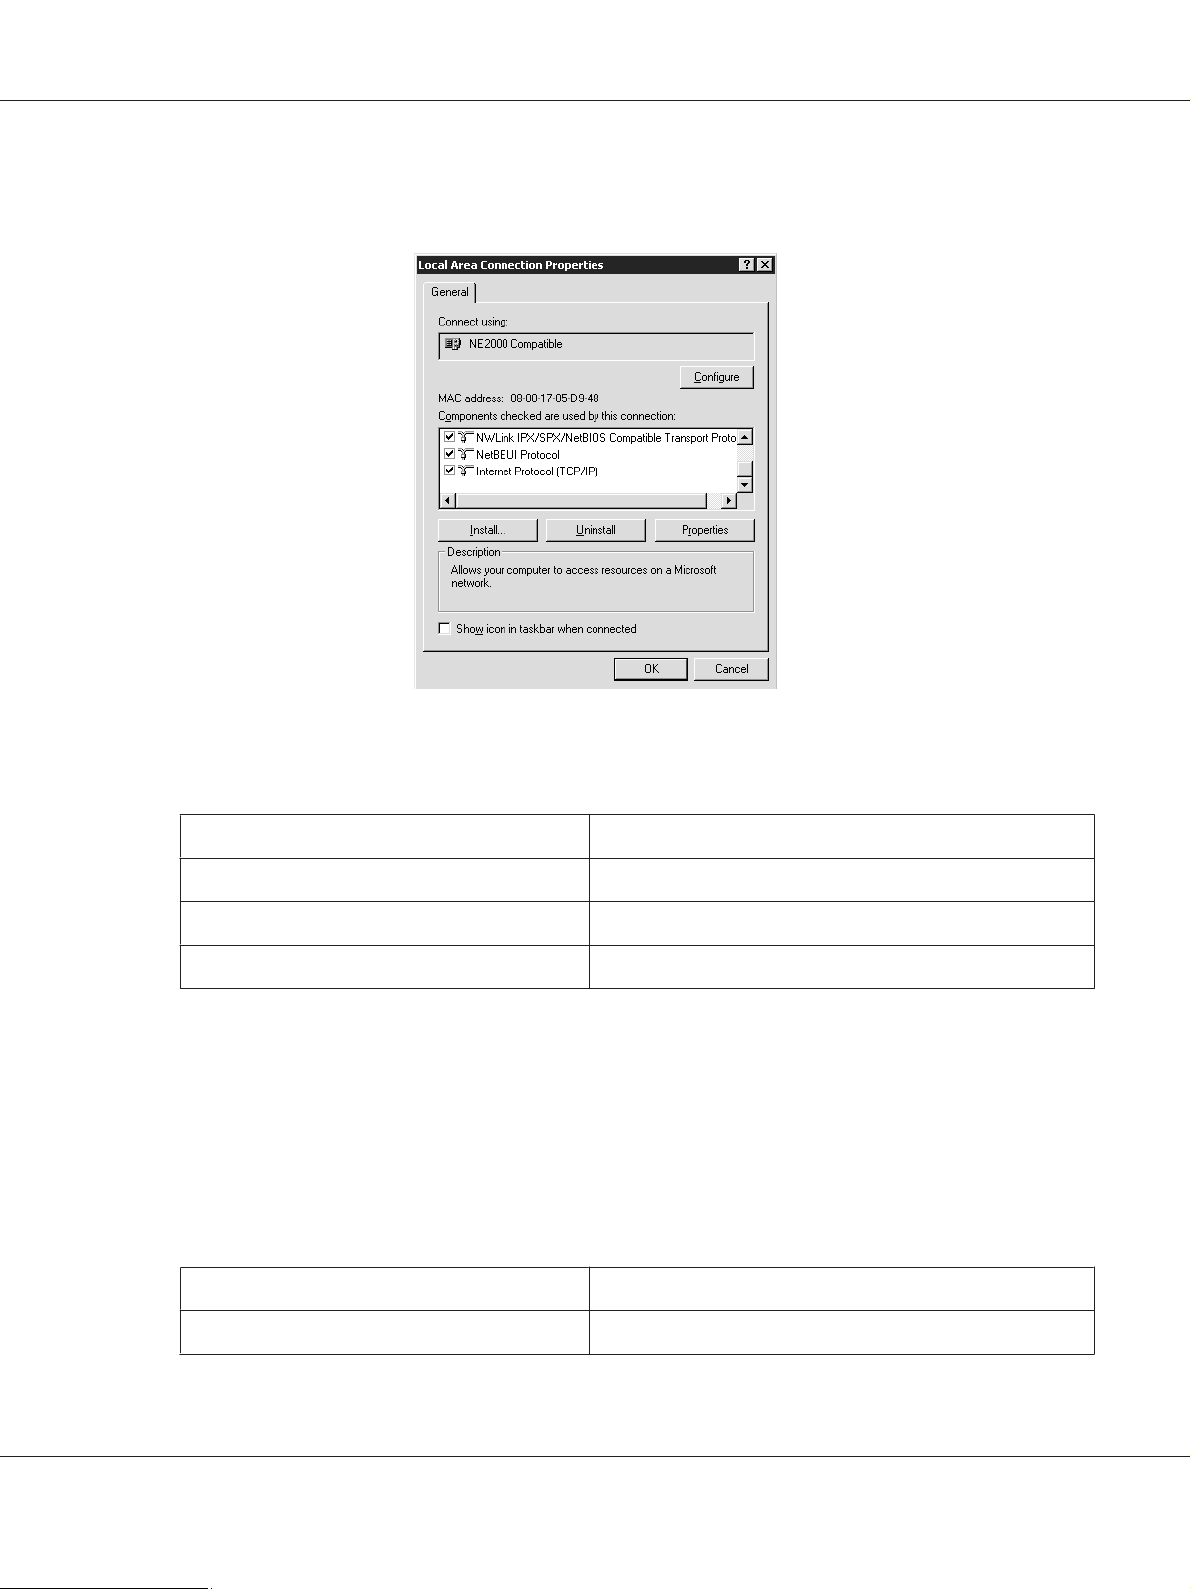
3. Check if the following necessary components are in the list. If they are already installed, go to the
next chapter.
The following table lists the components required for configuring the network interface with
EpsonNet Config.
EpsonNet Config’s setting screens Necessary components
TCP/IP, AppleTalk, IPP, SNMP (IP trap) TCP/IP
MS Network NetBEUI or TCP/IP
NetWare, SNMP (IPX trap)* Latest Novell Client downloaded from the Novell Web site
* Only for printers supporting NetWare queue-based printing
Note for users of printers supporting NetWare queue-based printing:
Do not run Novell Client for Windows 95/98 version 3.00 and Novell Client for Windows NT version
4.50 when using the following modes: NetWare 3.x/4.x Bindery Print Server mode, NetWare 3.x
Remote Printer mode, NetWare 4.x Bindery Remote Printer mode, and NetWare 4.x/5.x NDS
Remote Printer mode.
The following table lists the components required for network printing.
How To 32
Page 33

Epson Network Guide
Printing method Necessary components
LPR or Internet printing Protocols menu: TCP/IP
Services menu: Microsoft TCP/IP Printing
Microsoft Network Shared printing Protocols menu: TCP/IP or NetBEUI
Services menu: Workstation
Printing via NetWare server Latest Novell Client downloaded from the Novell Web site
4. If the necessary components are not in the list, click Add to install them, as described below.
For LPR or Internet printing:
Select the Protocols tab and then click Add. Select TCP/IP from the list and then click OK. Set the
IP address, the subnet mask, etc. and then click OK.
Select the Services tab and then click Add. Select Microsoft TCP/IP Printing from the list and
then click OK.
For Microsoft Network Shared printing:
To use TCP/IP, see the description described earlier to install TCP/IP.
To use NetBEUI, select the Protocols tab and then click Add. Select NetBEUI from the list and
then click OK.
Select the Services tab and then click Add. Select Workstation from the list and then click
OK.
How To 33
Page 34

Epson Network Guide
For printing via NetWare server:
Download the latest Novell Client from the Novell Web site and install it on the computer. Also, be
sure to install either IP or IPX. See the Novell Web site for detailed information.
5. Restart the computer.
The necessary components are now installed. Go to the section “Connecting the Network Interface to
the Network” on page 35.
Macintosh
To assign an IP address, subnet mask, etc. to your Macintosh, follow the steps below.
Note:
To print using the AppleTalk protocol and configure the network interface with EpsonNet Config for
Macintosh, select Ethernet or Built-in Ethernet on the AppleTalk Control Panel or the AppleTalk tab.
Then configure the network interface with EpsonNet Config for Macintosh.
Mac OS X
1. From the Apple menu, select System Preferences.
2. Open the Network control panel. Click the TCP/IP tab.
How To 34
Page 35

Note:
For Mac OS X 10.5, select Ethernet as the connecting method on the Network control panel, select
the method to assign the IP address from the Configure menu, and then assign the IP address.
3. Select Built-in Ethernet from the Show pull down menu.
4. Assign an IP address and other settings if necessary.
5. Click the Apply Now button to save any changes.
Go to the section “Connecting the Network Interface to the Network” on page 35.
Setting Up the Network Interface
Epson Network Guide
Connecting the Network Interface to the Network
Follow the instructions below to connect the network interface to the network.
1. Make sure that your printer is turned off.
2. Connect one end of the network cable to the RJ-45 connector on the network interface, and the
other end to the network.
Caution:
c
❏ You must use the following shielded twisted-pair cable to connect the network interface to
a network.
-- Category-5 or higher for the 10Base-T or 100Base-TX connection
-- Category-5e or higher for the 1000Base-T connection
❏ Do not connect the network interface and the computer directly. Be sure to use a HUB to
connect the network interface to the network.
Note:
You can use both 10Base-T and 100Base-TX. (On some models, 1000Base-T is also supported.)
When you print a lot of data, we recommend you use a higher-speed with light network traffic.
3. Turn on your printer. After the status lights go off, print a network status sheet.
How To 35
Page 36

Epson Network Guide
Caution:
c
After turning off the printer, wait until the status lights go off before turning it back on;
otherwise the network interface may not work correctly.
Note for Mac OS X 10.2.4 or later:
Since the printer supports Bonjour/Rendezvous and is on by default, you can use the printer on a
network just by connecting it to the network. If you want to disable the Bonjour/Rendezvous setting,
use the printer’s control panel. See “Setting an IP Address on the Printer’s Control Panel” on page
116 or “Setting an IP Address on the Printer’s Control Panel (Large Format Inkjet Printers)” on page
119 for details.
Now, you can configure the network interface to use on the TCP/IP network and also install the
printer driver.
If you are using Windows, see “Configuring the Network Interface (For Windows Users)” on page
36.
If you are using Macintosh, see “Configuring the Network Interface (For Macintosh Users)” on page
37.
Configuring the Network Interface (For Windows Users)
Configure the network interface for use on the TCP/IP network and install the printer driver on your
computer.
1. Insert the Software Disc into the CD-ROM drive.
2. The Epson Install Navi screen opens automatically.
If the Epson Install Navi screen does not appear, double-click EPSETUP.EXE on the CD-ROM.
3. Make sure that all applications are closed, and then click the Easy Install icon.
4. The software license agreement screen appears. Select the Agree radio button and then click the
Next button.
5. Select the Ethernet Network connection radio button and then click the Next button.
Note:
If your printer is connected to your computer with a USB cable, select the USB wired connection
radio button. Then follow the on-screen instructions.
How To 36
Page 37

Epson Network Guide
6. Make sure your printer is connected to the network (a hub or router) and click the Next button.
Note:
If the Windows Security Alert window appears, click the Allow access or Unblock button; otherwise
the printer is not listed on the EpsonNet Setup screen.
7. EpsonNet Setup starts.
Follow the on-screen instructions to complete the installation.
Configuring the Network Interface (For Macintosh Users)
Configure the network interface for use on the TCP/IP network and install the printer driver on your
computer.
1. Insert the Software Disc into the CD-ROM drive.
EPSON folder opens automatically.
2. Double-click the Install Navi icon in the EPSON folder.
The Epson Install Navi screen opens.
3. Make sure that all applications are closed, and then click the Easy Install icon.
4. The software license agreement screen appears. Select the Agree radio button and then click the
Next button.
5. Select the Ethernet Network connection radio button and then click the Next button.
Note:
If your printer is connected to your computer with a USB cable, select the USB wired connection
radio button. Then follow the on-screen instructions.
6. Make sure your printer is connected to the network (a hub or router) and click the Next button.
7. Enter the password in the Authenticate screen.
8. Click the Continue button in the software license agreement screen.
9. Click the Agree button to agree to the terms of the software license agreement.
How To 37
Page 38

10. Click the Install button to start installing the printer driver.
11. Click the Quit button to complete the printer driver installation.
12. EpsonNet Setup starts. Follow the on-screen instructions to complete the installation.
Setting Up the Printer
Mac OS X 10.5
1. Open System Preferences.
2. Open Print & Fax.
3. Click the + button to add a new printer.
4. Select the desired printer model that is connected with Bonjour.
Epson Network Guide
Note:
If your printer is not displayed with the desired connection, click More Printers, select the desired
connection from the drop down list, and then select the printer model.
5. Click Add.
Now you can use the printer on the TCP/IP network.
Note:
If your product supports the scanning function, see the product’s User’s Guide to make the settings.
Mac OS X 10.4 or below
1. Open the Applications folder.
2. Open the Utilities folder.
3. Open Print Center (for Mac OS X 10.2 or below) or Printer Setup Utility (for Mac OS X 10.3 or
later), and then click Add.
4. For Mac OS X 10.4, select the printer model that is connected with Bonjour.
For Mac OS X 10.2 or 10.3, select Rendezvous fr om t he dr op do wn l is t, an d t he n se le ct th e p r in te r
model from the list.
How To 38
Page 39

Epson Network Guide
Note:
For M ac OS X 10.4 , if y our p rinter is not displayed with the desired connection, click More Printers,
select the desired connection from the drop down list, and then select the printer model.
5. Click Add.
Now you can use the printer on the TCP/IP network.
Note:
If your product supports the scanning function, see the product’s User’s Guide to make the settings.
Installing the Printer Driver
About Installing the Printer Driver
To print to the network printer, you need to install the printer driver on the computer. See the section
in this chapter appropriate for your operating system.
Windows 7/Vista/Server 2008
The printer driver installation procedure differs depending on the printing method you prefer. Epson
recommends printing with EpsonNet Print. See “For Windows 7/Vista/XP/Server 2008/Server
2003/2000/NT 4.0 Users” on page 93.
LPR printing
Note:
If you are using EpsonNet Print, the setup procedure is different. See “About EpsonNet Print” on page
92 for details.
1. Click Start, Control Panel, and then View devices and printers (Windows 7) or Printers
(Windows Vista/Server 2008).
2. Click Add a printer to start the Add Printer wizard.
How To 39
Page 40

Epson Network Guide
3. Click Add a local printer.
4. Select the Create a new port radio button, and then select Standard TCP/IP Port from the list.
Then click Next.
How To 40
Page 41

Epson Network Guide
5. Enter the IP address of the network interface and then click Next.
6. If an error occurs, the following dialog box appears. Select the Standard radio button and then
select EPSON Network Printer. Click Next.
7. Click Finish.
8. See “Installing a printer driver” on page 42 to install the printer driver.
Internet printing
1. Click Start, Control Panel, and then Printers.
2. Click Add a printer to start the Add Printer wizard.
3. Click Add a network, wireless or Bluetooth printer.
How To 41
Page 42

Epson Network Guide
4. Click The printer that I want isn’t listed.
5. Select the Add a printer using a TCP/IP address or hostname radio button and then click
Next.
6. Enter the URL of the target device to the Hostname or IP address box using the format below.
The URL should be the same as the URL you set on EpsonNet Config’s IPP configuration page.
http://IP address of network interface:631/Printer name
Example: http://192.168.100.201:631/EPSON_IPP_Printer
Note:
To check the IP address of the network interface, use EpsonNet Config. See “About EpsonNet Config”
on page 82 for details.
7. Follow the on-screen instructions to set up the device. See “Installing a printer driver” on page 42
if necessary.
Installing a printer driver
1. Insert the Software Disc shipped with the device.
2. Close the EPSON Software Installation screen if it appears.
3. On the Add Printer screen, click the Have Disk button. The Install From Disk dialog box appears.
4. Click Browse.
How To 42
Page 43

Epson Network Guide
5. Select the CD-ROM drive for Drives, and double-click the WINVISTA_XP_2K folder or the
WINVISTA_XP64 folder depending on your operating system. Click Open.
6. Click OK in the Install From Disk dialog box.
7. Select the model name of the device, and then click Next.
Note:
If the Add Printer wizard prompts you to select either Keep existing driver or Replace existing
driver, be sure to select the Replace existing driver radio button.
8. Click Finish and follow the on-screen instructions to complete the setup.
Encrypting print data (Secure IPP printing)
Internet printing (IPP) enables you to encrypt data to print.
Required settings
Configure the following settings using EpsonNet Config with Web Browser.
See “EpsonNet Config with Web Browser” on page 85 for details.
❏ Importing server certificate
❏ Selecting server certificate
❏ Setting encryption strength
❏ Setting printer port
Configuring the printer port
1. Select Connect to a printer on the Internet or on a home or office network: in the Internet printing
(IPP) wizard.
2. Enter the URL using the format below.
https://IP address of network interface:443/EPSON_IPP_Printer
How To 43
Page 44

Epson Network Guide
Windows XP
For Windows XP, the printer driver installation procedure differs depending on the printing method
you prefer. Epson recommends printing with EpsonNet Print. See “For Windows 7/Vista/XP/Server
2008/Server 2003/2000/NT 4.0 Users” on page 93.
LPR printing
Note:
If you are using EpsonNet Print, the setup procedure is different. See “About EpsonNet Print” on page
92 for details.
1. Click Start, click Control Panel, click Printers and Other Hardware, and then click Printers
and Faxes.
2. Under Printer Tasks, click Add a printer to start the Add Printer wizard, and then click Next.
3. Click Local printer attached to this computer, clear the Automatically detect and install
my Plug and Play printer check box, and then click Next.
Note:
You must clear the Automatically detect and install my Plug and Play printer check box because
the printer is attached directly to the network, not to a Windows XP computer.
How To 44
Page 45

Epson Network Guide
4. Select the Create a new port radio button, and then select Standard TCP/IP Port from the list.
Then click Next.
5. Enter the IP address of the network interface and then click Next.
How To 45
Page 46

Epson Network Guide
6. If an error occurs, the following dialog box appears. Select the Standard radio button and then
select EPSON Network Printer. Click Next.
7. Click Finish.
8. See “Installing a printer driver” on page 48 to install the printer driver.
Internet printing
1. Click Start, click Control Panel, click Printers and Other Hardware, and then click Printers
and Faxes.
2. Under Printer Tasks, click Add a printer to start the Add Printer wizard, and then click Next.
3. Click A network printer, or a printer attached to another computer, and then click Next.
4. Select the Connect to a printer on the Internet or on a home or office network radio button.
5. Enter the URL of the target printer using the format below. The URL should be the same as the
URL you set on EpsonNet Config’s IPP configuration page.
http://IP address of printer:631/Printer name
How To 46
Page 47

Epson Network Guide
Example: http://192.168.100.201:631/EPSON_IPP_Printer
Note:
To check the IP address of the network interface, use EpsonNet Config. See “About EpsonNet Config”
on page 82 for details.
6. Follow the on-screen instructions to set up the printer. See “Installing a printer driver” on page
48 if necessary.
Microsoft Network Shared printing
1. Click Start, click Control Panel, click Printers and Other Hardware, and then click Printers
and Faxes.
2. Under Printer Tasks, click Add a printer to start the Add Printer wizard, and then click Next.
3. Click A network printer, or a printer attached to another computer, and then click Next.
4. Select the Browse for a printer radio button, and then click Next.
5. Enter the following in the Printer box or select the printer you want to use from the Shared printers
list box, and then click Next.
\\NetBIOS name of network interface\Device name of network interface
6. Follow the on-screen instructions to set up the printer. See “Installing a printer driver” on page
48 if necessary.
How To 47
Page 48

Epson Network Guide
Installing a printer driver
1. Insert the Software Disc shipped with the printer.
2. Close the Software Installation screen if it appears.
3. On the Add Printer screen, click the Have Disk button. The Install From Disk dialog box appears.
4. Click Browse.
5. Select the CD-ROM drive for Drives, and double-click the WINVISTA_XP_2K or WINXP_2K
folder. Click Open.
6. Click OK in the Install From Disk dialog box.
7. Select the model name of the printer, and then click Next.
Note:
If the Add Printer wizard prompts you to select either Keep existing driver or Replace existing
driver, be sure to select the Replace existing driver radio button.
8. Click Finish and follow the on-screen instructions to complete the setup.
Encrypting print data (Secure IPP printing)
Internet printing (IPP) enables you to encrypt data to print.
Required settings
Configure the following settings using EpsonNet Config with Web Browser.
See “EpsonNet Config with Web Browser” on page 85 for details.
❏ Importing server certificate
❏ Selecting server certificate
❏ Setting encryption strength
❏ Setting printer port
Configuring the printer port
1. Select Connect to a printer on the Internet or on a home or office network: in the Internet printing
(IPP) wizard.
How To 48
Page 49

Epson Network Guide
2. Enter the URL using the format below.
https://IP address of network interface:443/EPSON_IPP_Printer
Windows Me/98
For Windows Me/98, the printer driver installation procedure differs depending on the printing
method you prefer. Epson recommends printing with EpsonNet Print. See “For Windows Me/98/95
Users” on page 100.
LPR printing
Since Windows Me/98 does not support LPR, standard TCP/IP printing cannot be used. However,
you can print via TCP/IP using the EpsonNet Print utility included on the Software Disc. First, install
EpsonNet Print. Then, install the printer driver. See “About EpsonNet Print” on page 92 for more
details.
Internet printing (Windows Me)
Installing the IPP client
The IPP client must be installed on your computer. Follow the steps below to install it.
1. Insert the Windows Me CD-ROM.
2. Select the add-ons folder, and then select the IPP folder.
3. Double-click wpnpins.exe. Then follow the on-screen instructions.
4. Click OK to restart your computer.
Setting up the printer
Connect your computer to a printer through IPP.
1. Click Start, point to Settings, and then select Printers.
2. Double-click Add Printer, and then click Next.
3. Select the Network Printer radio button, and then click Next.
How To 49
Page 50

4. Type the URL of the printer, and then click Next.
http://IP address of network interface:631/printer name
Example: http://192.168.100.201:631/EPSON_IPP_Printer
Note:
To check the IP address of the network interface, use EpsonNet Config. See “About EpsonNet Config”
on page 82 for details.
5. See “Installing a printer driver” on page 51 to install the printer driver.
Microsoft Network Shared printing
1. Click Start, point to Settings, and then select Printers.
2. Double-click Add Printer, and then click Next.
Epson Network Guide
3. Select the Network Printer radio button, and then click Next.
\\NetBIOS name of network interface\Device name of network interface
4. Click Browse, and then select the network path from the list. If you cannot browse, enter the
following in the Network path or queue name box.
5. The Add Printer wizard appears. Click Next.
6. Follow the on-screen instructions to set up the printer. See “Installing a printer driver” on page
51 to install the printer driver.
How To 50
Page 51

Epson Network Guide
Installing a printer driver
1. Insert the Software Disc shipped with the printer.
2. Close the Software Installation screen if it appears.
3. On the Add Printer screen, click the Have Disk button. The Install From Disk dialog box appears.
4. Click Browse.
5. Select the CD-ROM drive for Drives, and then double-click the WIN9X folder. Click OK.
6. Click OK in the Install From Disk dialog box.
7. Select the model name of the printer, and then click Next.
Note:
If the Add Printer wizard prompts you to select either Keep existing driver or Replace existing
driver, be sure to select the Replace existing driver radio button.
8. Click Finish and follow the on-screen instructions to complete the setup.
Windows Server 2003
For Windows Server 2003, the printer driver installation procedure differs depending on the printing
method you prefer. Epson recommends printing with EpsonNet Print. See “For Windows 7/Vista/
XP/Server 2008/Server 2003/2000/NT 4.0 Users” on page 93.
LPR printing
Note:
If you are using EpsonNet Print, the setup procedure is different. See “About EpsonNet Print” on page
92 for details.
1. Click Start, and then select Printers and Faxes.
2. Double-click the Add Printer icon to start the Add Printer wizard, and then click Next.
3. Click Local printer attached to this computer, clear the Automatically detect and install
my Plug and Play printer check box, and then click Next.
How To 51
Page 52

Epson Network Guide
Note:
You must clear the Automatically detect and install my Plug and Play printer check box because
the printer is attached directly to the network, not to a computer.
4. Select the Create a new port radio button, and then select Standard TCP/IP Port from the list.
Click Next.
5. When Add Standard TCP/IP Printer Port Wizard dialog box appears, click Next.
How To 52
Page 53

Epson Network Guide
6. Enter the IP address of the network interface and then click Next.
7. If an error occurs, the following dialog box appears. Select the Standard radio button and then
select EPSON Network Printer. Click Next.
8. Click Finish.
9. See “Installing a printer driver” on page 55 to install the printer driver.
Internet printing
1. Click Start, and then select Printers and Faxes.
How To 53
Page 54

Epson Network Guide
2. Double-click the Add Printer icon to start the Add Printer wizard, and then click Next.
3. Select A network printer, or a printer attached to another computer, and then click Next.
4. Select the Connect to a printer on the Internet or on a home or office network radio button.
5. Enter the URL of the target printer using the format below. The URL must be the same URL you set
on EpsonNet Config’s IPP configuration page.
http://IP address of printer:631/Printer name
Example: http://192.168.100.201:631/EPSON_IPP_Printer
Note:
To check the IP address of the network interface, use EpsonNet Config. See “About EpsonNet Config”
on page 82 for details.
6. Follow the on-screen instructions to set up the printer. See “Installing a printer driver” on page
55 if necessary.
Microsoft Network Shared printing
1. Click Start, and then select Printers and Faxes.
2. Double-click the Add Printer icon to start the Add Printer wizard, and then click Next.
3. Click A network printer, or a printer attached to another computer, and then click Next.
How To 54
Page 55

Epson Network Guide
4. Select the Browse for a printer radio button, and then click Next.
5. Enter the following in the Printer box or select the printer you want to use from the Shared printers
list box. Click Next.
\\NetBIOS name of network interface\Device name of network interface
6. Follow the on-screen instructions to set up the printer. See “Installing a printer driver” on page
55 if necessary.
Installing a printer driver
1. Insert the Software Disc shipped with the printer.
2. Close the Software Installation screen if it appears.
3. On the Add Printer screen, click the Have Disk button. The Install From Disk dialog box appears.
4. Click Browse.
5. Select the CD-ROM drive for Drives, and double-click the WINVISTA_XP_2K, WINXP_2K, or
WIN2000 folder. Click Open.
6. Click OK in the Install From Disk dialog box.
7. Select the model name of the printer, and then click Next.
Note:
If the Add Printer wizard prompts you to select either Keep existing driver or Replace existing
driver, be sure to select the Replace existing driver radio button.
8. Click Finish and then follow the on-screen instructions to complete the setup.
Encrypting print data (Secure IPP printing)
Internet printing (IPP) enables you to encrypt data to print.
Required settings
Configure the following settings using EpsonNet Config with Web Browser.
See “EpsonNet Config with Web Browser” on page 85 for details.
❏ Importing server certificate
How To 55
Page 56

Epson Network Guide
❏ Selecting server certificate
❏ Setting encryption strength
❏ Setting printer port
Configuring the printer port
1. Select Connect to a printer on the Internet or on a home or office network: in the Internet printing
(IPP) wizard.
2. Enter the URL using the format below.
https://IP address of network interface:443/EPSON_IPP_Printer
Windows 2000
For Windows 2000, the printer driver installation procedure differs depending on the printing
method you prefer. Epson recommends printing with EpsonNet Print. See “For Windows 7/Vista/
XP/Server 2008/Server 2003/2000/NT 4.0 Users” on page 93.
LPR printing
Note:
If you are using EpsonNet Print, the setup procedure is different. See “About EpsonNet Print” on page
92 for details.
1. Click Start, point to Settings, and then select Printers.
2. Double-click Add Printer to start the Add Printer wizard, and then click Next.
3. Click Local printer, clear the Automatically detect and install my Plug and Play printer
check box, and then click Next.
How To 56
Page 57

Epson Network Guide
Note:
You must clear the Automatically detect and install my Plug and Play printer check box because
the printer is attached directly to the network, not to a Windows 2000 computer.
4. Select the Create a new port radio button, and then select Standard TCP/IP Port from the list.
Then click Next.
How To 57
Page 58

Epson Network Guide
5. Enter the IP address of the network interface and then click Next.
6. If an error occurs, the following dialog box appears. Select the Standard radio button and then
select EPSON Network Printer. Click Next.
7. Click Finish.
8. See “Installing a printer driver” on page 59 to install the printer driver.
Internet printing
1. Click Start, point to Settings, and then select Printers.
How To 58
Page 59

Epson Network Guide
2. Double-click Add Printer to start the Add Printer wizard, and then click Next.
3. Select the Network printer radio button and then click Next.
4. Select the Connect to a printer on the Internet or on your intranet radio button.
5. Enter the URL of the target printer using the format below. The URL should be the same as the
URL you set on EpsonNet Config’s IPP configuration page.
http://IP address of printer:631/Printer name
Example: http://192.168.100.201:631/EPSON_IPP_Printer
Note:
To check the IP address of the network interface, use EpsonNet Config. See “About EpsonNet Config”
on page 82 for details.
6. Follow the on-screen instructions to set up the printer. See “Installing a printer driver” on page
59 if necessary.
Microsoft Network Shared printing
1. Click Start, point to Settings, and then select Printers.
2. Double-click Add Printer to start the Add Printer wizard, and then click Next.
3. Select the Network printer radio button and then click Next.
4. Select the Type the printer name, or click Next to browse for a printer radio button.
5. Enter the following in the Name box or click Next to browse for a printer.
\\NetBIOS name of network interface\Device name of network interface
6. Follow the on-screen instructions to set up the printer. See “Installing a printer driver” on page
59 if necessary.
Installing a printer driver
1. Insert the Software Disc shipped with the printer.
2. Close the Software Installation screen if it appears.
How To 59
Page 60

Epson Network Guide
3. On the Add Printer screen, click the Have Disk button. The Install From Disk dialog box appears.
4. Click Browse.
5. Select the CD-ROM drive for Drives, and double-click the WINVISTA_XP_2K, WINXP_2K, or
WIN2000 folder. Click Open.
6. Click OK in the Install From Disk dialog box.
7. Select the model name of the printer, and then click Next.
Note:
If the Add Printer wizard prompts you to select either Keep existing driver or Replace existing
driver, be sure to select the Replace existing driver radio button.
8. Click Finish and follow the on-screen instructions to complete the setup.
Encrypting print data (Secure IPP printing)
Internet printing (IPP) enables you to encrypt data to print.
Required settings
Configure the following settings using EpsonNet Config with Web Browser.
See “EpsonNet Config with Web Browser” on page 85 for details.
❏ Importing server certificate
❏ Selecting server certificate
❏ Setting encryption strength
❏ Setting printer port
Configuring the printer port
1. Select Connect to a printer on the Internet or on a home or office network: in the Internet printing
(IPP) wizard.
2. Enter the URL using the format below.
https://IP address of network interface:443/EPSON_IPP_Printer
How To 60
Page 61

Epson Network Guide
Windows NT 4.0
For Windows NT 4.0, the printer driver installation procedure differs depending on the printing
method you prefer. Epson recommends printing with EpsonNet Print. See “For Windows 7/Vista/
XP/Server 2008/Server 2003/2000/NT 4.0 Users” on page 93.
LPR printing
Note:
If you are using EpsonNet Print, the setup procedure is different. See “About EpsonNet Print” on page
92 for details.
1. Click Start, point to Settings, and then select Printers.
2. Double-click the Add Printers icon.
3. Select the My Computer radio button, and then click Next.
4. Click Add Port in the Add Printer wizard dialog box.
5. Select LPR Port from the Available Printer Port list, and then click New Port.
Note:
You cannot use the Lexmark TCP/IP Network Port with this network interface.
6. Enter the IP address of the network interface in the first text box and the printer name in the
second text box. Click OK.
7. In the Printer Ports dialog box, click Close.
8. In the Add Printer Wizard dialog box, click Next.
9. See “Installing a printer driver” on page 62 to install the printer driver.
How To 61
Page 62

Epson Network Guide
Microsoft Network Shared printing
1. Click Start, point to Settings, and then select Printers.
2. Double-click Add Printer.
3. Select the Network printer server radio button and then click Next. The Connect to Printer
dialog box appears.
4. Select the printer you want to configure from the Shared Printers list. If you cannot select the
printer, enter the following in the Printer box:
\\NetBIOS name of network interface\Device name of network interface
5. Click OK.
6. Follow the on-screen instructions to set up the printer. See “Installing a printer driver” on page
62 if necessary.
Installing a printer driver
1. Insert the Software Disc shipped with the printer.
2. Close the Software Installation screen if it appears.
3. On the Add Printer screen, click the Have Disk button. The Install From Disk dialog box appears.
4. Click Browse.
5. Select the CD-ROM drive for Drives, and then double-click the WINNT40 folder. Click Open.
6. Click OK in the Install From Disk dialog box.
7. Select the model name of the printer, and then click Next.
Note:
❏ Announce the share name to your clients so that they know the share name of the printer they
want to use.
❏ If the Add Printer wizard prompts you to select either Keep existing driver or Replace existing
driver, be sure to select the Replace existing driver radio button.
8. Click Finish and follow the on-screen instructions to complete the setup.
How To 62
Page 63

Epson Network Guide
Macintosh
Follow the steps below to set a printer.
Note:
Make sure that the printer driver is installed on your Macintosh before following the steps below. See the
manual shipped with your printer for instruction on how to install the printer driver.
Mac OS X 10.5
Bonjour printing
1. Open System Preferences.
2. Open Print & Fax.
3. Click the + button to add a new printer.
4. Select the desired printer model that is connected with Bonjour.
5. Click Add.
TCP/IP printing
1. Open System Preferences.
2. Open Print & Fax.
3. Click the + button to add a new printer.
4. Select the desired printer model.
5. If the desired printer model does not appear in the list, click More Printers, select EPSON TCP/IP
from the drop down list, and then select the printer model.
6. Click Add.
Mac OS X 10.4 or below
Bonjour/Rendezvous printing
1. Open the Applications folder.
How To 63
Page 64

Epson Network Guide
2. Open the Utilities folder.
3. Open Print Center (for Mac OS X 10.2 or below) or Printer Setup Utility (for Mac OS X 10.3 or
later), and then click Add.
4. For Mac OS X 10.4, select the printer model that is connected with Bonjour.
For Mac OS X 10.2 or 10.3, select Rendezvous fr om t he dr op do wn l is t, an d t he n se le ct th e p r in te r
model from the list.
5. Click Add.
TCP/IP printing
1. Open the Applications folder.
2. Open the Utilities folder.
3. Open Print Center (for Mac OS X 10.2 or below) or Printer Setup Utility (for Mac OX 10.3 or
later), and then click Add.
4. For Mac OS X 10.4, click More Printers, select EPSON TCP/IP from the drop down list, and then
select the printer model.
For Mac OS X 10.2 or 10.3, select EPSON TCP/IP from the drop down list, and then select the
printer model from the list.
5. Click Add.
AppleTalk printing
1. Open the Applications folder.
2. Open the Utilities folder.
3. Open Print Center (for Mac OS X 10.2 or below) or Printer Setup Utility (for Mac OS X 10.3 or
later), and then click Add.
4. For Mac OS X 10.4, click More Printers, select EPSON Apple Talk from the drop down list, select
the zone from the drop down list, and then select the printer model.
For Mac OS X 10.2 or 10.3, select EPSON Apple Talk from the drop down list, select the zone from
the drop down list, and then select the printer model from the list.
5. Click Add.
How To 64
Page 65

Epson Network Guide
Settings for NetWare Users
Overview
If you are using a printer that supports NetWare queue-based printing, see “Configuring the Network
Interface” on page 65 for detailed information.
Note:
To find out whether your printer supports NetWare queue-based printing, see the User’s Guide.
Configuring the Network Interface
This section explains how to configure the network interface for NetWare. First, you need to set up the
printer in a NetWare environment, and then configure the network interface using EpsonNet Config.
Introduction to NetWare settings
Supported systems
Server environment
❏ NetWare 3.1/3.11/3.12/3.2 (Bindery)
❏ NetWare 4.1/4.11/4.2 (NDS, Bindery emulation)
❏ IntranetWare (NDS, Bindery emulation)
❏ NetWare 5.0/5.1 (NDS, NDPS)
❏ NetWare 6.0 (NDS, NDPS)
Client environment
The client environment must be supported by NetWare. The clients are able to use the printer driver
mounted on the network interface.
The following Novell Client is supported.
❏ For Windows 98:
Novell Client 3.4 or later for Windows 98/95
❏ For Windows 2000/NT 4.0:
Novell Client 4.8 or later for Windows 2000/NT 4.0
How To 65
Page 66

Epson Network Guide
❏ For Windows XP:
Novell Client 4.9 or later for Windows XP
About modes
You can choose either the Print Server, Remote Printer, or Standby mode. We recommend that you
use the Print Server mode unless the number of users exceeds the limit.
Features of these modes are described below.
Print Server mode (NDS/Bindery Print Server):
❏ High-speed printing with direct printing
❏ Uses the NetWare user account
❏ Can connect up to 8 file servers simultaneously
❏ Can register up to 32 print queues
Remote Printer mode:
❏ A NetWare user account is not required.
❏ A print server is needed to control the remote printer.
❏ Can attach up to 16 printers for NetWare 3.x, and up to 255 for NetWare 4.x or later.
Note:
When you turn on the printer, the user account is temporarily accessed in the Remote Printer mode. If
there is no user account available, turn on the printer before connecting the client to the network.
Standby mode (factory default mode):
The Standby mode is the default mode. This mode disables all NetWare related functions. Use the
Standby mode when you are not using the network interface in a NetWare environment.
Instructions for using NetWare
Printing a text file
When you print a text file using the NPRINT command of NetWare or DOS, redirection,
misconversion or a gap in characters may occur depending on the client environment.
How To 66
Page 67

Epson Network Guide
IPX routing protocol “NLSP”
It is possible to set the IPX routing protocol “NLSP” from NetWare 4.x or later; however, the network
interface does not support NLSP. RIP/SAP controls the communication.
You can select the routing protocol from a) NLSP with RIP/SAP Compatibility, or b) RIP/SAP Only. If
you remove the bind of RIP or SAP when NLSP with RIP/SAP Compatibility is specified, the network
interface then cannot communicate with the file server and NDS. (See “Protocols” and “Bindings” in
NetWare’s INETCFG utility.)
Bindery and NDS
❏ You can check the bindery context path from the server console by using the SET BINDERY
CONTEXT command.
❏ If the bindery context path has not been set, or if you want to use the printing environment of
another context from a non-NDS client, you need to specify the context for the bindery context.
Use the SET BINDERY CONTEXT command to set the context in the AUTOEXEC.NCF file.
❏ You cannot use the bindery print server mode with EpsonNet Config if you are running Novell
Client for Windows 95/98 version 3.00 or Novell Client for Windows NT version 4.50. To
configure the network interface for bindery mode, use Novell IntranetWare Client or EpsonNet
Config with Web Browser.
See your NetWare documentation for more information.
Time required to recognize the network interface
It takes up to two minutes for the NetWare server to recognize the network interface, after the printer
is turned on. During this start-up time, the status sheet does not show the correct information.
Frame type
The same frame type should be used for the NetWare server and IPX router on the same network. If
more than one frame type is used on the same network, bind all the frame types to the NetWare servers
and IPX routers.
For NetWare 5.x
The IPX protocol must be installed (bound) on the NetWare 5.x server.
How To 67
Page 68

Epson Network Guide
About modes
If the mode you have logged in is different from the mode you set for the network interface, a message
appears when you try to configure the network interface for NetWare. If you do not want to change the
current settings, click Cancel and log in again using the same mode set for the network interface.
Using Bindery Print Server (NetWare 3.x/4.x)
This section contains instructions on using the network interface in the Print Server mode on
NetWare 3.x/4.x/IntranetWare with Bindery emulation.
Note:
The network interface in the Print Server mode of NetWare 3.x does not allow you to use the Print Server
status display control with PCONSOLE.
1. Turn on your printer.
2. From any NetWare client, log in to the target NetWare server with supervisor privileges. You must
log in with the bindery connection.
3. Configure the network interface using EpsonNet Config. See the EpsonNet Config User’s Guide
for details.
If NetWare objects are already created, you can also use EpsonNet Config with Web Browser. See
the EpsonNet Config with Web Browser help for details.
Using NDS Print Server (NetWare 4.x/5.x/6.0)
This section contains instructions for using the network interface in the Print Server mode on
NetWare 4.x, IntranetWare, NetWare 5.x, or NetWare 6.0 with NDS mode.
1. Turn on your printer.
2. From any NetWare client, log in to the target context of the NDS tree as an ADMIN.
3. Configure the network interface using EpsonNet Config. See the EpsonNet Config User’s Guide
for details.
If NetWare objects are already created, you can also use EpsonNet Config with Web Browser. See
the EpsonNet Config with Web Browser help for details.
How To 68
Page 69

Epson Network Guide
Using Remote Printer Mode (NetWare 3.x)
For NetWare 3.x users, follow the steps below to make the printer environment with PCONSOLE.
Creating print queues in a file server
1. From any NetWare client, log in to the network with supervisor privileges.
2. Run PCONSOLE. From the Available Options screen, select Print Queue Information and press
Enter.
3. Press the Insert key on your keyboard and enter the print queue name. Press Enter.
Note:
Since your clients need the print queue name you set here when they use the printer, announce the
print queue name to your clients.
4. From the Print Queue list, select the print queue name that you just entered and press Enter. From
the Print Queue Information list, select Queue Users and press Enter. Next, select EVERYONE
from the list. If EVERYONE is not in the list, press Insert and select EVERYONE from the queue
user list.
Creating a print server
1. From the Available Options screen, select Print Server Information and press Enter.
2. Press the Insert key on your keyboard and type the print server name. Press Enter. It is a good idea
to write down the print server name for later use.
How To 69
Page 70

Epson Network Guide
3. From the Print Server list, select the print server name that you just typed and press Enter. From
the Print Server Information list, select Print Server Configuration and press Enter.
4. Select Printer Configuration from the Print Server Configuration Menu and press Enter.
5. From the Configured Printers list, select Not Installed (port number = 0) and press Enter.
How To 70
Page 71

Epson Network Guide
6. From the Printer configuration screen, type the printer name. Highlight Type and press Enter.
Select Remote Parallel, LPT1 for Remote Printer mode.
Note:
Be sure to select Remote Parallel, LPT1 for Remote Printer mode.
7. Press Esc; then press Enter to save your changes.
8. Press Esc.
9. Select Queues Serviced by Printer from the Print Server Configuration menu and press
Enter.
10. Select the printer that you want to use from the Defined Printers list and press Enter.
11. Press the Insert key and assign a queue to the print server port from the Available Queues list.
12. Specify a priority level between 1 to 10. One is top priority.
13. Press Esc to exit PCONSOLE.
Configuring for NetWare using EpsonNet Config
1. Turn on your printer.
How To 71
Page 72

Epson Network Guide
2. Load the print server from the file server’s system console which the print queue volume is set.
>LOAD PSERVER print server name you set using PCONSOLE
3. Configure the network interface using EpsonNet Config. See the EpsonNet Config User’s Guide
for details.
If NetWare objects are already created, you can also use EpsonNet Config with Web Browser. See
the EpsonNet Config with Web Browser help for details.
Using Bindery Remote Printer Mode (NetWare 4.x)
Follow the steps below to make the printer environment on NetWare 4.x and IntranetWare with
Bindery emulation.
Note:
❏ Assign Trusteeships for users if necessary.
❏ Be sure to use PCONSOLE to set the print queue and print server instead of using NWAdmin.
Creating objects
1. From any NetWare client, log in to the server as an ADMIN. Make sure to log in with Bindery
connection.
Note:
If the client using for this setting has been logged in with NDS mode, press F4 key while PCONSOLE is
starting to switch to the bindery mode.
2. Run PCONSOLE. From the Available Options screen, select Print Queues and press Enter. Press
Insert and type the print queue name. Press Enter.
Note:
Since your clients need the print queue name you set here when they use the printer, announce the
print queue name to your clients.
3. From the Print Queue list, select the print queue name that you just entered and press Enter. From
the Print Queue Information list, select Queue Users and press Enter. Next, select EVERYONE
from the list. If EVERYONE is not in the list, press Insert and select EVERYONE from the queue
user list.
4. From the Available Options screen, select Print Servers and press Enter. Press Insert and type
the print server name. Press Enter.
How To 72
Page 73

Epson Network Guide
5. Press Esc to exit PCONSOLE, and log out from the server.
6. Log in to the server as an ADMIN. Be sure to log in with NDS connection.
7. Start NWAdmin.
8. To create the Printer Object, click the container specified as the Bindery context and select Create
from the Object menu, then Printer. Type the printer name and click Create.
9. To assign the print queue, double-click the Printer object icon (created in step 8). The Printer
dialog box appears.
10. Click Assignments and then click Add. From the print queue list, select the queue (created in step
2) and click OK.
11. Click Configuration in the Printer dialog box, and select Parallel from the Printer type
pull-down menu.
12. Click Communication. The Parallel Communication dialog box appears.
13. Select LPT1 for Port; check Polled for Interrupts; and check Manual load (Remote from Print
Server) for Connection type, then click OK.
14. Click OK in the Printer dialog box.
15. To assign the printer, double-click the Print Server object icon (created in step 4). The Print Server
dialog box appears.
16. Click Assignments and then click Add. From the printer object list, select the printer object
(created in step 8) and click OK.
17. In the Print Server dialog box, select the assigned printer from the printer object list, and click the
Printer Number button to set the printer number from 0 to 15, then click OK.
18. To confirm the objects you have assigned, double-click the Print Server object icon. Click Print
Layout, and check that the print server, printer, and print queue are connected.
Configuring for NetWare using EpsonNet Config
1. Turn on your printer.
How To 73
Page 74

Epson Network Guide
2. Load the print server from the file server’s system console which the print queue volume is set.
>LOAD PSERVER print server name you set using PCONSOLE
3. Configure the network interface using EpsonNet Config. See the EpsonNet Config User’s Guide
for details.
If NetWare objects are already created, you can also use EpsonNet Config with Web Browser. See
the EpsonNet Config with Web Browser help for details.
Using NDS Remote Printer Mode (NetWare 4.x/5.x/6.0)
Follow the steps below to make the printer environment using NWAdmin under NetWare 4.x,
IntranetWare, NetWare 5.x, or NetWare 6.0 with NDS mode.
Creating objects
1. From any NetWare client, log in to the target context of the NDS tree as an ADMIN.
2. Run the Administrator tool (NWAdmin).
3. Create a printer:
Click the directory context icon, and select Create from the Object menu, then Printer. Type the
Printer name and click Create.
4. Create a print server:
Click the directory context icon, and select Create from the Object menu, then Print Server.
Type the Print Server name and click Create.
How To 74
Page 75

Epson Network Guide
5. Create a print queue:
Click the directory context icon, and select Create from the Object menu, then Print Queue.
Type the Print Queue name and select the Print Queue Volume, then click Create. Double-click
the print queue object, and register the user.
Note:
Since your clients need the print queue name you set here when they use the printer, announce the
print queue name to your clients.
6. Double-click the Printer Object icon in the NetWare Administrator screen.
How To 75
Page 76

7. In the Printer dialog box appears, click Assignments and then click Add.
8. From the print queue list, select the queue you created in step 5 and click OK.
Epson Network Guide
9. Click Configuration, and select Other/Unknown for the Printer type list box and click OK.
How To 76
Page 77

Epson Network Guide
10. Double-click the Print Server Object icon in the NetWare Administrator screen.
11. In the Print Server dialog box that appears, click Assignments and then click Add.
12. From the printer object list, select the printer object you want to assign and click OK.
13. Go back to the screen in step 11, and click the Printer Number button to set the printer number
from 0 to 254.
How To 77
Page 78

Epson Network Guide
14. To confirm the objects you have assigned, double-click the Print Server object icon. Click Print
Layout, and check that the print server, printer, and print queue are connected.
Configuring for NetWare using EpsonNet Config
1. Turn on your printer.
2. Load the print server from the file server’s system console which the print queue volume is set.
>LOAD PSERVER print server name you set using NWAdmin
3. Configure the network interface using EpsonNet Config. See the EpsonNet Config User’s Guide
for details.
If you use the NetWare objects that are already created, you can use EpsonNet Config with Web
Browser too. See the EpsonNet Config with Web Browser help for details.
Instructions for using a dial-up network
This section explains about using a dial-up network.
Note:
The primary server described in this manual indicates a primary time server which offers time to the
workstations on the network.
Using a dial-up network in each mode
Print Server mode
You must use a dedicated dial-up line.
Since polling is performed on the file server in the print server mode, no vicarious response by the
router is possible. Therefore, no dial-up connection is possible in this case.
Remote Printer mode
In Remote Printer mode, use of a router with a vicarious response function allows the primary server
to be installed at the dial-up destination. However, an extra account might be generated when the
primary server is down. To avoid that, it is recommend to use connections via a dedicated dial-up
line.
Follow the instructions for using a dial-up line.
How To 78
Page 79

When there is a primary server at the dial-up destination
For local networks with file servers:
Epson Network Guide
Primary file server
(primary print server)
Printer
File
server
Local network
Dial-up
router
Dial-up
router
Remote network
❏ When the power is turned on
A dial-up is generated because access is made to a local file server first and then to a primary server.
There is no problem since this dial-up only occurs at startup.
❏ When the network interface is not correctly set
A dial-up is generated because access is made to a local file server first and then to a primary server.
This dial-up is repeated at intervals of approximately 5 minutes. Make the network interface
settings correctly to avoid this problem.
❏ During normal operation (standby)
An SPX Watchdog packet is sent according to the NetWare protocol convention. Use a router with
a vicarious response function to avoid a dial-up.
❏ During normal operation (printing)
A dial-up is generated while the printing data is being transferred. This is not a problem because it
is a dial-up specific to the dial-up network.
❏ When the primary server is down during operation
A dial-up is generated because a connection to the primary server is attempted periodically. Since
this is attributable to the automatic re-connection function, turn off the printer once.
❏ When the file server on the local network is down
When there is no file server on the local network, NetWare cannot be used on the local network. In
this case, the NetWare protocol for the network interface is also not available. No dial-up is
generated under this condition. When the file server on the local network is restored, the network
interface is also automatically restored.
How To 79
Page 80

For local networks with no file server:
Epson Network Guide
Primary file server
(primary print server)
Printer
Dial-up
router
Local network
Dial-up
router
Remote network
Depending on the router settings, the NetWare protocol can be used without a file server on a local
network. This setup follows the same pattern as that described above.
When there is a primary server in the local network
Even if a primary server is installed on the local network, an unnecessary dial-up may be generated
depending on the configuration.
The following problems are common to both Print Server mode and Remote Printer mode.
File server
(print server)
Primary file server
(primary print server)
Dial-up
router
Dial-up
router
Printer
Local network
Remote network
❏ When the power is turned on
Since access is made only to the primary server, no dial-up is generated.
❏ When the network interface is not correctly set
Since access is made only to the primary server, no dial-up is generated. However, if the file server/
print server of the remote network is erroneously set as the primary server, an unnecessary dial-up
might be generated. Correct the settings to avoid this problem.
❏ During normal operation (standby/printing)
Since access is made only to the primary server, no dial-up is generated.
❏ When the primary server is down during operation
How To 80
Page 81

Epson Network Guide
Connection to the primary server is periodically attempted, but no dial-up is generated. However,
if the router is set to pass SAP packets (Find Nearest Server), an unnecessary dial-up might be
generated. To avoid this, turn off the printer once, or do not allow the router to pass SAP packets
(Find Nearest Server).
How To 81
Page 82

Epson Network Guide
Chapter 3
Network Software
This chapter explains how to use the network software provided with your printer.
Note:
The software provided varies depending on your printer model.
EpsonNet Config for Windows
About EpsonNet Config
EpsonNet Config is a Windows-based configuration software for administrators to configure the
network interface for TCP/IP.
Note:
Be sure to use EpsonNet Config included on the Software Disc shipped with this product.
Note for Windows 98/Me/NT 4.0 users:
EpsonNet Config on the Software Disc shipped with this product does not support Windows 98, Me, and
NT 4.0. To configure the network interface, use the previous version of the software (EpsonNet Config
Ver.2). You can download EpsonNet Config Ver.2 from the Epson Web site.
http://support.epson.net/netconfig_down.html
System Requirements
The following table lists the system requirements of EpsonNet Config.
Operating systems Windows 7
Windows Vista
Windows XP Professional/Home Edition
Windows Server 2008/Windows Server 2008 R2
Windows Server 2003/Windows Server 2003 R2
Windows 2000 Server/Professional
Memory 150 MB or more
Network Software 82
Page 83

Epson Network Guide
Hard disk drive space 50 MB
Installing EpsonNet Config
Follow the steps below to install EpsonNet Config on your computer to configure the network
interface.
Note:
❏ Log on to the operating system with an administrator account to install EpsonNet Config.
❏ If you add or delete protocols or services from your operating system after installing EpsonNet Config,
EpsonNet Config may not work correctly. If this happens, uninstall EpsonNet Config and then install
it again.
1. Make sure all the applications are closed, then insert the Software Disc in the CD-ROM drive.
2. The Software Installation screen opens automatically.
If the Software Installation screen does not appear, double-click EPSETUP.EXE on the CD-ROM.
3. Click User Installation if it appears.
4. Click the Install Network Utility button.
5. Click the icon located next to EpsonNet Config Ver.3.
6. Follow the on-screen instructions to complete the installation.
Note:
If the Windows Security Alert window appears after you start EpsonNet Config, click the Allow
access or Unblock button; otherwise the devices are not listed on the screen of EpsonNet Config.
Accessing the EpsonNet Config User’s Guide
The EpsonNet Config User’s Guide contains detailed information on EpsonNet Config. Follow the
steps below to access the EpsonNet Config User’s Guide.
1. Click Start, point to Programs (for Windows 2000 users) or All Programs (for Windows 7,
Vista, XP, Server 2008, and Server 2003 users), select EpsonNet, and then select EpsonNet
Config V3.
Network Software 83
Page 84

Epson Network Guide
2. Click EpsonNet Config User’s Guide.
The EpsonNet Config User’s Guide appears. By clicking the links on the front page or contents
page, you can get information on using EpsonNet Config.
EpsonNet Config for Macintosh
About EpsonNet Config
EpsonNet Config for Macintosh is a Macintosh-based configuration software for administrators that
allows you to configure the network interface for TCP/IP.
Note:
Be sure to use EpsonNet Config included on the Software Disc shipped with this product.
Note for Mac OS 9 users:
E ps o nN e t Co n f ig o n th e S of t w ar e D is c s hi p p ed wi th t hi s p ro d u ct do es n ot s u pp o r t M a c OS 9. To c on f i gu re
the network interface, use the previous version of the software (EpsonNet Config Ver.2). You can
download EpsonNet Config Ver.2 from the Epson Web site.
http://support.epson.net/netconfig_down.html
System Requirements
The following table lists the system requirements of EpsonNet Config.
Operating systems Mac OS 10.3.9 or higher
Java 1.4 or later is installed
Models PowerPC Macintosh/Intel Macintosh
Memory 150 MB or more
Hard disk drive space 50 MB
Installing EpsonNet Config
Follow the steps below to install EpsonNet Config to configure the network interface.
Network Software 84
Page 85

Epson Network Guide
1. Make sure all the applications are closed, then insert the Software Disc in the CD-ROM drive.
EPSON folder opens automatically.
2. Select the Mac OS X icon in the EPSON folder, and then double-click it.
3. Click the Install Network Utility button.
4. Click the icon located next to EpsonNet Config Ver.3.
5. Follow the on-screen instructions to complete the installation.
Accessing the EpsonNet Config User’s Guide
The EpsonNet Config User’s Guide contains detailed information on EpsonNet Config. Follow the
steps below to access the EpsonNet Config User’s Guide.
1. Double-click the Macintosh HD icon.
2. In the Applications folder, double-click the EpsonNet folder, and then double-click the
EpsonNet Config V3 folder. Finally, double-click the EpsonNet Config icon.
EpsonNet Config starts.
3. From the Help menu, select EpsonNet Config Help.
The EpsonNet Config User’s Guide appears. By clicking the links on the front page or contents
page, you can get information on using EpsonNet Config.
EpsonNet Config with Web Browser
About EpsonNet Config
EpsonNet Config with Web Browser is a Web-based utility designed to configure the printer for use
on a network.
Network Software 85
Page 86

Epson Network Guide
By typing the IP address of the network interface for the URL in your browser, you can start EpsonNet
Config to allow you to configure the network interface for TCP/IP, NetWare, MS Network,
AppleTalk, IPP, and SNMP.
Supported Web browser
Windows:
❏ Microsoft Internet Explorer version 5.0 or later
❏ Netscape Navigator version 7.0 or later
❏ Firefox version 2.0 or later
Mac OS X:
❏ Netscape Navigator version 7.0 or later
❏ Apple Safari version 1.2 or later
❏ Firefox version 2.0 or later
About Web browser setting
When running EpsonNet Config with Web Browser, be sure not to use a proxy server to access the
Internet. If the Access the Internet using a proxy server check box is selected, you cannot use
EpsonNet Config with Web Browser. Use the following steps to clear the Access the Internet using a
proxy server check box.
1. Right-click the Internet Explorer icon on the desktop, and then select Properties.
2. Click the Connection tab.
3. Clear the Access the Internet using a proxy server check box.
Configuring the Network Interface Using Web-Based EpsonNet Config
After you have assigned an IP address to the network interface using EpsonNet EasyInstall, EpsonNet
Config for Windows or Macintosh, or the arp/ping command, you can configure the network
interface using Web-based EpsonNet Config.
Note:
❏ A Web browser must be installed on your computer.
Network Software 86
Page 87

Epson Network Guide
❏ TCP/IP must be correctly set for the computer and the network interface.
❏ Do not run both EpsonNet Config for Windows or Macintosh and Web-based EpsonNet Config at
the same time.
❏ Your browser may restrict some characters you can use. For details, see your browser or operating
system documentation.
Note for users of printers supporting NetWare queue-based printing:
If you are using the dial-up environment without running NetWare, select Disable on the NetWare
screen. If Enable is selected, the extra account may be charged when you are using the dial-up router.
Follow the steps below to change the IP address using EpsonNet Config.
1. Turn on your printer.
2. Run EpsonNet Config using one of the following ways.
❏ Run EpsonNet Config for Windows or Macintosh. Select the printer you want to configure
from the list and then click Launch Browser.
❏ Open your browser, and then type in the IP address of the network interface directly. Do not
run EpsonNet Config for Windows or Macintosh.
http://IP address of network interface/
Example: http://192.168.100.201/
Note:
To check the IP address of the network interface, use EpsonNet Config. See “About EpsonNet Config”
on page 82 for Windows users, or see “About EpsonNet Config” on page 84 for Macintosh users for
details.
Note for users of printers supporting NetWare queue-based printing:
❏ From any NetWare client, log in to the target NetWare server or NDS context with supervisor
privileges.
❏ You cannot create a print server, print queue, or printer with Web-based EpsonNet Config. You
must create these objects before using Web-based EpsonNet Config.
3. Click TCP/IP under Network on the Configuration menu to display the TCP/IP setting screen.
Network Software 87
Page 88

Epson Network Guide
Note:
If you want to configure a protocol other than TCP/IP, configure the desired settings on
Configuration - Network screen.
4. Select a method for acquiring the IP address. When you select Auto, DHCP becomes available and
assigns an IP address automatically. If you want to set the IP address manually, select Manual.
Note:
❏ The network administrator must check any changes made to the IP address settings.
❏ When Auto is selected, DHCP becomes available. To use the DHCP server, make sure it is
installed on your computer and correctly configured. See your operating system’s online help for
detailed instructions.
❏ If Set Using Automatic Private IP Addressing (APIPA) is enabled, a private IP address is
automatically assigned to the network interface even when there are no DHCP servers on your
system or your network.
❏ If the Dynamic DNS function is not supported, we recommend that you select Manual and then
enter an IP address. This is because if you select Auto, the IP address of the network interface
changes every time you turn on the printer so that you need to change the printer port setting
accordingly.
5. To assign an IP address manually, enter the IP address, the subnet mask, and the default gateway.
Be sure the IP address does not conflict with any other devices on the network.
Note:
If there is a server or a router functioning as a gateway, enter the IP address of the server or the router
for the gateway address. If there is no gateway, leave the default values there.
6. If you want to get a private address between 169.254.1.1 and 169.254.254.254 automatically when
an IP address cannot be obtained by the DHCP server, leave it at Enable for Set Using Automatic
Private IP Addressing (APIPA); otherwise, select Disable.
7. When setting an IP address using the ping command, select Enable for Set Using PING. Select
Disable when setting an IP address with EpsonNet Config; this prevents any unexpected change
of the IP address.
8. Select Enable for Acquire DNS Server Address Automatically if you want to acquire the DNS
server address using the DHCP server.
Network Software 88
Page 89

Epson Network Guide
If you want to enter the DNS server address manually, select Disable and then enter the IP address
of the DNS server.
9. Select Enable for Acquire Host Name and Domain Name Automatically if you want to
acquire the host name and the domain name using the DHCP server.
If you want to specify manually, enter the host name and the domain name in the text boxes.
10. Select Enable for Register Network Interface Address to DNS Server if you want to register
the host name and domain name to the DNS server through the DHCP server that supports
Dynamic DNS.
If you want to register the host name and the domain name directly to the DNS server, select
Enable for Register Network Interface Address Directly to DNS Server.
11. Select Enable or Disable for Use Universal Plug and Play. Select Enable if you want to use the
Universal Plug and Play function on Windows Me or future operating systems.
12. Change the default Universal Plug and Play device name, if desired. This device name is used for
Windows that supports the Universal Plug and Play function.
13. Mac OS X only:
Select Enable or Disable for Use Bonjour. If you select Enable, enter the Bonjour Name and the
Bonjour Printer Name. If your network environment supports DHCP, you can use the printer on
the network just by enabling this setting.
14. Click Submit and then enter the password to update the settings.
Note:
If you have set the Administrator Name on the Administrator screen, enter the administrator name
for the user name.
15. If the message “Configuration change is complete!” appears on your screen, the update is
complete. Do not exit the Web browser and do not send a job to the printer until this message
appears. Follow the on-screen instructions to reset the printer.
Note:
❏ Since the new IP address becomes available after the printer is reset, you need to restart EpsonNet
Config by entering the new IP address.
❏ Only changes on the page where you press the Submit button take effect.
Network Software 89
Page 90

Epson Network Guide
Opening Screen
Any user can access the following screen by typing the IP address of the network interface for the URL
in your browser.
Note:
❏ The item appears only if your printer supports the function, and the name of the item may vary
depending on the model.
❏ See the EpsonNet Config with Web Browser help for details about each item.
Index
Home Links to the opening screen.
Favorite Links to a Web site previously defined by the administrator.
Help Links to Help.
Menu
About Links to the copyright and version information for EpsonNet Config.
EPSON Logo Links to the Epson Web site (http://www.epson.com).
Information - Printer
Device Displays the printer device information.
Consumables Displays the consumables information.
Confirmation Confirms and executes the Information Sheet, Reserve Job, and Form Overlay.
Input Displays the paper type information.
Print Displays the print information.
Emulation Displays the information for each type of emulation.
Interface Displays the printer interface information.
Information - Network
General Displays the network interface information.
NetWare Displays information about NetWare.
TCP/IP Displays information about TCP/IP.
Network Software 90
Page 91

AppleTalk Displays information about AppleTalk.
MS Network Displays information about Microsoft Network.
IPP Displays information about IPP.
SNMP Displays information about SNMP.
Access Control Displays information about Access Control.
Timeout Displays information about Timeout.
Time Displays information about Time.
EDM Displays the EDM Agent information.
Epson Network Guide
Configuration - Printer
*
Input Change the input settings.
Print Change the print settings.
Emulation Change the emulation settings.
Interface Change the printer interface settings.
Configuration - Network
NetWare Configure the applicable settings for NetWare.
TCP/IP Configure the desired settings/method for TCP/IP.
AppleTalk Configure the desired settings for AppleTalk.
MS Network Configure the desired settings for Microsoft Network.
IPP Configure the desired settings for IPP.
SNMP Configure the desired settings for SNMP.
Access Control Configure the desired settings for Access Control.
Timeout Configure the desired settings for Timeout.
Time Configure the desired settings for Time.
Configuration - Security Screens
*
Port Control Select either Enable or Disable for each of the LPR, RAW, FTP, and IPP ports.
SSL/TLS
Configure the desired settings for SSL/TLS communication.
Communication
Settings
Network Software 91
Page 92

CA Certificate Import or delete CA certificates.
Server Certificate Manage server certificates.
Configuration - Optional
Administrator Type the name of the administrator and a link to a favorite Web site.
Reset Resets the printer and returns to the default settings.
Password Set the password to protect settings.
* Large format inkjet printers do not support this function.
EpsonNet Print
About EpsonNet Print
Epson Network Guide
EpsonNet Print is a utility program that provides peer to peer printing to Epson printers on the TCP/
IP network.
By using EpsonNet Print, you can find a printer located in the same segment or beyond a router. You
can select LPR standard printing, LPR enhanced printing, or High-speed printing.
System Requirements
The following table lists the system requirements of EpsonNet Print.
Operating systems Windows 7
Windows Vista (with Service Pack 2 or higher)
Windows XP Home Edition/Professional (with Service Pack 3 or higher)
Windows Me, 98, 98 Second Edition
Windows 95 OSR2 (with Internet Explorer version 5.0 or higher)
Windows Server 2008 (with Service Pack 2 or higher)
Windows Server 2008 R2
Windows Server 2003 (with Service Pack 2 or higher)
Windows 2000 (with Service Pack 4 or higher)
Windows NT 4.0 (with Service Pack 6 or higher)
Network Software 92
Page 93

CPU Pentium II 400 MHz or better recommended
Memory 64 MB or more
Hard disk space 20 MB or more
Epson Network Guide
Display
800 × 600 screen resolution, 256 color or more
Installing EpsonNet Print
Follow the steps below to install EpsonNet Print. Be sure to install it on a computer connected to the
network.
1. Make sure all the applications are closed, then insert the Software Disc into the CD-ROM drive.
2. The Epson Install Navi screen opens automatically.
If the Epson Install Navi screen does not appear, double-click EPSETUP.EXE on the CD-ROM.
3. Click the Software List icon.
4. Select EpsonNet Print and then click the Next button.
5. Follow the on-screen instructions to complete the installation.
Your computer is now set up to print using LPR via EpsonNet Print. See the next section to set up your
printer.
For Windows 7/Vista/XP/Server 2008/Server 2003/2000/NT 4.0 Users
Follow the steps below to add a port using the Add Printer Wizard.
❏ If you want to add a port for a printer with its IP address assigned automatically by the DHCP
server or router, see “Adding a port for a printer assigned with a dynamic IP address” on page
94.
❏ If you want to add a port for a printer with its IP address assigned manually, see “Adding a port for
a printer assigned with a static IP address” on page 97.
Note:
❏ Be sure that the computer is connected to the network and TCP/IP is correctly set.
Network Software 93
Page 94

Epson Network Guide
❏ A valid IP address must be assigned to the printer.
Adding a port for a printer assigned with a dynamic IP address
1. For Windows 7/Vista/Server 2008: Click Start, Control Panel, and then View devices and
printers (Windows 7), or Printers (Windows Vista/Server 2008). Click Add a printer to start the
Add Printer Wizard.
For Windows XP: Click Start and then Printers and Faxes. Under Printer Tasks, click Add a
printer to start the Add Printer Wizard. Click Next.
For Windows Server 2003: Click Start and then Printers and Faxes. Double-click Add Printer
in the Printers folder to start the Add Printer Wizard. Click Next.
For Windows 2000: Click Start, point to Settings, and then select Printers. Double-click Add
Printer in the Printers folder to start the Add Printer Wizard. Click Next.
For Windows NT 4.0: Click Start, point to Settings, and then select Printers. Double-click the
Add Printers icon. Click Next.
2. For Windows 7/Vista/Server 2008: Click Add a local printer. Select the Create a new port
radio button, and then select EpsonNet Print Port from the list. Click Next.
Note:
If the Windows Security Alert screen appears, click the Allow access or Unblock button, and then
click the Search Again button to search the printers.
For Windows XP/Server 2003: Click Local printer attached to this computer, clear the
Automatically detect and install my Plug and Play printer check box, and then click Next.
Select the Create a new port radio button, and then select EpsonNet Print Port
from the list.
Click Next.
Note:
If the Windows Security Alert screen appears, click the Unblock button, and then click the Search
Again button to search the printers.
For Windows 2000: Click Local printer, clear the Automatically detect and install my Plug
and Play printer check box, and then click Next. Select the Create a new port radio button, and
then select EpsonNet Print Port from the list. Click Next.
Network Software 94
Page 95

Epson Network Guide
For Windows NT 4.0: Select the My Computer radio button, and then click Next. Click the Add
Port button in the Add Printer Wizard dialog box. Select EpsonNet Print Port from the Available
Printer Port list, and then click the New Port button.
3. Select the target printer, and then click Next.
Note:
❏ If the target printer is not in the list, click the Search Again button to search the printers using
new parameters.
❏ Each column can be sorted in ascending or descending order by clicking the column header.
However, Manual Setting is always displayed on the top of the list regardless of sorting.
Network Software 95
Page 96

Epson Network Guide
❏ If you want to search printers in other segments, click the N/W Settings button. Select the
Specific Network Segments check box, and then enter the network address and subnet mask of
the network segment for the search. Then click the Add button. You can also specify the time
before declaring communication error.
4. Confirm the information about the printer’s port you want to configure, and then click Finish.
Network Software 96
Page 97

Epson Network Guide
Items Explanations
Port Type The following items are listed in the pull-down menu, and you can select the port
type you need.
IP Address (Auto): Configure the port automatically. If the IP address of the
printer is acquired automatically and the computer and the printer are in the same
segment, you can select this port type.
IP Address (Manual): Use the printer’s IP Address for the port name.
HostName (DNS): Use the printer’s host name registered in the DNS server for the
port name.
MS Network: Use the NetBIOS name registered in the printer for the port name.
The port Information The following items are displayed:
- Port Name (If the port type is changed, the port name and the host name or IP
address are also changed.)
- Printer Model
- Host Name or IP Address
- Protocol
Finish button Register the port information to the system and close the Add EpsonNet Print Port
Wizard.
Back button Go back to the printer list window.
Cancel button Close the Add EpsonNet Print Port Wizard.
The new printer port is created in your computer. To install the printer driver, see “Installing the
Printer Driver” on page 100.
Adding a port for a printer assigned with a static IP address
1. For Windows 7/Vista/Server 2008: Click Start, Control Panel, and then View devices and
printers (Windows 7), or Printers (Windows Vista/Server 2008). Click Add a printer to start the
Add Printer Wizard.
For Windows XP: Click Start and then Printers and Faxes. Under Printer Tasks, click Add a
printer to start the Add Printer Wizard. Click Next.
For Windows Server 2003: Click Start and then Printers and Faxes. Double-click Add Printer
in the Printers folder to start the Add Printer Wizard. Click Next.
For Windows 2000: Click Start, point to Settings, and then select Printers. Double-click Add
Printer in the Printers folder to start the Add Printer Wizard. Click Next.
Network Software 97
Page 98

Epson Network Guide
For Windows NT 4.0: Click Start, point to Settings, and then select Printers. Double-click the
Add Printers icon. Click Next.
2. For Windows 7/Vista/Server 2008: Click Add a local printer. Select the Create a new port
radio button, and then select EpsonNet Print Port from the list. Click Next.
Note:
If the Windows Security Alert screen appears, click the Allow access or Unblock button, and then
click the Search Again button to search the printers.
For Windows XP/Server 2003: Click Local printer attached to this computer, clear the
Automatically detect and install my Plug and Play printer check box, and then click Next.
Select the Create a new port radio button, and then select EpsonNet Print Port from the list.
Click Next.
Note:
If the Windows Security Alert screen appears, click the Unblock button, and then click the Search
Again button to search the printers.
For Windows 2000: Click Local printer, clear the Automatically detect and install my Plug
and Play printer check box, and then click Next. Select the Create a new port radio button, and
then select EpsonNet Print Port from the list. Click Next.
For Windows NT 4.0: Select the My Computer radio button, and then click Next. Click the Add
Port button in the Add Printer wizard dialog box. Select EpsonNet Print Port from the Available
Printer Port list, and then click the New Port button.
3. Select Manual Setting from the list, and then click Next.
Network Software 98
Page 99

Epson Network Guide
4. Enter the printer’s name and the port name is automatically entered to the Port Name edit box.
Then click Next.
5. Confirm the information about the printer’s port you want to configure, and then click Finish.
Items Explanations
The port Information The following items are displayed:
- Port Name
- Host Name or IP Address
- Protocol
Finish button Register the port information to the system and close the Add EpsonNet Print Port
Wizard.
Back button Go back to the printer list window.
Network Software 99
Page 100

Items Explanations
Cancel button Close the Add EpsonNet Print Port Wizard.
The new printer port is created in your computer. To install the printer driver, see “Installing the
Printer Driver” on page 100.
Installing the Printer Driver
Install the printer driver that comes with your printer.
Note:
Some buttons in these steps may be slightly different depending on your operating system.
1. Insert the Software Disc shipped with the printer.
2. Close the Epson Install Navi screen if it appears.
Epson Network Guide
3. On the Add Printer screen, click the Have Disk button. The Install From Disk dialog box appears.
4. Click Browse.
5. Select the CD-ROM drive for Drives, and double-click the appropriate folder for your operating
system. Click OK.
6. Click OK in the Install From Disk dialog box.
7. Select the model name of the printer, and then click Next.
Note:
If the Add Printer Wizard asks you to select either Keep existing driver or Replace existing driver,
be sure to select the Replace existing driver radio button. Click Next.
8. Click Finish and follow the on-screen instructions to complete the setup.
The printer is now ready for peer-to-peer printing. To configure the printer port, see “Configuring the
Printer Port” on page 105.
For Windows Me/98/95 Users
Follow the steps below to add a port using the Add Printer Wizard.
Network Software 100
 Loading...