

Page 1
Centrifuge 5702 / Centrifuge 5702 R /
Centrifuge 5702 RH
Page 2
1
Centrifuge 5702 / 5702 R / 5702 RH
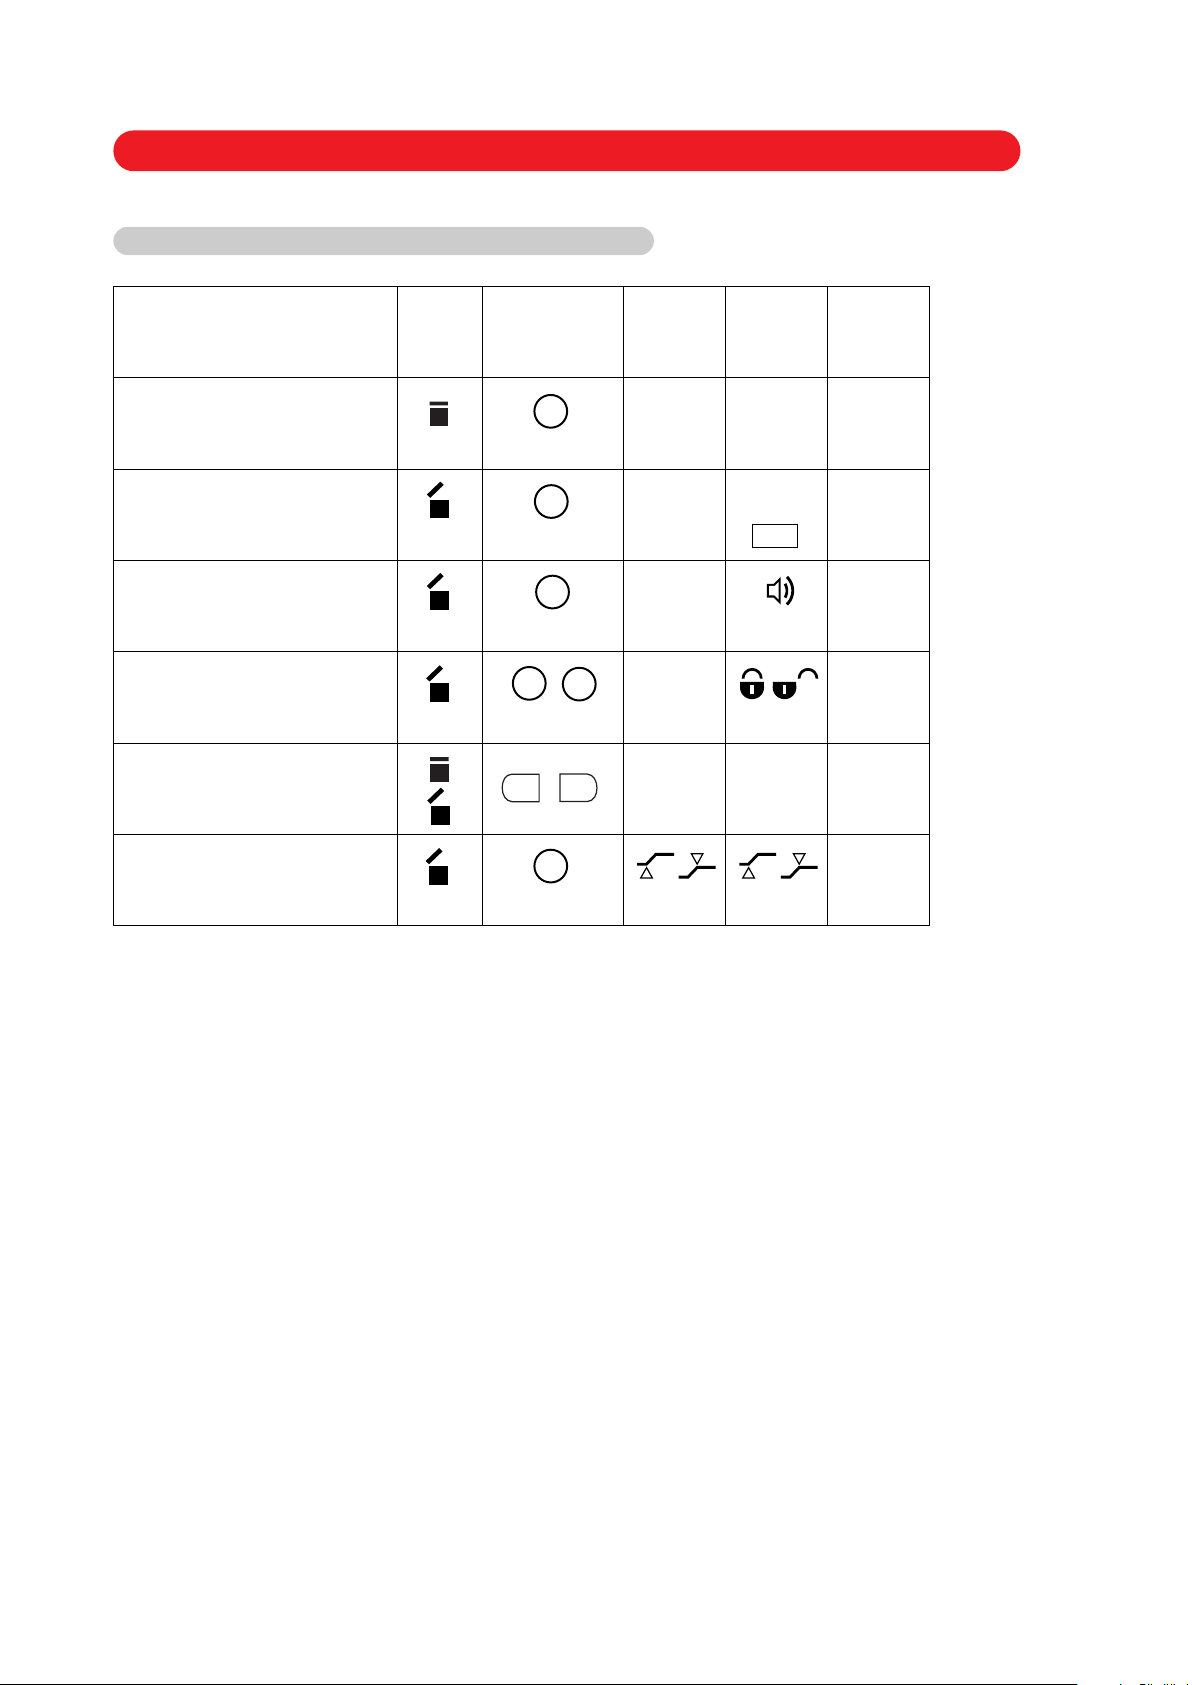
Tastenkürzel / Shortcuts
Task Lid Press
Parameter change
during centrifugation
closed
Brake
ON / OFF
open
Signal
ON / OFF
open
Parameter lock
ON / OFF
open
Program
(only Centrifuge 5702 R / RH) –
short
> 2 sec
short
> 5 sec
open
> 2 sec
short
+
open
> 2 sec
. set parameter
or
1
2
Display
5702
Display
flashes
5 sec
br on
br OF
b on
b OF
Lo on
Lo OF
> 2 sec
At set rpm
open
time
> 2 sec
Display
5702 R /
5702 RH
Display
flashes
5 sec
br on
br OF
soft
prog 1
prog 2
Instruction
manual
3.8
3.12
3.14
3.15
3.16
3.13
No part of this publication may be reproduced without the prior permission of the copyright owner.
Copyright
©
2012 Eppendorf AG, Hamburg
Page 3
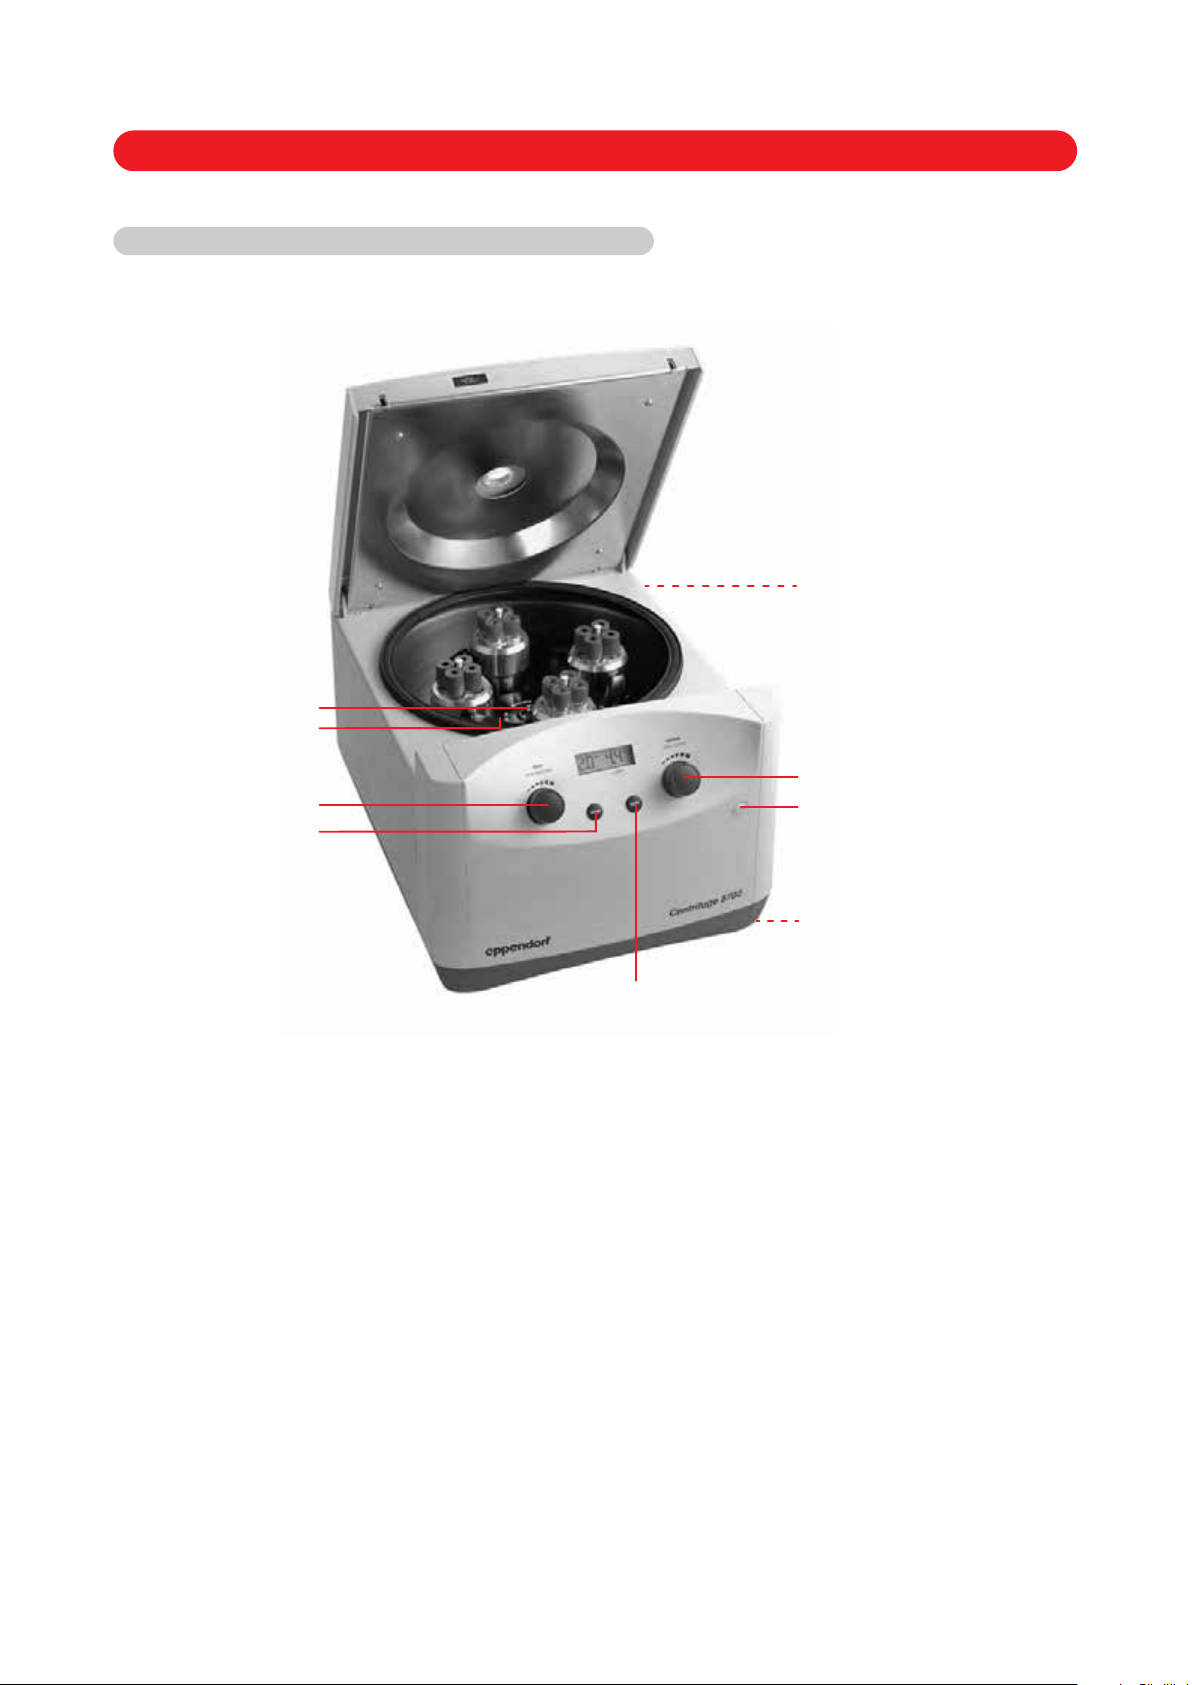
Centrifuge 5702
Abb. 1 / Fig. 1
Abbildung 1 / Figure 1
1
2
3
time
short
open
1 Netzschalter und -stecker 1 Mains switch and plug
2 Rotormutter 2 Rotor nut
3Rotor 3Rotor
E Notentriegelung E Emergency lid release
speed
stand-by
E
Page 4
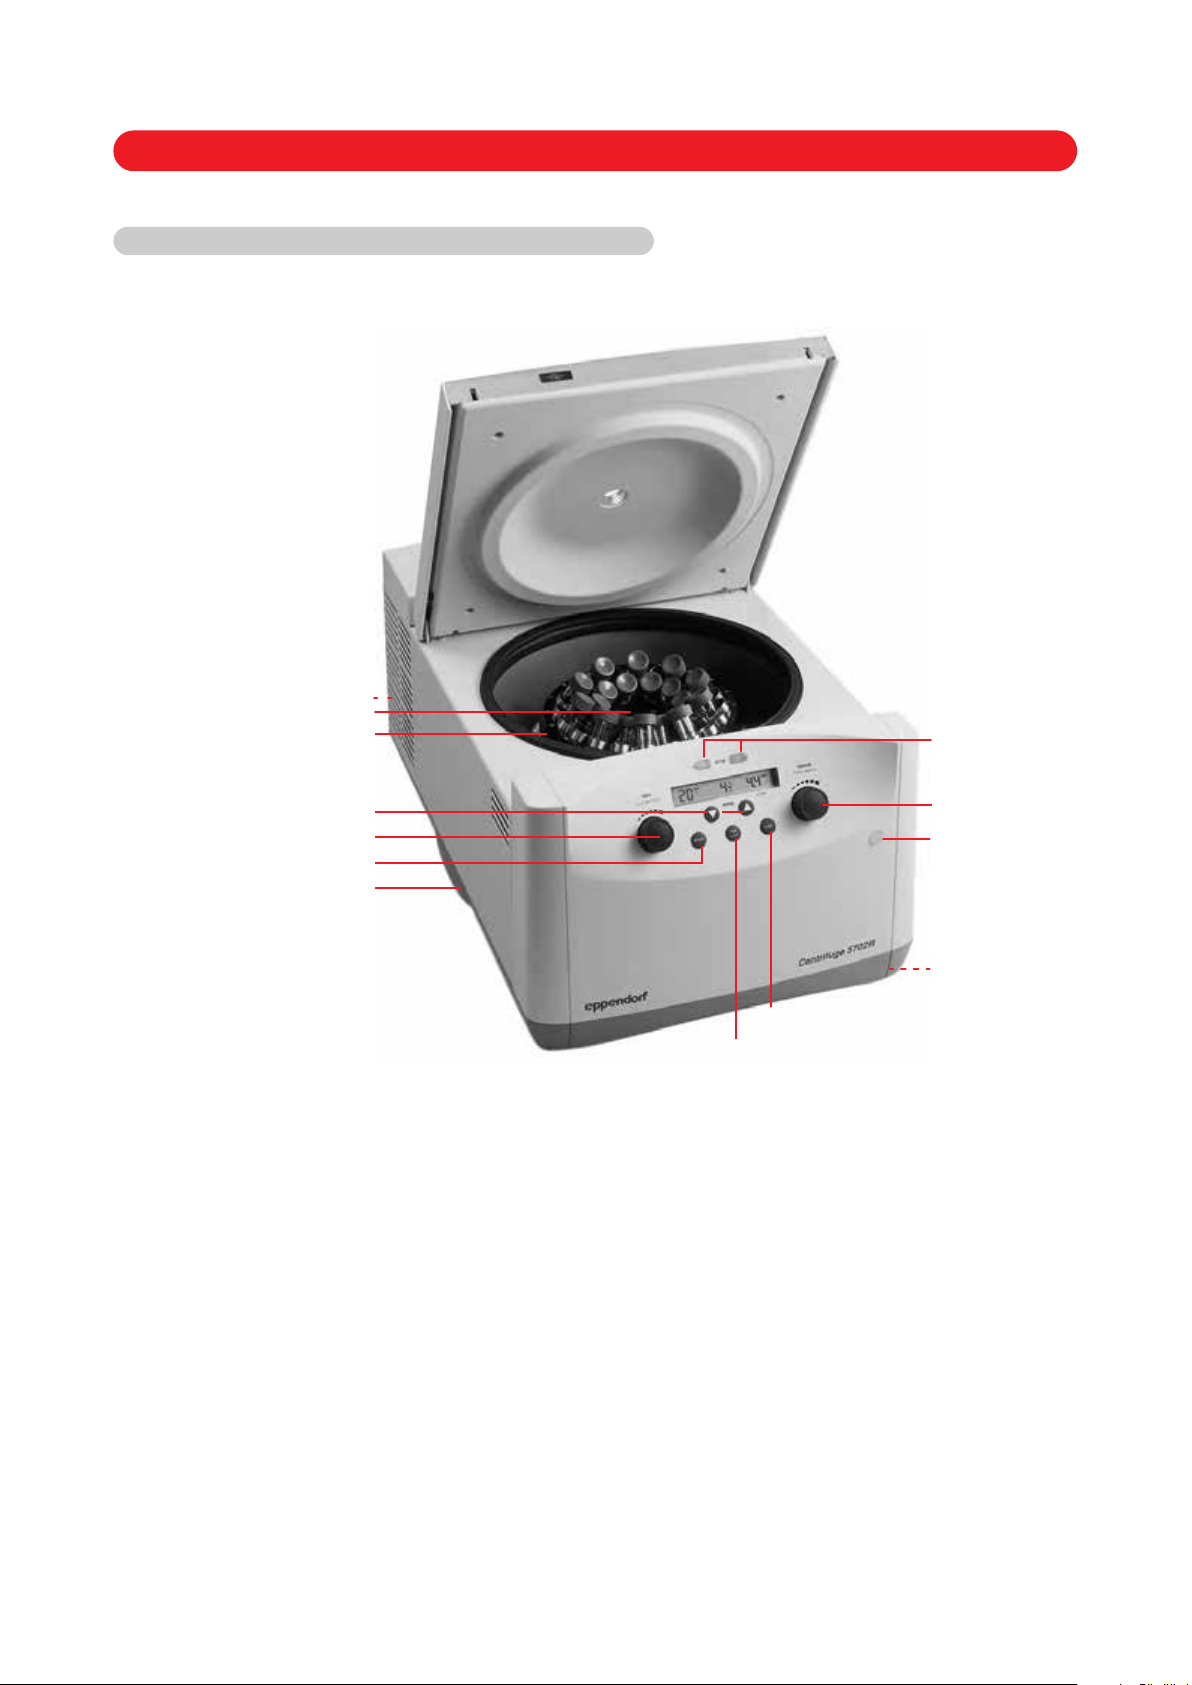
Centrifuge 5702 R
Abb. 2 / Fig. 2
Abbildung 2 / Figure 2
1
2
3
prog 1 /2
temp
time
short
C
open
fast temp
speed
stand-by
E
1 Netzschalter und -stecker 1 Mains switch and plug
2 Rotormutter 2 Rotor nut
3 Rotor 3 Rotor
E Notentriegelung E Emergency lid release
C Kondenswasserschale (nur 5702 R) C Condensation water tray (only 5702 R)
Front Centrifuge 5702 RH baugleich mit Centrifuge 5702 R.
Front of the Centrifuge 5702 RH is structurally identical to that of the 5702 R.
Page 5

Contents
Contents
1 Introduction . . . . . . . . . . . . . . . . . . . . . . . . . . . . . . . . . . . . . . . . . . . . . . . . . . . . . . . . . . . . . . . . . . . . . . . . . . . . . .25
1.1 Intended use . . . . . . . . . . . . . . . . . . . . . . . . . . . . . . . . . . . . . . . . . . . . . . . . . . . . . . . . . . . . . . . . . . . . . . . . . . . . . .25
1.2 Delivery package . . . . . . . . . . . . . . . . . . . . . . . . . . . . . . . . . . . . . . . . . . . . . . . . . . . . . . . . . . . . . . . . . . . . . . . . . .25
1.3 Installing the device . . . . . . . . . . . . . . . . . . . . . . . . . . . . . . . . . . . . . . . . . . . . . . . . . . . . . . . . . . . . . . . . . . . . . . . .25
2 Safety precautions and applicational limitations . . . . . . . . . . . . . . . . . . . . . . . . . . . . . . . . . . . . . . . . . . . . . . . .26
3 Operation . . . . . . . . . . . . . . . . . . . . . . . . . . . . . . . . . . . . . . . . . . . . . . . . . . . . . . . . . . . . . . . . . . . . . . . . . . . . . . . .28
3.1 Functional and operator control elements . . . . . . . . . . . . . . . . . . . . . . . . . . . . . . . . . . . . . . . . . . . . . . . . . . . . . . .28
3.2 Fitting and removing the rotors . . . . . . . . . . . . . . . . . . . . . . . . . . . . . . . . . . . . . . . . . . . . . . . . . . . . . . . . . . . . . . . .28
3.3 Loading the rotors . . . . . . . . . . . . . . . . . . . . . . . . . . . . . . . . . . . . . . . . . . . . . . . . . . . . . . . . . . . . . . . . . . . . . . . . . .28
3.4 Fixed-angle rotors . . . . . . . . . . . . . . . . . . . . . . . . . . . . . . . . . . . . . . . . . . . . . . . . . . . . . . . . . . . . . . . . . . . . . . . . . .29
3.5 Swing-bucket rotors. . . . . . . . . . . . . . . . . . . . . . . . . . . . . . . . . . . . . . . . . . . . . . . . . . . . . . . . . . . . . . . . . . . . . . . . .30
3.6 Operation of round bucket with aerosol-tight caps . . . . . . . . . . . . . . . . . . . . . . . . . . . . . . . . . . . . . . . . . . . . . . . . .31
3.7 Centrifugation with timer setting . . . . . . . . . . . . . . . . . . . . . . . . . . . . . . . . . . . . . . . . . . . . . . . . . . . . . . . . . . . . . . .31
3.8 Changing the centrifugation parameters during the run . . . . . . . . . . . . . . . . . . . . . . . . . . . . . . . . . . . . . . . . . . . . .31
3.9 Short centrifugation . . . . . . . . . . . . . . . . . . . . . . . . . . . . . . . . . . . . . . . . . . . . . . . . . . . . . . . . . . . . . . . . . . . . . . . . .31
3.10 Continuous running . . . . . . . . . . . . . . . . . . . . . . . . . . . . . . . . . . . . . . . . . . . . . . . . . . . . . . . . . . . . . . . . . . . . . . . . .32
3.11 Rcf display and calculation . . . . . . . . . . . . . . . . . . . . . . . . . . . . . . . . . . . . . . . . . . . . . . . . . . . . . . . . . . . . . . . . . . .32
3.12 Adjusting the acceleration and braking ramps. . . . . . . . . . . . . . . . . . . . . . . . . . . . . . . . . . . . . . . . . . . . . . . . . . . . .33
3.13 At set rpm . . . . . . . . . . . . . . . . . . . . . . . . . . . . . . . . . . . . . . . . . . . . . . . . . . . . . . . . . . . . . . . . . . . . . . . . . . . . . . . .33
3.14 Activating and deactivating the signal tone . . . . . . . . . . . . . . . . . . . . . . . . . . . . . . . . . . . . . . . . . . . . . . . . . . . . . . .33
3.15 Parameter lock. . . . . . . . . . . . . . . . . . . . . . . . . . . . . . . . . . . . . . . . . . . . . . . . . . . . . . . . . . . . . . . . . . . . . . . . . . . . .33
3.16 Programming (for 5702 R / 5702 RH only) . . . . . . . . . . . . . . . . . . . . . . . . . . . . . . . . . . . . . . . . . . . . . . . . . . . . . . .34
3.17 Program selection (for 5702 R / 5702 RH only). . . . . . . . . . . . . . . . . . . . . . . . . . . . . . . . . . . . . . . . . . . . . . . . . . . .34
3.18 Refrigeration (for 5702 R only) . . . . . . . . . . . . . . . . . . . . . . . . . . . . . . . . . . . . . . . . . . . . . . . . . . . . . . . . . . . . . . . .34
3.19 Heating and refrigeration (only for 5702 RH). . . . . . . . . . . . . . . . . . . . . . . . . . . . . . . . . . . . . . . . . . . . . . . . . . . . . .35
3.20 Opening the centrifuge in case of power failure . . . . . . . . . . . . . . . . . . . . . . . . . . . . . . . . . . . . . . . . . . . . . . . . . . .35
3.21 Device fuses . . . . . . . . . . . . . . . . . . . . . . . . . . . . . . . . . . . . . . . . . . . . . . . . . . . . . . . . . . . . . . . . . . . . . . . . . . . . . .35
4 Maintenance and cleaning . . . . . . . . . . . . . . . . . . . . . . . . . . . . . . . . . . . . . . . . . . . . . . . . . . . . . . . . . . . . . . . . . . 36
4.1 Device . . . . . . . . . . . . . . . . . . . . . . . . . . . . . . . . . . . . . . . . . . . . . . . . . . . . . . . . . . . . . . . . . . . . . . . . . . . . . . . . . . .36
4.2 Rotors . . . . . . . . . . . . . . . . . . . . . . . . . . . . . . . . . . . . . . . . . . . . . . . . . . . . . . . . . . . . . . . . . . . . . . . . . . . . . . . . . . .36
4.3 Refrigerated centrifuges . . . . . . . . . . . . . . . . . . . . . . . . . . . . . . . . . . . . . . . . . . . . . . . . . . . . . . . . . . . . . . . . . . . . .36
4.4 Glass breakage . . . . . . . . . . . . . . . . . . . . . . . . . . . . . . . . . . . . . . . . . . . . . . . . . . . . . . . . . . . . . . . . . . . . . . . . . . . .37
4.5 Returning devices . . . . . . . . . . . . . . . . . . . . . . . . . . . . . . . . . . . . . . . . . . . . . . . . . . . . . . . . . . . . . . . . . . . . . . . . . .37
5 Troubleshooting guide . . . . . . . . . . . . . . . . . . . . . . . . . . . . . . . . . . . . . . . . . . . . . . . . . . . . . . . . . . . . . . . . . . . . .38
6 Technical data . . . . . . . . . . . . . . . . . . . . . . . . . . . . . . . . . . . . . . . . . . . . . . . . . . . . . . . . . . . . . . . . . . . . . . . . . . . .39
7 Ordering information . . . . . . . . . . . . . . . . . . . . . . . . . . . . . . . . . . . . . . . . . . . . . . . . . . . . . . . . . . . . . . . . . . . . . .40
24
Page 6

1 Introduction
Centrifuge 5702 is non-refrigerated, Centrifuge 5702 R is refrigerated and Centrifuge 5702 RH is a refrigerated and
heatable bench-top centrifuge. For these centrifuges following rotors are available:
Fixed-angle rotor F-35-30-17 with a capacity of 30 x 15 ml centrifuge tubes.
Fixed-angle rotor F-45-24-11 with a max. capacity of 24 x 1.5 / 2.0 ml in micro test tubes.
Fixed-angle rotor F-45-18-17-Cryo with a max. capacity of 18 x cryotubes (max. 17 mm).
Swing-bucket rotor A-4-38 with a max. capacity of 4 x 85 ml in round buckets and 4 x 90 ml in
rectangular buckets.
Swing-bucket rotor A-8-17 with a max. capacity of 8 x 15 ml.
Before using the centrifuge 5702 / 5702 R / 5702 RH for the first time, please read the operating manual.
The latest version of the manual and the safety instructions in your language can be found on the Internet at
www.eppendorf.com.
You will see this symbol on your centrifuge and at a number of points throughout this manual. The texts it
highlights are relevant to safety. Use the centrifuge only after having read the safety notices.
1.1 Intended use
The Centrifuge 5702 / 5702 R / 5702 RH is intended exclusively for indoor use and for separating aqueous solutions and
suspensions of various densities in approved test tubes.
This device may only be operated by trained specialist staff. They must have carefully read the operating manual and be
familiar with the function of the device.
1.2 Delivery package
1 Centrifuge 5702 non-refrigerated or 1 Centrifuge 5702 R refrigerated with condensation water tray or
1 Centrifuge 5702 RH refrigerated and heatable, each without rotor
1 power cable
1 operating manual
1 rotor key
1 set of fuse
1
Introduction
1.3 Installing the device
– The device is heavy. Lifting and carrying the device can lead to back injuries.
► The device may only be transported in its original packaging.
► The device must be transported by least two people.
► Use a transport aid (e.g., dolly) to transport the device longer distances.
– For 5702 R / RH only: In order to prevent damage to the compressor following improper transport, the device
may not be switched on until four hours after setting up.
– For 5702 only: Please remove the transport safety device and keep it for possible use if the device is
subsequently moved again.
– Place the centrifuge on a solid, flat, non-resonant lab bench. For the Centrifuge 5702 R / RH , the condensation
water tray should be inserted from the side (see cover flap).
– The surrounding area must be well ventilated and protected against direct sunlight.
To ensure that the ventilation of the device is not impaired, a fundamental clearance of 30 cm to the side and a
min. of 15 cm to the back wall must be maintained. This is especially important for the refrigeration capacity of
the 5702 R / RH.
– During centrifugation, according to the recommendations set out in EN 61010-2-020 a safety clearance of 30 cm
must be maintained around the centrifuge within which there are no objects which may be destroyed and so
cause further damage.
– Only connect the device to power supplies which correspond with the electrical requirements on the name plate.
Only use sockets with a protective earth (PE) conductor and suitable power cable.
– Now connect the centrifuge to the power supply and switch it on at the main power switch (on the rear side,
see cover flap). The centrifuge is now ready for operation. The Stand-by button lights up green and the display is
active.
– Before starting, check that the rotor is firmly seated.
25
Page 7

2
2 Safety precautions and applicational limitations
For your personal safety, please be sure to comply with the following regulations unconditionally:
– The centrifuge 5702 / 5702 R / 5702 RH must only be use for the specified applications (see Introduction). It must not
be operated in explosive atmospheres. Explosive or highly reactive substances must not be centrifuged.
– When being moved from the cool room to a normal lab environment, the centrifuge must either warm up for half an
hour in the cool room first or it must warm up for at least 3 hours in the lab before being connected to the supply
system, in order to prevent damage by condensation.
– The centrifuge must not be moved or knocked while in operation.
– Improperly installed or serviced centrifuges must not be operated. Repairs may only be carried out by Service
personnel authorized by Eppendorf. Use only original Eppendorf spare parts and rotors.
– When handling toxic, radioactive liquids or pathogenic microorganisms of risk group II (see World Health
Organization: Laboratory Biosafety Manual) comply with the relevant national regulations. Bioseals are a part of
biological safety systems, which are not able to guarantee the safety of people and the environment on their own
when handling pathogenic microorganisms. When working with pathogenic organisms of a higher risk group, more
than one aerosol-tight bioseal must be provided for. If the named liquids are spilled in the rotor or rotor chamber, the
centrifuge must be thoroughly and professionally cleaned. Before using any cleaning or decontamination method
other than that set out in section 4, "Maintenance and cleaning", please consult Eppendorf to ensure the intended
method will not damage the device.
– Rotors must always be properly secured. The centrifuge may only be operated with the rotor firmly tightened.
For mechanical stability, all the places on the rotor must be fitted with identical buckets.
– The rotor may only be loaded symmetrically. Opposing tubes should be of the same type and be filled equally. On the
rotor you will find information concerning the weight that a completely filled bucket may not exceed.
– Prior to centrifugation, the tubes should in any case be visually inspected for material damage. Damaged tubes may
not be centrifuged. This is because broken tubes can, in addition to sample loss, result in further damage to the
centrifuge and accessories.
– Rotors showing clear signs of corrosion or mechanical damage must not be used. Check the accessories regularly.
Safety precautions and applicational limitations
– Rotors are high-grade components which have to withstand extreme stresses and strains. Aluminum rotors are
largely protected from corrosion by the most common laboratory chemicals by means of an anodized coating, though
the protection is not unlimited. Protect the rotors from mechanical damage. Even minor scratches or cracks can
result in serious internal material damage. Avoid damaging the rotors by the use of aggressive chemicals, such as:
strong and weak alkalis, strong acids, solutions of mercury, copper and other heavy metal ions, chlorinated
hydrocarbons, concentrated salt solutions and phenol. If the rotor is contaminated by aggressive substances, clean it
immediately
– The material being centrifuged may not exceed a density of 1.2 g/ml at maximum rotation speed. If the rotor is run for
a lengthy period of time, or more often with short centrifugation runs the sample tubes will become hot. Keep within
the limits specified by the tube manufacturers.
– Seal the tube lid down tight before centrifuging. The lids of unclosed tubes may rip off during centrifugation and
damage the centrifuge.
– When using organic solvents (e.g. phenol, chloroform) the durability of plastic tubes may be impaired.
– When closing the centrifuge lid do not place your fingers between the lid and the centrifuge, otherwise they may be
trapped.
with a mild cleaning agent.
26
Page 8
2 Safety precautions and applicational limitations
The following rotors and accessory buckets have a maximum service life of 7 years:
A-4-38 5702 720.003 and 5702 740.004
A-8-17 5702 700.002
The date of manufacture is engraved on them in the format 10/01 (October 2001).
Transparent aerosol-tight caps made of polycarbonate have a maximum service life of 3 years.
The date of manufacture is embossed on them in the form of a clock .
12
1
11
2
10
3
1
9
4
8
0
5
7
6
Aerosol tight caps may lose their sealing strength when exposed to organic solvents (e.g. phenol, chloroform).
Check the aerosol-tight caps regularly for changes or cracking. Aerosol-tight caps showing cracks or other changes must
be replaced immediately.
Rotors, caps or buckets which have been damaged by chemical or mechanical factors or which have passed
their maximum service life may no longer be used
!
– Transfer
If the device is passed on to someone else, please include the instruction manual.
– Disposal
In case the product is to be disposed of, the relevant legal regulations are to be observed.
– Information on the disposal of electrical and electronic devices in the European Community
The disposal of electrical devices is regulated within the European Community by national regulations based on EU
Directive 2002/96/EC on waste electrical and electronic equipment (WEEE).
According to these regulations, any devices supplied after 13.08.05 in the business-to-business sphere, to which this
product is assigned, may no longer be disposed of in municipal or domestic waste. They are marked with the
following symbol to indicate this.
As disposal regulations within the EU may vary from country to country, please contact your supplier if
necessary.
– Declaration concerning the ATEX directive (94/9/EC)
The present design and ambient conditions inside Eppendorf centrifuges mean that they are not suitable for use in a
potentially explosive atmosphere. The centrifuges must therefore only be used in a safe environment such as the open
environment of a ventilated laboratory or a fully-extracted fume hood. The use of substances which may contribute to a
potentially explosive atmosphere is not permitted. The final decision on the risks in connection with the use of such
substances is the responsibility of the user of the centrifuge.
2
Safety precautions and applicational limitations
27
Page 9

3
Operation
3 Operation
3.1 Functional and operator control elements
Refer to the frontal view on the first inside cover page of this manual.
Fig. 1: Front view of the Centrifuge 5702.
Fig. 2: Front view of the Centrifuge 5702 R. Front of the Centrifuge 5702 RH is structurally identical to that of the 5702 R
time
short – Short run button
speed
open
1
E
For the Centrifuge 5702 R / 5702 RH only:
temp
fast temp
prog 1
prog 2
C
–
Time dial and Start/Stop button
–
Speed selector dial and rpm/rcf button
–
Stand-by button
–
Lid release
–
Line socket with fuse set and main power switch,
device identification plate with power supply ratings
(rear).
–
Emergency lid release on underside with pull cord
–
Temperature selection buttons
–
Controlled temperature button
–
Program button 1
–
Program button 2
–
Condensation water tray
3.2 Fitting and removing the rotors
When fitting the rotor, follow the marking triangles on each side of the rotor nut . They indicate the direction of the
groove on the underside of the rotor, and are needed to position the rotor safely.
To insert the rotor rotate the driver pin of the motor shift longitudinally.
Fit the rotor onto the motor shaft so the marking triangles point in the same direction as the motor shaft driver pin. Tighten
the rotor nut by turning them clockwise using the rotor key supplied. If the rotor nut does not tighten easily, check whether
the rotor has caught on the motor shaft driver pin.
To release the rotor turn the rotor nut anticlockwise using the rotor key.
3.3 Loading the rotors
The rotors and buckets (round and rectangular) must be loaded symmetrically. The adapters must be loaded only with the
specified tubes. Minimize the difference in weight between the filled sample tubes. This will reduce wear on the drive and
cut running noise. The centrifuges 5702 / 5702 R / 5702 RH have an automatic imbalance detector, which shuts down the
centrifuge if the weight differences are excessive. This is indicated by the error message "Inb" in the display.
The maximum weight for a fully loaded bucket is indicated on each rotor.
28
Page 10
3 Operation
3.4 Fixed-angle rotor
The fixed-angle rotor F-35-30-17 can be loaded with 15 ml Falcons® and 15 ml round bottom centrifuge tubes. It is
available in the 10 and 30 position versions. Please use only swing-bucket rotor A-4-38 with round buckets and the
appropriate adapters for centrifuging blood sampling systems.
®
Before centrifuging the Falcons
being destroyed. For the centrifugation of round bottom tubes made of Duran® glass, round rubber pads are required to
prevent the tubes from cracking. Make sure a rubber pad is placed under each glass tube before centrifuging.
In order to avoid breakage of the tubes when using centrifuge tubes of glass, polystyrene or similar materials, please
observe the limiting data with reference to endurance specified by the manufacturer.
The maximum load capacity for Falcons
be loaded with a combination of 15 ml Falcons® and 15 ml round bottom centrifuge tubes. The maximum capacity is then
20 x 15 ml Falcons® and 10 x 15 ml round bottom centrifuge tubes.
15 ml
round bottom
centrifuge tube
, place their plastic adapters in the tube holders. The adapters prevent the Falcons® from
®
is 20 x 15 ml; for 15 ml round bottom centrifuge tubes 30 x 15 ml. The rotor can
3
Operation
15 ml Falcon
Fig.3: Loading of rotor F-35-30-17 with 15 ml Falcons® and 15 ml round bottom centrifuge tubes
A maximum of 24 1.5/2.0 ml test tubes can be centrifuged in rotor F-45-24-11. If the appropriate adapters are used, it is
also possible to load it with 0.2 ml PCR tubes, 0.4 ml test tubes, 0.5 ml test tubes and 0.6 ml Microtainers
Fixed-angle rotor F-45-18-17-Cryo can be equipped with cryotubes (max. diameter 17 mm or 13 mm with adapters) and
sealable centrifuge tubes (max. diameter 16.5 mm or 12.2 mm with adapters). In each of these cases, max. tube length is
50 mm.
Maximum load (adapter, tube and contents) per bore is 3.75 g on rotor F-45-24-11 and 8.7 g on rotor F-45-18-17-Cryo.
When loading the rotors, please make sure that the tubes are inserted in the bores of the rotor opposite one another in
pairs.
To ensure that the rotor is loaded symmetrically, the tubes opposite one another need to contain approximately the same
filling quantity.
®
The specified max. weight of 56 g imprinted on the rotor is the gross weight rating including the tube holder,
adapter, tubes and contents. Always weigh the tube holder and the load together.
®
.
Fixed-angle rotors are operated without a rotor lid.
29
Page 11

3
Operation
3 Operation
3.5 Swing-bucket rotors
The swing-bucket rotor A-4-38 can be equipped with round or rectangular buckets. Round buckets and the associated
adapters (see ordering information) are conceived for the centrifugation of Falcons®, blood withdrawal systems and other
centrifuging tubes with round bottoms. Rectangular buckets and associated adapters (see ordering information) are
conceived for the centrifugation of glass centrifugation tubes.
Use only the rotor / bucket (round or rectangular) / adapter combinations approved by Eppendorf. Check that all
buckets are fully attached, lubricated lightly and can swing out freely. If you use overlength tubes, it is essential to
carry out a manual swing test with empty tubes! When the rectangular buckets are not completely filled, insert the
adapters so that the bolts of the rotor A-4-38 are symmetrically loaded. Avoid unbalanced loading of the inner
adapter bores, pointing to the rotor nut, since this could cause overshooting of the rectangular buckets.
For mechanical stability, all the places must be fitted with identical buckets. The buckets are sorted by weight. The weight
class is embossed on the side of the bucket: e.g. 90 (the last 2 digits in grams). Opposing buckets must be
of the same weight class. When reordering, please quote the weight class required.
Before inserting the buckets in the grooves, make sure the grooves are clean. Dirty grooves or pegs will prevent the
buckets from swinging out evenly.
Fig. 4:
Rotor and buckets symmetrically
loaded.
The specified max. weight of 400 g imprinted on the rotor is the gross weight rating of a bucket (including adapter, tubes
and contents).
The maximum load (adapter, tubes and contents) of the round bucket is 190 g. The maximum load (adapter, tubes and
contents) of the rectangular bucket is 240 g.
®
A maximum of 8 x 15 ml Falcons
centrifugation of 15 ml Falcons®, please insert the provided plastic adapter into the rotor. Prior to the centrifugation of
tubes of Duran® glass, please insert the round rubber plate into the rotor. Please make certain prior to centrifugation that
such a rubber plate is found under every glass tube. In order to avoid breakage of the tubes when using centrifuge tubes
of glass, polystyrene or similar materials, please observe the limiting data with reference to endurance specified by the
manufacturer.
Only load the rotor symmetrically, so that the rotor and the pivots are evenly loaded during centrifugation. The maximum
load (adapter, tubes and contents) of the rotor A-8-17 is 8 x 38 g. The maximum permissible tube length is 120 mm.
or 8 x 15 ml tubes of Duran® glass can be centrifuged in the rotor A-8-17. Prior to the
Fig. 5:
Rotor and buckets asymmetrically
loaded. Not permitted, because the
pegs of the buckets are subject to
differing loads.
Fig. 6:
Adapter loaded asymmetrically.
Not permitted, because the
pegs of the bucket are not
uniformly loaded and the
loading of the adapter bores
pointing to the rotor nut could
cause overshooting of the
rectangular buckets.
30
Page 12

3 Operation
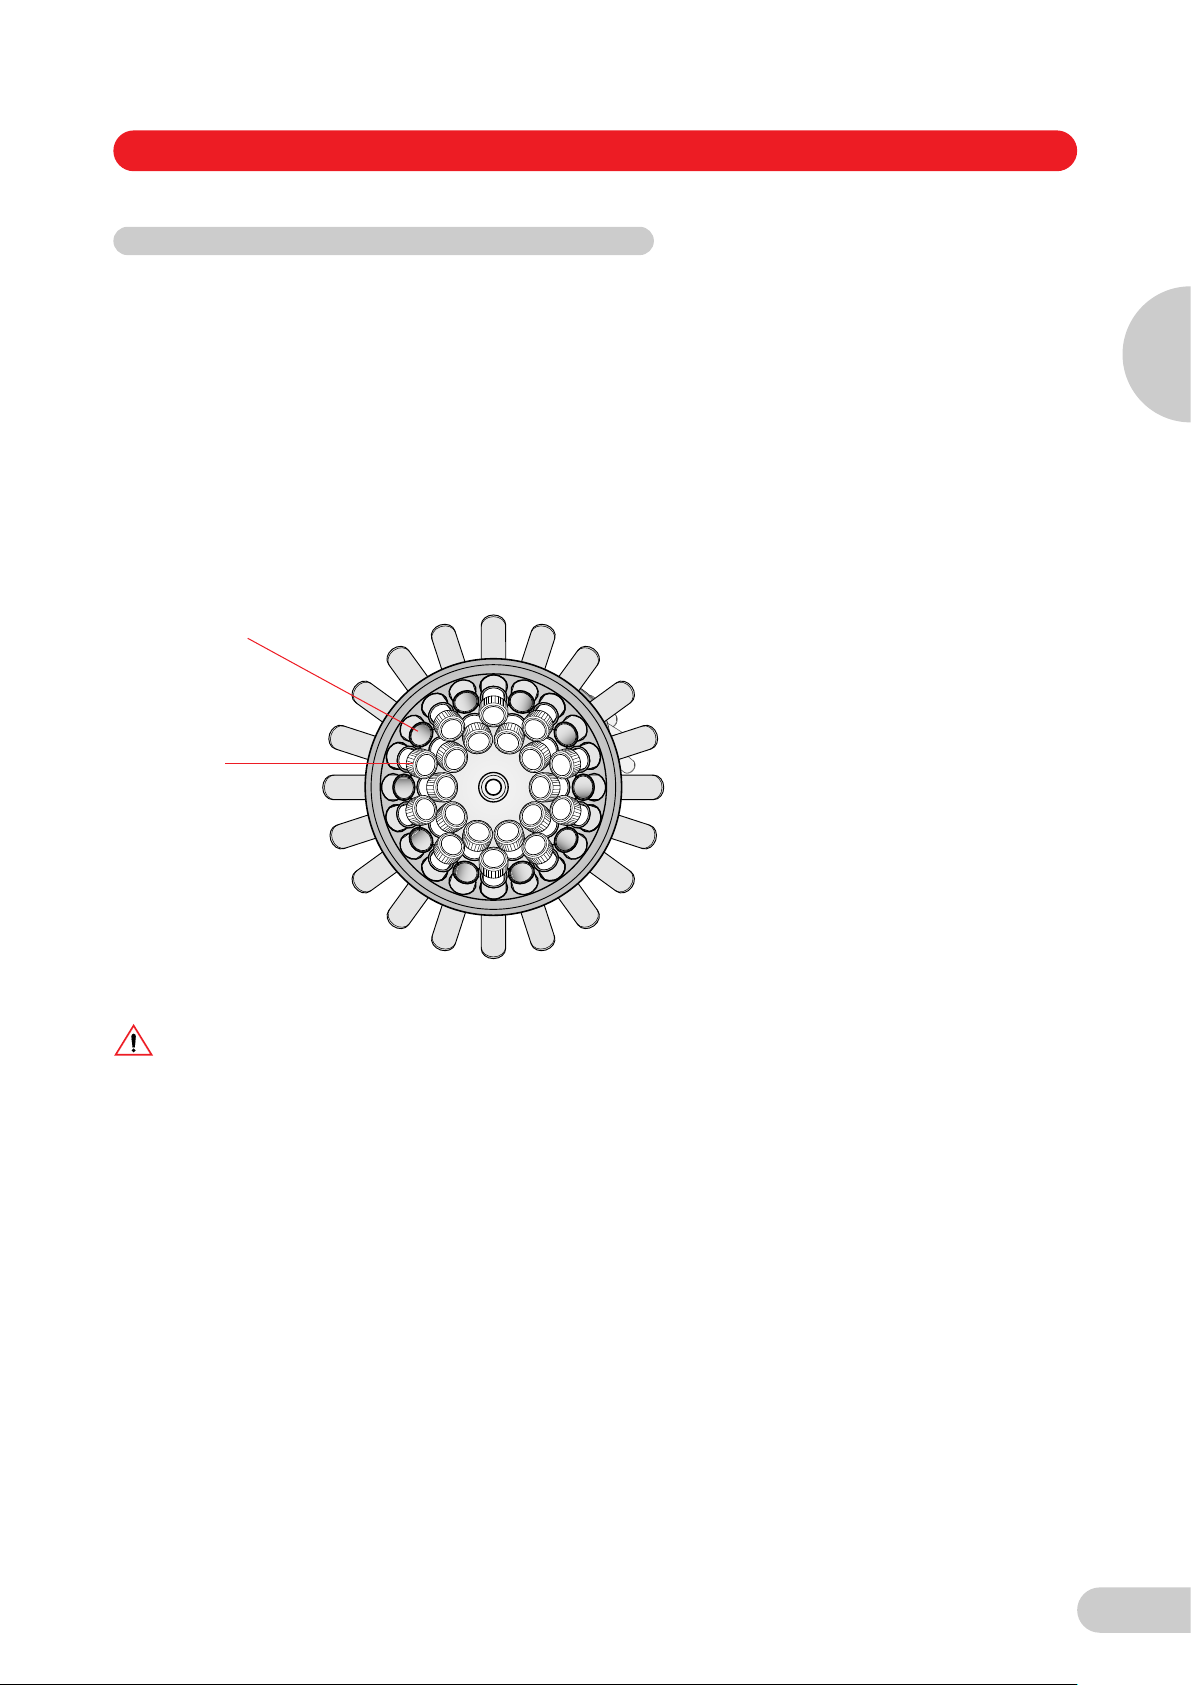
3.6 Operation of round bucket with aerosol-tight caps
The inner part of the aerosol-tight cap is also equipped with a silicone sealing ring. Never remove this sealing ring from
the cap. Whenever using the cap, make sure that the sealing ring is undamaged and sits uniformly in the groove.
Silicone sealing ring
The round bucket and the aerosol-tight cap are autoclavable (121 °C, 20 minutes). The aerosol-tight cap, including the
silicone sealing ring, is subject to natural wear and must be replaced when visual inspection reveals wear.
When handling the aerosol-tight cap, remember that polycarbonate has limited chemical resistance to phenol.
3.7 Centrifugation with timer setting
Switch on the centrifuge, with the mains power switch if necessary, and then with the switch. The nominal values of
the last run are displayed. Load the rotor symmetrically and close down the centrifuge lid.
–
time
speed
start
Alters the running time.
–
Alters the speed in increments of 100 1/min or rcf.
–
Starts the run. The symbol flashes while the rotor is running.
3
Operation
stop
stand-by
open
temp
While the centrifuge is running the remaining time is displayed. The last minute is counted down in seconds. When the
preset time elapses the centrifuge stops automatically and emits a signal tone to indicate the centrifugation is finished.
The lid of the non-refrigerated Centrifuge 5702 opens automatically following centrifugation. The lid of the refrigerated
Centrifuge 5702 R / 5702 RH remains closed to maintain the sample temperature and can be opened with the OPEN
button.
When you switch off the centrifuge 5702 / 5702 R / 5702 RH at the main power switch the display goes blank after a few
seconds' delay.
3.8 Changing the centrifugation parameters during the run
The timer setting, the rotation speed and the temperature (only 5702 R / 5702 RH) can be changed during the run by
briefly pressing the SHORT button. The display begins flashing. You can then set the new centrifugation parameters with
the TIME and SPEED and the TEMP dial adjustors. The new centrifugation parameters are programmed after 5 seconds.
3.9 Short centrifugation
–
Stops the centrifuge. The symbol appears briefly as soon as the rotor comes to a
standstill.
–
Centrifuge switched to stand-by mode.
–
Releases the lid latch.
–
Changes the nominal temperature value (for 5702 R / 5702 RH only)
short
–
Press this button with the lid closed to start a short run at maximum speed.
The centrifuge stops when you release the SHORT button again.
31
Page 13

3
3 Operation
3.10 Continuous running
–
time
stop
3.11 Rcf display and calculation
SPEED – Press the dial to toggle the display between 1/min (rpm) and (rcf) and vice versa.
The continuous run function is set by turning the TIME dial to either above
99 minutes or below 0.5 minutes. The timer displays "oo" to indicate that continuous
running is active. The time is counted upward in minutes.
–
Ends continuous running
Operation
Note that the rcf (g-force) indicated when the display is switched is standardized to 15 ml Falcon® tubes in the
rotor A-4-38. At 4,400 1/min you can achieve the following maximum rcf with the various adapters.
Rotor Adapter Max. centrifuging
radius (cm) r
A-4-38
Round bucket
A-4-38
Rectangular bucket
A-8-17 15 ml Falcon
F-35-30-17
Outer ring
F-35-30-17
Inner Ring
F-45-24-11 0.2 ml 6.6 1,430
F-45-18-17-Cryo without adapter 9.1 1,970
1.5/2.0 ml 13.4 2,900
1.1 – 1.4 ml 13.2 2,850
2 – 7 ml 13.2 2,850
2.6 – 7 ml 13.2 2,850
4 – 10 ml 13.2 2,850
9 – 15 ml 13.0 2,800
15 ml Falcon
25 ml 13.5 2,900
50 ml Falcon
85 ml 13.5 2,900
5 – 7 ml 12.7 2,750
9 ml 12.7 2,750
15 ml 12.7 2,750
20 ml 12.7 2,750
25 ml 12.7 2,750
15 ml DIN-tube 12.8 2,770
15 ml 12.7 2,750
15 ml Falcon
15 ml 10.7 2,300
15 ml Falcon
0.4 ml 8.2 1,770
0.5/0.6 ml 7.4 1,600
1.5/2.0 ml 8.2 1,770
with adapter 8.9 1,930
®
®
®
®
®
max
13.7 3,000
13.5 2,900
12.8 2,770
12.7 2,750
10.7 2,300
Max. rcf (g-force),
rounded
To ascertain the maximum rcf for a specific adapter you can apply the following formula as per DIN 58 970:
–5
rcf = 1,118 · 10
n: rotational speed in 1/min
r
: max. centrifuging radius in cm
max
Example: The 85 ml adapter has a maximum radius of 13.5 cm. At 4,000 rpm a maximum rcf of 2,415 x g is reached.
32
· n2 · r
max
Page 14

3 Operation
3.12 Adjusting the acceleration and braking ramps
When working with Ficoll® density gradients or other sensitive applications (e.g. certain types of blood and urine
centrifugations) slower acceleration and braking ramps can be switched on for the Centrifuge 5702 / 5702 R / 5702 RH.
This makes the centrifuge accelerate and decelerate gently. This guarantees optimal centrifugation results.
Press the SHORT key for longer than 5 seconds while the centrifuge lid is open. On the Centrifuge 5702, the text in the
display changes from "br on" (brake on) to "br OF" (brake off). The symbol appears in the display of Centrifuges
5702 R / RH. The slower acceleration and braking ramps are now activated. The current status will be displayed when the
SHORT button is pressed for less than 5 seconds while the centrifuge lid is open.
To switch faster acceleration and braking back on, press the short key for longer than 5 seconds again while the centrifuge
lid is open. The "br on" message appearing briefly in the display signals the reactivation of the faster acceleration and
braking ramps.
3.13 At set rpm
For centrifugation, time can be counted either immediately from the start or not until attainment of the preset speed.
Pressing the START / STOP button for longer than 2 seconds with the centrifuge lid open switches the "at set rpm" mode,
symbolized by the pictogram .
To exit the "at set rpm" mode again and begin counting down the centrifugation time immediately after starting the
centrifuge, press the START / STOP button again for longer than 2 seconds with the centrifuge lid open until the pictogram
is displayed.
soft
3
Operation
3.14 Activating and deactivating the signal tone
Press and hold down the OPEN button for longer than 2 seconds with the centrifuge lid open to toggle between "b on"
(signal tone on) and "b OF" (signal tone off). Press the OPEN button for less than 2 seconds with the centrifuge lid open to
display the current status. With the Centrifuge 5702 R / 5702 RH the selected signal tone is symbolized by the pictogram
.
The current status is shown when the OPEN button is pressed for less than 2 seconds while the centrifuge lid is open
(Centrifuge 5702).
3.15 Parameter lock
To secure the centrifuge parameters against unintentional adjustment, the Centrifuge 5702 and the Centrifuge 5702 R /
5702 RH allows you to lock in the parameters you need.
Press and hold down OPEN- and SHORT-button simultaneously for at least 5 seconds with the centrifuge lid open.
After 5 seconds the dial adjuster is disabled and the centrifugation parameters are locked against unintentional
adjustment. "Lo on" appears in the display of the Centrifuge 5702. In the display of the Centrifuge 5702 R / 5702 RH the
locked parameters are symbolized by an additional pictogram . The preset parameters can then no longer be altered,
whether the centrifuge is running or not. The START/STOP button can still be used to start and stop the centrifuge
however. It is also still possible to switch the signal tone and rcf switch on and off.
With the Centrifuge 5702 R / 5702 RH it is also possible to additionally lock a program called up against unintentional
resetting. A program already written is called up through the program buttons and then – as described above – the
program buttons and dial adjustor setting deactivated.
To enable the dial adjuster again, press and hold down OPEN- and SHORT-button simultaneously for 5 seconds with the
centrifuge lid open. The display shows "Lo OF" or (5702 R / 5702 RH ). The current status ("Lo on") can be displayed
on the Centrifuge 5702 by briefly pressing the SHORT and OPEN buttons while the lid is open.
33
Page 15

3
3 Operation
3.16 Programming (for 5702 R / 5702 RH only)
With the Centrifuge 5702 R / 5702 RH it is possible to store up to two permanent programs (only during standstill):
First set the required program data with the TIME and SPEED dial adjustors. The function "at set rpm" and the switchedoff braking function can also be stored if necessary in the permanent program.
–
PROG 1 or 2
3.17 Program selection (for 5702 R only)
Hold down for 2 seconds until the program button is no longer flashing and lights up
continuously. A brief signal will sound. The program is now stored.
Program selection is only possible during stillstand
Operation
PROG 1 or 2
If dial adjustors or buttons are required for the program setting, the program remains unchanged.
The text "Pr 1" (Program 1) or "Pr 2" (Program 2) appears in the centrifuge display.
Exit the program by again pressing the program button. The blue lighting of the button extinguishes and the centrifugation
parameters can be set freely again.
temp
fast temp
Stand-by refrigeration
–
Pressing once calls up the required program. The button for the program activated
lights up in blue.
3.18 Refrigeration (for 5702 R only)
–
The nominal temperature value can be set with the arrow keys from
– 9 °C to + 40 °C. During stillstand, the nominal temperature setting and the current
temperature in the rotor chamber are displayed alternately. With the centrifuge
running, only the current temperature in the rotor chamber is displayed.
A deviation of more than ± 3 °C from the temperature set is signalled during the run.
–
starts a controlled temperature run with a centrifuge-specific rotation speed, in
order to quickly reach the selected temperature in the rotor. During the FAST TEMP
run, "FA" appears in the display, as well as the present temperature and the fixed
optimal rotational speed. The run ends automatically or by pressing the STOP
button. A signal tone sounds periodically.
–
With closed centrifuge lid the rotor chamber is refrigerated before and after a run to
the selected nominal temperature if this is less than the ambient temperature. Since
there is no rotation of the rotor, the temperature adaptation takes place slowly. If the
centrifuge was in standby refrigeration over a longer time or at low temperatures,
start a brief FAST TEMP run before inserting the samples in order to prevent the
samples from freezing.
.
If the centrifuge is not used for more than 8 hours or the lid is not opened, the refrigeration switches off to protect the
device.
Remark: In cases of higher ambient temperature, temporary air noises may occur until the desired temperature is
attained. These are a sign of high refrigeration capacity. Block the ventilation slots under no circumstances!
For ambient temperatures below 18 °C a warming-up time of 1 hour is required before operating.
34
Page 16

3 Operation
3.19 Heating and refrigeration (5702 RH)
In the case of the Centrifuge 5702 RH, we are dealing with a benchtop centrifuge with a regulated heating and cooling
system. The Centrifuge 5702 RH can be refrigerated or heated precisely within a temperature range from – 9 °C to
+ 42 °C. By way of preprogrammed temperature profiles, it is possible to set optimized temperature arcs for the available
swing-bucket and fixed angle rotors. This enables exact temperature control even for sensitive samples.
Setting the preprogrammed temperature profiles:
Pressing the Fast Temp key while the centrifuge lid is open results in the display of the set rotor with the corresponding
temperature profile. Using the arrow keys it is possible to select other temperature profiles. The displays appearing stand
respectively for the following rotors:
Display Rotor
ro F 35 Fixed-angle rotor F-35-30-17
ro F 24 Fixed-angle rotor F-45-24-11
ro F 18 Fixed-angle rotor F-45-18-17-Cryo
ro A4 rE Swing-bucket rotor A-4-38 with rectangular buckets
ro A4 ro Swing-bucket rotor A-4-38 with round buckets
ro A8 Swing-bucket rotor A-8-17
ro AL L General temperature profile for all rotors
After 5 seconds a selected temperature profile will be automatically adopted and the display will return to the
operating status.
3
Operation
–
temp
fast temp
Stand-by
Heating and
refrigeration
3.20 Opening the centrifuge in case of power failure
Pull the power plug and wait for the rotor to come to a stop (this may take as long as 5 minutes!). Emergency lid release
on underside of device by pull cord: In front of the front right suction foot there is a small white plastic cap in the base
plate (see "E" in figures 1 and 2, cover flap). Remove the cap and draw the cord out straight downward.
The temperature nominal value can be set using the arrow keys. During the rest
period of the centrifuge, the current temperature and the temperature nominal value
are displayed alternately (current temperature short, temperature nominal value
long). Only the current temperature is displayed during the run. A deviation of the set
temperature nominal value of more than ± 3 °C is signalled during the run by a
blinking temperature display
–
Starts a temperature control run in order to reach the preselected temperature as
quickly as possible. During the temperature control run, "FA" appears in the display,
as well as the current temperature and the optimum rotational speed. Refrigeration
runs at less than room temperature are automatically carried out with a rotorspecific, low rotational speed, while heating runs are carried out initially with a
maximum and then with a nominal rotational speed. For runs with precisely
controlled temperatures, we recommend starting a short Fast Temp run immediately
prior to centrifugation. This prevents an overshooting of the temperature in the rotor
chamber, such as can sometimes occur after longer standby periods.
–
The rotor chamber is heated or cooled to the selected nominal temperature both
before and after a run with the lid closed. Because the rotor does not thereby rotate,
the temperature adjustment occurs slowly. The current temperature in the rotor
chamber is displayed. For runs with precise temperature control following longer
standby periods, we recommend starting a brief Fast Temp run immediately prior to
centrifugation. This prevents potential overshooting of the temperature in the rotor
chamber.
Please be sure to later make certain that the cord is pushed back completely into the housing before closing the lid.
Press the plastic button into the baseplate again.
3.21 Device fuses
The fuse box is located under the main power plug. The fuse box can be removed from the rear. The two fuses can be
replaced (see Ordering information).
35
Page 17

4 Maintenance and cleaning
4.1 Device
The outer surfaces of the centrifuge and the rotor chamber should be cleaned regularly with a mild cleaning agent. This is
for hygiene purposes and to prevent adhering impurities causing corrosion.
4
If material hazardous to health or aggressive material contaminate the device, the owner is responsible for appropriate
cleaning and decontamination.
Before cleaning, unplug the power plug with the lid open, unscrew the rotor using the rotor key supplied and clean it
separately. Use a mild cleaning agent for cleaning the accessible surfaces of the device. Choose disinfection methods that
correspond to the current legal regulations and guidelines for your area of application. Use, for example, alcohol (ethanol,
isopropanol) or alcohol-based disinfectants.
Do not allow any liquid to get into the gap at the motor shaft outlet. For this reason, the rotor chamber should be cleaned
only with a damp cloth.
You should also consult your laboratory safety officer with regard to a suitable method of cleaning and disinfecting. Before
any cleaning or disinfecting method other than that recommended by the manufacturer is used, please check with
Eppendorf that the intended method will not damage the device or its accessories. In order to ensure long-term, reliable
work with your centrifuge, please note that aggressive chemicals may damage the rotor and the chamber. Check your
device once a month for corrosion and damage.
The rubber seals in the rotor chamber should be rinsed off thoroughly with water and lubricated with glycerin or talc after
every clean to prevent them becoming brittle.
Maintenance and cleaning
4.2 Rotors
The rotors, buckets, tube holders and adapters should be cleaned once a month or when necessary with a neutral
cleaning agent to prevent residues of the material being centrifuged from changing the properties of the centrifuge and its
accessories. The rotor must be taken off for this.
Never place components in disinfectants or cleaning agents which contain sodium hypochlorite/chlorine or are oxidants.
This will cause the material to change. Disinfection with glutaraldehyde solution is possible. We recommend Cidex
activated glutaraldehyde solution. The plastic adapters and rubber plates are dishwasher safe.
®
Check the tube holders and buckets for residues and corrosion. For thorough cleaning, remove the rubber plates from tube
holders and buckets and clean all parts separately.
Then refit the rotor and bolt it into place with the supplied rotor key. Check the rotor, tube holders and buckets once a
month for mechanical damage.
All rotors, buckets, adapters, caps and tube holders can be autoclaved (121 °C, 20 min).
The aerosol-tight cap, including silicon sealing ring, rubber mats and rectangular bucket adapters are subject to normal
wear and must be replaced when a visual inspection reveals wear.
Do not unbolt the rectangular bucket adapters from each other.
On the swing-bucket rotor make sure, in particular, that the pegs and grooves of the buckets are free of dirt. They should
be lightly lubricated with pivot grease (provided with each swing-bucket rotor) so the buckets can swing freely.
The aerosol-tight buckets must not be stored with their caps sealed!
4.3 Refrigerated centrifuges
Clean condensation water and ice buildup regularly from the rotor chamber (by defrosting), using a soft, absorbent towel.
Regularly empty and clean the condensation water collector. Remove this from the left. Please clean the condensation
water drain regularly.
36
Page 18

4 Maintenance and cleaning
4.4 Glass breakage
When centrifuging glass tubes, please observe that high speeds/rcf’s increase the risk of glass breakage. Please follow
the manufacturer’s instructions concerning the maximum speed/rcf of centrifuge tubes. In the event of glass breakage,
carefully remove all splinters and all ground glass from the rotor, the buckets, the adapters and the rotor chamber. You
may need to replace the rubber mats and adapters to prevent further damage.
Fine splinters of glass may otherwise scratch the surface of the rotors and buckets, reducing their resistance to
chemicals. The air turbulences within the rotor chamber produce a very fine black powder of abraded metal. In addition
to causing damage to the rotor chamber, rotor, buckets and adapters, the powder also contaminates the samples.
Check the rotor bores regularly for residues and damage.
4.5 Returning devices
When returning centrifuges, please ensure that these devices are fully decontaminated so that they do not present a
health risk to our service staff.
You will find additional information and a blank of the decontamination confirmation at www.eppendorf.com.
Do also consult your laboratory safety officer about a suitable decontamination method.
Please fill out the decontamination confirmation and place it together with the device when it is to be sent back to
Eppendorf.
4
Maintenance and cleaning
37
Page 19

5 Troubleshooting
Error Cause Remedy
Stand-by button lit red. Centrifuge not ready. Press STANDBY button.
No display. No power. Plug power cable in on both ends.
5
Lid will not open. Power failure. Emergency lid release (see section 3.20).
Centrifuge shakes
when starting up.
Centrifuge will not start. Lid not closed. Press lid down or press OPEN button.
Display: LID Lid not released. Press lid down tight, press Start/Stop or emergency lid
Troubleshooting
Power failure. Check power fusing of lab / device.
Rotor still running. Wait for rotor to stop.
Rotor unevenly loaded. Stop centrifuge and load evenly.
release.
Lid not locked. Close lid again.
Lo on
(only 5702)
P 1
P 2
FA Display indicates a FAST TEMP
Inb Rotor unevenly
Int Power failure during run. Check power plug. Wait for rotor to come to a stop.
Er 2 Unbalanced rotor switch
Er 3 Error in speed system. Leave device switched on until error message
Er 5 Lid switch. Close lid, restart.
Centrifugation parameters
locked against adjustment.
Program 1 or 2 is called up. Press illuminated program button to exit the program
run.
loaded.
defective.
With open centrifuge lid simultaneously press SHORT
and OPEN for 5 seconds (see 3.15) if parameters
should be readjusted.
level (if required).
The run can be interrupted with the START / STOP
button if required.
Check loading and repeat run.
Repeat run.
Inform Service.
disappears (up to 5 min).
Er 6 Drive error. Repeat run.
Er 7 Overspeed. Error in drive or speed measurement system.
Er 8 Drive error. Repeat run.
Er 9 – 25 Electronics error. Repeat run.
Er 18 Temperature deviation
> 5 °C fr. nominal value.
Er 19 Refrigeration unit overheated. Make sure that the air circulation through the cooling
Er 23
(only 5702)
Er 24 Fault in the refrigeration unit. At start of operation: contact Service. After longer
If the suggested remedy repeatedly fails, please contact Service.
38
Motor overheating. Allow motor to cool.
Nominal value setting too low or refrigeration defective.
slots is not impaired.
running time: allow centrifuge to cool down.
Page 20

6 Technical data
Line connection: Centrifuge 5702
230 V / 50 – 60 Hz
120 V / 50 – 60 Hz
100 V / 50 – 60 Hz
Power output: 200 W 380 W
Max. speed: 4 400 rpm 4 400 rpm
Max. centrifugal acceleration: 3 000 rcf 3 000 rcf
Max. load: 4 x 90 ml 4 x 90 ml
Max. kinetic energy: 2 280 Nm 2 280 Nm
Permissible density of material
being centrifuged:
Ambient temperature: 2 – 40 °C 10 – 40 °C
Max. rel. air humidity: 75 % 75 %
Positioning height: max. 2000 m above NSL max. 2000 m above NSL
Dimensions: Height: 241 mm
Weight excluding rotor: 20 kg 36 kg
1,2 g/ml 1,2 g/ml
Depth: 395 mm
Width: 320 mm
Centrifuge 5702 R / 5702 RH
230 V / 50 – 60 Hz
120 V / 50 – 60 Hz
100 V / 50 – 60 Hz
Height: 265 mm
Depth: 580 mm
Width: 380 mm
6
Technical data
Startup time (230 V): < 25 sec < 25 sec
Deceleration time: < 25 sec < app. 25 sec
Startup time (100 V / 120 V): < 25 sec < 25 sec
Deceleration time: < 25 sec < app. 25 sec
Fuses: 2.5 A time-lag 230 V
5.0 A time-lag 120 V / 100 V
Noise level: < 58 dB (A) < 54 dB (A),
Overvoltage category: II II
Degree of contamination: 2 2
Technical specifications subject to change!
2.5 A time-lag 230 V
5.0 A time-lag 120 V
6.0 A time-lag 100 V
steady state at 4ºC;
23ºC ambient temperature,
empty rotor
39
Page 21

7 Ordering information
Centrifuge 5702
230 V / 50 – 60 Hz, without rotor 5702 000.019
Centrifuge 5702 R
230 V / 50 – 60 Hz, without rotor 5703 000.012
7
Ordering information
Centrifuge 5702 RH
230 V / 50 – 60 Hz, without rotor 5704 000.016
Fixed-angle rotor and accessories
Fixed-angle rotor F-35-30-17
Aluminum, 30 places, angle 35°,
for mounting of 15 ml Falcons
15 ml round bottom centrifuge tubes,
complete with stainless steel tube holders for
30 places 5702 704.008
10 places 5702 705.004
Tube holders (stainless steel), for rotor F-35-30-17,
for mounting of 15 ml Falcons
15 ml round bottom centrifuge tubes, set of 10 5702 707.007
Adapter, conical, to support 15 ml Falcons®,
for rotor F-35-30-17, set of 10 5702 706.000
Rubber mat for 15 ml round bottom centrifuge tubes, set of 10 5702 708.003
Fixed-angle rotor F-45-24-11
Aluminum, angle 45°, 24 places, max. 11 mm
for mounting of 1.5/2.0 ml micro test tubes 5702 746.002
Adapter for 0.2 ml PCR tubes,
for rotor F-45-24-11, set of 6 5425 715.005
Adapter for 0.4 ml micro test tubes,
for rotor F-45-24-11, set of 6 5425 717.008
®
or
®
or
Adapter for 0,5 ml micro test tubes and
0.6 ml Microtainer
Fixed-angle rotor F-45-18-17-Cryo
Aluminum, angle 45°, 18 places, max. 17 mm
for mounting of cryotubes (max. 17 mm) and
centrifuge tubes which can be sealed (max. 16.5 mm),
max. length in mm: 50 5702 747.009
Adapter for cryotubes (max. 13 mm) and
centrifuge tubes which can be sealed (max. 12.2 mm),
max. length in mm: 50 5702 752.002
Swing-bucket rotors and accessories
Swing-bucket rotor 4 x 85 ml, type A-4-38,
aluminum, incl. 4 round buckets 5702 720.003
Swing-bucket rotor 4 x 85 ml, type A-4-38,
aluminum, excluding round buckets 5702 740.004
Round bucket 85 ml for A-4-38, set of 4 5702 722.006
Round bucket 85 ml for A-4-38, set of 2 5702 761.001
Caps, aerosol tight, for round bucket 85 ml, set of 2 5702 721.000
®
, for rotor F-45-24-11, set of 6 5425 716.001
40
Page 22

7 Ordering information
Adapter for standard tubes and blood sampling systems for round bucket 85 ml
2 adapters 4 x 1.5 – 2.0 ml micro test tubes 5702 745.006
2 adapters 5 x 1.1 – 1.4 ml (ø adapter bore x max. vessel length in mm: 8.5 x 100) 5702 736.007
2 adapters 5 x 2 – 7 ml (12.5 x 100) 5702 737.003
2 adapters 4 x 2.6 – 7 ml (13.5 x 100) 5702 719.005
4 adapters 4 x 4 – 10 ml (16 x 100) 5702 735.000
9 adapters 4 x 9 – 15 ml (17.5 x 100) 5702 724.009
2 adapters 1 x 15 ml Falcon
2 adapters 2 x 15 ml Falcon® * (17.2 x 121) 5702 723.002
2 adapters 1 x 25 ml (25 x 100) 5702 717.002
2 adapters 1 x 50 ml Falcon
2 adapters 1 x 85 ml (38 x 106) 5702 718.009
Rectangular bucket 90 ml for A-4-38, set of 4 5702 709.000
Rectangular bucket 90 ml for A-4-38, set of 2 5702 762.008
Do not use with aerosol tight caps.
*
Adapter for standard tubes for rectangular buckets
2 adapters 10 x 5 – 7 ml 5702 710.008
2 adapters 8 x 9 ml 5702 711.004
2 adapters 6 x 15 ml 5702 712.000
2 adapters 4 x 20 ml 5702 713.007
2 adapters 2 x 25 ml 5702 716.006
®
(17.2 x 121) 5702 732.001
®
(30 x 115) 5702 734.004
7
Ordering information
Swing-bucket rotor type A-8-17 5702 700.002
®
Adapter, conical, to support 15 ml Falcons
,
for rotor A-8-17, set of 8 5702 702.005
Rubber pad for 15 ml round bottom centrifuge tubes, set of 8 5702 701.009
Set of fuses
for 5702 / 5702 R 230 V (2 x 2.5 A time-lag) 5425 351.003
for 5702 / 5702 R 120 V (2 x 5 A time-lag) 5425 353.006
Important note:
Please use the original accessories recommended by Eppendorf. Using spare parts or disposables which we have not
recommended can reduce the precision, accuracy and life of the centrifuges. We do not honor any warranty or accept
any responsibility for damage resulting from such action.
Falcon®: Registered trademark of Becton Dickinson
Cidex®: Registered trademark of Johnson & Johnson
Duran®: Registered trademark of Schott
Ficoll®: Registered trademark of Pharmacia Biotech AB
Microtainer®: Registered trademark of Becton Dickinson
Rotor code
All Eppendorf rotors are designated
according to a simple, logical system
which describes the technical specifications as a uniform series of numbers
and letters e.g.:
Fixed-angle Angle of
rotor
adapter bore
F A 45 30 11 A 4 81
version
Aerosol-tight
Max. no. tubes/
adapters
∅ Tube/
Adapter Swing-bucket rotor
Max. no tubes/
adapters
∅ tube/adapter
bore
41
Page 23

Istruzioni in breve
La centrifuga 5702 è una centrifuga da banco non refrigerata, la centrifuga 5702 R è una versione da banco refrigerata e
la centrifuga 5702 RH è una versione da banco refrigerata e riscaldata
Prima di mettere in funzione le centrifughe 5702 / 5702 R / 5702 RH per la prima volta, siete pregati di leggere le
istruzioni per l'uso. La versione più aggiornata delle istruzioni per l'uso e delle avvertenze di sicurezza è
disponibile in diverse lingue sul sito internet www.eppendorf.com. Consigliamo inoltre, per avere una visione
generale dell'utilizzo, di leggere anche la versione più completa in inglese (da pagina 24 a pagina 40) o in tedesco
(da pagina 5 a pagina 23).
Questo simbolo è riportato sulla centrifuga ed in diversi punti delle presenti istruzioni. I testi contrassegnati da tale
simbolo sono avvertenze importanti per la sicurezza vostra e dell'impianto. Utilizzate la centrifuga soltanto dopo
aver letto queste avvertenze di sicurezza.
Uso conforme
La Centrifuge 5702 / 5702 R / 5702 RH è concepita esclusivamente per l'uso in luoghi chiusi e serve a separare le
soluzioni acquose e le sospensioni di diversa densità nelle apposite provette.
L'apparecchio può essere utilizzato esclusivamente da personale specializzato e appositamente addestrato. È necessario
aver letto accuratamente le istruzioni per l'uso e conoscere bene il funzionamento dell'apparecchio.
Collocazione dell'apparecchio
– L'apparecchio è pesante. Sollevare e trasportare l'apparecchio può causare lesioni dorsali.
► Trasportare l'apparecchio solo nella confezione originale.
► Trasportare l'apparecchio con l'aiuto di una seconda persona.
► Se il trasferimento richiede un certo tempo avvalersi di un ausilio per il trasporto (ad es. il carrello portapacchi).
Istruzioni in breve
– Ponete la centrifuga su un banco da laboratorio stabile, orizzontale e privo di risonanze. L'ambiente circostante
deve essere ben ventilato e protetto dalla luce solare diretta. Per non compromettere la corretta ventilazione
dell'apparecchio è necessario mantenere una distanza di 15 cm su entrambi i lati rivolti verso altre
apparecchiature adiacenti e sul retro. Questa distanza deve essere osservata soprattutto per il corretto
raffreddamento della 5702 R / 5702 RH. Prima di collegare la centrifuga alla corrente di rete per la prima volta,
lasciatela spenta per tre ore affinché possa raggiungere la temperatura ambiente del laboratorio. In questo modo
eviterete danni alla centrifuga.
– Rimuovete tutti i dispositivi di sicurezza che sono stati applicati per il trasporto.
– Durante la centrifugazione, intorno alla centrifuga deve essere garantito uno spazio libero di 30 centimetri.
– Collegare l'apparecchio solo a fonti di alimentazione che corrispondano ai requisiti elettrici indicati sulla targhetta
del prodotto.
Utilizzare esclusivamente le prese dotate di messa a terra e un cavo di rete adeguato.
–Prima della prima messa in esercizio occorre controllare che il rotore sia saldamente fisso in sede.
Avvertenze di sicurezza e limitazioni di utilizzo
Per la vostra sicurezza personale, vi preghiamo di osservare scrupolosamente le seguenti disposizioni:
– La centrifuga 5702 / 5702 R / 5702 RH può essere utilizzata esclusivamente per le applicazioni indicate, non può
funzionare in locali esposti al pericolo di esplosione e non deve essere utilizzata con sostanze esplosive o con reazioni
chimiche violente.
– Quando si passa da un locale refrigerato al normale ambiente del laboratorio, la centrifuga deve essere lasciata
funzionare per almeno mezzora nel locale refrigerato oppure deve riscaldarsi almeno tre ore nel laboratorio senza
essere collegata alla rete per evitare che si formi condensa.
– Durante il funzionamento, la centrifuga non deve essere né spostata né urtata.
– Le centrifughe non installate o sottoposte a manutenzione da personale specializzato non devono essere utilizzate. Le
riparazioni possono essere effettuate unicamente dal personale di assistenza tecnica autorizzato dalla ditta Eppendorf
e si possono installare soltanto parti di ricambio e rotori originali Eppendorf.
– Per la centrifugazione di liquidi tossici e radioattivi oppure di germi patogeni del gruppo di rischio II (vedi
Organizzazione Mondiale per la Sanità: Manuale di sicurezza nel laboratorio biologico) si dovranno osservare le
disposizioni nazionali vigenti in materia. In presenza di germi patogeni appartenenti ad un gruppo di rischio più alto è
necessario prevedere più di una guarnizione biologica a tenuta di aerosol. Qualora si rovesciassero involontariamente
detti liquidi nel rotore o nel vano del rotore, occorrerà procedere ad un’accurata pulizia della centrifuga.
47
Page 24

Istruzioni in breve
– I rotori devono essere sempre fissati secondo le istruzioni. Si può centrifugare soltanto se il rotore è saldamente
serrato. Il rotore può essere caricato soltanto simmetricamente, le provette contrapposte l’una all’altra devono essere
dello stesso tipo e con lo stesso livello di riempimento.
– Prima della centrifugazione controllate sempre visivamente le provette per verificare l’eventuale presenza di danni del
materiale. Le provette danneggiate non devono essere centrifugate, in quanto l’eventuale rottura delle provette
potrebbe causare non solo la perdita dei campioni ma anche altri danni alla centrifuga e agli accessori.
– I rotori che presentano evidenti tracce di corrosione o danni meccanici non devono essere utilizzati. Controllate
mensilmente gli accessori ed, inoltre, evitate un eventuale indebolimento con sostanze chimiche aggressive, tra le
quali alcali forti e deboli, acidi forti, soluzioni con ioni di mercurio, rame ed altri metalli pesanti, idrocarburi clorurati,
soluzioni saline concentrate e fenolo. In caso di contaminazione con sostanze aggressive, pulire accuratamente il
rotore con un detergente blando.
– La densità della sostanza centrifugata non deve superare i 1,2 g/ml alla massima velocità di centrifugazione. In caso di
funzionamento prolungato, le provette si riscaldano.
– Chiudete il coperchio della provetta prima della centrifugazione. Durante la centrifugazione, i coperchi ancora aperti
potrebbero staccarsi danneggiando gravemente la centrifuga. Inoltre, si dovranno osservare i valori limite specificati
dal produttore delle provette riguardanti il carico ammissibile per le provette in plastica. Se si utilizzano solventi organici
(ad esempio fenolo, cloroformio) si potrebbe ridurre la stabilità e la capacità di portata delle provette in plastica.
– Chiudendo il coperchio della centrifuga occorre prestare attenzione a non lasciare le dita sotto il coperchio, poiché vi è
il pericolo di schiacciamento.
I seguenti rotori e relative sospensioni hanno una durata utile massima di 7 anni. La data di costruzione è incisa sotto
forma di cifre 10/01 = Ottobre 2001:
A-4-38 5702 720.003
A-8-17 5702 700.002
I coperchi ermetici in policarbonato trasparente hanno una durata utile massima di 3 anni. La data di costruzione è incisa
sotto forma di sigillo .
Se attaccati dall’azione di solventi organici (ad esempio fenolo, cloroformio), i coperchi a tenuta di aerosol potrebbero
perdere la loro stabilità. Pertanto, occorrerà assicurarsi ad intervalli regolari che non siano deformati e non presentino
Istruzioni in breve
fessurazioni. I coperchi ermetici danneggiati dovranno essere immediatamente sostituiti.
I rotori, i coperchi o le sospensioni danneggiati da azioni chimiche o meccaniche oppure che hanno
superato la propria durata utile massima non devono più essere utilizzati!
– Cessione
In caso di cessione del prodotto vogliate allegare le presenti istruzioni d’uso.
– Smaltimento
In case the product is to be disposed of, the relevant legal regulations are to be observed.
– Informazioni sullo smaltimento degli apparecchi elettrici ed elettronici nella Comunità Europea
Per lo smaltimento del prodotto attenersi alle disposizioni giuridiche in materia. All’interno della Comunità Europea lo
smaltimento è regolamentato da disposizioni nazionali basate sulla Direttiva UE 2002/96/CE sui rifiuti di apparecchia-
ture elettriche ed elettroniche (WEEE).
In base a tale disposizione tutti gli apparecchi forniti dopo il 13.08.2005 nel settore Business-to-Business, di cui fa
parte il presente prodotto, non possono più essere smaltiti con i rifiuti comunali o domestici. A scopo identificativo sono
contrassegnati con i seguenti simboli.
Poiché la normativa in materia di smaltimento in ambito UE può cambiare a seconda del Paese, vogliate
contattare i Vostri fornitori in caso di necessità.
12
1
11
2
10
3
1
9
4
8
0
5
7
6
Impiego
Accendete la centrifuga con l’interruttore di rete e premete il tasto di stand-by . A questo punto verranno visualizzati i
valori nominali dell'ultima centrifugazione. Per l'installazione del rotore occorre osservare i triangoli di contrassegno posti
su entrambi i lati del dado del rotore [Fig. triangoli] che indicano la direzione della scanalatura sul lato inferiore del rotore e
sono necessari per posizionare con sicurezza il rotore.
Per utilizzare il rotore occorre girare la spina di trascinamento dell'albero motore in direzione longitudinale, dopodiché si
dovrà innestare il rotore sull'albero motore in modo tale che i triangoli di contrassegno siano rivolti nella stessa direzione
della spina di trascinamento dell'albero motore stesso. A questo punto, stringete a fondo il dado del rotore girandolo in
senso orario con la chiave fornita in dotazione. In caso di problemi, assicuratevi che il rotore abbia ingranato con la spina
48
Page 25

Istruzioni in breve
di trascinamento dell'albero motore.
Ora, caricate il rotore simmetricamente e chiudete il coperchio della centrifuga. Non caricate mai il rotore in modo
squilibrato. Al termine della centrifugazione, il coperchio della centrifuga 5702 si apre automaticamente, mentre il
coperchio della centrifuga refrigerata 5702 R / 5702 RH resta ancora chiuso per mantenere costante la temperatura delle
provette; per aprirlo basta premere il tasto OPEN.
–
time
speed
start
stop
stand-by
open
temp
fast temp
modifica la durata del ciclo.
La funzione di ciclo continuo può essere impostata con la manopola TIME in un arco di 99
minuti oppure meno di 0,5 minuti. Il display visualizza "oo” per indicare il ciclo continuo.
–
modifica la velocità a passi di 100 giri/min. oppure in ACR. La commutazione da giri/min. ad
ACR avviene premendo il tasto SPEED.
–
avvia il ciclo. Il simbolo lampeggia finché è in funzione il rotore.
–
interrompe il ciclo. Il simbolo compare non appena il rotore si ferma e si può aprire il
coperchio della centrifuga.
–
accende e spegne la centrifuga.
–
sblocca il dispositivo di chiusura del coperchio.
–
modifica il valore nominale di temperatura (solo per il modello 5702 R / 5702 RH). Il valore
nominale di temperatura può essere impostato con i tasti a freccia da – 9 °C a + 40 °C
(centrifuga 5702 RH: da – 9 °C a + 42 °C). Durante le fasi di inattività della centrifuga, il display
visualizza alternativamente il valore nominale di temperatura impostato e la temperatura
attualmente presente nella cassa del rotore. Durante il ciclo di centrifugazione viene
visualizzata unicamente la temperatura correntemente presente nella cassa del rotore.
_
savvia un ciclo di termostatizzazione a velocità di centrifugazione specifica, il display visualizza
"FA”. Il ciclo termina automaticamente oppure attivando il tasto STOP. Si inserisce un segnale
acustico periodico.
Istruzioni in breve
L'impostazione del tempo, della temperatura e della velocità può essere modificata anche durante il funzionamento della
centrifuga. A tale scopo, premete dapprima il tasto SHORT; il display del timer lampeggia. Dopo aver modificato i
parametri di centrifugazione avviene un’accelerazione alla nuova velocità nominale impostata.
Durante il ciclo viene visualizzata la durata residua. In caso di modifica della durata durante la centrifugazione viene
tenuto in considerazione il tempo già trascorso. Per l’ultimo minuto avviene un conto alla rovescia in secondi. Trascorsa la
durata impostata, la centrifuga si ferma automaticamente.
–
short
Programmazione
Con la centrifuga 5702 R / 5702 RH si possono memorizzare sino a due programmi fissi (soltanto a centrifuga ferma)
impostando come prima cosa i parametri desiderati. Quindi, tenete premuto PROG 1 oppure 2 finché il tasto dei
programmi non lampeggia più e resta sempre acceso. Il programma è memorizzato. Per richiamare il programma
desiderato basta premere brevemente il tasto dei programmi.
Disattivazione della funzione di frenatur
Per un avvio delicato senza freno basta tenere premuto il tasto SHORT per più di 5 secondi quando il coperchio della
centrifuga è ancora aperto. Il messaggio sul display cambia da "br on" (freno attivo) a "br OF" (freno disattivato) oppure
viene visualizzato (5702 R / 5702 RH); a questo punto, il freno della centrifuga è disattivato.
Impostazione di precisione dei parametri
Per evitare di modificare inavvertitamente i parametri impostati, premete contemporaneamente il tasto SHORT ed il tasto
OPEN per 5 secondi quando il coperchio della centrifuga è ancora aperto. In questo modo, i parametri o i programmi
impostati non potranno più essere modificati, sia durante il ciclo che a centrifuga ferma, tuttavia si può normalmente
avviare o concludere un ciclo di centrifugazione con il tasto START/STOP.
Premendo questo pulsante quando il coperchio è chiuso si attiva un ciclo breve alla velocità
massima. Il ciclo viene arrestato rilasciando il tasto SHORT.
soft
49
Page 26

Istruzioni in breve
Apertura della centrifuga in caso di interruzione di corrente
Staccate la spina ed attendete che il rotore si fermi (può durare anche 5 minuti!). Sbloccaggio di emergenza tirando la
corda posta sul fondo dell’apparecchio: a monte del piedino a ventosa anteriore destro è inserito un pernetto bianco di
plastica nella piastra base (vedi il punto "E” dell’illustrazione). Estraetelo e tirate la corda verticalmente verso il basso.
Assicuratevi che, al termine, la corda sia completamente rientrata nell'alloggiamento. Dopo l'apertura del coperchio,
premete nuovamente il pernetto di plastica nella piastra base.
Manutenzione e pulizia
Centrifuga
Le superfici esterne della centrifuga e della camera rotore devono essere pulite regolarmente con un detergente blando al
fine di assicurare l’igiene ed evitare la corrosione da impurità non rimosse.
Sta all’utilizzatore effettuare l’opportuna pulizia e decontaminazione in caso di impurità dovute a sostanze aggressive o
pericolose per la salute.
A coperchio aperto staccare la spina, allentare il rotore con l’apposita chiave in dotazione e pulire separatamente. Per
effettuare la pulizia delle superfici accessibili dell’apparecchio utilizzare un detergente blando. Scegliere metodi di
disinfezione che siano conformi alle disposizioni e alle direttive di legge vigenti per il proprio campo di applicazione.
Utilizzare ad esempio alcol (etanolo, isopropanolo) o disinfettanti contenenti alcol. Non deve penetrare alcun liquido nella
fenditura presso l’albero motore, pertanto la camera rotore deve essere pulita esclusivamente con un panno umido.
Rivolgersi al responsabile per la sicurezza del proprio laboratorio in merito ai metodi di disinfezione e di pulizia appropriati.
Prima di utilizzare una procedura di pulizia e disinfezione diversa da quella consigliata dal produttore, consultare
Eppendorf per assicurarsi che la procedura in questione non danneggi l’apparecchio e gli accessori. Per garantire un
utilizzo della centrifuga duraturo e sicuro, fare attenzione alle sostanze chimiche aggressive che possono danneggiare il
rotore e la caldaia. Controllare una volta al mese che il proprio apparecchio non presenti segni di corrosione e danni.
Le guarnizioni in gomma nella camera rotore devono essere ben risciacquate con acqua dopo ogni pulizia e strofinate con
glicerina o talco per evitare la formazione di screpolature.
Istruzioni in breve
Rotori
Il rotore, il bilancino ermetico e la sospensione devono essere puliti ogni mese con un detergente neutro. Assicuratevi che
nei fori del rotore non vi siano residui né tracce di corrosione. Tutti i rotori, i bilancini ermetici, gli adattatori e le sospensioni
possono essere sterilizzati in autoclave (a 121 °C per 20 minuti). I coperchi a tenuta di aerosol, incluse le guarnizioni in
gomma, sono soggetti alla normale usura e in caso di deterioramento devono essere sostituiti.
Per i rotori a bilancini occorre prestare particolare attenzione a che i perni e le scanalature del bilancino ermetico e le
sospensioni siano perfettamente puliti.
Questi componenti devono essere lubrificati con grasso per perni in modo che i bilancini possano oscillare
senza attrito!
Rottura della vetreria
Durante la centrifugazione dei recipienti in vetro, occorre prestare attenzione al maggiore rischio di rottura dovuto al
numero crescente di giri e/o all'accelerazione centrifuga relativa. Rispettate le indicazioni del produttore per il carico
massimo ammesso dei recipienti per la centrifuga.
In caso di rottura di un vetro rimuovete i frammenti e tutta la polvere di dal rotore, dai becher, dagli adattatori e dal vano
centrifuga.
Per escludere ulteriori danni, si devono eventualmente sostituire le piastre in gomma e gli adattatori.
Spedizione di ritorno di apparecchiature
In caso di ritorno di apparecchi siete pregati di verificare che tali apparecchi siano perfettamente decontaminati e che
quindi non costituiscano alcun rischio per la salute del nostro personale addetto all'assistenza tecnica.
Per ulteriori informazioni e un prestampato della certificazione di decontaminazione visitate il sito www.eppendorf.com.
Per quanto riguarda un metodo di decontaminazione adeguato rivolgetevi anche all’incaricato della sicurezza del vostro
laboratorio.
Compilate la certificazione di decontaminazione e, una volta compilata, allegatela all’apparecchiatura che deve essere
rispedita alla ditta Eppendorf.
50
Page 27

Istruzioni in breve
Tabella per la ricerca dei guasti
Anomalia Causa Rimedio
Nessuna visualizzazione. Manca il collegamento a rete. Collegare entrambe le estremità del cavo di rete.
Interruzione di corrente. Controllare il fusibile del laboratorio / dell’apparecchio.
Non è possibile aprire il
coperchio.
La centrifuga vibra
all’avviamento.
Non è possibile avviare la
centrifuga.
Messagio: LID Il coperchio non è sbloccato. Premere con forza il coperchio, avvio/stop oppure
Lo on
(solo 5702)
P 1
P 2
FA Indica un ciclo di
Inb Il rotore non è caricato
Int Interruzione di corrente durante il
Er 2 L'interruttore di sbilanciamento
Er 3 Errore nel sistema di velocità. Lasciare acceso l’apparecchio finché il messaggio di
Interruzione di corrente. Sbloccaggio di emergenza.
Il rotore non funziona. Attendere che il rotore si fermi.
Il rotore non è caricato
uniformemente.
Il coperchio non è chiuso. Premere il coperchio.
Il coperchio non è bloccato. Chiudere di nuovo il coperchio.
I parametri di centrifugazione sono
protetti da un'eventuale modifica.
È stato richiamato il
Programma 1 o 2.
termostatizzazione FAST TEMP.
uniformemente.
ciclo.
difettoso.
Fermare la centrifuga e caricare uniformemente.
sbloccaggio di emergenza.
Per modificare i parametri, premere contemporaneamente i pulsanti SHORT e OPEN per 5 secondi a
coperchio aperto.
Premere il tasto dei programmi acceso per uscire dal
livello di programma attuale (se desiderato).
Il ciclo può essere interrotto, se necessario, con il tasto
START / STOP.
Controllare il carico e ripetere il ciclo.
Controllare la spina. Attendere che il rotore si fermi.
Ripetere il ciclo.
Contattare il servizio assistenza.
errore non scompare (può durare anche 5 minuti).
Istruzioni in breve
Er 5 Interruttore coperchio. Chiudere di nuovo il coperchio.
Er 6 Errore azionamento. Ripetere il ciclo.
Er 7 Velocità eccessiva.
Er 8 Errore di azionamento. Ripetere il ciclo.
Er 9 – 25 Errore elettronica. Ripetere il ciclo.
Er 18 Differenza di temperatura > 5 °C
Er 19 Circuito di raffreddamento
Er 23
(solo 5702)
Er 24 Errore nel gruppo di
Se i rimedi qui proposti non dovessero produrre alcun effetto, siete pregati di contattare il servizio di assistenza tecnica.
dal valore nominale.
surriscaldato.
Surriscaldamento del motore. Lasciare raffreddare il motore.
raffreddamento.
Errore nel sistema di azionamento o di misurazione
velocità.
Il valore nominale impostato è troppo basso o il
raffreddamento è difettoso.
Accertarsi che la circolazione dell'aria attraverso le
alette di raffreddamento non sia ostacolata (distanza
minima sui lati 15 cm).
All'inizio del ciclo: contattare il servizio assistenza.
Dopo un lungo funzionamento: lasciare raffreddare la
centrifuga.
51
Page 28

Page 29

Page 30

Page 31

Page 32

Your local distributor: www.eppendorf.com/contact
Eppendorf AG · 22331 Hamburg · Germany
eppendorf@eppendorf.com · www.eppendorf.com
and the Eppendorf logo are registered trademarks of Eppendorf AG, Hamburg, Germany.
®
5702 901.016-11/052013
Eppendorf
 Loading...