

Page 1
Register your instrument!
www.eppendorf.com/myeppendorf
Centrifuge 5427 R
Operating manual
Manual de instrucciones
Page 2

Copyright © 2013 Eppendorf AG, Hamburg. No part of this publication may be reproduced without the
prior permission of the copyright owner.
Trademarks
Eppendorf and the Eppendorf logo are registered trademarks of Eppendorf AG, Hamburg, Germany.
Microtainer is a registered trademark of Becton Dickinson, Franklin Lakes, NJ, USA.
Trademarks are not marked in all cases with ™ or
Operating manual. . . . . . . . . . . . . . . . . . . . . . . . . . . . . . . . . . . . . . . . . . . . . . . . . . . . . . . . . . . . . . . . . . . . . . 3
Manual de instrucciones . . . . . . . . . . . . . . . . . . . . . . . . . . . . . . . . . . . . . . . . . . . . . . . . . . . . . . . . . . . . . . . 55
Declarations and Certificates . . . . . . . . . . . . . . . . . . . . . . . . . . . . . . . . . . . . . . . . . . . . . . . . . . . . . . . . . . . . 95
®
in this manual.
5409 900.021-02/072013
Page 3

Table of contents
Centrifuge 5427 R
English (EN)
Operating manu al Centrifuge 5427 Rseeon p.Fig.Tab.p.
English (EN)Operating manual
Table of contents
1 Operating instructions . . . . . . . . . . . . . . . . . . . . . . . . . . . . . . . . . . . . . . . . . . . . . . . . . . . . . . . . . . . . . . 5
1.1 Using this manual . . . . . . . . . . . . . . . . . . . . . . . . . . . . . . . . . . . . . . . . . . . . . . . . . . . . . . . . . . . . . 5
1.2 Danger symbols and danger levels . . . . . . . . . . . . . . . . . . . . . . . . . . . . . . . . . . . . . . . . . . . . . . . . 5
1.2.1 Danger symbols . . . . . . . . . . . . . . . . . . . . . . . . . . . . . . . . . . . . . . . . . . . . . . . . . . . . . . . 5
1.2.2 Danger levels. . . . . . . . . . . . . . . . . . . . . . . . . . . . . . . . . . . . . . . . . . . . . . . . . . . . . . . . . . 5
1.3 Symbols used . . . . . . . . . . . . . . . . . . . . . . . . . . . . . . . . . . . . . . . . . . . . . . . . . . . . . . . . . . . . . . . . 5
1.4 Abbreviations used . . . . . . . . . . . . . . . . . . . . . . . . . . . . . . . . . . . . . . . . . . . . . . . . . . . . . . . . . . . . 6
2 Product description . . . . . . . . . . . . . . . . . . . . . . . . . . . . . . . . . . . . . . . . . . . . . . . . . . . . . . . . . . . . . . . . 7
2.1 Main illustration . . . . . . . . . . . . . . . . . . . . . . . . . . . . . . . . . . . . . . . . . . . . . . . . . . . . . . . . . . . . . . 7
2.2 Delivery package. . . . . . . . . . . . . . . . . . . . . . . . . . . . . . . . . . . . . . . . . . . . . . . . . . . . . . . . . . . . . . 8
2.3 Features. . . . . . . . . . . . . . . . . . . . . . . . . . . . . . . . . . . . . . . . . . . . . . . . . . . . . . . . . . . . . . . . . . . . . 8
2.4 Rotors . . . . . . . . . . . . . . . . . . . . . . . . . . . . . . . . . . . . . . . . . . . . . . . . . . . . . . . . . . . . . . . . . . . . . . 9
2.4.1 Rotor FA-45-12-17. . . . . . . . . . . . . . . . . . . . . . . . . . . . . . . . . . . . . . . . . . . . . . . . . . . . . . 9
2.4.2 Rotor FA-45-24-11. . . . . . . . . . . . . . . . . . . . . . . . . . . . . . . . . . . . . . . . . . . . . . . . . . . . . 10
2.4.3 Rotor FA-45-24-11-Kit. . . . . . . . . . . . . . . . . . . . . . . . . . . . . . . . . . . . . . . . . . . . . . . . . . 11
2.4.4 Rotors FA-45-30-11 and F-45-30-11 . . . . . . . . . . . . . . . . . . . . . . . . . . . . . . . . . . . . . . . 12
2.4.5 Rotors FA-45-48-11 and F-45-48-11 . . . . . . . . . . . . . . . . . . . . . . . . . . . . . . . . . . . . . . . 13
2.4.6 Rotor F-45-48-5-PCR. . . . . . . . . . . . . . . . . . . . . . . . . . . . . . . . . . . . . . . . . . . . . . . . . . . 14
2.4.7 Rotor S-24-11-AT . . . . . . . . . . . . . . . . . . . . . . . . . . . . . . . . . . . . . . . . . . . . . . . . . . . . . 14
3
3 Safety. . . . . . . . . . . . . . . . . . . . . . . . . . . . . . . . . . . . . . . . . . . . . . . . . . . . . . . . . . . . . . . . . . . . . . . . . . . 15
3.1 Intended use . . . . . . . . . . . . . . . . . . . . . . . . . . . . . . . . . . . . . . . . . . . . . . . . . . . . . . . . . . . . . . . . 15
3.2 User profile . . . . . . . . . . . . . . . . . . . . . . . . . . . . . . . . . . . . . . . . . . . . . . . . . . . . . . . . . . . . . . . . . 15
3.3 Application limits . . . . . . . . . . . . . . . . . . . . . . . . . . . . . . . . . . . . . . . . . . . . . . . . . . . . . . . . . . . . 15
3.3.1 Declaration concerning the ATEX directive (94/9/EC) . . . . . . . . . . . . . . . . . . . . . . . . . 15
3.3.2 Maximum service life for accessories . . . . . . . . . . . . . . . . . . . . . . . . . . . . . . . . . . . . . . 15
3.4 Information on product liability . . . . . . . . . . . . . . . . . . . . . . . . . . . . . . . . . . . . . . . . . . . . . . . . . 16
3.5 Warnings for intended use . . . . . . . . . . . . . . . . . . . . . . . . . . . . . . . . . . . . . . . . . . . . . . . . . . . . . 17
3.5.1 Personal injury or damage to the equipment . . . . . . . . . . . . . . . . . . . . . . . . . . . . . . . . 17
3.5.2 Incorrect handling of the centrifuge . . . . . . . . . . . . . . . . . . . . . . . . . . . . . . . . . . . . . . . 18
3.5.3 Incorrect handling of the rotors . . . . . . . . . . . . . . . . . . . . . . . . . . . . . . . . . . . . . . . . . . 18
3.5.4 Extreme strain on the centrifuging tubes . . . . . . . . . . . . . . . . . . . . . . . . . . . . . . . . . . . 19
3.5.5 Aerosol-tight centrifugation . . . . . . . . . . . . . . . . . . . . . . . . . . . . . . . . . . . . . . . . . . . . . 20
3.6 Safety instructions located on the device . . . . . . . . . . . . . . . . . . . . . . . . . . . . . . . . . . . . . . . . . . 20
4 Installation . . . . . . . . . . . . . . . . . . . . . . . . . . . . . . . . . . . . . . . . . . . . . . . . . . . . . . . . . . . . . . . . . . . . . . 21
4.1 Selecting the location . . . . . . . . . . . . . . . . . . . . . . . . . . . . . . . . . . . . . . . . . . . . . . . . . . . . . . . . . 21
4.2 Preparing installation . . . . . . . . . . . . . . . . . . . . . . . . . . . . . . . . . . . . . . . . . . . . . . . . . . . . . . . . . 21
4.3 Installing the instrument. . . . . . . . . . . . . . . . . . . . . . . . . . . . . . . . . . . . . . . . . . . . . . . . . . . . . . . 22
5 Operation . . . . . . . . . . . . . . . . . . . . . . . . . . . . . . . . . . . . . . . . . . . . . . . . . . . . . . . . . . . . . . . . . . . . . . . 23
5.1 Overview of operating controls. . . . . . . . . . . . . . . . . . . . . . . . . . . . . . . . . . . . . . . . . . . . . . . . . . 23
5.2 Menu navigation . . . . . . . . . . . . . . . . . . . . . . . . . . . . . . . . . . . . . . . . . . . . . . . . . . . . . . . . . . . . . 25
5.3 Menu . . . . . . . . . . . . . . . . . . . . . . . . . . . . . . . . . . . . . . . . . . . . . . . . . . . . . . . . . . . . . . . . . . . . . . 25
5.4 Preparing for centrifugation . . . . . . . . . . . . . . . . . . . . . . . . . . . . . . . . . . . . . . . . . . . . . . . . . . . . 27
5.4.1 Switching on the centrifuge . . . . . . . . . . . . . . . . . . . . . . . . . . . . . . . . . . . . . . . . . . . . . 27
5.4.2 Inserting the rotor . . . . . . . . . . . . . . . . . . . . . . . . . . . . . . . . . . . . . . . . . . . . . . . . . . . . . 27
5.4.3 Automatic rotor detection . . . . . . . . . . . . . . . . . . . . . . . . . . . . . . . . . . . . . . . . . . . . . . . 27
5.4.4 Replacing the rotor . . . . . . . . . . . . . . . . . . . . . . . . . . . . . . . . . . . . . . . . . . . . . . . . . . . . 27
5.4.5 Loading the rotor . . . . . . . . . . . . . . . . . . . . . . . . . . . . . . . . . . . . . . . . . . . . . . . . . . . . . 28
5.4.6 Closing the rotor lid . . . . . . . . . . . . . . . . . . . . . . . . . . . . . . . . . . . . . . . . . . . . . . . . . . . 30
5.4.7 Closing the centrifuge lid . . . . . . . . . . . . . . . . . . . . . . . . . . . . . . . . . . . . . . . . . . . . . . . 30
Page 4

Table of contents
Centrifuge 5427 R
4
English (EN)
5.5 Cooling . . . . . . . . . . . . . . . . . . . . . . . . . . . . . . . . . . . . . . . . . . . . . . . . . . . . . . . . . . . . . . . . . . . . 30
5.5.1 Set the temperature. . . . . . . . . . . . . . . . . . . . . . . . . . . . . . . . . . . . . . . . . . . . . . . . . . . . 30
5.5.2 Temperature display . . . . . . . . . . . . . . . . . . . . . . . . . . . . . . . . . . . . . . . . . . . . . . . . . . . 30
5.5.3 Temperature monitoring . . . . . . . . . . . . . . . . . . . . . . . . . . . . . . . . . . . . . . . . . . . . . . . . 31
5.5.4 Start FastTemp . . . . . . . . . . . . . . . . . . . . . . . . . . . . . . . . . . . . . . . . . . . . . . . . . . . . . . . 31
5.5.5 Continuous cooling . . . . . . . . . . . . . . . . . . . . . . . . . . . . . . . . . . . . . . . . . . . . . . . . . . . . 32
5.5.6 Endless operation of continuous cooling . . . . . . . . . . . . . . . . . . . . . . . . . . . . . . . . . . . 32
5.6 Centrifuging . . . . . . . . . . . . . . . . . . . . . . . . . . . . . . . . . . . . . . . . . . . . . . . . . . . . . . . . . . . . . . . . 33
5.6.1 Centrifuging with preset time . . . . . . . . . . . . . . . . . . . . . . . . . . . . . . . . . . . . . . . . . . . . 33
5.6.2 Centrifuging in continuous operation . . . . . . . . . . . . . . . . . . . . . . . . . . . . . . . . . . . . . . 34
5.6.3 Short spin centrifugation . . . . . . . . . . . . . . . . . . . . . . . . . . . . . . . . . . . . . . . . . . . . . . . 34
5.6.4 Setting the centrifugation radius . . . . . . . . . . . . . . . . . . . . . . . . . . . . . . . . . . . . . . . . . 35
5.6.5 After centrifugation . . . . . . . . . . . . . . . . . . . . . . . . . . . . . . . . . . . . . . . . . . . . . . . . . . . . 35
5.7 Standby mode . . . . . . . . . . . . . . . . . . . . . . . . . . . . . . . . . . . . . . . . . . . . . . . . . . . . . . . . . . . . . . . 35
6 Maintenance . . . . . . . . . . . . . . . . . . . . . . . . . . . . . . . . . . . . . . . . . . . . . . . . . . . . . . . . . . . . . . . . . . . . . 37
6.1 Prepare cleaning/disinfection . . . . . . . . . . . . . . . . . . . . . . . . . . . . . . . . . . . . . . . . . . . . . . . . . . . 37
6.2 Cleaning/disinfection . . . . . . . . . . . . . . . . . . . . . . . . . . . . . . . . . . . . . . . . . . . . . . . . . . . . . . . . . 37
6.2.1 Cleaning and disinfecting the device . . . . . . . . . . . . . . . . . . . . . . . . . . . . . . . . . . . . . . 38
6.2.2 Cleaning and disinfecting the rotor . . . . . . . . . . . . . . . . . . . . . . . . . . . . . . . . . . . . . . . 38
6.3 Additional service instructions for Centrifuge 5427 R . . . . . . . . . . . . . . . . . . . . . . . . . . . . . . . . 39
6.4 Glass breakage . . . . . . . . . . . . . . . . . . . . . . . . . . . . . . . . . . . . . . . . . . . . . . . . . . . . . . . . . . . . . . 39
6.5 Replacing fuses . . . . . . . . . . . . . . . . . . . . . . . . . . . . . . . . . . . . . . . . . . . . . . . . . . . . . . . . . . . . . . 40
6.6 Decontamination before shipment . . . . . . . . . . . . . . . . . . . . . . . . . . . . . . . . . . . . . . . . . . . . . . . 40
7 Troubleshooting . . . . . . . . . . . . . . . . . . . . . . . . . . . . . . . . . . . . . . . . . . . . . . . . . . . . . . . . . . . . . . . . . . 41
7.1 General errors . . . . . . . . . . . . . . . . . . . . . . . . . . . . . . . . . . . . . . . . . . . . . . . . . . . . . . . . . . . . . . . 41
7.2 Error messages . . . . . . . . . . . . . . . . . . . . . . . . . . . . . . . . . . . . . . . . . . . . . . . . . . . . . . . . . . . . . . 42
7.3 Emergency release . . . . . . . . . . . . . . . . . . . . . . . . . . . . . . . . . . . . . . . . . . . . . . . . . . . . . . . . . . . 44
8 Transport, storage and disposal . . . . . . . . . . . . . . . . . . . . . . . . . . . . . . . . . . . . . . . . . . . . . . . . . . . . . 45
8.1 Transport. . . . . . . . . . . . . . . . . . . . . . . . . . . . . . . . . . . . . . . . . . . . . . . . . . . . . . . . . . . . . . . . . . . 45
8.2 Storage . . . . . . . . . . . . . . . . . . . . . . . . . . . . . . . . . . . . . . . . . . . . . . . . . . . . . . . . . . . . . . . . . . . . 45
8.3 Disposal. . . . . . . . . . . . . . . . . . . . . . . . . . . . . . . . . . . . . . . . . . . . . . . . . . . . . . . . . . . . . . . . . . . . 45
9 Technical data. . . . . . . . . . . . . . . . . . . . . . . . . . . . . . . . . . . . . . . . . . . . . . . . . . . . . . . . . . . . . . . . . . . . 47
9.1 Power supply. . . . . . . . . . . . . . . . . . . . . . . . . . . . . . . . . . . . . . . . . . . . . . . . . . . . . . . . . . . . . . . . 47
9.2 Ambient conditions . . . . . . . . . . . . . . . . . . . . . . . . . . . . . . . . . . . . . . . . . . . . . . . . . . . . . . . . . . . 47
9.3 Weight/dimensions . . . . . . . . . . . . . . . . . . . . . . . . . . . . . . . . . . . . . . . . . . . . . . . . . . . . . . . . . . . 47
9.4 Application parameters. . . . . . . . . . . . . . . . . . . . . . . . . . . . . . . . . . . . . . . . . . . . . . . . . . . . . . . . 48
9.5 Acceleration times and deceleration times for the Centrifuge 5427 R (according to DIN 58 970)
49
10 Ordering Information . . . . . . . . . . . . . . . . . . . . . . . . . . . . . . . . . . . . . . . . . . . . . . . . . . . . . . . . . . . . . . 51
10.1 Centrifuge 5427 R . . . . . . . . . . . . . . . . . . . . . . . . . . . . . . . . . . . . . . . . . . . . . . . . . . . . . . . . . . . . 51
10.2 Accessories . . . . . . . . . . . . . . . . . . . . . . . . . . . . . . . . . . . . . . . . . . . . . . . . . . . . . . . . . . . . . . . . . 51
10.2.1 Rotors and rotor lids . . . . . . . . . . . . . . . . . . . . . . . . . . . . . . . . . . . . . . . . . . . . . . . . . . . 51
10.2.2 Adapters . . . . . . . . . . . . . . . . . . . . . . . . . . . . . . . . . . . . . . . . . . . . . . . . . . . . . . . . . . . . 52
10.2.3 Other accessories . . . . . . . . . . . . . . . . . . . . . . . . . . . . . . . . . . . . . . . . . . . . . . . . . . . . . 53
10.3 Safety. . . . . . . . . . . . . . . . . . . . . . . . . . . . . . . . . . . . . . . . . . . . . . . . . . . . . . . . . . . . . . . . . . . . . . 53
Page 5
Operating instructions
Centrifuge 5427 R
English (EN)
1 Operating instructions
1.1 Using this manual
Read this operating manual completely before using the device for the first time. Please also note the
operating instructions for the accessories, if applicable.
This operating manual is part of the product. Thus, it must always be easily accessible.
Enclose this operating manual when transferring the device to third parties.
If this manual is lost, please request another one. You will find the current version on our webpage
www.eppendorf.com
.
1.2 Danger symbols and danger levels
The safety instructions in this manual appear with the following danger symbols and danger levels:
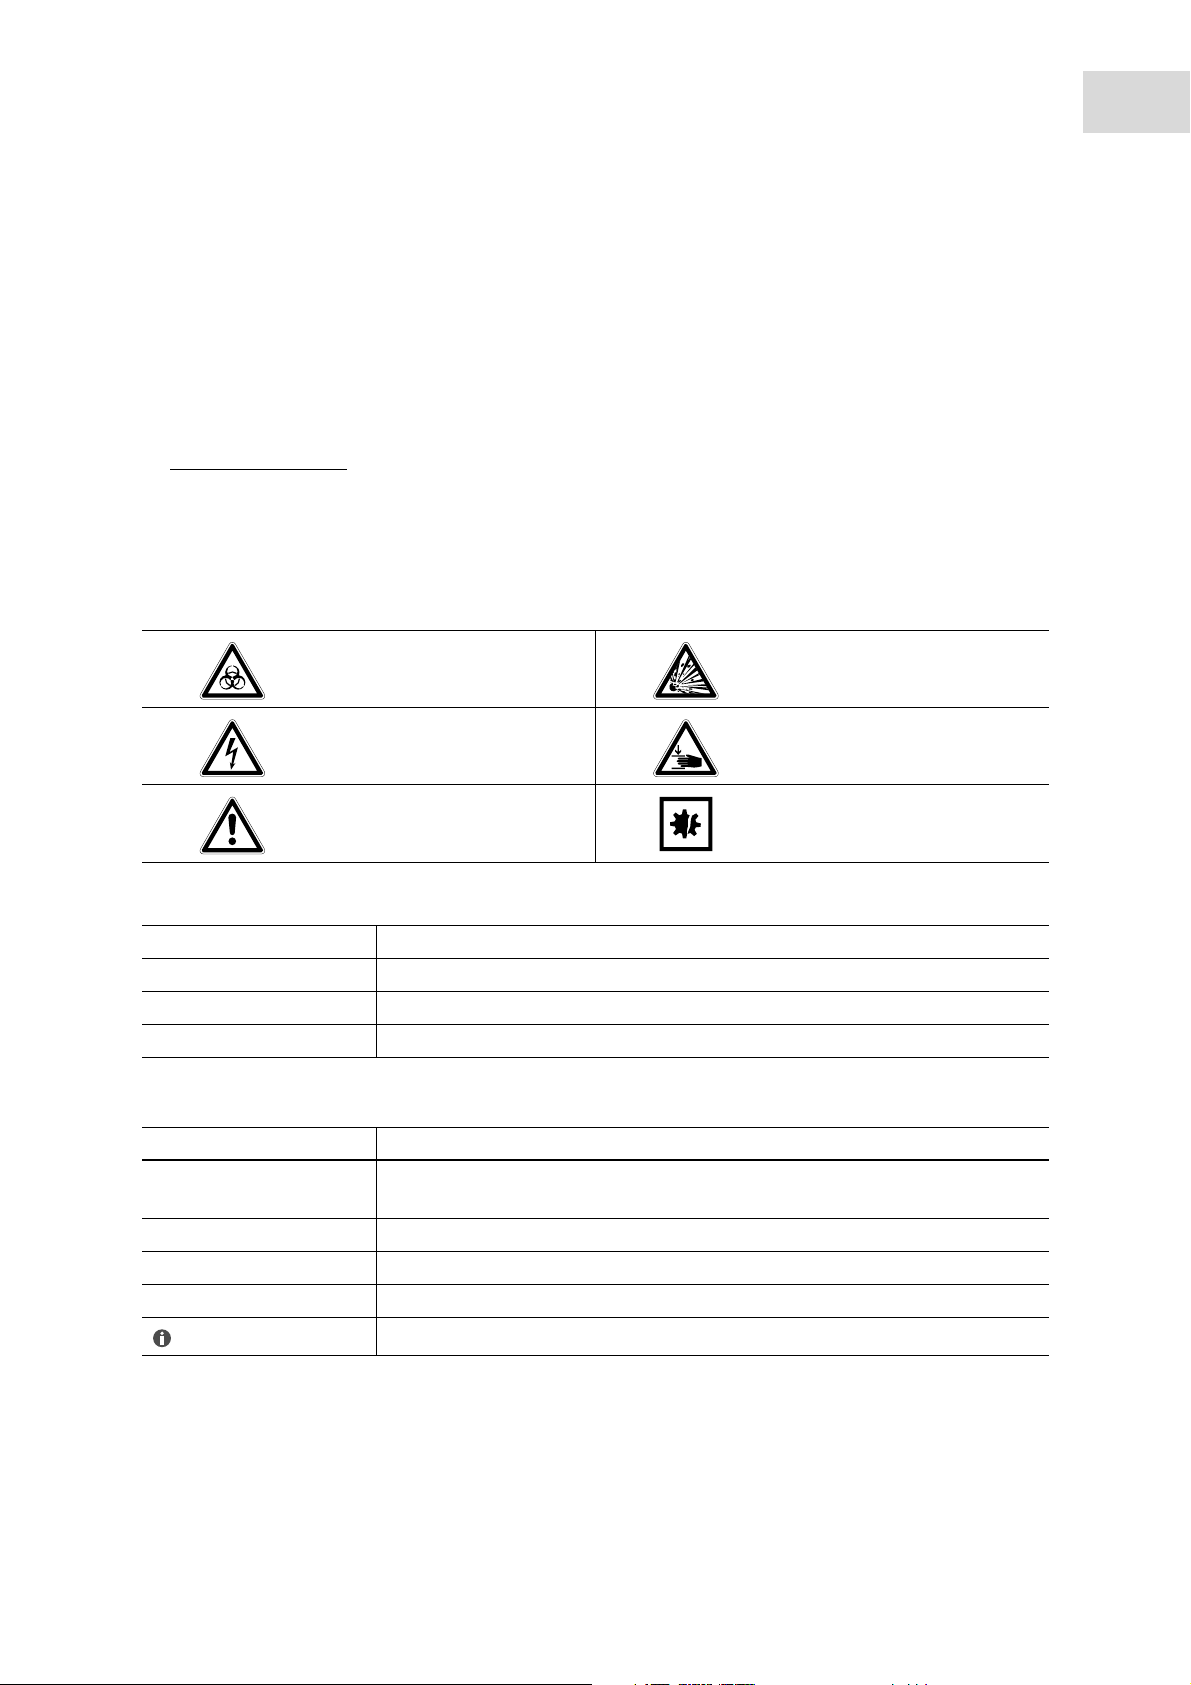
1.2.1 Danger symbols
Biohazard Explosion
5
Electric shock Crushing
Hazard point Material damage
1.2.2 Danger levels
DANGER Will lead to severe injuries or death.
WARNING Can lead to severe injuries or death.
CAUTION Can lead to light to moderate injuries.
ATTENTION May lead to material damage./Paragraph
1.3 Symbols used
Depiction Meaning
1.
2.
Actions without a specified order
• List:
Text Display or software texts
Actions in the specified order
Additional information
Page 6

Operating instructions
Centrifuge 5427 R
6
English (EN)
1.4 Abbreviations used
NN
Mean sea level (MSL)
PCR
Polymerase chain reaction
RZB/rcf
Relative centrifugal force – g-force in m/s
rpm
Revolutions per minute – in rpm
UV
Ultraviolet radiation
2
Page 7
2 Product description
rpm
rcf
f
ast
temp
menu
enter
open
short
star
t
s
t
op
USB
11
1
5
3
4
67
8
9 10
2
2.1 Main illustration
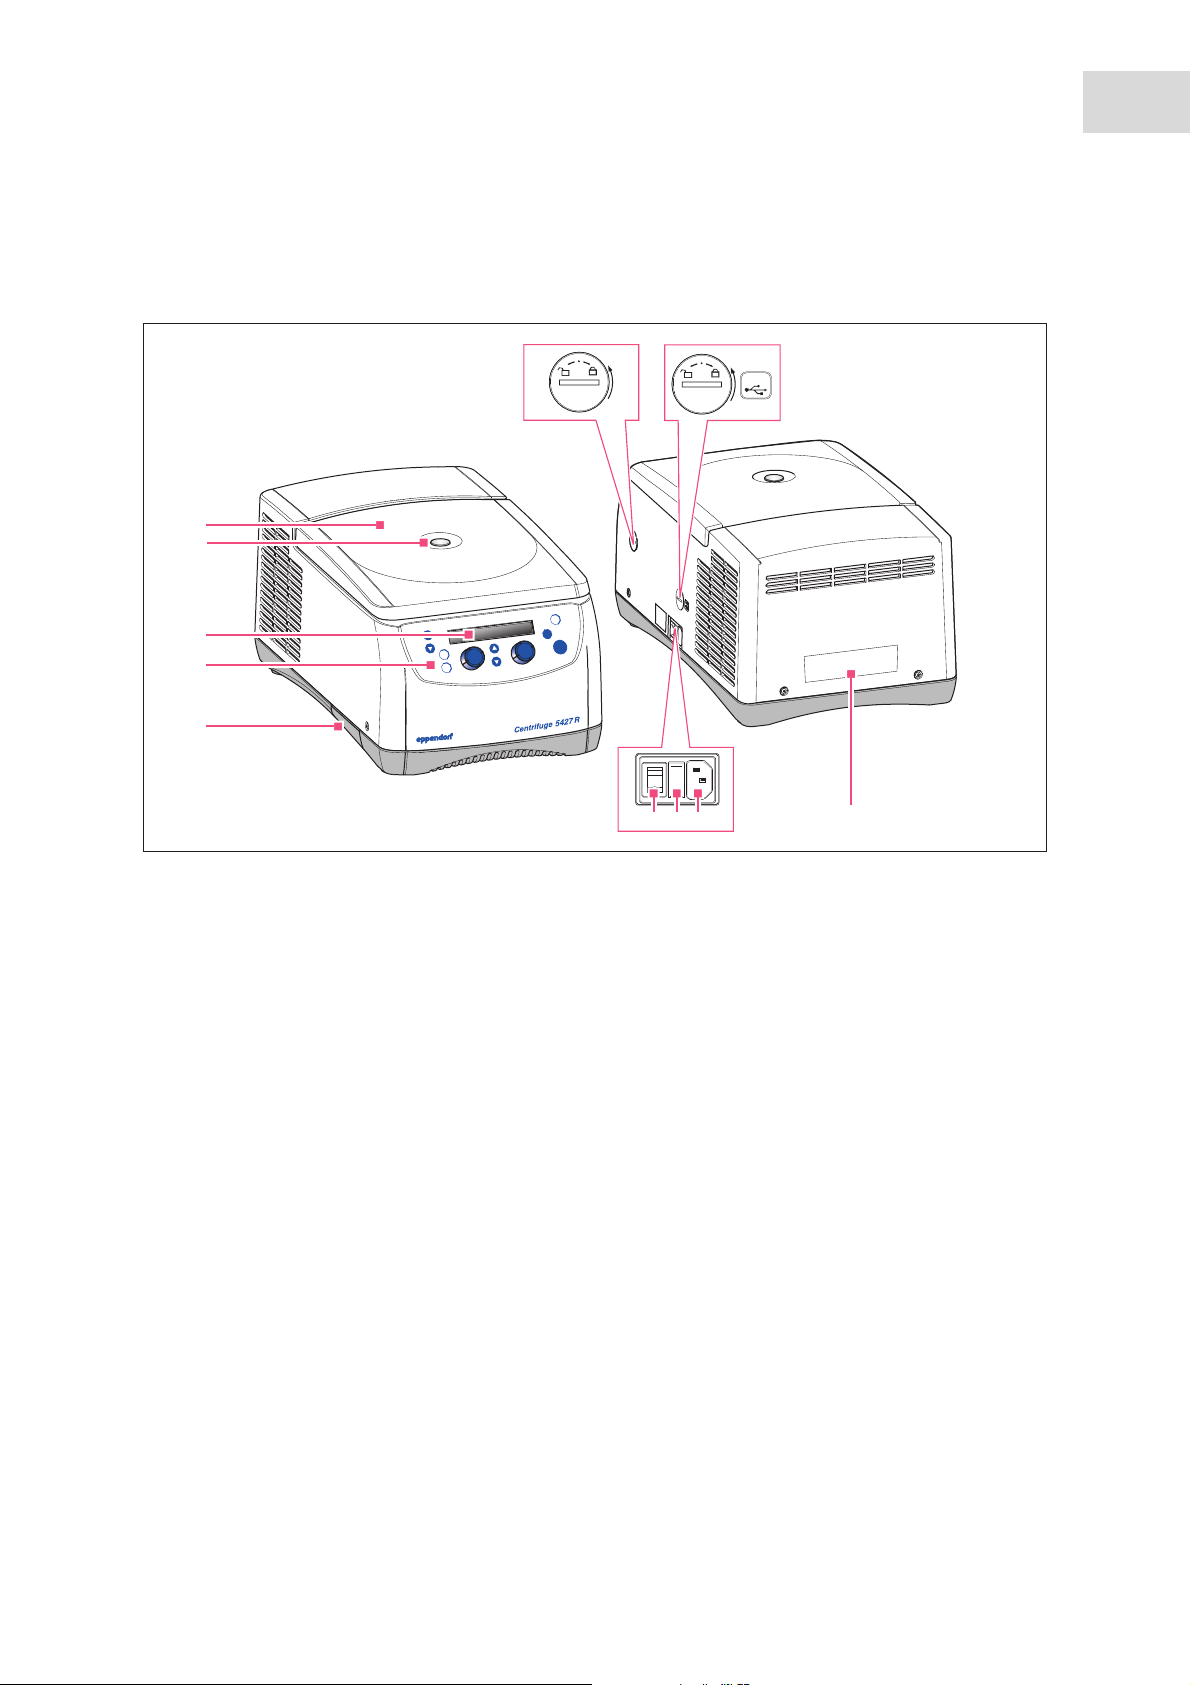
Abb. 2-1: Front and rear view of the Centrifuge 5427 R
Product description
Centrifuge 5427 R
English (EN)
7
Fig. 2-1: Front and rear view of the Centrifuge 5427 R
1 Centrifuge lid
2 Monitoring glass
Visual control for rotor stop or speed control
option using stroboscope
3Display
Display of centrifugation parameters and device
settings (see Fig. 5-2 on p. 24)
4 Control panel
Keys and dials for operating centrifuge (see
Fig. 5-1 on p. 23)
5 Condensation water tray (only)
7USB port
Only for Technical Service: interfaces for error
analyses and software updates
8 Mains/power switch
Switch for switching the device on (I) and off (0)
9Fuse holder
10 Power connection socket
Connection for supplied power cable
11 Name plate
6 Emergency release
(see p. 44)
Page 8

Product description
Centrifuge 5427 R
8
English (EN)
2.2 Delivery package
Quant
ity
1- - See chapter Ordering Information for corresponding device
1 5301 850.249 022654403 4.0 A (230 V), 2 pieces
or 5427 850.341 022654381 8.0 AT UL (120 V/100 V), 2 pieces
or 5811 352.006 022664107 10.0 AT UL (100 V), 2 pieces
1 5416 301.001 022634305 Standard
1- - Mains power cable
1 5409 850.083 Tray for condensation water
1 5409 900.021 5409900021 Languages: EN, DE, FR, ES, IT, PT
1 5409 900.030 5409900030 Languages: DA, FI, EL, NL, SV (only 230 V devices)
Order no.
(International)
Order no.
(North America)
Description
Centrifuge 5427 R
version, equipment and order number
Fuse
Rotor key
Operating Manual Centrifuge 5427 R
2.3 Features
The high-performance Centrifuge 5427 R has a capacity of 48 × 2 mL and maximally reaches 25 001 × g
resp. maximally 16 220 rpm. You can select from 9 different rotors to centrifuge the following tubes for
your various applications:
• Tubes (0.2 mL to 5.0 mL)
•PCR strips
• Microtainers (0.6 ml)
• Spin columns (1.5 mL, 2.0 mL)
The Centrifuge 5427 R has a temperature function for centrifugation at temperatures of-11 °C to 40 °C. The
FastTemp function is used to start a temperature control run without samples in order to quickly bring the
rotor chamber to the set temperature.
Page 9

2.4 Rotors
Eppendorf centrifuges may only be operated with rotors that are intended for use with the
corresponding centrifuge.
Only use rotors which are marked with the name of the centrifuge (e.g., 5427 R).
2.4.1 Rotor FA-45-12-17
Max. g-force: 20 598 × g
Rotor FA-45-12-17
Aerosol-tight fixed-angle rotor
for 12 reaction tubes
Vessels Vessel Adapters Adapter base Max. g-force:
Capacity Order no.
(international)
Vessels per
adapter/rotor
Vessel – – 20 598 × g
5 mL Ø 17 mm 14 000 rpm
-/12 9.4 cm
Max. speed: 14 000 rpm
Max. load (adapter, tube
and contents):
Tube diameter Max. speed
Product description
Centrifuge 5427 R
English (EN)
12 × 9.5 g
Centrifugation radius
9
Vessel
1.5 mL/2.0 mL Ø 11 mm 14 000 rpm
1/12 8.0 cm
HPLC vessel
1/12 7.4 cm
Cryo tube
1.0 mL – 2.0 mL Ø 13 mm 14 000 rpm
1/12 8.3 cm
5820 768.002
5820 770.007
5820 769.009
open 17 530 × g
flat 16 215 × g
Ø 11 mm 14 000 rpm
flat 18 188 × g
Page 10
10
Product description
Centrifuge 5427 R
English (EN)
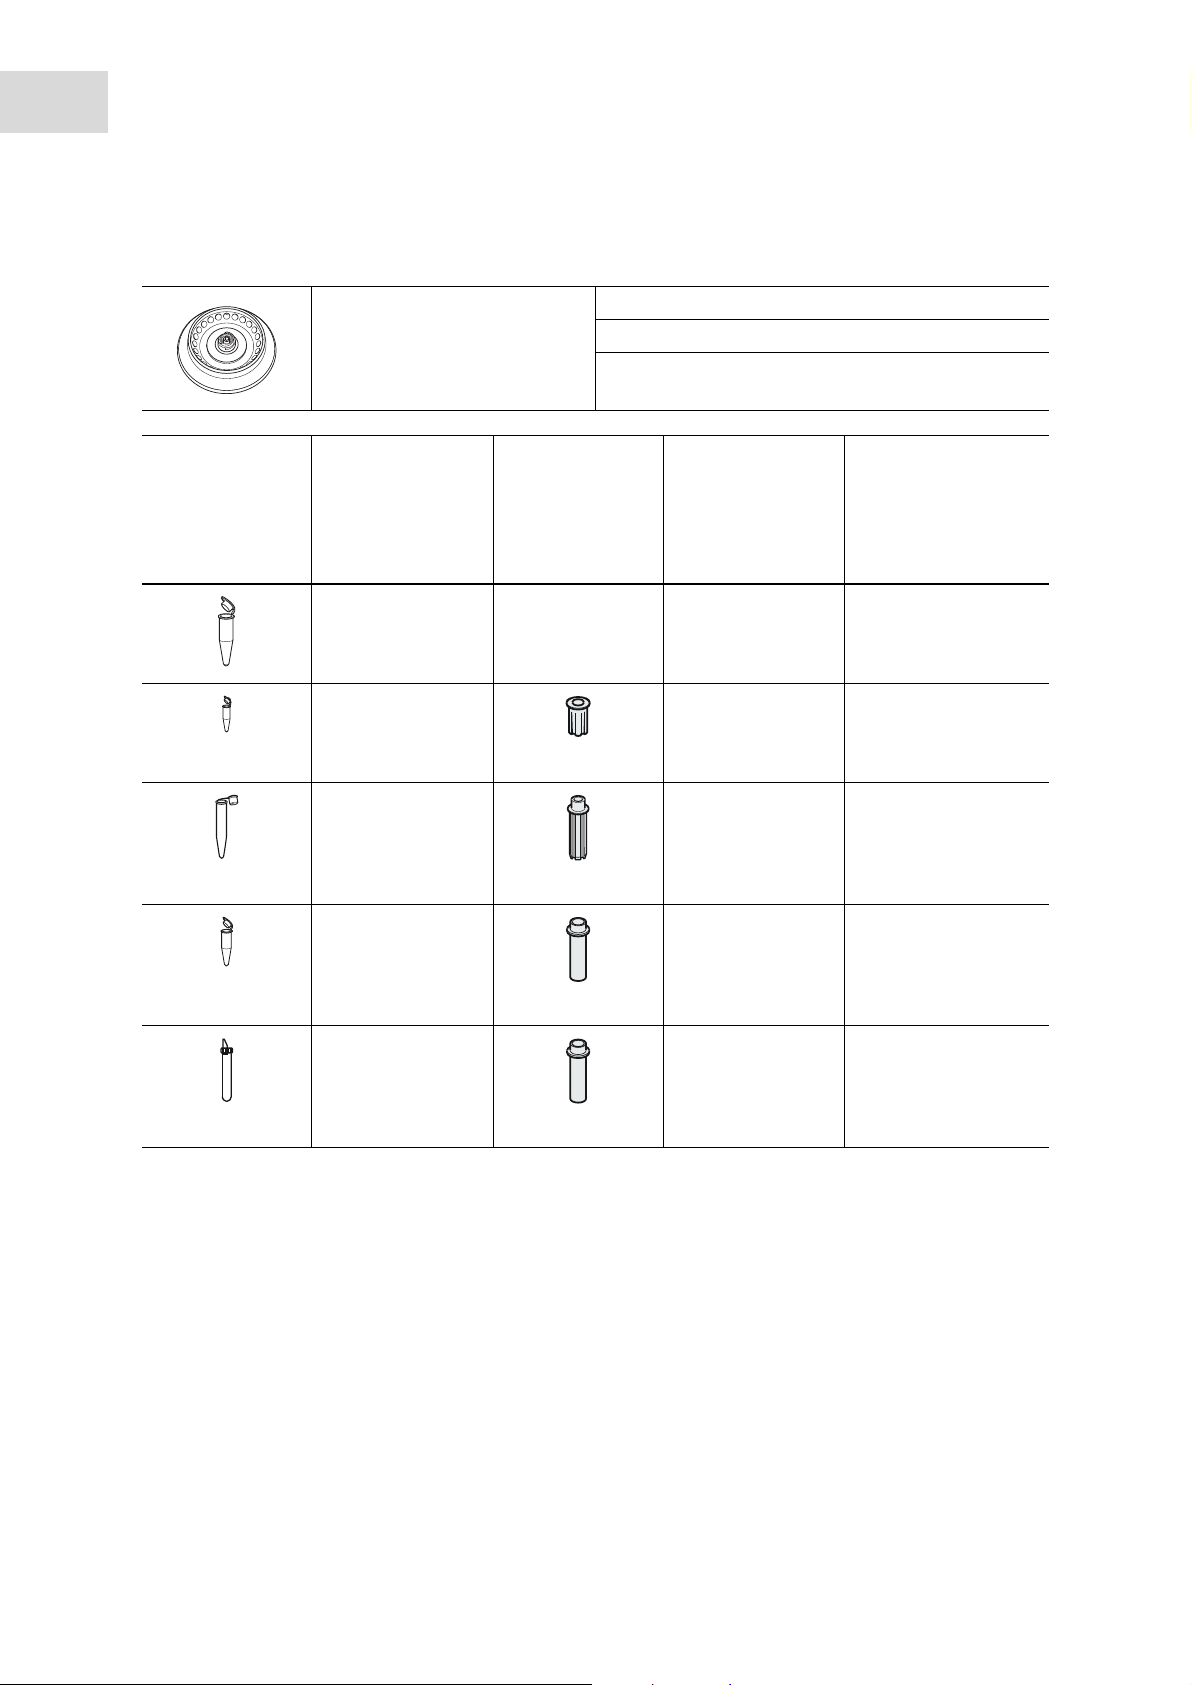
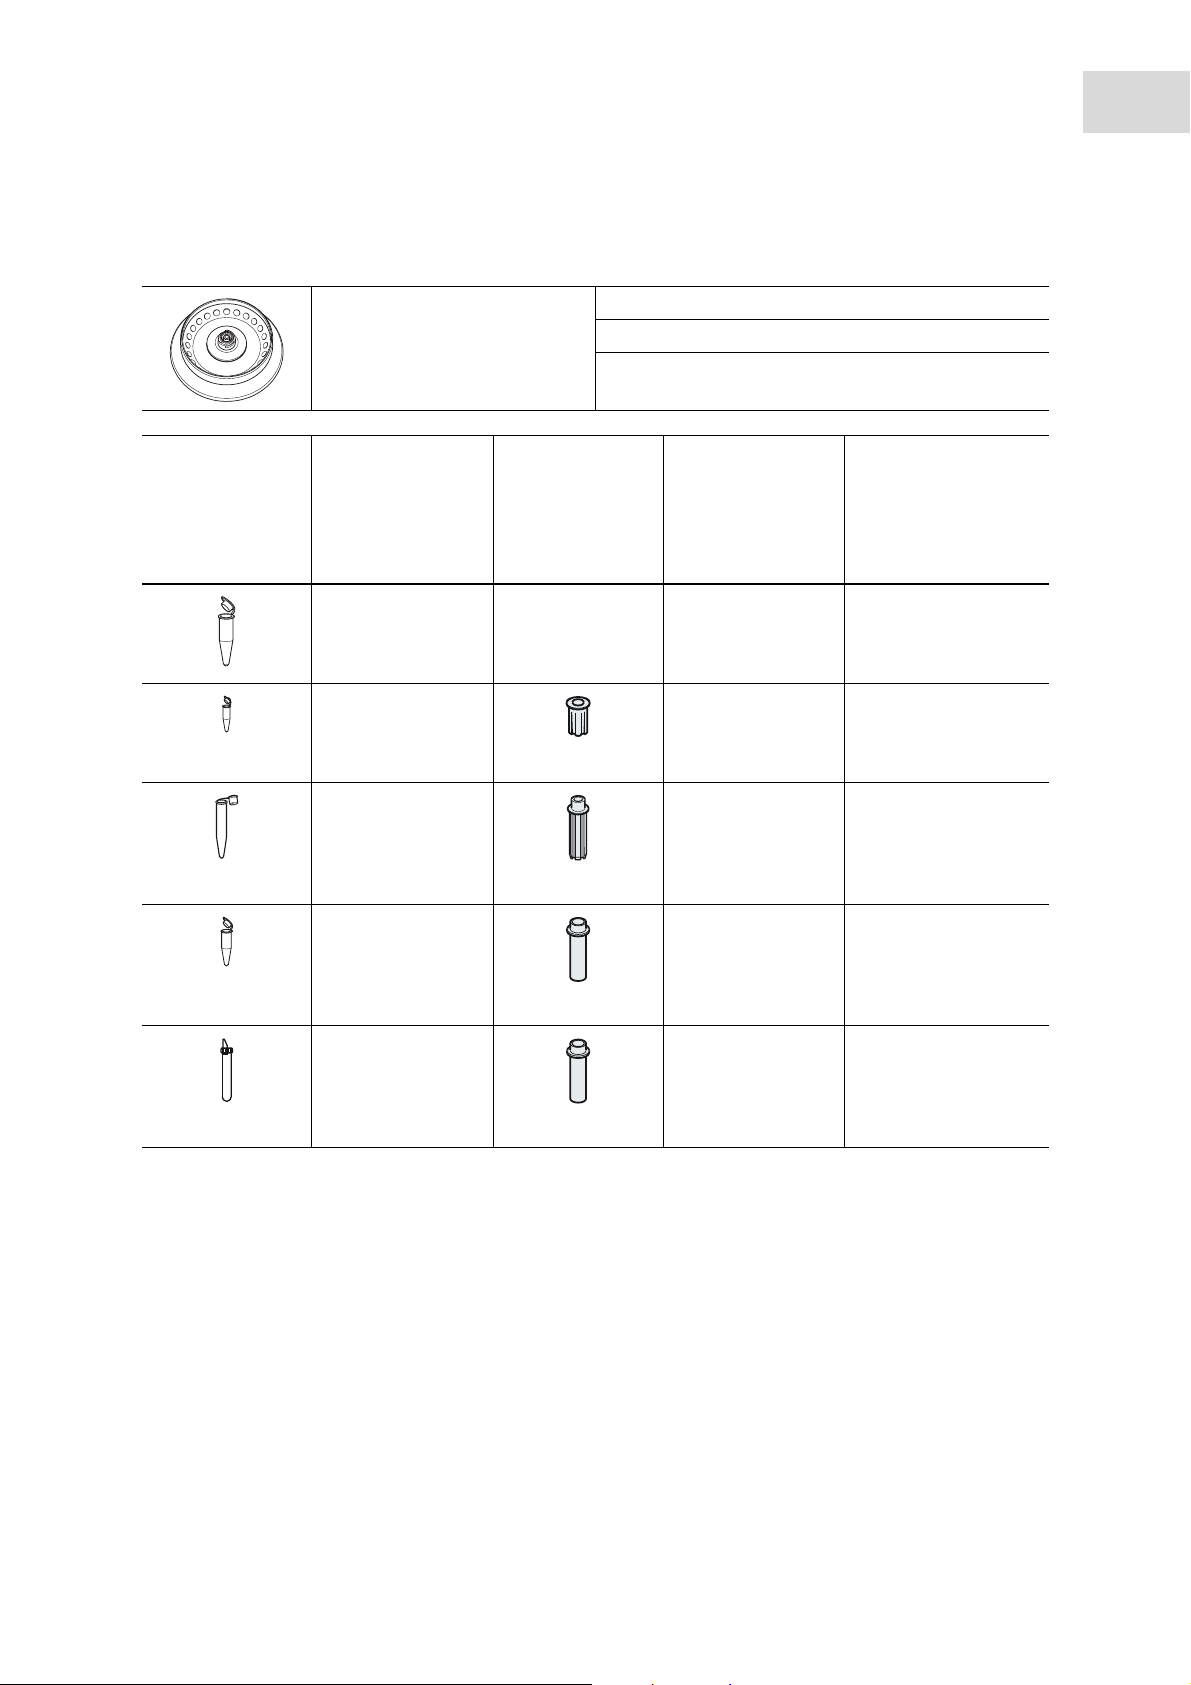
2.4.2 Rotor FA-45-24-11
Max. g-force: 25 001 × g
Rotor FA-45-24-11
Aerosol-tight fixed-angle rotor
for 24 tubes
Vessels Vessel Adapters Adapter base Max. g-force:
Capacity Order no.
(international)
Vessels per
adapter/rotor
Vessel – – 25 001 × g
1.5 mL/2.0 mL Ø 11 mm 16 220 rpm
-/24 8.5 cm
PCR tube
0.2 mL Ø 6 mm 16 220 rpm
1/24 6.4 cm
Vessel
0.4 mL Ø 6 mm 16 220 rpm
1/24 8.5 cm
Vessel
0.5 mL Ø 8 mm 16 220 rpm
1/24 7.4 cm
Microtainers
0.6 mL Ø 8 mm 16 220 rpm
1/24 8.5 cm
5425 715.005
5425 717.008
5425 716.001
5425 716.001
Max. speed: 16 220 rpm
Max. load (adapter, tube
and contents):
Tube diameter Max. speed
conical 18 825 × g
conical 25 001 × g
open 21 766 × g
open 25 001 × g
24 × 3.75 g
Centrifugation radius
Page 11
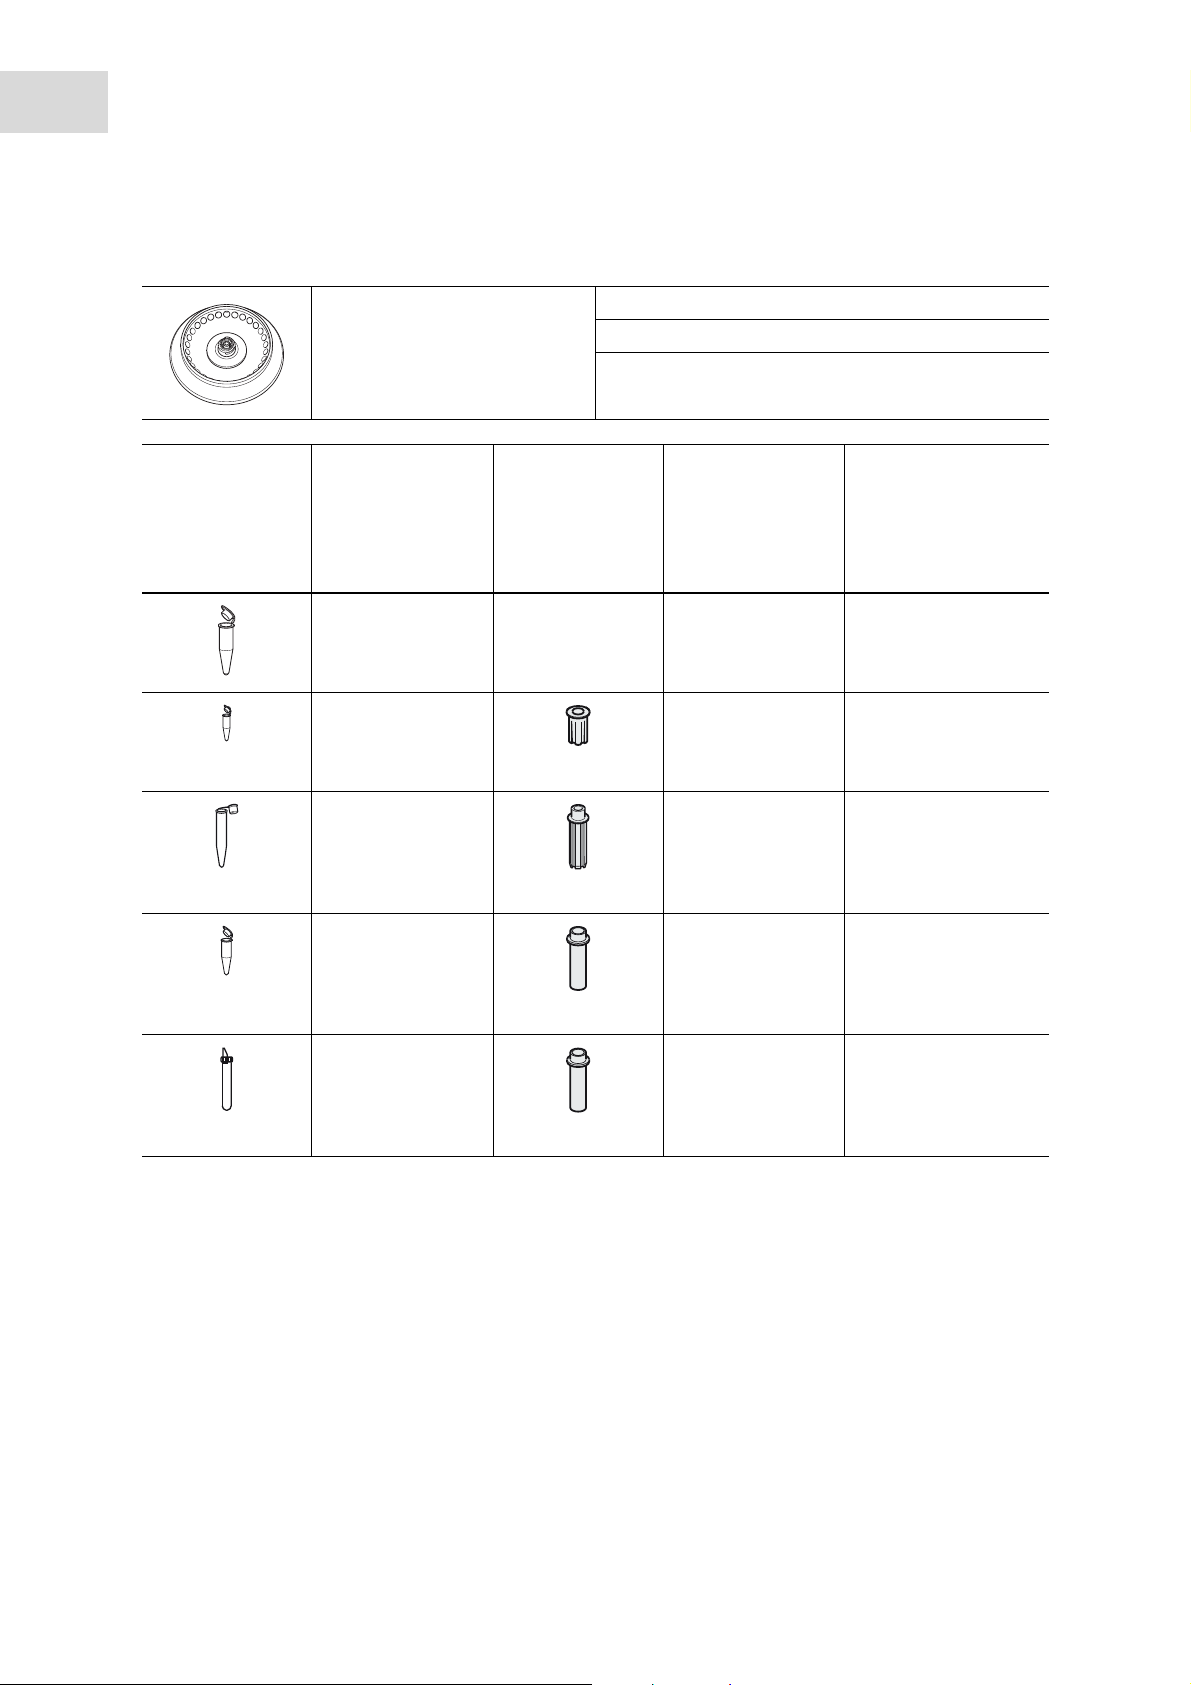
2.4.3 Rotor FA-45-24-11-Kit
Max. g-force: 19 090 × g
Rotor FA-45-24-11-Kit
Aerosol-tight fixed-angle rotor
for 24 tubes
Vessels Vessel Adapters Adapter base Max. g-force:
Capacity Order no.
(international)
Vessels per
adapter/rotor
Vessel – – 19 090 × g
1.5 mL/2.0 mL Ø 11 mm 13 200 rpm
-/24 9.8 cm
PCR tube
0.2 mL Ø 6 mm 13 200 rpm
1/24 7.7 cm
Vessel
0.4 mL Ø 6 mm 13 200 rpm
1/24 9.8 cm
Vessel
0.5 mL Ø 8 mm 13 200 rpm
1/24 8.7 cm
Microtainers
0.6 mL Ø 8 mm 13 200 rpm
1/24 9.8 cm
5425 715.005
5425 717.008
5425 716.001
5425 716.001
Max. speed: 13 200 rpm
Max. load (adapter, tube
and contents):
Tube diameter Max. speed
conical 15 000 × g
conical 19 090 × g
open 16 948 × g
open 19 090 × g
Product description
Centrifuge 5427 R
English (EN)
24 × 3.75 g
Centrifugation radius
11
Page 12
12
Product description
Centrifuge 5427 R
English (EN)
2.4.4 Rotors FA-45-30-11 and F-45-30-11
Rotor FA-45-30-11
Aerosol-tight fixed-angle rotor
for 30 tubes
Rotor F-45-30-11
Fixed-angle rotor for 30 tubes
Vessels Vessel Adapters Adapter base Max. g-force:
Capacity Order no.
(international)
Vessels per
adapter/rotor
Vessel – – 20 817 × g
1.5 mL/2.0 mL Ø 11 mm 14 000 rpm
-/30 9.5 cm
PCR tube
0.2 mL Ø 6 mm 14 000 rpm
1/30 7.4 cm
Vessel
0.4 mL Ø 6 mm 14 000 rpm
1/30 9.5 cm
Vessel
0.5 mL Ø 8 mm 14 000 rpm
1/30 8.4 cm
Microtainers
0.6 mL Ø 8 mm 14 000 rpm
1/30 9.5 cm
5425 715.005
5425 717.008
5425 716.001
5425 716.001
Max. g-force: 20 817 × g
Max. speed: 14 000 rpm
Max. load (adapter, tube
and contents):
Tube diameter Max. speed
conical 16 215 × g
conical 20 817 × g
open 18 407 × g
open 20 817 × g
30 × 3.75 g
Centrifugation radius
Page 13

2.4.5 Rotors FA-45-48-11 and F-45-48-11
Product description
Centrifuge 5427 R
English (EN)
13
FA-45-48-11 rotor
Aerosol-tight fixed-angle rotor
for 48 tubes
Rotor F-45-48-11
Fixed-angle rotor for 48 tubes
Vessels Vessel Adapters Adapter base Max. g-force:
Capacity Order no.
(international)
Vessels per
adapter/rotor
Vessel – – 18 213 × g
1.5 mL/2.0 mL Ø 11 mm 12 700 rpm
-/48 10.1 cm
PCR tube
0.2 mL Ø 6 mm 12 700 rpm
1/48 8 cm
Vessel
0.4 mL Ø 6 mm 12 700 rpm
1/48 10.1 cm
Vessel
0.5 mL Ø 8 mm 12 700 rpm
1/48 9 cm
Microtainers
0.6 mL Ø 8 mm 12 700 rpm
1/48 10.1 cm
5425 715.005
5425 717.008
5425 716.001
5425 716.001
Max. g-force: 18 213 × g (outer ring)
16 049 × g (inner ring)
Max. speed: 12 700 rpm
Max. load (adapter, tube
and contents):
Tube diameter Max. speed
conical 14 426 × g
conical 18 213 × g
open 16 229 × g
open 18 213 × g
48 × 3.75 g
Outer ring
Inner ring
Centrifugation radius
Outer ring
Inner ring
16 049 × g
8.9 cm
12 262 × g
6.8 cm
16 049 × g
8.9 cm
14 065 × g
7.8 cm
16 049 × g
8.9 cm
Page 14
14
Product description
Centrifuge 5427 R
English (EN)
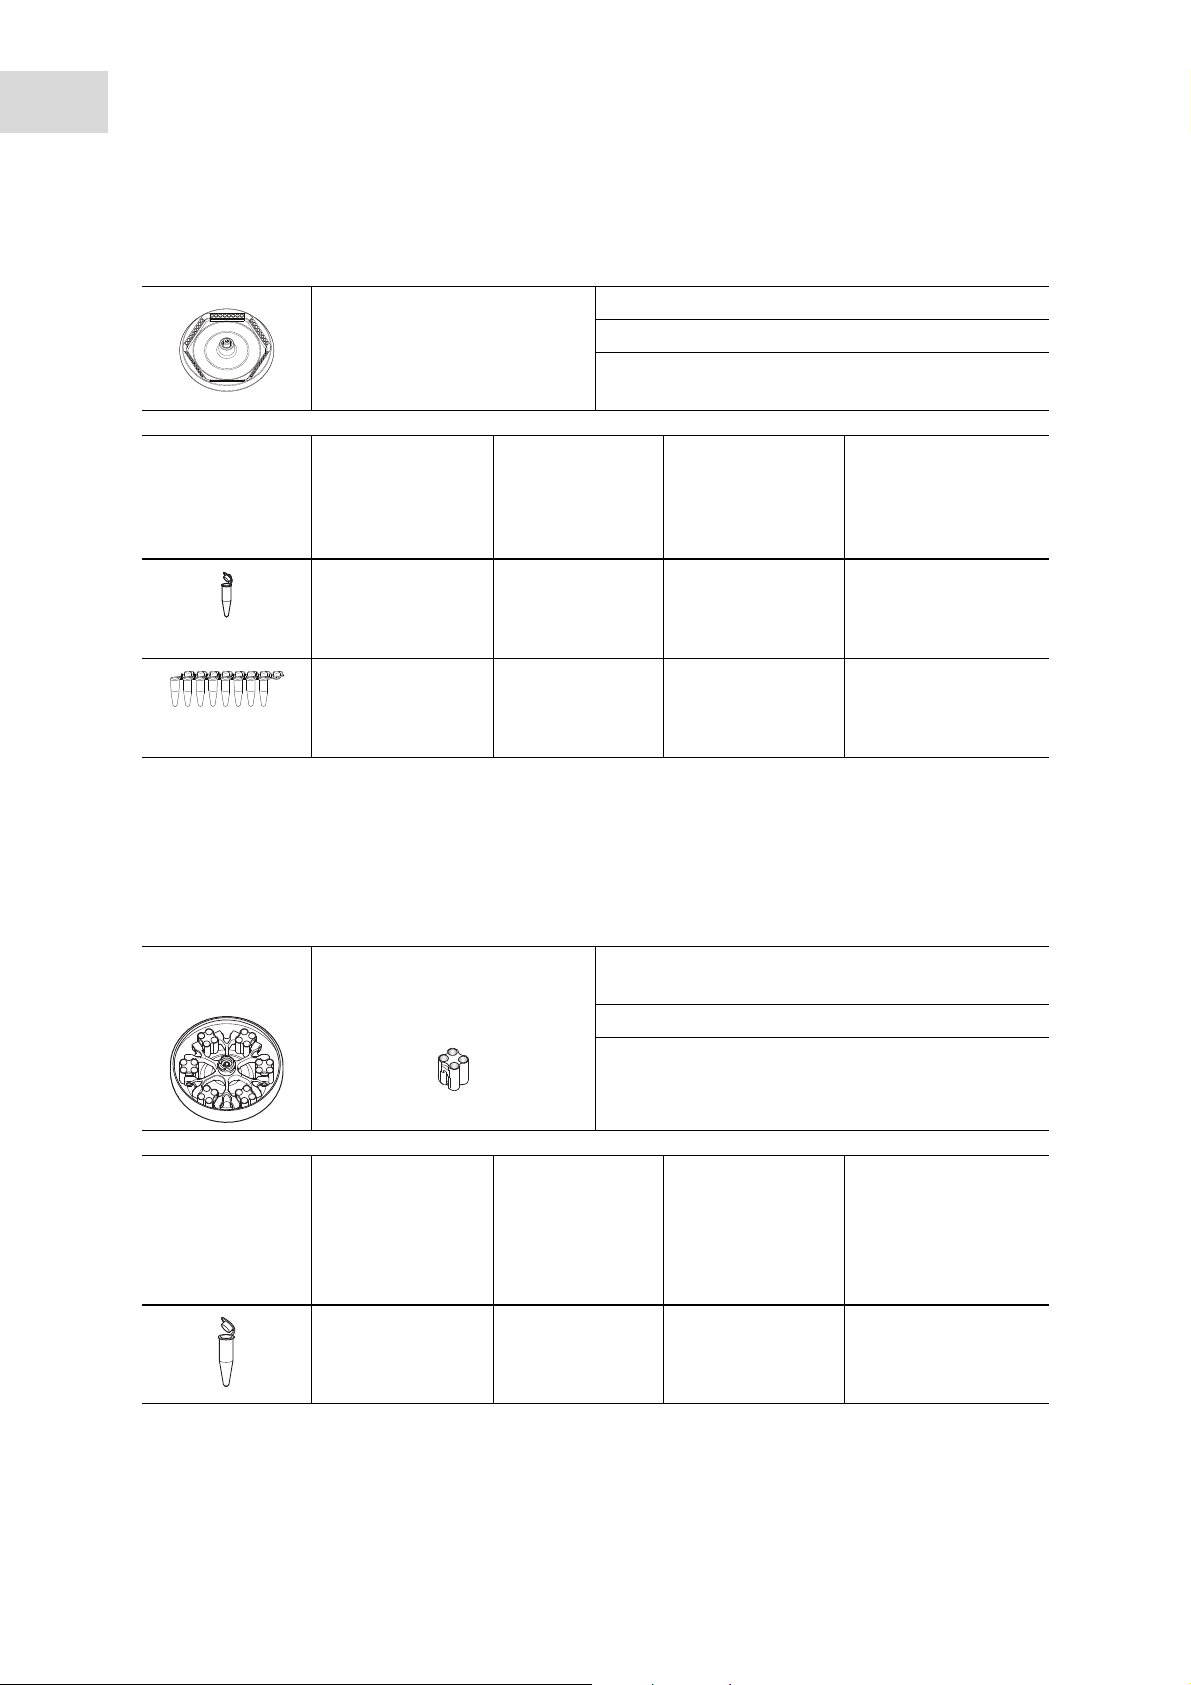
2.4.6 Rotor F-45-48-5-PCR
Rotor F-45-48-5-PCR
Fixed-angle rotor for 48 PCR
tubes
Tubes Tube Adapter Adapter base Max. g-force:
Capacity Tube diameter Max. speed
Tubes per adapter/
rotor
0.2 mL Ø 6 mm 10 500 rpm
–/48 9.5 cm
PCR strips – conical 11 710 × g
0.2 mL Ø 6 mm 10 500 rpm
–/6 × 8 9.5 cm
Max. g-force: 11 710 × g
Max. speed: 10 500 rpm
Max. load (tube and
contents):
– conical 11 710 × g
2.4.7 Rotor S-24-11-AT
This rotor is only intended for use with 1.5 mL/2.0 mL tubes.
The following tubes must not be used in this rotor:
• Adapters for 0.2 mL, 0.4 mL, 0.5 mL and 0.6 mL tubes and the corresponding tubes.
•Spin columns
48 × 0.43 g
Centrifugation radius
Rotor S-24-11-AT Bucket for tubes:
4 × 1.5 mL/2.0 mL
Vessels Vessel Adapters Adapter base Max. g-force:
Capacity Order no.
(international)
Vessels per
adapter/rotor
Vessel – – 16 049 × g
1.5 mL/2.0 mL Ø 11 mm 12 700 rpm
-/24 8.9 cm
Max. g-force: 16 049 × g
Max. speed: 12 700 rpm
Max. load per bucket (tube
and contents):
Tube diameter Max. speed
4 × 3.75 g
Centrifugation radius
Page 15

Safety
Centrifuge 5427 R
English (EN)
3Safety
3.1 Intended use
The Centrifuge 5427 R is intended exclusively for indoor use and for separating aqueous solutions and
suspensions of various densities in approved test tubes.
3.2 User profile
This device may only be operated by trained specialist staff. They must have carefully read the operating
manual and be familiar with the function of the device.
3.3 Application limits
3.3.1 Declaration concerning the ATEX directive (94/9/EC)
DANGER! Risk of explosion.
Do not operate the device in areas where work is completed with explosive substances.
Do not use this device to process any explosive or highly reactive substances.
Do not use this device to process any substances which may generate an explosive
atmosphere.
15
Due to its design and the environmental conditions inside the device, the Centrifuge 5427 R is not suitable
for use in a potentially explosive atmosphere.
The device only must be used in a safe environment, such as the open environment of a ventilated
laboratory or fume hood. The use of substances which could create a potentially explosive atmosphere is
not permitted. The final decision on the risks associated with the use of these types of substances is the
responsibility of the user.
3.3.2 Maximum service life for accessories
WARNING! Risk of injury from chemically or mechanically damaged accessories.
Even minor scratches and cracks can lead to serious internal material damage.
Protect all accessory parts from mechanical damage.
Inspect the accessories for damage before each use. Replace any damaged accessories.
Do not use rotors, rotor lids or buckets with signs of corrosion or mechanical damage (e.g.,
deformations).
Do not use any accessories whose maximum service life has been exceeded.
CAUTION! Risk of injury due to chemically damaged rotor lids or caps.
Transparent rotor lids or caps made from PC, PP or PEI may lose their strength under the
impact of organic solvents (e.g., phenol, chloroform).
If rotor lids or caps have come into contact with organic solvents, they should be cleaned
immediately.
Regularly check the rotor lids and caps for damages and cracks.
Immediately replace rotor lids or caps that have cracks or milky stains.
Page 16

16
Safety
Centrifuge 5427 R
English (EN)
Beginning with the first commissioning, the following rotors including the corresponding buckets, carriers
and rotor lids have a maximum service life of 7 years or of the number of cycles specified in the table
(depending on what occurs first).
Rotor/accessories Maximum service from commissioning onward
S-24-11-AT (5427 R/5430/5430 R) 75,000 cycles 7 years
FA-45-48-11
(5427 R/5430/5430 R/5804/5804 R/5810/5810 R)
FA-45-12-17 (Centrifuge 5427 R) 75,000 cycles 7 years
QuickLock rotor lid 3 years
Seals of the QuickLock rotor lid 50 autoclaving cycles –
Rotor lid or caps made of polycarbonate ( PC),
polypropylene (PP) or polyetherimide (PEI)
Adapter – 1 year
75,000 cycles 7 years
50 autoclaving cycles 3 years
For all other rotors and rotor lids of this centrifuge there is no service life limit as long as the following
requirements are met:
•Proper use,
• Recommended maintenance
• Undamaged condition
The date of manufacture is stamped on the rotors in the format 03/10 (= March 2010) or on the inside of the
plastic rotor lids in the form of a clock .
To ensure aerosol tightness, the following applies:
• Replace aerosol-tight rotor lids and caps after 50 autoclaving cycles.
• Replace the seal of QuickLock rotor lids after 50 autoclaving cycles.
3.4 Information on product liability
In the following cases, the designated protection of the device may be compromised. Liability for any
resulting property damage or personal injury is then transferred to the operator:
• The device is not used in accordance with the operating manual.
• The device is used outside of its intended use.
• The device is used with accessories or consumables which are not recommended by Eppendorf.
• The device is maintained or repaired by people not authorized by Eppendorf.
• The user makes unauthorized changes to the device.
Page 17

Centrifuge 5427 R
English (EN)
3.5 Warnings for intended use
Read the operating manual and observe the following general safety instructions before using the
Centrifuge 5427 R.
3.5.1 Personal injury or damage to the equipment
WARNING! Electric shock due to damage to device or mains cable.
Only switch on the device if the device and mains cable are undamaged.
Only use devices that have been properly installed or repaired.
In case of danger, disconnect the device from the mains supply by pulling the power plug
from the device or the mains socket or, by using the isolating device intended for this
purpose (e.g. emergency stop switch in the laboratory).
WARNING! Lethal voltages inside the device.
Ensure that the housing is always closed and undamaged so that no parts inside the device
can be contacted by accident.
Do not remove the housing of the device.
Do not allow any liquids to penetrate the inside of the housing.
Do not allow the device to be opened by anyone except service personnel who have been
specifically authorized by Eppendorf.
Safety
17
WARNING! Risk from incorrect supply voltage
Only connect the device to voltage sources which correspond to the electrical
requirements on the name plate.
Only use sockets with a protective earth (PE) conductor and suitable power cable.
WARNING! Damage to health due to infectious liquids and pathogenic germs.
When handling infectious liquids and pathogenic germs, observe the national regulations,
the biological security level of your laboratory, the material safety data sheets, and the
manufacturer's application notes.
Use aerosol tight sealing systems for the centrifugation of these substances.
When working with pathogenic germs belonging to a higher risk group, more than one
aerosol-tight bioseal must be used.
Wear personal protective equipment.
For full instructions regarding the handling of germs or biological material of risk group II
or higher, please refer to the "Laboratory Biosafety Manual" (Source: World Health
Organization, current edition of the Laboratory Biosafety Manual).
WARNING! Risk of injury when opening or closing the centrifuge lid.
There is a risk of crushing your fingers when opening or closing the centrifuge lid.
When opening or closing the centrifuge lid, do not reach between the lid and device or into
the latching mechanism of the lid.
Always open the centrifuge lid completely to prevent it from falling.
Page 18

18
Safety
Centrifuge 5427 R
English (EN)
CAUTION! Poor safety due to incorrect accessories and spare parts.
The use of accessories and spare parts other than those recommended by Eppendorf may
impair the safety, functioning and precision of the device. Eppendorf cannot be held liable or
accept any liability for damage resulting from the use of incorrect or non-recommended
accessories and spare parts, or from the improper use of such equipment.
Only use accessories and original spare parts recommended by Eppendorf.
NOTICE! Damage to device due to spilled liquids.
1. Switch off the device.
2. Disconnect the device from the power supply.
3. Carefully clean the device and the accessories in accordance with the cleaning and
disinfection instructions in the operating manual.
4. If a different cleaning and disinfecting method is to be used, contact Eppendorf AG to
ensure that the intended method will not damage the device.
NOTICE! Damage to electronic components due to condensation.
Condensate can form in the device after it has been moved from a cool environment to a
warmer environment.
After installing the device, wait for at least 4 h. Only then connect the device to the mains
power supply.
3.5.2 Incorrect handling of the centrifuge
NOTICE! Damage from knocking against or moving the device during operation.
If the rotor bangs against the rotor chamber wall, it will cause considerable damage to the
device and rotor.
Do not move or knock against the device during operation.
3.5.3 Incorrect handling of the rotors
WARNING! Risk of injury from improperly attached rotors and rotor lids.
Only centrifuge with rotor and rotor lid firmly tightened.
If unusual noises occur when the centrifuge starts, the rotor or the rotor lid may not be
properly secured. Immediately press the start/stop key to stop centrifuging.
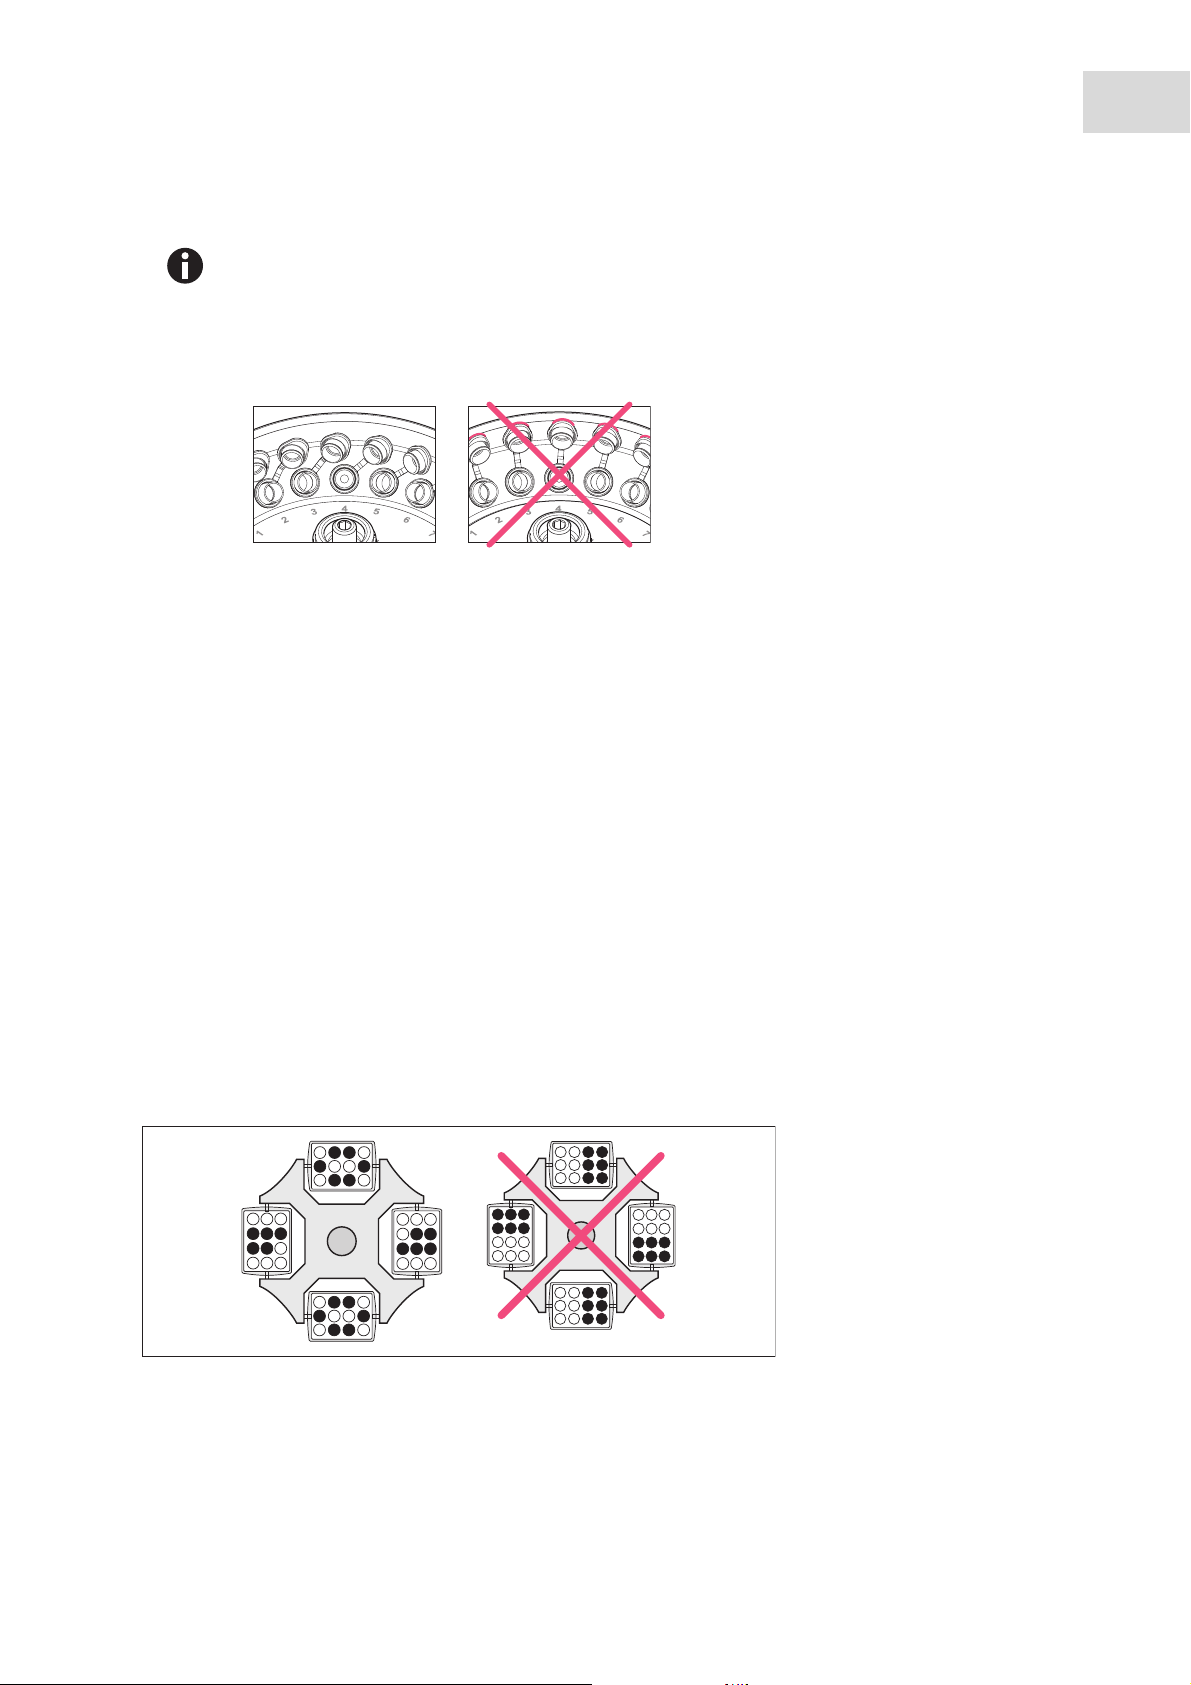
CAUTION! Risk of injury due to asymmetric loading of a rotor.
Load rotors symmetrically with identical tubes.
Only load adapters with suitable tubes.
Always use the same type of tubes (weight, material/density and volume).
Check symmetric loading by balancing the adapters and tubes used with scales.
Page 19

Safety
Centrifuge 5427 R
English (EN)
CAUTION! Risk of injury from overloaded rotor.
The Centrifuge 5427 R is designed for the centrifugation of material with a max. density of 1.2
g/mL at maximum speed and filling volume and/or load.
Do not exceed the maximum load of the rotor.
NOTICE! Damage to rotors from aggressive chemicals.
Rotors are high-quality components which withstand extreme stresses. This stability can be
impaired by aggressive chemicals.
Avoid using aggressive chemicals, including strong and weak alkalis, strong acids,
solutions with mercury, copper and other heavy metal ions, halogenated hydrocarbons,
concentrated saline solutions and phenol.
Due to the manufacturing process, color variations may occur on rotors marked "coated".
These color variations do not effect service life or resistance to chemicals.
NOTICE! If handled incorrectly, the rotor can fall over.
The rotor can fall over if the buckets are used as a handle.
Remove the buckets before inserting and/or removing a swing-bucket rotor.
Always use both hands to carry the rotor cross.
19
3.5.4 Extreme strain on the centrifuging tubes
CAUTION! Risk of injury from overloaded tubes.
Note the loading limits specified by the tube manufacturer.
Only use tubes which are approved by the manufacturer for the required rcf.
NOTICE! Risk from damaged tubes.
Damaged tubes must not be used, as this could cause further damage to the device and the
accessories and loss of the samples.
Before use, visually check all of the tubes for damage.
NOTICE! Risk from open tube lids.
Open tube lids can brake off during centrifugation and damage the rotor and the centrifuge.
Carefully seal all tube lids before centrifuging.
Exception: Note the information on the centrifugation of spin columns in the rotor
FA-45-24-11-Kit (see Preparing for centrifugation on p. 27).
NOTICE! Hazard to plastic tubes from organic solvents.
The density of plastic tubes is reduced when organic solvents (e.g., phenol, chloroform) are
used, i.e. the tubes could become damaged.
Observe the manufacturer's specifications for chemical resistance of the tubes.
Page 20
20
Safety
Centrifuge 5427 R
English (EN)
3.5.5 Aerosol-tight centrifugation
WARNING! Risk to health due to limited aerosol tightness with incorrect rotor/rotor lid
combination.
Aerosol-tight centrifugation is guaranteed only if the rotors and rotor lids intended for this
purpose are used. The designation of aerosol-tight fixed-angle rotors always starts with
FA.The aerosol-tight rotors and rotor lids of this centrifuge are additionally marked with a red
ring on the rotor and a red rotor lid screw.
Aerosol-tight swing-bucket rotors are marked with AT (aerosol-tight).
For aerosol-tight centrifugation, always simultaneously use rotors and rotor lids which are
marked as aerosol-tight in the centrifuge intended for the corresponding purpose. The
details specifying in which centrifuge you may use the aerosol-tight rotors and rotor lids
can be found on the rotor and, beginning from production date of October 2003, on the
upper side of the rotor lid.
Only use aerosol-tight rotor lids in combination with rotors which are marked on the rotor
lid.
WARNING! Damage to health as a result of limited aerosol tightness and incorrect usage.
Autoclaving, mechanical stresses and contamination by chemicals or other aggressive
solvents can impair the aerosol-tightness of the rotors and rotor lids.
Check the integrity of the seals of the aerosol-tight rotor lids or caps before each use.
Only use aerosol-tight rotor lids or caps if the seals are undamaged and clean.
Lightly grease the threads of the rotor lid screw with pivot grease after every proper
autoclaving (121 °C, 20 min.) (int. order no. Int. 5810 350.050, North America
022634330).
Replace aerosol-tight rotor lids and caps after 50autoclaving cycles.
For QuickLock rotor lids, the seal must be replaced after 50 autoclaving cycles.
Never store aerosol-tight rotors or buckets closed.
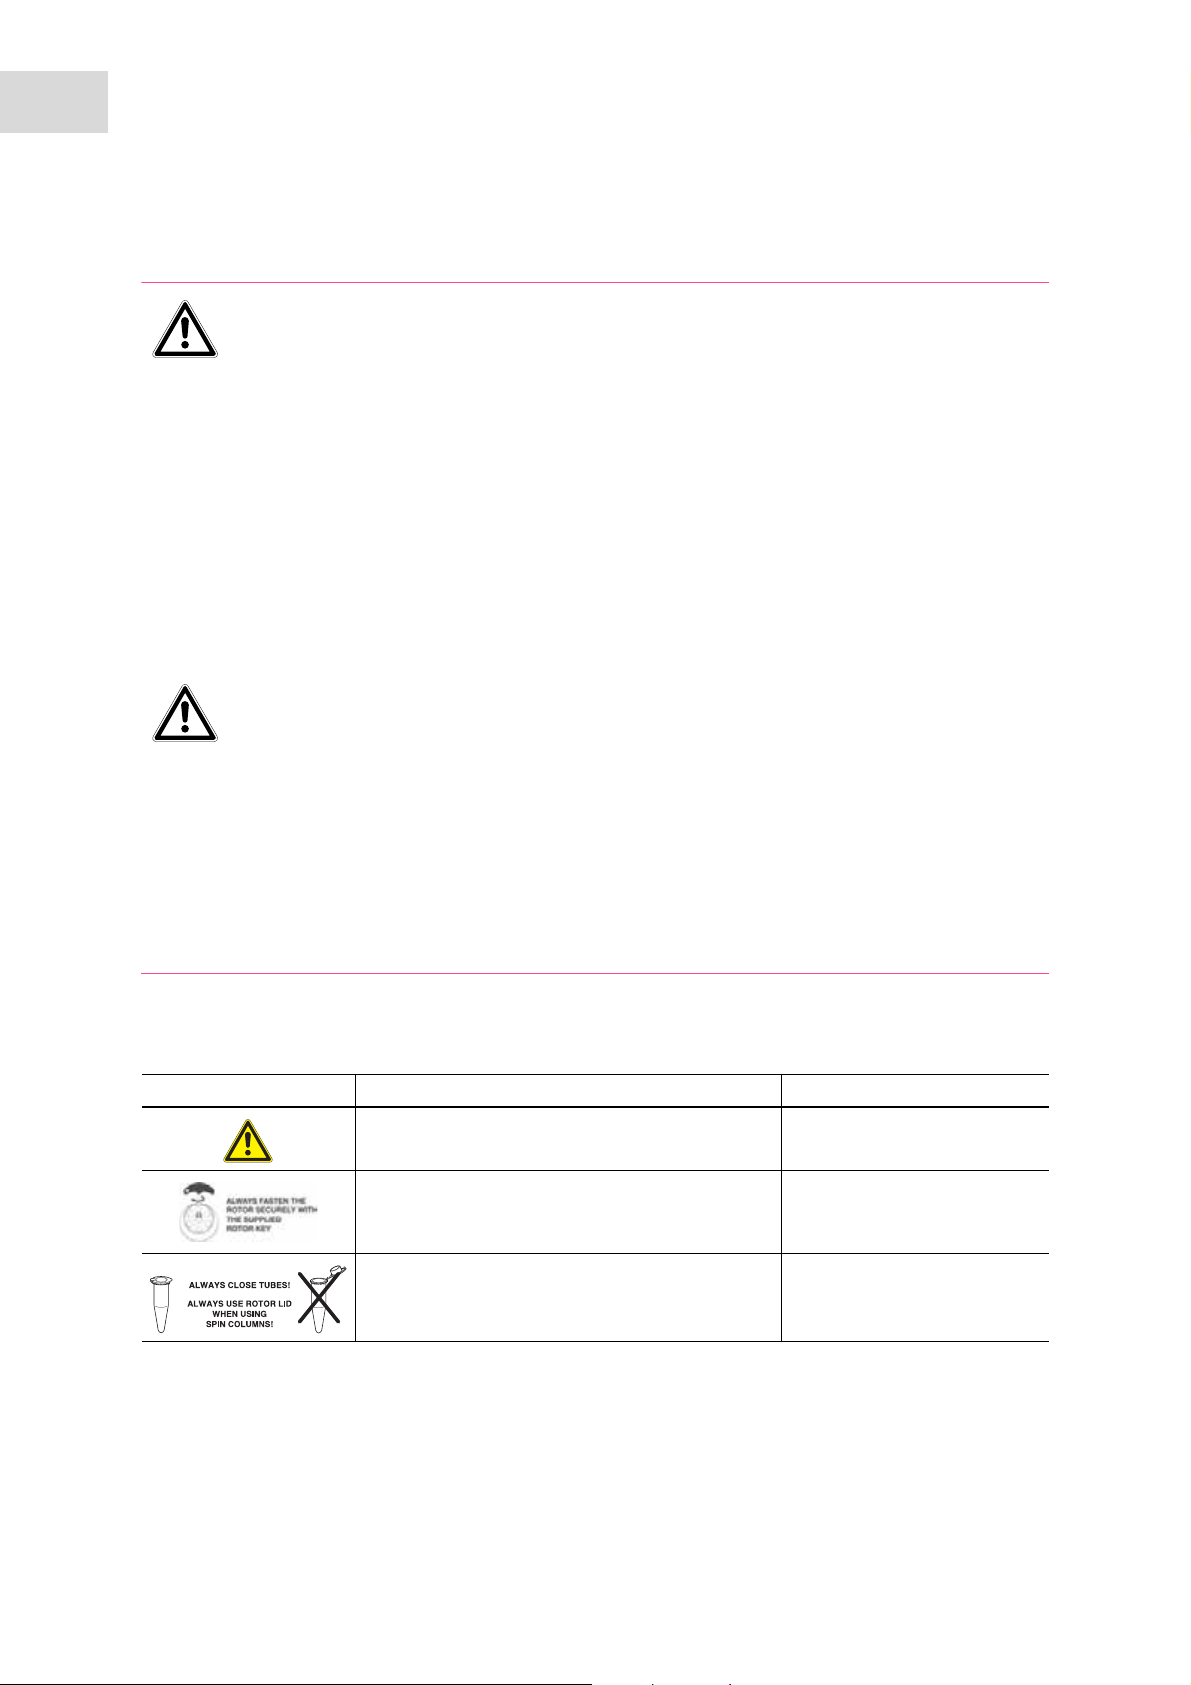
3.6 Safety instructions located on the device
Display Meaning Location
Hazard point Right side of the device
CAUTION
Always tighten the rotor using the supplied rotor
key.
CAUTION
Close all tubes and use a rotor lid.
Top of device, below the
centrifuge lid
Top of device, below the
centrifuge lid
Page 21

4 Installation
4.1 Selecting the location
NOTICE! If an error occurs, the objects in the immediate proximity of the device will be
damaged.
In accordance with recommendations in EN 61010-2-020, leave a safety clearance of
30 cm around the device during operation.
Please remove all materials and objects from this area.
NOTICE! Damage from overheating.
Do not install the device near heat sources (e.g. heating, drying cabinet).
Do not expose the device to direct sunlight.
Ensure unobstructed air circulation. Maintain a clearance of at least 30 cm (11.8 in)
around all ventilation grilles.
Installation
Centrifuge 5427 R
English (EN)
21
Select the location for the device according to the following criteria:
• Suitable power connection as per the name plate (230 V/120 V/100 V).
• Stable, horizontal and resonance-free lab bench.
• A well ventilated environment which is protected from direct sunlight to prevent the device from heating
up more.
4.2 Preparing installation
Prerequisites
The weight of the centrifuge is 30.0 kg (66.14 lb). For unpacking and installation the assistance of another
person is required.
Perform the following steps in the sequence described.
1. Open the box.
2. Remove the accessories.
3. The centrifuge must be lifted from the box by two people.
4. Remove the transport securing device from the sides.
5. Place the device on a suitable lab bench.
Do not use the opening for the condensation water tray as a handle.
6. Remove the plastic sleeve.
Page 22

22
Installation
Centrifuge 5427 R
English (EN)
4.3 Installing the instrument
Prerequisites
The device is on a suitable lab bench.
NOTICE! Damage to electronic components due to condensation.
Condensate can form in the device after it has been moved from a cool environment to a
warmer environment.
After installing the device, wait for at least 4 h. Only then connect the device to the mains
power supply.
NOTICE! Centrifuge 5427 R: compressor damage after improper transport.
Only switch on the centrifuge 4 h after installation.
Perform the following steps in the sequence described.
1. Let the device warm up to ambient temperature.
2. Check that the mains voltage and frequency match the requirements on the device type plate.
3. Connect the centrifuge to the mains and switch it on using the mains/power switch.
• Display is active.
•Lid opens automatically
4. Remove the transport securing device of the lid latch.
5. Remove the transport securing device of the motor shaft.
6. Use the details included in the scope of delivery to check that the delivery is complete.
7. Check all parts for any transport damage. Contact your dealer if any damage is found.
8. Insert the condensation water tray into the holder provided (see Fig. 2-1 on p. 7).
Retain the packaging material and the transport protection device for subsequent transport or
storage. See also the instructions relating to transport (see p. 45).
Page 23
Centrifuge 5427 R
time
speed
temp
1 2
3 5
4
6791010 8
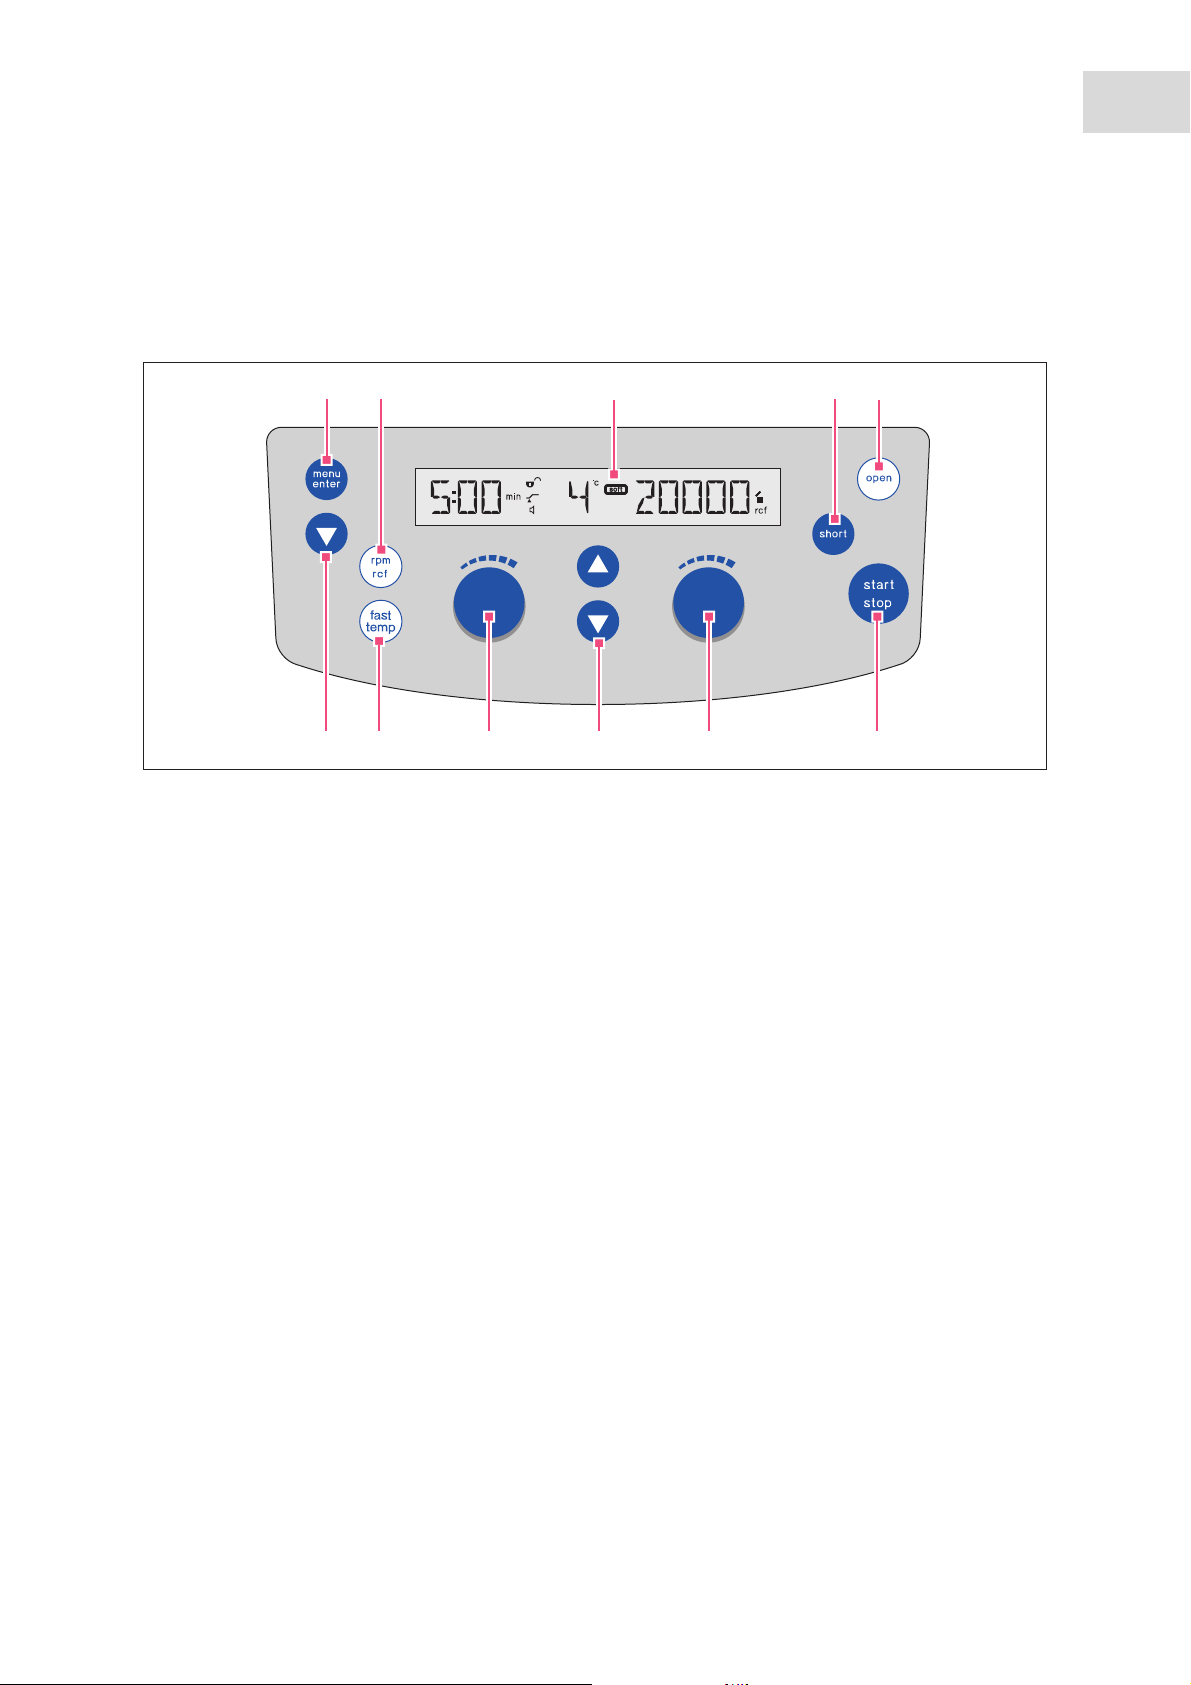
5 Operation
5.1 Overview of operating controls
Before using the Centrifuge 5427 R, familiarize yourself with the display and operating controls.
Abb. 5-1: Operator panel of the Centrifuge 5427 R
Operation
23
English (EN)
Fig. 5-1: Operator panel of the Centrifuge 5427 R
1 Call and select the menu parameters
(see Menu navigation on p. 25)
2 Switch display of centrifugation speed (rpm or
rcf)
3Display
4 Short spin centrifugation
(see Short spin centrifugation on p. 34)
7 Set speed of centrifugation
8 Set temperature
9Set centrifugation time
10 Start FastTemp temperature control run
(see Start FastTemp on p. 31)
11 Select menu item
(see Menu navigation on p. 25)
5Release lid
6 Start and stop centrifugation
Please also read the precise description of the individual menu functions (see p. 25).
Page 24
24
314 5
6
7
2
9
8
Operation
Centrifuge 5427 R
English (EN)
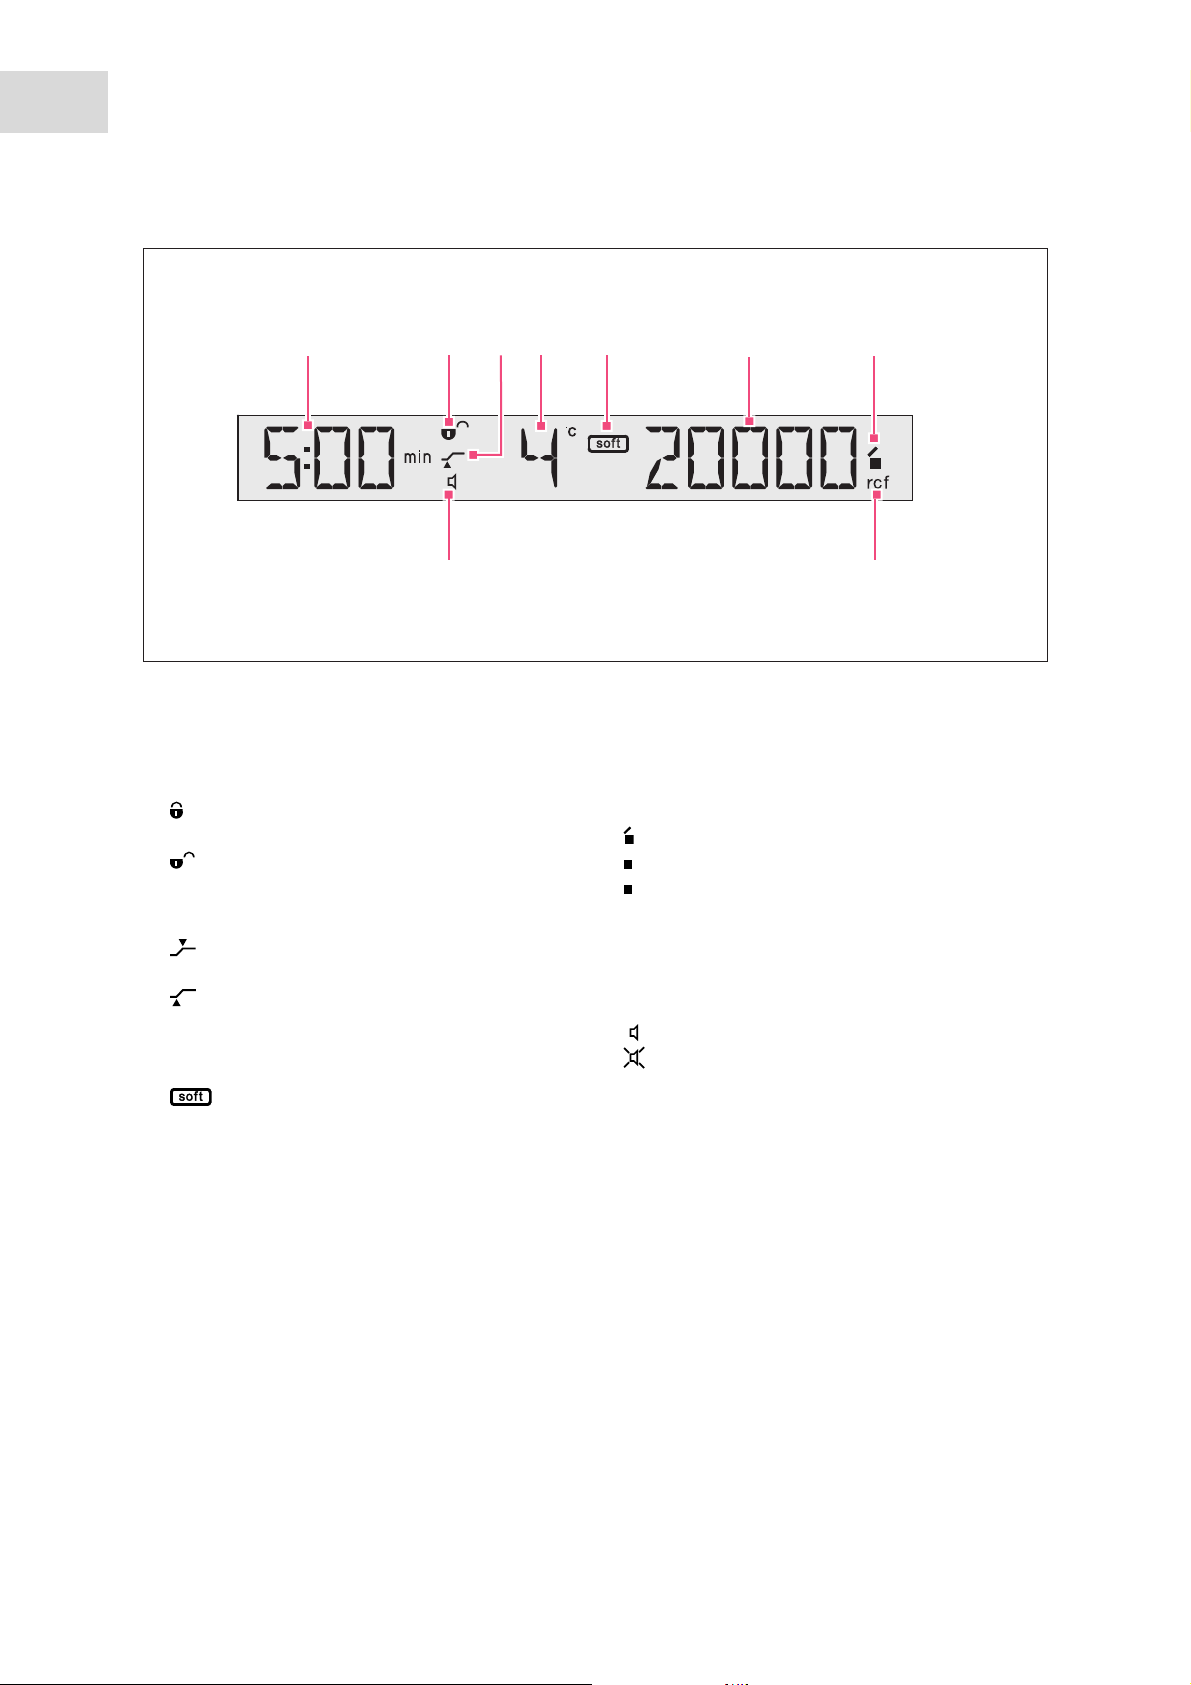
Abb. 5-2: Display of the Centrifuge 5427 R.
Fig. 5-2: Display of the Centrifuge 5427 R.
1 Centrifugation time
2Key lock
Key lock. Centrifugation parameters cannot be
accidentally changed.
No key lock. Centrifugation parameters can
be changed.
3 Start of run time: ATSET function
Start of run time after reaching 95 % of the
specified g-force (rcf) or speed (rpm).
Immediate start of run time.
4Temperature
5Soft ramp
Rotor accelerates and brakes slowly.
No symbol: fast acceleration and braking of rotor.
6 g-force (rcf) or speed (rpm)
(see Rotors on p. 9)
7 Status of centrifuge
: Centrifuge lid unlocked.
: Centrifuge lid locked.
(Flashing): Centrifuging in progress.
8 Display of centrifugation speed
rcf g-force (relative centrifugal acceleration).
rpm speed (revolutions per minute).
9 Status of speaker
Speaker switched on.
Speaker switched off.
Page 25
5.2 Menu navigation
Proceed as follows to change settings in the device menu:
1. Open the menu.
2. Select the desired menu item.
3. Confirm your selection.
4. Select the setting of the corresponding parameters.
Operation
Centrifuge 5427 R
English (EN)
25
5.
6. Exit the menu.
Confirm the changed setting.
The BACK menu item belonging to the first menu level appears.
To exit the second menu level without changing a parameter, select the BACK menu item and
confirm with menu/enter.
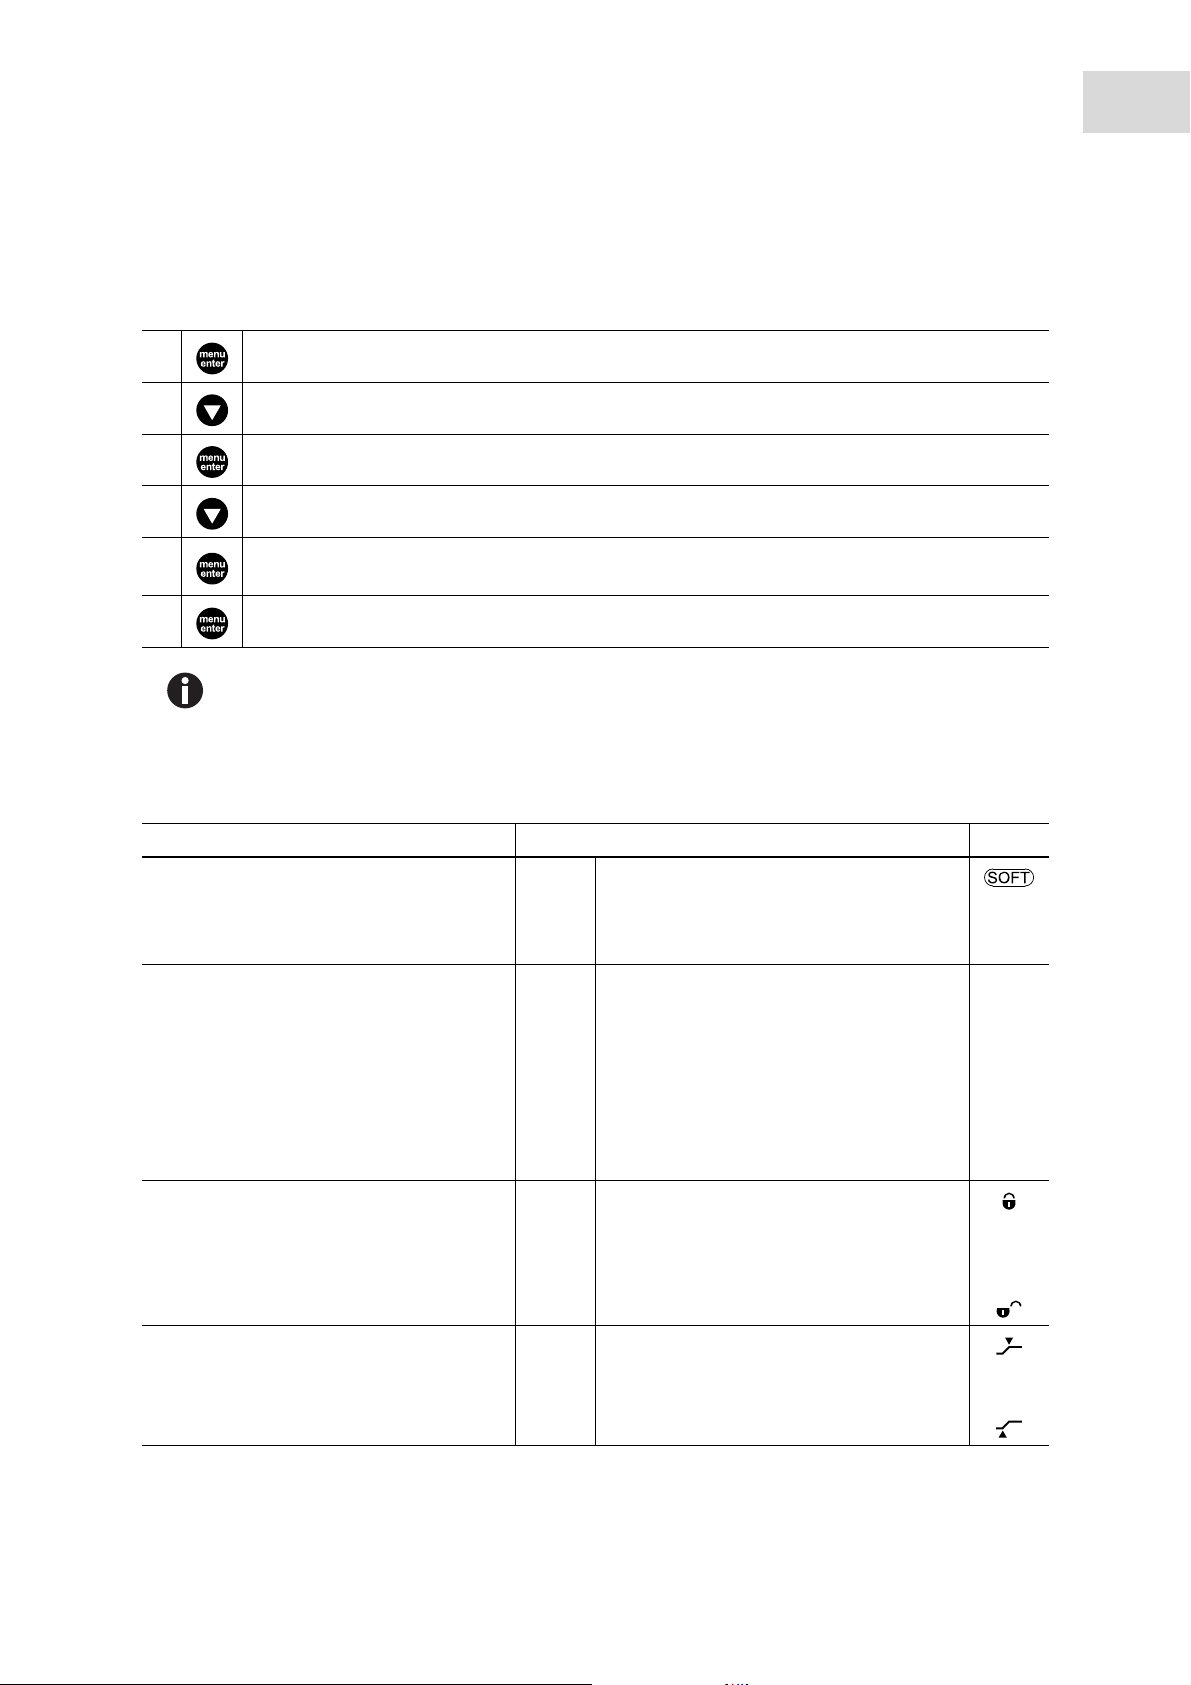
5.3 Menu
Tab. 5-1: Menu structure of the Centrifuge 5427 R.
Menu level 1 (M 1) Menu level 2 (M 2) Display
SOFT
Soft ramp: decreases acceleration speed
and braking speed
Disabled with short spin centrifugation
RAD
For the internal conversion of speed (rpm)
to g-force (rcf), the radius is dependent on
the adapter used.
LOCK
Key lock: centrifugation parameters
(temperature, g-force (rcf) or speed (rpm))
cannot be accidentally changed.
On Rotor accelerates and brakes slowly.
OFF Rotor accelerates and brakes rapidly.
0_2ML
0_4ML
0_5ML
0_6ML
MAX Largest radius of the used rotor.
On Set the centrifugation parameters
OFF
Select the radius according to the adapter
used.
Only rotor FA-45-12-17:
MAX
1_5/2
HPLC
CRYO
permanently. SAFE appears in the display
when the time, temp or speed keys are
pressed.
ATSET
Set start of centrifuging run time.
On The set run time will be counted down
after 95 % of the specified g-force (rcf) or
speed (rpm) has been reached.
OFF The set time is counted down immediately.
Page 26

26
Operation
Centrifuge 5427 R
English (EN)
Menu level 1 (M 1) Menu level 2 (M 2) Display
SHORT
Set the speed of the short spin
centrifugation.
No SOFT function with short spin
centrifugation.
Temp
Set the time limit for continuous cooling
("ECO shut-off") (see p. 30).
Alarm
Switch the loudspeaker on or off.
MAX Short spin centrifugation at the maximum
speed of the inserted rotor
Set Short spin centrifugation with set speed
(g-force (rcf) or speed (rpm)).
8 h Default setting: Continuous cooling ends
after 8 h.
1 h
2 h
4 h
oo Endless operation of continuous cooling.
On Switch on loudspeaker.
OFF Switch off loudspeaker.
To limit continuous cooling after a run to
1 h, 2 h, or 4 h, the centrifuge lid must be
opened and closed again after the run.
VOL
Set the volume.
SLEEP
Switch the standby mode on or off.
If the centrifuge has not been used for
15 min, it will switch to standby. EP then
appears in the display.
Press a key or close the centrifuge lid to
exit the standby mode.
The Back menu item can also be found in both menu levels.
Back in menu level 2: return to menu level 1.
Back in menu level 1: exit menu.
VOL1
…
VOL5
On Standby mode activated.
OFF Standby mode deactivated.
The volume of the loudspeaker can be set
to 5 levels (VOL1 to VOL5). The
loudspeaker must be switched on for the
adjustment to be audible.
Page 27

Operation
Centrifuge 5427 R
English (EN)
5.4 Preparing for centrifugation
5.4.1 Switching on the centrifuge
Switch the centrifuge on using the mains/power switch.
The centrifuge lid opens automatically after switching on using the mains/power switch.
The parameter settings of the last run are displayed.
5.4.2 Inserting the rotor
1. Fit the rotor vertically on the motor shaft.
2. Insert the supplied rotor key into the rotor nut.
3. Turn rotor key clockwise until the rotor nut is firmly tightened.
5.4.3 Automatic rotor detection
The centrifuge has automatic rotor detection. It detects a newly inserted rotor and displays the
name of the rotor for 2 s. g-force (rcf) and speed (rpm) are automatically limited to the
maximum permitted value for the rotor.
Manually turn the rotor counterclockwise to trigger rotor detection.
• The name of the rotor appears in the display.
•The g-force (rcf) and speed (rpm) are automatically limited to the maximum permissible value for the
rotor.
27
5.4.4 Replacing the rotor
1. Turn the rotor nut counterclockwise using the supplied rotor key.
2. Remove the rotor by lifting it vertically.
3. Vertically place another rotor on the motor shaft.
4. Insert the supplied rotor key into the rotor nut.
5. Turn rotor key clockwise until the rotor nut is firmly tightened.
6. In order to trigger the rotor detection, turn the rotor counterclockwise by hand.
• The name of the rotor appears in the display.
•The g-force (rcf) and speed (rpm) are automatically limited to the maximum permissible value for the
rotor.
Rotor detection can also be triggered by short spin centrifugation:
Press the short key until the name of the rotor appears in the display.
Error message after rotor change
• If you start centrifuging immediately after a rotor change, the centrifuge has not carried
out an automatic rotor detection yet. The speed set for the previous rotor may exceed the
maximum permitted speed for the new rotor. In this case, the centrifuge stops after the
automatic rotor detection and displays SPEED. The new maximum permitted speed
appears in the display. You can then restart the centrifuging with this setting or adjust the
speed as necessary.
After each rotor change, check whether the new rotor is detected by the device. Check the
set g-force (rcf) or speed (rpm) and adjust it if necessary.
Page 28
28
Operation
Centrifuge 5427 R
English (EN)
5.4.5 Loading the rotor
5.4.5.1 Loading a fixed-angle rotor
CAUTION! Risk of injury due to asymmetric loading of a rotor.
Load rotors symmetrically with identical tubes.
Only load adapters with suitable tubes.
Always use the same type of tubes (weight, material/density and volume).
Check symmetric loading by balancing the adapters and tubes used with scales.
CAUTION! Risk from damaged or overloaded tubes.
When loading the rotor, observe the safety precautions on dangers as a result of
overloaded or damaged tubes (see Warnings for intended use on p. 17).
Use matching rotor lids
• Fixed-angle rotors may only be operated with the appropriate rotor lid in each case. The
rotor name on the rotor must be the same as the name on the rotor lid.
• To carry out an aerosol-tight centrifugation, an aerosol-tight rotor (label: red ring) and the
corresponding aerosol-tight rotor lid (label: aerosol-tight and red lid screw) must be used.
The device automatically detects imbalances during operation and stops the run immediately
with an error message and a signal tone.
Check the load, balance the tubes and restart the run.
To load the rotor, proceed as follows:
1. Check the maximum payload (adapter, tube and contents) for each rotor bore.
The information about this can be found on every rotor and in this operating manual (see Rotors on p. 9).
2. Load rotors and adapters only with the tubes intended for them.
3. Insert sets of two tubes in the opposite bores of the rotor. To ensure symmetric loading, tubes that are
arranged opposite each other must be of the same type and contain the same filling quantity.
To minimize weight differences between filled sample tubes, we recommend taring with a scale. This
will reduce wear on the drive and reduce running noise.
Page 29
Operation
Centrifuge 5427 R
English (EN)
Spin columns
For centrifuging spin columns in the rotor FA-45-24-11-Kit, you can leave the tube lids open.
However, this can only be done using the tubes provided by kit manufacturers for this
purpose. For reliable centrifugation, you must lean the open tube lids against the edge of the
rotor. Ensure that the lids do not protrude past the edge of the rotor in the process, then attach
the matching rotor lid.
5.4.5.2 Loading a swing-bucket rotor
Prerequisites
• Use a rotor, bucket and adapter combination that is approved by Eppendorf.
• The carriers are sorted by weight category. Carriers located opposite each other must belong to the
same weight category. This is laterally engraved in the groove: e.g., 68 (the last two digits in grams). For
repeat orders, please specify the weight class.
• Matched and checked tubes
29
To load the rotor, proceed as follows:
1. Check the bucket grooves for cleanliness and lightly lubricate them with pivot grease (int. order
no.: 5810 350.050 / North America: 022634330).
Contaminated grooves and pegs prevent a uniform swinging of the bucket.
2. Hang the buckets into the rotor.
All rotor positions must be loaded with carriers.
3. Check that all carriers are hanging properly and can swing freely.
4. Check the maximum payload (adapter, tube and contents) for each bucket.
The details on the maximum payload can be found on the rotor and in this operating manual (see Rotors
on p. 9).
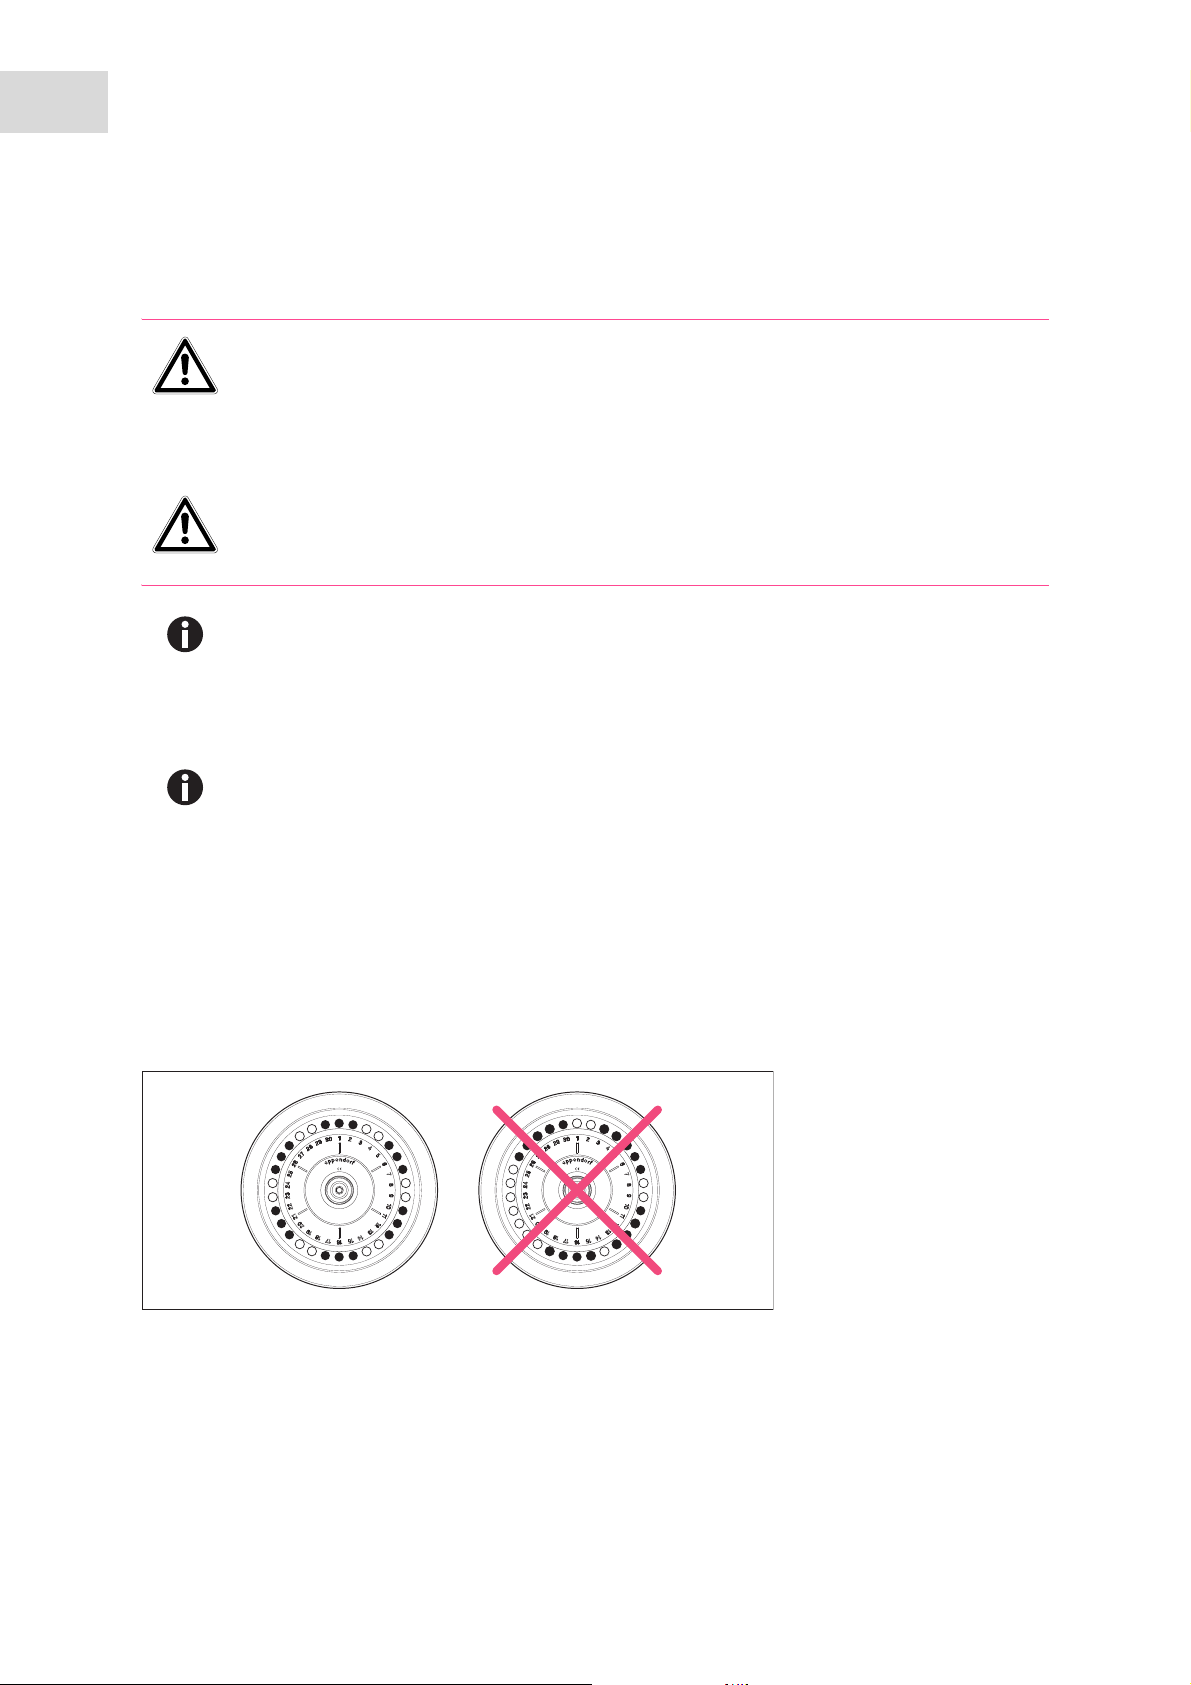
5. Load the buckets symmetrically.
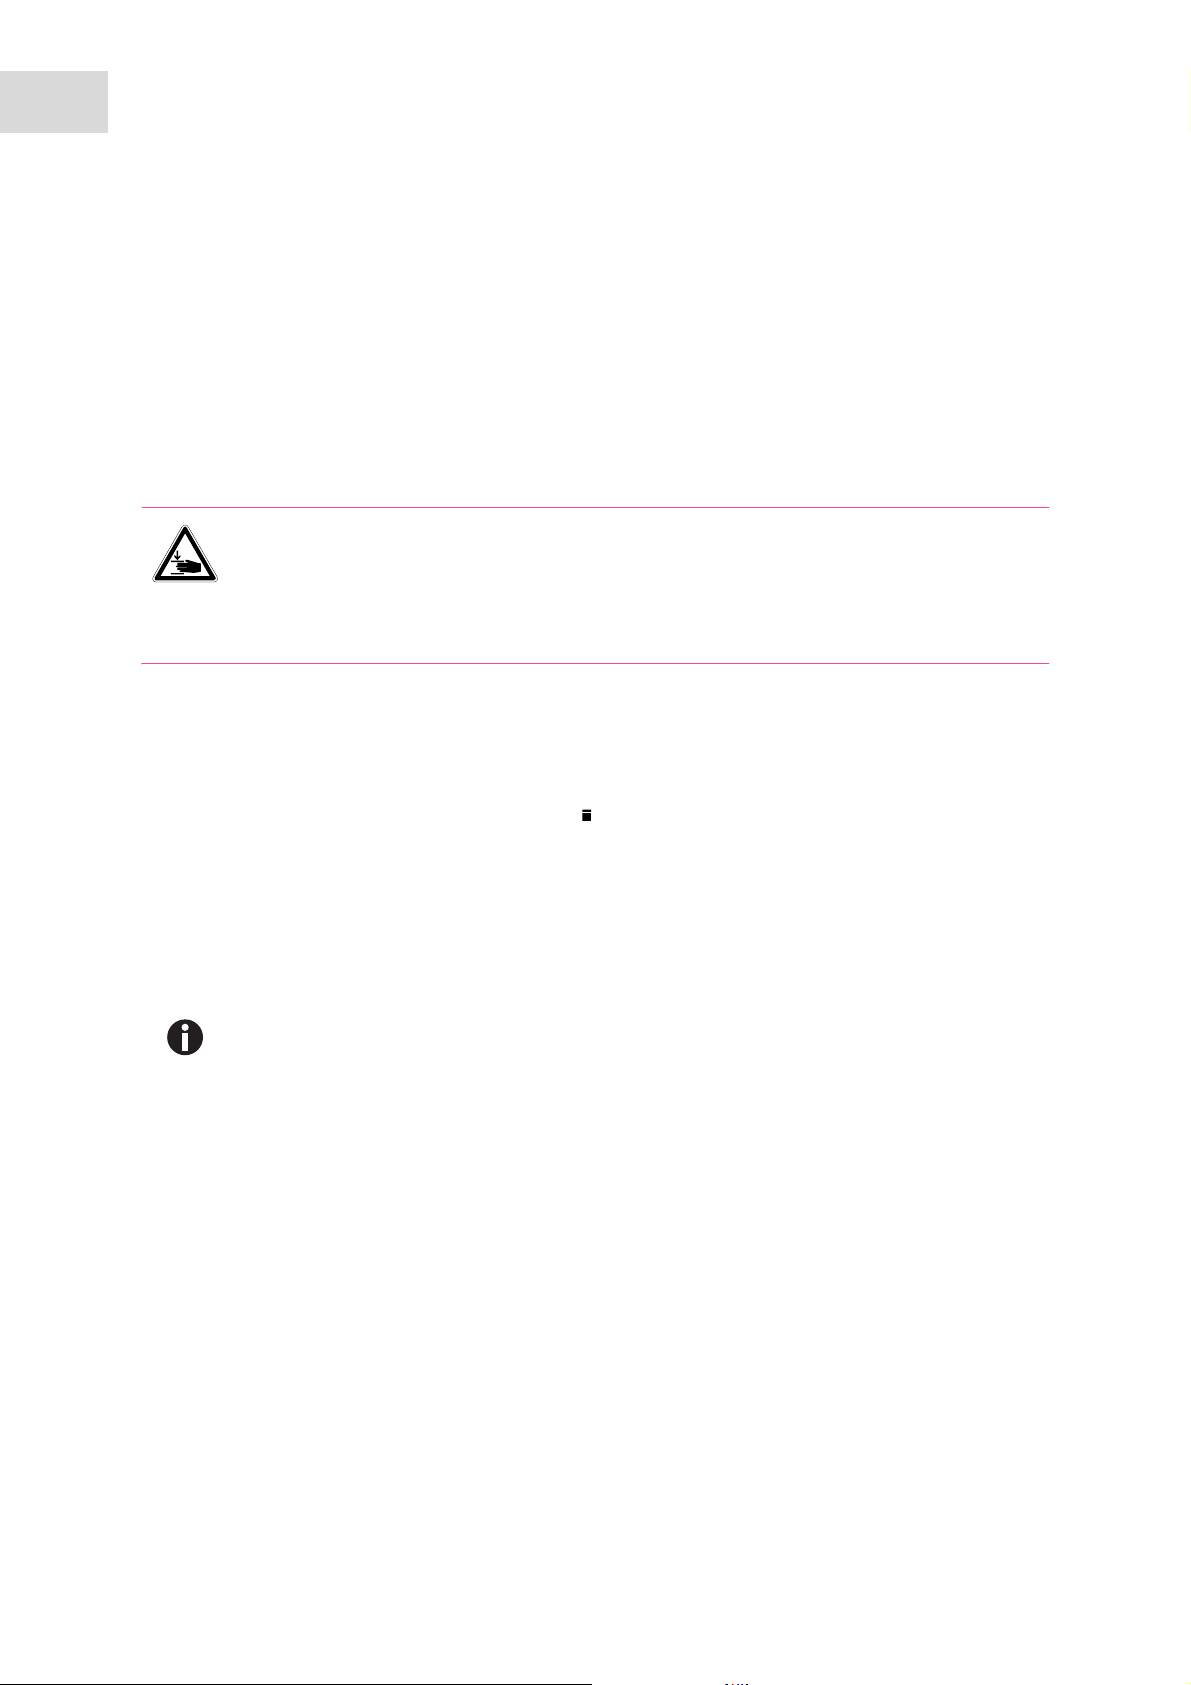
Abb. 5-3: Incomplete, but symmetric loading of the buckets. The pegs of each bucket must be uniformly loaded .
Fig. 5-3: Incomplete, but symmetric loading of the buckets. The pegs of each bucket must be uniformly
loaded.
The supply shown on the right side is incorrect because it does not allow the bucket to properly swing
out.
Page 30
30
Operation
Centrifuge 5427 R
English (EN)
5.4.6 Closing the rotor lid
1. Only QuickLock rotor lid: check that the external sealing ring correctly fits in the groove.
2. Vertically fit the rotor lid on the rotor.
3. Turn the rotor lid screw clockwise to seal the rotor.
Only QuickLock rotor lid:
Turn the rotor lid screw clockwise as far as it will go, until an audible "click" can be heard. The rotor is
not properly closed until an audible click is heard!
5.4.7 Closing the centrifuge lid
WARNING! Risk of injury when opening or closing the centrifuge lid.
There is a risk of crushing your fingers when opening or closing the centrifuge lid.
When opening or closing the centrifuge lid, do not reach between the lid and device or into
the latching mechanism of the lid.
Always open the centrifuge lid completely to prevent it from falling.
1. Check the correct attachment of the rotor and rotor lid.
2. Press the centrifuge lid down until it is gripped by the lid latch.
The lid will be automatically closed and the locking mechanism can be clearly heard.
The open key lights up blue. The display shows the symbol.
5.5 Cooling
The centrifuge cools or maintains the set temperature is the following requirements are met:
• The centrifuge is switched on.
• The centrifuge lid is closed.
• Only with continuous cooling: The set temperature is lower than the ambient temperature.
If the rotor stops (continuous cooling), cooling is slower than during centrifugation or a
temperature control run.
5.5.1 Set the temperature
1. To set the temperature, use the temp arrow keys to select a temperature between -11 °C and 40 °C.
2. Set the run time and g-force (rcf) or speed (rpm). Press the start/stop key to start the centrifugation.
The temperature can be changed during centrifugation.
5.5.2 Temperature display
Temperature display if the rotor stops Set temperature
Temperature display during centrifugation Actual temperature
Page 31

Operation
Centrifuge 5427 R
English (EN)
5.5.3 Temperature monitoring
After the set temperature has been reached, the centrifuge reacts to temperature deviations during
centrifugation as follows:
Deviation from target temperature Action
±3 °C Temperature display flashes.
±5 °C Display shows Err 18. Centrifugation is stopped automatically.
5.5.4 Start FastTemp
With the FastTemp function, you can immediately start a temperature run without samples, at rotor-specific
or temperature-specific speeds. This will quickly bring the rotor chamber, including rotor and adapter, up
to the set target temperature.
Prerequisites
• The centrifuge is switched on.
• Rotor and rotor lid are correctly mounted.
• The centrifuge lid is closed.
• The temperature and g-force (rcf) or speed (rpm) have been set for the upcoming centrifugation (see
Centrifuging on p. 33).
31
1. Press the fast temp key.
The display shows
• FT
• Actual temperature in the rotor chamber
• g-force (rcf) or speed (rpm)
The temperature control run FastTemp automatically ends when the target temperature has been
reached. A periodic signal tone sounds.
2. Press the start/stop key to end the temperature control run early.
• The centrifuge only stops the run once the rotor has reached the set temperature.
Therefore, there may be a delay of approx. 15 min (rotor S-24-11-AT: 30 min) between the
display indicating the set temperature has been reached and the automatic end of the
temperature control run.
Page 32

32
Operation
Centrifuge 5427 R
English (EN)
5.5.5 Continuous cooling
Continuous cooling
Continuous cooling maintains the rotor chamber at the set temperature if the rotor stops.
• During continuous cooling the display shows the set temperature.
• To prevent the rotor chamber from freezing or condensation from forming, the temperature does not go
below 4 °C , irrespective of the set temperature.
• If the rotor stops, temperature control is slower than during centrifugation or a temperature control run.
ECO shut-off
Continuous cooling is switched off if the centrifuge is not used for longer than the preset time. The
centrifuge switches to standby mode.
• Default setting: Continuous cooling ends after 8 h.
• Continuous cooling can be limited to 1 h, 2 h or 4 h.
• ECO shut-off can be switched off (continuous cooling set to endless operation).
Limit continuous cooling to 1 h (2 h, 4 h).
1. Press the menu/enter key.
2. Select TEMP using the arrow key. Confirm with the menu/enter key.
3. Select 1 h (2 h, 4 h) using the arrow key. Confirm with the menu/enter key.
4. To activate ECO shut-off after 1 h, 2 h or 4 h, open and close again the centrifuge lid after the end of the
run.
The device switches to standby mode after 1 h, 2 h or 4 h. The display shows EP.
• If the centrifuge lid is not opened and closed again after the run, ECO shut-off engages
after 8 h (default setting).
• Open the centrifuge lid to end continuous cooling early.
5.5.6 Endless operation of continuous cooling
The ECO shut-off function can be switched off. Continuous cooling is changed to endless operation.
• Endless operation can shorten the service life of the compressor.
• The rotor chamber may freeze.
1. Press the menu/enter key.
2. Select TEMP using the arrow key. Confirm with the menu/enter key.
3. Select oo using the arrow key. Confirm with the menu/enter key.
Ending continuous cooling
4. Open the centrifuge lid to end continuous cooling.
Page 33

Operation
Centrifuge 5427 R
English (EN)
5.6 Centrifuging
CAUTION! Risk from incorrectly-loaded rotors and damaged/overloaded tubes!
Before commencing centrifugation, follow the safety instructions relating to risks from
asymmetrically loaded and/or overloaded rotors and from overloaded, damaged and/or
open tubes (see Warnings for intended use on p. 17).
WARNING! Risk of injury from improperly attached rotors and rotor lids.
Only centrifuge with rotor and rotor lid firmly tightened.
If unusual noises occur when the centrifuge starts, the rotor or the rotor lid may not be
properly secured. Immediately press the start/stop key to stop centrifuging.
Before using the Centrifuge 5427 R for the first time, familiarize yourself with the operating controls and
the display (see Overview of operating controls on p. 23).
Each of the centrifuging variants described here must be preceded by the preparation described above (see
Preparing for centrifugation on p. 27).
Please also note the instructions on cooling (see p. 30).
33
5.6.1 Centrifuging with preset time
Perform the following steps in the sequence described.
1. Use time to set the run time.
2. Use temp to set the temperature.
3. Use speed to set the g-force (rcf) or speed (rpm).
4. Press start/stop to start the centrifugation.
During centrifugation
• blinks in the display when the rotor is running.
• The current actual temperature will be displayed.
• The current g-force (rcf) resp. speed (rpm) of the rotor is displayed.
•The fast temp, open, short keys and the device menu are blocked during centrifugation.
• The total run time, temperature and speed (rpm) can be changed during the run. The display can be
switched between g-force (rcf) and speed (rpm).
• You can also terminate the centrifugation before the set run time has elapsed by pressing the start/
stop key.
End of centrifugation
• After completion of the set time, the centrifuge stops automatically. During braking the elapsed
centrifugation time is displayed flashing. When the rotor stops a signal tone is heard.
• The centrifuge lid remains closed to maintain the sample temperature. You can open it by pressing
the open key.
During the run you can modify the total run time, the temperature and the g-force (rcf)/
speed (rpm).
The values on the display blink while changes are being made. The new parameters are
adopted immediately. If the time is changed during a run, the elapsed time will be subtracted
from this value. Please note that the shortest new total run time that can be set must be 2 min
longer than the elapsed time.
When using adapters, you can adjust the radius.
Page 34

34
Operation
Centrifuge 5427 R
English (EN)
5.6.2 Centrifuging in continuous operation
Perform the following steps in the sequence described.
1. Use time to set the continuous run.
The continuous run function can be set above 9:59 h or below 10 s. The timer shows oo to indicate
continuous operation.
2. Use temp to set the temperature.
3. With speed, set the g-force (rcf) or speed (rpm).
4. Press the start/stop key to start the centrifugation.
The symbol blinks in the display when the rotor is running.
5. Press the start/stop key to end the centrifugation.
• During the braking process, centrifugation time flashes in the display.
• When the rotor stops a signal tone is heard.
• The centrifuge lid remains closed to maintain the sample temperature. You can open it by pressing
the open key.
5.6.3 Short spin centrifugation
Prerequisites
In the SHORT menu, the user sets whether the short spin centrifugation runs with the maximum
g-force (rcf) or speed (rpm) of the inserted rotor (MAX) or with a freely selected speed (SET).
The short spin centrifugation runs as long as the short key is pressed.
1. Only with short spin centrifugation with a set speed: set the g-force (rcf) or speed (rpm) using the speed
arrow keys.
2. Use the temp arrow keys to adjust the temperature.
3. Start short spin centrifugation: hold the short key pressed down.
• The symbol blinks in the display when the rotor is running.
• All other keys are disabled during short spin centrifugation.
4. End short spin centrifugation: release the short key.
• During the braking process, centrifugation time flashes in the display.
• The centrifuge lid remains closed to maintain the sample temperature. Press the open key to open
the lid.
During the braking process, the short spin centrifugation can be restarted up to two times by
pressing the short key again.
The soft ramp is disabled during short spin centrifugation.
Page 35

Operation
Centrifuge 5427 R
English (EN)
5.6.4 Setting the centrifugation radius
If an adapter for tubes is used in a rotor, this changes the centrifugation radius. In the RAD menu item, the
parameter for the tube/adapter combination has to be set.
Prerequisites
• Rotor is inserted.
• The centrifuge has detected the rotor (see Automatic rotor detection on p. 27).
1. Press the menu/enter key.
2. Select the RAD menu item using the arrow key. Confirm with the menu/enter key.
In the RAD menu item, the parameters for the rotor-specific tube/adapter combination are available.
3. Select the parameters for the tube/adapter combination using the arrow key. Confirm with the menu/
enter key.
The display shows the g-force for the rotor/adapter combination used in the rotor.
35
Default setting: If the centrifugation speed is only controlled using the g-force (rcf), the
centrifuge calculates the g-force for the largest radius of the rotor used.
5.6.5 After centrifugation
If start centrifuging immediately has not been used for 15 min, it switches to standby. EP
appears in the display.
If the centrifuge is temporarily not used, carry out the following steps. Please also observe the care
instructions (see p. 39).
Turn the rotor nut counterclockwise using the supplied rotor key.
Remove the rotor by lifting it vertically.
Empty the condensation water tray.
Leave the centrifuge lid open.
5.7 Standby mode
The centrifuge switches to the standby mode when the following prerequisites are met:
• Centrifuge lid is open: centrifuge has not been used for 15 min.
• The centrifuge lid is closed: continuous cooling was stopped (see Continuous cooling on p. 32).
In the Standby mode, the following applies :
• The display shows EP.
• The rotor chamber is not cooled .
Press any key to end the standby mode.
Page 36

36
Operation
Centrifuge 5427 R
English (EN)
Page 37

Maintenance
Centrifuge 5427 R
English (EN)
6 Maintenance
6.1 Prepare cleaning/disinfection
Clean all accessible surfaces of the device and the accessories at least weekly and when contaminated.
Clean the rotor regularly. This way the rotor is protected and the durability is prolonged.
Furthermore, observe the notes on decontamination (see Decontamination before shipment on p. 40)
when the device is sent to the authorized Technical Service for repairs.
The procedure described in the following chapter applies to the cleaning as well as to the disinfection or
decontamination. The table below describes the steps required on top of this:
Cleaning Disinfecting/decontamination
1. Use a mild cleaning fluid to clean the
accessible surfaces of the device and the
accessories.
2. Carry out the cleaning as described in the
following chapter.
1. Choose the disinfection method which corresponds to
the legal regulations and guidelines in place for your
range of application. For example, use alcohol (ethanol,
isopropanol) or alcohol-based disinfectants.
2. Carry out the disinfection or decontamination as
described in the following chapter.
3. Then clean the device and the accessories.
37
If you have any further questions regarding the cleaning and disinfection or decontamination
or regarding the cleaning fluid to be used, contact the Eppendorf AG Application Support. The
contact details are provided on the back of this manual.
6.2 Cleaning/disinfection
DANGER! Electric shock as a result of penetration of liquid.
Switch off the device and disconnect the power plug before starting cleaning or
disinfection work.
Do not allow any liquids to penetrate the inside of the housing.
Do not spray clean/spray disinfect the housing.
Only plug the device back in if it is completely dry, both inside and outside.
NOTICE! Damage from the use of aggressive chemicals.
Do not use any aggressive chemicals on the device or its accessories, such as strong and
weak bases, strong acids, acetone, formaldehyde, halogenated hydrocarbons or phenol.
If the device has been contaminated by aggressive chemicals, clean it immediately using a
mild cleaning agent.
NOTICE! Corrosion due to aggressive cleaning agents and disinfectants.
Do not use corrosive cleaning agents, aggressive solvents or abrasive polishes.
Do not incubate the accessories in aggressive cleaning agents or disinfectants for longer
periods.
NOTICE! Damage from UV and other high-energy radiation.
Do not use UV, beta, gamma, or any other high-energy radiation for disinfecting.
Avoid storage in areas with strong UV radiation
Page 38

38
Maintenance
Centrifuge 5427 R
English (EN)
Autoclaving
All rotors, rotor lids and adapters can be autoclaved (121 °C, 20 min).
Aerosol tightness
Check that the seals are intact before use.
Only QuickLock rotor lid: Replace the sealing ring in the lid groove when it becomes worn.
The sealing rings require regular care to protect the rotors.
Aerosol-tight rotors should never be stored with lids screwed on!
In order to prevent damage, lightly lubricate the lid thread of the aerosol-tight rotors with
pivot grease (order no. Int.: 5810 350.050/North America: 022634330).
6.2.1 Cleaning and disinfecting the device
1. Open the lid. Switch off the device with the mains/power switch. Disconnect the power plug from the
power supply.
2. Loosen the rotor nut by turning the rotor key counterclockwise.
3. Remove the rotor.
4. Clean and disinfect all accessible surfaces of the device, including the power cable, using a damp cloth
and the recommended cleaning agents.
5. Thoroughly clean the rubber seals of the rotor chamber with water.
6. Rub the dry rubber seals with glycerine or talcum powder to prevent them from becoming brittle. Other
components of the device, such as the lid latch, motor shaft and rotor cone, must not be lubricated.
7. Clean the motor shaft with a soft, dry and lint-free cloth. Do not lubricate the motor shaft.
8. Check the motor shaft for damage.
9. Inspect the device for corrosion and damage.
10.Leave the centrifuge lid open when the device is not being used.
11.Only connect the device to the power supply if it is fully dry inside and out.
6.2.2 Cleaning and disinfecting the rotor
1. Inspect the rotor and accessories for damage and corrosion. Do not use any damaged rotors or
accessories.
2. Clean and disinfect the rotors and accessories with the recommended cleaning agents.
3. Clean and disinfect the rotor lids. ONLY QuickLock: It is imperative that the sealing ring be removed
during this process so that the groove below it can be thoroughly cleaned.
Page 39

Maintenance
Centrifuge 5427 R
English (EN)
4. Rinse the rotors and accessories thoroughly with distilled water. Rinse the rotor bores of fixed-angle
rotors particularly thoroughly.
Do not immerse the rotor in liquid as liquid can get trapped inside the cavities.
5. Place rotors and accessories on a cloth to dry. Place fixed-angle rotors with the rotor bores facing
downwards to allow the bores to also dry.
6. Correctly reinsert the rotor lid sealing ring in the clean and dry groove.
7. Clean the rotor cone with a soft, dry and lint-free cloth. Do not lubricate the rotor cone.
8. Inspect the rotor cone for damage.
9. Place the dry rotor onto the motor shaft.
10.Tighten the rotor nut firmly by turning it clockwise with the rotor key.
11.Leave the rotor lid open when the rotor is not being used.
6.3 Additional service instructions for Centrifuge 5427 R
39
Empty and clean the condensation water tray regularly and especially after liquid spillage in the rotor
chamber.
Regularly free the rotor chamber ice formations via thawing, by leaving the centrifuge lid open or
carrying out a short temperature control run at approx. 30 °C.
Leave the centrifuge lid open when not in use for a long period.
Residual moisture can escape. The lid spring is relieved.
Wipe up condensate in the rotor chamber using a soft, absorbent cloth.
Remove dust deposits from the ventilation slits of the centrifuge using a brush or swab at the latest
every six months. First switch off the device and remove the power plug.
6.4 Glass breakage
When using glass tubes there is a risk of glass breakage in the rotor chamber. The resulting glass splinters
are swirled around in the rotor chamber during centrifugation and have a sandblasting effect on the rotor
and accessories. The smallest glass particles become lodged in the rubber parts (e.g., the motor guide, the
rotor chamber seal, and the rubber mats of adapters).
NOTICE! Glass breakage in the rotor chamber
Glass tubes in the rotor chamber may break if the g-force is too high. Broken glass can
damage the rotor, accessories and samples.
Please note the manufacturer's information on the recommended centrifugation
parameters (load and speed).
Effects of glass breakage in the rotor chamber:
• Fine black metal abrasion in the rotor chamber (in metal rotor chambers)
• The surfaces of the rotor chamber and accessories are scratched.
• The chemical resistance of the rotor chamber is reduced.
• Contamination of samples
• Wear on rubber parts
Page 40

40
Maintenance
Centrifuge 5427 R
English (EN)
How to proceed in case of glass breakage
1. Remove all splinters and glass powder from the rotor chamber and accessories.
2. Thoroughly clean the rotor and rotor chamber. Thoroughly clean the bores of the fixed-angle rotors, in
particular.
3. If required, replace the adapters to prevent any further damage.
4. Regularly check the rotor bores for deposits and damage.
6.5 Replacing fuses
DANGER! Electric shock.
Switch off the device and disconnect the power plug before starting maintenance or
cleaning work.
The fuse holder is located between the mains connection socket and the mains power switch.
1
1. Disconnect the power plug.
2. Press the upper and lower end of the plastic springs 1 together and pull the fuse holder 2 fully out.
3. Replace faulty fuses and reinsert the fuse holder. Make sure that the guiding rail 3 is positioned
correctly.
2
3
6.6 Decontamination before shipment
If you are shipping the device to the authorized Technical Service for repairs or to your authorized dealer
for disposal please note the following:
WARNING! Risk to health from contaminated device
1. Follow the instructions in the decontamination certificate. It is available as a PDF file on
our webpage (www.eppendorf.com/decontamination
2. Decontaminate all the parts you would like to dispatch.
3. Include the fully completed decontamination certificate in the package.
).
Page 41

Troubleshooting
Centrifuge 5427 R
English (EN)
7 Troubleshooting
If you cannot remedy an error with the recommended measures, please contact your local Eppendorf
partner. The contact address can be found online at: www.eppendorf.com
.
7.1 General errors
Symptom/message Cause Remedy
No display. No mains power connection.
No display. Power failure.
Lid of the device
cannot be opened.
Lid of the device
cannot be opened.
Device cannot be
started.
Device shakes
when it starts up.
Centrifuge brakes
during a short run
centrifugation,
although the short
key is pressed.
Temperature
display flashes.
Rotor is still running.
Power failure. 1. Check the mains fuse of the
Lid of the device is not closed.
Rotor is asymmetrically loaded. 1. Stop the device and load
The short key was released briefly more
than twice (protective function for the
drive).
Temperature deviation from the set
value: ±3 °C.
Check the mains power connection.
Check the mains fuse of the
laboratory.
Wait for rotor to stop.
laboratory.
Close the lid of the device.
symmetrically.
2. Reboot device.
Press the short key continuously
during a short run centrifugation.
Check the settings.
Wait until the target temperature has
been reached.
Check unhindered air circulation
through the air slots.
Thaw ice or switch off device and
allow it to cool down.
41
Page 42

42
Troubleshooting
Centrifuge 5427 R
English (EN)
7.2 Error messages
Proceed as follows if the following error messages appear:
1. Remove fault (see remedy).
2. If necessary, repeat centrifugation.
Symptom/message Cause Remedy
ERR 1 Rotor not detected.
Err 2 Electronics fault.
NO RPM (ERR 3) Error in speed measuring system.
Err 5 Prohibited opening of lid or lid switch is
defective during a run.
Err 6 • Error in the drive electronics.
• Drive overheated.
Err 7 Major deviation in the speed control. 1. Wait for rotor to stop.
Err 8 Drive fault. 1. Wait for rotor to stop.
ERR 9 to ERR 14 Electronics error.
IMBAL (ERR 15) Rotor is asymmetrically loaded.
ERR 16 to ERR 17 Electronics error.
Err 18 Temperature deviation from set value in
the rotor chamber: ±5 °C.
Err 19 Condenser overheated.
Err 20 Temperature sensor in rotor chamber is
faulty.
Err 21 Temperature sensor on condenser is
faulty.
Check rotor.
If this error message appears again,
test with a different rotor.
Switch centrifuge off and back on
again after > 20 s.
Leave the device switched on until the
error message disappears (10 s or
6 min).
Wait for rotor to stop.
Repeat the run.
If this error message appears again,
switch centrifuge off and back on
again after > 20 s.
Allow the drive to cool down for at
least 15 min.
2. Tighten the rotor.
2. Repeat the run.
Switch centrifuge off and back on
again after > 20 s.
Load the rotor symmetrically and
balance.
Switch centrifuge off and back on
again after > 20 s.
Check the settings.
Check unhindered air circulation
through the air slots.
Thaw ice or switch off device and
allow it to cool down.
Check unhindered air circulation
through the air slots.
Allow device to cool down.
Switch centrifuge off and back on
again after > 20 s.
Switch centrifuge off and back on
again after > 20 s.
Page 43

Troubleshooting
Centrifuge 5427 R
English (EN)
Symptom/message Cause Remedy
Err 22 Electronics fault. Switch centrifuge off and back on
again after > 20 s.
NO E-FAN (ERR 23) Electronic fan is faulty.
Err 24 Failure at the compressor.
INT (ERR 25) Power failure during a run.
Err 28 Error during speed check.
Err 29 Set g-force/speed too high, e.g. after a
rotor change (see Automatic rotor
detection on p. 27).
LID (ERR 30) • Centrifuge lid cannot be locked.
• Centrifuge lid cannot be released.
Switch centrifuge off and back on
again after > 20 s.
Allow the centrifuge to cool down and
repeat the run.
Check the mains connection.
Switch centrifuge off and back on
again after > 20 s.
Check the g-force/speed.
Repeat the run.
Try again to close centrifuge lid.
Switch the centrifuge off and back on.
Press the open key.
If the error occurs repeatedly:
Switch off centrifuge.
Actuate emergency release(see
Emergency release on p. 44).
OFF • Displayed after power off.
43
Page 44

44
Troubleshooting
Centrifuge 5427 R
English (EN)
7.3 Emergency release
If the centrifuge lid cannot be opened, you can activate the emergency release manually.
WARNING! Risk of injury from rotating rotor.
If the emergency release of the lid is operated, the rotor may continue rotating for several
minutes.
Wait until the rotor stop before operating the emergency release.
Check the monitoring glass in the centrifuge lid.
Use the rotor key delivered with the Centrifuge 5427 R for the emergency release.
1. Pull the mains/power plug.
2. Remove the plastic cover for the emergency release on the right side of the device (see Fig. 1 and
Fig. 2).
Turn the plastic cover 90° counterclockwise using an appropriate tool (e.g., screwdriver) and remove it.
3. Insert the centrifuge rotor key in the rear hexagonal opening until a noticeable resistance is felt.
4. Turn the rotor key counterclockwise.
This will release the centrifuge lid.
5. Open the centrifuge lid.
6. Remove the rotor key or turn the plastic covers back on.
Turn the plastic cover using an appropriate tool (e.g., screwdriver) by 90° in a clockwise direction.
Page 45

Transport, storage and disposal
Centrifuge 5427 R
English (EN)
8 Transport, storage and disposal
8.1 Transport
CAUTION! Risk of injury due to lifting and carrying heavy loads
The device is heavy. Lifting and carrying the device can lead to back injuries.
Transport and lift the device with an adequate number of helpers only.
Use a transport aid to transport the device.
Remove the rotor from the centrifuge before transport.
Use the original packaging and the transport securing devices for transport.
Air temperature Relative humidity Atmospheric pressure
General transport -25 °C – 60 °C 10 % – 75 % 30 kPa – 106 kPa
Air freight -20 °C – 55 °C 10 % – 75 % 30 kPa – 106 kPa
45
8.2 Storage
Air temperature Relative humidity Atmospheric pressure
In transport packaging -25 °C – 55 °C 10 % – 75 % 70 kPa – 106 kPa
Without transport
packaging
-5 °C – 45 °C 10 % – 75 % 70 kPa – 106 kPa
8.3 Disposal
In case the product is to be disposed of, the relevant legal regulations are to be observed.
Information on the disposal of electrical and electronic devices in the European Community:
Within the European Community, the disposal of electrical devices is regulated by national regulations
based on EU Directive 2002/96/EC pertaining to waste electrical and electronic equipment (WEEE).
According to these regulations, any devices supplied after August 13, 2005, in the business-to-business
sphere, to which this product is assigned, may no longer be disposed of in municipal or domestic waste. To
document this, they have been marked with the following identification:
Because disposal regulations may differ from one country to another within the EU, please contact your
supplier if necessary.
Page 46

46
Transport, storage and disposal
Centrifuge 5427 R
English (EN)
Page 47

9 Technical data
9.1 Power supply
Centrifuge 5427 R
Mains connection 230 V, 50 Hz – 60 Hz
120 V, 50 Hz – 60 Hz
100 V, 50 Hz – 60 Hz
Current consumption 2.4 A (230 V )
4.6 A (120 V )
5.5 A (100 V )
Power consumption Maximum 550 W
EMC: interference emission (radio
interference)
EMC: noise immunity EN 61326
Overvoltage category II
Fuses 4 A (230 V )
Degree of pollution 2
EN 61326 – Class B (230 V)
FCC15 - Class A (120 V/100 V)
8 A (120 V )
10 A (100 V )
Technical data
Centrifuge 5427 R
English (EN)
47
9.2 Ambient conditions
Ambience Only for use indoors.
Ambient temperature 10 °C – 40 °C
Relative humidity 10 % – 75 %, non-condensing.
Atmospheric pressure 79.5 kPa – 106 kPa
9.3 Weight/dimensions
Dimensions Width: 31.9 cm (12.6 in)
Depth: 54.0 cm (21.3 in)
Height: 25.4 cm (10.2 in)
Weight without rotor 30.0 kg (66.14 lb)
Noise level
*
The noise level was measured head-on, according to DIN EN ISO 3745, in an acoustic chamber with
accuracy class 1, at a distance of 1 m to the device and at the height of the lab bench.
< 56 dB(A)
*
Page 48

48
Technical data
Centrifuge 5427 R
English (EN)
9.4 Application parameters
Run time 10 s – 9:59 h, infinite (∞),
• 10 s – 2 min: can be set in increments of 10 s
• 2 min – 10 min: can be set in increments of 30 s
• 10 min – 9:59 h: can be set in increments of 1 min
Temperature -11 °C – 40 °C
Relative centrifugal force 1 × g – 25 001 × g
can be set in increments of 50 × g
Speed 100 rpm – 16 220 rpm
can be set in increments of 50 rpm
Maximum load 48 tube with 2.0 mL volume
Maximum kinetic energy 9920 Nm
Compulsory test log book (in
Germany)
Permissible density of the material for
centrifuging (at maximum g-force (rcf)
or speed (rpm) and maximum load)
No
1.2 g/mL
Page 49

Technical data
Centrifuge 5427 R
English (EN)
9.5 Acceleration times and deceleration times for the Centrifuge 5427 R (according to DIN 58 970)
Rotor Acceleration time/Deceleration time Mains voltage
230 V 120 V 100 V
FA-45-12-17 Without soft ramp Acceleration time 27 s 29 s 29 s
Deceleration time 24 s 25 s 25 s
With soft ramp Acceleration time 39 s 39 s 39 s
Deceleration time 39 s 39 s 39 s
FA-45-24-11 Without soft ramp Acceleration time 18 s 19 s 19 s
Deceleration time 18 s 19 s 19 s
With soft ramp Acceleration time 29 s 29 s 29 s
Deceleration time 31 s 31 s 31 s
FA-45-24-11-Kit Without soft ramp Acceleration time 21 s 22 s 22 s
Deceleration time 21 s 21 s 21 s
With soft ramp Acceleration time 32 s 32 s 32 s
Deceleration time 31 s 31 s 31 s
FA-45-30-11 Without soft ramp Acceleration time 21 s 22 s 22 s
Deceleration time 18 s 19 s 19 s
With soft ramp Acceleration time 32 s 32 s 32 s
Deceleration time 33 s 33 s 33 s
F-45-30-11 Without soft ramp Acceleration time 21 s 22 s 22 s
Deceleration time 18 s 19 s 19 s
With soft ramp Acceleration time 29 s 29 s 31 s
Deceleration time 32 s 32 s 32 s
FA-45-48-11 Without soft ramp Acceleration time 28 s 29 s 29 s
Deceleration time 22 s 23 s 23 s
With soft ramp Acceleration time 36 s 36 s 39 s
Deceleration time 35 s 35 s 35 s
F-45-48-11 Without soft ramp Acceleration time 28 s 29 s 29 s
Deceleration time 22 s 23 s 23 s
With soft ramp Acceleration time 36 s 36 s 36 s
Deceleration time 35 s 35 s 35 s
F-45-48-PCR Without soft ramp Acceleration time 11 s 12 s 12 s
Deceleration time 12 s 13 s 13 s
With soft ramp Acceleration time 22 s 22 s 22 s
Deceleration time 22 s 22 s 22 s
S-24-11-AT Without soft ramp Acceleration time 18 s 18 s 18 s
Deceleration time 17 s 17 s 17 s
With soft ramp Acceleration time 29 s 29 s 29 s
Deceleration time 30 s 30 s 30 s
49
Page 50

50
Technical data
Centrifuge 5427 R
English (EN)
Page 51

10 Ordering Information
10.1 Centrifuge 5427 R
Ordering Information
Centrifuge 5427 R
English (EN)
51
Order no.
(International)
5409 000.012 230 V, 50 Hz – 60 Hz
5409 000.136 5409000136 120 V, 50 Hz – 60 Hz
5409 000.039 100 V, 50 Hz – 60 Hz
Order no. (North
America)
Description
Centrifuge 5427 R
without rotor
10.2 Accessories
10.2.1 Rotors and rotor lids
Order no.
(International)
5409 702.009 5409702009 aerosol-tight, aluminum, angle 45°, 24 places, max. tube
5409 703.005 5409703005 aerosol-tight, aluminum
5409 717.006 5409717006 Set of 5 pieces
5409 706.004 5409706004 aerosol-tight, aluminum, angle 45°, 30 places, max. tube
5409 707.000 5409707000 aerosol-tight, aluminum
5820 762.004 5820762004 Set of 5 pieces
5409 708.007 5409708007 aluminum, angle 45°, 30 places, max. tube diameter 11 mm,
5409 709.003 5409709003 Polypropylene
5409 710.001 5409710001 aerosol-tight, aluminum, angle 45°, 48 places, max. tube
5409 711.008 5409711008 aerosol-tight, aluminum
5409 718.002 5409718002 set of 5 pieces
5409 712.004 5409712004 aluminum, angle 45°, 48 places, max. tube diameter 11 mm,
Order no. (North
America)
Description
Rotor FA-45-24-11
diameter 11 mm, incl. rotor lid (aluminum)
Rotor lid for F-45-24-11
Seal for rotor lid
FA-45-24-11 (5427 R), FA-45-16-17 (5430/5430 R)
Rotor FA-45-30-11
diameter 11 mm, incl. rotor lid (aluminum)
Rotor lid for FA-45-30-11
Seal for rotor lid
FA-45-30-11 (5427 R/5430/5430 R)
Rotor F-45-30-11
incl. rotor lid (polypropylene)
Rotor lid for F-45-30-11
Rotor FA-45-48-11
diameter 11 mm, incl. rotor lid (aluminum)
Rotor lid for FA-45-48-11
Seal for rotor lid
FA-45-48-11 (5427 R/5430/5430 R)
Rotor F-45-48-11
incl. rotor lid (polypropylene)
Page 52

52
Ordering Information
Centrifuge 5427 R
English (EN)
Order no.
(International)
5409 713.000 5409713000 Polypropylene
5409 704.001 5409704001 aerosol-tight, aluminum, angle 45°, 24 places, max. tube
5409 705.008 5409705008 aerosol-tight, aluminum
5820 767.006 5820767006 Set of 5 pieces
5409 700.006 5409700006 aerosol-tight, aluminum, 45° angle, 12 places, max. tube
5409 701.002 5409701002 aerosol-tight, aluminum
5409 716.000 5409716000 set of 5 pieces
5409 714.007 5409714007 aluminum, angle 45°, 48 places, max. tube diameter 6 mm
5409 715.003 5409715003 aerosol-tight, steel, angle 90°, 24 places, max. tube diameter
5409 720.007 5409720007 aerosol-tight, aluminum
5409 721.003 5409721003 set of 2 pieces
5409 719.009 5409719009 set of 5 pieces
Order no. (North
America)
Description
Rotor lid for F-45-48-11
Rotor FA-45-24-11-Kit
diameter 11 mm, incl. rotor lid
Rotor lid for FA-45-24-11-Kit
Seal for rotor lid
FA-45-24-11-Kit (5427 R/5430/5430 R), FA-45-48-11,
FA-45-20-17 (5804/5804 R/5810/5810 R)
Rotor FA-45-12-17
diameter 17 mm, incl. rotor lid (aluminum)
Rotor lid for FA-45-12-17
Seal for rotor lid
FA-45-12-17 (5427 R)
Rotor F-45-48-5-PCR
Rotor S-24-11-AT
11 mm, incl. rotor lid (aluminum)
Rotor lid for S-24-11-AT
Tube holder for S-24-11-AT
for 4 × 1,5 mL/2,0 mL Eppendorf tubes
Seal for rotor lid
S-24-11-AT (5427 R/5430/5430 R)
Aerosol impermeability tested and certified by the Centre of Emergency Preparedness and Response,
Health Protection Agency, Porton Down (UK).
10.2.2 Adapters
Order no.
(International)
5425 715.005 022636260 for 1 PCR tube (0.2 mL, max. Ø 6 mm), set of 6
5425 717.008 022636243 for 1 sample tube (0.4 mL, max. Ø 6 mm), set of 6 pieces
5425 716.001 022636227 for 1 sample tube (0.5 mL, max. Ø 6 mm) or 1 Microtainer
Order no. (North
America)
Description
Adapter
used in FA-45-48-11, F-45-48-11, FA-45-30-11, F-45-30-11,
FA-45-24-11, FA-45-24-11-Kit
(0.6 mL, max. Ø 8 mm), set of 6
Page 53

10.2.3 Other accessories
Ordering Information
Centrifuge 5427 R
English (EN)
53
Order no.
(International)
5416 301.001 022634305 Standard
5409 850.083 Tray for condensation water
Order no. (North
America)
Description
Rotor key
10.3 Safety
Order no.
(International)
5301 850.249 022654403 4.0 A (230 V), 2 pieces
5427 850.341 022654381 8.0 AT UL (120 V/100 V), 2 pieces
5811 352.006 022664107 10.0 AT UL (100 V), 2 pieces
Order no. (North
America)
Description
Fuse
Page 54

54
Ordering Information
Centrifuge 5427 R
English (EN)
Page 55

Índice
Centrifuge 5427 R
Español (ES)
Manual de instrucciones Centrifuge 5427 Rveren pág.Fig.Tab.en pág.
Español (ES)Manual de instrucciones
Índice
1 Instrucciones de empleo . . . . . . . . . . . . . . . . . . . . . . . . . . . . . . . . . . . . . . . . . . . . . . . . . . . . . . . . . . . 57
1.1 Utilización de estas instrucciones. . . . . . . . . . . . . . . . . . . . . . . . . . . . . . . . . . . . . . . . . . . . . . . . 57
2 Descripción del producto. . . . . . . . . . . . . . . . . . . . . . . . . . . . . . . . . . . . . . . . . . . . . . . . . . . . . . . . . . . 59
2.1 Ilustración general . . . . . . . . . . . . . . . . . . . . . . . . . . . . . . . . . . . . . . . . . . . . . . . . . . . . . . . . . . . 59
3 Instrucciones generales de seguridad . . . . . . . . . . . . . . . . . . . . . . . . . . . . . . . . . . . . . . . . . . . . . . . . 61
3.1 Uso de acuerdo con lo previsto. . . . . . . . . . . . . . . . . . . . . . . . . . . . . . . . . . . . . . . . . . . . . . . . . . 61
3.2 Requerimiento para el usuario . . . . . . . . . . . . . . . . . . . . . . . . . . . . . . . . . . . . . . . . . . . . . . . . . . 61
3.3 Límites de aplicación . . . . . . . . . . . . . . . . . . . . . . . . . . . . . . . . . . . . . . . . . . . . . . . . . . . . . . . . . 61
3.3.1 Aclaración de la directriz ATEX (94/9/EG) . . . . . . . . . . . . . . . . . . . . . . . . . . . . . . . . . . 61
3.3.2 Máxima vida útil de los accesorios . . . . . . . . . . . . . . . . . . . . . . . . . . . . . . . . . . . . . . . . 61
3.4 Indicaciones relativas a la responsabilidad del producto . . . . . . . . . . . . . . . . . . . . . . . . . . . . . . 62
3.5 Peligros durante el uso previsto . . . . . . . . . . . . . . . . . . . . . . . . . . . . . . . . . . . . . . . . . . . . . . . . . 63
3.5.1 Daños personales o al equipo . . . . . . . . . . . . . . . . . . . . . . . . . . . . . . . . . . . . . . . . . . . . 63
3.5.2 Manipulación errónea de la centrífuga . . . . . . . . . . . . . . . . . . . . . . . . . . . . . . . . . . . . . 64
3.5.3 Manipulación errónea de los rotores . . . . . . . . . . . . . . . . . . . . . . . . . . . . . . . . . . . . . . 65
3.5.4 Utilización extrema de los tubos de centrifugado . . . . . . . . . . . . . . . . . . . . . . . . . . . . 66
3.5.5 Centrifugado hermético a los aerosoles . . . . . . . . . . . . . . . . . . . . . . . . . . . . . . . . . . . . 67
3.6 Indicaciones de seguridad en el equipo . . . . . . . . . . . . . . . . . . . . . . . . . . . . . . . . . . . . . . . . . . . 68
55
4 Instalación. . . . . . . . . . . . . . . . . . . . . . . . . . . . . . . . . . . . . . . . . . . . . . . . . . . . . . . . . . . . . . . . . . . . . . . 69
4.1 Seleccionar ubicación . . . . . . . . . . . . . . . . . . . . . . . . . . . . . . . . . . . . . . . . . . . . . . . . . . . . . . . . . 69
4.2 Preparación de la instalación . . . . . . . . . . . . . . . . . . . . . . . . . . . . . . . . . . . . . . . . . . . . . . . . . . . 69
4.3 Instalación del aparato . . . . . . . . . . . . . . . . . . . . . . . . . . . . . . . . . . . . . . . . . . . . . . . . . . . . . . . . 70
5 Manejo. . . . . . . . . . . . . . . . . . . . . . . . . . . . . . . . . . . . . . . . . . . . . . . . . . . . . . . . . . . . . . . . . . . . . . . . . . 71
5.1 Visión general de los elementos de control . . . . . . . . . . . . . . . . . . . . . . . . . . . . . . . . . . . . . . . . 71
5.2 Navegación por el menú . . . . . . . . . . . . . . . . . . . . . . . . . . . . . . . . . . . . . . . . . . . . . . . . . . . . . . . 73
5.3 Menú . . . . . . . . . . . . . . . . . . . . . . . . . . . . . . . . . . . . . . . . . . . . . . . . . . . . . . . . . . . . . . . . . . . . . . 73
5.4 Preparación del centrifugado . . . . . . . . . . . . . . . . . . . . . . . . . . . . . . . . . . . . . . . . . . . . . . . . . . . 75
5.4.1 Conexión de la centrífuga . . . . . . . . . . . . . . . . . . . . . . . . . . . . . . . . . . . . . . . . . . . . . . . 75
5.4.2 Inserción del rotor. . . . . . . . . . . . . . . . . . . . . . . . . . . . . . . . . . . . . . . . . . . . . . . . . . . . . 75
5.4.3 Detección automática del rotor . . . . . . . . . . . . . . . . . . . . . . . . . . . . . . . . . . . . . . . . . . . 75
5.4.4 Cambio del rotor . . . . . . . . . . . . . . . . . . . . . . . . . . . . . . . . . . . . . . . . . . . . . . . . . . . . . . 75
5.4.5 Carga del rotor . . . . . . . . . . . . . . . . . . . . . . . . . . . . . . . . . . . . . . . . . . . . . . . . . . . . . . . 76
5.4.6 Cierre de la tapa del rotor . . . . . . . . . . . . . . . . . . . . . . . . . . . . . . . . . . . . . . . . . . . . . . . 78
5.4.7 Cierre de la tapa de la centrífuga . . . . . . . . . . . . . . . . . . . . . . . . . . . . . . . . . . . . . . . . . 78
5.5 Enfriamiento . . . . . . . . . . . . . . . . . . . . . . . . . . . . . . . . . . . . . . . . . . . . . . . . . . . . . . . . . . . . . . . . 78
5.5.1 Ajuste de temperatura. . . . . . . . . . . . . . . . . . . . . . . . . . . . . . . . . . . . . . . . . . . . . . . . . . 78
5.5.2 Indicación de temperatura . . . . . . . . . . . . . . . . . . . . . . . . . . . . . . . . . . . . . . . . . . . . . . 78
5.5.3 Supervisión de temperatura . . . . . . . . . . . . . . . . . . . . . . . . . . . . . . . . . . . . . . . . . . . . . 78
5.5.4 Iniciar el ciclo de atemperado FastTemp . . . . . . . . . . . . . . . . . . . . . . . . . . . . . . . . . . . 79
5.5.5 Refrigeración continua . . . . . . . . . . . . . . . . . . . . . . . . . . . . . . . . . . . . . . . . . . . . . . . . . 79
5.5.6 Refrigeración continua en funcionamiento continuo . . . . . . . . . . . . . . . . . . . . . . . . . . 80
5.6 Centrifugado . . . . . . . . . . . . . . . . . . . . . . . . . . . . . . . . . . . . . . . . . . . . . . . . . . . . . . . . . . . . . . . . 80
5.6.1 Centrifugado con ajuste de tiempo . . . . . . . . . . . . . . . . . . . . . . . . . . . . . . . . . . . . . . . . 80
5.6.2 Centrifugado de corta duración . . . . . . . . . . . . . . . . . . . . . . . . . . . . . . . . . . . . . . . . . . 81
5.6.3 Ajuste del radio de centrifugado . . . . . . . . . . . . . . . . . . . . . . . . . . . . . . . . . . . . . . . . . . 82
5.6.4 Después del centrifugado . . . . . . . . . . . . . . . . . . . . . . . . . . . . . . . . . . . . . . . . . . . . . . . 82
Page 56

56
Índice
Centrifuge 5427 R
Español (ES)
6 Mantenimiento . . . . . . . . . . . . . . . . . . . . . . . . . . . . . . . . . . . . . . . . . . . . . . . . . . . . . . . . . . . . . . . . . . . 83
6.1 Preparación de la limpieza / desinfección . . . . . . . . . . . . . . . . . . . . . . . . . . . . . . . . . . . . . . . . . 83
6.2 Realización de la limpieza / desinfección . . . . . . . . . . . . . . . . . . . . . . . . . . . . . . . . . . . . . . . . . . 83
6.2.1 Limpieza y desinfección del equipo . . . . . . . . . . . . . . . . . . . . . . . . . . . . . . . . . . . . . . . 84
6.2.2 Limpieza y desinfección del rotor . . . . . . . . . . . . . . . . . . . . . . . . . . . . . . . . . . . . . . . . . 85
6.3 Indicaciones de cuidado adicionales para la Centrifuge 5427 R . . . . . . . . . . . . . . . . . . . . . . . . 85
6.4 Rotura de vidrio. . . . . . . . . . . . . . . . . . . . . . . . . . . . . . . . . . . . . . . . . . . . . . . . . . . . . . . . . . . . . . 86
6.5 Sustituir fusibles . . . . . . . . . . . . . . . . . . . . . . . . . . . . . . . . . . . . . . . . . . . . . . . . . . . . . . . . . . . . . 86
6.6 Descontaminación antes del envío . . . . . . . . . . . . . . . . . . . . . . . . . . . . . . . . . . . . . . . . . . . . . . . 87
7 Solución de problemas. . . . . . . . . . . . . . . . . . . . . . . . . . . . . . . . . . . . . . . . . . . . . . . . . . . . . . . . . . . . . 89
7.1 Errores generales . . . . . . . . . . . . . . . . . . . . . . . . . . . . . . . . . . . . . . . . . . . . . . . . . . . . . . . . . . . . 89
7.2 Mensajes de error . . . . . . . . . . . . . . . . . . . . . . . . . . . . . . . . . . . . . . . . . . . . . . . . . . . . . . . . . . . . 90
7.3 Desbloqueo de emergencia. . . . . . . . . . . . . . . . . . . . . . . . . . . . . . . . . . . . . . . . . . . . . . . . . . . . . 92
8 Transporte, almacenaje y eliminación. . . . . . . . . . . . . . . . . . . . . . . . . . . . . . . . . . . . . . . . . . . . . . . . . 93
8.1 Transporte. . . . . . . . . . . . . . . . . . . . . . . . . . . . . . . . . . . . . . . . . . . . . . . . . . . . . . . . . . . . . . . . . . 93
8.2 Almacenamiento . . . . . . . . . . . . . . . . . . . . . . . . . . . . . . . . . . . . . . . . . . . . . . . . . . . . . . . . . . . . . 93
8.3 Eliminación . . . . . . . . . . . . . . . . . . . . . . . . . . . . . . . . . . . . . . . . . . . . . . . . . . . . . . . . . . . . . . . . . 93
Page 57

Instrucciones de empleo
Centrifuge 5427 R
Español (ES)
1 Instrucciones de empleo
1.1 Utilización de estas instrucciones
Lea detenidamente este manual de instrucciones antes de poner en funcionamiento el equipo por
primera vez. Tenga en cuenta, en caso necesario, los manuales de instrucciones de los accesorios.
Este manual de instrucciones es parte del producto. Consérvelo en un lugar accesible.
Incluya siempre este manual de instrucciones cuando entregue el equipo a terceros.
En caso de pérdida del manual de instrucciones, solicite otro. Encontrará una versión actual de este
manual en nuestra página de internet www.eppendorf.com
.
57
Page 58

58
Instrucciones de empleo
Centrifuge 5427 R
Español (ES)
Page 59

2 Descripción del producto
rpm
rcf
f
ast
temp
menu
enter
open
short
star
t
s
t
op
USB
11
1
5
3
4
67
8
9 10
2
2.1 Ilustración general
Abb. 2-1: Vista anterior y posterior de la Centrifuge 5427 R
Descripción del producto
Centrifuge 5427 R
Español (ES)
59
Imag. 2-1: Vista anterior y posterior de la Centrifuge 5427 R
1 Tapa de la centrifuga
2Tubito de control
Control visual de la parada del rotor y/o
posibilidad de controlar las revoluciones
mediante estroboscopio.
3Indicador
Representación de los parámetros de
centrifugado y ajustes del equipo (ver Fig. 5-2 en
pág. 72).
4Panel de manejo
Teclas y selectores giratorios para el manejo de la
centrífuga (ver Fig. 5-1 en pág. 71).
7Puerto USB
Sólo para el servicio técnico: Interfaz para
análisis de errores y actualizaciones de software.
8Interruptor de red
Interruptor para encender (I) y apagar (0) el
equipo.
9Portafusible
10 Toma de conexión
Conexión para el cable de alimentación
suministrado.
11 Placa de características
5 Recipiente colector de agua condensada
6 Desbloqueo de emergencia
(ver en pág. 92)
Page 60

60
Descripción del producto
Centrifuge 5427 R
Español (ES)
Page 61

Instrucciones generales de seguridad
Centrifuge 5427 R
Español (ES)
3 Instrucciones generales de seguridad
3.1 Uso de acuerdo con lo previsto
La Centrifuge 5427 R está destinada exclusivamente para su uso en interiores y sirve para la separación de
soluciones acuosas y suspensiones de diferente densidad en tubos de muestras autorizados.
3.2 Requerimiento para el usuario
Este aparato debe ser manejado exclusivamente por personal técnico debidamente formado. El personal
debe haber leído atentamente el manual de instrucciones y estar familiarizado con el funcionamiento del
aparato.
3.3 Límites de aplicación
3.3.1 Aclaración de la directriz ATEX (94/9/EG)
¡PELIGRO! Peligro de explosión.
No utilice el equipo en salas en donde se trabaje con sustancias explosivas.
No procese con este equipo sustancias explosivas o que reaccionen bruscamente.
No procese con este equipo sustancias que puedan crear una atmósfera explosiva.
61
La Centrifuge 5427 R no está indicada para su utilización en una atmósfera potencialmente explosiva
debido a su construcción y a las condiciones en el interior del equipo.
El equipo sólo puede utilizarse en un ambiente seguro, es decir en el ambiente abierto de un laboratorio
ventilado o una campana extractora. No está permitido el uso de sustancias que puedan originar una
atmósfera potencialmente explosiva. La decisión definitiva respecto a los riesgos relacionados con el uso
de tales sustancias es responsabilidad del usuario.
3.3.2 Máxima vida útil de los accesorios
¡ADVERTENCIA! Peligro de lesión a causa de accesorios dañados química o
mecánicamente.
Tanto arañazos como grietas pequeñas pueden provocar graves daños en los materiales
internos.
Proteja todas las piezas de los accesorios contra los daños mecánicos.
Controle la presencia de daños en los accesorios antes de cada uso. Cambie los accesorios
dañados.
No utilice rotores, tapas de rotor o cestillos con huellas de corrosión o daños mecánicos
(p.ej. torceduras).
No utilice ningún accesorio, cuya máxima vida útil haya caducado.
Page 62

62
Instrucciones generales de seguridad
Centrifuge 5427 R
Español (ES)
¡ATENCIÓN! Peligro de lesiones a causa de tapas o cubiertas de rotor químicamente
deterioradas.
Las tapas de rotor o cubiertas transparentes de PC, PP o PEI pueden perder resistencia por el
efecto de disolventes orgánicos (p.ej. fenol, cloroformo).
Si las tapas de rotor o cubiertas entran en contacto con disolventes orgánicos, límpielas
inmediatamente.
Controle con regularidad la presencia de daños o fisuras en las tapas de rotor o las
cubiertas.
Sustituya inmediatamente las tapas de rotor o cubiertas con fisuras o decoloraciones
lechosas.
Los rotores siguientes, incluidos los frascos, cestillos y tapa del rotor correspondientes, tienen una vida útil
máxima de 7 años a partir de la primera puesta en marcha o el número de ciclos indicado en la tabla (según
lo que tenga lugar primero).
Rotor / Accesorios Máxima vida útil a partir de la puesta
en marcha
S-24-11-AT (5427 R/5430/5430 R) 75.000 ciclos 7 años
FA-45-48-11 (5427 R/5430/5430 R/5804/5804 R/5810/5810 R) 75.000 ciclos 7 años
FA-45-12-17 (Centrifuge 5427 R) 75.000 ciclos 7 años
Tapa del rotor QuickLock 3 años
Anillos de obturación de las tapas de rotor QuickLock 50 ciclos de autoclave –
Tapas de rotor o cubiertas de policarbonato (PC), polipropileno
(PP) o polieterimida (PEI)
Adaptador – 1 año
Los otros rotores y tapas de rotor de esta centrífuga no tienen una vida útil limitada, siempre y cuando se
cumplan las condiciones siguientes:
•Uso correcto
• Mantenimiento recomendado
• Estado libre de daños.
50 ciclos de autoclave 3 años
La fecha de fabricación está grabada en los rotores como 03/10 (= marzo 2010) o en la parte interior de la
tapa del rotor como un reloj .
Para garantizar la hermeticidad a los aerosoles se aplica lo siguiente:
• Cambie las tapas de rotor y cubiertas herméticas a los aerosoles después de 50 ciclos de autoclave.
• Cambie el anillo de obturación de la tapa de rotor QuickLock después de 50 ciclos de autoclave.
3.4 Indicaciones relativas a la responsabilidad del producto
Los siguientes casos pueden reducir la protección prevista del aparato. La entidad explotadora asume
entonces la responsabilidad por las lesiones personales y daños materiales producidos:
• El equipo no es utilizado de acuerdo con lo especificado en el manual de instrucciones.
• El equipo no es utilizado de acuerdo con lo prescrito.
• El equipo se utiliza con accesorios o consumibles no recomendados por Eppendorf.
• El equipo es mantenido o reparado por personas que no han sido autorizadas por Eppendorf AG.
• El usuario realiza modificaciones no autorizadas en el equipo.
Page 63

Instrucciones generales de seguridad
Centrifuge 5427 R
Español (ES)
3.5 Peligros durante el uso previsto
Antes de utilizar la Centrifuge 5427 R, lea primero el manual de instrucciones y tenga en cuenta las
siguientes indicaciones generales de seguridad.
3.5.1 Daños personales o al equipo
¡ADVERTENCIA! Descarga eléctrica por daños en el equipo o cable de alimentación.
Solo encienda el equipo si este y el cable de alimentación no presentan ningún daño.
Utilice únicamente equipos que hayan sido instalados o reparados correctamente.
En caso de peligro, separe el equipo de la red eléctrica extrayendo el enchufe de
alimentación del equipo o con ayuda del dispositivo de separación previsto para ello (p.ej.,
el interruptor de emergencia del laboratorio).
¡ADVERTENCIA! Descargas de tensión mortales en el interior del equipo.
Cerciórese de que la carcasa siempre esté cerrada y no presente daños, de modo que no
sea posible tocar piezas en el interior del equipo por descuido.
No desmonte el revestimiento del equipo.
No deje que ningún líquido entre al interior de la carcasa.
Solo deje que personal de mantenimiento autorizado por Eppendorf abra el equipo.
63
¡ADVERTENCIA! Peligro a causa de un suministro de energía eléctrica equivocado.
Solo conecte el equipo a fuentes de alimentación que cumplan los requisitos eléctricos
especificados en la placa de características.
Solo utilice enchufes con toma de tierra y un cable de red adecuado.
¡ADVERTENCIA! Daños para la salud a causa de líquidos infecciosos y gérmenes
patógenos.
Siempre tenga en cuenta las disposiciones nacionales, el nivel de seguridad biológica de
su laboratorio, así como las fichas de datos de seguridad y las instrucciones de uso del
fabricante cuando maneje líquidos infecciosos y gérmenes patógenos.
Utilice sistemas de cierre hermético a los aerosoles al centrifugar estas sustancias.
Cuando trabaje con gérmenes patógenos que pertenezcan a un grupo de riesgo superior,
debe disponer de más de una impermeabilización biológica hermética a los aerosoles.
Póngase su equipo de protección personal.
Encontrará amplias prescripciones respecto al manejo de gérmenes o material biológico
del grupo de riesgo II o superior en el "Manual de Bioseguridad en el Laboratorio" (fuente:
World Health Organisation, Laboratory Biosafety Manual, en la versión actualmente
vigente).
¡ADVERTENCIA! Peligro de lesiones al abrir o cerrar la tapa de la centrífuga.
Puede aplastarse los dedos al abrir o cerrar la tapa de la centrífuga.
Al abrir y cerrar la tapa de la centrífuga, no ponga la mano entre la tapa y el equipo o en el
mecanismo de cierre de la tapa.
Abra siempre la tapa de la centrífuga por completo para que esta no pueda cerrarse de
golpe.
Page 64

64
Instrucciones generales de seguridad
Centrifuge 5427 R
Español (ES)
¡ATENCIÓN! Riesgos de seguridad debido a accesorios y piezas de recambio equivocados.
Los accesorios y piezas de recambio no recomendados por Eppendorf merman la seguridad,
el funcionamiento y la precisión del equipo. Por daños producidos por accesorios y piezas de
recambio no recomendados por Eppendorf o por un uso incorrecto, Eppendorf queda eximido
de cualquier responsabilidad o garantía.
Utilice exclusivamente accesorios y piezas de recambio recomendados por Eppendorf.
¡AVISO! Daños en el equipo a causa de líquidos derramados.
1. Apague el equipo.
2. Desconecte el equipo del suministro de corriente.
3. Lleve a cabo una limpieza cuidadosa del equipo y sus accesorios según las indicaciones de
limpieza y desinfección del manual de instrucciones.
4. Si debe utilizarse otro método de limpieza o desinfección, consulte a Eppendorf AG para
asegurarse de que el método previsto no dañe el equipo.
¡AVISO! Daños en los componentes electrónicos debido a la formación de condensación.
Después de transportar el equipo de un entorno frío a un entorno más caliente se puede
formar líquido de condensación en el equipo.
Después de emplazar el equipo, debe esperar por lo menos 4 h. Una vez transcurrido este
tiempo, puede conectar el equipo a la red eléctrica.
3.5.2 Manipulación errónea de la centrífuga
¡AVISO! Daños por golpes o movimientos del equipo en funcionamiento.
Un rotor que golpea contra la pared de la cámara produce daños considerables en el equipo y
en el rotor.
No mueva o golpee el equipo mientras este está en funcionamiento.
Page 65

3.5.3 Manipulación errónea de los rotores
¡ADVERTENCIA! Peligro de lesión por rotores y tapa del rotor incorrectamente fijados.
Centrifugue solo cuando el rotor y la tapa del rotor estén bien fijados.
Si al arrancar la centrífuga se producen ruidos no habituales, puede que el rotor o la tapa
del rotor no estén fijados correctamente. Finalice el centrifugado de inmediato pulsando la
tecla start/stop.
¡ATENCIÓN! Peligro de lesión por carga asimétrica de un rotor.
Equipe los rotores siempre simétricamente con los mismos tubos.
Cargue los adaptadores solo con los tubos adecuados.
Utilice siempre tubos del mismo tipo (peso, material/densidad y volumen).
Compruebe la carga simétrica tarando o equilibrando los tubos y adaptador utilizados con
una báscula.
Instrucciones generales de seguridad
Centrifuge 5427 R
Español (ES)
65
¡ATENCIÓN! Peligro de lesión por sobrecarga del rotor.
La Centrifuge 5427 R está diseñada para el centrifugado de sustancias con una densidad
máxima de 1,2 g/mL al máximo número de revoluciones y al máximo volumen de llenado o
carga.
No exceda la carga máxima del rotor.
¡AVISO! Deterioro de los rotores a causa de productos químicos agresivos.
Los rotores son componentes de alta calidad que resisten cargas extremas. Esta estabilidad
puede verse perjudicada por productos químicos agresivos.
Evite el uso de productos químicos agresivos; a esta clase de productos pertenecen, entre
otros, álcalis fuertes y débiles, ácidos fuertes, soluciones con iones de mercurio, cobre u
otros metales pesados, hidrocarburos halogenados, soluciones salinas concentradas y
fenol.
En los rotores identificados con "revestido" ("coated") pueden surgir cambios de color
debido al proceso de producción. Estos no tienen ninguna repercusión sobre la
durabilidad o la resistencia a los productos químicos.
¡AVISO! El rotor se puede caer en caso de una manipulación errónea.
El rotor puede caerse si se utilizan los cestillos como asas.
Antes de colocar o extraer un rotor basculante, extraiga los cestillos.
Cargue siempre la cruz del rotor con ambas manos.
Page 66

66
Instrucciones generales de seguridad
Centrifuge 5427 R
Español (ES)
3.5.4 Utilización extrema de los tubos de centrifugado
¡ATENCIÓN! Peligro de lesión por tubos sobrecargados.
Observe los valores límite especificados por el fabricante de los tubos sobre la capacidad
de carga de los mismos.
Utilice exclusivamente tubos autorizados por el fabricante para la fuerza de la gravedad
(FCR) deseada.
¡AVISO! Peligro por tubos dañados.
No deben utilizarse tubos dañados. La consecuencia pueden ser daños adicionales en el
equipo y en los accesorios así como la pérdida de muestras.
Inspeccione visualmente todos los tubos respecto a posibles daños antes de su uso.
¡AVISO! Peligro por tapas de tubo abiertas.
Las tapas de tubo abiertas pueden romperse en el centrifugado y dañar tanto el rotor como la
centrífuga.
Cierre cuidadosamente todas las tapas de tubo antes del centrifugado.
Excepción: consulte la advertencia para el centrifugado de columnas de centrifugado en el
rotor FA-45-24-11-Kit (ver Preparación del centrifugado en pág. 75).
¡AVISO! Daños de los tubos de plástico por disolventes orgánicos.
En caso de utilización de disolventes orgánicos (p.ej. fenol, cloroformo) se reduce la
resistencia de los tubos de plástico, de forma que se pueden dañar los tubos.
Observe las indicaciones del fabricante sobre la resistencia química de los tubos.
Page 67

3.5.5 Centrifugado hermético a los aerosoles
¡ADVERTENCIA! Riesgos para la salud debido a una hermeticidad a los aerosoles limitada
por una combinación incorrecta de rotor/tapa del rotor.
El centrifugado hermético a los aerosoles solo está garantizado en caso de utilizar los rotores
y tapas de rotor previstos para ello. Las denominaciones de los rotores de ángulo fijo
herméticos a los aerosoles siempre empiezan con FA. Los rotores y las tapas de rotor
herméticos a los aerosoles de esta centrífuga están marcados adicionalmente con un anillo
rojo en el rotor y un tornillo de fijación rojo para la tapa del rotor.
Los rotores basculantes herméticos a los aerosoles tienen la marca AT (aerosol tight).
Para el centrifugado hermético a los aerosoles en la centrífuga prevista, utilice siempre al
mismo tiempo rotores y tapas de rotor con marca de hermético a los aerosoles. La
indicación sobre qué tipo de rotores y tapas de rotor herméticos a los aerosoles pueden
utilizarse en una determinada centrífuga la encontrará en el rotor y a partir de la fecha de
producción de octubre de 2003 en la parte superior de la tapa del rotor.
Utilice tapas de rotor herméticas a los aerosoles exclusivamente en combinación con
rotores que estén indicados en la tapa del rotor.
Instrucciones generales de seguridad
Centrifuge 5427 R
Español (ES)
67
¡ADVERTENCIA! Riesgos para la salud debido a una hermeticidad a los aerosoles limitada
por una aplicación incorrecta.
Las autoclaves, las cargas mecánicas y la contaminación por sustancias químicas u otras
soluciones agresivas pueden perjudicar la hermeticidad a los aerosoles de los rotores y las
tapas de rotor.
Controle antes de cada uso la integridad de los anillos de obturación de las tapas o
cubiertas herméticas a los aerosoles.
Utilice tapas de rotor o cubiertas herméticas a los aerosoles solo con anillos de obturación
limpios y en buen estado.
Unte ligeramente la rosca del tornillo de la tapa de rotor después de cada autoclave
correcta (121 °C, 20 min) con grasa para gorrones (n.° de pedido. int. 5810 350.050,
Norteamérica 022634330).
Cambie las tapas de rotor y cubiertas herméticas a los aerosoles después de 50 ciclos de
autoclave.
Con las tapas de rotor QuickLock, el anillo de obturación debe cambiarse después de 50
ciclos de autoclave.
Nunca almacene cerrados los rotores herméticos a los aerosoles o los frascos.
Page 68

68
Instrucciones generales de seguridad
Centrifuge 5427 R
Español (ES)
3.6 Indicaciones de seguridad en el equipo
Representación Significado Lugar
Lugar peligroso Lado derecho del equipo
ATE NCIÓN
Apriete siempre el rotor con la llave de rotor
adjunta.
ATE NCIÓN
Cierre todos los tubos y utilice una tapa de rotor.
Lado superior del equipo,
debajo de la tapa de la
centrífuga.
Lado superior del equipo,
debajo de la tapa de la
centrífuga.
Page 69

4 Instalación
4.1 Seleccionar ubicación
¡AVISO! En caso de error se pueden dañar objetos que se encuentran junto al equipo.
Respete las recomendaciones de la norma EN 61010-2-020, dejando durante el
funcionamiento un espacio de seguridad de 30 cm alrededor del equipo.
Retire todos los materiales y objetos que se encuentren en esta área.
¡AVISO! Daños por sobrecalentamiento.
No coloque el equipo cerca de fuentes de calor (p. ej., calefacción, armario de desecación).
No exponga el equipo a la radiación solar directa.
Asegúrese de que la circulación de aire no se obstaculice. Mantenga una distancia mínima
de 30 cm (11.8 in) de todas las rendijas de ventilación.
Instalación
Centrifuge 5427 R
Español (ES)
69
Determine la ubicación del equipo según los siguientes criterios:
• Alimentación eléctrica apropiada conforme a la placa de características (230 V/120 V/100 V).
• Mesa de laboratorio estable, horizontal y libre de resonancias.
• Entorno bien ventilado y protegido de la radiación solar directa para evitar un calentamiento adicional.
4.2 Preparación de la instalación
Requisitos
El peso de la centrifuga es de 30,0 kg (66.14 lb). Para el desembalaje y colocación es necesaria una persona
más como ayuda.
Ejecute los siguientes pasos en el orden indicado:
1. Abra el cartón de embalaje.
2. Extraiga los accesorios.
3. Saque la centrífuga del cartón con ayuda de dos personas.
4. Quitar los bloqueadores para el transporte de los lados.
5. Colocar el equipo sobre una mesa de laboratorio apropiada.
No utilice la abertura del recipiente colector de agua condensada como asa.
6. Quite las fundas de plástico.
Page 70

70
Instalación
Centrifuge 5427 R
Español (ES)
4.3 Instalación del aparato
Requisitos
El equipo está colocado sobre una mesa de laboratorio apropiada.
¡AVISO! Daños en los componentes electrónicos debido a la formación de condensación.
Después de transportar el equipo de un entorno frío a un entorno más caliente se puede
formar líquido de condensación en el equipo.
Después de emplazar el equipo, debe esperar por lo menos 4 h. Una vez transcurrido este
tiempo, puede conectar el equipo a la red eléctrica.
¡AVISO! Centrifuge 5427 R: daño del compresor tras un transporte inadecuado.
No conecte la centrífuga hasta 4 horas después de haberla colocado en su respectivo sitio.
Ejecute los siguientes pasos en el orden indicado:
1. Deje que el equipo se caliente a temperatura ambiente.
2. Verifique que la tensión y frecuencia de red coincidan con los requisitos especificados en la placa de
características del equipo.
3. Conecte la centrífuga a la red y enciéndala con el interruptor de red.
•El indicador está activo.
• La tapa se abre automáticamente.
4. Retire los bloqueadores para el transporte del bloqueo de la tapa.
5. Retire los bloqueadores para el transporte del eje del motor.
6. Compruebe todas las piezas respecto a posibles daños de transporte. Póngase en contacto con su
proveedor en caso de que exista algún daño.
7. Desplace el recipiente colector de agua condensada al soporte destinado para ello (ver Fig. 2-1 en
pág. 59).
Guarde el material de embalaje y los bloqueadores de transporte para un transporte posterior
o almacenaje. Observe también las indicaciones para el transporte (ver en pág. 93).
Page 71

Manejo
Centrifuge 5427 R
Español (ES)
5 Manejo
5.1 Visión general de los elementos de control
Familiarícese, antes de la primera utilización de la Centrifuge 5427 R con el indicador y los elementos de
control.
Abb. 5-1: Panel de manejo de Centrifuge 5427 R
1 2
3 5
4
71
time
Imag. 5-1: Panel de manejo de Centrifuge 5427 R
1 Llamar y seleccionar parámetros de menú
(ver Navegación por el menú en pág. 73)
2 Cambiar la indicación de la velocidad de
centrifugado (rpm o FCR)
3Indicador
4 Centrifugado de corta duración
(ver Centrifugado de corta duración en pág. 81)
5Desbloquear la tapa
temp
speed
6791010 8
7 Ajustar la velocidad de centrifugado
8 Ajustar la temperatura
9 Ajustar la duración de centrifugado
10 Iniciar el ciclo de atemperado FastTemp
(ver Iniciar el ciclo de atemperado FastTemp en
pág. 79)
11 Seleccionar elemento del menú
(ver Navegación por el menú en pág. 73)
6 Iniciar y detener el centrifugado
Page 72

72
314 5
6
7
2
9
8
Manejo
Centrifuge 5427 R
Español (ES)
Abb. 5-2: Indicador de la Centrifuge 5427 R.
Imag. 5-2: Indicador de la Centrifuge 5427 R.
1 Duración del centrifugado
2 Bloqueo del teclado
Bloqueo del teclado. Los parámetros de
centrifugado no se pueden cambiar
inintencionadamente.
Sin bloqueo del teclado. Los parámetros de
centrifugado pueden cambiarse.
3 Inicio del ciclo: Función ATSET
Inicio del ciclo cuando se alcanza el 95% de
la fuerza de gravedad (FCR) o el número de
revoluciones (rpm) predeterminado.
Inicio del ciclo inmediato.
4Temperatura
5Rampa suave
Aceleración y frenado lentos del rotor.
Ningún símbolo: Aceleración y frenado rápidos
del rotor.
6 Fuerza de la gravedad (FCR) o número de
revoluciones (rpm)
7Estado de la centrífuga
: tapa de centrífuga desbloqueada.
: tapa de centrífuga bloqueada.
(parpadea): centrifugado en marcha.
8 Indicación de la velocidad de centrifugado
rcf : fuerza de la gravedad (fuerza centrífuga
relativa).
rpm: número de revoluciones (revoluciones por
minuto).
9Estado del altavoz
Altavoz encendido.
Altavoz apagado.
Page 73

5.2 Navegación por el menú
Para modificar ajustes en el menú del equipo, tiene que proseguir de la siguiente manera:
1. Abrir menú.
2. Seleccionar el punto de menú deseado.
3. Confirmar la selección.
4. Seleccionar el ajuste del respectivo parámetro.
Manejo
Centrifuge 5427 R
Español (ES)
73
5.
6. Abandone el menú.
Confirmar el ajuste modificado.
Usted accede al punto del menú BACK del primer nivel del menú.
Para abandonar el segundo nivel del menú sin modificar un parámetro, debe seleccionar el
punto del menú BACK y confirmar con menu/enter.
5.3 Menú
Tab. 5-1: Estructura del menú de la Centrifuge 5427 R.
Nivel del menú 1 (M 1) Nivel del menú 2 (M 2) Indicador
SOFT
Rampa suave:Reducción de velocidad de
aceleración y la velocidad de frenado.
En el centrifugado de corta duración está
desactivada.
RAD
En la conversión interna del número de
revoluciones (rpm) a la fuerza de la
gravedad (FCR), el radio depende del
adaptador utilizado.
LOCK
Bloqueo del teclado: Los parámetros de
centrifugado (temperatura, fuerza de la
gravedad (FCR) o número de revoluciones
(rpm)) no se pueden cambiar
inintencionadamente.
ON Aceleración y frenado lentos del rotor.
OFF Aceleración y frenado rápidos del rotor.
0_2ML
0_4ML
0_5ML
0_6ML
MAX Radio mayor del rotor utilizado.
ON Ajuste fijo de los parámetros de
OFF
Seleccione el radio según el adaptador
utilizado.
Sólo rotor FA-45-12-17:
MAX
1_5/2
HPLC
CRYO
centrifugado. Al pulsar las teclas time,
temp y speed aparece SAFE en el
indicador.
Page 74

74
Manejo
Centrifuge 5427 R
Español (ES)
Nivel del menú 1 (M 1) Nivel del menú 2 (M 2) Indicador
ATSET
Ajuste del inicio de un ciclo de
centrifugado.
SHORT
Ajuste de la velocidad del centrifugado de
corta duración.
El centrifugado de corta duración no tiene
función SOFT (suave).
TEMP
Ajuste del límite temporal de la
refrigeración continua ("ECO shut-off")
(ver en pág. 78).
ALARM
Encendido o apagado del altavoz.
ON La cuenta atrás de la duración de ciclo
ajustada empieza al alcanzar el 95% del
valor de la fuerza de la gravedad (FCR) o
el número de revoluciones (rpm)
predeterminado.
OFF La cuenta atrás del tiempo que dure el
ciclo empieza de inmediato.
MAX Centrifugado de corta duración con
velocidad máxima del rotor utilizado.
SET Centrifugado de corta duración con
velocidad ajustada (fuerza de la
gravedad (FCR) o número de
revoluciones (rpm)).
8 h Ajuste estándar: Finalización de la
refrigeración continua después de 8 h.
1 h
2 h
4 h
oo Servicio continuo de la refrigeración
ON Encendido del altavoz.
OFF Apagado del altavoz.
Para limitar la refrigeración continua
después de un ciclo a 1 h, 2 h o 4 h, la
tapa de la centrífuga debe abrirse
después del ciclo y volver a cerrarse.
continua.
VOL
Ajuste de volumen.
SLEEP
Encendido o apagado del modo standby.
Si la centrífuga no se utiliza durante 15
minutos, ésta cambia al modo standby. En
el indicador aparece el texto EP.
Para finalizar el modo standby, pulse una
tecla o cierre la tapa de la centrífuga.
En ambos niveles del menú se encuentra además el elemento Back.
BACK en el nivel del menú 2: Volver al nivel del menú 1.
BACK en el nivel del menú 1: Salir del menú.
VOL1
…
VOL5
ON Modo standby activado.
OFF Modo standby desactivado.
Ajuste del volumen del altavoz en 5
niveles (de VOL1 a VOL5). Para poder
escuchar la modificación del volumen,
el altavoz tiene que estar encendido.
Page 75

Manejo
Centrifuge 5427 R
Español (ES)
5.4 Preparación del centrifugado
5.4.1 Conexión de la centrífuga
Conexión de la centrífuga con el interruptor de red.
Después de la conexión con el interruptor de red, la tapa de la centrífuga se abre automáticamente.
Los ajustes de los parámetros del último ciclo se visualizan.
5.4.2 Inserción del rotor
1. Coloque el rotor verticalmente en el eje del motor.
2. Inserte la llave de rotor suministrada en la tuerca del rotor.
3. Gire la llave de rotor en el sentido de las agujas del reloj hasta que la tuerca del rotor esté totalmente
apretada.
5.4.3 Detección automática del rotor
La centrífuga dispone de una detección automática del rotor. Reconoce un rotor recién
colocado e indica el nombre del rotor durante 2 s. La fuerza de la gravedad (FCR) y el número
de revoluciones (rpm) se limitan automáticamente al valor máx. permitido para el rotor.
Para iniciar la detección del rotor, gire el rotor con la mano en el sentido contrario a las agujas del
reloj.
• En el indicador aparece el nombre del rotor.
• La fuerza de la gravedad (FCR) y el número de revoluciones (rpm) se limitan automáticamente al
valor máximo permitido para el rotor.
75
5.4.4 Cambio del rotor
1. Gire la tuerca del rotor con la llave de rotor suministrada en el sentido contrario a las agujas del reloj.
2. Extraiga el rotor sacándolo verticalmente hacia arriba.
3. Coloque otro rotor verticalmente en el eje del motor.
4. Inserte la llave de rotor suministrada en la tuerca del rotor.
5. Gire la llave de rotor en el sentido de las agujas del reloj hasta que la tuerca del rotor esté totalmente
apretada.
6. Para iniciar la detección del rotor, gire el rotor con la mano en el sentido contrario a las agujas del
reloj.
• En el indicador se muestra el nombre del rotor.
• La fuerza de la gravedad (FCR) y el número de revoluciones (rpm) se limitan automáticamente al
valor máximo permitido para el rotor.
Alternativamente puede iniciar la detección del rotor a través del centrifugado de corta
duración:
Pulse la tecla short hasta que se muestre el nombre del rotor en el indicador.
Page 76

76
Manejo
Centrifuge 5427 R
Español (ES)
Mensaje de error después del cambio de rotor
• Si inicia un centrifugado directamente después de haber sustituido el rotor, la centrífuga
todavía no ha realizado una detección automática del mismo. Las revoluciones ajustadas
para el rotor anterior pueden sobrepasar las revoluciones máximas permitidas del nuevo
rotor. En este caso, la centrífuga se detiene después de la detección automática e indica
SPEED. Las nuevas revoluciones máximas permitidas aparecen en el indicador. Ahora
puede iniciar nuevamente el centrifugado con este ajuste o adaptar las revoluciones.
Compruebe después de cada cambio de rotor si el rotor nuevo ha sido detectado por el
equipo. Compruebe el valor de la fuerza de la gravedad (FCR) o el número de revoluciones
(rpm) ajustado y adáptelo si fuera necesario.
5.4.5 Carga del rotor
5.4.5.1 Carga del rotor de ángulo fijo
¡ATENCIÓN! Peligro de lesión por carga asimétrica de un rotor.
Equipe los rotores siempre simétricamente con los mismos tubos.
Cargue los adaptadores solo con los tubos adecuados.
Utilice siempre tubos del mismo tipo (peso, material/densidad y volumen).
Compruebe la carga simétrica tarando o equilibrando los tubos y adaptador utilizados con
una báscula.
Utilización de la tapa de rotor adecuada
• Los rotores de ángulo fijo sólo se deben utilizar con la tapa de rotor adecuada. El nombre
del rotor en el rotor debe ser el mismo que el de la tapa del rotor.
• Para realizar un centrifugado hermético a los aerosoles, debe instalarse un rotor hermético
a los aerosoles (identificación: anillo rojo) y la tapa de rotor hermética a los aerosoles
correspondiente (identificación: aerosol-tight y tornillo rojo de la tapa).
Durante el funcionamiento, el equipo detecta desequilibrios automáticamente y finaliza el
ciclo de inmediato emitiendo un mensaje de error y una señal acústica.
Compruebe la carga, tare los tubos e inicie el ciclo de nuevo.
Para cargar el rotor, proceda del siguiente modo:
1. Compruebe la carga máxima (adaptador, tubo y contenido) permisible para cada orificio de rotor.
Encontrará la indicación para ello sobre cada rotor y en este manual de instrucciones .
2. Cargue el rotor y el adaptador sólo con los tubos previstos para ello.
3. Introduzca los tubos por parejas en posición opuesta en los orificios del rotor. Para una carga simétrica,
los tubos en posición opuesta tienen que ser del mismo tipo y contener la misma cantidad de sustancia.
Para que la diferencia de peso entre los tubos de muestras llenos sea la mínima posible, es
recomendable pesarlos con una báscula. A través de ello se protege el accionamiento y se reducen los
ruidos de funcionamiento.
Page 77

Centrifuge 5427 R
Español (ES)
Columnas de centrifugado
Durante el centrifugado de columnas de centrifugado en el rotor FA-45-24-11-Kit se pueden
dejar abiertas las tapas de estos tubos. No obstante, esto sólo está permitido con tubos
previstos para ello por sus fabricantes. Para un centrifugado seguro, tiene que apoyar las
tapas abiertas en el borde del rotor. Preste atención a que las tapas no sobresalgan y cierre
luego el rotor con la tapa de rotor correspondiente.
5.4.5.2 Carga del rotor basculante
Requisitos
• Utilice una combinación de rotor, cestillos y adaptador autorizada por Eppendorf.
• Los cestillos están clasificados según la clase de peso. Los cestillos opuestos deben pertenecer a la
misma clase de peso. Éste está marcado en el lateral en la ranura: p.ej. 68 (las dos últimas cifras en
gramos). Cuando realice un pedido suplementario indique la clase de peso.
• Tubos adecuados y comprobados.
Manejo
77
Para cargar el rotor, proceda del siguiente modo:
1. Compruebe si las ranuras de los cestillos están limpias y engráselas moderadamente con grasa para
pernos (n.° de pedido int.: 5810 350.050/Norteamérica: 022634330).
Las ranuras y pernos sucios impiden la oscilación uniforme de los cestillos.
2. Enganche los cestillos en el rotor.
Todas las posiciones del rotor deben estar ocupadas con cestillos.
3. Compruebe que todos los cestillos estén bien colgados y que puedan oscilar libremente.
4. Compruebe la carga máxima por cestillo (adaptador, tubo y contenido).
Encontrará las indicaciones sobre la carga máxima en el rotor y en este manual de instrucciones .
5. Cargue los cestillos simétricamente.
Abb. 5-3: Carga simétrica pero incompleta de los frascos. Los gorrones de cada frasco tienen que estar expuestos a una carga homogénea.
Imag. 5-3: Carga simétrica pero incompleta de los frascos. Los gorrones de cada frasco tienen que estar
expuestos a una carga homogénea.
El suministro mostrado en la parte derecha es erróneo, ya que los cestillos no pueden oscilar
correctamente así.
Page 78

78
Manejo
Centrifuge 5427 R
Español (ES)
5.4.6 Cierre de la tapa del rotor
1. Sólo con la tapa de rotor QuickLock: Compruebe el asiento correcto del anillo de obturación exterior en
la respectiva ranura.
2. Coloque la tapa del rotor perpendicularmente al rotor.
3. Para cerrar el rotor, gire el tornillo de la tapa del rotor en el sentido de las agujas del reloj.
Sólo con la tapa de rotor QuickLock:
Gire el tornillo de la tapa del rotor en el sentido de las agujas del reloj hasta el tope, hasta que se
escuche un clic claro. Sólo después de haber escuchado el clic, el rotor está cerrado correctamente.
5.4.7 Cierre de la tapa de la centrífuga
1. Compruebe la fijación correcta del rotor y de su tapa.
2. Presione la tapa de la centrífuga hacia abajo hasta que el bloqueo de la tapa enganche.
La tapa se cierra automáticamente. La lengüeta de bloqueo se escucha claramente.
La tecla open parpadea en color azul. En el indicador aparece el símbolo .
5.5 Enfriamiento
La centrífuga enfría y/o mantiene la temperatura ajustada si se cumplen las siguientes condiciones:
• La centrífuga está encendida.
• La tapa de la centrífuga está cerrada.
• Sólo con refrigeración continua: La temperatura ajustada es inferior a la temperatura ambiente.
Cuando el rotor está detenido (refrigeración continua), la refrigeración se realiza más
despacio que con el centrifugado o con un ciclo de atemperado.
5.5.1 Ajuste de temperatura
1. Para ajustar la temperatura, seleccione con las teclas de flecha temp una temperatura entre -11 °C y
40 °C.
2. Ajuste la duración del ciclo y la fuerza de la gravedad (FCR) o el número de revoluciones (rpm). Para
iniciar el centrifugado, pulse la tecla start/stop.
Es posible modificar la temperatura durante el centrifugado.
5.5.2 Indicación de temperatura
Indicación de temperatura con rotor parado Temperatura ajustada
Indicación de temperatura durante el centrifugado Temperatura real
5.5.3 Supervisión de temperatura
Después de alcanzar la temperatura ajustada, la centrífuga reacciona de la siguiente manera a desviaciones
de temperatura que ocurren durante el centrifugado:
Desviación de la
temperatura ajustada
±3 °C La indicación de temperatura parpadea.
±5 °C El indicador muestra Err 18. El centrifugado finaliza automáticamente.
Acción
Page 79

Manejo
Centrifuge 5427 R
Español (ES)
5.5.4 Iniciar el ciclo de atemperado FastTemp
Con la función FastTemp inicia directamente un ciclo de atemperado sin muestras con un número de
revoluciones específico del rotor y la temperatura, para que la cámara del rotor con rotor y adaptador
alcance rápidamente la temperatura ajustada.
Requisitos
• La centrífuga está encendida.
• El rotor y la tapa de rotor están montados correctamente.
• La tapa de la centrífuga está cerrada.
• La temperatura y la fuerza de la gravedad (FCR) o el número de revoluciones (rpm) están definidos para
el centrifugado posterior (ver Centrifugado en pág. 80).
1. Pulse la tecla fast temp.
El indicador muestra
• FT
• Temperatura real en la cámara del rotor
• Fuerza de la gravedad (FCR) o número de revoluciones (rpm)
79
El ciclo de atemperado FastTemp finaliza automáticamente al alcanzar la temperatura ajustada. Se
produce un tono de señal periódico.
2. Para finalizar el ciclo de atemperado con cuidado, pulse la tecla start/stop.
• La centrífuga termina el ciclo cuando el rotor se ha atemperado totalmente. Por está razón,
se puede producir un retraso de aprox. 15 min entre la indicación de la temperatura
ajustada alcanzada y el fin automático del ciclo de atemperado (rotor S-24-11-AT: 30 min).
5.5.5 Refrigeración continua
Refrigeración continua
La refrigeración continua mantiene la cámara del rotor a la temperatura ajustada cuando el rotor está
parado.
• Durante la refrigeración continua, el indicador muestra la temperatura ajustada.
• Para evitar la congelación de la cámara del rotor o la formación de condensación, no se baja de 4 °C,
independientemente de la temperatura ajustada.
• Cuando el rotor está parado, se realiza el atemperado más despacio que con el centrifugado o un ciclo
de atemperado.
ECO shut-off
Cuando la centrífuga no se utiliza durante más tiempo que la duración ajustada, la refrigeración continua se
desconecta. La centrífuga cambia al modo standby.
• Ajuste estándar: La refrigeración continua finaliza después de 8 h.
• La refrigeración continua puede limitarse a 1 h, 2 h o 4 h.
• ECO shut-off puede apagarse (refrigeración continua en el funcionamiento continuo).
Limitación de la refrigeración continua a 1 h (2 h, 4 h)
1. Pulse la tecla menu/enter.
2. Seleccione con la tecla de flecha TEMP. Confirme con la tecla menu/enter.
3. Seleccione con la tecla de flecha 1 h (2 h, 4 h). Confirme con la tecla menu/enter.
Page 80

80
Manejo
Centrifuge 5427 R
Español (ES)
4. Para activar ECO shut-off después de 1 h, 2 h o 4 h, abra la tapa de la centrífuga después del ciclo y
vuelva a cerrarla.
El equipo cambia al modo standby después de 1 h, 2 h o 4 h. El indicador muestra EP.
• Cuando la tapa de la centrífuga no se abre y vuelve a cerrar después del ciclo, se realiza el
ECO shut-off después de 8 h (ajuste estándar).
• Para terminar la refrigeración continua con cuidado, abra la tapa de la centrífuga.
5.5.6 Refrigeración continua en funcionamiento continuo
La función ECO shut-off puede desconectarse. La refrigeración continua se cambia a funcionamiento
continuo.
• El funcionamiento continuo puede reducir la vida útil del compresor.
• La cámara del rotor puede congelarse.
1. Pulse la tecla menu/enter.
2. Seleccione con la tecla de flecha TEMP. Confirme con la tecla menu/enter.
3. Seleccione con la tecla de flecha oo. Confirme con la tecla menu/enter.
Finalización de la refrigeración continua
4. Para finalizar la refrigeración continua, abra la tapa de la centrífuga.
5.6 Centrifugado
Antes de utilizar la Centrifuge 5427 R, familiarícese con los elementos de control y el indicador (ver Visión
general de los elementos de control en pág. 71).
La condición para cada variante de centrífuga aquí descrita es la preparación mencionada anteriormente
(ver Preparación del centrifugado en pág. 75).
tenga en cuenta también las advertencias para el enfriamiento (ver en pág. 78).
5.6.1 Centrifugado con ajuste de tiempo
Ejecute los siguientes pasos en el orden indicado:
1. Ajuste con time la duración del ciclo.
2. Ajuste con temp la temperatura.
3. Ajuste con speed la fuerza de la gravedad (FCR) o el número de revoluciones (rpm).
4. Para iniciar el centrifugado pulse start/stop.
Durante el centrifugado
• Mientras el rotor gira, en el indicador parpadea .
• Se muestra la temperatura real actual.
• Se muestran la fuerza de la gravedad (FCR) y/o el número de revoluciones (rpm) actuales del rotor.
• Las teclas fast temp, open, short, así como el menú del equipo están bloqueados durante el
centrifugado.
• Durante el ciclo, usted puede modificar el tiempo total del ciclo, la temperatura y el número de
revoluciones (rpm). Puede cambiar la indicación en el indicador entre fuerza de la gravedad (FCR) y
número de revoluciones (rpm).
• También puede acabar el centrifugado antes de que se termine el tiempo establecido pulsando la
tecla start/stop.
Page 81

Centrifuge 5427 R
Español (ES)
Finalización del centrifugado
• Una vez transcurrido el tiempo ajustado, la centrífuga se detiene automáticamente. Durante el
proceso de frenado se indica el tiempo de duración del centrifugado de forma parpadeante. En
cuanto el rotor se haya detenido por completo, se escucha una señal acústica.
• La tapa de la centrífuga permanece cerrada para conservar la temperatura de las muestras. Puede
abrirla pulsando la tecla open.
El tiempo total del ciclo, la temperatura y la fuerza de la gravedad (FCR)/número de
revoluciones (rpm) se pueden modificar durante el ciclo.
Los valores parpadean en el indicador durante la modificación. Los parámetros nuevos se
aceptan inmediatamente. En caso de modificar el tiempo durante un ciclo, se tiene en cuenta
el tiempo ya transcurrido. Observe que el nuevo tiempo total del ciclo más breve ajustable
tiene que ser 2 minutos más largo que el tiempo ya transcurrido.
Al utilizar adaptadores se puede ajustar el radio.
Manejo
81
5.6.2 Centrifugado de corta duración
Requisitos
En el menú SHORT se ha definido si el centrifugado de corta duración debe funcionar con la fuerza de
gravedad (FCR) o el número de revoluciones (rpm) máximo del rotor utilizado (MAX) o con una velocidad
seleccionada por usted (SET).
El centrifugado de corta duración funciona mientras la tecla short permanece pulsada.
1. Sólo con centrifugado de corta duración con velocidad ajustada: Ajuste la fuerza de la gravedad (FCR) o
el número de revoluciones (rpm) con las teclas de flecha speed.
2. Ajuste la temperatura con las teclas de flecha temp.
3. Inicio del centrifugado de corta duración: Mantenga pulsada la tecla short.
• Mientras el rotor gira, en el indicador parpadea el símbolo .
• Durante el centrifugado de corta duración todas las demás teclas están desactivadas.
4. Finalización del centrifugado de corta duración: Suelte la tecla short.
• Durante el proceso de frenado, la duración del centrifugado es indicada de forma parpadeante.
• La tapa de la centrífuga permanece cerrada para conservar la temperatura de las muestras. Para
abrir la tapa, pulse la tecla open.
Durante el proceso de frenado puede reiniciar el centrifugado de corta duración hasta 2 veces,
volviendo a pulsar la tecla short.
La rampa suave está desactivada en el centrifugado de corta duración.
Page 82

82
Manejo
Centrifuge 5427 R
Español (ES)
5.6.3 Ajuste del radio de centrifugado
Si en un rotor utiliza un adaptador para tubos, el radio de centrifugado cambia. En el elemento del menú
RAD debe ajustarse el parámetro para la combinación tubo/adaptador.
Requisitos
• El roto está insertado.
• La centrífuga ha reconocido el rotor (ver Detección automática del rotor en pág. 75).
1. Pulse la tecla menu/enter.
2. Seleccione con la tecla de flecha el elemento del menú RAD. Confirme con la tecla menu/enter.
En el elemento del menú RAD, están disponibles los parámetros para la combinación tubo/adaptador
específica del rotor.
3. Seleccione con la tecla de flecha los parámetros para la combinación tubo/adaptador. Confirme con la
tecla menu/enter.
El indicador muestra la fuerza de la gravedad para la combinación de tubo/adaptador utilizada en el
rotor.
Ajuste estándar: Si controla la velocidad de centrifugado sólo a través de la fuerza de la
gravedad (FCR), la centrífuga calcula la fuerza de la gravedad para el radio mayor del rotor
utilizado.
5.6.4 Después del centrifugado
Si la centrífuga no se utiliza durante 15 minutos, ésta cambia al modo standby. En el indicador
aparece entonces el texto EP.
Si no utiliza la centrífuga temporalmente, lleve a cabo los pasos siguientes. Tenga en cuenta además las
indicaciones de cuidado (ver en pág. 85).
Gire la tuerca del rotor con la llave de rotor suministrada en el sentido contrario a las agujas del reloj.
Extraiga el rotor sacándolo verticalmente hacia arriba.
Vacíe el recipiente colector de agua condensada.
Deje abierta la tapa de la centrífuga.
Page 83

Mantenimiento
Centrifuge 5427 R
Español (ES)
6 Mantenimiento
6.1 Preparación de la limpieza / desinfección
Limpie las superficies accesibles del aparato y de los accesorios por lo menos una vez por semana, y en
caso de un fuerte ensuciamiento.
Limpie el rotor con regularidad. De esta manera se protege y se prolonga su vida útil.
Consulte además las indicaciones de descontaminación (ver Descontaminación antes del envío en
pág. 87), cuando mande el aparato al servicio técnico autorizado para su reparación.
El proceso descrito en el capítulo siguiente sirve tanto para la limpieza como también para la desinfección
o descontaminación. En la siguiente tabla se describen los pasos que se requieren adicionalmente:
Limpieza Desinfección/descontaminación
1. Utilice un producto de limpieza suave
para la limpieza de las superficies
accesibles del aparato y de los accesorios.
2. Realice la limpieza tal y como se describe
en el capítulo siguiente.
1. Seleccione los métodos de desinfección que
correspondan a las disposiciones legales y directrices
vigentes para su campo de aplicación. Utilice, p.ej.,
alcohol (etanol, isopropanol) o desinfectantes que
contengan alcohol.
2. Realice la desinfección o descontaminación tal y como
se describe en el capítulo siguiente.
3. Limpie a continuación el aparato y los accesorios.
83
En caso de preguntas sobre la limpieza y la desinfección o descontaminación y sobre los
detergentes utilizables, diríjase a Application Support de Eppendorf AG. Las informaciones de
contacto se encuentran en la parte posterior de estas instrucciones.
6.2 Realización de la limpieza / desinfección
¡PELIGRO! Descarga eléctrica debido a la penetración de líquidos.
Apague el equipo y desenchúfelo de la alimentación eléctrica antes de empezar los
trabajos de limpieza o de desinfección.
No deje que ningún líquido entre al interior de la carcasa.
No efectúe ninguna limpieza o desinfección por pulverización en la carcasa.
Solo vuelva a conectar el equipo a la red eléctrica si está completamente seco por dentro y
por fuera.
¡AVISO! Daños por sustancias químicas agresivas.
De ninguna manera utilice sustancias químicas agresivas como, por ejemplo, bases fuertes
o débiles, ácidos fuertes, acetona, formaldehídos, hidrógeno halogenado o fenol con el
equipo y sus accesorios.
Limpie el equipo inmediatamente con un producto de limpieza suave en caso de una
contaminación con una sustancia química agresiva.
Page 84

84
Mantenimiento
Centrifuge 5427 R
Español (ES)
¡AVISO! Corrosión producida por productos de limpieza y desinfección agresivos.
No utilice productos de limpieza corrosivos ni disolventes agresivos o abrillantadores.
No incube los accesorios durante un tiempo prolongado en productos de limpieza o
desinfectantes agresivos.
¡AVISO! Daños por radiación UV u otro tipo de radiación rica en energía.
No realice ninguna desinfección con radiación UV, beta o gamma ni con ningún otro tipo
de radiación rica en energía.
Evite el almacenamiento en zonas con fuerte radiación ultravioleta.
Autoclave
Todos los rotores, tapas de rotor y adaptadores pueden ser autoclavados (121 °C, 20 min).
Hermeticidad a los aerosoles
Asegúrese de la integridad de los anillos de obturación antes de la utilización.
Sólo con la tapa de rotor QuickLock: Sustituya el anillo de obturación de la ranura de la tapa
cuando esté desgastado.
Es necesario el cuidado habitual de los anillos de obturación para proteger a los rotores.
No almacene nunca los rotores herméticos a los aerosoles con la tapa cerrada.
Engrase regularmente la rosca de las tapas de los rotores herméticos a los aerosoles con grasa
para gorrones (n.º de pedido int.: 5810 350.050/Norteamérica: 022634330).
6.2.1 Limpieza y desinfección del equipo
1. Abra la tapa. Apague el equipo con el interruptor de red. Desenchufe el enchufe del suministro de
corriente.
2. Suelte la tuerca del rotor girándola con la llave de rotor en sentido contrario a las agujas del reloj.
3. Retire el rotor.
4. Limpie y desinfecte todas las superficies accesibles del equipo, incluido el cable de alimentación, con
un paño húmedo y el producto de limpieza recomendado.
5. Enjuague los anillos de obturación de goma de la cámara del rotor minuciosamente con agua.
6. Frote los anillos de obturación de goma secos con glicerina o talco para evitar que se vuelvan
quebradizos. Otros componentes del equipo como, p.ej., el bloqueo de la tapa, el eje del motor y el cono
del rotor no se pueden engrasar.
7. Limpie el eje del motor con un paño suave, seco y que no deje pelusas. No engrase el eje del motor.
8. Compruebe que el eje del motor no presente daños.
9. Controle que el equipo no presente daños ni corrosión.
10.Deje la tapa de la centrífuga abierta cuando no se utilice el equipo.
11.Sólo vuelva a conectar el equipo a la red eléctrica cuando éste esté completamente seco por dentro y
por fuera.
Page 85

Mantenimiento
Centrifuge 5427 R
Español (ES)
6.2.2 Limpieza y desinfección del rotor
1. Controle que el rotor y los accesorios no presenten daños ni corrosión. No utilice rotores ni accesorios
dañados.
2. Limpie y desinfecte los rotores y accesorios con los productos de limpieza recomendados.
3. Limpie y desinfecte la tapa del rotor. SÓLO QuickLock: Retire siempre el anillo de obturación para
poder limpiar exhaustivamente la ranura que se encuentra debajo.
85
4. Aclare los rotores y accesorios cuidadosamente con agua destilada. Aclare cuidadosamente los orificios
de los rotores de ángulo fijo.
No sumerja el rotor, ya que puede entrar líquido.
5. Deje secar los rotores y accesorios sobre un paño. Coloque los rotores de ángulo fijo con las
perforaciones hacia abajo para que las perforaciones también se puedan secar.
6. Coloque correctamente el anillo de obturación de la tapa del rotor de nuevo en la ranura limpia y seca.
7. Limpie el cono del rotor con un paño suave, seco y que no deje pelusas. No engrase el cono del rotor.
8. Compruebe que el cono del rotor no presente daños.
9. Coloque el rotor seco en el eje del motor.
10.Apriete la tuerca del rotor girándola con la llave de rotor en el sentido de las agujas del reloj.
11.Deje la tapa del rotor abierta cuando no se utilice el rotor.
6.3 Indicaciones de cuidado adicionales para la Centrifuge 5427 R
Vacíe y limpie con regularidad el recipiente colector de agua condensada y especialmente después de
derrames de líquido en la cámara del rotor.
Retire con regularidad la formación del hielo de la cámara del rotor mediante descongelación, dejando
abierta la tapa de la centrífuga o realizando un ciclo de atemperado breve a aprox. 30 °C.
Deje la tapa de la centrífuga abierta cuando no la vaya a utilizar durante un largo periodo de tiempo.
La humedad sobrante puede escaparse. El muelle de la tapa se descarga.
Limpie el agua de condensación de la cámara del rotor. Utilice para ello un paño absorbente suave.
Elimine el polvo de las ranuras de ventilación de la centrífuga como máximo cada medio año, utilizando
un pincel o una escobilla. Antes de la limpieza, apague la centrífuga y extraiga el enchufe de la toma de
corriente.
Page 86

86
Mantenimiento
Centrifuge 5427 R
Español (ES)
6.4 Rotura de vidrio
Al utilizar tubos de vidrio se pueden producir roturas en la cámara del rotor. Las astillas de vidrio
producidas se arremolinan durante el centrifugado en la cámara del rotor y afectan al rotor y los accesorios
como un chorro de arena. Las partículas de vidrio más pequeñas se acumulan en las piezas de goma (p.ej.
en el manguito del motor, el anillo de obturación de la cámara del rotor y las esterillas de goma de los
adaptadores).
¡AVISO! Rotura de vidrio en la cámara del rotor
Con una fuerza de la gravedad elevada pueden romperse los tubos de vidrio en la cámara del
rotor. La rotura de vidrio provoca daños en el rotor, los accesorios y las muestras.
Tenga en cuenta las indicaciones del fabricante de los tubos acerca de los parámetros de
centrifugado recomendados (carga y número de revoluciones).
Consecuencias de la rotura de vidrio en la cámara del rotor:
• Abrasión fina y negra en la cámara del rotor (con recipiente del rotor de metal).
• Las superficies de la cámara del rotor y los accesorios se arañan.
• La resistencia a los agentes químicos de la cámara del rotor se reduce.
• Impurezas de las muestras.
• Abrasión en las piezas de goma.
Comportamiento ante la rotura de vidrio
1. Retire las astillas y el vidrio pulverizado de la cámara del rotor y de los accesorios.
2. Limpie el rotor y la cámara del rotor exhaustivamente. Limpie con especial atención los orificios de los
rotores de ángulo fijo.
3. En caso necesario, sustituya los adaptadores para evitar daños posteriores.
4. Compruebe regularmente si hay residuos o daños en los orificios del rotor.
6.5 Sustituir fusibles
¡PELIGRO! Descarga eléctrica.
Apague el equipo y desconecte el enchufe de la red antes de que empiece con el
mantenimiento o la limpieza.
El portafusible se encuentra entre la hembrilla de conexión a la red eléctrica y el interruptor de la red.
1
1. Extraiga el conector de red.
2. Presione los resortes de plástico 1 arriba y abajo y extraiga por completo el portafusible 2.
3. Sustituya los fusibles defectuosos vuelva a insertar el portafusible. Preste atención a la posición correcta
del riel guía 3.
2
3
Page 87

Mantenimiento
Centrifuge 5427 R
Español (ES)
6.6 Descontaminación antes del envío
Cuando envíe el equipo en caso de reparación al servicio técnico autorizado o en el caso de eliminación del
mismo a su concesionario, tenga en cuenta lo siguiente:
¡ADVERTENCIA! Riesgo para la salud debido a la contaminación del equipo.
1. Tenga en cuenta las indicaciones del certificado de descontaminación. Encontrará estas
indicaciones como fichero PDF en nuestra página de Internet (www.eppendorf.com/
decontamination).
2. Descontamine todas las piezas que desee enviar.
3. Adjunte al envío el certificado de descontaminación completamente rellenado.
87
Page 88

88
Mantenimiento
Centrifuge 5427 R
Español (ES)
Page 89

Solución de problemas
Centrifuge 5427 R
Español (ES)
7 Solución de problemas
Si no puede solucionar el error con las medidas sugeridas, póngase en contacto con su socio local de
Eppendorf. Encontrará la dirección de contacto en Internet bajo www.eppendorf.com
.
7.1 Errores generales
Síntoma/mensaje Causa Ayuda
Ningún dato. No hay alimentación eléctrica.
Ningún dato. Caída de corriente.
La tapa del equipo no se
puede abrir.
La tapa del equipo no se
puede abrir.
El equipo no se deja
arrancar.
El equipo da sacudidas al
arrancar.
La centrífuga se detiene
durante un centrifugado
de corta duración,
aunque la tecla short
esté pulsada.
La indicación de
temperatura parpadea.
El rotor todavía gira.
Fallo de la tensión de red. 1. Compruebe el fusible de la red
Tapa del equipo sin cerrar.
El rotor se ha cargado
asimétricamente.
La tecla short ha sido soltada más de
dos veces de forma breve (función de
protección para el accionamiento).
Desviación de temperatura del valor
teórico: ±3 °C.
Controle la conexión de la red de
distribución.
Compruebe el fusible de la red
eléctrica del laboratorio.
Espere hasta que se pare el rotor.
eléctrica del laboratorio.
Cierre la tapa del equipo.
1. Pare el equipo y cárguelo de forma
simétrica.
2. Inicie de nuevo el equipo.
Mantenga pulsada la tecla short
durante un centrifugado de corta
duración.
Compruebe los ajustes.
Espere hasta que se alcance la
temperatura ajustada.
Compruebe que el aire circula
libremente a través de las ranuras
de ventilación.
Descongele el hielo o apague el
equipo y deje que se enfríe.
89
Page 90

90
Solución de problemas
Centrifuge 5427 R
Español (ES)
7.2 Mensajes de error
Si aparece uno de los siguientes mensajes de error, debe proseguir de la siguiente manera:
1. Eliminar el fallo (véase la sección de ayuda).
2. Si ha tenido éxito, repita la centrifugación.
Síntoma/mensaje Causa Ayuda
Err 1 El rotor no es detectado.
Err 2 Avería en el sistema electrónico.
No rpm (err 3) Error en el sistema medidor del
número de revoluciones.
Err 5 Apertura de tapa no permitida o
interruptor de la tapa defectuoso
durante un ciclo.
Err 6 • Error en la electrónica de
accionamiento.
• Accionamiento sobrecalentado.
Err 7 Una desviación considerable en el
control de revoluciones.
Err 8 Error de accionamiento. 1. Espere hasta que se pare el rotor.
Err 9 hasta err 14 Error del sistema electrónico.
Imbal (err 15) El rotor se ha cargado
asimétricamente.
Err 16 hasta err 17 Error del sistema electrónico.
Err 18 Desviación de temperatura del valor
teórico en la cámara del rotor: ±5 °C.
Controle el rotor.
En caso de repetirse el mensaje de
este error, comprobar con otro
rotor.
Desconecte la centrífuga y
conéctela de nuevo después de
> 20 s.
Deje la centrífuga encendida hasta
que desaparezca el error (10 s o 6
min).
Espere hasta que se pare el rotor.
Repita el ciclo.
En caso de un nuevo mensaje de la
centrífuga, apague y vuelva a
encender después de 20 segundos.
Deje enfriar el accionamiento 15
min. como mínimo.
1. Espere hasta que se pare el rotor.
2. Apriete el rotor.
2. Repita el ciclo.
Desconecte la centrífuga y
conéctela de nuevo después de
> 20 s.
Cargue el rotor de forma simétrica
y equilíbrelo.
Desconecte la centrífuga y
conéctela de nuevo después de
> 20 s.
Compruebe el ajuste.
Compruebe la circulación de aire
libre a través de las ranuras de
ventilación.
Descongele el hielo o apague el
equipo y deje que se enfríe.
Page 91

Solución de problemas
Centrifuge 5427 R
Español (ES)
Síntoma/mensaje Causa Ayuda
Err 19 Condensador sobrecalentado. Compruebe la circulación de aire
libre a través de las ranuras de
ventilación.
Deje que el equipo se enfríe.
Err 20 El sensor de temperatura en la cámara
del rotor está defectuoso.
Err 21 El sensor de temperatura en el
condensador está defectuoso.
Err 22 Avería en el sistema electrónico.
No e-fan (err 23) Ventilador electrónico defectuoso.
Err 24 Avería en el compresor.
Int (err 25) Interrupción de la red de alimentación
durante un ciclo.
Err 28 Error en el control de revoluciones.
Err 29 La fuerza de la gravedad/número de
revoluciones ajustado es demasiado
elevado, p. ej., después de un cambio
del rotor (ver Detección automática del
rotor en pág. 75).
Lid (err 30) • La tapa de la centrífuga no se
puede bloquear.
• La tapa de la centrífuga no se
puede desbloquear.
Desconecte la centrífuga y
conéctela de nuevo después de
> 20 s.
Desconecte la centrífuga y
conéctela de nuevo después de
> 20 s.
Desconecte la centrífuga y
conéctela de nuevo después de
> 20 s.
Desconecte la centrífuga y
conéctela de nuevo después de
> 20 s.
Deje que la centrífuga se enfríe y
repita el ciclo.
Compruebe la conexión de la red
de distribución.
Desconecte la centrífuga y
conéctela de nuevo después de
> 20 s.
Compruebe la fuerza de la
gravedad/número de revoluciones.
Repita el ciclo.
Cierre de nuevo la tapa de la
centrífuga.
Desconecte la centrífuga y
conéctela de nuevo.
Pulse open.
Si se vuelve a repetir el error:
Desconecte la centrífuga.
Pulse el desbloqueo de emergencia
(ver Desbloqueo de emergencia en
pág. 92).
OFF • Indicación tras desconexión de
red.
91
Page 92

92
Solución de problemas
Centrifuge 5427 R
Español (ES)
7.3 Desbloqueo de emergencia
En caso de que no pueda abrir la tapa de la centrífuga, puede pulsar manualmente el desbloqueo de
emergencia.
¡ADVERTENCIA! Peligro de lesión debido a la rotación del rotor.
Con el desbloqueo de emergencia de la tapa, el rotor puede seguir girando durante varios
minutos.
Espere a que el rotor se detenga antes de pulsar el desbloqueo de emergencia.
Como medida de control, mire a través del tubito de control en la tapa de la centrífuga.
Para accionar el desbloqueo de emergencia, utilice la llave del rotor incluida con Centrifuge
5427 R.
1. Desenchufe el enchufe.
2. Retire la cubierta de plástico del desbloqueo de emergencia que se encuentra en el lado derecho del
equipo (véase fig. 1 y fig. 2).
Gire la cubierta de plástico con una herramienta adecuada (p.ej. un destornillador) 90° en el sentido
contrario a las agujas del reloj y extráigala.
3. Introduzca la llave de rotor de la centrífuga en la abertura hexagonal situada directamente detrás hasta
que perciba una resistencia.
4. Gire la llave del rotor en el sentido contrario a las agujas del reloj.
La tapa de la centrífuga se desbloquea.
5. Abra la tapa de la centrífuga.
6. Retire la llave de rotor y desenrosque de nuevo la cubierta de plástico.
Gire la cubierta de plástico con una herramienta adecuada (p.ej. un destornillador) 90° en el sentido de
las agujas del reloj.
Page 93

Transporte, almacenaje y eliminación
Centrifuge 5427 R
Español (ES)
8 Transporte, almacenaje y eliminación
8.1 Transporte
¡ATENCIÓN! Peligro de lesiones por elevar y cargar cargas pesadas
El equipo es pesado. Elevar y cargar el equipo puede causar dolores de espalda.
Transporte y eleve el equipo con un número de ayudantes suficiente.
Utilice para el transporte una ayuda de transporte.
Saque el rotor de la centrífuga antes del transporte.
Para el transporte, utilice el embalaje original y los bloqueadores para el transporte.
Temperatura del aire Humedad relativa Presión atmosférica
Transporte general -25 °C – 60 °C 10 % – 75 % 30 kPa – 106 kPa
Transporte aéreo -20 °C – 55 °C 10 % – 75 % 30 kPa – 106 kPa
93
8.2 Almacenamiento
Temperatura del aire Humedad relativa Presión atmosférica
en embalaje de
transporte
sin embalaje de
transporte
-25 °C – 55 °C 10 % – 75 % 70 kPa – 106 kPa
-5 °C – 45 °C 10 % – 75 % 70 kPa – 106 kPa
8.3 Eliminación
Observe las disposiciones legales correspondientes al eliminar el producto.
Información para la eliminación de aparatos eléctricos y electrónicos en la Comunidad Europea:
En la Comunidad Europea la eliminación de aparatos eléctricos es regulada por reglamentaciones
nacionales que se basan en la Directiva comunitaria 2002/96/CE relativa a residuos de aparatos eléctricos y
electrónicos (RAEE).
Según esta directiva, todos los aparatos suministrados después del 13/08/2005 en el área de comercio de
empresa a empresa, al que este producto pertenece indudablemente, no pueden eliminarse conjuntamente
con la basura comunal o doméstica. Para documentar esto, estos aparatos han sido identificados con los
siguientes símbolos:
Dado que las normas de eliminación dentro de la UE pueden variar de país a país, le rogamos contactar con
sus proveedores en caso de necesidad.
Page 94

94
Transporte, almacenaje y eliminación
Centrifuge 5427 R
Español (ES)
Page 95

Page 96

Page 97

Page 98

Page 99

Page 100

 Loading...