

Page 1

E330II
Screamer 50 II
Operator´s Manual
Page 2

A FEW WORDS FROM THE AMP DESIGNER
„Back in the mid of the nineties I designed the very rst Screamer amp and since then this very popular
amp obtained a several smaller updates including sound tuning and additional features.
Within this brand new fantastic combo amplier, the Screamer 50 Mark II, I have packed some clever
and useful ideas that offers you a broader spectrum of tonal palettes like the “Mid Boost Plusex” switch
matrix. And last but not least I spent many hours in some further sound tuning sessions, my favourite
labour that is at ENGL Amps.
I hope you will enjoy the results of all my efforts.“
Horst Langer
Page 3

INTRODUCTION
The Screamer 50 Mark II delivers the sonic goods – tons of tone and palette of hip sounds from squeaky
clean to hi-gain shred and everything in between. This all-tube beast is your rst choice for many different
sound styles! With a host of practical features and a clearly-arranged control panel, handling this amp is
a piece of cake. The Screamer‘s opulent visuals are certainly arresting, but its unique, creamy tube tone
and silky spring reverb truly set this amplier apart. The Screamer comes complete with a bit of technical
wizardry which you‘ll nd useful where it counts most – out there in the real world of rehearsing and
gigging. Among these features are a Lo/Hi Gain switch, which in effect doubles your choice of channels
from two – Clean and Lead – to four – the afore-mentioned, plus Crunch and Heavy Lead. The built-in Noise
Gate helps stie the annoying hiss often generated when Gain Hi is engaged at very high gain levels. Other
trademark ENGL features include a second master volume (Master A/B), and an adjustable, switchable FX
loop (parallel/serial).
There are few more handy features to rave about: The Screamer amp sports our Serial Amp Control Port,
or S.A.C. Port for short. Plug an ENGL Z9 into it and get hip to some very convenient remote control options.
This footboard lets you activate the two channels directly in combination with Gain Lo/Hi and Master A/B
switching simply by tapping its four footswitches. And that affords you instant access to four sound varia-
tions at two different volume levels each. Moreover you can access further prominent features like Master
A/B, FX Loop off/on and Reverb off/on; the built-in Noise Gate is switchable via footswitch, too. In addition,
the amp comes with three stereo jacks designed to accept dual footswitches like the ENGL Z4 or a MIDI
switching system (e.g. ENGL Z11) for selecting the channels and other crucial Amp features.
Old world craftsmanship and highest quality components are part of what makes ENGL amps so special,
and the Screamer 50 Mark II is no exception. On that note, please read and heed the guidelines on handling
all-tube amps. The ENGL team is convinced that this amp will delight and inspire you.
Page 4
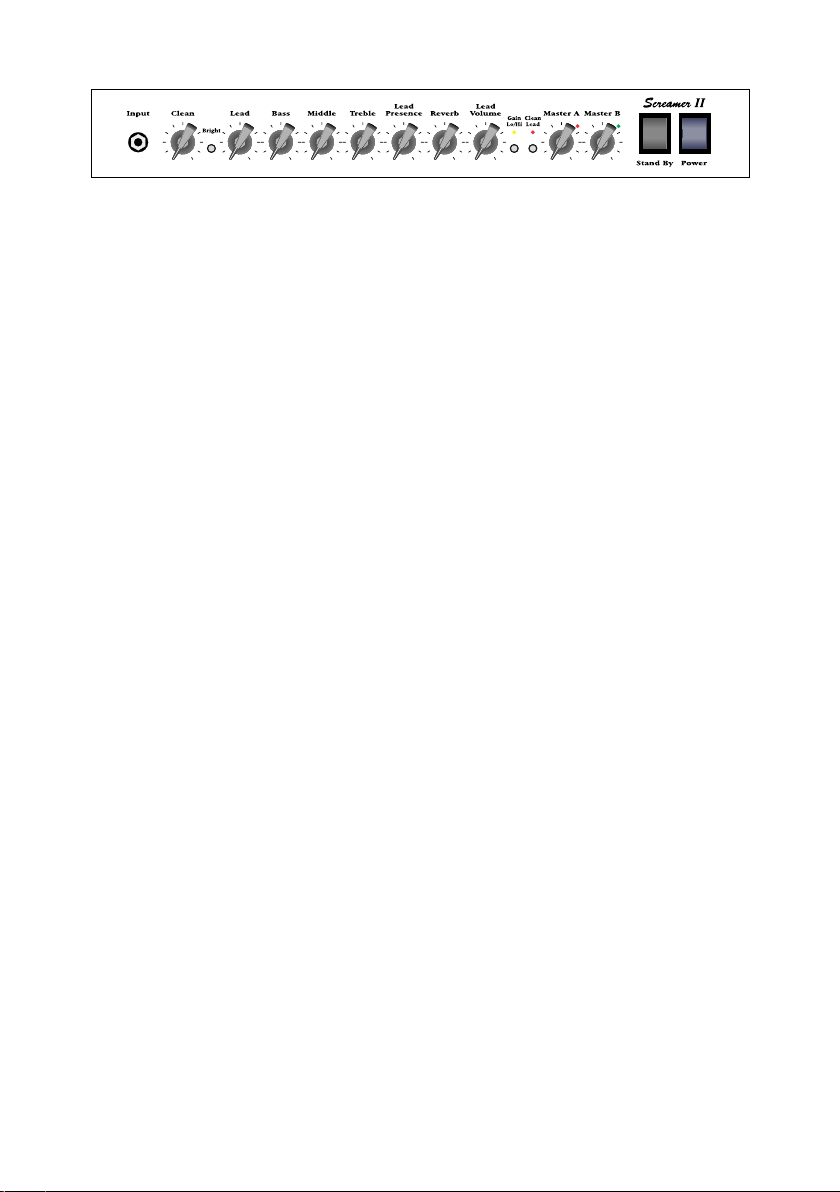
Input
Input ¼“ (6,3mm) unbalanced input. Plug your guitar in here using a shielded cord.
Clean
Gain control for the Clean and the Crunch channel.
(Clean: set the Gain-button to the Lo position, Crunch: set the Gain-button to the Hi position).
Bright switch
Alters the EQ by boosting the upper treble range; effectiveness decreases at higher Gain settings; the
Bright feature affects all channels.
Lead
Gain control for the Soft Lead and the Heavy Lead channel. This knob determines the preamp´s input sensitivity when the Soft Lead and the Heavy Lead channel is selected and, by extension, the preamp signal´s
saturation.
(Soft Lead: Gain Lo/Hi button disengaged; Heavy Lead: Gain Lo/Hi button engaged.)
CAUTION: Extremely high gain and volume levels in the Lead channels can produce powerful feedback. Avoid
feedback squeals, they lead to hearing loss and damaged speakers!
Bass
Bottom end voicing control of the preamp´s passive EQ.
Middle
Mid-range voicing control of the preamp´s passive EQ.
Treble
Upper range voicing control of the preamp´s passive EQ.
Lead Presence
This control denes the Treble response in the poweramp stage for the Lead channel.
Reverb
This controls adjusts the portion of the reverb signal and increases reverb intensity if you rotate it clock-
wise; the reverb can be switched on/off via the respective footswitch.
Page 5

Lead Volume
Volume control for the Lead channel (pre-FX Loop, inuences the send level). Use this knob to dial in the
desired balance of levels between the Lead and Clean channels.
Gain Lo/Hi
When you press this button, the input sensitivity of both channels is increased. The Hi-Gain function actually
turns Clean into a „Crunch“ channel, and Lead into a „Heavy Lead“ channel. It can also be activated via a
suitable footswitch; the Gain Lo/Hi button is automatically disabled when you connect a footswitch. The
yellow LED illuminates to indicate „Hi-Gain“ mode is active.
Clean/Lead
Channel selector push-button for Clean and Lead modes, red LED indicate Lead mode; This function can also
be activated via the respective footswitch connected. Once a footswitch is connected, the channel selector
push-button is deactivated.
Master A
Master A volume knob. Located post effect loop, it controls power amp output. The red LED to the right of
the knob lights up to indicate Master A is enabled and determining the master level.
You can switch between and using a ENGL Z9 connected to the S.A.C. Port or a footswitch connected to the
TRS footswitch inputs.
Master B
Master B volume knob. Located post effect loop, it controls power amp output. The green LED to the right of
the knob lights up to indicate Master B is enabled and determining the master level.
Stand By
Power amp standby switch: Use this switch to silence (0 position) the amp when you take longer break.
The amp‘s tubes stay nice and toasty, and the amp is ready to roll immediately when you ramp it back up
to full power. The standby switch is also well-suited for muting the amp for brief breaks, for instance when
you‘re switching guitars.
Power
Mains power on/off.
Please note: ensure that the Stand By switch is set to Stand By (0 position) before you switch the amp
on. Let the tubes heat up for about 30 seconds before you activate the power amp. This procedure spares
the tubes.
Page 6

Main Supply Connector (AC Power Inlet, IEC – C14 connector)
Plug the mains cord in here.
CAUTION! Make sure you use an intact mains line cord with a grounded plug! Before
you power the amp up, ensure the voltage value printed alongside the mains port is the same as the current
of the local power supply or wall outlet.
Please also heed the guidelines set forth in the separately included pamphlet, Instructions for the Prevention of Fire, Electrical Shock and Injury.
Mains Fuse Box
The rear chamber contains the mains fuse and the front chamber a spare fuse.
NOTE: Ensure replacement fuses bear identical ratings (refer to the table)!
CAUTION! ALWAYS make sure replacement fuses are of the same type and have the
same ratings as the original fuse! To this end, please refer to the fuse ratings shown on the type panel.
Footswitch: Serial Amp Control Port (S.A.C.)
This serial data input accepts the optional ENGL Z9, which lets you control various amp functions remotely.
Connect the ENGL Z9 to the amp using a cord equipped with stereo 6.3 mm (¼“) jack plugs. This MIDI-ena-
bled footcontroller is a custom tool designed to switch every amp feature designated as foot switchable in
this manual. To learn if a given feature may be controlled remotely, refer to its description herein.
Heads up: Plugging a jack plug into the S.A.C. Port disables the Channel switching functions on the amp‘s
front panel. What‘s more, it also disables the standard 6.3mm (¼“) TRS footswitch remote-control capability. In other words, when a ENGL Z9‘s board is plugged in, it has priority over the amp‘s Channel switching
controls as well as Channel switching via a standard 6.3mm (¼“) TRS footswitch.
CAUTION! Connect only the ENGL Z9 to this 6.3 mm (¼“) stereo jack!
Connecting any other switching device may damage it and/or the amp‘s circuitry!
Insert and remove the ENGL Z9 cable to and from the S.A.C. Port only when the amp is switched off!
Please note! Never link two S.A.C. Ports of ENGL amps via an Y-adaptor to a ENGL Z9! This can cause ground
humming noise and damage the internal circuits!
Footswitch: FX Loop, Noise Gate (conventional 6.3mm (¼“) TRS)
Use this jack to connect a conventional footswitch with two switching functions, for example, the ENGL Z4 (2
x off/on – Single Pole Single Throw or SPST for short).
Tip: switching the FX Loop on and off.
Sleeve: switching the Noise Gate on and off.
Page 7

Footswitch Master A/B, Reverb (conventional 6.3mm (¼“) TRS)
Use this jack to connect a conventional footswitch with two switching functions, for example, the ENGL Z4
(2 x off/on – Single Pole Single Throw or SPST for short).
Tip: switching between Master A and Master B.
Sleeve: switching the Reverb on and off.
Footswitch Clean/Lead, Gain Lo/Hi (conventional 6.3mm (¼“) TRS)
Use this jack to connect a conventional footswitch with two switching functions, for example, the ENGL Z4
(2 x off/on – Single Pole Single Throw or SPST for short).
Tip: switching between Clean and Lead channels
Sleeve: switching between Clean and Crunch (in the Clean channel)
switching from Soft Lead to Heavy Lead (in the Lead channel)
Mid Boost Plusex
The sound function „Mid Boost Plusex“ is newly designed for the Screamer 50 Mark II Amp. It can be
activated via a selector switch located on the back panel of the amplier. With this function, you can create
your own individual sound, and thus expand the entire sound spectrum. It can be paired with either Gain
Lo/Hi or Master A/B.
There are four options to enable or automatically assign the Mid Boost feature:
1. Mid Boost off
for all settings of the amp (channels, gain levels, master)
- the Mid Boost sound function is generally disabled (off)
2. Mid Boost Plusex Hi Gain
- Mid Boost is automatically activated on „Gain Hi“
3. Mid Boost Plusex Master B
- Mid Boost is automatically activated on „Master B“
4. Mid Boost on
for all settings (channels, gain levels, master) of the amp
- the Mid Boost sound function is generally activated (on)
Noise Gate Threshold Level
This control activates the onboard Noise Gate serving to suppress any excess noise generated when the
Lead Channel or Lead Channel and Gain Hi are active. To this end, twist the knob clockwise, near or just
beyond the 9 or 10 o‘clock position. In addition the Noise Gate can be controlled remotely (on/off) via a
footswitch connected to the responsible footswitch jack or via the ENGL Z9 connected to the S.A.C. port. If
you want to control the Noise Gate remotely via footswitch, you must set the Threshold knob to 10 o‘clock
or beyond. Use this knob to set a threshold value (that is, the noise level) at which the Noise Gate activates
Page 8

to suppress the signal within the 9 to 5 o‘clock range. The further you twist the knob to the right, the higher
the signal level at which the Noise Gate kicks in. If you set the knob to the 5 o‘clock position, the Noise Gate
reacts to extremely high noise levels, meaning that there‘s not much of a margin between the guitar signal
and background noise.
FX Loop
The FX Loop can be controlled remotely via a conventional footswitch connected to the responsible footswitch jack or via the ENGL Z9 connected to the S.A.C. port. In the signal path, the FX loop is located post
preamp and pre the two power amp Master knobs.
FX Loop Send
Connect the FX-Loop Send output to a signal processor‘s or an effect pedal´s input/return jack using the
shortest possible shielded cord equipped with 6.3mm (¼“) plugs.
FX Loop Return
Connect the input to a signal processor‘s or an effect pedal´s output/send jack using the shortest possible
shielded cord equipped with 6.3mm (¼“) plugs.
FX Loop Balance
FX mix control for the FX Loop. When the knob is set to Dry, the amp signal is routed through with no
processed signal (0% Wet balance) added to the mix. Twist the knob clockwise to blend in the processed
signal (parallel/passive, wet balance 1-99%, depending on knob position). When the knob arrives at the
Effect position, only the wet signal (that is, the processed signal generated by the connected effect device)
is patched to the power amp (serial, 100% Wet).
Note: Set this knob to Dry when the FX Loop is not in use! Settings between 9 and 3 o‘clock position reduce
the signal level. In the event of contact corrosion of the FX Return socket, volume uctuations may occur.
Line Output – 0 dB Poweramp Signal
This port taps the power amp‘s output to provide a line out signal congured at a level of about 0 dB. The
frequency response is identical to that of the power amp output signal. In other words, its frequency response is not compensated or corrected. You can feed this signal to another linear power amp. Another option is to patch it through an outboard lter to emulate a speaker, or for example into the ENGL CABLOADER
IR-Loader with an integrated microphone and poweramp simulation), and feed this externally processed
signal to a recording device or PA system.
Page 9

Poweramp Output, 4 Ohms Parallel
4 ohms speaker output jacks, internal connected parallel.
Poweramp Output, 8 Ohms Parallel
8 ohms speaker output jacks, internal connected parallel.
Poweramp Output, 16 Ohms
16 ohms speaker output jack.
Cabinet options
1. One 4 Ohm cabinet connected to a 4 Ohm jack
Summary: 4 Z, --> connected to 4 Ohm output
2. Two 8 Ohm cabinets connected to the 4 Ohm jacks
Summary: 8 Z + 8 Z, --> connected to 4 Ohm + 4 Ohm output
3. One 8 Ohm cabinet connected to an 8 Ohm jack
Summary: 8 Z, --> connected to 8 Ohm output
4. Two 16 Ohm cabinets connected to the 8 Ohm jacks
Summary: 16 Z + 16 Z --> connected to 8-ohm + 8-ohm output.
5. One 16 Ohm cabinet connected to the 16 Ohm jack
Summary: 16 Z --> connected to 16 Ohm output
6. An 8 Ohm cabinet connected to one of the 4 Ohm jacks in combination
with a 16 Ohm cabinet connected to one of the 8 Ohm jacks
Summary: 8 Z + 16 Z --> connected to 4-ohm + 8-ohm output
Important Note:
Never operate the power amp without a sufcient load, otherwise you may damage or destroy it! Always
check the connected cabinets‘ impedance to conrm it matches the amp‘s output impedance! For example,
if you are connecting a cabinet to one of the two 8-ohms output, make sure the speaker system is indeed
rated for 8 ohms. You‘ll nd the various speaker and cabinet options listed in the section above. I cannot
stress enough the importance of proper impedance matching when connecting one or more cabinets to
your amp. Impedance mismatching can damage the power amp!
Page 10

TECHNICAL DATA:
Output power: approx. 50 watts; adjusted accordingly to 4, 8 and 16 Ohm
Input sensitivity
Input: from -20 dB, nominal, max. 0 dB
Effect Return: from -20 dB, nominal, max. 0 dB
Output level
SEND, level range: from -20 dB to approx. 0 dB max.
Line Out: approx. 0 dB at nominal power output
Power consumption: approx. 220 Watt (260 VA) max.
Fuses:
220 / 230 / 240 supply voltage 1,25 AT L (T: slow-blow)
100 / 115 / 120 supply voltage 2,5 AT L (T: slow-blow)
Power Tube Fuses: 2 x 0,16 AM (M: medium-blow)
Important: Replace these with fuses oft he same type and rating only!
Tubes:
V1: ENGL ECC83 First Quality (FQ)
V2 / V3 / V4: ENGL ECC83 Selected
V5 / V6: ENGL 6L6GC Hand-matched duet
S.A.C.: Proprietary ENGL asynchronous data protocol
Dimension: 57,5cm x 48cm x 27cm
Weight: approx. 23kg
Page 11

HANDLING AND CARE
• Keep the amp safe from hard knocks and shocks. Tubes are fragile and tend to suffer when exposed
to mechanical stress!
• Let the amp cool down before you transport it. Ten minutes or so will spare the tubes.
• Tubes take some 20 seconds to warm up after you switch the power on, and about two to three
minutes before they are able to pump out full power. Make a habit of giving your amp plenty of time to
get toasty and ipping the Standby switch for short breaks.
• In order to spare the power tubes and prolong their lifetime, we recommend to set the Stand By
switch to (0 position, that is) before you switch the amp on. After a period of 30 seconds you may
activate the power amp by ipping the Stand By switch.
• Avoid storing the amp in damp or dusty rooms to spare jacks, switches and potentiometers. If you
don‘t use the amp all the time, we recommend that you drape a covering over it to prevent the intrusion of dust. Even better, keep it in a transport cover or ight case.
• Never use caustic or scouring detergents to clean the amp‘s housing, front or rear panels. Use a soft,
damp cloth or sponge with diluted soapsuds or a standard brand of mild dishwashing liquid instead.
Never use solvents they can corrode the amp‘s vinyl skin and dissolve the front and rear panel labels.
Keep liquids well away from the amp, particularly the interior of the housing. * Make sure air can
circulate at the rear and top of the amp to allow for adequate cooling, which increases component life.
• Never operate the amp without an adequate load (a speaker, cabinet or suitable terminating resistor).
• High ambient temperatures place an additional strain on diverse components; so if at all possible,
avoid operating the amp at temperatures far higher than 30°C for longer periods. Running the amp
at mains voltages exceeding the nominal mains input voltage over longer periods can also shorten
component life.
• Replace tubes with selected tubes that satisfy ENGL selection criteria to forestall microphonic pro-
perties, undesirable noise and unbalanced power amp signals. Because power tubes‘ idle current
(bias) must checked and possibly adjusted when replacing tubes, this is a job best left to experienced
and authorized specialists.
Page 12

Attention! Be sure to read this section before powering the amp up!
A few comments on tube ampliers:
• This amp´s input is extremely sensitive due to its high gain factor.
• This guitar amplier can produce high volume levels. Exposure to high volume levels may cause hearing damage!
• Leave tube replacement and power amp biasing to qualied professionals.
• Be sure the unit is switched off and unplugged!
• Caution! Tubes can get very hot and burn skin when touched.
• Always use high quality cables.
• Never plug the amp into an ungrounded outlet!
• Never bridge a defective fuse and be sure replacement fuses feature identical ratings!
• Pull the AC mains plug before replacing fuses!
• Never open the chassis or attempt repairs on your own. Consult qualied service personnel!
• Never expose the amplier to extreme humidity or dampness!
• Please read the instructions carefully before operating the unit!
• Be sure to operate and handle this amp as it was designed for. To this end, please heed the instruc-
tions in the operator‘s manual.
• You‘ll nd an additional pamphlet accompanying this owner‘s manual entitled „Instruction for the
prevention of re, electric shock or injury of persons“. Be sure to read it before you plug the preamp
in and switch it on!
In combination with inherent microphonics of tubes, at certain settings this can elicit powerful feedback
from the speakers – even without a guitar being connected! This occurs primarily when Crunch and Lead
channels (that is, all channels whose preamp is easily over-driven) are activated and the following settings
are dialed in: Gain and/or Lead Gain knob past the 12 o‘clock position; Treble knob past the 12 o‘clock position; Crunch/Lead Volume knob past the 12 o‘clock position; Presence knob past the 12 o‘clock position Avoid
setting the aforementioned knobs to extreme positions (that is, combinations in which several of these
knobs are set past the 12 o‘clock position).
This type of conguration can cause considerable feedback that could well damage your hearing and destroy speakers. If you set the Volume or Master knobs to higher volume levels, always make sure to back
off amplication levels to prevent feedback by turning the Lead channel Gain knobs down. The same applies
to these channels´ Treble and Presence knob settings. Before you power the amp up, take a moment to
check out the control panel and make sure that these knobs are not set to any conguration similar to the
one described above! A few words on background noise in tube ampliers: You may hear slight background
noise right after you power a tube amp up or even while you are operating. It manifests as intermittent
hissing or sizzling, crackling, or popping noises. Caused by tubes, this type of noise may even occur with
brand new tubes. This noise is particularly noticeable in high-gain Lead channels; reason being that these
channels´ gain stages are particularly powerful, amplifying noise along with these useful signal. It is not
necessary to swap tubes if you encounter this kind of noise every now and then, though you may consider
replacing tubes if it becomes a constant companion.
Page 13

TROUBLESHOOTING
Some features that may be controlled remotely using a ENGL Z9 or ENGL Z4 footswitch fail to
respond when you change settings:
• Powerful static charges, strong radio signals, or mains voltage spikes can affect microcontroller-driven systems, setting them to an undened status commonly called a hung chip. In this event, your only
choice is to reset the system. Simply switch the amp off and on again.
• If a reset doesn‘t solve the problem, there is a defect in the control system, probably on the logic
board holding the microcontroller or merely a faulty contact on one of the stereo footswitch jacks. In
this case, consult an authorized service centre or a professional specialist.
The amp fails to respond when you try to control switching functions remotely via the ENGL Z9
footcontroller:
• Is the ENGL Z9 footcontroller connected to the S.A.C.?
• Is the cord you are using stereo, intact, and wired properly?
The amp fails to respond when you try to control switching functions remotely using a footcontroller such as the ENGL Z4 or a MIDI switcher such as the ENGL Z11.
• Are the footboards or switching loops connected to the corresponding footswitch jacks?
• Are the cords you are using stereo, intact, and wired properly?
• If you are using footswitches other than an ENGL Z4 or ENGL Z11, are the switches or relays inside the
boards or switching loop systems off / on Single Pole Single Throw (SPST) switches? In other words,
do these switches continuously connect to GND when you wish to activate the given function? If you‘re
unsure about the answers to these questions, consult an authorized service centre or a professional
specialist.
The amp is not providing an output signal / no sound is emanating from the speaker:
• Is at least one speaker connected to the speaker outputs 4 ohms, 8 ohms or 16 ohms?
• Is the power amp activated (Standby switch to ON)?
• Are all cords (guitar, effect, and speaker) connected properly and are they functional?
• Unplug connected effectors and see if the preamp works ne without these peripheral devices.
• Is the Noise Gate activated in one of the Lead channels and the Threshold knob set to a high value?
Deactivate the Noise Gate for a quick check.
• Are the active Master knob and the Gain and Volume knobs set to a value greater than 0? If any of
these knobs is set to 0, no signal is routed to the amp‘s outputs.
• You may be looking at a faulty tube or another defect. In this case, be sure to take the preamp to an
authorized, professional service centre.
Page 14

The speaker is emitting humming noises:
• Is there a connection (for example, via a shielded circuit) between the amp and another device that
is grounded via a power plug of its own? Two or more circuits sharing a common electrical ground
line can cause audible hum. If low-frequency noise is emanating from your rig, be sure to consult a
specialist.
• The amp and mains grounds are not connected properly or are altogether disconnected. Have an
experienced specialist check this.
• Cords connected to the input or effect loops may not be shielded properly. Replace them to check if
this is indeed the case.
• The amp or speaker cords may be picking up interference from powerful magnetic elds (for example,
of nearby power transformers or electrical motors). Reposition the amp and connector cables.
• The amp or speaker cords may be picking up radio signals, for example, from activated mobile telephones or powerful local transmitting stations nearby. Switch off mobile phones while troubleshoo-
ting noise problems.
One of the power tube fuses blows:
• The given power tube is probably defective. If that power tube‘s fuse is replaced and the new fuse also
blows, the tube needs to be swapped out.
• The amp has been overloaded, perhaps by excessive volume levels, excess mains voltage, or the
wrong output impedance (where the impedance setting does not match the connected speaker‘s
impedance). Check the speakers‘ overall impedance and, if necessary, adjust your setup accordingly.
Error messages that can not be solved by the troubleshooting should be reported to the customer support.
You can reach us via the website www.engl-amps.com or via the email address service@engl-amps.com.
Please provide as much relevant information as possible and how the situation can be reproduced.
Page 15
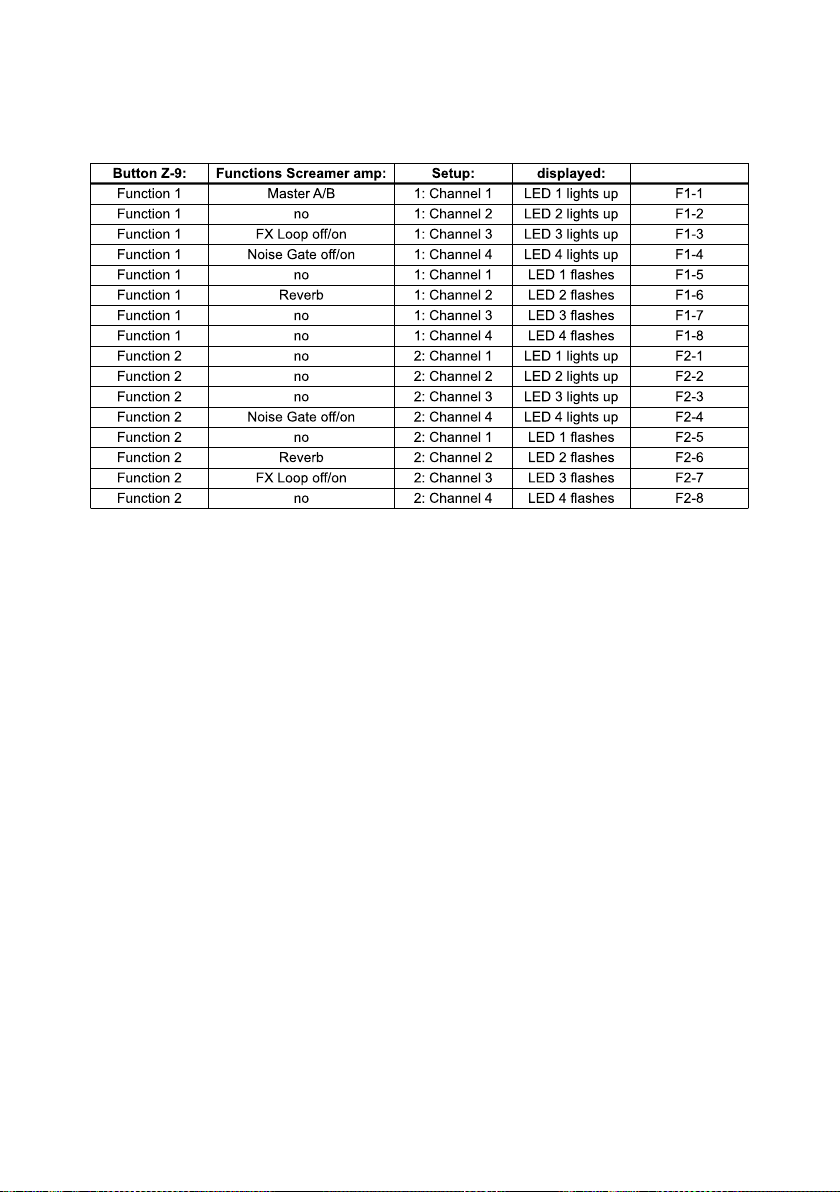
Conguration table for assigning the Screamer II Amp‘s sound-shaping and special functions to the
ENGL Z9 footswitch‘s Functions 1 and 2:
S.A.C.:
Comments:
Column 1 lists the Function button on the ENGL Z9. Column 2 lists the sound-shaping and special functions
that can be assigned to it.
Column 2 lists sound-shaping and special functions on the ENGL Screamer II Amp that can be controlled
remotely via the ENGL Z9.
Column 3 lists the conguration or setting required to remote-control sound-shaping or special functions
on the Screamer II Amp. The rst digit indicates the Function Setup routine, that is,
1: for Function 1 Setup and 2: for Function 2 Setup. Channel 1 to Channel 4 denotes the button used to enter
the setting.
Column 4 indicates the currently or newly selected conguration. For example, if LED 3 ashes when the
ENGL Z9‘s function 2 Setup routine is activated, then the Screamer II Amp‘s FX Loop switching feature is
currently assigned to Function 2 the corresponding S.A.C. command is F2-7.
Column 5 lists the shorthand designations for specic congurations that appear throughout the ENGL Z9
Operator‘s Manual. For detailed information, please refer to the ENGL Z9 Operator‘s Manual.
Please note: The ENGL Z9 is an optional accessory. The afore mentioned Function buttons, LEDs and setup
routines pertain to the ENGL Z9.
Whilst the information contained herein is correct at the time of publication, due to our policy of constant
improvement and development, ENGL AMPLIFICATION reserves the right to alter specications without prior
notice.
Page 16

www.engl-amps.com
 Loading...