


Full Manual
iNEX Client

|
|
iNEX Standard |
|
Table of Contents |
|
Chapter 1 — Introduction ............................................................................................ |
1 |
|
1.1 |
Features ............................................................................................................ |
1 |
1.2 |
System Diagram................................................................................................ |
2 |
|
Multi-Server....................................................................................................... |
2 |
|
Single-Server .................................................................................................... |
3 |
Chapter 2 — Installation .............................................................................................. |
5 |
|
2.1 |
Product Information........................................................................................... |
5 |
|
Package Contents............................................................................................. |
5 |
|
System Requirements....................................................................................... |
5 |
2.2 |
Installation ......................................................................................................... |
6 |
|
Server System................................................................................................... |
6 |
|
Client System.................................................................................................. |
12 |
2.3 |
Automatic Upgrade ......................................................................................... |
14 |
|
Update Service Setup ..................................................................................... |
14 |
|
Update Service Installation ............................................................................. |
15 |
|
Upgrade .......................................................................................................... |
16 |
2.4 |
Uninstall........................................................................................................... |
17 |
Chapter 3 — Getting Started..................................................................................... |
19 |
|
3.1 |
Running Services ............................................................................................ |
19 |
3.2 |
Log In .............................................................................................................. |
19 |
3.3 |
Registering Services ....................................................................................... |
20 |
3.4 |
Registering Devices ........................................................................................ |
22 |
3.5 |
Live Video Monitoring...................................................................................... |
26 |
3.6 |
Recording........................................................................................................ |
27 |
|
Allocating Cameras and Storage .................................................................... |
27 |
|
Setting up Recording Schedule ...................................................................... |
29 |
3.7 |
Playing Recorded Video.................................................................................. |
30 |
Chapter 4 — System Overview ................................................................................. |
31 |
|
4.1 |
Service Manager ............................................................................................. |
31 |
|
Menu ............................................................................................................... |
31 |
|
Status Display ................................................................................................. |
33 |
|
Service Database Backup/Restore................................................................. |
34 |
4.2 |
Setup ............................................................................................................... |
35 |
|
Service ............................................................................................................ |
36 |
|
Device ............................................................................................................. |
37 |
|
User................................................................................................................. |
38 |
|
Recording Schedule........................................................................................ |
39 |
|
Event Management......................................................................................... |
40 |
4.3 |
Client ............................................................................................................... |
40 |
|
Menu ............................................................................................................... |
42 |
|
Site List ........................................................................................................... |
43 |
|
Panel ............................................................................................................... |
43 |
|
Menu – Preference Settings ........................................................................... |
45 |
i

User’s Manual
Chapter 5 — Live Video Monitoring .......................................................................... |
51 |
|
5.1 |
Monitoring Video ............................................................................................. |
51 |
|
Layout Monitoring ........................................................................................... |
53 |
|
Layout Sequence Monitoring .......................................................................... |
55 |
|
Camera Sequence Monitoring ........................................................................ |
57 |
5.2 |
Map Monitoring ............................................................................................... |
58 |
5.3 |
Controlling Cameras ....................................................................................... |
60 |
|
PTZ Control..................................................................................................... |
61 |
|
Zoom Control .................................................................................................. |
62 |
5.4 |
Controlling Maps ............................................................................................. |
63 |
Chapter 6 — Recording............................................................................................. |
65 |
|
6.1 |
Setting up Recording Storage......................................................................... |
65 |
|
Registering Recording Service ....................................................................... |
66 |
|
Allocating Storage........................................................................................... |
66 |
6.2 |
Setting up Recording Schedule ...................................................................... |
69 |
|
Setting up Time-Lapse Recording .................................................................. |
70 |
|
Setting up Event-Based Recording................................................................. |
73 |
|
Managing Schedule ........................................................................................ |
76 |
|
Setting up Instant Recording........................................................................... |
77 |
Chapter 7 — Recorded Video Playback & Exportation............................................. |
79 |
|
7.1 |
Playing back Recorded Video......................................................................... |
79 |
|
Snapshot on Motion Event.............................................................................. |
83 |
|
Object/Motion Search ..................................................................................... |
83 |
|
Zoom Control .................................................................................................. |
84 |
|
Image Effect.................................................................................................... |
84 |
7.2 |
Exporting Recorded Video .............................................................................. |
85 |
|
Exporting as a Self-Player File........................................................................ |
85 |
|
Exporting as an AVI File ................................................................................. |
87 |
Chapter 8 — Event Handling..................................................................................... |
89 |
|
8.1 |
Handling a Monitoring Event........................................................................... |
89 |
|
Monitoring Video ............................................................................................. |
89 |
|
Playing Video .................................................................................................. |
90 |
8.2 |
Handling Event Recorded Video..................................................................... |
91 |
Chapter 9 — System Health & Status Monitoring ..................................................... |
93 |
|
9.1 |
Health Monitoring ............................................................................................ |
93 |
9.2 |
Status Monitoring ............................................................................................ |
94 |
Chapter 10 — Log Search......................................................................................... |
95 |
|
Chapter 11 — Streaming........................................................................................... |
97 |
|
Chapter 12 — Video Analytics................................................................................. |
101 |
|
12.1 Registering Service ..................................................................................... |
101 |
|
12.2 Configuring Video Analytics Detection Events............................................ |
103 |
|
ii

|
|
iNEX Standard |
Chapter 13 — Device Management ........................................................................ |
107 |
|
13.1 |
Registering Devices .................................................................................... |
108 |
13.2 |
Managing Devices....................................................................................... |
111 |
Editing Device Information ............................................................................ |
112 |
|
Changing Device’s Setting Remotely ........................................................... |
114 |
|
Upgrading Device’s Software........................................................................ |
114 |
|
Checking Device Status................................................................................ |
115 |
|
Editing Input/Output Device Information ....................................................... |
115 |
|
13.3 |
Remote Setup of ONVIFTM Conformance Protocol Devices....................... |
116 |
Chapter 14 — User Management ........................................................................... |
123 |
|
Chapter 15 — Storage Management ...................................................................... |
125 |
|
Chapter 16 — Event Management.......................................................................... |
129 |
|
16.1 |
Setting up Event Management Schedule.................................................... |
129 |
Managing Schedule ...................................................................................... |
134 |
|
16.2 |
Managing Events ........................................................................................ |
135 |
Live Popup .................................................................................................... |
136 |
|
Event Acknowledgement .............................................................................. |
136 |
|
Chapter 17 — Map Editor........................................................................................ |
139 |
|
17.1 |
Registering Map .......................................................................................... |
139 |
17.2 |
Setting up Map ............................................................................................ |
140 |
Chapter 18 — Controlling With a Network Keyboard.............................................. |
143 |
|
18.1 |
Registering .................................................................................................. |
143 |
18.2 |
Connecting .................................................................................................. |
144 |
18.3 |
Operating..................................................................................................... |
144 |
Monitoring Video ........................................................................................... |
144 |
|
Playing Back Recorded Video ...................................................................... |
145 |
|
18.4 |
Network Keyboard Buttons ......................................................................... |
146 |
Buttons for Operation Commands ................................................................ |
146 |
|
Buttons for Client System Control................................................................. |
147 |
|
Appendix.................................................................................................................. |
149 |
|
Schedule Setup Examples of Event Recording Mode ........................................ |
149 |
|
OSD Information.................................................................................................. |
151 |
|
Network Disconnection Log ................................................................................ |
151 |
|
Camera Installation Guide for Video Analytics Detection ................................... |
152 |
|
Troubleshooting................................................................................................... |
153 |
|
Index ........................................................................................................................ |
|
155 |
iii

User’s Manual
iv

iNEX Standard
Chapter 1 — Introduction
This manual describes installation and operation of iNEX Standard software, which is designed to be used with network cameras, network video transmitters and digital video recorders (DVRs).
1.1 Features
iNEX Standard is a software that controls monitoring and recording of live video and playback of recorded video.
Remote monitoring of live images
Remote monitoring of live images in multiple Client systems through a streaming service (the number of channels that can be streamed equals the number of channels that can be recorded unless streaming WIBU-Keys have been added)
Stable steaming by using the load balancing function in installation with more than one streaming server
Video analytics of live images through a video analytics service
Up to 64 simultaneous connections to the iNEX system
Remote software upgrades and system setup (supported only for devices which provide the functions)
Display of system log information (supported only for devices which use the iNEX protocol)
Map monitoring of live images
Centralized system operation and management and event handling
Decompression algorithm for H.264, MPEG-4 and M-JPEG
Enhanced security using the SSL function
Two-way audio communication
Enhanced security by setting up different authorities for each user group
Intuitive GUI
The following are supported only for network cameras and network video transmitters:
−Recording of video and playback of the recorded video
−Multiple recording servers for advanced recording performance
−Instant Recording of monitored images
−Audio recording
−Stable recording using proprietary video database file system
The following are supported only for DVRs:
−Playback of video recorded in DVRs
−Remote control of panic recording
Number of services and devices that can be registered and channels that recording, streaming and video analytics are available for:
−Service Registration: One monitoring service, one to four streaming services, 32 video analytics services, 64 recording services, 64 backup services (the number of streaming services that can be registered differs depending on the type and number of WIBU-Keys purchased. Backup services are sold separately)
−Device Registration: Maximum of 1,024 devices including devices which do not use the iNEX protocol (The devices which do not use the iNEX protocol can be registered up to the maximum number of available recording channels. For example, if your iNEX software supports four-channel recording, up to four devices that do not use the iNEX protocol can be registered.)
−Recording (not supported for DVRs): Maximum of four to 256 channels depending on the type and number of the WIBU-Keys (up to 256 channels per recording server with up to 64 recording servers)
−Streaming: The number of channels that can be streamed equals the number of channels that can be recorded unless streaming WIBU-Keys have been added (maximum of 512 to 2,048 channels depending on the type and number of the WIBU-Keys when WIBU-Keys have been added).
−Video Analytics: Up to 8 channels per video analytics service are available.
1

User’s Manual
NOTES:
Ask your dealer or distributor about the number of channels that can be recorded or streamed using your iNEX software. If the device is a four-channel network video transmitter which uses the iNEX protocol, all four cameras are counted even if some of the four cameras are disabled, and four channels per network video transmitter are deducted from the number of channels available for recording, streaming and video analytics.
Several types of WIBU-Keys are available and support different numbers of channels for streaming, recording or backup. You can increase the number of channels by buying a license file increasing the number of channels supported by a WIBU-Key or by buying additional WIBU-Keys. Refer to 4.1 Service Manager (p. 31) for details about the license file.
The iNEX Backup and iNEX Federation software are supported to allow you to build better surveillance systems. Ask your dealer or distributor about purchasing the software and details about it.
This product includes software developed by the OpenSSL Project for use in the OpenSSL Toolkit (http://www.openssl.org/).
The software included in this product contains some Open Sources. You may obtain the complete corresponding source code from us. See the Open Source Guide on the software CD (OpenSourceGuide\ OpenSourceGuide.pdf) or as a printed document included along with the User's Manual.
1.2 System Diagram
Multi-Server
NOTES:
The administration service and monitoring service can run on separate PCs.
The update service can run on a client PC or a PC with other iNEX service programs installed.
2

iNEX Standard
Single-Server
NOTES:
When 256 or more devices are registered, it might take several minutes or longer to change the settings of the Setup program.
It is suggested that you run the recording, streaming and video analytics services on separate PCs.
The update service can run on a client PC or a PC with other iNEX service programs installed.
3

User’s Manual
4

iNEX Standard
Chapter 2 — Installation
2.1 Product Information
Package Contents
Installation CD
User’s Manual
WIBU-Key (USB Dongle)
NOTES:
Up to four WIBU-Keys can be recognized by one administration server.
If a WIBU-Key is disconnected from an administration server, the iNEX program will not operate properly.
Stop running all services before connecting or disconnecting a WIBU-Key.
System Requirements
Server System
Operating System: Microsoft® Windows® XP x86 (32 Bit)/Vista (Home Standard, Business, Ultimate, Enterprise), Microsoft® Windows® 7 (Home Premium, Professional, Ultimate), Microsoft® Windows® Server 2003/2008
CPU: Intel Core II Quad 8200 2.33 GHz/Intel Xeon 3.0 GHz or faster
RAM: 2GB or more
VGA: ATI RadeonTM HD 2400 or NVIDIA GeForce FX5500 (ATI recommended) (1024x768, 24bpp or higher)
Hard Disk Drive: 5 GB or more free space for each service (for example, 10 GB or more free space when installing administration and monitoring services)
LAN: Gigabit Ethernet or faster
Client System
Recommended Requirements
Operating System: Microsoft® Windows® XP x86 (32 Bit)/Vista (Home Basic, Business, Ultimate, Enterprise), Microsoft® Windows® 7 (Home Premium, Professional, Ultimate)
CPU: Intel Core II Quad 8200 2.33 GHz or faster
RAM: 2GB or more
VGA: ATI RadeonTM HD 3650 or NVIDIA GeForce 8400GS (ATI recommended) (1024x768, 24bpp or higher)
Hard Disk Drive: 350 MB or more free space
LAN: Gigabit Ethernet or faster
Minimum System Requirements
Operating System: Microsoft® Windows® XP Home SP 3
CPU: Intel Pentium IV 3.0 GHz or faster
RAM: 1.5 GB or more
VGA: ATI RadeonTM HD 2400 or NVIDIA GeForce FX5500 (ATI recommended) (1024x768, 24bpp or higher)
5
User’s Manual
Hard Disk Drive: 350 MB or more free space
LAN: 10/100 Mbps Ethernet or faster
NOTES:
In this manual, the “server or server system” refers to a PC on which a iNEX service is running. The “client system” refers to a PC running the Client program.
It is recommended to add a new unformatted hard disk drive to ensure stable recording. If you are setting up a hard disk drive which contains data, however, you are to delete partition(s) and the file system in advance after formatting. Refer to the PC/server user’s manual or consult with the PC/server manufacturer for details about how to format or delete the partition(s) and file system.
2.2 Installation
NOTES:
It is recommended to install the recording, streaming and video analytics services on separate PCs for better performance of video recording, monitoring and playback.
In the Windows Start menu, go to Control Panel. Double click the Power Options to open the Management Properties dialog box. Under the Power Schemes tab, set both Turn off monitor and Turn off hard disks to Never.
CAUTION: If an older version of iNEX software is installed on your computer, a screen appears asking you to upgrade the software. In this case, you are required to upgrade the software according to the instructions in the screen.
Server System
Administration Server
1.Insert the software CD in the administration server.
2.Run the Setup.exe file in the Setup folder of the software CD.
NOTE: The User Account Control window might appear when using the Microsoft® Windows® Vista or later operating system. Click Allow and install the software following the instructions.
3. Select the language in which to run the program and then click OK.
NOTES:
To properly display the selected language, your PC’s operating system should be set to support the selected language.
To change the iNEX program’s language after the software has been installed, select Language Selector in the iNEX → Utility folder of the Start menu before running the iNEX program.
6

iNEX Standard
4.When the following screen appears, select Install and click
Next.
5.Select Administration Service and Monitoring Service, and click Next. If the administration service and monitoring service are installed on separate PCs, select the service to install and click Next.
6.Designate the folder path to install the services. Clicking the Disk Cost… button shows the available and required disk space for each hard disk drive for the installation. Then click
Next.
7.If you use the update service, it is required to enter the IP address and port number of the update server when installing the administration service. You can change the settings in the Service Manager program after completing installation. Refer to 2.3 Automatic Upgrade, Update Service Setup
(p.14) for details.
7

User’s Manual
8.If the service is installed on separate PCs, it is required to enter the IP address and port number of the administration server when installing the monitoring. You can change the settings in the Service Manager program after completing installation. When the installation is complete, the monitoring service is connected to the administration service via the network if the services are operating.
9.When the following screens appear, click Next.
NOTE: The following screen appears when using Microsoft® Windows® Vista or later operating systems. It is recommended that you check the Disable WS-Discovery Windows Service (fdPHost, FDResPub) box. If you do not check the box, the iNEX program cannot auto-scan devices using ONVIFTM Conformance protocol when scanning devices for device registration.
NOTE: The following screen appears when the port number of the service being installed is already in use, and the screen displays the port number that will be changed. The changed port number will be applied when the service starts operating after installation.
NOTE: .NET Framework and the Visual C++ Runtime Libraries are installed automatically, and it may take some time. This installation step will be skipped if the programs are already installed on your computer.
8

iNEX Standard
10.Disconnect the WIBU-Key from the server if a WIBU-Key is connected. Then install the WIBU-Key device driver following the instructions.
11.When the following screen appears, click the Close button to complete the installation.
NOTE: After successfully installing the services, the services, Service Manager program (the  icon is displayed in the notification area of the task bar) and Setup program run automatically.
12. Connect WIBU-Keys to the administration server.
9

User’s Manual
Recording Server / Streaming Server / Video Analytics Server
1.Insert the software CD in the server.
2.Run the Setup.exe file in the Setup folder of the software CD.
NOTE: The User Account Control window might appear when using the Microsoft® Windows® Vista or later operating system. Click Allow and install the software following the instructions.
3. Select the language in which to run the program and then click OK.
NOTES:
To properly display the selected language, your PC’s operating system should be set to support the selected language.
To change the iNEX program’s language after the software has been installed, select Language Selector in the iNEX → Utility folder of the Start menu before running the iNEX program.
4. When the following screen appears, select Install and click
Next.
5. Select a service to install and click Next.
10

iNEX Standard
6.Designate the folder path to install the service. Clicking the Disk Cost… button shows the available and required disk space for each hard disk drive for the installation. Then click
Next.
7.Enter the IP address and port number of the administration server and click Next. You can change the settings in the Service Manager program after completing installation.
When the installation is complete, the installed service is connected to the administration service via the network if the services are operating.
8.When the following screens appear, click Next.
NOTE: The following screen appears when using Microsoft® Windows® Vista or later operating systems. It is recommended that you check the Disable WS-Discovery Windows Service (fdPHost, FDResPub) box. If you do not check the box, the iNEX program cannot auto-scan devices using ONVIFTM Conformance protocol when scanning devices for device registration.
11

User’s Manual
NOTE: The following screen appears when the port number of the service being installed is already in use, and the screen displays the port number that will be changed. The changed port number will be applied when the service starts operating after installation.
NOTE: .NET Framework and the Visual C++ Runtime Libraries are installed automatically, and it may take some time. This installation step will be skipped if the programs are already installed on your computer.
9.When the following screen appears, click the Close button to complete the installation.
NOTE: After successfully installing the service, the service, Service Manager program (the  icon is displayed in the notification area of the task bar) and Setup program run automatically.
10. Connect WIBU-Keys to the administration server.
Client System
1.Insert the software CD in the Client PC.
2.Run the Setup.exe file in the Setup folder of the software CD.
NOTE: The User Account Control window might appear when using the Microsoft® Windows® Vista or later operating system. Click Allow and install the software following the instructions.
3. Select the language in which to run the program and then click OK.
NOTES:
To properly display the selected language, your PC’s operating system should be set to support the selected language.
To change the iNEX program’s language after the software has been installed, select Language Selector in the iNEX → Utility folder of the Start menu before running the iNEX program.
12

iNEX Standard
4.When the following screen appears, select Install and click
Next.
5. Select Client and click Next.
6.Designate the folder path to install the Client program. Clicking the Disk Cost… button shows the available and required disk space for each hard disk drive for the installation. Then click Next.
7. When the following screens appear, click Next.
13

User’s Manual
NOTE: The following screen appears when using Microsoft® Windows® Vista or later operating systems. It is recommended that you check the Disable WS-Discovery Windows Service (fdPHost, FDResPub) box. If you do not check the box, the iNEX program cannot auto-scan devices using ONVIFTM Conformance protocol when scanning devices for device registration.
NOTE: .NET Framework and the Visual C++ Runtime Libraries are installed automatically, and it may take some time. This installation step will be skipped if the programs are already installed on your computer.
8.When the following screen appears, click the Close button to complete the installation.
2.3 Automatic Upgrade
You can upgrade all services automatically by running the update service and designating the installation file of the software version to upgrade.
Update Service Setup
1.Run the Service Manager program in the administration server.
2.Click Option menu and select Update Package and then select Update Service tab. Check the Use box and enter the IP address and port number of the update server.
14

iNEX Standard
Update Service Installation
1.Insert the software CD in the update server.
2.Run the Setup.exe file in the Update folder of the software CD.
NOTE: The User Account Control window might appear when using the Microsoft® Windows® Vista or later operating system. Click Allow and install the software following the instructions.
3. |
Select the language in which to run the program and then click OK. |
NOTES: |
|
|
To properly display the selected language, your PC’s operating system should |
|
be set to support the selected language. |
|
To change the iNEX program’s language after the software has been installed, |
|
select Language Selector in the iNEX → Utility folder of the Start menu before |
|
running the iNEX program. |
4. |
When the following screen appears, select Install and click |
|
Next. |
5.Designate the folder path to install the service. Clicking the Disk Cost… button shows the available and required disk space for each hard disk drive for the installation. Then click
Next.
6. When the following screens appear, click Next.
15
User’s Manual
NOTE: .NET Framework and the Visual C++ Runtime Libraries are installed automatically, and it may take some time. This installation step will be skipped if the programs are already installed on your computer.
7.When the following screen appears, click the Close button to complete the installation.
Upgrade
1. Go to the Start Menu in the update server → Click iNEX → Run the Update Manager program.
16

iNEX Standard
Option: Designates the upgrade file or sets up the port number of the update server.
−Update Package: Designates the folder path of the upgrade installation file.
−Port Setup: Sets the port number of the update server.
Log: Selecting Show Log allows you to check and search the system log.
Setting up the time range of the log and clicking the Search button displays the log information. Selecting First displays from the oldest log entries regardless of date. Selecting Last displays to the newest log entries regardless of date.
2. Click the Option menu and select Update Package.
Click the  button and designate the folder path of the upgrade installation file. Click the OK button.
3.Click the Update button at the bottom of the Update Manager screen. For a Client system with no iNEX service program installed, clicking the Update button upgrades the Client program. For server systems, each service connects to the update service periodically and automatically upgrades if necessary.
2.4 Uninstall
1. Stop running the services and Client program first.
NOTE: The iNEX software might not be uninstalled correctly if you uninstall it while the services or Client program is running.
CAUTION: The iNEX software should be uninstalled following the procedures below. If you delete the installation folder manually, the iNEX software cannot be uninstalled or reinstalled.
2. Go to the Start Menu, and click iNEX. Click Uninstall iNEX.
17

User’s Manual
NOTE: You can uninstall the software by using the software CD.
Insert the software CD in the server or Client PC and run the
Setup.exe file. Select Remove and click Next.
3.Click Yes when the following screen appears.
4.Click the Remove All or Do not remove button when the following screen appears. Clicking the Remove All button deletes all saved data including recorded video and previous settings in the system. Clicking the Do not remove button uninstalls the software without deleting any saved data in the system and keeps all saved data in the system.
NOTE: The deleted data cannot be restored once the data is deleted.
5. Click the OK button to complete the uninstall process.
18

iNEX Standard
Chapter 3 — Getting Started
The iNEX software consists of Service Manager, Setup and Client programs, and services should be running on the iNEX servers for the iNEX program to operate. Refer to Chapter 4 — System Overview (p. 31) for details about Service Manager, Setup and Client programs.
NOTE: In this manual, the “server or server system” refers to a PC on which a iNEX service is running, the “client system” refers to a PC on which the Client program is running and the “network video device” refers to a network video transmitter or network camera.
3.1 Running Services
NOTE: A “service” in the iNEX program is a process that runs in the background and performs a specified operation.
When the services are installed, the services run automatically. You can also start or stop running the services manually. Go to the Start Menu →Click iNEX → Run the Service Manager program.
Administration Server |
Recording / Streaming / Video Analytics Server |
Check the status of services. If any of the services are not listed as Working under Status, start the services manually. Refer to 4.1 Service Manager (p. 31) for details about the Service Manager program.
3.2 Log In
You are required to log in to the administration service as follows when running the Setup and Client programs.
Go to the Start Menu → Click iNEX → Run the iNEX Setup or iNEX Client program and enter login information.
19

User’s Manual
Site Name: Select the administration service to connect to from the list. Select Local Host as the default setting if the administration service is running in the current system. You can add other administration
services to the list or modify information about the administration service in the list by clicking the  button at the right.
−Site Name, Service Address, Service Port: Designate the name of the administration service and enter the IP address and port number of the administration server (default: 11001).
User ID, Password: Enter your user ID and password. The default user ID is admin and default password is 12345678. You can change the user ID and password in the User menu. Refer to Chapter 14 — User Management (p. 123) for details.
Remember my ID on this computer: Check the box if you want to save your ID for logging on.
Restore last Live sessions: Check the box if you want to restore the previous live monitoring sessions in the current Live panels of the Client program (supported only for the Client program).
3.3 Registering Services
You must register recording, monitoring, streaming and video analytics services on the administration service to start the iNEX program. Services that are installed on the administration server are registered on the administration service automatically.
Go to the Start Menu → Click iNEX → Run the iNEX Setup program and enter login information.
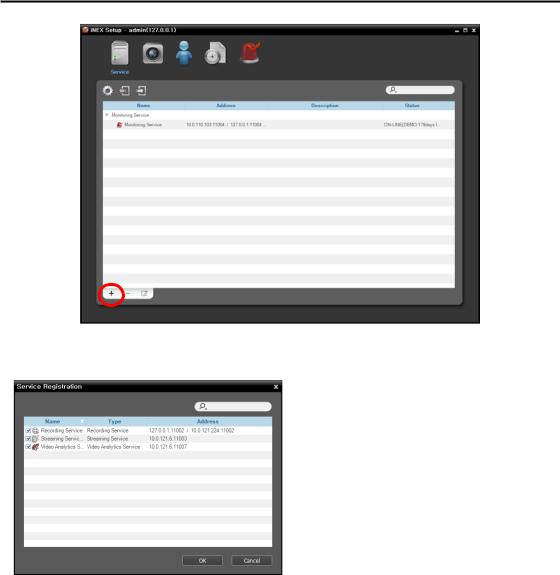
Select the Service menu, and then register recording, monitoring, streaming and video analytics services following the procedures below.
20
iNEX Standard
1.Click the  button at the bottom. The Service Registration window appears, and a list of available services is displayed with information about each service.
Name: Displays services that are currently connected to the administration service via the network.
Type: Displays the service type.
Address: Display the IP address and port number of each server.
NOTE: The administration server information required when installing the services should match the information of the currently connected administration server.
2.Select recording, monitoring, streaming and video analytics services to register on the iNEX system, and the selected services are displayed in the service list.
21

User’s Manual
3.4 Registering Devices
You must register devices on the administration service and add the devices to a device group in order to perform any operation.
Go to the Start Menu → Click iNEX → Run the iNEX Setup program and enter login information.
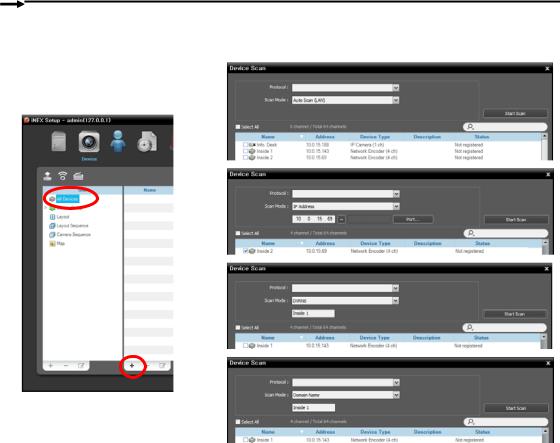
1. Select the Device menu.
22
iNEX Standard
2.Click All Devices in the Site panel, and then the  button at the bottom of the Site List panel. The Device Scan window appears.
Protocol: Select the protocol or manufacturer of the device to scan. Event related functions may not be supported depending on the protocol that the device uses (supported for the iNEX protocol and some versions of the Axis protocol), and some other functions may not be supported depending on the settings of the device.
Scan Mode: Select the scan mode. Clicking the Start Scan button displays the results in the list. If the IP address range of the device is different from that of the administration server, the iNEX program considers the IP address invalid. In this case, you must change the device’s IP address to register the device.
−Auto Scan (LAN): Lists devices in a LAN environment (supported only for the network video devices). If the device uses the ONVIFTM Conformance protocol, this function is supported only when you have
checked the Disable WS-Discovery Windows Service (fdPHost, FDResPub) box during the software installation in Microsoft® Windows® Vista or later operating systems. Also, if the device uses the ONVIFTM Conformance protocol, it is recommended that the device not be networked via DHCP (Dynamic Host Configuration Protocol). If the device is networked via DHCP, connection to the device may not be made properly depending on changes in the external network environment.
−IP Address: Allows you to enter the IP address of a device. You can search more than one device at a time by entering a range of IP addresses. It is recommended that the device not be networked via DHCP (Dynamic Host Configuration Protocol). If the device is networked via DHCP, connection to the device may not be made properly depending on changes in the external network environment.
−DVRNS: Allows you to enter the device name registered on a DVRNS server if the device uses the DVR Name Service (DVRNS) function. Ensure the DVRNS server information on which the device is registered is correct. If the DVRNS server information is not correct, the device will not be found.
23

User’s Manual
−Domain Name: Allows you to enter the device's domain name registered on a DNS server if the device uses the Domain Name Service.
 : Select the devices to register by checking the box beside each device name in the list. Selecting the Select All box selects all devices in the list.
NOTES:
Depending on the model, the device may not be supported even though the iNEX program supports the device's protocol. Ask your dealer or distributor about supported models.
If the device uses the ONVIFTM Conformance protocol, you can select either the manufacturer (or iNEX protocol) or the ONVIFTM Conformance protocol. However, it is possible that one or both of them are
not supported depending on the device model. Ask your dealer or distributor for details. Refer to the device User’s Manual about enabling the ONVIFTM Conformance protocol in the device, as procedures may differ for each model.
3. Click the Add Devices button at the bottom.
Name, Address, Device Type: Displays the name, IP address and type of the selected device. The name will be updated automatically depending on the settings of the device.
ID, Password: Enter the user ID and password which you set in the device in order to connect to that device remotely. The connection to the device is allowed only to the users under the Administrator group of the device, and recording is allowed only to the admin user under the Administrator group of the device.
Recording Service: Select a recording server from the list to record video from the selected device (supported only for the network video devices). The device is registered on the recording server and the recording server performs recording according to a recording schedule. It is recommended that you do not change the recording server once any recording has been made. If you change the recording server after some recording has been done, you cannot search or play back the video recorded on the original recording server. The number in the recording server list indicates the maximum number of cameras that can be registered, and the name indicates the name of a recording service, which was set during the Service menu setup. The maximum number of cameras that can be registered differs depending on the type and number of the WIBU-Keys connected to the administration server. When selecting the Do not record option, the iNEX program treats the device during the Schedule setup as though it was not registered and does not perform any of the scheduled activities associated with the device. You can check the list of devices registered on the recording server on a Device Setup tab while setting up the recording server in the Service menu. Refer to Chapter 15 — Storage Management (p. 125) for details.
24
iNEX Standard
Streaming Service: Select whether or not to use the streaming service for monitoring video from the device. If you use the streaming service, the iNEX program transmits video from the device to the client system through the streaming server, and it allows multiple users to monitor video simultaneously. The number of channels that can be streamed equals the number of channels that can be recorded unless streaming WIBU-Keys have been added. When you register more than one streaming service by buying additional WIBU-Keys, the iNEX program chooses any one of the streaming services depending on the system load of the streaming server. Refer to Chapter 11 — Streaming (p. 97) for details.
Apply to All Devices: Select to apply the same user ID and password to all selected devices if you selected more than one device and the selected devises have the same user ID and password.
NOTES:
If the device is a DVR, it might be necessary to enter the DVR port numbers depending on the specifications and version of the DVR.
When registering a four-channel network video transmitter which uses the iNEX protocol, all four cameras are automatically registered even if some of the four cameras are disabled.
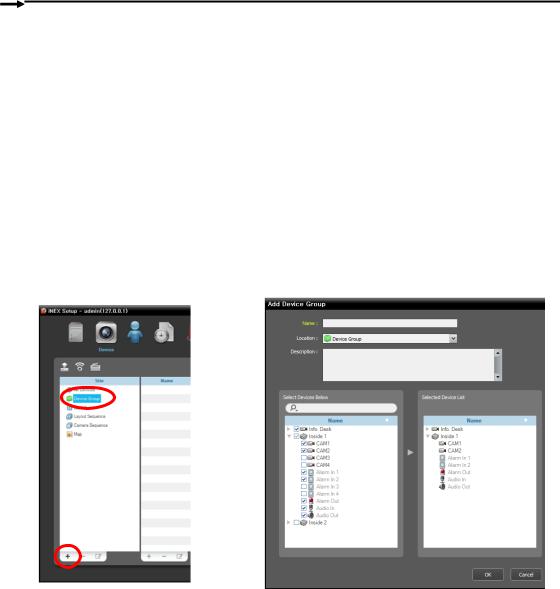
4.Click Device Group in the Site panel, and then the  button at the bottom of the Site panel. The Add Device Group window appears.
Name: Enter the device group name.
Location: Select an upper group to which the device group will belong.
Select Devices Below, Selected Device List: Check the box beside cameras in the left panel, and the selected cameras are added to the right panel.
Clicking the OK button completes the device group registration.
5.Check that the device was added to the device group correctly. Click Device Group in the Site panel
and then the arrow button ( ) beside Device Group. Clicking the registered group displays the list of devices added to the device group and connection status in the Site List panel. If the connection was not made properly, the network disconnection log is displayed (only for devices registered on the recording service). Refer to Appendix – Network Disconnection Log (p. 151) for details about the network disconnection log.
25
 Loading...