

Page 1
16
E0030-manual IW003-DCF 0-0-0-K
EMOS spol. s r. o.
GARANCIJSKA IZJAVA
1. Garancijski rok se prične z dnevom prodaje in velja 24 mesecev.
2. EMOS SI d.o.o. jamči kupcu, da bo v garancijskem roku na lastne stroške odpravil vse
pomanjkljivosti na aparatu zaradi tovarniške napake v materialu ali izdelavi.
3. Za čas popravila se garanjcijski rok podaljša.
4. Če aparat ni popravljen v roku 45 dni od dneva prijave okvare, lahko prizadeta stranka
zahteva novega ali vračilo plačanega zneska.
5. Garancija preneha, če je okvara nastala zaradi:
- nestrokovnega - nepooblaščenega servisa
- predelava brez odobritve proizvajalca
- neupoštevanje navodil za uporabo aparata.
6. Naravna obraba aparata je izključena iz garancijske obveznosti. Isto velja tudi za
poškodbe zaradi nepravilne uporabe ali preobremenitve
NAVODILA ZA REKLAMACIJSKI POSTOPEK
Lastnik uveljavlja garancijski zahtevek tako, da ugotovljeno okvaro prijavi pooblaščeni
delavnici (EMOS SI d.o.o., Kidričeva 38, 3000 Celje) pisno ali ustno. Kupec je odgovoren,
če s prepozno prijavo povzroči škodo na aparatu. Po izteku garancijskega roka preneha
pravica do uveljavljenja garancijskega zahtevka. Priložen mora biti potrjen garancijski list
z original potrjenim računom.
EMOS SI d.o.o. se obvezuje, da bo aparat zamenjal z novim, če ta v tem garancijskem roku
ne bi deloval brezhibno.
ZNAMKA: BREZŽIČNA METEOROLOŠKA POSTAJA IW003-DCF
+ TW003 senzor
TIP: IW003-DCF
DATUM PRODAJE:
Servis: EMOS SI d.o.o., Kidričeva 38, 3000 Celje, Slovenija,
Tel: + 386 (0) 3 42 42 420
SLO
IW003-DCF
IW003-DCF
GB
WIRELESS WEATHER STATION
CZ
BEZDRÁTOVÁ METEOSTANICE
SK
BEZDRÔTOVÁ METEOSTANICA
PL
BEZPRZEWODOWA STACJA METEOROLOGICZNA
H
VEZETÉK NÉLKÜLI METEOROLÓGIAI ÁLLOMÁS
SLO
BREZŽIČNA VREMENSKA POSTAJA
D
DRAHTLOSE WETTERSTATION
UA
БЕЗДРОТОВИЙ МЕТЕОРОЛОГІЧНИЙ ПРИСТРІЙ
RO
STAŢIE METEO FĂRĂ FIR
www.emos.cz
Page 2
2
E0030-manual IW003-DCF 0-0-0-K
EMOS spol. s r. o.
15
Ora reglată prin radio (DCF77)
După conexiunea cu staţia, senzorul începe să detecteze automat semnalul DCF77 timp
de 7 minute. Începe să clipească icoana .
În acest timp nu va fi actualizată nici o altă informaţie pe ecran şi butoanele nu vor fi
funcţionale (cu excepţia SNOOZE/LIGHT). În cazul semnalului slab clipeşte icoana ▲. La
eşuarea receptării semnalului icoana dispare. La receptarea cu succes a semnalului
DCF77 icoana încetează să clipească şi se afişează ora actuală. Pentru repetarea
detectării semnalului DCF77 apăsaţi din nou lung butonul WAVE.
Semnalul DCF77 va fi sincronizat zilnic între orele 2:00 şi 3:00 dimineaţa. Pentru receptarea
corectă a semnalului, nu amplasaţi senzorul în apropierea consumatorilor electrici sau
telefoanelor mobile.
Temperatura şi umiditatea interioară şi exterioară
Temperatura şi umiditatea interioară se afişează în câmpul K, L.
Temperatura şi umiditatea exterioară se afişează în câmpul P, R.
Cu butonul °C/°F/WAVE selectaţi unitatea de temperatură în °C/°F.
Tendinţa temperaturii şi umidităţii
Săgeata semnalizează tendinţa valorilor de măsurare a temperaturii şi umidităţii pe
senzorul concret sau staţie.
Indicaţia pe ecran
Tendinţa temperaturii şi
umidităţii
În creştere Stabilă În scădere
Presiunea atmosferică
Presiunea atmosferică în unităţi hPa şi graficul istoricului presiunii în ultimele 12 ore se
afişează în câmpul F. La mutarea staţiei meteo în alt loc, se ajunge la influenţarea valorilor
măsurate. Măsurarea se stabilizează în decurs de 12 – 24 ore.
Fazele lunii
Faza lunii este afişată în câmpul E.
Icoanele fazei lunii sunt următoarele:
Lună Creşte Primul Creşte Lună Descreşte Ultimul Descreşte
nouă pătrar plină pătrar
Afişarea valorilor maxime/minime măsurate
Prin apăsarea butonului MEM se afişează valorile de temperatură, umiditate şi presiune
maxime şi minime măsurate. Ţinând butonul MEM se şterg din memorie valorile salvate.
Reglarea manuală a orei
Apăsaţi lung butonul SET. Cu butoanele + şi - setaţi anul, luna, ziua, fusul orar, formatul
orar, ora, minuta.
Între valorile individuale vă deplasaţi apăsând butonul SET.
Reglarea alarmei
Staţia meteo permite reglarea a două alarme. Cu butonul ALM SET selectaţi alarma - A1, A2.
Apăsaţi lung butonul ALM SET. Reglaţi ora alarmei cu butoanele + şi - , între valori vă
deplasaţi cu butonul SET. Apoi reglaţi zilele în care va suna alarma.
Există trei posibilităţi:
MON, TUE, WED, THU, FRI, SAT, SUN Alarma este în funcţie întreaga săptămână (lu – du)
MON, TUE, WED, THU, FRI Alarma este în funcţie în zile lucrătoare (lu – vi)
SAT, SUN Alarma este în funcţie în weekend (sâ – du)
Cu butonul ALM ON.OFF activaţi alarma nr. 1 , 2 sau ambele. Se afişează icoana I, J. Cu
acelaşi buton dezactivaţi alarma – icoana dispare.
Funcţia alarmei repetate şi iluminarea ecranului
(SNOOZE/LIGHT)
La sunetul alarmei apăsaţi butonul SNOOZE, (apăsaţi uşor în jos partea de sus a staţiei
meteo). Alarma va fi amânată cu 5 minute, icoana alarmei 1,2 va clipi. Pentru anularea
funcţiei SNOOZE apăsaţi butonul ALM ON.OFF. Alarma va suna din nou ziua următoare.
Pentru iluminarea ecranului apăsaţi butonul SNOOZE/LIGHT.
Durata iluminării este de 5 secunde.
Prognoza vremii
Staţia indică prognoza vremii pe următoarele 12 – 24 ore pe baza modificărilor presiunii
atmosferice. Precizia prognozei vremii este de 70 – 75 %. Întrucât prognoza vremii nu
poate să coincidă întotdeauna 100%, producătorul nici vânzătorul nu poate fi responsabil
pentru orice daune provocate de prognoza inexactă a vremii. La prima reglare sau după
resetarea staţiei meteo, durează cca 24 de ore până ce staţia începe să prognozeze corect.
Staţia indică 5 icoane pentru prognoza vremii şi 3 icoane pentru presiune.
Indicaţia pe ecran
Tendinţa vremii Îmbunătăţire Fără modificări Înrăutăţire
Însorită Înnorată Închisă Ploaie Furtună Polei
Icoana apare
la temperatura
sub +3 °C
Rezolvarea problemelor:
Dacă staţia meteo nu afişează ora exactă sau temperatura, presiunea, umiditatea, icoana
prognozei vremii, apăsaţi butonul RESET.
Ora incorectă sau pierderea sincronizării poate să apară ca rezultat ale interferenţei
electromagnetice externe.
Grija şi întreţinerea
Produsul este proiectat astfel, ca la o manipulare adecvată să funcţioneze ani îndelungaţi.
Iată câteva recomandări pentru o manipulare corectă:
• Înainte de folosirea staţiei meteo citiţi cu atenţie aceste intrucţiuni de utilizare.
• Nu expuneţi produsul la radiaţii solare directe, frig şi umiditate extreme şi la schimbări
bruşte de temperatură (s-ar reduce precizia detectării).
• Nu amplasaţi produsul în locuri expuse la vibraţii şi zguduituri - ar putea provoca
deteriorarea lui.
• Nu expuneţi produsul la presiune excesivă, izbituri, praf, temperatură sau umiditate
extremă - ar putea provoca defectarea funcţionalităţii produsului, scurtarea autonomiei
energetice, deteriorarea bateriilor şi deformarea componentelor de plastic.
• Nu expuneţi produsul la ploaie nici umiditate, nu este destinat utilizării în exterior.
• Pe produs nu aşezaţi surse de foc deschis, de ex. lumânare aprinsă etc.
• Nu amplasaţi produsul în locuri fără flux de aer îndestulător.
• În deschizăturile de aerisire nu introduceţi alte obiecte.
• Nu interveniţi la circuitele electrice interne ale produsului – aceasta ar putea provoca
deteriorarea lui şi încetarea automată a valabilităţii garanţiei. Produsul trebuie reparat
doar de un specialist calificat.
• La curăţare folosiţi cârpă fină şi umedă. Nu folosiţi diluanţi nici detergenţi - s-ar putea
zgâria părţile de plastic şi întrerupe circuitele electrice.
• Nu scufundaţi produsul în apă sau în alte lichide.
• Nu expuneţi produsul la stropi sau jeturi de apă.
• În caz de deteriorare sau defectare a produsului nu efectuaţi singuri nici un fel de
reparaţii. Predaţi-l spre reparare la magazinul în care l-aţi procurat.
• Amplasaţi produsul în afara accesului copiilor – nu este jucărie.
• Îndepărtaţi întotdeauna la timp bateriile descărcate – ar putea să curgă şi să deterioreze
produsul. Folosiţi doar baterii noi de tipul indicat, iar la înlocuire respectaţi polaritatea
corectă.
• Nu aruncaţi bateriile în foc, nu le dezmembraţi sau scurtcircuitaţi.
• Bateriile devin după utilizare deşeu periculos – nu le aruncaţi la deşeuri menajere,
predaţi-le la bazele de recepţie – de ex. la magazinul în care aţi cumpărat produsul.
AVERTIZARE: Conţinutul acestor instrucţiuni poate fi modificat fără avertizare prealabilă
- datorită posibilităţilor de tipar reduse, simbolurile ilustrate pot să difere puţin de cele
afişate pe ecran - este interzisă copierea acestor instrucţiuni fără acordul producătorului.
Emos soc. cu r.l. declară, că IW003-DCF + TW003 este în conformitate cu cerinţele de
bază şi alte prevederi corespunzătoare ale directivei 1999/5/CE. Aparatul poate fi utilizat
liber în UE. Declaraţia de conformitate este parte integrantă a instrucţiunilor sau se poate
găsi pe paginile www.emos.cz
Aparatul poate fi utilizat pe baza autorizaţiei generale nr. VO-R/10/09.2010-11.
Page 3
14
E0030-manual IW003-DCF 0-0-0-K
EMOS spol. s r. o.
будильника 1,2 буде мигати. Для анулювання функції SNOOZE, синіть кнопку ALM ON.OFF.
Будильник знову буде дзвонити на слідуючий день.
Для підсвічення дисплею стисніть кнопку SNOOZE/LIGHT.
Час підсвічення триває 5 секунд.
Прогноз погоди
Пристрій прогнозує погоду на підставі змін атмосферного тиску на послідуючі 12 – 24
години. Точність прогнозу погоди відбувається біля 70 – 75%. Тому що прогноз погоди
не завжди 100% показує, виробник чи продавець не несе відповідальність за будь-які
втрати, причинені не точністю прогнозу погоди. Після першого налаштування або
повторного ввімкнення метеорологічного пристрою пройде не менше 24 години поки
метеорологічний пристрій почне правильно показувати прогноз погоди.
Метеорологічний пристрій показує 5 іконок прогнозу погоди та 3 іконки тиску
Показник на дисплеї
Тренд погоди покращення Без змін згіршення
Сонячно Похмуро Хмарно Дощ Громовиця Обледеніння
Іконка зобразиться
при температурі
нижче +3 °C
Вирішення проблеми:
Якщо метеорологічний пристрій не зображує правильний час або температуру, тиск,
вологість, іконку прогнозу погоди стисніть кнопку RESET.
Неправильний час або вимикання синхронізації може наступити у наслідку зовнішньої
електро-магнетичної інтерференції.
Догляд та обслуговування
Виріб сконструйований так, щоб надійно працював багато років. Тут знаходиться
декілька рад для правильного обслуговування:
• Перед тим, як почнете виробом користуватися уважно прочитайте інструкцію по
експлуатації
• Виріб не піддавайте прямим сонячним промінням, надзвичайному холоду та
вологості, різким змінам температури (це могло б знизити точність знімання)
• Виріб не поміщайте у місцях де буває вібрація чи трясіння - можуть причинити його
пошкодження
• Виріб не піддавайте надзвичайному тиску, ударам, пороху, високій температурі або
вологості - це могло б причинити зниження функції виробу, коротшу енергетичну
витримку, пошкодження батареї чи деформацію пластмасових частин.
• Виріб не піддавайте дощу та вологості, він не призначений для зовнішнього
користування.
• Не поміщайте на виріб жодне джерело відкритого вогню, напр. запалену свічку та
інше.
• Не поміщайте виріб в місцях, де не достатньо забезпечена циркуляція повітря.
• Не всовуйте у простір вентиляції виробу жодних предметів.
• Не втручайтеся у внутрішні електричні контури виробу – цим можете його
пошкодити та автоматично цим закінчити гарантійний строк. Виріб мав би
ремонтувати тільки кваліфікований спеціаліст.
• Для чищення використовуйте вологу, м,ягку ганчірку. Не використовуйте
розчинники, ні миючі заходи – можуть пошкрябати пластмасові частини та порушити
електричні контури.
• Виріб не занурюйте у воду та іншу рідину.
• Виріб не піддавайте каплям та бризкам води.
• Пошкоджений чи дефектний виріб самі не ремонтуйте. Здайте його для ремонту у
магазин де був придбаний.
• Виріб поміщайте подалі від дітей – це не являється іграшкою.
• Розряджені батареї завжди відстороніть - можуть витікати та пошкодити виріб.
Використовуйте тільки нові батареї рекомендованого типу та при їхньому
вимінюванні дбайте на правильну полярність.
• Батареї не вкидайте у вогонь, не розбирайте його та не робіть короткого замикання.
• Виріб після використання стає небезпечним відходом – тому не викидайте його до
звичайного побутового відходу, але поверніть у місце де ці вироби приймають –
наприклад у магазин в якому цей виріб придбали.
У В А Г А: Зміст цієї інструкції без попередження може бути змінений – по причині
обмежених можливостей друкування, зображені символи можуть не значно відрізнятися
від зображення на дисплеї – зміст цієї інструкції не можливо без згоди виробника
репродукувати.
Товариство ТОВ Emos повідомляє, що IW003-DCF + TW003 знаходиться у згоді з
основними вимогами та іншими відповідними постановленнями директиви 1999/5/
ЄС. Приладом можливо вільно користуватися в ЄС. Повідомлення про згоду, являється
частиною інструкції чи її можливо знайти на сторінках сайту www.emos.eu
Виробом можливо користуватися на підставі загальних правил № VO-R/10/09.2010-11
STAŢIE METEO FĂRĂ FIR IW003-DCF + TW003 senzor
Staţia meteo afişează ora, 2 alarme cu funcţia alarmei repetate, prognoza vremii, date privind temperatura interioară şi exterioară, umiditatea, presiunea atmosferică, fazele lunii. Are
memorie privind valorile minime şi maxime măsurate. Înainte de folosire citiţi cu atenţie aceste instrucţiuni de utilizare.
SPECIFICAŢII
ceas reglat prin semnal radio
temperatura interioară/exterioară: 0 °C la +50 °C; -20 °C la +70 °C
distingerea temperaturii: 0,1 °C
senzor fără fir: frecvenţă de transmisie, 433 MHz
raza de acţiune a semnalului radio: până la 30 m în spaţiu deschis
număr maxim de senzori: 3
umiditate relativă: 20 % – 95 %
distingerea: 1 %
interval de măsurare a pres. bar. 850 hPa la 1050 hPa
alimentarea:
staţia principală: 3 x 1,5V AA baterii
senzor: 2 x 1,5V AAA baterii
dimensiuni şi greutate:
staţia de bază: 120 x 55 x 170 mm; 253 g (fără baterií)
senzor: 60 x 23 x 110 mm; 46 g (fără baterií)
Lista de icoane şi butoane
Partea frontală
A – Icoana bateriei slabe în senzorul exterior
B – Temperatura exterioară minimă/maximă
C – Numărul senzorului fără fir
D – Valoarea max/min a presiunii
E – Fazele lunii
F – Istoricul presiunii în ultimele 12 ore
G – Icoana semnalului radio DCF77
H – Ziua actuală
I – Alarma 2
J – Alarma 1
K – Temperatura interioară
L – Umiditatea interioară
M – Icoana furtunii
N – Icoana prognozei vremii
O – Icoana poleiului
P – Temperatura exterioară
R – Umiditatea exterioară
Partea din spate
A – Locaşul bateriilor
B - Butonul SNOOZE/LIGHT
RO
Partea frontală
Apăsarea butonului
Ţinerea butonului (3
secunde)
-/°C/°F/WAVE
1 pas înapoi/afişarea temperaturii
în °C sau °F
Detectarea semnalului
DCF77
+/CHANNEL 1 pas înainte/numărul senzorului Detectarea senzorului
SET/ALM SET Reglarea alarmei nr. 1, 2 Reglarea orei , datei
ALM ON.OFF Activarea alarmei nr. 1, 2
MEM
Afişarea temperaturii şi
umidităţii max/min
RESET Ştergerea tuturor valorilor
Senzor fără fir
dioda LED RESET - resetarea senzorului
HOLDER - stativul senzorului Locaşul bateriilor
CHANNEL 1,2,3 – Comutarea canalului senzorului
Punerea în funcţiune
La prima pornire introduceţi mai întâi bateriile în staţia meteo (3x AA) iar apoi în senzorul
fără fir (2xAAA).
La introducerea bateriilor respectaţi polaritatea corectă, pentru a nu se ajunge la deterioararea staţiei meteo sau a senzorului. Folosiţi doar baterii alcaline de acelaşi tip, nu
folosiţi baterii reîncărcabile.
Aşezaţi alături staţia meteo şi senzorul. Staţia meteo detectează semnalul din senzor
în 3 minute. Dacă din senzor nu vine semnalul, apăsaţi lung butonul CHANNEL pentru
repetarea detectării.
Dacă dispare indicaţia temperaturii exterioare pe ecran, apăsaţi butonul RESET pe staţia
meteo. Staţia meteo va şterge toate valorile şi va detecta din nou semnalul din senzor.
Recomandăm amplasarea senzorului pe latura sudică a clădirii. Raza de acţiune a
senzorului în spaţii construite poate să scadă rapid. Senzorul este rezistent la stropi de
apă, nu-l expuneţi însă permanent la ploaie. Nu amplasaţi senzorul pe obiecte metalice,
ar scade distanţa de transmisie a acestuia. Dacă apare icoana bateriei slabe în câmpul
A, înlocuiţi bateriile din senzor.
Schimbarea canalului şi conectarea altor senzori
Prin apăsarea butonului CHANNEL pe partea din spate a staţiei meteo selectaţi canalul
dorit al senzorului - CH1, CH2 sau CH3. Apoi apăsaţi lung butonul CHANNEL, icoana
începe să clipească.
Pe partea din spate a senzorului îndepărtaţi capacul locaşului bateriilor. Reglaţi numărul dorit
al canalului senzorului - 1, 2, 3. Introduceţi bateriile în senzor (2x AA) şi înapoiaţi capacul.
Dacă nu se realizează detectarea semnalului senzorului, apăsaţi butonul RESET pe senzor.
3
WIRELESS METEO STATION IW003-DCF + TW003 sensor
The meteorological station shows time, it has 2 dials with a repeated alarm function, weather forecast, data on interior and exterior temperature, humidity, air pressure, lunar phase. It has
a memory of the minimum and maximum measured temperatures. Before you start working with the product, be careful to read this manual.
Specifications
clock radio signal controlled
interior/exterior temp.: 0 °C to +50 °C; -20 °C to +70 °C
temperature sensitivity: 0,1 °C
wireless sensor: broadcast frequency 433 MHz, TW003
radio signal range: up to 30 m in free space
max sensor qty: 3
relative humidity: 20 % – 95 %
resolution: 1 %
pressure measurement range: 850 hPa to 1050 hPa
power supply:
main station: 3 x 1,5V AA battery
sensor: 2 x 1,5V AAA battery
dimensions and weight:
main station: 120 x 55 x 170 mm; 253 g (no battery)
sensor: 60 x 23 x 110 mm; 46 g (no battery)
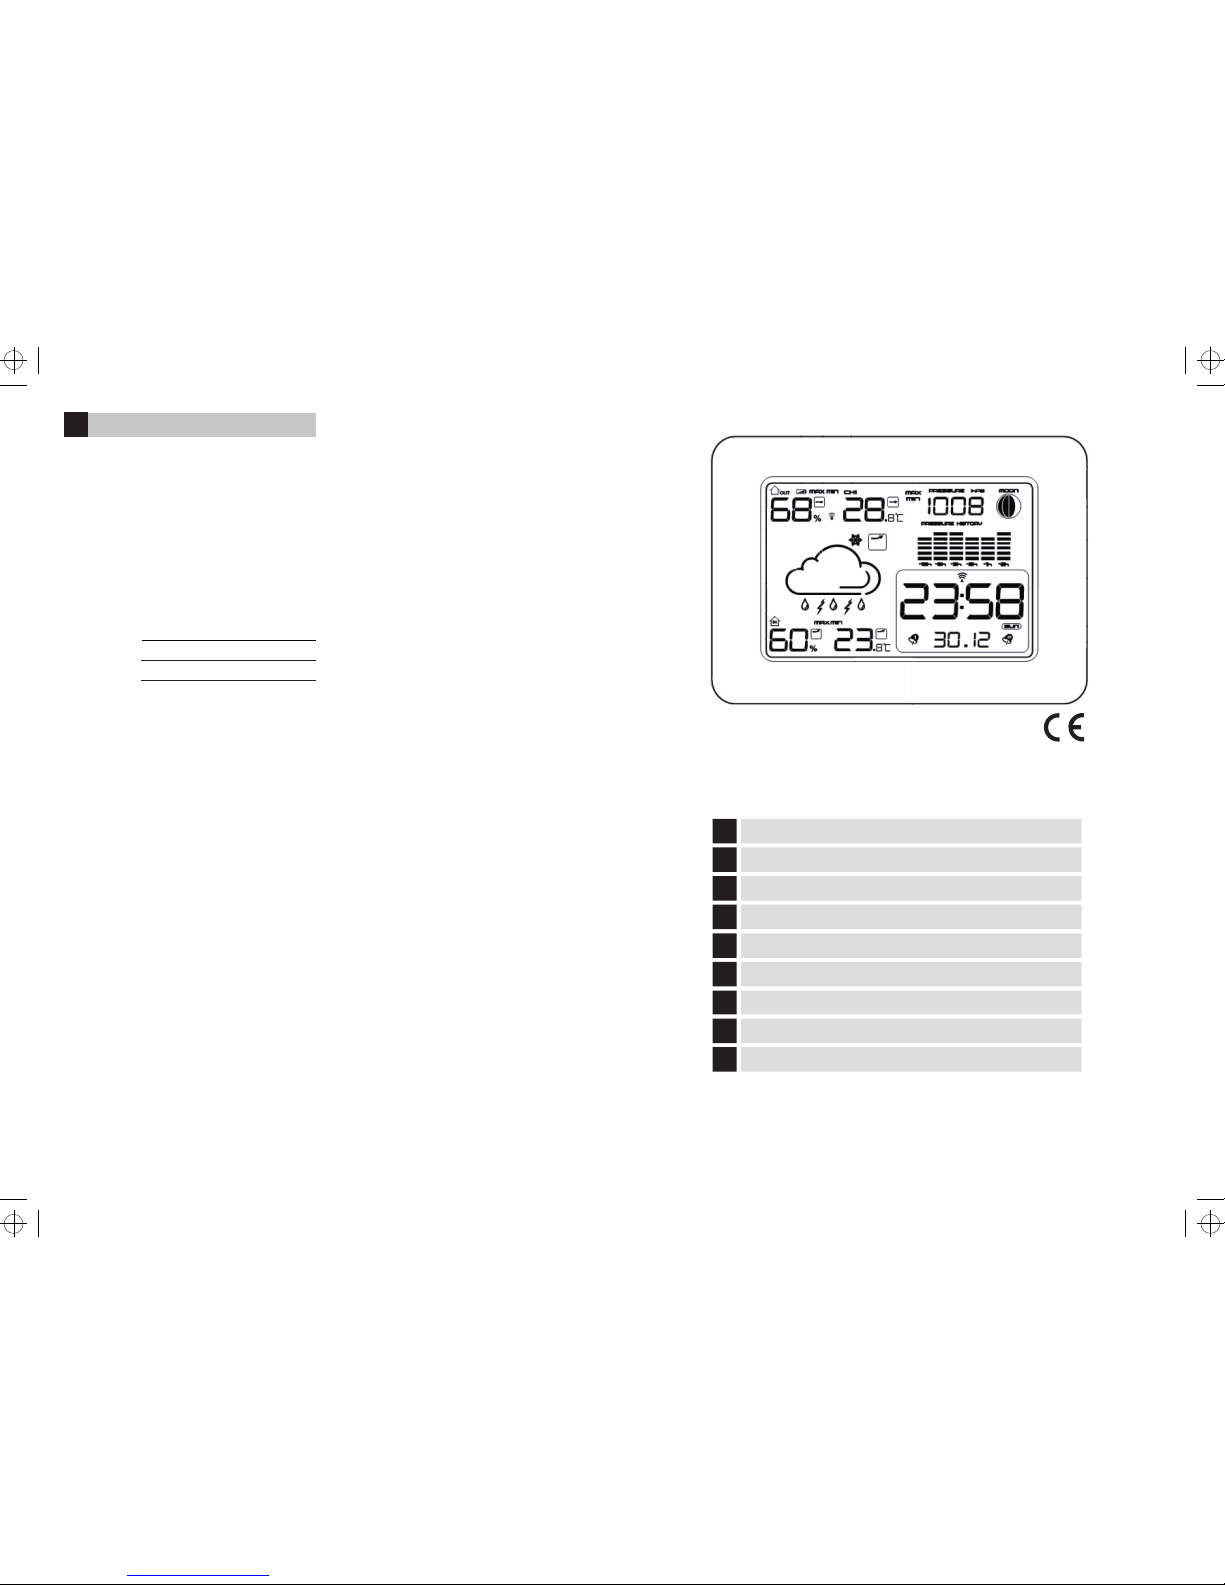
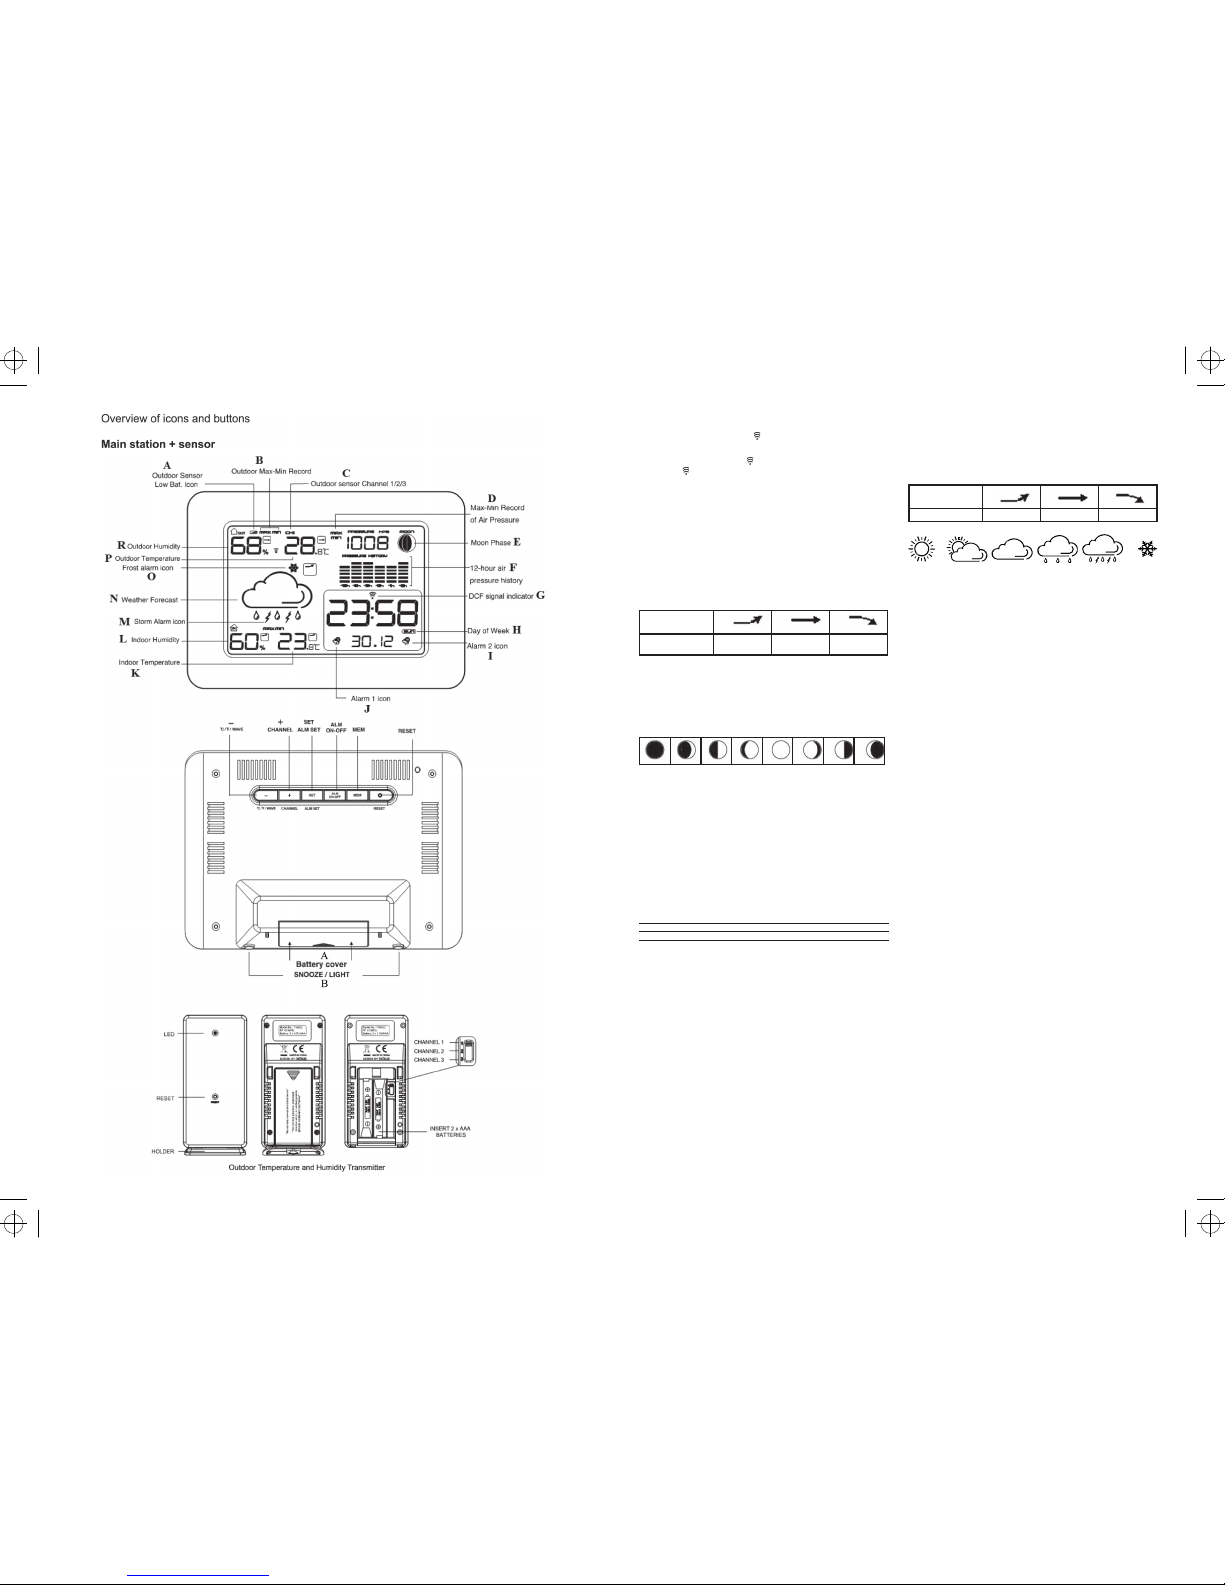
Overview of icons and buttons
Front side
A – icon for weak battery of exterior sensor
B – Max/min exterior temperature
C – Wireless sensor number
D – Max/min pressure value
E – Lunar phase
F – Pressure history over the last 12 hours
G – Radio signal icon DCF77
H – Current day
I – Alarm clock 2
J – Alarm clock 1
K – Interior temperature
L – Interior humidity
M – Storm icon
N – Weather forecast icon
O – Icy ground icon
P – Exterior temperature
R – Exterior humidity
Rear side
A – battery compartment
B - SNOOZE/LIGHT button
Main station – top side
Button push Button hold (3 seconds)
-/°C/°F/WAVE
1 step backward /display temperature in °C or °F
Signal DCF77 find
+/CHANNEL 1 step forward / sensor number Sensor find
SET/ALM SET Alarm clock 1, 2 setting Setting of time and date
ALM ON.OFF Alarm clock 1, 2 activation
MEM
Show max/min temperature and
humidity
RESET Erase all data
Wireless sensor
LED diode RESET - sensor reset
HOLDER - sensor stand Battery compartment
CHANNEL 1,2,3 – Switch the sensor channel
Commissioning
At the first start-up insert battery into the meteo station first (3x AA) and then in the
wireless sensor (2x AAA).
When inserting the battery, maintain proper polarity to avoid damage to the meteo
station or sensor.
Use only alkaline batteries of the same type, never use rechargeable batteries.
Place both the units next to each other. The meteo station shall find the sensor’s signal within
3 minutes. If the sensor signal is not found, hold the button CHANNEL to retry the search.
If the data on the exterior temperatures vanishes from the display, push the meteo
station’s RESET button.
The meteo station will erase all values and will search for the sensor’s signal again. We
recommend placing the sensor on the northern side of the house. The sensor range
may drop rapidly in urbanised areas. The sensor is resistant to dripping water, but
do not put it under constant rain. Do not place the sensor on metal objects, it would
lower its broadcast range. If an icon of weak battery appears in the A field, replace
the sensor’s battery.
GB
Change of channel and attachment of other sensors
Push the button CHANNEL at the rear side of the meteo station to select the desired sensor
channel - CH1, CH2 or CH3. Then hold the button CHANNEL, and the icon starts blinking.
At the rear side of the sensor, remove the battery compartment cover. Set the required sensor
channel number - 1, 2, 3. Insert battery into the sensor (2x AA) and get the cover back.
If the signal is not found, push RESET on the sensor.
Radio controlled clock (DCF77)
After registration with the meteo station, the wireless sensor starts automatic search for
the signals DCF77. This takes 7 minutes. Then the icon starts blinking.
During this period no other data on the display are updated and the buttons are not
functional (except SNOOZE/LIGHT). If the signal is weak, the icon ▲ blinks. Signal not
found - icon vanishes.
Signal found - icon stops blinking and shows current time. To search the signal DCF77 again,
hold the button WAVE. To abort the signal DCF77 search, hold again the WAVE button. The
DCF77 signal will be synchronised between 2:00 and 3:00 A.M. daily. For proper reception,
do not put the sensor near electric appliances and mobile phones.
Internal and external temperature, humidity
Internal temperature and humidity are displayed in field K, L.
External temperature and humidity are displayed in field P, R.
The button °C/°F/WAVE toggles the temperature units °C/°F.
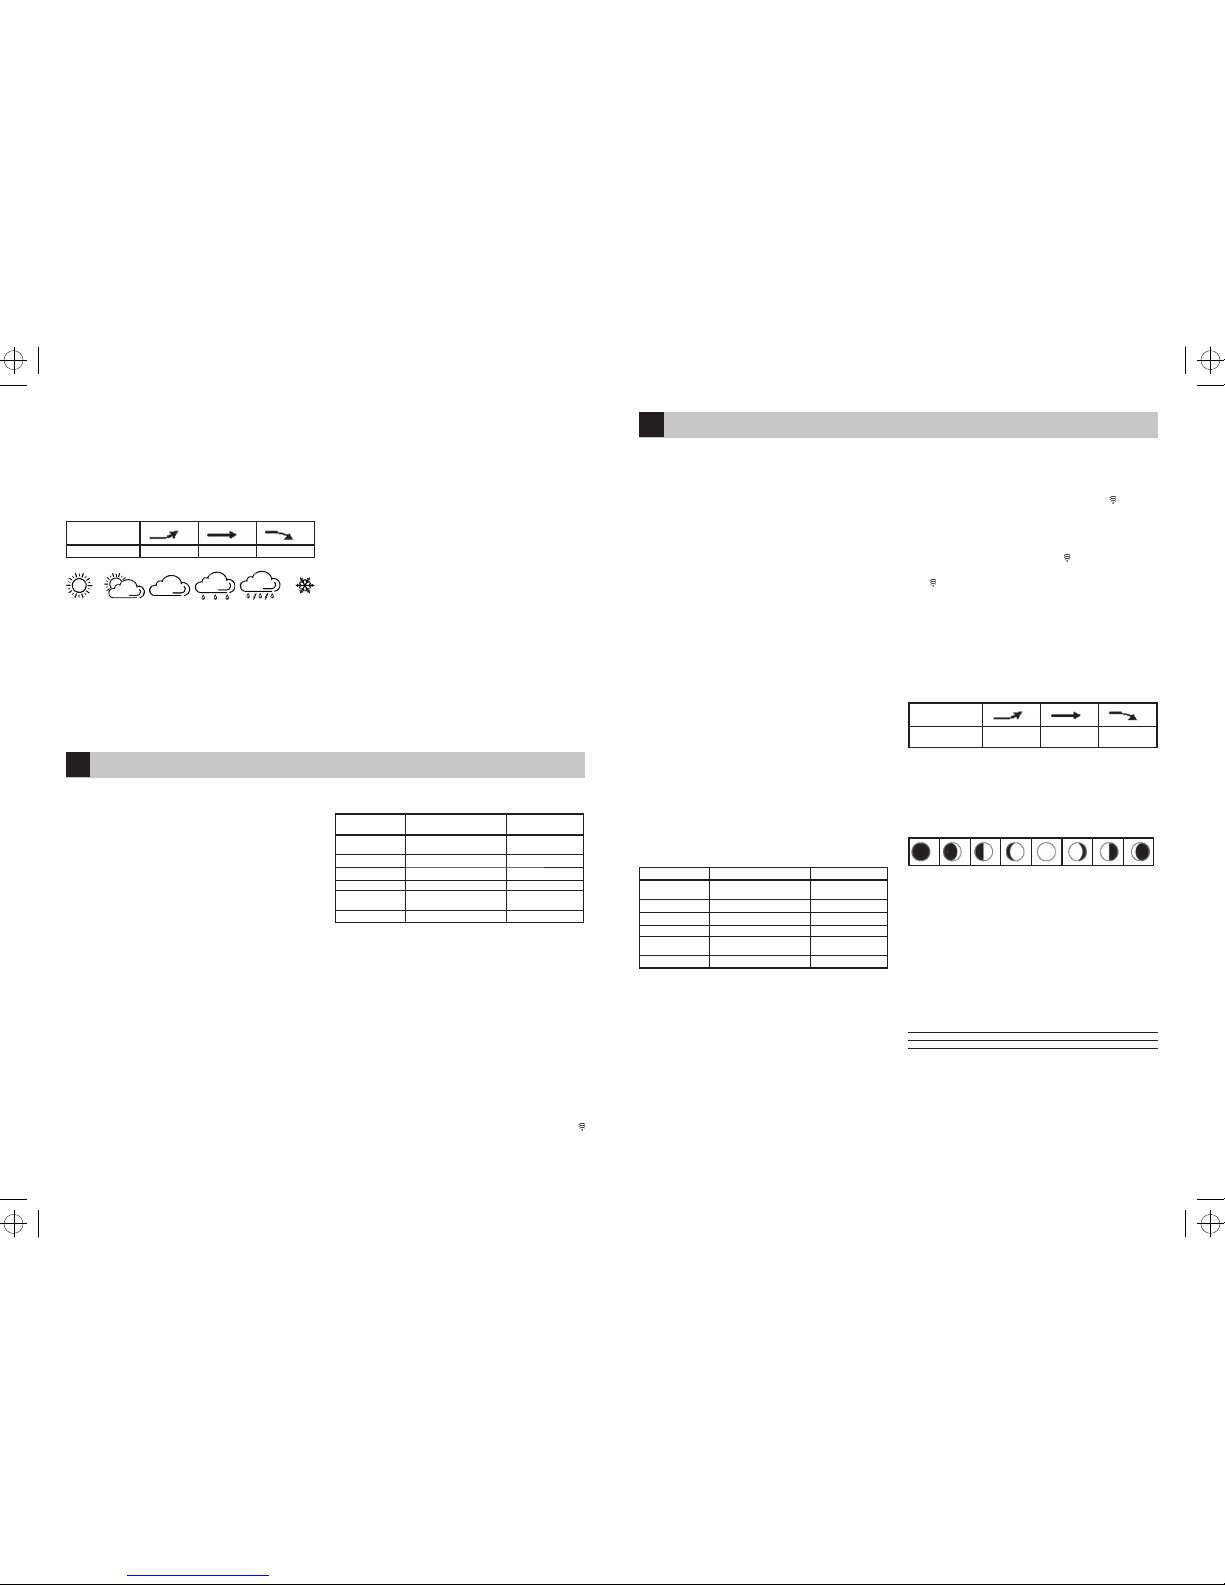
Temperature and humidity trend
The arrow shows a trend in the temperature and humidity values at a specific sensor
or station
Indication on display
Temperature
and humidity trend
Rising Stable Falling
Atmospheric pressure
Atmospheric pressure in hPa units and a graph of the pressure history over the last 12
hours is displayed in the F field.
When moving the meteo station to a different location, the measured values will change.
The measured values will stabilise within 12 – 24 hours.
Lunar phase
Lunar phase is displayed in field E.
Icons of the lunar phases are as follows:
Nov Leaving First Growing Full Shrinking Last Coming
Nov quarter full Moon Moon quarter Nov
Display of maximum/minimum measured values
Maximum and minimum measured values, humidity and pressure are displayed by pushing
the button MEM.
By holding the MEM button the stored values are deleted from memory.
Manual time setting
Hold the button SET. With the buttons + and - set the current year, month, day, time shift,
time format, hour, minute. You can move among the values by pushing the SET button.
Alarm setting
The meteo station allows setting for 2 alarm clocks. By the button ALM SET you select
the alarm clock - A1, A2.
Hold the button ALM SET. Set the alarm clock time by buttons + a - , move among the values
by the SET button. Then set the days, when the alarm is supposed to go off.
There are three options:
MON, TUE, WED, THU, FRI, SAT, SUN The alarm clock works the whole week (Mo – Sun)
MON, TUE, WED, THU, FRI The alarm clock works on work days (Mo –Fri)
SAT, SUN The alarm clock work on weekends (Sat – Sun)
Use the button ALM ON.OFF to activate the alarm clock 1 or 2 or both. The icon I, J displays.
Use the same button to abort the activation – the icon disappears.
Function of repeated alarm and display lighting
(SNOOZE/LIGHT)
When the alarm clock rings, push the button SNOOZE (gently push the top of the meteo
station downwards). The ringing will be postponed by 5 minutes. The icon of alarm clock 1,
2 will go blinking. To abort the SNOOZE function, push the button ALM ON.OFF. Then the
alarm clock will sound only the next day.
To make the display sub-lit, push the button SNOOZE/LIGHT.
The sub-lighting lasts for 5 seconds.
Page 4

4
E0030-manual IW003-DCF 0-0-0-K
EMOS spol. s r. o.
Weather forecast
The station makes weather forecasts based on changes of atmospheric pressure for the
next 12 – 24 hours. The forecast precision is 70 – 75 %. Because the forecast may not
always be 100% successful, the seller cannot be responsible for any losses due to imprecise
weather forecast. At first setting or reset, the meteo-station takes cca 24 hours before the
station is able to start forecasting correctly
The meteo station shows 5 icons for weather forecast and 3 pressure icons
Indication on display
Weather trend better no change worse
Sunny Some clouds Overcast Rain Storm Icy ground
Icon displays,
when the temperatures
drop below +3 °C
Troubleshooting:
If the meteo station does not show proper time or temperature, pressure, humidity, weather
forecast icon, push the button RESET.
Improper time or failure or synchronisation can occur due to an external electromagnetic
interference.
Maintenance
The product is designed to last for many years, if it is handled well. There are some hints
for good maintenance:
• Read the user manual before you start working with the product.
• Do not subject the product to direct sunshine, extreme cold and moisture and sudden
changes of temperature (it would lower the sensor precision).
• Do not put the product in places with a tendency to vibrations and shocks – it can cause
damage.
• Do not subject the product to extensive pressure, shocks, dust, high temperature or
humidity – it may harm functionality of the product, shorten the energetic endurance,
damage the batteries and cause deformation of plastic elements
• Do not subject the product to rain and moisture, it is not intended for external use.
• Do not put any sources of open fire on top of the product, such as a lit candle.
• Do not place the product to areas without proper air flow.
• Do not inser t any items into the ventilation space.
• Do not tamper with the internal electric circuits of the product – you may damage it
and thus void the warranty. The product may be repaired only by a qualified expert.
• For cleaning, use a mildly wet soft cloth. Do not use solvent or detergents – the plastic
elements could get scratched and electric circuits might be harmed.
• Do not submerge the product into water or any other liquids
• The product must not be subjected to dripping water or water stream.
• If the product is damaged or malfunctioning, do not repair it yourself. Take it to the
shop, where you bought it, for repairs.
• Keep the product away from children – it is not a toy.
• Always remove flat batteries – they might leak and damage the product. Use only new
batteries of the recommended type and when replacing them, keep the proper polarity.
• Do not throw the batteries into fire, do not dismantle them, do not short-circuit them.
• After use the battery becomes a dangerous waste – do not throw it into normal communal waste. Put it to the collection point – e.g. at the shop where you bought it.
WARNING: The content of this manual may be changed without prior notice – due to limited
printing options the displayed symbols may slightly differ from their look on the display –
the content of this manual must not be reproduced without the consent of the producer.
Emos spol.s r.o. declares that IW003-DCF + TW003 complies with the basic requirements
and other provisions of the directive 1999/5/ES. The equipment can be freely operated in EU.
The declaration of conformity is a part of the manual and it can also be found at www.emos.cz
The equipment can be operated under general license No. VO-R/10/09.2010-11.
BEZDRÁTOVÁ METEOSTANICE IW003-DCF + čidlo TW003
Meteostanice zobrazuje hodiny, 2 budíky s funkcí opakovaného buzení, předpověď počasí, údaje o vnitřní a venkovní teplotě, vlhkosti, atmosferickém tlaku, fázi měsíce. Má paměť minimálních
a maximálních naměřených hodnot. Než začnete s výrobkem pracovat, pozorně si pročtěte tento návod.
Specifikace
hodiny řízené rádiovým signálem
vnitřní/venkovní teplota: 0 °C až +50 °C; -20 °C až +70 °C
rozlišení teploty: 0,1 °C
bezdrátové čidlo: přenosová frekvence 433 MHz
dosah rádiového signálu: až 30 m ve volném prostoru
počet čidel: 3
relativní vlhkost: 20 % – 95 %
rozlišení: 1 %
měřící rozpětí bar.tlaku 850 hPa až 1050 hPa
napájení:
hlavní stanice: 3 x 1,5V AA baterie
čidlo: 2 x 1,5V AAA BATERIE
rozměry a hmotnost:
hlavní stanice: 120 x 55 x 170 mm; 253 g (bez baterií)
čidlo: 60 x 23 x 110 mm; 46 g (bez baterií)
Přehled ikon a tlačítek
Přední strana
A – Ikona slabé baterie venkovního čidla
B – Max/min venkovní teplota
C – Číslo bezdrátového čidla
D – Max/min hodnota tlaku
E – Fáze měsíce
F – Historie tlaku během uplynulých 12 hodin
G – Ikona rádiového signálu DCF77
H – Aktuální den
I – Budík 2
J – Budík 1
K – Vnitřní teplota
L – Vnitřní vlhkost
M – Ikona bouřky
N – Ikona předpovědi počasí
O – Ikona náledí
P – Venkovní teplota
R – Venkovní vlhkost
Zadní strana
A – bateriový prostor
B - SNOOZE/LIGHT tlačítko
CZ
Přední strana
Stisk tlačítka
Přidržení tlačítka
(3 sekundy)
-/°C/°F/WAVE
1 krok vzad/zobrazení teploty v
°C nebo °F
Vyhledání signálu DCF77
+/CHANNEL 1 krok vpřed/číslo čidla Vyhledání čidla
SET/ALM SET Nastavení budíku č. 1, 2 Nastavení hodin, data
ALM ON.OFF Aktivace budíku č. 1, 2
MEM
Zobrazení max/min
teploty a vlhkosti
RESET Vymazání všech hodnot
Bezdrátové čidlo
LED dioda RESET - resetování čidla
HOLDER - stojan čidla Bateriový prostor
CHANNEL 1,2,3 - Přepínání kanálu čidla
Uvedení do provozu
Při prvním spouštění vložte baterie nejdřív do meteostanice (3 x AA) a poté do bezdrátového
čidla (2 x AAA).
Při vkládání baterií dbejte na správnou polaritu, aby nedošlo k poškození meteostanice
nebo čidla.
Používejte pouze alkalické baterie stejného typu, nepoužívejte dobíjecí baterie.
Obě jednotky umístě vedle sebe. Meteostanice vyhledá signál z čidla do 3 minut.
Není-li nalezen signál z čidla, stiskněte dlouze tlačítko CHANNEL pro opakování vyhledávání.
Zmizí-li údaj venkovní teploty na displeji, stiskněte tlačítko RESET na meteostanici.
Meteostanice vynuluje všechny hodnoty a znovu vyhledá signál z čidla. Doporučujeme
umístit čidlo na severní stranu domu.V zastavěných prostorách může dosah čidla rapidně
klesnout. Čidlo je odolné kapající vodě, nevystavujte jej však trvale působení deště. Čidlo
nedávejte na kovové předměty, sníží se dosah jeho vysílání.Objeví-li se ikona slabé baterie
v poli A, vyměňte baterie v čidle.
Změna kanálu a připojení dalších čidel
Stiskem tlačítka CHANNEL na zadní straně meteostanice zvolte požadovaný kanál čidla - CH1,
CH2 nebo CH3.Poté dlouze stiskněte tlačítko CHANNEL, ikona
začne blikat.
Na zadní straně čidla oddělejte kryt bateriového prostoru. Nastavte požadované číslo kanálu
čidla - 1, 2, 3. Vložte baterie do čidla (2x AA) a nasaďte kryt.
Nedojde-li k vyhledání signálu čidla stiskněte tlačítko RESET na čidle.
13
UA
БЕЗДРОТОВИЙ МЕТЕОРОЛОГІЧНИЙ ПРИСТРІЙ IW003-DCF + TW003 датчик
Метеорологічний пристрій зображує години, 2 будильники із функцією повторного збудження, дані про внутрішню та зовнішню температуру, вологість, атмосферний тиск, фазу
місяця. Має пам,ять мінімальних та максимальних наміряних даних. Перед тим як почнете з виробом працювати, уважно прочитайте цю інструкцію.
СПЕЦИФІКАЦІЯ
годинник керується радієвим сигналом
внутрішня/зовнішня температура: від 0 °C до +50 °C; від -20 °C до +70 °C
розпізнання температури: 0,1 °C
бездротовий датчик: частота передачі 433 MГц
досяжність радієвого сигналу: до 30 м у вільному просторі
максимальна кількість датчиків: 3
відносна вологість: 20 % – 95 %
розпізнання: 1 %
діапазон вимірювання бар тиску від 850 hPa до 1050 hPa
живлення:
пристрій: 3 x 1,5V AA батарея
датчик: 2 x 1,5V AAA батарея
розміри та вага:
пристрій: 120 x 55 x 170 мм; 253 г (без батареї)
датчик: 60 x 23 x 110 мм; 46 г (без батареї)
Список іконок та кнопок
Передня сторона
A – Іконка слабої батареї зовнішнього датчика
B – Макс/мін зовнішня температура
C – Номер бездротового датчика
D – Макс/мін параметри тиску
E – Положення місяця
F – Історія тиску на протязі минулих 12 годин
G – Іконка радієвого сигналу DCF77
H – Актуальний день
I – Будильник 2
J – Будильник 1
K – Внутрішня температура
L – Внутрішня вологість
M – Іконка громовиці
N – Іконка прогнозу погоди
O – Іконка зледеніння
P – Зовнішня температура
R – Зовнішня вологість
Задня сторона
A – батарейний відсік
B - SNOOZE/LIGHT кнопка
Передня сторона
Стиснення кнопки
Тримання кнопки (3
секунди)
-/°C/°F/WAVE
1 крок назад/зображення
температури у°C або °F
Розшук сигналу DCF77
+/CHANNEL 1 крок вперед/номер датчика Розшук датчика
SET/ALM SET Налаштування будильника № 1, 2 Налаштування час у, дата
ALM ON.OFF Активування будильника № 1, 2
MEM
Зображення макс /мін
температури та вологи
RESET Стирання всіх параметрів
Бездротовий датчик
Світло діод RESET - повторне включення датчика
HOLDER - підставка датчика Батарейний відсік
CHANNEL 1,2,3 – Перемикання каналу датчика
Введення в експлуатацію
Під час першого спуску спочатку вкладіть батарею у метеорологічний пристрій (3хАА)
а потім у бездротовий датчик (2хААА)
При вкладанні батареї дбайте на правильну полярність, щоб не пошкодити
метеорологічний пристрій або датчик.
Використовуйте тільки лужні батареї однакового типу, не користуйтеся батареями,
що заряджаються.
Пристрій та датчик помістіть рядом. Метеорологічний пристрій розшукає сигнал з
датчика до 3 хвилин.
Якщо не найдеться сигнал із датчика, натисніть притримавши кнопку CHANNEL для
повторного розшуку.
Якщо пропадуть дані зовнішньої температури на дисплеї, стисніть кнопку RESET на
метеорологічному пристрої.
Метеорологічний пристрій зітре всі параметри та знову розшукає сигнал із датчика.
Рекомендуємо помістити датчик на північній стороні будинку. Досяжність датчика
у забудованих просторах може різко знизитися. Датчик стійкий проти каплям води,
але не піддавайте його постійному дощу. Датчик не поміщайте на металеві предмети,
знизиться досяжність його передачі. Якщо появиться іконка слабої батареї у полі А,
поміняйте батареї датчика.
UA
Зміна каналу та приєднання інших датчиків
Стисненням кнопки CHANNEL на задній стороні метеорологічного пристрою виберіть
необхідний канал датчика - CH1, CH2 або CH3.Після цього довше притримавши кнопку
CHANNEL, іконка
почне мигати.
На задній стороні датчика зніміть кришку батарейного відсіку. Налаштуйте необхідний
номер каналу датчика - 1, 2, 3. Вкладіть батарею у датчик (2x AA) тa закрийте кришку.
Якщо сигнал датчика не буде знайдений стисніть кнопку RESET на датчику.
Годинник що керується радієм (DCF77)
Бездротовий датчик після реєстрації з метеорологічним пристроєм почне автоматично
розшукувати сигнал DCF77 на протязі 7 хвилин. Почне мигати іконка .
На протязі цього часу на дисплеї не будуть актуалізовані жодні інші дані та кнопки не
будуть працювати (крім SNOOZE/LIGHT). При поганому сигналі мигає іконка ▲.Сигнал
не знайдений - іконка зникне.
Сигнал знайдений - іконка перестане мигати та зобразиться актуальний час. Для
повторного розшуку сигналу DCF77 стисніть та притримайте кнопку WAVE. Сигнал DCF77
буде щодня синхронізуватися між 2:00 та 3:00 годинами ранку. Щоб датчик приймав
сигнал правильно не поміщайте його близько електроприладів та мобільних телефонів.
Внутрішня та зовнішня температура, вологість
Внутрішня температура тa вологість зображується у полі K, L.
Зовнішня температура та вологість зображується в полі P, R.
Кнопкою °C/°F/WAVE виберіть одиницю температури у°C/°F.
Тренд температури та вологості
Стрілка показує тренд параметрів вимірювання температури та вологості на
конкретному датчику або пристрої.
Показник на дисплеї
Тренд температури та
вологості
Підвищується Постійна Знижується
Atmosferický tlak
Атмосферний тиск у hPa одиницях a графік історії тиску за пройдені 12 годин
зображується у полі F.
Переміщення метеорологічного пристрою на інше місце, буде впливати на вимірювання
параметрів. Вимірювання стабілізується на протязі 12 – 24 годин.
Положення місяця
Положення місяця зображене у полі E.
Послідуючі іконки положення місяці:
1 2 3 4 5 6 7 8
1 – Новий, 2- Відступаючий повний, 3-перша четверть, 4-Доростаючий повний місяць,
5- Повний місяць, 6-Зменшуючий місяць, 7-Остання четверть, 8-Наближається
новий
Зображення максимальних/мінімальних
виміряних параметрів
Максимальна та мінімальна виміряна температура, вологість та тиск зобразиться
стисненням кнопки MEM.
Притримавши кнопку MEM записані параметри зітрете з пам,яті..
Налаштування часу вручну
Стисніть та притримайте кнопку SET. Кнопкою + тa - налаштуйте актуальний рік, місяць,
день, переміщення часу, формат часу, години, хвилини.
Між окремими параметрами пересуваєте стисненням кнопки SET.
Налаштування будильника
Метеорологічний пристрій дає можливість налаштувати 2 будильники. Кнопкою ALM
SET виберете будильник - A1, A2. Стисніть та притримайте кнопку ALM SET. Налаштуйте
час на будильнику кнопками + тa - , між параметрами пересуваєте кнопками SET. Потім
налаштуйте дні в котрі будильник буде дзвонити.
Даються три можливості:
MON, TUE, WED, THU, FRI, SAT, SUN Будильник працює цілий тиждень (пон– нeд)
MON, TUE, WED, THU, FRI Будильник працює у робочі дні (пон-п,ятн)
SAT, SUN Будильник працює у вихідні дні (суб – нeд)
Кнопкою ALM ON.OFF ввімкніть будильник №. 1 , 2 або обидва. Зобразиться іконка I, J.
Тією ж самою кнопкою активацію анулюйте – іконка зникне.
Функція повторного збудження тa підсвічування
дисплея (SNOOZE/LIGHT)
При дзвонінні будильника стисніть кнопку SNOOZE (чутливо стисніть верхню частину
метеорологічного пристрою вниз). Дзвоніння буде відкладено на 5 хвилин, іконка
Page 5

12
E0030-manual IW003-DCF 0-0-0-K
EMOS spol. s r. o.
Nur Alkalie-Batterien gleichen Typs, keine Akkumulatorbatterien benutzen.
Beide Einheiten nebeneinander aufstellen. Die Station findet das Signal des Fühlers
innerhalb 3 Minuten.
Falls kein Signal gefunden wird, lange die Taste CHANNEL drücken und die Suche
wiederholen.
Falls die Angabe der Außentemperatur auf dem Display verschwindet RESET auf der
Wetterstation drücken.
Die Station löscht alle Angaben und sucht erneut das Fühlersignal. Wir empfehlen, den
Fühler möglichst an der Nordseite des Hauses anzubringen. Die Reichweite des Fühlers
kann in bebauten Räumen stark sinken. Der Fühler ist gegen Tropfwasser beständig, sollte
aber nicht dauerhaft der Einwirkung des Regens ausgesetzt sein. Den Fühler nicht auf
Metallgegenständen anbringen, dies senkt die Sendereichweite. Falls die Ikone schwache
Batterie im Feld A erscheint, die Batterien im Fühler auswechseln.
Änderung des Kanals und Anschluss weiterer Fühler
Durch Drücken der Taste CHANNEL auf der Rückseite der Station den gewünschten Fühlerkanal - CH1, CH2 oder CH3 wählen. Dann lange die Taste CHANNEL drücken, die Ikone blinkt.
Auf der Rückseite des Fühlers den Deckel vom Batteriefach nehmen. Den gewünschten
Fühlerkanal - 1, 2, 3 einstellen. Batterien (2x AA) einlegen und den Deckel aufsetzen.
Falls das Fühlersignal nicht gefunden wird, die Taste RESET auf dem Fühler drücken.
Funkgesteuerte Uhr (DCF77)
Der Fühler sucht nach Registration der Wetterstation automatisch 7 Minuten das DCF77-
-Signal. Es blinkt die Ikone .
Während dieser Zeit wird keine andere Angabe aktualisiert und die Tasten funktionieren
nicht (außer SNOOZE/LIGHT). Bei schlechtem Signal blinkt die Ikone ▲.Signal nicht
gefunden - die Ikone verschwindet.
Signal gefunden - die Ikone blinkt nicht mehr und die aktuelle Zeit wird abgebildet. Für
eine erneute Suche des DCF77-Signals die Taste WAVE drücken. Zum Unterbrechen der
Suche des DCF77-Signals erneut lange die Taste WAVE drücken. Das DCF77-Signal wird
täglich zwischen 2:00 und 3:00 Uhr synchronisiert. Für richtigen Empfang den Fühler nicht
in der Nähe elektrischer Geräte und Mobiltelefone aufstellen.
Innen- und Außentemperatur, Feuchtigkeit
Innentemperatur und Feuchtigkeit werden im Feld K, L abgebildet.
Außentemperatur und Feuchtigkeit werden im Feld P, R abgebildet.
Mit der Taste °C/°F/WAVE die Temperatureinheit in °C/°F wählen.
Temperatur- und Feuchtigkeitstrend
Der Pfeil zeigt den Trend der Messwerte der Temperatur und der Feuchtigkeit am konkreten
Fühler oder an der Station.
Indikation auf dem
Display
Temperatur- und Feuchtigkeitstrend
steigend gleichbleibend fallend
Luftdruck
Der Luftdruck in hPa und das Diagramm des Luftdrucks in den letzten 12 Stunden wird
im Feld F abgebildet.
Beim Umstellen der Wetterstationen an einen anderen Ort werden die gemessenen Werte
beeinflusst. Die Messung ist nach 12 - 24 Stunden wieder eingespielt.
Mondphase
Die Mondphase wird im Feld E angezeigt.
Die Ikonen der Mondphasen sind:
Neu- Erstes
Zunehmender
Zweites Voll- Drittes
Abnehmender
Letztes
mond Viertel
Halbmond
Viertel mond Viertel
Halbmond
Viertel
Zeigen der höchsten / niedrigsten gemessenen
Werte
Die höchsten und niedrigsten gemessenen Temperaturen, Feuchtigkeit und Luftdruck
erscheinen durch Drücken der Taste MEM.
Durch Halten der Taste MEM werden die gespeicherten Angaben gelöscht.
Manuelle Zeiteinstellung
Lange die Taste SET drücken. Mit den Tasten + und - das aktuelle Jahr, Monat, Tag,
Zeitverschiebung, Zeitformat, Stunde, Minute einstellen.
Zwischen den einzelnen Werten mit der Taste SET verschieben.
Einstellen des Weckers
An der Wetterstation können zwei unterschiedliche Weckzeiten eingestellt werden. Mit der
Taste ALM SET den Wecker wählen - A1, A2.
Lange die Taste ALM SET drücken. Die Weckzeit mit den Tasten + und - einstellen, zwischen den Werten mit der Taste SET verschieben. Danach die Tage einstellen, an denen
der Wecker klingeln soll.
Es existieren drei Möglichkeiten:
MON, TUE, WED, THU, FRI, SAT, SUN Der Wecker funktioniert die ganze Woche (Po - So)
MON, TUE, WED, THU, FRI Der Wecker funktioniert an Arbeitstagen (Mo - Fr)
SAT, SUN Der Wecker funktioniert am Wochenende (Sa - So)
Mit der Taste ALM ON.OFF werden der Wecker Nr. 1 , 2 oder beide aktiviert. Es erscheint
die Ikone I, J. Mit der gleichen Taste wird die Aktivierung gelöscht - die Ikone verschwindet.
Funktion Weckwiederholung und Displayunterleuchtung (SNOOZE/LIGHT)
Beim Klingeln des Weckers die Taste SNOOZE drücken (leicht das Oberteil der Wetterstation
nach unten drücken). Das Klingeln wird um 5 Minuten verschoben, die Ikone des Weckers
1,2 blinkt. Zur Aufhebung der Funktion SNOOZE die Taste ALM ON.OFF drücken. Der Wecker
klingelt erneut am nächsten Tag.
Zur Unterleuchtung des Displays die Taste SNOOZE/LIGHT drücken.
Die Unterleuchtung leuchtet 5 Sekunden.
Wettervorhersage
Die Station sagt das Wetter auf Grundlage der Luftdruckänderungen für die nächsten
12 - 24 Stunden voraus.
Die Genauigkeit der Wettervorhersage beträgt 70 - 75 %. Da die Wettervorhersage nicht
100 % ist, haften weder Hersteller noch Verkäufer für irgendeinen durch die ungenaue
Wettervorhersage verursachten Verlust. Bei der ersten Einstellung oder nach einem Reset
der Station dauert es etwa 24 Stunden bis sie richtig voraussagt.
Die Wetterstation zeigt 5 Ikonen der Wettervorhersage und 3 Ikonen für den Luftdruck.
Indikation auf dem
Display
Wettertrend Verbesserung Gleichbleibend Verschlechterung
Sonnig Bewölkt Bedeckt Regen Gewitter Glatteis
Diese Ikone wird
bei einer Temperatur
unter +3°C abgebildet.
Problemlösungen:
Falls die Wetterstation nicht die richtige Zeit, Temperatur, Druck, Feuchtigkeit, Wettervorschau abbildet, die Taste RESET drücken.
Eine unrichtige Zeit oder Synchronisierungsausfall können infolge äußerer elektromagnetischer Interferenzen auftreten.
Pflege und Wartung
Das Erzeugnis ist so konstruiert, dass es bei geeigneter Pflege lange Jahre zuverlässig
dienen kann. Hier einige Ratschläge für die richtige Bedienung:
• Bevor Sie mit dem Erzeugnis arbeiten, lesen Sie sich bitte sorgfältig das Anwendermanual durch.
• Stellen Sie das Gerät nicht direkter Sonneneinstrahlung, extremer Kälte, Feuchtigkeit
und plötzlichen Temperaturänderungen aus (verringert Fühlergenauigkeit).
• Bringen Sie das Gerät nicht an Vibrationen oder Schlägen ausgesetzten Stellen an - sie
können Beschädigungen verursachen.
• Stellen Sie das Erzeugnis nicht übermäßigem Druck, Schlägen, Staub, hohen Temperaturen oder Feuchtigkeit aus - dadurch können die Funktionsfähigkeit verringert,
Lebensdauer der Batterien verkürzt, die Batterien beschädigt oder Kunststoffteile
deformiert werden.
• Das Erzeugnis nicht Regen oder Feuchtigkeit ausstellen, es ist nicht für die Anwendung
im Freien bestimmt.
• Auf dem Erzeugnis kein offenes Feuer, z. B. brennende Kerze o. ä., anbringen.
• Das Erzeugnis nicht an einem Or t ohne ausreichender Luftströmung anbringen.
• In die Lüftungsöf fnungen keine Gegenstände stecken.
• Nicht in die inneren elektrischen Kreise des Erzeugnisses eingreifen - Sie können diese
beschädigen und automatisch damit die Garantiezeit beenden. Das Erzeugnis nur von
einem qualifizierten Fachmann reparieren lassen.
• Zur Reinigung ein feuchtes, weiches Tuch benutzen. Keine Lösungs- oder Reinigungsmittel benutzen - die Kunststoffteile könnten beschädigt und die elektrischen Kreise
gestört werden.
• Das Erzeugnis nicht in Wasser oder andere Flüssigkeiten tauchen.
• Das Erzeugnis dar f weder Tropf- noch Spritzwasser ausgesetzt werden.
• Bei Beschädigung oder Mangel des Produkts nicht selbst reparieren. Übergeben Sie
es zur Reparatur in der Verkaufsstelle ab, in der sie es gekauft haben.
• Das Erzeugnis außerhalb der Reichweite von Kindern aufstellen - es ist kein Spielzeug.
• Leere Batterien immer rechtzeitig hinausnehmen - sie könnten auslaufen und das
Erzeugnis beschädigen. Nur neue Batterien empfohlenen Typs benutzen und beim
Auswechseln auf die richtige Polarität achten.
• Batterien nicht ins Feuer werfen, nicht auseinandernehmen oder kurzschließen.
• Die Altbatterien sind gefährlicher Abfall - nicht in normalen Kommunalmüll werfen aber
an einer Sammelstelle, z. B. im Geschäft, in dem Sie das Erzeugnis gekauft haben,
abgeben.
HINWEIS: Der Inhalt dieser Anleitung kann ohne vorherigen Hinweis geändert werden - aus
Gründen eingeschränkter Druckmöglichkeiten können die dargestellten Symbole leicht von
der Abbildung auf dem Display abweichen - der Inhalt dieser Anleitung darf ohne Zustimmung
des Herstellers nicht vervielfältigt werden.
Emos spol.s r.o. erklärt, dass IW003-DCF + TW003 im Einklang mit den Grundanforderungen
und weiteren zugehörigen Bestimmungen der Richtlinie 1999/5/EG sind. Die Einrichtung
kann in der EU frei betrieben werden. Die Konformitätserklärung ist Bestandteil der Anleitung
oder befindet sich auf den Webseiten www.emos.cz.
Das Erzeugnis kann auf Grundlage der Allgemeinen Berechtigung Nr. VO-R/10/09.201011 betrieben werden.
5
Rádiem řízené hodiny (DCF77)
Bezdrátové čidlo začne po registraci s meteostanicí automaticky vyhledávat signál DCF77
po dobu 7 minut, bliká ikona .
Během vyhledávání nebude aktualizován žádný jiný údaj na displeji a tlačítka budou
nefunkční (kromě SNOOZE/LIGHT). Při špatném signálu bliká ikona ▲.Signál nenalezen
- ikona zmizí.
Signál nalezen - ikona přestane blikat a zobrazí se aktuální čas. Pro opětovné vyhledání
signálu DCF77 stiskněte dlouze tlačítko WAVE. Pro zrušení vyhledání signálu DCF77 znovu
stiskněte dlouze tlačítko WAVE. DCF77 signál bude denně synchronizován mezi 2:00 až 3:00
ráno. Pro správný příjem neumisťujte čidlo poblíž elektrospotřebičů a mobilních telefonů.
Vnitřní a venkovní teplota, vlhkost
Vnitřní teplota a vlhkost se zobrazuje v poli K, L.
Venkovní teplota a vlhkost se zobrazuje v poli P, R.
Tlačítkem °C/°F/WAVE zvolte jednotku teploty v °C/°F
Trend teploty a vlhkosti
Šipka ukazuje trend hodnot měření teploty a vlhkosti na konkrétním čidlu nebo stanici.
Indikace na displeji
Trend teploty a vlhkosti Stoupající Stálý Klesající
Atmosferický tlak
Atmosferický tlak v hPa jednotkách a graf historie tlaku v uplynulých 12 hodinách se
zobrazuje v poli F.
Při přemístění meteostanice na jiné místo dojde k ovlivnění měřených hodnot. Měření se
ustálí během 12 – 24 hodin.
Fáze měsíce
Fáze měsíce je zobrazena v poli E.
Ikony fází měsíce jsou následující:
Nov Odcházející První Dorůstající Úplněk Ubývající Poslední Blížící
Nov čtrvť úplněk úplněk čtvrť se nov
Zobrazení maximál./minimál. naměřených hodnot
Stiskem tlačítka MEM zobrazte maximální a minimální naměřené teploty, vlhkost a tlak.
Přidržením tohoto tlačítka uložené hodnoty z paměti vymažete.
Manuální nastavení času
Stiskněte dlouze tlačítko SET. Tlačítky + a - nastavte aktuální rok, měsíc, den, časový
posun, formát času, hodinu, minutu. Mezi jednotlivými hodnotami se přesunujete stiskem
tlačítka SET.
Nastavení budíku
Meteostanice umožňuje nastavit 2 budíky. Tlačítkem ALM SET zvolte budík - A1, A2.
Dlouze stiskněte tlačítko ALM SET. Nastavte čas budíku tlačítky + a - , mezi hodnotami se
přesunujete tlačítkem SET. Poté nastavte dny, ve kterých má budík zvonit.
Jsou tři možnosti:
MON, TUE, WED, THU, FRI, SAT, SUN Budík je funkční celý týden (po – ne)
MON, TUE, WED, THU, FRI Budík je funkční v pracovní dny (po – pá)
SAT, SUN Budík je funkční o víkendu (so – ne)
Tlačítkem ALM ON.OFF aktivujte budík č. 1 , 2 nebo oba. Zobrazí se ikona I, J. Stejným
tlačítkem aktivaci zrušíte – ikona zmizne.
Funkce opakovaného buzení a podsvícení displeje
(SNOOZE/LIGHT)
Při zvonění budíku stiskněte tlačítko SNOOZE (mírně zatlačte vrchní část meteostanice
směrem dolů). Zvonění bude posunuto o 5 minut, ikona budíku 1,2 bude blikat. Pro zrušení
funkce SNOOZE, stiskněte tlačítko ALM ON.OFF. Budík znovu zazní další den.
Stiskem tlačítka SNOOZE/LIGHT zapnete podsvícení displeje. Doba podsvícení je 5 sekund.
Předpověď počasí
Stanice předpovídá počasí na základě změn atmosférického tlaku na příštích 12 – 24 hodin.
Přesnost předpovědi počasí je 70 – 75 %. Protože předpověď počasí nemusí vždy 100%
vycházet, nemůže být výrobce ani prodejce odpovědný za jakékoliv ztráty způsobené
nepřesnou předpovědí počasí. Při prvním nastavení nebo po resetování meteostanice trvá
zhruba 24 hodin než meteostanice začne správně předpovídat.
Meteostanice ukazuje 5 ikon předpovědi počasí a 3 ikony tlaku
Indikace na displeji
Trend počasí zlepšení Bez změn zhoršení
Slunečno Oblačno Zataženo Déšť Bouřka Náledí
Ikona se zobrazí
při teplotě
pod +3 °C
Řešení problémů:
Nezobrazí-li meteostanice správný čas nebo teplotu, tlak, vlhkost, ikonu předpovědi počasí,
stiskněte tlačítko RESET.
Nesprávný čas nebo výpadek synchronizace může nastat v důsledku vnější elektromagnetické interference.
Péče a údržba
Výrobek je navržen tak, aby při vhodném zacházení spolehlivě sloužil řadu let. Zde
je několik rad pro správnou obsluhu:
• Než začnete s výrobkem pracovat, pozorně si pročtěte uživatelský manuál.
• Nevystavujte výrobek přímému slunečnímu světlu, extrémnímu chladu a vlhku
a náhlým změnám teploty (snížilo by to přesnost snímání).
• Neumísťujte výrobek do míst náchylných k vibracím a otřesům – mohou způsobit
jeho poškození.
• Nevystavujte výrobek nadměrnému tlaku, nárazům, prachu, vysoké teplotě nebo vlhkosti
– mohou způsobit poruchu funkčnosti výrobku, kratší energetickou výdrž, poškození
baterií a deformaci plastových částí.
• Nevystavujte výrobek dešti ani vlhku, není určen pro venkovní použití.
• Neumísťujte na výrobek žádné zdroje otevřeného ohně, např. zapálenou svíčku,apod.
• Neumísťujte výrobek na místa, kde není zajištěno dostatečné proudění vzduchu.
• Nevsunujte do větracích otvorů výrobku žádné předměty.
• Nezasahujte do vnitřních elektrických obvodů výrobku – můžete jej poškodit a automaticky tím ukončit platnost záruky. Výrobek by měl opravovat pouze kvalifikovaný odborník.
• K čištění používejte mírně navlhčený jemný hadřík. Nepoužívejte rozpouštědla ani čistící
přípravky – mohly by poškrábat plastové části a narušit elektrické obvody.
• Výrobek neponořujte do vody ani jiných kapalin.
• Výrobek nesmí být vystaven kapající ani stříkající vodě.
• Při poškození nebo vadě výrobku neprovádějte žádné opravy sami. Předejte jej k opravě
do prodejny, kde jste jej zakoupili.
• Výrobek umístěte mimo dosah dětí – není to hračka.
• Odstraňujte vždy vybité baterie – mohly by vytéct a výrobek poškodit. Používejte jen
nové baterie doporučeného typu a při jejich výměně dbejte na správnou polaritu.
• Baterie nevhazujte do ohně, nerozebírejte, nezkratujte.
• Baterie se po upotřebení stává nebezpečným odpadem – nevhazujte jej do běžného
komunálního odpadu, ale odevzdejte na místě zpětného odběru – např. v obchodě,
kde jste výrobek zakoupili.
UPOZORNĚNÍ: Obsah tohoto návodu může být změněn bez předchozího upozornění
- z důvodu omezených možností tisku se mohou zobrazené symboly nepatrně
lišit od zobrazení na displeji - obsah tohoto návodu nemůže byt bez souhlasu
výrobce reprodukován.
Emos spol.s r.o. prohlašuje, že IW003-DCF + TW003 je ve shodě se základními požadavky
a dalšími příslušnými ustanoveními směrnice 1999/5/ES. Zařízení lze volně provozovat
v EU. Prohlášení o shodě je součástí návodu nebo je lze najít na webových
stránkách www.emos.cz
Zařízení lze provozovat na základě všeobecného oprávnění č. VO-R/10/09.2010-11.
BEZDRÔTOVÁ METEOSTANICA IW003-DCF + TW003 čidlo
Meteostanica zobrazuje hodiny, 2 budíky s funkciou opakovaného budenia, predpoveď počasia, údaje o vnútornej a vonkajšej teplote, vlhkosti, atmosférickom tlaku, fázy mesiaca. Má
pamäť minimálnych a maximálnych nameraných hodnôt. Než začnete s výrobkom pracovať, pozorne si prečítajte tento návod.
ŠPECIFIKÁCIA
hodiny riadené rádiovým signálom
vnútorná/vonkajšia teplota: 0 °C až +50 °C; -20 °C až +70 °C
rozlíšenie teploty: 0,1 °C
bezdrôtové čidlo: prenosová frekvencia 433 MHz
dosah rádiového signálu: až 30 m vo voľnom priestore
maximálny počet čidiel: 3
relatívna vlhkosť: 20 % – 95 %
rozlíšenie: 1 %
meracie rozpätie bar.tlaku 850 hPa až 1050 hPa
napájanie:
hlavná stanica: 3 x 1,5V AA batérie
čidlo: 2 x 1,5V AAA batérie
rozmery a hmotnosť:
hlavná stanica: 120 x 55 x 170 mm; 253 g (bez batérií)
čidlo: 60 x 23 x 110 mm; 46 g (bez batérií)
SK
Page 6

6
E0030-manual IW003-DCF 0-0-0-K
EMOS spol. s r. o.
Atmosférický tlak
Atmosférický tlak v hPa jednotkách a graf histórie tlaku v uplynulých 12 hodinách sa
zobrazuje v poli F.
Pri premiestnení meteostanice na iné miesto dôjde k ovplyvneniu meraných hodnôt. Meranie
sa ustáli behom 12 – 24 hodín.
Fáza mesiaca
Fáza mesiaca je zobrazení v poli E.
Ikony fáze mesiaca sú nasledujúce:
Nov Odchádzajúci Prvá Dorastajúci Spln Ubúdajúci Posledná Blížiaci
Nov štvrť spln spln štvrť sa nov
Zobrazenie maximál. / minimál. nameraných hodnôt
Maximálne a minimálne namerané teploty, vlhkosť a tlak zobrazíte stlačením tlačítka MEM.
Pridržaním tlačítka MEM uložené hodnoty z pamäti vymažete.
Manuálne nastavenie času
Stlačte dlho tlačítko SET. Tlačítkami + a - nastavte aktuálny rok, mesiac, deň, časový posun,
formát času, hodinu, minútu.
Medzi jednotlivými hodnotami sa presúvate stlačením tlačítka SET.
Nastavenie budíku
Meteostanica umožňuje nastaviť 2 budíky. Tlačítkom ALM SET zvoľte budík - A1, A2.
Dlho stlačte tlačítko ALM SET. Nastavte čas budíku tlačítkami + a - , medzi hodnotami sa
presúvate tlačítkom SET. Potom nastavte dni, v ktorých má budík zvoniť.
Sú tri možnosti:
MON, TUE, WED, THU, FRI, SAT, SUN Budík je funkčný celý týždeň (po – ne)
MON, TUE, WED, THU, FRI Budík je funkčný v pracovné dni (po – pá)
SAT, SUN Budík je funkčný cez víkend (so – ne)
Tlačítkom ALM ON.OFF aktivujte budík č. 1 , 2 alebo obidva. Zobrazí sa ikona I, J. Rovnakým
tlačítkom aktiváciu zrušíte – ikona zmizne.
Funkcia opakovaného budenia a podsvietenie displeja (SNOOZE/LIGHT)
Pri zvonení budíku stlačte tlačítko SNOOZE (mierne zatlačte vrchnú časť meteostanice
smerom nadol). Zvonenie bude posunuté o 5 minút, ikona budíku 1,2 bude blikať. Pre
zrušenie funkcie SNOOZE, stlačte tlačítko ALM ON.OFF. Budík znovu zaznie ďalší deň.
Pre podsvietenie displeja stlačte tlačítko SNOOZE/LIGHT.
Doba podsvietenia je 5 sekúnd.
Predpoveď počasia
Stanica predpovedá počasie na základe zmien atmosférického tlaku na nasledujúcich
12–24 hodín.
Presnosť predpovedi počasia je 70 – 75 %. Pretože predpoveď počasia nemusí vždy 100%
vychádzať, nemôže byť výrobca ani predajca zodpovedný za akékoľvek straty spôsobené
nepresnou predpoveďou počasia. Pri prvom nastavení alebo po resetovaní meteostanice
trvá zhruba 24 hodín než meteostanice začne správne predpovedať.
Meteostanice ukazuje 5 ikon predpovedi počasia a 3 ikony tlaku
Indikácia na displeji
Trend počasí zlepšenie Bez zmien zhoršenie
Slnečno Oblačno Zamračené Dážď Búrka Námraza
Ikona sa zobrazí
pri teplote
pod +3 °C
Riešenie problémov:
Ak nezobrazí meteostanica správny čas alebo teplotu, tlak, vlhkosť, ikonu predpovedi
počasia,
stlačte tlačítko RESET.
Nesprávny čas alebo výpadok synchronizácie môže nastať v dôsledku vonkajšej elektromagnetickej interferencie.
Starostlivosť a údržba
Výrobok je navrhnutý tak, aby pri vhodnom zaobchádzaní spoľahlivo slúžil niekoľko rokov. Tu
je niekoľko rád pre správnu obsluhu:
• Než začnete s výrobkom pracovať, pozorne si prečítajte užívateľský manuál.
• Nevystavujte výrobok priamemu slnečnému svetlu, extrémnemu chladu a vlhku a náhlym
zmenám teploty (znížilo by to presnosť snímania).
• Neumiestňujte výrobok do miest náchylných k vibráciám a otrasom – môžu spôsobiť
jeho poškodenie.
• Nevystavujte výrobok nadmernému tlaku, nárazom, prachu, vysokej teplote alebo
vlhkosti – môžu spôsobiť poruchu funkčnosti výrobku, kratšiu energetickou výdrž,
poškodenie batérií a deformáciu plastových častí.
• Nevystavujte výrobok dažďu ani vlhku, nie je určený pre vonkajšie použitie.
• Neumiestňujte na výrobok žiadne zdroje otvoreného ohňa, napr. zapálenú sviečku,
apod.
Prehľad ikon a tlačítok
Predná strana
A – Ikona slabej batérie vonkajšieho čidla
B – Max/min vonkajšia teplota
C – Číslo bezdrôtového čidla
D – Max/min hodnota tlaku
E – Fázy mesiaca
F – História tlaku behom uplynulých 12 hodín
G – Ikona rádiového signálu DCF77
H – Aktuálny deň
I – Budík 2
J – Budík 1
K – Vnútorná teplota
L – Vnútorná vlhkosť
M – Ikona búrky
N – Ikona predpovedi počasia
O – Ikona poľadovice
P – Vonkajšia teplota
R – Vonkajšia vlhkosť
Zadní strana
A – batériový priestor
B - SNOOZE/LIGHT tlačítko
Predná strana
Stisk tlačítka
Pridržanie tlačítka (3
sekundy)
-/°C/°F/WAVE
1 krok vzad/zobrazenie teploty v
°C alebo °F
Vyhľadanie signálu
DCF77
+/CHANNEL 1 krok vpred / číslo čidla Vyhľadanie čidla
SET/ALM SET Nastavenie budíka č. 1, 2
Nastavenie hodín,
dátumu
ALM ON.OFF Aktivácia budíka č. 1, 2
MEM
Zobrazenie max/min
teploty a vlhkosti
RESET Vymazanie všetkých hodnôt
Bezdrôtové čidlo
ED dióda RESET - resetovanie čidla
HOLDER - stojan čidla Batériový priestor
CHANNEL 1,2,3 - Prepínanie kanálu čidla
Uvedenie do prevádzky
Pri prvom spustení vložte batérie najskôr do meteostanice (3x AA) a potom do bezdrôtového čidla (2x AAA).
Pri vkladaní batérií dbajte na správnu polaritu, aby nedošlo k poškodeniu meteostanice
alebo čidla.
Používajte iba alkalické batérie rovnakého typu, nepoužívajte dobíjacie batérie.
Obe jednotky umiestnite vedľa seba. Meteostanica vyhľadá signál z čidla do 3 minút.
Ak nie je nájdený signál z čidla, stlačte dlho tlačítko CHANNEL pre opakovanie vyhľadávania.
Ak zmizne údaj vonkajšej teploty na displeji, stlačte tlačítko RESET na meteostanici.
Meteostanica vymaže všetky hodnoty a znovu vyhľadá signál z čidla. Odporúčame umiestniť
čidlo na severnú stranu domu. Dosah čidla môže v zastavaných priestoroch rapídne klesnúť.
Čidlo je odolné kvapkajúcej vode, nevystavujte ho však trvale pôsobeniu dažďa. Čidlo
nedávajte na kovové predmety, zníži sa dosah jeho vysielania. Ak sa objaví ikona slabej
batérie v poli A, vymeňte batérie v čidle.
Zmena kanálu a pripojenie ďalších čidiel
Stlačením tlačítka CHANNEL na zadní strane meteostanice zvoľte požadovaný kanál
čidla - CH1, CH2 nebo CH3. Potom dlho stlačte tlačítko CHANNEL, ikona začne blikať.
Na zadnej strane čidla zložte kryt batériového priestoru. Nastavte požadované číslo kanálu
čidla - 1, 2, 3. Vložte batérie do čidla (2x AA) a nasaďte kryt.
Ak nedôjde k vyhľadaniu signálu čidla stlačte tlačítko RESET na čidle.
Rádiom riadené hodiny (DCF77)
Bezdrôtové čidlo začne po registrácií s meteostanicou automaticky vyhľadávať signál DCF77
po dobu 7 minút. Začne blikať ikona .
Behom tejto doby nebude aktualizovaný žiadny iný údaj na displeji a tlačítka budú nefunkčné
( okrem SNOOZE/LIGHT). Pri zlom signáli bliká ikona ▲.Signál nenájdený - ikona zmizne.
Signál nájdený - ikona prestane blikať a zobrazí sa aktuálny čas. Pre opätovné vyhľadanie
signálu DCF77 stlačte dlho tlačítko WAVE. Pre zrušenie vyhľadania signálu DCF77 znovu
stlačte dlho tlačítko WAVE. DCF77 signál bude denne synchronizovaný medzi 2:00 až 3:00
ráno. Pre správny príjem neumiestňujte čidlo blízko elektrospotrebičov a mobilných telefónov.
Vnútorná a vonkajšia teplota, vlhkosť
Vnútorná teplota a vlhkosť sa zobrazuje v poli K, L.
Vonkajšia teplota a vlhkosť sa zobrazuje v poli P, R.
Tlačítkom °C/°F/WAVE zvoľte jednotku teploty v °C/°F.
Trend teploty a vlhkosti
Šípka ukazuje trend hodnôt merania teploty a vlhkosti na konkrétnom čidle alebo stanici.
Indikácie na displeji
Trend teploty a vlhkosti Stúpajúci Stály Klesajúci
11
Nastavljanje budilke
Meteorološka postaja omogoča nastavljanje 2 različnih budilk. S tipko ALM SET izberite
budilko - A1, A2. Zadržite tipko ALM SET. Nastavite želeno uro bujenja s tipkama +
in - , med vrednostmi se premikate s tipko SET. Potem nastavite dni, ob katerih naj bi se
budilka sprožila.
Obstajajo tri možnosti:
MON, TUE, WED, THU, FRI, SAT, SUN Budilka je aktivna cel teden (po – ne)
MON, TUE, WED, THU, FRI Budilka je aktivna ob delovnikih (po – pá)
SAT, SUN Budilka je aktivna ob vikendu (so – ne)
S tipko ALM ON.OFF aktivirate budilko št. 1 , 2 ali obe. Prikaže se ikona I, J. Z enako tipko
aktivacijo izklopite – ikona izgine.
Funkcija ponavljanja bujenja in osvetlitve zaslona
(SNOOZE/LIGHT)
Med zvonjenjem budilke pritisnite tipko SNOOZE (rahlo pritisnite zgornji del meteorološke
postaje v smeri dol). Zvonjenje bo premaknjeno za 5 minut, ikona budilke 1,2 bo utripala. Za
izklop funkcije SNOOZE, pritisnite tipko ALM ON.OFF. Budilka ponovno zazvoni naslednji dan.
Za osvetlitev zaslona pritisnite tipko SNOOZE/LIGHT.
Čas svetenja je 5 sekund.
Vremenska napoved
Postaja napoveduje vreme na podlagi sprememb atmosferskega pritiska za naslednjih
12 – 24 ur.
Natančnost vremenske napovedi je 70 – 75 %. Ker vremenska napoved ne more biti
vedno 100% natančna, ne more biti proizvajalec niti prodajalec odgovoren za kakršne koli
izgube povzročene zaradi nenatančne vremenske napovedi. Pri prvem nastavljanju ali po
ponastavitvi vremenske postaje, traja približno 24 ur preden začne vremenska postaja
pravilno napovedovati.
Vremenska postaja prikazuje 5 ikon vremenske napovedi in 3 ikone pritiska
Indikacija na zaslonu
Trend vremena Izboljšanje Brez sprememb Poslabšanje
Sončno Spremenjlivo Oblačno Dež Nevihta Poledica
Ikona se prikaže
pri temperaturi
pod +3 °C
Reševanje problemov:
Če meteorološka postaja ne prikaže pravilne ure ali temperature, tlaka, vlažnosti, ikone
vremenske napovedi, pritisnite tipko RESET.
Nepravilna ura ali izpad sinhronizacije lahko nastane kot posledica zunanje elektromagnetne interference.
Skrb in vzdrževanje
Izdelek je konstruiran tako, da ob primerni uporabi zanesljivo deluje vrsto let. Tukaj je nekaj
nasvetov za pravilno uporabo:
• Preden začnete uporabljati izdelek, si pozorno preberite navodila za uporabo.
• Izdelka ne izpostavljajte neposredni sončni svetlobi, ekstremnemu mrazu, vlagi in naglim
spremembam temperature (to bi znižalo natančnost snemanja).
• Izdelka ne nameščajte na mesta, ki so nagnjena k vibracijam in pretresom – to lahko
povzroči poškodbe.
• Ne izpostavljajte izdelka prekomernemu tlaku, sunkom, prahu, visokim temperaturam
ali vlagi – lahko povzročijo poškodbe na kateri izmed funkcij izdelka, krajšo energetsko
vzdržljivost, poškodbo baterij in deformacije plastičnih delov.
• Izdelka ne izpostavljajte dežju ali vlagi, ni namenjen zunanji uporabi.
• Na izdelek ne postavljajte virov ognja, npr. prižgane svečke ipd.
• Izdelka ne postavljajte na mesta, kjer ni zadostnega kroženja zraka.
• V prezračevalne odprtine ne vtikajte nikakršnih predmetov.
• Ne posegajte v notranjo električno napeljavo izdelka – lahko ga poškodujete in s tem
prekinite veljavnost garancije. Izdelek sme popravljati le usposobljen strokovnjak.
• Za čiščenje uporabljajte zmerno navlaženo blago krpo. Ne uporabljajte raztopin ali
čistilnih izdelkov – lahko poškodujejo plastične dele in električno napeljavo.
• Izdelka ne potapljajte v vodo ali v druge tekočine.
• Izdelek ne sme biti izpostavljen kapljanju ali škropljenju vode.
• Pri poškodbah ali napaki izdelka ne popravljajte sami. Predajte ga v popravilo prodajalni,
kjer ste ga kupili.
• Izdelek namestite izven dosega otrok – izdelek ni igrača.
• Prazne baterije vedno pravočasno odstranite – lahko bi prišlo do iztekanja, kar bi
poškodovalo izdelek. Uporabljajte le nove priporočene baterije in pri menjavi pazite na
pravilno polarnost.
• Baterije ne odlagajte v ogenj, ne razstavljajte ali ne povzročajte kratkega stika.
• Baterije po koncu uporabe postanejo nevaren odpadek, ne odlagajte jih skupaj z
običajnimi odpadki, ampak jih odložite na odlagališča za reciklažo – npr. v trgovini,
kjer ste jih kupili.
OPOZORILO: Vsebina teh navodil se lahko spreminja brez prejšnjega opozorila - iz vzroka
omejenih možnosti tiska se prikazani simboli lahko nekoliko razlikujejo od prikaza na
zaslonu - vsebina teh navodil ne sme biti reproducirana brez dovoljenja proizvajalca.
Emos d.o.o. izjavlja, da sta IW003-DCF + TW003 v skladu z osnovnimi zahtevami in
drugimi z njimi povezanimi določbami direktive 1999/5/ES. Naprava se lahko prosto
uporablja v EU. Izjava o skladnosti je del navodil ali pa jo lahko najdete na spletnih
straneh www.emos.eu
Napravo lahko uporabljate na podlagi splošnega pooblastila št. VO-R/10/09.2010-11.
DRAHTLOSE WETTERSTATION IW003-DCF + TW003 sensor
Die Wetterstation zeigt Uhrzeit, 2 Wecker mit wiederholtem Signal, Wettervorausschau und genaue Werte der Innen- und Außentemperatur, Feuchtigkeit, Luftdruck und Mondphase. Sie
hat einen Speicher für die gemessenen Höchst- und Tiefstwerte. Lesen Sie sich zu Beginn sorgfältig diese Anleitung durch!
SPEZIFIKATION
Uhr gesteuert durch Funksignal
Innen-/Außentemperatur: 0 °C bis +50 °C; -20 °C bis +70 °C
Auflösung der Temperaturmessung: 0,1 °C
Sensor: Übertragungsfrequenz 433 MHz
Reichweite des Funksignals: bis 30 Meter in freiem Raum
maximale Fühleranzahl: 3
relative Feuchtigkeit: 20 % – 95 %
Auflösung: 1 %
Messbereich des Luftdrucks 850 hPa bis 1050 hPa
Speisung:
Hauptstation: 3 x 1,5V Batterie Typ AA
Sensor: 2 x 1,5V AAA
Abmessungen und Gewicht:
Hauptstation: 120 x 55 x 170 mm;
253 g (ohne Batterien)
Sensor: 60 x 23 x 110 mm;
46 g (ohne Batterien)
Ikonen- und Tastenübersicht
Vorderseite
A - Ikone schwache Batterie des Außensensors
B – Max./min. Außentemperatur
C - Nummer des Außensensors
D – Max./min. Luftdruck
E - Mondphase
F - Druckverlauf in den letzten 12 Stunden
G - Empfang des Funksignals DCF 77
H - Aktueller Tag
I - Wecker 2
J - Wecker 1
K - Innentemperatur
L - Innenfeuchtigkeit:
M - Ikone Gewitter
N – Ikone für die Wettervorausschau
D
O - Ikone Glatteis
P - Außentemperatur
R - Außenfeuchtigkeit
Rückseite
A – bateriový prostor
B - SNOOZE/LIGHT tlačítko
Vorderseite
Drücken der Tasten
Halten der Tasten
(3Sekunden)
-/°C/°F/WAVE
1 Schritt zurück/Abbildung der
Temperatur in °C oder °F
Suchen des DCF77-
-Signals
+/CHANNEL
1 Schritt nach vorn/Sensornummer
Suchen des Fühlersignals
SET/ALM SET Einstellen des Alarms Nr. 1, 2
Einstellen der Uhrzeit,
des Datums
ALM ON.OFF Einstellen des Alarms Nr. 1, 2
MEM
Abbildung der max./
min. Temperatur und
Feuchtigkeit
RESET Löschen aller Werte
Drahtloser Fühler
LED-Diode RESET - Reset des Fühlers
HOLDER - Ständer des Fühlers Batteriefach
CHANNEL 1,2,3 - Umschalten des Fühlerkanals
Inbetriebnahme
Beim ersten Start die Batterien zunächst in die Wetterstation (3x AA) und erst danach in
den drahtlosen Fühler (2x AAA) einlegen.
Beim Einlegen auf richtige Polarität achten, damit Wetterstation oder Fühler nicht
beschädigt werden.
Page 7

10
E0030-manual IW003-DCF 0-0-0-K
EMOS spol. s r. o.
• A termék szellőzőnyílásaiba ne tegyen semmilyen tárgyat.
• Ne avatkozzon a termék belső elektromos áramköreibe – kárt okozhat bennük és a
jótállás automatikusan érvényét veszíti. A terméket csak szakképzett személy javíthatja.
• A tisztításhoz enyhén nedves, puha rongyot használjon. Ne használjon oldószereket
vagy tisztítószereket – megkarcolhatják a műanyag részeket és megzavarhatják az
elektromos áramköröket.
• A terméket ne merítse vízbe vagy más folyadékba.
• A terméket ne tegye ki csepegő vagy folyó víz hatásának.
• Sérülés vagy meghibásodás esetén ne végezzen a terméken semmiféle javítást. Adja
le javításra azon az árusítóhelyen, ahol vásárolta.
• A terméket tartsa gyermekektől távol – nem játék.
• A lemerült elemeket mindig távolítsa el – kifolyhatnak, és kárt okozhatnak a termékben.
Csak az ajánlott típusú, új elemeket használjon, elemcsere esetén ügyeljen a helyes
polaritásra.
• Az elemeket ne dobja tűzbe, ne szedje szét, ne zárja rövidre.
• A használt elemek veszélyes hulladéknak minősülnek – ne dobja őket a háztartási
hulladék közé, hanem adja le valamelyik gyűjtőhelyen – pl. az üzletben, ahol a terméket
vásárolta.
FIGYELEM: Ezen útmutató tartalma előzetes figyelmeztetés nélkül megváltozhat – a nyomtatás korlátozott lehetőségei miatt az ábrázolt jelek kissé eltérhetnek a kijelzőn megjelenőktől
– ezen útmutató tartalma a gyártó engedélye nélkül nem másolható.
Az Emos Kft. kijelenti, hogy az IW003-DCF + TW003 megfelel a 1999/5/EK irányelv alapvető
követelményeinek és egyéb vonatkozó rendelkezéseinek. A berendezés az EU-ban szabadon
üzemeltethető. A megfelelőségi nyilatkozat az útmutató részét képezi, vagy megtalálható
a www.emos-hu.hu weboldalon.
A termék a VO-R/10/09.2010-11 sz. általános jogosultság alapján üzemeltethető.
BREZŽIČNA METEOROLOŠKA POSTAJA IW003-DCF + TW003 senzor
Meteorološka postaja prikazuje uro, 2 budilki s funkcijo ponavljajočega bujenja, vremensko napoved, podatke o notranji in zunanji temperaturi, vlažnosti, zračnem pritisku, lunine mene.
Shranjuje minimalne in maksimalne namerjene vrednosti. Pred uporabo naprave si natančno preberite ta navodila.
SPECIFIKACIJA
ura vodena z radijskim signalom
notranja/zunanja temp.: 0 °C do +50 °C; -20 °C do +70 °C
ločljivost tem.: 0,1 °C
brezžični senzor: prenosna frekvenca 433 MHz
doseg radijskega signala: do 30 m v odprtem prostoru
največje št. senzorjev: 3
relativna vlažnost: 20 % – 95 %
ločljivost: 1 %
merilno območ. bar. pritiska 850 hPa do 1050 hPa
napajanje:
glavna postaja: 3 x 1,5V AA baterije
senzor: 2 x 1,5V AAA baterije
mere in teža:
glavna postaja: 120 x 55 x 170 mm; 253 g (brez baterij)
senzor: 60 x 23 x 110 mm; 46 g (brez baterij)
Pregled ikon in tipk
Sprednja stran
A – Ikona šibke baterije zunanjega senzorja
B – Maks/min zunanja temperatura
C – Številka brezžičnega senzorja
D – Maks/min vrednost pritiska
E – Lunina faza
F – Zgodovina pritiska v preteklih 12 urah
G – Ikona radijskega signala DCF77
H – Aktualen dan
I – Budilka 2
J – Budilka 1
K – Notranja temperatura
L – Notranja vlažnost
M – Ikona nevihte
N – Ikona vremenske napovedi
O – Ikona poledice
P – Zunanja temperatura
R – Zunanja vlažnost
Zadnja stran
A – prostor za baterije
B - SNOOZE/LIGHT tipka
Sprednja stran
Pritisk tipke
Zadrževanje tipke (3
sekunde)
-/°C/°F/WAVE
1 korak nazaj/prikaz temperature
v °C ali °F
Iskanje signala DCF77
+/CHANNEL 1 korak naprej/številka senzorja Iskanje senzorja
SET/ALM SET Nastavitev budilke št. 1, 2 Nastavitev ure, datuma
ALM ON.OFF Vklop budilke č. 1, 2
MEM
Prikaz maks/min temp. in
vlažnosti
RESET Izbris vseh vrednosti
Brezžični senzor
LED dioda RESET - ponastavitev senzorja
HOLDER - stojalo senzorja Prostor za baterije
CHANNEL 1,2,3 – Preklop kanala senzorja
Začetek uporabe
Pred prvo uporabo vstavite baterije najprej v meteorološko postajo (3x AA) nato pa v
brezžični senzor (2x AAA).
Pri vstavitvi baterij pazite na pravilno polarnost, da ne bi prišlo do poškodb meteorološke
postaje ali senzorja.
SLO
Uporabljajte izključno alkalne baterije enakega tipa, ne uporabljajte polnilnih baterij.
Obe enoti namestite poleg sebe. Meteorološka postaja poišče signal senzorja v 3 minutah.
Če signala senzorja ne najde, pritisnite dolgo tipko CHANNEL za ponovitev iskanja.
Če na zaslonu izginejo podatki o zunanji temperaturi, pritisnite tipko RESET na vremenski
postaji. Vremenska postaja izbriše vse vrednosti in ponovno poišče signal senzorja.
Priporočamo, da senzor namestite na severno stran hiše. Doseg senzorja lahko v gosto pozidanih območjih naglo pade. Senzor je odporen na kapljajočo vodo, vendar ga ne izpostavljajte
stalnim vplivom dežja. Namestitev senzorja na kovinske predmete zniža doseg njegovega
oddajanja. Če se prikaže ikona šibke baterije v polju A, baterijo v senzorju zamenjajte.
Sprememba kanala in priključitev drugih senzorjev
S pritiskom tipke CHANNEL na zadnji strani meteorološke postaje izberite želen kanal
senzorja - CH1, CH2 ali CH3. Nato dolgo pritisnite tipko CHANNEL, ikona začne utripati.
Na zadnji strani senzorja snemite pokrov prostora za baterije. Nastavite želeno številko
kanala senzorja - 1, 2, 3. Vstavite bateriji v senzor (2x AA) in namestite pokrov.
Če ne pride do iskanja signala senzorja, pritisnite tipko RESET na senzorju.
Radijsko vodena ura (DCF77)
Brezžični senzor začne po povezavi z vremensko postajo avtomatično iskati signal DCF77.
Iskanje traja 7 minut. Začne utripati ikona
.
V tem času ne bodo aktualizirani nobeni drugi podatki na zaslonu in tipke ne bodo delovale
(razen SNOOZE/LIGHT). Pri slabem signalu utripa ikona ▲.Signal ni najden -
ikona izgine.
Signal najden - ikona neha utripati in prikaže se aktualna ura. Za ponovno iskanje signala
DCF77 dolgo pritisnite tipko WAVE. Za prekinitev iskanja signala DCF77 pritisnite ponovno
tipko WAVE. DCF77 signal bo dnevno sinhroniziran med 2:00 in 3:00 uro. Da bo senzor
pravilno sprejemal signal, ga ne nameščajte v bližino električnih naprav ali mobilnih telefonov.
Notranja in zunanja temperatura, vlažnost
Notranja temperatura in vlažnost sta prikazani v polju K, L.
Zunanja temperatura in vlažnost sta prikazani v polju P, R.
S tipko °C/°F/WAVE izberite enoto temperature °C/°F.
Trend temperature in vlažnosti
Puščica prikazuje trend vrednosti merjenja temperature in vlažnosti na določenem
senzorju ali postaji.
Indikacija na zaslonu
Trend temperature in
vlažnosti
Naraščajoč Stalen Padajoč
Zračni pritisk
Zračni pritisk v hPa enotah in graf zgodovine pritiska v preteklih 12 urah je prikazan v polju F.
Premestitev meteorološke postaje na drugo mesto vpliva na namerjene vrednosti. Merjenje
se stabilizira do 12 – 24 ur.
Lunina faza
Lunina faza je prikazana v polju E.
Ikone luninih faz so naslednje:
Mlaj Odhajajoči Prvi Naraščajoča Polna luna Izginjajoča Zadnji Bližajoči
Mlaj krajec polna luna polna luna krajec se mlaj
Prikaz maksimal./minimal. namerjenih vrednosti
Maksimalne in minimalne namerjene vrednosti temperature, vlažnost in pritisk se prikažejo
s pritiskom tipke MEM.
Po zadrževanju tipke MEM se shranjene vrednosti iz spomina izbrišejo.
Ročno nastavljanje ure
Z dolgim pritiskom tipke SET. S tipkama + a - nastavite aktualno leto, mesec, dan, časovni
premik, urni format, uro, minuto.
Med posameznimi vrednostmi se lahko premikate s pritiskom tipke SET.
7
• Neumiestňujte výrobok na miesta, kde nie je zaistené dostatočné prúdenie vzduchu.
• Nevsúvajte do vetracích otvorov výrobku žiadne predmety.
• Nezasahujte do vnútorných elektrických obvodov výrobku – môžete ho poškodiť a
automaticky tým ukončiť platnosť záruky. Výrobok by mal opravovať iba kvalifikovaný
odborník.
• K čisteniu používajte mierne navlhčenú jemnú handričku. Nepoužívajte rozpúšťadlá ani
čistiace prípravky – mohli by poškriabať plastové časti a narušiť elektrické obvody.
• Výrobok neponárajte do vody ani iných kvapalín.
• Výrobok nesmie byť vystavený kvapkajúcej ani striekajúcej vode.
• Pri poškodení alebo poruche výrobku nevykonávajte žiadne opravy sami. Odovzdajte
ho k oprave do predajne, kde ste ho zakúpili.
• Výrobok umiestite mimo dosah detí – nie je to hračka.
• Odstraňujte vždy vybité baterie – mohly by vytéct a výrobek poškodit. Používejte jen
nové baterie doporučeného typu a při jejich výměně dbejte na správnou polaritu.
• Baterie nevhazujte do ohně, nerozebírejte, nezkratujte.
• Baterie se po upotřebení stává nebezpečným odpadem – nevhazujte jej do běžného
komunálního odpadu, ale odevzdejte na místě zpětného odběru – např. v obchodě,
kde jste výrobek zakoupili.
UPOZORNENIE: Obsah tohto návodu môže byť zmenený bez predchodzieho upozornenia
- z dôvodu obmedzených možností tlače sa môžu zobrazené symboly nepatrne líšiť od
zobrazenia na displeji.
Obsah tohto návodu nemôže byt bez súhlasu výrobcu reprodukovaný.
Emos SK s.r.o. prehlasuje, že IW003-DCF + TW003 je v zhode so základnými požiadavkami
a ďalšími príslušnými ustanoveniami smernice 1999/5/ES. Zariadenie možno voľne
prevádzkovať v EU. Prehlásenie o zhode je súčasťou návodu alebo ho možno nájsť na
webových stránkach www.emos.cz
Zariadenie možno prevádzkovať na základe všeobecného oprávnenia č. VO-R/10/09.2010-
11.
BEZPRZEWODOWA STACJA METEOROLOGICZNA IW003-DCF + TW003 czujnik
Stacja meteorologiczna zawiera i wyświetla dane z zegara, 2 budzików z funkcją powtórnego budzenia, prognozę pogody i dane o temperaturze wewnętrznej i zewnętrznej, wilgotności,
poziomie ciśnienia atmosferycznego i fazach księżyca. Stacja ma pamięć minimalnych i maksymalnych wartości zmierzonych. Przed uruchomieniem tego wyrobu do pracy, prosimy starannie
przeczytać tę instrukcję.
SPECYFIKACJA
zegar sterowany sygnałem radiowym
temperatura wewnętrzna/zewnętrzna: 0 °C do +50 °C; -20 °C do +70 °C
rozdzielczość temperatury: 0,1 °C
czujnik bezprzewodowy: częstotliwość transmisji 433 MHz
zasięg sygnału radiowego: do 30 m na wolnej przestrzeni
maksymalna liczba czujników: 3
wilgotność względna: 20 % – 95 %
rozdzielczość: 1 %
zakres pomiaru ciśnienia atmosferycznego: 850 hPa do 1050 hPa
zasilanie:
stacja główna: 3 x 1,5V AA baterie
czujnik: 2 x 1,5V AAA baterie
wymiary i waga:
stacja główna: 120 x 55 x 170 mm; 253 g (bez baterii)
czujnik 60 x 23 x 110 mm; 46 g (bez baterii)
Przegląd ikon i przycisków
Panel przedni
A – rozładowane baterie w czujniku zewnętrznym
B – Max/min. temperatura zewnętrzna
C – Numer czujnika bezprzewodowego
D – Max/min. wartość ciśnienia
E – Faza księżyca
F – Historia ciśnienia w czasie ostatnich 12 godzin
G – Ikona sygnału radiowego DCF77
H – Aktualny dzień
I – Budzik 2
J – Budzik 1
K – Temperatura wewnętrzna
L – Wilgotność wewnętrzna
M – Ikona burzy
N – Ikona prognozy pogody
O – Ikona gołoledzi
P – Temperatura zewnętrzna
R – Wilgotność zewnętrzna
Panel tylny
A – pojemnik na baterie
B - przycisk SNOOZE/LIGHT
Panel przedni
Naciśnięcie przycisku
Przytrzymanie przycisku
(3 sekundy)
-/°C/°F/WAVE
1 krok wstecz/wyświetlanie
temperatury w °C albo °F
Wyszukiwanie sygnału
DCF77
+/CHANNEL 1 krok do przodu/numer czujnika Wyszukiwanie
SET/ALM SET Ustawianie budzika nr 1, 2 Ustawianie zegara, daty
ALM ON.OFF Włączenie budzika nr 1, 2
MEM
Wyświetlanie max/min.
temperatury i wilgotności
RESET Kasowanie wszystkich wartości
Czujnik bezprzewodowy
Dioda LED RESET - kasowanie czujnika
HOLDER - podstawka czujnika Pojemnik na baterie
CHANNEL 1,2,3 – Przełączanie kanałów czujników
Uruchomienie do pracy
Przed pierwszym włączeniem należy najpierw włożyć baterie do stacji meteorologicznej (3x
AA) a potem do czujnika bezprzewodowego (2x AAA).
PL
Przy wkładaniu baterii należy zachować właściwą polaryzację, żeby nie doszło do uszkodzenia
stacji meteorologicznej albo czujnika.
Stosujemy zawsze baterie alkaliczne tego samego typu, nie korzystamy z baterii umożliwiających ich doładowywanie.
Stację meteorologiczną ustawiamy obok czujnika. Stacja meteorologiczna wyszukuje sygnał z
czujnika w czasie do 3 minut. Jeżeli nie zostanie wykryty sygnał z czujnika, to należy nacisnąć
dłużej w czujniku przycisk CHANNEL, żeby powtórzyć wyszukiwanie sygnału.
Jeżeli znikną dane o temperaturze zewnętrznej na wyświetlaczu, to należy nacisnąć przycisk
RESET na stacji meteorologicznej.
Stacja meteorologiczna skasuje wszystkie wartości i ponownie odszuka sygnał z czujnika.
Zalecamy umieścić czujnik z północnej strony domu. Zasięg czujnika może gwałtownie
zmaleć w zastawionych pomieszczeniach. Czujnik jest odporny na kapiącą wodę, ale lepiej
go nie narażać na ciągłe działanie deszczu. Również lokalizacja czujnika na przedmiotach
metalowych zmniejsza zakres jego nadawania. Jeżeli w polu A pojawi się ikona rozładowanych
baterii, to należy wymienić baterie w czujniku.
Zmiana kanału i podłączanie następnych czujników
Naciskamy przycisk CHANNEL na tylnym panelu stacji meteorologicznej i wybieramy kanał
dla czujnika - CH1, CH2 albo CH3. Następnie dłużej naciskamy przycisk CHANNEL, ikona
zacznie migać.
Na tylnym panelu usuwamy osłonę z pojemnika na baterie. Ustawiamy wybrany numer
kanału dla czujnika - 1, 2, 3. Wkładamy baterie do czujnika (2x AA) i montujemy osłonę.
Jeżeli sygnał czujnika nie zostanie wykryty, to należy nacisnąć przycisk RESET w czujniku.
Zegar sterowany radiowo (DCF77)
Czujnik po połączeniu ze stacją meteorologiczną automatycznie wyszukuje sygnał DCF77
w czasie 7 minut. Zaczyna migać ikona .
W tym czasie nie są aktualizowane żadne inne dane na wyświetlaczu a przyciski nie
działają (oprócz SNOOZE/LIGHT). Przy słabym sygnale miga ikona ▲.Sygnał nieodebrany
- ikona znika.
Sygnał odebrany - ikona przestaje migać i wyświetla się aktualny czas. Żeby ponownie
wyszukać sygnał DCF77 naciskamy dłużej przycisk WAVE. Żeby przerwać wyszukiwanie
sygnału DCF77 ponownie naciskamy dłużej przycisk WAVE. Sygnał DCF77 będzie codziennie
synchronizowany między godz. 2:00
a 3:00 rano. Jeżeli czujnik ma poprawnie odebrać sygnał, to nie powinien się znajdować w
pobliżu odbiorników energii elektrycznej i telefonów komórkowych.
Temperatura wewnętrzna i zewnętrzna, wilgotność
Temperatura wewnętrzna i wilgotność jest wyświetlana w polu K, L.
Temperatura zewnętrzna i wilgotność jest wyświetlana w polu P, R.
Przyciskiem °C/°F/WAVE wybieramy jednostkę temperatury °C/°F.
Trend temperatury i wilgotności
Strzałka wskazuje trend mierzonych wartości temperatury i wilgotności przez konkretny
czujnik albo stację.
Sygnalizacja na wyświetlaczu
Trend temperatury i wilgotności
Wzrost Stabilizacja Spadek
Ciśnienie atmosferyczne
Ciśnienie atmosferyczne w jednostkach hPa i wykres historii ciśnienia w czasie ostatnich
12 godzin jest przedstawiony w polu F.
Przy przemieszczeniu stacji meteorologicznej w inne miejsce dojdzie do zmiany wartości
mierzonych. Pomiary ustabilizują się w czasie 12 – 24 godzin.
Fazy księżyca
Fazy księżyca są wyświetlane w polu E.
Ikony faz księżyca są następujące:
Nów Wyjście Pierwsza Dojście Pełnia Wyjście Ostatnia Dojście
z nowiu kwadra do pełni z pełni kwadra do nowiu
Page 8

8
E0030-manual IW003-DCF 0-0-0-K
EMOS spol. s r. o.
Wyświetlanie maksymalnych/minimalnych zmierzonych wartości
Maksymalne i minimalne zmierzone temperatury, wilgotności i ciśnienia wyświetlamy
naciskając przycisk MEM.
Przytrzymując dłużej przycisk MEM kasujemy wartości zapisane w pamięci.
Ręczne ustawianie czasu
Naciskamy dłużej przycisk SET. Przyciskami + i - ustawiamy aktualny rok, miesiąc, dzień,
strefę czasową, format czasu, godziny i minuty.
Pomiędzy poszczególnymi wartościami przesuwamy się naciskając przycisk SET.
Ustawianie budzika
Stacja meteorologiczna umożliwia ustawianie 2 budzików. Przyciskiem ALM SET wybieramy
budzik - A1, A2.
Przytrzymujemy dłużej przycisk ALM SET. Czas budzika ustawiamy przyciskami + a -, pomiędzy
poszczególnymi wartościami przesuwamy się naciskając przycisk SET. Następnie ustawiamy
dni, w których budzik ma dzwonić.
Mamy trzy możliwości:
MON, TUE, WED, THU, FRI, SAT, SUN Budzik działa przez cały tydzień (po – nie)
MON, TUE, WED, THU, FRI Budzik działa w dni robocze (po – pi)
SAT, SUN Budzik działa w weekend (so – nie)
Przyciskiem ALM ON. OFF włączamy budzik nr 1, 2 albo oba. Pojawia się ikona I, J. Kolejnym
naciśnięcie tego przycisku powodujemy wyłączenie – ikona znika.
Funkcja powtórnego budzenia i podświetlania wyświetlacza (SNOOZE/LIGHT)
Podczas dzwonienia budzika naciskamy przycisk SNOOZE (lekko naciskamy górną część
obudowy stacji meteorologicznej w dół). Dzwonienie zostaje przesunięte o 5 minut, ikona
budzika 1, 2 zaczyna migać. Żeby skasować funkcję SNOOZE, naciskamy przycisk ALM ON.
OFF. Budzik po raz kolejny zadzwoni następnego dnia.
Żeby podświetlić wyświetlacz, naciskamy przycisk SNOOZE/LIGHT.
Czas podświetlenia wynosi 5 sekund.
Prognoza pogody
Stacja prognozuje pogodę na następne 12 – 24 godzin na podstawie zmian ciśnienia
atmosferycznego.
Wiarygodność prognozy pogody wynosi 70 – 75 %. Ponieważ prognoza pogody nie może się
sprawdzać w 100%, to producent, ani sprzedawca nie może odpowiadać za jakiekolwiek
straty wynikające z niedokładnej prognozy pogody. Przy pierwszym ustawieniu albo po
ponownym uruchomieniu stacji meteorologicznej mija około 24 godziny do czasu, kiedy
stacja meteorologiczna zacznie dobrze prognozować pogodę.
Wskazanie na wyświetlaczu
Trend wzrost bez zmian spadek
Słonecznie Lekkie Pochmurno Deszcz Burza Gołoledź
zachmurzenie Ikona pojawi
się przy temperaturze
poniżej +3 °C
Rozwiązywanie problemów:
Jeżeli stacja meteorologiczna nie wyświetla poprawnie czasu albo temperatury, ciśnienia,
wilgotności, czy ikony prognozy pogody, to należy nacisnąć przycisk RESET.
Błędne wskazanie czasu albo utrata synchronizacji może mieć miejsce w wyniku zewnętrznej
interferencji elektromagnetycznej.
Konserwacja
Stacja meteorologiczna jest zaprojektowana tak, aby przy właściwym obchodzeniu się z
nią mogła służyć przez wiele lat. Dalej zamieszczamy kilka uwag związanych z jej właściwą
obsługą:
• Przed uruchomieniem stacji meteorologicznej należy uważnie przeczytać instrukcję
użytkownika.
• Wyrobu nie wystawiamy na działanie bezpośredniego światła słonecznego, ekstremalne zimno albo wilgoć oraz nie narażamy na nagłe zmiany temperatury (powoduje to
pogorszenie dokładności pomiarów).
• Wyrobu nie umieszczamy w miejscach narażonych na wibracje i wstrząsy – mogą
spowodować jego uszkodzenie.
• Wyrobu nie narażamy na nadmierne naciski i uderzenia, tył, wysoką temperaturę albo
wilgotność – mogą one spowodować uszkodzenie wyrobu, zwiększony pobór prądu,
uszkodzenie baterii i deformację plastikowych części.
• Wyrobu nie narażamy na działanie deszczu, ani wilgoci, nie jest on przeznaczony do
użytku na zewnątrz.
• Na wyrobie nie ustawiamy żadnych źródeł otwartego ognia, na przykład zapalonej
świeczki, itp.
• Wyrobu nie umieszczamy w miejscach, w których nie ma dostatecznego przepływu
powietrza.
• Do otworów wentylacyjnych w wyrobie nie wsuwamy żadnych przedmiotów.
• Nie ingerujemy do wewnętrznych elektronicznych obwodów w wyrobie – możemy
go uszkodzić i utracić uprawnienia gwarancyjne. Wyrób może naprawiać wyłącznie
przeszkolony specjalista.
• Do czyszczenia używamy lekko zwilżoną, delikatną ściereczkę. Nie korzystamy z
rozpuszczalników, ani z preparatów do czyszczenia – mogą one podrapać plastikowe
części i uszkodzić obwody elektroniczne.
• Wyrobu nie wolno zanurzać do wody, ani do innych cieczy.
• Wyrobu nie narażamy na działanie kapiącej, ani pryskającej wody.
• Przy uszkodzeniu albo wadzie wyrobu żadnych napraw nie wykonujemy we własnym
zakresie. Wyrób przekazujemy do naprawy do sklepu, w którym został zakupiony.
• Wyrób umieszczamy poza zasięgiem dzieci – to nie jest zabawka.
• Zawsze na czas usuwamy rozładowane baterie – mogą one się rozlać i uszkodzić wyrób.
Korzystamy tylko z nowych baterii zalecanego typu a przy ich wymianie zachowujemy
poprawną polaryzację.
• Baterii nie wrzucamy do ognia, nie rozbieramy i nie zwieramy.
• Baterie po zużyciu stają się odpadem niebezpiecznym – nie wolno ich wyrzucać razem
ze zwykłymi odpadami komunalnymi, ale należy je przekazywać do punktów odbioru – na
przykład do sklepu, w którym wyrób został zakupiony.
UWAGA: Treść tej instrukcji może być zmieniona bez wcześniejszego uprzedzenia - z
powodu ograniczonych możliwości druku pewne symbole mogą się nieznacznie różnić
od znaków wyświetlanych na wyświetlaczu - treść tej instrukcji nie może być powielana
bez zgody producenta.
Emos spol. s r.o. oświadcza, że wyrób IW003-DCF + TW003 jest zgodny z wymaganiami
podstawowymi i innymi, właściwymi postanowieniami dyrektywy 1999/5/ES. Urządzenie
można bez ograniczeń użytkować w UE. Deklaracja zgodności jest częścią instrukcji albo
można ją znaleźć na stronach internetowych www.emos.cz.
Urządzenie można eksploatować na podstawie ogólnego zezwolenia nr VO-R/10/09.2010-11.
Zgodnie z przepisami Ustawy z dnia 29 lipca 2005 r. o ZSEiE zabronione jest
umieszczanie łącznie z innymi odpadami zużytego sprzętu oznakowanego
symbolem przekreślonego kosza. Użytkownik, chcąc pozbyć się sprzętu
elektronicznego i elektrycznego, jest zobowiązany do oddania go do punktu
zbierania zużytego sprzętu.
W sprzęcie nie znajdują się składniki niebezpieczne, które mają szczególnie
negatywny wpływ na środowisko i zdrowie ludzi.
VEZETÉK NÉLKÜLI METEOROLÓGIAI ÁLLOMÁS IW003-DCF + TW003 érzékelö
A meteorológiai állomás mutatja az órát, az időjárás-előrejelzést, adatokat a belső és külső hőmérsékletről, a páratartalomról, a légnyomásról, a holdfázisokat, valamint 2 db, ismételt ébresztés
funkcióval ellátott ébresztőórát tartalmaz. Memóriája tárolja a mért legalacsonyabb és legmagasabb értékeket. Mielőtt a terméket használni kezdi, figyelmesen olvassa el ezt az útmutatót.
SPECIFIKÁCIÓ
óra rádiójellel vezérelt
belső/külső hőmérséklet: 0 °C – +50 °C; -20 °C – +70 °C
hőmérséklet felbontás: 0,1 °C
vezeték nélküli érzékelő: átviteli frekvencia 433 MHz
a rádiójel hatósugara: akár 30 m szabad területen
érzékelők maximális száma: 3
relatív páratartalom: 20 % – 95 %
felbontás: 1 %
légnyomás mérési tartománya: 850 hPa - 1050 hPa
tápellátás:
főállomás: 3 x 1,5V AA elem
érzékelő: 2 x 1,5V AAA elem
méretek és tömeg:
főállomás: 120 x 55 x 170 mm; 253 g (elemek nélkül)
érzékelő: 60 x 23 x 110 mm; 46 g (elemek nélkül)
Az ikonok és gombok áttekintése
Előoldal
A – Gyenge elemek a külső érzékelőben
H
B – Max/min. külső hőmérséklet
C – A vezeték nélküli érzékelő száma
D – Max/min. légnyomás
E – Holdfázis
F – A légnyomás alakulása az elmúlt 12 órában
G – A DCF77 rádiójel ikonja
H – Az aktuális nap
I – 2. sz. ébresztő
J – 1. sz. ébresztő
K – Belső hőmérséklet
L – Belső páratartalom
M – Vihar ikonja
N – Időjárás-előrejelző ikon
O – Jegesedés ikonja
P – Külső hőmérséklet
R – Külső páratartalom
Hátoldal
A – elemtároló rekesz
B – SNOOZE/LIGHT gomb
9
Előoldal
A gomb megnyomása röviden
A gomb megnyomása
hosszan (3 másodperc)
-/°C/°F/WAVE
1 lépés vissza/A hőmérséklet
megjelenítése °C vagy °F-ben
A DCF77 jel keresése
+/CHANNEL 1 lépés előre/az érzékelő száma Az érzékelő keresése
SET/ALM SET Az 1, 2. sz. ébresztő beállítása Óra, dátum beállítása
ALM ON.OFF Az 1, 2. sz. ébresztő aktiválása
MEM
A max/min. hőmérséklet
és páratartalom megjelenítése
RESET Minden érték törlése
Vezeték nélküli érzékelő
LED dióda RESET - az érzékelő resetelése
HOLDER - az érzékelő állványa Elemtároló rekesz
CHANNEL 1,2,3 - Az érzékelő csatornáinak váltása
Üzembe helyezés
Az első üzembe helyezéskor tegye be az elemeket (3x AA) először a meteorológiai állomásba,
majd azután a vezeték nélküli érzékelőbe (2x AAA).
Az elemek behelyezésekor ügyeljen a helyes polaritásra, nehogy károsodjon a meteorológiai
állomás vagy az érzékelő.
Kizárólag azonos típusú alkáli elemeket használjon, ne használjon tölthető elemeket.
A két egységet helyezze egymás mellé. A meteorológiai állomás max. 3 percig keresi az
érzékelő által adott jelet.
Ha nem találja az érzékelő által adott jelet, a keresés megismétléséhez nyomja meg
hosszan a CHANNEL gombot.
Ha a kijelzőről eltűnik a külső hőmérsékletre vonatkozó adat, nyomja meg a meteorológiai
állomáson a RESET gombot.
A készülék kitöröl minden értéket és újra megkeresi az érzékelő által kibocsátott jelet.
Javasoljuk, hogy az érzékelőt a ház északi oldalán helyezze el. Az érzékelő hatósugara
beépített területeken nagymértékben csökkenhet. Az érzékelő csepegő víznek ellenáll,
de ne tegye ki az eső tartós hatásának. Az érzékelőt ne helyezze fém tárgyakra, mert az
csökkenti a sugárzás hatótávolságát. Ha az A mezőben megjelenik a gyenge elemeket jelző
ikon, cserélje ki az elemeket az érzékelőben.
Csatornaváltás és további érzékelők csatlakoztatása
A meteorológiai állomás hátoldalán levő CHANNEL gomb megnyomásával válassza ki az
érzékelő kívánt csatornáját – CH1, CH2 vagy CH3. Azután nyomja meg hosszan a CHANNEL
gombot, az ikon villogni kezd.
Az érzékelő hátoldalán vegye le az elemtartó rekesz fedelét. Állítsa be az érzékelő kívánt
csatornaszámát – 1, 2, 3. Tegye be az elemeket (2x AA) az érzékelőbe és helyezze vissza
a fedelet.
Ha nem kerül sor az érzékelő által kibocsátott jel keresésére, nyomja meg az érzékelőn
a RESET gombot.
Rádióvezérelt óra (DCF77)
A meteorológiai állomáshoz való csatlakozás után az érzékelő automatikusan elkezdi keresni
a DCF77 jelet 7 percen keresztül. Villogni kezd az ikon.
Ezalatt az idő alatt semmilyen más érték nem frissül a kijelzőn és a gombok sem működnek (kivéve a SNOOZE/LIGHT). Hibás jel esetén az ▲ ikon villog. Nem találja a jelet – az
ikon eltűnik.
Megtalálta a jelet – az ikon abbahagyja a villogást és megjelenik a pontos idő. A DCF77
jel ismételt kereséséhez nyomja meg hosszan a WAVE gombot. A DCF77 jel keresésének
leállításához nyomja meg újra hosszan a WAVE gombot. A DCF77 jel minden nap, reggel
2:00 és 3:00 óra között szinkronizálásra kerül. A megfelelő vétel érdekében ne tegye az
érzékelőt elektromos fogyasztók vagy mobiltelefonok közelébe.
Belső és külső hőmérséklet, páratartalom
A belső hőmérséklet és páratartalom a K, L mezőkben jelenik meg.
A külső hőmérséklet és páratartalom a P, R mezőkben jelenik meg.
A °C/°F/WAVE gomb megnyomásával választhatja ki a hőmérséklet mértékegységét
(°C/°F).
Hőmérséklet és páratartalom alakulásának iránya
A nyíl a hőmérsékleti és páratartalom értékek tendenciáját mutatja a konkrét érzékelőn
vagy állomáson.
A kijelző jelzése
Hőmérséklet és páratartalom alakulásának
iránya
Emelkedő Állandó Süllyedő
Légköri nyomás
A légköri nyomás hPa-ban, valamint a légnyomás alakulásának grafikonja az elmúlt 12 óra
során az F mezőben jelenik meg.
A meteorológiai állomás más helyre helyezése befolyásolja a mért értékeket. A mérés
12 – 24 óra alatt stabilizálódik.
Holdfázis
A holdfázist az E mező mutatja.
Az egyes holdfázisokat az alábbi ikonok jelzik:
Újhold Távozó Első Növekvő Teli- Csökk. Utolsó Közelgő
újhold negyed telihold hold telihold negyed újhold
A mért legmagasabb/legalacsonyabb értékek megjelenítése
A mért legmagasabb és legalacsonyabb hőmérsékletet, páratartalmat és légnyomást a
MEM gomb megnyomásával jelenítheti meg.
A MEM gomb hosszan történő megnyomásával kitörölheti az elmentett értékeket a
memóriából.
Az idő kézi beállítása
Nyomja meg hosszan a SET gombot. A + és - gombokkal állítsa be az év, hónap, nap,
időeltolódás, időformátum, óra, perc értékeket.
Az egyes értékek között a SET gomb megnyomásával lépegethet.
Az ébresztő beállítása
A meteorológiai állomás 2 ébresztőóra beállítását teszi lehetővé. Az ALM SET gombbal
válassza ki az ébresztőórát - A1, A2.
Nyomja meg hosszan az ALM SET gombot. A + és - gombokkal állítsa be az ébresztés
idejét, az egyes értékek között a SET gombbal lépegethet. Azután állítsa be, mely napokon
csengessen az ébresztő.
Három lehetőség van:
MON, TUE, WED, THU, FRI, SAT, SUN Az ébresztő egész héten (H-V) működik
MON, TUE, WED, THU, FRI Az ébresztő munkanapokon (H-P) működik
SAT, SUN Az ébresztő hétvégén (Szo-V) működik
Az ALM ON.OFF gombbal aktiválhatja az 1., 2. sz. ébresztőórát, vagy mindkettőt. Megjelenik
az I, J ikon. Ugyanazzal a gombbal szüntetheti meg az aktiválást – az ikon eltűnik.
Ismételt ébresztés és kijelző-háttérvilágítás funkció
(SNOOZE/LIGHT)
Amikor cseng az ébresztő, nyomja meg a SNOOZE gombot (enyhén nyomja lefelé a meteorológiai állomás felső részét). A csengés elhalasztódik 5 perccel, az 1,2 ébresztő ikonja
villogni fog. A SNOOZE funkció megszüntetéséhez nyomja meg az ALM ON.OFF gombot.
Az ébresztő másnap szólal meg újra.
A kijelző háttérvilágításához nyomja meg a SNOOZE/LIGHT gombot.
A háttérvilágítás időtartama 5 másodperc.
Időjárás-előrejelzés
Az állomás a légköri nyomás változásai alapján jelzi előre az időjárást a következő 12
- 24 órára.
Az időjárás-előrejelzés pontossága 70 – 75 %. Tekintettel arra, hogy időjárás-előrejelzés
nem 100%-os bizonyosságú, sem a gyártó, sem a forgalmazó nem lehet felelős az időjárás
pontatlan előrejelzése miatt keletkezett károkért. A meteorológiai állomás első beállításakor vagy resetelés után kb. 24 óráig tart, mire az állomás helyes előrejelzést kezd adni.
A meteorológiai állomás 5 ikonnal jelzi az időjárást és 3 ikonnal a légnyomást
A kijelző jelzése
Időjárási tendencia javulás Nem változik romlás
Napos Felhős Borult Eső Vihar Jegesedés
Az ikon +3 °C alatti
hőmérséklet esetén
jelenik meg.
Problémamegoldás:
Ha a meteorológiai állomás nem mutatja a helyes időt vagy a hőmérsékletet, nyomást,
páratartalmat, ill. az időjárást előrejelző ikont, nyomja meg a RESET gombot.
Helytelen időkijelzés vagy a szinkronizálás kiesése belső elektromágneses interferencia
következtében fordulhat elő.
Karbantartás és ápolás
A terméket úgy alakítottuk ki, hogy megfelelő bánásmód esetén évekig megbízhatóan
működjön. Néhány tanács a megfelelő kezeléshez:
• Mielőtt a terméket használni kezdi, figyelmesen olvassa el a kezelési útmutatót.
• Ne tegye ki a terméket közvetlen napfény, extrém hideg és nedvesség, valamint hirtelen hőmérsékletváltozások hatásának (ezek a körülmények csökkentik az érzékelés
pontosságát).
• Ne tegye a készüléket rezgésekre vagy rengésekre hajlamos helyekre – ezek a termék
megrongálódását okozhatják.
• Ne tegye ki a terméket túlzott nyomásnak, ütéseknek, pornak, magas hőmérsékletnek
vagy páratartalomnak – ezek zavart okozhatnak a termék működésében, csökkenthetik
az élettartamát, károsíthatják az elemeket, ill. a műanyag alkatrészek deformálódását
okozhatják.
• A terméket ne tegye ki esőnek vagy nedvességnek, nem kültéri használatra készült.
• Ne helyezzen a termékre nyílt láng forrást, pl. égő gyertyát, stb.
• Ne tegye a terméket olyan helyre, ahol nem biztosított a levegő megfelelő áramlása.
 Loading...