

Page 1
INSTRUCTION
MANUAL
GEBRAUCHSANWEISUNG----
MANUEL
D'INSTRUCTION
MODO
DUSO-
---
101,/
300
....
3
00
-
-
--
-
-
/-
-
Page 2
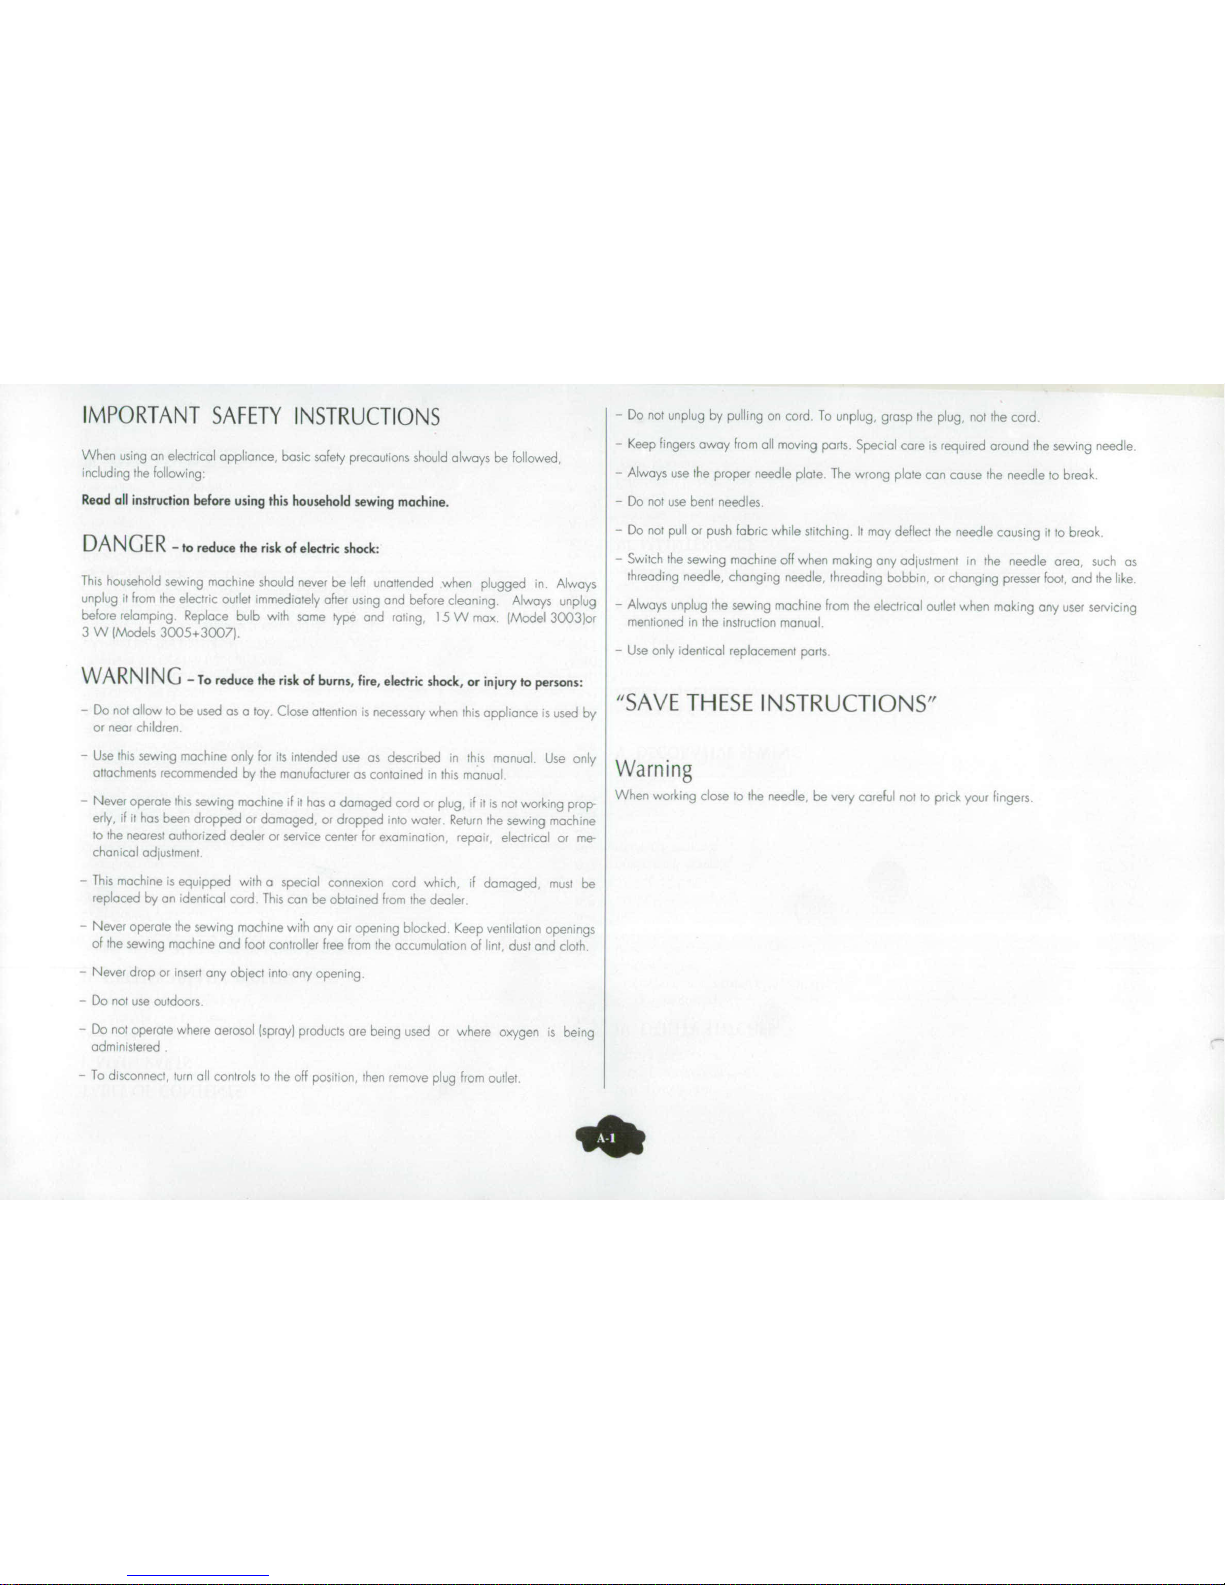
IMPORTANT
SAFETY
INSTRUCTIONS
-
Do
not
unplug
by
pulling
on
cord
To
unplug,
grasp
the
plug,
not the
cord.
-
Keep
fingers
away
from
all
moving
parts.
Special
care
is
required
around
the
sewing
needle
When
using
an
electrical
appliance,
basic
safety
precautions
should
always
be
followed,
including
the
following:
-
Always
use the
proper
needle
plate
The
wrong
plate
can
cause
the
needle
to
break.
Read
all
instruction
before
using
this
household
sewing
machine.
-
Do
not
use
bent
needles
-
Do
nor
pull
or
push
fabric
while
stitching.
It
may
deflect
the
needle
causing
it
to
break.
DA
NCGER
-
to
reduce
the
risk
of
electrk•
shock:
-
Switch
the
sewing
machine
off
when
making
any
adjustment
in
the
needle
area,
such
as
This
household
sewing machine
should
never
be
left
unattended
when
plugged
in.
Always
threading
needle,
changing
needle,
threading
bobbin,
or
changing
presser
foot,
and
the like
unplug
it
from
the
electric
outlet
immediately
after
using
and
before
cleaning.
Always
unplug
-
Always
unplug
the
sewing
machine
from
the
electrical
outlet
when
making
any
user
servicing
before
relamping
Replace
bulb
with
same
type
and
rating,
15
W
max
(Model
3003)or
mentioned
in
the
instruction
manual
3 W (Mdedls
3005+3007)
-
Use
only
identical
replacement
parts.
WARN
ING
-
To
reduce
the
risk
of
burns,
fire,
electric
shock,
or
injury
to
persons:
-
Do
not
allow
to
be
used
as
a
toy.
Close
attention
is
necessary
when
this
appliance
is
used
by
"SAVE
THESE
INSTRUCTIONS"
or
near
children,
-
Use
this
sewing
machine
only
for
its
intended
use
as
described
in
this
manual.
Use
only
attachments
recommended
by
the
manufacturer
as
contained
in
this
manual.
Warning
-
Never
operate
this
sewing
machine
if
it
has
a
damaged
cord
or
plug,
if
it
is
not
working
prop
When
workng
close
to
the
needle,
be
very
careful
not
to
prick
your
fingers
erly,
if
it
has
been
dropped
or
damaged,
or
dropped
into
water
Return
the
sewing
machine
to
the
nearest
authorized
dealer
or
service
center
for
examination,
repair,
electrical
or
me-
chanicol
adjustment
-
This
machine
is
equipped
with
a
special
connexion
cord
which,
if
damaged,
mustI
be
replaced
by
an
identical
cord
This
can
be
obtained
from
the
dealer.
Never
operate
the
sewing
machine
with
any
air
opening
blocked.
Keep
ventilation
openings
of
the
sewing
machine
and
foot
controller
free
from
the
accumulation
of
lint,
dust
and cloth
Never
drop
or
insert
any
object
into
any
opening
-
Do
not
use
outdoors
-
Do
not
operate
where
aerosol
(spray)
products
are
being
used
or
where
oxygen
is
being
administered
To
disconnect,
turn
all
controls
to
the
off
position,
then
remove
plug
from
outlet
ao
Page 3
TABLE
OF
CONTENTS
Sewing
an
Angle...........
....
A-16
Straight
Stitching
on
Heavy
Fabrics
...
A-16
1
MAIN
PARTS
Zigzag
Stitch
A
17
Designation of
Parts
....
A
3.4
Foot
Storage
Compartment
..
A-5
IV
UTILITY
STITCHES
Extension
Table (Accessory
BOX)-~
A-5
Quick Overcasting
. .... -
111',.....
A
17
Assembling
Stretch
Fabrics
(Model
3007)
-..........
..
A-
17
11
GETTING
READY
TO
SEW
Overedge
Stitch
...
A.17
Connecting
the
Machine
to
the
Power
Supply
....-....
A-6
Double
Overcasting
A-
I8
Needle
Up/Down
(Model
3007)
~..
.-...
A-6
Elastic Stitch.
-..........
A-18
Foot
Control
..... ...
.....
........
.....
A-6
Triple
Seam
..
......
. .........
A
19
Speed Reducer
....................
.......................
A-6
Interlock
Shell
Stitching
.......
A-19
S e w
in g L
ig
ht
...........
.........
...........
...........
........
.......
...........
. . . .... .A -6
Sew
ing o n B
utto
ns
..........
......
A
-2
0
F
o o
t P
re
ssu
re
..............
..............
................
...... ....
..........
..
.....
..
..... A -7 A uto m a
tic B utto
nho
le
..
............
2..............
....................
.. ..
... A
-2 0 , 2 1
D
ropp
ing
the Feed D og
........................
.. .
........
. .
........
......... ... ...
....... A -7 M a
nual
Buttonho
le
....
2...........................-
....
2............... A 2 2
To
Snap
Off
and
On
the
Presser
Foot,....
.... ......
A-7
Corded
Buttonhole
.A23
To
Rem
ove
and
Attach
the
Foot
Holder
............................
.....
....
A-8
Zipper
Insertion
.....
...................
............
A-23,
24
S e w ing
in R e
ve rse
........
I.........
....
........
.... ..
.............
.....
....................
A
-8 N a
rrow
H e m ....
...............
...
.............
.... .........
..............
A 2 5
S e a m G u
id e ........
...............
............................ .... . . . . . . . .
. . . . . . . . . . . . . ........... A
-8
B
lin d S
titc h ......
. . . . . . . . ..
. . . . . . . . .
.......
I.. ''.........................
......... .. .. A -2
6
C h a n g
in g the N e e d le
.
A
-........
S.......................................................
.................
.... A -8
Fabrics,
Threads
and
Needles
.......................
.................
........
...
A-9
V
D
ECO
RATIVE
SEW
IN
G
Placing
the Thread S pool
.............. .............
..............
........
........
...... A -9
Decorative
Sa
tin
Stitch
............................
....................................
D
ec...o.rat...
A 2 7
A
dditional
Spool
Pin
.A.. ....
.................................
.
.......
A
-9
Stretch
Stitch
Patterns
...................
................
..... A 27
R e m
oving
the
B
ob b in
.................
.......
...... .................
.........................
.. ...... A -9 A d
justing
Stretch
Stitch
Ba
la
nce
.........
..
...........
............................
.... . . . . ..
. . . . .A -2
7
W
ind ing
the B o
b b
in
(M o d e l
3003
) -. ... .... ..
............
.........
.......
...................
. .... A -10
Sm
ocking
.....
..........
...............
.................... ......
.. .. . . . . .. . . ............... A -2
8
Inserting
the
Bobbin
(ModelA uting
Stretch
Stitch.........
.. .. .Balance..... A... 2n.......................
A-28
W
inding
the
Bobbin
(M
odel
3005+3007)
.....................
A-11
Pin-Tucking
.............
.....................................
A-29
Inserting
the
Bobbin
(Model
3005+3007)
.....
............... . ...
A-11
Shell
Tuck
...................
A
29
Threading
the M achine
.................................
.. .
..... ........
A-12
Fagoting
(M
odel
3007)
............................
................ A 29
Automatic Needle
Threader
(Model
3005+3007)
A-13
Applications
..............
...........................................
A-30
Drawing Up the
Bobbin
Thread
..........
A-14
Assembling
Edge-to-Edge
.....................................
A-30
B
alancing
the
Thread
Tension
....... ....
............
......
.............................
...... A -14
Pattern
Selection
..- .... ......................
A-15
VI
MAINTENANCE
Stitch W idth
....... ............
A
-..................
......
.........
. ..
C leaning
the
Bobbin
C
ase
...................................
A
-31
S
tiict
L
e n ghe ..
..... .....
....
.....
....
.....
.....
....
.....
....
.....
.....
....
.....
.....
....
.....
....
.....
.H
oo1kCle-in
g h e.Ho
k ..
.....
....
.....
.....
....
.....
....
.....
.....
....
.....
....
..... .....
....
..... A .3
Decentering
the
Needle
..........................................
.................
.....
.
A-15
Refitting
the
Bobbin
C
ase
..........
A-3l1
III
BA SIC
SEW
IN
G
M
inor
Disorders
............................................
..............
..
A-32,
33
Straight
Stitch
...........
........
A-16
Page 4
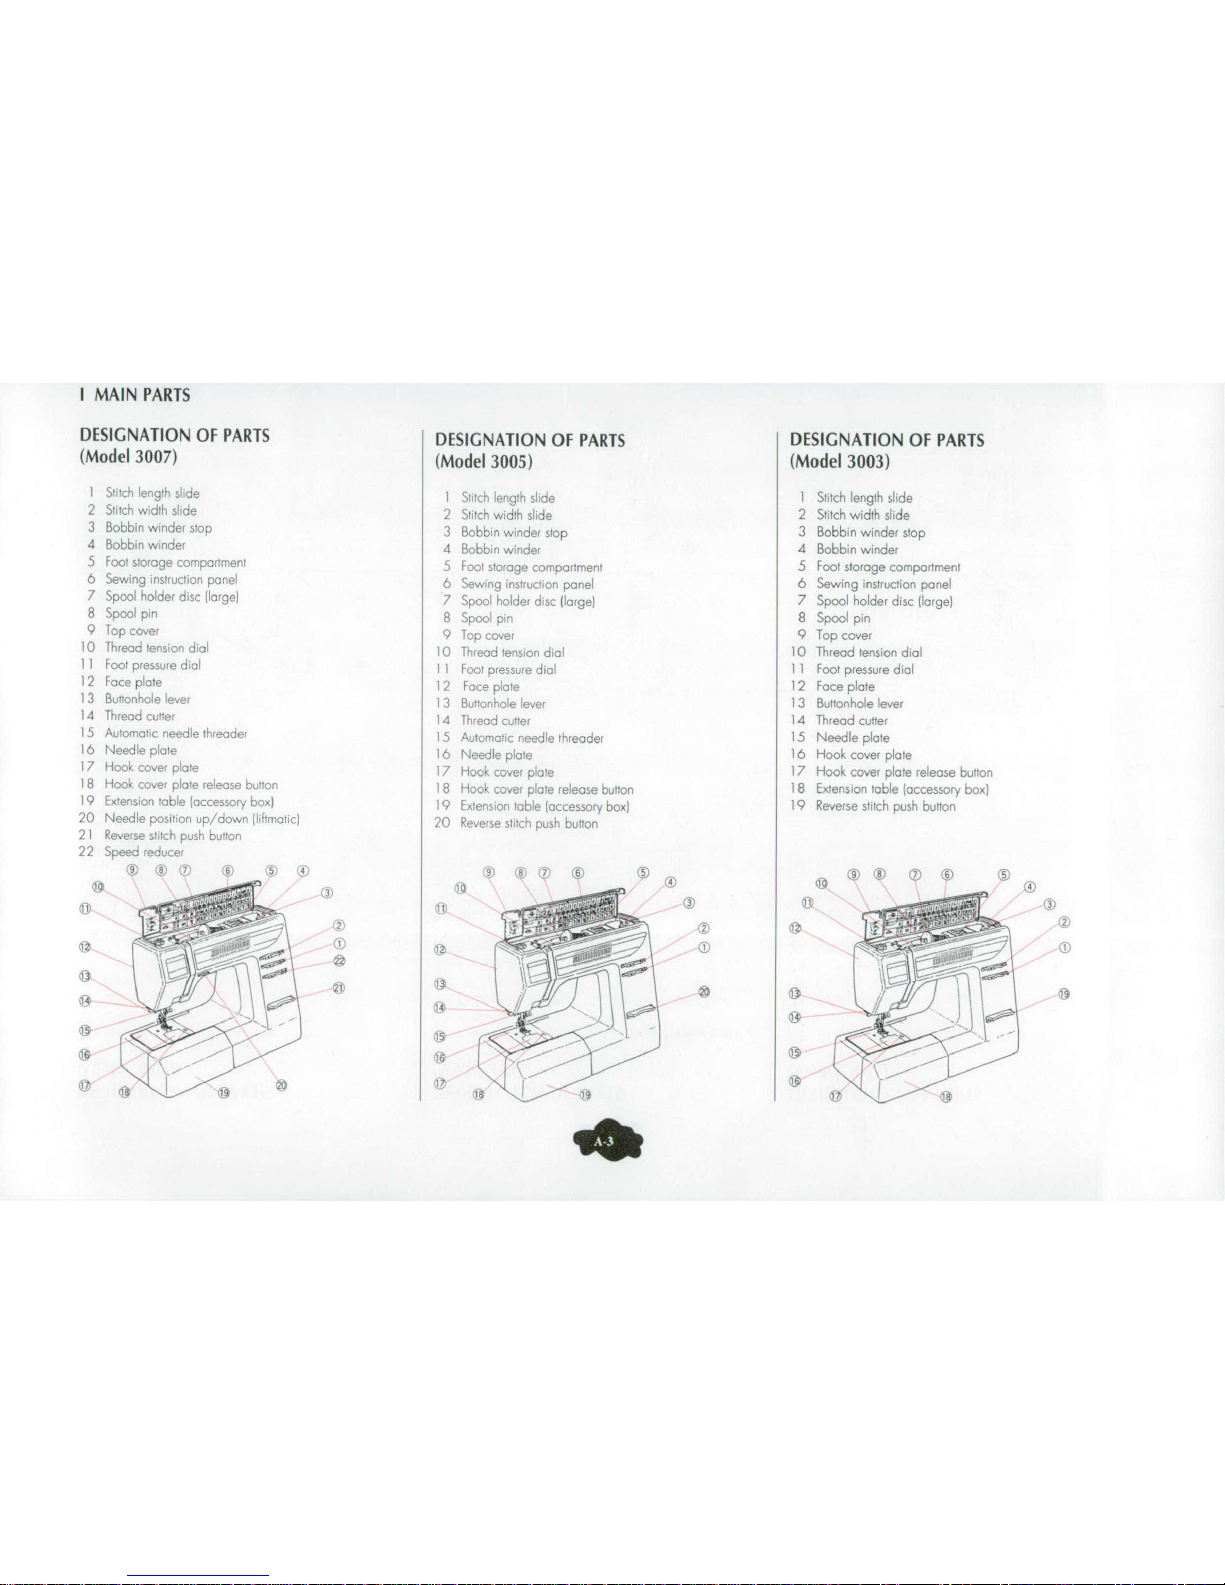
I
MAIN
PARTS
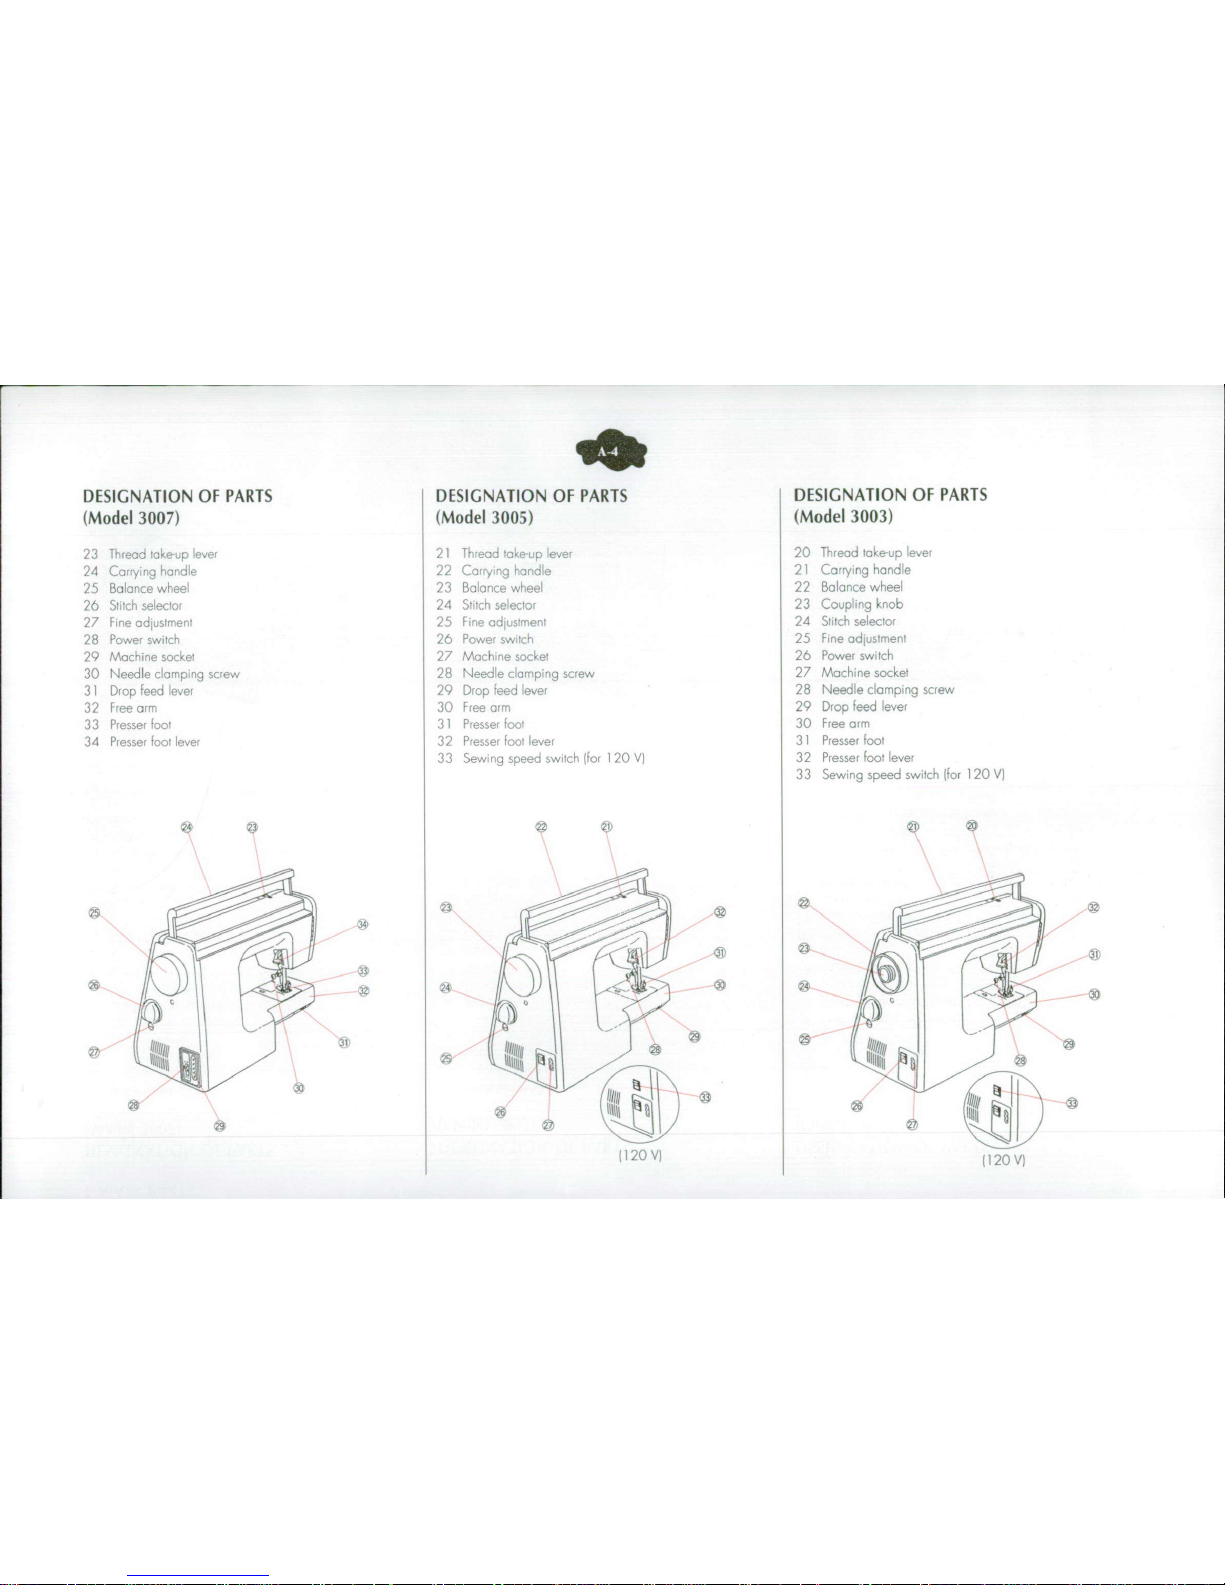
DESIGNATION
OF
PARTS
DESIGNATION
OF
PARTS
DESIGNATION
OF
PARTS
(Model
3007)
(Model
3005)
(Model
3003)
1
Stitch
length
slide
I
Stitch
length
slide
I
Stitch
length
slide
2
Stitch
width
slide
2
Stitch
width
slide
2
Stitch
width
slide
3
Bobbin
winder
stop
3
Bobbin
winder
stop
3
Bobbin
winder
stop
4
Bobbin
winder
4
Bobbin
winder
4
Bobbin
winder
5
Foot
storage
compartment
5
Foot
storage
compartment
5
Foot
storage
comportment
6
Sewing
instruction
panel
6
Sewing
instruction
panel
6
Sewing
instruction
panel
7
Spool
holder
disc
(large)
7
Spool
holder
disc
(large)
7
Spool
holder
disc
(large)
8
Spool
pin
8
Spool
pin
8
Spool
pin
9
Top
cover
9
Top
cover
9
Top
cover
I0
Thread
tension
dial
10
Thread
tension
dial
10
Thread
tension
dial
1 I
Foot
pressure
dial
1
I
Foot
pressure
dial
1 I
Foot
pressure
dial
12
Face
plate
12
Face
plate
12
Face
plate
13
Buttonhole
lever
1 3
Buttonhole
lever
1 3
Buttonhole
lever
14
Thread
cutter
14
Thread
cutter
14
Thread
cutter
I5
Automatic
needle
threader
15
Automatic
needle
threader
15
Needle
plate
16
Needle
plate
16
Needle
plate
16
Hook
cover
plate
17
Hook
cover
plate
17
Hook
cover
plate
17
Hook
cover
plate
release
button
18
Hook
cover
plate
release
burton
I8
Hook
cover
plate
release
button
18
Extension
table
(accessory
box)
19
Extension
table
laccessory
box)
19
Extension
table
(accessory
box)
19
Reverse
stitch
push
button
20
Needle
position
up/down
(/iltmoaic)
20
Reverse
stitch
push
button
21
Reverse
stitch
push
button
22
Speed
reduce
@.
"
Q,
y....
>@
t
@
,'---Ž<
14
"d(t
Nte
14
2*4
Page 5
DESIGNATION
OF
PARTS
DESIGNATION
OF
PARTS
DESIGNATION
OF
PARTS
(Model
3007)
(Model
3005)
(Model
3003)
23
Thread
take
up
lever
21
Ti-ead
ua
e
ap
lve,
20
Thread
take-co
lever
24
Carr/ing
handie
22
Caryng
randle
21
Carrving
handle
25
Balance wheel
23
Balance
wheel
22
Balance
wheel
26
Stitch
selector
24
Stitch
selector
23
Coupling
knob
27
Firre
adjustrmenr
25
Fine
adrstmenr
24
Sltlch
selector
28
Power
switcfh
26
Power
swtch
25
Fine
adjustment
29
Machine
socket
27
Machine
socket
26
Power
switch
30
Needle
clamping
screw
28
Needle
clamping
screw
27
Machine
socket
31
Drop
feed
lever
29
Drop feed
lever
28
Needle
clamping
screw
32
Free
arm
30
Free
arm
29
Drop
feed lever
33
Presser
foor
31
Presse
[oor
30
Free
arm
34
Presser
foot
lever
32
Presser
foot
lever
31
Presser
foot
33
Sewing
speed
switch
ifor
120
V)
32
Presser
foot
lever
33
Sewing
speed
switch
(for
120
V)
'34
ý
S.
r)
-A
2 VII
12V
l120OV)
(120
V)
Page 6
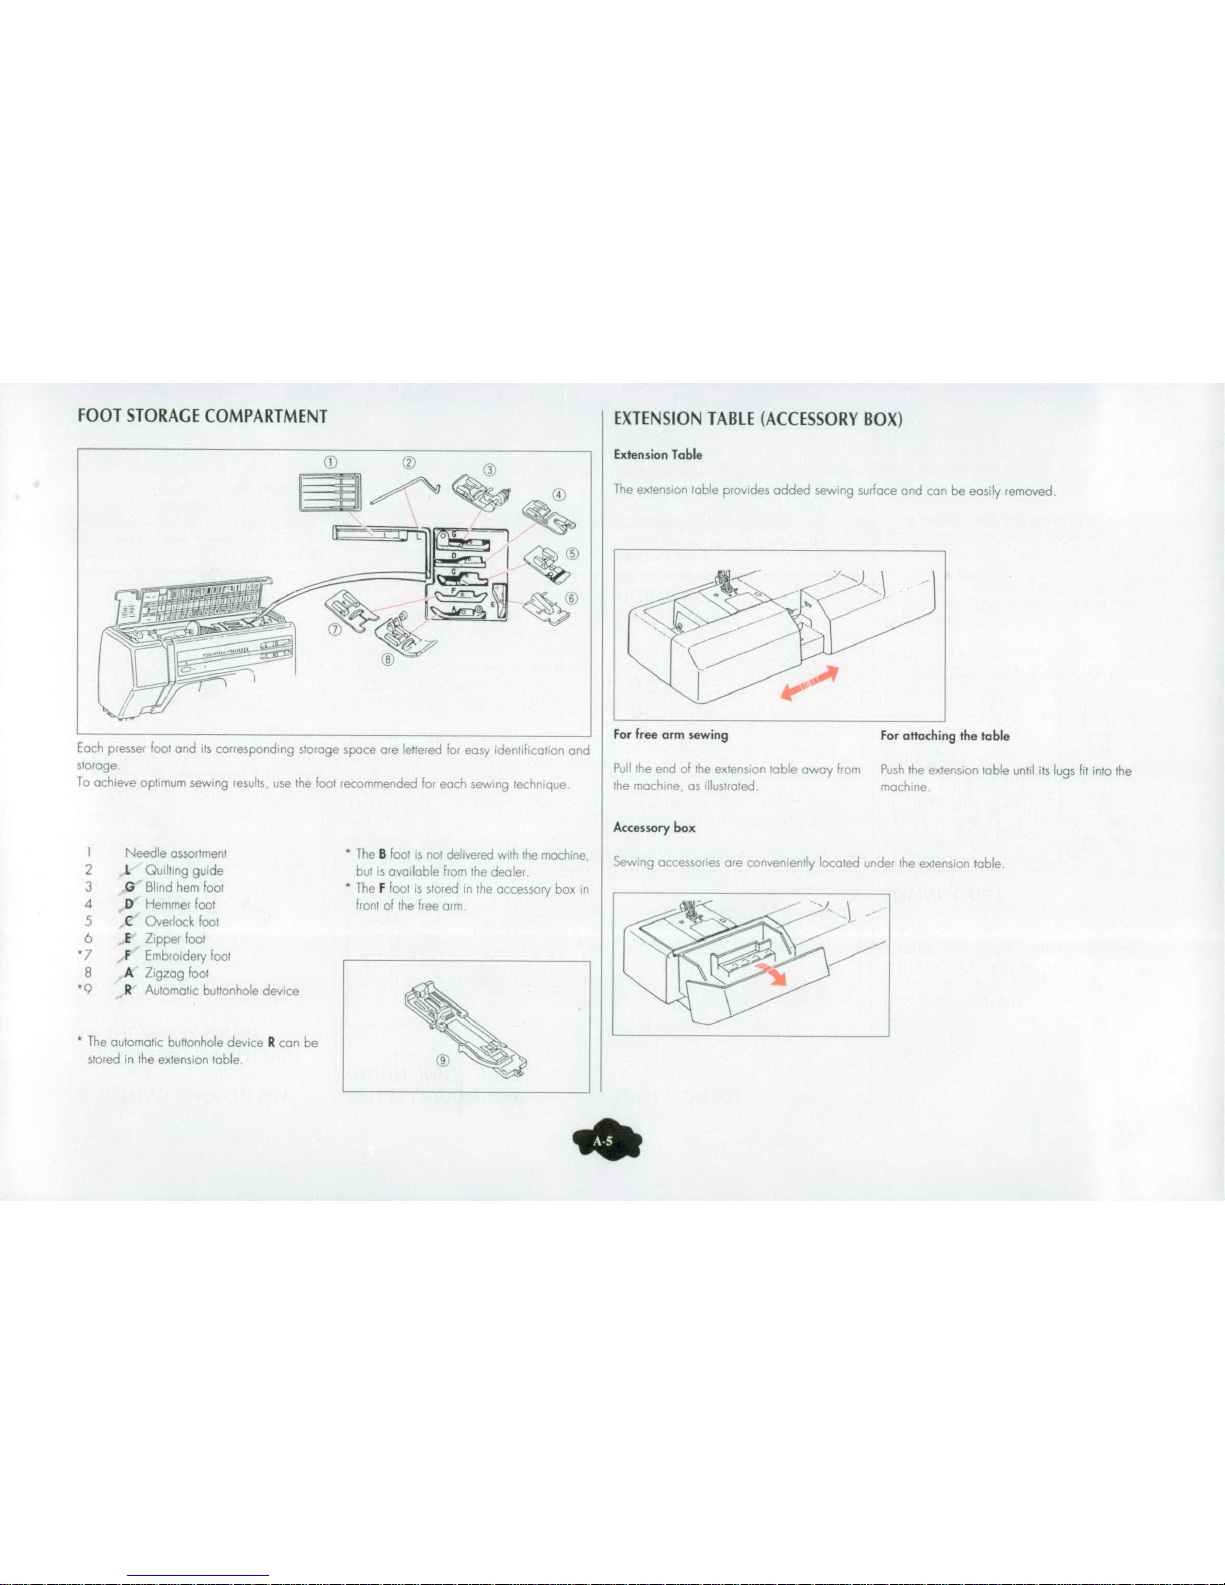
FOOT
STORAGE
COMPARTMENT
EXTENSION
TABLE
(ACCESSORY
BOX)
J)
C.3
Extension
Table
4ý"
ý
The
extension
table
provides
added
sewing
surface
and
can
be
easily
removed,
P--
-
For
free
arm
sewing
For
attaching
the
table
Each
presser
foot and
its
corresponding
storage
space
are
lettered
for
easy
idenlification
and
storage,
Pull
the
end
of
the
ex-ension
table
away
from
Push
the
extension
table
until
its
lugs
fit
into
the
To
achieve
optimum
sewing
results,
use
the
foot
recommended
for
each
sewng
technique
the
mochine,
as
llusirated
machine
Accessory
box
I
Needle
assortment
*
The
B
foot
is
nor
delivered
with
the
machine,
Sewo
accessories
ore
conveniently
located
under
the
extension
table.
2
L
Quilting
guide
but
is
available
from
the
dealer
S
3
G
Blind
hem
foot
*
The
F
foot
is
stored
in
the
accessory
box
in
4
D
Hemmer
fool
front
of the
free
arm.
5
.C'
Overlock
foot
6
.1
Zipper
foot
'7
j
Embroidery
foot
l_-__
_"
a
A
Zigzag
foot
'9
lit,
Automattc
buttonhole
device
I
the
automatic
buttonhole
device
R
can
be
stored
in
the
extension
table.
ak
Page 7
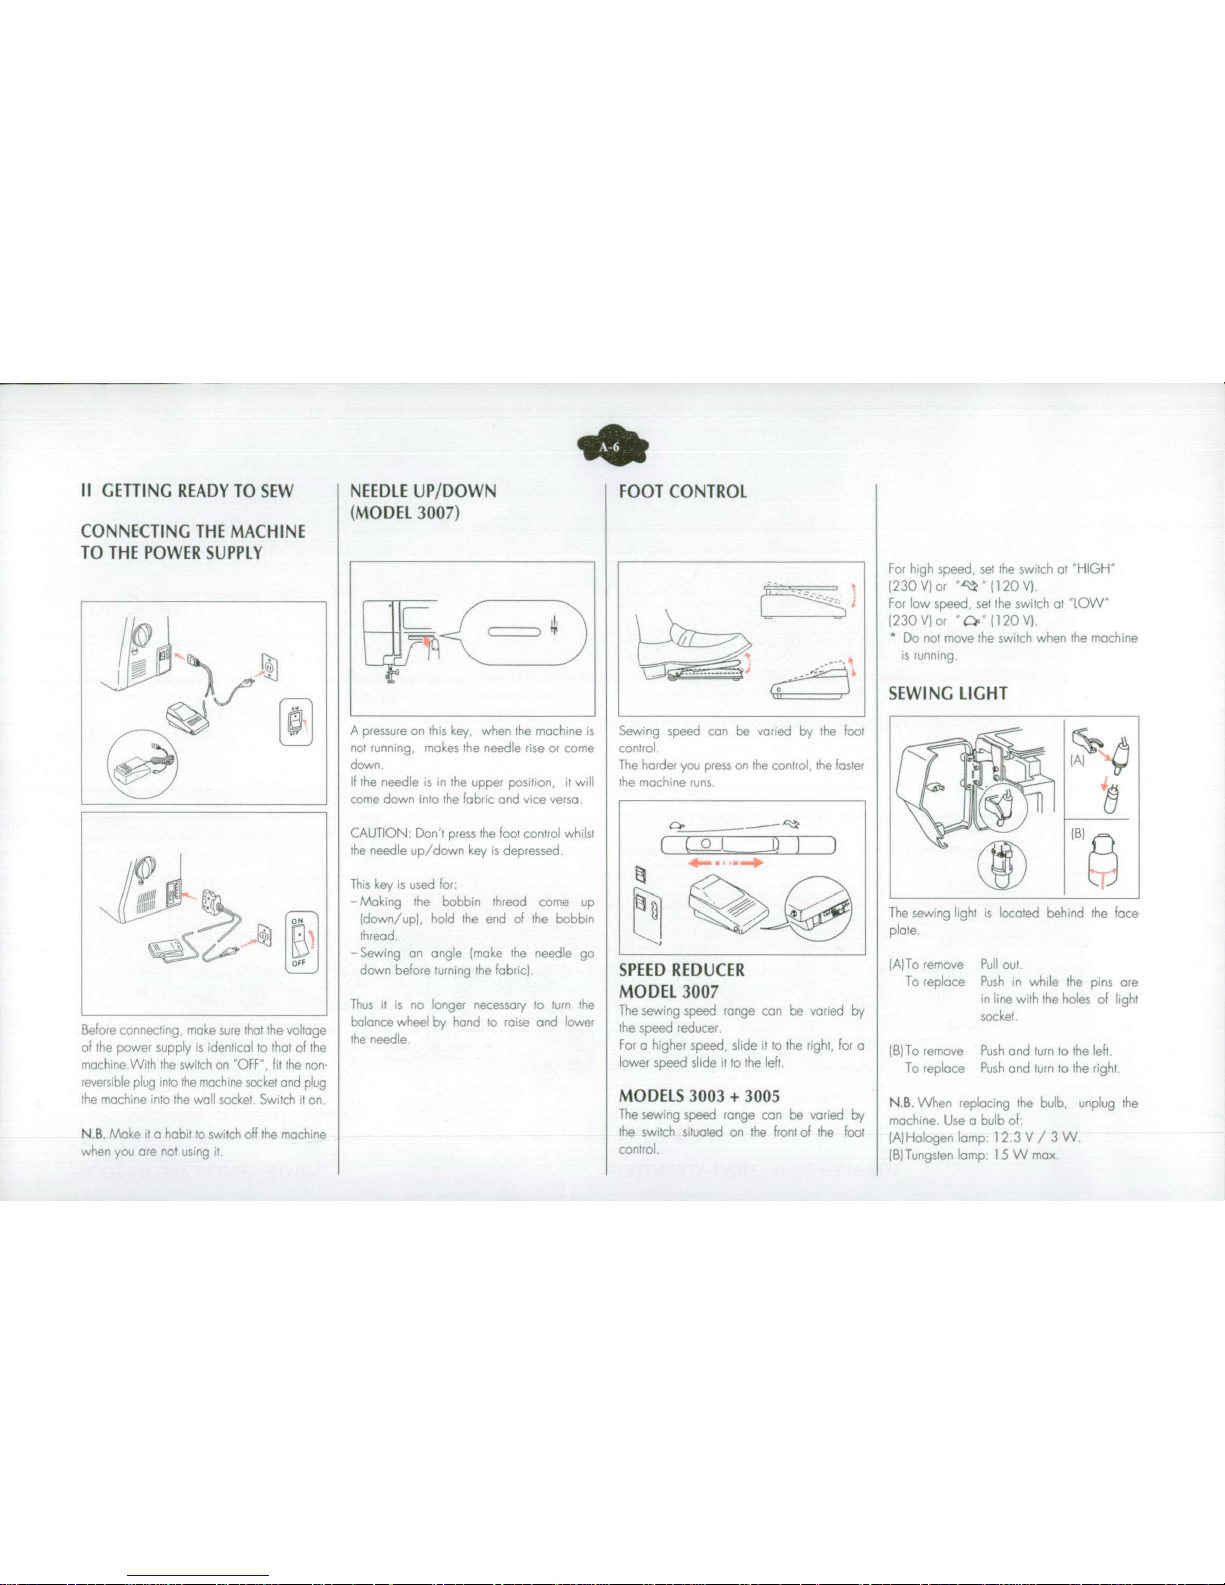
II
GETTING
READY
TO
SEW
NEEDLE
UP/DOWN
FOOT
CONTROL
(MODEL
3007)
CONNECTING
THE
MACHINE
TO
THE
POWER
SUPPLY
for
high
speed,
set
the
switch
at
'HIGH"
-
.
(230V)
or
""
(120V),
For
low
speed,
set
the
switch
at
"LOW"
I~\(230
VI
of
'Cp
10V
*
Do
not
move
the
switch
when
the
machine
..-
"'s
running.
41J
.SEWING
LIGHT
•
-A
pressure
on
this
key,
when
the
machine
is
Sewing
speed can
be
varied
by
the
foot
not
running,
makes
the
needle
rise
or
come
control.
down
The
harde
you
press
on
the
control,
the
faster
-
If
;he
needle
is in
the
upper
position,
it
will
the
machine
runs
come
down
into
the
fabric
and
vice
versa
CAUTION:
Don't
press
the
foot
control
whilst
(B)
the
needle
up/down
key
is
depressed.
40
This
key
is
used
for,
l-'•lJ•
•
•Making
the
bobbin
thread
come
up
Maki•on/upg
hod
d
the
bobbin•• tThe
sewing
lght
is
located
behind
the
face
(down/up),
hold
the
end
of
thCobbi
thread.
plate.
-Sewing
an
angle
(make
the
needle
go
down before
turning
the
fabric).
SPEED
REDUCER
)A)To
remove
Pull
out
MODEL
3007
To
replace
Push
in
while
the
pins
are
MODEL
3007in
line
with
the
holes
of
light
Thus
it
is
no
longer
necessary
to
turn
the
The
sewing
speed
range
can
be
varied
by
inliet
balance
wheel
by
hand
to
raise
and
lower
the
speed
reducer
Bef~or
connecting,
make
sure
tha I the
voltage
the
needle.
tesedrdcr
of
the
power
supply
is
identical
to
that
of
the
For a higher
speed,
slide
it
to
the
right,
for
0
FB)
To
remove
Push
and
turn
to
the
left.
machine
With
the
switch
on
"OFF",
fit
the
non
lower
speed
slide
it
to
the
left.
To
replace
Push
and
turn
to
the
right.
reversible
plug
into
the
machine
socket
and
plug
the
machine
into
the
wail
socket
Switch
it
on
MODELS
3003
+
3005
N.B.
When
replacing
the
bulb,
unplug
the
The
sewing
speed
range
can
be
varied
by
machine
Use
a
bulb
of:
NB.
Make
ita
habit
to
switch
off
the
machine
the
switch
situated
on
the
front
of
the
foot
[A)Halogen
lamp
123V/3W
when
you are not
using
it
control.
(B}Tungsten
lamp:
15
W
max,
Page 8
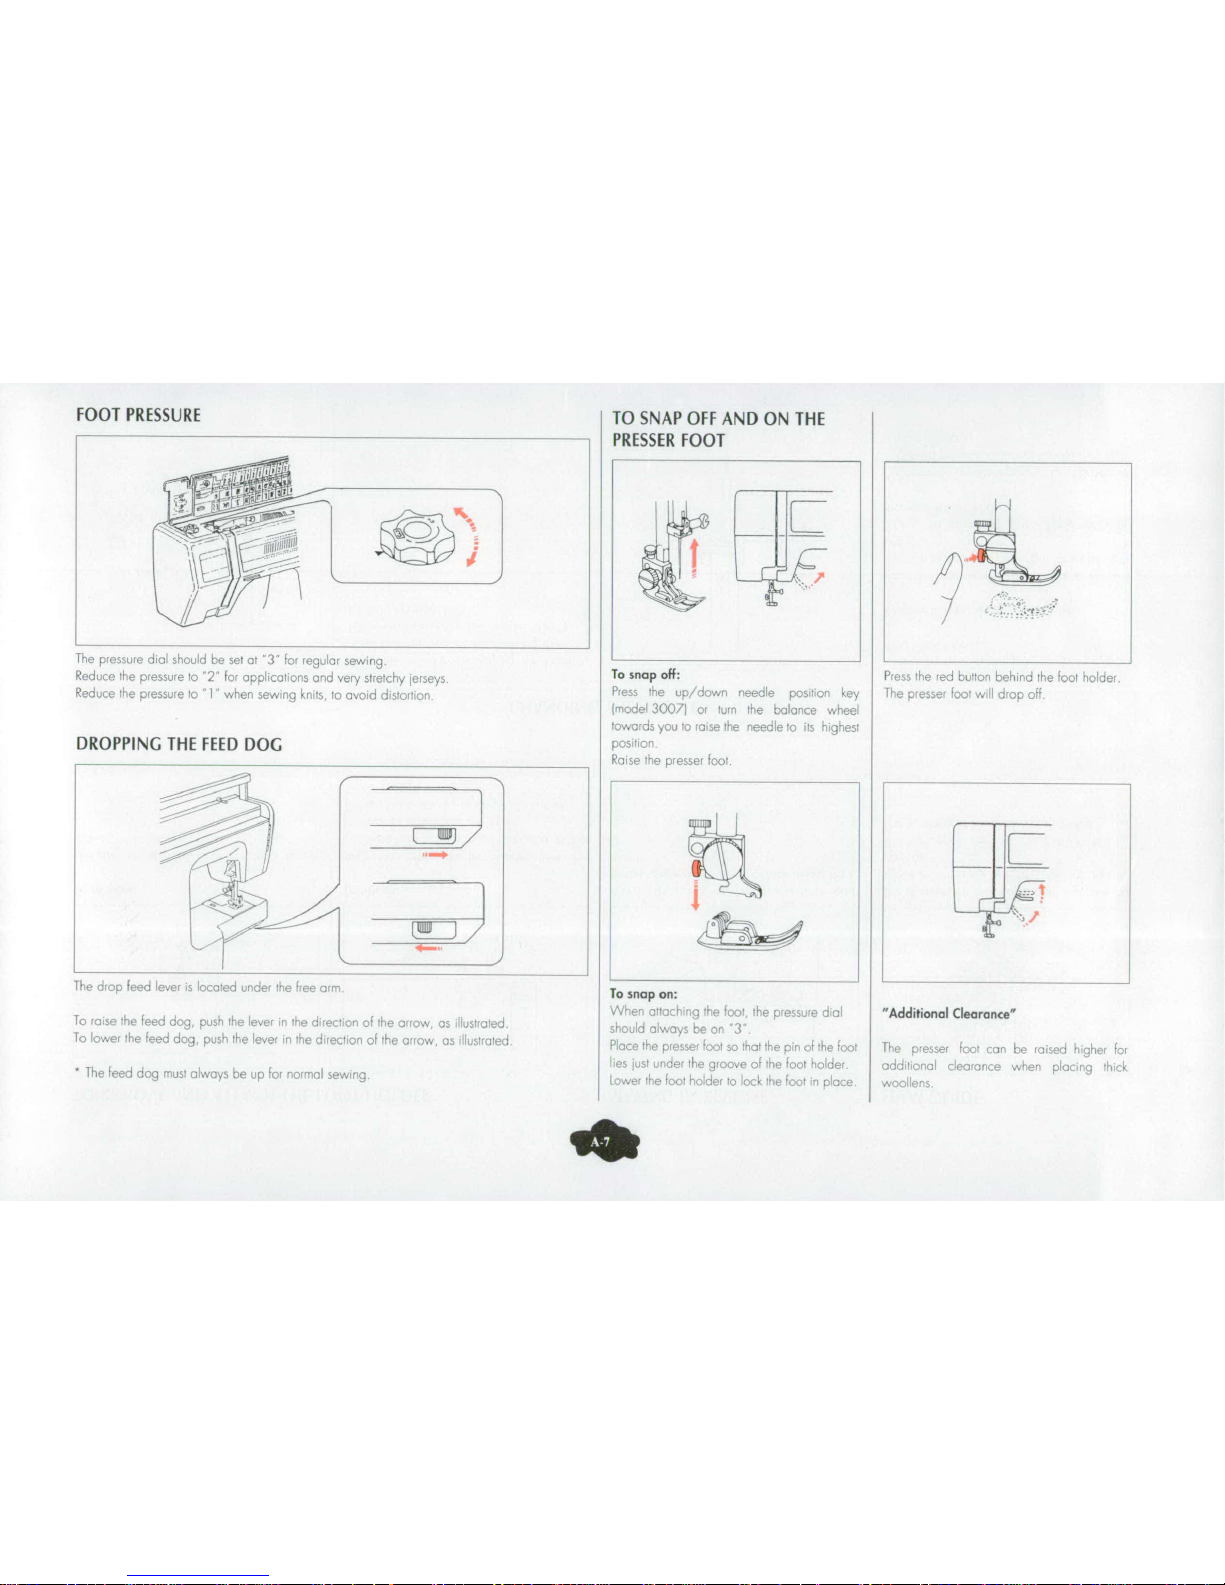
FOOT
PRESSURE
TO
SNAP
OFF
AND
ON
THE
PRESSER
FOOT
The
pressure
dial
should
be
set
at
'3"
for
regular
sewing.
..... ...............
Reduce
the
pressure
to
"2"
for
applications
and
very
stretchy
jerseys,
To
snap
off:
Press
the
red
button
behind
the
foot
hlcder
Reduce
the
pressure
to
"'
when
sewing
knits,
to
avoid
distottion
Press
the
up/down
needle
position
key
Ithe
Presser
root
wil
drop
off
!model
3007/
or
turn
the
balance
wheel
oowards
you
to
raise
the
needle
to
its
hkghesi
DROPPING
THE
FEED
DOG
poston
.....
_
-_
-_------Raise
the
presser
foot
.
•~
~~~~~~
~~~~~~
.........................
.........
x" I
•
L
-------
-
L
The
daop
feed
lever
is
lo
aed
u
der
the
free
arm
To
snap
on:
*,rn
!'&ýg
Irfotrheprssreda9
"Additional
Clearoncew
to
raise
the
feed
dog
push
the
lever
in
the
directon
of
the
arrow
as
rusvtred
should
always
be
on
"3'
To
lower
the
feed
dog,
push
'he
lever
in
the
drrecton
of
the
arrow,
as
ilusirated
Place
the
oresser
foot
so
that
the
pit
of
the
ootr
The
presser
foot
(an
be
raised
higher
lor
os
iust
under'
the
groove
of
the
foot
holder
aatid
ioral
clearance
when
placing
•,c;k
*
The
heed
dog
must
always
be
up
nor
normal
sewing
lower
the
foot
holder
to
ock
the
foot
in
oace
wooOners
ao
Page 9
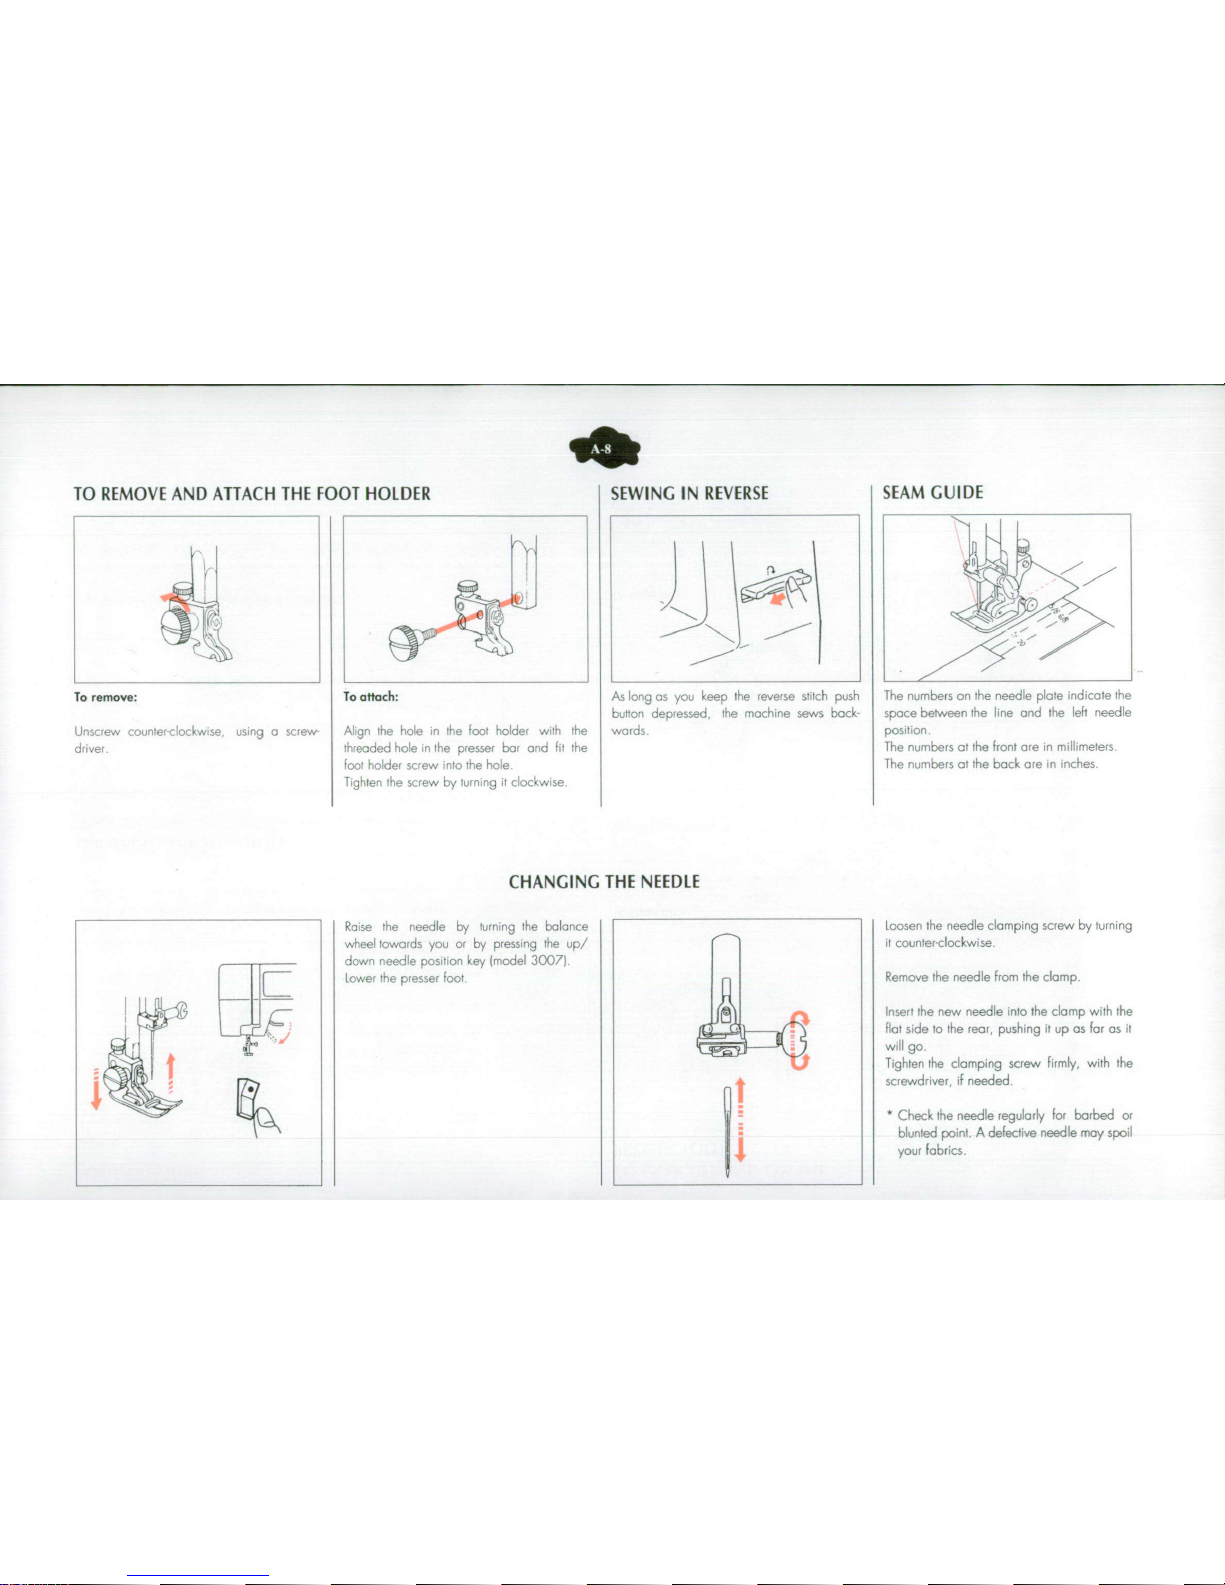
TO
REMOVE
AND
ATTACH
THE
FOOT
HOLDER
SEWING
IN
REVERSE
SEAM
GUIDE
To
remove:
To
attach:
As
long
as
you
keep
the
reverse
stitch
push The
numbers
on
the
needle
plate
indicate
the
button
depressed,
the
machine
sews
back- space
between
the
line
and
the
left
needle
Unscrew
counterclockwise
using a screw
Align
the
hole
in
the
foot
holder
with
the
wards
position.
driver,
threaded
hole
in
the
presser
bar
and
fit
the
The
numbers
at
the
front
are
in
millimeters.
foot
holder screw
into
the
hole.
The
numbers
at
the
back
are
in
,nches.
Tighten
the
screw
by
turning
it
clockwise
CHANGING
THE
NEEDLE
Raise
the
needle
by
turning
the
balance
Loosen
the
needle
clamping
screw
by
turning
wheel
towards
you
or
by
pressing
the
up/
it
counter-clockwise.
down
needle
position
key
(model
30071
L
I
Lower
the
presser
foot
Remove the
needle
from
the
clamp.
Insert
the
new
needle
into
the
clamp
with
the
flat
side
to
the
rear, pushing
it
up
as
far
as
it
will
go.
Tighten
the
clamping
screw
firmly,
with
the
screwdriver,
if
needed.
*Check
the
needle
regularly
for
barbed
or
blunted
point.
A
defeclive
needle
may
spoil
your
fabrics.
Page 10
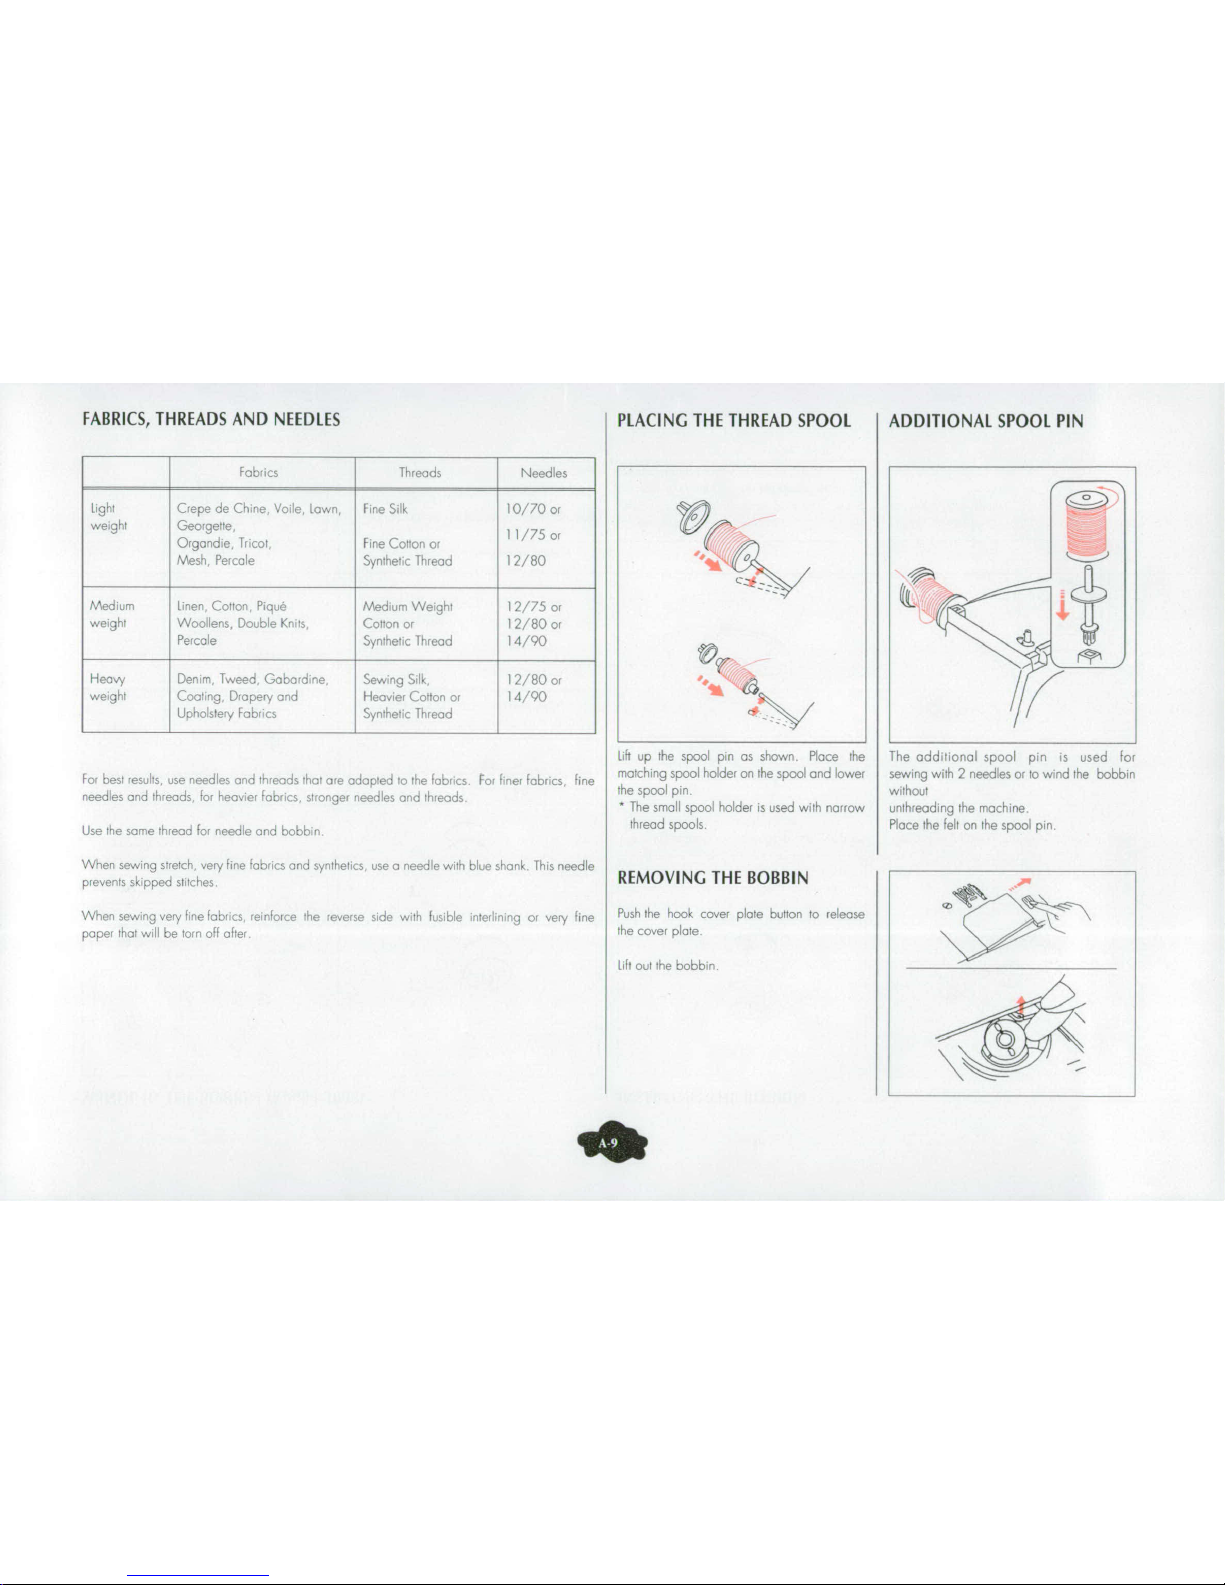
FABRICS,
THREADS
AND
NEEDLES
PLACING
THE
THREAD
SPOOL
ADDITIONAL
SPOOL
PIN
Fabics
Threads
Needles
Light
Crepe
de
Chine,
Voile,
lawn,
fine
Silk
10/70
or
,7
weight
Georgette,
11/75
or
Orgondie,
Trico,
fine Cotton
or
Mesh,
Percale
Synthetic
Thread
12/80
Medium
Linen,
Cotton
Piqu6
Medium
Weight
12/75
or
,-
weight
Woollens,
Double
Knits
Cotton
or
12/80
or
Percale
Synthetic Thread
14/90
Hear/
Denin,
Tweed,
Gabardine,
Sewing
Silk,
12/80
or
#
weight
Coatng,
Drapery
and
Heavier
Cotton
or
14/90
Upholstery
Fabrics
Synthetic
Thread
Lift
up
the
spool
pin
as
shown.
Place
the
The
additional
spool
pin
is
used
for
For
best
results,
use
needles
and
threads
that
are
adapted
to
the
fabrics.
For
finer
fabrics,
fine
matching
spool
holder
on
the
spool
and
lower
sewing with
2
needles
or
to
wind
the
bobbin
needles
and
threads,
for
heavier
fabrics,
stronger
needles
and
threads
the
spool pin
without
*
The
small
spool
holder
is
used
with
narrow
unthreading
the
machine.
Use
the
same
thread
For
needle
and
bobbin
thread
spools.
Place
the felt
on
the
spool
pin
When
sewing
stretch,
very
fine
fabrics and
synthelics,
use
a
needle
with
blue
shank.
This
needle
prevents
skipped
stitches.
REMOVING
THE
BOBBIN
When
sewing
very fine
fabrics,
reinforce
the
reverse
side
with fusible
intledining
or
very
fine
Push
the
hook
cover
plate
button to
release
paper
that
will
be
torn
off
afler
the
cover
plate.
tift
out
the
bobbin.
Page 11
Ca
3
4,
thP0"Rc-e
thre
LoLL>
+rt
bor>;
os
wtrh
te
Keep
s'owfy
puihng
th-e
thread
unr::i
it
ie
2
[>0w,
the
thread!
ifarn
tht
sar,.
trec
'nlea
rring~
ca
rio
the
notch
'13,
4Gui
eth~e
thread
around
the
LoLL n wir
LB
[ &
er
thrFead
guii"t7
/
Hoik
the
end
ofý
the
threaýd
and
depress
t4
e n fo
tru(c l
fat a (cu
i-Pe
oF
turns
5Passý
the
thread
thtrioghthe
hale
in:
thie
babbitt
C
t4
e
thren
Da ii
ens
the,
fear
cor
tra!
ak
neuban
wrill
stop
automaricatioly
when
i
6
Place-
t~h'
LbcbLer
on,
the
abobin
win)der
')A
and
rujsih
1
tot
the
rýr ht
3 $ rLL'>winder
Lack
-c
the,
el,
the
tx-rhr)F,
& r
co u the
t~hreag.
9
r
a>
V n he
balaince
K
nIth
oulig
Guide
the
thtreaoiro
the
notch
'A'
on
the
Puff
out
aout
15c-m
6"of
th-reard
and
roth'
4
e
r
ont,
Har!d
the
LoLbin
with
yorr
right
h~and
the
hook
cover
pi.Ote
i
~and
pukl
the
tread
to
the
left
arrd
througth
the
tenston
spring
blades.
Page 12

WINDING
THE
BOBBIN
(Models
3005
+
3007)
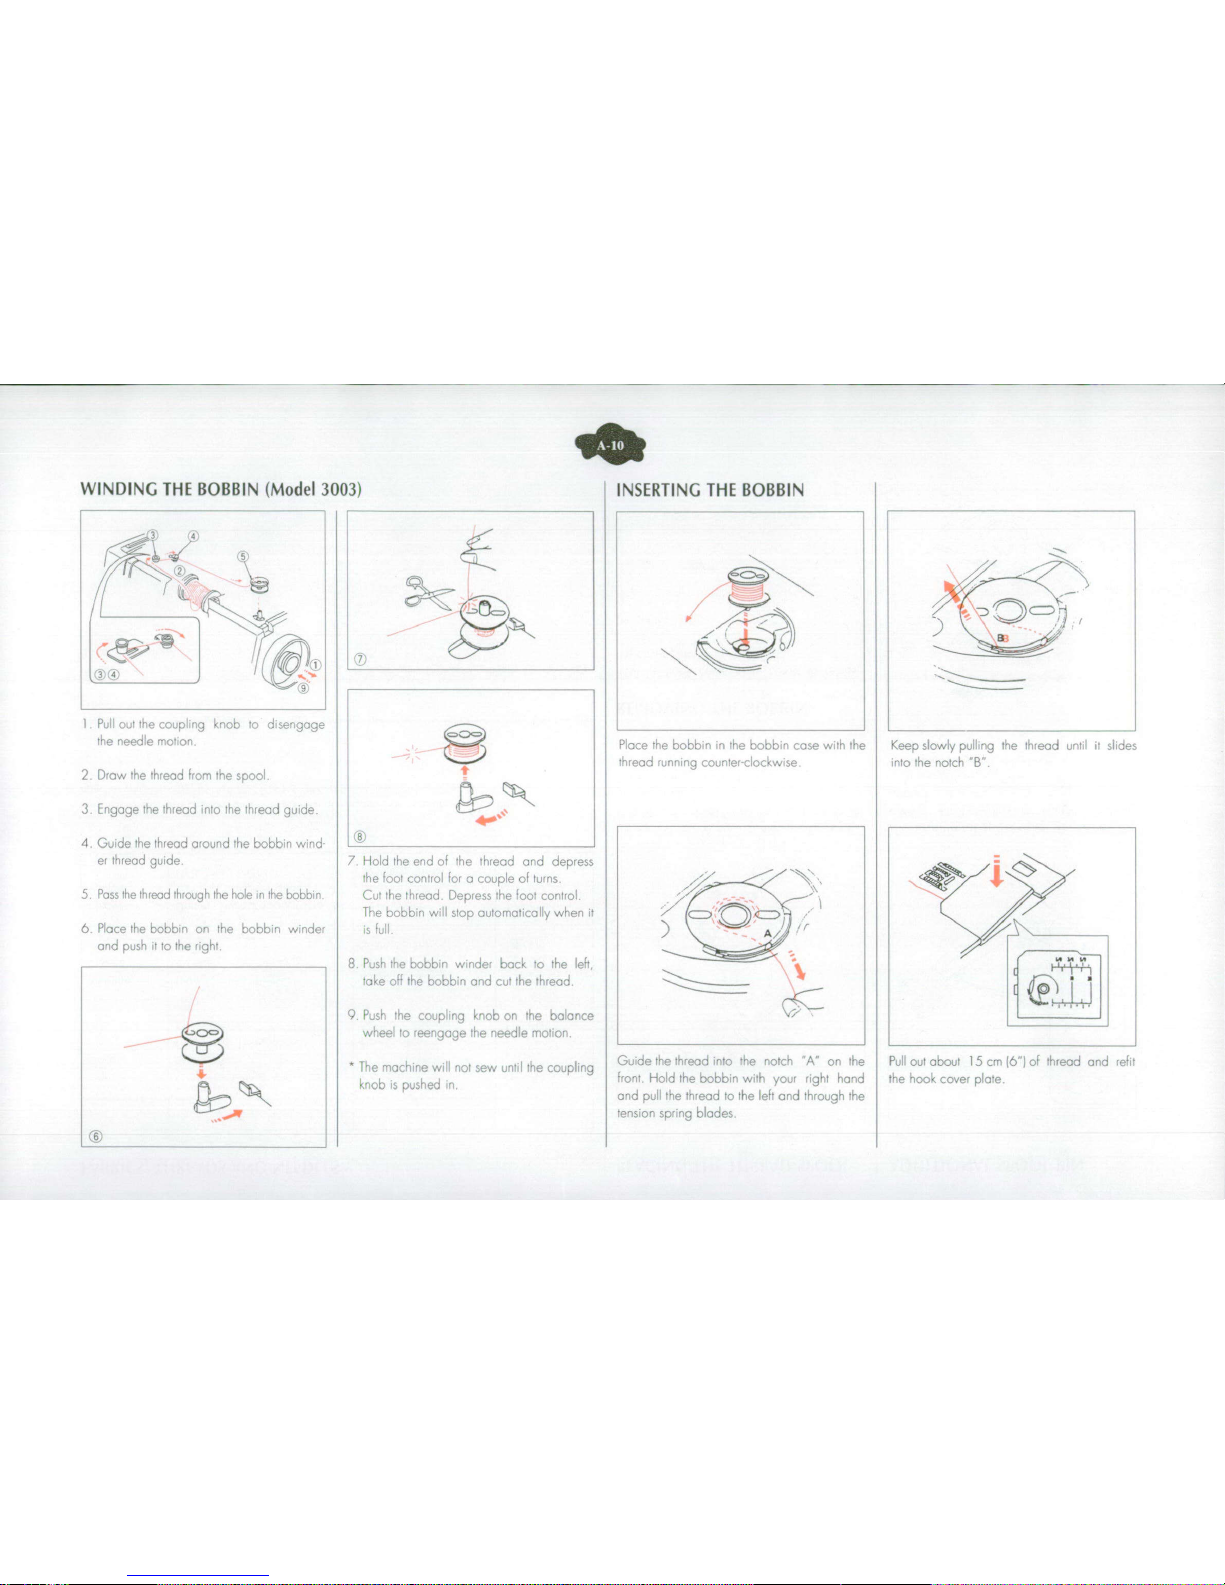
INSERTING
THE
BOBBIN
Draw
the
thread
from
the
spool,
Place
the
bobbin
in
the
bobbin
case
with
the
Keep
slowly
pulling
the
thread
unti
it
sides
read
running
counter-cl
ockwise.
into
the
notch
'B'.
2.
Engage
the
thread
into
the
thread
guide.
3.
Guide
the
thread
around
the
bobbir
wind
t
er
thread
guide.
4.
Pass
the
thread
through
the
hole
in
the
prýorbhin.
5.
Place
thre
bobbin
or
the
bobbion
wrrrder
6
Hoin
tihoendot
the
thriead
and
depress7
and
push
it
to
the
rghi
the
hoot
control
for a couole
of
turns.
Cut
"
the
thread
Depress
the
foot
control.
The
A
_
botbi
woi
stop
auiomatically
when
it
is
full.H
+
7.
Pus
the
brobbn
winder
back
to
the
le;7
take
art
the buobbin
and
cut
the
thread
6Guae
the
thread
into
the
notch
'A
on
the
Pul
out
about
1Scm(6")of
Thread
and
refit
front.
Hold
the
bobbin
with
your
right
hand
the
hook
cover
plate
~and
pull
the
thread
to
tire
left
and
thfough
the
tension
spring
blades.
S.)
al
Page 13

THREADING
THE
MACHINE
itLi
__ __ __C_)
05
Raose
rhe
oake p ovef
to
its
highest
2.
Pass
the
thread
around
the
thread
3
Frmly
draw
the
thread
from
right
4.
Slide
the
thread
to the
left
behind
(jc
,
position
by
turnin
thie
ba.'je
wheel
guide
and
up
again
in
the
left
to
left
into
the
take-up lever
the
thread
guide
on
the
needle
:wards
yeo
slot.
eyelet
bar.
or
P
Rise
the
pesser
fcot,
then
pass
the
/3
t-I-thoed
"i [le
,rdef
Foret
1
to
5
Model
3003
5.
Draw
about
15
cm
(6"1
of
-I)
Pas
the
hread
nro
he
thread
thread
through
needle
eye.
2'-
qguide
and
draw
it
down
along
4-
the
right
s5ot
Models
3005
+
3007:
/
5
Thread
the
needle
by
using
the
needle
threader
(see
page A 13)
Page 14

AUTOMATIC
NEEDLE
THREADER
(MODELS
3005 + 3007)
t
(Model
3005):
Turn
the
balance
Turn
the
knob
®) n
the
direction
of
Turn
the
knob ® in
the
direction
of
Raise
the
needle
threader
knob
(®)
Pass
the
end
of
the
thread
through
wheel
towards
you
to
raise
the
the
arrow
in
the
illustration,
then
the
arrow
in
the
llustrotior
then
slowly
to
draw
the
thread
loop
up,
the
needle
eye
by pulling
the
thread
needle
to
the
highest
position.
insert
the
hook
(B
into
the
needle
draw
the
thread
loop
to
the
back
of
loop
to
the
back,
Pull
15
cm
16') of
thread,
eye.
the
needle
Lead
the
thread
around
the
guide
The
needle
threader
can
be
used
(Model
3007):
By
pressing
the
©)
and
under
the
hook
®.
with
needles
No.
11/75,
up/down
needle
position
key,
raise
12/80,
14/90, 16/00oand
the
needle
to
its
highest
position
needles
with
blue
shank.
Pull
15
cm
(6")
of
thread.
Pull
the
automatic
needle
threader
down
as
far as
it
will
go.
Page 15

DRAWING
UP
THE
BOBBIN
THREAD
Raise
the
presser
foot
and
hold
the
needle
thread
Q007)
Press
the
up/down
needle
position
key
3003
+
3005):
Turn
the
balance
wheel
Pull
bath
threads
to
the
leh
and
lrghrly
w~th
your
left
hand.
'Wrce
towards
you
until
the
needle
has
risen
and
the
under
the
presser
foot,
leaving
take-up
lever
is
at
its
highest
position.
10
cm
(4")
Lightly
draw
up
the
needle thread
forming a loop
of
the
bobbin
thread
BALANCING
THE
THREAD
TENSION
In
straight
seams,
the
needle
thread
Turn
the
thread
tension
dial
until
the
Loosen
the
needle
thread
tension
by
Tighten
the
needle
thread
tension
Adjusting
the
Thread
Tension
for
and
the
bobbin
thread
should
inter-
desired
number
is
facing
the
setting
moving
the
dial
to
a
lower
number
by
turning
the
dial
to
a
higher
Z'ftgz
and Embroidery.
lock
in
the
center
of
the
two
layers
mark
number.
The
upper
thread
tension
should
be
of
fabric.
slightly
weaker
when
sewing
a
zig-
zag
or a pattern
based
on
the
satin
stitch.
The
upper
thread
should
appear
slightly
on
the
reverse
side
of
the
fabric.
Page 16

PATTERN
SELECTION
STITCH
WIDTH
STITCH LENGTH
DECENTERING
THE
NEEDLE
C3D
0-1-2-3-4-5-6-
o
=1
2
3
4
4
0"1*2 3 4-5 6 "
0
-~1 2 3 - 4
o
0
234-5
6. '
Select
a
pattern
by
turning
the
stitch
selector
The
higher
the
number,
the
wider
the
srich.
The
higher
the
number,
the
longer
the
stitch
The
straight
stitch
and
the
triple
seam
may
be
The
red
signal
confirms
the
chosen
pattern.
This
machine
can sew
stitches
of
a maximum
For a fine
fabric,
a
stitch
length
of
1,5
to
2,5
decenered
to
the
left
by
using
the
stitch
width
width
of
6.5
mm
(1/4)
is
preferable
slide
N.B.
The
needle
must
be
in
the
upper
position
For a thicker
fabric
a
stitch
ength
of 2 5
to
when
you
turn
the stitch
selector
*
For
adjusting
the
stitch
width,
the
needle
4 0 is
indicated
must
be
in
the
upper
position,
i.e
out
of
the
fabric
N.B
1he
stitch
length
is
automatc
and
cannot
be
modified
as
from
the
triple
seam
onward,
Page 17

III
BASIC
SEWING
STRAIGHT
STITCH
1.5
-
4
...
7
Rose
the
presser
foot
and place
the
fabric
To
secure
the
ends
of
the
seams,
press
the
The
thread
cutter
cuts
the
threads
to
the
next
to
the
guide
line
on the
needle
plate,
reverse
stitch
button
and
sew
a
few
stitches,
proper
length
for
starting
the
next
seam,
__mA
Smooth
the
threads
to
the
left
and
lower
the
Raise
the
presser
foot
and
eemove
the
fabric
presser
foot
Depress
the
foot
control
pulling
the
threads
to
the
rear,
Gently
guide
the
fabric
along
the
guide
line
The
needle
must
be
in
its
highest
position
when
removing
the
fabric.
SEWING
AN
ANGLE
STRAIGHT
STITCHING
ON
Slop
the
machine.,
HEAVY
FABRICS
13003 + 3005)
Turn
the
balance
wheele
owertheneedleintothefabricatthestarting,
towards
you
to
bring
the
needle
down
into
the
-
point
Press
the
small
black
button
on
foot
A
fabric,
with
your
left
hand
thus
giving
extra
weight
to
(3007):
Lower
the
needle
into
the
fabric
by
t
the
presser
foot,
pressing
the
needle
up/down
key
lower
the
presser
foot
with
your
right
hand,
Raise
the
presser
foot.
maintaining
the
pressure
on
the
black
button
Pivot
the
fabric
around
the
needle
To
change
,with
your
left
hand.
Release
the
block
button
the
sewing
direction
Lower
the
presser
foot
and
start
sewing.
and
continue
sewing
Page 18

ZIGZAG
STITCH
IV
UTILITY
STITCHES
QUICK
OVERCASTING
1
-65
5
1 25
2~
3-7
Simple
zigzag
stitching
is
used
For
overcast~
The
C
fool
prevents
the
fabric
from
rolling,
A
inmg
and
sew
ng on
bunions
Cwhen
overcasting.
NB.
For
a
decorative
satn
stitch,
use
trans-
Place
the
fabric
next
to the
black
guide
an
the
parent
fool
F,
reduce
stitch
length
between
right Minimum
stitch
width
5.
0.3
and
0.5
and
thread
tension
beween
2
and
3
ASSEMBLING
STRETCH
FABRICS
(MODEL
3007)
OVEREDGE
STITCH
5
"- 3-65
05
1 5
3-7
7
3
-6
For
light
jersey the
C
foot
keeps
the
fabric
This
stitch
is
useful
to
prevent
raw
edges
from
Pat
Place
the
edge
of
te
fabric
next
to
the
fraying
C
black
guide
on
the
right
A
Place
the
fabric
under
the
presser
fool,
so
that
- -
-
-----------
05Use
the
F
foot
for
sewing
inside
the
fabric
the
right
edge
runs
along
the
brim
of
the
For
assembling
and
overcasting slretch
fabics
N.B.
To
prevent
distortion
in
lerseys
reduce
transparent
par.
and
jerseys
in
one
opeiaion
.he
foot
pressure
see
pagle
A.7
ao
Page 19

DOUBLE
OVERCASTING
ELASTIC
STITCH
"
4,:
3
-3
6
5
05-.1
4-.
. -'
4-5
Eja
ýTl
s
a>c
ute~Fij
'o;
fcbr~cs
wihrch
tend
to
C
roy
Pace
the
edge
of
the
faricr
next
to
the
black
guide
on
the
right
-
_
Choose
this
stitch
to
attach
elastic
to
garments.
I
Mark
the
elastic
into
quarters
and
match
these
to
the
center
front,
center
back
and
side
seams.
2.
Place
the
middle
of
the
elastic
under
the
center
of
the presser
foot
and
sltitch
into
place,
making
sure
the
eiastic
is
eveny
distributed.
Page 20

TRIPLE
SEAM
INTERLOCK
SHELL
STITCHING
HI
K(CD)2-4
1-2
For
shell
stitching
on blouses
and
lingerie.
This
stitch
can
also
be
used
as a single
over
24
lock
stitch.
AA
A
A
This
reinforced
and
extensible
seam
is
recom
This stitch
is
sewn
with
2
stitches
forward
and
mended
for
armholes,
working
garments
and
I
stitch
backward,
forming
a
very
solid
seam,
sports
wear
Garments
should
be
basted
and
tried
before
inal
sewing
Page 21

SEWING
ON
BUTTONS
F
-__l
.
-]-
------
-
---
3-37
Push
the
lever
to
the
right
to
drop
the
feed
Make
sure
that
the
needle
stitches
well
into
the
of
the
holes,
wind
it
round
the
shank
and
knot
dog
right
hole
If
necessary,
adIust
the
width,
it
safely
on
the
wrong
side
PLce
the
button
on
the
fabric
and lower
the
Sew
a
few
stitches
When
sewing
on
buttons
N.B.
Bring
the
feed
dog
back
to
its
original
needle
into
the
left
hole
by
turning
the
with
a
shank,
place
a
pin
over
the
foot.
To
position
by
pushing
the
lever
to
the
left,
The
ba
once
wheel
reinforce
the
shank,
cut
the
threads
leaving
a
feed
dog
will
raise
automatically
when
turn-
Lower the
foot.
20cm
181
tail.
Draw
the
thread
through
one
ing
the
balance
wheel
AUTOMATIC
BUTTONHOLE
*
The
size
of the
buttonhole
its
automatically
set
to the
size
of
the
button
when
the
latter
4
-65
is
placed
into
the
buttonhole
device
R
U
0
I
*
The
button
holder
of
the
device
rakes
a
but-
'on
up
to
a 2
5
cm
(I "
size
on
its
rear
*
Make
a
test
buttonhole
on
a
sample
of
your
fabric
lined
with
interfacing
3003
+
3005):
Turn
balance
wheel
towards
you
or
(3007)
depress
the
needle
up/down
key
to
raise
the
needle
to
its
highest
position
1
5
tMark
he
starting
point
of
the
buttonhole Raise the
presser
foot,
*
Use
nerfacing
fr
stretchable
and
fine
th
sero
"H",
Turn
stitch
selector
t B'
U*
If
the
indicator
light
is
already
on
"BH"
reset
the
machine
according
to
the
instructions
on
abrc
page
A-2
I.
R
Attach
the
automatic
buttonhole
device
R
NOTE:
There
should
be
no
gap
between
the
presser
foot
and
the
front
of
the
device,
see
illustration.
Page 22

Pull
the
button
holder
to
the
back
and
place
the
button
Pass
the
needle
thread
under
the
presser
foot.
Models
3003 + 3005:
Push
the
button
holder
firmly
back
to
secure
the
button
Sew
slowly
and
stop
the
machine
at
the
starting
point
when
a
Pull
down
the
buttonhole
lever
as
far
as
it
will
go.
Place
the
fabric
under
the
presser foot.
buttonhole
is
completed
Turn
the
balance
wheel
towards
you,
until
the
needle descends
exactly
at
the
starting
point
of
the
buttonhole.
Model
3007:
Lower
the
presser
foot.
Depress
the
foot control
until
the
machine
stops
by
itself
*
When
the
buttonhole
is
completed,
the
3BHW
indicator
light
*
The
buttonhole
starts
with
the
barrack
The
left
row
is
sewn
will
flash
backwards.
272
Cut
threads at
10cm(14").
Pass
the
needle
thread
to
the
To
repeat a buttonhole:
When
buttonhole
sewing
is
firished,
raise
the
buttonhole lever
wrong
side
of
the
fabric
by
pulling
the
bobbin
thread
Knot
the
After
the
buttonhole
is
sewn,
select
stitch
I"
and
return
to
to
its
initial
position.
threads.
"RH"
to
be
at
the
starting point
of
the
buttonhole
Insert
a
pin
into
one of
the
bartacks
and
cut
open
carefully
with
the
buttonhole
knife
ao
Page 23

MANUAL
BUTTONHOLE
1'-5
*Butnoe
eo
utn
with
a
diameter
of
more than
2.5
cm
(3003
+
3005).
Turn
the
balance
wheel
towards
you
or
Pull
down
the
buttonhole
lever
completely.
]Ihvtobe
swn
manually.
13007)
depress
the
needle
up/down
key
to
raise
the
needle
to
tower
the
needle
into
the
fabric
at
the
starting
point
of
the
its
highest
position.
Raise
the
presser
foot.
buttonhole
and
lower
the
foot,
Turn
the
selector
dial
to
"BH"
for
the
buttonhole.
*If
the
indicator
light
is
already
on
"BH"
reset
the
machine
according
to
the
instructions
on
page
A-21.
Attach
the
F
foot.
Sew
the
first
oarlock
and
the
left
row
to
the
desired
length.
Pull
the
buttonhole
lever
towards
you.
Sew
the
second
bartack
and
the
right
raw.
Stop
when
you
reach
the
first
bartack.
*To
open
the
buttonhole
and
start
the
next
one,
refer
to the
_________________________________________
instructions
on
page
A-2
1
Page 24

CORDED
BUTTONHOLE
With
the
buttonhole
foot
raised,
hook
the
Sew
the
buttonhole
according
the
the
instruc
Pull
the
left
end of
the
piping
cord
to
make
cord
on
the
cord
spur
at
the
back
of
the
foot
tions
given
on
pages
A-20
and
A-2
I
disappear
the
loop
at
the
tear
Lead the
two
ends
of
the
cord
towards
you
Remove
the
garment
from
the
machine
and
Cut
flush
the
cord
ends.
R
and
under
the
foot,
with
the
tails
showing
in
secure
the
threads.
front.
"
Adjust
the
stitch
width
to
the
thickness
of
the
Pass
the
ends
into
the
forks
at
the
front
of
the
cord
used.
foot
and
hold
them
tightly.
"
To
open
the
buttonhole
and
start
the
next
Lower
the
needle
into
the
fabric
at
the
starling
one,
refer
to
the
instructions
on
page
A2
1.
point,
then
lower
the
foot.
ZIPPER
INSERTION
15-4
A
3 -6
The
zipper
foot E can
be
attached
either
on
Preparing
the
fabric:
Baste
the
opening
and
iron
Remove
the
bast
the
left
or
on
the
right,
depending
on
the
way
Prepare
an
open
searm
and
sew
both
fabrics
ing
threads.
the
zipper
is
fixed
on
the
garment
together,
right
side
against
right
side
to
the
height
oF
the
opening.
Page 25

Start
on
the
visible
side
of
the
zipper.
The
foot
is
on
the
right
Close
the
zipper
and
pin
the
other
side
of
the
fabric
onto
the
Finish
by
opening
the
zipper
as
indicated
before.
side,
fastener
taking
care
that
it is
well
covered.
It
is
preferable
to
If
the
zipper
is
covered
from
the
other
side,
attach
the
Foot
on
Place
?he
closed
zipper,
right
side
against
right
side
of
the
baste
first
the
left.
fabric,
so
that
the
zipper
teeth
run
along
the
fold
of
the
fabric.
Start
sewing
from
the
lower
end,
with
the
zipper
closed.
Pin
and
baste.
Start
sewing
from
the
lower
end,
using
the
tape
as
a
guide
for
the
edge
of
the
foot,
the
zipper
remains
closed.
Before
stopping
to
sew,
lower
the
needle
into
the
fabric,
lift
the
presser
foot
and
open
the
zipper
by
pulling
the
slide
Lower
the
presser
foot
to
finish
the
seam.
Page 26

NARROW
HEM
15
4
Make
a
double
fold
of
2.5
mm
1
/8"1
over
a
Lower
the
needle
into
the
fabric
at
the
starting
Lower
the
needle
into
the
fabric,
lift
the
D
length
of about
8
cm
(3).
point,
then
lower
the
hemmer
Foot
D.
presser
foot
and
insert
the
folded
portion
into
Sew 2 or
3
stitches
while
holding
both
the
spiral
of
the
foot.
threads.
Lower
the
Foot,
then
sew,
carefully
guiding
the
Trim
about
7
mm
(1/4")
from
the
corners,
as
fabric
so
that
it
remains
in
the
spiral.
illustrated, to
reduce
bulk.
Page 27

BLIND
STITCH
12 3 -3,
1-3
tron
+,
nem
at
the
equired
height
Place
the
fabric
so
that
the
needle
just
pierces
Adjust
the
guide
by
turning
the
nut.
Sew
by
the
folded
part
of
the
fabric
when
it
comes
to
guiding
the
folded edge
along
the
guide
G
•the
left
Lower
the
presser
foot.
On
light
fabrics,
the
raw
edge
can
be
turned
under
and
pressed
On
heavy
fabrics
that
tend
to
fray,
the
row
edge
should
be overcast
first
Page 28

V
DECORATIVE
SEWING
ADJUSTING
STRETCH
STITCH
BALANCE
DECORATIVE
SATIN
STITCH
4
-65
I
*
If
the
patterns
are
compressed,
the
stitch
is
too
short.
Correct
by
turning
the
screw
to
//-,
Sew
a
row
of
stitches
and
adjust
the
tension,
_
__-,..
_
+
_
so
that
the
needle
thread
will
slightly
appear
aon
the
reverse
side
of
the
fabric.
F
Test the stitch
on a piece
of
the
actual
fabric
for
the
best
result.
,,
,
If
the
patterns
are
not
neat,
it is
possible
to
adjust
them
with
the
feed
balance
screw,
STRETCH
STITCH
PATTERNS
After
sewing
with
the
modified
feed
balance,
I
If
the
patterns
are
too
distorted,
the
stitch
is
return
to
the
standard
adjustment
'o"
too
long.
Correct
by turning
the
screw
to
3-65
4
-
5
The
stitch
lengths
of
the
automatic
patterns
are
A F
,
preset.
No
adjustment
is
needed
for
the
stitch
length,
Page 29

SMOCKING
-•
46
o
cm(3/8"}
~O
F
VWith
the
stitch
length
on
4,
sew
straight
stith
lines
at
a
di
tance of
10
mm
13/8')
over
the
whole
area
to
be
smocked
Knot the
threads
on
one
side,
Pull
the
bobbin
1hreads
and
dis
tribute
the
gathers
evenly
Knot the
threads
on
the
other
side,
N.
Gatherin
is
easier
with
a
weaker
upper
ension
Sew
the
decorative
stitch
in
the
middle
between
the stitch
rows.
Remove the
gathering
threads.
QUILTING
•~
3-6
/•Atlach
the
quilting
guide
L. it
will
help
you
to
keep
on
ever,
Sew
and
let
the
guide
follow
the
previous
stitch
row
LA
distance
between
the
stitch
rows
L
Page 30

PIN-TUCKING
SHELL
TUCK
5-6,5
0I'554Se
1.5
-3
15-3
Place
the
fabric
under
the presser
foot
Lower
Hold
the
fabric
against
the
guide
when
the
needle
into
the
fabric
according
to the
sewing.
G
desired
depth
of
the
tucks.
Press
the
tucks
to
one side
F
Lower
the
presser
foot
Adjust
the
guide
by
Fold
the
fabric
left
side
against
left
side,
turning
the
thumb
nut
FAGOTING
(MODEL
3007)
5-6.5
----
~~Ol
I
§
Fold
under
each
fabric edge
1.5
cm
(1
/2")
Place
the
folded
fabric on
the
edge
of
the
3
~5
and
press
transparent
part
on
the
right,
Pin
the
two
edges
to
paoer
or
tear-away
The
needle
should
stitch
just
outside
on
the
backing 2 to 3 mm
(1
/81
apart
rght
and
form a fod
F
Sew
slowly,
guiding
the
fobr.c
so
rhat
the
needle
catches
the
folded
edge
on each
side
a&
Page 31

APP
ICATIONS
ASSEMBLING
EDGE-TO-EDGE
5-6,5
3-5
m
05-
1
Baste,
or
press,
using
self-adhesive
lining,
the
4
-
5
Fold
each
fabric
edge
to
the
wrong
side
and
2
4
application
onto
the
fabric.
,
press.
Present
the
folded
edges
facing
one
Sew
around
the
entire
application,
making
against
the
other
under
the
middle
of
the
pres
sure
the
needle
always
goes
down
outside
ser
foot.
the
application
when
at
the
right.
A
F
When
sewing
curbs,
stitch
the
needle
into
the
fabric,
raise
the
presser
fool
and
swing
round
the
fabric
in
the
direction
of
the
design.
*
When
the
application
is
finished,
reset
the
foot
pressure
on
Page 32

VI
MAINTENANCE
CLEANING
THE
BOBBIN
CASE
Remove the
plug
from
the
outlet
socket.
This
machine
does
not
need
oiling
However,
(
the
area
around
the
bobbin
and
hook
must
be
ý,)
cleaned
each
time
the
machine
has
been
used
extensively.
The
casing
may
be
cleaned
--
)
with
a
soft
cloth
and
pure
soap.
Remove
the
needle
before
cleaning
the
machine.
To
remove
the
hook
cover
push
the
button
on
Take
out
the
bobbin.
Insert
the
bobbin
the
side
to
the
right
Clean
the
whole
area
with
the
lint
brush.
Refit
the
hook
cover.
CLEANING
THE
HOOK
REFITTING
THE
BOBBIN
CASE
Remove
the
plug
from
the outlet
socket.
Remove
the
bobbin
and
the
bobbin
case
Clean
the
feed
dog,
the
hook
and
the
bobbin
When
refitring
the
bobbin
case, make
sure
Raise
the
needle
to
its
highest
position,
case
with
the lint
brush
that
the
front
notch
holds
the
bobbin
case
well
Remove
the
presser
foot
and
the
needle.
With
in
place
to
prevent
it
from turning
the
screwdriver,
remove
the
screw
at the
left
of
the
needle
plate.
Remove
the
needle plate
ao
Page 33

MINOR
DISORDERS
Problem
Cause
See
page
The
machine
is
noisy
and
does
not
I
Threads
have
been
caught
ithe
hoo
mechanism
A
run
smoothly
2.
The
feed
dog
is
packed
with
lint
A31
The
needle
thread
breaks
1.
The
needle
is
not
threaded
properly
AS8
2.
The
upper
tension
is
too
tight
A- 14
3.
The
needle
is
bent
or
blunt
A-8
4,
The
needle
is
not
inserted
correctly
A-8
5.
TheŽ
fabric
cannot
be
removed
to
the
rear
after
sewing
A-
16
6.
The
thread
is
either
too
heavy
or
too
fine
for
the
needle
A-9
The
bobbin
thread
breaks
1I
The
bobbin
thread
is
not
threaded
correctly
in
the
bobbin
case
A-10,
11
2.
Lint
has
collected
in
the
bobbin
case
A-3
1
3.
The
bobbin
is
damaged
and
does
not
turn
smoothly
Change
the
bobbin
The
needle
breaks
1.,
The
needle
is
badly
secured
A-8
2.
The
needle
is
bent
or
blunt
A-8
3,
The
needle
clamp
screw
is
loose
A-8
4,
The
upper
tension
is
too
tight
A-
14
5.
The
fabric
cannot
be
removed
to
the
rear
after
sewing
A-
16
6
The
needle
is
too
fine
for
the
fabric
being
sewn
A-9
7,
The
pattern
selector
dial
has
been
turned
while
the
needle
was
in
the
fabric
A-1
5
Skipped
stitches
1.
The
needle
is
not
inserted
correctly
A-S
2.
The
needle
is
bent
or
blunt
A-8
3
The
needle
and/or
the
threads
are
unsuitable
for the
work
A-9
4
No
needle
with
blue
shank
is
being
used
for
sewing
stretch,
very
fine
and
synthetic
fabrics
A-9
5
The
needle
thread
is
not
threaded
properly
A-i
2
Page 34

Problem
Cause
See
page
The
seam
puckers
1 ,
The
upper
tension
is
too
tight
A-14
2.
The
machine
is
not
threaded
correctly
A-]
2
3.
The
needle
is
too
heavy
for
the
fabric
being
sewn
A-9
4.
The
stitches
are
too
long
for
the
fabric
A-9
5.
The
pressure
of
the
presser
foot
is
not
set
correctly
A-7
*
When
sewing
extremely
light
weight
fabrics
place
a
sheet
of
paper
underneath
the
fabric
The
stitches
form
loops
underneath
the
fabric
1
The
upper
tension
is
too
loose
A-14
2.
The
needle
is
either
too
heavy
or
to
fine
for
the
thread
A-9
The
fabric
is
not
fed
smoothty
I
.
The
feed
dog
is
packed
with
lint
A-31
2.
The
pressure
of
the
presser
foot
is
too
weak
A-7
3.
The
stitches
are
too
short
A-
15
The
machine
does
not
work
1.
The
machine
is
not
plugged
in
A-6
2.
A
thread
is
caught
in
the
hook
race
A-31
3
The
coupling
knob
is
disengaged
A10,
1 1
4
The
bobbin
w;nder
spindle
is in
the
winding
position
A-10,
1 1
The
buttonhole
is
not
balanced
I]
The
stitch
length
is
not
suitable
for
the
fabric
being
sewn
A-15
2.
The
work
is
being
pulled
or
held
bock
Guide
the
fabric
gently
3.
No
interfacing
is
being
used
with
stretch
or
fine
fabrics
A-9
Page 35

12
3
4
5
6
7 8
9
10
1112
1314
15
Ga16n
sl
17
18
1
Flasti
gatherer
2
Walking
loot
3
Looping sole
4
Tucker
sole
17) 5,
Sequins
and
ribbon
sole
6
Straight
stitch
sole
Eronceur
elaslique
Pied
transport
superreur
Semnelle a boudlettes
Senielle
nervures
(7)
Semnelle
Apaillettes~rubans
Semnelle
couture
droite
Gummnibiandkrausler
Doppeltransportirus
Schlingensohle
Bieserisohle
(7)
Pailletten-und
B~ndlersohle
Geradsuchsohle
Arrcciatore
elastl
Pledino
trasporto
superiors
Suola oochielli
Suolas
nervalure
(7)
Super
lustrini e resrin
Suola
cucilura
diritlar
71
Giatherinngggd soeigel
)-mm
liTucker
sole
(5)
11
Roller
sole
1ý Teflon
sole
Guide
couture circulaire
Semelle a perles
ý2-4mnm) Semnelle
a
troncer
Semnefle
nervures
(5)
Seeines a rouleaux
Sen'elle
tefllon
Xrersnahfihrung
Perlensohle
(2
4mm)
Krauselsohle
Biesensohle
(5)
Rollensohle Teflonsohie
Guide cucitura
circolari Suola
perline,
(2-mm)
Suola
arriccdatore
Suola
nervature
(5)
Suola a ruili
Suola
teflon
13
Fagoting plate
14 Edging
sole
15,
Piping
sole
:
16,Tucker
sole
cord
guide
17 Ruttier
18
Patchwork
sole
Plaqutt
faux-1ours
Semelle a border
Semelle A nieches
Guide
cordon
pour
nervures
Alprl a plisser
Semelle patchwork
Falsd,-l-ohlsaum
Pl~ttcten
Bandeinfasssohle
Schnursohle
Kordeltoihrung fur Biesen
Phissietrapparrat
Patchworirsohl
Piastrina fint
giorni
Suola
per snlare
Suola cordoncini
Guida
cordonon
per nervature
Appareechio
per
pieghettare
Suola
applicaioni
A
-2.95
AnglaisI
Allemand
/Frangas
hlalien -395705 -15
Printed
in
Taiwan
754-S00-202(EIGIFII)
 Loading...