


ISTRUZIONI I
INSTRUCTIONS GB
BEDIENUNGSANLEITUNG D
MODE D’EMPLOI F
INSTRUCCIONES E
INSTRUCTIES NL
1 Supercrono HydroMag Dgt.indd 1 |
|
|
|
05/11/09 12:21 |
|
|
|
||
|
|
|
||
|
|
|
||
|
|
|
|
|

I - ITALIANO
IMPORTANTE |
3 |
INTRODUZIONE |
3 |
INSTALLAZIONE DEL COMPUTER |
4 |
UTILIZZO COMPUTER |
4 |
Impostazioni |
4 |
Utilizzo |
5 |
Avvio |
5 |
SCHERMATE |
5 |
Informazioni disponibili durante la corsa |
5 |
Fine della corsa |
6 |
Cancellazione dei dati della corsa |
6 |
Batterie |
6 |
Risoluzione dei problemi |
6 |
ATTENZIONE |
7 |
SI CONSIGLIA |
7 |
GARANZIA |
34 |
D - DEUTSCH |
|
WICHTIGER HINWEIS |
13 |
EINLEITUNG |
13 |
MONTAGE DER KONSOLE |
14 |
VERWENDUNG DES COMPUTERS/EINSTELLUNGEN 14 |
|
Einstellungen |
14 |
Gebrauch |
15 |
Start |
15 |
Bildschirme |
15 |
Während des Trainings verfugbare Informationen |
15 |
Trainingsende |
16 |
Löschen der Trainingswerte |
16 |
Batterien |
16 |
Problemlösungen |
16 |
ACHTUNG! |
17 |
RATSCHLÄGE |
17 |
GARANTIE |
34 |
E - ESPAÑOL |
|
IMPORTANTE |
23 |
INTRODUCCIÓN |
23 |
USO DEL ORDENADOR |
24 |
Programación |
24 |
Utilización |
25 |
Puesta en marcha |
25 |
PANTALLAS DE CONFIGURACIÓN |
25 |
Informaciones disponibles durante la carrera |
25 |
Final de la carrera |
26 |
Anulación de los datos de la carrera |
26 |
Baterias |
26 |
Solución de problemas |
26 |
IMPORTANTE |
27 |
ACONSEJAMOS |
27 |
GARANTIA |
34 |
|
|
|
|
GB - ENGLISH
IMPORTANT |
8 |
INTRODUCTION |
8 |
CONSOLE AND GEAR SHIFT INSTALLATION |
9 |
USING THE COMPUTER |
9 |
Set up instructions |
9 |
How to use |
10 |
Starting a run |
10 |
SCREENS |
10 |
Information available during the run |
10 |
Finish a run |
11 |
Delete data of a run |
11 |
Batteries |
11 |
Troubleshooting |
11 |
ATTENTION |
12 |
ADVICE |
12 |
WARRANTY |
34 |
F - FRANÇAIS |
|
IMPORTANT |
18 |
INTRODUCTION |
18 |
INSTALLATION ORDINATEUR |
19 |
UTILISATION DE L’ORDINATEUR |
19 |
Réglage des données |
19 |
Utilisation |
20 |
Démarrage |
20 |
ECRANS |
20 |
Informations disponibles durant la course |
20 |
Fin de la course |
21 |
Elimination des données de la course |
21 |
Piles |
21 |
Résolution des problèmes |
21 |
ATTENTION |
22 |
NOUS CONSEILLONS |
22 |
GARANTIE |
34 |
NL - DUTCH |
|
BELANGRIJK |
28 |
INLEIDING |
28 |
INSTALLATIE VAN DE CONSOLE |
29 |
DE COMPUTER GEBRUIKEN |
29 |
Set up instructies |
29 |
Tijdens een rit |
30 |
Een rit starten |
30 |
SCHERMEN |
30 |
Beschikbare informatie tijdens de rit |
30 |
Een rit beëindigen |
31 |
Ritgegevens verwijderen |
31 |
Batterijen |
31 |
Probleemoplossingen |
31 |
OPGELET |
32 |
ADVIEZEN |
32 |
GARANTIE |
34 |
1 Supercrono HydroMag Dgt.indd 2 |
|
|
05/11/09 12:21 |
|
|
I
ITALIANO
Molte grazie per aver acquistato Super Crono Hydromag Digital.
IMPORTANTE
Non frenare durante l’utilizzo del trainer, ciò danneggia irreparabilmente il rullino e il pneumatico.
INTRODUZIONE
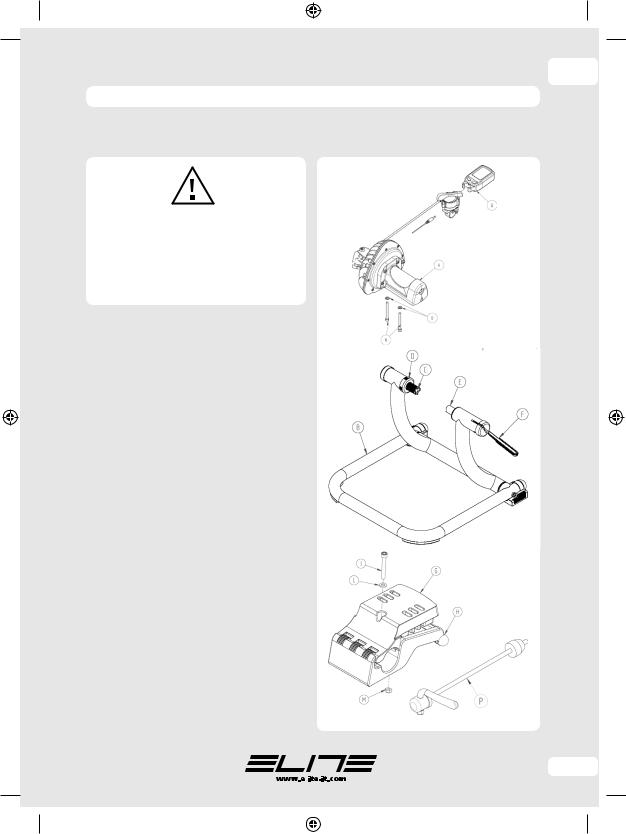
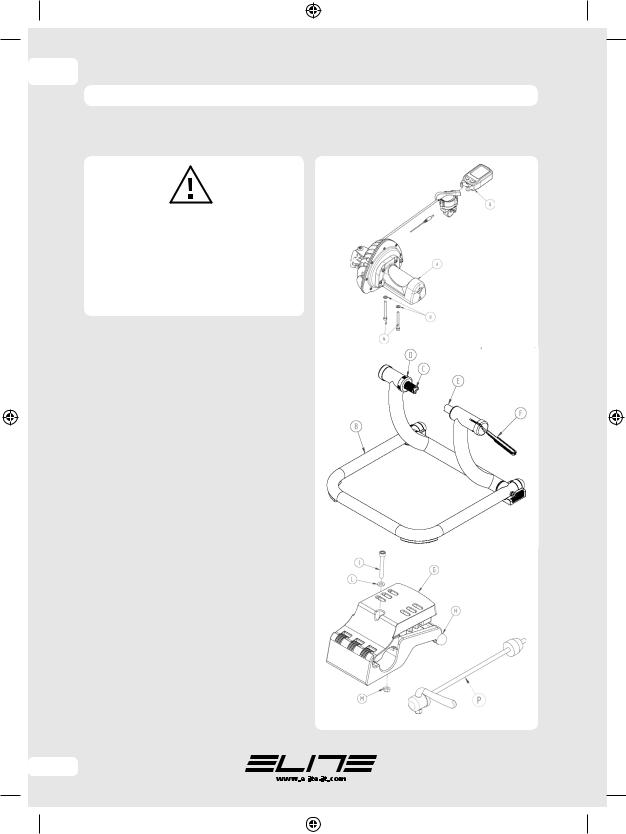
Verificare la presenza di tutti i componenti seguenti.
N°1 unità Hydromag (Rif. A)
N°1 cavalletto (Rif.B)
-N°1 perno bussola sinista (Rif.C)
-N°1 ghiera (Rif.D)
-N°1 perno bussola destra (Rif.E)
-N°1 leva comando (Rif.F)
-N°1 base superiore supporto unità (Rif.G)
-N°1 base inferiore supporto unità (Rif.H)
-N°1 vite M6 x45 mm (Rif.I)
-N°1 rondella Ø6 mm (Rif.L)
-N°1 dado M6 (Rif.M)
N°1 sacchetto accessori unità:
-N°1 chiave esagonale
-N°2 viti M6 x 55 mm (Rif.N)
-N°2 rondelle Ø6 mm (Rif.O) N°1 Sgancio Rapido (Rif.P) N°1 console (Rif.Q)
3
1 Supercrono HydroMag Dgt.indd 3 |
|
|
05/11/09 12:21 |
|
|
||
|
|
||
|
|
||
|
|
|
|
I
INSTALLAZIONE DEL COMPUTER
•Installare il computer sulla leva comando, come mostrato in figura 1.
1
• Connettere il cavo uscente dal retro del computer alla corrispondente presa della leva.
2
• Qualora non fosse già collegato, infilare la spina del sensore di velocità (cavo che esce del guscio dell’unità di resistenza) alla leva.
3
•Assicurarsi che la leva comando e la console siano fissati bene e che i cavi non intralcino i movimenti del ciclista e quelli della bicicletta (pedali, catena, ecc.).
•Ora è possibile iniziare l’allenamento. E’ possibile variare la resistenza del rullo, agendo sulla manopola di regolazione presente sul manubrio e visualizzare tutti i dati dell’allenamento sullo schermo del computer.
4
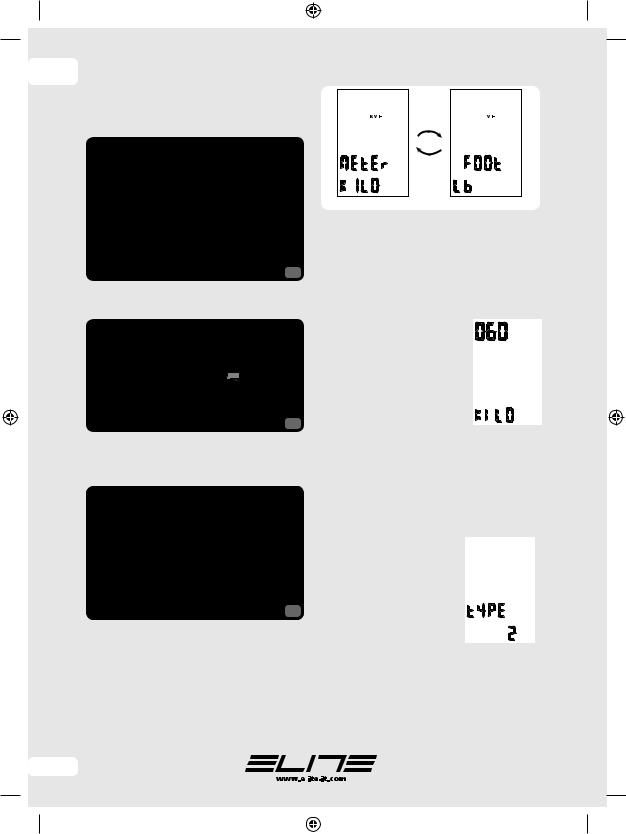
SET
Schermata per la scelta delle unità di misura
UTILIZZO DEL COMPUTER
Impostazioni
Per utilizzare correttamente il Super Crono Hydromag Digital è inizialmente necessario impostare i propri parametri. Per far ciò si deve entrare nella schermata SET UP.
Per entrare nella schermata SET UP si deve premere il tasto di destra (MODE) per almeno tre secondi.
A questo punto apparirà la scritta SET UP. Quando si rilascia il tasto, il computer mo-
stra la prima schermata della fase di SET UP. Attenzione: è possibile entrare nel-
la fase di SET UP solo a velocità nulla.
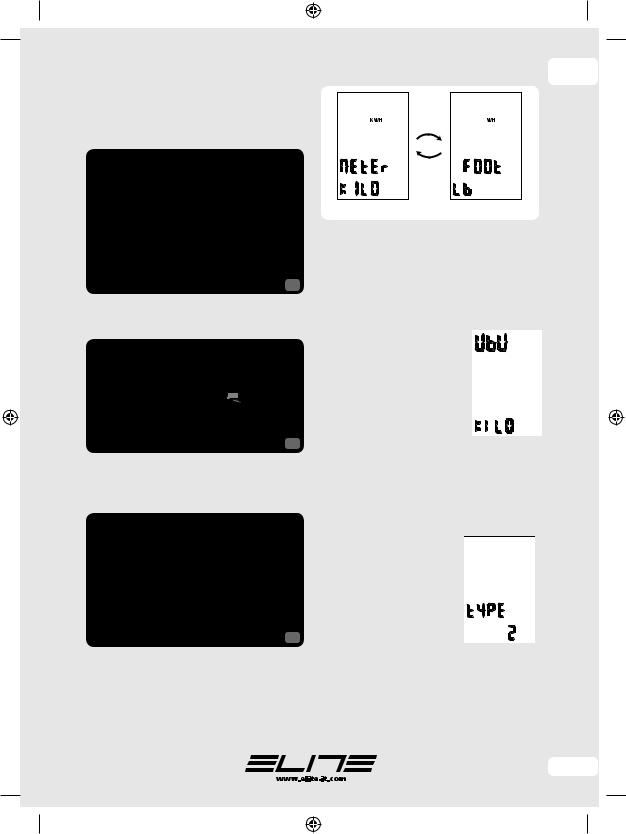
Innanzitutto si devono scegliere le unità di misura tra decimali o anglosassoni. Per far ciò è sufficiente premere il tasto sinistro (SET). Sul-
lo schermo appariranno alternativamente le unità di misura METER
(metri), KM/H e KILO (chilogrammi) o FOOT (piedi), M/H (miglia) e LB (once). Premendo il tasto MODE si confermano le unità scelte e si passa alla schermata successiva. In questa schermata, in alto abbiamo un numero a tre cifre che indica il nostro peso più quello della bici, espresso nell’unità di misura precedentemente scelta. Apparirà il peso impostato dal costruttore o l’ultimo valore inserito. Per modificare questo valore, premere il tasto SET per modificare la cifra che lampeggia e il tasto MODE per confermare la valore scelto e passare
alla cifra successiva che incomincerà a lampeggiare. Ripetere l’operazione per impostare tutte e tre le cifre del peso. Premere il tasto MODE per confermare il
peso e passare alla |
schermata |
||
successiva. Questa |
schermata |
||
serve per scegliere il tipo di uni- |
|||
tà di resistenza. Per impostare |
|||
correttamente |
il computer |
per |
|
il Super Crono |
Hydromag |
Digi- |
|
tal impostare il valore “2”. Questo valore dovrebbe essere già impostato, se così non fosse, premere il tasto SET finché la cifra non diventa “2”. Premere il tasto MODE per uscire dalla schermata di SET UP. Attenzione: un valore non corretto comporta una visualizzazione errata dei dati. Esempio: se si vuole impostare come unità di misura chilogrammi, metri, chilometri e come peso 78 chilogrammi si dovrà eseguire la seguente operazione.
1 Supercrono HydroMag Dgt.indd 4 |
|
|
05/11/09 12:21 |
|
|
||
|
|
||
|
|
||
|
|
|
|
Per entrare nella schermata SET UP premere il tasto MODE per 3 secondi. Premere il tasto SET finché non appare sullo schermo METER, KILO e KM/H. Premere il tasto MODE. Premere il tasto SET finché la cifra che lampeggia (quella più a destra) diventa “8”. Premere il tasto MODE. Premere il tasto SET finché la cifra che lampeggia (quella centrale) diventa “7”. Premere il tasto MODE.
Premere il tasto SET finché la cifra che lampeggia (quella più a sinistra) diventa “0”. Premere il tasto MODE.
Premere il tasto SET finché la cifra che lampeggia diventa “2”. Premere il tasto MODE. Fine dell’impostazione.
Utilizzo |
|
|
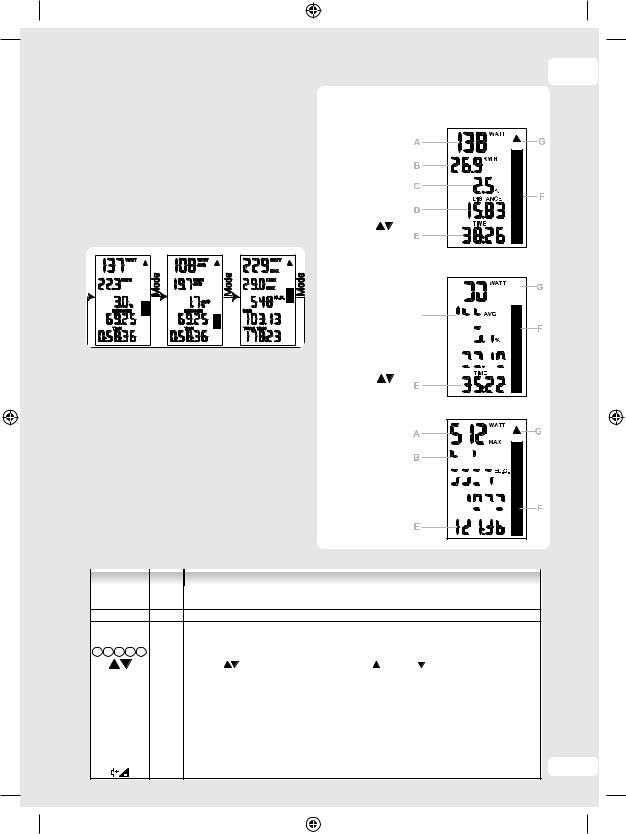
valori correnti |
valori medi |
valori max |
Durante la corsa sono disponibili tre diverse schermate. Ogni schermata è suddivisa in sette aree con informazioni che variano a seconda della schermata in cui ci si trova.
Durante la corsa si può passare indifferentemente da una schermata all’altra per visualizzare i dati che interessano maggiormente. Per far ciò premere il tasto MODE.
Durante la corsa è possibile variare la resistenza dell’unità, cambiando la posizione della leva comando. Sulla console verrà aggiornato il numero della posizione e alcuni dei valori rappresentati sullo schermo (ad esempio la pendenza, ecc.).
Avvio
Per l’accensione dello schermo è sufficiente premere uno dei due pulsanti SET o MODE oppure iniziare a pedalare.
I
SCHERMATE
Ia schermata:
A Potenza corrente
B Velocità corrente
C Pendenza
D Distanza
E Tempo della corsa
F Posizione della Leva
G Indicatore
IIa schermata:
A Potenza media 


 B Velocità media


 C Pendenza media


 D Distanza


 E Tempo della corsa


 F Posizione della Leva


G Indicatore
IIIa schermata:
A Potenza massima
B Velocità massima 


 C Guadagno in elevazione


 D Distanza totale


 E Tempo totale


F Posizione della Leva 


 G Indicatore


Informazioni disponibili durante la corsa
SIMBOLO |
SCHER- |
INFORMAZIONE |
|
MATA |
|||
|
|
||
WATT |
1 |
Potenza corrente. Potenza che si sta sviluppando nel momento in cui si legge il valore. |
|
KM/H-M/H |
1 |
Velocità corrente. Velocità a cui si sta pedalando nel momento in cui si legge il valore. |
%1 Pendenza. La pendenza visualizzata è una funzione del peso del ciclista e della posizione della leva. comando.
|
DST |
1-2 |
Distanza percorsa. Distanza che si è percorsa dall’inizio della corsa. |
|
|||||
|
|
|
|
|
|
|
|||
TIME |
1-2 |
Tempo della corsa. Misura del tempo dall’inizio della corsa. |
|
||||||
1 2 3 4 5 |
1-2-3 |
Posizione della leva comando. Indica in che posizione si trova la leva di variazione della resistenza dell’unità. |
|
||||||
|
|
|
|
1-2-3 |
Indicatore |
Indica se la velocità corrente è maggiore ( ) o minore ( ) della velocità media. |
|
||
AVG WATT |
2 |
Potenza media. Potenza media sviluppata dall’inizio della corsa. |
|
||||||
AVG KM/H-M/H |
2 |
Velocità media. Velocità media dall’inizio della corsa. |
|
||||||
% AVG |
2 |
Pendenza media. Pendenza media della corsa. |
|
||||||
MAX WATT |
3 |
Potenza massima. Massima potenza sviluppata durante la corsa. |
|
||||||
MAX KM/H |
3 |
Velocità massima. Massima velocità raggiunta durante la corsa. |
|
||||||
ELV.G |
3 |
Guadagno in elevazione. Indica il dislivello ottenuto durante la corsa. |
|
||||||
|
ODO |
3 |
Distanza totale |
percorsa. Distanza totale che è stata |
percorsa con il Digital Mag. |
|
|||
TOTAL TIME |
3 |
Tempo totale. |
Tempo totale che è stato utilizzato il Digital Mag. |
5 |
|||||
|
|
|
|
1-2-3 |
Indicatore di |
batteria scarica. |
|||
|
|
|
|
|
|
|
|
|
|
1 Supercrono HydroMag Dgt.indd 5 |
|
|
05/11/09 12:21 |
|
|
I
Fine della corsa
Alla fine della corsa è possibile visualizzare i dati massimi e medi di velocità e potenza, il guadagno in elevazione, la distanza percorsa e il tempo della corsa appena eseguita.
Se si rincomincia a pedalare i dati della corsa (valori medi, massimi, tempo e distanze) vengono aggiornati come se fossero parte della stessa corsa.
Cancellazione dei dati della corsa
Dopo due minuti di inattività, cioè senza pedalare o senza premere i tasti della console, il programma va in stand-by (modalità riposo). Quando il computer va in stand-by, tutti le informazioni della corsa appena fatta vengono memorizzate.
In caso si volesse iniziare una nuova corsa e cancellare i dati è sufficiente effettuare l’operazione di CLEAR.
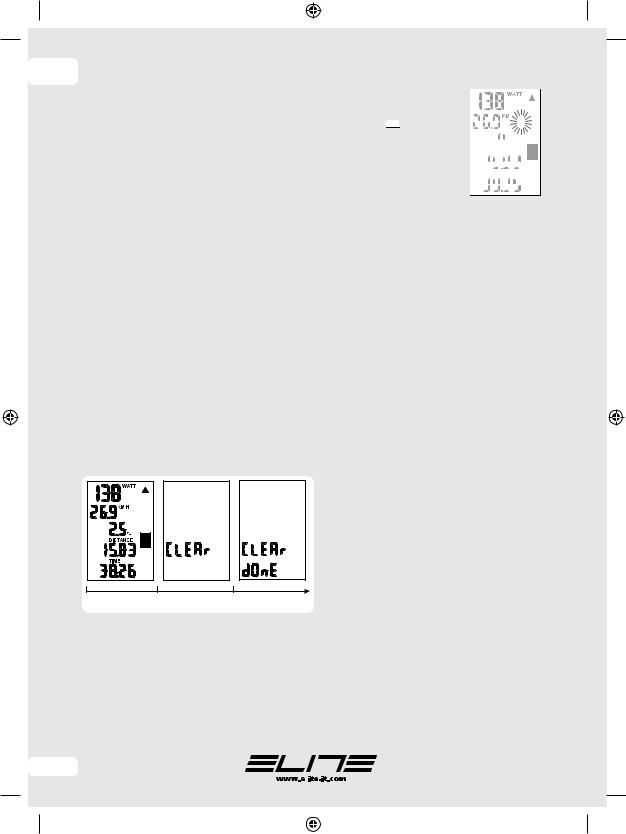
Per eseguire la procedura CLEAR è necessario premere il tasto SET per almeno 6 secondi. Attenzione: è possibile effettuare la procedura di cancellazione solo a velocità nulla.
Per i primi tre secondi la schermata non cambia. Tenendo il tasto SET, dopo i primi tre secondi, apparirà la scritta CLEAR. Questa è una scritta che avverte che si sta per eseguire la cancellazione dei dati. È comunque possibile interrompere la procedura di cancellazione, semplicemente smettendo di premere il tasto.
Dopo aver premuto il tasto SET per sei secondi apparirà la schermata con la scritta CLEAR e DONE. Questa scritta significa che la cancellazione dei dati è stata eseguita. Ora si può smettere di premere il tasto.
Qui di seguito sono raffigurate le schermate che appariranno durante la procedura.
3 |
6 |
secondi |
Batterie
Il Super Crono Hydromag Digital utilizza due batterie di tipo AA. L’autonomia del sistema dipende dalla qualità di batteria che si utilizza. Per ottimizzare il consumo delle batterie in fase di stand-by è necessario staccare il cavo del sensore di velocità dalla leva comando. In condizioni ottimali le normali batterie alcaline hanno una durata di circa 300 ore. Non è possibile utilizzare batterie ricaricabili a meno che non siano da 1,5 Volt.
6
Quando le batterie si stanno per scaricare incomincerà a lampeggiare sullo schermo il simbolo
della batteria (


 ).
). 


 Da quando incomincia a lampeg-
 giare il simbolo passano alcune

 ore prima che le batterie si sca-


 richino del tutto.


 Quando le batterie sono com-


 pletamente scariche lo schermo


 si spegnerà, il programma però
provvederà a salvare tutti i dati in memoria. Così anche quando si sostituiranno le batterie tutti i dati che erano memorizzati non andranno persi. Proprio grazie a questa memorizzazione dei dati, il Super Crono Hydromag Digital può stare lunghissimo tempo senza alimentazione e senza perdere nessuna informazione.
Attenzione: gettare le batterie esauste negli appositi contenitori. Non disperderle nell’ambiente.
Risoluzione problemi
1.Mentre si sta pedalando, sullo schermo della console i valori di velocità, potenza, tempo e distanze non cambiano come dovrebbero (nella schermata dei valori correnti velocità, potenza sono nulle mentre gli altri valori non cambiano).
È probabile che non arrivino le informazioni dal sensore di velocità. Provare a verificare se il cavo del sensore velocità è ben inserito nel guscio del- l’unità di resistenza e se la spina è ben inserita nella leva comando.
2.Sulla console tutti i valori sono regolari, ma il logo del ciclista, che mostra la posizione della leva comando, è fisso su una posizione indipendentemente dalla effettiva posizione della leva.
Probabilmente non arriva il segnale dal sensore della leva di comando. Controllare il cavo che va dal computer alla leva sia connesso.
3.Al variare della posizione della leva di comando, la pendenza che si legge è cambiata rispetto a ieri.
La pendenza è una funzione del peso e quindi ogni volta che si variano le impostazioni del peso del ciclista, cambia anche la pendenza per ogni posizione della leva.
4.Il valore della pendenza è troppo elevato.
Controllare il peso impostato (vedi paragrafo Impostazioni). Infatti il valore della pendenza equivalente è inversamente proporzionale al peso del ciclista e se il peso impostato è troppo basso, tale valore risulta errato.
5.La velocità è molto più alta di quella corretta e anche gli altri valori sono errati.
È possibile che il computer sia stato impostato per una unità di resistenza diversa da quella del Super Crono Hydromag Digital. Controllare se nella fase di SET UP il valore TYPE è uguale a 2.
1 Supercrono HydroMag Dgt.indd 6 |
|
|
05/11/09 12:21 |
|
|
||
|
|
||
|
|
||
|
|
|
|
ATTENZIONE
•L’unità di resistenza si riscalda sensibilmente quando in uso. È necessario aspettare che si raffreddi prima di toccare i gusci di alluminio.
•Non frenare durante l’utilizzo del trainer, ciò danneggia irreparabilmente il rullino e il pneumatico.
•Il cavalletto é studiato per l’uso da parte di un solo ciclista.
•Verificare la sicurezza e la stabilità della bicicletta prima di ogni allenamento.
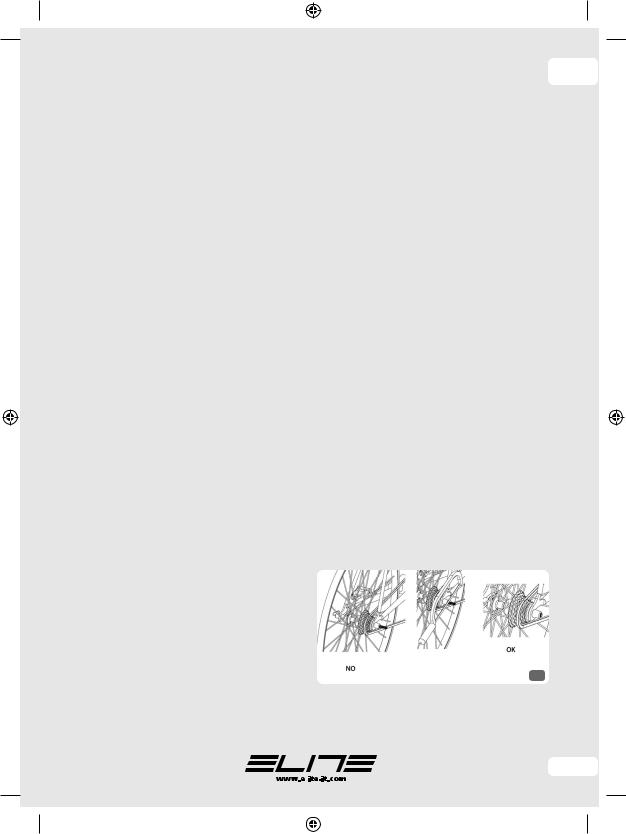
•Qualora lo sgancio rapido non fosse compatibile con le bussole del cavalletto, sostituirlo con quello fornito in dotazione (P).
•Il computer che si applica sul manubrio non è impermeabile. Attenzione a non sudare sopra il display, perché potrebbe danneggiare il circuito elettronico.
•Non conservate il Super Crono Hydromag Digital in luoghi bagnati o umidi. Questo potrebbe danneggiare i componenti elettronici.
•Se non si utilizza il trainer per lungo tempo, si consiglia di togliere le batterie dal computer e dal trasmettitore.
•Non ci sono componenti utilizzabili singolarmente all’interno. La garanzia è nulla se l’unità viene aperta o manomessa.
•Poiché i piedini sono costruiti in materiale morbido antiscivolo, potrebbe verificarsi che durante l’uso lascino tracce di gomma sul pavimento.
•Durante l’uso del Super Crono Hydromag Digital
con rullino Elastogel, una leggera usura dello stesso rientra nella normalità. I test eseguiti in Elite dimostrano che dopo un uso continuo di 20.000 Km il consumo del rullino si aggira sui 0,1 mm, ed essendo 17.5 mm lo spessore totale, un consumo ben superiore non impedisce il corretto funzionamento del trainer.
Contestazioni dovute ad utilizzo improprio o negligente, non verranno riconosciute. Si potrebbe ve-
I
rificare una leggera usura della parte in gomma che rientra nella normalità.
•L’utilizzo con pneumatici stretti o con pressione del pneumatico non ottimale, può danneggiare irreparabilmente il rullino Elastogel.
•Qualora si avvertisse uno slittamento della ruota sul rullino Elastogel, rendere più progressivo lo sforzo sul pedale. L’allenamento con il pneumatico che slitta può danneggiare irreparabilmente il rullino Elastogel.
SI CONSIGLIA
•Per un minor consumo del pneumatico e una migliore aderenza al rullino, consigliamo di utilizzare pneumatici larghi 23 mm.
•Pressione consigliata della ruota posteriore: 7 -8 atmosfere per pneumatico da corsa; 3,5 - 4 atmosfere per pneumatico MTB. Per casi particolari attenersi alla pressione consigliata dal costruttore dei pneumatici.
•Per una minor rumorosità, una maggiore aderenza del pneumatico sul rullino e una riduzione delle vibrazioni, utilizzare pneumatici slick (anche per Mountain bike).
•Prima dell’uso, pulire il pneumatico con alcool o acqua.
•Se il perno dello sgancio rapido fornito sporge più di 3 mm dal dado di fissaggio tagliare la parte sporgente (fig. 4).
4
7
1 Supercrono HydroMag Dgt.indd 7 |
|
|
05/11/09 12:21 |
|
|
||
|
|
||
|
|
||
|
|
|
|
GB
ENGLISH
Thank you for choosing the Super Crono Hydromag Digital.
IMPORTANT
Do not stop the rotation of the bicycle wheel by using caliper or disk brake. This seriously damages the roller and the tire.
INTRODUCTION
Check the presence of all the following components.
1 Hydromag Unit (Ref. A)
1 stand (Ref.B)
-1 left bushing pin (Ref.C)
-1 ring (Ref.D)
-1 right bushing pin (Ref.E)
-1 control lever (Ref.F)
-1 unit support upper base (Ref.G)
-1 unit support lower base (Ref.H)
-1 screw M6 x45 mm (Ref.I)
-1 washer Ø6 mm (Ref.L)
-1 nut M6 (Ref.M)
1 bag of unit accessories:
-1 hex wrench
-2 screws M6 x 55 mm (Ref.N)
-2 washers Ø6 mm (Ref.O)
1 Quick release (Ref.P)
1 console (Rif.Q)
8
1 Supercrono HydroMag Dgt.indd 8 |
|
|
05/11/09 12:21 |
|
|
||
|
|
||
|
|
||
|
|
|
|
CONSOLE AND GEAR SHIFT
INSTALLATION:
• Install the LCD console to the shifting lever (see the following illustration).
1
• Connect the wire from the back of the LCD console to the shifting lever as shown in the following illustration.
2
• In case it isn’t firmly connected, insert the plug of the speed sensor (the cable that comes from the flywheel housing) in the shifting lever, as shown in the following illustration.
3
•Make sure the shifter is securely mounted and that the cable does not interfere with you or the bicycle while pedal-ling (pedals, chain, etc).
•It is now possible to start the training session. It is possible to change the resistance level using the remote regulation shifter installed on the handlebar and view all the data of your training session on the LCD display.
GB
SET
Screen to select the units of measurement.
USING THE COMPUTER
Set up instructions
The first operation with Super Crono Hydromag Digital is to set your personal parameters.
This is possible from the SET UP screen that you may have access by keeping pressed the right (MODE) key for at least 3 seconds. SET UP will appear at the bottom of the screen. By stop pressing the key, the SET UP screen will appear on the 


LCD display. Attention: the trainer must not be running to be able to enter the SET
UP screen.
The next step is to select the units of measurement, which can be metric or Anglo-Saxon.
By pressing the left button (SET), METER, KM/H, KILO and FOOT, M/H
e LB will alternate on the screen. Press the MODE key to select the desired units and to pass to the next screen where you can input your personal weight.
In this screen, a three digit number will appear at the top right corner of the screen which indicates your weight including your bicycle, in the unit of measurement previously selected. Using the trainer for the first time, the number that ap-
pears is the figure preinserted at the factory; from the second time onwards, it’s the figure introduced the previous run. To amend the number, press the SET key to modify the first flashing digit
and the MODE key to confirm the value selected and pass to the se-
cond digit which will start to flash. Repeat the same operation for all three digits. Press MODE to con-
firm the weight value and to pass to the next screen.
In this screen the model of resistance unit is selected. Select value ”2” for Super Crono Hydromag Digital. This value should already be preinserted at the factory; if this is not the case, press the SET key until the number becomes “2”. Press the MODE key to exit the SET UP screen.
9
1 Supercrono HydroMag Dgt.indd 9 |
05/11/09 12:21 |

GB
10
Attention: Inputting an incorrect value will process incorrect data during your training sessions. Example: You want to set the following units of measurement: kilometres, metres, kilograms and input your personal weight which is 78 kg.
To access the SET UP screens keep pressed the MODE key for at least 3 seconds. Press SET until METER, KILO and KM/H appear on the screen. Then press the MODE key. Press the SET key until the flashing digit (first from the right) becomes “8”. Then press MODE. Press the SET key until the flashing number (middle) becomes “7”. Then press MODE. Press the SET key until the flashing number (first from the left) becomes “0”. Then press MODE. Press the SET key until the flashing number becomes “2”. Then press MODE. Now you are ready to go!
How to use
During the run, you can select from four different screens. Each screen is divided in seven parts with different information displayed in each one.
During the run, you can toggle through the screens at will with the MODE key.
During the run, you can adjust the resistance level with the remote shifting lever. The console will automatically indicate the gear shift position on the screen and up-date some values (i.e. slope).
Starting a run
To start a run simply press ADJUST or MODE or simply start pedalling.
Information available during the run.
SCREENS
1st screen:
A Current power B Current speed
C Slope/current incline D Distance
E Course time
F Resistance level/gear shift position
G Indicator
2nd screen:
A Average power B Average speed C Average slope/incline
D Distance
E Course time
F Resistance level/gear shift position 
G Indicator
3rd screen:
A Maximum power
B Maximum speed C Elevation gain D Total distance E Total time
F Resistance level/gear 


 shift position


G Indicator
SYMBOL |
SCREEN |
INFO |
|
|
|
|
|
WATT |
1 |
Current power. Power developed the moment you read the value on the screen. |
|
KM/H- M/H |
1 |
Current speed. The speed you are proceeding the moment you read the value on the screen. |
|
%1 Slope. The slope value is in function of the cyclist’s weight and the resistance level/gear shift position.
|
DST |
1-2 |
Distance covered since training commenced. Indicates the distance covered from the starting point. |
||||||
TIME |
1-2 |
Race duration. Indicates the time passed since training commenced. |
|
||||||
1 2 3 4 5 |
1-2-3 |
Resistance level/Gear shift position. Indicates the gear shift position of the resistance unit. |
|||||||
|
|
|
1-2-3 |
Indicator |
. Indicates if the current speed is higher ( |
) or lower ( |
) than the average speed. |
||
|
|
|
|
|
|||||
AVG WATT |
2 |
Average power. Indicates the average power developed since training commenced. |
|||||||
AVG KM/H-M/H |
2 |
Average speed. Indicates the average speed since training commenced. |
|
||||||
% AVG |
2 |
Average slope. Average slope of the run. |
|
|
|||||
MAX WATT |
3 |
Maximum power. Indicates the peak on power during the run. |
|
||||||
MAX KM/H |
3 |
Maximum speed. Indicates the peak on speed during the run. |
|
||||||
ELV.G |
3 |
Elevation gain. Indicates the elevation gained during the run. |
|
|
|||||
|
ODO |
3 |
Total distance covered. Indicates the total distance covered by your Digital Mag. |
||||||
TOTAL TIME |
3 |
Total time. Indicates the total time your Digital Mag has been used. |
|
||||||
|
|
|
3 |
Flat battery indicator. |
|
|
|
|
|
1 Supercrono HydroMag Dgt.indd 10 |
|
|
05/11/09 12:21 |
|
|
Finish a run
Once completed the run, it is possible to view the maximum and average values for speed and power, the elevation gain, the distance covered and the duration of the run.
If you restart pedalling, the values of the run (average and maximum values, time and distance) are up-dated.
Delete data of a run
After two minutes of inactivity, which means there is no pedalling motion nor pressing of the console keys, the program goes in “stand-by”. Once in “stand-by”, all the information of the run just completed are memorized.
To commence a new run and delete the previous data, just proceed with the CLEAR procedure.
To start the CLEAR procedure, press the left (SET) key for at least six seconds.
Attention: the trainer must not be running to be able to delete data of a run.
For the first three seconds nothing changes. Maintaining pressed the SET key, after the first three seconds, CLEAR will appear on the screen. This confirms that you are deleting the data of the run just completed. To stop the delete procedure, simply stop pressing the key.
After six seconds you kept the key pressed, CLEAR and DONE will appear on the screen.
This confirms that you have deleted the data of the run just completed, and you can now stop pressing the key.
Shown below are the screens that appear during this procedure.
3 |
6 |
seconds |
Batteries
Two AA batteries are necessary to power Super Crono Hydromag Digital. The life duration depends on the quality of batteries used.
Battery life will last longer if you disconnect the speed sensor plug from the shifting lever when the trainer is not running. In normal conditions, standard alkaline batteries should last for about 300 hours. Rechargeable batteries can be used only if they are 1.5 V.
GB
When the batteries are running down a battery symbol will start flashing on the screen. From when the symbol  starts flashing the batteries still have several hours of life.
When the batteries completely run down the screen will turn off, while the program will save
all the data in it’s memory. With the replacement of the batteries all the data stored will be saved. With the possibility of storing information, Super Crono Hydromag Digital can remain without power for long periods without losing any data.
Attention: Throw away run out batteries in appropriate containers.
Troubleshooting
1. While pedalling, the values on the LCD screen representing speed, power, time and distance don’t up-date as they should (in the current screen, speed and power values are zero while the others don’t change).
Probably the information from the sensor placed on the resistance unit doesn’t arrive to the console. Check that the speed sensor and the plug are properly fixed.
2. All the values on the LCD screen are correct but the resistance level indicator, which indicates the resistance level/gear shift position, remains blocked on the first level even if I change gear.
Probably no information arrives from the sensor of the gear shift. Check the cable from the console to the lever.
3.The slope values are different from yesterday.
The slope value is in function of the weight, thus every time you introduce a new weight value, the slope figure for each resistance level will automatically change.
4.The slope value is too high.
Check the weight value (see paragraph Set up settings Instructions). In fact the slope value is inversely proportional to the rider’s weight and if the weight value is too low, the slope value is wrong.
5.The speed value is too high and the other values are incorrect.
Probably the model of resistance unit selected is not Super Crono Hydromag Digital. Check the SET UP fase that the TYPE value is “2”.
11
1 Supercrono HydroMag Dgt.indd 11 |
|
|
05/11/09 12:21 |
|
|
||
|
|
||
|
|
||
|
|
|
|
 Loading...