


Warranty:
LIMITED WARRANTY* ONE (1) YEAR:
Your Elite Professional small kitchen appliance is built with precision, inspected and tested before leaving our factory. It is warranted, to the original purchaser or gift recipient, to be free from any manufacturing defects under normal use and conditions for one (1) year, cord excluded. During that period, should the appliance fail to operate properly, return the appliance with your sales receipt to the store where purchased. This warranty gives you special legal rights and you may also have other rights to which you are entitled, which may vary from state to state. If you use your appliance for household use and according to instructions, it should give you years of satisfactory service.
This limited warranty covers appliances purchased and used within the surrounding United States and does NOT cover:
-Damages caused from improper usage or installation of appliance.
-Damages caused from shipping.
-Defects other than manufacturing defects.
-Breakage caused by misuse, abuse, accident, alteration, lack of proper care and maintenance, or incorrect current or voltage.
-The loss or missing parts of the appliance. Parts will need to be purchase separately.
-Damage from service by other than an authorized dealer or service center.
-Any transportation and shipping charges.
RETURNS: Any return of defective merchandise to the manufacturer must be processed accordingly by contacting customer service first to obtain RA # (Return Authorization Number). We will not accept any returns of merchandise without an applicable RA #.
*One Year Limited Warranty valid only in the United States, excluding Alaska, Hawaii, and Puerto Rico.
**Any instructions or policy included in this manual may subject to change at any time.
Kitchen Center
Toaster Oven Broiler
Model ERO-2006S |
Elite Professional Kitchen Center |
|
Toaster Oven Broiler |
Distributed by: MAXI-MATIC® , USA
18041 E. Arenth Ave. City of Industry, CA 91748
Customer Service Department: (626) 912-9877 Ext. 116/120 MON-FRI 9am-5pm PCT Email: info@maxi-matic.com
Or visit our website: www.maxi-matic.com
Model ERO-2006S
INSTRUCTION MANUAL & RECIPES
Before operating your oven toaster, please read all instructions carefully and keep for future reference.

PARTS & DESCRIPTION.
Thermostat Control
Timer
TOASTER OVEN:
Thermostat Control – Maximum control over your cooking cycle.
Heat Selection – Choose the direction of cooking heat for convenient control of cooking in your oven.
Timer – A 60 minute timer with indicator bell.
NOTE: THE TIMER SERVES AS THE OVEN’S ON/OFF SWITCH.
Grilling Rack – Grill a variety of delicious foods or toast bread, bagels and English muffins.
Roasting Tray – Perfect for roasting or broiling a variety of foods.
Roasting Tray Removal Clip – Remove hot baking tray from the oven quick and easy.
ROTISSERIE:
Rotisserie Spit & Fork – Roast chicken, hams, or roasts for delicious healthy meals. Rotisserie Removal Tongs – Remove hot foods on the rotisserie from the oven quick and easy.
OVEN TOP STEAMER & GRILL:
Steamer / Warming Rack – Steam delicious savory vegetables while cooking in the oven for a complete meal and to keep food warm.
Oven Top Dome Lid – High dome lid for steaming vegetables or grilling on oven top. Oven Top Grill & Griddle – Grill or fry a variety of tasty foods on the oven top while cooking in the oven at the same time.
All parts and accessories are dishwasher safe. 1
IMPORTANT SAFEGUARDS..
When using electrical appliances, basic safety precautions should always be followed, including the following:
1.Read all instructions before operating.
2.Do not touch hot surfaces. Use handles or knobs.
3.Remove all packaging plastics and other materials from unit before operating.
4.Wash all removable accessories before using for the first time.
5.Unit should be turned on to MAX temperature for 10 minutes for the first time to burn off any access manufacturing or packaging oils.
6.To protect against electrical shock, do not immerse cord, plug or appliance itself in water or other liquids.
7.Close supervision is necessary when appliance is used by or near children.
8.Unplug from outlet when not in use and before cleaning. Allow to cool before putting on or taking off parts.
9.Do not operate any appliance with a damaged cord or plug or after the appliance malfunctions or has been damaged in any manner. Return the appliance to the nearest authorized service facility for examination, repair or adjustment.
10.The use of accessory attachments not recommended by the appliance manufacturer may cause injuries.
11.Do not use outdoors.
12.Do not let cord hang over edge of table or counter or touch hot surfaces.
13.Do not place on or near a hot gas or electric burner, or in a heated oven.
14.Always attach plug to appliance first, then plug cord into wall outlet. To disconnect, turn any control to OFF position, then remove plug from wall outlet.
15.Oversized foods or metal utensils must not be inserted in the appliance as they may cause a fire or risk of electrical shock.
16.A fire may occur if the appliance is covered or touching flammable material including curtains, draperies, walls and the like when in operation.
17.Do not clean with metal scouring pads. Pieces can break off the pad and touch electrical parts, involving a risk of electrical shock.
18.Extreme caution should be exercised when using containers constructed of other material other than metal or glass.
19.Do not store any materials other than manufacturer's recommended accessories in this oven when not in use.
20.Do not place any of the following materials in the oven: Paper, cardboard, plastic and the like.
SAVE THESE INTRUCTIONS
THIS PRODUCT IS FOR HOUSEHOLD USE ONLY!
2
USING YOUR OVEN..
ROASTING |
BROILING & BROWNING |
Roast wonderful cuts of meat to perfection such as chicken, turkey, beef, pork, ham, lamb and even vegetables. Your new oven can cook up to 6-8 pounds of your favorite meals. Please follow the directions below on how to roast using your new toaster oven.
OPERATION:
1)Place the desired food into the Roasting Tray.
2)Place the Roasting Tray into the oven at the lowest position making sure the tops of the food is at least two inches away from the ceiling heat element of the oven.
3)Set the Thermostat Control to desired temperature.
4)Set the Heat Selection Switch to ROTISSERIE & ROAST, this will turn on both Heating Elements.
5)Set the Timer Switch to desired time. (For foods that need over 60 minutes of cooking time, the Timer may need to be reset after the first 60 minutes.)
6)To remove the Roasting Tray from the oven, first make sure the oven is set to OFF. It is recommended to unplug the unit, but it is not necessary.
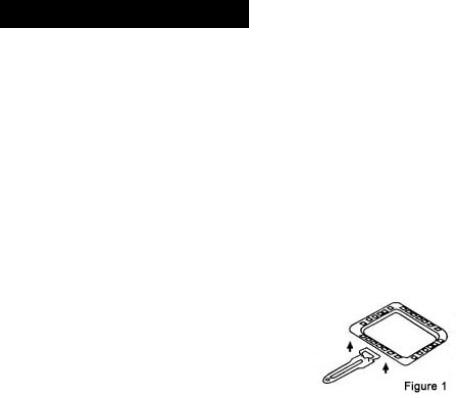
7)Use the Tray Removal Clip and position the top two clasps above the Roasting Tray, then hook the bottom of the clasp underneath the tray. It should catch and
simply slide out. (See Figure 1.)
8)Slowly pull out the Roasting Tray and set on a heat resistant surface.
9)Remove food from tray and serve.
ROASTING CHART*
|
FOOD |
TEMP |
WEIGHT |
TIME |
TEMP (F°) OF |
|
|
(F° ) |
FINISHED |
||||
|
|
|
|
|
ROAST |
|
|
|
|
|
|
|
|
Beef** |
|
|
|
|
|
|
- |
Eye of Round |
325°F |
3 |
– 5 lbs. |
1:30 – 2:00 |
150°F - 160°F |
- |
Standing Rib |
325°F |
|
4 lbs. |
2:25 – 3:00 |
150°F - 160°F |
- |
Top Round |
375°F |
3 ½ lbs. |
2:00 |
150°F - 160°F |
|
|
Roast |
|
|
|
|
|
Pork |
|
|
|
|
|
|
- |
Loin (Boneless) |
325°F |
3 |
– 5 lbs. |
2:30 – 3:00 |
170°F |
- |
Loin (W/ Bone) |
325°F |
3 |
– 5 lbs. |
2:30 – 3:00 |
170°F |
- |
Ham |
325°F |
5 |
– 7 lbs. |
1:50 – 2:25 |
140°F |
Chicken (Whole) |
350°F |
3 |
– 5 lbs. |
1:25 – 1:50 |
190°F |
|
Cornish Hens |
350°F |
1 – 1½ lbs. |
1:00 – 1:25 |
190°F |
||
Turkey (Breast) |
350°F |
6 |
– 8 lbs. |
2:00 – 2:30 |
190°F |
|
Vegetables |
300°F |
|
N/A |
0:25 – 0:35 |
N/A |
|
*All cooking times and temperature provided are approximate and are only for your reference.
**Cooking times for beef are for medium doneness. For rare, subtract approximately 15 minutes from the cooking time. For well done, add approximately 15 minutes to the cooking time.
Before using your oven’s broiling feature, preheat the oven for 5 minutes on MAX temperature setting for best results. Trim any excess fats from meat and dry off any moisture that may be on the food. Please follow the directions below on how to use your new toaster oven broiler.
OPERATION:
1)Set the Thermostat Control to MAX temperature.
2)Set the Heat Selection Switch to BROIL/GRILL & GRIDDLE. This will turn on Top Heating Element.
3)Let oven preheat for approximately 15 minutes .
4)Place desired food onto the Grilling Rack or the Roasting Tray.
5)Brush food with desired sauces, oils or marinades if you wish.
6)Slide the Grilling Rack or the Bake Tray into the highest position making sure the tops of the food is at least two inches away from the ceiling heat element of the oven. (You can place rack or tray in the middle position if desired.)
7)Set Timer Switch to desired time. For foods that need over 60 minutes of cooking time, the Timer may need to be reset after the first 60 minutes.)
8)When cooking cycle is complete, make sure the oven is set to OFF. It is recommended to unplug the unit, but it is not necessary.
9)Remove the rack or tray from the oven.
10)Set onto a heat resistant surface.
11)Remove food from rack or tray and serve.
BROILING CHART*
|
FOOD |
WEIGHT/THICKNESS |
DONENESS |
TIME |
Beef |
|
|
|
|
- |
Porterhouse/Sirloin |
1 Inch Thickness |
Medium |
15 – 20 MIN |
- |
London Broil |
1 Inch Thickness |
Medium |
15 – 20 MIN |
- |
Rib Eye |
1 Inch Thickness |
Medium |
15 – 20 MIN |
- |
Hamburger |
8 Ounces |
Medium |
20 – 25 MIN |
Pork |
|
|
|
|
- |
Chops |
¾ Inch Thickness |
Well |
20 – 25 MIN |
- |
Ribs |
1 Rack |
Well |
25 MIN |
Chicken Breast |
1 Inch Thickness |
Well |
30 – 40 MIN |
|
Fish |
|
|
|
|
- |
Fillets** |
½ Inch Thickness |
Well |
10 – 15 MIN |
- |
Steak |
1 Inch Thickness |
Well |
18 – 20 MIN |
*All cooking times and temperature provided are approximate and are only for your reference.
**Fish fillets are delicate when cooking. It is recommended to use the Roasting Tray when cooking fish fillets to keep from the fillet from breaking up when handling. Turn fillet once carefully midway through broiling cycle.
3 |
4 |

ROTISSERIE
Cook mouth watering foods on the rotisserie for healthy meals. Reduce the amount of fat, grease and oils. It is recommended that when using the rotisserie, that you do not exceed 6 lbs. Season your food with your favorite herbs, marinades or baste for a terrific meal that’s low in fat and high in taste.
OPERATION:
1)Prepare your desired food to be cooked on the rotisserie such as marinating it, brushed with your favorite sauces or flavored with herbs.
-It is recommended that if cooking a whole chicken or Cornish hens, to secure the wings and the drumsticks w/ food ties to keep them from dangling or moving around during the rotisserie cooking cycle.
2)Take the rotisserie spit and secure one fork to spit rod at position towards the blunt end of the spit making sure it’s locked in the groove of the spit rod. This will keep the fork from moving.
-To secure the forks, simply tighten w/ the “fly screw” into the holes provided and tighten against the spit rod. To remove, simply unscrew the “fly screw” in the opposite direction and remove. Be sure to keep these parts clean after each use.
3)Spear your food onto the spit rod from the pointed end and push food towards the first fork. Spike the fork into the food and make sure it’s secure.
4)Take the second fork and slide onto the spit rod.
5)Pierce the fork into the food and tighten with “fly screw”.
6)Take entire assembly and place into the oven. Making sure the blunt “wheel end” of the spit rod is facing the right hand side.
7)Gently insert the pointed end into the insertion hole provided on the left hand side of the oven. Then rest the blunt “wheel end” onto the spoke provided on the right hand side of the oven.
8)Insert Roasting tray to the lowest slot in the oven to catch any oils or grease that will drip down. This will prevent the drippings from burning on the heating element.
9)Set the thermostat control to 350° - MAX temperature.
10)Set the Heat Selection switch to ROTISSERIE & ROAST. This will turn on both heating elements. However, you can also cook with only the Top Elements on which is set at the BROIL/GRILL & GRIDDLE.
11)Set Timer to desired time
12)Switch the Rotisserie switch to ON.
13)When cooking cycle is complete, make sure the oven is set to OFF. It is recommended to unplug the unit, but it is not necessary.
14)Remove the rotisserie assembly by using the Rotisserie Spit & Fork Removal Tongs by sliding it underneath the spit rods. Lift up gently away from the spoke and the insertion hole. Pull out of the oven and place onto cutting board or a clean surface.
15)Loosen the fork closest to the pointed end of the spit by unscrewing the “fly screw”. Slide food off of the spit. TIP: Do not unscrew the fork by the blunt end of the wheel. Keeping it on will help in removing the food easier.
16)Remove food entirely and serve.
5
ROTISSERIE COOKING TIME CHART*
FOOD |
WEIGHT |
TEMPERATURE |
TIME |
Chicken |
4 – 5 lbs. |
MAX |
1 HR 30 MIN |
Pork Roast |
4 – 5 lbs. |
MAX |
1 HR 45 MIN |
Roast Beef** |
3 – 4 lbs. |
MAX |
1 HR 30 MIN |
Cornish Hens |
1 ½ lbs. |
MAX |
1 HR |
Smoked Ham |
4 – 5 lbs. |
MAX |
1 HR 45 MIN |
Veal Roast |
4 – 5 lbs. |
MAX |
2 HR 30 MIN |
(Boneless) |
|
|
|
*All cooking times and temperature provided are approximate and are only for your reference.
** Cooking times for beef are for medium doneness. For rare, subtract approximately 10-15 minutes from the cooking time. For well done, add approximately 10-15 minutes to the cooking time.
BAKING
Baking in your new MAXI-MATIC Toaster Oven/Broiler will cover a wide range of baked pastry such as cookies, pies, brownies, cakes and much more. Any bake ware ranging from cookie sheets, bunt cake pans, muffin racks, pie plates square pans, etc. can be used inside the oven to meet all your baking needs. Any of these bake ware with measurements below 12” x 8 ½“can fit into the oven and rest on the Grilling Rack for stability. It is not recommended to use plastic or glass containers in the oven. Note: When positioning bake ware inside the oven, make sure to always slide the Grilling Rack into the lowest or middle positions in the oven and set your bake ware onto the Tray.
OPERATION:
1)Preheat the oven as directed in recipe.
2)Insert grilling rack to set positions.
3)Place item to be baked onto the rack.
4)Set the Heat Selection to BAKE & KEEP WARM.
5)Set Timer switch to desired time.
6)When baking is complete, turn off the oven and unplug the unit.
7)Remove the item, let cool and serve.
8)When cooking cycle is complete, make sure the oven is set to OFF. It is recommended to unplug the unit, but it is not necessary.
Always follow package or recipe instructions for baking time and the temperature.
6

GRILL & GRIDDLE
The grill & griddle located right on top of the oven is a wonderfully convenient way to cook a variety of delicious foods without having to use many pots or pans. Food can be kept warm for up to 30min. while the oven is on and in use; it’s ideal for making bacon and eggs, pancakes, hamburgers, hot dogs, steaks, fish, chicken breasts and even grilled cheese sandwiches.
WARNING: Never use the Grill & Griddle when the oven is stored beneath a cabinet overhang. Use caution.
OPERATION:
1)When not cooking inside the oven at the same time, simply slide out the Crumb Tray from the bottom of the oven and slide it into the top slot in the oven right below the Top Heating element. This will prevent the interior of the oven from heating up too high.
2)While using the oven, let the Grill or the Griddle heat up for approximately 5 minutes before cooking on it.
3)Set desired temperature and set heat selection to BROIL/GRILL & GRIDDLE. Set Timer to desired cooking time.
4)The Oven Top Dome lid can also be used to cook faster or to prevent spattering.
5)When cooking cycle is complete, make sure the oven is set to OFF. It is recommended to unplug the unit, but it is not necessary.
6)The oven can remain on still to finish cooking the meal inside if cooking inside the oven at the same time.
7)However, ALWAYS wait until the oven is OFF and has completely cooled off to remove the Grill & Griddle for cleaning.
STEAMING
Steam a wide variety of savory vegetables to add a delicious side dish to your meal. And all this right on top of the same oven that is cooking your main course all at the same time. Add your favorite fresh vegetables such as carrots, broccoli, green beans, corn on the cob, squash and many more to the Steamer area right on top of your oven and have it ready to eat in a matter of minutes.
OPERATION:
1)When not cooking inside the oven at the same time, simply slide out the Crumb Tray from the bottom of the oven and slide it into the top slot in the oven right below the Top Heating element. This will prevent the interior of the oven from heating up too high.
2)Begin by pouring ¼ cup of lukewarm water into the grill & griddle area.
3)Place the Steam / Warming Rack over the water, making sure the water does NOT rise up above the ventilation holes in the steamer rack.
4)Set desired temperature and set heat selection to BROIL/GRILL & GRIDDLE. This turns on the top elements for steaming. Set Timer to desired cooking time.
5)Place the desired vegetables on top of the Steamer / Warming Rack. Season with herbs, salt and pepper.
6)Cover with the Oven Top Dome Lid.
7)Vegetables steam quickly. Depending on the toughness of the vegetable. It can be done within 10 minutes.
8)Remove lid CAREFULLY for hot steam may rise up when lid is removed.
9)Remove vegetables from the steamer rack and serve while still hot.
10)DO NOT remove remaining water until the oven has been turned off and completely
cooled.
When cooking cycle is complete, make sure the oven is set to OFF. It is recommended to unplug the unit, but it is not necessary.
7
KEEPING FOOD WARM
There are two great ways to keep your food warm while finishing up other dishes that may require longer cooking times. By using the inside of the oven to keep food warm up to 30min. and to also keep food warm on top of the oven while still cooking inside it at the same time.
OPERATION:
INSIDE THE OVEN –
1)Wait until the cooking cycle has completed for your food.
2)Set the Temperature switch to the lowest setting.
3)The oven will remain warm and keep your food warm for up to 30min. Longer periods may result in drying the food out too much.
ON TOP OF THE OVEN –
1)While the oven is cooking inside and other dishes need to be kept warm.
2)Simply set the Steamer / Warming Rack on top of the Grill & Griddle area.
3)DO NOT add water.
4)Place food onto the rack, cover with lid.
5)Food can be kept warm for up to 30 – 45 minutes.
Longer periods may result in drying the food out too much.
TOASTING
Toasting in the oven is quite simple. You can toast regular slices of bread or also brown biscuits or bread rolls.
OPERATION:
1)Place the Grilling Rack into the center position in the oven.
2)Set the thermostat setting to approximately between 450°-500°.
3)Set the heat selection switch to BAKE & KEEP WARM.
4)Place the bread onto the grilling rack and set the timer to 5 minutes.
Note: When setting the timer for such a short period of time, the timer may need to be turned to approximately 15 minutes first until the light comes on, then switch the timer back to 5 minutes.
5)When bread is toasted to your desired coloring, simply shut the oven off by turning the Timer to 0 (zero) if you wish to end the cycle early.
6)Use caution when removing the bread from the oven.
PREHEATING
For certain recipes, it calls for the oven to be pre-heated.
OPERATION:
1)Plug unit into an outlet.
2)Set temperature setting to desired setting or as indicated in recipe.
3)Turn heat selection to BAKE & KEEP WARM.
4)Set the timer to 15 minutes to preheat the oven.
5)When pre-heating cycle has completed, insert food and reset the Timer.
Note: It is recommended not to preheat the oven when using the rotisserie. The oven will be hot and it will be difficult to insert the rotisserie assembly.
8
 Loading...