

Electrolux ZT3510UK Operating Instructions Manual
72Sx0 2 01 02
Vacuum cle ane r
Ope rating ins tru ctions
17
12
13*
14*
15*
16*
10 *
11*
4
7
8
1
3
2
5
6
20
21
22
23
24
25
27
28
31
29
30
* De pe nding on th e m ode l
SAFETY PRECAUTIONS
This appliance is not inte nde d for use by pe rsons
(including ch ildre n) with reduce d ph ys ical, se nsory
or me ntal capabilities , or lack of expe rience and
k now le dge , unle ss the y h ave be e n given
su pervision or instru ction conce rning use of th e
appliance by a pe rson res ponsib le for th e ir safety.
Th e vacuu m cle ane r fe ature s dou ble ins ulation
and doe s not nee d to be e arth e d.
Ch ildre n sh ould be s upe rvise d to ens ure that th ey
do not play w ith th e appliance .
Never vacuum :
• In we t areas .
• Close to am m able gas e s , etc.
• W ith out a dust bag / cartridge filte r (th is m ay
dam age the cle ane r). A safe ty de vice is fitted
w h ich prevents th e cove r to clos e w ith out a
dus t bag / cartridge filter. Do not atte m pt to
force cove r to clos e .
• Sh arp obje cts.
• Fluids (this can cause s e rious dam age to th e
m ach ine ).
• H ot or cold cinders, lit cigare tte butts , e tc.
• Fine du st from plas ter, concrete, or or as h , for
e xam ple .
The above can cause se rious dam age to th e m otor
– dam age w h ich is not cove re d by th e w arranty.
Ele ctrical cable precautions:
• If th e supply cord is dam age d, it m us t be
replaced b y th e m anufactu rer, it’s s e rvice
age nt or sim ilary qu alifie d pe rson in order to
avoid a h azard. Dam age to th e cle aner cable
w ill not be cove re d by the w arranty.
• Ne ve r pull or lift th e vacuum cle aner by th e cable .
• Dis connect th e plu g from th e w all s ocke t be fore
cle aning or m aintaining th e vacuum cle ane r.
• Re g ularly ch e ck that th e cable is not
dam age d. Ne ve r us e the vacuum cle ane r if
th e cable is dam age d.
All s e rvice and re pairs m us t be carrie d ou t by an
authorise d E le ctrolux s e rvice ce ntre . Alw ays k e e p
th e vacuum cle ane r in a dry place .
INSTRUCTIONS FOR USE
• Be fore placing into ope ration m ak e ce rtain
th at th e filters are in th e proper position.
20 To connect th e h ose into th e s uction inlet
pus h it until it click s .
20 To disconne ct th e h ose from th e s uction inlet
pus h the bu tton at th e e nd of th e h os e .
• Unw ind a sufficie nt le ngth of cable and inse rt the
plug into th e pow e r socke t. A YELLOW m ark on
th e powe r cable s h ow s th e ide al cable le ngth.
Do not e xtend the cable be yond th e RED mark .
• Pres s th e ON/OFF b utton to sw itch the
appliance on. On initial start up full pow e r is
reach e d afte r approximately 1-2 s e conds.
• To rew ind th e pow e r cable , pres s th e rew ind
button w ith foot, and guide th e cable with h and
to ens ure th at it does not wh ip causing dam age .
• By m oving th e variable pow e r control, the
su ction pow e r can be adju sted.
MAINTENANCE
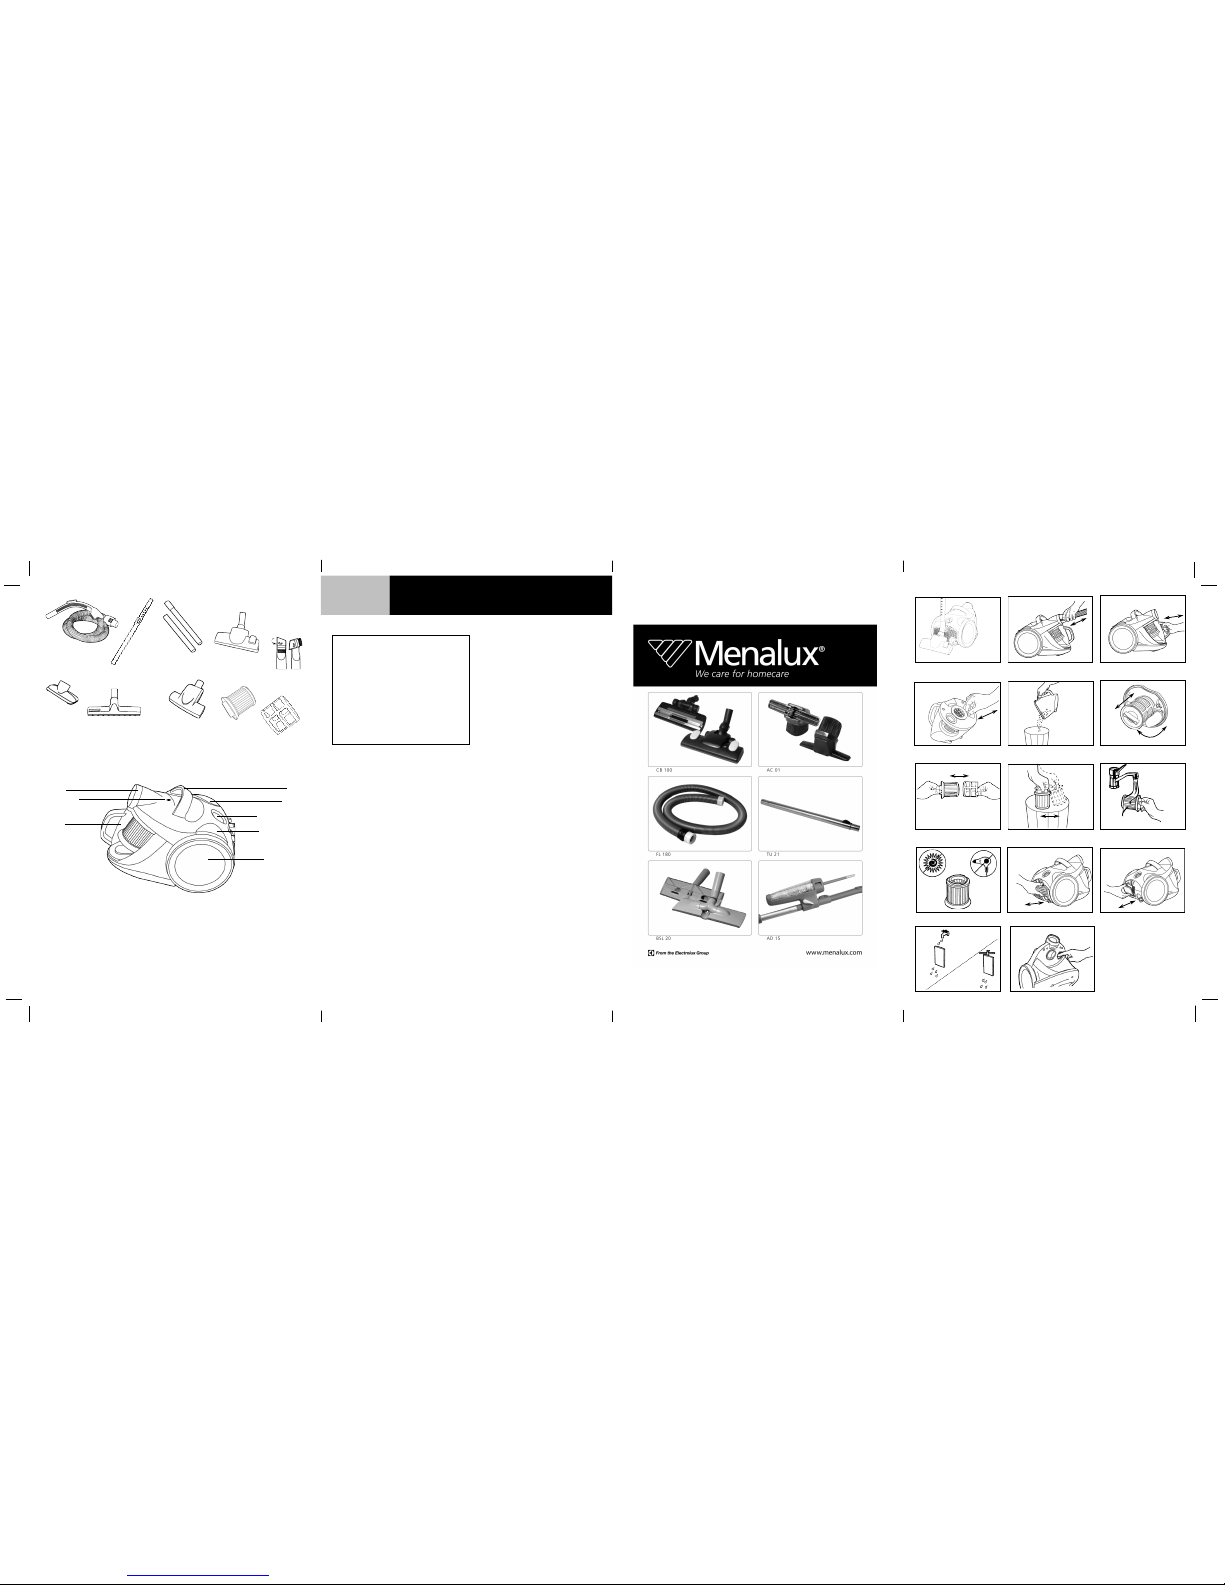
REM OVING TH E CO NTENTS OF TH E D UST CONTAINER
Ne ver ope rate th e cle ane r with out th e du st
containe r installe d.
It is q uite normal for th e du stbin indicator to activate
w h ils t using the cle ane r. Th ere fore be fore you
comm e nce cle aning, turn th e cle ane r on without
th e tools attache d, if th e indicator is activated th e n
ch e ck for dirty filte rs and cle an if nece s sary.
32 If th e dustbin indicator is activate d th an firstly ch e ck
th e air inle t channel of the appliance. If it is clogged
by big piece s of paper, dust, hair or oth e r materials
th e n cle an it. If after cle aning th e dustbin indicator
stayes activate d ch e ck the H EPA.
21 Re m ove the du st containe r from the cle aner.
22 Re m ove the filte r se t from th e dus t container
by tak ing it in th e w ay indicate d in th e icon.
23 Re m ove the contents of th e du st containe r.
22 Put th e filter se t back into th e dus t container.
21 Put th e dus t container back into th e cle ane r.
CLEANING TH E FILTERS
• Filters s h ould be re place d at le as t tw ice a
ye ar or w h en th e y be com e visibly soile d.
• Dis conne ct from e le ctrical outle t be fore
ch anging th e filte rs.
DESCRIPTION O F PARTS
1. Suction inle t
2. Dust containe r
indicator
3. Variable pow e r
control
4. Cable rew ind bu tton
5. On/off s w itch
6. W h e e l
7. Dust containe r
8. Carrying h andle
9 . H os e
10. Te le s copic tube *
11. M e tal tube s *
12. D ual purpos e floor
nozz le
13. Com b ination crevice
nozz le / brush *
14. Uph ols tery nozz le *
15. H ard floor nozz le *
16. Turbo nozz le *
17. Cartridge filter
18. Prote ctor m e s h
19. Parking pos ition
* De pe nding on the
m ode l
1
Englis h
19
9
A
B
26
18
32
Th ank you for ch oos ing an Ele ctrolux Cyclone Pow e r vacuum cle ane r. The s e ope rating instructions cover all
Cyclone Powe r m ode ls . Th is m e ans that with your spe cific m ode l, som e acce s sorie s m ay not be inclu de d.
 Loading...