

Page 1

Art.-Nr.: 34.111.60 I.-Nr.: 11011
BG-CT 18/1 Li
7
D Originalbetriebsanleitung
Akku-Rasentrimmer
GB Original operating instructions
Cordless Grass Trimmer
F Mode d’emploi d’origine
Coupe-herbe sans fi l
I Istruzioni per l’uso originali
Trimmer a batteria
Anleitung_BG_CT_18_1_Li_SPK7.indb 1Anleitung_BG_CT_18_1_Li_SPK7.indb 1 03.05.12 11:0203.05.12 11:02
Page 2
- 2 -
1
2
12
8
8
5
4
6
12
7
10
2 1
3
9
4
3
B
11
Anleitung_BG_CT_18_1_Li_SPK7.indb 2Anleitung_BG_CT_18_1_Li_SPK7.indb 2 03.05.12 11:0203.05.12 11:02
Page 3
- 3 -
7
3 4
5
6
8
8
7
C
4
B
3
3
AA
Anleitung_BG_CT_18_1_Li_SPK7.indb 3Anleitung_BG_CT_18_1_Li_SPK7.indb 3 03.05.12 11:0303.05.12 11:03
Page 4
- 4 -
13
9 10
11
a
12
D
9
12
12
14
11
E
11
H
G
F
Anleitung_BG_CT_18_1_Li_SPK7.indb 4Anleitung_BG_CT_18_1_Li_SPK7.indb 4 03.05.12 11:0303.05.12 11:03
Page 5
- 5 -
15 16
17
1
2
34
5
6
Anleitung_BG_CT_18_1_Li_SPK7.indb 5Anleitung_BG_CT_18_1_Li_SPK7.indb 5 03.05.12 11:0403.05.12 11:04
Page 6

D
- 6 -
Inhaltsverzeichnis
1. Sicherheitshinweise ......................................................................................................................... 7
2. Gerätebeschreibung ........................................................................................................................ 7
3. Bestimmungsgemäße Verwendung .................................................................................................. 7
4. Technische Daten ............................................................................................................................. 7
5. Vor Inbetriebnahme .......................................................................................................................... 8
6. Bedienung ........................................................................................................................................ 9
7. Reinigung, Wartung und Ersatzteilbestellung .................................................................................10
8. Entsorgung und Wiederverwertung ................................................................................................ 10
9. Störungen ....................................................................................................................................... 10
Anleitung_BG_CT_18_1_Li_SPK7.indb 6Anleitung_BG_CT_18_1_Li_SPK7.indb 6 03.05.12 11:0403.05.12 11:04
Page 7

D
- 7 -
Achtung!
Beim Benutzen von Geräten müssen einige Sicherheitsvorkehrungen eingehalten werden, um
Verletzungen und Schäden zu verhindern. Lesen
Sie diese Bedienungsanleitung / Sicherheitshinweise deshalb sorgfältig durch. Bewahren Sie diese gut auf, damit Ihnen die Informationen jederzeit
zur Verfügung stehen. Falls Sie das Gerät an andere Personen übergeben sollten, händigen Sie
diese Bedienungsanleitung / Sicherheitshinweise
bitte mit aus. Wir übernehmen keine Haftung für
Unfälle oder Schäden, die durch Nichtbeachten
dieser Anleitung und den Sicherheitshinweisen
entstehen.
1. Sicherheitshinweise
Die entsprechenden Sicherheitshinweise fi nden
Sie im beiliegenden Heftchen!
Warnung
Lesen Sie alle Sicherheitshinweise und Anweisungen. Versäumnisse bei der Einhaltung der
Sicherheitshinweise und Anweisungen können
elektrischen Schlag, Brand und/oder schwere
Verletzungen verursachen. Bewahren Sie alle
Sicherheitshinweise und Anweisungen für
die Zukunft auf.
Erklärung des Hinweisschildes auf dem Gerät (siehe Bild 17)
1: Warnung!
2: Augenschutz tragen!
3: Vor Feuchtigkeit schützen!
4: Vor Inbetriebnahme lesen Sie die Gebrauchs-
anweisung!
5: Dritte aus dem Gefahrenbereich fernhalten!
6: Werkzeug läuft nach!
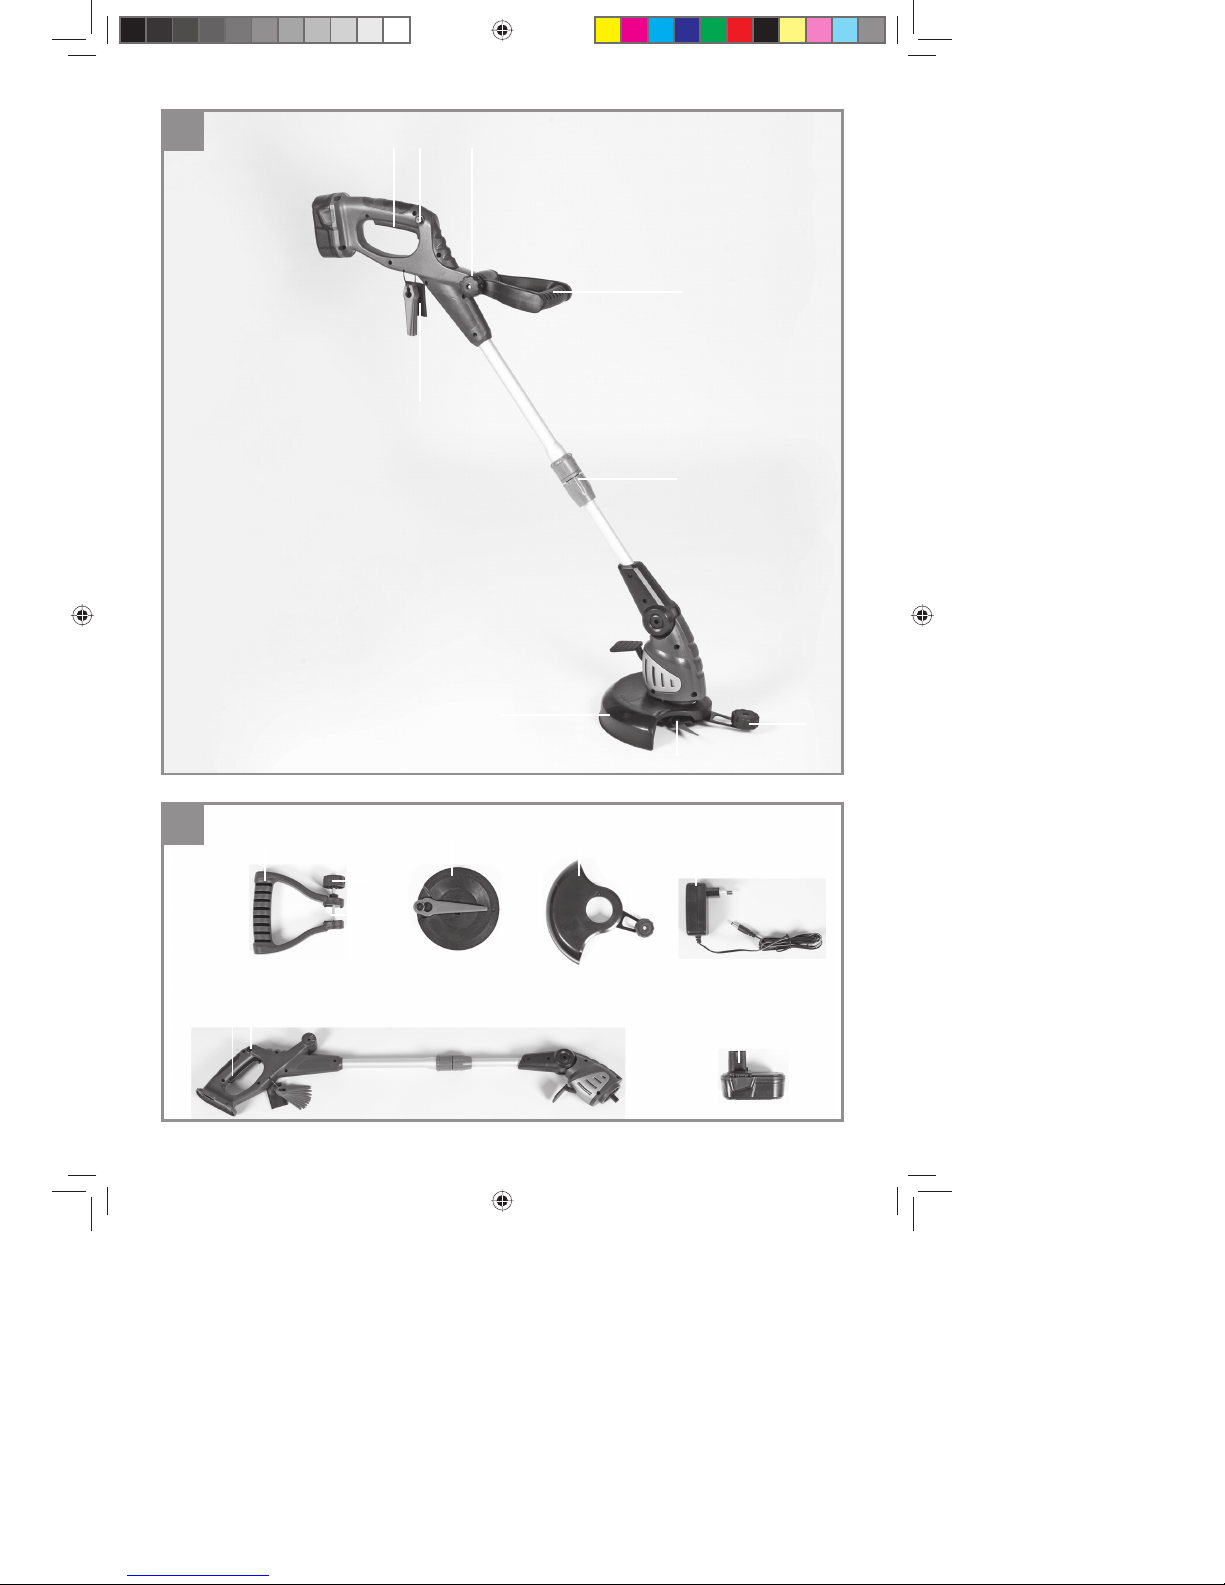
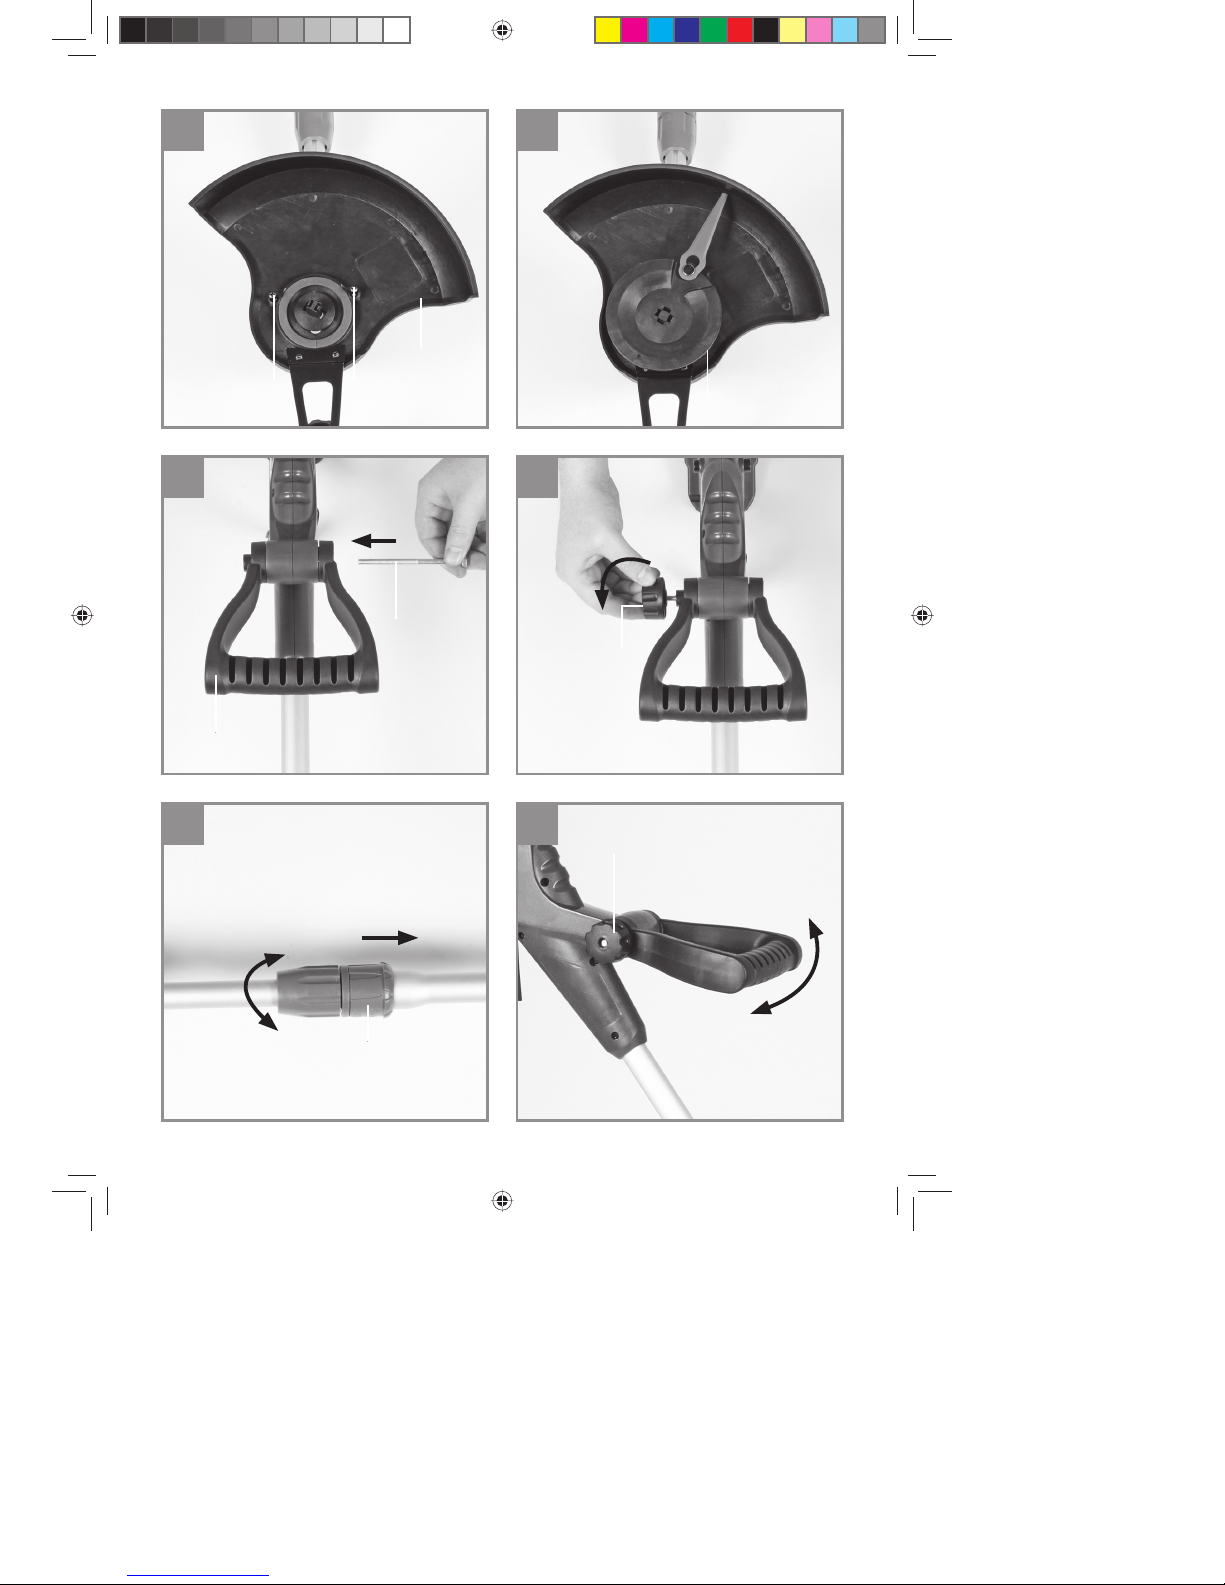
2. Gerätebeschreibung (Bild 1/2)
1 Einschaltsperre
2 Ein-/ Ausschalter
3 Befestigunhsschraube
4 Zusatzhandgriff
5 Höhenverstellung
6 Kantenführung
7 Messerkopf
8 Schutzhaube
9 Messer
10 Ladegerät
11 Akku
12 Montagehilfe
3. Bestimmungsgemäße
Verwendung
Das Gerät ist zum Schneiden von Rasen, kleinen
Grasfl ächen im privaten Haus- und Hobbygarten
bestimmt.
Als Geräte für den privaten Haus- und Hobbygarten werden solche angesehen, die nicht in öff ent-
lichen Anlagen, Parks, Sportstätten, an Straßen
und in der Land- und Forstwirtschaft eingesetzt
werden. Die Einhaltung der vom Hersteller beigefügten Gebrauchsanweisung ist Voraussetzung
für den ordnungsgemäßen Gebrauch des Gerätes.
Achtung! Wegen Gefahr von Personen und
Sachschaden darf das Gerät nicht zum Zerkleinern im Sinn von Kompostieren verwendet werden.
Das Gerät darf nur nach seiner Bestimmung verwendet werden. Jede weitere darüber hinausgehende Verwendung ist nicht bestimmungsgemäß.
Für daraus hervorgerufene Schäden oder Verletzungen aller Art haftet der Benutzer/Bediener und
nicht der Hersteller.
Bitte beachten Sie, dass unsere Geräte bestimmungsgemäß nicht für den gewerblichen, handwerklichen oder industriellen Einsatz konstruiert
wurden. Wir übernehmen keine Gewährleistung,
wenn das Gerät in Gewerbe-, Handwerks- oder
Industriebetrieben sowie bei gleichzusetzenden
Tätigkeiten eingesetzt wird.
4. Technische Daten
Drehzahl n0 ........................................8.000 min
-1
Schnittkreis ............................................Ø 25 cm
max. Laufzeit ....................................... ca. 35 min
Schalleistungspegel L
WA
............................. 85 dB
Unsicherheit K ........................................ 3 dB (A)
Schalldruckpegel L
pA
............................... 69,2 dB
Wechselakku .....................18 V d. c. / 1300 mAh
Vibration Handgriff a
hv
..........................≤ 2,5 m/s
2
Unsicherheit K ........................................1,5 m/s
2
Gewicht ......................................................1,9 kg
Anleitung_BG_CT_18_1_Li_SPK7.indb 7Anleitung_BG_CT_18_1_Li_SPK7.indb 7 03.05.12 11:0403.05.12 11:04
Page 8

D
- 8 -
Ladegerät
Netzspannung .......... 100 V - 240 VAC, 50-60 Hz
Ausgang
Nennspannung .....................................24 V d. c.
Nennstrom .............................................. 350 mA
Das Geräusch der Maschine kann 85 dB(A) überschreiten. In diesem Fall sind Schallschutzmaßnahmen für den Bedienenden erforderlich. Das
Geräusch wurde nach EN 60745-1 gemessen.
Der Wert der am Griff ausgesendeten Schwin-
gungen wurde nach EN 60745-1 ermittelt.
Warnung!
Der angegebene Schwingungsemissionswert ist
nach einem genormten Prüfverfahren gemessen
worden und kann sich, abhängig von der Art und
Weise, in der das Elektrowerkzeug verwendet
wird, ändern und in Ausnahmefällen über dem
angegebenen Wert liegen.
Der angegebene Schwingungsemissionswert
kann zum Vergleich eines Elektrowerkzeuges mit
einem anderen verwendet werden.
Der angegebene Schwingungsemissionswert
kann auch zu einer einleitenden Einschätzung
der Beeinträchtigung verwendet werden.
Achtung!
Der Schwingungswert wird sich aufgrund des
Einsatzbereiches des Elektrowerkzeuges ändern
und kann in Ausnahmefällen über dem angegebenen Wert liegen.
Beschränken Sie die Geräuschentwicklung
und Vibration auf ein Minimum!
•
Verwenden Sie nur einwandfreie Geräte.
•
Warten und reinigen Sie das Gerät regelmäßig.
•
Passen Sie Ihre Arbeitsweise dem Gerät an.
•
Überlasten Sie das Gerät nicht.
•
Lassen Sie das Gerät gegebenenfalls überprüfen.
•
Schalten Sie das Gerät aus, wenn es nicht
benutzt wird.
•
Tragen Sie Handschuhe.
5. Vor Inbetriebnahme
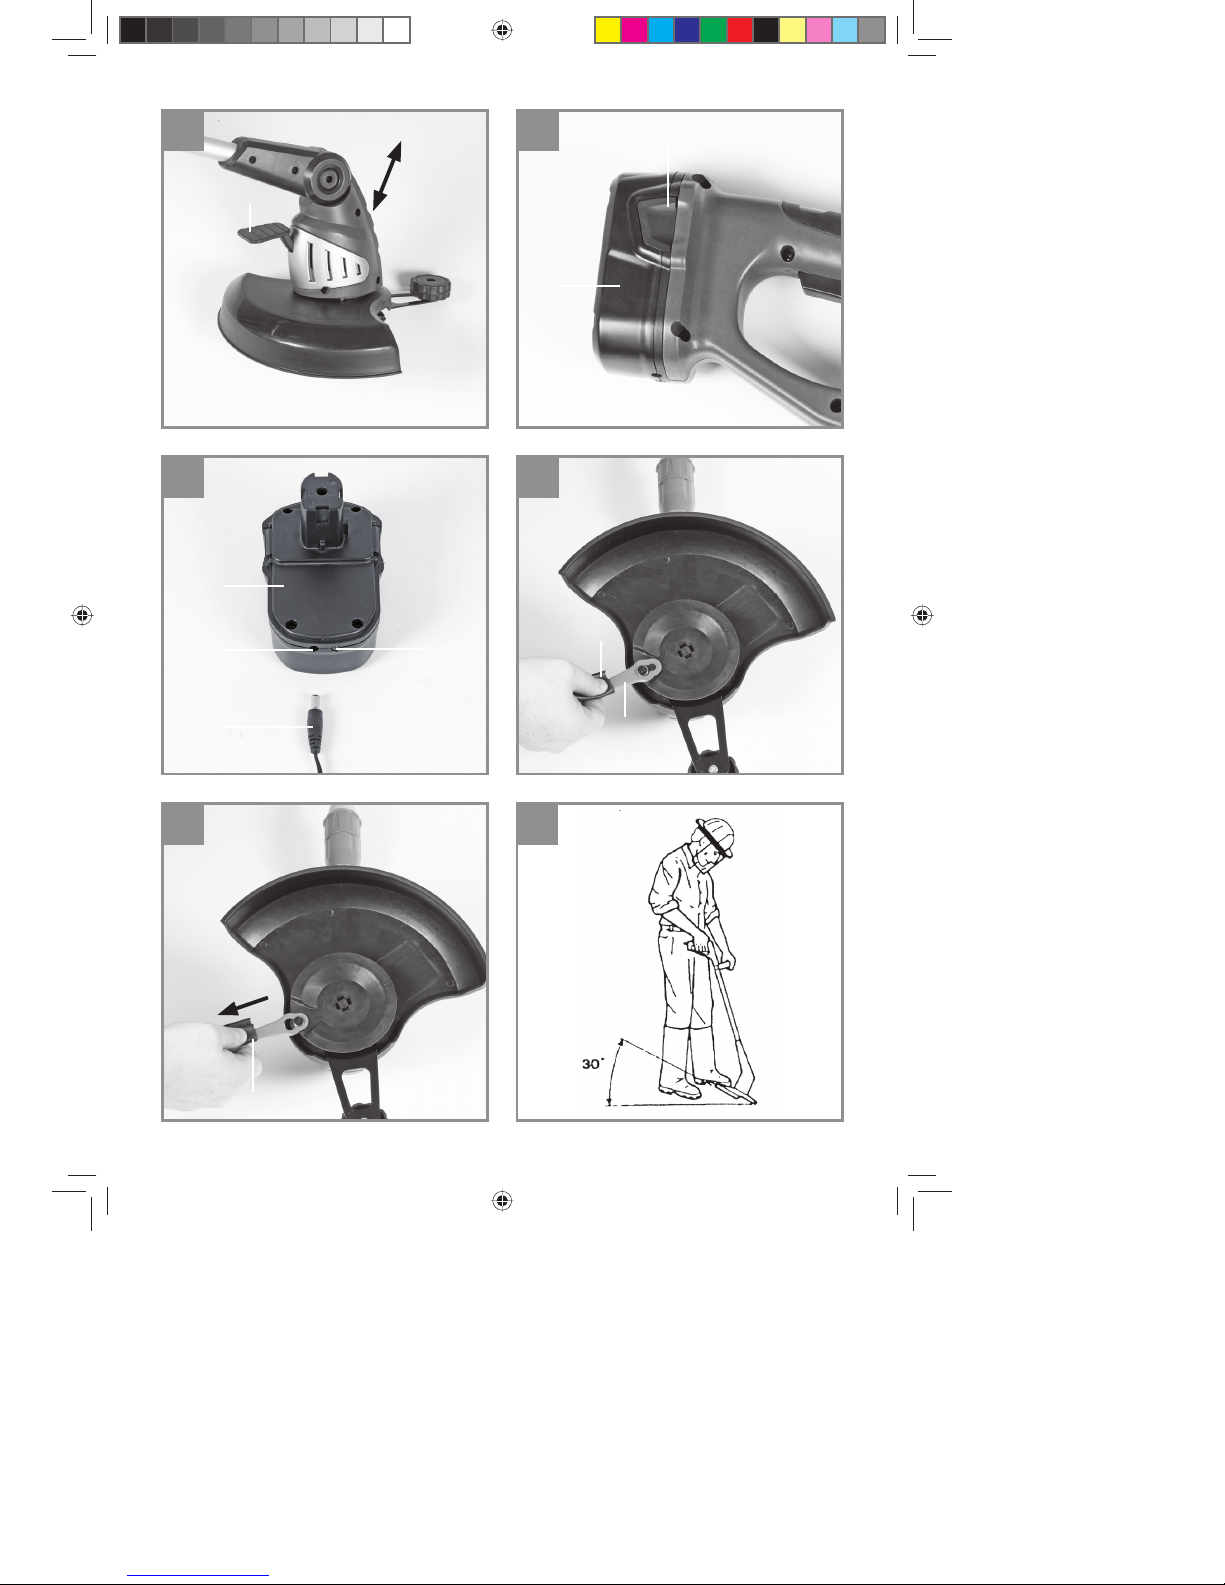
5.1 Montage der Schutzhaube (Abb. 3)
Stecken Sie die Schutzhaube (Abb. 3 / Pos. 8)
auf den Motorkopf wie in Abbildung 3 gezeigt und
fi xieren Sie diese mit den Schrauben (Abb. 3 /
Pos. A).
5.2. Montage des Messerkopfes (Bild 4)
Messerkopf (Bild 4/Pos 7) auf die Aufnahme an
der Motorwelle aufstecken. Auf sicheres Einrasten achten.
5.3 Montage Zusatzhandgriff (Abb. 2, 5-6)
Lösen Sie den vormontierten Stellknopf (Abb. 2 /
Pos. 3) und die Schraube (Abb. 5 / Pos. B).
Schieben Sie den Handgriff auf die in Abbildung
5 gezeigte Position und stecken Sie die Schraube
in die Bohrung. Fixieren Sie nun den Handgriff mit
dem Stellknopf (Abb. 6 / Pos.3).
5.4 Höhenverstellung (Abb. 1)
Lösen Sie die Höhenverstellung (Abb. 1/Pos 5)
bis sich der Holm des Rasentrimmers frei zusammen und auseinander schieben lässt. Stellen Sie
nun die gewünschte Arbeitshöhe ein, und fi xieren
den Holm in dieser Position indem Sie die Überwurfmutter wieder festschrauben.
5.5 Verstellung des Zusatzhandgriff es
(Abb. 8)
Lösen Sie die Befestigungsschraube (Bild 8/Pos
3) des Zusatzhandgriff es soweit, dass dieser
sich ohne großen Widerstand nach vorne und
hinten bewegen lässt. Stellen Sie die gewünschte
Position ein und schrauben Sie die Befestigungsschraube wieder fest.
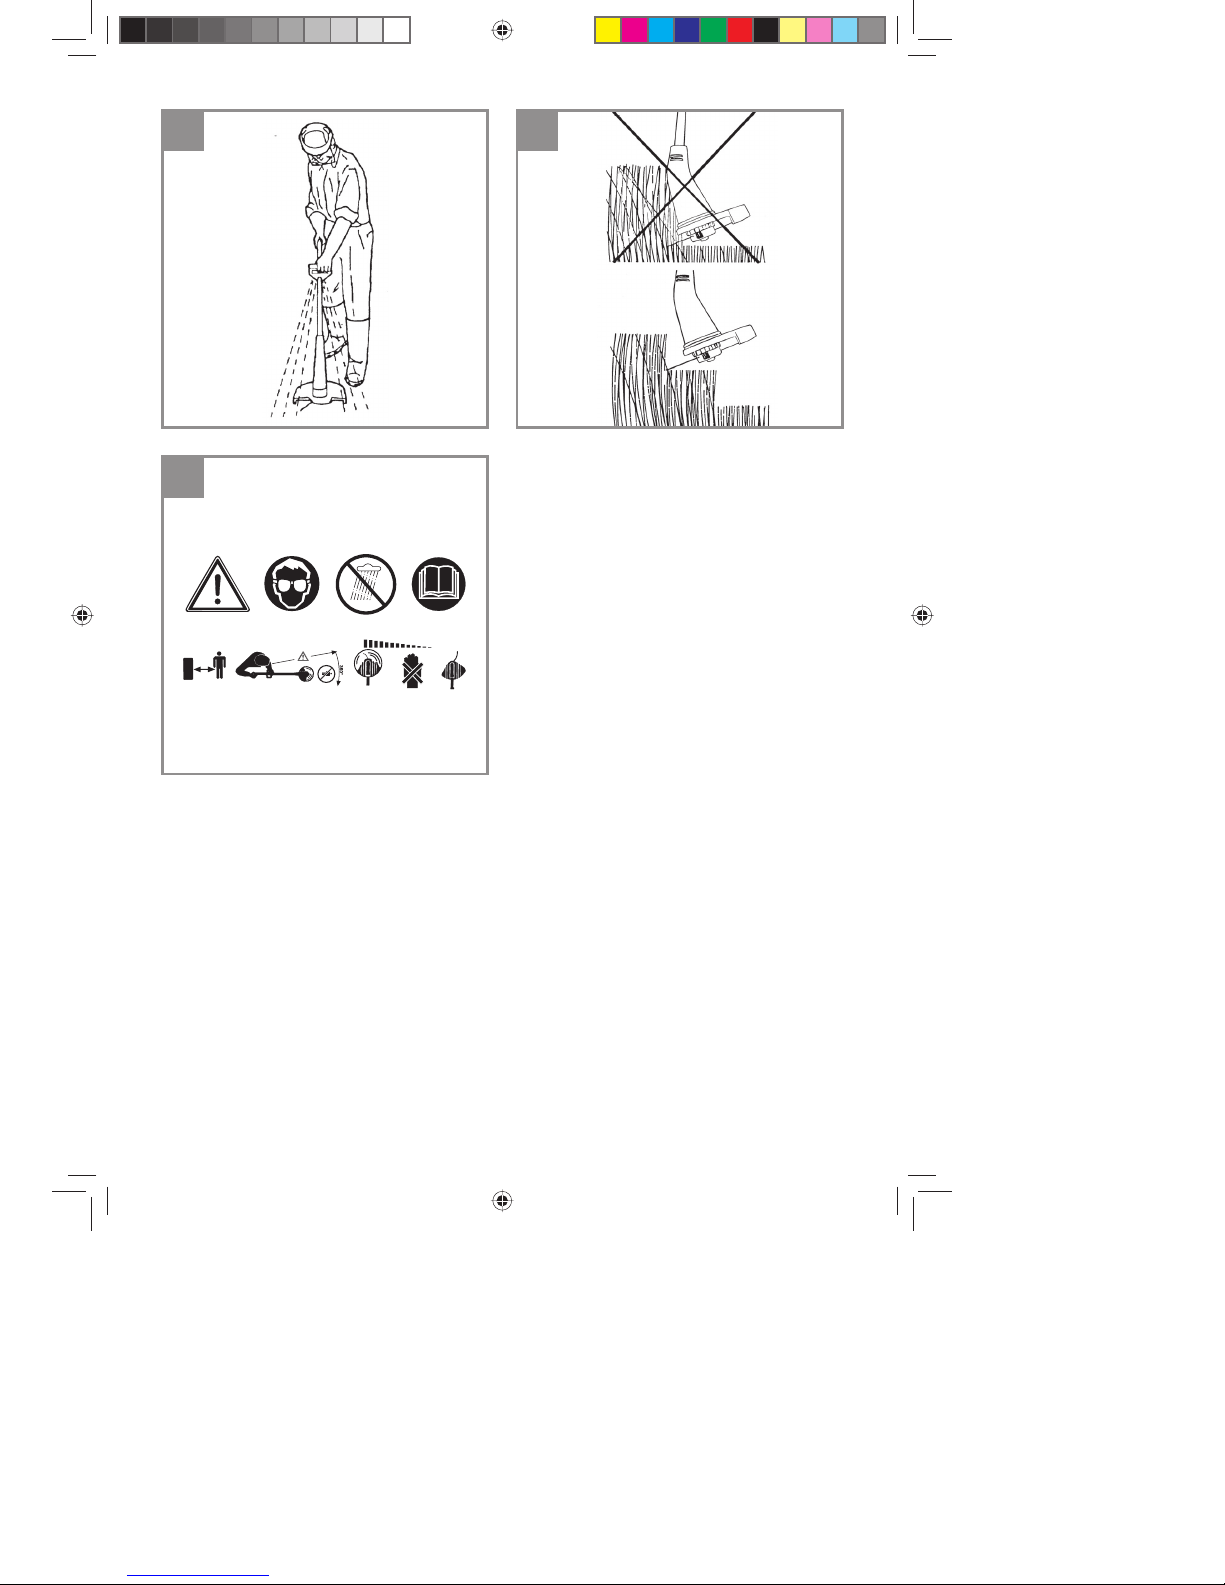
5.6 Neigungswinkelverstellung des Füh-
rungsholmes (Abb. 9)
Stellen Sie den Rasentrimmer fest auf den Boden. Drücken Sie das Pedal für die Neigungswinkelverstellung (Abb. 9/Pos D). Nun können Sie
den Holm auf den gewünschten Neigungswinkel
einstellen. Um den Neigungswinkel zu fi xieren,
lassen Sie das Pedal los und den Holm einrasten
3 Rastungen sind möglich.
Anleitung_BG_CT_18_1_Li_SPK7.indb 8Anleitung_BG_CT_18_1_Li_SPK7.indb 8 03.05.12 11:0503.05.12 11:05
Page 9

D
- 9 -
5.7 Laden des Akkus (Abb. 10-11)
1. Akku-Pack aus dem Gerät nehmen. Dazu die
seitliche Rasttaste (Bild 10/Pos E) drücken.
2. Vergleichen Sie, ob die auf dem Typenschild
angegebene Netzspannung mit der vorhandenen Netzspannung übereinstimmt. Schließen Sie das Netzkabel des Ladegerätes
an eine Steckdose an und stecken Sie den
Stecker (Abb. 11/Pos. H) in die Ladebuchse
(Abb. 11/Pos. G) am Akku. Die rote LED (Abb.
11/Pos. F) zeigt den Ladevorgang an.
3. Das Ladegerät beendet den Ladevorgang
automatisch wenn der Akku voll geladen ist
(nach ca. 3-5 h). Die grüne LED (Abb. 11/Pos.
F) leuchtet.
Während des Ladens kann sich der Akku etwas
erwärmen. Dies ist jedoch normal.
Sollte das Laden des Akku-Packs nicht möglich
sein, überprüfen Sie bitte,
•
ob an der Steckdose die Netzspannung vorhanden ist
•
ob ein einwandfreier Kontakt an den Ladekontakten vorhanden ist.
Sollte das Laden des Akku-Packs immer noch
nicht möglich sein, bitten wir Sie,
•
das Ladegerät
•
und den Akku-Pack
an unseren Kundendienst zu senden.
Im Interesse einer langen Lebensdauer des
Akku-Packs sollten Sie für eine rechtzeitige Wiederaufl adung des Akku-Packs sorgen. Dies ist auf
jeden Fall notwendig, wenn Sie feststellen, dass
die Leistung des Akku-Rasentrimmers nachlässt.
Entladen Sie den Akku-Pack nie vollständig. Dies
führt zu einem Defekt des Akku-Packs!
6. Bedienung
Um die höchste Leistung von Ihrem Rasentrimmer zu erhalten, sollten Sie bitte den folgenden
Anweisungen folgen:
•
Verwenden Sie den Rasentrimmer nicht ohne
Schutzvorrichtung.
•
Mähen Sie nicht, wenn das Gras nass ist. Die
besten Ergebnisse erzielen Sie bei trockenem Gras.
•
Um Ihren Rasentrimmer einzuschalten drücken Sie die Einschaltsperre (Abb. 2 / Pos. 1)
und den Ein-/Aus- Schalter (Abb. 2 / Pos. 2).
•
Um Ihren Rasentrimmer auszuschalten lassen Sie den Ein-/Aus Schalter (Abb. 2 / Pos.
2) wieder los.
•
Den Rasentrimmer nur dann an das Gras annähern, wenn der Schalter gedrückt ist, d.h.
wenn der Rasentrimmer in Betrieb ist.
•
Um richtig zu schneiden, das Gerät seitlich
schwenken und Vorwärtsgehen. Halten Sie
den Rasentrimmer dabei um ca. 30° geneigt
(siehe Abb. 14 und 15).
•
Bei langem Gras muss das Gras, von der
Spitze aus, stufenweise kürzer geschnitten
werden (siehe Abb. 16).
•
Nutzen Sie die Schutzhaube aus, um einen
unnötigen Verschleiß zu vermeiden
•
Halten Sie den Rasentrimmer fern von harten
Gegenständen, um einen unnötigen Verschleiß zu vermeiden.
Verwendung des Rasentrimmers als Kantenschneider (Abb. 7)
Um die Kanten von Rasen und Beeten zu schneiden, kann der Rasentrimmer auf folgende Weise
umfunktioniert werden:
•
Akku entfernen (Abb. 10)
•
Ziehen Sie die Einstellhülse (Abb. 7 / Pos. C)
in die auf Abbildung 7 gezeigten Richtung.
•
Halten Sie die Einstellhülse nach hinten gezogen und drehen Sie den unteren Teil des
Trimmers um 180° bis dieser einrastet.
•
Auf diese Weise hat man den Rasentrimmer
zu einem Kantenschneider umfunktioniert,
mit dem man Vertikalschnitte des Rasens
ausführen kann.
Anleitung_BG_CT_18_1_Li_SPK7.indb 9Anleitung_BG_CT_18_1_Li_SPK7.indb 9 03.05.12 11:0503.05.12 11:05
Page 10

D
- 10 -
7. Reinigung, Wartung und
Ersatzteilbestellung
Vor dem Abstellen und Reinigen den Rasentrimmer ausschalten, den Akku abziehen (Abb. 10).
7.1 Reinigung
•
Halten Sie Schutzvorrichtungen, Luftschlitze
und Motorengehäuse so staub- und schmutzfrei wie möglich. Reiben Sie das Gerät mit
einem sauberen Tuch ab oder blasen Sie es
mit Druckluft bei niedrigem Druck aus.
•
Wir empfehlen, dass Sie das Gerät direkt
nach jeder Benutzung reinigen.
•
Reinigen Sie das Gerät regelmäßig mit einem
feuchten Tuch und etwas Schmierseife. Verwenden Sie keine Reinigungs- oder Lösungsmittel; diese könnten die Kunststoffteile des
Gerätes angreifen. Achten Sie darauf, dass
kein Wasser in das Geräteinnere gelangen
kann.
•
Ablagerungen an der Schutzabdeckung mit
einer Bürste entfernen
7.2 Austausch des Messers (Abb. 12-13)
ACHTUNG! Vor Austausch unbedingt Akku
entfernen (Abb. 10)!
•
Verwenden Sie zur Montage und Demontage
des Messers die mitgelieferte Montagehilfe
(Abb. 12 / Pos. 12).
•
Zum Entfernen des Messers das Messer
nach innen schieben und über die größere
Öffnung entfernen wie in Bild 12 gezeigt.
•
Der Einbau des neuen Messers erfolgt in
umgekehrter Reihenfolge. Auf korrektes Einrasten achten wie in Bild 13 gezeigt.
7.3 Wartung
Im Geräteinneren befi nden sich keine weiteren zu
wartenden Teile.
7.4 Ersatzteilbestellung:
Bei der Ersatzteilbestellung sollten folgende Angaben gemacht werden;
•
Typ des Gerätes
•
Artikelnummer des Gerätes
•
Ident-Nummer des Gerätes
•
Ersatzteilnummer des erforderlichen Ersatzteils
Aktuelle Preise und Infos fi nden Sie unter
www.isc-gmbh.info
Ersatzmesser Art.-Nr.: 34.057.30
8. Entsorgung und
Wiederverwertung
Das Gerät befi ndet sich in einer Verpackung um
Transportschäden zu verhindern. Diese Verpackung ist Rohstoff und ist somit wieder verwend-
bar oder kann dem Rohstoff kreislauf zurückge-
führt werden. Das Gerät und dessen Zubehör
bestehen aus verschiedenen Materialien, wie z.B.
Metall und Kunststoff e. Führen Sie defekte Bau-
teile der Sondermüllentsorgung zu. Fragen Sie im
Fachgeschäft oder in der Gemeindeverwaltung
nach!
9. Störungen
Gerät läuft nicht:
Überprüfen Sie, ob der Akku geladen ist und ob
das Ladegerät funktioniert. Falls das Gerät trotz
vorhandener Spannung nicht funktioniert, senden
Sie es bitte an die angegebene Kundendienstadresse.
Anleitung_BG_CT_18_1_Li_SPK7.indb 10Anleitung_BG_CT_18_1_Li_SPK7.indb 10 03.05.12 11:0503.05.12 11:05
Page 11

D
- 11 -
Nur für EU-Länder
Werfen Sie Elektrowerkzeuge nicht in den Hausmüll!
Gemäß europäischer Richtlinie 2002/96/EG über Elektro- und Elektronik-Altgeräte und Umsetzung in
nationales Recht müssen verbrauchte Elektrowerkzeuge getrennt gesammelt werden und einer umweltgerechten Wiederverwertung zugeführt werden.
Recycling-Alternative zur Rücksendeauff orderung:
Der Eigentümer des Elektrogerätes ist alternativ anstelle Rücksendung zur Mitwirkung bei der sachgerechten Verwertung im Falle der Eigentumsaufgabe verpfl ichtet. Das Altgerät kann hierfür auch einer
Rücknahmestelle überlassen werden, die eine Beseitigung im Sinne der nationalen Kreislaufwirtschafts- und Abfallgesetze durchführt. Nicht betroff en sind den Altgeräten beigefügte Zubehörteile und
Hilfsmittel ohne Elektrobestandteile.
Der Nachdruck oder sonstige Vervielfältigung von Dokumentation und Begleitpapieren der Produkte,
auch auszugsweise, ist nur mit ausdrücklicher Zustimmung der iSC GmbH zulässig.
Technische Änderungen vorbehalten
Anleitung_BG_CT_18_1_Li_SPK7.indb 11Anleitung_BG_CT_18_1_Li_SPK7.indb 11 03.05.12 11:0503.05.12 11:05
Page 12

D
- 12 -
Anleitung_BG_CT_18_1_Li_SPK7.indb 12Anleitung_BG_CT_18_1_Li_SPK7.indb 12 03.05.12 11:0503.05.12 11:05
Page 13

D
- 13 -
Garantieurkunde
Sehr geehrte Kundin, sehr geehrter Kunde,
unsere Produkte unterliegen einer strengen Qualitätskontrolle. Sollte dieses Gerät dennoch einmal nicht
einwandfrei funktionieren, bedauern wir dies sehr und bitten Sie, sich an unseren Servicedienst unter
der auf dieser Garantiekarte angegebenen Adresse zu wenden. Gern stehen wir Ihnen auch telefonisch
über die untenangegebene Servicerufnummer zur Verfügung. Für die Geltendmachung von Garantieansprüchen gilt folgendes:
1. Diese Garantiebedingungen regeln zusätzliche Garantieleistungen. Ihre gesetzlichen Gewährleistungsansprüche werden von dieser Garantie nicht berührt. Unsere Garantieleistung ist für Sie
kostenlos.
2. Die Garantieleistung erstreckt sich ausschließlich auf Mängel, die auf Material- oder Herstellungsfehler zurückzuführen sind und ist auf die Behebung dieser Mängel bzw. den Austausch des Gerätes beschränkt. Bitte beachten Sie, dass unsere Geräte bestimmungsgemäß nicht für den gewerblichen, handwerklichen oder industriellen Einsatz konstruiert wurden. Ein Garantievertrag kommt
daher nicht zustande, wenn das Gerät in Gewerbe-, Handwerks- oder Industriebetrieben sowie bei
gleichzusetzenden Tätigkeiten eingesetzt wird.
Von unserer Garantie sind ferner Ersatzleistungen für Transportschäden, Schäden durch Nichtbe-
achtung der Montageanleitung oder aufgrund nicht fachgerechter Installation, Nichtbeachtung der
Gebrauchsanleitung (wie durch z.B. Anschluss an eine falsche Netzspannung oder Stromart), missbräuchliche oder unsachgemäße Anwendungen (wie z.B. Überlastung des Gerätes oder Verwendung von nicht zugelassenen Einsatzwerkzeugen oder Zubehör), Nichtbeachtung der Wartungsund Sicherheitsbestimmungen, Eindringen von Fremdkörpern in das Gerät (wie z.B. Sand, Steine
oder Staub), Gewaltanwendung oder Fremdeinwirkungen (wie z. B. Schäden durch Herunterfallen)
sowie durch verwendungsgemäßen, üblichen Verschleiß ausgeschlossen. Dies gilt insbesondere
für Akkus, auf die wir dennoch eine Garantiezeit von 12 Monaten gewähren. Der Garantieanspruch
erlischt, wenn an dem Gerät bereits Eingriff e vorgenommen wurden.
3. Die Garantiezeit beträgt 2 Jahre und beginnt mit dem Kaufdatum des Gerätes. Garantieansprüche
sind vor Ablauf der Garantiezeit innerhalb von zwei Wochen, nachdem Sie den Defekt erkannt
haben, geltend zu machen. Die Geltendmachung von Garantieansprüchen nach Ablauf der Garantiezeit ist ausgeschlossen. Die Reparatur oder der Austausch des Gerätes führt weder zu einer
Verlängerung der Garantiezeit noch wird eine neue Garantiezeit durch diese Leistung für das Gerät
oder für etwaige eingebaute Ersatzteile in Gang gesetzt. Dies gilt auch bei Einsatz eines Vor-OrtServices.
4. Für die Geltendmachung Ihres Garantieanspruches übersenden Sie bitte das defekte Gerät portofrei an die unten angegebene Adresse. Fügen Sie den Verkaufsbeleg im Original oder einen sonstigen datierten Kaufnachweis bei. Bitte bewahren Sie deshalb den Kassenbon als Nachweis gut auf!
Beschreiben Sie uns bitte den Reklamationsgrund möglichst genau. Ist der Defekt des Gerätes von
unserer Garantieleistung erfasst, erhalten Sie umgehend ein repariertes oder neues Gerät zurück.
Selbstverständlich beheben wir gegen Erstattung der Kosten auch gerne Defekte am Gerät, die vom
Garantieumfang nicht oder nicht mehr erfasst sind. Dazu senden Sie das Gerät bitte an unsere Serviceadresse.
iSC GmbH · Eschenstraße 6 · 94405 Landau/Isar (Deutschland)
Telefon: +49 [0] 180 5 120 509 · Telefax +49 [0] 180 5 835 830
(Festnetzpreis: 14 ct/min, Mobilfunkpreise maximal: 42 ct/min)
Außerhalb Deutschlands fallen stattdessen Gebühren für ein reguläres Gespräch ins dt. Festnetz an.
E-Mail: info@isc-gmbh.info · Internet: www.isc-gmbh.info
Anleitung_BG_CT_18_1_Li_SPK7.indb 13Anleitung_BG_CT_18_1_Li_SPK7.indb 13 03.05.12 11:0503.05.12 11:05
Page 14

D
- 14 -
Service Hotline: 01805 120 509 · www.isc-gmbh.info · Mo-Fr 8:00-18:00 Uhr
(Festnetzpreis: 14 ct/min, Mobilfunkpreise maximal: 42 ct/min; Außerhalb Deutschlands fallen stattdessen Gebühren für ein reguläres Gespräch ins dt. Festnetz an.)
1
Name:
2
Straße / Nr.:
PLZ: Ort:
Retouren-Nr. iSC:
Telefon:
Mobil:
Welcher Fehler ist aufgetreten (genaue Angabe): Art.-Nr.: I.-Nr.:
3
Sehr geehrte Kundin, sehr geehrter Kunde,
bitte beschreiben Sie uns die von Ihnen festgestellte Fehlfunktion Ihres Gerätes als Grund Ihrer Beanstandung möglichst genau. Dadurch können wir für Sie Ihre Reklamation schneller bearbeiten
und Ihnen schneller helfen. Eine zu ungenaue Beschreibung mit Begriff en wie „Gerät funktioniert nicht“ oder „Gerät defekt“ verzögert hingegen die Bearbeitung erheblich.
Garantie JA NEIN Kaufbeleg-Nr. / Datum:
4
1
Service Hotline kontaktieren oder bei iSC-Webadresse anmelden - es wird Ihnen eine Retourennummer zugeteilt l
2
Ihre Anschrift eintragen
3
Fehlerbeschreibung und Art.-Nr. und I.-Nr. angeben l
4
Garantiefall JA/NEIN ankreuzen sowie Kaufbeleg-Nr. und Datum angeben und eine Kopie des Kaufbeleges beilegen
Anleitung_BG_CT_18_1_Li_SPK7.indb 14Anleitung_BG_CT_18_1_Li_SPK7.indb 14 03.05.12 11:0503.05.12 11:05
Page 15

GB
- 15 -
Table of contents
1. Safety regulations ...........................................................................................................................16
2. Layout ............................................................................................................................................16
3. Proper use ...................................................................................................................................... 16
4. Technical data ................................................................................................................................ 16
5. Before starting the appliance .......................................................................................................... 17
6. Operation ....................................................................................................................................... 18
7. Cleaning, maintenance and ordering of spare parts .......................................................................18
8. Disposal and recycling ...................................................................................................................19
9. Faults .............................................................................................................................................. 19
Anleitung_BG_CT_18_1_Li_SPK7.indb 15Anleitung_BG_CT_18_1_Li_SPK7.indb 15 03.05.12 11:0503.05.12 11:05
Page 16

GB
- 16 -
Important!
When using the equipment, a few safety precautions must be observed to avoid injuries and
damage. Please read the complete operating
instructions and safety regulations with due care.
Keep this manual in a safe place, so that the information is available at all times. If you give the
equipment to any other person, hand over these
operating instructions and safety regulations as
well. We cannot accept any liability for damage
or accidents which arise due to a failure to follow
these instructions and the safety instructions.
1. Safety regulations
The corresponding safety information can be
found in the enclosed booklet.
Caution!
Read all safety regulations and instructions.
Any errors made in following the safety regulations and instructions may result in an electric
shock, fi re and/or serious injury.
Keep all safety regulations and instructions
in a safe place for future use.
Explanation of the warning signs on the machine (Figure 17)
1: Caution!
2: Wear safety goggles!
3: Protect from the damp!
4: Read the directions for use before putting into
operation for the fi rst time!
5: Keep third parties away from the danger
zone!
6: The tool runs on after being switched off !
2. Layout (Fig. 1/2)
1. Safety lock-off
2 ON/OFF switch
3 Fastening screw
4 Additional handle
5 Height adjustment bar
6 Edge guide
7 Thread spool
8 Safety hood
9 Blade
10 Battery charger
11 Battery
12 Assembly tool
3. Proper use
The equipment is designed for cutting the edges
of lawns and small areas of grass in private and
hobby gardens.
Tools for private and hobby gardens are not suitable for use in public facilities, parks and sport
centers, along roadways, on farms or in the forestry sector. For the tool to be used properly it is
imperative to follow the instructions set out in the
manufacturer’s directions for use.
Important! It is prohibited to use the tool to
chop material for composting because of the
potential danger to persons and property.
The equipment is to be used only for its prescribed purpose. Any other use is deemed to be a
case of misuse. The user / operator and not the
manufacturer will be liable for any damage or injuries of any kind caused as a result of this.
Please note that our equipment has not been designed for use in commercial, trade or industrial
applications. Our warranty will be voided if the
machine is used in commercial, trade or industrial
businesses or for equivalent purposes.
4. Technical data
Speed n0: ............................................8,000 min
-1
Cutting range: ..............................25 cm diameter
Max. running period: ..................... approx. 35 min
Sound power level L
WA
: ........................... 85 dB(A)
K uncertainty: ........................................... 3 dB(A)
Sound pressure level L
pA
: .................... 69.2 dB(A)
Replaceable battery: ............. 18 V d.c./1300 mAh
Handle vibration a
hv
: ............................≤ 2,5 m/s
2
K uncertainty ...........................................1.5 m/s
2
Weight.........................................................1.9 kg
Power supply unit:
Mains voltage: .............. 100 V-240VAC, 50-60 Hz
Output:
Rated voltage: .........................................24 V d.c.
Rated current: ..........................................350 mA
Anleitung_BG_CT_18_1_Li_SPK7.indb 16Anleitung_BG_CT_18_1_Li_SPK7.indb 16 03.05.12 11:0503.05.12 11:05
Page 17

GB
- 17 -
The noise level of this machine may exceed 85
dB(A). In this case, noise protection is necessary
for the user. The machine’s noise was measured
in accordance with EN 60745-1. The level of vibrations at the handle is < 2,5 m/s
2
. Measurements
were taken in accordance with EN 60745-1.
Warning!
The specifi ed vibration value was established in
accordance with a standardized testing method. It
may change according to how the electric equipment is used and may exceed the specifi ed value
in exceptional circumstances.
The specifi ed vibration value can be used to
compare the equipment with other electric power
tools.
The specifi ed vibration value can be used for initi-
al assessment of a harmful eff ect.
Important!
The vibration value changes according to the
area of application of the electric tool and may
exceed the specifi ed value in exceptional cir-
cumstances.
Keep the noise emissions and vibrations to a
minimum.
•
Only use appliances which are in perfect working order.
•
Service and clean the appliance regularly.
•
Adapt your working style to suit the appliance.
•
Do not overload the appliance.
•
Have the appliance serviced whenever necessary.
•
Switch the appliance off when it is not in use.
•
Wear protective gloves.
5. Before starting the appliance
5.1 Fitting the guard hood (Fig. 3)
Mount the guard hood (Fig. 3 / Item 8) on the motor head as shown in Fig. 3 and fasten it in place
with the screws (Fig. 3 / Item A).
5.2. Assembly of the knife head (Fig. 4)
Place the knife head (Fig. 6/ Item 7) onto the
mounting on the motor shaft. Make sure there is
an audible click when they engage.
5.3 Fitting the additional handle (Fig. 2, 5-6)
Undo the preassembled setting knob (Fig. 2 / Item
3) and the screw (Fig. 5 / Item B).
Push the handle into the position shown in Fig. 5
and insert the screw into the hole. Now fasten the
handle with the setting knob (Fig. 6 / Item 3).
5.4 Height adjustment (Fig. 1)
Undo the union nut (Fig. 1/Item 5) until the grass
trimmer handle can be moved in and out freely.
Now set the required working height and secure
the handle in this position by tightening the union
nut again.
5.5 Adjusting the additional handle (Fig. 8)
Undo the securing screw on the additional handle
until it can be moved forwards and backwards
without any great resistance. Set the required position and tighten the securing screw again.
5.6 Adjusting the angle of tilt of the long
handle (Fig. 9)
Place the grass trimmer on a fi rm surface. Press
the pedal for the angle of tilt adjustment (Fig. 9/
Item D). Now you can set the long handle to the
required tilt. To fi x the angle of tilt, release the pe-
dal and allow the long handle to lock into position.
Three diff erent locking angles are possible.
5.7 Charging the battery (Fig. 10-11)
1. Take the battery pack out of the equipment.
To do so, press the locking buttons on the
side (Fig. 10/Item E).
2. Check that your mains voltage is the same as
that marked on the rating plate. Connect the
power cable of the charging unit to a socket
outlet and insert the connector (Fig. 11/Item
H) into the charging jack (Fig. 11/Item G) of
the battery pack. The red LED (Fig. 11/Item F)
indicates that charging is in progress.
3. The charger will end the charging process
automatically when the battery is fully charged (after approx. 3-5 hours). The green LED
indicator (Fig. 11/Item F) is lit.
The rechargeable battery can become a little
warm during the charging process. This is normal.
If the battery pack fails to charge, please check
•
whether there is voltage at the socket-outlet
•
whether there is good contact at the charging
contacts
Anleitung_BG_CT_18_1_Li_SPK7.indb 17Anleitung_BG_CT_18_1_Li_SPK7.indb 17 03.05.12 11:0503.05.12 11:05
Page 18

GB
- 18 -
If the battery pack still fails to charge, send
•
the battery charger with charging adapter
•
and the battery pack
•
to our customer services department.
To ensure that the battery pack provides long service you should take care to recharge it promptly.
Recharging is always necessary when you notice
a drop in the performance of your cordless grass
trimmer. Never fully discharge the battery pack.
This will cause it to develop a defect.
6. Operation
Your grass trimmer will work at its best if you observe the following instructions:
•
Never use the grass trimmer without its safety
devices.
•
Do not cut grass when it is wet. The best results are had on dry grass.
•
To switch on your grass trimmer, press the safety lock-off and the ON/OFF switch (Fig. 2/
Pos. 2).
•
To switch off your grass trimmer, let go of the
ON/OFF switch (Fig. 2/Pos. 2).
•
Do not move the grass trimmer against the
grass until the switch is pressed, i.e. wait until
the trimmer is running.
•
For the correct cutting action, swing the grass
trimmer to the side as you walk forward, holding it at an angle of approx. 30° as you do so
(see Figure 14+15).
•
Make several passes to cut long grass shorter step by step from the top (see Figure 16).
•
Use the guard hood to prevent unnecessary
wear.
•
To avoid unnecessary wear, keep the grass
trimmer away from hard objects.
Using the grass trimmer as an edge trimmer.
The grass trimmer can be adjusted as follows to
trim the edges of lawns and fl ower beds.
•
Remove the battery (Fig. 10)
•
Pull the adjusting sleeve (Fig. 7 / Item C) in
the direction shown in Fig. 7.
•
Hold the adjusting sleeve in the drawn-back
position and turn the lower part of the trimmer
through 180° until it latches home.
•
Now you have converted the grass trimmer to
an edge trimmer for cutting the lawn vertically.
7. Cleaning, maintenance and
ordering of spare parts
Before putting away or cleaning the grass trimmer, pull out the battery pack (Fig. 10).
7.1 Cleaning
•
Keep all safety devices, air vents and the
motor housing free of dirt and dust as far as
possible. Wipe the equipment with a clean
cloth or blow it with compressed air at low
pressure.
•
We recommend that you clean the device
immediately each time you have finished
using it.
•
Clean the equipment regularly with a moist
cloth and some soft soap. Do not use
cleaning agents or solvents; these could
attack the plastic parts of the equipment. Ensure that no water can seep
into the device.
•
Remove deposits from the guard hood with a
brush.
7.2 Replacing the blade (Fig. 12-13)
IMPORTANT! Make sure that you remove the
battery pack before replacing the blade (Fig.
10).
•
Use the supplied assembly tool to fit and remove the blade (Fig. 12/Item 12).
•
To remove the blade, push the blade inwards
and remove via the larger opening as shown
in Figure 12.
•
To fit the new blade, proceed in reverse order.
Make sure the blade locks into place correctly
as shown in Figure 13.
7.3 Maintenance
There are no parts inside the equipment which
require additional maintenance.
7.4 Ordering replacement parts:
Please quote the following data when ordering
replacement parts:
•
Type of machine
•
Article number of the machine
•
Identification number of the machine
•
Replacement part number of the part required
For our latest prices and information please go to
www.isc-gmbh.info
Spare blade art. no.: 34.057.30
Anleitung_BG_CT_18_1_Li_SPK7.indb 18Anleitung_BG_CT_18_1_Li_SPK7.indb 18 03.05.12 11:0503.05.12 11:05
Page 19

GB
- 19 -
8. Disposal and recycling
The unit is supplied in packaging to prevent its
being damaged in transit. This packaging is raw
material and can therefore be reused or can be
returned to the raw material system.
The unit and its accessories are made of various
types of material, such as metal and plastic. Defective components must be disposed of as special waste. Ask your dealer or your local council.
9. Faults
The device does not operate:
Check whether the rechargeable battery is charged and whether the battery charger works. If
the device still does not work even with a voltage
supply, please send it to our customer services
department at the address indicated.
Anleitung_BG_CT_18_1_Li_SPK7.indb 19Anleitung_BG_CT_18_1_Li_SPK7.indb 19 03.05.12 11:0503.05.12 11:05
Page 20

GB
- 20 -
For EU countries only
Never place any electric power tools in your household refuse.
To comply with European Directive 2002/96/EC concerning old electric and electronic equipment and
its implementation in national laws, old electric power tools have to be separated from other waste and
disposed of in an environment-friendly fashion, e.g. by taking to a recycling depot.
Recycling alternative to the return request:
As an alternative to returning the equipment to the manufacturer, the owner of the electrical equipment
must make sure that the equipment is properly disposed of if he no longer wants to keep the equipment.
The old equipment can be returned to a suitable collection point that will dispose of the equipment in
accordance with the national recycling and waste disposal regulations. This does not apply to any accessories or aids without electrical components supplied with the old equipment.
The reprinting or reproduction by any other means, in whole or in part, of documentation and papers
accompanying products is permitted only with the express consent of the iSC GmbH.
Subject to technical changes
Anleitung_BG_CT_18_1_Li_SPK7.indb 20Anleitung_BG_CT_18_1_Li_SPK7.indb 20 03.05.12 11:0503.05.12 11:05
Page 21

GB
- 21 -
Warranty certifi cate
Dear Customer,
All of our products undergo strict quality checks to ensure that they reach you in perfect condition. In the
unlikely event that your device develops a fault, please contact our service department at the address
shown on this guarantee card. Of course, if you would prefer to call us then we are also happy to off er
our assistance under the service number printed below. Please note the following terms under which
guarantee claims can be made:
1. These guarantee terms cover additional guarantee rights and do not aff ect your statutory warranty
rights. We do not charge you for this guarantee.
2. Our guarantee only covers problems caused by material or manufacturing defects, and it is restricted to the rectifi cation of these defects or replacement of the device. Please note that our devices
have not been designed for use in commercial, trade or industrial applications. Consequently, the
guarantee is invalidated if the equipment is used in commercial, trade or industrial applications or
for other equivalent activities. The following are also excluded from our guarantee: compensation for
transport damage, damage caused by failure to comply with the installation/assembly instructions
or damage caused by unprofessional installation, failure to comply with the operating instructions
(e.g. connection to the wrong mains voltage or current type), misuse or inappropriate use (such as
overloading of the device or use of non-approved tools or accessories), failure to comply with the
maintenance and safety regulations, ingress of foreign bodies into the device (e.g. sand, stones or
dust), eff ects of force or external infl uences (e.g. damage caused by the device being dropped) and
normal wear resulting from proper operation of the device. This applies in particular to rechargeable
batteries for which we nevertheless issue a guarantee period of 12 months. The guarantee is rendered null and void if any attempt is made to tamper with the device.
3. The guarantee is valid for a period of 2 years starting from the purchase date of the device. Guarantee claims should be submitted before the end of the guarantee period within two weeks of the defect being noticed. No guarantee claims will be accepted after the end of the guarantee period. The
original guarantee period remains applicable to the device even if repairs are carried out or parts are
replaced. In such cases, the work performed or parts fi tted will not result in an extension of the gua-
rantee period, and no new guarantee will become active for the work performed or parts fi tted. This
also applies when an on-site service is used.
4. In order to assert your guarantee claim, please send your defective device postage-free to the
address shown below. Please enclose either the original or a copy of your sales receipt or another dated proof of purchase. Please keep your sales receipt in a safe place, as it is your proof of
purchase. It would help us if you could describe the nature of the problem in as much detail as possible. If the defect is covered by our guarantee then your device will either be repaired immediately
and returned to you, or we will send you a new device.
Of course, we are also happy off er a chargeable repair service for any defects which are not covered by
the scope of this guarantee or for units which are no longer covered. To take advantage of this service,
please send the device to our service address.
Anleitung_BG_CT_18_1_Li_SPK7.indb 21Anleitung_BG_CT_18_1_Li_SPK7.indb 21 03.05.12 11:0503.05.12 11:05
Page 22

F
- 22 -
Sommaire
1. Consignes de sécurité .................................................................................................................... 23
2. Description de l’appareil ................................................................................................................ 23
3. Utilisation conforme à l’aff ectation .................................................................................................. 23
4. Données techniques....................................................................................................................... 24
5. Avant la mise en service ................................................................................................................. 24
6. Fonctionnement.............................................................................................................................. 25
7. Nettoyage, maintenance et commande de pièces de rechange ..................................................... 26
8. Mise au rebut et recyclage .............................................................................................................. 26
9. Dérangements ............................................................................................................................... 26
Anleitung_BG_CT_18_1_Li_SPK7.indb 22Anleitung_BG_CT_18_1_Li_SPK7.indb 22 03.05.12 11:0503.05.12 11:05
Page 23

F
- 23 -
Attention !
Lors de l’utilisation d’appareils, il faut respecter
certaines mesures de sécurité afi n d’éviter des
blessures et dommages. Veuillez donc lire attentivement ce mode d’emploi/ces consignes de
sécurité. Veillez à le conserver en bon état pour
pouvoir accéder aux informations à tout moment.
Si l’appareil doit être remis à d’autres personnes,
veillez à leur remettre aussi ce mode d’emploi/
ces consignes de sécurité. Nous déclinons toute
responsabilité pour les accidents et dommages
dus au non-respect de ce mode d’emploi et des
consignes de sécurité.
1. Consignes de sécurité
Vous trouverez les consignes de sécurité correspondantes dans le cahier en annexe.
Avertissement !
Veuillez lire toutes les consignes de sécurité
et instructions. Tout non-respect des consignes
de sécurité et instructions peut provoquer une
décharge électrique, un incendie et/ou des blessures graves.
Conservez toutes les consignes de sécurité
et instructions pour une consultation ultérieure.
Explication de la plaque indicatrice sur
l’appareil (fi gure 17)
1: Avertissement!
2: Portez une protection des yeux!
3: Protégez l’appareil contre l’humidité !
4: Avant la mise en service, lisez le mode
d’emploi!
5: Gardez les autres personnes hors de la zone
de dangers!
6: L’outil continue à tourner par inertie!
2. Description de l’appareil (fi g. 1-2)
1. Verrouillage de démarrage
2 Interrupteur Marche/Arrêt
3 Vis de fi xation
4 Poignée supplémentaire
5 Réglage de la hauteur
6 Guide-lisières
7 Bobine de fi l
8 Capot de protection
9 Lames
10 Chargeur
11 Accumulateur
12 Aide au montage
3. Utilisation conforme à
l’aff ectation
Cet appareil est conçu pour découper des pordures de pelouses et de petites surfaces d’herbe
dans les jardins privés et les jardins de loisirs.
Sont considérés comme des appareils pour jardins privés, ceux qui ne sont pas employés dans
des installations publiques, parcs, terrains de
sport, rues, ni dans les exploitations agricoles et
forestières. L’emploi de l’appareil sera considéré
comme conforme à la condition que le mode
d’emploi joint à la livraison par le constructeur
aura bien été respecté.
Attention! Pour des raisons de danger occasionné aux personnes et aux biens, l’appareil
ne doit pas être employé pour broyer - dans
le sens de composter.
La machine doit exclusivement être employée
conformément à son aff ectation. Chaque uti-
lisation allant au-delà de cette aff ectation est
considérée comme non conforme. Pour les
dommages en résultant ou les blessures de tout
genre, le producteur décline toute responsabilité
et l’opérateur/l’exploitant est responsable.
Veillez au fait que nos appareils, conformément
à leur aff ectation, n’ont pas été construits, pour
être utilisés dans un environnement professionnel, industriel ou artisanal. Nous déclinons toute
responsabilité si l’appareil est utilisé professionnellement, artisanalement ou dans des sociétés
industrielles, tout comme pour toute activité
équivalente.
Anleitung_BG_CT_18_1_Li_SPK7.indb 23Anleitung_BG_CT_18_1_Li_SPK7.indb 23 03.05.12 11:0503.05.12 11:05
Page 24

F
- 24 -
4. Données techniques
Vitesse n0: ..........................................8.000 tr/min
Cercle de coupe: ..................................... Ø 25 cm
Durée maximale de
fonctionnement: ...........................35 minutes env.
Niveau de puissance acoustique L
WA
: ....85 dB(A)
Imprécision K ........................................... 3 dB(A)
Niveau de pression acoustique L
pA
: .....69,4 dB(A)
Accumulateur échangeable: .18 V d.c./1300 mAh
Vibration poignée a
hv
: ...........................≤ 2,5 m/s
2
Imprécision K ..........................................1,5 m/s
2
Poids ...........................................................1,9 kg
Bloc d’alimentation:
Tension de secteur: ........ 100-240 VAC, 50-60 Hz
Sortie:
Tension de secteur nominale: .................24 V d.c.
Courant nominal: ...................................... 350 mA
Le bruit au poste de travail peut dépasser 85
dB (A). Dans ce cas, les mesures antibruit sont
requises pour l’opérateur. Le bruit a été mesuré
conformément à EN 60745-1.
La valeur des vibrations émises au niveau de la
poignée s’élève à < 2,5 m/s2. et a été déterminée
selon EN 60745-1.
Avertissement !
La valeur d’émission de vibration a été mesurée
selon une méthode d’essai normée et peut être
modifi ée, en fonction du type d’emploi de l’outil
électrique ; elle peut dans certains cas exceptionnels être supérieure à la valeur indiquée.
La valeur d’émission de vibration indiquée peut
être utilisée pour comparer un outil électrique à
un autre.
La valeur d’émission de vibration indiquée peut
également être utilisée pour estimer l’altération
au début.
Attention !
La valeur de vibration est diff érente en fonction du
domaine d’utilisation de l’outil électrique et peut,
dans des cas exceptionnels, être supérieure à la
valeur indiquée.
Limitez le niveau sonore et les vibrations à
un minimum !
•
Utilisez exclusivement des appareils en excellent état.
•
Entretenez et nettoyez l’appareil régulièrement.
•
Adaptez votre façon de travailler à l’appareil.
•
Ne surchargez pas l’appareil.
•
Faites contrôler l’appareil le cas échéant.
•
Mettez l’appareil hors circuit lorsque vous ne
l’utilisez pas.
•
Portez des gants.
5. Avant la mise en service
5.1 Montage du capot de protection (fi g. 3)
Enfi chez le capot de protection (fi g. 3/pos. 8) sur
la tête du moteur comme indiqué sur la fi gure 3 et
fi xez celui-ci à l‘aide des vis (fi g. 3/pos. A).
5.2. Montage de la tête de lame (fi gure 4)
Enfi chez la tête de lame (fi gure 4/pos. 7) sur le
logement sur l’arbre du moteur. Veillez à ce que
l’encliquetage soit sûr.
5.3 Montage de la poignée supplémentaire
(fi g. 2, 5-6)
Dévissez le bouton de réglage prémonté (fi g. 2/
pos. 3) et la vis (fi g. 5/pos. B).
Poussez la poignée dans la position indiquée
sur la fi gure 5 et insérez la vis dans le trou. Fixez
maintenant la poignée à l‘aide du bouton de réglage (fi g. 6/pos. 3).
5.4 Réglage de la hauteur (fi g. 1)
Desserrez l’écrou-raccord (fi g. 1/pos 5) jusqu’à
ce que le manche de la débroussailleuse puisse
être assemblé et défait sans problème. Réglez
à présent la hauteur désirée et fi xez le manche
dans cette position en resserrant à fond l’écrouraccord.
5.5 Réglage des poignées supplémentaires
(fi g. 8)
Desserrez la vis de fi xation de la poignée sup-
plémentaire jusqu’à ce que cette dernière puisse
être poussée sans grande résistance vers l’avant
et l’arrière. Réglez la position désirée et revissez
la vis de fi xation à fond.
Anleitung_BG_CT_18_1_Li_SPK7.indb 24Anleitung_BG_CT_18_1_Li_SPK7.indb 24 03.05.12 11:0503.05.12 11:05
Page 25

F
- 25 -
5.6 Réglage de l‘angle d‘inclinaison du guidon (fi g. 9)
Placez le coupe-herbe sur le sol de façon stable.
Appuyez sur la pédale pour le réglage de l‘angle
d‘inclinaison (fi g. 9/pos. D). Vous pouvez à pré-
sent régler le manche sur l‘angle d‘inclinaison désiré. Afi n de bloquer l‘angle d‘inclinaison, relâchez
la pédale et laissez le guidon s‘encranter 3 crans
d‘arrêt sont possibles.
5.7 Charge de l’accumulateur (fi g. 10-11)
1. Sortez le bloc accumulateur de l‘appareil.
Pour cela, appuyez sur la touche à crans latérale (fi gure 10/pos. E).
2. Comparez si la tension du secteur indiquée
sur la plaque signalétique correspond à la
tension secteur disponible. Raccordez le câble réseau du chargeur à une prise de courant
et enfi chez la fi che (fi g. 11/pos. H) dans le
connecteur femelle de charge (fi g. 11/pos. G)
sur l‘accumulateur. Le voyant LED rouge (fi g.
11/pos. F) indique le processus de charge.
3. Le chargeur termine le processus de charge
automatiquement lorsque l‘accumulateur est
complètement chargé (au bout d‘env. 3-5 h).
Le voyant LED vert (fi g. 11/pos. F) est allumé.
Pendant le chargement de la batterie,
l’accumulateur peut légèrement se réchauff er.
Ceci est cependant normal.
Si la recharge du bloc accumulateur est impossible, veuillez contrôler
•
si une tension du réseau est présente au niveau de la prise de courant
•
si le contact est bien irréprochable au niveau
des contacts de charge.
Si le chargement du bloc accumulateur reste
impossible, nous vous prions de bien vouloir
renvoyer
•
le chargeur et l’adaptateur de charge
•
ainsi que le bloc accumulateur
à notre service après-vente.
Dans l’intérêt d’une longue durée de vie du bloc
accumulateur, vous devez prendre soin de recharger le bloc accumulateur en temps voulu.
Ceci est de toute manière nécessaire, lorsque
vous constatez que la puissance du coupe-bordure à accumulateur diminue.
Ne déchargez jamais complètement le bloc accumulateur. Ceci entraînerait un défaut du bloc
accumulateur !
6. Fonctionnement
Pour obtenir la meilleure performance de votre
coupe-bordure, suivez les instructions suivantes:
•
N’utilisez jamais le coupe-bordure sans dispositif de protection.
•
Ne coupez jamais lorsque l’herbe est humide. Vous obtiendrez les meilleurs résultats
lorsque l’herbe est sèche.
•
Pour mettre votre débroussailleuse en circuit,
appuyez sur le bouton de mise en circuit et
de verrouillage et sur l’interrupteur Marche/
Arrêt (figure 2/rep. 2).
•
Pour mettre votre débroussailleuse en circuit,
appuyez sur l’interrupteur de mise en marche
et de verrouillage (figure 2/ rep. 2)
•
Pour mettre votre coupe-bordure hors circuit,
relâchez l’interrupteur Marche/Arrêt
•
N’approchez le coupe-bordure de l’herbe que
lorsque l’interrupteur est enfoncé, autrement
dit lorsque le coupe-bordure fonctionne.
•
Pour couper correctement, pivotez l’appareil
latéralement et avancez. Maintenez, ce faisant, le coupe-bordure incliné d’env. 30° (cf.
figure 14+15).
•
Lorsque l’herbe est haute, coupez-la en partant de la pointe, par étapes (cf. figure 16).
•
Utilisez le capot de protection afin d’éviter
une usure inutile.
•
Maintenez la débroussailleuse à l’écart
d’objets durs afin d’éviter une usure inutile.
Utilisation de la débroussailleuse comme
coupe-bordure
Afi n de couper les bordures de gazon et de
plates-bandes, transformez la débroussailleuse
comme suit :
•
Retirer l’accumulateur (fig. 10)
•
Tirez la douille de réglage (fig. 7/pos. C) dans
la direction indiquée sur la figure 7.
•
Maintenez la douille de réglage tirée vers
l‘arrière et tournez la partie inférieure
du coupe-herbe de 180° jusqu‘à ce qu‘il
s‘enclenche.
•
De cette manière, on peut transformer le
coupe-herbe en un coupe-bordures avec
lequel il est possible de couper le gazon verticalement.
Anleitung_BG_CT_18_1_Li_SPK7.indb 25Anleitung_BG_CT_18_1_Li_SPK7.indb 25 03.05.12 11:0503.05.12 11:05
Page 26

F
- 26 -
7. Nettoyage, maintenance et
commande de pièces de
rechange
Avant de déposer et de nettoyer le coupe-bordure, mettez-le hors circuit et retirez l’accumulateur
(fi gure 10).
7.1 Nettoyage
•
Maintenez les dispositifs de protection, les
fentes à air et le carter de moteur aussi propres (sans poussière) que possible. Frottez
l’appareil avec un chiffon propre ou soufflez
dessus avec de l’air comprimé à basse pression.
•
Nous recommandons de nettoyer l’appareil
directement après chaque utilisation.
•
Nettoyez l’appareil régulièrement à l’aide d’un
chiffon humide et un peu de savon. N’utilisez
aucun produit de nettoyage ni détergeant
; ils pourraient endommager les pièces en
matières plastiques de l’appareil. Veillez à
ce qu’aucune eau n’entre à l’intérieur de
l’appareil.
•
Retirez les dépôts du capot de protection à
l’aide d’une brosse
7.2 Remplacement de la lame (fi g. 12-13)
ATTENTION ! Avant le remplacement, ôter absolument l’accumulateur (fi g. 10) !
•
Utilisez pour le montage et le démontage de
la lame, l‘aide au montage ci-jointe (fig. 12/
pos. 12)
•
Pour retirer la lame, poussez-la vers l’intérieur
et ôtez-le via la grande ouverture comme indiqué dans la figure 12.
•
Le montage de la nouvelle lame s’effectue
dans l’ordre inverse. Veillez à un encliquetage
correct comme indiqué dans la figure 13.
7.3 Maintenance
Aucune pièce à l’intérieur de l’appareil n’a besoin
de maintenance.
7.4 Commande de pièces de rechange :
Pour les commandes de pièces de rechange,
veuillez indiquer les références suivantes:
•
Type de l’appareil
•
No. d’article de l’appareil
•
No. d’identification de l’appareil
•
No. de pièce de rechange de la pièce requise
Vous trouverez les prix et informations actuelles à
l’adresse www.isc-gmbh.info
Lame de rechange réf. : 34.057.30
8. Mise au rebut et recyclage
L’appareil se trouve dans un emballage permettant d’éviter les dommages dus au transport.
Cet emballage est une matière première et peut
donc être réutilisé ultérieurement ou être réintroduit dans le circuit des matières premières.
L’appareil et ses accessoires sont en matériaux
divers, comme par ex. des métaux et matières
plastiques. Eliminez les composants défectueux
dans les systèmes d’élimination des déchets
spéciaux. Renseignez-vous dans un commerce
spécialisé ou auprès de l’administration de votre
commune
9. Dérangements
L’appareil ne démarre pas :
Contrôlez si l’accumulateur est rechargé et si le
chargeur fonctionne. Dans le cas où l’appareil ne
fonctionne pas alors que la tension est présente, renvoyez celui-ci au service après-vente, à
l’adresse indiquée.
Anleitung_BG_CT_18_1_Li_SPK7.indb 26Anleitung_BG_CT_18_1_Li_SPK7.indb 26 03.05.12 11:0503.05.12 11:05
Page 27

F
- 27 -
Uniquement pour les pays de l’Union Européenne
Ne jetez pas les outils électriques dans les ordures ménagères!
Selon la norme européenne 2002/96/CE relative aux appareils électriques et systèmes électroniques
usés et selon son application dans le droit national, les outils électriques usés doivent être récoltés à
part et apportés à un recyclage respectueux de l’environnement.
Possibilité de recyclage en alternative à la demande de renvoi :
Le propriétaire de l’appareil électrique est obligé, en guise d’alternative à un envoi en retour, à contribuer à un recyclage eff ectué dans les règles de l’art en cas de cessation de la propriété. L’ancien appareil
peut être remis à un point de collecte dans ce but. Cet organisme devra l’éliminer dans le sens de la Loi
sur le cycle des matières et les déchets. Ne sont pas concernés les accessoires et ressources fournies
sans composants électroniques.
Toute réimpression ou autre reproduction de la documentation et des papiers joints aux produits, même
sous forme d’extraits, est uniquement permise une fois l’accord explicite de l’ISC GmbH obtenu.
Sous réserve de modifi cations techniques
Anleitung_BG_CT_18_1_Li_SPK7.indb 27Anleitung_BG_CT_18_1_Li_SPK7.indb 27 03.05.12 11:0503.05.12 11:05
Page 28

F
- 28 -
Bon de garantie
Chère Cliente, Cher Client,
Nos produits sont soumis à un contrôle de qualité très strict. Si cet appareil devait toutefois ne pas fonctionner impeccablement, nous en serions désolés. Dans un tel cas, nous vous prions de bien vouloir
prendre contact avec notre service après-vente à l‘adresse indiquée sur le bulletin de garantie. Nous
restons également volontiers à votre disposition au numéro de téléphone de service indiqué plus bas.
Pour faire valoir une demande de garantie, ce qui suit est valable :
1. Les conditions de garantie règlent les prestations de garantie supplémentaires. Vos droits de garantie légaux ne sont en rien altérés par la garantie présente. Notre prestation de garantie est gratuite.
2. La prestation de garantie s’applique exclusivement aux défauts occasionnés par des vices de fabrication ou de matériau et est limitée à l’élimination de ces défauts ou encore au remplacement
de l’appareil. Veillez au fait que nos appareils, conformément à leur aff ectation, n’ont pas été con-
struits pour être utilisés dans un environnement professionnel, industriel ou artisanal. Un contrat
de garantie ne peut avoir lieu dès lors que l’appareil est utilisé à des activités dans des entreprises
professionnelles, artisanales ou industrielles ou toute autre activité du même genre. Sont également exclus de notre garantie : les prestations de substitution de dommages dus aux transports,
les dommages occasionnés par le non-respect des instructions de montage ou en raison d’une
installation non conforme, du non-respect du mode d’emploi (comme par exemple le raccordement
à une mauvaise tension réseau ou à un mauvais type de courant), les applications abusives ou non
conformes (comme par exemple une surcharge de l’appareil ou encore l’emploi d’accessoires non
homologués), le non-respect des prescriptions de maintenance et de sécurité, l’infi ltration de corps
étrangers dans l’appareil (comme par exemple du sable, des pierres ou de la poussière), l’emploi
de la force ou l’infl uence extérieure (comme par exemple les dommages dus à une chute), ainsi que
l’usure normale conforme à l’utilisation. Ceci est particulièrement valable pour les accumulateurs
pour lesquels nous off rons toutefois une période de garantie de 12 mois. Le droit à la garantie dis-
paraît dès lors que des interventions ont lieu sur l’appareil.
3. Le délai de garantie s’élève à 2 ans et commence à la date de l’achat de l’appareil. Les demandes
de garanties doivent être présentées avant écoulement du délai de garantie, dans les deux semaines suivant le moment auquel le défaut a été reconnu. Toute reconnaissance de demande de
garantie après écoulement du délai de garantie est exclue. La réparation ou l’échange de l’appareil
n’entraîne nullement une prolongation de la durée de garantie. Elle ne fait pas non plus commencer
un nouveau délai de garantie, en raison de cette prestation, pour l’appareil ou pour toute autre pièce
de rechange intégrée. Ceci est également valable lorsqu’un service après-vente sur place a été
consulté.
4. Pour faire reconnaître votre demande de garantie, veuillez nous envoyer l’appareil défectueux franco de port à l’adresse indiquée ci-dessous. Ajoutez à l’envoi l’original du bon d’achat ou de tout autre preuve de l’achat datée. Veuillez donc toujours bien conserver le bon d’achat en guise de preuve
! Décrivez la raison de la réclamation le plus précisément possible. Si le défaut de l’appareil est
compris dans notre prestation de garantie, nous vous retournerons sans délai un appareil réparé ou
encore un nouveau.
Bien entendu, nous sommes prêts également à réparer les appareils défectueux contre remboursement
des frais, dès lors que l’appareil n’est plus ou pas garanti. Pour ce faire, veuillez envoyer l’appareil à notre adresse de service après-vente.
Anleitung_BG_CT_18_1_Li_SPK7.indb 28Anleitung_BG_CT_18_1_Li_SPK7.indb 28 03.05.12 11:0503.05.12 11:05
Page 29

I
- 29 -
Indice
1. Avvertenze sulla sicurezza ............................................................................................................. 30
2. Descrizione dell’apparecchio ......................................................................................................... 30
3. Utilizzo proprio ................................................................................................................................30
4. Caratteristiche tecniche .................................................................................................................. 31
5. Prima della messa in esercizio .......................................................................................................31
6. Esercizio ......................................................................................................................................... 32
7. Pulizia, manutenzione, conservazione e ordinazione dei pezzi di ricambio .................................... 33
8. Smaltimento e riciclaggio ............................................................................................................... 33
9. Anomalie ........................................................................................................................................ 33
Anleitung_BG_CT_18_1_Li_SPK7.indb 29Anleitung_BG_CT_18_1_Li_SPK7.indb 29 03.05.12 11:0503.05.12 11:05
Page 30

I
- 30 -
Attenzione!
Nell’usare gli apparecchi si devono rispettare
diverse avvertenze di sicurezza per evitare lesioni e danni. Quindi leggete attentamente queste
istruzioni per l’uso/le avvertenze di sicurezza.
Conservate bene le informazioni per averle a
disposizione in qualsiasi momento. Se date
l’apparecchio ad altre persone, consegnate queste istruzioni per l’uso/le avvertenze di sicurezza
insieme all’apparecchio. Non ci assumiamo alcuna responsabilità per incidenti o danni causati
dal mancato rispetto di queste istruzioni e delle
avvertenze di sicurezza.
1. Avvertenze sulla sicurezza
Le relative avvertenze di sicurezza si trovano
nell’opuscolo allegato.
Avvertimento!
Leggete tutte le avvertenze di sicurezza e le
istruzioni. Dimenticanze nel rispetto delle avver-
tenze di sicurezza e delle istruzioni possono causare scosse elettriche, incendi e/o gravi lesioni.
Conservate tutte le avvertenze e le istruzioni
per eventuali necessità future.
Spiegazione della targhetta di avvertenze
sull’apparecchio (fi g. 17)
1 Avvertimento!
2 Indossare occhiali protettivi!
3 Proteggere dall’umidità!
4 Leggere le istruzioni per l’uso prima della
messa
in esercizio!
5 Tenere lontane le altre persone dalla zona di
pericolo!
6 L’utensile continua a ruotare dopo avere
spento il motore!
2. Descrizione dell’apparecchio (Fig.
1-2)
1. Sicura
2 Interruttore ON/OFF
3 Vite di fi ssaggio
4 Impugnatura addizionale
5 Regolazione dell’altezza
6 Guida per bordo
7 Bobina
8 Calotta protettiva
9 Lama
10 Carica batteria
11 Batteria
12 Aiuto al montaggio
3. Utilizzo proprio
L’apparecchio è concepito per tagliare l’erba
del prato e di piccole superfi ci erbose di giardini
privati.
Si considerano utensili per giardini privati quelli
che non vengono usati in giardini pubblici, parchi,
impianti sportivi, lungo le strade, nell’agricoltura e
nell’economia forestale.
Il rispetto delle istruzioni per l’uso fornite dal
produttore è una condizione per l’uso corretto
dell’apparecchio.
Attenzione! Visto il pericolo per persone e
cose, l’apparecchio non deve essere usato
per sminuzzare rifi uti organici per il compos-
taggio.
L’apparecchio deve venire usato solamente per lo
scopo a cui è destinato. Ogni altro tipo di uso che
esuli da quello previsto non è un uso conforme.
L’utilizzatore/l’operatore, e non il costruttore, è
responsabile dei danni e delle lesioni di ogni tipo
che ne risultino.
Tenete presente che i nostri apparecchi non sono
stati costruiti per l’impiego professionale, artigianale o industriale. Non ci assumiamo alcuna
garanzia quando l’apparecchio viene usato in
imprese commerciali, artigianali o industriali, o in
attività equivalenti.
Anleitung_BG_CT_18_1_Li_SPK7.indb 30Anleitung_BG_CT_18_1_Li_SPK7.indb 30 03.05.12 11:0503.05.12 11:05
Page 31

I
- 31 -
4. Caratteristiche tecniche
Numero di giri n0: .................................8.000 min
-1
Diametro di taglio: ...................................ø 25 cm
Periodo di esercizio max.: ................... ca. 35 min
Livello di potenza acustica L
WA
: ..................85 dB
Incertezza K .................................................3 dB
Livello di pressione acustica L
pA
: .............69,2 dB
Batteria sostituibile: ..............18 V d. c./1300 mAh
Vibrazione a
hv
impugnatura: .................≤ 2,5 m/s
2
Incertezza K ............................................1,5 m/s
2
Peso ............................................................1,9 kg
Alimentatore
Tensione di rete: ..........100 V-240 VAC, 50-60 Hz
Uscita
Tensione nominale: ...............................24 V d. c.
Corrente nominale: ..................................350 mA
Il rumore dell’apparecchio può superare gli
85 dB(A). In questo caso è necessario che
l’utilizzatore prenda delle misure di protezione
dal rumore. Il rumore è stato misurato secondo
prEN 60745-1. Il valore delle vibrazioni emesse
sull’impugnatura è stato rilevato secondo EN
60745-1.
Avvertimento!
Il valore di emissione di vibrazioni indicato è stato
misurato secondo un metodo di prova normalizzato e può variare a seconda del modo in cui
l’elettroutensile viene utilizzato e, in casi eccezionali, può essere superiore al valore riportato.
Il valore di emissione di vibrazioni indicato può
essere usato per il confronto tra elettroutensili di
marchi diversi.
Il valore di emissione di vibrazioni può essere
utilizzato anche per una valutazione preliminare
dei rischi.
Attenzione!
Il valore di vibrazione cambierà a causa del settore di impiego dell’elettroutensile e in casi eccezionali può essere superiore ai valori riportati.
Limitate al minimo lo sviluppo di rumore e le
vibrazioni!
•
Utilizzate soltanto apparecchi in perfetto stato.
•
Eseguite regolarmente la manutenzione e la
pulizia dell’apparecchio.
•
Adattate il vostro modo di lavorare
all’apparecchio.
•
Non sovraccaricate l’apparecchio.
•
Fate eventualmente controllare l’apparecchio.
•
Spegnete l’apparecchio se non lo utilizzate.
•
Indossate i guanti.
5. Prima della messa in esercizio
5.1 Montaggio della calotta protettiva (Fig. 3)
Inserite la calotta protettiva (Fig. 3 / Pos. 8) sulla
testa del motore come mostrato in Fig. 3 e fi ssa-
tela con le viti (Fig. 3 / Pos. A).
5.2. Montaggio della testa della lama (Fig. 4)
Inserite la testa della lama (Fig. 4/Pos. 7) nella
sede sull’albero motore. Assicuratevi che scatti in
posizione.
5.3 Montaggio dell‘impugnatura addizionale
(Fig. 2, 5-6)
Allentate il bottone di regolazione premontato
(Fig. 2 / Pos. 3) e la vite (Fig. 5 / Pos. B).
Spingete l‘impugnatura nella posizione mostrata in Fig. 5 e infi late la vite nel foro. Fissate ora
l‘impugnatura con il bottone di regolazione (Fig.
6 / Pos. 3).
5.4 Regolazione dell’altezza (Fig. 1)
Allentate il dado a risvolto (Fig. 1/Pos 5) fi no a
quando è possibile accorciare ed allungare liberamente il manico del tosaerba. Regolate adesso
l’altezza di lavoro desiderata e fi ssate il manico
in tale posizione riavvitando saldamente il dado
a risvolto.
5.5 Regolazione dell’impugnatura addizionale
(Fig. 8)
Allentate la vite di fi ssaggio dell’impugnatura
addizionale fi no a quando sia possibile spostarla
in avanti ed all’indietro senza troppa resistenza.
Regolate la posizione desiderata e riavviate
saldamente la vite di fi ssaggio.
Anleitung_BG_CT_18_1_Li_SPK7.indb 31Anleitung_BG_CT_18_1_Li_SPK7.indb 31 03.05.12 11:0503.05.12 11:05
Page 32

I
- 32 -
5.6 Regolazione dell‘angolo di inclinazione
del manico di guida (Fig. 9)
Appoggiate il tosaerba a fi lo in piedi ed in modo
stabile sul terreno.
Premete il pedale per la regolazione dell‘angolo
di inclinazione (Fig. 9/Pos. D). Adesso potete
regolare il manico con l‘angolo di inclinazione
desiderato. Per fi ssare l‘angolo di inclinazione,
lasciate andare il pedale e fate scattare in posizione il manico. Sono possibili 3 livelli di arresto.
5.7 Ricarica della batteria (Fig. 10-11)
1. Estraete la batteria dall‘apparecchio. Premete
a tal fi ne il tasto di arresto laterale (Fig. 10/
Pos. E).
2. Controllate che la tensione di rete indicata
sulla targhetta corrisponda alla tensione di
rete a disposizione. Collegate il cavo del carica batteria ad una presa di corrente e inserite
il connettore (Fig. 11/Pos. H) nella presa di
ricarica (Fig. 11 /Pos.G) della batteria. Il LED
rosso (Fig. 11/Pos. F) indica il processo di
ricarica.
3. Il carica batteria termina il processo di ricarica
automaticamente quando la batteria è completamente ricaricata (dopo ca. 3-5 h). Il LED
verde (Fig. 11/Pos. F) si illumina.
Durante la ricarica la batteria si può riscaldare un
po’, ma ciò è del tutto normale.
Se la ricarica della batteria non fosse possibile,
verifi cate
•
che sia presente tensione di rete sulla presa
di corrente
•
che ci sia un perfetto contatto dei contatti di
ricarica.
Se la ricarica della batteria continuasse a non
essere possibile, spedite
•
il carica batteria con l’adattatore di ricarica
•
e la batteria
al nostro servizio di assistenza clienti.
Per ottenere una lunga durata della batteria si
deve provvedere a una puntuale ricarica della
batteria. Ciò è comunque necessario quando ci
si accorge della diminuzione delle prestazioni
della batteria del tosaerba. Non fate scaricare mai
completamente la batteria. Questo potrebbe danneggiare la batteria!
6. Esercizio
Per ottenere i migliori risultati dal vostro tosaerba
a fi lo, dovete seguire le seguenti istruzioni.
•
Non usate il tosaerba senza dispositivo di
protezione.
•
Non tagliate l’erba se è bagnata. I risultati migliori si ottengono se l’erba è asciutta.
•
Per accendere il tosaerba premete la sicura e
l’interruttore ON/OFF (Fig. 2/ Pos. 2).
•
Per spegnere il tosaerba lasciate andare
l’interruttore ON/OFF (Fig. 2/ Pos. 2).
•
Avvicinate l’apparecchio all’erba solo quando
l’interruttore è premuto, cioè quando il tosaerba è in funzione.
•
Per tagliare in modo corretto, fate oscillare
l’apparecchio di lato e camminate in avanti.
Nel fare questo tenete il tosaerba inclinato di
ca. 30° (vedi Fig. 14+15).
•
In caso di erba alta, questa deve venire tagliata a più riprese cominciando dall’alto (vedi
Fig. 16).
•
Usate la calotta protettiva per evitare l’usura
superflua.
•
Tenete il tagliaerba lontano da oggetti duri per
evitare un’usura superflua.
Uso del tosaerba a fi lo per tagliare i bordi
Per tagliare i bordi di prati e aiole il tagliaerba a
fi lo può essere trasformato come segue
•
Togliete la batteria (Fig. 10)
•
Portate la bussola di regolazione (Fig. 7 / Pos.
C) nella direzione mostrata in Fig. 7.
•
Tenete tirata indietro la bussola di regolazione
e ruotate la parte inferiore del tosaerba a filo
di 180° fino a quando non scatta in posizione.
•
Il tosaerba a filo è stato così modificato in
modo da tagliare i bordi e da eseguire i tagli
verticali del prato.
Anleitung_BG_CT_18_1_Li_SPK7.indb 32Anleitung_BG_CT_18_1_Li_SPK7.indb 32 03.05.12 11:0503.05.12 11:05
Page 33

I
- 33 -
7. Pulizia, manutenzione,
conservazione e ordinazione dei
pezzi di ricambio
Prima di pulire e mettere via il tagliaerba spegnetelo e togliete la batteria (Fig. 10).
7.1 Pulizia
•
Tenete il più possibile i dispositivi di protezione, le fessure di aerazione e la carcassa del
motore liberi da polvere e sporco. Strofinate
l’apparecchio con un panno pulito o soffiatelo
con l’aria compressa a pressione bassa.
•
Consigliamo di pulire l’apparecchio subito
dopo averlo usato.
•
Pulite l’apparecchio regolarmente con un
panno asciutto ed un po’ di sapone. Non usate detergenti o solventi perché questi ultimi
potrebbero danneggiare le parti in plastica
dell’apparecchio. Fate attenzione che non
possa penetrare dell’acqua nell’interno
dell’apparecchio.
•
Togliete con una spazzola i depositi sulla calotta protettiva.
7.2 Sostituzione della lama (Fig. 12+13)
ATTENZIONE! Prima della sostituzione togliete assolutamente la batteria (Fig. 10)!
•
Utilizzate l‘aiuto al montaggio fornito per montare e smontare la lama (Fig. 12 / Pos. 12).
•
Per togliere la lama spingetela verso l’interno
e toglietela attraverso il foro più grande, come
mostrato nella Fig. 12.
•
Il montaggio della nuova lama avviene
nell’ordine inverso. Fate attenzione che scatti
correttamente, come illustrato nella Fig. 13.
7.3 Manutenzione
All’interno dell’apparecchio non si trovano altre
parti sottoposte ad una manutenzione qualsiasi.
7.4 Ordinazione di pezzi di ricambio:
Volendo commissionare dei pezzi di ricambio, si
dovrebbe dichiarare quanto segue:
•
modello dell’apparecchio
•
numero dell’articolo dell’apparecchio
•
numero d’ident. dell’apparecchio
•
numero del pezzo di ricambio del ricambio
necessitato.
Per i prezzi e le informazioni attuali si veda
www.isc-gmbh.info
Lama di ricambio n. art.: 34.057.30
8. Smaltimento e riciclaggio
L’apparecchio si trova in una confezione per evitare i danni dovuti al trasporto. Questo imballaggio
rappresenta una materia prima e può perciò essere utilizzato di nuovo o riciclato.
L’apparecchio e i suoi accessori sono fatti di materiali diversi, per es. metallo e plastica. Consegnate i pezzi difettosi allo smaltimento di rifi uti spe-
ciali. Per informazioni rivolgetevi ad un negozio
specializzato o all’amministrazione comunale!
9. Anomalie
L’utensile non funziona:
controllate che la batteria sia carica e che il carica
batteria funzioni. Nel caso in cui l’utensile non
funzioni pur in presenza di tensione, speditelo
all’indirizzo riportato dell’assistenza clienti.
Anleitung_BG_CT_18_1_Li_SPK7.indb 33Anleitung_BG_CT_18_1_Li_SPK7.indb 33 03.05.12 11:0503.05.12 11:05
Page 34

I
- 34 -
Solo per paesi membri dell’UE
Non smaltite gli elettroutensili nei rifi uti domestici!
Secondo la direttiva europea 2002/96/CE sui rifi uti di apparecchiature elettriche ed elettroniche e il suo
recepimento nelle normative nazionali, gli elettroutensili usati devono venire raccolti separatamente e
venire smaltiti in modo ecocompatibile.
Alternativa di riciclaggio alla richiesta di restituzione:
il proprietario dell’apparecchio elettrico è tenuto in alternativa, invece della restituzione, a collaborare in
modo che lo smaltimento venga eseguito correttamente in caso ceda l’apparecchio. L’apparecchio vecchio può anche venire consegnato ad un centro di raccolta che provvede poi allo smaltimento secondo
le norme nazionali sul riciclaggio e sui rifi uti. Non ne sono interessati gli accessori e i mezzi ausiliari sen-
za elementi elettrici forniti insieme ai vecchi apparecchi.
La ristampa o l’ulteriore riproduzione, anche parziale, della documentazione o dei documenti
d’accompagnamento dei prodotti è consentita solo con l’esplicita autorizzazione da parte della
iSC GmbH.
Con riserva di apportare modifi che tecniche
Anleitung_BG_CT_18_1_Li_SPK7.indb 34Anleitung_BG_CT_18_1_Li_SPK7.indb 34 03.05.12 11:0503.05.12 11:05
Page 35

I
- 35 -
Certifi cato di garanzia
Gentili clienti,
i nostri prodotti sono soggetti ad un rigido controllo di qualità. Se l’apparecchio non dovesse tuttavia
funzionare correttamente, ci scusiamo e vi preghiamo di rivolgervi al nostro servizio di assistenza clienti
all’indirizzo indicato in questa scheda di garanzia. Siamo a vostra disposizione anche telefonicamente
al numero del servizio assistenza sotto indicato. Per la rivendicazione dei diritti di garanzia vale quanto
segue:
1. Queste condizioni di garanzia regolano ulteriori prestazioni di garanzia. La presente garanzia non
tocca i vostri diritti al ricorso di garanzia previsti dalla legge. Le nostre prestazioni di garanzia sono
per voi gratuite.
2. La prestazione di garanzia riguarda esclusivamente le anomalie riconducibili a difetti del materiale o
di produzione ed è limitata all’eliminazione di queste anomalie o alla sostituzione dell’apparecchio.
Tenete presente che i nostri apparecchi non sono stati costruiti per l’impiego professionale, artigianale o industriale. Un contratto di garanzia non viene concluso quando l’apparecchio viene usato
in imprese commerciali, artigianali o industriali, o con attività equivalenti. Dalla nostra garanzia
sono escluse inoltre le prestazioni di risarcimento per danni dovuti al trasporto o danni causati
dalla mancata osservanza delle istruzioni per il montaggio o per installazione non corretta, dalla
mancata osservanza delle istruzioni per l’uso (come per es. collegamento a tensione di rete o tipo
di corrente non corretto), dall’uso improprio o illecito (come per es. sovraccarico dell’apparecchio o
utilizzo di utensili o accessori non consentiti), dalla mancata osservanza delle norme di sicurezza e
di manutenzione, dalla penetrazione di corpi estranei nell’apparecchio (come per es. sabbia, pietre
o polvere), dall’impiego della forza o dall’infl usso esterno (come per es. danni dovuti a caduta) e
dall’usura normale e dovuta all’impiego. Ciò vale particolarmente per batterie, per esse concediamo tuttavia 12 mesi di garanzia. Il diritti di garanzia decadono quando sono già eff ettuati interventi
sull’apparecchio.
3. Il periodo di garanzia è 2 anni e inizia alla data d’acquisto dell’apparecchio. I diritti di garanzia devono essere fatti valere prima della scadenza del periodo di garanzia, entro due settimane dopo avere
accertato il difetto. È esclusa la rivendicazione di diritti di garanzia dopo la scadenza del relativo
periodo. La riparazione o la sostituzione dell’apparecchio non comporta una proroga del periodo di
garanzia e con questa prestazione per l’apparecchio o per pezzi di ricambio eventualmente installati
non inizia un nuovo periodo di garanzia. Questo vale anche nel caso si ricorra ad un servizio sul
posto.
4. Per la rivendicazione dei vostri diritti di garanzia inviate l’apparecchio difettoso franco di porto
all’indirizzo sotto indicato. Allegate lo scontrino di cassa in originale o un’altra prova d’acquisto che
riporti la data. Conservate bene perciò lo scontrino di cassa come prova! Indicate il motivo di reclamo nel modo più dettagliato possibile. Se il difetto dell’apparecchio rientra nella nostra prestazione
di garanzia, ricevete l’apparecchio riparato o un apparecchio nuovo a stretto giro di posta.
Naturalmente eff ettuiamo a pagamento anche riparazioni sull’apparecchio che non rientrano o non rien-
trano più nella garanzia. A tale scopo inviate l’apparecchio all’indirizzo del servizio assistenza.
Anleitung_BG_CT_18_1_Li_SPK7.indb 35Anleitung_BG_CT_18_1_Li_SPK7.indb 35 03.05.12 11:0503.05.12 11:05
Page 36

Gao/Product-ManagementWeichselgartner/General-Manager
- 36 -
D erklärt folgende Konformität gemäß EU-Richtlinie und
Normen für Artikel
GB explains the following conformity according to EU directi-
ves and norms for the following product
F déclare la conformité suivante selon la directive CE et les
normes concernant l’article
I dichiara la seguente conformità secondo la direttiva UE e
le norme per l’articolo
NL verklaart de volgende overeenstemming conform EU
richtlijn en normen voor het product
E declara la siguiente conformidad a tenor de la directiva y
normas de la UE para el artículo
P declara a seguinte conformidade, de acordo com a
directiva CE e normas para o artigo
DK attesterer følgende overensstemmelse i medfør af
EU-direktiv samt standarder for artikel
S förklarar följande överensstämmelse enl. EU-direktiv och
standarder för artikeln
FIN vakuuttaa, että tuote täyttää EU-direktiivin ja standardien
vaatimukset
EE tõendab toote vastavust EL direktiivile ja standarditele
CZ vydává následující prohlášení o shodě podle směrnice EU
a norem pro výrobek
SLO potrjuje sledečo skladnost s smernico EU in standardi za
izdelek
SK vydáva nasledujúce prehlásenie o zhode podľa smernice
EÚ a noriem pre výrobok
H a cikkekhez az EU-irányvonal és Normák szerint a
következő konformitást jelenti ki
PL deklaruje zgodność wymienionego poniżej artykułu z
następującymi normami na podstawie dyrektywy WE.
BG декларира съответното съответствие съгласно
Директива на ЕС и норми за артикул
LV paskaidro šādu atbilstību ES direktīvai un standartiem
LT apibūdina šį atitikimą EU reikalavimams ir prekės normoms
RO declară următoarea conformitate conform directivei UE şi
normelor pentru articolul
GR δηλώνει την ακόλουθη συμμόρφωση σύμφωνα με την
Οδηγία ΕΚ και τα πρότυπα για το προϊόν
HR potvrđuje sljedeću usklađenost prema smjernicama EU i
normama za artikl
BIH potvrđuje sljedeću usklađenost prema smjernicama EU i
normama za artikl
RS potvrđuje sledeću usklađenost prema smernicama EZ i
normama za artikal
RUS следующим удостоверяется, что следующие продукты
соответствуют директивам и нормам ЕС
UKR проголошує про
зазначену нижче відповідність виробу
директивам та стандартам ЄС на виріб
MK ја изјавува следната сообрзност согласно
ЕУ-директивата и нормите за артикли
TR Ürünü ile ilgili AB direktifl eri ve normları gereğince aşağıda
açıklanan uygunluğu belirtir
N erklærer følgende samsvar i henhold til EU-direktivet og
standarder for artikkel
IS Lýsir uppfyllingu EU-reglna og annarra staðla vöru
Konformitätserklärung
Akku-Rasentrimmer BG-CT 18/1 Li / Ladegerät NG BG-CT 18/1 Li (Einhell)
87/404/EC_2009/105/EC
2005/32/EC_2009/125/EC
2006/95/EC
2006/28/EC
X
2004/108/EC
2004/22/EC
1999/5/EC
97/23/EC
90/396/EC_2009/142/EC
89/686/EC_96/58/EC
X
2011/65/EC
X
2006/42/EC
Annex IV
Notifi ed Body:
Notifi ed Body No.:
Reg. No.:
X
2000/14/EC_2005/88/EC
Annex V
X
Annex VI
Notifi ed Body: LWA = 85 dB (A); guaranteed LWA = 90 dB (A)
P = KW; L/Ø = cm
Notifi ed Body: TÜV SÜD Industrie Service GmbH (0036)
2006/28/EC
Emission No.:
Standard references:
EN 60745-1; EN 786; EN 62233;
EN 55014-1; EN 55014-2; EN 61000-3-2; EN 61000-3-3
Landau/Isar, den 02.12.2011
First CE: 11 Archive-File/Record: NAPR003784
Art.-No.: 34.111.60 I.-No.: 11011 Documents registrar: Alexander Scheifl
Subject to change without notice Wiesenweg 22, D-94405 Landau/Isar
ISC GmbH · Eschenstraße 6 · D-94405 Landau/Isar
Anleitung_BG_CT_18_1_Li_SPK7.indb 36Anleitung_BG_CT_18_1_Li_SPK7.indb 36 03.05.12 11:0503.05.12 11:05
Page 37

- 37 -
Anleitung_BG_CT_18_1_Li_SPK7.indb 37Anleitung_BG_CT_18_1_Li_SPK7.indb 37 03.05.12 11:0503.05.12 11:05
Page 38

- 38 -
Anleitung_BG_CT_18_1_Li_SPK7.indb 38Anleitung_BG_CT_18_1_Li_SPK7.indb 38 03.05.12 11:0503.05.12 11:05
Page 39

- 39 -
Anleitung_BG_CT_18_1_Li_SPK7.indb 39Anleitung_BG_CT_18_1_Li_SPK7.indb 39 03.05.12 11:0503.05.12 11:05
Page 40

EH 04/2012 (01)
Anleitung_BG_CT_18_1_Li_SPK7.indb 40Anleitung_BG_CT_18_1_Li_SPK7.indb 40 03.05.12 11:0503.05.12 11:05
 Loading...