

Page 1
k
Bedienungsanleitung
Akku Gras- und Strauchschere
t
Operating Instructions
Cordless Grass and Shrub Shears
p
Mode dʼemploi
cisaille à herbes et buissons portable
C
Istruzioni per lʼuso
Forbici a batteria per erba ed arbusti
j
Návod k obsluze
Akumulátorové nůžky na trávu a keře
W
Návod na obsluhu
Akumulátorové nožnice na trávu a kríky
N
Gebruiksaanwijzing
Accu gras- en struikschaar
U
Bruksanvisning
Batteridriven gräs-/häcksax
Art.-Nr.: 34.104.40 I.-Nr.: 01018
BG-CG
3,6 Li
Anleitung_BG_CG_3_6_Li_SPK7:_ 29.10.2008 14:01 Uhr Seite 1
Page 2

2
Vor Inbetriebnahme Bedienungsanleitung und
Sicherheitshinweise lesen und beachten
Read and follow the operating instructions and safety information
before using for the first time.
Avant la mise en service, lisez le mode dʼemploi et les consignes de
sécurité et respectez-les.
Prima della messa in esercizio leggete e osservate le istruzioni
per lʼuso e le avvertenze di sicurezza.
j Před uvedením do provozu si přečíst návod k obsluze a bezpečnostní
předpisy a oboje dodržovat.
W Pred uvedením do prevádzky si prečítajte a dodržiavajte návod na
obsluhu a bezpečnostné pokyny.
Vóór ingebruikneming de handleiding en de veiligheidsvoorschriften
lezen en in acht nemen!
Läs igenom och beakta bruksanvisningen och säkerhetsanvisningarna
före användning.
Anleitung_BG_CG_3_6_Li_SPK7:_ 29.10.2008 14:01 Uhr Seite 2
Page 3
3
2
1
1
5
7
6
2
8
1
4
3
11
3
8
2
2
9
11
9
6
5
4
3
10
Anleitung_BG_CG_3_6_Li_SPK7:_ 29.10.2008 14:01 Uhr Seite 3
Page 4
4
3b3a
4b
65
1
8
2
2
8
1
1
1
2
1
4a
Anleitung_BG_CG_3_6_Li_SPK7:_ 29.10.2008 14:01 Uhr Seite 4
Page 5

5
7
1
10
2
2
8
1
9
1
Anleitung_BG_CG_3_6_Li_SPK7:_ 29.10.2008 14:01 Uhr Seite 5
Page 6
Achtung!
Beim Benutzen von Geräten müssen einige
Sicherheitsvorkehrungen eingehalten werden, um
Verletzungen und Schäden zu verhindern. Lesen Sie
diese Bedienungsanleitung / Sicherheitshinweise
deshalb sorgfältig durch. Bewahren Sie diese gut auf,
damit Ihnen die Informationen jederzeit zur
Verfügung stehen. Falls Sie das Gerät an andere
Personen übergeben sollten, händigen Sie diese
Bedienungsanleitung / Sicherheitshinweise bitte mit
aus. Wir übernehmen keine Haftung für Unfälle oder
Schäden, die durch Nichtbeachten dieser Anleitung
und den Sicherheitshinweisen entstehen.
1. Sicherheitshinweise
Die entsprechenden Sicherheitshinweise finden Sie
im beiliegenden Heftchen!
WARNUNG
Lesen Sie alle Sicherheitshinweise und
Anweisungen. Versäumnisse bei der Einhaltung der
Sicherheitshinweise und Anweisungen können
elektrischen Schlag, Brand und/oder schwere
Verletzungen verursachen.
Bewahren Sie alle Sicherheitshinweise und
Anweisungen für die Zukunft auf.
Erklärung des Hinweisschildes auf dem Gerät
(siehe Bild 10)
1. Achtung! Betriebsanweisung lesen und Warnund Sicherheitshinweise befolgen.
2. Dritte aus dem Gefahrenbereich fernhalten.
3. Achtung! Nach dem Ausschalten laufen die
Messer nach. Stillstand der Messer abwarten.
Verletzungsgefahr!
4. Akku fachgerecht entsorgen
5. Gerät vor Regen und Feuchtigkeit schützen!
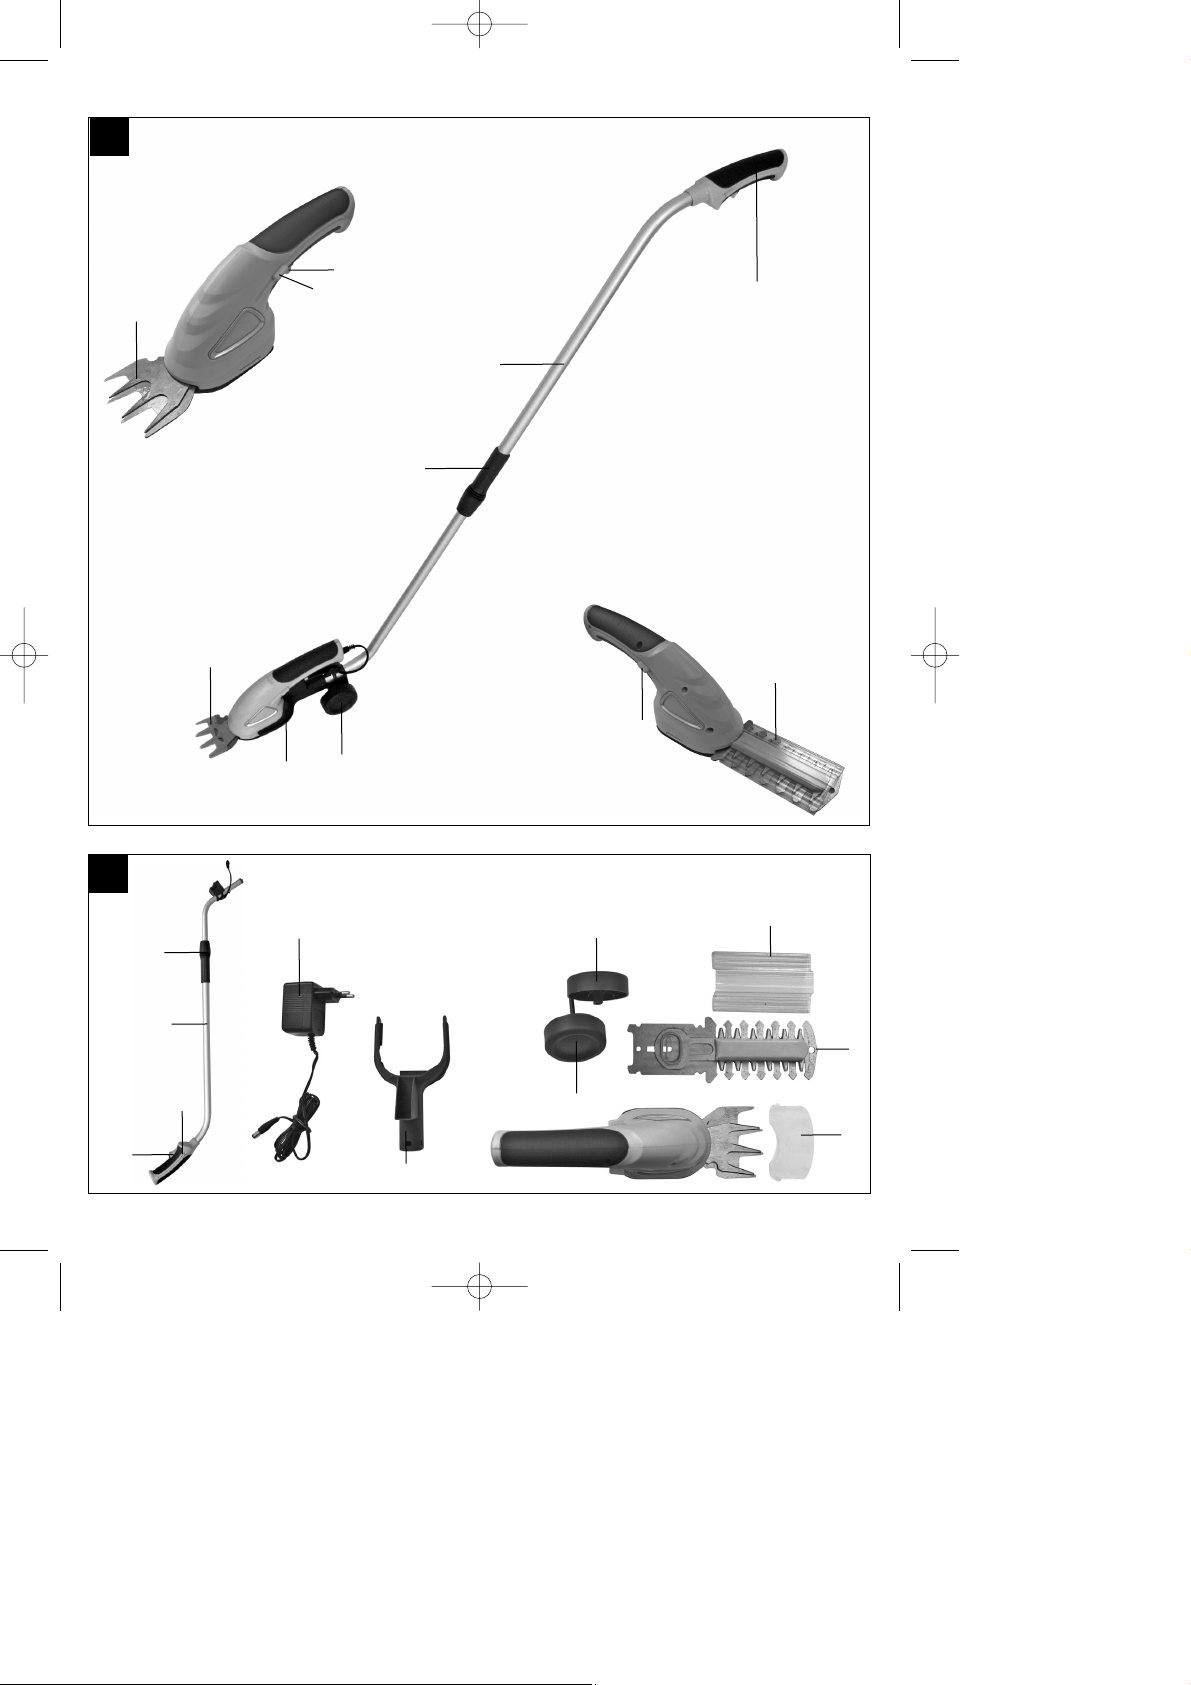
2. Gerätebeschreibung (Bild 1/2)
1 Grasschneidmesser
2 Räder
3 Einschaltsperre
4 Einschalttaste
5 Teleskop-Führungsholm
6 Teleskopverschraubung
7 Führungsgriff
8 Geräteaufnahme
9 Messerschutz
10 Ladegerät
11 Strauchmesser
3. Bestimmungsgemäße Verwendung
Das Gerät ist zum Schneiden von Rasenkanten und
kleineren Grasflächen im privaten Haus- und
Hobbygarten bestimmt.
Als Geräte für den privaten Haus- und Hobbygarten
werden solche angesehen, die nicht in öffentlichen
Anlagen, Parks, Sportstätten, an Straßen und in der
Land- und Forstwirtschaft eingesetzt werden. Die
Einhaltung der vom Hersteller beigefügten
Gebrauchsanweisung ist Voraussetzung für den
ordnungsgemäßen Gebrauch des Gerätes.
Achtung! Wegen Gefahr von Personen und
Sachschaden darf das Gerät nicht zum
Zerkleinern im Sinn von Kompostieren verwendet
werden.
Das Gerät darf nur nach seiner Bestimmung
verwendet werden. Jede weitere darüber
hinausgehende Verwendung ist nicht
bestimmungsgemäß. Für daraus hervorgerufene
Schäden oder Verletzungen aller Art haftet der
Benutzer/Bediener und nicht der Hersteller.
Bitte beachten Sie, dass unsere Geräte
bestimmungsgemäß nicht für den gewerblichen,
handwerklichen oder industriellen Einsatz konstruiert
wurden. Wir übernehmen keine Gewährleistung,
wenn das Gerät in Gewerbe-, Handwerks- oder
Industriebetrieben sowie bei gleichzusetzenden
Tätigkeiten eingesetzt wird.
6
D
Anleitung_BG_CG_3_6_Li_SPK7:_ 29.10.2008 14:01 Uhr Seite 6
Page 7

7
D
4. Technische Daten
Drehzahl n
0
950 min
-1
Schnittbreite Grasschere 70 mm
Schnittbreite Strauchschere 100 mm
Schnittstärke Strauchschere 8 mm
max. Laufzeit 60 min
Akku Li-Ion / 3,6 V d.c. / 1,3 Ah
Ladezeit 3-5 h
Schutzklasse III
Schalleistungspegel L
pA
72,7 dB
Schalldruckpegel L
WA
92,9 dB
Vibration a
hv
Grasschere ≤ 2,5 m/s
2
Vibration a
hv
Strauchschere 5,5 m/s
2
Gewicht 1,4 kg
Ladegerät
Netzspannung 230 V ~ 50 Hz
Ausgang
Nennspannung 6 V d. c.
Nennstrom 300 mA
Geräusch und Schwingungen wurden gemessen
nach EN ISO 3744
5. Vor Inbetriebnahme
5.1. Akku laden (Bild 1/5)
Ladegerät und Gerät verbinden (Bild 5).
Vergleichen Sie, ob die auf dem Typenschild
angegebene Netzspannung mit der vorhandenen
Netzspannung übereinstimmt. Ladegerät in
Netzsteckdose einstecken, die rote LED (Bild 5/
Pos. 1) leuchtet und zeigt die vorhandene
Ladespannung an.
Der Akku wird geladen. Die Ladezeit beträgt bei
leerem Akku max. 3-5 Stunden. Während des
Ladevorgangs kann sich der Akku im Gerät
etwas erwärmen, dies ist jedoch normal.
Ist der Akku voll geladen, erlischt die rote LED
(Bild 5/Pos. 1).
Sollte das Laden des Akkus nicht möglich sein,
überprüfen Sie bitte
ob an der Steckdose die Netzspannung
vorhanden ist.
Sollte das Laden des Akkus immer noch nicht
möglich sein, bitten wir Sie das komplette Gerät mit
Ladegerät an unseren Kundendienst zu senden.
Im Interesse einer langen Lebensdauer des Akkus
sollten Sie für eine rechtzeitige Wiederaufladung des
Akkus sorgen, Dies ist auf jeden Fall notwendig,
wenn Sie feststellen, dass die Leistung des Gerätes
nachlässt.
Entladen Sie den Akku nie vollständig. Dies führt zu
einem Defekt des Akkus!
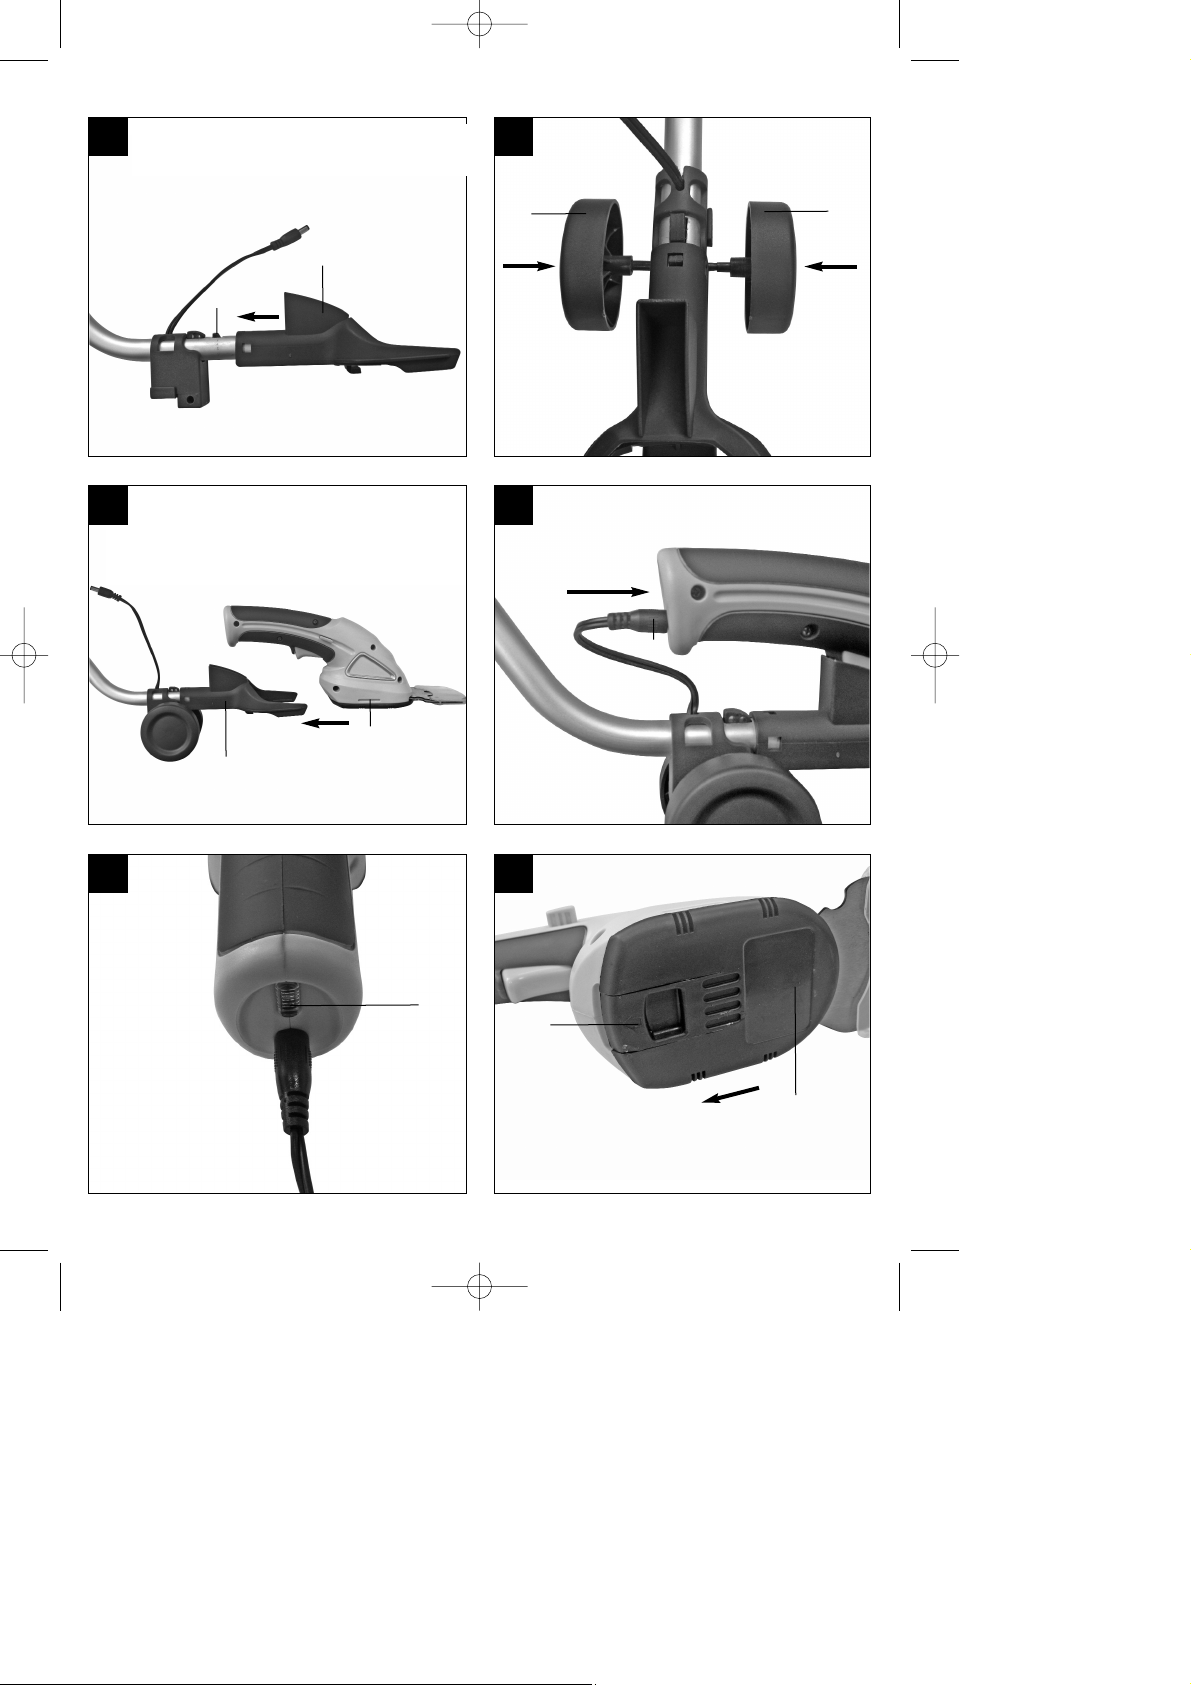
5.2. Montage des Führungsholmes
Mit dem Teleskop-Führungsholm (Bild 1/ Pos. 5) wird
die Akkugrasschere auf den Rädern über den Rasen
geschoben.
Zur Montage des Führungsholmes die
Geräteaufnahme (Abb. 3a/Pos. 8) auf den Holm
aufschieben bis die Arretierung (Abb. 3a/Pos. 1) in
einer der Aussparungen der Geräteaufnahme
einrastet. Es ist eine Aussparung oben für normales
Schneiden sowie zwei Aussparungen links und rechts
für Kantenschnitte vorhanden. Nun die Räder (Abb.
3b/Pos. 2) durch die Achsaufnahme hindurch
zusammenstecken.
Die Klemmverschraubung (Bild 1/ Pos. 6) lösen, den
Teleskop-Führungsholm auf die gewünschte Länge
bringen und die Klemmverschraubung wieder
festdrehen. Nun das Gerät wie in Abb. 4a gezeigt in
Pfeilrichtung in die Geräteaufnahme (Abb. 4a/Pos. 8)
schieben. Dabei auf ein korrektes Einrasten der
Geräteaufnahme in die Aussparungen (Abb. 4a/Pos.
1) achten. Abschließend den Stecker (Abb. 4b/Pos. 1)
wie in Abb. 4b gezeigt an das Gerät anschließen.
Das Zerlegen erfolgt in umgekehrter Reihenfolge.
Achtung!
Die vom Hersteller am Gerät installierten
Schalteinrichtungen dürfen nicht entfernt oder
überbrückt werden, z. B. durch Anbinden einer
Schalttaste am Griff, da andernfalls
Verletzungsgefahr besteht und das Gerät nicht
automatisch abschaltet.
Anleitung_BG_CG_3_6_Li_SPK7:_ 29.10.2008 14:02 Uhr Seite 7
Page 8

8
D
6. Bedienung
Die zu schneidende Fläche vorher von Steinen und
anderen festen Gegenständen befreien. Die
Einschaltsperre (Bild 1 / Pos. 3) verhindert ein
unbeabsichtigtes Einschalten des Gerätes. Zum
Einschalten die Einschaltsperre (Bild 1/ Pos. 3) durch
drücken und gleichzeitig den Ein- /Ausschalter (Bild 1
/ Pos. 4) drücken. Durch Loslassen des Ein/Aus
Schalters (Bild 1 / Pos. 4) kann das Gerät wieder
ausgeschaltet werden.
6.1. Gras schneiden
Die Grasschere über den Boden gleiten lassen. Die
beste Schneideleistung erzielt man bei trockenem
Rasen.
Beim Nachlassen der Schneideleistung, Schere
sofort neu aufladen, damit die Akkus nicht völlig
entleert werden.
Wird die Grasschere nicht benutzt, muss die
schwarze Messerschutzhaube auf die Messer
aufgesetzt werden.
6.2. Hecken schneiden
Das Gerät kann zum Schneiden kleiner Hecken und
Sträucher verwendet werden.
Neigen Sie die Strauchschere leicht in Richtung der
zu schneidenden Hecke.
Schneiden Sie zunächst die Seiten, von unten nach
oben, dann erst die Oberseite.
Achten Sie auf Fremdkörper in oder an der Hecke,
die das Messer beschädigen könnten.
Wann schneidet man die Hecken:
Allgemein gilt die Regel, Hecken, die Ihr Laub im
Herbst verlieren im Juni und Oktober zu
schneiden.
Immergrüne Hecken können im April und August
geschnitten werden.
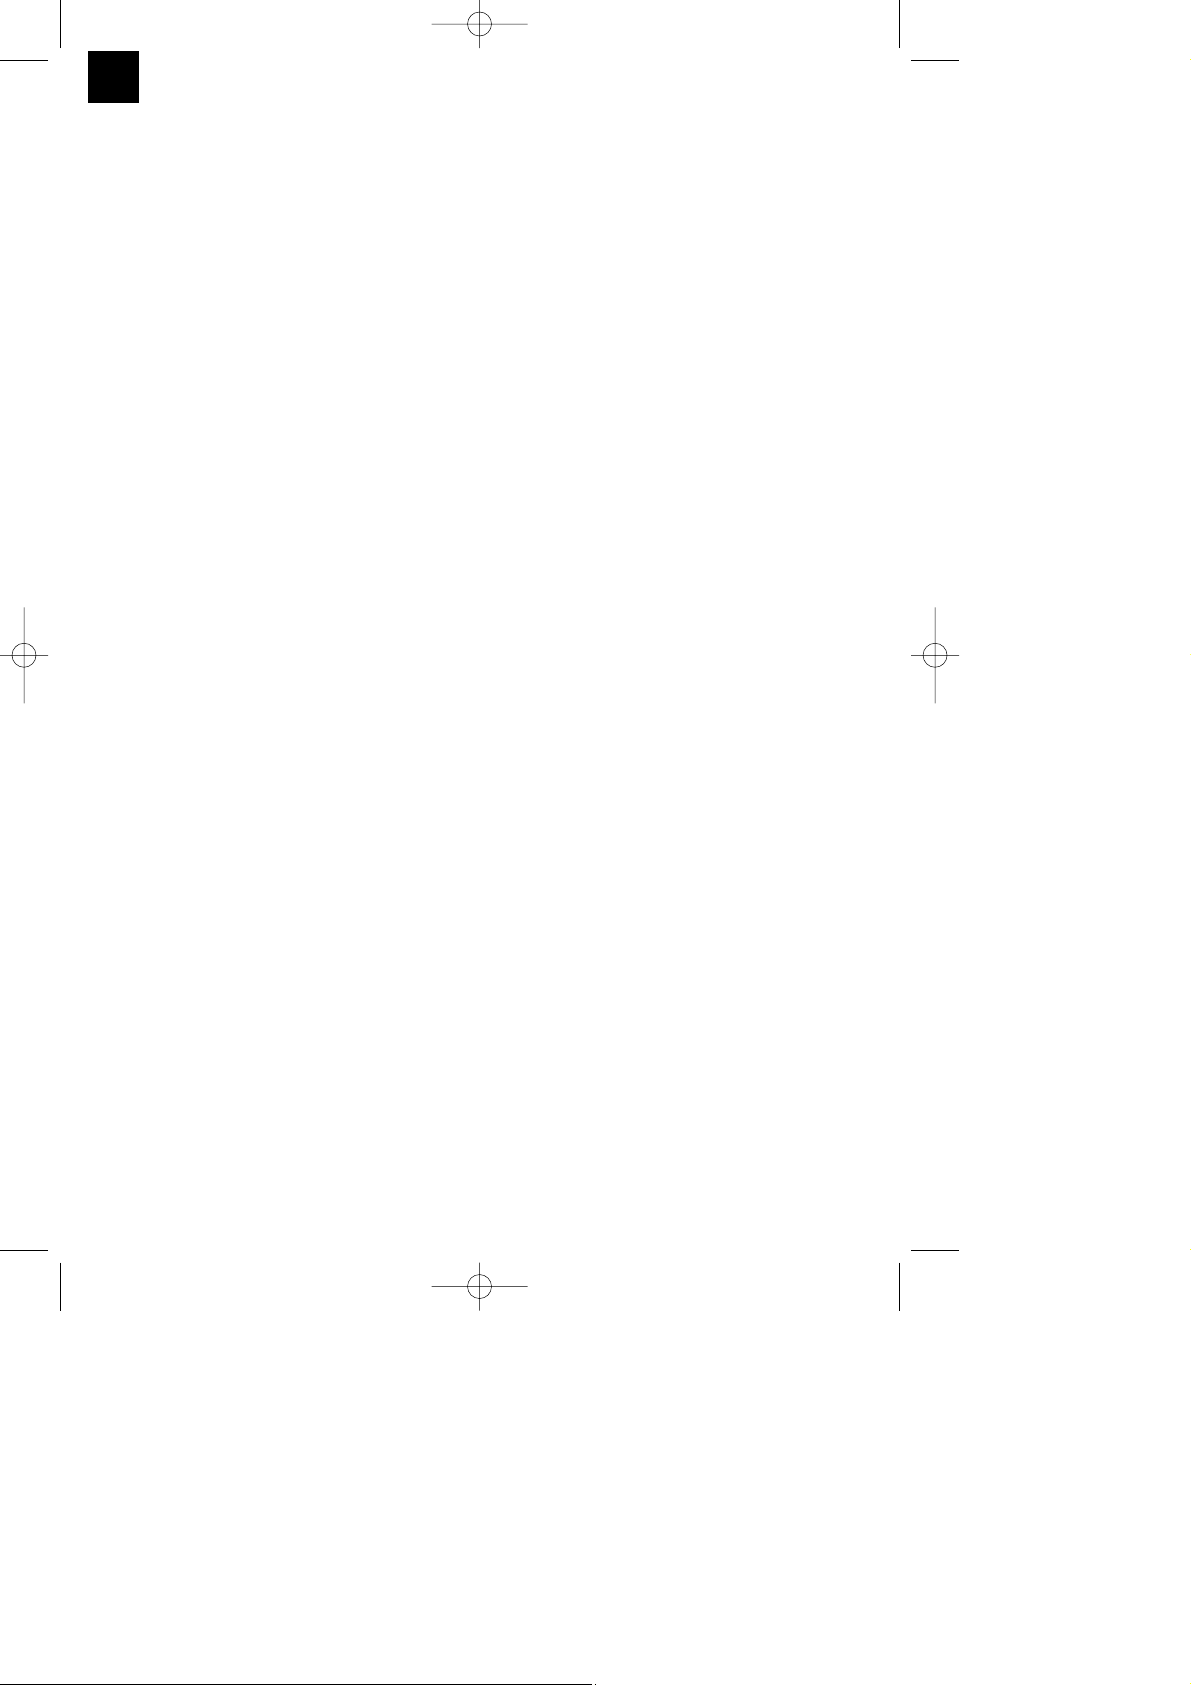
6.3. Wechseln der Messer
Achtung! Verletzungsgefahr!
Zum Entfernen der Messer heben Sie die Lasche
(Abb. 6/Pos. 1) an und schieben Sie den Deckel
(Abb. 6/Pos. 2) in Pfeilrichtung ab.
Nach dem Entfernen des Messers sind die
Getriebezahnräder zu sehen (Bild 7). Achten Sie
darauf, dass während des Messerwechsels kein
Schmutz in das Getriebe gelangt.
Die Montage erfolgt in umgekehrter Reihenfolge.
Beim Einsetzen des Heckenscherenmessers
achten Sie darauf, in welcher Stellung sich der
Exzenterstift (Bild 7 / Pos.1) befindet. Nehmen Sie
das Heckenscherenmesser und schieben Sie die
Exzenteraufnahme (Bild 8/ Pos.1) an die Position, so
dass beim Zusammenbau der Exzenterstift genau
auf die Exzenteraufnahme passt. Das
Heckenscherenmesser wird auf die Führungsstifte
(Bild 7 / Pos. 2) gesteckt.
Beim Einsetzen des Grasschneidemessers achten
Sie wieder auf die Stellung des Exzenterstiftes (Bild 7
/ Pos.1).
Am Grasscherenmesser kann durch verschieben der
Exzenteraufnahme (Bild 9 / Pos. 1) nach links oder
rechts die Position gefunden werden, dass der
Exzenterstift (Bild 7 /Pos. 1) und die
Exzenteraufnahme (Bild 9 / Pos. 1) zusammen
passen.
7. Reinigung, Wartung und
Ersatzteilbestellung
7.1 Reinigung
Halten Sie Schutzvorrichtungen, Luftschlitze und
Motorengehäuse so staub- und schmutzfrei wie
möglich. Reiben Sie das Gerät mit einem
sauberen Tuch ab oder blasen Sie es mit
Druckluft bei niedrigem Druck aus.
Wir empfehlen, dass Sie das Gerät direkt nach
jeder Benutzung reinigen.
Reinigen Sie das Gerät regelmäßig mit einem
feuchten Tuch und etwas Schmierseife.
Verwenden Sie keine Reinigungs- oder
Lösungsmittel; diese könnten die Kunststoffteile
des Gerätes angreifen. Achten Sie darauf, dass
kein Wasser in das Geräteinnere gelangen kann.
Vor und nach dem Gebrauch sollte die Schere
gründlich gereinigt werden. Ein paar Tropfen Öl
(z. B. Nähmaschinenöl) auf die Messer
verbessern die Schneideleistung. Messer jedoch
niemals fetten.
Für einen gleichbleibend exakten Schnitt ist es
notwendig, dass Grasreste und Schmutz auch
zwischen Ober- und Untermesser entfernt
werden.
Achtung!
Wegen der Gefahr von Personen- und
Sachschäden, reinigen Sie das Produkt nie mit
fließendem Wasser, insbesondere nicht unter
Hochdruck. Bewahren Sie die Akkuschere an
einem trockenen und frostsicheren Ort auf. Der
Aufbewahrungsort muss für Kinder unzugänglich
sein.
Anleitung_BG_CG_3_6_Li_SPK7:_ 29.10.2008 14:02 Uhr Seite 8
Page 9

9
D
7.2 Wartung
Für ein gutes Schneideergebnis sollten die
Messer stets scharf sein. Sie können deshalb mit
einem Abziehstein wieder geschärft werden.
Besonders empfehlen wir, Scharten und Grate,
die durch Steine o. ä. entstehen können, zu
entfernen.
Im Geräteinneren befinden sich keine weiteren
zu wartenden Teile.
7.3 Ersatzteilbestellung:
Bei der Ersatzteilbestellung sollten folgende Angaben
gemacht werden;
Typ des Gerätes
Artikelnummer des Gerätes
Ident-Nummer des Gerätes
Ersatzteilnummer des erforderlichen Ersatzteils
Aktuelle Preise und Infos finden Sie unter
www.isc-gmbh.info
Grasschneidemesser: 341044001001
Strauchmesser: 341044001002
8. Entsorgung und Wiederverwertung
Das Gerät befindet sich in einer Verpackung um
Transportschäden zu verhindern. Diese Verpackung
ist Rohstoff und ist somit wieder verwendbar oder
kann dem Rohstoffkreislauf zurückgeführt werden.
Das Gerät und dessen Zubehör bestehen aus
verschiedenen Materialien, wie z.B. Metall und
Kunststoffe. Führen Sie defekte Bauteile der
Sondermüllentsorgung zu. Fragen Sie im
Fachgeschäft oder in der Gemeindeverwaltung nach!
Anleitung_BG_CG_3_6_Li_SPK7:_ 29.10.2008 14:02 Uhr Seite 9
Page 10

10
GB
Important!
When using equipment, a few safety precautions
must be observed to avoid injuries and damage.
Please read the complete operating manual with due
care. Keep this manual in a safe place, so that the
information is available at all times. If you give the
equipment to any other person, give them these
operating instructions as well.
We accept no liability for damage or accidents which
arise due to non-observance of these instructions
and the safety information.
1. Safety information
Please refer to the booklet included in delivery for the
safety instructions.
CAUTION!
Read all safety regulations and instructions.
Any errors made in following the safety regulations
and instructions may result in an electric shock, fire
and/or serious injury.
Keep all safety regulations and instructions in a
safe place for future use.
Explanation of the warning signs on the machine
(Figure 10)
1. Important! Read the operating instructions and
follow the warnings and safety instructions
2. Keep all other persons away from the danger
zone.
3. Caution! The cutter blades continue to run after
the motor is switched off. Wait for the blades to
come to a standstill.
Risk of injury!
4. Dispose of batteries correctly!
5. Protect the tool from the damp and never
expose it to rain.
2. Layout (Fig. 1/2)
1 Grass cutter blade
2 Wheels
3 Safety lock-off
4 ON button
5 Telescopic long handle
6 Clamp coupling for telescopic long handle
7 Handle grip
8 Mount
9 Blade guard
10 Battery charger
11 Shrub cutter blade
3. Proper use
The equipment is designed for cutting the edges of
lawns and small areas of grass in private and hobby
gardens.
Tools for private and hobby gardens are not suitable
for use in public facilities, parks and sport centers,
along roadways, on farms or in the forestry sector.
For the tool to be used properly it is imperative to
follow the instructions set out in the manufacturerʼs
directions for use.
Important! It is prohibited to use the tool to chop
material for composting because of the potential
danger to persons and property.
The machine is to be used only for its prescribed
purpose. Any other use is deemed to be a case of
misuse. The user / operator and not the
manufacturer will be liable for any damage or injuries
of any kind caused as a result of this.
Please note that our equipment has not been
designed for use in commercial, trade or industrial
applications. Our warranty will be voided if the
machine is used in commercial, trade or industrial
businesses or for equivalent purposes.
Anleitung_BG_CG_3_6_Li_SPK7:_ 29.10.2008 14:02 Uhr Seite 10
Page 11

11
GB
4. Technical data
Speed n0: 950 rpm
Cutting width of the grass cutter: 70 mm
Cutting width of the shrub shears 100 mm
Cutting thickness of the shrub shears 8 mm
Running time max.: 60 min
Battery pack: Li-Ion / 3,6 V d. c. / 1.3 Ah
Charging time: 3-5 h
Protection class: III
LpAsound pressure level: 72.7 dB
LWAsound power level: 92.9 dB
Vibration a
hV
grass shears: ≤ 2.5m/s
2
Vibration a
hV
shrub shears: 5.5m/s
2
Weight: 1.4 kg
Battery charger
Mains voltage 230 V ~ 50 Hz
Output
Rated voltage 6 V DC
Rated current: 300 mA
Sound and vibration were measured in accordance
with EN ISO 3744.
5. Before starting
5.1 Charging the battery pack (Figure 1, 3)
앬 Connect the charger to the charging station
(Figure 5).
앬 Check that your mains voltage is the same as
that marked on the rating plate of the battery
charger. Plug the battery charger in a socketoutlet. The red LED (Figure 5 / Item 1) comes on
to indicate that charging voltage is available.
앬 The battery pack is being charged. An empty
battery pack requires a maximum charging period
of 3 to 5 hours. The temperature of the battery
pack may rise slightly during the charging
operation. This is normal.
앬 As soon as battery pack is fully charged, the red
LED (Fig. 5/Item 1) extinguishes
If the rechargeable battery fails to charge, check
whether there is voltage at the socket outlet.
Timely recharging of the battery pack will help it
serve you well for a long time. Recharging is always
necessary when you notice a drop in the toolʼs
performance.
Never allow the battery pack to become fully
discharged. This will cause it to develop a defect.
5.2 Fitting the long handle
Using the telescopic long handle (Fig. 1/Item 5) you
can push the cordless shears on wheels over the
lawn.
To fit the long handle, push the mount (Fig. 3a/Item 8)
onto the long handle until the lock engages in one of
the recesses on the mount. The equipment is
provided with one recess at the top for standard
cutting and two recesses on the left and right for
cutting edges. Now pass the wheels (Fig. 3b/Item 2)
through the axle mount and plug together.
Undo the clamp coupling (Fig. 1/Item 6), adjust the
telescopic handle to the required length and then retighten the clamp coupling again. Now push the
equipment in the direction indicated by the arrow into
the mount (Fig. 4a/Item 8) as shown in Figure 4a.
Ensure that the mount locks into the recesses
correctly. Then connect the power plug (Fig. 4b/Item
1) to the equipment as shown in Figure 4b. To
disassemble, proceed in reverse order.
Important!
It is prohibited to remove or bridge any of the
switching elements installed on the tool by the
manufacturer (e.g. by securing a button to the
handle) as this would prevent the tool from
switching off automatically and result in high risk
of injury.
Under no circumstances are you to use the shrub
cutter with the telescopic long handle fitted.
Anleitung_BG_CG_3_6_Li_SPK7:_ 29.10.2008 14:02 Uhr Seite 11
Page 12

6. Operation
The area to be cut must first be cleared of stones
and other solid objects. The safety lock-off (Fig.
1/Item 3) prevents the tool being started
unintentionally. Activate the safety lock-off (Figure 1 /
Item 3) by pushing it forward and pressing the
ON/OFF switch (Figure 1 Item 4) at the same time.
To switch off the tool, let go of the ON/OFF switch
(Figure 1 / Item 4).
6.1 Cutting grass
Allow the grass cutter to glide above the ground. The
best results are achieved when the lawn is dry.
When you notice a drop in cutting performance, recharge the tool immediately so that the battery does
not become fully discharged.
6.2 Trimming hedges
The tool can be used to trim small hedges and
shrubs.
Hold the tool slightly tilted in relation to the hedge
you want to cut.
First cut the sides from the bottom up, then cut the
top.
Watch out for foreign objects in or on the hedge
which could damage the blades.
When is the best time to trim hedges?
앬 As a general rule, hedges which lose their leaves
in the autumn should be trimmed in June and
October.
앬 Hedges which do not lose their leaves should be
cut in April and August.
6.3. Changing the blades
Important. Risk of injury!
To remove the blades, raise the lug (Fig. 6/Item 1)
and push off the cover (Fig. 6/Item 2) in direction of
the arrow. Once you have removed the blade you will
be able to see the toothed wheels of the gear unit
(Fig. 7). Make sure that no dirt gets into the gear unit
when you change the blade. To assemble, proceed in
reverse order.
When you fit the hedge cutter blade
check the position of the pin for the eccentric
connector (Fig. 7/Item 1). Take the hedge cutter
blade and slide the eccentric mount (Fig. 8/Item 1)
into position so that the pin for the eccentric
connector and the eccentric mount fit together
precisely when assembled. Slot the hedge cutter
blade onto the guide pins (Fig. 7/Item 2).
When you fit the grass cutter blade
check the position of the pin for the eccentric
connector (Fig. 7/Item 1) again. Shift the eccentric
mount (Fig. 9/Item 1) on the grass cutter blade to the
left or the right to find the position at which the pin for
the eccentric connector (Fig. 7/Item 1) and the
eccentric mount (Fig. 9/Item 1) match up.
7. Cleaning, maintenance and ordering
of spare parts
7.1 Cleaning
Keep all safety devices, air vents and the motor
housing free of dirt and dust as far as possible.
Wipe the equipment with a clean cloth or blow it
with compressed air at low pressure.
We recommend that you clean the device
immediately each time you have finished using it.
Clean the equipment regularly with a moist cloth
and some soft soap. Do not use cleaning agents
or solvents; these could attack the plastic parts of
the equipment. Ensure that no water can seep
into the device.
A few drops of oil (e.g. sewing machine oil) will
improve the cutting performance of the blades,
but never apply any grease to the blades. To
ensure constant exact cutting it is also important
to remove grass remnants and dirt from between
the upper and lower blade.
Important!
Never clean the tool under running water - and
particularly never with high pressure - because
of the potential danger to persons and property.
Keep your cordless grass cutter and hedge
trimmer in a dry and frost-proof place. Choose a
place that children are unable to enter.
7.2 Maintenance
To achieve good results you should keep the
blades sharp at all times. In particular we
recommend that you immediately level off any
jags or ridges caused by stones or the like. The
tool should be thoroughly cleaned both before
and after use.
There are no parts inside the equipment which
require additional maintenance.
12
GB
Anleitung_BG_CG_3_6_Li_SPK7:_ 29.10.2008 14:02 Uhr Seite 12
Page 13
7.3 Ordering replacement parts:
Please quote the following data when ordering
replacement parts:
Type of machine
Article number of the machine
Identification number of the machine
Replacement part number of the part required
For our latest prices and information please go to
www.isc-gmbh.info
Grass cutter blade: 341044001001
Hedge cutter blade: 341044001002
8. Disposal and recycling
The unit is supplied in packaging to prevent its being
damaged in transit. This packaging is raw material
and can therefore be reused or can be returned to
the raw material system.
The unit and its accessories are made of various
types of material, such as metal and plastic.
Defective components must be disposed of as
special waste. Ask your dealer or your local council.
13
GB
Anleitung_BG_CG_3_6_Li_SPK7:_ 29.10.2008 14:02 Uhr Seite 13
Page 14

Attention !
Lors de lʼutilisation dʼappareils, il faut respecter
certaines mesures de sécurité afin dʼéviter des
blessures et dommages. Veuillez donc lire
attentivement ce mode dʼemploi. Conservez-le bien
de façon à pouvoir disposer à tout moment de ces
informations. Si lʼappareil doit être remis à dʼautres
personnes, remettez-leur aussi ce mode dʼemploi.
Nous déclinons toute responsabilité pour les
accidents et dommages dus au non-respect de ce
mode dʼemploi et des consignes de sécurité.
1. Consignes de sécurité
Vous trouverez les consignes de sécurité
correspondantes dans le petit manuel ci-joint.
AVERTISSEMENT !
Veuillez lire toutes les consignes de sécurité et
instructions.
Tout non-respect des consignes de sécurité et
instructions peut provoquer une décharge électrique,
un incendie et/ou des blessures graves.
Conservez toutes les consignes de sécurité et
instructions pour une consultation ultérieure.
Explication de la plaque indicatrice sur lʼappareil
(figure 10)
1. Attention ! Lisez les instructions de service et
respectez les avertissements et les consignes de
sécurité.
2. Gardez les autres personnes hors de la zone
de danger.
3. Attention ! Après la mise hors service, les
couteaux continuent à tourner. Attendez lʼarrêt
des couteaux.
Risque de blessure !
4. Eliminez lʼaccumulateur selon les règles de
lʼart
5. Protégez lʼappareil contre la pluie et
lʼhumidité !
2. Description de l’appareil (fig. 1/2)
1 Cisaille à gazon
2 Roues
3 Verrouillage de démarrage
4 Bouton de mise sous tension
5 Manche télescopique
6 Vissage télescopique
7 Poignée
8 Logement de l’appareil
9 Protection de la lame
10 Chargeur
11 Lame taille-haies
3. Utilisation conforme à l’affectation
Cet appareil est conçu pour découper des pordures
de pelouses et de petites surfaces dʼherbe dans les
jardins privés et les jardins de loisirs.
Sont considérés comme des appareils pour jardins
privés, ceux qui ne sont pas employés dans des
installations publiques, parcs, terrains de sport, rues,
ni dans les exploitations agricoles et forestières.
Lʼemploi de lʼappareil sera considéré comme
conforme à la condition que le mode dʼemploi joint à
la livraison par le constructeur aura bien été
respecté.
Attention! Pour des raisons de danger
occasionné aux personnes et aux biens,
lʼappareil ne doit pas être employé pour broyer dans le sens de composter.
La machine doit exclusivement être employée
conformément à son affectation. Chaque utilisation
allant au-delà de cette affectation est considérée
comme non conforme. Pour les dommages en
résultant ou les blessures de tout genre, le
producteur décline toute responsabilité et
lʼopérateur/lʼexploitant est responsable.
Veillez au fait que nos appareils, conformément à
leur affectation, nʼont pas été construits, pour être
utilisés dans un environnement professionnel,
industriel ou artisanal. Nous déclinons toute
responsabilité si lʼappareil est utilisé
professionnellement, artisanalement ou dans des
sociétés industrielles, tout comme pour toute activité
équivalente.
14
F
Anleitung_BG_CG_3_6_Li_SPK7:_ 29.10.2008 14:02 Uhr Seite 14
Page 15

15
F
4. Données techniques
Vitesse de rotation n0: 950 tr/min
Largeur de coupe de la cisaille à herbes : 70 mm
largeur de coupe de la cisaille à buissons 100 mm
Epaisseur de coupe de la cisaille à buissons 8 mm
Temps de fonctionnement maxi. : 60 min
Accumulateur : Li-Ion / 3,6 V d.c. / 1,3 Ah
Durée de charge : 3-5 h
Catégorie de protection : III
Niveau de pression acoustique LpA: 72,7 dB
Niveau acoustique LWA: 92,9 dB
Vibration ahvtaille-herbes: ≤ 2,5m/s
2
Vibration ahvtaille-haies: 5,5m/s
2
Poids : 1,4 kg
Chargeur
Tension du réseau 230 V ~ 50 Hz
Sortie
Tension nominale 6 V d. c.
Courant nominal 300 MA
Le bruit et les vibrations ont été mesurées dʼaprès
EN-ISO 3744.
5. Avant la mise en service
5.1 Charger accumulateur (figure 1, 3)
앬 Connectez le chargeur et le support de charge
(figure 5).
앬 Comparez si la tension du secteur indiquée sur
la plaque signalétique correspond à la tension du
bloc du serveur disponible. Branchez le chargeur
dans la prise de courant, la DEL rouge (figure 5 /
rep. 1) sʼallume et affiche la tension de charge
présente.
앬 Lʼaccumulateur est en charge. Le temps de
charge pour un accumulateur vide est de maxi
3 - 5 heures. Pendant la recharge,
lʼaccumulateur peut un peu sʼéchauffer dans
lʼappareil, ceci est cependant normal.
앬 Si lʼaccumulateur est totalement rechargé, la
DEL rouge sʼéteint (fig. 5 / pos. 1).
Sʼil est impossible de charger lʼaccumulateur,
contrôlez si de la tension est présente à la prise de
courant.
Dans lʼintérêt dʼune grande longévité de
lʼaccumulateur, veillez à un rechargement de
lʼaccumulateur à temps. Ceci est de toute manière
nécessaire, lorsque vous constatez que la puissance
de lʼappareil diminue.
Ne déchargez jamais complètement lʼaccumulateur.
Ceci entraînerait lʼendommagement de
lʼaccumulateur !
5.2 Montage du manche
Avec le manche télescopique enfichable (figure 1/
pos. 5), la cisaille sans fil est poussée sur les roues
au-dessus du gazon.
Pour monter le guidon, poussez le logement de
lʼappareil (fig. 3a/pos. 8) sur le manche jusquʼà ce
que le dispositif dʼarrêt (fig. 3a/pos. 1) sʼenclenche
dans une des encoches du logement de lʼappareil. Il
y a une encoche en haut pour la coupe normale et
deux encoches à gauche et à droite pour la coupe
de bordure. Enfichez à présent les roues (fig. 3b/pos.
2) par le logement dʼaxe.
Dévissez le raccord de serrage (fig. 1/pos. 6), mettez
le manche télescopique à la longueur désirée et
resserrez le raccord de serrage. Poussez lʼappareil
comme indiqué en fig. 4a dans le sens de la flèche
dans le logement de lʼappareil (fig. 4/pos. 8). Veillez
ce faisant à ce que le logement de lʼappareil
encliquète correctement dans les encoches (fig.
4/pos. 1). Branchez ensuite la fiche (fig. 4b/pos. 1)
comme représenté en fig. 4b sur lʼappareil. Le
démontage se fait dans lʼordre inverse.
Attention!
Les dispositifs de commutation installés sur
lʼappareil par le constructeur ne doivent pas être
retirés ni pontés, en reliant par ex. une touche de
commande à la poignée. Le non respect de cette
remarque entraînerait un risque de blessures et
empêcherait lʼappareil de se mettre
automatiquement hors circuit.
Anleitung_BG_CG_3_6_Li_SPK7:_ 29.10.2008 14:02 Uhr Seite 15
Page 16

16
F
6. Fonctionnement
Retirez tout dʼabord les pierres et autres objets durs
de lʼendroit à couper. Le verrouillage de démarrage
(figure 1/pos. 3) empêche une mise en service de
lʼappareil involontaire. Pour la mise en circuit,
déverrouillez le verrouillage de démarrage (figure 1/
pos. 3) en le poussant vers lʼavant et appuyez
simultanément sur lʼinterrupteur Marche / Arrêt
(figure 1 / pos. 4). Lʼappareil peut être remis hors
circuit en relâchant lʼinterrupteur Marche/Arrêt (figure
1 / pos. 4).
6.1 Coupe de gazon
Faire glisser le taille-herbes au-dessus du sol. La
meilleure coupe est atteinte lorsque lʼherbe est
sèche.
Lorsque la puissance de coupe diminue, rechargez
immédiatement le taille-herbes de façon que les
accumulateurs ne soient pas complètement vides.
6.2 Taille de haies
Cet appareil peut être employé à tailler de petites
haies et de petits buissons.
Inclinez légèrement le taille-haies vers la haie à
tailler.
Taillez tout dʼabord les côtés, de bas en haut,
ensuite la partie supérieure.
Veillez au fait que des corps étrangers se trouvant
éventuellement dans ou sur la haie peuvent
endommager la lame.
Quand tailler une haie:
앬 Généralement, lʼon considère que les haies qui
perdent leurs feuillage en automne doivent être
taillées en juin ou octobre.
앬 Les haies à feuilles persistantes peuvent être
taillées en avril et en août.
6.3. Remplacement des lames
Attention ! Risque de blessure !
Pour retirer les lames, soulevez la languette (fig.
6/pos. 1) et poussez le couvercle (fig. 6/pos. 2) dans
le sens de la flèche. Une fois la lame retirée, on voit
les roues dentées de lʼengrenage (fig. 7). Veillez à
empêcher que lʼengrenage ne soit sali pendant le
remplacement de lame. Le montage se fait dans
lʼordre inverse.
Lorsque vous introduisez la lame du taille-haies,
veillez à la position de la broche de lʼexcentrique (fig.
7 / pos. 1). Prenez la lame du taille-haies et poussez
le logement de lʼexcentrique (fig. 8/ pos. 1) dans
cette position, de façon que la broche de
lʼexcentrique aille exactement dans le logement de
lʼexcentrique lors de lʼassemblage. La lame du taille-
haies est enfichée sur les broches de guidage (fig. 7
/ pos. 2).
Lorsque vous mettez la lame de coupe dʼherbes,
veillez à nouveau à la position de la broche de
lʼexcentrique (fig. 7 / pos.1). En poussant le logement
de lʼexcentrique (fig. 9 / pos. 1) à gauche ou à droite
sur la lame du taille-herbe, on peut trouver la position
à laquelle la broche de lʼexcentrique (fig. 7 /pos. 1) et
le logement de lʼexcentrique (fig. 9 / pos. 1)
sʼaccordent.
7. Nettoyage, maintenance et
commande de pièces de rechange
7.1 Nettoyage
Maintenez les dispositifs de protection, les fentes
à air et le carter de moteur aussi propres (sans
poussière) que possible. Frottez lʼappareil avec
un chiffon propre ou soufflez dessus avec de lʼair
comprimé à basse pression.
Nous recommandons de nettoyer lʼappareil
directement après chaque utilisation.
Nettoyez lʼappareil régulièrement à lʼaide dʼun
chiffon humide et un peu de savon. Nʼutilisez
aucun produit de nettoyage ni détergeant ; ils
pourraient endommager les pièces en matières
plastiques de lʼappareil. Veillez à ce quʼaucune
eau nʼentre à lʼintérieur de lʼappareil.
Toujours bien nettoyer lʼappareil avant et après
chaque emploi. Quelques gouttes dʼhuile (par ex.
pour machine à coudre) sur les lames améliorent
la performance de coupe. Ne jamais graisser
cependant les lames. Pour que la coupe soit
toujours exacte et régulière, il est indispensable
de retirer aussi les restes dʼherbe et de saleté
entre les lames inférieure et supérieure.
Attention!
En raison du danger pour les personnes et les
biens, ne nettoyez jamais le produit à lʼeau
courante, surtout pas sous haute pression.
Conservez le taille-haies dans un endroit sec et à
lʼabri du gel. Le lieu de stockage doit être
inaccessible aux enfants.
Anleitung_BG_CG_3_6_Li_SPK7:_ 29.10.2008 14:02 Uhr Seite 16
Page 17

17
F
7.2 Maintenance
Il est préférable que les lames soient toujours très
tranchantes pour un bon résultat de coupe. Elles
peuvent donc être aiguisées à lʼaide dʼune pierre
à aiguiser. Nous recommandons tout
particulièrement de toujours égaliser
immédiatement les ébréchures et bavures dues
aux pierres, entre autres.
Aucune pièce à lʼintérieur de lʼappareil nʼa besoin
de maintenance.
7.3 Commande de pièces de rechange :
Pour les commandes de pièces de rechange,
veuillez indiquer les références suivantes:
Type de lʼappareil
No. dʼarticle de lʼappareil
No. dʼidentification de lʼappareil
No. de pièce de rechange de la pièce requise
Vous trouverez les prix et informations actuelles à
lʼadresse www.isc-gmbh.info
Lame du taille-herbe : 341044001001
Lame du taille-haies : 341044001002
8. Mise au rebut et recyclage
Lʼappareil se trouve dans un emballage permettant
dʼéviter les dommages dus au transport. Cet
emballage est une matière première et peut donc
être réutilisé ultérieurement ou être réintroduit dans
le circuit des matières premières.
Lʼappareil et ses accessoires sont en matériaux
divers, comme par ex. des métaux et matières
plastiques. Eliminez les composants défectueux
dans les systèmes dʼélimination des déchets
spéciaux. Renseignez-vous dans un commerce
spécialisé ou auprès de lʼadministration de votre
commune
Anleitung_BG_CG_3_6_Li_SPK7:_ 29.10.2008 14:02 Uhr Seite 17
Page 18

18
I
Attenzione!
Nellʼusare gli apparecchi si devono rispettare diverse
avvertenze di sicurezza per evitare lesioni e danni.
Quindi leggete attentamente queste istruzioni per
lʼuso. Conservatele bene per avere a disposizione le
informazioni in qualsiasi momento. Se date
lʼapparecchio ad altre persone consegnate loro
queste istruzioni per lʼuso insieme allʼapparecchio!
Non ci assumiamo alcuna responsabilità per incidenti
o danni causati dal mancato rispetto di queste
istruzioni e delle avvertenze di sicurezza.
1. Avvertenze di sicurezza
Le relative avvertenze di sicurezza si trovano
nellʼopuscolo allegato.
AVVERTIMENTO!
Leggete tutte le avvertenze di sicurezza e le
istruzioni.
Dimenticanze nel rispetto delle avvertenze di
sicurezza e delle istruzioni possono causare scosse
elettriche, incendi e/o gravi lesioni.
Conservate tutte le avvertenze e le istruzioni per
eventuali necessità future.
Spiegazione della targhetta di avvertenze
sullʼapparecchio (fig. 10)
1. Attenzione! Leggere le istruzioni per lʼuso e
osservare le indicazioni di avvertenza e di
sicurezza.
2. Tenere le altre persone lontane dalla zona di
pericolo.
3. Attenzione! Dopo avere spento lʼapparecchio le
lame continuano a muoversi. Attendere che si
fermino.
Pericolo di lesioni!
4. Smaltire la batteria in modo appropriato.
5. Proteggere lʼapparecchio da pioggia e
umidità!
2. Descrizione dell’apparecchio
(Fig. 1/2)
1 Lama per tagliare lʼerba
2 Ruote
3 Blocco dellʼavviamento
4 Pulsante dʼavviamento
5 Manico telescopico
6 Collegamento a vite del manico telescopico
7 Impugnatura di comando
8 Sede dell’apparecchio
9 Protezione della lama
10 Carica batteria
11 Lama per arbusti
3. Utilizzo proprio
Lʼapparecchio è concepito per tagliare lʼerba del
prato e di piccole superfici erbose di giardini privati.
Si considerano utensili per giardini privati quelli che
non vengono usati in giardini pubblici, parchi,
impianti sportivi, lungo le strade, nellʼagricoltura e
nellʼeconomia forestale.
Il rispetto delle istruzioni per lʼuso fornite dal
produttore è una condizione per lʼuso corretto
dellʼapparecchio.
Attenzione! Visto il pericolo per persone e cose,
lʼapparecchio non deve essere usato per
sminuzzare rifiuti organici per il compostaggio.
Lʼapparecchio deve venire usato solamente per lo
scopo a cui è destinato. Ogni altro tipo di uso che
esuli da quello previsto non è un uso conforme.
Lʼutilizzatore/lʼoperatore, e non il costruttore, è
responsabile dei danni e delle lesioni di ogni tipo che
ne risultino.
Tenete presente che i nostri apparecchi non sono
stati costruiti per lʼimpiego professionale, artigianale
o industriale. Non ci assumiamo alcuna garanzia
quando lʼapparecchio viene usato in imprese
commerciali, artigianali o industriali, o in attività
equivalenti.
Anleitung_BG_CG_3_6_Li_SPK7:_ 29.10.2008 14:02 Uhr Seite 18
Page 19

19
I
4. Caratteristiche tecniche
Numero di giri n0: 950 min
-1
Larghezza di taglio delle forbici per erba: 70 mm
Larghezza di taglio delle forbici per arbusti: 100 mm
Spessore di taglio delle forbici per arbusti: 8 mm
Autonomia max. di esercizio: 60 min
Batteria: Li-Ion / 3,6 V d.c. / 1,3 Ah
Tempo di ricarica: 3-5 h
Grado di protezione: III
Livello di pressione acustica L
pA
:
72,7 dB
Livello di potenza acustica LWA: 92,9 dB
Vibrazioni a
hV
cesoie per erba: ≤ 2,5 m/s
2
Vibrazioni a
hV
cesoie per arbusti: 5,5 m/s
2
Peso: 1,4 kg
Carica batteria
Tensione di rete 230 V ~ 50 Hz
Uscita
Tensione nominale 6 V DC.
Corrente nominale 300 mA
Il rumore e le vibrazioni sono stati misurati secondo
la norma EN ISO 3744.
5. Prima della messa in esercizio
5.1 Ricarica della batteria (Fig. 1, 3)
앬 Collegate il carica batteria e la stazione di
ricarica (Fig. 5).
앬 Controllate che la tensione di rete indicata sulla
targhetta corrisponda alla tensione di rete a
disposizione. Inserite il carica batteria nella presa
di corrente, il LED rosso (Fig. 5 / Pos. 1) si
illumina e indica la tensione di carica presente.
앬 La batteria viene caricata. Con la batteria
scarica, il tempo di ricarica è di max. 3-5 ore.
Durante il processo di ricarica la batteria
nellʼapparecchio si può riscaldare un poʼ, ma ciò
è del tutto normale.
앬 Quando la batteria è completamente carica il
LED rosso (Fig. 5 / Pos. 1) si spegne.
Se non riuscite a caricare la batteria, controllate che
ci sia tensione di rete nella presa di corrente.
Per ottenere una lunga durata della batteria si deve
provvedere a una puntuale ricarica. Ciò è comunque
necessario quando ci si accorge della diminuzione
delle prestazioni dellʼapparecchio.
Non fate scaricare mai completamente la batteria.
Questo potrebbe danneggiarla!
5.2 Montaggio del manico
Le forbici a batteria per erba poggiano sulle ruote e
così vengono spinte sul prato mediante il manico
telescopico (Fig. 1 / Pos. 5).
Per il montaggio del manico inserite la sede
dellʼapparecchio (Fig. 3a/Pos. 8) sullʼimpugnatura
fino a quando lʼarresto (Fig. 3a/Pos. 1) scatta in una
delle cavità della sede dellʼapparecchio. Sono
presenti una cavità in alto per il taglio normale e due
cavità a sinistra ed a destra per tagliare i bordi.
Adesso infilate le ruote (Fig. 3b/Pos. 2) attraverso la
sede dellʼasse.
Allentate le viti di bloccaggio (Fig. 1 / Pos. 6), portate
il manico telescopico alla lunghezza desiderata e
serrate di nuovo saldamente le viti. Poi spingete
lʼapparecchio come mostrato in Fig. 4a in direzione
della freccia nella sede dellʼapparecchio (Fig.
4a/Pos. 8). Fate attenzione che la sede
dellʼapparecchio scatti correttamente nelle cavità
(Fig. 4a/Pos. 1). Poi collegate il connettore (Fig.
4b/Pos. 1) allʼapparecchio, come mostrato in Fig. 4b.
Lo smontaggio avviene nellʼordine inverso.
Attenzione!
I dispositivi di commutazione installati dal
produttore nellʼapparecchio non devono essere
tolti o esclusi, ad esempio legando un
interruttore allʼimpugnatura, perchè altrimenti si
corre il rischio di lesioni e lʼapparecchio non si
spegne automaticamente. Per nessuna ragione si
deve montare il manico telescopico se
lʼapparecchio viene usato come forbici per
arbusti.
Anleitung_BG_CG_3_6_Li_SPK7:_ 29.10.2008 14:02 Uhr Seite 19
Page 20

20
I
6. Esercizio
Tenete la superficie da tagliare sempre libera da
pietre e da altri oggetti. Il blocco dellʼavviamento (Fig.
1 / Pos. 3) evita unʼaccensione involontaria
dellʼapparecchio. Per accendere sbloccate il blocco
dellʼavviamento (Fig. 1 / Pos. 3) spingendolo in avanti
e contemporaneamente premete il pulsante ON/OFF
(Fig. 1 / Pos. 4). Rilasciando lʼinterruttore ON /OFF
(Fig. 1 / Pos. 4), le forbici possono essere di nuovo
disattivate.
6.1 Per tagliare lʼerba
Tenere il tosaerba ad una certa altezza dal terreno.
Le migliori prestazioni di taglio si hanno con il prato
asciutto.
Quando diminuiscono le prestazioni di taglio,
ricaricate subito il tosaerba perchè la batteria non si
scarichi completamente.
6.2 Per tagliare la siepe
Lʼapparecchio può essere usato per tagliare piccole
siepi ed arbusti.
Inclinate il tagliasiepi leggermente in direzione della
siepe da tagliare.
Iniziate a tagliare dal basso verso lʼalto e passate poi
alla parte superiore.
Fate attenzione ai corpi estranei nella siepe o vicino
ad essa perchè possono danneggiare la lama.
Quando si taglia la siepe:
앬 normalmente vale la regola che le siepi che
perdono le foglie in autunno devono essere
tagliate in giugno ed ottobre
앬 le siepi sempreverdi possono essere tagliate in
aprile e agosto
6.3. Sostituzione delle lame
Attenzione! Pericolo di lesioni!
Per togliere le lame sollevate la linguetta (Fig. 6/Pos.
1) e togliete il coperchio (Fig. 6/Pos. 2) spingendolo
in direzione della freccia. Dopo aver tolto la lama si
vedono le ruote dentate degli ingranaggi (Fig. 7).
Fate attenzione che non entri sporco negli ingranaggi
durante la sostituzione delle lame. Il montaggio
avviene nellʼordine inverso.
Durante lʼinserimento della lama delle cesoie per
siepi
fate attenzione alla posizione in cui si trova il perno
eccentrico (Fig. 7 / Pos. 1). Prendete la lama delle
forbici per siepi e posizionate la sede eccentrica (Fig.
8 / Pos. 1) in modo che essa, durante
lʼassemblaggio, corrisponda perfettamente al perno
eccentrico. La lama per siepi viene inserita sui i perni
di guida (Fig. 7 / Pos. 2).
Durante lʼinserimento della lama delle cesoie per
erba
fate di nuovo attenzione alla posizione in cui si trova
il perno eccentrico (Fig. 7 / Pos. 1). Sulla lama delle
cesoie per erba potete spostare la sede eccentrica
(Fig. 9 / Pos. 1) a destra oppure a sinistra in modo
essa che corrisponda al perno eccentrico (Fig. 7 /
Pos. 1).
7. Pulizia, manutenzione,
conservazione e ordinazione dei
pezzi di ricambio
7.1 Pulizia
Tenete il più possibile i dispositivi di protezione, le
fessure di aerazione e la carcassa del motore
liberi da polvere e sporco. Strofinate
lʼapparecchio con un panno pulito o soffiatelo con
lʼaria compressa a pressione bassa.
Consigliamo di pulire lʼapparecchio subito dopo
averlo usato.
Pulite lʼapparecchio regolarmente con un panno
asciutto ed un poʼ di sapone. Non usate
detergenti o solventi perché questi ultimi
potrebbero danneggiare le parti in plastica
dellʼapparecchio. Fate attenzione che non possa
penetrare dellʼacqua nellʼinterno dellʼapparecchio.
Prima e dopo lʼutilizzo utensile deve venire pulito
a fondo. Alcune gocce dʼolio (ad es. olio per
macchine da cucire) sulle lame migliorano le
prestazioni di taglio. Tuttavia non ingrassare mai
le lame.
Per un taglio costante e preciso è necessario che
vengano eliminati residui dʼerba e sporco anche
tra la lama inferiore e quella superiore.
Attenzione!
In considerazione del pericolo per le persone e le
cose non pulite mai il prodotto sotto lʼacqua
corrente, in particolare non con un getto dʼacqua
a pressione.
Conservate lʼapparecchio in un luogo asciutto e
protetto dal gelo. Lʼattrezzo devʼessere
conservato in un luogo non accessibile ai
bambini.
Anleitung_BG_CG_3_6_Li_SPK7:_ 29.10.2008 14:02 Uhr Seite 20
Page 21

7.2 Manutenzione
Per ottenere un buon risultato di taglio, le lame
dovrebbero essere sempre affilate. Comunque
possono venire riaffilate con una còte. In modo
particolare consigliamo sempre di eliminare
subito tacche e bave che possono venire causate
da pietre o simili.
Allʼinterno dellʼapparecchio non si trovano altre
parti sottoposte ad una manutenzione qualsiasi.
7.3 Ordinazione di pezzi di ricambio:
Volendo commissionare dei pezzi di ricambio, si
dovrebbe dichiarare quanto segue:
modello dellʼapparecchio
numero dellʼarticolo dellʼapparecchio
numero dʼident. dellʼapparecchio
numero del pezzo di ricambio del ricambio
necessitato.
Per i prezzi e le informazioni attuali si veda
www.isc-gmbh.info
Lama per erba: 341044001001
Lama per arbusti: 341044001002
8. Smaltimento e riciclaggio
Lʼapparecchio si trova in una confezione per evitare i
danni dovuti al trasporto. Questo imballaggio
rappresenta una materia prima e può perciò essere
utilizzato di nuovo o riciclato.
Lʼapparecchio e i suoi accessori sono fatti di
materiali diversi, per es. metallo e plastica.
Consegnate i pezzi difettosi allo smaltimento di rifiuti
speciali. Per informazioni rivolgetevi ad un negozio
specializzato o allʼamministrazione comunale!
21
I
Anleitung_BG_CG_3_6_Li_SPK7:_ 29.10.2008 14:02 Uhr Seite 21
Page 22

Pozor!
Při používání přístrojů musí být dodržována určitá
bezpečnostní opatření, aby se zabránilo zraněním a
škodám. Přečtěte si proto pečlivě tento návod k
obsluze. Dobře si ho uložte, abyste měli tyto
informace kdykoliv po ruce. Pokud předáte přístroj
jiným osobám, předejte s ním i tento návod k
obsluze.
Nepřebíráme žádné ručení za škody a úrazy vzniklé
v důsledku nedodržování tohoto návodu k obsluze a
bezpečnostních pokynů.
1. Bezpečnostní pokyny
Příslušné bezpečnostní pokyny naleznete v přiložené
brožurce.
VAROVÁNÍ!
Přečtěte si všechny bezpečnostní pokyny a
instrukce.
Zanedbání při dodržování bezpečnostních pokynů a
instrukcí mohou mít za následek úder elektrickým
proudem, požár a/nebo těžká zranění.
Všechny bezpečnostní pokyny a instrukce si
uložte pro budoucí použití.
Vysvětlení štítku s pokyny na přístroji
(obr. 10)
1. Pozor! Přečíst si návod k použití a dodržovat
varovné a bezpečnostní pokyny.
2. Třetí nepouštět do oblasti nebezpečí.
3. Pozor! Po vypnutí nože dobíhají. Vyčkat
zastavení nožů. Nebezpečí zranění!
4. Akumulátor odborně zlikvidovat.
5. Přístroj chránit před deštěm a vlhkostí!
2. Popis přístroje (obr. 1/2)
1 Nůž na trávu
2 Kolečka
3 Blokování zapnutí
4 Zapínací tlačítko
5 Teleskopická vodicí násada
6 Šroubové spojení teleskopické násady
7 Vodicí rukojeť
8 Upínání přístroje
9 Ochrana nožů
10 Nabíječka
11 Nůž na keře
3. Použití podle účelu určení
Přístroj je určen na stříhání okrajů trávníků, malých
travních ploch, keřů a malých živých plotů v
soukromých zahradách u domů a chalup.
Jako přístroje pro použití v soukromých zahradách u
domů a chalup jsou považovány ty, které nejsou
používány na veřejných zelených plochách, v
parcích, sportovištích, u silnic a v zemědělství a
lesnictví. Dodržení výrobcem přiloženého návodu k
použití je předpokladem pro řádné použití přístroje.
Pozor! Kvůli nebezpečí pro osoby a věcným
škodám nesmí být přístroj používán k drcení ve
smyslu kompostování.
Stroj smí být používán pouze podle svého účelu
určení. Každé další toto překračující použití
neodpovídá použití podle účelu určení. Za z toho
vyplývající škody nebo zranění všeho druhu ručí
uživatel/obsluhující osoba a ne výrobce.
Dbejte prosím na to, že naše přístroje nebyly podle
svého účelu určení konstruovány pro živnostenské,
řemeslnické nebo průmyslové použití. Nepřebíráme
žádné ručení, pokud je přístroj používán v
živnostenských, řemeslných nebo průmyslových
podnicích a při srovnatelných činnostech.
22
CZ
Anleitung_BG_CG_3_6_Li_SPK7:_ 29.10.2008 14:02 Uhr Seite 22
Page 23

4. Technická data :
Počet otáček n0: 950 min
-1
Šířka záběru nůžek na trávu: 70 mm
Šířka záběru nůžek na keře 100 mm
Tloušťka řezu nůžek na keře 8 mm
Doba provozu max: 60 min
Akumulátor: Li-Ion / 3,6 V d.c. / 1,3 Ah
Doba nabíjení: 3-5 h
Třída ochrany: III
Hladina akustického tlaku LpA: 72,7 dB
Hladina akustického výkonu LWA: 92,9 dB
Vibrace a
hV
nůžek na trávu: ≤ 2,5m/s
2
Vibrace a
hV
nůžek na keře: 5,5m/s
2
Hmotnost: 1,4 kg
Nabíječka
Síťové napětí 230 V~ 50 Hz
Výstup
Jmenovité napětí 6 V d. c.
Jmenovitý proud 300 mA
Hluk a vibrace měřeny podle normy EN ISO 3744
5. Před uvedením do provozu
5.1 Nabíjení akumulátorů (obr. 1, 3)
앬 Nabíječku a nabíjecí stanici spojit (obr. 5).
앬 Porovnejte, jestli souhlasí síťové napětí udané na
typovém štítku se síťovým napětím, které je k
dispozici. Zastrčte nabíječku do zásuvky,
červená LED (obr. 5 / pol. 1) svítí a ukazuje
existující nabíjecí napětí.
앬 Akumulátor se nabíjí. Doba nabíjení činí u
prázdného akumulátoru max. 3-5 hodin. Během
nabíjení se akumulátor v přístroji může trochu
ohřát, to je ovšem normální.
앬 Když je akumulátor plně nabitý, červená LED
(obr. 5/pol. 1) zhasne.
Pokud by nabití akumulátoru nebylo možné,
překontrolujte prosím
앬 zda je v zásuvce k dispozici síťové napětí.
앬 zda je k dispozici bezvadný kontakt na
nabíjecích kontaktech nabíjecí stanice.
Pokud by nabití akumulátoru nebylo i nadále možné,
prosíme Vás zaslat kompletní přístroj s nabíječkou a
nabíjecí stanicí do našeho zákaznického servisu.
V zájmu dlouhé životnosti akumulátoru byste se měli
postarat o jeho včasné dobití. Toto je v každém
případě nutné, když zjistíte, že klesá výkon přístroje.
Nevybíjejte akumulátor nikdy úplně. Toto vede k
defektu akumulátoru!
5.2 Montáž vodicí násady
Pomocí teleskopické vodicí násady (obr. 1/ pol. 5)
jsou akumulátorové nůžky na kolečkách posouvány
po trávě.
K montáži vodicí rukojeti nasunout upínání přístroje
(obr. 3a/pol. 8) na rukojeť, až aretace (obr. 3a/pol. 1)
zaskočí do jednoho z otvorů upínání přístroje. K
dispozici je jeden otvor nahoře pro normální stříhání a
dva otvory vlevo a vpravo pro stříhání hran. Nyní
spojit kolečka (obr. 3b/pol. 2) dohromady skrz upínání
v ose.
Svěrací šroubení (obr. 1/ pol. 6) povolit, teleskopickou
vodicí násadu nastavit na požadovanou délku a
svěrací šroubení opět utáhnout. Nyní přístroj
nasunout ve směru šipky do upínání přístroje (obr.
4a/pol. 8) tak, jak je znázorněno na obr. 4a. Dbát
přitom na správné zacvaknutí upínání přístroje do
otvorů (obr. 4a/pol. 1). Poté zapojit zástrčku (obr.
4b/pol. 1) do přístroje tak, jak je znázorněno na obr.
4b. Rozložení se provádí v opačném pořadí.
Pozor!
Výrobcem na přístroji instalovaná spínací
zařízení nesmí být odstraněna nebo přemostěna,
např. přivázáním spínacího tlačítka na rukojeť,
protože jinak hrozí nebezpečí zranění a přístroj
automaticky nevypíná.
V žádném případě nesmí být při používání jako
nůžky na keře používána teleskopická vodicí
násada.
23
CZ
Anleitung_BG_CG_3_6_Li_SPK7:_ 29.10.2008 14:02 Uhr Seite 23
Page 24

6. Obsluha
Z plochy určené ke stříhání nejdříve odstranit
kameny a jiné tvrdé předměty. Blokování zapnutí
(obr. 1 / pol. 3) zabrání nechtěnému zapnutí
přístroje. K uvedení přístroje do provozu musí být
blokování zapnutí palcem odblokováno. Přitom
stiskněte blokování zapnutí a držte je stisknuté,
současně může být aktivací za-/vypínače (obr. 1 /
pol. 4) přístroj uveden do chodu.
Puštěním za-/vypínače (obr. 1 / pol. 4) může být
přístroj opět vypnut.
6.1 Stříhání trávy
Nůžky na trávu nechat klouzat nad zemí. Nejlepších
výsledků se docílí u suché trávy.
Při poklesu řezné síly nůžky ihned znovu nabít, aby
se akumulátory nevybily úplně.
Pokud nejsou nůžky na trávu používány, musí být na
nože nasazen černý ochranný kryt nožů.
6.2 Stříhání živých plotů
Přístroj může být používán na stříhání malých živých
plotů a keřů. Skloňte nůžky mírně ve směru živého
plotu určeného ke stříhání. Stříhejte nejdříve strany,
odspoda nahoru, poté teprve horní stranu. Dbejte na
cizí tělesa v nebo na živém plotu, která by mohla
poškodit nůž.
Kdy se stříhají živé ploty:
앬 Obecně platí pravidlo, živé ploty, jejichž listí na
podzim opadá, se stříhají v červnu a říjnu.
앬 Stále zelené živé ploty mohou být stříhány v
dubnu a srpnu.
6.3. Výměna nožů
Pozor! Nebezpečí zranění!
Na odstranění nožů nadzvedněte úchytku (obr. 6/pol.
1) a odsuňte kryt (obr. 6/pol. 2) ve směru šipky. Po
odstranění nože jsou vidět převodová ozubená kola
(obr. 7). Dbejte na to, aby se během výměny nože
nedostaly do převodu žádné nečistoty. Montáž se
provádí v opačném pořadí.
Při vložení nože na stříhání živých plotů
dbejte na to, v jaké poloze se nachází excentrický
kolík (obr. 7/pol. 1). Uchopte nůž na stříhání živých
plotů a posuňte excentrické upínání (obr. 8 / pol. 1) do
takové polohy, aby při montáži excentrický kolík
přesně lícoval s excentrickým upínáním. Nůž na
stříhání živých plotů se nasadí na vodicí kolíky (obr. 7
/ pol. 2).
Při vložení nože na stříhání trávy
dbejte opět na polohu excentrického kolíku (obr. 7 /
pol. 1). Na noži na stříhání trávy může být
posouváním excentrického upínání (obr. 9 / pol. 1)
doleva nebo doprava nalezena poloha, ve které
excentrický kolík (obr. 7 / pol. 1) a excentrické upínání
(obr. 9 / pol. 1) spolu lícují.
7. Čištění, údržba a objednání
náhradních dílů
7.1 Čištění
Udržujte bezpečnostní zařízení, větrací otvory a
kryt motoru tak prosté prachu a nečistot, jak jen
to je možné. Otřete přístroj čistým hadrem nebo
ho profoukněte stlačeným vzduchem při nízkém
tlaku.
Doporučujeme přímo po každém použití přístroj
vyčistit.
Pravidelně přístroj čistěte vlhkým hadrem a
trochou mazlavého mýdla. Nepoužívejte žádné
čisticí prostředky nebo rozpouštědla, mohlo by
dojít k poškození plastových částí přístroje.
Dbejte na to, aby se dovnitř přístroje nedostala
voda.
Před a po použití by měly být nůžky důkladně
vyčištěny. Několik kapek oleje ( např. do šicích
strojů) na nože vylepší řezný výkon. Nože ovšem
nikdy nemazat tuky. Pro konstantní přesný řez je
nutné, aby byly zbytky trávy a nečistoty
odstraňovány také mezi horním a dolním nožem.
Pozor!
Z důvodů škody na zdraví osob a věcných škod
nečistěte výrobek nikdy pod tekoucí vodou,
obzvlášť ne vysokotlakým proudem. Uchovávejte
nůžky na trávu na suchém a nezamrzajícím
místě. Místo uložení musí být nepřístupné dětem.
7.2 Údržba
Pro dobrý výsledek práce by měly být nože stále
ostré. Proto je můžete pomocí obtahovacího
brousku brousit. Obzvlášť doporučujeme, vždy
hned vyrovnat zuby a otřepy, které mohou
vzniknout dotekem s kameny a pod.
Uvnitř přístroje se nevyskytují žádné další,
údržbuvyžadující, díly.
24
CZ
Anleitung_BG_CG_3_6_Li_SPK7:_ 29.10.2008 14:02 Uhr Seite 24
Page 25

7.3 Objednání náhradních dílů:
Při objednávce náhradních dílů je třeba uvést
následující údaje:
Typ přístroje
Číslo výrobku přístroje
Identifikační číslo přístroje
Číslo náhradního dílu požadovaného náhradního
dílu
Aktuální ceny a informace naleznete na
www.isc-gmbh.info
Nůž na stříhání trávy: 341044001001
Nůž na keře: 341044001002
8. Likvidace a recyklace
Přístroj je uložen v balení, aby bylo zabráněno
poškození při přepravě. Toto balení je surovina a tím
znovu použitelné nebo může být dáno zpět do
cirkulace surovin.
Přístroj a jeho příslušenství jsou vyrobeny z
rozdílných materiálů, jako např. kov a plasty.
Defektní součástky odevzdejte k likvidaci zvláštních
odpadů. Zeptejte se v odborné prodejně nebo na
místním zastupitelství!
25
CZ
Anleitung_BG_CG_3_6_Li_SPK7:_ 29.10.2008 14:02 Uhr Seite 25
Page 26

Pozor!
Pri používaní prístrojov sa musia dodržiavať príslušné
bezpečnostné opatrenia, aby bolo možné zabrániť
prípadným zraneniam a vecným škodám. Preto si
starostlivo prečítajte tento návod na obsluhu /
bezpečnostné pokyny. Následne ich starostlivo
uschovajte, aby ste mali vždy k dispozícii potrebné
informácie. V prípade, že budete prístroj požičiavať
tretím osobám, prosím odovzdajte im spolu
s prístrojom tento návod na obsluhu/ bezpečnostné
pokyny. Nepreberáme žiadne ručenie za nehody ani
škody, ktoré vzniknú nedodržaním tohto návodu na
obsluhu a bezpečnostných pokynov.
1. Bezpečnostné pokyny
Príslušné bezpečnostné pokyny nájdete v priloženej
brožúrke.
VÝSTRAHA!
Prečítajte si všetky bezpečnostné predpisy a
pokyny.
Nedostatky pri dodržovaní bezpečnostných
predpisov a pokynov môžu mať za následok úraz
elektrickým prúdom, vznik požiaru a/alebo ťažké
poranenia.
Všetky bezpečnostné predpisy a pokyny si
odložte pre budúce použitie.
Vysvetlenie štítku s upozornením na prístroji
(obr. 10)
1. Pozor! Starostlivo si prečítajte návod na obsluhu
a dodržiavajte výstražné a bezpečnostné
pokyny.
2. Udržujte bezpečnú vzdialenosť od iných
osôb.
3. Pozor! Po vypnutí prístroja bežia nože ešte
chvíľu ďalej. Počkajte do úplného zastavenia
nožov. Nebezpečenstvo poranenia!
4. Akumulátor nechajte kvalifikovane
zneškodniť.
5. Prístroj chrániť pred dažďom a vlhkosťou.
2. Popis prístroja (Obr. 1/2)
1 Strihací nôž na trávu
2 Kolieska
3 Poistka zapínača
4 Zapínač
5 Teleskopické vodiace porisko
6 Teleskopické skrutkovacie spojenie
7 Vodiaca rukoväť
8 Uloženie prístroja
9 Kryt na strihací nôž
10 Nabíjačka
11 Strihací nôž na kríky
3. Správne použitie prístroja
Prístroj je určený na strihanie okrajov trávnikov,
malých trávnatých plôch, kríkov a malých živých
plotov v súkromných domácich a oddychových
záhradách.
Za prístroje určené pre súkromné záhrady sa
považujú len tie prístroje, ktoré sa nepoužívajú na
verejných priestranstvách, v parkoch, športoviskách,
na uliciach ako aj v poľnohospodárstve a lesníctve.
Dodržiavanie návodu na obsluhu, priloženého
výrobcom, je predpokladom pre náležité
zaobchádzanie s prístrojom.
Pozor! Z dôvodu ohrozenia osôb a možnosti
vzniku vecných škôd, sa nesmie prístroj používať
na rozdrobovanie v zmysle kompostovania.
Prístroj smie byť použitý len na ten účel, na ktorý bol
určený. Každé iné odlišné použitie prístroja sa
považuje za nespĺňajúce účel použitia. Za škody
alebo zranenia akéhokoľvek druhu spôsobené
nesprávnym používaním ručí používateľ /
obsluhujúca osoba, nie však výrobca.
Prosím zohľadnite skutočnosť, že správny spôsob
prevádzky našich prístrojov nie je na profesionálne,
remeselnícke ani priemyselné použitie.
Nepreberáme žiadne záručné ručenie, ak sa prístroj
bude používať v profesionálnych, remeselníckych
alebo priemyselných prevádzkach ako aj na činnosti
rovnocenné s takýmto použitím.
26
SK
Anleitung_BG_CG_3_6_Li_SPK7:_ 29.10.2008 14:02 Uhr Seite 26
Page 27

4. Technické údaje
Otáčky n0: 950 min
-1
Šírka strihania nožníc na trávu: 70 mm
Šírka strihania nožníc na kríky: 100 mm
Sila strihania nožníc na kríky: 8 mm
Prevádzková doba max.: 60 min
Akumulátor: Li-Ion / 3,6 V d.c. / 1,3 Ah
Doba nabíjania: 3-5 h
Trieda ochrany: III
Hladina akustického tlaku LpA: 72,7 dB
Hladina akustického výkonu LWA: 92,9 dB
Vibrácia a
hv
nožníc na trávu: ≤ 2,5m/s
2
Vibrácia a
hv
nožníc na kríky: 5,5m/s
2
Hmotnosť: 1,4 kg
Nabíjačka
Sieťové napätie 230 V~ 50 Hz
Výstup
Nominálne napätie 6 V d. c.
Nominálny prúd 300 mA
Zvuk a vibrácie boli merané podľa EN ISO 3744.
5. Pred uvedením do prevádzky
5.1 Nabitie akumulátora (Obr. 1, 3)
앬 Spojte nabíjačku s nabíjacou stanicou (Obr. 5).
앬 Skontrolujte, či elektrické napätie uvedené na
výrobnom štítku zariadenia zodpovedá
elektrickému napätiu vo vašej zásuvke.
Nabíjačku zasuňte do zásuvky, červená LED
(Obr. 5 / pol. 1) sa rozsvieti a indikuje prítomnosť
nabíjacieho napätia.
앬 Akumulátor sa nabíja. Doba nabíjania je pri
prázdnom akumulátore max. 3-5 hodín. Počas
procesu nabíjania môže dôjsť k čiastočnému
zohriatiu akumulátora v prístroji, čo je však úplne
normálne.
앬 Keď je akumulátor úplne nabitý, červená
kontrolka LED (obr. 5/pol. 1) zhasne.
Ak by nemalo byť možné nabitie akumulátora,
skontrolujte prosím
앬 či je zásuvka správne zapojená a je pod prúdom
앬 či je kontakt na nabíjacích kontaktoch nabíjacej
stanice v bezchybnom stave.
Ak stále nie je možné nabíjať akumulátor, prosíme
vás o zaslanie kompletného zariadenia aj s
nabíjačkou a nabíjacou stanicou nášmu
zákazníckemu centru.
V záujme dlhej životnosti akumulátora by ste sa mali
postarať o včasné znovunabitie akumulátora. To je
potrebné v každom prípade vtedy, keď zistíte, že sa
výkon zariadenia začne znižovať.
Akumulátor by nemal byť nikdy úplne vybitý. Vedie
to totiž k poškodeniu akumulátora!
5.2 Montáž vodiaceho držadla
Pomocou teleskopického vodiaceho držadla (obr.
1/pol. 5) sa akumulátorové nožnice môžu posúvať
po trávniku na kolieskach.
Na montáž vodiaceho držadla nasuňte upínanie
prístroja (obr. 3a/pol. 8) na držadlo, kým aretácia (obr.
3a/pol. 1) nezaskočí do jedného z otvorov upínania
prístroja. Nachádza sa tam jeden otvor hore pre
normálne strihanie ako aj dva otvory vľavo a vpravo
pre strihy hrán. Teraz spojte kolesá (obr. 3b/pol. 2)
nasunutím cez upnutie osi.
Povoľte svorkové skrutkové spoje (obr. 1/pol. 6),
nastavte teleskopické vodiace držadlo na
požadovanú dĺžku a svorkové skrutkové spoje znovu
pevne dotiahnite. Teraz nasuňte prístroj podľa
zobrazenia na obr. 4a v smere šípky do uloženia
prístroja (obr. 4a/pol. 8). Dbajte pritom na správne
zaskočenie uloženia prístroja do otvorov (obr. 4a/ pol.
1). Nakoniec zapojte zástrčku (obr. 4b/pol. 1) na
prístroj tak, ako to je zobrazené na obr. 4b.
Rozloženie sa uskutoční v opačnom poradí.
Pozor!
Výrobcom inštalované spínacie zariadenia na
prístroji sa nesmú odstraňovať ani premosťovať,
napr. priväzovaním spínača o rukoväť, pretože v
opačnom prípade vzniká nebezpečenstvo
poranenia, nakoľko sa zariadenie nevypína
automaticky.
V žiadnom prípade nesmie byť namontované
teleskopické vodiace porisko na zariadení, počas
jeho používania ako strihačka na kríky.
27
SK
Anleitung_BG_CG_3_6_Li_SPK7:_ 29.10.2008 14:02 Uhr Seite 27
Page 28

6. Obsluha
Zabezpečte, aby sa v strihanej oblasti nenachádzali
žiadne kamene ani iné tvrdé predmety. Poistka
zapínača (Obr. 1 / pol. 3) zabraňuje neúmyselnému
zapnutiu prístroja. Na uvedenie prístroja do
prevádzky je potrebné palcom odistiť poistku
zapínača. Pritom zatlačte poistku a držte ju stlačenú,
zároveň je možné stlačením prepínača Vyp/Zap
(Obr. 1 / pol. 4) uviesť zariadenie do prevádzky.
Povolením zapínača Vyp/Zap (Obr. 1 / pol. 4) je
možné prístroj znovu vypnúť.
6.1 Strihanie trávy
Strihačkou na trávu pohybujte nad zemou. Najlepší
strihací výkon dosiahnete pri suchej tráve.
Pri znižovaní strihacieho výkonu zariadenie ihneď
znovu nabite, aby nedošlo k úplnému vyprázdneniu
akumulátora.
Ak sa strihačka nepoužíva, musí sa nasadiť čierny
ochranný kryt na strihacie nože.
6.2 Strihanie kríkov
Toto zariadenie je možné použiť na strihanie
menších živých plotov a kríkov.
Nakloňte strihačku zľahka v smere kríka, ktorý idete
strihať.
Strihajte najprv po stranách, smerom zdola nahor,
až potom strihajte hornú časť.
Dávajte pozor na cudzie predmety, ktoré sa
nachádzajú v kríku alebo pri kríku, a ktoré by mohli
poškodiť strihacie nože.
Kedy sa strihajú živé ploty:
앬 Vo všeobecnosti platí pravidlo, že kríky, z
ktorých na jeseň opadáva lístie, sa strihajú v júni
a októbri.
앬 Stále zelené kríky je možné strihať v apríli a
auguste.
6.3. Výmena nožov
Pozor! Nebezpečenstvo poranenia!
Na vybratie nožov nadvihnite sponu (obr. 6/pol. 1)
a odsuňte kryt (obr. 6/pol. 2) v smere šípky. Po vybratí
noža sa dajú vidieť ozubené kolieska prevodovky
(obr. 7). Dbajte na to, aby sa pri výmene noža
nedostali do prevodovky žiadne nečistoty. Montáž sa
uskutoční v opačnom poradí.
Pri nasadzovaní noža na strihanie živých plotov
dbajte na to, v akej polohe sa nachádza excentrický
kolík (obr. 7/pol. 1). Zoberte nôž na strihanie živých
plotov a posuňte excentrické upínanie (obr. 8/pol. 1)
do polohy tak, aby pri zložení excentrický kolík
pasoval presne na excentrické upínanie. Nôž na
strihanie živých plotov sa nasunie na vodiace kolíky
(obr. 7/pol. 2).
Pri nasadzovaní noža na strihanie trávy
dbajte opäť na polohu excentrického kolíka (obr.
7/pol. 1). Na noži na strihanie trávy sa dá presúvaním
excentrického upínania (obr. 9/pol. 1) doľava alebo
doprava nájsť poloha, aby excentrický kolík (obr.
7/pol. 1) a excentrické upínanie (obr. 9/pol. 1) spolu
pasovali.
7. Čistenie, údržba a objednanie náh
radných dielov
7.1 Čistenie
앬 Udržujte ochranné zariadenia, vzduchové otvory
a ebo ho vyčistite vyfúkaním stlačeným
vzduchom pri nastavení na nízky tlak.
앬 Odporúčame, aby ste prístroj čistili spravidla
vždy po každom použití.
앬 Čistite prístroj pravidelne pomocou vlhkej utierky
aostriedky alebo riedidlá; tieto prostriedky by
mohli napadnúť umelohmotné diely prístroja.
Dbajte na to, aby sa do vnútra prístroja
nedostala voda.
Vždy pred použitím a po ňom by sa mali nože
dôkladne očistiť. Niekoľko kvapiek oleja (napr.
olej na šijacie stroje) nanesených na nože zlepší
strihací výkon. Nože však nikdy nemastite
tukom. Pre rovnomerný a presný strih je
potrebné, aby sa pravidelne odstraňovali zvyšky
trávy a nečistoty aj medzi horným a dolným
nožom.
Pozor!
Z dôvodu ohrozenia osôb a možnosti vzniku
vecných škôd nikdy nečistite výrobok pod
tečúcou vodou, obzvlášť nie pod vysokým
tlakom. Uskladnite zariadenie na suchom mieste,
chránenom pred mrazom. Miesto uskladnenia
musí byť neprístupné pre deti.
28
SK
Anleitung_BG_CG_3_6_Li_SPK7:_ 29.10.2008 14:02 Uhr Seite 28
Page 29

7.2 Údržba
Pre dosiahnutie dobrých výsledkov musia byť
nože stále ostré. Na tento účel ich môžete znovu
nabrúsiť osličkou alebo brúskou. Obzvlášť
odporúčame vždy zarovnávať štrbiny a ryhy,
ktoré môžu vzniknúť pri kontakte s kameňmi, a
pod.
Vo vnútri prístroja sa nenachádzajú žiadne
ďalšie diely vyžadujúce údržbu.
7.3 Objednávanie náhradných dielov:
Pri objednávaní náhradných dielov je potrebné
uviesť nasledovné údaje;
앬 Typ prístroja
앬 Výrobné číslo prístroja
앬 Identifikačné číslo prístroja
앬 Číslo potrebného náhradného dielu
Aktuálne ceny a informácie nájdete na stránke
www-isc-gmbh.info
Nôž na strihanie trávy: 341044001001
Nôž na kríky: 341044001002
8. Likvidácia a recyklácia
Prístroj sa nachádza v obale za účelom zabránenia
poškodeniu pri transporte. Tento obal je vyrobený
zo suroviny a tým pádom je ho možné znovu použiť
alebo sa môže dať do zberu na recykláciu surovín.
Prístroj a jeho príslušenstvo sa skladajú z rôznych
materiálov, ako sú napr. kovy a plasty. Poškodené
súčiastky odovzdajte na vhodnú likvidáciu
špeciálneho odpadu. Informujte sa v odbornej
predajni alebo na miestnych úradoch!
29
SK
Anleitung_BG_CG_3_6_Li_SPK7:_ 29.10.2008 14:02 Uhr Seite 29
Page 30

Let op!
Bij het gebruik van gereedschappen dienen enkele
veiligheidsmaatregelen te worden nageleefd om
lichamelijk gevaar en schade te voorkomen. Lees
daarom deze handleiding/veiligheidsinstructies
zorgvuldig door. Bewaar deze goed zodat u de
informatie op elk moment kunt terugvinden. Mocht u
dit gereedschap aan andere personen doorgeven,
gelieve dan deze handleiding/veiligheidsinstructies
mee te geven. Wij zijn niet aansprakelijk voor
ongevallen of schade die te wijten zijn aan nietnaleving van deze handleiding en van de
veiligheidsinstructies.
1. Veiligheidsvoorschriften
De overeenkomstige veiligheidsinstructies vindt u in
de bijgaande brochure.
WAARSCHUWING!
Lees alle veiligheidsinstructies en aanwijzingen.
Nalatigheden bij de inachtneming van de
veiligheidsinstructies en aanwijzingen kunnen
elektrische schok, brand en/of zware letsels tot
gevolg hebben.
Bewaar alle veiligheidsinstructies en
aanwijzingen voor de toekomst.
Verklaring van het instructiebord op het toestel
(fig. 10)
1. Let op! Lees de handleiding en volg de
waarschuwingsinstructies en
veiligheidsvoorschriften op.
2. Hou derden weg uit de gevarenzone.
3. Let op! Na het uitschakelen blijven de messen
nog een tijdje draaien. Wacht totdat de messen
tot stilstand zijn gekomen.
Lichamelijk gevaar !
4. Accu verwijderen conform de
milieuwetgeving.
5. Toestellen beschermen tegen regen en vocht!
2. Beschrijving van het gereedschap
(fig. 1/2)
1 Grassnijmes
2 Wielen
3 Veiligheid tegen onbedoeld aanzetten
4 Aanzettoets
5 Telescopische geleidesteel
6 Schroefkoppeling telescopische geleidesteel
7 Geleidehandgreep
8 Gereedschapshouder
9 Beschermkap
10 Laadtoestel
11 Struikmes
3. Reglementair gebruik
Het gereedschap dient voor het bijknippen van de
rand van uw gazon en voor het snoeien van kleinere
grasvlakten in de particuliere tuin en in de hobbytuin.
Als toestellen voor de particuliere tuin bij het huis en
in de hobbytuin worden diegene beschouwd die niet
worden gebruikt in openbare plantsoenen, parken,
sportpleinen, langs wegen en in de land- en
bosbouw.
Het behoorlijk gebruik van het toestel houdt in dat de
bijgaande gebruiksaanwijzing van de fabrikant in
acht wordt genomen.
Let op! Wegens gevaar voor personen en
materiële schade mag het toestel niet worden
gebruikt om takken klein te snijden voor het
composteren.
De machine mag slechts voor werkzaamheden
worden gebruikt waarvoor ze bedoeld is. Elk ander
verder gaand gebruik is niet reglementair. Voor
daaruit voortvloeiende schade of verwondingen van
welke aard dan ook is de gebruiker/bediener, niet de
fabrikant, aansprakelijk.
Wij wijzen erop dat onze gereedschappen
overeenkomstig hun bestemming niet geconstrueerd
zijn voor commercieel, ambachtelijk of industrieel
gebruik. Wij geven geen garantie indien het
gereedschap in ambachtelijke of industriële bedrijven
alsmede bij gelijk te stellen activiteiten wordt
gebruikt.
30
NL
Anleitung_BG_CG_3_6_Li_SPK7:_ 29.10.2008 14:02 Uhr Seite 30
Page 31

31
NL
4. Technische gegevens
Toerental n0: 950 t/min
Knipbreedte grasschaar: 70 mm
Snoeibreedte struikschaar 100 mm
Snoeidikte struikschaar 8 mm
Gebruiksduur per snijbeurt max.: 60 min
Accu: Li-Ion / 3,6 V d.c. / 1,3 Ah
Laadtijd: 3-5 h
Bescherming klasse: III
Geluidsdrukniveau LpA: 72,7 dB
Geluidsvermogen LWA: 92,9 dB
Vibratie a
hV
grasschaar: ≤ 2,5m/s
2
Vibratie a
hV
struikschaar: 5,5m/s
2
Gewicht: 1,4 kg
Lader
Netspanning 230 V ~ 50 Hz
Uitgang
Nominale spanning 6 DC
Nominale stroom 300 mA
Geluid en trillingen werden gemeten volgens EN ISO
3744.
5. Vóór ingebruikneming
5.1 Accu laden (fig. 1,3)
앬 Lader verbinden met het laadstation (fig. 5).
앬 Vergelijk of de netspanning vermeld op het
kenplaatje overeenkomt met de voorhanden
zijnde netspanning. Lader het netstopcontact in
steken, de rode LED (fig. 5, pos. 1) gaat branden
en geeft de voorhanden zijnde laadspanning
aan.
앬 De accu wordt geladen. De laadtijd bedraagt
maximaal 3 tot 5 uur als de accu leeg is. Tijdens
het laden kan de accu in het toestel wat warm
worden, dat is echter normaal.
앬 Als de accu vol geladen is, gaat de rode LED
(fig. 5/pos. 1) uit.
Als het accu-pack niet kan opgeladen worden,
vergewis U zich dan dat de
netspanning aan het stopcontact voorhanden is
en dat een perfect contact van de laadcontacten
van de oplader verzekerd is.
Als het laden van het accu-pack nog altijd niet
mogelijk is, gelieve dan de oplader en het accu-pack
aan onze service-afdeling te sturen.
In het belang van een lange levensduur van de accu
is het raadzaam om op tijd voor het herladen van de
accu te zorgen. Dit is in ieder geval noodzakelijk
wanneer u vaststelt dat het vermogen van het toestel
vermindert.
Ontlaadt de accu nooit helemaal. Dat leidt tot een
defect van de accu!
5.2 Montage van de geleidesteel
Met de telescoopsteel (fig. 1, pos. 5) wordt de
accugrasschaar op haar wieltjes over het gazon
geschoven.
Voor de montage van de geleidesteel de
gereedschapshouder (fig. 3a/pos. 8) op de steel
schuiven tot het arrêt (fig. 3a/pos. 1) in één van de
uitsparingen van de gereedschapshouder vastklikt.
Er zijn één uitsparing boven voor het normaal
snoeien alsmede twee uitsparingen links en rechts
voor het kantensnijden. Dan de wielen (fig. 3b/pos.
2) doorheen de ashouder in elkaar steken.
De klemschroefverbinding (fig. 1/pos. 6) losdraaien,
de telescoopsteel op de gewenste lengte brengen en
de klemschroefverbinding terug aandraaien. Dan het
gereedschap in pijlrichting de gereedschapshouder
(fig. 4a/pos. 8) in schuiven, zoals getoond in fig. 4a.
Daarbij op het correct vastklikken van de
gereedschapshouder in de uitsparingen (fig. 4a/pos.
1) letten. Daarna de stekker (fig. 4b/pos. 1) op het
gereedschap aansluiten zoals getoond in fig. 4b. Het
ontmantelen gebeurt in omgekeerde volgorde.
Let op!
De door de fabrikant op het toestel geïnstalleerde
schakelinrichtingen mogen niet worden
verwijderd of overbrugd, b.v. door een
schakeltoets vast te binden op het handvat,
omdat anders het gevaar bestaat een verwonding
op te lopen en het toestel niet automatisch wordt
uitgeschakeld.
De telescopische geleidesteel mag geenszins
gemonteerd zijn als u de struikschaar gebruikt.
Anleitung_BG_CG_3_6_Li_SPK7:_ 29.10.2008 14:02 Uhr Seite 31
Page 32

6. Inbedrijfstelling
De te snoeien vlakte voordien van stenen en andere
vaste voorwerpen ontdoen. De beveiliging tegen
ontijdig inschakelen (fig. 1, pos. 3) voorkomt het
onbedoeld inschakelen van het gereedschap. Om
het gereedschap in te schakelen ontgrendelt u de
inschakelbeveiliging (fig. 1, pos. 3) door
voorschuiven en drukt u tegelijkertijd de AAN/UITschakelaar (fig. 1, pos. 4) in. Door de AAN/UITschakelaar (fig. 1, pos. 4) los te laten schakelt u het
gereedschap terug uit.
6.1 Gras snijden
De grasschaar over de grond laten glijden. Het beste
snijvermogen wordt bereikt als het gazon droog is.
Wanneer het snijvermogen vermindert, schaar
onmiddellijk opnieuw laden zodat de accuʼs niet
helemaal ontladen worden.
6.2 Heggen snoeien
Het toestel kan worden gebruikt om kleinere heggen
en struiken te snoeien. Hou de heggenschaar lichtjes
schuin in de richting van de te snoeien heg.
Snoei eerst de zijkanten van beneden naar boven,
dan pas de bovenkant. Let op vreemde voorwerpen
in of tegen de heg die het mes zouden kunnen
beschadigen.
Wanneer wordt een heg gesnoeid:
앬 Over het algemeen geldt de regel, heggen die
hun lof in de herfst verliezen, in juni en oktober te
snoeien.
앬 Groenblijvende heggen kunnen in april en
augustus worden gesnoeid.
6.3. Verwisselen van messen
Let op! Lichamelijk gevaar!
Om de messen te verwijderen heft u de las (fig.
6/pos. 1) op en schuift u het deksel (fig. 6/pos. 2) in
pijlrichting eraf. Na het verwijderen van het mes zijn
de transmissietandwielen te zien (fig. 7). Let er goed
op dat tijdens het verwisselen van de messen geen
vuil in de transmissie terechtkomt. De montage
gebeurt in omgekeerde volgorde.
Bij het installeren van het heggenschaarmes
dient u op de stand van de excenterpen (fig. 7/pos.
1) te letten. Neem het heggenschaarmes en schuif
de excenterkooi (fig. 8/pos. 1) naar de juiste stand
zodat de excenterpen bij het assembleren exact in
de excenterkooi past. Het heggenschaarmes wordt
op de geleidepennen (fig. 7/pos. 2) gestoken.
Bij het installeren van het grassnijmes
dient u opnieuw op de stand van de excenterpen (fig.
7/pos. 1) te letten. Op het grasschaarmes kunt u
door verschuiven van de excenterkooi (fig. 9/pos. 1)
naar links of rechts de juiste stand vinden zodat de
excenterpen (fig. 7/pos. 1) en de excenterkooi (fig.
9/pos. 1) bijeen passen.
7. Reiniging, onderhoud en bestellen
van wisselstukken
7.1 Reiniging
Hou de veiligheidsinrichtingen, de
ventilatiespleten en het motorhuis zo veel
mogelijk vrij van stof en vuil. Wrijf het toestel met
een schone doek af of blaas het met perslucht bij
lage druk schoon.
Het is aan te bevelen het toestel direct na elk
gebruik te reinigen.
Reinig het toestel regelmatig met een vochtige
doek en wat zachte zeep. Gebruik geen
reinigings- of oplosmiddelen; die zouden de
kunststofcomponenten van het toestel kunnen
aantasten. Let er goed op dat geen water in het
toestel terechtkomt.
Voor en na gebruik moet de schaar grondig
worden schoongemaakt. Enkele druppels olie (b.
v. naaimachineolie) op de messen verbeteren het
snijresultaat. Messen echter nooit vetten. Voor
een altijd exacte snede is het noodzakelijk
grasresten en vuil ook tussen boven- en
ondermes te verwijderen.
Let op!
Maak het product nooit schoon met stromend
water, vooral niet onder hoge druk, anders
bestaat gevaar voor persoonlijke ongelukken en
materiële schade.
Bewaar de accuschaar op een droge en vorstvrije
plaats. De opbergplaats moet onbereikbaar zijn
voor kinderen.
7.2 Onderhoud
Om een goed snoeiresultaat te behalen dienen
de messen steeds scherp te zijn. Ze kunnen
daarom met een aanzetsteen worden
aangescherpt Het is bijzonder aan te bevelen
schaarden en baarden die door stenen e. d.
kunnen worden veroorzaakt altijd onmiddellijk te
egaliseren.
In het toestel zijn er geen andere te onderhouden
onderdelen.
32
NL
Anleitung_BG_CG_3_6_Li_SPK7:_ 29.10.2008 14:02 Uhr Seite 32
Page 33

33
NL
7.3 Bestellen van wisselstukken:
Gelieve bij het bestellen van wisselstukken volgende
gegevens te vermelden:
Type van het toestel
Artikelnummer van het toestel
Ident-nummer van het toestel
Wisselstuknummer van het benodigd stuk
Actuele prijzen en info vindt u terug onder
www.isc-gmbh.info
Grassnijmes: 341044001001
Struikmes: 341044001002
8. Afvalbeheer en recyclage
Het toestel bevindt zich in een verpakking om
transportschade te voorkomen. Deze verpakking is
een grondstof en bijgevolg herbruikbaar of kan de
grondstofkringloop terug worden ingebracht.
Het toestel en zijn accessoires bestaan uit diverse
materialen, zoals b.v. metaal en kunststof. Ontdoet u
zich van defecte onderdelen op de inzamelplaats
waar u gevaarlijke afvalstoffen mag afgeven.
Informeer u in uw speciaalzaak of bij uw
gemeentebestuur!
Anleitung_BG_CG_3_6_Li_SPK7:_ 29.10.2008 14:02 Uhr Seite 33
Page 34

34
S
Obs!
Innan produkten kan användas måste särskilda
säkerhetsanvisningar beaktas för att förhindra
olyckor och skador. Läs därför noggrant igenom
denna bruksanvisning. Förvara den på ett säkert
ställe så att du alltid kan hitta önskad information.
Om produkten ska överlåtas till andra personer
måste även denna bruksanvisning medfölja.
Vi övertar inget ansvar för olyckor eller skador som
har uppstått om denna bruksanvisning eller
säkerhetsanvisningarna åsidosätts.
1. Säkerhetsanvisningar:
Gällande säkerhetsanvisningar finns i det bifogade
häftet.
VARNING!
Läs alla säkerhetsanvisningar och instruktioner.
Försummelser vid iakttagandet av
säkerhetsanvisningarna och instruktionerna kan
förorsaka elstöt, brand och/eller svåra skador.
Förvara alla säkerhetsanvisningar och
instruktioner för framtiden.
Förklaring av skylten på maskinen (se bild 10)
1. Obs! Läs igenom bruksanvisningen och följ
varnings- och säkerhetsanvisningarna.
2. Se till att inga andra personer finns i farozonen.
3. Obs! Efter att du slagit ifrån maskinen fortsätter
knivarna att köra. Vänta tills knivarna har
stannat. Risk för skador!
4. Batteriet måste avfallshanteras enligt gällande
föreskrifter.
5. Skydda maskinen mot regn och fukt.
2. Beskrivning av maskinen (bild 1)
1 Gräsklippningsknivar
2 Hjul
3 Inkopplingsspärr
4 Strömbrytare
5 Teleskopstång
6 Teleskopkoppling
7 Styrhandtag
8 Maskinfäste
9 Knivskydd
10 Laddare
11 Svärd för häckklippning
3. Ändamålsenlig användning
Maskinen är avsedd för klippning av gräsmattekanter
och mindre gräsytor i privata och hobbyanlagda
trädgårdar.
Maskiner för sådana trädgårdar får inte användas till
allmänna grönområden, parker, sportanläggningar,
gator eller inom lant- och skogsbruk. En förutsättning
för ändamålsenlig användning av maskinen är att
tillverkarens bruksanvisning beaktas.
Obs! För att undvika personskador samt
materiella skador får maskinen inte användas till
att finfördela material inför kompostering.
Maskinen får endast användas till sitt avsedda
ändamål. Användningar som sträcker sig utöver
detta användningsområde är ej ändamålsenliga. För
materialskador eller personskador som resulterar av
sådan användning ansvarar användaren/operatören
själv. Tillverkaren påtar sig inget ansvar.
Tänk på att våra produkter endast får användas till
ändamålsenligt syfte och inte har konstruerats för
yrkesmässig, hantverksmässig eller industriell
användning. Vi ger därför ingen garanti om
produkten ska användas inom yrkesmässiga,
hantverksmässiga eller industriella verksamheter
eller vid liknande aktiviteter.
4. Tekniska data
Varvtal n
0
950 min
-1
Klippningsbredd grässax 70 mm
Klippningsbredd häcksax 100 mm
Klippkapacitet häcksax 8 mm
Max. drifttid 60 min
Batteri Li-Ion / 3,6 V DC / 1,3 Ah
Laddningstid 3-5 h
Skyddsklass III
Ljudeffektnivå L
pA
72,7 dB
Ljudeffektnivå L
WA
92,9 dB
Vibration ahvgrässax ≤ 2,5 m/s
2
Vibration ahvhäcksax 5,5 m/s
2
Vikt 1,4 kg
Anleitung_BG_CG_3_6_Li_SPK7:_ 29.10.2008 14:02 Uhr Seite 34
Page 35

35
S
Laddare
Nätspänning 230 V ~ 50 Hz
Utgång
Nominell spänning 6 V DC
Nominell ström 300 mA
Buller och vibration har mätts upp enligt
EN ISO 3744.
5. Före användning
5.1. Ladda upp batteriet (bild 1/5)
Anslut laddaren till maskinen (bild 5).
Kontrollera att nätspänningen som anges på
typskylten stämmer överens med nätspänningen
i vägguttaget. Sätt in laddningsadaptern i
vägguttaget. Den röda lysdioden (bild 5/pos. 1)
lyser och indikerar därmed att laddningsspänning
är förhanden.
Batteriet laddas upp. Om batteriet är tomt uppgår
laddningstiden till max. 3-5 timmar. Medan
batteriet laddas upp värms det en aning. Detta är
dock normalt.
När batteriet har laddats klart slocknar den röda
lysdioden (bild 5/pos. 1).
Om batteriet inte kan laddas upp, måste du
kontrollera
att nätspänning finns i vägguttaget.
Om du ändå inte kan ladda batteriet, måste du
skicka in den kompletta maskinen med laddare till
vår kundtjänst.
För att batteriets livslängd ska bli så lång som möjligt
måste du alltid ladda upp batteriet i god tid. Detta är
alltid nödvändigt om du märker att maskinens
prestanda börjar försvagas.
Se till att batteriet aldrig laddas ur helt. Detta leder till
att batteriet förstörs!
5.2. Montera stången
Den batteridrivna grässaxen som är försedd med hjul
kan skjutas över gräsmattan med hjälp av
teleskopstången (bild 1/pos. 5).
Innan stången monteras kan maskinfästet (bild
3a/pos. 8) skjutas på stången tills spärren (bild
3a/pos. 1) snäpper in i ett av spåren i fästet. Det
finns ett spår upptill för normal klippning och två spår
till höger och vänster för kantklippning. Skjut sedan
samman hjulen (bild 3b/pos. 2) genom axelfästet.
Lossa på teleskopkopplingen (bild 1/pos. 6), ställ in
teleskopstången på lämplig längd och dra sedan åt
kopplingen igen. Skjut sedan in maskinen i
maskinfästet (bild 4a/pos. 8) i pilens riktning enligt
beskrivningen i bild 4a. Se till att maskinfästet
snäpper in rätt i spåren (bild 4a/pos. 1). Anslut
stickkontakten (bild 4b/pos. 1) till maskinen enligt
beskrivningen i bild 4b. Maskinen kan demonteras i
omvänd följd.
Obs!
Brytarna som tillverkaren har installerat på
maskinen får inte demonteras eller överbryggas,
t ex genom att strömbrytaren på handtaget binds
fast. I annat fall finns risk för skador eftersom
maskinen inte kopplas ifrån automatiskt.
6. Användning
Se till att ytan där du ska klippa är fri från stenar och
andra fasta föremål. Brytarspärren (bild 1/pos. 3)
förhindrar att maskinen slås på oavsiktligt. Om du
ska slå på maskinen måste du först trycka in
brytarspärren (bild 1/pos. 3) och samtidigt trycka in
strömbrytaren (bild 1/pos. 4). Om du släpper
strömbrytaren (bild 1/pos. 4) stannar maskinen igen.
6.1. Klippa gräs
Låt grässaxen glida över gräsmattan. Det bästa
klippresultatet får du om gräsmattan är torr.
Om kvaliteten försämras måste du genast ladda upp
saxen så att batterierna inte laddas ur helt. När
grässaxen inte längre ska användas måste det
svarta knivskyddet sättas på knivarna.
6.2. Klippa häckar
Maskinen kan även användas till att klippa mindre
häckar och buskar. Vinkla häcksaxen en aning mot
häcken som ska klippas. Klipp först in sidorna,
nerifrån och upp, och först därefter ovansidan. Se till
att inga främmande föremål finns i eller i närheten av
häcken. Det finns annars risk för att häcksaxen
Anleitung_BG_CG_3_6_Li_SPK7:_ 29.10.2008 14:02 Uhr Seite 35
Page 36

36
S
skadas.
När ska man klippa häckar?
Allmänt sett gäller regeln att häckar som tappar
sina löv på hösten ska klippas i juni och oktober.
Häckar som alltid är gröna kan klippas i april och
augusti.
6.3. Byta ut knivarna
Varning! Risk för skador!
Om knivarna ska bytas ut måste du först lyfta på
plattan (bild 6/pos. 1) och därefter skjuta av locket
(bild 6/pos. 2) i pilens riktning. Efter att du har tagit
av knivarna syns växelkugghjulen (bild 7). Var
försiktig så att ingen smuts tränger in i växeln när du
byter ut knivarna. Montera i omvänd ordningsföljd.
När du använder svärdet för häckklippning
Kontrollera i vilket läge excenterstiftet (bild 7/pos. 1)
står. Ta häcksaxen och skjut in excenterfästet (bild
8/pos. 1) tills det befinner sig i ett läge där
excenterstiftet passar exakt på excenterfästet. Sätt
häcksaxen på ledarstiften (bild 7/pos. 2).
När du använder gräsklippningsknivarna
Kontrollera på nytt var excenterstiftet (bild 7/pos. 1)
befinner sig. Excenterfästet (bild 9/pos. 1) på
grässaxen kan förskjutas till vänster och höger för att
hitta läget där excenterstiftet (bild 7/pos. 1) och
excenterfästet (bild 9/pos. 1) passar till varandra.
7. Rengöring, Underhåll och
reservdelsbeställning
7.1 Rengöra maskinen
앬 Håll skyddsanordningarna,
ventilationsöppningarna och motorkåpan i så
damm- och smutsfritt skick som möjligt. Torka av
maskinen med en ren duk eller blås av den med
tryckluft med svagt tryck.
앬 Vi rekommenderar att du rengör maskinen efter
varje användningstillfälle.
앬 Rengör maskinen med jämna mellanrum med en
fuktig duk och en aning såpa. Använd inga
rengörings- eller lösningsmedel. Dessa kan
skada maskinens plastdelar. Se till att inga
vätskor tränger in i maskinens inre.
앬 Rengör saxen noggrant före och efter
användning. Ett par droppar olja (t ex
symaskinsolja) på knivarna förbättrar
klippresultatet. Fetta dock aldrig in knivarna. För
att klippresultatet ska förbli exakt är det
nödvändigt att gräsrester och smuts mellan överoch underkniven tas bort.
Obs!
På grund av risken för personskador och
materiella skador får produkten aldrig rengöras
under rinnande vatten, särskilt inte under
högtryck. Förvara den batteridrivna grässaxen på
en torr och frostfri plats. Se till att maskinen är
oåtkomlig för barn.
7.2 Underhåll
Håll alltid knivarna i vasst skick för att få fullgott
klippningsresultat. Knivarna kan slipas med en
skärpsten. Vi rekommenderar att skåror och
grader som har uppstått av stenar och liknande
åtgärdas.
I maskinens inre finns inga delar som kräver
underhåll.
7.3 Reservdelsbeställning
Lämna följande uppgifter vid beställning av
reservdelar:
앬 Maskintyp
앬 Maskinens artikel-nr.
앬 Maskinens ident-nr.
앬 Reservdelsnummer för erforderlig reservdel
Aktuella priser och ytterligare information finns på
www.isc-gmbh.info
8. Skrotning och återvinning
Produkten ligger i en förpackning som fungerar som
skydd mot transportskador. Denna förpackning
består av olika material som kan återvinnas. Lämna
in förpackningen till ett insamlingsställe för
återvinning.
Produkten och tillbehören består av olika material
som t ex metaller och plaster. Lämna in defekta
komponenter till ett godkänt insamlingsställe i din
kommun. Hör efter med din kommun eller med
försäljaren i din specialbutik.
Anleitung_BG_CG_3_6_Li_SPK7:_ 29.10.2008 14:02 Uhr Seite 36
Page 37

37
k
erklärt folgende Konformität gemäß EU-Richtlinie
und Normen für Artikel
t
declares conformity with the EU Directive
and standards marked below for the article
p
déclare la conformité suivante selon la
directive CE et les normes concernant lʼarticle
verklaart de volgende conformiteit in overeenstemming met de EU-richtlijn en normen voor
het artikel
m
declara la siguiente conformidad a tenor de la
directiva y normas de la UE para el artículo
O
declara a seguinte conformidade de acordo
com a directiva CE e normas para o artigo
U
förklarar följande överensstämmelse enl. EUdirektiv och standarder för artikeln
q
ilmoittaa seuraavaa Euroopan unionin direktiivien ja normien mukaista yhdenmukaisuutta
tuotteelle
erklærer herved følgende samsvar med EUdirektiv og standarder for artikkel
T
заявляет о соответствии товара
следующим директивам и нормам EC
B
izjavljuje sljedeću uskladjenost s odredbama i
normama EU za artikl.
Q
declarå urmåtoarea conformitate cu linia directoare CE μi normele valabile pentru articolul.
Z
ürün ile ilgili olarak AB Yönetmelikleri ve
Normlar∂ gere©ince aμa©∂daki uygunluk aç∂kla
mas∂n∂ sunar.
z
‰ЛПТУВИ ЩЛУ ·ОfiПФ˘ıЛ Ы˘МКˆУ›· Ы‡МКˆУ· МВ
ЩЛУ √‰ЛБ›· ∂∂ О·И Щ· ЪfiЩ˘Ф БИ· ЩФ ЪФ˚fiУ
C dichiara la seguente conformità secondo la
direttiva UE e le norme per lʼarticolo
l
attesterer følgende overensstemmelse i
henhold til EU-direktiv og standarder for produkt
j
prohlašuje následující shodu podle směrnice
EU a norem pro výrobek.
A
a következő konformitást jelenti ki a termékekre vonatkozó EU-irányvonalak és normák szerint
X
pojasnjuje sledečo skladnost po smernici EU
in normah za artikel.
deklaruje zgodność wymienionego poniżej
artykułu z następującymi normami na
podstawie dyrektywy WE.
W
vydáva nasledujúce prehlásenie o zhode podľa
smernice EÚ a noriem pre výrobok.
e
деклаpиpа следното съответствие съгласно
диpективите и ноpмите на ЕС за пpодукта.
1
заявляє про відповідність згідно з Директивою
ЄС та стандартами, чинними для даного товару
.
deklareerib vastavuse järgnevatele EL direktiivi
dele ja normidele
G
deklaruoja atitikti pagal ES direktyvas ir normas
straipsniui
4
izjavljuje sledeçi konformitet u skladu s odred
bom EZ i normama za artikl
H
Atbilstības sertifikāts apliecina zemāk minēto preču
atbilstību ES direktīvām un standartiem
E
Samræmisyfirl‡sing sta›festir eftirfarandi samræmi
samkvæmt reglum Evfrópubandalagsins og stö›lum
fyrir vörur
Konformitätserklärung
ISC-GmbH · Eschenstraße 6 · D-94405 Landau/Isar
Akku-Gras-und Strauchschere BG-CG 3,6 Li + Netzgerät NG-BG-CG 3,6 Li
Art.-Nr.: 34.104.40 I.-Nr.: 01018 Archivierung: 3410440-41-4155050-08
Subject to change without notice
EN 60335-1; IEC 60335-2-94; EN 60745-2-15; EN 50366;
EN 55014-1; EN 55014-2; EN 60745-1; EN 61000-3-2;
EN 61000-3-3; EN 61558-1; EN 61558-2-6; KBV V
Landau/Isar, den 28.05.2008
Tury Gao
Product-Management
Weichselgartner
General-Manager
98/37/EC
2006/95/EC
97/23/EC
2004/108/EC
90/396/EEC
89/686/EEC
87/404/EEC
R&TTED 1999/5/EC
2000/14/EG_2005/88/EC:
95/54/EC:
97/68/EC:
X
X
X
X
LWM= 81,7 dB; LWA= 84 dB
Anleitung_BG_CG_3_6_Li_SPK7:_ 29.10.2008 14:02 Uhr Seite 37
Page 38

38
k Nur für EU-Länder
Werfen Sie Elektrowerkzeuge nicht in den Hausmüll!
Gemäß europäischer Richtlinie 2002/96/EG über Elektro- und Elektronik-Altgeräte und Umsetzung in
nationales Recht müssen verbrauchte Elektrowerkzeuge getrennt gesammelt werden und einer
umweltgerechten Wiederverwertung zugeführt werden.
Recycling-Alternative zur Rücksendeaufforderung:
Der Eigentümer des Elektrogerätes ist alternativ anstelle Rücksendung zur Mitwirkung bei der sachgerechten Verwertung im Falle der Eigentumsaufgabe verpflichtet. Das Altgerät kann hierfür auch einer
Rücknahmestelle überlassen werden, die eine Beseitigung im Sinne der nationalen Kreislaufwirtschaftsund Abfallgesetze durchführt. Nicht betroffen sind den Altgeräten beigefügte Zubehörteile und Hilfsmittel
ohne Elektrobestandteile.
t For EU countries only
Never place any electric tools in your household refuse.
To comply with European Directive 2002/96/EC concerning old electric and electronic equipment and its
implementation in national laws, old electric tools have to be separated from other waste and disposed of
in an environment-friendly fashion, e.g. by taking to a recycling depot.
Recycling alternative to the demand to return electrical devices:
As an alternative to returning the electrical device, the owner is obliged to cooperate in ensuring that the
device is properly recycled if ownership is relinquished. This can also be done by handing over the used
device to a returns center, which will dispose of it in accordance with national commercial and industrial
waste management legislation. This does not apply to the accessories and auxiliary equipment without
any electrical components which are included with the used device.
p Uniquement pour les pays de l'Union Européenne
Ne jetez pas les outils électriques dans les ordures ménagères.
Selon la norme européenne 2002/96/CE relative aux appareils électriques et systèmes électroniques
usés et selon son application dans le droit national, les outils électriques usés doivent être récoltés à
part et apportés à un recyclage respectueux de l'environnement.
Possibilité de recyclage en alternative à la demande de renvoi :
Le propriétaire de lʼappareil électrique est obligé, en guise dʼalternative à un envoi en retour, à contribuer
à un recyclage effectué dans les règles de lʼart en cas de cessation de la propriété. Lʼancien appareil
peut être remis à un point de collecte dans ce but. Cet organisme devra lʼéliminer dans le sens de la Loi
sur le cycle des matières et les déchets. Ne sont pas concernés les accessoires et ressources fournies
sans composants électroniques.
Anleitung_BG_CG_3_6_Li_SPK7:_ 29.10.2008 14:02 Uhr Seite 38
Page 39

39
C Solo per paesi membri dell'UE
Non gettate gli utensili elettrici nei rifiuti domestici.
Secondo la Direttiva europea 2002/96/CE sui rifiuti di apparecchiature elettriche ed elettroniche e
l'applicazione nel diritto nazionale gli elettroutensili usati devono venire raccolti separatamente e smaltiti
in modo ecologico.
Alternativa di riciclaggio alla richiesta di restituzione
Il proprietario dellʼapparecchio elettrico è tenuto in alternativa, invece della restituzione, a collaborare in
modo che lo smaltimento venga eseguito correttamente in caso ceda lʼapparecchio. Lʼapparecchio
vecchio può anche venire consegnato ad un centro di raccolta che provvede poi allo smaltimento
secondo le norme nazionali sul riciclaggio e sui rifiuti. Non ne sono interessati gli accessori e i mezzi
ausiliari senza elementi elettrici forniti insieme ai vecchi apparecchi.
Enkel voor EU-landen
Elektrisch gereedschap hoort niet bij het huisvuil thuis.
Volgens de Europese richtlijn 2002/96/EG op afgedankte elektrische en elektronische toestellen en
omzetting in nationaal recht dienen afgedankte elektrische gereedschappen afzonderlijk te worden
verzameld en milieuvriendelijk te worden gerecycleerd.
Recyclagealternatief i.p.v. het verzoek het toestel terug te sturen:
In plaats van het elektrische toestel terug te sturen is alternatief de eigenaar van het toestel gehouden
mee te werken aan de adequate recyclage als het eigendom wordt opgegeven. Hiervoor kan het
afgedankte toestel eveneens bij een inzamelplaats worden afgegeven waar het toestel wordt verwijderd
als bedoeld in de wetgeving in zake afvalverwerking en recyclage. Dit geldt niet voor toebehoorstukken
en hulpmiddelen zonder elektrische componenten die bij de afgedankte toestellen zijn bijgevoegd.
j Pouze pro členské země EU
Nedávejte elektrické nářadí do domácího odpadu.
Podle Evropské směrnice 2002/96/EG o starých elektrických a elektronických přístrojích (WEEE) a podle
národního práva musí být použité elektrické nářadí odděleně skladováno a odevzdáno k ekologické
recyklaci.
Alternativa recyklace k zaslání zpět:
Vlastník elektrického přístroje je alternativně namísto zaslání zpět povinen ke spolupráci při odborné
recyklaci v případě, že se rozhodne přístroj zlikvidovat. Starý přístroj může být v tomto případě také
odevzdán do sběrny, která provede likvidaci ve smyslu národního zákona o hospodářském koloběhu a
zákona o odpadech. Toto neplatí pro ke starým přístrojům přiložené části příslušenství a pomocné
prostředky bez elektrických součástí.
W Len pre krajiny EÚ
Neodstraňujte elektrické prístroje ako domový odpad.
Podľa Európskej smernice 2002/96/ES o odpade z elektrických a elektronických zariadení (OEEZ) a v
súlade s národnými právnymi predpismi sa musia použité elektronické prístroje odovzdať do triedeného
zberu a musí sa zabezpečiť špecifické spracovanie a recyklácia.
Recyklačná alternatíva k výzve na spätný odber výrobku:
Vlastník elektrického prístroja je alternatívne namiesto spätnej zásielky povinný spolupracovať pri riadnej
recyklácii prístroja voj môže byť za týmto účelom taktiež prenechaný zbernému miestu, ktoré vykoná
odstránenie v zmysle národného zákona o recyklácii a ckých komponentov.
Anleitung_BG_CG_3_6_Li_SPK7:_ 29.10.2008 14:02 Uhr Seite 39
Page 40

40
U Endast för EU-länder
Kasta inte elverktyg i hushållssoporna.
Enligt det europeiska direktivet 2002/96/EG om avfall som utgörs av eller innehåller elektriska eller
elektroniska produkter och dess tillämpning i den nationella lagstiftningen, måste förbrukade elverktyg
källsorteras och lämnas
Återvinnings-alternativ till begäran om återsändning:
Som ett alternativ till återsändning är ägaren av elutrustningen skyldig att bidraga till ändamålsenlig
avfallshantering för det fall att utrustningen ska skrotas. Efter att den förbrukade utrustningen har läm
nats in till en avfallsstation kan den omhändertas i enlighet med gällande nationella lagstiftning om återvinning och avfallshantering. Detta gäller inte för tillbehörsdelar och hjälpmedel utan elektriska komponenter vars syfte har varit att komplettera den förbrukade utrustningen.
Anleitung_BG_CG_3_6_Li_SPK7:_ 29.10.2008 14:02 Uhr Seite 40
Page 41

41
Technische Änderungen vorbehalten
Technical changes subject to change
Sous réserve de modifications
Con riserva di apportare modifiche tecniche
j Technické změny vyhrazeny
W Technické změny vyhradené
Technische wijzigingen voorbehouden
Förbehåll för tekniska förändringar
Anleitung_BG_CG_3_6_Li_SPK7:_ 29.10.2008 14:02 Uhr Seite 41
Page 42

42
Der Nachdruck oder sonstige Vervielfältigung von Dokumentation und
Begleitpapieren der Produkte, auch auszugsweise ist nur mit ausdrücklicher Zustimmung der ISC GmbH zulässig.
The reprinting or reproduction by any other means, in whole or in part,
of documentation and papers accompanying products is permitted only
with the express consent of ISC GmbH.
La réimpression ou une autre reproduction de la documentation et des
documents dʼaccompagnement des produits, même incomplète, nʼest
autorisée quʼavec lʼagrément exprès de lʼentreprise ISC GmbH.
La ristampa o lʼulteriore riproduzione, anche parziale, della
documentazione o dei documenti dʼaccompagnamento dei prodotti è
consentita solo con lʼesplicita autorizzazione da parte della ISC GmbH.
j
Dotisk nebo jiné rozmnožování dokumentace a průvodních
dokumentů výrobků, také pouze výňatků, je přípustné výhradně se
souhlasem firmy ISC GmbH.
W
Kopírovanie alebo iné rozmnožovanie dokumentácie a sprievodných
podkladov produktov, a to aj čiastočné, je prípustné len s výslovným
povolením spoločnosti ISC GmbH.
Nadruk of andere reproductie van documentatie en geleidepapieren
van de producten, geheel of gedeeltelijk, enkel toegestaan mits
uitdrukkelijke toestemming van ISC GmbH.
Eftertryck eller annan duplicering av dokumentation och medföljande
underlag för produkter, även utdrag, är endast tillåtet med uttryckligt
tillstånd från ISC GmbH.
Anleitung_BG_CG_3_6_Li_SPK7:_ 29.10.2008 14:02 Uhr Seite 42
Page 43

43
Anleitung_BG_CG_3_6_Li_SPK7:_ 29.10.2008 14:02 Uhr Seite 43
Page 44

44
t
GUARANTEE CERTIFICATE
Dear Customer,
All of our products undergo strict quality checks to ensure that they reach you in perfect condition. In the unlikely
event that your device develops a fault, please contact our service department at the address shown on this
guarantee card. Of course, if you would prefer to call us then we are also happy to offer our assistance under
the service number printed below. Please note the following terms under which guarantee claims can be made:
1. These guarantee terms cover additional guarantee rights and do not affect your statutory warranty rights.
We do not charge you for this guarantee.
2. Our guarantee only covers problems caused by material or manufacturing defects, and it is restricted to the
rectification of these defects or replacement of the device. Please note that our devices have not been
designed for use in commercial, trade or industrial applications. Consequently, the guarantee is invalidated
if the equipment is used in commercial, trade or industrial applications or for other equivalent activities. The
following are also excluded from our guarantee: compensation for transport damage, damage caused by
failure to comply with the installation/assembly instructions or damage caused by unprofessional
installation, failure to comply with the operating instructions (e.g. connection to the wrong mains voltage or
current type), misuse or inappropriate use (such as overloading of the device or use of non-approved tools
or accessories), failure to comply with the maintenance and safety regulations, ingress of foreign bodies
into the device (e.g. sand, stones or dust), effects of force or external influences (e.g. damage caused by
the device being dropped) and normal wear resulting from proper operation of the device.
The guarantee is rendered null and void if any attempt is made to tamper with the device.
3. The guarantee is valid for a period of 2 years starting from the purchase date of the device. Guarantee
claims should be submitted before the end of the guarantee period within two weeks of the defect being
noticed. No guarantee claims will be accepted after the end of the guarantee period. The original guarantee
period remains applicable to the device even if repairs are carried out or parts are replaced. In such cases,
the work performed or parts fitted will not result in an extension of the guarantee period, and no new
guarantee will become active for the work performed or parts fitted. This also applies when an on-site
service is used.
4. In order to assert your guarantee claim, please send your defective device postage-free to the address
shown below. Please enclose either the original or a copy of your sales receipt or another dated proof of
purchase. Please keep your sales receipt in a safe place, as it is your proof of purchase. It would help us if
you could describe the nature of the problem in as much detail as possible. If the defect is covered by our
guarantee then your device will either be repaired immediately and returned to you, or we will send you a
new device.
Of course, we are also happy offer a chargeable repair service for any defects which are not covered by the
scope of this guarantee or for units which are no longer covered. To take advantage of this service, please send
the device to our service address.
Anleitung_BG_CG_3_6_Li_SPK7:_ 29.10.2008 14:02 Uhr Seite 44
Page 45

45
p
BULLETIN DE GARANTIE
Chère Cliente, Cher Client,
Nos produits sont soumis à un contrôle de qualité très strict. Si cet appareil devait toutefois ne pas fonctionner
impeccablement, nous en serions désolés. Dans un tel cas, nous vous prions de bien vouloir prendre contact
avec notre service après-vente à l‘adresse indiquée sur le bulletin de garantie. Nous restons également
volontiers à votre disposition au numéro de téléphone de service indiqué plus bas. Pour faire valoir une
demande de garantie, ce qui suit est valable :
1. Les conditions de garantie règlent les prestations de garantie supplémentaires. Vos droits de garantie
légaux ne sont en rien altérés par la garantie présente. Notre prestation de garantie est gratuite.
2. La prestation de garantie s’applique exclusivement aux défauts occasionnés par des vices de fabrication ou
de matériau et est limitée à l’élimination de ces défauts ou encore au remplacement de l’appareil. Veillez au
fait que nos appareils, conformément à leur affectation, n’ont pas été construits pour être utilisés dans un
environnement professionnel, industriel ou artisanal. Un contrat de garantie ne peut avoir lieu dès lors que
l’appareil est utilisé à des activités dans des entreprises professionnelles, artisanales ou industrielles ou
toute autre activité du même genre. Sont également exclus de notre garantie : les prestations de
substitution de dommages dus aux transports, les dommages occasionnés par le non-respect des
instructions de montage ou en raison d’une installation non conforme, du non-respect du mode d’emploi
(comme par exemple le raccordement à une mauvaise tension réseau ou à un mauvais type de courant),
les applications abusives ou non conformes (comme par exemple une surcharge de l’appareil ou encore
l’emploi d’accessoires non homologués), le non-respect des prescriptions de maintenance et de sécurité,
l’infiltration de corps étrangers dans l’appareil (comme par exemple du sable, des pierres ou de la
poussière), l’emploi de la force ou l’influence extérieure (comme par exemple les dommages dus à une
chute), ainsi que l’usure normale conforme à l’utilisation.
Le droit à la garantie disparaît dès lors que des interventions ont lieu sur l’appareil.
3. Le délai de garantie s’élève à 2 ans et commence à la date de l’achat de l’appareil. Les demandes de
garanties doivent être présentées avant écoulement du délai de garantie, dans les deux semaines suivant
le moment auquel le défaut a été reconnu. Toute reconnaissance de demande de garantie après
écoulement du délai de garantie est exclue. La réparation ou l’échange de l’appareil n’entraîne nullement
une prolongation de la durée de garantie. Elle ne fait pas non plus commencer un nouveau délai de
garantie, en raison de cette prestation, pour l’appareil ou pour toute autre pièce de rechange intégrée. Ceci
est également valable lorsqu’un service après-vente sur place a été consulté.
4. Pour faire reconnaître votre demande de garantie, veuillez nous envoyer l’appareil défectueux franco de
port à l’adresse indiquée ci-dessous. Ajoutez à l’envoi l’original du bon d’achat ou de tout autre preuve de
l’achat datée. Veuillez donc toujours bien conserver le bon d’achat en guise de preuve ! Décrivez la raison
de la réclamation le plus précisément possible. Si le défaut de l’appareil est compris dans notre prestation
de garantie, nous vous retournerons sans délai un appareil réparé ou encore un nouveau.
Bien entendu, nous sommes prêts également à réparer les appareils défectueux contre remboursement des
frais, dès lors que l’appareil n’est plus ou pas garanti. Pour ce faire, veuillez envoyer l’appareil à notre adresse
de service après-vente.
Anleitung_BG_CG_3_6_Li_SPK7:_ 29.10.2008 14:02 Uhr Seite 45
Page 46

46
C
CERTIFICATO DI GARANZIA
Gentili clienti,
i nostri prodotti sono soggetti ad un rigido controllo di qualità. Se l’apparecchio non dovesse tuttavia funzionare
correttamente, ci scusiamo e vi preghiamo di rivolgervi al nostro servizio di assistenza clienti all’indirizzo
indicato in questa scheda di garanzia. Siamo a vostra disposizione anche telefonicamente al numero del
servizio assistenza sotto indicato. Per la rivendicazione dei diritti di garanzia vale quanto segue:
1. Queste condizioni di garanzia regolano ulteriori prestazioni di garanzia. La presente garanzia non tocca i
vostri diritti al ricorso di garanzia previsti dalla legge. Le nostre prestazioni di garanzia sono per voi gratuite.
2. La prestazione di garanzia riguarda esclusivamente le anomalie riconducibili a difetti del materiale o di
produzione ed è limitata all’eliminazione di queste anomalie o alla sostituzione dell’apparecchio. Tenete
presente che i nostri apparecchi non sono stati costruiti per l’impiego professionale, artigianale o
industriale. Un contratto di garanzia non viene concluso quando l’apparecchio viene usato in imprese
commerciali, artigianali o industriali, o con attività equivalenti. Dalla nostra garanzia sono escluse inoltre le
prestazioni di risarcimento per danni dovuti al trasporto o danni causati dalla mancata osservanza delle
istruzioni per il montaggio o per installazione non corretta, dalla mancata osservanza delle istruzioni per
l’uso (come per es. collegamento a tensione di rete o tipo di corrente non corretto), dall’uso improprio o
illecito (come per es. sovraccarico dell’apparecchio o utilizzo di utensili o accessori non consentiti), dalla
mancata osservanza delle norme di sicurezza e di manutenzione, dalla penetrazione di corpi estranei
nell’apparecchio (come per es. sabbia, pietre o polvere), dall’impiego della forza o dall’influsso esterno
(come per es. danni dovuti a caduta) e dall’usura normale e dovuta all’impiego.
Il diritti di garanzia decadono quando sono già effettuati interventi sull’apparecchio.
3. Il periodo di garanzia è 2 anni e inizia alla data d’acquisto dell’apparecchio. I diritti di garanzia devono
essere fatti valere prima della scadenza del periodo di garanzia, entro due settimane dopo avere accertato
il difetto. È esclusa la rivendicazione di diritti di garanzia dopo la scadenza del relativo periodo. La
riparazione o la sostituzione dell’apparecchio non comporta una proroga del periodo di garanzia e con
questa prestazione per l’apparecchio o per pezzi di ricambio eventualmente installati non inizia un nuovo
periodo di garanzia. Questo vale anche nel caso si ricorra ad un servizio sul posto.
4. Per la rivendicazione dei vostri diritti di garanzia inviate l’apparecchio difettoso franco di porto all’indirizzo
sotto indicato. Allegate lo scontrino di cassa in originale o un’altra prova d’acquisto che riporti la data.
Conservate bene perciò lo scontrino di cassa come prova! Indicate il motivo di reclamo nel modo più
dettagliato possibile. Se il difetto dell’apparecchio rientra nella nostra prestazione di garanzia, ricevete
l’apparecchio riparato o un apparecchio nuovo a stretto giro di posta.
Naturalmente effettuiamo a pagamento anche riparazioni sull’apparecchio che non rientrano o non rientrano più
nella garanzia. A tale scopo inviate l’apparecchio all’indirizzo del servizio assistenza.
Anleitung_BG_CG_3_6_Li_SPK7:_ 29.10.2008 14:02 Uhr Seite 46
Page 47

47
j
ZÁRUČNÍ LIST
Vážená zákaznice, vážený zákazníku,
naše výrobky podléhají přísné kontrole kvality. Pokud i přesto tento přístroj bezvadně nefunguje, velice toho
litujeme a prosíme Vás, abyste se obrátili na náš zákaznický servis, jehož adresa je uvedena na tomto záručním
listu. Rádi Vám budeme k dispozici také telefonicky na níže uvedeném servisním čísle. Pro uplatňování nároků
na záruku platí následující:
1. Tyto záruční podmínky upravují dodatečný záruční servis. Vašich zákonných nároků na záruku se tato
záruka netýká. Náš záruční servis je pro Vás bezplatný.
2. Záruční servis se vztahuje výhradně na nedostatky, které lze odvodit z vad materiálu nebo výrobních vad a
je také omezen pouze na odstranění těchto nedostatků, resp. výměnu přístroje. Dbejte prosím na to, že
naše přístroje nebyly podle svého účelu určení konstruovány pro živnostenské, řemeslnické nebo
průmyslové použití. Záruční smlouva tak není realizována, pokud byl přístroj používán v živnostenských,
řemeslných nebo průmyslových podnicích a při srovnatelných činnostech. Z naší záruky je dále vyloučeno
poskytnutí náhrady za dopravní škody, škody způsobené nedodržováním montážního návodu nebo z
důvodů neodborné instalace, nedodržování návodu k použití (jako např. připojení na chybné síťové napětí
nebo druh proudu), nedovoleného nebo neodborného používání (jako např. přetížení přístroje nebo použití
neschválených vložných nástrojů nebo příslušenství), nedodržování pokynů pro údržbu a bezpečnostních
pokynů, vniknutí cizích těles do přístroje (jako např. písek, kameny nebo prach), použití násilí nebo
poškození v důsledku cizích vlivů (jako např. škody způsobené pádem), jakož také běžného opotřebení
způsobeného používáním.
Nárok na záruku zaniká, pokud bylo do přístroje již zasahováno.
3. Záruční doba činí 2 roky a začíná datem koupě přístroje. Nároky na záruku před vypršením záruční doby je
třeba uplatňovat během dvou týdnů od zjištění defektu. Uplatňování nároků na záruku po vypršení záruční
doby je vyloučeno. Oprava nebo výměna přístroje nevede k prodloužení záruční doby, ani k zahájení nové
záruční doby za provedený výkon pro přístroj nebo pro případné zamontované náhradní díly. Toto platí také
v případě servisu v místě Vašeho bydliště.
4. Při uplatňování Vašeho nároku na záruku zašlete prosím přístroj bez poštovného na níže uvedenou adresu.
Přiložte originál prodejního dokladu nebo jiného datovaného potvrzení o koupi. Pokladní lístek si proto
dobře uložte jako důkaz! Popište nám prosím pokud možno přesně důvod reklamace. Je-li defekt přístroje v
našem záručním servisu obsažen, obdržíte obratem opravený nebo nový přístroj.
Samozřejmě rádi za úhradu nákladů odstraníme defekty na přístroji, které nespadají nebo již nespadají do
rozsahu záruky. K tomu nám přístroj prosím zašlete na naši servisní adresu.
Anleitung_BG_CG_3_6_Li_SPK7:_ 29.10.2008 14:02 Uhr Seite 47
Page 48

48
W
ZÁRUČNÝ LIST
Vážená zákazníčka, vážený zákazník,
naše výrobky podliehajú prísnej kontrole kvality. V prípade, že nebude prístroj napriek tomu bezchybne
fungovať, je nám to veľmi ľúto a prosíme Vás, aby ste sa obrátili na našu servisnú službu na adrese uvedenej
na tomto záručnom liste. Radi Vám budeme k dispozícii taktiež telefonicky na uvedenom servisnom telefónnom
čísle. Pri uplatňovaní nárokov na záručné plnenie platia nasledujúce podmienky:
1. Tieto záručné podmienky upravujú dodatočné záručné plnenie. Vaše zákonné nároky na záruku nie sú
touto zárukou dotknuté. Naše záručné plnenie je pre Vás zadarmo.
2. Záručné plnenie sa vzťahuje výlučne len na nedostatky, ktoré sú spôsobené chybami materiálu alebo
výrobnými chybami, a je obmedzené na odstránenie týchto nedostatkov resp. výmenu prístroja. Prosím,
dbajte na to, že naše prístroje neboli svojim určením konštruované na profesionálne, remeselnícke ani
priemyselné použitie. Táto záručná zmluva sa preto neuzatvára, ak sa prístroj bude používať
v profesionálnych, remeselníckych alebo priemyselných prevádzkach ako aj na činnosti rovnocenné s
takýmto použitím. Z našej záruky sú okrem toho vylúčené náhradné plnenie za škody pri transporte, škody
spôsobené nedodržaním návodu na montáž alebo na základe neodbornej inštalácie, nedodržaním návodu
na použitie (ako napr. pripojením na nesprávne sieťové napätie alebo druh prúdu), zneužívaním alebo
nesprávnym používaním (ako napr. preťaženie prístroja alebo použitie neprípustných pracovných nástrojov
alebo príslušenstva), nedodržaním pokynov pre údržbu a bezpečnostných pokynov, vniknutím cudzích
telies do prístroja (ako napr. piesok, kamene alebo prach), použitím násilia alebo cudzieho pôsobenia
(napr. škody spôsobené pádom), a taktiež je vylúčené bežné opotrebenie primerané použitiu.
Nárok na záruku zaniká, ak už boli na prístroji svojvoľne uskutočnené zásahy.
3. Doba záruky je 2 roky a začína sa dátumom nákupu prístroja. Nároky na záruku sa musia uplatniť pred
koncom uplynutia záručnej doby do dvoch týždňov od zistenia nedostatku. Uplatnenie nárokov na záruku
po uplynutí záručnej doby je vylúčené. Oprava alebo výmena prístroja nevedie k predľženiu záručnej doby
ani nedochádza na základe tohto plnenia ku vzniku novej záručnej doby pre prístroj ani pre akékoľvek
inštalované náhradné diely. To platí taktiež pri nasadení miestneho servisu.
4. Pre uplatnenie nároku na záruku nám prosím zašlite defektný prístroj oslobodený od poštovného na dole
uvedenú adresu. Priložte predajný doklad v origináli alebo iný doklad o zakúpení s dátumom. Prosím,
starostlivo si preto uschovajte pokladničný blok ako doklad o zakúpení! Prosím, popíšte nám čo
najpresnejšie dôvod reklamácie. Ak spadá defekt prístroja pod naše záručné plnenie, dostanete obratom
naspäť opravený alebo nový prístroj.
Samozrejme Vám radi opravíme závady na prístroji na vaše náklady, ak tieto závady nespadajú alebo už
nespadajú do rozsahu záruky. Prosím, pošlite nám v takom prípade prístroj na našu servisnú adresu.
Anleitung_BG_CG_3_6_Li_SPK7:_ 29.10.2008 14:02 Uhr Seite 48
Page 49

49
N
GARANTIEBEWIJS
Geachte klant,
onze producten zijn aan een strenge kwaliteitscontrole onderhevig. Mocht dit apparaat echter ooit niet naar
behoren functioneren, spijt het ons ten zeerste en vragen u zich tot onze servicedienst onder het adres vermeld
op dit garantiebewijs te wenden. Wij staan ook graag telefonisch tot uw dienst via het hieronder vermelde
servicetelefoonnummer. Voor vorderingen in verband met garantie geldt het volgende:
1. Deze garantievoorwaarden regelen bijkomende garantieprestaties. Uw wettelijke garantieclaims blijven
onaangetast door deze garantie. Onze garantieprestatie is voor uw gratis.
2. De garantieprestatie heeft uitsluitend betrekking op gebreken die te wijten zijn aan materiaal- of
fabricagefouten en is beperkt tot het verhelpen van deze gebreken of het vervangen van het apparaat. Wij
wijzen erop dat onze apparaten overeenkomstig hun bestemming niet geconstrueerd zijn voor
commercieel, ambachtelijk of industrieel gebruik. Een garantieovereenkomst komt daarom niet tot stand als
het apparaat in ambachtelijke of industriële bedrijven alsmede bij gelijk te stellen activiteiten wordt gebruikt.
Uitgesloten van onze garantie zijn verder schadeloosstellingen voor transportschade, schade door nietnaleving van de montage-instructies of op grond van ondeskundige installatie, niet-naleving van de
handleiding (zoals door b.v. aansluiting op een verkeerde netspanning of stroomsoort), oneigenlijke of
onoordeelkundige toepassingen (zoals b.v. overbelasting van het apparaat of gebruik van niet toegestane
inzetgereedschappen of toebehoren), niet-naleving van de onderhouds- en veiligheidsbepalingen,
binnendringen van vreemde voorwerpen in het apparaat (zoals b.v. zand, stenen of stof), gebruikmaking
van geweld of invloeden van buitenaf (zoals b.v. schade door neervallen) alsmede door normale slijtage die
zich bij het doelmatig gebruik van het apparaat voordoet.
Er kan geen aanspraak op garantie worden gemaakt als op het apparaat reeds ingrepen werden
uitgevoerd.
3. De garantieperiode bedraagt 2 jaar en gaat in op de datum van aankoop van het apparaat. Garantieclaims
dienen voor het verloop van de garantieperiode binnen de twee weken na het vaststellen van het defect
geldend te worden gemaakt. Het geldend maken van garantieclaims na verloop van de garantieperiode is
uitgesloten. De herstelling of vervanging van het apparaat leidt noch tot een verlenging van de
garantieperiode noch wordt door deze prestatie een nieuwe garantieperiode voor het apparaat of voor
eventueel ingebouwde wisselstukken op gang gebracht. Dit geldt ook bij het ter plaatse uitvoeren van een
serviceactiviteit.
4. Om een garantieclaim geldend te maken dient u het defecte apparaat franco op te sturen aan het hieronder
vermelde adres. Voeg het originele verkoopbewijs of een ander gedateerd bewijs van aankoop bij. Gelieve
daarom de kassabon als bewijs goed te bewaren! Wij verzoeken u de reden van de klacht zo nauwkeurig
mogelijk te beschrijven. Valt het defect van het apparaat binnen onze garantieprestatie bezorgen wij u per
omgaande een hersteld of nieuw apparaat terug.
Uiteraard staan wij ook tot u dienst om mits betaling van de kosten defecten van het apparaat te verhelpen die
buiten de garantieomvang vallen. Te dien einde stuurt u het apparaat aan ons serviceadres op.
Anleitung_BG_CG_3_6_Li_SPK7:_ 29.10.2008 14:02 Uhr Seite 49
Page 50

50
U
GARANTIBEVIS
Bästa kund,
Våra produkter genomgår en sträng kvalitetskontroll. Om denna produkt mot förmodan inte fungerar på rätt sätt,
beklagar vi detta och ber dig att kontakta vår serviceavdelning under adressen som anges på garantikortet. Vi
står även gärna till tjänst på telefon under servicenumret som anges nedan. Följande punkter gäller för att du
ska kunna göra anspråk på garantin:
1. I dessa garantivillkor regleras extra garantitjänster. Garantianspråk som regleras enligt lag påverkas inte av
denna garanti. Våra garantitjänster är gratis för dig.
2. Garantitjänsterna täcker endast in sådana brister som kan härledas till material- eller fabrikationsfel och är
begränsade till arbetsuppgifter som syftar till att åtgärda dessa brister eller byta ut produkten. Tänk på att
våra produkter endast får användas till ändamålsenligt syfte och inte har konstruerats för yrkesmässig,
hantverksmässig eller industriell användning. Ett garantiavtal sluts därför ej om produkten ska användas
inom yrkesmässiga, hantverksmässiga eller industriella verksamheter eller vid liknande aktiviteter. Vår
garanti omfattar dessutom inte ersättning för transport skador, skador som kan härledas till missaktade
monterings anvisningar eller ej föreskriven installation, åsidosatt bruksanvisning (t ex anslutning till felaktig
nätspänning eller strömart), missbruk eller ej ändamålsenliga användningar (t ex överbelastning av
produkten eller användning av ej godkända insatsverktyg eller tillbehör), åsidosatta underhålls- och
säkerhetsbestämmelser, främmande partiklar som har trängt in i produkten (t ex sand, sten eller damm),
yttre våld eller yttre påverkan (t ex skador om produkten har fallit ned) samt normalt och användningsbundet
slitage.
Anspråk på garanti upphör att gälla om ingrepp redan har gjorts i produkten.
3. Garantitiden uppgår till 2 år och gäller från datumet när produkten köptes. Medan garantitiden fortfarande
gäller ska anspråk på garanti ställas inom två veckor efter att defekten fastställdes. Det är inte möjligt att
ställa anspråk på garanti efter att garantitiden har löpt ut. Garantitiden förlängs inte när produkten repareras
eller byts ut, dessutom medför sådana arbeten inte att en ny garantitid börjar gälla för produkten eller för ev.
reservdelar som har monterats in. Detta gäller även vid hembesök.
4. För att du ska kunna ställa anspråk på garantin ska den defekta produkten skickas in i tillräckligt frankerat
skick till adressen som anges nedan. Bifoga kvittot i original eller ett annat daterat köpebevis. Förvara därför
kassakvittot på en säker plats! Beskriv orsaken till reklamationen så noggrant som möjligt. Om defekten i
produkten täcks av våra garantitjänster, får du genast en reparerad eller ny apparat av oss.
Givetvis kan vi även, mot debitering, åtgärda skador som antingen inte täcks av garantin eller som har uppstått
efter garantitidens slut. Skicka in produkten till nedanstående serviceadress.
Anleitung_BG_CG_3_6_Li_SPK7:_ 29.10.2008 14:02 Uhr Seite 50
Page 51

51
k
GARANTIEURKUNDE
Sehr geehrte Kundin, sehr geehrter Kunde,
unsere Produkte unterliegen einer strengen Qualitätskontrolle. Sollte dieses Gerät dennoch einmal nicht einwandfrei funktionieren, bedauern wir dies sehr und bitten Sie, sich an unseren Servicedienst unter der auf dieser Garantiekarte angegebenen Adresse zu wenden. Gern stehen wir Ihnen auch telefonisch über die unten
angegebene Servicerufnummer zur Verfügung. Für die Geltendmachung von Garantieansprüchen gilt Folgendes:
1. Diese Garantiebedingungen regeln zusätzliche Garantieleistungen. Ihre gesetzlichen Gewährleistungsansprüche werden von dieser Garantie nicht berührt. Unsere Garantieleistung ist für Sie kostenlos.
2. Die Garantieleistung erstreckt sich ausschließlich auf Mängel, die auf Material- oder Herstellungsfehler zurückzuführen sind und ist auf die Behebung dieser Mängel bzw. den Austausch des Gerätes beschränkt.
Bitte beachten Sie, dass unsere Geräte bestimmungsgemäß nicht für den gewerblichen, handwerklichen
oder industriellen Einsatz konstruiert wurden. Ein Garantievertrag kommt daher nicht zustande, wenn das
Gerät in Gewerbe-, Handwerks- oder Industriebetrieben sowie bei gleichzusetzenden Tätigkeiten eingesetzt wird.
Von unserer Garantie sind ferner Ersatzleistungen für Transportschäden, Schäden durch Nichtbeachtung
der Montageanleitung oder aufgrund nicht fachgerechter Installation, Nichtbeachtung der Gebrauchsanleitung (wie durch z.B. Anschluss an eine falsche Netzspannung oder Stromart), missbräuchliche oder unsachgemäße Anwendungen (wie z.B. Überlastung des Gerätes oder Verwendung von nicht zugelassenen
Einsatzwerkzeugen oder Zubehör), Nichtbeachtung der Wartungs- und Sicherheitsbestimmungen, Eindringen von Fremdkörpern in das Gerät (wie z.B. Sand, Steine oder Staub), Gewaltanwendung oder
Fremdeinwirkungen (wie z. B. Schäden durch Herunterfallen) sowie durch verwendungsgemäßen, üblichen
Verschleiß ausgeschlossen.
Der Garantieanspruch erlischt, wenn an dem Gerät bereits Eingriffe vorgenommen wurden.
3. Die Garantiezeit beträgt 2 Jahre und beginnt mit dem Kaufdatum des Gerätes. Garantieansprüche sind vor
Ablauf der Garantiezeit innerhalb von zwei Wochen, nachdem Sie den Defekt erkannt haben, geltend zu
machen. Die Geltendmachung von Garantieansprüchen nach Ablauf der Garantiezeit ist ausgeschlossen.
Die Reparatur oder der Austausch des Gerätes führt weder zu einer Verlängerung der Garantiezeit noch
wird eine neue Garantiezeit durch diese Leistung für das Gerät oder für etwaige eingebaute Ersatzteile in
Gang gesetzt. Dies gilt auch bei Einsatz eines Vor-Ort-Services.
4. Für die Geltendmachung Ihres Garantieanspruches übersenden Sie bitte das defekte Gerät portofrei an die
unten angegebene Adresse. Fügen Sie den Verkaufsbeleg im Original oder einen sonstigen datierten Kaufnachweis bei. Bitte bewahren Sie deshalb den Kassenbon als Nachweis gut auf! Beschreiben Sie uns bitte
den Reklamationsgrund möglichst genau. Ist der Defekt des Gerätes von unserer Garantieleistung erfasst,
erhalten Sie umgehend ein repariertes oder neues Gerät zurück.
Selbstverständlich beheben wir gegen Erstattung der Kosten auch gerne Defekte am Gerät, die vom Garantieumfang nicht oder nicht mehr erfasst sind. Dazu senden Sie das Gerät bitte an unsere Serviceadresse.
iSC GmbH • Eschenstraße 6 • 94405 Landau/Isar (Deutschland)
Telefon: +49 [0] 180 5 120 509 • Telefax +49 [0] 180 5 835 830 (Anrufkosten: 0,14 Euro/Minute, Festnetz der T-Com)
E-Mail: info@isc-gmbh.info
• Internet: www.isc-gmbh.info
Anleitung_BG_CG_3_6_Li_SPK7:_ 29.10.2008 14:02 Uhr Seite 51
Page 52

EH 09/2008 (01)
Anleitung_BG_CG_3_6_Li_SPK7:_ 29.10.2008 14:02 Uhr Seite 52
Service Hotline kontaktieren oder bei iSC-Webadresse anmelden - es wird Ihnen eine Retourennummer zugeteilt l Ihre Anschrift eintragen l Fehlerbeschreibung
und Art.-Nr. und I.-Nr. angeben l Garantiefall JA/NEIN ankreuzen sowie Kaufbeleg-Nr. und Datum angeben und eine Kopie des Kaufbeleges beilegen
Sehr geehrte Kundin, sehr geehrter Kunde,
bitte beschreiben Sie uns die von Ihnen festgestellte Fehlfunktion Ihres Gerätes als Grund Ihrer Beanstandung möglichst genau. Dadurch können wir
für Sie Ihre Reklamation schneller bearbeiten und Ihnen schneller helfen. Eine zu ungenaue Beschreibung mit Begriffen wie „Gerät funktioniert nicht“
oder „Gerät defekt“ verzögert hingegen die Bearbeitung erheblich.
Welcher Fehler ist aufgetreten (genaue Angabe): Art.-Nr.: I.-Nr.:
PLZ Ort
Straße / Nr.:
Garantie:
JA
NEIN
Kaufbeleg-Nr. / Datum:
Name:
Service Hotline: 01805 120 509 · www.isc-gmbh.info
(0,14 € / min. Festnetz T-Com) - Mo-Fr. 8:00-20:00 Uhr
Mobil:
Telefon:
Retouren-Nr. iSC:
 Loading...