

Ultra® TT Bluetooth®Configuration Procedure
®
A NORDSON COMPANY
This is an EFD publication, which is protected by copyright. No part of this document may be photocopied, reproduced, or translated to another
language without the prior written consent of EFD.The information contained in this publication is subject to change without notice.
USA: 800-556-3484 or +1-401-434-1680
Europe: 0800 585733 or +44 (0) 1582 666334
Asia: +86 (21) 5854 2345
technical@efd-inc.com www.efd-inc.com

®
2
This document accompanies the EFD Ultra TT Bluetooth Kit (PN 700855) and provides step-bystep instructions for configuring the Ultra TT for use with Bluetooth. The Kit contains the following:
• CD containing EFD Ultra TT Version 1.2 firmware, User Guide and PDA Software (PN 7203452)
• Cordless Serial Adapter (PN 700856-1) which includes:
– Socket
™
Cordless Serial Adapter with Bluetooth®Wireless Technology
– AC Adapter
– Null Modem Connector
You will also need the following (not included in the Kit) to run Bluetooth on the Ultra TT:
• Bluetooth-enabled PDA
1
NOTE
The PDA should be fully charged before performing these procedures.
• Ultra TT Main PWA Board, Rev H with firmware Version 1.2 or higher
(Refer to Section II of this document for more details)
NOTE
Customers with Ultra TT systems with serial number EF30188 and below will need to purchase and
install a NEW main board (PN 700835). All new main boards come pre-installed with the Version 1.2
firmware.
Customers with Ultra TT systems with serial numbers EF30189—EF30372, will only need to install/re-
flash the Version 1.2 firmware on their existing board.
1
As of the published date of this document, the following Palm PDAs have been tested and known to work with the Ultra TT software
and hardware: Zire™ 72, Tungsten™ T, Tungsten™ T3, Tungsten™ T5, Tungsten™ E2.
Ultra TT Bluetooth®Configuration Procedure
A NORDSON COMPANY
®
Section I. Configuring the Socket™Adapter
What you will need:
• Computer with RS232 port and HyperTerminal
• Socket Cordless Serial Adapter
• AC Adapter
• Null Modem Connector (depending on your computer’s configuration)
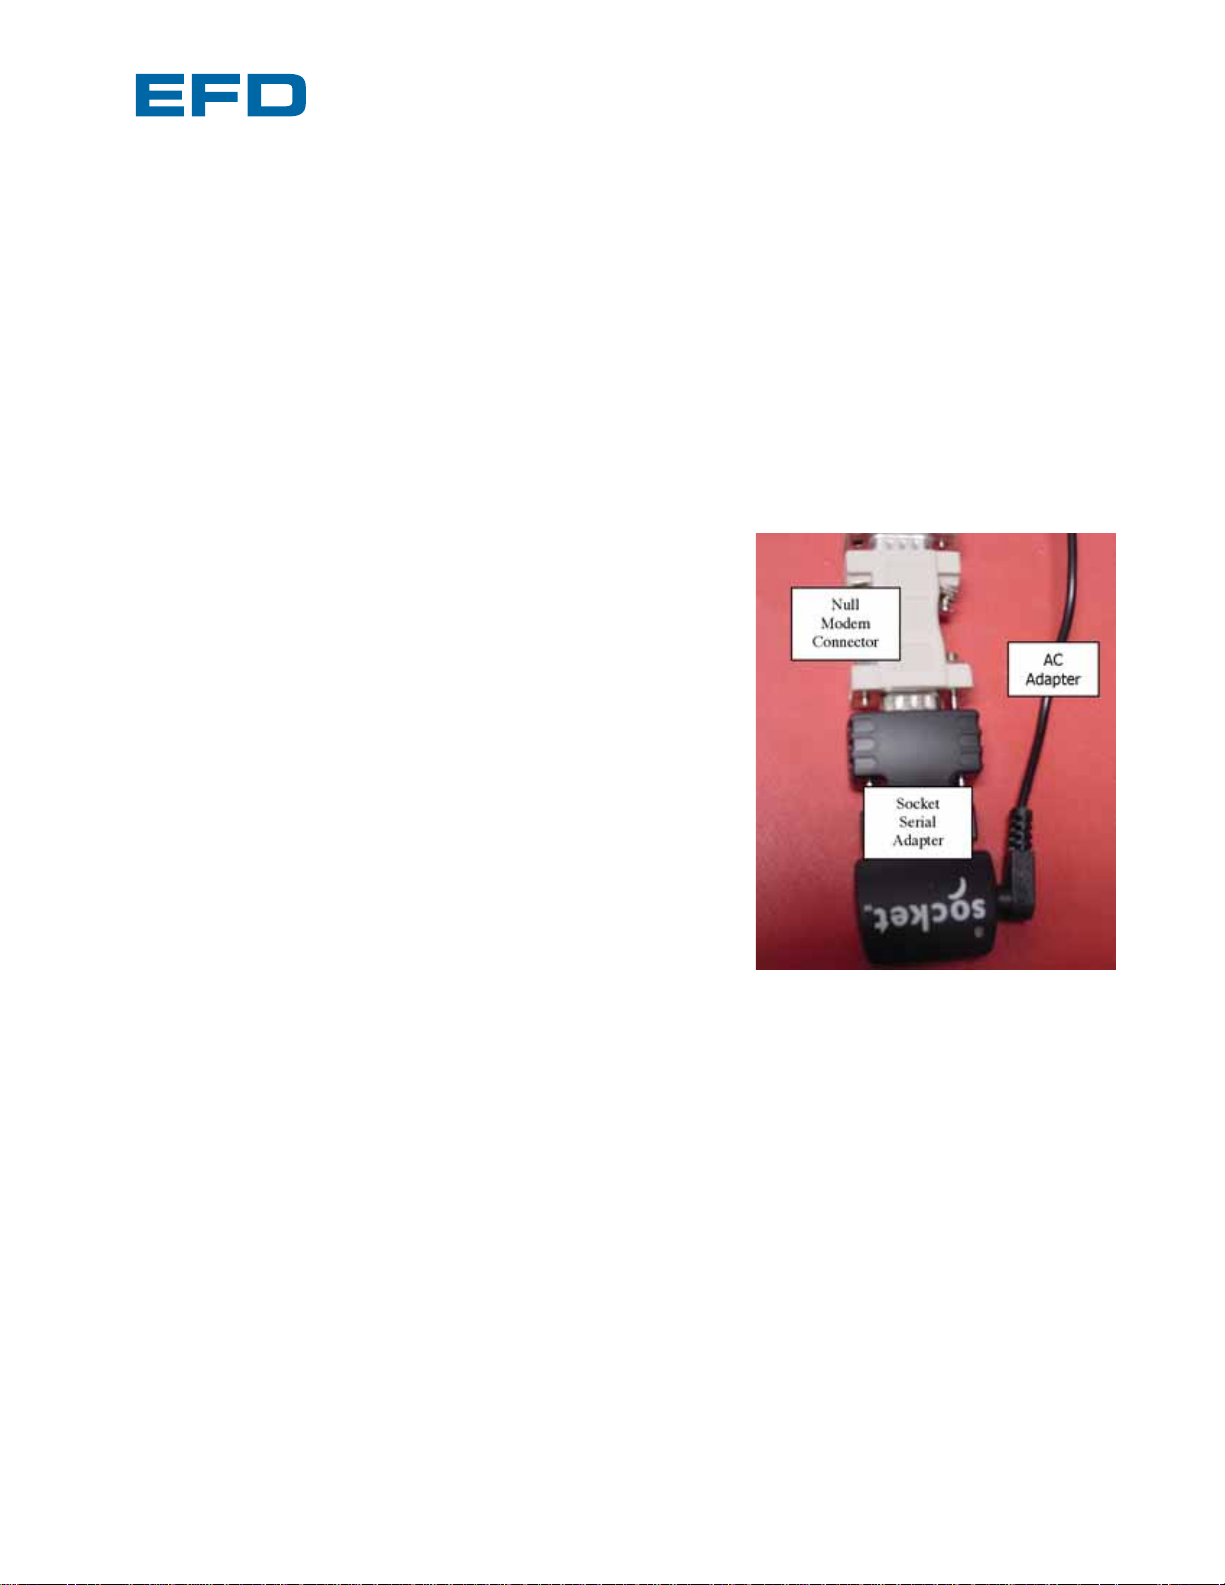
Configuring the adapter:
1. Plug the AC adapter into an AC outlet and connect the
other end to the Socket adapter.
2. Depending on your computer’s configuration, do ONE
of the following:
a. Insert the Socket adapter directly into the computer’s
COM port
OR
b. Insert the null modem connector into the COM port,
then insert the Socket adapter into the null modem
connector.
3. Insert the Socket Installation CD into the computer’s
CD-ROM drive
4. Use My Computer or Internet Explorer to access the
CD-ROM drive. Click on Setup.EXE. Follow the installation procedure.
5. The Socket Configuration Utility will run in Internet Explorer. Follow the instructions for your
device type and operating system. Click on the “Cordless Serial Adapter” icon that was placed
on your desktop to open the program. Click the Properties button on the main window.
3
Ultra TT Bluetooth®Configuration Procedure
A NORDSON COMPANY
A NORDSON COMPANY
®
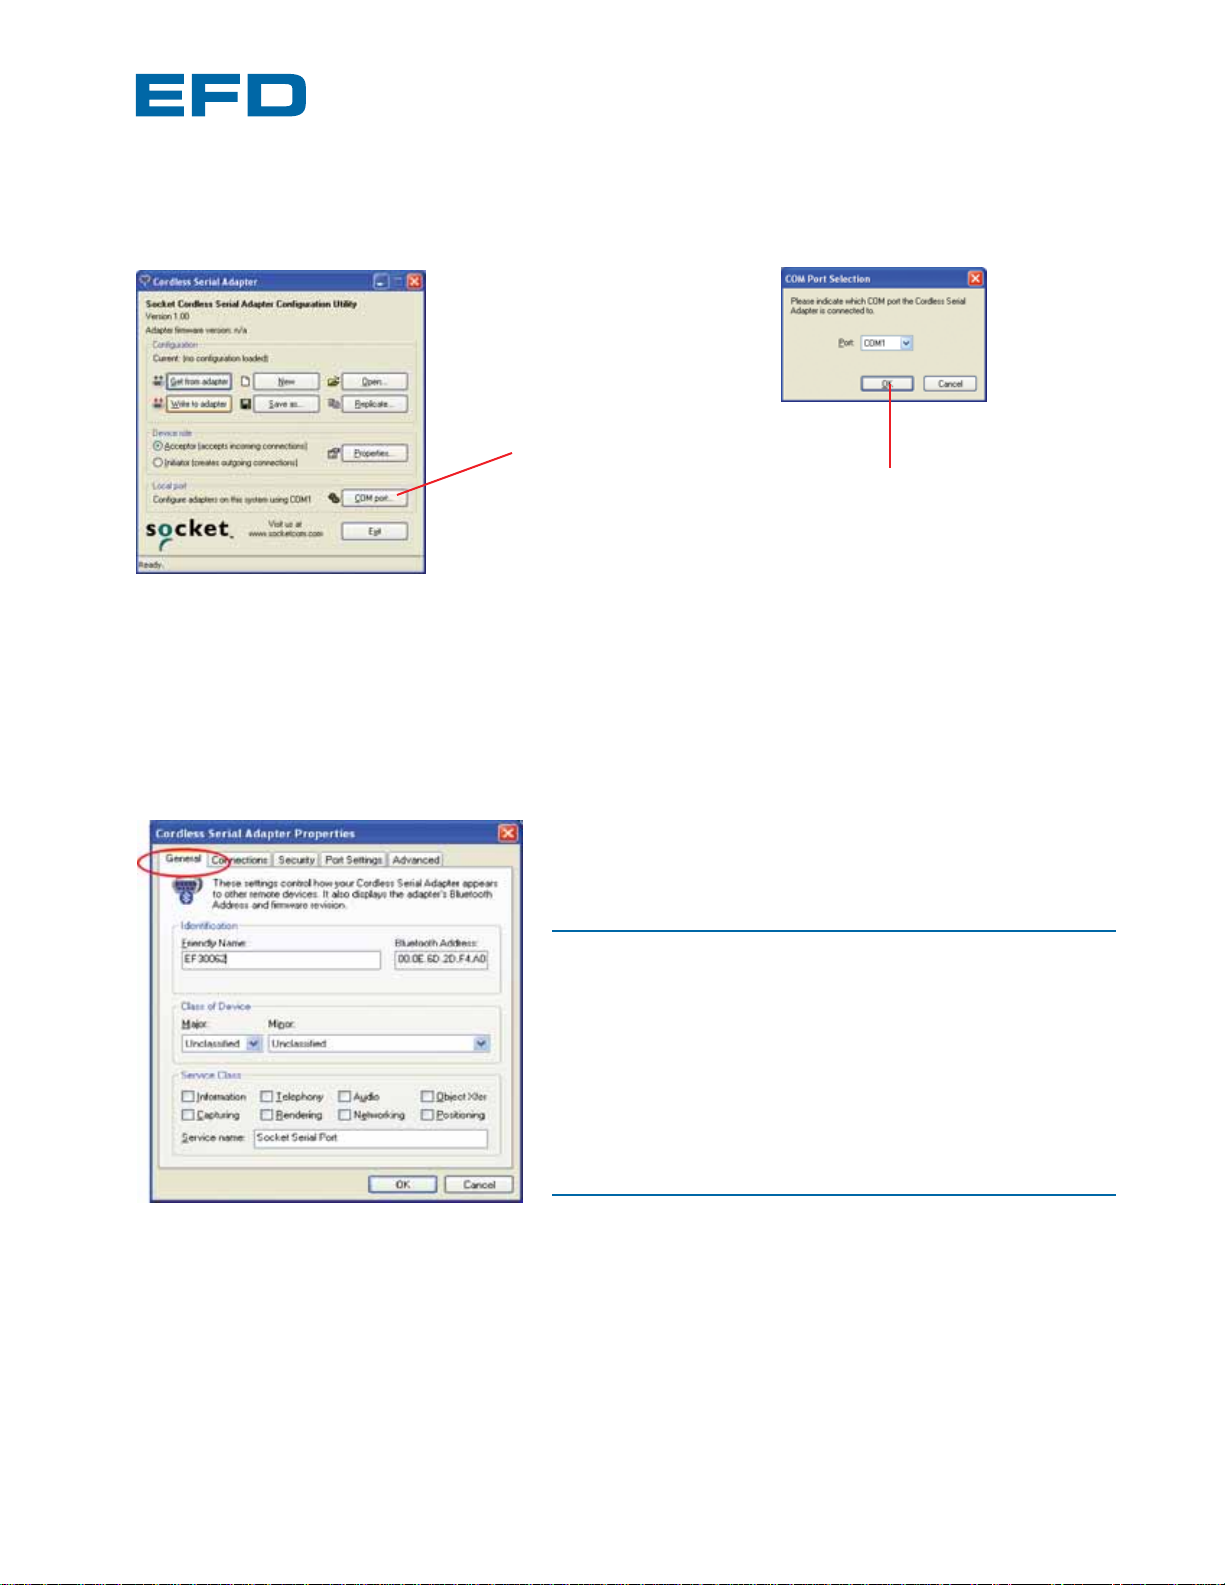
6. Select the COM port to which the Socket adapter is connected and click “OK.”
7. Click the Properties button on the main window.
8. On the General tab, enter EFxxxxx (where xxxxx is
the 5-digit serial number of the Ultra TT unit) in the
Friendly Name box.
NOTE
Once you have configured a Socket adapter for a specific
Ultra TT, it is recommended that you do not use that
adapter on a different Ultra TT unit to avoid confusion
during Pairing (ref: Section III).
Otherwise, reconfigure the Socket adapter by following the
above procedures before using it with a different
Ultra TT unit.
4
®
Ultra TT Bluetooth®Configuration Procedure
Click here to change PORT
Click “OK” once correct
PORT is selected
A NORDSON COMPANY
A NORDSON COMPANY
®
5
A NORDSON COMPANY
Ultra TT Bluetooth®Configuration Procedure
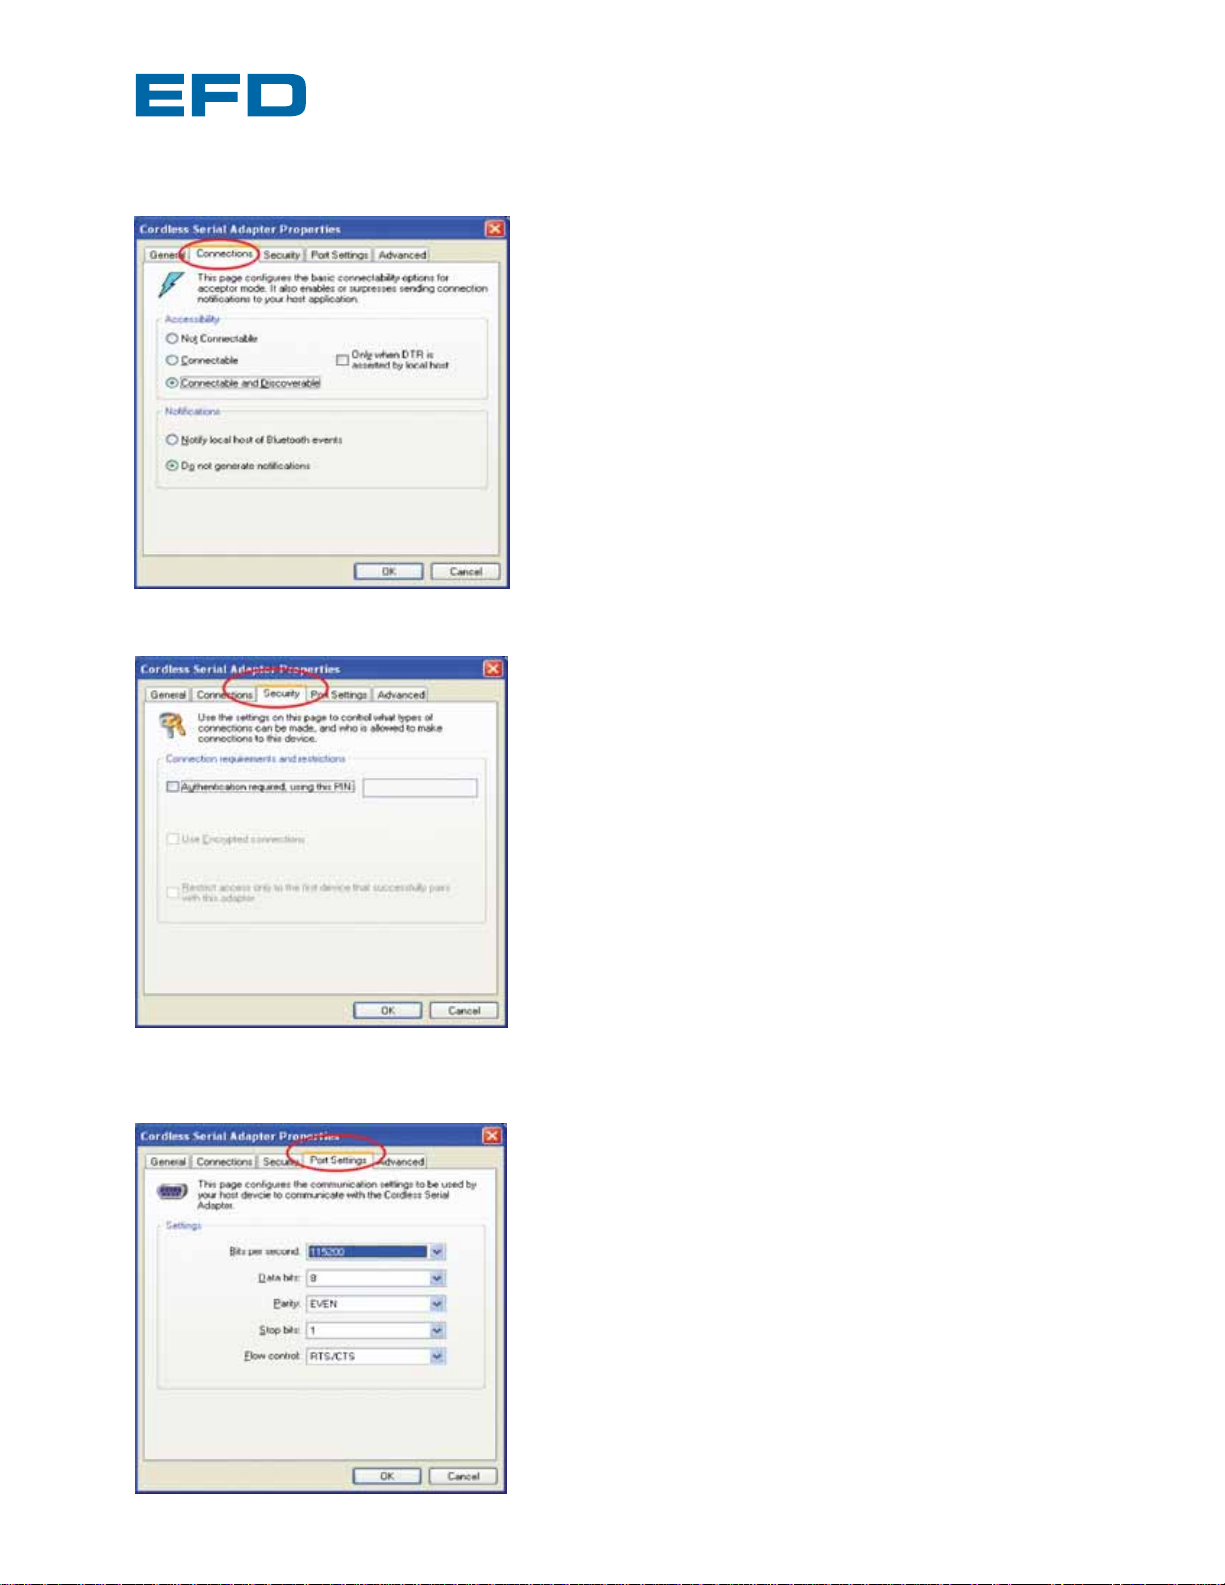
9. On the Connections tab, verify that Accessibility is
set to “Connectable and Discoverable” and
Notifications is set to “Do not generate notifications.”
10. On the Security tab, verify that no boxes have been
checked.
11. On the Port Settings tab, verify that the parameters
have been set as shown.
A NORDSON COMPANY
®
®

A NORDSON COMPANY
Ultra TT Bluetooth®Configuration Procedure
6
12. On the Advanced tab, verify that the parameters
have been set as shown, then click “OK.” You will be
returned to the main screen.
13. On the main screen, click on Write to Adapter. Select “Yes” if
prompted.
14. Click on Exit. The Socket adapter is now configured for use
with your Ultra TT.
15. Remove the Socket adapter from the computer and label it
with the Friendly Name entered in Step 8.
Click here
®

®
Section II. Configuring the Ultra TT for Bluetooth
For systems with serial number EF30188 and below:
1. Replace the board with a new Rev H board .
2. Install the configured Socket adapter.
3. Verify that the Version 1.2 firmware is installed by viewing the LCD panel display upon power-up.
4. Proceed to Section III and pair the PDA to the Ultra TT.
For systems with serial number EF30189 and above:
CAUTION
Observe proper ESD precautions when performing the following procedures.
1. Power down the Ultra TT, using the main circuit breaker on the back of the machine.
2. Unplug the power cord from the Ultra TT.
3. Remove the 11 screws that hold the electronics pan to the Ultra TT frame. There are 5
screws on the back panel and 4 along the front top edge. Two screws on the front top edge
are under the Y-axis cover plate, which is attached by two screws at the back of the cover.
7
Ultra TT Bluetooth®Configuration Procedure
2
To purchase new boards, contact EFD Customer Service (Americas: 800-556-3484; UK: 0800 585733) or your local EFD Ultra TT representative.
A NORDSON COMPANY

4. Slide the electronics pan out by placing your hands under the front bezel and lifting
slightly as you pull the pan out of the Ultra TT. Slide the pan out far enough to access the
DIP switches found on the right side of the main board.
5. Verify that DIP switches 1 and 2 are set as follows:
SW1: Bits 1&2 OFF – Sets front and rear COM ports to 8 data bits for Bluetooth capability
SW2: Bits 1&2 OFF – Sets front and rear COM ports to 115k baud (should already be off)
6. Slide the electronics pan back into the Ultra TT.
7. Remove the AC adapter and attach the
configured Socket adapter to the Ultra TT’s
rear COM port.
8. Power up the Ultra TT and verify that the
LED on the Socket adapter is blinking.
9. Note the firmware version # when it appears
on the Ultra TT display
• Version 1.1 or below: Proceed to Appendix A and upgrade the firmware before pairing
the PDA to the Ultra TT.
• Version 1.2 or above: Power down the Ultra TT.
10. Reinstall the 11 screws and Y-axis cover, then pair the PDA to the Ultra TT as described
in Section III.
8
®
Ultra TT Bluetooth®Configuration Procedure
SW2
SW1
SW3
A NORDSON COMPANY
A NORDSON COMPANY
®

®
Ultra TT Bluetooth®Configuration Procedure
Section III. Pairing the PDA to the Ultra TT
1. Power down the Ultra TT, using the main circuit breaker on the back of the machine.
2. Turn the PDA on. Verify that EFD Ultra TT PDA Software Version 1.2 is installed on the PDA by
tapping the top-left corner on the Main screen and choosing “About.” If not, install according
to the instructions on the CD included with the Ultra TT Bluetooth Kit.
3. Turn the PDA off.
4. Verify that the configured Socket Adapter is connected to the Ultra TT.
5. Power up the Ultra TT and verify that the Socket adapter is blinking. From the front panel,
select Setup -> Next -> Configure Serial Ports -> Data Bits 8 to configure the Ultra TT’s front
and rear COM ports for Bluetooth.
NOTE
To use a Teach Pendant Cable (PN # 700818) with a non-Bluetooth PDA or teach pendant,
you must select “Data Bits 7.”
6. Turn the PDA on.
7. Launch EFD Ultra TT PDA Application Version 1.2.
8. In the Main Menu, select Tools -> Bluetooth -> Discover. Wait about 15 seconds to list any
wireless devices in range.
9. Highlight the name or serial number entered when you configured the Socket Adapter in
Section I, then tap “Connect.”
10. Enter 1234 as the passkey for the Socket Adapter. Verify that the “Add to trusted devices list”
option is NOT selected, then tap “OK”.
9
A NORDSON COMPANY

Important Notes
Recharge the PDA and sync it to your computer at the end of every day. Otherwise, you might
lose the information entered since the last sync session.
The next time you want to connect to the Ultra TT using the same PDA, launch the EFD Ultra TT
PDA Application. When asked if you wish to reconnect to the last device you communicated
with, select “Yes” and go through the re-initialization steps.
If you are using a new PDA or a different PDA from the one last used/paired with the Ultra TT,
you must perform steps 7-10, Section 3 again to pair the new PDA with the Socket Adapter
installed on the Ultra TT.
If the PDA ever gets out of range of the Ultra TT (approximately 30 feet), Communications Error
#1104 will occur. The Bluetooth connection will be re-established automatically when the PDA
comes back within range.
If the PDA powers down, it may be able to reconnect without restarting the Ultra TT and the EFD
Ultra TT PDA Application by waiting 8-10 seconds. In this case, the Bluetooth Reconnect
window will pop up and communication will be established. (If the Reconnect window does not
pop up, restart the application by returning to PDA Home and relaunching the EFD Ultra TT PDA
Application.)
10
®
Ultra TT Bluetooth®Configuration Procedure
A NORDSON COMPANY
A NORDSON COMPANY
®

®
Ultra TT Bluetooth®Configuration Procedure
Appendix A
EFD Ultra TT PDA Application Firmware Upgrade
Overview
This procedure describes how to upgrade the EFD Ultra TT PDA Application firmware on the Ultra
TT using a PDA. Note that the PDA software must first be loaded onto a computer so that the
firmware data file can be hot-synced (copied) to the PDA.
You will also need the restoration diskette or mini CD that came with your Ultra TT to restore
system parameters or “personalities” after the firmware update. If you are unable to locate your
restoration disk or did not receive one with your Ultra TT system, please contact your local Ultra
TT sales representative.
NOTE
After flashing the firmware, all dispensing programs will be erased from the TT!
Be sure that all dispensing programs have been hot-synced and backed up on your computer prior
to performing the firmware upgrade. After the upgrade, you will need to download your dispensing
programs to the TT again using the PDA.
Procedure
Upgrade the firmware on the Ultra TT as follows:
A. Hot-Sync Files to the PDA
1. Copy the firmware file (.MOT) from the Ultra TT CD to the EFD sync folder (C:\Programs
Files\Palm\<your PDA name>\EFD\Sync) on your computer.
(If you do not have this folder on your computer, you must first install the EFD PDA software
from the CD that came with your Ultra TT.)
2. Copy the SNxxxxx.ACL recovery file from the Ultra TT mini-CD or diskette to the EFD sync
folder.
3. Hot-sync your PDA to copy the files from the computer to the PDA.
11
A NORDSON COMPANY

®
Ultra TT Bluetooth®Configuration Procedure
B. Set up Ultra TT Hardware for Firmware Flashing
1. Power down the Ultra TT, using the main circuit breaker on the back of the machine.
2. Unplug the power cord from the Ultra TT.
3. Remove the 11 screws that hold the electronics pan to the Ultra TT frame. There are 5
screws on the back panel and 4 along the front top edge. Two screws on the front top edge
are under the Y-axis cover plate, which is attached by two screws at the back of the cover.
4. Slide the electronics pan out by placing your hands under the front bezel and lifting slightly
as you pull the pan out of the Ultra TT. Slide the pan out far enough to access the DIP
switches on the right side of the main electronics board.
5. Locate DIP switch SW3. Slide SW3-2 (the middle bit) to the OFF position
to enable the re-flash mode.
6. Slide the electronics pan back into the Ultra TT.
C. Download the Firmware File to the Ultra TT with the PDA
1. Turn on the PDA and launch the EFD Ultra TT PDA Application. Do not tap any buttons or
menus other than those listed in these instructions.
NOTE
In the re-flash mode, the Ultra TT will not initialize with the PDA as it normally does.
2. Tap the main menu bar, then tap the “Controller” menu item. Verify that the baud rate is set
at 115200.
The lower half of this screen is titled “Update firmware from:” If more than one firmware file
has been loaded onto this PDA, select the desired firmware file from the dropdown list, then
tap the Download button.
3. Since the TT is already powered up, when the “Boot…Flash” message appears, just tap the
“OK” button.
12
A NORDSON COMPANY

®
Ultra TT Bluetooth®Configuration Procedure
4. A sequence of status messages will appear to the right of the download button. The first
message is “Erasing flash...” Once the flash memory has been erased, the message will
change to “Starting download...” A gas gauge, showing the percentage of bytes sent
compared to the total number of bytes to send, will be displayed.
When all bytes have been downloaded, a “Waiting to complete” message will be displayed. If the
download was successful, a “Download complete” message will be displayed.
5. Exit the EFD Ultra TT PDA application by tapping the “Home” button.
D. Return Hardware Setup to Run Mode
1. Power down the Ultra TT, using the main circuit breaker on the back of the machine.
2. Unplug the power cord from the Ultra TT.
3. Slide the electronics pan out by placing your hands under the front bezel and lifting slightly as
you pull the pan out of the Ultra TT. Slide the pan out far enough to access the DIP switches
found on the right side of the main electronics board.
4. Locate SW3. Slide SW3-2 (the middle bit) back to the ON position to disable the re-flash mode.
5. Slide the electronics pan back into the Ultra TT.
6. Reinstall the 11 screws and Y-axis cover, connect the power cord and turn on the TT.
E. Clear Download Memory
1. From the front panel of the TT, turn the rotary knob to the right until the SETUP selection
appears. Press the softkey button under the SETUP label.
2. Press the softkey under the “ESC.!35:” display, then press the softkey under the “PROCEED”
display. Wait for this process to complete (screen returns to RUN- LOAD-JOG> display).
Cycle the TT power off and then back on using the red emergency switch and the green
power button.
13
A NORDSON COMPANY

®
Ultra TT Bluetooth®Configuration Procedure
F. Restore Machine-specific Configuration Data
1. Turn on the PDA and start the EFD Ultra TT PDA Application. Tap the Tools button and then
the Database Manager button.
2. From the “Type:” drop-down list, select ACL.
3. From the Databases list select the SNxxxxx.ACL file synced in Step A above.
4. Tap the Download button.
5. The download time should be very quick, resulting in a “Download complete” status
message to the right of the Download button.
6. Exit the EFD application by tapping the “Home” button.
7. Cycle the TT power off and then back on using the red emergency switch and the green
power button.
G. Confirmation
1. When powering up the TT, the Serial Number and firmware version will be displayed on the
LCD panel display for a few seconds. The firmware version should read “V1.2.”
2. To start the EFD Ultra TT PDA application, tap either the Setup or the Program button to
initialize the Ultra TT. The Ultra TT should home the axes and then display the Setup or
Program window.
14
A NORDSON COMPANY

®
Ultra TT Bluetooth®Configuration Procedure
Troubleshooting
Firmware download fails to complete, resulting in Error #1104 (A Comm error has disabled
communications).
First, try to flash the firmware again. Exit the EFD Ultra TT PDA application and cycle the power on
the TT off and then back on. Start over at Section C, step 1.
If the flash fails again, attempt to flash at 9600 baud. To set the machine to 9600 baud (115200 is
the default) set DIP switch SW2-1 to ON . This is for the front panel connector used by the PDA,
not the back panel 9-pin connector. Power down the TT, set SW2-1 to ON, then power up the TT.
Set the baud rate on the PDA to 9600 by using the “Baud Rate:” drop-down list at the top of the
“Controller Options” window.
Once the firmware re-flash is successful, remember to change SW2-1 back to the OFF position
and set the PDA’s baud rate back to 115200.
Controller Error (1) – An unrecognized mnemonic received.
The socket adapter is configured to “Notify Local Host of Bluetooth Events”. Reconfigure the
Connections Property by checking the “Do not generate notifications” button. Refer to Section 1
(9) on page 5.
Technical Support
For further assistance, please contact EFD Customer Service at
Email: automation@efd-inc.com
USA: 800-556-3484
+1 401-434-1680
UK: 0800 585733
+44 (0) 1582 666334
15
A NORDSON COMPANY

This equipment is regulated by the European Union under WEEE Directive (2002/96/EC).
See www.efd-inc.com for information about how to properly dispose of this equipment."
For EFD sales and service in over 30 countries,
contact EFD or go to www.efd-inc.com/contact
EFD,Inc.
East Providence, RI USA
800-556-3484; +1-401-434-1680 (outside the USA)
automation@efd-inc.com www.efd-inc.com/xyz
EFD International Inc.
Dunstable, Bedfordshire, UK
0800 585733 or +44 (0) 1582 666334
Ireland 00800 8272 9444
europe@efd-inc.com www.efd-inc.com/xyz
EFD,Inc.,Asia
China: +86 (21) 5854 2345
china@efd-inc.com www.efd-inc.com/cn/xyz
Singapore: +65 6896 9630 sin-mal@efd-inc.com
EFD, Ultra and ValveMate are trademarks of EFD,Inc. Palm is a trademark of Palm, Inc.
Socket is a trademark of Socket Communications, Inc. Bluetooth is a trademark of Bluetooth
SIG, Inc. ©2006 Nordson Corporation LIT-BTCONF-01 v051806
A NORDSON COMPANY
www.efd-inc.com
 Loading...