

Page 1

MimioClassroom
User Guide
for Windows
®
mimio.dymo.com
Page 2

© 2011 Sanford, L.P. All rights reserved. Revised 6/10/2011.
No part of this document or the software may be reproduced or transmitted in any form
or by any means or translated into another language without the prior written consent
of Sanford, L.P.
Mimio, MimioClassroom, MimioTeach, MimioCapture, MimioVote, MimioView,
MimioHub, and MimioStudio are registered marks in the United States and other
countries. All other trademarks are the property of their respective holders.
Page 3

Contents
About MimioClassroom 1
MimioStudio 1
MimioTeach 1
Mimio Interactive 1
MimioCapture 2
Mimio Capture Kit 2
MimioVote 2
MimioView 2
Mimio Pad 2
Minimum System Requirements 2
Using this Guide 3
MimioStudio 7
About MimioStudio 7
About MimioStudio Notebook 7
About MimioStudio Tools 7
About MimioStudio Gallery 9
Getting Started with MimioStudio 9
Accessing MimioStudio Notebook 9
Accessing MimioStudio Tools 10
Accessing MimioStudio Gallery 10
Using MimioStudio Notebook 10
Working with Pages 11
Attaching Files 14
Using MimioStudio Tools 14
Creating Objects 14
Manipulating Objects 17
Adding Actions to Objects 21
Using MimioStudio Gallery 22
Importing Gallery Items into a Notebook 23
Customizing the Content of the Gallery 23
Exporting a Gallery Folder to a Gallery File 25
Working with Saved Annotation Snapshots 25
Viewing Screen Annotation Snapshots 25
Renaming an Annotation Snapshot 26
Adding Keywords to an Annotation Snapshot 26
iii
Page 4

Searching for an Annotation Snapshot 26
Importing an Annotation Snapshot 26
Pasting an Annotation Snapshot Into Another Application 26
Printing Annotation Snapshots 27
Deleting Annotation Snapshots 27
Delivering Interactive Notebook Lessons and Presentations 27
Using Fullscreen View 27
Navigating Through a Presentation 27
Working with Multimedia Objects 28
MimioTeach 29
What's Included 29
About MimioTeach 29
Status Lights 30
About MimioStudio Tools 31
Getting Started 32
Setting Up the MimioTeach Stylus 33
Setting Up the MimioTeach Bar 33
Setting Up Interactive Mode 35
Projecting Your Desktop 35
Calibrating Interactive Mode 36
Using MimioTeach 36
Using the MimioTeach Stylus 36
Focusing Attention Using the Reveal and Spotlight Tools 37
Using the Reveal Tool 37
Using the Spotlight Tool 38
Marking Up the Display Using Screen Annotations 39
Enabling Screen Annotation Mode 39
Annotating the Screen Using MimioStudio Tools 39
Clearing All Annotations from the Display 42
Inserting Text Into an Application Using MimioStudio Text Tools 42
Using the On-Screen Keyboard 43
Using Write Anywhere 43
Using Writing Pad 44
Using Gesture Recognition 44
Using the Web Browser, Calculator, and Magnify Tools 45
Recording Desktop Actions and Audio in Interactive Mode 45
Caring for MimioTeach 45
Cleaning MimioTeach 46
iv
Page 5

Inserting the Batteries 46
Mounting MimioTeach to a Non-Magnetic Whiteboard 46
Mimio Interactive 49
What's Included 49
About Mimio Interactive 49
Status Lights 50
About Mimio Wireless 51
Status Lights 52
About MimioStudio Tools 53
Getting Started 54
Setting Up the Mimio Interactive Mouse 55
Setting Up the Mimio Interactive Bar 55
Setting Up Mimio Wireless 56
Setting Up Interactive Mode 58
Projecting Your Desktop 58
Calibrating Interactive Mode 59
Using Mimio Interactive 60
Using the Mimio Interactive Mouse 60
Focusing Attention Using the Reveal and Spotlight Tools 60
Using the Reveal Tool 60
Using the Spotlight Tool 61
Marking Up the Display Using Screen Annotations 62
Enabling Screen Annotation Mode 62
Annotating the Screen Using MimioStudio Tools 63
Clearing All Annotations from the Display 65
Inserting Text Into an Application Using MimioStudio Text Tools 66
Using the On-Screen Keyboard 66
Using Write Anywhere 66
Using Writing Pad 67
Using Gesture Recognition 68
Using the Web Browser, Calculator, and Magnify Tools 68
Recording Desktop Actions and Audio in Interactive Mode 68
Caring for Mimio Interactive 69
Cleaning Mimio Interactive 69
Inserting the Batteries 69
Mounting Mimio Interactive Permanently 69
MimioCapture 73
What's Included 73
v
Page 6

About MimioCapture 73
Status Lights 74
About MimioStudio Notebook 74
Getting Started 74
Setting Up the MimioCapture Tray 75
Setting Up the MimioCapture Pens 76
Setting Up the MimioCapture Eraser 77
Charging the Pens and Eraser 78
Setting Up MimioStudio Notebook for Capture 78
Setting the Whiteboard Size 78
Starting Ink Capture Mode 78
Using MimioCapture 79
Capturing Digital Ink 79
Writing and Drawing Digital Ink 79
Adding, Copying, and Printing Notebook Pages 80
Caring for MimioCapture 80
Cleaning MimioCapture 80
Mounting MimioCapture to a Non-Magnetic Whiteboard 81
Mimio Capture Kit 83
What's Included 83
About Mimio Capture Kit 83
About MimioStudio Notebook 84
Getting Started 84
Setting Up the Mimio Capture Kit Pens 84
Setting Up the Mimio Capture Kit Eraser 86
Setting Up MimioStudio Notebook for Capture 87
Setting the Whiteboard Size 87
Starting Ink Capture Mode 87
Using Mimio Capture Kit 88
Capturing Digital Ink 88
Writing and Drawing Digital Ink 88
Adding, Copying, and Printing Notebook Pages 89
Downloading Digital Ink 90
Caring for Mimio Capture Kit 90
Cleaning the Mimio Capture Kit 90
Mounting the Mimio Capture Kit 91
MimioVote 93
What's Included 93
vi
Page 7

About MimioVote 93
About the MimioVote Station 93
About the MimioVote Units 94
About the Software 95
About MimioStudio Notebook 95
About the Vote Toolbar 96
About MimioStudio Quick Vote 96
About MimioStudio Gradebook 96
Getting Started 97
Setting Up MimioVote 97
Adding a Second MimioVote System 99
Using MimioStudio Gradebook 99
Setting Up the Gradebook 100
Creating a Class 100
Adding Students 100
Importing a List of Students 100
Adding Activities 101
Modifying the Gradebook 101
Editing Student Information 101
Removing a Student 102
Editing Activities 102
Editing Questions 102
Generating Reports 103
Exporting a List of Students 103
Archiving Classes 103
Exporting Results 103
Opening Archived Classes 104
Creating Activities 104
Creating Activities in Notebook 105
Creating Activities in PowerPoint® 105
Modifying Question Objects 106
Importing Standard Assessments 106
Printing Activities 106
Using the MimioVote Unit 107
Answering Questions 107
Answering Questions for Teacher-Led Activities 107
Answering Questions for Self-Paced Activities 107
Requesting Help 108
Using the Vote Toolbar 108
vii
Page 8

Taking Attendance 108
Using the Timer 108
Conducting Activities 108
Conducting a Teacher-Led Activity 109
Asking Questions Using Quick Vote 109
Conducting a Self-Paced Activity 110
Viewing Question Results 110
Viewing Activity Results 110
Viewing a List of Students that Have Not Responded 111
Viewing Requests for Help 111
Caring For MimioVote 111
Cleaning MimioVote 111
Storing MimioVote 112
MimioView 113
What's Included 113
About MimioView 114
Status Lights 114
About MimioStudio View 115
Getting Started 115
Installing MimioView 115
Opening the View Window 116
Closing the View Window 116
Using MimioView 116
Displaying an Image 116
Displaying a Document 116
Displaying an Object 117
Displaying a Microscope Slide 117
Freezing the Image 117
Adjusting the Image 118
Rotating the Image 118
Zooming the Image 118
Adjusting the Settings 119
Annotating an Image 119
Clearing All Annotations from the Image 120
Transferring an Image 120
Recording Video 121
Turning Off the Lamps 121
Caring For MimioView 121
viii
Page 9

Cleaning MimioView 121
Mounting MimioView Permanently 121
Mimio Pad 123
What's Included 123
About Mimio Pad 124
About the Feature Indicators 124
Getting Started 125
Setting Up the Mimio Pad 125
Charging the Battery 125
Setting Up the Pen 125
Configuring Mimio Pad 126
Using Mimio Pad 126
Using the Shortcut Keys 126
Changing the Pen Tip 127
Pairing an Additional Mimio Pad with the Wireless Receiver 127
MimioStudio Recorder 129
Using MimioStudio Recorder 129
Recording a Presentation 129
Sharing the Whiteboard Remotely 131
Setting up MimioStudio with NetMeeting 131
Adjusting the NetMeeting Settings 131
Customizing MimioStudio 133
Adjusting the Classroom Devices Settings 133
Adjusting the Ink Capture Settings 133
Adjusting the Interactive Settings 136
General Settings 136
Actions and Commands Settings 137
Adjusting the Language Settings 137
Adjusting MimioStudio Notebook Settings 137
General Settings 137
Ink Capture Settings 138
Adjusting MimioStudio Recorder Settings 138
Adjusting the Vote Settings 138
Getting Help 139
Updating the Software 139
Troubleshooting 139
ix
Page 10

Contacting DYMO 139
Technical and Environmental Information 141
Environmental Information 141
Safety Precautions for Lithium-Ion Rechargeable Batteries 141
Documentation Feedback 142
x
Page 11

MimioStudio
Chapter 1
About MimioClassroom
MimioClassroom is a suite of tools for capturing, creating, and presenting information.
The following MimioClassroom components are described in this User Guide:
n MimioStudio
n MimioTeach
n Mimio Interactive
n MimioCapture
n Mimio Capture Kit
n MimioVote
n MimioView
n Mimio Pad
MimioStudio software includes all of the tools you need to make the most out of your
MimioClassroom devices. You can also use the MimioStudio software without a
MimioClassroom device to prepare presentations and manipulate previously created content.
MimioStudio Notebook provides a multi-page workspace for creating lessons and
presentations. Using the MimioStudio Notebook is very similar to using other word
processing or presentation software applications.
MimioStudio Notebook provides multiple authoring and editing tools for creating almost
any type of content. You can use Notebook with MimioStudio Tools to create a variety of
objects including text boxes, freehand writing and drawing, lines, arrows, and many basic
shapes. Images can be imported into a Notebook, both as objects and as background images.
MimioTeach
Using MimioTeach with a projector, you can deliver lessons and presentations directly from
your whiteboard. Using MimioStudio Interactive mode, you control the movement of the
cursor on your screen with the MimioTeach stylus, much like you would with a mouse at
your computer.
Mimio Interactive
Using Mimio Interactive with a projector, you can deliver lessons and presentations directly
from your whiteboard. Using MimioStudio Interactive mode, you control the movement of
1
Page 12

About MimioClassroom
the cursor on your screen with the Mimio Interactive Mouse, much like you would with a
mouse at your computer.
MimioCapture
MimioCapture is used with a MimioTeach-enabled whiteboard to record notes and drawings
from your whiteboard. Using MimioStudio Ink Capture mode, you make notes and drawings
on your whiteboard using the MimioCapture pens. Your notes are automatically captured in
a MimioStudio Notebook.
Mimio Capture Kit
Mimio Capture Kit is used with a Mimio Interactive-enabled whiteboard to record notes and
drawings from your whiteboard. Using MimioStudio Ink Capture mode, you make notes and
drawings on your whiteboard using the Mimio Capture Kit pens. Your notes are
automatically captured in a MimioStudio Notebook.
MimioVote
MimioVote is a wireless, interactive, student response system. Using MimioVote, you can
easily and quickly gather student responses. This quick feedback from students allows you
to make sure each student is keeping up and adjust your lesson accordingly.
MimioView
MimioView works seamlessly with MimioStudio software to display documents, threedimensional objects, and microscope slides for your entire class to view. You can use
MimioView to display still images or live video.
Mimio Pad
Mimio Pad is a 2.4 GHz wireless pad. To configure Mimio Pad for use, install the
MimioStudio software and plug the wireless receiver into your computer. Once connected,
you can use the Mimio Pad from anywhere in the room to interact with your computer. No
additional configuration is required.
Minimum System Requirements
The minimum system requirements for MimioStudio are:
n Microsoft Windows
n Microsoft Windows XP SP2, Microsoft Vista
system
n 512 MB RAM minimum (1 GB RAM recommended)
n 250 MB free disk space (English), 350 MB free disk space (International)
n CD-ROM drive or Internet connection to download the software
n Available USB port (required to use a MimioClassroom device)
®
-compatible computer with a Pentium II, 750 MHz processor
®
, or Microsoft Windows 7 operating
2
Page 13

Using this Guide
This User Guide includes information for using the different MimioClassroom components.
Depending on the types of MimioClassroom devices you have, some sections of this User
Guide may not apply to you.
The following table provides a summary of the contents.
Using this Guide
3
Page 14
About MimioClassroom
User Guide Chapter Description
About MimioClassroom This chapter gives an overview of the MimioClassroom products,
including MimioStudio software, MimioTeach, MimioCapture,
MimioVote, and MimioView.
MimioStudio This chapter describes how to work with MimioStudio Notebook,
Tools, and Gallery to create and deliver lessons and other presentations.
This chapter describes how to set up and use MimioTeach with your
MimioTeach
whiteboard and a projector. This chapter also describes how to use
MimioStudio in Interactive mode.
This chapter describes how to set up and use Mimio Interactive with your
Mimio Interactive
whiteboard and a projector. This chapter also describes how to use
MimioStudio in Interactive mode.
MimioCapture This chapter describes how to set up and use MimioCapture. Included
in this chapter are instructions for capturing notes and drawings from a
MimioTeach-enabled whiteboard as digital ink using MimioCapture.
Mimio Capture Kit This chapter describes how to set up and use Mimio Capture Kit. I ncluded in
this chapter ar e instructions for capturing notes and drawings from a Mimio
Interactive-enabled whiteboard as digital ink using Mimio Capture Kit
This chapter describes how to set up and use MimioVote. Included in
MimioVote
this chapter are instructions for creating and conducting MimioVote
activities, as well as information about setting up and using
MimioStudio Gradebook to save student grades and information.
This chapter describes how to set up and use MimioView. Included in
MimioView
this chapter are instructions for displaying and annotating images in the
MimioStudio View window.
Mimio Pad This chapter describes how to set up and use Mimio Pad.
Using MimioStudio Recorder This chapter describes how to use MimioStudio Recorder to create
movies (with audio) of your presentations.
Sharing the Whiteboard
Remotely
Customizing MimioStudio
This chapter describes how to share your MimioTeach-enabled
whiteboard using Microsoft NetMeeting.
This chapter describes how to customize the features of the
MimioStudio software and the MimioClassroom devices.
Getting Help This chapter gives troubleshooting information for some common
problems, describes how to check for and install MimioStudio software
updates, and describes how to contact Technical Support.
Technical and Environmental This chapter contains technical, certification, and safety information for
4
Page 15

User Guide Chapter Description
Information the MimioClassroom products.
Using this Guide
5
Page 16

This page intentionally left blank for double-sided printing.
6
Page 17

MimioStudio software includes all of the tools you need to make the most out of your
MimioClassroom devices. You can also use the MimioStudio software without a
MimioClassroom device to prepare presentations and manipulate previously created content.
About MimioStudio
The following are the three main MimioStudio software applications that are used to create
and present information.
n MimioStudio Notebook
n MimioStudio Tools
n MimioStudio Gallery
For information about other MimioStudio applications, see the chapters of this User
Guide that describe the MimioClassroom devices that you have.
MimioStudio Notebook provides a multi-page workspace for creating lessons and
presentations. Using the MimioStudio Notebook is very similar to using other word
processing or presentation software applications.
Chapter 2
MimioStudio
MimioStudio Notebook provides multiple authoring and editing tools for creating almost
any type of content. You can use Notebook with MimioStudio Tools to create a variety of
objects including text boxes, freehand writing and drawing, lines, arrows, and many basic
shapes. Images can be imported into a Notebook, both as objects and as background images.
About MimioStudio Notebook
You can create and present information with MimioStudio Notebook. Using Notebook is
very similar to using other word processing or presentation software. Content created in
Notebook can be saved as Mimio INK files or a variety of other file formats including
HTML, JPEG, PNG, GIF, BMP, TIF, WMF, IWB, and PDF.
You can use Tab View to view a list of files that are attached to a Notebook or to view a
thumbnail of each page in a Notebook.
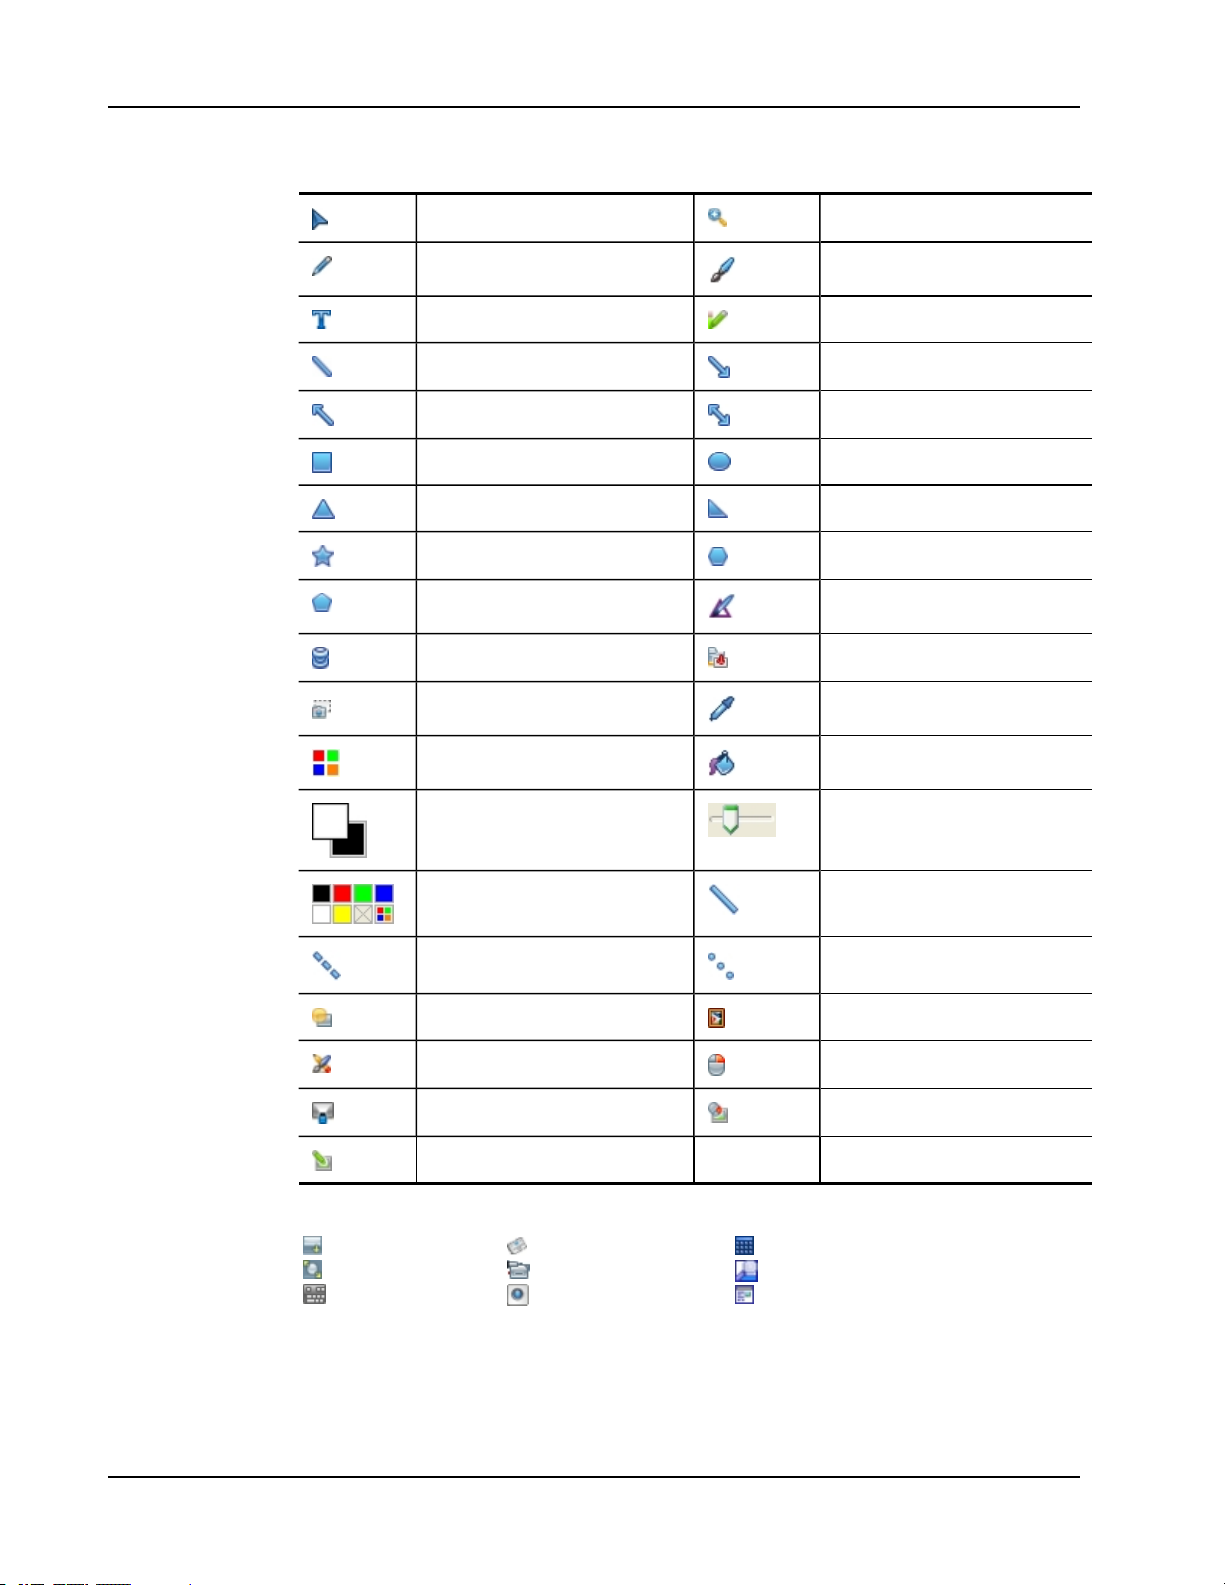
About MimioStudio Tools
MimioStudio Tools provides a comprehensive set of interactive tools and resources to create
and present information. MimioStudio Tools is used to modify MimioStudio Notebook
pages and to make screen annotations on the whiteboard.
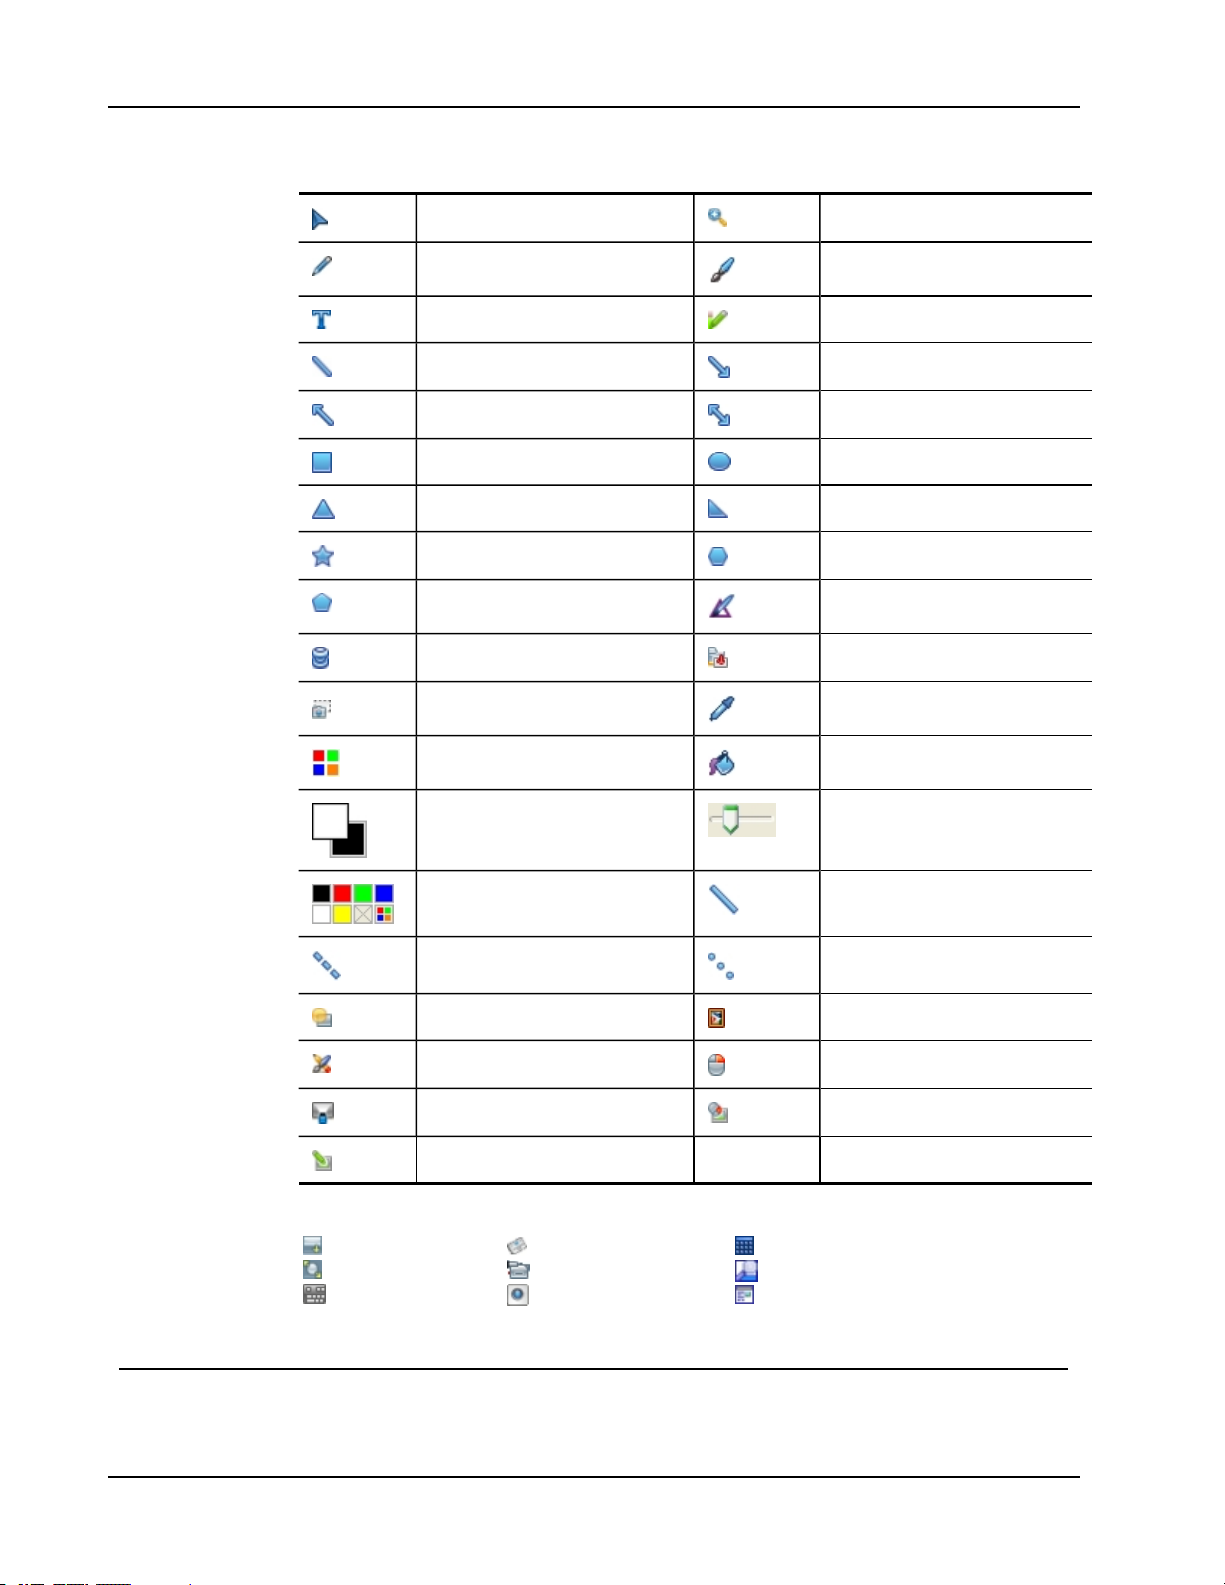
The following table describes the major components of MimioStudio Tools.
7
Page 18
MimioStudio
Selection tool Zoom
Pen Brush
Text Highlighter
Line Arrow End
Arrow Start Arrow Both
Rectangle Ellipse
Triangle Right Triangle
Five Pointed Star Hexagon
Pentagon Shape Recognition
Eraser Insert file
Screen clipping Color picker
More colors Object Fill
Outline and Fill color Thickness slider
Color palette Solid Line
Dash Line Dotted Line
Transparency Gallery
Applications (see below) Right-click
Interactive Mouse
Screen Annotation
From the Applications tool, you can access the following:
Reveal
Spotlight
Text Tools
Quick Vote
Recorder
View
Calculator
Magnify
Web Browser
MimioStudio Tools has two views: a fully expanded view, for easy access to all features,
and a compressed view, which takes up less space on the screen.
To compress and expand MimioStudio Tools
8
Page 19
Double-click at the top of the MimioStudio Tools toolbar.
About MimioStudio Gallery
MimioStudio Gallery contains elements that can be used to create your lessons and
presentations, such as images, templates, movies, and previously created lessons.
MimioStudio Gallery also contains Screen Annotation snapshots. You can customize the
Gallery by adding your own elements.
MimioStudio Gallery consists of the following four main folders:
n Screen Annotations - contains all saved Screen Annotation snapshots.
n Imported Content Packs - contains any imported content that you have not yet added
to the Gallery folder.
n Questions and Results - contains a variety of objects for use with MimioVote.
n Gallery - contains a number of different folders used to categorize items, such as
Geography, Mathematics, and so on.
The Gallery folder and each of the Gallery subfolders can contain five different types of
objects:
Getting Started with MimioStudio
n Images - Images include pictures and graphics.
n Templates - Templates include backgrounds and predefined page layouts.
n Multimedia - Multimedia objects include movies, animation, and sound.
n Questions and Results - Questions and Results include objects for creating and
displaying the results of MimioVote activities.
This section of the Gallery does not appear until you move objects from the
Questions and Results folder to the Gallery folder or a Gallery subfolder.
n Lessons - Lessons include lessons created using MimioStudio Notebook and imported
documents. You can create your own lessons or import lessons created by someone else.
Getting Started with MimioStudio
After installing MimioStudio, MimioStudio Notebook and MimioStudio Tools open on
your desktop.
You can access many of the features in MimioStudio in several ways; from the menu bar,
the MimioStudio Tools buttons, and the right-click menus. The available features change
depending on what you are doing in the software. Be sure to explore the right-click menu
options as you work with MimioStudio.
Accessing MimioStudio Notebook
Several ways to access MimioStudio Notebook are shown in the following table.
9
Page 20
MimioStudio
To start from the Do this
Desktop
Taskbar
Start menu Point to Programs, MimioStudio, and then choose MimioStudio Notebook.
Accessing MimioStudio Tools
Several ways to access MimioStudio Tools are shown in the following table.
To start from the Do this
Desktop
Taskbar
StartMenu Point to Programs, MimioStudio, and then choose MimioStudio Tools.
MimioStudio Notebook
MimioTeach
Double-click on the desktop.
Right-click , and then choose Notebook.
Double-click on the desktop.
Right-click , and then choose Tools.
Do one of the following:
n
Double-click on the status bar.
n
Choose MimioStudio Tools from the Tools menu.
Press the Launch button, , on the MimioTeach bar, and then click
Tools in the Launch window.
Mimio Interactive
Accessing MimioStudio Gallery
Several ways to access MimioStudio Gallery are shown in the following table.
To start from Do this
StartMenu Point to Programs, MimioStudio, Tools, and then choose MimioStudio
MimioStudio Tools
MimioStudio Notebook
Using MimioStudio Notebook
You can create and present information with MimioStudio Notebook. Using Notebook is
very similar to using other word processing or presentation software. Content created in
Press the New page button, , on the Mimio Interactive bar.
Gallery.
Click on the MimioStudio Tools toolbar.
Do one of the following:
n
Double-click on the status bar.
n
Choose Gallery from the Insert menu.
10
Page 21
Using MimioStudio Notebook
Mimio INK files or a variety of other file formats including HTML, JPEG, PNG, GIF, BMP,
TIF, WMF, IWB, and PDF.
You can use Tab View to view a list of files that are attached to a Notebook or to view a
thumbnail of each page in a Notebook.
To open an existing Notebook
1.
Start MimioStudio Notebook and click .
2. From the Open dialog box, navigate to and select the file to open and click Open.
To save a Notebook
1.
Click the Save button, .
2. From the Save As dialog box, enter a name for your file in the File name box.
3. Choose the desired format from the Save as type list.
4. Click Save.
When saving in a format other than INK, the Select Pages dialog box appears.
5. From the Select Pages dialog box, do the following:
l Select the pages to save under Page Selection.
l Choose a size for the images from the Size list.
6. Click OK.
Working with Pages
Each lesson or presentation created in MimioStudio Notebook consists of a series of pages.
Pages can be viewed, presented, and edited in the main Notebook window or in Full Screen
view. You can view a thumbnail of each page in a Notebook using the Thumbnails pane in
the Tab View.
You can insert new pages, import pages from another Notebook, delete pages, and reorder
pages. You can also change the size of a page, change the background of a page, and add
transition effects between pages in your Notebook.
To insert a new page
To select a page
1.
2. Do one of the following:
To insert a duplicate of an existing page
Do one of the following:
Click the New Page button, .
l
l
(Capture mode only) Press the New Page button, , on your MimioCapture tray.
In the Tab View, click to display the Thumbnails pane.
l To select multiple pages, press CTRL and select each page.
l To select multiple pages that are close to each other, drag a selection rectangle over
the pages to select.
l To select a range of pages, select the first page, and then press SHIFT and select
the last page.
l To select all pages, choose Select All from the Edit menu.
11
Page 22
MimioStudio
1.
In the Tab View, click , and then select the page to duplicate.
2. Do one of the following:
l Choose Duplicate Page from the Insert menu.
l
(Capture mode only) Press the Copy Page button, , on your MimioCapture tray.
To delete a page
1.
In the Tab View, click , and then select the page to delete.
2.
Click the Delete button, .
To import a page from another Notebook
1.
In the Tab View of the source Notebook, click and then select the page to import.
2.
Click the Copy button, .
3. Select the location in the target Notebook to insert the page.
4.
Click the Paste button, .
You can also import pages by dragging the pages from the source Notebook to the
target Notebook.
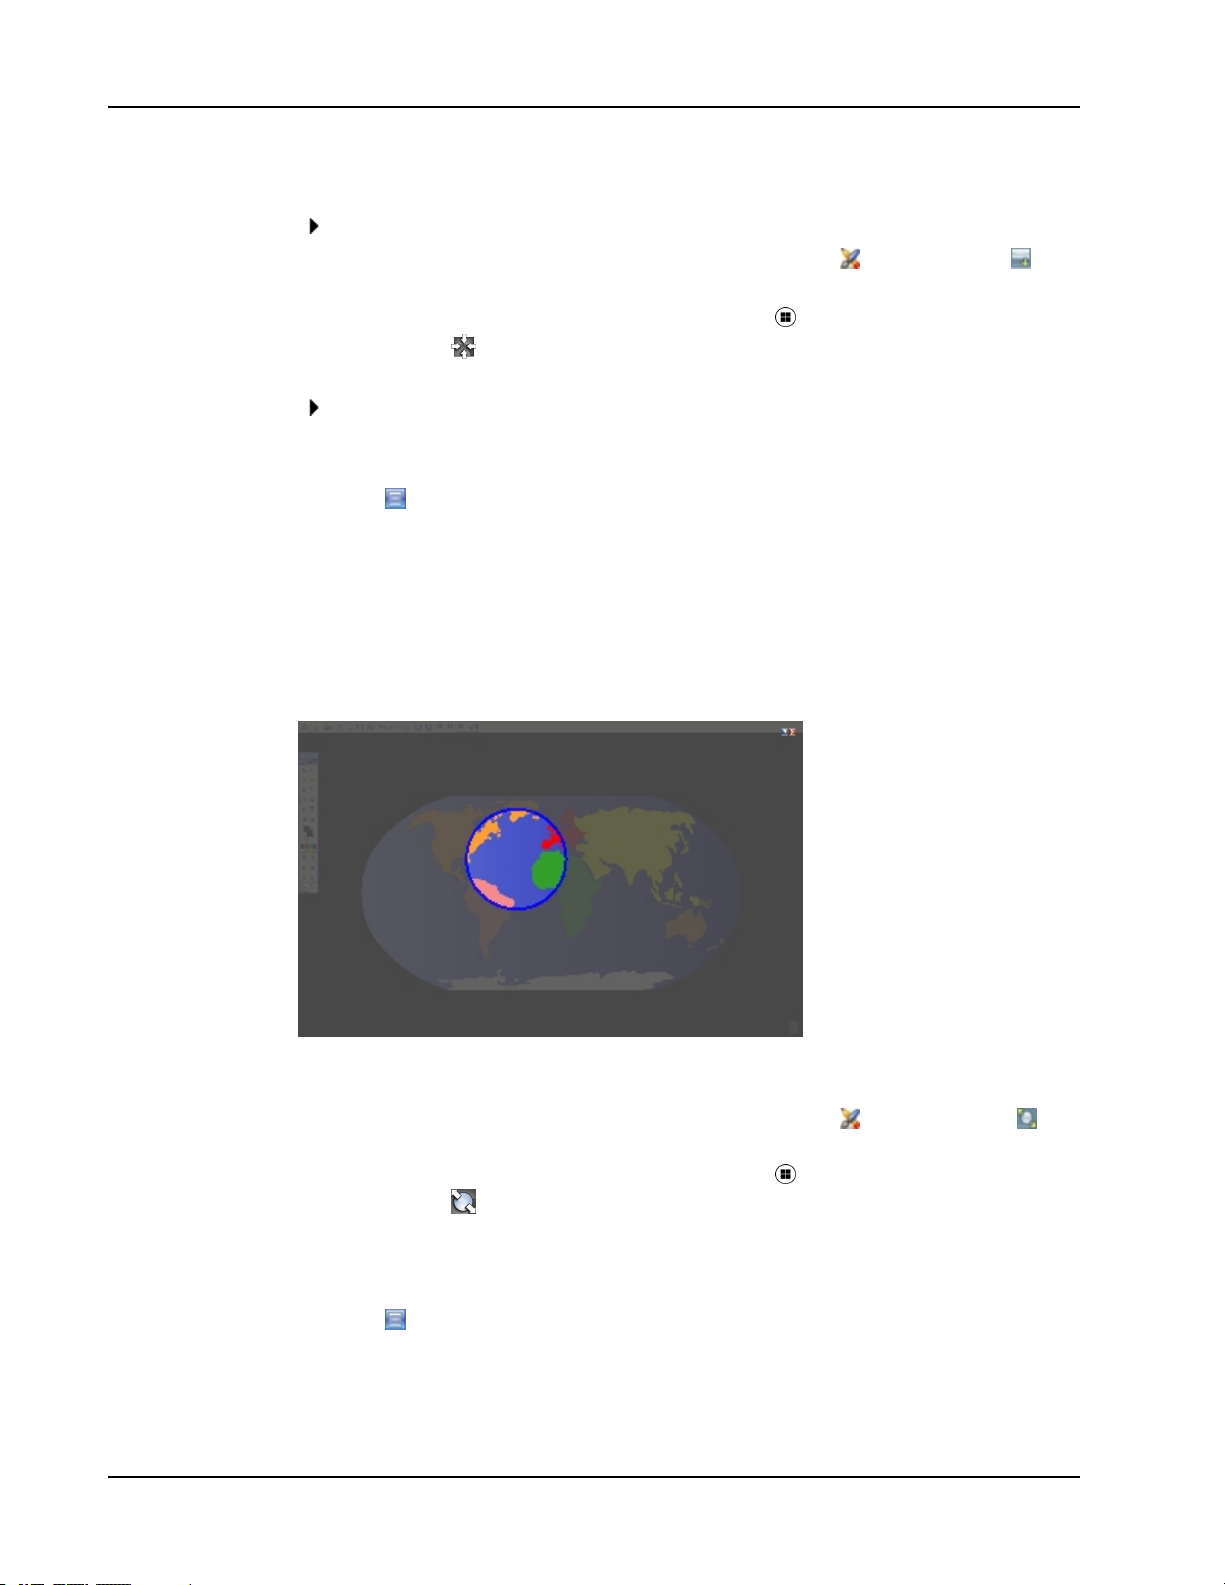
To insert the desktop as a new page
1.
From MimioStudio Tools, click the Screen Clipping button, .
The desktop is displayed with a transparent mask.
2.
Click .
The desktop is inserted as a new page in the Notebook.
To change the page size
1. Choose Page Setup from the File menu.
The Page Setup dialog box appears.
2. Do one of the following:
l From the Page Size list, choose any of the available display or device sizes.
l From the Page Size list, choose Custom, and then enter the desired valued into the
Width and Height boxes.
3. From the Apply To list, choose one of the following:
l Current Page to apply the page size to the current page only.
This option is not available if more than one page is selected in the Tab View.
l Selected Pages to apply the page size to the selected pages.
This option is only available if more than one page is selected in the Tab View.
l Whole Document to apply the page size to all of the pages in the Notebook.
4. (Optional) Do one of the following:
l To apply the page size to all new pages, select the All new pages check box.
This option is only available if no MimioTeach device is connected.
l To apply the page size to all new pages and the currently connected device, select
the The connected device check box.
This option is only available if a MimioTeach device is connected.
5. Click OK to apply your changes.
To change the background color of a page
12
Page 23
Using MimioStudio Notebook
1. Choose Background from the Insert menu.
2. From the Background dialog box, click Color.
3. From the Color dialog box, select a color, and then click OK.
4. From the Apply To list, select the pages to apply the background color to.
5. To apply the background color to all new pages, select the All new pages check box.
6. Click OK to apply your changes.
To change the background image of a page
1. Choose Background from the Insert menu.
2. From the Background dialog box, click Image.
3. From the Open dialog box, navigate to and select the image file that you want to use as
your background.
4. Click Open.
The image is displayed in the Preview area.
You can also import an image from another application or from the MimioStudio
Gallery to use as a background. To do this, select the image and drag to the
Preview area.
5. Select the display mode for the new background from the Mode list.
Mode Result
Place The image is placed in the top left corner of the page and is not resized.
Stretch The image is resized to fill the entire page.
Tile The image is tiled repeatedly to fill the entire page and is not resized.
Center The image is placed in the center of the page and is not resized.
6. From the Apply To list, select the pages to apply the background to.
7. To apply the background to all new pages, select the All new pages check box.
8. Click OK to apply your changes.
To add a transition effect between pages
1. Choose Page Transition from the Insert menu.
The Page Transition dialog box appears.
2. From the Transitions list, select the transition to apply.
3. From the Apply To list, select the pages to apply the transition to.
4. To apply the transition to all new pages, select the All new pages check box.
5. Click OK.
To sort pages
1.
In the Tab View, click to display the Thumbnails pane.
2. Select the pages to sort.
3. Drag the selected pages to the desired location.
To print a page
13
Page 24

MimioStudio
Attaching Files
1.
In the Tab View, click to display the Thumbnails pane.
2. Select the pages to print.
3.
Click the Print button, .
The Print dialog box appears.
4. Click Print.
To print the current page in Ink Capture mode, press the Print Page button, , on your
MimioCapture tray.
You can attach any type of file to a MimioStudio Notebook. Once a file is attached to the
Notebook, you can quickly open the file directly from within MimioStudio Notebook.
To attach a file to a Notebook
1. In the Tab View, click to display the File Attachment pane.
2. On your computer, navigate to and select the file to attach to the Notebook.
3. Drag the file to the File Attachment pane.
The file is attached to the Notebook.
To open an attached file
1. In the Tab View, click to display the File Attachment pane.
2. Double-click the file to open.
Using MimioStudio Tools
Using MimioStudio Tools, you can create a wide variety of objects on any MimioStudio
Notebook page, including lines, shapes, and freehand drawing and writing.
See Accessing MimioStudio Tools for information on accessing MimioStudio Tools.
Creating Objects
MimioStudio Tools provides tools for inserting freehand writing or drawing into your
MimioStudio Notebook, as well as lines, arrows, basic shapes, and formatted text. You can
also import images and multimedia objects, or insert a clipping of your screen into your
Notebook using Tools.
Once you select a drawing tool, that tool remains selected until you select a different
drawing tool or the selection tool.
To use the freehand pen
1.
Click the Pen button, .
2. (Optional) To adjust the line width, drag the Thickness slider.
3. (Optional) To adjust the line color, do one of the following:
l Select a color from the Color Palette.
l
Click , and then select a color from the Color dialog box.
l
Click , and then select a color from the desktop.
4.
(Optional) To adjust the transparency of the line, click the Transparency button, ,
and then choose a transparency percentage.
14
Page 25
Using MimioStudio Tools
5. Place the cursor where you want the ink stroke to start on the page.
6. Drag the cursor to draw ink strokes.
To use the freehand brush
1.
Click the Brush button, .
2. (Optional) To adjust the line width, drag the Thickness slider.
3. (Optional) To adjust the line color, do one of the following:
l Select a color from the Color Palette.
l
Click , and then select a color from the Color dialog box.
l
Click , and then select a color from the desktop.
4.
(Optional) To adjust the transparency of the line, click the Transparency button, ,
and then choose a transparency percentage.
5. Place the cursor where you want the brush stroke to start on the page.
6. Drag the cursor to draw brush strokes.
To highlight a portion of the display
1.
Click the Highlighter button, .
2. (Optional) To adjust the highlighter width, drag the Thickness slider.
3. (Optional) To change the color, do one of the following:
l Select a color from the Color Palette.
l
Click , and then select a color from the Color dialog box.
l
Click , and then select a color from the desktop.
4. Place the cursor where you want the highlight stroke to start on the page.
5. Drag the cursor over the area you want to highlight.
To erase ink and highlighting
1.
Click the Eraser button, .
2. (Optional) To adjust the eraser width, drag the Thickness slider.
3. Drag the cursor over the ink or highlighter strokes you want to erase.
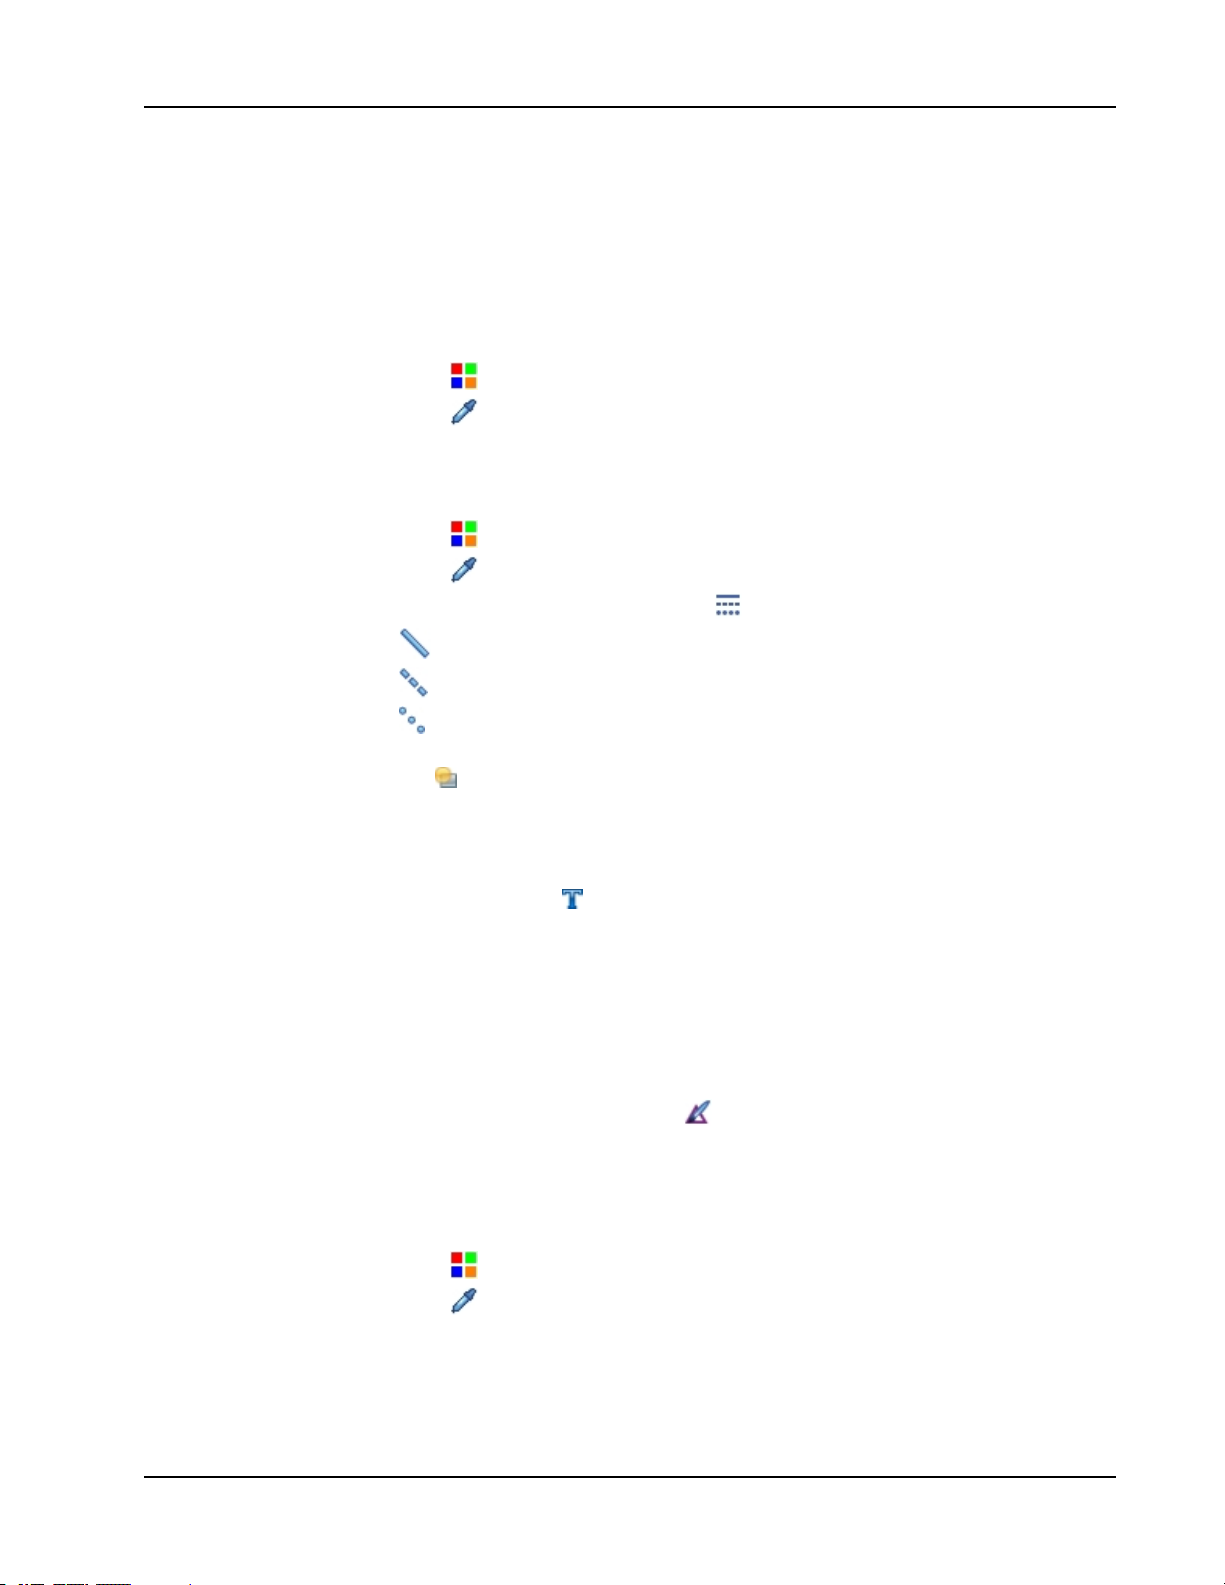
To add a line or shape
1. Click the line type or shape you want to add.
2. (Optional) To adjust the line or outline width, drag the Thickness slider.
3. (Optional) To change the line or outline color, select the Outline Color box, and then
do one of the following:
l Select a color from the Color Palette.
l
Click , and then select a color from the Color dialog box.
l
Click , and then select a color from the desktop.
4. (Optional) To adjust the fill color, select the Fill Color box, and then do one of the
following:
l Select a color from the Color Palette.
l
Click , and then select a color from the Color dialog box.
l
Click , and then select a color from the desktop.
15
Page 26
MimioStudio
5.
To change the line or outline style, click and choose one of the following:
l
l
l
Solid Line
Dash Line
Dotted Line
6. (Optional) To adjust the transparency of the line or shape, click the Transparency
button, , and then choose a transparency percentage.
7. Place the cursor where you want the line or shape to start on the page.
8. Drag the cursor to draw the line or shape.
To add formatted text
1.
Click the Text button, .
2. Place the cursor where you want the text to start on the page.
For a fixed width text box, place the cursor where you want the text box to start on the
page and then drag to the desired width.
3. Select a font style, size, color, and an alignment option for the text.
4. Enter text in the text box.
To draw a shape
1.
Click the Shape Recognition button, .
2. (Optional) To adjust the outline width, drag the Thickness slider.
3. (Optional) To change the outline color, select the Outline Color box, and then do one
of the following:
l Select a color from the Color Palette.
l
Click , and then select a color from the Color dialog box.
l
Click , and then select a color from the desktop.
4. (Optional) To adjust the fill color, select the Fill Color box, and then do one of the
following:
l Select a color from the Color Palette.
l
Click , and then select a color from the Color dialog box.
l
Click , and then select a color from the desktop.
5.
To change the line or outline style, click and choose one of the following:
l
l
l
6.
(Optional) To adjust the transparency of the shape, click the Transparency button, ,
Solid Line
Dash Line
Dotted Line
and then choose a transparency percentage.
7. Place the cursor where you want the shape to start on the page.
8. Drag the cursor to draw the shape.
The Shape Recognition tool can be used to draw circles, ellipses, triangles, rectangles,
squares, and lines.
To import a picture, multimedia object, or document
16
Page 27
Using MimioStudio Tools
1.
From MimioStudio Tools, click the Insert File button, .
2. From the Open dialog box, select the file to import.
3. Click Open.
The image or object is displayed on the Notebook page.
You can also copy and paste images from another application, or drag images from
another application into Notebook.
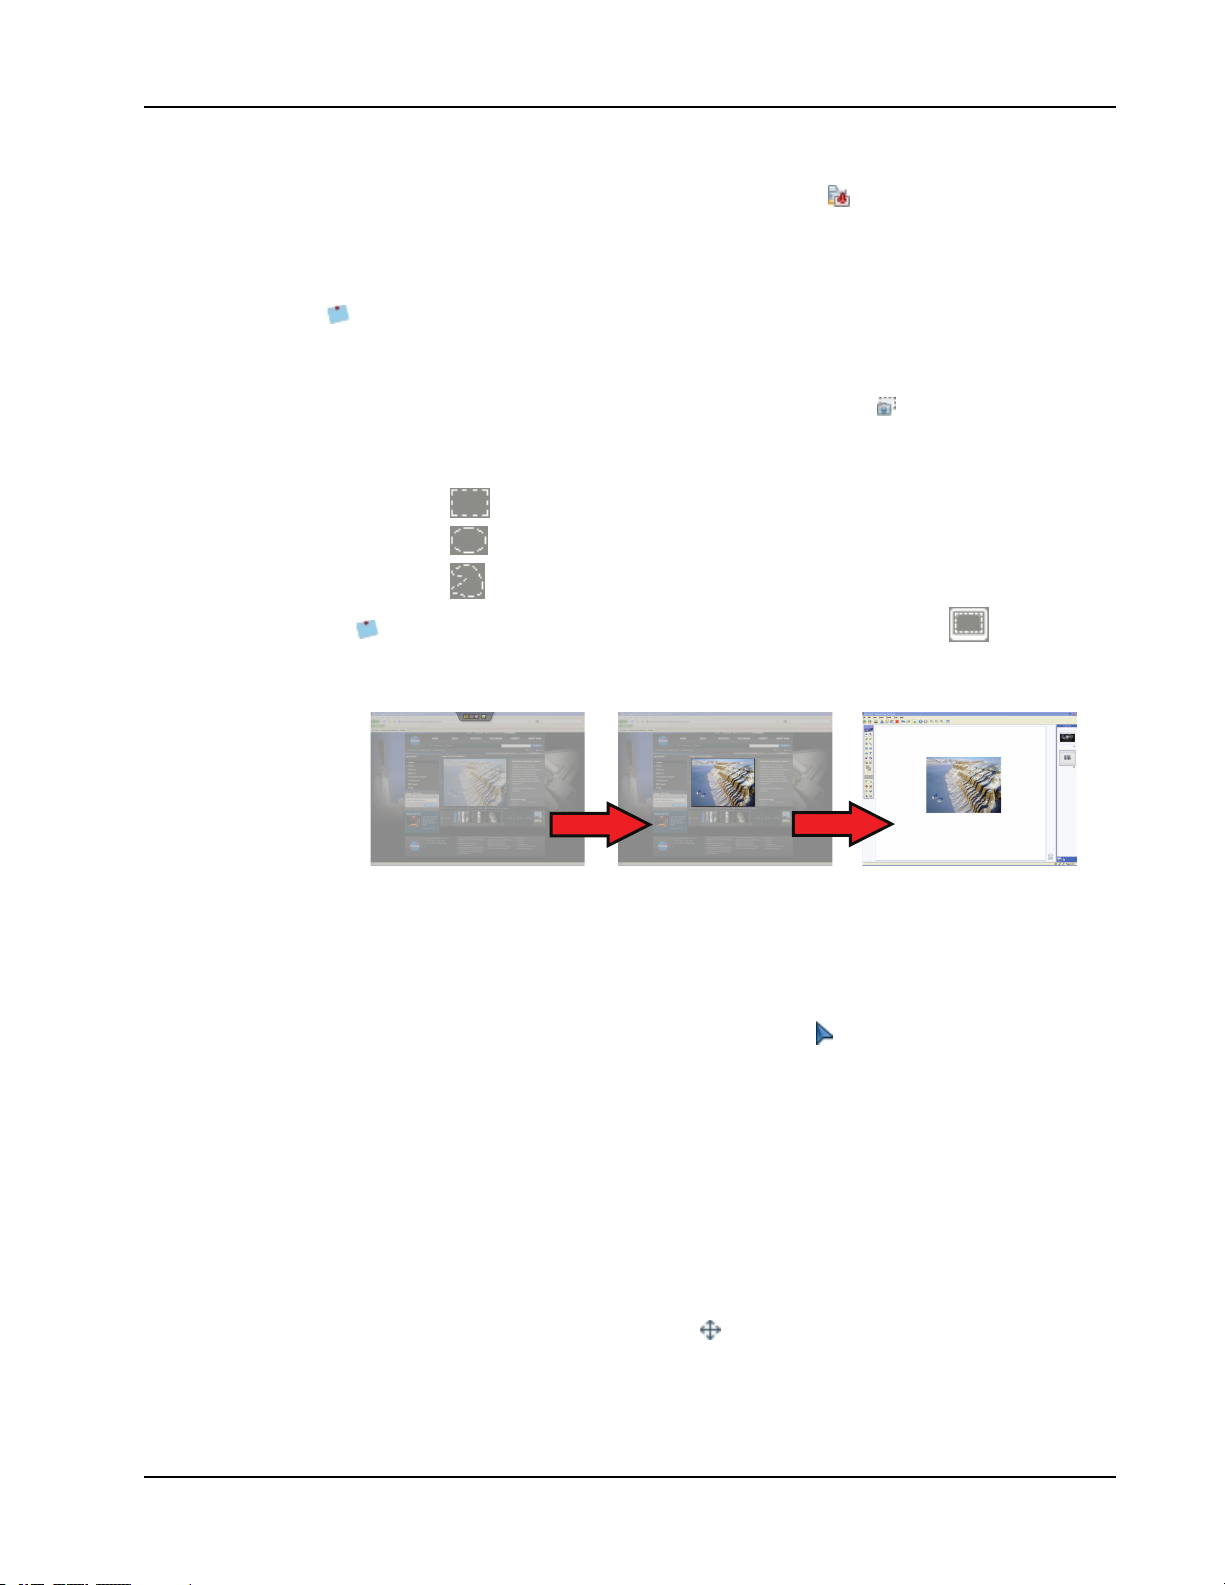
To insert a screen clipping
1.
From MimioStudio Tools, click the Screen Clipping button, .
The desktop is displayed with a transparent mask.
2. Do one of the following:
l
Click to insert a rectangular screen clipping.
l
Click to insert an elliptical screen clipping.
l
Click to insert a free-form screen clipping.
To insert the entire desktop as a new page in the Notebook, click .
3. Drag the cursor to select the area to capture.
The selected area is inserted in the Notebook page.
Manipulating Objects
Objects on a page can be moved, rotated, copied, deleted, locked, and have their properties
adjusted.
To select an object
1.
2. Do one of the following:
To move an object
1. Select the object to move.
2. Position the cursor over the object.
From MimioStudio Tools, click the Selection button, .
l Click the object to select.
l To select multiple objects, press CTRL and select each object.
l To select multiple objects that are close to each other, drag a selection rectangle
over the objects to select.
l To select all objects on a page, choose Select All from the Edit menu.
The cursor changes to the move cursor, .
17
Page 28

MimioStudio
3. Drag the object to the desired location.
To resize an object
1. Select the object to resize.
A frame is displayed around the object.
2. Position the cursor over one of the white sizing handles.
The cursor changes to the resize cursor, .
3. Drag the cursor to resize the object.
18
To constrain object proportions during resizing, right-click the object and choose Fixed
Aspect Ratio.
To rotate an object
1. Select the object to rotate.
A frame is displayed around the object.
2. Position the cursor over the green rotation handle.
The cursor changes to the rotation cursor, .
3. Drag the cursor to rotate the object.
Page 29
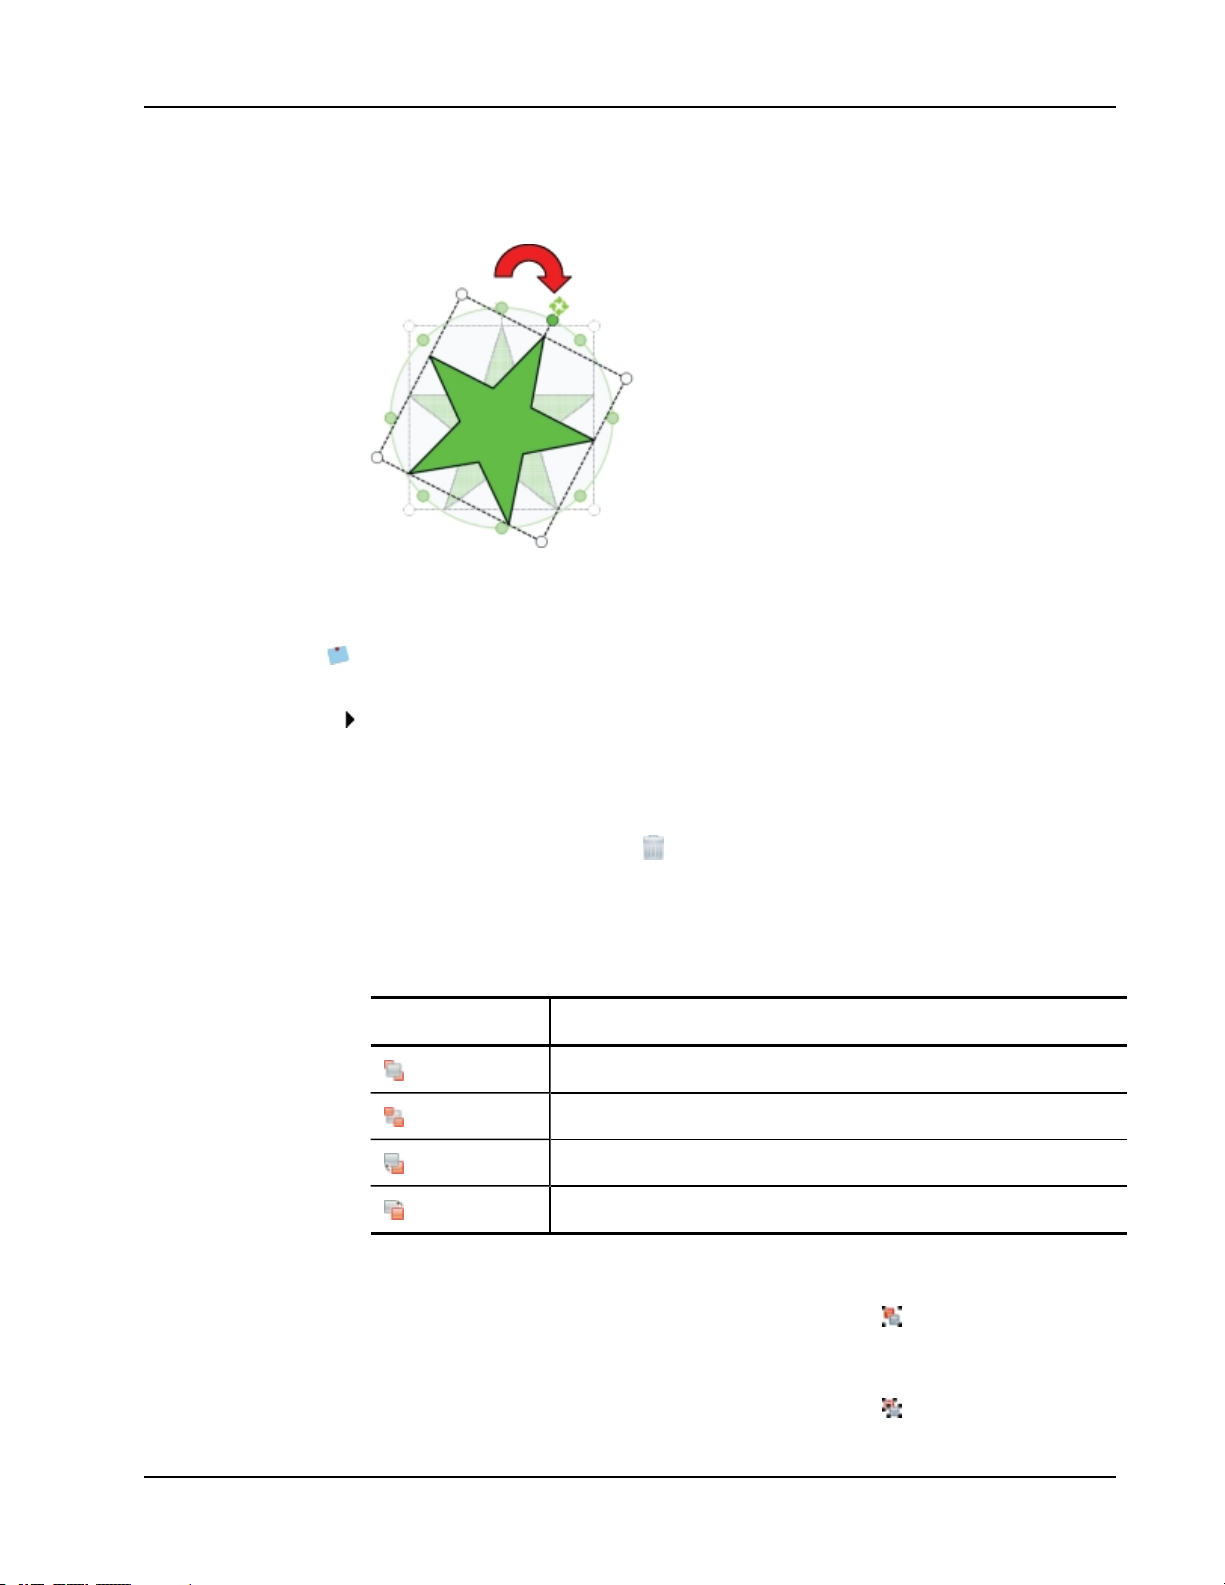
Using MimioStudio Tools
To snap to one of the predefined 45° increments, move the rotate cursor and release
over the predefined rotation anchor point.
To lock the position and properties of an object
1. Select the object to lock.
2. From the Format menu, point to Locking, and then choose Lock.
A locked object cannot be selected.
To unlock an object
From the Format menu, point to Locking, and then choose Unlock All.
Objects can only be unlocked collectively; you cannot unlock individual objects.
To delete an object
1. Select the object to delete.
2.
Drag the object to the trash can, .
To reorder objects
1. Select the object to reorder.
2. Choose Order from the Format menu.
3. Choose how to order the object.
Option Action
Front
Back
Forward
Backward
To group objects
Brings the selected object to the front of the order.
Sends the selected object to the back of the order.
Steps the object forward in the order, by one.
Steps the object backward in the order, by one.
1. Select the objects to group.
2.
From the Format menu, point to Grouping, and then choose Group.
To ungroup objects
1. Select the objects to ungroup.
2.
From the Format menu, point to Grouping, and then choose Ungroup.
19
Page 30
MimioStudio
To edit object properties
1. Select the object to edit.
2. To adjust the line or outline width, drag the Thickness slider.
3. To adjust the color, select the Outline Color box or the Fill Color box, and then do one
of the following:
l Select a color from the Color Palette.
l
Click , and then select a color from the Color dialog box.
l
Click , and then select a color from the desktop.
4.
To change the line or outline style, click and choose one of the following:
l
l
l
5.
To adjust the transparency, click the Transparency button, , and then choose a
Solid Line
Dash Line
Dotted Line
transparency percentage.
To change the fill color of an object
1.
From MimioStudio Tools, click the Object Fill button, .
2. Do one of the following:
l Select a color from the Color Palette.
l
Click , and then select a color from the Color dialog box.
l
Click , and then select a color from the desktop.
3. Click the object to change the fill color for.
To change the fill color for an object that currently has no fill color, click the object
border.
To edit text
1. Double-click the text box.
2. Select the text to adjust, or enter new text.
3. Adjust the font style, size, color, or alignment.
To import an object from another Notebook page
1. Select the object to import from the source Notebook page.
2.
Click the Copy button, .
3. Navigate to the target Notebook page.
4.
Click the Paste button, .
You can also import an object by dragging the object from the source page to the target
page.
To convert ink to text
1. Select the objects to convert.
All selected objects are combined into one text object.
20
Page 31

Using MimioStudio Tools
2. Do one of the following:
l
Right-click, and then choose Recognize Text.
l
Choose Recognize Text from the Tools menu.
To convert ink to shapes
1. Select the objects to convert.
2. Do one of the following:
l
Right-click, and then choose Recognize Shapes.
l
Choose Recognize Shapes.from the Tools menu.
To snap objects to grid
1.
Choose Grid from the View menu.
The Grid dialog box appears.
2. To force objects to snap to grid, select the Snap objects to grid check box.
3. To allow objects to snap to angles, select the Snap objects to angles check box.
4. To adjust the spacing between grid snap locations, enter the desired value into the
Spacing box.
5. To display a grid on the screen, select the Display grid on screen check box.
6. To make the grid settings permanent for each new MimioStudio Notebook, select the
Set as default for all new documents check box.
7. Click OK.
Adding Actions to Objects
Objects can have actions associated with them. You can associate an action with any object
that you create or import into a MimioStudio Notebook; you cannot add an action to a
template or background.
You can choose to perform the associated action each time you click the object or each time
you drag the object.
You can associate two different actions with a single object. For example, you can
choose to launch a hyperlink when you click an object and clone the object when you
drag the object. However, you cannot associate two different hyperlinks or two different
sounds with the same object.
There are three types of actions that you can associate with objects:
n Launch Hyperlink - opens a file, a web page, or a different page within a Notebook.
n Clone - creates a copy of the object on the Notebook page.
n Play Sound - plays a sound file.
To add a hyperlink to an object
1. Select the object to add the hyperlink to.
2. Choose Hyperlink from the Insert menu.
The Action Settings dialog box appears.
3. Select one of the following from the Action list:
l On Click - to launch the hyperlink each time the object is clicked.
l On Drag - to launch the hyperlink each time the object is dragged.
21
Page 32

MimioStudio
4. Select Launch Hyperlink from the Feature list.
5. Select Existing file or Web Page from the Link To list.
Alternately, select a page from within the current Notebook from the Link To list.
6. Enter a file name or web address to link to in the Address box.
Alternately, click Browse to search for a file to link to.
7. Click OK to add the hyperlink to the object.
To add cloning to an object
1. Select the object to add the clone action to.
2. Choose Action Settings from the Insert menu.
The Action Settings dialog box appears.
3. Select one of the following from the Action list:
l On Click - to create a copy of the object each time the object is clicked
l On Drag - to create a copy of the object each time the object is dragged
4. Select Clone from the Feature list, and then click OK.
You can also add the clone action to an object by choosing Clone from the Insert
menu. By default, a copy of the object is created whenever you drag the object.
To add a sound to an object
1. Select the object to link the sound file to.
2. Choose Action Settings from the Insert menu.
The Action Settings dialog box appears.
3. Select one of the following from the Action list:
l On Click - to play the sound file each time the object is clicked
l On Drag - to play the sound file each time the object is dragged
4. Select Play Sound from the Feature list.
5. Click Load.
The Open dialog box appears.
6. Navigate to and select the sound file to link to the object, and then click Open.
7. Click OK in the Action Settings dialog box.
To remove an action from an object
1. Select the object with the action to remove.
2. Choose Action Settings from the Insert menu.
The Action Settings dialog box appears.
3. Choose None from the Feature list, and then click OK.
Using MimioStudio Gallery
MimioStudio Gallery consists of the following four main folders:
n Screen Annotations - contains all saved Screen Annotation snapshots.
n Imported Content Packs - contains any imported content that you have not yet added
to the Gallery folder.
n Questions and Results - contains a variety of objects for use with MimioVote.
22
Page 33

Using MimioStudio Gallery
n Gallery - contains a number of different folders used to categorize items, such as
Geography, Mathematics, and so on.
The Gallery folder and each of the Gallery subfolders can contain five different types of
objects:
n Images - Images include pictures and graphics.
n Templates - Templates include backgrounds and predefined page layouts.
n Multimedia - Multimedia objects include movies, animation, and sound.
n Questions and Results - Questions and Results include objects for creating and
displaying the results of MimioVote activities.
This section of the Gallery does not appear until you move objects from the
Questions and Results folder to the Gallery folder or a Gallery subfolder.
n Lessons - Lessons include lessons created using MimioStudio Notebook and imported
documents. You can create your own lessons or import lessons created by someone else.
See Accessing MimioStudio Gallery for information on accessing MimioStudio Gallery.
To navigate MimioStudio Gallery
Click any folder to view the available items in that folder.
Click the plus sign next to a Gallery folder to see any subfolders that are contained in
that Gallery folder.
To select a Gallery item
1. Navigate to the Gallery folder that contains the item you want to select.
2. Do one of the following:
l Click the Gallery item to select.
l To select multiple items, press CTRL and select each item.
l To select multiple items that are close to each other, drag a selection rectangle over
the items to select.
l To select a range of items, select the first item, and then press SHIFT and select
the last item.
l To select all items, right-click, and then choose Select All.
Importing Gallery Items into a Notebook
You can import any Gallery item into a MimioStudio Notebook to add to your presentation.
To import a Gallery item into a Notebook
1. Select the image, template, multimedia item, questions and results object, or lesson to
import.
2. Drag the item into the Notebook.
You can also import items by double-clicking or by copying and pasting the items into
a Notebook.
Customizing the Content of the Gallery
The MimioStudio Gallery is fully expandable and modifiable, so you can add your own
folders, pictures, templates, multimedia items, and lessons.
23
Page 34
MimioStudio
You can also add Microsoft Word, Excel, PowerPoint, and PDF documents to the Gallery.
All imported documents are placed in the Lessons section of the MimioStudio Gallery
MimioStudio does not support network or shared galleries.
To import a Gallery folder from a Gallery file
1.
Click the Import Content Pack button, .
2. From the Open dialog box, navigate to and select the Gallery file to import.
3. Click Open.
The contents of the Gallery file are added to the Imported Content Packs folder in
MimioStudio Gallery.
4. Review the imported content and make any desired changes.
5. To move the content to the Gallery folder, right-click the folder to move and then
choose Install.
The content is moved to the Gallery folder.
To add a new Gallery folder
1. Select the main Gallery folder or a Gallery subfolder to add the new folder to.
2.
Click the New Folder button, .
The Gallery Item Properties dialog box appears.
3. Enter a name for the new folder in the Name box.
4. (Optional) Enter a keyword in the Keywords box to make the new folder searchable
from the Gallery search bar.
5. Click OK.
To add a new item to a folder
1. Select the folder to add the item to.
2.
Click the Insert File button, .
3. From the Open dialog box, navigate to and select the file to import.
4. Click Open.
The item is inserted in the appropriate area of the Gallery folder.
You can also add new items by selecting one or more items, and then dragging and
dropping or copying and pasting them into a Gallery folder.
To create a template from a Notebook image
1. Right-click and drag the image into the Gallery.
The right-click menu appears.
2. Choose Insert as template.
To copy an existing Gallery item
1. Select the Gallery item to copy.
2.
Click the Copy button, .
3. Select a Gallery folder to insert the new item into.
4.
Click the Paste button, .
The item is inserted in the appropriate area of the Gallery folder.
To delete a Gallery item
24
Page 35
1. Select the Gallery item to delete.
2.
Click the Delete button, .
A delete confirmation dialog box appears.
3. Click Yes.
To find similar Gallery items
1. Right-click the Gallery item, and then choose Open Folder.
2. If the item is contained in more than one folder, choose the folder to open.
The folder containing the selected item opens in MimioStudio Gallery.
Exporting a Gallery Folder to a Gallery File
Entire Gallery folders can be exported and imported into the MimioStudio Gallery as
Gallery (MCF) files. You can then share Galleries that you have created with other
MimioStudio users.
MimioStudio does not support network or shared galleries.
To export a Gallery folder to a Gallery file
1. Select the Gallery folder to export.
2.
Click the Export Content Pack button, .
3. From the Save As dialog box, enter a name for the file in the File Name box.
4. Select a location to save the file to.
5. Click Save.
Working with Saved Annotation Snapshots
Working with Saved Annotation Snapshots
MimioStudio automatically saves a snapshot of the annotated screen each time you exit
Screen Annotation mode. These snapshots are saved in the Screen Annotations folder in
MimioStudio Gallery.
For information about creating Screen Annotation snapshots, see Marking Up the Display
Using Screen Annotations.
Viewing Screen Annotation Snapshots
You can view your saved screen annotations from the Screen Annotations folder in
MimioStudio Gallery.
To view Screen Annotation snapshots
1. Start MimioStudio Gallery.
2. Select the Screen Annotations folder.
To select a snapshot
Do one of the following:
l Click on the snapshot to select.
l To select multiple snapshots, press CTRL and select each snapshot.
l To select multiple snapshots that are close to each other, drag a selection rectangle
over the snapshots.
25
Page 36

MimioStudio
l To select a range of snapshots, select the first snapshot and then press SHIFT and
select the last snapshot.
l To select all snapshots, right-click, and then choose Select All.
Renaming an Annotation Snapshot
Screen Annotation snapshots are saved in chronological order, using the date and time that
the snapshot was created as the name of the snapshot. You can rename a snapshot any time
after it has been saved.
To rename a snapshot
1. Select the snapshot to rename.
2. Right-click and choose Properties.
3. Enter a name for the snapshot in the Name box and click OK.
Adding Keywords to an Annotation Snapshot
You can add keywords to any snapshot so that you can use the search bar in MimioStudio
Gallery to find that snapshot later.
To add keywords to a snapshot
1. Select the snapshot to add keywords to.
2. Right-click and choose Properties.
3. Enter each keyword on a separate line in the Keywords box and click OK.
Searching for an Annotation Snapshot
You can search for a specific snapshot using the search bar in MimioStudio Gallery. You
can search for a snapshot using a keyword or part of the snapshot name.
To search for a specific snapshot
1. Select the Screen Annotations folder in the Gallery.
2. Enter text to search for in the Search box.
All snapshots associated with the text appear in the preview area of the Gallery.
Importing an Annotation Snapshot
You can import a snapshot into an open Notebook.
To import a snapshot
1. Open a MimioStudio Notebook.
2. Select the snapshot to import.
3. Drag the selected snapshot into the target Notebook.
Pasting an Annotation Snapshot Into Another Application
Annotation snapshots can be used in other applications such as Microsoft Word or
PowerPoint.
To paste a snapshot into another application
1. Select the snapshot to copy.
2.
Click the Copy button, .
26
Page 37

3. Navigate to the target application.
4. Right-click, and then choose Paste.
Alternatively, you can drag the selected snapshot into the target application.
Printing Annotation Snapshots
You can print a snapshot directly from the Screen Annotations folder in MimioStudio
Gallery.
To print a snapshot
1. Select the snapshot to print.
2. Right-click and choose Print.
Deleting Annotation Snapshots
You can delete snapshots from the Screen Annotations folder.
To delete a snapshot
1. Select the snapshot to delete.
2.
Click the Delete button, .
A delete confirmation dialog box appears.
3. Click Yes.
Delivering Interactive Notebook Lessons and Presentations
Delivering Interactive Notebook Lessons and Presentations
MimioStudio Notebook can be used to deliver lessons and presentations that were created
in or imported into a MimioStudio Notebook.
Using Fullscreen View
For presenting information, the Fullscreen view can be used to fill the entire screen with the
current page.
The MimioStudio Notebook standard toolbar and all MimioStudio Tools are available in
Fullscreen view.
To access the Fullscreen view
Click the Fullscreen button, .
The current page fills the entire screen and the MimioStudio Notebook standard toolbar
remains visible.
Navigating Through a Presentation
To navigate through a Notebook presentation
Use the MimioStudio Notebook standard toolbar to navigate through the Notebook
presentation.
27
Page 38
MimioStudio
Button Action
Use this button to enter or exit the Fullscreen view.
Use this button to insert a new page
Use this button to return to the previous page in the Notebook.
Use this button to advance to the next page in the Notebook.
Working with Multimedia Objects
You can play, pause, fast forward, and rewind movie, animation, and sound objects you
added to your presentation.
To play video or audio
Click anywhere on the movie, animation, or sound object to play.
To show and hide the video and audio controls
1. While the video or audio is playing, click once anywhere on the object to view the
object controls.
2. Click the object again to hide the controls.
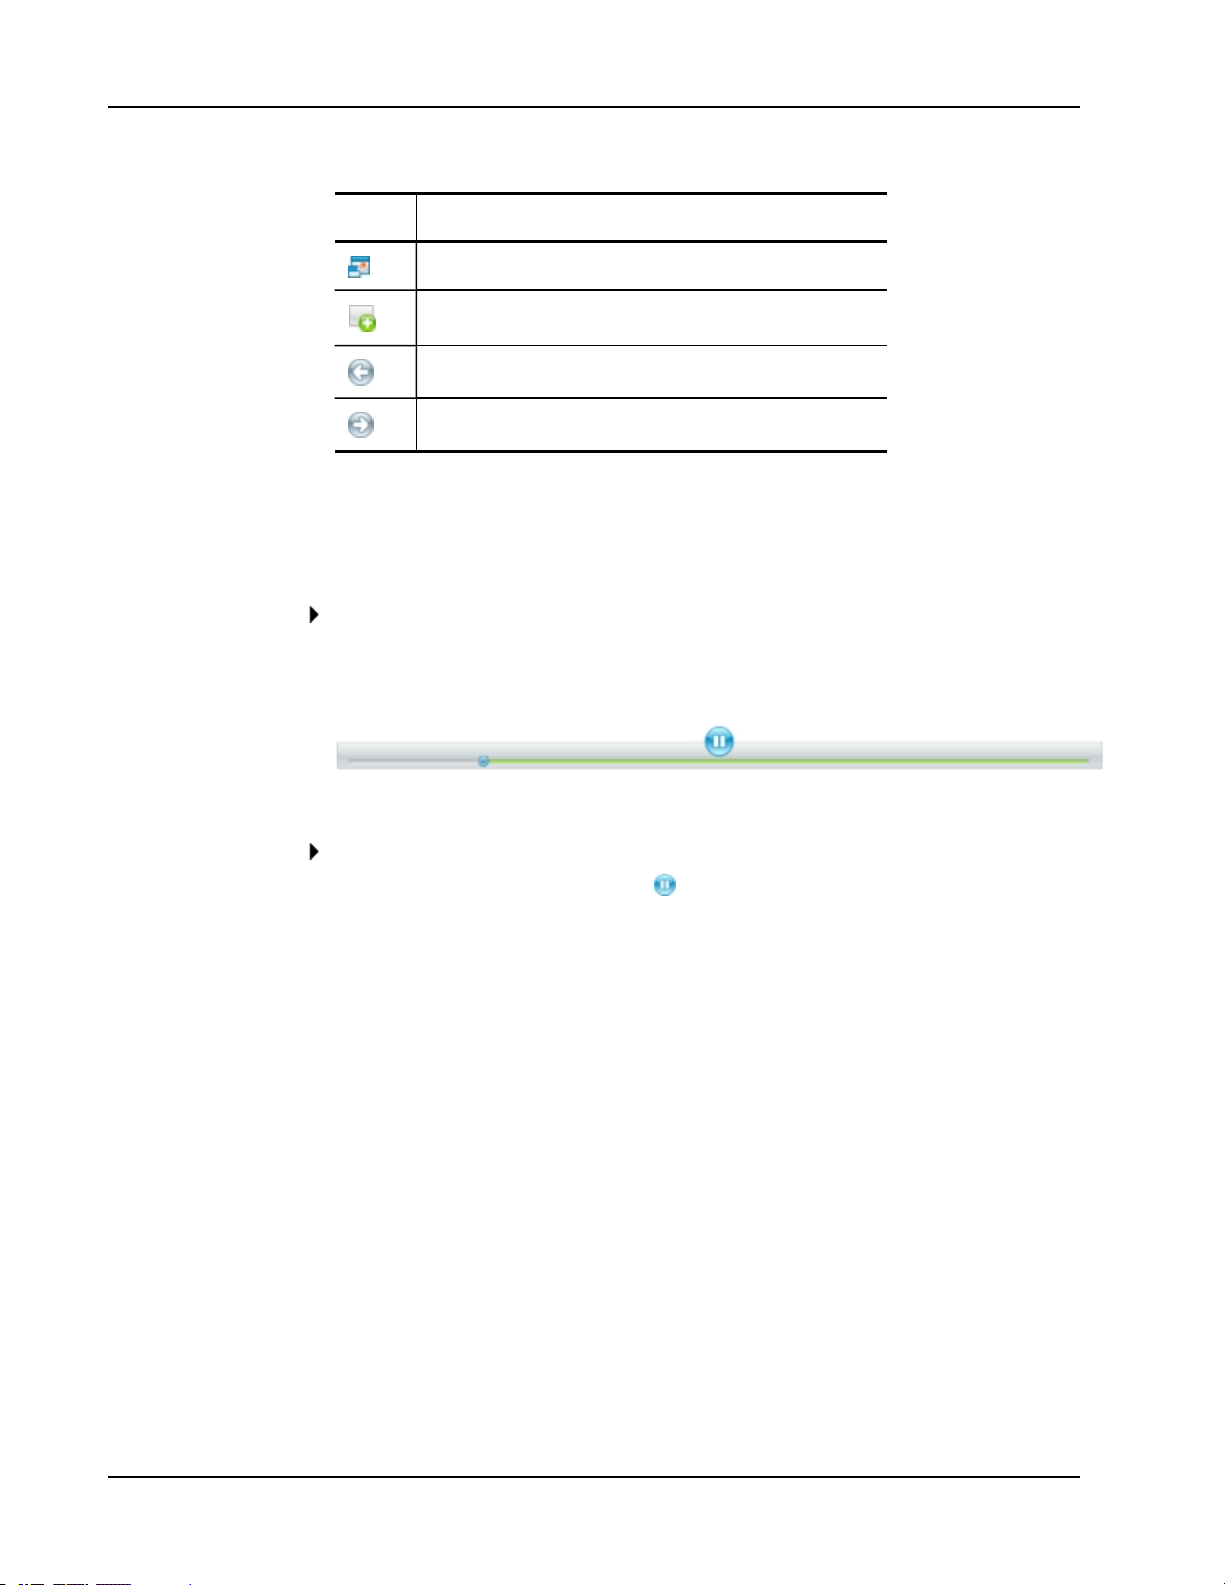
To pause, fast forward, or rewind video or audio
Do one of the following:
To pause the video or audio, click .
l
l To fast forward the video or audio, drag the slider to the right.
l To rewind the video or audio, drag the slider to the left.
28
Page 39

What's Included
Chapter 3
MimioTeach
Using MimioTeach with a projector, you can deliver lessons and presentations directly from
your whiteboard. Using MimioStudio Interactive mode, you control the movement of the
cursor on your screen with the MimioTeach stylus, much like you would with a mouse at
your computer.
The MimioTeach package contains the following items:
If you are missing any of the items above, contact Customer Support.
About MimioTeach
You can use the MimioTeach bar and stylus in MimioStudio Interactive mode to deliver
lessons and presentations.
1 MimioTeach bar 5 Mounting plates
2 USB power adapter 6 MimioStudio DVD
3 MimioHub 7 MimioTeach stylus
4 USB cable
29
Page 40
MimioTeach
You can also use the MimioTeach bar with MimioCapture to capture notes from your
whiteboard into MimioStudio Notebook. For more information about using MimioTeach
with MimioCapture, see MimioCapture.
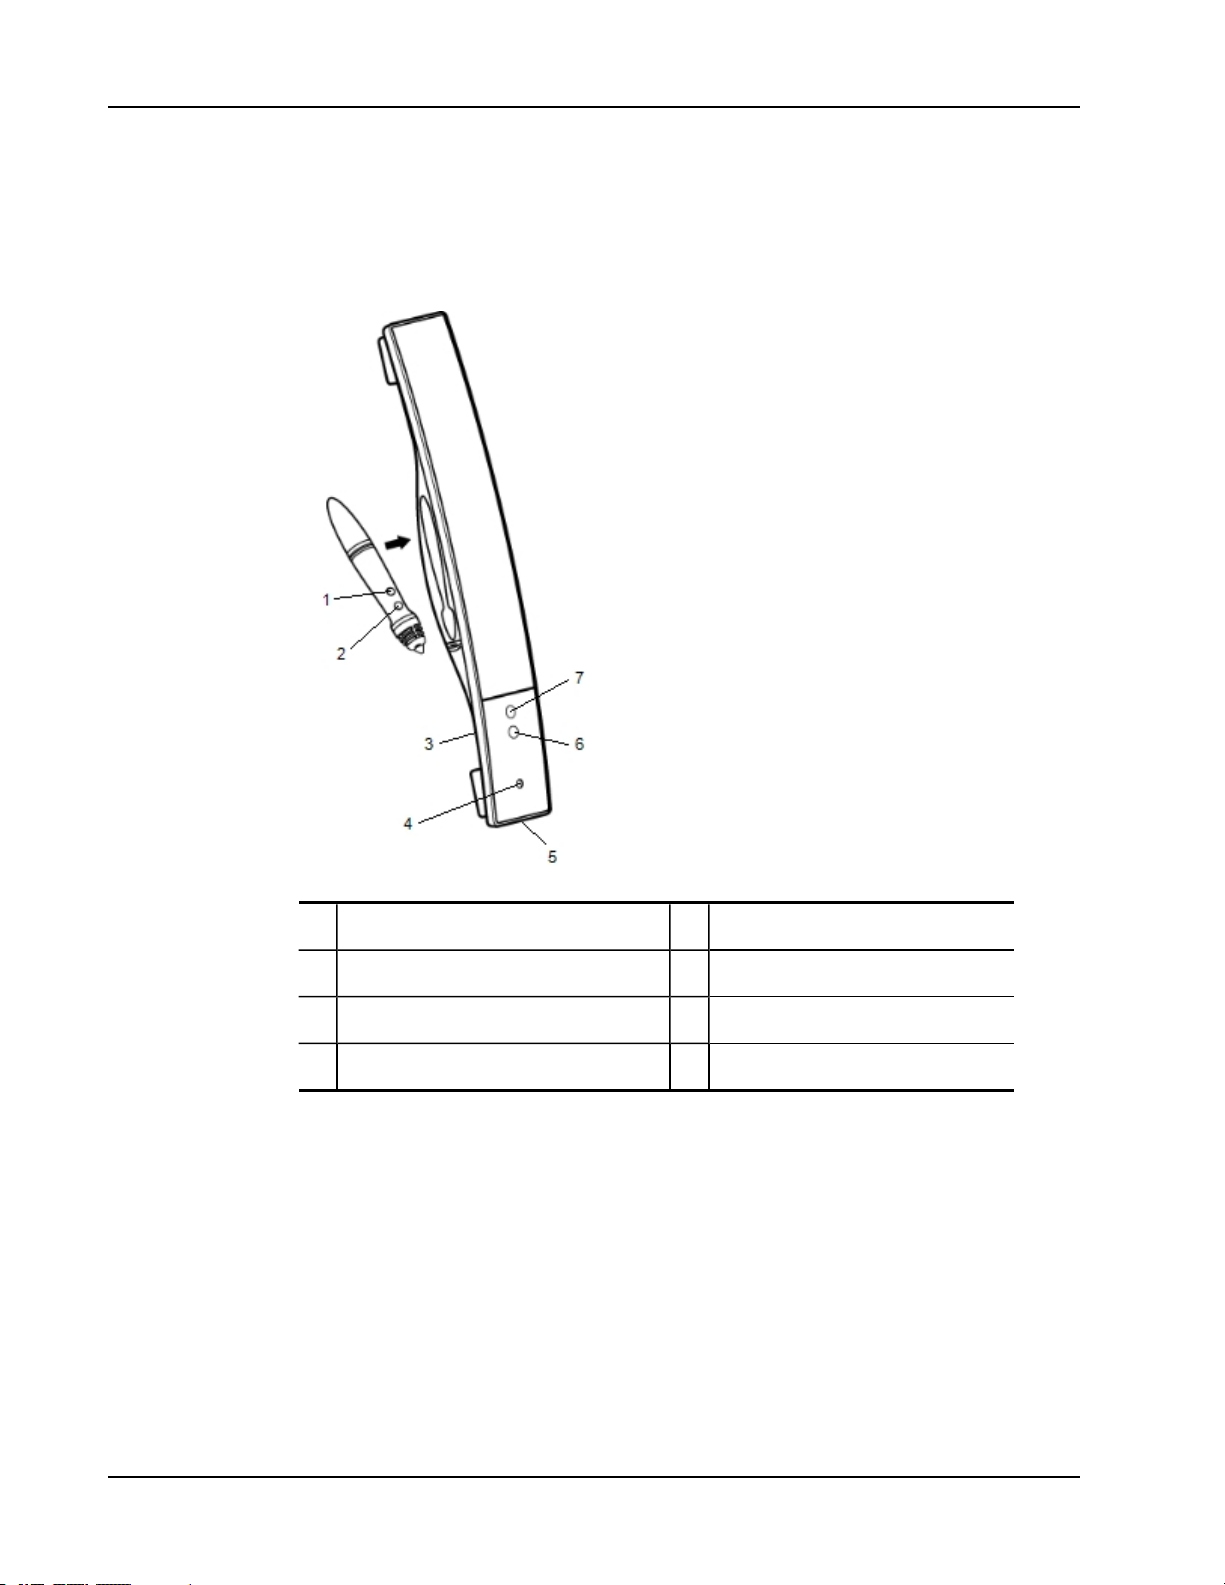
The following figure shows the major components of the MimioTeach.
30
1 Start Tools (button A) 5 USB/Power connector
2 Hover/Right-click (button B) 6 Launch
3 MimioHub dock 7 Calibrate
4 Power/Status light
Status Lights
The status light visually shows the status of the MimioTeach bar.
Page 41

Off Not receiving power; USB/powercable is not connected or MimioTeach is turned off.
Solid Green MimioTeach is connected and receiving power; MimioStudio software is running.
Flashing Green
Solid Amber MimioTeach cannot f ind an available MimioHub.
Flashing Amber MimioTeach is searching for an available MimioHub.
About MimioStudio Tools
With the various presentation tools found in MimioStudio Tools you can focus your
audience on a specific area of the screen by displaying only certain parts of the screen. You
can also annotate the screen with the drawing tools available in MimioStudio Tools using
the Screen Annotation feature.
For more information about MimioStudio Tools, see Marking Up the Display Using Screen
Annotations.
The following table describes the major components of MimioStudio Tools.
MimioTeach is connected or connecting, and receiving power; MimioStudio software is
not running.
31
Page 42
MimioTeach
Selection tool Zoom
Pen Brush
Text Highlighter
Line Arrow End
Arrow Start Arrow Both
Rectangle Ellipse
Triangle Right Triangle
Five Pointed Star Hexagon
Pentagon Shape Recognition
Eraser Insert file
Screen clipping Color picker
More colors Object Fill
Outline and Fill color Thickness slider
Color palette Solid Line
Dash Line Dotted Line
Transparency Gallery
Applications (see below) Right-click
Interactive Mouse
Screen Annotation
From the Applications tool, you can access the following:
Reveal
Spotlight
Text Tools
Quick Vote
Recorder
View
Calculator
Magnify
Web Browser
Getting Started
Review the following topics to install and start using your MimioTeach.
32
Page 43

n Setting Up the MimioTeach Stylus
n Setting Up the MimioTeach Bar
n Setting Up Interactive Mode
Setting Up the MimioTeach Stylus
The MimioTeach stylus is powered by a rechargeable lithium-ion battery. The battery
recharges whenever the stylus is docked on the MimioTeach bar.
To set up the MimioTeach stylus
1. Turn the top of the stylus counter-clockwise to separate the top from the body of the
stylus.
Getting Started
2. Remove the plastic strip from the stylus.
3. Replace the top onto the body of the stylus and turn clockwise to attach.
Setting Up the MimioTeach Bar
The MimioTeach bar comes pre-linked to the included MimioHub. You can also use this
MimioHub to connect other MimioClassroom devices to your computer, such as
MimioVote.
When not in use, the MimioHub can be stored in the MimioHub dock on the back of
the MimioTeach bar.
MimioTeach is powered using the included USB cable and power adapter.
33
Page 44

MimioTeach
Optionally, MimioTeach can be powered using three AAA batteries. For information
about using batteries to power the MimioTeach bar, see Inserting the Batteries.
To set up the MimioTeach bar
1. Plug the USB cable into the USB port on the power adapter.
2. Plug the other end of the USB cable into the USB port on the MimioTeach bar.
3. Plug the power adapter into a power outlet.
4. Place the MimioTeach bar along the left edge of the whiteboard as shown.
34
Page 45
The MimioTeach bar attaches securely to any magnetic whiteboard. See Mounting
MimioTeach to a Non-Magnetic Whiteboard for information about mounting the bar to
a non-magnetic whiteboard.
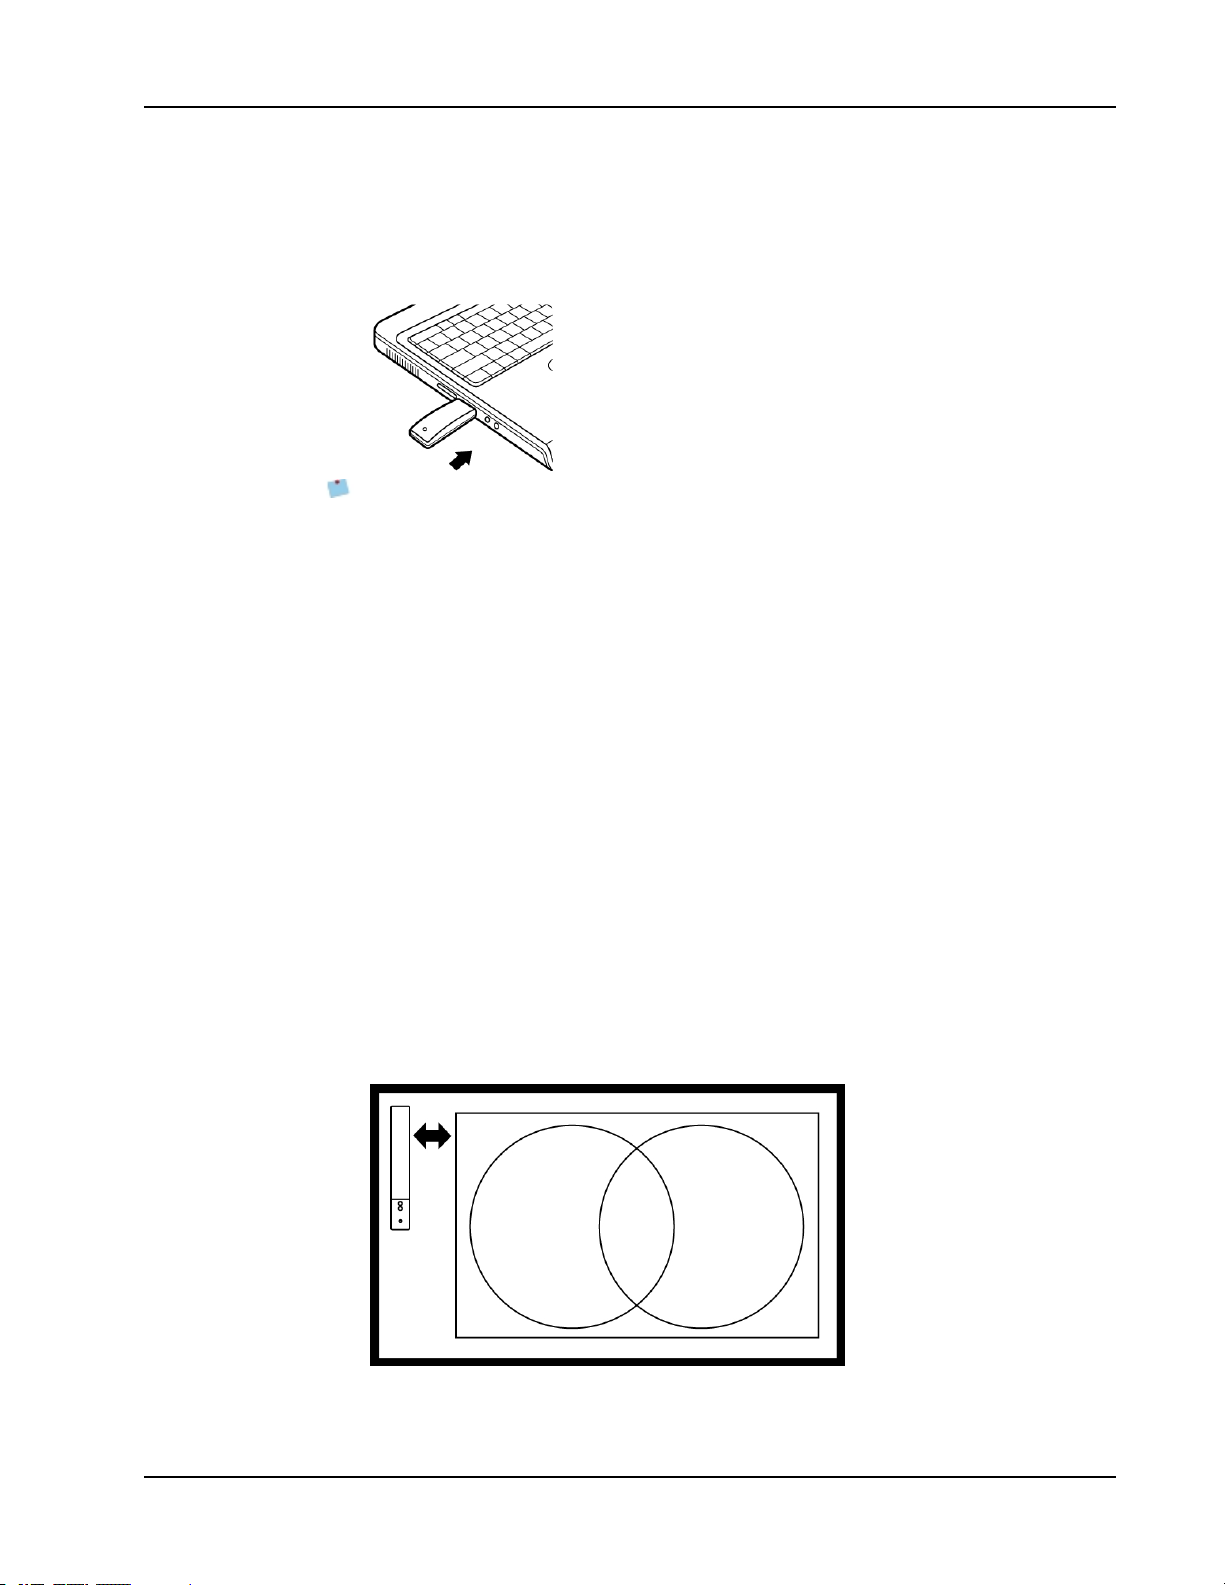
5. Plug the MimioHub into an available USBport on your computer.
If you do not want to connect the MimioTeach bar to your computer wirelessly, you
can link the bar to your computer using the included USB cable without the power
adapter. The bar will be powered by USB through your computer.
Setting Up Interactive Mode
Using MimioStudio Interactive mode, you can deliver lessons and presentations directly
from your whiteboard.
Getting Started
To use Interactive mode you need a projector, a MimioTeach-enabled whiteboard, and a
MimioTeach stylus. Combined, these devices make for a powerful tool for delivering lessons
and presentations.
Projecting Your Desktop
If you are presenting from a MimioStudio Notebook or another application, such as a
PowerPoint presentation, you can open the application before or after Interactive mode is
enabled and calibrated.
To set up for Interactive mode
1. Project your desktop image onto your whiteboard.
Refer to your projector’s documentation for instructions on how to project your desktop
image.
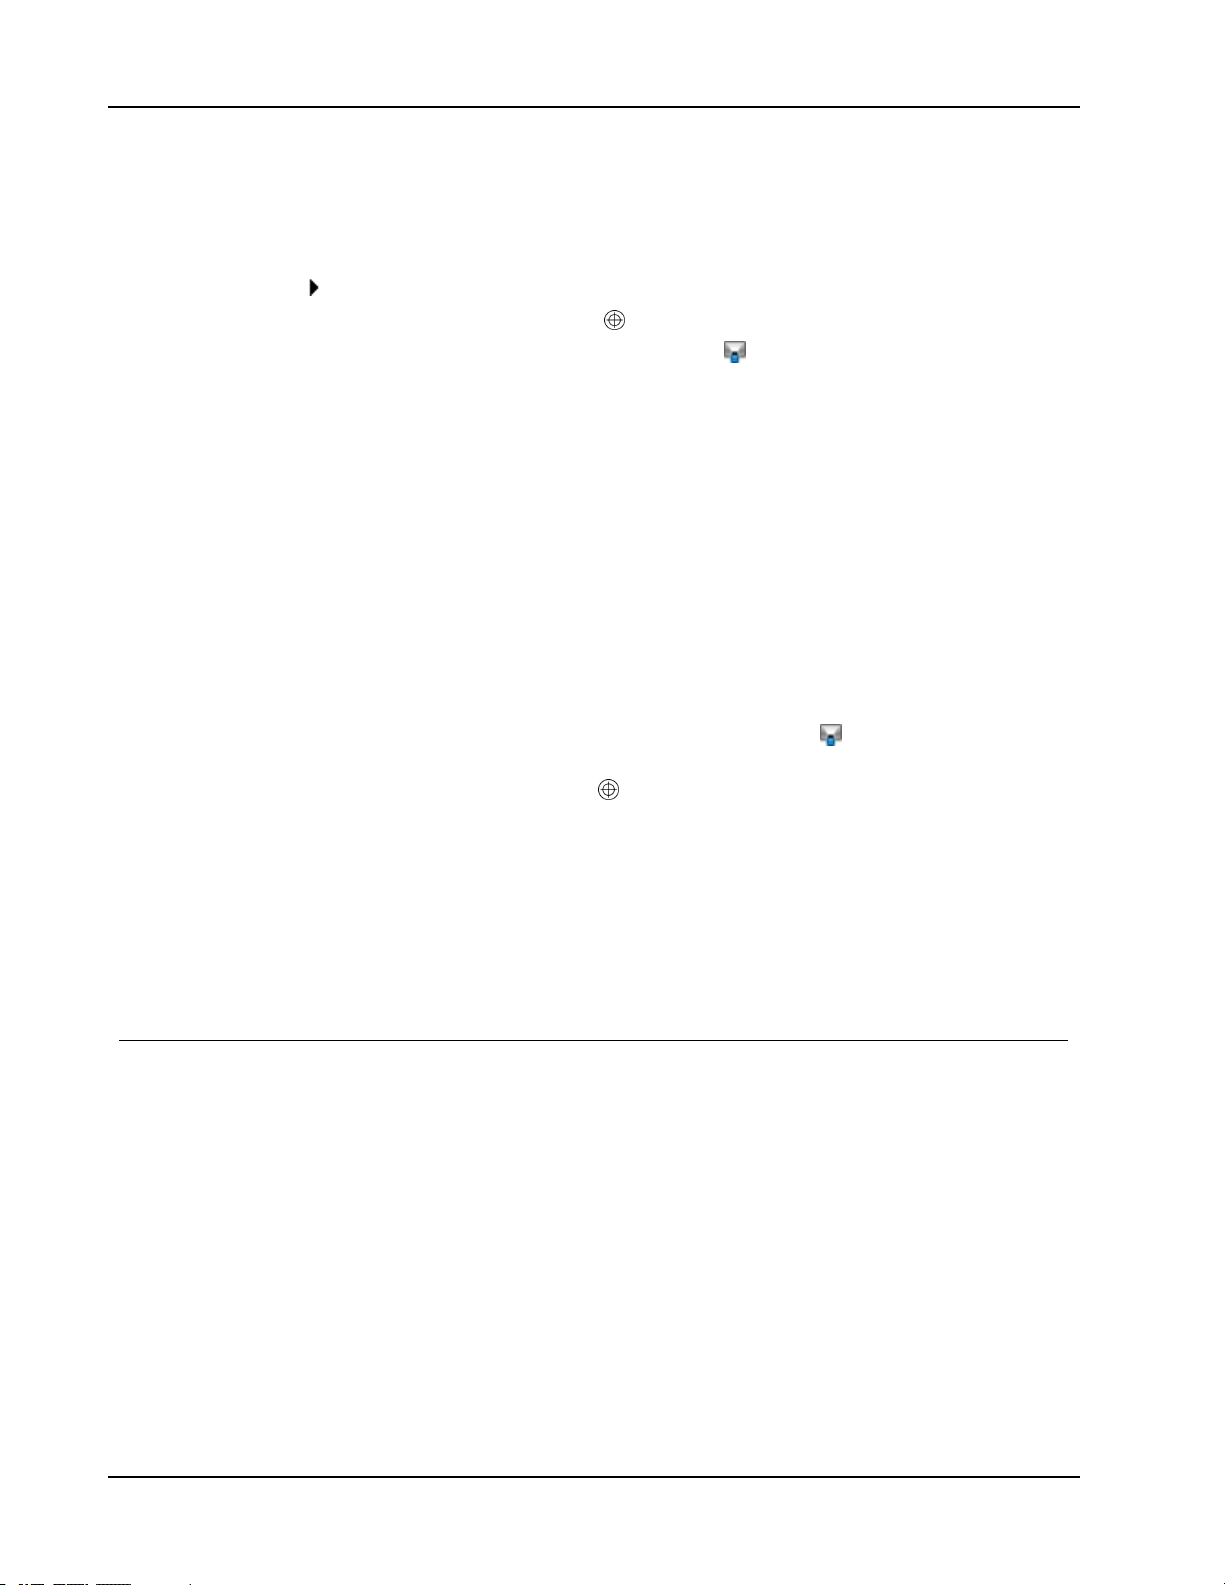
2. Adjust the projected image to have a 2-inch to 3-inch buffer between the edge of your
projection and your MimioTeach.
35
Page 46
MimioTeach
Calibrating Interactive Mode
3. Click the MimioTeach Mouse anywhere on the whiteboard.
Interactive mode starts and the calibration screen appears.
To exit Interactive mode
Do one of the following:
l
Press the Interactive button, , twice on the MimioTeach bar.
Start MimioStudio Tools, click Interactive , and then click Exit.
l
l Start MimioStudio Settings, select Interactive, and then click Disable.
See Customizing MimioStudio for information on how to access MimioStudio
Settings.
Each time Interactive mode is enabled, you are prompted to calibrate using the MimioTeach
stylus.
When using a permanently installed whiteboard and projector, you do not need to
recalibrate Interactive mode after the first session. See Adjusting the Interactive Settings.
To calibrate Interactive mode
1. If the calibration screen does not appear when you start Interactive mode, do one of the
following:
l
Start MimioStudio Tools, click the Interactive button, , and then click
Recalibrate.
l
Press the Interactive button, , on your MimioTeach bar.
l Start MimioStudio Settings, select Interactive, and then click Calibrate.
2. Press the MimioTeach stylus down on the whiteboard at the center of each of the nine
calibration targets.
Make sure to hold the stylus perpendicular to the writing surface as you click.
The calibration target disappears and the next calibration target appears.
When the calibration screen disappears, Interactive mode is enabled.
Using MimioTeach
You can use the MimioTeach bar and stylus in MimioStudio Interactive mode to deliver
lessons and presentations. In MimioStudio Interactive mode, you control the movement of
the cursor on your screen with the MimioTeach stylus, much like you would with a mouse
at your computer.
You can also use the various presentation tools found in MimioStudio Tools to focus your
audience on a specific area of the screen by displaying only certain parts of the screen. And,
you can annotate the screen with the drawing tools available in MimioStudio Tools using
the Screen Annotation feature.
Using the MimioTeach Stylus
In Interactive mode, the MimioTeach stylus can be used to control your desktop and interact
with applications on your computer from your whiteboard.
36
Page 47
Using MimioTeach
The following table describes how to use the MimioTeach stylus to control your desktop
from the whiteboard.
To execute Do this
Left mouse click Click in the projected area at the desired location with the tip of the stylus.
Double left mouse click Quickly click twice in the projected area at the desired location with the tip of
the stylus.
Right mouse click
Hover
Press the B button on the stylus, and then click in the projected area at the
desired location with the tip of the stylus.
1. Hold the stylus at the desired location, staying as close to the whiteboard
as possible without touching it.
2. Press the B button on the stylus.
3. Move the stylus to the desired location.
4. Release the B button on the stylus.
To change the functions of the MimioTeach stylus buttons, see Adjusting the Interactive
Settings.
Focusing Attention Using the Reveal and Spotlight Tools
The Reveal tool and the Spotlight tool help you to focus your audience on a specific area of
the screen by keeping parts of the screen hidden.
Using the Reveal Tool
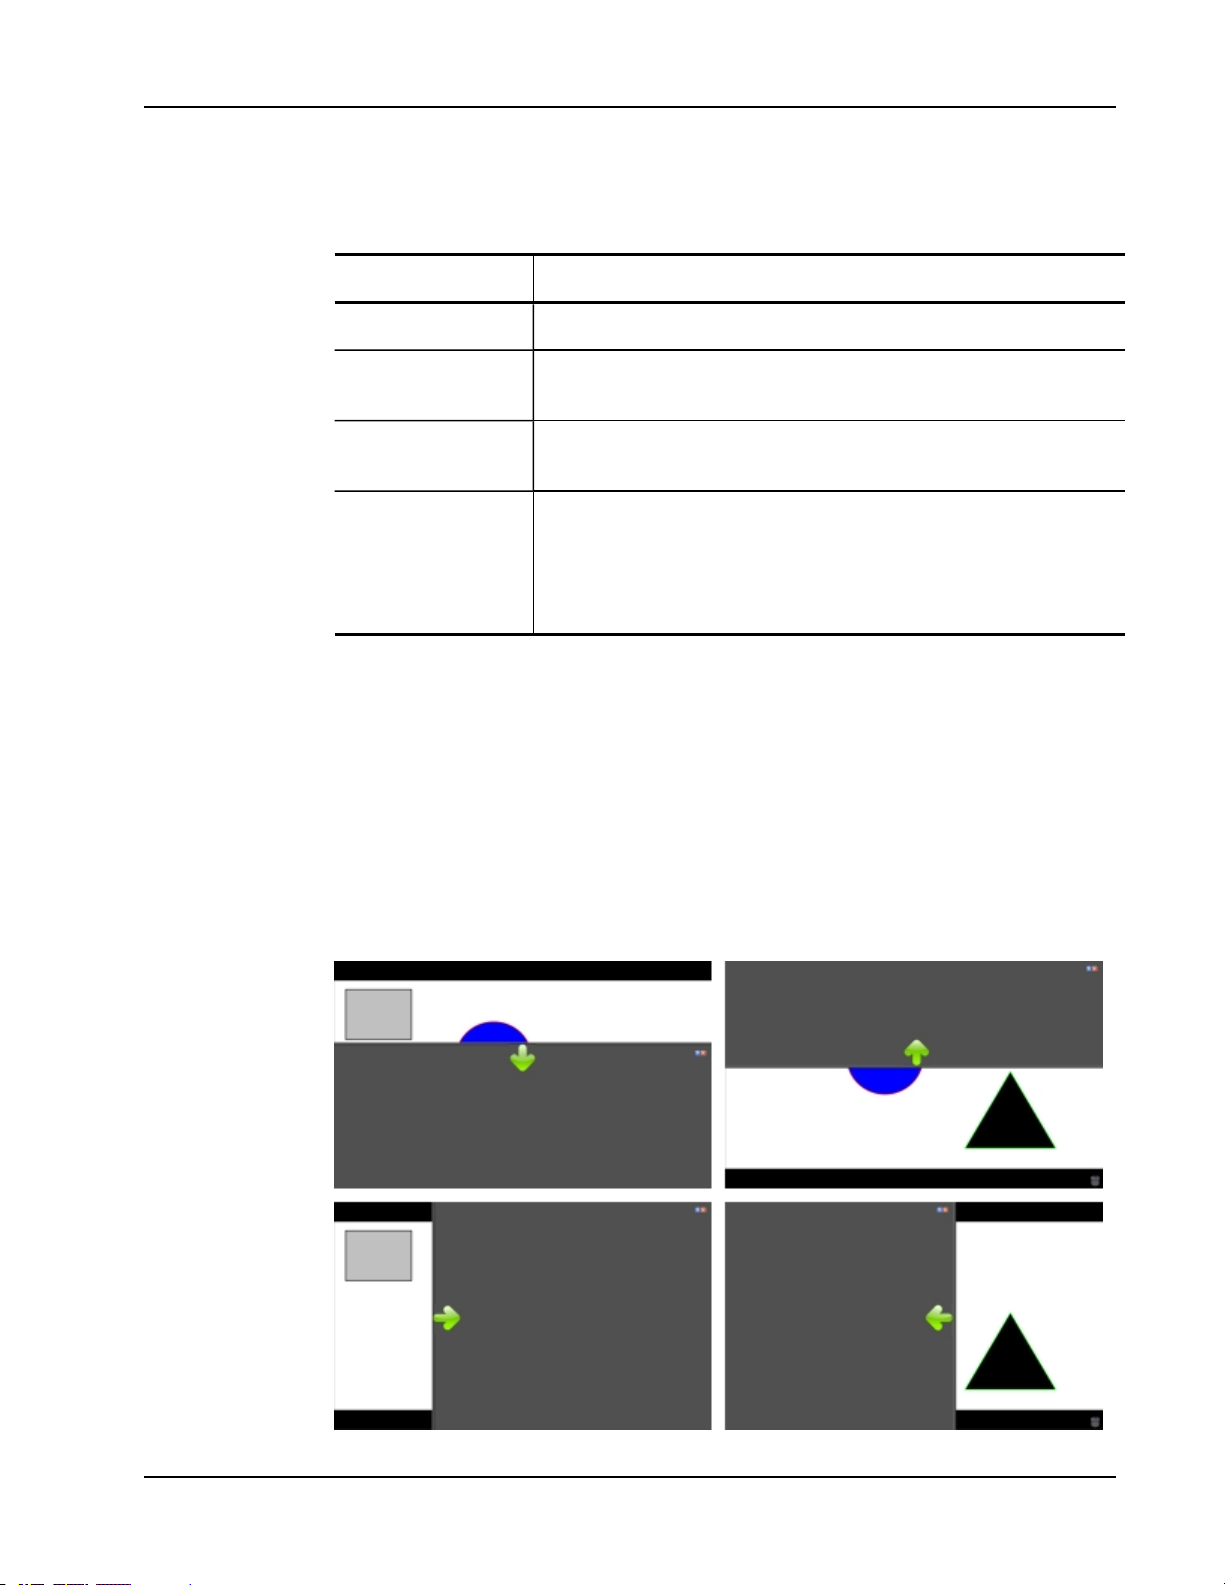
The Reveal tool creates a shade that you can raise, lower, move left, and move right over
the screen image, as if you are moving a shade up, down, or across the screen. You can then
expose bullet points or other information progressively.
37
Page 48
MimioTeach
Using the Spotlight Tool
To use the Reveal tool
Do one of the following:
l
From MimioStudio Tools, click the Applications button, , and then choose
Reveal.
l
(Interactive mode only) Press the Launch button, , on the MimioTeach bar, and
then click Reveal in the Launch window.
To adjust the revealed area
Click inside the shaded area and drag down, up, left, or right to reveal more or less of
the displayed area.
To adjust the transparency of the Reveal tool
1.
Click , and then point to Transparent.
2. From the Transparent list, choose a percentage.
A transparency of 0% means that the shaded area will be completely opaque.
The Spotlight tool masks the entire screen except for a small area, the spotlight. You can
then focus audience attention on a specific area of the screen. The spotlight area can be
reshaped, resized, and moved around the screen.
38
To use the Spotlight tool
1. Do one of the following:
l
From MimioStudio Tools, click the Applications button, , and then choose
Spotlight.
l
(Interactive mode only) Press the Launch button, , on the MimioTeach bar, and
then click Spotlight in the Launch window.
2. Click the shaded area outside of the spotlight border and drag the spotlight to
the desired location.
To adjust the shape of the spotlight
1.
Click , and then point to Shape.
2. From the Shape list, choose a shape for the spotlight.
To resize the spotlight
Page 49

1.
Click , and then point to Size.
2. From the Size list, choose a spotlight size.
You can also resize the spotlight by dragging the colored border of the spotlight until
the spotlight is the desired size.
To adjust the spotlight transparency
1.
Click , and then point to Transparent.
2. From the Transparent list, choose a transparency percentage.
A transparency of 0% means that the shaded area will be completely opaque.
Marking Up the Display Using Screen Annotations
Screen Annotation mode allows you to annotate applications, web pages, and images. When
in Annotation mode, a green border with a faded edge appears around your desktop.
When you exit from Screen Annotation mode, all annotations are cleared from the
whiteboard and automatically archived in the Screen Annotations folder in MimioStudio
Gallery.
Enabling Screen Annotation Mode
To enable Screen Annotation mode
1. Do one of the following
l
From MimioStudio Tools, click the Screen Annotation button, , to freeze your
current desktop image.
l
(Interactive mode Only) Press the Launch button, , on the MimioTeach bar, and
then click Screen Annotation in the Launch window.
A green border with a faded edge appears around your desktop.
2. Annotate the screen using MimioStudio Tools.
All object, drawing, and manipulation features in MimioStudio Tools are available in
Screen Annotation mode.
To exit Screen Annotation mode
Do one of the following:
Using MimioTeach
From MimioStudioTools, click the Mouse button, , to “unfreeze” the screen.
l
l
(Interactive mode only) Press the Launch button, , on the MimioTeach bar, and
then click Screen Annotation in the Launch window.
To disable the Annotation mode border
1.
Right-click in the notification area of the taskbar and choose Settings.
2.
Select Notebook from the MimioStudio Settings dialog box.
3. Under General, clear the Enable fullscreen border (Screen Annotation only) check
box.
4. Click OK to save the settings.
Annotating the Screen Using MimioStudio Tools
MimioStudio Tools are used to annotate the screen. All object, drawing, and manipulation
features in MimioStudio Tools are available in Screen Annotation mode.
39
Page 50

MimioTeach
Once you select a drawing tool, that tool remains selected until you select a different
drawing tool or the selection tool.
See Manipulating Objects for a complete description of manipulating objects.
All of the functions and features of the MimioStudio drawing tools that are available in
MimioStudio Notebook are available in Screen Annotation mode.
To use the freehand pen
1.
Click the Pen button, .
2. (Optional) To adjust the line width, drag the Thickness slider.
3. (Optional) To adjust the line color, do one of the following:
l Select a color from the Color Palette.
l
Click , and then select a color from the Color dialog box.
l
Click , and then select a color from the desktop.
4.
(Optional) To adjust the transparency of the line, click the Transparency button, ,
and then choose a transparency percentage.
5. Place the cursor where you want the ink stroke to start on the page.
6. Drag the cursor to draw ink strokes.
To use the freehand brush
1.
Click the Brush button, .
2. (Optional) To adjust the line width, drag the Thickness slider.
3. (Optional) To adjust the line color, do one of the following:
l Select a color from the Color Palette.
l
Click , and then select a color from the Color dialog box.
l
Click , and then select a color from the desktop.
4.
(Optional) To adjust the transparency of the line, click the Transparency button, ,
and then choose a transparency percentage.
5. Place the cursor where you want the brush stroke to start on the page.
6. Drag the cursor to draw brush strokes.
To highlight a portion of the display
1.
Click the Highlighter button, .
2. (Optional) To adjust the highlighter width, drag the Thickness slider.
3. (Optional) To change the color, do one of the following:
l Select a color from the Color Palette.
l
Click , and then select a color from the Color dialog box.
l
Click , and then select a color from the desktop.
4. Place the cursor where you want the highlight stroke to start on the page.
5. Drag the cursor over the area you want to highlight.
To erase ink and highlighting
1.
Click the Eraser button, .
2. (Optional) To adjust the eraser width, drag the Thickness slider.
3. Drag the cursor over the ink or highlighter strokes you want to erase.
40
Page 51
Using MimioTeach
To add a line or shape
1. Click the line type or shape you want to add.
2. (Optional) To adjust the line or outline width, drag the Thickness slider.
3. (Optional) To change the line or outline color, select the Outline Color box, and then
do one of the following:
l Select a color from the Color Palette.
l
Click , and then select a color from the Color dialog box.
l
Click , and then select a color from the desktop.
4. (Optional) To adjust the fill color, select the Fill Color box, and then do one of the
following:
l Select a color from the Color Palette.
l
Click , and then select a color from the Color dialog box.
l
Click , and then select a color from the desktop.
5.
To change the line or outline style, click and choose one of the following:
l
l
l
Solid Line
Dash Line
Dotted Line
6. (Optional) To adjust the transparency of the line or shape, click the Transparency
button, , and then choose a transparency percentage.
7. Place the cursor where you want the line or shape to start on the page.
8. Drag the cursor to draw the line or shape.
To add formatted text
1.
Click the Text button, .
2. Place the cursor where you want the text to start on the page.
For a fixed width text box, place the cursor where you want the text box to start on the
page and then drag to the desired width.
3. Select a font style, size, color, and an alignment option for the text.
4. Enter text in the text box.
To draw a shape
1.
Click the Shape Recognition button, .
2. (Optional) To adjust the outline width, drag the Thickness slider.
3. (Optional) To change the outline color, select the Outline Color box, and then do one
of the following:
l Select a color from the Color Palette.
l
Click , and then select a color from the Color dialog box.
l
Click , and then select a color from the desktop.
4. (Optional) To adjust the fill color, select the Fill Color box, and then do one of the
following:
41
Page 52

MimioTeach
l Select a color from the Color Palette.
l
Click , and then select a color from the Color dialog box.
l
Click , and then select a color from the desktop.
5.
To change the line or outline style, click and choose one of the following:
l
l
l
6.
(Optional) To adjust the transparency of the shape, click the Transparency button, ,
Solid Line
Dash Line
Dotted Line
and then choose a transparency percentage.
7. Place the cursor where you want the shape to start on the page.
8. Drag the cursor to draw the shape.
The Shape Recognition tool can be used to draw circles, ellipses, triangles, rectangles,
squares, and lines.
Clearing All Annotations from the Display
When you exit Screen Annotation mode, all annotations are cleared from the display and all
annotations are automatically preserved as a snapshot of the display. See Working with
Saved Annotation Snapshots for information about reviewing and using the snapshots.
Inserting Text Into an Application Using MimioStudio Text Tools
You can enter text into any text-entry box or page using the MimioStudio Text Tools. The
Text Tool has three modes for entering text:
n On-Screen Keyboard allows you to enter text through an on-screen keyboard
application.
n Write Anywhere allows you to enter text by writing anywhere on the screen. Your
handwriting is automatically converted into text and entered into the current
application.
Write Anywhere is only available on Windows XP 32-bit.
n Writing Pad allows you to enter text through a small on-screen writing pad. Your
handwriting is automatically converted into text and input into the current application.
42
In addition, Write Anywhere and Writing Pad also support gesture recognition, which
allows handwritten shortcuts to be automatically recognized as commonly used keys.
To access MimioStudio Text Tools
1.
From MimioStudio Tools, click the Applications button, , and then choose Text
Tools.
2.
Right-click the Text Tools icon , , or in the notification area of the Windows
taskbar.
3. Choose the Text Tool that you want to use.
l
Keyboard to enable the On-Screen Keyboard.
l
Write Anywhere to enable Write Anywhere.
l
Writing Pad to enable Writing Pad.
Page 53

To disable MimioStudio Text Tools
Do one of the following:
l
Click the Text Tools icon , , or in the notification area of the taskbar.
l
From MimioStudio Tools, click the Applications button, , and then choose
Text Tools.
Using the On-Screen Keyboard
You can enter text into any application using the On-Screen Keyboard.
To use the On-Screen Keyboard
1. Start the On-Screen Keyboard.
2. Click in the text-entry box or on the page where you want to enter the text.
3. Using your mouse or MimioTeach stylus, press the virtual keys on the on-screen
keyboard.
The text is entered into the text-entry box or on the page that you selected.
Using Write Anywhere
With Write Anywhere you can enter text into any text-entry box or page, by writing
anywhere on the screen with the MimioTeach stylus while in Interactive mode. You can
also use Write Anywhere with your mouse or other input device from your computer.
Using MimioTeach
Write Anywhere is only available on Windows XP 32-bit.
To use Write Anywhere
1. Start Write Anywhere.
The Write Anywhere on-screen buttons appear.
2. Click in the text-entry box or on the page where you want to enter the text.
3. Using your mouse or MimioTeach stylus, write anywhere on the screen.
Your handwriting is automatically converted to text and entered into the text-entry box
or on the page that you selected.
4. Use the on-screen buttons for commonly used keys.
Button Description
Backspace
Enter
Tab
Space
Write Anywhere also supports gesture recognition for commonly used keys. See Using
Gesture Recognition.
43
Page 54

MimioTeach
Using Writing Pad
With Writing Pad you can enter text through a small on-screen writing pad using the
MimioTeach stylus while in Interactive mode. You can also use Writing Pad with your
mouse or other input device from your computer.
To use Writing Pad
1. Start Writing Pad.
The on-screen writing pad appears.
2. Click in the text-entry box or on the page where you want to enter the text.
3. Using your mouse or MimioTeach stylus, write within the yellow space of the onscreen writing pad.
Your handwriting is automatically converted to text and entered into the textentry box or on the page that you selected.
4. Use the on-screen buttons for commonly used keys.
Button Description
Writing Pad also supports gesture recognition for commonly used keys. See Using Gesture
Recognition.
Using Gesture Recognition
With gesture recognition, handwritten shortcuts are automatically recognized as commonly
used keys. Both Write Anywhere and Writing Pad support gesture recognition.
The following table describes how to use gestures to perform common functions.
Backspace
Enter
Tab
Space
44
Page 55
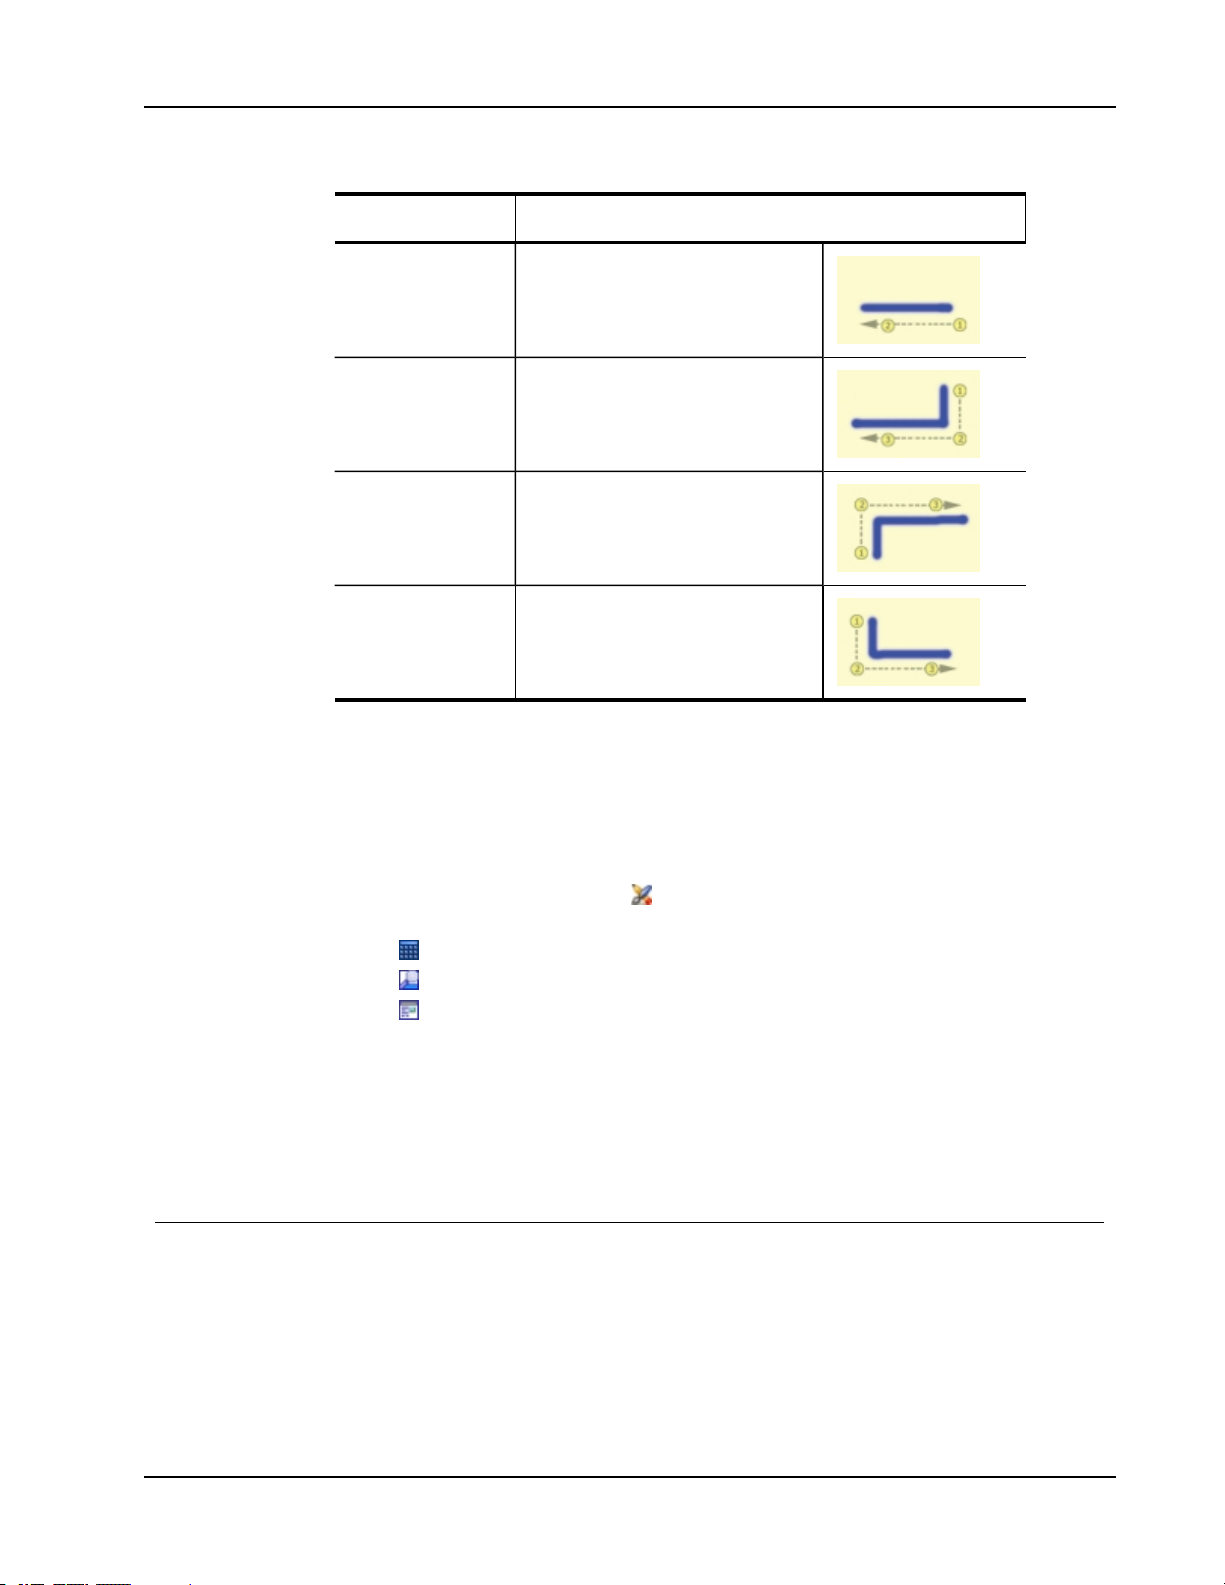
To press Do this
Caring for MimioTeach
Backspace
Enter
Tab
Space bar
Draw a line from right to left.
Draw a connected line from top to bottom
and then from r ight to left.
Draw a connected line from bottom to top
and then from left to right.
Draw a connected line from top to bottom
and then from left to right.
Using the Web Browser, Calculator, and Magnify Tools
MimioStudio Tools includes shortcuts for accessing a Web browser, a calculator, and a
magnifier.
To use the tools
1. Start MimioStudio Tools.
2.
Click the Applications button, , choose More Tools, and then choose one of the
following tools:
l
Calculator
l
Magnify
l
Web Browser
Recording Desktop Actions and Audio in Interactive Mode
Using MimioStudio Recorder, you can record your interactions into an AVI movie file, with
or without audio. See Using MimioStudio Recorder for more information on how to use
MimioStudio Recorder.
Caring for MimioTeach
Review the following topics for information about cleaning, inserting the batteries, and
permanently mounting your MimioTeach.
n Cleaning MimioTeach
n Inserting the Batteries
n Mounting MimioTeach to a Non-Magnetic Whiteboard
45
Page 56

MimioTeach
Cleaning MimioTeach
MimioTeach is designed to give you long and trouble-free service while requiring very little
maintenance.
You can easily clean your MimioTeach using the following items:
n Lint-free cloth.
n Isopropyl alcohol, diluted dishwashing detergent, or diluted glass cleaner.
To clean the MimioTeach bar and stylus
1. Disconnect the USB cable from the MimioTeach bar.
2. Use the lint-free cloth to wipe the exterior of the MimioTeach bar and stylus.
3. Remove dirt and smudges with one of the cleaning solutions mentioned above.
4. Reconnect the USB cable.
If you use glass cleaner, make sure it does not contain ammonia.
Avoid using liquids on any exposed charging contacts. Do not allow liquid into
any openings on the equipment.
Inserting the Batteries
MimioTeach is powered using the included USB cable and power adapter. Optionally,
MimioTeach can be powered using three AAA batteries.
To insert the batteries
1. Press down and slide off the battery compartment cover.
2. Insert three AAA batteries into the battery compartment.
3. Replace the battery compartment cover.
Remove the batteries if the MimioTeach bar will not be used for a long period of time.
Mounting MimioTeach to a Non-Magnetic Whiteboard
The MimioTeach bar attaches securely to any magnetic whiteboard. If you do not have a
magnetic whiteboard, you can mount the MimioTeach bar to your whiteboard using the
included metal plates.
If you are installing both MimioTeach and MimioCapture, you must mount
MimioCapture before mounting MimioTeach. This will ensure proper placement of the
MimioTeach bar. See Mounting MimioCapture to a Non-Magnetic Whiteboard for
information on mounting MimioCapture.
To mount MimioTeach to a non-magnetic whiteboard
1. Place the metal plates against the back of the MimioTeach bar as shown.
Make sure that the recess on each plate is inserted into the recess on the back of the
MimioTeach bar.
46
Page 57

Caring for MimioTeach
2. Remove the paper backing from the adhesive strips to expose the adhesive.
3. Press the MimioTeach bar firmly along the left edge of the whiteboard as shown.
47
Page 58

This page intentionally left blank for double-sided printing.
48
Page 59

What's Included
Chapter 4
Mimio Interactive
Using Mimio Interactive with a projector, you can deliver lessons and presentations directly
from your whiteboard. Using MimioStudio Interactive mode, you control the movement of
the cursor on your screen with the Mimio Interactive Mouse, much like you would with a
mouse at your computer.
The Mimio Interactive package contains the following items:
1 Mimio Interactive bar 4 MimioStudio DVD
2 Mounting brackets 5 Mimio mouse
3 USB cable 6 AA battery
If you are missing any of the items above, contact Customer Support.
About Mimio Interactive
You can use the Mimio Interactive bar and mouse in MimioStudio Interactive mode to
deliver lessons and presentations.
You can also use the Mimio Interactive bar with Mimio Capture Kit to capture notes from
your whiteboard into MimioStudio Notebook. For more information about using Mimio
49
Page 60
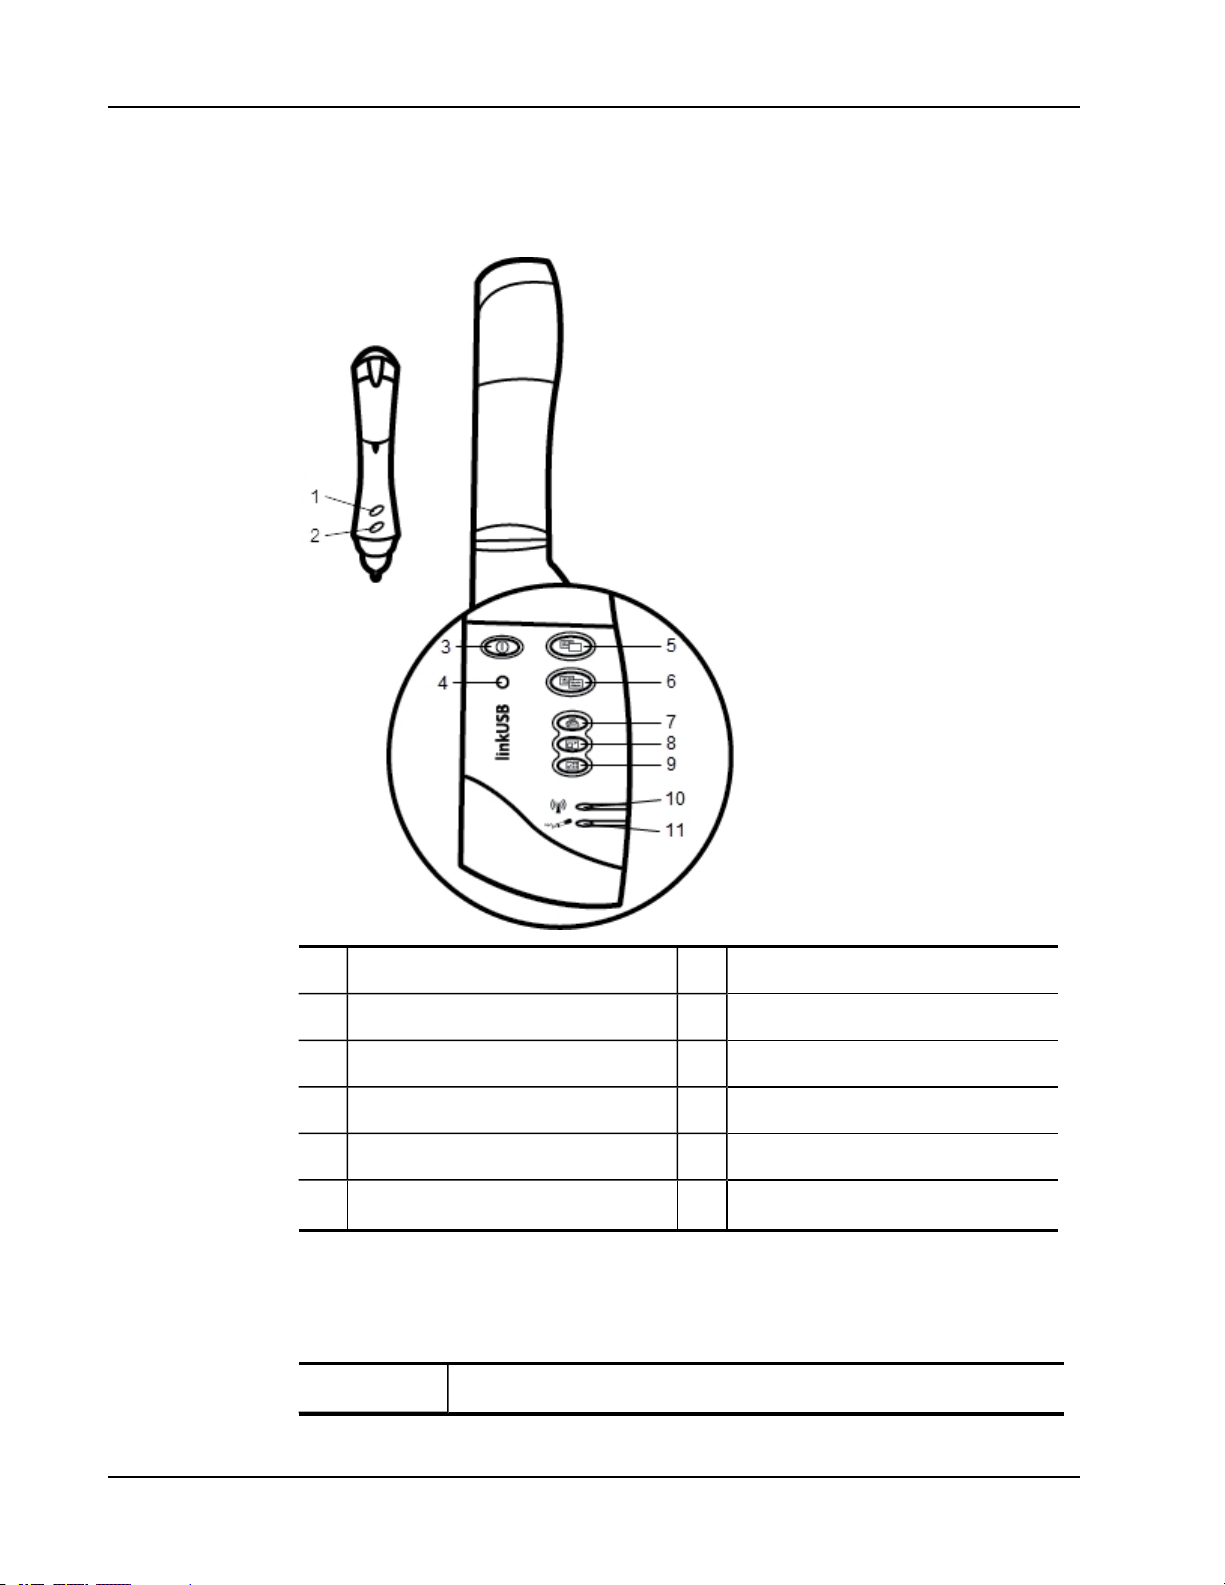
Mimio Interactive
Interactive with Mimio Capture Kit, see Mimio Capture Kit.
The following figure shows the major components of Mimio Interactive.
50
Status Lights
The status lights visually show the status of the Mimio Interactive bar.
Power Status Lights
1 A button (right-click) 7 Print page (Spotlight tool)
2 B button (hover) 8 Resize window (Reveal tool)
3 Power button/status light 9 Interactive
4 Learning button 10 Data transmission status light
5 New page (MimioStudio Tools) 11 Memory status light
6
Copy page (Annotation mode)
Off Not receiving power; USB/powercable is not connected, batteries need replaced,
Page 61
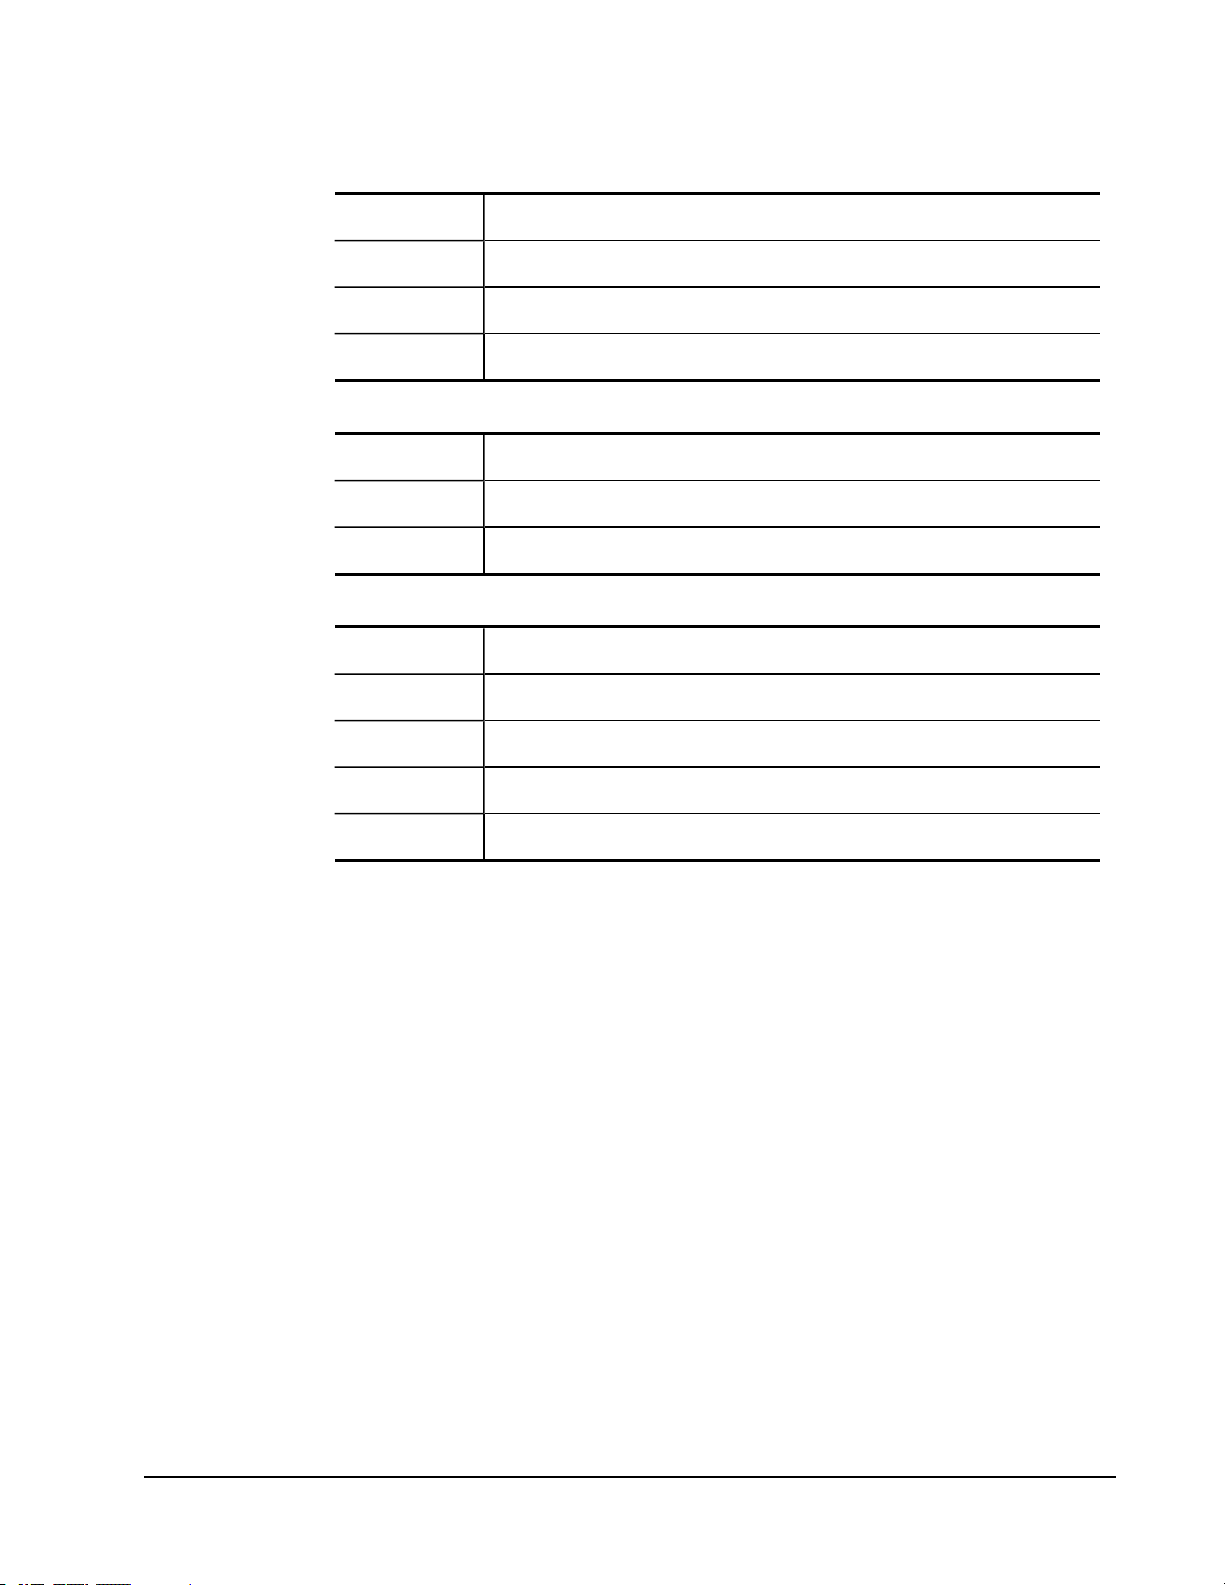
or Mimio Interactive is turned off.
Solid Green Mimio Interactive is receiving power.
Solid Amber Mimio Interactive is receiving power; one to five hours of battery life remaining.
Flashing Amber Mimio Interactive is receiving power; less than one hour of battery life remaining.
Data Transmission Status Lights
Off Mimio Capture Kit pen or Mimio Interactive mouse is not in use.
Solid Green Mimio Capture Kit pen or Mimio Interactive mouse is in use.
Solid Amber Mimio Capture Kit pen or Mimio Interactive mouse battery is low.
Memory Status Lights
Off Mimio Interactive bar memory is empty.
Flashing Green Data is being downloaded from the Mimio Interactive bar to your computer.
Solid Green Mimio Interactive bar memory is less than 80% full.
Solid Amber Mimio Interactive bar memory is between 80% and 90% full.
Flashing Amber Mimio Interactive bar memory is over 90% full.
About Mimio Wireless
You can use the Mimio Wireless module and wireless receiver to connect the Mimio
Interactive bar wirelessly to your computer.
The following figure shows the major components of Mimio Wireless.
51
Page 62

Mimio Interactive
1 Power button/status light 6 Resize window (Reveal tool)
Status Lights
The status lights visually show the status of the Mimio Interactive bar.
Power Status Lights
2 Learning button 7 Interactive
3 New page (MimioStudio Tools) 8 Link status light
4 Copy page (Annotation mode) 9 Data transmission status light
5 Print page (Spotlight tool)
Off Not receiving power; USB/powercable is not connected, batteries need
replaced, or Mimio Interactive is turned off.
Solid Green Mimio Interactive is receiving power.
Solid Amber
Flashing Amber
Mimio Interactive is receiving power; one to five hours of battery life
remaining.
Mimio Interactive is receiving power; less than one hour of battery life
remaining.
52
Link Status Lights
Solid Green Mimio Interactive is connected to the wireless receiver.
Flashing Green Mimio Interactive is establishing a connection to the wireless receiver.
Page 63

Solid Amber Mimio Interactive cannot find an available wireless receiver.
Data Transmission Status Lights
Flashing Green
(slowly)
Flashing Green
(quickly)
Solid Amber
About MimioStudio Tools
With the various presentation tools found in MimioStudio Tools you can focus your
audience on a specific area of the screen by displaying only certain parts of the screen. You
can also annotate the screen with the drawing tools available in MimioStudio Tools using
the Screen Annotation feature.
For more information about MimioStudio Tools, see Marking Up the Display Using Screen
Annotations.
The following table describes the major components of MimioStudio Tools.
Mimio Capture Kit pen or Mimio Interactive mouse is not in use.
Mimio Capture Kit pen or Mimio Interactive mouse is in use.
Mimio Capture Kit pen or Mimio Interactive mouse battery is low.
53
Page 64

Mimio Interactive
Selection tool Zoom
Pen Brush
Text Highlighter
Line Arrow End
Arrow Start Arrow Both
Rectangle Ellipse
Triangle Right Triangle
Five Pointed Star Hexagon
Pentagon Shape Recognition
Eraser Insert file
Screen clipping Color picker
More colors Object Fill
Outline and Fill color Thickness slider
Color palette Solid Line
Dash Line Dotted Line
Transparency Gallery
Applications (see below) Right-click
Interactive Mouse
Screen Annotation
From the Applications tool, you can access the following:
Reveal
Spotlight
Text Tools
Quick Vote
Recorder
View
Calculator
Magnify
Web Browser
Getting Started
Review the following topics to install and start using your Mimio Interactive.
54
Page 65

n Setting Up the Mimio InteractiveMouse
n Setting Up the Mimio Interactive Bar
n Setting Up Mimio Wireless
n Setting Up Interactive Mode
Setting Up the Mimio Interactive Mouse
The Mimio Interactive Mouse is powered by one AA battery.
To set up the Mimio Interactive Mouse
1. Press down and slide off the battery compartment cover.
2. Insert one AA battery into the battery compartment.
Getting Started
3. Replace the battery compartment cover.
Setting Up the Mimio Interactive Bar
Mimio Interactive is powered through your computer using the included USB cable.
Optionally, Mimio Interactive can be powered using four AA batteries. For information
about using batteries to power the Mimio Interactive bar, see Inserting the Batteries.
To set up the Mimio Interactive bar
1. Unfold the Mimio Interactive bar.
2. Plug the USB cable into the USB port on the Mimio Interactive bar.
55
Page 66

Mimio Interactive
3. Plug the other end of the USB cable into an available USB port on your computer.
4. Place the Mimio Interactive bar along the left edge of the whiteboard as shown.
The Mimio Interactive bar attaches to any whiteboard using the suction cups on the
back of the bar.
If the Mimio Interactive bar will be used for extended periods of time or will be used
repeatedly in any one location, you should mount the bar using the included brackets.
See Mounting the Mimio Capture Kit for information about mounting the bar using the
brackets.
Setting Up Mimio Wireless
The Mimio Wireless module comes pre-linked to the included wireless receiver.
Mimio Interactive bar is powered using the included power adapter.
Optionally, Mimio Interactive can be powered using four AA batteries. For information
about using batteries to power the Mimio Interactive bar, see Inserting the Batteries.
To set up Mimio Wireless
1. Press the release button on the back of the Mimio Interactive bar, and then slide the
linkUSB module down to remove.
56
Page 67

2. Slide the Mimio Wireless module onto the Mimio Interactive bar.
Getting Started
3. Plug the power adapter into the power connector on the bottom of the Mimio
Interactive bar.
4. Plug the other end of the power adapter into a power outlet.
5. Place the Mimio Interactive bar along the left edge of the whiteboard as shown.
57
Page 68
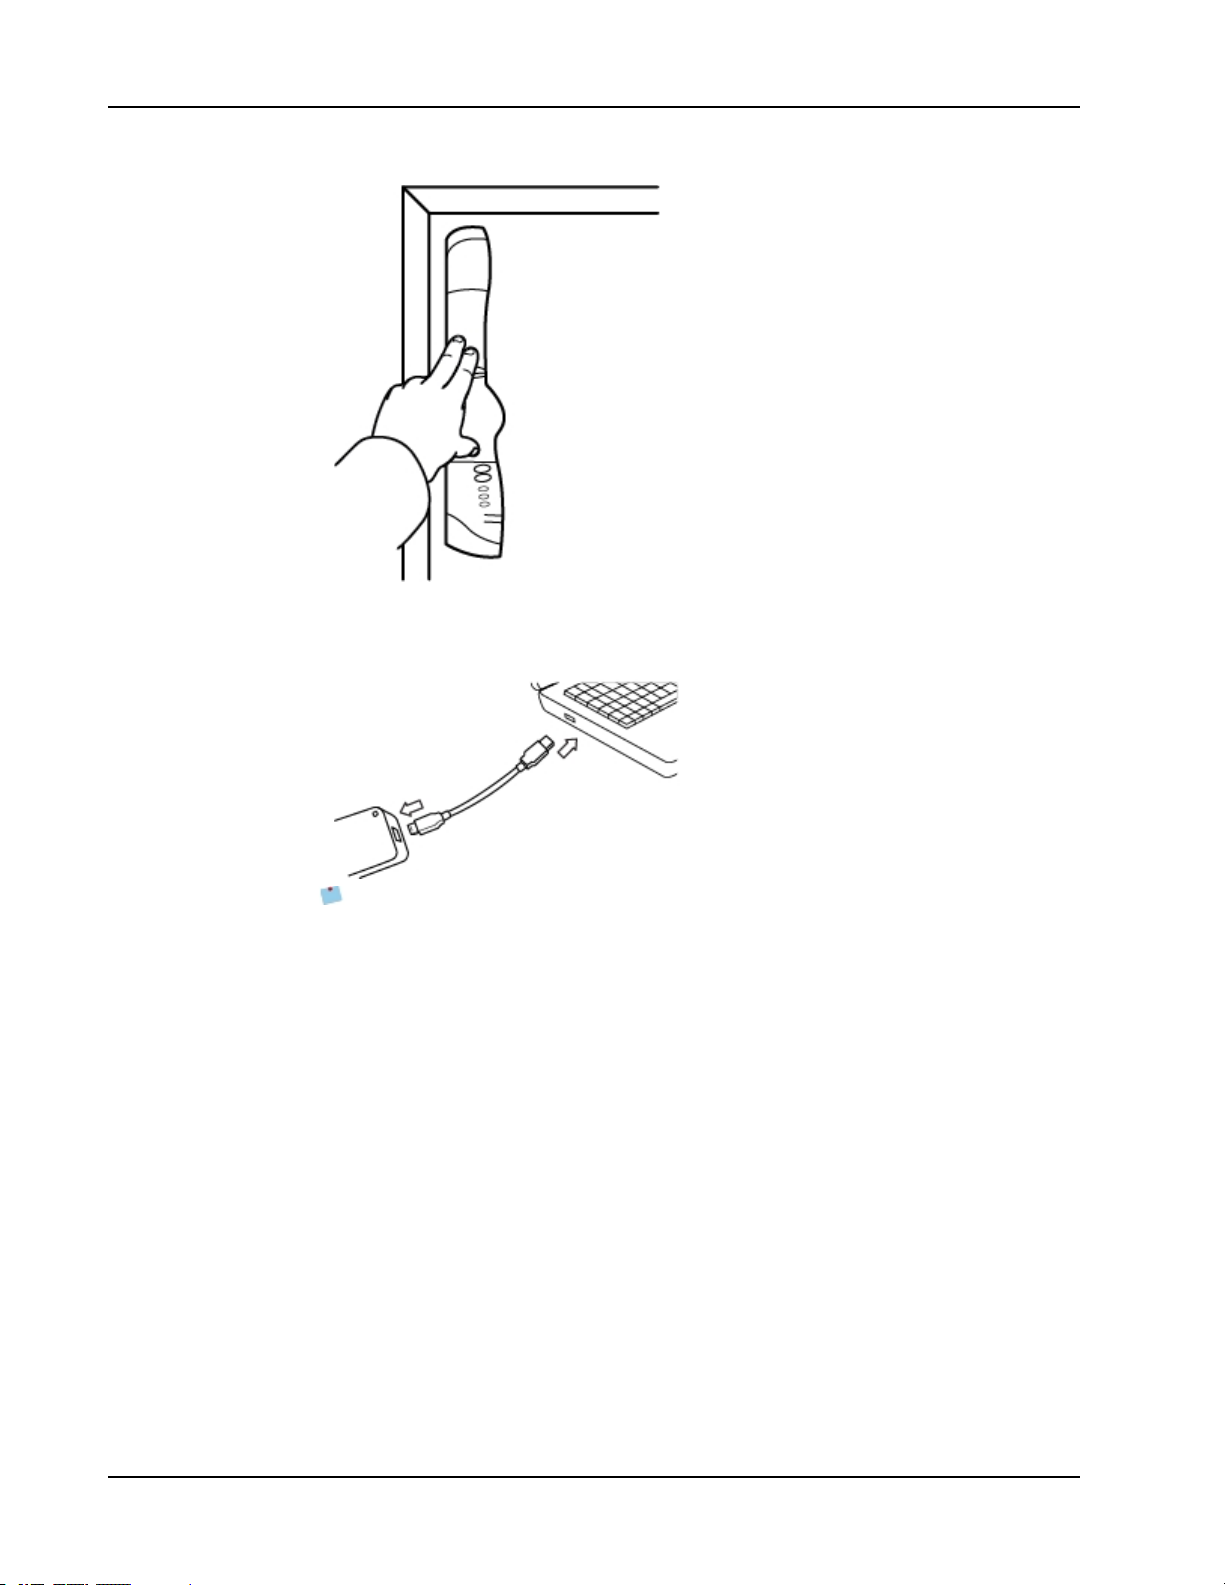
Mimio Interactive
The Mimio Interactive bar attaches to any whiteboard using the suction cups on the
back of the bar.
6. Plug the wireless receiver into an available USBport on your computer.
If the Mimio Interactive bar will be used for extended periods of time or will be
used repeatedly in any one location, you should mount the bar using the included
brackets. See Mounting the Mimio Capture Kit for information about mounting the
bar using the brackets.
Setting Up Interactive Mode
Using MimioStudio Interactive mode, you can deliver lessons and presentations directly
from your whiteboard.
To use Interactive mode you need a projector, a Mimio Interactive-enabled whiteboard, and
a Mimio Interactive Mouse. Combined, these devices make for a powerful tool for
delivering lessons and presentations.
Projecting Your Desktop
If you are presenting from a MimioStudio Notebook or another application, such as a
PowerPoint presentation, you can open the application before or after Interactive mode is
enabled and calibrated.
To set up for Interactive mode
58
Page 69

Getting Started
1. Project your desktop image onto your whiteboard.
Refer to your projector’s documentation for instructions on how to project your desktop
image.
2. Adjust the projected image to have a 2-inch to 3-inch buffer between the edge of your
projection and your Mimio Interactive.
3. Click the Mimio Interactive Mouse anywhere on the whiteboard.
Interactive mode starts and the calibration screen appears.
To exit Interactive mode
Do one of the following:
Press the Interactive button, , twice on the Mimio Interactive bar.
l
Start MimioStudio Tools, click Interactive , and then click Exit.
l
l Start MimioStudio Settings, select Interactive, and then click Disable.
See Customizing MimioStudio for information on how to access MimioStudio
Settings.
Calibrating Interactive Mode
Each time Interactive mode is enabled, you are prompted to calibrate using the Mimio
Interactive Mouse.
When using a permanently installed whiteboard and projector, you do not need to
recalibrate Interactive mode after the first session. See Adjusting the Interactive Settings.
To calibrate Interactive mode
1. If the calibration screen does not appear when you start Interactive mode, do one of the
following:
l
Start MimioStudio Tools, click the Interactive button, , and then click
Recalibrate.
l
Press the Interactive button, , on your Mimio Interactive bar.
l Start MimioStudio Settings, select Interactive, and then click Calibrate.
2. Press the Mimio Interactive Mouse down on the whiteboard at the center of each of the
nine calibration targets.
Make sure to hold the stylus perpendicular to the writing surface as you click.
The calibration target disappears and the next calibration target appears.
When the calibration screen disappears, Interactive mode is enabled.
59
Page 70
Mimio Interactive
Using Mimio Interactive
You can use the Mimio Interactive bar and stylus in MimioStudio Interactive mode to
deliver lessons and presentations. In MimioStudio Interactive mode, you control the
movement of the cursor on your screen with the Mimio Interactive Mouse, much like you
would with a mouse at your computer.
You can also use the various presentation tools found in MimioStudio Tools to focus your
audience on a specific area of the screen by displaying only certain parts of the screen. And,
you can annotate the screen with the drawing tools available in MimioStudio Tools using
the Screen Annotation feature.
Using the Mimio Interactive Mouse
In Interactive mode, the Mimio Interactive Mouse can be used to control your desktop and
interact with applications on your computer from your whiteboard.
The following table describes how to use the Mimio Interactive Mouse to control your
desktop from the whiteboard.
To execute Do this
Left mouse click Click in the projected area at the desired location with the tip of the Mimio
Interactive Mouse.
Double left mouse click Quickly click twice in the projected area at the desired location with the tip of
the Mimio Interactive Mouse.
1. Hold the Mimio Interactive Mouse at the desired location, staying as close to the
Right mouse click
Hover
whiteboard as possible without touching it.
2. Press the A (concave) button on the Mimio Interactive Mouse.
1. Hold the Mimio Interactive Mouse at the desired location, staying as close
to the whiteboard as possible without touching it.
2. Press the B (convex) button on the Mimio Interactive Mouse.
3. Move the Mimio Interactive Mouse to the desired location.
4. Release the B button on the Mimio Interactive Mouse.
To change the functions of the Mimio Interactive Mouse buttons, see Adjusting the
Interactive Settings.
Focusing Attention Using the Reveal and Spotlight Tools
The Reveal tool and the Spotlight tool help you to focus your audience on a specific area of
the screen by keeping parts of the screen hidden.
60
Using the Reveal Tool
The Reveal tool creates a shade that you can raise, lower, move left, and move right over
the screen image, as if you are moving a shade up, down, or across the screen. You can then
expose bullet points or other information progressively.
Page 71
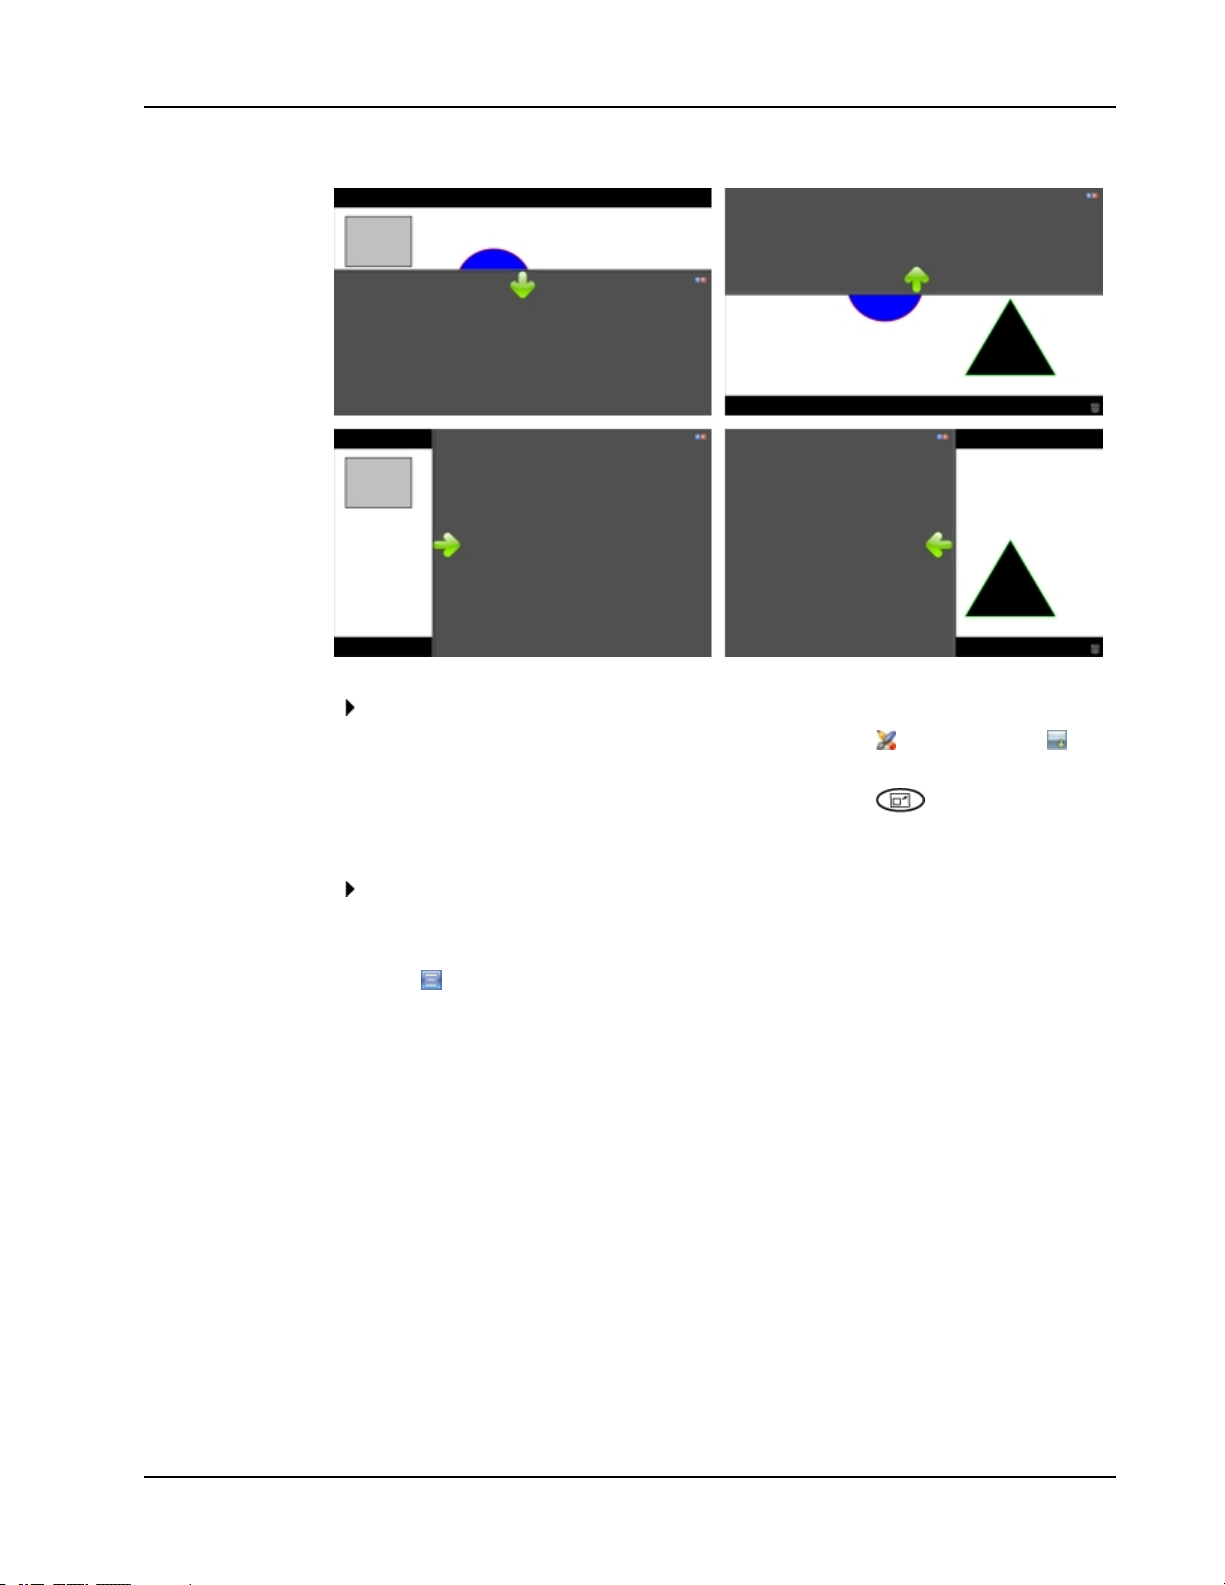
Using Mimio Interactive
To use the Reveal tool
Do one of the following:
l
From MimioStudio Tools, click the Applications button, , and then choose
Reveal.
(Interactive mode only) Press the Resize window button, , on the Mimio
l
Interactive bar.
To adjust the revealed area
Click inside the shaded area and drag down, up, left, or right to reveal more or less of
the displayed area.
To adjust the transparency of the Reveal tool
1.
Click , and then point to Transparent.
2. From the Transparent list, choose a percentage.
A transparency of 0% means that the shaded area will be completely opaque.
Using the Spotlight Tool
The Spotlight tool masks the entire screen except for a small area, the spotlight. You can
then focus audience attention on a specific area of the screen. The spotlight area can be
reshaped, resized, and moved around the screen.
61
Page 72

Mimio Interactive
To use the Spotlight tool
1. Do one of the following:
l
From MimioStudio Tools, click the Applications button, , and then choose
Spotlight.
l
(Interactive mode only) Press the Print page button, , on the Mimio Interactive
bar.
2. Click the shaded area outside of the spotlight border and drag the spotlight to
the desired location.
To adjust the shape of the spotlight
1.
Click , and then point to Shape.
2. From the Shape list, choose a shape for the spotlight.
To resize the spotlight
1.
Click , and then point to Size.
2. From the Size list, choose a spotlight size.
You can also resize the spotlight by dragging the colored border of the spotlight until
the spotlight is the desired size.
To adjust the spotlight transparency
1.
Click , and then point to Transparent.
2. From the Transparent list, choose a transparency percentage.
A transparency of 0% means that the shaded area will be completely opaque.
Marking Up the Display Using Screen Annotations
Screen Annotation mode allows you to annotate applications, web pages, and images. When
in Annotation mode, a green border with a faded edge appears around your desktop.
When you exit from Screen Annotation mode, all annotations are cleared from the
whiteboard and automatically archived in the Screen Annotations folder in MimioStudio
Gallery.
Enabling Screen Annotation Mode
To enable Screen Annotation mode
62
Page 73

Using Mimio Interactive
1. Do one of the following
l
From MimioStudio Tools, click the Screen Annotation button, , to freeze your
current desktop image.
l
(Interactive mode Only) Press the Copy page button, , on the Mimio
Interactive bar.
A green border with a faded edge appears around your desktop.
2. Annotate the screen using MimioStudio Tools.
All object, drawing, and manipulation features in MimioStudio Tools are available in
Screen Annotation mode.
To exit Screen Annotation mode
Do one of the following:
From MimioStudioTools, click the Mouse button, , to “unfreeze” the screen.
l
(Interactive mode Only) Press the Copy page button, , on the Mimio
l
Interactive bar.
To disable the Annotation mode border
1.
Right-click in the notification area of the taskbar and choose Settings.
2.
Select Notebook from the MimioStudio Settings dialog box.
3. Under General, clear the Enable fullscreen border (Screen Annotation only) check
box.
4. Click OK to save the settings.
Annotating the Screen Using MimioStudio Tools
MimioStudio Tools are used to annotate the screen. All object, drawing, and manipulation
features in MimioStudio Tools are available in Screen Annotation mode.
Once you select a drawing tool, that tool remains selected until you select a different
drawing tool or the selection tool.
See Manipulating Objects for a complete description of manipulating objects.
All of the functions and features of the MimioStudio drawing tools that are available in
MimioStudio Notebook are available in Screen Annotation mode.
To use the freehand pen
1.
Click the Pen button, .
2. (Optional) To adjust the line width, drag the Thickness slider.
3. (Optional) To adjust the line color, do one of the following:
l Select a color from the Color Palette.
l
Click , and then select a color from the Color dialog box.
l
Click , and then select a color from the desktop.
4.
(Optional) To adjust the transparency of the line, click the Transparency button, ,
and then choose a transparency percentage.
5. Place the cursor where you want the ink stroke to start on the page.
6. Drag the cursor to draw ink strokes.
To use the freehand brush
63
Page 74

Mimio Interactive
1.
Click the Brush button, .
2. (Optional) To adjust the line width, drag the Thickness slider.
3. (Optional) To adjust the line color, do one of the following:
l Select a color from the Color Palette.
l
Click , and then select a color from the Color dialog box.
l
Click , and then select a color from the desktop.
4.
(Optional) To adjust the transparency of the line, click the Transparency button, ,
and then choose a transparency percentage.
5. Place the cursor where you want the brush stroke to start on the page.
6. Drag the cursor to draw brush strokes.
To highlight a portion of the display
1.
Click the Highlighter button, .
2. (Optional) To adjust the highlighter width, drag the Thickness slider.
3. (Optional) To change the color, do one of the following:
l Select a color from the Color Palette.
l
Click , and then select a color from the Color dialog box.
l
Click , and then select a color from the desktop.
4. Place the cursor where you want the highlight stroke to start on the page.
5. Drag the cursor over the area you want to highlight.
To erase ink and highlighting
1.
Click the Eraser button, .
2. (Optional) To adjust the eraser width, drag the Thickness slider.
3. Drag the cursor over the ink or highlighter strokes you want to erase.
To add a line or shape
1. Click the line type or shape you want to add.
2. (Optional) To adjust the line or outline width, drag the Thickness slider.
3. (Optional) To change the line or outline color, select the Outline Color box, and then
do one of the following:
l Select a color from the Color Palette.
l
Click , and then select a color from the Color dialog box.
l
Click , and then select a color from the desktop.
4. (Optional) To adjust the fill color, select the Fill Color box, and then do one of the
following:
l Select a color from the Color Palette.
l
Click , and then select a color from the Color dialog box.
64
l
Click , and then select a color from the desktop.
5.
To change the line or outline style, click and choose one of the following:
l
l
Solid Line
Dash Line
Page 75

Using Mimio Interactive
l
Dotted Line
6. (Optional) To adjust the transparency of the line or shape, click the Transparency
button, , and then choose a transparency percentage.
7. Place the cursor where you want the line or shape to start on the page.
8. Drag the cursor to draw the line or shape.
To add formatted text
1.
Click the Text button, .
2. Place the cursor where you want the text to start on the page.
For a fixed width text box, place the cursor where you want the text box to start on the
page and then drag to the desired width.
3. Select a font style, size, color, and an alignment option for the text.
4. Enter text in the text box.
To draw a shape
1.
Click the Shape Recognition button, .
2. (Optional) To adjust the outline width, drag the Thickness slider.
3. (Optional) To change the outline color, select the Outline Color box, and then do one
of the following:
l Select a color from the Color Palette.
l
Click , and then select a color from the Color dialog box.
l
Click , and then select a color from the desktop.
4. (Optional) To adjust the fill color, select the Fill Color box, and then do one of the
following:
l Select a color from the Color Palette.
l
Click , and then select a color from the Color dialog box.
l
Click , and then select a color from the desktop.
5.
To change the line or outline style, click and choose one of the following:
l
l
l
6.
(Optional) To adjust the transparency of the shape, click the Transparency button, ,
Solid Line
Dash Line
Dotted Line
and then choose a transparency percentage.
7. Place the cursor where you want the shape to start on the page.
8. Drag the cursor to draw the shape.
The Shape Recognition tool can be used to draw circles, ellipses, triangles, rectangles,
squares, and lines.
Clearing All Annotations from the Display
When you exit Screen Annotation mode, all annotations are cleared from the display and all
annotations are automatically preserved as a snapshot of the display. See Working with
Saved Annotation Snapshots for information about reviewing and using the snapshots.
65
Page 76
Mimio Interactive
Inserting Text Into an Application Using MimioStudio Text Tools
You can enter text into any text-entry box or page using the MimioStudio Text Tools. The
Text Tool has three modes for entering text:
n On-Screen Keyboard allows you to enter text through an on-screen keyboard
application.
n Write Anywhere allows you to enter text by writing anywhere on the screen. Your
handwriting is automatically converted into text and entered into the current
application.
Write Anywhere is only available on Windows XP 32-bit.
n Writing Pad allows you to enter text through a small on-screen writing pad. Your
handwriting is automatically converted into text and input into the current application.
In addition, Write Anywhere and Writing Pad also support gesture recognition, which
allows handwritten shortcuts to be automatically recognized as commonly used keys.
To access MimioStudio Text Tools
1.
From MimioStudio Tools, click the Applications button, , and then choose Text
Tools.
2.
Right-click the Text Tools icon , , or in the notification area of the Windows
taskbar.
3. Choose the Text Tool that you want to use.
l
Keyboard to enable the On-Screen Keyboard.
l
Write Anywhere to enable Write Anywhere.
l
Writing Pad to enable Writing Pad.
To disable MimioStudio Text Tools
Do one of the following:
l
Click the Text Tools icon , , or in the notification area of the taskbar.
l
From MimioStudio Tools, click the Applications button, , and then choose
Text Tools.
66
Using the On-Screen Keyboard
You can enter text into any application using the On-Screen Keyboard.
To use the On-Screen Keyboard
1. Start the On-Screen Keyboard.
2. Click in the text-entry box or on the page where you want to enter the text.
3. Using your mouse or Mimio Interactive Mouse, press the virtual keys on the on-screen
keyboard.
The text is entered into the text-entry box or on the page that you selected.
Using Write Anywhere
With Write Anywhere you can enter text into any text-entry box or page, by writing
anywhere on the screen with the Mimio Interactive Mouse while in Interactive mode. You
can also use Write Anywhere with your mouse or other input device from your computer.
Page 77

Using Mimio Interactive
Write Anywhere is only available on Windows XP 32-bit.
To use Write Anywhere
1. Start Write Anywhere.
The Write Anywhere on-screen buttons appear.
2. Click in the text-entry box or on the page where you want to enter the text.
3. Using your mouse or Mimio Interactive Mouse, write anywhere on the screen.
Your handwriting is automatically converted to text and entered into the text-entry box
or on the page that you selected.
4. Use the on-screen buttons for commonly used keys.
Button Description
Backspace
Enter
Tab
Write Anywhere also supports gesture recognition for commonly used keys. See Using
Gesture Recognition.
Using Writing Pad
With Writing Pad you can enter text through a small on-screen writing pad using the Mimio
Interactive Mouse while in Interactive mode. You can also use Writing Pad with your
mouse or other input device from your computer.
To use Writing Pad
1. Start Writing Pad.
The on-screen writing pad appears.
2. Click in the text-entry box or on the page where you want to enter the text.
3. Using your mouse or Mimio Interactive Mouse, write within the yellow space of
the on-screen writing pad.
Your handwriting is automatically converted to text and entered into the textentry box or on the page that you selected.
4. Use the on-screen buttons for commonly used keys.
Button Description
Space
Backspace
Enter
Tab
Space
67
Page 78

Mimio Interactive
Using Gesture Recognition
Writing Pad also supports gesture recognition for commonly used keys. See Using Gesture
Recognition.
With gesture recognition, handwritten shortcuts are automatically recognized as commonly
used keys. Both Write Anywhere and Writing Pad support gesture recognition.
The following table describes how to use gestures to perform common functions.
To press Do this
Backspace
Enter
Tab
Space bar
Draw a line from right to left.
Draw a connected line from top to bottom
and then from r ight to left.
Draw a connected line from bottom to top
and then from left to right.
Draw a connected line from top to bottom
and then from left to right.
Using the Web Browser, Calculator, and Magnify Tools
MimioStudio Tools includes shortcuts for accessing a Web browser, a calculator, and a
magnifier.
To use the tools
1. Start MimioStudio Tools.
2.
Click the Applications button, , choose More Tools, and then choose one of the
following tools:
l
Calculator
l
Magnify
l
Web Browser
Recording Desktop Actions and Audio in Interactive Mode
Using MimioStudio Recorder, you can record your interactions into an AVI movie file, with
or without audio. See Using MimioStudio Recorder for more information on how to use
MimioStudio Recorder.
68
Page 79

Caring for Mimio Interactive
Review the following topics for information about cleaning, inserting the batteries, and
permanently mounting your Mimio Interactive.
n Cleaning Mimio Interactive
n Inserting the Batteries
n Mounting Mimio Interactive Permanently
Cleaning Mimio Interactive
Mimio Interactiveis designed to give you long and trouble-free service while requiring very
little maintenance.
You can easily clean your Mimio Interactive using the following items:
n Lint-free cloth.
n Isopropyl alcohol, diluted dishwashing detergent, or diluted glass cleaner.
If you use glass cleaner, make sure it does not contain ammonia.
To clean the Mimio Interactive bar and Mouse
1. If necessary, disconnect the USB cable from the Mimio Interactive bar.
2. Use the lint-free cloth to wipe the exterior of the Mimio Interactive bar and Mouse.
3. Remove dirt and smudges with one of the cleaning solutions mentioned above.
Avoid using liquids on any exposed charging contacts. Do not allow liquid into
any openings on the equipment.
4. Reconnect the USB cable.
Caring for Mimio Interactive
Inserting the Batteries
Mimio Interactiveis powered using the included USB cable and power adapter. Optionally,
Mimio Interactive can be powered using four AA batteries.
To insert the batteries
1. Press down and slide off the battery compartment cover.
2. Insert four AA batteries into the battery compartment.
3. Replace the battery compartment cover.
Remove the batteries if the Mimio Interactive bar will not be used for a long period of
time.
Mounting Mimio Interactive Permanently
The Mimio Interactive bar attaches to any whiteboard using the suction cups on the back of
the bar. If the Mimio Interactive bar will be used for extended periods of time or will be
used repeatedly in any one location, you should mount the bar using the included brackets.
To mount Mimio Interactive permanently
1. Snap the mounting brackets over the suction cups on the back of the Mimio Interactive
bar.
69
Page 80
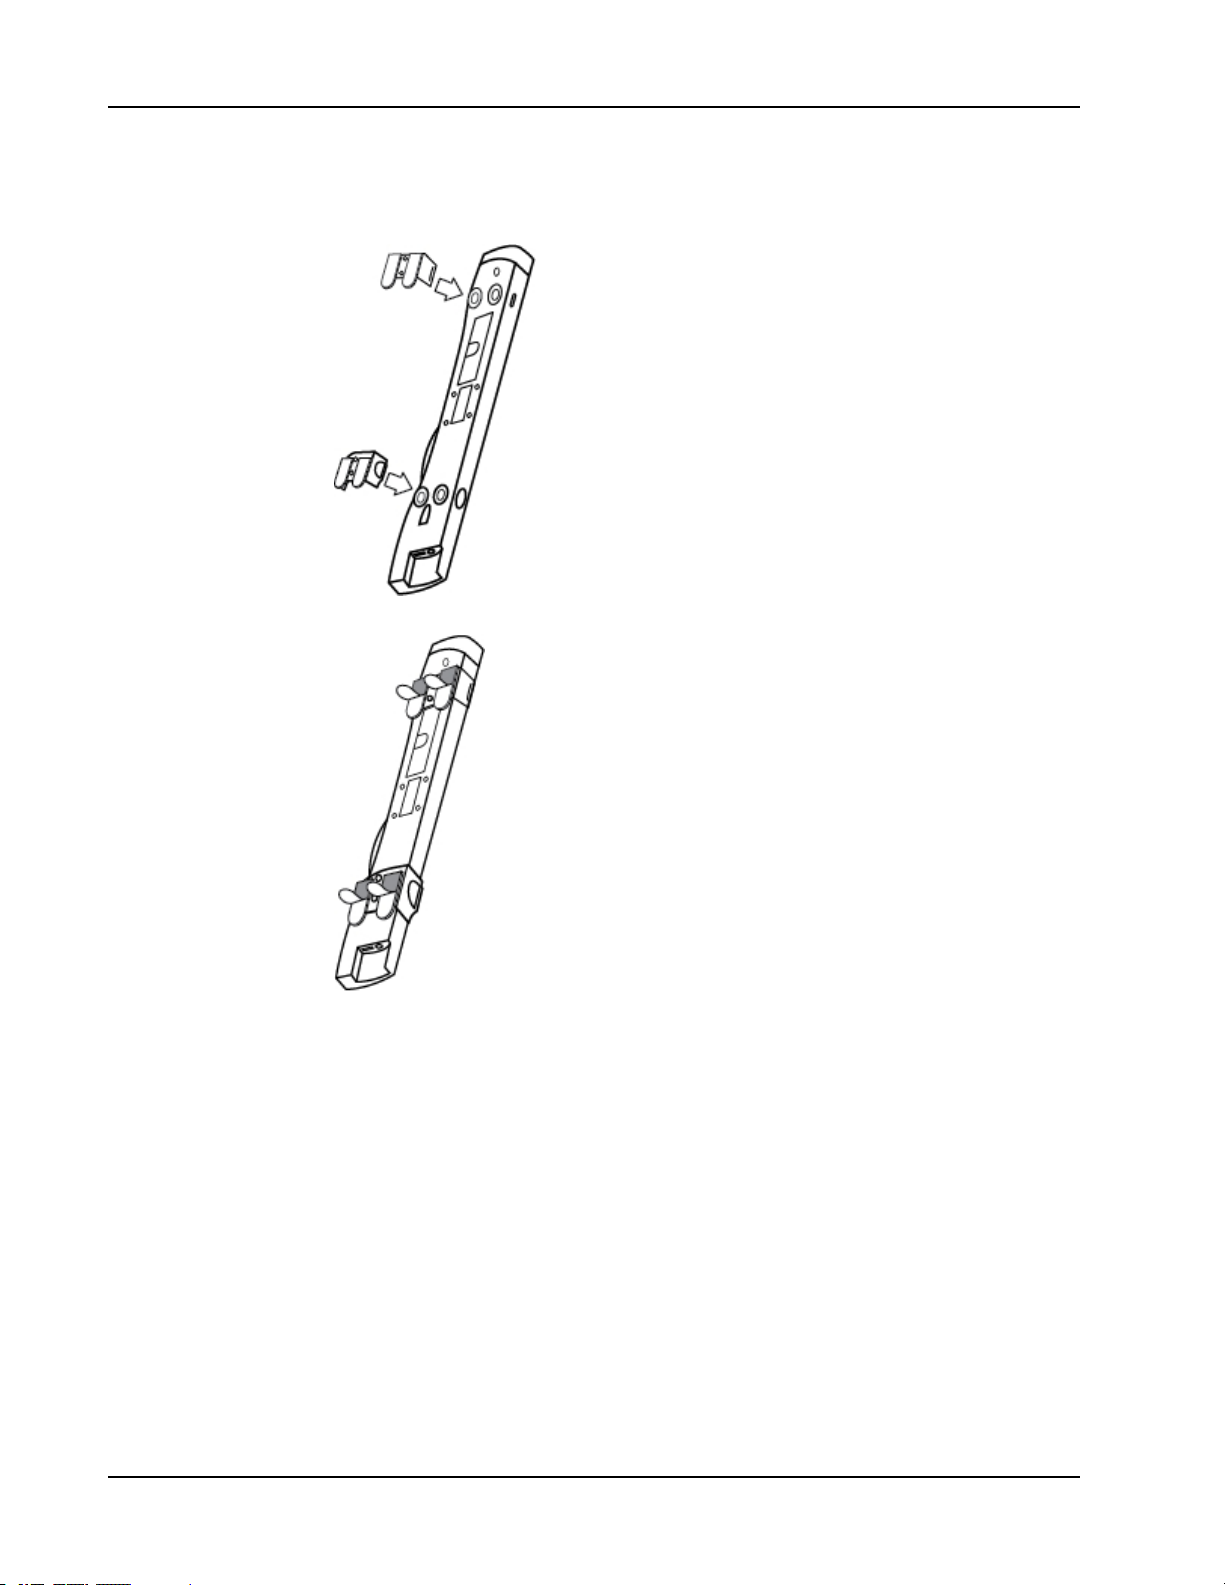
Mimio Interactive
Make sure that the brackets clip into the recesses on the sides of the Mimio Interactive
bar.
2. Remove the paper backing from the adhesive strips to expose the adhesive.
70
3. Press the Mimio Interactive bar firmly along the top left edge of the whiteboard as
shown.
Page 81

Caring for Mimio Interactive
71
Page 82

This page intentionally left blank for double-sided printing.
72
Page 83
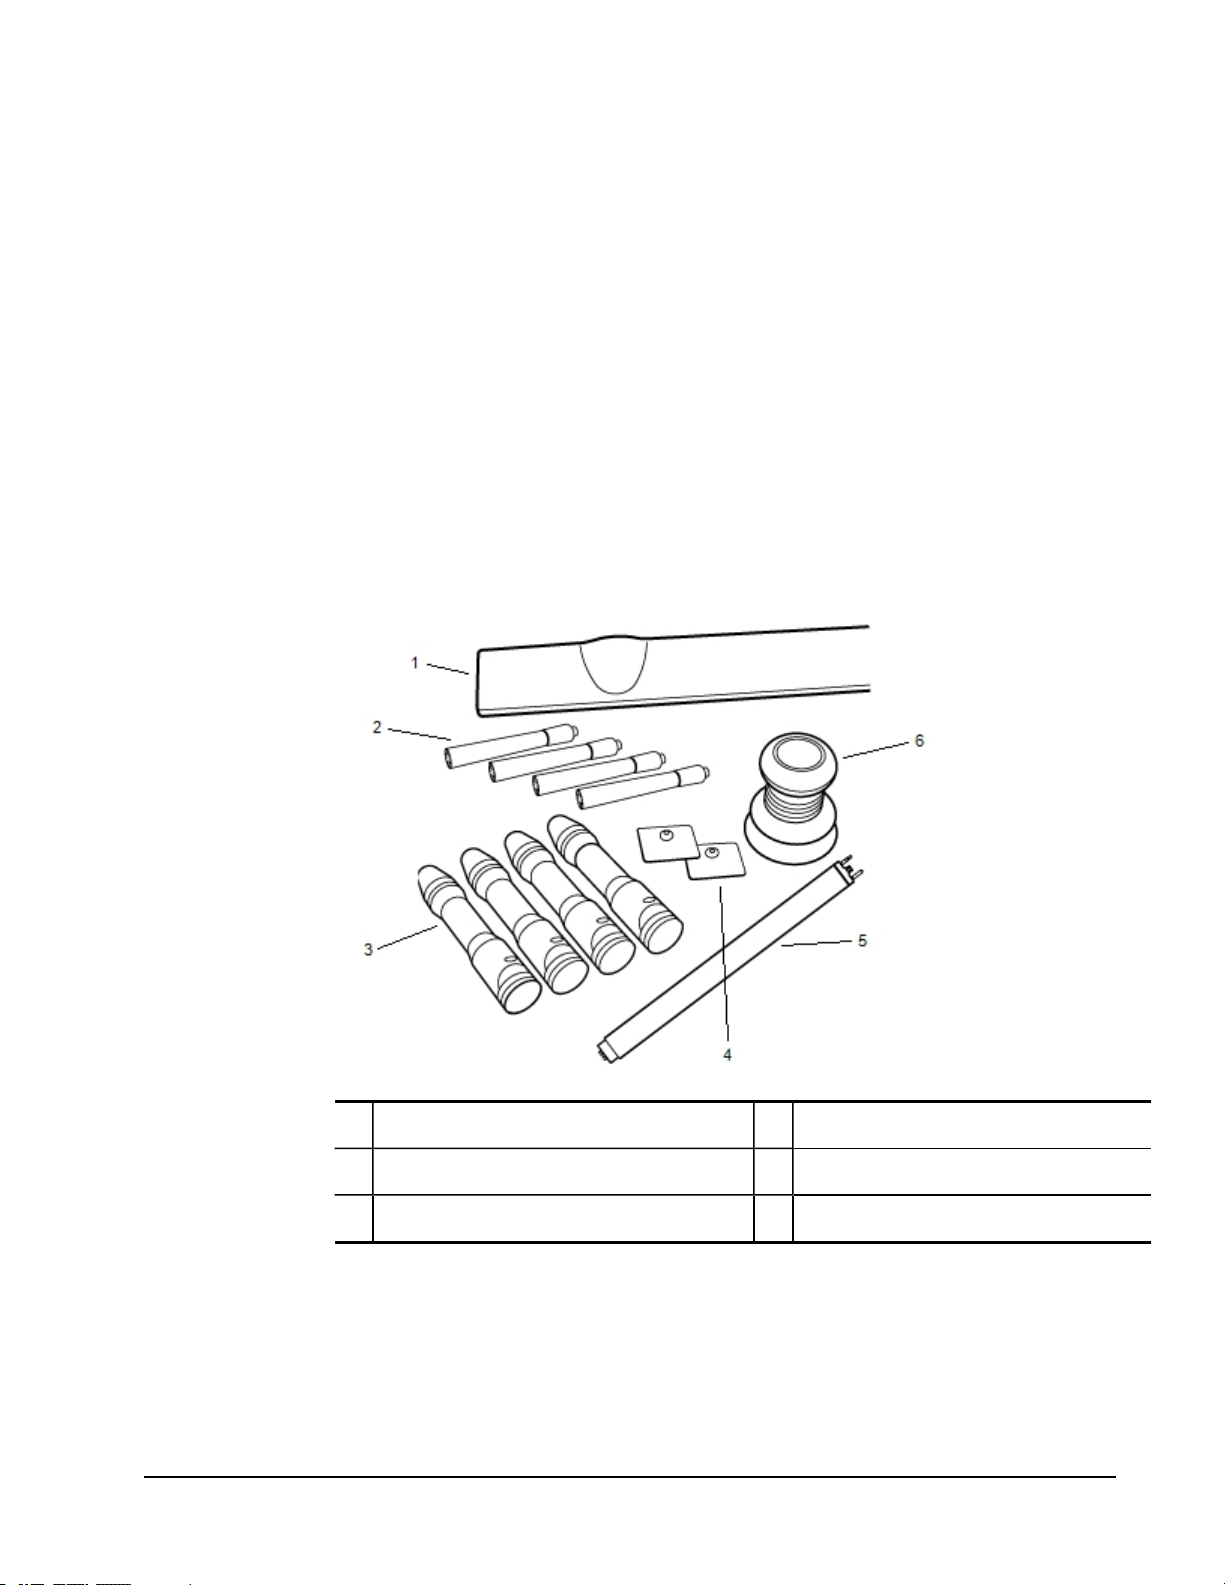
What's Included
Chapter 5
MimioCapture
MimioCapture is used with a MimioTeach-enabled whiteboard to record notes and drawings
from your whiteboard. Using MimioStudio Ink Capture mode, you make notes and drawings
on your whiteboard using the MimioCapture pens. Your notes are automatically captured in
a MimioStudio Notebook.
The MimioCapture package contains the following items:
1 MimioCapture tray 4 Mounting plates
2 Expo dry erase markers (4) 5 Connector bar
3 MimioCapture pens (4) 6 MimioCapture eraser
If you are missing any of the items above, contact Customer Support.
About MimioCapture
MimioCapture includes four pens and one eraser for making notes on your MimioTeachenabled whiteboard. The MimioCapture tray is used to store and charge the pens and eraser.
You can also perform some common actions using the buttons on the MimioCapture tray.
73
Page 84

MimioCapture
The following figure shows the major components of MimioCapture.
1 Connector bar port 4 Capture buttons
2 MimioCapture eraser 5 Status lights
3 MimioCapture pens 6 Charging tray
Status Lights
The status lights visually show the status of each MimioCapture pen and the MimioCapture
eraser.
Off The MimioCapture pen or eraser is not receiving power. The status light is off when
Amber The MimioCapture pen or eraser has a low battery. The battery should be recharged.
Solid Green The MimioCapture pen or eraser is charging.
About MimioStudio Notebook
As you make notes on your whiteboard using MimioCapture, you can automatically save
those notes into MimioStudio Notebook. Once the information is in Notebook, you can
save the Notebook as a MimioStudio INK file or a variety of other formats.
For more information about using MimioStudio Notebook, see Working with MimioStudio
Notebook.
Getting Started
the pen or eraser is in use.
74
MimioCapture links directly to your MimioTeach for seamless integration with
MimioStudio software. Before you can begin capturing digital ink, you must first set up
your MimioCapture tray, MimioCapture pens, MimioCapture eraser, and MimioStudio
Notebook.
Page 85

Setting Up the MimioCapture Tray
The MimioCapture tray is powered using the USB cable and power adapter that were
included with your MimioTeach. The MimioTeach bar connects to the MimioCapture tray
using the connector bar that was included with your MimioCapture.
To connect
1. Remove the MimioTeach bar from the whiteboard.
2. Unplug the USB cable from the MimioTeach bar.
3. Plug the USB cable into the USB port on the MimioCapture tray.
Getting Started
4. Place the MimioCapture tray along the bottom-left edge of the whiteboard as shown.
The MimioCapture tray attaches securely to any magnetic whiteboard. See Mounting
MimioCapture to a Non-Magnetic Whiteboard for information about mounting the tray
to a non-magnetic whiteboard.
5. Connect the connector bar to the MimioCapture tray as shown.
6. Connect the other end of the connector bar to the MimioTeach bar as shown.
75
Page 86
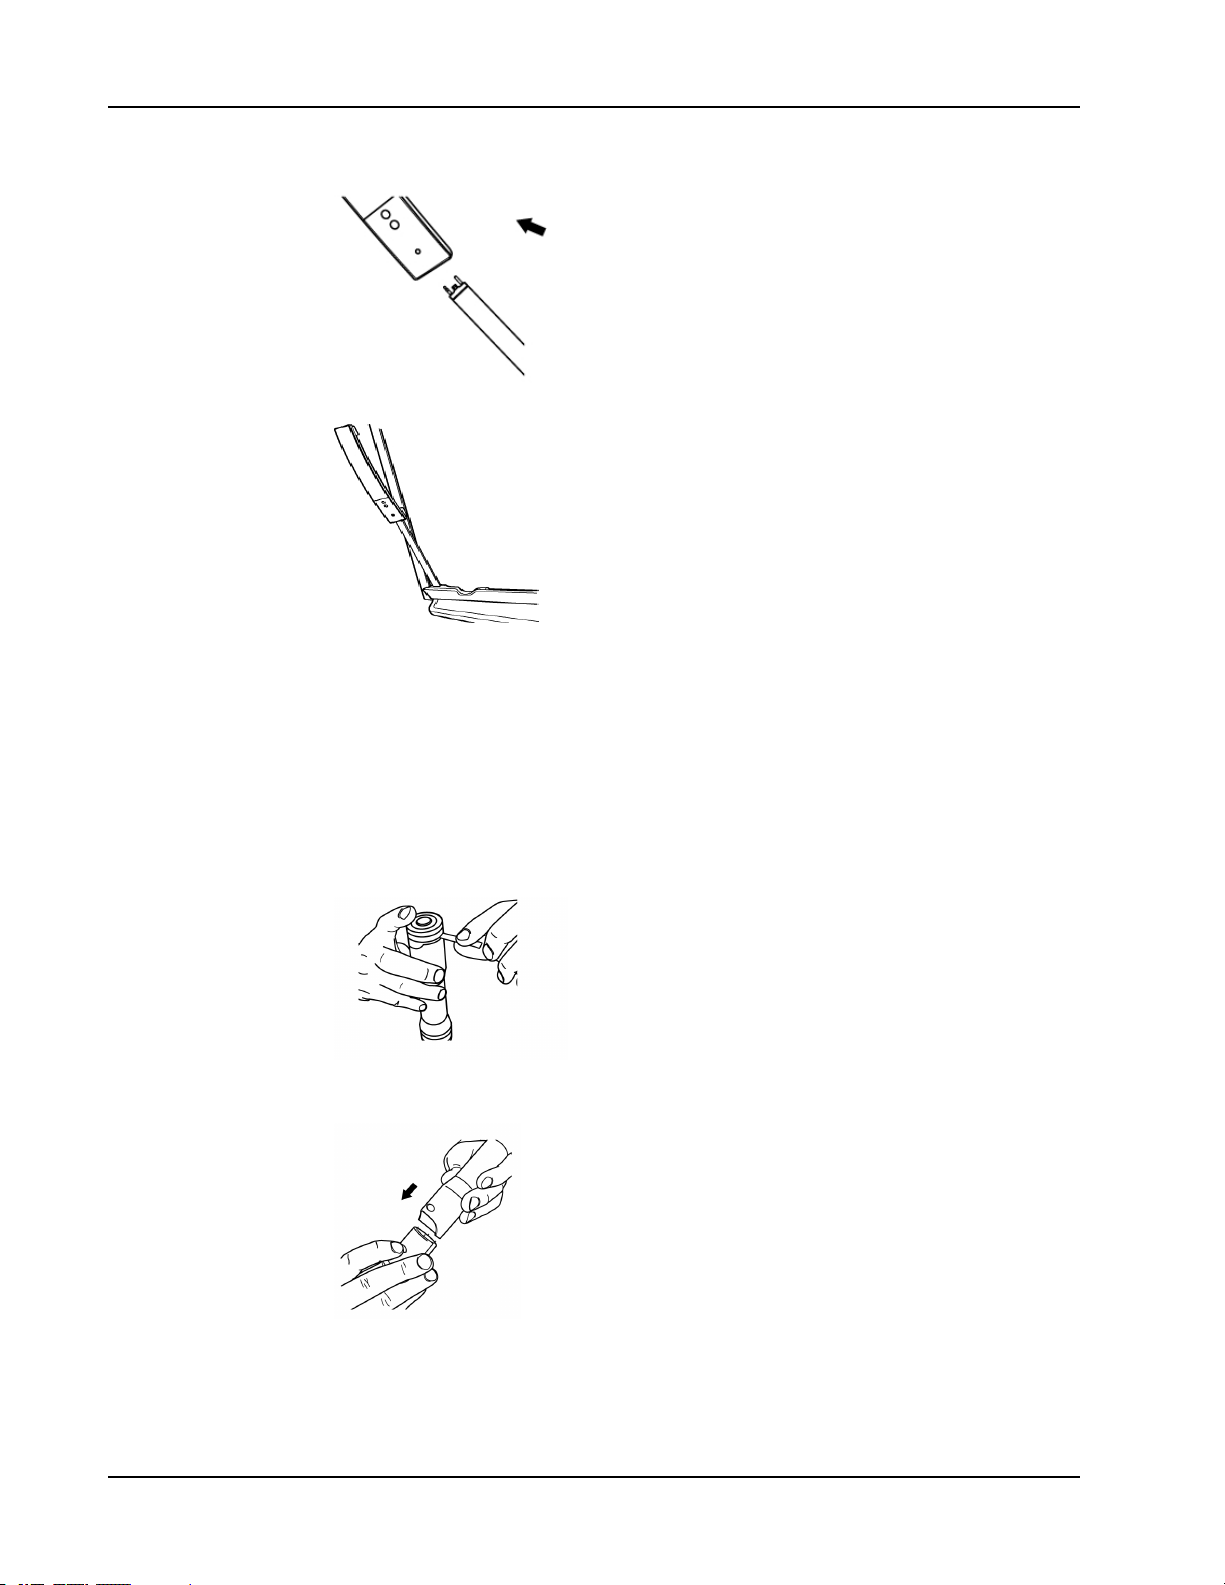
MimioCapture
7. Reattach the MimioTeach bar along the left side of the whiteboard.
Setting Up the MimioCapture Pens
MimioCapture comes with four colored MimioCapture pens and four Expo®dry erase
markers. Before you can start using MimioCapture, you must first set up your MimioCapture
Pens.
The MimioCapture pens are each powered by a rechargeable lithium-ion battery. The pens
charge whenever they are docked on the MimioCapture tray.
To set up the MimioCapture pens
1. Pull the plastic strip from the top part of the pen to activate the rechargeable battery.
2. Press the button on the side of the pen and pull the top part of the pen from the pen
body.
3. Insert a colored Expo®dry erase marker into the matching colored pen body.
76
Page 87

4. Replace the top part of the pen onto the pen body.
Getting Started
5. Place the pen cap onto the pen.
Setting Up the MimioCapture Eraser
The MimioCapture eraser is powered by a rechargeable lithium-ion battery. The eraser
charges whenever the eraser is docked on the MimioCapture tray.
To set up the MimioCapture eraser
Pull the plastic strip from the top part of the eraser to activate the rechargeable battery.
77
Page 88

MimioCapture
Charging the Pens and Eraser
The MimioCapture pens and MimioCapture eraser recharge quickly whenever they are
docked on the MimioCapture tray.
To charge the pens and eraser
Place each pen and the eraser into the appropriate part of the MimioCapture tray.
The status lights turn solid green when the pen or eraser is charging.
Setting Up MimioStudio Notebook for Capture
To begin capturing digital ink, you must first do the following:
n Set the size of your whiteboard in MimioStudio Settings.
n Start MimioStudio Ink Capture mode.
Setting the Whiteboard Size
Before you begin capturing digital ink, you must first set the size of your whiteboard in
MimioStudio Settings. The default size is 96 inches by 48 inches.
To set the whiteboard size for a MimioCapture device
1.
Right-click in the notification area of the taskbar, and then choose Settings.
The MimioStudio Settings dialog box appears.
2.
Click Ink Capture.
3. If you have more than one MimioTeach bar connected to your computer, choose the
device to change the size for from the Device list.
4. Do one of the following:
l Choose a size from the Surface Size list.
l Choose Custom from the Surface Size list and enter the desired values into the
Width and Height boxes.
l Click Auto Size and touch a MimioCapture pen to the whiteboard at the location
shown in the Auto Size dialog box.
Starting Ink Capture Mode
Using MimioStudio Ink Capture mode, you can make notes on your whiteboard and
instantaneously capture them into a MimioStudio Notebook.
To start Ink Capture mode
Touch the tip of any MimioCapture pen to the whiteboard.
A new Notebook opens automatically for capturing your notes.
78
Page 89
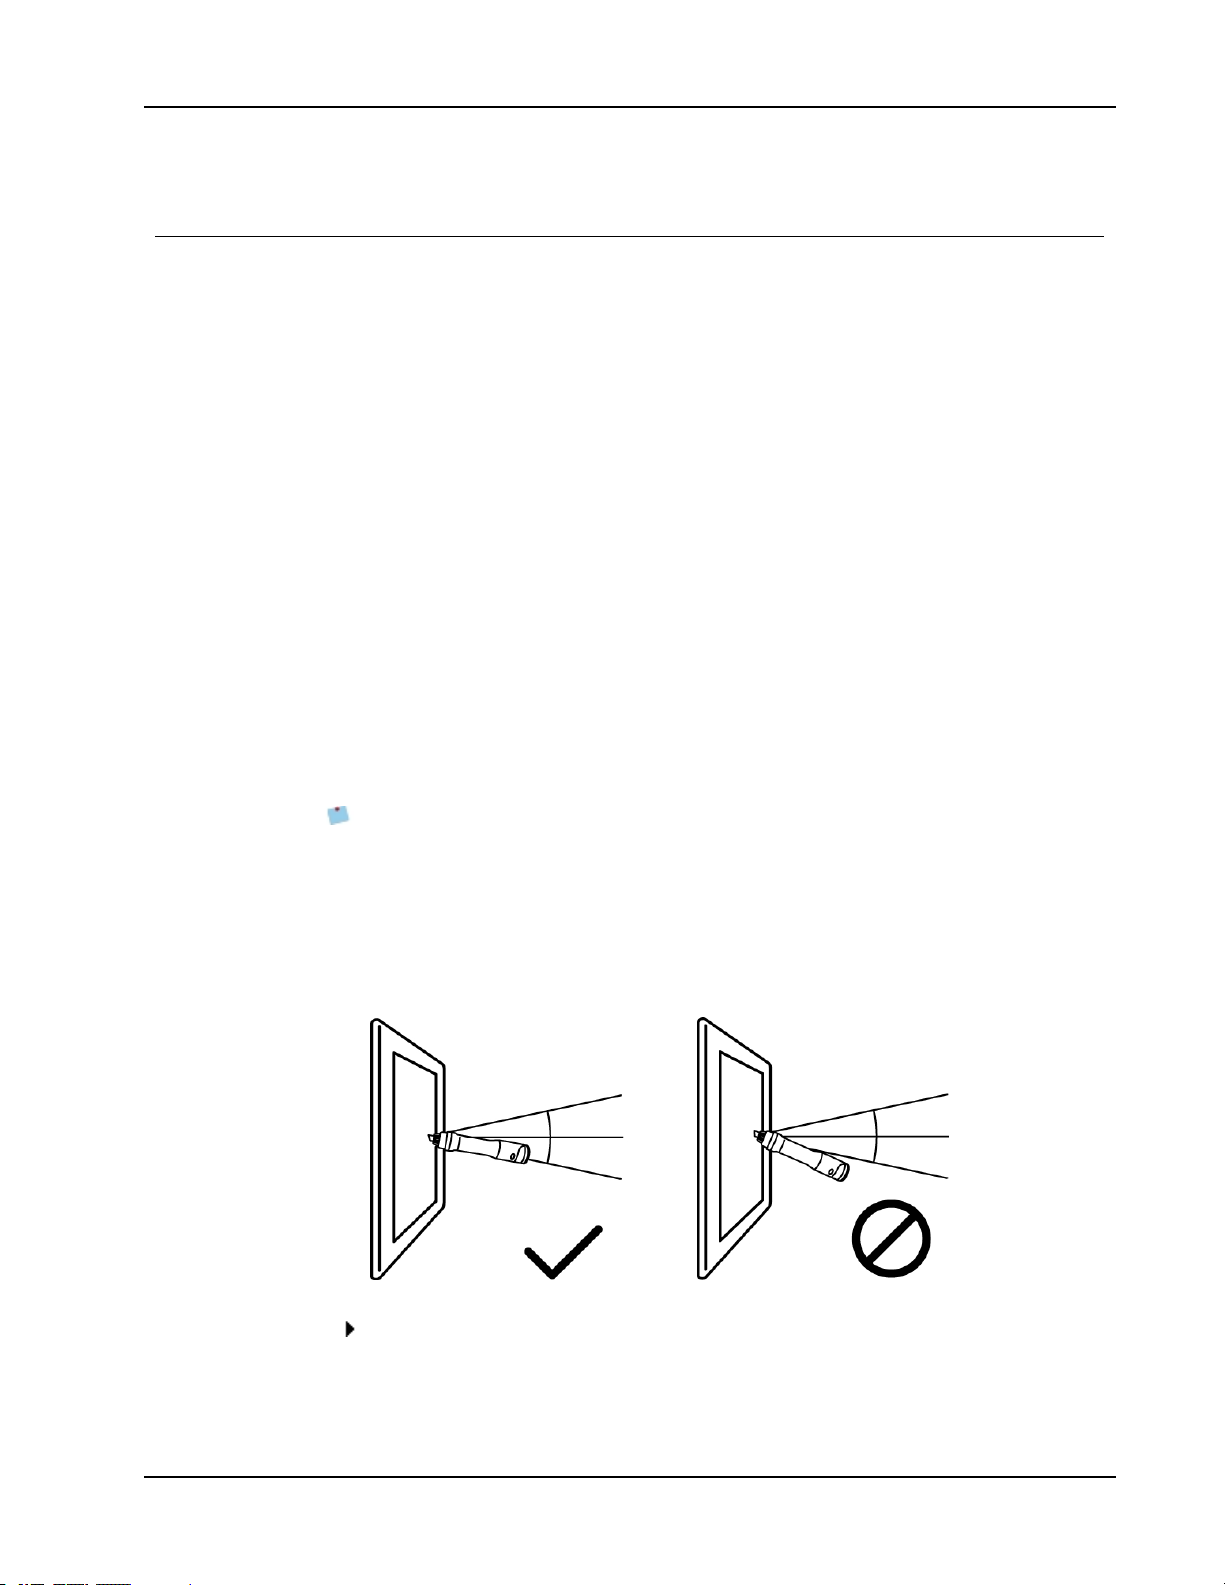
Using MimioCapture
MimioCapture can be used along with MimioTeach, without a projector, to record notes and
drawings from your whiteboard. This is called capturing digital ink.
Capturing Digital Ink
When using Ink Capture mode, your notes are automatically captured in a MimioStudio
Notebook. You can use the buttons on the MimioCapture tray to insert a new Notebook
page, insert a copy of the current page into Notebook, or print the current Notebook page.
To capture digital ink
1. If your MimioTeach bar is not on, turn on your MimioTeach bar.
2. Write or draw on your whiteboard using the MimioCapture pens.
A new Notebook automatically opens on the connected computer and begins capturing
digital ink.
3. Add, copy, and print pages as desired using the buttons on the MimioCapture tray.
Writing and Drawing Digital Ink
In Ink Capture mode, the MimioCapture pens and the MimioCapture eraser are used to draw
and erase ink on your whiteboard.
Using MimioCapture
By default, the color recorded matches the color of the MimioCapture pen, regardless of the
color of the marker that is inserted.
The MimioTeach stylus is for use with Interactive mode only. The stylus does not work
with Ink Capture mode.
To draw digital ink
1. Choose one of the colored MimioCapture pens.
2. Draw on the whiteboard with the pen.
Keep the pen within 15 degrees of its perpendicular position to the whiteboard to
ensure that the data is accurately captured.
To erase digital ink
Erase the ink from the whiteboard using the MimioCapture eraser.
Keep the eraser surface flat against the whiteboard to ensure that the data is accurately
erased.
79
Page 90

MimioCapture
Adding, Copying, and Printing Notebook Pages
The buttons on the MimioCapture tray can be used to easily access features directly from
your whiteboard. Using the buttons on the MimioCapture tray, you can insert a new
Notebook page, insert a copy of the current page into Notebook, or print the current
Notebook page.
The following figure shows the MimioCapture traybuttons.
The following table describes the functions of the MimioCapture tray buttons.
New page Inserts a new page into MimioStudio Notebook.
Copy page Inserts a duplicate of the current page into MimioStudio
Print page Prints the current page.
Caring for MimioCapture
Review the following topics for information about cleaning, storing, and mounting your
MimioCapture to a non-magnetic whiteboard.
n Cleaning MimioCapture
n Mounting MimioCapture to a Non-Magnetic Whiteboard
Cleaning MimioCapture
MimioCapture is designed to give you long and trouble-free service, while requiring very
little maintenance.
You can easily clean your MimioCapture using the following items:
n Lint-free cloth.
n Isopropyl alcohol, diluted dishwashing detergent, or diluted glass cleaner.
If you use glass cleaner, make sure it does not contain ammonia.
To clean the MimioCapture
1. Disconnect the power cable and the connector bar.
2. Use the lint-free cloth to wipe the exterior of the MimioCapture tray, pens, and eraser.
Notebook.
80
Page 91

3. Remove dirt and smudges with one of the cleaning solutions mentioned above.
Avoid using liquids on any exposed charging contacts. Do not allow liquid into
any openings on the equipment.
4. Reconnect the power cable and the connector bar.
Mounting MimioCapture to a Non-Magnetic Whiteboard
The MimioCapture tray attaches securely to any magnetic whiteboard. If you do not have a
magnetic whiteboard, you can mount the MimioCapture tray to your whiteboard using the
included metal plates.
To mount MimioCapture to a non-magnetic whiteboard
1. Place the metal plates against the back of the MimioCapture tray as shown.
Caring for MimioCapture
Make sure that the recess on each plate is inserted into the recess on the back of the
MimioCapture tray.
2. Remove the paper backing from the adhesive strips to expose the adhesive.
3. Press the MimioCapture tray firmly along the bottom-left edge of the whiteboard as
shown.
81
Page 92

This page intentionally left blank for double-sided printing.
82
Page 93
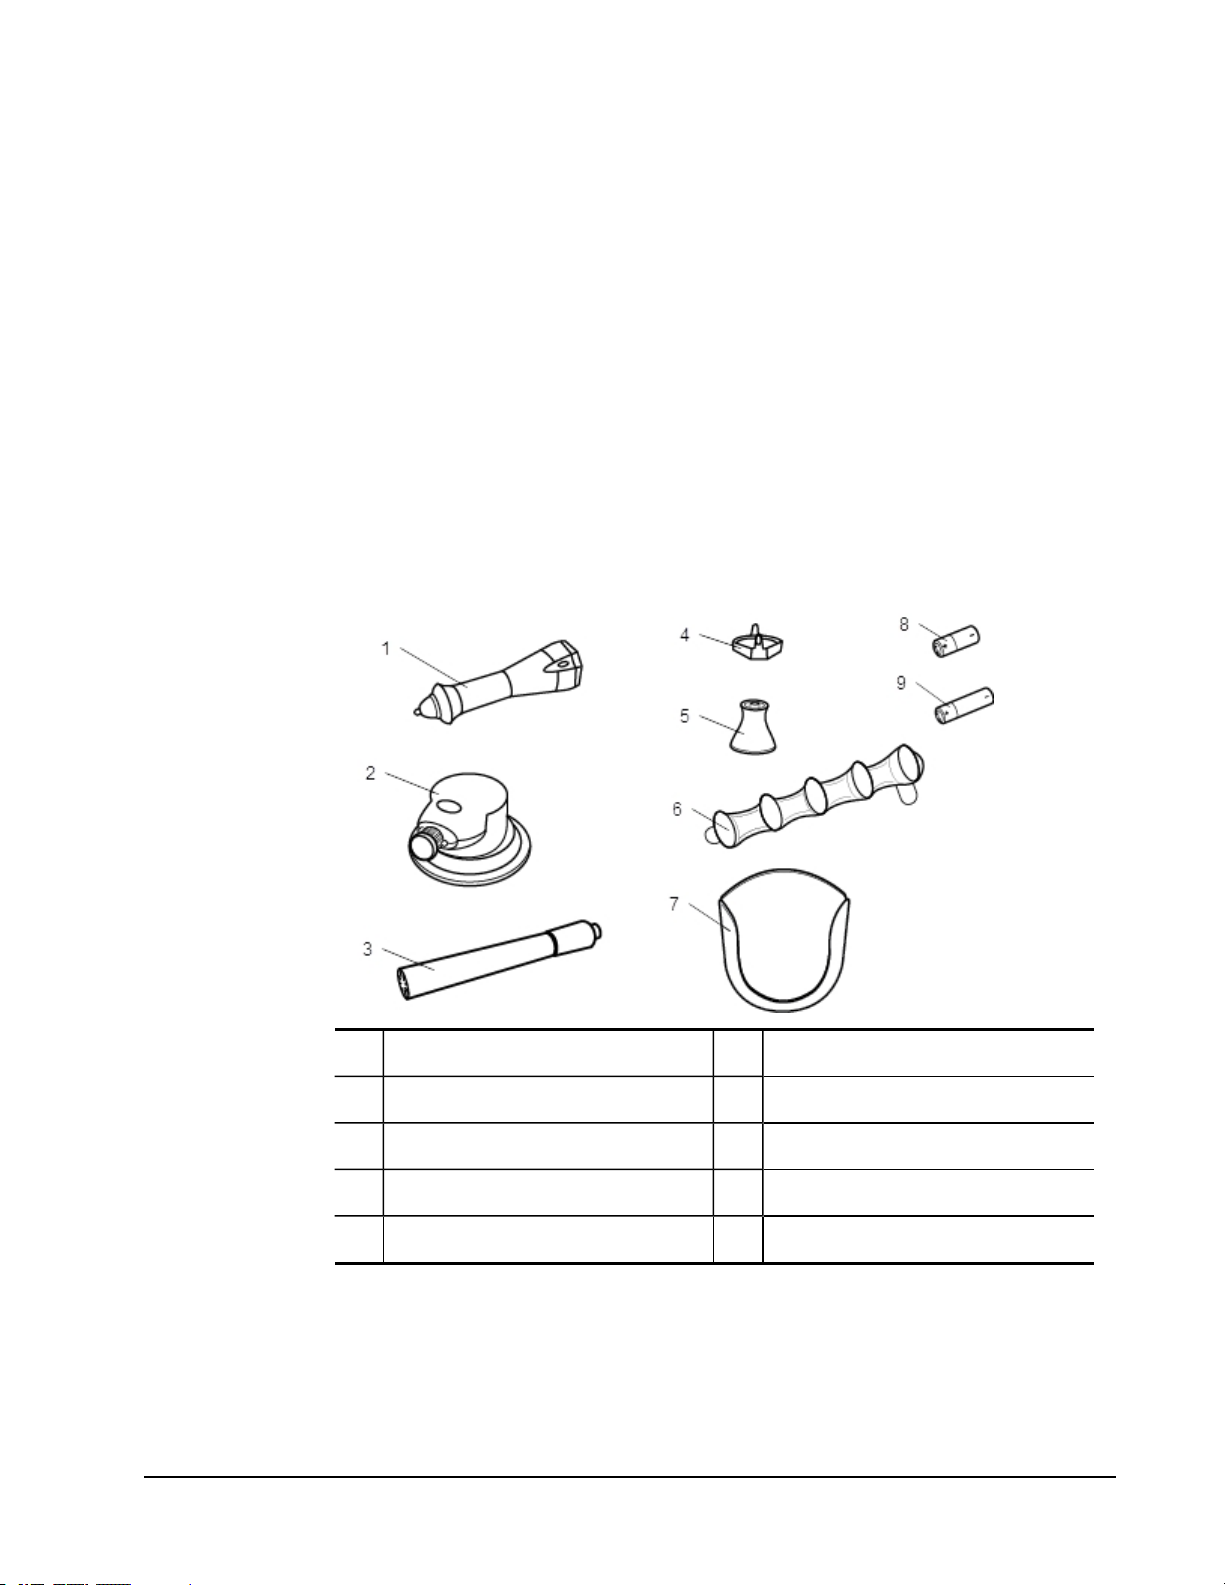
What's Included
Chapter 6
Mimio Capture Kit
Mimio Capture Kit is used with a Mimio Interactive-enabled whiteboard to record notes and
drawings from your whiteboard. Using MimioStudio Ink Capture mode, you make notes and
drawings on your whiteboard using the Mimio Capture Kit pens. Your notes are
automatically captured in a MimioStudio Notebook.
The Mimio Capture Kit package contains the following items:
1 Mimio Capture Kit pens (4) 6 Mimio Capture Kit pen holder
2 Mimio Capture Kit eraser 7 Mimio Capture Kit eraser holder
3 Expo markers (4) 8 N-Cell batteries (4)
4 Color caps (8) 9 AAA battery
5 Mimio Capture Kit pen caps (4)
If you are missing any of the items above, contact Customer Support.
About Mimio Capture Kit
Mimio Capture Kit includes four pens and one eraser for making notes on your Mimio
Interactive-enabled whiteboard. The pen holder and eraser holder are used to store the pens
83
Page 94
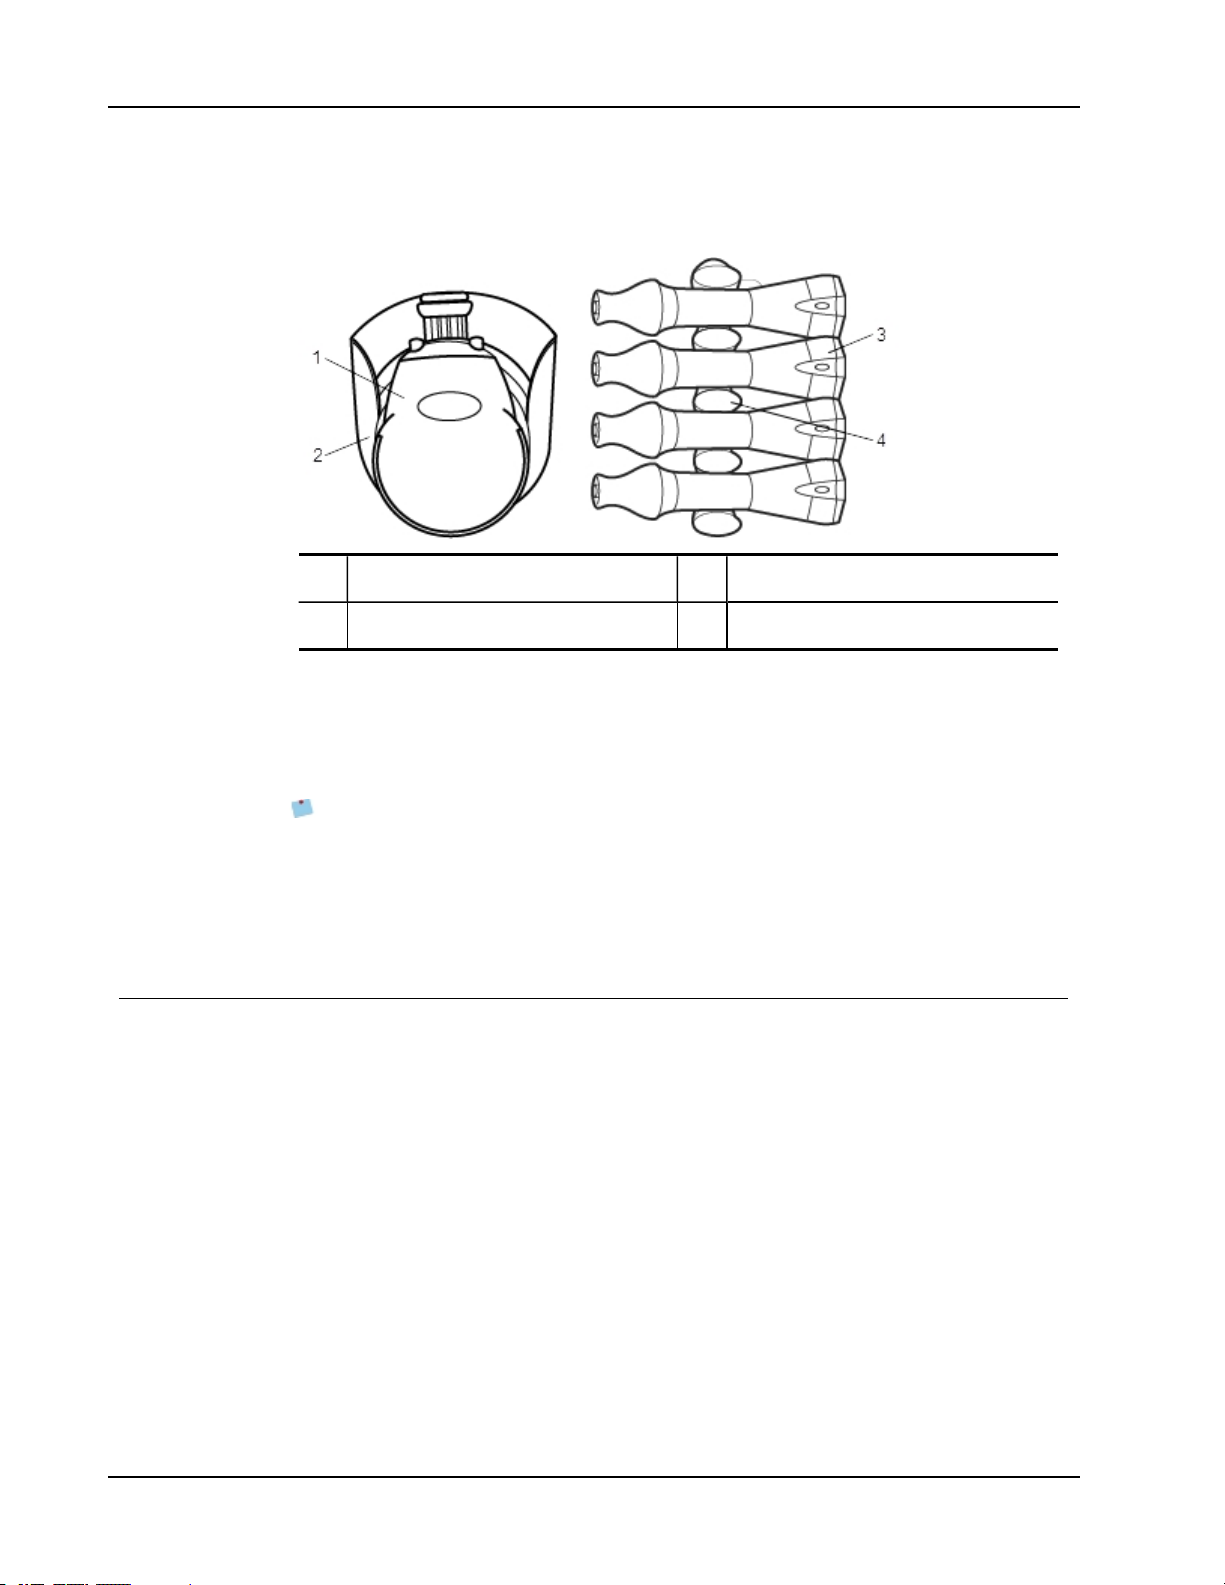
Mimio Capture Kit
and eraser.
The following figure shows the major components of Mimio Capture Kit.
1 Mimio Capture Kit eraser 3 Mimio Capture Kit pens
2 Mimio Capture Kit eraser holder 4 Mimio Capture Kit pen holder
About MimioStudio Notebook
As you make notes on your whiteboard using Mimio Capture Kit, you can automatically
save those notes into MimioStudio Notebook. Once the information is in Notebook, you
can save the Notebook as a MimioStudio INK file or a variety of other formats.
Your Mimio Interactive bar can capture and store ink while disconnected from your
computer. See Downloading Digital Ink for more information about capturing and
downloading digital ink for an offline session.
For more information about using MimioStudio Notebook, see Working with MimioStudio
Notebook.
Getting Started
Mimio Capture Kit links directly to your Mimio Interactive for seamless integration with
MimioStudio software. Before you can begin capturing digital ink, you must first set up
your Mimio Capture Kit pens, Mimio Capture Kit eraser, and MimioStudio Notebook.
Setting Up the Mimio Capture Kit Pens
Mimio Capture Kit comes with four Mimio Capture Kit pens, four Expo®dry erase markers,
and eight color caps. Before you can start using Mimio Capture Kit, you must first set up
your Mimio Capture Kit pens.
The Mimio Capture Kit pens are each powered by one N-cell battery.
To set up the Mimio Capture Kit pens
1. Gently turn and pull the top part of the Mimio Capture Kit pen to separate the top part
of the pen from the pen body.
84
Page 95

Getting Started
2. Press the colored nodes on each side of the pen and pull to remove the color cap.
3. Insert one N-cell battery into the Mimio Capture Kit pen.
4. Replace the color cap making sure to align the spring on the color cap with the battery.
5. Insert an Expo®dry erase marker that matches the color of the color cap into the pen
body.
6. Align the arrow on the pen body with the arrow on the top part of the pen.
85
Page 96

Mimio Capture Kit
7. Push the two parts of the pen together, and then twist to lock in place.
8. Place the pen cap onto the pen.
Setting Up the Mimio Capture Kit Eraser
The Mimio Capture Kit eraser is powered by one AAAbattery.
To set up the Mimio Capture Kit eraser
1. Lightly press both sides of the eraser and lift to remove the battery compartment cover.
2. Insert the battery into the battery compartment.
86
Page 97

3. Replace the battery compartment cover.
Setting Up MimioStudio Notebook for Capture
To begin capturing digital ink, you must first do the following:
Getting Started
n Set the size of your whiteboard in MimioStudio Settings.
n Start MimioStudio Ink Capture mode.
Setting the Whiteboard Size
Before you begin capturing digital ink, you must first set the size of your whiteboard in
MimioStudio Settings. The default size is 96 inches by 48 inches.
To set the whiteboard size for a Mimio Interactive device
1.
Right-click in the notification area of the taskbar, and then choose Settings.
The MimioStudio Settings dialog box appears.
2.
Click Ink Capture.
3. If you have more than one Mimio Interactive bar connected to your computer, choose
the device to change the size for from the Device list.
4. Do one of the following:
l Choose a size from the Surface Size list.
l Choose Custom from the Surface Size list and enter the desired values into the
Width and Height boxes.
l Click Auto Size and touch a Mimio Capture Kit pen to the whiteboard at the
location shown in the Auto Size dialog box.
Starting Ink Capture Mode
Using MimioStudio Ink Capture mode, you can make notes on your whiteboard and
instantaneously capture them into a MimioStudio Notebook.
Your Mimio Interactive bar can capture and store ink while disconnected from your
computer. However, you need to supply power to your Mimio Interactive bar using
batteries or a wall adapter. See Downloading Digital Ink for more information about
capturing and downloading digital ink for an offline session.
87
Page 98

Mimio Capture Kit
To start Ink Capture mode
Touch the tip of any Mimio Capture Kit pen to the whiteboard.
A new Notebook opens automatically for capturing your notes.
Using Mimio Capture Kit
Mimio Capture Kit can be used along with Mimio Interactive, without a projector, to record
notes and drawings from your whiteboard. This is called capturing digital ink.
Capturing Digital Ink
When using Ink Capture mode, your notes are automatically captured in a MimioStudio
Notebook. You can use the buttons on the Mimio Interactive bar to insert a new Notebook
page, insert a copy of the current page into Notebook, or print the current Notebook page.
Your Mimio Interactive bar can capture and store ink while disconnected from your
computer. See Downloading Digital Ink for more information about capturing and
downloading digital ink for an offline session.
To capture digital ink
1. If your Mimio Interactive bar is not on, turn on your Mimio Interactive bar.
2. Write or draw on your whiteboard using the Mimio Capture Kit pens.
A new Notebook automatically opens on the connected computer and begins capturing
digital ink.
3. Add, copy, and print pages as desired using the buttons on the Mimio Interactive bar.
Writing and Drawing Digital Ink
In Ink Capture mode, the Mimio Capture Kit pens and the Mimio Capture Kit eraser are
used to draw and erase ink on your whiteboard.
By default, the color recorded matches the color of the color cap on the Mimio Capture Kit
pen, regardless of the color of the marker that is inserted.
The Mimio Interactive Mouse is for use with Interactive mode only. The Mouse does
not work with Ink Capture mode.
To draw digital ink
1. Choose one of the Mimio Capture Kit pens.
2. Draw on the whiteboard with the pen.
88
Page 99

Keep the pen within 15 degrees of its perpendicular position to the whiteboard to
ensure that the data is accurately captured.
To erase digital ink
Erase the ink from the whiteboard using the Mimio Capture Kit eraser.
Keep the eraser surface flat against the whiteboard to ensure that the data is accurately
erased.
Adding, Copying, and Printing Notebook Pages
When using Ink Capture mode, the buttons on the Mimio Interactive bar can be used to
easily access features directly from your whiteboard. Using the buttons on the Mimio
Interactive bar, you can insert a new Notebook page, insert a copy of the current page into
Notebook, or print the current Notebook page.
Using Mimio Capture Kit
The following figure shows the Mimio Interactive bar buttons.
The following table describes the functions of the Mimio Interactive bar buttons.
89
Page 100

Mimio Capture Kit
Downloading Digital Ink
You can use your Mimio Interactive bar to record and save Digital Ink even when not
connected to your computer. You can then download the Digital Ink to MimioStudio
Notebook for printing, distributing, or editing.
When your Mimio Interactive bar is not connected to your computer through the USB
cable, the Mimio Interactive bar must be powered by batteries or a power adapter.
To download digital ink
1. Connect the Mimio Interactive bar to your computer.
2. Do one of the following:
l If configured to automatically download digital ink (default), open a new
MimioStudio Notebook.
The ink download process begins automatically.
l If configured to manually download digital ink, open a new MimioStudio Notebook
and double-click Download Ink on the status bar.
New page Inserts a new page into MimioStudio Notebook.
Copy page Inserts a duplicate of the current page into MimioStudio
Notebook.
Print page Prints the current page.
Resize window Minimizes or Maximizes the MimioStudio Notebook window.
Interactive Exits Ink Capture mode and starts Interactive mode.
Caring for Mimio Capture Kit
Review the following topics for information about cleaning, storing, and mounting your
Mimio Capture Kit.
n Cleaning the Mimio Capture Kit
n Mounting the Mimio Capture Kit
Cleaning the Mimio Capture Kit
Mimio Capture Kit is designed to give you long and trouble-free service, while requiring
very little maintenance.
You can easily clean your Mimio Capture Kit using the following items:
n Lint-free cloth.
n Isopropyl alcohol, diluted dishwashing detergent, or diluted glass cleaner.
If you use glass cleaner, make sure it does not contain ammonia.
To clean the Mimio Capture Kit
90
 Loading...