

Page 1
English
Quick Start Guide
Follow these steps to install and configure the DYMO File software.
1 Download and install the software.
2 Activate the software.
3 Set up your printer and scanner.
4 Scan your first document.
NOTE If you have a version of OMEGA File installed on your computer, uninstall
OMEGA File prior to installing DYMO File.
1. Installing the Software
NOTE To print barcode labels on a label printer, you must have DYMO Label Software
and a LabelWriter printer installed before installing DYMO File software.
To install the software
1 Click the link to download the DYMO File Installer.
2 Click Save to save the installation file to your computer.
3 Double-click DYMO_File_setup.exe.
4 Follow the onscreen instructions.
Page 2
2. Activating the Software
The first time you start DYMO File, you are asked to activate the software. You will
need the Product Key located on the outside of the DYMO File CD envelope.
To activate the software
1 Double-click on your desktop.
2 When the activation dialog box appears, select Activate DYMO File with
Product Key.
3 Do one of the following:
• Select Activate automatically over the Internet. and proceed to step 3.
• Select Activate manually by phone and follow the instructions. Proceed
to 3. Setting Up Your Printer and Scanner.
4 Enter your product key in the Product Key field and click Submit. Your
product key is included in the email you received when you purchased
DYMO File.
5 Click OK when the Activation successful message appears.
3. Setting Up Your Printer and Scanner
The first time DYMO File starts, the DYMO File First Run wizard appears. The First
Run Wizard will guide you through the following steps:
• Selecting your printer
• Selecting a folder for your scanned documents
• Setting up your scanning software
• Testing your configuration
2
Page 3

To set up your printer and scanner
1 Follow the onscreen instructions to set up your printer and scanner, and test
your configuration.
2 At the end of the Wizard, watch the one minute Getting Started video.
4. Scanning Your First Document
Follow the steps in this section to scan your first document. You can also view the
Getting Started video or read the Getting Started section in the Online Help.
To scan your first document
1 Select a folder to file your document under Filing Location.
2 Enter the document name in the File name field under Document
Information.
3 Select one of the following under Reservation:
• Label to print a barcode label on your LabelWriter printer.
• Cover sheet to print a cover sheet with a barcode on your regular printer.
4 Click Create Reservation. A barcode label or cover sheet is printed and a
document reservation file is created in the folder you selected.
5 Attach the barcode label to your document or place the cover sheet on top
of your document.
6 Scan the document on your scanner.
After a few moments, the document reservation file is replaced with your
scanned document.
3
Page 4
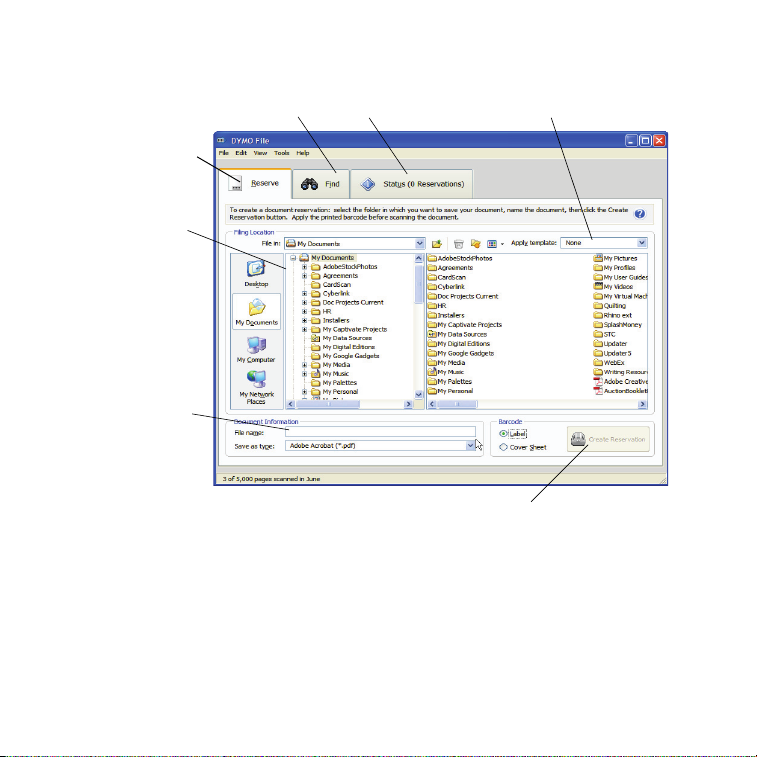
The following figure highlights some of the major features available in DYMO File.
Step 1. Choose your
filing location.
Use filing templates to
quickly create a set of folders
and document reservations.
Step 2. Name your
document.
See which documents are
waiting to be scanned.
Step 3. Print a barcode
label or cover sheet to
create a document
reser vation.
Find docume nts previo usly
filed on your computer.
Quickly file a single
document in a few
easy steps.
Step 4. Attach the
barcode and scan your
document, now or later.
For complete details on using the software, refer to the DYMO File Online Help.
4 © 2007 Sanford, L.P. All rights reserved.
ABBYY™ FineReader™ 8.x Engine © ABBYY Software House 2005. OCR by ABBYY Software House.
DYMO File, LabelWriter, and DYMO are trademarks or registered trademarks of Sanford, L.P.
 Loading...