

CD/DVD Printer
User Guide

Copyright
© 2007 Sanford, L.P. All rights reserved. Version 1.0 Revised 7/07.
No part of this document or the software may be reproduced or transmitted in any form or by any
means or translated into another language without the prior written consent of Sanford, L.P.
Trademarks
DYMO and DiscPainter are registered trademarks of Sanford, L.P. All other trademarks are the
property of their respective holders.

Contents
Introduction. . . . . . . . . . . . . . . . . . . . . . . . . . . . . . . . . . . . . . . . . . . . . . . . . . . . . . . . . . . . . . . . . . . . . . . . . . . . . . . . 1
Printer Overview and Features. . . . . . . . . . . . . . . . . . . . . . . . . . . . . . . . . . . . . . . . . . . . . . . . . . . . . 1
System Requirements. . . . . . . . . . . . . . . . . . . . . . . . . . . . . . . . . . . . . . . . . . . . . . . . . . . . . . . . . . . . 1
Mac OS System Requirements. . . . . . . . . . . . . . . . . . . . . . . . . . . . . . . . . . . . . . . . . . . . . . . . . . . 1
Windows System Requirements. . . . . . . . . . . . . . . . . . . . . . . . . . . . . . . . . . . . . . . . . . . . . . . . . . 1
Your Printer at a Glance. . . . . . . . . . . . . . . . . . . . . . . . . . . . . . . . . . . . . . . . . . . . . . . . . . . . . . . . . . 2
About Discus for DYMO Software . . . . . . . . . . . . . . . . . . . . . . . . . . . . . . . . . . . . . . . . . . . . . . . . . 2
Important Notes . . . . . . . . . . . . . . . . . . . . . . . . . . . . . . . . . . . . . . . . . . . . . . . . . . . . . . . . . . . . . . . . 2
For More Information . . . . . . . . . . . . . . . . . . . . . . . . . . . . . . . . . . . . . . . . . . . . . . . . . . . . . . . . . . . 3
Working with Discs. . . . . . . . . . . . . . . . . . . . . . . . . . . . . . . . . . . . . . . . . . . . . . . . . . . . . . . . . . . . . . . . . . . . . . . . 5
About Printable CDs/DVDs. . . . . . . . . . . . . . . . . . . . . . . . . . . . . . . . . . . . . . . . . . . . . . . . . . . . . . . 5
Loading Discs . . . . . . . . . . . . . . . . . . . . . . . . . . . . . . . . . . . . . . . . . . . . . . . . . . . . . . . . . . . . . . . . . 6
Caring for Discs. . . . . . . . . . . . . . . . . . . . . . . . . . . . . . . . . . . . . . . . . . . . . . . . . . . . . . . . . . . . . . . . 7
Printing from Mac OS . . . . . . . . . . . . . . . . . . . . . . . . . . . . . . . . . . . . . . . . . . . . . . . . . . . . . . . . . . . . . . . . . . . . . 9
Controlling Printer Features. . . . . . . . . . . . . . . . . . . . . . . . . . . . . . . . . . . . . . . . . . . . . . . . . . . . . . . 9
Controlling Print Quality . . . . . . . . . . . . . . . . . . . . . . . . . . . . . . . . . . . . . . . . . . . . . . . . . . . . . . 10
Controlling Ink Density . . . . . . . . . . . . . . . . . . . . . . . . . . . . . . . . . . . . . . . . . . . . . . . . . . . . . . . 10
Controlling Disc Settings . . . . . . . . . . . . . . . . . . . . . . . . . . . . . . . . . . . . . . . . . . . . . . . . . . . . . . 11
Printing Multiple Copies . . . . . . . . . . . . . . . . . . . . . . . . . . . . . . . . . . . . . . . . . . . . . . . . . . . . . . 13
Printing to the DiscPainter Printer. . . . . . . . . . . . . . . . . . . . . . . . . . . . . . . . . . . . . . . . . . . . . . . . . 13
Using Sample Files. . . . . . . . . . . . . . . . . . . . . . . . . . . . . . . . . . . . . . . . . . . . . . . . . . . . . . . . . . . 13
General Printing Instructions . . . . . . . . . . . . . . . . . . . . . . . . . . . . . . . . . . . . . . . . . . . . . . . . . . . 14
Printing From Windows. . . . . . . . . . . . . . . . . . . . . . . . . . . . . . . . . . . . . . . . . . . . . . . . . . . . . . . . . . . . . . . . . . 15
About the DiscPainter Status Monitor. . . . . . . . . . . . . . . . . . . . . . . . . . . . . . . . . . . . . . . . . . . . . . 15
Controlling Print Options. . . . . . . . . . . . . . . . . . . . . . . . . . . . . . . . . . . . . . . . . . . . . . . . . . . . . . . . 16
Controlling Print Quality/Speed. . . . . . . . . . . . . . . . . . . . . . . . . . . . . . . . . . . . . . . . . . . . . . . . . 17
Controlling Ink Density . . . . . . . . . . . . . . . . . . . . . . . . . . . . . . . . . . . . . . . . . . . . . . . . . . . . . . . 18
Controlling Disc Settings . . . . . . . . . . . . . . . . . . . . . . . . . . . . . . . . . . . . . . . . . . . . . . . . . . . . . . 18
Restoring Default Settings . . . . . . . . . . . . . . . . . . . . . . . . . . . . . . . . . . . . . . . . . . . . . . . . . . . . . 19
Printing Multiple Copies . . . . . . . . . . . . . . . . . . . . . . . . . . . . . . . . . . . . . . . . . . . . . . . . . . . . . . 19
Printing to the DiscPainter Printer. . . . . . . . . . . . . . . . . . . . . . . . . . . . . . . . . . . . . . . . . . . . . . . . . 19
Using Sample Files. . . . . . . . . . . . . . . . . . . . . . . . . . . . . . . . . . . . . . . . . . . . . . . . . . . . . . . . . . . 20
General Printing Instructions . . . . . . . . . . . . . . . . . . . . . . . . . . . . . . . . . . . . . . . . . . . . . . . . . . . 21
iii

Caring for Your Printer . . . . . . . . . . . . . . . . . . . . . . . . . . . . . . . . . . . . . . . . . . . . . . . . . . . . . . . . . . . . . . . . . . 23
Handling Inkjet Cartridges . . . . . . . . . . . . . . . . . . . . . . . . . . . . . . . . . . . . . . . . . . . . . . . . . . . . . . 23
Using Printer Services. . . . . . . . . . . . . . . . . . . . . . . . . . . . . . . . . . . . . . . . . . . . . . . . . . . . . . . . . . 23
Checking the Ink Level . . . . . . . . . . . . . . . . . . . . . . . . . . . . . . . . . . . . . . . . . . . . . . . . . . . . . . . 24
Cleaning the Inkjet Cartridge . . . . . . . . . . . . . . . . . . . . . . . . . . . . . . . . . . . . . . . . . . . . . . . . . . 25
Purchasing New Inkjet Cartridges. . . . . . . . . . . . . . . . . . . . . . . . . . . . . . . . . . . . . . . . . . . . . . . 25
Replacing the Inkjet Cartridge . . . . . . . . . . . . . . . . . . . . . . . . . . . . . . . . . . . . . . . . . . . . . . . . . . . 25
Cleaning the Printer. . . . . . . . . . . . . . . . . . . . . . . . . . . . . . . . . . . . . . . . . . . . . . . . . . . . . . . . . . . . 27
Repacking the Printer for Travel. . . . . . . . . . . . . . . . . . . . . . . . . . . . . . . . . . . . . . . . . . . . . . . . . . 27
Printing Over a Network . . . . . . . . . . . . . . . . . . . . . . . . . . . . . . . . . . . . . . . . . . . . . . . . . . . . . . . . . . . . . . . . 31
Printing to a Shared Printer from Mac OS . . . . . . . . . . . . . . . . . . . . . . . . . . . . . . . . . . . . . . . . . . 31
Sharing a Printer on a Network . . . . . . . . . . . . . . . . . . . . . . . . . . . . . . . . . . . . . . . . . . . . . . . . . 31
Adding a Shared Printer . . . . . . . . . . . . . . . . . . . . . . . . . . . . . . . . . . . . . . . . . . . . . . . . . . . . . . 32
Printing to a Shared Printer from Windows . . . . . . . . . . . . . . . . . . . . . . . . . . . . . . . . . . . . . . . . . 33
Sharing a Printer on a Network . . . . . . . . . . . . . . . . . . . . . . . . . . . . . . . . . . . . . . . . . . . . . . . . . 33
Installing a Network Printer . . . . . . . . . . . . . . . . . . . . . . . . . . . . . . . . . . . . . . . . . . . . . . . . . . . 34
Frequently Asked Questions . . . . . . . . . . . . . . . . . . . . . . . . . . . . . . . . . . . . . . . . . . . . . . . . . . . . . . . . . . . . 35
Troubleshooting . . . . . . . . . . . . . . . . . . . . . . . . . . . . . . . . . . . . . . . . . . . . . . . . . . . . . . . . . . . . . . . . . . . . . . . . . . 39
Installation Problems. . . . . . . . . . . . . . . . . . . . . . . . . . . . . . . . . . . . . . . . . . . . . . . . . . . . . . . . . . . 39
Windows Installation Problems. . . . . . . . . . . . . . . . . . . . . . . . . . . . . . . . . . . . . . . . . . . . . . . . . 39
Mac OS Installation Problems. . . . . . . . . . . . . . . . . . . . . . . . . . . . . . . . . . . . . . . . . . . . . . . . . . 39
Printing Problems . . . . . . . . . . . . . . . . . . . . . . . . . . . . . . . . . . . . . . . . . . . . . . . . . . . . . . . . . . . . . 40
Error Messages . . . . . . . . . . . . . . . . . . . . . . . . . . . . . . . . . . . . . . . . . . . . . . . . . . . . . . . . . . . . . 40
Printer Status Lights . . . . . . . . . . . . . . . . . . . . . . . . . . . . . . . . . . . . . . . . . . . . . . . . . . . . . . . . . 41
Ink Level Appears Empty . . . . . . . . . . . . . . . . . . . . . . . . . . . . . . . . . . . . . . . . . . . . . . . . . . . . . 41
Printing is Too Light or Dark . . . . . . . . . . . . . . . . . . . . . . . . . . . . . . . . . . . . . . . . . . . . . . . . . . 41
Smudges Appear Outside of Design . . . . . . . . . . . . . . . . . . . . . . . . . . . . . . . . . . . . . . . . . . . . . 41
Ink Pools on Disc. . . . . . . . . . . . . . . . . . . . . . . . . . . . . . . . . . . . . . . . . . . . . . . . . . . . . . . . . . . . 41
Printing a Self-Test . . . . . . . . . . . . . . . . . . . . . . . . . . . . . . . . . . . . . . . . . . . . . . . . . . . . . . . . . . 41
Opening the Front Cover. . . . . . . . . . . . . . . . . . . . . . . . . . . . . . . . . . . . . . . . . . . . . . . . . . . . . . 42
Printer Specifications. . . . . . . . . . . . . . . . . . . . . . . . . . . . . . . . . . . . . . . . . . . . . . . . . . . . . . . . . . . . . . . . . . . . 45
Physical Specifications . . . . . . . . . . . . . . . . . . . . . . . . . . . . . . . . . . . . . . . . . . . . . . . . . . . . . . . 45
Power Specifications . . . . . . . . . . . . . . . . . . . . . . . . . . . . . . . . . . . . . . . . . . . . . . . . . . . . . . . . . 45
Disc Service, Duty Cycle, and Warranty Specifications. . . . . . . . . . . . . . . . . . . . . . . . . . . . . . 45
Environmental Specifications . . . . . . . . . . . . . . . . . . . . . . . . . . . . . . . . . . . . . . . . . . . . . . . . . . 45
Declaration of Conformity. . . . . . . . . . . . . . . . . . . . . . . . . . . . . . . . . . . . . . . . . . . . . . . . . . . . . 46
Waste from Electric & Electronic Equipment (WEEE) . . . . . . . . . . . . . . . . . . . . . . . . . . . . . . 46
Limited Warranty . . . . . . . . . . . . . . . . . . . . . . . . . . . . . . . . . . . . . . . . . . . . . . . . . . . . . . . . . . . 46
Index . . . . . . . . . . . . . . . . . . . . . . . . . . . . . . . . . . . . . . . . . . . . . . . . . . . . . . . . . . . . . . . . . . . . . . . . . . . . . . . . . . . . . . . 49
iv

This chapter introduces the DYMO DiscPainter printer and covers the following topics:
• Printer overview and features
• System requirements
• DiscPainter printer at a glance
• Important notes for printing on discs
• Road map for finding more information
Printer Overview and Features
The DiscPainter CD/DVD printer is a color inkjet printer that prints high-quality graphics, text, and
images directly onto inkjet-printable CDs and DVDs with ease and accuracy. Set up is quick and
easy , and can be accomplished in just a few minutes. Regardless of your content (music, video, or
data), you can print attractive, professional-looking text and graphics on discs without using
clumsy adhesive labels.
Below are some of the printer’s most important features:
• Prints clear, attractive designs onto the printable side of CDs and DVDs
•
Prints high-resolution, color text and images using RadialPrint™ Technology (up to 1200 dpi)
• Prints on 120 mm and 80 mm inkjet-printable discs
• Supports full-coverage (hub-printable) discs
• Includes Discus for DYMO software so that you can create your own custom designs
Chapter 1
Introduction
System Requirements
The DiscPainter printer system requirements are as follows:
Mac OS System Requirements
•
Mac OS® v10.3/10.4
• 512 MB RAM
• USB port (USB 2.0 certified high-speed device works with USB 1.1)
• 700 MB hard disk space
Windows System Requirements
•
Windows® XP
• 512 MB RAM
• USB port (USB 2.0 certified high-speed device works with USB 1.1)
• 700 MB hard disk space
1
Introduction
15
87
23 4
6
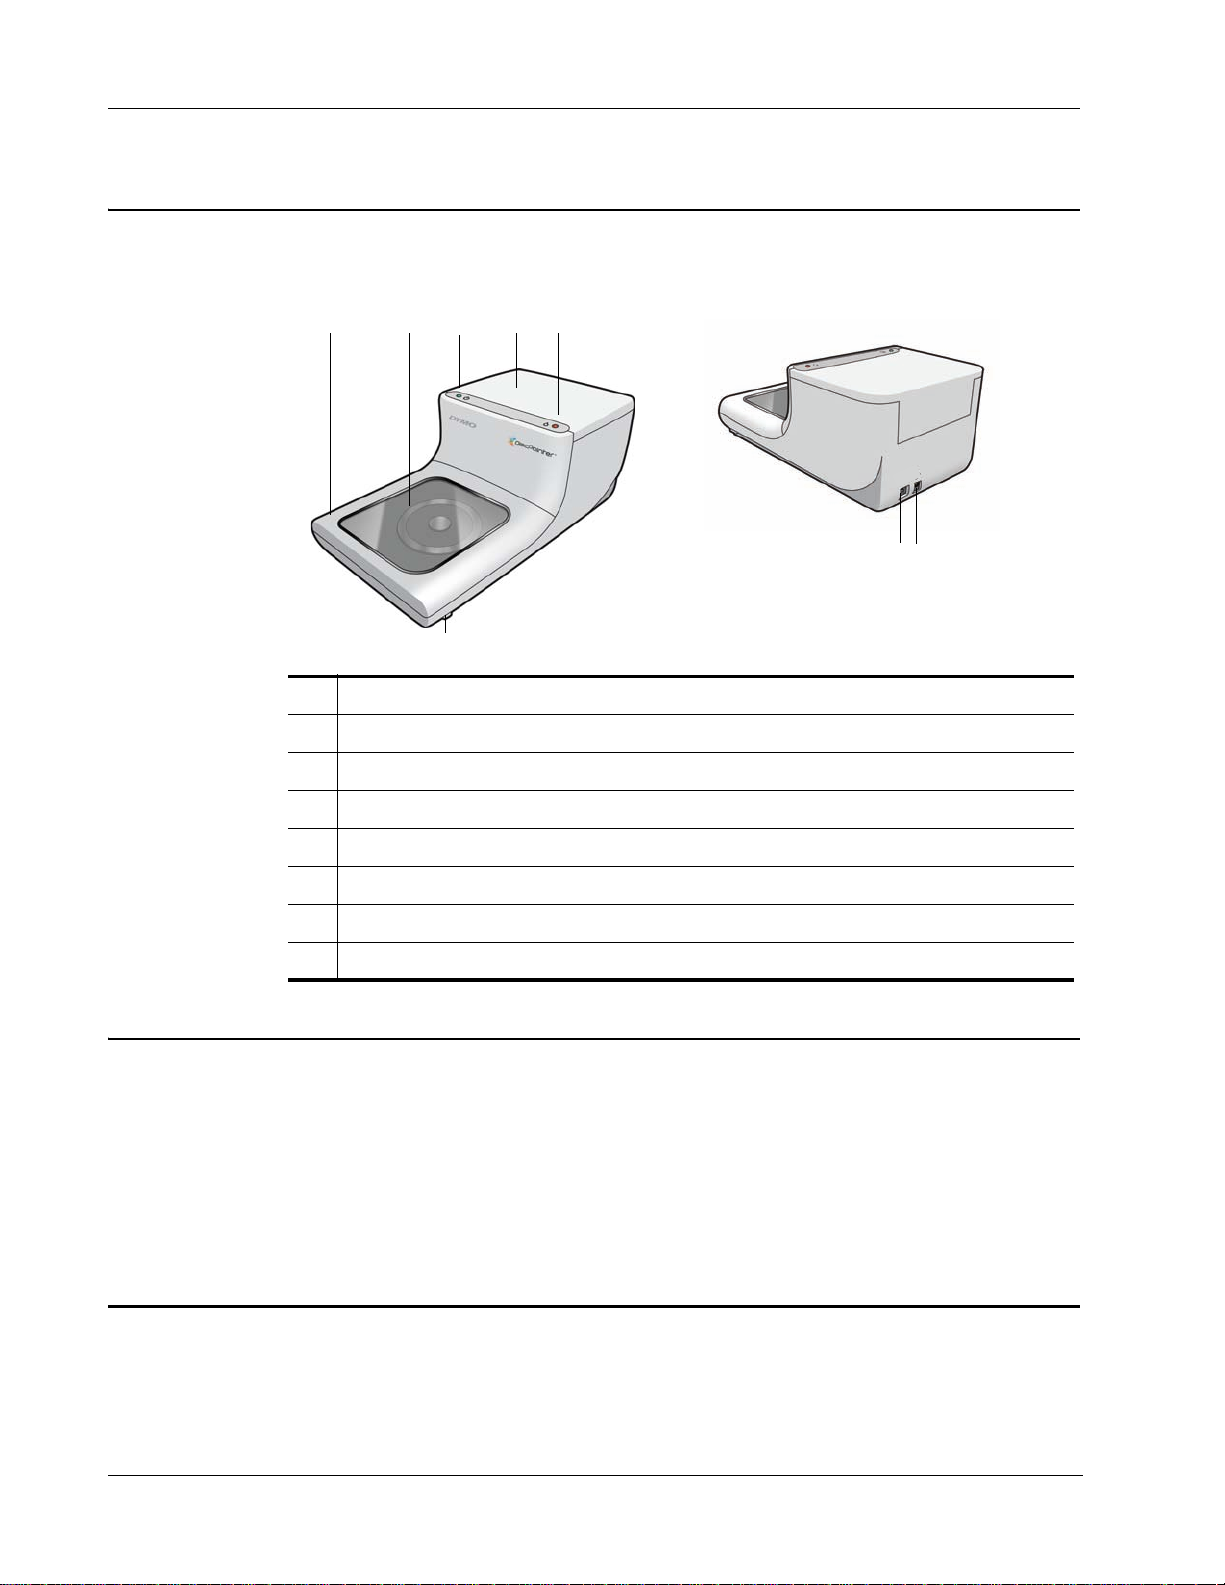
Your Printer at a Glance
These drawings show the front and back of the printer. The numbers in the illustrations correspond
to the printer part names listed below the figure.
1 Front cover
2Disc tray
3 Power status (see "Printer Status Lights" on page 41 for information)
4 Top cover
5 Ink status (see "Printer Status Lights" on page 41 for information)
6 Front cover release levers (see "Opening the Front Cover" on page 42 for information)
7 USB connection
8 Power connector
About Discus for DYMO Software
Included with your new printer is Discus for DYMO software. Discus for DYMO software is a
powerful application that allows you to create professional looking CD/DVD designs with a
minimum amount of effort. In addition to printing disc designs on the DiscPainter printer, you can
design and print jewel case covers and inserts, and other types of projects on a standard inkjet
printer. Refer to the Discus for DYMO Online Help for complete information.
You can also print to the DiscPainter printer from other design applications, such as Adobe
Photoshop
®
or Illustrator®. See "Printing to the DiscPainter Printer" on page 19.
®
Important Notes
Below are some things to keep in mind when printing.
• Use only inkjet-printable discs. These usually have a white printing surface. Inkjet-printable
discs are available from your local office supply retailer or online at www.dymo.com.
2

• Only use DYMO-branded inkjet cartridges.
• Do not open the top cover or front cover during printing.
• After printing, wait for the ink to dry completely before touching the disc to avoid smearing
the ink and handle the discs only by the edges.
For More Information
The table below provides a road map to all the DiscPainter-related instructional information.
Information Location/How to Access
Quick Start Guide Included in product package.
For More Information
DiscPainter Printer
User Guide
Provides complete instructions for using the printer.
Mac OS: Located in the DiscPainter application folder or the Help menu in the
Discus for DYMO software.
Windows: Accessed from the Start menu on the Windows desktop or the Help
menu in the Discus for DYMO software.
Discus for DYMO
Online Help
DiscPainter Web site Use a Web browser to go to: www.dymo.com/discpainter
Provides complete information about the Discus for DYMO software.
Mac OS: Accessed from the Help menu in the Discus for DYMO software.
Windows: Accessed from the Start menu on the Windows desktop or the Help
menu in the
Complete information about DiscPainter, including the most recent versions of
the software and this User Guide, are available on the DiscPainter W eb site
Discus for DYMO software.
.
3

Introduction
4
This chapter describes how the DiscPainter printer works with inkjet-printable discs.
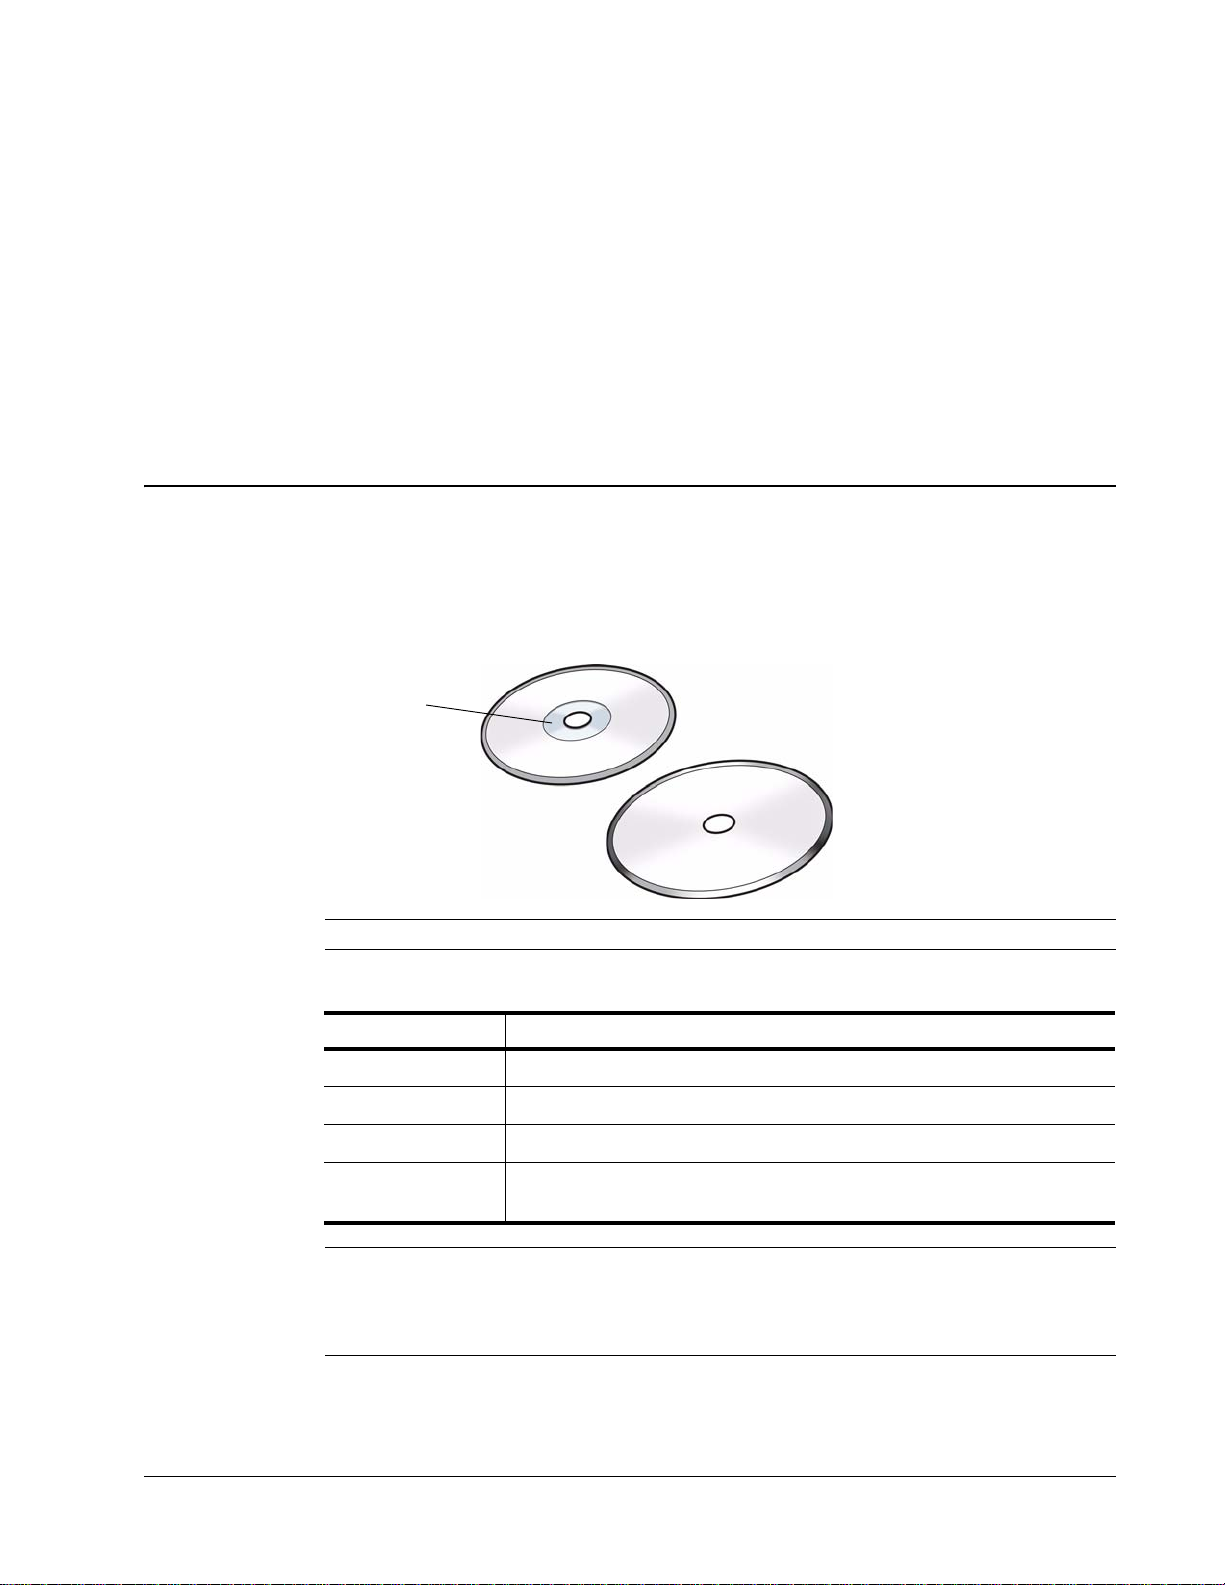
Non hub-printable disc
Hub-printable disc
Hub
About Printable CDs/DVDs
Inkjet-printable CDs and DVDs are available in two basic sizes (diameters): Standard size (120
mm) and Mini size (80 mm).
Inkjet-printable discs can be hub-printable (also called full face or full coverage) or non hubprintable. Hub-printable discs allow you to print close to the inner edge of the center hole, while
non hub-printable discs have a larger unprintable area at the center of the disc.
Chapter 2
Working with Discs
Note The printer does not support printing on business card discs.
Inkjet-printable discs are available with a variety of surface finishes, which are described below.
Disc Surface Finish Char acteristics
Matte Dull, flat, non-glossy
Glossy Lustrous, shiny
Silver or Color Reflective, mirror-like. Red, blue, green and other colors are also available.
Water-resistant/
Water-proof
Note Different disc finishes require different ink densities (the amount of ink deposited by the
printer) in order to optimize print quality. You can adjust the ink density for the various types of
disc finishes. See "Controlling Ink Density" on page 10 (Mac OS) or page 18 (Windows) for
information.
Resistant to smearing and color bleeding from contact with liquids.
5
Working with Discs
Loading Discs
Drying Time
Drying times will vary based on the disc type and ink density used. Most discs should dry within
seconds; however, depending on ink density, some discs may require much longer to dry. In
general, do not touch the printed surface until you are sure it is dry and only handle the disc by
holding the edge.
Note The printer is designed to print only on inkjet-printable discs. If you print onto discs that are
not inkjet-printable, the ink will not dry correctly and may pool. Not using inkjet-printable discs
may damage your printer.
Designs containing large amounts of black color may be damp after printing. To avoid this, reduce
the amount of black in the design.
Keep the following important points in mind when loading discs into the printer:
• Never remove a disc during printing (while it is spinning). Always wait for the disc to stop
spinning. The ink status light will blink yellow, which indicates that the disc is finished
printing.
• Avoid touching the bottom part of the disc. Always handle the disc by its ou ter edge. You can
also support the disc by inserting a finger through its center hole.
• Always use an inkjet-printable disc.
• Before printing, make sure the disc size and other characteristics (finish, hub printable/non-hub
printable, and so on) match the settings defined for the printer. See "Controlling Print Quality/
Speed" on page 17 for information on controlling the printer.
• Make sure you insert the disc with the printable surface facing up. The printable surface is
typically white, but can also be silver, red, blue, green, or other colors, depending on the disc’ s
finish. See "About Printable CDs/DVDs" on page 5 for information.
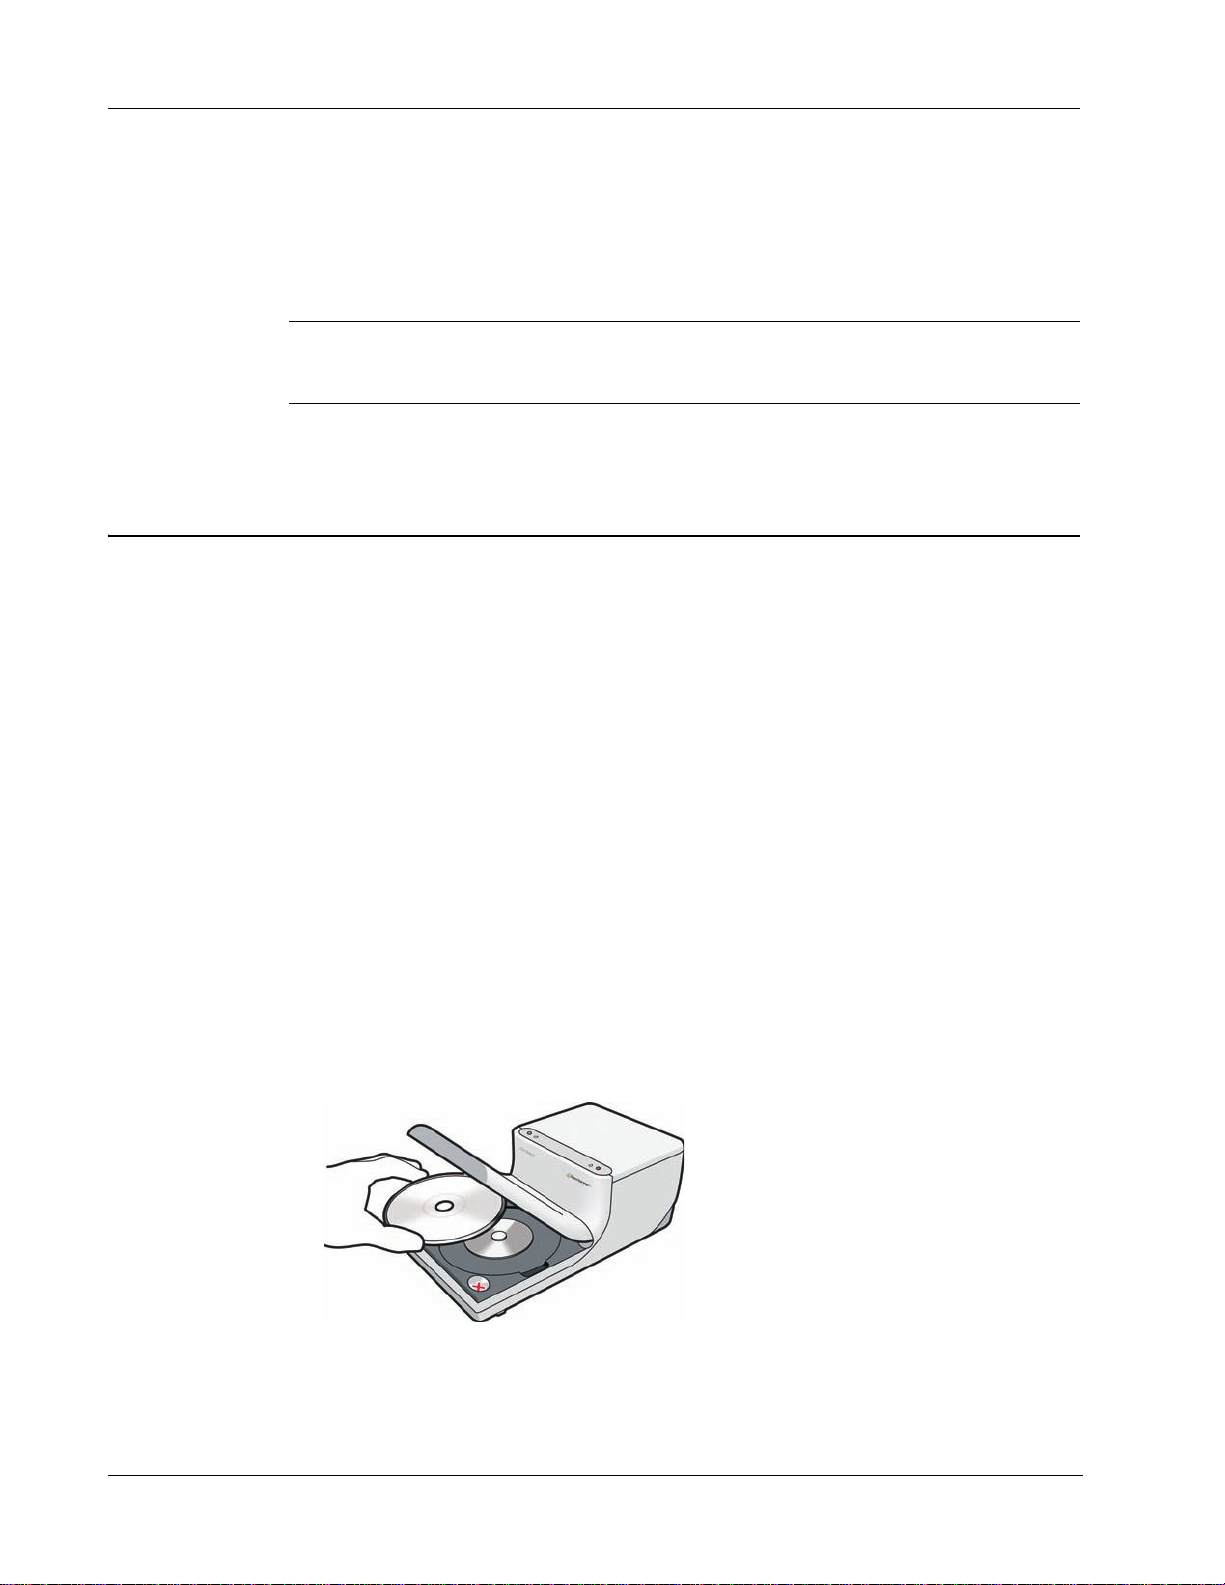
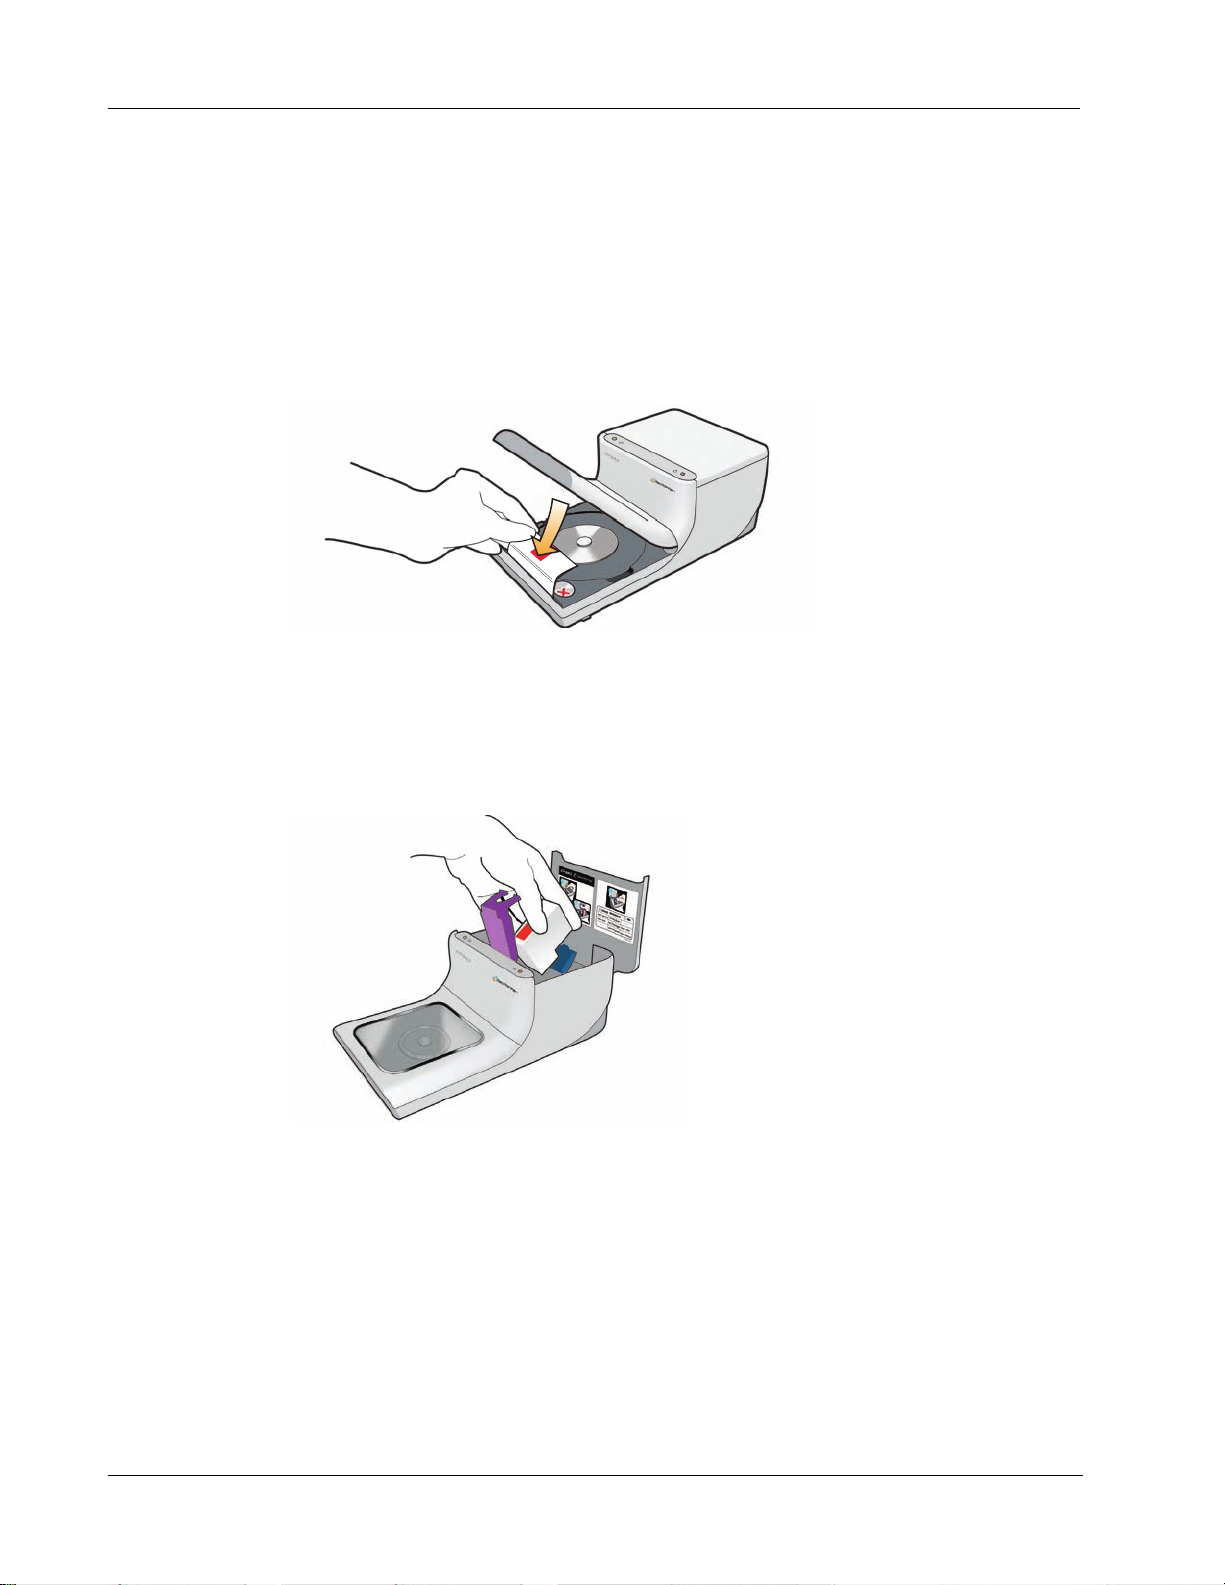
To load a disc into the printer
1 Carefully raise the front cover to its upright position.
The ink status light on top of the printer blinks yellow.
2 If another disc is already on the disc tray, remove the disc, touching the disc only on the outer
edges.
3 Place the blank disc onto the center spindle in the disc tray with the printable side up.
4 Carefully lower the front cover.
The Ink LED stops blinking. This indicates that you are ready to print on the disc.
6

Caring for Discs
This section contains information on how to care for your discs.
Keep the following tips in mind:
• Always place discs back in their protective covers when not in use.
• Make sure the printing is completely dry before inserting a disc into its cover. If you are not
To clean the printable side of a disc
♦
Note Avoid getting moisture on the printable surface of the disc. Moisture can smear the ink.
Caring for Discs
sure the ink is completely dry, leave the disc to set overnight.
Using a clean, dry, lint-free cloth, gently wipe off the disc.
7

Working with Discs
8
Printing from Mac OS
The chapter describes how to print on a DYMO DiscPainter printer from Mac OS and covers the
following topics:
• Controlling printer features
• Printing from other software
Note See "Using Printer Services" on page 23 for information about using printer services from
Mac OS or Windows.
Controlling Printer Features
You can control several printer features for your DYMO DiscPainter printer, including:
• Print quality
• Ink density
• Inner and outer diameter
Chapter 3
Note This section describes how to define print options when using your DiscPainter printer with
other applications. For information on using the printer with the Discus for DYMO software, see
the Discus for DYMO Online Help.
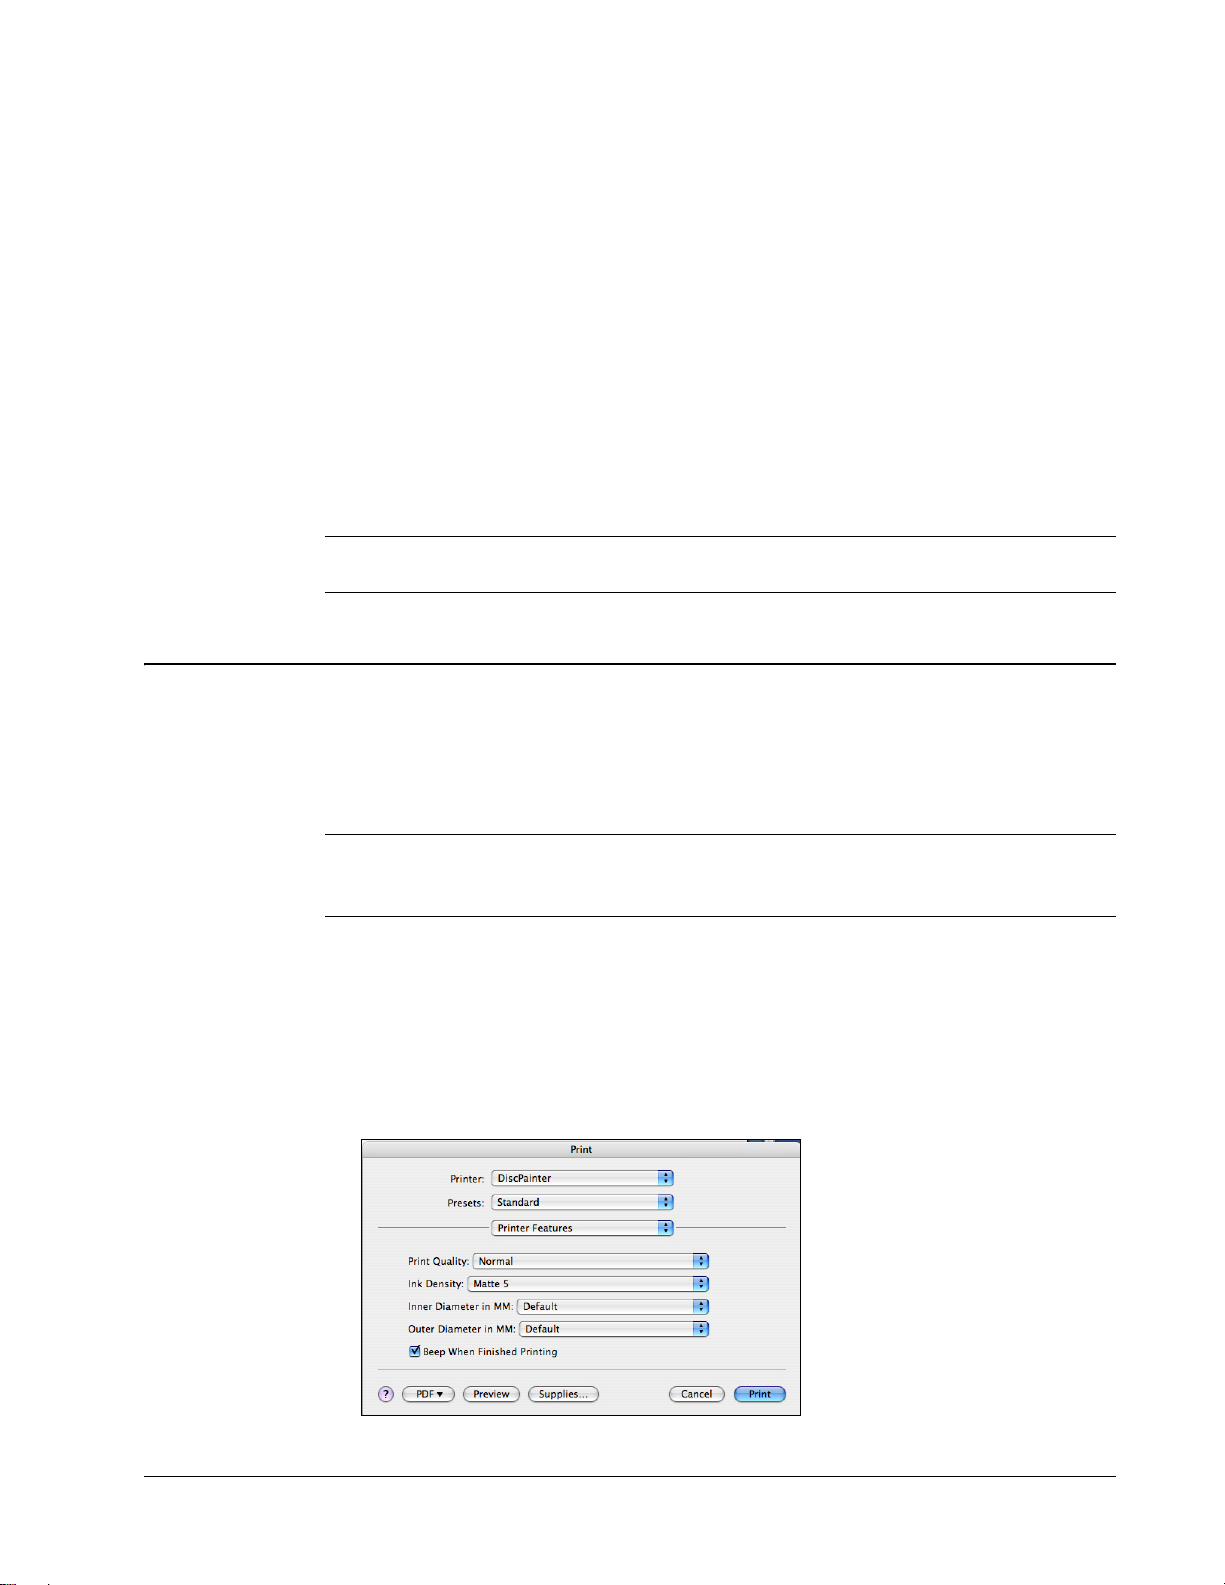
To control printer features
1 From any application that supports printin g, select Print from the File menu.
The Print dialog box is displayed.
2 Select DiscPainter from the Printer menu.
3 Select Printer Features from the menu below the Presets menu.
The Printer Features properties are displayed.
9
Printing from Mac OS
4 Make any necessary adjustments to the settings. The settings are described in detail in this
chapter.
5 When you are finished selecting printer features, click Print.
Controlling Print Quality
You can choose from several print quality options. In general, higher quality print requires longer
print times. Print speed depends on many factors: the amount of computer memory you have, the
complexity of your design, the number of colors in your design, and so on.
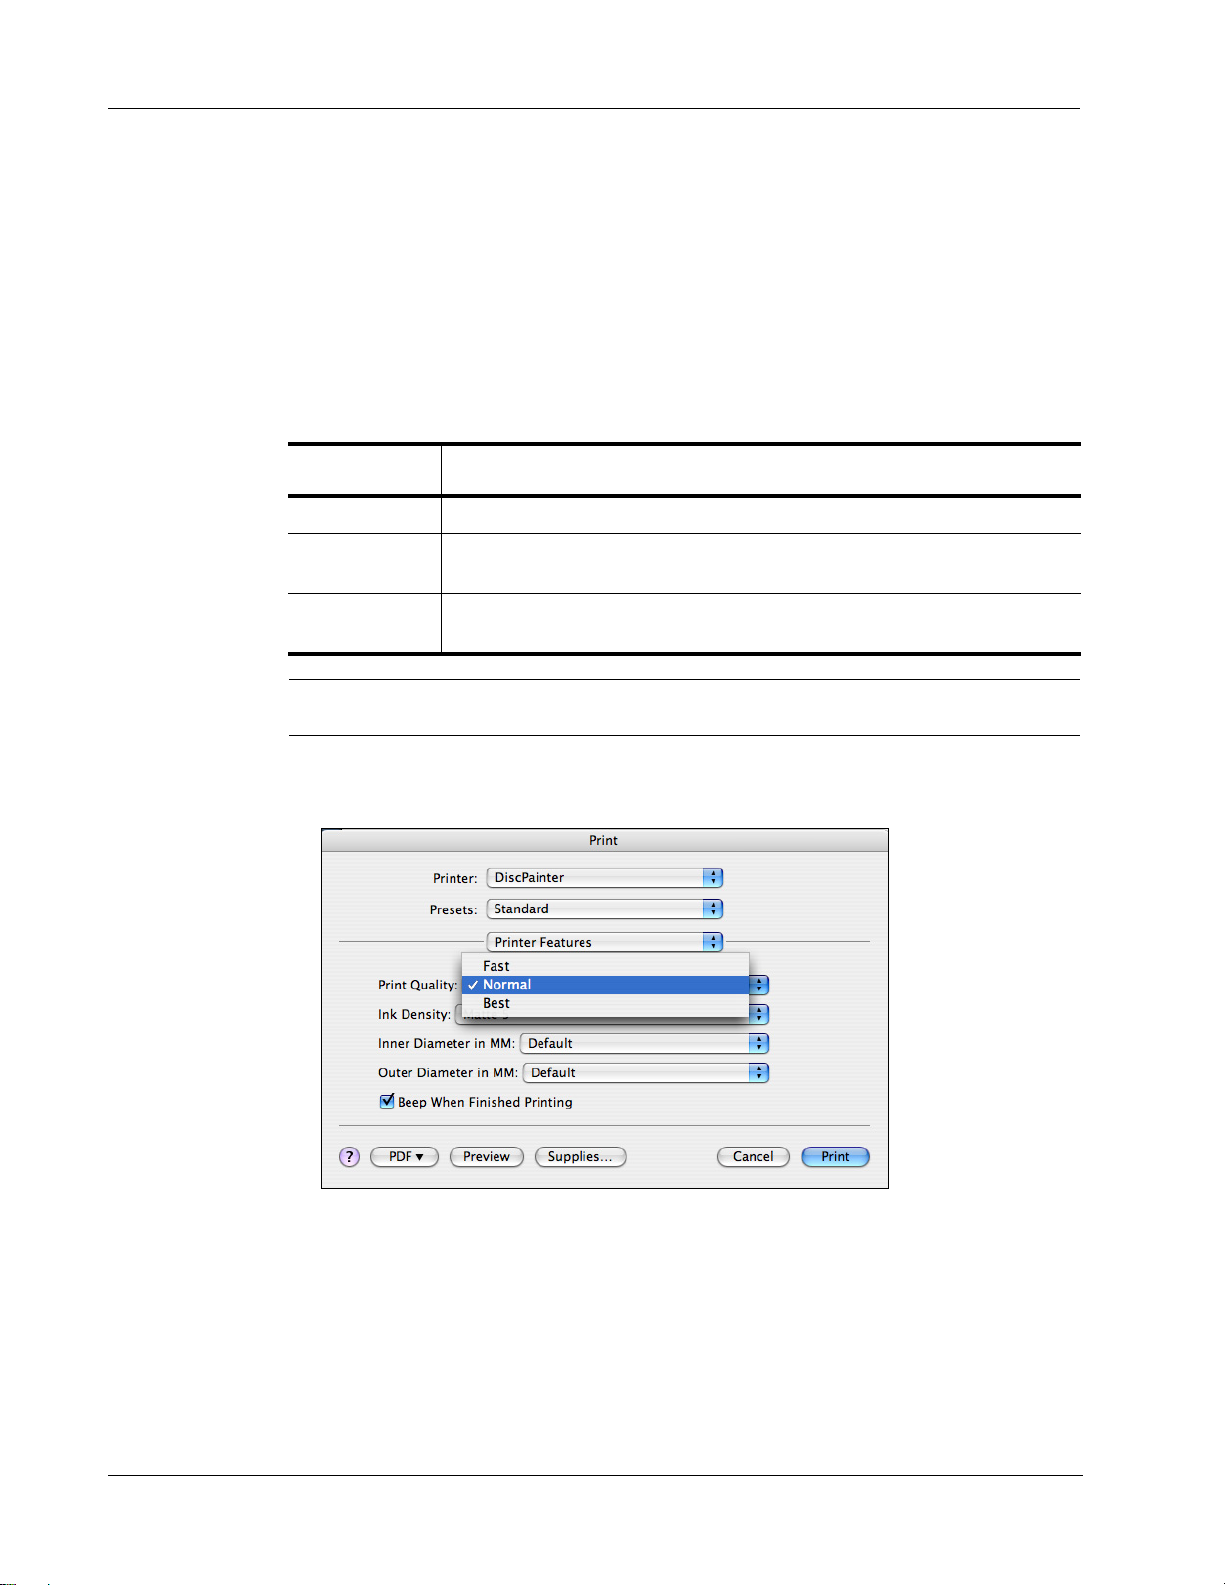
The Print Quality options are described below.
Print Quality
/Speed Option
Fast
Normal
Best
Note The print time mentioned above is measured from the time the print tray moves into printing
Description
Uses image smoothing and halftoning to produce full-color print quality.
Produces full-color print quality superior to Fast mode; the resulting image is sui table
for most applications. Images require about twice as long to print as in Fast mode.
Produces the best full-color print quality available. Images require about twice as long
to print as in Normal mode.
position.
To select a Print Quality option
♦ From the Print dialog box, select the quality you want from the Print Quality drop-down list.
Controlling Ink Density
You can easily adjust the density of the ink printed on discs. Less ink results in images that are less
dense; more ink results in denser images. In general, the disc’s finish (matte, glossy, silver, and so
on) determines the ink density you should use. See "About Prin table CDs/DVDs" on page 5 for
details about the various types of printable discs.
10
Controlling Printer Features
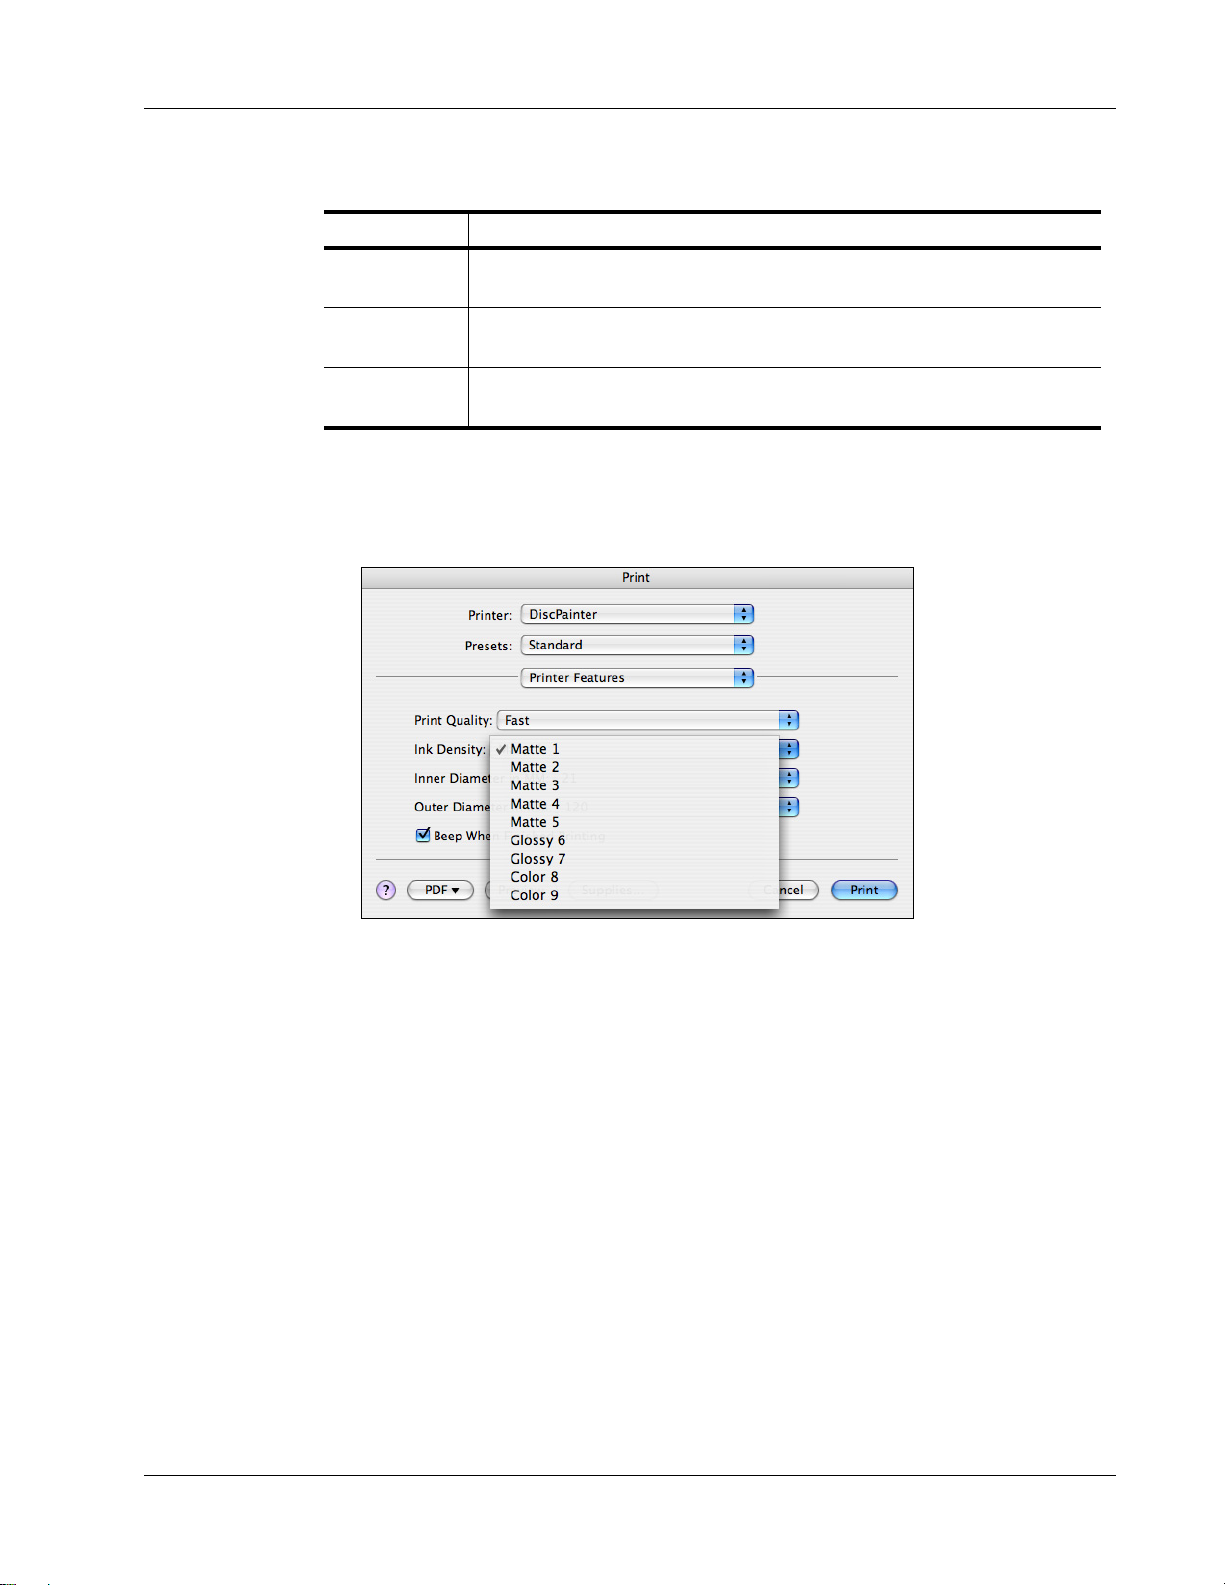
The Ink Density control on the DiscPainter Properties dialog box has nine settings.
Setting Description
Matte 1 - 5
Glossy 6 - 7
Color 8 - 9
Uses less ink and printed image is less dense. Recommended setting for inkjetprintable discs with a matte finish. Default setting is Matte 5.
Uses slightly more ink than the matte settings. Recommended setting for inkjetprintable discs with a glossy finish.
Uses more ink and printed image is more dense. Recommended setting for inkjetprintable discs with a silver or color finish.
Experiment with the settings to see what works best for your inkjet-printable media.
To select the ink density
From the Print dialog box, select the setting that you want to use from the Ink Density drop-
♦
down list.
You might find that you prefer settings other than those recommended. Select a finish (matte,
glossy, or color) that matches your disc. If the results are not what you expected, try printing with a
different ink density setting.
Controlling Disc Settings
As with any other printer, the paper size selected determines the area to be printed. Before printing,
you must make sure that the Paper Size selected matches the disc that you are going to print on.
Four paper sizes are pre-defined for the printer:
• Standard (120 mm) Hub Printable
• Standard (120 mm) Non-Hub Printable
• Mini (80 mm) Hub Printable
• Mini (80 mm) Non-Hub Printable
Default Inside Diameter and Outside Diameter values are assigned to each of the paper size
options. However, you can change these values if you need to expand or reduce the printable area
on the disc (see "Customizing the Inner and Outer Diameter" on page 12 for information).
To select the disc setting
1 Choose Page Setup from the File menu.
11

Printing from Mac OS
2 Select Page Attributes from the Settings drop-down list.
3 Select DiscPainter from the Format for drop-down list.
4 From the Paper Size drop-down list, select th e disc setting that matches the size and type of
inkjet-printable disc you are using.
5 Click OK.
Customizing the Inner and Outer Diameter
You can customize the inner and outer diameters appropriate for the discs you are using. The inner
and outer dimensions of inkjet-printable discs are not standardized and you might find that you
need to specify different inside and outside diameter values to match the discs you buy.
For example, if you find that a batch of inkjet-printable discs you purchase has a printable area
between 25 mm and 118 mm, you can specify 25 mm for the Inner Diameter and 118 mm for the
Outer Diameter. With these settings, designs you print would appear in the area 25 mm to 118 mm
from the disc’s center.
To control the Inner and Outer Diameter
♦ From the Print dialog box, select the desired inner and/or outside diameter from the Inner
Diameter in MM and/or Outer Diameter in MM drop-downs, respectively.
12

Printing Multiple Copies
You can easily print multiple copies of the same disc image. After each print job is finished
printing, the Ink LED on top of the printer blinks yellow to indicate the print job is finished. You
can then remove the finished disc and insert a blank disc for the next print job.
When printing multiple copies, you can configure the printer to beep after each disc is finished
printing to let you know when to insert a new disc.
To turn on the disc-finished-printing beep
♦ Select Beep When Finished Printing check box.
Printing to the DiscPainter Printer
Printing to the DiscPainter Printer
This section describes the steps required to print images to your printer from applications other than
the Discus for DYMO software. The printing process varies to some degree with different
applications. Sample files for several common applications are provided to simplify printing from
these programs.
For details about printing using a particular program, see the documentati on incl uded with that
program. For information on using the printer with the Discus for DYMO software, see the D iscus
for DYMO Online Help. Below are some general tips on using the printer with other applications.
To configure your application to print to the DiscPainter printer
• Set up a paper size that matches the size of the disc you are using.
For example, if printing to a Standard (120 mm, 4.7") disc, set up a paper size of 120 mm wide
and 120 mm high; if printing to a Mini (80 mm, 3.15") disc, set up a paper size of 80 mm wide
and 80 mm high.
• Set all the margins to 0.
The new document is a 120 mm or 80 mm square with no margins on any of the four sides. By
defining the appropriate paper size, your design will be centered on the paper.
Using Sample Files
Sample files for several popular graphics design programs are included in the Sample Documents
folder. These sample files contain the proper page settings for printing a CD/DVD design to the
DiscPainter printer.
13

Printing from Mac OS
Sample files are provided for the following programs:
• Photoshop
• Illustrator
®
®
• QuarkXPress
• InDesign
To create disc designs using one of the sample files
1 From the application program, select the program’s file open command and navigate to the
Sample Documents folder in the DYMO DiscPainter folder.
2 Select and open the sample file appropriate for the program you are using.
A blank document, pre-configured with the proper DiscPainter printer settings, is displayed.
3 Create your design and print.
Note Make sure you set the printer features that are appropriate for the type of disc you are using.
®
General Printing Instructions
When you are ready to print an image onto a disc, follow the steps below.
To print to a DiscPainter printer
1 Insert a blank disc into the printer (see "Loading Discs" on page 6 for information).
2 Select Print (this command is typically accessed from the application’s File menu). The Print
dialog box is displayed.
3 Select the DiscPainter printer. (If you don’t see a list or menu used to select printers, see the
documentation included with the program for instructions on selecting printers.)
4 Select Printer Features from the menu below the Presets menu.
5 Select the desired features from the Printer Features menus. See "Controlling Printer
Features" on page 9 for details about the printer features.
6 Click Print.
®
14
During printing, the Print Progress dialog box is displayed. This dialog box shows the progress of
the current print job (percentage completed, from 0% to 100%), the copy currently being printed,
and the total number of copies (“Printing copy 1 of 2,” for example).
To cancel the current print job
♦
Click Cancel Printing in the Print Progress dialog box. Printing stops at the point the printer
receives the cancel printing instruction. The disc tray moves back to the home position.
Printing From Windows
This chapter describes printing to the DYMO DiscPainter printer from Windows and covers the
following topics:
• Using the DiscPainter Status Monitor
• Controlling print options
• Printing from other software programs
See “Printing from Mac OS” for information on printing from Mac OS.
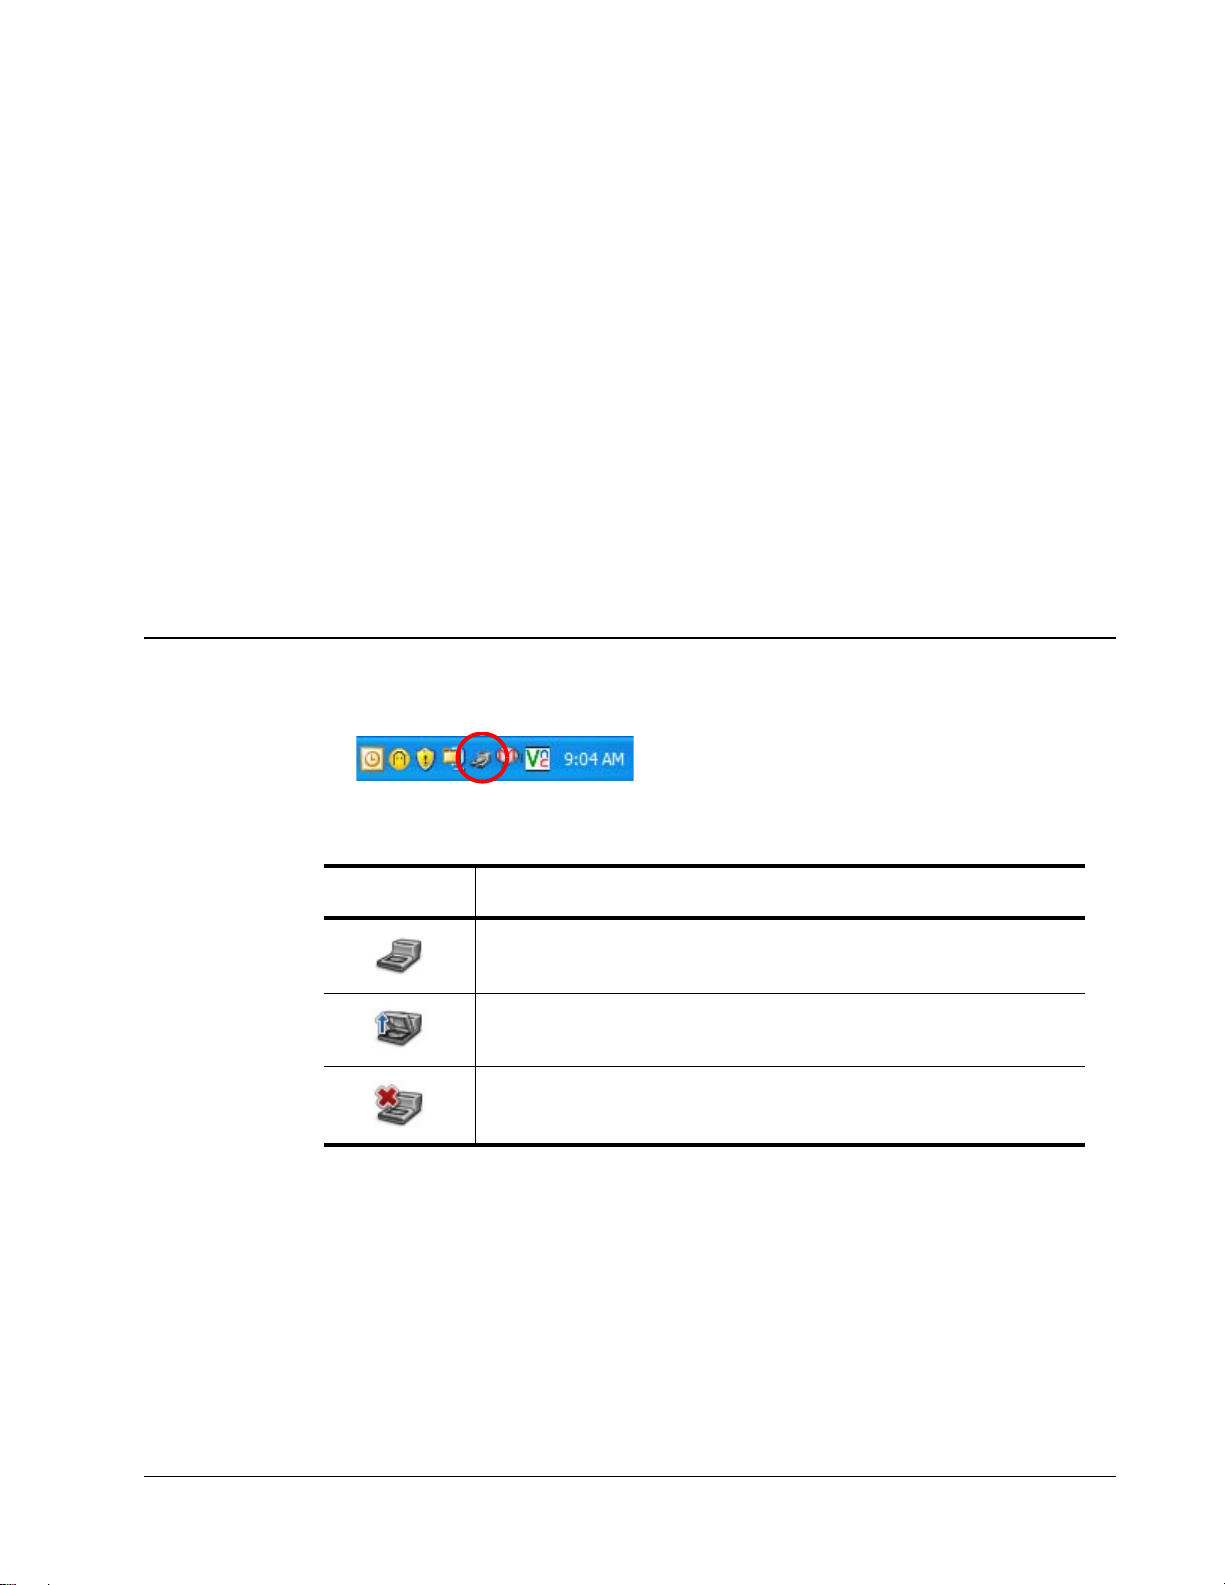
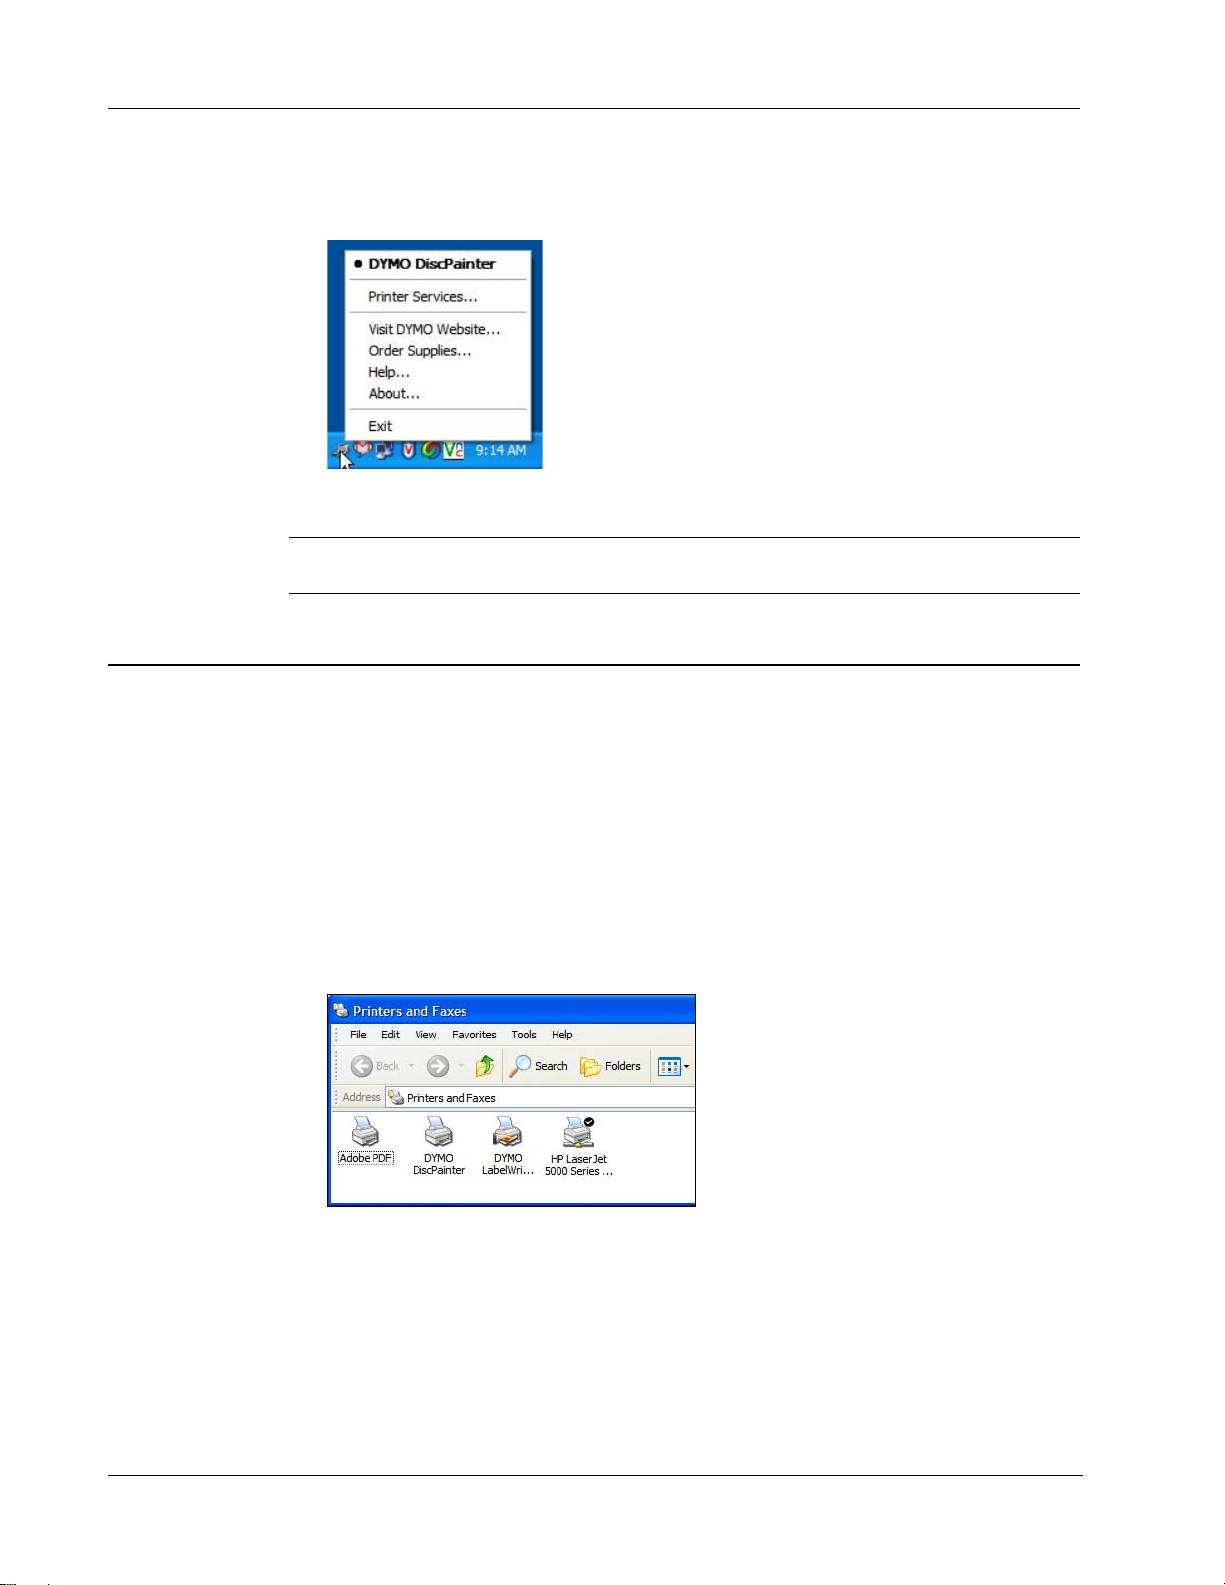
About the DiscPainter Status Monitor
After you install the DYMO DiscPainter software (see the DYMO DiscPainter Quick Start Guide
for information), the DiscPainter Status Monitor icon is displayed in the system tray.
The appearance of the DiscPainter Status Monitor icon in the system tray shows the status of the
printer. The possible printer states are described below.
Chapter 4
DiscPainter Status
Monitor Icon
From Windows, you can access several printer services using the DiscPainter Status Monitor icon.
Description
Printer is ready to print
Front cover is open; close the cover to print
Printer is not ready to print (see "Troubleshooting" on page 39 for information on
resolving errors).
15
Printing From Windows
To access the printer services
♦
Click the DiscPainter Status Monitor icon and select Printer Services. A menu is displayed.
See "Using Printer Services" on page 23 for more information.
Note DYMO DiscPainter is grayed out in the menu if no DiscPainter printer is found. See
"Installation Problems" on page 39 for more information.
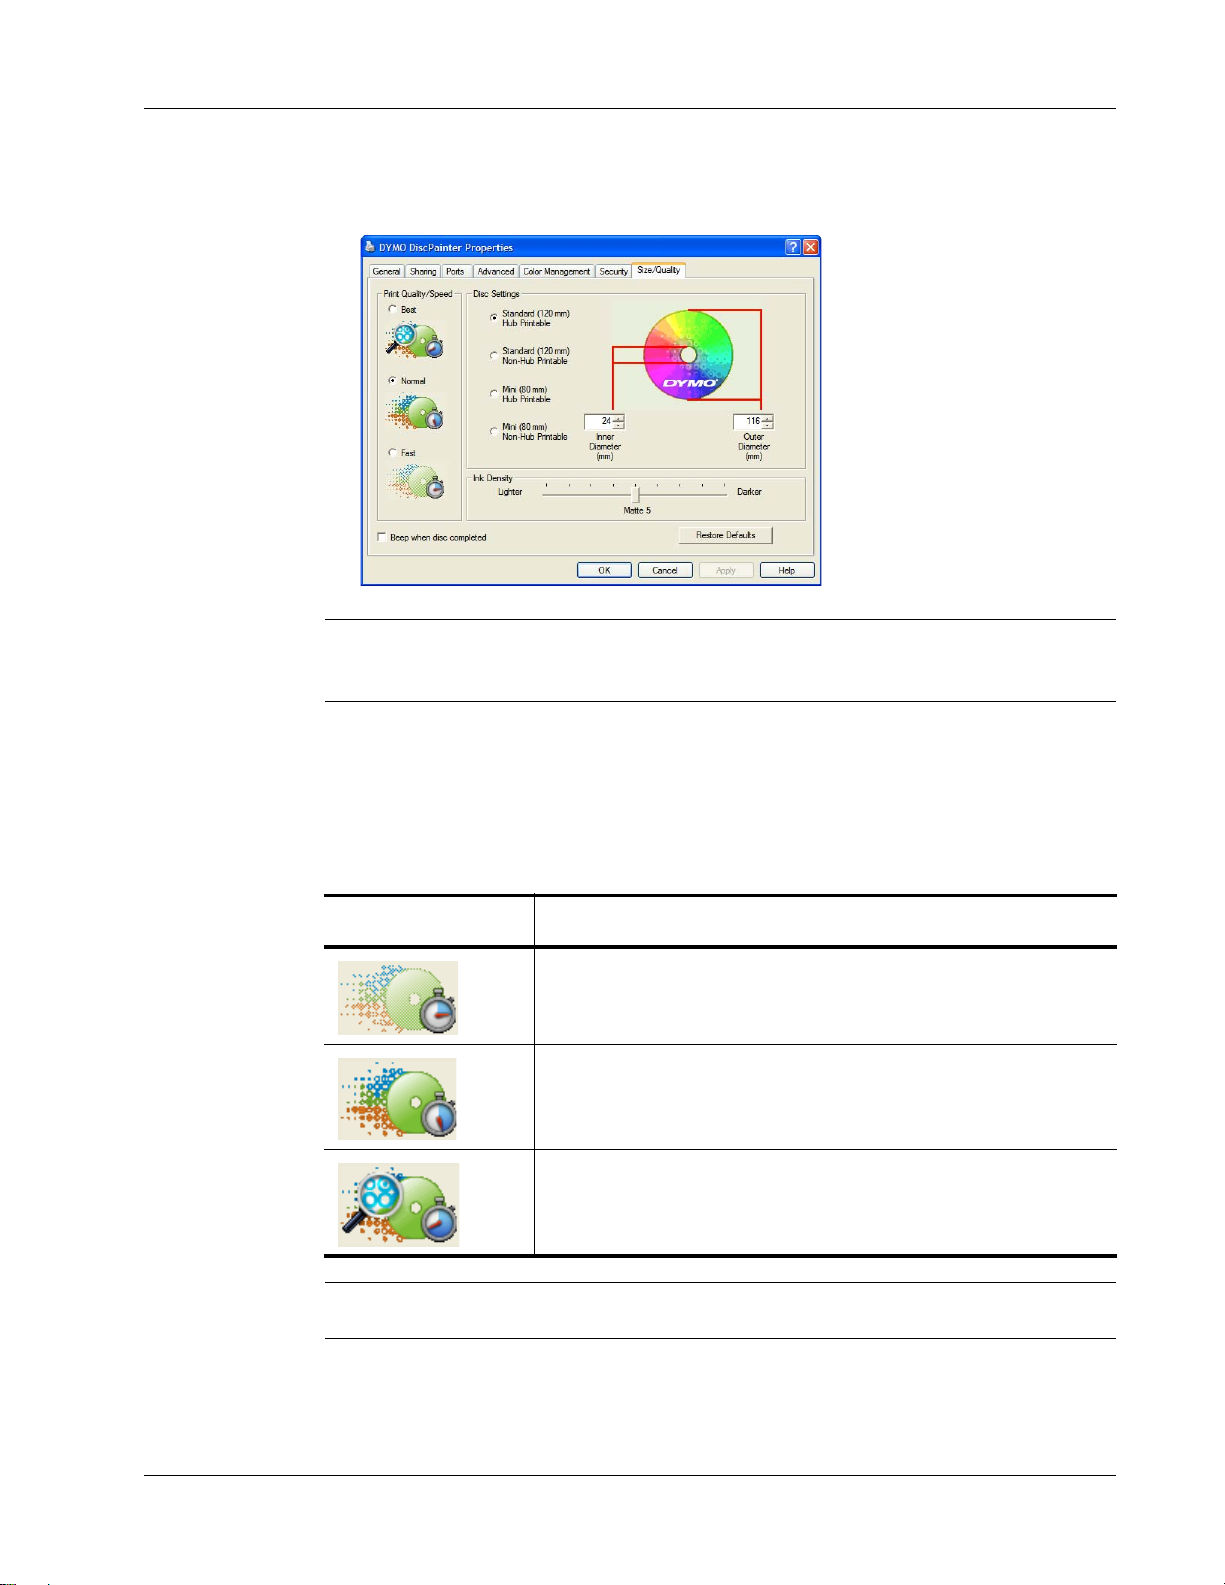
Controlling Print Options
You can define several print options for your DYMO DiscPainte r printer fro m the DiscPainter
Properties dialog box:
• Print quality and speed
• Disc settings
• Ink density
All of these settings can be controlled directly from the Discus for DYMO software. However, if
for some reason you are not using Discus for DYMO, these print options can be controlled directly .
To open the DiscPainter Properties dialog box
1 Open the Printer and Faxes control panel.
The Printers and Faxes control panel is displayed.
2 Right-click the DiscPainter icon and select Properties.
The DiscPainter Properties dialog box is displayed.
16
Controlling Print Options
3 Click the Size/Quality tab.
The Size/Quality pane is displayed.
Note The settings you define as described above are saved until you change them. However, if
you change the print options from within an application (such as Adobe Photoshop), the settings
you define are not saved.
Controlling Print Quality/Speed
You can choose from several print quality/speed options. In general, higher quality print requires
longer print times. Print speed depends on many factors: the amount of computer memory you
have, the complexity of your design, the number of colors in the design, and so on.
The Print Quality/Speed options are described below.
Print Quality
/Speed Option
Fast
Normal
Best
Note The print time mentioned above is measured from the time the print tray moves into printing
position.
Description
Uses image smoothing and halftoning to produce full-color print quality.
Produces full-color print quality superior to Fast mode; the resulting image is
suitable for most applications. Images require about twice as long to print as
in Fast mode.
Produces the best full-color print quality available. Images require about
twice as long to print as in Normal mode.
To select a Print Quality/Speed option
♦ Select the print quality/speed option you want.
17
Printing From Windows
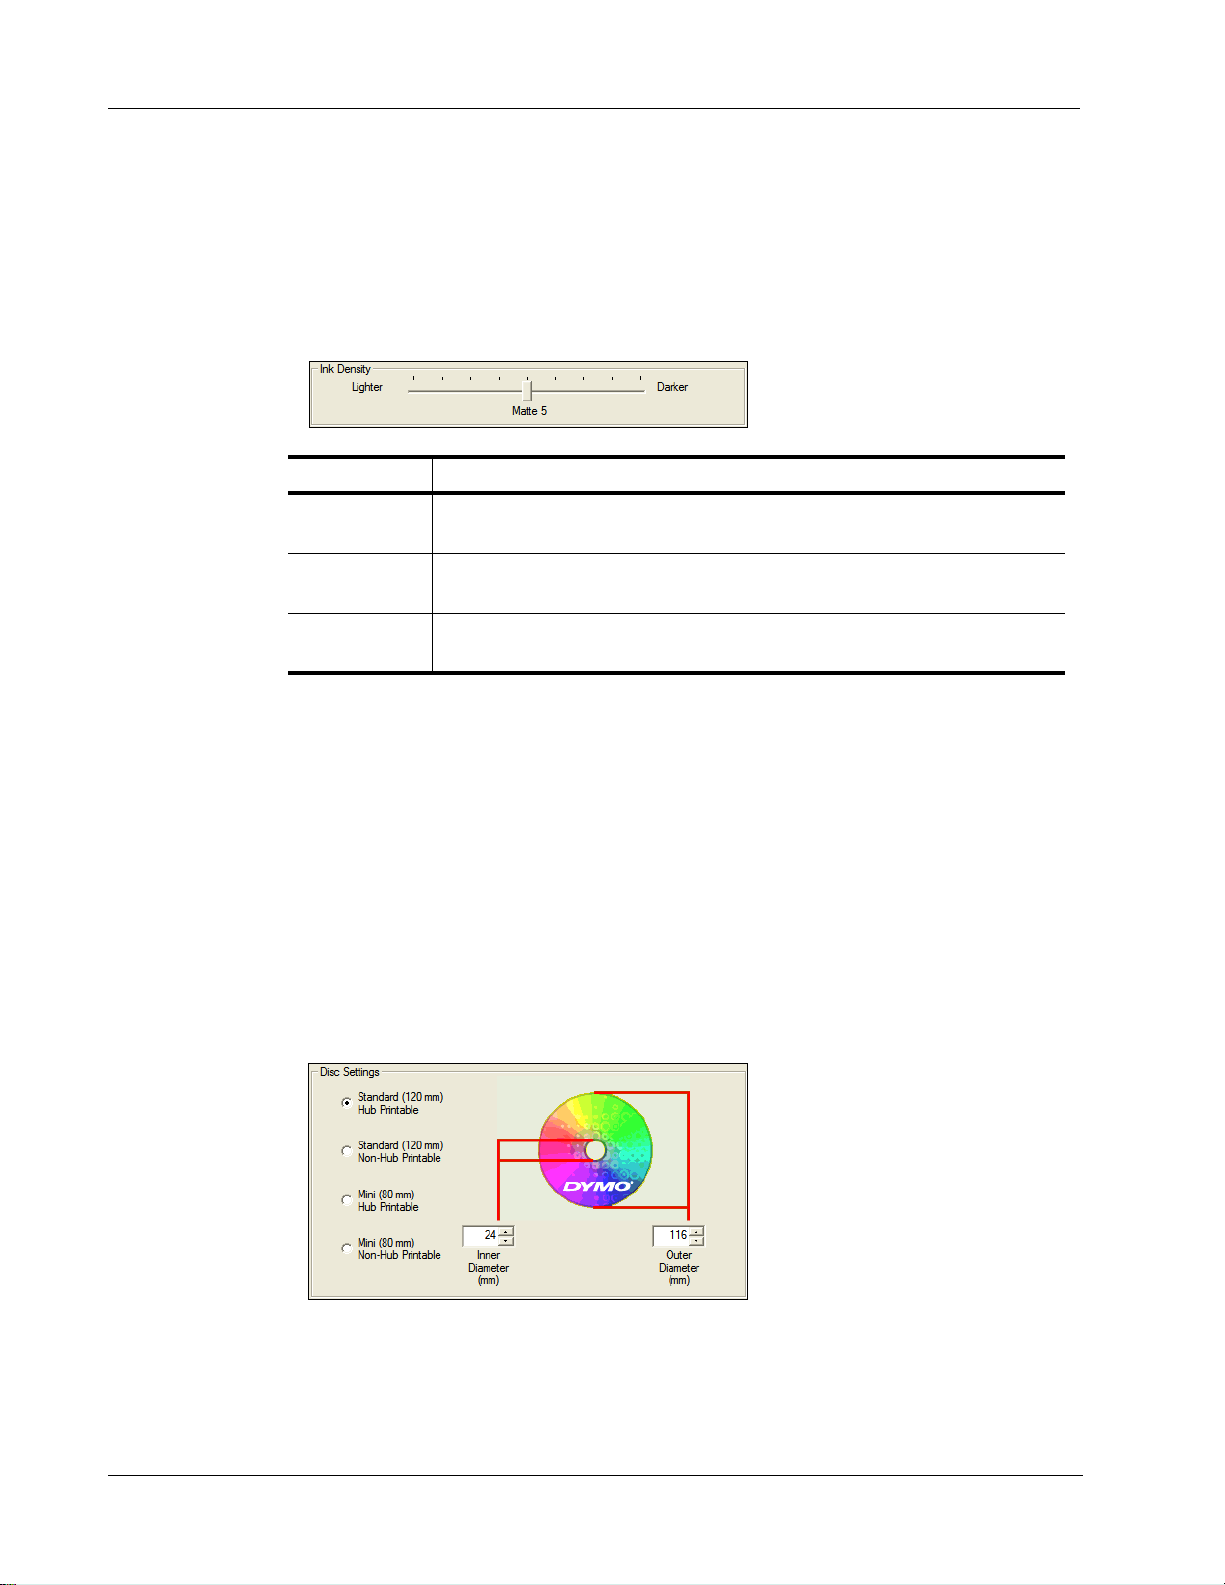
Controlling Ink Density
You can easily adjust the ink density (amount of ink) printed on discs. Less ink results in images
that are less dense; more ink results in denser images. In general, the disc’s finish (matte, glossy,
color, and so on) determines the ink density you should use. See "About Printable CDs/DVDs" on
page 5 for details about the various types of inkjet-printable discs.
The Ink Density control on the DiscPainter Properties dialog box has nine settings.
Setting Description
Matte 1 - 5
Glossy 6 - 7
Color 8 - 9
We recommend experimenting with the settings to see what works best for your inket-printable
media.
To select the ink density
♦ Drag the Ink Density slider toward Lighter to decrease ink density;
♦ Drag the Ink Density slider toward Darker to increase ink density.
You might find that you prefer settings other than those recommended. Select a finish (matte,
glossy, or color) that matches your disc. If the results are not what you expected, try printing with a
different ink density setting.
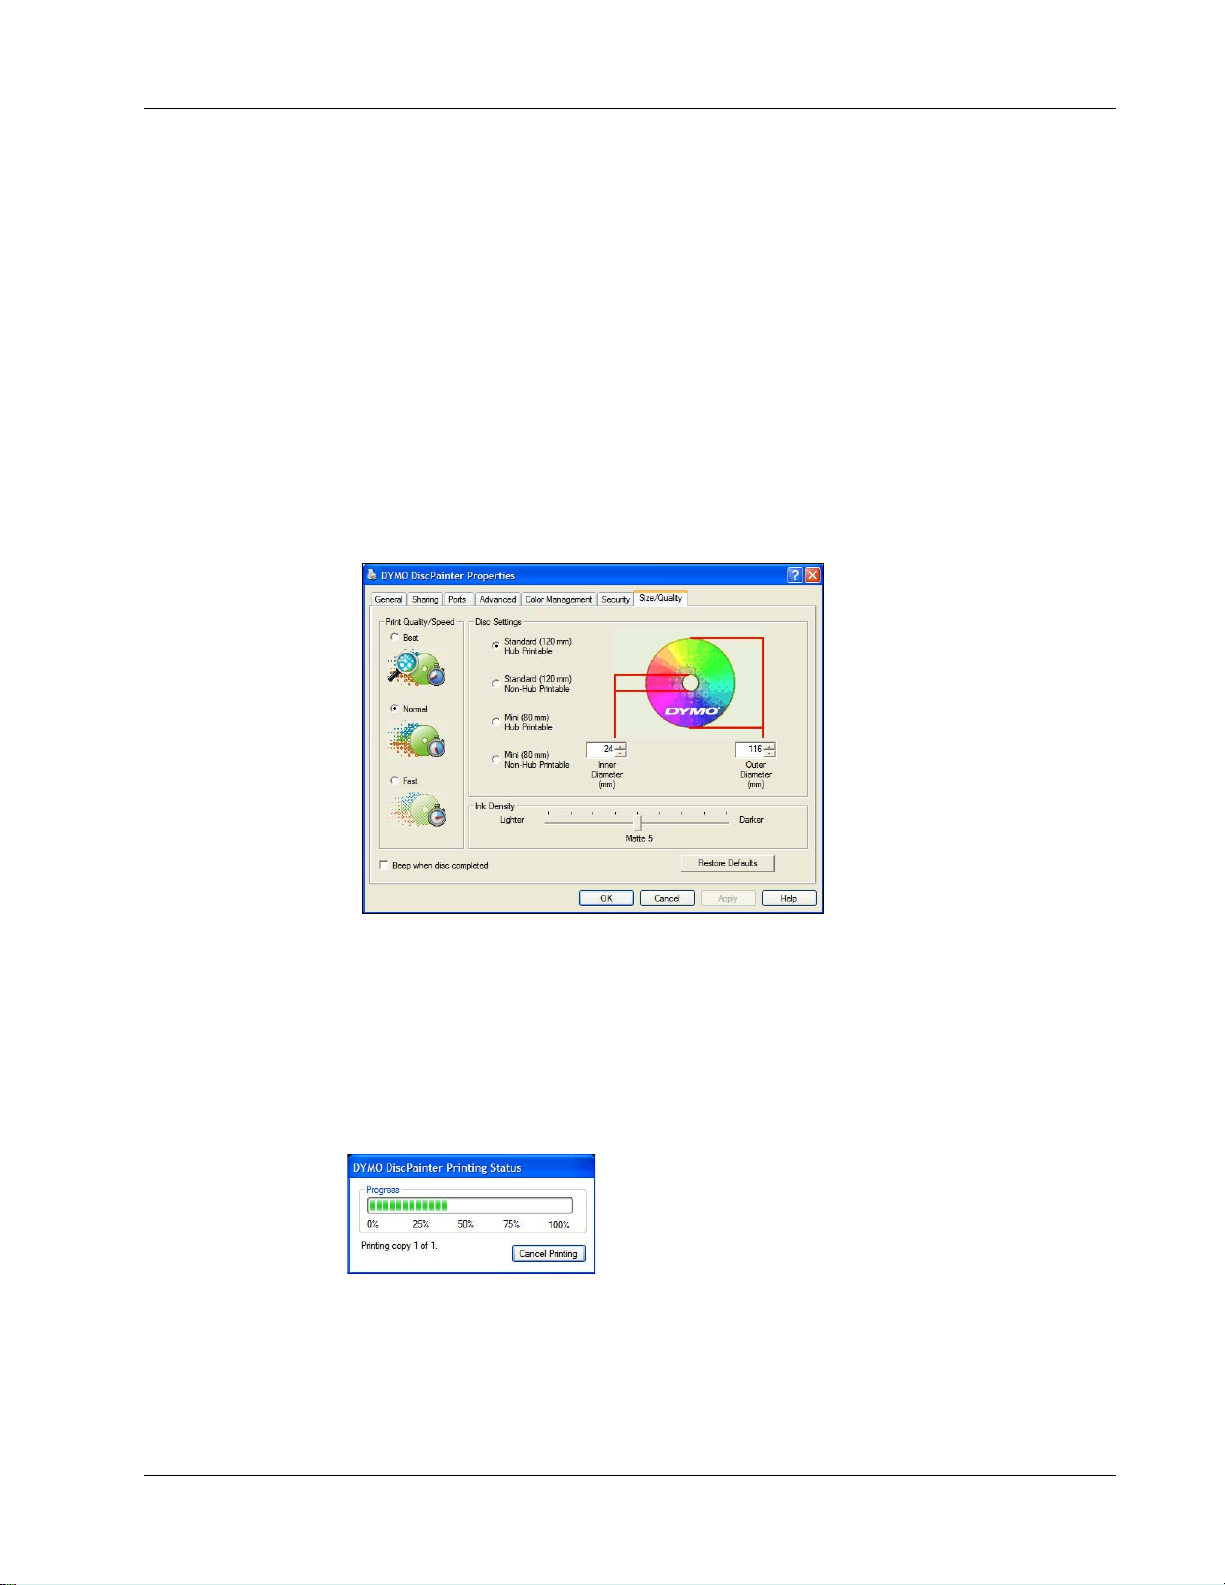
Controlling Disc Settings
Default Inside Diameter and Outside Diameter values are assigned to each of the Disc Settings
options. However, you can change these values if you need to expand or reduce the printable area
on the disc (see “Controlling Disc Inside and Outside Diameters” below for information).
Uses less ink and printed image is less dense. Recommended setting for inkjetprintable discs with a matte finish. Default setting is Matte 5.
Uses slightly more ink than the matte settings. Recommended setting for inkjetprintable discs with a glossy finish.
Uses more ink and printed image is more dense. Recommended setting for inkjetprintable discs with a silver or color finish.
18
To select the Disc Settings option
♦ Select the disc setting that matches the size and type of inkjet-printable disc you are using.

Printing to the DiscPainter Printer
The calipers correspond to the values displayed in the Inner Diameter (mm) and Outer
Diameter (mm) fields. The values (in millimeters) in these fields control the printable area on
the disc.
Controlling Disc Inside and Outside Diameters
The inner and outer dimensions of inkjet-printable discs are not standardized and you might find
that you need to specify different inside and outside diameters to match the discs you buy. You can
specify custom values for the inside and outside diameters for each Disc Settings option. For
example, if you find that a batch of standard size, hub-printable discs you purchase has a printable
area between 25 and 118 mm, you can select the Standard (120 mm) Hub Printable option and then
specify 25 (mm) for the Inner Diameter and 118 (mm) for the Outer Diameter. With these settings,
designs you print would appear in the area 25 mm to 118 mm from the disc’s center.
To control the inner and Outer diameter settings
1 Select the disc setting that matches the size and type of inkjet-printable disc you are using.
2 Select the Inner or Outer Diameter value you want to change.
3 Either type in the desired value (in millimeters) or click the up/down arrows to increase or
decrease the value in the field.
Restoring Default Settings
If you change any of the printer settings, you can easily restore the original factory default settings.
To restore the printer settings
♦ Click Restore Defaults in the DiscPainter Properties dialog box.
The settings in the dialog box revert to their default values.
Printing Multiple Copies
You can easily print multiple copies of the same disc image. After each print job is finished
printing, the Ink LED on top of the printer blinks yellow to indicate the print job is finished. You
can then remove the finished disc and insert a blank disc for the next print job.
When printing multiple copies, you can configure your system to beep after each disc is finished
printing to let you know when to insert a new disc.
To turn on the disc-finished-printing beep
Select Beep when disc completed in the DiscPainter Properties dialog box.
♦
Note You can turn off this option from the DiscPainter Document Properties dialog box.
Printing to the DiscPainter Printer
This section describes the steps required to print images to your printer from programs other than
the Discus for DYMO software. The printing process varies to some degree with different
applications. Sample files for several common applications are provided to simplify printing from
these programs.
For details about printing using a particular application, see the documentation included with that
program. For information on using the printer with the DiscPainter software, see the Discus for
DYMO Online Help.
19

Printing From Windows
Below are some general tips on using the printer with other applications.
To configure your application to print to the DiscPainter printer
• Set up a paper size that matches the size of the disc you are using.
• Set all the margins to 0.
By defining the appropriate paper size, your design will be centered on the paper.
Using Sample Files
Sample files for several popular graphics design programs are included in the Sample Files folder.
These sample files contain the proper page settings for printing a CD/DVD design to the
DiscPainter printer.
Sample files are provided for the following programs:
• Photoshop
• Illustrator
• InDesign
• SureThing
• QuarkXPress
To print using the sample files
1 From the application program, select Open from the File menu and navigate to the Sample
2 Select and open the sample file appropriate for the program you are using.
3 Create your design and print.
For example, if printing to a Standard (120 mm, 4.7") disc, set up a paper size of 120 mm wide
and 120 mm high; if printing to a Mini (80 mm, 3.15") disc, set up a paper size of 80 mm wide
and 80 mm high.
®
®
®
™
CD/DVD Labeler
®
Documents folder.
The Sample Documents folder is typically located in C:\Program Files\DYMO DiscPainter.
A blank document, pre-configured with the proper DiscPainter printer settings, is displayed.
20
Note Make sure you set the printer features that are appropriate for the type of disc you are using.
General Printing Instructions
Discus for DYMO automatically sets the printer options based on the settings you select on the
Project Preview tab. However, if you are printing from another application, you may need to
manually control the printer settin gs. When you are ready to print an image, follow the s teps in this
section.
To print to a DiscPainter printer
1 Insert a blank disc into the printer (see "Loading Discs" on page 6 for information).
2 Select Print. This command is typically accessed from the application’s File menu. A dialog
box is displayed.
3 Select the DiscPainter printer. (If you don’t see a list or menu used to select printers, see the
documentation included with the program for instructions on selecting printers.)
4 Click Properties (or Setup). The DiscPainter Document Properties dialog box is displayed.
5 Click the Size/Quality tab. The Size/Quality pane is displayed.
Printing to the DiscPainter Printer
6 If necessary, adjust any printer settings you want. See "Controlling Print Options" on page 16
for details.
7 When finished, click OK.
8 Click Print.
During printing, the Printing Status dialog box is displayed. This dialog box displays the progress
of the current print job (percentage completed, from 0% to 100%), the copy currently being printed,
and the total number of copies (“Printing copy 1 of 2,” for example).
To cancel the current print job
1 Click Cancel in the Printing Status dialog box. A confirmation dialog box is displayed.
2 Click Yes to cancel the print job. Printing stops at the point the printer receives the cancel
printing instruction. The disc tray moves back to the home position.
21

Printing From Windows
22

Caring for Your Printer
This chapter describes how to care for your DYMO DiscPainter printer and covers the following
topics:
• Handling print cartridges
• Using printer services
• Replacing the inkjet cartridge
• Cleaning the printer
• Repacking the printer for travel
Handling Inkjet Cartridges
Below are some tips on working with inkjet cartridges.
• Keep new inkjet cartridges in their protective packaging until you are ready to use them.
• Avoid touching the flexible circuit (metallic, gold) po rt ion of the cartridge or placing it other
than inside the printer.
• Handle the inkjet cartridge with care: do not drop it or let it fall as this could make it unusable.
Chapter 5
Using Printer Services
You can use Printer Services to:
• Display the ink level of the printer’s inkjet cartridge. See "Checking the Ink Level" on page 24
for more information.
• Clean the inkjet cartridge. See "Cleaning the Inkjet Cartridge" on page 25 for more
information.
• Order printing supplies. See "Purchasing New Inkjet Cartridges" on page 25 for more
information.
• Print a self-test pattern. See "Printing a Self-Test" on page 41 for more information.
The steps for accessing printer services vary somewhat on Mac OS and Windows systems. See the
steps below that are appropriate for your operating system.
23

Caring for Your Printer
To access printer services from Mac OS
1 From the Finder, select Applications>Utilities>Printer Setup Utility.
The Printer List dialog box is displayed.
2 Select DiscPainter from the Printer List.
3 Click .
The Printer Services dialog box is displayed.
To access printer services from Windows
♦ Click the DiscPainter Status Monitor icon in the Windows system tray and select Printer
Services.
The Printer Services dialog box is displayed.
Checking the Ink Level
The Ink Level gauge on the Printer Services dialog box displays the amount of ink remaining in the
printer’s inkjet cartridge (100% = full, 0% = empty).
The number of discs that can be printed from one ink cartridge varies greatly depending on the
image size and ink density per disc. A message is displayed when ink levels reach approximately
20% and again when the ink level reaches 10% and 5%. When the ink level reaches 2%, a low ink
message appears each time you print. See "Purchasing New Inkjet Cartridges" on page 25 for more
information.
24

Cleaning the Inkjet Cartridge
You can clean the inkjet cartridge to help eliminate print output problems related to the inkjet
nozzles. If you see white lines (blank lines where ink should appear), this could mean one or more
of the small nozzles that deliver the ink are clogged. You should clean the inkjet cartridge.
Note Heavy cleaning should only be performed when the printer has not been used for an
extended period of time.
To clean the inkjet cartridge
1 Click Clean Cartridge.
The Clean Cartridge dialog box is displayed.
Replacing the Inkjet Cartridge
2 Select the button beside the type of cleaning you want.
Start by selecting Light cleaning, and then if the problem is not solved try Medium and then
Heavy cleaning.
3 Click Clean.
4 Click Finish when done.
Purchasing New Inkjet Cartridges
You can purchase replacement inkjet cartridges at your local office supply retailer or directly from
DYMO.
To purchase new inkjet cartridges
1 Click Order Supplies.
Your Web browser opens the appropriate DYMO Web page.
2 Locate the link for ordering inkjet cartridges and follow the instructions for placing your order.
Replacing the Inkjet Cartridge
The DiscPainter printer uses a single, multicolored, inkjet cartridge (part number 1738252).
Note For best printing results, wait 2 to 4 minutes after changing the inkjet cartridge before
printing. This allows the ink temperatures to equalize.
25

Caring for Your Printer
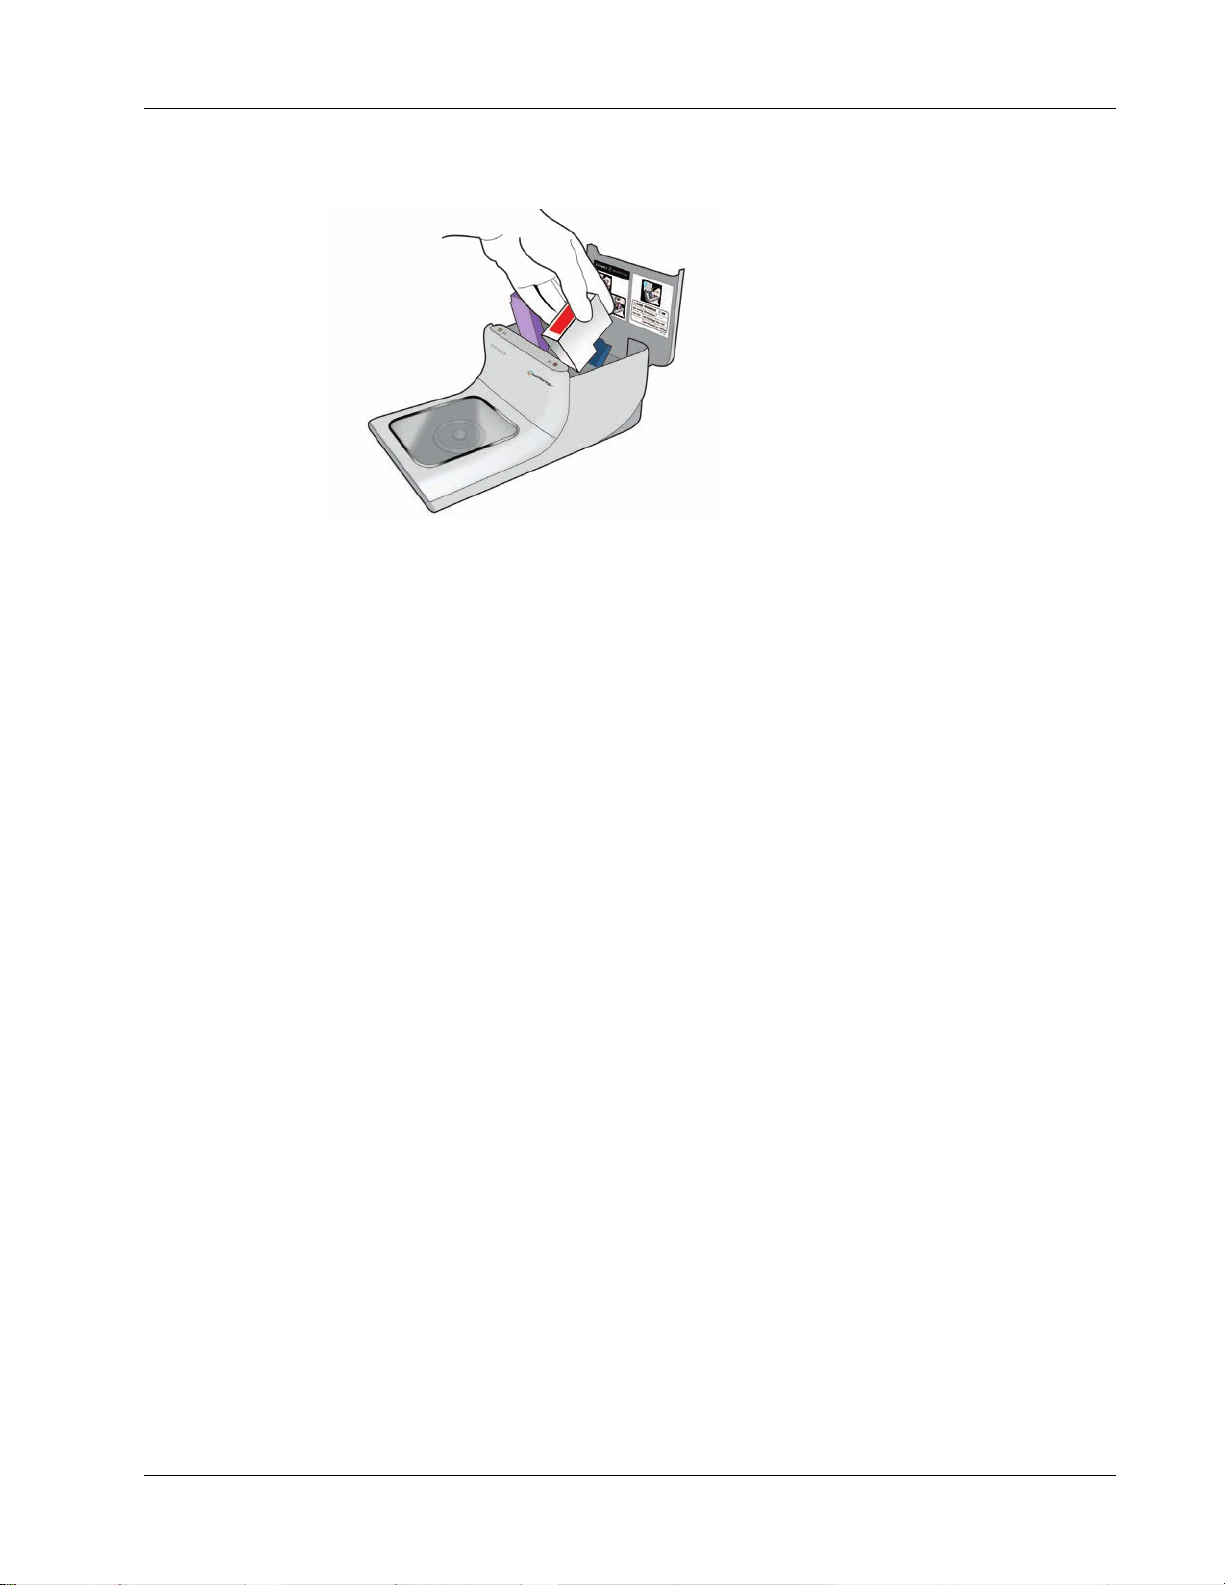
To replace the inkjet cartridge
1 Open the top cover.
2 Push the blue cartridge release lever to unlock the purple cartridge latch.
3 Remove the old cartridge.
4 Carefully remove the new inkjet cartridge from the packaging.
5 Remove the protective tape from the cartridge.
26

Cleaning the Printer
6 Insert the inkjet cartridge into the cartridge bay with the label facing up and the gol d cont acts
towards the front of the printer.
7 Press the purple cartridge latch down until it locks in place.
8 Close the top cover.
Cleaning the Printer
After using the printer for a period of time, a thin film of ink residue may build up on the clear
window in the front cover. This is normal and is caused by the misting of the ink during printing.
Caution Avoid spraying or applying household cleaners inside the printer. Cleaners should only
be used on external surfaces.
To clean the printer
♦ Clean the clear cover and outside of the printer case using a soft cloth and non-petroleum based
cleaner, such as Windex
Caution Avoid spraying or applying household cleaners inside the printer. Cleaners should only
®
or similar cleaner.
be used on external surfaces of the printer.
Repacking the Printer for Travel
The printer’s disc tray is carefully aligned to print perfectly. This alignment can be affected when
the printer is bumped or otherwise mishandled during shipping.
27
Caring for Your Printer
When you originally unpacked your printer, you removed a piece of cardboard from in front of the
disc tray and two pieces of foam packing from inside the ink cartridge compartment. When
packaging the printer for shipping, or any time the printer will be transported out of your care, you
should insert these packing pieces to preserve the disc alignment.
To repack the printer
1 With the power connected, open the front cover, and then open the top cover.
The disc tray moves towards the back of the printer.
2 Insert cardboard between the disc tray and the front of the printer.
3 Close the top cover.
The disc tray moves forward against the cardboard insert.
4 Close the front cover.
5 Unplug the power cable from the power outlet and, then from the printer.
6 Open the top cover and remove the ink cartridge.
7 Insert the foam packing block into the ink cartridge bay.
28
8 Push the purple latch until the blue latch locks in place.
Repacking the Printer for Travel
9 Insert the foam packing block into the space on the right side of the ink cartridge.
10 Close the top cover.
11 Pack the printer in the original packaging.
29

Caring for Your Printer
30

Chapter 6
Printing Over a Network
This chapter describes how to print to a DYMO DiscPainter printer over a network. The topics
covered in this chapter are:
• “Printing to a Shared Printer from Mac OS”
• “Printing to a Shared Printer from Windows”
The following are the general steps you need to follow to set up a printer for printing over a
network. These steps are provided as a general overview and reminder that you must be able to
print locally to the printer before you can share it.
The term local computer refers to the computer to which the printer is physically connected. The
term remote computer refers to the com puter from which you wish to print to a printer on the
network.
Note When printing to a shared printer, any messages generated by the printer, including error
messages, are displayed on the local computer, not on the remote computer.
To print to a shared printer over a network, the remote computer must be able to access the local
computer over the network. Contact your System Administrator for more information.
1 Install the printer to be shared on the local computer.
2 Confirm that you can print to the printer locally.
3 Share the printer on the local computer.
4 Install the DiscPainter Software on the rem ote com puter.
Printing to a Shared Printer from Mac OS
This section describes how to print to a shared printer in a Mac OS workgroup. For information on
printing to a shared printer under other versions of Mac OS, see your Mac OS documentation or
contact your System Administrator.
Sharing a Printer on a Network
These instructions assume that you have already installed DYMO DiscPainter Software on the
local computer. See the printer’s Quick Start Guide for information.
Before printing to a shared printer, you first need to share the printer on the local computer.
To share the printer
1 Select System Preferences from the Apple menu.
The System Preferences dialog box is displayed.
31
Printing Over a Network
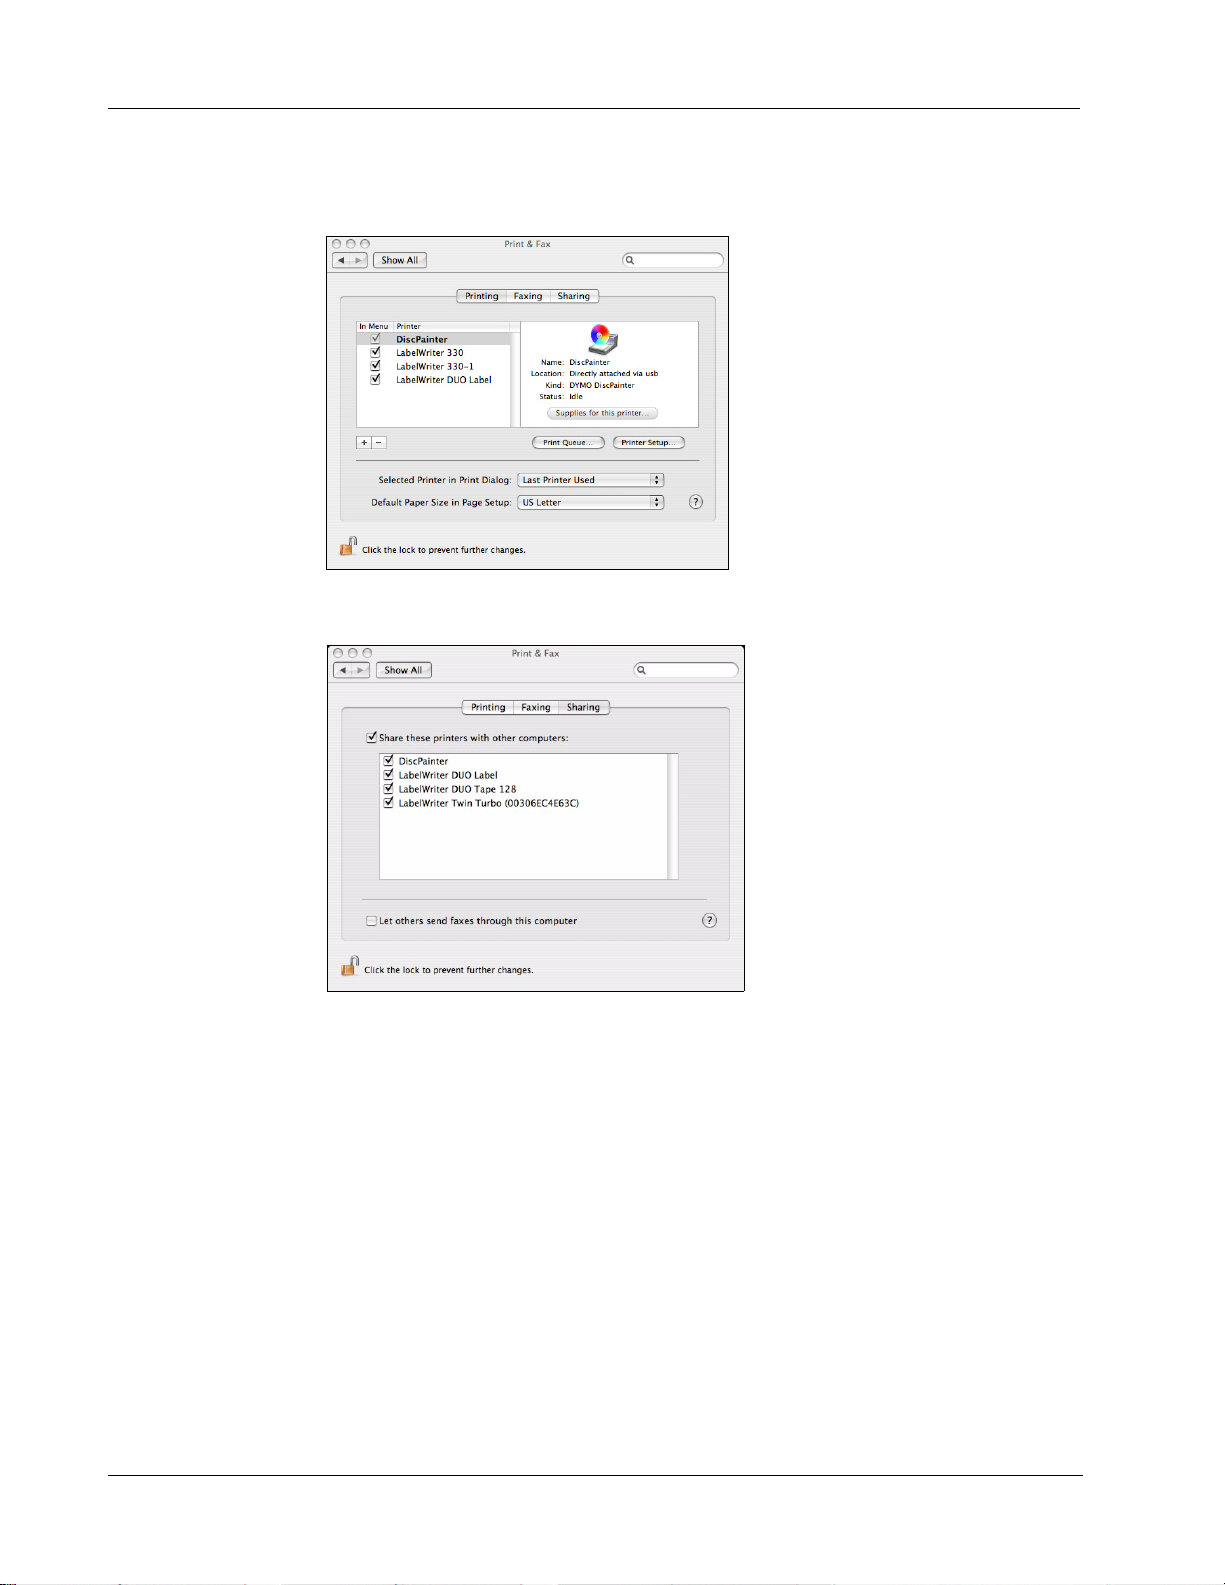
2 Double-click Print & Fax.
3 Select the printer you want to share and then click Sharing.
The Print & Fax dialog box is displayed.
The Sharing pane is displayed.
4 Select the Share these printers with other computers check box and then select the check
box in front of each printer you wish to share.
5 Close the Print & Fax dialog box.
Adding a Shared Printer
Before you can print to a shared network printer, you need to install DiscPainter software on your
local computer.
To install a shared network printer
1 Install DYMO DiscPainter Software. (See the Quick Start Guide for information.)
2 From the Finder, select Applications>Utilities>Printer Setup Utilities.
The Printer List dialog box is displayed.
32
Printing to a Shared Printer from Windows
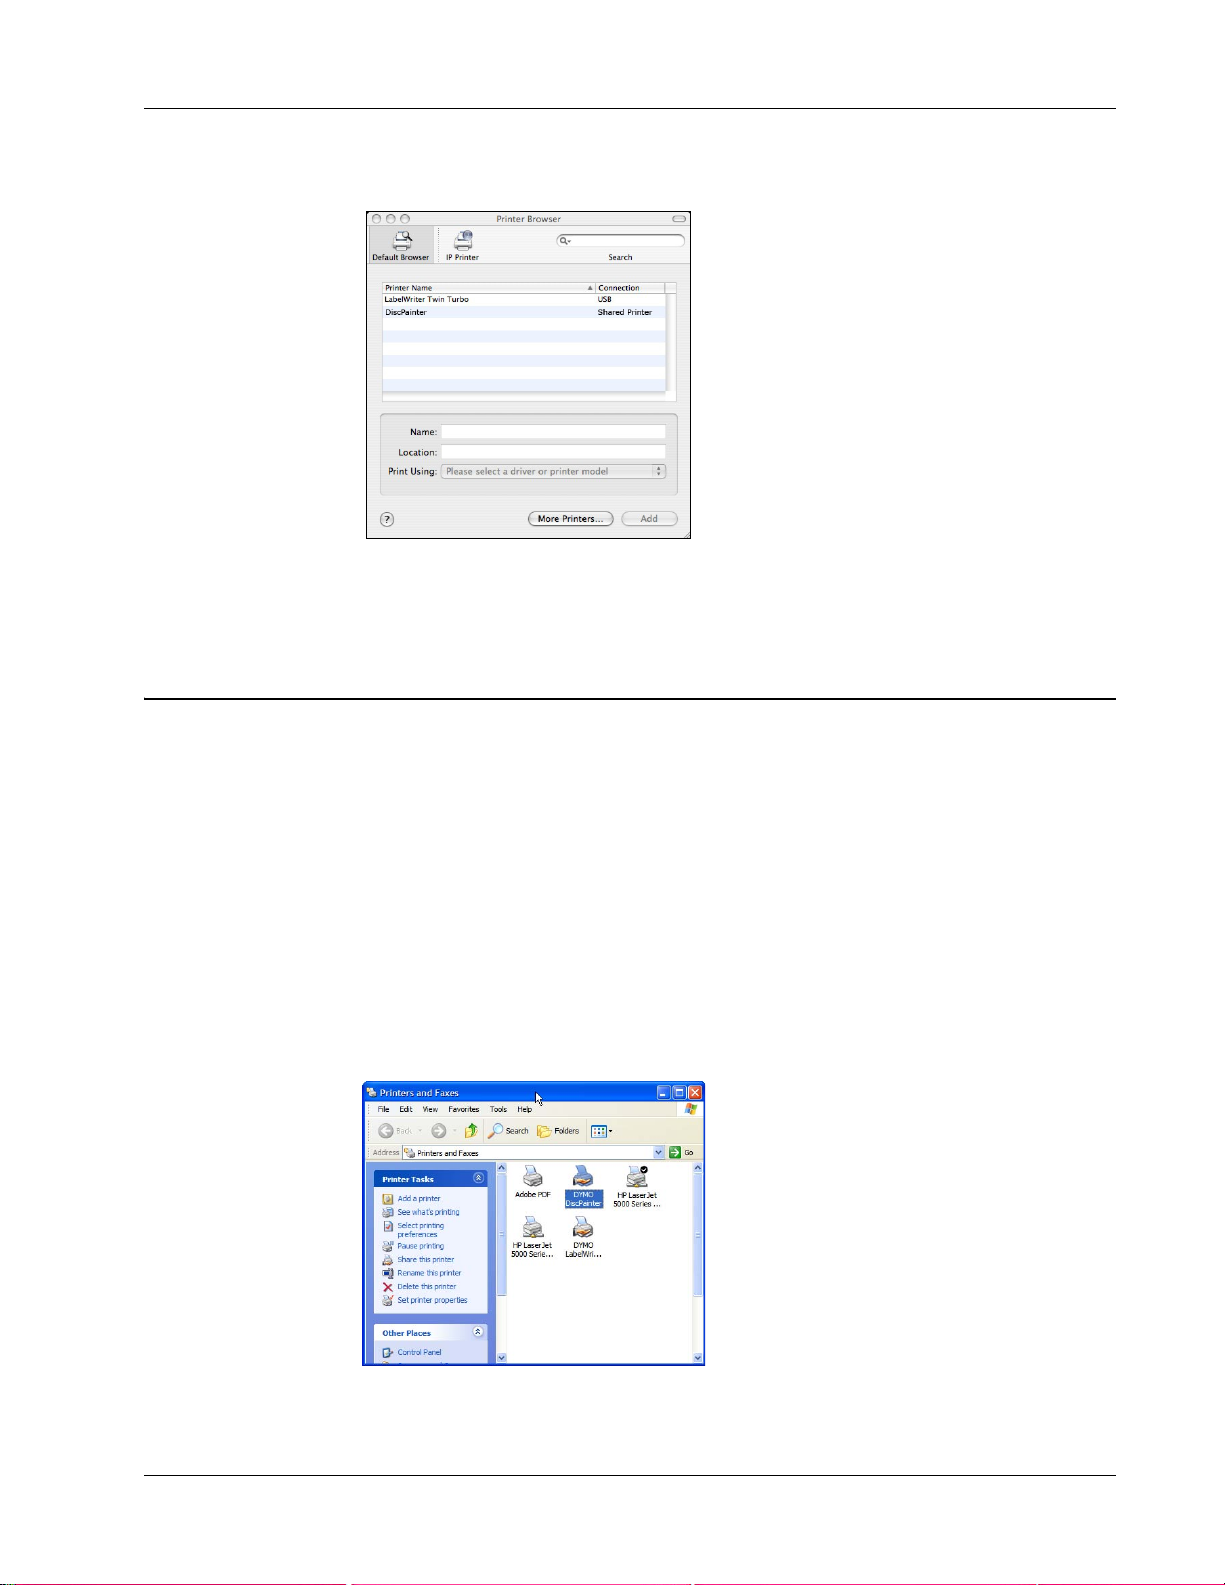
3 Click Add. The Printer Browser dialog box is displayed.
4 Select the printer and then click Add.
The shared printer is added to the Printer List dialog box.
5 Close the Printer List dialog box.
Printing to a Shared Printer from Windows
This section describes how to print to a shared DiscPainter printer in a Windows XP workgroup.
For information on printing to a shared printer under Windows Server or other versions of
Windows, see your Windows documentation or contact your System Administrator.
Sharing a Printer on a Network
These instructions assume that you have already installed DiscPainter printer software on the local
computer. See the printer’s Quick Start Guide for information.
Before printing to a shared printer from Windows, you first need to share the printer on the local
computer.
To share the printer
1 Click Start and select Printers and Faxes.
The Printers and Faxes control panel is displayed.
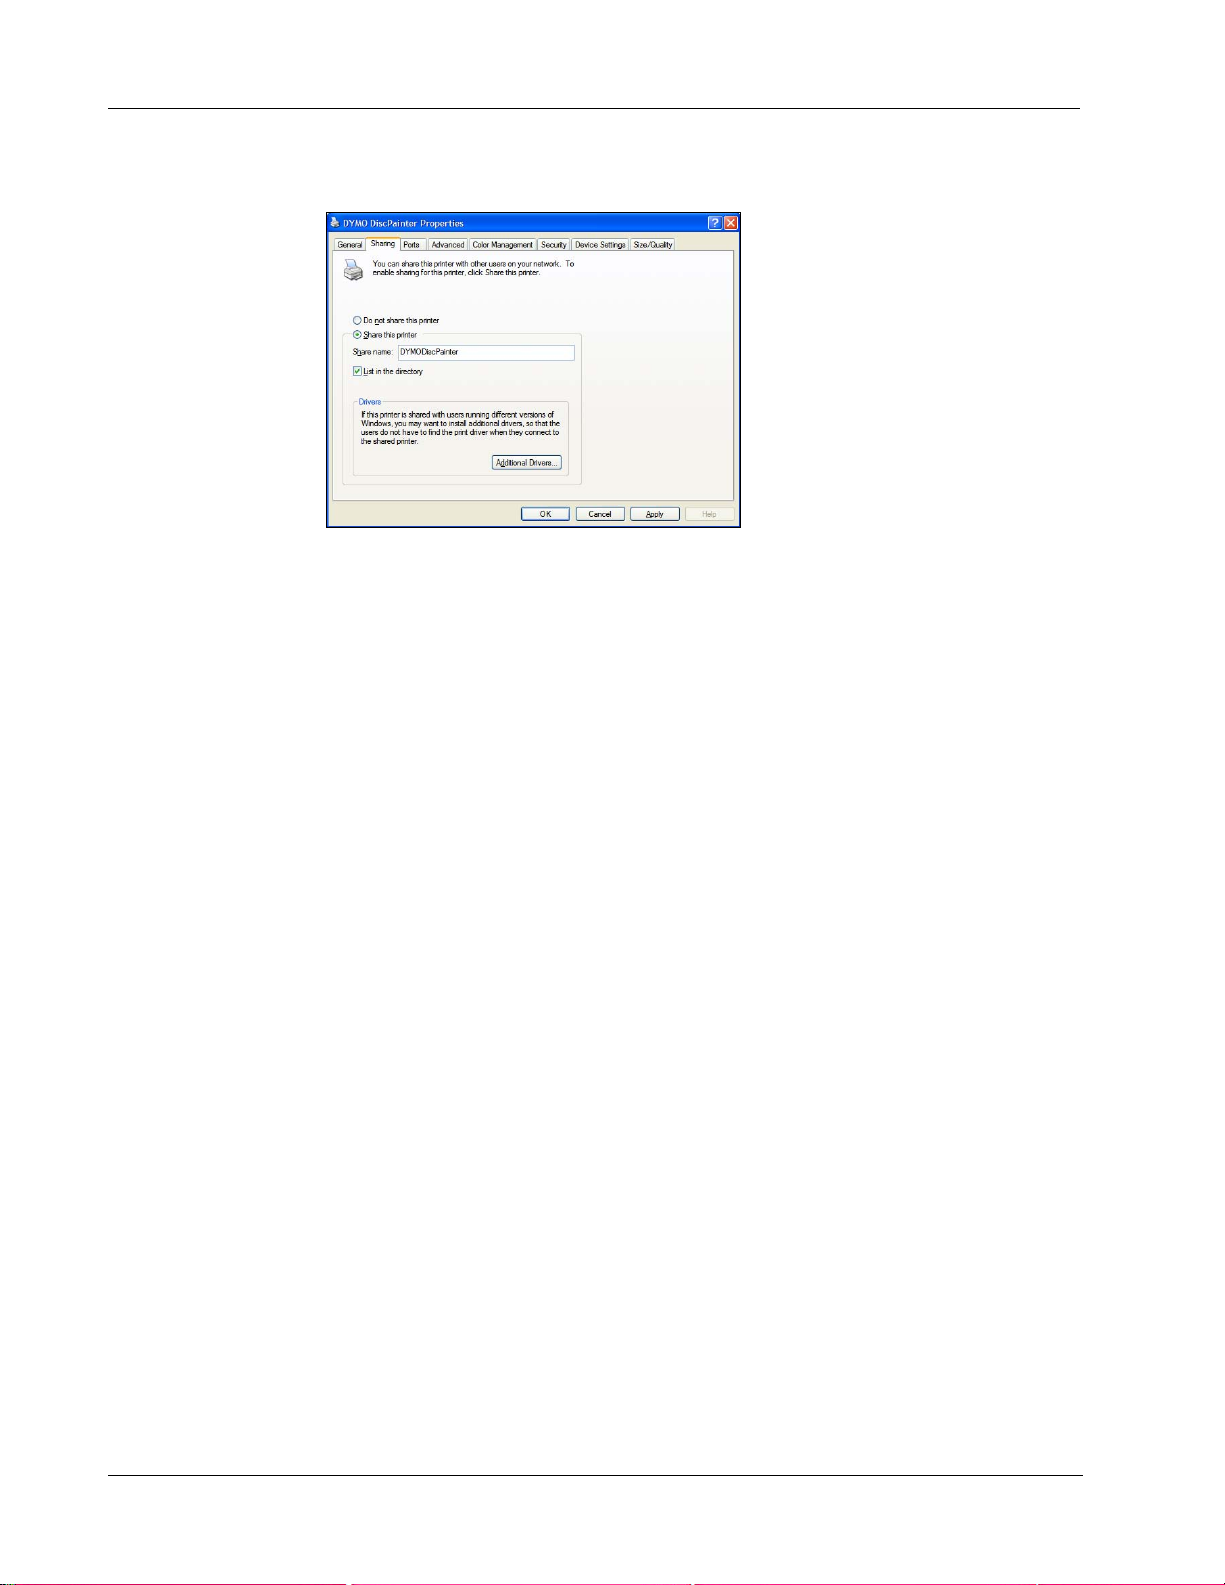
2 Right-click the printer you want to share and select Sharing.
33
Printing Over a Network
3 Select Share this printer.
4 Optionally, enter a different name for the printer in the Share name field.
5 Click OK. The share icon (hand) is displayed under the shared printer. This indicates that other
The DYMO Printer Properties dialog box is displayed with the Sharing pane open.
This is the printer name that appears to other users on the network.
users in the workgroup can print to this printer.
Installing a Network Printer
Before you can print to a shared network printer, you need to install DiscPainter software on your
local computer.
To install a network printer using DiscPainter Installer
1 Install DYMO DiscPainter Software. (See the Quick Start Guide for information.)
2 Run the Add Printer Wizard to connect to the network printer you wish to use.
34

Chapter 7
Frequently Asked Questions
This chapter gives answers to some frequently asked questions about working with the DiscPainter
CD/DVD printer.
What kind of discs can I print on with the DiscPainter printer?
You can only print on discs designed for inkjet printers. Do not use thermal discs, which can also
have a white printable surface, or other non inkjet-printable discs.
What will happen if I don’t use an inkjet-printable disc?
Inkjet printable discs are coated with a special material to allow the ink to adhere. If you do not use
discs with this special coating, the ink will pool on the disc surface and not dry.
What are hub-printable discs?
Hub-printable discs allow you to print your design closer to the inner edge of the center hole in the
disc. Refer to "Working with Discs" on page 5 for more information about discs.
What type of discs are recommended for inkjet printing?
W e recommend purchasing inkjet-printable discs from any of the major disc manufacturers. Glossy
inkjet or water-resistant inkjet discs give the best quality of inkjet printing.
What is the difference between matte and glossy discs?
Inkjet matte discs have a dull, flat surface. Inkjet glossy discs have a lustrous, shiny surface and are
often described as water-resistant. Matte surfaces, by their design, provide a softened appearance,
while glossy surfaces provide much sharper images.
Where can I find inkjet-printable discs?
You can purchase inkjet-printable discs locally or online from a computer or office supply retailer,
or directly from DYMO at www.dymo.com.
Why does my printed design look different on different discs?
Manufacturers add a special coating to inkjet-printable discs so that the ink can be absorbed into the
coating allowing the ink to adhere to the surface. Different manufacturers develop different
coatings. The differences you see in your printed design are due to the amount and depth that the
ink is absorbed into the surface. Some coatings absorb the ink deeper than others, and this results in
differences in density or brightness of the colors. Matte surfaces, by their design, provide a softened
appearance, while glossy surfaces provide much sharper images.
35

Frequently Asked Questions
What software do I need to print to my DiscPainter printer?
The DiscPainter printer software included with your printer is all the software you need to print
from any application to the DiscPainter printer. The DiscPainter software installation includes the
Discus for DYMO software for creating disc designs; however, you can print to the DiscPainter
printer using many popular design programs, such as Adobe
"Printing from Mac OS" on page 9 and "Printing From Windows" on page 15 for more information.
What are the system requirements for using the DiscPainter printer?
Refer to "System Requirements" on page 1 for complete system requirements.
What kind of ink cartridge does the DiscPainter printer require?
The DiscPainter printer uses a special DYMO inkjet cartridge, part number 1738252. You can
purchase replacement print cartridges at your local or online office supply retailer or directly from
DYMO at www.dymo.com.
How can I tell when the ink cartridge is running low on ink?
When the ink is running low in the ink cartridge, the ink status light on the top of the printer
will first become solid yellow when the ink level drops below 20% and then solid red when the ink
level drops below 5%. You can also check the ink level in the Printer Services dialog box. Refer to
"Using Printer Services" on page 23 for more information.
®
Illustrator® or Photoshop®. Refer to
How do I install a new ink cartridge?
Refer to "Replacing the Inkjet Cartridge" on page 25 for complete information about inserting an
ink cartridge.
How long will the ink cartridge last if I am not printing very often? Will the ink dry out?
Environmental and storage conditions can accelerate ink evaporation, which reduces the life of the
inkjet cartridge. To maximize the number of discs you can print from one inkjet cartridge, use the
printer regularly.
How do I clean the printer?
You can clean you printer using a soft cloth and a mild, non-petroleum based household cleaner,
such as Windex.
Caution Avoid spraying or applying household cleaners inside the printer. Cleaners should only
be used on external surfaces of the printer.
What is special about RadialPrint™ Technology?
With RadialPrint Technology, the DiscPainter printer is fast and compact, and there is no need for
add-on accessories and cumbersome disc carriers. For complete information about RadialPrint
Technology, visit the DiscPainter Web site.
Can I print on a disc twice?
It is possible to print on a disc twice. However, because the disc is spinning during printing, it is
impossible to align a new design to print correctly on top of the existing design.
36

Can I install more than one DiscPainter printer on my computer?
Installing multiple DiscPainter printers is not supported at this time.
How do I pack the printer for travel?
When transporting the printer, make sure you pack the printer as it was packed in the original
packaging using the foam packing blocks and cardboard insert. Refer to "Repacking the Printer for
Travel" on page 27 for complete instructions on packing the printer properly.
37

Frequently Asked Questions
38

This chapter describes how to resolve errors you might encounter using your DYMO DiscPainter
printer. Topics covered in this chapter include:
• Installation problems
• Printing problems
Installation Problems
This section lists some software installation problems you might encounter and provides
information on how to resolve the problems.
Windows Installation Problems
If you do not see the DiscPainter printer in the Print dialog box or the Printers and Faxes window,
try the following:
• Make sure that your system conforms to the DiscPainter system requirements (see "System
Requirements" on page 1 for information).
• Make sure you use the USB cable that came with the printer. This cable is rated for USB 2.0
data rates, and other, less expensive cables may cause improper operation.
• Make sure the USB printer cable is correctly connected to your computer and the USB
connector on the back of the printer.
• Make sure the printer is plugged in and receiving power (the Power status light should be
green).
Chapter 8
Troubleshooting
If the steps above do not solve the problem, try uninstalling and then reinstalling the Di scPainter
software.
Mac OS Installation Problems
If the DiscPainter printer does not appear in the Printer List, try the following:
• Make sure that your system conforms to the DiscPainter system requirements (see "System
Requirements" on page 1 for information).
• Make sure you use the USB cable that came with the printer. This cable is rated for USB 2.0
data rates, and other, less expensive cables may cause improper operation.
• Make sure the USB printer cable is correctly connected to your computer and the USB
connection on the back of the printer. Do not connect the USB cable to a USB port on a
Macintosh keyboard.
• Make sure the printer is plugged in and receiving power (the power status light should be
green).
If the steps above do not solve the problem, try uninstalling and then reinstalling the Di scPainter
software.
39

Troubleshooting
Printing Problems
This section lists some printing problems you might encounter while printing and provides
information on how to resolve the problems.
Error Messages
Below are conditions and error messages you might encounter while using the printer, along with
possible solutions to the problems
Condition/Message Possible Solution
No Printer Connected
Warning: Your printer’s cartridge cover is
open.
Warning: A disc is w ait ing to be p rinted but
the cartridge cover is open.
Warning: The cartridge cover was opened
during printing.
Warning: The printer cannot prin t while the
disc cover is open
Warning: The disc cover was opened during
printing.
Warning: No printable disc was found.
Warning: The disc size in the printer does
not match the size specified in the print job.
Check the following:
Make sure you use the USB cable that came with the prin ter .
This cable is rated for USB 2.0 data rates, and other, less
expensive cables may cause improper operation.
Make sure the USB printer cable is correctly connected to
your computer and the USB connection on the back of the
printer.
Make sure the printer is plugged in and receiving power (the
green Status LED should be lit).
Make sure the inkjet cartridge is correctly installed in the
printer and close the printer’s top cover.
Close the top cover to allow the disc to print.
The print job will be cancelled once the top cover is closed.
Start the print job again.
Close the front cover to allow the disc to print.
The print job will be cancelled. Close the front cover and
start the print job again.
Insert an inkjet-printable disc and click Continue.
Make sure the disc in the printer matches the disc size for
the print job.
40
The ink cartridge is not inserted correctly or
is missing.
The ink cartridge has failed.
Check to make sure the inkjet cartridge is inserted correctly.
If it is inserted correctly, try inserting another cartridge or
inserting the cartridge with the printer’s power connector
unplugged.
Remove and reinsert the inkjet cartridge. If the error still
occurs, try a new cartridge.

Printer Status Lights
The Power and Ink LED status lights on top of the printer indicate the current status of the printer.
Printing Problems
Power Light Ink Status Light
Solid Green Any state Ready to print.
Solid Green Blinking Yellow Disc printing is finished; remove
Blinking Green Blinking Yellow Wrong or missing media.
Solid Red Blinking Red Wrong or missing ink cartridge.
Solid Red Any state General error.
Any state Solid Yellow Ink level is low .
Any state Solid Red Change ink cartridge.
Green and Red blinking Red blinking Self-test after power is
Ink Level Appears Empty
If the Ink Level gauge in the Printer Services dialog box displays 0% (empty), and you believe this
is incorrect, the printer may have lost contact with the computer.
To confirm that the ink level is empty
1 Disconnect the power cable from the back of the printer and wait a few minutes.
2 Remove the print cartridge from the printer and then place it back in the printer (see
"Replacing the Inkjet Cartridge" on page 25 for information on removing the print cartridge).
3 Connect the power cable and check the ink level again.
Description
disc from disc tray.
Cover opened during printing.
connected.
Printing is Too Light or Dark
If printing is too light or dark, the ink density setting may be too light or too dark. For Mac OS, see
"Controlling Ink Density" on page 10; For Windows, see "Controlling Ink Density" on page 18.
Smudges Appear Outside of Design
Check the printing area defined in your design software. For Mac OS, see "Controlling Disc
Settings" on page 11; for Windows, see "Controlling Disc Settings" on page 18.
Ink Pools on Disc
If ink pools on the disc, make sure you are using an inkjet-printable disc. See "About Printable
CDs/DVDs" on page 5.
Printing a Self-Test
You can print a self-test pattern on a disc to verify that the printer is functioning correctly. The test
pattern printed lets you check for inkjet cartridge nozzles that are plugged or misfiring. If the colors
on the test pattern are solid, with no lines or streaks, then the nozzles are working properly.
41

Troubleshooting
The self-test pattern is designed to allow you to use one disc for multiple self-tests. Save your disc
for future tests.
To print a self-test image
1 Insert a blank printable disc in the printer and close the disc lid.
2 Do one of the following:
• For Windows, click the DiscPainter Status Monitor icon in the Windows system tray and
select Printer Services.
• For Mac OS, select the DiscPainter printer and click on the Printers List dialog box.
The Printer Services dialog box is displayed.
3 Click Print Self-Test. A confirmation dialog box is displayed.
4 Click Continue.
A “ring” of colors is printed on the disc.
If the test pattern appears streaked or “missing” some lines, try cleaning the inkjet print cartridge,
as described in"Cleaning the Inkjet Cartridge" on page 25. After cleaning the print cartridge print
the self-test again and examine the results. If necessary, try cleaning the cartridge again and print
another self-test.
Opening the Front Cover
When the disc tray moves into printing position, the front cover locks. If you need to remove the
disc due to a power failure or printer malfunction, you can use the disc lid release levers, located on
each side of the front of the printer, to open the front cover and remove the disc.
42

Printing Problems
To open the disc lid when it is locked
1 Disconnect the power cord from the printer.
2 Pull the two disc lid release levers forward. The front cover opens.
3 Remove the disc from the disc tray.
Note If you attempt to open the disc lid during printing, printing will be interrupted and the image
will not print correctly.
43

Troubleshooting
44
The chapter gives the specifications for the DYMO DiscPainter printer.
Physical Specifications
Print Method Inkjet
Resolution Up to 1200 dpi
Height 4.33" (110 mm)
Length 10.62" (270 mm)
Width 5.7" (145 mm)
Weight 2.65 lbs. (1.2 kg)
Power Specifications
Chapter 9
Printer Specifications
Input Output
Printer Power
Adapter
Requirements
Disc Service, Duty Cycle, and Warranty Specifications
Environmental Specifications
Average Disc Service
Life (discs)
Warranty One Year Limited
Operating
Environment
AC 100-240V
~1.0A 50-60Hz
2000 discs
Normal office environment, 55°- 90° F (13°- 32° C), 20%-90% non-condensing
humidity
3.0A or:
12VDC, 36W
45

Printer Specifications
Declaration of Conformity
This device has been tested and complies with the requirements of:
EN60950: Low Voltage Directive Product Safety
FCC Part 15 Class B
EN55022: Radiated and Conducted Emissions B
EN50082-1: Generic Immunity ESD, RF, and Transient Susceptibility
Waste from Electric & Electronic Equipment (WEEE)
The equipment that you bought has required the extraction and use of natural resources for its
production. It may contain hazardous substances for the health and the environment.
In order to avoid the dissemination of those substances in our environment and to diminish the
pressure on the natural resources, we encourage you to use the appropriate take-back systems.
Those systems will reuse or recycle most of the materials of your end life equipment in a sound
way.
The crossed-bin symbol marked in your device invites you to use those systems.
Limited Warranty
If you need more information on the collection, reuse and recycling systems, please contact your
local or regional waste administration.
You can also contact us for more information on the environmental performance of our products.
Sanford L.P. (“Sanford”) warrants to the original retail purchaser that your DYMO® DiscPainter
CD/DVD printer will be free of defects in materials or workmanship, for one year from the original
date of purchase, when used in accordance with all operating instructions. Normal wear and tear is
not covered, nor is excessive use, abuse or damage caused by a user either intentionally or
accidentally. Sanford also warrants that the consumable ink cartridge enclosed with the printer will
perform to the manufacturer’s specified usage, which usage may expire before the expiration of the
limited warranty for the DYMO DiscPainter printer.
DYMO DiscPainter CD/DVD printers are warranted for use only with ink cartridges made or
approved by Sanford. Sanford will not be responsible for malfunction or damage caused by the use
of other ink cartridges.
EXCEPT AS PROVIDED HEREIN, SANFORD MAKES NO OTHER WARRANTIES,
EXPRESS OR IMPLIED, AND SANFORD SPECIFICALLY EXCLUDES WARRANTIES OF
MERCHANTABILITY AND FITNESS FOR A PARTICULAR PURPOSE. SANFORD’S
LIABILITY UNDER THIS WARRANTY SHALL BE LIMITED TO REPAIR OR
REPLACEMENT OF THE PRINTER. SANFORD SHALL NOT BE RESPONSIBLE FOR ANY
INCIDENTAL OR CONSEQUENTIAL DAMAGES, WHETHER OR NOT FORESEEABLE.
This warranty does not apply to refurbished or reconditioned products. This warranty covers only
normal use in the United States and Canada. This warranty is not transferable. This warranty does
not cover any color change or fading of prints or reimbursement of materials or services required
™
46

for reprinting. This warranty does not cover damage to the DYMO DiscPainter printer caused by
parts or supplies not manufactured, distributed or certified by Sanford. Sanford is not responsible
for warranty service should the DYMO label or logo or serial number be removed or should the
product fail to be properly maintained or fail to function properly as a result of misuse, abuse,
improper installation, neglect, improper shipping, damage caused by disasters such as fire, flood,
and lightning, improper electrical current, software problems, interaction with no n- DYMO
products, or service other than by a Sanford-authorized service provider. If a claimed defect cannot
be identified or reproduced, you will be held responsible for the costs incurred.
Proof of purchase showing the date of original purchase is required for warranty service.
Additionally, printer must be shipped back in the original packaging. If the product is not shipped
in its original packaging, the warranty may become void.
You may obtain warranty service by contacting Sanford’s DYMO technical support department for
a return authorization number. Products sent to Sanford for repair without authorization will be
returned to you at your expense.
Contact the DYMO technical support department at (203) 588-2500 between 9 A.M. and 8 P.M.
Eastern time. A technical support specialist will ask you to describe the problem and provide the
product’s serial number. Upon confirmation of the defect, the service representative will give you a
Return Material Authorization (RMA) for you to use and return the printer.
The RMA number must be clearly written on the side of the shipping container in which you return
TM
the DiscPainter
. Unless otherwise instructed by us, the product must be sent freight prepaid to
the following repair center:
DYMO Service Center
RMA#xxxxxx-xxxxxx (place your RA# here)
30 Commerce Road
Stamford, CT 06902-5506
DYMO will repair the defects covered under warranty at no charge within approximately three
working days. DYMO will return the repaired product to you using an equivalent shipping method.
The original warranty on the printer remains – it does not restart from the repair date.
47

Printer Specifications
48

Index
A
adding
shared printer (Mac OS)
shared printer (Windows) 34
application programs
printing from
13
32
C
cancelling printing 14, 21
caring for discs 7
cleaning
7
discs
inkjet cartridge 25
cleaning the printer 27
color finish 5, 18
copies, printing 13
D
default settings 19
disc tray 2
DiscPainter
print options
discs
caring for
cleaning 7
defining diameter 12
diameter 12
drying time 6
finishes 5, 10, 18
handling 2
hub-printable 5
inserting 6
loading 6
mini 5, 19
printable area 12, 19
printing 13, 19
printing multiple copies 13, 19
standard 5, 19
types 5
Discus for DYMO Software 2
16
7
E
environmental specifications 45
error messages 40
F
FAQs 35
features 1
front cover 2
G
getting help
3
Help
glossy finish 5, 18
I
Illustrator 14, 20
InDesign 14, 20
ink density 10, 18
settings 11
ink level 24, 41
ink status light 2
inkjet cartridge
cleaning
handling 23
part number 25
purchasing new 25
replacing 25
inserting
discs
inkjet cartridge 25
25
6
L
LEDs 21
limited warranty 46
loading discs 6
M
matte finish 5, 18
multiple copies 13, 19
N
network printing 31
P
packing the printer 27
paper size 13, 19
Photoshop 14, 20
physical specifications 45
power connector 2
49

power requirements 45
print quality 10
printable area 19
printer
cleaning
default settings 19
packing for travel 27
selecting paper size 19
self-test 41
services 16, 23
sharing (Mac OS) 31
sharing (Windows) 33
specifications 45
status lights 2, 41
printing 13, 19, 21
cancelling 14, 21
ink density 10
network 31
options 16
quality 10, 17
setting paper size 13
software 36
speed 10, 17
status 41
printing from other applications 19
programs
printing from
27, 36
13
system requirements
Mac OS
Windows 1
1
T
templates 14, 20
top cover 2
troubleshooting 39
error messages 40
installation 39
printing 40
U
USB connector 2
W
warranty 45
warranty, limited 46
water-resistant 5
Q
QuarkXPress 14, 20
R
reliability specifications 45
repacking the printer 27
replacing the inkjet cartridge 25
restoring default settings 19
S
sample files 14, 20
self-test 41
sharing a printer
Mac OS
Windows 33
specifications 45
speed 10
standard discs 19
status lights 2, 41
Status Monitor 15
SureThing 20
31
50
 Loading...