

Page 1
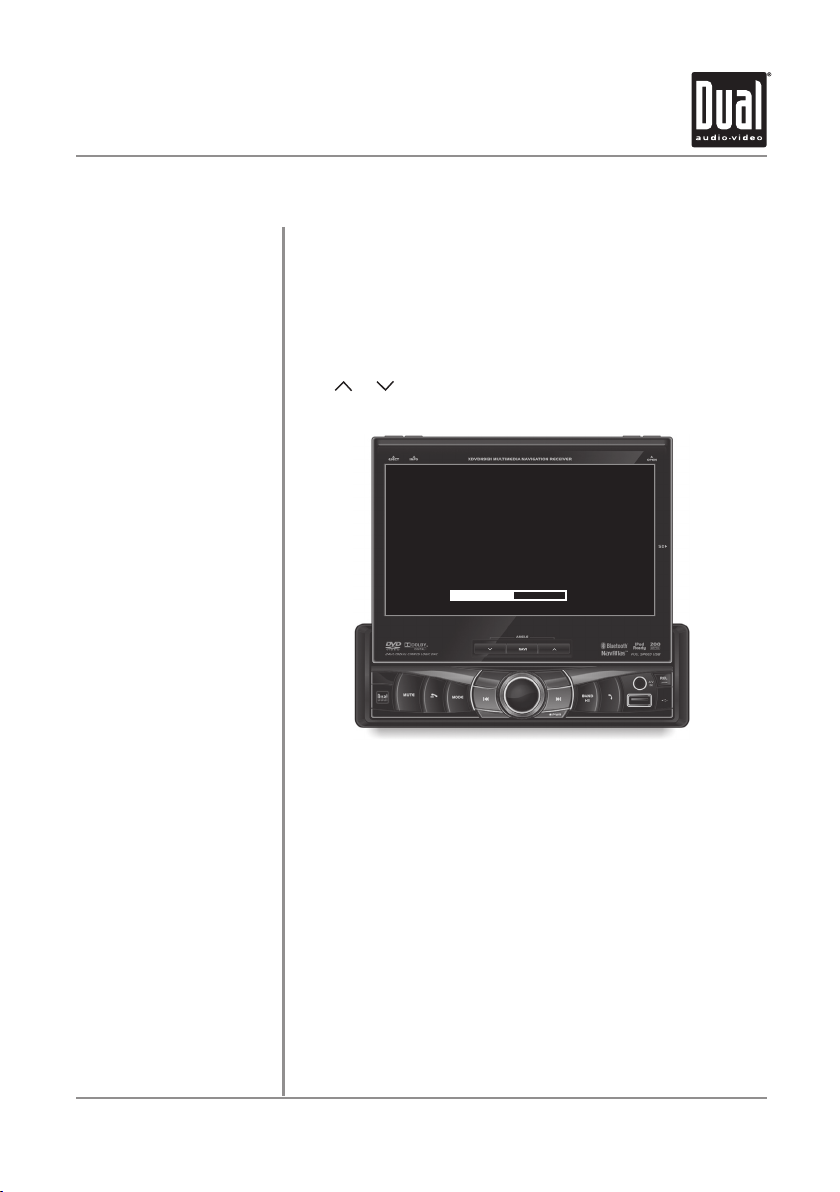
XDVDN9131
INSTALLATION/OWNER’S MANUAL
DVD Multimedia Receiver with GPS Navigation and 7” Touch Screen Display
Safety Notes:
The DVD video display of the in-dash unit will not operate while the vehicle is moving. This is a safety feature
to prevent driver distraction. In-dash DVD video functions will only operate when vehicle is in Park and the
parking brake is engaged. It is illegal in most states for the driver to view video while the vehicle is in motion.
Page 2

Copyright Notes
This product incorporates copyright protection technology that is protected by method claims of certain U.S. patents and other
intellectual property rights owned by Macrovision Corporation and other rights owners. Use of this copyright protection technology
must be authorized by Macrovision Corporation, and is intended for home and other limited viewing uses only unless otherwise
authorized by Macrovision Corporation. Reverse engineering or disassembly is prohibited.
Manufactured under license from Dolby Laboratories.
Dolby and the double-D symbol are registered trademarks of Dolby Laboratories.
The Bluetooth word mark and logos are owned by the Bluetooth SIG, Inc. and any use of such marks by Namsung is under license.
Windows Media and the Windows logo are trademarks, or registered trademarks of Microsoft Corporation in the United States and
or other countries.
iPod is a trademark of Apple Inc., registered in the U.S. and other countries.
“Made for iPod” means that an electronic accessory has been designed to connect specifically to iPod and has been certified by the
developer to meet Apple performance standards.
Apple is not responsible for the operation of this device or its compliance with safety and regulatory standards.
The SD logo is a trademark of the SD Card Association.
©2009 Tele Atlas. All rights reserved. Tele Atlas and the Tele Atlas logo are registered trademarks of Tele Atlas B.V.
©2009 EnGIS Technologies, Inc. All rights reserved. EnGIS and the Gogo logo are trademarks of EnGIS Technologies, Inc.
All other trademarks are property of their respective owners.
Page 3

XDVDN9131 PREPARATION
Table of Contents
Warning Statement . . . . . . . . . . . . . . . . . . . . . . . . . . . . . . . . . . . . . . . . . . . . .
Safety Information/Precautions . . . . . . . . . . . . . . . . . . . . . . . . . . . . . . . . . . .
Preparation/Mounting/Wiring . . . . . . . . . . . . . . . . . . . . . . . . . . . . . . . . . . . . .
Remote Control Overview . . . . . . . . . . . . . . . . . . . . . . . . . . . . . . . . . . . . . . . .
Control Locations - Monitor Closed . . . . . . . . . . . . . . . . . . . . . . . . . . . . . . . .
Control Locations - Monitor Open . . . . . . . . . . . . . . . . . . . . . . . . . . . . . . . . .
Control Locations - Remote . . . . . . . . . . . . . . . . . . . . . . . . . . . . . . . . . . . . . .
General Operation . . . . . . . . . . . . . . . . . . . . . . . . . . . . . . . . . . . . . . . . . . . . . .
Main Setup Menu . . . . . . . . . . . . . . . . . . . . . . . . . . . . . . . . . . . . . . . . . . . . . .
Screen Setup Menu . . . . . . . . . . . . . . . . . . . . . . . . . . . . . . . . . . . . . . . . . . . .
AM/FM Tuner Operation . . . . . . . . . . . . . . . . . . . . . . . . . . . . . . . . . . . . . . . . .
Warning Statement . . . . . . . . . . . . . . . . . . . . . . . . . . . . . . . . . . . . . . . . . . . . .
DVD Setup . . . . . . . . . . . . . . . . . . . . . . . . . . . . . . . . . . . . . . . . . . . . . . . . . . . .
DVD Operation . . . . . . . . . . . . . . . . . . . . . . . . . . . . . . . . . . . . . . . . . . . . . . . . .
CD Operation . . . . . . . . . . . . . . . . . . . . . . . . . . . . . . . . . . . . . . . . . . . . . . . . . .
MP3/WMA/JPG Operation . . . . . . . . . . . . . . . . . . . . . . . . . . . . . . . . . . . . . . . .
USB/SD Operation . . . . . . . . . . . . . . . . . . . . . . . . . . . . . . . . . . . . . . . . . . . . . .
Media Compatibility Information . . . . . . . . . . . . . . . . . . . . . . . . . . . . . . . . . . .
Operation of iPod
Auxiliary Inputs . . . . . . . . . . . . . . . . . . . . . . . . . . . . . . . . . . . . . . . . . . . . . . . .
Rear Camera Operation . . . . . . . . . . . . . . . . . . . . . . . . . . . . . . . . . . . . . . . . . .
Bluetooth Operation . . . . . . . . . . . . . . . . . . . . . . . . . . . . . . . . . . . . . . . . . . . . .
Navigation Operation . . . . . . . . . . . . . . . . . . . . . . . . . . . . . . . . . . . . . . . . . . . .
Warranty . . . . . . . . . . . . . . . . . . . . . . . . . . . . . . . . . . . . . . . . . . . . . . . . . . . . .
EULA . . . . . . . . . . . . . . . . . . . . . . . . . . . . . . . . . . . . . . . . . . . . . . . . . . . . . . . .
Specifications . . . . . . . . . . . . . . . . . . . . . . . . . . . . . . . . . . . . . . . . . . . . . . . . .
Troubleshooting . . . . . . . . . . . . . . . . . . . . . . . . . . . . . . . . . . . . . . . . . . . . . . .
®
. . . . . . . . . . . . . . . . . . . . . . . . . . . . . . . . . . . . . . . . . . . . . . . . .
Page
3
4
5-7
8
9-11
12
13-14
15-17
18-22
23-26
27-30
31
32-38
39-42
43-46
47-50
51-54
55-57
58-63
64
64
65-69
70-75
76
77-78
79
80-82
2
Page 4

3
XDVDN9131 PREPARATION
WARNING
Upon installation of this Monitor/DVD player (“unit”) into a vehicle, the driver of the vehicle
must not operate this unit by watching videos or playing video games while driving.
Failure to follow this instruction could lead to driver distraction which could result in
serious injury or death to the vehicle’s occupants or persons outside the vehicle and/or
property damage.
Several states prohibit the installation of monitors/DVD players if the screen is visible from
the driver’s seat. If you reside in a jurisdiction which has enacted such a law, this unit
must not be installed so that the screen is visible from the driver’s seat. When installing
this unit in the front console/dashboard, the unit must be positioned so that it is facing the
front passenger seat only. Failure to follow this instruction could lead to driver distraction
which could result in serious injury or death to the vehicle’s occupants or persons outside
the vehicle and/or property damage.
This unit is designed so that it may be operated only when the vehicle is in “Park” and the
parking brake is fully engaged. To this end, this unit includes a parking brake lock-out
feature which prohibits the unit from operating if the vehicle is not in “Park” and/or the
parking brake is not fully engaged. When installing this unit, the installer must connect
the parking brake detect wire (“Yellow-Blue Lead”) to the parking brake mechanism in
order to make the parking brake lock-out feature operable. DO NOT simply ground the
parking brake detect wire to a metal portion of the vehicle. Failure to properly install
the parking brake lock-out feature could lead to driver distraction which could result in
serious injury or death to the driver’s occupants or persons outside the vehicle and/or
property damage.
Once the parking brake lock-out feature is installed, the owner/user must not attempt to
disrupt/neutralize the parking brake lock-out feature by (a) partially engaging the parking
brake and/or (b) purchasing/using any device or unit designed to send necessary brake
signals to the unit. Failure to follow these instructions could lead to driver distraction
which could result in serious injury or death to the driver’s occupants or persons outside
the vehicle and/or property damage.
When operating this unit, keep the unit’s volume level low enough so that the vehicle’s
occupants can hear traffic-related sounds such as police and emergency vehicles.
Failure to follow this instruction could lead to driver distraction which could result in
serious injury or death to the vehicle’s occupants or persons outside the vehicle and/or
property damage.
Page 5

4
XDVDN9131 OPERATION
Safety Information
Please read all instructions carefully before attempting to install or operate.
Due to its technical nature, it is highly recommended that your DUAL XDVDN9131 is installed by a professional
installer or an authorized dealer. This product is only for use in vehicles with 12VDC negative ground only.
To prevent damage or injury:
• Make sure to ground the unit securely to the vehicle chassis ground.
• Do not remove the top or bottom covers of the unit.
• Do not install the unit in a spot exposed to direct sunlight or excessive heat or the possibility of water splashing.
• Do not subject the unit to excessive shock.
• When replacing a fuse, only use a new one with the prescribed rating. Using a fuse with the wrong rating may
cause the unit to malfunction.
• To prevent short circuits when replacing a fuse, disconnect the wiring harness first.
• Use only the provided hardware and wire harness.
• You cannot view video while the vehicle is moving. Find a safe place to park and engage the parking brake.
• If you experience problems during installation, consult your nearest DUAL dealer.
• If the unit malfunctions, reset the unit as described on page 11 first. If the problem still persists, consult your
nearest DUAL dealer or call tech assistance @ 1-866-382-5476.
• To clean the monitor, wipe only with a dry silicone cloth or soft cloth. Do not use a stiff cloth, or volatile solvents
such as paint thinner and alcohol. They can scratch the surface of the panel and/or remove the printing.
• When the temperature of the unit falls (as in winter), the liquid crystal inside the screen will become darker than
usual. Normal brightness will return after using the monitor for a while.
• When extending the ignition, battery or ground cables, make sure to use automotive-grade cables or other cables
with an area of 0.75mm (AWG 18) or more to prevent voltage drops.
• Do not touch the liquid crystal fluid if the LCD is damaged or broken. The liquid crystal fluid may be hazardous
to your health or fatal. If the liquid crystal fluid from the LCD contacts your body or clothing, wash it off with soap
immediately.
FCC Compliance
This device complies with Part 15 of the FCC Rules. Operation is subject to the following two conditions:
(1) this device may not cause harmful interference, and
(2) this device must accept any interference received, including interference that may cause undesired operation.
Warning: Changes or modifications to this unit not expressly approved by the party responsible for compliance
could void the user’s authority to operate the equipment.
Note: This equipment has been tested and found to comply with the limits for a Class B digital device, pursuant to
Part 15 of the FCC Rules. These limits are designed to provide reasonable protection against harmful interference
in a residential installation. This equipment generates, uses and can radiate radio frequency energy and, if not
installed and used in accordance with the instructions, may cause harmful interference to radio communications.
However, there is no guarantee that interference will not occur in a particular installation. If this equipment does
cause harmful interference to radio or television reception, which can be determined by turning the equipment off
and on, the user is encouraged to try to correct the interference by one or more of the following measures:
• Reorient or relocate the receiving antenna.
• Increase the separation between the equipment and receiver.
• Connect the equipment into an outlet on a circuit different from that to which the receiver is connected.
• Consult the dealer or an experienced radio/TV technician for help.
Page 6
5
XDVDN9131 INSTALLATION
Preparation
Before You Start
• Disconnect negative battery terminal. Consult a qualified technician for instructions.
• Avoid installing the unit where it would be subject to high temperatures, such as from direct sunlight, or where it
would be subject to dust, dirt or excessive vibration.
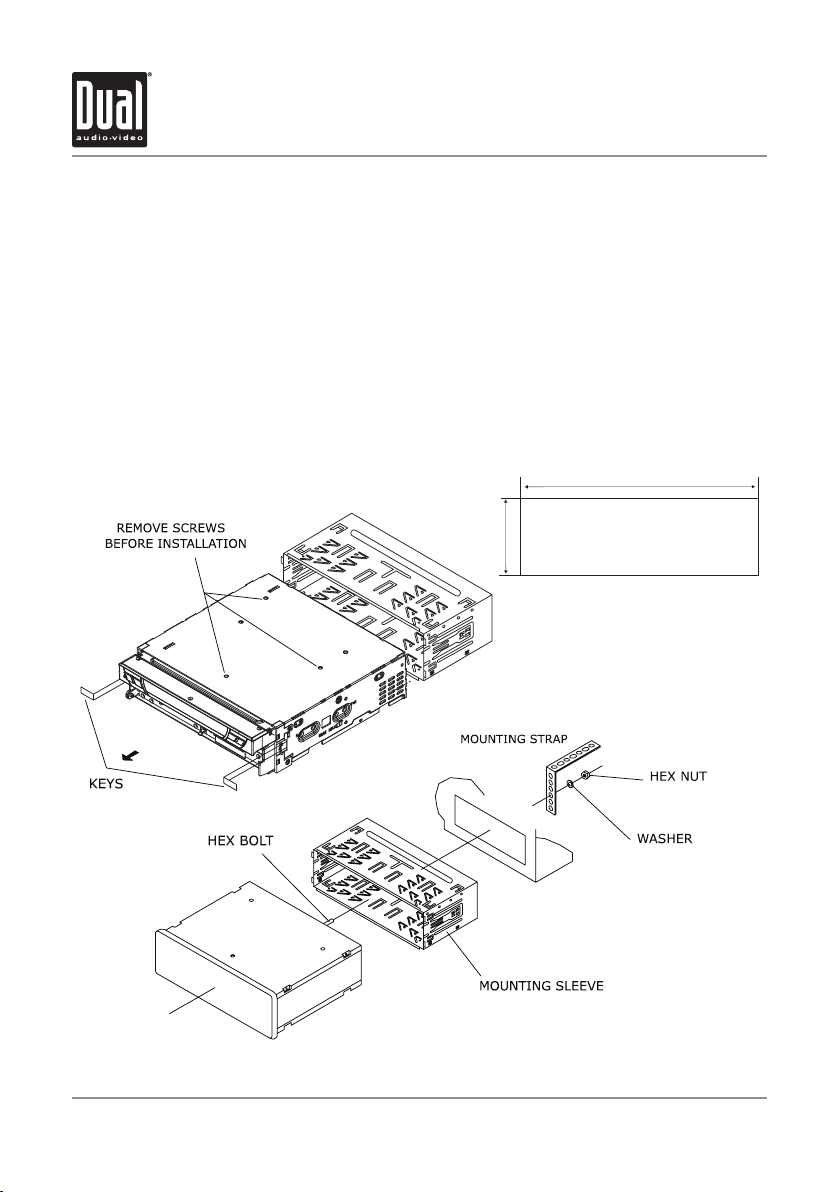
Getting Started
• Remove 3 transit screws located on top of the unit.
• Insert the supplied keys into the slots as shown, and slide the unit out of the mounting sleeve.
• Install mounting sleeve into opening, bending tabs to secure.
• Connect wiring harness and antenna as shown on pages 6-7. Consult a qualified technician if you are unsure.
• Certain vehicles may require an installation kit and/or wiring harness adapter (sold separately).
• Reconnect negative battery terminal, attach front panel as described on page 11 and test for correct operation.
• Snap trim ring into place making sure the notched area is on the bottom.
• Slide unit into mounting sleeve to secure.
Mounting sleeve opening dimensions
7-3/16” x 2-1/16” (183 mm x 53 mm)
TYPICAL FRONT-LOAD DIN MOUNTING METHOD
Page 7
6
Note:
When replacing a fuse, make
sure to use the correct type
and amperage. Using an
incorrect fuse could damage
the unit. The XDVDN9131
uses (2) 10 amp ATM mini
style fuses. There is one fuse
located on the back of the unit
and one fuse located inside
the in-line filter box.
XDVDN9131 INSTALLATION
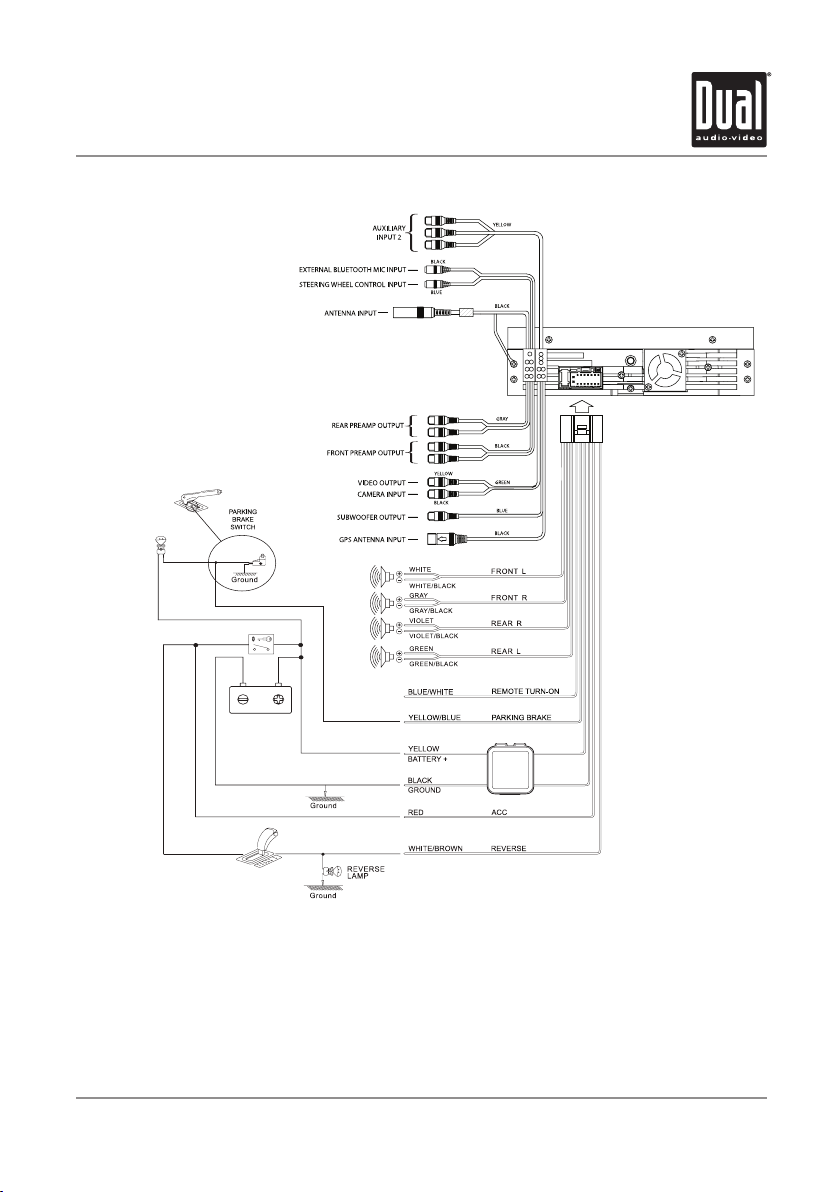
Wiring Diagram - Inputs/Outputs
Wiring Notes:
Subwoofer output
The SUBWOOFER preamp audio output (Blue RCA) is active in all audio modes.
Rear view camera
A rear view camera (not included) can be used with the CAMERA input. Refer to page 64 for details.
Steering wheel controls (optional)
The steering wheel interface input allows connection to the Pacific Accessory Corporation SWI-PS interface module
(sold separately). Visit www.pac-audio.com for details. *Note the SWI input 3.5mm connector color is blue.
Page 8

7
XDVDN9131 INSTALLATION
Installation - GPS Antenna & Microphone
• Determine a suitable location for mounting the GPS antenna. For optimum reception, the antenna should be
mounted in the center of the vehicle roof with a minimum of 6” from any window. The antenna can also be
mounted to the rear trunk lid at least 4” from the rear window.
• Do not install the antenna in a location where it may obstruct the field of view to the skyline such as on the front
dashboard or rear deck tray.
• Clean the mounting location thoroughly before attaching the antenna. The antenna uses a powerful magnet and
requires no adhesive. Do not slide the antenna during positioning as damage to the painted surface can occur.
• Use the included steel mounting plate with 2-sided tape when attaching the antenna to non-metallic surfaces.
• Once the antenna is mounted, carefully plan the cable route to the main unit. Be careful not to pinch or twist the
antenna cable. Use a grommet when running wires through any metal openings.
• Connect the antenna to the locking antenna connector on the back of the unit.
GPS Signal
When the system is turned on for the first time it can take several minutes to acquire a GPS signal. GPS signal
acquisition times will be typically less than a minute when the unit is turned on again.
Typical GPS Antenna Mounting
Typical Microphone Mounting
Note: Installation of the external microphone is
optional but recommended for the highest sound
quality of hands-free calls.
• Determine a suitable location for mounting the
external microphone. Suggested placement includes
the sun visor or the A-pillar of the vehicle. Choose
the best location for your vehicle.
• The microphone includes a removable mounting clip
and windscreen.
• Once the microphone is mounted, carefully plan the
cable route to the main unit. Be careful not to pinch
or twist the antenna cable.
• Connect the microphone to the 3.5mm external
Bluetooth microphone input on the back of the unit.
*Note the 3.5mm connector color is black.
• After the installation is complete, follow the
instructions on page 66 for selecting the "external"
microphone option.
Page 9
8
XDVDN9131 OPERATION
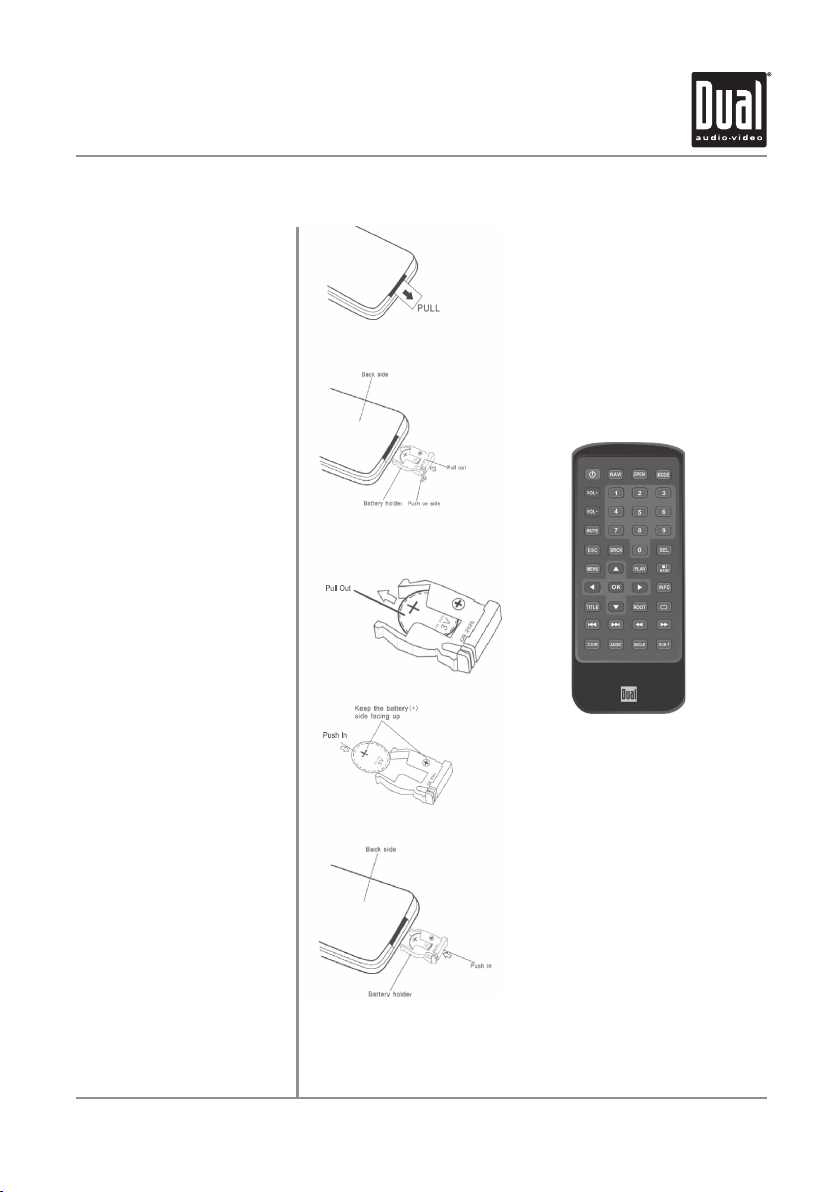
IR Remote Preparation
Remove battery insulation tape
To insert or replace the battery:
Remove the battery holder
Remove the battery from the
battery holder
Install the new battery
Make sure to keep the (+) side up
Notes:
• Remove the battery if the remote will not
be used for a month or longer
• Remove and dispose of battery properly
• Do not store battery with metallic objects
or materials
Insert the battery holder
Page 10
9
XDVDN9131 OPERATION
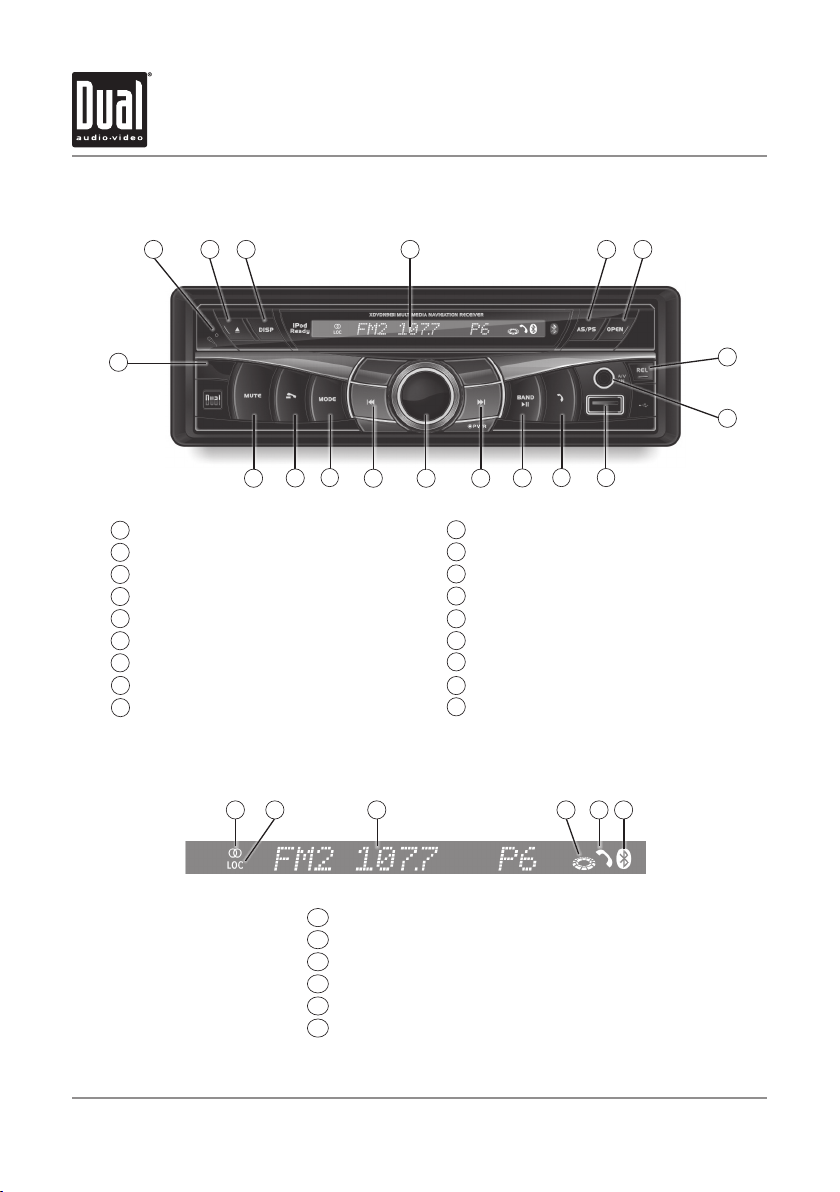
Control Locations - Monitor Closed
2 53 61
18
Bluetooth Microphone
1
Eject
2
Display/Info
3
Secondary LCD
4
5
Auto Store/Preset Scan
6
Open/Close Monitor
7
Front Panel Release
8
3.5mm A/V Input
9
USB Input
Secondary LCD Information
1 2 3 54 6
4
7
8
9
1015
13
10
11
12
13
14
15
16
17
18
1116
121417
Talk
Band/Play/Pause
Channel/Chapter/Track Up/Fast Forward
Power/Volume/EQ
Channel/Chapter/Track Down/Fast Reverse
Mode
End Call
Mute/Loudness
Infrared Sensor
Stereo indicator
1
Local indicator
2
Main information display
3
Disc-in indicator
4
5
Bluetooth call indicator
6
Bluetooth connection indicator
Note: Secondary LCD only functions when TFT monitor is closed.
Page 11

XDVDN9131 OPERATION
10
Control Functions - Monitor Closed
Bluetooth Microphone
Eject
Display
Secondary LCD
AS/PS
(Auto Store/Preset Scan)
Open Monitor
Release
3.5mm A/V Input
USB Input
Talk Button
Band/Play/Pause
Channel/Chapter/Track Up
Fast Forward
Power/Volume/EQ
Navigation Voice Announcement
Volume Level
Channel/Chapter/Track Down
Fast Reverse
Built-in microphone for Bluetooth hands-free calls.
once to eject disc.
Press
When the monitor is closed, press DISP to toggle display between
information available for the current mode such as clock, frequency, track,
song or chapter information.
Additional LCD for system information while monitor is closed.
Press AS/PS momentarily to start station Preset Scan function. Press AS/PS
for 2 seconds to start Auto Store station preset function in current band.
Press OPEN to open or close the monitor. Be careful not to not touch
or obstruct the monitor movement during the open/close sequence, or
permanent damage could occur.
Press REL to release the front panel for disc access or front panel removal.
Connect external devices or the included cable for an iPod device to this
3.5mm auxiliary audio/video input.
Insert USB flash drive to play MP3, WMA or JPEG files. Connect included
cable for an iPod device to control and charge an iPod device.
Press to answer an incoming call or to place an outgoing call.
In Disc, operation of iPod, USB or SD mode, press once for PAUSE, and
"Pause" will appear in the display. Press again to resume PLAY.
Press BAND to select FM1, FM2, ] AM.
Press to select the next channel/chapter/track for playback.
Press and hold to manual tune up or fast forward.
Momentarily press the volume knob or any other button (except EJECT) to
turn the unit on. Press for more than 3 seconds to turn the unit off.
Turn the volume knob to adjust the volume level lower or higher (0-46).
The current volume level will be displayed on the secondary LCD when the
monitor is closed. Turning the knob while the volume is muted will cancel
the mute function.
Press the volume knob momentarily to select between Flat, Classic, Pop,
Rock or User EQ presets.
In Navigation mode, adjust voice announcement volume level during the
voice announcement. To adjust voice announcement volume level at any
other time, press the volume knob first, then adjust the volume level.
Press to select the previous channel/chapter/track for playback.
Press and hold to manual tune down or fast reverse.
Page 12
11
XDVDN9131 OPERATION
Control Functions - Monitor Closed
Reset
Mode
End Button
Mute
Infrared Sensor
Caution
Press MODE to select between Tuner, Disc (which includes DVD and CD
playback), operation of iPod, USB, Bluetooth, SD, Auxiliary 1 and Auxiliary 2
inputs. Each time the MODE button is pressed the next mode is chosen. Modes
of operation are indicated on the OSD or the secondary LCD. Optional iPod
device, USB flash drive, SD card or Bluetooth device must be
connected/inserted to appear in the mode selection string.
Press to end a call in progress or reject an incoming call.
Press MUTE to silence audio output. "Mute" will flash in the display. Press
MUTE again to restore audio at previous volume level. Press and hold MUTE to
toggle the Loudness function On or Off.
Point the remote control towards the infrared sensor to control various
functions of the unit. Refer to page 13 for more information.
Upon installation, do not attempt to move the monitor by hand. Use the •
or
buttons, the OPEN button on the front panel or the remote control.
The unit will stop if it encounters any obstacles during the open/close •
sequence. If this occurs, remove the obstacle and press OPEN again to
resume the monitor open/close sequence.
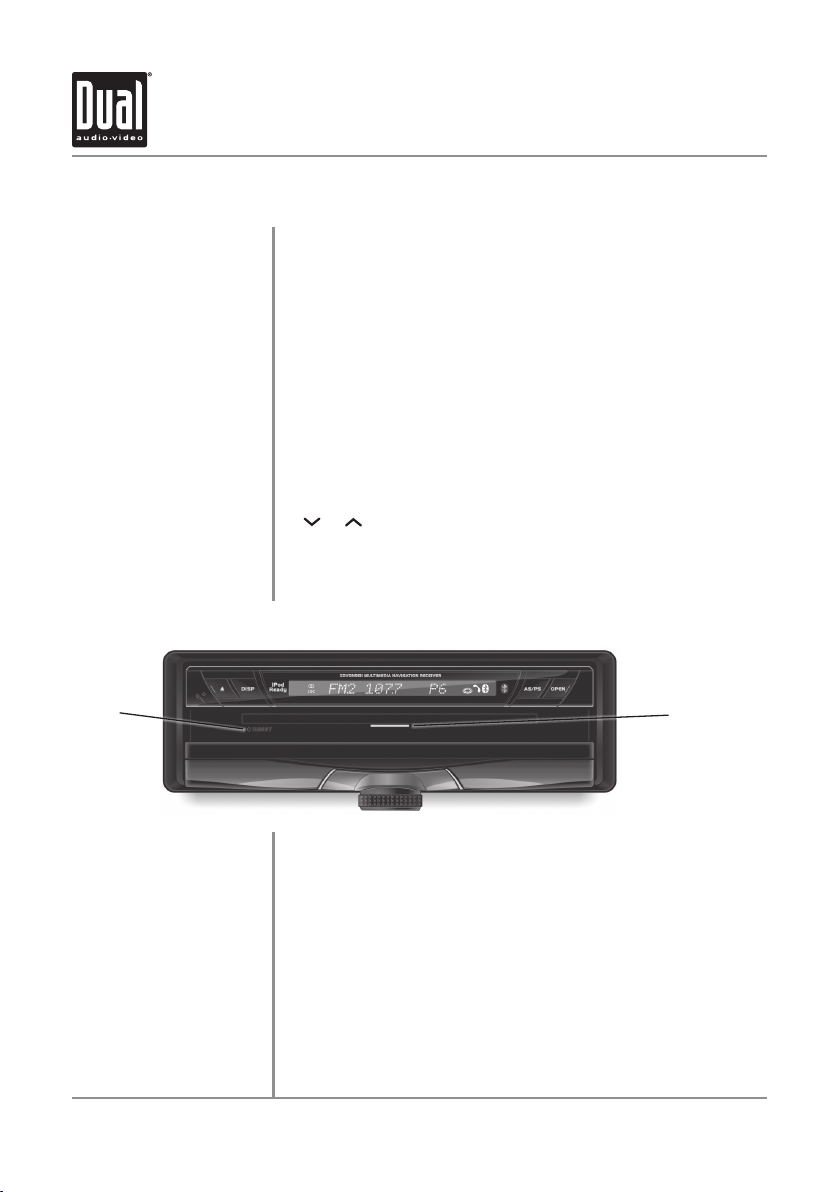
Disc-in
Indicator
Front Panel
Removal/Attachment
Reset
Disc-in Indicator
Press REL to fold down the front panel. In the down position, gently press the
right side of the front panel to the left, then pull away from the bottom right to
remove. To re-install the front panel, insert the right side of the bottom of the
front panel first, then snap the left side into place and fold up. It is easiest to
reattach the front panel whe it is in the open position.
To resolve abnormal operation or if the unit is inoperable, press the
RESET button located behind the front panel directly under the disc slot. The
unit will reset the main processor to the default settings.
Note: Use the tip of a pen to access the reset button. To restore the factory
default software settings, refer to page 19.
The disc-in indicator will illuminate blue when a disc is loaded.
Page 13
XDVDN9131 OPERATION
12
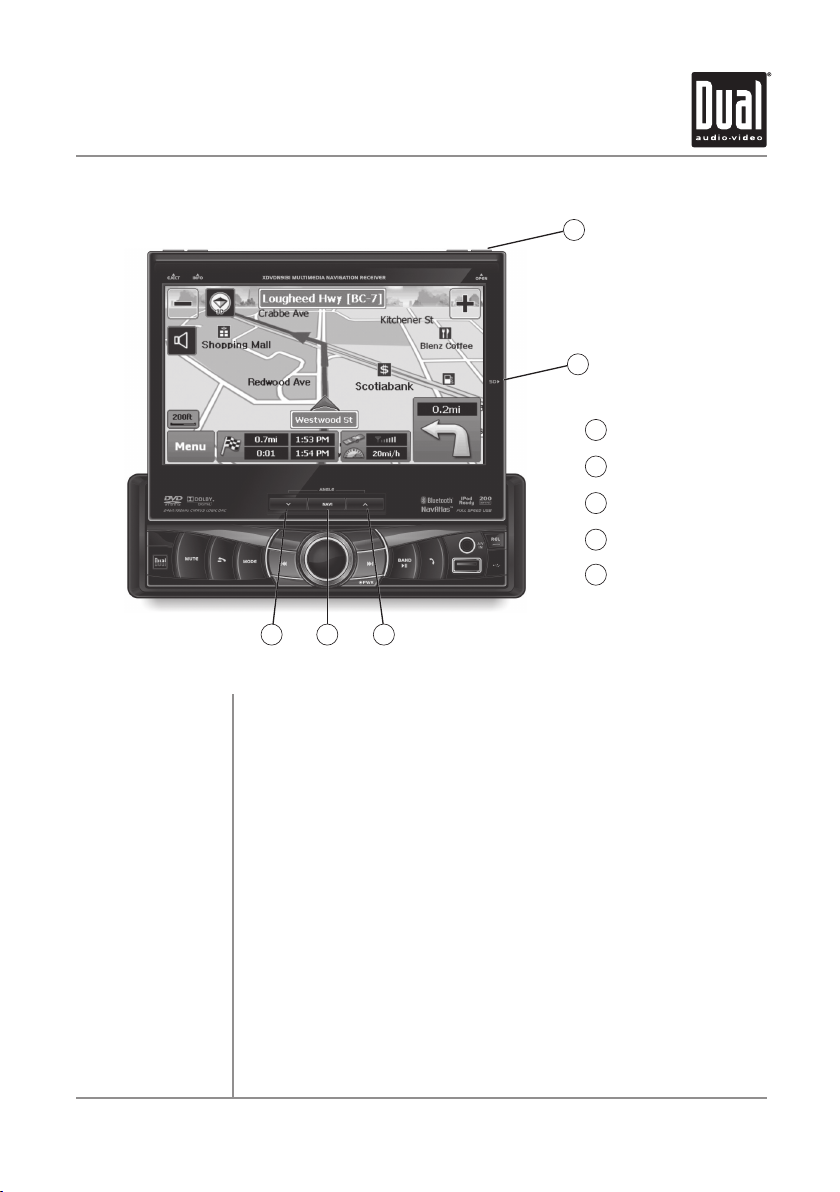
Control Locations and Functions - Monitor Open
1
2
Close Monitor
1
SD Card Input
2
Screen Angle Up
3
Navigation
4
Screen Angle Down
5
5 34
Close Monitor
SD Card Input
Screen Angle Up
Navigation
Screen Angle Down
Monitor Notes
Press CLOSE to open or close the monitor. Be careful not to not touch or obstruct the
monitor movement during the open/close sequence, or permanent damage could
occur.
Insert SD card to play audio files.
Press momentarily to adjust the angle of the screen upwards. Press and hold to slide
the monitor inwards.
Press NAVI to toggle the display between the current mode and the navigation map.
Press to adjust the angle of the screen downwards. Press and hold to slide the
monitor outwards.
• The angle can also be manually selected via the screen setup menu.
• The color of the LCD monitor varies between viewing angles. Select the angle with
the most optimum view for your location.
• The last position of the monitor can be saved in memory. When “TFT Auto Open”
is set to "On" in the Main Setup menu, the monitor will return to its last position
automatically the next time the unit is turned on.
Page 14
13
XDVDN9131 OPERATION
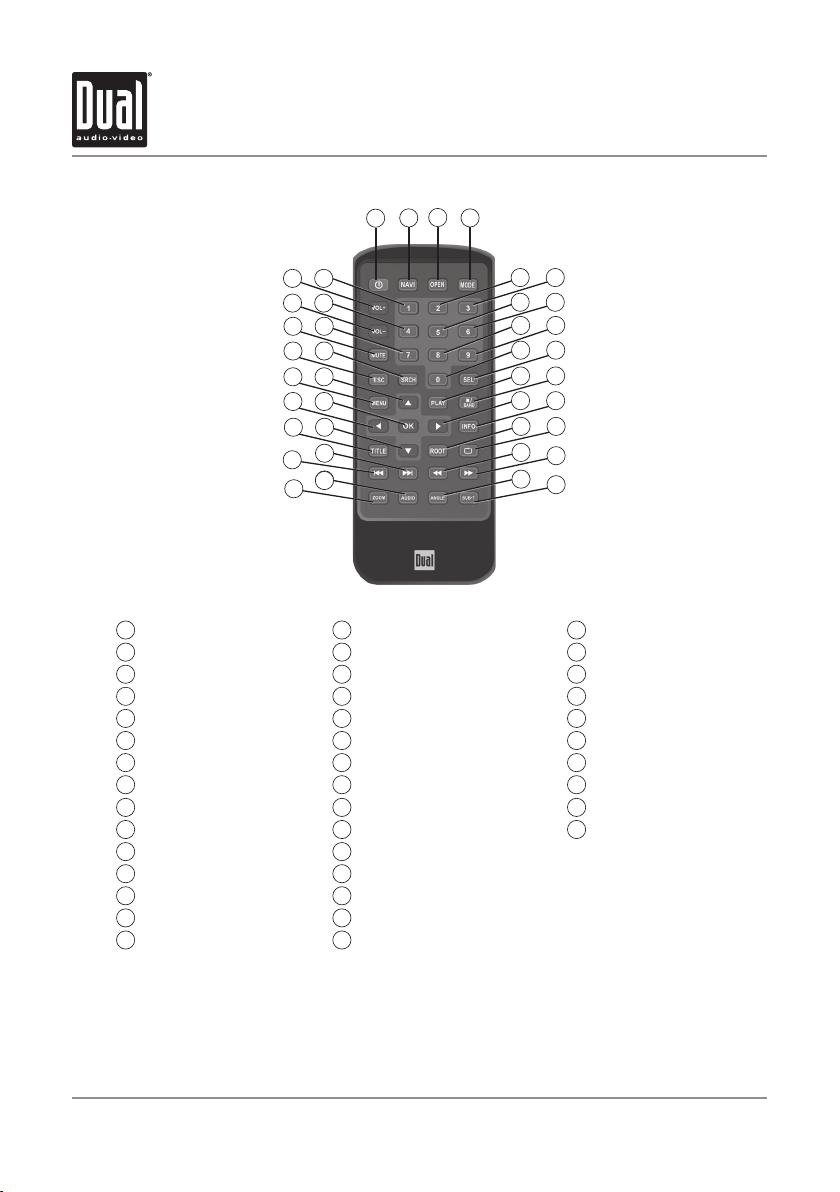
Control Locations - Remote
2
1
5 8
6
109
13
14
17
18
22
21
26
25
30
34
33
38
37
3
4
7
11
12
15
16
20
19
24
23
28
27
32
3129
35
36
39
40
Power
1
Navigation
2
Open/Close
3
Mode
4
Volume Up
5
Key #1
6
Key #2
7
Key #3
8
Volume Down
9
Key #4
10
Key #5
11
Key #6
12
Mute/Loudness
13
Key #7
14
Key #8
15
* The remote control uses one 3 volt Lithium CR2025 battery. For best performance, replace only with CR2025 or equivalent.
Key #9
16
Escape
17
Search
18
Key #0/DVD Setup
19
Audio Select
20
Menu
21
4-Way - Up
22
Play
23
Band/Stop
24
4-Way - Left
25
OK
26
4-Way - Right
27
Info
28
Title Menu
29
4-Way - Down
30
Root
31
Repeat
32
Chapter/Track/Seek Tune Down
33
Chapter/Track/Seek Tune Up
34
Fast Reverse/Manual Tune Down
35
Fast Forward/Manual Tune Up
36
Zoom
37
Audio
38
Angle
39
Sub-Title
40
Page 15

XDVDN9131 OPERATION
14
Control Functions - Remote
Power
Navigation
Open
Mode
Volume Up
Keys 0-9
Volume Down
Mute
Escape
Search
Audio Select
Menu
4-Way-Up/Down/Left/Right
Play
Band/Stop
OK
Info
Title Menu
Root Menu
Repeat
Chapter/Track/Seek Tune Down
Chapter/Track/Seek Tune Up
Fast Reverse/Manual Tune Down
Fast Forward/Manual Tune Up
Zoom
Audio
Angle
Sub-Title
Press once to turn the unit on, press again to turn unit off.
Press to select between navigation mode and current source.
Press once to open monitor; press again to close the monitor.
Press once to incrementally select desired source.
Increase VOLUME.
Direct access for chapter/track/preset stations 1 ~ 9; keypad entry 0 ~ 9.
Decrease VOLUME.
Press once to MUTE audio; press again to return audio. Press and hold to
select Loudness On/Off.
Exit current menu.
Search function in Disc and operation of iPod modes.
Enter AUDIO Setup mode.
Enter the MAIN system menu.
Navigating system and DVD menus.
Press to pause/begin playback.
Press to select desired BAND or to STOP while in disc mode.
Press to confirm settings.
Displays DVD information. Press and hold to access brightness menu.
Enters the title menu of the DVD.
Enters the main menu of the DVD.
Repeats playback of current chapter/track or folder.
Selects the previous chapter/track/station for playback.
Selects the next chapter/track/station for playback.
Fast reverses the Disc/USB/SD/content of iPod, manual tune down.
Fast forwards the Disc/USB/SD/content of iPod, manual tune up.
Zooming in/out on an image.
Change the audio language (when available) for DVD playback.
Selects between different angles (when available) for a DVD scene.
Language selection for subtitle (when available) for DVD playback.
Page 16
XDVDN9131 OPERATION
15
General Operation
Power On/Off
Mute
Loudness
Mode
Optional Mode Selection
Volume
Audio Setup
(from OSD)
Momentarily press the volume control (PWR) or any other button
(except EJECT) to turn the unit on. Hold for 3 seconds to turn the unit off.
Press MUTE to silence the audio;
Press MUTE again to cancel.
Press LOUD on the OSD to turn the Loudness on/off. Pressing and holding the
MUTE button on the front panel or remote will also turn the Loudness on/off.
Press MODE to select between Tuner, Disc (which includes DVD and CD
playback), operation of iPod, USB, Bluetooth, SD, Auxiliary 1 and Auxiliary
2 inputs. Modes of operation are indicated on the OSD On Screen Display.
Optional iPod device, USB flash drive and SD card must be connected/inserted
to appear in the mode selection string.
Press MENU at the top left corner of the screen to display the OSD main menu.
Press Tuner, Disc, operation of iPod, USB, Navi, Bluetooth, SD, AV/1, AV/2 or
Camera in the MAIN menu page to select the desired source.
Turn the rotary or use the volume or to adjust the volume level lower or
higher (0-46). The current volume level will be displayed on the secondary LCD
when the monitor is closed or on the LCD (to the right of the volume icon
) when the monitor is open. Turning the rotary while the volume is muted
will cancel the mute function.
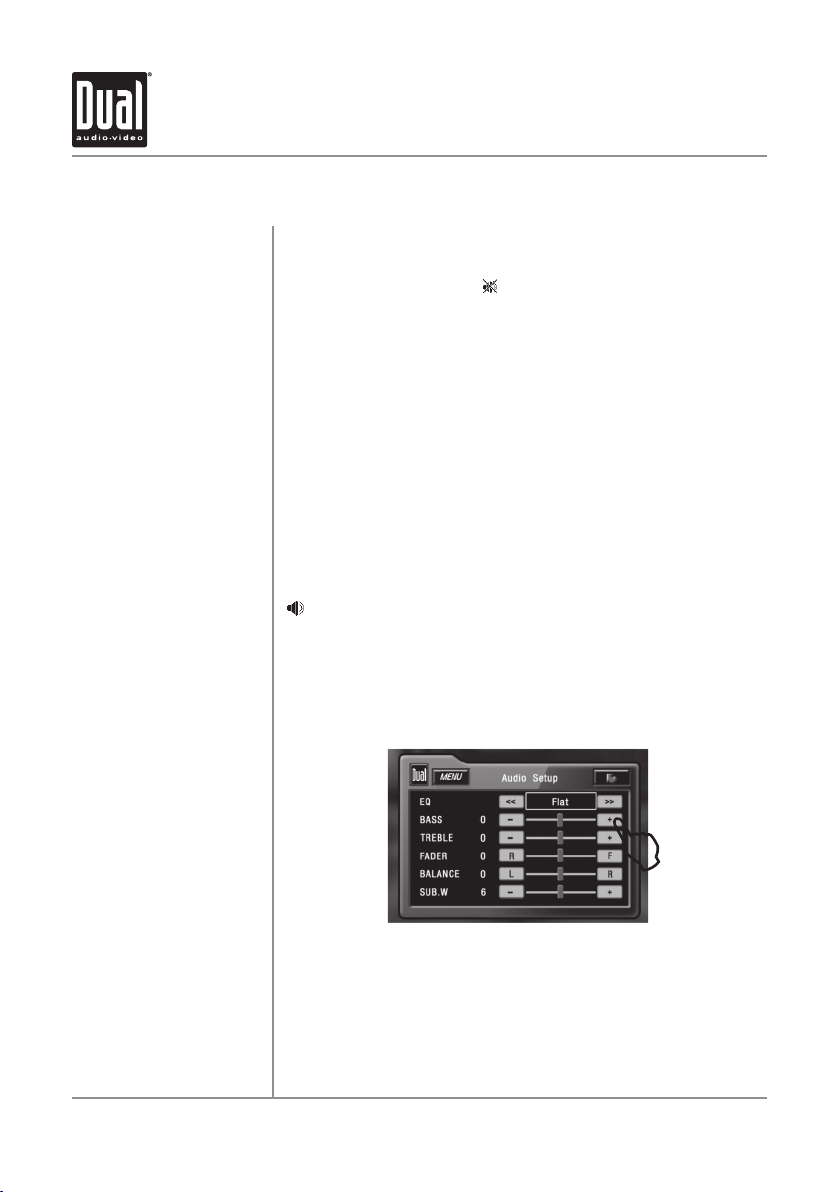
From Tuner, Disc (CD only), operation of iPod, USB, Bluetooth or SD mode,
touch EQ on the OSD or press the rotary momentarily to enter the Audio
Setup menu. Adjust audio parameters by pressing the desired level you wish
to change. Operation will return back to previous mode after 15 seconds of
inactivity or by pressing the RETURN arrow in the top right corner.
will appear in the OSD (On Screen Display).
L
Audio Setup
(from remote)
Press the SEL button. Press the p or q buttons on the remote to select an
item to be adjusted. Press or to decrease (-) or increase (+) the current
level. Press RETURN on the OSD or the ESC button on the remote control to exit
the audio control menu.
Note: The Bass and Treble levels are only adjustable when EQ is set to "User”
mode. The Loud function compensates for deficiencies in sound ranges at low
levels. When the Loud function is on, LOUD:On is displayed in the OSD.
Page 17
XDVDN9131 OPERATION
16
Info
COLOR SETUP
Sharpness
Color
Contrast
Brightness
Tint
10
10
10
10
10
Monitor Brightness
Color Setup
General Operation
Press INFO momentarily to display DVD disc information. Press and hold to
access brightness menu.
Press and hold INFO for 3 seconds to change monitor Brightness.
Turn the rotary Q or P to adjust to desired level.
(0 minimum/20 maximum; 10 is default).
When a video source is connected to the front or rear auxiliary inputs, press
INFO for more than 2 seconds to adjust COLOR SETUP during video play.
Press
or to step to the desired menu option:
Sharpness
Brightness
Color
Contrast
Tint
Turn the rotary Q or P to adjust the sharpness.
(0 minimum/+15 maximum).
Turn the rotary Q or P to adjust the color.
(0 minimum/+20 maximum).
Turn the rotary Q or P to adjust the contrast.
(0 minimum/+20 maximum).
Turn the rotary Q or P to adjust the brightness.
(0 minimum/+20 maximum).
Turn the rotary Q or P to adjust the tint.
(0 minimum/+20 maximum).
Note: A video signal must be connected to A/V 1 or A/V 2 in order to access
the COLOR SETUP menu.
Page 18
XDVDN9131 OPERATION
17
General Operation - Main Menu
14
13
12
Main Menu Access
Button/Icon Identification
10)
11)
12)
13)
14)
1
2 43 5
6
7
8
L
11
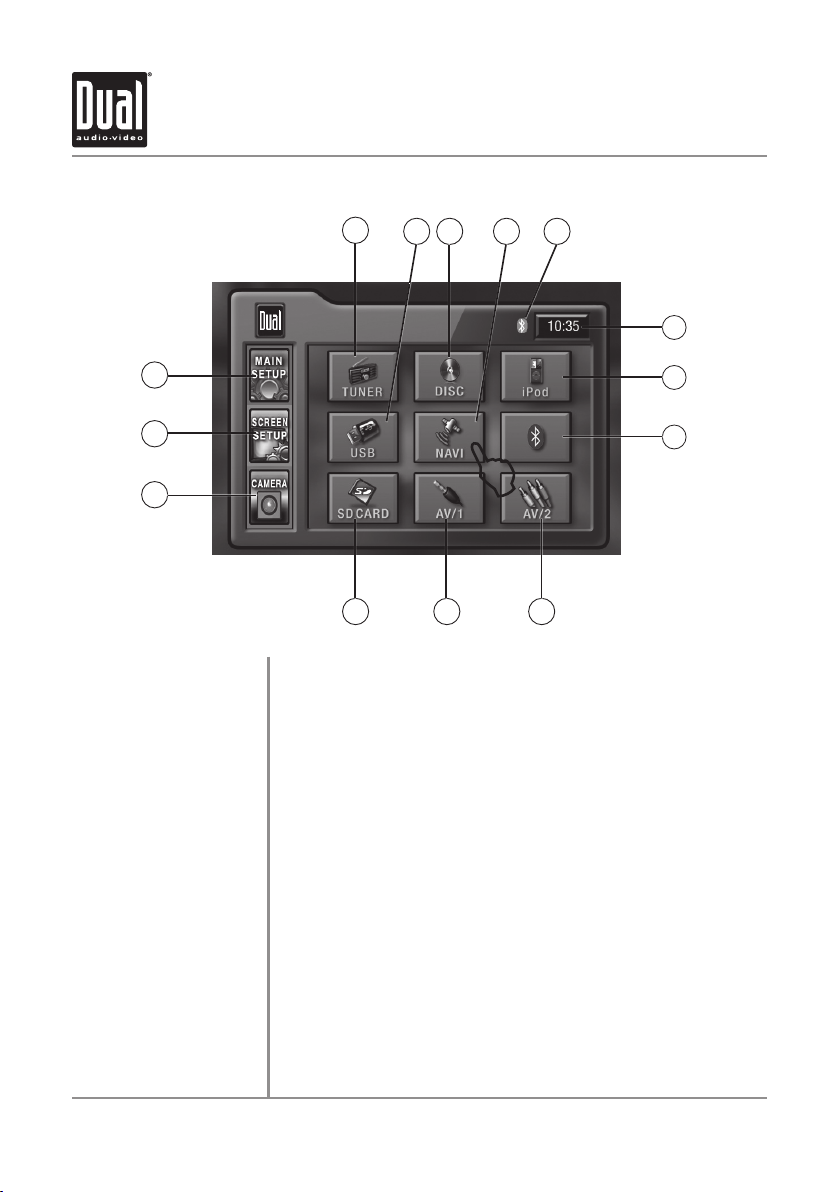
There are two methods to access the MAIN menu:
Press • MENU button on the remote control.
• Touch MENU or the upper left corner of the touch screen from
any mode (except Navigation).
Touch to access AM/FM TUNER mode.
1)
Touch to access USB mode (optional USB flash drive must be inserted).
2)
Touch to access CD/DVD mode (CD/DVD must be inserted).
3)
Touch to access NAVIGATION mode.
4)
Bluetooth icon will illuminate when a Bluetooth device is connected.
5)
Current time is displayed.
6)
Touch to access operation of iPod (optional iPod device must be connected).
7)
Touch to access BLUETOOTH mode.
8)
Touch to access AUXILIARY A/V2 INPUT mode.
9)
Touch to access AUXILIARY A/V1 INPUT mode.
Touch to access SD mode (optional SD memory card must be inserted).
Touch to access CAMERA mode (optional camera must be connected).
Note: If optional camera isn't connected, "No Signal Detected" will be displayed.
Touch to access SCREEN SETUP menu.
Touch to access MAIN SETUP menu.
10
9
Page 19
XDVDN9131 OPERATION
18
L
Main Setup - Menu
L
L
Main Setup Menu
Page 1
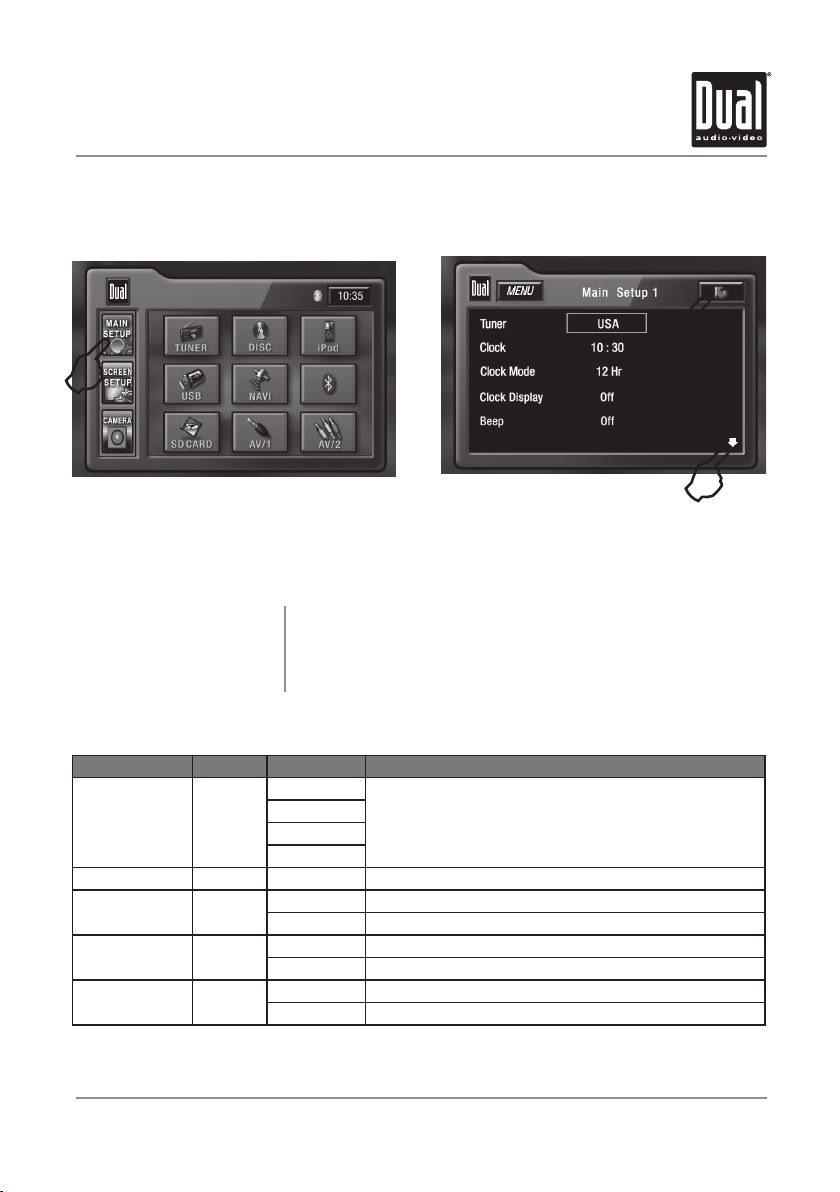
Settings Default Options Function
Tuner USA
Clock 00:00 00:00 See adjusting the clock on page 21 for more details
Clock Mode 12Hr 12Hr 3:32 (example of 12 hour time setting)
Clock Display Off Off Clock is not displayed when unit is powered off
Beep Off Off Disables confirmation beep
Press • MAIN SETUP icon to access the Main setup mode.
Select desired parameter you wish to change.•
Page will return back to previous screen after 15 seconds of inactivity or •
by pressing the RETURN arrow in the top right corner.
Press the • PAGE DOWN icon to access Main Setup page 2.
MAIN Setup Menu matrix - page 1
USA
S-Amer1
S-Amer2
Europe
24Hr 15:32 (example of 24 hour time setting)
On Clock is displayed when unit it powered off
On Enables confirmation beep
Select appropriate tuner frequency spacing for your area
Page 20

XDVDN9131 OPERATION
19
Main Setup - Menu
L
MAIN Setup Menu matrix - page 2
Settings Default Options Function
Camera Image Normal Normal Normal image
Reverse Mirror camera image 180 degrees
TFT Auto Open Off
Anti-theft Code 0000 **** Must enter password to turn anti-theft on or off
Anti-theft Off On System will require a password if main battery power is
Reset Unit No Are you sure?
Settings Default Options Function
Tuner Gain 10 0 - 20 Adjust the relative level of gain for Tuner mode
Disc Gain 14 0 - 20 Adjust the relative level of gain for Disc mode
iPod Gain 11 0 - 20 Adjust the relative level of gain for iPod mode
USB Gain 14 0 - 20 Adjust the relative level of gain for USB mode
Navi Gain 10 0 - 20 Adjust the relative level of gain for Navi mode
BT-HF Gain 10 0 - 20 Adjust the relative level of gain for Bluetooth
BT-A2DP Gain 10 0 - 20 Adjust the relative level of gain for Bluetooth
SD Gain 10 0 - 20 Adjust the relative level of gain for SD mode
AV/1 Gain 12 0 - 20 Adjust the relative level of gain for AV/1 mode
AV/2 Gain 12 0 - 20 Adjust the relative level of gain for AV/2 mode
On TFT panel will automatically open when ACC is turned on
Off TFT panel will not auto open when ACC is turned on
Manual TFT will only open/close when OPEN button is pressed
removed
Off No password will be required if main battery power is
Yes/No
MAIN Setup Menu matrix - pages 3 - 5
removed
Load all factory parameters to their original settlings
Note: This will not reset the anti-theft password
Default anti-theft password is 0000
hands-free mode
streaming audio mode
L
Page 21

XDVDN9131 OPERATION
20
Main Setup - Adjusting Radio Frequency
Adjusting Radio Frequency
1
L
Step 1
Touch MENU at the top left corner of screen.
2
L
Step 2
Touch MAIN SETUP icon.
L
3
Step 3
Touch USA.
Step 4
Touch the setting for your region.
Step 5
Touch RETURN to exit.
4
L
5
L
Page 22
XDVDN9131 OPERATION
21
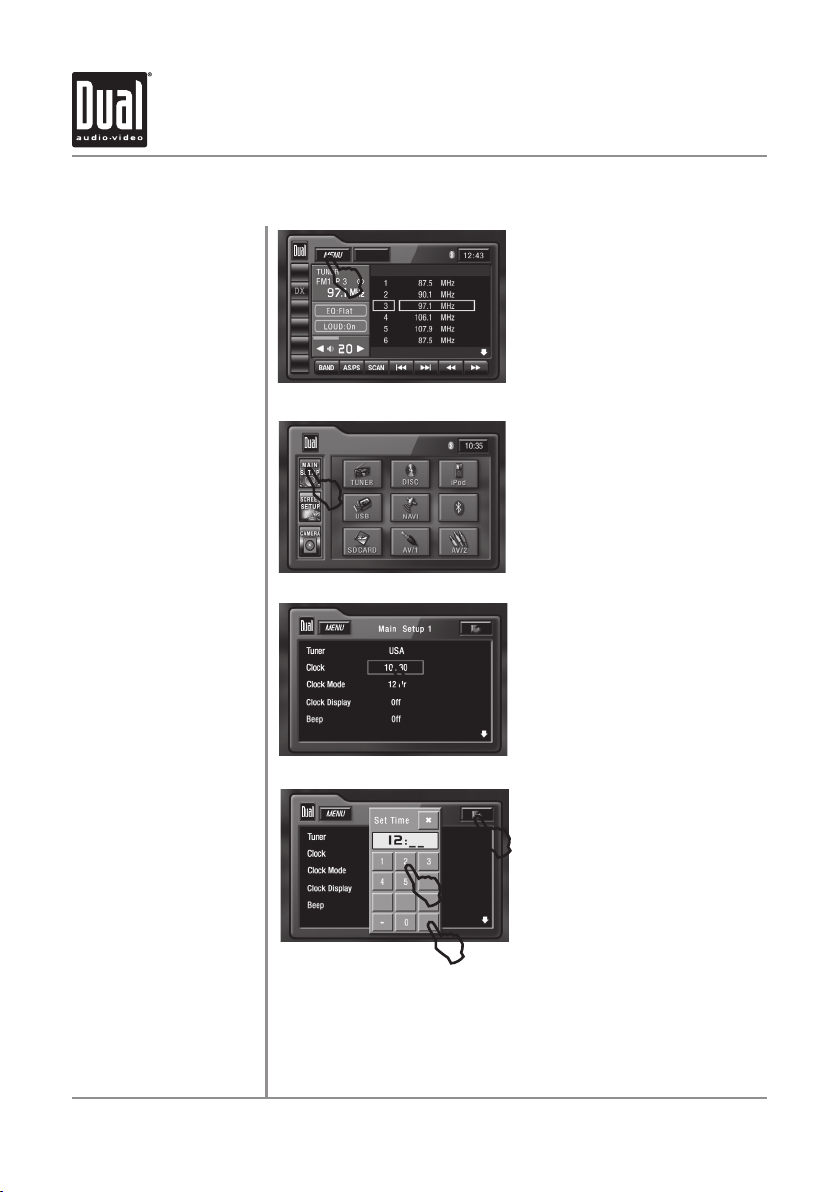
Main Setup - Adjusting the Clock
12Hr Clock Mode
1
L
Step 1
Step 2
Step 3
Steps 4-6
Touch MENU at the top left corner of screen.
2
L
Touch MAIN SETUP icon.
3
L
3) Touch the current time in the CLOCK row.
6
L
4
L
OK
5
4) When keypad appears, enter HOURS, followed by MINUTES.
5) When finished, touch OK.
6) Touch RETURN to exit.
For 24Hr format, select 24Hr from CLOCK MODE, then follow steps 1-6.
L
Page 23
XDVDN9131 OPERATION
22
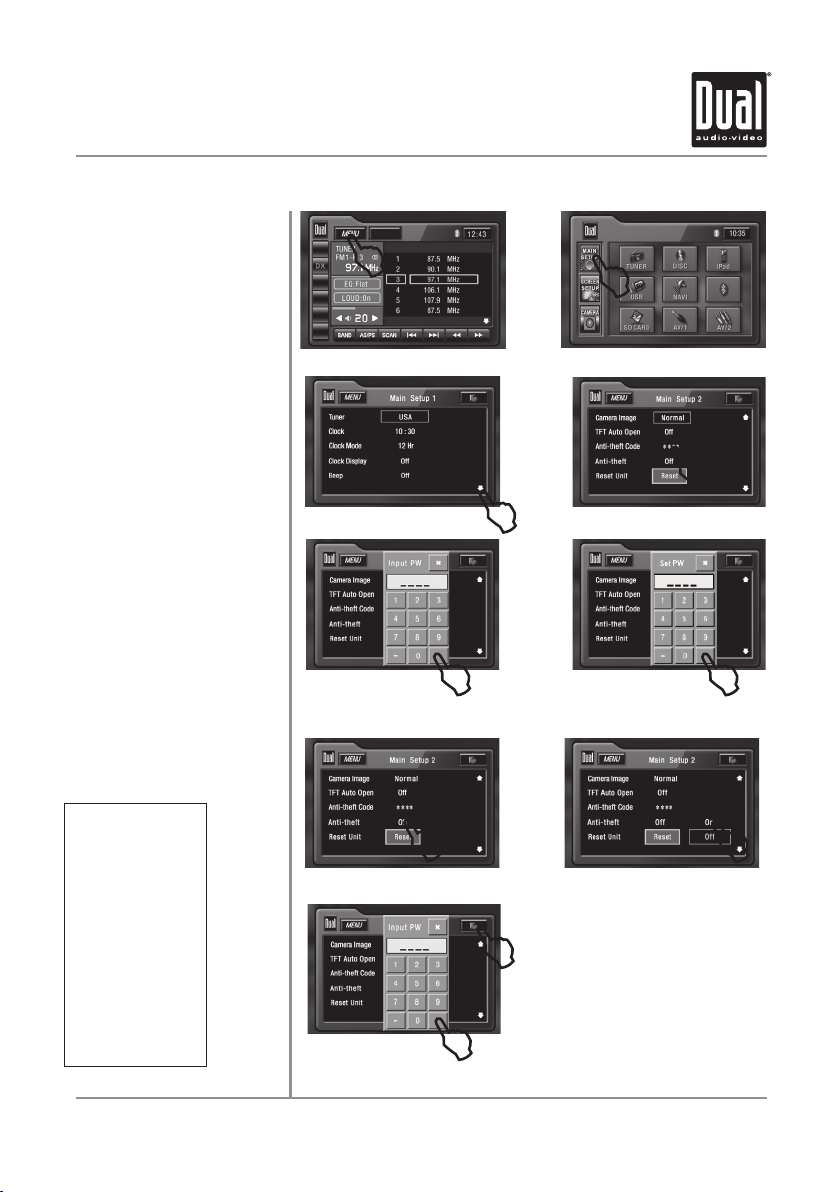
Main Setup - Setting the Anti-theft Code
The default Anti-theft password
is 0000 and is turned off by
default. To turn this feature on,
follow the steps below.
CAUTION!! This will lock your
unit from operating if battery
power is disconnected.
1
L
2
L
Note:
It is recommended
that you choose your
own 4-digit password
carefully, write it
down somewhere
and keep in a safe
location. In the event
you ever lose or
forget your password,
call our technical
support hot-line at
1-866-382-5476 for
support in unlocking
the system.
Step 1 & 2
Step 3 & 4
Step 5 & 6
Step 7 & 8
Step 9 & 10
1) Touch MENU. 2) Touch MAIN SETUP icon.
4
L
OK
5
L
3
L
OK
6
L
8
L
10
3) Touch down arrow icon. 4) Touch ****.
5) Enter 0000, then press OK. 6) Set new 4-digit password,
then press OK.
7
7) Touch Off. 8) Touch On.
L
L
OK
9
9) Enter new 4-digit password (created in step 6), then press OK.
10) Touch RETURN to exit.
L
Page 24
XDVDN9131 OPERATION
23
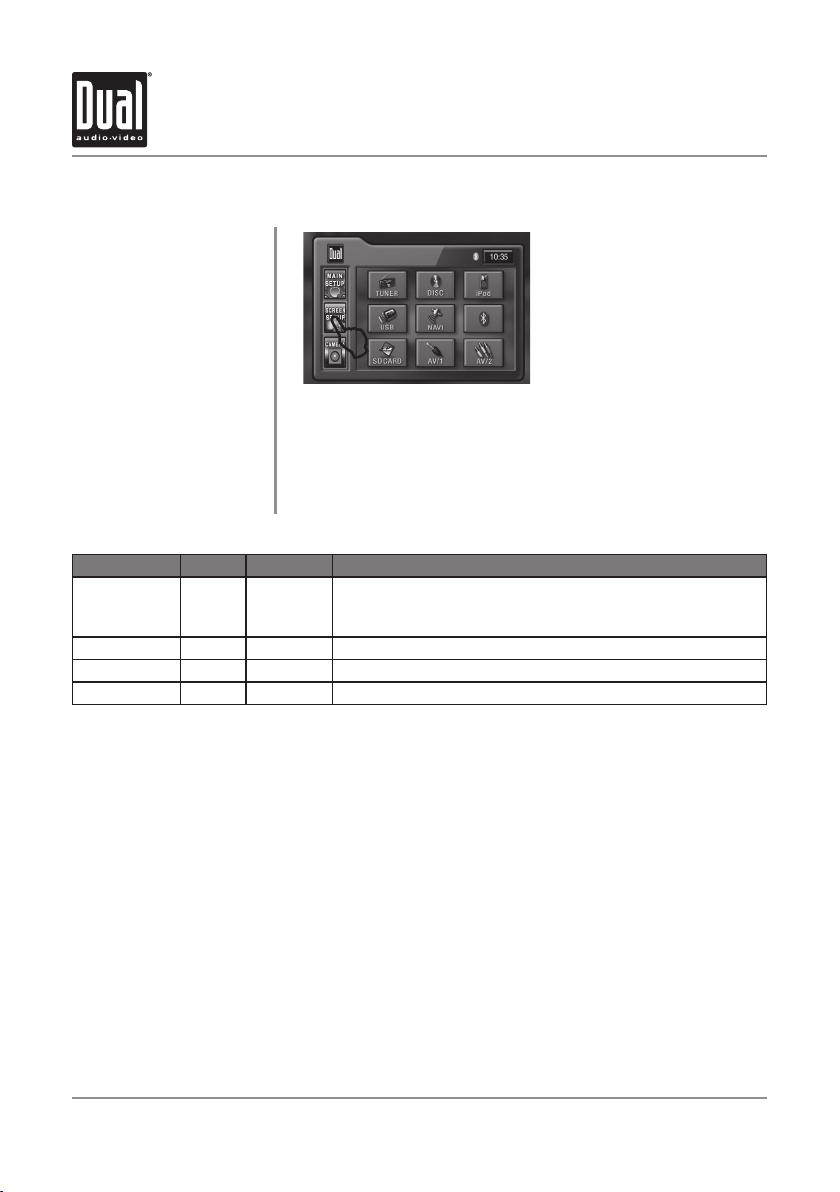
Screen Setup - Menu
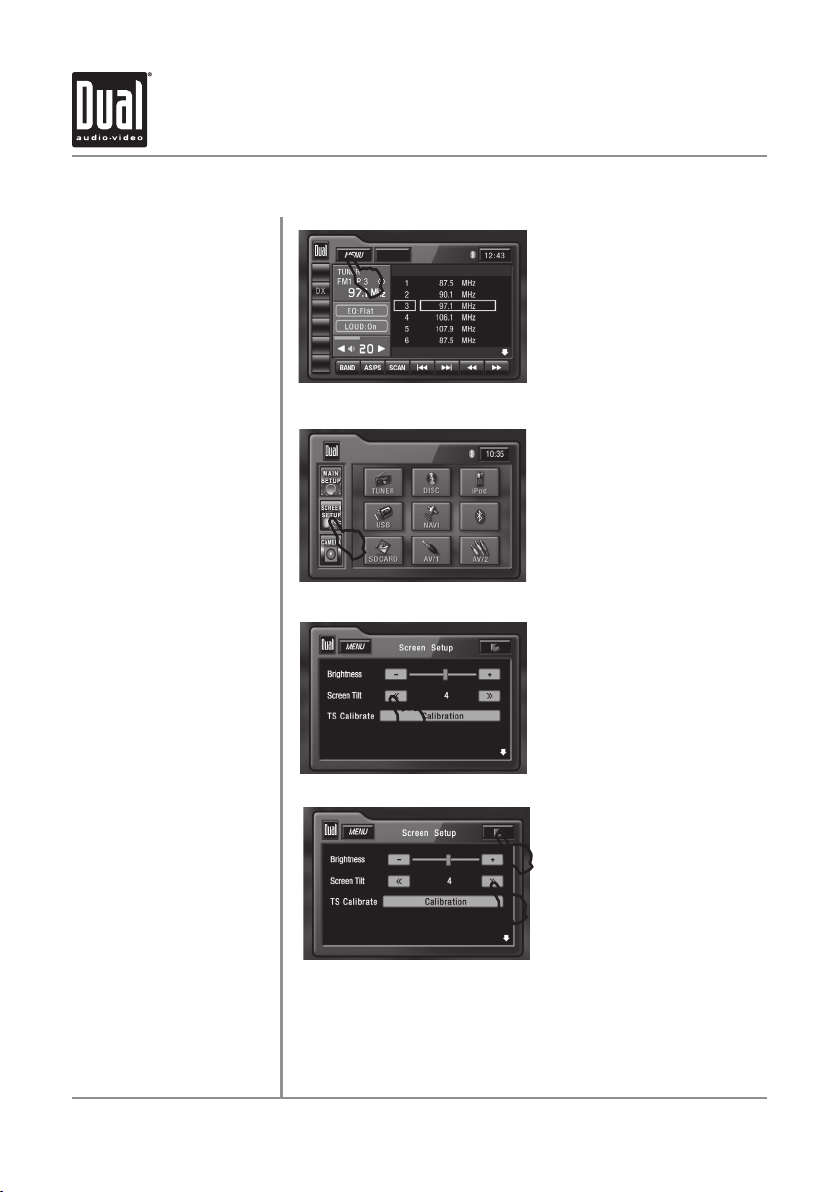
Screen Setup Menu
L
From the main menu, press • SCREEN SETUP icon to access the Screen
Setup mode.
Press the • PAGE DOWN icon to access the Version List (pages 2 and 3).
Select desired parameter you wish to change.•
Page will return back to previous screen after 15 seconds of inactivity or by •
pressing the RETURN arrow in the top right corner.
Press the • PAGE UP icon to access Screen Setup page 1.
SCREEN Setup Menu matrix
Settings Default Options Function
Brightness 10
(OSD)
Screen Tilt 2 1 - 4 Select 1 to 4 to adjust the default tilt angle of the screen
TS Calibrate Calibration Touch Calibration to enter the Touch Screen calibration mode
Version List Displays software version of unit (pages 2 and 3)
0 - 20
(OSD)
or on the remote, then press OK to adjust the
Press
brightness to the desired setting. Brightness can also be
adjusted by touching the Brightness + and - buttons.
Page 25
XDVDN9131 OPERATION
24
This will set the default setting
for the TFT display brightness.
This can also be set by pressing
the INFO button for more than 3
seconds, then turning the rotary
to adjust brightness level.
Screen Setup - Setting TFT Brightness
1
L
Step 1
Step 2
Step 3
1) Touch MENU at the top left corner of screen.
2
L
2) Touch SCREEN SETUP icon.
3
L
3) Touch [-] to reduce brightness.
5
L
4
L
Step 4
Step 5
4) Touch [+] to increase brightness.
5) Touch RETURN to exit.
Note: When using the remote control to adjust the brightness, the OSD range
is 0 - 20 and the default is 10.
Page 26
XDVDN9131 OPERATION
25
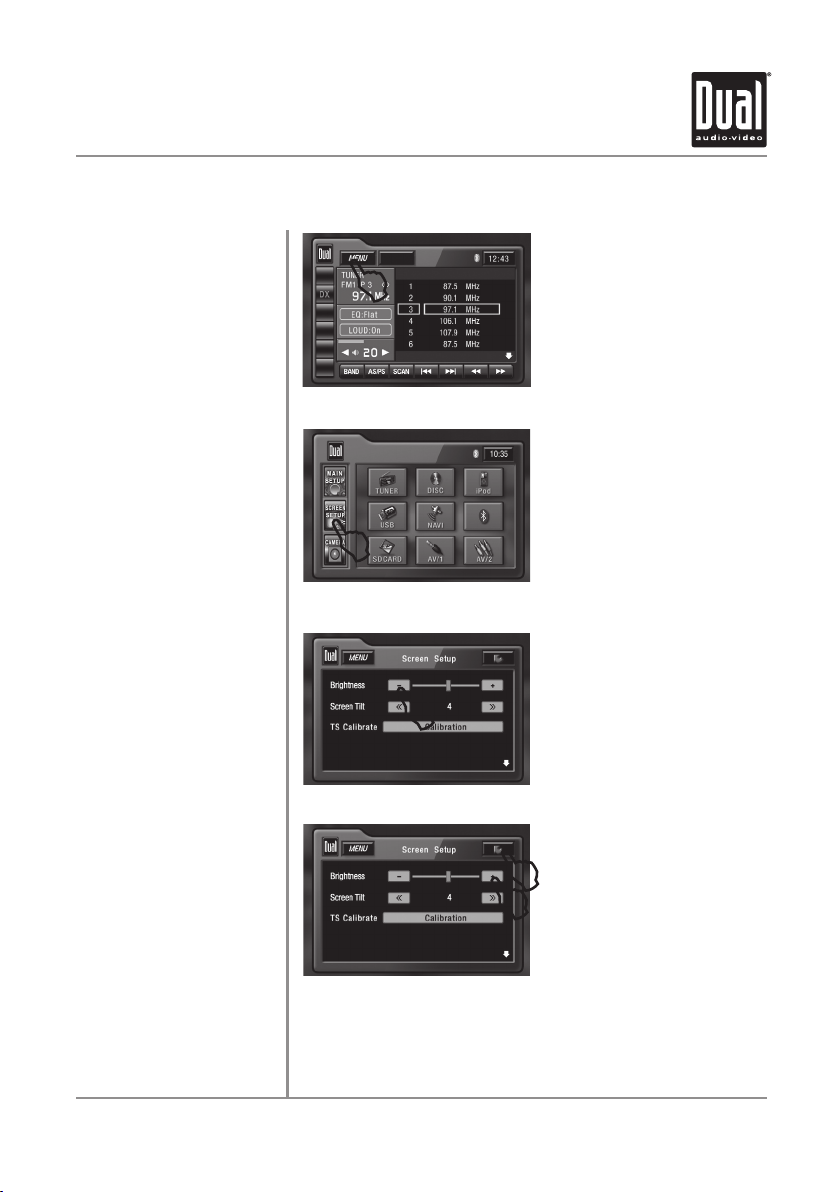
Screen Setup - Setting TFT Angle
Set for best viewing angle for
your vehicle
Step 1
Step 2
Step 3
1
L
1) Touch MENU at the top left corner of screen.
2
L
2) Touch SCREEN SETUP icon.
3
L
3) Touch << to decrease the screen angle.
5
L
4
L
Step 4
Step 5
4) Touch >> to increase the screen angle.
The range is 1 - 4
Default = 1
5) Touch RETURN to exit.
Page 27

XDVDN9131 OPERATION
26
Screen Setup - Touch Screen Calibration
Upon initial installation or
occasionally, the touch screen
may have to be calibrated. Follow
these steps as described.
1
L
Step 1
Step 2
Step 3 & 4
Step 4 & 5
1) Touch MENU at the top left corner of screen.
2
L
2) Touch SCREEN SETUP icon.
3
L
3) Touch Calibration in TS Calibration row.
4
L
4) Touch the pointers as indicated on the screen.
5) Screen will automatically return to MAIN MENU when the calibration
procedure is complete.
Page 28

XDVDN9131 OPERATION
27
AM/FM Tuner Operation - OSD Overview
21
20
19
18
17
16
Tuner Mode
1
2
3
4
5
6
7
8
2 31 4 6 7
5
8
15
14
13
12
11
10
9
From the main menu, touch TUNER icon on the screen to select AM/FM Tuner
mode.
Current Source Indicator
Displays source currently playing.
Main Menu
Touch MENU to access the main menu.
Stereo Indicator
Shows that the frequency selected is received in stereo.
Information Indicator
Displays status of various tuning functions including Auto Station
Store, Preset Scan, Scan tuning, etc.
Preset Number List Display
Shows the preset list by preset number. Touch preset number to
select a preset. Touch and hold preset number to store presets.
Preset Station List Display
Shows the preset station list by frequency. Touch frequency to
select a preset. Touch and hold frequency to store presets.
Clock Indicator
Shows current time.
Preset List Page - Up/Down
Touch Page Up/Down arrows to select the next or previous page.
Page 29

XDVDN9131 OPERATION
28
AM/FM Tuner Operation - OSD Overview
9
10
11
12
13
14
15
16
17
18
19
20
21
Tune Frequency - Up
Touching this icon will tune the radio to a higher frequency by one
frequency step. Touch and hold for continuous tuning up. (This
function can also be performed by pressing the corresponding
key on the remote control.)
Tune Frequency - Down
Touching this icon will tune the radio to a lower frequency by one
frequency step. Touch and hold for continuous tuning down. (This
function can also be performed by pressing the corresponding
key on the remote control.)
Seek Next Station - Up
Touching this icon will tune to the next strong station at a higher
frequency. (This function can also be performed by pressing the
corresponding key on the front panel or remote control.)
Seek Next Station - Down
Touching this icon will tune to the next strong station at a lower
frequency. (This function can also be performed by pressing the
corresponding key on the front panel or remote control.)
Tuner Scan
Touch this icon to scan through all available stations in the
current band. Touch again to disable.
Preset Scan/Auto Station Tune
Touching this icon will scan through all presets in the current
band. Holding this button for more than 2 seconds will
automatically program the 12 strongest stations available into the
presets in the current band.
Band
Touch band icon repeatedly until the desired band is displayed,
FM1, FM2 or AM. (This function can also be performed by
pressing BAND button.)
Volume Indicator
Indicates current volume level, controlled by rotary encoder.
Loudness Indicator
Touch screen here to turn the Loudness function on/off.
EQ Indicator
Touch screen here to enter Audio Setup Menu.
Current Station Indicator
Indicates current frequency.
Local / DX Tuning Mode
Shows when local or distance tuning is on.
Band Indicator
Shows which band the radio is tuned to, FM1, FM2 or AM.
Page 30

XDVDN9131 OPERATION
29
AM/FM Tuner Operation
AM/FM Tuner Mode
Band
Manual Tuning
Seek Tuning
Storing Presets
Auto Store Presets
Preset Scan
From the main menu, touch TUNER icon to select AM/FM Tuner mode.
From the remote control or the front panel:
Press MODE until the current station information is displayed on the screen.
Touch BAND on the screen repeatedly until the desired band is displayed, FM1,
FM2 or AM.
Press the BAND button on the front panel to switch between bands, FM1, FM2
or AM.
From the remote control:
Press the BAND button.
Touch
Touch
Touch and hold either
multiple stations.
From the remote control:
Touch
Touch
Touch
From the remote control:
Press
Press
There are 24 FM and 12 AM presets available in 3 bands.
After finding the desired frequency to store in memory, touch and hold the
screen on any of the frequencies or preset numbers in the preset station list
until it turns yellow. The new station will replace the previous selection.
Press and hold AS/PS on the front panel or touch and hold AS/PS to
automatically program the 12 strongest stations available into the presets in the
current band.
Press AS/PS on the front panel or touch AS/PS to scan through all tunable
presets in the current band and play them for 10 seconds each.
on the screen to tune to the next higher frequency step.
on the screen to tune to the next lower frequency step.
or on the screen to continue tuning across
or to perform manual tuning.
to tune to the next higher strong station.
to tune to the next lower strong station.
to tune to the next higher strong station.
to tune to the next lower strong station.
Page 31

XDVDN9131 OPERATION
30
AM/FM Tuner Operation
Direct Preset Tuning
Scan Tuning
Local/Distance Tuning
To select a desired station from the preset station list, touch any of the
displayed station frequencies or preset numbers from the list. Use the up and
down arrows on screen to select between the preset pages, if necessary.
From the remote control:
or to scroll through the presets. When the correct preset is
Press
highlighted press OK.
Touch SCAN on the screen and it will tune you to all stations available with
good reception for 10 seconds at a time. Touch SCAN again to disable.
Local tuning lets you tune in radio stations with sufficiently strong signals
for good reception. In areas that reception is poor, you can switch from local
to distance tuning by touching the LOC button on the screen. To return to
distance tuning mode, press the LOC button again. (Distance tuning is the
default tuning mode.)
Page 32

XDVDN9131 OPERATION
31
WARNING
Upon installation of this Monitor/DVD player (“unit”) into a vehicle, the driver of the vehicle
must not operate this unit by watching videos or playing video games while driving.
Failure to follow this instruction could lead to driver distraction which could result in
serious injury or death to the vehicle’s occupants or persons outside the vehicle and/or
property damage.
Several states prohibit the installation of monitors/DVD players if the screen is visible from
the driver’s seat. If you reside in a jurisdiction which has enacted such a law, this unit
must not be installed so that the screen is visible from the driver’s seat. When installing
this unit in the front console/dashboard, the unit must be positioned so that it is facing the
front passenger seat only. Failure to follow this instruction could lead to driver distraction
which could result in serious injury or death to the vehicle’s occupants or persons outside
the vehicle and/or property damage.
This unit is designed so that it may be operated only when the vehicle is in “Park” and the
parking brake is fully engaged. To this end, this unit includes a parking brake lock-out
feature which prohibits the unit from operating if the vehicle is not in “Park” and/or the
parking brake is not fully engaged. When installing this unit, the installer must connect
the parking brake detect wire (“Yellow-Blue Lead”) to the parking brake mechanism in
order to make the parking brake lock-out feature operable. DO NOT simply ground the
parking brake detect wire to a metal portion of the vehicle. Failure to properly install
the parking brake lock-out feature could lead to driver distraction which could result in
serious injury or death to the driver’s occupants or persons outside the vehicle and/or
property damage.
Once the parking brake lock-out feature is installed, the owner/user must not attempt to
disrupt/neutralize the parking brake lock-out feature by (a) partially engaging the parking
brake and/or (b) purchasing/using any device or unit designed to send necessary brake
signals to the unit. Failure to follow these instructions could lead to driver distraction
which could result in serious injury or death to the driver’s occupants or persons outside
the vehicle and/or property damage.
When operating this unit, keep the unit’s volume level low enough so that the vehicle’s
occupants can hear traffic-related sounds such as police and emergency vehicles.
Failure to follow this instruction could lead to driver distraction which could result in
serious injury or death to the vehicle’s occupants or persons outside the vehicle and/or
property damage.
Page 33

XDVDN9131 OPERATION
32
CAUTION !!!
IT'S UNLAWFUL TO OPERATE
A VEHICLE WHILE VIDEO IS
DISPLAY IN THE DRIVERS
VIEWING AREA
ENGAGE EMERGENCY BRAKE
TO WATCH VIDEO
DVD Setup - Parking Brake Initialization
SAFETY WARNING
• The video display of the in-dash unit will not operate while the vehicle is
moving. This is a safety feature to prevent driver distraction. In-dash video
functions will only operate when vehicle is in Park and the PARKING BRAKE
is engaged. It is illegal in most states for the driver to view video while the
vehicle is in motion. Refer to local laws in your area.
• The vehicle must be in park and the parking brake applied to view video on the
in-dash monitor.
• As a safety feature, !!Safety Warning!! blue screen will show on the display
when the vehicle's parking brake is not engaged. Video display on the front
monitor isn't allowed until the PARKING BRAKE is engaged. Connect the
yellow/blue PARKING BRAKE wire to the brake switch circuit as described
on page 6. Note: DVD and AUX AV audio can be heard while the vehicle is in
motion without engaging the parking brake.
Front Monitor Video
Initialization
Parking Brake Initialization
Situation 1
Parking Brake Initialization
Situation 2
Follow these two initialization procedures carefully to allow video playback on
on the XDVDN9131 front monitor:
There are two situations to initiate the PARKING BRAKE sequence.
First situation (if vehicle is moving):
1) Stop vehicle, put in Park, make sure PARKING BRAKE is off/released.
2) Depress PARKING BRAKE for 1 second.
3) Release PARKING BRAKE for 1 second.
4) Depress PARKING BRAKE permanently.
Note:
Once above procedure 1-4 is completed, video will display in about 2 seconds.
Second situation (if vehicle is already parked and the PARKING BRAKE is
already applied):
1) Keep vehicle in Park, PARKING BRAKE should be on.
2) Release PARKING BRAKE for 1 second.
3) Depress PARKING BRAKE for 1 second.
4) Release PARKING BRAKE for 1 second.
5) Depress PARKING BRAKE permanently.
Notes:
Once above procedure 1-5 is completed, video will display in about 2 seconds.
The transition time must be less than 2 seconds between depress and release.
This procedure must be repeated anytime the vehicle ignition is turned off.
Page 34

XDVDN9131 OPERATION
33
DVD Setup - Region Management
DVD Region Management
Some DVD discs can be played only in certain playback modes according to the intentions of the software. As the
XDVDN9131 plays discs according to their intentions, some functions may not work as intended. Please be sure to
read the instructions provided with each disc. This player has been designed to play back DVD software that has
been encoded for specific region areas. It cannot play back DVD software encoded for other region areas than the
region areas for which it has been designed.
The XDVDN9131 will play discs labeled “Region 1” or “All”.
DVD region codes:
1 - USA, Canada
2 - Japan, Europe, South Africa, Middle East
3 - Rep. of Korea, Taiwan, Hong Kong, Parts of Southeast Asia
4 - Australia, New Zealand, Mexico, South America
5 - Eastern Europe, Russia, India, Africa
6 - China
DVD Disc Symbols
Notes:
Some DVD discs can be
played only in certain playback
modes according to the
intentions of the software. As
the XDVDN9131 plays discs
according to their intentions,
some functions may not work
as intended. Please be sure to
read the instructions provided
with each disc.
Page 35

XDVDN9131 OPERATION
34
Eject Button
Disc Loading Slot
DVD Setup - Inserting a Disc
Inserting a Disc
Note
Ejecting the Disc
Reset the Loading Mechanism
Insert DVD with label facing upwards
Press REL to fold down the front panel. With the label facing up, insert a
standard size disc into the slot. Gently close the front panel, the disc will
automatically begin playback. Sub-menus may have to be pressed to access
the DVD movie/music content. Read the directions of your specific DVD disc for
other features.
If PARENTAL Lock is activated and the disc inserted is not authorized, a 4-digit
code must be entered and/or the disc be authorized. See "RATING MENU" on
page 38.
Press REL to fold down the front panel, then press the EJECT button.
If the disc loads abnormally or an system error occurs, press and hold the
eject button for 3 seconds to reset the loading mechanism. The disc will eject
and normal operation should resume.
Page 36

XDVDN9131 OPERATION
35
DVD Setup - Touch Screen Controls
Hidden Touch Screen areas
while in DVD mode
Using the hidden
Touch Screen Controls
A - Displays MAIN menu
B - Displays DVD disc
information
C - Selects PREVIOUS
chapter
D - Selects NEXT chapter
E - Displays the DVD
transport controls
F - Displays search menu
Note:
A DVD disc must be
inserted to access these
functions and features.
There are several hidden TOUCH SCREEN areas as outlined below:
"A" area can be used in DVD, A/V 1 and A/V 2 modes to access MAIN menu.
L
L
AREA A
Access MAIN Menu
AREA B
Displays Disc Information
L
AREA C
Selects PREVIOUS Chapter
AREA D
Selects NEXT Chapter
L
L
L
Displays DVD Transport Controls
AREA E
AREA F
DVD Search
Page 37

XDVDN9131 OPERATION
36
DVD Setup Menu - Language
LANGUAGE Setup Menu
Note:
A DVD disc must be inserted
to access these functions
and features.
Sub Title
DVD Audio
With the unit in DVD mode, press AREA E (bottom center of screen) to display
the DVD transport controls (1). Press Setup (2) or press and hold the 0 key on
the remote to access the DVD setup menu. The LANGUAGE setup menu will
automatically be displayed.
2
L
1
L
Press the current selection to select desired disc subtitle language.
English
French
Spanish
Auto
Off = DEFAULT
Press the current selection to select desired disc audio language.
English = DEFAULT
French
Spanish
L
DVD Menu
L
Press the current selection to select desired disc menu language.
English = DEFAULT
French
Spanish
L
Page 38

XDVDN9131 OPERATION
37
DVD Setup Menu - Video Settings
Video Setup Menu
Note:
A DVD disc must be inserted
to access these functions
and features.
TV Shape
Angle Mark
With the unit in DVD mode, press AREA E (bottom center of screen) to display
the DVD transport controls (1). Press Setup (2) or press and hold the 0 key on
the remote to access the DVD setup menu. The LANGUAGE setup menu will
automatically be displayed. Press the VIDEO icon (3) to display the VIDEO
setup menu.
2
L
3
L
1
L
Press to select desired TV shape.
Normal/PS
Normal/LB
Wide
NORMAL
L
L
WIDE
Select On to activate angle mark.
L
On
Off
Page 39

XDVDN9131 OPERATION
38
DVD Setup Menu - Rating
Rating Setup Menu
Note:
A DVD disc must be inserted
to access these functions
and features.
Enable Parental Lock
Password
Setting Parental Lock
Password
Rating Setting
Parental Password
Override
With the unit in DVD mode, press AREA E (bottom center of screen) to display
the DVD transport controls (1). Press Setup (2) or press and hold the 0 key on
the remote to access the DVD setup menu. The LANGUAGE setup menu will
automatically be displayed. Press the RATING icon (3) to display the RATING
setup menu.
2
L
1
L
Touch the current rating, select desired rating, then input password. Default
password is "0000".
3
L
L
L
L
1. Touch ****, enter current password, then press OK.
2. Enter new password, then press OK.
1. Kid Safe
2. G
3. PG
4. PG-13
5. PG-R
6. R
7. NC-17
8. Adult = DEFAULT
L
In the event you forget or loose your PARENTAL LOCK password, enter 9991.
Page 40

XDVDN9131 OPERATION
39
DVD Operation - Touch Screen Controls
Using the Hidden Touch
Screen Controls
Touch AREA E
2 43 5 76 8
DVD Mode
From the main menu, touch the DISC icon on the screen to select DVD mode.
Setup Menu
1
Touch to access the DVD Setup menu.
2
Stop
Touch the
Touch again to stop the disc (full stop).
3
Fast Reverse
Touch the
speed from 2x to 4x to 8x to 16x to 32x, then back to 1x play.
4
Fast Forward
Touch the
speed from 2x to 4x to 8x to 16x to 32x, then back to 1x play.
Repeat
5
Touch the
Sub-Title Mode
6
Touch to activate sub-titles on DVD's that have multiple
sub-title languages.
Audio Mode
7
Touch to activate alternate audio modes on DVD's that have
Title Menu
8
Touch to access DVD Title menu.
alternate audio streams.
icon to stop the chapter where it is (resume stop).
icon to fast reverse at 2x speed. Each touch changes
icon to fast forward at 2x speed. Each touch changes
icon to repeat the current chapter or title.
1
Page 41

XDVDN9131 OPERATION
40
Searching a DVD
DVD Operation - Searching a DVD
L
Searching by Time, Title
or Chapter
Time Search
Title/Chapter Search
Touch Area F to bring up the Search keypad, which allows
a search for a specific time, title or chapter. The Time
search window appears as the default.
Press Time to toggle to the Title/Chapter search window.
Once the Time search window is open, use the keyboard
to enter a specific time on the disc, then touch OK. For
example, to skip to 1 hour, 12 minutes and 19
seconds into the DVD, touch 0 1, 1 2, 1 9, OK).
Once the Title/Chapter search window is open, use the
keypad to enter a specific title and/or chapter on the
disc, then touch OK. This can be used to select a specific
chapter in the current title, a new title or a specific chapter
in a new title.
From the remote control:
Press SRCH once to access Time. Press SRCH again to
access Title/Chapter. Use the arrows to highlight either
the time, title or chapter field and use the numeric keypad
to enter the appropriate information and press OK.
Note:
Some DVD discs can be played only in certain playback modes according
to the intentions of the software. As the XDVDN9131 plays discs according
to their intentions, some functions may not work as intended. Please be
sure to read the instructions provided with each disc.
OK
OK
Page 42

XDVDN9131 OPERATION
41
DVD Operation
Playback Control
Repeat Mode
Play/Pause
Stop
Sub-Titles
Touch Area E to bring up the on-screen buttons.
to fast forward or to fast reverse.
Touch
Each subsequent press of the button will change the speed from normal to 2x
to 4x to 8x to 16x to 32x and back to 1x.
From the front panel:
Press and hold
Press and hold
From the remote control:
Press
Press
Touch the
Repeat Chapter mode and a second touch activates Repeat Title mode. Press a
third time to turn Repeat Off.
From the remote control:
Press
Note: The Repeat Mode can only be changed while the DVD is playing.
Touch
Touching it again will resume playback,
From the remote control:
Press PLAY to temporarily stop and resume playback.
From the remote control, touch
will resume playback. If
completely and will restart from the beginning of the disc.
Touch the SUB-T icon to activate Sub-Title menu and select a sub-title
language. Each touch will cycle the sub-title from off to language 1, language
2, etc., and back to off.
From the remote control:
Press the SUB-T button to control Sub-Title.
Notes:
• Not all DVD's have sub-titles and when they do, some will only have 1
language. Therefore this function may be disabled or limited.
• The sub-title can only be changed while the DVD is playing.
to fast forward.
to fast reverse.
to fast forward.
to fast reverse.
icon to repeat either a chapter or title. The first touch activates
to select Repeat Chapter, Repeat Title and Repeat Off modes.
on the front panel to temporarily stop playback of the DVD.
to stop playback. Pressing PLAY at this point
is touched a second time, then playback stops
Page 43

XDVDN9131 OPERATION
42
DVD Operation
DVD Audio
DVD Disc Information
Zoom Mode
DVD Title Menu
Touch AUD to change the audio stream. Each touch will cycle the audio stream.
From the remote control:
Press the AUDIO button to select the Audio stream.
Notes:
• Not all DVD's have multiple languages, therefore this function may be disabled or
limited.
• The Audio stream can only be changed while the DVD is playing.
Touch Area B or press INFO to bring up the DVD Disc Information, which includes:
Current/Total Titles (1), elapsed time for current title (2), EQ Mode (3), current time
(4), Current/Total Chapters (5), and Loudness setting (On/Off) (6).
From the remote control:
Press the INFO button to bring up the DVD Disc Information.
From the remote control:
Press the ZOOM button to activate Zoom Mode.
Each subsequent press of the button will change the magnification from normal to
1x to 2x to 3x to 4x then to 1/2x, 1/3x, 1/4x and back to normal.
When Zoom Mode is active in 2x, 3x or 4x, the arrows on the remote will pan the
screen up, down, right and left.
Touch the Title Menu icon to return to the DVD main menu.
From the remote control:
Press TITLE to return to the DVD main menu.
Press ROOT to move up one level on the DVD menus. (For example, when viewing
bonus materials, the ROOT button will return to the bonus menu instead of the main
menu.) Pressing ROOT again will usually return to the current chapter.
Note: On some DVD's the TITLE and ROOT functions may be reversed.
Page 44

XDVDN9131 OPERATION
43
CD Operation - OSD Overview
20
19
18
17
16
15
14
CD Mode
2 3 5
From the main menu, touch the DISC icon on the screen to select CD mode.
1
Current Source Indicator
Displays source currently playing.
2
Track Number Indicator
Displays current track number and total number of tracks on the disc.
3
Track Time Indicator
Shows the elapsed time of the current track.
4
Track Title List
Displays up to 6 tracks on the disc in order, with track number.
5
Clock
Displays the current time.
6
Scroll bar
Indicates position of current track relative to the disc.
7
Page Up
Touch the
4
910111213 78
icon to see the previous 6 tracks on the disc.
61
Page 45

XDVDN9131 OPERATION
44
CD Operation - OSD Overview
Page Down
8
Touch the
Fast Forward
9
Touch the
speed from 2x to 4x to 8x to 16x to 32x then to 1x play.
Fast Reverse
10
Touch the
speed from 2x to 4x to 8x to 16x to 32x then to 1x play.
11
Track Up
Touch
Track Down
12
Touch
Press again to return to the previous track.
Play/Pause
13
Touch the
14
Volume Adjustment
Indicates current volume level, Turn the rotary or use the volume
or on screen to adjust the volume level lower or higher (0-46).
Loudness Indicator
15
Touch LOUD to turn the Loudness feature On or Off.
Direct Select Keyboard
16
Touch DIR to display a numeric keyboard. Enter desired track
17
EQ Indicator
Touch screen here to enter Audio Setup Menu.
Repeat
18
Touch RPT to repeat current track. Rpt Trk will appear next to the
Random
19
Touch RDM to shuffle all tracks on the disc. Random will appear
20
Intro
Touch INT to listen to 10 seconds of each track in order. Intro will
number and touch
MENU button while this feature is activated. Touch RPT again to exit
Repeat mode.
next to the MENU button while this feature is activated. Touch RDM
again to exit Random mode.
appear next to the MENU button while this feature is activated.
Touch INT again to exit Intro mode.
icon to see the next 6 tracks on the disc.
icon to fast forward at 2x speed. Each touch changes
icon to fast reverse at 2x speed. Each touch changes
to skip ahead to the next track.
once to return to the beginning of the current track.
icon to temporarily stop or resume playback.
OK to select it.
Page 46

XDVDN9131 OPERATION
45
CD Operation
Navigating the Track Title List
Track Select
Direct Select
Direct Track Entry
Fast Forward/Fast Reverse
Intro Mode
Random Mode
Navigate the track title list in one of two ways:
• Using the Page Up and Page Down buttons on the screen.
• Using the arrow buttons on the remote control.
To select a desired track from the track title list, touch any track on the list.
From the remote control:
or to scroll through the tracks. When the correct track is highlighted
Press
press OK.
To navigate forwards or backwards through all tracks, press
screen, front panel or remote control:
to skip to the next track.
Press
to skip to the previous track.
Press
Note: Pressing
Pressing it a second time will skip to the previous track.
Touch DIR to display a numeric keyboard. Enter desired track number, and
touch OK to select it.
From the remote control:
Use the numeric keypad to enter the desired track number.
Use the Fast Forward or Fast Reverse on-screen buttons to speed up the
playback of a track. Each subsequent press of the button will change the speed
from normal to 2x to 4x to 8x to 16x to 32x and back to 1x.
Press
Press
From the remote control:
Press
Press
Touch INT on the screen to listen to all tracks on the CD for 10 seconds at a time,
starting from the next track on the CD. Intro will appear next to the MENU button
while this feature is activated. Touch INT again to exit Intro Mode.
Touch RDM to shuffle all of the tracks on the CD. Random will appear next to the
MENU button while this feature is activated. Touch RDM again to exit Random
Mode.
once will return to the beginning of the current track.
to fast forward.
to fast reverse.
to fast forward.
to fast reverse.
or on the
Page 47

XDVDN9131 OPERATION
46
CD Operation
Repeat Mode
Play/Pause
Stop
Touch RPT to repeat a track. Rpt Trk will appear next to the MENU button
while this feature is activated. Touch RPT again to exit Repeat Mode.
From the remote control:
to select Repeat. Press it a second time to disable Repeat.
Press
Note: Shuffle and Repeat modes can not be used simultaneously and
engaging one mode will cancel the other mode (if active.)
Press the
From the remote control:
Press PLAY to temporarily stop and resume playback.
From the remote control:
Press
PLAY at this point will resume playback. If
playback stops completely and will restart from the beginning of the CD.
button to temporarily stop or resume playback.
on the remote control to stop playback of the current song. Pressing
is touched a second time,
Page 48

XDVDN9131 OPERATION
47
MP3/WMA/JPG Operation - OSD Overview
213
5 7
4
26
25
24
23
22
21
20
19
18
17
16
15
14
6 9
13 121011
8
MP3/WMA/JPG Mode
From the main menu, touch the DISC or USB icon on the screen.
Current Source Indicator
1
Displays source currently playing.
File Number Indicator
2
Displays current file number and total number of files in the current
folder.
3
Elapsed Time Indicator
Shows the elapsed time of the current song.
Audio to Image Indicator
4
Press to switch from audio files to image files.
Folder Name
5
Displays the name of the currently selected folder.
Playlist
6
Displays up to 6 files in order, with filename.
Clock
7
Displays the current time.
File Type Indicator
8
Displays type of file, either MP3, or WMA or JPG.
Scroll bar
9
Indicates position of current file relative to the current folder.
10
Page Up
Touch the
icon to see the previous 6 files in the current folder.
Page 49

XDVDN9131 OPERATION
48
MP3/WMA/JPG Operation - OSD Overview
Page Down
11
Touch the
Fast Forward
12
Touch the
changes speed from 2x to 4x to 8x to 16x to 32x then to 1x play.
Fast Reverse
13
Touch the
changes speed from 2x to 4x to 8x to 16x to 32x then to 1x play.
Information
14
Displays available ID3 tag information for the current song.
Track Up
15
Touch
Track Down
16
Touch
Press again to return to the previous track.
Play/Pause
17
Touch
Next Folder
18
Touch the
Volume Adjustment
19
Indicates current volume level, Turn the rotary or use the volume
or on screen to adjust volume level lower or higher (0-46).
Previous Folder
20
Touch the
21
Loudness Indicator
Touch LOUD to turn the Loudness feature On or Off.
22
Direct Select Keyboard
Press DIR to display a numeric keyboard. Enter desired track number
23
EQ indicator
Press EQ to enter the Audio Setup Menu.
24
Repeat
Touch RPT to repeat current track and again to repeat all tracks in the
25
Random
Touch RDM to shuffle all tracks in the current folder and again to
26
Intro
Touch INT to listen to 10 seconds of each track in the current folder and
and touch OK to select it.
current folder. Touch RPT again to exit Repeat mode.
shuffle all tracks. Touch RDM again to exit Random mode.
again to preview all tracks. Touch INT again to exit Intro mode.
icon to see the next 6 files in the current folder.
icon to fast forward at 2x speed. Each touch
icon to fast reverse at 2x speed. Each touch
to skip ahead to the next track.
once to return to the beginning of the current track.
icon to temporarily stop or resume playback.
icon to select the next available folder.
icon to select the previous available folder.
Page 50

XDVDN9131 OPERATION
49
MP3/WMA/JPG Operation
Audio to Image Indicator
Folder List
Navigating the Folder/Playlist
File Select
Direct Select
Direct Track Entry
Fast Forward/Fast Reverse
Intro Mode
The Audio to Image indicator allows the selection of either audio (MP3 or WMA) or
image (JPEG) files to be displayed in the Playlist.
Indicates that audio files are currently displayed. Press to switch to
viewing image files.
Indicates that image files are currently displayed. Press to switch to
viewing audio files.
Press the Folder Name area at the top of the screen to display the first six folders.
Press
additional folders.
Once a folder is selected, the display will change to show the first six files in that
folder. The current folder name will appear in the Folder Name area. Press
to navigate back to the previous folder, or press
folder.
Navigate through the Playlist by pressing
desired file is highlighted, simply touch the screen at the appropriate file name to
begin playback.
From the remote control:
Press
press OK.
To navigate forwards or backwards through all tracks, press
screen, front panel or remote control:
Press
Press
Note: Pressing
it a second time will skip to the previous track.
Note: Pressing
in the next folder. Pressing
previous folder.
Touch DIR to display a numeric keyboard. Enter desired track number in the
current folder, and touch OK to select it.
From the remote control:
Use the numeric keypad to enter the desired track number in the current folder.
Use the Fast Forward or Fast Reverse on-screen buttons to speed up the
playback. Each subsequent press of the button will change the speed from
normal to 2x to 4x to 8x to 16x to 32x and back to 1x.
Touch INT on the screen to listen to all tracks in the current folder for 10 seconds
at a time, starting from the next track. Int Fol will appear next to the MENU button
while this feature is activated.
or or use the and buttons on the remote control to view
to skip forward to the next
or on the screen. Once the
or to scroll through the files. When the correct file name is highlighted
or on the
to skip to the next track.
to skip to the previous track.
once will return to the beginning of the current track. Pressing
from the last track in one folder will advance to the first track
from the first track in a folder will return to the
Page 51

XDVDN9131 OPERATION
50
MP3/WMA/JPG Operation
Intro Mode
Random Mode
Repeat Mode
Play/Pause
Stop
Touch INT again to preview all tracks. Intro will appear next to the MENU
button while this feature is activated. Touch INT again to exit Intro Mode.
Touch RDM on the screen to shuffle all tracks in the current folder. Rdm Fol
will appear next to the MENU button while this feature is activated.
Touch RDM again to shuffle all tracks. Rdm All will appear next to the MENU
button while this feature is activated. Touch RDM again to exit Random Mode.
Touch RPT to repeat a track and again to repeat all tracks in the current
folder. Rpt Trk or Rpt Fol will appear next to the MENU button while this
feature is activated. Touch RPT again to exit Repeat Mode.
Press PLAY/PAUSE to temporarily stop playback of the current track.
Touching it again will resume playback,
on the remote control to stop playback of the current track. Pressing
Press
PLAY at this point will resume playback. If
playback stops completely and will restart from the beginning.
is touched a second time,
JPG OSD Controls
When viewing JPG images from a Disc or USB device, the hidden controls
function similar to DVD mode. Refer to page 35 for more details.
Press Area E to display the JPG on-screen controls.
to stop the slideshow.
Press
Press P to rotate the image by 90˚.
Press ESC to hide the OSD controls.
Notes: It is not possible to view JPG files on the in-dash monitor while the
vehicle is moving. This is a safety feature to prevent driver distraction. The
JPG image viewer function will only operate when vehicle is in Park and the
parking brake is engaged as described on page 32.
Page 52

XDVDN9131 OPERATION
51
USB/SD Operation - OSD Overview
26
25
24
23
22
21
20
19
18
USB/SD Mode
*Note:
To provide the highest
level of navigation
performance, this
model does not
support JPG image
file playback from
SD cards.
213
17
16
15
From the main menu, touch the USB or SD icon on the screen.
Current Source Indicator
1
Displays source currently playing.
File Number Indicator
2
Displays current file number and total number of files in the
current folder.
3
Elapsed Time Indicator
Shows the elapsed time of the current song.
Audio to Image Indicator
4
Press to switch from audio files to *image files.
Folder Name
5
Displays the name of the currently selected folder.
Playlist
6
Displays up to 6 files in order, with filename.
Clock
7
Displays the current time.
File Type Indicator
8
Displays type of file, either MP3, or WMA or JPG.
Scroll bar
9
Indicates position of current file relative to the current folder.
10
Page Up
Touch the
5 7
4
14
6 9
8
13 121011
icon to see the previous 6 files in the current folder.
Page 53

XDVDN9131 OPERATION
52
USB/SD Operation - OSD Overview
11
12
13
14
15
16
17
18
19
20
21
22
23
24
25
26
Page Down
Touch the
Fast Forward
Touch the
changes speed from 2x to 4x to 8x to 16x to 32x then to 1x play.
Fast Reverse
Touch the
changes speed from 2x to 4x to 8x to 16x to 32x then to 1x play.
Information
Displays available ID3 tag information for the current song.
Track Up
Touch
Track Down
Touch
Press again to return to the previous track.
Play/Pause
Touch
Next Folder
Touch the
Volume Adjustment
Indicates current volume level, Turn the rotary or use the volume
or on screen to adjust volume level lower or higher (0-46).
Previous Folder
Touch the
Loudness Indicator
Touch LOUD to turn the Loudness feature On or Off.
Direct Select Keyboard
Press DIR to display a numeric keyboard. Enter desired track
EQ indicator
Press EQ to enter the Audio Setup Menu.
Repeat
Touch RPT to repeat current track and again to repeat all tracks in
Random
Touch RDM to shuffle all tracks in the current folder and again to
Intro
Touch INT to listen to 10 seconds of each track in the current folder
number and touch OK to select it.
the current folder. Touch RPT again to exit Repeat mode.
shuffle all tracks. Touch RDM again to exit Random mode.
and again to preview all tracks. Touch INT again to exit Intro mode.
icon to see the next 6 files in the current folder.
icon to fast forward at 2x speed. Each touch
icon to fast reverse at 2x speed. Each touch
to skip ahead to the next track.
once to return to the beginning of the current track.
icon to temporarily stop or resume playback.
icon to select the next available folder.
icon to select the previous available folder.
Page 54

XDVDN9131 OPERATION
53
USB/SD Operation
USB/SD Connection
Audio to Image Indicator
Note
Folder List
Navigating the Folder/Playlist
Track Select
Direct Select
Direct Track Entry
Connect a USB device or insert an SD card. When inserting an SD card, the label
should face away from the unit. Note: The unit will automatically switch to SD
mode when an SD card is inserted.
The Audio to Image indicator allows the selection of either sound (MP3 or WMA) or
image (JPEG) files to be displayed in the Playlist.
To provide the highest level of navigation performance, this model does not
support JPG image file playback from SD cards.
Indicates that audio files are currently displayed. Press to switch to
viewing image files.
Indicates that image files are currently displayed. Press to switch to
viewing audio files.
Press the Folder Name area at the top of the screen to display the first six folders.
Press
additional folders.
Once a folder is selected, the display will change to show the first six files in that
folder. The current folder name will appear in the Folder Name area. Press
to navigate back to the previous folder, or press
folder.
Navigate through the Playlist by pressing
desired file is highlighted, simply touch the screen at the appropriate file name to
begin playback.
From the remote control:
Press
press OK.
To navigate forwards or backwards through all tracks, press
screen, front panel or remote control:
Press
Press
Note: Pressing
it a second time will skip to the previous track.
Note: Pressing
in the next folder. Pressing
previous folder.
Touch DIR to display a numeric keyboard. Enter desired track number in the
current folder, and touch OK to select it.
From the remote control:
Use the numeric keypad to enter the desired track number in the current folder.
or or use the and buttons on the remote control to view
to skip forward to the next
or on the screen. Once the
or to scroll through the files. When the correct file name is highlighted
or on the
to skip to the next track.
to skip to the previous track.
once will return to the beginning of the current track. Pressing
from the last track in one folder will advance to the first track
from the first track in a folder will return to the
Page 55

XDVDN9131 OPERATION
54
USB/SD Operation
Fast Forward/Fast Reverse
Intro Mode
Random Mode
Repeat Mode
Play/Pause
Stop
Use the Fast Forward or Fast Reverse on-screen buttons to speed up the
playback. Each subsequent press of the button will change the speed from
normal to 2x to 4x to 8x to 16x to 32x and back to 1x.
to fast forward.
Press
to fast reverse.
Press
From the remote control:
to fast forward.
Press
to fast reverse.
Press
Touch INT on the screen to listen to all tracks in the current folder for 10
seconds at a time, starting from the next track. Int Fol will appear next to the
MENU button while this feature is activated.
Touch INT again to preview all tracks. Intro will appear next to the MENU
button while this feature is activated. Touch INT again to exit Intro Mode.
Touch RDM on the screen to shuffle all tracks in the current folder. Rdm Fol
will appear next to the MENU button while this feature is activated.
Touch RDM again to shuffle all tracks. Rdm All will appear next to the MENU
button while this feature is activated. Touch RDM again to exit Random Mode.
Touch RPT to repeat a track and again to repeat all tracks in the current
folder. Rpt Trk or Rpt Fol will appear next to the MENU button while this
feature is activated. Touch RPT again to exit Repeat Mode.
From the remote control:
to select between Repeat, Folder Repeat and Repeat Off modes.
Press
Note: Shuffle and Repeat modes can not be used simultaneously and
engaging one mode will cancel the other mode (if active.)
Press PLAY/PAUSE to temporarily stop playback of the current track.
Touching it again will resume playback,
From the remote control:
Press PLAY to temporarily stop and resume playback.
on the remote control to stop playback of the current track. Pressing
Press
PLAY at this point will resume playback. If
playback stops completely and will restart from the beginning.
Notes: It is not possible to view JPG files on the in-dash monitor while the
vehicle is moving. This is a safety feature to prevent driver distraction. The
JPG image viewer function will only operate when vehicle is in Park and the
parking brake is engaged as described on page 32.
is touched a second time,
Page 56

XDVDN9131 OPERATION
55
Media Compatibility - Disc
MEDIA CD/DVD
File Type WMA MP3
File System
File
Extension
MPEG
Format
Sampling
Frequency
Bitrate
Other
Information
ISO966 0 Level 1, Level 2
Level 3 X X
ISO966 0
Extension
Other
Extensions
MP3 ID3 TAG ver.1.x X
WMA TAG Title, Artist, Album
JOLIET Playback
Filename 32 bytes 32 bytes
ROMEO Playback X X
Filename X X
Apple I SO X X
.mp3/.MP3/.Mp3/.mP3 X
.wma /.WMA
.rm p/.m4a X X
MPEG 1 X
MPEG 2 X
MPEG 2. 5 X
MPEG 1
MPEG 2 X 32/44.1/48kHz
MPEG 2. 5
WMA 22.05/32/44.1/48kHz X
MPEG 1 X 8 ~ 320k bps
MPEG 2 X 64 ~ 912kbps
MPEG 2. 5 X 8 ~ 32 0kbps
WMA 32 ~ 192kbps X
Directory Depth Unlimited Unlimited
File Name Length 23 bytes 23 bytes
Total File Number 3000 files 3000 files
Total Folder Number 256 folders 256 folders
File Number via Folder 3000 files 3000 files
ver.2.x X v2.3
Title, Artist, Album X
X
X
8/11.025/12/16/22.05
24/32/44.1/48kHz
8/11.025/12/16/22.05
24/32/44.1/48kHz
X
X
Page 57

XDVDN9131 OPERATION
56
Media Compatibility - USB/SD
MEDIA USB Flash Drive/SD Card
File Type WMA MP3
File System
File
Extension
MPEG
Format
Sampling
Frequency
Bitrate
Other
Information
Notes:
• To provide the highest level of navigation performance, this model does not support JPG file playback from SD cards.
• For disc and USB modes, it is not possible to view JPG files on the in-dash monitor while the vehicle is moving.
This is a safety feature to prevent driver distraction.
• The JPG image viewer function will only operate when vehicle is in park and the parking brake is engaged as
described on page 32.
• Due to ongoing technological advancement, some USB flash drives and/or SD cards may be incompatible with
this unit.
FAT FAT 12 X X
FAT 16/FAT 32
.mp3/.MP3/.Mp3/.mP3 X
.wma /.WMA
.rm p/.m4a X X
MPEG 1 X
MPEG 2 X
MPEG 2. 5 X
MPEG 1
MPEG 2 X 32/44.1/48kHz
MPEG 2. 5
WMA 22.05/32/44.1/48kHz X
MPEG 1 X 8 ~ 320k bps
MPEG 2 X 64 ~ 912kbps
MPEG 2. 5 X 8 ~ 32 0kbps
WMA 32 ~ 192kbps X
Directory Depth Unlimited Unlimited
File Name Length 23 bytes 23 bytes
Total File Number 3000 files 3000 files
Total Folder Number 256 folders 256 folders
File Number via Folder 3000 files 3000 files
MP3 ID3 TAG ver.1.x X
ver.2.x X v2.3
Title, Artist, Album X
WMA TAG Title, Artist, Album
X
X
X
8/11.025/12/16/22.05
24/32/44.1/48kHz
8/11.025/12/16/22.05
24/32/44.1/48kHz
X
Page 58

XDVDN9131 OPERATION
57
Media Compatibility - Notes
Media Compatibility
Playback Order
Compatible Recording Formats
Additional MP3/WMA Information
Notes
The following types of discs are compatible:
• CD-DA, CD-ROM (ISO), CD-R, CD-RW
• DVD Video, DVD+R/RW, DVD-R/RW
The following types of discs/files are not compatible:
• WMA files that are protected by DRM (Digital Rights Management)
• WMA lossless format
• Discs recorded with Track At Once or packet writing
• MP3 PRO format, MP3 playlists
• RMP format
• WAV format
• WMV format
• DivX, Xvid format
• AVI format
• MPG, MPEG-4 format
• AAC, protected AAC, M4A format
Some recordable DVD's and CD's may be incompatible with this unit,
depending on media type and recording method.
MP3/WMA playback sequence is based on recorded order of files and begins
in the root folder of the disc, USB flash drive or SD card. Any empty folders
or folders that do not include MP3/WMA/JPG files are skipped. Refer to your
recording software’s user’s manual for more information.
ISO9660 standards:
• Maximum nested folder depth is 8 (including the root folder).
• Valid characters for folder/file names are letters A-Z (all caps), numbers
0-9, and “_” (underscore). Some characters may not be displayed correctly,
depending on the character type.
• This device can play back discs in Joliet and other standards that conform
to ISO9660. MP3/WMA written in the formats other than the above may
not play and/or their file names or folder names may not be displayed
properly.
An internal buffer provides ESP (Electronic Skip Protection) to virtually
eliminate skipping.
When playing a disc recorded with regular audio files (CD-DA or .WAV) and
MP3/WMA files, the unit will play the MP3/WMA files only.
Some files may not play or be displayed correctly, depending on sampling
rates and bit rates.
For best results, use the following settings when ripping MP3 files:
128kbps or higher constant bit rate
44.1kHz or higher sampling frequency
For best results, use the following settings when ripping WMA files:
64kbps or higher constant bit rate
44.1kHz or higher sampling frequency
Page 59

XDVDN9131 OPERATION
58
Operation of iPod - OSD Overview
23
22
21
20
19
18
17
16
Operation of iPod
1
2
3
4
5
6
7
8
9
213
15
14
13
Connect an iPod device using the included cable. From the main menu, touch the icon
of the iPod device on the screen.
Current Source Indicator
Displays source currently playing.
Song Number Indicator
Displays current song number and total number of songs.
Elapsed Time Indicator
Shows the elapsed time of the current song.
Artist Information
Displays the artist information for the currently selected song.
Playlist
Displays up to 6 songs/groups in order, with filename.
Clock
Displays the current time.
Scroll bar
Indicates position of current song in relation to the current folder.
Page Up
Touch the
Page Down
Touch the
icon to see the previous 6 songs.
icon to see the next 6 songs.
4 6
12
5 7
11 1089
Page 60

XDVDN9131 OPERATION
59
Operation of iPod - OSD Overview
10
11
12
13
14
15
16
17
18
19
20
21
22
23
Fast Forward
Touch the
cancel.
Fast Reverse
Touch the
cancel.
Album Information
Displays available album information for the current song.
Track Up
Touch
Track Down
Touch
Press again to return to the previous song.
Play/Pause
Touch
Volume Adjustment
Indicates current volume level, Turn the rotary or use the volume
or on screen to adjust volume level lower or higher (0-46).
Search Menu
Allows selection of content by various groups.
Return/Back
Touch
Loudness Indicator
Touch LOUD to turn the Loudness feature On or Off.
EQ indicator
Press EQ to enter the Audio Setup Menu.
Repeat
Touch RPT to repeat current song. Repeat will appear next to the
Random
Touch RDM to shuffle all songs. Random will appear next to the
Intro
Touch INT to listen to 10 seconds of each song in order. Intro will
MENU button while this feature is activated. Touch RPT again to exit
Repeat mode.
MENU button while this feature is activated. Touch RDM again to
exit Random mode.
appear next to the MENU button while this feature is activated.
Touch INT again to exit Intro mode.
icon to fast forward at 2x speed. Touch again to
icon to fast reverse at 2x speed. Touch again to
to skip ahead to the next song.
once to return to the beginning of the current song.
icon to temporarily stop or resume playback.
to return to the previous group/menu.
Page 61

XDVDN9131 OPERATION
60
Operation of iPod
Search Menu
Return/Back
Page Up/Down
Song Select
Direct Select
Song Control
Intro Mode
Random Mode
The content is organized by groups. Touch the on the screen to access the
search menu. Once in search menu, select one of the group types from the menu,
then select an item in that group.
For example:
• Select the Artist group and the display will change to a list of available artists.
Then select an artist from this list to hear some or all songs from that artist.
• Select the Song group to hear all songs.
Touch the
when browsing songs from a particular artist in Artist group mode, touch
return to the list of all available artists.
When there are more than 6 songs in a given group, the Page Up and Page Down
on-screen buttons can be used to see the rest of the songs in the current group.
Then use the Direct Select method to play a song from that group.
The Page Up and Page Down on-screen buttons can be used to preview the next/
previous pages.
Note: The Page Up/Down buttons will not select a song, but simply display more
songs in the group. If another song is not selected within 10 seconds of the last
press then the screen will return to the currently playing song/group.
From the remote control:
Press
Press
to the previous song.
To select a desired song from the song list, touch any of the displayed songs in
the list.
From the remote control:
When the correct song is highlighted press OK.
You can use the Fast Forward and Fast Reverse on-screen buttons to play a song
forwards or backwards at a higher speed. Touch the same button a second time
or press Play to return to normal playback.
From the remote control:
Press
Press
Touch INT on the screen to listen to all songs in the current group for 10 seconds
at a time, starting from the next track. Intro will appear next to the MENU button
while this feature is activated. Touch INT again to exit Intro Mode.
Touch RDM to shuffle the songs in the current group. Random will appear next to
the MENU button while this feature is activated. Touch RDM again to exit Random
Mode.
on-screen button to go back to a previous menu. For example,
to
to skip to the next song.
to return to the beginning of the current song. A second press will skip
to fast forward.
to fast reverse.
Page 62

XDVDN9131 OPERATION
61
Operation of iPod
Repeat Mode
Play/Pause
High Speed Search
Playing Music Files
Touch RPT to repeat a song. Repeat will appear next to the MENU button
while this feature is activated. Touch RPT again to exit Repeat Mode.
From the remote control:
to select Repeat. Press it a second time to disable Repeat.
Press
Note: Shuffle and Repeat modes can not be used simultaneously and
engaging one mode will cancel the other mode (if active.)
Press PLAY/PAUSE to temporarily stop playback of the current song. Press it
again will resume playback,
From the remote control:
Press PLAY to temporarily stop and resume playback.
Press and hold
The rate of advancement will increase the longer the button is pressed.
or to quickly advance up or down when searching.
L
1. Touch
2. Touch Music, then select desired category.
icon to access the search menu.
Selecting Music By:
Playlists
Artists
Albums
Genres
Songs
Composers
Audiobooks
Podcasts
L
Page 63

XDVDN9131 OPERATION
62
Playing Video Files
Operation of iPod
L
1. Touch
2. Touch Video, then select desired video.
icon to access the search menu.
Video Controls
Touch Area C to select the previous chapter and Area D to select the next
chapter. Note: Not all movies support this feature.
L
Touch Area A to return to the search menu.
From the front panel:
to skip to the next chapter.
Press
to skip to the previous chapter.
Press
From the remote control:
to skip to the next chapter.
Press
to skip to the previous chapter.
Press
to fast forward. Press to fast reverse.
Press
Notes: It is not possible to view videos or photos on the in-dash monitor
while the vehicle is moving. This is a safety feature to prevent driver
distraction. Video/photo functions will only operate when vehicle is in Park
and the parking brake is engaged as described on page 32.
Page 64

XDVDN9131 OPERATION
63
Operation of iPod
Viewing Photos
Photo Controls
Notes
Device Compatibility
L
1. Touch
2. Touch Photo, then begin slideshow from your iPod device.
Touch Area A to return to the search menu.
Character support - only alphanumeric characters can be displayed on the
secondary LCD (ASCII type).
The Video and Photo modes are not supported when using the 1st and 2nd
generation iPod Nano.
Compatible with
• iPod touch (2nd generation)
• iPod nano (4th generation)
• iPod classic
• iPod touch (1st generation)
• iPod nano (3rd generation)
• iPod nano (2nd generation)
• iPod with video
• iPod nano (1st generation)
icon to access the search menu.
Page 65

64
XDVDN9131 OPERATION
Auxiliary Inputs - A/V 1 & A/V 2
Using A/V1 Input
Using A/V2 Input
Using Rear Camera
Auto Selection
Connect an optional audio/video source into the 3.5mm (front panel) input.
Select AV/1 from the Main Menu to listen to audio.
Engage parking brake as described on page 32 to watch video.
Adjust volume on the external audio source as needed (if connected to the
headphone output).
Connect an optional audio/video source to the Auxiliary Input 2 (Red/White/Yellow
RCA connectors). Refer to page 6 for details.
Select AV/2 from the Main Menu to listen to audio.
Engage parking brake as described on page 32 to watch video.
Rear Camera Operation - (Optional)
Connect an optional rear camera to the Camera Input (Black RCA connector).
Refer to page 6 for details.
The camera image can be reversed (if needed) in the Main Setup Menu. Refer to
page 19 for details.
Manual selection - Touch CAMERA icon from the Main Menu to select camera
mode. Touch the top left area on the screen to exit camera mode.
The unit will automatically select camera mode when connected to the reverse
lamp circuitry. Refer to page 6 for details. Anytime the reverse gear is selected,
the panel will open and select camera mode automatically.
Page 66

XDVDN9131 OPERATION
65
Bluetooth® - OSD Overview (Optional)
10
9
8
Before using Bluetooth
Bluetooth Mode
1
2
3
4
5
6
7
8
21
3 4
5
6
7
Make sure the Bluetooth option is set to On in the Bluetooth Setup menu.
From the main menu, touch the Bluetooth icon on the screen. A Bluetooth icon will
appear anytime a Bluetooth device is connected.
Audio Transfer Button
Press to transfer audio between the head unit and mobile phone.
Talk button
Press to answer an incoming call or to place an outgoing call.
Display Indicator
Phone number display and call status indicator.
Bluetooth status indicator
When Bluetooth is On and a Bluetooth device is being paired, the
indicator will flash.
When Bluetooth is On and a phone is connected to the unit, the indicator
will illuminate steady.
Return button
Touch to RETURN to exit.
Keypad interface
Press 0-9, *, # and + to enter desired phone number.
Press Clear to clear the last digit.
End button
Press to end a call in progress or to reject an incoming call.
Setup Menu Icon
Press to access Bluetooth setup menu.
Page 67

XDVDN9131 OPERATION
66
Bluetooth® - OSD Overview (Optional)
Phone book Icon
9
Press to access the phone book menu.
Keypad Interface Icon
10
Press to display the keypad interface.
Bluetooth Setup Menu
Bluetooth Setup Menu matrix
Settings Default Options Function
Bluetooth On Off Turns off the Bluetooth functionality and resets the device list
On
Search No No Press Yes to begin the search/pairing process. Press No to
Yes
Device Not Paired Device
Names
Connect Auto Manual You must connect the phone to the head unit manually each
Auto The head unit will automatically connect to the last connected
Auto Answer Off Off You must press the Talk button to answer an incoming call
On All incoming calls will be automatically answered
Bluetooth MIC Internal Internal The hands-free audio will use the built-in microphone
External The hands-free audio will use the external microphone
Turns on the Bluetooth functionality
cancel the search/pairing process. See page 67 for more
details.
When connected, the current Bluetooth device name will be
displayed. Press the device name to display a list of available
devices that can be connected.
time
device. See page 67 for more details.
Notes: Some Bluetooth approved devices may not communicate or work properly with this head unit, depending on
the features or specifications of the device. During hands free operation, some noise may be heard when using a
mobile device with this head unit, depending on the mobile device and or the communication environment.
Page 68

XDVDN9131 OPERATION
67
Bluetooth® - Setup Menu (Optional)
Pairing
Search For Device
Step 1
Step 2
Device List
Notes
Connect
Auto Answer
Bluetooth MIC
Before you can use a Bluetooth device to make hands-free calls or stream
audio, it must be authenticated. This is also referred to as "pairing" a device.
Note: Please make sure that Bluetooth is activated on your mobile device before
you begin the pairing process. Refer to the owner's manual of your mobile
device for more details.
Access Bluetooth setup menu, make sure Bluetooth is set to On and press
Search - Yes to begin the pairing process. The head unit will display the device
name "DUAL BT" and the Pin "1234" and will search for any nearby Bluetooth
device. If you have more than one Bluetooth device, please make sure only the
device you want to connect to is powered on. Refer to the owner's manual of
your mobile device for more details on searching for Bluetooth devices.
When prompted by your mobile device, enter 1234 for the PIN or pass code. The
device name of the head unit will show up as "DUAL BT". During the pairing
process, the Bluetooth icon will flash. After the pairing process has completed,
and the device is connected, the Bluetooth icon will illuminate steady.
To connect to a previously connected device, press the current device name.
Any previously connected devices that are in range will be listed by their device
name. Press the desired device name to disconnect from the current device and
connect to the new device.
This head unit can remember the last 8 paired mobile devices. It is only possible
to connect to one Bluetooth mobile device at a time.
When pairing to more than 8 mobile devices, the head unit will delete the device
that was used the least. The mobile device that is last connected will always be
remembered by default.
It is possible to search for previously connected Bluetooth devices from this
head unit. It may be possible to search for this head unit from other Bluetooth
devices. It is also possible to disconnect this head unit from other devices.
The head unit will automatically connect to the last connected device when the
Connect feature is set to Auto. If the Connect feature is set to Manual, the head
unit will not automatically connect to any device. Set the Connect feature to
Manual when you do not want to connect to any Bluetooth device.
The head unit will automatically answer incoming calls when the Auto Answer
feature is set to On. If the Auto Answer feature is set to Off, the Talk button must
be pressed to answer an incoming call.
The head unit includes a built-in microphone for hands-free calling. As an
option, the included external microphone can be used. Set the Bluetooth MIC to
External to use the external microphone. Refer to page 7 for details on installing
the microphone.
67
Page 69

XDVDN9131 OPERATION
68
Bluetooth® - Operation (Optional)
Phone Book Menu Incoming Call Screen
Dialed Calls
Received Calls
Missed Calls
Making a Phone Call
Answering a Phone Call
Ending a Phone Call
Notes
Press Dialed Calls to retrieve the list of dialed calls from the mobile device. Touch
the desired number to call. Press the page up/down buttons to navigate through
the pages.
Press Received Calls to retrieve the list of received calls from the mobile device.
Touch the desired number to call. Press the page up/down buttons to navigate
through the pages.
Press Missed Calls to retrieve the list of missed calls from the mobile device.
Touch the desired number to call. Press the page up/down buttons to navigate
through the pages.
It is possible to make a phone call several different ways:
1. Enter the desired phone number using the on-screen keypad, then touch the
Talk icon.
2. Enter the desired phone number using the numeric keypad on the remote
control, then touch the Talk icon.
3. When the panel is closed, press Talk, enter the desired phone number using
the numeric keypad on the remote control, then press Talk.
4. Select a previous call from the phone book menu.
The head unit will answer calls automatically if the Auto Answer feature is set
to On. Pressing the Talk icon on-screen or pressing the Talk button on the front
panel can be used to answer an incoming call. During an incoming call, the audio
is muted for the current source and the incoming call screen will be displayed.
Adjust the volume during the call using the volume control.
Press the End icon on screen or the End button on the front panel to end a call in
progress or to reject an incoming call.
It is not possible to hear navigation voice guidance when using Bluetooth to make
a hands-free phone call. Voice guidance will resume once the call is ended.
Page 70

XDVDN9131 OPERATION
69
Bluetooth® - Streaming Audio (Optional)
1 2 3
Bluetooth Audio Mode
Before Using
Streaming Audio
Streaming Audio
Notes
The XDVDN9131 supports A2DP wireless streaming audio from your Bluetooth mobile
device directly to your head unit. You can also control your music from the front panel
of the head unit using AVRCP.
Make sure the Bluetooth option is set to On in the Bluetooth Setup menu and your
device is paired and connected as described on page 67.
To stream music to your head unit, your mobile device must support the following
Bluetooth profiles:
• A2DP profile to stream audio.
• AVRCP profile to control your music. Check the owner's manual or manufacturer of
your device for compatibility.
• Streaming audio must be enabled from your mobile device. This option will vary
depending on the device. Example: "wireless stereo."
From the main menu, touch the Bluetooth icon on the screen.
From the mobile device, start the music player and enable streaming audio. Press
Play/Pause on the front panel. The head unit will display the Audio Stream mode.
Track Down
1
Touch
Play/Pause
2
Touch
Track Up
3
Touch
Stop
on the remote control to stop playback.
Press
• A2DP and AVRCP operation may not be supported on every mobile device.
• On some mobile devices, it may be necessary to control the music from the device.
• On some mobile devices, audio streaming may begin automatically when connected
or when the device or the XDVDN9131 is powered off/on. Refer to the owner's
manual of your mobile device for more information.
to return to the beginning of the previous song.
to temporarily stop or resume playback.
to skip ahead to the next song.
69
Page 71

XDVDN9131 OPERATION
70
Navigation
2 3 41
15
5
14
Navigation Mode
10)
11)
12)
13)
14)
15)
6
79 811 1013 12
From the main menu, touch the NAVI icon on the screen or press the NAVI button on
the front panel. The image above shows the map screen features when in guidance
mode. Descriptions of each item are as follows:
1)
Zoom out: Zooming out from level 1 to level 21
2)
Compass: By tapping this icon, you can change the map display mode to Track up,
North up, or 3D View. (Refer to Settings>Map View for more information)
3)
Next street name
4)
Zoom in: Zooming in from level 21 to level 1
5)
Current street name
6)
Turn-by-Turn instruction: Indicates next guidance information
(Tap this icon to go to Turn-by-Turn screen)
7)
GPS signal reception: Tap this icon to go to GPS Status/information page
8)
Current speed
9)
Current time
Expected time to arrive at destination
Remaining travel time from current position to destination
Remaining travel distance from current position to destination
(To go to Route Summary page, tap anywhere from 9-12)
Menu button: Tap to go to Menu
Map scale: Indicates current map scale level
Voice guidance repeat button: Repeats the last voice instruction
70
Page 72

XDVDN9131 OPERATION
71
Navigation
Turn-by-Turn Screen
Route Summary Screen
Navigation Main Menu
71
Where to?
My Route
Clear route
Settings
The main menu can be accessed by pressing the MENU button on the map
screen. Descriptions of each button are as follows:
Allows you to search for a location in various ways.
Provides editing of the current route or retrieving the current route information.
Stops route guidance and removes all existing locations from route.
Allows you to customize navigation system settings.
Page 73

XDVDN9131 OPERATION
72
Navigation
Where to?
Page 1 of 2
Go Home
Favorites
Emergency
Recent Destination
Itinerary
Address
Intersections
Where to?
Page 2 of 2
Press Where To? to easily search for a location in various ways according to your
purpose or preference.
Hotkey for route guidance to your home location (saved in your Favorites list).
Search for locations saved to your Favorites list.
Hotkey for quickly searching the nearest emergency points of interest from your
current position without entering any additional information.
Recalls a list of recently traveled destinations.
Allows you to create or edit itineraries.
Search for destination by address.
Search for destination by intersections.
Go to page 2.
Zip Code
Point on Map
Cities
POI Category
POI Name
POI in City
POI Telephone No.
Search for locations by zip code.
Search for locations by pointing directly on the map.
Search for the center of a city or town.
Search for points of interest by category around your current location.
Search for points of interest by point of interest name.
Search for points of interest by category in a certain city.
Search for points of interest by telephone number.
Go to page 1.
72
Page 74

XDVDN9131 OPERATION
73
Navigation
How to plan your rst route
1. Press Menu, Where To?,
then Address
Your current position (and direction) is indicated on the map by the red arrow .
L
L
L
2. Search for a City Name
3. Search for a Street Name
4. Enter House number
73
For your convenience, previously searched state/province name and city name
are initially selected on the first stage of address search. If you want to change
state/province, tap Change. For State/Province search, you can search by either
the full name (e.g. New York), or abbreviation (e.g. NY).
Type letters and/or choose from the list of
results (only valid next letters appear).
Tap 123 to access numbers. Tap Back to
return to the previous screen.
L
L
Type letters and/or choose from the list of
results (only valid next letters appear).
L
Reconfirm the city, and street, then enter
the house number and tap Done.
L
The final destination will appear, tap Done
to calculate the route and proceed.
Page 75

XDVDN9131 OPERATION
74
Navigation
My Route
Create Route
Edit Route
Detour
Simulation Mode
Route Summary
Map Mode
Turn-by-Turn
Settings
Page 1 of 3
My Route allows you to create a new route or to edit an existing route. Create Route / Edit
Route buttons will change depending on situation.
Available if a route has not been set.
Available if a route has already been set. Use this option to edit your existing route.
Allows you to avoid part of the route, a roadblock, or to set a travel via point.
Starts a driving simulation of the route.
Displays the route summary page.
Displays the full map of your route.
Displays simplified guidance mode with no map.
Settings allows you to customize the settings of the Navigation system.
Color Mode
Map View
Set Brightness
Map Colors
Auto Zoom
Home
Label on Map
You can set the color mode of map as Day, Night or Auto mode. Auto mode allows the
navigation system to automatically choose day or night mode based on the current
system time.
You can change the view of map display mode as Track up, North up, or 3D View.
You can adjust the map brightness of day and night modes.
You can change the map colors.
You can set the automatic zooming at intersection and/or on speed.
You can set or change your home location.
You can turn on/off displaying various labels on the map.
Go to page 2.
Page 76

75
XDVDN9131 OPERATION
Navigation
Page 2 of 3
Settings
Settings allows you to customize the settings of the Navigation system.
Voice/Text Language
Routing Options
Units
Set Clock
Time Zone
Speed Limit
Fuel Cost
Settings
Page 3 of 3
Volume
Keyboard
About
Restore Settings
Change voice/text language of navigation.
Change routing options.
Change distance units (Miles or Kilometers).
Set time and apply options such as Daylight Saving and Sync. with GPS time.
Select time zone.
Turn on/off the speed warning and set a tolerance level for receiving a warning
alert. For example, set tolerance level as 2 mph to receive a warning when speed
limit is exceeded by 2 mph.
Adjust fuel prices and consumption.
Go to page 3.
Adjust the volume and link the volume to car speed.
Change keyboard options.
Shows product name and version.
Restore all settings to system defaults.
Back to page 1.
Please visit www.dualav.com for the latest version of the full-length owner's
manual. Please visit www.gogonav.com for map updates.
Page 77

76
XDVDN9131 OPERATION
Limited One Year Warranty
This warranty gives you specific legal rights. You may
also have other rights which vary from state to state.
Dual Electronics Corp. warrants this product to the
original purchaser to be free from defects in material
and workmanship for a period of one year from the
date of the original purchase.
Dual Electronics Corp. agrees, at our option, during
the warranty period, to repair any defect in material
or workmanship or to furnish an equal new, renewed
or comparable product (whichever is deemed
necessary) in exchange without charges, subject to
verification of the defect or malfunction and proof
of the date of purchase. Subsequent replacement
products are warranted for the balance of the original
warranty period.
Who is covered? This warranty is extended to the
original retail purchaser for products purchased from
an authorized Dual dealer and used in the U.S.A.
What is covered? This warranty covers all defects
in material and workmanship in this product. The
following are not covered: software, installation/
removal costs, damage resulting from accident,
misuse, abuse, neglect, product modification,
improper installation, incorrect line voltage,
unauthorized repair or failure to follow instructions
supplied with the product, or damage occurring
during return shipment of the product. Specific
license conditions and copyright notices for the
software can be found via www.dualav.com.
What to do?
1. Before you call for service, check the
troubleshooting guide in your owner’s manual.
A slight adjustment of any custom controls may
save you a service call.
2. If you require service during the warranty period,
you must carefully pack the product (preferably
in the original package) and ship it by prepaid
transportation with a copy of the original receipt
from the retailer to an
authorized service center.
3. Please describe your problem in writing and
include your name, a return UPS shipping address
(P.O. Box not acceptable), and a daytime phone
number with your shipment.
4. For more information and for the location of the
nearest authorized service center please contact
us by one of the following methods:
• Call us toll-free at 1-866-382-5476
• E-mail us at cs@dualav.com
Exclusion of Certain Damages: This warranty is
exclusive and in lieu of any and all other warranties,
expressed or implied, including without limitation
the implied warranties of merchantability and fitness
for a particular purpose and any obligation, liability,
right, claim or remedy in contract or tort, whether or
not arising from the company’s negligence, actual or
imputed. No person or representative is authorized
to assume for the company any other liability in
connection with the sale of this product. In no event
shall the company be liable for indirect, incidental or
consequential damages.
Page 78

XDVDN9131 OPERATION
77
End-User License Agreement (EULA)
IMPORTANT – READ THESE TERMS AND CONDITIONS OF THIS END USER LICENSE AGREEMENT CAREFULLY BEFORE
USING THE SOFTWARE.
This End-User License Agreement (“EULA”) is a legal agreement between you and EnGIS Technologies, Inc. (EnGIS).
This EULA applies to (the use of) EnGIS software, including Internet-based services, and all contents and contents
programs offered by EnGIS (“Software”).
It applies to the software that accompanies these license terms. By using all or any portion of the Software you accept all
the terms and conditions of this EULA. The breaking or removal of the seal of a DVD, CD-ROM, floppy disc, memory card
or any other media, and pressing the “I agree” button displayed by the software during installation or use (hereinafter
referred to as Use), or for a download of any Software, updates, supplements, or upgrades is considered use of the
Software.
If you do not agree to the terms of this EULA, you are not entitled to use the Software and you must press the “Cancel”
button to decline the installation, download or usage of the Software.
1) GRANT OF LICENSE: This EULA grants you a non-exclusive, non-transferable and revocable license to use the
accompanying Software already installed on the device and/or contained on the CD-ROM/DVD-ROM/memory cards
and any other storage media. For the license granted above, you shall only use the Software on one signal device at
a time. You shall not permit concurrent use of the Software without proper licenses. The Software shall include the
operating computer program, its complete documentation, the map database pertaining thereto and any third-party
content and services accessible through the Software Product. This License does not grant any rights to obtaining
future upgrades, updates or supplements of the Software. If upgrades, updates or supplements of the Software are
obtained, however, the use of such upgrades or updates is governed by this EULA and any amendments to it unless
other terms accompany the upgrades, updates or supplements in which case those terms apply.
2) COPYRIGHT: Copyright and other intellectual, industrial and/or proprietary rights to the Software and to any
copies that you may make are owned by EnGIS and/or its suppliers. EnGIS permits you to use the Software only in
accordance with the terms of this EULA. All rights not specifically granted in this EULA are reserved by EnGIS. You
may either (a) make one copy of the Software solely for backup or archival purposes, or (b) transfer the Software
to a single medium, provided you keep the original solely for backup or archival purposes. You may not copy the
product manual(s) or written materials accompanying the Software, except for own use. You only become the
owner of the material data carrier, if any, and you do not acquire ownership of the Software.
3) OTHER RESTRICTIONS: Other than as permitted by applicable legislation, you will not, and will not allow any other
person to:
i. modify the Software or any part thereof;
ii. reverse engineer, decompile or disassemble the Software;
iii. create compilations or derivative works;
iv. translate, adapt, or disassemble the Software or any part thereof, including the third-party content data;
v. work around any technical limitations in the Software;
vi. make more copies of the Software than specified in this agreement,
vii. publish the Software for others to copy;
viii. rent, lease or lend the Software; or
ix. use the Software in any way that is against the law.
4) CONFIDENTIALITY: You acknowledge and agree that the Software was developed at considerable time and expense
by EnGIS and is confidential to and a trade secret of EnGIS and/or third parties. You agree to maintain the Software
in strict confidence and not to disclose or provide access thereto to any person.
5) THIRD PARTY SOFTWARE LICENSES: EnGIS may make use of third party software. Notwithstanding the terms and
conditions of this License, use of some third party materials included in the Software may be subject to other terms
and conditions. The official third party copyright notices and specific license conditions of these third party software
codes and algorithms are to be found in the ABOUT screen of the software program. You hereby agree to the terms
and conditions for such third party software.
Page 79

XDVDN9131 OPERATION
78
End-User License Agreement (EULA)
6) LIMITED WARRANTY: a) The Software is intended to be used only as a travel aid and must not be used for any
purpose requiring precise measurement of direction, distance, location or topography. EnGIS makes no warranty
as to the accuracy or completeness of map data or other third-party content in the application. EnGIS does not and
cannot warrant that the Software operate error-free. You should be particularly aware of the fact that calculation
errors may occur when using Software for instance caused by local environmental conditions and/or incomplete
data. b) TO THE MAXIMUM EXTENT PERMITTED BY APPLICABLE LAW, ENGIS AND ITS SUPPLIERS PROVIDE THE
SOFTWARE “AS IS AND WITH ALL FAULTS”, AND HEREBY DISCLAIM ALL OTHER WARRANTIES AND CONDITIONS,
WHETHER EXPRESS, IMPLIED OR STATUTORY, INCLUDING, BUT NOT LIMITED TO, ANY (IF ANY) IMPLIED
WARRANTIES, DUTIES OR CONDITIONS OF: MERCHANTABILITY, NON-INFRINGEMENT, QUIET ENJOYMENT,
SYSTEM INTEGRATION, SATISFACTORY QUALITY, FITNESS FOR A PARTICULAR PURPOSE, RELIABILITY OR
AVAILABILITY, ACCURACY OR COMPLETENESS OF RESPONSES, RESULTS, WORKMANLIKE EFFORT, LACK OF
VIRUSES, AND REASONABLE CARE AND SKILL, ALL WITH REGARD TO THE SOFTWARE, AND THE PROVISION OF
OR FAILURE TO PROVIDE SUPPORT OR OTHER SERVICES, INFORMATION, SOFTWARE, AND RELATED CONTENT
THROUGH THE SOFTWARE OR OTHERWISE ARISING OUT OF THE USE OF THE SOFTWARE. This exclusion does
not apply to (i) any implied condition as to title and (ii) any implied warranty as to conformity with description. If
applicable law requires any implied warranties with respect to the Software, all such warranties are limited in
duration to ninety (90) days. Some states and/or jurisdictions do not allow limitations on how long an implied
warranty lasts, so the above may not apply to you. c) This Limited Warranty is the only express warranty made to
you and is provided in lieu of any other express warranties or similar obligations (if any) created by any advertising
documentation, packaging, or other communications.
7) LIMITATION OF LIABILITY: a) NEITHER ENGIS NOR ITS SUPPLIERS SHALL BE LIABLE TO YOU OR TO ANY THIRD
PARTY FOR ANY INDIRECT, INCIDENTAL, CONSEQUENTIAL, SPECIAL, OR EXEMPLARY DAMAGES (INCLUDING
IN EACH CASE, BUT NOT LIMITED TO, DAMAGES FOR THE INABILITY TO USE ANY THIRD PARTY EQUIPMENT
OR ACCESS DATA, LOSS OF DATA, LOSS OF BUSINESS, LOSS OF PROFITS, BUSINESS INTERRUPTION OR THE
LIKE) ARISING OUT OF THE USE OF OR INABILITY TO USE THE SOFTWARE EVEN IF ENGIS HAS BEEN ADVISED
OF THE POSSIBILITY OF SUCH DAMAGES. b) NOTWITHSTANDING ANY DAMAGES THAT YOU MIGHT INCUR FOR
ANY REASON WHATSOEVER (INCLUDING, WITHOUT LIMITATION, ALL DAMAGES REFERENCED HEREIN AND ALL
DIRECT OR GENERAL DAMAGES IN CONTRACT OR ANYTHING ELSE), THE ENTIRE LIABILITY OF ENGIS AND ANY
OF ITS SUPPLIERS ARISING FROM OR RELATED TO THIS EULA, SHALL BE LIMITED TO THE AMOUNT ACTUALLY
PAID BY YOU FOR THE SOFTWARE. c) Notwithstanding clauses 7(a) and (b), or anything else contained in this
EULA, neither party’s liability for death or personal injury resulting from its own negligence shall be limited. d)
Some states and/or jurisdictions do not allow the exclusion or limitation of incidental or consequential damages, so
the above limitations or exclusions may not apply to you.
8) TERMINATION: Without prejudice to any other rights, EnGIS may immediately terminate this EULA if you fail to
comply with any of its terms and conditions. In such event, you must destroy all copies of the Software and all
of its component parts. The following provisions of this EULA will survive termination, will remain in effect after
termination of this EULA: Sections 3, 4, 6, 7, 8, 9, 10, and 11. EnGIS reserves the right, with or without notice, to
discontinue update, upgrade and supplement services provided to you or made available to you through the use of
the Software.
9) ENTIRE AGREEMENT: This EULA (including any addendum or amendment to it which may be supplied with the
Software), if applicable, and any other terms and conditions, if applicable, is the entire agreement between you and
EnGIS relating to the Software and the support services (if any) and they supersede all prior or contemporaneous
oral or written communications, proposals and representations with respect to the Software or any other subject
matter covered by this EULA. To the extent that the terms of any EnGIS policies or programs for support services
conflict with the terms of this EULA, the terms of this EULA shall govern. If any provision of this EULA is held to be
void, invalid, unenforceable or illegal, the other provisions shall continue in full force and effect.
10) TRANSLATIONS: The English version of this EULA is the controlling version. Any translations are provided for
convenience only.
11) GOVERNING LAW: This EULA shall be governed by the laws of the state of California, USA. The United Nations
Convention on Contract for the international Sale of Goods is hereby excluded in its entirety from application to this
Agreement.
Page 80

XDVDN9131 OPERATION
79
Specifications
Disc
Frequency response: 10Hz-20kHz
Channel separation @ 1kHz: >65dB
D/A converter: 24 Bit
FM Tuner
AM Tuner
USB
Bluetooth
Monitor
General
Tuning range: 87.5MHz-107.9MHz
Usable sensitivity: 8.5dBf
50dB quieting sensitivity: 15dBf
Stereo separation @ 1kHz: 35dB
Frequency response: 30Hz-11kHz
Tuning range: 530kHz-1710kHz
Usable sensitivity: 26uV
Frequency response: 30Hz-2.2kHz
Compatibility: Full Speed USB 1.1
Output: 5VDC, 500mA
Compatibility: Version 2.0 + EDR
Supported Profiles: HFP, A2DP, ACVRP
Panel size: 7” (177.8 mm) diagonal measurement
View angle (up/down/left/right): 40/65/65/65
Resolution: 480 W x 234 H
Brightness (cd/m2): 350
Contrast ratio: 300:1
Elements: 336,960
Speaker output impedance: 4~8 ohms
Line output voltage: 2 volts
Line output impedance: 200 ohms
Chassis dimensions: 7" x 7" x 2"
(178 x 178 x 51 mm)
Design and specifications subject to change without notice.
CEA-2006 Power Standard Specifications
(reference: 14.4VDC +/- 0.2V, 20Hz~20kHz)
Power Output: 17 Watts RMS x 4 channels at 4 ohms and < 1% THD+N
Signal to Noise Ratio: 80dBA (reference: 1 watt into 4 ohms)
Page 81

XDVDN9131 OPERATION
80
General
Problem Cause Action
Unit will not turn on
(no power)
Unit has power
(but no sound)
Unit blows fuse(s)
Unit has audio
(but no video)
No navigation, SD or rear
camera video output
No video display
(when in reverse)
DVD does not start
playback
IR remote does not work
Excessive skipping
Invalid Disc appears
on display or ERROR 2
flashes on LCD
Invalid Region appears on
display or Wrong Region
flashes on LCD
Monitor will not
open/close
Yellow wire not connected or incorrect voltage
Red wire not connected or incorrect voltage
Black wire not connected Check connection to ground
Fuse blown Replace fuse(s)
Speaker wires not connected Check connections at speakers
One or more speaker wires touching each
other or touching chassis ground
Yellow or red wire touching chassis ground Check for pinched wire
Speaker wires touching chassis ground Check for pinched wire
Incorrect fuse rating Use fuses with correct rating
Parking brake safety circuit not connected
Parking brake not applied
Video output is not supported for navigation
mode, SD mode or rear camera input
Reverse circuit not connected
Vehicle is not in reverse
Physical defect in media
Wrong region
Dead battery Replace battery
Unit is not mounted correctly Check mounting sleeve
Physical defect in media Check media for scratches
Focus error
Disc is in upside down
Disc type/content is not compatible
Region code error Use only DVD's labeled “Region 1” or “All” only.
Monitor travel path obstructed Remove the obstacle and press OPEN to resume the
Check connections for proper voltage (11~16VDC)
Insulate all bare speaker wires from each other and
chassis ground
Check connections at parking brake
Apply parking brake as described on page 32
Choose Tuner, Disc, operation of iPod, USB, A/V 1 or
A/V 2 source to display video output
Check connections at reverse lamp
Select reverse gear
Check media for scratches
Use discs labeled "Region 1" or "All" only.
Press REL to open the front panel, then press eject. If the
problem persists, press RESET located behind the front
panel as described on page 11.
monitor open/close sequence.
Troubleshooting
Page 82

XDVDN9131 OPERATION
81
Troubleshooting
Bluetooth
Problem Cause Action
"Please connect first"
is displayed when the
Talk button is pressed
Mobile device will
not connect to the
head unit
Mobile device will not
connect to the head
unit automatically
Ring tone can not be
heard through the
speakers
Echo or noise is heard
during a phone call
Call is connected
(but no audio can be
heard through the
speakers)
Call is connected
(but other party can
not hear audio)
Call is answered
automatically
Caller ID does not
appear during
incoming call
There is no mobile device connected to the head unit Pair and or connect a mobile device to the head unit as
Bluetooth function is not active on the head unit Activate Bluetooth function as described on page 66
Bluetooth function is not active on the mobile device Refer to the owner's manual of your mobile device
A mobile device is already connected to the head
unit. This head unit can only be connected to one
device at a time
The time limit for pairing the mobile device has
been reached
The Connect function is set to Manual. When the
Connect function is set to Manual, the head unit will
not connect to any mobile device automatically
Volume is turned down Increase the volume during the ringing process
MUTE function is activated on the head unit Press MUTE to cancel the mute function and resume
Possible road noise or interior interference Close all open windows and turn off any fans or A/C
Microphone opening on the front panel is obstructed Clear any obstacles in front of microphone opening
Audio is routed to the mobile device Press Transfer to allow audio from the phone to be
Volume is turned down Increase the volume
Bluetooth MIC is set to external, but no external mic
is connected
External mic is connected to the wrong input (blue)
3.5mm connector
Auto Answer function is set to On Set Auto Answer function to Off as described on page 66
The calling mobile device is not set to send the
Caller ID or, the service is not available
described on page 67
Disconnect current mobile device first, then connect
desired mobile device
Pair the mobile device within 60 seconds
Set Connect function to Auto as described on page 66
audio
heard through the speakers
Set Bluetooth MIC to internal as described on page 66,
or install and connect external mic as described on
page 7
Connect external mic to the correct (black) 3.5mm
connector
Some devices may not communicate or work properly
with this head unit
Page 83

XDVDN9131 OPERATION
82
Navigation
Problem Cause Action
No voice guidance
"Acquiring GPS satellites.
Please wait a moment."
appears on display.
(No GPS signal)
"The Navigation program
cannot start because the
license is invalid" message
appears on display
Left front speaker is not connected Check speaker connection at left front speaker
Navi volume is turned down Increase the Navi volume as described on page 10
Main volume is Muted Increase the Main volume
Bluetooth call is in progress Voice guidance is not available during a Bluetooth phone call
The GPS antenna is not connected Check GPS antenna connection
The GPS antenna cable is damaged Check for pinched or cut antenna cable
The GPS signal is blocked (such as
inside a tunnel or garage)
The GPS signal can not be established Reset GPS module by entering the GPS information page as
The map software license is missing
or expired
Make sure the antenna has an unobstructed view of the sky
described on page 70 and press RESET
Please call Dual Customer Service for assistance
1-866-382-5476
Troubleshooting
For Your Records
Register Your Product
Please keep your original sales receipt and be prepared to provide this receipt
in the event you require service, as your original receipt is considered the best
proof of purchase and indicates the date you purchased your Dual product.
Dealer Name
Dealer Phone
Purchase Date
Register your product online at www.dualav.com
Page 84

Dual Electronics Corp.
Toll Free: 1-866-382-5476
©2009 Dual Electronics Corp. All rights reserved.
www.dualav.com
NSA1209-V01.4
Printed in China
 Loading...