

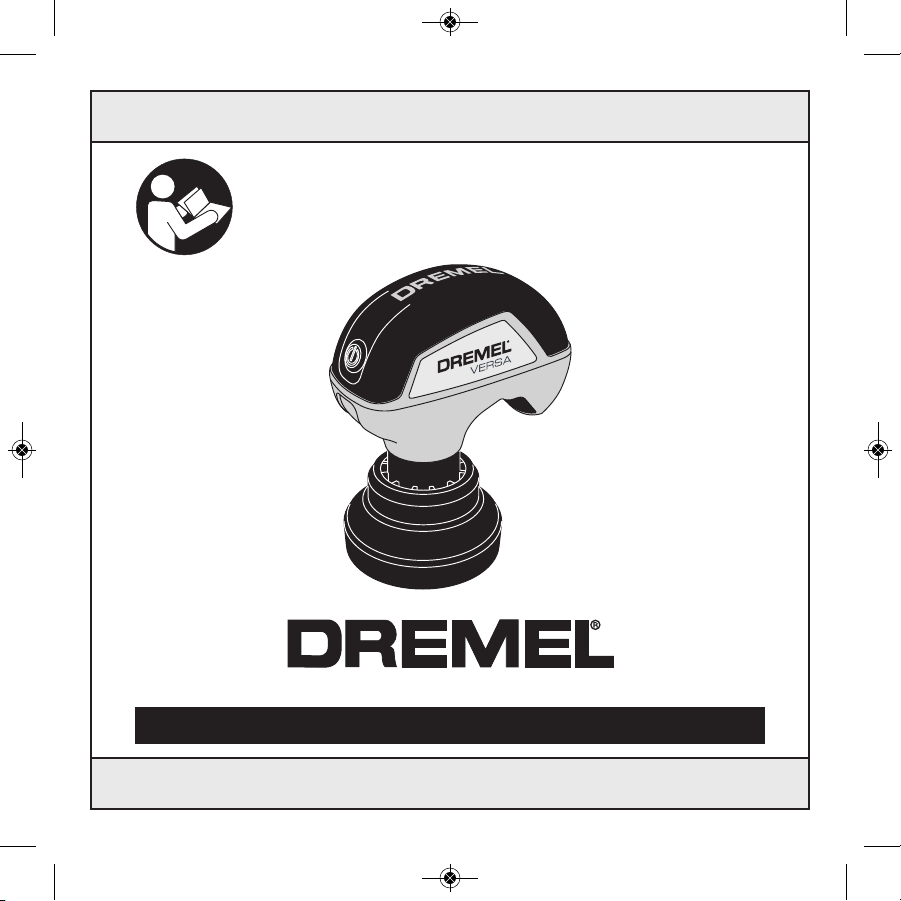
Page 1
IMPORTANT: IMPORTANT : IMPORTANTE:
Read Before Using Lire avant usage Leer antes de usar
Operating/Safety Instructions
Consignes de sécurité/d’utilisation
Instrucciones de funcionamiento y seguridad
For English Version Version française Versión en español
See page 2 Voir page 24 Ver la página 46
1-800-4-DREMEL (1-800-437-3635) www.dremel.com
P.O. Box 081126 Racine, WI 53408-1126
PC10
1600A018W0AA 02-18 PC10.qxp_Layout 1 2/7/18 7:28 AM Page 1
Page 2
2
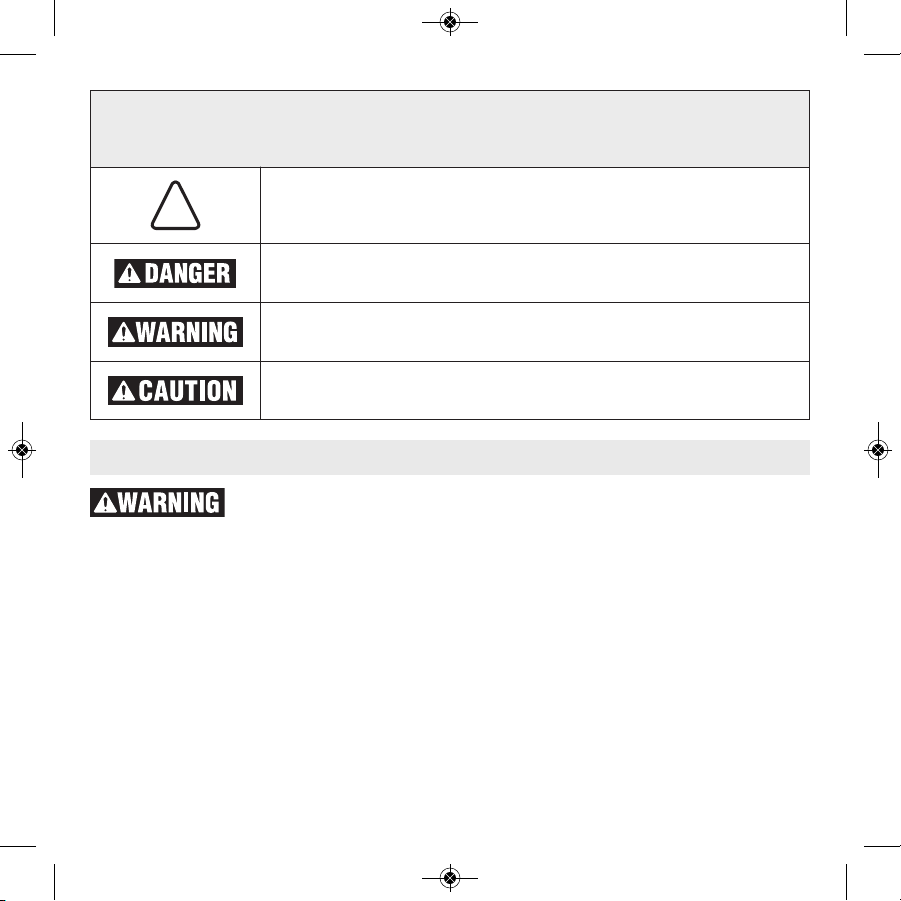
Safety Symbols
The definitions below describe the level of severity for each signal word. Please read the manual
and pay attention to these symbols.
!
This is the safety alert symbol. It is used to alert you to potential personal
injury hazards. Obey all safety messages that follow this symbol to avoid
possible injury or death.
DANGER indicates a hazardous situation which, if not avoided, will result in death or serious injury.
WARNING indicates a hazardous situation which, if not avoided, could
result in death or serious injury.
CAUTION, used with the safety alert symbol, indicates a hazardous
situation which, if not avoided, will result in minor or moderate injury.
Read all safety warnings and all instructions. Failure to follow the warnings and
instructions may result in electric shock, fire and/or serious injury.
SAVE ALL WARNINGS AND INSTRUCTIONS FOR FUTURE REFERENCE
The term “power tool” in the warnings refers to your mains-operated (corded) power tool or battery-operated (cordless) power tool.
General Power Tool Safety Warnings
Work area safety
Keep work area clean and well lit. Cluttered or
dark areas invite accidents.
Do not operate power tools in explosive atmospheres, such as in the presence of flammable liquids, gases or dust. Power tools
create sparks which may ignite the dust or
fumes.
Keep children and bystanders away while
operating a power tool. Distractions can cause
you to lose control.
Electrical safety
Power tool plugs must match the outlet.
Never modify the plug in any way. Do not use
any adapter plugs with earthed (grounded)
power tools. Unmodified plugs and matching
outlets will reduce risk of electric shock.
1600A018W0AA 02-18 PC10.qxp_Layout 1 2/7/18 7:28 AM Page 2
Page 3

3
Avoid body contact with earthed or grounded
surfaces such as pipes, radiators, ranges
and refrigerators. There is an increased risk of
electric shock if your body is earthed or
grounded.
Do not expose power tools to rain or wet
conditions. Water entering a power tool will in-
crease the risk of electric shock.
Do not abuse the cord. Never use the cord
for carrying, pulling or unplugging the power
tool. Keep cord away from heat, oil, sharp
edges or moving parts. Damaged or entangled
cords increase the risk of electric shock.
When operating a power tool outdoors, use
an extension cord suitable for outdoor use.
Use of a cord suitable for outdoor use reduces
the risk of electric shock.
If operating a power tool in a damp location is
unavoidable, use a Ground Fault Circuit Interrupter (GFCI) protected supply. Use of an
GFCI reduces the risk of electric shock.
Personal safety
Stay alert, watch what you are doing and use
common sense when operating a power tool.
Do not use a power tool while you are tired or
under the influence of drugs, alcohol or medication. A moment of inattention while operating
power tools may result in serious personal injury.
Use personal protective equipment. Always
wear eye protection. Protective equipment
such as dust mask, non-skid safety shoes, hard
hat, or hearing protection used for appropriate
conditions will reduce personal injuries.
Prevent unintentional starting. Ensure the
switch is in the off-position before connecting
to power source and / or battery pack, picking
up or carrying the tool. Carrying power tools
with your finger on the switch or energizing power
tools that have the switch on invites accidents.
Remove any adjusting key or wrench before
turning the power tool on. A wrench or a key
left attached to a rotating part of the power tool
may result in personal injury.
Do not overreach. Keep proper footing and
balance at all times. This enables better control
of the power tool in unexpected situations.
Dress properly. Do not wear loose clothing
or jewelry. Keep your hair, clothing and
gloves away from moving parts. Loose
clothes, jewelry or long hair can be caught in
moving parts.
If devices are provided for the connection of
dust extraction and collection facilities, ensure these are connected and properly used.
Use of dust collection can reduce dust-related
hazards.
Power tool use and care
Do not force the power tool. Use the correct
power tool for your application. The correct
power tool will do the job better and safer at the
rate for which it was designed.
Do not use the power tool if the switch does
not turn it on and off. Any power tool that can-
not be controlled with the switch is dangerous
and must be repaired.
Disconnect the plug from the power source
and/or the battery pack from the power tool
before making any adjustments, changing
accessories, or storing power tools. Such
preventive safety measures reduce the risk of
starting the power tool accidentally.
1600A018W0AA 02-18 PC10.qxp_Layout 1 2/7/18 7:28 AM Page 3
Page 4

4
Store idle power tools out of the reach of
children and do not allow persons unfamiliar
with the power tool or these instructions to
operate the power tool. Power tools are dan-
gerous in the hands of untrained users.
Maintain power tools. Check for misalignment
or binding of moving parts, breakage of parts
and any other condition that may affect the
power tool’s operation. If damaged, have the
power tool repaired before use. Many acci-
dents are caused by poorly maintained power
tools.
Keep cutting tools sharp and clean. Properly
maintained cutting tools with sharp cutting edges
are less likely to bind and are easier to control.
Use the power tool, accessories and tool
bits etc. in accordance with these instructions,
taking into account the working conditions
and the work to be performed. Use of the
power tool for operations different from those intended could result in a hazardous situation.
Service
Have your power tool serviced by a qualified
repair person using only identical replacement parts. This will ensure that the safety of
the power tool is maintained.
Safety Warnings Common for
Sanding or Polishing Operations
This power tool is intended to function as a
sander or polisher. Read all safety warnings,
instructions, illustrations and specifications
provided with this power tool. Failure to follow
all instructions listed below may result in electric
shock, fire and/or serious injury.
Operations such as grinding, wire brushing,
or cutting-off are not recommended to be
performed with this power tool.Operations for
which the power tool was not designed may create a hazard and cause personal injury.
Do not use accessories which are not specifically designed and recommended by the
tool manufacturer. Just because the accessory
can be attached to your power tool, it does not
assure safe operation.
The rated speed of the accessory must be at
least equal to the maximum speed marked
on the power tool. Accessories running faster
than their rated speed can break and fly apart.
The outside diameter and the thickness of
your accessory must be within the capacity
rating of your power tool.Incorrectly sized ac-
cessories cannot be adequately guarded or controlled.
Threaded mounting of accessories must
match the grinder spindle thread. For accessories mounted by flanges, the arbour hole
of the accessory must fit the locating diameter of the flange.Accessories that do not match
the mounting hardware of the power tool will run
out of balance, vibrate excessively and may
cause loss of control.
Do not use a damaged accessory. Before
each use inspect the accessory such as
abrasive wheels for chips and cracks, backing pad for cracks, tear or excess wear, wire
brush for loose or cracked wires. If power
tool or accessory is dropped, inspect for
1600A018W0AA 02-18 PC10.qxp_Layout 1 2/7/18 7:28 AM Page 4
Page 5

5
damage or install an undamaged accessory.
After inspecting and installing an accessory,
position yourself and bystanders away from
the plane of the rotating accessory and run
the power tool at maximum no-load speed
for one minute. Damaged accessories will nor-
mally break apart during this test time.
Wear personal protective equipment. Depending on application, use face shield,
safety goggles or safety glasses. As appropriate, wear dust mask, hearing protectors,
gloves and workshop apron capable of stopping small abrasive or workpiece fragments.
The eye protection must be capable of stopping
flying debris generated by various operations.
The dust mask or respirator must be capable of
filtrating particles generated by your operation.
Prolonged exposure to high intensity noise may
cause hearing loss.
Keep bystanders a safe distance away from
work area. Anyone entering the work area
must wear personal protective equipment.
Fragments of workpiece or of a broken accessory may fly away and cause injury beyond immediate area of operation.
Never lay the power tool down until the accessory has come to a complete stop. The
spinning accessory may grab the surface and
pull the power tool out of your control.
Do not run the power tool while carrying it at
your side. Accidental contact with the spinning
accessory could snag your clothing, pulling the
accessory into your body.
Regularly clean the power tool’s air vents.
The motor’s fan will draw the dust inside the
housing and excessive accumulation of powdered metal may cause electrical hazards.
Do not operate the power tool near flammable
materials. Sparks could ignite these materials.
Do not use accessories that require liquid
coolants. Using water or other liquid coolants
may result in electrocution or shock.
Kickback and Related Warnings
Kickback is a sudden reaction to a pinched or
snagged rotating wheel, backing pad, brush or
any other accessory. Pinching or snagging
causes rapid stalling of the rotating accessory
which in turn causes the uncontrolled power tool
to be forced in the direction opposite of the accessory’s rotation at the point of the binding.
For example, if an abrasive wheel is snagged or
pinched by the workpiece, the edge of the wheel
that is entering into the pinch point can dig into
the surface of the material causing the wheel to
climb out or kick out. The wheel may either jump
toward or away from the operator, depending on
direction of the wheel’s movement at the point
of pinching. Abrasive wheels may also break
under these conditions.
Kickback is the result of power tool misuse
and/or incorrect operating procedures or conditions and can be avoided by taking proper precautions as given below.
a) Maintain a firm grip on the power tool and
position your body and arm to allow you to
1600A018W0AA 02-18 PC10.qxp_Layout 1 2/7/18 7:28 AM Page 5
Page 6

resist kickback forces. Always use auxiliary
handle, if provided, for maximum control
over kickback or torque reaction during
start-up. The operator can control torque reac-
tions or kickback forces, if proper precautions
are taken.
b) Never place your hand near the rotating
accessory. Accessory may kickback over your
hand.
c) Do not position your body in the area
where power tool will move if kickback occurs. Kickback will propel the tool in direction
opposite to the wheel’s movement at the point
of snagging.
d) Use special care when working corners,
sharp edges etc. Avoid bouncing and snagging the accessory. Corners, sharp edges or
bouncing have a tendency to snag the rotating
accessory and cause loss of control or kickback.
e) Do not attach a saw chain woodcarving
blade or toothed saw blade. Such blades cre-
ate frequent kickback and loss of control.
Safety Warnings Specific for
Sanding Operations
Do not use excessively oversized sanding
disc paper. Follow manufacturers recommendations, when selecting sanding paper.
Larger sanding paper extending beyond the
sanding pad presents a laceration hazard and
may cause snagging, tearing of the disc or kickback.
Safety Warnings Specific for
Polishing Operations
Do not allow any loose portion of the polishing bonnet or its attachment strings to spin
freely. Tuck away or trim any loose attachment strings. Loose and spinning attachment
strings can entangle your fingers or snag on the
workpiece.
6
1600A018W0AA 02-18 PC10.qxp_Layout 1 2/7/18 7:28 AM Page 6
Page 7
7
Additional Safety Warnings
GFCI and personal protection devices like electrician’s rubber gloves and footwear will further
enhance your personal safety.
Do not use AC only rated tools with a DC
power supply. While the tool may appear to
work, the electrical components of the AC rated
tool are likely to fail and create a hazard to the
operator.
Keep handles dry, clean and free from oil and
grease. Slippery hands cannot safely control the
power tool.
Develop a periodic maintenance schedule for
your tool. When cleaning a tool be careful not
to disassemble any portion of the tool since
internal wires may be misplaced or pinched
or safety guard return springs may be improperly mounted. Certain cleaning agents such
as gasoline, carbon tetrachloride, ammonia, etc.
may damage plastic parts.
Some dust created by
power sanding, sawing,
grinding, drilling, and other construction activities contains chemicals known to cause
cancer, birth defects or other reproductive
harm. Some examples of these chemicals
are:
• Lead from lead-based paints,
• Crystalline silica from bricks and cement and
other masonry products, and
• Arsenic and chromium from chemically-
treated lumber.
Your risk from these exposures varies, depending on how often you do this type of work. To reduce your exposure to these chemicals: work in
a well ventilated area, and work with approved
safety equipment, such as those dust masks
that are specially designed to filter out microscopic particles.
Charger Safety Rules
Read and understand all instructions. Failure to follow all instructions listed
below, may result in electric shock, fire and/or serious personal injury.
IMPORTANT SAFETY AND OPERATING INSTRUCTIONS
SAVE THESE INSTRUCTIONS
This manual contains instructions for battery
charger model 510. Do not substitute any other
charger.
Before using battery charger, read all instructions and cautionary markings on battery
charger and product using battery.
1600A018W0AA 02-18 PC10.qxp_Layout 1 2/7/18 7:28 AM Page 7
Page 8

8
Charge only Dremel Versa. Other types of cordless tools may burst causing personal injury and
damage.
Charge tool in temperatures above +32 degrees F (0 degrees C) and below +113 degrees
F (45 degrees C). Store tool in locations where
temperatures will not exceed 120 degrees F
(49 degrees C). This is important to prevent se-
rious damage to the battery cells.
Do not recharge tool in damp or wet environment. Do not expose charger to rain or snow.
Water entering battery charger may result in electric shock or fire.
Battery leakage may occur under extreme
usage or temperature conditions. Avoid contact with skin and eyes. The battery liquid is
caustic and could cause chemical burns to tissues. If liquid comes in contact with skin, wash
quickly with soap and water. If the liquid contacts
your eyes, flush them with water for a minimum
of 10 minutes and seek medical attention.
Place charger on flat nonflammable surfaces
and away from flammable materials when
recharging tool. Carpeting and other heat insu-
lating surfaces block proper air circulation which
may cause overheating of the charger and tool. If
smoke or melting of the charger or tool is observed, unplug the charger immediately and do
not use the tool or charger. Contact customer
service immediately.
Make sure cord is located so that it will not be
stepped on, tripped over, or otherwise subjected to damage or stress. Damaged plug and
cord may result in electric shock or fire.
Disconnect the charger by pulling the plug
rather than the cord. Do not operate charger
with damaged cord or plug; have them replaced immediately. Damaged plug or cord may
result in electric shock or fire.
Do not insert tool in charger if tool housing is
cracked. Using damaged tool may result in elec-
tric shock or fire.
Do not disassemble charger or operate the
charger if it has received a sharp blow, been
dropped or otherwise damaged in anyway. In-
correct reassembly or damage may result in electric shock or fire.
Before each use, check the battery charger,
cable and plug. If damage is detected, do not
use the battery charger. Never open the battery charger yourself, take it to a Dremel Factory Service Center, or qualified serviceman
only using original spare parts. Incorrect re-
assembly may result in electric shock or fire.
Do not use attachments not recommended or
sold by Dremel. Using attachments not recom-
mended may result in electric shock or fire.
Do not store tool in charger. Tool stored in
charger over a long period of time could lead to
battery pack damage and fire.
Unplug charger from outlet before storage, attempting any maintenance or cleaning. Such
preventive safety measures reduce the risk of
electric shock or fire.
Keep the battery charger clean by wiping the
charger housing with a damp cloth. Contami-
nation may result in electric shock or fire.
1600A018W0AA 02-18 PC10.qxp_Layout 1 2/7/18 7:28 AM Page 8
Page 9
9
Battery Disposal
Do not attempt to disassemble the tool or remove
any com ponent projecting from the tool. Fire
or injury may result. Prior to disposal, protect exposed terminals with heavy insulating tape to
prevent shorting.
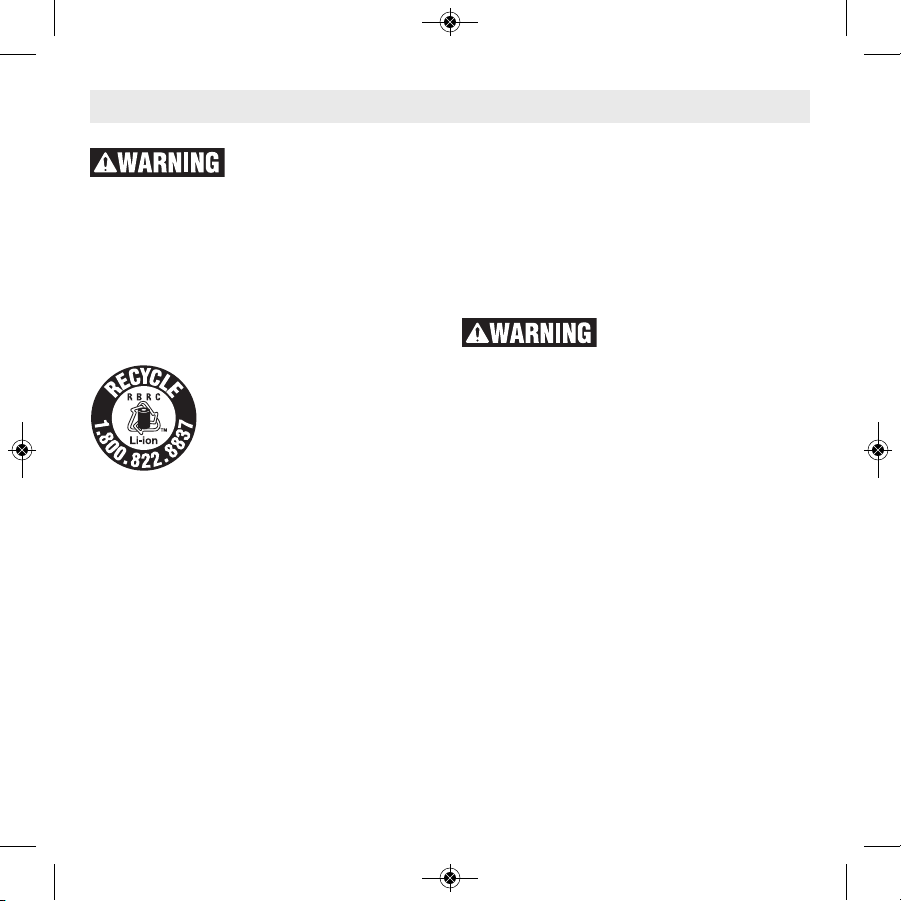
LITHIUM-ION BATTERIES
If equipped with a lithium-ion battery, the battery
must be collected, recycled or disposed of in an
environ mentally sound manner.
“The EPA certified RBRC Battery Recycling Seal on the
lithium-ion (Li-ion) battery indicates Robert Bosch Tool Corporation is voluntarily
participating in an industry program to collect and recycle these batteries at the
end of their useful life, when taken out of service
in the United States or Canada. The RBRC program provides a convenient alterative to placing
used Li-ion batteries into the trash or the munici pal waste stream, which may be illegal in your
area.
Please call 1-800-8-BATTERY for information on
Li-ion battery recycling and disposal bans/restrictions in your area, or return your batteries to
a Bosch/Dremel Service Center for recycling.
Robert Bosch Tool Corporation’s involvement in
this program is part of our commitment to preserving our environment and conserving our natural resources.”
Do not open the tool or attempt to remove battery
from your tool. Dispose of tool through your
local waste removal authority or a
Bosch/Dremel Service Center.
1600A018W0AA 02-18 PC10.qxp_Layout 1 2/7/18 7:28 AM Page 9
Page 10
10
Symbols
IMPORTANT: Some of the following symbols may be used on your tool. Please study them and
learn their meaning. Proper interpretation of these symbols will allow you to operate the tool
better and safer.
Symbol Designation / Explanation
V Volts (voltage)
A Amperes (current)
Hz Hertz (frequency, cycles per second)
W Watt (power)
⌀
Diameter (size of drill bits, grinding wheels, etc.)
n Rated speed (maximum attainable speed)
.../min
Revolutions or reciprocation per minute (revolutions, strokes, surface speed, orbits
etc. per minute)
Arrow (action in the direction of arrow)
Alternating current (type or a characteristic of current)
Direct current (type or a characteristic of current)
Class II construction (designates double insulated construction tools)
1600A018W0AA 02-18 PC10.qxp_Layout 1 2/7/18 7:28 AM Page 10
Page 11
11
Symbols
IMPORTANT: Some of the following symbols may be used on your tool. Please study them and
learn their meaning. Proper interpretation of these symbols will allow you to operate the tool
better and safer.
Symbol Designation / Explanation
Designates Li-ion battery recycling program
Alerts user to read manual
Alerts user to wear eye and respiratory protection
This symbol designates that this tool is listed by Underwriters Laboratories,
to United States and Canadian Standards.
This symbol designates that this tool is listed by the Canadian Standards
Association, to United States and Canadian Standards.
1600A018W0AA 02-18 PC10.qxp_Layout 1 2/7/18 7:28 AM Page 11
Page 12

12
HIGH SPEED
The tool runs at 2200 RPM max, making it the
fastest powered cleaning tool in the market.
The higher speed allows for faster and more
aggressive cleaning/removal, which helps eliminate much of the manual effort typically required for the user applications. Standard
powered cleaners spin around 300/min with
low-speed, high torque. These tools still require
extensive manual effort for cleaning applications. The Dremel Versa is the opposite – a
high-speed, low torque tool. The difference to
the user is that with the Dremel high-speed tool,
the speed combined with the accessory does
the work for you, without having to apply heavy
pressure. Simply hold the tool and guide it.
POWERFUL LITHIUM-ION
BATTERY TECHNOLOGY
Power is another great benefit you will experience while working with the Dremel Versa. The
combination of a compact and highly efficient
DC motor, smaller Lithium-ion battery cells and
smart electronics allow for tough applications.
Utilizing the cutting edge Lithium Technology
batteries benefits the user by giving them
greater consistency of power through a single
charge. It will not slowly loose performance during use (like with AA batteries or NiCad).
Recharging is fast and easy with the micro USB
charger. You will not have to constantly replace
batteries. The charge time is also extremely
short (~2hr charge time, when charged with the
provided Dremel 510 1Amp USB power
adapter) so the tool can be ready when you
need it.
VERSATILE
There will be 4 different accessory attachments: foam eraser pad, non-scratch scrub
pad, abrasive heavy-duty scrub pad, and nylon
bristle brush. These 4 accessories allow the
tool to be used on multiple surfaces to remove
dirt/build-up/material. The different levels of
abrasiveness of the pads and brush give the
user the ability to complete a wide spectrum of
applications. The hook-and-loop attachment
system allows the user to quickly change between the different accessories. The accessory
change mechanism is tool-less for ease-of-use
Dremel Versa – Introduction
Thank you for purchasing the new Dremel Versa, the fastest and most compact cordless cleaning
tool produced by the worldwide leader in rotary tools. This product was designed for the user who
wants an easy to use, convenient yet powerful tool that allows them to clean/prep difficult surfaces
and reduce the amount of manual effort. It is efficient for multiple applications around the home
and garage. It can handle the tough jobs that other cleaners cannot. The combination of its ergonomic design, motor, and battery and electronics makes the Dremel Versa highly user friendly
and ideal for versatile and demanding tasks.
1600A018W0AA 02-18 PC10.qxp_Layout 1 2/7/18 7:28 AM Page 12
Page 13

13
and “frustration-free” operation for the user. The
Dremel Versa kit also comes with a splash
guard attachment.
COMPACT SIZE
The tool is designed so that it can be operated
with one hand. The overmolding on the top
helps the user grip the tool to give more control
in use, especially in wet applications. The small
size allows the user to clean in tight areas, and
also being cordless it is easy to take virtually
anywhere, indoor and outdoor.
WATER RESISTANT
The Dremel Versa is fully sealed so that it can
be safely used in wet applications. However, it
is not meant to be completely submerged in liquid.
Battery tools are always in an operative condition. To reduce the risk of possible hazards do not operate the tool before reading the operating instructions.
SAVE THESE INSTRUCTIONS
Functional Description and Specifications
VERSA CORDLESS POWER CLEANER
Model Number PC10
Voltage Rating 3.6V / 4V MAX
Rated Speed n 2,200 RPM
CHARGER
Model Number 510
Charge Time 2 Hrs
Voltage Rating 120 V 60 Hz
Amperage Rating 1A
Battery Chemistry Lithium-Ion
Dremel Versa – Introduction
1600A018W0AA 02-18 PC10.qxp_Layout 1 2/7/18 7:28 AM Page 13
Page 14
14
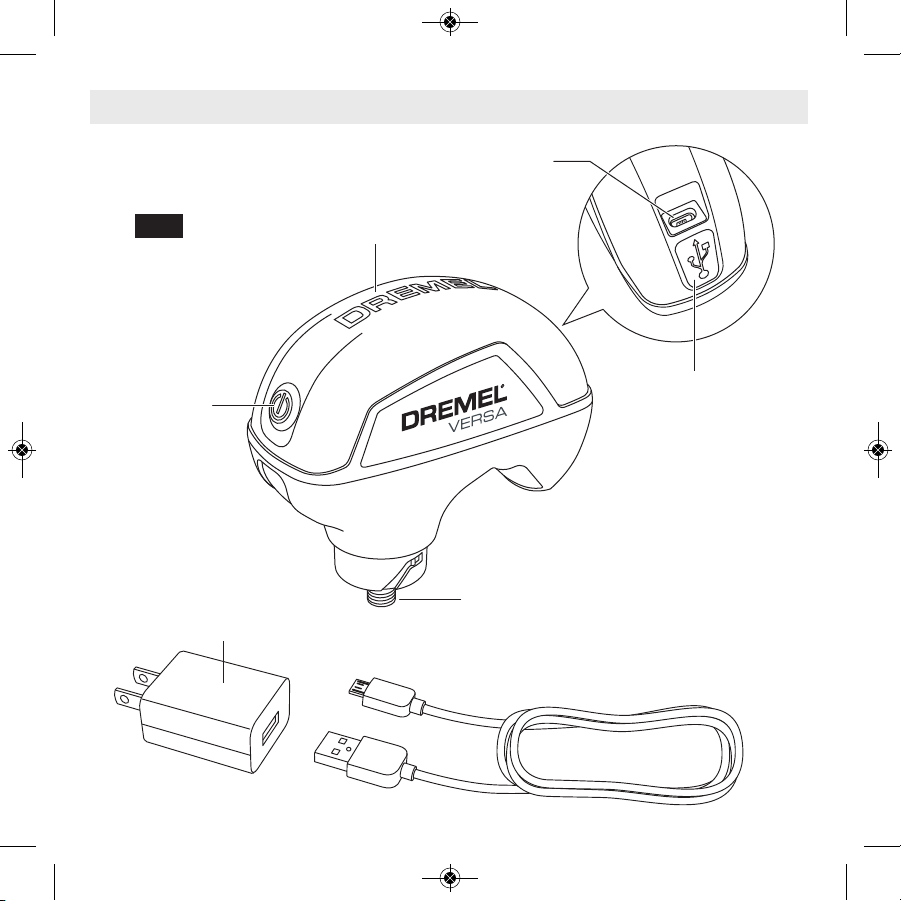
FIG. 1
On/Off
Button
Threaded Shank
Grip Zone
w/Soft Grip
Charging
Terminal
Power
Adapter
USB Charging Cable
Charging
Light
Functional Description and Specifications
1600A018W0AA 02-18 PC10.qxp_Layout 1 2/7/18 7:28 AM Page 14
Page 15
15
To reduce the risk of injury,
always be sure the tool is
turned “OFF” before changing accessories,
changing backing pad, removing splash
guard, or servicing your cordless rotary
tool.
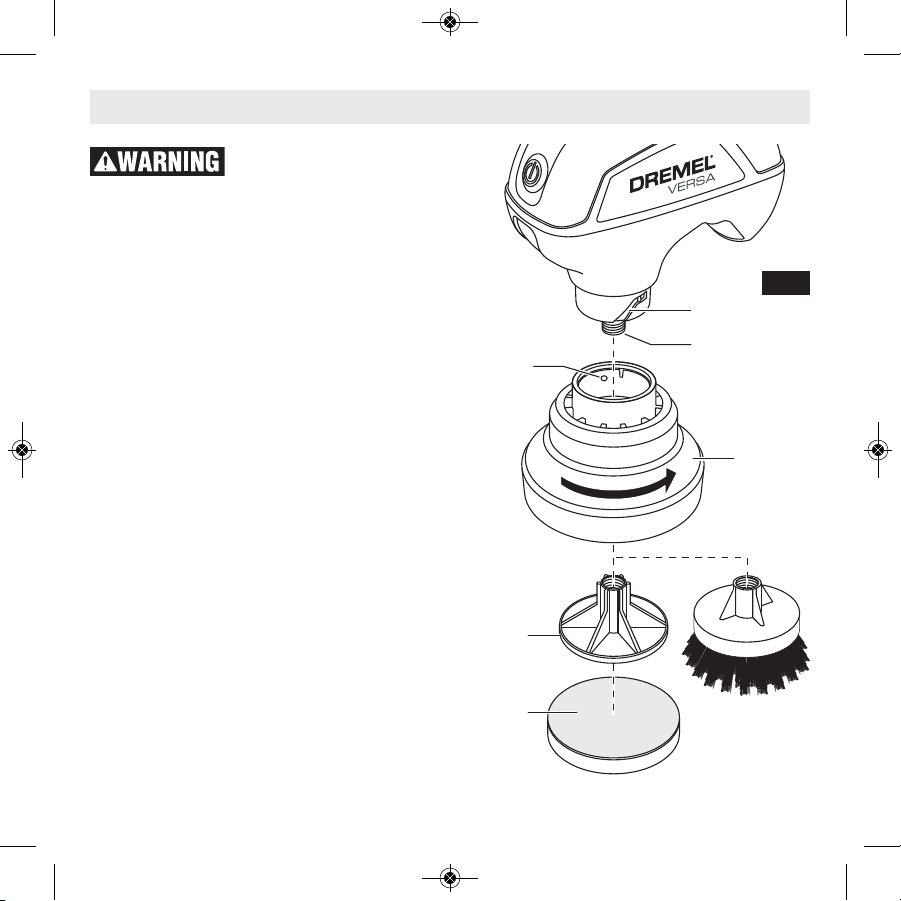
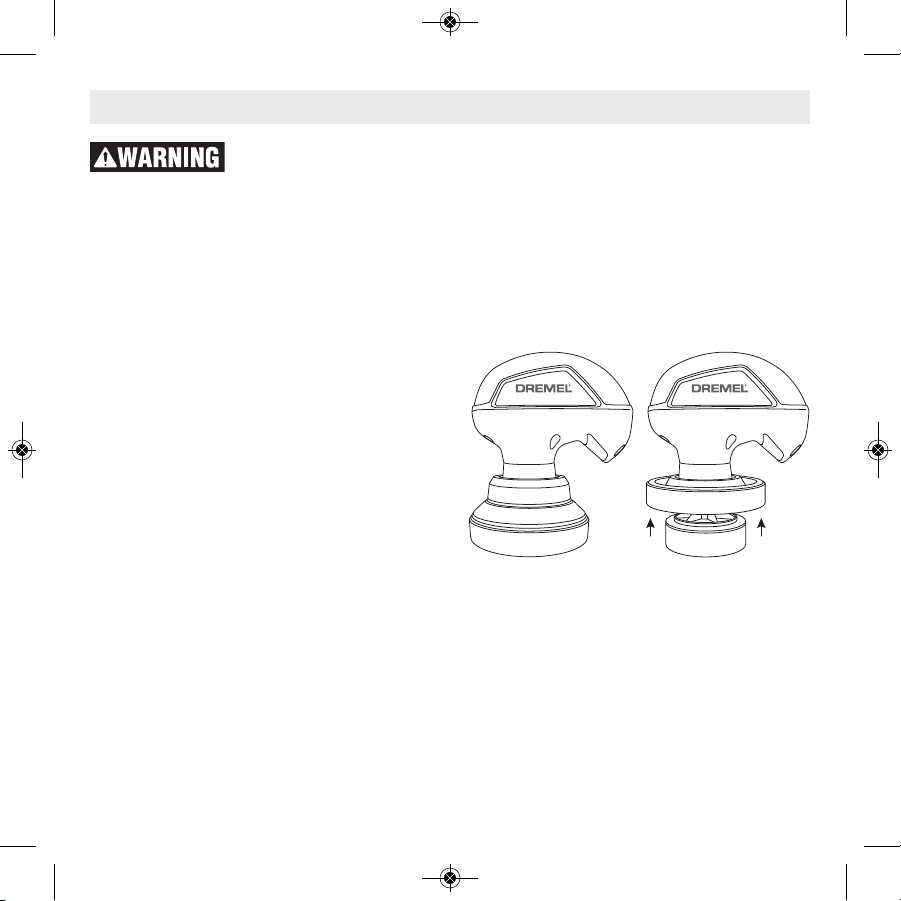
ATTACHING SPLASH GUARD
To attach splash guard: line up pins on the
guard with the slots on the tool housing (Fig. 2).
Twist in a clockwise direction until it is snug on
the tool. You must attach the splash guard before attaching the backing pad.
ATTACHING BACKING PAD
To attach backing pad: align with the threads of
the output shank and finger tighten the pad in
a clockwise direction (Fig. 2).
ATTACHING ACCESSORIES
Accessories are attached to backing pad by
hook-and-loop system.
To attach: align “loop” side of accessory to
“hook” side of backing pad on the tool (Fig. 2).
Align accessory as close to center as possible
on the backing pad so it spins concentrically for
optimal performance and ease of use. The accessories will overhang the backing pad, which
allows the user to get into corners and tight
spaces.
Assembly
Pin
Slot
Shank
Backing
Pad
Bristle
Brush
Accessory
Splash
Guard
Loop
Side
FIG. 2
1600A018W0AA 02-18 PC10.qxp_Layout 1 2/7/18 7:28 AM Page 15
Page 16
16
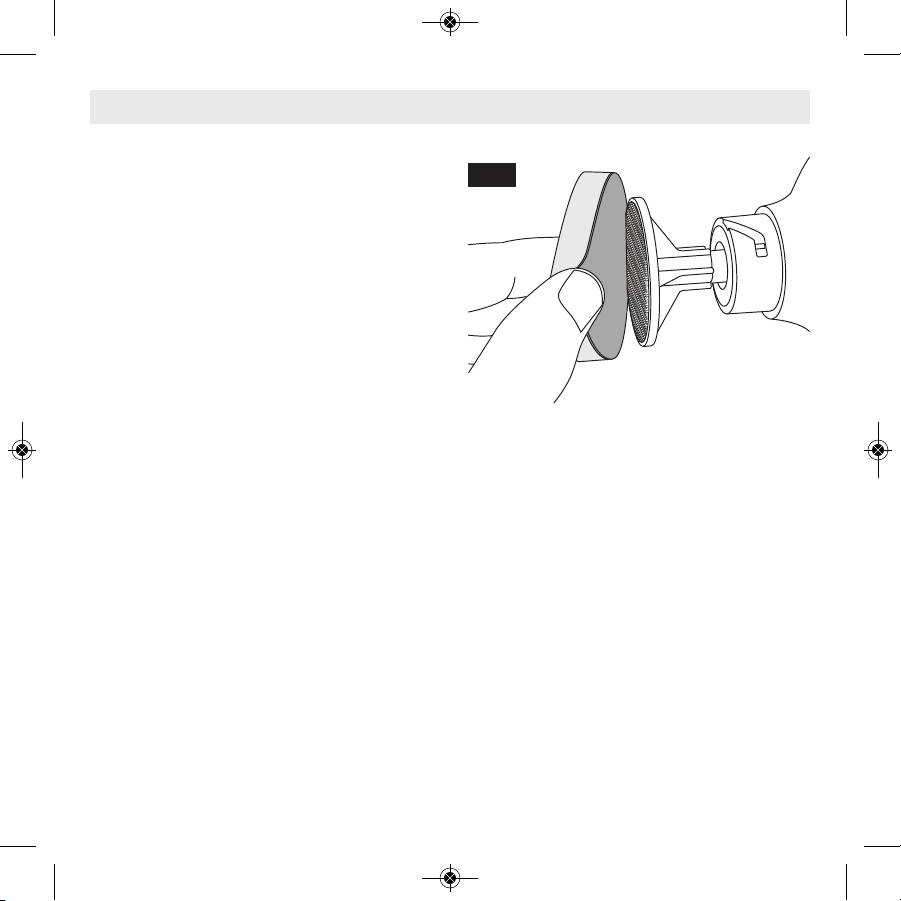
To remove: pull the accessory off the backing
pad. Hold the accessory by the “loop” backing
material and peel away from backing pad (as
shown in figure 3), rather than grabbing the
sponge/microfiber material.
To attach the bristle brush: first remove the
backing pad completely and then attach brush
by aligning the threads of the output shank and
finger tighten the bristle brush in a clockwise direction.
FIG. 3
Assembly
1600A018W0AA 02-18 PC10.qxp_Layout 1 2/7/18 7:28 AM Page 16
Page 17
The Dremel Versa is designed to work with
spray, foam, gel, or liquid cleaners. Before
using cleaning solutions please read and follow
manufacturer’s warnings and instructions for
use. Cover the surrounding area that you are
cleaning to protect from spray. Use splash
guard on open surfaces to contain spray. Recommended to apply water and cleaning agent
to the surface that needs cleaning and/or to the
accessory directly. If applying water or cleaning
agent directly on accessory, shake excess liquid off or “pulse” the tool by quickly turning it
“on” and then “off” in a contained areas (i.e.
bucket or sink) to reduce spray.
To start cleaning, press and release the On/Off
button (Fig. 1) while the accessory is in contact
with the surface to be cleaned. The tool will
come up to speed quickly. Gently press to the
surface to be cleaned, do not press too hard,
let the tool do the work.
To turn the tool off, press and release the on/off
button.
The kit includes a backing pad, splash guard,
and 4 different accessories. Spot-test a small
section of the surface that you intend to clean
for acceptability before cleaning entire job.
SPLASH GUARD
It is recommended to use the splash guard for
all wet cleaning applications. Keep splash
guard in the “extended” position while tool is
running to contain the spray of water and cleaning solutions.
To get into tighter spaces, the splash guard can
be retracted into the “up” position.
To remove the splash guard entirely, turn the
tool off, unscrew the backing pad (counterclockwise when looking at the bottom of the
tool), then twist the splash guard a quarter turn
to remove. Screw the backing pad back on.
17
Use only Dremel®, high-performance accessories. Other accessories are not
designed for this tool and may lead to personal injury or property damage. Store
accessories in a dry and temperate environment to avoid deterioration.
VERSAVERSA
Extended Position Retracted Position
Operating Instructions
1600A018W0AA 02-18 PC10.qxp_Layout 1 2/7/18 7:28 AM Page 17
Page 18
18
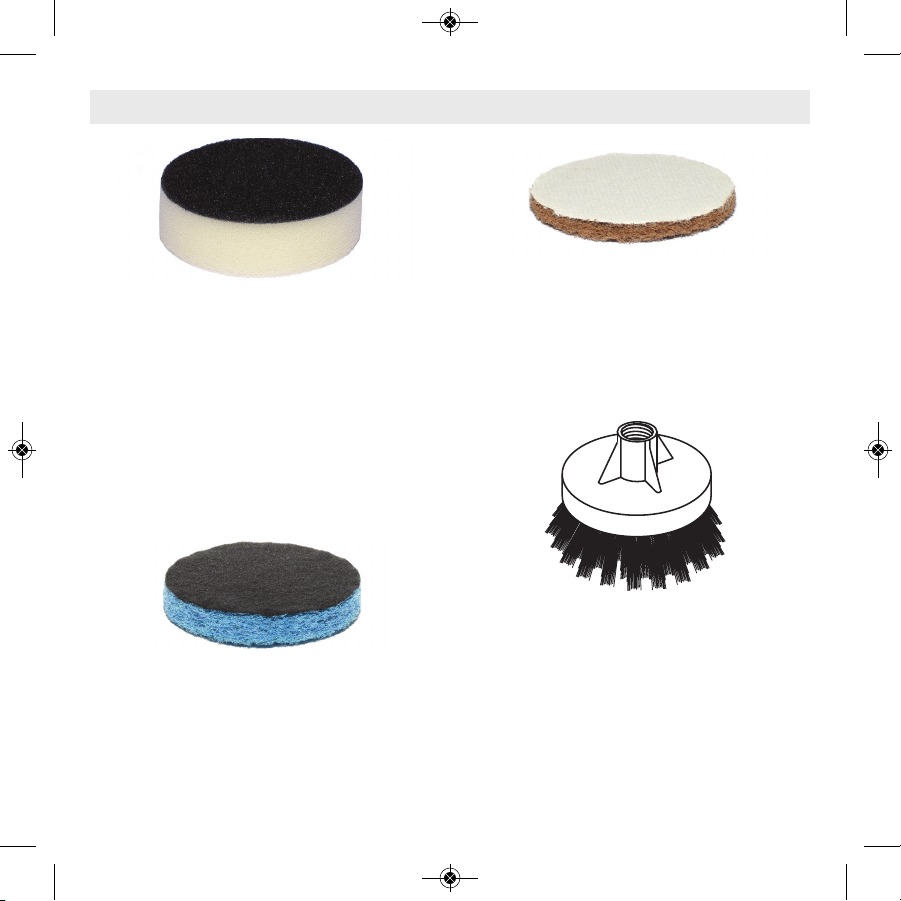
WHITE FOAM ERASER PAD
Multipurpose pad recommended for use on hard
surfaces, such as countertops, glass, floors, baseboards, doors, walls, shoes, and non-stainless steel
appliances. Due to the micro-abrasive technology,
the pad will help to remove stains without using an
abrasive cleaner; however, if the surface being
cleaned is not sufficiently hard, it may be finely
scratched by the material. Test small area with light
pressure before use. Not recommended for the
following surfaces: Wood with high gloss, polish, brushed, satin, Faux, or bare; copper; stainless steel; non-stick coating or vehicle body.
BLUE MICROFIBER NON-SCRATCH PAD
Recommended for tough jobs without scratching. Good for use on pots and pans, grill exterior, sink, stove top and stove grates, kitchen
appliances, and outdoor tools/equipment.
BROWN ABRASIVE HEAVY-DUTY PAD
Abrasive pad has embedded grit for jobs that
require more aggressive cleaning and removal,
such as metal prep, lawn furniture, paint removal, uncoated cookware and more. It quickly
cuts through and removes tough stuck-on
messes.
BLACK NYLON BRISTLE BRUSH
Use for tough scrubbing applications, such as:
grout, tire rims, sinks, fixtures, equipment, patio
furniture, and various other surfaces in your
bathroom and kitchen. Durable nylon bristles are
angled to allow you to get into corners better.
Operating Instructions
1600A018W0AA 02-18 PC10.qxp_Layout 1 2/7/18 7:28 AM Page 18
Page 19
19
ELECTRONIC MONITORING
Your tool is equipped with an internal electronic
monitoring system that helps to maximize
motor and battery performance by limiting the
current to the tool when overload and stall conditions occur.
If you stall the tool for too long the tool will automatically turn off. Once this happens, simply
press and release the on/off button twice to
start the tool again, and continue using it.
When the battery becomes close to empty, the
tool may shut down automatically more frequent than normal. If this happens, it is time to
recharge the tool.
Operating Instructions
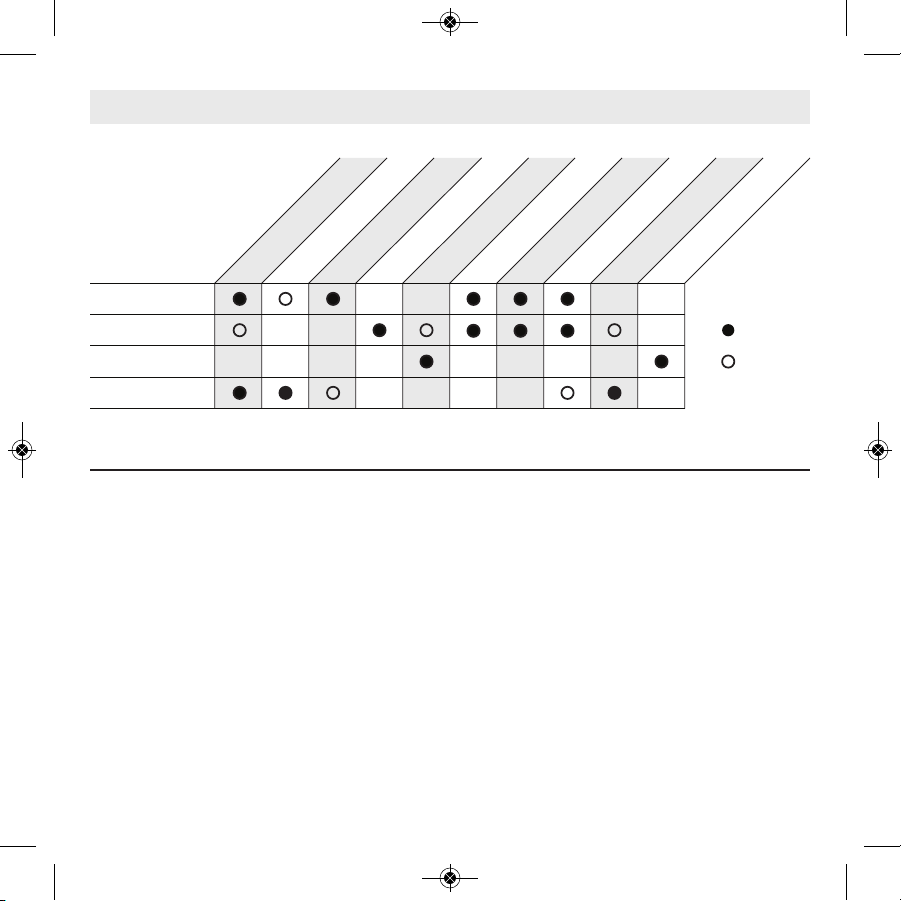
=
Ideal
=
Acceptable
ACCESSORY
Bristle Brush
Non-Scratch Pad
Heavy Duty Pad
Eraser Pad
H
a
r
d
S
ur
f
a
c
e
s
P
a
i
n
t
e
d
S
u
r
f
a
c
e
s
F
ab
r
i
c
s
S
t
ai
n
l
es
s
S
t
e
e
l
e
C
a
s
t
I
r
o
n
C
e
r
a
m
i
c
&
P
or
c
e
l
ain
A
l
u
mi
n
um
&
Me
t
a
l
Pl
a
s
t
i
c
&
L
a
m
i
n
at
e
Gl
a
s
s
P
a
i
n
t
&
R
u
s
t Re
m
o
v
a
l
1600A018W0AA 02-18 PC10.qxp_Layout 1 2/7/18 7:28 AM Page 19
Page 20
20
510 2 HOUR CHARGER
Your Dremel Versa does not come completely
charged from the factory. Be sure to charge tool
prior to initial use.
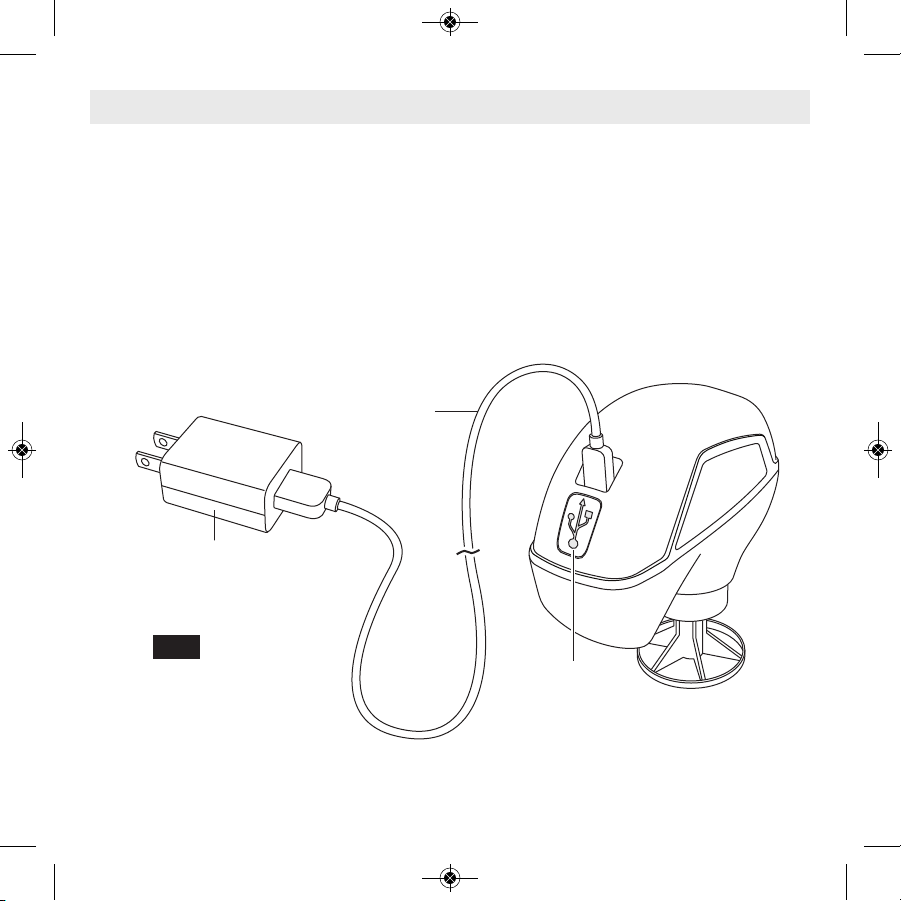
To charge: plug the USB cord into the tool and
power adapter, then insert the power adapter
plug into a standard power outlet. The blue LED
light located on the tool housing below the USB
outlet will turn on to signal the battery is receiving a charge. When the tool is fully charged (approx 2 Hrs.), charging will automatically stop
and the blue LED light will turn off.
When the battery is dead, the tool will automatically turn off. This will be a sudden stop as opposed to a gradual winding down of the tool.
Simply recharge the tool and reuse.
Charging Tool
Power
Adapter
FIG. 4
Charging
Light
USB
Cord
1600A018W0AA 02-18 PC10.qxp_Layout 1 2/7/18 7:28 AM Page 20
Page 21

21
IMPORTANT CHARGING NOTES
1. The charger was designed to charge the tool
only when the battery temperature is between 32˚F (0˚C) and 113˚F (45˚C). If the tool
is too hot or too cold, the charger will not
charge the tool. (This may happen if the tool
is hot from heavy use). When the tool temperature returns to between 32˚F (0˚C) and
113˚F (45˚C), the charger will automatically
begin charging.
2. A substantial drop in operating time per
charge may mean that the tool is nearing the
end of its life.
3. Remember to unplug the power adapter
during storage period.
4. If tool does not charge properly:
a. Try plugging in some other electrical de-
vice into the outlet.
b. Check to see if outlet is connected to a
light switch which turns power “off” when
lights are turned off.
c. Check charging base and power supply
terminals for dirt. Disconnect form outlet
and clean with cotton swab and alcohol if
necessary.
d. If the tool still is not charging properly, lo-
cate the nearest Dremel Service Center
and have the tool inspected.
Note: Use of power supply not sold by Dremel
will void the warranty.
FCC Caution:
The manufacturer is not responsible for radio
interference caused by unauthorized modifications to this equipment. Such modifications
could void the user’s authority to operate the
equipment.
This device complies with Part 15 of the FCC
Rules. Operation is subject to the following two
conditions:
1) This device may not cause harmful interference, and
2) This device must accept any interference received, including interference that may
cause undesired operation.
NOTE! This equipment has been tested and
found to comply with the limits for a Class B
digital devices, pursuant to Part 15 of the FCC
rules. These limits are designed to provide reasonable protection against harmful interference
in a residential installation. This equipment generates uses and can radiate radio frequency
energy and, if not installed and used in accordance with the instructions, may cause harmful
interference to radio communications. However, there is no guarantee that interference will
not occur in a particular installation. If this
equipment does cause harmful interference to
Charging Tool
1600A018W0AA 02-18 PC10.qxp_Layout 1 2/7/18 7:28 AM Page 21
Page 22

22
radio or television reception, which can be determined by turning the equipment off and on,
the user is encouraged to try to correct the interference by one or more of the following
measures:
• Reorient or relocate the receiving antenna.
• Increase the separation between the equipment and receiver.
• Connect the equipment into an outlet on a
circuit different from that to which the receiver is connected.
• Consult the dealer or an experienced
radio/TV technician for help.
Service
NO USER SERVICE-ABLE
PARTS INSIDE. Preventive maintenance performed by un au thorized personnel may result in misplacing
of internal wires and components which
could cause serious hazard. We recom mend
that all tools that are not operating correctly be
returned to a Bosch/Dremel Service Center.
BATTERIES
Be alert for batteries that are nearing their
end of life. If you notice decreased tool per-
formance or significantly shorter running time
between charges then it is time to replace the
tool.
Cleaning
To avoid accidents, always be sure the tool is
turned “OFF” before cleaning. Only use a
mild detergent to clean the tool. Do not submerse tool in water.
Certain cleaning agents
and solvents damage
plastic parts. Some of these are: gasoline,
car bon tetrachloride, chlorinated cleaning solvents, ammonia and household detergents that
contain ammonia.
Maintenance
FCC Caution:
1600A018W0AA 02-18 PC10.qxp_Layout 1 2/7/18 7:28 AM Page 22
Page 23

23
Your Dremel product is warranted against defective material or workmanship for a period of two years from date of
purchase. In the event of a failure of a product to conform to this written warranty, please take the following action:
1. DO NOT return your product to the place of purchase.
2. Carefully package the product by itself, with no other items, and return it, freight prepaid, along with:
A. A copy of your dated proof of purchase (please keep a copy for yourself).
B. A written statement about the nature of the problem.
C. Your name, address and phone number to:
We recommend that the package be insured against loss or in transit damage for which we cannot be responsible.
This warranty applies only to the original registered purchaser. DAMAGE TO THE PRODUCT RESULTING FROM TAMPER-
ING, ACCIDENT, ABUSE, NEGLIGENCE, UNAUTHORIZED REPAIRS OR ALTERATIONS, UNAPPROVED ATTACHMENTS
OR OTHER CAUSES UNRELATED TO PROBLEMS WITH MATERIAL OR WORKMANSHIP ARE NOT COVERED BY THIS
WARRANTY.
No employee, agent, dealer or other person is authorized to give any warranties on behalf of Dremel. If Dremel inspection
shows that the problem was caused by problems with material or workman ship within the limitations of the warranty,
Dremel will repair or replace the product free of charge and return product prepaid. Repairs made necessary by normal
wear or abuse, or repair for product outside the warranty period, if they can be made, will be charged at regular factory
prices.
DREMEL MAKES NO OTHER WARRANTY OF ANY KIND WHATEVER, EXPRESSED OR IMPLIED, AND ALL IMPLIED WARRANTIES OF MERCHANTABILITY AND FITNESS FOR A PARTICULAR PURPOSE WHICH EXCEED THE ABOVE MENTIONED
OBLIGATION ARE HEREBY DISCLAIMED BY DREMEL AND EXCLUDED FROM THIS LIMITED WARRANTY.
This warranty gives you specific legal rights and you may also have other rights which vary from state to state. The
obligation of the warrantor is solely to repair or replace the product. The warrantor is not liable for any incidental or consequential damages due to any such alleged defect. Some states do not allow the exclusion or limitation of incidental or
consequential damages, so the above limitations or exclusion may not apply to you.
For prices and warranty fulfillment in the continental United States, contact your local Dremel distributor.
Exportado por: © Robert Bosch Tool Corporation Mt. Prospect, IL 60056 -2230, E.U.A.
Importado a México por: Robert Bosch, S. de R.L. de C.V.
Calle Robert Bosch No. 405 - 50071 Toluca, Edo. de Méx. - México
Tel. 052 (722) 279 2300 ext 1160 / Fax. 052 (722) 216-6656
Dremel Limited Warranty
UNITED STATES
Dremel Service Center
4915 21st Street
Racine, WI 53406
CANADA
Giles Tool Agency
47 Granger Av.
Scarborough, Ontario Canada
M1K 3K9
1-416-287-3000
OUTSIDE CONTINENTAL UNITED STATES
See your local distributor or write to
Dremel,
4915 21st Street Racine,
WI 53406
1600A018W0AA 02-18 PC10.qxp_Layout 1 2/7/18 7:28 AM Page 23
Page 24

24
Symboles relatifs à la sécurité
Les définitions ci-dessous décrivent le niveau de gravité pour chaque terme signalant un danger. Veuillez lire le
mode d’emploi et lire la signification de ces symboles.
!
C’est le symbole d’alerte relatif à la sécurité. Il est utilisé pour vous avertir de l’existence possible d’un danger de lésion corporelle. Obéissez à
tous les messages relatifs à la sécurité qui suivent ce symbole pour
éviter tout risque de blessure ou même de mort.
DANGER indique une situation dangereuse qui, si elle n’est pas
évitée, causera la mort d’une personne ou une blessure grave.
AVERTISSEMENT indique une situation dangereuse qui, si elle n’est pas
évitée, pourrait causer la mort d’une personne ou une blessure grave.
MISE EN GARDE, conjointement avec le symbole d’alerte en liaison
avec la sécurité, indique une situation dangereuse qui, si elle n'est
pas évitée, causera une blessure légère ou modérée.
Veuillez lire tous les avertissements et toutes les consignes de sécurité. Si l'on
n'observe pas ces avertissements et ces consignes de sécurité, il existe un risque
de choc électrique, d'incendie et/ou de blessures corporelles graves.
CONSERVEZ TOUS LES AVERTISSEMENTS ET TOUTES LES CONSIGNES
DE SÉCURITÉ POUR RÉFÉRENCE FUTURE.
Dans les avertissements, le terme « outil électroportatif » se rapporte à votre outil branché sur le secteur (avec fil) ou à
votre outil alimenté par piles (sans fil).
Avertissements généraux concernant la sécurité des outils électroportatifs
Sécurité du lieu de travail
Maintenez le lieu de travail propre et bien éclairé. Les
risques d’accident sont plus élevés quand on travaille dans
un endroit encombré ou sombre.
N’utilisez pas d’outils électroportatifs dans des atmosphères explosives, comme par exemple en présence
de gaz, de poussières ou de liquides inflammables. Les
outils électroportatifs produisent des étincelles qui risquent
d’enflammer les poussières ou les vapeurs.
Éloignez les enfants et les visiteurs quand vous vous
servez d’un outil électroportatif. Vous risquez une perte
de contrôle si on vous distrait.
1600A018W0AA 02-18 PC10.qxp_Layout 1 2/7/18 7:28 AM Page 24
Page 25

25
Sécurité électrique
Les fiches des outils électroportatifs doivent correspondre à la prise. Il ne faut absolument jamais modifier la
fiche. N’utilisez pas d’adaptateur de prise avec des outils électroportatifs munis d’une fiche de terre. Le risque
de choc électrique est moindre si on utilise une fiche non
modifiée sur une prise qui lui correspond.
Évitez tout contact du corps avec des surfaces reliées à
la terre tels que tuyaux, radiateurs, gazinières ou
réfrigérateurs. Le risque de choc électrique augmente si
votre corps est relié à la terre.
N’exposez pas les outils électroportatifs à la pluie ou à
l’humidité. Si de l’eau pénètre dans un outil électropor-
tatif, le risque de choc électrique augmente.
Ne maltraitez pas le cordon. Ne vous en servez jamais
pour transporter l’outil électroportatif, pour le tirer ou
pour le débrancher. Éloignez le cordon de la chaleur,
des huiles, des arêtes coupantes ou des pièces mobiles.
Les cordons abîmés ou emmêlés augmentent les risques
de choc électrique.
Si vous utilisez un outil électroportatif à l’extérieur, employez une rallonge conçue pour l’extérieur. Ces ral-
longes sont faites pour l’extérieur et réduisent le risque de
choc électrique.
S'il est absolument nécessaire d'utiliser l'outil électroportatif dans un endroit humide, utilisez une alimentation protégée par un disjoncteur de fuite de terre (GFCI).
L'utilisation d'un disjoncteur GFCI réduit les risques de
choc électrique.
Sécurité personnelle
Restez concentré, faites attention à ce que vous faites,
et servez-vous de votre bon sens lorsque vous utilisez
un outil électroportatif. N'employez pas d’outils électroportatifs quand vous êtes fatigué ou sous l’emprise
de drogues, d’alcool ou de médicaments. Quand on
utilise des outils électroportatifs, il suffit d’un moment d’inattention pour causer des blessures corporelles graves.
Utilisez des équipements de sécurité personnelle. Portez
toujours une protection oculaire. Le port d'équipements
de sécurité tels que des masques antipoussières, des
chaussures de sécurité antidérapantes, des casques de
chantier et des protecteurs d'oreilles dans des conditions
appropriées réduira le risque de blessure corporelle.
Évitez les démarrages intempestifs. Assurez-vous que
l'interrupteur est dans la position arrêt (Off) avant de
brancher l'outil dans une prise de courant et/ou un blocpiles, de le ramasser ou de le transporter. Le transport
d'un outil électroportatif avec le doigt sur la gâchette ou le
branchement de cet outil quand l'interrupteur est en position de marche (ON) est une invite aux accidents.
Enlevez toutes les clés de réglage avant de mettre l’outil
électroportatif en marche. Si on laisse une clé sur une
pièce tournante de l’outil électroportatif, il y a risque de
blessure corporelle.
Ne vous penchez pas. Conservez toujours une bonne assise et un bon équilibre. Ceci vous permettra de mieux
maîtriser l’outil électroportatif dans des situations inattendues.
Habillez-vous de manière appropriée. Ne portez pas de
vêtements amples ou de bijoux. Attachez les cheveux
longs. N’approchez pas les cheveux, les vêtements ou
les gants des pièces en mouvement. Les vêtements am-
ples, les bijoux ou les cheveux longs risquent d’être happés
par les pièces en mouvement.
Si l’outil est muni de dispositifs permettant le raccordement d’un système d’aspiration et de collecte des poussières, assurez-vous que ces dispositifs sont raccordés
et utilisés correctement. L'utilisation d'un dépoussiéreur
peut réduire les dangers associés à l'accumulation de
poussière.
Utilisation et entretien des outils
électroportatifs
Ne forcez pas sur l’outil électroportatif. Utilisez l’outil
électroportatif qui convient à la tâche à effectuer. L’outil
qui convient à la tâche fait un meilleur travail et est plus
sûr à la vitesse pour lequel il a été conçu.
1600A018W0AA 02-18 PC10.qxp_Layout 1 2/7/18 7:28 AM Page 25
Page 26

26
Ne vous servez pas de l’outil électroportatif si son interrupteur ne parvient pas à le mettre en marche ou à
l’arrêter. Tout outil électroportatif qui ne peut pas être
commandé par son interrupteur est dangereux et doit
être réparé.
Débranchez la fiche de la prise ou enlevez le bloc-pile
de l’outil électroportatif avant tout réglage, changement
d’accessoires ou avant de ranger l’outil électroportatif.
De telles mesures de sécurité préventive réduisent le risque
de démarrage intempestif de l’outil électroportatif.
Rangez les outils électroportatifs dont vous ne vous
servez pas hors de portée des enfants et ne permettez
pas à des personnes qui ne connaissent pas l’outil électroportatif ou qui ignorent ces consignes de s’en servir.
Les outils électroportatifs sont dangereux dans les mains
d’utilisateurs inexpérimentés.
Entretenez les outils électroportatifs. Vérifiez que les
pièces mobiles sont alignées correctement et ne coincent
pas. Vérifiez qu’il n’y a pas de pièces cassées ou d’autre
circonstance qui risquent d’affecter le fonctionnement de
l’outil électroportatif. Si l’outil est abîmé, faites-le réparer avant de l’utiliser. De nombreux accidents sont
causés par des outils électroportatifs mal entretenus.
Maintenez les outils coupants affûtés et propres. Les
outils coupants entretenus correctement et dotés de bords
tranchants affûtés sont moins susceptibles de coincer et
sont plus faciles à maîtriser.
Utilisez l'outil électroportatif, les accessoires et les embouts d'outil, etc. conformément à ces instructions, en
tenant compte des conditions de travail et des travaux à
réaliser. L'emploi d’outils électroportatifs pour des tâches
différentes de celles pour lesquelles ils ont été prévus peut
résulter en une situation dangereuse.
Entretien
Faites réparer votre outil électroportatif par un agent de
service qualifié n’utilisant que des pièces de rechange
identiques. Ceci assure que la sécurité de l’outil électro-
portatif est préservée.
Avertissements relatifs à la sécurité communs aux
opérations de ponçage ou de polissage :
Cet outil électroportatif est conçu pour fonctionner comme
outil adapté aux opérations de pon çage ou de polis sage.
Lisez l’en sem ble des avertissements relatifs à la sécurité,
des instruc tions, des illustrations et des spécifications
accom pagnant cet outil électroportatif. Le non-respect de
toutes les instructions figurant ci-dessous pourrait causer un
choc électrique, un incendie et/ou une blessure grave.
Des opérations telles que le
meulage, de passage à la
brosse métallique,
et le
tronçonnage abrasif
pas recom-
mandées avec cet outil électrique. L'usage de l'outil au
cours de travaux pour lesquels il n'a pas été conçu risque
de présenter un danger et de causer des blessures corporelles.
N’utilisez pas d’accessoires qui ne sont pas conçus et recommandés spécifiquement par le fabricant de l’outil. Le
simple fait que l’accessoire puisse être connecté à votre outil
électroportatif ne suffit pas à garantir un fonctionnement sans
danger.
La VITESSE NOMINALE des accessoires doit être au moins
égale à la vitesse de fonctionnement indiquée sur l’outil
électrique. Si des accessoires fonctionnent à une vitesse su-
périeure à leur VITESSE NOMINALE, ils risquent de se casser
et d’être projetés dans l’air.
Le diamètre extérieur et l’épaisseur de votre acces soire
doivent être compris dans la capacité nominale de votre
outil électromécanique. Des accessoires de taille incorrecte
ne peuvent pas être contrôlés de façon adéquate.
La taille de l’axe de rotation des meules, des tambours de
ponçage ou de tous autres accessoires doit corres pondre
exactement à celle de l’axe de rotation ou à la douille de
l’outil électroportatif. Les accessoires qui ne correspondent
pas à la taille du matériel de montage de l’outil électroportatif
fonctionneront de manière désé qui librée, avec des vibrations
excessives, et ils risqueraient de causer une perte de contrôle.
N’utilisez pas un accessoire endommagé. Avant chaque utilisation, inspectez l’accessoire (p. ex., une meule abrasive
pour vous assurer qu’il n’y a pas de fissures ou d’éclats, un
tambour de ponçage pour vous assurer qu’il n’est pas fis-
1600A018W0AA 02-18 PC10.qxp_Layout 1 2/7/18 7:28 AM Page 26
Page 27

27
suré ou excessivement usé, ou une brosse métallique pour
vous assurer qu’elle ne comporte pas de fils desserrés ou
fissurés). Si vous avez laissé tomber l’outil ou l’accessoire,
inspectez-le pour vous assurer qu’il n’est pas endommagé
ou installez un accessoire qui n’est pas endommagé. Après
avoir inspecté et installé un accessoire, placez-vous (et
toutes autres personnes présentes) hors de la trajectoire
prévisible de l’accessoire en rotation, et faites fonctionner
l’outil électroportatif à la vitesse maximum à vide pendant
une minute. Des accessoires endommagés se briseraient
normalement avant la fin de la durée de ce test.
Portez des équipements de protection personnelle. Selon
l’application, utilisez un écran de protection du visage, des
lunettes de protection ou des lunettes de sécurité. Suivant
les besoins, portez également un masque de protection
contre la poussière, des protec teurs d’oreilles, des gants
et un tablier d’atelier capable d’intercepter des petits objets
ou fragments d’ouvrage abrasifs. Le dispositif de protection
des yeux doit être capable d’intercepter des débris volants
projetés par diverses opérations. L’appareil respiratoire ou
le masque de protection doit être capable de filtrer les particules produites par votre opération. Une exposition prolongée
à un bruit de haute intensité peut causer une perte auditive.
Veillez à ce que toutes les personnes présentes soient à
une distance de sécurité de la zone de travail. Toute personne entrant dans la zone de travail doit porter des équipements de protection personnelle. Des fragments
d’ouvrage ou d’un accessoire cassé pourraient être projetés
violemment et causer des blessures au-delà de la zone d’opération immédiate.
Ne posez jamais l’outil électroportatif avant que l’ac ces soire se soit totalement arrêté. L’accessoire en rotation ris-
querait d’accrocher la surface et de tirer sur l’outil, vous faisant
perdre le contrôle de l’outil électroportatif.
Ne laissez pas l’outil électroportatif en marche pendant que
vous le transportez. Un contact accidentel avec l’accessoire
pourrait lui faire accrocher vos vêtements, attirant ainsi l’accessoire vers votre corps et risquant de vous blesser.
Nettoyez régulièrement les évents d’aération de l’outil électroportatif. Le ventilateur du moteur attirera de la poussière à
l’intérieur du carter, et une accumulation excessive de métal
en poudre pourrait causer des dangers électriques.
N’utilisez pas l’outil électroportatif à proximité de matériaux
inflammables. Des étincelles risqueraient de mettre le feu à
ces matériaux.
N’utilisez pas d’accessoires qui nécessitent des liquides de
refroidissement. L’utilisation d’eau ou d’autres liquides de re-
froidissement pourrait causer une électrocution ou un choc
électrique.
Avertissements concernant l’effet de rebond
et avertissements associés
L’effet de rebond est une réaction soudaine à un pince ment
ou à l’accrochage d’une meule, d’un plateau porte-disque,
d’une brosse ou de tout autre accessoire en rotation. Le pincement ou l’accrochage cause un blocage rapide de l’accessoire en rotation, ce qui, à son tour, cause la projection de
l’outil électroportatif qui n’est plus contrôlé dans le sens opposé à celui de la rotation de l’accessoire.
Par exemple, si une meule abrasive est accrochée ou pincée
par l’ouvrage, le bord de la meule qui entre dans le point de
pincement peut s’enfoncer dans la surface du matériau et causer un choc en retour, étant éjectée violemment du matériau.
La meule peut alors être projetée vers l’opérateur, ou dans le
sens contraire, en fonction du sens du mouvement de la
meule au point de pincement. Les meules abrasives risquent
également de se casser dans de telles circonstances.
L’effet de rebond est la conséquence d’une utilisation incorrecte de l’outil électroportatif et/ou de conditions ou de procédures d’utilisation incorrectes ; il peut être évité si l’on prend
les précautions appropriées, comme indiqué ci-dessous.
a) Maintenez une prise ferme sur l’outil électroportatif et
positionnez votre corps et vos bras de façon à vous permettre de résister à la force d’un tel effet de rebond éventuel.
L’opérateur peut contrôler les forces des effets de rebond s’il
prend les précautions nécessaires.
b) Ne placez jamais votre main à proximité de l'accessoire en mouvement. L'accessoire risquerait de rebondir
sur votre main.
1600A018W0AA 02-18 PC10.qxp_Layout 1 2/7/18 7:28 AM Page 27
Page 28

28
c) Ne vous placez jamais dans la zone où l'outil électroportatif se dirigerait si un rebond se produisait. L'effet de
rebond projetterait l'outil dans la direction opposée à celle
du mouvement de la meule à l'emplacement de l'accrochage.
d) Faites particulièrement attention lorsque vous travaillez
dans des coins, sur des bords tranchants, etc. Évitez de
faire rebondir l’accessoire ou de le laisser s’accrocher. Les
coins, les bords tranchants et les rebondissements ont tendance à accrocher un accessoire en rotation et de causer une
perte de contrôle ou un choc en retour.
e) N’attachez pas une lame de scie dentelée. De telles lames
causent souvent des effets de rebond et des pertes de
contrôle.
Avertissements spécifiques à la sécurité
des opérations de ponçage :
N'utilisez pas de papier à disque de ponçage surdimensionné. Suivez les recommandations du fabricant quand
vous choisissez votre papier de ponçage. Un papier de
ponçage trop grand qui dépasse du patin de ponçage
représente un danger de lacération et peut entraîner un
blocage, une déchirure du disque ou un rebond.
Avertissements spécifiques à la sécurité des
opérations de polissage :
Ne laissez pas une quelconque partie mal assujettie du
capuchon de polissage ou de ses courroies de fixation
tourner librement. Rangez les courroies de fixation mal
assujetties à l’intérieur ou coupez-les. Des courroies de
fixation mal assujetties et en rotation pourraient se prendre
dans vos doigts ou coincer l’ouvrage.
1600A018W0AA 02-18 PC10.qxp_Layout 1 2/7/18 7:28 AM Page 28
Page 29

29
Avertissements supplémentaires concernant la sécurité
L’emploi d’un GFCI et de dispositifs de protection personnelle tels que gants et chaussures d’électricien en
caoutchouc améliorent votre sécurité personnelle.
N’utilisez pas un outil conçu uniquement pour le C.A. sur
une alimentation en C.C. Même si l’outil semble fonc-
tionner, les composants électriques d’un outil prévu pour
le C.A. tomberont probablement en panne et risquent de
créer un danger pour l’utilisateur.
Maintenez les poignées sèches et exemptes d’huile et
de graisse. On ne pas maîtriser un outil électroportatif en
toute sécurité quand on a les mains glissantes.
Créez un agenda d’entretien périodique pour votre outil.
Quand vous nettoyez un outil, faites attention de n’en
démonter aucune pièce car il est toujours possible de
mal remonter ou de pincer les fils internes ou de remonter incorrectement les ressorts de rappel des capots de
protection. Certains agents de nettoyage tels que
l’essence, le tétrachlorure de carbone, l’ammoniaque, etc.
risquent d’abîmer les plastiques.
Les travaux à la
machine tel que
ponçage, sciage, meulage, perçage et autres travaux du
bâtiment peuvent créer des poussières contenant des
produits chimiques qui sont des causes reconnues de
cancer, de malformation congénitale ou d’autres problèmes reproductifs. Ces produits chimiques sont, par exemple :
• Le plomb provenant des peintures à base de plomb,
• Les cristaux de silices provenant des briques et du ciment
et d’autres produits de maçonnerie, et
• L’arsenic et le chrome provenant des bois traités chim-
iquement.
Le niveau de risque dû à cette exposition varie avec la
fréquence de ces types de travaux. Pour réduire l’exposition à ces produits chimiques, il faut travailler dans un lieu
bien ventilé et porter un équipement de sécurité approprié
tel que certains masques à poussière conçus spécialement
pour filtrer les particules microscopiques.
Ce manuel contient des instructions pour le chargeur de
piles modèle 510. Ne lui substituez aucun autre chargeur.
Avant d’utiliser le chargeur de piles, lisez toutes les instructions et mises en garde figurant sur le chargeur de piles et
le produit utilisant les piles.
Chargez seulement l’outil Dremel Versa. D’autres types
d’outils sans fil risqueraient d’éclater et de causer ainsi des
blessures et des dommages.
Chargez l’outil à des températures supérieures à
+32 degrés F (0 degré C) et inférieures à +113 degrés F (45
Consignes de sécurité applicables aux chargeurs
Vous devez lire et comprendre toutes les instructions. Le non-respect, même
partiel, des instructions ci-après entraîne un risque de choc életrique, d'incendie
et/ou de blessures graves.
IMPORTANTES CONSIGNES DE SÉCURITÉ ET DE FONCTIONNEMENT
CONSERVEZ CES INSTRUCTIONS
1600A018W0AA 02-18 PC10.qxp_Layout 1 2/7/18 7:28 AM Page 29
Page 30

30
degrés C). Rangez l’outil à des endroits dont la tem pé rature
ne dépassera pas 120 degrés F (49 degrés C). Ceci est im-
portant pour ne pas risquer de causer des dommages graves
aux cellules des piles.
Ne rechargez pas les piles dans un environnement humide
ou mouillé. N’exposez pas le chargeur à la pluie ou à la
neige. La pénétration d’eau dans le chargeur de piles risquerait
de causer un choc électrique ou un incendie.
Il peut y avoir une fuite de pile dans des conditions extrêmes d'utilisation ou de température. Évitez tout contact avec la peau et les yeux. Le liquide de pile est
caustique et pourrait causer des brûlures chimiques aux
tissus. Si le liquide vient en contact avec la peau, lavez rapidement à l'eau savonneuse. Si le liquide vient en contact
avec les yeux, rincez-les à l'eau pendant au moins 10 minutes et sollicitez des soins médicaux.
Placez le chargeur sur des surfaces plates et non inflammables, et à distance de tous matériaux inflammables, lorsque
vous rechargez l’outil. De la moquette et d’autres surfaces
thermiquement isolantes bloquent une circulation appropriée
de l’air, ce qui pourrait causer une surchauffe du chargeur et
de l’outil. Si vous observez de la fumée ou si vous voyez que
le chargeur ou l’outil commence à fondre, débranchez immédiatement le chargeur et ne vous servez plus du chargeur ou
de l’outil. Contactez immédiatement le service à la clientèle.
Assurez-vous que le cordon est placé à un endroit où il ne
sera pas piétiné, ou il ne fera trébucher personne et ou il ne
sera pas exposé par ailleurs à des dommages ou à des contraintes. Une fiche et un cordon endommagés pourraient
causer un choc électrique ou un incendie.
Débranchez le chargeur en tirant sur la fiche et non sur le
cordon. N’utilisez pas un chargeur dont le cordon ou la fiche
est endommagé ; faites-les remplacer immédiatement. Une
fiche ou un cordon endommagé pourrait causer un choc électrique ou un incendie.
N’insérez pas l’outil dans le chargeur si le boîtier de l’outil
est fissuré. L’utilisation d’un outil endommagé pourrait causer
un choc électrique ou un incendie.
Ne démontez pas le chargeur et ne l’utilisez pas s’il a reçu
un impact violent, s’il est tombé ou s’il a été endommagé
par ailleurs d’une quelconque autre façon.Un réassemblage
incorrect ou un endommagement pourrait causer un choc
électrique ou un incendie.
Avant chaque utilisation, inspectez le chargeur de piles, le
câble et la fiche. N’utilisez pas le chargeur de piles si vous
détectez un dommage quelconque. N’ouvrez jamais le
chargeur de piles vous-même ; apportez-le dans un Centre
de service usine de Dremel ou chez un réparateur compétent
n’utilisant que des pièces de rechange d’origine. Un
réassemblage incorrect pourrait causer un choc électrique ou
un incendie.
N’utilisez pas d’accessoire qui n’est pas recommandé ou
vendu par Dremel. L’utilisation d’accessoires non recom-
mandés pourrait causer un choc électrique ou un incendie.
Ne rangez pas le chargeur avec l’outil à l’intérieur. Le stock-
age de l’outil à l’intérieur d’un chargeur pendant une période
prolongée pourrait endommager le bloc-piles et risquerait
même de causer un incendie.
Débranchez le chargeur de la prise de courant avant de le
ranger, d’effectuer une opération de maintenance ou de réparation, ou de le nettoyer. De telles mesures préventives en
matière de sécurité réduisent le risque de choc électrique ou
d’incendie.
Gardez le chargeur de piles propre en soufflant de l’air comprimé sur les évents du chargeur et en essuyant le boîtier
du chargeur avec un tissu humide.Tout contamination pour-
rait causer un choc électrique ou un incendie.
Si vous constatez une baisse substantielle de l’autonomie
de fonctionnement après les recharges, cela peut signifier
que le bloc-piles de l’outil s’approche de la fin de sa vie
utile. Apportez l’outil dans un centre de service usine Dremel
ou à un réparateur qualifié pour remplacer le bloc-piles par une
pièce de rechange Dremel authentique.
1600A018W0AA 02-18 PC10.qxp_Layout 1 2/7/18 7:28 AM Page 30
Page 31

31
Mise au rebut des piles
Ne tentez pas de
d és as s e m b l e r
l’outil ou d’enlever tout composant faisant saillie de
l’outil. Ceci pourrait provoquer un incendie ou des
blessures. Avant la mise au rebut, protégez les bornes exposées à l’aide d’un ruban isolant épais pour prévenir le
court-circuitage.
PILES LITHIUM-ION
Si le produit est équipé d'une pile lithium-ion, la pile doit
être ramassée, recyclée ou mise au rebut d'une manière
qui ne soit pas nocive pour l'environnement.
“Le sceau RBRC de recyclage des
piles, homologué par l’EPA (Agence
pour la protection de l’environne ment
des États-Unis), qui se trouve sur les
piles au lithium-ion (Li-ion) indique que
Robert Bosch Tool Corporation participe volontairement à un programme industriel de ramassage et de recyclage de ces piles au terme de leur vie utile,
pourvu qu’elles soient mises hors service aux États-Unis
ou au Canada. Le programme du RBRC offre une alternative pratique à la mise des piles au Li-ion usées au rebut
ou au ramassage d’ordures municipal, ce qui pourrait être
interdit dans votre région.
Veuillez appeler le 1-800-8-BATTERY pour obtenir de plus
amples renseignements sur le recyclage des piles au Liion et sur les restrictions ou interdictions de mise au rebut
qui s’appliquent à votre région ou renvoyez vos piles à un
Centre de Service Bosch/Dremel pour recyclage. La participation de Robert Bosch Tool Corporation à ce programme s'insère dans le contexte de notre engagement à
préserver notre environnement et à conserver nos
ressources naturelles.”
N'ouvrez pas
l'outil et n'es-
sayez pas de retirer la batterie de votre outil.
Débarrassez-vous de l'outil auprès de votre service d'élimination des déchets local ou d'un centre
de service Bosch / Dremel.
1600A018W0AA 02-18 PC10.qxp_Layout 1 2/7/18 7:28 AM Page 31
Page 32

32
Symboles
I
M
P
O
R
T
A
N
T
:
C
e
r
t
a
i
n
s
d
e
s
s
y
m
b
o
l
e
s
s
u
i
v
a
n
t
s
p
e
u
v
e
n
t
ê
t
r
e
u
t
i
l
i
s
é
s
s
u
r
v
o
t
r
e
o
u
t
i
l
.
V
e
u
i
l
l
e
z
l
e
s
é
t
u
d
i
e
r
e
t
a
p
p
r
e
n
d
r
e
l
e
u
r
s
i
g
n
i
f
i
c
a
t
i
o
n
.
U
n
e
i
n
t
e
r
p
r
é
t
a
t
i
o
n
a
p
p
r
o
p
r
i
é
e
d
e
c
e
s
s
y
m
b
o
l
e
s
v
o
u
s
p
e
r
m
e
t
t
r
a
d
'
u
t
i
l
i
s
e
r
l
'
o
u
t
i
l
d
e
f
a
ç
o
n
p
l
u
s
e
f
f
i
c
a
c
e
e
t
p
l
u
s
s
û
r
e
.
Symbole Désignation / Explication
V Volts (voltage)
A Ampéres (courant)
Hz Hertz (fréquence, cycles par seconde)
W Watt (puissance)
⌀
Diamétre (taille des mèches de perceuse, meules, etc.)
n Vitesse nominale (vitesse maximum pouvant être atteinte)
.../min
Tours ou mouvement alternatif par minute (tours, coups, vitesse en surface, orbites, etc., par
minute)
Flèche (action dans la direction de la flèche)
Courant alternatif (type ou caractéristique du courant)
Courant continu (type ou caractéristique du courant)
Construction classe II (désigne des outils construits avec double isolation)
1600A018W0AA 02-18 PC10.qxp_Layout 1 2/7/18 7:28 AM Page 32
Page 33

33
Symboles (suite)
IMPORTANT : Certains des symboles suivants peuvent être utilisés sur votre outil. Veuillez les étudier et apprendre leur
signification. Une interprétation appropriée de ces symboles vous permettra d'utiliser l'outil de façon plus efficace et
plus sûre.
Symbole Désignation / Explication
Désigne le programme de recyclage des piles Li-ion.
Alerte l’utilisateur pour lire le mode d’emploi
Alerte l’utilisateur pour lui indiquer le besoin de porter des lunettes de sécurité et une
protection respiratoire
Ce symbole signifie que cet outil est approuvé par Underwriters Laboratories
selon les normes des États-Unis et du Canada.
Ce symbole signifie que cet outil est approuvé par l'Association canadienne de normalisation selon les normes des États-Unis et du Canada.
1600A018W0AA 02-18 PC10.qxp_Layout 1 2/7/18 7:28 AM Page 33
Page 34

34
UN OUTIL TRÈS RAPIDE
L’outil fonctionne à une vitesse maximum de 2 200
tr/min., ce qui en fait l’outil électrique de nettoyage le
plus rapide qui existe. Sa vitesse supérieure lui permet
de nettoyer plus rapidement et plus agressivement, ce
qui contribue à éliminer beaucoup des efforts manuels
qui sont normalement nécessaires pour les applications
de l’utilisateur. Les outils électriques de nettoyage standard tournent à environ 300 tr/min, combinant faible
vitesse et couple élevé. Ces outils nécessitent toujours
de grands efforts manuels pour les applications de nettoyage. Le Dremel Versa est le contraire – un outil à
vitesse élevée et faible couple. La différence pour l’utilisateur est que dans l’outil à grande vitesse Dremel la
vitesse et l’accessoire se combinent pour faire le travail
à votre place, sans que vous ne deviez appliquer une
forte pression. Tenez simplement l’outil et guidez-le.
TECHNOLOGIE DES PILES LITHIUM-ION – TRÈS
PUISSANTE
La puissance est un autre avantage important que vous
constaterez lorsque vous travaillerez avec le Dremel
Versa. La combinaison d’un moteur c.c. compact, mais
très efficace, de piles lithium-ion de petite taille et d’une
électronique intelligente permet d’utiliser cet appareil
dans des applications difficiles. L’utilisation de piles in-
corporant la puissante technologie très pointue du
lithium est bénéfique pour l’utilisateur car elle assure une
puissance plus uniforme en une seule charge. Cet outil
ne perdra pas progressivement de sa puissance pendant
l’emploi (à la différence des appareils utilisant des piles
AA ou NiCad). La recharge est rapide et facile grâce au
chargeur micro USB. Vous n’aurez pas besoin de remplacer constamment les piles. Comme le temps de
charge est également très court (~2 h de temps de
charge en cas de charge avec l’adaptateur de courant
Dremel 510 de 1 A USB fourni), l’outil sera prêt lorsque
vous en aurez besoin.
UN OUTIL VERSATILE
Il y aura quatre attachements accessoires différents :
tampon de polissage en mousse, tampon anti-rayures,
tampon de brossage abrasif pour nettoyage en profondeur et brosse à soies en nylon. Ces quatre accessoires permettent d’utiliser l’outil sur de multiples
surfaces afin de nettoyer les saletés et les déchets accumulés. Les différents niveaux d’abrasivité des tampons
et de la brosse permettent à l’utilisateur d’utiliser cet outil
dans le cadre d’applications très variées. Le système de
fixation par fermeture auto-agrippante permet à l’utilisateur de changer rapidement d’accessoires. Le mécanisme de changement des accessoires ne requiert pas
Dremel Versa – Introduction
Merci d’avoir acheté le nouveau Dremel Versa, l’outil de nettoyage sans fil le plus rapide et le plus compact qui soit,
fabriqué par le numéro un mondial des outils rotatifs. Ce produit a été conçu pour l’utilisateur qui veut un outil facile
à utiliser et pratique tout en étant puissant pour lui permettre de nettoyer ou de préparer des surfaces difficiles et
pour réduire les efforts manuels nécessaires sans un tel outil. Il est efficace pour de nombreuses tâches à la maison
comme dans le garage. Il peut être utilisé pour des projets difficiles que d’autres appareils de nettoyage ne pourraient
pas gérer. La combinaison de sa conception ergonomique, de son moteur, de ses piles et de son électronique fait
du Dremel Versa un outil très convivial et idéal pour des tâches versatiles et exigeantes.
1600A018W0AA 02-18 PC10.qxp_Layout 1 2/7/18 7:28 AM Page 34
Page 35

35
d’outil, ce qui permet un remplacement facile et non
frustrant par l’utilisateur. Le kit Dremel Versa est également fourni avec un dispositif de protection contre les
éclaboussures.
TAILLE COMPACTE
Cet outil est conçu pour pouvoir être utilisé d’une seule
main. Le surmoulage sur le dessus permet à l’utilisateur
de saisir l’outil de manière à pouvoir mieux le contrôler
pendant l’utilisation, tout particulièrement dans le cadre
d’applications humides. Sa petite taille permet à l’utilisateur de nettoyer les endroits d’accès difficile, et le fait
qu’il fonctionne sans fil permet à l’utilisateur de s’en
servir pratiquement partout, à l’intérieur comme à l’extérieur.
UN OUTIL RÉSISTANT À L’EAU
Le Dremel Versa est totalement étanche, ce qui veut dire
qu’il peut être utilisé sans danger dans des applications
humides. Cependant, il ne faut pas l’immerger complètement dans des liquides.
Les outils contenant des piles sont toujours en état de fonctionnement. Pour réduire le risque de dangers possibles, ne commencez pas à vous en servir avant
d’avoir lu le mode d’emploi.
CONSERVEZ CES INSTRUCTIONS
Description fonctionnelle et spécifications
OUTIL DE NETTOYAGE SANS FIL VERSA
Numéro de modèle PC10
Tension nominale 3,6 V / 4 V max.
Vitesse nominale n 2 200 tr/min
CHARGEUR
Numéro de modèle 510
Durée de charge 2 h
Tension nominale 120 V 60 Hz
Intensité nominale 1 A
Agent chimique (piles) Lithium-Ion
Dremel Versa – Introduction
1600A018W0AA 02-18 PC10.qxp_Layout 1 2/7/18 7:28 AM Page 35
Page 36

36
FIG. 1
Bouton
Marche/Arrêt
Tige filetée
Zone de préhension
souple
Borne de
charge
Adaptateur
de courant
Câble de charge USB
Voyant de
charge
Description fonctionnelle et spécifications
1600A018W0AA 02-18 PC10.qxp_Layout 1 2/7/18 7:28 AM Page 36
Page 37

37
Pour réduire le
risque de
blessure, assurez-vous toujours que l’outil est à l’arrêt
(OFF) avant de changer des accessoires, de changer
le plateau de fixation, de retirer le dispositif de protection contre les éclaboussures ou de réparer votre
outil rotatif sans fil.
FIXATION DU DISPOSITIF DE PROTECTION CONTRE
LES ÉCLABOUSSURES
Pour attacher le dispositif de protection contre les
éclaboussures : alignez les broches du dispositif sur les
fentes du boîtier de l’outil (Fig. 2). Faites tourner le dispositif dans le sens des aiguilles d’une montre jusqu’à
ce qu’il soit fermement installé sur l’outil. Vous devez attacher le dispositif de protection contre les éclaboussures avant d’attacher le plateau de fixation.
FIXATION DU PLATEAU DE FIXATION
Pour attacher le plateau de fixation : alignez sur les filets
de la tige de sortie, puis serrez le plateau à la main dans
le sens des aiguilles d’une montre (Fig. 2).
FIXATION DES ACCESSOIRES
Les accessoires sont attachés au plateau de fixation par
un système de fermeture auto-agrippante.
Pour attacher : alignez le côté « boucle » de l’accessoire
sur le côté « crochet » du plateau de fixation de l’outil
(Fig. 2). Alignez l’accessoire aussi près que possible du
centre sur le plateau de fixation afin qu’il tourne de façon
concentrique pour assurer une performance optimale et
une grande facilité d’utilisation. Les accessoires dépasseront du plateau de fixation ; ceci permet à l’utilisateur d’atteindre les coins et les espaces d’accès restreint.
Assemblage
Broche
Fente
Tige
Plateau de
fixation
Brosse à soies
en nylon
Accessoire
Dispositif de
protection
contre les
éclaboussures
Côté
boucle
FIG. 2
1600A018W0AA 02-18 PC10.qxp_Layout 1 2/7/18 7:28 AM Page 37
Page 38

38
Vitesses de fonctionnement
N’utilisez que des accessoires Dremel®haute performance. Les autres ac-
cessoires ne sont pas conçus pour cet outil, et ils pourraient causer des
blessures ou des dommages matériels.Rangez les accessoires dans un environnement sec et tempéré pour évite
qu’ils ne se détériorent.
Le Dremel Versa est conçu pour travailler avec divers
types de produits de nettoyage (jet, mousse, gel ou liquide). Avant d’utiliser des solutions de nettoyage, veuillez
lire et suivre les avertissements et les instructions du
fabricant concernant leur utilisation. Couvrez les zones
avoisinantes lorsque vous nettoyez afin de les protéger
des jets pulvérisés. Utilisez le dispositif de protection
contre les éclaboussures sur les surfaces ouvertes pour
les protéger contre les pulvérisations. Il est recommandé
d’appliquer directement l’eau et l’agent de nettoyage sur
la surface qui doit être nettoyée et/ou sur l’accessoire.
Si vous appliquez directement de l’eau ou de l’agent de
nettoyage sur l’accessoire, secouez pour éliminer l’excédent de liquide ou agitez l’outil en le mettant en marche
pendant quelques secondes seulement dans un endroit
protégé (p. ex., un seau ou un évier) afin de réduire le
jet.
Pour commencer le nettoyage, appuyez sur le bouton
Marche/Arrêt (Fig. 1), puis relâchez-le pendant que l’accessoire est en contact avec la surface à nettoyer. L’outil
atteindra rapidement sa vitesse optimale. Appuyez-le
délicatement sur la surface à nettoyer ; n’appuyez pas
trop fort ; laissez l’outil faire le travail.
Pour retirer : tirez sur l’accessoire pour le séparer du
plateau de fixation. Tenez l’accessoire par le matériau «
boucle » du plateau de fixation et pelez pour le détacher
du plateau de fixation (comme cela est illustré à la Figure
3), plutôt qu’en saisissant le matériau éponge/microfibre.
Pour attacher la brosse à soies en nylon : retirez d’abord
complètement le plateau de fixation, puis attachez la
brosse en alignant les filets de la tige de sortie, et serrez
à la main la brosse à soies en nylon dans le sens des
aiguilles d’une montre.
FIG. 3
Assemblage
1600A018W0AA 02-18 PC10.qxp_Layout 1 2/7/18 7:28 AM Page 38
Page 39

Pour éteindre l’outil, appuyez sur le bouton
Marche/Arrêt, puis relâchez-le.
Le kit comprend un plateau de fixation, un dispositif de
protection contre les éclaboussures et quatre accessoires différents. Testez l’outil sur une petite section de
la surface que vous avez l’intention de nettoyer pour
vous assurer que le résultat est acceptable avant de nettoyer toute la surface.
DISPOSITIF DE PROTECTION CONTRE LES
ÉCLABOUSSURES
Il est recommandé d’utiliser le dispositif de protection
contre les éclaboussures pour toutes les applications de
nettoyage humide. Maintenez le dispositif de protection
contre les éclaboussures en position « sortie » pendant
que l’outil fonctionne afin de contenir le jet d’eau pulvérisée avec la solution de nettoyage.
Pour travailler dans des espaces d’accès difficile, il est
possible de rétracter le dispositif de protection contre
les éclaboussures en position surélevée.
Pour retirer complètement le dispositif de protection
contre les éclaboussures, éteignez l’outil, dévissez le
plateau de fixation (dans le sens contraire des aiguilles
d’une montre en regardant vers le bas de l’outil), puis
faites tourner le dispositif de protection contre les
éclaboussures d’un quart de tour pour le retirer. Vissez
à nouveau le plateau de fixation pour le remettre en
place.
TAMPON DE POLISSAGE EN MOUSSE BLANC
Tampon universel recommandé pour utilisation sur des
surfaces dures telles que des revêtements de comptoirs,
du verre, des planchers, des plinthes, des portes, des
murs, des chaussures et des appareils ménagers en acier
non inoxydable. En raison de sa technologie micro-abrasive, le tampon aidera à éliminer les taches sans devoir
utiliser de produit de nettoyage abrasif ; cependant, si la
surface à nettoyer n’est pas assez dure, elle risque d’être
très légèrement rayée par le matériau. Testez le tampon
sur une petite surface en n’exerçant qu’une très faible
pression avant de l’utiliser. Le tampon n’est pas recom-
mandé pour les surfaces suivantes : bois très brillant,
vernis, brossé, satiné, faux ou nu ; cuivre ; acier inoxydable ; revêtement antiadhésif ou carrosserie automobile.
39
VERSAVERSA
Position sortie Position rentrée
Vitesses de fonctionnement
1600A018W0AA 02-18 PC10.qxp_Layout 1 2/7/18 7:28 AM Page 39
Page 40

40
Vitesses de fonctionnement
TAMPON ANTI-RAYURES EN MICROFIBRES BLEU
Recommandé pour les tâches difficiles sans risque de
rayures. Peut être utilisé sur les casseroles et les poêles
à frire, l’extérieur des grils, les éviers, le dessus et les
grilles des cuisinières, les équipements électroménagers
de cuisine et les outils/équipements d’extérieur.
TAMPON ABRASIF POUR NETTOYAGE EN
PROFONDEUR MARRON
Ce tampon de brossage comporte des particules abrasives appropriées pour les tâches qui nécessitent des efforts plus agressifs de nettoyage, comme pour la
préparation des métaux, sur le mobilier de jardin, pour
le décapage de peinture, sur les batteries de cuisine non
enrobées et autres applications de ce genre. Il découpe
les détritus accumulés récalcitrants et les détache rapidement.
BROSSE À SOIES EN NYLON NOIRE
Utilisez cette brosse pour les applications nécessitant un
brossage rigoureux telles que : le coulis, les talons de
pneus, les éviers, les bâtis et équipements, le mobilier de
terrasse et diverses autres surfaces dans votre salle de
bain et votre cuisine. Les soies en nylon durable sont inclinées pour vous permettre de nettoyer plus facilement
les coins.
1600A018W0AA 02-18 PC10.qxp_Layout 1 2/7/18 7:28 AM Page 40
Page 41

41
CONTRÔLE ÉLECTRONIQUE
Votre outil est pourvu d’un système de contrôle
électronique interne qui contribue à maximiser
la performance du moteur et des piles en limitant l’approvisionnement de l’outil en courant
en cas de surcharge ou si l’outil cale.
Si vous faites caler l’outil et le laissez trop
longtemps dans cette situation, il s’éteindra automatiquement. Une fois que cela se produit,
appuyez sur le bouton Marche/Arrêt et relâchez
simplement à deux reprises pour remettre l’outil
sous tension, puis continuez à vous en servir.
Lorsque les piles sont presque complètement
déchargées, l’outil peut s’arrêter automatiquement plus fréquemment que normalement. Si
cela se produit, cela signifie que le moment est
venu de recharger l’outil.
=
I
déal
=
Accept
abl
e
A
C
C
E
S
S
O
I
R
E
B
ro
s
se
à
so
i
e
s
T
a
mp
o
n
a
n
t
i
-r
a
yu
re
s
T
am
pon pour
nettoyage
en profondeur
Ta
mp
o
n
de
po
l
i
s
s
a
ge
S
u
rf
a
ce
s
d
u
res
S
u
rf
a
ce
s
p
e
i
n
t
e
s
Ti
s
su
s
A
c
i
e
r
i
n
o
xy
d
a
b
l
e
F
o
n
te
Cé
ra
miq
u
e
et
po
r
c
e
l
a
i
n
e
A
l
u
m
in
i
u
m
e
t
m
é
t
a
l
P
l
a
s
t
i
q
u
e
e
t
s
t
r
a
t
i
f
i
é
s
V
er
r
e
D
éc
a
p
a
g
e
,
p
e
i
n
t
ur
e
e
t
r
o
u
i
l
l
e
Vitesses de fonctionnement
1600A018W0AA 02-18 PC10.qxp_Layout 1 2/7/18 7:28 AM Page 41
Page 42

42
CHARGEUR 2 HEURES 510
Votre Dremel Versa n’est pas complètement chargé à l’usine avant d’être expédié. Vous devez le charger avant
de vous en servir pour la première fois.
Pour charger : branchez le cordon USB dans l’outil et
l’adaptateur de courant, puis insérez la fiche de l’adaptateur de courant dans une prise de courant standard.
La lampe à DEL bleue située sur le boîtier de l’outil en
dessous de la prise USB s’allumera pour signaler que les
piles sont en train de charger. Lorsque l’outil est complètement chargé (ce qui prend environ 2 heures), la
charge sera interrompue immédiatement et la lampe à
DEL bleue s’éteindra.
Lorsque les piles sont totalement déchargées, l’outil
cesse automatiquement de fonctionner. Il s’agira d’un
arrêt soudain, plutôt qu’un ralentissement progressif de
l’outil. Rechargez alors simplement l’outil et recommencez ensuite à vous en servir.
Charge de l’outil
Adaptateur
de courant
FIG. 4
Voyant de
charge
Câble de
charge USB
1600A018W0AA 02-18 PC10.qxp_Layout 1 2/7/18 7:28 AM Page 42
Page 43

43
REMARQUES IMPORTANTES
CONCERNANT LA CHARGE
1. Le chargeur a été conçu pour ne charger l’outil que
lorsque la température des piles est comprise entre
32° F (0° C) et 113° F (45° C). Si l’outil est trop chaud
ou trop froid, le chargeur ne chargera pas l’outil. (Ceci
peut se produire si l’outil est très chaud en conséquence d’une utilisation intensive.) Lorsque la température de l’outil retourne entre 32° F (0° C) et 113°
F (45° C), le chargeur recommence automatiquement
à charger.
2. Une diminution substantielle de la durée de fonction-
nement par charge peut indiquer que l’outil est près
de la fin de sa vie utile.
3. Souvenez-vous de débrancher l’adaptateur de courant
pendant toute période d’inutilisation prolongée.
4. Si l’outil ne charge pas comme il faudrait :
a. Essayez de brancher un autre appareil électrique
dans la prise.
b. Regardez si la prise de courant est connectée à un
commutateur d’alimentation en électricité qui se
met hors tension quand la lumière est éteinte.
c. Assurez-vous qu’il n’y a pas saletés sur la base de
charge et sur les bornes d’alimentation.
Débranchez l’outil de la prise de courant et nettoyez avec un coton-tige et de l’alcool si besoin est.
d. Si l’outil ne charge pas comme il faudrait, contactez
le centre de service après-vente Dremel le plus
proche et demandez-lui d’inspecter l’outil.
Remarque : L’utilisation d’une alimentation qui n’est pas
vendue par Dremel annulera la garantie.
Mise en garde de la FCC :
Le fabricant n'est pas responsable des perturbations radioélectriques causées par des modifications non autorisées de ce matériel. De telles modifications pourraient
annuler le droit de l'utilisateur de se servir de ce matériel.
Cet appareil est conforme à la Partie 15 des Règles de la
FCC. Son exploitation est sujette au respect de deux conditions :
1) Cet appareil ne risque pas de causer des interférences
nuisibles ; et
2) Cet appareil doit accepter toutes les interférences
reçues, y compris les interférences qui peuvent causer
un fonctionnement indésirable.
REMARQUE : ce matériel a été testé et il a été démontré
qu'il respecte les limites fixées pour un appareil numérique
de Classe B, conformément à la Partie 15 des Règles de la
FCC. Ces limites sont conçues de manière à assurer une
protection raisonnable contre les perturbations nuisibles
dans une installation résidentielle. Ce matériel produit,
utilise et peut rayonner de l'énergie de fréquence radioélectrique et, s'il n'est pas installé et utilisé conformément aux
instructions, il risque de causer des perturbations nuisibles
aux communications radio. Cependant, il n'est pas possible de garantir qu'aucune perturbation ne résultera d'une
installation particulière. Si ce matériel cause des perturbations radioélectriques nuisibles affectant la réception de la
Charge de l’outil
1600A018W0AA 02-18 PC10.qxp_Layout 1 2/7/18 7:28 AM Page 43
Page 44

44
radio ou de la télévision – ce qui peut être déterminé en
mettant ce matériel sous tension et hors tension – l'utilisateur devrait essayer de remédier à de telles perturbations en prenant une ou plusieurs des mesures
suivantes :
• Changer l'orientation de l'antenne de réception ou la
placer à un autre endroit.
• Augmenter la distance entre le matériel et le récepteur.
• Brancher le matériel dans une prise de courant faisant
partie d'un circuit différent de celui auquel le récepteur
est connecté.
• Consulter le revendeur ou un technicien radio/télévision
expérimenté pour obtenir de l'aide.
Service
IL N’EXISTE À L’IN-
TÉRIEUR AUCUNE
PIÈCE SUSCEPTIBLE D’ÊTRE ENTRE TENUE PAR L’UTILISATEUR. L’entretien préventif exécuté par des personnes non autorisés peut entraîner un positionnement
erroné des composants et des fils internes, ce qui peut
présenter de graves dangers. Nous recommandons que
tous les outils qui ne fonctionnent pas correctement soient
renvoyés à un centre de service après-vente Bosch/Dremel.
PILES
Faites preuve de vigilance lorsque les piles sont proches
de la fin de leur vie utile. Si vous constatez que la per-
formance de l’outil se dégrade ou si la durée de fonctionnement est substantiellement plus courte entre deux
charges, cela signifie que le moment est venu de remplacer
votre outil.
Nettoyage
Pour éviter les acci-
dents, débranchez
toujours l’outil et/ou le chargeur de la source de courant
avant de nettoyer. La façon la plus efficace de nettoyer
l’outil est à l’aide d’air sec comprimé. Portez toujours des
lunettes de sécurité en nettoyant les outils à l’air comprimé.
Certains agents de nettoyage et certains dis-
solvants abîment les pièces en plastique. Parmi
ceux-ci se trouvent: l’essence, le tétrachlorure de carbone, les dissolvants de nettoyage chlorés, l’ammoniaque ainsi que les détergents domestiques qui en
contiennent.
Entretien
Mise en garde de la FCC :
1600A018W0AA 02-18 PC10.qxp_Layout 1 2/7/18 7:28 AM Page 44
Page 45

45
Votre produit Dremel est garanti contre les vices de matériau ou de façon pendant un délai de deux ans à compter de la date d’achat. Dans
l’hypothèse où le produit ne se conformerait pas à cette garantie écrite, veuillez procéder de la façon suivante :
1. NE RAPPORTEZ PAS votre produit à l’endroit où vous l’avez acheté.
2. Emballez avec soin le produit seul, sans aucun autre article, et renvoyez-le, en port payé, accompagné :
A. d’une copie de votre justificatif d’achat daté (veuillez en garder une copie pour vous-même)
B. d’une déclaration écrite concernant la nature du problème
C. d’une indication de vos nom, adresse et numéro de téléphone, à l’adresse suivante :
Nous vous recommandons d’assurer le paquet contre la perte ou les dommages en cours de route dont nous ne pouvons assumer
la responsabilité.
Cette garantie n’est offerte qu’à l’acheteur enregistré d’origine. LES DOMMAGES AU PRODUIT RÉSULTANT DE MANIPULATIONS
ABUSIVES, D'ACCIDENTS, D'USAGES ABUSIFS, DE NÉGLIGENCE, DE RÉPARATIONS OU D'ALTÉRATIONS NON AUTORISÉES, D'UTILISATION D’ACCESSOIRES NON APPROUVÉS OU D'AUTRES CAUSES NON LIÉES AU MATÉRIAU OU À LA FAÇON NE SONT PAS
COUVERTS PAR CETTE GARANTIE.
Aucun employé, mandataire, vendeur ou autre n’est autorisé à accorder des garanties au nom de Dremel. Si l’inspection effectuée
par Dremel révèle que le problème a été causé par un problème de matériau ou de façon dans les limites de la garantie, Dremel
réparera ou remplacera le produit gratuitement et renverra le produit en port payé. Si elles peuvent être effectuées, les réparations
rendues nécessaires par l’usure normale ou un usage abusif, ou les réparations du produit une fois la période de garantie expirée,
seront facturées aux tarifs réguliers de l’usine.
DREMEL N’ACCORDE AUCUNE AUTRE GARANTIE DE QUELQUE NATURE QUE CE SOIT, EXPLICITE OU IMPLICITE, ET TOUTES LES
GARANTIES IMPLICITES DE COMMERCIALISATION ET D’APTITUDE À UN USAGE PARTICULIER EN PLUS DE L’OBLIGATION SUSVISÉE
SONT REJETÉES PAR LES PRÉSENTES PAR DREMEL ET EXCLUES DE CETTE GARANTIE LIMITÉE.
Cette garantie vous accorde certains droits précis, et vous pouvez également avoir d’autres droits qui varient d’un endroit à un autre.
L’obligation du garant se limite à réparer ou remplacer le produit. Le garant n’est responsable d’aucun dommage accessoire ou indirect
attribuable à de telles défaillances alléguées. Certaines juridictions ne permettent pas l’exclusion ou la limitation des dommages accessoires
ou indirects ; il se peut donc que les limitations ou l’exclusion qui précède ne s’appliquent pas à vous.
En ce qui concerne les prix et la façon de vous prévaloir de la garantie sur le territoire continental des États-Unis, mettez-vous en contact
avec votre distributeur Dremel local.
Exportado por: © Robert Bosch Tool Corporation Mt. Prospect, IL 60056 -2230, E.U.A.
Importado a México por: Robert Bosch, S. de R.L. de C.V.
Calle Robert Bosch No. 405 - 50071 Toluca, Edo. de Méx. - México
Tel. 052 (722) 279 2300 ext 1160 / Fax. 052 (722) 216-6656
Garantie limitée de Dremel
®
ÉTATS-UNIS
Dremel Service Center
4915 21st Street
Racine, WI 53406
CANADA
Giles Tool Agency
47 Granger Av.
Scarborough, Ontario Canada
M1K 3K9
1-416-287-3000
À L’EXTÉRIEUR DU TERRITOIRE CONTINENTAL
DES ÉTATS-UNIS
Consultez votre distributeur local ou écrivez à
Dremel,
4915 21st Street Racine,
WI 53406
1600A018W0AA 02-18 PC10.qxp_Layout 1 2/7/18 7:28 AM Page 45
Page 46

46
Símbolos de seguridad
Las definiciones que aparecen a continuación describen el nivel de gravedad de cada palabra de señal de seguri-
dad. Por favor, lea el manual y preste atención a estos símbolos.
!
Éste es el símbolo de alerta de seguridad. Se utiliza para alertarle a usted
de posibles peligros de lesiones corporales. Obedezca todos los mensajes de seguridad que sigan a este símbolo para evitar posibles lesiones
o muerte.
PELIGRO indica una situación peligrosa que, si no se evita, causará la
muerte o lesiones graves.
ADVERTENCIA indica una situación peligrosa que, si no se evita, podría
causar la muerte o lesiones graves.
PRECAUCIÓN, cuando se utiliza con el símbolo de alerta de seguridad,
indica una situación peligrosa que, si no se evita, causará lesiones leves
o moderadas.
Seguridad del área de trabajo
Mantenga el área de trabajo limpia y bien iluminada.
Las áreas desordenadas u oscuras invitan a que se produzcan accidentes.
No utilice herramientas mecánicas en atmósferas explosivas, como por ejemplo en presencia de líquidos,
gases o polvos inflamables. Las herramientas mecánicas
generan chispas que pueden incendiar el polvo o los vapores.
Mantenga alejados a los niños y a las personas que
estén presentes mientras esté utilizando una herramienta mecánica. Las distracciones pueden hacerle
perder el control de la herramienta.
Lea todas las advertencias de seguridad y todas las instrucciones. Si no se siguen
las
advertencias e instrucciones, el resultado podría ser sacudidas eléctricas, incendio y/o le-
siones graves.
GUARDE TODAS LAS ADVERTENCIAS E INSTRUCCIONES
PARA REFERENCIA FUTURA
La expresión “herramienta mecánica” en las advertencias se refiere a su herramienta mecánica alimentada por la red
eléctrica (herramienta alámbrica) o su herramienta mecánica alimentada por baterías (herramienta inalámbrica).
Advertencias generales de seguridad para herramientas mecánicas
1600A018W0AA 02-18 PC10.qxp_Layout 1 2/7/18 7:28 AM Page 46
Page 47

47
Seguridad eléctrica
Los enchufes de las herramientas mecánicas deben coincidir con el tomacorriente. No modifique nunca el
enchufe de ningún modo. No use enchufes adaptadores
con herramientas mecánicas conectadas a tierra (puestas a tierra). Los enchufes no modificados y los tomacor-
rientes coincidentes reducirán el riesgo de sacudidas
eléctricas.
Evite el contacto del cuerpo con las superficies conectadas o puestas a tierra, tales como tuberías, radiadores, estufas y refrigeradores. Hay un aumento del
riesgo de sacudidas eléctricas si el cuerpo del operador se
conecta o pone a tierra.
No exponga las herramientas mecánicas a la lluvia o a
condiciones mojadas. La entrada de agua en una her-
ramienta mecánica aumentará el riesgo de que se produzcan sacudidas eléctricas.
No maltrate el cordón de energía. No use nunca el
cordón para transportar la herramienta mecánica, tirar
de ella o desenchufarla. Mantenga el cordón alejado del
calor, el aceite, los bordes afilados o las piezas móviles.
Los cordones dañados o enganchados aumentan el riesgo
de que se produzcan sacudidas eléctricas.
Cuando utilice una herramienta mecánica en el exterior,
use un cordón de extensión adecuado para uso a la intemperie. La utilización de un cordón adecuado para uso
a la intemperie reduce el riesgo de que se produzcan sacudidas eléctricas.
Si es inevitable utilizar una herramienta mecánica en un
lugar húmedo, utilice una fuente de energía protegida
por un interruptor de circuito accionado por corriente de
pérdida a tierra (GFCI). El uso de un GFCI reduce el riesgo
de sacudidas eléctricas.
Seguridad personal
Manténgase alerta, fíjese en lo que está haciendo y use
el sentido común cuando esté utilizando una herramienta mecánica. No use una herramienta mecánica
cuando esté cansado o bajo la influencia de drogas, al-
cohol o medicamentos. Un momento de distracción
mientras esté utilizando herramientas mecánicas podría
causar lesiones corporales graves.
Use equipo de protección personal. Use siempre protección de los ojos. El equipo de protección, como por ejem-
plo una máscara antipolvo, calzado de seguridad
antideslizante, casco o protección de oídos, utilizado para
las condiciones apropiadas, reducirá las lesiones corporales.
Evite el arranque accidental. Asegúrese de que el interruptor esté en la posición de apagado antes de conectar
la herramienta a la fuente de energía y / o al paquete de
batería, levantar la herramienta o transportarla. Trans-
portar herramientas mecánicas con un dedo en el interruptor o encender herramientas mecánicas que tengan el
interruptor en la posición de encendido invita a que se produzcan accidentes.
Quite todas las llaves de ajuste o de tuerca antes de encender la herramienta mecánica. Una llave de tuerca o
de ajuste que se deje colocada en una pieza giratoria de la
herramienta mecánica podría causar lesiones corporales.
No intente alcanzar demasiado lejos. Mantenga un
apoyo de los pies y un equilibrio apropiados en todo momento. Esto permite controlar mejor la herramienta
mecánica en situaciones inesperadas.
Vístase adecuadamente. No use ropa holgada ni alhajas
holgadas. Mantenga el pelo, la ropa y los guantes alejados de las piezas móviles. La ropa holgada, las alhajas
holgadas o el pelo largo pueden quedar atrapados en las
piezas móviles.
Si se proporcionan dispositivos para la conexión de instalaciones de extracción y recolección de polvo,
asegúrese de que dichas instalaciones estén conectadas
y se usen correctamente. El uso de dispositivos de
recolección de polvo puede reducir los peligros relacionados con el polvo.
Uso y cuidado de las herramientas mecánicas
No fuerce la herramienta mecánica. Use la herramienta
1600A018W0AA 02-18 PC10.qxp_Layout 1 2/7/18 7:28 AM Page 47
Page 48

48
mecánica correcta para la aplicación que desee realizar.
La herramienta mecánica correcta hará el trabajo mejor y
con más seguridad a la capacidad nominal para la que fue
diseñada.
No use la herramienta mecánica si el interruptor no la
enciende y apaga. Toda herramienta mecánica que no se
pueda controlar con el interruptor es peligrosa y debe ser
reparada.
Desconecte el enchufe de la fuente de energía y/o el paquete de batería de la herramienta mecánica antes de
hacer cualquier ajuste, cambiar accesorios o almacenar
herramientas mecánicas. Dichas medidas preventivas de
seguridad reducen el riesgo de arrancar accidentalmente
la herramienta mecánica.
Guarde las herramientas que no esté usando fuera del
alcance de los niños y no deje que personas que no
estén familiarizadas con la herramienta mecánica o con
estas instrucciones utilicen la herramienta. Las her-
ramientas mecánicas son peligrosas en manos de usuarios
que no hayan recibido capacitación.
Mantenga las herramientas mecánicas. Compruebe si
hay piezas móviles desalineadas o que se atoran, si hay
piezas rotas y si existe cualquier otra situación que podría afectar el funcionamiento de la herramienta
mecánica. Si la herramienta mecánica está dañada,
haga que la reparen antes de usarla. Muchos accidentes
son causados por herramientas mecánicas mantenidas deficientemente.
Mantenga las herramientas de corte afiladas y limpias.
Es menos probable que las herramientas de corte mantenidas apropiadamente, con bordes de corte afilados, se
atoren, y dichas herramientas son más fáciles de controlar.
Utilice la herramienta mecánica, los accesorios, las brocas de la herramienta, etc., de acuerdo con estas instrucciones, teniendo en cuenta las condiciones de
trabajo y el trabajo que se vaya a realizar. El uso de la
herramienta mecánica para operaciones distintas a aquéllas para las que fue diseñada podría causar una situación
peligrosa.
Servicio de ajustes y reparaciones
Haga que su herramienta mecánica reciba servicio de
un técnico de reparaciones calificado, utilizando únicamente piezas de repuesto idénticas. Esto asegurará que
se mantenga la seguridad de la herramienta mecánica.
Advertencias de seguridad comunes para
las operaciones de lijado o pulido:
Esta herramienta eléctrica está diseñada para funcio nar
como lijadora o pulidora. Lea todas las advertencias de
seguridad, instruc ciones, ilustraciones y especificaciones suministradas con esta herramienta eléctrica. Si
no se siguen todas las instrucciones que se indican a continuación, el resultado podría ser descargas eléctricas, incendio y/o lesiones graves.
No se recomienda realizar operaciones tales como amoladora, cepillo de alambre, o tronzadora con esta herramienta eléctrica. Las operaciones para las cuales la
herramienta mecánica no fue diseñada pueden crear un
peligro y causar lesiones corporales.
No utilice accesorios que no estén diseñados y recomendados específicamente por el fabricante de la herramienta. Sólo porque el accesorio se pueda acoplar a su
herramienta eléctrica, eso no garantiza un funcionamiento
seguro.
La VELOCIDAD NOMINAL de los accesorios debe ser por
lo menos igual al ajuste de velocidad de funcionamiento
marcado en la herramienta eléctrica. Los accesorios que
funcionen más rápidamente que su VELOCIDAD NOMINAL
se pueden romper y ser lanzados al aire.
El diámetro exterior y el grosor de su accesorio deben
estar dentro de los límites de la capacidad nominal de
su herramienta eléctrica. Los accesorios de tamaño in-
correcto no se pueden controlar adecuadamente.
El tamaño del eje portaherramienta de las ruedas, los
tambores de lijar o cualquier otro accesorio debe encajar
apropiadamente en el husillo o el porta herra mienta de
la herramienta eléctrica. Los accesorios que no coincidan
con los herrajes de montaje de la herra mienta eléctrica fun-
1600A018W0AA 02-18 PC10.qxp_Layout 1 2/7/18 7:28 AM Page 48
Page 49

49
cionarán desequilibrados, vibrarán excesivamente y podrán
causar pérdida de control.
No utilice un accesorio que esté dañado. Antes de cada
uso, inspeccione el accesorio, como por ejemplo las
ruedas abrasivas para comprobar si tienen pica du ras y
grietas, el tambor de lijar para revisar si tiene grietas,
desgarraduras o desgaste excesivo, y el cepillo de alambre para comprobar si hay alambres flojos o agrietados.
Si la herramienta eléctrica o el accesorio se cae, realice
una inspección para com probar si se ha dañado o instale
un accesorio que no esté dañado. Después de inspeccionar e instalar un accesorio, posiciónese usted y posicione a las perso nas que estén presentes alejados del
plano del accesorio que rota y haga funcionar la herramienta eléctrica a la máxima velocidad sin carga durante un minuto. Normalmente, los accesorios dañados se
romperán en pedazos durante este tiempo de prueba.
Use equipo de protección personal. Dependiendo de la
aplicación, use una careta, anteojos de seguridad o
gafas de seguridad. Según sea apropiado, use una máscara antipolvo, protectores de la audición, guantes y un
delantal de taller capaz de detener pequeños fragmentos
de abrasivo o de la pieza de trabajo. La protección de los
ojos debe ser capaz de detener los residuos que salgan
despedidos al ser generados por diversas operaciones.
La máscara antipolvo o el respirador debe ser capaz de impedir mediante filtración el paso de las partículas generadas
por la operación que usted vaya a realizar. La exposición
prolongada a ruido de alta intensidad podría causar pérdida
de audición.
Mantenga a las personas que estén presentes a una distancia segura del área de trabajo. Toda persona que entre
al área de trabajo debe usar equipo de protección personal. Los fragmentos de la pieza de trabajo o de un acce-
sorio roto pueden salir despedidos y causar lesiones más
allá del área de operación inmediata.
No deje nunca la herramienta eléctrica en ningún lugar
hasta que el accesorio se haya detenido por completo.
El accesorio que gira se puede enganchar en la superficie y
jalar la herramienta eléctrica hasta hacer que usted pierda
el control de la misma.
No tenga la herramienta eléctrica en marcha mientras la
lleva junto a usted. Un contacto accidental con el accesorio
que gira podría engancharle la ropa y jalar el accesorio hasta
su cuerpo.
Limpie regularmente las aberturas de ventilación de la
herramienta eléctrica. El ventilador del motor absorberá
el polvo en el interior de la carcasa y la acumulación excesiva de metal en polvo podría causar peligros eléctricos.
No utilice la herramienta eléctrica cerca de materiales
inflamables. Las chispas podrían incendiar estos materi-
ales.
No utilice accesorios que requieran refrigerantes líquidos. El uso de agua u otros refrigerantes líquidos podría
causar electrocución o descargas eléctricas.
Retroceso y advertencias relacionadas
El retroceso es una reacción repentina a una rueda, una almohadilla de refuerzo, un cepillo o cualquier otro accesorio
que esté rotando y que resulte pellizcado o enganchado. El
pellizcamiento o el enganche causan una parada rápida del
accesorio que rota, lo cual a su vez hace que la herramienta
eléctrica descontrolada sea forzada en sentido opuesto al
de rotación del accesorio.
Por ejemplo, si una rueda abrasiva es enganchada o pellizcada por la pieza de trabajo, el borde de la rueda que esté
entrando en el punto de pellizcamiento puede penetrar en
la superficie del material y hacer que la rueda se salga del
corte o experimente retroceso. La rueda puede saltar hacia
el operador o alejándose de éste, dependiendo del sentido
del movimiento de dicha rueda en el punto de pellizcamiento. Las ruedas abrasivas también se pueden romper
en estas condiciones.
El retroceso es el resultado de la utilización indebida de la
herramienta eléctrica y/o de procedimientos o condi ciones
de operación incorrectos, y se puede evitar tomando las
precauciones apropiadas tal y como se indica a continuación.
1600A018W0AA 02-18 PC10.qxp_Layout 1 2/7/18 7:28 AM Page 49
Page 50

50
a) Mantenga un agarre firme de la herramienta eléctrica
y posicione el cuerpo y el brazo de manera que le permitan resistir las fuerzas de retroceso. El operador puede
controlar las fuerzas de retroceso, si se toman las precauciones adecuadas.
b) No coloque nunca la mano cerca del accesorio que
gira. El accesorio puede experimentar retroceso sobre la
mano.
c) No ubique el cuerpo en el área donde la herramienta
mecánica se moverá si se produce retroceso. El retroceso
propulsará la herramienta en sentido contrario al del
movimiento de la rueda en el punto de enganche.
d) Tenga cuidado especial cuando trabaje en esquinas,
bordes afilados, etc. Evite hacer rebotar y enganchar el
accesorio. Las esquinas, los bordes afilados o los rebotes
tienen tendencia enganchar el accesorio que rota y causar
pérdida de control o retroceso.
e) No instale una hoja de sierra dentada. Dichas hojas
crean retroceso y pérdida de control frecuentes.
Advertencias de seguridad específicas para
las operaciones de lijado:
No utilice papel de disco de lijar excesivamente grande.
Siga las recomendaciones del fabricante cuando seleccione el papel de lija. El papel de lija más grande que so-
bresale de la zapata de lijar presenta un peligro de
laceraciones y puede causar enganche, desgarradura del
disco o retroceso.
Advertencias de seguridad específicas para
las operaciones de pulido:
No deje que ninguna parte floja del bonete de pulir o sus
cordeles de sujeción giren libremente. Meta por completo o recorte cualquier cordel de sujeción flojo. Los
cordeles de sujeción flojos y que giran pueden enredarse
en los dedos del usuario o engancharse en la pieza de trabajo.
1600A018W0AA 02-18 PC10.qxp_Layout 1 2/7/18 7:28 AM Page 50
Page 51

51
Advertencias de seguridad adicionales
Un GFCI y los dispositivos de protección personal, como
guantes de goma y calzado de goma de electricista, mejorarán más su seguridad personal.
No use herramientas mecánicas con capacidad nominal
solamente para CA con una fuente de energía de CC.
Aunque pueda parecer que la herramienta funciona correctamente, es probable que los componentes eléctricos
de la herramienta con capacidad nominal para CA fallen y
creen un peligro para el operador.
Mantenga los mangos secos, limpios y libres de aceite
y grasa. Las manos resbalosas no pueden controlar de
modo seguro la herramienta mecánica.
Desarrolle un programa de mantenimiento periódico
de la herramienta. Cuando limpie una herramienta,
tenga cuidado de no desmontar ninguna de sus partes,
ya que los cables internos podrían reubicarse incorrectamente o pellizcarse, o los resortes de retorno de
los protectores de seguridad podrían montarse incorrectamente. Ciertos agentes de limpieza, tales como
gasolina, tetracloruro de carbono, amoníaco, etc., podrían dañar las piezas de plástico.
Cierto polvo generado
por el lijado, aserrado,
amolado y taladrado mecánicos, y por otras actividades
de construcción, contiene agentes químicos que se sabe
que causan cáncer, defectos de nacimiento u otros
daños sobre la reproducción. Algunos ejemplos de estos
agentes químicos son:
• Plomo de pinturas a base de plomo,
• Sílice cristalina de ladrillos y cemento y otros productos
de mampostería, y
• Arsénico y cromo de madera tratada químicamente.
Su riesgo por causa de estas exposiciones varía, dependi-
endo de con cuánta frecuencia realice este tipo de trabajo.
Para reducir su exposición a estos agentes químicos: trabaje en un área bien ventilada y trabaje con equipo de seguridad aprobado, como por ejemplo máscaras antipolvo
que estén diseñadas especialmente para impedir mediante
filtración el paso de partículas microscópicas.
Normas de seguridad para cargadores
Lea y entienda todas las instrucciones. El incumplimiento de todas las instrucciones
indicadas a continuación puede dar lugar a sacudidas eléctricas, incendios y/o lesiones
personales graves.
INSTRUCCIONES DE SEGURIDAD Y DE FUNCIONAMIENTO IMPORTANTES
CONSERVE ESTAS INSTRUCCIONES
Este manual contiene instrucciones para el cargador de
baterías modelo 510.No lo sustituya por ningún otro car-
gador.
Antes de utilizar el cargador de baterías, lea todas las
instrucciones e indicaciones de precaución que se en-
cuentran en el cargador de baterías y el producto que utiliza la batería.
Cargue solamente la Dremel Micro. Otros tipos de her-
ramientas inalámbricas pueden reventar, causando lesiones
corporales y daños.
1600A018W0AA 02-18 PC10.qxp_Layout 1 2/7/18 7:28 AM Page 51
Page 52

52
Cargue la herramienta a temperaturas por encima de +32
grados F (0 grados C) y por debajo de
+113 grados F (45 grados C). Almacene la herramienta
en lugares en los que las temperaturas no excedan 120
grados F (49 grados C). Esto es importante para prevenir
daños graves a las celdas de la batería.
No recargue la batería en un ambiente húmedo o mojado. No exponga el cargador ni a la lluvia ni a la nieve.
La entrada de agua en el cargador de baterías puede causar
descargas eléctricas o incendio.
Se puede producir un escape del líquido de las baterías
bajo condiciones extremas de uso o de temperatura.
Evite el contacto con la piel y los ojos. El líquido de la
batería es cáustico y podría causar quemaduras químicas
en los tejidos. Si el líquido entra en contacto con la piel,
lávela rápidamente con agua y jabón. Si el líquido entra en
contacto con los ojos, enjuáguelos con agua durante un
mínimo de 10 minutos y obtenga atención médica.
Coloque el cargador sobre superficies planas ininflamables y alejado de materiales inflamables cuando recargue la herramienta. Las alfombras y otras superficies
termoaislantes bloquean la circulación apropiada de aire, lo
cual puede causar sobrecalenta miento del cargador y de la
herramienta. Si se observa humo o derretimiento del cargador o de la herramienta, desenchufe inmediatamente el
cargador y no utilice la herramienta ni el cargador. Contacte
inmediatamente a servicio al cliente.
Asegúrese de que el cable de alimentación esté ubicado
de manera que no se pueda pisar ni tropezar en él, ni
que pueda sufrir daños ni someterse a esfuerzo excesivo
de alguna otra manera. El enchufe y el cable de ali-
mentación dañados pueden causar descargas eléctricas o
incendio.
Desconecte el cargador jalando el enchufe en lugar de
jalando el cable de alimentación. No utilice el cargador
con el cable de alimentación o el enchufe dañado; haga
que reemplacen el cable o el enchufe de inmediato.Un
enchufe o un cable de alimentación dañado puede causar
descargas eléctricas o incendio.
No inserte la herramienta en el cargador si la carcasa de
la herramienta está agrietada. La utilización una her-
ramienta dañada puede causar descargas eléctricas o incendio.
No desensamble el cargador ni lo utilice si ha recibido
un golpe fuerte, se ha caído o se ha dañado de alguna
otra manera. Un reensamblaje incorrecto o los daños
pueden causar descargas eléctricas o incendio.
Antes de cada uso, compruebe el cargador de baterías,
el cable y el enchufe. Si se detecta algún daño, no utilice
el cargador de baterías. No abra nunca el cargador de
baterías usted mismo, llévelo a un Centro de Servicio de
Fábrica Dremel o a un técnico de servicio calificado que
utilice únicamente piezas de repuesto originales. Un
reensamblaje incorrecto puede causar descargas eléctricas
o incendio.
No utilice un aditamento no recomendado o no vendido
por Dremel. La utilización de aditamentos no recomenda-
dos puede causar descargas eléctricas o incendio.
No almacene la herramienta en el cargador. La her-
ramienta almacenada en el cargador durante un período de
tiempo prolongado podría causar daños al paquete de
batería e incendio del mismo.
Desenchufe el cargador del tomacorriente antes de almacenarlo, intentar cualquier mantenimiento o
limpiarlo. Dichas medidas preventivas de seguridad re-
ducen el riesgo de descargas eléctricas o incendio.
Mantenga limpio el cargador de baterías soplando aire
comprimido en las aberturas de ventilación del cargador
y limpiando la carcasa del cargador con un paño
húmedo. La contaminación puede causar descargas eléc-
tricas o incendio.
Si se observa un descenso sustancial del tiempo de funcionamiento por carga, es posible que la batería de la
herramienta se esté acercando al final de su vida útil.
Lleve la herramienta a un Centro de Servicio de Fábrica
Dremel o a un técnico de servicio calificado para reemplazar
la batería con piezas de repuesto originales Dremel.
1600A018W0AA 02-18 PC10.qxp_Layout 1 2/7/18 7:28 AM Page 52
Page 53

53
Eliminación de las baterías
No intente desarmar la
herra mienta ni quitar
ninguno de los componentes que sobresalen de la herra mienta. Se pueden producir lesiones o un incendio. Antes
de tirarla, proteja los terminales que están al descubierto
con cinta adhesiva aislante gruesa para prevenir cortocircuitos
BATERÍAS DE IONES DE LITIO
Si este producto está equipado con una batería de iones
de litio, dicha batería debe recogerse, reciclarse o eliminarse de manera segura para el medio ambiente.
“El sello de reciclaje de baterías RBRC
certificado por la EPA que se encuentra en la batería de iones de litio (Liion) indica que Robert Bosch Tool
Corporation está participando voluntariamente en un programa de la in-
dustria para recoger y reciclar estas
baterías al final de su vida útil, cuando se retiran de servicio
en los Estados Unidos y Canadá. El programa RBRC proporciona una alternativa conveniente a tirar las baterías de
Li-ion usadas a la basura o a la corriente municipal de
aguas residuales, lo cual quizás sea ilegal en su área.
Tenga la amabilidad de llamar al 1-800-8-BATTERY para
obtener información acerca de las prohibiciones/ restricciones sobre el reciclaje y la eliminación de baterías de Liion en su lugar o devuelva las baterías a un Centro de
servicio Bosch/Dremel para reciclarlas. La participación de
Robert Bosch Tool Corporation en este programa es parte
de nuestro compromiso hacia preservar nuestro medio
ambiente y conservar nuestros recursos naturales.”
No abra la herramienta ni intente
extraer la batería de su herramienta. Deshá-
gase de la herramienta a través de su autoridad local de eliminación de desechos o de un
Centro de servicio Bosch / Dremel.
1600A018W0AA 02-18 PC10.qxp_Layout 1 2/7/18 7:28 AM Page 53
Page 54

54
Símbolos
IMPORTANTE: Es posible que algunos de los símbolos siguientes se usen en su herramienta. Por favor, estúdielos
y aprenda su significado. La interpretación adecuada de estos símbolos le permitirá utilizar la herramienta mejor y
con más seguridad.
Símbolo Désignación / Explicación
V Volt (tensión)
A Ampere (corriente)
Hz Hertz (frecuencia, ciclos por segundo)
W Watt (potencia)
⌀
Diámetro (tamaño de las brocas taladradoras, muelas, etc)
n Velocidad nominal (máxima velocidad obtenible)
.../min
Revoluciones o alternación por minuto (revoluciones, golpes, velocidad de superficie,
órbitas, etc., por minuto)
Flecha (Acción en la dirección de la flecha)
Corriente alterna (tipo o una característica de corriente)
Corriente continua (tipo o una característica de corriente)
Construcción de clase II (designa las herramientas de construcción con aislamiento doble)
1600A018W0AA 02-18 PC10.qxp_Layout 1 2/7/18 7:28 AM Page 54
Page 55

55
Símbolos
IMPORTANTE: Es posible que algunos de los símbolos siguientes se usen en su herramienta. Por favor, estúdielos
y aprenda su significado. La interpretación adecuada de estos símbolos le permitirá utilizar la herramienta mejor y
con más seguridad.
Símbolo Désignación / Explicación
Designa el programa de reciclaje de baterías de Li-ion.
Alerta al usuario para que lea el manual.
Alerta al usuario para que use protección de los ojos y respiratoria
Este símbolo indica que Underwriters Laboratories ha catalogado esta herramienta indicando que cumple con las normas estadounidenses y canadienses.
Este símbolo indica que la Canadian Standards Association ha catalogado esta herramienta indicando que cumple con las normas estadounidenses y canadienses.
1600A018W0AA 02-18 PC10.qxp_Layout 1 2/7/18 7:28 AM Page 55
Page 56

56
ALTA VELOCIDAD
La herramienta funciona a 2200 RPM máx., lo cual hace
que sea la herramienta de limpieza eléctrica más rápida
del mercado. La velocidad más alta permite una
limpieza/remoción más rápida y más agresiva, lo cual
ayuda a eliminar gran parte del esfuerzo manual que se
requiere típicamente para las aplicaciones del usuario.
Las limpiadoras eléctricas estándar giran aproximadamente a 300/min con baja velocidad y alta fuerza de torsión. Estas herramientas requieren un extenso esfuerzo
manual para las aplicaciones de limpieza. La Dremel
Versa es lo contrario, se trata de una herramienta de alta
velocidad y baja fuerza de torsión. La diferencia para el
usuario es que con la herramienta de alta velocidad
Dremel, la velocidad combinada con el accesorio hace
el trabajo para usted, sin tener que aplicar una presión
fuerte. Simplemente agarre la herramienta y guíela.
POTENTE TECNOLOGÍA DE BATERÍAS DE ION LITIO
La potencia es otra gran ventaja que usted experimentará
mientras trabaja con la Dremel Versa. La combinación
de un motor de CC compacto y altamente eficiente, las
celdas de batería de ion litio más pequeñas y el sistema
electrónico inteligente permite realizar las aplicaciones
exigentes. La utilización de baterías con tecnología de
litio de vanguardia beneficia al usuario dándole mayor
uniformidad de potencia con una carga individual. No
perderá lentamente rendimiento durante el uso (como
sucede con las baterías AA o de NiCd). La recarga es
rápida y fácil con el cargador micro USB. Usted no tendrá que reemplazar constantemente las baterías. El
tiempo de carga también es sumamente corto (~2 h de
tiempo de carga, cuando la carga se realice con el adaptador de alimentación USB de 1 A Dremel 510) para que
la herramienta pueda estar lista cuando usted la necesite.
VERSÁTIL
Habrá 4 aditamentos tipo accesorio diferentes: almohadilla borradora de espuma, almohadilla desincrustante
antirrayones, almohadilla desincrustante abrasiva de
servicio pesado y cepillo de cerdas de nylon. Estos 4 accesorios permiten que la herramienta se utilice en múltiples superficies para retirar suciedad/acumulación/
material. Los diferentes niveles de abrasividad de las almohadillas y el cepillo dan al usuario la capacidad de
completar un amplio espectro de aplicaciones. El sistema de sujeción de enganche y cierre permite al usuario
cambiar rápidamente entre los diferentes accesorios. El
mecanismo de cambio de accesorios no necesita herramientas, con lo cual se facilita el uso y se ofrece una
utilización “libre de frustraciones” para el usuario. El kit
Dremel Versa también viene con un aditamento protector
antisalpicaduras.
Dremel Versa: Introducción
Gracias por comprar la nueva Dremel Versa, la herramienta de limpieza inalámbrica más rápida y más compacta
producida por el líder mundial en herramientas rotativas. Este producto fue diseñado para el usuario que desea una
herramienta fácil de usar y conveniente, y sin embargo potente, que le permita limpiar/preparar superficies difíciles
y reducir la cantidad de esfuerzo manual. Es eficiente para múltiples aplicaciones en el hogar y el garaje. Puede
realizar los trabajos difíciles que otras limpiadoras no pueden. La combinación de su diseño ergonómico, motor,
batería y sistema electrónico hace que la Dremel Versa sea muy fácil de usar e ideal para tareas versátiles y exigentes.
1600A018W0AA 02-18 PC10.qxp_Layout 1 2/7/18 7:28 AM Page 56
Page 57

57
TAMAÑO COMPACTO
La herramienta está diseñada para que pueda ser utilizada con una mano. El sobremoldeado en la parte superior ayuda al usuario a agarrar la herramienta para dar
más control durante el uso, especialmente en aplicaciones en áreas mojadas. El tamaño pequeño permite al
usuario limpiar en áreas reducidas y además, al ser inalámbrica, es fácil llevar la herramienta prácticamente a
cualquier lugar, en interiores y exteriores.
RESISTENTE AL AGUA
La Dremel Versa está completamente sellada para que
se pueda usar de manera segura en aplicaciones en
áreas mojadas. Sin embargo, no está diseñada para ser
sumergida completamente en líquido.
Las herramientas que funcionan con baterías están siempre en condiciones operativas. Para reducir el riesgo de posibles peligros, no utilice la her-
ramienta antes de leer las instrucciones de utilización.
CONSERVE ESTAS INSTRUCCIONES
Descripción funcional y especificaciones
LIMPIADORA ELÉCTRICA INALÁMBRICA VERSA
Número de modelo PC10
Tensión nominal 3,6 V / 4 V MÁX
Velocidad nominal n 2.200 RPM
CARGADOR
Número de modelo 510
Tiempo de carga 2 h
Voltaje nominal 120 V 60 Hz
Amperaje nominal 1 A
Química de la batería Ion litio
Dremel Versa – Introduction
1600A018W0AA 02-18 PC10.qxp_Layout 1 2/7/18 7:28 AM Page 57
Page 58

58
FIG. 1
Botón de
encendido y
apagado
Vástago roscado
Grip Zone
w/Soft Grip
Terminal
de carga
Adaptador de
alimentación
Cable de carga USB
Luz de carga
Descripción funcional y especificaciones
1600A018W0AA 02-18 PC10.qxp_Layout 1 2/7/18 7:28 AM Page 58
Page 59

59
Para reducir el riesgo
de lesiones, asegúrese
siempre de que la herramienta esté “APAGADA” antes
de cambiar accesorios, cambiar la almohadilla de soporte, retirar el protector antisalpicaduras o hacer servicio de ajustes y reparaciones de su herramienta
rotativa inalámbrica.
INSTALACIÓN DEL PROTECTOR
ANTISALPICADURAS
Para instalar el protector antisalpicaduras: alinee las espigas ubicadas en el protector con las ranuras ubicadas
en la carcasa de la herramienta (Fig. 2). Gire el protector
en el sentido de las agujas del reloj hasta que esté bien
ajustado en la herramienta. Debe instalar el protector antisalpicaduras antes de instalar la almohadilla de soporte.
INSTALACIÓN DE LA ALMOHADILLA DE SOPORTE
Para instalar la almohadilla de soporte: alinee la almohadilla con las roscas del vástago de salida y apriétela con
los dedos en el sentido de las agujas del reloj (Fig. 2).
INSTALACIÓN DE ACCESORIOS
Los accesorios se instalan en la almohadilla de soporte
por el sistema de enganche y cierre.
Para instalar un accesorio: alinee el lado de “cierre” del
accesorio con el lado de “enganche” de la almohadilla
de soporte ubicada en la herramienta (Fig. 2). Alinee el
accesorio tan cerca del centro como sea posible sobre
la almohadilla de soporte, de manera que gire concéntricamente para lograr un rendimiento óptimo y ofrecer
facilidad de uso. Los accesorios sobresaldrán de la almohadilla de soporte, lo cual permitirá al usuario llegar
a esquinas y espacios reducidos.
Ensamblaje
Espiga
Ranura
Vástago
Almo-
hadilla de
soporte
Cepillo
de cerdas
Accesorio
Protector
antisalpicaduras
Lado de
cierre
FIG. 2
1600A018W0AA 02-18 PC10.qxp_Layout 1 2/7/18 7:28 AM Page 59
Page 60

60
Velocidades de funcionamiento
Utilice únicamente accesorios de alto rendimiento Dremel®. Otros ac-
cesorios no están diseñados para esta herramienta y es posible que
causen lesiones corporales o daños materiales. Almacene los accesorios en un entorno seco y tem-
plado para evitar su deterioro.
La Dremel Versa está diseñada para funcionar con
limpiadores en aerosol, en espuma, en gel o líquidos.
Antes de utilizar soluciones de limpieza, sírvase leer y
seguir las advertencias e instrucciones de uso del fabricante. Cubra el área circundante que esté limpiando para
protegerla del aerosol. Utilice el protector antisalpicaduras en superficies abiertas para confinar el aerosol.
Se recomienda para aplicar agua y agente de limpieza a
la superficie que necesite limpieza y/o al accesorio directamente. Si se está aplicando agua o agente de
limpieza directamente sobre un accesorio, agite la
unidad para eliminar el exceso de líquido o “cicle” la her-
ramienta “encendiéndola” rápidamente y luego “apagándola” en áreas confinadas (es decir, una cubeta o un
lavamanos o fregadero) para reducir el aerosol.
Para comenzar a limpiar, presione y suelte el botón de
encendido y apagado (Fig. 1) mientras el accesorio esté
en contacto con la superficie que se vaya a limpiar. La
herramienta alcanzará rápidamente su velocidad de funcionamiento. Presione la herramienta suavemente contra
la superficie que se vaya a limpiar, no presione demasiado fuerte, deje que la herramienta haga el trabajo.
Para apagar la herramienta, presione y suelte el botón
de encendido y apagado.
Para retirar un accesorio: Jale el accesorio hasta separarlo de la almohadilla de soporte. Agarre el accesorio
por el material de soporte de “cierre” y despréndalo de
la almohadilla de soporte (tal y como se muestra en la
figura 3), en lugar de agarrar el material de esponja/microfibra.
Para instalar el cepillo de cerdas: primero, retire completamente la almohadilla de soporte y luego instale el
cepillo alineando las roscas del vástago de salida, y apriete con los dedos el cepillo de cerdas en el sentido de
las agujas del reloj.
FIG. 3
Ensamblaje
1600A018W0AA 02-18 PC10.qxp_Layout 1 2/7/18 7:28 AM Page 60
Page 61

El kit incluye una almohadilla de soporte, un protector
antisalpicaduras y 4 accesorios distintos. Haga una
prueba en distintos puntos de una sección pequeña de
la superficie que piensa limpiar, para comprobar su
aceptabilidad antes de realizar el trabajo de limpieza
completo.
PROTECTOR ANTISALPICADURAS
Se recomienda utilizar el protector antisalpicaduras para
todas las aplicaciones de limpieza de áreas mojadas.
Mantenga el protector antisalpicaduras en la posición
“extendida” mientras la herramienta esté funcionando,
para confinar el aerosol de agua y soluciones de
limpieza.
Para llegar a espacios más reducidos, el protector antisalpicaduras se puede retraer hasta la posición hacia “arriba”.
Para retirar enteramente el protector antisalpicaduras,
apague la herramienta, desenrosque la almohadilla de
soporte (en sentido contrario al de las agujas del reloj
cuando se mira hacia la parte inferior de la herramienta)
y luego gire el protector antisalpicaduras un cuarto de
vuelta para retirarlo. Enrosque de vuelta la almohadilla
de soporte.
ALMOHADILLA BORRADORA DE ESPUMA BLANCA
Almohadilla multiuso recomendada para utilizarse en superficies duras, tales como tableros de mostrador, vidrio,
pisos, zócalos, puertas, paredes, zapatos y electrodomésticos que no sean de acero inoxidable. Gracias a la tecnología microabrasiva, la almohadilla ayudará a quitar las
manchas sin utilizar un limpiador abrasivo; sin embargo,
si la superficie que se esté limpiando no es suficientemente dura, es posible que el material le cause rasguños
finos. Pruebe un área pequeña con una presión ligera
antes de usar la almohadilla. No se recomienda para las
siguientes superficies: Madera con alto brillo, pulidor,
cepillada, satinada, de imitación o desnuda; cobre;
acero inoxidable; revestimiento antiadherente o carrocería de vehículo.
61
VERSAVERSA
Posición extendida Posición retraída
Velocidades de funcionamiento
1600A018W0AA 02-18 PC10.qxp_Layout 1 2/7/18 7:28 AM Page 61
Page 62

62
Velocidades de funcionamiento
ALMOHADILLA ANTIRRAYONES DE MICROFIBRA AZUL
Se recomienda para trabajos difíciles sin causar rasguños. Idónea para utilizarse en ollas y cacerolas, exterior de parrillas, lavamanos o fregaderos, superficies de
estufa de cocina y parrillas de estufa de cocina, electrodomésticos de cocina y herramientas/equipos exteriores.
ALMOHADILLA ABRASIVA DE SERVICIO
PESADO MARRÓN
La almohadilla abrasiva tiene grano incrustado para realizar trabajos que requieren una limpieza y una remoción más agresivas, tales como preparación de metal,
muebles de jardín, remoción de pintura, ollas y cacerolas
sin recubrimiento y más. La almohadilla corta rápidamente a través del material y elimina los residuos pegados muy resistentes.
CEPILLO DE CERDAS DE NYLON NEGRO
Utilícelo para aplicaciones de desincrustación, tales como:
lechada, rines de llantas, lavamanos o fregaderos, elementos fijos, equipos, muebles de patio y otras superficies diversas en el baño y la cocina. Las duraderas cerdas de
nylon están anguladas para permitir que usted llegue
mejor a las esquinas.
1600A018W0AA 02-18 PC10.qxp_Layout 1 2/7/18 7:28 AM Page 62
Page 63

63
MONITOREO ELECTRÓNICO
Esta herramienta está equipada con un sistema electrónico de monitoreo interno que ayuda a maximizar el
rendimiento del motor y de la batería al limitar la corriente que llega a la herramienta cuando ocurren condiciones de sobrecarga y parada.
Si usted mantiene encendida la herramienta sin usarla
demasiado tiempo, ésta se apagará automáticamente.
Una vez que esto ocurra, simplemente presione y suelte
dos veces el botón de encendido y apagado para arrancar de nuevo la herramienta y continuar utilizándola.
Cuando la batería esté casi vacía, es posible que la herramienta se apague automáticamente con mayor frecuencia de lo normal. Si esto sucede, es momento de
recargar la herramienta.
Velocidades de funcionamiento
=
I
deal
=
A
c
eptable
A
C
C
E
S
O
R
I
O
C
e
p
i
l
l
o
d
e
c
e
r
d
a
s
A
l
mo
h
a
d
i
l
l
a
a
n
t
i
r
r
a
y
o
n
e
s
Al
mohadi
lla de
s
er
v
icio pesado
Almohadilla
borradora
S
u
p
e
rf
i
ci
e
s
d
u
ra
s
S
u
p
e
rf
i
c
i
e
s
pi
n
t
a
d
a
s
T
e
l
a
s
Ac
e
ro
i
n
o
x
i
d
a
b
l
e
H
i
e
rro
f
u
nd
i
d
o
C
e
rá
m
ica
y
po
rcel
a
na
A
l
u
m
i
n
i
o
y
m
e
t
al
P
l
á
s
t
i
c
o
y
l
a
m
i
n
a
d
o
V
i
d
r
io
R
e
m
o
c
ió
n
d
e
p
i
n
t
u
r
a
y
ó
x
id
o
1600A018W0AA 02-18 PC10.qxp_Layout 1 2/7/18 7:28 AM Page 63
Page 64

64
CARGADOR DE 2 HORAS 510
Su Dremel Versa no viene completamente cargada de la
fábrica. Asegúrese de cargar la herramienta antes de su
uso inicial.
Para cargar la herramienta: enchufe el cable USB en la
herramienta y el adaptador de alimentación, y luego inserte el enchufe del adaptador de alimentación en un
tomacorriente estándar. La luz LED azul ubicada en la
carcasa de la herramienta debajo del tomacorriente USB
se encenderá para indicar que la batería está recibiendo
carga. Cuando la herramienta esté completamente cargada (aprox. 2 h), el proceso de carga se detendrá automáticamente y la luz LED azul se apagará.
Cuando la batería esté agotada, la herramienta se apagará automáticamente. Esto será una parada repentina
en contraposición a una pérdida gradual de velocidad de
la herramienta. Simplemente recargue la herramienta y
reutilícela.
Operación de carga de la herramienta
Adaptador de
alimentación
FIG. 4
Luz de
carga
Cable de
carga USB
1600A018W0AA 02-18 PC10.qxp_Layout 1 2/7/18 7:28 AM Page 64
Page 65

65
NOTAS DE CARGA IMPORTANTES
1. El cargador fue diseñado para cargar la herramienta so-
lamente cuando la temperatura de la batería esté entre
32 °F (0 °C) y 113 °F (45 °C). Si la herramienta está demasiado caliente o demasiado fría, el cargador no la cargará. (Es posible que esto ocurra si la herramienta está
caliente por causa de un uso intenso). Cuando la temperatura de la herramienta regrese a niveles entre 32 °F
(0 °C) y 113 °F (45 °C), el cargador comenzará a cargar
automáticamente.
2. Es posible que una reducción sustancial del tiempo op-
erativo por carga signifique que la herramienta se está
acercando al final de su vida útil.
3. Recuerde desenchufar el adaptador de alimentación du-
rante el período de almacenamiento.
4. Si la herramienta no se carga correctamente:
a. Pruebe a enchufar algún otro dispositivo eléctrico en
el tomacorriente.
b. Compruebe si el tomacorriente está conectado a un
interruptor de luz que “desconecte” la alimentación
eléctrica al apagar las luces.
c. Compruebe si los terminales de la base de carga y de
la fuente de alimentación tienen suciedad. Desconecte la unidad del tomacorriente y, si es necesario, limpie los terminales con un bastoncillo de
algodón y alcohol.
d. Si la herramienta sigue sin cargarse correctamente,
localice el Centro de Servicio Dremel más cercano y
haga que inspeccionen la herramienta.
Nota: El uso de una fuente de alimentación no vendida por
Dremel anulará la garantía.
Aviso de precaución de la FCC:
El fabricante no es responsable de la radiointerferencia
causada por las modificaciones no autorizadas que se realicen en este equipo. Dichas modificaciones podrían anular la autoridad del usuario para utilizar el equipo.
Este dispositivo cumple con la Parte 15 de las Reglas de
la FCC. El funcionamiento está sujeto a las dos condiciones
siguientes:
1) Este dispositivo no puede causar interferencias nocivas
y
2) Este dispositivo debe aceptar cualquier interferencia
recibida, incluyendo interferencia que pueda causar un
funcionamiento no deseado.
NOTA: Este equipo ha sido sometido a pruebas y se ha
comprobado que cumple con los límites para un dispositivo digital de Clase B, conforme a la parte 15 de las Normas de la FCC. Estos límites están diseñados para
proporcionar protección razonable contra la interferencia
perjudicial en una instalación residencial. Este equipo genera, usa y puede irradiar energía de radiofrecuencia y, si
no se instala y utiliza de acuerdo con las instrucciones,
puede causar interferencia perjudicial para las radiocomunicaciones. Sin embargo, no hay garantía de que no vaya
a ocurrir interferencia en una instalación específica. Si este
equipo causa interferencia perjudicial para la recepción de
Operación de carga de la herramienta
1600A018W0AA 02-18 PC10.qxp_Layout 1 2/7/18 7:28 AM Page 65
Page 66

66
radio o televisión, lo cual se puede determinar apagando y
encendiendo el equipo, se recomienda al usuario que intente corregir la interferencia tomando una o más de las
medidas siguientes:
• Reoriente o reubique la antena receptora.
• Aumente la separación entre el equipo y el receptor.
• Conecte el equipo a un tomacorriente que esté en un
circuito distinto al circuito al que el receptor esté conectado.
• Consulte al distribuidor o a un técnico experto en
radio/TV para obtener ayuda.
Servicio
NO HAY PIEZAS EN EL
INTERIOR QUE PUEDAN
SER AJUSTADAS O REPARADAS POR EL USUARIO. El
mantenimiento preventivo realizado por personal no autorizado pude dar lugar a la colocación incorrecta de cables y componentes internos que podría constituir un
peligro serio. Recomendamos que todas las herramientas
que no estén funcionando correctamente sean devueltas
a un Centro de Servicio Bosch/Dremel.
BATERÍAS
Esté alerta a si las baterías se están acercando al final
de su vida útil. Si nota una disminución en el
rendimiento de la herramienta o un tiempo de funcionamiento significativamente más corto entre cargas,
es momento de reemplazar la herramienta.
Limpieza
Para evitar accidentes,
asegúrese siempre de
que la herramienta esté APAGADA antes de la limpieza.
La herramienta se puede limpiar más eficazmente con aire
comprimido seco. Use gafas de seguridad siempre que
limpie herramientas con aire comprimido.
Ciertos agentes de limpieza
y disolventes dañan las
piezas de plástico. Algunos de es tos son: gasolina, tetra-
cloruro de carbono, disolventes de limpie za clorados,
amoníaco y detergentes domésticos que contienen
amoníaco.
Mantenimiento
Aviso de precaución de la FCC:
1600A018W0AA 02-18 PC10.qxp_Layout 1 2/7/18 7:28 AM Page 66
Page 67

67
Garantía limitada de Dremel
®
Su producto Dremel está garantizado contra defectos de material o de fabricación durante un período de dos años a partir de la fecha
de compra. En caso de que un producto no se ajuste a esta garantía escrita, por favor, tome las medidas siguientes:
1. NO devuelva el producto al lugar de compra.
2. Empaquete el producto cuidadosamente y solo, sin otros artículos, y envíelo con el porte pagado junto con:
A. Una copia de la prueba de compra fechada (por favor, conserve una copia para usted).
B. Una explicación por escrito de la naturaleza del problema.
C. Su nombre, dirección y número de teléfono a:
Recomendamos que el paquete sea asegurado contra pérdida o daños durante el transporte por los cuales no podemos ser responsables.
Esta garantía tiene validez únicamente para el comprador original inscrito. LOS DAÑOS AL PRODUCTO PRODUCIDOS POR
MANIPULACION INCORRECTA, ACCIDENTE, ABUSO, NEGLIGENCIA, REPARACIONES O ALTERACIONES NO AUTORIZADAS, ACCE SORIOS NO APROBADOS U OTRAS CAUSAS NO RELACIONADAS CON PROBLEMAS DEL MATERIAL O LA FABRICACION NO ESTAN
CUBIERTOS POR ESTA GARANTIA.
Ningún empleado, agente, distribuidor, ni ninguna otra persona está autorizado a dar ninguna garantía en nombre de Dremel. Si la
inspección de Dremel demuestra que el problema fue causado por problemas con el material o la fabricación dentro de los límites de la
garantía, Dremel reparará o reemplazará el producto gratuitamente y devolverá el producto con el porte pagado. Las reparaciones
necesarias debido al desgaste normal o al abuso, o las reparaciones de productos que se encuentren fuera del período de garantía, en
caso de que se puedan realizar, se cobrarán a precios de fábrica normales.
DREMEL NO DA NINGUNA OTRA GARANTIA DE NINGUN OTRO TIPO, EXPRESA O IMPLICITA, Y TODAS LAS GARANTIAS IMPLICITAS
DE COMERCIABILIDAD E IDONEIDAD PARA UN PROPOSITO ESPECIFICO QUE EXCEDEN LA OBLIGACION MENCIONADA
ANTERIORMENTE QUEDAN POR LA PRESENTE RECHAZADAS POR PARTE DE DREMEL Y ESTAN EXCLUIDAS DE ESTA GARANTIA
LIMITADA.
Esta garantía le confiere a usted derechos legales específicos y es posible que usted también tenga otros derechos que varían de un
estado a otro. La obligación del garante consiste únicamente en reparar o reemplazar el producto. El garante no es responsable de
ningún daño incidental o emergente debido a cualquiera de dichos defectos alegados. Algunos estados no permiten la exclusión o
limitación de los daños incidentales o emergentes, por lo que es posible que las limitaciones o la exclusión anteriores no sean aplicables
en el caso de usted.
Para precios y cumplimiento de la garantía en los territorios continentales de los Estados Unidos, póngase en contacto con el distribuidor
local Dremel.
Exportado por: © Robert Bosch Tool Corporation Mt. Prospect, IL 60056 -2230, E.U.A.
Importado a México por: Robert Bosch, S. de R.L. de C.V.
Calle Robert Bosch No. 405 - 50071 Toluca, Edo. de Méx. - México
Tel. 052 (722) 279 2300 ext 1160 / Fax. 052 (722) 216-6656
ESTADOS UNIDOS
Dremel Service Center
4915 21st Street
Racine, WI 53406
CANADÁ
Giles Tool Agency
47 Granger Av.
Scarborough, Ontario Canada
M1K 3K9
1-416-287-3000
FUERA DE LOS TERRITORIOS CONTINENTALES
DE LOS EE.UU.
Vea al distribuidor local o escriba a
Dremel,
4915 21st Street Racine,
WI 53406
1600A018W0AA 02-18 PC10.qxp_Layout 1 2/7/18 7:28 AM Page 67
Page 68

1600A018W0 AA 02/2018
!1600A018w0AA!
1600A018W0AA 02-18 PC10.qxp_Layout 1 2/7/18 7:28 AM Page 68
 Loading...