

Page 1
DM 2610030830 01-13_DM 2610030830 01-13.qxp 1/22/13 11:25 AM Page 1
IMPORTANT: IMPORTANT : IMPORTANTE:
Read Before Using Lire avant usage Leer antes de usar
Operating/Safety Instructions
Consignes de fonctionnement/sécurité
Instrucciones de funcionamiento y seguridad
MM45
P.O. Box 081126 Racine, WI 53408-1126
Call Toll Free for
Consumer Information
& Service Locations
1-800-4-DREMEL (1-800-437-3635) www.dremel.com
For English Version Version française Versión en español
See page 2 Voir page 19 Ver la página 36
Pour obtenir des informations
et les adresses de nos centres
de service après-vente,
appelez ce numéro gratuit
Llame gratis para
obtener información
para el consumidor y
ubicaciones de servicio
General Power Tool Safety Warnings
WARNING
!
SAVE ALL WARNINGS AND INSTRUCTIONS FOR FUTURE REFERENCE
The term “power tool” in the warnings refers to your mains-operated (corded) power tool or
battery-operated (cordless) power tool.
Keep work area clean and well lit. Cluttered
or dark areas invite accidents.
Do not operate power tools in explosive
atmospheres, such as in the presence of
flammable liquids, gases or dust. Power
tools create sparks which may ignite the dust
or fumes.
Keep children and bystanders away while
operating a power tool. Distractions can
cause you to lose control.
Power tool plugs must match the outlet.
Never modify the plug in any way. Do not
us e a ny adapter pl ug s with earthe d
(grounded) power tools. Unmodified plugs
and matching outlets will reduce risk of electric
shock.
Avoid body contact with earthed or grounded
surfaces such as pipes, radiators, ranges
and refrigerators. There is an increased risk
of electric shock if your body is earthed or
grounded.
Do not expose power tools to rain or wet
conditions. Water entering a power tool will
increase the risk of electric shock.
Do not abuse the cord. Never use the cord
for carrying, pulling or unplugging the power
tool. Keep cord away from heat, oil, sharp
edges or moving parts. Damaged or entangled
cords increase the risk of electric shock.
When operating a power tool outdoors,
use an extension cord suitable for outdoor
use. Use of a cord suitable for outdoor use
reduces the risk of electric shock.
If operating a power tool in a damp location
is unavoidable, use a Ground Fault Circuit
Interrupter (GFCI) protected supply. Use of
an GFCI reduces the risk of electric shock.
Stay alert, watch what you are doing and
us e co mmon sense when operating a
Read all safety warnings and all instructions. Failure to follow the warnings
and instructions may result in electric shock, fire and/or serious injury.
Work area safety
Electrical safety
power tool. Do not use a power tool while
you are tired or under the influence of drugs,
alcohol or medication. A moment of inattention
while operating power tools may result in
serious personal injury.
Use personal protective equipment. Always
wear eye protection. Protective equipment
such as dust mask, non-skid safety shoes, hard
hat, or hearing protection used for appropriate
conditions will reduce personal injuries.
Prevent unintentional starting. Ensure the
sw itch is in th e o ff-po sitio n b efore
connecting to power source and / or battery
pa ck, picki ng up or carrying the t ool.
Carrying power tools with your finger on the
switch or energizing power tools that have the
switch on invites accidents.
Remove any adjusting key or wrench before
turning the power tool on. A wrench or a
key left attached to a rotating part of the
power tool may result in personal injury.
Do not overreach. Keep proper footing and
balance at all times. This enables better
co ntrol of the power to ol in unexpe ct ed
situations.
Dress properly. Do not wear loose clothing
or jewelry. Keep your hair, clothing and
gloves away from moving parts. Loose
clothes, jewelry or long hair can be caught in
moving parts.
If devices are provided for the connection
of dust extraction and collection facilities,
ensure these are connected and properly
used. Use of dust collection can reduce dust-
related hazards.
Power tool use and care
Do not forc e the power to ol . Use the
correct power tool for your application. The
correct power tool will do the job better and
safer at the rate for which it was designed.
Personal safety
Do not use the power tool if the switch does
not turn it on and off. Any power tool that
ca nn ot be co nt ro ll ed wi th th e swi tc h is
dangerous and must be repaired.
-2-
Page 2

DM 2610030830 01-13_DM 2610030830 01-13.qxp 1/22/13 11:25 AM Page 3
Disconnect the plug from the power source
and/or the battery pack from the power tool
before making any adjustments, changing
accessories, or storing power tools. Such
preventive safety measures reduce the risk of
starting the power tool accidentally.
Store idle power tools out of the reach of
children and do not allow persons unfamiliar
with the power tool or these instructions to
operate the power tool. Power tools are
dangerous in the hands of untrained users.
Maintain power tools. Check for misalignment
or binding of moving parts, breakage of
parts and any other condition that may
affect the power tool’s operation. If damaged,
have the power tool repaired before use.
Ma ny acci de nt s ar e ca us ed by poorly
maintained power tools.
Safety Rules for Oscillating Tools
Hold power tool by insulated gripping
surfaces, when performing an operation
where the cutting tool may contact hidden
wiring o r i ts ow n cord. C ut ti ng tool
contacting a "live" wire may make exposed
metal parts of the power tool "live" and could
give the operator an electric shock.
Use clamps or another practical way to
secure and support the workpiece to a
stable platform. Holding the work by hand or
against your body leaves it unstable and may
lead to loss of control.
Do not drill, fasten or break into existing
walls or other blind areas where electrical
wi ring may exist. If th is s ituatio n i s
unavoidable, disconnect all fuses or circuit
breakers feeding this worksite.
Use a metal detector to determine if there
are gas or water pipes hidden in the work
area or call the local utility company for
assistance before beginning the operation.
Striking or cutting into a gas line will result in
explosion. Water entering an electrical device
may cause electrocution.
Always hold the tool firmly with both hands
for maximum control. Keep proper footing
and balance at all times. This enables better
co ntrol of the power tool i n unex pected
situations.
Keep cutting tools sharp and clean. Properly
maintained cutting tools with sharp cutting
edges are less likely to bind and are easier to
control.
Use the power tool, accessories and tool
bits etc. in accordance with these instructions,
taking into account the working conditions
and the work to be performed. Use of the
power tool for operations different from those
intended could result in a hazardous situation.
Service
Have your power tool serviced by a qualified
re pa ir person u sing on ly identical
replacement parts. This will ensure that the
safety of the power tool is maintained.
Keep hands away from cutting area. Do
not reach under the material being cut. The
proximity of the blade to your hand is hidden
from your sight.
Do not use dull or damaged blades. Bent
blade can break easily or cause kickback.
Exercise extreme caution when handling
the accessories. The accessories are very
sharp.
Wear protective gloves when changing
cutting accessories. Accessories become
hot after prolonged usage.
Use thick cushioned gloves and limit the
exposure time by taking fr equ ent rest
periods. Vibration caused by the tool may be
harmful to the hands and arms.
Before scraping, check workpiece for nails.
If there are nails, either remove them or set
them well below intended finished surface.
Striking a nail with accessory edge could
cause the tool to jump.
Do not wet sand with this tool. Liquids
entering the motor housing is an electrical
shock hazard.
Never work in area which is soaked with a
li quid, such as a solv ent or wat er, or
da mpened su ch as ne wly appl ied
wallpape r. Th ere is an ele ctr ical shock
hazard when working in such conditions with a
power tool and heating of the liquid caused by
scraping action may cause harmful vapors to
be emitted from workpiece.
Always wear eye protection and a dust
mask for dusty applications and when
sanding overhead. Sanding particles can be
absorbed by your eyes and inhaled easily
and may cause health complications.
Use special precautions when sanding
chemically pressure treated lumber, paint
th at may be lea d base d, or a ny oth er
materials that may contain carcinogens. A
suitable breathing respirator and protective
Additional Safety Warnings
GFCI and personal protection devices like
electrician’s rubber gloves and footwear will
further enhance your personal safety.
Do not use AC only rated tools with a DC
power supply. While the tool may appear to
work, the electrical components of the AC
rated tool are likely to fail and create a hazard
to the operator.
Keep handles dry, clean and free from oil
and grease. Slippery hands cannot safely
control the power tool.
Develop a periodic maintenance schedule
for your tool. When cleaning a tool be
careful not to disassemble any portion of
th e tool sinc e interna l wires may be
misplaced or pinched or safety guard return
sp rings may be improperly moun ted.
Certain cleaning agents such as gasoline,
carbon tetrachloride, ammonia, et c. may
damage plastic parts.
clothing must be worn by all persons entering
the work area. Work area should be sealed by
plastic sheeting and persons not protected
should be kept out until work area is thoroughly
cleaned.
Do not use sandpaper intended for larger
sanding pads. Larger sandpaper will extend
beyond the sanding pad causing snagging,
tearing of the paper or kick-back. Extra paper
extending beyond the sanding pad can also
cause serious lacerations.
Risk of injury to user. The power cord must only
be serviced by a Dremel Service Facility.
WARNING
!
drilling, and other construction activities
contains chemicals known to cause cancer,
birth defects or other reproductive harm.
Some examples of these chemicals are:
• Lead from lead-based paints,
• Crystalline silica from bricks and cement and
other masonry products, and
• Arsenic and chromiu m from chemicallytreated lumber.
Yo ur ri sk from these expo su re s var ie s,
depending on how often you do this type of
work. To reduce your exposure to these
chemicals: work in a well ventilated area, and
work with approved safety equipment, such as
those dust masks that are specially designed
to filter out microscopic particles.
Some dust created by power
sanding, sawing, grinding,
-3-
-4-
Page 3
0
DM 2610030830 01-13_DM 2610030830 01-13.qxp 1/22/13 11:25 AM Page 5
Symbols
IMPORTANT: Some of the following symbols may be used on your tool. Please study them
and learn their meaning. Proper interpretation of these symbols will allow you to operate the
tool better and safer.
Symbol Name Designation/Explanation
V Volts Voltage (potential)
A Amperes Current
Hz Hertz Frequency (cycles per second)
W Watt Power
kg Kilograms Weight
min Minutes Time
s Seconds Time
Diameter Size of drill bits, grinding wheels, etc.
n
0
n Rated speed Maximum attainable speed
.../min Revolutions or reciprocation Revolutions, strokes, surface speed,
0 Off position Zero speed, zero torque...
1, 2, 3, ... Selector settings Speed, torque or position settings.
I, II, III, Higher number means greater speed
No load speed Rotational speed, at no load
per minute orbits etc. per minute
Infinitely variable selector with off Speed is increasing from 0 setting
Arrow Action in the direction of arrow
Alternating current Type or a characteristic of current
Direct current Type or a characteristic of current
Alternating or direct current Type or a characteristic of current
Class II construction Designates Double Insulated
Construction tools.
Earthing terminal Grounding terminal
Warning symbol Alerts user to warning messages
Symbols (continued)
IMPORTANT: Some of the following symbols may be used on your tool. Please study them
and learn their meaning. Proper interpretation of these symbols will allow you to operate the
tool better and safer.
This symbol designates that this tool is listed by Underwriters Laboratories.
This symbol designates that this tool is recognized by Underwriters Laboratories.
This symbol designates that this tool is listed by Underwriters Laboratories,
to United States and Canadian Standards.
This symbol designates that this tool is listed by the Canadian Standards
Association.
This symbol designates that this tool is listed by the Canadian Standards
Association, to United States and Canadian Standards.
This symbol designates that this tool is listed by the Intertek Testing
Services, to United States and Canadian Standards.
Li-ion RBRC seal Designates Li-ion battery recycling
program
Ni-Cad RBRC seal Designates Ni-Cad battery recycling
program
Read manual symbol Alerts user to read manual
Wear eye protection symbol Alerts user to wear eye protection
-5-
This symbol designates that this tool complies to NOM Mexican Standards.
-6-
Page 4
DM 2610030830 01-13_DM 2610030830 01-13.qxp 1/22/13 11:25 AM Page 7
Functional Description and Specifications
WARNING
!
measures reduce the risk of starting the tool accidentally.
Di sc onnect the plug fro m the pow er source bef ore maki ng any
assembly, adjustments or changing accessories. Such preventive safety
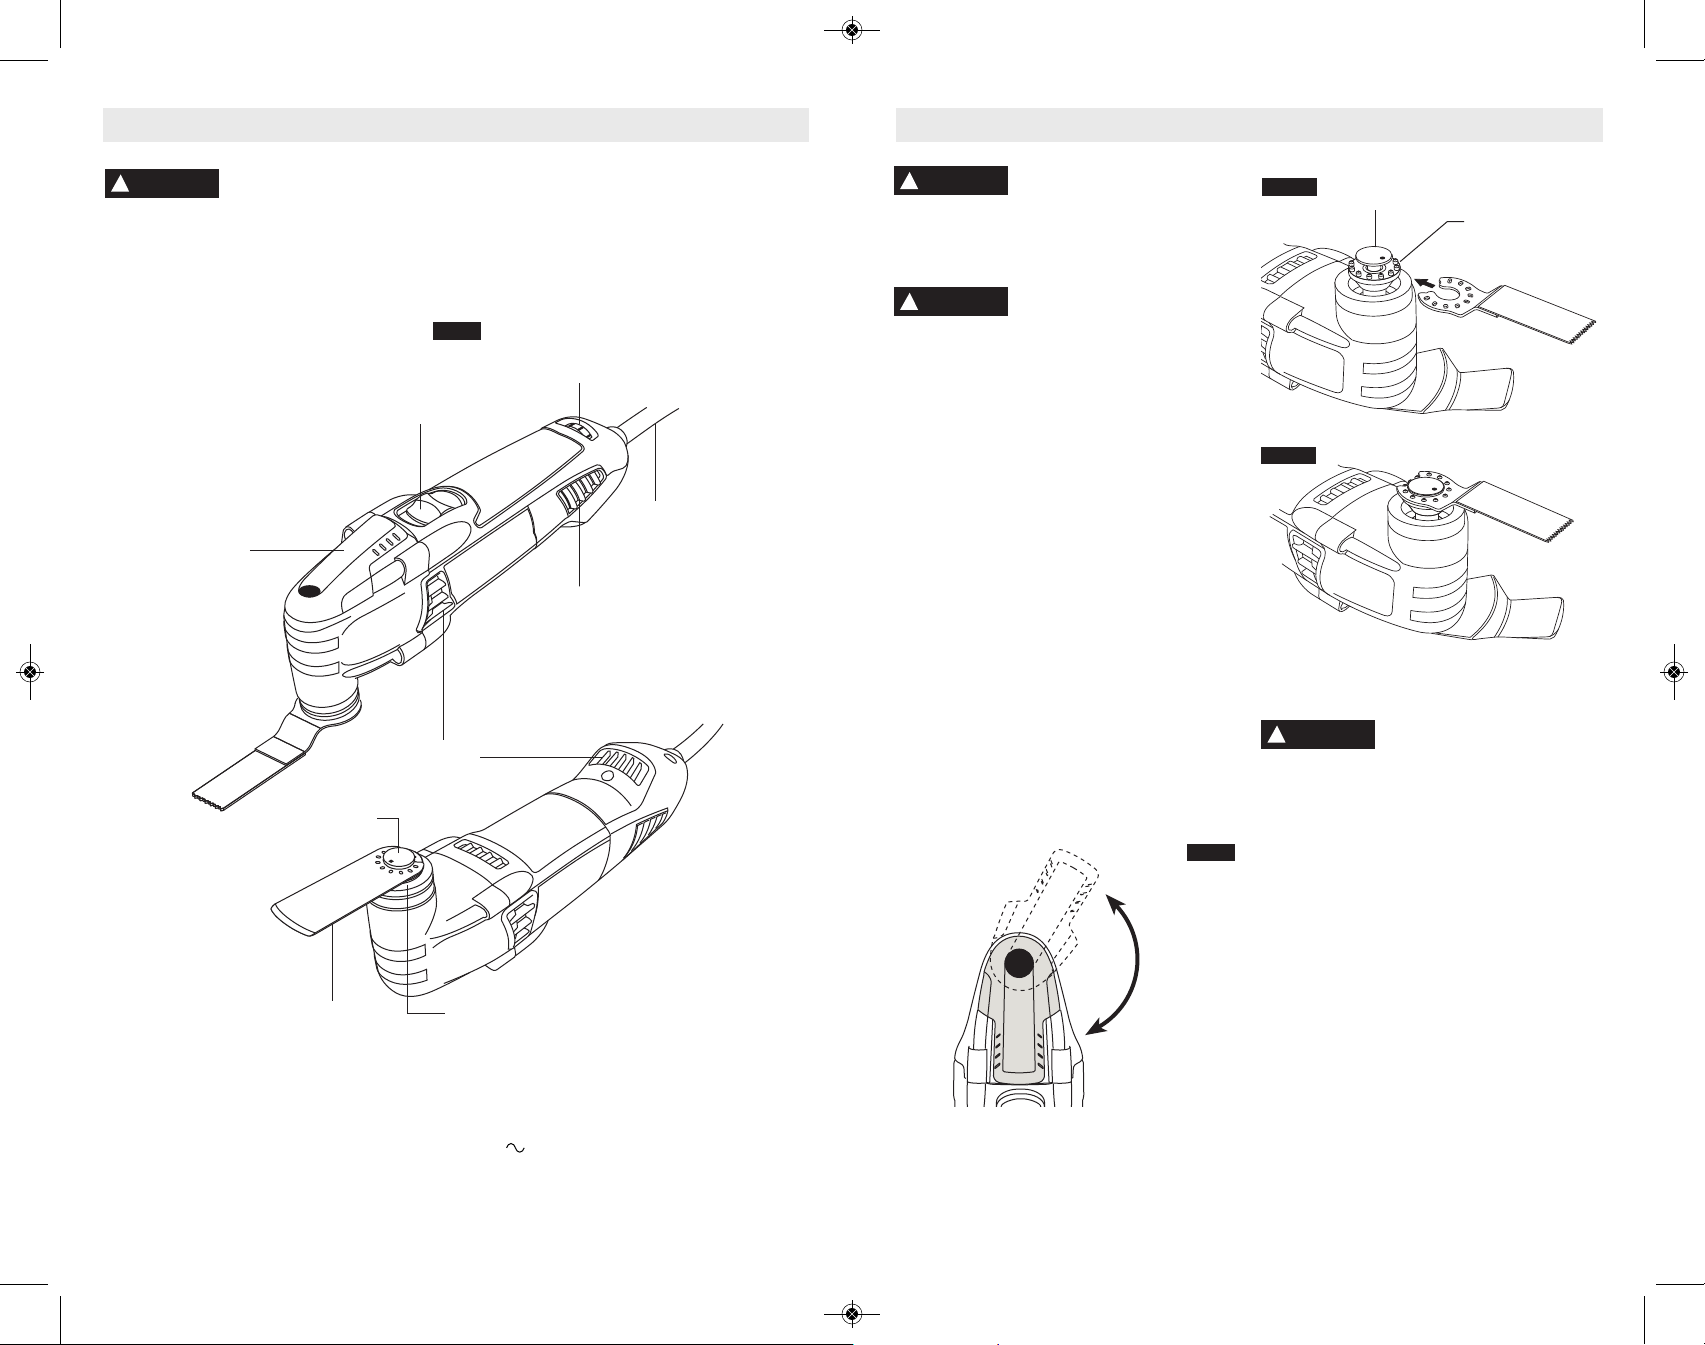
Model MM45 Multi-Max™ Oscillating Power Tool
FIG. 1
ON/OFF
SWITCH
QUICK LOCK
™
LEVER
VENTILATION
OPENINGS
CLAMPING
FLANGE
ACCESSORY
Model number MM45
No load speed n
Voltage rating 120 V 60 Hz
NOTE: For tool specifications refer to the nameplate on your tool.
ACCESSORY HOLDER
10,000-21,000/min
0
-7-
VARIABLE SPEED
CONTROL DIAL
VENTILATION
OPENINGS
POWER
CORD
Assembly
WARNING
!
making any assemb ly, adjustmen ts or
changing accessories. Such preventive
safety measures reduce the risk of starting the
tool accidentally.
WARNING
!
alway s wear protectiv e glo ves. Such
preventive safety measures reduce the risk of
injury from sharp edges of the accessories.
Application tools can become very hot while
working. Danger of burns!
INSTALLING AND REMOVING
ACCESSORIES WITH QUICK LOCK™
The Dremel Multi-Max™ MM45 includes an
integrated accessory change mechanism. The
Quick Lock™ accessory interface allows you to
install and remove accessories without the need
of a wrench or hex key. You will also no longer
need to worry about losing a clamping screw &
washer as these parts are no longer used in the
MM45 version of the Multi-Max™.
1. To install an accessory using the Quick
Lock™ feature, hold tool upside down to
preve nt th e blade from fal ling off the
acces sory holder when instal ling an d
removing accessories.
2. Turn the Quick Lock™ lever on the top on the
tool counter-clockwise to unlock the clamping
mechanism (Fig. 2). The lever needs to be
fully engage d to unlock the clamping
mechanism.
3. Clean accessory holder, accessory and the
clamping flange with a clean cloth.
4. Place the accessory onto the accessory
holder making sure the accessory engages
all pins in the holder and the accessory is
Disconnect the plug from
the pow er source before
For all work or when
chang ing acces sories
ACCESSORY CHANGE
FIG. 2
OPEN
CLOSE
FIG. 3a
FIG. 3b
!
fastening accessory. Avoid placing hands
or fingers between lever and tool body.
5. Turn the Quick Lock™ lever on the top of the
tool in a clockwise motion, to the closed
position, to securely lock the accessory in
place (Fig. 2).
6. To remove an accessory, simply unlock the
clamping mechanism by turning the Quick
Lock™ lever counter-clockwise as described
above (Fig. 2).
7. Lift up on the accessory bracket to take it off
the pins. (Note: be careful, blade may be
hot.)
NOTE: Some accessories, such as scrapers
or blades, may be mounted either straight
on the tool, o r at an angle to i ncr eas e
usability (Fig. 4). In order to do this with the
Quick Lock™ interface, place the accessory
onto the accessory holder making sure the
accessory engages all pins in the holder and
the accessory is flush against the accessory
holder. Securely lock the accessory in place
as described previously (Fig. 2).
CLAMPING
FLANGE
flush against the accessory holder (Fig. 3a &
Fig 3b).
WARNING
To avoid pinching, firmly
hold Quick Lock lever when
ACCESSORY
HOLDER
-8-
Page 5
DM 2610030830 01-13_DM 2610030830 01-13.qxp 1/22/13 11:25 AM Page 9
INSTALLING AND REMOVING
SANDING SHEETS
Your backing pad uses hook-and-loop backed
sandpaper, which firmly grips the backing pad
when applied with moderate pressure.
1. Align the sanding sheet and press it onto
the sanding plate by hand.
2. Firm ly press th e pow er tool with the
sanding sheet against a flat surface and
briefly switch the power tool on. This will
pr omote good adhesion and helps to
prevent premature wear.
3. To change, merely peel off the old sanding
sheet, remove dust from the backing pad if
necessary, and press the new sanding
sheet in place.
After considerable service the backing pad
surface will become worn, and the backing pad
must be replaced when it no longer offers a
firm grip. If you are experiencing premature
Introduction
Thank you for purchasing the Dremel MultiMax™.
This tool was designed to tackle home repair,
remodeling and restoration projects. The
Dremel Multi-Max™ tackles tasks that are
tedious, time consuming or simply next to
impossible to achieve with any other tool.
The ergonomic housing is designed for you
to hold and control in a comfortable manner
during operation.
It comes with an assortment of accessories
that are specifically designed for remodeling
work where you need precision and control.
Your Dreme l Multi- Ma x™ ha s a ro bust
electric motor, is comfortable in the hand,
and is m ade to acce pt a lar ge variety of
ac ce ss or ie s including fl us h cut bl ad es ,
Operating Instructions
LEARNING TO USE THE TOOL
Getting the most out of your oscillating tool is a
matter of learning how to let the speed and the
feel of the tool in your hands work for you.
The first step in learning to use the tool is to
get the “feel” of it. Hold it in your hand and feel
wear out of the backing pad facing, decrease
the amount of pressure you are applying
during operation of the tool.
For maximum use of abrasive, rotate pad 120
degrees when tip of abrasive becomes worn.
FIG. 4
scraper blades, grout removal wheels and
sanding pads.
Accessories come in a variety of shapes and
permit you to do a number of different jobs.
As you become familiar with the range of
accessories and their uses, you will learn just
how versatile your Dremel Multi-Max™ is.
Visit www.dremel.com to learn more about
what you can do with your Dremel MultiMax™.
INTENDED USE
This Dremel Multi-Max™ Tool is intended for
dry san ding of surface s, corners, edges,
sc rapin g, saw ing soft m etals , wood and
plastic components, and grout removal using
the app li cable t oo ls and a cc es sorie s
recommended by Dremel.
its weight and balance (Fig. 5). Depending on
the application, you will need to adjust your
hand position to achieve optimum comfort and
control. The unique comfort grip on the body of
the tool allows for added comfort and control
during use.
FIG. 5
When holding tool, do not cover the air vents
with your hand. Blocking the air vents could
cause the motor to overheat.
IMPORTANT! Practice on scrap material first
to see how the to ol’s h igh-s pe ed a ction
performs. Keep in mind that your tool will
perform best by allowing the speed, along with
the correct accessory, do the work for you. Be
careful not to apply too much pressure.
Instead, lower the oscillating accessory lightly
to the work surface and allow it to touch the
point at which you want to begin. Concentrate
on guiding the tool over the work using very
little pressure from you r hand. Allow the
accessory to do the work.
Usually it is better to make a series of passes
with the tool rather than to do the entire job
with one pass. To make a cut, for example,
pass the tool back and forth over the work. Cut
a little material on each pass until you reach
the desired depth.
SLIDE "ON/OFF" SWITCH
The tool is switched "ON" by the slide switch
located on the topside of the motor housing.
TO TURN THE TOOL "ON", slide the switch
button forward.
TO TURN THE TOOL "OFF", slide the switch
button backward.
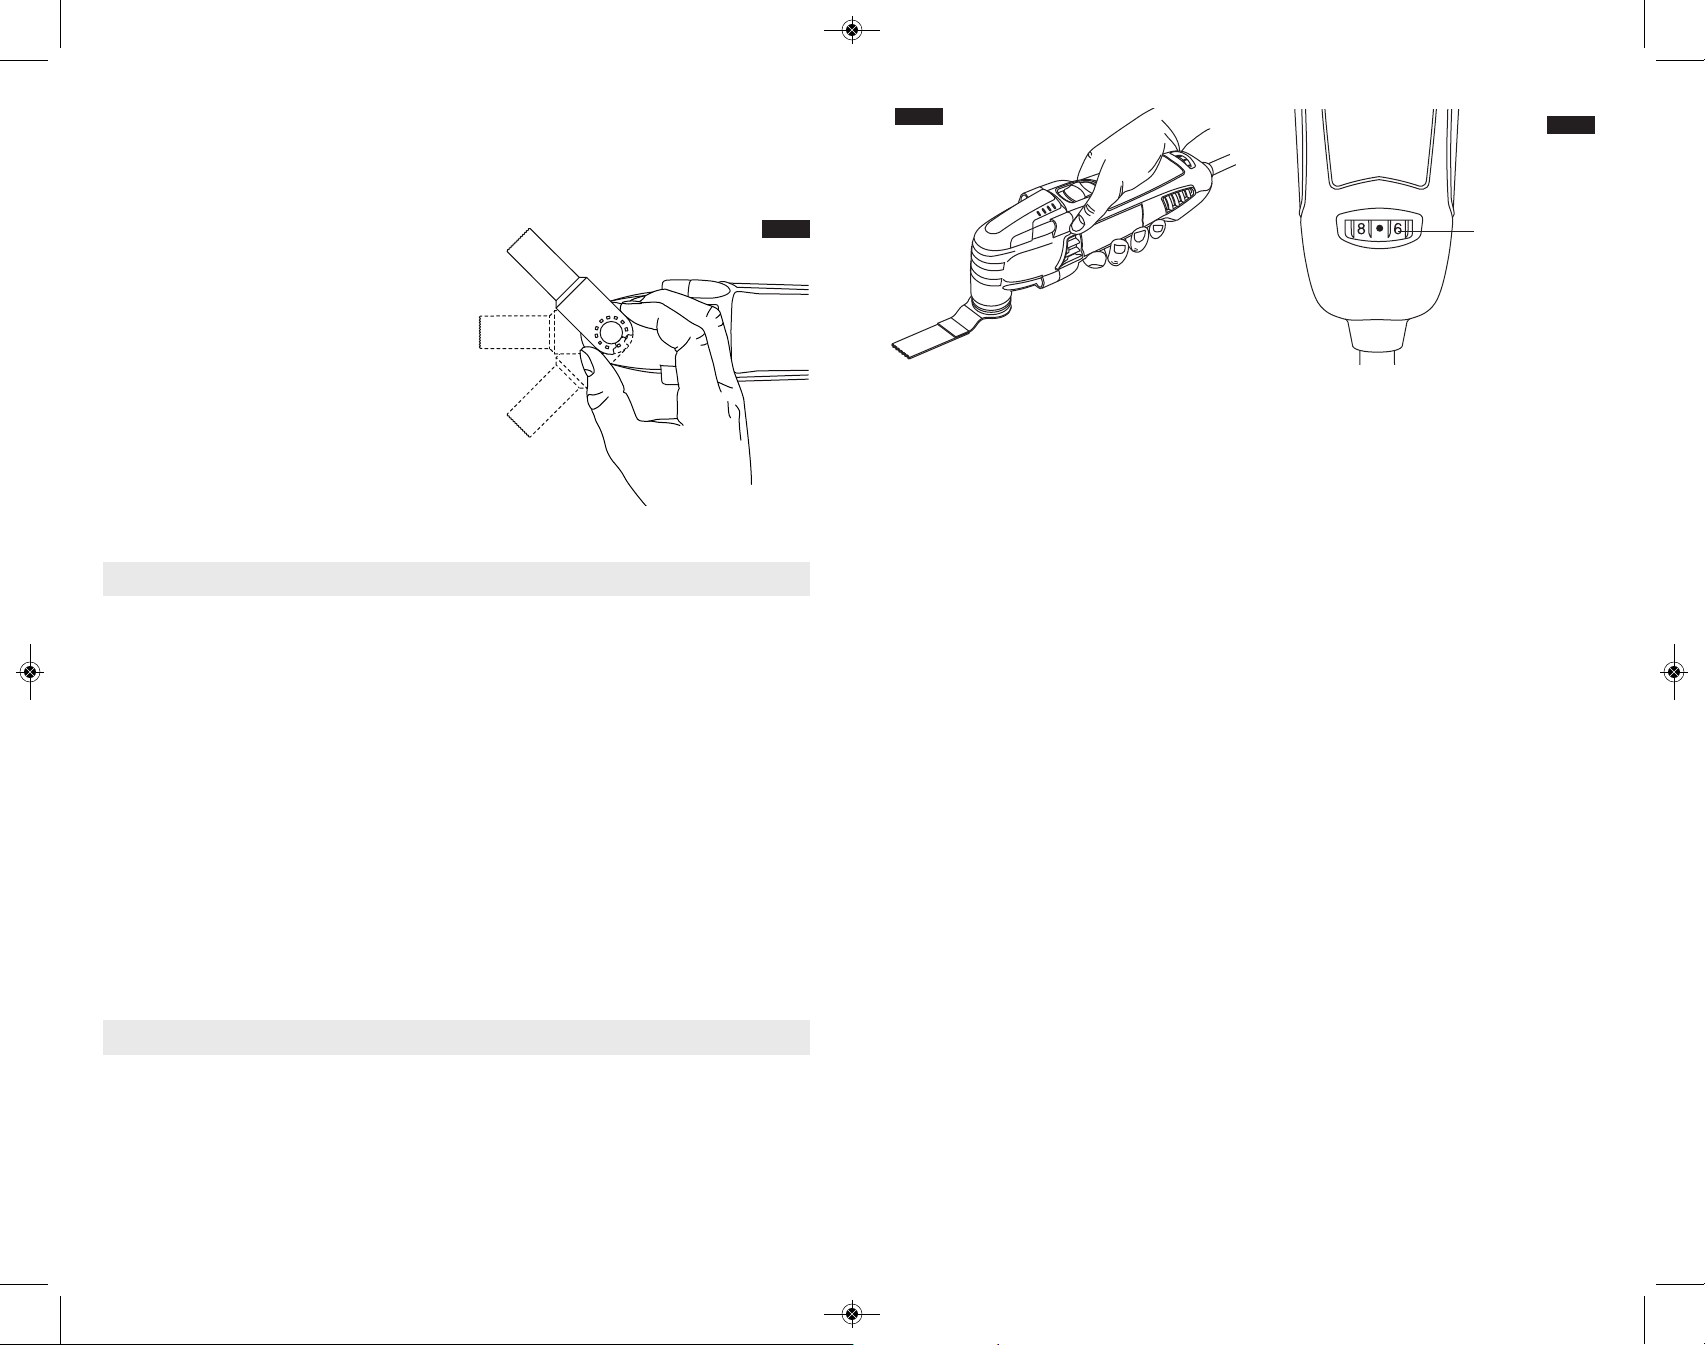
VARIABLE SPEED CONTROL DIAL
This tool is equipped with a variable speed
co ntrol di al (Fi g. 6). Th e spee d may b e
controlled during operation by presetting the
dial in any one of ten positions.
OPERATING SPEEDS
The Dremel Multi-Max™ consists of an AC
universal motor and oscillating mechanism to
perform applications such as cutting, grout
removal, scraping, sanding and more.
FIG. 6
VARIABLE SPEED
CONTROL DIAL
The Dre me l M ul ti-Max™ h as a h ig h
oscillating motion of 10,000 - 21,000 /min
(OPM). The high speed motion allows the
Dremel Multi-Max™ to achieve with excellent
results. The oscillating motion allows the dust
to fall to the surface ra ther than slinging
particles into the air.
To achieve the best results when working
with d ifferent materials, set the var iable
speed control to suit the job (See Speed
Chart on Page 12 & 13 for guidance) . To
select the right speed for the accessory in
use, practice with scrap material first.
NOTE: S peed is af fecte d by volta ge s
changes. A reduced incoming voltage will
slow the OPM of the tool, especially at the
lowest setting. If your tool appears t o be
running slowly, increase the speed setting
accordingly. The tool may not start at the
lowest switch setting in areas where outlet
voltage is less than 120 volts. Simply move
the speed setting to a hig her pos iti on to
begin operation.
Th e variab le speed contr ol setti ng s are
marked on the sp ee d c ontrol d ia l. Th e
settings for approximate /min (OPM) are:
Switch Setting Speed Range
/min (OPM)
2 10,000-11,000
4 11,000-13,000
6 13,000-16,000
8 16,000-19,000
10 19,000-21,000
You can refer to the charts on the following
pages to determine the proper speed, based
on the material and accessory being used.
These charts enable you to select both the
correct accessory and the optimum speed at a
glance.
-9-
-10-
Page 6
60, 120 and 240 Grit
Paper - Bare Wood
60, 120 and 240 Grit
Paper - Paint
HCS Wood Flush
Cut Blade
1-1/4" x 3/8"
HCS Wood Flush
Cut Blade
1-1/4" x 3/4"
HCS Wood Flush
Cut Blade
1-1/4" x 1-1/8"
HCS Wood Flush
Cut Blade
1-5/8" x 3/4"
HCS Wood Flush
Cut Blade
1-1/4" x 1-11/16"
BiM Wood/Metal
Flush Cut Blade
1" x 3/4"
BiM Wood/Metal
Blade
1-1/4" x 1-1/8"
2 - 10
2 - 10
8 - 10
8 - 10
8 - 10
8 - 10
8 - 10
8 - 10
8 - 10
2 - 10
2 - 10
6 - 10
6 - 10
6 - 10
6 - 10
6 - 10
6 - 10
6 - 10
2 - 10
-
-
-
-
-
-
-
2 - 6
2 - 6
2 - 6
2 - 6
2 - 6
2 - 6
2 - 6
2 - 6
2 - 6
8 - 10
8 - 10
-
-
-
-
8 - 10*
8 - 10*
8 - 10
8 - 10
-
-
-
-
8 - 10
8 - 10
"
-
-
-
-
-
-
-
-
-
!
-
-
-
-
-
-
-
-
-
-
-
-
-
-
-
-
-
-
-
-
-
-
-
-
-
-
-
MM70W
MM70P
MM411
MM440
MM460
MM470
MM480
MM422
MM462
WOOD
1/4
IN
3/4
1
1/2
"
DM 2610030830 01-13_DM 2610030830 01-13.qxp 1/22/13 11:25 AM Page 11
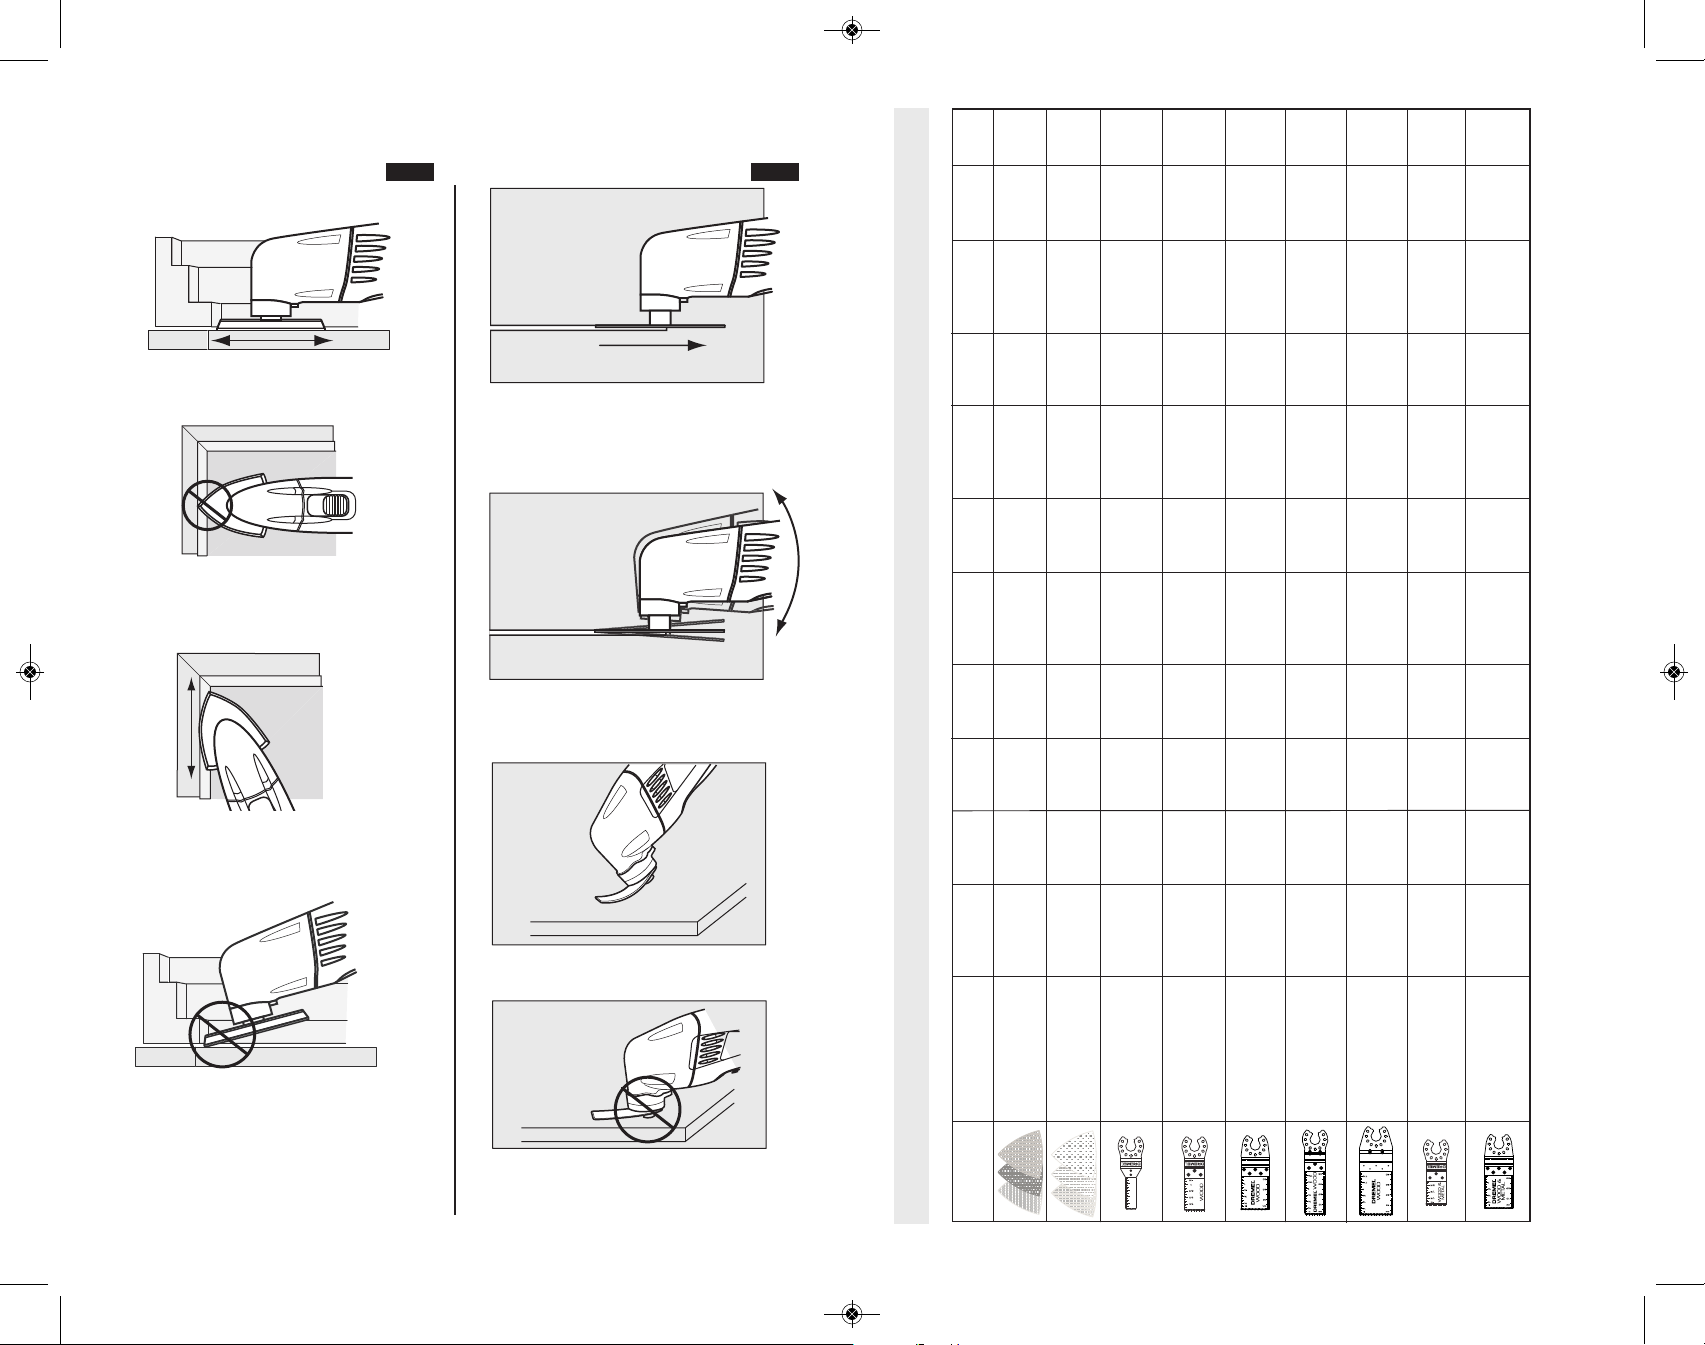
Please refer to figures 7 and 8 for further instruction on how to use your Dremel Multi-Max™.
Following these instructions will allow you to get the highest performance out of your oscilating tool.
FIG. 8FIG. 7
CORRECT: Sand with a smooth
back and forth motion, allowing the
weight of the tool to do the work.
CORRECT: Always cut with a
smooth back and forth motion.
Never force the blade. Apply light
pressure to guide the tool.
INCORRECT: Avoid sanding with
only the tip of the pad. Keep as
much sand paper in touch with the
Use only Dremel, high-performance accessories.
work surface as possible.
INCORRECT: Do not twist the tool
while cutting.This can cause the
CORRECT: Always sand with the
pad and sandpaper flat against the
blade to bind.
work surface. Work smoothly in a
back and forth motion.
Note: The MM720 Multi-Flex Blade is not compatible with the MM45.
INCORRECT: Avoid tipping the
pad. Always sand flat.
CORRECT: Make sure flexible
scraper blade flexes enough
Multi-Max™ Accessory Speed Settings
INCORRECT: Avoid screw head
touching surface with flexible
scraper blade.
-11-
-12-
Page 7
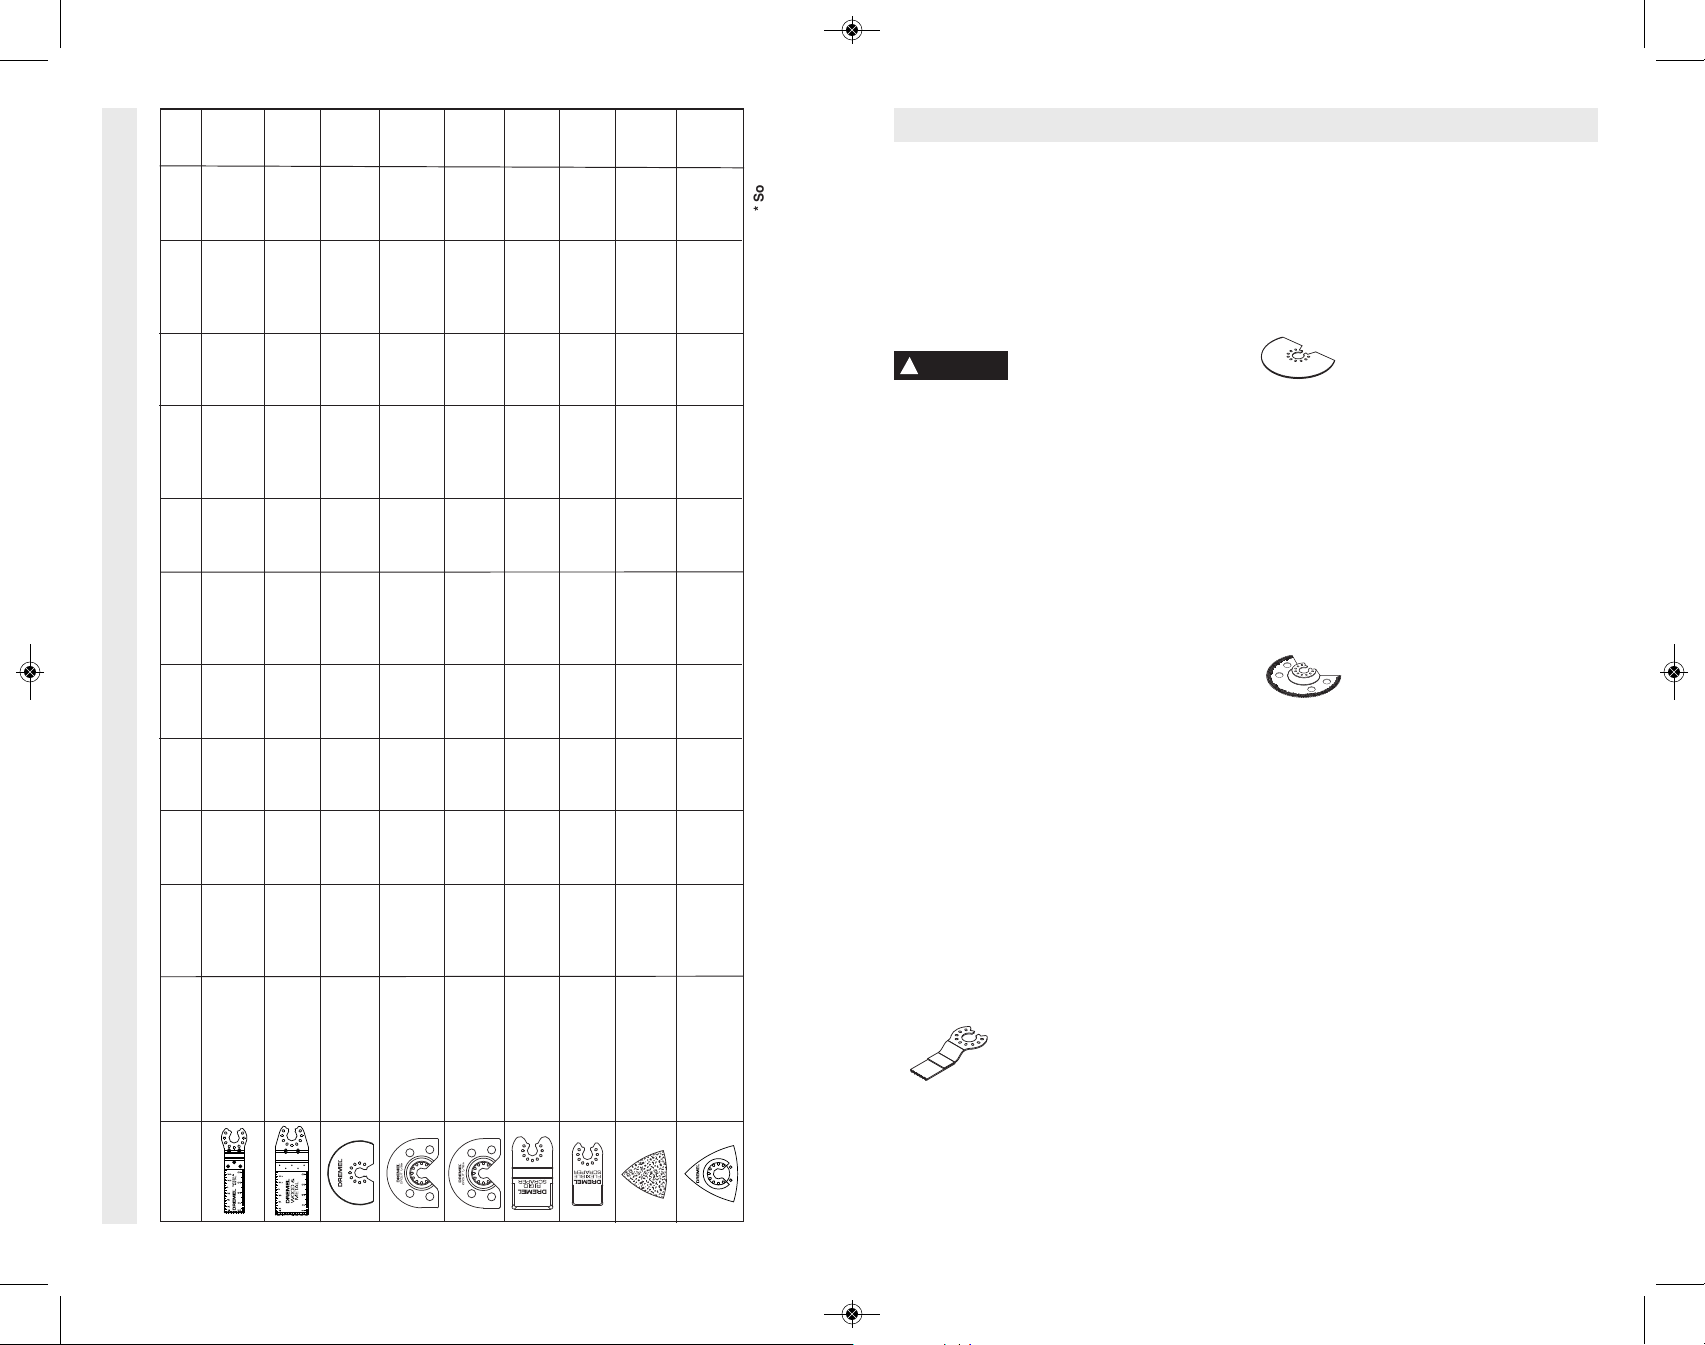
BiM Wood/Metal
Blade
1-5/8" x 3/4"
BiM Wood/Metal
Blade
1-1/4" x 1-11/16"
3" Flat
Saw Blade
1/8" Grout Removal
Blade
1/16" Grout Removal
Blade
Rigid Scraper Blade
Flexible Scraper
Blade
60 Grit Diamond
Paper
24 Grit Carbide
Rasp
8 - 10
8 - 10
8 - 10
-
-
-
6 - 10
6 - 10
6 - 10
6 - 10
-
-
-
-
6 - 10
-
-
-
-
2 - 4
2 - 4
6 - 10
2 - 6
2 - 6
2 - 6
-
-
-
-
-
-
8 - 10*
8 - 10*
-
-
-
-
-
-
-
8 - 10
8 - 10
-
-
-
-
-
-
-
"
-
-
-
-
2 - 8
-
-
-
!
-
-
-
-
2 - 6
2 - 6
-
-
-
-
-
-
-
-
6 - 10
6 - 10
-
-
6 - 10
6 - 10
-
6 - 10
6 - 10
MM472
MM482
MM450
MM500
MM501
MM600
MM610
MM900
MM920
WOOD
a
a
a
"
DM 2610030830 01-13_DM 2610030830 01-13.qxp 1/22/13 11:25 AM Page 13
Operating Applications
Your Dremel Multi-Max™ Tool is intended for
sanding and cutting wooden materials, plastic,
plaster and non-ferrous metals. It is especially
Use only Dremel, high-performance accessories.
Multi-Max™ Accessory Speed Settings
-13-
Note: The MM720 Multi-Flex Blade is not compatible with the MM45.
suitable for working close to edges, in tight
spaces, and for flush cutting. This tool must be
used only with Dremel accessories .
Below are some typical uses for your Dremel
Multi-Max™ Tool.
WARNING
!
from the body. Never position hand near or
directly in front of working area. Always hold
the tool with both hands and wear protective
gloves.
Flush Cutting
Remove excess wood from door jamb, window
sill and/or toekick. Removing excess copper or
PVC pipe.
Removal work
e.g. carpets & backing, old tile adhesives,
ca ulking on masonry, wood and ot he r
surfaces.
Removal of excess materials
e.g. plaster, mortar splatters, concrete on tiles,
sills.
Preparation of surfaces
e.g. for new floors and tiles.
Detail sanding
e.g. for sanding in extre mely ti ght are as
otherwise difficult to reach and require hand
sanding
Saw blades are ideal for making precise cuts
in tight areas, close to edges or flush to a
surface.
Select a medium to high speed for making
initial plunge, start off at medium speed for
increased control. After making your initial cut,
you can increase speed for faster cutting
ability.
it is important not to force the tool during the
plunge cut. If you experience a strong vibration
in you r hand dur ing the pl unge cut, this
indicates that you are applying too much
pressure. Back the tool out and let the speed
of the tool do the work. While keeping the teeth
APPLICATION
For all accessories, work
with the accessory away
CUTTING
Fl ush cutting b lades are
intended to make precise cuts to
allow for installation of flooring or
wall material. When flush cutting
of the blade in the work surface, move the
back of the tool in a slow sideways motion.
This motion will help expedite the cut.
When making a flush cut it is always a good
idea to have a piece of scrap material (tile or
wood) supporting the blade. If you need to rest
the flush cutting blade on a delicate surface,
you should protect the surface with cardboard
or masking tape.
Th e fl at s aw blade i s id eal for
ma king pr ecise cut s in wo od ,
plaster, drywall material.
Applications include cutting openings in flooring
for venting, repairing damaged flooring, cutting
openings for electrical boxes. The blade works
best on softer woods such as pine. For harder
woods, the blade life will be limited.
Select a medium to high speed.
The flat saw blad e can also be used for
window restoration making glazing easy to
remove. The saw blade can be placed directly
against the edge of the window frame, guiding
the blade through the glazing.
GROUT REMOVAL
Grout removal blades are ideal
fo r r emoving dama ged or
cracked grout. Grout blades come in different
widths (1/16" and 1/8") to tackle different grout
line widths. Before selecting a grout blade
measure t he g rout line width to pick the
appropriate blade.
Select a medium to high speed.
To remove the grout, use a back and forth
motion, making several passes along the grout
line. The hardness of the grout will dictate how
many passes are needed. Try and keep the
grout blade aligned with the grout line and be
careful not to apply too much side pressure on
the grout blade during the process. To control
plunge depth use the carbide grit line on the
blade as an indicator. Be careful not to plunge
beyond the carbide grit line to avoid damage to
the backer board material.
The grout blades can handle both sanded and
un sanded grout. If you n otice the blade
clogging during the grout removal process, you
can use a brass brush to clean the grit, thus
exposing the grit again.
The grout blade geometry is designed so that
the blade can remove all grou t up to the
su rface of a w all or cor ner. This can be
-14-
Page 8
DM 2610030830 01-13_DM 2610030830 01-13.qxp 1/22/13 11:25 AM Page 15
accomplished by ensuring that the segmented
portion of the blade is facing the wall or corner.
SCRAPING
Scrapers are suitable for removing old coats of
va rnish or adhes iv es, re mo ving b on ded
carpe ting, e .g. on stairs/ steps a nd othe r
small/medium size surfaces.
Select low to medium speed.
Rigid scrapers are for large area
removal, and harder materials
such as vinyl flooring, carpeting
an d ti le adhesive s. When
removing strong, tacky adhesives, grease the
scraper blade surface with (petroleum jelly
or silicone grease) to reduce gumming up.
The carpet/vinyl flooring removes easier if
it is scored prior to removal so the scraper
blade can move underneath the flooring
material.
Flexible scrapers are used for
hard to reach areas and softer
material such as caulk.
Mount the scraper blade with the logo side
facing up. With the flexible scraper, make sure
that the screw head does not make contact
with surface during the scraping process (a 30
- 45 degree pitch is recommend). This can be
accomplished by making sure that the tool is at
an angle to the blade. You should be able to
see the blade flex during the scraping process.
If you are removing caulk from a delicate
surface such as a bath tub or tile back splash,
we recomme nd tapin g or protecti ng the
surface that the blade will rest on. Use rubbing
alcohol to clean the surface after the caulk
and/or adhesive is removed.
Turn the tool on and place desired accessory
on the area where material is to be removed.
Begin with light pressur e. The oscillating
mo tion of ac cessory only occurs when
pressure is ap plied to the mat eri al to be
removed.
Excessive pressure can gouge or damage the
background surfaces (e.g,. wood, plaster).
SANDING
Sanding accessories are suitable
for dry sanding of wood, metal,
surfaces, corners and edges and
hard to reach areas.
Work with the complete surface of the sanding
pad, not only with the tip.
Corners may be finished using the tip or edge
of the s elected acce ssory, which should
occasionally be rotated during use to distribute
the wear on the accessory and backing pad
surface.
Sand with a continuous motion and light
pressure. DO NOT apply excessive pressure let the tool do the work. Excessive pressure
will result in poor handling, vibration, and
unwanted sanding marks and premature wear
on the sanding sheet.
Always be certain that smaller workpieces are
securely fastened to a bench or other support.
Larger panels may be held in place by hand on
a bench or sawhorses.
Open-coat aluminum oxide sanding sheets are
recommended for most wood or metal sanding
applications, as this synthetic material cuts
quickly and wears well. Some applications,
such as metal finishing or cleaning, require
special abrasive pads which are available from
your dealer. For best results, use Dremel
sanding accessories which are of superior
quality and are carefully selected to produce
professional quality results with your oscillating
tool.
The following suggestions may be used as a
general guide for abrasive selection, but the
best results will be obtained by sanding a test
sample of the workpiece first.
Grit Application
Coarse For rough wood or metal
sanding, and rust or old
finish removal.
Medium For general wood or metal
sanding
Fine For final finishing of wood,
metal, plaster and other
surfaces.
With the workpiece firmly secured, turn tool on
as described above. Contact the work with the
tool after the tool has reached its full speed,
and remove it from the work before switching
the tool off. Operating your oscillating tool in
this manner will prolong switch and motor life,
and greatly increase the quality of your work.
Move the oscillating tool in long steady strokes
parallel to the grain using some lateral motion
to overlap the strokes by as much as 75%.
DO NOT apply excessive pressure - let the
tool do the work. Excessive pressure will result
in poor handling, vibration, and unwanted
sanding marks.
GRINDING
Th e d iamond p ap er acces so ry
allows for the Multi-Max™ to be
used for grin ding away cement ,
plaster or thin set. Preparing the surface for tile
replacement is a common application for this
accessory.
The diamond paper needs to be mounted to
the backing pad prior to use.
Select a low to high speed depending on the
material removal rate desired.
The carbide rasp accessory also
allows the Mul ti-Max™ to grind
aw ay cement , thinse t mortar ,
plaster, and also wood. This accessory is
commonly used to prepare for tile replacement
or ras ping w ood to smo oth a surf ace or
remove material.
The speed should be set at high speed for
aggressive material removal or at low speed
for a more detailed removal of material.
Do not apply excessive pressure on the tool-let
it do the work.
Corners may be finished using the tip or edge
of the s elected acce ssory, which should
occasionally be rotated during use to distribute
the wear on the accessory and backing pad
surface.
Grind with a continu ous motion and light
pressure. DO NOT apply excessive pressure let the tool do the work. Excessive pressure
will result in poor handling, vibration, and
premature wear on the diamond paper sheet.
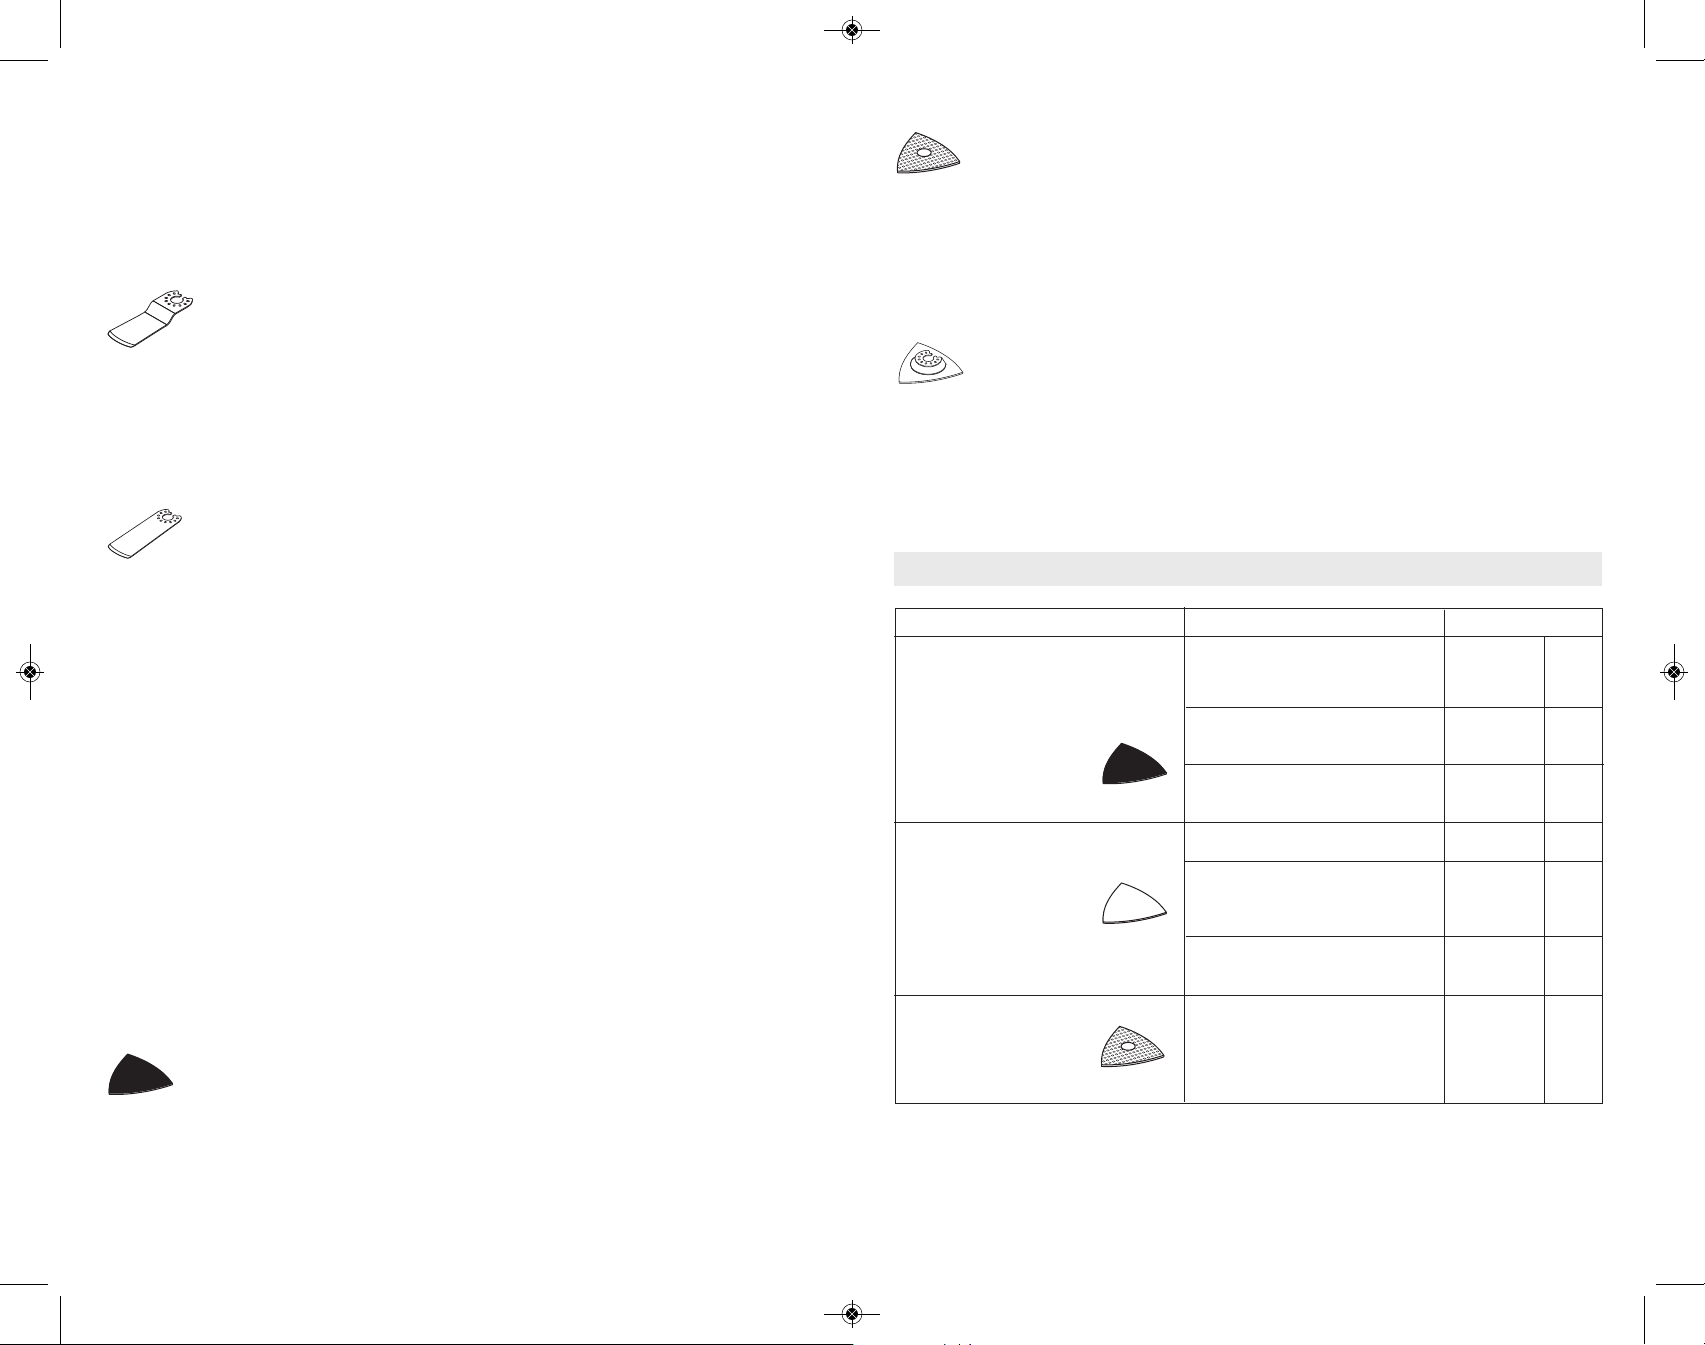
Selecting Sanding/Grinding Sheets
Material Application Grit Size
All wooden materials (e.g.,
hardwood, softwood, chipboard,
building board) Metal materials–
Metal materials, fiberglass
and plastics
Sand Paper (Dark)
Paint, varnish, filling compound
and filler
Sand Paper (White)
Masonry, stone, cement
and thin set
Diamond Paper
For coarse-sanding, e.g. of
rough, unplanned beams and
boards
For face sanding and planing
small irregularities
For finish and fine sanding of
wood
For sanding off paint
For sanding primer (e.g., for
removing brush dashes, drops
of paint and paint run)
For final sanding of primers
before coating
For smoothing, shaping and
braking edges
Coarse
Medium
Fine
Coarse
Medium
Fine
Coarse
60
120
240
80
120
240
60
-15-
-16-
Page 9

DM 2610030830 01-13_DM 2610030830 01-13.qxp 1/22/13 11:25 AM Page 17
Maintenance Information
Service
!
WARNING
maintenance performed by un au thorized
personnel may result in misplacing of
inter nal wires and compon ents which
co uld cause serio us h az ar d. We
recommend that all tool service be performed
by a Dremel Service Facility.
The brushes and commutator in your tool have
be en engineer ed for many h ours of
de pendable s ervice.To m aintain pe ak
efficiency of the motor, we recommend every
50 - 60 hours the brush es be serviced by a
Dremel Service Facility.
NO USER SERVICEABLE
PARTS INSIDE. Preventive
CARBON BRUSHES
Extension Cords
Extension Cords
!
WARNING
adequate size conductors that is capable
of carrying the current necessary for your
to ol mu st be us ed . T hi s w il l p re vent
excessive voltage drop, loss of power or
overheating. Grounded tools must use 3-wire
extension cords that have 3-prong plugs and
receptacles.
NOTE: The smaller the gauge number, the
heav i er the cord.
If an extension cord is
ne ce ss ar y, a co rd with
Cleaning
!
WARNING
th e power supply be fo re cl ea ni ng or
performing any main tenance. The tool may
be cleaned most effectively with compressed
dry air. Always wear safety gog gles when
cleaning tools with compressed air.
Ventilation openings and switch levers must
be kept clean and free of foreign matter. Do
not at tempt to clean by inserting pointed
objects through openings.
!
CAUTION
plastic parts. Some of these are: gasoline,
carbon tetrachlo ride, chlo rinated cleaning
solvent s, a mmonia and hou se hold
detergents that contain ammonia.
RECOMMENDED SIZES OF EXTENSION CORDS
120 VOLT ALTERNATING CURRENT TOOLS
Tool’s
Ampere
Rating
3-6
6-8
8-10
10-12
12-16
To avoid accidents always
dis connect the tool from
Ce rtain clean ing ag ents
and sol ven ts d amage
Cord Size in A.W.G.
Cord Length in Feet Cord Length in Meters
25 50 100 150 15 30 60 120
18 16 16 14 0.75 0.75 1.5 2.5
18 16 14 12 0.75 1.0 2.5 4.0
18 16 14 12 0.75 1.0 2.5 4.0
16 16 14 12 1.0 2.5 4.0 —
14 12 —— ————
Wire Sizes in mm
Dremel®Limited Warranty
Your Dremel product is warranted against defective material or workmanship for a period of two years from
date of purchase. In the event of a failure of a product to conform to this written warranty, please take the
following action:
1. DO NOT return your product to the place of purchase.
2. Carefully package the product by itself, with no other items, and return it, freight prepaid, along with:
A. A copy of your dated proof of purchase (please keep a copy for yourself).
B. A written statement about the nature of the problem.
C. Your name, address and phone number to:
UNITED STATES CANADA
Dremel Service Center Giles Tool Agency
4915 21st Street OR 47 Granger Av.
Racine, WI 53406 Canada M1K 3K9 1-416-287-3000
OUTSIDE CONTINENTAL UNITED STATES CONTINENTAL UNITED STATES
See your local distributor or write to Dremel, 4915 21st Street Racine, WI 53406
We recommend that the package be insured against loss or in transit damage for which we cannot be
responsible.
This warranty applies only to the original registered purchaser. DAMAGE TO THE PRODUCT RESULTING
FROM TAMPERING, ACCIDENT, ABUSE, NEGLIGENCE, UNAUTHORIZED REPAIRS OR ALTERATIONS,
UNAPPROVED ATTACHMENTS OR OTHER CAUSES UNRELATED TO PROBLEMS WITH MATERIAL OR
WORKMANSHIP ARE NOT COVERED BY THIS WARRANTY.
No employee, agent, dealer or other person is authorized to give any warranties on behalf of Dremel. If
Dremel inspection shows that the problem was caused by problems with material or workman ship within the
limitations of the warranty, Dremel will repair or replace the product free of charge and return product
prepaid. Repairs made necessary by normal wear or abuse, or repair for product outside the warranty period,
2
if they can be made, will be charged at regular factory prices.
DREMEL MAKES NO OTHER WARRANTY OF ANY KIND WHATEVER, EXPRESSED OR IMPLIED, AND ALL
IMPLIED WARRANTIES OF MERCHANTABILITY AND FITNESS FOR A PARTICULAR PURPOSE WHICH
EXCEED THE ABOVE MENTIONED OBLIGATION ARE HEREBY DISCLAIMED BY DREMEL AND EXCLUDED
FROM THIS LIMITED WARRANTY.
This warranty gives you specific legal rights and you may also have other rights which vary from state to
state. The obligation of the warrantor is solely to repair or replace the product. The warrantor is not liable for
any incidental or consequential damages due to any such alleged defect. Some states do not allow the
exclusion or limitation of incidental or consequential damages, so the above limitations or exclusion may not
apply to you.
For prices and warranty fulfillment in the continental United States, contact your local Dremel distributor.
-17-
Exportado por:
Calle Robert Bosch No. 405 - 50071 Toluca, Edo. de Méx. - México
© Robert Bosch Tool Corporation Mt. Prospect, IL 60056 -2230, E.U.A.
Importado a México por: Robert Bosch, S. de R.L. de C.V.
Tel. 052 (722) 279 2300 ext 1160 / Fax. 052 (722) 216-6656
-18-
Page 10

DM 2610030830 01-13_DM 2610030830 01-13.qxp 1/22/13 11:25 AM Page 19
Avertissements généraux concernant la sécurité des outils électroportatifs
!
AVERTISSEMENT
choc électrique, d'incendie et/ou de blessures corporelles graves.
CONSERVEZ TOUS LES AVERTISSEMENTS ET TOUTES LES CONSIGNES
Dans les avertissements, le terme « outil électroportatif » se rapporte à votre outil branché sur le secteur (avec fil) ou
à votre outil alimenté par piles (sans fil).
Sécurité du lieu de travail
Maintenez le lieu de travail propre et bien éclairé.
Les risques d’accident sont plus élevés quand on
travaille dans un endroit encombré ou sombre.
N’utilisez pas d’outils électroportatifs dans des
atmosphères explosives, comme par exemple en
présence de gaz, de poussières ou de liquides
inflammables. Les outils électroportatifs produisent
des étincelles qui risquent d’enflammer les poussières
ou les vapeurs.
Éloignez les enfants et les visiteurs quand vous vous
servez d’un outil électroportatif. Vous risquez une
perte de contrôle si on vous distrait.
Sécurité électrique
Les fiches des outils électroportatifs doivent
correspondre à la prise. Il ne faut absolument jamais
modifier la fiche. N’utilisez pas d’adaptateur de prise
avec des outils électroportatifs munis d’une fiche de
terre. Le risque de choc électrique est moindre si on
utilise une fiche non modifiée sur une prise qui lui
correspond.
Évitez tout contact du corps avec des surfaces reliées
à la terre tels que tuyaux, radiateurs, gazinières ou
réfrigérateurs. Le risque de choc électrique augmente
si votre corps est relié à la terre.
N’exposez pas les outils électroportatifs à la pluie ou
à l’humidité. Si de l’eau pénètre dans un outil
électroportatif, le risque de choc électrique augmente.
Ne maltraitez pas le cordon. Ne vous en servez
jamais pour transporter l’outil électroportatif, pour le
tirer ou pour le débrancher. Éloignez le cordon de la
chaleur, des huiles, des arêtes coupantes ou des
pièces mobiles. Les cordons abîmés ou emmêlés
augmentent les risques de choc électrique.
Si vous utilisez un outil électroportatif à l’extérieur,
employez une rallonge conçue pour l’extérieur. Ces
rallonges sont faites pour l’extérieur et réduisent le
risque de choc électrique.
S'il est absolument nécessaire d'utiliser l'outil
électroportatif dans un endroit humide, utilisez une
alimentation protégée par un disjoncteur de fuite de
terre (GFCI). L'utilisation d'un disjoncteur GFCI réduit
les risques de choc électrique.
Veuillez lire tous les avertissements et toutes les consignes de sécurité. Si l'on
n'observe pas ces avertissements et ces consignes de sécurité, il existe un risque de
DE SÉCURITÉ POUR RÉFÉRENCE FUTURE.
Sécurité personnelle
Restez concentré, faites attention à ce que vous
faites, et servez-vous de votre bon sens lorsque vous
utilisez un outil électroportatif. N'employez pas
d’outils électroportatifs quand vous êtes fatigué ou
sous l’emprise de drogues, d’alcool ou de
médicaments. Quand on utilise des outils
électroportatifs, il suffit d’un moment d’inattention pour
causer des blessures corporelles graves.
Utilisez des équipements de sécurité personnelle.
Portez toujours une protection oculaire. Le port
d'équipements de sécurité tels que des masques
antipoussières, des chaussures de sécurité
antidérapantes, des casques de chantier et des
protecteurs d'oreilles dans des conditions appropriées
réduira le risque de blessure corporelle.
Évitez les démarrages intempestifs. Assurez-vous que
l'interrupteur est dans la position arrêt (Off) avant de
brancher l'outil dans une prise de courant et/ou un
bloc-piles, de le ramasser ou de le transporter. Le
transport d'un outil électroportatif avec le doigt sur la
gâchette ou le branchement de cet outil quand
l'interrupteur est en position de marche (ON) est une
invite aux accidents.
Enlevez toutes les clés de réglage avant de mettre
l’outil électroportatif en marche. Si on laisse une clé
sur une pièce tournante de l’outil électroportatif, il y a
risque de blessure corporelle.
Ne vous penchez pas. Conservez toujours une bonne
assise et un bon équilibre. Ceci vous permettra de
mieux maîtriser l’outil électroportatif dans des situations
inattendues.
Habillez-vous de manière appropriée. Ne portez pas
de vêtements amples ou de bijoux. Attachez les
cheveux longs. N’approchez pas les cheveux, les
vêtements ou les gants des pièces en mouvement.
Les vêtements amples, les bijoux ou les cheveux longs
risquent d’être happés par les pièces en mouvement.
Si l’outil est muni de dispositifs permettant le
raccordement d’un système d’aspiration et de
collecte des poussières, assurez-vous que ces
dispositifs sont raccordés et utilisés correctement.
L'utilisation d'un dépoussiéreur peut réduire les
dangers associés à l'accumulation de poussière.
Utilisation et entretien des outils
électroportatifs
Ne forcez pas sur l’outil électroportatif. Utilisez l’outil
électroportatif qui convient à la tâche à effectuer.
L’outil qui convient à la tâche fait un meilleur travail et
est plus sûr à la vitesse pour lequel il a été conçu.
Ne vous servez pas de l’outil électroportatif si son
interrupteur ne parvient pas à le mettre en marche ou
à l’arrêter. Tout outil électroportatif qui ne peut pas
être commandé par son interrupteur est dangereux et
doit être réparé.
Débranchez la fiche de la prise ou enlevez le bloc-pile
de l’outil électroportatif avant tout réglage,
changement d’accessoires ou avant de ranger l’outil
électroportatif. De telles mesures de sécurité
préventive réduisent le risque de démarrage intempestif
de l’outil électroportatif.
Rangez les outils électroportatifs dont vous ne vous
servez pas hors de portée des enfants et ne permettez
pas à des personnes qui ne connaissent pas l’outil
électroportatif ou qui ignorent ces consignes de s’en
servir. Les outils électroportatifs sont dangereux dans
les mains d’utilisateurs inexpérimentés.
Consignes de sécurité pour les outils oscillants
Tenez l’outil électroportatif par ses surfaces de
préhension isolées lorsque vous effectuez une
opération à l’occasion de laquelle l'outil de coupe
risque d’entrer en contact avec un fil caché ou avec
son propre cordon d’alimentation. Tout contact de
l'outil de coupe avec un fil sous tension risque de
mettre aussi sous tension les parties métalliques
exposées de l’outil électroportatif, ce qui pourrait
causer un choc électrique pour l’opérateur.
Utilisez des brides ou d’autres moyens pratiques de
brider ou de supporter la pièce sur une plate-forme
stable. Tenir la pièce à la main ou contre le corps est
instable et risque de résulter en une perte de contrôle.
Ne percez, fixez et ne rentrez pas dans des murs
existants ou autres endroits aveugles pouvant abriter
des fils électriques. Si cette situation est inévitable,
débranchez tous les fusibles ou les disjoncteurs
alimentant ce site.
Utilisez un détecteur de métaux afin d’établir s’il y a
des tuyaux d’eau ou à gaz dissimulés dans l’aire de
travail ou appelez la compagnie de service public
locale pour assistance avant de commencer
l’opération. Le fait de frapper une conduite de gaz ou
Entretenez les outils électroportatifs. Vérifiez que les
pièces mobiles sont alignées correctement et ne
coincent pas. Vérifiez qu’il n’y a pas de pièces
cassées ou d’autre circonstance qui risquent
d’affecter le fonctionnement de l’outil électroportatif.
Si l’outil est abîmé, faites-le réparer avant de
l’utiliser. De nombreux accidents sont causés par des
outils électroportatifs mal entretenus.
Maintenez les outils coupants affûtés et propres. Les
outils coupants entretenus correctement et dotés de
bords tranchants affûtés sont moins susceptibles de
coincer et sont plus faciles à maîtriser.
Utilisez l'outil électroportatif, les accessoires et les
embouts d'outil, etc. conformément à ces
instructions, en tenant compte des conditions de
travail et des travaux à réaliser. L'emploi d’outils
électroportatifs pour des tâches différentes de celles
pour lesquelles ils ont été prévus peut résulter en une
situation dangereuse.
Entretien
Faites réparer votre outil électroportatif par un agent
de service qualifié n’utilisant que des pièces de
rechange identiques. Ceci assure que la sécurité de
de couper dans celle-ci provoquera une explosion.
L’eau pénétrant dans un appareil électrique peut
entraîner une électrocution.
Tenez toujours l’outil fermement à deux mains pour
mieux le maîtriser. Conservez toujours une bonne
assise et un bon équilibre. Ceci vous permettra de
mieux maîtriser l’outil électroportatif dans des situations
inattendues.
Tenez les mains à l'écart de l'aire de coupe. Ne
tendez pas la main sous la lame de scie ou à
proximité de celle-ci. La proximité de la lame par
rapport à votre main peut vous être dissimulée.
N' utilisez pas de lames émouss ées ou
endommagées. Les lames pliées peuvent aisément
se fracturer ou causer un rebond.
Fa ites extrêm ement attention lorsque vous
manipulez des accessoires. Les accessoires sont
très tranchants.
Po rtez des gants de protection lorsq ue vous
changez des accessoires de coupe. Les accessoires
de viennent très chauds après une utilisation
prolongée.
-19-
-20-
Page 11

A
0
A
A
0
A
DM 2610030830 01-13_DM 2610030830 01-13.qxp 1/22/13 11:25 AM Page 21
Utilisez des gants épais et rembourrés, et limitez la
durée d'exposition en faisant des pauses fréquentes.
Les vibrations causées par l'outil pourraient être
nuisibles aux mains et aux bras.
Avant de racler, vérifiez l'ouvrage pour y relever
des clous. Si vous relevez des clous, enlevez-les ou
enfoncez-les bien en dessous de la surface finie
recherchée. Le contact du bord de l'accessoire avec
un clou pourrait faire sauter l'outil.
Ne poncez pas par voie humide à l'aide de cette
outil. La pénétration de liquides dans le carter du
moteur constitue un risque de secousses électriques.
Ne travaillez jamais dans un endroit qui est imbibé
de liquide, tel que solvant ou eau, ou humecté tel
qu'un papier peint nouvellement appliqué. Il existe
un danger de secousses électriques en travaillant
dans ces conditions avec un outil électrique, et le
chauffage du liquide causé par le raclage peut faire
dégager des vapeurs nocives du matériau.
Portez toujours des lunettes de protection et un
masque anti-poussières pour les applications
poussiéreuses et lors du ponçage au-dessus de la
Avertissements supplémentaires concernant la sécurité
L’emploi d’un GFCI et de dispositifs de protection
personnelle tels que gants et chaussures d’électricien en
caoutchouc améliorent votre sécurité personnelle.
N’utilisez pas un outil conçu uniquement pour le C.A.
sur une alimentation en C.C. Même si l’outil semble
fonctionner, les composants électriques d’un outil prévu
pour le C.A. tomberont probablement en panne et
risquent de créer un danger pour l’utilisateur.
Maintenez les poignées sèches et exemptes d’huile et
de graisse. On ne pas maîtriser un outil électroportatif
en toute sécurité quand on a les mains glissantes.
Créez un agenda d’entretien périodique pour votre
outil. Quand vous nettoyez un outil, faites attention
de n’en démonter aucune pièce car il est toujours
possible de mal remonter ou de pincer les fils
internes ou de remonter incorrectement les ressorts
de rappel des capots de protection. Certains agents
de nettoyage tels que l’essence, le tétrachlorure de
carbone, l’ammoniaque, etc. risquent d’abîmer les
plastiques.
Risque de blessure pour l'utilisateur. Le cordon
d'alimentation électrique ne doit être réparé que par un
Centre de service usine de Dremel ou à un centre de
service après-vente Dremel agréé.
tê te. D es particules de ponça ge peuvent être
absorbées par vos yeux et inhalées facilement et
peuvent causer des problèmes de santé.
Utilisez des précautions spéciales en ponçant le
bois d'oeuvre traité chimiquement par pression, la
peinture pouvant contenir du plomb, ou tout autre
ma tériau qui peut contenir des a gents
cancérigènes. Toutes les personnes pénétrant dans
la zone de travail doivent porter un respirateur et des
vêtements protecteurs adéquats. L'aire de travail doit
être scellée par des feuilles en plastique, et les
personnes non protégées doivent être maintenues à
l'extérieur jusqu'à ce que l'aire de travail soit dûment
nettoyée.
N'utilisez pas du papier de verre destiné à des blocs
de ponçage plus gros. Le papier de verre de
dimensions plus grandes fera saillie au-delà du bloc
de ponçage entr aînant ainsi des accrocs, un
déchirement du papier ou un rebond. Le papier
supplémentaire faisant saillie au-delà du bloc de
ponçage peut également causer des lacérations
graves.
!
AVERTISSEMENT
meulage, perçage et autres travaux du bâtiment
peuvent créer des poussières contenant des produits
chimiques qui sont des causes reconnues de cancer,
de malformation congénitale ou d’autres problèmes
reproductifs. Ces produits chimiques sont, par
exemple :
• Le plomb provenant des peintures à base de plomb,
• Les cristaux de silices provenant des briques et du
ciment et d’autres produits de maçonnerie, et
• L’arsenic et le chrome provenant des bois traités
chimiquement.
Le niveau de risque dû à cette exposition varie avec la
fréquence de ces types de travaux. Pour réduire
l’exposition à ces produits chimiques, il faut travailler
dans un lieu bien ventilé et porter un équipement de
sécurité approprié tel que certains masques à poussière
conçus spécialement pour filtrer les particules
microscopiques.
Les travaux à la machine
tel que ponçage, sciage,
Symboles
IMPORTANT : Certains des symboles suivants peuvent être utilisés sur votre outil. Veuillez les étudier et apprendre
leur signification. Une interprétation appropriée de ces symboles vous permettra d'utiliser l'outil de façon plus
efficace et plus sûre.
Symbole Nom Désignation/Explication
V Volts Tension (potentielle)
A Ampères Courant
Hz Hertz Fréquence (cycles par seconde)
W Watt Puissance
kg Kilogrammes Poids
min Minutes Temps
s Secondes Temps
Diamètre Taille des mèches de perceuse, meules, etc.
n
0
n Vitesse nominale Vitesse maximum pouvant être atteinte
.../min Tours ou mouvement alternatif par Tours, coups, vitesse en surface, orbites,
0 Position d'arrêt Vitesse zéro, couple zéro ...
1, 2, 3, ... Réglages du sélecteur Réglages de vitesse, de couple ou de position. Un
l, ll, lll, ... nombre plus élevé signifie une vitesse plus grande
Vitesse à vide Vitesse de rotation, à vide
minute etc., par minute
Sélecteur variable à l'infini avec arrêt La vitesse augmente depuis le réglage 0
Flèche Action dans la direction de la flèche
Courant alternatif Type ou caractéristique du courant
Courant continu Type ou caractéristique du courant
Courant alternatif ou continu Type ou caractéristique du courant
Construction classe II Désigne des outils construits avec double
isolation
Borne de terre Borne de mise à la terre
Symbole d'avertissement Alerte l'utilisateur aux messages
d'avertissement.
Sceau Li-ion RBRC Désigne le programme de recyclage
des piles Li-ion.
Sceau Ni-Cad RBRC Désigne le programme de recyclage
des piles Ni-Cad.
Symbole de lecture du mode Alerte l’utilisateur pour lire le mode
d’emploi d’emploi
Symbole de port de lunettes Alerte l’utilisateur pour porter des lunettes
de sécurité de sécurité
-21-
-22-
Page 12

DM 2610030830 01-13_DM 2610030830 01-13.qxp 1/22/13 11:25 AM Page 23
Symboles (suite)
IMPORTANT : Certains des symboles suivants peuvent être utilisés sur votre outil. Veuillez les étudier et apprendre
leur signification. Une interprétation appropriée de ces symboles vous permettra d'utiliser l'outil de façon plus
efficace et plus sûre.
Ce symbole signifie que cet outil est approuvé par Underwriters Laboratories.
Ce symbole indique que cet outil est reconnu par Underwriters Laboratories.
Ce symbole signifie que cet outil est approuvé par Underwriters Laboratories selon les
normes des États-Unis et du Canada.
Ce symbole signifie que cet outil est approuvé par l'Association canadienne
de normalisation.
Ce symbole signifie que cet outil est approuvé par l'Association canadienne de normalisation
selon les normes des États-Unis et du Canada.
Description fonctionnelle et spécifications
!
AVERTISSEMENT
préventive réduisent le risque d'une mise en marche accidentelle de l'outil.
Débranchez la fiche de la prise de courant avant d'effectuer quelque assemblage
ou réglage que ce soit ou de changer les accessoires. Ces mesures de sécurité
Outil électrique oscillant Multi-Max™ modèle MM45
FIG. 1
INTERRUPTEUR
MARCHE/ARRÊT
LEVIER QUICK
LOCK™
CADRAN DE
COMMANDE DE
VITESSE VARIABLE
OUVERTURES DE
VENTILATION
CORDON
D'ALIMENTATION
ÉLECTRIQUE
Ce symbole signifie que cet outil est approuvé par Intertek Testing Services selon
les normes des États-Unis et du Canada
Ce symbole signifie que cet outil se conforme aux normes mexicaines NOM.
-23-
OUVERTURES DE
VENTILATION
BRIDE DE
FIXATION
ACCESSOIRE
Numéro de modèle MM45
Régime à vide n010,000-21,000/min
Tension nominale 120 V 60Hz
PORTE-ACCESSOIRE
-24-
Page 13

DM 2610030830 01-13_DM 2610030830 01-13.qxp 1/22/13 11:25 AM Page 25
Assemblage
!
AVERTISSEMENT
d'effectuer quelque assemblage ou réglage que ce
soit ou de changer les accessoires. Ces mesures de
sécurité préventive réduisent le risque d'une mise en
marche accidentelle de l'outil.
!
AVERTISSEMENT
les opérations et pour changer les accessoires. De
telles mesures de sécurité à titre préventif réduisent le
risque de blessures causées par les bords tranchants
des accessoires. De plus, les outils d'applications
peuvent devenir très chauds après un emploi prolongé.
Risque de brûlures !
INSTALLATION ET RETRAIT DES ACCESSOIRES
AVEC LE SYSTÈME DE CHANGEMENT
L’outil Dremel Multi-Max™ MM45 comprend un
mécanisme de changement d’accessoires intégré.
L’interface pour les accessoires Quick Lock™ vous
permet d’installer et de retirer des accessoires sans
avoir besoin de vous servir d’une clé hexagonale ou
d’une clé à ouverture fixe. Et vous n’aurez plus besoin
de craindre de perdre une vis de serrage ou une
rondelle étant donné que ces pièces ne sont plus
utilisées dans la version MM45 de l’outil Multi-Max™.
1. Po ur ins taller un access oire en utilis ant la
2. Faites tourner le levier Quick Lock™ en haut de
3. Nettoyez le porte-accessoire, l'accessoire et la bride
4. Placez l'accessoire sur le porte-accessoire ; assurez-
D’ACCESSOIRES QUICK LOCK™
fonctionnalité de Quick Lock™, tenez l’outil sens
dessus dessous pour empêcher la lame de tomber
du porte-accessoire lorsque vous installez et retirez
des accessoires.
l’outil dans le sens contraire des aiguilles d’une
montre de façon à déverrouiller le mécanisme de
fixation (Fig. 2). Il faut que le levier soit totalement
engagé pour déverrouiller le mécanisme de fixation.
de fixation avec un tissu propre.
vous que l'accessoire s'engage dans toutes les
Débranchez la fiche de la
pr ise de courant avant
Portez toujours des gants
de protection pour toutes
FIG. 2
OUVRIR
FERMER
FIG. 3a
FIG. 3b
broches du porte-accessoire et qu'il est ajusté au ras
du porte-accessoire (Fig. 3a et Fig. 3b).
!
Quick Lock lorsque vous assujettissez l’accessoire.
Évitez de mettre les mains ou les doigts entre le
levier et le corps de l’outil.
5. Faites tourner le levier Quick Lock™ en haut de l’outil
dans le sens des aiguilles d’une montre, jusqu’à la
position fermée, afin de verrouiller solidement
l’accessoire en place (Fig. 2).
6. Pour enlever un accessoire, déverrouillez
simplement le mécanisme de fixation en faisant
tourner le levier Quick Lock™ dans le sens contraire
des aiguilles d’une montre, comme cela est décrit
plus haut (Fig. 2).
7. Soulevez le support de l’accessoire afin de le retirer
des goujons. (Remarque : faites très attention car il
se peut que la lame soit très chaude.)
REMARQUE : Certains accessoires, tels que des
racloirs et des lames, peuvent être montés soit droits
sur l’outil, soit à un certain angle afin de les rendre
plus faciles à utiliser (Fig. 4). Afin de pouvoir faire
ceci avec l’interface Quick Lock™, placez l'accessoire
sur le porte-accessoire ; assurez-vous que
l'accessoire s'engage dans toutes les broches du
porte-accessoire et qu'il est ajusté au ras du porteaccessoire. Verrouillez solidement l’accessoire en
place comme cela a été décrit précédemment (Fig. 2).
BRIDE DE
FIXATION
AVERTISSEMENT
PORTE-
ACCESSOIRE
Pour éviter de vous pincer,
tenez fermement le levier
-25-
INSTALLATION ET RETRAIT DES FEUILLES
DE PAPIER ABRASIF
Votre plaque de support utilise des accessoires à fixation
par bandes velcro qui s'attachent solidement à la plaque
de support quand une pression modérée et appliquée.
1. Alignez la feuille de papier abrasif et appuyez-la à la
main sur la plaque à poncer.
2. Appuyez fermement sur l'outil électrique avec la
feuille de papier abrasif contre une surface plate et
mettez l'outil en marche pendant quelques
secondes. Ceci assurera une adhésion adéquate et
contribuera à éviter une usure prématurée.
3. Pour remplacer la feuille de papier abrasif, pelez
simplement l'ancienne feuille, enlevez la poussière
de la plaque de support si besoin est, et appuyez
sur la nouvelle feuille de papier abrasif pour la
mettre en place.
Après une période de service considérable, la surface de la
plaque de support commencera à s'user. La plaque de
support devra être remplacée quand elle ne permettra plus
d'accrocher adéquatement les feuilles de papier abrasif. Si
Introduction
Nous vous remercions pour votre achat de l'outil
Multi-Max™ de Dremel.
Cet outil a été conçu pour les projets de réparation, de
remaniement et de restauration dans un cadre
résidentiel. L'outil Multi-Max™ de Dremel permet de
réaliser des tâches qui sont laborieuses, qui prennent
beaucoup de temps ou qui sont même pratiquement
impossibles à réaliser avec n'importe quel autre outil.
Le bâti ergonomique est conçu pour vous permettre
de tenir et de contrôler l'outil de façon confortable
pendant son utilisation.
Cet outil est fourni avec un assortiment d'accessoires
qui sont conçus spécifiquement pour les travaux de
remaniement pour lesquels vous avez besoin de
précision et de contrôle.
Votre outil Multi-Max™ de Dremel a un moteur
électrique robuste, est confortable dans la main et a
été conçu de façon à pouvoir accepter un grand
nombre d'accessoires différents, dont des lames pour
Instructions d'utilisation
APPRENEZ À VOUS SERVIR DE CET OUTIL
Vous tirerez le maximum de votre outil oscillant si vous
apprenez comment utiliser la vitesse et contrôler
manuellement l'outil de façon appropriée.
La première chose à apprendre pour utiliser cet outil est
de maîtriser son contrôle avec la main. Tenez-le dans la
vous constatez une usure prématurée de la surface de la
plaque de support, réduisez la force de pression que vous
utilisez pendant le fonctionnement de l'outil.
Pour utiliser le papier abrasif au maximum, faites
tourner la plaque de 120 degrés lorsque les pointes des
grains abrasifs sont usées.
FIG. 4
co upes à ras, des la mes à racler, des meules
d'enlèvement de coulis et des feuilles de papier
abrasif.
Les accessoires sont fournis avec des formes variées
qui vous permettent d'effectuer diverses opérations.
Au fur et à mesure que vous vous familiariserez avec
les divers accessoires et la façon de les employer,
vous apprendrez à apprécier la versatilité de votre
outil Multi-Max™ de Dremel.
Vi sitez www.dr emel.com pour en ap prendre
davantage sur tout ce que vous pouvez faire avec
votre outil Multi-Max™ de Dremel.
UTILISATIONS PRÉVUES
Cet outil Multi-Max™ de Dremel est conçu pour le
ponçage à sec de surfaces, coins et bords, pour
racler, pour scier des métaux doux, du bois et des
composants en plastique, et pour enlever le coulis en
ut ilisant les outils et accessoires applicabl es
recommandés par Dremel.
main et habituez-vous à l'équilibrer en tenant compte de
son centre de gravité (Fig. 5). Selon l'application, vous
devrez ajuster la position de votre main afin d'assurer le
maximum de confort et de contrôle. La zone de
préhension confortable unique sur le corps de l'outil
offre un confort et un contrôle additionnels pendant
l'emploi.
-26-
Page 14

DM 2610030830 01-13_DM 2610030830 01-13.qxp 1/22/13 11:25 AM Page 27
FIG. 5
Lorsque vous tenez l'outil dans la main, faites attention
de ne pas bloquer les évents de ventilation. Si les évents
sont bloqués par votre main, le moteur de l'outil
risquerait de surchauffer.
IMPORTANT ! Pratiquez d'abord sur des résidus de
matériaux pour déterminer la performance de l'outil à
vitesse élevée. N'oubliez pas que votre outil produira les
meilleurs résultats possibles si vous laissez la vitesse et
l'accessoire approprié faire le travail pour vous. Faites
attention de ne pas appliquer une pression excessive.
Au lieu de cela, abaissez délicatement l'accessoire
oscillant sur la surface de travail et permettez-lui
d'entrer en contact avec le point précis où vous voulez
commencer le travail. Concentrez-vous sur le guidage
de l'outil sur la surface de travail en appliquant
seulement une faible pression avec votre main. Laissez
l'accessoire faire le travail pour vous.
Il est généralement préférable de faire une série de
passes avec l'outil plutôt que de faire tout le travail en
une seule passe. Par exemple, pour faire une coupe,
faites repasser l'outil sur l'ouvrage un certain nombre
de fois. Coupez un peu de matériau lors de chaque
passe jusqu'à ce que vous ayez atteint la profondeur
désirée.
INTERRUPTEUR « MARCHE/ARRÊT » COULISSANT
L'outil est mis en marche en faisant glisser
l'interrupteur coulissant, qui est situé sur le dessus du
bâti du moteur, en position de marche.
POUR METTRE L'OUTIL EN MARCHE, faites glisser le
bouton de l'interrupteur vers l'avant.
POUR ÉTEINDRE L'OUTIL, faites glisser le bouton de
l'interrupteur vers l'arrière.
CADRAN DE COMMANDE DE VITESSE VARIABLE
Cet outil est pourvu d'une cadran de commande de
vitesse variable (Fig. 6). La vitesse peut être contrôlée
pendant le fonctionnement en réglant le cadran sur l'une
quelconque des dix positions.
VITESSES DE FONCTIONNEMENT
L'outil Multi-Max™ de Dremel consiste en un moteur
c. a. universel et un mécanis me oscillant qu i
permettent de réaliser des applications telles que la
coupe, l'enlèvement de coulis, le raclage, le ponçage
et bien d'autres opérations.
CADRAN DE
COMMANDE DE
VITESSE
VARIABLE
L'outil Multi-Max™ de Dremel a une plage étendue de
vitesses de fonctionnement oscillant comprise entre
10 000 et 21 000 /min (OPM). Le fonctionnement à
grande vitesse permet à l'outil Multi-Max™ de Dremel
d'obtenir d'excellents résultats. Le mouvement
oscillant permet à la poussière de tomber sur la
surface plutôt que de projeter des particules dans l'air.
Pour obtenir les meilleurs résultats possibles lorsque
vous travaillez avec des matériaux variés, réglez la
commande de vitesse variable sur la vitesse la plus
appropriée en fonction de l'opération désirée (voir le
Tableau des vitesses à la page 29 et 30 pour vous y
aider). Pratiquez d'abord sur un résidu de matériau
pour déterminer la vitesse appropriée en fonction de
l'accessoire que vous comptez utiliser.
RE MARQUE : la vitesse est affecté e par l es
changements de tension. Une tension d'entrée réduite
ralentira la vitesse de fonctionnement de l'outil, en
particulier si vous travaillez alors à la vitesse nominale
la plus basse. Si votre outil semble fonctionner trop
lentement, augmentez la vitesse selon les besoins.
L'outil ne démarrera peut-être pas à la vitesse
nominale la plus basse dans les endroits où la tension
secteur est inférieure à 120 volts. Mettez simplement
le réglage de la vitesse dans une position plus élevée
pour commencer l'opération.
Les paramètres de réglage de la commande de vitesse
variable sont marqués sur le cadran de commande de
vitesse variable. Voici les réglages correspondant
approximativement aux diverses plages /min (OPM):
Réglage du sélecteur Plage de vitesse de
fonctionnement
/min (OPM)
2 10 000-11 000
4 11 000-13 000
6 13 000-16 000
8 16 000-19 000
10 19 000-21 000
Vous pouvez consulter les tableaux des pages suivantes
pour déterminer la vitesse appropriée en fonction du
matériau et de l'accessoire utilisés. Ces tableaux vous
permettent de sélectionner à la fois l'accessoire correct
et la vitesse optimale d'un seul coup d'œil.
-27-
FIG. 6
Veuillez vous référer aux figures 7 et 8 pour plus d’instructions sur la façon de vous servir de votre outil Multi-Max™
de Dremel. Le respect de ces instructions vous permettra d’obtenir les meilleurs résultats possibles de votre outil oscillant.
FIG. 8FIG. 7
CORRECT : poncez avec un mouvement de
va et vient régulier en laissant le poids de
l'outil faire le travail.
INCORRECT : évitez de poncer seulement
avec la pointe de la plaque de support.
Maintenez autant de papier abrasif en contact
avec la surface de l'ouvrage que possible.
CORRECT : poncez toujours avec la plaque
de support et le papier abrasif à plat contre
la surface de travail. Travaillez de façon
régulière, avec un mouvement de va et vient.
INCORRECT : évitez d'incliner la plaque de
support à un angle par rapport à la surface
de travail. Travaillez toujours à plat.
CORRECT : coupez toujours avec un
mouvement de va et vient régulier. Ne
forcez jamais la lame. Appliquez une
pression légère pour guider l'outil.
INCORRECT : ne tordez pas l'outil pendant
la coupe. Ceci pourrait causer le coinçage
de la lame.
CORRECT : assurez-vous que la lame d'un
outil à racler flexible fléchit suffisamment.
INCORRECT : ne laissez pas la tête de la
vis entrer en contact avec la surface quand
vous travaillez avec une lame d'outil à
racler flexible.
-28-
Page 15

Description
Lame bimétallique pour la coupe
de bois/métal de 1-5/8 po x
3/4 po
Lame bimétallique pour la coupe
bois/métal de 1-1/4 po x
1-11/16 po
Lame de scie plate de 3 po
Lame pour l'enlèvement de
coulis de 1/8 po
Lame pour l'enlèvement de
coulis de 1/16 po
Lame de raclage rigide
Lame de raclage flexible
Papier diamanté 60 grains
Racloir au carbure 24 grains
Bois de
conifères
8 - 10
8 - 10
8 - 10
-
-
-
-
6 - 10
Bois de
feuillus
6 - 10
6 - 10
6 - 10
-
-
-
-
6 - 10
Bois
peint
-
-
-
-
2 - 4
2 - 4
-
6 - 10
Matériaux
stratifiés/plastiques
2 - 6
2 - 6
2 - 6
-
-
-
-
-
-
Acier
8 - 10*
8 - 10*
-
-
-
-
-
-
-
Aluminium/
cuivre
8 - 10
8 - 10
-
-
-
-
-
-
-
Vinyle/
moquette
-
-
-
-
2 - 8
-
-
-
Calfeutrage/
adhésifs
-
-
-
-
2 - 6
2 - 6
-
-
Pierre/
ciment
-
-
-
-
-
-
6 - 10
6 - 10
Coulis
-
-
6 - 10
6 - 10
-
6 - 10
6 - 10
Numéros de
catalogue
MM472
MM482
MM450
MM500
MM501
MM600
MM610
MM900
MM920
WOOD
a
a
a
*Acier doux seulement
Description
Papier abrasif 60, 120 et 240
grains – Bois nu
Papier abrasif 60, 120 et 240
grains – Bois peint
Lame en acier à haute teneur en
carbone pour la coupe à ras de
bois de 1-1/4 po x 3/8 po
Lame en acier à haute teneur en
carbone pour la coupe à ras de
bois de 1-1/4 po x 3/4 po
Lame en acier à haute teneur en
carbone pour la coupe à ras de
bois de 1-1/4 po x 1-1/8 po
Lame en acier à haute teneur en
carbone pour la coupe à ras de
bois de 1-5/8 po x 3/4 po
Lame en acier à haute teneur en
carbone pour la coupe à ras de
bois de 1-1/4 po x 1-11/16 po
Lame bimétallique pour la coupe
à ras de bois/métal de 1-1/4 po
x 3/4 po
Lame bimétallique pour la coupe
de bois/métal de 1-1/4 po x
1-1/8 po
Bois de
conifères
2 - 10
2 - 10
8 - 10
8 - 10
8 - 10
8 - 10
8 - 10
8 - 10
8 - 10
Bois de
feuillus
2 - 10
2 - 10
6 - 10
6 - 10
6 - 10
6 - 10
6 - 10
6 - 10
6 - 10
Bois
peint
2 - 10
-
-
-
-
-
-
-
Matériaux
stratifiés/plastiques
2 - 6
2 - 6
2 - 6
2 - 6
2 - 6
2 - 6
2 - 6
2 - 6
2 - 6
Acier
8 - 10
8 - 10
-
-
-
-
8 - 10*
8 - 10*
Aluminium/
cuivre
8 - 10
8 - 10
-
-
-
-
8 - 10
8 - 10
Vinyle/
moquette
-
-
-
-
-
-
-
-
-
Calfeutrage/
adhésifs
-
-
-
-
-
-
-
-
-
-
Pierre/
ciment
-
-
-
-
-
-
-
-
-
-
Coulis
-
-
-
-
-
-
-
-
-
Numéros de
catalogue
MM70W
MM70P
MM411
MM440
MM460
MM470
MM480
MM422
MM462
WOOD
1/4
IN
3/4
1
1/2
*Acier doux seulement
DM 2610030830 01-13_DM 2610030830 01-13.qxp 1/22/13 11:25 AM Page 29
Utilisez uniquement les accessoires de haute performance mis à l'épreuve par Dremel.
Réglages de la vitesse pour les accessoires Multi-Max™
-29-
Remarque : La lame Multi-Flex MM720 n'est pas compatible avec le modèle MM45.
Utilisez uniquement les accessoires de haute performance mis à l'épreuve par Dremel.
Remarque : La lame Multi-Flex MM720 n'est pas compatible avec le modèle MM45.
Réglages de la vitesse pour les accessoires Multi-Max™
-30-
Page 16

DM 2610030830 01-13_DM 2610030830 01-13.qxp 1/22/13 11:25 AM Page 31
Applications pour l'emploi
Votre outil Multi-Max™ de Dremel est conçu pour
poncer et couper des matériaux en bois, des plastiques,
du plâtre et des métaux non ferreux. Il est
particulièrement approprié pour le travail près des
bords, dans des endroits exigus et pour les coupes à
ras. Cet outil ne doit être utilisé qu'avec des accessoires
Dremel.
On trouvera ci-dessous quelques emplois types de votre
outil Multi-Max™ de Dremel.
!
AVERTISSEMENT
l'accessoire orienté dans le sens opposé à celui de
votre corps. Ne placez jamais une main près de la zone
de travail ou devant celle-ci. Tenez toujours l'outil des
deux mains et portez des gants de protection.
Coupe à ras
Retirez le bois excédentaire des embrasures de portes,
des appuis de fenêtre et/ou des coups de pied. Retirez
les longueurs excédentaires de tuyaux en cuivre ou en
CPV.
Travaux d'enlèvement
p. ex., moquettes et supports, adhésifs de carreaux
anciens, matériau de calfeutrage sur la maçonnerie, bois
et autres surfaces.
Enlèvement de matériaux excédentaires
p. ex., plâtre, éclaboussure de mortier, béton sur
carreaux, appuis.
Préparation de surfaces
p. ex., pour les nouveaux planchers et carreaux.
Ponçage de finition
p. ex., pour poncer dans des endroits extrêmement
serrés qui seraient normalement difficiles à atteindre et
nécessitent un ponçage de finition à la main.
Les lames de scie sont idéales pour effectuer des
coupes précises dans les endroits exigus, près des
bords ou au ras d'une surface.
Sélectionnez une vitesse de moyenne à rapide pour
effectuer la coupe en plongée initiale, commencez à
vitesse moyenne pour obtenir un contrôle accru. Après
avoir effectué votre coupe initiale, vous pouvez
augmenter la vitesse pour pouvoir couper plus
vous effectuez une coupe à ras, il est important de ne
pas forcer l'outil pendant la coupe en plongée. Si vous
constatez de fortes vibrations dans votre main pendant
la coupe en plongée, ceci indique que vous appliquez
trop de force. Retirez l'outil et laissez l'outil faire le
travail à la vitesse sélectionnée. Tout en laissant les
APPLICATION
Quel que soit l'accessoire,
travaillez toujours avec
COUPE
rapidement.
Les lames de coupe à ras sont conçues
pour réaliser des coupes précises afin
de permettre l'installation de matériaux
sur le sol ou sur les murs. Lorsque
dents de la lame engagées dans la surface de l'ouvrage,
déplacez l'arrière de l'outil avec un mouvement latéral
lent. Ce mouvement permettra d'accélérer la coupe.
Lorsque vous faites une coupe à ras, il est toujours
conseillé d'utiliser un morceau de matériau résiduel
(carreau ou bois) pour supporter la lame. Si vous avez
besoin de faire reposer la lame de coupe à ras sur une
surface délicate, il est recommandé de protéger la
surface avec un carton ou du ruban-cache.
La lame de scie plate est idéale pour
réaliser des coupes précises dans du bois,
du plâtre ou des cloisons sèches.
Les applications possibles comprennent la découpe
d'ouvertures dans les planches pour la ventilation, la
réparation de planchers endommagés et la découpe
d'ouvertures pour des boîtiers électriques. La lame
produit les meilleurs résultats en coupant du bois tendre
tel que le pin. La durée de la lame sera réduite si elle est
surtout utilisée pour couper du bois de feuillus.
Sélectionnez une vitesse comprise entre moyenne et
rapide.
La lame de scie plate peut également être utilisée pour
la restauration de fenêtres, car elle permet d'enlever
facilement le mastic. La lame de la scie peut être placée
directement contre le bord du cadre de la fenêtre, en
guidant la lame à travers le mastic.
ENLÈVEMENT DU COULIS
Les lames d'enlèvement du coulis sont
idéales pour enlever le coulis
endommagé ou fissuré. Les lames à
coulis existent en deux largeurs (1/16 po et 1/8 po) pour
tenir compte des différentes largeurs de traits de coulis.
Avant de choisir une lame à coulis, mesurez la largeur
du trait de coulis pour pouvoir choisir la lame
appropriée.
Sélectionnez une vitesse comprise entre moyenne et
rapide.
Pour enlever le coulis, utilisez un mouvement de va et
vient en faisant plusieurs passes le long du trait de
coulis. La dureté du coulis dictera le nombre de passes
nécessaires. Essayez de maintenir la lame à coulis
alignée avec le trait de coulis et faites attention de ne
pas appliquer trop de pression latérale sur la lame à
coulis pendant l'opération. Pour contrôler la profondeur
de plongée, utilisez le trait de grains de carbure sur la
lame comme indicateur. Faites attention de ne pas
plonger au-delà du trait de grains de carbure pour éviter
d'endommager le matériau du support.
Les lames à coulis peuvent être utilisées pour couper du
coulis poncé ou non poncé. Si vous remarquez des
accumulations de matériau sur la lame pendant
l'opération d'enlèvement de coulis, vous pouvez utiliser
une brosse à poils de laiton pour nettoyer les grains afin
qu'ils soient à nouveau exposés.
La géométrie de la lame à coulis est conçue de façon
que la lame puisse enlever tout le coulis jusqu'à la
surface d'un mur ou d'un coin. Ceci peut être accompli
en s'assurant que la partie segmentée de la lame est
bien face au mur ou au coin.
RACLAGE
Les outils à racler sont appropriés pour enlever les
couches existantes de vernis ou d'adhésifs, enlever les
moquettes collées, par ex., sur les marches/dans les
escaliers et sur d'autres surfaces de faible taille ou de
taille moyenne.
Sélectionnez une vitesse comprise entre basse et
moyenne.
Les outils à racler rigides sont
appropriés pour l'enlèvement de
matériau sur de grandes surfaces, et
pour couper les matériaux durs comme
les sols en vinyle, la moquette et les adhésifs de carreaux.
Lorsque vous voulez enlever des adhésifs puissants et
gluants, graissez la surface de la lame de l'outil à
racler avec de la vaseline ou de la graisse de silicone
afin de réduire l'adhérence.
Il est plus facile de retirer de la moquette ou du vinyle
du sol si on y a pratiqué des incisions auparavant afin
de permettre à la lame de l'outil à racler de se
déplacer au-dessous de la moquette ou du vinyle.
Les outils à racler flexibles sont utilisés
dans les endroits difficiles d'accès et pour
couper les matériaux doux tels que du
calfeutrage.
Montez la lame de l'outil à racler avec le côté comportant
le logo orienté vers le haut. Avec un outil à racler flexible,
assurez-vous que la tête de la vis n'entre pas en contact
avec la surface pendant le processus de raclage (un angle
de 30 à 45 degrés est recommandé). Ceci peut être
accompli en s'assurant que l'outil est incliné par rapport à
la lame. Vous devriez pouvoir voir la lame fléchir pendant
l'opération de raclage.
Si vous voulez retirer du calfeutrage d'une surface
délicate comme une baignoire ou un dosseret en
carrelage, nous recommandons de protéger la surface
sur laquelle la lame reposera, par exemple avec un rubancache. Utilisez de l'alcool dénaturé pour nettoyer la
surface après avoir enlevé le calfeutrage et/ou l'adhésif.
Mettez l'outil en marche et placez l'accessoire désiré à
l'endroit où vous voulez retirer du matériau.
Commencez avec une pression légère. Le mouvement
oscillant de l'accessoire ne se produira que quand de la
pression sera appliquée sur le matériau que vous voulez
retirer.
Une pression excessive risquerait de rayer ou
d'endommager les surfaces sous-jacentes (p. ex., bois,
plâtre).
PONÇAGE
Les accessoires de ponçage sont
appropriés pour le ponçage à sec de
bois, de métal, de surfaces, de coins et
de bords, ainsi que pour le travail dans des endroits
d'accès difficile.
Travaillez avec touts la surface du tampon de ponçage –
pas seulement avec la pointe.
Les coins peuvent être finis en utilisant la pointe ou le
bord de l'accessoire sélectionné. Il est recommandé
d'effectuer une rotation occasionnelle de l'accessoire
pendant l'emploi afin de distribuer l'usure sur
l'accessoire et sur la surface de la plaque de support.
Poncez avec un mouvement continu et une pression
légère. N'appliquez PAS une pression excessive - laissez
l'outil faire le travail. Une pression excessive rendra la
manipulation plus difficile, produira des vibrations et
des marques de ponçage indésirables et causera l'usure
prématurée de la feuille abrasive.
Assurez-vous toujours que les ouvrages de petites
dimensions sont solidement attachés à un établi ou un
autre support. Les grands panneaux peuvent être tenus
en place à la main sur un établi ou un chevalet de
sciage.
Des feuilles de papier abrasif à l'oxyde d'aluminium à
structure ouverte sont recommandées pour la plupart
des applications sur du bois ou du métal, étant donné
que ce matériau synthétique coupe rapidement et a de
bonnes propriétés d'usure. Certaines applications, telles
que la finition ou le nettoyage du métal, nécessitent des
tampons abrasifs spéciaux que vous pourrez vous
procurer chez votre fournisseur. Pour obtenir les
meilleurs résultats, utilisez des accessoires de ponçage
de Dremel de qualité supérieure qui sont
soigneusement sélectionnés pour produire des résultats
de qualité professionnelle avec votre outil oscillant.
Les suggestions suivantes peuvent être utilisées comme
guide général pour la sélection de matériaux abrasifs,
mais les meilleurs résultats seront obtenus en
effectuant un ponçage de test sur une partie peu visible
de l'ouvrage en premier.
Grains abrasifs Application
Grossiers Pour le ponçage grossier de bois
ou de métal, et pour l'enlèvement
de rouille ou d'un matériau de
finition ancien.
Moyens Pour les opérations générales de
ponçage de bois ou de métal.
Fins Pour la finition finale de bois,
de métal, de plâtre et
d'autres surfaces.
Après avoir fermement assujetti l'ouvrage, mettez l'outil
en marche comme indiqué plus haut. Mettez l'ouvrage
en contact avec l'outil après que l'outil aura atteint sa
vitesse de croisière, et éloignez l'outil de l'ouvrage avant
de l'éteindre. Si vous utilisez votre outil de cette
manière, vous prolongerez la durée de vie de
l'interrupteur et du moteur, et vous améliorerez
considérablement la qualité de votre travail.
Déplacez l'outil oscillant avec de longs mouvements
réguliers parallèles au grain en utilisant un mouvement
-31-
-32-
Page 17

DM 2610030830 01-13_DM 2610030830 01-13.qxp 1/22/13 11:25 AM Page 33
latéral de façon à ce que chaque course chevauche la
trajectoire de la course précédente d'environ 75 %.
N'appliquez PAS une pression excessive. Laissez l'outil
faire le travail. Une pression excessive rendra la
manipulation difficile, produira des vibrations et causera
des marques de ponçage indésirables.
MEULAGE
L'accessoire en papier diamanté permet à
l'outil Multi-Max™ d'être utilisé pour meuler
du ciment, du plâtre ou de Thinset afin de
les retirer de la surface sous-jacente. La préparation de
surfaces pour remplacer des carreaux est une
application courante de cet accessoire.
Du papier diamanté doit être monté sur la plaque de
support avant le début de l'opération.
Sélectionnez une vitesse aussi basse ou aussi élevée
que nécessaire en fonction de la vitesse d'enlèvement
du matériau désirée.
L’accessoire pour raclage au carbure
permet également à l’outil Multi-Max™ de
plâtre et aussi du bois. Cet accessoire est couramment
utilisé dans le cadre d’opérations de préparation pour
remplacer des carreaux ou racler du bois afin de
produire une surface lisse ou de retirer du matériau.
L’outil doit être réglé sur une vitesse rapide pour retirer
agressivement du matériau ou sur une vitesse lente
pour retirer du matériau de façon plus délicate.
Ne faites pas excessivement pression sur l’outil laissez-le faire le travail.
Les coins peuvent être finis en utilisant la pointe ou le
bord de l'accessoire sélectionné. Il est recommandé
d'effectuer la rotation occasionnelle de l'accessoire
pendant l'emploi afin de distribuer l'usure sur
l'accessoire et sur la surface de la plaque de support.
Meulez avec un mouvement continu et une pression
légère. N'appliquez PAS une pression excessive –
laissez l'outil faire le travail. Une pression excessive
rendra la manipulation difficile, produira des vibrations
et causera l'usure prématurée de la feuille de papier
diamanté.
meuler du ciment, du mortier Thinset, du
Sélection des feuilles de ponçage/meulage
Matériau Application Type de grains
Tous les matériaux en bois (p. ex., bois
de feuillus, bois de conifères, panneaux
de particules, panneaux de construction)
Matériaux en métal, fibre de
verre et plastiques
Pour un ponçage grossier, p. ex., pour
e ponçage grossier de poutres et
panneaux non rabotés
Pour le ponçage de surfaces finies et
raboter de petites irrégularités
Pour la finition et le ponçage fin de
Papier abrasif (sombre)
Peinture, vernis, matériaux de
bois
Pour poncer un matériau peint
remplissage et mastic
Pour poncer un apprêt (p. ex., pour
retirer des traces de pinceau, des
gouttelettes de peinture et des traînées
de peinture)
Papier abrasif (blanc)
Pour le ponçage de finition d'apprêts
avant d'appliquer une couche de
peinture
abrasifs
Grossiers
Moyens
Fins
Grossiers
Moyens
Fins
60
120
240
80
120
240
Renseignements sur l’entretien
Service
!
AVERTISSEMENT
PIÈCE SUSCEPTIBLE D’ÊTRE ENTRE TENUE PAR
L’UTILISATEUR. L’entretien préventif effectué par
des employés non auto risés peut entraîner un
position nement erroné des composants et des fils
internes, et ainsi causer des dangers sévères. Il est
recom man dé que l’entretien et la réparation de nos
outils soient confiés à un centre de service-usine
Dremel ou à un centre de service après-vente Dremel
agréé.
BALAIS AU CARBONE
Les balais et le commutateur dans votre outil ont été
conçus de façon à permettre de nombreuses heures de
fonctionnement sans problèmes. Pour assurer
l'efficacité maximum du moteur, nous recommandons
de faire inspecter les balais tous les 50 – 60 heures par
un centre de service après-vente agréé de Dremel.
IL N’EXISTE À
L’ INTÉRIEUR AUCUNE
Cordons de rallonge
Rallonges
!
AVERTISSEMENT
devez utiliser un cordon avec conducteurs de
dimension adéquate pouvant porter le courant
nécessaire à votre outil. Ceci préviendra une chute
excessive de tension, une perte de courant ou une
surchauffe. Les outils mis à la terre doivent utiliser des
cordons de rallonge trifilaires pourvus de fiches à trois
broches ainsi que des prises à trois broches.
REMARQUE : Plus le calibre est petit, plus le fil est gros.
Si un cordon de rallonge
s'avère nécessaire, vous
Nettoyage
!
AVERTISSEMENT
et/ou le chargeur de la source de courant avant de
nettoyer. La façon la plus efficace de nettoyer l’outil est
à l’aide d’air sec comprimé. Portez toujours des
lunettes de sécurité en nettoyant les outils à l’air
comprimé.
Les prises d’air et les leviers de commutation doivent
être gardés propres et exempts de corps étrangers. Ne
tentez pas de nettoyer en insérant des objets pointus à
travers l’ouverture.
!
MISE EN GARDE
dissolvants abîment les pièces en plastique. Parmi
ceux-ci se trouvent: l’essence, le tétrachlorure de
carbone, les dissolvants de nettoyage chlorés,
l’ammoniaque ainsi que les détergents domestiques
qui en contiennent.
DIMENSIONS DE RALLONGES RECOMMANDÉES
OUTILS 120 VOLTS COURANT ALTERNATIF
Intensité
nominale
de l’outil
3-6
6-8
8-10
10-12
12-16
Calibre A.W.G.
Longueur en pieds
25 50 100 150 15 30 60 120
18 16 16 14 0,75 0,75 1,5 2,5
18 16 14 12 0,75 1,0 2,5 4,0
18 16 14 12 0,75 1,0 2,5 4,0
16 16 14 12 1,0 2,5 4,0 —
14 12 —— ————
Pour éviter les accidents,
débranchez toujours l’outil
Certains agents de
nettoyages et certains
Calibre en mm
Longueur en mètres
2
Maçonnerie, pierre, ciment
et Thinset
Papier diamanté
Pour lisser, former et travailler les
bords
-33-
Grossiers
60
-34-
Page 18

DM 2610030830 01-13_DM 2610030830 01-13.qxp 1/22/13 11:25 AM Page 35
Garantie limitée de Dremel
Votre produit Dremel est garanti contre les vices de matériau ou de façon pendant un délai de deux ans à compter de
la date d’achat. Dans l’hypothèse où le produit ne se conformerait pas à cette garantie écrite, veuillez procéder de la
façon suivante :
1. NE RAPPORTEZ PAS votre produit à l’endroit où vous l’avez acheté.
2. Emballez avec soin le produit seul, sans aucun autre article, et renvoyez-le, en port payé, accompagné :
A. d’une copie de votre justificatif d’achat daté (veuillez en garder une copie pour vous-même)
B. d’une déclaration écrite concernant la nature du problème
C. d’une indication de vos nom, adresse et numéro de téléphone, à l’adresse suivante :
ÉTATS-UNIS CANADA
Dremel Service Center Giles Tool Agency
4915 21st Street OU Scarborough, Ont.
Racine, WI 53406 Canada M1K 3K9 1-416-287-3000
À L’EXTÉRIEUR DU TERRITOIRE CONTINENTAL DES ÉTATS-UNIS
Consultez votre distributeur local ou écrivez à Dremel : 4915 21st Street Racine, WI 53406
Nous vous recommandons d’assurer le paquet contre la perte ou les dommages en cours de route dont nous ne
pouvons assumer la responsabilité.
Cette garantie n’est offerte qu’à l’acheteur enregistré d’origine. LES DOMMAGES AU PRODUIT RÉSULTANT DE
MANIPULATIONS ABUSIVES, D'ACCIDENTS, D'USAGES ABUSIFS, DE NÉGLIGENCE, DE RÉPARATIONS OU
D'ALTÉRATIONS NON AUTORISÉES, D'UTILISATION D’ACCESSOIRES NON APPROUVÉS OU D'AUTRES
CAUSES NON LIÉES AU MATÉRIAU OU À LA FAÇON NE SONT PAS COUVERTS PAR CETTE GARANTIE.
Aucun employé, mandataire, vendeur ou autre n’est autorisé à accorder des garanties au nom de Dremel. Si
l’inspection effectuée par Dremel révèle que le problème a été causé par un problème de matériau ou de façon
dans les limites de la garantie, Dremel réparera ou remplacera le produit gratuitement et renverra le produit en
port payé. Si elles peuvent être effectuées, les réparations rendues nécessaires par l’usure normale ou un usage
abusif, ou les réparations du produit une fois la période de garantie expirée, seront facturées aux tarifs réguliers
de l’usine.
DREMEL N’ACCORDE AUCUNE AUTRE GARANTIE DE QUELQUE NATURE QUE CE SOIT, EXPLICITE OU IMPLICITE,
ET TOUTES LES GARANTIES IMPLICITES DE COMMERCIALISATION ET D’APTITUDE À UN USAGE PARTICULIER
EN PLUS DE L’OBLIGATION SUSVISÉE SONT REJETÉES PAR LES PRÉSENTES PAR DREMEL ET EXCLUES DE
CETTE GARANTIE LIMITÉE.
Cette garantie vous accorde certains droits précis, et vous pouvez également avoir d’autres droits qui varient d’un
endroit à un autre. L’obligation du garant se limite à réparer ou remplacer le produit. Le garant n’est responsable
d’aucun dommage accessoire ou indirect attribuable à de telles défaillances alléguées. Certaines juridictions ne
permettent pas l’exclusion ou la limitation des dommages accessoires ou indirects ; il se peut donc que les
limitations ou l’exclusion qui précède ne s’appliquent pas à vous.
En ce qui concerne les prix et la façon de vous prévaloir de la garantie sur le territoire continental des États-Unis,
mettez-vous en contact avec votre distributeur Dremel local.
Exportado por: © Robert Bosch Tool Corporation Mt. Prospect, IL 60056 -2230, E.U.A.
Importado a México por: Robert Bosch, S. de R.L. de C.V.
Calle Robert Bosch No. 405 - 50071 Toluca, Edo. de Méx. - México
Tel. 052 (722) 279 2300 ext 1160 / Fax. 052 (722) 216-6656
®
Advertencias generales de seguridad para herramientas mecánicas
!
ADVERTENCIA
La expresión “herramienta mecánica” en las advertencias se refiere a su herramienta mecánica alimentada por la red
eléctrica (herramienta alámbrica) o su herramienta mecánica alimentada por baterías (herramienta inalámbrica).
Seguridad del área de trabajo
Mantenga el área de trabajo limpia y bien iluminada.
Las áreas desordenadas u oscuras invitan a que se
produzcan accidentes.
No utilice herramientas mecánicas en atmósferas
explosivas, como por ejemplo en presencia de
líquidos, gases o polvos inflamables. Las
herramientas mecánicas generan chispas que pueden
incendiar el polvo o los vapores.
Mantenga alejados a los niños y a las personas que
estén presentes mientras esté utilizando una
herramienta mecánica. Las distracciones pueden
hacerle perder el control de la herramienta.
Los enchufes de las herramientas mecánicas deben
coincidir con el tomacorriente. No modifique nunca el
enchufe de ningún modo. No use enchufes
adaptadores con herramientas mecánicas conectadas
a tierra (puestas a tierra). Los enchufes no
modificados y los tomacorrientes coincidentes
reducirán el riesgo de sacudidas eléctricas.
Evite el contacto del cuerpo con las superficies
conectadas o puestas a tierra, tales como tuberías,
radiadores, estufas y refrigeradores. Hay un aumento
del riesgo de sacudidas eléctricas si el cuerpo del
operador se conecta o pone a tierra.
No exponga las herramientas mecánicas a la lluvia o
a condiciones mojadas. La entrada de agua en una
herramienta mecánica aumentará el riesgo de que se
produzcan sacudidas eléctricas.
No maltrate el cordón de energía. No use nunca el
cordón para transportar la herramienta mecánica,
tirar de ella o desenchufarla. Mantenga el cordón
alejado del calor, el aceite, los bordes afilados o las
piezas móviles. Los cordones dañados o enganchados
aumentan el riesgo de que se produzcan sacudidas
eléctricas.
Cuando utilice una herramienta mecánica en el
exterior, use un cordón de extensión adecuado para
uso a la intemperie. La utilización de un cordón
adecuado para uso a la intemperie reduce el riesgo de
que se produzcan sacudidas eléctricas.
Si es inevitable utilizar una herramienta mecánica en
un lugar húmedo, utilice una fuente de energía
Lea todas las advertencias de seguridad y todas las instrucciones. Si no se siguen las
advertencias e instrucciones, el resultado podría ser sacudidas eléctricas, incendio y/o lesiones graves.
GUARDE TODAS LAS ADVERTENCIAS E INSTRUCCIONES
PARA REFERENCIA FUTURA
protegida por un interruptor de circuito accionado por
corriente de pérdida a tierra (GFCI). El uso de un GFCI
reduce el riesgo de sacudidas eléctricas.
Seguridad personal
Manténgase alerta, fíjese en lo que está haciendo y
use el sentido común cuando esté utilizando una
herramienta mecánica. No use una herramienta
mecánica cuando esté cansado o bajo la influencia de
drogas, alcohol o medicamentos. Un momento de
distracción mientras esté utilizando herramientas
mecánicas podría causar lesiones corporales graves.
Use equipo de protección personal. Use siempre
protección de los ojos. El equipo de protección, como
Seguridad eléctrica
por ejemplo una máscara antipolvo, calzado de
seguridad antideslizante, casco o protección de oídos,
utilizado para las condiciones apropiadas, reducirá las
lesiones corporales.
Evite el arranque accidental. Asegúrese de que el
interruptor esté en la posición de apagado antes de
conectar la herramienta a la fuente de energía y / o al
paquete de batería, levantar la herramienta o
transportarla. Transportar herramientas mecánicas
con un dedo en el interruptor o encender herramientas
mecánicas que tengan el interruptor en la posición de
encendido invita a que se produzcan accidentes.
Quite todas las llaves de ajuste o de tuerca antes de
encender la herramienta mecánica. Una llave de
tuerca o de ajuste que se deje colocada en una pieza
giratoria de la herramienta mecánica podría causar
lesiones corporales.
No intente alcanzar demasiado lejos. Mantenga un
apoyo de los pies y un equilibrio apropiados en todo
momento. Esto permite controlar mejor la herramienta
mecánica en situaciones inesperadas.
Vístase adecuadamente. No use ropa holgada ni
alhajas holgadas. Mantenga el pelo, la ropa y los
guantes alejados de las piezas móviles. La ropa
holgada, las alhajas holgadas o el pelo largo pueden
quedar atrapados en las piezas móviles.
Si se proporcionan dispositivos para la conexión de
instalaciones de extracción y recolección de polvo,
asegúrese de que dichas instalaciones estén
conectadas y se usen correctamente. El uso de
dispositivos de recolección de polvo puede reducir los
peligros relacionados con el polvo.
-35-
-36-
Page 19

DM 2610030830 01-13_DM 2610030830 01-13.qxp 1/22/13 11:25 AM Page 37
Uso y cuidado de las herramientas
mecánicas
No fuerce la herramienta mecánica. Use la
herramienta mecánica correcta para la aplicación que
desee realizar. La herramienta mecánica correcta hará
el trabajo mejor y con más seguridad a la capacidad
nominal para la que fue diseñada.
No use la herramienta mecánica si el interruptor no la
enciende y apaga. Toda herramienta mecánica que no
se pueda controlar con el interruptor es peligrosa y
debe ser reparada.
Desconecte el enchufe de la fuente de energía y/o el
paquete de batería de la herramienta mecánica antes
de hacer cualquier ajuste, cambiar accesorios o
almacenar herramientas mecánicas. Dichas medidas
preventivas de seguridad reducen el riesgo de arrancar
accidentalmente la herramienta mecánica.
Guarde las herramientas que no esté usando fuera
del alcance de los niños y no deje que personas que
no estén familiarizadas con la herramienta mecánica
o con estas instrucciones utilicen la herramienta. Las
herramientas mecánicas son peligrosas en manos de
usuarios que no hayan recibido capacitación.
Mantenga las herramientas mecánicas. Compruebe si
hay piezas móviles desalineadas o que se atoran, si
Normas de seguridad para herramientas oscilantes
Agarre la herramienta eléctrica por las superficies
de agarre con aislamiento cuando realice una
operación en la que el herramienta de corte pueda
entrar en contacto con cables ocultos o con su
propio cable de alimentación. El herramienta de
corte que entre en contacto con un cable que tenga
corriente puede hacer que las partes metálicas de la
herramienta eléctrica que estén al descubierto tengan
corriente y podrían causar una descarga eléctrica al
operador.
Use abrazaderas u otro modo práctico de sujetar y
soportar la pieza de trabajo en una plataforma
estable. Si se sujeta la pieza de trabajo con la mano o
contra el cuerpo, se crea una situación inestable que
podría causar pérdida de control.
No taladre, rompa, ni haga trabajo de sujeción en
paredes existentes ni en otras áreas ciegas donde
pueda haber cables eléctricos. Si esta situación es
inevitable, desconecte todos los fusibles o cortacircuitos
que alimentan este sitio de trabajo.
Utilice un detector de metales para determinar si hay
tuberías de gas o de agua ocultas en el área de
trabajo o llame a la compañía local de servicios
públicos para obtener asistencia antes de comenzar la
operación. Golpear o cortar una tubería de gas
producirá una explosión. La entrada de agua en un
dispositivo eléctrico puede causar electrocución.
hay piezas rotas y si existe cualquier otra situación
que podría afectar el funcionamiento de la
herramienta mecánica. Si la herramienta mecánica
está dañada, haga que la reparen antes de usarla.
Muchos accidentes son causados por herramientas
mecánicas mantenidas deficientemente.
Mantenga las herramientas de corte afiladas y
limpias. Es menos probable que las herramientas de
corte mantenidas apropiadamente, con bordes de corte
afilados, se atoren, y dichas herramientas son más
fáciles de controlar.
Utilice la herramienta mecánica, los accesorios, las
brocas de la herramienta, etc., de acuerdo con estas
instrucciones, teniendo en cuenta las condiciones de
trabajo y el trabajo que se vaya a realizar. El uso de la
herramienta mecánica para operaciones distintas a
aquéllas para las que fue diseñada podría causar una
situación peligrosa.
Servicio de ajustes y reparaciones
Haga que su herramienta mecánica reciba servicio de
un técnico de reparaciones calificado, utilizando
únicamente piezas de repuesto idénticas. Esto
asegurará que se mantenga la seguridad de la
herramienta mecánica.
Sujete siempre firmemente la herramienta con las
dos manos para tener un control máximo. Mantenga
un apoyo de los pies y un equilibrio apropiados en
todo momento. Esto permite controlar mejor la
herramienta mecánica en situaciones inesperadas.
Mantenga siempre las manos alejadas de las áreas
de corte. No ponga las manos debajo ni cerca de la
hoja de sierra. La proximidad de la hoja a las manos
puede quedar oculta a la vista.
No utilice hojas desfiladas ni dañadas. Una hoja
do blada puede romperse fáci lmente o causar
retroceso.
Te nga suma precaución cuando manej e los
accesorios. Los accesorios están muy afilados.
Us e guantes protector es cuando cambie los
accesorios de corte. Los accesorios estarán calientes
después del uso prolongado.
Use guantes acolchados gruesos y limite el tiempo
de exposición tomando períodos frecuentes de
descanso. La vibración causada por la herramienta
puede ser perjudicial para las manos y los brazos.
Antes de rascar, compruebe si hay clavos en la
pieza de trabajo. Si los hay, quítelos o sitúelos
bien por debajo de la superficie acabada que se
desea lograr. Si se golpea un clavo con el borde del
accesorio, la herramienta podría saltar.
-37-
No lije en mojado con esta herramienta. La entrada
de líquidos en la caja del motor constituye un peligro
de sacudidas eléctricas.
Nunca trabaje en un área que esté empapada con
un líquido, tal como un disolvente o agua, o que
esté humedecida, tal como un papel de pared
recién aplicado. Ex iste pel igro de sacudidas
eléctricas al trabajar en dichas condiciones con una
herramienta mecánica y el calentamiento del líquido
causado por la acción de rascado puede hacer que la
pieza de trabajo emita vapores nocivos.
Us e siempre protecc ión para los ojos y una
máscara antipolvo para aplicaciones que generen
polvo y al lijar en alto. Las partículas resultantes del
lijado pueden ser absorbidas por los ojos e inhaladas
fácilmente y pueden causar complicaciones de salud.
Advertencias de seguridad adicionales
Un GFCI y los dispositivos de protección personal,
como guantes de goma y calzado de goma de
electricista, mejorarán más su seguridad personal.
No use herramientas mecánicas con capacidad
nominal solamente para CA con una fuente de
energía de CC. Aunque pueda parecer que la
herramienta funciona correctamente, es probable que
los componentes eléctricos de la herramienta con
capacidad nominal para CA fallen y creen un peligro
para el operador.
Mantenga los mangos secos, limpios y libres de
aceite y grasa. Las manos resbalosas no pueden
controlar de modo seguro la herramienta mecánica.
Desarrolle un programa de mantenimiento periódico
de la herramienta. Cuando limpie una herramienta,
tenga cuidado de no desmontar ninguna de sus
partes, ya que los cables internos podrían reubicarse
incorrectamente o pellizcarse, o los resortes de
retorno de los protectores de seguridad podrían
montarse incorrectamente. Ciertos agentes de
limpieza, tales como gasolina, tetracloruro de carbono,
amoníaco, etc., podrían dañar las piezas de plástico.
Riesgo de lesiones para el usuario. El cordón de energía
debe recibir servicio de ajustes y reparaciones
solamente por un Centro de servicio de fábrica Dremel.
Use precauciones especiales al lijar madera tratada
químicamente a presión, pintura que pueda estar
basada en plomo o cualquier otro material que
pueda contener carcinógenos. Todas las personas
que entren en el área de trabajo deben usar un
aparato de respiración adecuado y ropa protectora. El
área de trabajo debe cerrarse con cubiertas colgantes
de plástico y debe mantenerse fuera a las personas no
protegidas hasta que el área de trabajo haya sido
limpiada a fondo.
No use papel de lija diseñado para zapatas de lijar
más grandes. El papel de lija más grande sobresaldrá
de la zapata de lijar, causando atasco y rasgado del
papel o retroceso. El papel extra que sobresalga de la
zapata de lijar también puede causar laceraciones
graves.
!
ADVERTENCIA
taladrado mecánicos, y por otras actividades de
construcción, contiene agentes químicos que se sabe
que causan cáncer, defectos de nacimiento u otros
daños sobre la reproducción. Algunos ejemplos de
estos agentes químicos son:
• Plomo de pinturas a base de plomo,
• Sílice cristalina de ladrillos y cemento y otros
productos de mampostería, y
• Arsénico y cromo de madera tratada químicamente.
Su riesgo por causa de estas exposiciones varía,
dependiendo de con cuánta frecuencia realice este tipo
de trabajo. Para reducir su exposición a estos agentes
químicos: trabaje en un área bien ventilada y trabaje con
equipo de seguridad aprobado, como por ejemplo
máscaras antipolvo que estén diseñadas especialmente
para impedir mediante filtración el paso de partículas
microscópicas.
Cierto polvo generado por el
lijado, aserrado, amolado y
-38-
Page 20

A
0
A
A
0
A
DM 2610030830 01-13_DM 2610030830 01-13.qxp 1/22/13 11:25 AM Page 39
Símbolos
IMPORTANTE: Es posible que algunos de los símbolos siguientes se usen en su herramienta. Por favor,
estúdielos y aprenda su significado. La interpretación adecuada de estos símbolos le permitirá utilizar la
herramienta mejor y con más seguridad.
Símbolo Nombre Designación/explicación
V Volt Tensión (potencial)
A Ampere Corriente
Hz Hertz Frecuencia (ciclos por segundo)
W Watt Potencia
kg Kilogramo Peso
min Minuto Tiempo
s Segundo Tiempo
Diámetro Tamaño de las brocas taladradoras, muelas, etc
n
0
n Velocidad nominal Máxima velocidad obtenible
.../min Revoluciones o alternación Revoluciones, golpes, velocidad de
0 Posición "off" (apagado) Velocidad cero, par motor cero...
1, 2, 3, ... Graduaciones del selector Graduaciones de velocidad, par motor o posición.
I, II, III, Un número más alto significa mayor velocidad
Velocidad sin carga Velocidad rotacional sin carga
por minuto superficie, órbitas, etc., por minuto
Selector infinitamente variable La velocidad aumenta desde la graduación de 0
con apagado
Flecha Acción en la dirección de la flecha
Corriente alterna Tipo o una característica de corriente
Corriente continua Tipo o una característica de corriente
Corriente alterna o continua Tipo o una característica de corriente
Construcción de clase II Designa las herramientas de construcción
con aislamiento doble.
Terminal de toma de tierra Terminal de conexión a tierra
Símbolo de advertencia Alerta al usuario sobre mensajes de
advertencia
Sello RBRC de Li-ion Designa el programa de reciclaje de baterías
de Li-ion
Símbolos (continuación)
IMPORTANTE: Es posible que algunos de los símbolos siguientes se usen en su herramienta. Por favor,
estúdielos y aprenda su significado. La interpretación adecuada de estos símbolos le permitirá utilizar la
herramienta mejor y con más seguridad.
Este símbolo indica que esta herramienta está catalogada por UnderwritersLaboratories.
Este símbolo indica que esta herramienta está reconocida por Underwriters Laboratories.
Este símbolo indica que Underwriters Laboratories ha catalogado esta herramienta
indicando que cumple con las normas estadounidenses y canadienses.
Este símbolo indica que esta herramienta está catalogada por la Canadian Standards
Association.
Este símbolo indica que la Canadian Standards Association ha catalogado esta herramienta
indicando que cumple con las normas estadounidenses y canadienses.
Este símbolo indica que Intertek Testing Services ha catalogado esta herramienta
indicando que cumple con las normas estadounidenses y canadienses.
Este símbolo indica que esta herramienta cumple con la norma mexicana oficial (NOM).
Sello RBRC de Ni-Cd Designa el programa de reciclaje de baterías
de Ni-Cd
Símbolo de lectura del manual Alerta al usuario para que lea el manual
Símbolo de uso de protección Alerta al usuario para que use protección
de los ojos de los ojos
-39-
-40-
Page 21

DM 2610030830 01-13_DM 2610030830 01-13.qxp 1/22/13 11:25 AM Page 41
Descripción funcional y especificaciones
!
ADVERTENCIA
riesgo de arrancar la herramienta accidentalmente.
Desconecte el enchufe de la fuente de energía antes de realizar cualquier ensamblaje
o ajuste, o cambiar accesorios. Estas medidas de seguridad preventivas reducen el
Herramienta eléctrica oscilante Multi-Max™ modelo MM45
INTERRUPTOR DE
ENCENDIDO Y
APAGADO
PALANCA
QUICK LOCK™
ABERTURAS DE
VENTILACIÓN
PESTAÑA DE
FIJACIÓN
ACCESORIO
Número de modelo MM45
Velocidad sin carga n0 10,000-21,000/min
Tensión nominal 120 V 60Hz
FIG. 1
DIAL DE CONTROL DE
VELOCIDAD VARIABLE
ABERTURAS DE
PORTAACCESORIO
-41-
VENTILACIÓN
CABLE DE
ALIMENTACIÓN
Ensamblaje
!
ADVERTENCIA
realizar cualquier ensamblaje o ajuste, o cambiar
accesorios. Estas medidas de seguridad preventivas
re ducen el rie sgo de arran car la herra mienta
accidentalmente.
!
ADVERTENCIA
guantes protectores. Dichas medidas de seguridad
preventiva reducen el riesgo de lesiones causadas por
los bordes afilados de los accesorios. Las herramientas
de aplicación se pueden poner muy calientes mientras
funcionan. ¡Peligro de quemaduras!
INSTALACIÓN Y REMOCIÓN DE ACCESORIOS CON EL
CAMBIO DE ACCESORIOS QUICK LOCK™
La Dremel Multi-Max™ MM45 incluye un mecanismo
integrado de cambio de accesorios. La interfaz de
accesorios Quick Lock™ le permite a usted instalar y
retirar los accesorios sin necesidad de una llave de
tuerca o una lleve hexagonal. Usted ya no tendrá que
preocuparse tampoco de perder un tornillo de sujeción
y una arandela, debido a que estas piezas ya no se
utilizan en la versión MM45 de la Multi-Max™.
1. Para instalar un accesorio utilizando el dispositivo
Quick Lock™, sostenga la herramienta en posición
invertida para evitar que la hoja se caiga del
portaaccesorio al instalar y retirar accesorios.
2. Gire la palanca Quick Lock™, ubicada en la parte de
arriba de la herramienta, en sentido contrario al de
las agujas del reloj para desbloquear el mecanismo
de fijación (Fig. 2). La palanca necesita estar
completamente acoplada para desbloquear el
mecanismo de fijación.
3. Limpie el portaaccesorio, el accesorio y el pestaña
de fijación con un paño limpio.
4. Coloque el accesorio en el portaaccesorio,
asegurándose de que el accesorio se acople en las
espigas ubicadas en el portaaccesorio y que el
accesorio esté al ras contra el portaaccesorio (Fig.
3a y Fig. 3b).
Desconecte el enchufe de la
fuente de energía antes de
Para todo el trabajo o cuando
cambie accesorios, use siempre
FIG. 2
ABRIR
CERRAR
FIG. 3a
FIG. 3b
!
Quick Lock cuando realice la sujeción de un accesorio.
Evite colocar las manos o los dedos entre la
palanca y el cuerpo de la herramienta.
5. Gire la palanca Quick Lock™, ubicada en la parte de
arriba de la herramienta, en el sentido de las agujas
del reloj, hasta la posición cerrada, para bloquear el
accesorio de manera segura en su sitio (Fig. 2).
6. Para retirar un accesorio, simplemente desbloquee el
mecanismo de fijación girando la palanca Quick
Lock™ en sentido contrario al de las agujas del reloj
tal y como se ha descrito anteriormente (Fig. 2).
7. Levante el soporte del accesorio para retirarlo de las
espigas. (Nota: Tenga cuidado, la hoja puede estar
caliente.)
NOTA: Algunos accesorios, tales como los rascadores
o las hojas, se pueden montar en posición recta en la
herramienta o en ángulo para aumentar la
utilizabilidad (Fig. 4). Para hacer esto con la interfaz
Quick Lock™, coloque el accesorio en el
portaaccesorio, asegurándose de que el accesorio se
acople en las espigas ubicadas en el portaaccesorio
y que el accesorio esté al ras contra el
portaaccesorio. Fije el accesorio de manera segura
en su sitio tal y como se ha descrito anteriormente
(Fig. 2).
PESTAÑA DE
FIJACIÓN
ADVERTENCIA
PORTA-
ACCESORIO
Para evitar los pellizcamientos,
sujete firmemente la palanca
-42-
Page 22

DM 2610030830 01-13_DM 2610030830 01-13.qxp 1/22/13 11:25 AM Page 43
INSTALACIÓN Y REMOCIÓN DE LAS HOJAS DE LIJA
La almohadilla de soporte utiliza accesorios con soporte
de enganche y cierre, los cuales agarran firmemente la
almohadilla de soporte cuando se aplican con una
presión moderada.
1. Alinee la hoja de lija y presiónela a mano sobre la
placa de lijado.
2. Presione firmemente la herramienta eléctrica con la
hoja de lija contra una superficie plana y encienda
brevemente la herramienta eléctrica. Esto promoverá
una buena adhesión y ayudará a evitar el desgaste
prematuro.
3. Para cambiar la hoja de lija, simplemente desprenda
la hoja de lija vieja, quite el polvo de la almohadilla de
soporte, si es necesario, y presione la hoja de lija
nueva en la posición correcta.
Después de un servicio considerable, la superficie de la
almohadilla de soporte se desgastará y dicha
almohadilla deberá ser reemplazada cuando ya no
ofrezca un agarre firme. Si la almohadilla de soporte se
Introducción
Gracias por comprar la herramienta Dremel MultiMax™.
Esta herramienta fue diseñada para realizar proyectos
caseros de reparación, remodelación y restauración.
La Dremel Mul ti-Max™ reali za tareas q ue son
tediosas, toman mucho tiempo o simplemente son
ca si impos ibles de realiza r con cualquier otra
herramienta. La carcasa ergonómica está diseñada
para que usted la agarre y controle de manera
cómoda durante la utilización.
La herramienta viene con un surtido de accesorios
que están diseñados específicamente para realiza
trabajo de remodelación d onde usted necesita
precisión y control.
La Dremel Multi-Max™ tiene un robusto motor
eléctrico, es cómoda en la mano y está hecha para
aceptar una gran variedad de accesorios, incluyendo
Instrucciones de utilización
APRENDIZAJE DEL USO DE LA HERRAMIENTA
Sacar el máximo provecho de su herramienta oscilante
es cuestión de aprender a dejar que la velocidad y la
sensación de la herramienta en sus manos trabajen para
usted.
El primer paso para aprender a usar la herramienta es
familiarizarse con su “sensación”. Sosténgala en la
desgasta prematuramente, reduzca la cantidad de
presión que está ejerciendo durante la utilización de la
herramienta.
Para obtener el máximo uso del abrasivo, rote la
almohadilla 120 grados cuando la punta del abrasivo se
desgaste.
hojas para cortar al ras, hojas rascadoras, discos
quitalechada y almohadillas de lijar.
Los accesorios vienen en una variedad de formas y
permiten que usted realice varios trabajos diferentes.
A medida que usted se vaya familiarizando con la
gama de accesorios y sus usos, descubrirá lo muy
versátil que es su Dremel Multi-Max™.
Vi site w ww.dremel.com pa ra obtener más
información sobre lo que usted puede hacer con su
Dremel Multi-Max™.
USO PREVISTO
Esta herramienta Dremel Multi-Max™ está diseñada
para lijar en seco superficies, esquinas y bordes, para
rascar, para aserrar metales blandos, madera y
componentes de plástico, y para quitar lechada
utilizando las herramientas y accesorios aplicables
recomendados por Dremel.
mano y sienta su peso y equilibrio (Fig. 5).
Dependiendo de la aplicación, usted tendrá que ajustar
la posición de la mano para lograr una comodidad y un
control óptimos. El agarre cómodo especial del cuerpo
de la herramienta brinda comodidad y control
adicionales durante la utilización.
-43-
FIG. 4
FIG. 5
Cuando agarre la herramienta, no cubra las aberturas de
ventilación con la mano. Si se bloquean las aberturas de
ventilación, el resultado podría ser que el motor se
sobrecaliente.
¡IMPORTANTE! Practique primero en material de
desecho para comprobar cómo funciona la acción de
alta velocidad de la herramienta. Tenga presente que la
herramienta funcionará mejor al permitir que la
velocidad, junto con el accesorio correcto, haga el
trabajo para usted. Tenga cuidado de no ejercer
demasiada presión.
En lugar de ello, baje ligeramente el accesorio oscilante
hasta la superficie de trabajo y deje que toque el punto
en el cual usted desea comenzar. Concéntrese en guiar
la herramienta sobre la pieza de trabajo utilizando muy
poca presión con la mano. Deje que el accesorio haga el
trabajo.
Generalmente es mejor hacer una serie de pasadas con
la herramienta en lugar de hacer todo el trabajo en una
sola pasada. Por ejemplo, para hacer un corte, pase la
herramienta hacia detrás y hacia delante sobre la pieza
de trabajo. Corte un poco de material en cada pasada
hasta que alcance la profundidad deseada.
INTERRUPTOR DE "ENCENDIDO Y APAGADO"
DESLIZANTE
La herramienta se ENCIENDE por medio del interruptor
oscilante ubicado en el lado superior de la carcasa del
motor.
PARA ENCENDER LA HERRAMIENTA, deslice el botón
del interruptor hacia delante.
PARA APAGAR LA HERRAMIENTA, deslice el botón del
interruptor hacia detrás.
DIAL DE CONTROL DE VELOCIDAD VARIABLE
Esta herramienta está equipada con un dial de control
de velocidad variable (Fig. 6). La velocidad se puede
controlar durante la utilización preajustando el dial en
cualquiera de las diez posiciones.
VELOCIDADES DE FUNCIONAMIENTO
La Dreme l Mult i-Max™ co nsiste en un motor
universal de CA y un mecanismo oscilante para
realizar aplicaciones tales como corte, remoción de
FIG. 6
DIAL DE CONTROL
DE VELOCIDAD
VARIABLE
lechada, rascado, lijado y mucho más.
La Dremel Multi-Max™ tiene un elevado movimiento
de oscilación de 10,000 a 21,000 /min (OPM). El
movimiento de alta velocidad permite que la Dremel
Mu lti-Max™ logre excelentes resultad os. E l
movimiento oscilante permite que el polvo caiga a la
superficie en lugar de lanzar las partículas al aire.
Para lograr los mejores resultados cuando trabaje con
diferentes materiales, ajuste el control de velocidad
variable para adecuarse al trabajo (consulte el
“Cuadro de velocidades” que aparece en la página 46
y 47 para obtener orientación). Para seleccionar la
velocidad adecuada para el accesorio que se esté
ut ilizando, pract ique primero con mat erial de
desecho.
NOTA: La velocidad es afectada por los cambios de
voltaje. Una disminución en el voltaje de entrada
reducirá las OPM de la herramienta, especialmente en
el ajuste más bajo. Si parece que la herramienta
funciona despacio, aumente el ajuste de velocidad de
ma nera correspondiente . E s posible que la
herramienta no arranque en el ajuste más bajo del
in terruptor en las áreas donde el voltaje del
tomacorriente sea inferior a 120 V. Simplemente
mueva el ajuste de velocidad a una posición más alta
para comenzar la operación.
Los ajustes del control de velocidad variable están
marcados en el dial de control de velocidad. Los
ajustes para las /min (OPM) aproximadas son:
Ajuste del interruptor Gama de velocidad
en /min (OPM)
2 10,000-11,000
4 11,000-13,000
6 13,000-16,000
8 16,000-19,000
10 19,000-21,000
Usted puede consultar los cuadros que aparecen en las
siguientes páginas para determinar la velocidad
apropiada, basada en el material y el accesorio que se
esté utilizando. Estos cuadros le permiten seleccionar
tanto el accesorio correcto como la velocidad óptima
con sólo echar un vistazo.
-44-
Page 23

Descripción
Papel de grano 60, 120 y 240 para
madera desnuda
Papel de grano 60, 120 y 240 para
pintura
Hoja de HCS de 1-1/4 de pulgada
(32 mm) x 3/8 de pulgada (9.5 mm)
para cortar al ras madera
Hoja de HCS de 1-1/4 de pulgada
(32 mm) x 3/4 de pulgada (19 mm)
para cortar al ras madera
Hoja de HCS de 1-1/4 de pulgada
(32 mm) x 1-1/8 de pulgada (28.5
mm) para cortar al ras madera
Hoja de HCS de 1-5/8 de pulgada
(41 mm) x 3/4 de pulgada (19 mm)
para cortar al ras madera
Hoja de HCS de 1-1/4 de pulgada
(32 mm) x 1-11/16 de pulgada (42
mm) para cortar al ras madera
Hoja BiM de 1 de pulgada (25.4) x
3/4 de pulgada (19 mm) para cortar
al ras madera/metal
Hoja BiM de 1-1/4 de pulgada (32
mm) x 1-1/8 de pulgada (28.5 mm)
para madera/metal
Madera
blanda
2 - 10
2 - 10
8 - 10
8 - 10
8 - 10
8 - 10
8 - 10
8 - 10
8 - 10
Mader
a dura
2 - 10
2 - 10
6 - 10
6 - 10
6 - 10
6 - 10
6 - 10
6 - 10
6 - 10
Madera
pintada
2 - 10
-
-
-
-
-
-
-
Laminados/
Plásticos
2 - 6
2 - 6
2 - 6
2 - 6
2 - 6
2 - 6
2 - 6
2 - 6
2 - 6
Acero
8 - 10
8 - 10
-
-
-
-
8 - 10*
8 - 10*
Aluminio/
Cobre
8 - 10
8 - 10
-
-
-
-
8 - 10
8 - 10
Vinilo/
Alfombra
-
-
-
-
-
-
-
-
-
Calafateo/
Adhesivo
-
-
-
-
-
-
-
-
-
Piedra/
Cemento
-
-
-
-
-
-
-
-
-
Lechada
-
-
-
-
-
-
-
-
-
Números de
catálogo
MM70W
MM70P
MM411
MM440
MM460
MM470
MM480
MM422
MM462
WOOD
1/4
IN
3/4
1
1/2
*Acero suave solamente
DM 2610030830 01-13_DM 2610030830 01-13.qxp 1/22/13 11:25 AM Page 45
Sírvase consultar las figuras 7 y 8 para obtener instrucciones adicionales sobe cómo utilizar su Dremel MultiMax™. Seguir esas instrucciones le permitirá obtener el máximo rendimiento de su herramienta oscilante.
CORRECTO: Lije con un movimiento suave
hacia detrás y hacia delante, dejando que el
peso de la herramienta haga el trabajo.
CORRECTO: Corte siempre con un
movimiento suave hacia detrás y hacia
delante. No fuerce nunca la hoja. Ejerza una
presión ligera para guiar la herramienta.
INCORRECTO: Evite lijar solamente con la
punta de la almohadilla. Mantenga tanto papel
de lija en contacto con la superficie de trabajo
como sea posible.
FIG. 8FIG. 7
Utilice únicamente accesorios de alto rendimiento comprobados por Dremel.
INCORRECTO: No tuerza la herramienta
mientras corta. Esto puede hacer que la
hoja se atore.
CORRECTO: Lije siempre con la almohadilla y
el papel de lija en posición plana contra la
superficie de trabajo. Trabaje suavemente con
Nota: La hoja Multi-Flex MM720 no es compatible con la MM45.
un movimiento hacia detrás y hacia delante.
CORRECTO: Asegúrese de que la hoja
rascadora flexible se flexione lo suficiente.
INCORRECTO: Evite inclinar la almohadilla.
Lije siempre en posición plana.
Ajustes de velocidad de los accesorios Multi-Max™
INCORRECTO: Evite que la cabeza del
tornillo toque la superficie con la hoja
-45-
rascadora flexible.
-46-
Page 24

Descripción
Hoja BiM de 1-5/8 de pulgada
(41 mm) x 3/4 de pulgada (19 mm)
para madera/metal
Hoja BiM de 1-1/4 de pulgada (32
mm) x 1-1/8 de pulgada (42 mm)
para madera/metal
Hoja de sierra plana de 3 pulgadas
(7.6 cm)
Hoja quitalechada de 1/8 de pulgada
(3 mm)
Hoja quitalechada de 1/16 de pulga-
da (1.5 mm)
Hoja rascadora rígida
Hoja rascadora flexible
Papel de diamante de grano 60
Escofina de carburo de grano 24
Madera
blanda
8 - 10
8 - 10
8 - 10
-
-
-
-
6 - 10
Mader
a dura
6 - 10
6 - 10
6 - 10
-
-
-
-
6 - 10
Madera
pintada
-
-
-
-
2 - 4
2 - 4
6 - 10
Laminados/
Plásticos
2 - 6
2 - 6
2 - 6
-
-
-
-
-
-
Acero
8 - 10*
8 - 10*
-
-
-
-
-
-
-
Aluminio/
Cobre
8 - 10
8 - 10
-
-
-
-
-
-
-
Vinilo/
Alfombra
-
-
-
-
2 - 8
-
-
-
Calafateo/
Adhesivo
-
-
-
-
2 - 6
2 - 6
-
-
Piedra/
Cemento
-
-
-
-
-
-
6 - 10
6 - 10
Lechada
-
-
6 - 10
6 - 10
-
6 - 10
6 - 10
Números de
catálogo
MM472
MM482
MM450
MM500
MM501
MM600
MM610
MM900
MM920
WOOD
a
a
a
*Acero suave solamente
DM 2610030830 01-13_DM 2610030830 01-13.qxp 1/22/13 11:25 AM Page 47
Aplicaciones de operación
La herramienta Dremel Multi-Max™ está diseñada para
lijar y cortar materiales de madera, plástico, yeso y
metales no ferrosos. Es especialmente adecuada para
Utilice únicamente accesorios de alto rendimiento comprobados por Dremel.
Ajustes de velocidad de los accesorios Multi-Max™
Nota: La hoja Multi-Flex MM720 no es compatible con la MM45.
trabajar cerca de bordes, en espacios estrechos y para
cortar al ras. Esta herramienta se debe utilizar
solamente con accesorios Dremel.
A continuación se indican varios usos típicos de la
herramienta Dremel Multi-Max™.
!
ADVERTENCIA
del cuerpo. No ponga nunca la mano cerca del área de
trabajo ni directamente delante de dicha área. Agarre
siempre la herramienta con las dos manos y use
guantes protectores.
Corte al ras
Retire el exceso de madera de jamba de puerta,
alféizar de ventana y/o panel inferior. Remoción de
exceso de tubería de cobre o de PVC.
Trabajo de remoción
Por ejemplo, alfombras y refuerzo trasero, adhesivos
de baldosa viejos, calafateado en mampostería,
madera y otras superficies.
Remoción de exceso de materiales
Por ejemplo, yeso, salpicaduras de mortero, concreto
en baldosas, alféizares.
Preparación de superficies
Por ejemplo, para pisos nuevos y baldosas nuevas.
Lijado de detalles
Por ejemplo, para lijar en áreas sumamente estrechas
en las que de lo contrario es difícil llegar y se requiere
lijado a mano.
Las hojas de sierra son ideales para hacer cortes
precisos en áreas estrechas, cerca de bordes o al ras
con una superficie.
Seleccione una velocidad de intermedia a alta para
hacer la penetración inicial y comience a una velocidad
intermedia para tener un mayor control. Después de
hacer el corte inicial, usted puede aumentar la velocidad
para poder cortar más rápidamente.
ras es importante no forzar la herramienta durante el
corte por inmersión. Si nota una vibración fuerte en la
mano durante el corte por inmersión, eso indica que
está ejerciendo demasiada presión. Retroceda un poco
la herramienta y deje que la velocidad de la herramienta
haga el trabajo. Mientras mantiene los dientes de la hoja
dentro de la superficie de trabajo, mueva la parte trasera
de la herramienta con un movimiento lateral lento. Este
movimiento ayudará a acelerar el corte.
APLICACIÓN
Para todos los accesorios,
trabaje con el accesorio alejado
CORTE
Las hojas para cortar al ras están
diseñadas para hacer cortes precisos
con el fin de permitir la instalación de
material de piso o de pared. Al cortar al
Al hacer un corte al ras, siempre es una buena idea
tener una un pedazo de material de desecho (de baldosa
o madera) que soporte la hoja. Si necesita apoyar la
hoja para cortar al ras en una superficie delicada, debe
proteger dicha superficie con cartón o cinta adhesiva.
La hoja de sierra plana es ideal para hacer
cortes precisos en madera, yeso y
material de panel de yeso.
Las aplicaciones incluyen cortar aberturas en pisos para
ventilación, reparar pisos dañados y cortar aberturas
para cajas eléctricas. La hoja funciona mejor en
maderas más blandas, tales como pino. Para maderas
más duras, la duración de la hoja será limitada.
Seleccione una velocidad de intermedia a alta.
La hoja de sierra plana también se puede utilizar para
restaurar ventanas, facilitando la remoción de vidriado.
La hoja de sierra se puede colocar directamente contra
el borde del marco de la ventana, guiando la hoja a
través del vidriado.
REMOCIÓN DE LECHADA
Las hojas quitalechada son ideales para
quitar lechada dañada o agrietada. Las
hojas quitalechada vienen en diferentes
anchuras (1/16 y 1/8 de pulgada [1.5 y 3 mm]) para
trabajar con diferentes anchuras de línea de lechada.
Antes de seleccionar una hoja quitalechada, mida la
anchura de la línea de lechada para seleccionar la hoja
apropiada.
Seleccione una velocidad de intermedia a alta.
Para quitar la lechada, use un movimiento hacia detrás
y hacia delante, haciendo varias pasadas a lo largo de la
línea de lechada. La dureza de la lechada dictará cuántas
pasadas se necesitan. Intente mantener y mantenga
alineada la hoja quitalechada con la línea de lechada y
tenga cuidado de no ejercer demasiada presión lateral
sobre la hoja quitalechada durante el proceso. Para
controlar la profundidad de inmersión, use la línea de
grano de carburo de la hoja como indicador. Tenga
cuidado de no penetrar más allá de la línea de grano de
carburo, para evitar dañar el material de la tabla de
soporte.
Las hojas quitalechada pueden quitar lechada con arena
y sin arena. Si observa que la hoja se satura durante el
proceso de remoción de lechada, puede usar un cepillo
de latón para limpiar el grano, con lo cual dejará de
nuevo expuesto el grano.
La geometría de la hoja quitalechada está diseñada para
que la hoja pueda quitar toda la lechada hasta la
superficie de una pared o esquina. Esto se puede lograr
asegurándose de que la porción segmentada de la hoja
esté orientada hacia la pared o la esquina.
-47-
-48-
Page 25

DM 2610030830 01-13_DM 2610030830 01-13.qxp 1/22/13 11:25 AM Page 49
Los rascadores son adecuados para quitar capas viejas
RASCADO
de barniz o adhesivos y quitar alfombra adherida, por
ej., en escaleras, escalones y otras superficies de
tamaño pequeño o mediano.
Seleccione una velocidad de baja a intermedia.
Los rascadores rígidos son para la
remoción de áreas grandes y
materiales más duros, tales como piso
de vinilo, alfombra y adhesivos para
baldosa. Cuando quite adhesivos fuertes y pegajosos,
engrase la superficie de la hoja rascadora con
vaselina o grasa de silicona para reducir la
acumulación de goma.
El piso de alfombra o de vinilo se quita más
fácilmente si se estría antes de quitarlo, para que la
hoja rascadora se pueda mover debajo del material
del piso.
Los rascadores flexibles se utilizan para
áreas difíciles de alcanzar y material más
blando, tal como calafateo.
Monte la hoja rascadora con el lado del logotipo
orientado hacia arriba. Con el rascador flexible,
asegúrese de que la cabeza del tornillo no entre en
contacto con la superficie durante el proceso de
rascado (se recomienda una inclinación de 30 a 45
grados). Esto se puede lograr asegurándose de que la
herramienta esté en ángulo respecto a la hoja. Usted
debería poder ver cómo la hoja se flexiona durante el
proceso de rascado.
Si está quitando lechada de una superficie delicada, tal
como una tina o un protector de baldosa contra
salpicaduras, recomendamos poner cinta adhesiva en la
superficie o proteger la superficie en la que la hoja se
vaya a apoyar. Use alcohol desinfectante para limpiar la
superficie después de quitar el calafateo y/o el adhesivo.
Encienda la herramienta y coloque el accesorio deseado
en el área donde se vaya a quitar material.
Comience con una presión ligera. El movimiento
oscilante del accesorio ocurre solamente cuando se
aplica presión al material que se va a quitar.
Una presión excesiva puede estriar o dañar las
superficies de fondo (por ejemplo, madera o yeso).
LIJADO
Los accesorios de lijado son adecuados
para lijar en seco madera, metal,
superficies, esquinas, bordes y áreas
difíciles de alcanzar.
Trabaje con la superficie completa de la almohadilla de
lijar, no solamente con la punta.
Las esquinas se pueden acabar utilizando la punta o el
borde del accesorio seleccionado, el cual se debe rotar
ocasionalmente durante el uso, para distribuir el
desgaste en la superficie del accesorio y de la
almohadilla de soporte.
Lije con un movimiento continuo y una presión ligera.
NO ejerza una presión excesiva, deje que la herramienta
haga el trabajo. Una presión excesiva causará un
manejo deficiente, vibración, marcas de lijado no
deseadas y desgaste prematuro de la hoja de lija.
Asegúrese siempre de que las piezas de trabajo más
pequeñas estén sujetas firmemente a un banco de
trabajo u otro soporte. Los paneles más grandes se
pueden sujetar en posición adecuada con la mano en un
banco de trabajo o en caballetes de aserrar.
Se recomiendan hojas de lija de óxido de aluminio de
capa abierta para la mayoría de aplicaciones de lijado de
madera o metal, ya que este material sintético corta
rápidamente y resiste bien el desgaste. Algunas
aplicaciones, tales como el acabado o la limpieza de
metales, requieren almohadillas abrasivas especiales
que están disponibles a través de su distribuidor. Para
obtener los mejores resultados, use accesorios de lijar
Dremel, que son de calidad superior y están
seleccionados cuidadosamente para producir resultados
de calidad profesional con su herramienta oscilante.
Las siguientes sugerencias se pueden usar como guía
general para la selección del abrasivo, pero los mejores
resultados se obtendrán lijando primero una muestra de
prueba de la pieza de trabajo.
Grano Aplicación
Grueso Para lijado basto de madera o metal,
y para remoción de óxido o
acabado viejo.
Mediano Para lijado general de madera
o metal
Fino Para acabado final de madera,
metal, yeso y otras superficies.
Con la pieza de trabajo firmemente sujeta, encienda la
herramienta tal y como se ha descrito anteriormente.
Contacte la pieza de trabajo con la herramienta después
de que ésta haya alcanzado toda su velocidad y retire la
herramienta de la pieza de trabajo antes de apagarla. La
utilización de la herramienta oscilante de esta manera
prolongará la duración del interruptor y del motor, y
aumentará enormemente la calidad del trabajo que
usted realiza.
Mueva la herramienta oscilante en pasadas largas y
firmes paralelas a la veta, utilizando un poco de
movimiento lateral para superponer las pasadas tanto
como en un 75%. NO ejerza una presión excesiva, deje
que la herramienta haga el trabajo. Una presión excesiva
causará un manejo deficiente, vibración y marcas de
lijado no deseadas.
El accesorio de papel de diamante permite
AMOLADO
utilizar la Multi-Max™ para amolar
cemento, yeso o mortero de capa delgada.
La preparación de la superficie para reemplazar
baldosas es una aplicación común para este accesorio.
El papel de diamante se debe montar en la almohadilla
de soporte antes de utilizarlo.
Seleccione una velocidad de baja a alta, dependiendo de
la tasa de remoción de material deseada.
El accesorio de escofina de carburo
también permite a la Multi-Max™ amolar
cemento, mortero de capa delgada y
enlucido, así como madera. Este accesorio se utiliza
comúnmente para realizar la preparación con el fin de
reemplazar baldosa o para raspar madera con el fin de
alisar una superficie o retirar material.
La velocidad se debe a ajustar a alta velocidad para una
remoción agresiva de material o a baja velocidad para
una remoción más detallada de material.
No ejerza una presión excesiva sobre la herramienta.
Deje que ésta haga el trabajo.
Las esquinas se pueden acabar utilizando la punta o el
borde del accesorio seleccionado, el cual se debe rotar
ocasionalmente durante el uso, para distribuir el
desgaste en la superficie del accesorio y de la
almohadilla de soporte.
Amole con un movimiento continuo y una presión
ligera. NO ejerza una presión excesiva, deje que la
herramienta haga el trabajo. Una presión excesiva
causará un manejo deficiente, vibración y desgaste
prematuro de la hoja de papel de diamante.
Selección de hojas de lija/amolado
Material Aplicación Tamaño de grano
Todos los materiales de madera (por ej.,
madera dura, madera blanda, tablero de
cartón-madera y tablero de construcción)
Materiales metálicos:
Materiales metálicos, fibra
de vidrio y plásticos
Papel de lija (oscuro)
Pintura, barniz, compuesto de relleno y
rellenador
Papel de lija (blanco)
Mampostería, piedra, cemento y mortero
de capa delgada
Papel de diamante
Para lijado basto, por ej., de vigas y
tablas bastas no acepilladas
Para lijado de caras y acepillado de
irregularidades pequeñas
Para lijado de acabado y fino de
madera
Para lijar pintura
Para lijar imprimador (por ej., para
quitar pelos de cepillo, gotas de
pintura y escurrimiento de pintura)
Para lijado final de imprimadores
antes de recubrirlos
Para alisar, perfilar y romper bordes
Grueso
Mediano
Fino
Grueso
Mediano
Fino
Grueso
60
120
240
80
120
240
60
-49-
-50-
Page 26

DM 2610030830 01-13_DM 2610030830 01-13.qxp 1/22/13 11:25 AM Page 51
Información de mantenimiento
Servicio
!
ADVERTENCIA
autorizado pude dar lugar a la colocación incorrecta
de cables y componentes internos que podría
constituir un peligro serio. Recomendamos que todo el
servicio de las herramientas sea realizado por un Centro
de servicio de fábrica Dremel.
Las escobillas y el conmutador de esta herramienta han
sido diseñados para brindar muchas horas de servicio
confiable. Para mantener la eficiencia máxima del
motor, recomendamos que cada 50 - 60 horas las
escobillas sean ajustadas y reparadas por un Centro de
Servicio Dremel.
El mantenimiento preventivo
realizado por personal no
ESCOBILLAS DE CARBONO
Cordones de extensión
Cordones de extensión
!
ADVERTENCIA
cordón con conductores de tamaño adecuado que sea
capaz de transportar la corriente necesaria para la
herramienta. Esto evitará caídas de tensión excesivas,
pérdida de potencia o recalentamiento. Las herramientas
conectadas a tierra deben usar cordones de extensión de
3 hilos que tengan enchufes de 3 terminales y
receptáculos para 3 terminales.
NOTA: Cuanto más pequeño es el número de calibre,
más grueso es el cordón.
Si es necesario un cordón de
extensión, se debe usar un
Limpieza
!
ADVERTENCIA
mienta de la fuente de energía antes de la limpieza o
de la realización de cual quier mantenimiento. La
herramienta se puede limpiar más eficazmente con aire
comprimido seco. Use gafas de segu ridad siempre que
limpie herramientas con aire comprimido.
Las aberturas de ventilación y las palancas de interruptor
deben mante nerse limpias y libres de materias extrañas.
No intente limpiar intro du ciendo objetos puntiagudos a
través de las aberturas.
!
PRECAUCION
plástico. Algunos de estos son: gasolina, tetracloruro de
carbono, disolventes de limpieza clorados, amoníaco y
detergentes domésticos que contienen amoníaco.
TAMAÑOS RECOMENDADOS DE CORDONES DE EXTENSION
HERRAMIENTAS DE 120 V CORRIENTE ALTERNA
Capacidad
nominal en
amperes de la
herramienta
3-6
6-8
8-10
10-12
12-16
Para evitar accidentes
desconecte siempre la herra -
Ciertos agentes de limpieza y
disol ventes dañan las piezas de
Tamaño del cordón en A.W.G.
Longitud del cordón en pies Longitud del cordón en metros
25 50 100 150 15 30 60 120
18 16 16 14 0,75 0,75 1,5 2,5
18 16 14 12 0,75 1,0 2,5 4,0
18 16 14 12 0,75 1,0 2,5 4,0
16 16 14 12 1,0 2,5 4,0 —
14 12 —— ————
Tamaños del cable en mm
Garantía limitada de Dremel
Su producto Dremel está garantizado contra defectos de material o de fabricación durante un período de dos años a
partir de la fecha de compra. En caso de que un producto no se ajuste a esta garantía escrita, por favor, tome las
medidas siguientes:
1. NO devuelva el producto al lugar de compra.
2. Empaquete el producto cuidadosamente y solo, sin otros artículos, y envíelo con el porte pagado junto con:
A. Una copia de la prueba de compra fechada (por favor, conserve una copia para usted).
B. Una explicación por escrito de la naturaleza del problema.
C. Su nombre, dirección y número de teléfono a:
ESTADOS UNIDOS CANADÁ
Dremel Service Center Giles Tool Agency
4915 21st Street O 47 Granger Av.
Racine, WI 53406 Canada M1K 3K9 1-416-287-3000
FUERA DE LOS TERRITORIOS CONTINENTALES DE LOS EE.UU.
Vea al distribuidor local o escriba a Dremel, 4915 21st Street Racine, WI 53406
Recomendamos que el paquete sea asegurado contra pérdida o daños durante el transporte por los cuales no
podemos ser responsables.
Esta garantía tiene validez únicamente para el comprador original inscrito. LOS DAÑOS AL PRODUCTO PRODUCIDOS
POR MANIPULACION INCORRECTA, ACCIDENTE, ABUSO, NEGLIGENCIA, REPARACIONES O ALTERACIONES NO
AUTORIZADAS, ACCE SORIOS NO APROBADOS U OTRAS CAUSAS NO RELACIONADAS CON PROBLEMAS DEL
MATERIAL O LA FABRICACION NO ESTAN CUBIERTOS POR ESTA GARANTIA.
Ningún empleado, agente, distribuidor, ni ninguna otra persona está autorizado a dar ninguna garantía en nombre de
Dremel. Si la inspección de Dremel demuestra que el problema fue causado por problemas con el material o la
fabricación dentro de los límites de la garantía, Dremel reparará o reemplazará el producto gratuitamente y devolverá
el producto con el porte pagado. Las reparaciones necesarias debido al desgaste normal o al abuso, o las
reparaciones de productos que se encuentren fuera del período de garantía, en caso de que se puedan realizar, se
cobrarán a precios de fábrica normales.
2
DREMEL NO DA NINGUNA OTRA GARANTIA DE NINGUN OTRO TIPO, EXPRESA O IMPLICITA, Y TODAS LAS
GARANTIAS IMPLICITAS DE COMERCIABILIDAD E IDONEIDAD PARA UN PROPOSITO ESPECIFICO QUE EXCEDEN
LA OBLIGACION MENCIONADA ANTERIORMENTE QUEDAN POR LA PRESENTE RECHAZADAS POR PARTE DE
DREMEL Y ESTAN EXCLUIDAS DE ESTA GARANTIA LIMITADA.
Esta garantía le confiere a usted derechos legales específicos y es posible que usted también tenga otros derechos
que varían de un estado a otro. La obligación del garante consiste únicamente en reparar o reemplazar el producto.
El garante no es responsable de ningún daño incidental o emergente debido a cualquiera de dichos defectos alegados.
Algunos estados no permiten la exclusión o limitación de los daños incidentales o emergentes, por lo que es posible
que las limitaciones o la exclusión anteriores no sean aplicables en el caso de usted.
Para precios y cumplimiento de la garantía en los territorios continentales de los Estados Unidos, póngase en
contacto con el distribuidor local Dremel.
®
-51-
Exportado por: © Robert Bosch Tool Corporation Mt. Prospect, IL 60056 -2230, E.U.A.
2610030830 01-13
Importado a México por: Robert Bosch, S. de R.L. de C.V.
Calle Robert Bosch No. 405 - 50071 Toluca, Edo. de Méx. - México
Tel. 052 (722) 279 2300 ext 1160 / Fax. 052 (722) 216-6656
!2610030830!
 Loading...