

Page 1

HearPlus
317ci
Page 2
1 Kraftig blixtlampa
2 Headsetuttag
3 Återuppringning
4 R-knapp
5 Tonkontroll
6 Volymkontroll för luren
7 Knapp för extra förstärkning
8 Snabbval
9 Volymkontroll högtalare/headset
10 Avsluta högtalar-/headset-
samtal/radera/avbryt
11 Knapp för högtalare/
headset och indikator
12 Nummerpresentation
13 Linjeindikator
14 Uttag för telesladden
15 Uttag för strömadaptern
16 Uttag för vibrator
Svenska
3
4
5
6
8
7
1
9
12
13
11
10
2
141516
Page 3

1 Kirkkaasti vilkkuva valo
2 Kuulokeliitäntä
3 Uudelleensoittaminen
4 R-painike
5 Äänen sävyn säätö
6 Luurin äänenvoimakkuuden säädin
7 Ylimääräisen tehostuksen painike
8 Pikavalinta
9 Handsfree-/sankakuulokkeen
äänenvoimakkuuden säädin
10 Handsfree-/sankakuulokepuhelun
lopettaminen/poistaminen/keskeyttäminen
11 Handsfree-/sankakuulokepainike
ja merkkivalo
12 Numeronäyttö
13 Linjamerkkivalo
14 Puhelinjohdon liitäntä
15 Muuntajan liitäntä
16 Värinähälytinliitäntä
Suomi
1 Kraftig blitzlampe
2 Stik til headset
3 Genopkaldstast
4 R-tast
5 Tonevalg
6 Lydstyrkeregulering-telefonrør
7 Knap til ekstra forstærkning
8 Hurtigvalgstaster
9 Lydstyrkeregulering-headset/højttaler
10 Afslut headset-/højttalersamtale/
slet/afbryd
11 Knap til højttaler/headset og indikator
12 Nummerviser
13 Linjeindikator
14 Udtag til telefonledning
15 Udtag til netadapter
16 Udtag til vibrator
Dansk
1 Kraftig blitslampe
2 Hodesettuttak
3 Repetisjon
4 R-knapp
5 Tonekontroll
6 Volumkontroll-håndsettet
7 Knapp for ekstra forsterkning
8 Hurtigtaster
9 Volumregulering høyttaler/hodesett
10 Avslutt høyttaler-
hodesettsamtale/slett/avbryt
11 Knapp for høyttaler/
hodesett og indikator
12 Nummervisning
13 Linjeindikator
14 Uttak for telefonledning
15 Uttak for strømadapter
16 Uttak for vibrasjonsenhet
Norsk
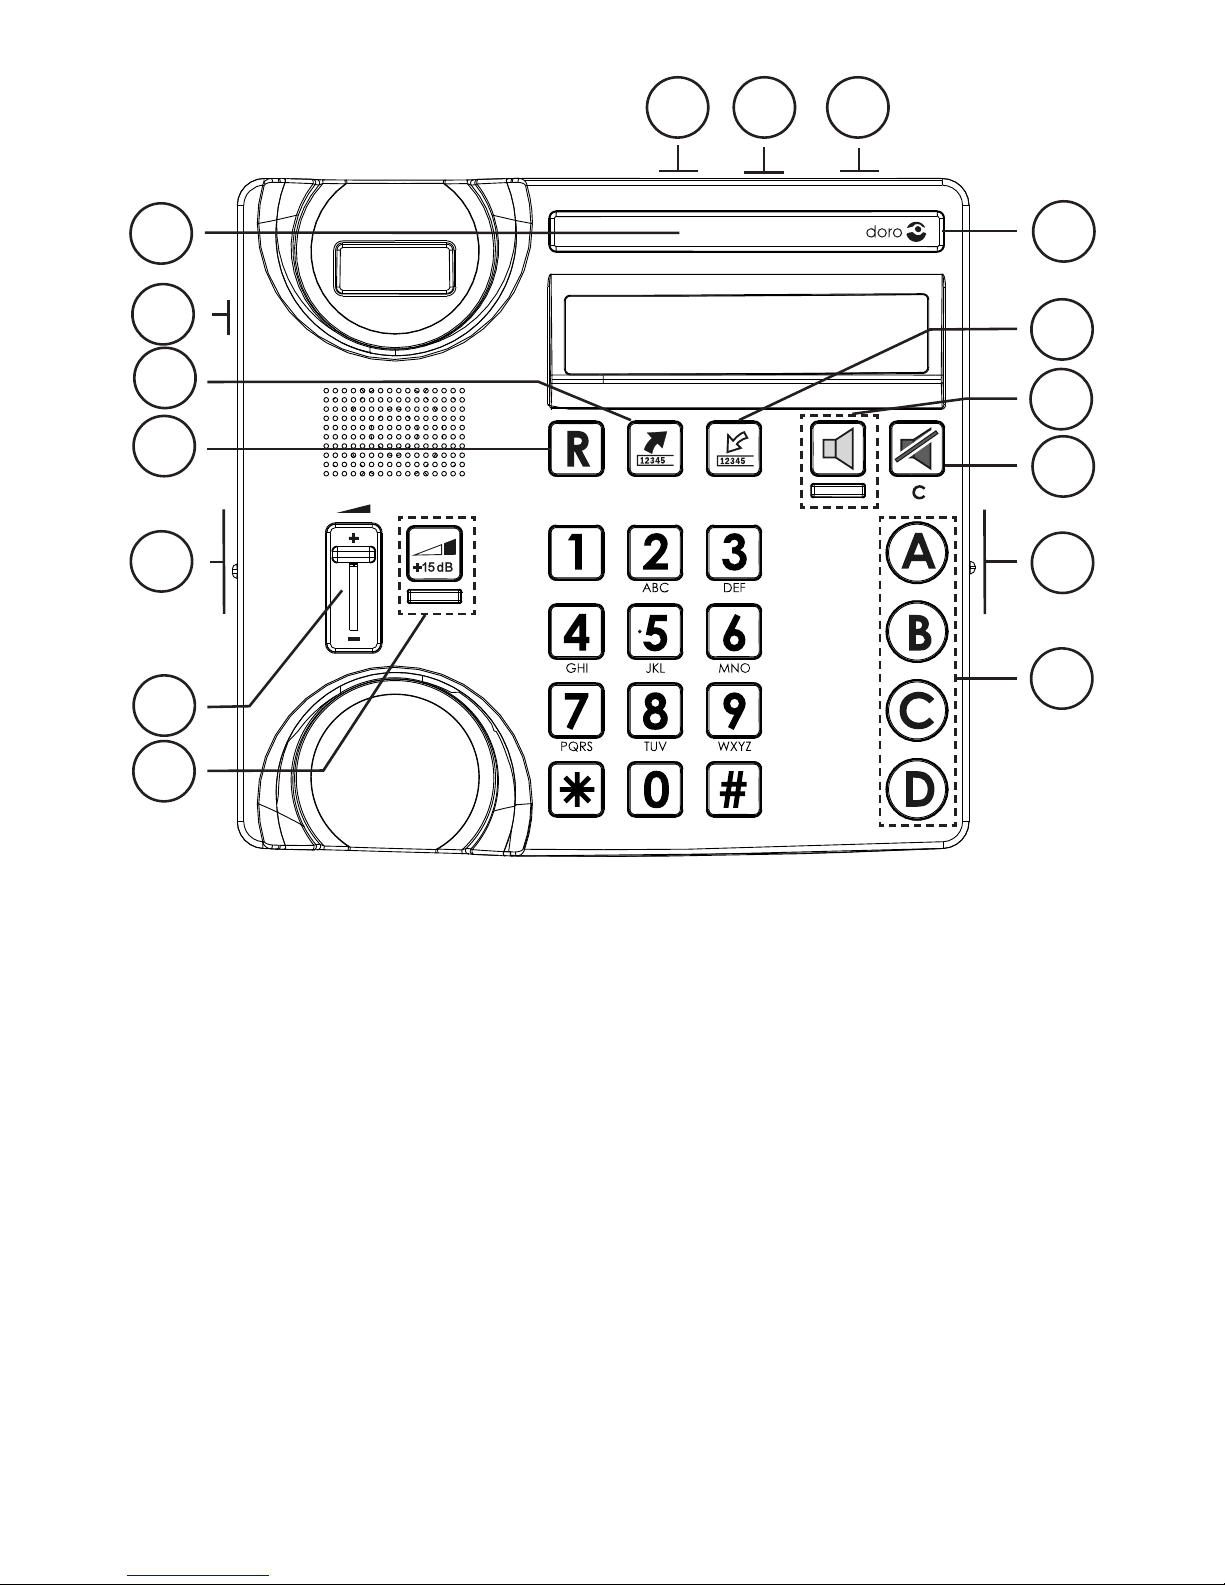
1 Powerful flashing light
2 Headset connector
3 Redial function
4 Flash button
5 Tone control
6 Handset volume control
7 Button for extra amplification
8 Speed dial memories
9 Handsfree/headset volume control
10 End handsfree call/headset
call/delete/cancel
11 Handsfree/headset button and LED
12 Caller ID
13 Line indicator
14 Telephone cord socket
15 Socket for power supply
16 Socket for additional alert equipment
English
Page 4

1
English
Operation
Making a call
Regular dialling
1. Pick up the handset.
2. Enter the desired number.
Dialling using correction function
If necessary, the telephone number entered can be altered
before it is connected.
1. Enter the required number. You can delete with .
2. Pick up the handset, the number is dialled.
To make a call using the handsfree/headset, see separate
description.
Redial function
Press one or more times to scroll between the 5 most
recently dialled numbers, which will be shown on the LCD
display. Pick up the handset to dial or press to cancel.
Memory
This telephone has 4 speed dial memories.
Once a number has been saved in a memory location, you
only need to press one button to make the call. Speed dial
numbers are marked A, B, C, and D.
Dialling/control using Speed Dial
1. Select required speed dial (A-D) by pressing on the
appropriate button.
2. The saved number is shown in the display.
3. Pick up the handset to dial or press to cancel.
Page 5

2
English
Volume control
This product can adjust the sound in a number of ways:
Normal volume control for the handset.
Press the button to activate powerful amplification.
The amplification is normally deactivated at the
end of each call to avoid harming people with
normal hearing. This safety function is adjustable,
see Technical Information.
Change frequency range/tone level and quality (on
the left side). PLEASE NOTE! Only works when
the powerful amplification is active.
Handsfree/Headset volume control.
Warning!
The handset volume can be turned up very loud. The
powerful amplification should only be used by people with
impaired hearing ability.
Caller ID
Caller ID allows you to see who is calling before you answer
a call or to see who has called in your absence. If the number
has been saved in the memory, the name is shown instead.
Calls received are stored chronologically, with the
sequence number shown next to the telephone number.
When the memory is full, the oldest number will be deleted
automatically as the new call is logged. New numbers are
indicated by .
Please note!
You must subscribe to this service from your network
operator in order for this feature to function.
Retrieving and dialling incoming numbers
1. Press to scroll between the numbers of calls that have
been received.
2. Pick up the handset to dial or press to cancel.
Page 6

3
English
Messages
Apart from phone numbers, the display can show:
????? No information received, e.g. an international call.
!!!!! The call comes from a withheld number or a PBX.
Number not previously seen.
a
Message indication (sent from your network
operator)*.
*Message indication can be deleted manually by pressing
down for a few seconds in standby mode.
Deleting telephone numbers
1. Scroll to the required entry with .
2. Press down until the number disappears.
Hands free function
1. Press . The hands free function will be activated and
the LED indicator next to the button will illuminate.
2. Dial the required telephone number. Adjust the volume
using the volume control located on the side of the
telephone.
3. Press to terminate the call.
Please note!
If you wish, you can switch between handset and hands free
mode by simply pressing or lifting the handset.
Please remember that in hands free mode it is only possible
for one person at a time to talk.
Page 7

4
English
Connecting a headset
You can connect a headset to the socket on the
telephone’s left side. When a headset is connected the
speaker buttons / are used to connect /disconnect
a telephone call (equivalent to lifting and putting down the
handset).
The volume in the headset can be adjusted, see previous
page.
Please note!
On delivery, the telephone is set for speaker function.
Select headset function by setting the switch
/ behind
the battery cover on the underside of the telephone to
(see Technical Information).
A neck loop/extra handset can be connected to this socket
instead of a headset.
DORO original headsets are tested and adapted for
this model. Other types and makes of headsets may be
used, though the function and sound quality cannot be
guaranteed. In the worst case, these could damage the
headset and telephone. This type of damage is not covered
by the telephone’s guarantee.
Hearing loop
The handset has a built-in hearing loop for those who wish
to use their hearing aids while using the telephone. Select
the T mode on your hearing aid to enable this feature.
Page 8

5
English
Settings
Connection
1. Connect the telephone cord to a network wall socket and
to the
T
socket on the back of the telephone.
2. Connect the mains adapter to the mains power socket
and to the
Y
socket on the back of the telephone.
3. Connect the curly cord to the handset and to the
q
socket on the base of the telephone. (You will hear a click
when the modular plug is correctly in place).
4. Set the correct Flash time to 100 (see technical information).
5. Lift the handset and listen for the dial tone.
Date/Time
1. Press down until
H
is shown.
2. Enter date (DD/MM).
3. Enter time of day (HH:MM).
Press to cancel and return to standby mode.
Batteries
Four 1.5V type AAA batteries are needed so that caller ID,
memory etc will continue to function in the event of a power
cut. When the batteries have almost expired the
7
symbol will light up. Only use high quality batteries.
1. Check that the adapter is correctly inserted to avoid
losing saved information.
2. Unplug the telephone cable and remove the cover on the
base of the telephone.
3. Insert the batteries according to the markings for plus
and minus terminals.
4. Replace the battery cover and reconnect the telephone
cord.
Page 9

6
English
Ring signal
Ring volume, melody and tone can be adjusted to ensure
you can hear the ring clearly. These are found underneath
the telephone:
Ring volume
n Ring melody
Ring tone
LCD Display
On the base of the telephone there is a switch /
to change the style of the LCD display. Choose the style
you are able to see more clearly.
Memory
Saving Speed Dial Numbers
1. Press down
*
until
b
123... is shown.
2. Enter the telephone number, including the area code.
3. Press down
*
until
b
ABC... is shown.
4. Press equivalent numerical digit key one or more times for
desired name (the characters are printed below the numerical
keys). Space=1.
5. Press down
*
until
b
A-D is shown.
6. Select speed dial (A-D) by pressing on the appropriate button.
7.
º
is shown. The number is now saved.
If a pause is required in the telephone number, press .
The display shows P.
If a number needs changing, simply save the new number in
place of the old one.
You can go back/delete using .
Flashing light
To alert you to incoming calls, a powerful flashing light can
be activated when the telephone is ringing. The settings
can be found under the telephone.
Flashing light ON.
Flashing light OFF.
Page 10

7
English
Socket for additional alert equipment
Extra equipment e.g. a vibrator for the ring signal can be
connected to the ((o)) socket on the back of the telephone.
Technical Information
Behind the battery cover on the underside of the telephone
you will find several switches.
These switches set technical parameters as detailed below.
Remove the small cover on the base of the telephone.
Key beep ( )
The sound that is heard when the buttons are pressed can
be switched off/on.
Microphone adaptation ( )
The microphone level may need to be adjusted for certain people.
0 is the standard setting for most countries.
+6 gives a somewhat higher sound and -6 gives a
somewhat lower sound.
Flash button time (100/300)
100 is the standard setting for most countries.
300 for France/Portugal.
Tone(♫) / Pulse(...)
Select dialling method.
The dial mode setting for UK must be Tone (Europe only).
Locking the powerful amplification ( )
The powerful amplification is set to switch off after every
call, this can be changed so the very high amplification stays
permanent switched on using the
setting. This setting
should only be activated if all users have impaired hearing and
require powerful amplification. The standard setting is
.
Selecting headset or speaker function
Select headset-/handsfree-function by setting the switch
/ . Please note that the speaker function will not work
when the headset function is activated and vice versa.
Page 11

8
English
Troubleshooting
Check that the telephone cord is undamaged and
properly plugged in. Disconnect any additional equipment,
extension cords and other phones. If the problem is
resolved, the fault is with some other equipment.
Test the equipment on a known working line (e.g. at a
neighbour’s house). If the equipment works there the fault
is probably with your telephone line. Please inform your
network operator.
If you are still experiencing difficulties, contact the place of
purchase.
Declaration of conformity
Doro hereby declares that the product Doro HearPlus
317ci conforms to the essential requirements and other
relevant regulations contained in the Directive 1999/5/EC
(R&TTE), 2002/95/EC (ROHS).
A copy of the manufacturer’s declaration is available at
www.doro.com/dofc
Guarantee
This product is guaranteed for a period of 24 months
from the date of purchase. Proof of purchase is required
for any service or support required during the guarantee
period. This guarantee shall not apply to a fault caused
by an accident or a similar incident or damage, liquid
ingress, negligence, abnormal usage, not reasonably
maintained or any other circumstances on the purchaser’s
part. Furthermore, this guarantee shall not apply to a
fault caused by a thunderstorm or any other voltage
fluctuations. This guarantee does not in any way affect
your statutory rights. (As a matter of precaution, we
recommend disconnecting the telephone during a
thunderstorm.)
 Loading...