

Page 1

DECT 160/360
English
User guide
Digital Cordless Telephone
with Caller ID
and Answering Machine (360)
Page 2
2 www.doro.com
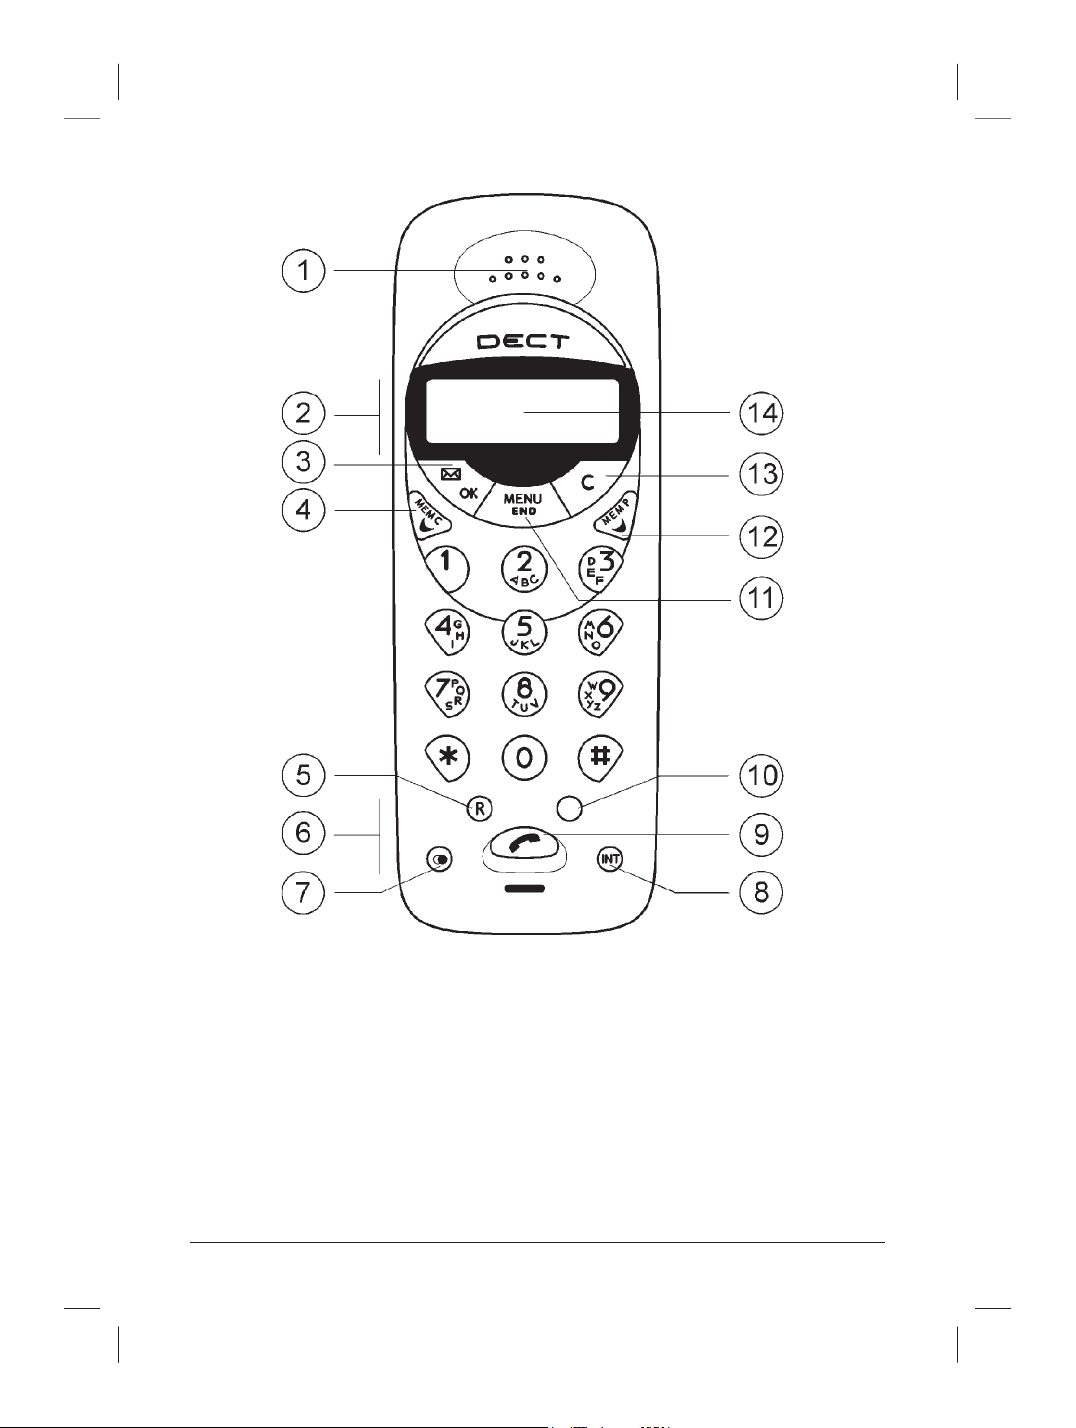
1 Speaker
2 Volume Control/Review CID
Numbers for dialling
3 CID Log/OK button
4 Left Scroll button
5 Recall button
6 Headset Socket
7 Redial button
8 Intercom button
9 Talk button
10 Speaker button (360) / Priority
Number (160)
11 Menu/End button
12 Right Scroll button
13 Cancel button
14 Display
Page 3
www.doro.com 3
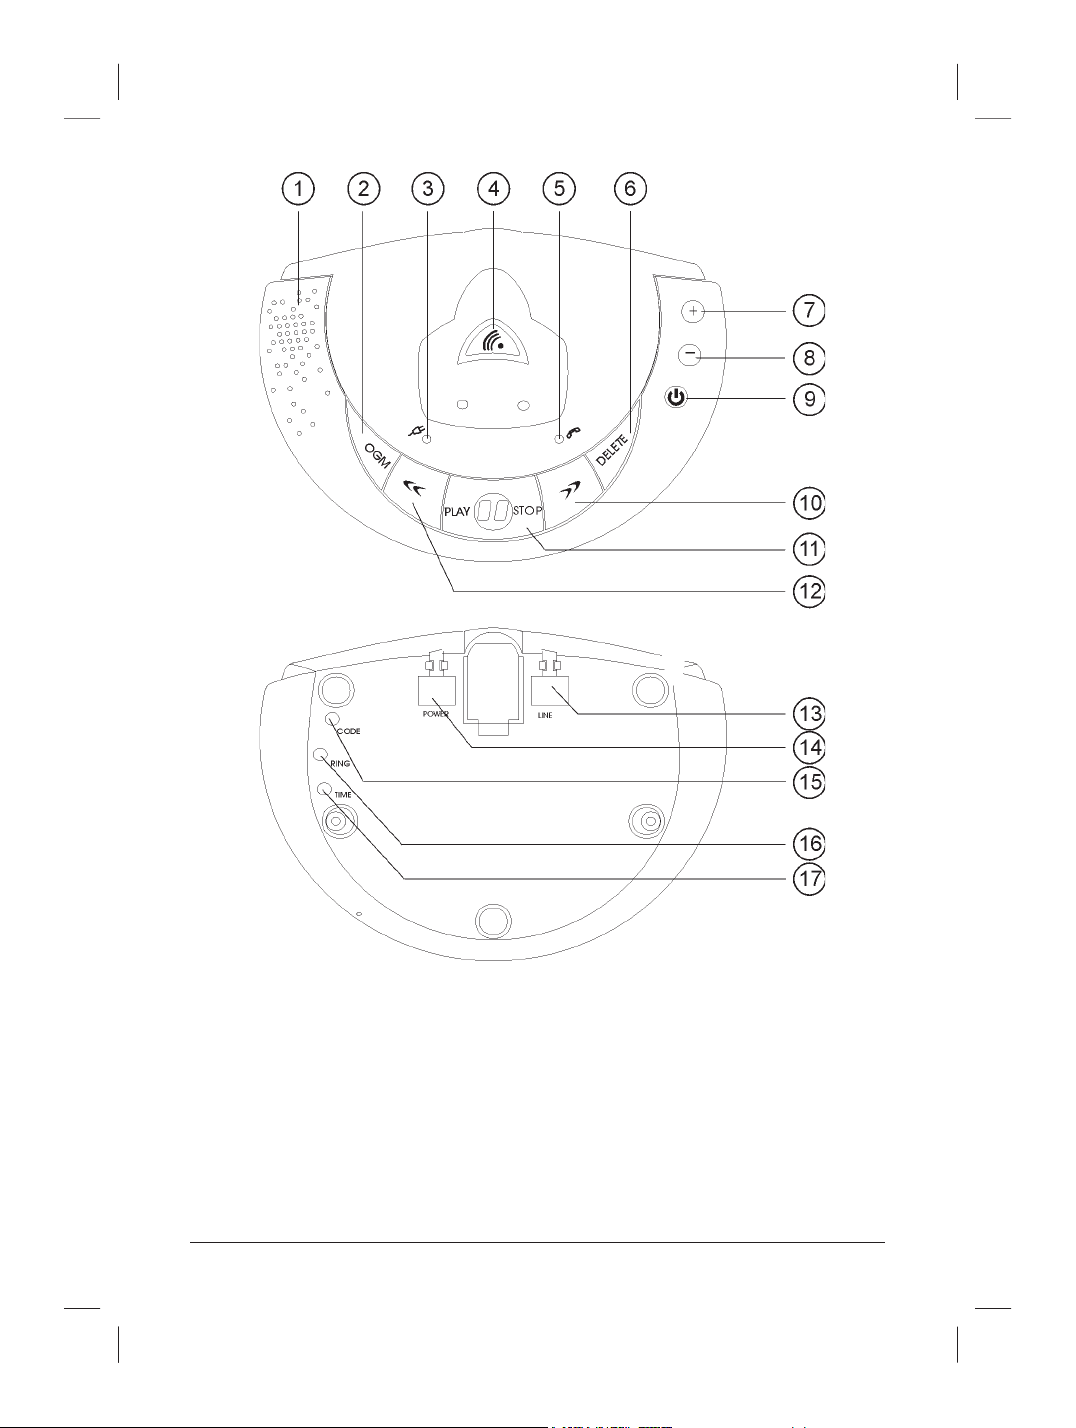
1. Speaker
2. OGM (Outgoing Message) Button
3. Power LED
4. Page button
5. In-use LED
6. Delete button
7. Speaker volume Up
8. Speaker volume Down
9. ON/OFF button
10. Skip button
11. Play/Stop button
12. Repeat button
13. Socket for line cord
14. Socket for power supply
15. Remote access code button
16. Ring select button
17. Day/time button
Note: DECT 160 has items 3, 4, 5, 13 and
14 ONLY.
Page 4

English
4 www.doro.com
Index
Installation 5
Unpacking........................... 5
Connection ......................... 5
Belt Clips ............................ 6
Battery ................................ 6
Battery Charge Indicator .... 7
Range ................................. 7
Headset .............................. 7
The Display......................... 8
Base Unit Indicators ........... 8
Operation 9
Making a Call ...................... 9
Receiving a Call.................. 9
Redial.................................. 9
Volume Control ................... 9
Handset Locator ................. 9
Optional Network Services. 10
Group Listening .................. 10
Menu 11
Phone Book 12
Caller ID 15
Settings 17
The Handset Signal ............ 17
Button Click ........................ 17
Timer................................... 17
Phone Lock......................... 18
Handset PIN Code.............. 18
User Name ......................... 18
Handset Register 19
System Settings 20
Base Unit PIN Code ........... 20
Deregister a Handset.......... 20
Base Unit Signal ................. 20
Select Country of
Installation .......................... 21
Expanded System 22
General Information............ 22
Several Base Units ............. 22
Several Handsets ............... 23
Placement of Base Units .... 23
Intercom Function ............... 23
Transferring Calls Between
Handsets ............................ 24
Answering Machine 25
Introduction......................... 25
Number of rings .................. 26
Turning Answering
Machine On/Off .................. 26
Day/Time stamp ................. 26
Outgoing Message ............. 27
Monitoring Incoming
Messages ........................... 27
Receiving Messages .......... 27
Playback of Messages ....... 28
Remote Control .................. 29
Out of Memory.................... 30
Other 31
Troubleshooting .................. 31
Guarantee........................... 32
Notes for New Zealand....... 33
Page 5

English
www.doro.com 5
Installation
Unpacking
The package should include the following items:
- Handset - Mains adapter
- Base unit - Line cord
- Battery pack - Belt clip & 2 coloured inserts
- Battery cover
Connection
1. Connect the mains adapter to the POWER socket of the base unit and to
the mains power wall socket.
2. Remove the battery lid from the back of the handset. Place the battery in the
handset, connect the battery plug and replace the lid.
3. Place the handset in the base unit. Once the handset is correctly placed in
the base unit, a beep will be heard and the segments of the battery charge
indicator in the display will ash.
4. The handset must be charged for 14 hours before use. Do not lift or use the
handset during this time.
5. Connect the telephone line cord to the socket marked LINE on the base unit
and plug into the telephone network socket (using adaptor plug if required).
6. For installation of the answering machine (DECT 360) please refer to pages
25-30.
7. The system is now ready for use.
IMPORTAN T NOTES
1. Under power failure conditions, this telephone may not operate. Please ensure that a
separate telephone, not dependent on local power, is available for emergency use.
2. The earpiece of the handset may attract small ferromagnetic objects such as staples and pins,
care should be taken when placing the handset near these items.
3. Do not place the base unit where it will be exposed to direct sunlight or other major
heat sources.
Page 6

English
6 www.doro.com
Installation
Belt Clips
A belt clip is included, which can be tted on the back of the handset. To attach
the clip, align the two edges with the indents on either side of the handset and
press rmly into place.
Battery
The telephone comes supplied with an environmentally friendly nickel metal
hydride (NiMH) battery. As with all batteries performance may degrade over
time, should you notice that the standby time has reduced considerably or there
are signs of leakage, the battery pack should be replaced.
A fully charged battery will last for approx. 5 days in standby or approx. 8 hours
talk time. These operation times apply at normal room temperature.
Recharging of a run-down battery takes about 14 hours.
Please note that the battery charge indicator in the handset display ashes while
charging and will stop when the battery is fully charged.
The base unit has an automatic charging mechanism that prevents the battery
from being overcharged or damaged due to prolonged charging.
Please note!
When the telephone is installed for the rst time, the battery must be charged for 14 hours
before using the telephone.
Use only DORO original batteries. The guarantee does not cover any damage caused by
incorrect batteries.
The handset is charged with the buttons facing upward.
Page 7

English
www.doro.com 7
Installation
Battery Charge Indicator
The symbol | in the display indicates whether it is time to recharge the
battery. The symbol has three segments which disappear as the battery charge
decreases. When the battery charge has reduced, the symbol ] is shown in
the display and warning signals are heard. If the handset is not recharged at this
time, the phone will cease to function until it is recharged.
Range
The range of the telephone varies depending on various factors in the
surrounding environment. The radio waves transmitting the call may be
hindered by obstructions, reducing the range.
Specied ranges require an unobstructed transmission between the handset and
the base unit. In such ideal circumstances, the telephone range can be up to
300 meters. In a densely populated area, house, apartment, etc. the range of the
telephone will be reduced. Try to get the best range by relocating the base unit.
The ideal location for the base unit is a high and unobstructed place.
Out of range warning
If the handset is too far from the base, the message OUT OF RANGE will be
shown on the display. Move the handset closer to the base unit within a few
seconds or the call will be lost.
Headset
The handset can be used with an optional headset via the socket on the side.
When using a headset, there is no change in the way a call is received or made.
When a headset is connected, the microphone and speakers of the handset are
automatically disconnected.
Page 8
English
8 www.doro.com
Installation
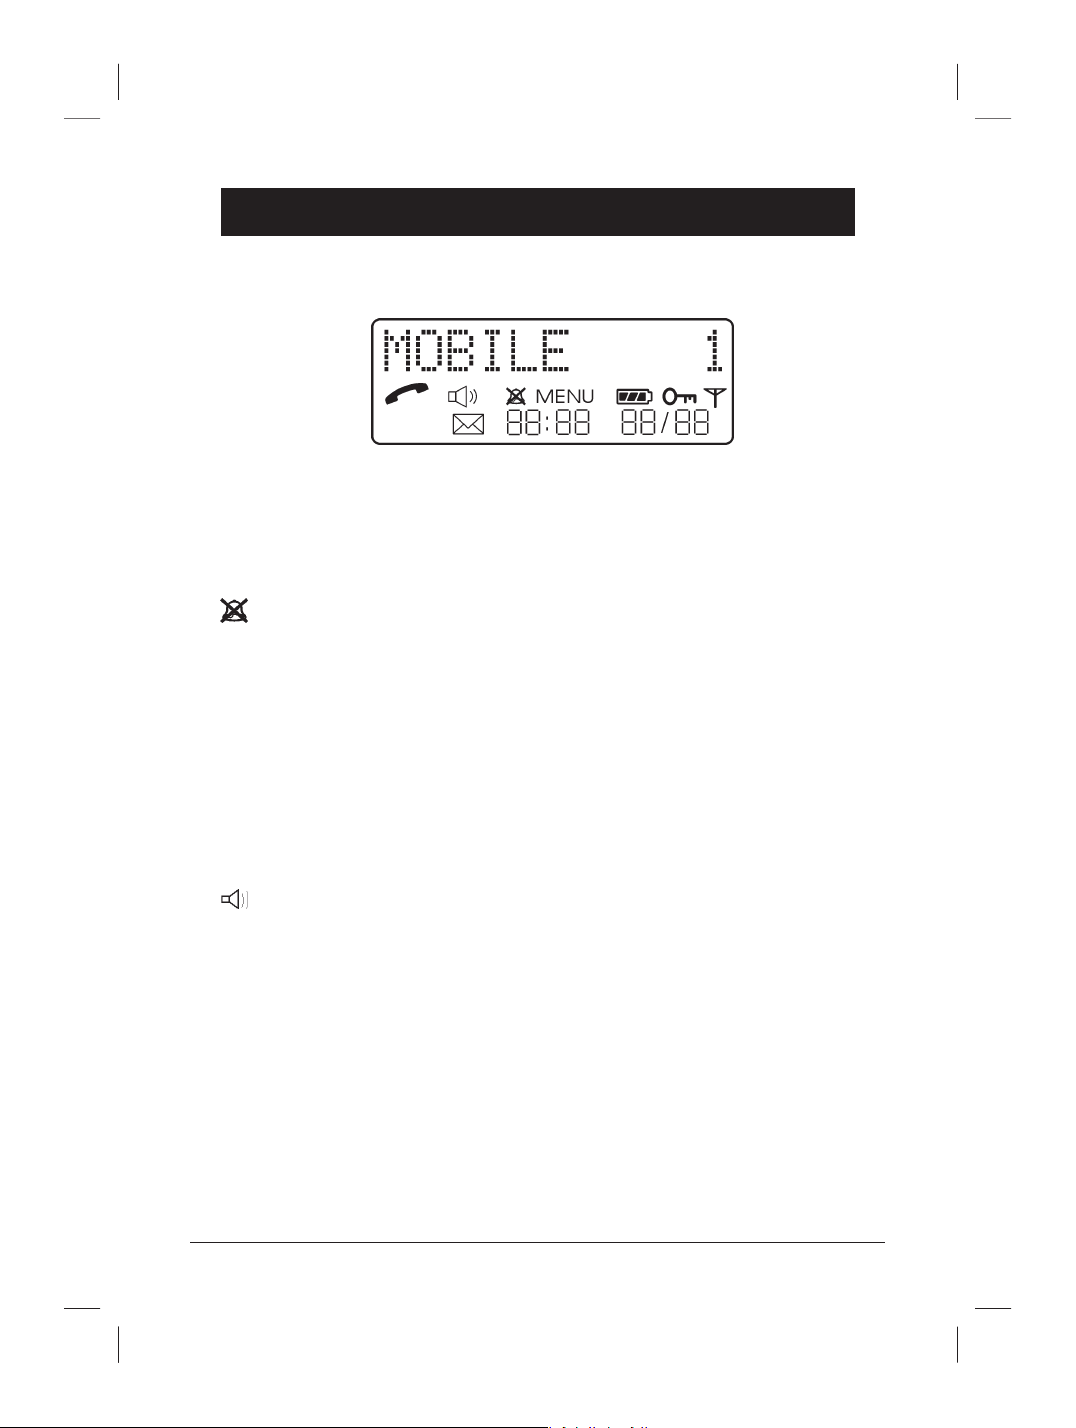
The Display
Indicator Function
q - Indicates that a call is connected.
- Indicates an answered call in the list of previously dialled
numbers
- - Handset ringer is off.
MENU - The menu is in use.
| - Battery charge indicator.
N - Phone locked.
6 - Shown within range of the base unit. Flashes when out of range.
5 - New numbers have been stored.
- Audio monitor (speaker) activated. (DECT 360, only)
Date/time
Date and time are only displayed if you subscribe to a Caller ID service, and you
have received at least one incoming call. The time cannot be manually adjusted,
it is updated automatically with each incoming call.
Base Unit Indicators
Q (green) - Indicates that a call is connected to the handset.
- Flashes while searching, registering, or ringing.
y (red) - The base unit is on and connected to the mains.
Page 9

English
www.doro.com 9
Operation
Making a Call
1. Enter the desired number. Mistakes can be erased using C.
2. Press q and the number is dialled.
3. Press q to terminate the call.
Please note!
If the telephone cannot connect to a line, a warning signal will be heard. The problem may
be due to the battery running low, the handset being too far from the base unit or all of the
transmission channels being engaged.
Receiving a Call
1. Wait for the handset to ring.
2. Press q to answer the call.
3. Press q to terminate the call.
Redial button
The ten most recently dialled numbers can easily be redialled using r:
1. Press r, the most recently dialled number is shown in the display.
2. Press +/- (on the side) repeatedly, to browse through the numbers
3. Press q, and the number is dialled.
Volume Control
The volume may be adjusted during a call using +/- (on the side of the
handset).The display will show up to four volume settings.
Handset Locator/Paging
By pressing on the base unit (located behind the charge pins), the paging
signal of the handset will be activated. This function is used to help nd the
handset or to page the person carrying the handset.
Page 10

English
10 www.doro.com
Operation
Group Listening (speaker) (DECT 360, only)
With this function activated, calls will be heard on the loudspeaker of the base
unit. This enables anyone in the same room as the base unit to hear both parties
and follow the conversation. This feature works on DECT 360 only.
1. Dial the number as usual.
2. When the call is connected, press . Group listening is activated and the
conversation is heard in the base unit speaker. The audio monitor indicator is
shown in the display.
3. The speaker volume can be adjusted with the +/- buttons.
4. To continue the conversation in the handset only, press again.
5. Press Q to terminate the call and disconnect the line.
Page 11
English
www.doro.com 11
Menu
Description of the menu system
The telephone has an easy menu system with distinct display texts.
The following buttons are used to operate the menu system:
MENU Takes you in and out of the menu system.
OK Takes you one step down into the menus and/or conrms your
choice.
C To erase/correct.
Used to scroll through the menus.
The menu consists of the following:
COMMON PHONE BOOK (COMMON MEM) This feature allows you to
store, change or erase entries in the common phone book memories stored in
the base unit. The button enters the common phone book directly from
standby mode.
PERSONAL PHONE BOOK (PERSONAL MEM) This feature allows you to
store, change or erase entries in the personal phone book memories stored in
the handest. The button enters the personal phone book directly from
standby mode.
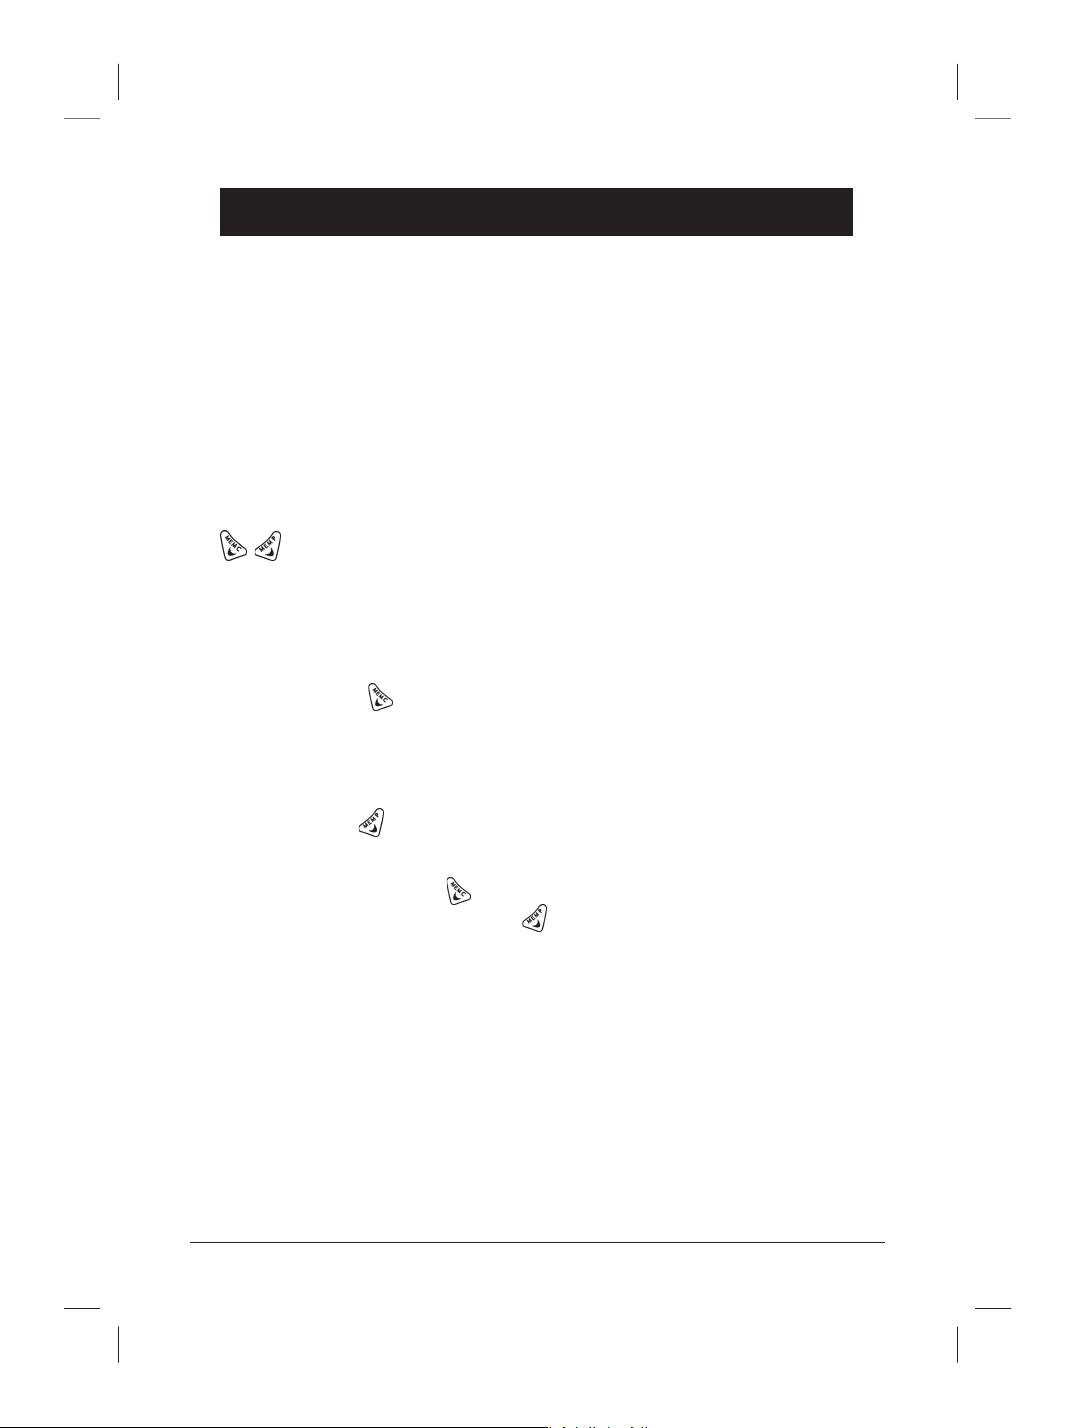
Pressing the MEMC button steps through the menu in the following
sequence. Pressing the MEMP button steps through the menu in reverse.
COMMON MEM
SYSTEM
HANDSET NAME
REGISTER
PHONE LOCK
CALL TIMER
KEY TONE
HS RINGER
PERSONAL MEM
Page 12

English
12 www.doro.com
Phone Book
Using the Phone Book
The phone book is divided into a common part (30 entries) and a personal part
(20 entries). The common phone book is stored in the base unit and is therefore
available to all registered handsets, while the personal one is available to the
individual handset only. The phone book is organised alphabetically. Each name
can be up to 10 characters long, and each phone number up to 20 digits.
After subscribing to the Caller ID service, you can set these memories as VIP.
For example, store names and numbers in your personal phone book and set as
VIP, when a call is received from one of these memories the handset will ring
differently to identify a VIP caller and the name of that person will show
on the display (memory matching).
Letters
Each number button also has several letters:
Button Letters/symbols
1.......................................... [Space character] - /
2.......................................... A B C
3.......................................... D E F
4.......................................... G H I
5.......................................... J K L
6.......................................... M N O
7.......................................... P Q R S
8.......................................... T U V
9.......................................... W X Y Z
Page 13

English
www.doro.com 13
Phone Book
Storing name/number
1. Press MENU.
2. Scroll to the desired phone book COMMON MEM/PERSONAL MEM.
3. Press OK.
4. Scroll to STORE. Press OK.
5. Enter name. Press the corresponding number button one or more times for
the rst letter, see the table on the previous page. Use C to erase and digit
1 to insert space.
6. When the whole name is entered, press OK.
7. Enter the telephone number, including the area code. To enter a dialling
pause, hold the # button until you hear a beep.
8. Press OK. The display will show VIP? (special ring signal).
9. Scroll to required setting (Yes/No). Press OK to store.
Making a call using the phone book
1. Press MENU.
2. Scroll to the desired phone book COMMON MEM/PERSONAL MEM.
3. Press OK.
4. Scroll to SEARCH. Press OK.
5. Scroll the entries or nd it faster by pressing the button corresponding to the
rst letter in the name (see the table on the previous page).
6. Press q to dial the number .
brings you directly to the common phone book from standby mode.
brings you directly to the personal phone book from standby mode.
Page 14

English
14 www.doro.com
Phone Book
Alter name/number
1. Press MENU.
2. Scroll to the desired phone book COMMON MEM/PERSONAL MEM.
3. Press OK.
4. Scroll to CHANGE. Press OK.
5. Scroll the entries or nd it faster by pressing the button corresponding to the
rst letter in the name (see the table on page 12). Press OK.
6. Use C to erase, and the number buttons to alter the name. Press OK.
7. Use C to erase, and the number buttons to alter the number. Press OK.
8. The display will show VIP? (special ring signal)
9. Scroll to preferred setting. (Yes/No) Press OK to store.
Removing an Entry
1. Press MENU.
2. Scroll to the desired phone book COMMON MEM/PERSONAL MEM.
3. Press OK.
4. Scroll to CHANGE. Press OK.
5. Scroll the entries or nd it faster by pressing the button corresponding to the
rst letter in the name (see the table on page 12).
6. Press C and then OK.
Storing a Priority number (DECT 160, only)
1. Press MENU.
2. Scroll to PERSONAL MEM. Press OK.
3. Scroll to SOS. Press OK.
4. Scroll to SOS:NUMBER. Press OK.
5. Enter the telephone number, including the area code. Press OK.
Dialling a Priority number (DECT 160, only)
Hold down the PR button for 2 seconds, the number is dialled.
This number can be called even if the phone is locked.
Page 15

English
www.doro.com 15
Caller Identication
Explanation of Caller ID
Caller ID allows you to see who is calling before you answer a call, see who has
called in your absence and see who is calling while you are on a call.
Type 1 - When Caller ID is enabled on your telephone line, your telephone will
ring. Between the rst and second ring, the display will show the callers number
or the name (if the name is stored in the phone book).
Type 11 - While on the telephone and you receive another call you will hear a
short burst of data (noise) and the call waiting tone. Following this you can view
the caller’s number/name on the display.
New calls are indicated in standby mode by a ashing 5 in the display. This
indicator is turned off when all numbers are erased. Up to 30 incoming calls can
be stored in the call log including the date and time. When the log is full, the
oldest number will be deleted automatically.
Please note!
In order for numbers to be shown, the Caller ID service must be provided by your network
operator and a current subscription in place. Contact your operator for more information.
Retrieving and Dialling Incoming Numbers.
1. Press 5. The display will indicate the number of new calls as well as the
total number stored.
2. Scroll to preferred entry. If the same number has called more than once
then this is indicated by a >. Press in order to see how many repeat
calls were made.
3. Press Q to dial the number or MENU to return to standby mode.
Page 16

English
16 www.doro.com
Caller Identication
Messages
Besides showing telephone numbers, the display may also show a number of
messages.
UNKNOWN It is an International call or a call from a PBX (no
information received).
********** The call is from a private or blocked number.
Removing a number
1. Press 5.
2. Scroll to selected entry. Press C. The display will show DELETE?
3. Press OK to erase.
Erasing all read (i.e. old) numbers.
1. Press 5. The display will indicate the number of new phone numbers as
well as the total number stored.
2. Press C. The display will show DELETE?.
3. Press OK. The display will show DELETE ALL?.
4. Press OK to erase.
Page 17

English
www.doro.com 17
Settings
The Handset Signal
There are a number of settings for the volume and melody of the handset ring
signal.
1. Press MENU.
2. Scroll to HS RINGER. Press OK.
3. Select a melody (1-3). Press OK.
4. Select the desired volume (OFF, MED and HIGH).
5. Press OK to store.
Button Click
The sound heard when the buttons are pressed can be turned off or on.
1. Press MENU.
2. Scroll to KEY TONE. Press OK.
3. Scroll to preferred setting (ON/OFF).
4. Press OK to store.
Timer
Following the connection of a call the timer is shown on the display. This call
duration timer can be switched on or off.
1. Press MENU.
2. Scroll to CALL TIMER. Press OK.
3. Scroll to preferred setting (ON/OFF).
4. Press OK to store.
Page 18

English
18 www.doro.com
Settings
Phone Lock
The telephone can be blocked for outgoing calls. However, calls to numbers in
the phone book, emergency numbers, and to the Priority number (DECT 160
only) can still be made.
1. Press MENU.
2. Scroll to PHONE LOCK. Press OK.
3. Enter the handset PIN code (0000 as default).
4. Scroll to preferred setting (ON/OFF).
5. Press OK to store.
Calls can still be received, even if the phone lock is active. When the call is
nished, the hand unit returns to locked mode.
Handset PIN Code
The handset PIN code is a four-digit code that you can set yourself. It protects
against unauthorised use of certain functions.
1. Press MENU.
2. Scroll to PHONE LOCK. Press OK.
3. Enter the present PIN code (0000 as default).
4. Scroll to CHANGE PIN? Press OK.
5. Enter the new code.
6. Conrm by entering the new code again. Press OK.
User Name
You can personalise each handset by entering text which will show on the
display in standby mode, the default is “MOBILE”.
1. Press MENU.
2. Scroll to HANDSET NAME. Press OK.
3. The name is entered in the same way as in the phone book. See page 13. Up
to 10 letters. Use C to erase.
4. Press OK to store.
Page 19

English
www.doro.com 19
Registration
Register a New Handset or Base Unit
In order to enable the use of more than one handset a registration has to be
performed.
Every new handset must be registered in order to use a base unit. A maximum
number of 4 base units can be registered with each handset, and each base unit
can handle up to 6 handsets.
On registration the handset is allocated a handset number from 1-6.
Additional base units and handsets can be purchased from your local retailer.
See also page 22 for more information about EXPANDED SYSTEM.
1. Press the on the base unit (refer to page 9) and hold it down (about 5
seconds) until the Q indicator on the base unit starts to ash and a beep
sound is heard. Registration mode will remain active for about 2 minutes.
2. Press MENU (on the handset).
3. Scroll to REGISTER. Press OK.
4. Scroll to REG. HANDSET. Press OK.
5. Select a base number for the base unit you wish to register by pressing the
corresponding number button 1-4 (Flashing numbers are available).
6. Enter the base unit PIN code (0000 as default).
7. The handset will now search for the base unit. The display will show
WAITING...
8. After a few seconds (no more than 90) unused handset numbers are
displayed. Select one of these by pressing the corresponding number button.
9. If the registration is successful the handset will return to standby mode. The
new handset number is shown on the right of the display.
Select Base Unit
You can decide which base unit you wish the handset to communicate with. You
can also set the hand unit to automatically select the base unit with the best
connection (AUTO).
1. Press MENU.
2. Scroll to REGISTER. Press OK.
3. Scroll to SELECT BASE. Press OK.
4. Select a base unit by pressing the corresponding number button (0=AUTO).
The selected number remains steady and the available alternatives will ash.
5. Press OK to store.
Page 20

English
20 www.doro.com
System Settings
Base Unit PIN Code
The base unit PIN code is a four-digit code that you can set yourself. It protects
against unauthorised use of certain functions.
1. Press MENU.
2. Scroll to SYSTEM. Press OK.
3. Scroll to CHANGE PIN? Press OK.
4. Enter the present PIN code (0000 at default).
5. Enter the new code.
6. Conrm by entering the new code again. Press OK.
De-register a Handset
Any handset can be easily be de-registered from a base unit.
Deregistration means that the handset number of the selected handset is erased
from the list of registered handsets.
Note: It is not recommended that you do not deregister the master handset (handset 1)
1. Press MENU.
2. Scroll to SYSTEM. Press OK.
3. Scroll to DE-REGISTER. Press OK.
4. Enter the base unit PIN code (0000 at default).
5. Select the handset to be de-registered by pressing the corresponding number
button.
Base Unit Ring Signal (DECT 360, only)
The ring signal of the base unit can be switched on or off.
1. Press MENU.
2. Scroll to SYSTEM. Press OK .
3. Scroll to BASE RINGER. Press OK.
4. Scroll to preferred setting (ON/OFF).
5. Press OK to store.
Page 21

English
www.doro.com 21
System Settings
Select Country of Installation (New Zealand only)
(Not applicable in the UK)
In order for the R button and the Caller ID to work properly, the proper country
must be selected. The default setting on delivery is for Australia.
1. Press MENU.
2. Scroll to SYSTEM. Press OK.
3. Scroll to SELECT AU/NZ. Press OK.
4. Scroll to proper setting. Press OK.
Page 22

English
22 www.doro.com
Expanded System
General Information
DECT (Digital Enhanced Cordless Telephone) technology offers superior
performance, clarity and security using its completely digital method of
transmission.
This model is GAP (Generic Access Prole) compatible, which means that the
handset and the base units can be used with most other GAP compatible units
irrespective of the manufacturer.
Multiple Base Units
By connecting several base units to the system, the useful range for the handsets
can be expanded. Registering desired base units with the handset will cause
the handset to automatically connect to another base unit if and when it loses
contact with the current base unit. Another practical application could be to
have one base station at home and one at work. Then the same handset can
be used in both places.
The handset remains in contact with its base unit until it goes out of range.
When this happens, the handset will begin to search for another base unit from
its list of registered base units.
It is essential that the range of the base units overlap, in order to achieve
uninterrupted coverage. The transfer from one base unit to another is automatic,
however, it cannot be done while a call is in progress.
Page 23

English
www.doro.com 23
Expanded System
Multiple Handsets
The combination of Multiple base units and multiple handsets provides for many
useful applications.
- Any of 6 handsets can answer incoming calls or make outgoing calls.
- External calls can be transferred between handsets.
- Internal handset to handset communication (intercom).
- The system allows for one internal and one external call to be in progress
at the same time.
Placement of Base Units
If you wish to use several handsets with one base unit, you should see to it that
the base unit is placed “in the middle”, so that the range will be evenly divided
among the handsets.
If you wish to use several base units to achieve an extended coverage within a
specic area, e. g. a large home or ofce, storage areas, etc. then it’s important
that the ranges of the base stations overlap. If not there may be reduced
communication in certain areas where the handsets have no signal from the
base units.
Intercom Function
When using several handsets with the same base unit, calls can be made
internally between the handsets, referred to as internal calls, or intercom.
Internal calls are limited to 2 minutes, and can only be made between handsets
connected to the same base unit.
1. Press INT.
2. Press * for a general call (to all handsets) or enter the handset number of
the handset you wish to call.
Should an external call come in while an internal call is in progress (2 handset
system), a tone will be heard. You must then terminate the internal call by
pressing INT, in order to be able to receive the external call by pressing q.
Page 24

English
24 www.doro.com
Expanded System
Transferring Calls Between Handsets
An external call can be transferred from one handset to another (they must both
be using the same base unit).
1. An external call is connected on line. Press INT on the handset, followed by
the handset number to which you wish to transfer the call.
2. During this time, the external call will be on hold (for a maximum of 2
minutes). The other handset receives the call just as always, and it is possible
to talk internally.
3. To transfer the external call, press q on the calling handset.
If you decide not to transfer the call, press INT on the calling handset to return
to the external caller.
Page 25

English
www.doro.com 25
Answering Machine (DECT 360)
Introduction
The internal answering machine can be used to store messages digitally.
Incoming messages are time-stamped with a voice that recounts the day of the
week and the time when the message was received.
When the answering machine is activated it will answer incoming calls. The
caller hears your outgoing message followed by a tone, the caller can then
leave a message up to 2 minutes in length. The total recording capacity is
15 minutes. This time is distributed between the outgoing message and the
incoming messages.
The answering machine is voice activated, which means that only those callers
who leave a message are registered.
Remote control functions enable you to ring the answering machine and play
back recorded messages from an external telephone.
Button Function
OGM - Is used to record and listen to your outgoing message.
<</>>- - Browse the incoming messages.
PLAY/STOP - Listen to messages received. Press again to stop playback.
DELETE - Delete messages.
!
- Activate the answering machine.
+/- - Adjust the speaker volume.
The following buttons are located under the base unit.
CODE - Remote access code.
RING - Number of rings before the machine answers.
TIME - Day/Time stamp.
Page 26

English
26 www.doro.com
Answering Machine (DECT 360)
Number of Rings
You can select the number of ring signals it takes before the answering machine
answers an incoming call.
2, 4 or 6 - calls are answered after the specied number of signals.
EC (TOLL SAVE) - activates the toll save function.
The toll save function allows calls to be answered after six rings when no
messages have been recorded. When a message has been recorded the machine
will answer after two rings. This is useful when using remote control, if there
is no answer after three rings, then there have been no messages recorded and
you can hang up before you are charged for the call. If, on the other hand, the
machine answers after two rings, messages have been recorded.
1. Press and hold RING (underneath the base unit) until the voice announces
"SET RINGS".
2. Use the << and >> on the base unit to select the preferred setting.
3. Press RING to store.
Day/Time Stamp
The Day/time stamp function is a voice that announces the day of the week and
the time (24 hour) each message was recorded. The Day/time stamp is heard
before each message when played back.
1. Press and hold TIME ( underneath the base unit) until the voice says “Set
day”.
2. Use <</>> to set the correct day of the week.
3. The voice says “Set hour”. Use <</>> to set the correct hour (24 hour).
4. The voice says “Set minute”. Use <</>> to set the correct minute.
5. Press TIME. The voice announces the new setting.
Turning Answering Machine On/Off
The ! button is used to switch the answering machine on and off. In the
ON position all incoming calls will be answered by the machine. If the display
indicates -- , then the answering machine is off and no calls will be answered.
Page 27

English
www.doro.com 27
Answering Machine (DECT 360)
Outgoing Message
The outgoing message is your message which is played back to all callers. The
outgoing message can be up to 2 minutes in length or you may wish to use the
pre-recorded message.
An example of an outgoing message:
“Hello and welcome to the Anderson’s. We are sorry we cannot take your call at
this time, please leave a message after the beep and we will return your call as
soon as we can. Thank you for calling.”
1. Hold OGM until the voice is heard.
2. Say your message clearly towards the machine from a distance of about
15-20 cm.
3. Press OGM to terminate recording.
4. After a few seconds the message will be played back so that you can
check the result. Repeat the same procedure if you want to change the
message. Any old outgoing message is automatically erased when a new one
is recorded.
You can check the outgoing message any time you like by pressing OGM once.
If you wish to revert back to the pre-recorded message, press the OGM and
when your message starts to play press and hold DELETE. The pre-recorded
message will play.
Monitoring Incoming Messages
Incoming messages will be heard on the loudspeaker of the base unit as they
are received. If there is no sound adjust the volume by pressing +/- . The call
can be intercepted by pressing q or lifting the receiver of another telephone
connected to the same line. If the recording does not terminate automatically,
press the STOP button once.
Receiving Messages
The answering machine has to be turned on in order to be able to receive
messages. When the phone rings, calls will be answered after the specied
number of rings (see previous page).
The caller can leave a message up to 2 minutes in length, if this time is exceeded
the call will be disconnected. The memory will store a total of 15 minutes of
messages (including the outgoing message).
Page 28

English
28 www.doro.com
Answering Machine (DECT 360)
Playback of Messages
The display indicates the number of new messages (ashing) as well as the total
number of stored messages.
Playback will always begin with new messages. If for instance there are three old
messages and two new ones, only the two new ones will be played back, then the
answering machine will return to standby mode. Press the playback button once
again to listen to all messages, starting with the oldest.
1. Press PLAY to start playback.
2. Before each message the day/time stamp will state the day and time the
message was received. A beep is sounded between the messages.
3. When playback is nished the voice says “End of messages” and the machine
returns to standby mode. All messages are saved (unless you have erased
any during playback, see below) and new messages will be recorded after
the old ones.
The following functions are available during playback:
Button Function
<</>> - Repeat/skip to next or previous message.
STOP - Terminate playback.
DELETE - Hold button down about 2 seconds to erase current
message.
+/- - Adjust the speaker volume.
To erase all old messages, hold down DELETE for 2 seconds after playback
has stopped.
Page 29

English
www.doro.com 29
Answering Machine (DECT 360)
Remote Control
This machine can be controlled remotely from any tone dialling telephone. To
use remote control, ring the answering machine and enter the remote code after
the outgoing message has been played. Once the code is accepted, several remote
control commands are available.
Remote Code
This code is needed in order to gain access to the remote control functions of
the answering machine. This code is set to 0000, but it has to be changed to
another four-digit code (0001-9999) in order for the remote control functions
to work.
1. Hold CODE (underneath the base unit) until a beep is heard.
2. Select each digit using <</>>. The display as well as the voice will help you
select the right digits.
3. Press CODE to store.
To check the current remote code, press CODE once.
Remote Control
1. Ring the answering machine.
2. Enter the remote code after the beep that follows the outgoing message.
If the code is accepted, you will hear two short beeps.
3. New messages will play back automatically.
4. Select other commands from the list on the next page.
5. To end the remote control session, hang up the phone.
Please note!
If the machine doesn’t respond correctly to the remote control commands, try pressing the
touch-tone buttons for a longer or shorter time.
Page 30

English
30 www.doro.com
Answering Machine (DECT 360)
Remote Control Commands
Button Function
1.......................................... Playback of incoming messages
2.......................................... Playback of the outgoing message
3.......................................... Erase current message
4.......................................... Repeat/skip to previous message
5.......................................... Stop, wait for new command
6.......................................... Skip to next message
7.......................................... Not used
8.......................................... Not used
9.......................................... Terminate remote control
0.......................................... Record a new outgoing message
* .......................................... Turn the answering machine off or on
#.......................................... Turn the day/time stamp function off or on
Remote Activation of the Answering Machine
If you have forgotten to turn the machine on, you can do so by remote access.
1. Ring the answering machine. It will answer after 12 rings with a long tone.
2. Enter the remote code after the beep that follows the outgoing message. If
the code is accepted, you will hear two short beeps.
3. Enter
* and hang up.
Out of Memory
The total capacity of the answering machine’s memory is approximately 15
minutes including outgoing and incoming messages. If the memory is full, no
new messages will be accepted until the existing messages have been played and
erased. The symbol .. on the display of the base unit indicates that memory
is full.
When memory is full the machine will answer after 12 rings to allow remote
playback and deletion of messages.
Page 31

English
www.doro.com 31
Other
Troubleshooting
Check that the telephone cord is undamaged and properly plugged in.
Disconnect any additional equipment, extension cords, and other telephones. If
the problem is resolved the fault is with the other equipment.
Test the equipment on a known working line (e. g. at the neighbour’s). If the
product works then the fault is with the line.
No number is shown when it rings
- In order for this feature to work you must subscribe to the Caller ID service
from your network provider.
- If the display shows ********** the call is from a private or blocked number.
If the display shows UNKNOWN it is an international call or from a PBX
(no data received).
Warning tones are heard while talking/Cannot connect
- The batteries may be running low (recharge the hand unit).
- The hand unit may be (nearly) out of range. Move closer to a base unit.
Telephone Does Not Work
- Check if the handset is turned on.
- Check the adapter, is it correctly connected to the base unit and to the
mains power?
- Check that the telephone cord has been correctly connected to the base unit
and to the line socket, by disconnecting and reconnecting both ends.
- Check the charge status of the handset battery.
- Try connecting another telephone, known to be in working order, to the line
socket. If that phone works then it is likely that this equipment is faulty.
Page 32

English
32 www.doro.com
Other
UK
If you cannot resolve the fault using the faultnder section, technical support is
available on the Premium Rate Number: 0906 302 0114.
Calls cost 50 pence per minute (prices correct at the time of going to
press), and is operational between 9AM - 5PM Monday-Friday excluding Bank
Holidays. Alternatively,
You can contact us in writing: Consumer Support Group, Doro UK Ltd.,
22 Walkers Road, North Moons Moat, Redditch, Worcestershire, B98 9HE,
(regarding any Spares or Technical query), or
Telephoning Spares: 01527 584377
E-mail on: tech@doro-uk.com
Web site: www.doro-uk.com
Guarantee
This product is guaranteed for a period of 12 months from the date of purchase.
Proof of purchase is required for any service or support required during the
guarantee period.
This guarantee shall not apply to a fault caused by an accident or a similar
incident or damage, liquid ingress, negligence, abnormal usage or any other
circumstances on the purchaser’s part. Furthermore, this guarantee shall not
apply to a fault caused by a thunderstorm or any other voltage uctuations.
This guarantee does not in any way affect your statutory rights. (As a matter of
precaution, we recommend disconnecting the telephone during a thunderstorm.)
Page 33

English
www.doro.com 33
Other
Australia and New Zealand
If you believe this product is malfunctioning, please refer to the relevant section
and/or consult the troubleshooting guide in this manual to ensure that you have
followed the instructions carefully. Additional information on DORO and our
products can be found by visiting our web site www.doro.com
Guarantee
The product is guaranteed for a period of 12 months from the date of purchase.
For more information regarding the guarantee, please refer to the guarantee card
included with this product. In the unlikely event of a fault during this period,
please contact us for assistance. If the product is then found to be faulty you will
be asked to return it directly to us with a copy of the purchase receipt.
Australia New Zealand
DORO Australia Pty Ltd Atlas Gentech (NZ) Limited
PO Box 6760 Private Bag 14927,
Baulkham Hills BC NSW 2153 Panmure
Australia Auckland
Helpline Consumer Support
Ph: (02) 8853 8444 Ph: 0900 50-025 (Toll Call)
Fax: (02) 8853-8489 Fax: (09) 574-2722
Email: helpline@doro.com.au Email: support@atlasgentech.co.nz
Web site: www.doro.com.au
Please note: The guarantee does not extend to damage caused by misuse, negligence, excessive
voltage, faults on the telephone line or lightning. This guarantee in no way affects your statutory
rights.
Accessories
The following accessories can be purchased by contacting the above.
Belt Clip
Power Supply
Coloured Handset Inserts
Headsets
Handset battery
Please note; The use of non-genuine power supplies or batteries will void your warranty.
Page 34

English
34 www.doro.com
Other
NOTE S FOR OPER ATION IN NEW ZEA LAND
ALL PRODUCTS
The grant of a Telepermit for any item of ter min al equ ipment indi cates on ly that Telecom ha s accept ed th at the item
complies wit h the mini mum conditions for connect ion to its network. It i ndicates no endorseme nt of the pr oduct by
Telecom, nor d oes it prov ide any sort of wa rra nty. Above all , it provides no assura nce th at any ite m wil l work correctly in
all r espec ts wit h anot her item of Teleperm itted equipment of a d ifferent make or model, nor doe s it imply t hat any produc t is
compat ible with al l of Teleco m’s networ k serv ices.
Thi s equi pment sh all not be set to m ake automatic calls to the Tele com “111” Emergency Ser vice.
Thi s equi pment may not provide for th e effective h and-over of a ca ll to a nother devic e conne cted to t he same line .
CND PRODU CTS
If a charge for local ca lls i s unacceptable, the “ Dial” but ton shou ld NOT be used for loc al ca lls. O nly t he 7-di gits of t he local
number should b e dia lled from you r telephone. DO NO T dia l the area code dig it or the “ 0” pre x.
ANSW ERING M ACH INES
Thi s equi pment should not be used un der any c irc umst ances w hich m ay const itute a nuisa nce to the other Tele com
custom ers.
All p erson s usin g this devi ce for recordi ng tele phone conversat ions shall c omply with New Z ealand law. T his re qui res that
at least one par ty to t he conver sation is to be aw are that it is be ing recorded . In additio n, the P rinc iples enumerated in t he
Priva cy Act 1993 s hal l be compl ied with in r espec t to the natur e of the pe rsona l informat ion col lecte d, the purp ose for its
colle ctio n, how it is u sed and w hat is d isclosed to any other part y.
Page 35

English
www.doro.com 35
Page 36

www.doro.com
 Loading...