

Page 1
English
Doro CareMobile
User Guide
Page 2

English
Contents
Package contents.......................................................................................... 1
Read first: Safety information....................................................................... 1
Important information................................................................................... 2
Product description ....................................................................................... 3
Parts and descriptions .......................................................................... 4
Different types of alarm transmitters................................................... 6
Other functions...................................................................................... 6
To activate the alarm..................................................................................... 7
Installation ..................................................................................................... 8
Step-by-step installation guide ............................................................. 8
Verification of the signal coverage and strength................................. 9
Verification of the alarm trigger ratio coverage................................. 10
Radio trigger Elliot .......................................................................................10
Programming ...............................................................................................12
Programming radio triggers................................................................12
Delete all radio triggers.......................................................................12
Maintenance................................................................................................13
Cleaning ...............................................................................................13
Replace the battery.............................................................................13
Replace the radio trigger battery........................................................13
Technical data .............................................................................................14
Carephone Doro CareMobile .............................................................. 14
Portable alarm trigger Elliot................................................................ 14
Environment.........................................................................................14
Radio receiver parameters: ................................................................ 15
Environmental information .........................................................................16
Legal notices................................................................................................ 16
Page 3
English
Package contents
• Doro CareMobile
• Power supply
• User guide
• SIM card activation instructions (including alarm receiver contacts)
• Elliot radio trigger with accessories:
• Wristband
• Wristband attachment
• Neckband
• Neckband attachment
• Pocket clip
• Easy press concept (EPC) accessory
Read first: Safety information
Always read and follow the safety information accompanied by this
symbol.
Do pay particular attention to the potential for interference from other
systems operating in the same or adjacent frequency bands.
Do only use supplied and/or approved accessories. Using unapproved
accessories may cause performance problems and malfunctions that
are not covered by the warranty.
Do install the equipment easily accessible and near the wall socket.
The power supply can be used as a disconnecting device.
Don't open the covers to the compartments on the back side. The covers may only be opened by authorized persons in accordance with the
instructions in the service manual.
Don't replace the batteries on your own. Battery replacement may be
performed only by authorized persons in accordance with the instructions in service manual. Only use recommended battery type as stated
in the service manual. Risk of explosion if battery is replaced by an incorrect type. Used batteries shall be disposed of in an environmentally-responsible manner according to its instructions.
1
Page 4

English
Important information
All systems using radio and network communication are subject to interference beyond the user’s control.
Products from Doro are designed to minimise the impact of such interference. Nevertheless, the user must be aware that system components
can be subjected to interference or other influences that may cause
malfunction.
It is therefore important to regularly check that every part of the system
works in all areas, especially radio communications. Contact your supplier immediately in case of any suspected malfunction.
For further information, please contact your supplier or refer to the service manual or the documentation at www.icareonline.com.
Information in this document may become out of date without notice.
The only warranties for Doro Care's products and services are those that
are specifically mentioned in the warranty terms and conditions accompanying such products and services. Nothing in this document shall be
construed as a warranty. Doro Care shall not be liable for technical errors, typographical errors, or omissions in this document.
2
Page 5

English
Product description
Doro CareMobile is a digital alarm unit with a built in GSM module, the
unit has possibility to transfer alarms over broadband/network connections and mobile telephone networks. The unit offers the user the possibility of two way voice communication using existing standard for VoIP
(Voice over Internet Protocol) calling. The unit uses SIP, a standard protocol to initiate speech and video over broadband connections. In addition
to voice connected alarm calls Doro CareMobile offers a platform for
transfer of detailed alarm information, speech messages, medical information, online status etc.
The Elliot radio trigger is adapted for use with the unit, see Radio trigger
Elliot, p.10.
3
Page 6
English
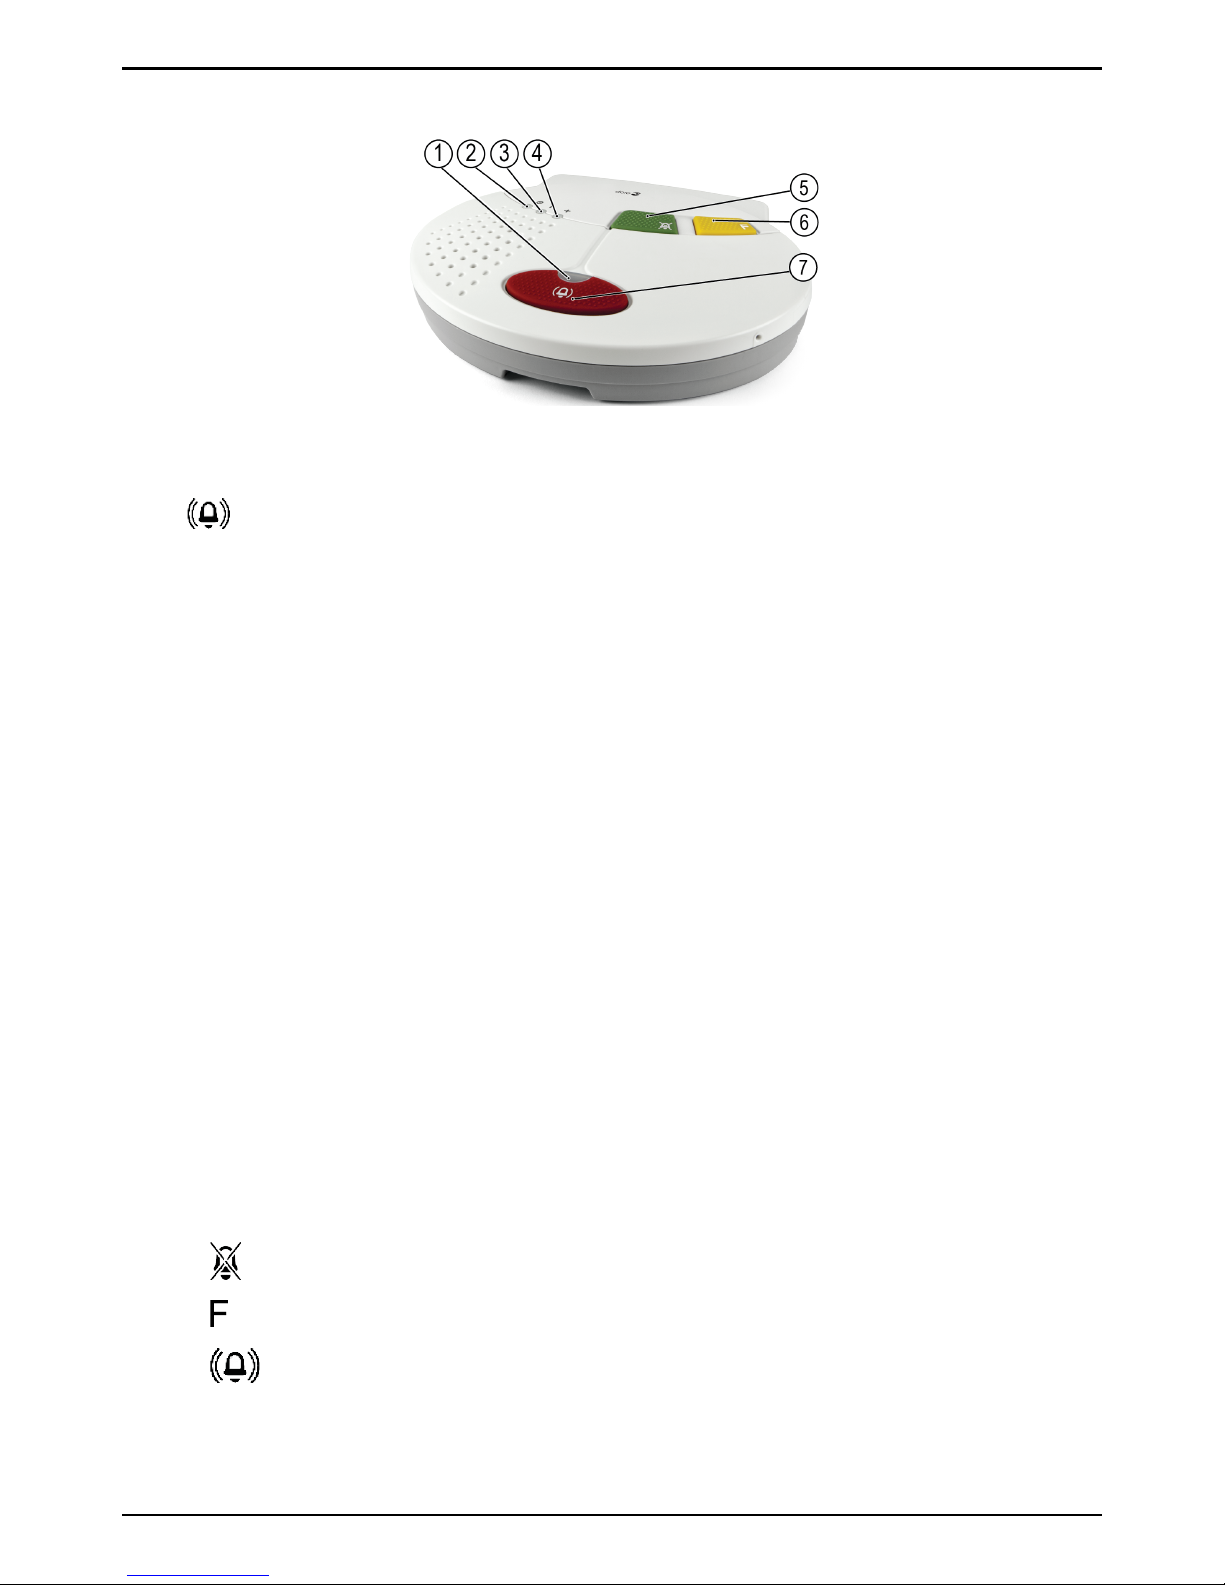
Parts and descriptions
Indicator lights:
1
Alarm
Off
Steady light
Slow flashing light
RED
No alarm contacts programmed
or battery operation mode
Idle mode (normal mode)
Ongoing alarm!
2
!
Power on
Steady light
Flashing light
Slow flashing light
GREEN
Mains power
Ready for programming the
alarm accessories
Battery operation
3
! Error
Off
Steady light
Flashing light
RED
Normal operation
Mains fault GSM
Trying to connect
4
+
Status
Off
Steady red light
Alternating red and green
RED / GREEN
Normal operation
Battery problem
Ongoing alarm!
Buttons (with the following standard functions):
5
Green button Cancel alarm
6
Yellow button Function button
7
Red button Activate alarm
Note! The yellow Function button has no function upon delivery but is
programmable for special functions.
4
Page 7

English
Connections overview
1
Volume Loudspeaker volume adjustable in three
(3) levels.
2 USB port
Power supply
3
Power switch
The device is powered on when the SIM
card is inserted in the SIM card holder.
To power off the device, remove the SIM
card from the SIM card holder.
4 Hole for wall mounting
– – –
5 Antenna connector
Doro CareMobile has a built-in antenna
that is optimised for best reception. In
cases where the operator's coverage is inadequate where Doro CareMobile is located, you can attach an external
antenna to the SMA connector, this is activated automatically. NOTE! Aerials only
approved of Doro Care and adapted for
Doro CareMobile may be used.
6
Battery compartment
– – –
CAUTION
The covers to the compartments on the back side may only be opened
by authorized persons in accordance with the instructions in the
service manual.
5
Page 8

English
Different types of alarm transmitters
CAUTION
In order for an alarm to be sent, at least one alarm receiver/response
needs to be programmed.
Up to ten transmitters, e.g. radio triggers, can be programmed with the
Doro CareMobile. Examples are the smoke detector, door alarm, bed
alarm and the personal alarm trigger Elliot, see Radio trigger Elliot, p.10.
All alarm accessories automatically perform tests on its own battery status and provides alerts for battery failure.
Other functions
Additional functions can be activated or changed by programming – refer
to the service manual or contact your supplier for further information.
6
Page 9

English
To activate the alarm
The assistance alarm can be activated:
1. by pushing a radio trigger.
2. by pressing the red button on the Doro CareMobile.
On activation, the Doro CareMobile calls an alarm receiver to summon
help. There is a possibility to attach up to ten (10) different radio accessories. wired alarm triggers.
7
Page 10

English
Installation
CAUTION
Installation must be performed only by authorized persons in
accordance with the instructions in the service manual. Always verify
the functionality and coverage ratio after installation and programming.
Step-by-step installation guide
1
Unmount the cover and the
safety screw over the SIM card
and mains connector.
Connect the power adaptor to
the power outlet and
to the USB port
on the
Doro CareMobile.
2 Push the SIM card into the SIM
card holder. The Doro CareMobile has a built-in switch in the
rack for the SIM card. The device
is powered on when the SIM
card is inserted in the SIM card
holder. Remove the SIM card to
power off.
Mount the cover and the safety
screw over the SIM card and
mains connector.
Note! The power supply shall be placed so the information text Do not to
unplug sticker is visible.
For further advice regarding installation, contact your supplier.
8
Page 11

English
Verification of the signal coverage and strength
The signal strength shall always be verified during, or in association with,
the installation/deployment of the CareMobile in order to ensure troublefree operation.
The verification is done as follows: Press the yellow and green button simultaneously, then release. The three indicators showing the current signal strength during four seconds as follows:
+
Lights red
The measured signal strength 0 –
Not defined
+
Lights green
The measured signal strength 14 or lower –
Not sufficient
!+Lights red
Lights green
The measured signal strength 15 or higher –
Good
!
!
+
Lights green
Lights red
Lights green
The measured signal strength 20 or higher –
Very good
The higher the value the higher the strength. You need to get at least
strength Good for good communication. If this can’t be achieved, try to
move the unit in different locations in the residence until approved value
are fulfilled.
Note! If accepted value can’t be achieved an external antenna must be
used.
9
Page 12

English
Verification of the alarm trigger ratio coverage
CAUTION
Always verify the functionality and coverage ratio after installation and
programming.
• Hold down the green button for approximately four seconds until the
unit emits a beep, release the button. The indicator light Power on
! flashes green.
• Push the radio trigger. Once the Doro CareMobile receives the radio
signal, you will hear a tone.
Radio trigger Elliot
Radio trigger Elliot uses two-way radio communication, this means that
when Doro CareMobile receives an alarm from Elliot it will send an confirmation receipt This is indicated on Elliot by indicator light change from
red to green. If Elliott doesn't get any confirmation, the alarm will be repeated. Elliot has two programmable buttons.
Elliot can be worn using a wristband, neckband or pocket clip. The Doro
Care Easy Press Concept (EPC) accessory simplifies use for persons with
reduced dexterity to activate an alarm.
10
Page 13

English
The accessories are easily attached with a simple click-in action.
1. Indicator light
2. Alarm button
3. Function button
Wristband attachment
1. Neckband attachment
2. Cover plate
Easy press concept (EPC) accessory
The Doro Care Easy Press Concept
(EPC) accessories makes it easier
for those with reduced physical
strength to activate the alarm.
• Pocket clip
• Cover plate
11
Page 14

English
Programming
Contacts, alarm codes and settings are programmed using
www.icareonline.com or by using a computer and the Doro Care CS2 soft-
ware. In some cases, the Doro CareMobile can be delivered pre-programmed by the supplier. For help with programming, please refer to the
service manual or contact your supplier.
Programming radio triggers
Up to ten (10) radio triggers or other radio-alarm transmitters can be programmed to Doro CareMobile.
To connect a radio trigger
• Press the green button for approximately four seconds until the unit
emits a beep, release the button. The indicator light Power on !
flashes green.
• Push the radio trigger or activate other alarm accessories. Once the
Doro CareMobile receives the radio signal, you will hear a distinct
tone signal.
• Confirm by pressing the red button CareMobile, you will hear a confirmation tone.
Delete all radio triggers
CAUTION
All programmed radio triggers will be deleted!
To delete all radio triggers
• Press the green button for approximately four seconds until the unit
emits a beep, release the button. The indicator light Power on !
flashes green.
• Briefly press the volume key
on the bottom of the CareMo-
bile. You will hear a distinct tone signal, all accessories are deleted.
12
Page 15

English
Maintenance
Cleaning
The CareMobile and radio trigger should be cleaned using a slightly damp
cloth. Solvents may not be used.
Tip: By ordering a complete housing set you can upgrade your used Elliotbutton to look as brand new.
Replace the battery
Battery should be replaced within three years, or a.s.a.p after battery
alarm.
Replace the radio trigger battery
To replace the radio trigger battery, please refer to the service manual or
contact your supplier.
CAUTION
Battery replacement may be performed only by authorized persons in
accordance with the instructions in service manual.
13
Page 16

English
Technical data
Carephone Doro CareMobile
Dimensions:
200 mm x 175 mm x 35 mm (HxWxD)
Power supply:
AC-DC Adapter 230VAC/5VDC 1.0A. Model
no. SDB0501000P
Power consumption:
2W (Nominal)
Backup battery:
3.7V Li-Ion, Art. nr: 300163, Cell Model:
BK514461AR
Backup time:
Battery operation up to 120 hours
Communication: GSM/GPRS dual band 900/1800 MHz
Radio frequency band: 869,2125 MHz
Radio receiver class:
1
Number of radio
transmitters:
Up to 10
SIM card interface: 1,8V and 3V
Equipment class:
Class 1 radio equipment
Portable alarm trigger Elliot
Dimensions:
45 mm x 30 mm x 13 mm (HxWxD)
Battery:
3V lithium battery CR2430
Battery life: Up to five years
Water resistance:
Complies with IP67
Radio frequency band: 869,2-869,25 MHz
Radio frequency power: max. 3,16mW (5 dBm)
Environment
This product is intended for indoor use in a normal residential environment.
Temperature:
Operating temperature 5° C (41° F) to 35°
C (95° F)
Humidity:
0% to 75% relative humidity (noncondensed)
Environmental class:
1 (EG-I)
14
Page 17

English
Radio receiver parameters:
Max. usable sensitivity:
–113dBm
Average usable sensitivity:
ver: 28,7dBuV/m, hor: 27,0dBuV/m
Adjacent channel selectivity:
-26,2dBm/-28,2dBm
Intermodulation rejection:
-36dBm/-37dBm
Spurious response rejection: -30dBm
Blocking or desensitisation:
-16dBm
15
Page 18

English
Environmental information
This product complies with the requirements of the EU directives, 2012/
19/EU (WEEE) and 2006/66/EG (batteries). These directives regulate
the product liability for electrical and battery recycling with the purpose
of increasing recycling and minimising waste. The unit is marked with the
crossed out wheeled bin logo, which indicates that it shall be handed in
for recycling. The product can be returned free of charge to a recycling
station that is connected, directly or via a recycling system, to Doro Care
or to your distributor. For detailed instructions, please check with your
distributor or visit our website, www.icareonline.com. Note! The WEEE information and recycling instructions applies to European Union member
states only. For other countries please check local legislation or contact
your distributor. Manufactured in accordance with the EU directive,
2011/65/EU (RoHS2). The materials used in the radio trigger wristband
and neckband meet the textile safety requirements of
Oeko-Tex standard 100.
Legal notices
The information contained here is subject to change without notice. The
only warranties for Doro Care products and services are set forth in the
express warranty statements accompanying such products and services.
Nothing herein should be construed as constituting an additional warranty. Doro shall not be liable for technical or editorial errors or omissions
contained herein.
16
Page 19

English
17
Page 20

English
Version 1.0
© 2017 Doro AB. All rights reserved.
www.doro.com
REV 17858 — STR
 Loading...