

Page 1
This product can be set up usingThis product can be set up using
This product can be set up using
This product can be set up usingThis product can be set up using
anan
y curry curr
an
y curr
anan
y curry curr
Internet Explorer 6 or NetscapeInternet Explorer 6 or Netscape
Internet Explorer 6 or Netscape
Internet Explorer 6 or NetscapeInternet Explorer 6 or Netscape
Navigator 6.2.3.Navigator 6.2.3.
Navigator 6.2.3.
Navigator 6.2.3.Navigator 6.2.3.
enen
t web brt web br
en
t web br
enen
t web brt web br
owserowser
owser
owserowser
, i.e, i.e
, i.e
, i.e, i.e
.,.,
.,
.,.,
DWL-2210AP
D-LinkD-Link
D-Link
D-LinkD-Link
802.11g/2.4GHz Wireless802.11g/2.4GHz Wireless
802.11g/2.4GHz Wireless
802.11g/2.4GHz Wireless802.11g/2.4GHz Wireless
AA
dd
aptive Aaptive A
A
d
aptive A
AA
dd
aptive Aaptive A
AirAir
PremierPremier
Air
Premier
AirAir
PremierPremier
ccess Pccess P
ccess P
ccess Pccess P
oinoin
oin
oinoin
Before You Begin
Networks with a DHCP Server: The DWL-2210AP is DHCP enabled by default. Use the
KickStart Wizard on the DWL-2210AP CD-ROM to discover and identify DWL-2210AP
Access Points on your network.
Networks without a DHCP Server: The DWL-2210AP will default to an IP address of
192.168.0.50 with a subnet mask of 255.255.255.0. Y ou will need to assign your computer
a Static IP address within the same range as the DWL-2210AP’s IP address for the
purpose of configuring the DWL-2210AP .
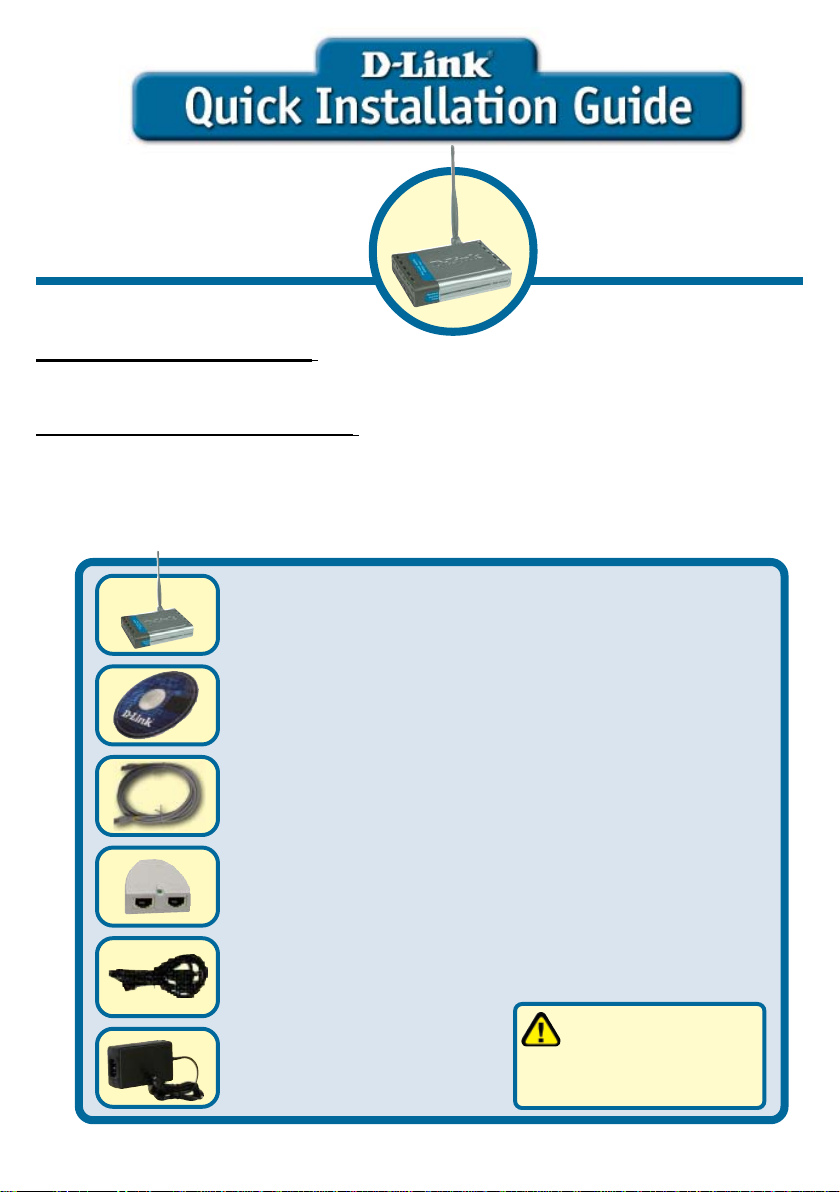
Check Your Package Contents
DWL-2210AP AirPremier™ Wireless Adaptive
Access Point
CD-ROM with Manual and Software
™™
™
™™
tt
t
tt
Ethernet (CAT5e UTP/Straight-Through) Cable
PoE Base Unit
Power Cord
Using a power adapter
with a different voltage
Power Adapter
If any of the above items are missing, please contact your reseller.
©2004 D-Link Systems, Inc. All rights reserved. Trademarks or registered trademarks are the property of their respective holders.
Software and specifications subject to change without notice. DWL-2210AP . 08262004
rating will damage and void
the warranty of this product.
Page 2

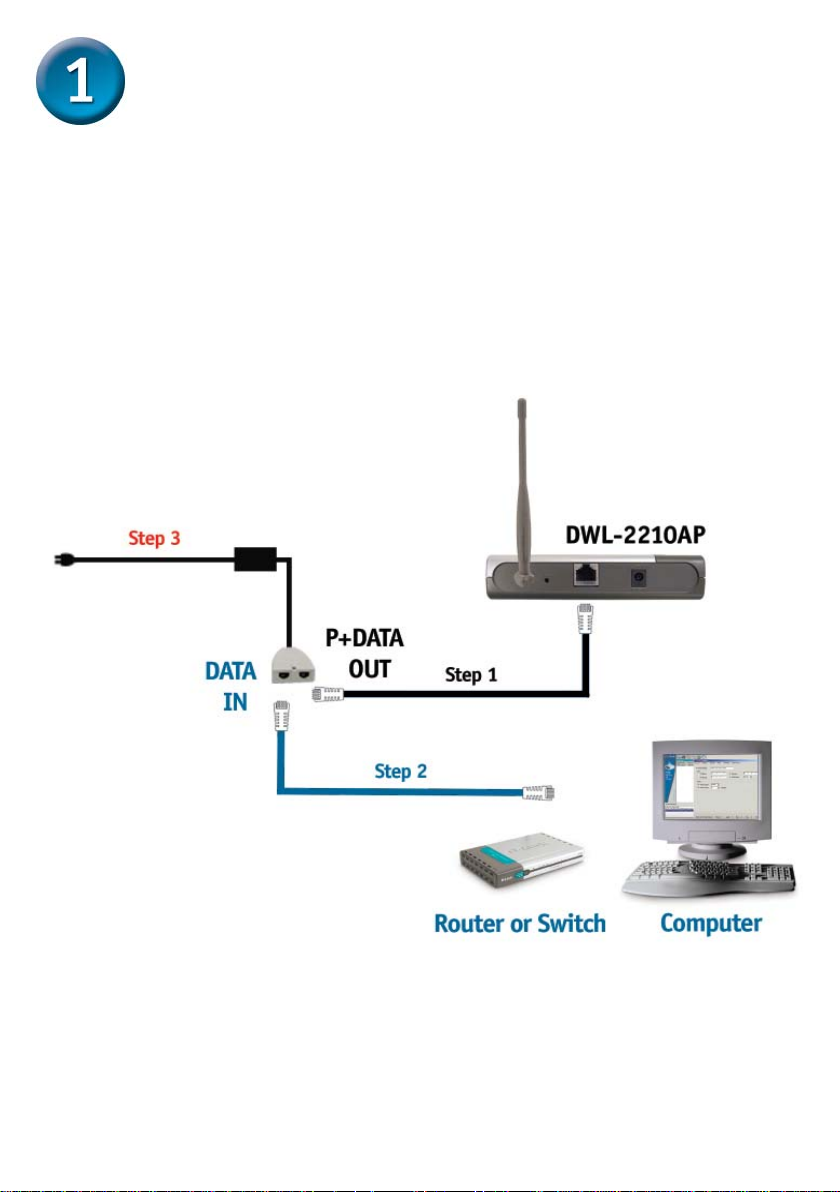
Connecting the DWL-2210AP to Your
Network
There are two methods of powering the DWL-2210AP . The power adapter can plug directly
into the unit or plug into the PoE (Power over Ethernet) base unit. To connect power
directly to the DWL-2210AP, please follow the step s on this page. To use the PoE base
unit, please follow the steps on the next page.
Connecting Power Directly to the DWL-2210AP
A.Connect the power adapter to the receptor at the back panel of the DWL-2210AP.
Plug the other end of the power adapter to a wall outlet or power strip. The Power LED
will turn ON to indicate proper operation.
B.Insert one end of the Ethernet cable to the Ethernet port on the back panel of the
DWL-2210AP and the other end of the Ethernet cable to an Ethernet Broadband
Router (i.e., D-Link DI-604) or Switch (i.e., D-Link DSS-5+). Note: Y ou also have the
option of connecting the DWL-2210AP directly to the computer that will be used for
configuration. The LAN LED light should illuminate to indicate a proper Ethernet
connection. (Note: The Ethernet Port on the DWL-2210AP is Auto-MDI/MDIX. This
allows you to use a straight-through or crossover Ethernet cable to connect to the
Ethernet port on the DWL-2210AP .)
C.The DWL-G650 AirPlus Xtreme G™ Wireless Cardbus Adapter and the DWL-G520
AirPlus Xtreme G™ Wireless PCI Adapter will connect, right out of the box with the
DWL-2210AP , using their default wireless settings. Computers with 802.1 1b wireless
adapters can also connect to the DWL-2210AP.
2
Page 3
Connecting the DWL-2210AP to Your
Network (continued)
Connecting PoE (Power over Ethernet) to the DWL-2210AP
• Step 1: Connect one end of an Ethernet cable (included with your package) to the
LAN port on the DWL-2210AP and the other end of the Ethernet cable to the port
labeled P+DATA OUT on the PoE base unit.
• Step 2: Connect another Ethernet cable from the DA T A IN port on the PoE base unit
to your router/switch or to a PC.
• Step 3: Attach the power adapter to the connector labeled POWER IN on the PoE
base unit. Att ach the power cord to the power adapter and into an electrical outlet.
3
Page 4
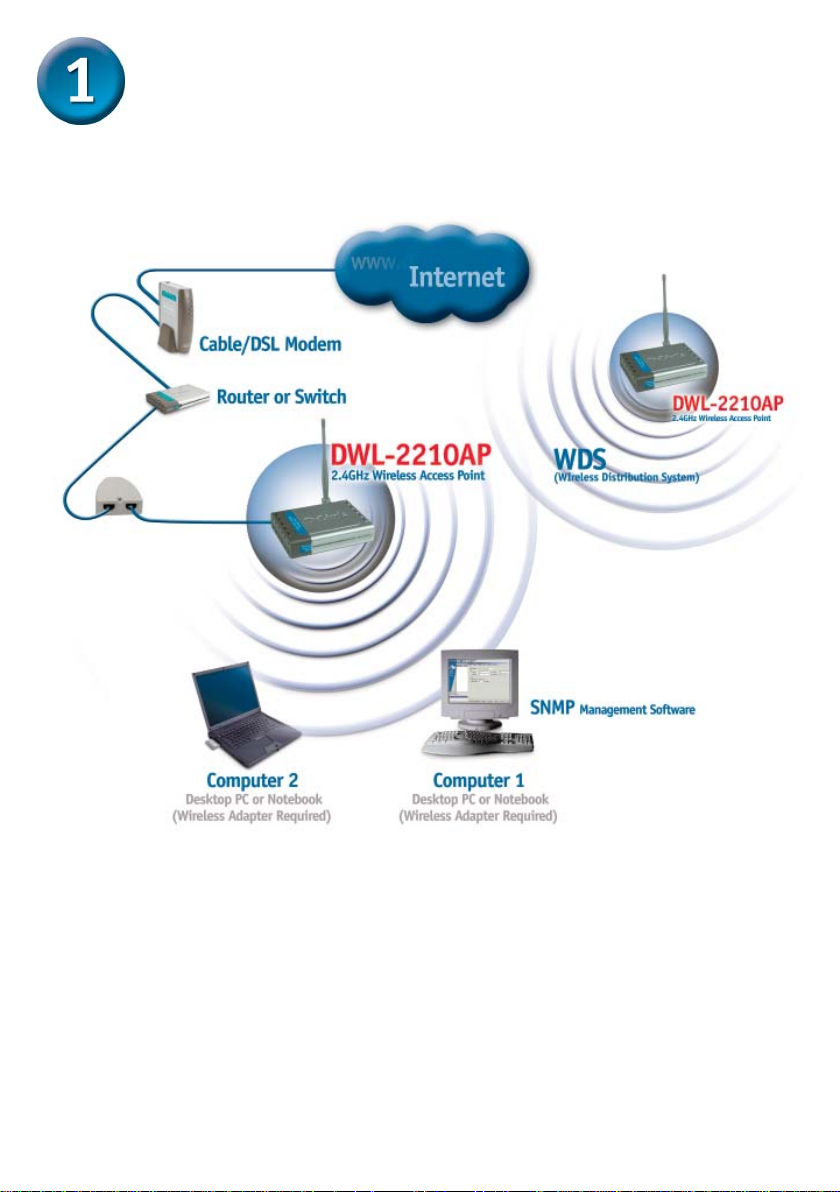
Connecting the DWL-2210AP to Your
Network (continued)
When you have completed the steps in this Quick Installation Guide, your connected
network should look similar to this:
4
Page 5
Connecting the DWL-2210AP to Your
Network (continued)
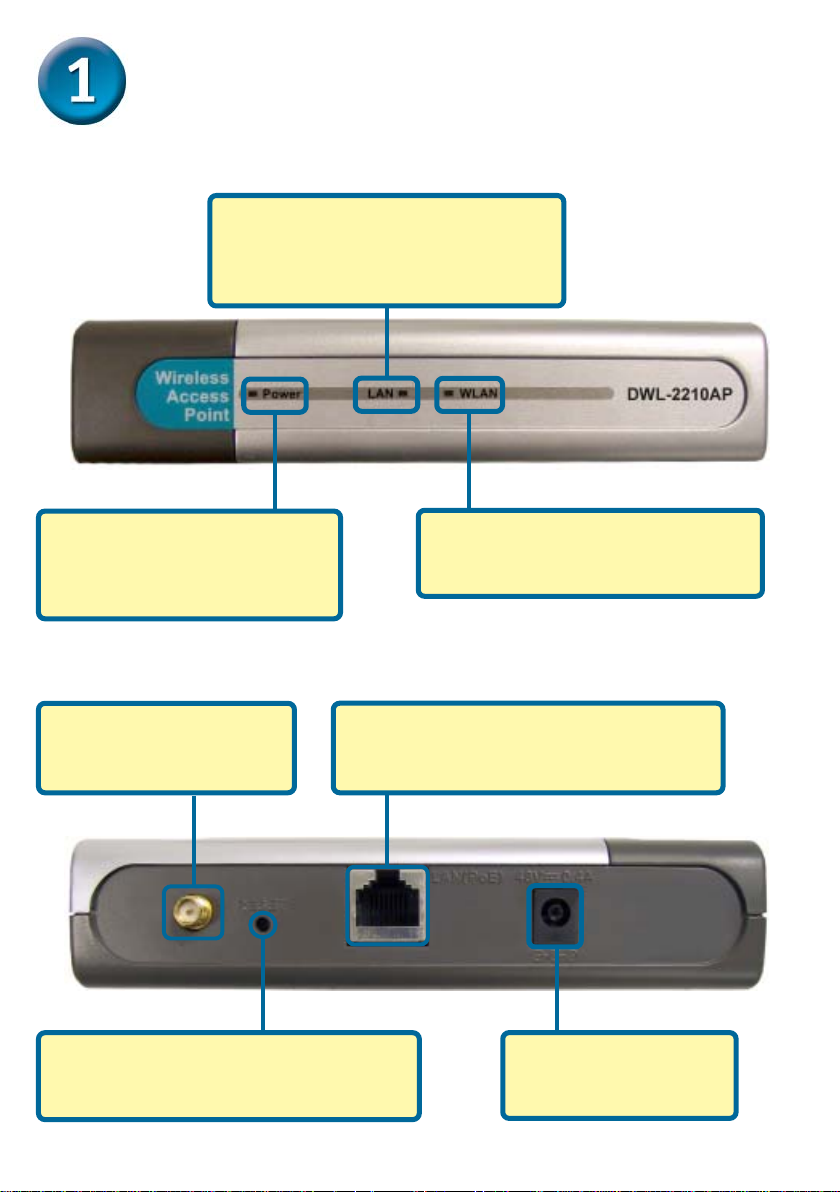
Front Panel
LAN LED
A solid green light indicates a good
network connection. The light will blink
when there is activity on the LAN.
Power LED
The Power LED will light up solid
green when properly connected
to a valid power source.
Rear Panel
Antenna Connector
Attach the wireless antenna
to this connector.
Reset Button
Pressing this button restores the Access
Point to its original factory default settings.
LAN Port
Connects to a computer , a switch, router,
or PoE base unit using an Ethernet cable.
WLAN LED
The Wireless LAN LED will blink to
indicate wireless network activity .
Receptor
Used to connect Power
Adapter directly to unit.
5
Page 6

Using the KickStart Wizard on a Network
with a DHCP Server
The KickStart Wizard is used to discover and identify DWL-2210AP Access Points
on a network with a DHCP server. KickStart will not discover any other devices. If
your network does not have a DHCP server, please skip to Section 3 on page 9.
Insert the DWL-2210AP CD-ROM into
your CD-ROM drive. The autorun screen
should load automatically . If not, go to
My Computer and double click on your
CD-ROM icon.
Click on KickStart
(DHCP networks only)
The KickStart welcome
screen appears.
Click Next
The KickStart Wizard will
search for DWL-2210AP
Access Points on your
network.
6
Page 7

Using the KickStart Wizard on a Network
with a DHCP Server (continued)
KickStart will display the
Access Point(s) on your
network. If necessary,
click Back to rescan the
network.
Click Next
Click Administration Console
The DWL-2210AP login
screen will appear.
Type admin in the User
name and Password fields.
Click OK
7
Page 8

Using the KickStart Wizard on a Network
with a DHCP Server (continued)
The DWL-2210AP Web-management interface will appear. Please refer to the
user manual located on the CD-ROM for details on configuring the DWL-2210AP.
8
Page 9

Using a Static IP Address to Connect to
the DWL-2210AP
To assign a Static IP Address on the computer that you are using to configure the
DWL-2210AP, follow the steps for the appropriate operating system:
Windows XP:
Go to Start, click on Control Panel
double-click on Network Connections,
right-click on Local Area Connections
and select Properties.
Highlight Internet Protocol (TCP/IP)
Click Properties
Input a static IP address in the same range
as the DWL-2210AP’s IP address of
192.168.0.50. Each computer/device must
have a unique IP address.
Select Use the following IP address
IP address: 192.168.0.51
Subnet mask: 255.255.255.0
Click OK
9
Page 10

Using a Static IP Address to Connect to
the DWL-2210AP
Windows 2000:
Go to Start > Settings > Network and Dial-
up Connections. Double-click on the Local
Area Connection associated with the
Network Adapter installed on your system and
select Properties.
Click Internet Protocol (TCP/IP)
Click Properties
Input a static IP address in the same range
as the DWL-2210AP’s IP address of
192.168.0.50. Each computer/device must
have a unique IP address.
Select Use the following IP address
IP address: 192.168.0.52
Subnet mask: 255.255.255.0
Click OK
10
Page 11

Using a Static IP Address to Connect to
the DWL-2210AP
Windows Me & 98SE:
Go to Start > Settings > Control Panel >
Double-click on the Local Area Connection
associated with the Network Adapter inst alled
on your system > select Properties
Click Internet Protocol (TCP/IP)
Click Properties
Input a static IP address in the same range
as the DWL-2210AP’s IP address of
192.168.0.50. Each computer/device must
have a unique IP address.
Select Specify IP Address
IP address: 192.168.0.52
Subnet mask: 255.255.255.0
Click OK
11
Page 12

Using a Static IP Address to Connect to
the DWL-2210AP
Mac OS X:
Go to the Apple Menu and Select
System Preferences.
Click on Network
Select Built in Ethernet from
the Show pull-down menu
Select Manually in the
Configuration pull-down menu
Input a static IP address in the same range
as the DWL-2210AP’s IP address of
192.168.0.50. Each computer/device must
have a unique IP address.
IP address: 192.168.0.28
Subnet mask: 255.255.255.0
Click on Apply Now
12
Page 13

Using a Static IP Address to Connect to
the DWL-2210AP
Open up your Web
browser.
T ype http://192.168.0.50 in
the address bar and hit
Enter or Return.
The DWL-2210AP login
screen will appear.
Type admin in the user
name and password fields.
Click OK
13
Page 14

Using a Static IP Address to Connect to
the DWL-2210AP
The Web-management
interface screen will
appear.
Click Advanced
Click Ethernet
14
Page 15

Using a Static IP Address to Connect to
the DWL-2210AP
Under Connection T ype,
Select Static IP
Enter a Static IP Address, Subnet
Mask, and Default Gateway.
The DWL-2210AP defaults to a static IP address of 192.168.0.50. Each device on the
network must have a unique IP address. It is recommended that you assign an IP
address that varies the last digit from the default address, such as 192.168.0.55. By
doing this you will avoid an IP conflict if another DWL-2210AP is added to the network.
Once you’ve made your
changes, Click Update
Please refer to the user manual located on the CD-ROM for additional details
on configuring the DWL-2210AP .
15
Page 16

TT
echniechni
T
echni
TT
echniechni
Y ou can find software updates and user documentation on the D-Link website.
D-Link provides free technical support for customers within the United States and
within Canada for the duration of the warranty period on this product.
U.S. and Canadian customers can contact D-Link technical support through our
website, or by phone.
Tech Support for customers within the United States:
D-Link Technical Support over the Telephone:
(877) 453-5465
Monday to Friday , 6:00am to 6:00pm PST.
D-Link Technical Support over the Internet:
http://support.dlink.com
email:support@dlink.com
Tech Support for customers within Canada:
D-Link Technical Support over the Telephone:
(800) 361-5265
Monday to Friday 7:30am to 12:00am EST
D-Link Technical Support over the Internet:
http://support.dlink.ca
email:support@dlink.ca
cal Supportcal Support
cal Support
cal Supportcal Support
 Loading...