

Page 1
Building Networks for People
Quick Installation Guide
Wireless N Exterior Access Point
This document will guide you through the
basic installation process for your new
D-Link Wireless Access Point.
DAP-3315
Quick Installation Guide
Installationsanleitung
Guide d’installation
Guía de instalación
Guida di Installazione
Documentation also available via
the D-Link Website
Page 2

Page 3

ENGLISH
IMPORTANT INFORMATION
This product should ONLY be installed by an experienced installer who is familiar with local building
and safety codes and, wherer applicable, is licensed by the appropriate authorities. Failure to employ
an experienced installer may render the D-Link product warranty void and may also expose the end
user or the service provider to legal and financial liabilities. D-Link and its resellers or distributors
expressly disclaim any and all liabilities for injury, damage, or violation of regulations due to the
improper installation of outdoor units or antennas.
A safety grounding system is necessary to protect your outdoor installation from lightning strikes and
the build-up of static electricity. Direct grounding of an outdoor AP is very important and can protect
your networks from brutal outdoor environments and devastating ESD attacks. The grounding system
must comply with the National Electrical Code and safety standards that apply in your country and/
or region. Always check with a qualified electrician if you are in doubt as to whether your outdoor
installation is properly grounded.
DEUTSCH
WICHTIGE INFORMATIONEN
Dieses Produkt darf AUSSCHLIESSLICH von einer erfahrenen Installationsfachkraft installiert werden,
die mit den Gebäude- und Sicherheitsvorschriften vor Ort vertraut ist und über die entsprechende
Lizenz der zuständigen Behörden verfügt. Wird dem nicht nachgekommen und es wird keiner
erfahrenen Installationsfachkraft der Auftrag erteilt, erlischt seitens D-Link gegebenenfalls die
Garantie für das Produkt und es kann darüber hinaus für den Endbenutzer oder den Dienstanbieter
rechtliche und nanzielle Haftungsansprüche zur Folge haben. D-Link und seine Fachhändler oder
Vertriebspartner schließen ausdrücklich jegliche Haftung für entstandene Verletzungen, Schäden oder
Verstöße gegen Vorschriften aus, die sich eventuell auf Grund einer unsachgemäßen Installation der
Geräte oder Antennen in Außenbereichen ergeben.
Zum Schutz Ihrer Außeninstallation vor Blitzschlägen und zum Schutz vor elektrostatischer Auadung
ist ein Erdungssystem erforderlich. Eine direkte Erdung des Access Point in Außenbereichen ist sehr
wichtig und kann Ihre Netzwerke vor äußeren Einüssen und elektrostatischen Entladungen schützen.
Das Erdungssystem muss den entsprechenden nationalen und/oder regionalen elektrotechnischen
Sicherheitsvorschriften und Sicherheitsstandards entsprechen. Bitten Sie einen qualifizierten
Elektriker um eine entsprechende Prüfung und/oder Bestätigung, wenn Sie nicht sicher sind, ob Ihre
Außeninstallation ordnungsgemäß geerdet ist.
FRANÇAIS
RENSEIGNEMENTS IMPORTANTS
Ce produit ne doit être installé QUE par un installateur expérimenté, familier avec les codes de
sécurité et les normes locales du bâtiment, si applicables, et détenteur d’une licence délivrée par les
autorités compétentes. Le non-respect de cette consigne peut rendre la garantie du produit D-Link
nulle et exposer aussi l'utilisateur ou le prestataire de service à des poursuites légales et nancières.
D-Link et ses revendeurs ou distributeurs renoncent à toute responsabilité relative aux blessures, aux
dommages ou aux infractions aux règlements potentiellement associés à l'installation d'appareils ou
d'antennes en extérieur.
Un système de protection de mise à la terre est nécessaire pour protéger votre installation extérieure
des foudroiements et de l'accumulation d'électricité statique. La mise à la terre directe d'un Point d’accès
extérieur est très importante et peut protéger vos réseaux des environnements extérieurs brutaux et
des attaques ESD (décharges électrostatiques) dévastatrices. Le système de mise à la terre doit être
conforme au Code d'électricité national et aux normes de sécurité en vigueur dans votre pays et/ou
région. Toujours vérier auprès d'un électricien qualié si vous avez des doutes quant à savoir si votre
installation extérieure est correctement mise à la terre.
Page 4

ESPAÑOL
INFORMACIÓN IMPORTANTE
Este producto debe ser instalado ÚNICAMENTE por un instalador experimentado que esté
familiarizado con las normas de construcción y seguridad locales y, cuando corresponda, esté
autorizado por las autoridades pertinentes. No emplear un instalador experimentado puede invalidar
la garantía del producto D-Link y, asimismo, exponer al usuario final o al proveedor del servicio
a responsabilidades jurídicas y financieras. D-Link y sus proveedores o distribuidores rechazan
expresamente todas y cada una de las responsabilidades por las lesiones, los daños o la violación de
normativas debidas a la instalación incorrecta de unidades o antenas para exteriores.
Es necesario un sistema de conexión a tierra de seguridad para proteger la instalación exterior de
los rayos y de la acumulación de electricidad estática. La conexión a tierra directa de un AP externo
es muy importante y puede proteger las redes frente a entornos externos brutales y ataques de ESD
desastrosos. El sistema de conexión a tierra debe cumplir el Código eléctrico nacional y las normas
de seguridad aplicables en su país o región. Consulte siempre con un electricista cualicado si tiene
dudas sobre si la instalación de exterior cuenta con la toma de tierra adecuada.
ITALIANO
INFORMAZIONI IMPORTANTI
Questo prodotto deve essere installato SOLO da personale altamente specializzato che abbia la
necessaria esperienza con le regole di sicurezza e che abbia il regolare permesso di installazione
fornito dagli enti competenti. L'installazione eseguita da personale non specializzato può invalidare
la garanzia del prodotto D-Link, nonché esporre l'utente nale a sanzioni legali e pecuniarie. D-Link
e i propri rivenditori o distributori non risconoscono espressamente nessun tipo di responsabilità per
lesioni, danni o violazione delle norme associate all’installazione errata di unità esterne o antenne.
Per proteggere l'installazione esterna dai fulmini e dall'accumulo di elettricità statica, è necessario un
sistema di messa a terra di sicurezza. La messa a terra diretta di un punto di accesso per esterni è
estremamente importante e può proteggere le reti in caso di condizioni esterne sfavorevoli e attacchi
ESD di particolare rilevanza. Il sistema di messa a terra deve essere conforme al National Electrical
Code e agli standard di sicurezza in vigore nel proprio paese e/o area geograca. Consultare sempre
un elettricista qualicato in caso di dubbi sulla corretta messa a terra dell'installazione esterna.
Page 5
Quick Install Guide
Physical Installation
ENGLISH
This installation guide provides basic
instructions for installing the DAP-3315
Wireless N Exterior Access Point1 on your
network. For additional information about
how to use the Access Point, please see
the datasheet and user manual available on
the D-Link support website.
1
The DAP-3315 support the IPX5 water/dustproof
standard. It is recommended that you place the AP
under a roof, shelter, or weatherproof container in severe
weather environments.
Minimum System Requirements
- Computer with Windows, Mac OS, or
Linux-based operating system, and an
Ethernet adapter installed
- Internal Explore 11, Safari 7, Firefox 28,
Google Chrome 33 or later versions of
these browsers
Package Contents
- DAP-3315 Wireless N Exterior Access
Point
- PoE Injector(24V/0.5A)
- Pole Mount (Non-detachable)
- Wall Mount
- Two Plastic Mounting Ties
- Grounding Wire
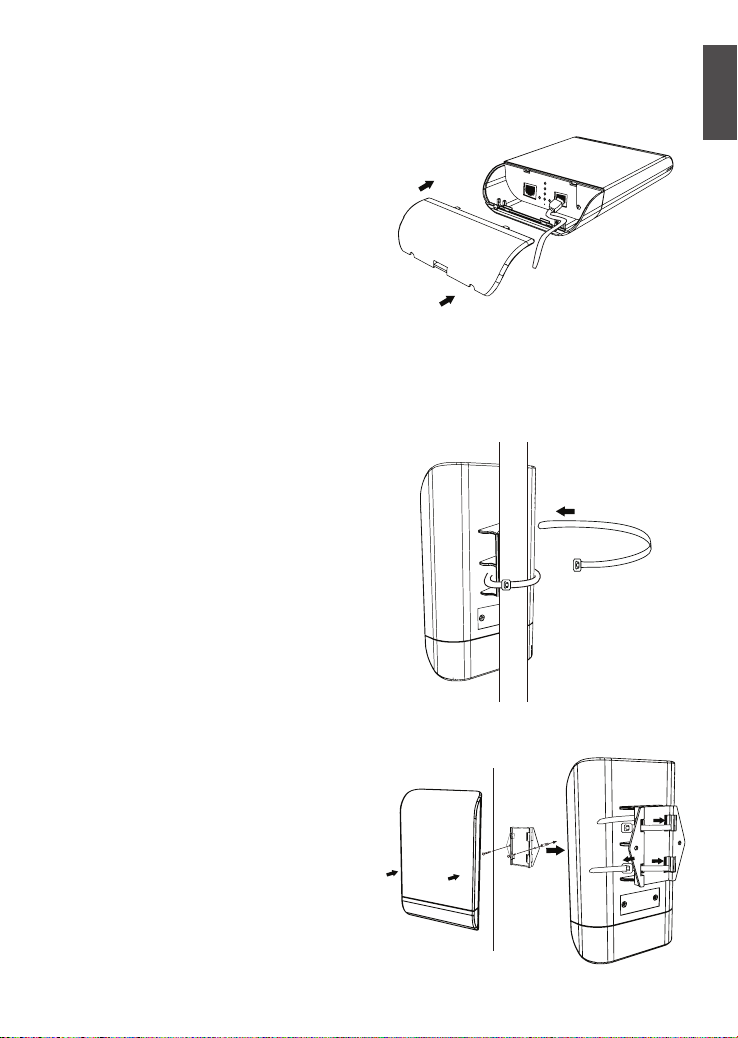
STEP 1: Connect an Ethernet Cable3 to
the LAN (PoE) Port on the AP.
3
An Ethernet cable is not included in the package.
STEP 2: Mount the AP to a Pole or Wall
2A: Pole Mounting
If any of the above items are missing,
please contact your reseller.
2B: Wall Mounting
D-Link DAP-3310/DAP-3410 Quick Install Guide 5
Page 6

STEP 3: Connect Grounding Wire
A grounding wire is to protect your device
from lightning strikes and the buildup of
static electricity.
ENGLISH
Conguration
If you are configuring the AP locally,
connect a PC to the PoE Injector DATA IN
port using an Ethernet cable.
A. Assign a static IP address to your PC
that is in the same network segment as
the device. As the default IP address
of this unit is 192.168.0.50, you may
choose any address from 192.168.0.1 to
192.168.0.254, except 192.168.0.50.
STEP 4: Connect the AP to Your Network
AP
4
LAN (PoE)
A
POWER IN
C
4
This product uses a proprietary PoE design and
can only be used with the included PoE injector.
POE
PoE Injector
LAN
4
B
Router or Switch Computer
A. Connect the Ethernet cable that is
connected to the AP from STEP 1 to the
POE port on the PoE Injector.
B. Connect an Ethernet cable from a router,
switch, or PC to the LAN port on the PoE
Injector.
C. Attach the power cord to the PoE Injector,
and attach it into an electrical outlet.
B. Open a web browser and go to
http://192.168.0.50. Enter admin as
your username and leave the password
blank to log in to the web UI. Now you
can configure the AP through the web UI.
TECHNICAL SUPPORT
6 D-Link DAP-3310/DAP-3410 Quick Install Guide
dlink.com/support
Page 7

Installationsanleitung
Physische Installation
Diese Installationsanleitung bietet Ihnen
grundlegende Anleitungen zur Installation
des DAP-3315 Wireless N Exterior Access
1
in Ihrem Netzwerk. Zusätzliche
Point
Informationen zur Verwendung des Access
Point nden Sie auf dem Datenblatt und im
Benutzerhandhandbuch, die Ihnen auf der
Support Website von D-Link zur Verfügung
stehen.
1
Der DAP-3315 unterstützen die Schutzart IPX5 gegen
Wasser und Staub. Es wird empfohlen, den AP bei
schwierigen Witterungsbedingungen unter einem Dach,
einer Schutzvorrichtung oder in einem wetterfesten
Container aufzustellen.
Mindestsystemanforderungen
- Computer mit Windows, Mac OS oder
Linux-basiertem Betriebssystem und
einem installierten Ethernet-Adapter
- Internet Explorer 11, Mozilla Firefox 28,
Safari 7 oder Chrome 33 oder höher
Packungsinhalt
- DAP-3315 Wireless N Exterior Access
Point
- PoE-Injector (24 V/0,5 A)
- Mastmontage (nicht abnehmbar)
- Wandmontage
- Zwei Plastik-Kabelbinder
- Erdungskabel
SCHRITT 1: Schließen Sie ein EthernetKabel3 an den LAN (PoE) Port des AP an.
3
Ein Ethernet-Kabel ist nicht im Lieferumfang des
Produkts enthalten.
SCHRITT 2: Bringen Sie den AP an
einem Mast oder einer Wand an
2A: Montage an einem Mast
2B: Wandmontage
DEUTSCH
Sollte einer der oben aufgeführten Artikel
fehlen, wenden Sie sich bitte an Ihren
Fachhändler.
D-Link DAP-3315 Quick Install Guide 7
Page 8

SCHRITT 3: Erdungskabel anschließen
Zum Schutz Ihres Geräts vor Blitzschlägen
und vor elektrostatischer Auadung wird die
Verwendung eines Erdungskabels.
SCHRITT 4: Verbinden Sie den AP mit
Ihrem Netzwerk
DEUTSCH
POWER IN
(STROM EIN)
C
4
Dieses Produkt nutzt ein proprietäres PoE-
Design und kann nur mit dem im Lieferumfang
des Produkts enthaltenen PoE-Injector
verwendet werden.
AP
4
LAN (PoE)
A
POE
PoE-Injector
LAN
4
B
Router oder Switch Computer
Konguration
Wenn Sie den AP lokal konfigurieren,
schließen Sie mithilfe eines ErhernetKabels einen PC an den PoE-Injector DATA
IN Port an.
A. Weisen Sie Ihrem PC, der sich im
gleichen Netzwerksegment wie das
Gerät befindet, eine statische IP-Adresse
zu. Da die standardmäßige IP-Adresse
dieser Einheit 192.168.0.50 ist, können
Sie eine beliebige Adresse zwischen
192.168.0.1 bis 192.168.0.254 (außer
192.168.0.50) wählen.
B. Öffnen Sie einen Webbrowser und rufen
Sie http://192.168.0.50 auf. Geben Sie
admin als Benutzernamen ein und lassen
Sie das Kennwortfeld leer, um sich auf
der webbasierten Benutzeroberfläche
anzumelden. Sie können nun den AP
über die webbasierte Benutzeroberfläche
konfigurieren.
A. Schließen Sie das in SCHRITT 1 an den
AP angeschlossene Ethernet-Kabel an den
POE Port am PoE-Injector an.
B. Schließen Sie ein Ethernet-Kabel von
einem Router, Switch oder PC an den
LAN Port am PoE-Injector an.
C. Schließen Sie das Netzkabel an den
PoE an Injektor, und befestigen Sie es in
einem elektrischen Auslauf.
TECHNISCHE UNTERSTÜTZUNG
8 D-Link DAP-3315 Quick Install Guide
dlink.com/support
Page 9

Guide d’installation rapide
Installation physique
Ce guide d'installation fournit les
instructions de base pour l'installation
du point d'accès sans l N d'extérieur1
DAP-3315 sur votre réseau. Pour de plus
amples informations sur l'utilisation du point
d'accès, consultez la che produit et le
manuel d'utilisation, disponibles sur le site
Web d'assistance de D-Link.
1
Le DAP-3315 prennent en charge la norme IPX5
d'étanchéité à l'eau et à la poussière. Lorsque les
conditions météorologiques sont rigoureuses, il est
recommandé de placer le PA sous un toit, dans un abris
ou dans une boîte étanche.
Conguration minimale requise
- Ordinateurs avec système d’exploitation
Windows, Mac OS ou Linux et équipés
d’un adaptateur Ethernet
- Internet Explorer 11, Mozilla Firefox 28,
Safari 7 ou Chrome 33 ou toute version
plus récente
Contenu de la boîte
- Point d'accès sans l N d'extérieur
DAP-3315
- Injecteur PoE(24V/0.5A)
- Montage sur un pied (non amovible)
- Montage mural
- Deux attaches de montage en plastique
- Dil de mise a la terre
ÉTAPE 1 : Connectez un câble Ethernet3
au port de réseau local (PoE) du PA.
3
Aucun câble Ethernet n'est inclus dans le kit.
ÉTAPE 2 : Installez le PA sur un pied ou
sur un mur
2A : Installation sur un pied
2B : Montage mural
FRANÇAIS
Contactez votre revendeur s'il manque l'un
des éléments ci-dessus.
D-Link DAP-3315 Quick Install Guide 9
Page 10

ÉTAPE 3 : Connectez le fil de mise à la terre.
L'utilisation d'un câble de mise à la terre est
obligatoire pour protéger votre périphérique
de la foudre et de la formation d'électricité
statique.
ÉTAPE 4 : Connectez le PA à votre réseau
PA
4
LAN (PoE)
A
POWER IN
C
POE
Injecteur PoE
LAN
B
4
FRANÇAIS
Routeur ou commutateur
4
Ce produit dispose d'une conception PoE
exclusive, qui ne peut qu'être utilisée avec
l'injecteur PoE fourni.
Ordinateur
Conguration
Si vous configurez le PA localement,
connectez un PC au port DATA IN de
l'injecteur PoE à l'aide d'un câble Ethernet.
A. Attribuez une adresse IP statique au
PC se trouvant sur le même segment
de réseau que le périphérique. Par
défaut, l'adresse IP de cet appareil est
192.168.0.50, mais vous pouvez choisir
une autre adresse, comprise entre
192.168.0.1 et 192.168.0.254, sauf
192.168.0.50.
B. Ouvrez un navigateur Web et allez sur
http://192.168.0.50. Saisissez admin
comme nom d'utilisateur et laissez le mot
de passe vierge pour vous connecter à
l'interface Web. Vous pouvez maintenant
configurer le PA via l'interface Web.
A. Connectez le câble Ethernet que vous
avez relié au PA à l'ÉTAPE 1 au port
POE de l'injecteur PoE.
B. Reliez un routeur, un commutateur ou un
PC au port LAN de l'injecteur PoE via un
câble Ethernet.
C. Branchez le cordon d'alimentation sur le
PoE Injecteur, et l'attacher dans un prise
électrique.
ASSISTANCE TECHNIQUE
10 D-Link DAP-3315 Quick Install Guide
dlink.com/support
Page 11

Guía de instalación rápida
Instalación física
Esta guía de instalación proporciona
instrucciones básicas para la instalación
del DAP-3315 Wireless N Exterior Access
1
en su red. Para obtener información
Point
adicional acerca de cómo utilizar el punto
de acceso, consulte la hoja informativa y
el manual del usuario disponible en el sitio
web de soporte de D-Link.
1
El DAP-3315 cumplen la norma IPX5 sobre
impermeabilidad/resistencia al polvo. Se recomienda
colocar el AP bajo un techo, cubierta o en un contenedor
impermeable si se encuentra en ambientes metereológicos
extremos.
Requisitos mínimos del sistema
- Ordenador con sistema operativo basado
en Windows, Mac OS o Linux y un
adaptador Ethernet instalado
- Internet Explorer 11, Mozilla Firefox 28,
Safari 7, Chrome 33 o posterior
¿Qué contiene la caja?
- DAP-3315 Wireless N Exterior Access
Point
- Inyector PoE(24V/0.5A)
- Montaje para poste (no desmontable)
- Montaje para pared
- Dos bridas de montaje de plástico
- El cable de conexion a tierra
PASO 1: conectar un cable3 Ethernet al
puerto LAN (PoE) del AP.
3
En el paquete no se incluye un cable Ethernet.
PASO 2: montar el AP en un poste o en
la pared
2A: montaje en poste
2B: montaje en la pared
ESPAÑOL
Si falta cualquiera de los componentes
anteriores, póngase en contacto con el
proveedor.
D-Link DAP-3315 Quick Install Guide 11
Page 12

PASO 3: conectar el cable de conexión a
tierra
Se utilizará un cable de conexión a tierra
para proteger el dispositivo de los rayos y
de la acumulación de electricidad estática.
PASO 4: conectar el AP a la red
AP
4
LAN (PoE)
A
ENTRADA DE
ALIMENTACIÓN
C
POE
Inyector PoE
LAN
B
4
Conguración
Si está configurando el AP de forma local,
conecte un PC al puerto ENTRADA DATOS
del inyector PoE utilizando un cable Ethernet.
A. Asigne una dirección IP estática al PC
que está en el mismo segmento de red
que el dispositivo. Como la dirección
IP predeterminada de esta unidad
es 192.168.0.50, puede seleccionar
cualquier dirección desde 192.168.0.1 a
192.168.0.254, excepto 192.168.0.50.
B. Abra un explorador de web y vaya a
http://192.168.0.50. Introduzca admin
como nombre de usuario y deje la
contraseña en blanco para iniciar sesión
en la interfaz de usuario web. Ahora
puede configurar el AP a través de la
interfaz de usuario web.
Router o conmutador
4
Este producto utiliza un diseño PoE patentado y
solo se usa con el inyector PoE incluido.
Ordenador
A. Conecte el cable Ethernet que está
conectado al AP desde el PASO 1 al puerto
POE en el inyector PoE.
ESPAÑOL
B. Conecte un cable Ethernet desde un
router, conmutador o PC al puerto LAN
en el inyector PoE.
C. Conecte el cable de alimentación al
inyector PoE, conéctelo a una toma de
corriente.
ASISTENCIA TÉCNICA
12 D-Link DAP-3315 Quick Install Guide
dlink.com/support
Page 13

Guida di installazione rapida
Installazione sica
La presente Guida di installazione fornisce
istruzioni di base per l'installazione del
punto di accesso1 esterno N Wireless
DAP-3315 nella rete. Per ulteriori
informazioni sull'utilizzo del punto di
accesso, consultare la scheda tecnica e il
manuale dell'utente disponibili sul sito Web
di supporto di D-Link.
1
I modelli DAP-3315 supportano lo standard IPX5
di resistenza ad acqua e polvere. In ambienti con
condizioni atmosferiche rigide, si consiglia di installare il
punto di accesso al riparo sotto un tetto, una pensilina o
in un contenitore resistente alle intemperie.
Requisiti minimi di sistema
- Computer dotato di sistema operativo
Windows, Mac OS o Linux e scheda
Ethernet installata
- Internet Explorer 11, Mozilla Firefox 28,
Safari 7, o Chrome 33 o versioni più
recenti
Contenuto della confezione
- Punto di accesso esterno N wireless
DAP-3315
- Iniettore PoE(24V/0.5A)
- Montaggio su asta (non scollegabile)
- Montaggio a parete
- Due fascette di montaggio in plastica
- Cavo di messa a terra
PASSO 1: collegamento di un cavo
Ethernet3 alla porta LAN (PoE) del punto
di accesso.
3
Il cavo Ethernet non è incluso nella confezione.
PASSO 2: installazione del punto di
accesso su un'asta o a parete
2A: installazione su asta
2B: installazione a parete
Se uno o più degli articoli sopra elencati
risultano mancanti, rivolgersi al rivenditore.
ITALIANO
D-Link DAP-3315 Quick Install Guide 13
Page 14

PASSO 3: collegamento del cavo di
messa a terra
È consigliata l'installazione di un cavo di
messa a terra per proteggere il dispositivo
da fulmini e accumulo di elettricità statica.
PASSO 4: collegamento del punto di
accesso alla rete
Punto di accesso
LAN (PoE)
A
POE
INGRESSO
ALIMENTAZIONE
C
Router o switch Computer
4
Questo prodotto utilizza un design PoE
proprietario e può essere utilizzato
esclusivamente con l'iniettore PoE in dotazione.
4
Iniettore PoE
LAN
B
4
Congurazione
Per la configurazione del punto di accesso
in locale, collegare un PC alla porta di
INGRESSO DATI dell'iniettore PoE
mediante un cavo Ethernet.
A. Assegnare un indirizzo IP statico al PC
presente nello stesso segmento di rete
del dispositivo. L'indirizzo IP predefinito
di questa unità è 192.168.0.50;
è possibile scegliere qualsiasi
indirizzo compreso tra 192.168.0.1 e
192.168.0.254, tranne 192.168.0.50.
B. Aprire un browser Web e accedere
all'indirizzo http://192.168.0.50.
Immettere admin come nome utente e
lasciare il campo della password vuoto
per accedere all'interfaccia utente Web.
A questo punto è possibile configurare il
punto di accesso utilizzando l'interfaccia
utente Web.
A. Collegare il cavo Ethernet connesso al
punto di accesso durante il PASSO 1
alla porta POE sull'iniettore PoE.
B. Collegare un cavo Ethernet da un router,
un switch o un PC alla porta LAN
dell'iniettore PoE.
C. Collegare il cavo di alimentazione
all'iniettore PoE, collegarlo a una presa
elettrica.
SUPPORTO TECNICO
ITALIANO
14 D-Link DAP-3315 Quick Install Guide
dlink.com/support
Page 15

Page 16

Ver. 1.00(EU)_130x183
2018/8/24
5300-00007364-01W
 Loading...