

Page 1
Warning and Attention Symbols
You must be aware of safety when you install and use this system. This User Guide provides various procedures. If you do
some of these procedures carelessly, you could injure or kill yourself or damage equipment or property. Some other
procedures require special attention.
The WARNING! symbol means that if you are not careful,
You could injure or kill yourself, or
You could damage equipment or property.
ATTENTION! symbol means you should pay special attention to:
The
Important instructions for using the system, or
Important instructions for maintaining the system.
Class II symbol alerts qualified service personnel to use only identical replacement
The
parts in this apparatus.
For Your Safety
Do not try to open the case of the receiver. There is risk of electrical shock, which may cause damage to
the receiver and/or personal injury or death to you. There are no user-serviceable parts inside the
receiver. Opening the receiver case or making unauthorized changes will void the warranty.
To reduce the risk of fire or electric shock, do not expose this appliance to rain or moisture.
Important Software Notice
As with all software controlled products, unexpected behavior could arise if the user tries to perform operations in a nonroutine manner. This product, like almost any other high tech product, is subject to bugs and hence EchoStar CANNOT
AND DOES NOT GUARANTEE OR WARRANT THAT ALL FEATURES, SUCH AS PARENTAL CONTROL, WILL WORK
AS INTENDED UNDER ALL CIRCUMSTANCES. EchoStar endeavors to improve such conditions and will periodically
download improvements.
In compliance with the terms of the GNU Public License (GPL), EchoStar is making some source code available to the
public to download from www.echostar.com.
Equipment and Software Covered by this User’s Guide
This User Guide covers the DISH 381 receiver and software model DP381. This Guide may cover other devices, not listed
here.
Copyright Notice
Copyright © 2005 EchoStar Technologies Corporation, Englewood, Colorado 80112. All rights reserved.
The information in this User Guide may change without notice. We may issue revisions to tell you about such changes.
Please send comments or questions about this User Guide to: Technical Publications, EchoStar Technologies Corporation, 94 Inverness
Terrace East, Englewood, Colorado 80112. Email: techpubs@echostar.com.
Part Number: 146733
Printed in the United States of America.
DISH Network is a registered trademark of EchoStar Satellite L.L.C. For information about DISH Network, please visit our website at
www.dishnetwork.com.
We acknowledge all product names, trade names, or corporate names we mention in this User Guide to be the proprietary property of the
registered owners.
Manufactured under license from Dolby Laboratories. “Dolby” and the double-D symbol are trademarks of Dolby Laboratories.
Page 2

Important Safety Precautions iii
1 Introduction
WELCOME 2
H
OW TO USE THIS GUIDE 2
A
BOUT YOUR DISH NETWORK ACCOUNT 3
W
ATCHING TV NOW 4
A
DDITIONAL SERVICES 5
A
BOUT SATELLITE TV RECEPTION 5
W
HY CONNECT TO A PHONE LINE 6
2 Receiver and Remote Control
REMOTE CONTROL 8
S
ATELLITE RECEIVER FRONT PANEL 12
S
ATELLITE RECEIVER BACK PANEL 12
U
SING THE MENUS 13
U
SING TEXT FIELDS 15
3 Finding Programs to Watch
CHANGING CHANNELS 18
U
SING THE PROGRAM GUIDE 18
U
SING THE BROWSE BANNER 19
U
SING SEARCH TO FIND A PROGRAM 20
F
INDING A PROGRAM BY ITS THEME 21
4 Pay-Per-View
BUYING A PAY-PER-VIEW PROGRAM 24
R
EVIEWING PAY-PER-VIEW PURCHASES 24
5 Favorites Lists
WHAT ARE FAVORITES LISTS? 28
C
REATING OR CHANGING FAVORITES LISTS 28
N
AMING FAVORITES LISTS 29
U
SING FAVORITES LISTS 29
6 Locks
WHAT ARE LOCKS? 32
C
REATING OR CHANGING A PASSWORD 32
L
OCKING AND UNLOCKING YOUR RECEIVER 33
C
REATING OR CHANGING RATINGS LOCKS 33
C
REATING OR CHANGING CHANNEL LOCKS 34
L
OCKING OR UNLOCKING PAY-PER-VIEW CHANNELS 34
H
IDING ADULT CONTENT 35
L
OCKING OR UNLOCKING THE FRONT PANEL 35
i
Page 3

Table of Contents
7 Interactive TV
8Timers
9 Remote Control Setup
DISHHOME 38
C
USTOMER SUPPORT 38
TIMERS 40
U
SING THE TIMERS LIST 42
S
ETTING UP A QUICK RECORD 42
S
ETTING UP AN AUTOMATIC TIMER 42
S
ETTING UP A MANUAL TIMER 43
D
ELETING A TIMER 43
O
VERLAPPING TIMERS 44
IMPROVING RECEIVER CONTROL 46
C
ONTROLLING OTHER COMPONENTS 49
R
ECOVER BUTTON 55
T
EACHING ANOTHER REMOTE CONTROL 56
S
ENDING DISCRETE POWER ON AND OFF 58
10 Receiver Customization
USING CALLER ID 60
C
HANGING LANGUAGES 61
U
SING CLOSED CAPTIONING 61
U
SING DOLBY® SURROUND SOUND 62
C
HANGING THE PROGRAM GUIDE ORDER 64
C
HANGING THE GUIDE DISPLAY 64
R
ESETTING TO FACTORY DEFAULTS 65
11 Connections and Setup
CONNECTING TO A TV 68
C
ONNECTING TO YOUR DISH ANTENNA 72
C
ONNECTING THE PHONE LINE 73
C
ONNECTING A VCR 74
C
ONNECTING OVER-THE-AIR ANTENNA/CABLE TV 75
QAM I
NSTALLATIONS 79
U
SING TROUBLESHOOTING TOOLS 79
Reference
TROUBLESHOOTING TABLES 82
R
EMOTE CONTROL DEVICE CODES 93
ii
Appendix 97
Index 107
Page 4
Important Safety Instructions
1 Read these instructions.
2 Keep these instructions.
3 Heed all warnings.
4 Follow all instructions.
5 Do not use this apparatus near water.
6 Clean only with a dry cloth.
7 Do not block any ventilation openings. Install in accordance with the manufacturer’s instructions.
8 Do not install near any heat sources such as radiators, heat registers, stoves, or other apparatus (including amplifiers) that
produce heat.
9 Do not defeat the safety purpose of the polarized or grounding-type plug. A polarized plug has two blades with one wider
than the other. A grounding-type plug has two blades and a third grounding prong. The wide blade or the third prong are
provided for your safety. If the provided plug does not fit into your outlet, consult an electrician for replacement of the obsolete outlet.
10 Protect the power cord from being walked on or pinched, particularly at plugs, convenience receptacles, and the point
where they exit from the apparatus.
11 Use only attachments/accessories specified by the manufacturer.
12 Unplug this apparatus during lightning storms or when unused for long periods of time.
13 Refer all servicing to qualified service personnel. Servicing is required when the apparatus has been damaged in any way,
such as the power supply cord or plug is damaged, liquid has been spilled or objects have fallen into the apparatus, the
apparatus has been exposed to rain or moisture, does not operate normally, or has been dropped.
Apparatus shall not be exposed to dripping or splashing and no objects filled with liquids, such as vases, shall
be placed on the apparatus.
iii
Page 5
Safety
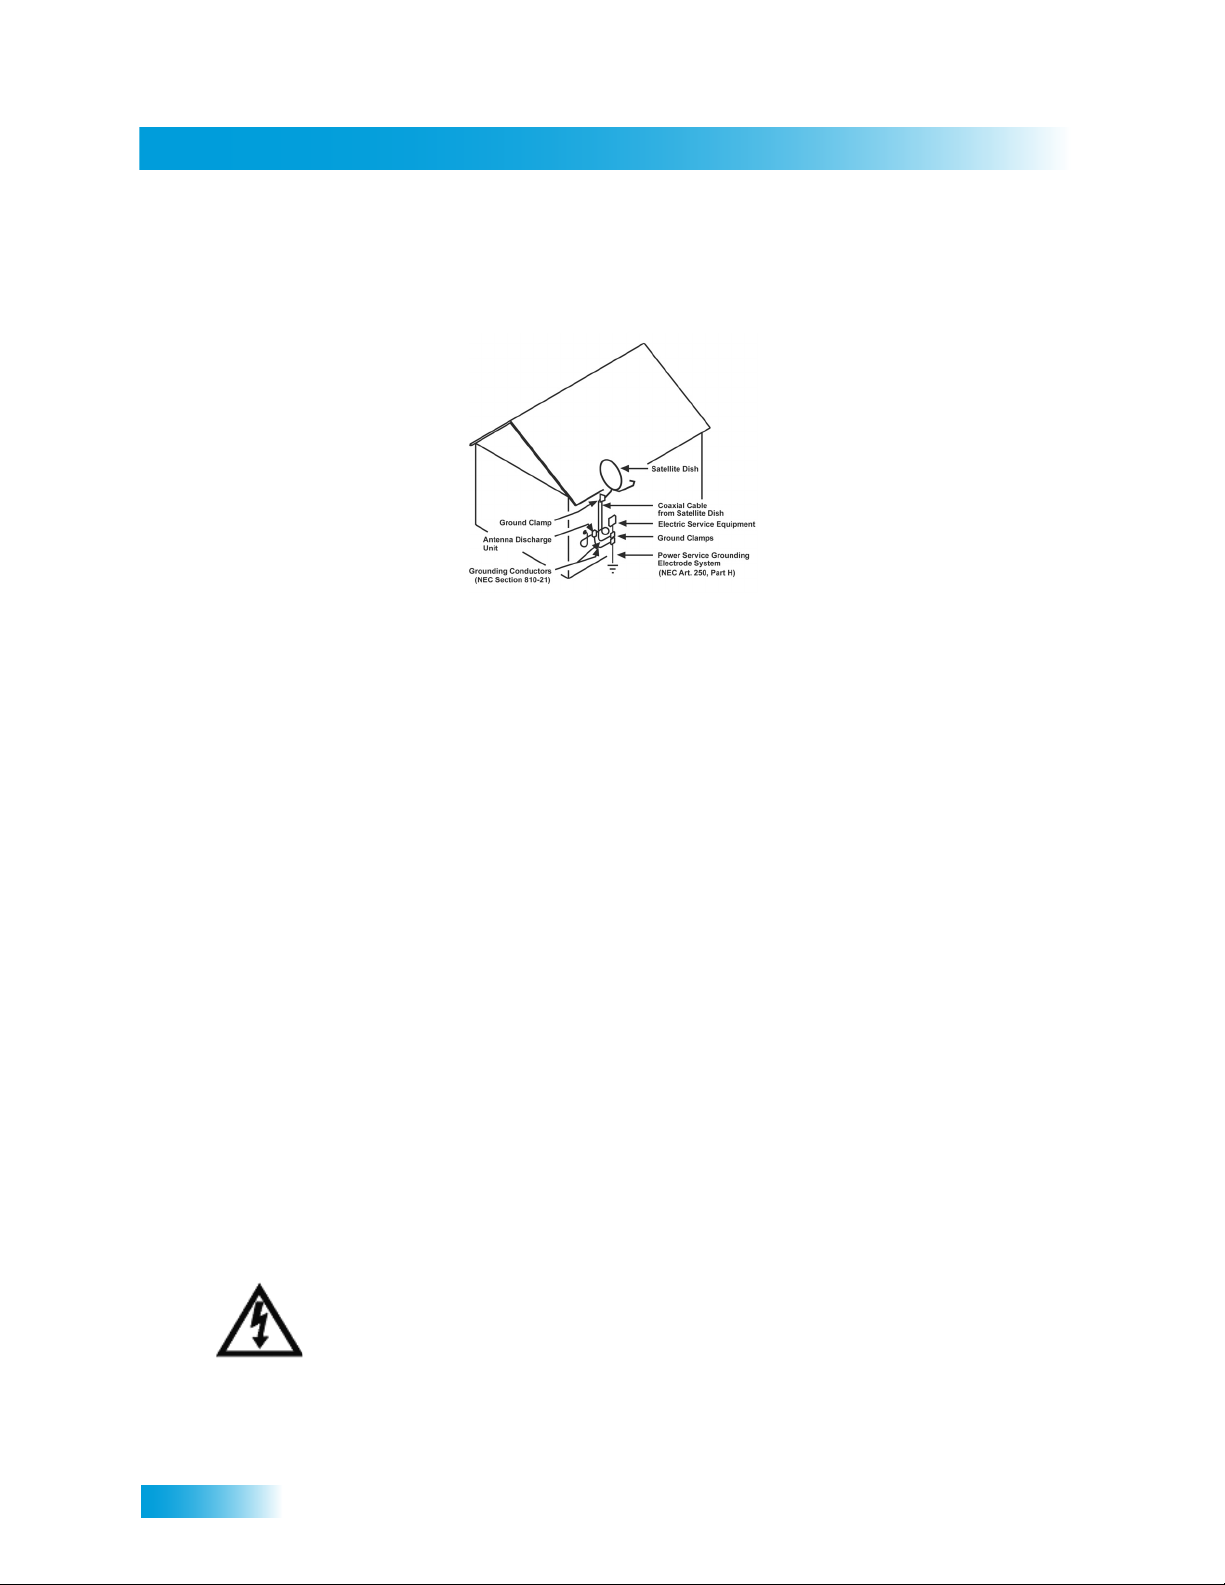
Note to Satellite TV System Installer: This reminder is provided to call the satellite TV system installer’s attention to
Article 820-40 of the National Electrical Code (NEC) that provides guidelines for proper grounding and, in particular,
specifies that the cable ground shall be connected to the grounding system of the building as close to the point of cable
entry as practical.
• Operate the receiver using only the type of power source indicated on the marking label. Unplug the receiver power
• Do not overload wall outlets or extension cords, as this can result in a risk of fire or electrical shock.
• Never insert objects of any kind into the receiver through openings, as the objects may touch dangerous voltage
• Do not locate the antenna near overhead light or power circuits, or where it can fall into such power lines or circuits.
• Do not attempt to service the receiver yourself, as opening or removing covers may expose you to dangerous voltage,
cord by gripping the power plug, not the cord.
points or short out parts. This could cause fire or electrical shock.
When installing the antenna, take extreme care to avoid touching such power lines or circuits, as contact with them
can be fatal.
and will void the Limited Warranty. Refer all servicing to authorized service personnel.
Proper Care of Your Equipment
• Always handle the satellite receiver carefully. Avoid excessive shock and vibration at all times as this can damage the
hard drive.
• Unplug the receiver from the AC power outlet before cleaning.
• If you have the receiver turned on and need to move it, be sure to unplug the receiver and let it sit for at least 30 sec-
onds before moving it.
• The use of accessories or attachments not recommended by the receiver manufacturer will void the Limited Warranty.
• Do not place the receiver in an enclosure such as a cabinet without proper ventilation.
• Do not stack the receiver on top of or below other electronic devices as this can cause heat build-up and vibration.
• Do not install the receiver in any area where the temperature can be less than 40°F or more than 113°F. If the receiver
is cold to the touch, do not plug it in immediately. Let it sit unplugged at room temperature for at least 45 minutes
before plugging it in.
• Use an outlet that contains surge suppression or ground fault protection. For added protection during a lightning
storm, or when the receiver is left unattended and unused for long periods of time, unplug the power cord from the wall
outlet, disconnect the lines between the receiver and the antenna, and disconnect the telephone line. This will provide
some protection against damage caused by lightning or power line surges.
On some TVs, the presence of fixed images for extended periods of time may cause them to be permanently
imprinted on the screen. Consult your TV user guide for information on whether this is a problem for your TV,
what operating/viewing restrictions apply to avoid this problem, and associated TV warranty coverage.
iv
Page 6
IntroductionIntroduction
Introduction to DISH Network Services
So you have a new receiver and you want to know how it works, right? Take a look
through this guide and you’ll quickly learn how to use all of the features. This chapter
familiarizes you with your DISH Network satellite TV receiver.
• WELCOME
• HOW TO USE THIS GUIDE
• ABOUT YOUR DISH NETWORK ACCOUNT
• WATCHING TV NOW
• ADDITIONAL SERVICES
• A
BOUT SATELLITE TV RECEPTION
• WHY CONNECT TO A PHONE LINE
1
Page 7

Chapter 1
Welcome
WELCOME
Congratulations on choosing DISH Network. You are about to experience the excitement and
convenience of our Direct Broadcast Satellite (DBS) service, which delivers the very best picture
and sound quality. DISH Network consistently provides the latest products and satellite-delivered
services — with high performance, ease of operation, and a wide variety of entertainment options.
HOW TO USE THIS GUIDE
Special consideration was given to every aspect of this guide to help you become familiar with
your receiver. This section explains how the guide is divided and the conventions used throughout.
Guide Overview
The information in this guide is separated into several chapters to make it easy for you to find
exactly what you’re looking for:
• Chapter 1 - Introduction gives you a brief overview of DISH Network and your new receiver.
• Chapter 2 - Receiver and Remote Control explains the basic features of your system and how
to use the remote control, front panel buttons, and back panel connections.
• Chapter 3 - Finding Programs to Watch describes how to change channels and look for pro-
grams.
• Chapter 4 - Pay-Per-View shows you how to order and watch Pay-Per-View events.
• Chapter 5 - Favorites Lists explains how to create, name, and use favorites lists.
• Chapter 6 - Locks explains how to set locks and passwords.
• Chapter 7 - Interactive TV describes how to use the DishHOME Interactive TV features of your
satellite TV system.
• Chapter 8 - Timers shows you how you can record and play back your favorite programs when
you want to watch them.
• Chapter 9 - Remote Control Setup Setup contains instructions for programming your remote to
control your satellite receiver and equipment like a TV or VCR.
• Chapter 10 - Receiver Customization shows you how to customize your receiver.
• Chapter 11 - Connections and Setup explains how to connect your satellite receiver to your TV
and equipment like a VCR.
2
Page 8
Introduction
About Your DISH Network Account
Guide Conventions
• The names of remote control buttons are all uppercase.
Example: Press SAT.
• Select means to move the highlight to an on-screen option or choice in a list and press
SELECT on the remote control.
Example: Select the Locks option.
• The instructions in this guide are shown in one of two ways:
– Instructions in the form of pictures are handy if you’d like to learn something quickly.
These instructions are numbered left to right as shown in the sample below.
– Instructions that are written out are helpful if you’d like to learn more about a feature or
function of the receiver.
– If the instructions are complicated, you’ll see both methods.
ABOUT YOUR DISH NETWORK ACCOUNT
This section explains how to order your packages and shows you where to find information about
your DISH Network account.
Ordering Your Programming Packages
Before you can enjoy your new receiver, you must order your programming packages.
3
Page 9
Chapter 1
Watching TV Now
Where to Find Information on Your Account
If you want to know about charges to your DISH Network account or if you would like to make
changes to your programming packages, be sure to have your account information handy and
choose one of the following:
• Go to the website at dishnetwork.com
• Press MENU on your remote control to open the Main Menu and then select Customer
Service.
• Call DISH Network at 1-800-333-DISH (3474).
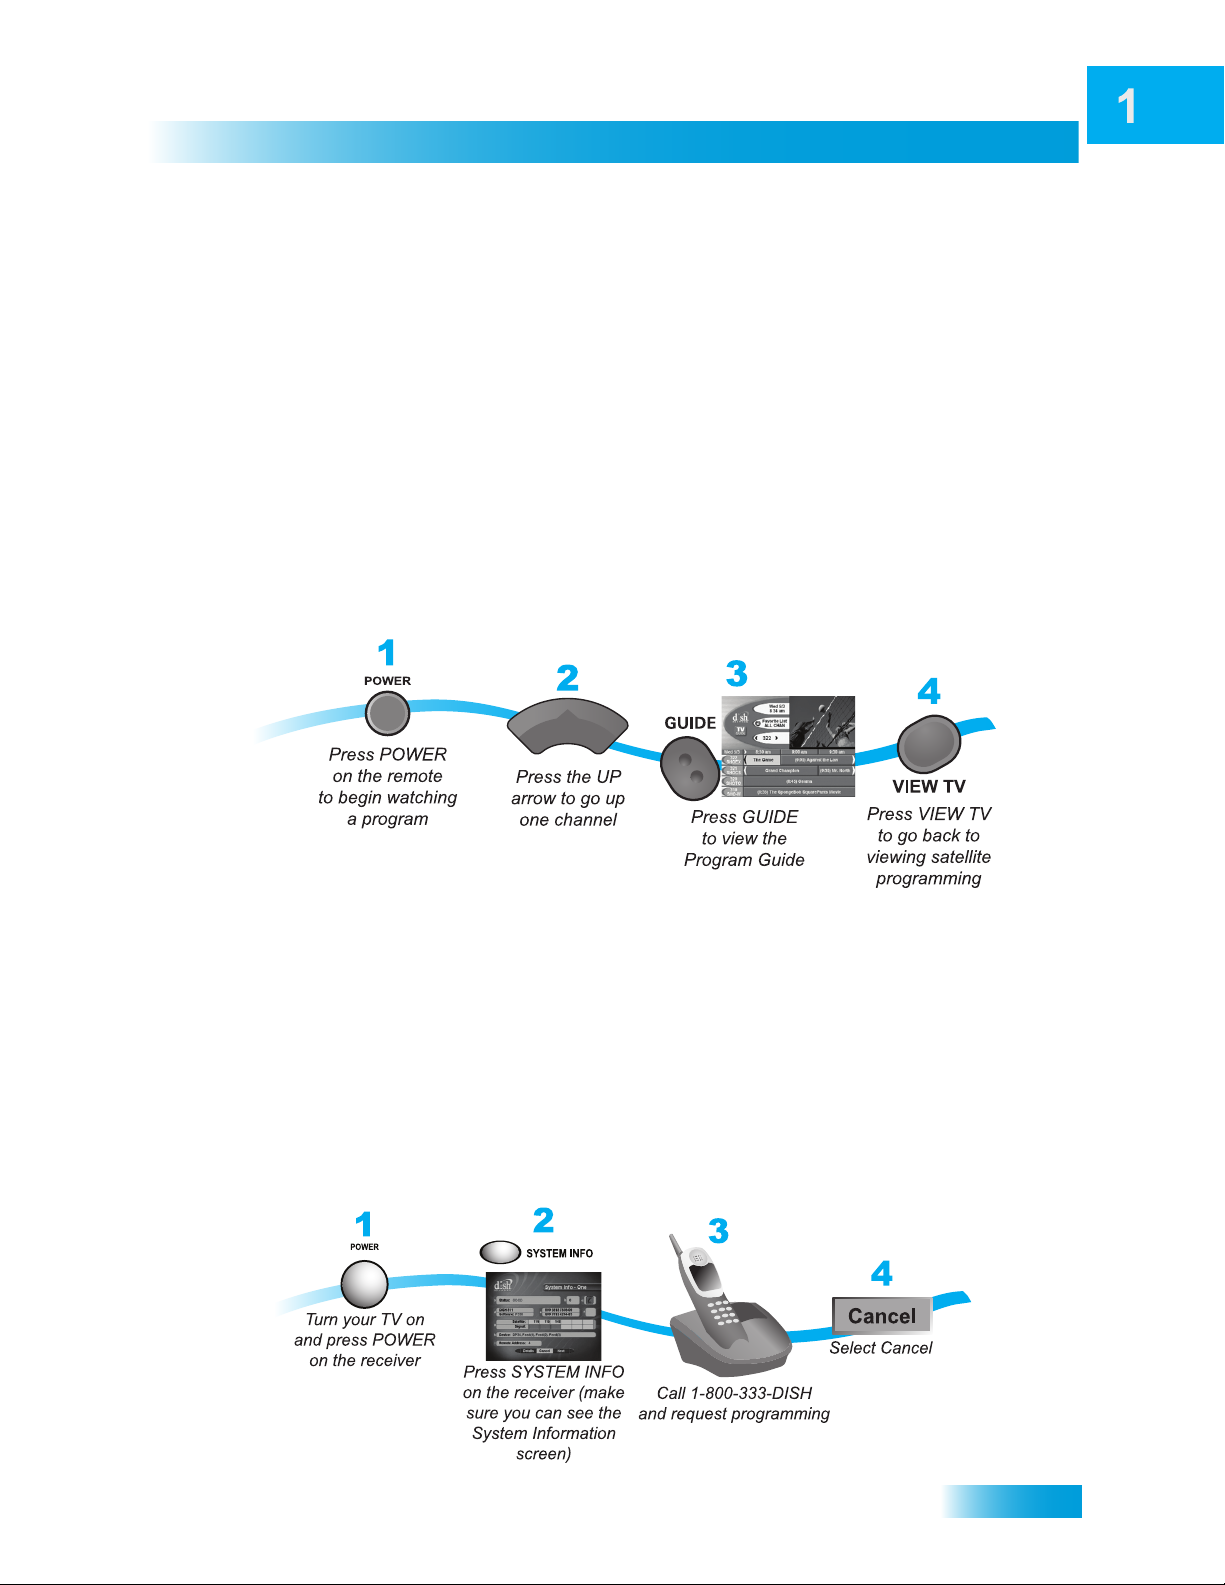
WATCHING TV NOW
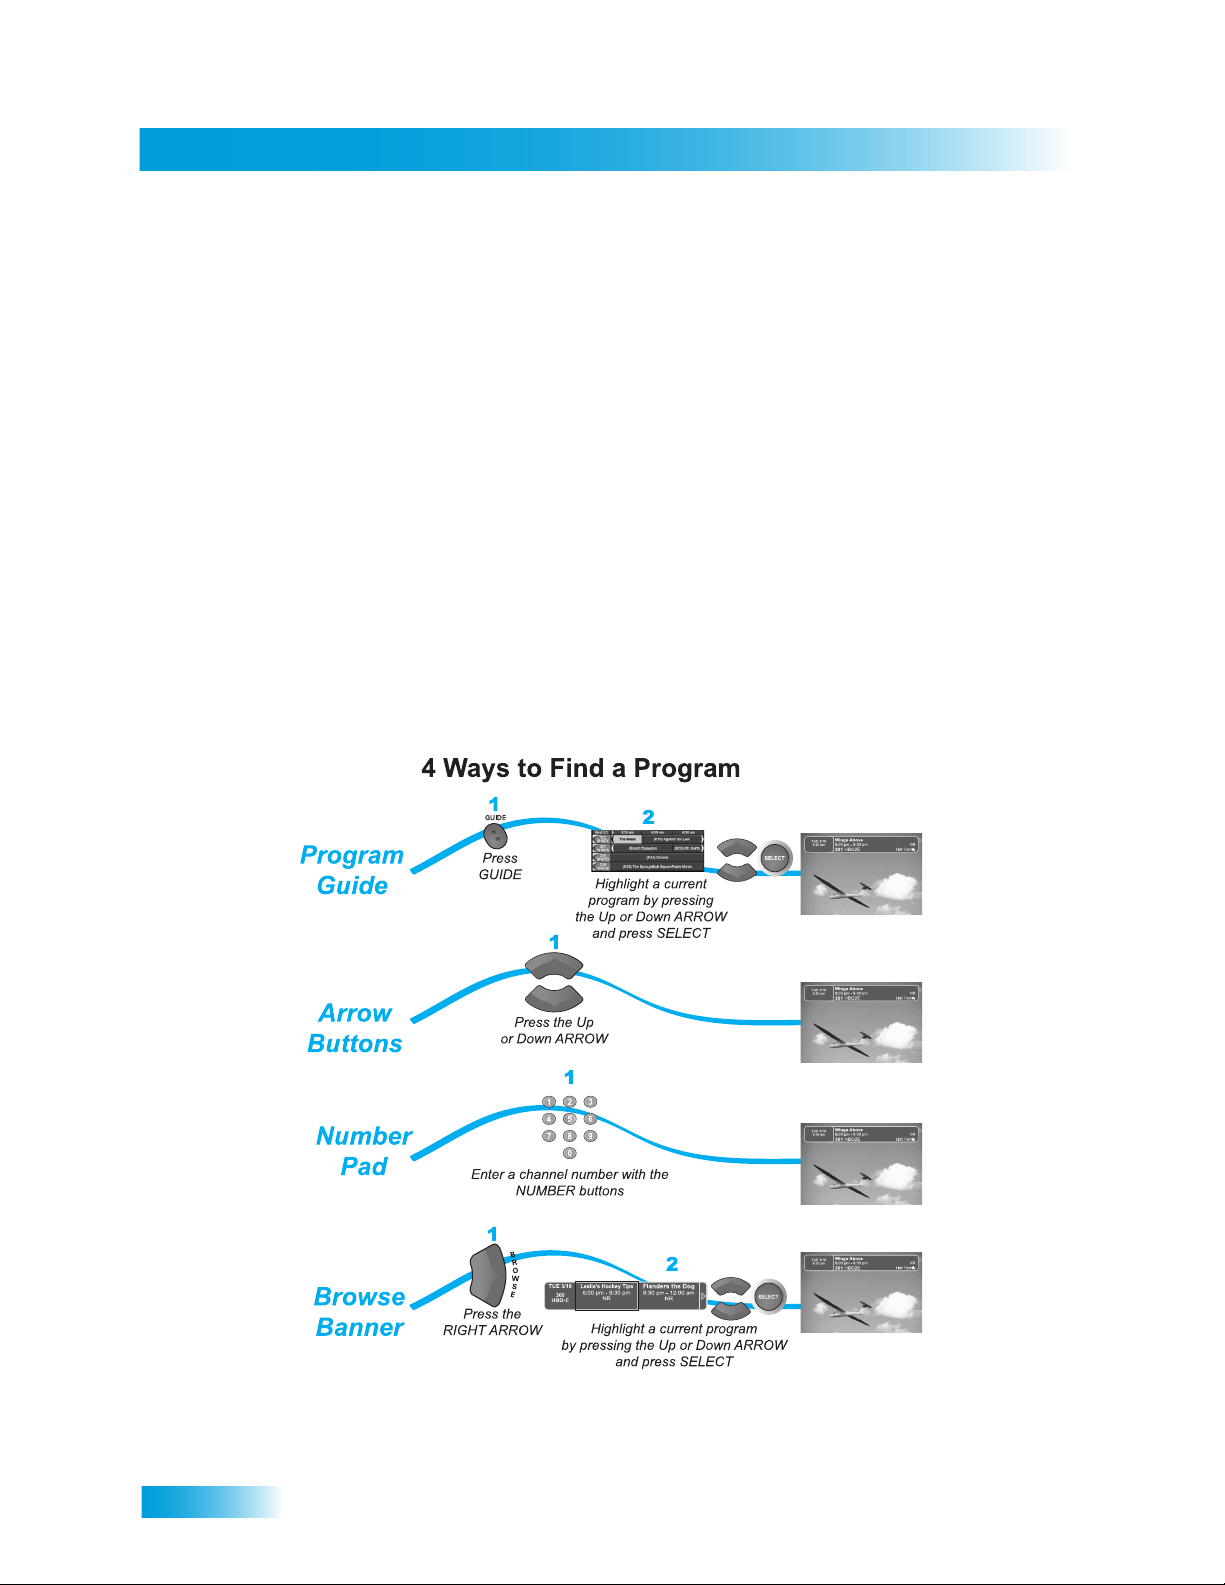
This tour shows you the simplest ways to change channels on your receiver. When you are done
with this tour, you will be able to use your remote control to change channels four different ways. If
you want to know more about watching TV, see Chapter 3 - Finding Programs to Watch starting on
page 17.
You’re already itching to use your remote control, so pick it up now and find something to watch.
4
Page 10

ADDITIONAL SERVICES
Pay-Per-View
Catch all the action on Pay-Per-View. Take a break from regular TV and order the latest movies,
sports, and special events. For details on ordering Pay-Per-View events, see page 23. Be sure to
connect an active phone line to your receiver before you order a Pay-Per-View event.
DishHOME
At DishHOME (press DISH on your remote control), you’ll find news, sports scores, weather
information, TV and movie buzz, customer service, games, and more (see page 37).
ABOUT SATELLITE TV RECEPTION
Satellite television uses satellites in a stationary orbit over the Earth to deliver television and audio
programming. This type of orbit enables the satellites to stay aligned over one place on the surface
of the Earth. Once the satellite dish is aimed at the satellite, the dish does not have to move to
follow it.
Introduction
Additional Services
Here’s something interesting! Noted science fiction author Arthur C. Clarke
calculated the orbit that causes satellites to remain stationary in the sky. To this
day the 22,000 mile high orbit bears the name Clarke Belt.
Rain and Snow Fade
Heavy rain, snow, or dense cloud cover can reduce the
satellite signal, which may interrupt your programming
service. Your service will return after the weather
condition has passed. Aiming the satellite dish to get the
strongest signal during installation, will help prevent rain
and snow from interrupting the signal.
5
Page 11
Chapter 1
Why Connect to a Phone Line
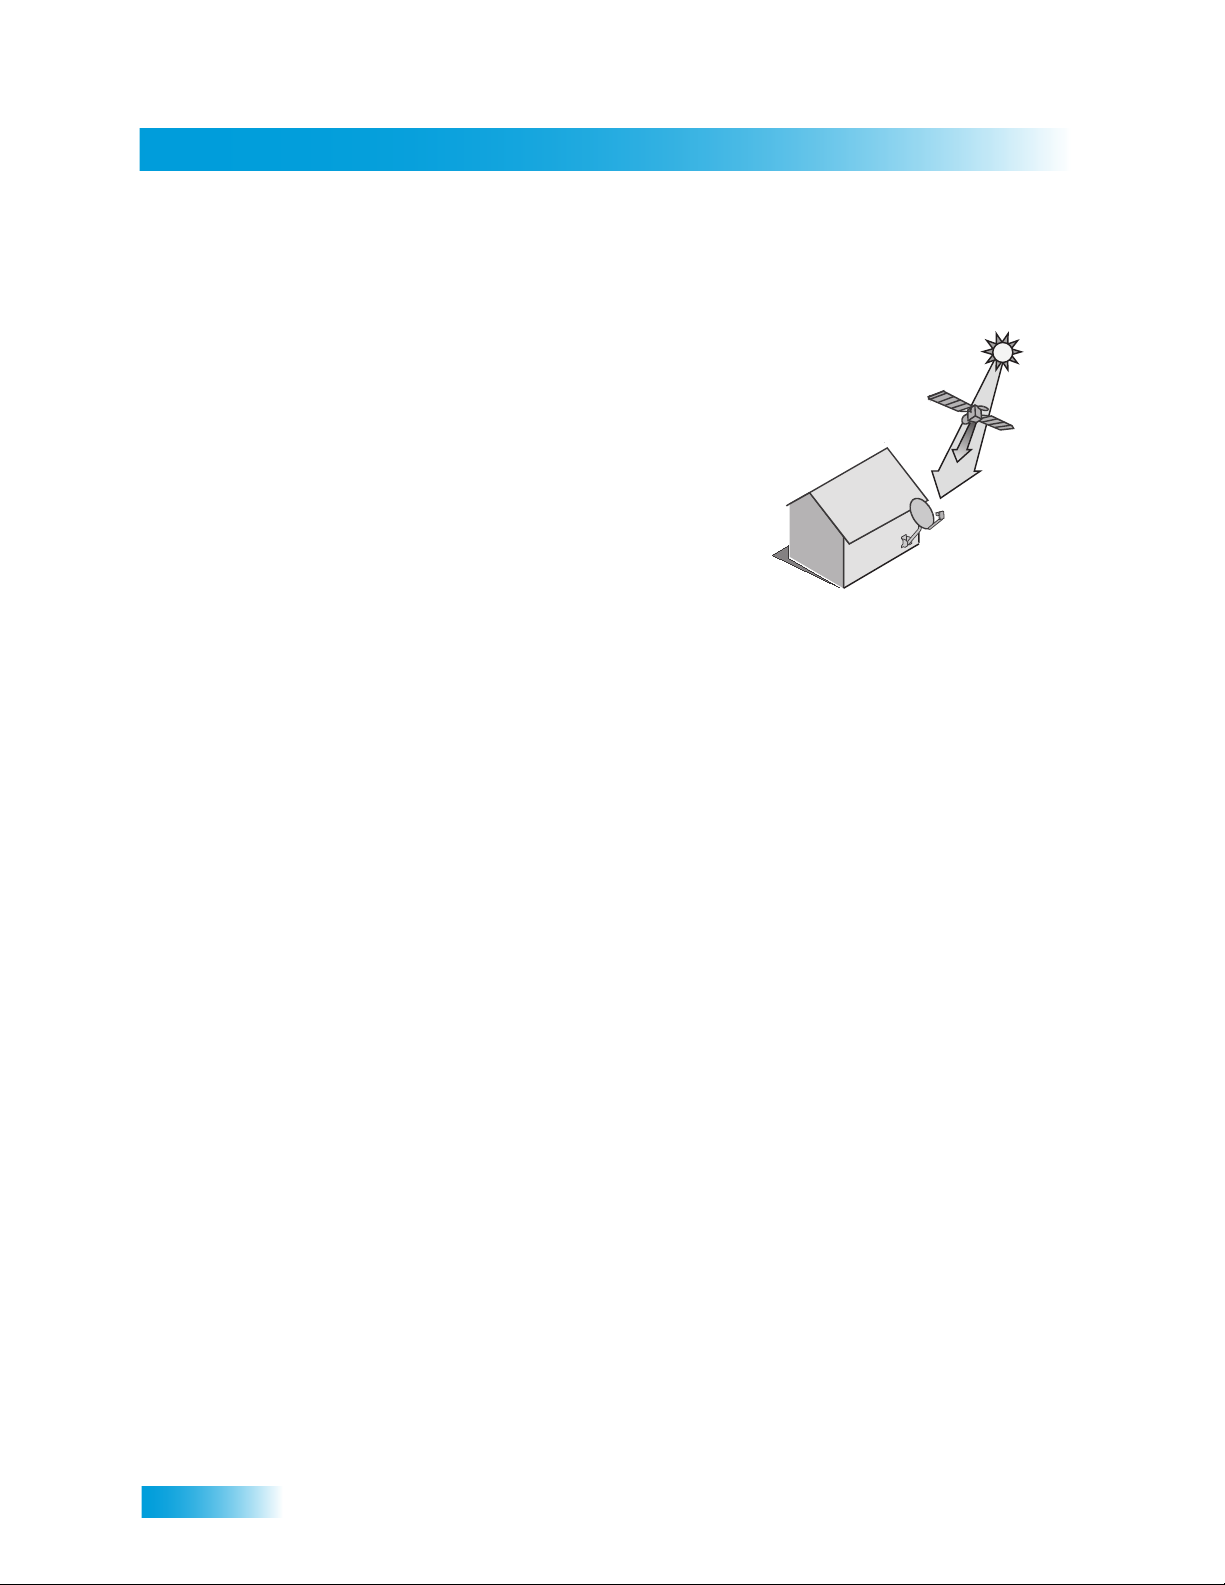
Solar Interference
Twice a year, the sun moves to a position behind the
DISH Network satellite as it orbits the Earth. This event
occurs during a few days at the beginning of the spring
and the beginning of the autumn and lasts only a few
minutes.
During these brief periods, you will not be able to see
programs on DISH Network. When the sun has moved
from behind the satellite, the programs will reappear. This
is an unavoidable natural event for all television involving
the use of satellites and has an adverse effect on many
program providers.
WHY CONNECT TO A PHONE LINE
Your satellite receiver is equipped with a standard telephone jack that you use to connect to an
active telephone line. Keep the receiver connected to an active telephone line so that you will be
able to order pay-per-view programs using your remote control, use all of the DishHOME
Interactive TV features, and other services from DISH Network (see page 37).
6
Page 12
Receiver and Remote Control
About Your Satellite Receiver
This chapter helps you get to know your remote control, which in turn lets you use all of
the functions of your receiver. After you read the information here, be sure to practice what
you learn so that you can quickly understand what’s presented in later chapters.
What you’ll find in this chapter:
• REMOTE CONTROL
• SATELLITE RECEIVER FRONT PANEL
• SATELLITE RECEIVER BACK PANEL
• USING THE MENUS
• USING TEXT FIELDS
7
Page 13
Chapter 2
Remote Control
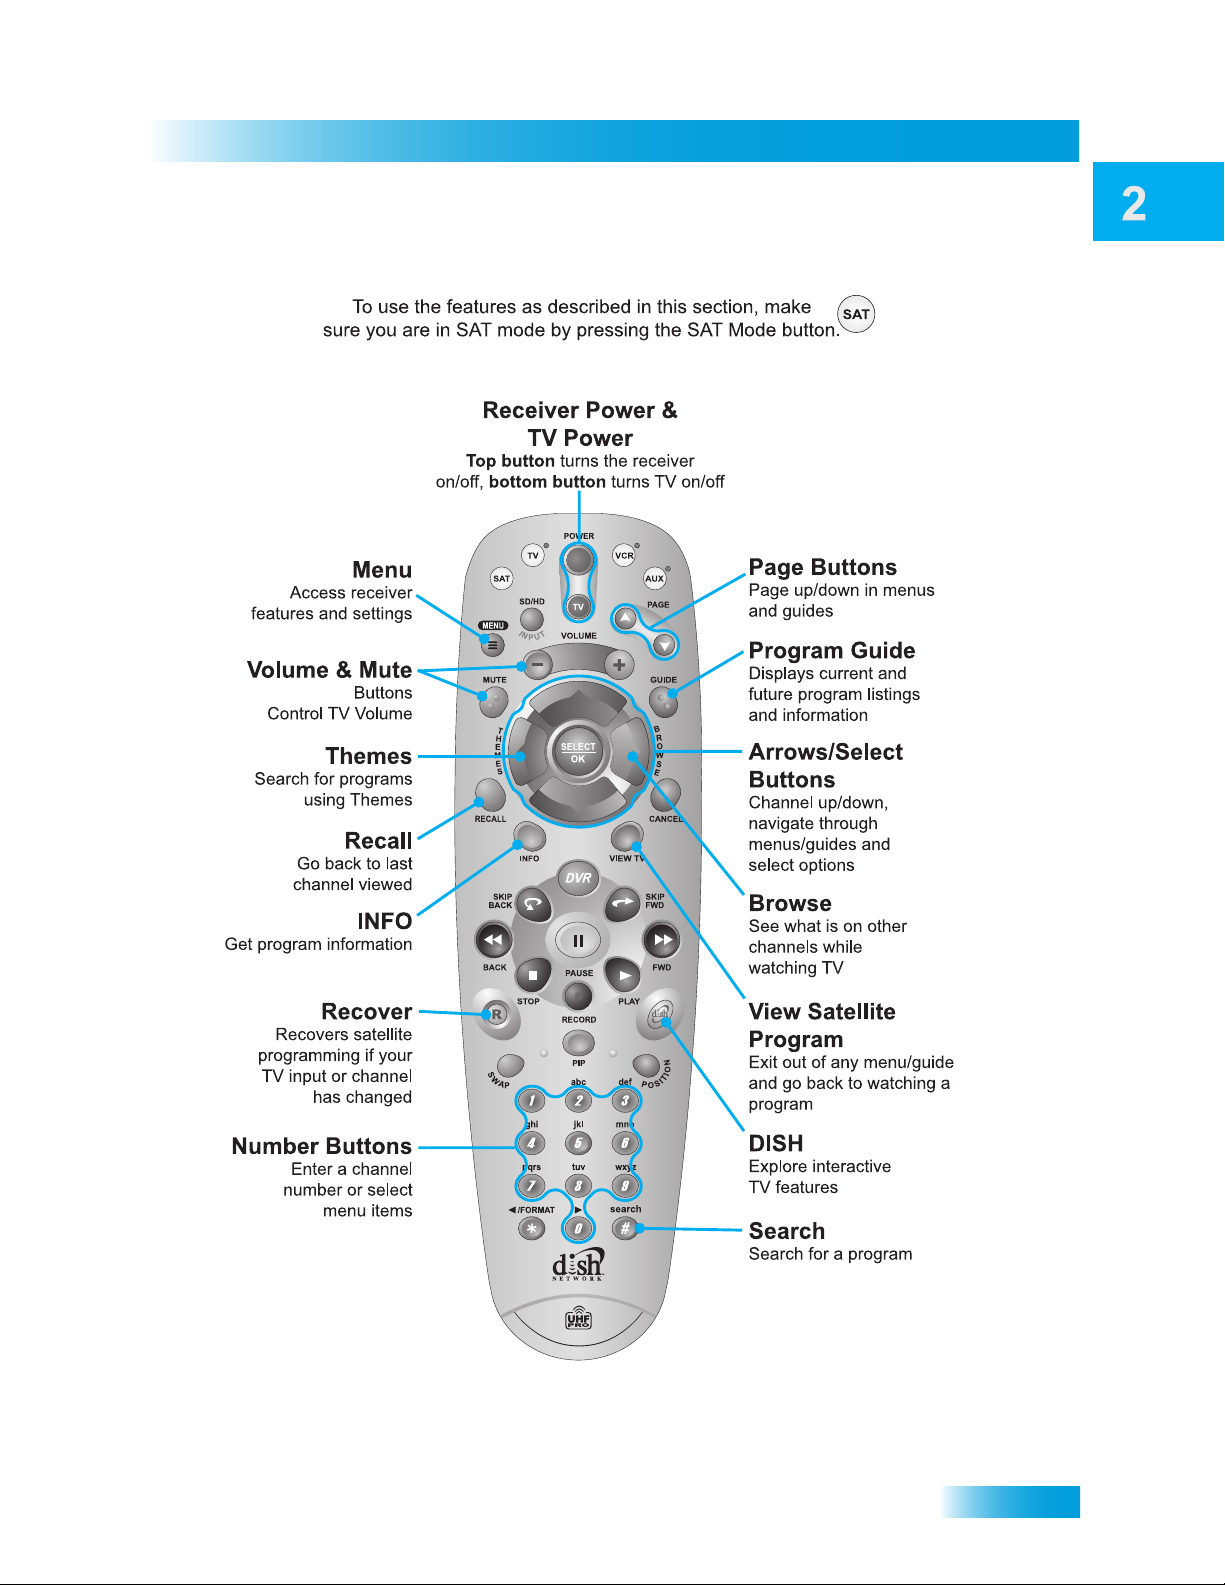
REMOTE CONTROL
The remote control gives you easy access to all the features of your satellite receiver. You can
program the remote to control the satellite receiver and up to three other devices (see page 49).
These devices can be a TV, a VCR or DVD player, and a third device.
This section describes how to use the various features of the remote control delivered with your
satellite TV system.
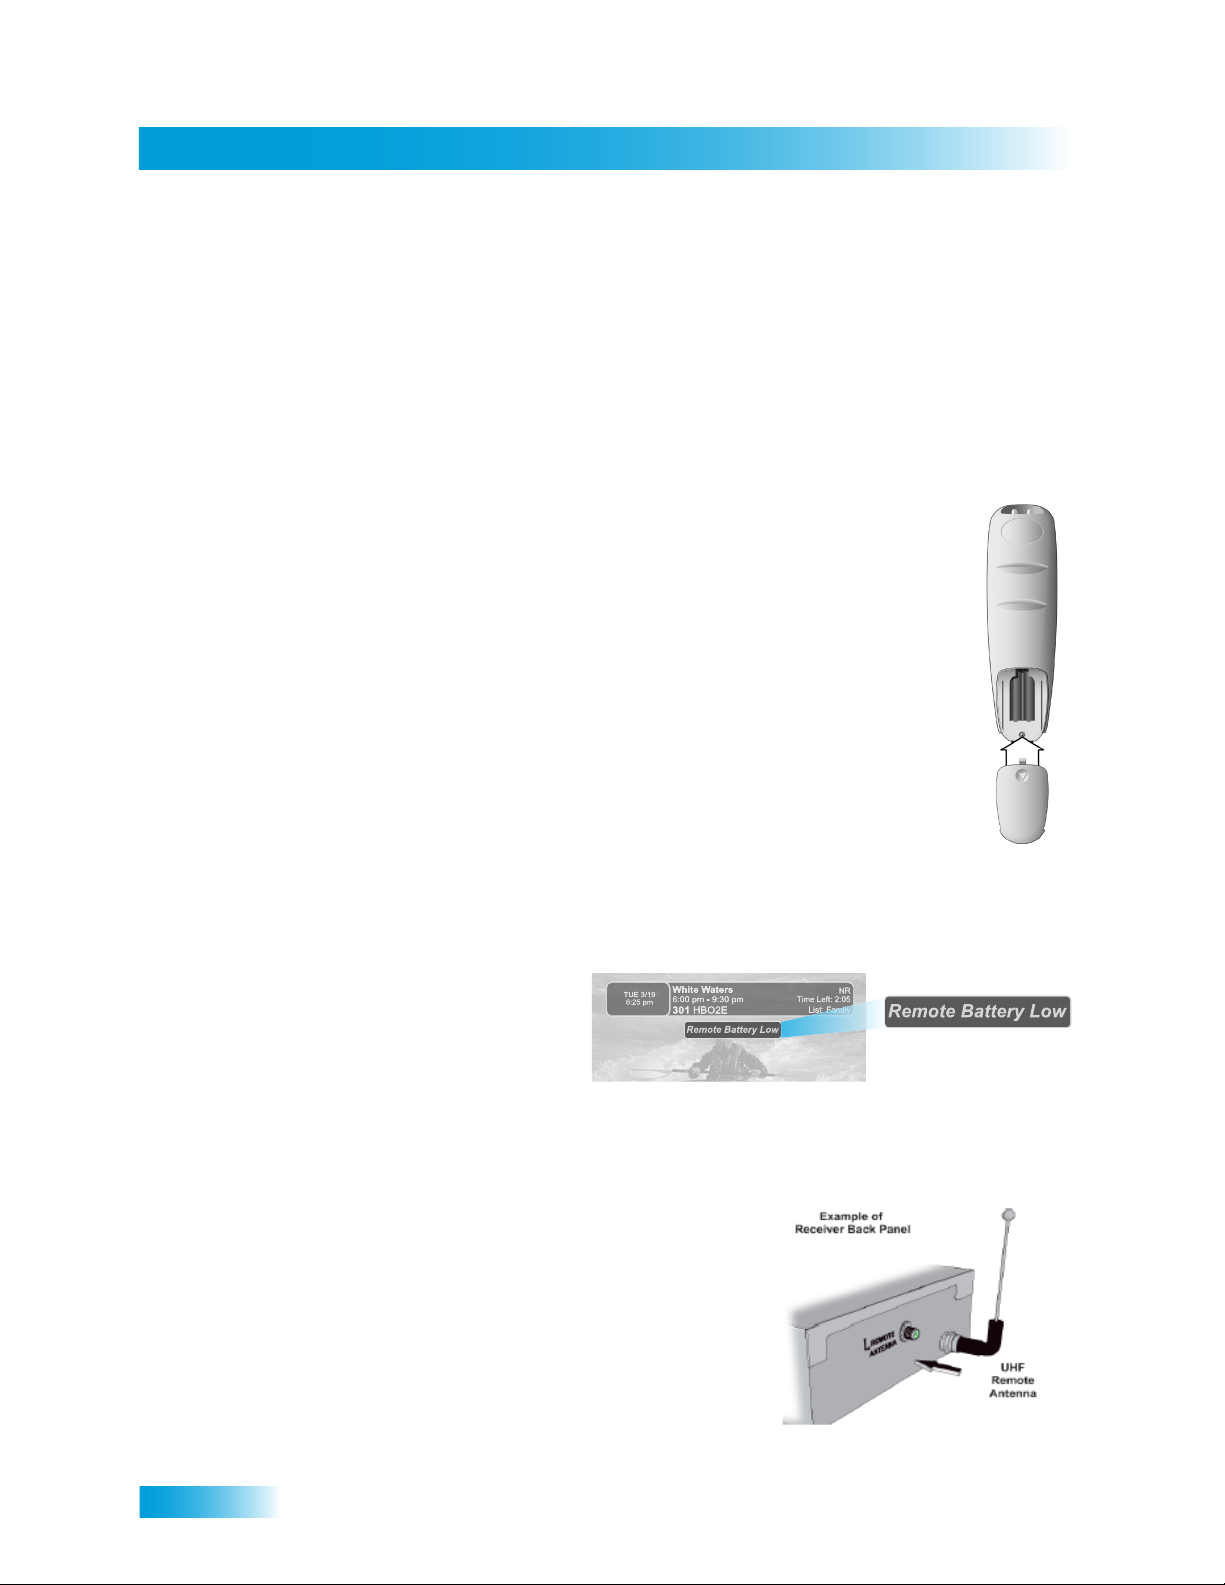
Remote Control Batteries
The remote control comes with four AAA batteries. When you replace old batteries,
you should replace all of the batteries. Use batteries of the same kind, for example,
alkaline or carbon zinc. Don’t mix batteries of different kinds. Alkaline batteries last
longer.
1 Press down on the top of the battery cover and slide the cover off.
2 Take out all of the old batteries.
3 Put four new batteries in. Make sure you match the plus (“+”) ends with the plus
markings on the battery case.
Note: The remote control cannot work with less than four AAA batteries.
4 Slide the cover back into place.
Low Battery Warning
When you see a low battery warning
message on your screen below the
Program Banner, the batteries in your
remote control are weak and need to be
replaced.
UHF Remote Antenna
Attach the UHF remote control antenna to the receiver's
back panel REMOTE ANTENNA input so you can use
your UHF Pro remote control. Be sure to set the
antenna straight up so you can use the remote control
from as far away as possible. Don't let the antenna
touch anything.
8
Page 14
Remote Control Buttons
Receiver and Remote Control
Remote Control
9
Page 15
Chapter 2
Remote Control
10
Note: See page 49 for instructions to program the remote to control your TV.
Page 16
Receiver and Remote Control
Remote Control
Note: See page 49 for instructions to program the remote to control
your VCR or DVD Player.
11
Page 17
Chapter 2
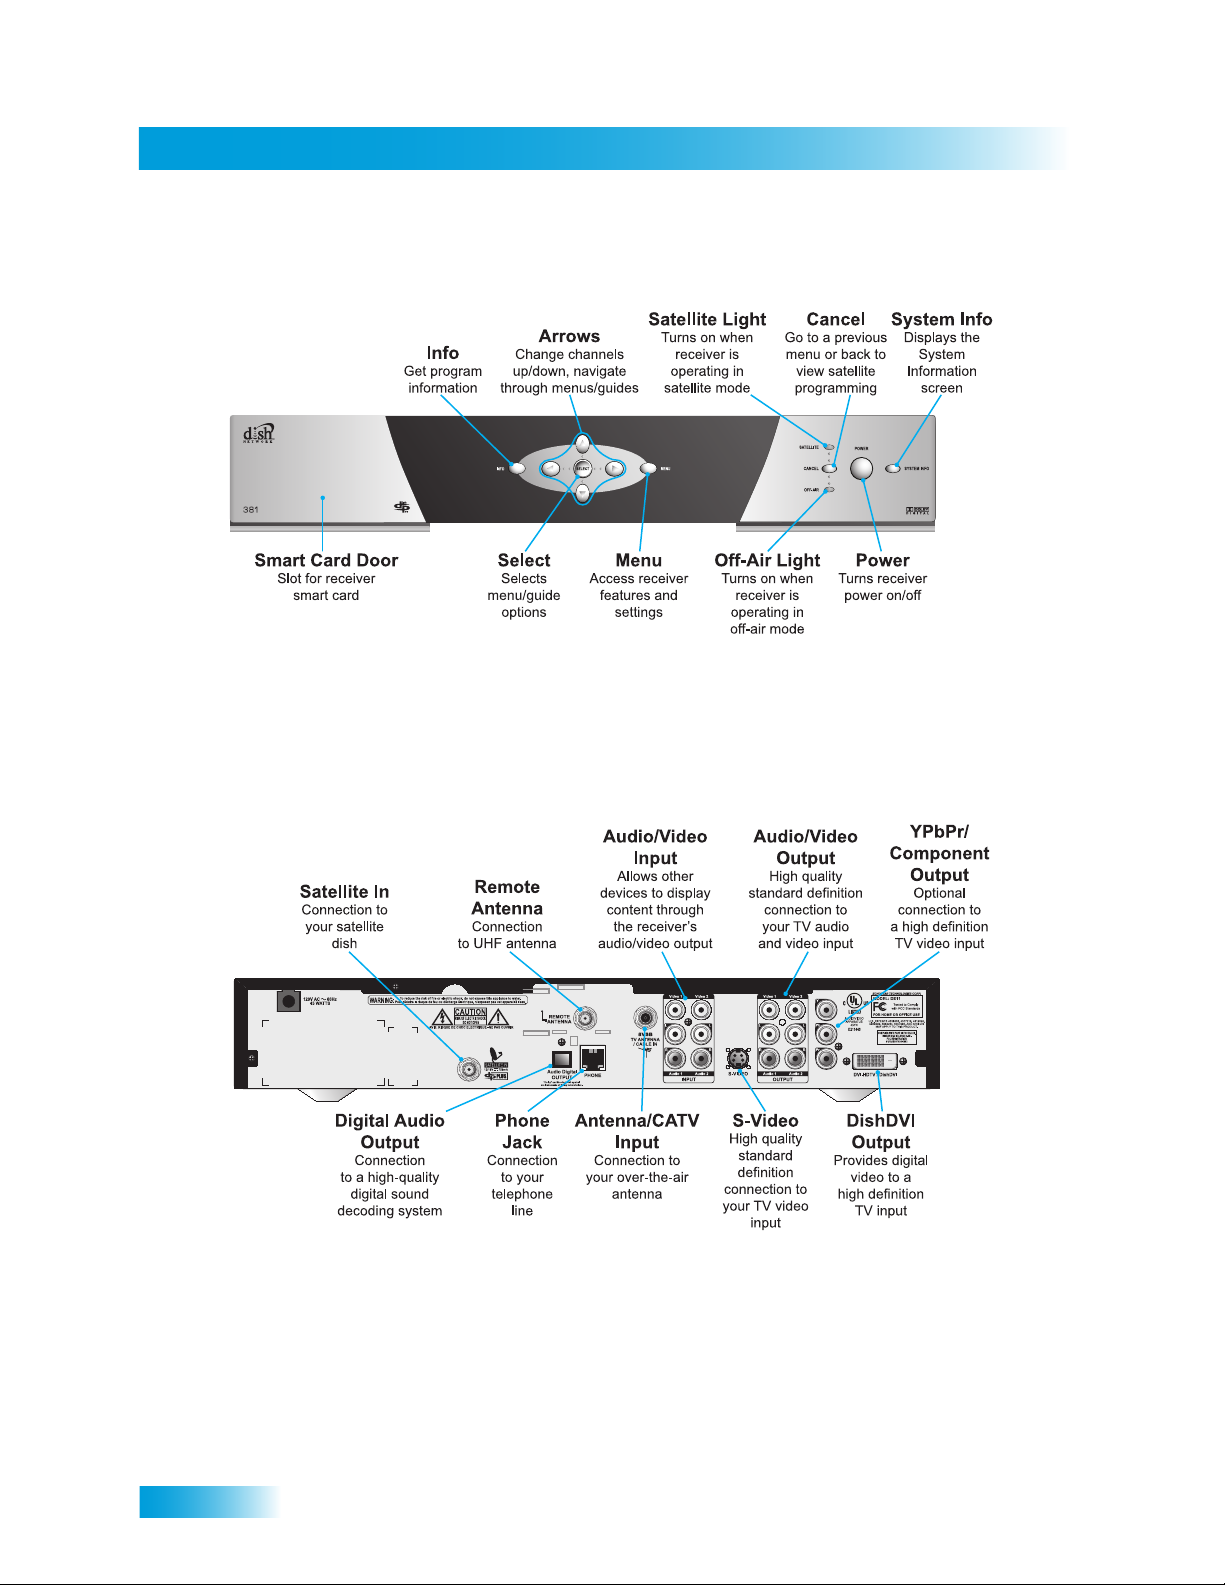
Satellite Receiver Front Panel
SATELLITE RECEIVER FRONT PANEL
SATELLITE RECEIVER BACK PANEL
12
Page 18
USING THE MENUS
The menus make using the receiver and selecting programs quick and easy. Use the menus to
control the receiver and to use its features, such as setting locks, choosing a program, or creating
a favorites list.
Open and Close Menus
You can open the menus in either of two ways:
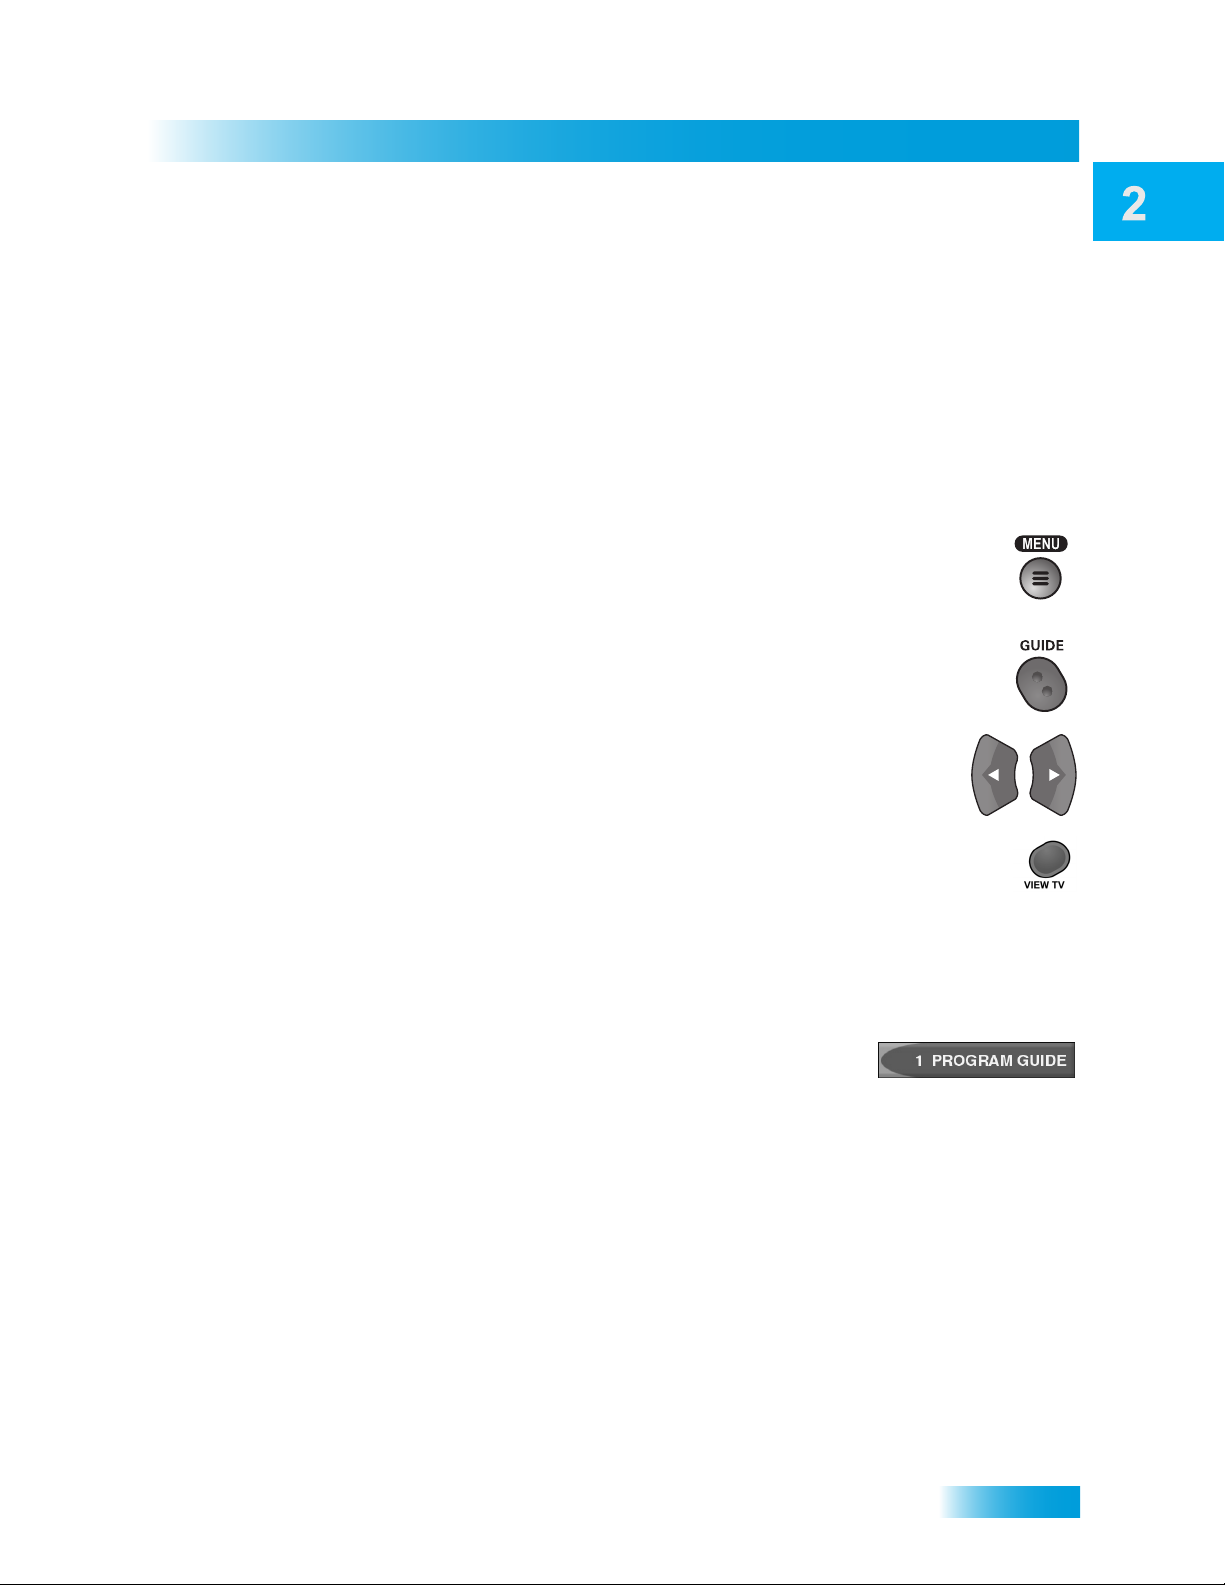
• Press MENU to open the Main Menu, then open any of the other menus from the
Main Menu.
• Use the following buttons on the remote control:
– Press GUIDE to open the Program Guide.
Receiver and Remote Control
Using the Menus
– Press THEMES (LEFT ARROW) when watching a program to open the
Themes and Search menu.
– Press BROWSE (RIGHT ARROW) to display the Browse Banner.
To close a menu and return to watching a program, press VIEW TV.
Highlighting Menu Options
To highlight a menu option, use the remote control ARROWS to move the on-screen highlight to
the menu option. When you do move the on-screen highlight, the option becomes amber.
Selecting Menu Options
When you select a menu option, that option takes effect right away. You
can select a menu option in either of two ways:
• If the option has a number next to it, press the number on the NUMBER PAD button that
matches this number. When you use the NUMBER PAD, you do not need to highlight the
option first.
• Move the highlight to the menu option using the remote control ARROWS. Then press
SELECT. In the example, Program Guide is highlighted.
13
Page 19
Chapter 2
Using the Menus
List of Choices in the Menus
When you make a choice in a list, the receiver does not apply the change until you select Done. If
you do not want to save any changes, select Cancel to discard all the changes made in the menu.
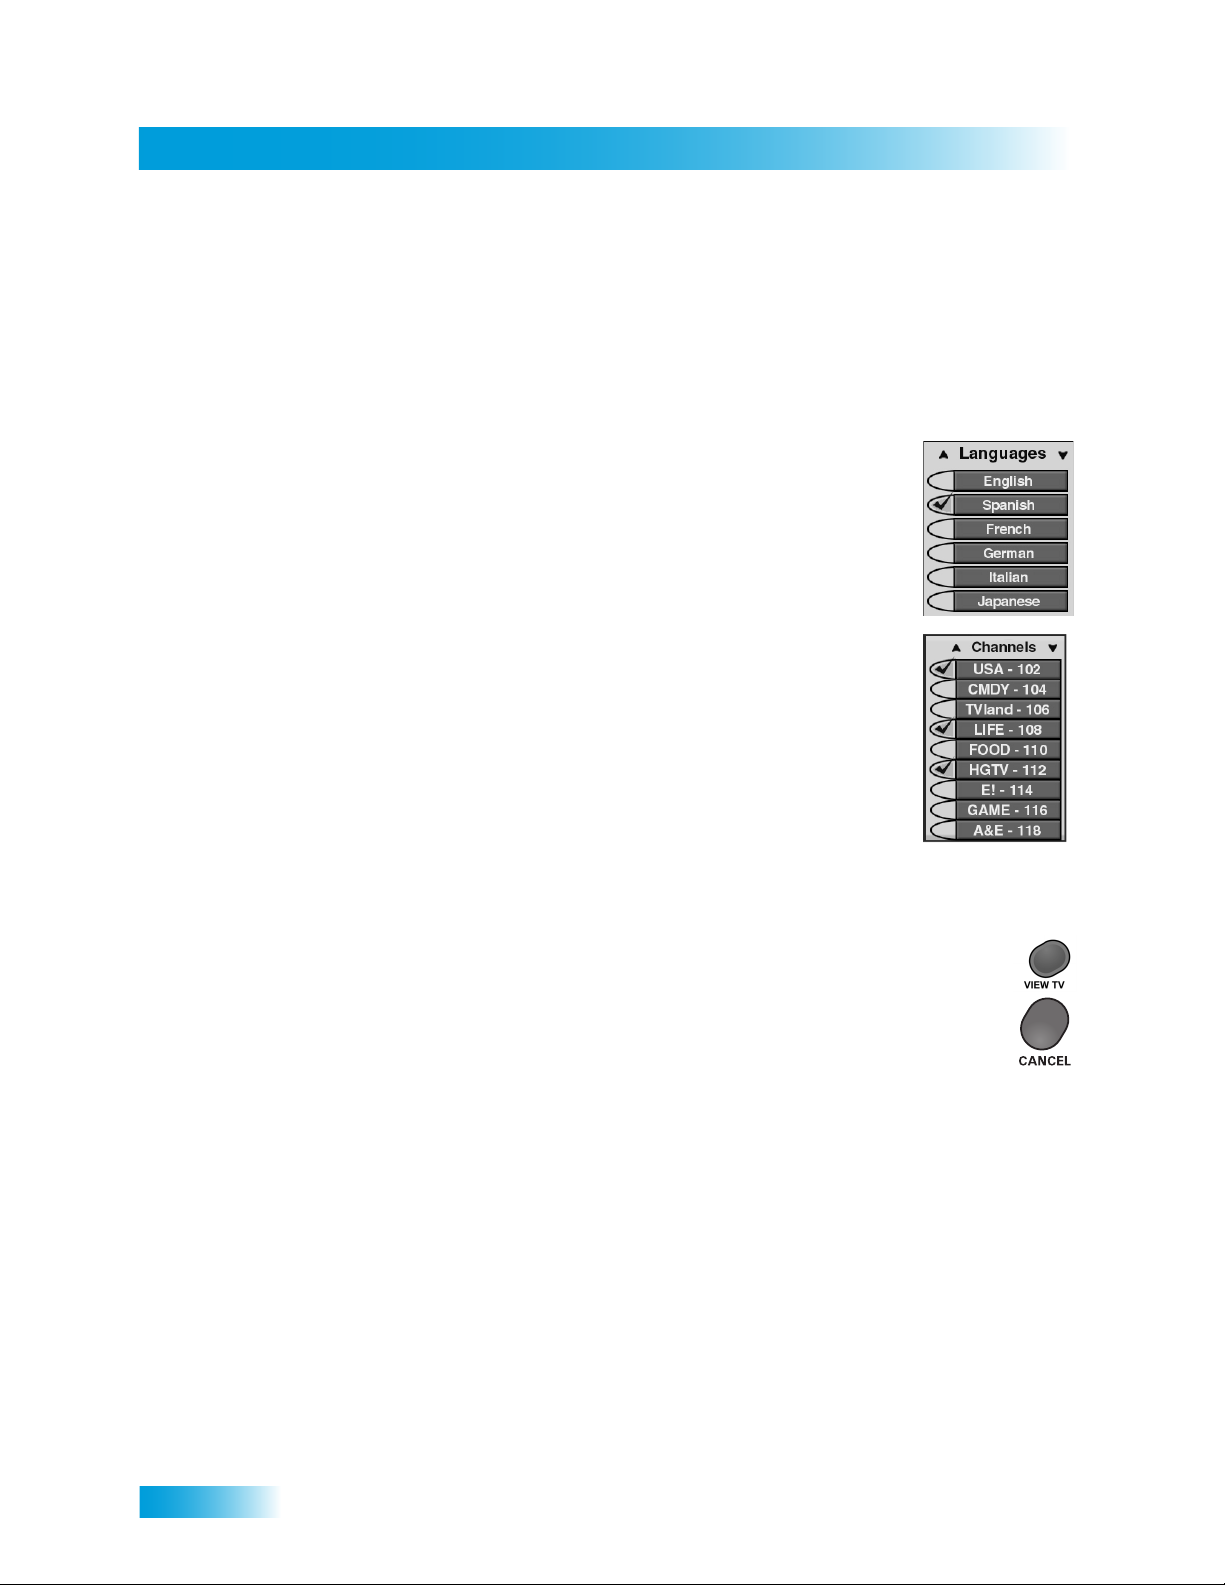
There are two types of lists:
• A single choice list allows you to select only one choice at a time. If you
select another choice, your previous choice is deselected.
• A multiple choice list allows you to select more than one choice at one
time. If you select another choice, your previous choice(s) stays selected.
Canceling a Procedure
You can cancel a procedure in any of three ways:
• If you want to return to watching a program, press VIEW TV.
• If you want to return to the previous menu, press CANCEL.
• Wait a few minutes and the menu will close automatically, discarding any changes
you have made.
14
Page 20
USING TEXT FIELDS
When you use features on the receiver, you might be required to enter information, such as the
name of a movie when using Search, into areas known as text fields. Your receiver has two basic
ways to enter the information:
• Virtual Keyboard
• Remote Control NUMBER PAD
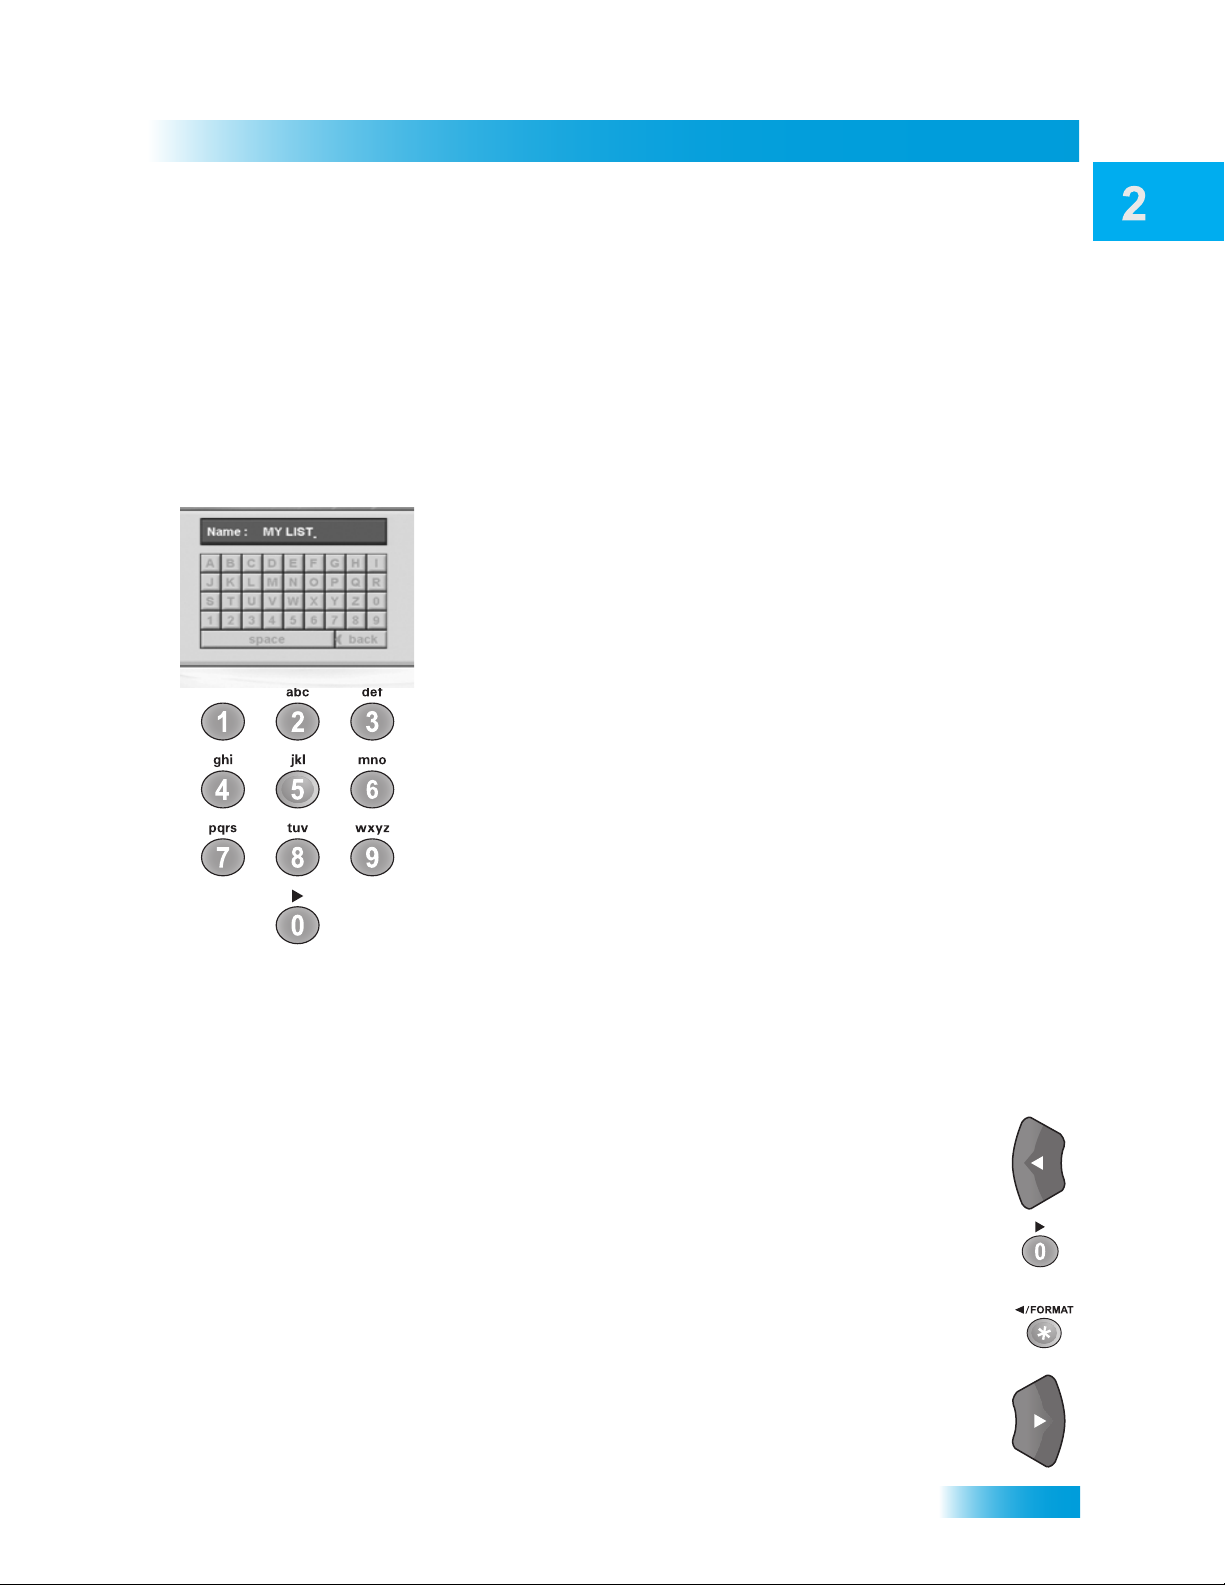
Using the Virtual Keyboard
Use the virtual keyboard letters to type the information. Use the LEFT,
RIGHT, UP, and DOWN ARROWS to navigate around the keyboard.
Select the characters you want.
Using the Number Pad
Receiver and Remote Control
Using Text Fields
Use the letters above the NUMBER PAD on the remote control while the
highlight is in the field. For example, when looking for the channel and
times to watch Rudy Friml Presents, you press 7 three times for an R, 8
two times for a U, 3 one time for a D, and 9 three times for a Y to spell the
word “Rudy.”
While in the Text Field
When the cursor is in the field:
• Press the LEFT ARROW to delete characters.
• Press 0 to enter a blank space, such as between words.
• Press STAR to backspace without deleting characters.
• Use the RIGHT ARROW to forward space without deleting characters.
15
Page 21

Chapter 2
Tips
TIPS
• If you do not do anything in a menu for several minutes, the menu automatically
closes. This will discard any changes you made, and display the program you were
watching.
• Keep from accidentally changing the channel or input on your TV by programming the
remote in Limited Mode (see page 49).
QUESTIONS
Why doesn’t my remote control work?
• Make sure the remote control is in the right mode (see pages 8 and 49).
• Make sure the batteries are good (see page 8).
• Make sure you are pointing the remote directly at the receiver (TV, VCR, DVD player,
etc.) (page 8).
16
Page 22
Finding Programs to Watch
Watching TV
The receiver is on channel 414, but you want to change the channel to 210. How do you
change the channel? You know your team is playing, but you’re not sure of the channel.
How do you find the game? You’re in the mood for a movie, but you don’t know which one.
Is there a way to look for movies? This chapter shows you the various ways for you to find
something to watch.
You’ll find the following information in this chapter:
• CHANGING CHANNELS
• USING THE PROGRAM GUIDE
• USING THE BROWSE BANNER
• USING SEARCH TO FIND A PROGRAM
• FINDING A PROGRAM BY ITS THEME
17
Page 23
Chapter 3
Changing Channels
CHANGING CHANNELS
Using the Up and Down Arrows
While watching TV, if you want to change the channels one at a time to see
what’s on, press the UP and DOWN ARROWS on your remote control. You can
also change the channels the same way using the UP and DOWN ARROWS on
the receiver front panel.
Entering a Channel Number
While watching TV, if you know the specific channel you want to watch, enter
the channel number using the NUMBER PAD on the remote control.
Using the RCA Audio and Video Inputs
You can select the RCA Audio and Video inputs as sub-channels of Channel 0.
Select Channel 0 from the Program Guide, and then select either Input 1 or Input 2.
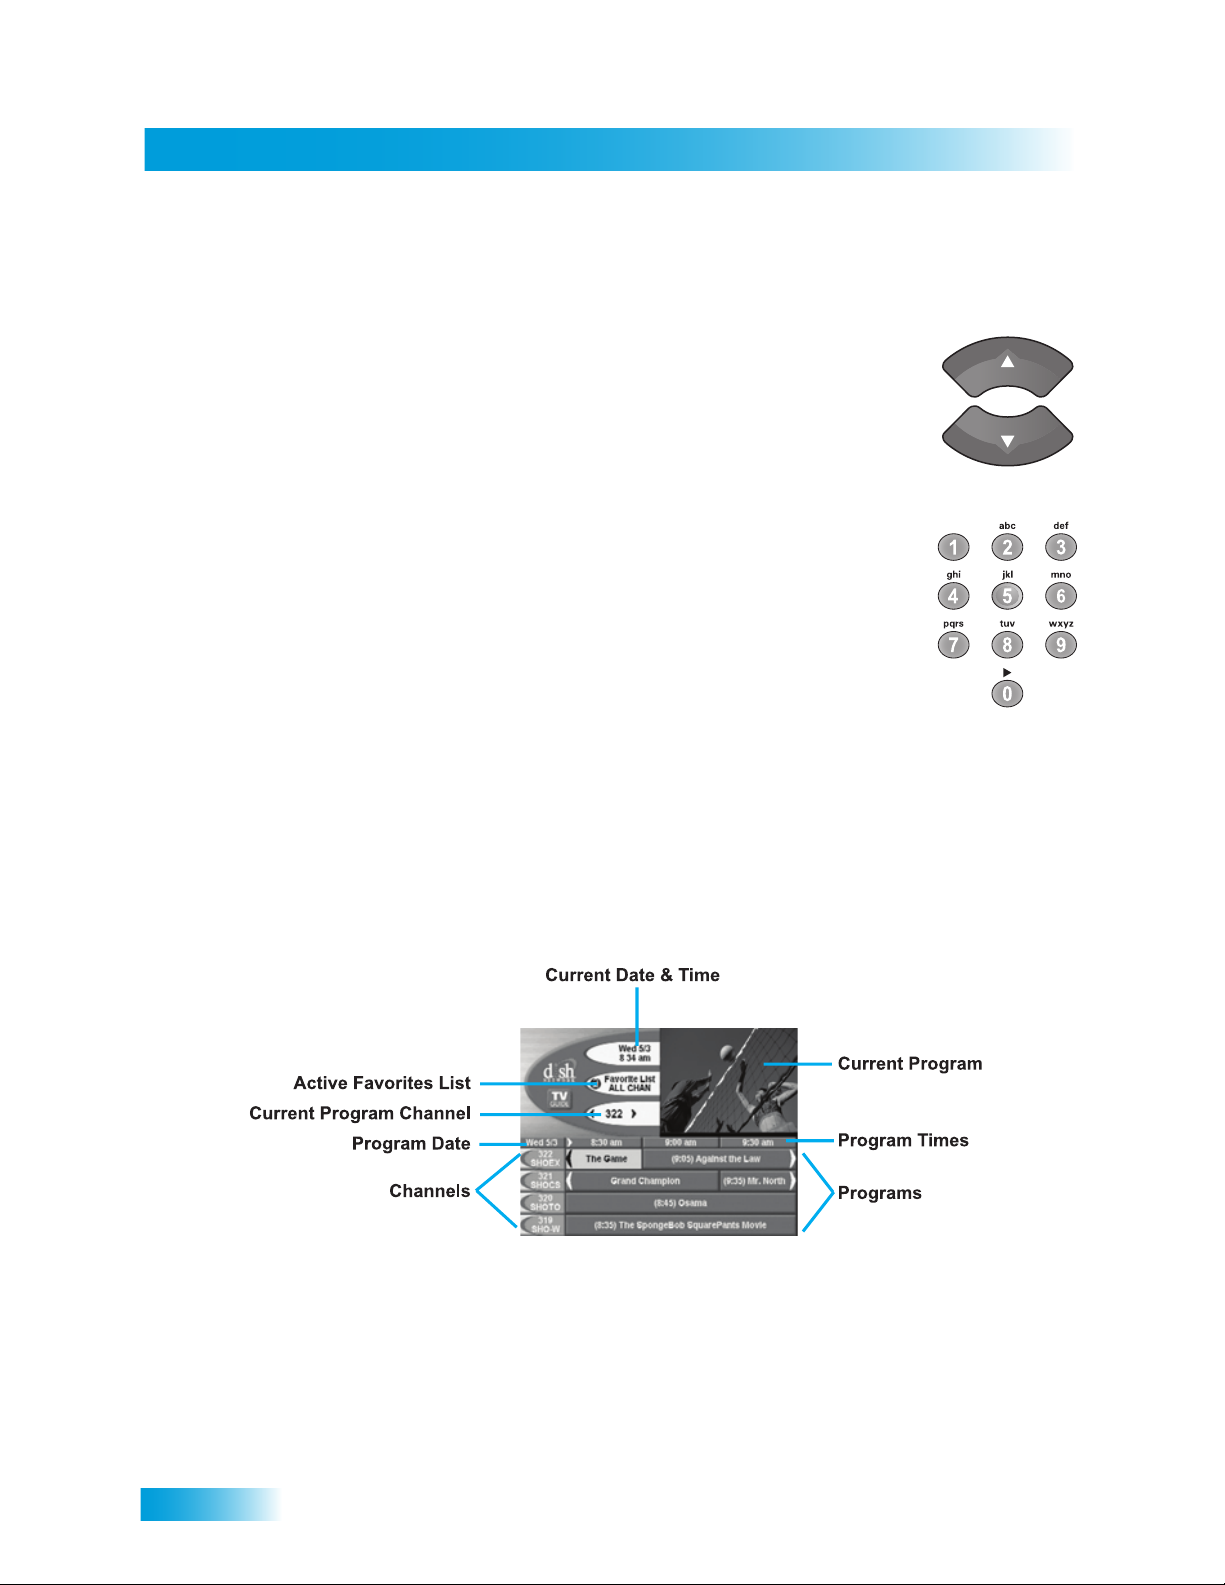
USING THE PROGRAM GUIDE
You can use the Program Guide to see what programs are on, to change channels, and to set up
recordings. To access this guide, press GUIDE.
• A red background behind a channel usually means you have not subscribed to the channel.
After you subscribe to a channel, you can tune to it. To subscribe to a channel, call
1-800-333-DISH (3474).
• A yellow background behind a channel is for over-the-air digital channels. See page 75 for
instructions to connect an over-the-air antenna to your receiver.
18
Page 24
Finding Programs to Watch
Using the Browse Banner
• The Program Guide shows which Favorites List is active. If All Chan is active, the Program
Guide shows all the channels. The All Sub list shows only the channels in your subscription. If
you activate another list, the Program Guide shows only the channels on that list. See page 27
for information on Favorites Lists.
• The Program Guide shows programs on now and coming on within the next two days. The
guide does not show programs that have ended.
While using the Program Banner, you can:
• Press PAGE UP or PAGE DOWN to move a page of channels at a time.
• Enter the number of hours you want to skip forward or backward in the schedule, and then
press the RIGHT/LEFT ARROW to move forward or back in the schedule. The Program Guide
shows the number of hours.
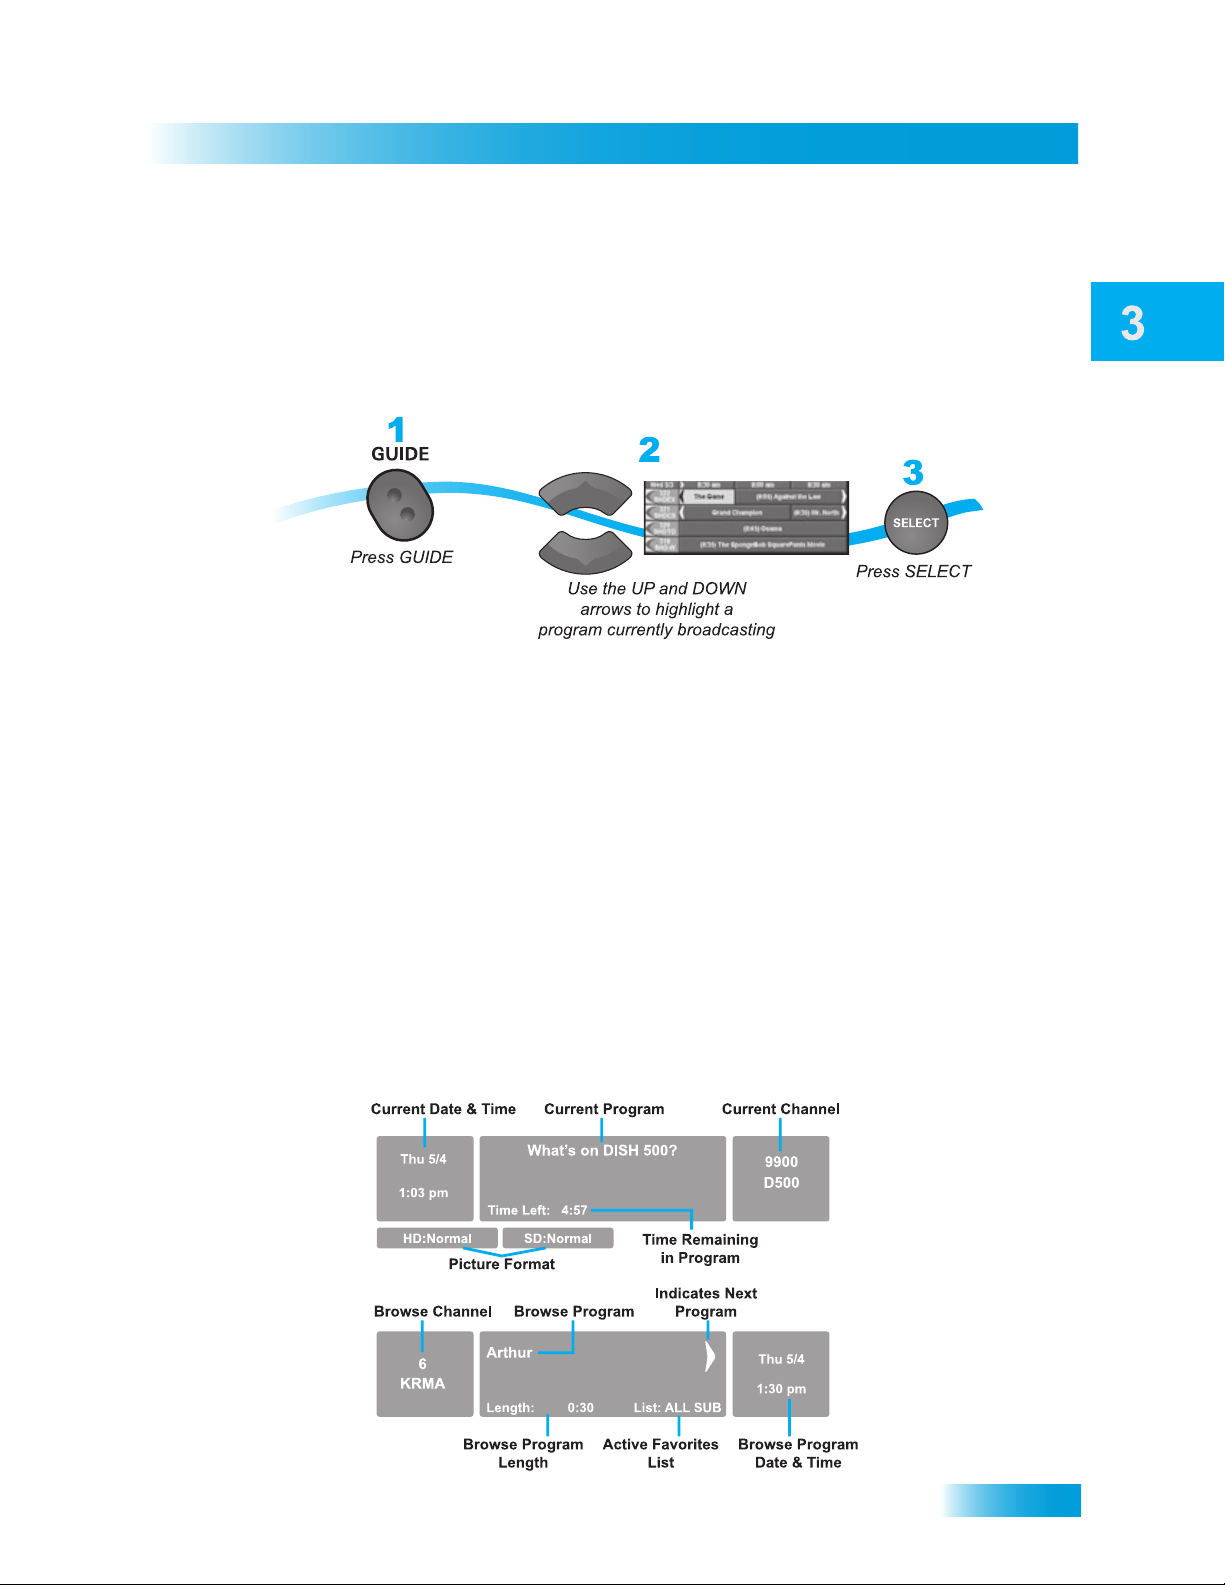
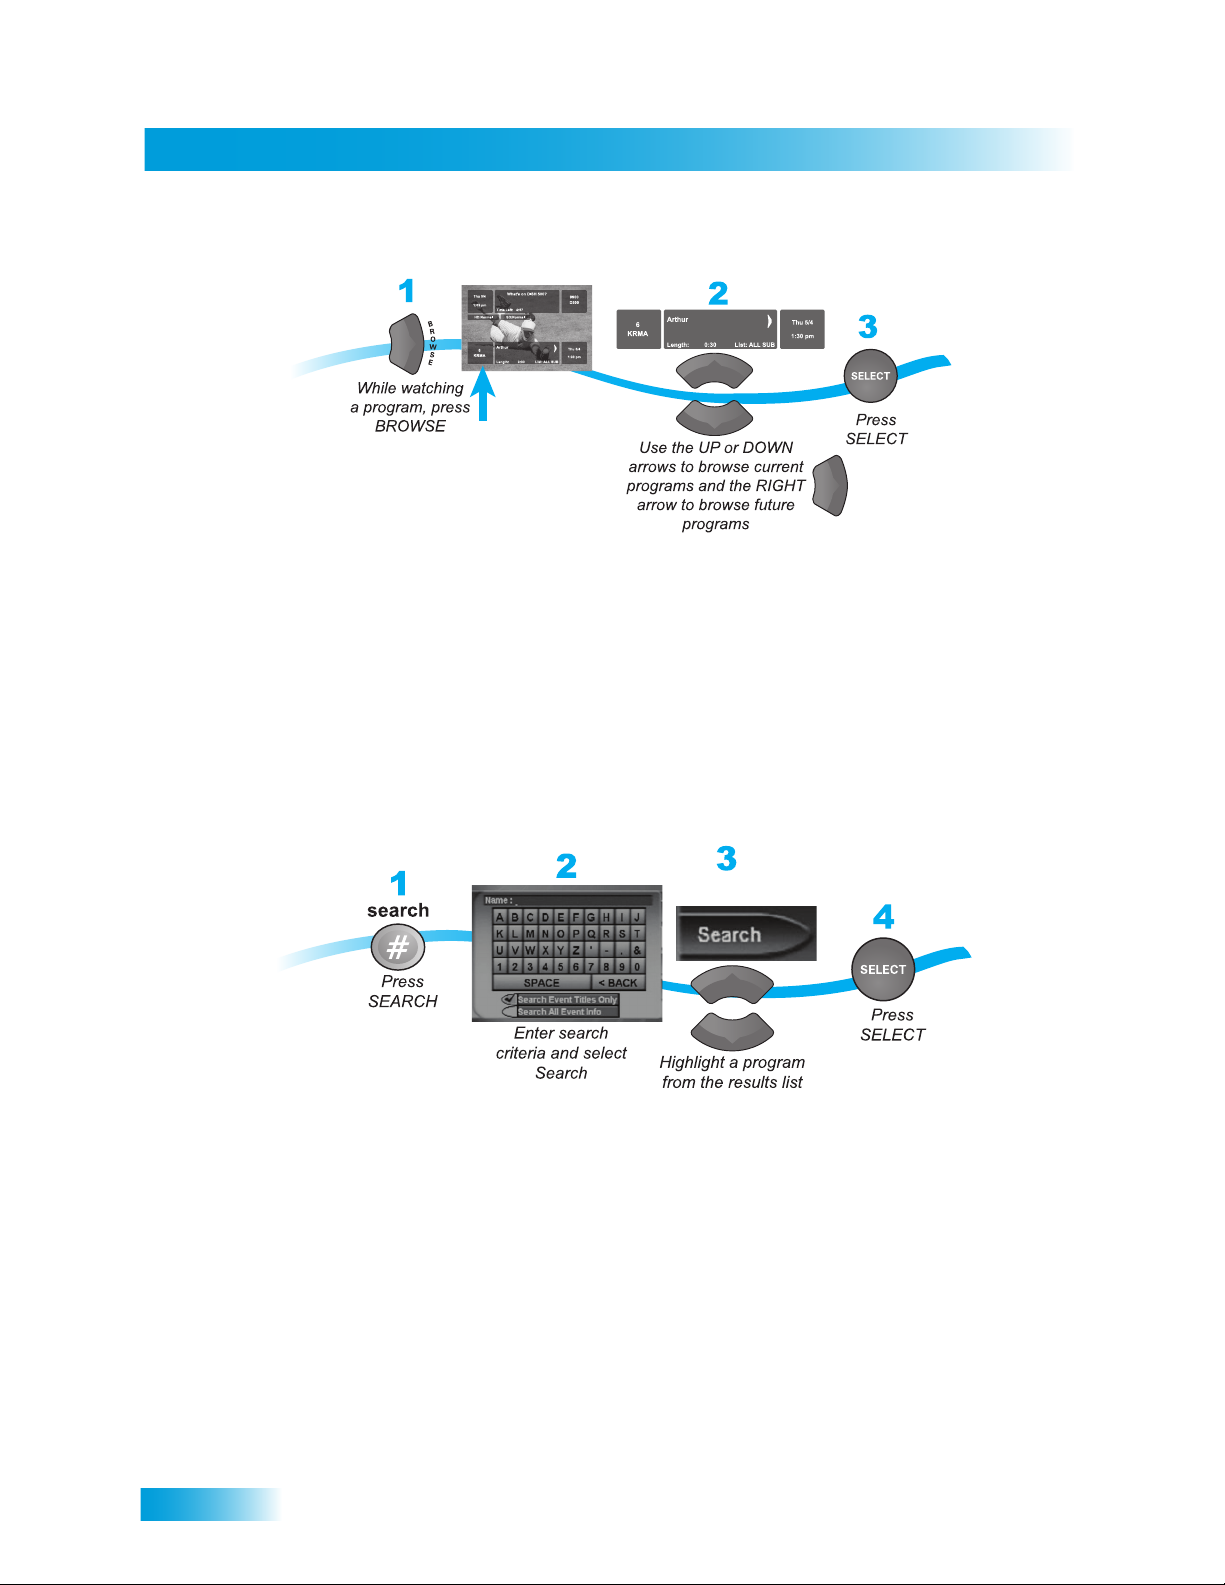
USING THE BROWSE BANNER
Use the Browse Banner to see what other programs are on and not miss any of a program you are
watching. When the Browse Banner is open, you will see the Program Banner information on the
current program at the top of the screen, and on the left side of the Browse Banner at the bottom of
the screen. At the bottom right of the screen is information on the program that is on next on the
same channel.
19
Page 25
Chapter 3
Using Search to Find a Program
If you select a current program, the receiver will tune to that channel. If you choose a future
program, the Create Timer screen will display. See Chapter 8 - Timers on page 39 for more
information.
USING SEARCH TO FIND A PROGRAM
You can find programs to watch by using the Search feature of the receiver. This feature will
search all channels, including over-the-air channels (if an over-the-air antenna is connected to the
receiver as described on page 75), and find programs that match keywords that you enter.
You can search for events two ways:
• Select Title to search for the words that appear in the title of a program.
• Select Info to search for words that are in the program description or title.
Enter the search word(s) in the Search Criteria Field in one of two ways (see page 15):
• Use the virtual keyboard.
• Use the letters on the NUMBER PAD.
If you select a program that is on now, the receiver tunes to that program. If you choose a future
program, the Create Timer screen will display. See Chapter 8 - Timers on page 39 for more
information.
20
Page 26
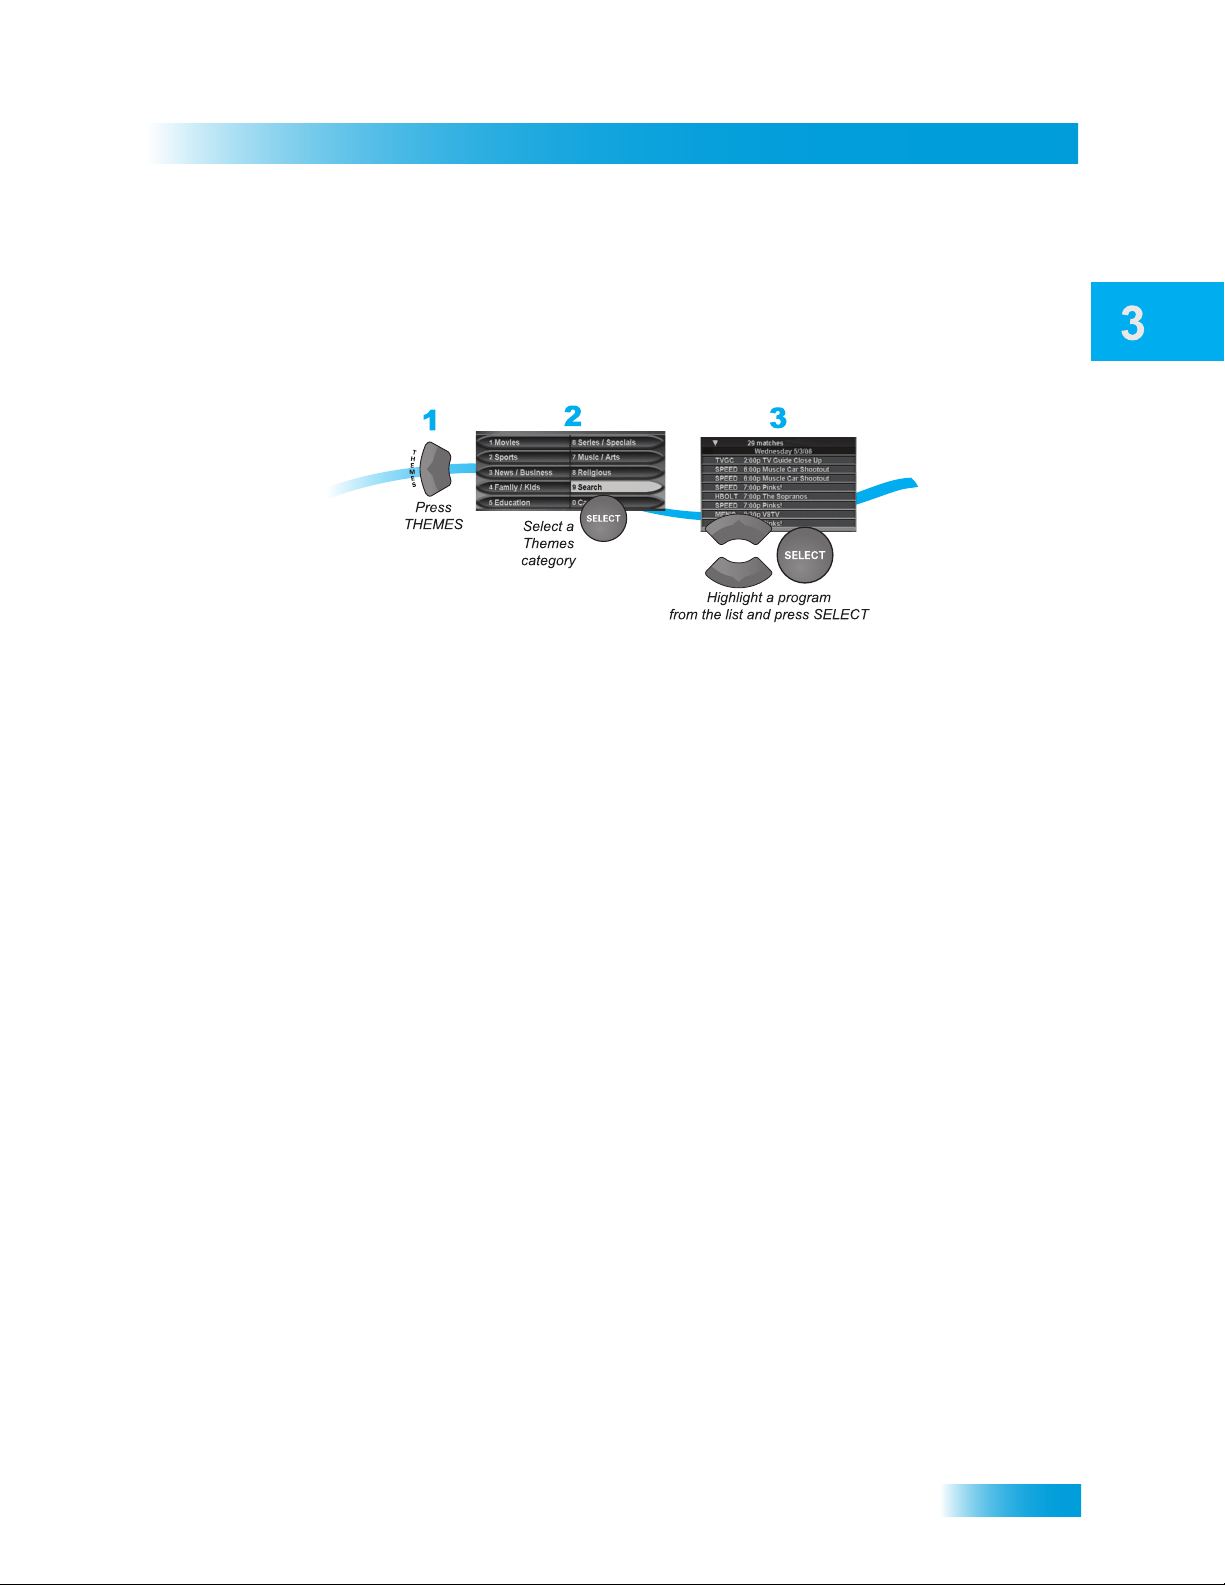
FINDING A PROGRAM BY ITS THEME
You can list and choose programs by the theme of their contents, for example, just movies or just
sports. You can then quickly list programs based on that theme, and choose the program you
want. This feature also categorizes programs on over-the-air channels (if an over-the-air antenna
is connected to the receiver as described on page 75).
If you select a program that is on now, the receiver tunes to that program. If you choose a future
program, the Create Timer screen will display. See Chapter 8 - Timers on page 39 for more
information.
Finding Programs to Watch
Finding a Program by its Theme
21
Page 27

Chapter 3
Tips
TIPS
• Press INFO to get more information about the program you highlighted.
• Press VIEW TV to cancel almost any screen and return to viewing TV.
• Skip forward 24 hours (and then back again) at a time in the Program Guide by press-
ing the SKIP FWD (SKIP BACK) button on the remote control.
QUESTIONS
• How can I customize the Program Guide to show only my favorite channels?
You can set up a Favorites List as described on page 28.
• Why are some of my channels missing?
– You may have locked or hidden the channels. See Chapter 6 - Locks on page 31
for information on locking and unlocking the receiver.
– You may have the wrong list showing in the Program Guide. Press Guide to open
the Program Guide. Press Guide again to select the next Favorites List. Press
Guide repeatedly to scan through all the available lists. See Favorites Lists on
page 29 for more information.
22
Page 28
Pay-Per-View
Order and Watch Pay-Per-Views
Is tonight a popcorn and movie night? Why rent videos when you can just watch Pay-PerViews? This chapter describes how to use these additional services:
• BUYING A PAY-PER-VIEW PROGRAM
• REVIEWING PAY-PER-VIEW PURCHASES
23
Page 29
Chapter 4
Buying a Pay-Per-View Program
To buy Pay-Per-View programs, you must connect the receiver to an active phone line. After you
buy a Pay-Per-View program, you can watch it on all of the receivers on your DISH Network
account. Using the remote control, you can order the exact same program for each receiver but
you pay for the program only once. However, replays of programs are separate events.
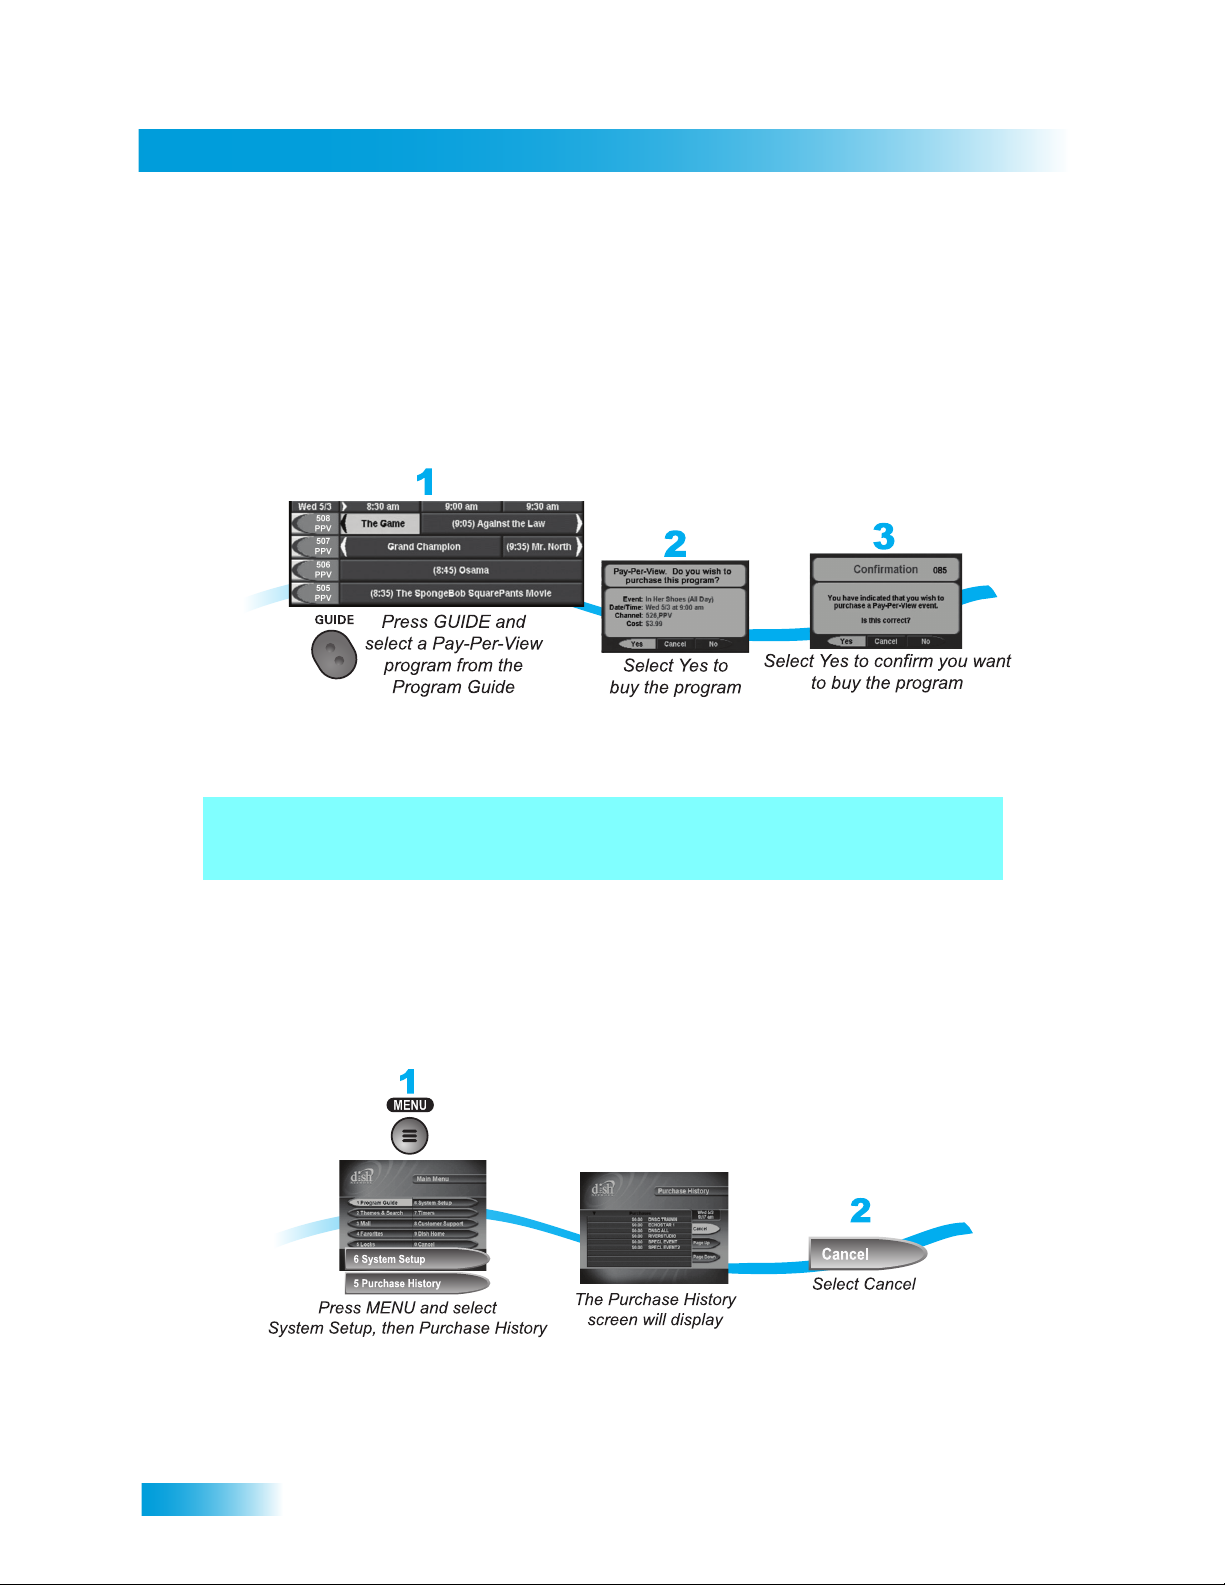
BUYING A PAY-PER-VIEW PROGRAM
Note: Once you confirm an order for a Pay-Per-View program, you cannot cancel the order and
you will be billed for it.
Here’s something interesting! The first Pay-Per-View event was a professional
basketball game in 1977.
REVIEWING PAY-PER-VIEW PURCHASES
Use this feature to review events you’ve purchased, including those you have watched and those
you purchased but have not yet watched.
24
Page 30
Pay-Per-View
TIPS
• You can set up a VCR to record Pay-Per-View programs. See page 75 for more details.
• You can prevent others from purchasing Pay-Per-View programs by using locks (see
page 34).
• Tune to Channel 103 for a list of what’s playing on Pay-Per-View.
QUESTIONS
Tips
• How can I order an event for all my receivers?
– Order on each receiver, one at a time with the remote control. Make sure an active phone
line is connected to each receiver.
– Order the event over the phone 1-877-DISH-PPV (347-4778).
– Order the event online at dishnetwork.com/ppv.
• Will I be charged more than once for ordering the same Pay-Per-View on two or more
receivers? If you’re using the remote control, you won’t be charged more than once as long
as it is the same exact event (for example, at the same time or All Day events).
• Why doesn’t my Program Guide show any Pay-Per-View channels? You may be using a
Favorites List that doesn’t include Pay-Per-View channels. Press GUIDE to open the Program
Guide and then press GUIDE again until you see All Chan in the upper left corner of the Program Guide. See Chapter 5 - Favorites Lists on page 27 for more information on using Favor-
ites Lists.
25
Page 31

Chapter 4
Questions
Notes
26
Page 32

Favorites Lists
Setting Up Your Favorites Lists
One of the benefits of DISH Network is that you have access to many channels. However,
the number of channels can make it difficult to find something to watch. When you read
this chapter, you’ll learn how to set up and use Favorites Lists. The information in this
chapter shows you how to fit your favorite channels into neat, organized lists.
• WHAT ARE FAVORITES LISTS?
• C
REATING OR CHANGING FAVORITES LISTS
• NAMING FAVORITES LISTS
• USING FAVORITES LISTS
27
Page 33

Chapter 5
What are Favorites Lists?
WHAT ARE FAVORITES LISTS?
Favorites Lists are lists of your favorite channels. You can create and change the lists yourself,
adding and removing channels as you wish. Your favorite channels can be grouped in up to four
lists.
• When using a Favorites List, the Program Guide and Browse Banner display only the channels in that Favorites List. Also, when you use the remote control UP or DOWN ARROW to
change channels, the receiver skips channels that are not on the list.
• The All Chan list contains all the channels, including channels not in your current subscription.
You cannot make any changes to the All Chan list.
• The All Sub list contains all the channels in your subscription. You cannot make any changes
to the All Sub list, except by changing your subscription.
• Each Favorites List has a unique color in the Program Guide. You can give each list a name.
When you first get the receiver, the four lists are named List 1, List 2, List 3, and List 4. The
lists are empty until you add channels to them.
• If you choose a program using Themes or by entering a channel number using the remote
controls, the receiver tunes to the channel for that program whether or not that channel is on
the active Favorites List.
• You can include over-the-air channels in your Favorites Lists if an over-the-air antenna is
connected to the receiver. See page 75 for instructions on connecting an over-the-air antenna.
CREATING OR CHANGING FAVORITES LISTS
You can create, add channels to, and remove channels from a Favorites List. When you use your
Favorites List (see page 29) only those channels in your list are shown in the Program Guide and
Browse Banner.
28
Page 34

NAMING FAVORITES LISTS
You can name your Favorites Lists whatever you want, up to eight characters long.
USING FAVORITES LISTS
Favorites Lists
Naming Favorites Lists
Press GUIDE to open the Program Guide. Press GUIDE again to select the next
Favorites List. Press GUIDE repeatedly to scan through all the available lists.
TIPS
• Two lists cannot have the same name.
• Pressing GUIDE to switch Favorites Lists works only if you have added channels to the Favor-
ites List. If you have not created a Favorites List, pressing GUIDE switches the receiver
between the All Chan and All Sub Lists.
• Hidden channels do not display in Favorites Lists.
QUESTIONS
• Why are channels missing from the Program Guide?
– You might have a Favorites List that does not contain those channels. Press GUIDE until
the All Chan or All Sub list displays.
– You might have channels hidden.
29
Page 35

Chapter 5
Questions
Notes
30
Page 36

Locks
Securing Your Receiver and Account
An important concern to parents is the ability to protect their children. With high tech
television comes greater potential for unwanted programming beamed into your home.
Use the safeguards described in this chapter to set up and use locks.
• WHAT ARE LOCKS?
• CREATING OR CHANGING A PASSWORD
• LOCKING AND UNLOCKING YOUR RECEIVER
• CREATING OR CHANGING RATINGS LOCKS
• CREATING OR CHANGING CHANNEL LOCKS
• LOCKING OR UNLOCKING PAY-PER-VIEW
C
HANNELS
• HIDING ADULT CONTENT
• LOCKING OR UNLOCKING THE FRONT PANEL
31
Page 37

Chapter 6
What are Locks?
WHAT ARE LOCKS?
Locks allow you to password-protect programming based on ratings, or on a channel-by-channel
basis. When you have locked the receiver:
• If you try to access a locked item or open the Locks menu, the receiver displays a message
prompting you to enter the password.
• The receiver allows you three attempts to enter the correct password. If you fail to enter the
correct password, the receiver does not allow you to try again for several minutes.
• If you enter the correct password, you can access the locked item or open the Locks menu.
• If you exit a locked item or close the Locks menu, you must enter the password to access the
item again.
Locking the receiver is a two-step process:
1 Create the locks that you want.
2 Lock the receiver.
When the receiver is locked, anyone who wants to access locked items must enter the password.
CREATING OR CHANGING A PASSWORD
The first thing to do before using the receiver locks is set up your password.
Memorize the new password. From now on, you must enter this password to lock or unlock the
receiver. If you forget your password, you will need to speak with a Customer Service
Representative.
32
Page 38

Locking and Unlocking Your Receiver
LOCKING AND UNLOCKING YOUR RECEIVER
You must lock the receiver for any receiver locks you set to take effect. To lock the receiver, you
must first create a password (see Creating or Changing a Password in the previous section). Be
sure to refer to this section whenever you set any lock on your receiver.
Locks
CREATING OR CHANGING RATINGS LOCKS
You can lock programs based on Motion Picture Association of America (MPAA) ratings (PG, PG
13, etc.) and expanded ratings (violence, language, etc.).
Note: Highlight the least restrictive rating that you want to block. Press SELECT to lock the
highlighted rating and all ratings more restrictive than it (for example, locking PG 13 automatically
locks R and NC-17).
From the history vault! If today’s date is November 1, wish the ratings system
a happy birthday because the Motion Picture Association of American
introduced the system in 1968.
33
Page 39

Chapter 6
Creating or Changing Channel Locks
CREATING OR CHANGING CHANNEL LOCKS
The locks use the ratings that the original program providers assigned to the programs.
The actual content of the programs may differ from their assigned ratings. No rating
system can guarantee that all objectionable material is screened out. Like all other
locks, these locks are only in effect when the receiver is locked. You can lock any
program, including Pay-Per-View programs. The locks built into some televisions do not
apply to satellite programs. Television program ratings differ from movie ratings.
You can lock any channel, including Pay-Per-View and over-the-air channels. This type of lock
keeps anyone from viewing these channels unless they enter the correct password.
LOCKING OR UNLOCKING PAY-PER-VIEW CHANNELS
This locks all Pay-Per-View channels. This type of lock keeps anyone from viewing these channels
by using the UP or DOWN ARROWS or the remote control NUMBER PAD. You also can lock
individual Pay-Per-View channels by using channel locks.
34
Page 40

HIDING ADULT CONTENT
When you hide adult channels, you prevent the Program Guide, Themes lists, and the Browse
Banner from displaying adult channels. It also prevents anyone from choosing these channels by
using the UP or DOWN ARROWS or the remote control NUMBER PAD.
Locks
Hiding Adult Content
LOCKING OR UNLOCKING THE FRONT PANEL
This lock keeps anyone from using the front panel buttons unless they enter the correct password,
but it does not lock the remote control buttons.
35
Page 41

Chapter 6
Tips
TIPS
• If the receiver displays a message prompting you to enter a password, the receiver is locked.
• When you lock a rating, you also lock all other more restrictive ratings. For example, if you lock
PG 13 rated programs, then all programs with the R, NC-17, and NR/AO ratings are also
locked.
QUESTIONS
• Why didn’t a lock I set take effect? You have to lock the receiver for any lock you set to take
effect. See page 33 for details.
• What do I do if I forget my password? If you forget your password, you will need to speak
with a Customer Service Representative.
36
Page 42

Interactive TV
Interacting with Your TV
Play games, shop, and get help from Customer Service! Use the information in this
chapter learn about interactive services available on your satellite receiver.
• DISHHOME
• CUSTOMER SUPPORT
37
Page 43

Chapter 7
DishHOME
DISHHOME
Press DISH on the remote control to go to DishHOME features available with your service. Watch
video from popular news, entertainment, and sports networks all on one screen. You can also
select an icon from the bottom of the screen for customer support, news, shopping sports, games,
and entertainment.
CUSTOMER SUPPORT
An important feature of your satellite TV receiver is Customer Support. This menu provides
convenient access to your DISH Network account to review your statement, pay your bill, upgrade
programming, and more. Make sure you connect an active phone line to your receiver.
Press MENU and then select Customer Support.
38
TIPS
• Whenever you want to exit an interactive feature and return to watching programming, press
VIEW TV and you’ll be taken to the last channel you were watching.
• You can also get to Customer Support from DishHOME.
Page 44

Timers
Setting Up and Using Timers
Have you found yourself having to make a choice between watching your favorite shows
and living your life away from television? This chapter shows you how to set up to record
future programs on a VCR so that you’ll never miss your favorite shows.
• TIMERS
• USING THE TIMERS LIST
• SETTING UP A QUICK RECORD
• SETTING UP A MANUAL TIMER
• DELETING A TIMER
• OVERLAPPING TIMERS
39
Page 45

Chapter 8
Timers
TIMERS
A timer is your instruction telling the satellite receiver the programs you want to view in the future.
For most VCR timers, you select a specific program on a specific channel, and tell the satellite
receiver how often you want to record that program. Be sure to set up the receiver to control your
VCR (see page 75).
Timer Types
There are three types of timers:
•VCR - Records an event on a previously inserted tape for later viewing. Make sure you have
your VCR connected and turned on when using this type of timer. Also, be sure to set up the
receiver to tell the VCR to start/stop recording.
• Auto/Ext. - Automatically changes the channel for live viewing of the event. Use this setting to
record to a portable media device. Connect the device to the receiver’s RCA Outputs (see
page 12). Be sure to read the guide that came with the device for setup and recording
instructions.
• Reminder - Creates an on-screen reminder when the event is about to air.
Timer Frequency
Deciding how often you want to watch a program will help you make the best choice:
•Once - Records a program once (good for movies, sporting events, etc.).
• Weekly - Records a program once a week, at that time, on that channel.
• Daily - Records a program once a day, at that time, on that channel.
• Monday-Friday - Records a program once a day, Monday through Friday, at the selected
time, on that channel.
Timers List
Use the Timers List as described on page 42 to:
• View the general list of timers.
• Create a Manual timer.
• Edit a timer.
40
Page 46

Timers
When a Timer Starts a Recording
For two minutes before a timer starts a recording, the receiver may display a digital countdown on
the TV screen. This symbol disappears when the program begins. While the symbol is displayed,
you may do one of the following:
• Press CANCEL to clear the symbol from the TV screen. This does not stop the timer from
starting.
• Press INFO or SELECT to see more information on the timer. If you do this, you have the
following choices:
— Select OK to continue with the timer.
— Select Stop Timer to stop the timer.
Note: Pressing INFO about a timer event only works one time. Subsequently pressing INFO
results in the current program’s information being displayed in the normal way.
When the Receiver is Off
Timers
If the receiver is off when a timer is scheduled, the receiver will:
•VCR - Turn on to record the event. Make sure you have your VCR turned on and a tape
inserted when using this type of timer.
• Auto/Ext. - Turn on for the event.
• Reminder - Turn on at the scheduled time. After a period of time, if you do nothing, the
receiver will turn OFF.
Special Considerations When Using Timers
• For Locked Programs - You must enter the receiver password before you can create an
automatic timer. You can create a manual timer for a locked program without entering the
password. However, if you do this, when the timer operates, the receiver may display only an
error or password entry menu.
• For Pay-Per-View Programs - You must order a Pay-Per-View program when you create a
timer for it.
• For Blacked Out Programs - If you set a timer for a program that is blacked out in your area,
when the timer operates the receiver may display only an error.
41
Page 47

Chapter 8
Using the Timers List
USING THE TIMERS LIST
SETTING UP A QUICK RECORD
This is the quickest, simplest way to record your favorite shows. All you have to do is find what you
want, press RECORD, and follow the on-screen instructions. Just make sure your VCR is on and
has a tape inserted.
SETTING UP AN AUTOMATIC TIMER
You can create an automatic timer for a future event. The following instructions explain the
simplest way to set up an automatic timer.
• See page 75 for instructions on connecting an over-the-air antenna to your receiver.
• Select the Timer Frequency See page 40 for more details on Timer Frequency and Type.
42
Page 48

SETTING UP A MANUAL TIMER
A manual timer lets you set custom start and stop times for a timer.
Select the Timer Frequency. See page 40 for more details on Timer Frequency and Type.
DELETING A TIMER
Timers
Setting Up a Manual Timer
When you no longer need a timer, you can delete it.
43
Page 49

Chapter 8
Overlapping Timers
OVERLAPPING TIMERS
If you try to create event timers for overlapping programs, the receiver displays a screen with the
dates and times of both programs. You must delete or edit one of the timers.
TIPS
• It's very important to leave the receiver enabled to receive updates. By doing this, the receiver
can have the latest software and Program Guide information.
• If your VCR does not respond to the receiver’s commands, see if you accidentally left the
protective film on the receiver’s front panel.
44
Page 50

Remote Control Setup
Personalizing Your Remote Control
Great! Another remote control is the last thing you need, right? Well, this remote could be
the last remote you’ll ever need. Use the information in this chapter to learn more about
using your remote to control much more than just your receiver.
• IMPROVING RECEIVER CONTROL
• CONTROLLING OTHER COMPONENTS
• RECOVER BUTTON
• TEACHING ANOTHER REMOTE CONTROL
45
Page 51

Chapter 9
Improving Receiver Control
IMPROVING RECEIVER CONTROL
These instructions help you improve your remote control settings to best operate your satellite
receiver.
Changing the Address
Because UHF signals travel long distances and go through walls, a neighbor’s remote may control
your receiver by mistake. To keep this from happening, you can change the remote address.
1 Press SYSTEM INFO on the receiver's front panel. The System Information screen displays and
shows the Remote Address.
Write down the address shown:
2 Press and hold SAT on your remote control for about three seconds, until all of the mode buttons
light up, and then let go of SAT.
3 Use the NUMBER PAD to enter any number between 1 and 16, but not the one you wrote in step
1.
4 Press POUND (#). If you entered the address correctly, SAT will flash three times.
Write down the number you entered:
5 Press RECORD. Make sure the Remote Address you see on the System Information screen is the
same as the one you entered in step 3. If it isn't, the remote cannot control the receiver.
6 Press SELECT to close the System Information screen.
46
Page 52

Remote Control Setup
Improving Receiver Control
Checking the Remote Control Address
You can see what address is programmed on the remote control by completing the following
instructions.
1 Press and hold the SAT mode button for three seconds, until all of the mode buttons light up, and
then let go of the SAT button.
2 Press POUND (#) twice. The SAT mode button will flash the same number of times as the address
number (for example, three flashes means address 3).
Confirming Remote Control Operation
Complete the following to make sure the remote operates the receiver:
1 Make sure the remote has fresh batteries and is in SAT mode.
2 Press SYSTEM INFO on the receiver front panel to display the System Info screen.
3 Press RECORD on the remote control. The address in the System Info screen changes to match
the address preset in your remote control.
4 Press POWER on the remote control to turn on/off the receiver.
47
Page 53

Chapter 9
Improving Receiver Control
Adjusting the Remote Antenna
Be sure to set the remote control antenna (back of the receiver) straight up so you can use the
remote control from as far away as possible. Don't let the antenna touch anything.
If your UHF Pro Remote Control isn't working very well from far away, you may be
experiencing interference from objects near your receiver. To improve your remote
control's range, try the following:
– Place the receiver higher than all of the other equipment in your entertainment
center.
– Provide room above the receiver so that the antenna can be installed straight up.
If you cannot install the antenna straight up, tilt the UHF antenna at about a 30°
angle.
– Place the UHF antenna outside the entertainment center by using a coaxial cable
to connect the antenna to the receiver.
– Try moving the receiver to other locations.
– Move any nearby over-the-air antennas away from the UHF remote antenna. Do
not place an over-the-air antenna on top of your receiver.
– Install a UHF attenuator. See Installing a UHF Attenuator in the following section
for details.
Installing a UHF Attenuator
Unwanted UHF signals may interfere with signals from the remote control to the receiver. To
prevent such interference, you can install a 10 dB attenuator (available from many consumer
electronics parts stores). Adding this attenuator will help keep out stray UHF signals, but it also cut
down how far away you can use the remote control.
1 Remove the UHF antenna from the UHF Remote
Antenna input on the receiver back panel.
48
Page 54

2 Attach a 10 dB attenuator to the UHF Remote
Antenna input.
3 Attach the UHF antenna to the attenuator.
Remote Control Setup
Controlling Other Components
CONTROLLING OTHER COMPONENTS
To use the remote to control other devices (such as a TV, VCR, DVD player, tuner, amplifier, or
DISH Network satellite receiver), you must first program it to control these other devices. You can
do this by either following the instructions in Setting Up Using Device Code Tables on page 50, or
the Setting Up Using Device Codes Scan procedure described on page 51.
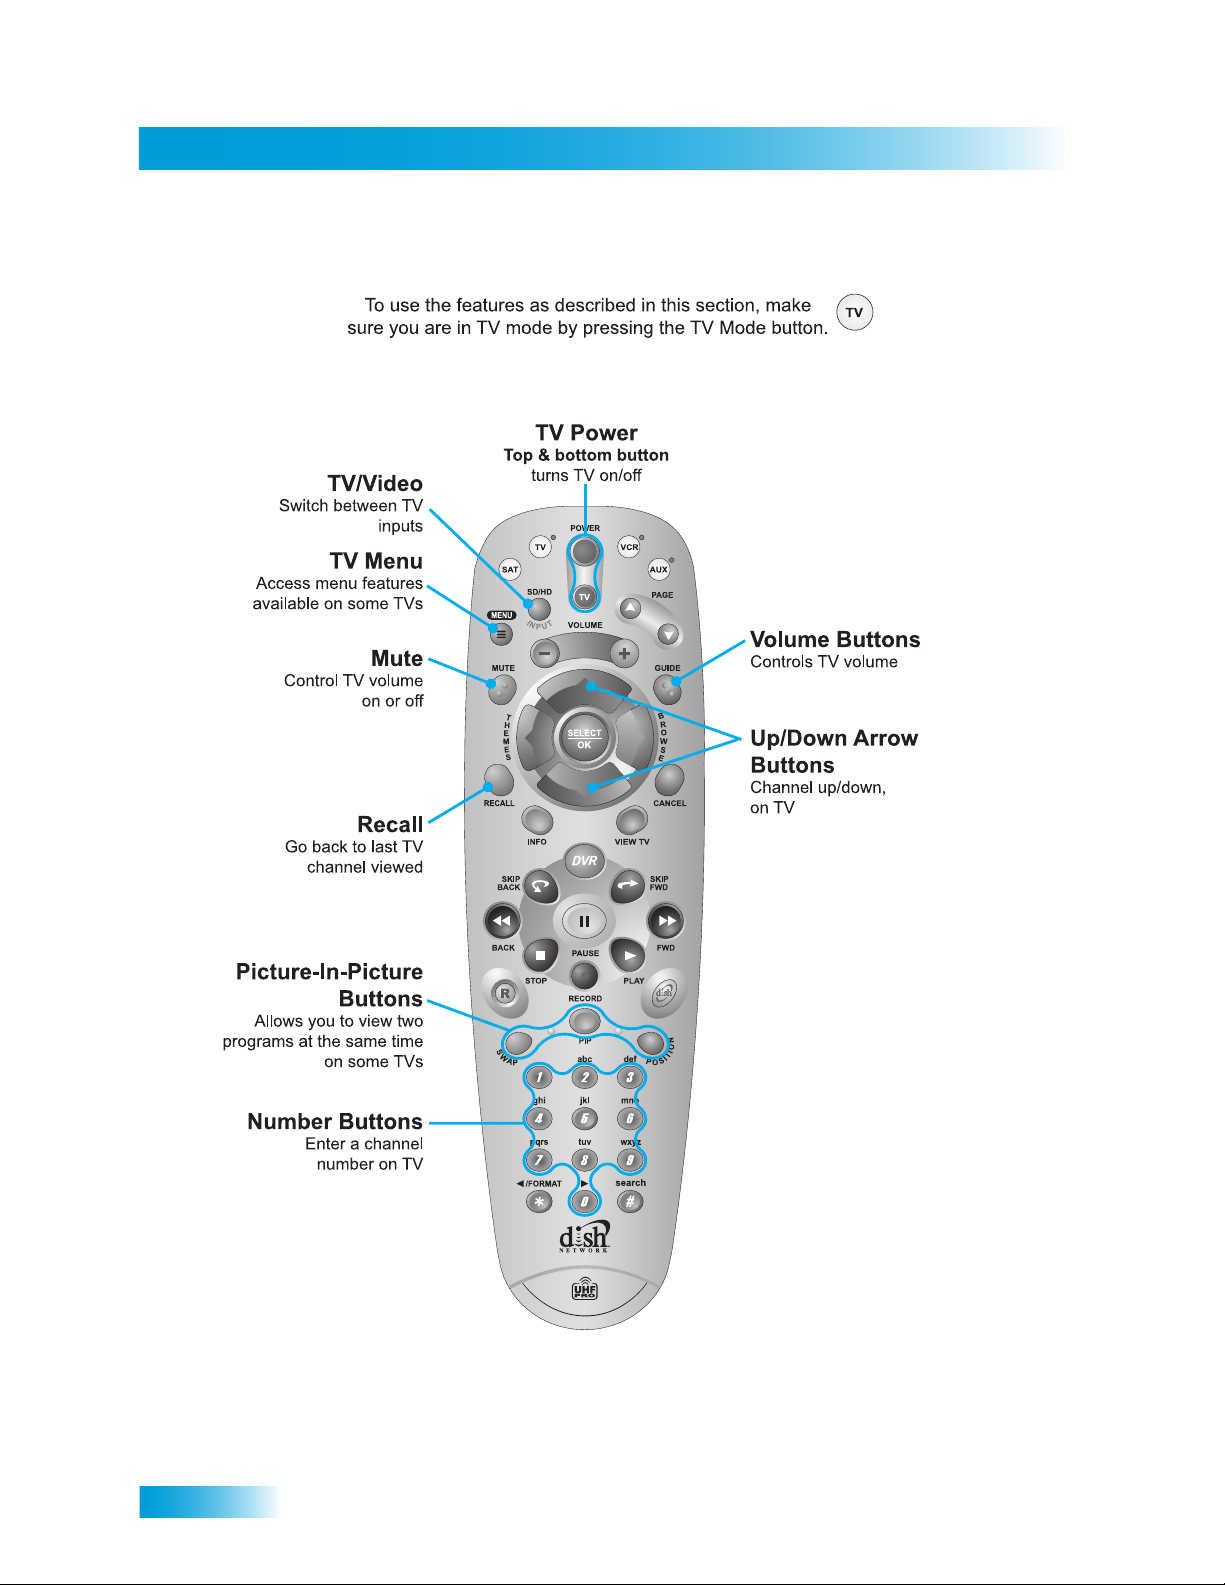
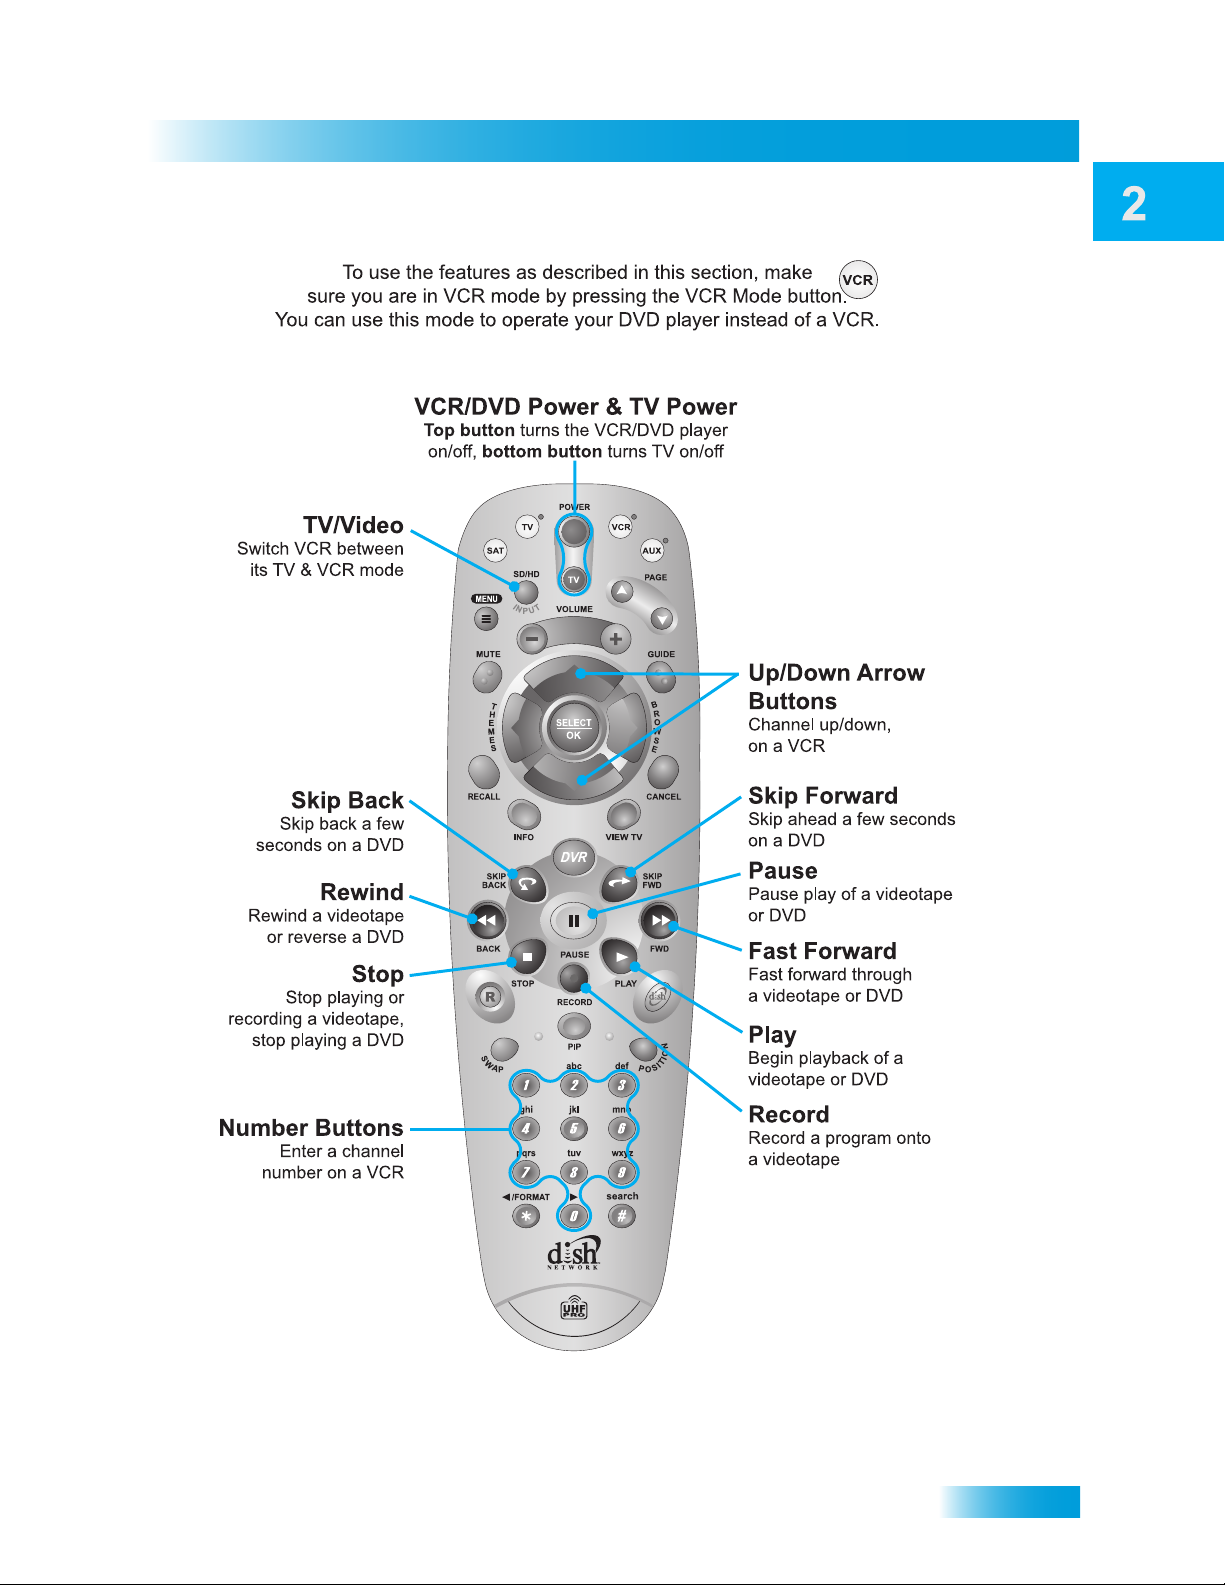
Remote Control Modes
Use the remote control’s mode buttons, SAT (satellite receiver), TV (for a TV), VCR (for a VCR or
a DVD player), and AUX (“auxiliary,” for a second TV, a VCR, a tuner, an audio amplifier, or a
second DISH Network satellite receiver) to set the remote to the right mode for the device. To
change the mode, press the button for the device you want the remote to control. The mode button
lights for two seconds to show you’ve set the remote to that mode.
Limited Mode
You can program your remote control in Limited Mode to keep from accidentally changing the
channel on your TV or VCR. When you use the remote to control your TV in Limited Mode, you will
only be able to use POWER, MUTE, and VOLUME. Also, when you use the remote to control your
VCR in Limited Mode, you will only be able to use POWER and the VCR function buttons.
49
Page 55

Chapter 9
Controlling Other Components
Combination Devices
If you are programming the remote to control a combination device, such as a TV/VCR or a TV/
DVD, program the remote control in one mode, and then repeat the procedure in the other mode.
For example, to program the remote to control a TV/VCR using code 748, follow the instructions to
program the remote to control the TV using code 748, and then repeat the instructions for the VCR
using the same code.
Setting Up Using Device Code Tables
You can set up the remote to control other devices using the device codes listed on page 93. In the
instructions below, the column on the left contains the instructions and the column on the right
provides additional information.
Instructions Additional Information
1 Turn the device on.
2 Find the brand name of the device in
the tables starting on page 93.
3 Press and hold the mode button until
all the other mode buttons light up, and
then let go of the button. The mode
button flashes.
4 For AUX mode only. Press 0 for a
second TV, or 1 for a second VCR,
or 2 for a tuner, or amplifier.
5 Enter one of the three-digit device
codes from the table using the number
buttons.
6 If you want to program Limited Mode,
press PAGE UP. If not, skip to step 7.
Use the device’s front panel buttons or its
remote control.
If the brand isn’t listed, see Setting Up Using
Device Codes Scan on page 51.
For example, hold TV for a TV until all of the
other mode buttons light. When you let go, TV
will flash.
This step is for programming which kind of
device that should be programmed in AUX
mode. If you’re not programming in AUX mode,
skip to step 5.
The three-digit device code should be for the
brand name of your device that you found in
step 2.
See Limited Mode for more information.
50
Page 56

Remote Control Setup
Controlling Other Components
Instructions Additional Information
7 Press POUND (#).
8 Press POWER to turn off the device. If
the device does not turn off, go to
step 10.
9 Turn the device back on and try some
other buttons to make sure they work.
If the code works for other buttons,
stop here.
10 If the code doesn’t work, redo steps 3
through 9 with another device code
from the tables.
If you entered the code correctly, the mode
button flashes three times.
If the code works, the device should turn off.
Sometimes POWER works when other buttons
don’t.
Try every code listed for your brand until one
works for your device.
11 If you can’t find a code that works try,
Setting Up Using Device Codes Scan
that follows.
Setting Up Using Device Codes Scan
If the code for your device is not listed in the tables starting on page 93, use this procedure to scan
the remote control’s memory for the device code. In the instructions below, the column on the left
contains the instructions and the column on the right provides additional information.
Instructions Additional Information
1 Turn the device on.
2 Press and hold the mode button until
all the other mode buttons light up, and
then let go of the button. The mode
button flashes.
Use the device’s front panel buttons or its
remote control.
For example, hold TV for a TV until all of the
other mode buttons light. When you let go, TV
will flash.
51
Page 57

Chapter 9
Controlling Other Components
Instructions Additional Information
3 For AUX mode only. Press 0 for a
second TV, or 1 for a second VCR,
or 2 for a tuner, or amplifier. Then press
the STAR (*) button.
4 If you want to program Limited Mode,
press PAGE UP. If not, skip to step 7.
5 Press POWER.
6 Press the UP or DOWN ARROW
repeatedly until the device turns off.
7 Press POUND (#).
8 Turn the device back on and try some
other buttons to make sure they work.
This step is for programming which kind of
device that should be programmed in AUX
mode. If you’re not programming in AUX mode,
skip to step 4.
See Limited Mode for more information.
This puts your remote in the scan mode.
As you press the UP or DOWN ARROW, the
remote tries each code in the memory to see if
it can turn off your device. When the device
turns off, you have found a code that might
work.
Note: The mode button for the device will flash
rapidly eight times when you’ve scanned all the
codes for that device.
The mode button flashes three times if you
have entered the code correctly. This stores the
code you found.
Press POWER to turn the device back on. Try
some other buttons to make sure they work.
Sometimes POWER works when other buttons
don’t.
52
9 If necessary, repeat this procedure until
you’ve tried all the codes.
You may need to repeat the scan to find the
best code for your device.
Page 58

Remote Control Setup
Controlling Other Components
Reading Out the Device Codes
You can find out what device code you’ve set for each remote control mode (TV, VCR, and AUX).
Instructions Additional Information
1 Press and hold the appropriate mode
button until all the other mode buttons
light up, and then let go of the button.
The mode button flashes.
2 Press POUND (#) twice.
Watch the mode light to determine your
code. The mode button flashes the
number for each digit of the device
code, with a pause between the groups
of flashes. A quick flash is for zero.
For AUX mode: The first group of
flashes tells you what the AUX mode
controls. A quick flash (zero) before the
three-digit code is for a TV; one regular
flash is for a VCR; and two flashes is
for a tuner, or amplifier.
For a satellite receiver programmed in
AUX mode: The AUX mode button will
flash the same number of times as the
address number.
For example, hold TV for a TV until all of the
other mode buttons light. When you let go, TV
will flash.
For example, if the code is 570, the mode
button flashes five times, pauses, flashes
seven times, pauses, and flashes once quickly.
For example, if the TV code is 570, the AUX
mode button flashes once quickly (indicating 0
for TV), pauses, flashes five times, pauses,
flashes seven times, pauses, and flashes once
quickly.
For example, if the receiver address is 3, the
AUX mode button flashes three times.
For Limited Mode: If you have
programmed a TV or VCR in Limited
Mode, the mode button flashes once at
the end of the flash sequence.
For example, if the TV code is 570, the AUX
mode button flashes once quickly (indicating 0
for TV), pauses, flashes five times, pauses,
flashes seven times, pauses, flashes once
quickly, and then flashes once (indicting
Limited Mode).
53
Page 59

Chapter 9
Controlling Other Components
Switching Between TV and Device Volume Control
When you set up the remote to control a TV, the mute and volume buttons control the TV volume.
However, if you want to use the AUX mode to control a tuner or amplifier and the device has a
volume setting, you can set up the remote to control the device’s volume instead of the TV volume.
Be sure to set up the remote to control a device in AUX mode before using this feature.
Controlling the Amplifier’s Volume
1 Press and hold AUX for four seconds, and then let go of it. AUX will blink.
2 Press POUND (#).
3 Press the plus (+) side of VOLUME.
4 Press ZERO (0).
5 Press POUND (#). AUX flashes three times.
Now make sure the remote controls the amplifier’s volume:
6 Press SAT.
7 Press the plus (+) and minus (-) sides of VOLUME. The device’s volume changes and AUX lights
instead of TV.
54
Page 60

Controlling the TV’s Volume
1 Press TV for four seconds, and then let go of it. TV will blink.
2 Press POUND (#).
3 Press the plus (+) side of VOLUME.
4 Press ZERO (0).
Remote Control Setup
Recover Button
5 Press POUND (#). TV flashes three times.
Now make sure the remote controls the TV’s volume:
6 Press SAT.
7 Press the plus (+) and minus (-) sides of VOLUME. The TV’s volume changes and TV lights
instead of AUX.
RECOVER BUTTON
Use RECOVER if you accidentally change the channel or video input on your TV and cannot get
the picture back from your satellite receiver. When you press RECOVER as described below, the
remote control sends commands to your TV to change channels or video inputs to try to get you
back to watching satellite programming. This procedure works only if you have accidentally
changed the TV channel or video input. It does not recover lost satellite signal (See
Troubleshooting on page 82 for information on solving problems).
Note: The remote must be programmed to control the TV (and VCR, if applicable) for RECOVER
to work as described.
Note: RECOVER will first try to tune your TV to channel 3, then channel 4, and then other video
inputs with each press of RECOVER. You may need to press RECOVER up to 30 times to recover
your satellite TV video.
The following setup is required to use RECOVER:
• The remote control must be set up to control the TV and, if installed, the VCR.
• If a VCR is installed, make sure it is connected as shown on page 74.
55
Page 61

Chapter 9
Teaching Another Remote Control
1 Make sure the TV is on.
2 Press and hold RECOVER until all four mode buttons light, and then let go of the button. The SAT
mode button flashes twice and then all four mode buttons flash three times.
3 Press RECOVER. Wait for the TV or VCR mode button to flash once and then all four mode but-
tons to flash once.
4 If you see the System Info screen, press the Select button to close the screen. You have recov-
ered your satellite video.
5 If you do not see the System Info screen, repeat steps 3 and 4 until you have recovered your sat-
ellite video.
Note: Press any remote control button other than RECOVER to end this procedure.
From the History Vault - Robert Adler invented the first wireless TV remote
control for Zenith. The “Zenith Space Command” brought the “clicker” into
American homes (and vocabularies) in 1956.
TEACHING ANOTHER REMOTE CONTROL
Your DISH Network receiver can pass certain functions through from the original receiver remote
to another remote. Although most learning remotes are compatible with the Teach Remote option
featured in your DISH Network receiver, there may be a few that are not. Consult your universal
learning remote user’s guide for details.
Follow these steps to teach (program) a universal learning remote from the remote supplied with
your satellite receiver. The universal learning remote is not supplied with your receiver. You can
purchase it separately at an electronics supply store.
56
Page 62

Remote Control Setup
Teaching Another Remote Control
1 Press the MENU button, select System Setup (6), and then select Diagnostics (3). The receiver
displays the blank System Diagnostic Tests screen.
2 Select the Teach Remote option. The receiver displays a pop up screen warning that you must
press any button on the front panel to quit the teaching mode.
3 If you want to continue, select the Yes option. The receiver now displays the System Diagnostic
Tests screen containing further instructions.
4 Aim both remotes at the receiver. Press one button at a time on your DISH Network remote, while
pressing the button to be taught on the universal learning remote at the same time. Repeat this
process for each button you want to be taught to the learning remote.
Note: Any button on the DISH Network remote that is not used with your DISH Network receiver
will not teach the universal learning remote.
5 You can quit the teaching mode at any time by either of the two following methods:
• Press any front panel button on your receiver.
• Leave the receiver alone for at least three minutes.
The receiver again displays the blank System Diagnostic Tests screen. You can cancel out of this
screen back to your original viewing screen.
57
Page 63

Chapter 9
Sending Discrete Power On and Off
SENDING DISCRETE POWER ON AND OFF
Installers use Remote control discrete power ON and power OFF IR commands when
programming macro commands into universal remotes. Using an ON-only or OFF-only command
is more effective than a toggle ON/OFF command when trying to make sure the satellite receiver is
reliably in one state or the other. To use discrete power commands, complete the following:
TIPS
• If you don’t want to accidentally change channels on your TV or VCR, try programming the
remote control in Limited Mode as described on page 49.
• Be sure to put the remote control back in SAT mode whenever you’re finished watching TV.
QUESTIONS
• My remote doesn’t control my receiver or other components. What should I do?
– Put the remote control is in the correct mode (page 49).
– Check the remote control address (pages 47 and 53).
– Check the batteries (page 8).
58
Page 64

Receiver Customization
Personalizing Your Satellite Receiver
Take a look through this chapter and you’ll find out how to change settings on the receiver
to make it just the way you like it. As an added bonus, if you find out that you don’t like how
it turned out, you can reset the receiver to the way it was when you got it.
Here’s what’s in this chapter:
• USING CALLER ID
• C
HANGING LANGUAGES
• USING CLOSED CAPTIONING
• U
SING DOLBY® SURROUND SOUND
• CHANGING THE PROGRAM GUIDE ORDER
• CHANGING THE GUIDE DISPLAY
• RESETTING TO FACTORY DEFAULTS
59
Page 65

Chapter 10
Using Caller ID
USING CALLER ID
Caller ID displays on your TV the names of people and/or telephone numbers as they call you if
you subscribe to Caller ID from your local phone company. To use this feature, make sure you
have a phone line connected to the receiver and that the Caller ID feature is enabled.
Caller ID Screens
When you receive a call, you will see a Caller ID popup screen.
You can select OK to eliminate the message. If you do nothing, it will disappear after 20 seconds.
If you are using a menu when a call comes in, you will see a different Caller ID popup screen.
Setting Up Caller ID Display
Use these instructions to enable or disable Caller ID.
60
Page 66

CHANGING LANGUAGES
You may be able to change the language of some programs. An alternate language may not be
available for all programs. Some programs, such as movies, indicate at the beginning whether an
alternate language or descriptive video is available. An alternate language applies only to the
audio part of a program and does not change the language used in the menus displayed by the
receiver. Descriptive video—not included on all channels and programs—is a feature for the
visually impaired that describes what is happening during a program.
Receiver Customization
Changing Languages
Note: If a program contains descriptive video, select Alternate.
USING CLOSED CAPTIONING
The receiver supports a variety of closed captioning formats. If turned on in the receiver, closed
captioning is displayed by the receiver through the DISH DVI and YPbPr outputs for each format.
The RCA and S-VIDEO receiver outputs provide closed captioning information in the audio/video
signal. However a closed-captioning compatible TV is required to decode and display the
captioning information the screen. Standard definition display of closed captioning is a function of
the TV and not the receiver. Refer to your TV manual for enabling and setting up these closed
captioning options.
Note: While the Program Guide information might show “CC” for a program, closed captioning
information is provided by programmers and guide data providers to DISH Network. Therefore,
while best efforts are made to provide the most accurate information, DISH Network is not
ultimately responsible for the accuracy of Program Guide and Closed Captioning information
provided by others.
61
Page 67

Chapter 10
Using Dolby® Surround Sound
The following is a list of closed captioning options:
• Caption Font/Size - Select the font and size that makes the captioning comfortable to read.
• Caption Colors - Sets the background, letter, and edge colors. Choose the color
combinations that makes the captioning easy to see.
• Caption Edge Style - Sets the edge style of the closed captioning text.
• Captioning Service - Selects the service you want to use.
• Caption Opacity - Choose from Provider, Transparent (see-through), Translucent (semi-see-
through), Solid, and Flashing.
• Reset CC Defaults.
USING DOLBY® SURROUND SOUND
Dolby Digital gives you the capability to enjoy programs in surround sound. An external decoder is
required to enjoy this feature. Refer to your decoder user’s guide.
Note: Not all programs contain a Dolby Digital sound track.
The receiver uses an optical port for outputting digital audio. The optical output can provide two
audio data types: Dolby Digital and Linear PCM (only Dolby Digital can provide full 5.1-channel
sound).
62
Page 68

Receiver Customization
Using Dolby® Surround Sound
1 Connect an external Dolby Digital decoder to the receiver's back panel Digital Audio Output using
an optical cable (available at consumer electronics stores).
2 Press MENU, select System Setup (6), and then Dolby Digital (8) to open the Dolby Digital screen.
3 Select one of the following optical output options:
• Dolby Digital Only - Select this option if the stereo system or amplifier can decode only Dolby
Digital and will not process Linear PCM signals. See your amplifier's owner's manual for more
details on the amplifier (and see the following table).
• PCM Only - Select this option only if the stereo system or amplifier cannot decode Dolby
Digital signals.
• Dolby Digital/PCM - Select this option only if the stereo system or amplifier can decode both
Dolby Digital and Linear PCM signals.
The audio output is also dependent on what is present in the program you are watching. The table
below shows what type of output you will hear:
Signal Present in Program
Optical Output Setting Dolby Digital PCM Both
Dolby Digital Only Dolby Digital PCM Dolby Digital
PCM Only PCM (downmix) PCM PCM
Dolby Digital/PCM Dolby Digital PCM Dolby Digital
Note: When both audio signals are present in the program, the receiver defaults to Dolby Digital
output unless you have selected PCM Only.
Note: If you have selected Dolby Digital Only but there is only PCM audio in the program, you will
hear nothing. This also applies to the analog audio outputs.
4 Select Save.
63
Page 69

Chapter 10
Changing the Program Guide Order
CHANGING THE PROGRAM GUIDE ORDER
You can set up the Program Guide to list channels in descending order, with the highest channel
number at the top, or in ascending order, with the highest channel number at the bottom.
Note: If you do not set a channel order, the Program Guide lists the channels in descending order.
CHANGING THE GUIDE DISPLAY
The receiver comes set to display the Program Guide with video in the upper right corner.
However, you can change the way the Program Guide displays.
64
Page 70

Receiver Customization
Resetting to Factory Defaults
RESETTING TO FACTORY DEFAULTS
You can reset the receiver to discard any changes you have made to the receiver, except for
remote control address settings and locks. Resetting the receiver to factory default settings also
discards all Favorite Lists except the All Chan and All Sub lists.
If you have set any locks on the receiver, and the receiver is locked, these locks will be kept. If the
receiver is unlocked, your locks will be lost. You cannot reset the receiver to default settings to
discard a password you have forgotten. No one but a Customer Service Representative can reset
the receiver to bypass a receiver lock.
1 Press MENU, select System Setup (6), Installation (1), and then Factory Defaults (6). The receiver
displays a Warning message to confirm that you want to reset the receiver’s preferences.
2 Select Yes.
65
Page 71

Chapter 10
Tips
TIPS
• To take full advantage of Dolby Digital 5.1 surround sound, you need an optical cable and a
stereo that supports this feature.
• Be sure to have the receiver connected to an active phone line and have Caller ID service
from your phone company to use the Caller ID feature on this receiver.
QUESTIONS
• Why is my audio in another language? You may have selected an alternate language. See
the instructions on page 61 to change your preferred language.
• How can I change the channel order in the Program Guide? You can switch from
ascending order (lowest to highest) or descending order (highest to lowest) by following the
instructions on page 64.
66
Page 72

Connections and Setup
How to Connect Your Satellite Receiver
Do you have a handful of cables and a head full of questions? This chapter is the perfect
place to find out how to connect the receiver to all kinds of equipment. You’ll find this
chapter particularly helpful if you decide to move your receiver or if you get a new TV,
VCR, or DVD player.
• CONNECTING TO A TV
• CONNECTING TO YOUR DISH ANTENNA
• CONNECTING THE PHONE LINE
• CONNECTING A VCR
• CONNECTING OVER-THE-AIR ANTENNA/
CABLE TV
• QAM INSTALLATIONS
• USING TROUBLESHOOTING TOOLS
67
Page 73

Chapter 11
Connecting to a TV
CONNECTING TO A TV
This section describes how to connect receiver output ports to a TV. Select one of the following
methods.
Standard-Definition TV Connections
You can connect the receiver to a standard-definition (SD) TV in two ways:
• RCA Audio/Video connections
• S-Video and RCA Audio
1 Connect the receiver to the TV using one of the following:
• RCA Audio/Video connection
• S-Video and RCA Audio (Red and White)
2 Turn on the TV and receiver to make sure you have a picture.
3 Turn up the volume on the TV to make sure you have audio.
High-Definition TV Connections
The following sections described how to connect the receiver to a high-definition (HD) TV or
monitor. Use these connections if you have an over-the-air antenna connected to your receiver to
receive local HD broadcasts.
DISH DVI Connections
The DISH DVI connection provides high-quality audio and video to your HDTV or HD Monitor in
one cable.
68
Page 74

Connections and Setup
Connecting to a TV
1 Connect an DISH DVI cable between the DISH DVI connection on the receiver and HDTV set or
monitor.
2 Turn on your receiver and TV using the front panel buttons.
3 Confirm that you are getting a picture from the receiver. Consult your HDTV user’s guide if you
need to change your HDTV to display from the Digital Audio/Video input.
4 If you do not see a picture, see No Picture on the HDTV on page 70.
Note: In most cases connecting the Digital Audio/Video cable will provide plug-and-play control of
the monitor’s display resolution and other settings. However, your HDTV may require selecting a
different format to display from the receiver during setup.
5 Turn up the volume on your HDTV and confirm you have sound. If you don’t have sound, your
system may require you to connect audio (red and white) RCA-type cables between the receiver
Audio Outputs and audio input connections.
YPBPR Connections
The YPbPr connections provide high-quality audio and video to your HDTV or HD monitor.
1 Connect between the YPbPr component connections on the receiver and the HDTV using
component video cables.
2 Connect audio (red and white) RCA-type cables between the receiver Audio Outputs and audio
input connections that go with the YPbPr connectors on your HDTV or monitor.
3 If you do not see a picture, change the resolution setting on the receiver.
4 Turn up the volume on your HDTV and confirm you have sound. Check the RCA-type connections
if you don’t have sound.
69
Page 75

Chapter 11
Connecting to a TV
No Picture on the HDTV
This section will help you make a picture on the HDTV in the event that you could not do so in the
previous sections.
1 Connect RCA-type cable connections between the receiver and the HDTV.
2 Make sure the receiver and HDTV are on.
3 Make sure the HDTV is set to display satellite TV. Look on the back of your HDTV and consult your
HDTV user’s guide.
4 Change the HDTV settings as described in the next section.
5 Switch the HDTV to display satellite TV from the YPbPr or DISH DVI inputs. If you have a picture,
you are finished.
6 Repeat steps 4 and 5 until the HDTV displays video from the receiver.
Setting Up to Display in HD
Use the following steps to select the desired HDTV format.
1 Consult your HDTV user’s guide for the HD format resolution that the TV supports (1080i or 720p).
2 Press MENU, select System Setup (6), Installation (1), and then HDTV Setup (9).
3 Select the Aspect Ratio option that matches your TV:
• 16x9 is the setting for wide screen HDTV display.
• 4x3 #1 is the setting to use on a 4x3 TV that uses vertical compression. A compatible TV
automatically makes the 16x9 picture letterbox format (black bars top and bottom), to preserve
the correct horizontal and vertical proportions.
• 4x3 #2 is the setting to use on a 4x3 TV that does NOT have internal vertical compression.
The TV will not show black bars at the top and bottom, and the picture will appear tall and
skinny.
4 Press Save.
5 If required, set up the HDTV to display in the format you desire. Some HDTVs will automatically
adjust to the resolution setting of the receiver.
70
Page 76

Connections and Setup
Connecting to a TV
HD Display
You can change the format of the HD display output (called the aspect ratio). To choose between
the 16 x 9 widescreen format and the two 4 x 3 screen formats, as well as the output resolution:
1 Press MENU 6-1-9 and select the configuration you want.
2 Select Save.
The available display modes for the HD and the SD outputs on their displays may be selected
independently. This feature allows you to control the viewing format of programs in Normal, Grey
Bar, Stretch, Partial Zoom, or Full Zoom. To change the format, while watching TV:
• Press the PAGE UP button on the remote to change through the available options on the HD
output.
• Press the PAGE DOWN button on the remote to change through the available options on the
SD output.
Only supported options for the type of program and the output in use are displayed. You can keep
pressing the PAGE UP or PAGE DOWN button until you reach the display format you like. The
receiver will remember the last selected output format independently for each type of output and
program type. The selected display format will be displayed in the view banner when changing to a
new channel.
Screen Positioning
If you need to adjust the position of the video on the HD display screen:
1 Press MENU 6-1-9.
2 Select Adjust.
3 Use the ARROW buttons on the remote to change the vertical and horizontal positions of the video
and menu images on the screen.
4 Press SELECT/OK to save the setting.
Note: Not all HD monitors permit this feature to operate as they may provide automatic positioning
that will conflict with settings on the receiver.
71
Page 77

Chapter 11
Connecting to Your Dish Antenna
CONNECTING TO YOUR DISH ANTENNA
Use the instructions here if you are connecting a receiver into an existing satellite TV system.
1 Before you can begin connecting your receiver to your dish antenna, you must first complete the
preceding sections on connecting your TVs to the receiver.
2 Connect an RG-6 coaxial cable between the Satellite In port on the receiver’s back panel to an
available port on either your switch or your LNBF in your existing system.
Note: If you are installing your receiver into a system with DISH Pro or DISH Pro Plus LNBFs (and/
or switches), you can have as much as 200 feet of cable between the LNBF and the receiver.
However, you must use only RG-6 coaxial cables rated up to at least 2150 MHz. Some cables may
say “Swept tested for 2150 MHz.” If you have any doubt about this, ask your DISH Network
retailer, or look on the container the cable came in. Do not use cable company TV cables or cables
from other satellite TV systems not rated up to at least 2150 MHz. These other cables may cause
signal loss. Do not use existing cables such as RG-59. Use waterproof F-connectors outdoors.
3 Peel off the blue sticker and affix it to the cable close to where it connect to the Satellite In
connection on the back of the receiver. The sticker is in the front cover of this guide.
4 On the remote control, press Menu, select System Setup (6), Installation (1), and then Point Dish
(1) to display the Point Dish screen on the TV.
5 Select Check Switch. Select Test.
6 The receiver begins performing the Check Switch tests. When it is finished, the Installation
Summary screen displays.
7 Make sure that the information on the Installation Summary screen identifies your system correctly
and shows all transponders for all satellites in your system.
8 Select OK to go to the Point Dish/Signal screen.
9 Select Cancel to exit the Point Dish menu. At this point, the receiver may walk you through a
procedure to download software. If this prompt displays, follow the instructions and do not disturb
the receiver until the TV is displaying DISH Network video. Otherwise, press View TV. After a few
minutes, you should be watching TV.
72
Page 78

CONNECTING THE PHONE LINE
You must keep the receiver connected to an active telephone line to order Pay-Per-View
programs, use all of the DishHOME Interactive features, or other services from DISH Network with
your remote control.
Note: You may be able to use a wireless modem jack. However, this may not support all the
features of this receiver, such as Caller ID. See dishnetwork.com for compatible modem products.
Note: If you have a Digital Subscriber Line (DSL), you may have to install a DSL filter between the
receiver’s back panel Phone Jack and the telephone wall jack to successfully connect with DISH
Network. You can obtain a filter from your DSL provider.
Phone Line Connections
Run a telephone cable with a standard RJ-11 connector from the receiver’s back panel Phone
Jack to an active telephone connection.
Connections and Setup
Connecting the Phone Line
Phone System Setup
You must also set up the receiver for your telephone system (touch tone or rotary), and set a
telephone number prefix, if you need a prefix to make an outside call.
73
Page 79

Chapter 11
Connecting a VCR
1 Pressing MENU, then select System Setup (6), Installation (1), and then
Phone System (4).
2 Select the Touch Tone or the Rotary Phone option in the Phone Type list.
3 Select either the No Prefix or the Prefix Code option in the Outside Line Prefix list.
Note: Usually, you need a telephone number prefix only for business installations. For most
residential installations, all you need to do is set the telephone system type. The default setting of
No Prefix will allow correct dialing.
4 If you selected No Prefix, select Save.
5 If you selected Prefix Code, the receiver highlights the box where you must enter the exact
sequence you dial the phone to obtain an outside line.
6 Select Save.
CONNECTING A VCR
Use this section to connect your VCR and set up the receiver for VCR Timers.
VCR Connections
The diagram below provides example of how to connect VCRs to your satellite TV system.
74
Page 80

Connections and Setup
Connecting Over-the-Air Antenna/Cable TV
Setting Up the Receiver to Control Your VCR
Use this section to set up the receiver to control your VCR so that you can use VCR timers. The
receiver’s front panel IR BLASTER sends a signal to control the VCR. This signal can bounce off
walls and other objects on its way from the receiver. However, shelves or smoked glass between
the receiver and VCR can block the signal. Make sure nothing blocks the signal and that you don’t
have the VCR too far away from the receiver.
CONNECTING OVER-THE-AIR ANTENNA/CABLE TV
The 8VSB TV Antenna/Cable input on your receiver's back panel can be used to receive and view
programming from an over-the-air antenna or cable service. This connection can support viewing
both ATSC digital over-the-air broadcasts or analog NTSC over-the-air broadcasts. It can also
support viewing analog cable TV service.
You can add local over-the-air channels and assign them network affiliations. After you have
added channels, you can access the channels via the Program Guide or the Browse Banner in
much the same way as you would satellite channels.
Connect an external VHF/UHF over-the-air antenna or analog cable TV source to the 8VSB TV
ANTENNA/CABLE port. Peel off the black sticker and affix it to the cable close to where it
connects to the back of the receiver. The stickers are inside the front cover of this guide.
Note: The type of antenna required depends on the channels used by, and the locations of, the
local broadcasters for your area. Contact a professional installer if you are unsure about how to
connect an external antenna to this input.
75
Page 81

Chapter 11
Connecting Over-the-Air Antenna/Cable TV
Note: Move all nearby over-the-air antennas away from the UHF remote antenna. Do not place an
over-the-air antenna on top of your receiver.
The audio/video quality on local over-the-air channels depends on the
distance and terrain between the broadcast station and your home, and on
the placement and quality of the over-the-air TV antenna you use. If you
have questions about over-the-air channels, contact the broadcaster, not
DISH Network.
Make sure to follow the antenna installation instructions correctly. Ground
the antenna per the National Electrical Code (NEC) and any local electrical
codes.
Scanning for Over-the-Air Channels
Use these instructions to scan for over-the-air channels for the TV.
Peaking Your Over-the-Air Antenna
Use these instructions to make sure you have the strongest signal from your over-the-air antenna.
76
Page 82

Connections and Setup
Connecting Over-the-Air Antenna/Cable TV
Display Options for Local Channels
You can set up your local channels in the Program Guide for viewing either with your local channel
numbers or the DISH Network four-digit numbers. Digital over-the-air channels are always
displayed in the 2-99 channel range (if you have an over-the-air antenna connected to your
receiver).
1 Press MENU, select System Setup (6), Installation (1), Local Channels (5), and then Display
Options.
2 Select one of the following:
• DISH Network Locals - Displays your DISH Network local channels at the broadcast channel
number (subscription required).
• Off-Air Antenna Locals - Displays the local and analog channels from your over-the-air
antenna at the broadcast channel number. Your subscribed DISH Network local channels
remain at the four-digit channel number designation.
Transmit Channel Numbers
For information on channel numbers, you can visit the National Association of Broadcasters (NAB)
web page at nab.org. On this web page, go to nab.org/Newsroom/Issues/digitaltv/DTVstations.asp
for a listing of digital broadcast stations and their Transmit Channel numbers.
Note: Where Transmit Channel is displayed by the receiver, the NAB web page uses the term RF
Channel. These terms mean the same thing.
Another good source of local channel information is available from the Consumer Electronics
Association (CEA) web page at: antennaweb.org. This website provides recommendations for
antenna types and pointing directions.
About Over-the-Air TV Broadcasts
Over-the-air TV signals are broadcast from stations on the ground, while satellite TV signals are
broadcast from satellites in space. You receive over-the-air TV signals using an indoor or outdoor
antenna instead of the satellite dish. Digital over-the-air TV broadcasting uses advanced
technology like that of the DISH Network to deliver superb picture quality and CD quality sound.
However, digital over-the-air signal reception (like analog over-the-air signal reception) depends
on several things:
• The distance between the broadcast station and your home (the farther away the station, the
weaker the signal);
• The broadcast station's power (the lower the power, the weaker the signal);
• Obstacles between the station and your home, such as mountains, buildings, trees, or other
objects (these may block or reflect the signal before it reaches you);
• Multiple broadcast stations (to receive good signals from several stations, you may need to
compromise in how you aim the antenna or you may need more than one antenna).
77
Page 83

Chapter 11
Connecting Over-the-Air Antenna/Cable TV
The effects of poor digital reception are different from the effects of poor analog reception:
• Poor analog reception usually causes the TV picture to be “snowy” or to include “ghosts,” that
is, multiple images caused by receiving reflected signals along with the direct signal from a
station.
• Poor digital reception may cause the TV picture to be “pixelized,” that is, broken up into small
squares of various colors, or to be lost completely (the TV screen is all black or all blue).
• Digital broadcasts often provide either a very good picture or no picture at all.
• You may be able to receive a poor analog signal but not be able to receive a digital signal at
all.
To get the best possible digital signal reception, make sure you use the best over-the-air antenna
for where you live:
• You can receive a limited number of channels using a rabbit ears type antenna on top of the
TV set, or a much larger number via a large UHF/VHF indoor/outdoor antenna.
• The higher the quality of the antenna you use, the greater its range and the better its reception
will be.
The Consumer Electronics Association maintains a website, antennaweb.org, that you can visit for
help in choosing an antenna.You may want to contact a professional TV antenna installer for
advice or help in choosing, installing, and aiming an antenna. Keep in mind, digital over-the-air TV
broadcasting is in its infancy. So, digital over-the-air service may be interrupted because:
• Broadcasters are testing digital signals, and may stop broadcasting without notice.
• Many broadcasters do not yet have permanent broadcast stations and may be operating at
less than full power.
• Broadcasters are not legally required to provide full-time digital signals for several years.
• Some digital channels do not broadcast all the time.
If you have questions about over-the-air channels, contact the broadcasters, not DISH Network.
DISH Network does not broadcast over-the-air signals and so cannot do anything to change overthe-air signal quality. However, the receiver's digital channel setup menus provide a signal strength
bar that can help you in aiming the over-the-air TV antenna for the strongest possible signal.
Here’s something interesting! We all know there’s no Channel 1, but did you know that no
TV stations broadcast on Channel 37? That channel is reserved for radio astronomy.
Perhaps someday we will receive TV shows from Alpha Centauri.
78
Page 84

QAM INSTALLATIONS
If you live in an apartment, condominium or other clustered housing, your television signal is
transmitted to you through master multiplexing distribution equipment located in a central area in
your dwelling complex. This distribution equipment is owned and maintained by the dwelling
complex owners or managers.
Note: Do not change the setting on this screen unless otherwise directed.
Connections and Setup
QAM Installations
USING TROUBLESHOOTING TOOLS
Your receiver has diagnostic tools that a Customer Service Representative may ask you to use if
you should ever run into problems while using your equipment. Even though these tools are quite
helpful, it is recommended that you only use them when on the phone with a DISH Network
representative.
Resetting Your Receiver
Reset your receiver as directed by the Customer Service Representative as follows:
1 Press and hold the front panel POWER until the front panel light blinks once and the TV screen
goes blank.
2 Let go of the front panel POWER.
It will take a few minutes for your receiver to reset and come back on. When you reset your
receiver, your receiver will download an updated Program Guide.
79
Page 85

Chapter 11
Using Troubleshooting Tools
Diagnostics
The Customer Service Representative may ask you to open the Diagnostics screen. Remember to
have an active phone line connected to your receiver.
1 Press MENU, select System Setup (6), and then select Diagnostics. The Diagnostics screen
shows you various tests the Customer Service Representative may ask you to perform on your
receiver:
• Connection - Tests for a valid receiver phone connection.
• Dial Out - If “No Dial Out Pending” is displayed, the receiver does not need to have its smart
card records updated.
• Counters - Shows you a list of diagnostic counters. Use PAGE UP and PAGE DOWN to scroll
through the list of counters displayed.
2 Select Done.
Point Dish and Check Switch
The Point Dish and Check Switch screens are helpful to the Customer Service Representatives.
You may be asked to display these screens when you call DISH Network. Even though there are
items that can be changed, only change them when specifically directed by a Customer Service
Representative.
80
Page 86

Troubleshooting and Device Codes
• TROUBLESHOOTING TABLES
• REMOTE CONTROL DEVICE CODES
81
Page 87

Reference
Troubleshooting Tables
TROUBLESHOOTING TABLES
Use these tables if you have problems using the system. Look in this section for a description of
the problem before calling the Customer Service Center. Many problems arise from basic
misunderstandings of how the system works, especially when you are just becoming familiar with
it. These tables cover many problems, usually with a simple solution for each one. To solve a
particular problem, do the following:
1 Review the section in this Guide that relates to the problem.
2 If you cannot find a solution, then find the section in the following tables that relates to the problem.
• Read the What’s Happening column until you find the problem.
• Read the information in the Possible Reason column.
• Try each of the suggested solutions in the What to Do column.
3 Sometimes resetting the receiver can fix a minor problem. See Resetting Your Receiver on
page 79.
4 Make sure your TV is tuned to the correct channel or input. Use RECOVER as described on
page 55.
5 Make sure your remote control has fresh batteries. If you see the Remote Battery Low warning on
your TV screen, it’s time to change the batteries. Follow the instructions on page 8.
6 Make sure your receiver is connected to an active telephone line. See the instructions on page 73.
7 Check for anything that might be blocking the satellite signal (for example, tree branches, snow,
etc.).
8 For more information, call the Customer Service Center at 1-800-333-DISH (3474), or see dishnet-
work.com or tech.dishnetwork.com.
Note: Before calling the Customer Service Center, have ready the date of purchase and either
your customer account number, the receiver conditional access number, or the receiver model
number. Display the System Information screen to find these numbers (See Ordering your
Programming). Also, write down any error messages that the receiver displays on the television
screen.
82
Page 88

Message Numbers
Number Possible Reason What to Do
Reference
Troubleshooting Tables
001
002
003, 004
005
• There may be a problem with the
multi-dish switch.
• Heavy rain, snow, or cloud cover
may be interfering with
transmission of the satellite
signal, or there may be other
interference.
• The wrong type of coaxial cable
may be used in the system, or the
cable run length may be too long.
Or, there may be a problem with
the multi-dish switch.
• The receiver may not yet have
been electronically linked with the
system, via the satellite signal.
The satellite dish may have
moved so that it is no longer
picking up the satellite signal. The
cable connections may have
loosened or have moisture inside.
There may be an interruption of
the satellite signal.
• Check the coaxial cables and their connections to and from
the multi-dish switch. Make sure that all required cables are in
place, and check that all cable connections are tight and dry
(for outdoor cables). Run Check Switch as described on
page 80. If this does not work, call the Customer Service
Center at 1-800-333-DISH (3474) for help.
• Note the local weather conditions. Remove any snow or other
debris which may have collected on the satellite dish.
Make sure that the satellite dish has a clear line of sight to the
satellite. Check whether branches or leaves have grown into
the line of sight.
• Make sure that the satellite dish is aimed at the satellite.
Check the strength of the signal using the Point Dish screen
as described on page 80. Consult your installer to re-aim the
dish, if necessary, to obtain the strongest possible signal.
• Make sure the system uses RG6 coaxial cable; if not, call your
dealer or installer.
• Check the dish-to-receiver cable run length. If your entire
system is DISH Pro, it can be as much as 200 feet. If it is a
Legacy system, it should not be more than 100 feet. Check
the coaxial cables and their connections to and from the multidish switch. Make sure that all required cables are in place,
and check that all cable connections are tight and dry (for
outdoor cables). If this does not work, do the Check Switch
test described on page 80.
• If you have authorized the receiver, wait a few minutes to see
if the message is removed. Make sure that all required cables
are in place, and check that all cable connections are tight and
dry (for outdoor cables).
• Make sure that the satellite dish has a clear line of sight to the
satellite. Check whether branches or leaves have grown into
the line of sight. Check that the Signal Strength bar in the
Point Dish screen is green and displays the word Locked, as
described on page 80. If not, contact your installer to re-aim
the satellite dish. If you have not authorized the receiver, call
the Customer Service Center at 1-800-333-DISH (34740 for
help.
006
011, 012
013, 014
• The receiver may not be
connected to an active telephone
line.
• Viewers in specific areas are
prohibited from watching certain
programs. For example, viewers
who live close to a particular
football stadium may be
prohibited from watching football
games that are played in that
stadium.
• You may have tried to tune to a
program on a channel which you
have not bought.
• You must connect the receiver to an active telephone
connection at all times. If you install two or more receivers,
you must connect each receiver to an active telephone
connection at all times.
• Remember that the program providers specify which
programs are “blacked out” for which viewers, not DISH
Network.
• You must buy a channel before you can tune to a program on
that channel. Call the Customer Service Center at 1-800-333DISH (3474) to buy the channel, or if you believe this message
was displayed by mistake.
83
Page 89

Reference
Troubleshooting Tables
Message Numbers
Number Possible Reason What to Do
015
018
022
026
• You may have just plugged in the
receiver, and it is acquiring the
satellite signal. Or, the receiver
may have temporarily lost the
signal.
• The receiver may not be
connected to an active telephone
line.
• The receiver may not yet have
been electronically linked with the
system, via the satellite signal.
The satellite dish may have
moved so that it is no longer
picking up the satellite signal. The
cable connections may have
loosened or have moisture inside.
There may be an interruption of
the satellite signal.
• The receiver may have
temporarily lost the satellite
signal.
• Wait a few minutes to see if the message is removed. Make
sure that all required cables are in place, and check that all
cable connections are tight and dry (for outdoor cables).
Make sure that the satellite dish has a clear line of sight to the
satellite. Check whether branches or leaves have grown into
the line of sight.
• Check that the Signal Strength bar in the Point Dish screen is
green and displays the word Locked, as described on
page 80. If not, contact your installer to re-aim the satellite
dish.
• You must connect the receiver to an active telephone
connection at all times. If you install two or more receivers,
you must connect each receiver to an active telephone
connection at all times.
• Call the Customer Service Center at 1-800-333-DISH (3474)
for help checking the credit limit and/or to get authorization to
make a purchase.
• If you have authorized the receiver, wait a few minutes to see
if the message is removed. Make sure that all required cables
are in place, and check that all cable connections are tight and
dry (for outdoor cables).
• Make sure that the satellite dish has a clear line of sight to the
satellite. Check whether branches or leaves have grown into
the line of sight.
• Check that the Signal Strength bar in the Point Dish screen is
green and displays the word Locked, as described on
page 83. If not, contact your installer to re-aim the satellite
dish. If you have not authorized the receiver, call the
Customer Service Center at 1-800-333-DISH (3474) for help.
• Wait a few minutes to see if the message is removed. Make
sure that all required cables are in place, and check that all
cable connections are tight and dry (for outdoor cables).
• Make sure that the satellite dish has a clear line of sight to the
satellite. Check whether branches or leaves have grown into
the line of sight.
• Check that the Signal Strength bar in the Point Dish screen is
green and displays the word Locked, as described on
page 80. If not, contact your installer to re-aim the satellite
dish.
84
028
059
060
061
• The receiver may need to get new
software before you can use it to
order Pay-Per-View programs.
• You may have tried to close an
installation menu without having
done the Check Switch test.
• You may have aimed the satellite
dish at one satellite, but selected
the option for another satellite on
the Point Dish screen.
• You may have set up the receiver
to accept a transmission (a
“download”) of the latest
operating software via the
satellite signal.
• Turn the receiver off. Doing this allows the receiver to
“download” new software via the satellite signal. The
download may take several minutes; do not disturb or unplug
the receiver during this time. When the download is done, you
will be able to use it to order Pay-Per-View programs.
• If your setup includes a multi-dish switch, you must run the
Check Switch test as described on page 80.
• Make sure that you have selected the option for the right
satellite on the Point Dish screen, as described on page 80.
• Make sure that the cable(s) for the satellite you have selected
are connected to the LNBF that receives signals from that
satellite. Re-aim the satellite dish at the right satellite.
• It is very important for the receiver to get the latest operating
software, so let the receiver do so. The “download” may take
several minutes. Do not disturb or unplug the receiver during
this time.
Page 90

Message Numbers
Number Possible Reason What to Do
Reference
Troubleshooting Tables
074
078, 079,
080
093
• The receiver gives you three
chances to enter the correct
password. If you fail to do so, the
receiver “times out” and will not
allow you to try again for several
minutes.
• You may not have connected the
receiver to an active telephone
line, or the telephone line may be
defective.
• You may have set up the receiver
to reset itself back to the “factory
defaults,” that is, the settings it
had when it was shipped from the
factory.
• Wait a few minutes and then try again to enter the password.
Note: The “time out” feature is designed to prevent someone
from trying password after password until he or she happens
to guess the right one and so gains unauthorized access to
the receiver.
• Connect the receiver to an active telephone line. Make sure
that the telephone line to which you connect the receiver is
working properly.
Note: To be able to order Pay-Per-View programs, you must
keep the receiver connected to an active telephone line at all
times. If your setup includes more than one receiver, this
applies to each receiver. The receiver uses the telephone line
to make toll-free calls, usually in the middle of the night, to
send information to the Customer Service Center at 1-800333-DISH (3474).
• If you want to reset the receiver to its factory default settings,
select the Yes option. If not, select the No option.
Changing Channels
What Is Happening Possible Reason What to Do
You enter a desired channel
number. The channel
changes, but the new channel
is not exactly the channel you
entered.
• You may have made a
mistake entering the channel
number, or the channel
number you entered may be
invalid.
• Carefully try entering again the channel number
you want.
You are scanning up or down
through the channels, and the
receiver is skipping channels
that you know you have
subscribed to.
• If so, the channel displayed is
the closest possible to the
channel you entered.
• If you entered the number for
a channel that you have not
subscribed to, the receiver will
change to the channel and
display a message suggesting
that you might want to
subscribe to the channel.
• If a Favorites List other than
All Chan is applied, the
receiver will skip channels that
are not on the applied list.
• If you have set up the
Program Guide to hide adult
channels and the receiver is
locked, the receiver will skip
such channels.
• Select All Chan as the active Favorites List.
Unlock the receiver so that it does not skip adult
channels. If you want to buy a channel, call the
Customer Service Center at 1-800-333-DISH
(3474).
85
Page 91

Reference
Troubleshooting Tables
Remote Control
What Is Happening Possible Reason What to Do
You cannot find the remote control. • N/A • Use the receiver front panel Control
When you press a button on the
remote control, the receiver does not
do what you expect.
When you press the remote control
Power button to turn the receiver ON,
the receiver front panel Power light
does not light up.
• The remote control may be missing
batteries, the batteries may be
incorrectly placed in the remote, or
the batteries may be weak or dead.
• Other lights are too bright. • Try other remote control buttons to
• Remote control is not operating
properly or the batteries are weak or
dead.
• The receiver power cord is not
plugged into a power outlet, or there
may be a problem with the power.
• The remote control may not be set to
the address used by the satellite
receiver.
Buttons to control the receiver until
you find the remote. If the remote
control is permanently lost or too
damaged to use, call the Customer
Service Center to order a
replacement.
• If the batteries are missing or dead,
insert fresh AAA-size batteries.
If the remote has fresh batteries,
check whether they are placed
according to the label diagram. If not,
remove them and place correctly.
see if the receiver is responding.
• Replace the remote batteries with
fresh ones.
• Check that the receiver power cord is
not damaged, and that the plug is
inserted correctly into the outlet.
• Make sure the remote control is set to
the same address used by the
satellite receiver. See page page 46
for information on changing the
remote control address.
Menus
What Is Happening Possible Reason What to Do
You were using a menu, and it
suddenly closed.
86
• The receiver has a time-out
feature that closes any menu
after several minutes of no
activity. This will discard any
changes you have made, but
otherwise does no harm to the
receiver.
• Start over again.
Page 92

Troubleshooting Tables
Program Guide or the Browse Banner
What Is Happening Possible Reason What to Do
Reference
In the Program Guide, some
channels have a red background.
You cannot display future programs
in the Program Guide or Browse
Banner.
You cannot display programs that
have ended in the Program Guide
or Browse Banner.
When you are using the Program
Guide or Browse Banner, some
channels are missing.
• Red means that you have not
subscribed to that channel.
You must subscribe to a
channel before you can tune
the receiver to it.
• The Program Guide and
Browse Banner can display
programs scheduled for an
extended, but not unlimited
time beyond the present.
• The Program Guide and
Browse Banner can display
only programs that have not
yet ended. These features
cannot display a time earlier
than the present.
• You may have applied a
Favorites List other than the
list named All Chan.
• You may have set up the
Program Guide so that when
the receiver is locked, the
Guide hides adult channels
• If you want to buy a channel, call the
Customer Service Center at 1-800-333DISH (3474).
• Use Customer Service on DishHOME.
• Try displaying the Program Guide again
later. By that time, it may show programs for
the time and date you want.
• Contact the program providers (for example,
the channel or network affiliate that
broadcast the program) for details on past
programs.
• You can change the applied Favorites List
while using the Program Guide by pressing
the remote control Guide button. You can
choose another custom Favorites List, the
All Chan list, which includes all the channels,
or the All Sub list, which includes all
subscribed channels.
• Unlock the receiver for the Program Guide to
display adult channels.
Favorites Lists
What Is Happening Possible Reason What to Do
You press the remote Guide
button while the Program
Guide is displayed. You find
that you can apply only the All
Chan list or the All Sub list.
You try to change the
All Chan list or the All Sub list.
The receiver displays an
ERROR message.
You try to apply an empty
Favorites List. The receiver
displays an ERROR message.
A Favorites List does not show
channels that you know you
have added to it.
• If you have not added
channels to any custom
Favorites List, you will be able
to apply only the All Chan list
or the All Sub list.
• The receiver will not allow you
to change the All Chan list or
the All Sub list.
• The receiver will not allow you
to apply an empty list.
• If you have set up the
Program Guide to hide adult
channels and the receiver is
locked, the Favorites List will
not show such channels.
• You must add channels to a custom Favorites List
before you can apply it.
• Choose another list to change.
Note: You can change the All Sub list by changing
what channels you buy.
• Choose another list to apply, or add at least one
channel to the empty list.
• Unlock the receiver for the list to show adult
channels.
87
Page 93

Reference
Troubleshooting Tables
Watching A Program
What Is Happening Possible Reason What to Do
The receiver front panel Power light
is on, but the TV image:
• is black (no picture)
•is frozen
• has break-ups
• has “snow,”
• shows small squares of various
colors
The receiver front panel Power light
is on, and there is a picture on the
TV screen, but the picture:
• has sparkles or is grainy
• has a herringbone pattern
• lacks color or vertical hold
• wobbles
• looks “washed out” or fuzzy.
• The TV set may not be
working properly
• The TV may be connected to
the wrong input
• If the TV and the receiver are
working properly, there may
be interference with the
satellite signal.
• You have selected an HD
mode your HDTV does not
support.
• The TV set may not be
working properly.
• If the receiver is connected to
the remote TV using the RF or
VHF connections, there may
be a strong local broadcast on
the same channel, or a
channel adjacent to the one to
which the TV is tuned.
• Make sure that the TV set is plugged into an
electrical outlet.
• Make sure the outlet has electrical power.
• Make sure that the TV is turned on and
tuned to the correct input.
• Make sure that the TV brightness and
contrast are adjusted correctly.
• Make sure that the TV is connected properly
to the receiver.
• Make sure that the TV’s text mode and
closed captioned features are turned off.
• Check that the system has been installed
correctly.
• Make sure that all required coaxial cables
are in place, and check that all cable
connectors are tight and dry (for outdoor
cables).
• Make sure that the satellite dish has a clear
line of sight to the satellite.
• Check whether branches or leaves have
grown into the line of sight.
• Make sure that the satellite dish is aimed at
the satellite. Check the strength of the signal
using the Point Dish screen, as described
on page 80. Consult your installer to re-aim
the dish, if necessary, to obtain the
maximum possible signal strength.
• Note the local weather conditions. Heavy
rain, snow, or cloud cover may be interfering
with transmission of the satellite signal.
Remove any snow or other debris which
may have collected on the satellite dish
• Refer to your HDTV user’s guide.
• Make sure that the TV brightness and
contrast are adjusted correctly, and that the
TV is working properly.
• Make sure that the TV is connected properly
to the receiver.
88
Page 94

Watching A Program
What Is Happening Possible Reason What to Do
• There may be interference
from other nearby electrical
devices (such as radio towers,
cellular telephones,
computers, microwave ovens,
radios, stereos, or TVs).
A “black box” fills almost all of the
TV screen.
The TV screen is all blue. • You may have connected the
• You may have turned on the
Closed Captioned feature on
the TV, and put that feature
into Text mode.
receiver to an input on the TV
that is incorrect for the signal
output from the receiver.
• Check other nearby electrical devices as
possible sources of interference.
• Check that all required coaxial cables are in
place.
• Check for moisture or water leaking into all
connections. Dry them out if needed, then
seal them with coaxial cable sealant.
• Check the dish-to-receiver cable run length;
if it is over 100 feet, call your dealer or
installer.
• Make sure the system is properly grounded.
• Using the TV remote control and/or menus
displayed by the TV (not the receiver remote
control or the menus displayed by the
receiver), turn off the closed captioned
feature.
• Check your TV owner’s manual for the
correct TV input to use for the signal output
from the receiver.
Reference
Troubleshooting Tables
Caller ID
What Is Happening Possible Reason What to Do
Caller ID is not working. • You do not have Caller ID
service from your local phone
company.
• Your phone line is not
connected to the phone jack
on the back of the receiver.
• You do not have the Caller ID
option enabled.
• Verify that Caller ID is a service provided by your
local phone company.
• Verify that you have connected the phone line to
the phone jack on the back of the receiver.
• Verify that you have enabled the Caller ID option
on the Caller ID screen.
Locks
What Is Happening Possible Reason What to Do
You set a lock (for example, a lock on
programs by ratings), but the lock
does not take effect.
You forgot the password, so that you
are unable to unlock the receiver.
• You may not have locked the
receiver.
• You may not have written
down the password, to keep it
in a safe place.
•You must lock the receiver to apply any
lock that you have set.
• Call the Customer Service Center at 1-800333-DISH (3474. You must provide the
following information: (1) your name; (2)
your address; (3) your telephone
number;(4) and the receiver serial
identification number.
89
Page 95

Reference
Troubleshooting Tables
Timers
What Is Happening Possible Reason What to Do
You try to set up an event timer
and the receiver displays a
message noting that the
program is locked.
You try to set up an event timer
and the receiver displays a
message noting that the
program is a Pay-Per-View
event.
You try to set up an event
timer, but the receiver displays
an Error message giving you
the option to delete an event
timer that was set up earlier.
You set up an event timer, but
the receiver does not tune to
the channel of the program, or
does not record the program.
You set up an event timer for a
program that is repeated (such
as a regularly scheduled
program), but the timer does
not operate for a showing of
the program.
You stop the operation of an
event timer for one showing of
a program that is repeated
(such as a regularly scheduled
program), but the timer
operates for the next showing.
•You must enter the password
before you can create an
event timer for a locked
program.
•You must order a Pay-Per-
View event before you can
create an event timer for it.
• You already have set up the
maximum number of event
timers.
• You may have set up a
Reminder but what you should
have set up is an Auto-Tune
or a VCR timer.
• You may have set up a timer
with an incorrect frequency.
• Stopping the event timer
applies only to the current
showing of the program.
• To be able to set up an event timer for the
program, first enter the password.
• To be able to set up an event timer for the event,
first order it.
• To be able to set up a new event timer, delete one
of the event timers you set up earlier.
• Remember that a Reminder just reminds you that
the program is about to start. An Auto-Tune timer
reminds you and tunes the receiver to the
program. A VCR timer reminds you, tunes the
receiver, and starts recording to tape.
• Remember that a Once event timer operates just
one time. A Mon.-Fri. event timer operates
Monday through Friday on the same channel at
the same time. A Daily event timer does the
same, Monday through Sunday. A Weekly event
timer operates once a week on the same channel
at the same time.
• To stop all operations of a repeated event timer,
you must delete the event timer.
Note: The receiver deletes a Once event timer
when it operates.
You edit an automatic event
timer. The timer does not start
or does not end according to
the program for which you set
the timer.
You try to set up a manual
event timer. The receiver
displays an Error message.
The receiver does not display
the program name for a
manual event timer.
You set an event timer.
The event timer misses the
beginning or the end of a
program.
90
• Editing an automatic event
timer converts it to a manual
event timer. Such a timer
starts and stops at the times
you specify, not the start and
stop times of any specific
program.
• You may have tried to set a
manual event timer with
invalid start or stop times.
• The receiver may not be able
to display a program name for
a manual event timer.
• The program may have
started a little earlier than
scheduled, or it may have run
over its scheduled ending
time.
• If you want an automatic event timer to start and
stop according to a specific program, avoid
editing that event timer.
• Review the rules on start and stop times for
manual event timers.
• Use the Program Guide or a printed schedule to
find the program name.
• Use the Start 1 min. early option to start any event
timer one minute early, except for a Pay-Per-View
event.
• Use a manual event timer to start any event timer
at the times you set yourself, except for a PayPer-View event.
Page 96

Troubleshooting Tables
Hearing A Program
What Is Happening Possible Reason What to Do
Reference
The receiver front panel Power light is
on and there is a good picture on the
TV set, but you do not hear any
sound.
You hear a foreign language with a
program.
• You may have muted the
sound, or set the volume so
low that you cannot hear it.
• The audio connections may
not be properly connected.
• You have selected Dolby
Digital Only when there is no
Dolby Digital soundtrack.
• You may have set the receiver
to select an alternate audio
language. The program may
be in a foreign language.
• Check the volume level on the TV or audio
device. Turn off the mute or turn up the
volume, as required.
• Check the audio connectors and cables
from the receiver to the TV or the sound
system.
• Check the TV speakers or the sound
system.
• In the Dolby Digital menu, select Dolby
Digital/PCM for the audio output. If your
decoder/amplifier will not accept Linear
PCM digital input, use the analog
connections instead.
• Use the Alternate Audio Language menu
to select the language that you prefer.
Telephone for Voice/Data/FAX
What Is Happening Possible Reason What to Do
While you are making a
telephone call, you hear
“clicks.”
• The receiver may have tried to
call the Customer Service
Center to send Pay-Per-View
purchase information. When
the receiver found that the
telephone was busy, it
automatically disconnected.
• You do not have to do anything. You can always
use your telephone line, because the receiver
automatically hangs up if it finds the line is busy.
You pick up the telephone to
make a call, but you do not
hear a dial tone.
Your computer or facsimile
(FAX) machine tries to send a
FAX or modem transmission,
but fails.
• The receiver was calling the
Customer Service Center to
send Pay-Per-View
information. When the
receiver found that the
telephone was busy, it
automatically disconnected.
• The receiver was calling the
Customer Service Center to
send Pay-Per-View
information. When the
receiver found that the
telephone was busy, it
automatically disconnected.
The FAX or modem found that
there was no dial tone, and
cancelled the transmission.
• Hang up, and then pick up the telephone again to
get a dial tone.
• Re-send the FAX or modem transmission.
91
Page 97

Reference
Troubleshooting Tables
Telephone for Voice/Data/FAX
What Is Happening Possible Reason What to Do
Your computer or FAX
machine was receiving a FAX
or modem transmission, but an
error occurred.
• The receiver may have tried to
call the Customer Service
Center to send Pay-Per-View
purchase information during
the FAX or modem call. When
the receiver found that the
telephone was busy, it
automatically disconnected.
This generated “clicks” that
caused an error in the FAX or
modem transmission.
• Have the sender resend the FAX or modem
transmission.
Buying a Pay-Per-View Program
What Is Happening Possible Reason What to Do
Someone orders a Pay-PerView program without your
permission.
You find that you are not able
to order a Pay-Per-View
program.
• You may have been away
from the receiver, and
someone else used it.
• The receiver may not be
connected to an active
telephone line.
• Lock the purchase of Pay-Per-View programs.
Remember that you are responsible for all PayPer-View purchases, whether or not you
authorize such purchases. If you lock Pay-Per-
View purchases, then anyone who wants to order
a Pay-Per-View program must enter the
password.
•You must connect the receiver to an active
telephone connection at all times. If you install
two or more receivers, you must connect each
receiver to an active telephone connection at all
times.
You find that you are not able
to cancel a Pay-Per-View
program.
Your setup includes more than
one receiver. You order a PayPer-View program, but it does
not appear via all of the
receivers.
92
• You ordered a Pay-Per-View
program, and then decided
not to watch it.
• You ordered a Pay-Per-View
program, and want it to be
available via all the receivers
in your setup.
•You cannot cancel an order for a Pay-Per-View
program, whether it was just ordered or ordered
earlier.
• If you want to watch a Pay-Per-View program on
TVs connected to up to six receivers, you must
order the program for each receiver but you only
pay for the program once.
Page 98

Reference
Remote Control Device Codes
REMOTE CONTROL DEVICE CODES
These tables contain the manufacturer codes for programming the remote to control your TV, VCR, DVD
player, or audio amplifier. Every attempt has been made to include all codes. If your device brand is not
listed or if the codes do not work, the remote may not control your device. In some cases, codes may
operate some but not all buttons shown in this guide.
TV Codes
Programming in AUX mode: In most
cases use these codes to program in TV
mode; however, if programming in AUX
mode, press 0 before entering the TV
code.
A Mark 670
Action 662
Admiral 514 521 605 668 669 675
Aiko 727
Aiwa 751
Akai 570 573 659 660
A-Mark 620
Amtron 657
Anam National 509 541 620 651 657
661 663 698
AOC 505 506 519 520 573 620 627 652
653 654 659 664 665 670 672
Apex 743 744 745
Archer 620
Audiovox 620 657 662 672
Bell & Howell 590 669 675
Broksonic 752 659 661 748
Capehart 519 627
Citizen 506 516 523 524 525 526 590
652 654 657 658 680 727
Classic 659
Colortyme 573 627 652 654 660 667
668 671 674 679 681
Contec/Cony 541 655 657 661 662 726
Craig 536 541 657 661 662 666 667 694
Crown 526 536 657 666 670
Curtis Mathes 506 516 526 573 590
641 645 650 652 654 658 659 660 664
665 667 668 670 674 680 703 708
Daewoo 505 524 526 529 530 531 573
652 653 654 658 659 663 664 665 670
672 674 684 698 719 727
Daytron 526 627 652 654 658 665 670
672
Dimensia 645 650
DISH Network 742
Dixi 566 620
Dumont 501 627 652
Echostar 722
Electrohome 526 573 651 652 654 656
659 660 665 670 709 728
Emerson 526 534 535 536 537 538 539
541 573 590 627 636 642 648 652 654
655 657 658 659 660 661 662 665 666
667 669 670 677 679 682 692 696 699
720
Envision 506 573 652 654 660 664
Fisher 542 590 683
Fujitsu 534 682 694
Funai 534 541 657 661 662 677 682
694
GE 508 509 543 544 630 645 646 650
651 652 654 659 661 663 665 667 668
670 673 676 681 690 691 698 701 715
716 725 728 742
Goldstar 505 523 526 545 546 566 573
652 653 654 655 656 658 659 660 664
665 670 671 678 693 730 747
Gradiente 660 671
Granada 627 670 671
Grundig 670 673
Hallmark 627 652 654 659
Harmon/Kardon 561 659
Hinari 534
Hitachi 523 526 548 549 553 554 555
585 597 626 636 638 643 648 652 654
655 665 668 669 670 672 673 702 718
726
Infinity 566 671
JBL 566 671
JC Penney 505 506 516 525 526 543
546 631 645 646 650 652 653 654 658
659 664 667 668 670 673 676 678 680
690 691 701 725 726 728 730
Jensen 556 573 652 654 660
JVC 508 557 559 642 649 655 667 673
676 726 735 736 737
Kawasho 548 561 573 652 654 664
Kenwood 506 573 652 654 656 659 660
664 679 681
Kloss Novabeam 657 663 698 723 724
Konka 753
KTV 526 539 541 573 657 658 661 662
664 665 670 696
Lloyds 627 679
Loewe 566
Logik 675
Luxman 523 652 654
LXI 563 566 590 595 667 631 635 645
646 650 654 659 668 678 683 691 701
725
Magnasonic 573 659 660 669 672 677
Magnavox 506 520 525 536 566 567
568 573 610 652 654 656 659 660 664
665 666 669 671 673 674 677 723 724
729
Majestic 675
Marantz 506 566 573 652 654 660 664
665 671 678 681
Megatron 627 654
Memorex 590 627 653 654 659 675 678
720
MGA 504 505 506 542 571 573 627 652
653 654 656 660 728
Mitsubishi 504 505 542 570 571 572
573 597 623 627 652 653 654 656 659
660 664 665 670 671 705 728
Montgomery Ward 675
Motorola 521 605 651
MTC 505 506 516 523 573 627 652 653
654 659 664 667 672 680
Multitech 657
NAD 502 617 627 631 635 637 654
National 509
NEC 505 506 507 517 523 573 627 651
652 653 654 660 664 665 679 681 731
732
Nikkai 612
Nikko 654 672 727
Onwa 541 657 661
Optimus 637
Optonica 521 605 607
Orion 694
Osaki 612
Panasonic 508 509 510 512 566 644
651 662 663 668 672 673 676 685 689
698 700 716, 234, 247
Philco 505 506 525 536 568 573 610
651 652 653 654 655 656 659 660 664
665 666 669 671 672 674 677 723 724
729
Philips 525 566 651 652 655 656 671
690 723 724 729
Pioneer 502 548 576 636 637 648 652
654 663 665 681 708
Portland 505 526 573 652 654 658 659
664 665 670 727
Price Club 680
Prism 676
Proscan 645 646 650 668 691 725 742
Proton 513 519 526 536 585 627 652
654 655 659 660 665 666 668 670 678
Quasar 508 509 651 663 673 676 698
700 747
Radio Shack/Realistic 526 541 590
607 612 645 650 652 654 655 657 658
661 662 663 668 670 683 698 730
RCA 503 505 548 586 630 633 634 636
641 645 646 648 650 651 652 653 654
656 661 663 665 667 668 670 681 691
698 701 708 715 716 725 742 749
Runco 501
Sampo 506 519 652 654 658 663 664
665 698 730 746
93
Page 99

Reference
Remote Control Device Codes
Samsung 505 506 516 523 526 566 573
612 627 647 652 653 654 655 656 658
659 664 665 667 669 670 679 680 704
717 730 738
Sansui 754
Sanyo 542 590 652 683
SBR 566
Schneider 566
Scott 526 534 537 541 600 652 654 655
657 661 662 665 670 677 682 696 701
Sears 523 534 542 563 590 595 601
604 617 627 631 635 645 646 650 652
654 656 659 661 668 670 682 683 688
691 703 725 726
Sharp 521 526 585 605 607 628 629
652 654 655 658 669 670 674 679 739
740 741
Signature 675
Solavox 612
Sony 500 578 640 670 690
Soundesign 525 536 541 627 652 654
657 659 661 665 666 682
Starlite 657
Supra 523
Sylvania 506 525 536 566 568 569 573
600 610 652 654 656 659 660 664 665
666 671 672 674 677 723 724 729 733
Symphonic 632 657 662 677 692 694
Tan dy 521 605
Tat ung 509 651 663 698
Technics 508 673 676
Tec hwood 523 573 652 654 660 676
Tek nika 504 505 512 516 523 524 525
526 534 536 541 573 644 652 653 654
655 657 658 661 662 664 665 666 670
672 675 680 681 682 685 726 727
Telefunken 679
Tos hiba 516 590 617 631 635 667 678
680 683 688 750
Totevision 526 658 668
Ultra 672
Universal 543 690
Vector Research 506
Video Concepts 570 661
Wards 536 573 607 645 650 652 653
654 656 659 664 665 666 667 668 669
674 675 677 678 682 690 715 723 724
729
White Westinghouse 659 664 670 672
674
Yam ah a 505 506 573 652 653 654 656
664 666 672 679
VCR Codes
Programming in AUX mode: In most
cases use these codes to program in
VCR mode; however, if programming in
AUX mode, press 1 before entering the
VCR code.
Aiwa 588 622 623
Akai 513 514 515 516 517 518 520 568
682
Alba 546
Amstrad 588
ASA 556
Audiovox 676
Bell & Howell 581
Broksonic 559 748
Bush 589
Calix 676
Canon 554 678 679
Capehart 546
CCE 681
Citizen 534 591 592 594 675 676 677
684
Colortyme 592
Craig 591 658 675 676 681 685 687 688
Curtis Mathes 554 592 594 605 607
675 677 678 679 683 684
Daewoo 506 534 546 547 559 588 684
Daytron 546
Denon 686
Dimensia 607
Dumont 549
Electrohome 512 676 687
Emerson 505 506 508 509 511 512 534
559 568 588 590 618 676 678 684 687
Finlandia 549
Finlux 549 556 588
Fisher 548 549 581 584 588 608 610
684 688
Fuji 678
Funai 588
Garrard 588
GE 550 551 552 554 572 591 605 607
675 678 679
Go Video 557 558 620 685
Goldstar 592 594 676 687 747
Goodmans 585 589
Gradiente 588 687
Granada 549 581
Grundig 556
Harmon/Kardon 568 592
Harwood 681
Hinari 589
Hitachi 536 538 539 540 588 595 597
680 682 686
ITT 518
JC Penney 554 581 591 592 594 595
600 674 675 676 678 679 680 681 685
686 687
Jensen
595 680 682
JVC 561 562 563 581 592 594 600 674
682 686
Kenwood 562 581 592 594 600 674 677
682 683
KLH 681
Kodak 676 678
Lloyds 683 688
Logik 589 681 685
Luxor 518
LXI 676
Magnasonic 685 687
Magnavox 527 533 554 556 678 679
684 685
Marantz 554 556 581 585 592 594 600
602 674 677 678 683
Matsushita 678
Memorex 507 533 549 554 566 581 585
588 608 675 676 678 686 687 688
MGA 512 567 568
Minolta 595 680 686
Mitsubishi 512 562 567 568 570 571
595 680 687
Motorola 678
MTC 544 588 675 685
Multitech 579 588 675 677 681
NAD 573
NEC 562 581 592 594 600 602 674 677
682 683
Nikko 676
Noblex 675
Olympus 678
Optimus 676 687
Optonica 585
Orion 506 684 687
Panasonic 523 554 598 614 628 633
678 679 684 685 688 747
Pentax 592 595 677 680 683 686
Pentex Research 594
Perdio 588
Philco 554 678 679 686
Philips 554 556 585 678 684
Pioneer 562 573 574 575 576 600 674
680
Portland 546 677
Proscan 605 607
Proton 685
Quasar 554 678 679 747
Radio Shack/Realistic 512 581 584
588 607 608 610 675 676 678 679 687
Radix 676
RCA 518 525 527 528 591 595 605 607
615 631 649 675 678 680 686
Realistic 534 549 554 581 584 585 588
608 675 678 679 687 688
Ricoh 502
Runco 533
Saisho 506
Salora 567 581
Samsung 515 517 534 579 591 675
Sansui 544 562 600 674 682 685
Sanyo 549 581 582 583 608 675 688
Schneider 589
Scott 508 534 559 590 684 687
Sears 548 549 581 584 595 608 610
676 678 680 683 684 686 687 688
Sentra 546
Sharp 512 585 607 625
Shintom 589 595 681 685
Singer 678 681 685
94
Page 100

Reference
Remote Control Device Codes
Sony 500 501 502 504
STS 678
Sylvania 554 556 567 588 678 679
Symphonic 588 594 683 688
Tan dy 581 588
Tas hiko 588 676
Tat ung 594 682
Tea c 588 594 682
Technics 554 633 678
Tek nika 554 588 676 678 687
Tos hiba 534 535 567 584 590 680 684
688
Totevision 591 675 676 687
Unitech 675
Vector Research 534 592 600 674 677
683
Video Concepts 534 568 592 600 674
677 683
Wards 534 588 595 608 675 676 678
680 681 684 687 688
XR-1000 588 678 681
Yam ah a 581 592 594 600 674 682 683
Zenith 500 501 533 747
Tuner/Amplifier Codes
Programming in AUX mode: Press 2
before entering the tuner/amplifier code.
Aiwa 636 641 656 687 718 720 724 725
726
Bose 761
Carver 653
Citizen 709
Curtis Mathes 734
Denon 647 674 757 758 759 760 762
Fisher 653 741
GE 711
Goldstar 677 690
Harmon/Kardon 640 672 751
Hitachi 717 754
JBL 640
JVC 637 683 703 725
Kenwood 649 676 691 726 728 745
Luxman 752
Magnavox 654 705 740
Marantz 651 740 742 743 764
NAD 739
Nakamichi 671 748 750
NEC 716 739
Onkyo 642 660 662 678
Optimus 648 664 734 744 749
Panasonic 643 644 652 742 746 764
Pioneer 658 667 668 679 702 734
Proton 654 705
Quasar 652 742 746 764
Radio Shack 744
RCA 635 638 704 727
Sansui 753
Sanyo 741
Sharp 712 713 714 715 749
Sherwood 646 670 736 738 744
Sony 639 645 650 687 728 729 730
Soundmatters 763
Teac 684 737
Technics 643 644 652 742 746 764
Tos hiba 710
Yam ah a 663 730 731 732 733 745 747
DVD Player Codes
Programming in AUX mode: In most
cases use these codes to program in
VCR mode; however, if programming in
AUX mode, press 1 before entering the
VCR code.
Aiwa 634 694 751
Alpine 653
Apex 654 655 743 744 757
Bose 758
Broksonic 656 752
Clarion 696
Classic 695
Daewoo 657
Denon 697 698 699 700
Emerson 658 701
Fisher 659
Funai 658
GE 702 703
Go Video 692 693
GPX 704
Hitachi 632 635 660 705 706 707
JVC 636 689 708 711
Kenwood 761
Konka 637 638 753
Koss 745
Lasonic 762
Magnavox 626 661
Memorex 709
Mintek 710
Mitsubishi 629 767
NAD 701
Nakamichi 763
Norcent 712
Onkyo 713
Oritron 723
Panasonic 639 662 663 714 715 716
717 734 765
Philips 640 641 766
Pioneer 665 718 719
Proscan 720
Qwestar 721 723
RCA 627 650 666 690 742 749
Sampo 724
Samsung 651 652 667 668 691 740 741
Sansui 725 754
Sanyo 643 726
Sharp 669 727 746
Sherwood 728
Sony 617 644 645 670 671 729 730 731
Sylvania 658 764
Teac 732
Technics 733
Techwood 664
Tos hib a 616 646 647 672 735 736 750
Yamaha 737 738 739
Zenith 648 673
TV/DVD Combo Codes
Programming for combination
equipment: Program the remote control
in TV mode and then in VCR (or AUX press 1 before entering the DVD code)
mode.
Aiwa 751
Apex 757
Broksonic 752
Konka 753
Panasonic 734 765
RCA 749
Sansui 754
Sylvania 764
Tos hib a 750
TV/VCR Combo Codes
Programming for combination
equipment: Program the remote control
in TV mode and then in VCR mode.
Broksonic 748
Goldstar 747
Panasonic 747
Quasar 747
Samsung 755
Sylvania 756
Zenith 747
DVD/VCR Combo Codes
Programming for combination
equipment: Use VCR mode to control
VCR and DVD functions; however, if
programming in AUX mode, press 1
before entering the DVD/VCR code.
Go Video 692 693
JVC 689
RCA 690
Samsung 667 691
95
 Loading...