

Page 1

Contents
Safety Instructions ..........................................................................iii
Chapter 1 - Introduction...................................................................1
Welcome to DISH Network ................................................................... 1
About this Receiver .............................................................................. 1
Overview .............................................................................................. 2
Getting Started ..................................................................................... 4
Quick Tour of Basic Features ............................................................... 5
Quick Tour of the Menus ...................................................................... 7
About Satellite Television ................................................................... 11
Satellite Signal Quality ....................................................................... 11
Chapter 2 - Receiver Description and Installation.......................13
Receiver Front Panel .......................................................................... 13
Receiver Back Panel .......................................................................... 14
Remote Controls ................................................................................ 16
Connecting the Receiver to a Nearby TV ........................................... 19
Connecting the Receiver to the TV(s) in Another Room(s) ................ 21
Programming the Recover Button ...................................................... 25
Changing the TV1 and TV2 Output Channels .................................... 26
Connecting the Receiver to the Phone Line ....................................... 27
Connecting the Receiver to a Dish Antenna System ......................... 28
Optional - Connecting VCRs to the System ....................................... 31
Optional - Connecting to an Off-Air Antenna or Cable ....................... 32
Optimize Your Remote Controls ......................................................... 32
Setting Up TV1 to Operate in UHF Pro .............................................. 34
Setting Up TV1 to Operate in IR ......................................................... 35
Chapter 3 - Using the System........................................................37
Using the Remote Controls ................................................................ 37
Using the Menus ................................................................................ 42
Changing Channels ............................................................................ 45
Using the Program Guide ................................................................... 45
Displaying Program Information ......................................................... 47
Using Favorites Lists .......................................................................... 49
Using Timers ...................................................................................... 52
Using Themes and Search ................................................................. 59
Using Locks ........................................................................................ 62
Personal Identification Number .......................................................... 69
Using Caller ID ................................................................................... 69
Resetting to Factory Default Settings ................................................. 70
Changing Program Languages .......................................................... 71
Control Other Devices with the Remote Controls ............................... 72
Testing the System ............................................................................. 82
System Updates ................................................................................. 83
Page i
Page 2

Contents
Chapter 4 - Dish Antenna Installation...........................................85
Installing a DISH 500 Antenna ............................................................85
Installing a Multiple Dish DISH Pro System ........................................91
DISH Pro Wiring Diagrams .................................................................94
Running Coaxial Cable .......................................................................99
Chapter 5 - Reference...................................................................101
Troubleshooting Tables ....................................................................101
Device Codes ....................................................................................113
Appendix ......................................................................................109
Limited Warranty ...............................................................................119
Residential Customer Agreement .....................................................121
Staying Legal ....................................................................................127
FCC Compliance ...............................................................................127
Index ..............................................................................................129
Page ii
Page 3

Safety Instructions
1. Read these instructions.
2. Keep these instructions.
3. Heed all warnings.
4. Follow all instructions.
5. Do not use this apparatus near water.
6. Clean only with a dry cloth.
7. Do not block any ventilation openings. Install in accordance with the
manufacturer’s instructions.
8. Do not install near any heat sources such as radiators, heat registers, stoves, or
other apparatus (including amplifiers) that produce heat.
9. Do not defeat the safety purpose of the polarized or grounding-type plug. A
polarized plug has two blades with one wider than the other. A grounding-type
plug has two blades and a third grounding prong. The wide blade or the third
prong are provided for your safety. If the provided plug does not fit into your
outlet, consult an electrician for replacement of the obsolete outlet.
10. Protect the power cord from being walked on or pinched, particularly at plugs,
convenience receptacles, and the point where they exit from the apparatus.
11. Use only attachments/accessories specified by the manufacturer.
12. Unplug this apparatus during lightning storms or when unused for long periods
of time.
13. Refer all servicing to qualified service personnel. Servicing is required when the
apparatus has been damaged in any way, such as the power supply cord or plug
is damaged, liquid has been spilled or objects have fallen into the apparatus, the
apparatus has been exposed to rain or moisture, does not operate normally, or
has been dropped.
Apparatus shall not be exposed to dripping or splashing and no
objects filled with liquids, such as vases, shall be placed on the
apparatus.
Page iii
Page 4

Safety
t
(
)
Note to Satellite TV System Installer: This reminder is provided to call the
satellite TV system installer’s attention to Article 820-40 of the National
Electrical Code (NEC) that provides guidelines for proper grounding and, in
particular, specifies that the cable ground shall be connected to the grounding
system of the building as close to the point of cable entry as practical.
Satellite Dish
Coaxial Cable
Ground Clamp
Antenna Discharge
Unit
Grounding Conductors
NEC Section 810-21
Safety Tips
• Unplug the receiver from the AC power outlet before cleaning.
• The use of accessories or attachments not recommended by the receiver
manufacturer will void the Limited Warranty.
•Do not place the receiver in an enclosure such as a cabinet without proper
ventilation.
• Do not install the receiver in any area where the temperature can be less than
40°F or more than 113°F.
•Do not stack the receiver on top of or below other electronic devices.
• Operate the receiver using only the type of power source indicated on the
marking label. Unplug the receiver power cord by gripping the power plug, not
the cord.
•Do not overload wall outlets or extension cords, as this can result in a risk of
fire or electrical shock.
• Never insert objects of any kind into the receiver through openings, as the
objects may touch dangerous voltage points or short out parts. This could cause
fire or electrical shock.
• Make sure that the outdoor parts of the antenna system are grounded in
accordance with local, state, federal, and National Electrical Code (NEC)
requirements.
•Do not locate the antenna near overhead light or power circuits, or where it can
fall into such power lines or circuits. When installing the antenna, take extreme
care to avoid touching such power lines or circuits, as contact with them can be
fatal.
•Do not attempt to service the receiver yourself, as opening or removing covers
may expose you to dangerous voltage, and will void the Limited Warranty.
Refer all servicing to authorized service personnel.
• Use an outlet that contains surge suppression or ground fault protection. For
added protection during a lightning storm, or when the receiver is left
unattended and unused for long periods of time, unplug the power cord from the
wall outlet, disconnect the lines between the receiver and the antenna, and
disconnect the telephone line. This will provide some protection against
damage caused by lightning or power line surges.
from Satellite Dish
Electric Service Equipmen
Ground Clamps
Power Service Grounding
Electrode System
(NEC Art. 250, Part H)
Page iv
Page 5

Chapter 1
Introduction
Welcome to DISH Network
Congratulations on choosing DISH Network. You are about to experience
the excitement and convenience of Direct Broadcast Satellite (DBS) service,
which delivers the very best picture and sound quality. DISH Network
consistently provides state-of-the-art products and satellite-delivered
services — with high performance, ease of operation, and a wide variety
of entertainment options.
About this Receiver
UHF Pro
Remote Control
2
2
IR
Remote Control
1
To gain a better understanding of your DISH Network satellite receiver, look at
the picture above. This receiver is a two-tuner satellite receiver that allows you
to watch different programs in two locations:
• Nearby TV - Programming from the receiver is delivered to the TV near the
receiver using short audio/video cables.
• Remote TV - Programming from the receiver is delivered to a TV located in
another room using existing in-home coaxial cable.
Page 1
Page 6

Chapter 1
Introduction
Two remote controls come with your receiver:
• An Infrared (IR) remote to control programming for the nearby TV.
This remote is labeled with a green number 1, which matches similar
markings on the receiver output connections and the menus for the
nearby TV.
• An Ultra-High Frequency Pro (UHF Pro) remote to control
programming to a remote TV. This remote is labeled with blue
number 2, which matches the similar markings on the receiver
output connections and the menus for the remote TV.
Overview
Before you use your satellite receiver, you need to install the system or
have it installed by a professional technician. For a professional installation,
please call the Customer Service Center at 1-800-333-DISH (3474). If you
install the system yourself, use the instructions in Chapter 2.
A vital part of the installation is to set up the receiver to get the
latest software from the satellite signal. If you are installing a
new system and follow the instructions in Chapter 2, your
receiver will automatically get this software.
For information on the receiver and its installation, read Chapter 2, Receiver
Description and Installation beginning on page 13.
For information on any specific feature or function, read Chapter 3, Using
The System beginning on page 37.
For information on assembling and installing a dish antenna, read Chapter 4,
Dish Antenna Installation beginning on page 85.
If you have a problem operating the system or receive an error message, use
the Troubleshooting Tables beginning on page 101.
Tips
In the margins of pages throughout this guide are tips and other information
to make using your satellite receiver easier.
Conventions
To make it easy for you to use this guide, we use the following conventions.
• The names of remote control buttons are all uppercase.
Example: Press the SAT button.
• Menus and options that appear on the TV screen are in bold type.
Example: Open the
• Select means to move the highlight to an on-screen option or choice
in a list and press the SELECT button on the remote control.
Example: Select the
Program Guide.
Locks option.
Page 2
• Connections on the back of the receiver are in small capital letters.
Example: S
AT IN
Page 7

• Where this guide mentions nearby TV, it refers to the TV near the
receiver. The nearby TV receives TV1 menus and programming
from the receiver’s TV1 outputs and is connected using short audio/
video cables.
• Where this guide mentions remote TV, it refers to the cable-ready
TV(s) located in rooms away from the receiver. The remote TV
receives TV2 menus and programming from the receiver’s TV2
outputs through your in-home cable system.
• Where this guide mentions remote control, it refers to either
Remote Control 1 when viewing the nearby TV or Remote Control
2 when viewing the remote TV(s). If a specific remote control must
be used, this guide will refer directly to Remote Control 1 or
Remote Control 2.
Fixed Images
On some TVs, the presence of fixed images for extended periods
of time may cause them to be permanently imprinted on the
screen. Consult your TV user guide for information on whether
this is a problem for your TV, what operating/viewing restrictions
apply to avoid this problem, and associated TV warranty
coverage.
Overview
DISH Network Logo
Whenever the receiver’s outputs are turned off using the
remote control or front panel POWER buttons, you will
see the DISH Network logo moving around on your TV
screen. This feature is included with your receiver to
assure you that the connections between your receiver and
TV(s) is not lost. Press the blank POWER or SELECT
button on the remote control to resume watching satellite
TV programming. Make sure you are using the correct
remote (see page 16 for details).
Note: This logo is displayed on all TV1 and TV2 outputs except the
CH 3–4 OUT. So if your nearby TV is connected using the CH 3–4 OUT,
this logo will not be displayed.
Page 3
Page 8

Chapter 1
Introduction
Tip: Remote
Control 1 is used to
control TV1 menus
on the nearby TV.
Remote Control 2
is used to control
TV2 menus on the
remote TV(s).
Getting Started
After your system has been installed, order and watch your programming
using the following steps:
Step 1: Ordering Your Programming
1. Using a remote control, press SAT and then press the
blank POWER button. Make sure the TV is also on.
Note: If you see the DISH Network logo displayed on
your TV screen, press the SELECT or blank
POWER button on the remote control to view
satellite TV programming.
2. Press GUIDE.
You will see that some channels in the
in white. These channels can be viewed immediately. However, many
channels will be in red. You cannot view these channels until you order
programming.
Program Guide appear
3. Press the SYS INFO button on the remote control to display
Important System Information screen.
the
4. Call the Customer Service Center at 1-800-333-DISH (3474). A
customer service representative will help you start DISH Network
programming on your system and will discuss the various programming
packages available.
5. Choose a package and the representative will authorize your
programming.
6. Press SELECT to close the
Important System Information screen.
Page 4
7. Wait a few minutes and the channels you purchased will turn from red to
white, and can now be viewed.
Page 9

Step 2: Finding Programs To Watch
Quick Tour of Basic Features
1. Press the GUIDE button.
2. When the
Program Guide opens, use the UP or
DOWN ARROW to view information on other
channels. The channels for the programming you
ordered should be shown in white and are available for
viewing. After you have highlighted a current program
Program Guide, press SELECT to watch it.
in the
Quick Tour of Basic Features
This tour guides you quickly through a number of basic satellite receiver
features accessible directly from the remote control without using menus.
For more detailed information about each feature, see Chapter 3, Using the
System.
1. Make sure the TV is on.
2. Press the UP or DOWN ARROW button to
change channels.
Tip: The Program
Guide provides a
complete listing of
all programs
available on all
channels,
including those
that are not in your
subscription
(these channels
have red
backgrounds).
3. Press the RECALL button to go back to the last channel
you watched.
4. Press the THEMES (LEFT ARROW) button to open the
Themes and Search menu. This menu allows you to
search for programming by themes (movies, sports, and
more) or by key words used in the programming
information.
Page 5
Page 10

Chapter 1
Introduction
5. Select Sports.
6. Press the VIEW TV button to go back to watch a program.
7. Press the INFO button to see information about the program.
Page 6
8. Press the CANCEL button to go back to watch the program.
9. Press the BROWSE (RIGHT ARROW) button to open the
Browse Banner. The Browse Banner shows information
on a program we’re watching at the top, and information on
two other programs at the bottom.
Page 11

10. Press the UP or DOWN ARROW button to
change the channel information you see at the
bottom of the TV screen.
11. Press the RIGHT ARROW button to highlight
the program coming on next at the bottom. Press
the LEFT ARROW button to go back to the
program on now.
Quick Tour of the Menus
12. Press the VIEW TV button to clear the
Banner
from the TV screen and to go back to watching a
Browse
program.
Quick Tour of the Menus
This tour guides you quickly through the basic features available through
Main Menu. See Chapter 3, Using the System for more information
the
about these and other features.
1. Press the remote control MENU button to open the
Menu
.
Main
Tip: Remote
Control 1 is used to
control TV1 menus
on the nearby TV.
Remote Control 2
is used to control
TV2 menus on the
remote TV(s).
Page 7
Page 12

Chapter 1
Introduction
2. Press the 1 button to select the Program Guide option on the
Main Menu. This opens the Program Guide on the TV screen.
You can use the
Program Guide to find and select a program to watch.
For now, though, go on with this tour.
3. Press the MENU button to go back to the
4. Press the 2 button to select the
Main Menu. This menu allows you to search for
the
Themes and Search option on
Main Menu.
programming by themes (movies, sports, etc.) or by key words
used in the program information.
5. Press the MENU button to go back to the
Main Menu.
Page 8
6. Press the 3 button to select the
Customer option. This menu
provides convenient access to your DISH Network account to
review your statement, pay your bill, upgrade programming, and
more.
Page 13

7. Press the 0 button to go back to the Main Menu.
Quick Tour of the Menus
8. Press the 4 button to select the
Dish Home option. You can
order channels, check the news and weather, and even play
games.
9. Press the 0 button to go back to the
10. Press the 5 button to select the
. This menu allows you to apply password-protected
Menu
Main Menu.
Locks option on the Main
locks on programming based on rating, or even on a channelby-channel basis.
Page 9
Page 14

Chapter 1
Introduction
11. Press MENU to go back to the
12. Press the 6 button to select the
Main Menu. Use this menu to set up the system the way you
Main Menu.
System Setup option on the
want.
13. Press MENU to go back to the
14. Press the 7 button to select the
. This menu is used for creating and changing timers used
Menu
Main Menu.
Timers option on the Main
to trigger automatic channel changes, reminders, or VCR
recordings.
Page 10
Page 15

15. Press MENU to go back to the Main Menu.
About Satellite Television
16. Press the 8 button to open the
Favorites menu. This menu
allows you to set up lists of your favorite channels to make
finding what you want to watch more convenient.
17. Press MENU to go back to the
Main Menu.
18. Press the VIEW TV button to go back to watching a program.
About Satellite Television
Satellite television uses a satellite in a stationary orbit over the Earth to
deliver television and audio programming. This type of orbit enables the
satellite to stay aligned over one place on the surface of the Earth.
Once the satellite dish is aimed at the satellite, the dish does not have to
move to follow it.
Satellite Signal Quality
Rain and Snow Fade
Heavy rain, snow, or cloud cover can block the satellite signal, which can
interrupt your programming service. By aiming the satellite dish to get the
strongest signal during installation, you can help prevent rain and snow
from interrupting the signal. Your service will return after the weather
condition has passed.
Tip: If you lose
your picture, it’s
most likely due to
heavy rain, snow or
snow build-up on
your dish.
Page 11
Page 16

Chapter 1
Introduction
Solar Interference
Twice a year, the sun moves to a position behind the DISH Network satellite
as it orbits the Earth. The exact time of the year that this occurs varies,
depending on the location, but it is near the beginning of spring and again
near the beginning of autumn. The period of solar interference lasts for a few
minutes at about the same time everyday for a few days during the spring
and autumn, so do not be alarmed when it happens.
Page 12
This is an unavoidable natural event for all television involving the use of
satellites and has an adverse effect on many program providers. During this
period, you will not be able to see programs on DISH Network. Once the sun
has moved from behind the satellite, the programs will reappear.
Page 17

Chapter 2
Receiver Description and Installation
Receiver Front Panel
Smart Card Door
Behind this door is a slot for a future smart card. No smart card is included with
this receiver.
Arrow Buttons
Use the ARROW buttons to change channels on the nearby TV.
Power Button
Press the POWER button to turn the TV1 programming on or off to the nearby
TV.
TV1 and TV2 Indicators
• When the green TV1 indicator is on, the receiver is providing programming
to the nearby TV through the TV1 output connections.
• When the blue TV2 indicator is on, the receiver is providing programming
to the remote TVs through the TV2 output connections.
Note: If you see the DISH Network logo displayed on your TV screen,
press the SELECT or blank POWER button on the remote control to view
satellite TV programming.
IR Sensor and IR Blaster
The INFRARED (IR) SENSOR receives IR signals from Remote Control 1.
The IR BLASTER transmits IR signals to control a VCR to perform automated
recordings.
Page 13
Page 18

Chapter 2
Receiver Description and Installation
Receiver Back Panel
Tip: The six coaxial
connections on the
back of your
receiver are color
coded to make the
connectors easy to
identify. Inside the
front cover of this
guide are stickers
that are color
coded the same
way as the coaxial
connections. See
the installation
instructions
starting on page 19
for information on
how to use the
stickers that go on
the coaxial cables.
The receiver connections on the back panel are placed in three groups:
•
TV1 Connections - Use these connections with the nearby TV.
TV2 Connections - Use these connections with the remote TV(s).
•
Other Connections - Use these connections with the dish antenna, UHF
•
antenna, and phone line.
TV1 Connections
Page 14
The following connections provide TV1 menus and programming to the
nearby TV.
TV CH 3-4 OUT
The CH 3-4 OUT connection provides good quality video
and mono (non-stereo) audio to your nearby TV. Use a
coaxial cable to make the connection. The
CH 3–4 OUT
connection is color coded white.
RCA Out
The RCA audio/video outputs provide high quality
picture and stereo sound to the nearby TV (if your
TV has these connections). Use an RCA-type cable
assembly to make the connection. If the TV has
only one input for this type of audio, connect it to
the right (R) phono (RCA) audio output on the
receiver.
Page 19

S-Video Out
The S-VIDEO connection provides the highest quality video
available to your nearby TV (if your TV has this connection).
Use an S-Video cable to make the connection. If you use this
back panel output for video between your receiver and
nearby TV, you must still connect the audio using the
(RCA) A
UDIO LEFT/RIGHT OUTPUTS and Phono (RCA) cables.
PHONO
Receiver Back Panel
TV Antenna/Cable In
The TV ANTENNA/CABLE IN is used if you want the satellite
receiver to connect the tuner of the nearby TV to an off-air
antenna or cable TV system when the satellite receiver is
turned off or when using the TV/VIDEO button on Remote
Control 1. Use a coaxial cable to make this connection to an
off-air antenna or cable TV system. The
ABLE IN connection is color coded black. Your nearby TV
C
must be connected to the
CHANNEL 3-4 output to use this
TV ANTENNA/
feature.
TV2 Connections
The following connections provide TV2 menus and programming to the
remote TVs.
Ch 21–69 OUT
Tip: If you connect
a cable to the TV
A
NTENNA/CABLE IN
port, attach the
black sticker to the
cable near where it
attaches to the
receiver. The
stickers are
located inside the
front cover of this
guide.
The CH 21–69 OUT connection provides good quality video
and mono (non-stereo) audio for the remote TV(s).
Use a coaxial cable to make this connection to your home
cable system. Remote TVs connected to the home cable
system can receive programming from this receiver output.
CH 21–69 OUT connection is color coded yellow.
The
When connecting to the home distribution (
CH 21–69 OUT)
coaxial port, you must meet requirements covered under FCC
Compliance in the Appendix. To meet these requirements, an in-
line coaxial attenuator has been included with your receiver and
may need to be installed using the following guidance:
• If connecting directly to a TV tuner port, you must install the
attenuator in the cable between the
CH 21–69 OUT port and the
TV tuner.
• If connecting to your in-home cabling system to distribute the
signal to a TV(s) in other rooms, in most cases you will not
have to install the attenuator for most in-home cabling systems.
Page 15
Page 20

Chapter 2
Receiver Description and Installation
RCA Out
The RCA audio/video outputs provide high
picture quality and stereo sound to your TV (if
your TV has these connections). These outputs
can be used to provide TV2 menus and
programming to a wireless audio/video transmitter
or to a second input on a nearby TV. Use an RCAtype cable assembly to make the connection. If the
TV has only one input for this type of audio,
connect it to the right (R) phono (RCA) audio
output on the receiver.
Other Connections
Satellite In
The SATELLITE IN connections are used to
receive satellite TV signals from the dish
antenna. The connection is made using
RG-6 coaxial cable. The
connections are color coded blue.
SATELLITE IN
Remote Antenna
The REMOTE ANTENNA port receives UHF signals from
the Remote Control 2 so that it can control TV2 menus
from another room. Connect the UHF antenna here,
and place it so that it does not touch anything. If you
do not connect the antenna, you cannot use Remote
Control 2 to control the receiver for TV2 menus and
programming. The
coded green.
REMOTE ANTENNA port is color
Telephone Jack
The TELEPHONE JACK is used to connect the receiver to an
active telephone line. Use a standard RJ-11 telephone
cable assembly to make the connection.
Remote Controls
The two remote controls give you easy access to all the features of your
satellite receiver. You can set up each remote to control the satellite receiver
and up to three other devices. These devices can be a TV, a VCR or DVD
player, and a third device.
Page 16
Page 21

Types of Remote Controls
Remote Controls
Remote Control 1 uses infrared (IR)
light signals to control
TV1 menus for
the nearby TV and other devices that
the remote is programmed to control.
IR signals travel only short distances
(40 feet or less), and cannot go
through walls or other solid objects.
You must point the remote control
directly at the device, with no objects
blocking the line of sight.
This remote control is identified by
the green number 1 at the bottom of
the remote control.
Remote Control 2 uses UHF Pro
signals to control
TV2 menus for the
remote TVs.
UHF Pro signals travel long distances
and go through walls and other solid
objects.
To use Remote Control 2 to control
the receiver, you must attach the UHF
antenna to the receiver back panel
(see Attach a UHF Antenna on page
18).
Remote Control 2 uses IR signals to
control other devices that the remote
is programmed to control. You must
point the remote control directly at
these devices, with no objects
blocking the line of sight.
This remote control is identified by
the blue number 2 at the bottom of the
remote control.
Page 17
Page 22

Chapter 2
Receiver Description and Installation
Batteries
The remote controls come with AAA batteries, which need to be installed
when you first receive your system. When you replace old batteries, you
should replace all of the batteries. Use batteries of the same kind, for
example alkaline or carbon zinc, and don’t mix batteries of different kinds.
Alkaline batteries last longer than carbon zinc.
Installing or Changing the Batteries
1. Press down on the battery cover’s top latch and slide the
cover off.
2. If you are changing out batteries, take out all of the old
batteries.
3. Put the new batteries in. Make sure you match the plus
(“+”) ends with the plus markings on the battery case.
4. Slide the cover back into place.
Low Battery Warning
When you see a low battery warning message below the Program Banner,
the batteries in your remote control are weak and need to be replaced.
Attach a UHF Antenna
You need to attach the UHF remote antenna to the
receiver’s back panel
you can use UHF Pro Remote Control 2.
Note: Be sure to set the antenna straight up so you can use the remote
control from as far away as possible. Don’t let the antenna touch anything.
REMOTE ANTENNA input so
Page 18
Page 23

Connecting the Receiver to a Nearby TV
Attention: If your UHF Pro Remote Control 2 isn’t working
very well from far away, you may be experiencing
interference from objects near your receiver. To improve your
remote control’s range, try any or all of the following:
• Place the receiver higher than all of the other equipment in
your entertainment center.
• Provide room above the receiver so that the antenna can be
installed straight up. If this is not possible, tilt the UHF
antenna at about a 30° angle.
• Place the UHF antenna outside the entertainment center by
using a coaxial cable to connect the antenna to the receiver.
• Try moving the receiver to other locations.
• Attach a UHF attenuator to the
REMOTE ANTENNA port (see
33).
Connecting the Receiver to a Nearby TV
This section describes how to connect receiver TV1 output ports to a nearby
TV. The easiest way to connect the receiver to the TV is using coaxial cable
connections, but you may also use
RCA or S-Video outputs.
Coaxial Cable Connections (TV1)
1. Connect a coaxial cable from the CH 3-4 OUT output on the receiver to
the nearby TV’s tuner port.
2. Place the white
connects to the receiver (see the picture in the margin).
3. Plug in the power cord for the receiver.
CH 3-4 OUT sticker on the cable near where the cable
Tip: Using cable
labels makes it easy
to tell which cables
connect to the
receiver ports.
Inside the front
cover of this guide
are stickers that are
color coded the
same way as the
coaxial
connections.
4. Turn on the receiver with the front panel power button and make sure
the green TV1 indicator is lit.
Page 19
Page 24

Chapter 2
Receiver Description and Installation
5. Turn on the nearby TV.
6. Tune the TV to channel 3.
Tip: The channel
stickers are located
inside the front
cover of this guide.
7. You should see the
Point Dish screen.
8. If you do not see the correct screen, tune the TV to channel 4.
Note: If you want to change the channel that the CH 3-4 OUT connection
provides to your TV, see Changing the TV1 and TV2 Output Channels
on page 26.
9. If desired to remind you of which TV channel (3 or 4) to tune to watch
satellite programming, place one of the channel stickers (3 or 4) near or
on your TV.
RCA and S-Video Connections (TV1)
1. Connect one of the following video cables:
• RCA video cable (yellow) from the receiver TV1 outputs to the
nearby TV’s
S-VIDEO cable from the receiver TV1 outputs to the nearby TV’s S-
•
V
IDEO input.
2. Connect the
outputs to the nearby TV’s audio inputs. If the TV has only one input for
this type of audio, connect it to the right (R) phono (RCA) audio output
on the receiver.
RCA video input.
RCA audio cables (red and white) from the receiver TV1
Tip: Remote
Control 1 is used to
control TV1 menus
on the nearby TV.
Remote Control 2
is used to control
TV2 menus on the
remote TV(s).
3. Make sure your nearby TV is on and set to receive TV from the correct
audio and video inputs. Refer to the instructions that came with your TV.
4. Plug in the power cord for the receiver.
5. Turn on the receiver with the front panel power button and make sure the
green TV1 indicator is lit.
6. You should see the
Point Dish screen.
Confirm Remote Control 1 Operation
After the nearby TV has been connected to a TV1 output using one of the
methods above, do the following to confirm that the IR Remote Control 1
controls the receiver:
1. Make sure that fresh batteries are installed properly in the IR Remote
Control 1.
2. Press the SAT button to put the IR Remote Control 1 in SAT mode to
control the satellite receiver.
3. Use the Remote Control 1 arrow keys to move around the
screen. If you are able to move around in the Point Dish screen, you
confirmed that Remote Control 1 is controlling the receiver.
Point Dish
Page 20
Page 25

Connecting the Receiver to the TV(s) in Another Room(s)
Connecting the Receiver to the TV(s) in Another
Room(s)
This section describes how to connect the receiver CH 21–69 OUT
connection to the cable-ready remote TV located in another room away
from the receiver. This installation uses your in-home cable system. If your
house does not have built-in cabling, it will be necessary to run cables from
the receiver to each remote TV. Due to the difficulty of this installation, you
should consider having this professionally installed. Call DISH Network at
1-800-333-DISH (3474).
Note: When connecting to the home distribution (CH 21–69 OUT) coaxial
port, you must meet the FCC requirements in the Appendix. To meet these
requirements, an in-line coaxial attenuator has been included with your
receiver and may need to be installed using the following guidance:
• If connecting to your in-home cabling system to distribute the signal to
a TV(s) in other rooms, in most cases you will not have to install the
attenuator on the
CH 21–69 port for typical in-home cabling systems.
• If connecting directly to a TV tuner port, you must install the attenuator
in the cable between the
Receiver Back Panel
CH 21–69 OUT port and the TV tuner.
Attenuator
If you have an off-air antenna or cable connected to your inhome cable system, see Optional - Connecting to an Off-
Air Antenna or Cable following this section.
Page 21
Page 26

Chapter 2
Receiver Description and Installation
Make sure you are familiar with how to change channels on
your TV and if necessary how to switch your TV between
off-air and cable channels. During this procedure, it will be
necessary to change the channels on your TV(s) to tune to
these channels to see the video from the receiver. See your
TV user guide for instructions.
Tip: Using cable
labels makes it
easy to tell which
cables connect to
the receiver ports.
Inside the front
cover of this guide
are stickers that
are color coded the
same way as the
coaxial
connections.
1. Connect CH 21-69 OUT on the receiver to your existing wall cable outlet
using a coaxial cable.
Note: If you do not have an existing in-home cable system, you
will need to run coaxial cable to each TV in other rooms. If this is
too difficult, you may want to contact a professional to do this
installation.
2. Place the yellow sticker on the CH 21-69 OUT cable near where the cable
attaches to the receiver. See the tip in the margin.
3. Make sure batteries are installed in Remote Control 2 and the UHF
antenna is attached to
4. Make sure the receiver's blue TV2 indicator is off. If it is on, turn it off
by doing the following:
a. Press the SAT mode button on Remote Control 2 to put the remote
control in SAT mode.
b. Press the POWER button on Remote Control 2 and make sure the
receiver's TV2 blue indicator turns off.
5. Connect the tuner input of the remote TV(s) in other rooms to an
existing wall cable outlet using a coaxial cable.
6. Turn on every remote TV connected to the in-home cabling system.
7. Find three channels next to each other on one of your remote TVs that
do not pick up any signals from off-air or cable broadcasts (they should
show nothing but snow or static). These channels must fall in one of the
two ranges below. For example, if you find that cable channels 75, 76,
and 77 do not pickup any broadcasts, pick these channels since they fall
into the range below for cable channels. Make sure these three channels
on other remote TVs also do not pick up broadcasts.
REMOTE ANTENNA port on the receiver.
Channel:
Air/Cable:
Page 22
•
Air Mode - Select a channel between 21 and 69.
•
Cable Mode - Select a channel between 73 and 125.
Note: The remote TV(s) will have to be set to the same channel mode,
either off-air or cable channel mode for this installation. See your TV
user guide for instructions on how to set your TV to off-air or cable
channel modes.
8. Pick the channel in the middle of the three you selected in step 7. Write
that channel down in the blank provided in the margin. For example, if
the three channels you picked in the preceding step were cable channels
75, 76, and 77, pick channel 76 and write it in the margin.
Page 27

Connecting the Receiver to the TV(s) in Another Room(s)
9. If your TV is in off-air mode for the channels you picked in step 7, write
“Air” in the blank provided in the margin. If your TV is in cable mode
for the channels you picked in step 8, write “Cable” in the blank
provided in the margin.
10. Set all of your remote TV(s) to the channel mode (Off-Air or Cable)
you wrote in the margin.
11. Tune all of your remote TV(s) to the channel you wrote in the margin.
This is the channel you will use to receive your satellite programming.
12. Turn on the nearby TV (the TV that gets programming from the TV1
outputs).
13. Press the POWER button on Remote Control 1 to turn on the receiver's
green TV1 indicator.
14. You should now be looking at the
TV. Select the
Modulator Setup, if shown. If the option is not shown,
Point Dish screen on your nearby
press MENU 6-1-5 on Remote Control 1 to get to the
screen.
15. With the
Modulator Setup screen displayed on the nearby TV, use
Remote Control 1 to do the following:
a. Under
Cable (for cable channel numbers) based on what you wrote down in
TV2 Out, select either Air (for off-air channel numbers) or
the margin in step 9.
b. Under
TV2 Out, use the up and down arrow buttons to change the
modulator channel to the one you wrote in the margin in step 8.
c. Select
Done to save the changes.
Modulator Setup
16. Using Remote Control 2, press the POWER button and make sure the
receiver's blue TV2 indicator turns on.
17. For some TVs, you must run a channel scan so that the TVs will find
and display the selected channel from the receiver. Run channel scan on
all remote TV(s), if available. See your TV user guide for instructions.
18.
Confirm that you see a picture from the receiver TV2 output, likely the
Point Dish screen, on your remote TV(s).
• If your picture looks good, go to step 26.
• If your TV(s) do not have a picture or if it is not as clear as you
would like it to be, go to the next step.
Page 23
Page 28

Chapter 2
Receiver Description and Installation
19. You may need to change the cable connection on the splitter that sends
the TV signal throughout your house. The change that needs to be made
is move the cable coming from the receiver
output of the splitter to the input of the splitter using the instructions
below.
The following figure shows an example of what your splitter may look
like. Your splitter may look different. The places where the splitter
indicates
places where the splitter indicates
the splitter.
OUT refers to all TVs connected to your cable system. The
CH 21-69 OUT from the
IN refers to where the signal is fed into
1 Input, 4 Output (4-Way) Splitter
20. Find where the TV signal is distributed throughout your house. It should
be near where the cable TV service enters the house.
21. Disconnect the cable TV service cable or antenna cable from the splitter
input, if necessary. Make sure the disconnected cable is capped or
otherwise protected from the weather.
22. Disconnect the cable coming from the receiver
CH 21–69 OUT port from
the splitter. If you do not know which cable this is, go to the next step.
Otherwise, go to step 24.
23. If you have multiple TVs on the cable system, do the following to
determine which cable on the splitter is coming from the receiver:
• If you have at least some picture on your TV(s), turn on all remote
TVs connected to the cable system. Disconnect and reconnect each
cable one by one observing what happens to the TV(s). When all
remote TVs lose the signal, you have disconnected the receiver’s
cable. If only some or one TV loses the signal, then you have
disconnected a cable from the TV(s).
• If the above step does not work, disconnect one of the output cables
and connect to the splitter input. If you do not see a picture, connect
the cable back to its output. Repeat this step on every connection
until you get a picture on the remote TV(s).
Page 24
24. Reconnect the receiver’s cable to the input of the splitter.
Page 29

Programming the Recover Button
25. Make sure you have a good picture on your remote TV(s).
26. If desired to remind you of which TV channel your satellite
programming is on, write the channel number you wrote in step 8 on a
blank channel sticker and place it on or near your remote TV(s).
Confirming Remote Control 2 Operation
After the remote TV(s) have been connected to the CH 21–69 OUT using inhome cabling using the proceeding steps, do the following to make sure
Remote Control 2 controls the receiver:
1. Press the SAT button to put Remote Control 2 in SAT mode to control
the satellite receiver.
2. From a remote TV, use the Remote Control 2 arrow keys to move
around the
Point Dish screen, you confirmed that Remote Control 2 is controlling
Point Dish screen. If you are able to move around in the
the receiver.
Programming the Recover Button
Your remote controls come equipped with a RECOVER button that helps
you if you accidentally change the channel or video input on your remote
TV and cannot get the picture back from your satellite receiver. When you
press the RECOVER button as described on page 41, the remote control
sends commands to your remote TV to change channels or video inputs to
try to get you back to watching satellite programming.
Tip: The channel
stickers are
located inside the
front cover of this
guide.
Tip: Remote
Control 1 is used to
control TV1 menus
on the nearby TV.
Remote Control 2
is used to control
TV2 menus on the
remote TV(s).
When your Remote Control 2 is shipped from the factory, the RECOVER
button is set up restore satellite TV viewing by tuning your TV to channel 3,
4, and other inputs (see page 41 for details). However, to use the
RECOVER button with your remote TV, you need to program the
RECOVER button with the specific channel (for example, channel 60) that
you use to watch TV2 programming. The following instructions describe
how to program the RECOVER button to tune your remote TV back to a
selected channel.
Programming the Recover Button Channel
1. Program Remote Control 2 to control your remote TV using the
instructions in Control Other Devices with the Remote Controls.
2. Press and hold the TV mode button until all the other mode
buttons light up, and then let go of the button. The TV mode
button flashes.
3. Press the STAR (*) button.
4. Enter the three digits of your channel number. For example, if
your remote TV is set to channel 60, enter 0-6-0.
5. Press the POUND (#) button. The TV mode button flashes three
times.
Page 25
Page 30

Chapter 2
Receiver Description and Installation
Removing the Recover Button Channel Programming
The following instructions describe how to reset the RECOVER button to
the way it was delivered to you from the factory.
1. Press and hold the TV mode button until all the other mode
buttons light up, and then let go of the button. The TV mode
button flashes.
2. Press the STAR (*) button.
3. Press 0-0-0.
4. Press the POUND (#) button. The TV mode button flashes three
times.
Changing the TV1 and TV2 Output Channels
The receiver comes preset to use channel 3 for TV1 and off-air channel 60
TV2. If you are experiencing interference on the channels you are using,
for
follow these instructions to change the channel that
TV1 or TV2 uses.
Tip: It’s easier to
set the output
channel from the
opposite TV. For
example, if you are
changing the output on TV1 (nearby
TV), use TV2
(remote TV) to
make the change.
When you save the
changes, simply
remember to
change the channel on the nearby
TV.
Make sure you are familiar with how to change channels on
your TV and if necessary how to switch your TV between offair and cable channels. When you change these receiver output
channels, you must also change the channels on your TV(s) to
tune to these channels to see the video from the receiver. See
your TV user guide for instructions.
1. Press MENU-6-1-5 to open the
2. For
TV1 Out, highlight the number under TV1 Out. For TV2 Out skip to
Modulator Setup screen.
step 4.
3. Use the UP and DOWN ARROW buttons to change the modulator
channel either
3 or 4. Continue to the next step to set TV2 Out or skip to
step 7 if you are finished making changes.
Page 26
Page 31

Connecting the Receiver to the Phone Line
4. For TV2 Out, select either Air (for off-air channel numbers) or Cable
(for cable channel numbers).
5. Highlight the number under
TV2 Out.
6. Use the UP and DOWN ARROW buttons to change the modulator
channel to one of the following:
•
Air Mode - Select a channel between 21 and 69.
•
Cable Mode - Select a channel between 73 and 125.
7. Select
Done to save the changes.
8. Change the channel on your TV(s) to match the channel(s) you selected.
9. If desired to remind you of which TV channel to tune to get satellite
programming, place a channel sticker near or on your TV to indicate the
correct channel.
10. If you changed your TV2 Out channel, repeat Programming the
Recover Button for a Remote TV.
Connecting the Receiver to the Phone Line
Yo u must keep the receiver connected to an active telephone line.
Otherwise, you may not be able to order pay per view programs or use all of
the DISH Interactive features.
Note: You may be able to use a wireless telephone extender. However, this
may not support all the features of this receiver, such as Caller ID.
Tip: The channel
stickers are located
inside the front
cover of this guide.
Note: If you have a Digital Subscriber Line (DSL), you may have to install
a DSL filter between the receiver’s back panel PHONE JACK and the
telephone wall jack to successfully connect with the DISH Network. You
can obtain a filter from your DSL provider.
Phone Line Connection
Run a telephone cable with a standard RJ-11 connector from the receiver’s
back panel Phone Jack to an active telephone connection.
Phone System Setup
You must also set up the receiver for your telephone system (touchtone or
rotary/pulse), and set a telephone number prefix, if you need a prefix to
make an outside call.
1. Display the
Phone System screen by pressing MENU-6-1-4.
Page 27
Page 32

Chapter 2
Receiver Description and Installation
2. Select the Touch Tone or the Rotary/Pulse option in the Phone Type
list.
3. Select either the
Line Prefix
Note: Usually, you need a telephone number prefix only for business
No Prefix or the Prefix Code option in the Outside
list.
installations. For most residential installations, all you need to do is set
the telephone system type. The default setting of
correct dialing. If this is the case, select the
No Prefix will allow
Save option to save the
above setting, and stop here. If you do need to set a prefix, then instead
of selecting the
4. If you selected the
5. If you selected the
Save option, go on to step 4.
No Prefix option, select Save to finish.
Prefix Code option, the receiver highlights the box
(highlighting the top box) where you must enter the digits. To do this, do
the following:
a) Enter the number of digits required to obtain an outside line in the
top box.
b) Move the highlight to the bottom box.
c) Enter the exact sequence you dial the phone to obtain an outside line
in the bottom box.
6. Select the
Save option to save the settings.
Connecting the Receiver to a Dish Antenna System
Page 28
Note: Before you can begin connecting your receiver to your dish antenna,
you must first complete the preceding sections on connecting your TVs to
the receiver. Then if you are installing a dish antenna system for the first
time, see Chapter 4 - Dish Antenna Installation starting on page 85.
Otherwise, if you already have a dish antenna system installed and peaked
for maximum signal strength, complete the following instructions to connect
the dish antenna system to the receiver.
Note: You will need two available receiver connection points on your
installed switch or LNBF to complete this installation. If these ports are not
available, you may need to upgrade your system with different or additional
equipment. See DISH Pro Wiring Diagrams in Chapter 4 starting on
page 94.
Page 33
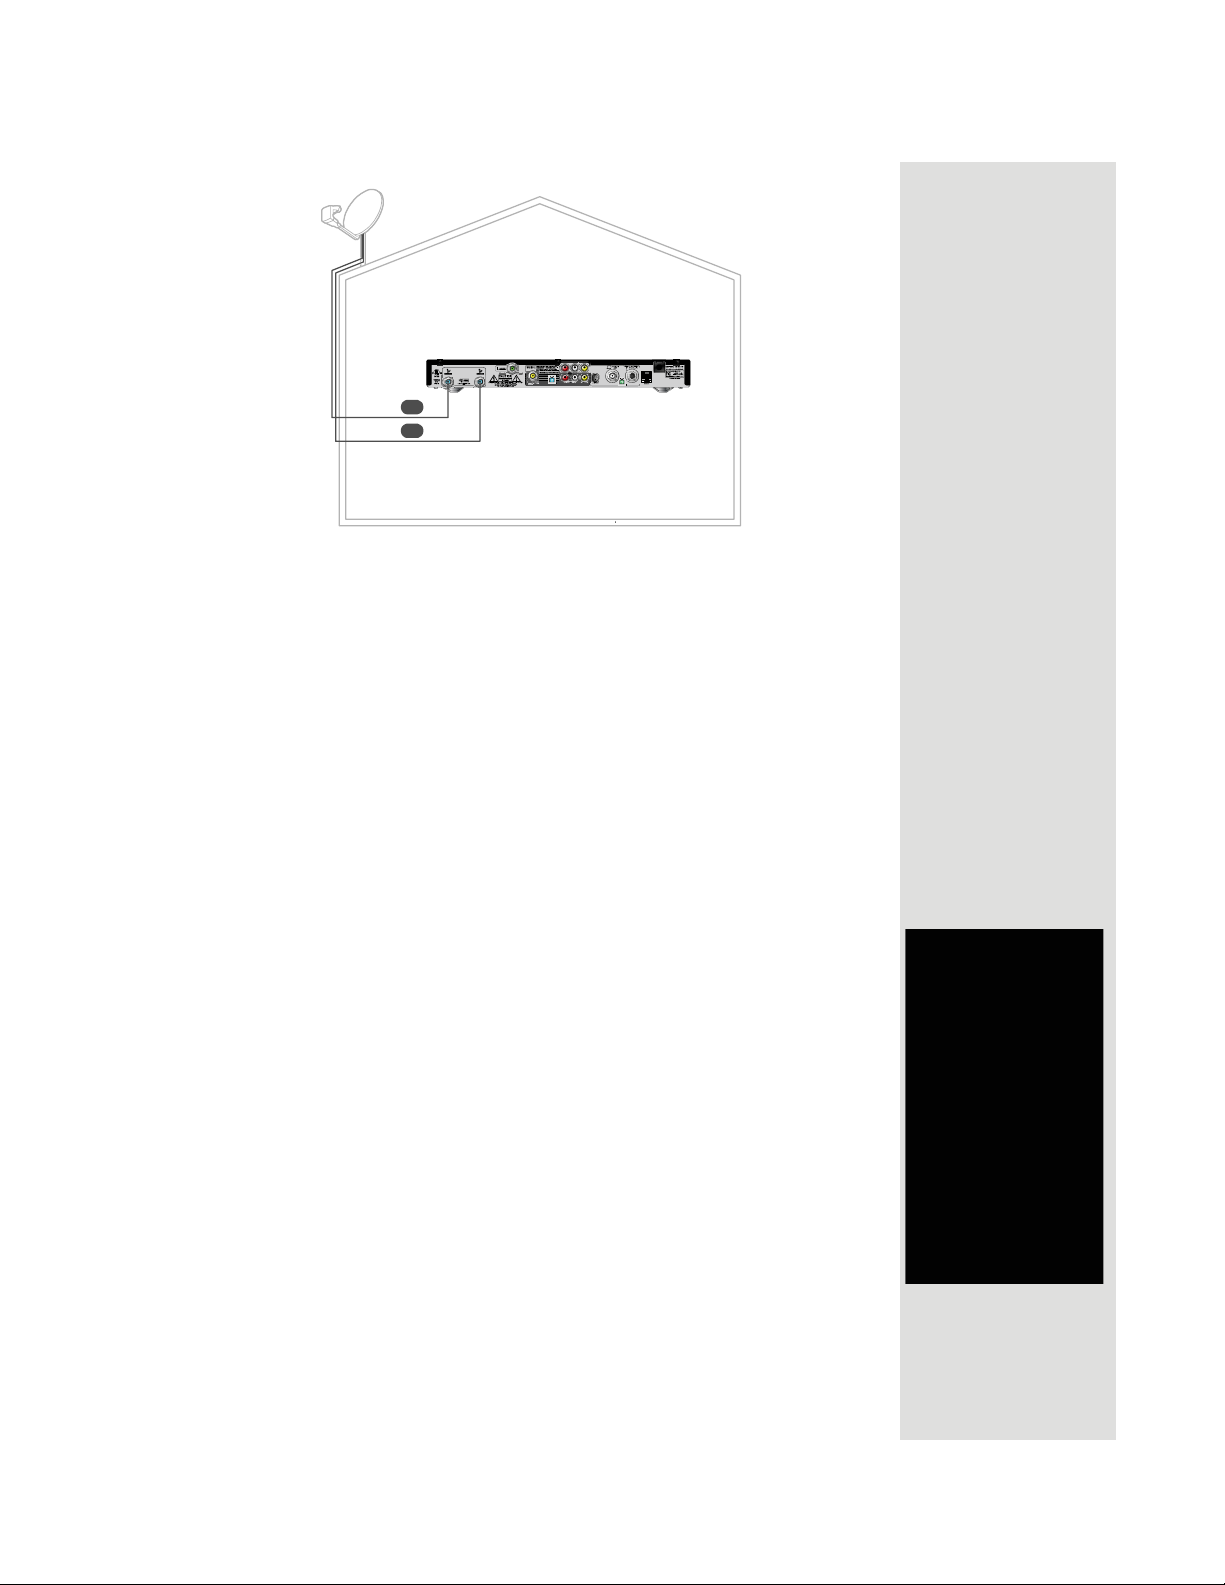
Connecting the Receiver to a Dish Antenna System
Satellite Connections
1
2
1. Connect two RG-6 coaxial cables between the SATELLITE IN 1 and
SATELLITE IN 2 ports on the receiver’s back panel to two available ports
on either your switch or your LNBF in your existing system. See the
wiring diagrams in Chapter 4 for appropriate receiver connections in
your system.
Note: If you are installing your receiver into a system with DISH Pro
LNBFs (and/or switches), you can have as much as 200 feet of cable
between the LNBF and the receiver. However, you must use only RG-6
coaxial cables rated for 950 to 2150 MHz. Some cables may say "Swept
tested for 2150 MHz." If you have any doubt about this, ask your DISH
retailer, examine the cable’s outer jacket, or look on the container the
cable came in. Do not use cable company TV cables or cables from
other satellite TV systems not rated for 950-2150 MHz. These other
cables may cause signal loss. Do not use existing cables such as RG-59.
Use waterproof F-connectors outdoors.
2. Peel off the blue stickers and affix them to the cables close to where
they connect to the
the back of the receiver.
3. On Remote Control 1, Press the MENU-6-1-1 to display the
Dish/Signal
4. Select
screen on the nearby TV.
Check Switch. When an attention screen displays, select Tes t.
5. The receiver begins performing the
finished, the
SATELLITE IN 1 and SATELLITE IN 2 connections on
Point
Check Switch tests. When it is
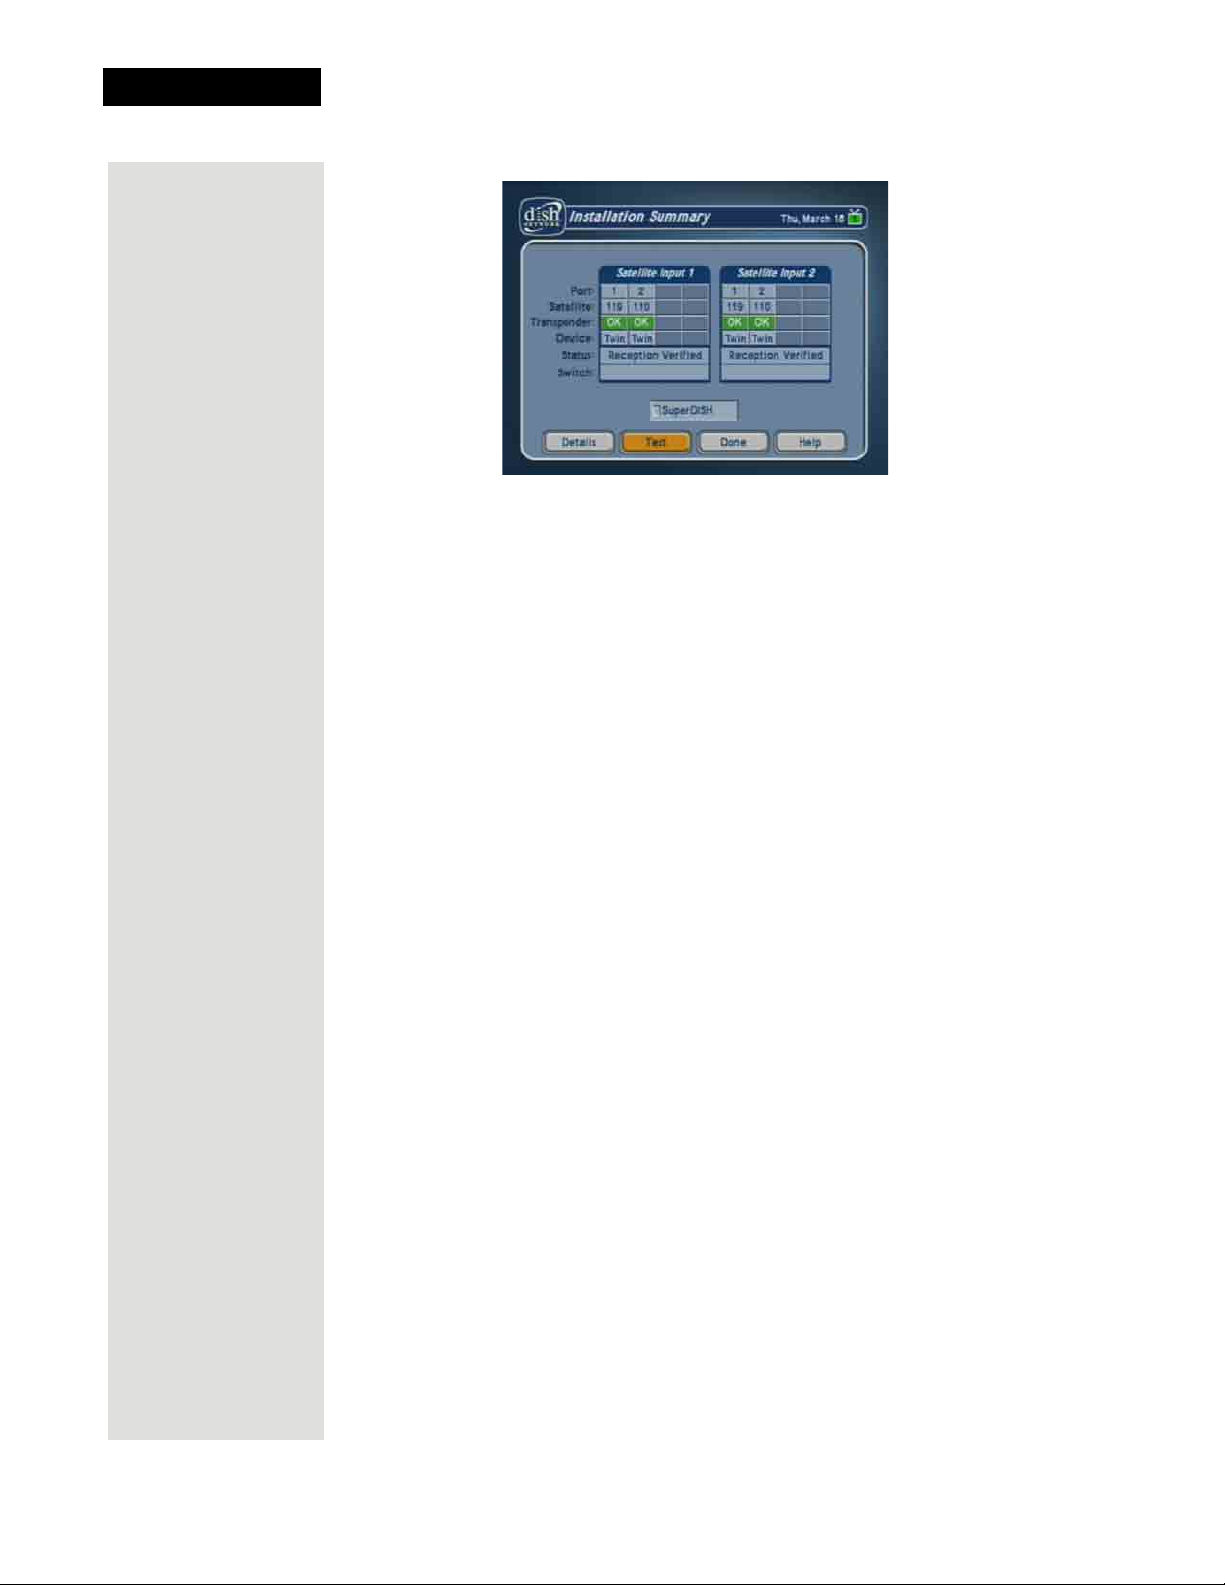
Installation Summary screen displays.
Tip: Using cable
labels makes it
easy to tell which
cables connect to
the receiver ports.
Inside the front
cover of this guide
are stickers that
are color coded
the same way as
the coaxial
connections.
Page 29
Page 34
Chapter 2
Receiver Description and Installation
6. Make sure that the information on the Installation Summary screen
identifies your system correctly and shows all transponders for all
satellites in your system. Your screen may look different from the
example above depending on the dish antenna system you are using.
7. Select
8. Select
OK to go to the Point Dish/Signal screen.
Cancel to exit the Point Dish menu. An Attention screen will
open asking if the mounting and positioning of your dish is complete
Locked indication in the Point Dish screen. If the answer is yes,
with a
select Yes.
If the answer is No, you will need to repoint your dish following the
preceding steps until the mounting and positioning is complete and you
do have the
Locked indication.
9. After you select Yes, the receiver will begin taking a software upgrade.
You will see a Warning that
downloaded into your receiver
Vital program information will now be
. You will also see a status bar showing
the progress of this upgrade.
10. Once the software upgrade is complete, you will see a message that your
receiver’s memory is being upgraded.
11. Do not disturb the receiver while the receiver’s memory is being
upgraded.
Note: If you are installing other DISH Pro or DISH Pro Plus receivers,
be sure to run
Check Switch on all of them, and allow them to take the
necessary software upgrade.
12. When the memory upgrade is complete, you should be watching TV.
Your dish antenna installation is now complete.
Page 30
Page 35

Optional - Connecting VCRs to the System
Optional - Connecting VCRs to the System
The diagram below provide example of how to connect VCRs to your
satellite TV system. Your installation may be different.
Connecting a VCR to the Nearby TV
1. Connect a coaxial cable from the CH 3-4 OUT output on the receiver to
the nearby VCR’s tuner port.
2. Connect a coaxial cable from the output on the VCR to the nearby TV’s
tuner port.
3. Plug in and turn on the nearby VCR and TV.
4. Set the VCR output to Channel 3 or 4 as set on page 26
5. Tune the nearby VCR and TV to Channel 3 or 4 as set on page 26.
Connecting a VCR to the Remote TV
1. Connect the tuner input of the remote VCR to an existing wall cable
outlet using a coaxial cable.
2. Connect a coaxial cable from the output on the VCR to the remote TV’s
tuner port.
3. Plug in and turn on the remote VCR and TV.
4. Tune the remote VCR to the remote TV channel that you use to watch
satellite TV programming (for example, channel 60) as set on page 26.
5. Set the VCR output to channel 3 or 4.
6. Tune the remote TV to the same channel that you set your VCR to in
step 5.
Page 31
Page 36
Chapter 2
Receiver Description and Installation
Optional - Connecting to an Off-Air Antenna or Cable
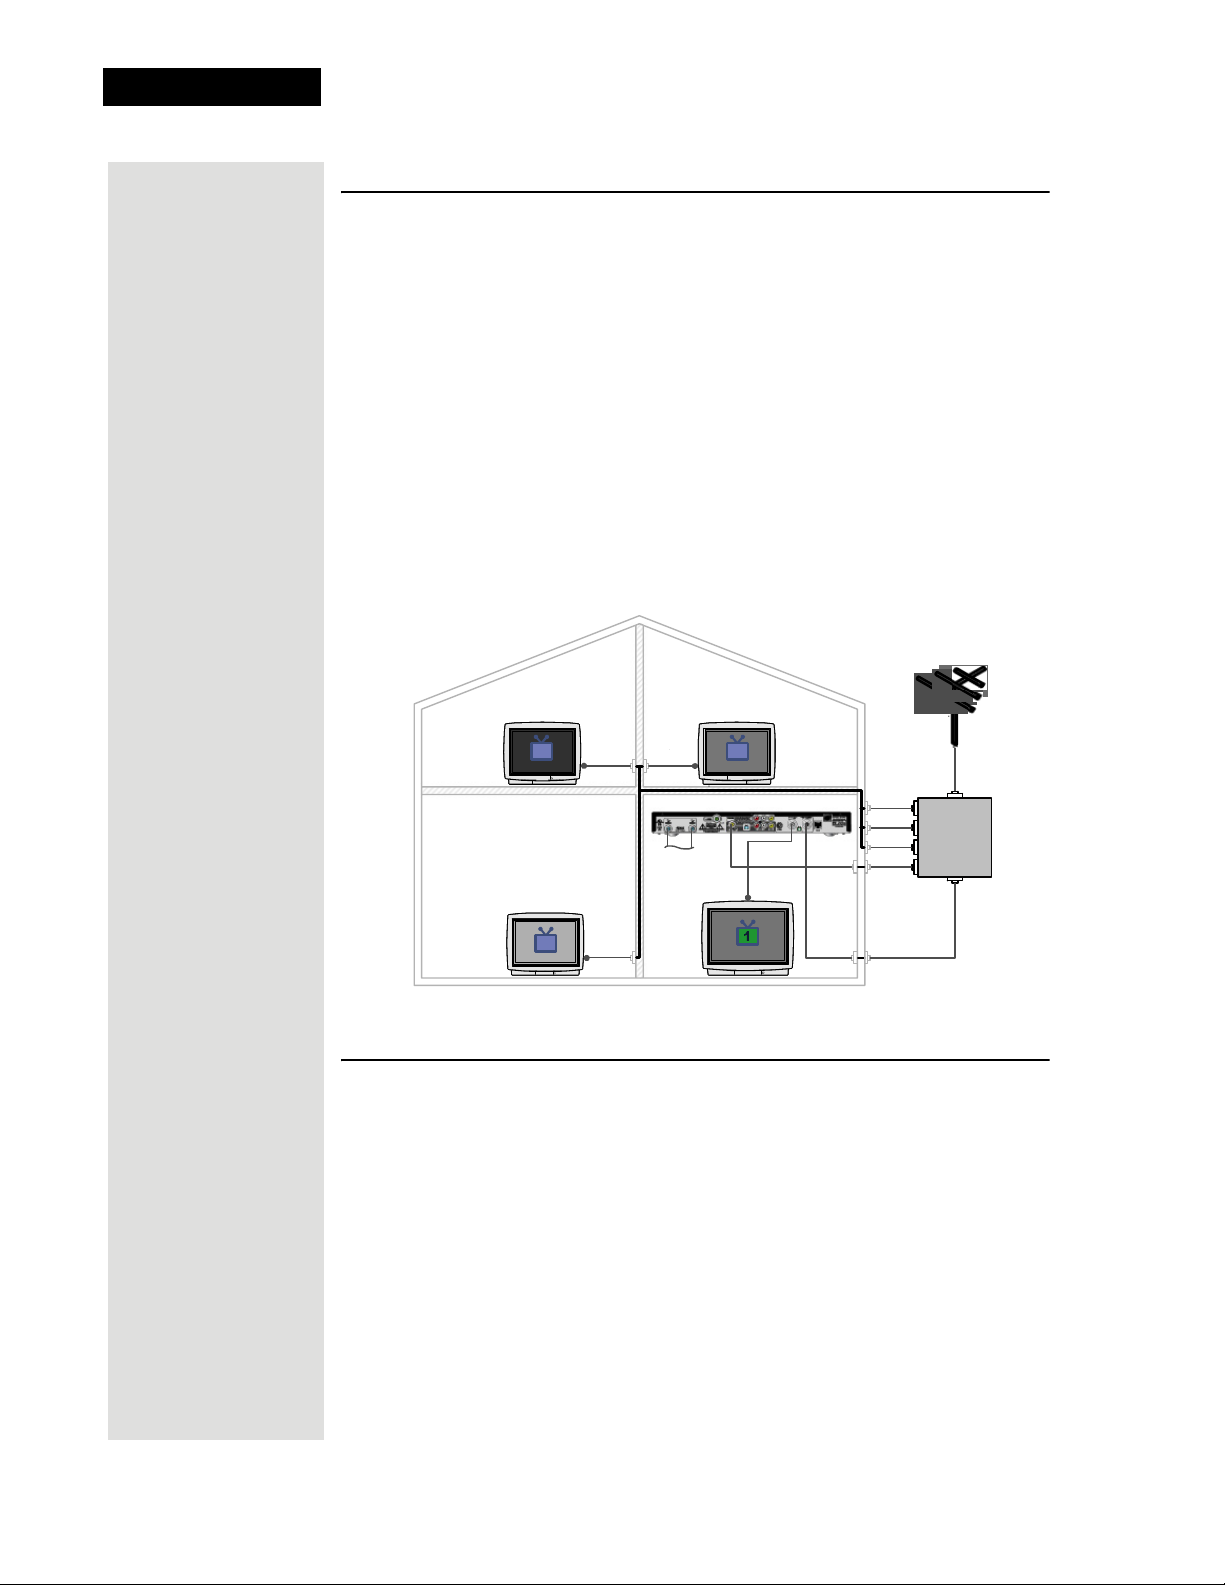
If you want to receive channels from an off-air antenna or cable in addition
to your satellite receiver programming, connect the off-air antenna/cable into
your TV distribution equipment.
For the nearby TV receiving programming from
antenna cable needs to be connected to the
For remote TVs receiving programming from
CH 3–4 OUT, the off-air
TV ANTENNA/CABLE IN port.
CH 21-69 OUT, the off-air
antenna needs to be connected to your TV distribution equipment. When
adding this connection, the FCC requires that your install appropriate
equipment between the off-air antenna/cable and the satellite TV receiver to
prevent you from accidentally retransmitting DISH Network programming
(see FCC Compliance in the Appendix).
TV distribution equipment devices include coax panels, amplifiers or super
home nodes, and are available through many companies.
2
To Dish Antenna
(Dish and cabling
omitted for clarity)
2
Off-Air/CATV
To CH.
21-69 Out
Input
TV
Distr ibut ion
Eq u i p m e n t
Tip: You can also
use this procedure
to change the
Primary Remote
Address for
Remote Control 1
on a nearby TV, if
necessary.
Page 32
2
To TV Antenna/Cable In
Optimize Your Remote Controls
Change the Address
When you receive your system, both remote controls and the receiver have
been set to communicate on address 1. However, because UHF signals travel
long distances and go through walls, a neighbor’s UHF Pro remote could
control your receiver by mistake if they are on the same address. To handle
this problem, you can change address on Remote Control 2 and the receiver
as follows:
1. Make sure you turn on the TV.
2. With the receiver off, press CHANNEL UP or CHANNEL DOWN on
the receiver’s front panel to display the
TV.
System Info screen on a remote
Page 37
Optimize Your Remote Controls
The System Info screen shows the Secondary Remote Address.
Write down this address:
3. Press and hold the SAT button on Remote Control 2 for about
three seconds, until all of the mode buttons light up, and then
let go of the SAT button.
4. Use the NUMBER PAD buttons to enter any number between 1 and 16,
but not the one you wrote in step 2.
Write down the number you entered:
5. Press the POUND (#) button. If you entered the address
correctly, the SAT mode will flash three times.
6. Press the RECORD button.
7. Make sure the
System Info screen is the same as the one you entered in step
Secondary Remote Address you see on the
4. If it isn’t, the remote cannot control the receiver.
8. Press the SELECT button to close the
System Info screen.
Check the Remote Control Address
1. Press and hold the SAT mode button for three seconds, until
all of the mode buttons light up, and then let go of the SAT
button.
2. Press the POUND (#) button twice. The SAT mode button
will flash the same number of times as the address number
(three flashes means address 3).
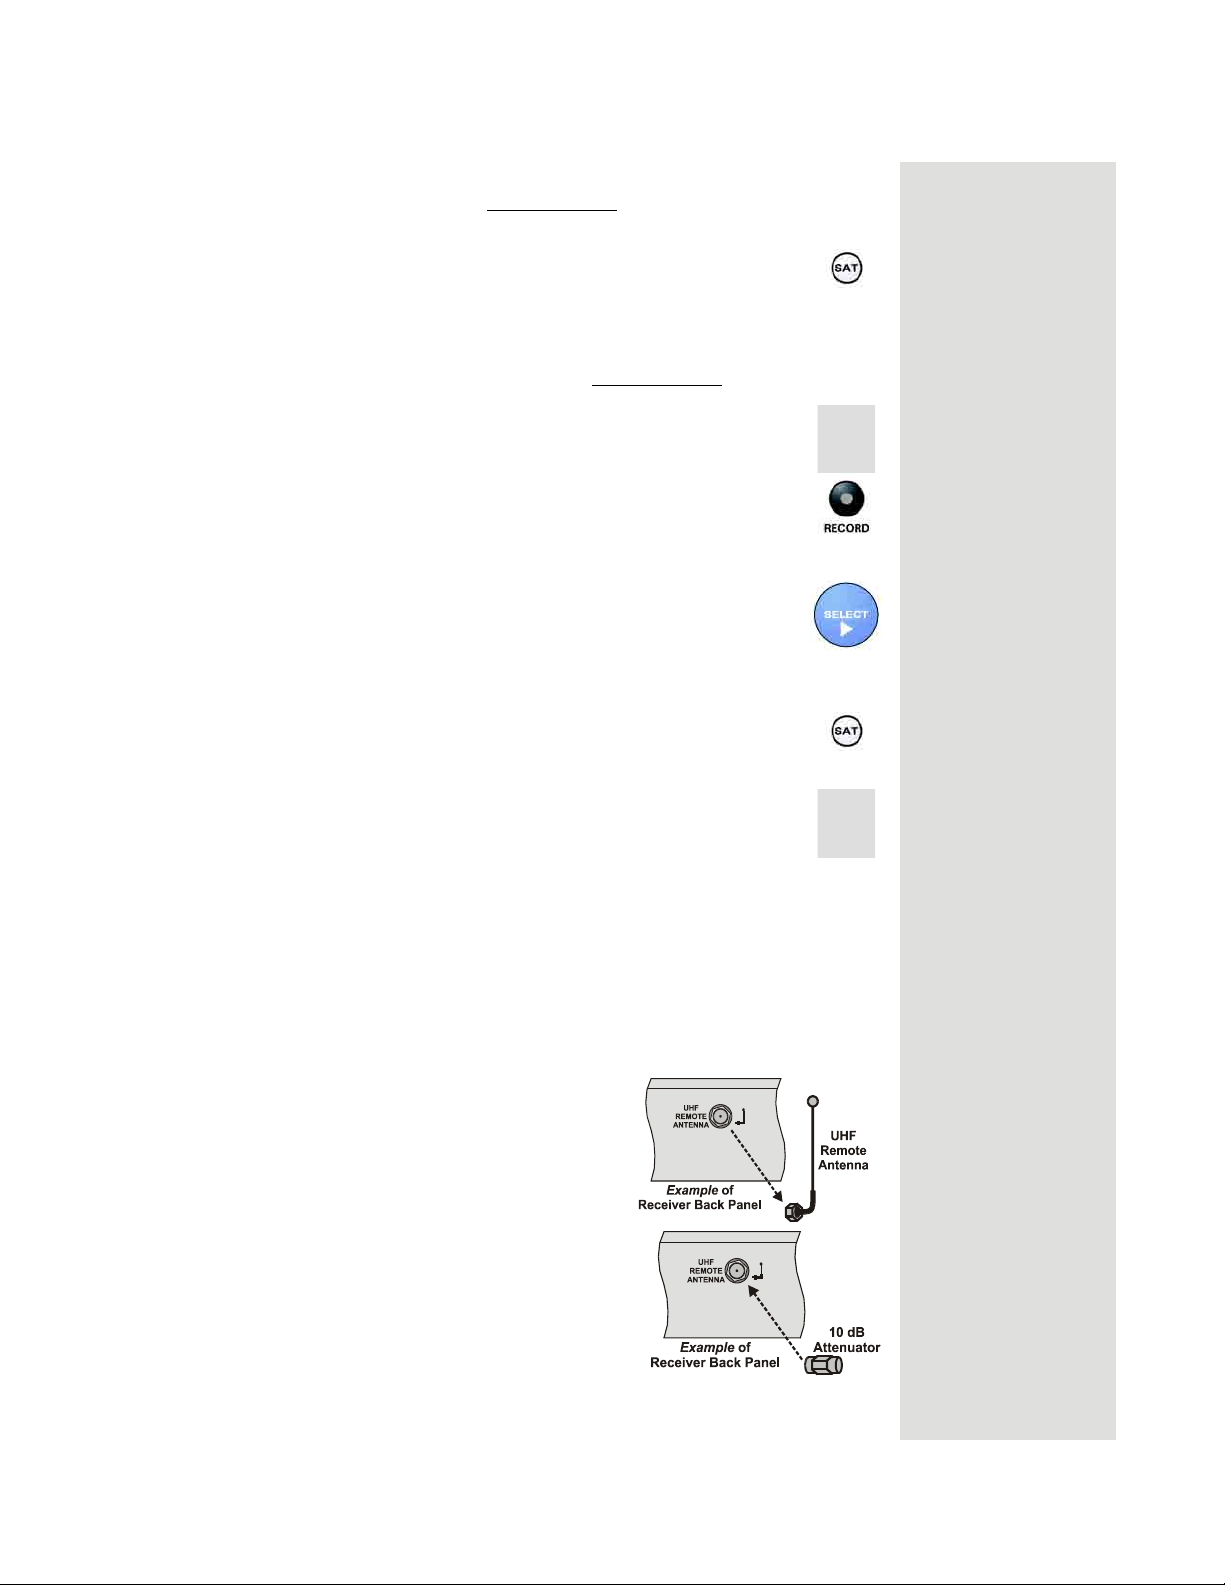
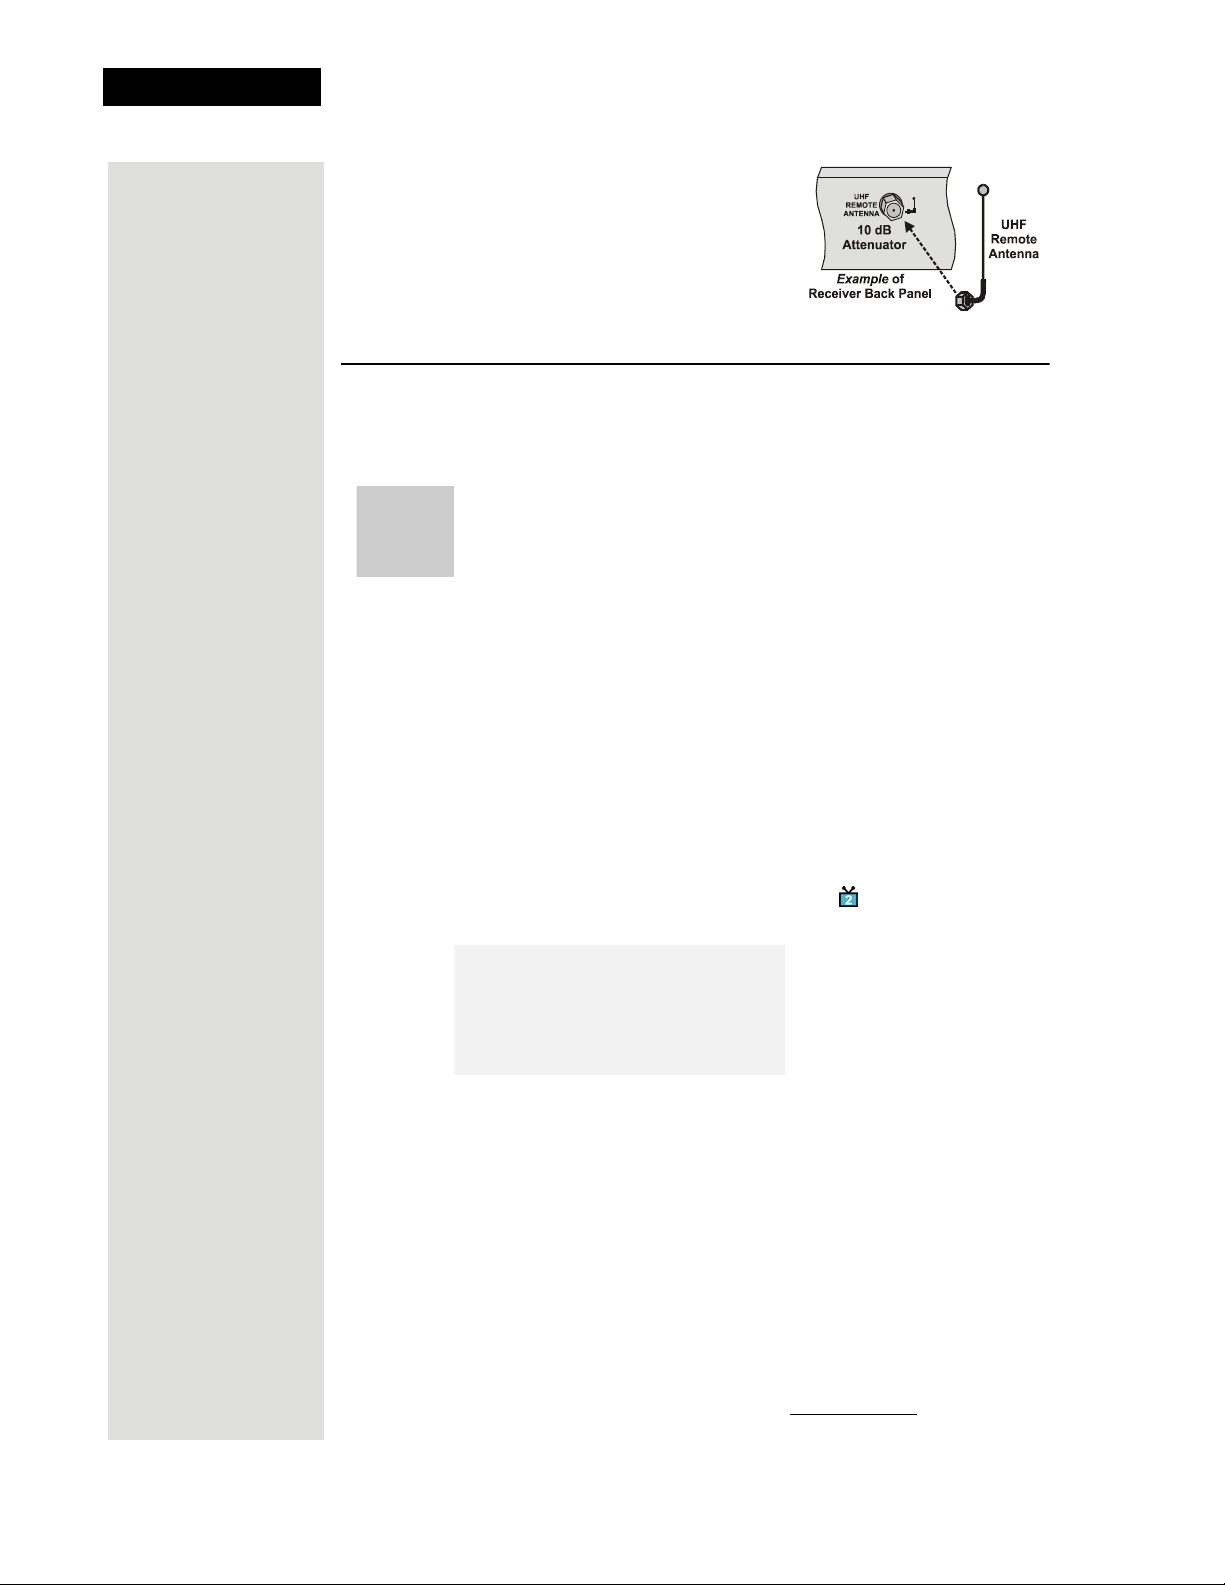
Attach a UHF Attenuator
Stray UHF signals can block signals from the remote control to the receiver.
To prevent blocks, you can install a 10 dB attenuator (you can buy one from
a consumer electronics parts store).
Note: This will help keep out stray UHF signals, but also cut down how far
away you can use the remote control.
1. Take the UHF antenna off of the
receiver’s back panel UHF Remote
Antenna input.
2. Put a 10 dB attenuator onto the UHF
Remote Antenna input.
Page 33
Page 38
Chapter 2
Receiver Description and Installation
3. Put the UHF antenna onto the attenuator.
Setting Up TV1 to Operate in UHF Pro
You can set your receiver to operate your TV1 using another UHF Pro
remote control (sold separately) by completing the following instructions:
If you set up your DISH 322 to operate the side using UHF Pro,
the two UHF Pro remotes for this receiver will interfere with
each other when operated at the same time. This may prevent
the remotes from operating the receiver momentarily.
1. Perform the following using an existing remote control:
a. Open the
TV1 UHF Pro Setup screen by pressing MENU-6-1-8 on
the remote control.
b. Select
c. Select
d. Move the highlight to the address for the
Enable from the TV1 UHF Pro Setup screen.
System Info to open the System Information screen.
Primary Remote Address
as shown below. This is important - if you do not do this, your
remote will change the receiver's
cause your Remote Control 1 to control the
Secondary Remote Address and
side of your receiver.
Note: Highlight the
Primary Remote
Address.
2. Perform the following using the UHF Pro remote that you are going to
use to control TV1:
a. Press and hold the SAT mode button about three seconds, until all
the mode buttons light up, and then let go of the SAT button. The
SAT mode button will blink.
Page 34
b. Use the NUMBER PAD buttons to enter any number from 1 to 16,
except for the number shown by the
Secondary Remote Address.
The SAT mode button goes out after you enter each digit, and then
lights up again.
Write down the number you entered:
Page 39
Setting Up TV1 to Operate in IR
c. Press the POUND (#) button. If you entered the address correctly,
the SAT mode button will flash three times.
d. Press the RECORD button.
e. Make sure the
Remote Address
System Information screen shows that the Primary
shows UHF Pro and IR and that this address
matches the number you entered in step b.
Setting Up TV1 to Operate in IR
The following instructions describe how to set up TV1 to operate in IR only.
1. Perform the following with an existing remote control:
a. Open the
the remote control.
b. Select
c. Select
2. Using an IR remote control, such as a Remote Control 3.0, that you
intend to use to control TV1:
a. Press the RECORD button. The
highlighted.
b. Make sure the
Remote Address
TV1 UHF Pro Setup screen by pressing MENU-6-1-8 on
Disable from the TV1 UHF Pro Setup screen.
System Info to open the System Information screen.
Done button should be
System Information screen shows that the Primary
shows IR.
Page 35
Page 40

Chapter 2
Receiver Description and Installation
Notes
Page 36
Page 41
Chapter 3
Using the System
Using the Remote Controls
The following section describes how to use the remote controls with your
satellite receiver. The remote control must be in SAT mode for the buttons to
control the satellite receiver. You can also use the remote to control your VCR
and other devices. See Control Other Devices with the Remote on page 72.
SAT Mode Button
Press the SAT mode button to set the remote to SAT mode, to control the
receiver. The SAT mode button’s back light turns ON briefly to show that the
remote is set to SAT mode.
Tip: Remote
Control 1 is used to
control TV1 menus
on the nearby TV.
Remote Control 2
is used to control
TV2 menus on the
remote TV(s).
Power Buttons
Press the blank POWER button to turn the TV1 or TV2 (depending on which
remote is being used) ON or OFF. Press the TV POWER button to turn the TV
on or off.
Note: You must program the remote to control your TV for the TV POWER
button to work as described. See page 72 for instructions.
Menu Button
Press the MENU button to open the Main Menu.
Page Up and Page Down (Arrow) Buttons
Press the PAGE UP button or the PAGE DOWN button to move, page by
page, through the
Timers
list, or a list of channels.
Program Guide, a Theme list, a Favorites List, an Event
Page 37
Page 42
Chapter 3
Using the System
Mute Button
Press the MUTE button to turn off the TV sound. Press it again to restore the
TV sound.
Note: You must program the remote to control your TV for the MUTE
button to work as described. See page 72 for instructions.
Volum e B utt on
Press the minus (-) side of the VOLUME button to lower the TV volume.
Press the plus (+) side of the VOLUME button to raise the TV volume.
Note: You must program the remote to control your TV for the VOLUME
button to work as described. See page 72 for instructions.
Guide Button
Press the GUIDE button to open the Program Guide. When the Program
is open, press this button to switch among Favorites Lists.
Guide
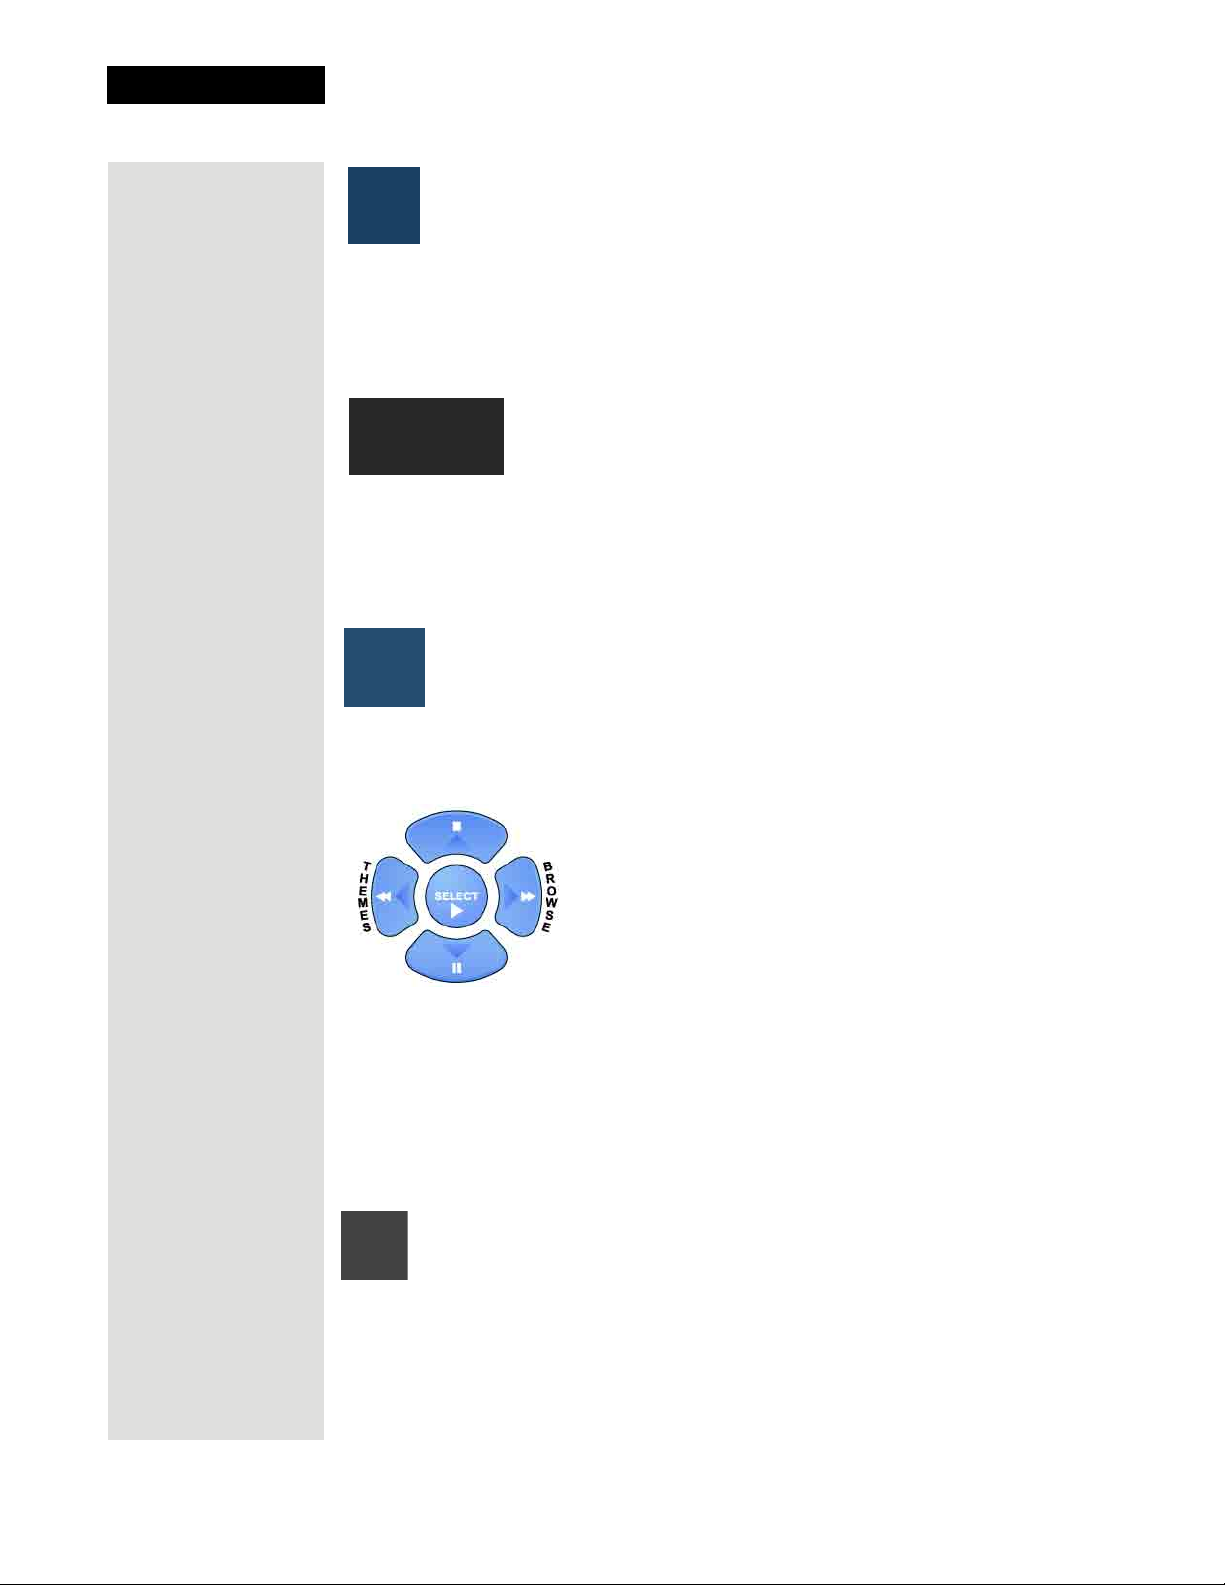
Arrow Buttons
• Change channels - Press the UP or DOWN ARROW button to change
channels.
• Open the
•Show
• Move around within the
Browse Banner - Press the RIGHT ARROW button.
Themes - Press the LEFT ARROW button.
Program Guide, menus, and Browse Banner -
Press the UP, DOWN, LEFT, and RIGHT ARROW buttons.
TV/Video Button
Page 38
If you connect the receiver using its back panel TV ANTENNA/CABLE IN
CHANNEL 3–4 connections, use this button to switch the receiver
and
CHANNEL 3–4 output between the satellite programming and another
video signal such as cable or broadcast TV antenna connected to the
receiver’s
TV ANTENNA/CABLE IN.
Page 43
Using the Remote Controls
Select Button
Press the SELECT button to select the option you highlight in a menu.
Recall Button
Press the RECALL button to go back to the last satellite receiver channel
you were watching. Press it again to switch between the last two satellite
receiver channels you were watching.
Info Button
• Program information - Press the INFO button for more information
when you watch a program, or when you have the
Browse Banner, or Themes list open.
Program Guide,
• Help - Press the INFO button to see help information when a
button appears in a menu.
Help
View TV Button
Press the VIEW TV button to close all menus and go to watching
programming. Press the VIEW TV button to briefly display the
Banner
while watching a program.
Program
Cancel Button
Press the CANCEL button to cancel and go back to the previous menu or to
watch a program.
Sys Info Button
Press the SYS INFO button to display the System Info screen.
Dish Button
Press the DISH button to go to Dish Home.
Page 39
Page 44
Chapter 3
Using the System
Number Pad Buttons
When watching a program or with the Program Guide open, use these
buttons to enter a channel number to change to that channel.
•When the Program Guide is open, you can skip ahead and then back a
number of hours. Just enter the number you want to skip ahead (or
back), and then press the RIGHT (or LEFT) ARROW button.
• Use these buttons to enter menu option numbers instead of highlighting
the option and then pressing the SELECT button.
• Use these buttons to enter numbers in a menu:
• Highlight the place where you want to enter the first number, and
press the appropriate number buttons on the remote.
• Use the LEFT or RIGHT ARROW button to move the highlight to
the next place where you want to enter a number. When you are
done entering numbers, press SELECT.
• Use the letters above the NUMBER PAD buttons while in the
menu. For example, when looking for the channel and times to watch
Rudy Fremmel Presents, you press 7 three times for an R, 8 two times
for a U, 3 one time for a D, and 9 three times for a Y to spell the word
“Rudy” (see Using Themes and Search on page 59).
Search
Star Button
Press the STAR button to back space while using the search function of your
receiver.
Zero Button
Press the ZERO button to forward space while using the search function of
your receiver.
Page 40
Page 45
Using the Remote Controls
Pound Button
Press the POUND button to display the Search screen. Also, you use this
button in several procedures in this User’s Guide.
Recover Button
Press the RECOVER button if you accidentally change the channel or
video input on your TV and cannot get the picture back from your satellite
receiver. When you press the RECOVER button as described below, the
remote control sends commands to your TV to change channels or video
inputs to try to get you back to watching satellite programming. This
procedure works only if you have accidentally changed the TV channel or
video input. It does not recover lost satellite signal (See Chapter 5 -
Reference for troubleshooting information).
The following setup is required to use the RECOVER button:
• The remote control must be set up to control the TV and, if installed, the
VCR (see page 72).
• If a VCR is installed, make sure it is connected as shown on page 31.
• On a remote TV, the RECOVER button must be programmed to tune
your remote TV to the specific channel to receive TV2 programming
(for example, channel 60), using the instructions on page 25.
To use the RECOVER button, complete the following instructions:
1. Press and hold the RECOVER button until all four mode buttons light,
and then let go of the button. The SAT mode button flashes twice and
then all four mode buttons flash three times.
2. Press the RECOVER button. Wait for the TV or VCR mode button to
flash once and then all four mode buttons to flash once.
3. If you see the
System Info screen, press the SELECT button to close
the screen. You have recovered your satellite video.
4. If you do not see the
System Info screen, repeat steps 2 and 3 until you
have recovered your satellite video.
Note: Press any remote control button other than the RECOVER
button to end this procedure.
Note: If the RECOVER button is not programmed to a specific
channel, the RECOVER button will first try to tune your TV to channel
3, then channel 4, and then other video inputs with each press of the
RECOVER button. You may need to press the RECOVER button up
to 30 times to recover your satellite TV video. If the RECOVER button
is programmed to a specific channel (see page 25), the RECOVER
button will tune the TV to the specific channel (for example, channel
60).
Page 41
Page 46
Chapter 3
Using the System
Tip: Remote
Control 1 is used to
control TV1 menus
on the nearby TV.
Remote Control 2
is used to control
TV2 menus on the
remote TV(s).
Using the Menus
The menus make using the receiver and selecting programs quick and easy.
Use the menus to control the receiver and to use its features, such as setting
locks, choosing a program, or creating a favorites list.
Open and Close Menus
You can open the menus in either of two ways:
• Press the MENU button to open the
the other menus from the
Main Menu.
Main Menu, then open any of
• Use the matching buttons on the remote control:
Open the
Program Guide.
Page 42
Page 47
• When watching a program, open the Themes and Search menu.
Using the Menus
• Display the
• To close a menu and return to watching a program, press either the
VIEW TV or CANCEL button.
Note: If you do not do anything in a menu for several minutes, the
menu automatically closes. This will discard any changes you
made, and display the program you were watching.
Browse Banner.
Highlighting Menu Options
To highlight a menu option, use the remote control ARROW buttons to
move the on-screen highlight to the menu option. When you do move the
on-screen highlight, the option becomes amber. The highlight is like the one
that you may have seen on a computer screen.
Page 43
Page 48
Chapter 3
Using the System
Selecting Menu Options
When you select a menu option, that option takes effect right away. You can
select a menu option in either of two ways:
• If the option has a number next to it, press the
number on the NUMBER PAD button that
matches this number. When you use the
NUMBER PAD button, you do not need to
highlight the option first.
• Move the highlight to the menu option using the remote control
ARROW buttons. Then press the remote control SELECT button.
In the example above,
Sports is highlighted.
List of Choices in the Menus
When you make a choice in a list, the receiver does not apply the change
until you select the
changes, select the
menu.
Save or OK option. If you do not want to save any
Cancel option to discard all the changes made in the
There are two types of lists:
• A single choice list allows you to select only
one choice at a time. If you select another
choice, your previous choice is deselected.
• A multiple choice list allows you to select more
than one choice at one time. If you select
another choice, your previous choice(s) stays
selected.
Highlighting a Choice in a Menu List
Use the remote control ARROW buttons to move the highlight to the desired
item in the list. The black arrows on the list show where you can move the
highlight.
Page 44
Selecting a Choice in a Menu
To select a choice in a list, highlight the choice and then press the remote
control SELECT button. Make sure you select the
save your choice. Select the
Cancel or Done option to discard your choice.
Save or OK option to
Page 49
Canceling a Procedure
You can cancel a procedure in any of three ways:
• If you want to return to watching a program, press the
remote control VIEW TV button.
• If you want to return to the previous menu, press the
CANCEL button.
• Wait a few moments and the menu will close
automatically, discarding any changes you have made. If
this does not work, you must finish the procedure.
Changing Channels
There are three ways to change channels:
• Press the UP or DOWN ARROW buttons.
• Use the NUMBER PAD buttons.
• Press GUIDE and then select the channel from the
• Press BROWSE and then select the channel from the
Banner
.
Changing Channels
Program Guide.
Browse
Using the Program Guide
The on-screen Program Guide provides a complete listing of the available
channels and programs. You can use the
channels, to see what programs are scheduled, and to buy pay per view
programs.
Program Guide shows which Favorites List is active. If the All Chan
The
list is active, the Program Guide shows all of the channels available from
DISH Network. If the
All Sub list is active, the Program Guide displays
only the channels in your subscription. When another list is active, the
Program Guide displays only the channels in that list. For more
information, see Using Favorites Lists on page 49. The
shows programs that are on now and that are scheduled up to two days in
advance. The guide does not show programs that have ended.
Program Guide to change
Program Guide
Tip: If the program
is on a channel that
is not part of your
subscription, the
channel will be in
red.
Page 45
Page 50

Chapter 3
Using the System
Tip: When using the
Program Guide, do
you want to know
who is in the movie
you’re about to
watch? Press the
INFO button to find
out. When you’re
finished, press the
CANCEL button to
return to the
Program Guide.
Tip: Selecting a
program that is
not on yet will
open the Timers
menu. See page 52
for information on
setting timers.
Changing the Channel in the Program Guide
1. Press GUIDE to open the Program Guide.
2. Choose a channel using either of the following:
• Use the NUMBER PAD buttons to enter the channel number.
Program Guide displays a block of channels including the one
The
that you just entered.
• Use the ARROW buttons to move the highlight to the channel.
3. Press the SELECT button to change to the new channel.
4. Press the CANCEL button to close the
Program Guide
without changing the channel.
Scrolling Through the Program Guide
There are two ways to scroll through the Program Guide:
• Scroll by channel - Press the PAGE UP or PAGE
DOWN button to scan, page by page, through the
listing of channels.
• Scroll by time - Enter the number of hours that you
want to skip, using the NUMBER PAD buttons.
Then, press the LEFT or RIGHT ARROW button.
Page 46
Page 51

Displaying Program Information
The Program Banner
The Program Banner provides information about the program
you are watching. The receiver displays the
a few seconds at the top of the TV screen every time you change
the channel or press the remote control VIEW TV button.
Program Banner for
Displaying Program Information
The Browse Banner
You can use the Browse Banner to change channels, or to see what other
programs are available without changing the program that you are watching.
The receiver displays information on the program you are watching at the
top and
Note: If the All Chan Favorite list is active, the Browse Banner displays
all the channels. If the
only the channels in your subscription. If a
Browse Banner displays only the channels in that list.
If you have set up the
receiver is locked, the
Browse Banner information at the bottom of the TV screen.
All Sub list is active, the Browse Banner displays
Favorites List is active, the
Program Guide to hide adult channels and the
Browse Banner does not display such channels.
Page 47
Page 52
Chapter 3
Using the System
Using the Browse Banner
Tip: When using the
Browse Banner, do
you want to know
when the movie
you’re about to
watch was made?
Press the INFO
button to find out.
When you’re
finished, press the
CANCEL button to
return to the
Program Guide.
1. Press the BROWSE (RIGHT ARROW) button to open the
Browse Banner.
2. Change the channel displayed on the
Browse Banner by doing one of
the following:
• Enter the channel number for the program that you
want, using the NUMBER PAD buttons.
• Press the UP or DOWN ARROW to display the
next channel.
Tip: If you choose
a program that is
on next, you’ll see
a Timers menu.
See page 52 for
more information.
3. Press the RIGHT ARROW button multiple times to
highlight the next programs. Press the LEFT
ARROW button to return to the current program.
4. Close the
following
Browse Banner by doing one of the
:
• Press the SELECT button to watch the program.
• Press the VIEW TV or CANCEL button to close
the Browse Banner without changing the channel.
Page 48
Page 53
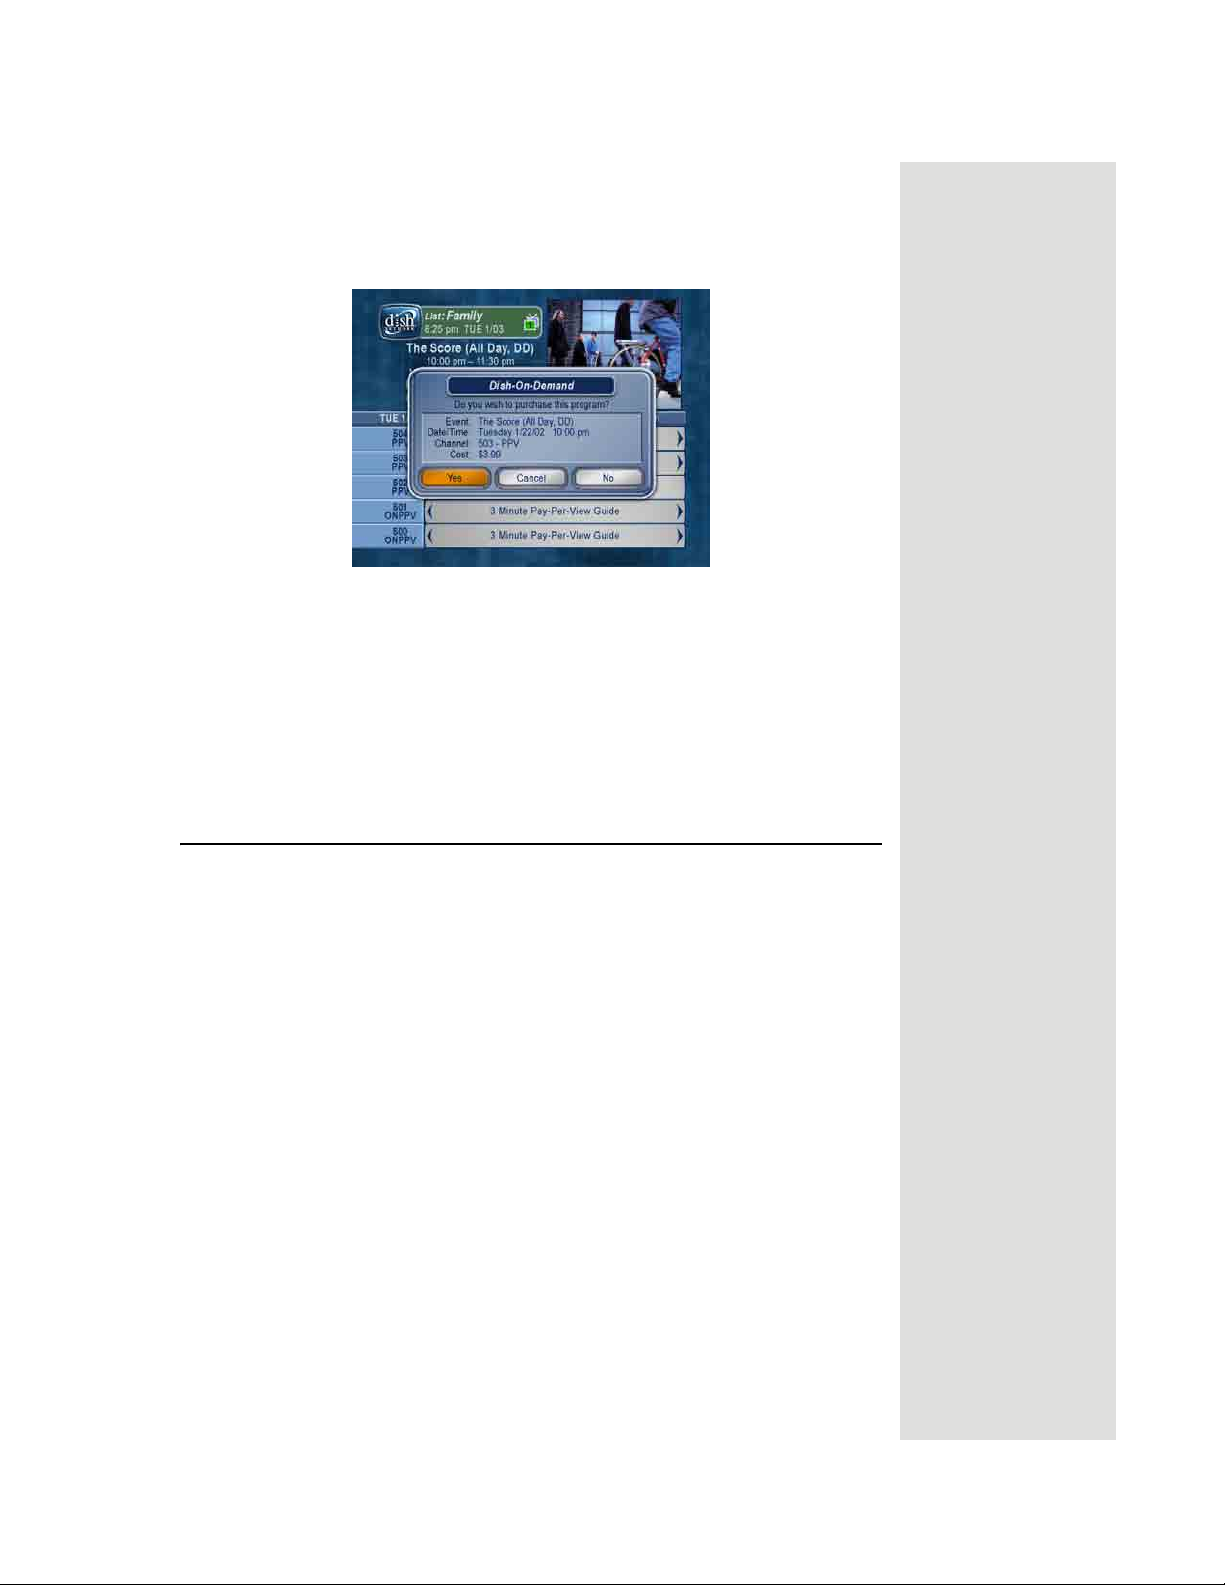
Ordering Pay Per View Programs
1. Highlight the desired pay per view program in the Program Guide and
press the SELECT button. A message like the following displays:
Using Favorites Lists
2. To buy the pay per view program, select the
Yes option.
The receiver displays a confirmation menu.
Note: Once you confirm an order for a pay per view program, you
cannot cancel the order and you will be billed for it.
Yes if you want to confirm your purchase.
Select
If you do not want to purchase the pay per view program, select the
Cancel option.
or
Using Favorites Lists
Favorites Lists are lists of your favorite channels. You can create and
change the lists yourself, adding and removing channels as you wish. You
can have an unlimited number of favorite channels but they must be
grouped into no more than four lists. For example, one
have 100 channels and a second list only 10. Or all four lists could have 50
channels each.
• When you make a
Favorites List active, the Program Guide
displays only the channels in that list. Also, the receiver skips
channels that are not on the list when you use the remote control
UP or DOWN ARROW button to change channels.
•The
•The
All Chan Favorites List contains all the channels. You cannot
make any changes to the
All Sub Favorites List contains all the channels in your
All Chan list.
subscription. You cannot make any changes to the
except by changing your subscription.
• Each
Favorites List has a unique color in the Program Guide. You
can give each list a name. When you first get the receiver, the four
lists are named
List 1, List 2, List 3, and List 4. The lists are empty
until you add channels to them.
Note: If you choose a program using Theme, the receiver tunes to
the channel for that program whether or not that channel is on the
Favorites List.
active
Favorites List could
All Sub list,
No
Page 49
Page 54

Chapter 3
Using the System
Creating or Changing a Favorites List
You can create, add channels to, and remove channels from a Favorites List.
1. Press the MENU-8 to open
2. Select the
Note: You cannot modify the All Chan or All Sub lists.
3. Select
Favorites List that you want to create or change.
Modify List.
Favorites.
Page 50
4. In the
5. Press SELECT to add the highlighted channel to the
Channels list, highlight a channel you want to add to the
Favorites List.
Favorites List. A
dot appears next to the channel.
6. Repeat steps 5 and 6 until you have added all the channels that you want.
7. To delete a channel from the
Favorites Lists, select the channel in the
list. The dot next to the channel disappears.
8. Select the
Note: If you try to save a Favorites List with no channels, you will see
Done option to save all changes to the Favorites List.
an error message.
Page 55

Naming a Favorites List
1. Press MENU-8 to open Favorites.
Using Favorites Lists
2. Select the
3. Select the
Note: You cannot change the name of the All Chan or All Sub list.
Favorites List that you want to change.
Edit Name option.
4. Enter the list’s name by doing one of the following:
• Use the virtual keyboard to type the list’s name.
• Use the remote control NUMBER PAD to enter the letters in the
Enter Name box. Numbers 2 through 9 have telephone-style
numbers written above them. To enter an
H, for example, press 4
twice because H is the second letter listed above the 4 on the
NUMBER PAD.
• You can enter up to eight characters, including spaces. If needed,
select the space option to insert a space in the name or the
option to correct a letter.
Note: A list must have at least one character. Two lists cannot have the
same name. TV1 and TV2 can have lists with the same names.
Note: At any time, you can select the Clear Entry option to clear the
name.
5. Select the
Done option to save all changes.
Making a Favorites List Active
If the Program Guide is open, press the GUIDE button to select the next
Favorites List. Press the GUIDE button repeatedly to scan through all the
available lists.
Note: This works only if you have added channels to the Favorites List. If
you have not created any
switches the receiver between the
Favorites List, pressing the GUIDE button
All Chan and All Sub.
Back
Page 51
Page 56
Chapter 3
Using the System
Using Timers
Event timers let you set up the receiver to tune in future programs and/or
record them on a VCR (TV1 only). An “event” is a program, sports event,
pay per view movie, or anything else on satellite TV.
• You can set an automatic event timer for a program listed with start
and stop times in the
comes on each day or each week.
• A manual event timer lets you set custom start and stop times for a
timer.
Note: If you want to have the Event Timer record to a VCR, you
must set up the receiver to control the VCR (see page 57).
Program Guide. This can be a program that
Remember: Most TV
programs and films
are copyrighted. In
some cases,
copyright law may
apply to private,
in-home recording.
Event Timer Types
Reminder - Reminds you that a program is about to start.
Auto-Tune - Reminds you that a program is about to start and tunes the
receiver to the program when it begins.
VCR - Reminds you that a program is about to start, tunes the receiver to the
program when it begins, and starts your VCR. This timer is available
through TV1 menus only.
Note: You can record only the program to which the receiver is tuned. If you
open any menu while recording a program on videotape, the menu also will
be recorded. If a program time changes by more than twenty-four hours, the
timer will not operate.
Event Timer Frequency
Once - Applies to a one-time program. If the program time changes, this
timer operates at the new time. The receiver deletes this timer when the
timer operates.
Mon.-Fri. - Applies to a program that is scheduled for Monday through
Friday on the same channel at the same time each day.
Daily - Applies to a program that is scheduled for Monday through Sunday
on the same channel at the same time each day.
Weekly - Applies to a program that is scheduled for once a week on the same
channel at the same time on the same day.
Page 52
Before an Event Timer Operates
Two minutes before an event timer operates, the receiver displays a small
clock on the TV screen. This clock disappears when the program begins.
While the clock is displayed, you may do either one of the following:
• Press the CANCEL button to clear the symbol from the
TV screen. This does not affect the timer; it will operate.
• Press the INFO button to see more information on the
event timer. If you do this, you will have the following
choices:
Page 57
• Select the OK or Cancel option to continue with the event
timer.
• Select the
Note: This stops only this instance of a Mon.-Fri., Daily or
Weekly timer. The timer will operate the next time it is
Stop Timer or No option to stop the event timer.
scheduled. To stop all operations of such a timer, you must
delete the timer. For a
Reminder Event Timer, instead of
having the option to stop the timer, you have the option to
tune to the program.
Setting Up an Automatic Event Timer
1. Select a future program using the Browse Banner,
Themes menu or the Program Guide. One of the
following
Create Timer screens display:
Using Timers
TV1
2. Select a
Timer Frequency option. Notice that a mark displays in the
box.
3. Select a
TV1 and has a
Timer Type. The Create Timer screen shown on the left is for
VCR Timer Type option. This Timer Type is not
available for TV2 (shown on the right).
4. Select the
Create option to save the event timer.
5. The receiver displays a timer symbol in the
TV2
Tip: Remote
Control 1 is used to
control TV1 menus
on the nearby TV.
Remote Control 2
is used to control
TV2 menus on the
remote TV(s).
Program Guide.
Page 53
Page 58

Chapter 3
Using the System
Setting Up a Manual Event Timer
1. Press the MENU button.
2. Select the
3. Select the
Event Timer
4. Select a
Note: VCR timers are available through TV1 menus only.
5. Select a
Timers option.
Create option. The receiver displays the Create a Manual
menu.
Timer Type option.
Timer Frequency option.
6. Select a channel by doing one of the following:
• Highlight a channel using the UP or DOWN ARROW button.
Then, press the SELECT button.
• Enter a channel number using the NUMBER PAD buttons.
7. Select the
Manual Timer menu.
8. Use the NUMBER PAD buttons to enter the
selecting AM or PM) and the
Edit Time option. The receiver displays the Set Date/Time for
Start Time (this includes
End Time, (this includes selecting AM or
PM).
9. Use the NUMBER PAD buttons to enter the
10. Select the
Create Timer option.
Date.
11. To create another event timer, do one of the following:
• Select the
Create option again.
• If you do not want to create another event timer, press the CANCEL
button.
Note: You cannot set a manual event timer for a pay per view event.
Overlapping Timers
If you try to create event timers for overlapping programs, the receiver
displays a screen with the dates and times of both programs. The receiver
also displays this screen if a program time has changed, causing one timer to
overlap another. You must delete, edit, or skip one of the timers.
Page 54
Page 59

When the Timer Conflict screen displays, resolve the conflict by doing the
following:
Using Timers
1. Select one of the timers. The
Timer Conflict Resolution screen
displays.
2. When the
Timer Conflict Resolution displays, select one of the
following choices:
• Delete This Timer - Removes the timer completely.
• Edit This Timer - You can edit the timer to resolve the conflict.
• Skip This Timer Once - Select this option if you are creating a
timer for a special program (
program you watch regularly (
Once) and have a timer set for a
Mon.-Fri, Daily, or Weekly). For
example, you want to set a timer for an awards show (
conflicts with the timer for a news program (
Weekly). Select the timer for the news program and then select
Skip This Timer Once.
Mon.-Fri, Daily, or
Once), but it
3. Select
4. Select
Yes to close the Timer Conflict Resolution screen.
Done.
Page 55
Page 60

Chapter 3
Using the System
Maximum Number of Event Timers
You can create a limited number of event timers. If you try to create more,
the receiver displays a menu giving you the option to delete an existing
timer. If you do not delete an existing timer, you will not be able to create
any new ones.
Reviewing and Editing Event Timers
You can review and edit both automatic and manual event timers. If you
need to change an event timer, you can edit almost any feature of an event
timer.
Note: If you edit an automatic timer, it becomes a manual timer. The manual
event timer operates at the times you set, not the actual program times.
1. Press the MENU button.
2. Select the
Timers option. The receiver displays the Timers menu.
3. Select the event timer that you want to edit. A mark appears in the box
next to the event timer.
4. Select the
Frequency
5. If you want to change the
the
Edit option. You may change the Timer Type, Timer
, or Channel. To do this, select each option that you want.
Start Time, the End Time, or the Date, select
Edit Time option to display the Edit Time for Manual Timer menu.
Otherwise, skip to step 8 of this procedure.
6. Use the number buttons to enter the
AM or PM) and the
End Time (this includes selecting AM or PM), if
Start Time (this includes selecting
applicable.
Page 56
7. Use the NUMBER PAD buttons to enter the
8. Select the
Create Timer option.
Date.
Page 61

Deleting an Event Timer
1. Press the MENU button.
Using Timers
2. Select the
Timers option. The receiver displays the Timers menu.
3. Select an event timer(s) that you want to delete. A check mark appears
in the box next to the event timer(s).
4. Move the highlight to
Delete and press SELECT on the remote.
Special Considerations When Using Event Timers
• For Locked Programs - You must enter the receiver password before
you can create an automatic event timer. You can create a manual event
timer for a locked program without entering the password. However, if
you do this, when the event timer operates the receiver may display
only an error or password entry menu. If you have set a VCR Event
Timer, the VCR will record only that menu.
•
For Pay Per View Programs - You must order a pay per view program
before you can create a timer for it.
•
For Blacked Out Programs - If you set a timer for a program that is
blacked out in your area, when the event timer operates the receiver
may display only an error. If you have set a
VCR Event Timer, the VCR
will record only that menu.
Event Timer Performance when the Receiver is Off
If the receiver is OFF at the time an Auto-Tune or VCR Event Timer is
scheduled to operate, the receiver will turn ON. Once the event has ended,
the receiver will turn OFF, unless you pressed any remote control or
receiver front panel buttons during the time that the timer was active.
If the receiver is OFF at the time a Reminder Event Timer is scheduled to
operate, the timer will turn the receiver ON and tune it to the channel you
last watched. The receiver will then display the reminder menu. You will
have a few seconds to respond. If you do not respond to the reminder menu,
the receiver will turn OFF.
Setting Up the Receiver to Control a VCR (TV1 Menu Only)
To use VCR Timers, connect the receiver back panel outputs to the audio/
video inputs on the VCR (see your VCR user’s guide for instructions).
Before you can use VCR Timers, you must set up the receiver to control the
VCR. If the receiver cannot control the VCR, use an Auto-Tune Timer to
tune the receiver to the channel you want to record. Use the timers built into
the VCR to start and stop the VCR at the right times.
The receiver transmits an IR signal from the front panel to control the VCR.
This signal is much stronger than the signal the remote uses, so it can
bounce off walls or other objects on its way to the VCR. This works in most
home setups. However, shelves or smoked glass doors between the receiver
front and the VCR may block the signal. Also, if the signal must cross a
very large room, or bounce off curtains, it may not be strong enough to
control the VCR. Make sure that nothing blocks the signal, and that the
signal can bounce off relatively nearby, light-colored, smooth surfaces.
Tip: Remote
Control 1 is used to
control TV1 menus
on the nearby TV.
Remote Control 2
is used to control
TV2 menus on the
remote TV(s).
Page 57
Page 62

Chapter 3
Using the System
Note: VCR setup is only available through TV1 menus.
To set up TV1 to control a VCR, use Remote Control 1 at the nearby TV and
do the following:
1. Press the MENU button.
2. Select the
3. Select the
4. Select the
System Setup option.
Installation option.
VCR Setup option.
5. Set the VCR code by doing one of the following:
• Enter the 3-digit VCR code number, from the tables starting on page
114, using the NUMBER PAD buttons.
• Highlight each digit of the VCR code, and then press the UP or
DOWN ARROW button until you reach the correct number and
then press SELECT.
Page 58
6. Make sure the VCR is connected to one of the TV1 outputs and is set to
display from the TV1 output to the nearby TV. Consult your VCR user’s
guide.
7. Make sure the VCR is turned on. Insert a rewound tape on which you
want to record.
Note: The receiver only starts and stops the VCR recording, but does not
turn ON the VCR, so you must do this yourself.
8. To test the new code, highlight the
Test option. The receiver displays a
message warning you to make sure the VCR is turned ON.
9. Press the SELECT button to start the test. Your VCR records for a few
seconds, stops, and then rewinds. The receiver displays a message
saying that your VCR test is complete. Follow the instructions on the
message. If your VCR did not do the test, enter another code from the
table. Repeat step 8 and this step.
10. Once you have found the correct VCR code, select the
save the VCR code you entered and return to the
Save option to
Installation and Setup
menu.
Page 63
Using Themes and Search
Setting Up a VCR for VCR Timers
After you have properly set up the receiver to control the VCR during VCR
timers, complete the following to set up the VCR to operate when you set a
VCR timer.
1. Turn the VCR on. Make sure you keep the VCR on because the receiver
cannot turn the VCR on for you.
2. Insert a tape. A blank, rewound tape makes the best recording.
3. If you need to change the VCR settings (tape length or channel), see the
instructions that came with your VCR.
Using Themes and Search
The Themes and Search feature of your receiver makes it easy to find
programs to watch. This menu allows you to search for programming by
themes (movies, sports, etc.) or by key words used in the program
information.
Themes
You can list and choose programs by the theme of their contents, for
example, just movies or just sports. You can then quickly list programs
based on that theme, and choose the program you want.
1. Open the
• While watching a program, press the LEFT ARROW
• Press the MENU button, and then select the
Themes and Search menu by doing one of the following:
button.
Themes
option.
2. Select the option for a category.
3. Select the desired program in the program list.
Page 59
Page 64
Chapter 3
Using the System
Note: If the program you highlighted is on some time in the future, the
receiver will open the
Create An Event Timer menu. See Using Timers
on page 52 for more information.
Search
1. Open the Search screen by doing one of the following:
• Press the
Pound (#) button on the remote control.
• While watching a program, press the LEFT ARROW
button to display the
Search.
select
Themes and Search menu. Then
• Press the MENU button, and then select the
Themes and Search menu. The
2. The
option to display the
Search.
select
Search screen displays with a virtual keyboard.
Themes
Tip: Use Search
History instead of
the keyboard if
you’ve searched for
the program or
information before.
Page 60
3. You can search for events two ways:
• Select
Title to search for the words that appear in the title of a
program.
• Select
Info to search for words that are in the program description.
4. Enter the information in that space provided in one of two ways:
• Use the virtual keyboard to type the information in the space
provided.
• Use the letters above the NUMBER PAD buttons while in the
Search menu. For example, when looking for the channel and times
to watch Rudy Fremmel Presents, you press 7 three times for an R, 8
two times for a U, 3 one time for a D, and 9 three times for a Y to
spell the word “Rudy.”
Page 65

5. Select Search.
Using Themes and Search
6. When the receiver displays the
Search Results you have the following
options:
• Use the UP and DOWN ARROW buttons to scroll through the
results.
•Use the PAGE UP and PAGE DOWN buttons to scroll a page at a
time.
• Select
7. Select one of the programs to watch, or select
Results
Note: If you select a program that is on now, the receiver tunes to that
Page Up or Page Down to scroll a page at a time.
Done to close the Search
screen.
program. If you select a program that is on in the future, you will have
to set a timer. See page 52 for more information on event timers.
Search History
After you have searched for programs or other information, your receiver
builds a history. TV1 and TV2 keep separate
You can use the
Search History instead of typing the information again
with the virtual keyboard.
1. Press the Pound (#) button to open the
2. Select
History to display the Search History screen.
Search History information.
Search screen.
Page 61
Page 66
Chapter 3
Using the System
3. At the Search History screen, you have the following options:
Search - Select one of the items and then select Search.
•
•
Edit - Select one of the items and then select Edit to make changes.
Delete - Select one of the items and then select Delete.
•
Delete All - Select Delete All to clear the Search History.
•
Using Locks
When you unlock programming delivered by the TV2 outputs
to your in-home cabling system, you are allowing all TVs
connected to your in-home cabling system to have access to
this programming. In this case, you must rely on the V-Chip
technology and settings in the individual TVs to prevent
viewing of inappropriate programming. Consult your TV
user’s guides for instructions to set up V-Chip protection.
Note: Locks for programming on the TV1 outputs for the nearby TV are set
using the TV1 menus. Locks for programming on the TV2 outputs to remote
TVs are set using the TV2 menus. The section below applies to locks set by
either TV1 or TV2 menus. Locks set for TV1 programming are separate
from locks set for TV2 programming.
How to Set Locks: A Two Step Process
1. Create the locks that you want.
2. Lock the receiver.
When the receiver is locked, anyone who wants to access locked items must
enter the password.
When You Have Locked the Receiver
• If you try to access a locked item or open the Locks menu, the receiver
displays a message prompting you to enter the password.
• The receiver allows you three tries to enter the correct password. If you
fail to enter the correct password, the receiver does not allow more tries
for several minutes.
• If you enter the correct password, you can access the locked item or
open the
Locks menu.
Page 62
• If you exit a locked item or close the
password to access the item.
Locks menu, you must enter the
Page 67
Locking and Unlocking the Receiver
You must lock the receiver for any receiver Locks you set to take effect. To
lock the receiver, you must first create a password. If you forget your
password, you will need to speak with a Customer Service Representative.
If you have a Personal Identification Number (PIN), you will need to give it
to the Customer Service Representative. See page 69 for information on
PINs.
Using Locks
1. Press the MENU button to display the
2. Select the
Note: If the receiver displays a message prompting you to enter a
Locks option to display the Locks menu.
Main Menu.
password, the receiver has already been locked.
3. Select the
Lock System or Unlock System option. The receiver
displays a message prompting you to enter a password to lock the
system.
4. Enter and verify a password, using the NUMBER PAD buttons. The
receiver continues to display stars (*) as you enter the digits of the
password. As soon as you enter the fourth digit of the password, the
receiver highlights the
OK button. Press SELECT.
5. Memorize your password. From now on, you must enter this password
to lock or unlock the receiver.
6. Select the
OK option. Confirm the password by re-entering it. All the
locks you have set are now in effect.
Page 63
Page 68
Chapter 3
Using the System
Creating or Changing Rating (Content) Code Locks
1. Press the MENU button.
2. Select the
Locks option.
3. If the receiver is locked, enter the password using the number pad
buttons. The receiver continues to display stars (*) as you enter
the digits of the password. As soon as you enter the fourth digit of the
password, the receiver highlights the
OK option. Press the SELECT
button.
4. Select the
Ratings Locks option.
5. Highlight the rating that corresponds to the lowest unacceptable
audience age. Press the SELECT button to lock the highlighted rating.
Note: All ratings that are more restrictive than the selected rating are
also selected. For example, if you lock PG-13 rated programs, then all
programs with the R, NC-17, and NR/AO ratings are also locked.
Page 64
6. Select the expanded rating code(s), if you want to also lock these ratings.
7. To unlock a rating code, highlight the code and press SELECT.
8. Select the
Done option to save the changes.
9. If the receiver is not locked, you must lock it to put the locks you just
created into effect by selecting
Lock System.
Creating or Changing Channel Locks
You can lock any channel, including pay per view channels.
1. Press the MENU button.
2. Select the
3. If the receiver is locked, enter the password using the number pad
buttons. The receiver continues to display stars (*) as you enter
the digits of the password. As soon as you enter the fourth digit of the
password, the receiver highlights the
button.
Locks option.
OK option. Press the SELECT
Page 69
4. Select the Channel Locks option.
5. Highlight the channel that you want to lock. If necessary, press the UP
or DOWN ARROW button to see the channel. You can also enter each
channel number using the NUMBER PAD buttons.
6. Press the SELECT button to lock or unlock the highlighted channel. If
the box next to the channel has a mark, the channel is locked.
Using Locks
7. Select the
Done option to save the changes.
8. If the receiver is not already locked, you must lock it to put the locks
you just created into effect by selecting
Lock System.
Locking and Unlocking the Receiver Front Panel (TV1 Only)
This keeps anyone from changing the channel, but it does not lock the
remote control buttons. This option is only available on TV1 menus.
1. Press the MENU button.
2. Select the
3. If the receiver is locked, enter the password using the NUMBER PAD
buttons. The receiver continues to display stars (*) as you enter the
digits of the password. As soon as you enter the fourth digit of the
password, the receiver highlights the
button.
4. Select the
Locks option.
OK option. Press the SELECT
Front Panel Lock option to lock or unlock the front panel.
Tip: Remote
Control 1 is used to
control TV1 menus
on the nearby TV.
Remote Control 2
is used to control
TV2 menus on the
remote TV(s).
Page 65
Page 70
Chapter 3
Using the System
5. Select the Yes option.
6. To activate the front panel lock, you must lock the receiver by selecting
Lock System.
Locking and Unlocking Pay Per View Channels
This locks all pay per view channels. You also can lock one or more pay per
view channels by using channel locks or rating locks.
1. Press the MENU button.
2. Select the
Locks option.
3. If the receiver is locked, enter the password using the NUMBER PAD
buttons. The receiver continues to display stars (*) as you enter the digits
of the password. As soon as you enter the fourth digit of the password,
the receiver highlights the
4. Select the
Lock PPV or Unlock PPV option.
OK option. Press the SELECT button.
5. If the receiver is not locked, you must lock it to put the lock you just
created into effect by selecting
Lock System.
Page 66
Page 71
Hiding and Showing Adult Channels
When you hide adult channels, you keep the Program Guide, Themes lists,
and the
anyone from choosing such channels by using the UP or DOWN ARROW
buttons or the remote control NUMBER PAD buttons.
1. Press the MENU button.
Browse Banner from displaying adult channels. It also keeps
Using Locks
2. Select the
Locks option.
3. If the receiver is locked, enter the password using the NUMBER PAD
buttons. The receiver continues to display stars (*) as you enter the
digits of the password. As soon as you enter the fourth digit of the
password, the receiver highlights the
OK option. Press the SELECT
button.
4. Select the
Hide Adult or Show Adult option.
5. If the receiver is not locked, you must lock it to put the lock you just
created into effect by selecting
Lock System.
Changing the Receiver Password
1. Press the MENU button.
2. Select the
If the receiver is locked, enter the password using the NUMBER PAD
buttons. The receiver continues to display stars (*) as you enter the
digits of the password. As soon as you enter the fourth digit of the
password, the receiver highlights the
3. Press the SELECT button.
4. Select the
Locks option.
Change Password option.
OK option.
Page 67
Page 72

Chapter 3
Using the System
5. Enter the current password using the number pad buttons. As soon as
you enter the fourth digit of the password, the receiver highlights the
OK
option. Press the SELECT button.
6. Enter the new password using the number pad buttons. As soon as you
enter the fourth digit of the password, the receiver highlights the
OK
option. Select the OK option to change the password.
Page 68
7. Enter the new password again for confirmation, using the NUMBER
PAD buttons. The receiver continues to display stars (*) as you enter the
digits of the password. As soon as you enter the fourth digit of the
password, the receiver highlights the
OK option. Press the SELECT
button.
8. Memorize the new password. From now on, you must enter this
password to lock or unlock the receiver.
Page 73
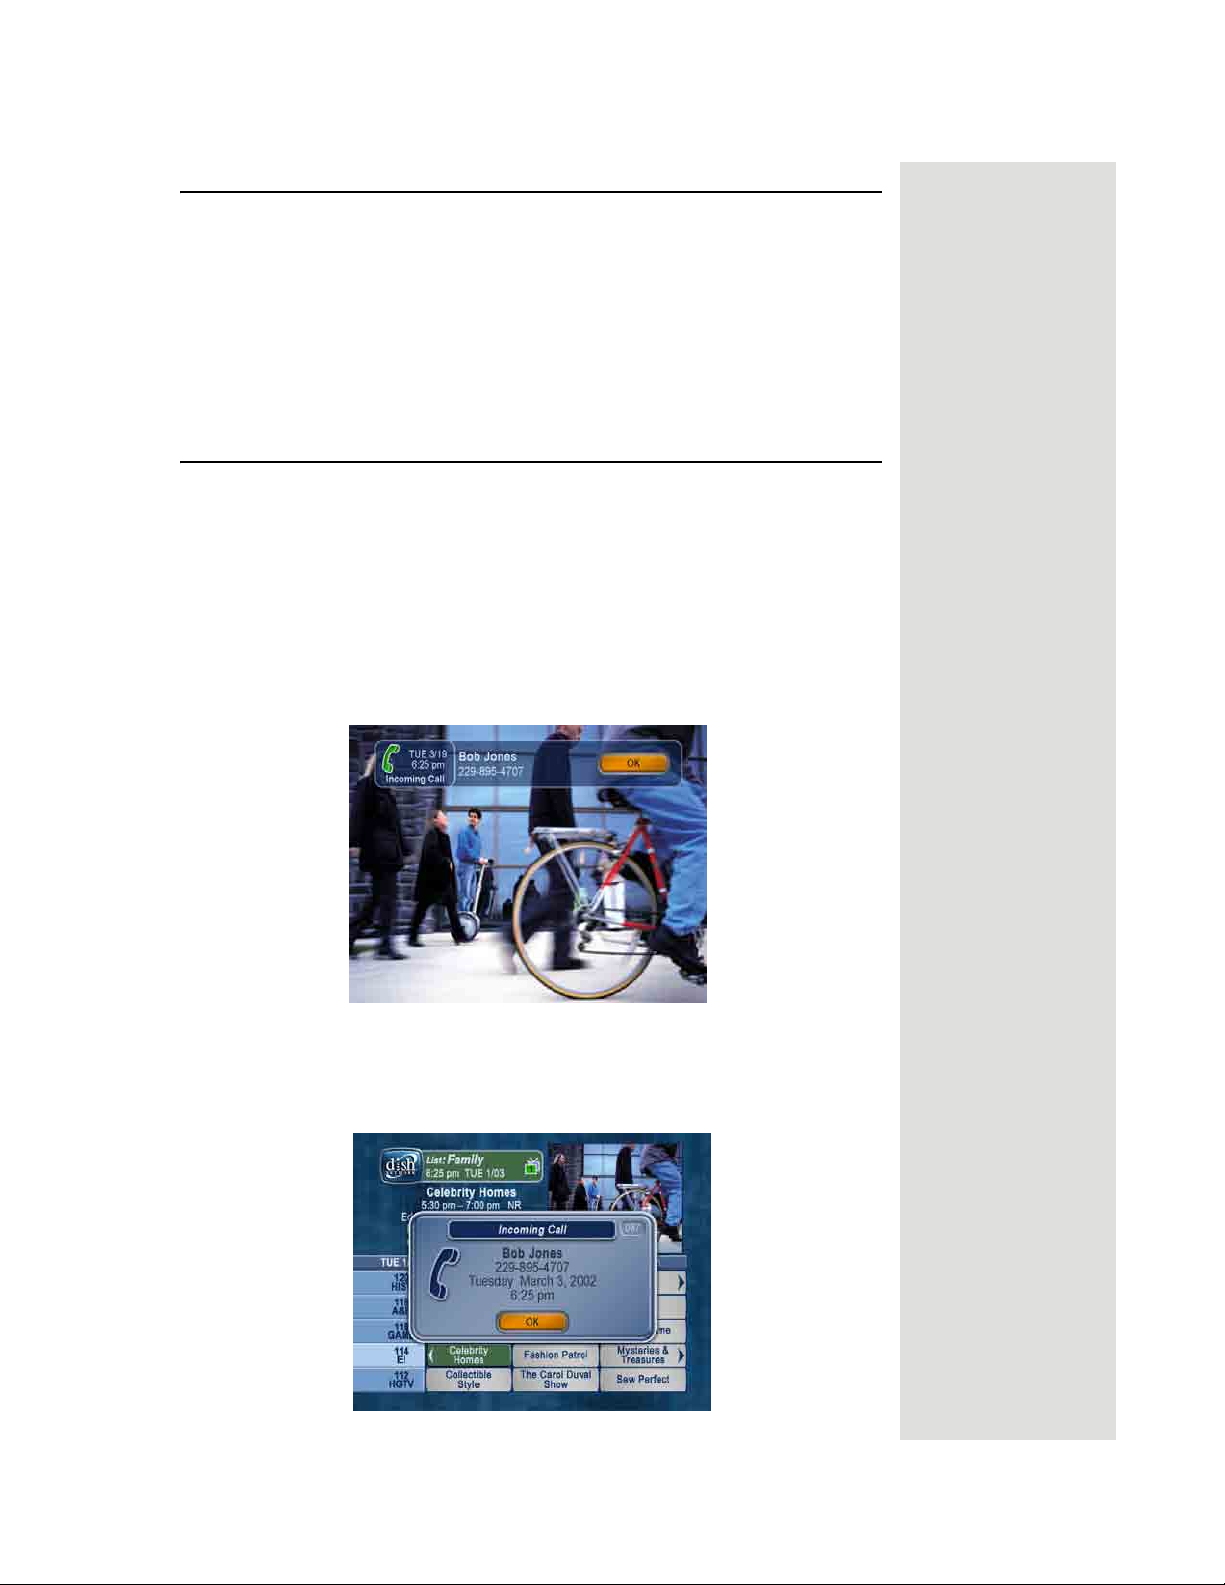
Personal Identification Number
Personal Identification Number
You can set up a Personal Identification Number (PIN) for call-in requests
only. Anyone calling the Customer Service Center must provide this PIN to
make any changes to your account. You may call the Customer Service
Center at any time to set up a PIN.
If you forget your PIN, you will need to speak with a Customer Service
Representative. The representative may ask for more information to make
sure that you are authorized to make changes to your account.
Using Caller ID
Caller ID displays on your TV the names of people as they call you if you
subscribe to
make sure you have a phone line connected to the receiver and that the
Caller ID feature is enabled. After you turn on Caller ID, it stays on until
you decide to turn it off.
Caller ID Screens
Caller ID from your local phone company. To use this feature,
When you receive a call, you will see a Caller ID popup screen.
You can select
disappear after 20 seconds.
If you are in a menu when a call comes in, you will see a different
popup screen.
OK to eliminate the message. If you do nothing, it will
Caller ID
Page 69
Page 74
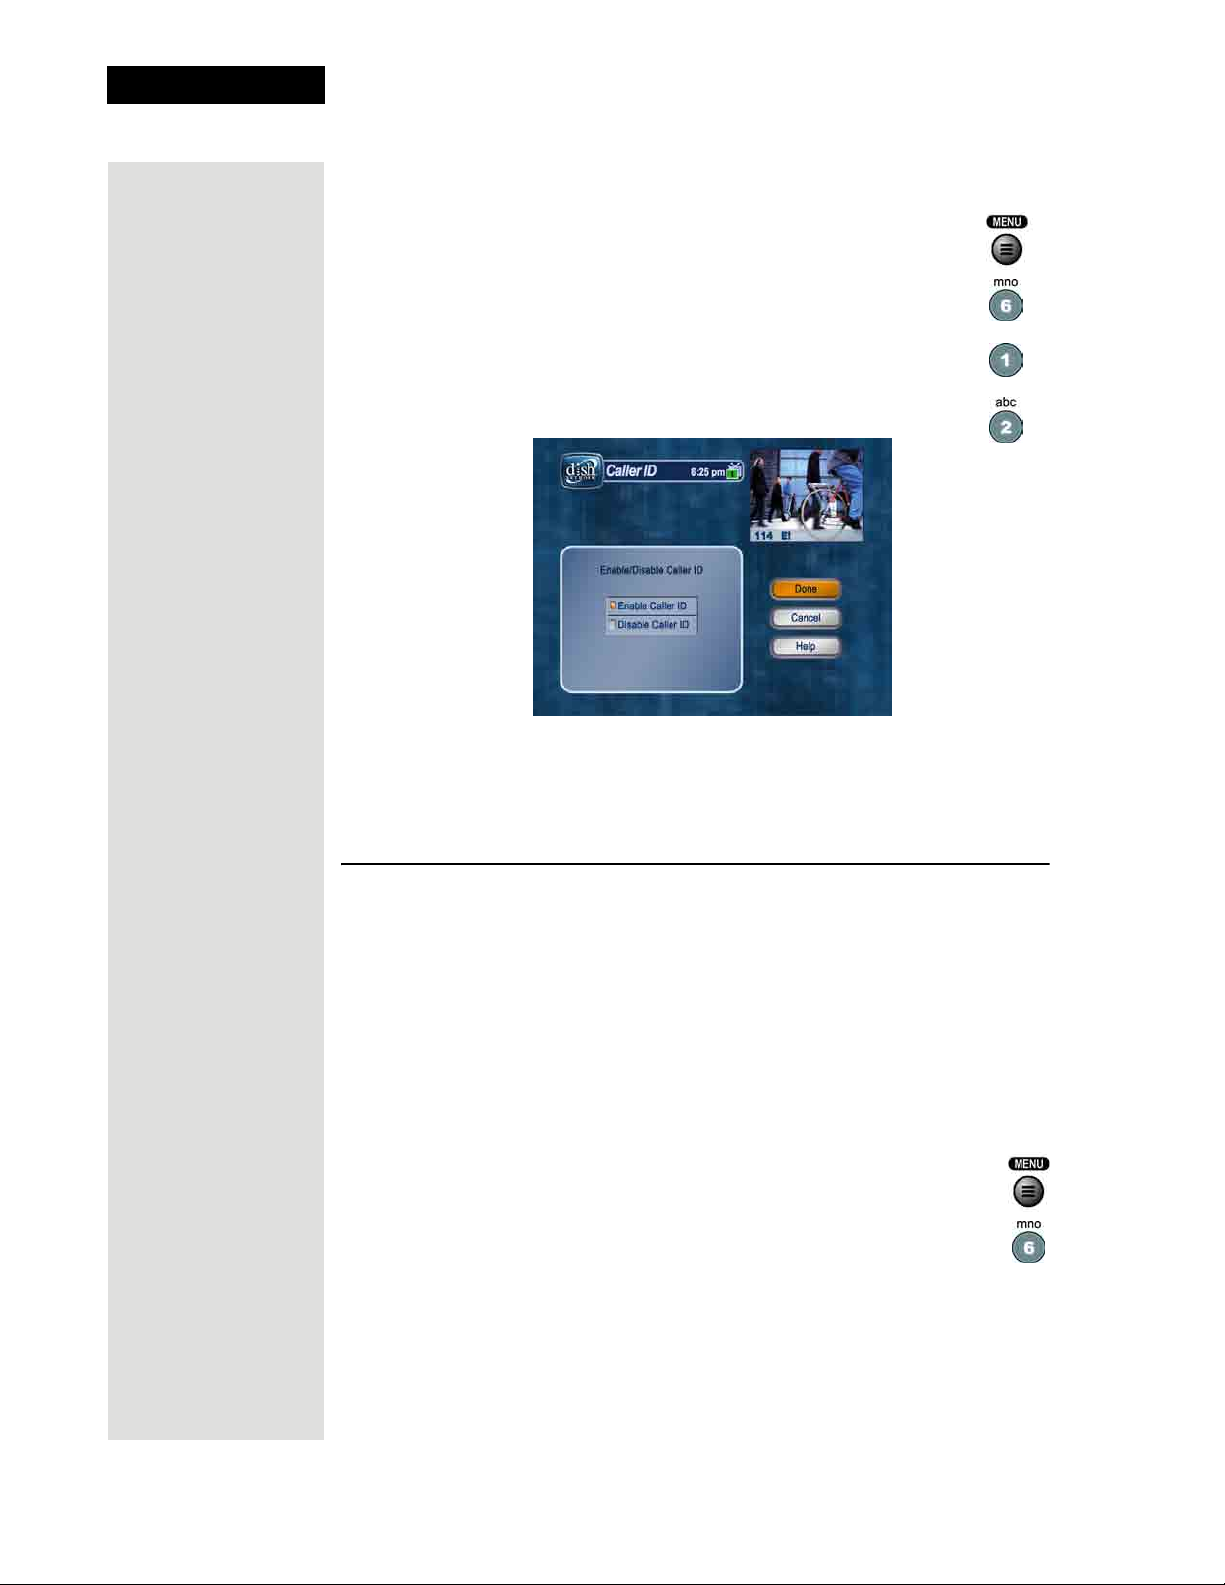
Chapter 3
Using the System
Turning Caller ID On and Off
1. Press MENU on the remote control.
2. Select
3. Select
4. Select
5. Select
6. Select
System Setup.
Installation.
Caller ID.
Enable Caller ID or select Disable Caller ID.
Done.
Resetting to Factory Default Settings
Page 70
Note: Resetting the receiver to factory default settings discards all Favorite
except the All Chan and All Sub lists.
Lists
Note: If you have set any locks on the receiver, and the receiver is locked,
these locks will be kept. If the receiver is unlocked, any such locks will be
lost; however, you cannot reset the receiver to factory default settings to
bypass a lock or to discard a password you have forgotten. Call the Customer
Service Center if you have forgotten your password.
Complete the following instructions if you want to reset the receiver to be
the same as when it was shipped from the factory.
1. Press the MENU button.
2. Select the
System Setup option.
Page 75
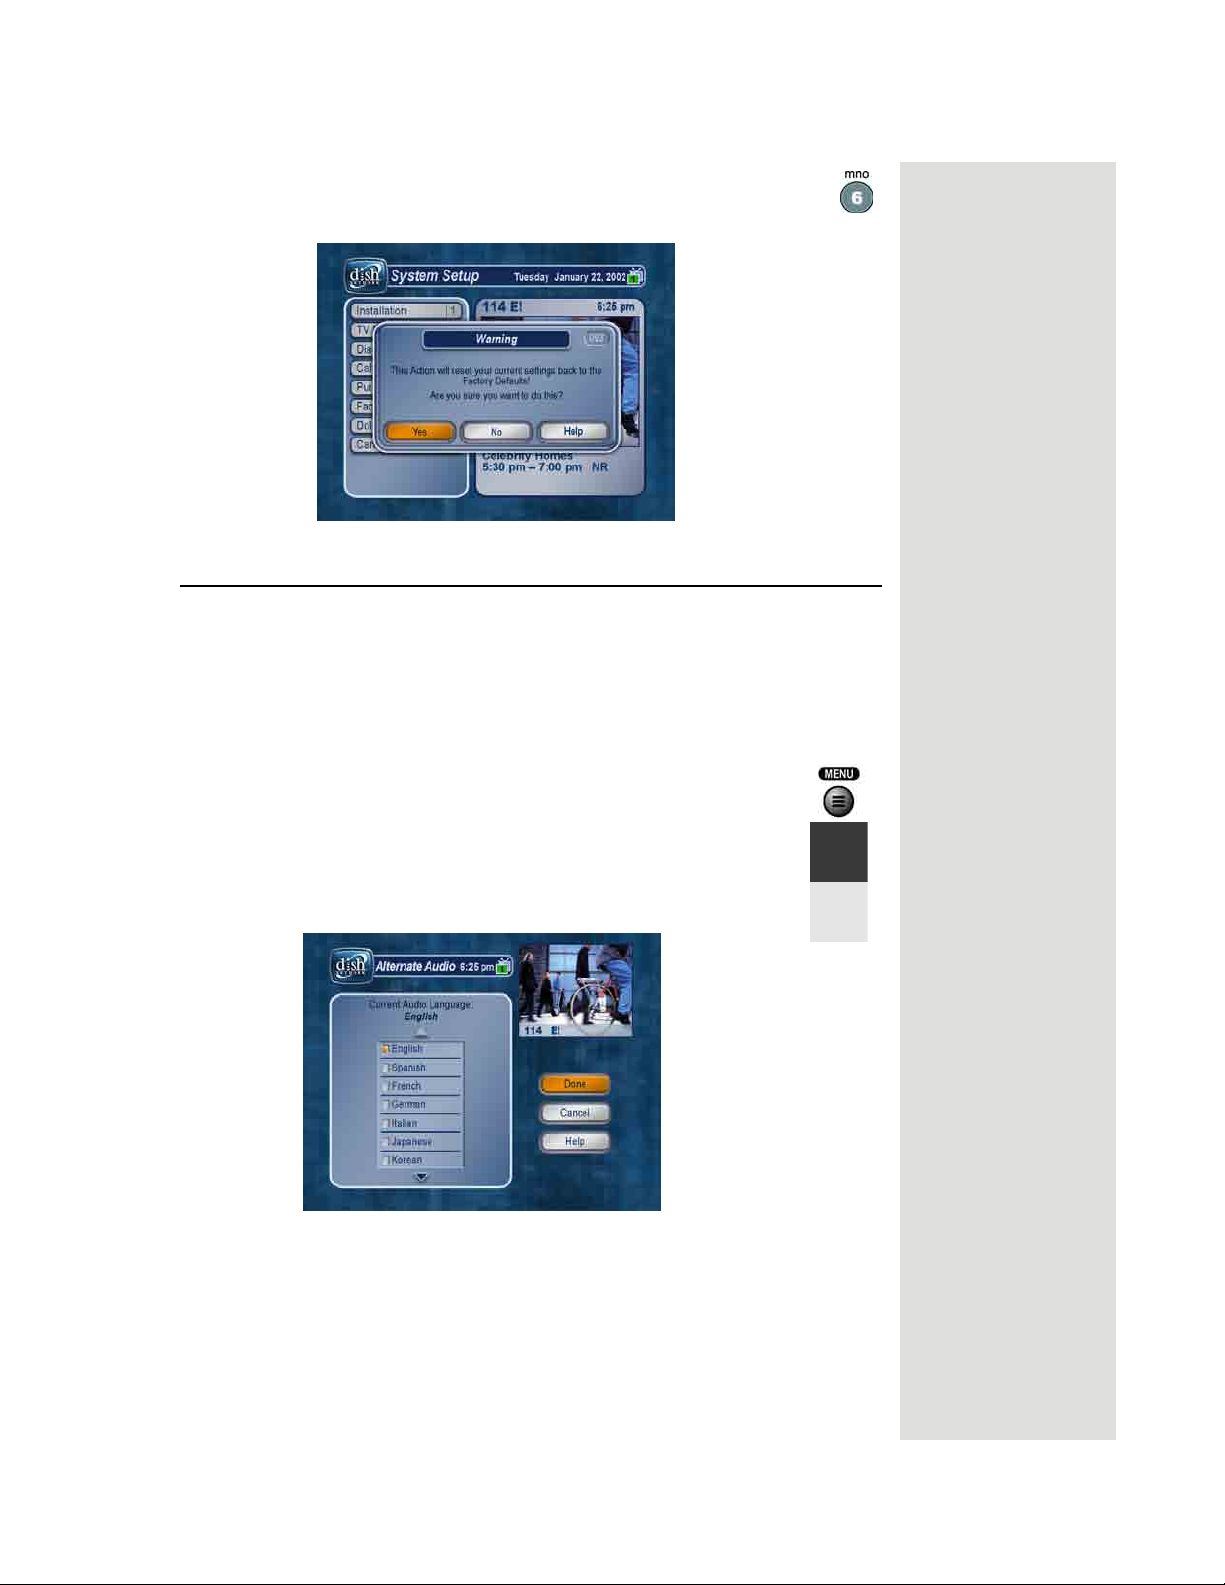
Changing Program Languages
3. Select the Factory Defaults option. When the receiver displays
Warning message, confirm that you want to reset the receiver
a
to factory default settings.
Changing Program Languages
You may be able to change the language of some programs. An alternate
language may not be available for all programs. Some programs, such as
movies, show at the start whether an alternate language is available. An
alternate language applies only to the audio part of a program and does not
change the language used in the menus displayed by the receiver.
1. Press the MENU button.
2. Select the
3. Select the
System Setup option.
Alternate Audio option.
4. Select the language you want in the
5. Select the
displays the
Done option to save your language choice. The receiver
System Setup menu.
Languages list.
Page 71
Page 76

Chapter 3
Using the System
Tip: Remote
Control 1 is used to
control TV1 menus
on the nearby TV.
Remote Control 2
is used to control
TV2 menus on the
remote TV(s).
Control Other Devices with the Remote Controls
This section describes how to use Remote Control 1 or Remote Control 2 to
control with a TV, a VCR, or other devices. For information on how to use
the remote to control the receiver, see Using the Remote Controls on page
37. You can set up both remote controls to control the satellite TV receiver
and up three other devices each. These devices can be a TV, a VCR or DVD
player, and a third device.
Where the word “remote” is used in the following section, it applies to both
Remote Control 1 and Remote Control 2.
Remote Control Modes
You can set the remote to four different modes to control the receiver or
other devices. When you get the remote it’s already set up to control the
receiver. You must set up the remote to control a device like a TV or a VCR.
See Set Up the Remote to Control Other Devices, below.
Use the remote control’s mode buttons, SAT (satellite receiver), TV (for a
TV), VCR (for a VCR or a DVD player), and AUX (“auxiliary,” for a second
TV, a second VCR, a tuner, or an audio amplifier) to set the remote to the
right mode for the device. To change the mode, press the button for the
device you want the remote to control. The mode button lights for two
seconds to show you’ve set the remote to that mode.
Tip: Limited mode
is not used with
amplifiers.
Limited Mode
You can program your remote control in limited mode to keep from
accidentally changing the channel on your TV or VCR. When you use the
remote to control your TV in limited mode, you will only be able to use the
POWER, MUTE, and VOLUME buttons. Also, when you use the remote to
control your VCR in limited mode, you will only be able to use the power
and VCR function buttons. The section Setting Up the Remote to Control
Other Devices has a step that tells the remote control to go into limited
mode.
Note: You can use Limited Mode for TV and VCR codes programmed in
AUX mode.
Set Up the Remotes to Control Other Devices
Over the next few pages we tell you how to use the remote to control a TV, a
VCR, a DVD player, a tuner, or an amplifier.
To use the remote to control other devices, you must first program it to
control these other devices. You can do this by either following the
instructions in Set Up the Remote Control below, or the Scan for Device
Codes procedure described on page 74.
If you are programming the remote to control a combination device, such as
a TV/VCR or a VCR/DVD, program the remote control in one mode, and
then repeat the procedure in the other mode. For example, to program the
remote to control a TV/VCR using code 748: Follow the instructions to
program the remote to control the TV using code 748, and then repeat the
instructions for the VCR using the same code.
Page 72
Page 77

Control Other Devices with the Remote Controls
Set Up the Remote Control
1. Turn the device on. Use the device’s front panel buttons
or its remote control.
2. Find the brand name of the
device in the tables starting on
page 113.
3. Press and hold the mode
button until all the other mode
buttons light up, and then let
go of the button.
The mode button flashes.
If you are repeating this
procedure to program a
combination device, be sure to
press the correct mode button
(for example, if you have a
TV/VCR combination and
you have already programmed
the remote to control the TV,
press and hold the VCR mode
button as described above).
4. For AUX mode only:
• Press 0 for a second TV.
• Press 1 for a second VCR
or DVD player.
• Press 2 - for a tuner or
amplifier.
If the brand isn’t listed, see Scan for
Device Codes on page 74.
For example, hold the TV mode
button for a TV until all of the other
mode buttons light. When you let
go, the TV mode light will flash.
This step is for programming which
kind of device that should be
programmed in AUX mode. If
you’re not programming in AUX
mode, skip to step 5.
5. Enter one of the three-digit
device codes from the table
using the number buttons.
6. If you want to program
limited mode, press 1. If not,
skip to step 7.
7. Press the POUND (#) button. If you entered the code correctly, the
8. Press the blank POWER
button to turn off the device. If
the device does not turn off,
go to step 10.
The three-digit device code should
be for the brand name of your device
that you found in step 2.
See Limited Mode for more
information.
mode button flashes three times.
If the code works, the device should
turn off.
Page 73
Page 78

Chapter 3
Using the System
9. Turn the device back on and
try some other appropriate
buttons to make sure they
work. If the code works for
other buttons, stop here.
10. If the code doesn’t work, redo
steps 3 through 9 with another
device code from the tables.
11. If you can’t find a code that
works try Scan for Device
Codes that follows.
Sometimes the blank POWER
button works when other buttons
don’t.
Try every code listed for you brand
until one works for your device.
Scan for Device Codes
If the code for your device is not listed in the tables starting on page 113, use
this procedure to scan the remote control’s memory for the device code.
1. Turn the device on. Use the device’s front panel buttons
or its remote control.
2. Press and hold the mode
button until all the other mode
buttons light up, and then let
go of the button.
For example, hold the TV mode
button for a TV until all of the other
mode buttons light. When you let
go, the TV mode light will flash.
The mode button flashes.
3. For AUX mode only:
• Press 0 for a second TV.
• Press 1 for a second VCR
or DVD player.
• Press 2 - for a tuner or
amplifier.
4. For AUX mode only: Press the STAR (*) button.
5. Press the blank POWER
button.
6. Press the UP or DOWN
ARROW button repeatedly
until the device turns off.
This step is for programming which
kind of device that should be
programmed in AUX mode. If
you’re not programming in AUX
mode, skip to step 4.
This puts your remote in the scan
mode.
As you press the UP or DOWN
ARROW button, the remote is
trying each code in the memory to
see if it can turn off your device.
When the device turns off, you have
found a code that might work.
Note: The mode button for the
device will flash rapidly eight times
when you’ve scanned all the codes
for that device.
Page 74
Page 79

Control Other Devices with the Remote Controls
7. Press the POUND (#) button. This stores the code you found.
8. Turn the device back on and
try some other appropriate
buttons to make sure they
work.
Press the blank POWER button to
turn the device back on. Try some
other buttons to make sure they
work. Sometimes, the blank
POWER button works when other
buttons don’t.
9. Repeat this procedure until
you’ve tried all the codes.
You may need to repeat the scan to
find the best code for your device.
Check the Device Codes
You can find out what device code you’ve set for each remote control mode.
1. Press and hold the mode
button until all the other mode
buttons light up, and then let
go of the button.
The mode button flashes.
2. Press the POUND (#) button
twice.
Watch the mode light to
determine your code. The
mode button flashes the
number for each digit of the
device code, with a pause
between the groups of flashes.
A quick flash is for zero.
For example, hold the TV mode
button for a TV until all of the other
mode buttons light. When you let
go, the TV mode light will flash.
For example, if the code is 570, the
mode button flashes five times,
pauses, flashes seven times, pauses,
and flashes once quickly.
Tip: Remote
Control 1 is used to
control TV1 menus
on the nearby TV.
Remote Control 2
is used to control
TV2 menus on the
remote TV(s).
3. For AUX mode only. The first
group of flashes tells you what
the AUX mode controls. A
quick flash (zero) before the
three-digit code is for a TV;
one regular flash is for a VCR
or DVD player; and two
flashes is for a tuner or
amplifier.
For example, if the TV code is 570,
the AUX mode button flashes once
quickly (indicating 0 for TV),
pauses, flashes five times, pauses,
flashes seven times, pauses, and
flashes once quickly.
Page 75
Page 80
Chapter 3
Using the System
Remote Control Buttons
Control the Receiver
When you get the remote it’s already set up to control the receiver. However,
you must set up the remote to control the TV before you can use the MUTE
and VOLUME buttons.
For information on the remote buttons that control the receiver, see Using
the Remote Controls on page 37.
Control a TV (or a Second TV)
Only the buttons described here control a TV. Some of the buttons described
here may not control your TV. Please see your TV user’s manual for
information about the TV’s features.
TV Mode Button
You must first set up the remote to control the TV. See Set Up the Remote to
Control Other Devices, beginning on page 72. Then, you must press the TV
mode button to set the remote to TV mode. The TV mode button lights for
two seconds to show you’ve set the remote to TV mode. Make sure you keep
the remote in TV mode to use the buttons described here.
Note: You can set up the remote to control a second TV in AUX mode, the
same way it controls the first TV in TV mode. See Set Up the Remote to
Control Devices beginning on page 72.
TV/Video Button
If the TV has video input options, use this button to switch the TV video
input.
Power Button
Press the TV POWER button to turn the TV on or off.
Mute Button
Press the MUTE button to turn the TV sound on or off.
Volume B utto n
Press this button to raise (+) or lower (-) the TV sound volume.
Page 76
Page 81
Control Other Devices with the Remote Controls
Up and Down Arrow Buttons
Use the UP and DOWN ARROW buttons to change channels on the TV.
Note: These buttons do not change the channels on the TV if the remote
control is in limited mode.
Select Button
The SELECT button works as the ENTER button for a TV.
Recall Button
Press the RECALL button to go back to the last TV channel you watched.
Press it again to switch between the last two TV channels you watched.
Number Buttons
Use the NUMBER buttons to directly enter a different channel.
Note: These buttons do not change the channels on the TV if the remote
control is in limited mode.
Page 77
Page 82
Chapter 3
Using the System
Control a VCR (or a Second VCR or a DVD Player)
Only the buttons described here control a VCR or DVD player. Some of the
buttons described here may not control your VCR or DVD player. See the
user’s manual that came with your VCR or DVD player for information
about the features.
VCR Mode Button
Yo u must first set up the remote to control the VCR or DVD player. See Set
Up the Remote to Control Devices, beginning on page 72. Then, you must
press the VCR mode button to set the remote to VCR mode. The VCR mode
button lights for two seconds to show you’ve set the remote to VCR mode.
Make sure you keep the remote in VCR mode to use the buttons described
here.
Note: You can set up the remote to control a second VCR or DVD player in
AUX mode, the same way it controls the first VCR or DVD player in VCR
mode. See Set Up the Remote to Control Devices beginning on page 72.
Note: You must set the remote to VCR mode to set it up to control a DVD
player.
TV/Video Button
Use the TV/VIDEO button to switch the VCR between its TV mode and its
VCR mode (see your VCR user’s manual for information).
Power Button
Press the blank POWER button to turn the VCR on or off.
Page Up and Down Arrow Buttons
Use the PAGE UP and DOWN ARROW buttons to change channels on the
VCR.
Note: If you are using the remote control in limited mode, the VCR will not
change channels.
Page 78
Recall Button
Press the RECALL button to go back to the last VCR channel you used.
Press it again to switch between the last two VCR channels you used.
Page 83
Control Other Devices with the Remote Controls
VCR Buttons
•Press the LEFT ARROW button to rewind a videotape
or DVD.
•Press the DOWN ARROW button to pause a
videotape or DVD. Press this button or the PLAY
button to go back to playing the tape or DVD.
•Press the RIGHT ARROW button to fast forward a
videotape or DVD.
•Press the STOP button to stop playing or recording
on a videotape or DVD.
•Press the RECORD button to record on a videotape.
•Press the SELECT button to play or to go back to playing
a videotape or DVD.
Number Buttons
Use the NUMBER buttons to enter channel numbers.
Note: If you are using the remote control in limited mode, the VCR will not
change channels.
Page 79
Page 84
Chapter 3
Using the System
Control a Tuner or Amplifier
Only the buttons described here control a tuner or amplifier. Some of the
buttons described here may not control your tuner or amplifier. Please see
the user’s manual that came with your tuner or amplifier for more
information.
AUX Mode Button
Yo u must first set up the remote to control the device. See Set Up the Remote
to Control Devices, beginning on page 72. Then, you must press the AUX
mode button to set the remote to AUX mode. The AUX mode button flashes
once to show you’ve set the remote to AUX mode. Make sure you keep the
remote in AUX mode to use the buttons described here. Refer to TV Mode
Button and VCR Mode Button, as appropriate, for the buttons available for
use in AUX mode.
Power Button
Press the blank POWER button to turn the tuner or amplifier on or off.
Mute Button
Press the MUTE button to turn the sound off or on.
Volume B utto n
Press the VOLUME button to raise (+) or lower (-) the volume.
Up and Down Arrow Buttons
Use UP and DOWN ARROW buttons to change channels on the tuner or
amplifier.
Page 80
Select Button
The SELECT button works as the INPUT SELECT button for the tuner or
amplifier.
Page 85
Control Other Devices with the Remote Controls
Other Remote Control Features
Switch Between TV and AUX Device Volume Control
When you set up the remote to control a TV, the mute and volume buttons
control the TV volume. However, if you want to use the AUX mode to
control a tuner or amplifier and the device has a volume setting, you can set
up the remote to control the device’s volume instead of the TV volume.
To set the remote to control the device’s volume:
1. Press and hold the AUX mode button for three seconds, and
then release it. The AUX mode button will blink.
2. Press the POUND (#) button.
3. Press the plus (+) side of the VOLUME button.
4. Press the 0 number button.
5. Press the POUND (#) button.
The AUX mode button flashes three times.
6. Press the SAT mode button.
7. Press the plus (+) and minus (-) sides of the
VOLUME button.
The device’s volume changes and the AUX mode
button lights instead of the TV mode button.
To set the remote back to control the TV volume:
1. Press and hold the TV mode button for three seconds, and then
release it. The TV mode button will blink.
2. Press the POUND (#) button.
3. Press the plus (+) side of the VOLUME button.
4. Press the 0 number button.
Page 81
Page 86
Chapter 3
Using the System
5. Press the POUND (#) button.
The TV mode button flashes three times.
6. Press the SAT mode button.
7. Press the plus (+) and minus (-) sides of the
VOLUME button.
The TV’s volume changes and the TV mode button
lights instead of the AUX mode button.
Testing the System
Starting a Test
1. Press the MENU button.
2. Select
3. Select
System Setup.
Diagnostics.
Telephone Connection Test
This test checks that the receiver telephone connection is correct. Select the
Connection option to begin the test. The receiver displays a message asking
you to wait until the test is done.
Page 82
• If the telephone connection is correct, the receiver displays a
Connection OK
• If the receiver highlights the
message.
Done option, select the Dial Out option so
Phone
the receiver can make a toll-free call to the Customer Service Center.
The receiver displays a message asking you to wait until the call is done.
When the call is done, select the
Done option to exit the test menu.
Page 87
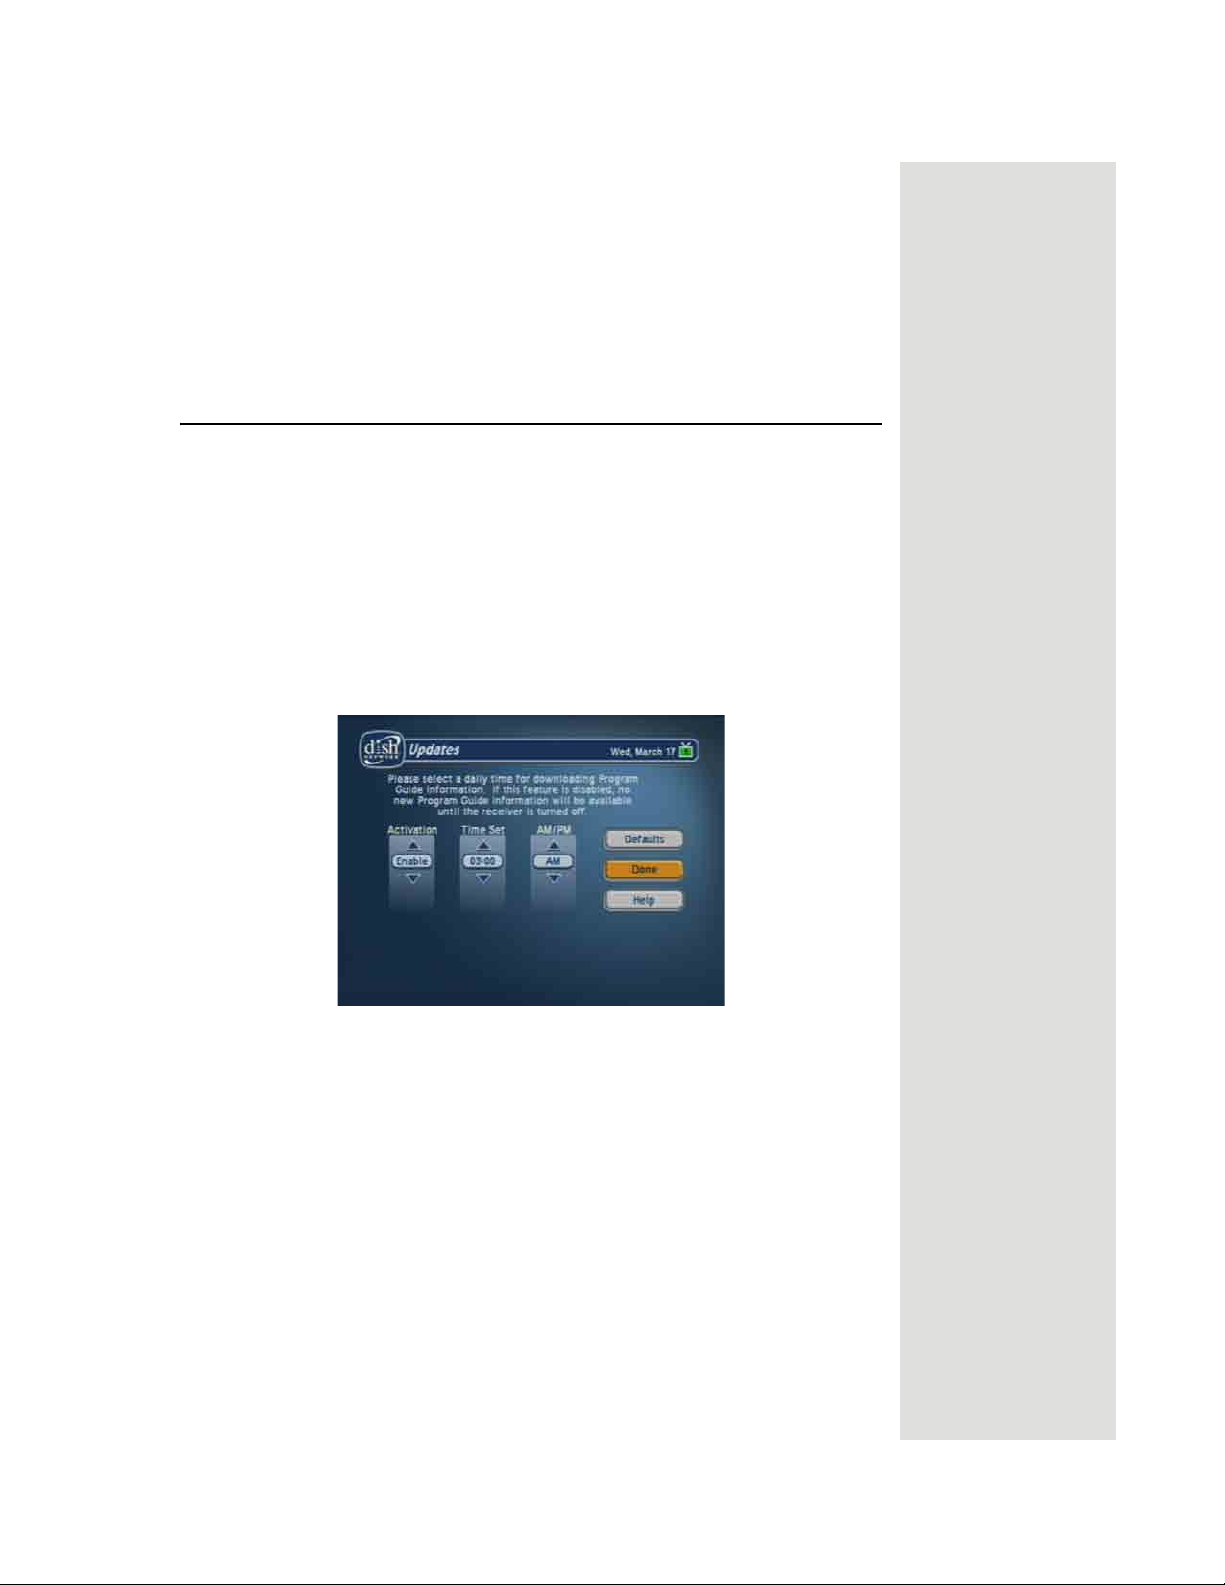
• If the telephone line is not connected properly, the receiver displays a
failure message. In this case, check the telephone connection and then
repeat the test.
Note: If you have the receiver connected to a DSL (Digital Subscriber
Line) phone line, it may cause this test to fail. If so, you will need to
install a DSL filter between the receiver and the phone jack on the wall.
You should be able to get a DSL filter from your DSL provider, or your
local electronic parts store.
System Updates
Your receiver includes a feature that allows you to set the time in
which your receiver downloads
Updates feature is enabled, the receiver will shut off every day at the same
time receive a software update. The default time for this feature is 3:00 a.m.
1. Press the MENU button.
Program Guide information. When the
System Updates
2. Select
3. Select
4. Select
5. Highlight the
System Setup.
Installation.
Updates.
Activation field.
6. Press the UP or DOWN ARROW button to enable or disable the
automatic update feature.
Note: If you disable this feature, no new Program Guide information
will be available until the you turn off the receiver.
7. Highlight the
Time Set field.
8. Use the NUMBER PAD buttons to set the time that you want the
system to update the
9. Highlight the
AM/PM field.
10. Press the UP or DOWN ARROW button to set
Program Guide.
AM or PM.
Page 83
Page 88

Chapter 3
Using the System
11. When you are finished making changes, select Done to close the screen.
Note: If you do not want to save your changes or if you want to reset the
time the system updates the
Done.
select
Program Guide, select Defaults and then
Page 84
Page 89
Chapter 4
Dish Antenna Installation
These instructions guide you through the installation of a satellite system which
includes your receiver (included with this manual), and a DISH Pro DISH 500
antenna system that can be identified by the DISH Pro logo shown below.
Installing a DISH 500 Antenna
The first step in installing your dish antenna is to assemble the satellite dish,
mount it, and point it in the general direction of a satellite. To do this, follow
these instructions:
Finding the Satellites
You need to find the satellites in the sky. To do this, you need to know the azimuth
angle (the south, southeast, or southwest direction to the satellites) and the elevation
angle (the angle up to the satellites) from your location, and the skew angle.
1. Make sure that the batteries are fresh in both remote controls, and are installed
properly. If needed, make sure that the remote is in SAT mode to control the
satellite receiver.
2. Make sure your satellite receiver is connected to your TV(s) and confirm that
the remote controls are controlling the menus properly using the instructions in
Chapter 2. Turn ON the television and receiver.
3. Display the
6-1-1 using Remote Control 1 (unless your TV already displays this menu).
Point Dish menu on the nearby TV by pressing MENU and then
Tip: Remote
Control 1 is used to
control TV1 menus
on the nearby TV.
Remote Control 2
is used to control
TV2 menus on the
remote TV(s).
4. Enter your ZIP code in the
5. Make sure that
500 is shown under Dish System.
ZIP Code field.
Page 85
Page 90
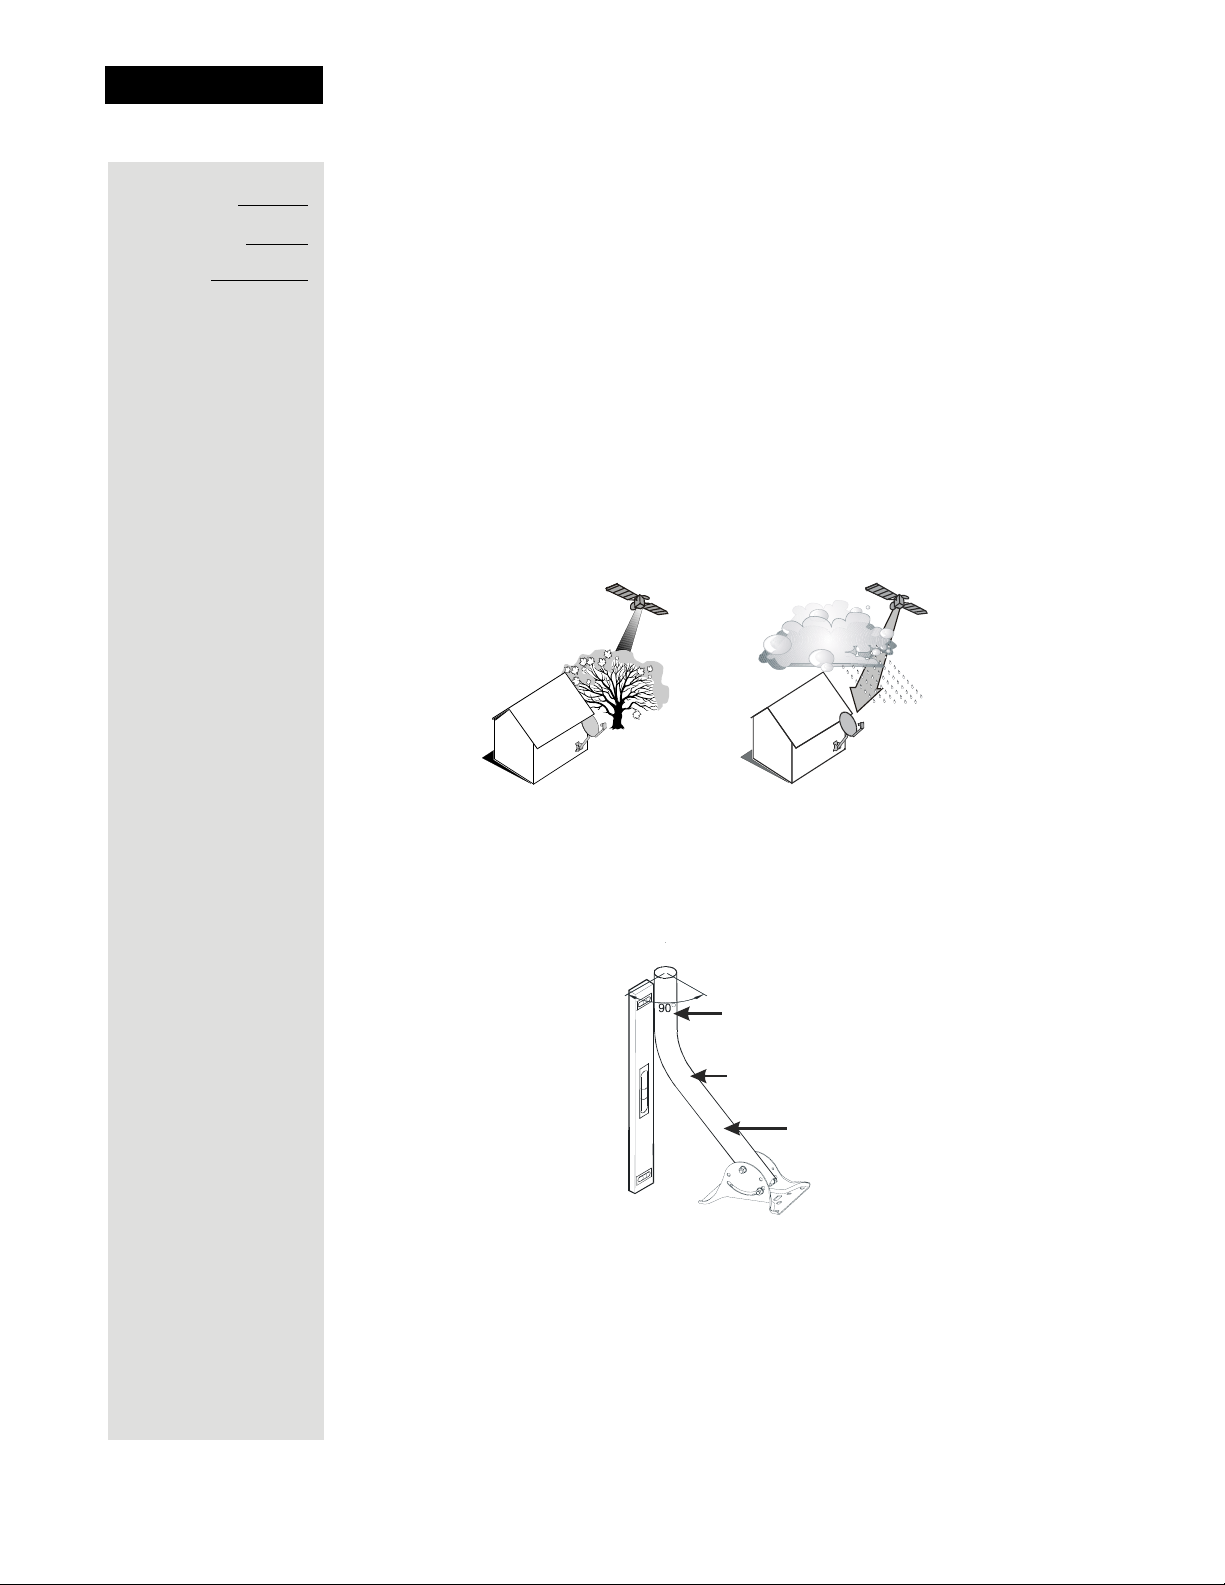
Chapter 4
Dish Antenna Installation
6. The menu displays the azimuth, elevation, and skew angles. Write down these
Azimuth:
numbers in the blanks provided in the margin.
Elevation:
Skew:
Mounting the Dish
1. Using the azimuth and elevation angles, find a location for the satellite dish
which can be pointed towards the satellites located at these angles. With a
compass, find the required azimuth angle. Then, use the elevation angle to find
out how high the satellites are in the sky from your location.
Make sure nothing blocks the line of sight between the dish and the satellites.
2. Mount the mast to a solid surface so that the dish antenna cannot move or be
bumped out of adjustment. Keep in mind that physical and environmental
conditions can block your satellite dish’s ability to receive a clear satellite
signal. The conditions to be aware of are: Eaves and overhangs on your building
or house, wind, plant growth, and deterioration of the mounting surface. Never
mount to a tree or a public utility pole.
NO YES
3. Align the top part of the mast so that it is absolutely vertical, as shown below. If
the top part of the mast is off vertical by only a few degrees, it will be difficult or
maybe even impossible for you to find the satellites. Take at least two readings
with a bubble level, on the upper mast, that are 90 degrees apart from one
another.
Top Part
of Mast
Bubble Level
Mast
Page 86
Page 91
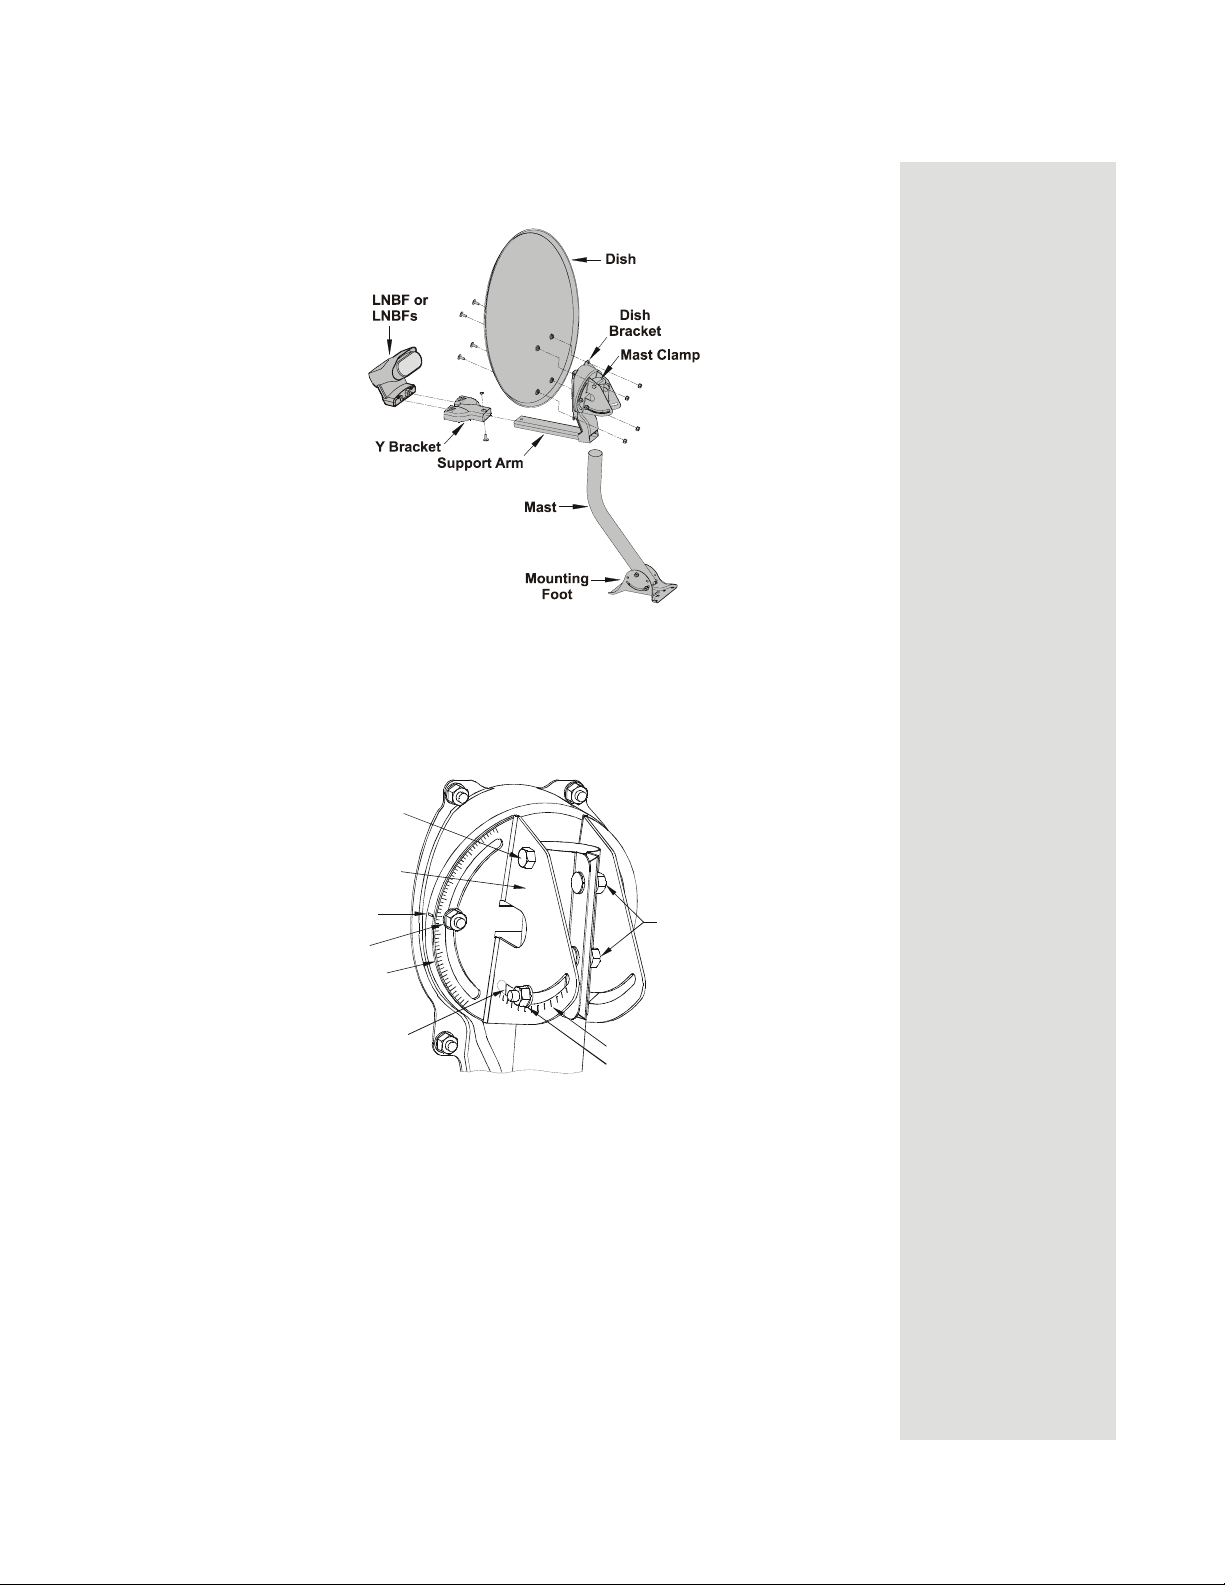
Installing a DISH 500 Antenna
s
4. Assemble the satellite dish as shown below, except do not attach the Ybracket or LNBF at this time.
5. Loosen both skew bolts and set the skew by rotating the dish mounting
bracket to align the red mark with the required angle on the skew scale
which you wrote down on page 86. Tighten the skew bolts securely to keep
the dish from rotating. Once the skew is set, do not try to fine-tune this
angle when aiming the dish.
Pivot Bolt
Elevation Bracket
Skew Point
(Red Mark)
Skew Bolt
Skew Scale
Red Edge
Mast Clamp Bolt
Elevation Scale
Elevation Bolt
6. Set the elevation by tilting the dish mounting bracket to align the red edge
with the required angle from page 86 on the elevation scale. Tighten the
elevation bolts, but do not tighten the pivot bolt at this time.
7. Slide the dish assembly down onto the mast. Make sure the pivot bolt rests
on the top of the mast. Turn the dish assembly so that it points in the general
direction of the satellites, using the azimuth angle from page 86.
8. Thread two RG-6 coaxial cables through the mast, support arm, and
the Y-bracket. These cables should be long enough to run from your
receiver to your LNBF.
Note: See Running Coaxial Cables on page 99 for cable installation
guidance.
Page 87
Page 92
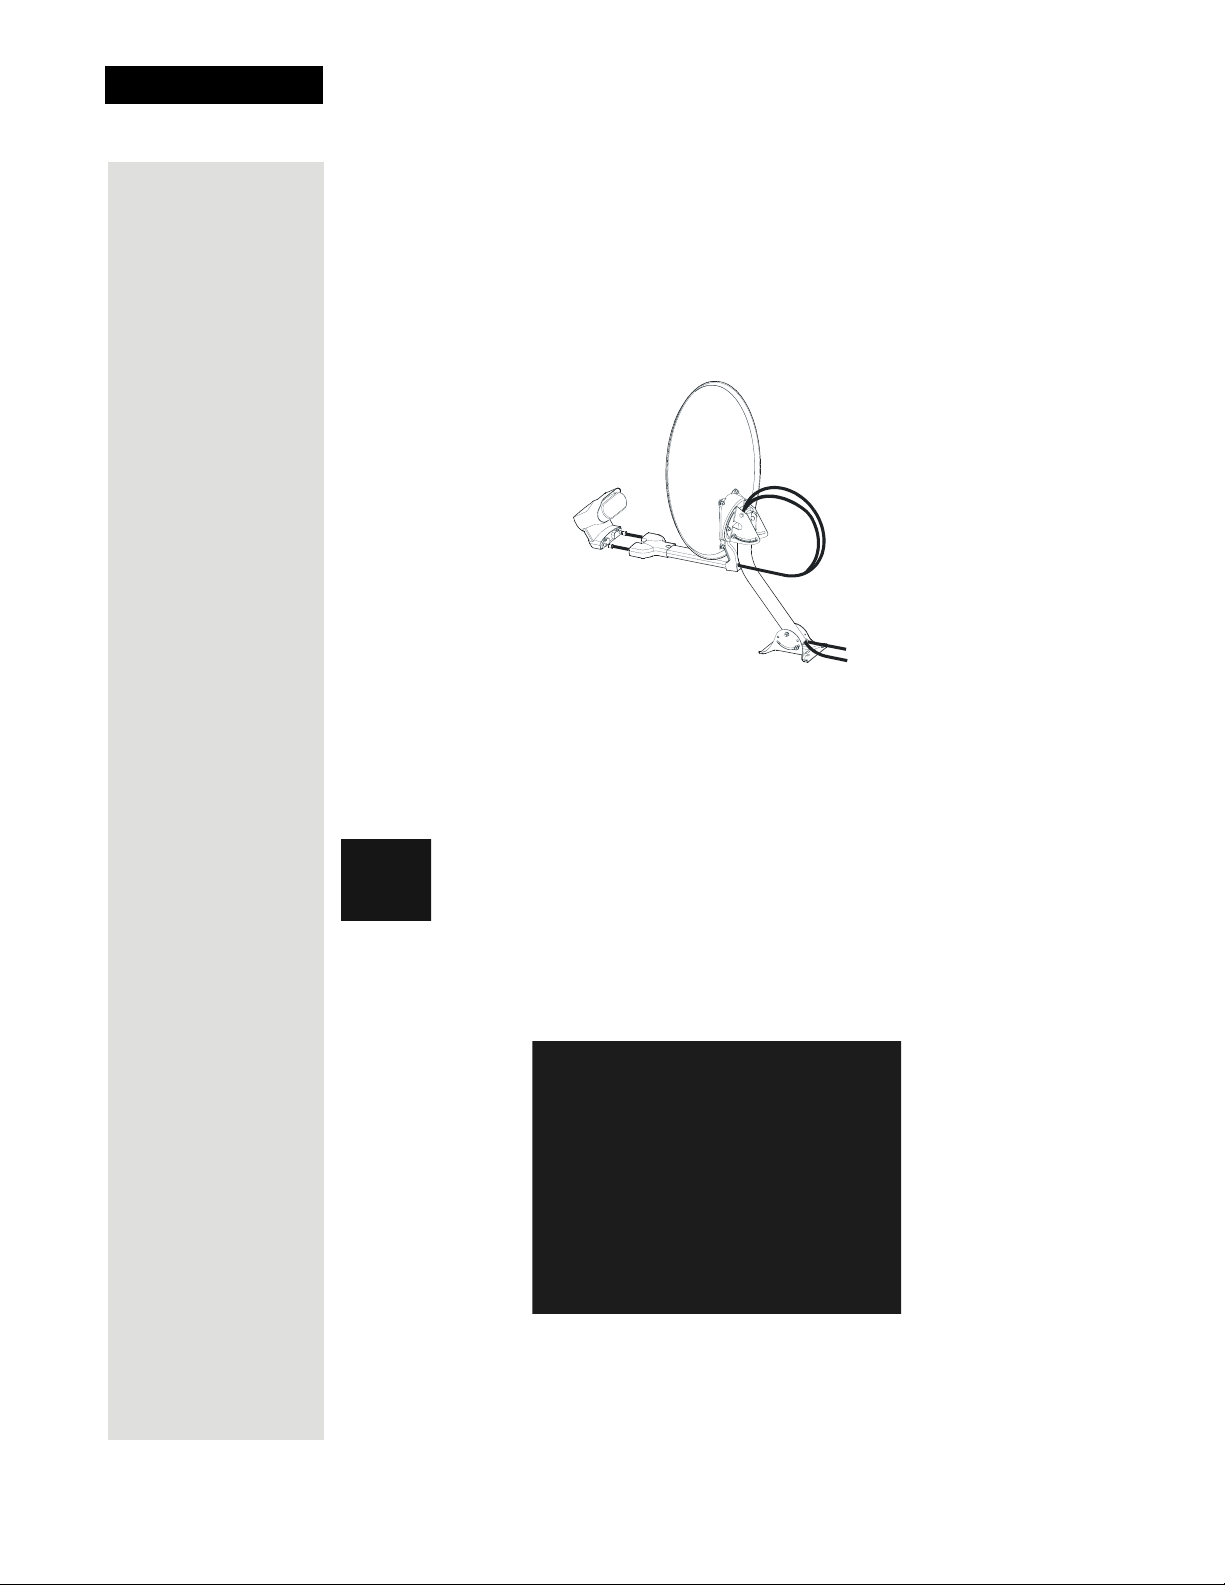
Chapter 4
Dish Antenna Installation
Note: You can have as much as 200 feet of cable between the DISH Pro LNBF
and the DISH Pro receiver. However, you must use only RG-6 coaxial cables
rated for 950 to 2150 MHz. Some cables may say "Swept tested for 2150 MHz."
If you have any doubt about this, ask your DISH Network retailer, examine the
cable’s outer jacket, or look on the container the cable came in. Do not use cable
company TV cables or cables from other satellite TV systems not rated for 9502150 MHz. These other cables may cause signal loss. Do not use existing cables
such as RG-59. Also, be sure that any outdoor connections are made using
waterproof F-connectors.
9. Attach the Y-bracket, using the Y-bracket screw.
10. Connect the RG-6 cables from the two S
ATELLITE IN connections on the back of
the receiver directly to the two ports of the DISH Pro Twin LNBF, as shown
below. Be sure there are no multi-dish switches between the LNBF and the
receiver.
Tighten all of the coaxial cable connections only by hand. If you use a
wrench, you may over-tighten the connections and damage your
equipment. Such damage is not covered by the limited warranty.
11. Attach the LNBF to the Y-bracket using the two LNBF screws.
12. You should see the
Point Dish menu on your nearby TV. If not press MENU
and then 6-1-1 on Remote Control 1.
Page 88
13. Select
14. Select
Check Switch. The Check Switch screen will open.
Retest. The receiver shows you a message that it is checking the system.
Page 93
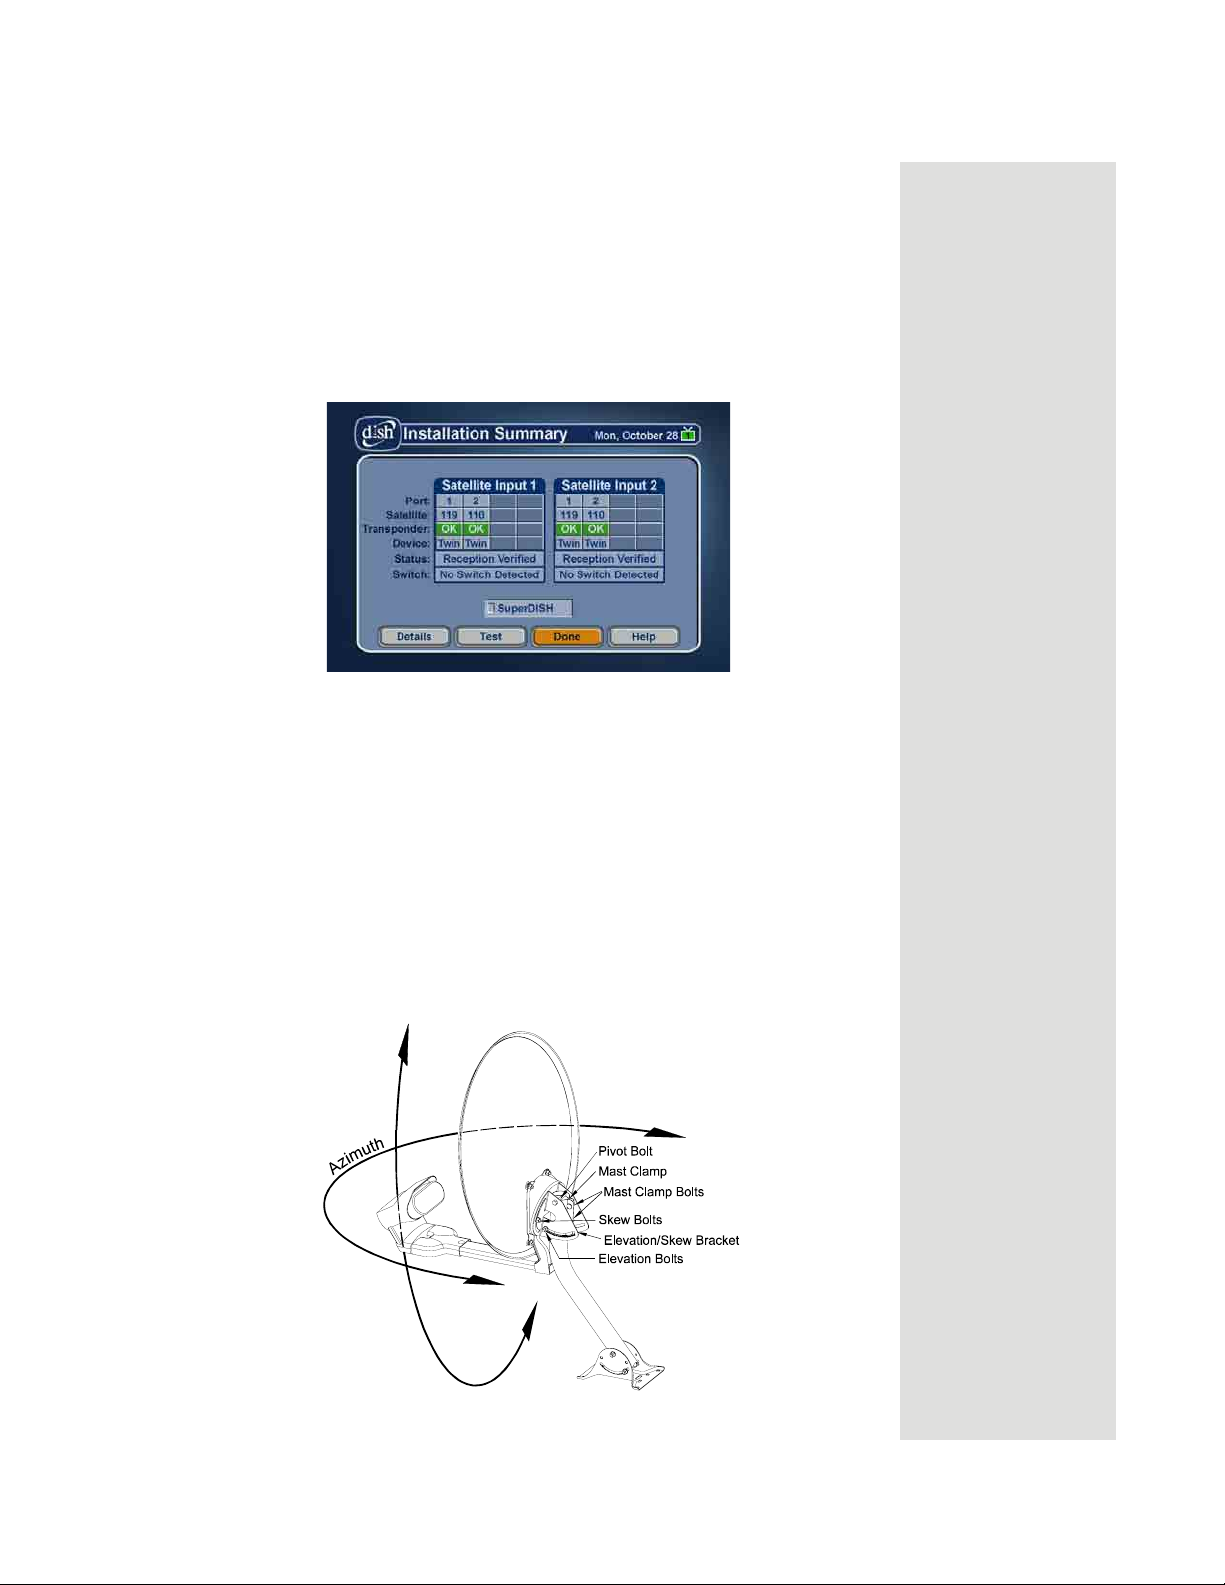
Installing a DISH 500 Antenna
15. When the check switch procedure finishes, you will see an Installation
Summary
Input 1
• Satellite -
•
• Device Type -
screen similar to the one below. The information for Satellite
and Satellite Input 2 should be the same:
Conn twice.
Transponder - X twice. This is OK and does not indicate a problem
with the receiver.
Twin twice. This indicates that your receiver has
confirmed the connection with your DISH Pro Twin LNBF is working.
16. Select
OK to return to the Point Dish screen.
17. Make sure the screen shows 119 under Satellite. If not, move the highlight
to 119 and press either the UP or DOWN ARROW.
Note: The signal strength bar is used to help you aim the dish by showing
the strength of the signal you are receiving. Look at the signal strength bar
while you aim the dish.
Note: Don’t stand in front of the dish while you aim it, because your body
will block the satellite signal. After you adjust the aim, let go of the dish so
that you can get a good signal reading after the dish settles back in place by
itself.
18. Turn the dish back and forth very slowly, until the signal strength bar turns
green. This shows you’ve found the signal.
Tip: Have one
person aim the dish
while another
watches the signal
strength or listens
to the signal tone.
n
o
i
t
a
v
e
l
E
Page 89
Page 94
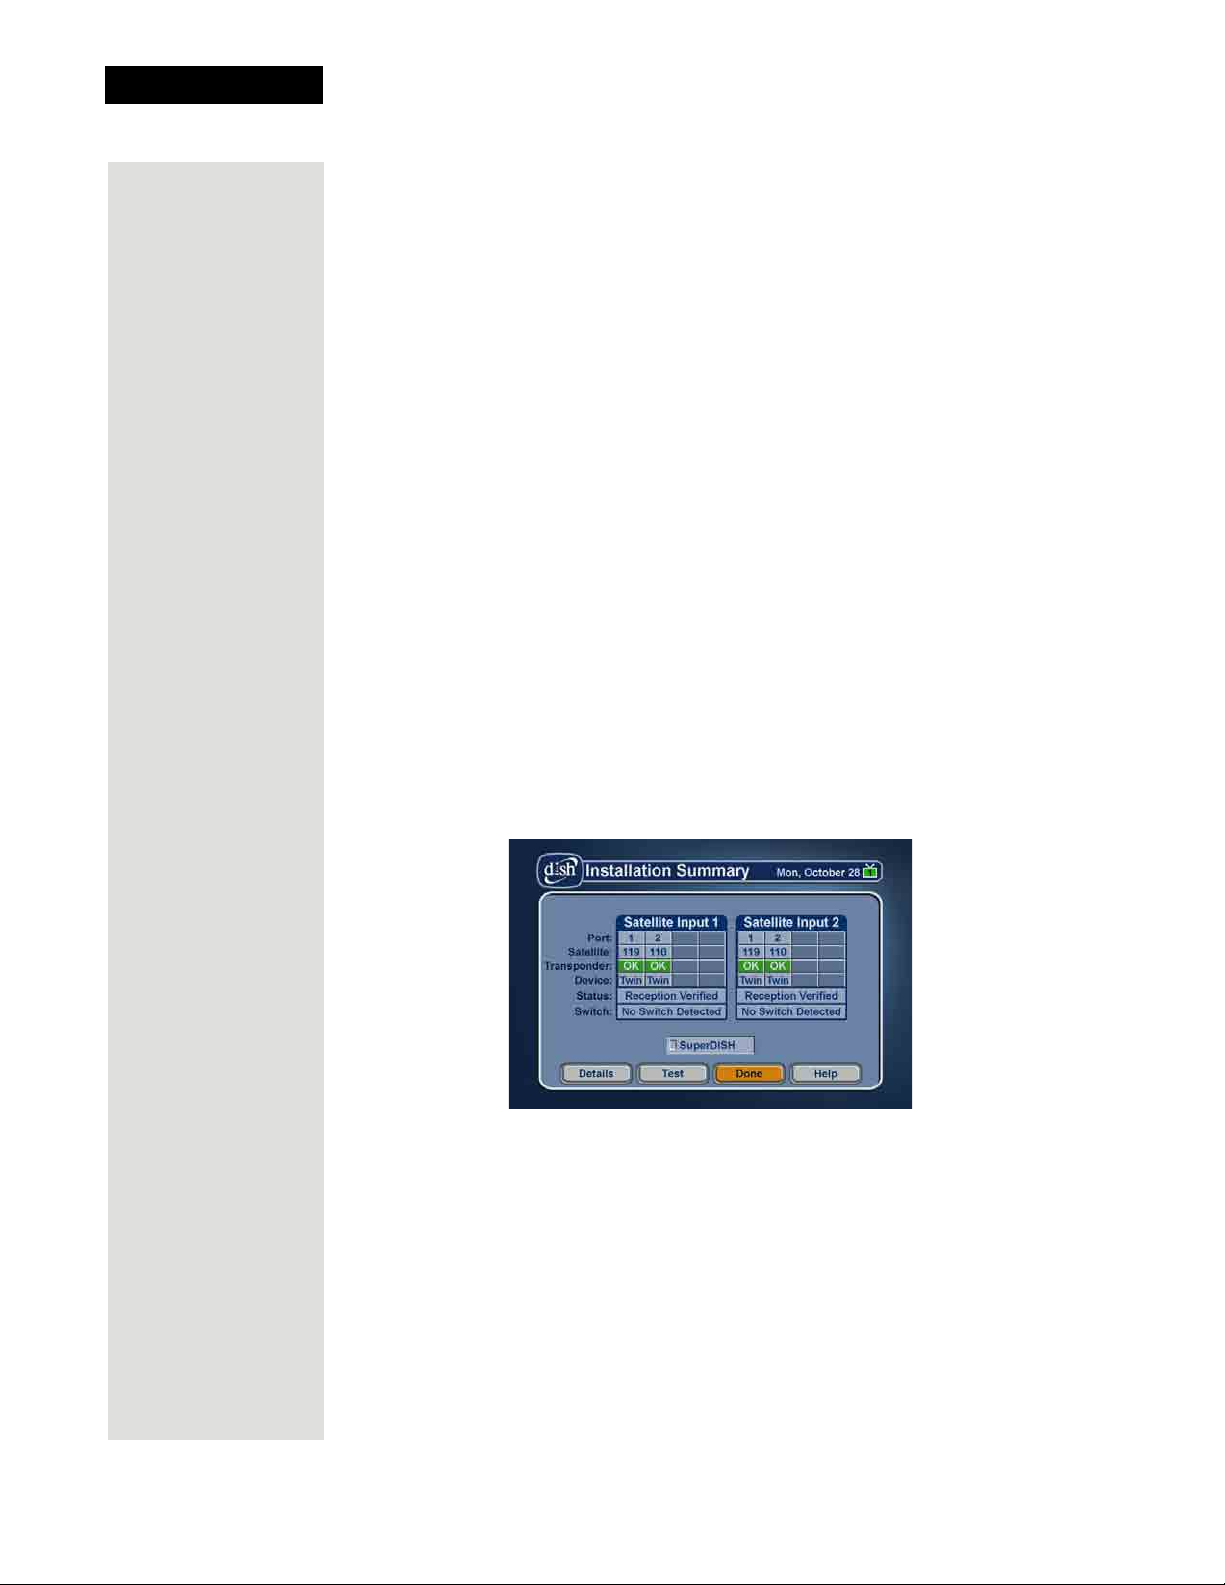
Chapter 4
Dish Antenna Installation
Note: If you cannot find the signal, turn the dish back to the first azimuth angle.
Then, loosen both elevation bolts just enough so you can tilt the dish. Tilt the
dish elevation up by two degrees, and then tighten both bolts. Now, turn the dish
back and forth again. If you still can’t find the signal, tilt the dish up again very
slightly and turn the dish back and forth until you find the signal. Do not change
the skew setting.
19. When the signal strength bar is green, turn the dish back and forth just a little, to
where the signal strength bar shows the strongest signal. When you find the
strongest signal, tighten both mast clamp bolts. Then loosen both elevation
bolts, just enough so you can tilt the dish. Tilt the dish up and down just a little,
to where the signal strength bar shows the strongest signal. When you find the
strongest signal, tighten all bolts in the dish assembly so the dish cannot be
moved.
20. You are now ready to verify reception from both satellites. Select the Check
Switch option. When the Check Switch menu opens, select Retest. The
receiver shows you a message that it is checking the system. When the
procedure is finished, you will see an Installation Summary screen. This
screen may look different than the one shown below.
• Satellite -
•
• Device Type -
•
119 in Port 1 and 110 in Port 2.
Transponder - All twice. This is OK and does not indicate a problem with
the receiver.
Twin twice. This indicates that your receiver has confirmed
the connection with your DISH Pro Twin LNBF is working. Press OK to
exit this menu.”
Status - Satellite reception verified.
Page 90
21. If you do not see
110 under Port 2:
• Make sure the skew angle you wrote down on page 86 is exactly the same as
the skew angle you set in step 5 on page 87. If it is not, reset the skew angle
as described on page 87. After you reset the skew angle, go back page 89
and start over from step 16.
119 is shown under Port 2, move the dish approximately 9° to the east
• If
and restart the procedure at step 12.
22. Look at the Point Dish menu. If you have good signal strength with
119 is indicated by a green signal bar, select 110. If you have good signal
strength on 110, go to step 23.
Page 95

Installing a Multiple Dish DISH Pro System
If you do not have good signal strength with 110, go back to step 18, and
fine-tune the dish but with 110 selected instead of 119. While the
119 signals will not be equal, you should be able to fine-tune the dish until
you have the strongest possible signal from both satellites.
110 and
23. Select
Cancel to exit the Point Dish menu. An Attention screen will open
asking the mounting and positioning of your dish is complete with a
Locked indication in the Point Dish screen. If the answer is yes, select
Yes.
If the answer is No, you will need to repoint your dish following the
preceding steps until the mounting and positioning is complete and you do
have the
Locked indication.
24. After you select Yes, the receiver will begin taking a software upgrade. You
will see a Warning that
downloaded into your receiver
Vital program information will now be
. You will also see a status bar showing the
progress of this upgrade.
Once the software upgrade is complete, you will see a message that your
receiver’s memory is being upgraded.
Do not disturb the receiver while the receiver’s memory is being upgraded.
25. When the memory upgrade is complete, you should be watching TV. Your
dish antenna installation is now complete.
Note: If you are installing other DISH Pro or DISH Pro Plus receivers, be
sure to run
Check Switch on all of them, and allow them to take the
necessary software upgrade.
Installing a Multiple Dish DISH Pro System
Note: You cannot use DISH Pro LNBFs and switches (those marked with the
DISH Pro logo) with Legacy switches and LNBFs (those without the DISH Pro
logo). You must install your DISH antenna system with either all DISH Pro
LNBFs and switches or all Legacy LNBFs and switches. If you mix the two, the
system will not work.
Note: You can have as much as 200 feet of cable between the DISH Pro LNBF
and the DISH Pro receiver. However, you must use only RG-6 coaxial cables
rated for 950 to 2150 MHz. Some cables may say "Swept tested for 2150 MHz."
If you have any doubt about this, ask your DISH retailer, examine the cable’s
outer jacket, or look on the container the cable came in. Do not use cable
company TV cables or cables from other satellite TV systems not rated for 9502150 MHz. These other cables may cause signal loss. Do not use existing cables
such as RG-59. Also, be sure that any outdoor connections are made using
waterproof F-connectors.
Once you have installed the DISH 500 with its DISH Pro Twin LNBF using the
preceding instructions, you can add a single satellite dish with a DISH Pro
LNBF and switch as follows:
1. Turn on the television and the receiver if they are not already on. You
should see the
Point Dish screen. If not, open the Main Menu and press 6-
1-1 on the remote.
Page 91
Page 96
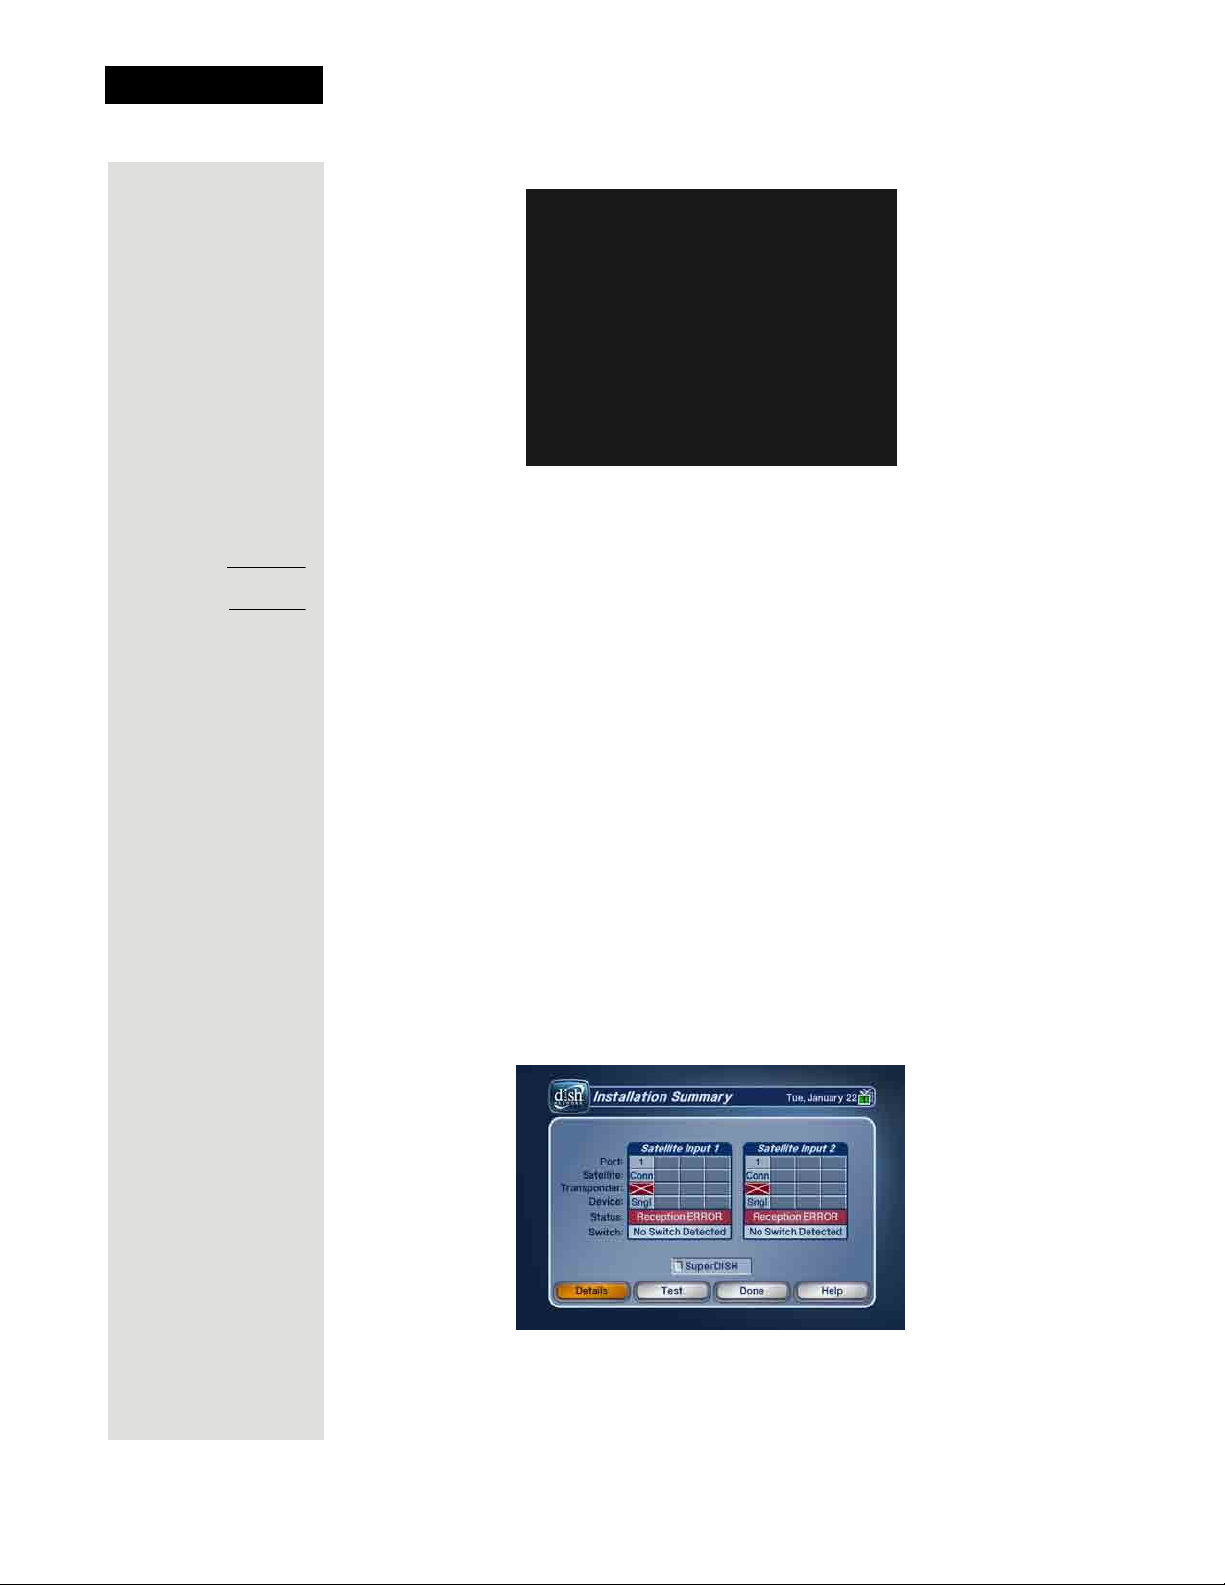
Chapter 4
Azimuth
Dish Antenna Installation
2. Select the satellite your dish will be pointed toward.
3. Select
300 under the Dish System.
:
Elevation:
4. Use the number buttons on the remote to enter your ZIP code to get the
necessary azimuth and elevation. Write these numbers down in the spaces
provided in the margin.
5. Mount the dish antenna and multi-dish switches following the mounting
instructions that came with them and the DISH Pro Wiring Diagrams starting on
page 94.
6. Connect two RG-6 cables from both S
ATELLITE IN connections on the receiver
to two available ports on the switch(es).
7. Connect the LNBF on the dish antenna to LNBF port 1 on the switch(es) using
RG-6 cable.
8. Select
9. When
Check Switch from the Point Dish menu. When the Check Switch
screen opens, select
Check Switch is complete, you will see an Installation Summary screen
Retest.
similar to the one shown next. It will show a connection (“Conn” next to
satellite) and
Single device under 1 (Dish Input). It may also show an X on the
Transponder line. This is okay and does not mean there is a problem with the
system.
10. Press CANCEL to exit back to the Point Dish menu.
11. Point the dish for the strongest possible signal, following the instructions that
came with it.
Page 92
Page 97

Installing a Multiple Dish DISH Pro System
12. Connect two RG-6 cables between both ports on your DISH Pro Twin
LNBF and your switch(es) using the switch instructions and the DISH Pro
Wiring Diagrams that start on page 94.
13. Select Check Switch from the Point Dish menu. When the Check
Switch menu opens, select Retest. When the procedure completes, you
will see the Installation Summary screen again. This time you should
see confirmation for all satellites your dishes are pointed at, and “Satellite
reception verified.” You should also see that the switch(es) in your system
has been correctly identified.
Refer to the DISH Pro wiring diagrams for examples of installation
summary screens.
14. Press CANCEL to exit this menu, and then Done to exit the Point
Dish screen. If you have any other receivers in your system, make sure you
run Check Switch on each of them, and allow each to take the software
upgrade, as needed.
Page 93
Page 98
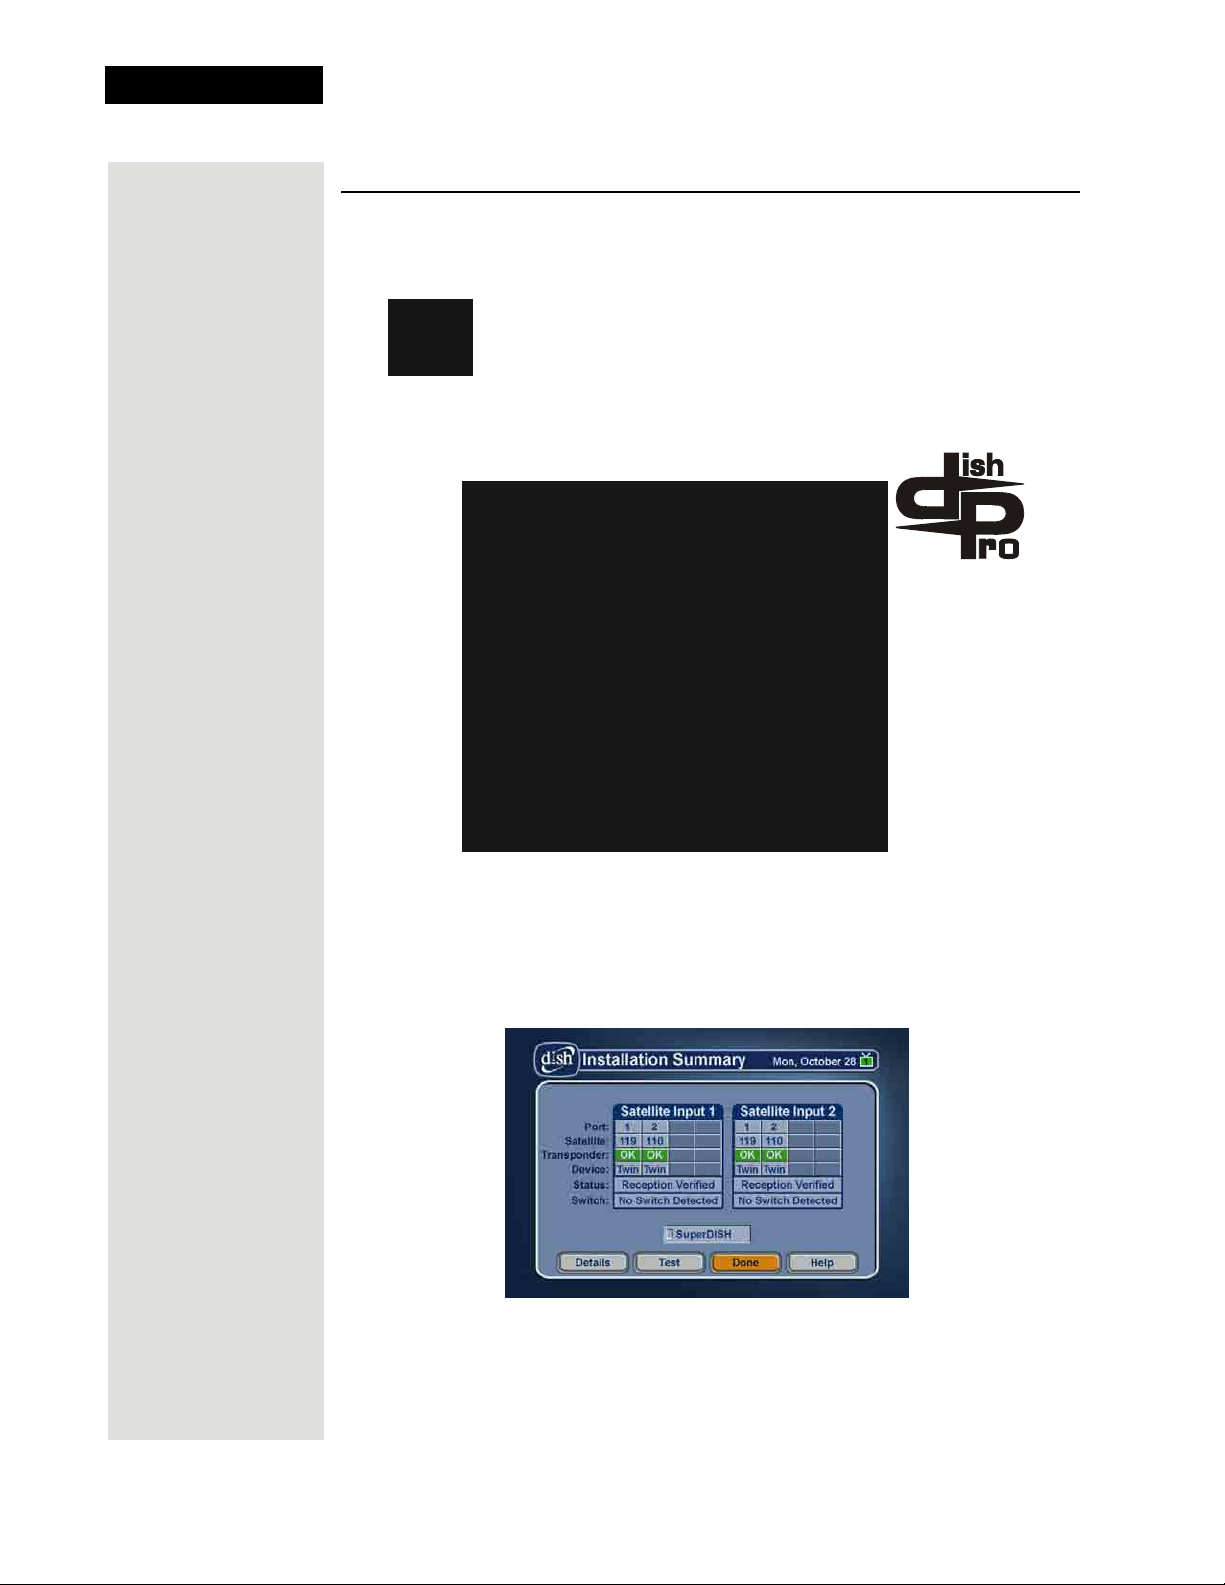
Chapter 4
Dish Antenna Installation
DISH Pro Wiring Diagrams
DISH 500, One DISH Pro Twin LNBF
This diagram leaves out grounding to be clear. Make sure
you ground the system per the National Electrical Code
(NEC) and all local electrical codes.
Note: Each cable
carries both the 119
and 110 signals
after you use each
receiver to check
the setup.
To two DISH Pro
Receivers or one DISH
Pro Plus Receiver
When you set up your system following this diagram and run Check Switch the
Installation Summary screen should look similar to the one shown below.
Page 94
Page 99
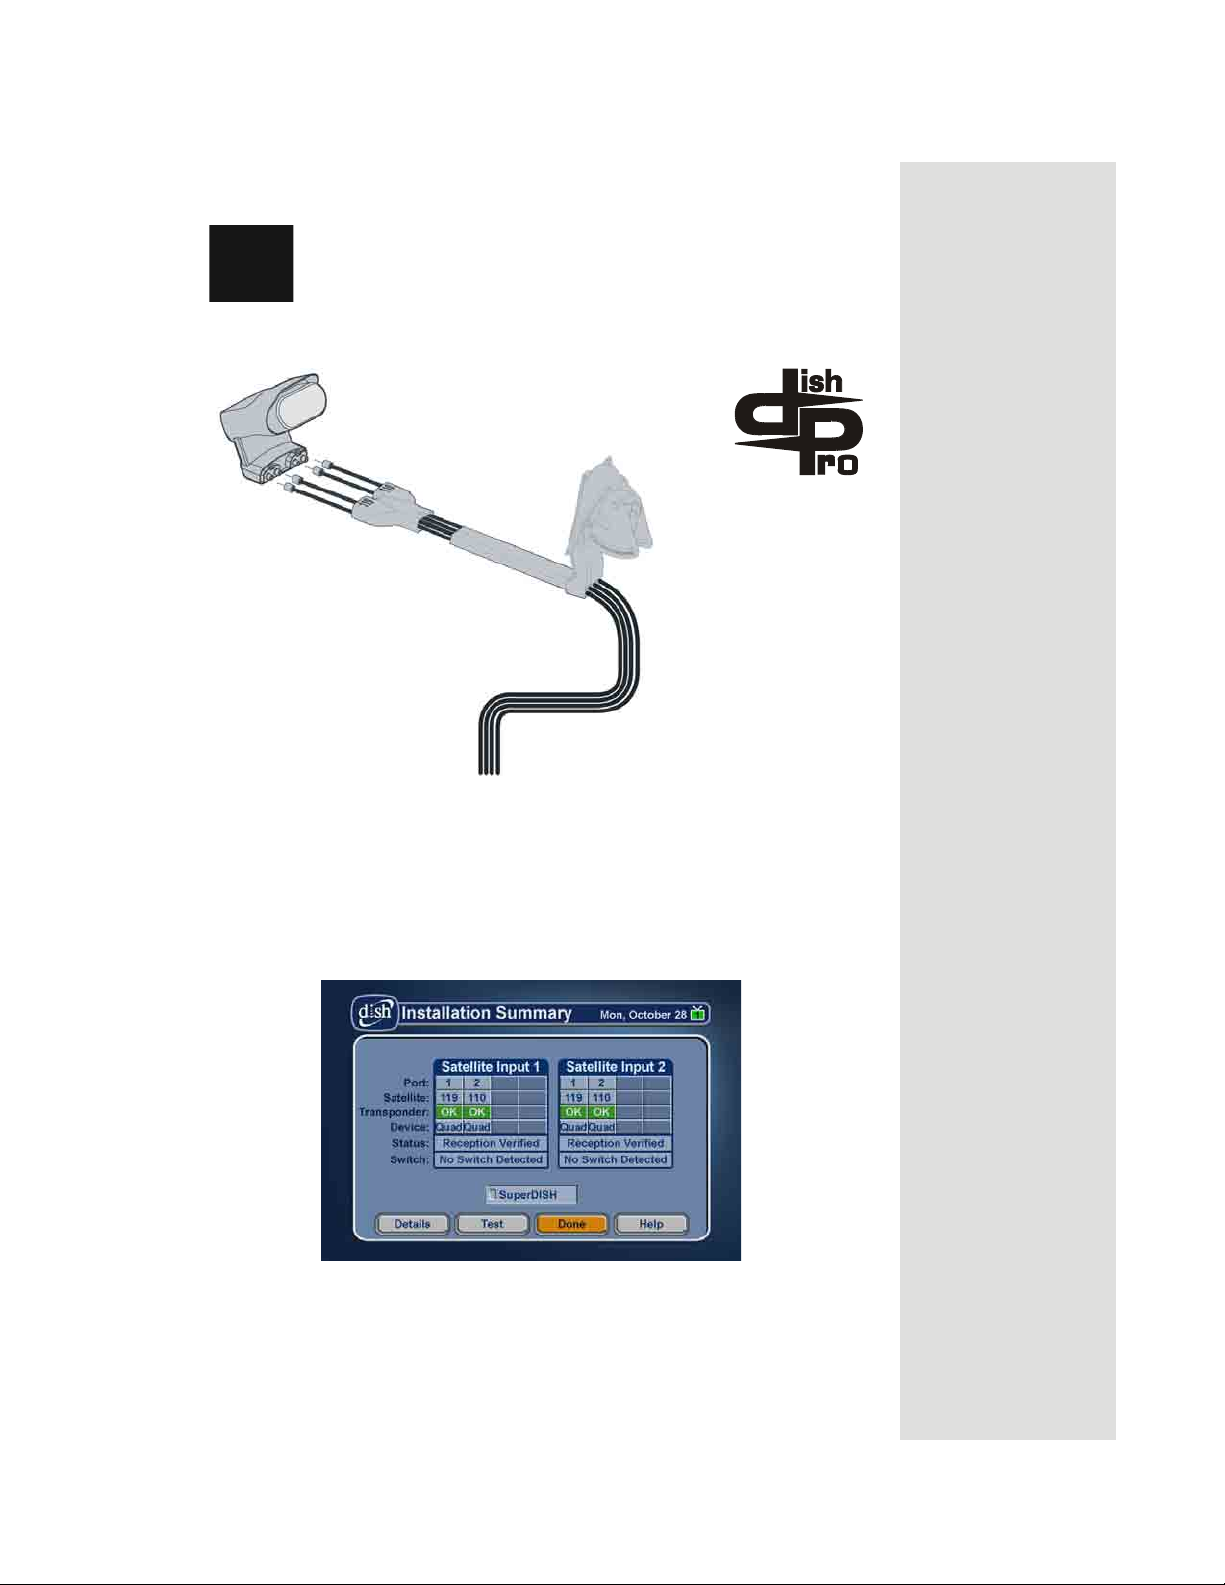
DISH 500, One DISH Pro Quad LNBF
This diagram leaves out grounding to be clear. Make sure
you ground the system per the National Electrical Code
(NEC) and all local electrical codes.
Note: Each cable
carries both the 119
and 110 signals
after you use each
receiver to check
the setup.
DISH Pro Wiring Diagrams
To four DISH Pro
Receivers or two DISH
Pro Plus Receivers
When you set up your system following this diagram and run Check Switch
the Installation Summary screen should look similar to the one shown
below.
Page 95
Page 100
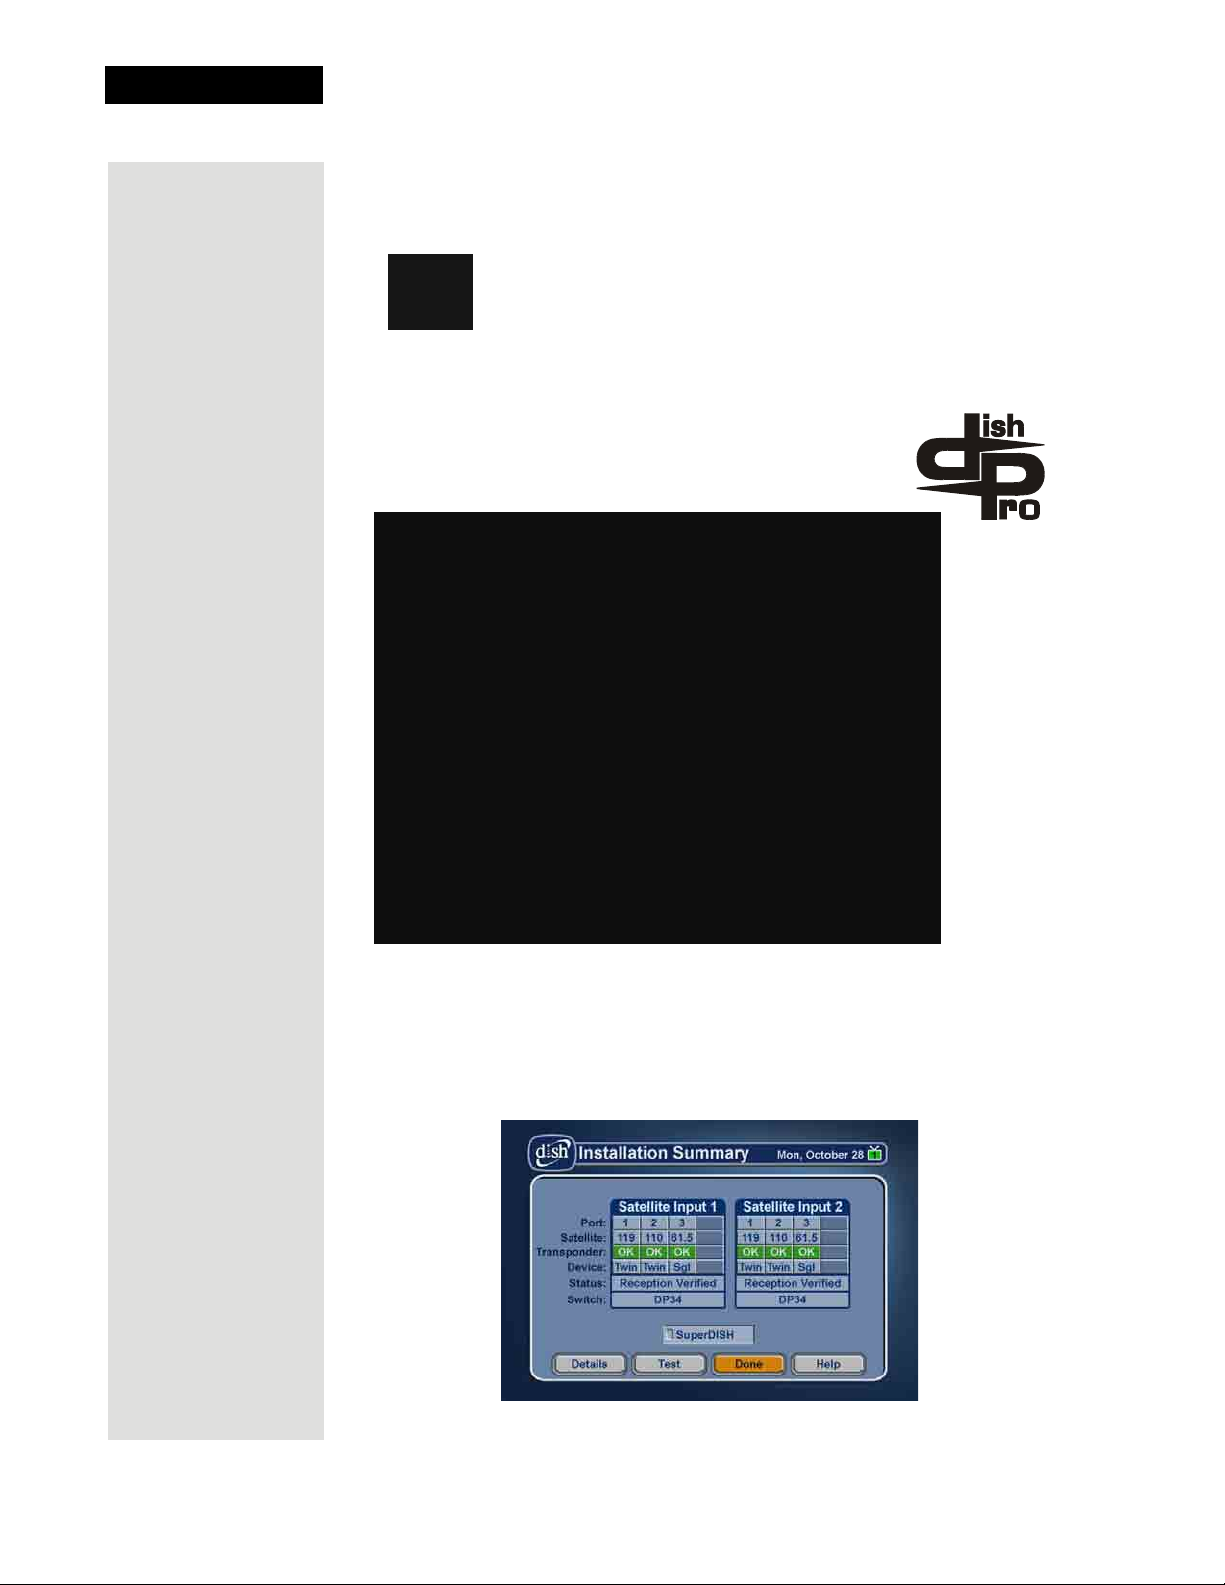
Chapter 4
Dish Antenna Installation
DISH 500 with a DISH Pro Twin LNBF, One DISH 300 with a DISH
Pro LNBF, DP34 Switch
This diagram leaves out grounding to be clear. Make sure
you ground the system per the National Electrical Code
(NEC) and all local electrical codes.
Page 96
To four DISH Pro
Receivers or two DISH
Pro Plus Receivers
When you set up your system following this diagram and run Check Switch the
Installation Summary screen should look similar to the one shown below.
 Loading...