

Page 1

Connecting Your Satellite Receiver
Connections
What you’ll find in this chapter:
• CONNECTING TO THE TV
• C
ONNECTING TO YOUR DISH ANTENNA
• CONNECTING THE PHONE LINE
• CONNECTING A BROADBAND INTERNET
C
ONNECTION
• CONNECTING AN OVER-THE-AIR ANTENNA
• SCANNING FOR OVER-THE-AIR CHANNELS
• USING TROUBLESHOOTING TOOLS
85
Page 2

Connecting to the TV
Chapter 12
CONNECTING TO THE TV
High-Definition Connection: HDMI Cable
The HDMI (High-Definition Multimedia Interface) connection provides high-quality audio
and video to your HDTV or HD Monitor using one cable. If your HDTV or monitor has an
HDMI connection available, this is the recommended connection.
Note: Connecting your TV directly to the audio/video outputs of your receiver will assure a
more vivid picture and enhance your viewing enjoyment.
1
Connect receiver
and monitor with
HDMI cable
HDMI
2-4
Turn monitor
and receiver on
and confirm picture
5
Confirm
sound and
volume
1 Connect an HDMI cable to the HDMI connection on the receiver.
2 Connect the other end of the HDMI cable to the HDMI input of the HDTV set or monitor.
3 Turn on your receiver and TV. Change your TV to the correct input or source. Consult your
HDTV user’s guide for assistance.
4 Confirm that you are getting a picture from the receiver.
5 If you do not see a picture, refer to No Picture on the TV on page 87.
Note: In most cases connecting the HDMI cable provides plug-and-play control of the
monitor’s display resolution and other settings. However, your HDTV may require
selecting a different format to display from the receiver during setup.
6 Turn up the volume on your HDTV and confirm you have sound. If you don’t have sound,
your system may require you to connect audio (red and white) RCA-type cables between
the receiver’s Audio Outputs and the TV’s audio input connections.
7 Refer to Setting Up to Display in HD on page 88 to adjust the receiver’s HD display
settings to match your TV.
86
Page 3

Connections
Connecting to the TV
High-Definition Connection: YPBPR (Component) Cables
The YPBPR connections provide high-quality video to your HDTV or HD monitor. Use
these connections if your TV does not have an HDMI connection.
2
1
L
Connect receiver
and monitor with
YPbPr Component
connections
Connect receiver
and monitor with
Audio cables
AUDIO
R
3
Turn monitor
and receiver on
and confirm
picture
4
Confirm
sound and
volume
1 Connect component video cables to the YPBPR (compon ent) connections on the receiver.
Connect the other end of the component video cables to the YPbPr (component) connections on the TV.
2 Connect audio (red and white) RCA-type cables between the receiver’s Audio Outputs
and TV’s audio inputs.
3 Turn on your receiver and TV. Change your TV to the correct input or source. Consult your
HDTV user’s guide for assistance.
4 If you do not see a picture, refer to No Picture on the TV, below.
5 Turn up the volume on your HDTV and confirm you have sound.
6 Refer to Setting Up to Display in HD on page 88, to adjust the receiver’s HD display
settings to match your TV.
No Picture on the TV
This section helps you display a picture on your TV if you were not able to using the
previous sections.
1 Connect RCA-type cables between the receiver’s COMPOSITE (RCA-type) video output
and your TV’s Composite (RCA-type) input.
2 Verify the receiver and the TV are on.
3 Make sure the TV is set to the correct input for the RCA-type connection. Refer to your
HDTV user’s guide for assistance.
4 Change the HDTV settings to match your TV’s display settings as described on page 88.
5 Change the TV to display from the HD input you connected in the previous sections. If you
can see a picture, you are finished.
6 Repeat steps 4 and 5 until the TV displays video from the rec eiv er .
87
Page 4

Connecting to the TV
Chapter 12
Setting Up to Display in HD
Once the receiver has been activated with qualifying DISH Network HD programming, you
will be able to receive HD programs. Use the following steps to select the HDTV display
format that best matches your TV or monitor.
1 Consult your HDTV user’s guide for the HD resolution that the TV supports (1080i or
720p).
2 Press MENU, select System Setup, then HDTV Setup.
3 Select the HD format settings (Analog Type and TV Type) that match the format
supported by your TV, either 1080i or 720p.
4 Select the Aspect Ratio that matches your TV type.
• 16x9 is the setting for wide-screen HDTV displays.
• 4x3 #1 is the setting to use on a 4x3 TV which uses vertical compression. When fed
with a 16x9 program, a compatible TV automatically makes the picture letterbox
format (black bars top and bottom) to preserve the correct horizontal and vertical
proportions.
• 4x3 #2 is the setting to use on a 4x3 TV which does NOT have internal vertical
compression. When fed with a 16x9 program, this type of TV will not show black bars
at the top and bottom, and the picture will appear tall and skinny.
5 Select Done.
6 If required, set up the HDTV to display in the format that matches the receiver’s settings.
Some HDTVs will automatically adjust to the resolution setting of the receiver.
88
Page 5

Connections
Standard-Definition Connections
1 Connect the receiver to the TV using one of the following:
UDIO/VIDEO connection (RCA-type composite connection)
• A
Connecting to the TV
• S-V
• TV SET OUT
IDEO and LEFT/RIGHT AUDIO
2 If using the TV SET OUT connection, peel off the white sticker and attach it to the cable
close to where it connects to the TV S
sticker is in the front cover of this guide.
ET OUT connection on the back of the receiver. The
3 Turn on the TV and receiver to make sure you have a picture.
• If using the TV S
This output channel can be changed in the receiver’s menus by pressing MENU on
the remote control, selecting System Setup, Installation, then Modulator Setup.
The default output is channel 3.
• If using the S-V
input or source. Refer to your TV’s user guide for more information.
ET OUT connection, you’ll need to set your TV to either channel 3 or 4.
IDEO or AUDIO/VIDEO connections, you’ll need to set your TV to a video
4 Turn up the volume on the TV to make sure you have audio.
89
Page 6
Connecting to Your Dish Antenna
Chapter 12
CONNECTING TO YOUR DISH ANTENNA
Connect your TV to the satellite receiver using the previous sections before connecting
the receiver to the dish antenna.
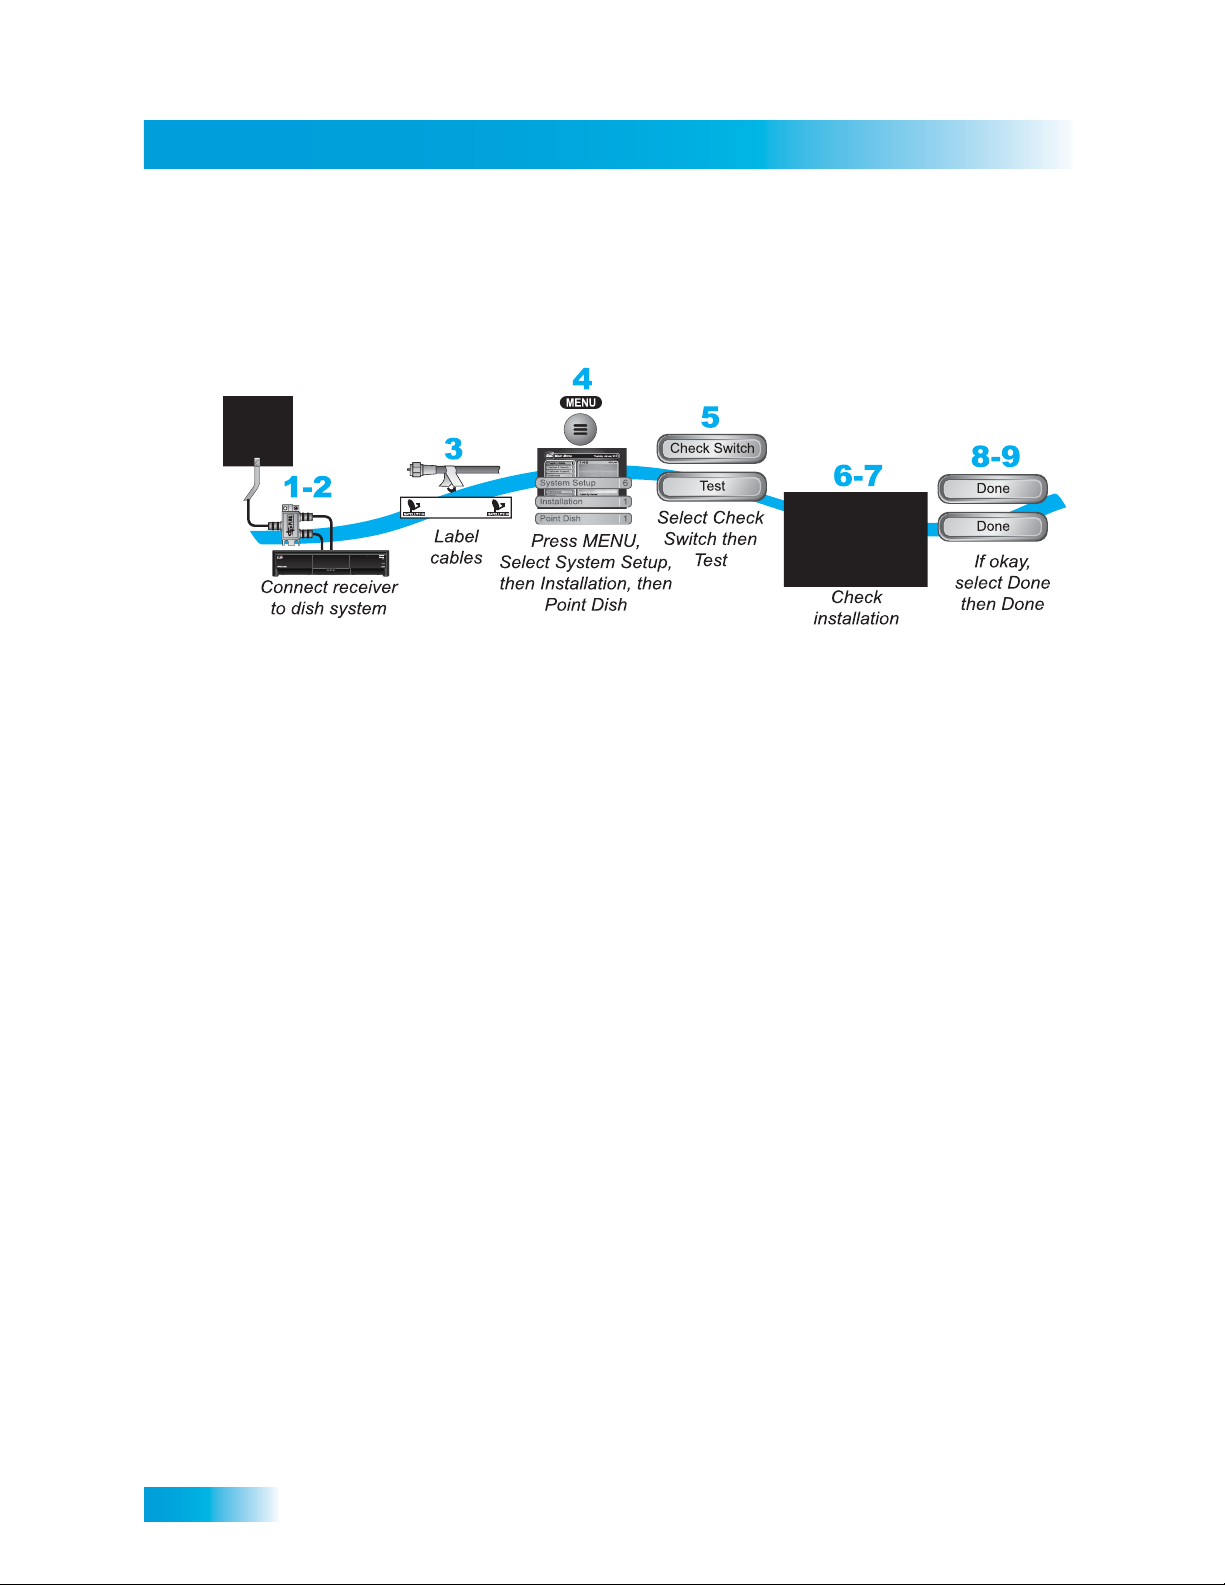
1 Connect two RG-6 coaxial cables between the SATELLITE IN 1 and SATELLITE IN 2 ports on
the receiver’s back panel and two available ports on either the switch, LNBF, or DISH Pro
Plus Separator in your existing system.
Note: If you are installing your receiver in a system with DISH Pro or DISH Pro Plus
LNBFs (and/or switches), you can have as much as 200 feet of cable between the LNBF
and the receiver. You must use RG-6 coaxial cables rated up to at least 2150 MHz.
2 Peel off the blue stickers (found at th e beginning of this User’s Guide) and affix them to the
cables near where they connect to the S
the back of the receiver.
ATELLITE IN 1 and SATELLITE IN 2 connections on
3 On the remote control, press MENU, select System Setup, Installation, and then Point
Dish to display the Point Dish screen on the TV.
4 Select Check Switch to go to the Installation Summary screen, then select Test.
5 The receiver begins performing the Check Switch test. When it is finished, the Installation
Summary screen displays with the results of the test.
6 Verify that the information on the Installation Summary screen identifies your system
correctly and shows all transponders for all satellites in your system.
7 Select Done.
8 Select Done to exit the Po int Dish menu. If you re ceive a prompt that the receiver nee ds to
download software, follow the on-screen instructions and do not disturb the receiver until
the TV is displaying DISH Network video. The software download process usually takes
between 15 and 30 minutes. If you do not receive the software download prompt, press
VIEW LIVE TV. The receiver displays the “Acquiring Satellite Signal” message for a few
minutes, then will display video.
90
Page 7
Connections
CONNECTING THE PHONE LINE
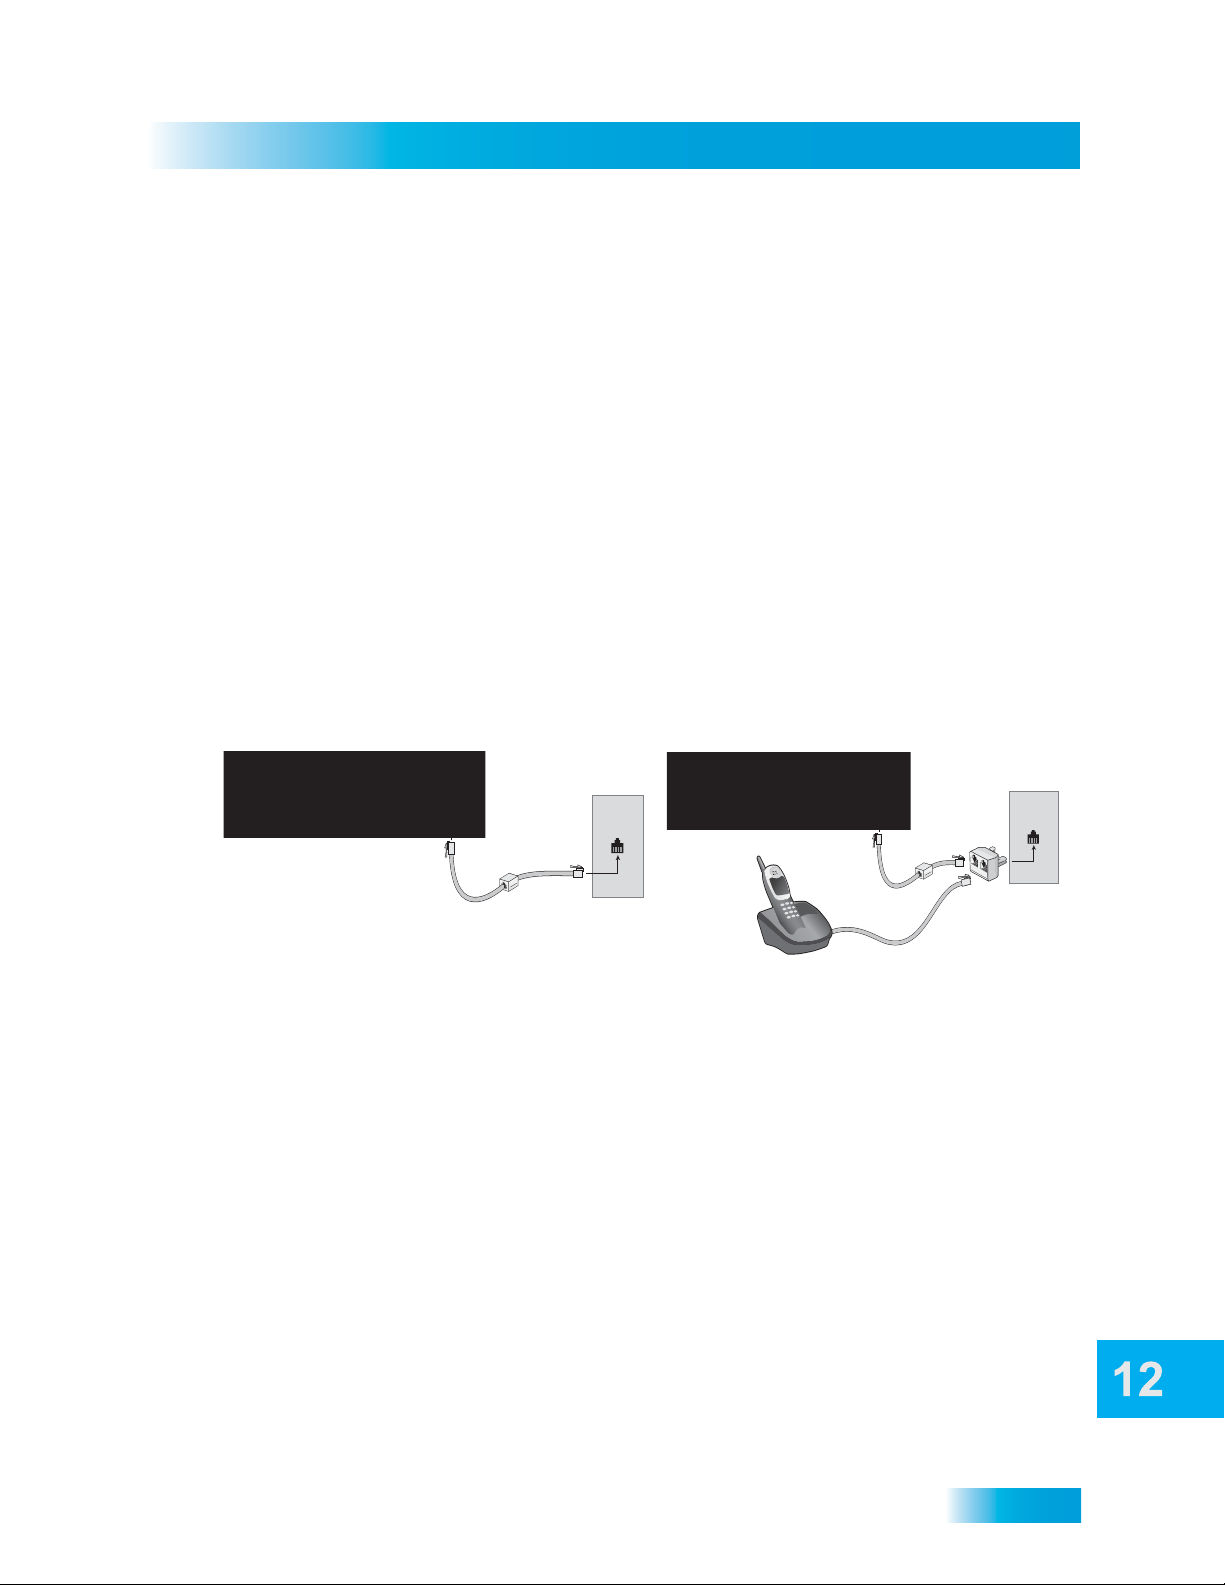
Phone Jack
Optional
Phone Coupler
You must keep the receiver connected to an active telephone line to order Pay-Per-View
programs, use all of the DishHOME Interactive features, or use other services from DISH
Network with your remote control.
Note: You may be able to use a wireless modem jack. However, this may not support all
the features of this receiver, such as Caller ID. See www.dishnetwork.com for compatible
modem products. If you have a Digital Subscriber Line (DSL), you may have to install a
DSL filter between the receiver’s back panel Phone Jack and the telephone wall jack to
successfully connect with DISH Network. You can obtain a filter from your DSL provider.
Phone Line Connection
Connect a telephone cable with a standard RJ-11 connector between the receiver’s back
panel P
HONE connection and an active telephone connection as shown below.
Connecting the Phone Line
Note: Do not connect the phone line to the E
connect the phone line to the E
THERNET port, all phones in your home may stop
THERNET connection. If you accidentally
functioning.
Phone Jack
Phone
Optional
Phone Coupler
Y-Adapter
Phone Connection Recommendations for VoIP
If you have a VoIP (Voice over Internet Protocol) phone service, the following tips may
help improve the chances of the satellite receiver successfully connecting to DISH
Network using the VoIP phone service.
Note: Not all VoIP services will function with the receiver.
• Manually set the VoIP equipment for the proper bandwidth, to the highest bandwidth
possible, using the VoIP equipment’s instructions.
• Use other settings or connections suitable for modems or fax machines.
• For Vonage VoIP customers only, using the phone prefix *99 in the phone systems
setup can allow the VoIP connection to switch to its highest possible bandwidth.
Follow the steps in Phone System Setup, below, to enter a phone prefix.
91
Page 8
Connecting the Phone Line
Chapter 12
Phone System Setup
You must also set up the receiver for your telephone system (touch tone or rotary). If you
need a prefix to make an outside call, set a telephone number prefix.
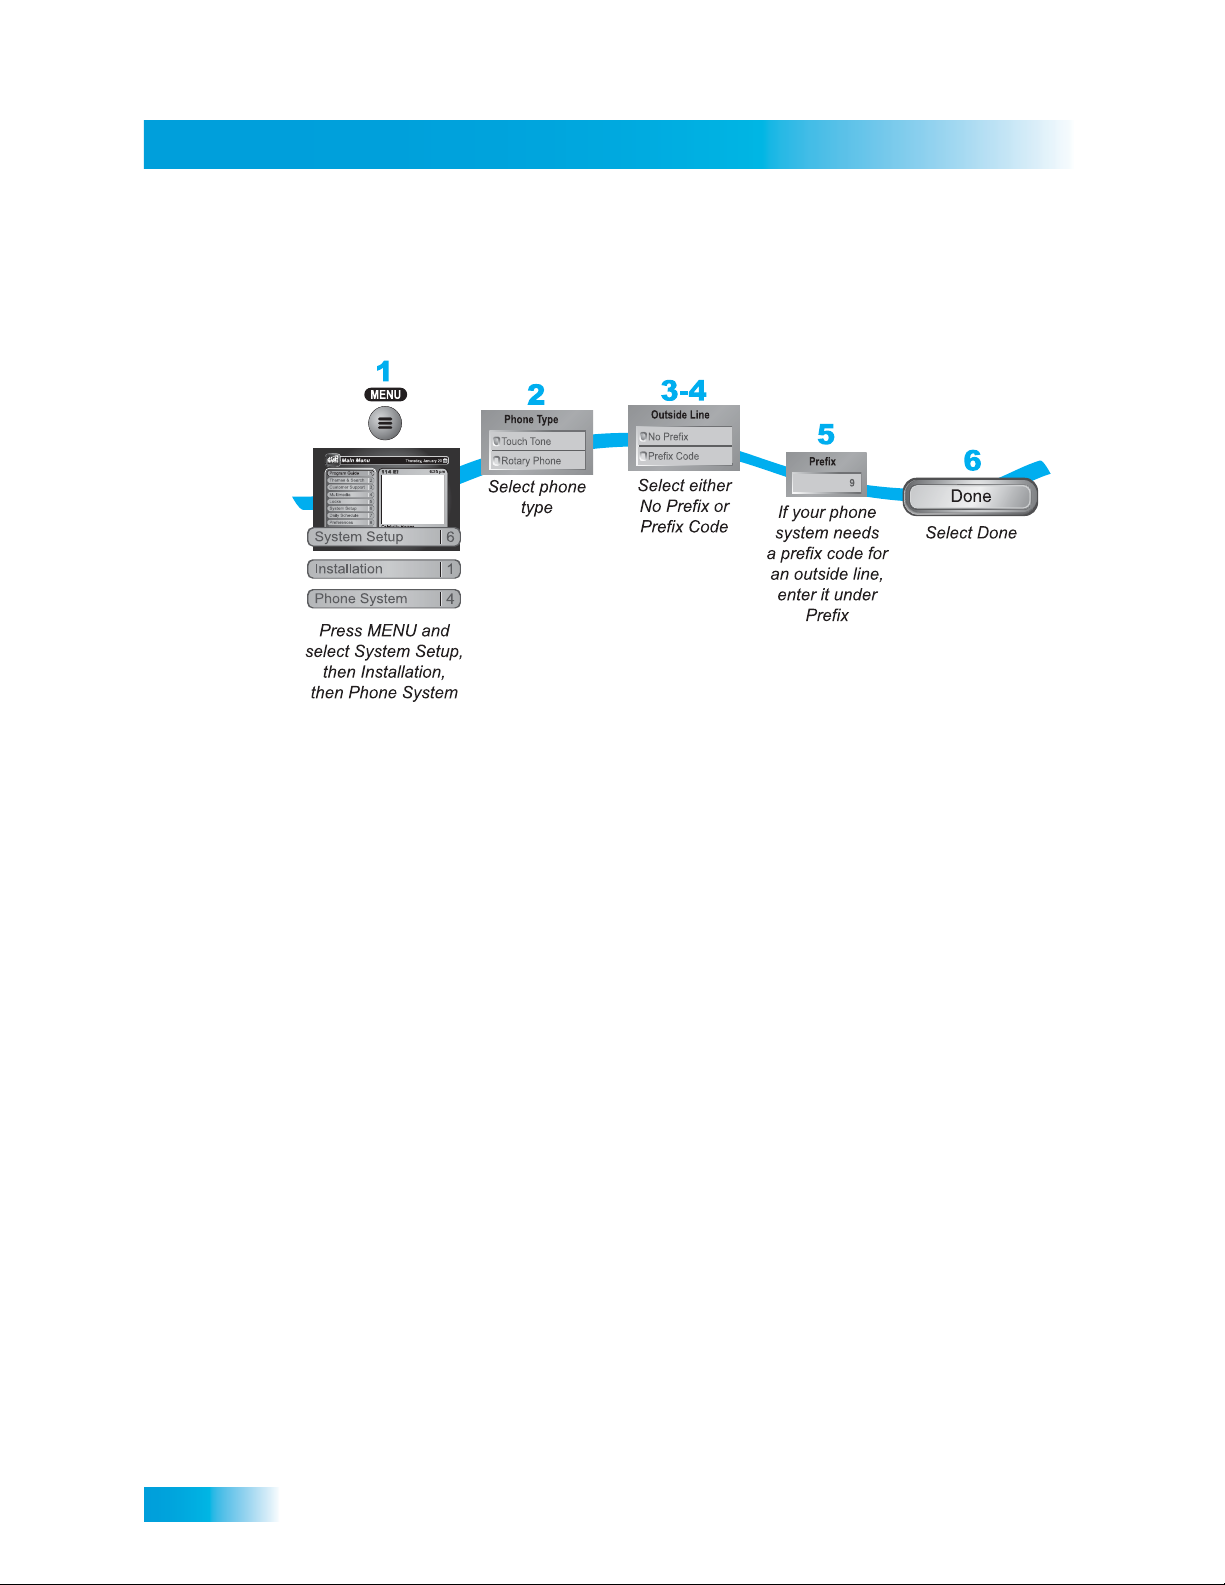
1 Press MENU on the remote control, then select System Setup, Installation, and then
Phone System.
2 Select the Touch Tone or Rotary Phone option in the Phone Type list.
3 Select the Prefix Code option under Outside Line if you need to dial a prefix to make
outside calls. Otherwise, leave this setting on No Prefix.
Note: Usually, you need a telephone number prefix only for business installations. For
most residential installations, all you need to do is set the telephone system type. The
default setting of No Prefix will allow correct dialing. If this is the case, select the Save
option to save the above setting, and stop here. If you do need to set a prefix, then instead
of selecting the Save option, go on to step 5.
4 If you selected No Prefix, select Done.
5 If you selected Prefix Code, the receiver highlights the box where you must enter the
exact sequence you dial to reach an outside line.
6 Select Done.
92
Page 9
Connections
Connecting a Broadband Internet Connection
CONNECTING A BROADBAND INTERNET CONNECTION
If you have broadband (high-speed) Internet access at home, you can access additional
features and capabilities by connecting your receiver to your home network. Refer to
tech.dishnetwork.com
making this type of connection.
and search for “home networking” for detailed instructions on
CONNECTING AN OVER-THE-AIR ANTENNA
If you want to receive digital channels from an over-the-air antenna in addition to your
satellite receiver programming, connect the over-the-air antenna to your satellite receiver.
• The O
• Connect a VHF/UHF over-the-air antenna to the O
• You can add local over-the-air channels to the receiver’s channels lists and assign
Note: The type of antenna required depends on the channels used by, and the locations
of, the local broadcasters for your area. Visit www.antennaweb.org or contact a
professional installer to help you select a suitable antenna.
VER-THE-AIR ANTENNA IN connection on your receiver's back panel can be used
to receive and view programming on the TV from an over-the-air antenna.
VER-THE-AIR ANTENNA IN port. Peel
off the black sticker (found at the beginning of this User’s Guide) and affix it to the
cable close to where it connects to the back of the receiver.
them network affiliations. Once you have done this, you can access the channels via
the Program Guide or the Browse Banner similar to accessing satellite channels.
Make sure to follow the antenna installation instructions correctly. Ground an
outdoor antenna per the National Electrical Code (NEC) and any state and local
electrical codes.
The audio/video quality on local over-the-air channels depends on the distance
and terrain between the broadcast station and your home, and on the
placement and quality of the over-the-air TV antenna you use. If you have
questions about over-the-air chan n els, contact the broadcaster, not DISH
Network.
93
Page 10
Scanning for Over-the-Air Channels
Chapter 12
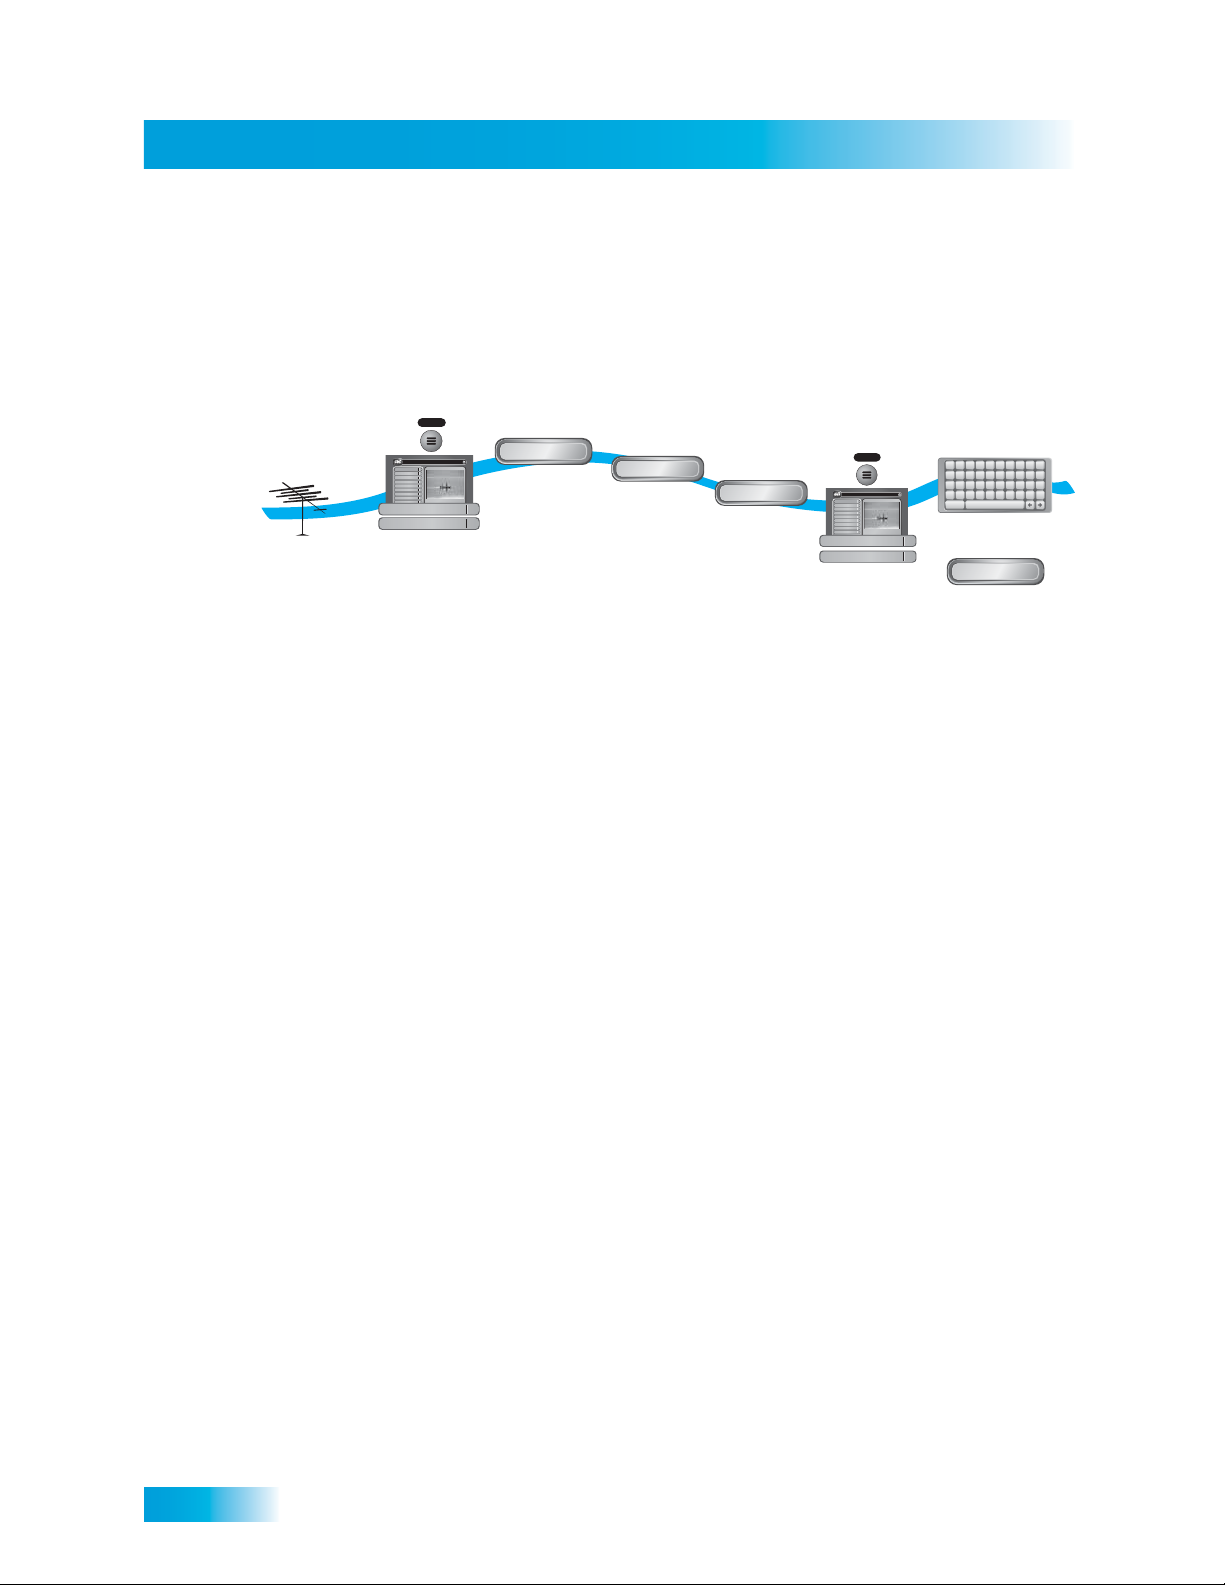
SCANNING FOR OVER-THE-AIR CHANNELS
After your over-the-air antenna is adjusted for the best reception and connected to the
receiver’s O
air channels into the satellite receiver’s menus.
1
Check off-air
antenna
installation
1 Verify your over-the-air antenna is installed and connected to the receiver’s OVER-THE-AIR
A
NTENNA IN.
2 On the remote control, press MENU, select System Setup, and then Local Channels. If
this is the first time you have opened the Local Channels screen, it will have no channels
listed.
VER-THE-AIR ANTENNA IN connection, use these instructions to scan over-the-
2
MENU
1
Thursday, January 20
Main Menu
6:25 pm
114 E!114 E!
Program Guide
1
Themes & Search
2
Customer Support
3
Multimedia
4
Locks
5
System Setup
6
Daily Schedule
7
Preferences
8
Celebrity Homes
Cancel
0
5:30 pm - 7:00 pm NR
System Setup
Local Channels
6
8
Press MENU and
select System Setup
then Local Channels
3
Scan Locals
Select Scan
Locals
4-5
OK
Allow
receiver to
scan for locals
then select OK
6
Done
Select
Done
to store
channels
7
MENU
1
Thursday, January 20
Main Menu
6:25 pm
114 E!114 E!
Program Guide
1
Themes & Search
2
Customer Support
3
Multimedia
4
Locks
5
System Setup
6
Daily Schedule
7
Preferences
8
Celebrity Homes
Cancel
0
5:30 pm - 7:00 pm NR
System Setup
Local Channels
Go back to
the Local
Channels screen
A B C D E F G H I J
K L M N O P Q R S T
U V W X Y Z ' - . &
1 2 3 4 5 6 7 8 9 0
Back
Enter local
6
channel names
8
then select
8-9
Space
Done
Done
3 Scan for channels by selecting Scan Locals.
4 The scan will take a few minutes to complete. When it finishes, the results will show how
many channels the scan found. If you want to stop the scan before it is completed, select
Cancel.
5 Select OK to go back to the Local Channels screen and view the list of channels.
Note: The ARROW at the bottom left means that there are more channels, off the bottom
of the screen, which you can get to with the ARROW keys if you wish to edit their names
or remove them.
6 If you want to name the over-the-air channels, cont inu e on. If yo u do not want to na me
your over-the-air channels, select Done. You will then be taken out of the menus back to
watching TV.
7 Select a channel and then select Edit Nam e to modify the way the channel name displays
on your screen. You can rename only one channel at a tim e.
8 Use the on-screen keyboard on the screen to select the letters of your channel name.
9 When you are finished making changes, select Done. The receiver displays a message
while it is saving the changes. Be sure not to interrupt the receiver while it is saving the
changes.
94
Page 11
Connections
Scanning for Over-the-Air Channels
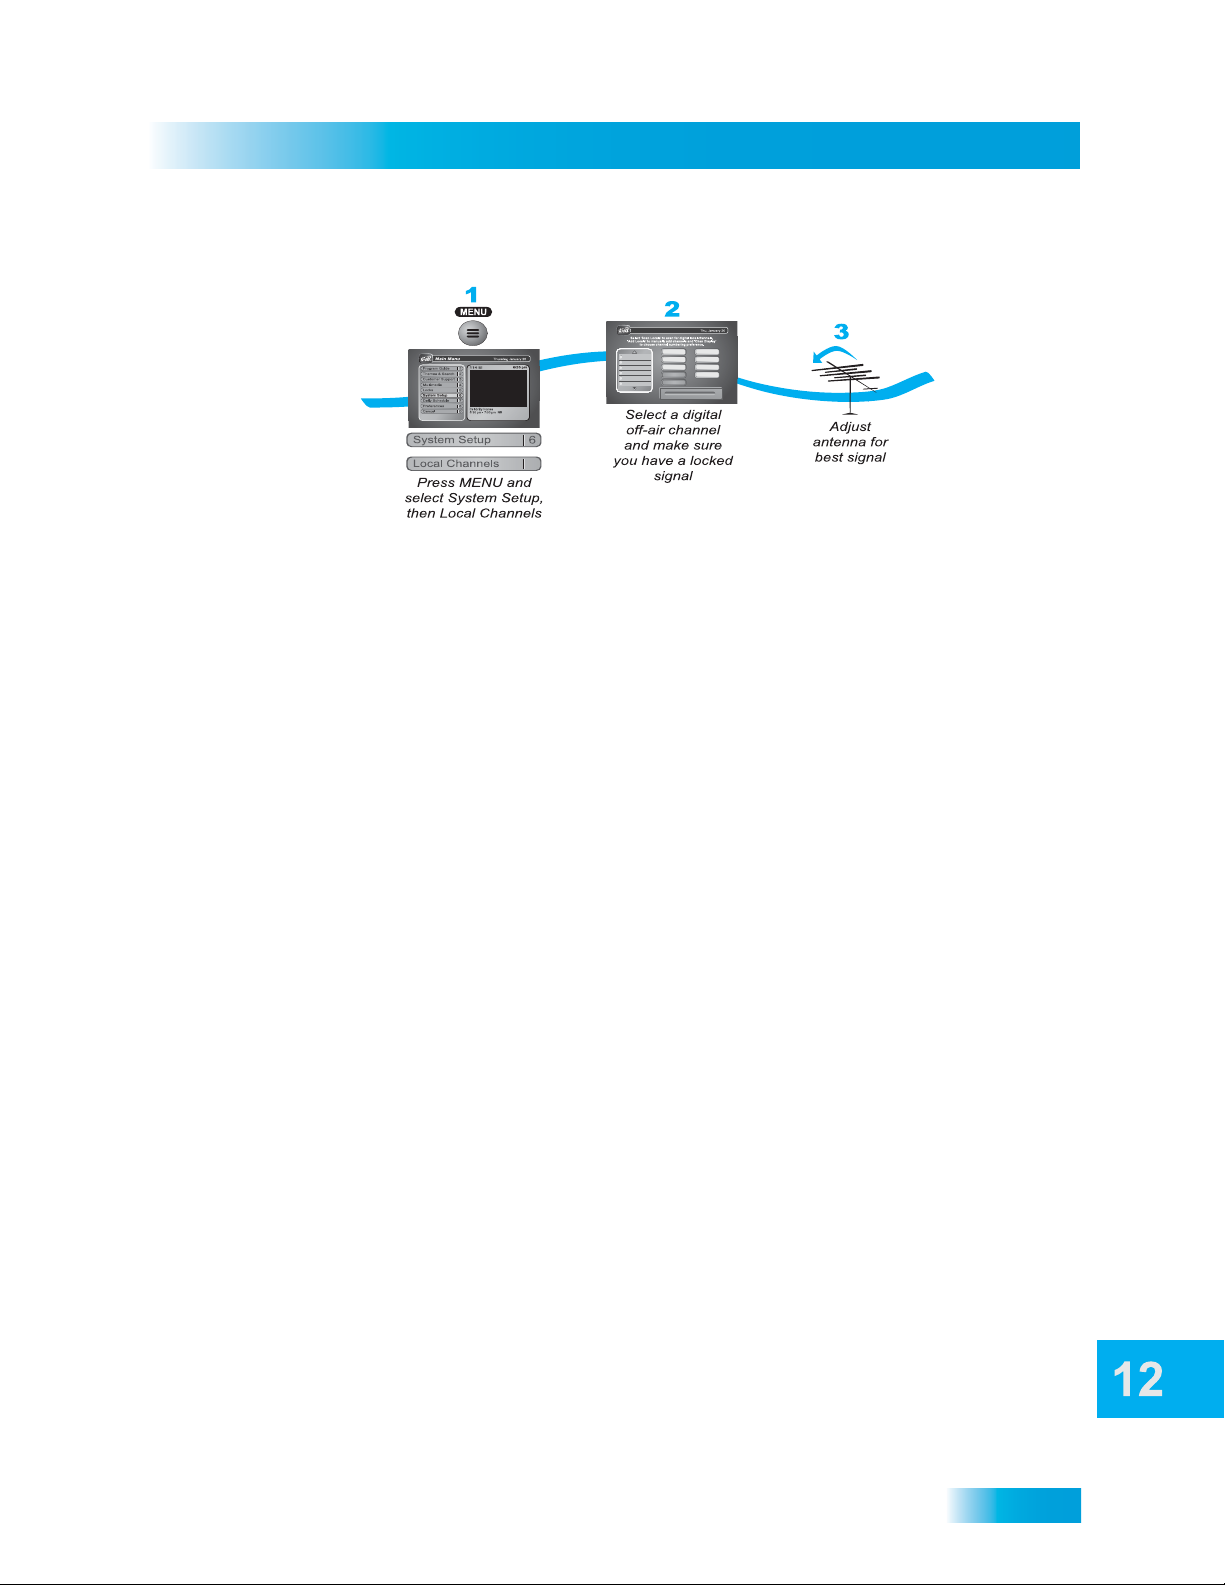
Peaking Your Over-the-Air Antenna
Local Channels
Select All
Scan Locals
2-1 KWGN-D
2-2 TUBE
4-1 KCNC-D
6-1 KRMA-D
6-2 V-mo
7-1 KMGH-H
8
Add Locals
Chan Display
Edit Name
Delete
0
50 100
Not Locked Signal Strength: 0
Done
Cancel
Help
1 Press MENU, select System Setup, and then Local Channels.
2 Highlight a channel in the local channels list to display its signal strength. Make sure you
see a green signal strength bar and a Locked indication on the signal meter.
3 Adjust the orientation of your antenna to maximize the signal strength . If you cannot get a
Locked indication, you may need to upgrade your antenna or relocate it.
About Over-the-Air TV Broadcasts
Over-the-air TV signals are broadc as t by loc a l TV stations from a transmitter tower. You
receive over-the-air TV signals using an indoor or outdoor antenna instead of the satellite
dish. You are likely familiar with analog over-the-air TV signals - these are the signals that
have been used to broadcast TV for many years. New digital over-the-air TV signals are
broadcast and received in the same way. Digital over-the-air TV broadcasting uses
advanced technology like that of the DISH Network to deliver superb picture quality and
CD quality sound. However, digital over-the-air signal reception (like analog over-the-air
signal reception) depends on several things.
• The distance between the broadcast station and your home (the farther away the
station, the weaker the signal)
• The broadcast station's power (the lower the power, the weaker the signal)
• Obstacles between the station and your home, such as mountains, buildings, trees, or
other objects (these may block or reflect the signal before it reaches you)
• Multiple broadcast stations (to receive good signals from several stations, you may
need to compromise in how you aim the antenna or you may need more than on e
antenna)
The effects of poor digital reception are different from the effects of poor analog reception:
• Poor analog reception usually causes the TV picture to be “snowy” or to include
“ghosts,” that is, multiple images caused by receiving reflected signals along with the
direct signal from a station. Poor digital reception may cause the TV picture to be
“pixelized,” that is, broken up into small squares of various colors, or to be lost
completely (the TV screen is all black or all blue).
• Digital broadcasts often provide either a very good picture or no picture at all.
95
Page 12

Scanning for Over-the-Air Channels
Chapter 12
• You may be able to receive a poor analog signal but not be able to receive a digital
signal at all.
To get the best possible digital signal reception, make sure you use the best over-the-air
antenna for where you live:
• You can receive a limited number of channels using a rabbit ears type ante nna on to p
of the TV set, or a much larger number via a large UHF/VHF indoor/outdoor antenna.
• The higher the quality of the antenna you use, the greater its range and the better its
reception will be.
Digital OTA Broadcasts are Still Developing
• Broadcasters may still be testing digital signals and their strength, and may stop
broadcasting without notice, vary power output, or turn it off.
• Some broadcasters do not yet have permanent transmitter to wer.
• Broadcasters may choose to multicast, which allows them to provide multiple
standard-definition channels in the same bandwidth used to provide a high-definition
channel.
• These factors are outside of DISH Network's control.
Additional Installation Considerations
• Follow local and National Electric Code requirements for grounding the antenna.
• RG-6 coaxial cable is preferred for the O
are diplexing the O
cable must be used.
• You can not use a diplexer to combine the O
N cables if using an amplified antenna.
I
If you have questions about over-the-air channels, contact the broadcasters, not DISH
Network. DISH Network does not broadcast over-the-air signals and so cannot do
anything to change over-the-air signal quality. However, the receiver's digital channel
setup menus provide a signal strength bar that can help you in aiming the over-the-air TV
antenna for the strongest possible signal.
VER THE AIR ANTENNA IN and SATELLITE IN cables, RG-6 coaxial
VER THE AIR ANTENNA IN connection. If you
VER THE AIR ANTENNA IN and SATELLITE
Additional Resources for Over-the-Air TV Broadcasts
For information on channel numbers, you can visit the National Association of
Broadcasters (NAB) web page at www.nab.org.
Note: The receiver displays “Transmit Channel” which is referred to on the NAB we b page
as RF Channel. These terms mean the same thing.
Another good source of local channel information is available from the Consumer
Electronics Association (CEA) web page at: www.antennaweb.org. This website provides
recommendations for antenna types and pointing directions.
96
Page 13
Connections
Using Troubleshooting Tools
USING TROUBLESHOOTING TOOLS
Your receiver has troubleshooting tools that you can use to solve many common
problems.
Resetting Your Receiver
1 Press and hold the receiver POWER button until the front panel lights blink.
2 Release the POWER button.
The receiver will take several minutes to reset, will display the message “Acquiring
Satellite Signal”, may download the Program Guide, and then will return you to
programming.
Diagnostics
The Diagnostics screen allows you to check the phone and broadba nd Internet connection
of your receiver.
1 Press MENU, select System Setup, then select Diagnostics.
• Connection—Tests for a valid phone connection or broadband Internet connection.
• Call Out—Updates the receiver’s smart card records. If “No Call Out Pending” is
displayed, the receiver does not need to have its smart card records updated.
2 Select Done to exit the Diagnostics screen.
97
Page 14
Using Troubleshooting Tools
Chapter 12
Point Dish and Check Switch
The Point Dish and Check Switch screens are helpful to the Custo m er Serv ice
Representatives. You may be asked to display these screens when you call DISH
Network. Even though there are items that can be changed, only change them when
specifically directed by a Customer Service Representative.
Warning: Running the Check Switch test while the receiver has low or no signal
will result in incorrect receiver settings and cause you to lose channels. Do not run
a Check Switch test unless directed to by a Customer Service Representative or
other DISH Network instructions.
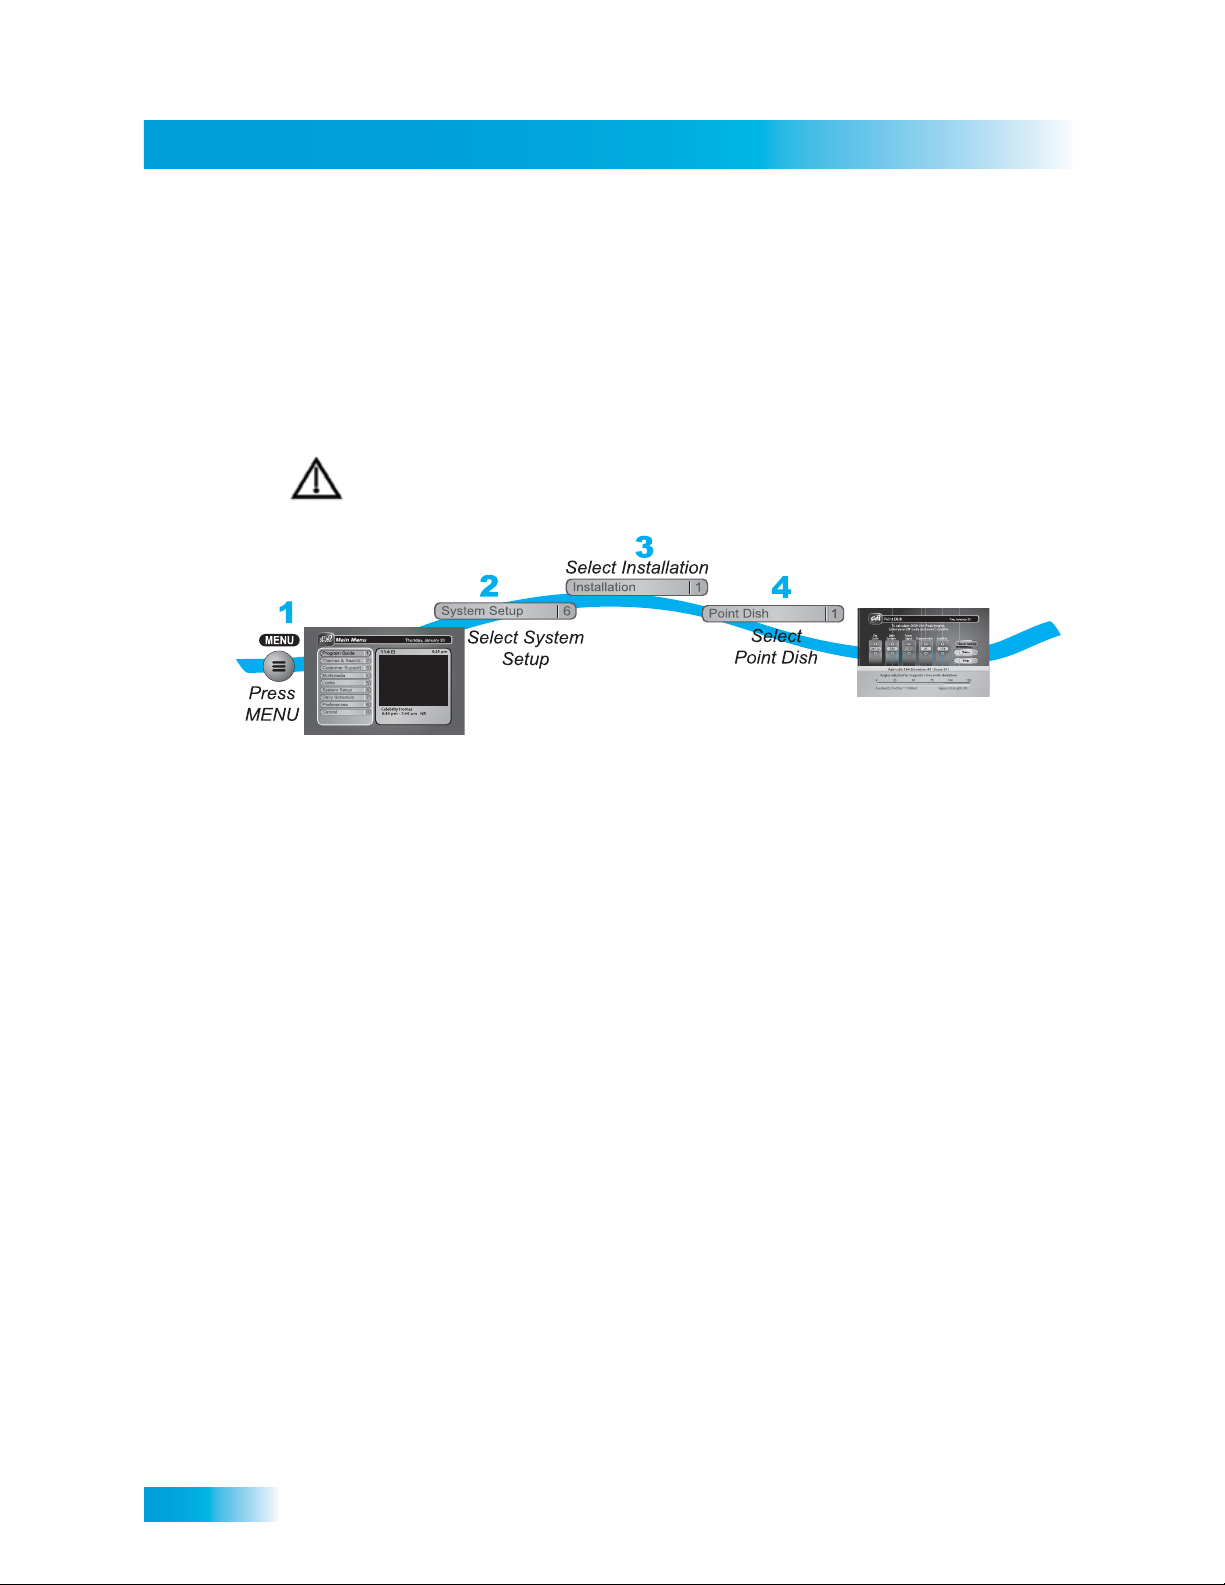
1 Press MENU.
2 Select System Setup.
3 Select Installation.
4 Select Point Dish. This screen shows you information to help maximize your satellite
signal. The bar at the bottom of the screen tells you the signal strength. Green is a good
signal, yellow is a marginal signal, and red indicates the signal is not acceptab le or is from
the wrong satellite.
98
 Loading...