

Page 1

DISH Network
EZ Remote Control
User Guide
POWER
SAT TV
CHANNEL
CONTROL
GUIDE
N
N
A
E
H
L
C
T
H
SELECT
E
M
E
C
H
INFO
CANCEL
123
456
789
RECALL
B
R
O
W
S
E
L
E
A
N
N
VOL
0
MUTE
Page 2

CONTENTS OF THIS GUIDE
About the DISH Network EZ Remote Control................... 3
Buttons and Features Overview........................................ 3
Installing Batteries.............................................................. 4
Receiver Upgrade ............................................................... 5
SettingUp toSwitchtheTVto
Watch Satellite Programming......................................... 5
Connecting Your Satellite Receiver and TV ............... 6
Setting Up the Remote to Control Your TV ................ 7
Setting Up on Your Remote Control .................... 8
SettingUp toSwitchtheTVtoa
Preferred Off-Air Channel .............................................. 12
Connecting an Off-Air Antenna to Your
Satellite Receiver.................................................... 12
Setting Up on the Remote Control...................... 13
SettingUp toPassSatellite
Programming Through Your VCR to Your TV.............. 14
Connecting YourSatellite Receiver, VCR,
and TV .................................................................... 15
Setting Up the Remote to Control Your VCR ........... 16
Setting Up on Your Remote Control .................. 17
Using When a VCR is Installed................................... 20
Other Remote Control Instructions.................................. 21
How to Scan for TV Codes ....................................... 21
How to Scan for VCR Codes.................................... 22
How to Check the TV Codes .................................... 23
How to Check the VCR Codes ................................. 23
How to Remove TV Codes ....................................... 24
How to Remove VCR Codes.................................... 24
How to Use the Remote Control....................................... 25
Pointing the Remote Control .................................... 25
Using the Remote Control for
Satellite TV Programming....................................... 25
Using the Remote Control for
Off-Air TV Programming ......................................... 30
TV and VCR Codes ........................................................... 32
TV Codes.................................................................. 32
VCR Codes............................................................... 39
Limited Warranty ............................................................... 45
118866 1
Page 3

Turn on/off the satellite receiver Turn on/off the TV
Watch satellite
TV programming
Dish Home
Access the menus
Channel up
Access programs
by Themes
Get information
about satellite
a program
Cancel an action
Recall the
last channel
POWER
SAT TV
CHANNEL
CONTROL
N
N
A
E
H
L
C
T
H
SELECT
E
M
E
C
L
H
E
A
N
N
INFO
CANCEL
123
456
789
0
RECALL
GUIDE
VOL
MUTE
Watch off-air
TV programming
Access the
program guide
B
R
O
W
S
E
Browse without
changing channels
Channel down
Turn up/down
the TV volume
Enter channel and
other numbers
Mute the
TV sound
Figure 1. The EZ Remote
See How to Use the Remote C ontrol for more details on
each button.
2 118866
Page 4

ABOUT THE DISH NETWORK EZ REMOTE
CONTROL
The DISH Network EZ Remote Control makes operating
your DISH Network satellite receiver easy and
convenient. This remote control includes large, easy-tofind buttons which are m ost commonly used tocontrol the
basic satellite receiver features you need. In addition, the
DISH Network EZ Remote Control lets you switch
between satellite receiverprogramming and programming
from an off-air antenna with the press of one button.
BUTTONS AND FEATURES OVER VIEW
Figure 1 on page 2 briefly describes each button on the
DISH NetworkEZ Remote Control.Most of thesebuttons
work thesame way as the buttons on other DISH Network
remote controls. See the User’s Guide for your DISH
Network satellite receiver for a description of how your
satellite receiver works with these buttons.
There are some added buttons on this remote control to
make operation with your TV easier. These buttons are:
SATELLITE CHANNEL CONTROL - Press to switch
your TV to watch programming from your satellite
receiver.
OFF-AIR CHANNELCONTROL - Press to switch your
TV to watch programming from your off-air antenna.
TV
TV POWER- Press to turn your TV on or off.
118866 3
Page 5

To use these added buttons and other features to control
your TV, follow the step-by-step instructions below to set
up your remote control. This setup also requires you to
connect your satellite receiver to your TV’s tuner using
coaxial cable. After completing your setup, see How to
Use the Remote Control on page 25 for m ore de tails on
each button.
INSTALLING BATTERIES
Before you can use the remote control, you m ust install
four AAA batteries. Use batteries of the same grade, for
example, alkaline or carbon z inc, and do not mix differe nt
grades. Alkaline batteries provide longer battery life.
1. Press down on the arrow on the battery cover and
slide off the cover.
2. Insert the new batteries, making sure that the ends
marked “+” are installed as shown inside the battery
compartment.
3. Replace the battery cover by sliding the cover back
into place.
CLOSE
OPEN
4 118866
Page 6

RECEIVER UPGRADE
Turn on your TV the way you normally would to watch
satellite TV programming. Using your DISH Network EZ
Remote Control, press and then try using this remote
control to operate some basic satellite receiver features
MENU or GUIDE. If the remote control does not work,
like
your satellite receiver may need to get an upgrade from
the satellite. To receive this upgrade, turn off your
satellite receiver for 20 minutes. After completing the
upgrade,try using theremote control againto make sureit
works.
Note: Check the inside front cover of this guide to see if
the remote control is compatible with your satellite
receiver.
Note: If you are installing the satellite receiver for the first
time, youmust use the remotecontrol that camewith your
receiver to guide the receiver through the installation
procedures, which includes getting the upgrade from the
satellite.
SETTING UPTOSWITCH THE TV TO
WATCH SATELLITE PROGRAMMING
The following instructions show you how to set up your
system and DISHNetwork EZ Remote Control so that
when you press the TV gives you satellite
programming every time.
The first thing you will do is m ake the right connections
between the TV and satellite receiver. After that, you will
set up your remote control to work with your TV and then
set up .
118866 5
Page 7

CONNECTING YOUR SATELLITE RECEIVER AND TV
1. Connect a coaxial cable between the TV Set Out on
the satellite receiver and the tuner input on the TV
(see Figure 2).
Note: If you connect your TV a different way (for
example, using yellow, r ed, and white audio/video
RCA-type or S-Vide o cables), the feature to switch
your TV to satellite programming using will
not work.
2. Set on the back of the receiver to
Note: If you prefer Channel 4, instructions are
CH3.
provided later to change this setting.
Note: If your satellite receiver does not have a ,
see your satellite receiver’s User ’s Guide for how
to set
TV Set Out on the satellite receiver to
Channel 3.
Step 1
Figure 2. Connect the Satellite Receiver and TV
6 118866
Step 2
Page 8

SETTING UPTHEREMOTE TO CONTROL YOUR TV
1. Find the brand name of your TV in the TV c ode
tables starting on page 32. You will be referring to
this location for codes in the instructions below.
2. Turn on your TV.
SAT
3. Press and hold until both lights turn
TV
on (it takes about five seconds).
4. Release . light will flash.
5. Press . Notice light turns on and stays on.
TV
TV
TV
6. Enter one ofthe three-digit codes for your TV from
the TV code tables while light is on.
Note: You have about 20 seconds to begin entering
TV
the TV code.
7. Press the
If light flashes three times, the code is valid
MUTE button and watch light.
TV
and you cango to step 8. If light does not flash
TV
TV
at all, the code may not have been entered
correctly. So, startover from step 3 and try the code
again.
8. Press and your TV should shut off . If your TV
TV
shuts off, go to step 9. If not, pick another code for
your TV brand from the TV Codes table and go
back to step 3. If you have tried all of the codes and
none work, go to How to Scan for TV and VCR
Codeson page 21.
9. Turn your TV back on by pressing again and
TV
try the other buttons below to m ake sure they work.
• Press the 0 through 9 buttons to change channels
on your TV.
118866 7
Page 9

• Press and to change channels on
your TV.
• Pre ss to change the TV volume.
VOLVOL
If these buttons work, go on to the next section to
set up . If not, pick another code for your TV
brandfromtheTVCodestableandgobackto
step 3.
SETTING UPONYOUR REMOTE CONTROL
1. Make sure your TV a nd satellite receiver are
connected and your remote control is set up to
control your TV using the instructions in the last
two sections.
2. Turn on your TV and tune to achannel other than 3
(for example, 4 or 5).
3. Press and your satellite receiver should turn on
and your TV should tune to C hannel 3.
4. Press the
receiver
MENU button. If you see the satellite
Menu screen,gotostep5.Ifnot,goto
step 15.
5. If you want to keep your satellite programming on
TV Channel 3, check the box below and go to step
28.
3
6. If you preferto have your satellite programming on
TVChannel4,goontostep7.
8 118866
Page 10

7. Set the switch on the back of the satellite
receiver to
CH4. The TV will lose the picture from
the satellite receiver, but this is OK.
Note: If your satellite receiver does not have a
switch, see your satellite receiver’s User’s Guide
for how to set
TV Set Out on the satellite receiver to
channel 4.
SAT
8. Press and hold until both lights turn
TV
on (it takes about five seconds).
9. Release . light will flash.
SAT
10.Enter
11.Press
12. light will flash three times.
0-4.
MUTE while watching light.
SAT
SAT
If the light does not flash at all, repeat this
procedure starting with step 8.
13.Press while watching your TV. If your TV
tunes to Channel 4, go to step 14. If not, go to
step 7.
14.Press the
receiver
MENU button. If you see the satellite
Menu screen, check the box below and go
to step 28.
4
15. Answer the questions in Table 1. The information
you provide is what you will use to teach your
remote control to change the channel on your TV
correctly.
118866 9
Page 11

Table 1: How I Change My TV Channels
Column 1:
How do youchange yourTVto
Channel 3 using the number
buttons?
“I just press the number buttons
on my remote to change the
channel.”
If you only press 3 on your
remote control to changethe TV
to Channel 3,circle t he “3” to the
right in Column2 and go to
step 16.
“Ihave toenter azerobefore the
channel numbers.”
If you press0, 3 on your remote
control tochange the TV to
Channel3, circlethe “ 0, 3” to the
right in Column2 and go to
step 16.
“I have to press Enter after I
press the channel numbers.”
If you press0, 3, Enter on your
remote control to changethe TV
to Channel 3, circle the “0, 3,
SELECT”to therightinColumn 2
and go to step 16.
Column 2:
Circle the number
sequence you use to
change your TV to
Channel 3
3
0, 3
0, 3, Select
“I enter a special number
sequence not found above.”
In the spaceto the right, enter
your special number sequence
you use to change your TV to
Channel 3 (max.four entries)
Then circlethis sequence you
wrote and go to step 16.
10 118866
Page 12

16.Write the number(s) you circled into the blank in
step 19.
SAT
17.Press and hold until both lights turn
TV
on (it takes about five seconds).
18.Release . light will flash.
SAT
19.Press
(Fill in this blank with the exact sequence you circled in Table 1)
20.Press the MUTE button while watching light.
21.If the light flashes three times, go to step 22.
If light does not flash at a ll, go ba ck to step
SAT
SAT
SAT
17.
22.Press . If your TV tunes to Channel 3, go to
step 23. If not, go back to step 15.
23.If you wa nt to keep your satellite programming on
TV Channel 3, check the box below and go to
step 28.
3
24.If you prefer to have your satellite programmingon
TV Channel 4, check the box below and go to
step 25.
4
25.In the blank below, write down the numbers you
circled in Table 1, except replace “
26.Cross out “0-4”on step 10 (page 9) andin the blank
next to thecrossed-out text write whatyou wrote in
step 25.
27.Repeat steps 7 through 14 on page 9, including the
changes you made to step 10.
28.You have completed setting up the button and
TV control features of the remote control.
118866 11
3”with“4.”
Page 13

SETTING UPTOSWITCH THE TV TO A
PREFERRED OFF-AIR CHANNEL
If you watch local programming from an off-air antenna,
follow these instructions to set up to switch your TV
to your preferred off-air channel. You will need to
connect your off-air antenna to your satellite receiver and
then set up your remote control. Before you can do these
instructions you must first complete Setting Up to
Switch TV to Watch Satellite Programming on page 5.
ONNECTING AN OFF-AIR ANTENNA TO YOUR
C
SATELLITE RECEIVER
1. Connect a coaxial cable between your off-air
antenna and the
receiver (see Figure 3).
TV Antenna/Cable In on the satellite
Off-Air Antenna
Step 1
This was set up
in SettingUp
to Watch
Satellite
Programming on
page 5.
Figure 3. Off-Air Antenna Connections
12 118866
Page 14

SETTING UPONTHEREMOTE CONTROL
1. In the blank below, write down your preferred offair channel that you want your TV to tune to when
you press .
2. If step 19 on page 11 is blank and was not used to
set up , go to step 8. Otherwise, go to step 3.
3. In the blank below, write down the number
sequence from step 19 on page 11.
If the number you wrote in step 1 is a 2-digit number:
4.
In the blank below, write the number sequence
from step 3, except replace “
3”or“0-3” with your
2-digit number from step 1 (for example, if you
wrote “
channel is Channel 25, write “
If the number you wrote in step 1 is a 1-digit number:
5.
0-3-SELECT” in step 3 and your preferred
2-5-SELECT”).
In the blank below, write the number sequence
from step 3, except replace “
3” with your 1-digit
number from step 1 (for e xample, if you wrote “
SELECT
Channel 7, write “
”instep3andyourpreferredchannelis
0-7-SELECT”).
0-3-
6. Write the number sequence you wrote in either
step4orstep5intotheblankinstep11onpage14.
7. Go to step 9.
8. In the blank provided in step 11, write the number
recorded in step 1. If that number has one digit,
write “
9. Press and hold untilboth lights turn
0” before the number.
SAT
TV
on (it takes about five seconds).
118866 13
Page 15

10.Release . light flashes.
TV
11.Press .
12.Press the
MUTE button while watching the
TV
light.
13.If the light flashes three times, go to step 14. If
TV
TV
doesnotflashatall,gobacktostep9.
14.Press tomake sure your TV tunes to the off-air
TV channel you wanted.
SETTING UPTOPASS SATELLITE
PROGRAMMING THROUGH YOUR VCR TO
YOU R TV
If you want to install a VCR between your satellite
receiver and your TV, follow these instructions to set up
your system and your remote control to switch your
system towatch satellite programming through your VC R
when you press .
Note: The remote control setup for the VCR is only to
allow the to pass satellite programming through your
VCR. This re mote control does not provide any buttons to
control standard VCR functions.
The first thing you will do is m ake the right connections
between your satellite receiver, V CR, a nd TV. After that,
you will set up your remote control. Before you can do
these instructions, you must first complete Setting Up
to Switch the TV to Watch SatelliteProgramming on
page 5.
14 118866
Page 16

CONNECTING YOUR SATELLITE RECEIVER, VCR,
AND TV
1. Connect a coaxial cable between the
TV Set Out on
the satellite receiver and the tuner input to the VC R
(see Figure 4).
Note: If you connect your VCR a different way (for
example, using yellow, r ed, and white audio/video
RCA-type or S-Vide o cables), the feature to switch
your VCR to pass satellite programming using
will not work.
2. Look at the boxes you checked on page 8, 9,
and 11. If you checked a box next to “
3,” write “ 3”
in the blank below. If you checked a box next to
4,” write “ 4” in the blank below.
“
Channel
3. Make sure that the switches on the back of
both your satellite receiver and your VCR are set to
the channel you wrote down in step 2.
Note: If your satellite receiver does not have a
switch, see your satellite receiver’s User’s Guide
for how to set
TV Set Out on the satellite receiver to
the channel you wrote in step 2.
4. Connect a coaxial cable between the coaxial TV
output connection on the VCR and the tuner input
to the TV.
118866 15
Page 17
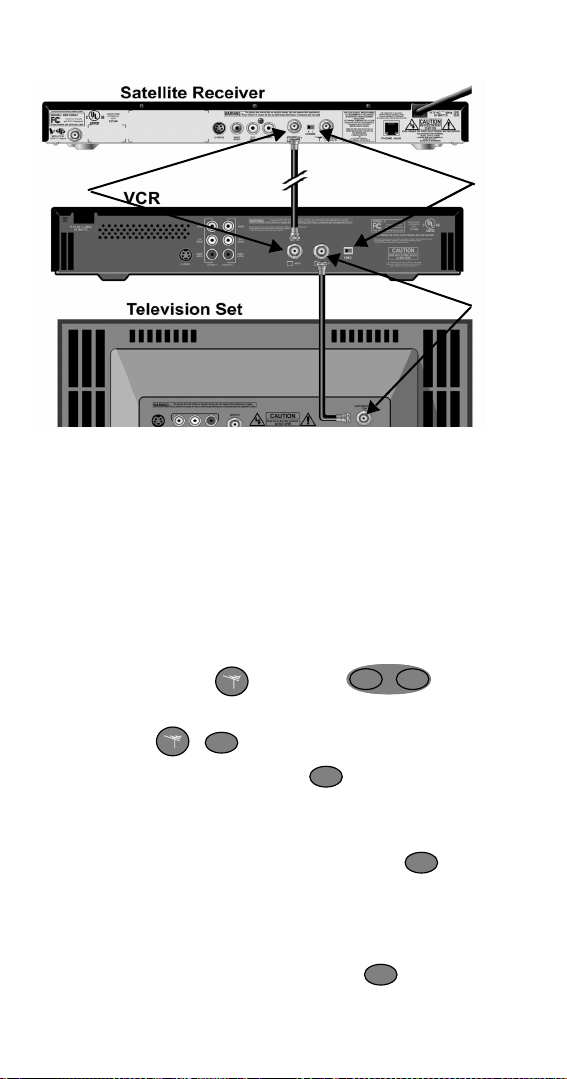
Step 1
Step 3
Step 4
Figure 4. Connecting a Satellite Rece ive r, VCR,
and TV
SETTING UPTHEREMOTE TO CONTROL YOUR VCR
1. Find the br and name of your VCR in the VC R code
tables starting on page 39. You will be referring to
this location for codes in the instructions below.
2. Turn on your VCR.
SAT
3. Press and hold until both lights turn
TV
on (it takes about five seconds).
4. Release . light will flash.
5. Press the
TV
RECALL button. light turns on and
TV
stays on.
6. Enter one of the three-digit codes for your VCR
from the VCR code tables while the light is
TV
on.
Note: You have about 20 seconds to begin entering
the VCR code.
7. Press the
MUTE while watching light.
16 118866
TV
Page 18

8. If light flashes three times, the code is valid
TV
and you cango to step 9. If light does not flash
TV
at all, the code may not have been entered
correctly. So, startover from step 3 and try the code
again.
9. Press while looking at the channel number
display on your VCR. If the VCR is trying to
change channels to the channel you wrote in step 2
on page 15, go on to the next section to set up
for your VCR. If not, pick another code for your
VCR brand from the VCR code tables and go back
to step 3.
Note: The way yourVCR displayschannel numbers
may differ from the description above. See the
User’s Guide that came with your VCR for more
information.
If you have tried all of the codes and none work, go
to How to Scan for VCR Codes on page 22.
SETTING UP ON YOUR REMOTE CONTROL
1. Make sure yoursatellite receiver, VCR, and TV are
connected and your remote control is set up to
control your VCR using the instructions in the
previous sections.
2. Turn on your VCR and tune your VCR to a channel
other than 3 or 4 (for example, 5).
3. Press to turn on your TV.
TV
4. Press . Make sure your VCR tunes to either
Channel 3 or 4.
5. Press the
receiver
MENU button. If you see the satellite
Menu screen, go to step 26. If not, go to
step 6.
118866 17
Page 19

6. Write the number in step 2 from page 15 into the
blankinstep10below.
SAT
7. Press and hold the until both lights
TV
turn on (it takes about five seconds).
8. Release and light will flash.
SAT
9. Press the
RECALL button.
10.Enter 0- .
11.Press the
12.If the light flashes three times, go to
step 13. If light does not f lash, go to step 7
MUTE button while watching light.
SAT
SAT
SAT
and try again.
13.Press . Make sure your VC R tunes to the
channelinstep10.
14.Press the
receiver
MENU button. If you see the satellite
Menu screen, go to step 26. If not, go to
step 15.
15.Answer the questions in the Table 2. The
information you provide is what you will use to
teach your remote control to c hange the channel on
your VCR correctly.
18 118866
Page 20
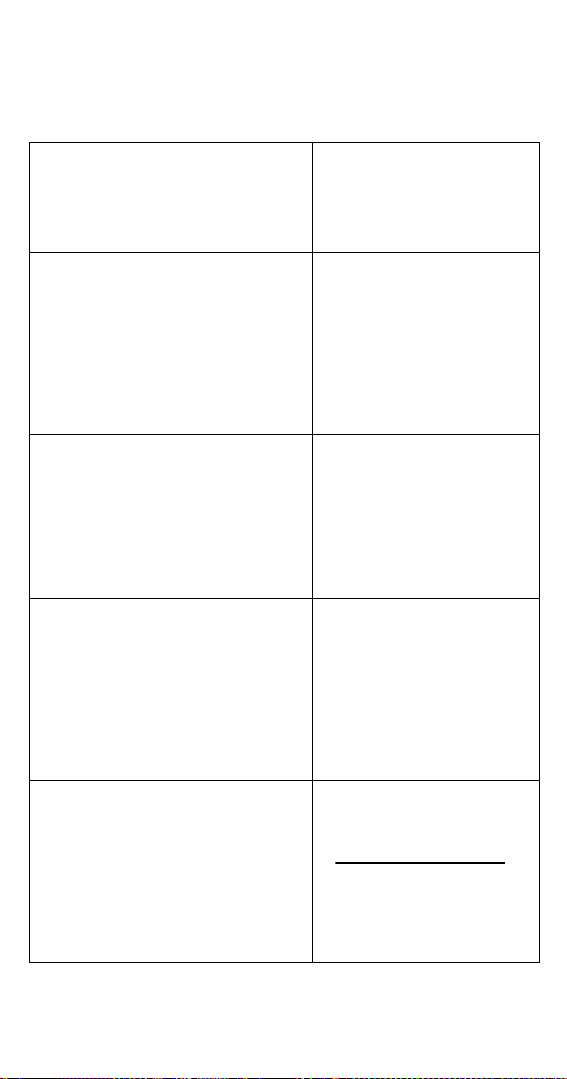
Table 2: How I Change My VCR Channels
Column 1:
How do you change your VCR
toChannel3 using thenumber
buttons?
“I just press the number buttons
on my remote to change the
channel.”
If you only press 3 on your
remote control to change the
VCR to Channel 3, circle the “3”
totherightinColumn2andgoto
step 16.
“Ihave toenter azerobefore the
channel numbers.”
If you press0, 3 on your remote
control tochange the VCR to
Channel3, circlethe “ 0, 3” to the
right in Column2 and go to
step 16.
“I have to press Enter after I
press the off-air channel
numbers.”
If you press0, 3, Enter on your
remote control to change the
VCR to Channel 3, circle the “0,
3, SELECT” to the right in
Column 2 and go to step 16.
Column 2:
Circle the number
sequence you use to
change your VCR to
Channel 3
3
0, 3
0, 3, Select
“I enter a special number
sequence not found above.”
In the spaceto the right, enter
your special number sequence
you use to change your VCR to
Channel 3 (max.four entries).
Then circlethis sequence you
wrote and go to step 16.
118866 19
Page 21
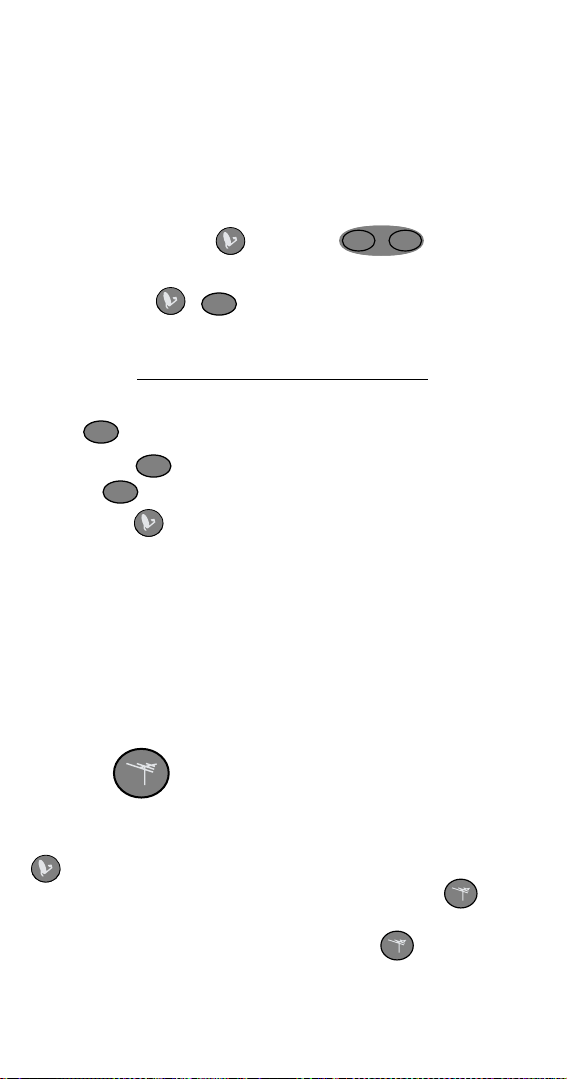
16.If the information in step 2 on page 15 is a “3,”
write the numbers you circled in Table 2 into the
blankinstep21.
17.If the information in step 2 on page 15 is a “4,”
write the numbers you circled in Table 2 into the
blank in step 21, except replace the “3” with a “4.”
SAT
18.Press and hold until both lights turn
TV
on (it takes about five seconds).
19.Release . light will flash.
SAT
20.Press the
RECALL button.
21.Press .
22.Press the MUTE button while watching
SAT
light.
23.If the light flashes three times, go to step 24.
If light does not flash at all,go back to step18.
SAT
SAT
24.Press . You should see both your TV and your
VCR change to the channel you wrote in step 21
above so that you can wa tch satellite programming.
25.Press the
receiver
MENU button. If you see the satellite
Menu screen, go to step 26. If not, go to
step 15 on page 18.
26.You are finished programming the remote control.
USING WHEN A VCR IS INSTALLED
If youinstalled a VCR using the instructions in Setting Up
to Pass Satellite Programming T hrough Your VCR to
Your TV on page 14, but you would like to use to
switch your TV to the preferred off-air channel, make sure
your VCR is turned off before pressing .
20 118866
Page 22
OTHER REMOTE CONTROL INSTRUCTIONS
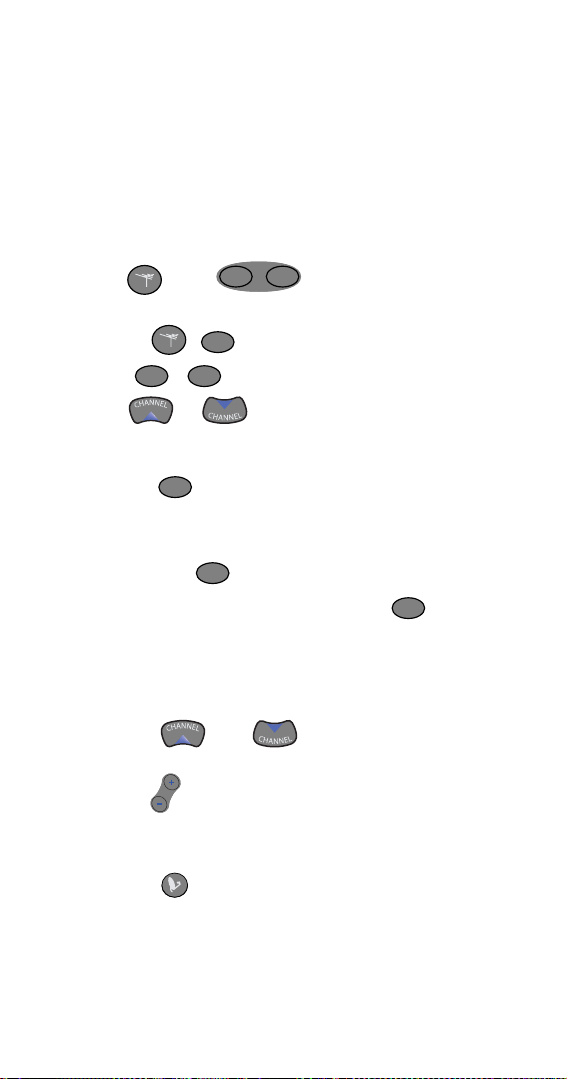
HOW TO SCAN FOR TV CODES
If the code for your TV is not in the TV Codes tables
startingon page 32, complete the followinginstructionsto
scan for your TV’s code.
1. Make sure your TV is on.
SAT
2. Hold until lights turn on (it takes
about five seconds).
3. Release . light flashes.
4. Press . light stays on.
TV TV
TV
5. Press or until the TV turns OF F. You
will have to do this repeatedly to scan through all
codes.
Note: If flashes eight times, you have tried
TV
every code in the remote control.
TV
6. Press the
control. The light will flash three times.
7. Turn your TV back on by pressing again and
MUTE to finish programming the remote
TV
TV
try the other buttons below to m ake sure they work.
• Press the 0 through 9 buttons to change channels
on your TV.
• Press and to change channels on
your TV.
• Pre ss to change the TV volume.
VOLVOL
If the buttons work, you have found the c orrect
code for your TV and you may want togo to page 8
to set up . If the buttons do not work, go back to
step 2 to find another code.
118866 21
Page 23
HOW TO SCAN FOR VCR CODES
If the code for your VCR is not in the VC R Codes tables
startingon page 39, complete the followinginstructionsto
scan for your VCR’s code.
1. Make sure your VCR is on.
SAT
2. Hold until lights turn on (it takes
TV
about five seconds).
3. Release . light flashes.
4. Press the
TV
RECALL button. light stays on.
TV
5. Press or until the VCR turns OFF. You
will have to do this repeatedly to scan through all
codes.
Note: If flashes eight times, you have tried
TV
every code in the remote control.
6. Press the
control. The light will flash three times.
MUTE to finish programming the remote
TV
7. Press while looking at the channel number
display on your VCR. If the VCR is trying to
change channels to Channel 3 (or 4), you have
found the correct code for your VCR and you may
want to go back to page 17 to set up . If the
VCR is not trying to change channels, go back to
step 2 to find another code.
Note: The way yourVCR displayschannel numbers
may differ from the description above. See the
User’s Guide that came with your VCR for more
information.
22 118866
Page 24
HOW TO CHECK THE TV CODES
You can find out what TV code is set up in your remote
control when you complete the following instructions.
SAT
1. Hold until lights turn on (it takes
TV
about five seconds).
2. Release . light flashes.
3. Press . stays on.
TV TV
4. Press the
TV
MUTE button twice. flashes the
TV
number for each digit of the device code, with a
pause between the groups of flashes. A quick flash
is zero.
Example: For the code 570, the TV POWER button
flashes fivetimes, pauses, flashes seven times,
pauses, and flashes once quickly.
OW TO CHECK THE VCR CODES
H
You can find out what VCR code is set up in your remote
control when you complete the following instructions.
SAT
1. Hold until lights turn on (it takes
TV
about five seconds).
2. Release . light flashes.
3. Press the
4. Press the
TV
RECALL button. stays on.
MUTE button twice. flashes the
TV
TV
number for each digit of the device code, with a
pause between the groups of flashes. A quick flash
is zero.
Example: For the code 590, the TV POWER button
flashes five times, pauses, flashes nine times,
pauses, and flashes once quickly.
118866 23
Page 25
HOW TO REMOVE TV CODES
If you decide to change the TV you are using with the
remote control, it is a good idea to remove the TV code
from the remote.
SAT
1. Press and hold until lightsturn on (it
TV
takes about five seconds).
2. Release . light flashes.
3. Press . stays on.
4. Enter
TV TV
9-9-9-9 with the keypad.
TV
5. Press the
6. The light will flash three times.
MUTE button.
TV
The TV code is now cleared from the remote
control’s memory. The TV channel also is reset
back to “
0-3” for the nexttime you set up a new TV
code in your remote control.
OW TO REMOVE VCR CODES
H
If you decide to change the VCR you are using with the
remote control, it is a good idea to remove the VCR code
from the remote.
SAT
1. Press and hold until lightsturn on (it
TV
takes about five seconds).
2. Release . light flashes.
3. Press the
4. Enter
9-9-9-9 with the keypad.
5. Press the
6. The light will flash three times.
TV
TV
RECALL button. stays on.
MUTE button.
TV
The VCR code is now cleared from the remote
control’s memory. The VCR channel also is reset
back to “
0-3” for the next time you set up a new
VCR code in your remote control.
24 118866
Page 26
HOW TO USE THE REMOTE CONTROL
This section describes how to use your DISH Network
Remote Control. Figure 1 on page 2 shows the remote
control with a brief description of the buttons.
P
OINTING THE REMOTE CONTROL
The remote control uses infrared (IR) light signals to
control the satellite receiver and TV. IR signals travel
about 40 feet or less and cannot go through walls or other
solid objects. To operate a device, you must point the
remote control at the device, with no objects in the way.
U
SING THE REMOTE CONTROL FOR SATELLITE TV
ROGRAMMING
P
SATELLITE CHANNEL CONTROL BUTTON
To usethe remote controlto get satelliteTV programming
and operatethe satellite receiver, you must first press ,
which will do three things:
• Turns on the satellite receiver.
• Tunes your TV to the channel (3 or 4) you use to
watch satellite TV programming (this function only
works if you have completed the instructions in
Setting Up to Sw itch the TV to Watch Satellite
Programmingon pa ge 5).
• Makes the remote control buttons work as described
below to support watching satellite TV programming.
SAT
SAT POWER BUTTON
Press the SAT POWER button to turn the satellite r eceiver
ON or OFF.
118866 25
Page 27
TV
TV POWER B
UTTON
Press the TV POWER buttontoturntheTVONorOFF.
This button works only if you have completed the
instructions in Setting Up the Remote to Control Your TV
on page 7.
MENU BUTTON
Press the MENU button to ope n the Main Menu.
VOLUME BUTTONS
VOLVOL
Press the VOLUME buttons to raise (+)ortolower(-)the
sound volume on the TV. This works only if you have
completed the instructions in Setting Up the Remote to
Control Your TV on page 7.
GUIDE
GUIDE BUTT ON
Press this button to open the Program Guide. When the
Program Guide is open, press this button to switch among
Favorite Lists.
26 118866
Page 28

N
N
A
E
H
L
C
T
H
E
M
E
C
H
A
N
B
R
O
W
S
E
L
E
N
UP/DOWN/LEFT/RIGHT B
UTTONS
• Change channels - Press the UP or DOWN button.
• Open the B rowse Banner -PresstheRIGHT button.
• Show Themes -PresstheLEFT button.
• Move around within the Program Guide, the menus,
Browse Banner -PresstheUP, DOWN, LEFT,and
and
RIGHT buttons.
SELECT
SELECT BUTTON
Press this buttonto select a highlighted program or option
in a menu.
INFO (INFORMATION) BUTTON
INFO
• Programinformation - Press theINFO button formore
information when you watch a program, or when you
have the
Program Guide, Browse Banner,orThemes
list open.
• Help - Press the INFO button to see help information
whena
Help button appears in a menu.
• System Information - Press and hold the INFO button
SAT
until both lights turn on. When you release
the button the
TV
Important System Information menu
displays.
118866 27
Page 29

CANCEL
• Cancel - Press the CANCEL buttontocancela
CANCEL B
UTTON
procedure and go back to the previous menu or to
watching a program.
• View - Press and hold the CANCEL button until both
SAT
TV
lights turn on. When you release the button,
you will return to watching TV.
123
456
789
NUMBER BUTTONS
0
• Change the channel - Use the NUMBER buttons to
enter a channel number to change the channel. If you
have the
Program Guide open, use the NUMBER
buttons to jump to the channel listing on the Program
.
Guide
• Scrollthrough theProgram Guide by time - When you
have the
hours using these buttons, and then press the
Program Guide open, enter a number of
RIGHT
or LEFT arrowbuttontoskiptheProgram Guide
forward or backward that many hours.
• Enter menu options - For an option with a number,
you can press the number for that option instead of
highlighting and selecting the option.
• Enter numbers in a menu - Highlight the place where
you need to enter the number. Press a number
button(s) (or, you can use the
UP/DOWN arrow
buttons to enter the number).
28 118866
Page 30
DISH B
UTTON
Press the DISH buttontogotoDish H ome for receivers
that support Dish Home.
RECALL
RECALL BUTTON
• Recall - Press the RECALL button to return to the last
satellite receiver channel you watched. Press it again
to switch between the last two satellite receiver
channels you watched.
•
- Press and hold the RECALL button until both
*
SAT
*
lights turn on. Release the button send the
TV
key.
Note: On DISHPVR receivers, this f unction will
activate the PVR Recorded Events List.
MUTE
MUTE BUTTON
• Mute - Press the MUTE button to turn the TV sound
ON and OFF. This button works only if you have
completed the instructions in Setting Up the Remote
to Control Your TV on page 7.
• # - P ress and hold the MUTE button until both
SAT
TV
lights turn on. Release the button to send
#key.
the
Note: On DISHPVR receivers, this f unction will
activate the Search feature.
118866 29
Page 31
USING THE REMOTE CONTROL FOR OFF-AIR TV
ROGRAMMING
P
OFF-AIR CHANNEL CONTROL BUTTON
To use the remote control to get programs from an off-air
antenna and operate your TV, you must first press ,
which will do three things:
• Turns off the satellite receiver to pass through your
off-air antenna to your TV tuner. To watch off-air
channels, you must have an off-air antenna connected
as instructed in Setting Up to Switch the TV to a
Preferred Off-Air Channel on page 12.
• Tunes your TV to your preferred off-air channel.This
function works only if you have completed the
instructions in Setting Up to Switch the TV to a
Preferred Off-Air Channel on page 12.
• Makes the remote control buttons work as described
below to support off-air programming. For any of
these buttons to work, you must first have completed
the instructions in Setting Up the Remote to Control
Your TV on page 7.
TV
POWER BUTTON
Press the POW ER button to turn the TV on or off.
VOLVOL
VOLUME BUTTON
Press these buttons to raise (+)ortolower(-) the sound
volume on the TV.
30 118866
Page 32

CHANNEL UP/DOWN B
UTTONS
Use the CHANNEL UP/DOWN buttons to change channels
on the TV.
SELECT
SELECT BUTTON
The SELECT button works as the ENTER button for a TV.
123
456
789
0
NUMBER BUTTONS
Use these buttons to enter numbers in a TV menu or
directly enter a channel number.
RECALL
RECALL BUTTON
Press the RECALL button to return to the last off-air TV
channel you watched. Press it againto switch between the
last two off-air TV channels you watched.
MUTE
MUTE BUTTON
Press this button to turn the TV sound ON and OFF.
118866 31
Page 33
TV AND VCR CODES
These tables contain the manufacturer codes for
programming the remote control to control your TV or
VCR. Every attempt has been made to include all codes.
If your TV or VCR is not listed or the codes do not work,
the remote may not control your device. In some cases
codes may operate some but not all buttons shown in this
guide.
ODES
TV C
TV Brand Code
Admiral 514, 521
Akai 532, 570, 573
Alba 613
A-Mark 620
Amstrad 533
Anam 509, 541, 620, 621, 691,698
AOC 505, 506, 519, 520, 620, 695, 712
Archer 620
Audiovox 620
Bauer 611
Baycraft 536
Brockwood 695
Broksonic 562, 691
Candle 506, 522, 523, 525, 536, 691, 695, 712
Capehart 519, 695
32 118866
Page 34
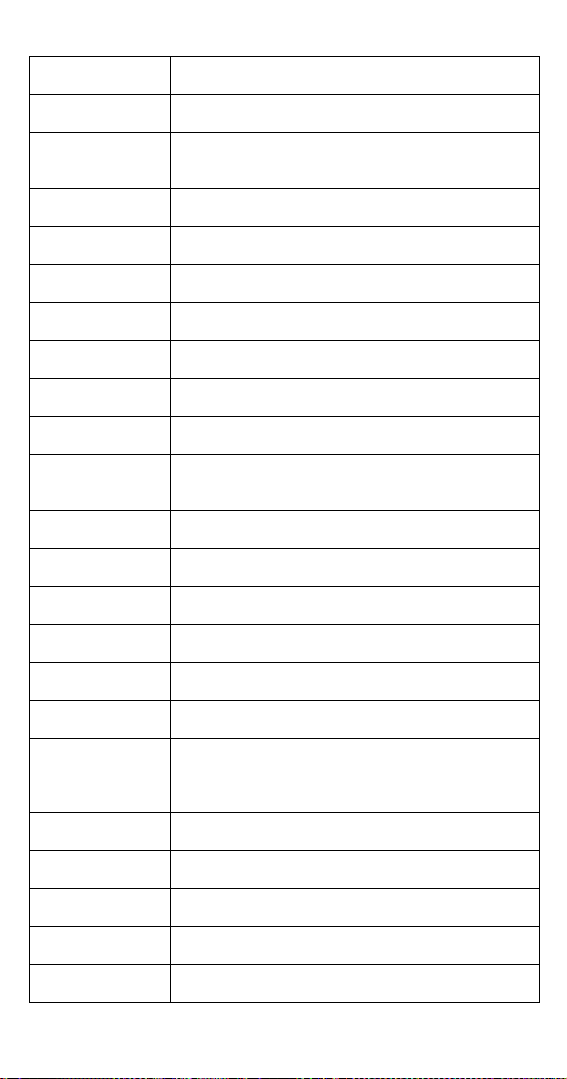
TV Brand Code
Circuit City 695
Citizen 506, 516, 522, 523, 524, 525, 526, 691,
Colortyme 573, 695
Concerto 523
Contec 527, 528, 541, 591, 691
Craig 536, 541, 691, 694
Crown 526, 536
Curtis Mathes 506, 516, 526, 573, 703, 708, 712
CXC 541, 691
Daewoo 505, 524, 526, 529, 530, 531, 532, 698,
Daytron 526, 695
Dixi 532, 588, 620
Dumont 695
EchoStar 722
Electorhome 526, 573, 709, 713
Elta 532
712
712, 719
Emerson 526, 527, 528, 533, 534, 535, 536, 537,
Envision 506,712
Etron 532
Fisher 542, 590
Formenti 611
Fortress 573, 605
538, 539, 540, 541, 573,622, 691, 692,
695, 696, 699, 720,
118866 33
Page 35
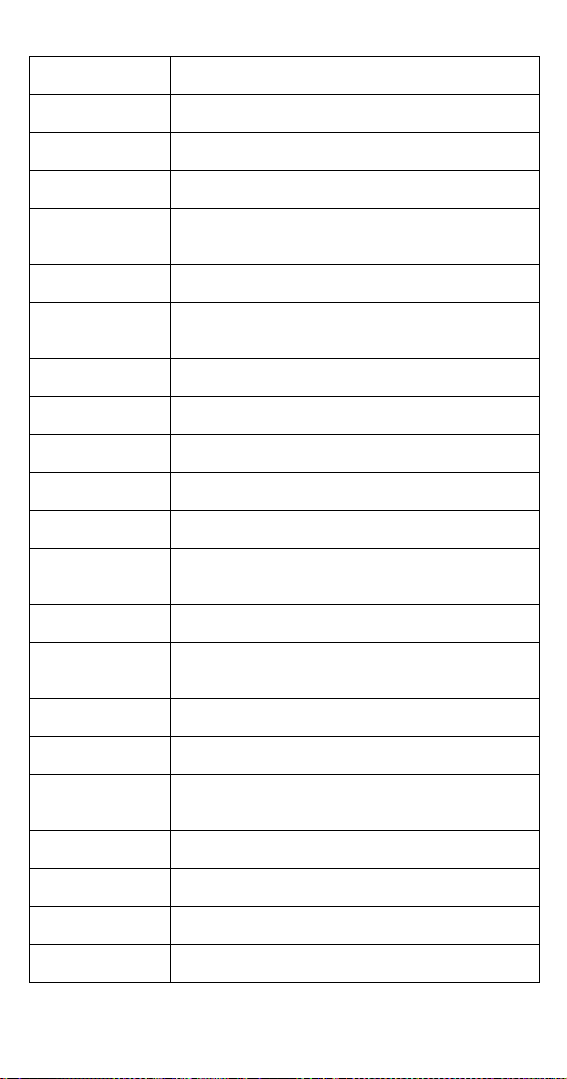
TV Brand Code
Fujitsu 534, 694
Funai 534, 541, 691, 694
Futuretech 541, 691, 694
General
Electric ( GE)
Genexxa 613
Goldstar 505,523, 526, 545, 546, 573, 588, 693,
Granada 695, 711
Grand 695
Grandiente 711
Grundig 547
Hallmark 695
Harmon
Kardon
Hinari 534
Hitachi 523, 526, 548, 549, 550, 551, 552, 553,
Infinity 566
JBL 566
JC Penney 503, 505, 506, 516, 526, 531, 543, 596,
503, 508, 509, 515, 540, 543, 544, 630,
695, 698, 701,714, 715, 716
712
561
554, 555, 585, 597, 626, 702, 718
701, 714
Jenson 556, 573
JVC 557, 558, 559, 560
Kawasho 548, 561, 712
Kenwood 506, 573,712
34 118866
Page 36
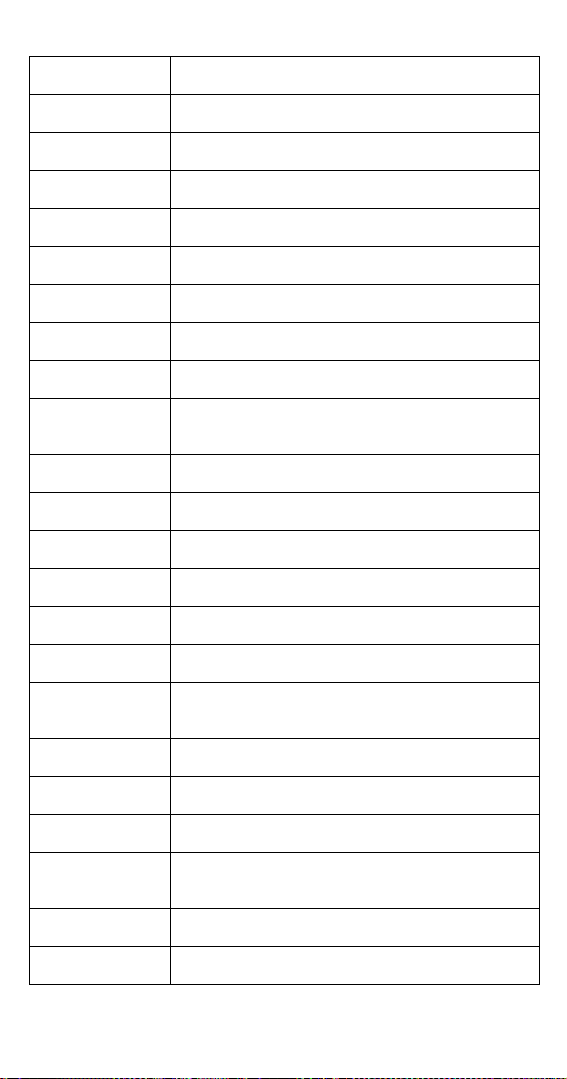
TV Brand Code
Kloss 522, 561, 610, 698
KTV 526, 539, 540, 541, 691, 696, 712
Lloyds 695
Lloytron 526
Loewe 588
Logik 518
Luxman 523
LXI 503, 563, 566, 590, 595, 617, 625, 701
Magnavox 506, 520, 525, 536, 564, 565, 566,567,
Magnasonic 573
Marantz 506, 566, 573, 588, 712
Matsui 532, 609
Megatron 695
Memorex 518, 532, 590, 695, 720
MGA 504, 505, 506, 571, 573,695
Mitsubishi 504, 505, 570, 571, 572, 597, 623, 695,
MTC 505, 506, 516, 523, 531, 695, 712
NAD 502, 617, 695
National 509, 697, 698
National
Quenties
NEC 505, 506, 507, 517, 523, 573, 627, 712
Nikkai 612, 613, 618
568, 569, 573, 575, 610, 710, 712,
705, 707, 712
697
118866 35
Page 37
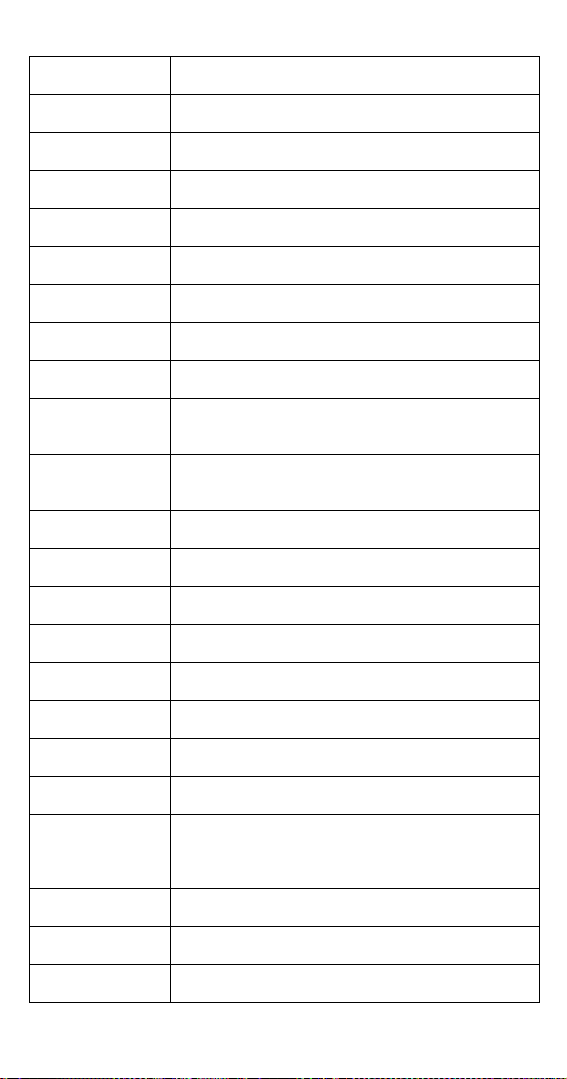
TV Brand Code
Nordmende 551
Normandic 717
Novabeam 561, 698
Nyon 701
Onwa 541, 691
Optonica 605, 607
Orion 694
Osaki 612
Panasonic 508, 509, 510, 511, 512, 566, 574, 685,
Philco 505, 506, 525, 536, 564, 565,568, 573,
Philips 566, 588
Pioneer 502, 548, 551, 576, 708
Portland 505, 526, 712
Proscan 503
Proton 513, 519, 526, 536, 585, 624, 695
Pulsar 501
Quasar 508,509, 577, 698, 700
Radio Shack 526, 541, 607, 612, 691, 698
RCA 503, 505, 515, 548, 579, 580, 581, 582,
Realistic 590
Saba 551
Saisho 532, 533, 609
687, 689, 697, 698, 700, 706, 714, 716
610, 712
583, 584, 586, 587, 625, 633, 634, 691,
698, 701, 708, 714, 715, 716
36 118866
Page 38
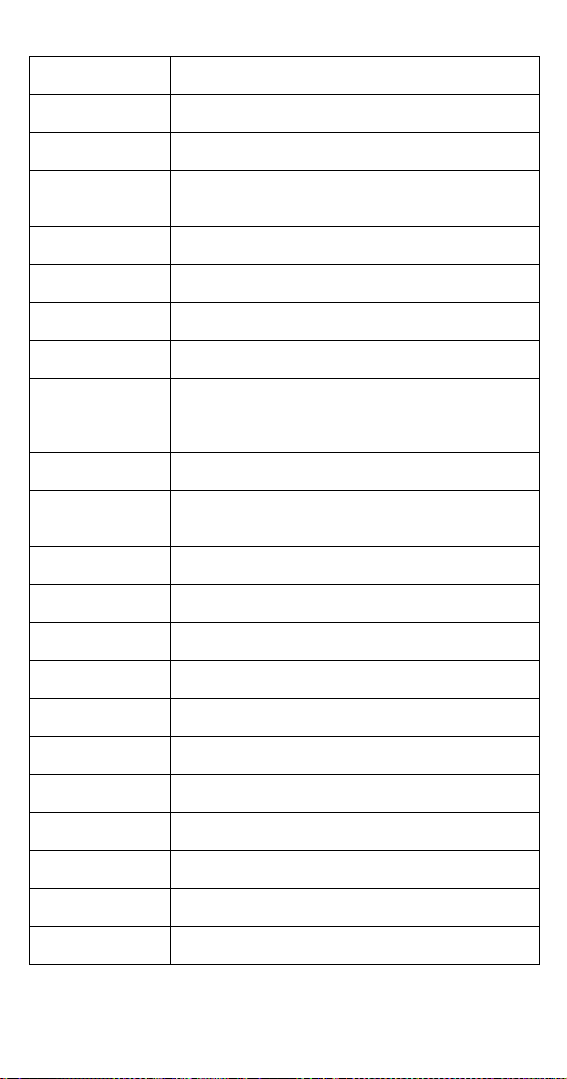
TV Brand Code
Sampo 506, 519, 698
Samwon 620
Samsung 505, 506, 516, 523, 526, 532, 588, 612,
Sanyo 542, 589, 590, 591, 592, 609
SBR 588
Schneider 588
Scott 526, 534, 537, 541,593, 600, 691,696, 701
Sears 503, 523, 534, 542, 563, 589, 590, 594,
Seimitsu 695
Sharp 526, 585, 591, 605, 606, 607, 608, 628,
Siemens 591
Signature 518
Silver 573
Solavox 612
Sony 500, 578, 609, 619, 622, 690
Soundesign 525,536, 541, 691, 695
695, 704, 712, 721
595, 596, 598, 599, 601, 602, 603, 604,
617, 695, 703
629
Spectricon 520, 620
Squareview 694
SSS 505, 541,573, 691, 712
Supra 523
Supremacy 522
118866 37
Page 39
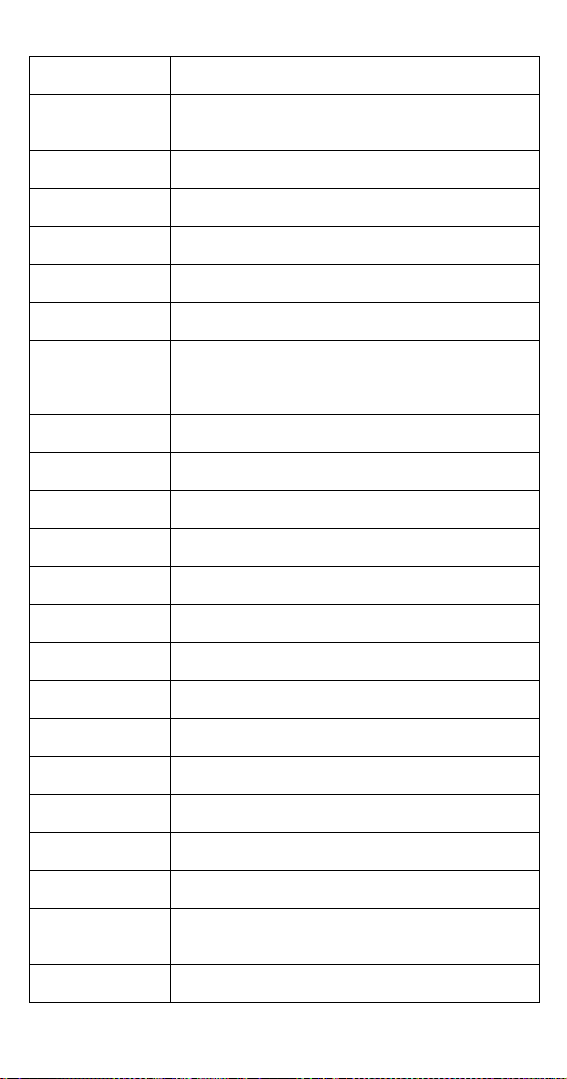
TV Brand Code
Sylvania 506,525, 536, 564, 565, 566, 568, 573,
Symphonic 632, 692, 694
Tandy 605, 613
Tatung 509, 698
Technics 508
Techwood 523, 573
Teknika 504, 505, 516, 518, 522, 523, 524, 525,
Teleavia 551
Telefunken 551
Teletech 532
Tera 513
Thomas 695
Thompson 709
Thomson 551, 616
575, 600, 610, 611, 712
526, 534, 536, 541, 614, 615, 686, 691,
712
TMK 523, 573, 695
Toshiba 516, 590,596, 617, 618, 631, 688
Tosonic 528
Totevision 526
Toyomenko 695
Universal 543
Vector
Research
Victor 557
506
38 118866
Page 40
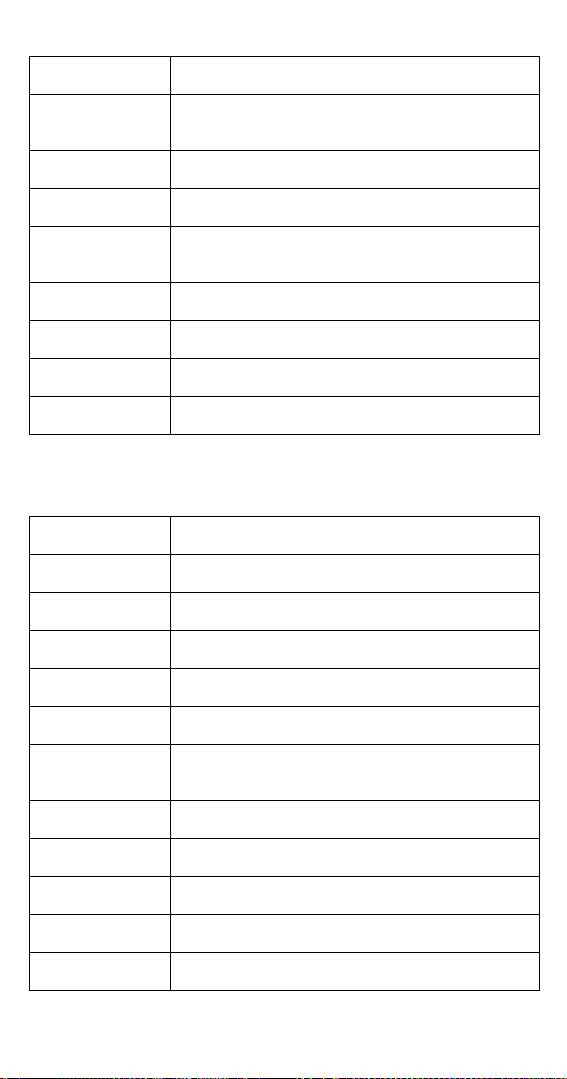
TV Brand Code
Video
Concepts
Vidtech 505, 695, 712
Viking 522
Wards 505, 506, 515,518, 534, 536, 543, 564,
Yamaha 505, 506, 712
York 695
Zenith 501, 518, 693
Zonda 620
570, 691
565, 567, 568, 607, 619, 712, 714, 715
VCR CODES
VCR Brand Code
Aiwa 588
Akai 513, 514, 515, 516, 518, 519, 520
Alba 546
Amstrad 588
ASA 565
Audio
Dynamics
Broksonic 665, 689
Bush 589
Candle 592
Canon 553, 554, 669
Capehart 543, 546
594, 600, 668
118866 39
Page 41
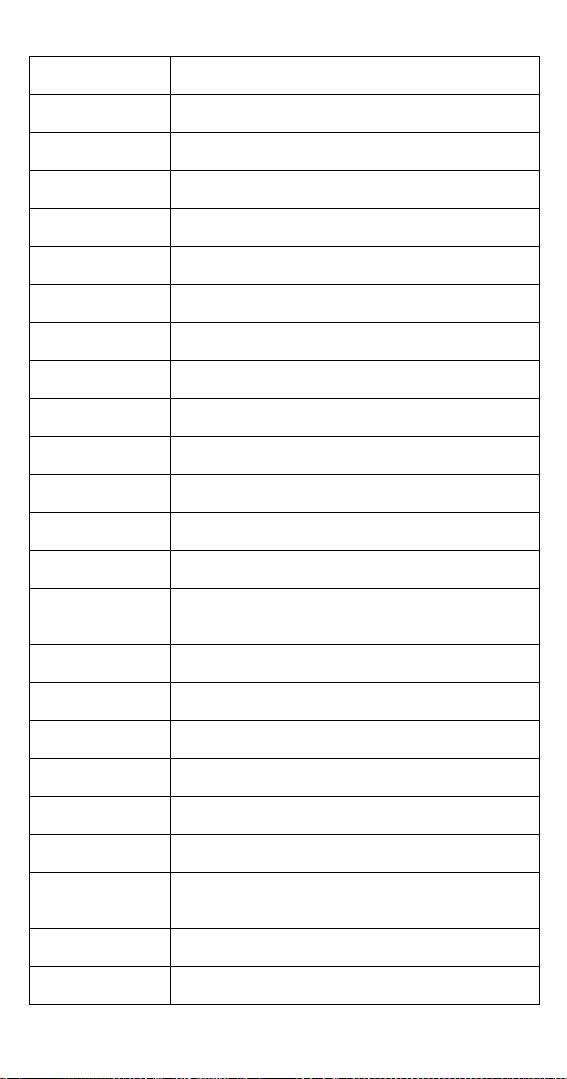
VCR Brand Code
Carver 664
CCE 677
Citizen 591, 592
Colt 677
Craig 591, 608, 677
Croslex 553
Curtis Mathes 554, 592, 653, 669
Daewoo 534, 545, 546, 547, 665, 666
Daytron 546
DBX 594, 600, 668
Dimensia 653
Dumont 549
Dynatech 588, 666
Emerson 505, 506, 509, 588, 590, 654, 655, 660,
Finlandia 549
Finlux 549, 565, 588
Fisher 549, 584, 588, 608, 674, 676
Fuji 685
Funai 666
Garrard 666
General
Electric ( GE)
Goldstar 530,592, 613
Goodmans 589
665, 666, 670, 672, 683, 689
550, 552, 554, 591, 653, 669
40 118866
Page 42
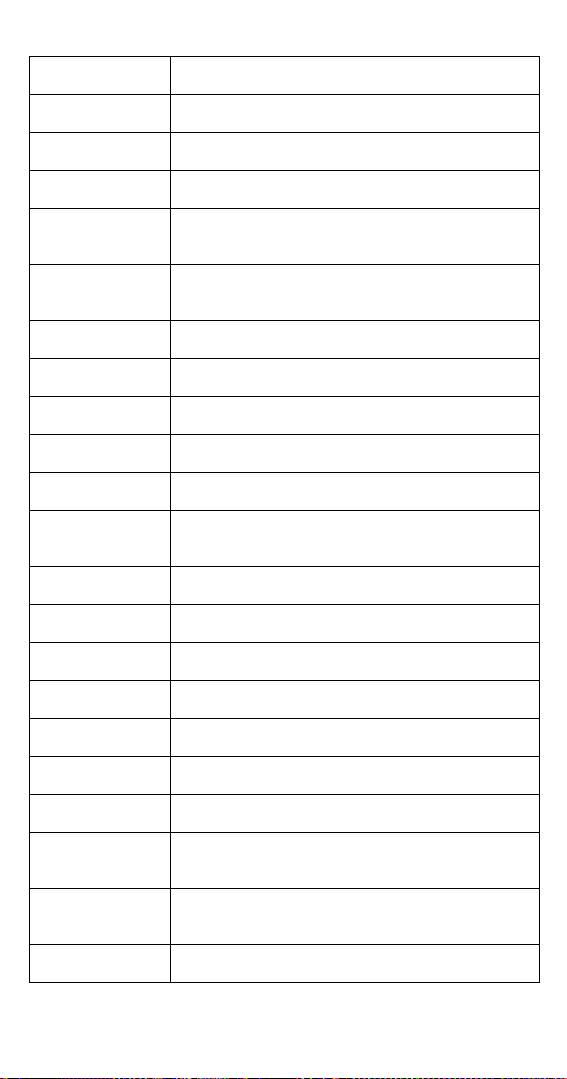
VCR Brand Code
Gradiente 666
Granada 549, 581
Grundig 565
Harley
Davidson
Harmon
Kardon
Harwood 677
Hinari 589
Hitachi 553, 588, 595, 596, 681, 688
Instant Replay 553
ITT 518
JC Penney 530, 554, 591, 594, 600, 668, 669, 675,
Jenson 560
JVC 592, 594, 600, 662, 668
Kenwood 581, 592, 594, 600, 662, 668
KLH 677
Lloyd 588, 666
Logik 589, 677
666
530
681
Luxor 518
Magnavox 553, 554, 556, 565, 611, 663, 664, 669,
Marantz 530, 554, 565, 592, 594, 600, 603, 664,
MEI 554
682
668
118866 41
Page 43
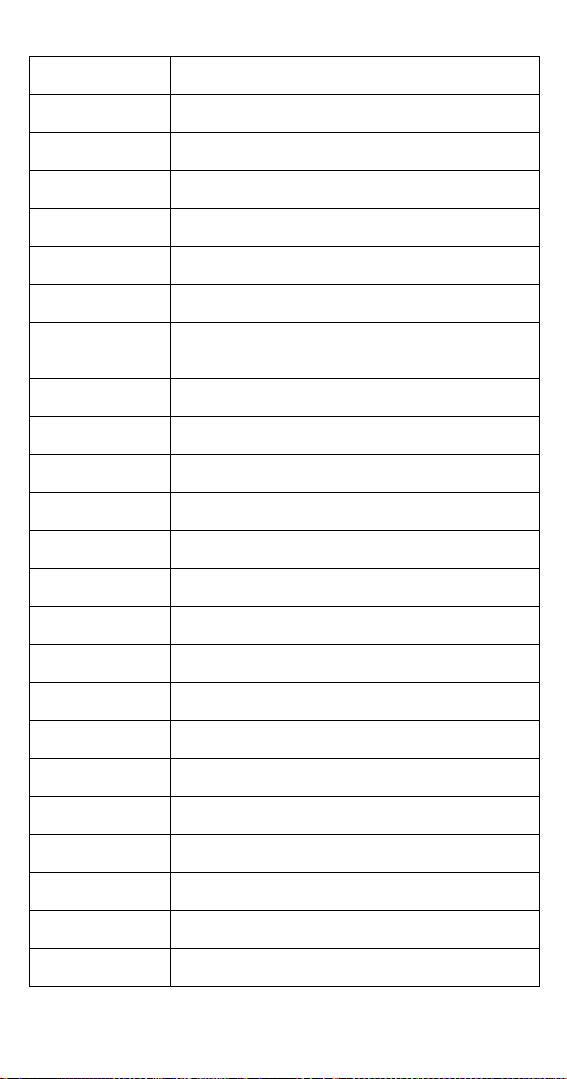
VCR Brand Code
Memorex 549, 554, 581, 588, 608, 663, 666
Minolta 681
Mitsubishi 659, 662, 671, 687
MTC 544, 588
Multitech 588, 589, 591, 666, 677
NAD 573
NEC 530, 531, 532, 562, 592, 594, 599, 600,
Olympic 553
Orion 506
Panasonic 523, 553, 554, 614, 633, 669
Pentax 592, 681
Perdio 588
Philco 553, 554, 611, 664, 669
Philips 553, 554, 565, 664
Pioneer 553, 573, 600, 662, 668
Portland 546
Proscan 553, 653
Protec 677
Pulsar 663
Quartz 581
Quasar 553,554, 669
602, 603, 604, 662, 668, 678
Radio Shack 608, 666, 669, 676
RCA 591, 653, 656, 657, 679, 680, 681, 684
42 118866
Page 44
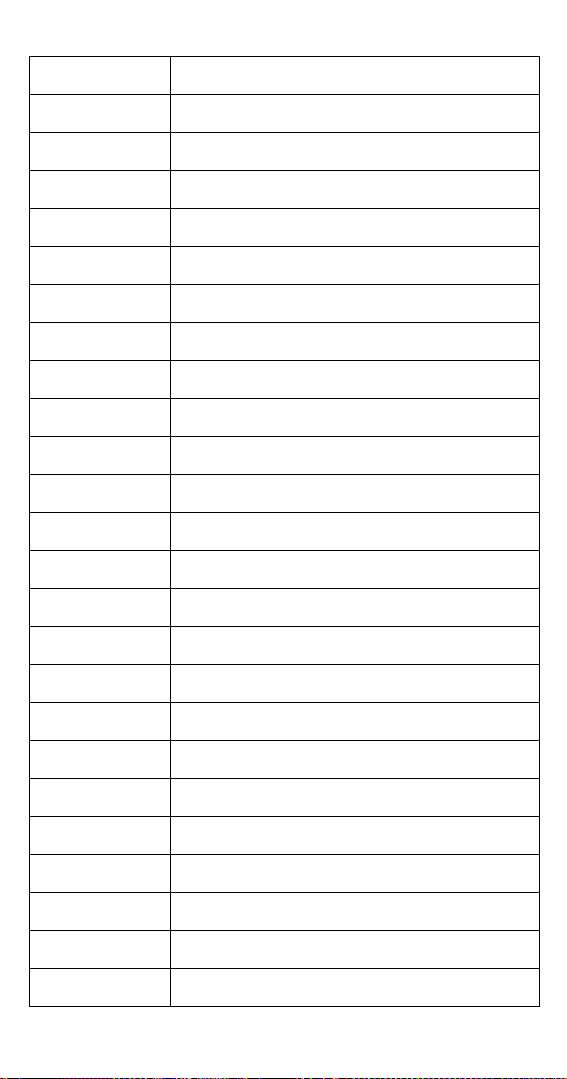
VCR Brand Code
Realistic 549, 554, 581, 584, 588, 666, 669, 676
Ricoh 502, 686
Runco 663
Saisho 506
Salora 581
Samsung 534, 591, 661
Sanky 663
Sansui 532, 544, 600, 621, 662, 668
Sanyo 549, 581, 582, 608
SBR 565
Schneider 589
Scott 590, 654, 665, 673, 683, 689
Sears 549, 581, 584, 608, 676, 681
Sentra 546
Shintom 589, 667, 677
Singer 677, 686
Sony 500, 501, 502, 667, 685
STS 681
Sylvania 553, 554, 556, 588, 611, 664, 669
Symphonic 588, 594, 666
Tandy 588
Tashiko 588
Tatung 586, 594
Teac 588, 594, 666, 679
118866 43
Page 45
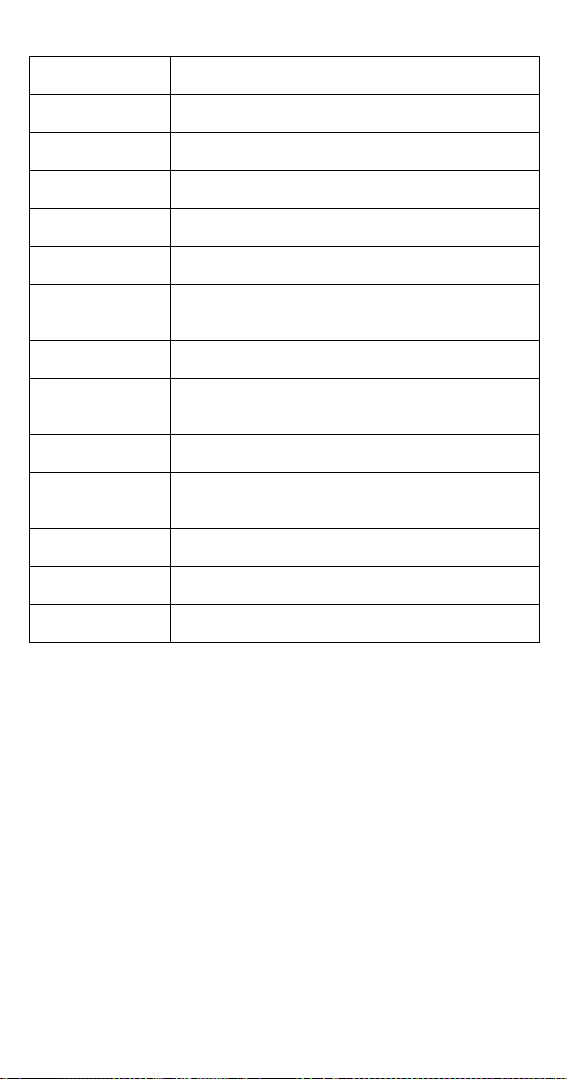
VCR Brand Code
Technics 553, 554
Teknika 554, 588, 666
TMK 506, 660
Toshiba 534, 590,673, 683
Totevision 591
Vector
Research
Victor 600, 668
Video
Concepts
Videosonic 591
Wards 554, 588, 589,590, 591, 608, 658, 666,
XR1000 666, 677
Yamaha 530, 592, 594, 600, 668
Zenith 500, 501, 663, 667, 685, 686
530, 600, 668
600, 668
681, 683
44 118866
Page 46

LIMITED WARRANTY
This warranty extends only to the original user of theDISH N etwork
remote control (“you,” “your”) and is limited tothepurchasepriceof
the remote control. EchoStar Communications Corporation and its
affiliated companies (“we,” “our,” “us”) warrant this remote control
against defects in materials or workmanship as follows.
For one year from the original date of purchase, ifwe find the remote
control is defectivesubject to the limits of this warranty, we will
replacethe remote at no charge for parts or labor. We warrant any such
work done againstdefects in materials or workmanship for the
remaining part of the original warranty period.
This warranty does not cover installation of the DISH Network
System; consumer instruction;physical set up or adjustment of any
consumer electronicdevice; remote control batteries; signal reception
problems; loss of useof the equipment; unused programming charges
due to equipmentmalfunction; cosmetic damage; damage due to
lightning, electrical or t elephone line surges, fire, flood, or other actsof
Nature;accident; misuse; abuse; repair or alterationby otherthan our
factoryservice; negligence;commercialor institutional use; improper
or neglected maintenance; equipment sold AS IS or WITH ALL
FAULTS; equipmentremoval or reinstall ation; shipping damage if the
equipmentwas notpacked and shipped inthe manner we prescribe; nor
equipmentpurchased,serviced,or operated outside the contiguous
United States of America.
REPLACEMENT AS PROVIDED UNDER THIS WARRANTY IS
YOUR EXCLUSIVE REMEDY. WE SHALL NOT BE HELD
LIABLE FOR ANY INCIDENTAL OR CONSEQUENTIAL
DAMAGES FOR BREACH OF ANY EXPRESSED OR IMPLIED
WARRANTY ON THIS DEVICE, NOR FOR ANY INCIDENTAL
OR CONSEQUENTIAL DAMAGE RESULTI NG FROM THE USE
OF, OR INABILITY TO USE,THIS DEVICE. UNDER NO
CIRCUMSTANCES SHALL OUR LIABILITY, IF ANY, EXCEED
THE PURCHASE PRICE PAID FOR THIS DEVICE. EXCEPT TO
THE EXTENT PROHIBITED BY APPLICABLELAW, ANY
IMPLIED WARRANTY OF MERCHANTABILITY OR FITNESS
FOR A PARTICULAR PURPOSE ON THIS DEVICE IS LIMITED
IN DURATION TO THE DURATIO N OF THIS WARRANTY. WE
RESERVE THE RIGHT TO REFUSE TO HONOR THIS
WARRANTY IF WE DETERMINE ANY OF THE ABOVE
EXCEPTIONS TO HAVECAUSED THIS DEVICE NOT TO HAVE
118866 45
Page 47

PERFORMED PROPERLY. THIS WARRANTY SHALL BE VOID
IF ANY FACTORY-APPLIED IDENTIFICATION MARK,
INCLUDINGBUT NOT LIMITEDTO SERIAL OR CONDITIONAL
ACCESS NUMBERS, HAS BEEN ALTERED OR REMOVED.
THIS WARRANTY SHALL ALSO BE VOID IF THE DEVICE HAS
BEEN OPENED BY AN UNAUTHORIZED PERSON
(with the exception of opening the batterycover).
This warranty gives you specific legal rights whichmay vary from
state to state. Some states do not allow the exclusion or limitations of
incidental or consequential damages, or allow limitations on the
durationof an implied warranty, so those limitations may not applyto
you.
ADVANCE EXCHANGE PROGRAM
The Advance ExchangeProgram allows you to have replacement
equipmentshipped immediately to you (depending uponwhere you
live, it could take three to five business days). Along with replacement
equipment, youwill receive a prepai d shipping label and instructions
on howto return the defectiveequipment.
The shipping charge, for receiving replacement equipment and
returning the defective equipment, is a one time fee based on
EchoStar's competitive bulk shipping rates (additional charges m ay
apply outside of the continental US). This fee will be charged to your
billingaccount or your valid creditcard.
If you do notship the defective equipment to EchoStarwithin ten days
afterreceivingthe replacement,your billing account or creditcard will
be charged the market priceof the replacement.If you return the
defective equipment after ten days, you will receive a fullrefund less
an administrative fee.
If your equipment is out of warrantyand can be repaired your billing
account or credit card willbe charged the standard repair fee for the
replacement. If damage to the defective equipment i s found, which
EchoStar in its sole discretiondetermineshas voided the warrant y, or
makes the equipmentunrepairable, your billing account or credit card
will be charged themarket price of the replacement.
46 118866
Page 48

POST RECEIPT EXCHANGE PROGRAM
You may choose to ship the equipment to us at your cost. To provide
fasterservice, upon receiptof your equipment you will be shipped a
replacement. Youroriginal equipment will not be available for return.
The equipment youreturn will be checked to verify whether it is
covered under this warranty. If the defective equipment is covered
under this warranty, it will be replaced and shipped backto you at no
additional cost(additional chargesmay apply outside of the continental
US).
If your equipment is out of warrantyand can be repaired your billing
account or credit card willbe charged the standard repair fee for the
replacement. If damage to the defective equipment i s found, which
EchoStar in its sole discretiondetermineshas voided the warrant y, or
makes the equipmentunrepairable, your billing account or credit card
will be charged themarket price of the replacement.
ACCESSORY WARRANTY
An accessoryis anyDISH Network branded equipment, displayingthe
DISH Network logo,excluding the receiver,Smart Card, cables and
hookups,and non-mechanical components. A one-year warranty
becomeseffectiveupon the activation of the DISH systemor date of
purchase, if bought separately. A proofof purchase is required to
verify the purchase date. If an accessory has an expired warranty, no
exchange will be issued. You may purchase replacement accessories
from DISH Network or your local retail er.
IF YOU NEED HELP
1.Review this User Guide.
2.Call t he CustomerService Center at 1-800-333-DISH (3474).
Have thedate ofpurchase and your customer account number
ready.
3.A Representativewill help you.
4.If the Representative finds you should return theremote control,
you will get a telephone number to call for a Return
Authorization (RA) number.Before shipping any equipment
to us, you must get a Return Authori zation number.
5.You must package returned equipment properly. Follow the
instructions the Representative gives you.
118866 47
Page 49

6.Write the RA number in large, clearly visible characters on the
outsideof the shipping box used to return the equipment.
To avoid confusion andmisunderstandings, we will return
shipments without an RA numberclearly visible onthe outside
of the box to you at your expense.
7.We will:
• Check the remote control, including whether it is covered
under the warranty.
• Replace any remote we find is defective with a new or
refurbished remote, if the defective remote is covered under
the warranty. We will ship the replacement remote at our
expense.
• If a defectiveremote is not covered underthe warranty,
we willt ell you. We may assess you a flat rate charge for a
replacement remote, including shipping and insurance.
48 118866
Page 50
REGULATORY FACTORS
WIRELESS REMOTE CONTROL
This device complies with Part 15 of FCC Rules. Operation is subject to the
following conditions:
(1) this device may not cause harmful interference,and
(2) this device must acceptany interference received, including
interference that may causeundesired operation.
SAFETY INSTRUCTIONS
You must keep safety in mindwhile using this device. Keepthese
and any other instructions for future reference.
INSTALLATION
Observe W arnings: Carefully follow all warningson the device
and in the operating instructions.
Heat: DO NOT place the device nearheat sourcessuch as radiators, stoves,
heat registers, or other appliances that produce heat.
CARE AND USE
Cleaning: DO NOT use liquid, abrasive, solvent, or aerosol cleaners. Use a
damp cloth for cleaning.
When Not in Use:Removethebatteriesifthisdeviceistobe
left unattended or unused for a long period of time.
Refer servicing to qualified personnel
when a solid object or liquid has fallen
onto or into the device.
DO NOT attemptto service this device. Refer al l
servicing to qualified personnel. Opening covers
otherthan the batterycover will void the warranty.
REMOTE CONTROL COMPATIBILITY
This remote control is supported by all DISH Network receiver models except
7100/7200 (DISHPlayer), Model HM-DSR100RU (JVC-DVHS ), some 2 000,
4000, and 5000. Also, the channel control featureson the remote control do not
work with the Model 6000.
118866
Page 51

Copyright © 2002
EchoStarTechnologies Corporation
Englewood, Colorado 80112
All rights reserved.
The information in this Guide m ay change without notice .
Revisionsmay be issued to tell you about such changes.
Please send any comments or questionsdirectly to:
EchoStar Technologies Corporation,
Technical Publications, 94 Inverness Terrace East,
Englewood,Colorado 80112
Part Number: 118866
Printed in the United States of America.
DISH Network isa registered trademark of EchoStar Technologies
Corporation.
Page 52

For ALL your customer needs,
call the Customer Service Center
at 1-800-333-DISH (3474).
118866
 Loading...