


Remote Control Setup
Personalizing Your Remote Controls
What you’ll find in this chapter:
•IMPROVING RECEIVER CONTROL
•CONTROLLING OTHER COMPONENTS
•THE RECOVER BUTTON
•SENDING DISCRETE POWER ON AND OFF
71

Chapter 10
Improving Receiver Control
Improving Receiver Control
These instructions help you improve your remote control settings to best operate your satellite receiver.
Changing the Address for Remote Control 2
Because UHF signals travel long distances and go through walls, a neighbor’s remote may control your receiver by mistake. To keep this from happening, you can change the remote address. You can also use these instructions to change the address on Remote Control 1.
1
S Y S T E M I N F O
Press SYSTEM INFO on the receiver and note the
Remote Address number
2 |
3 |
|
|
|
|
SAT |
|
4 |
Press and hold |
|
# |
|
|
|
the SAT Mode |
Enter a number |
Press |
button until all |
other than the |
POUND |
Mode buttons |
one found in |
(SAT Mode |
light up |
step one |
button will flash) |
6 5 
SELECT
Press SELECT
Press
RECORD
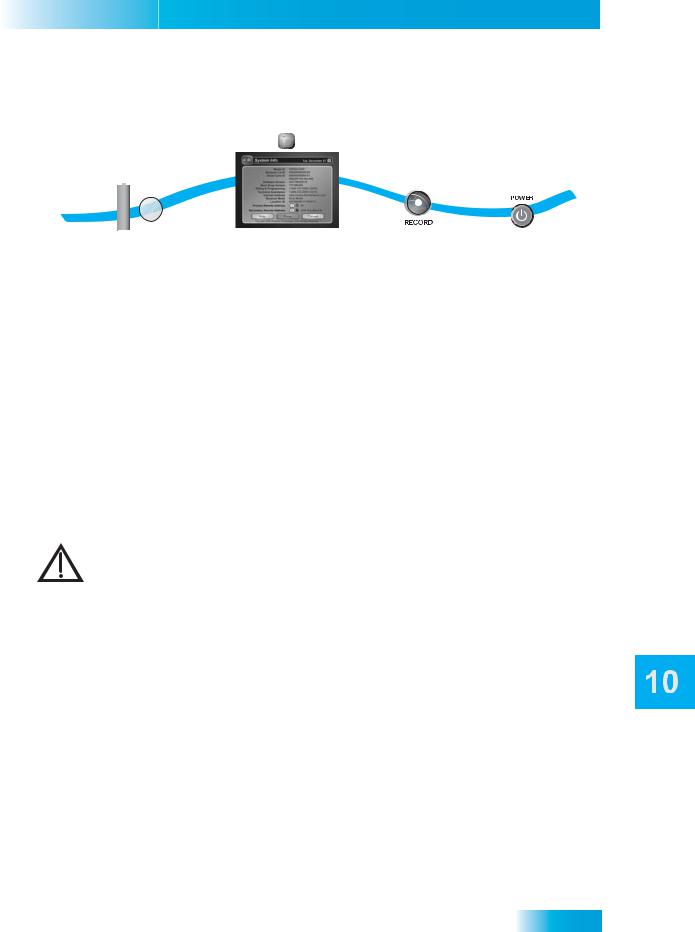
1. Press SYSTEM INFO on the receiver's front panel. The System Information screen displays on the nearby TV and shows the Remote Address.
Write down the Secondary Remote Address:
If changing the address for Remote Control 1, write down the Primary Remote Address:
2.Press and hold SAT on your remote control for about three seconds, until all of the mode buttons light up, and then release SAT.
3.Use the NUMBER PAD to enter any number between 1 and 16, but not the one you wrote in step 1.
4.Press POUND (#). If you entered the address correctly, SAT will flash three times.
Write down the number you entered:
5.Press RECORD. Make sure the Remote Address you see on the System Information screen is the same as the one you entered in step 3. If it isn't, the remote cannot control the receiver.
6.Press SELECT to close the System Information screen.
Checking the Remote Control Address
|
|
2 |
1 |
# |
# |
SAT |
Press POUND |
|
|
twice |
SAT |
|
|
|
Press & hold the SAT |
|
Watch the SAT Mode |
Mode button until all Mode |
|
|
|
button and count the flashes |
|
buttons light up |
|
|
|
|
1.Press and hold the SAT mode button until all of the mode buttons light up, then release it.
2.Press POUND (#) twice. The SAT mode button will flash the same number of times as the address number (for example, three flashes means address 3).
72
Remote Controls
Improving Receiver Control
Confirming Remote Control Operation
2
S Y S T E M I N F O
AAA Battery
1 |
3 |
4 |
|
||
|
|
|
SAT |
|
|
Check batteries |
If no operation, |
Press |
Press |
|
RECORD |
POWER |
|
and press |
press SYSTEM INFO on the |
||
|
|
|
|
SAT Mode |
receiver to display the |
|
|
|
|
|
|
|
System Information screen |
|
|
1.Make sure the remote has fresh batteries and is in SAT mode.
2.Press SYSTEM INFO on the receiver front panel to display the system information screen on the nearby TV.
3.Press RECORD on the remote control:
•Remote Control 1 - The Primary Remote Address in the system information screen changes to match the address preset in your remote control.
•Remote Control 2 - The Secondary Remote Address in the system information screen changes to match the address preset in your remote control.
4. Press POWER on the remote controls to turn the receiver on or off.
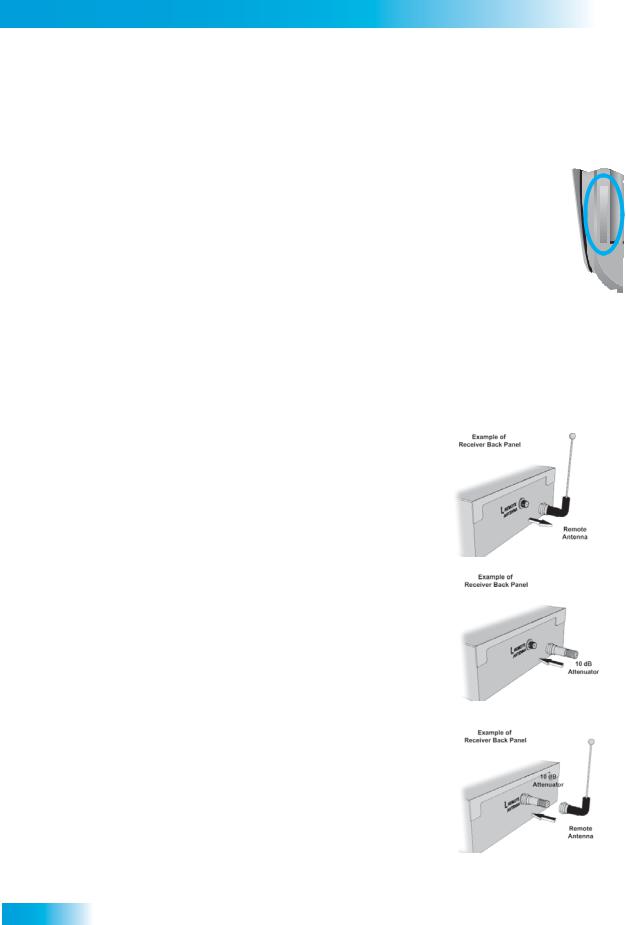
Adjusting the Remote Control Antenna
Be sure to set the remote control antenna (back of the receiver) straight up so you can use the remote control from as far away as possible. Don't let the antenna touch anything.
If your UHF Pro Remote Control 2 isn't working well from far away, you may be experiencing interference from objects near your receiver. To improve your remote control's range, try the following:
–Place the receiver higher than all of the other equipment in your entertainment center.
–Provide room above the receiver so that the remote control antenna can be installed straight up. If you cannot install the antenna straight up, tilt the antenna at about a 30° angle.
–Place the remote control antenna outside the entertainment center by using a coaxial cable to connect the antenna to the receiver.
–Try moving the receiver to other locations.
–Move any nearby over-the-air antennas away from the remote control antenna. Do not place an over-the-air antenna on top of your receiver.
–Install a UHF attenuator. See Installing a UHF Attenuator for details.
73
Chapter 10
Improving Receiver Control
Changing the UHF Frequency Using the A/B Switch
Your remote control has a switch to change the UHF frequency that your remote control uses. The
switch comes preset to the A position, but you can change the setting to the B position to lessen |
|
|||
the likelihood of another UHF remote interfering with yours. |
|
|
|
|
1. |
Remove the battery cover from the remote control. |
|
|
|
2. |
Use a small screw driver or a paper clip to carefully change the setting. |
|
|
Battery |
3. |
Put the battery cover back on the remote control. |
A |
||
4. |
Use the SYS INFO button on the front panel to open the System Information |
|
|
|
|
|
|
||
|
screen. |
|
|
|
5. |
Press RECORD on the remote control. |
B |
|
|
6. |
Make sure the System Information screen shows the correct band information: |
|
|
|
•Switch position A - IR/UHF Pro Band A
•Switch Position B - IR/UHF Pro Band B
Installing a UHF Attenuator
Unwanted UHF signals may interfere with signals from the remote control to the receiver. To prevent such interference, you can install a 10 dB attenuator (available from many consumer electronics parts stores). Adding this attenuator will help keep out stray UHF signals, but it also cut down how far away you can use the remote control.
1.Remove the remote control antenna from the REMOTE ANTENNA input on the receiver back panel.
2.Attach a 10 dB attenuator to the REMOTE ANTENNA input.
3.Attach the remote control antenna to the attenuator.
74
Remote Controls
Controlling Other Components
Controlling Other Components
To use the remote to control other devices (such as a TV, VCR, DVD player, tuner, amplifier, or DISH Network satellite receiver), you must first program it to control these other devices. You can do this by either following the instructions in Setting Up Using Device Code Tables on page 76, or the Setting Up Using Device Codes Scan procedure described on page 77.
Remote Control Modes
Use the remote control’s mode buttons, SAT (satellite receiver), TV (for a TV), VCR (for a VCR or a DVD player), and AUX (“auxiliary,” for a second TV, a VCR, a tuner, an audio amplifier, or a second DISH Network satellite receiver) to set the remote control to the right mode for the device. To change the mode, press the button for the device you want the remote to control. The mode button lights for two seconds to show you’ve set the remote to that mode.
Limited Mode
You can program your remote control in Limited Mode to keep from accidentally changing the channel on your TV or VCR. When you use the remote to control your TV in Limited Mode, you will only be able to use POWER, MUTE, and VOLUME. Also, when you use the remote to control your VCR in Limited Mode, you will only be able to use POWER and the VCR function buttons.
Turning Limited Mode On and Off
1.Press and hold the mode button (for example, TV) until all of the mode buttons light. Release the mode button.
2.Press:
•PAGE UP to turn Limited Mode on.
•PAGE DOWN to turn Limited Mode off.
3. Press POUND.
Note: Limited Mode is not used with amplifiers.
Combination Devices
If you are programming the remote to control a combination device, such as a TV/VCR or a TV/ DVD, program the remote control in one mode, and then repeat the procedure in the other mode. For example, to program the remote to control a TV/VCR using code 748, follow the instructions to program the remote to control the TV using code 748, and then repeat the instructions for the VCR using the same code.
75
 Loading...