

Page 1

Important Safety Precautions v
1 Introduction
WELCOME 2
HOW TO USE THIS GUIDE 2
ABOUT YOUR DISH NETWORK ACCOUNT 4
WATCHING TV NOW 5
ADDITIONAL SERVICES 7
ABOUT SATELLITE TV RECEPTION 7
WHY CONNECT TO A PHONE LINE 8
OVING ON-SCREEN LOGO 8
M
2 Receiver and Remote Controls
SATELLITE RECEIVER OVERVIEW 12
DUAL AND SINGLE MODES 12
R
EMOTE CONTROL 15
SATELLITE RECEIVER FRONT PANEL 21
ATELLITE RECEIVER BACK PANEL 21
S
USING THE MENUS 22
U
SING TEXT FIELDS 23
i
Page 2

Table of Contents
3 Finding Programs to Watch
4 Pay Per Programs
5 Favorites Lists
CHANGING CHANNELS 28
USING THE PROGRAM GUIDE 28
USING THE BROWSE BANNER 30
USING THEMES AND SEARCH 31
USING PICTURE-IN-PICTURE 33
PAY-PER-VIEW 36
DISH ON DEMAND 36
WHAT ARE FAVORITES LISTS? 40
CREATING OR CHANGING FAVORITES LISTS 41
NAMING FAVORITES LISTS 41
USING FAVORITES LISTS 41
6 Locks
WHAT ARE LOCKS? 44
C
REATING OR CHANGING A PASSWORD 45
OCKING AND UNLOCKING YOUR RECEIVER 45
L
C
REATING OR CHANGING RATINGS LOCKS 46
REATING OR CHANGING CHANNEL LOCKS 47
C
LOCKING OR UNLOCKING PAY-PER-VIEW CHANNELS 47
H
IDING ADULT CONTENT OR LOCKED CHANNELS 48
LOCKING OR UNLOCKING THE FRONT PANEL 49
7 Interactive TV
ii
DISHHOME INTERACTIVE TV 52
C
USTOMER SERVICE 52
Page 3

8 Digital Video Recording
WHAT IS DVR? 54
PAUSING A PROGRAM 54
REVERSING, FAST FORWARDING, AND SKIPPING 55
SLOW MOTION AND FRAME-BY-FRAME 55
RECORDING A LIVE PROGRAM 56
PLAYING A RECORDED PROGRAM 56
USING RECORD PLUS 56
USING RECORD LINK 57
RECORDING WHILE WATCHING DIFFERENT PROGRAMS 57
RECORDING OPTIONS 60
Table of Contents
9 Record Future Programs
TIMERS AND RECORDINGS 62
USING THE TIMERS LIST 65
USING THE DAILY SCHEDULE 65
SETTING UP AN AUTOMATIC TIMER 66
SETTING UP A MANUAL TIMER 67
ETTING UP A DISHPASS™ TIMER 68
S
DELETING A TIMER 69
10 Remote Control Setup
IMPROVING RECEIVER CONTROL 72
C
ONTROLLING OTHER COMPONENTS 75
HE RECOVER BUTTON 81
T
SENDING DISCRETE POWER ON AND OFF 83
iii
Page 4

Table of Contents
11 Receiver Customization
USING SHARED VIEW 88
MODULATOR SETUP 88
USING MULTIMEDIA 89
USING CALLER ID 90
CHANGING LANGUAGES 91
USING CLOSED CAPTIONING 92
USING DOLBY® DIGITAL SURROUND SOUND 93
CHANGING THE PROGRAM GUIDE ORDER 94
CHANGING THE GUIDE DISPLAY 94
RESETTING TO FACTORY DEFAULTS 95
SCHEDULING RECEIVER UPDATES 96
INACTIVITY STANDBY 96
12 Connections and Setup
CONNECTING TO THE NEARBY TV (TV1) 100
CONNECTING TO THE REMOTE TVS (TV1 OR TV2) 103
CONNECTING TO YOUR DISH ANTENNA 107
ONNECTING THE PHONE LINE 108
C
CONNECTING A VCR TO THE REMOTE TV 109
C
ONNECTING AN OVER-THE-AIR ANTENNA 110
SING TROUBLESHOOTING TOOLS 116
U
Reference
TROUBLESHOOTING TABLES 120
REMOTE CONTROL DEVICE CODES 132
iv
Appendix 135
Index 145
Page 5

Important Safety Instructions
1 Read these instructions.
2 Keep these instructions.
3 Heed all warnings.
4 Follow all instructions.
5 Do not use this apparatus near water.
6 Clean only with a dry cloth.
7 Do not block any ventilation openings. Install in accordance with the manufacturer’s instructions.
8 Do not install near any heat sources such as radiators, heat registers, stoves, or other apparatus (including amplifiers) that
produce heat.
9 Do not defeat the safety purpose of the polarized or grounding-type plug. A polarized plug has two blades with one wider
than the other. A grounding-type plug has two blades and a third grounding prong. The wide blade or the third prong are
provided for your safety. If the provided plug does not fit into your outlet, consult an electrician for replacement of the obsolete outlet.
10 Protect the power cord from being walked on or pinched, particularly at plugs, convenience receptacles, and the point
where they exit from the apparatus.
11 Use only attachments/accessories specified by the manufacturer.
12 Unplug this apparatus during lightning storms or when unused for long periods of time.
13 Refer all servicing to qualified service personnel. Servicing is required when the apparatus has been damaged in any way,
such as the power supply cord or plug is damaged, liquid has been spilled or objects have fallen into the apparatus, the
apparatus has been exposed to rain or moisture, does not operate normally, or has been dropped.
Apparatus shall not be exposed to dripping or splashing and no objects filled with liquids, such as vases, shall be
placed on the apparatus.
i
Page 6

Safety
Satellite Dish
Coaxial Cable
from Satellite Dish
Electric Service Equipment
Ground Clamps
Power Service Grounding
Electrode System
(NEC Art. 250, Part H)
Antenna Discharge
Unit
Ground Clamp
Grounding Conductors
(NEC Section 810-21)
Note to Satellite TV System Installer: This reminder is provided to call the satellite TV system installer’s
attention to Article 820-40 of the National Electrical Code (NEC) that provides guidelines for proper grounding
and, in particular, specifies that the cable ground shall be connected to the grounding system of the building as
close to the point of cable entry as practical.
• Operate the receiver using only the type of power source indicated on the marking label. Unplug the
receiver power cord by gripping the power plug, not the cord.
• Do not overload wall outlets or extension cords; this can result in a risk of fire or electrical shock.
• Never insert objects of any kind into the receiver through openings, as the objects may touch dangerous
voltage points or short out parts. This could cause fire or electrical shock.
• Do not locate the antenna near overhead light or power circuits, or where it can fall into such power lines or
circuits. When installing the antenna, take extreme care to avoid touching such power lines or circuits, as
contact with them can be fatal.
• Do not attempt to service the receiver yourself, as opening or removing covers may expose you to dangerous voltage, and will void the Limited Warranty. Refer all servicing to authorized service personnel.
Proper Care of Your Equipment
• Always handle the satellite receiver carefully. Excessive shock and vibration can damage the hard drive.
• Unplug the receiver from the AC power outlet before cleaning.
• Always turn the receiver off, unplug it and let it sit for at least 30 seconds before moving it.
• The use of accessories or attachments not recommended by the receiver manufacturer will void the Limited
Warranty.
• Do not place the receiver in an enclosure (such as a cabinet) without proper ventilation.
• Do not stack the receiver on top of or below other electronic devices as this can cause heat build-up and
vibration.
• Do not install the receiver in any area where the temperature can be less than 40°F or more than 113°F. If
the receiver is cold to the touch, do not plug it in immediately . Let it sit unplugged at room temperature for at
least 45 minutes before plugging it in.
• Use an outlet that contains surge suppression or ground fault protection. During an electrical storm or when
the receiver is left unattended and unused for long periods of time, unplug the power cord from the wall outlet, disconnect the lines between the receiver and the antenna, and disconnect the telephone line. This will
provide additional protection against damage caused by lightning or power line surges.
On some TVs, the presence of fixed images for extended periods of time may cause them to be
permanently imprinted on the screen. Consult your TV user guide for information on whether this is
a problem for your TV, what operating/viewing restrictions apply to avoid this problem, and
associated TV warranty coverage.
ii
Page 7

Introduction
Introduction to DISH Network Services
What you’ll find in this chapter:
• WELCOME
• HOW TO USE THIS GUIDE
• ABOUT YOUR DISH NETWORK ACCOUNT
• WATCHING TV NOW
• ADDITIONAL SERVICES
• A
BOUT SATELLITE TV RECEPTION
• WHY CONNECT TO A PHONE LINE
• MOVING ON-SCREEN LOGO
1
Page 8

Chapter 1
Welcome
WELCOME
HOW TO USE THIS GUIDE
Thank you for choosing DISH Network. You are about to experience the excitement and
convenience of our Direct Broadcast Satellite (DBS) service, which delivers the very best
picture and sound quality. DISH Network consistently provides the latest products and
satellite-delivered services—with high performance, ease of operation, and a wide variety
of entertainment options.
Your new DISH Network Digital Video Recorder (DVR) receiver has three tuners (two
satellite and one over-the-air) for record and playback in standard or high definition.
Additionally, the DVR features and a host of other functions make it one of the most
versatile and exciting devices in home entertainment.
This satellite receiver lets you decide how you watch TV. You can record and play back
audio and video with full digital quality. You can pause a live program and not miss any of
the action, or you can record a program to watch later without a VCR.
This section explains how the guide is divided and the conventions used throughout.
Guide Overview
The information in this guide is separated into several chapters to make it easy for you to
find exactly what you’re looking for:
• Chapter 1 - Introduction gives you a brief overview of DISH Network and your new
receiver.
• Chapter 2 - Receiver and Remote Controls explains the basic features of your system
and how to use the remote controls, front panel buttons, and back panel connections.
• Chapter 3 - Finding Programs to Watch describes how to change channels and look
for programs.
• Chapter 4 - Pay Per Programs shows you how to order and watch Pay-Per-View and
DISH On Demand programs.
• Chapter 5 - Favorites Lists explains how to create, name, and use favorites lists.
• Chapter 6 - Locks explains how to set locks and passwords.
• Chapter 7 - Interactive TV describes how to use the DishHOME Interactive TV
features of your satellite TV system.
• Chapter 8 - Digital Video Recording explains how to use the recording features of you r
satellite TV receiver to maximize your viewing pleasure.
• Chapter 9 - Record Future Programs shows you how you can rec or d an d play ba ck
your favorite programs when you want to watch them.
• Chapter 10 - Remote Control Setup contains instructions for programming your
remote to control your satellite receiver and equipment like a TV or VCR.
• Chapter 11 - Receiver Customization shows you how to customize your receiver.
• Chapter 12 - Connections and Setup explains how to connect your satellite receiver to
your TV and equipment like a VCR.
2
Page 9

Introduction
How to Use this Guide
Guide Conventions
• The names of remote control buttons are all uppercase.
Example: Press SAT.
• Select means to move the highlight to an on-screen option or choice in a list and p ress
SELECT on the remote control.
Example: Select the Locks option.
• This guide uses HD for high-definition and SD for standard-definition.
• Where this guide mentions nearby TV, it is referring to TV1, the TV nearest the
receiver. The ne arby TV receives TV1 menus and programming from the receiver’s
TV1 outputs and is connected using short audio/video cables.
• Where this guide mentions remote TV, it is referring to TV2, the cable-ready TV(s)
located in rooms away from the receiver. The remote TV receives TV2 menus and
programming from the receiver’s TV2 outputs through your in-home cable system.
• Where this guide mentions remote control, it refers to either Remote Control 1 when
viewing a nearby TV or Remote Control 2 when viewing the remote TV(s). If a specific
remote control must be used, this guide will refer directly to Remote Control 1 or
Remote Control 2.
• The instructions in this guide are shown in two ways:
– Instructions in the form of pictures are handy if you’d like to learn something
quickly. These instructions are numbered left to right as shown in the sample
below.
– Instructions that are written out are helpful if you’d like to learn more details.
2
3
1
Press the UP
Press POWER
on the remote
to begin watching
a program
Arrow to go up
one channel
ample
Press
PAUSE to
pause the
program
Press VIEW LIVE TV
to go to live TV
4
3
Page 10

Chapter 1
About Your DISH Network Account
ABOUT YOUR DISH NETWORK ACCOUNT
This section describes how to order your packages and provides information on how to
find information about your DISH Network account.
Ordering Your Programming Packages
Before you can enjoy your new receiver, order your programming packages.
1 Press POWER on the front panel to turn on the receiver.
2 Press SYSTEM INFO on the front panel to display the receiver’s System Information
menu on the nearby TV screen.
3 Call 1-800-333-DISH (3474) and tell the Customer Service Center the system has been
installed and you would like to begin receiving services. A representative will explain the
available program packages. Give the representative information from the System
Information screen, as requested.
4 Your services will be turned on via the satellite signal. This process usually takes just a
few minutes.
5 Select Done.
Where to Find Information on Your Account
If you want to know about charges to your DISH Network account or if you would like to
make changes to your programming packages, be su re to have your account information
handy and choose one of the following:
• Go to our website at www.dishnetwork.com/my account
• Press MENU on your remote control and then select Customer Support.
• Call DISH Network 1-800-333-DISH (3474).
Note: Additional authorization may be required before high-definition programming and/or
over-the-air broadcasts can be viewed; additional fees may apply.
4
Page 11

WATCHING TV NOW
After you have ordered your programming package, you can begin enjoying the features
of your new satellite TV receiver . When you complete these simple tours, you’ll be fami liar
with the remote control and be able to find a program to watch, pause live TV, and record
your favorite shows.
Finding a Program to Watch
If you want to know more about watching TV, see Chapter 3 - Finding Programs to Watch
starting on page 27.
4 Ways to Find a Program
Introduction
Watching TV Now
Program
Guide
Arrow
Buttons
Number
Pad
Browse
Banner
1
GUIDE
Press
GUIDE
Tue 1/22
120
HIST
118
A&E
116
MOMAX
114
ESPN
112
HGTV
Highlight a current
program by pressing
the UP or DOWN ARROW
1
and press SELECT
Press the UP
or DOWN ARROW
1
Enter a channel number with the
Number Buttons
1
TUE 3/19
Leslie's Hockey Tips
6:00 pm - 9:30 pm
Press the
RIGHT ARROW
300
HBO-E
by pressing the UP or DOWN ARROW
NR
Highlight a current program
2
6:30 pm 7:00 pm 7:30 pm
History's Lost
The Early Writings of Thomas
The Leslie Comedy Hour
Law & Order
Benorama! Match Game
Jeopardy!
Hockey
Collectible
Style
NHL
Jan's Fashions
The Carol Duval
Show
Mysteries &
Treasures
Tim's Garden
2
Flanders the Dog
9:30 pm - 12:00 am
NR
and press SELECT
SELECT
SELECT
1
Dual Mode
1
Dual Mode
1
Dual Mode
1
Dual Mode
TUE 3/19
6:25 pm
TUE 3/19
6:25 pm
TUE 3/19
6:25 pm
TUE 3/19
6:25 pm
Wings Above
6:00 pm - 9:30 pm
HBO2E
301
Wings Above
6:00 pm - 9:30 pm
HBO2E
301
Wings Above
6:00 pm - 9:30 pm
HBO2E
301
Wings Above
6:00 pm - 9:30 pm
HBO2E
301
List: Family
List: Family
List: Family
List: Family
NR
NR
NR
NR
5
Page 12

Chapter 1
Watching TV Now
Pausing Live TV
Here’s something you can’t do with regular old TV: pause live TV because someone’s at
the door or calling you on the phone or there’s something you just have to do right now.
For more about the pause feature of your receiver, see Pausing a Program on page 54.
3
1
Find a
program to
watch
2
Press
PAUSE
1
101
DFYI
0:00:45
Live TV
Press PLAY
to start playing
the program
at the point you
Press VIEW LIVE TV
to go back to live TV
paused
4
LIVE
LIVE
programming
Recording and Playing Back a Program
Take this tour to learn how to make basic recordings of your favorite shows. For more
about the DVR features of your receiver, see Chapter 8 - Digital Video Recording starting
on page 53.
1
REC
REC
3
After a few minutes,
press STOP and select
STOP
Yes to stop recording
Yes
TV
TV
6
program
DVR
Sort
Edit
Done
Help
History
Select the
program you
recorded
4
To begin watching
your recorded
program,
press DVR
Page 13

ADDITIONAL SERVICES
Pay-Per-View
Catch all the action on Pay-Per-View. Take a break from regular TV and order the latest
movies, sports, and special events. For details on ordering Pay-Per-View events, see
page 36. Be sure to connect an active phone line to your receiver before you order a
Pay-Per-View event (see the instructions on page 108).
DISH On Demand
Enjoy movies and other programming any time without schedules, without waiting and
without leaving your home.
DishHOME
At DishHOME (press DISH on your remote control), you’ll find news, sports, weather
information, TV and movie buzz, customer service, games, and more.
Introduction
Additional Services
ABOUT SATELLITE TV RECEPTION
Satellite television uses satellites in a stationary orbit over the Earth to deliver television
and audio programming. This type of orbit enables the satellites to stay aligned over one
place on the surface of the Earth. Once the satellite dish is aimed at the satellite, the dish
does not have to move to follow it.
Rain and Snow Fade
Heavy rain, snow, o r dense cloud cover can
reduce the satellite signal, which may interrupt
your programming service. Your service will
return after the weather condition has passed.
Aiming the satellite dish to get the strongest
signal during installation, will help prevent rain
and snow from interrupting the signal.
7
Page 14

Chapter 1
Why Connect to a Phone Line
Solar Interference
Twice a year, the sun moves to a position behind
the DISH Network satellites as they orbit the
Earth. This event occurs during a few days at the
beginning of the spring and the beginning of the
autumn and lasts only a few minutes.
During these brief periods, you will not be able to
see programs on DISH Network. When the sun
has moved from behind the satellites, the
programs will reappear. This is an unavoidable
natural event and has an adverse effect on man y
satellite program providers.
WHY CONNECT TO A PHONE LINE
Your satellite receiver is equipped with a standard telephone jack that you use to connect
to an active telephone line. Keep the receiver connected to an active telephone line so
that you will be able to order pay-per-view programs using your remote control, use all of
the DishHOME Interactive TV features, and other services from DISH Network (see the
instructions on page 108).
MOVING ON-SCREEN LOGO
Whenever the receiver is turned off, you will see the DISH Network logo moving around on
your TV screen. This feature is included with your receiver to assure you that the
connections between your receiver and TV(s) are not lost. Press POWER or SELECT on
the remote control to resume watching satellite TV programming. Make sure you are using
the correct remote for your TV-viewing location (see page 16 for details).
8
Page 15

Introduction
Tips
TIPS
• Always have the latest software—Turn off the receiver when you’re not using it.
• Order Pay-Per-View with your remote control—Keep an active phone line
connected to the receiver. Not only will you have Pay-Per-View at your fingertips, but
you’ll also avoid unnecessary charges.
SYSTEM INFO
QUESTIONS
• How do I find something to watch? Refer to page 5. For more information on finding
something to watch, see Chapter 3 - Finding Programs to Watch.
• Why are some of the channels red in the Program Guide? The channels that are
red in the Program Guide are those which are not currently in your subscription. If
you’d like to watch those channels, call 1-800-333-DISH (3474) or go to
www.dishnetwork.com
• I’m looking at program information in a guide I bought at the grocery store, but
nothing matches what’s on my DISH Network receiver , is something wrong? No.
DISH Network programming may vary from what you’ll find in a local publication. For
best results, use the Program Guide on your receiver or order DISH Entertainment
Magazine.
9
Page 16

Chapter 1
Notes
NOTES
10
Page 17

Remote Control Setup
Personalizing Your Remote Controls
What you’ll find in this chapter:
• IMPROVING RECEIVER CONTROL
• CONTROLLING OTHER COMPONENTS
• THE RECOVER BUTTON
• SENDING DISCRETE POWER ON AND OFF
71
Page 18

Chapter 10
1
2
3
4
5
Press SYSTEM INFO
on the receiver and note the
Remote Address number
Press and hold
the SAT Mode
button until all
Mode buttons
light up
Press
RECORD
Press SELECT
SELECT
Enter a number
other than the
one found in
step one
SAT
#
6
Press
POUND
(SAT Mode
button will flash)
SYSTEM INFO
Improving Receiver Control
Improving Receiver Control
These instructions help you improve your remote control settings to best operate your satellite
receiver.
Changing the Address for Remote Control 2
Because UHF signals travel long distances and go through walls, a neig hbor’s remote may control
your receiver by mistake. To keep this from happening, you can change the remote address. You
can also use these instructions to change the address on Remote Control 1.
1. Press SYSTEM INFO on the receiver's front panel. The System Information screen displays
Write down the Secondary Remote Address:
If changing the address for Remote Control 1, write down
the Primary Remote Address:
2. Press and hold SAT on your remote control for about three seconds, until all of the mode
3. Use the NUMBER PAD to enter any number between 1 and 16, but not the one you wrote in
4. Press POUND (#). If you entered the address correctly, SAT will flash three times.
Write down the number you entered:
5. Press RECORD. Make sure the Remote Address you see on the System Information scre en is
6. Press SELECT to close the System Information screen.
Checking the Remote Control Address
1. Press and hold the SAT mode button until all of the mode buttons light up, the n release it.
2. Press POUND (#) twice. The SAT mode button will flash the same number of times as the
72
on the nearby TV and shows the Remote Address.
buttons light up, and then release SAT.
step 1.
the same as the one you entered in step 3. If it isn't, the remote cannot control the receiver.
2
1
SAT
Press & hold the SAT
Mode button until all Mode
buttons light up
address number (for example, three flashes means address 3).
#
#
Press POUND
twice
SAT
Watch the SAT Mode
button and count the flashes
Page 19

Confirming Remote Control Operation
2
SYSTEM INFO
Remote Controls
Improving Receiver Control
1
Battery
SAT
AAA
Check batteries
and press
SAT Mode
If no operation,
press SYSTEM INFO on the
receiver to display the
System Information screen
3
Press
RECORD
4
Press
POWER
1. Make sure the remote has fresh batteries and is in SAT mode.
2. Press SYSTEM INFO on the receiver front panel to display the system information screen on
the nearby TV.
3. Press RECORD on the remote control:
• Remote Control 1 - The Primary Remote Address in the syste m information screen change s to
match the address preset in your remote contr o l.
• Remote Control 2 - The Secondary Remote Address in the system information screen
changes to match the address preset in your remote control.
4. Press POWER on the remote controls to turn the receiver on or off.
Adjusting the Remote Control Antenna
Be sure to set the remote control antenna (back of the receiver) straight up so you can use the
remote control from as far away as possible. Don't let the antenna touch anything.
If your UHF Pro Remote Control 2 isn't working well from far away, you may be
experiencing interference from objects near your receiver. To improve your remote
control's range, try the following:
– Place the receiver higher than all of the other equipment in your
entertainment center.
– Provide room above the receiver so that the remote control antenna can
be installed straight up. If you cannot install the antenna straight up, tilt
the antenna at about a 30° angle.
– Place the remote control antenna outside the entertainment center by
using a coaxial cable to connect the antenna to the receiver.
– Try moving the receiver to other locations.
– Move any nearby over-the-air antennas away from the remote control
antenna. Do not place an over-the-air antenna on top of your receiver.
– Install a UHF attenuator. See Inst alling a UHF Attenuator for details.
73
Page 20

Chapter 10
Battery
A
B
Improving Receiver Control
Changing the UHF Frequency Using the A/B Switch
Your remote control has a switch to change the UHF frequency tha t your r emote control u ses. The
switch comes preset to the A position, but you can change the setting to the B position to lessen
the likelihood of another UHF remote interfering with yours.
1. Remove the battery cover from the remo te control.
2. Use a small screw driver or a paper clip to carefully change the setting.
3. Put the battery cover back on the remote control.
4. Use the SYS INFO button on the front panel to open the System Informatio n
screen.
5. Press RECORD on the remote control.
6. Make sure the System Information screen shows the correct band information:
• Switch position A - IR/UHF Pro Band A
• Switch Position B - IR/UHF Pro Band B
Installing a UHF Attenuator
Unwanted UHF signals may interfere with signals from the remote control to the receiver. To
prevent such interference, you can install a 10 dB attenuator (a vailable from many consumer
electronics parts stores). Adding this attenuator will help keep out stray UHF signals, but it also cut
down how far away you can use the remote control.
1. Remove the remote control antenna from the R
NTENNA input on the receiver back panel.
A
2. Attach a 10 dB attenuator to the R
EMOTE ANTENNA
EMOTE
input.
3. Attach the remote control antenna to the attenuator.
74
Page 21

Remote Controls
Controlling Other Components
Controlling Other Component s
To use the remote to control other devices (such as a TV, VCR, DVD player, tuner, amplifier, or
DISH Network satellite receiver), you must first program it to control these other devices. You can
do this by either following the instructions in Setting Up Using Device Code Tables on page 76, or
the Setting Up Using Device Codes Scan procedure described on page 77.
Remote Control Modes
Use the remote control’s mode buttons, SAT (satellite receiver), TV (for a TV), VCR (for a VCR or
a DVD player), and AUX (“auxiliary,” for a second TV, a VCR, a tuner, an audio amplifier, or a
second DISH Network satellite receiver) to set the remote control to the right mode for the device.
To change the mode, press the button for the device you want the remote to control. The mode
button lights for two seconds to show you’ve set the remote to that mode.
Limited Mode
You can program your remote control in Limited Mode to keep from accidentally changing the
channel on your TV or VCR. When you use the remote to control your TV in Limited Mode, you will
only be able to use POWER , MUTE, and VOLUME. Also, when you use the remote to control your
VCR in Limited Mode, you will only be able to use POWER and the VCR function buttons.
Turning Limited Mode On and Off
1. Press and hold the mode button (for example, TV) until all of the mode buttons light. Release
the mode button.
2. Press:
• PAGE UP to turn Limited Mode on.
• PAGE DOWN to turn Limited Mode off.
3. Press POUND.
Note: Limited Mode is not used with amplifiers.
Combination Devices
If you are programming the remote to control a combination device, such as a TV/VCR or a TV/
DVD, program the remote control in one mode, and then repeat the procedure in the other mode.
For example, to program the remote to control a TV/VCR using code 748, follow the instructions to
program the remote to control the TV using code 748, and then repeat the instructions for the VCR
using the same code.
75
Page 22

Chapter 10
Controlling Other Components
Setting Up Using Device Code Tables
Set up the remote to control other devices using the dev ice co de s lis te d on page 132. In the
instructions below, the column on the left contains the instructions and the column on the right
provides additional information.
1
VCR
Turn
device on
2
Find code in
tables
3-4
VCR
Press & hold
Mode button
until all Mode
buttons light up
5-6
Enter code
from table
7
#
Press
POUND
Press POWER
to see if device
turns off
Instructions Additional Information
1. Turn the device on.
2. Find the brand name of the device in the
tables starting on page 132.
3. Press and hold the mode button until a ll the
other mode buttons light up, then release
Use the device’s front panel buttons or its remote control.
If the brand isn’t listed, see Setting Up Using Device Codes
Scan on page 77.
For example, for a TV, hold the TV mode button until all of
the other mode buttons light. When you let go, TV will flash.
the button. The mode button flashes.
4. For AUX mode only. Press 0 for a TV, 1 for
If you’re not programming in AUX mode, skip to step 5.
a VCR, or 2 for a tuner or amplifier.
5. Enter one of the three-digit device codes
from the table using the number buttons.
The three-digit device code is for the brand name of your
device that you found in step 2.
8
9-11
VCR
Test to make
sure code
works
76
6. If you want to program Limited Mode, press
1. If not, skip to step 7.
7. Press POUND (#).
8. Press POWER to turn off the device. If the
device does not turn off, go to step 10.
9. T urn the device back on and try some other
buttons to make sure they work. If the code
works for other buttons, stop here.
10. If the code doesn’t work, repeat steps 3
through 9 with another device code from
the tables.
11. If you can’t find a code that works try,
Setting Up Using Device Codes Scan that
follows.
See Limited Mode for more information.
If you entered the code correctly, the mode button flashes
three times.
If the code works, the device should turn off.
Sometimes POWER works when other buttons don’t. If in
Limited Mode, try VOLUME or MUTE.
Try every code listed for your brand until one works for your
device.
Page 23

Remote Controls
Controlling Other Components
Setting Up Using Device Codes Scan
If the code for your device is not listed in the tables starting on page 132 or if you could not find a
code that worked for your device, use this procedure to scan the remote control’s memory for the
device code. In the instructions below, the column on the left contains the instructions and the
column on the right provides additional infor m at ion .
4
2-3
1
VCR
Turn
device on
Instructions Additional Information
VCR
Press & hold
Mode button
until all Mode
buttons light up
Press
POWER
5
Press UP or
DOWN ARROW
until device
turns off
6
#
Press
POUND
7-8
VCR
Turn device back on
and test to make
sure code works
1. Turn the device on.
2. Press and hold the mode button until all the
other mode buttons light up, and then
Use the device’s front panel buttons or its remote control.
For example, hold the TV mode button until all of the other
mode buttons light. When you let go, TV will flash.
release the button. The mode button
flashes.
3. For AUX mode only. Press 0 for TV, 1 for
VCR, or 2 for a tuner , or amplifier. Then
press the STAR (*) button.
4. Press POWER.
This step is for programming the type of device that will be
programmed in AUX mode. If you’re not programming in
AUX mode, skip to step 4.
This puts your remote in the scan mode.
Instructions Additional Information
5. Press the UP or DOWN ARROW
repeatedly until the device turns off.
6. Press POUND (#).
As you press the UP or DOWN ARROW, the remote
tries each code in the memory to see if it can turn off your
device. When the device turns off, you have found a code
that might work.
Note: The mode button for the device will flash rapidly eight
times when you’ve scanned all the codes for that device.
The mode button flashes three times if you have entered
the code correctly, and stores the code you found.
7. T urn the device back on and try some other
buttons to make sure they work.
8. If necessary, repeat this procedure until
you’ve tried all the codes.
Sometimes POWER works when other buttons don’t. If
using Limited Mode, try VOLUME or MUTE.
You may need to repeat the scan to find the best code for
your device.
77
Page 24

Chapter 10
Controlling Other Components
Checking the Device Codes
Use these steps to find the device code you’ve set for each remote control mode (TV, VCR, and
AUX)
.
VCR
Press & hold the Mode
button until all Mode
buttons light up
Instructions Additional Information
1
2
#
#
Press POUND
twice
VCR
Watch the Mode button
and count the flashes
1. Press and hold the mode button until all the
other mode buttons light up, and then
For example, hold TV until all of the other mode buttons
light. When you let go, TV will flash.
release the button. The mode button
flashes.
2. Press the Pound (#) button twice.
Watch the mode light to determine your
code. The mode button flashes the number
For example, if the code is 570, the mode button flashes
five times, pauses, flashes seven times, pauses, and
flashes once quickly.
for each digit of the device code, with a
pause between the groups of flashes. A
quick flash is for zero.
Instructions Additional Information
For AUX mode: The first group of flashes tells
you what the AUX mode controls. A quick flash
(zero) before the three-digit code is for a TV,
one regular flash is for a VCR, and two flashes
For example, if the TV code is 570, the AUX mode button
flashes once quickly (indicating 0 for TV), pauses, flashes
five times, pauses, flashes seven times, pauses, and
flashes once quickly.
is for a tuner, or amplifier.
For a satellite receiver programmed in AUX
mode: The AUX mode button will flash the
For example, if the receiver address is 3, the AUX mode
button flashes three times.
same number of times as the address number.
For Limited Mode: If you have programmed a
TV or VCR in Limited Mode, the mode button
flashes once at the end of the flash sequence.
For example, if the TV code is 570, the AUX mode button
flashes once quickly (indicating 0 for TV), pauses, flashes
five times, pauses, flashes seven times, pauses, flashes
once quickly, and then flashes once (indicating Limited
Mode).
78
Page 25

Remote Controls
VOLUME
Controlling Other Components
Controlling a Tuner or Amplifier
Use the following remote control buttons to control a tuner or amplifier. When the remote control is
set up as described on pages 75 and 79, press the AUX mode button to set the remote to AUX
mode. The AUX mode button will stay lit for two seconds to show you’ve set the remote to AUX
mode. Make sure to keep the remote in AUX mode to use the following buttons.
AUX Mode
To use the features described in this section, make sure
youi are in AUX mode by pressing the AUX Mode button.
Press this
button for
Power
Turns the
tuner/amplifier
on and off
AUX Mode
AUX
Volume & Mute Buttons
Control tuner/amplifier
volume
Arrows/Select
Buttons
Channel up/down
with the Arrow buttons.
Change tuner/amplifier
inputs with the Select
button
Switching Between TV and Tuner/Amplifier Volume Adjustment
When the remote control is setup to operate your TV, the VOLUME and MUTE buttons
will adjust your TV volume. If you prefer the volume and mute functions of the remote control to
adjust the volume of a remote-controllable audio tuner or amplifier instead of the TV, this capability
can be set up using the AUX mode of the remote control.
To set the remote to adjust the tuner/amplifier volume (steps 1-5 set up the remote an d steps 6-7
make sure the remote is set up correctly):
3
4
5
1
AUX
Press and hold the
AUX Mode buttton for
four seconds
(button will flash)
2
Press
POUND
Press the plus
side of VOLUME
Press
ZERO
(AUX button
will flash 3 times)
Press
POUND
6
SAT
Press
SAT Mode
7
Test to make
sure volume
works on device
79
Page 26

Chapter 10
Controlling Other Components
To set the remote back to adjust the TV volume (steps 1-5 set up the remote and steps 6-7 make
sure the remote is set up correctly):
1
TV
Press and hold the
TV Mode buttton for
four seconds
(button will flash)
2
Press
POUND
3
VOLUME
Press the plus
side of VOLUME
4
Press
ZERO
(AUX button
will flash 3 times)
5
Press
POUND
6
SAT
Press
SAT Mode
7
Test to make
sure volume
works on device
80
Page 27

Remote Controls
The Recover Button
Programming to Control a Second Satellite Receiver
If you have another DISH Network satellite receiver installed, you can use this remote in AUX
mode to control it along with your new receiver. When you program the remote to control this other
receiver, the remote will send out IR and UHF (not UHF Pro) signals to the receiver. You can
program the remote to control any other DISH Network satellite receiver, except for following:
• TV2 on DISH 322, ViP222, ViP622 DVR, ViP722 DVR, DISH Player-DVR 522, 625, and 942
• DishPlayer 7100/7200
3
2
1
Mon, October 18
j
2
UHF
0
0
Remote Addrs.
TV Out
Next
2
cb
f
AUX Mode buttton until all
5
3
Mode butttons light up
System Info
a
Status: Good
DISH Player-DVR 522
R00 0000 0000-01
de
Software: L236
S00 0000 0000-01
Satellite:
119110 148
g
Signal:
h
Device: DP34, Feed(1), Feed(2), Feed(3)
Remote Addrs.
5
1
i
UHF
TV Out
3
Details
Done
Copyright 2005, EchoStar Technologies Corp. All Rights Reserved.
Display System Information
screen and note the
Remote Control Address
1. Turn on the other receiver and display the System Info screen.
AUX
Press and hold the
(Button will Flash)
Press the
3 button
address from step
4
Enter remote
one
5
Press POUND
(AUX button
will flash 3 times)
6
Press
RECORD
Write down the receiver’s address:
2. Using the new remote control, press and hold AUX until all the other mode buttons light up,
and then release the button. AUX flashes.
3. Press the 3 button.
4. Use the NUMBER PAD to enter the address you wrote in step 1.
5. Press POUND (#). AUX blinks three times.
6. Press RECORD to make sure the address in the remote matches the address on the other
receiver.
The Recover Button
Use RECOVER if you have a snowy, blue, or black screen on your TV and cannot get the picture
back from your satellite receiver. When you press RECOVER as described, the remote control
sends commands to your TV to change channels or video inputs to get back to watching satellite
programming. This procedure works only if you have accidentally changed the TV channel or
video input. It does not recover lost satellite signal (See Troubleshooting on page 120 for more
information).
Note: The remote must be programmed to control the TV (and VCR, if applicable) for RECOVER
to work as described.
Note: RECOVER will first try to tune your TV to channel 3, then channel 4, and then other video
inputs with each press of RECOVER. You may need to press RECOVER up to 30 times to recover
81
Page 28

Chapter 10
The Recover Button
your satellite TV video. If RECOVER is programmed to a specific channel, RECOVER will tune the
TV to the specific channel first (for example, channel 60).
Programming the Recover Button for Remote Control 2
When your Remote Control 2 is shipped from the factory, RECOVER is set up to restore sa te llit e
TV viewing by tuning your TV (or VCR) to channel 3, 4, and other inputs. To use RECOVER with
your remote TV (or VCR), you need to program RECOVER with the specific three-digit number
channel that you use to watch TV2 programming. (For two-digit number channels, use zero first.
For example, enter channel 60 as 060.) The following instructions describe how to program
RECOVER to tune your remote TV (or VCR) back to a selected channel.
3
Press
STAR
4
Enter the
digits of your
channel number
5
Press POUND
(TV Mode button
will flash 3 times)
1
POWER
TV
VCR
AUX
SAT
TV/VIDEO
PAGE
TV
MENU
I
T
N
VOLUME
U
P
MUTE GUIDE
T
B
R
H
O
E
SELECT
W
M
S
E
S
E
RECALL CANCEL
INFO VIEW TV
DVR
SKIP
SKIP
FWD
BACK
FWD
BACK
PAUSE
STOP PLAY
R
RECORD
N
PIP
O
S
I
W
T
I
abc def
A
P
S
P
O
3
1
2
ghi mnojkl
6
4
5
pqrs wxyztuv
9
7
8
search/format
#
0
1
Program Remote 2 to
2
TV
Press and hold the
TV Mode button until all
Mode buttons light up
(button will flash)
control your remote
TV
Using the Recover Button
The following setup is required to use RECOVER:
• The remote control must be set up to control the TV and, if installed, the VCR.
• If a VCR is installed, it must be connected as shown on page 109.
• On a remote TV, RECOVER must be programmed to tune your remote TV to the specif ic
channel to receive TV2 programming (for example, channel 60), using the instructions on
page 82.
4
Mon, October 18
R00 0000 0000-01
S00 0000 0000-01
2
j
UHF
Done
Remote Addrs.
TV Out
2
0
cb
0
f
5
3
Next
System Info
a
Status: Good
DISH Player-DVR 522
de
Software: L236
Satellite:
119110 148
g
Signal:
h
Device: DP34, Feed(1), Feed(2), Feed(3)
Remote Addrs.
5
1
i
UHF
TV Out
3
Details
Copyright 2005, EchoStar Technologies Corp. All Rights Reserved.
When the System
Information screen
displays, you have
programming
5
Don’t see the System
Information Screen?
Repeat steps 2 & 3
until the System Information
screen appears
SELECT
1
Make sure
your TV is
on
2
Press
and hold
RECOVER
until all
Mode buttons
light up
3
Press RECOVER
again and wait for the
TV or VCR Mode
buttons to flash once
then all four Mode
buttons to flash once
recovered your satellite
(press SELECT to exit)
82
Note: Press any remote control button other than RECOVER to end this procedure.
Note: If RECOVER is not programmed to a specific channel, RECOVER will first try to tune your
TV to channel 3, then channel 4, and then other video inputs with each press of RECOVER. You
may need to press RECOVER up to 30 times to recover your satellite TV video. If RECOVER is
programmed to a specific channel (see page 82), RECOVER will tune the TV to the specific
channel (for example, channel 60).
Page 29

Remote Controls
VOLUME
Sending Discrete Power On and Off
Removing the Recover Button Channel Programming
The following instructions describe how to reset RECOVER to restore satellite TV viewing by
tuning your TV (or VCR) to channel 3, 4, and other inputs.
1
TV
Press and hold the
TV Mode button until all
Mode buttons light up
2
Press STAR
3
Press the
Zero button
3 times
4
Press POUND
(TV Mode button
will flash 3 times)
(button will flash)
Sending Discrete Power On and Off
Installers use remote control discrete power On and power Off IR commands when programming
macro commands into universal remotes. Using a n On-only or Of f-only command is more ef fective
than a toggle On/Off command when trying to make sure the satellite receiver is reliably in one
state or the other. To use discrete power commands, complete the following:
4
VOLUME
or
Press VOLUME UP
5
Press any
button
to end this
procedure
1
SAT
MENU
TV/VIDEO
MUTEGUIDE
VOLUME
T
H
E
M
E
S
RECALL
SELECT
INFO
O
SKIP
W
BACK
S
E
DVR
CANCEL
BACK
R
STOPPLAY
SKIP
PAUSE
FWD
S
W
RECORD
A
P
FWD
1 2 3
PIP
abc def
ghi mnojkl
456
pqrs wxyztuv
P
78
N
O
O
S
I
I
T
/FORMAT
0
9
#
1
Program the
remote control
TV
POWER
VCR
TV
AUX
PAGE
B
R
until all mode
buttons light up
2
SAT
Press
SAT Mode
3
Press
POWER
for discrete power on
or press VOLUME DOWN
for discrete power off
Tips
• If using a specific channel for TV2 (for example, channel 60), TV2’s remote control must be
programmed with a TV2 channel before you can use RECOVER.
• Place the channel sticker on the remote TV and write down the channel you use to watch
DISH Network programming. The stickers are inside the front cover of this guide.
• If you don’t want to accidentally change channels on your TV or VCR, the remote control in
Limited Mode as described on page 75.
• Make sure you have a remote control antenna connected so you ca n use Remote Control 2.
See page 17 for instructions.
83
Page 30

Chapter 10
Questions
• My remote doesn’t control my receiver or other components. What should I do?
• Why does my receiver change channels or display menus at random? Your neighbor
may have their remote control set on the same address. Change the address on your remote
control and receiver as described on page 72. If that doesn’t help, you may have to install a
UHF attenuator as described on page 74.
Questions
– Ensure the remote control is in the correct mode (page 75).
– Check the batteries (page 17).
– Check the remote control address (pages 72 and 78).
– Check the remote control antenna (page 17).
– Adjust the remote control antenna (page 73).
84
Page 31
Notes
Remote Controls
Notes
85
Page 32

Chapter 10
Notes
Notes
86
Page 33
Receiver Customization
Personalizing Your Satellite Receiver
What you’ll find in this chapter:
• USING SHARED VIEW
• MODULATOR SETUP
• USING MULTIMEDIA
• USING CALLER ID
• CHANGING LANGUAGES
• USING CLOSED CAPTIONING
• USING DOLBY® DIGITAL SURROUND SOUND
• CHANGING THE PROGRAM GUIDE ORDER
• CHANGING THE GUIDE DISPLAY
• RESETTING TO FACTORY DEFAULTS
• SCHEDULING RECEIVER UPDATES
• INACTIVITY STANDBY
87
Page 34
Chapter 11
Using Shared View
Using Shared View
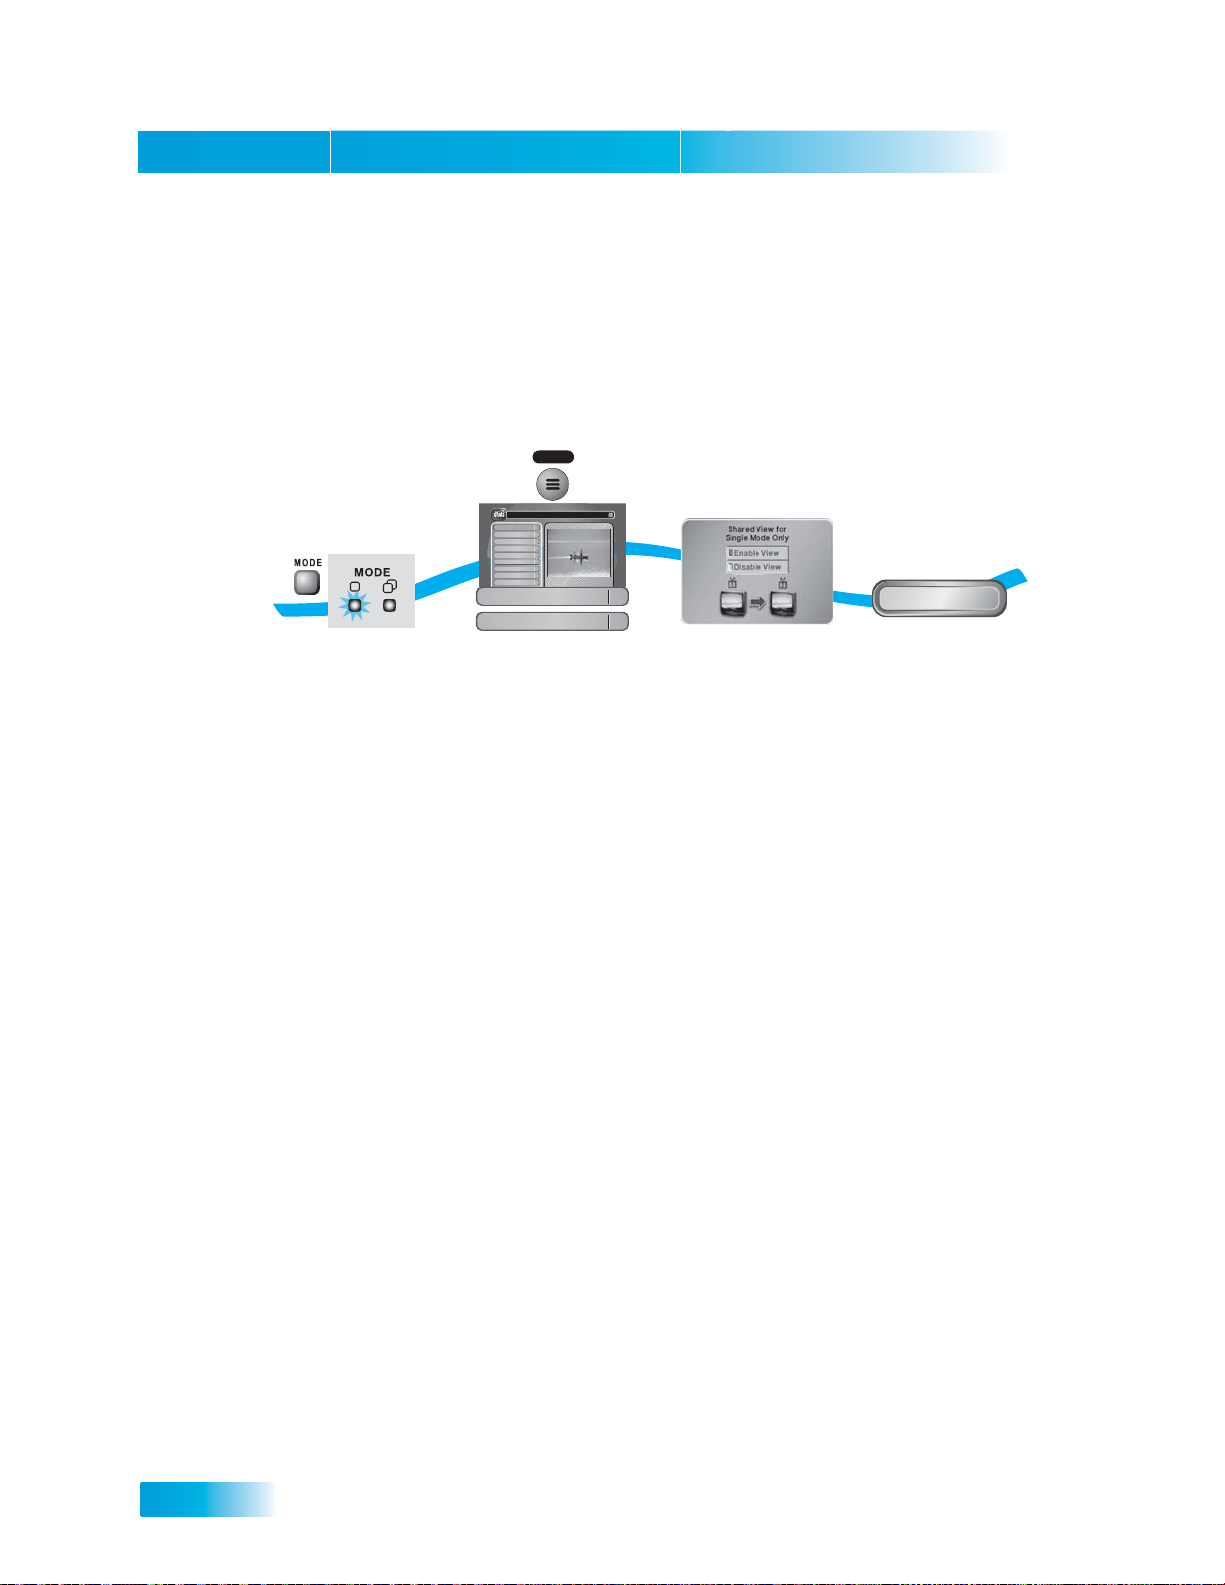
Shared View is a feature of Single Mode that lets you activate the TV2 audio and video outputs to
display the same programming as the TV1 outputs. While using this feature, both Remote Control
1 and Remote Control 2 for your satellite receiver can control what is displayed on all TVs
connected to the system. This feature is available only in Single Mode.
2
MENU
3
Select Enable
(or Disable) View
4
Done
Select Done
1
Make sure
receiver is in
Single Mode
1
2
3
4
5
6
7
8
0
114 E!114 E!
Celebrity Homes
5:30 pm - 7:00 pm NR
Thursday, January 20
6:25 pm
Main Menu
Program Guide
Themes & Search
Customer Support
Multimedia
Locks
System Setup
Daily Schedule
Preferences
Cancel
System Setup
Shared View
Press MENU, select
System Setup then
select Shared View
1
6
2
Note: Make sure you are using Remote Control 1 and TV1 because you cannot enable or disable
this feature using Remote Control 2.
Note: If you do not want to display programming on an y other TV besides TV1 a nd you do not want
Remote Control 2 to control the receiver, select Disable View. After you select Done, TV2 will
show a screen that says Shared View is currently disabled.
Modulator Setup
If you have TV1 and TV2 connected to the receiver with coaxial cables (see page 103), you can
decide which channel you’d like to use to view your DISH Network programming. If you have the
system locked, you’ll have to enter the password to enable TV1’s output on this screen. Make sure
your TV can tune to the channel you pick before you change the setting on this screen.
88
Page 35
Receiver Customization
Using Multimedia
Using Multimedia
Photos
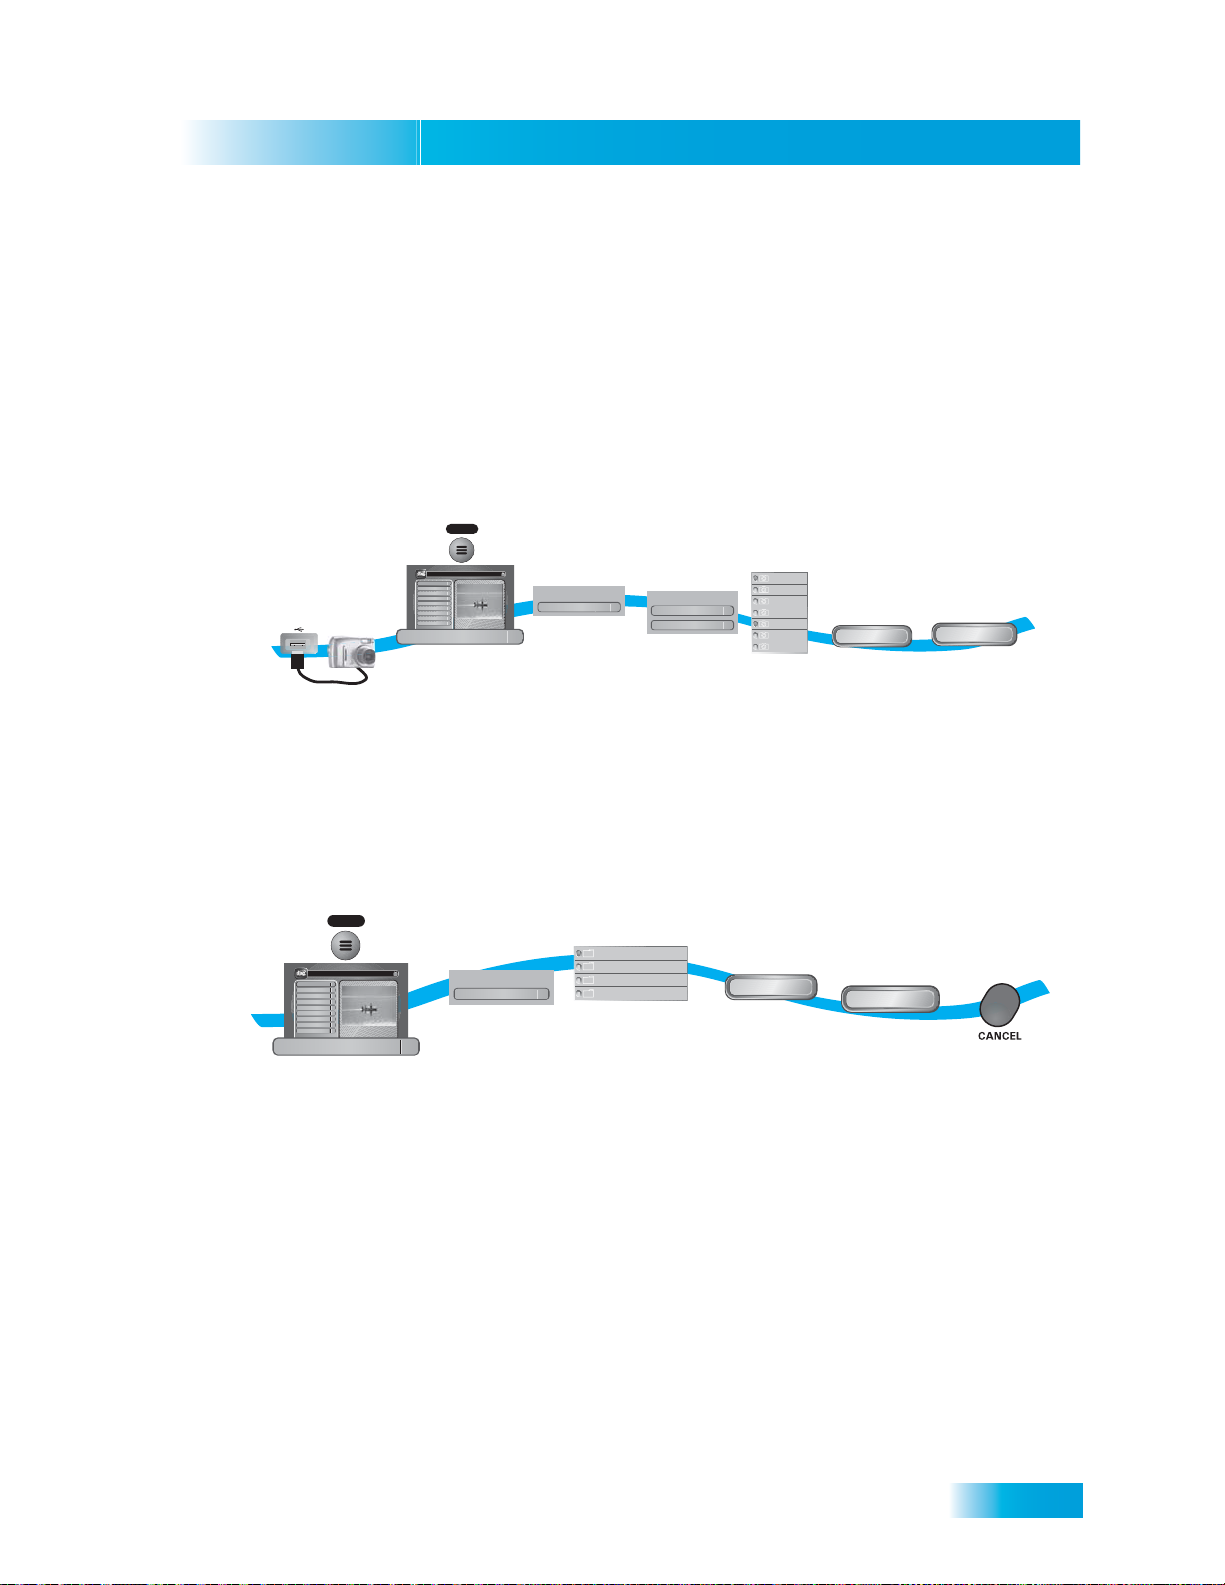
Copy photos from select digital cameras and storage devices to the receiver’s DVR hard drive for
viewing on the connected TV (options vary by receiver model). Now you don’t have to pass photos
around or have a crowd of people hover around your digital camera.
Transferring Photos to Your Receiver
2
MENU
1
Thursday, January 20
1
Connect receiver to a
Main Menu
114 E!114 E!
Program Guide
1
Themes & Search
2
Customer Support
3
Multimedia
4
Locks
5
System Setup
6
Daily Schedule
7
Preferences
8
Celebrity Homes
Cancel
0
5:30 pm - 7:00 pm NR
Multimedia
Press MENU and
select Multimedia
6:25 pm
External USB Devices
Digital Camera
Select the
4
option under
External USB
3
Devices
Photo
2
Manage Device
Get from Device
Under "Photo"
select Get from
4
Device
digital camera or
other USB supported
device* using the
USB connection
* Some Cameras and USB multimedia devices may not be compatible.
Viewing Photos on Your Receiver
1
MENU
Thursday, January 20
Main Menu
Program Guide
Themes & Search
Customer Support
Multimedia
Locks
System Setup
Daily Schedule
Preferences
Cancel
1
2
3
4
5
6
7
8
0
114 E!114 E!
Celebrity Homes
5:30 pm - 7:00 pm NR
6:25 pm
Multimedia
Press MENU and
select Multimedia
1
My Photos under
4
2
My DISH Receiver
My Photos
Select the
My DISH
Receiver
1
3
August 31 2005 10:03am
September 3 2005 9:03am
December 2 2005 10:03am
January 8 2006 11:00pm
Select the
photo folder
you want to
view
5
Pic01.jpg
Pic02.jpg
Pic03.jpg
3
Pic04.jpg
Pic05.jpg
4
Pic06.jpg
Pic07.jpg
Select the
pictures
you want to send to
your receiver
4
Slideshow
Select
Slideshow
6
Send Photos
Select
Send Photos
After the transfer
5
Play
Select Play
(or set up your
options then
select Play)
7
OK
process, select
OK
6
Press the
CANCEL button
to exit out of the
slideshow
89
Page 36
Chapter 11
Using Caller ID
Using Caller ID
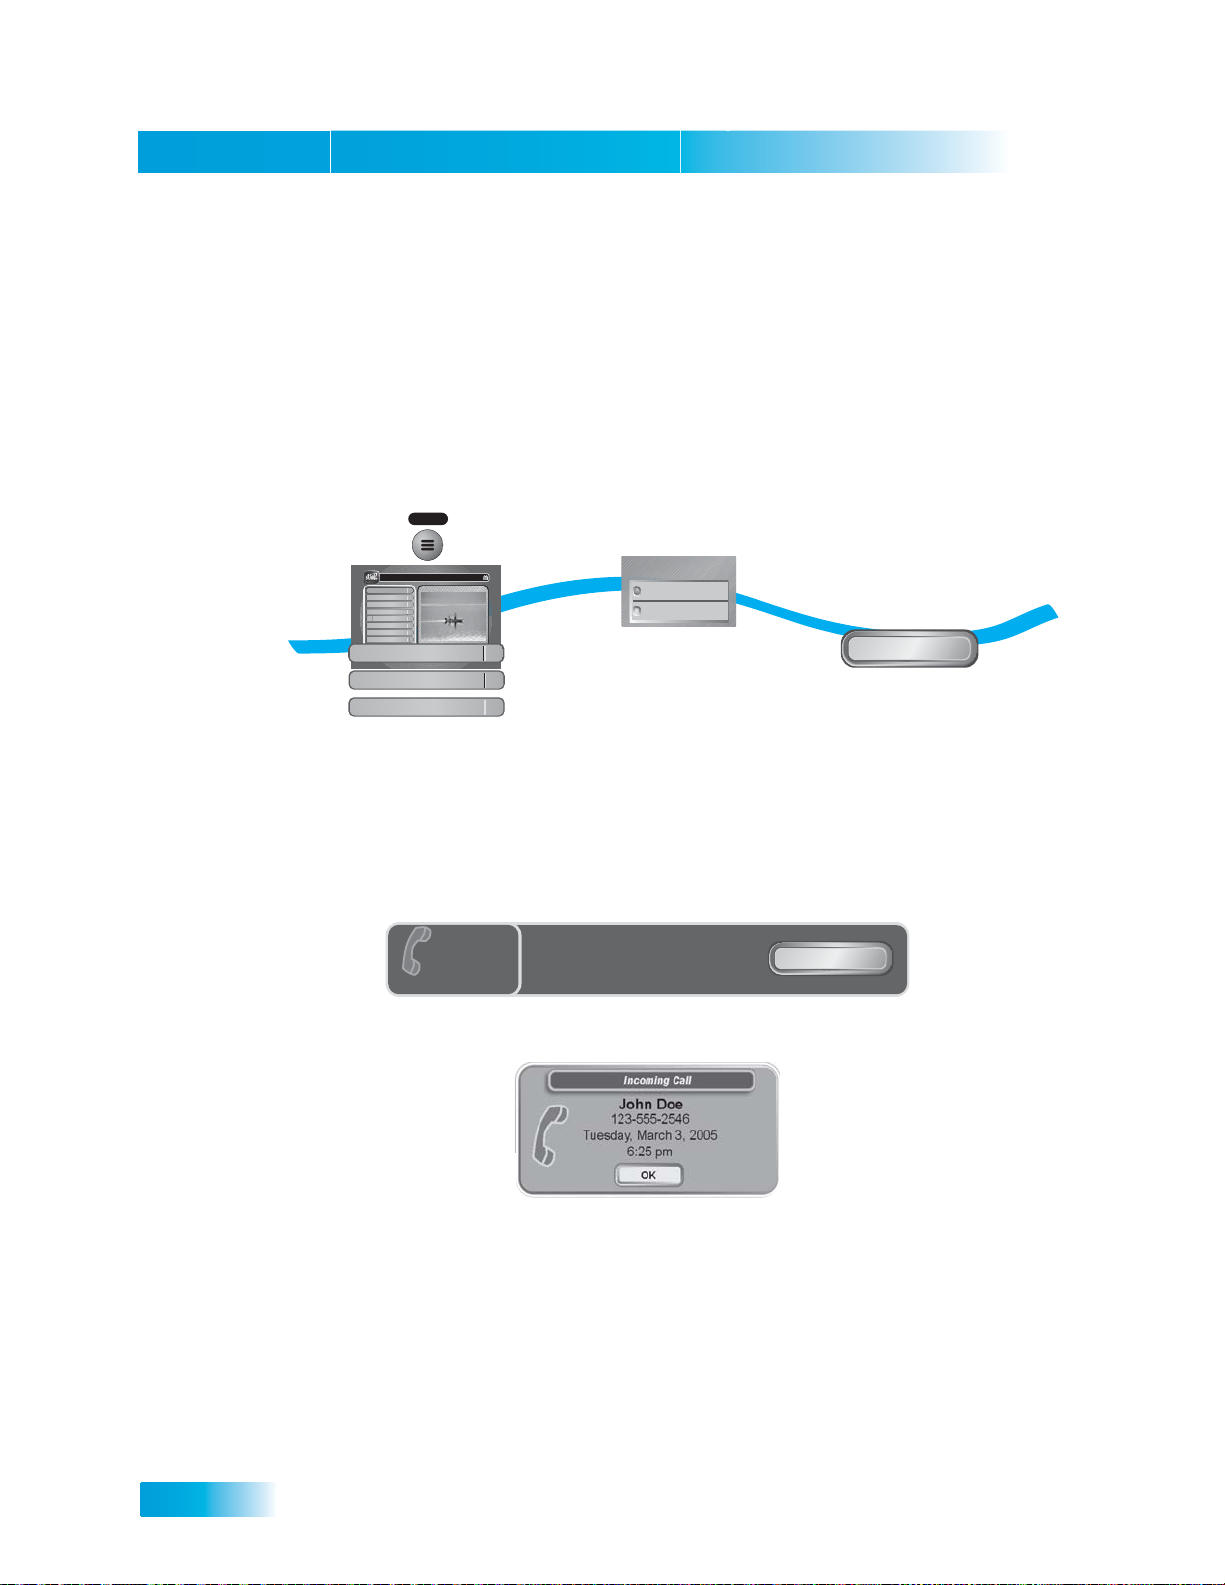
Caller ID displays on your TV if you subscribe to Caller ID from your local phone company. To use
this feature make sure you have a phone line connected to the receiver, Caller ID is enabled on
your phone line and that the Caller ID option is selected on your receiver.
Setting Up Caller ID Display
Use these instructions to enable or disable Caller ID.
1
MENU
1
1
2
3
4
5
6
7
8
0
114 E!114 E!
Celebrity Homes
5:30 pm - 7:00 pm NR
Thursday, January 20
6:25 pm
6
1
2
Main Menu
Program Guide
Themes & Search
Customer Support
Multimedia
Locks
System Setup
Daily Schedule
Preferences
Cancel
System Setup
Installation
Caller ID
Press MENU and select
System Setup, then Installation,
then Caller ID
2
Enable/Disable Caller ID
Enable Caller ID
Disable Caller ID
Select Enable Caller ID
or
Disable Caller ID
3
Done
Select Done
Caller ID Screens
When you receive a call, you will see a Caller ID popup screen.
TUE 3/19
6:25 pm
Incoming Call
You can select OK to eliminate the message. If you do nothing, it will disappear after 20 seconds.
If you are using a menu when a call comes in, you will see a different Caller ID popup screen.
John Doe
123-555-2546
Incoming Call
John Doe
123-555-2546
Tuesday, March 3, 2005
6:25 pm
OK
OK
90
Page 37
Receiver Customization
Changing Languages
Using Caller ID History
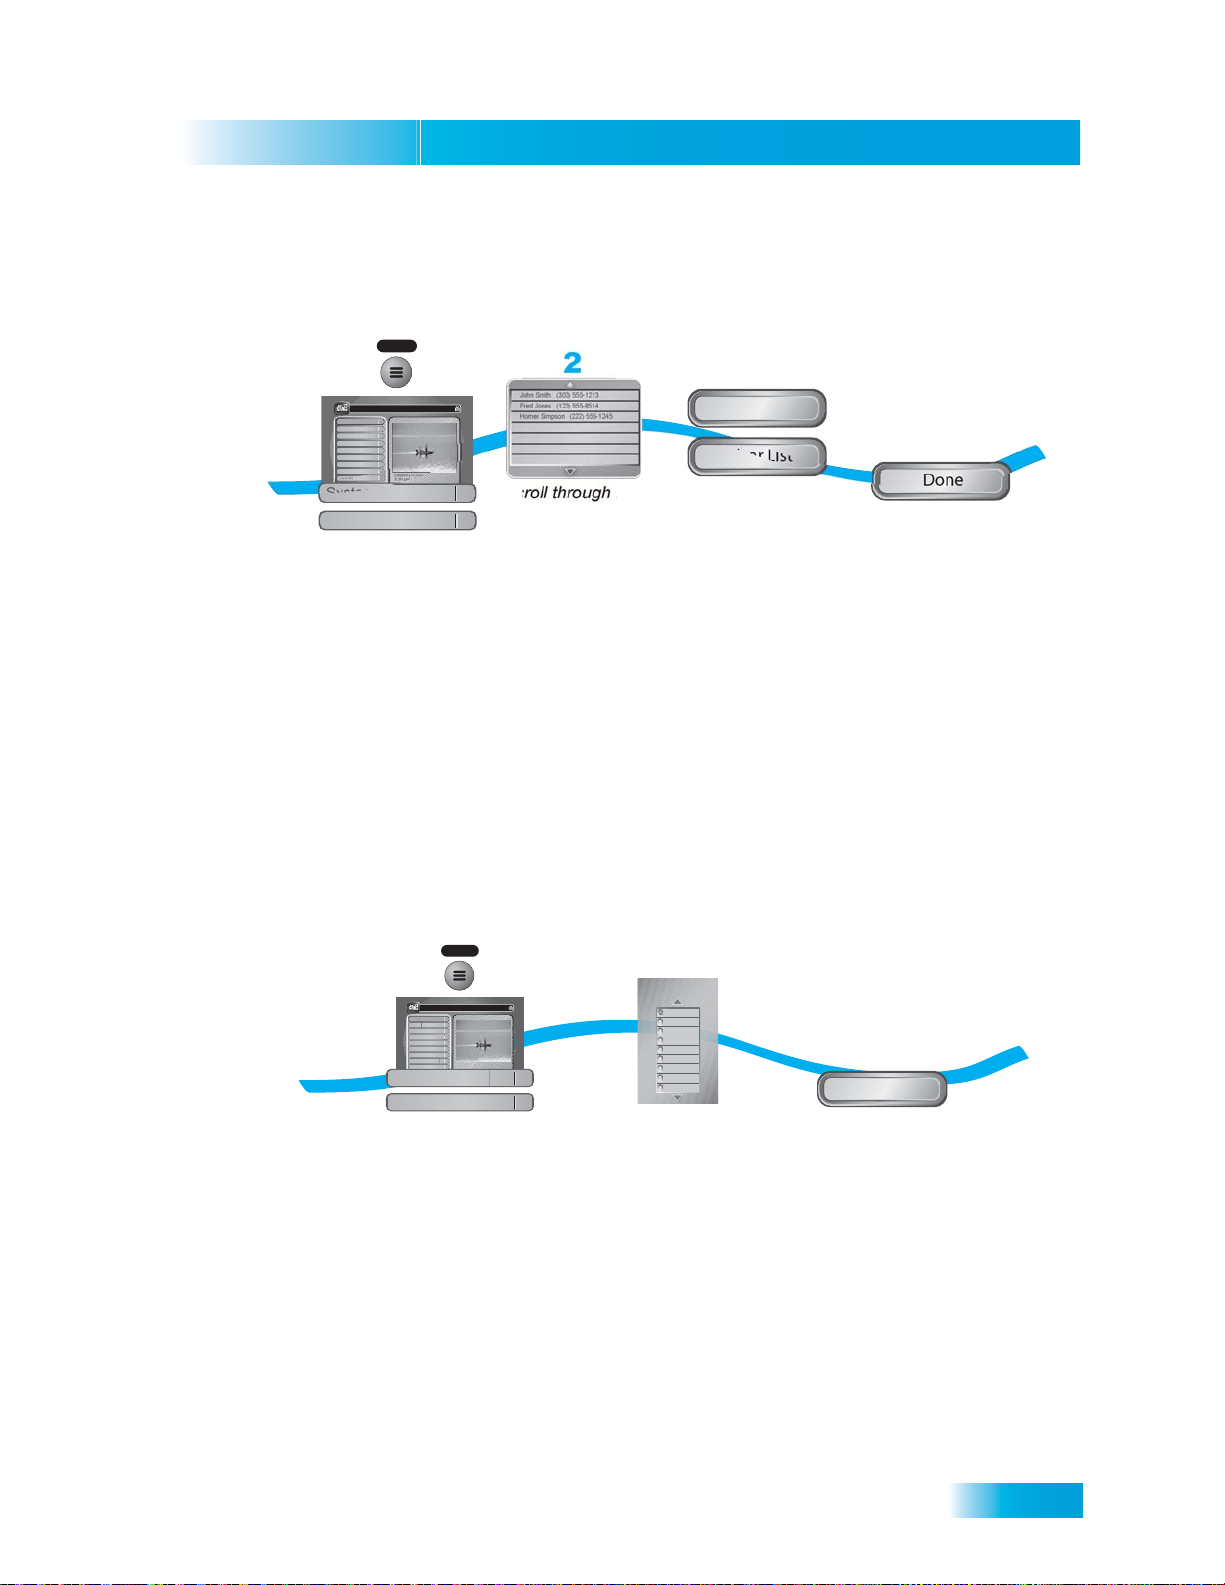
Use the following instructions to view and delete numbers from your Caller ID History.
1
MENU
3
John Smith (303) 555-1213
1
2
3
4
5
6
7
8
0
114 E!114 E!
Celebrity Homes
5:30 pm - 7:00 pm NR
Thursday, January 20
6:25 pm
Main Menu
Program Guide
Themes & Search
Customer Support
Multimedia
Locks
System Setup
Daily Schedule
Preferences
Cancel
1
System Setup
Caller ID History
Press MENU and select
Fred Jones (123) 555-8514
Homer Simpson (222) 555-1245
6
Scroll through list
4
Delete
Clear List
Select Delete
or
Clear List
or
4
Done
Select Done
System Setup,
then Caller ID History
Changing Languages
You may be able to change the language of some programs. Some programs, such as movies,
indicate at the beginning whether an alternate language or descriptive video is available. An
alternate language applies only to the audio part of a program and does not change the language
used in the menus displayed by the receiver. Descriptive video—not included on all channels and
programs—is a feature for the visually impaired that describes what is happening during a
program.
1
MENU
1
Thursday, January 20
Main Menu
Program Guide
Themes & Search
Customer Support
Multimedia
Locks
System Setup
Daily Schedule
Preferences
Cancel
Preferences
1
2
3
4
5
6
7
8
0
114 E!114 E!
Celebrity Homes
5:30 pm - 7:00 pm NR
6:25 pm
Alternate Audio
Press MENU and
select Preferences,
then Alternate Audio
8
4
2
Current Audio Language
English
English
Spanish
French
Swedish
German
Italian
Japanese
Korean
Cushite
Select preferred
language
3
Done
Select Done
91
Page 38
Chapter 11
Using Closed Captioning
Using Closed Captioning
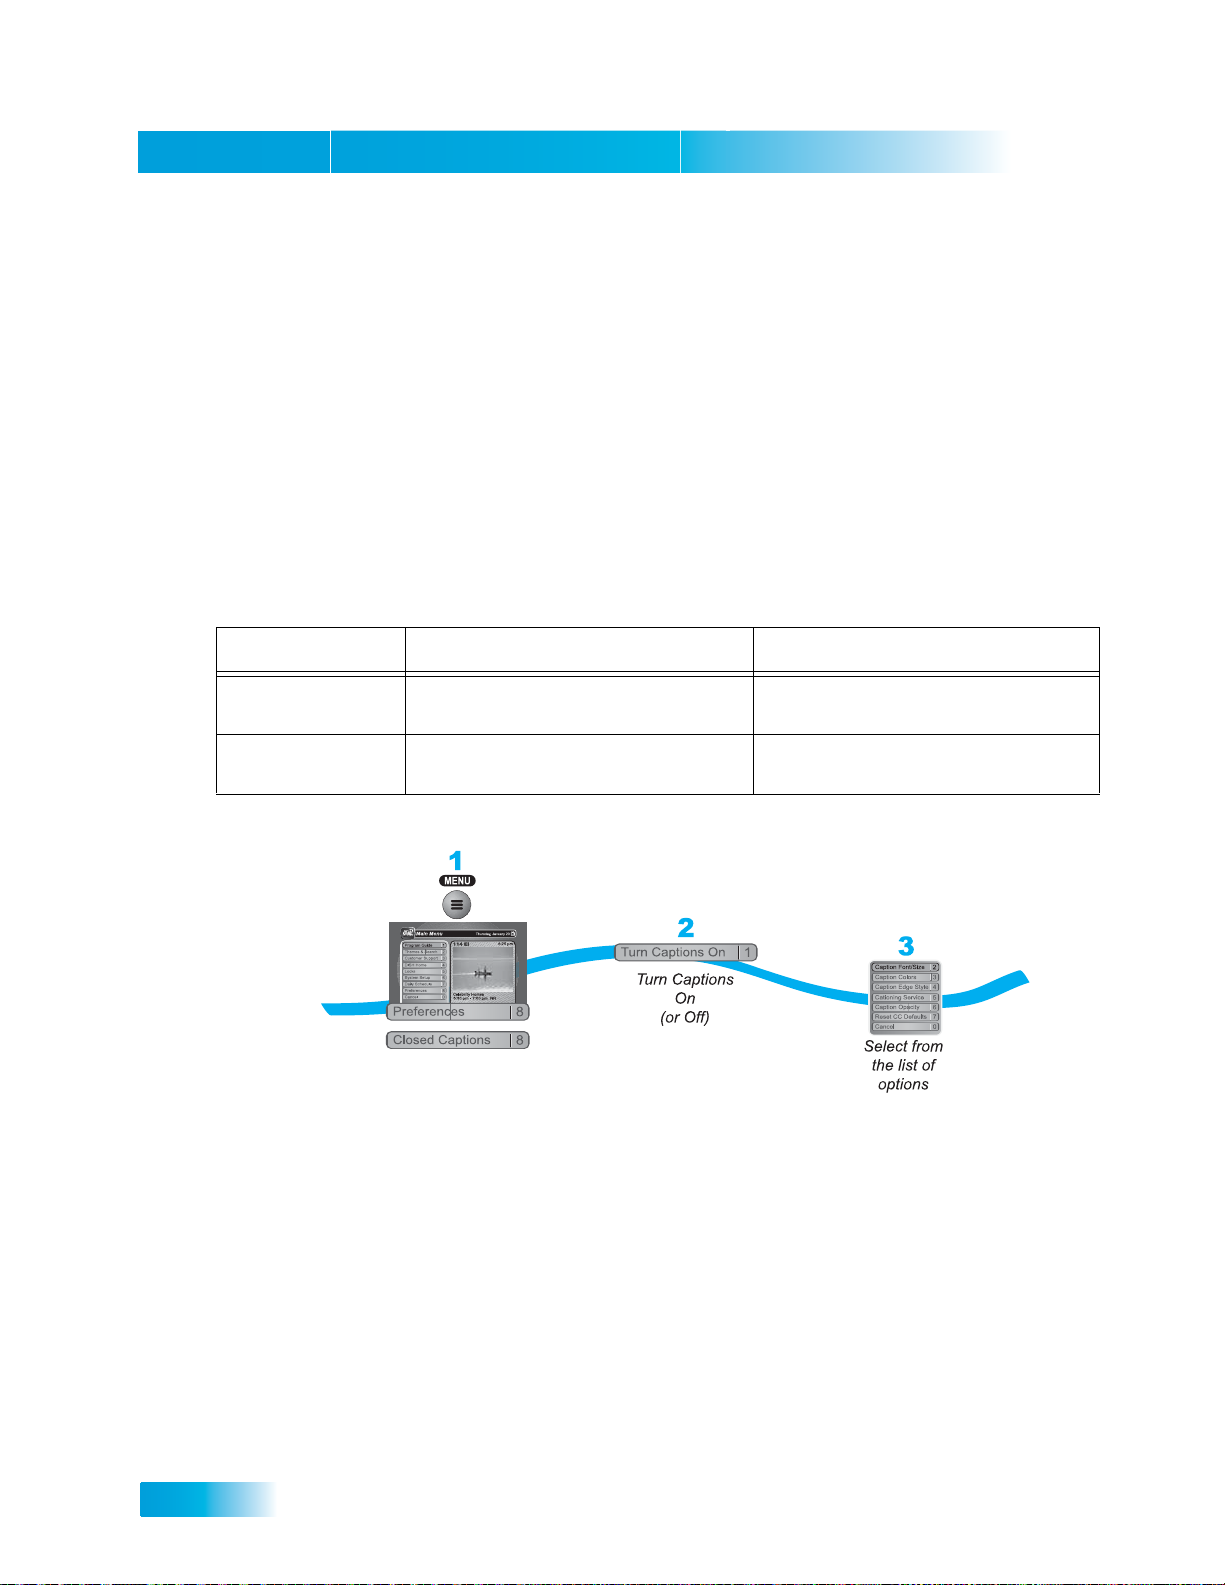
The receiver has many options for Closed Captioning (CC), which allow you to change the featur e
to suit your needs. Also, you can display captions when you play back programs recorded on the
receiver's hard drive (DVR), even if you didn't have them turned on at the time the program was
recorded.
Note: Not all programming contains CC information.
Use the following questions and table to determine if CC is available at your TV location:
1. Are you watching SD or HD programming?
2. Are you in Single or Dual Mode? Refer to page 15 for information on switching modes.
3. Are you watching TV1 or TV2?
Programming Type Single Mode Dual Mode
SD Programming TV1 - CC available through the receiver.
TV2 - CC available through the receiver.
HD Programming TV1 - CC available through the receiver.
TV2 - CC available through the receiver.
Press MENU and
select Preferences,
then Closed Captions
• Caption Font/Size - Select a comfortable font and size. Select Done.
• Caption Colors - Sets the background, letter, and edge colors. Choose the color
combinations that makes the captioning easy to see. Select Done.
Caption Edge Style - Sets the edge style of the
• Captioning Service - Selects the service you want to use. Select Done.
• Caption Opacity - Choose from Provider, Transparent (see-through), Translucent (semi-
see-through), Solid, and Flashing. Select Done.
• Reset CC Defaults.
CC available text. Select Done.
TV1 - CC available through the receiver.
TV2 - CC must be enabled on the TV.
TV1 - CC available through the receiver.
TV2 - CC must be enabled on the TV.
92
Page 39
Receiver Customization
Using Dolby® Digital Surround Sound
Using Dolby® Digit al Surround Sound
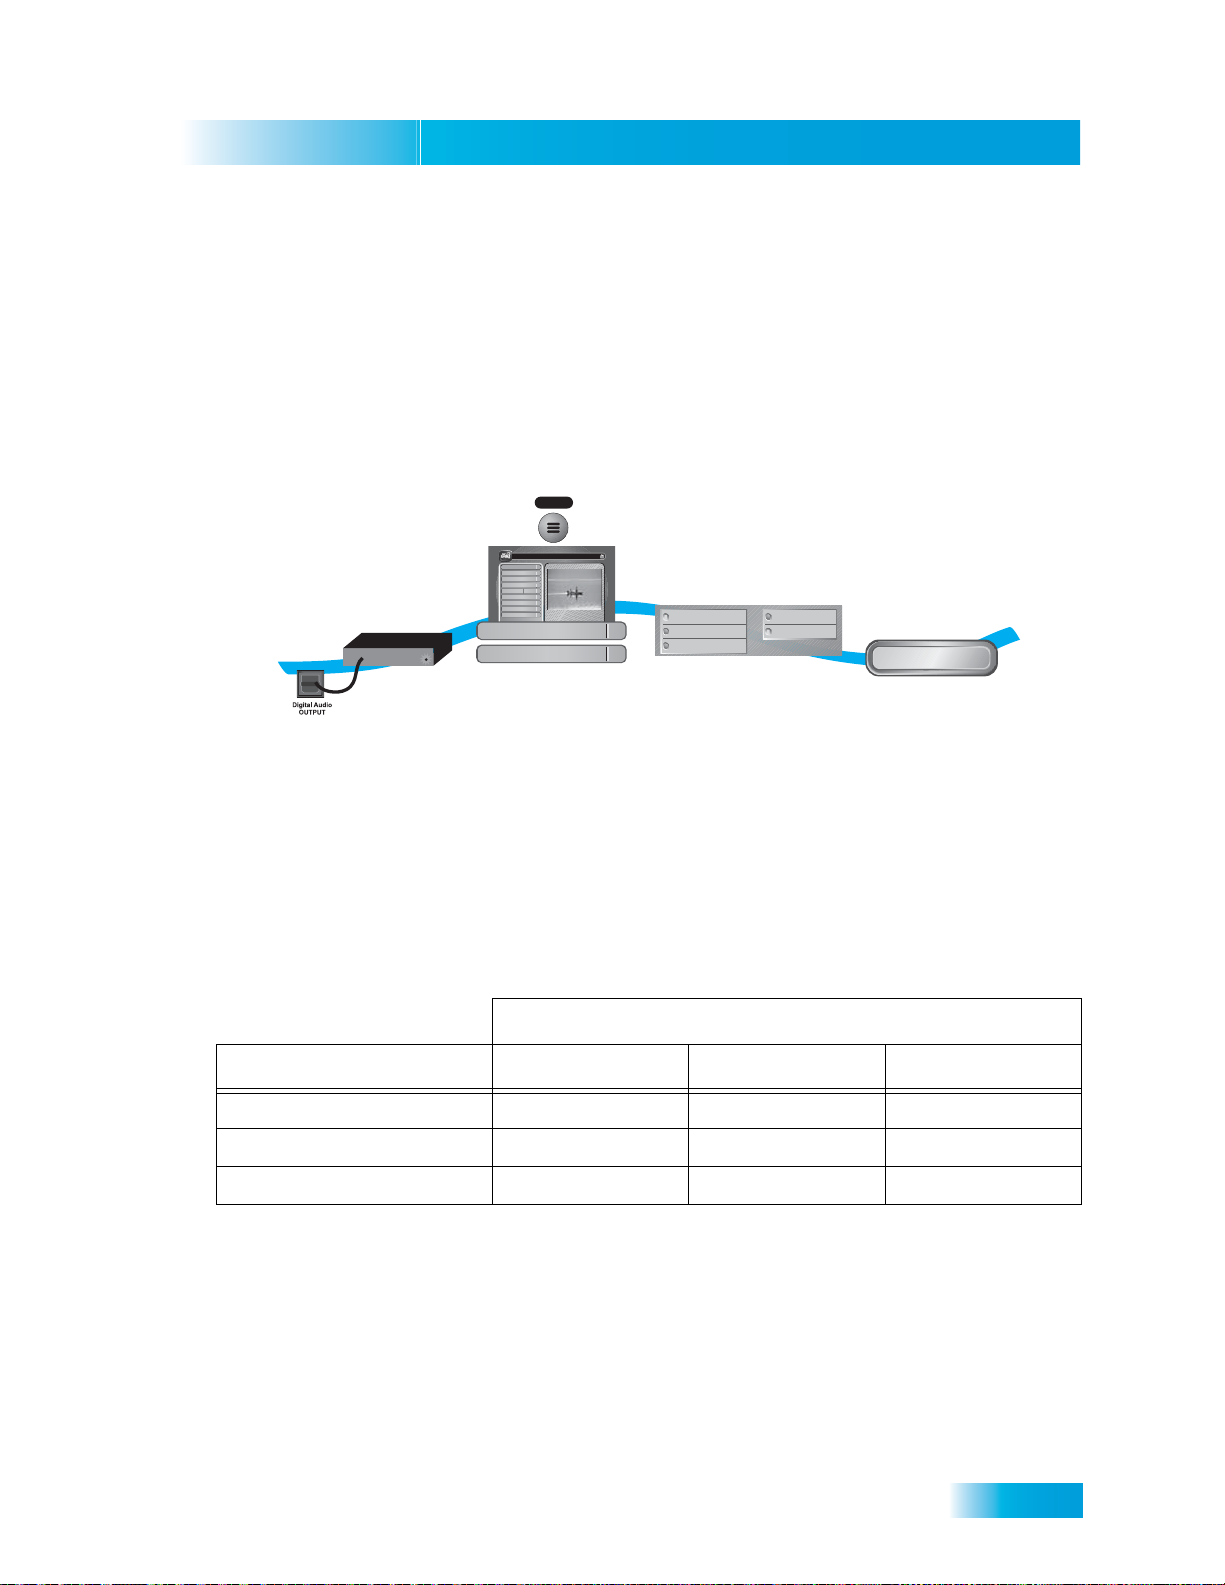
Dolby Digital gives you the capability to enjoy programs in surround sound. An external decoder is
required to enjoy this feature. Refer to your decoder user’s guide.
Note: Not all programs contain a Dolby Digital sound track.
The receiver uses an optical port for outputting digital audio. The optica l output can provide two
audio data types: Dolby Digital and Linear PCM (only Dolby Digital can provide full 5.1-channel
sound).
2
MENU
1
Thursday, January 20
Main Menu
Program Guide
Themes & Search
Customer Support
Multimedia
Locks
System Setup
Daily Schedule
Preferences
1
Decoder
Cancel
System Setup
Dolby Digital
Press MENU and
select System Setup,
Connect receiver to an
then Dolby Digital
external decoder
• Dolby Digital Only - Select this option if the stereo system or amplifier can decode only Dolby
Digital and will not process Linear PCM signals. See your amplifier's owner's manual for more
details on the amplifier (and see the following table).
• PCM Only - Select this option only if the stereo system or amplifier cannot decode Dolby
Digital signals.
• Dolby Digital/PCM - Select this option only if the stereo system or amplifier can decode both
Dolby Digital and Linear PCM signals.
The audio output is also dependent on what is present in the program you ar e watching. The t abl e
below shows what type of output you will hear:
1
2
3
4
5
6
7
8
0
114 E!114 E!
Celebrity Homes
5:30 pm - 7:00 pm NR
6:25 pm
3-4
6
7
Dolby Digital PCMRFLine
Dolby Digital only
Both
Select from
the options
5
Done
Select Done
Signal Present in Program
Optical Output Setting Dolby Digital PCM Both
Dolby Digital Only Dolby Digital PCM Dolby Digital
PCM Only PCM (downmix) PCM PCM
Dolby Digital/PCM Dolby Digital PCM Dolby Digital
Note: When both audio signals are present in the program, the receiver defaults to Dolby Digital
output unless you have selected PCM Only.
Note: If you have selected Dolby Digital Only but there is only PCM audio in the program, you will
hear nothing. This also applies to the analog audio outputs.
• Line Mode. When you use this setting, in comparison to RF Mode, the dynamic range is
wider, which makes the music and loud noises louder, but voices quieter.
• RF Mode. When you use this setting, in comparison with Line Mode, the dynamic range is
narrower , which makes music and loud noises quieter, but voices louder.
93
Page 40
Chapter 11
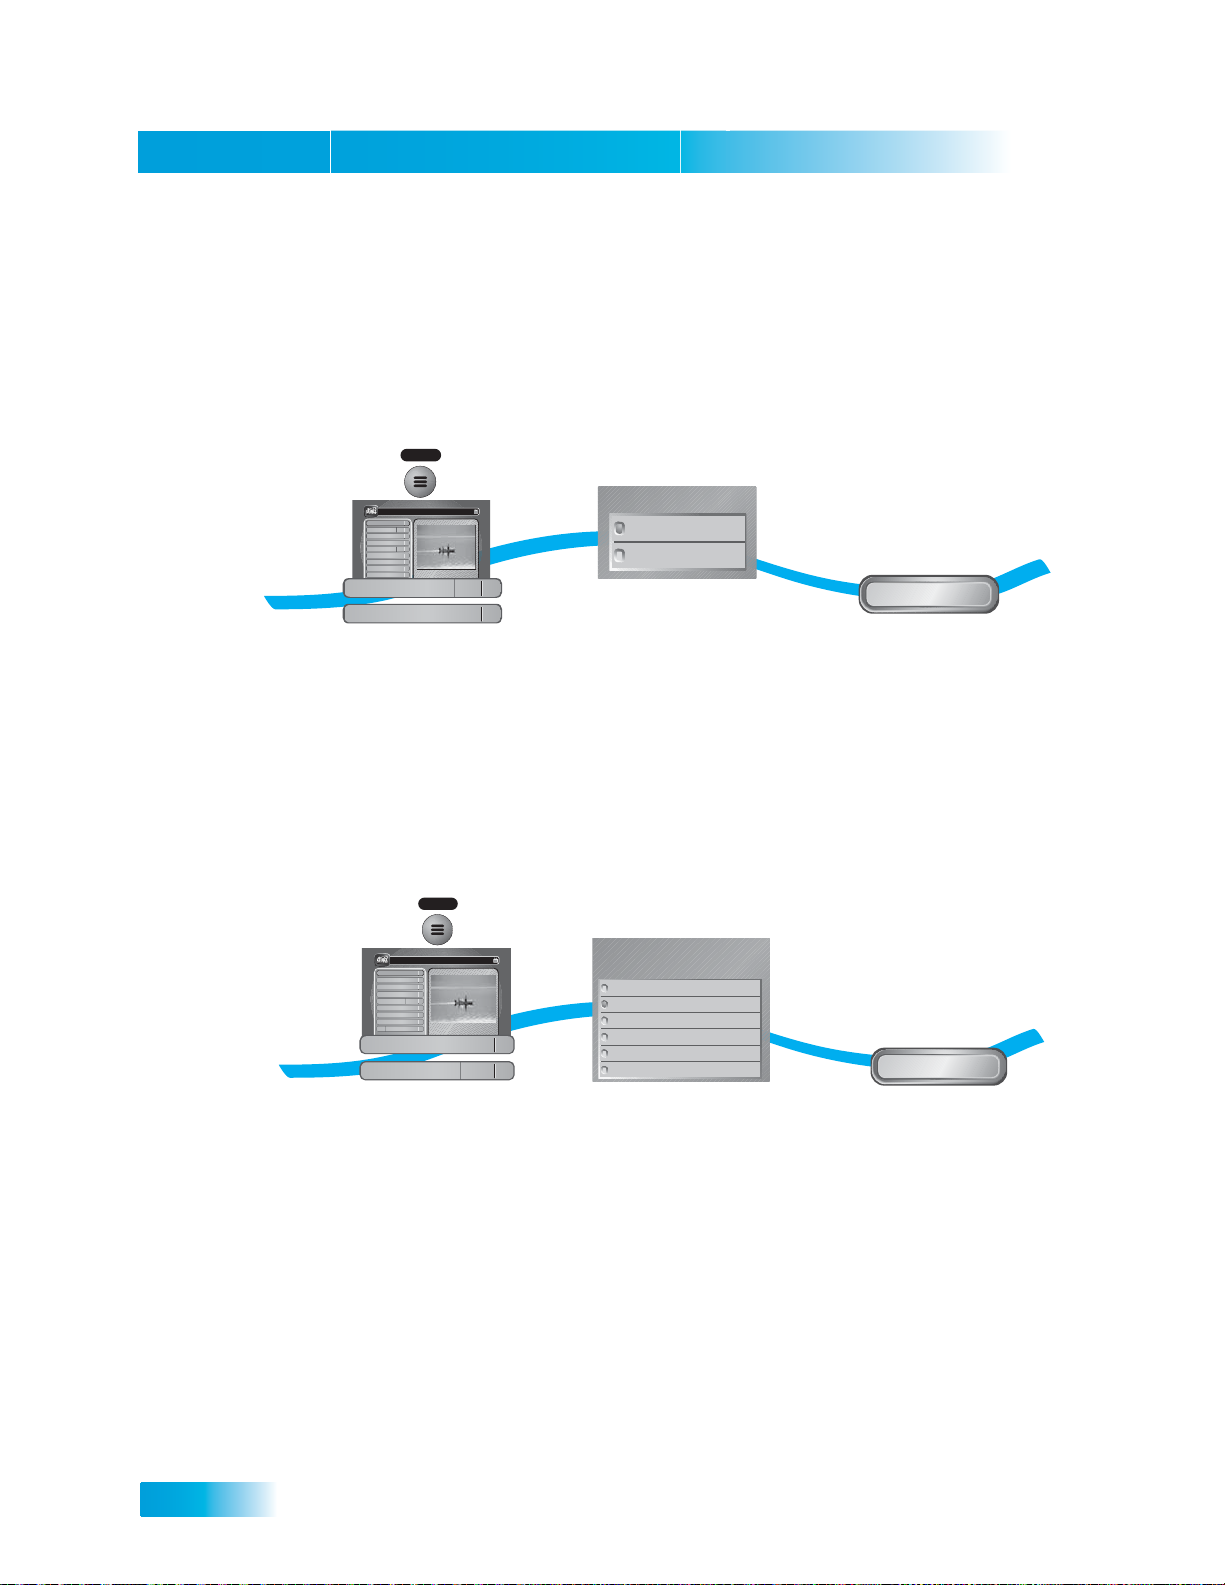
Changing the Program Guide Order
Changing the Program Guide Order
You can set up the Program Guide to list channels in descending order, with the highest channel
number at the bottom, or in ascending order, with the highest channel number at the top.
Note: If you do not set a channel order, the Program Guide lists the channels in descending order.
1
MENU
Thursday, January 20
Main Menu
Program Guide
Themes & Search
Customer Support
Multimedia
Locks
System Setup
Daily Schedule
Preferences
Cancel
Preferences
Channel Order
Press MENU and
select Preferences,
then Channel Order
1
2
3
4
5
6
7
8
0
114 E!114 E!
Celebrity Homes
5:30 pm - 7:00 pm NR
6:25 pm
2
1
8
7
Channel Order Setup
Ascending
Descending
Select Ascending
or Descending
3
Done
Select Done
Changing the Guide Display
The receiver comes set to display the Program Guide with video in the upper right corner.
However, you can change the way the Program Guide displays.
1
MENU
2
1
2
3
4
5
6
7
8
0
114 E!114 E!
Celebrity Homes
5:30 pm - 7:00 pm NR
Thursday, January 20
6:25 pm
8
2
Main Menu
Program Guide
Themes & Search
Customer Support
Multimedia
Locks
System Setup
Daily Schedule
Preferences
Cancel
Preferences
Guide Display
1
Press MENU and
select Preferences,
then Guide Display
• Standard - Partial Guide with Video. This optio n is pr eset when you fir st set up the r eceiver.
The Program Guide displays video in the upper right corner and 1.5 hours of schedule per
page.
• Enhanced - Partial Guide with Video. Choose this option if you’d like larger text on your
Program Guide. The Program Guide displays video in the upper right corner and one hour of
schedule per page.
• Extended - Partial Guide with Video. Choose this option if you’d like to see video in the
upper right corner and three hours worth of schedule per page on the Program Guide.
• Standard - Full Guide without Video. Choose this option if you’d like to see more channels
per page on the Program Guide.
Select a Guide Display Option
Standard - Guide with Regular Text Size
Enhanced - Guide with Larger Text Size
Standard - Partial guide with video
Enhanced - Partial guide with video
Extended - Partial guide with video
Standard - Full guide without video
Enhanced - Full guide without video
Extended - Full guide without video
Select from
the guide display
options
3
Done
Select Done
94
Page 41

Receiver Customization
Resetting to Factory Defaults
• Enhanced - Full Guide without Video. Ch oose thi s option if you ’d like to se e more ch ann els
per page in large text on the Program Guide.
• Extended - Full Guide without Video. Choose this option if you’d like to see more channels
and three hours of schedule per page on the Program Guide.
Resetting to Factory Default s
You can reset the receiver to discard any changes you have made to the receiver, exce pt for
remote control address settings and locks. Resetting the receiver to factory default settings also
discards all Favorite Lists except the All Chan, All Sub, and All HD lists.
If you have set any locks on the receiver, and the receiver is locked, these locks will be kept. If the
receiver is unlocked, any such locks will be lost. Yo u cannot reset the receiver to default settings to
discard a password you have forgotten. No one but a Custo mer Ser vice Repre sentative can reset
the receiver to bypass a receiver lock.
1. Press MENU, select System Setup, and then Factory Default s. The receiver displays a
Warning message to confirm that you want to reset the receiver’s preferences.
2. Select Yes.
95
Page 42
Chapter 11
Scheduling Receiver Updates
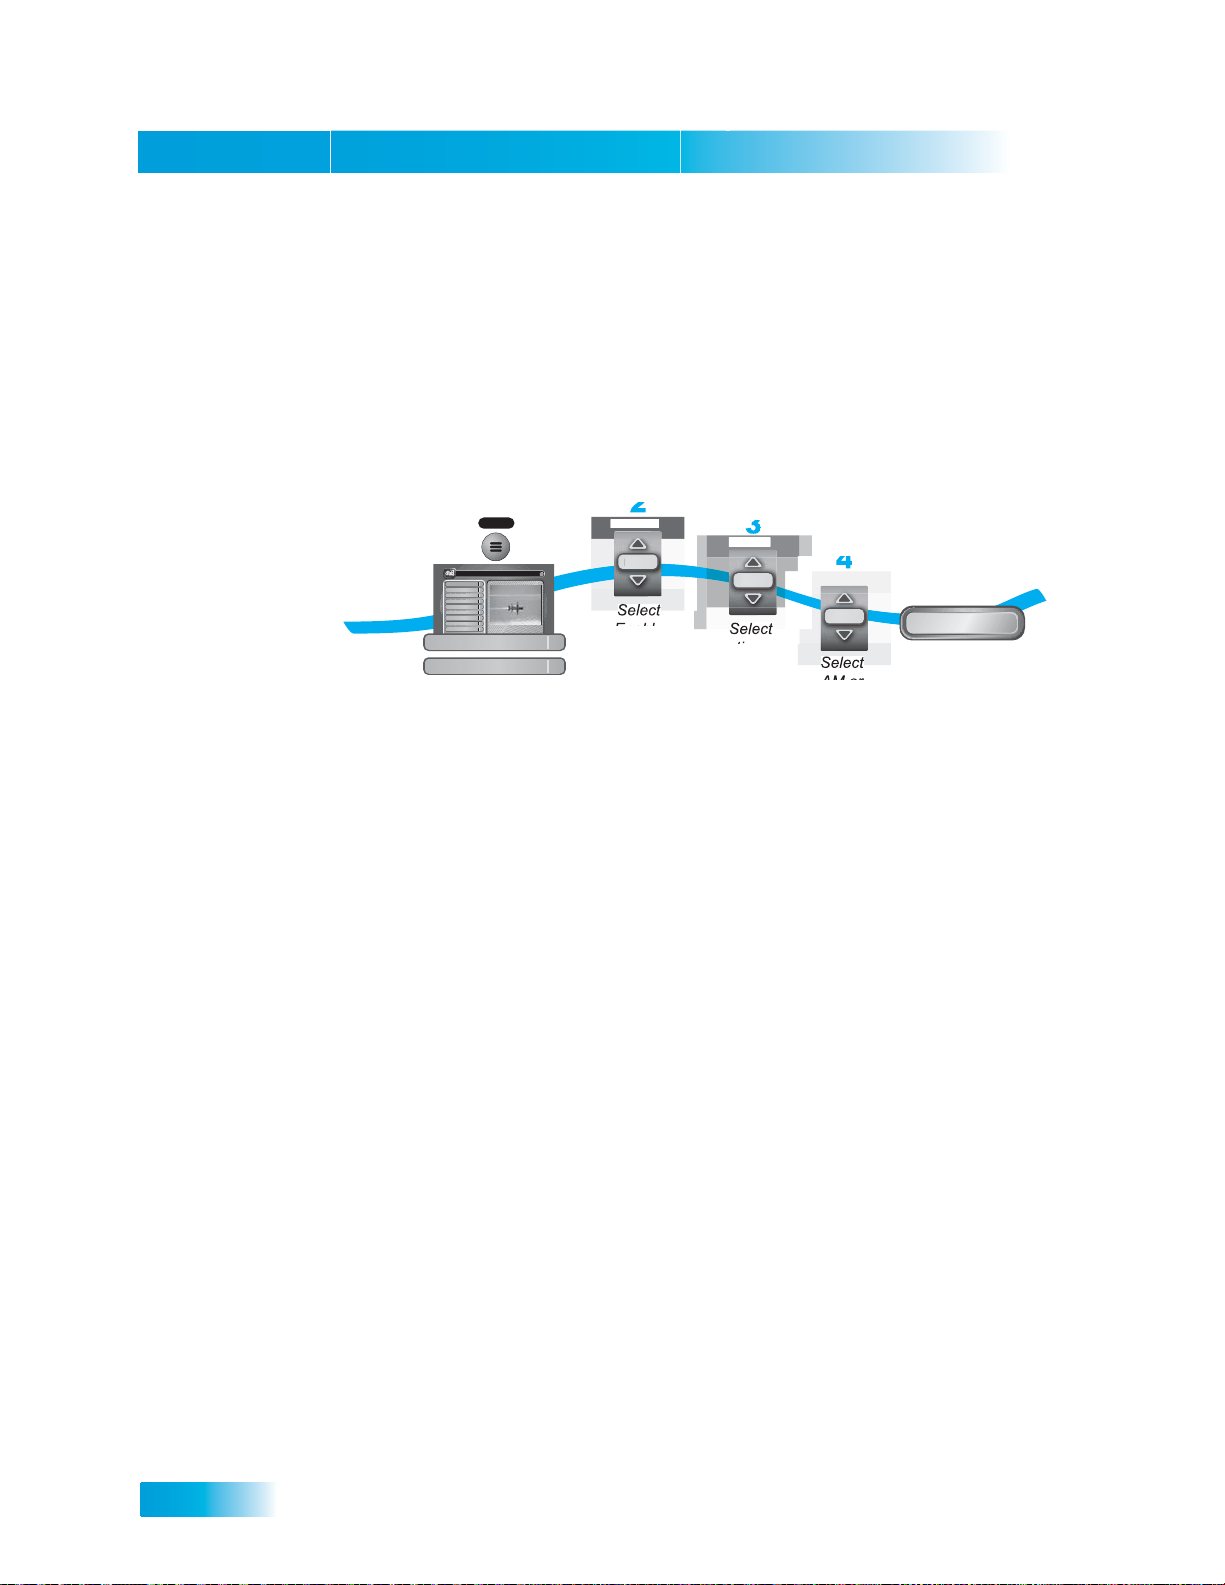
Scheduling Receiver Up dates
The receiver comes scheduled to update the Program Guide at 3:00 am every day. This section
describes how to change the Updates settings. Keep this feature enabled so that your DVR Events
and DishPASS Timers remain current.
Note: This feature does not interfere with scheduled timers.
1
MENU
1
Thursday, January 20
Main Menu
Program Guide
Themes & Search
Customer Support
Multimedia
Locks
System Setup
Daily Schedule
Preferences
Cancel
Preferences
Updates
1
2
3
4
5
6
7
8
0
114 E!114 E!
Celebrity Homes
5:30 pm - 7:00 pm NR
6:25 pm
Press MENU and
select Preferences,
8
5
2
Activation
Enable
Select
Enable
or
Disable
3
Time Set
03:00
Select
time
4
AM/PM
AM
Select
AM or
PM
5
Done
Select Done
then Updates
Inactivity Standby
If your receiver is on for a preset period of time without any activity (for example, no channel
changes), the Inactivity Standby feature turns off the receiver so that you’ll always have the latest
Program Guide and DISH On Demand (if available on your model). Enabling this feature
(recommended) also improves the reliability of your receiver. To change the settings for this
feature, complete the following:
1. Press the MENU.
2. Select Preferences, and then Inactivity Standby.
3. Highlight Activation and use the UP and DOWN ARROW buttons to switch between Enabled
and Disabled.
4. Highlight Inactivity Duration and use the UP and DOWN ARROW buttons to select the
amount of time the receiver waits before turning off.
5. Select Done.
Note: Select Defaults to reset the changes you’ve made to this feature.
96
Page 43
Receiver Customization
Tips
Tips
• To take full advantage of Dolby Digital 5.1 surround sound, you need an optical cable and a
stereo that supports this feature.
• To use the Caller ID feature on this receiver be sure to have the receiver connected to an
active phone line and have Caller ID service from your phone company.
SYSTEM INFO
Questions
• How can I see who has called me in the past? Open your Caller ID History by pressing
MENU, select System Setup and then Caller ID History.
• Why is my audio in another language? You may have selected an alternate language. See
the instructions on page 91 to change your preferred language.
• How can I change the channel order in the Program Guide? You can switch from
ascending order (lowest to highest) or descending order (highe st to lowest) by following the
instructions on page 94.
97
Page 44

Chapter 11
Notes
Notes
98
Page 45
Connections and Setup
How to Connect Your Satellite Receiver
What you’ll find in this chapter:
• CONNECTING TO THE NEARBY TV (TV1)
• C
ONNECTING TO THE REMOTE TVS (TV1 OR
TV2)
• CONNECTING TO YOUR DISH ANTENNA
• CONNECTING THE PHONE LINE
• CONNECTING A VCR TO THE REMOTE TV
• C
ONNECTING AN OVER-THE-AIR ANTENNA
• USING TROUBLESHOOTING TOOLS
99
Page 46
Connecting to the Nearby TV (TV1)
CONNECTING TO THE NEARBY TV (TV1)
This section describes how to connect receiver TV1 output ports to a nearby TV. Select
one of the following methods.
Note: If you would like to put the receiver in a remote location (closet, cabinet, etc.), be
sure to get the replacement remote control that uses UHF Pro sign als to control TV1. Call
your DISH Network retailer or go to www.dishnetwork.com
click on Accessories.
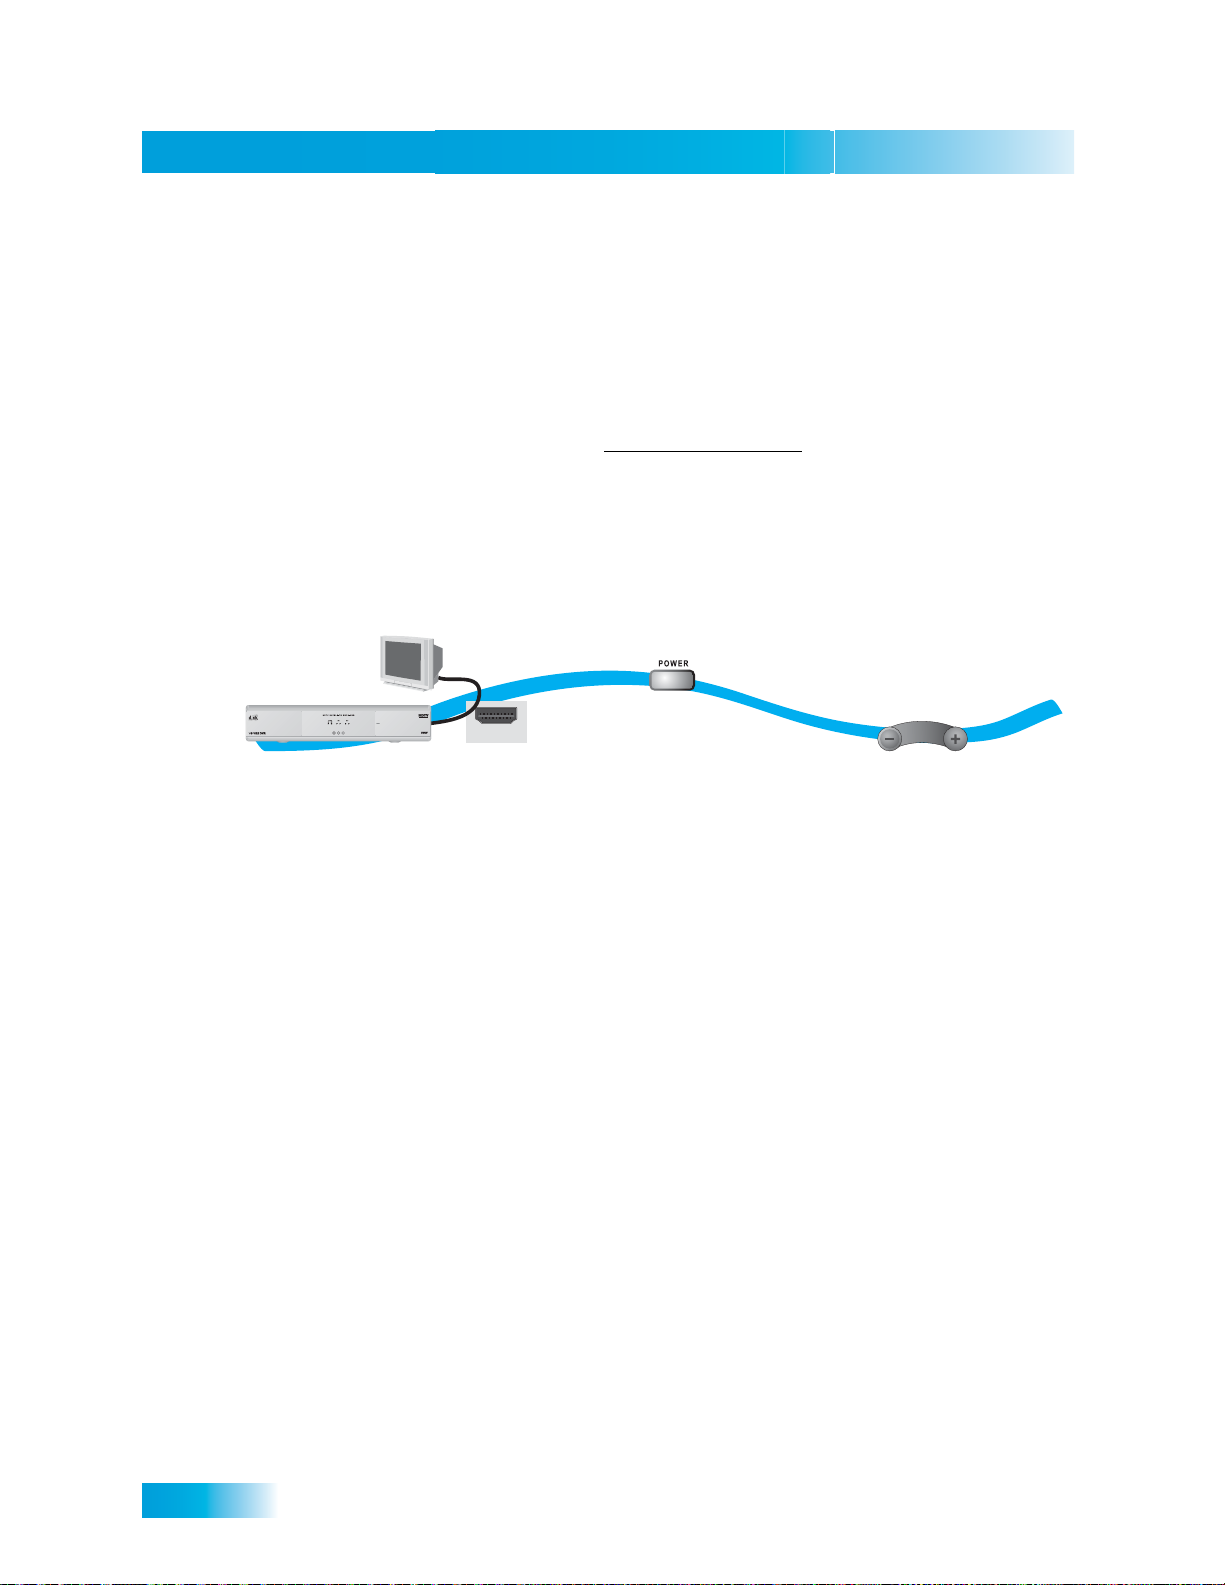
HDMI Connections
The HDMI connection provides high-quality audio and video to your HDTV or HD Monitor
in one cable.
1
SYSTEM INFO
Connect receiver
and monitor with
HDMI cable
HDMI
2-4
Turn monitor
and receiver on
and confirm picture
Chapter 12
, select our Products, and then
5
Confirm
sound and
volume
1 Connect an HDMI cable between the HDMI connection on the receiver and HDTV set or
monitor.
2 Turn on your receiver and TV using the front panel buttons.
3 Confirm that you are getting a picture from the receiver . Consult your HDTV user’s guide if
you need to change your HDTV to display from the Digital Audio/Video input.
4 If you do not see a picture, see No Picture on the Nearby TV on page 101.
Note: In most cases connecting the HDMI cable will provide plug-and-play control of the
monitor’s display resolution and other settings. However, your HDTV may require
selecting a different format to display from the receiver during setup.
5 Turn up the volume on your HDTV and confirm you have sound. If you don’t have sound,
your system may require you to connect audio (red and white) RCA-type cables between
the receiver audio outputs and audio input connections.
100
Page 47
Connections and Setup
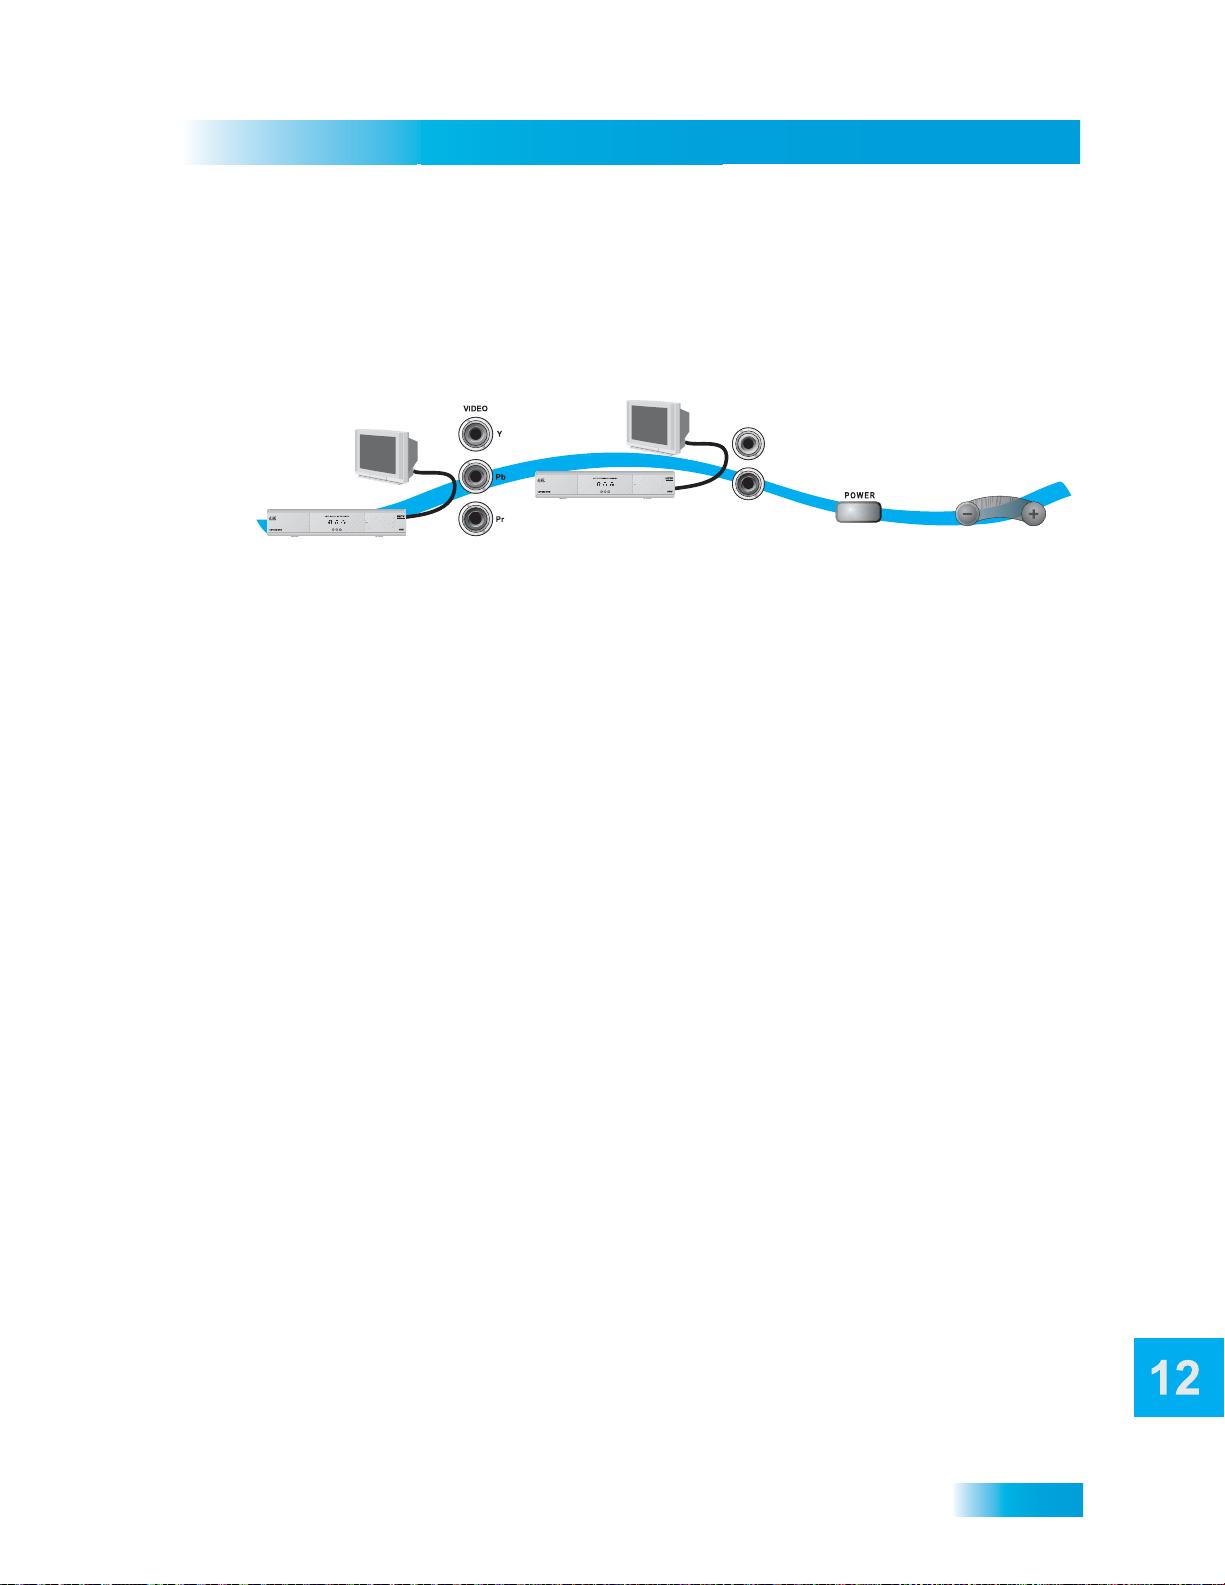
1
3
4
Connect receiver
and monitor with
YPbPr Component
connections
Turn monitor
and receiver on
and confirm
picture
Confirm
sound and
volume
2
Connect receiver
and monitor with
Audio cables
AUDIO
L
R
SYSTEM INFO
SYSTEM INFO
YPbPr Connections
YPBPR CONNECTIONS
The YPbPr (component) connections provide high-quality video to your HDTV or HD
monitor.
1 Connect between the YPBPR component connections on the receiver and the nearby TV
using component video cables.
2 Connect audio (red and white) RCA-type cables between the rece iver AUDIO OUTPUTS and
audio input connections that go with the YPbPr connectors on your HDTV or monitor.
3 If you do not see a picture, change the resolution setting on the receiver. Use the steps
below and Setting Up to Display in HD on the next page.
4 Turn up the volume on your HDTV and confirm you have sound. Check the RCA-type
connections if you don’t have sound.
No Picture on the Nearby TV
This section will help you make a picture on the nearby TV in the event that you could not
do so in the previous sections.
1 Connect RCA-type cable connections betwe en the rec eiv er TV1 Ou t an d th e ne ar b y TV.
2 Make sure the receiver and nearby TV are on.
3 Make sure the nearby TV is set to use the RCA-type inputs. Look on the back of your
HDTV and consult your HDTV user’s guide.
4 Change the HDTV settings as described on page 102.
5 Switch to the nearby TV to display from the HD inputs you selected in the previous
sections. If you have a picture from TV1, you are finished.
6 Repeat steps 4 and 5 until the nearby TV displays video from the receiver.
101
Page 48
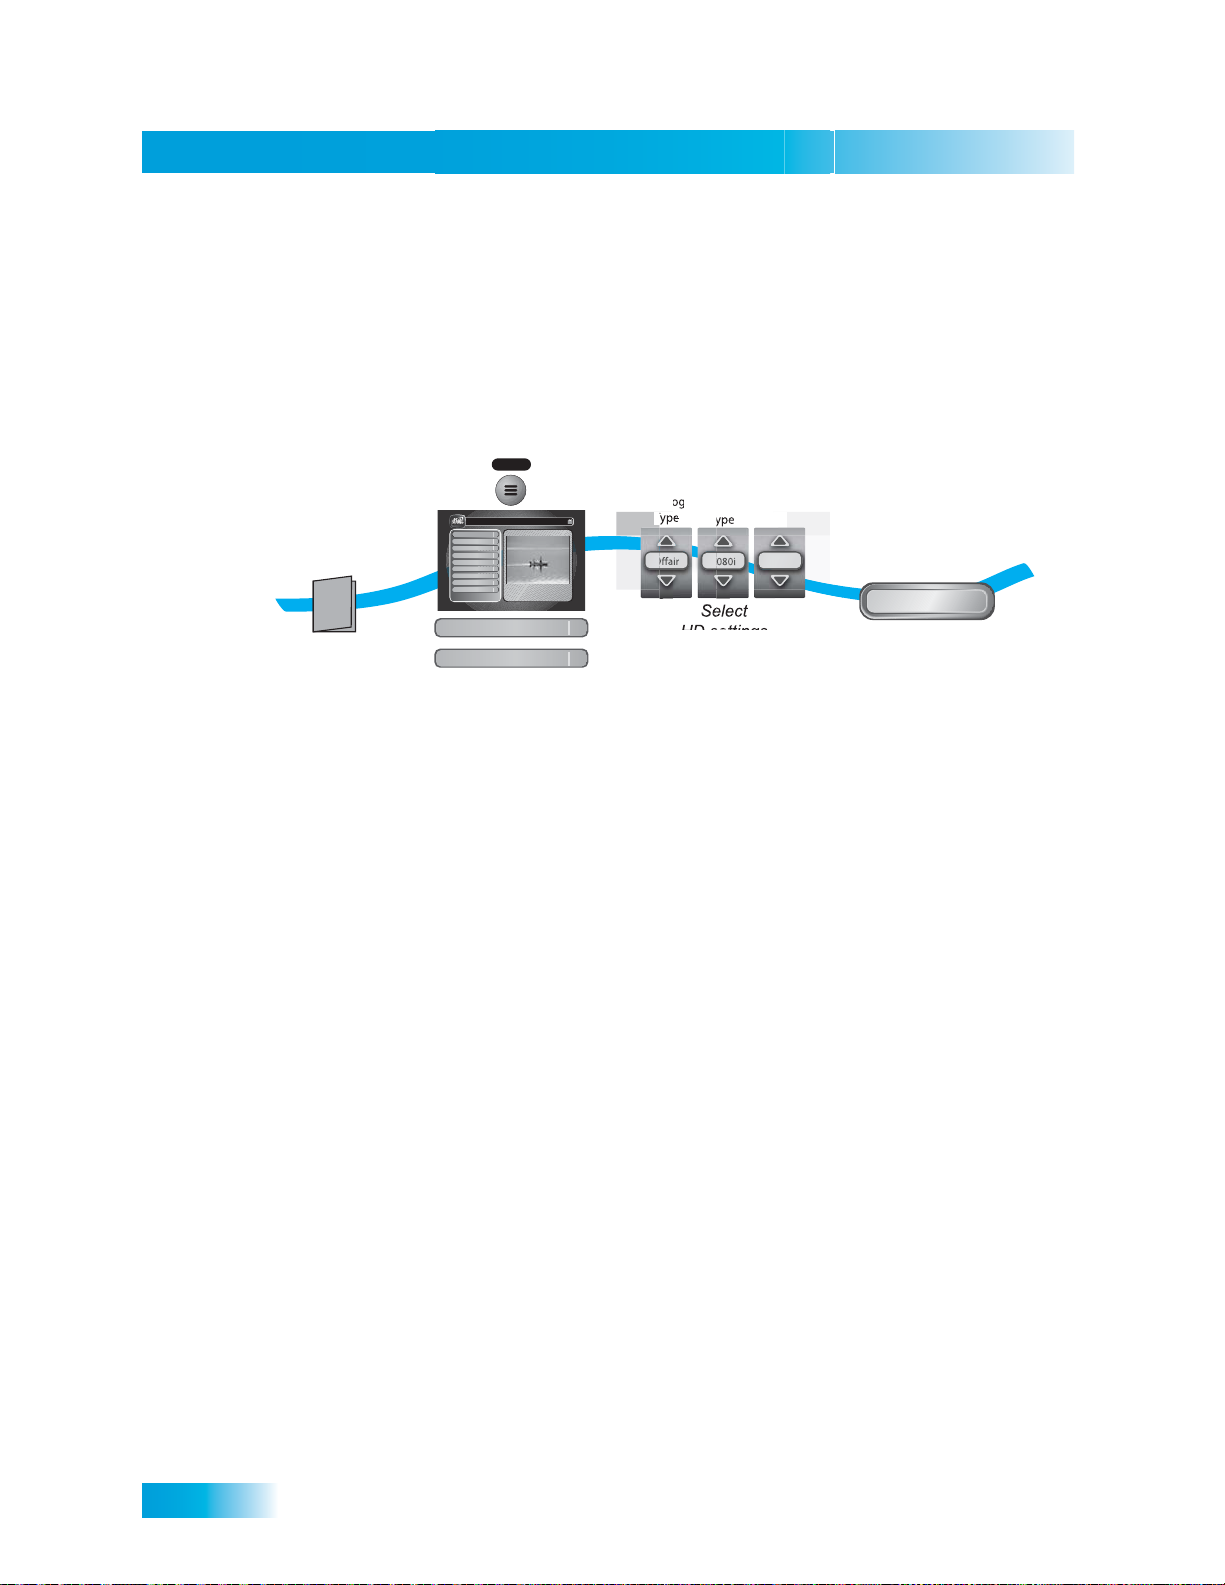
Setting Up to Display in HD
SETTING UP TO DISPLAY IN HD
Once the receiver has been activated with qualifying DISH Network programming, you will
be able to receive HD programs to watch. Use the following steps to select the desired
HDTV format.
1
Guide
Consult
HDTV
User's Guide
2
MENU
1
1
2
3
4
5
6
7
8
0
114 E!114 E!
Celebrity Homes
5:30 pm - 7:00 pm NR
Thursday, January 20
6:25 pm
Main Menu
Program Guide
Themes & Search
Customer Support
Multimedia
Locks
System Setup
Daily Schedule
Preferences
Cancel
System Setup
HDTV Setup
Press MENU,
select System Setup
then Display Setup
Chapter 12
3-4
Analog
Type
Oair
Select
6
8
HD settings
TV
Type
1080i
Aspect
Ratio
16x9
5-6
Done
Select Done
1 Consult your HDTV user’s guide for the HD format resolution that the TV supports (1080i
or 720p).
2 Press MENU, select System Setup, and then HDTV Setup.
3 Select the HD format settings (Analog T ype and TV T ype) that matches the form at your TV
supports.
4 While in this menu, select the Aspect Ratio option that matches your TV:
• 16x9 is the setting for wide screen HDTV display.
• 4x3 #1 is the setting to use on a 4x3 TV which uses vertical compression. When
viewing with a 16x9 program, a compatible TV automatic a lly makes the picture
letterbox format (black bars top and bottom), to preserve the correct horizontal and
vertical proportions.
• 4x3 #2 is the setting to use on a 4x3 TV which does NOT have internal vertical
compression. When viewing a 16x9 program, such a TV will not show black bars at
the top and bottom, and the picture will appear tall and skinny.
5 Select Done.
6 If required, set up the HDTV to display in the format you desire. Some HDTVs will
automatically adjust to the resolution setting of the receiver.
102
Page 49

Connections and Setup
Connecting to the Remote TVs (TV1 or TV2)
CONNECTING TO THE REMOTE TVS (TV1 OR TV2)
This section describes how to connect the receiver HOME DISTRIBUTION connection to the
cable-ready remote TV located in another room away from the receiver. You can use
these instructions to connect TVs in your house to see programming from TV1 or TV2.
This installation uses your in-home cable system. If your house does not have built-in
cabling, it will be necessary to run cables from the receiver to each remote TV. Due to the
difficulty of this installation, you should consider having this professionally installed. Call
DISH Network at 1-800-333-DISH (3474).
If you’re using TV1 in a room away from the receiver, be sure to order the replacement
remote control that uses UHF Pro signals instead of IR. Call your DISH Network retailer or
go to www.dishnetwork.com
When connecting to the
requirements in the Appendix. To meet these requirements, an in-line coaxial attenuator
has been included with your receiver and may need to be installed using the following
guidance:
• If connecting to your in-home cabling system to distribu te the signal to a TV(s) in other
rooms, in most cases you will not have to install the attenuator on the H
ISTRIBUTION port for typical in-home cabling systems.
D
, select our Products, and then click on Accessories.
HOME DISTRIBUTION coaxial port, you must meet the FCC
OME
103
Page 50
Connecting to the Remote TVs (TV1 or TV2)
• If connecting directly to a nearby TV tuner port, you must install the attenuator in the
cable between the H
If you have an over-the-air antenna or cable connected to your inhome cable system, see Connecting an Over-the-Air Antenna
following this section.
Make sure you are familiar with how to change channels on your TV
and if necessary how to switch your TV between over-the-air and
cable channels. During this procedure, it will be necessary to change
the channels on your TV(s) to tune to these chan nels to see the video
from the receiver. See your TV user’s guide for instructions.
OME DISTRIBUTION port and the TV tuner.
1 Connect the tuner input of the remote TVs in other rooms to an existing wall cable outlet
using a coaxial cable.
2 Turn on every remote TV connected to the in-home cabling system.
3 Find three channels next to each other on one of your remote TVs that d o not pick up a ny
signals from over-the-air or cable broadcasts (they should show nothing but snow or
static). These channels must fall in one of the two ranges below. For example, if you find
that cable channels 75, 76, and 77 do not pickup any broadcasts, pick these channels
since they fall into the range below for cable channels. Make sure these three chann els on
other remote TVs also do not pick up broadcasts.
Chapter 12
• Air Mode - Select a channel between 21 and 69 if your TV(s) will be set in Air Mode.
• Cable Mode - Select a channel between 73 and 125 if your TV(s) will be set in Cable
Mode.
Note: The remote TV(s) will have to be set to the same channel mode, either air or cable
channel mode for this installation. See your TV user’s guide for instructions on how to set
your TV to air or cable channel modes.
4 Pick the channel in the middle of the three you se lected in step 3. Write that channe l down
in the blank provided in step 5. For example, if the three channels you picked in the
preceding step were air channels 60, 61, and 62 , pick chan nel 61 and write it in the space
provided in step 5.
5 If your TV is in over-the-air mode for the channels you picked in step 4, circle “Air” below .
If your TV is in cable mode for the channels you picked in step 4, circle “Cable” below. If
you are using these instructions for TV1 and TV2, pick different channels (for example,
Channel 60 for TV1 and Channel 64 for TV2).
TV1 Channel: Air/CableTV2 Channel:
6 Set all of your remote TV(s) to the channel mode (air or cable) you wrote in step 5.
104
Page 51

Connections and Setup
Connecting to the Remote TVs (TV1 or TV2)
7 Tune all of your remote TV(s) to the channel(s) you wrote in step 5. This is the channel
you will use to receive your satellite programming.
8 Connect CH 21-69 Out on the receiver to your existing wall cable outlet using a coaxial
cable.
Note: If you do not have an existing in-home cable system, you will need to run coaxial
cable to each TV in other rooms. If this is too difficult, you may want to contact a
professional to do this installation.
9 Place the yellow sticker on the CH 21-69 Out cable near wher e th e cab le attaches to the
receiver. The stickers are located inside the front cover of this guide.
10Turn on the nearby TV (the TV that gets programming from the TV1 outputs).
11Make sure the receiver's green TV1 indicator is on.
12Press MENU. Select System Setup, Installation, and then Modulator Setup.
13With the Modulator Setup screen displayed on the nearby TV, use Remote Control 1 to do
the following:
a Under TV2 Out (or TV1 Out), select either Air (air channel numbers) or Cable (for
cable channel numbers) based on what you wrote down in step 5.
b Under TV2 Out (or TV1 Out), use the UP and DOWN ARROWS to change the modu-
lator channel to the one you wrote in step 5.
c Select Done.
Note: For TV1 O
enter your password.
UT, if you locked the receiver, a message will display asking you to
14 For some TVs, you must run a channel scan so that the TVs will find and display the
selected channel from the receiver. Run the channel scan on all remote TVs, if available.
See your TV user’s guide for instructio ns .
15 Confirm that you see a picture from the receiver on your remote TVs.
• If your picture looks good, go to step 23.
• If your TVs do not have a picture or if it is not as clear as you would like it to be, go to
the next step.
16 You may need to change the cable connection on the splitter that sends the TV signal
throughout your house. The change that needs to be made is to reconnect the cable
coming from the receiver H
the splitter using the instructions that follow.
OME DISTRIBUTION from the output of the splitter to the input of
The following figure shows an example of what your splitter may look like. Your splitter
may look different. The places where the splitter indicate s O
UT refers to all TVs connected
105
Page 52
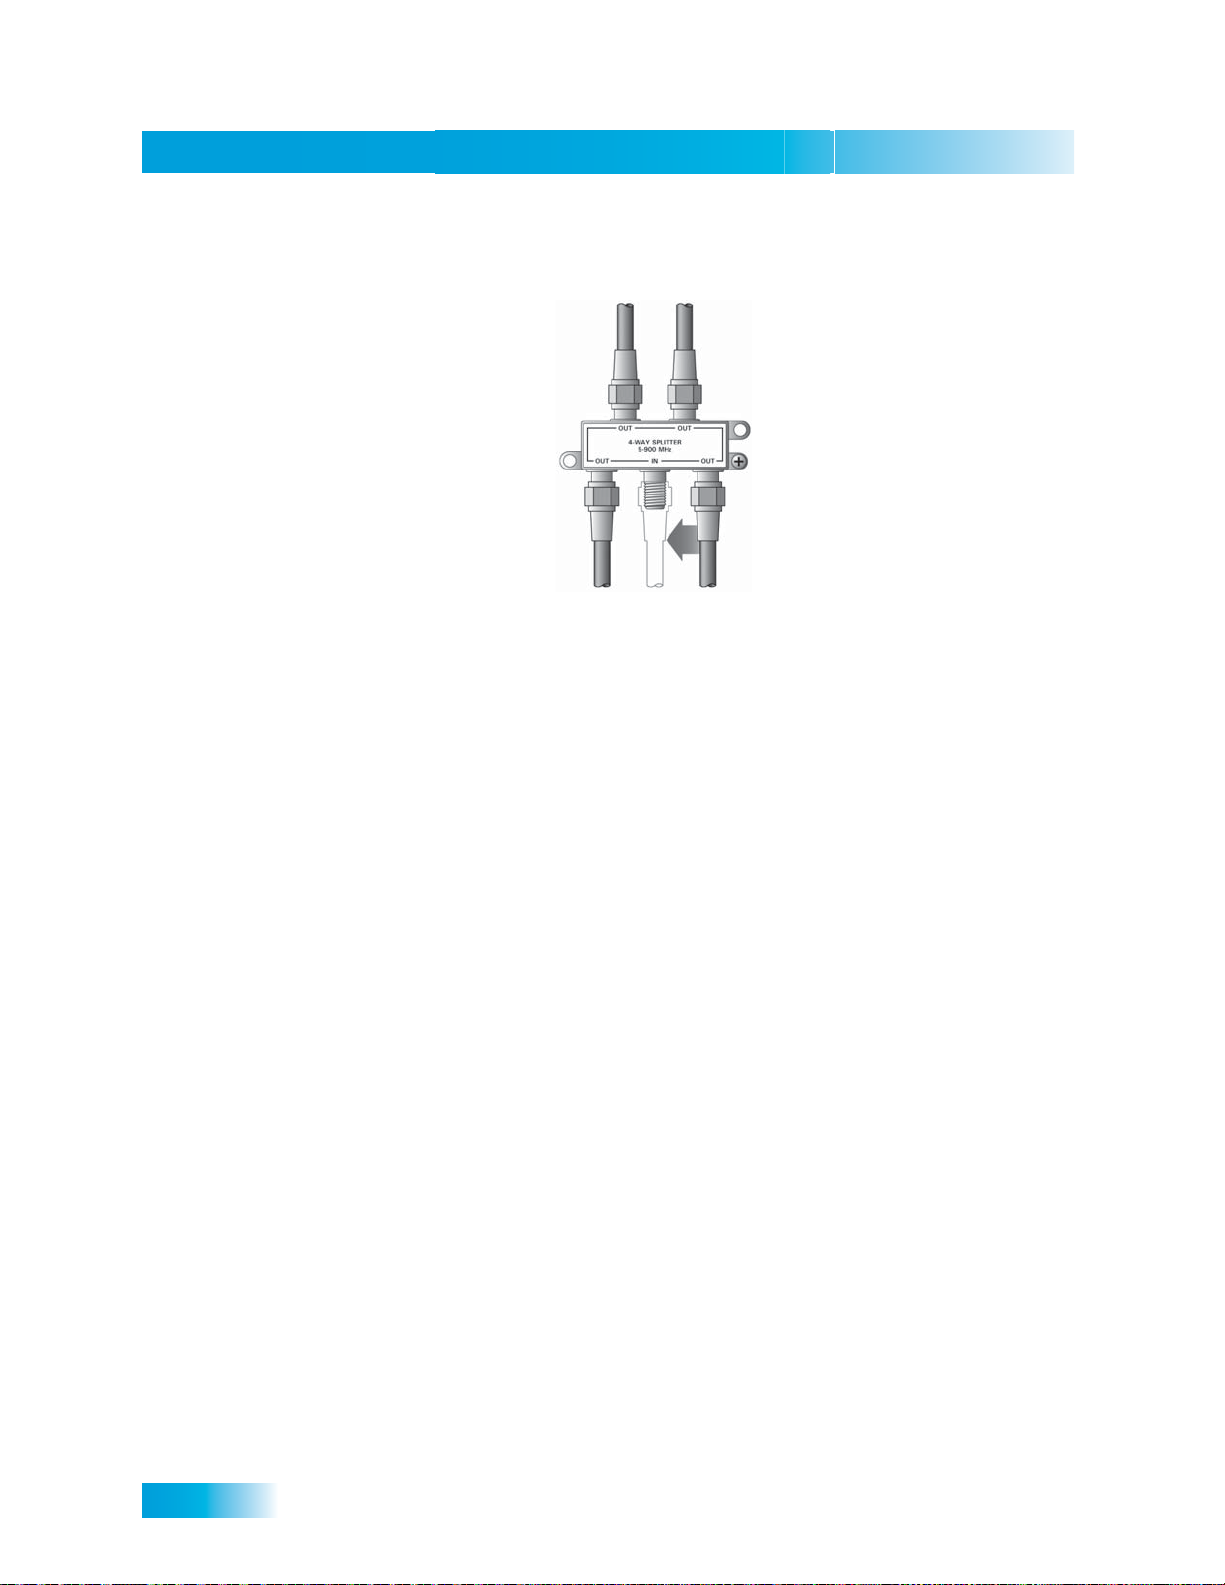
Connecting to the Remote TVs (TV1 or TV2)
Chapter 12
to your cable system. The places where the splitter indicates I
signal is fed into the splitter.
1 Input, 4 Output (4-Way) Splitter
N refers to where the TV
17 Find where the TV signal is distributed throughout your house. It should be near where the
cable TV service enters the house.
18 Disconnect the cable TV service cable or antenna cable from the splitter input, if
necessary. Make sure the disconnected cable is capped or otherwise protected from the
weather.
19 Disconnect the cable coming from the receiver HOME DISTRIBUTION port from the splitter . If
you do not know which cable this is, go to the next step. Otherwise, go to step 21.
20 If you have multiple TVs on the cable system, do the following to determine which cable
on the splitter is coming from the receiver:
• If you have at least some picture on your TVs, turn on a ll remote TVs connecte d to the
cable system. Disconnect and reconnect each cable one by one observing what
happens to the TVs. When all remote TVs lose the signal, you have disconnected the
receiver’s cable. If only some or one TV loses the signal, then you have disconnected
a cable from the TVs.
• If the above step does not work, disconnect one of the output cables and connect to
the splitter input. If you do not see a picture, connect the cable back to its output.
Repeat this step on every connection until you get a picture on the remote TV(s).
21 Reconnect the receiver’s cable to the input of the splitter.
22 Make sure you have a good picture on your remote TV(s).
23 If desired to remind you of which TV channel your satellite programming is on, write the
channel number you wrote in step 5 on a blank channel sticker and place it on or near
your remote TV(s). The stickers are inside the front cover of this guide.
24 Confirm Remote Control 2 (or Remote Control 1 with a Green UHF Pro key, sold
separately) controls the receiver. See page 73 for instructions.
25 Program Remote Control 2’s (or Remote Control 1 with a Green UHF Pro key, sold
separately) RECOVER to the channel you selected in step 5. See page 82 for instructions.
106
Page 53
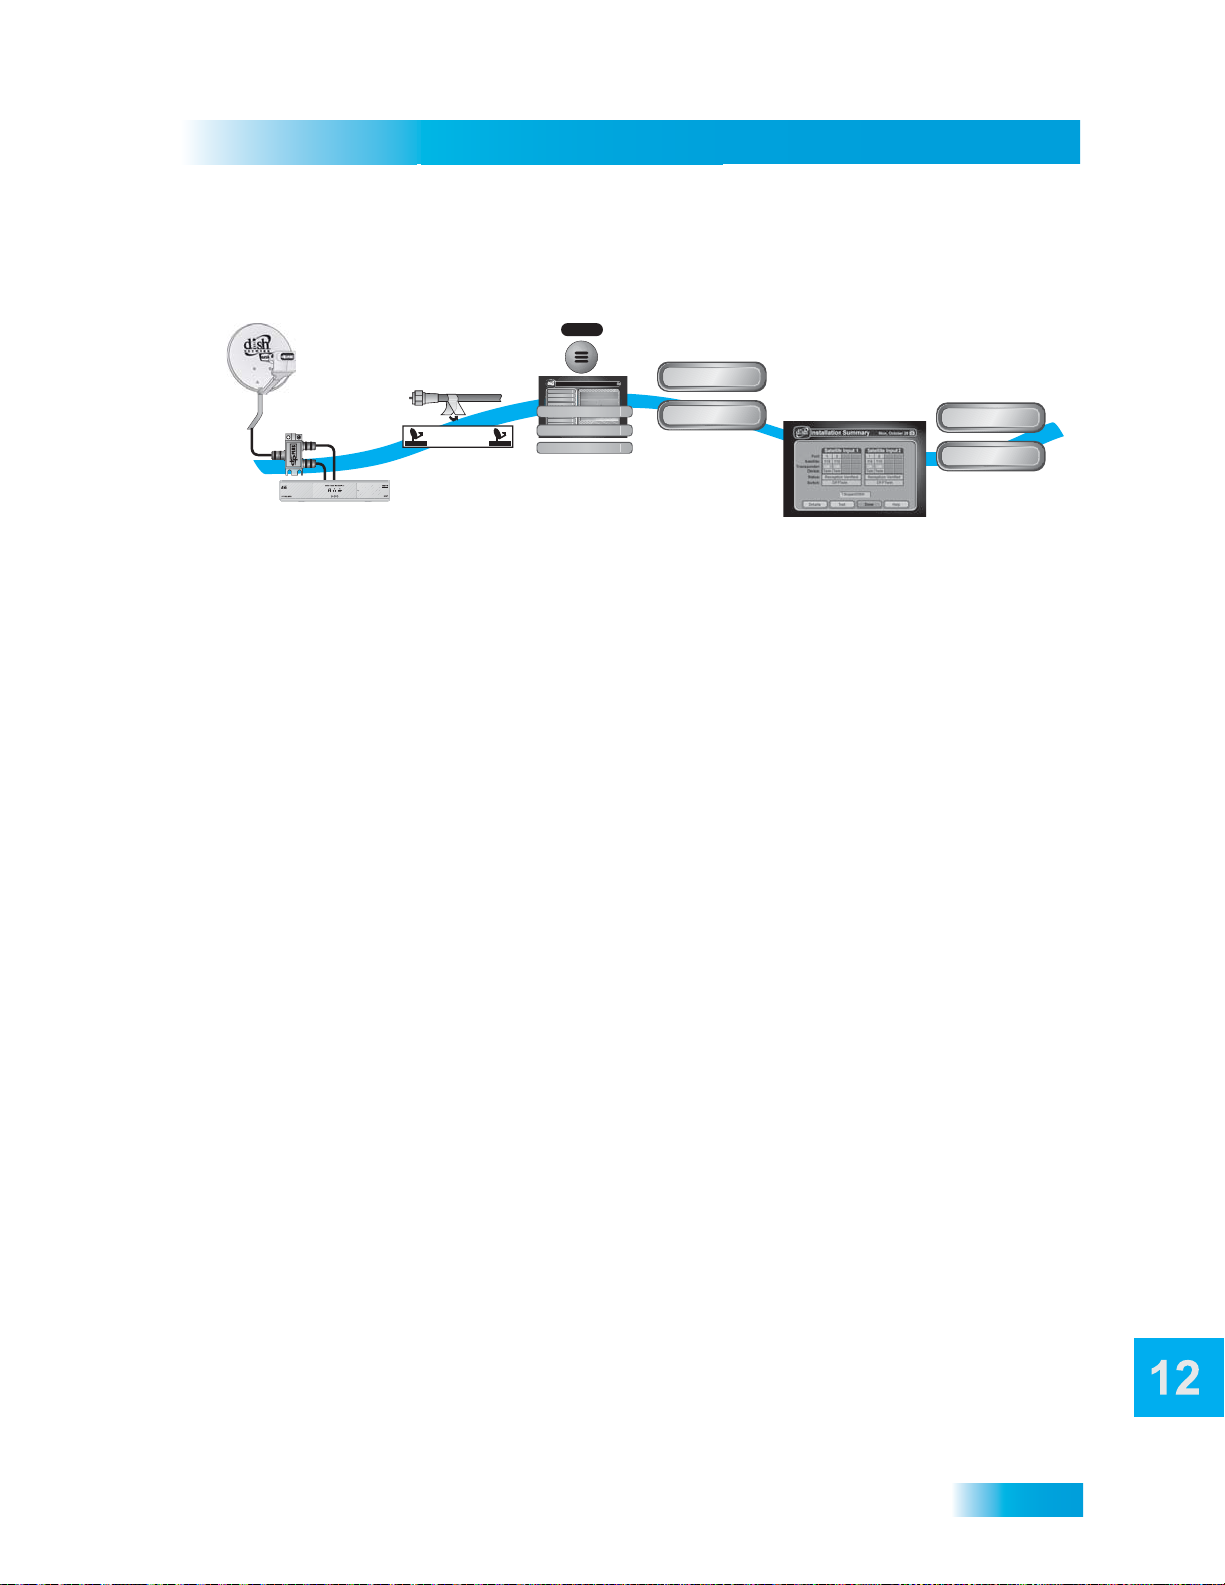
Connections and Setup
Connecting to Your Dish Antenna
CONNECTING TO YOUR DISH ANTENNA
4
MENU
5
Check Switch
1
Thursday, January 20
3
1-2
SATELLITE IN SATELLITE IN
Label
SYSTEM INFO
cables
Connect receiver
to dish system
1 Before you can begin connecting your receiver to your dish antenna, you must first com-
plete the preceding sections to connecting your TVs to the receiver.
2 Connect two RG-6 coaxial cables between the SATELLITE IN 1 and SATELLITE IN 2 ports on
the receiver’s back panel to two available ports on either the switch, DISH Pro Plus
Separator, or LNBF in your existing system.
Point Dish/Signal Strength
Main Menu
6:25 pm
114 E!114 E!
Program Guide
1
Themes & Search
2
Customer Support
3
Multimedia
4
Locks
5
System Setup
6
System Setup
Daily Schedule
Preferences
Cancel
Installation
Point Dish/Signal
6
7
8
Celebrity Homes
0
5:30 pm - 7:00 pm NR
1
1
Press MENU,
Select System Setup,
then Installation, then
Screen
Test
Select Check
Switch then
Test
6-7
Check
installation
8-9
OK
Cancel
If okay,
select OK
then Cancel
Note: If you are installing your receiver into a system with DISH Pro or DISH Pro Plus
LNBFs (and/or switches), you can have as much as 200 feet of cable between the LNBF
and the receiver. However, you must use only RG-6 coaxial cables rated up to at least
2150 MHz. Some cables may say “Swept tested for 2150 MHz.” If you have any doubt
about this, ask your DISH Network retailer, or look on the container the cable ca me in. Do
not use cable company TV cables or cables from other satellite TV systems not rated up to
at least 2150 MHz. These other cables may cause signal loss. Do not use existing cables
such as RG-59. Use waterproof F-connectors outdoors.
3 Peel off the blue stickers and affix them to the cables close to where they connect to the
S
ATELLITE IN 1 and SATELLITE IN 2 connections on the back of the receiver. The stickers
are in the front cover of this guide.
4 On Remote Control 1, press MENU, select System Setup, Installation, and then Point
Dish to display the Point Dish screen on the nearby TV.
5 Select Check Switch. Select Test.
6 The receiver begins performing the Check Switch tests. When it is finished, the Installation
Summary screen displays.
7 Make sure that the information on the Installation Summary screen identifies your system
correctly and shows all transponders for all satellites in your system.
8 Select OK.
9 Select Cancel to exit the Point Dish menu. At this point, the receiver may walk you
through a procedure to download software. If this prompt displays, follow the instructions
and do not disturb the receiver until the nearby TV is displaying DISH Network video.
Otherwise, press VIEW LIVE TV. After a few minutes, you should be watching TV.
107
Page 54
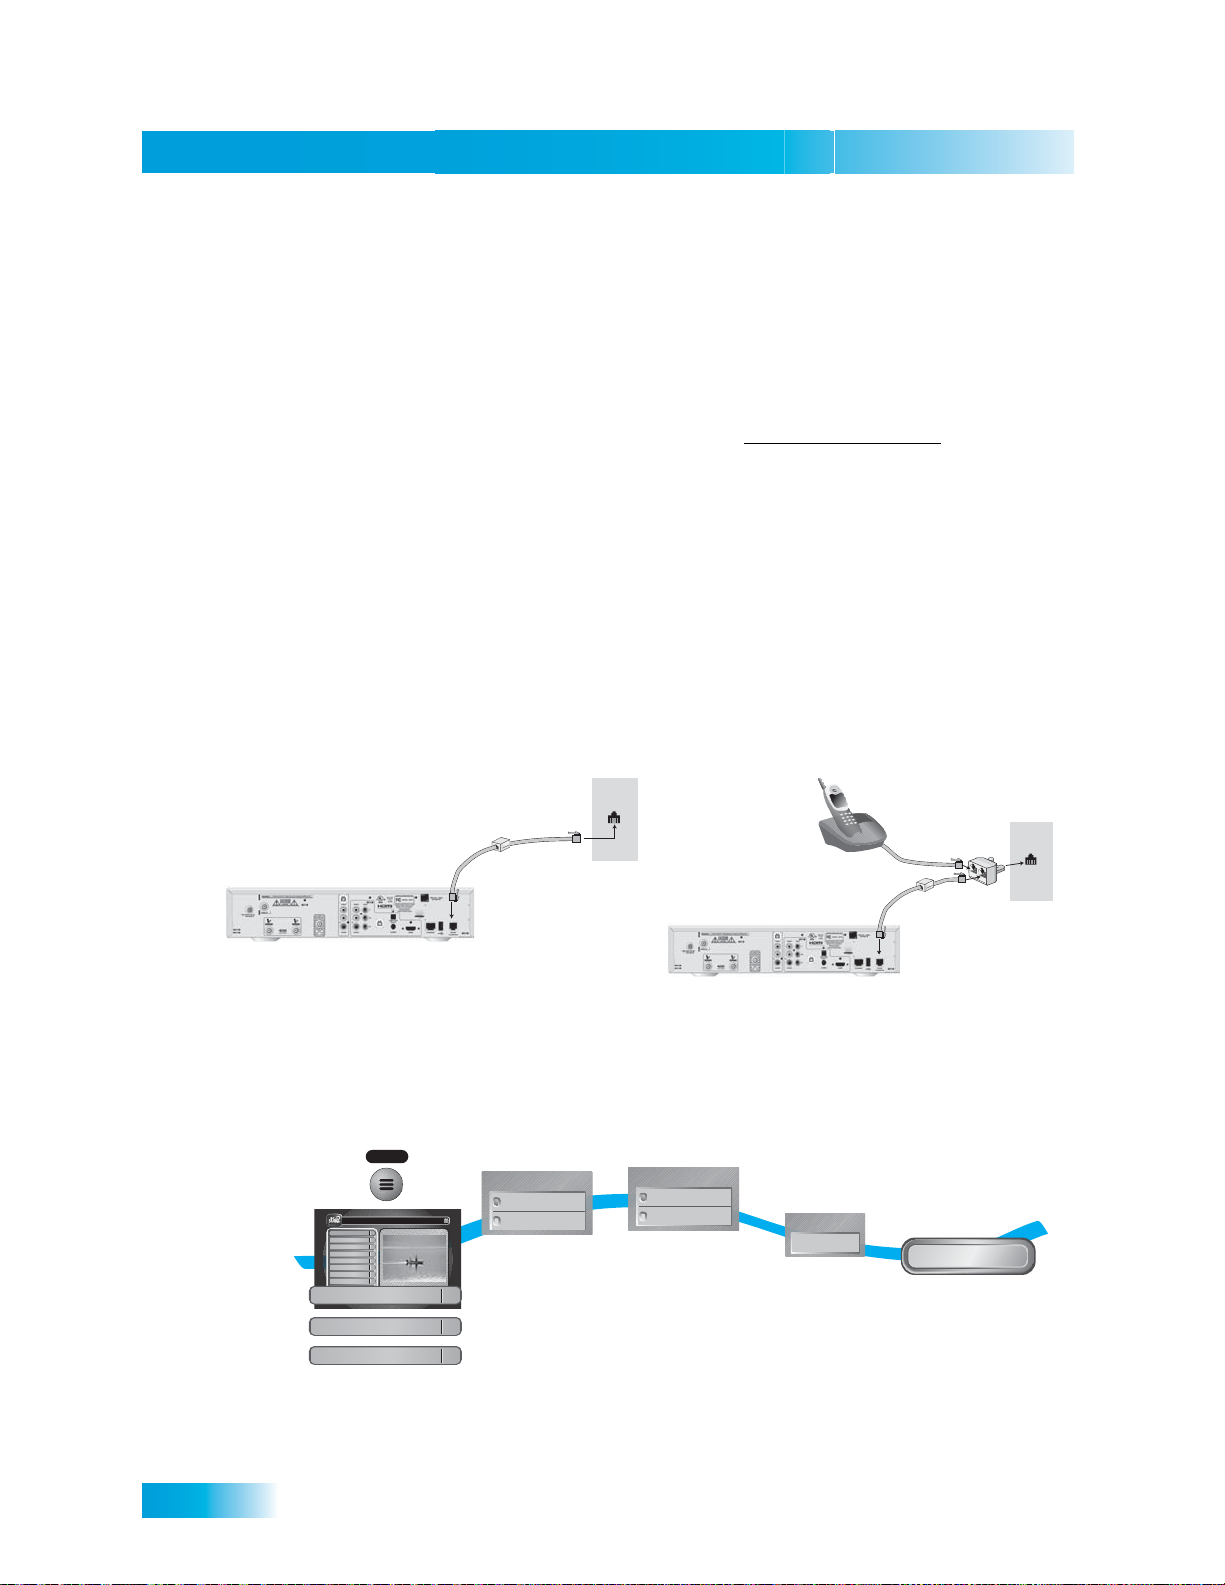
Connecting the Phone Line
Phone Jack
Phone Y-Adapter
Optional
Phone Coupler
CONNECTING THE PHONE LINE
You must keep the receiver connected to an active telephone line to order Pay-Per-View
programs, use all of the DishHOME Interactive features, or use other services from DISH
Network with your remote control.
Note: You may be able to use a wireless modem jack. However, this may not support all
the features of this receiver, such as Caller ID. See www.dishnetwork.com
modem products.
Note: If you have a Digital Subscriber Line (DSL), you may have to install a DSL filter
between the receiver ’s back panel P
successfully connect with DISH Network. You can obtain a filter from your DSL provider.
Phone Line Connection
Run a telephone cable with a standard RJ-11 connector from the receiver’s back panel
HONE to an active telephone connection as shown below.
P
Chapter 12
for compatible
HONE JACK and the telephone wall jack to
Note: Do not connect the phone line to the Ethernet connection.
Optional
Phone Coupler
Phone Jack
Phone System Setup
You must set up the receiver for your telephone system (touch tone or rotary), and set a
telephone number prefix, if you need a prefix to make an outside call.
1
MENU
1
2
3
4
5
6
7
8
0
114 E!114 E!
Celebrity Homes
5:30 pm - 7:00 pm NR
Thursday, January 20
Main Menu
Program Guide
Themes & Search
Customer Support
Multimedia
Locks
System Setup
Daily Schedule
Preferences
Cancel
System Setup
Installation
Phone System
Press MENU and
select System Setup,
then Installation,
then Phone System
1
6:25 pm
6
1
4
2
Phone Type
Touch Tone
Rotary Phone
Select phone
type
3-4
Outside Line
No Prefix
Prefix Code
Select either
No Prefix or
Prefix Code
5
Prefix
9
If your phone
system needs
a prefix code for
an outside line,
enter it under
Prefix
6
Done
Select Done
108
Page 55
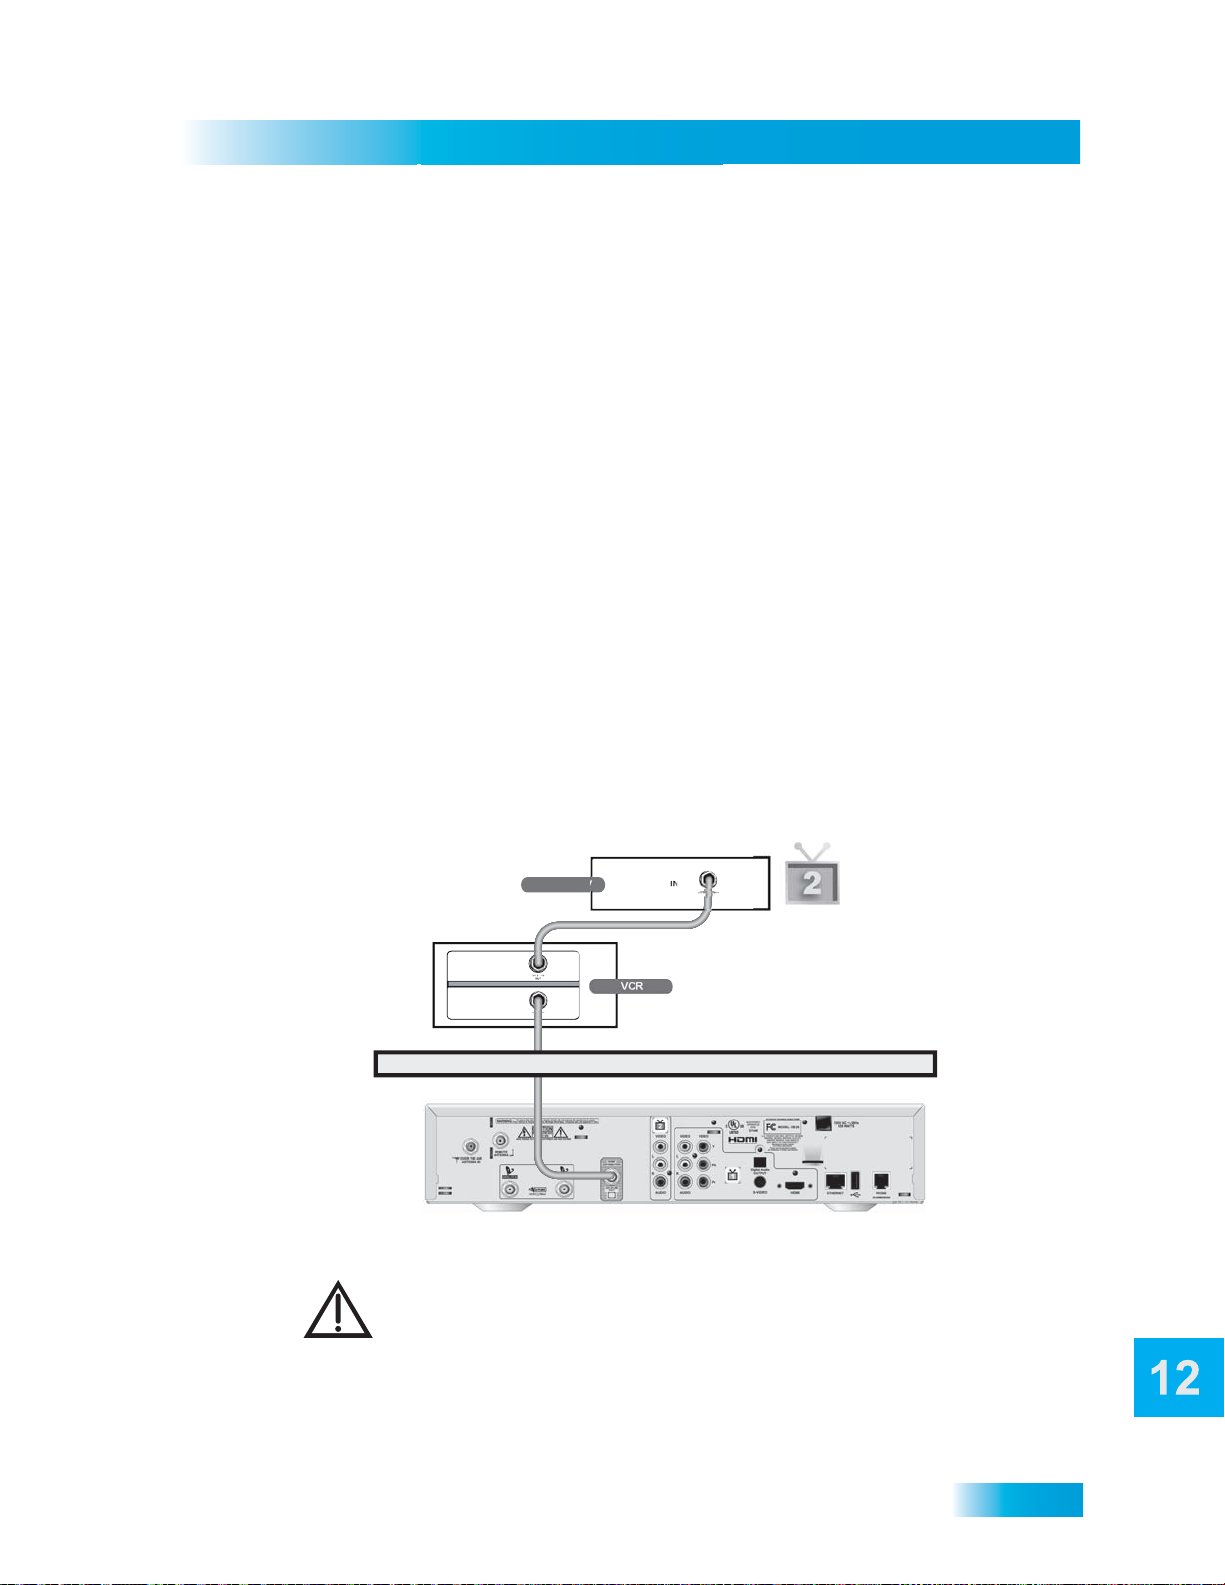
Connections and Setup
Connecting a VCR to the Remote TV
1 Pressing MENU, then select System Setup, Installation, and then
Phone System.
2 Select the Touch Tone or the Rotary Phone option in the Phone Type list.
3 Select either the No Prefix or the Prefix Code option in the Outside Line Prefix list.
Note: Usually, you need a telephone number prefix only for business installations. For
most residential installations, all you need to do is set the telephone system type. The
default setting of No Prefix will allow correct dialing. If this is the case, select the Save
option to save the above setting, and stop here. If you do need to set a prefix, then instead
of selecting the Save option, go on to step 5.
4 If you selected No Prefix, select Done.
5 If you selected Prefix Code, the receiver highlights the box where you must enter the
exact sequence you dial the phone to obtain an outside line.
6 Select Done.
CONNECTING A VCR TO THE REMOTE TV
The diagram below provides example of how to connect VCRs to your satellite TV system.
Remote TV
OUT
IN
For this installation, always leave your VCR powered on so that the TV can
receive satellite programming. If you turn off your VCR, your TV will not be
tuned to the correct channel to receive satellite programming.
Coaxial Cable
Coaxial Cable
IN
Wall
Note: Connecting your TV directly to the satellite receiver provides the best audio and
video quality.
109
Page 56

Connecting an Over-the-Air Antenna
1 Connect the tuner input of the remote VCR to an existing wall cab l e outlet using a coaxial
cable.
2 Connect a coaxial cable from the output on the VCR to the remote TV’s tuner port.
3 Plug in and turn on the remote VCR and TV.
4 Tune the remote VCR to the remote TV channel that you use to watch satellite TV
programming (for example, channel 60) as set on page 104.
5 Write the channel number you tuned your VCR to in the previous step on one of the TV2
channel stickers. Place the sticker on or near the VCR. This sticker will remind you which
VCR channel to use to watch satellite programming. The stickers are located in the inside
front cover of this guide.
6 Set the VCR output to channel 3 or 4.
7 Tune the remote TV to the same channel that you set your VCR to in step 6.
8 Write the channel number you tuned your TV to in the previous step on one of the TV2
channel stickers. Place the sticker on or near the TV. This sticker will remind you which
channel to use to watch satellite programming. The stickers are located in the inside front
cover of this guide.
Chapter 12
CONNECTING AN OVER-THE-AIR ANTENNA
If you want to receive digital channels from an over-the-air antenna in addition to your
satellite receiver programming, connect the over-the-air antenna into your TV distribution
equipment.
• The TV A
programming on the nearby TV from an over-the-air antenna.
• Connect a VHF/UHF over-the-air antenna to the TV A
sticker and affix it to the cable close to where it connects to the back of the receiver.
The stickers are inside the front cover of this guide.
• The remote TV can view over-the-air channels only in Single Mode.
• For remote TVs receiving programming from H
antenna needs to be connected to your TV distribution equipment. When adding this
connection, the FCC requires that you install appropriate equipment between the
over-the-air antenna/cable and the satellite TV receiver to prevent you from
accidentally retransmitting DISH Network programming (see FCC Compliance in the
Appendix). TV distribution equipment devices include coax panels, amplifiers, or
Super Home Nodes, and are available through many companies.
• You can add local over-the-air channels and assign them network affiliations. Once
you have done this, you can access the channels via the Program Guide or the
Browse Banner in much the same way as you would satellite channels.
NTENNA IN on your receiver's back panel can be used to receive and view
NTENNA port. Peel off the black
OME DISTRIBUTION, the over-the-air
110
Page 57
Connections and Setup
Connecting an Over-the-Air Antenna
Note: The type of antenna required depends on the channels used by, and the locations
of, the local broadcasters for your area. Visit www.antennaweb.org or contact a
professional installer to help you select a suitable antenna.
Make sure to follow the antenna installation instructions correctly. Ground an
outdoor antenna per the National Electrica l Code (NEC) and any local
electrical codes.
The audio/video quality on local over-the-air channels depends on the
distance and terrain between the broadcast station and your home, and on
the placement and quality of the over-the-air TV antenna yo u use. If yo u have
questions about over-the-air channels, contact the broadcaster, not DISH
Network.
111
Page 58
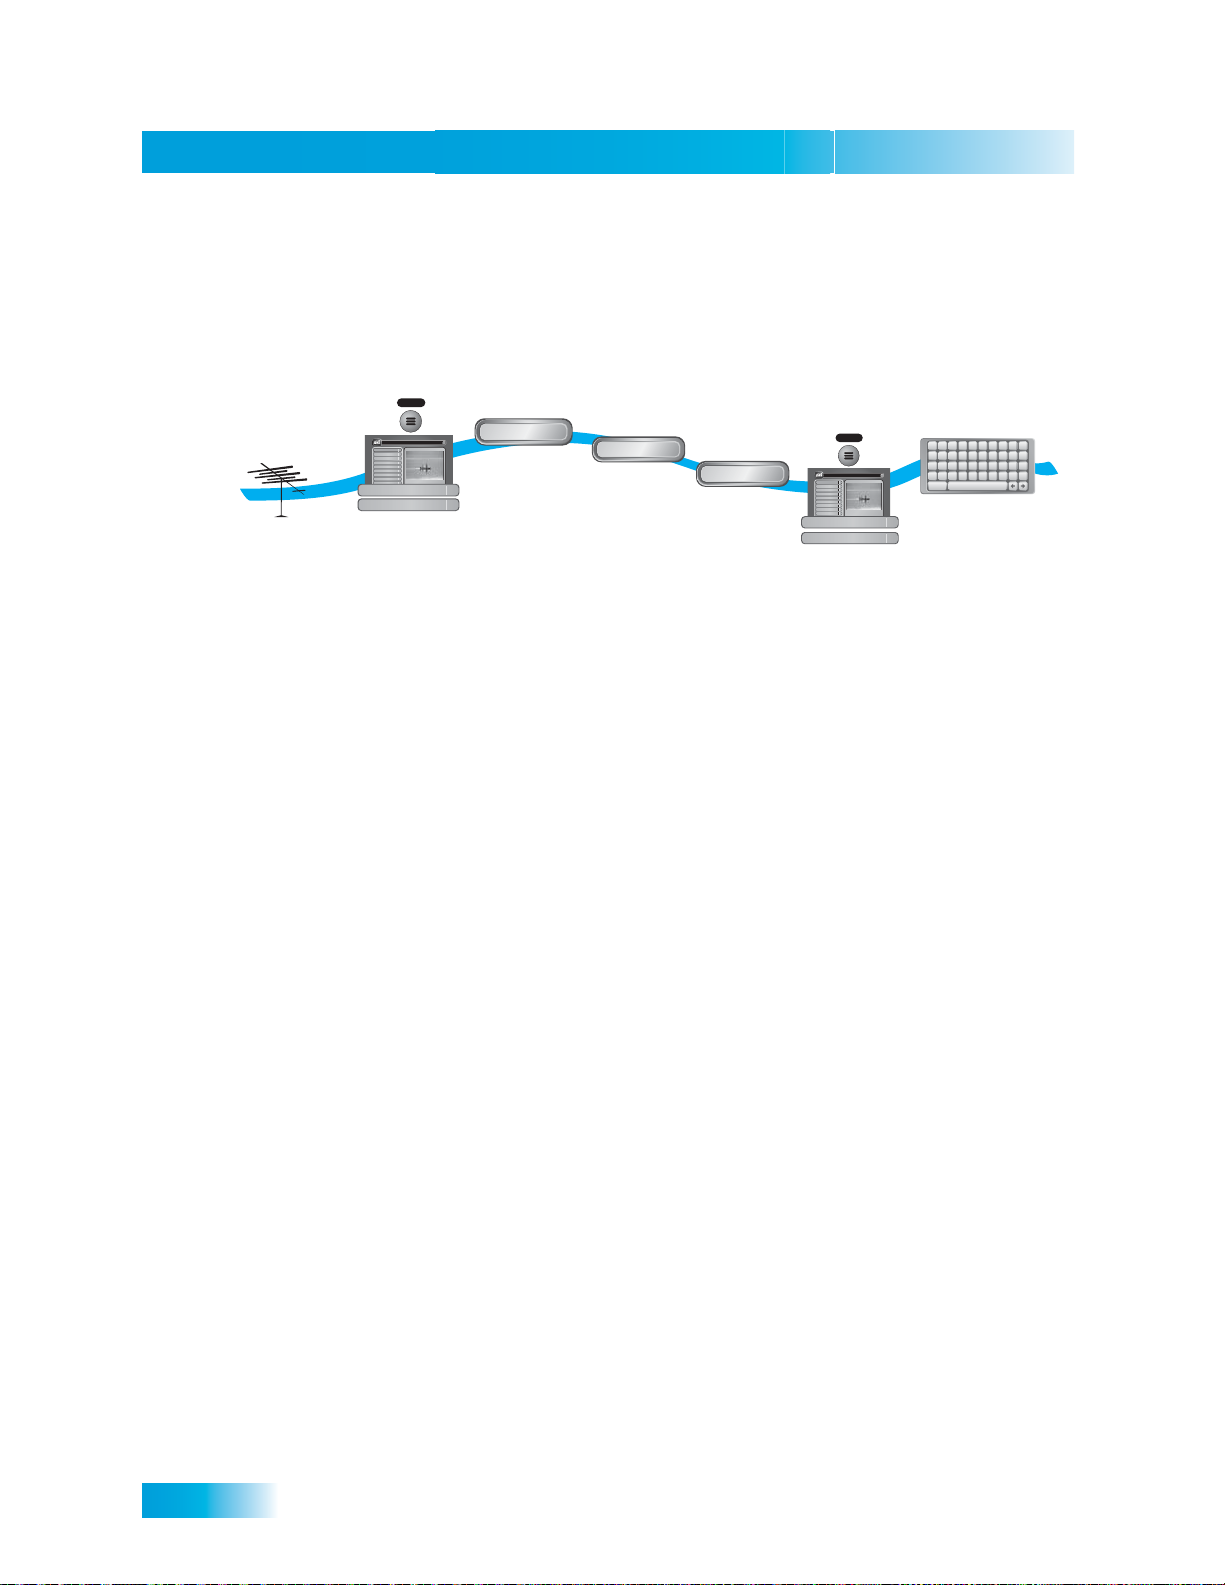
Connecting an Over-the-Air Antenna
Scanning for Over-the-Air Channels
With your over-the-air antenna adjusted for best reception, use these instructions to scan
for over-the-air channels for the nearby TV.
2
MENU
1
Thursday, January 20
Main Menu
6:25 pm
114 E!114 E!
Program Guide
1
Themes & Search
1
Check
over-the-air
antenna
installation
1 Make sure you have your over-t he-air antenna connected to the r eceiver’s TV ANTENNA IN
2 Press MENU, select System Setup, and then Local Channels . If this is the first time you
select System Setup
then Local Channels
connection.
have opened the Local Channels screen, it will have no channels listed.
2
Customer Support
3
Multimedia
4
Locks
5
System Setup
6
Daily Schedule
7
Preferences
8
Celebrity Homes
Cancel
0
5:30 pm - 7:00 pm NR
System Setup
Local Channels
6
9
Press MENU and
Select Scan
3
Scan Locals
Locals
4-5
OK
Allow
receiver to
scan for locals
then select OK
6
Done
Select
Done
to store
channels
7
MENU
1
Thursday, January 20
Main Menu
6:25 pm
114 E!114 E!
Program Guide
1
Themes & Search
2
Customer Support
3
Multimedia
4
Locks
5
System Setup
6
Daily Schedule
7
Preferences
8
Celebrity Homes
Cancel
0
5:30 pm - 7:00 pm NR
System Setup
Local Channels
6
9
Go back to
the Local
Channels screen
Chapter 12
8-9
A B C D E F G H I J
K L M N O P Q R S T
U V W X Y Z ' - . &
1 2 3 4 5 6 7 8 9 0
Space
Back
Enter local
channel names
then select
Done
3 Scan for channels by selecting Scan Locals.
4 The scan will take a few minutes to complete. When it finishes, the results will show how
many channels the scan found.
5 Select OK to go back to the Local Channels screen.
Note: If the channel number says None, you have not yet assigned this channel a network
affiliation or name. The ARROW at the bottom left means that there are more channels, off
the bottom of the screen, which you can get to with the ARROW keys if you wish to edit
their names or remove them.
6 If you want to name the over-the-air channels, cont inu e on. If yo u do not want to na me
these channels, select Done. You will then be taken out of the menus and back to
watching TV.
7 Select a channel and then select Edit Name to modify the way the chann el name di splays
on your screen.
8 Use the virtual keyboard on the screen to select the letters of your channel name.
9 When you are finished making changes, select Done.
112
Page 59
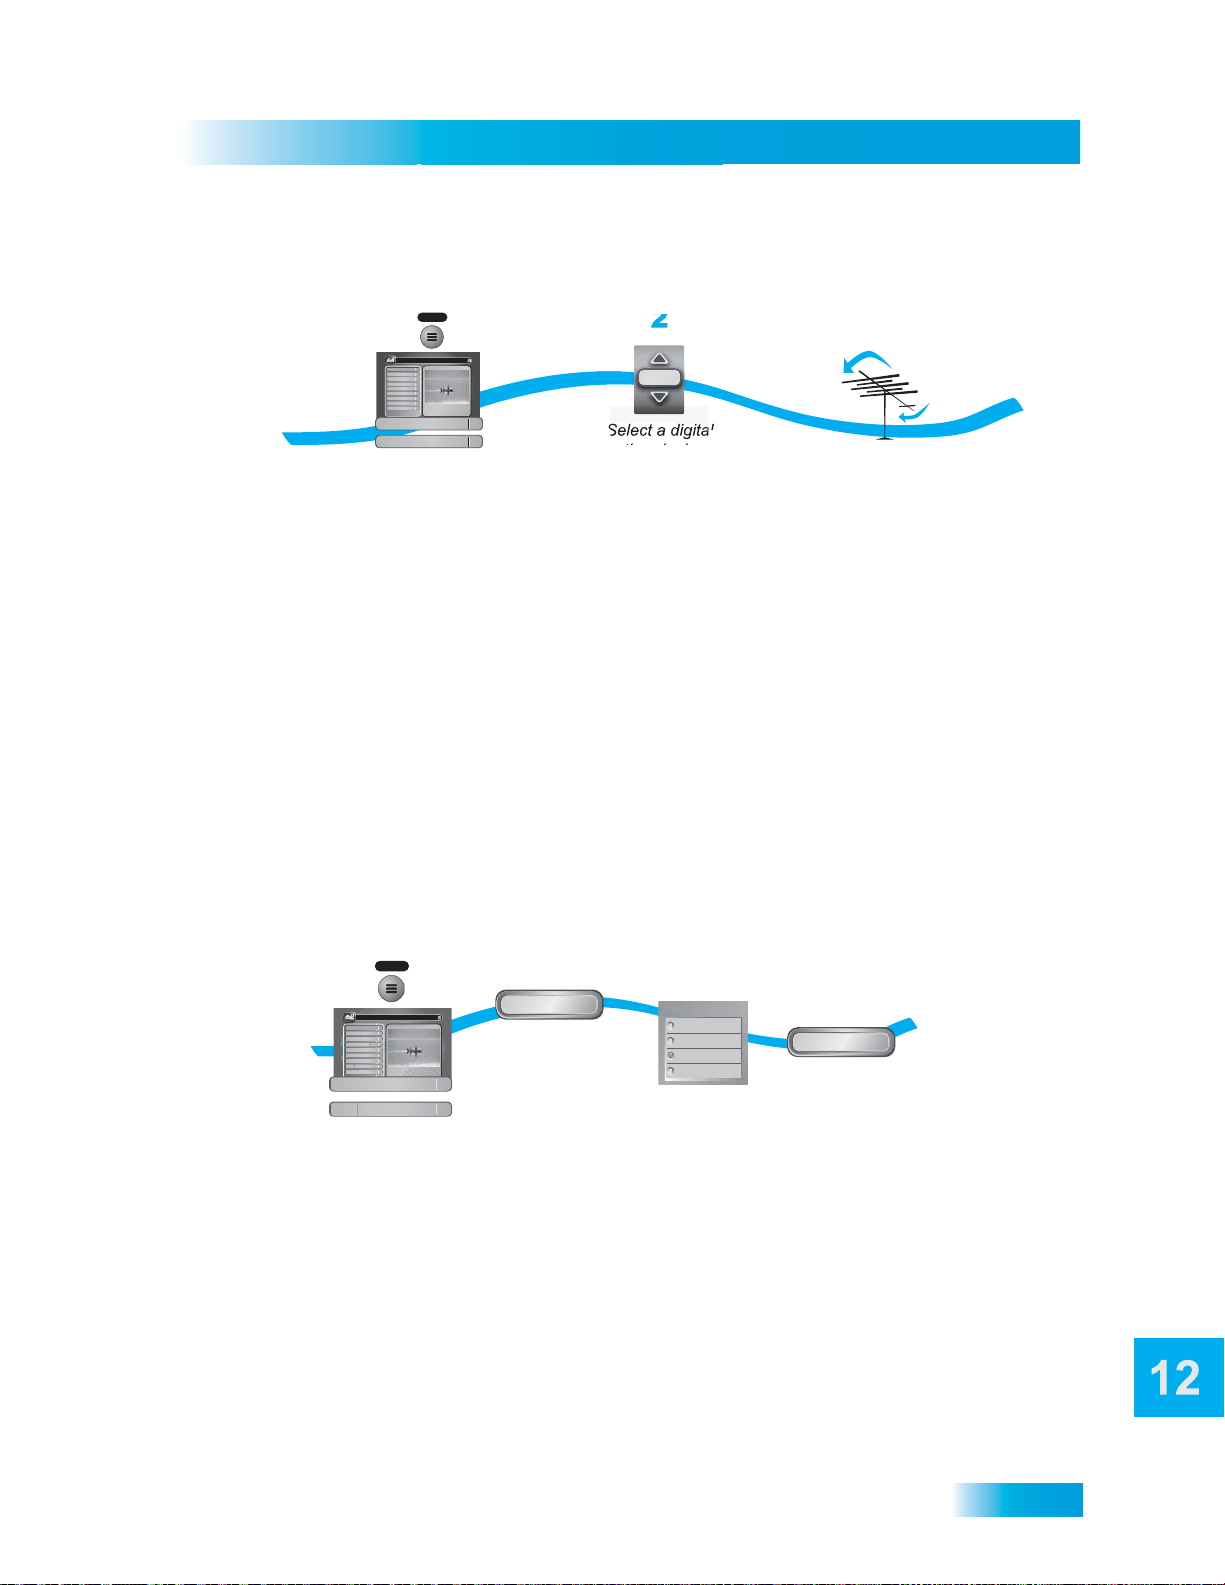
Connections and Setup
Connecting an Over-the-Air Antenna
Peaking Your Over-the-Air Antenna
1
MENU
1
Thursday, January 20
Main Menu
Program Guide
Themes & Search
Customer Support
Multimedia
Locks
System Setup
Daily Schedule
Preferences
Cancel
System Setup
Local Channels
Press MENU and
6:25 pm
114 E!114 E!
1
2
3
4
5
6
7
8
Celebrity Homes
0
5:30 pm - 7:00 pm NR
6
9
over-the-air channel
select System Setup
then Local Channels
1 Press MENU, select System Setup, and then Local Channels.
2 Highlight the Channel field and use the UP and DOWN ARROWS to select a digit al over-
the-air channel. Make sure you see a green sig nal strength bar and a L ocked indication on
the meter.
3 Adjust the orientation of your antenna to maximize the signa l stre ng th. If you ca nn ot get a
Locked indication, you may need to upgrade your antenna or relocate it to a better
position.
2
Channel
009
Select a digital
and make sure
you have a locked
signal
3
Adjust
antenna for
best signal
Using Local Satellite Channels
If you subscribe to the local satellite channels and want to see the them in the Program
Guide by broadcast number, select the Sat Locals option. Otherwise, the local satellite
channels will display in the four-digit channel range. Digital over-the-air channels display
in the guide at the broadcast channel regardless of the setting you choose here.
1
MENU
Thursday, January 20
Main Menu
114 E!114 E!
Program Guide
1
Themes & Search
2
Customer Support
3
Multimedia
4
Locks
5
System Setup
6
Daily Schedule
7
Preferences
8
Celebrity Homes
Cancel
0
5:30 pm - 7:00 pm NR
System Setup
Local Channels
Press MENU and
1
6:25 pm
6
9
2
Sat Locals
Select Sat
Locals
3
HD Priority
SD Only
HD and SD
Disable
Select HD Priority,
SD Only, HD and SD,
or Disable
4
Done
Select Done
select System Setup,
then Local Channels
1 Press MENU, select System Setup, and then Local Channels.
2 Select Sat Locals.
3 Select HD Priority (display HD local channels only, if available), SD Only (display SD
local channels only), HD and SD (display both HD and SD satellite local channels) or
Disable (cancel HD Priority default).
Note: Selecting HD Priority will cancel satellite local timers for SD programs. Selecting
SD Only will cancel satellite local timers for HD programs.
4 Select Done.
113
Page 60

Connecting an Over-the-Air Antenna
Transmit Channel Numbers
For information on channel numbers, you can visit the National Association of
Broadcasters (NAB) web page at www.nab.org
For a list of digital broadcast stations and their Transmit Channel numbers go to
www.nab.org/AM/ASPcode/DTVstations/dtvstations.asp
Note: Where Transmit Channel is displayed by the receiver, the NAB web page uses the
term RF Channel. These terms mean the same thing.
Another good source of local channel information is available from the Consumer
Electronics Association (CEA) web page at: www.antennaweb.org
recommendations for antenna types and pointing directions.
About Over-the-Air TV Broadcasts
Over-the-air TV signals are broadcast from stations on the ground, while satellite TV
signals are broadcast from satellites in space. You receive over-the-air TV signals using
an indoor or outdoor antenna instead of the satellite dish. You are likely familiar with
analog over-the-air TV signals—these are the signals that have been used to broadcast
TV for many years. New digital over-the-air TV signals are broadcast and received in the
same way. Digital over-the-air TV broadcasting uses advanced technology like that of the
DISH Network to deliver superb picture quality and CD-quality sound. However, digital
over-the-air signal reception (like analog over-t he-air signal reception ) depends on several
things:
Chapter 12
. This website provides
114
• The distance between the broadcast station and your home (the farther away the
station, the weaker the signal).
• The broadcast station's power (the lower the power, the weaker the signal).
• Obstacles between the station and your hom e, such as mountains, buildings, trees, or
other objects (these may block or reflect the signal before it reaches you).
• Multiple broadcast stations (to receive good signals from several st ations, you may
need to compromise in how you aim the antenna or you may need more than on e
antenna).
The effects of poor digita l reception are different from the effects of poor analog reception:
• Poor analog reception usually causes the TV picture to be “snowy” or to include
“ghosts,” that is, multiple images caused by receiving reflected signals along with the
direct signal from a station.
• Poor digital reception may cause the TV picture to be “pixelized,” that is, broken up
into small squares of var ious colors, or to be lost completely (the TV screen is all black
or all blue).
• Digital broadcasts often provide either a very good pictur e or no picture at all.
• You may be able to receive a poor analog signal but not be able to receive a digital
signal at all.
Page 61

Connections and Setup
Connecting an Over-the-Air Antenna
To get the best possible digital signal reception, make sure you use the best over-the-air
antenna for where you live:
• You can receive a limited number of channels using a rabbit ears type antenna on top
of the TV set, or a much larger number via a large UHF/VHF indoor/outdoor antenna.
• The higher the quality of the antenna you use, the greater its range and the better its
reception will be.
Digital OTA Broadcasts are Still Developing
• Broadcasters may still be testing digital signals and their strength, and may stop
broadcasting without notice, vary power output, or turn it off.
• Some broadcasters do not yet have a permanent transmitter tower.
• Broadcasters may choose to multicast, which allows them to provide multiple
standard-definition channels in the same bandwidth used to provide a high-definition
channel.
These factors are outside of DISH Network's control.
Additional Installation Considerations
• Follow local and National Electric Code requirements for grounding the antenna.
• RG-6 coaxial cable is preferred for the A
NTENNA IN and SATELLITE IN cables, RG-6 coaxial cable must be used.
A
• You can not use a diplexer to combine the A
NTENNA IN line. If you are diplexing the
NTENNA IN and SATELLITE IN cables if
using an amplified antenna.
• If you are using a diplexer to combine the TV 2 H
and the A
broadcasting the H
NTENNA IN, you must use a Super Home Node to prevent accide n tally
OME DISTRIBUTION from the antenna. See page 49 for more
OME DISTRIBUTION of the receiver,
information.
If you have questions about over-the-air channels, contact the broadcasters, not DISH
Network. DISH Network does not broadcast over-the-air signals and so cannot do
anything to change over-the-air signal quality. However, the receiver's digital channel
setup menus provide a signal strength bar that can help you in aiming the over-the-air TV
antenna for the strongest possible signal.
115
Page 62

Using Troubleshooting Tools
USING TROUBLESHOOTING TOOLS
Your receiver has troubleshooting tools that a Customer Service Representative may ask
you to use if you should ever run into problems while using your equipment. Even though
these tools are quite helpful, it is recommended that you only use them when on the phone
with a DISH Network representative.
Resetting Your Receiver
A Customer Service Representative will instruct you when to reset the receiver.
1 Press and hold the receiver POWER button until the front panel lights blink.
2 Release the POWER button.
The receiver may take several minutes to reset, complete downloads, and power on
again.
Diagnostics
Chapter 12
The Customer Service Representative may ask you to open the Diagnostics screen.
Remember to have an active phone line connected to your receiver.
1 Press MENU, select System Setup, and then select Diagnostics. The diagnostics
screen shows you various tests the Custome r Service Representative may ask you to perform on your receiver:
• Connection - Tests for a valid receiver phone connection.
• Dial Out - If “No Dial Out Pending” is displayed, the re ceiver does not ne ed to have it s
smart card records updated.
• Counters - Shows you a list of diagnostic counters. Use PAGE UP and PAGE DOWN
to scroll through the list of counters displayed.
2 Select Done.
116
Page 63
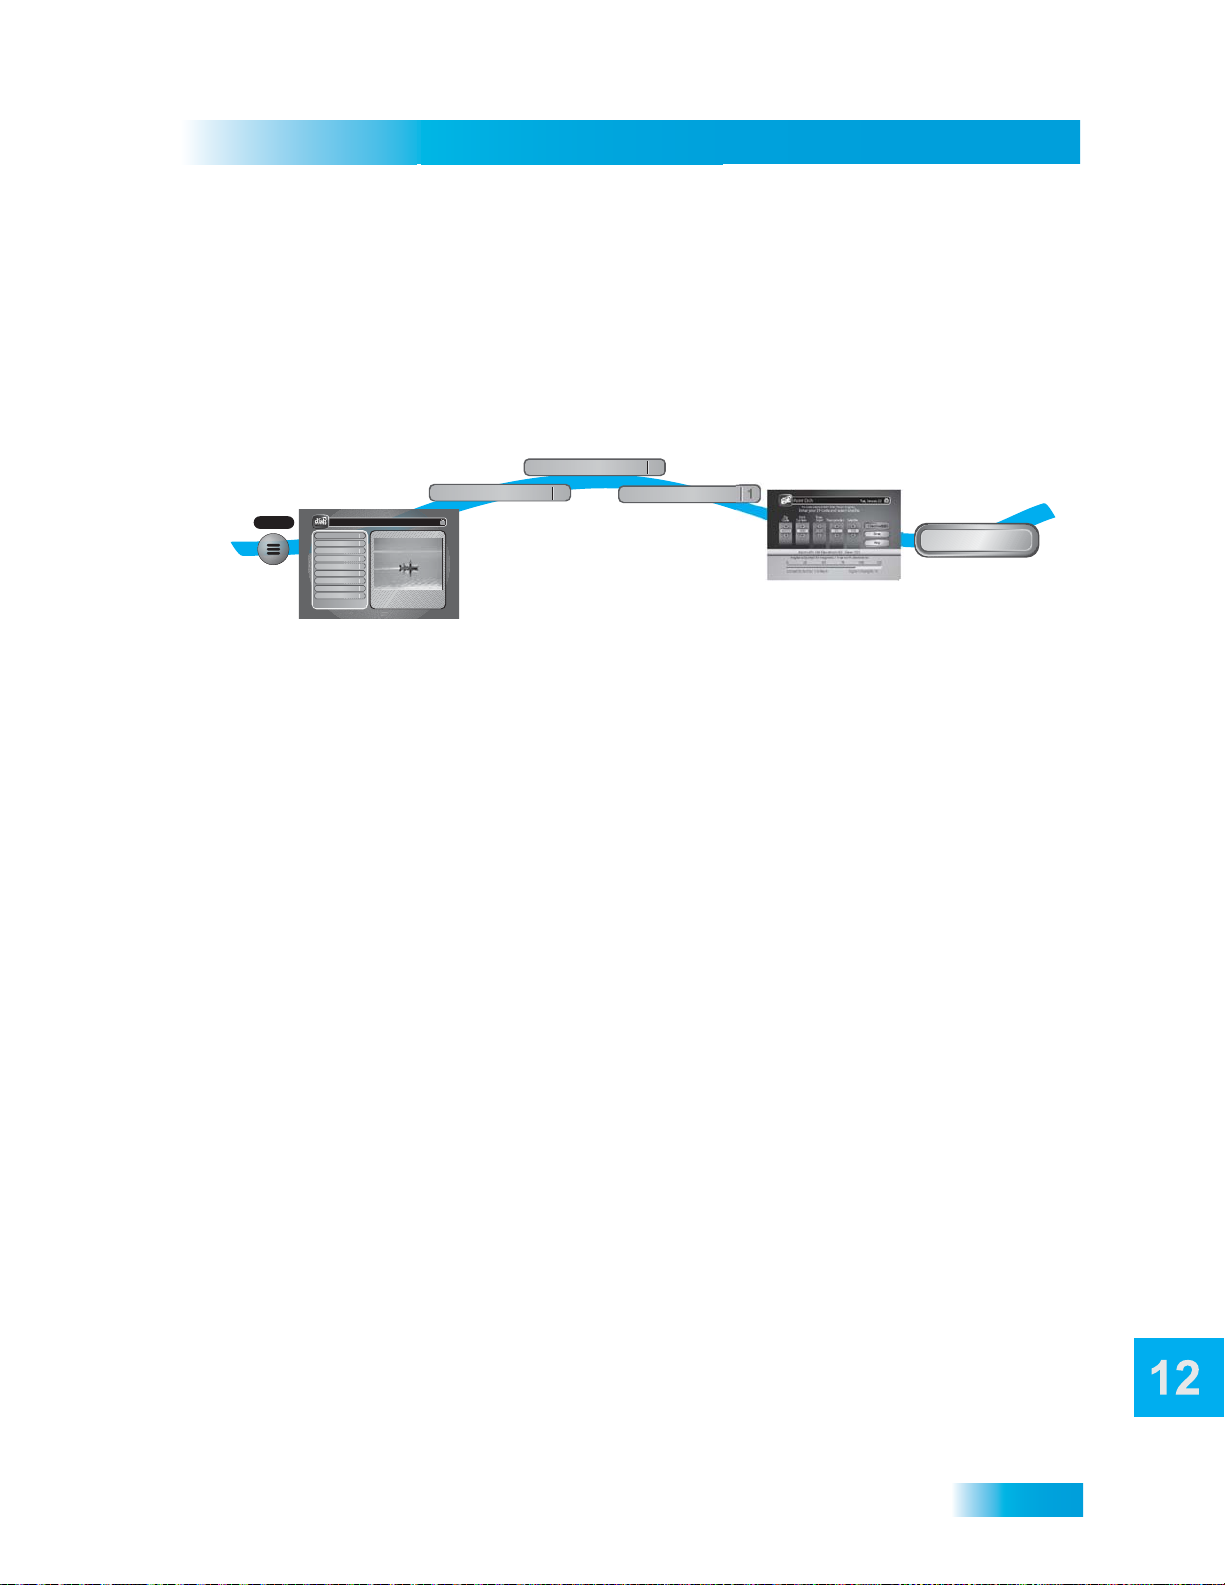
Connections and Setup
Using Troubleshooting Tools
Point Dish and Check Switch
The Point Dish and Check Switch screens are helpful to the Customer Service
Representatives. You may be asked to display these screens when you call DISH
Network. Even though there are items that can be changed, only change them when
specifically directed by a Customer Service Representative.
Select Installation
3
Installation
2
1
MENU
Press
MENU
Main Menu
Program Guide
Themes & Search
Customer Support
Multimedia
Locks
System Setup
Daily Schedule
Preferences
Cancel
1
2
3
4
5
6
7
8
0
114 E!114 E!
Celebrity Homes
5:30 pm - 7:00 pm NR
Thursday, January 20
System Setup
1
Select System
6:25 pm
Setup
6
1 Press MENU.
2 Select System Setup.
3 Select Installation.
4 Select Point Dish. This screen shows you information to help maximize your satellite
signal. The bar at the bottom of the screen tells you the signal strength. Green is a good
signal, while red indicates the signal is not acceptable or is from the wrong satellite.
5 Select Check Switch to display the installation summary screen. The installation
summary screen tells you if you are receiving signals from the satellites and which multidish switches you have installed, if any.
6 Select Test only if directed by the Customer Service Representative.
1
Point Dish
Select
Point Dish
4
Point Dish
To calculate DISH 500 Peak Angles,
Enter your ZIP code and select satellite
Zip
Dish Tuner
Transponder Satellite
Code System Input
Angles adjusted for magnetic / true north deviations
0 25 50 75 100 125
Locked:EchoStar 119 West
119
Azimuth:184 Elevation:43 Skew:101
Signal strength: 95
1
Tue, January 22
5-7
Check Switch
If you need to
run a check switch,
select Check Switch
7 Select Done.
117
Page 64

Notes
Chapter 12
NOTES
118
Page 65
Receiver and Remote Controls
About Your Satellite Receiver
What you’ll find in this chapter:
• SATELLITE RECEIVER OVERVIEW
• DUAL AND SINGLE MODES
• REMOTE CONTROL
• SATELLITE RECEIVER FRONT PANEL
• SATELLITE RECEIVER BACK PANEL
• USING THE MENUS
• USING TEXT FIELDS
11
Page 66

Chapter 2
Satellite Receiver Overview
Satellite Receiver Overview
This section gives you an overview of your DISH Network satellite TV receiver system.
Satellite Receiver
The ViP622 DVR and ViP722 DVR are dual-tuner satellite receivers with digital video recorders.
With either receiver you can view/record standard-definition (SD) and high-definition (HD)
DISH Network programming on two TVs or view/record over-the-air digital/HD broadcasts on the
nearby HDTV.
• Nearby TV (TV1)—Connect to an HDTV to view SD and HD DISH Network programming and
over-the-air digital/HD broadcasts. Programming from the receiver is delivered to the nearby
TV using short audio/video cables.
• Remote TV(s) (TV2)—Connect to an SDTV to view SD and down-converted HD broadcasts.
Programming from the receiver is usually delivered to the remote TV(s) u sing existing in-home
coaxial cable.
Remote Controls
Two remote controls come with your receiver:
• Remote Control 1 - An Infrared (IR) remote to control progr amming for the nearby TV (TV1).
This remote control is labeled with a green number 1, which matches similar markings on the
receiver output connections and the menus for the nearby TV.
• Remote Control 2 - An Ultra-High Frequency Pro (UHF Pro) remote to contro l programming at
a remote TV (TV2). This remote control is labeled with a blue number 2, which match es similar
markings on the receiver output connections and the menus for the remote TV. Be sure to set
up the remote control to operate the receiver (see page 72).
12
Dual and Single Modes
Your satellite receiver includes two modes of operation: Dual and Single. These modes increase
your entertainment options because you’ll be able to choose how you watch and record your favorite programs.
Dual Mode
While in Dual Mode, you can use this dual-tuner satellite receiver to watch different programming
in two separate locations:
• Nearby TV—Programming from the receiver is delivered to the TV near the receiver using
short audio/video cables and is controlled using Remote Control 1. The nearby TV is also
referred to as “TV1.”
• Remote TV—Programming from the receiver is delivered to a TV located in another ro om
using existing in-home coaxial cable and is controlled using Remote Control 2. The video
displayed on the remote TV is always in standard definition (SD). High-definition stellite
Page 67
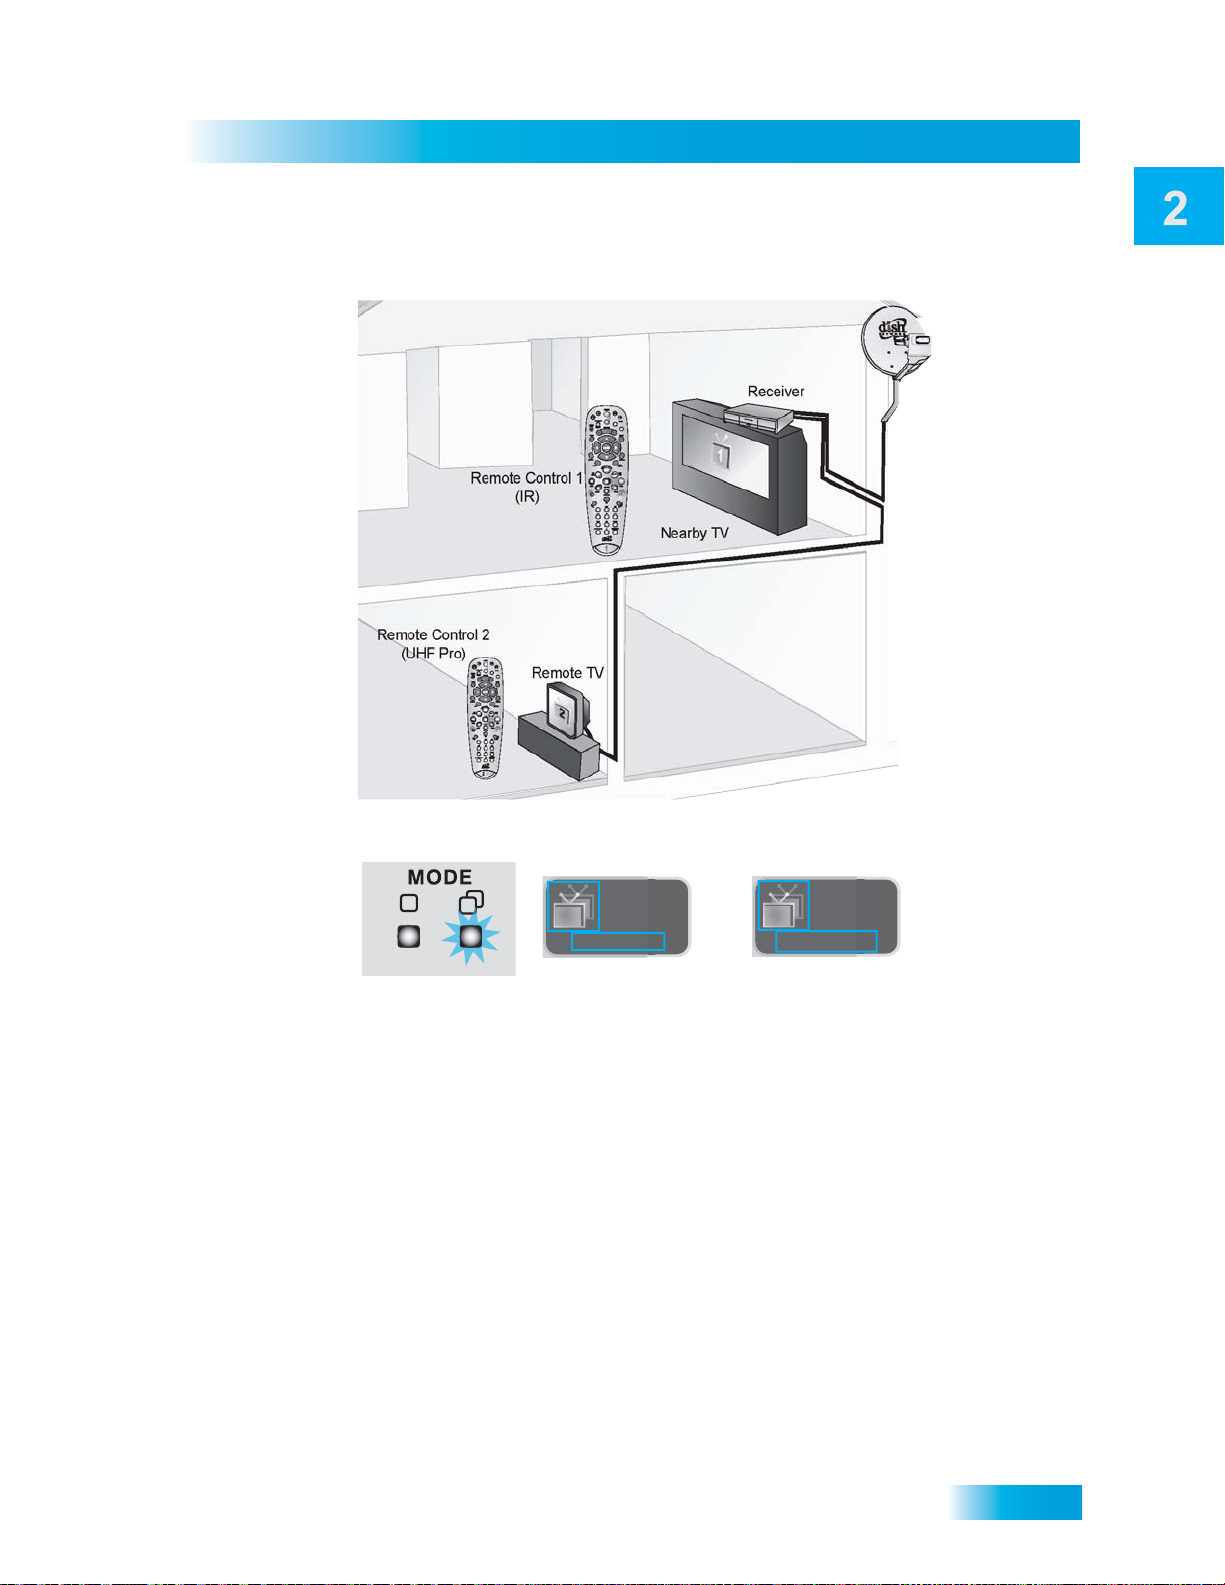
Satellite Receiver
Dual and Single Modes
programming can be viewed on the remote TV; however, it is down-converted for viewing on
the remote TV. The remote TV is also referred to as “TV2.”
1
2
You can tell your receiver is in Dual Mode because the front panel mode indicator will light and the
menu and other screens will display Dual Mode (as shown below).
TUE 3/19
1
6:25 pm
Dual Mode
TUE 3/19
2
6:25 pm
Dual Mode
Single Mode
13
Page 68
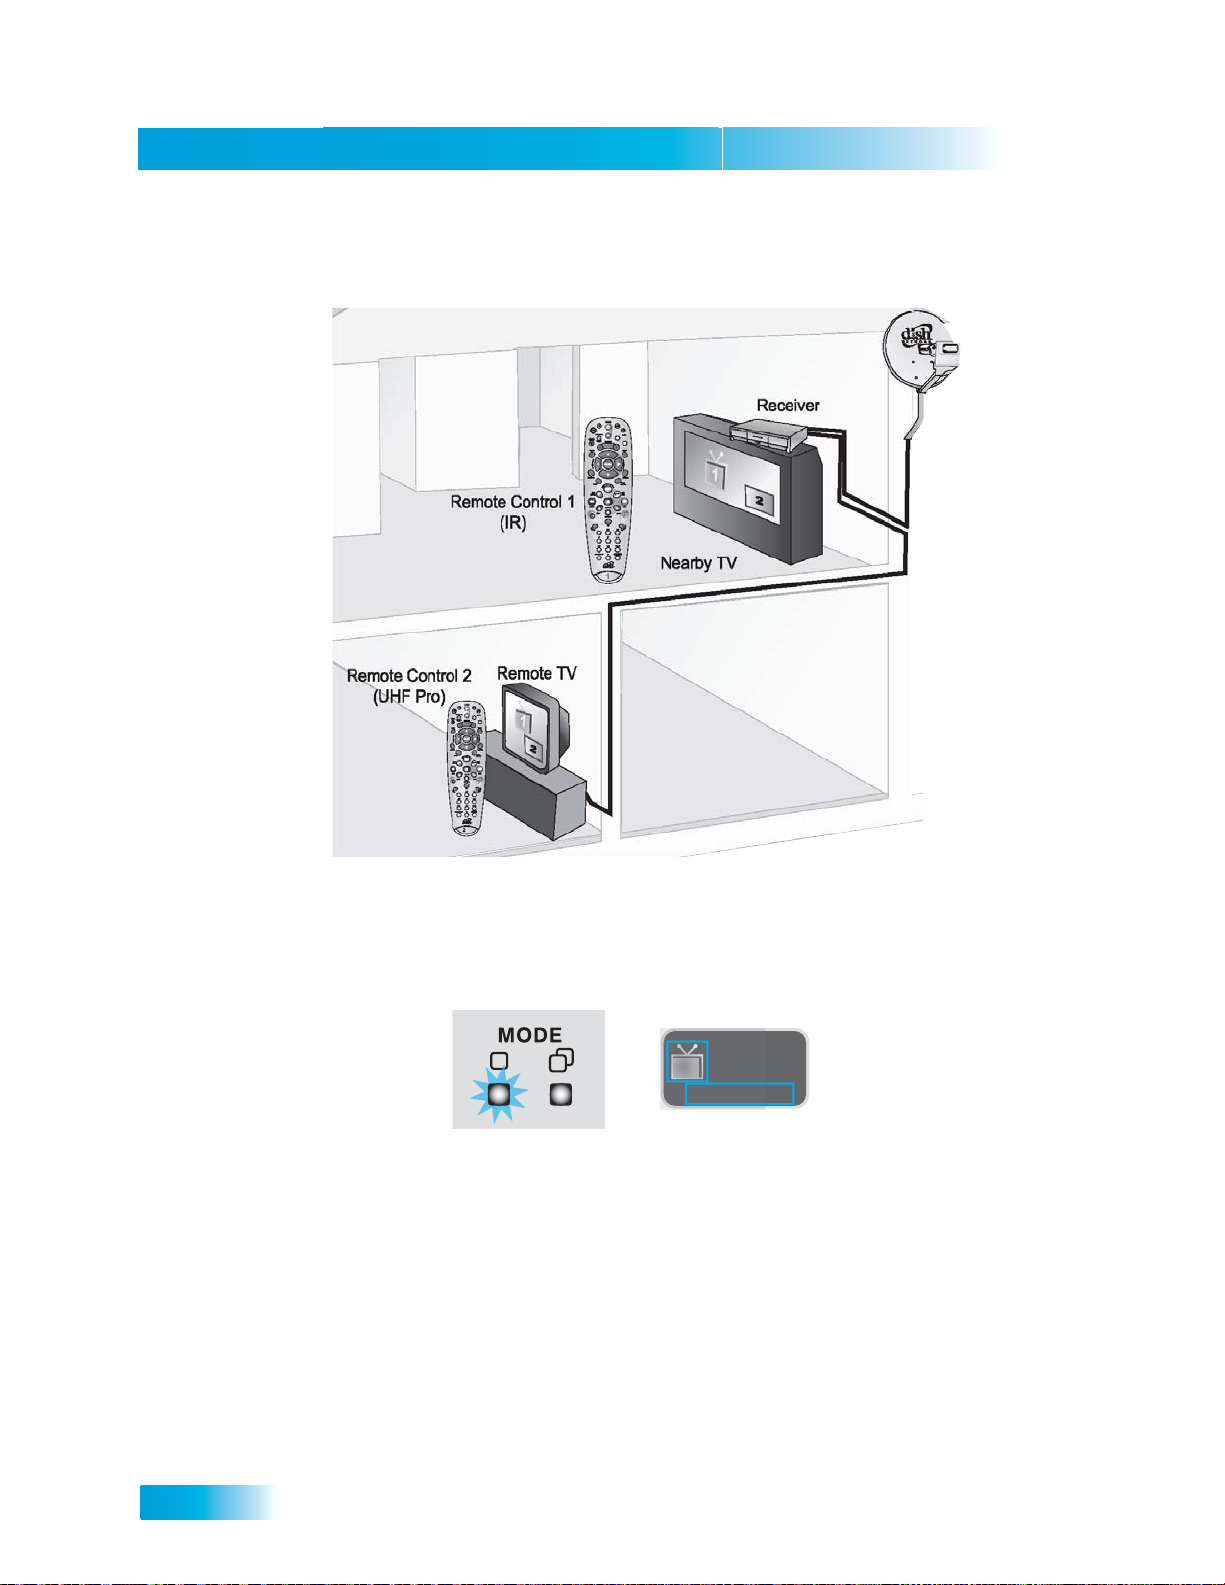
Chapter 2
Dual and Single Modes
Single Mode provides dual-tuner receiver features—like Picture-in-Picture (PIP) and the ability to
watch one live program while recording another—to all connected TVs.
1
2
Single Mode delivers the same programming to all of the TVs connected to the satellite receiver
and allows control by either remote control. The format of the programming shown on the remote
TV(s) is standard-definition (SD); high-definition (HD) is shown only on the nearby TV. High-definition programming can be viewed at either TV location; however, it is down-converted for viewing
on the remote TV. You can tell you are in Single Mode because the front panel mode indicator will
light and the menus and other screens will display Single Mode (as shown below).
TUE 3/19
1
6:25 pm
Single Mode
14
Page 69
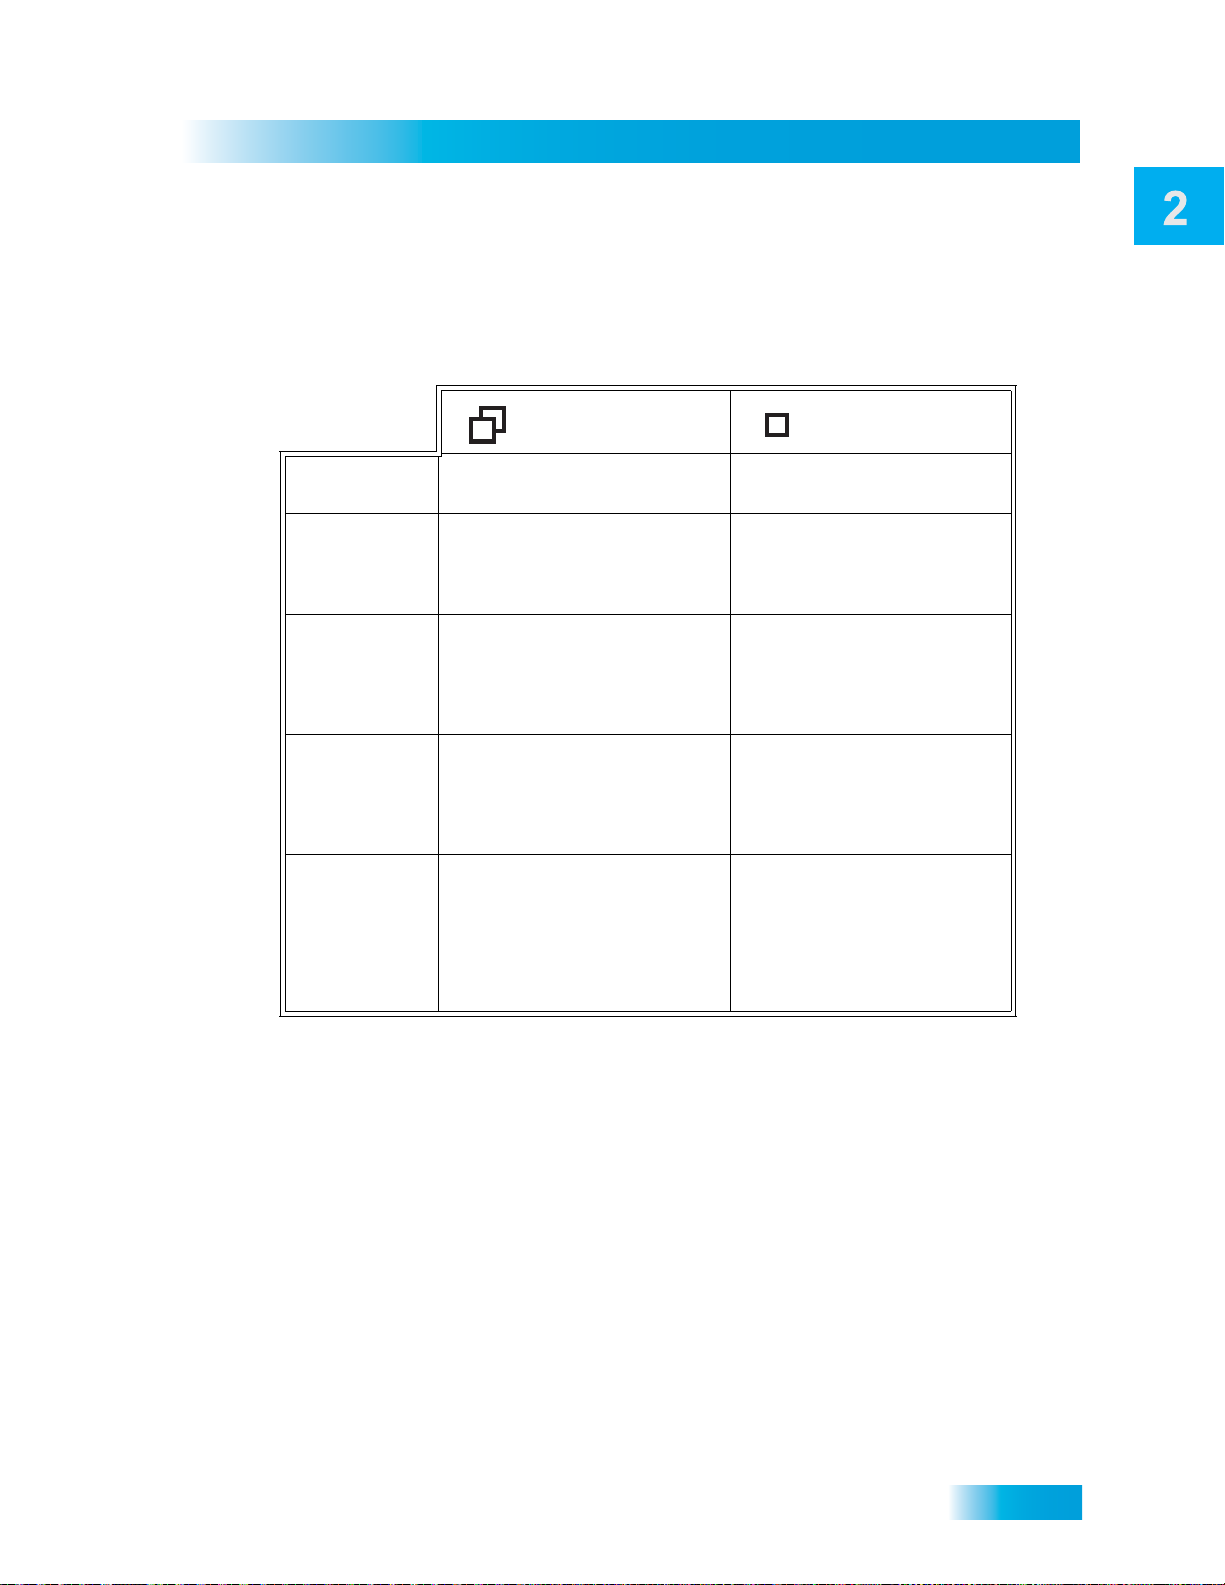
Satellite Receiver
Remote Control
Switching Between Dual and Single Mode
Put the satellite receiver in Single or Dual Mode by pressing the front panel MODE button. Keep
the following items in mind when switching the satellite receiver between Dual and Single Mode:
Dual Mode Single Mode
Indications
Recording
Favorites
Lists
Locks
Closed
Captioning
Note: If someone is viewing the remote TVs while the receiver is in Dual Mode, you will see a
popup on the nearby TV warning you that you are about to disrupt the use of the TV2 outputs.
Dual Mode front panel
indicator lights.
The Recording front panel
indicator lights to show
whether TV1, TV2, or both
are currently recording.
Favorites Lists set up for
both outputs (TV1 and TV2)
are available.
Locks set up for both outputs
(TV1 and TV2) are available.
Closed Captioning (CC)
from SD and HD
programming is available on
TV1. CC from only SD
programming is available on
TV2 (CC must be enabled
on the TV).
Single Mode front panel
indicator lights.
The TV1 Recording front
panel indicator lights when
you are recording from one
or both tuners.
Only Favorites Lists set up
for TV1 are available. The
lists for TV2 are not lost,
they are simply unavailable
in Single Mode.
Locks set up for only TV1
are available. The locks for
TV2 are not lost, they are
simply unavailable in Single
Mode.
Closed Captioning from the
receiver is available on
both outputs (TV1 and
TV2).
Remote Control
The two remote controls give you access to all the features of your satellite receiver. You can set
up each remote to control the satellite receiver and up to three other devices (see page 75). These
devices can be a TV, a VCR or DVD player, and a third device.
This section describes how to use the various features on the two types of remote controls
included with your satellite TV system.
15
Page 70
Chapter 2
2
UHF
PRO
Remote Control
Types of Remote Controls
1
Remote Control 1 uses infrared (IR)
signals to:
• Control TV1 menus for the nearby
TV in Dual Mode.
• Control the satellite receiver in
Single Mode.
IR signals travel only short distances
(60 feet or less), and cannot go
through walls or other solid objects.
You must point the remote control
directly at the receiver , with no objects
blocking the line of sight.
Remote Control 1 uses IR signals
to control the receiver and other
devices it is programmed to operate.
This remote control is identified by the
green number 1 at the bottom of the
remote control.
Remote Control 2 uses UHF Pro
signals to:
• Control TV2 menus for the remote
TVs in Dual Mode.
• Control the satellite receiver in
Single Mode.
UHF Pro signals travel long distances
and go through walls and other solid
objects.
To use Remote Control 2 to control
the receiver, you must attach the
remote control antenna to the receiver
back panel (see page 17).
Remote Control 2 uses IR signals to
operate other devices programmed
into the remote control. You must
point the remote control directly at
these devices, with no objects
blocking the line of sight.
This remote control is identified by the
blue number 2 at the bottom of the
remote control.
16
Page 71
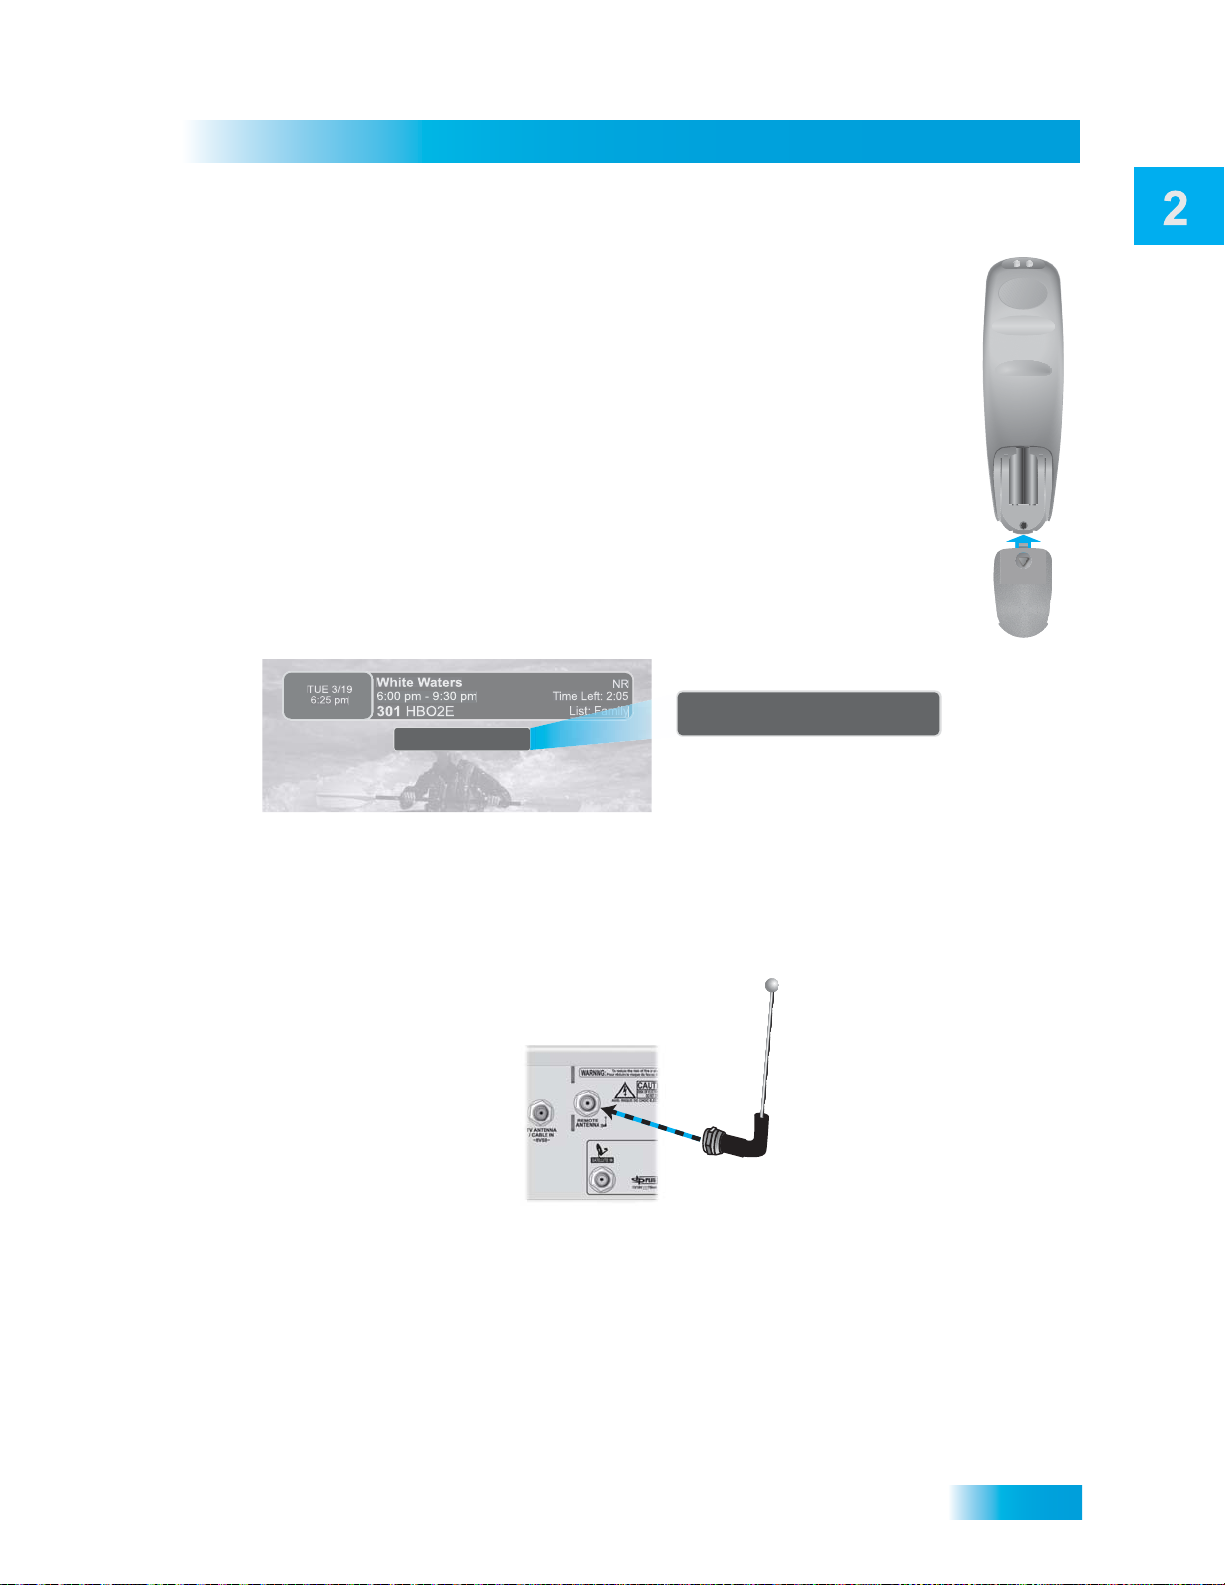
Satellite Receiver
Remote Control
Remote Control Batteries
The remote control comes with AAA batteries. When you replace old batteries, you
should replace all of the batteries. Use batteries of the same kind, for example,
alkaline or carbon zinc. Don’t mix batteries of different kinds. Alkaline batteries las t
longer.
1. Press down on the top of the battery cover and slide the cover off.
2. Take out all of the old batteries.
3. Put the new batteries in. Make sure you match the plus (“+”) ends with
the plus markings on the battery case.
4. Slide the cover back into place.
Low Battery Warning
When you see a low battery warning message on your screen below the Program
Banner, th e batteries in your remote control are weak and need to be replaced.
Remote Battery Low
Remote Battery Low
Attach the Remote Antenna
Attach the remote control antenna to the rece iver' s back p anel REMOTE ANTENNA input so you can
use your UHF Pro Remote Control 2. Without the remote control antenna, you cannot use the
remote to control the receiver. See Adjusting the Remote Control Antenna on page 73 for more
detailed information about improving the performance of your UHF Pro Remote Control 2.
17
Page 72
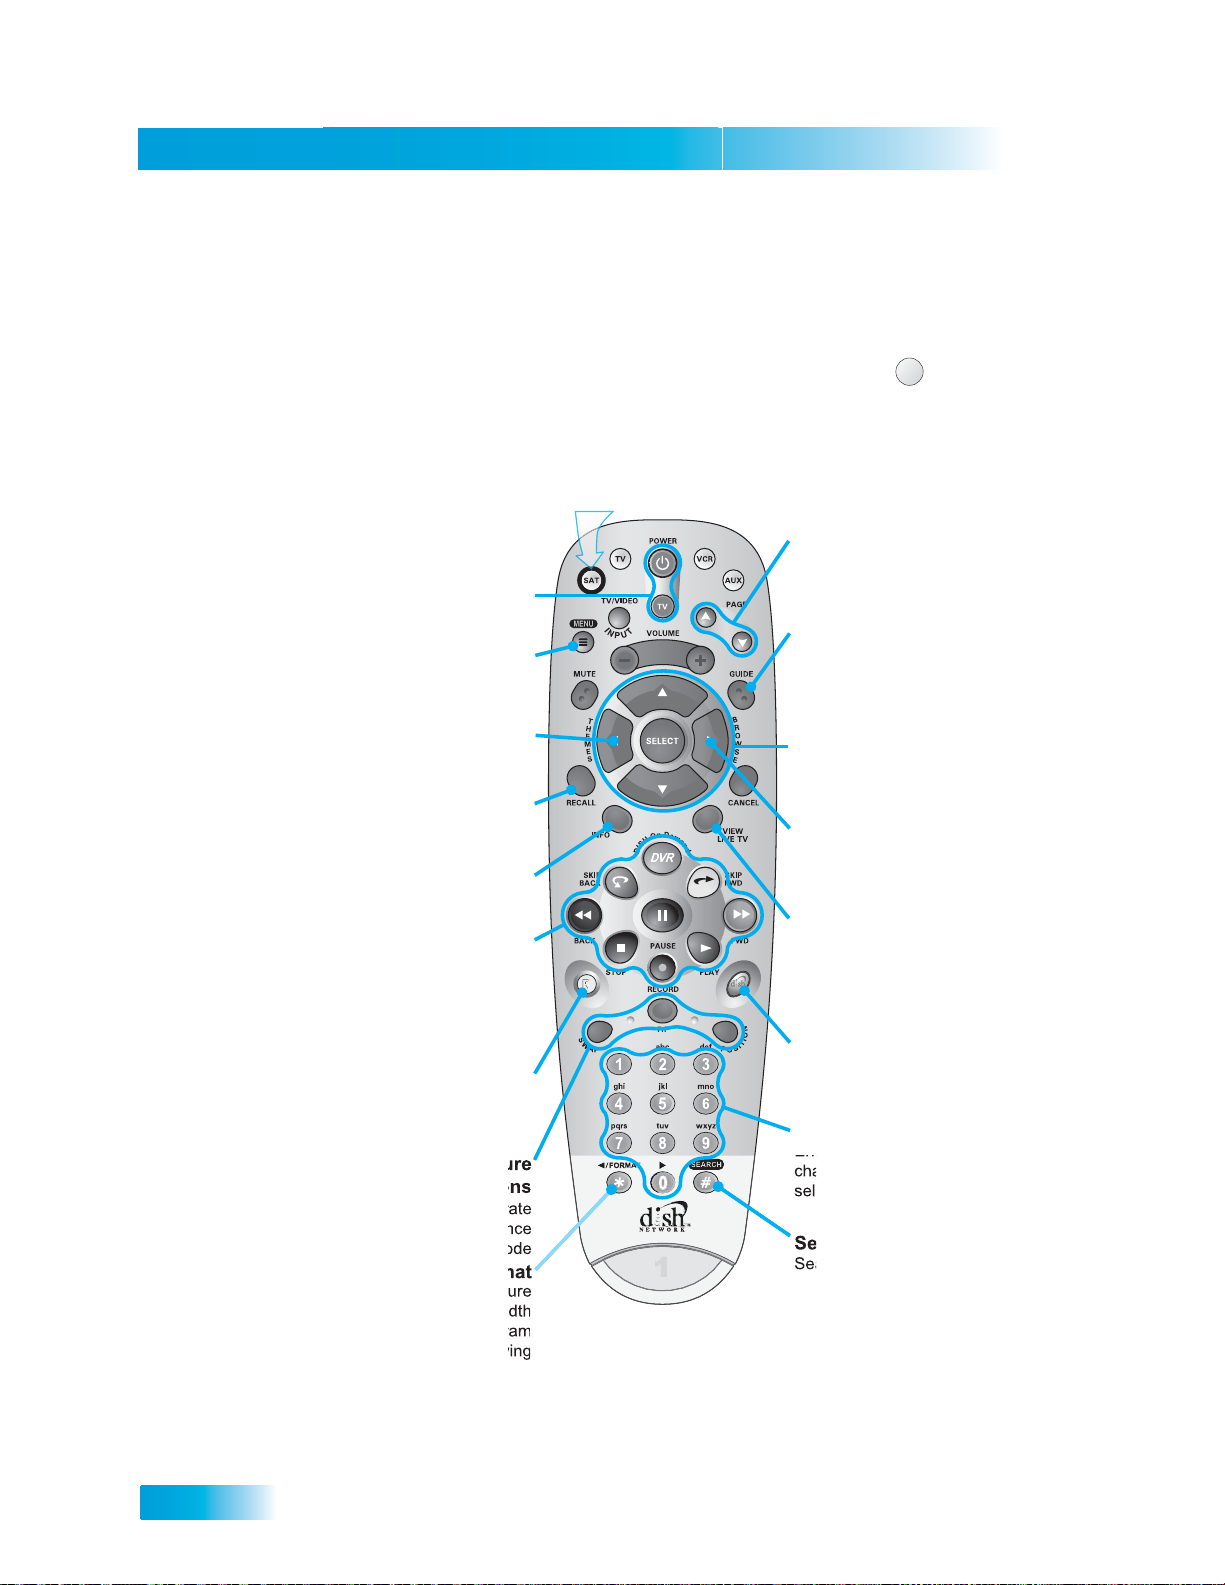
Chapter 2
Remote Control
Remote Control Buttons
SAT Mode
To use the features described in this section, make
sure you are in SAT mode by pressing the SAT Mode button.
Receiver Power
& TV Power
Top button turns
the receiver on/off,
bottom button
turns the TV on/off
Programming required
Menu
Access receiver
features and settings
Themes
Search for programs
using Themes
Recall
Go back to last
channel viewed
Info
Display program
information
Digital Video
Recorder (DVR)
Buttons
Pause live TV and
play or record
programming
Recover
Recovers satellite
programming if your TV
input or channel has changed
Picture-In-Picture
(PIP) Buttons
Watch two separate
programs at once
in single mode
Format
Format the picture
to the desired width
to match the program
you are viewing
Volume & Mute Buttons
Press this
button for
SAT Mode
Remote key may
be different than shown
1
here
Control TV volume
Programming required
Page Buttons
Page up/down in menus
and display options
Program Guide
Display current and
future satellite program
listings
Arrows/Select
Buttons
Channel up/down,
navigate through
menus/guides and
select a desired
option
Browse
See what is on other
channels while
watching TV
View Satellite
Programming
Exit out of any menu/
guide and go back to
viewing live TV
DISH
Explore interactive
TV features
Number Buttons
Enter a desired
channel number, or
select menu items
Search
Search for a program
SAT
18
Page 73
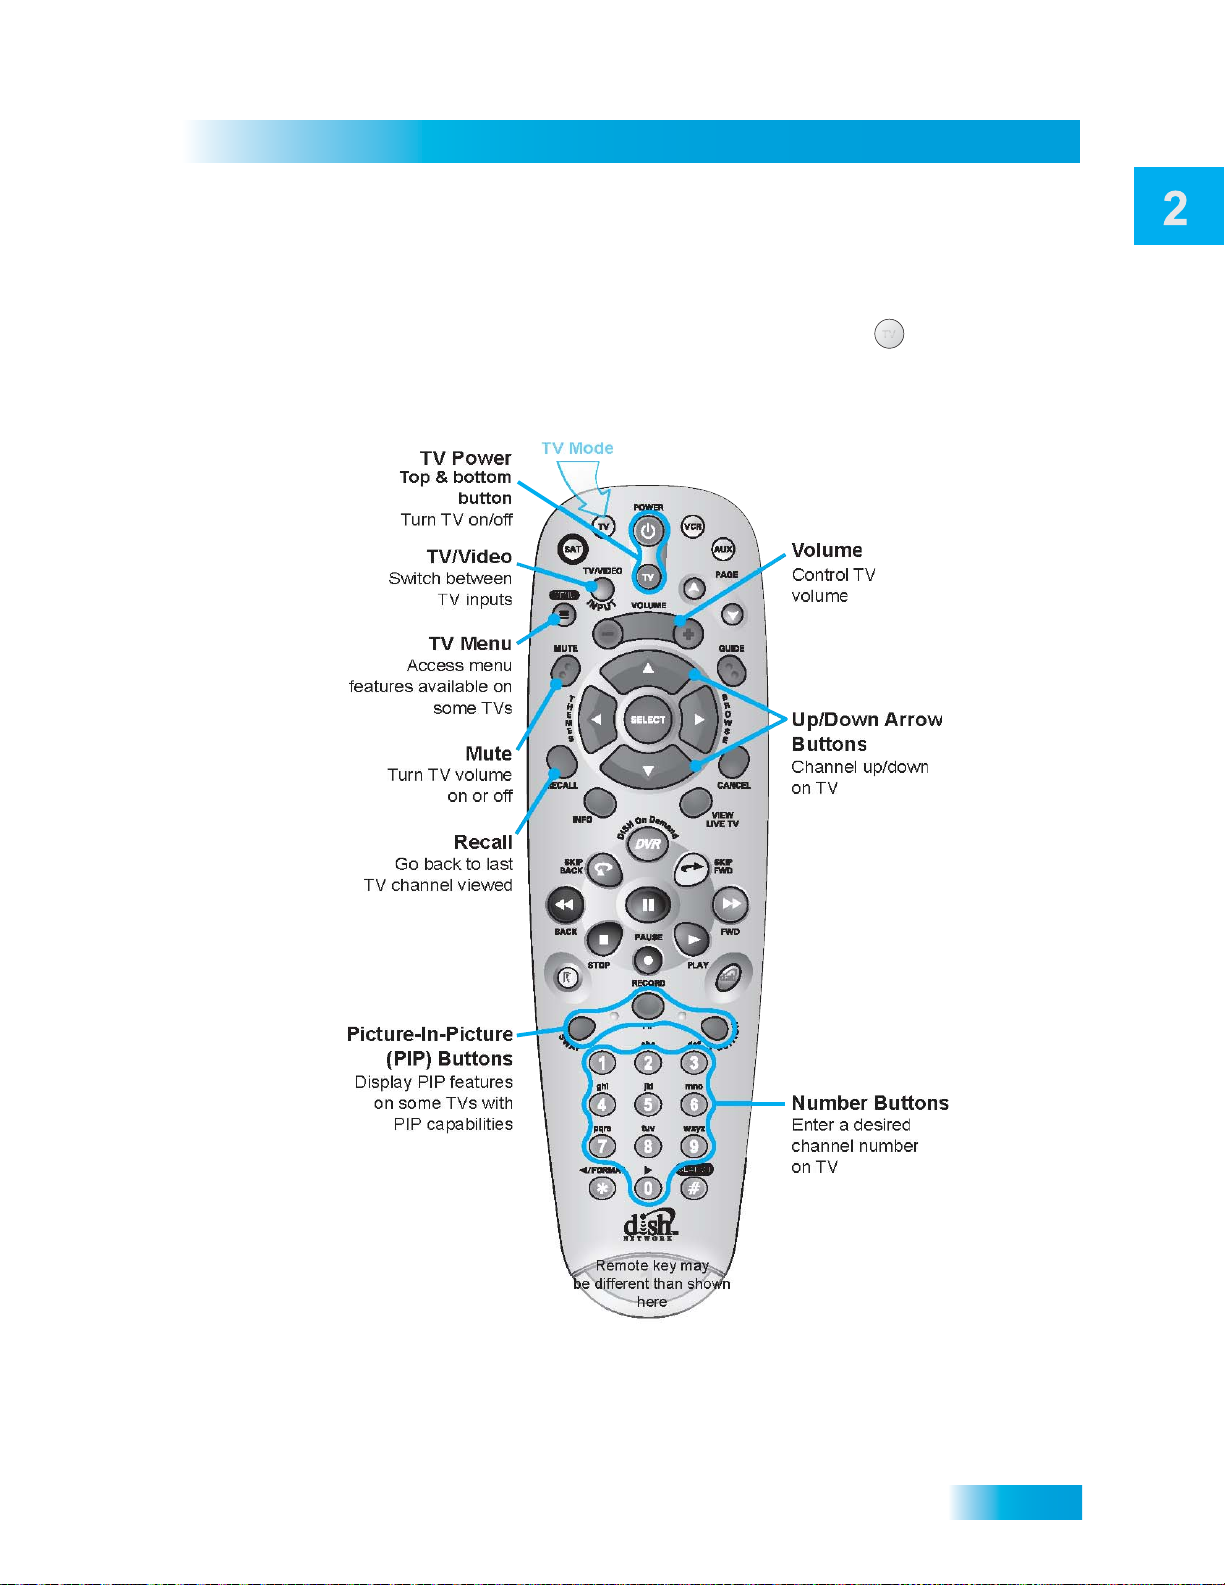
TV Mode
Satellite Receiver
Remote Control
To use the features described in this section, make
sure you are in TV mode by pressing the TV Mode button.
Remote programming is required.
Press this
button for
TVTV
Remote key may
be different than shown
here
19
Page 74
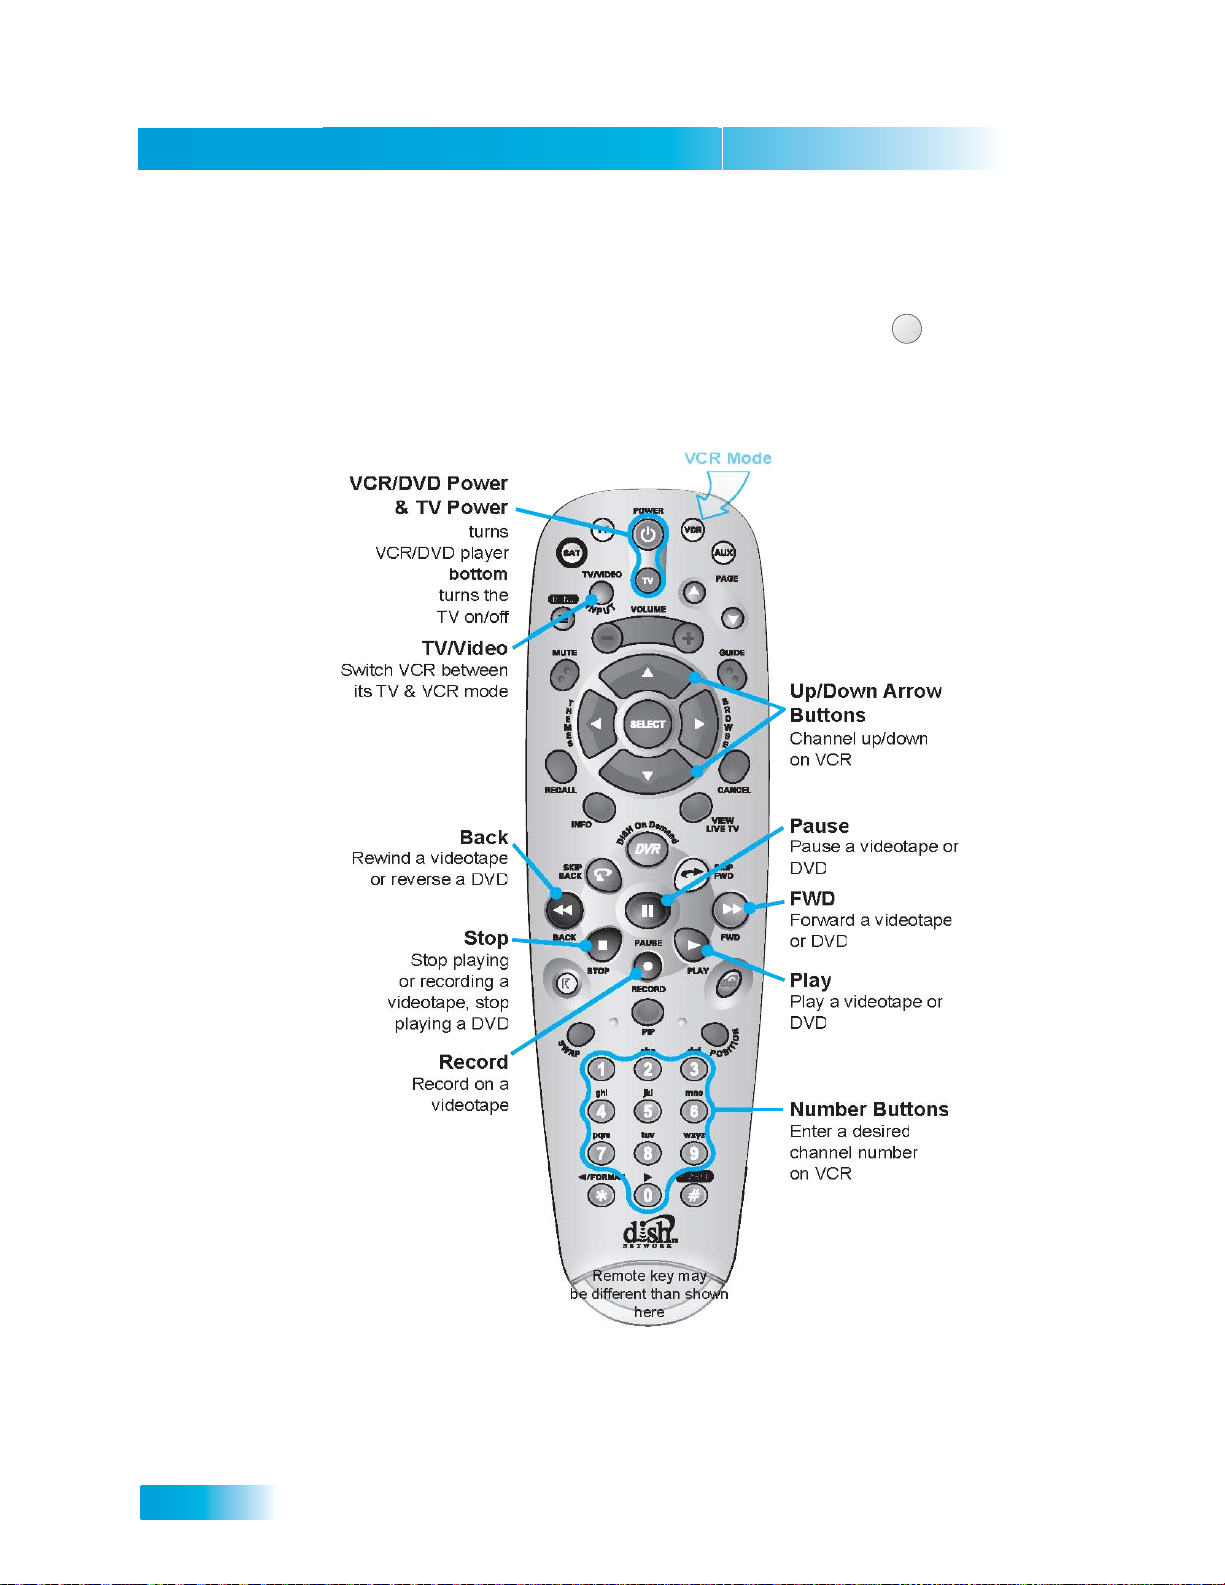
Chapter 2
Remote Control
VCR Mode
To use the features described in this section, make
sure you are in VCR mode by pressing the VCR Mode button.
You can use this mode to operate your DVD player instead of a VCR.
Remote programming is required.
Press this
button for
Top button
on/off,
button
VCR
20
Remote key may
be different than shown
here
Page 75
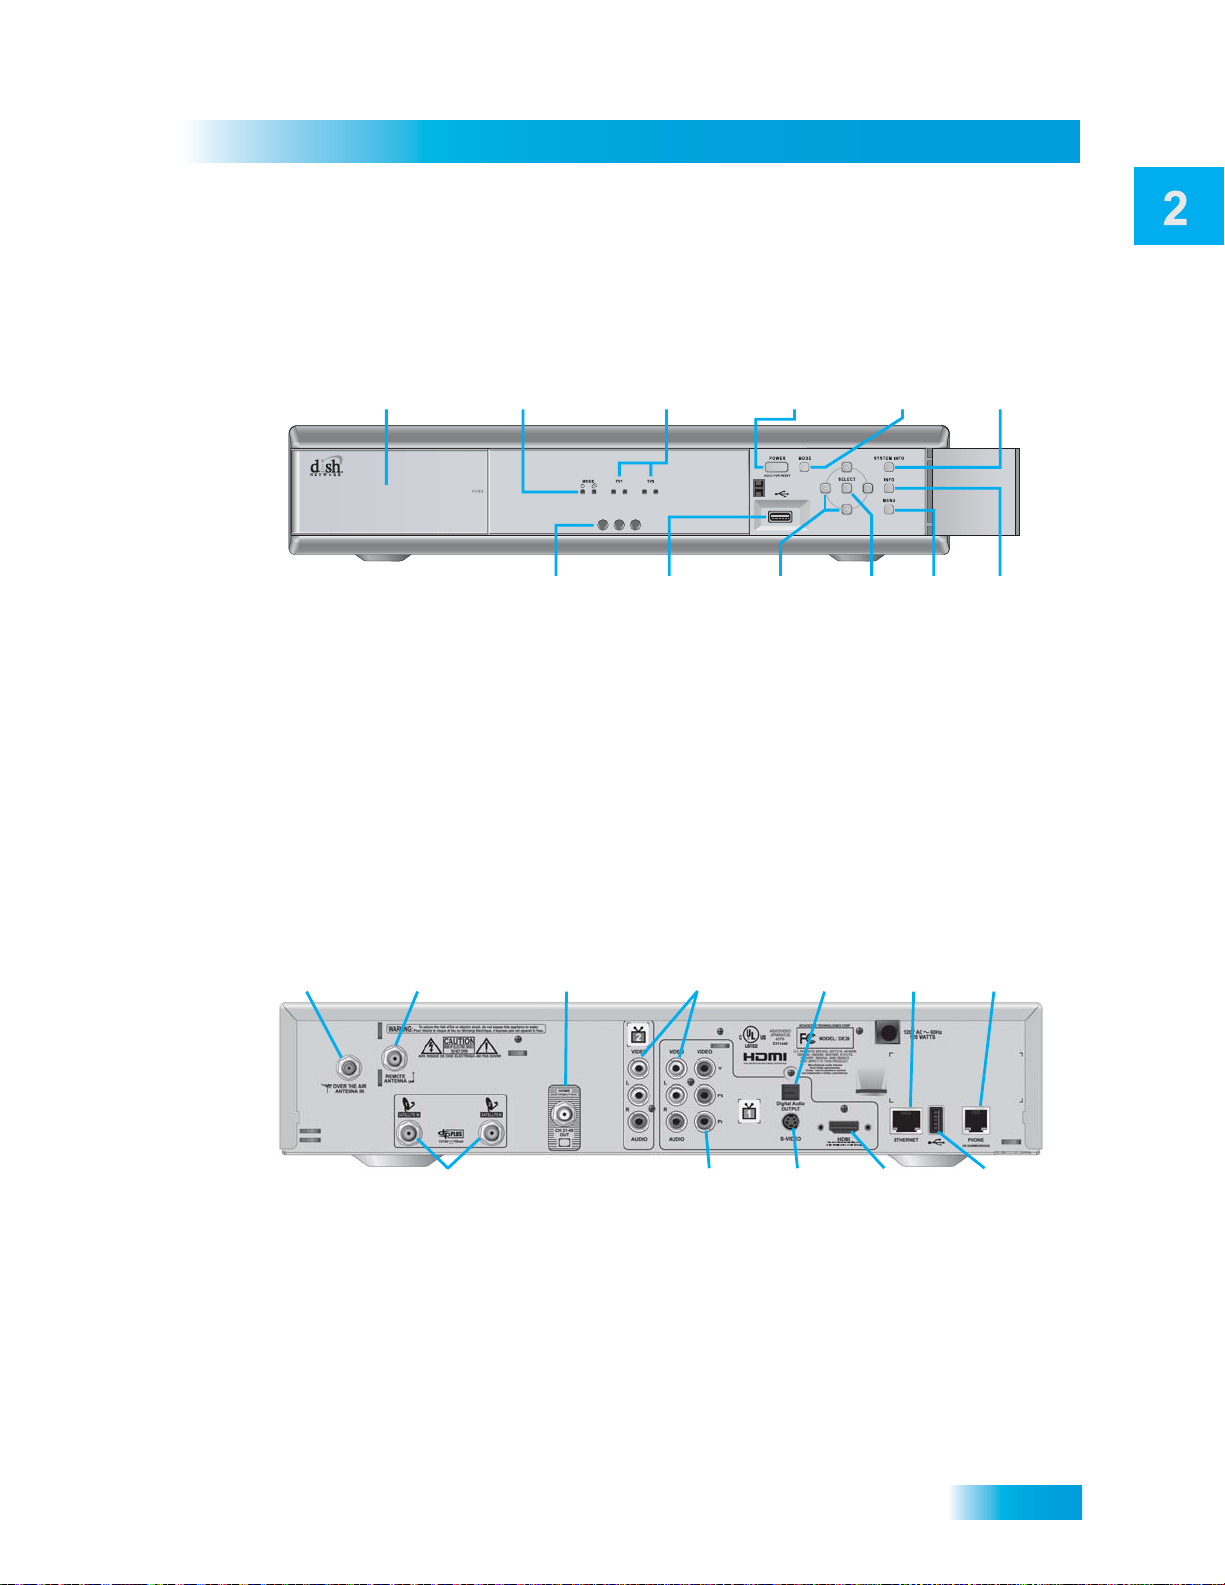
Satellite Receiver
A
Satellite Receiver Front Panel
Satellite Receiver Front Panel
TV1 and TV2
Smart Card Door
Slot for a future
smart card
Dual and Single
Mode Indicators
Left light indicates
Single Mode, right
indicates Dual Mode
Infrared
Sensor/Blaster
Receives IR Signals
from your remote and
sends IR signals to
other components
Power and
Record Lights
Left light indicates
power is on, right red
light indicates recording
USB Port
Connection to
other
multimedia
devices*
Power
Turns receiver
power on/off;
press and hold
to reset receiver
Arrows
Change channels
up/down, and move
around in on-screen
menus and guides
Switches receiver
between Single
and Dual Mode
Select
Selects
menu
items
Note: Your receiver may be a differerent color than the unit pictured in the diagram.
Satellite Receiver Back Panel
Audio/Video
Output TV1/TV2
ntenna/CATV
Input
Connection to
over-the-air
antenna
Remote
Antenna
Connection to
remote control antenna
In-home
distribution
output
High quality
standard
definition
connection
to your TV
audio and video
input
Digital Audio
Output
connection to
a high-quality
digital sound
decoding system
Mode
Menu
Displays
the Main
Menu
Ethernet
Port
For future
use
System Info
Displays the
System
Information
Screen
Info
Displays
program
information
Phone
Jack
Connect
to your
telephone
line
Satellite In
Connection to
your satellite
dish
YPbPr/
Component
Output
Optional
connection to
your high
definition TV
video input
S-Video
High quality
standard-
definition
connection
to your TV
video input
HDMI Output
Provides digital
audio and video
to an HDTV
USB
Port
Connect to
other
multimedia
devices*
*Some USB multimedia devices may not be compatible.
21
Page 76
Chapter 2
Program Guide
1
Themes & Search
2
Customer Support
3
Multimedia
4
Locks
5
System Setup
6
Daily Schedule
7
Preferences
8
Cancel
0
Using the Menus
Using the Menus
The menus make using the receiver and selecting programs quick and easy. Use the menus to
control the receiver and to use its features, such as setting locks, choosing a progr am, or cr ea ting
a favorites list.
Open and Close Menus
You can open the menus in either of two ways:
• Press MENU to open the Main Menu, then open any of the other menus from the Main Menu.
• Use the following buttons on the remote control:
To close a menu and return to watching a program, press VIEW LIVE TV.
– Press GUIDE to open the Program Guide.
– Press THEMES (LEFT ARROW) when watching a program to open the Themes
and Search menu.
– Press BROWSE (RIGHT ARROW) to display the Browse Banner.
22
Highlighting Menu Options
Use the remote control ARROWS to move the on-screen highlight to the menu option. When you
move the on-screen highlight, the option becomes orange.
Selecting Menu Options
When you select a menu option, that option takes effect right away. You can select a menu option
in either of two ways:
• Move the highlight to the menu option using the remote control
ARROWS. Then press SELECT. In the example, Program Guide is
highlighted.
• If the option has a number next to it, press the number on the
NUMBER PAD button that matches this number. When you use the
NUMBER PAD, you do not need to highlight the option first.
List of Choices in the Menus
When you make a choice in a list, the receiver does not apply the change until you select Save or
Done. If you do not want to save any changes, select Cancel to discard all the changes made in
the menu.
There are two types of lists:
Page 77
Satellite Receiver
Using Text Fields
• A single choice list allows you to select only one choice at a time. If you
select another choice, your previous choice is deselected.
• A multiple choice list allows you to select more than one choice at one
time. If you select another choice, your previous choice(s) stays selected.
All Episodes
New Episodes
Once
Weekly
Daily
Mon-Fri
632 - MLB
631 - MLB
630 - MLB
629 - MLB
628 - MLB
627 - MLB
626 - MLB
Canceling a Procedure
You can cancel a procedure in any of three ways:
• If you want to return to watching a program, press VIEW LIVE TV.
• If you want to return to the previous menu, press CANCEL.
• Wait a few moments and the menu will close automatically, discarding any changes you have
made.
Using Text Fields
When you use features on the receiver, you might be required to enter information, such as the
name of a movie when using Search, into areas known as text fields. Your receiver has two basic
ways to enter the information:
• Virtual Keyboard
• Remote Control NUMBER PAD
23
Page 78
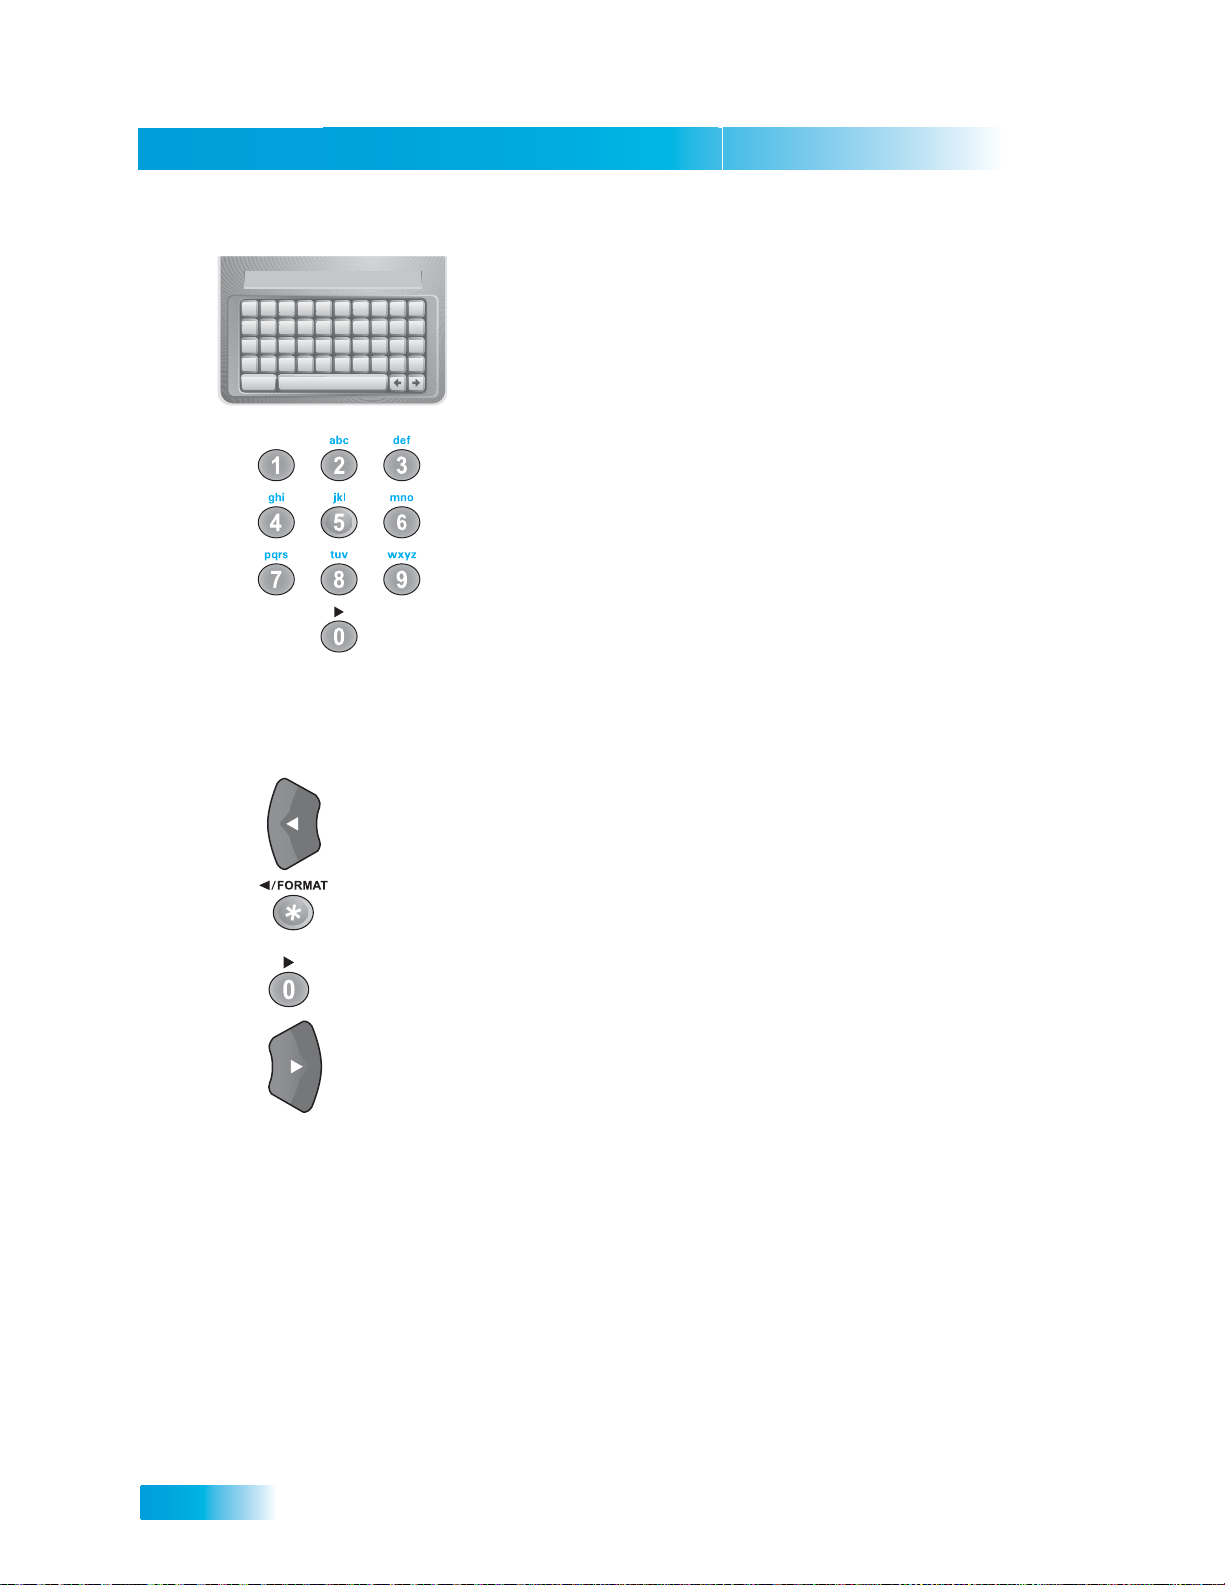
Chapter 2
A B C D E F G H I J
K L M N O P Q R S T
U V W X Y Z ' - . &
1 2 3 4 5 6 7 8 9 0
Space
Back
Cheers_
While in the Text Field
When the cursor is in the text field:
Using the Virtual Keyboard
Use the virtual keyboard letters to type the information. Use the LEFT,
RIGHT, UP, and DOWN ARROWS to navigate around the keyboard.
Press SELECT to choose each character.
Using the Number Pad
Use the letters printed above the NUMBER PAD on the remote control—just like on a telephone—while the highlight is in the field. For
example, when looking for the channel and times to watch Rudy Friml
Presents, you press 7 three times for an R, 8 two times for a U, 3 one
time for a D, and 9 three times for a Y to spell the word “Rudy.”
• Press the LEFT ARROW to delete characters.
24
• Press FORMAT/* to backspace without deleting characters.
• Press 0 to enter a blank space, such as between words.
• Use the RIGHT ARROW to forward space without deleting characters.
Page 79
Satellite Receiver
Tips
Tips
• You can use the Front Panel Locks to prevent the mode from being changed
accidentally. See page 49 for instructions.
• The only way to turn off the TV2 outputs is by pressing POWER on Remote
Control 2.
• In Dual Mode, Remote Control 1 is used to control TV1 menus on the nearby TV. Remote
Control 2 is used to control TV2 menus on the remote TVs.
• If you would like to put the receiver in a remote location (such as a closet or cabinet), be sure
to get the replacement remote control that uses UHF Pro signals to control TV1. Call your
DISH Network retailer or go to www.dishnetwork.com
Accessories.
• If you do not do anything in a menu for several minutes, the menu automatically closes. This
will discard any changes you made, and display the program you were watching.
• To use Remote Control 2, be sure to attach the Remote Control Antenna. See page 17 for
details.
• On Remote Control 2, press FORMAT/* to change the aspect ratio (display shape) of HD
channels displayed on remote TV(s).
, select Our Products, and then click on
Questions
• Why put the receiver in Single Mode? When the receiver is in Single Mode, you can use the
PIP functions.
• How can I watch and use the DVR functions on the same program on all of the TVs in
my house? Put the receiver in Single Mode (page 15) and then enable Shared View
(page 88).
25
Page 80

Chapter 2
Notes
Notes
26
Page 81
Finding Programs to Watch
Watching TV
What you’ll find in this chapter:
• CHANGING CHANNELS
• USING THE PROGRAM GUIDE
• USING THE BROWSE BANNER
• USING THEMES AND SEARCH
• USING PICTURE-IN-PICTURE
27
Page 82
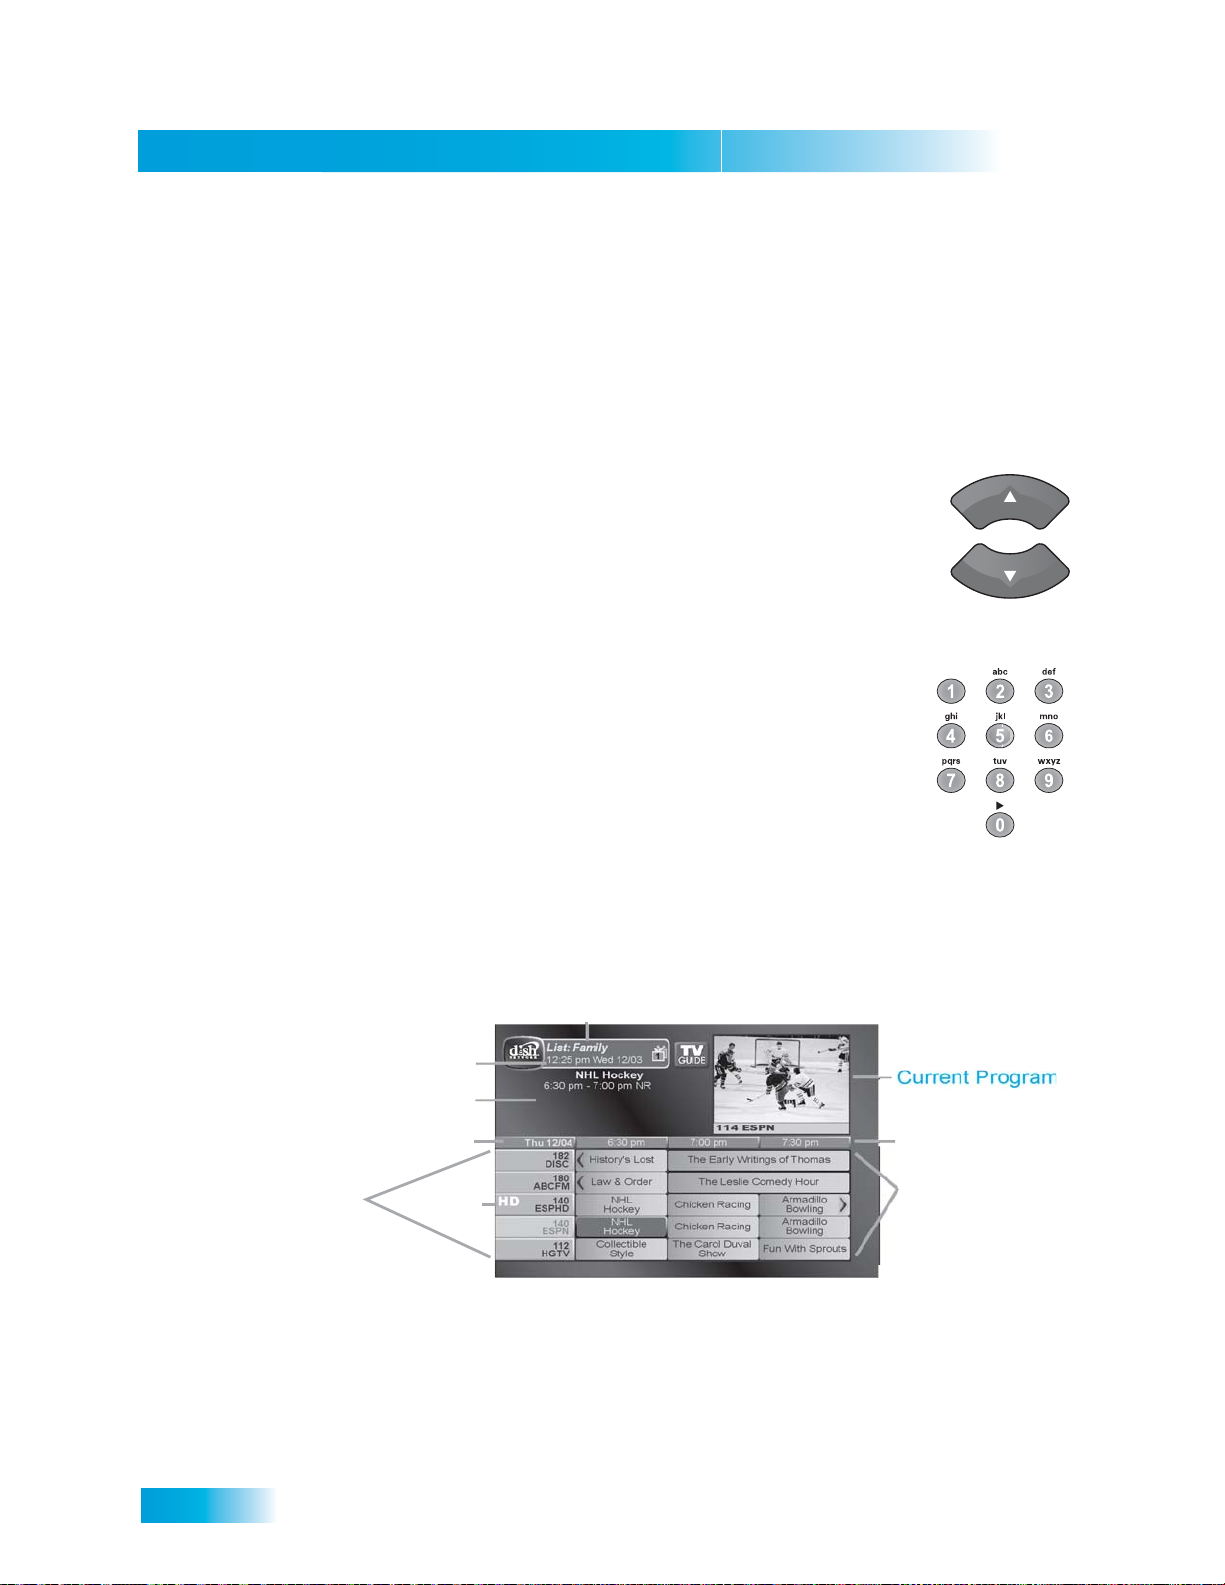
Chapter 3
Changing Channels
CHANGING CHANNELS
There are two basic ways to change the channel on your satellite TV receiver:
• Use UP and DOWN ARROWS on your remote control
• Enter a channel number with the NUMBER PAD
Using the Up and Down Arrows
While watching live TV, if you want to change the channels one at a time
to see what’s on, press the UP and DOWN ARROWS on your remote
control. You can also change the channels the same way using the UP
and DOWN ARROWS on the receiver front panel.
Entering a Channel Number
While watching live TV, if you know the specific channel you want to
watch, enter the channel number using the NUMBER PAD on the
remote control.
USING THE PROGRAM GUIDE
You can use the Program Guide to see what programs are on, to change channels, and to
set up recordings. To access the guide, press GUIDE.
Active Favorite
List
Current Date & Time
Program Information
Program Date
Channels
• A red background behind a channel usually means you have not subscribed to the
channel. After you subscribe to a channel, you can watch i t. To subscribe to a channel,
visit our website at dishnetwork.com or call 1-800-333-DISH (3474).
• A yellow background behind a channel is for digital over-the-air channels. See
page 110 for instructions to connect an over-the-air antenna to your receiver.
HD Channel
HD
Program Times
Programs
28
Page 83
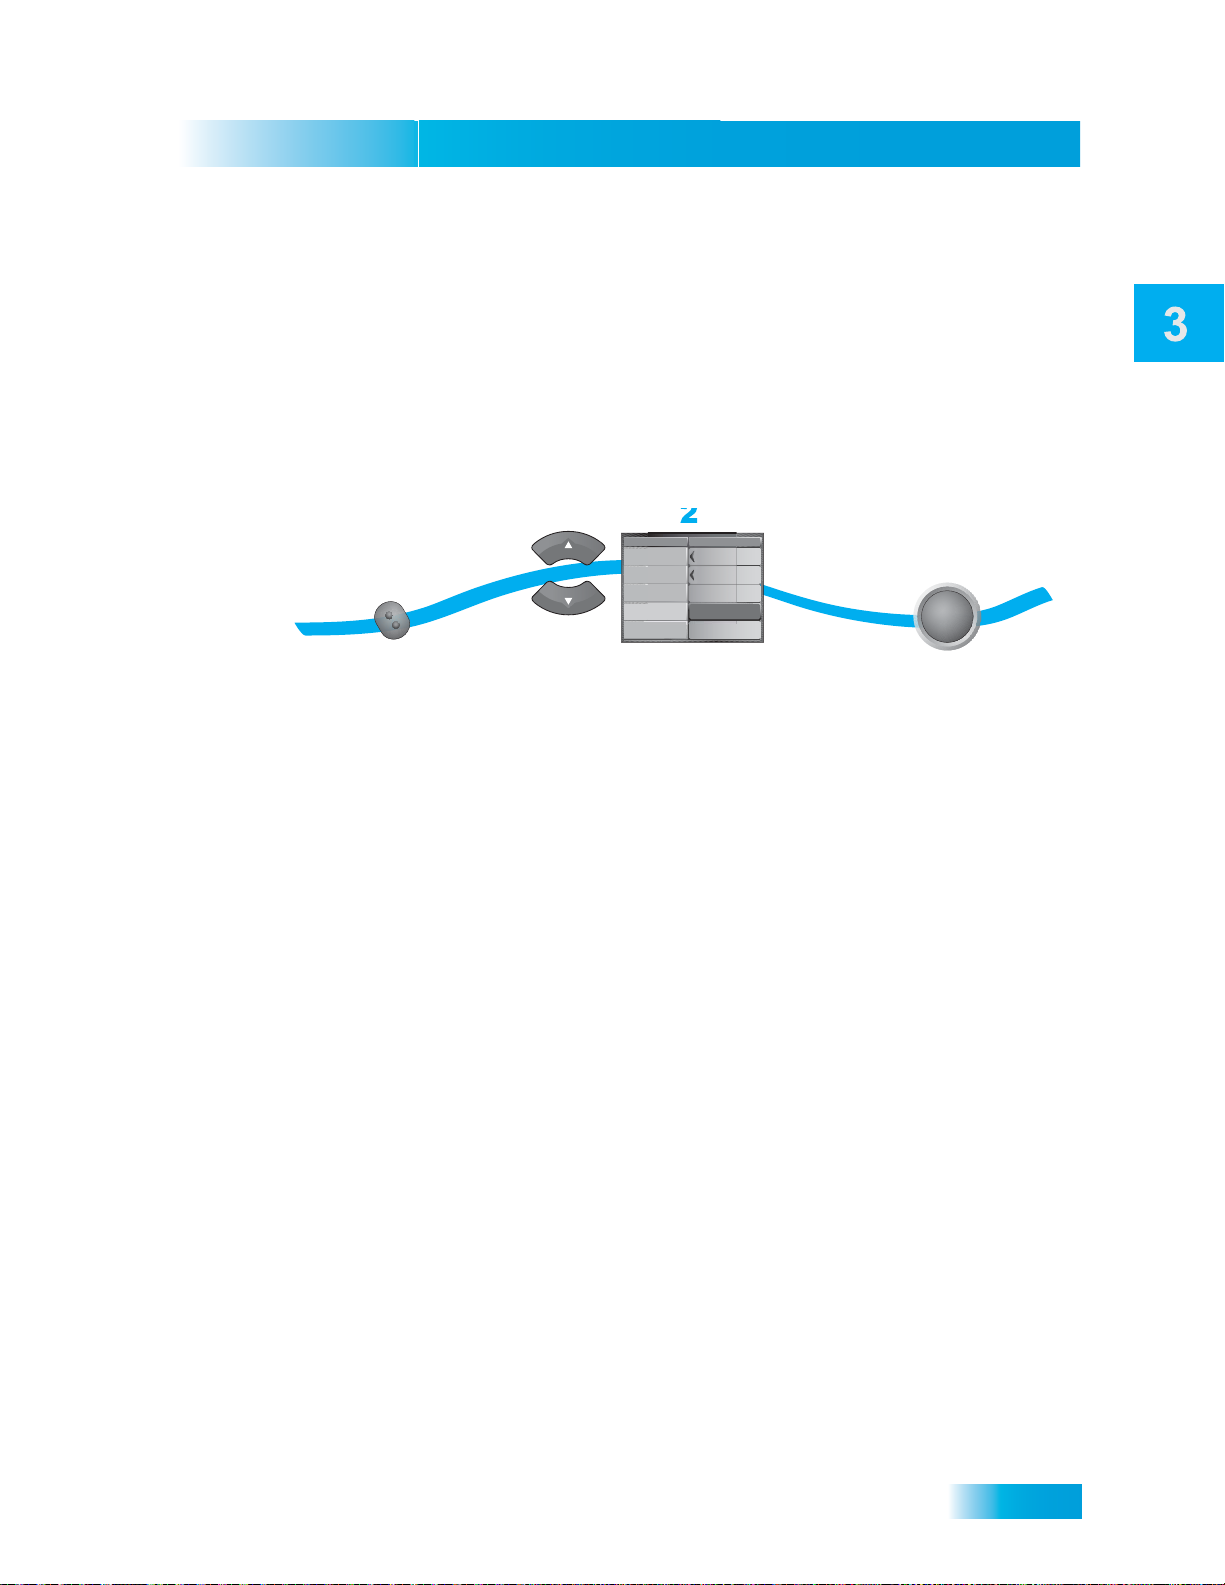
Finding Programs to Watch
Using the Program Guide
• A green background behind a channel means that you can use SELECT on your
remote control to confirm the channel to your subscription.
• The Program Guide shows which Favorites List is active. If All Chan is active, the
Program Guide shows all the channels. The All Sub list shows only the channels in
your subscription. The All HD list shows only the HD channels in your subscription.
If you set up another list, the Program Guide shows only the channels on that list. See
page 39 for information on Favorites Lists.
• The Program Guide shows programs on now and coming on within the next nine
days. The guide does not show programs that have ended.
2
120
HIST
118
A&E
116
114
ESPN
112
HGTV
6:30 pm
History's Lost
Law & Order
Jeopardy!
NHL
Hockey
Collectible
Style
3
SELECT
Press
SELECT
1
GUIDE
Press
GUIDE
Tue 1/22
MOMAX
Use the Up and Down
ARROWs to highlight
a program currently broadcasting
While using the Program Banner, you can:
• Press PAGE UP/PAGE DOWN to move a page at a time.
• Enter the number of hours you want to skip, and then press the RIGHT/LEFT ARROW
to move forward/back in the schedule.
• Press SKIP FWD/SKIP BACK to move forward or back a day at a time.
Note: You must be able to receive satellite programming from the 119°W orbital location
for the Program Guide to display up to nine days of program information. Otherwise, you
can only view up to two days of program information.
29
Page 84
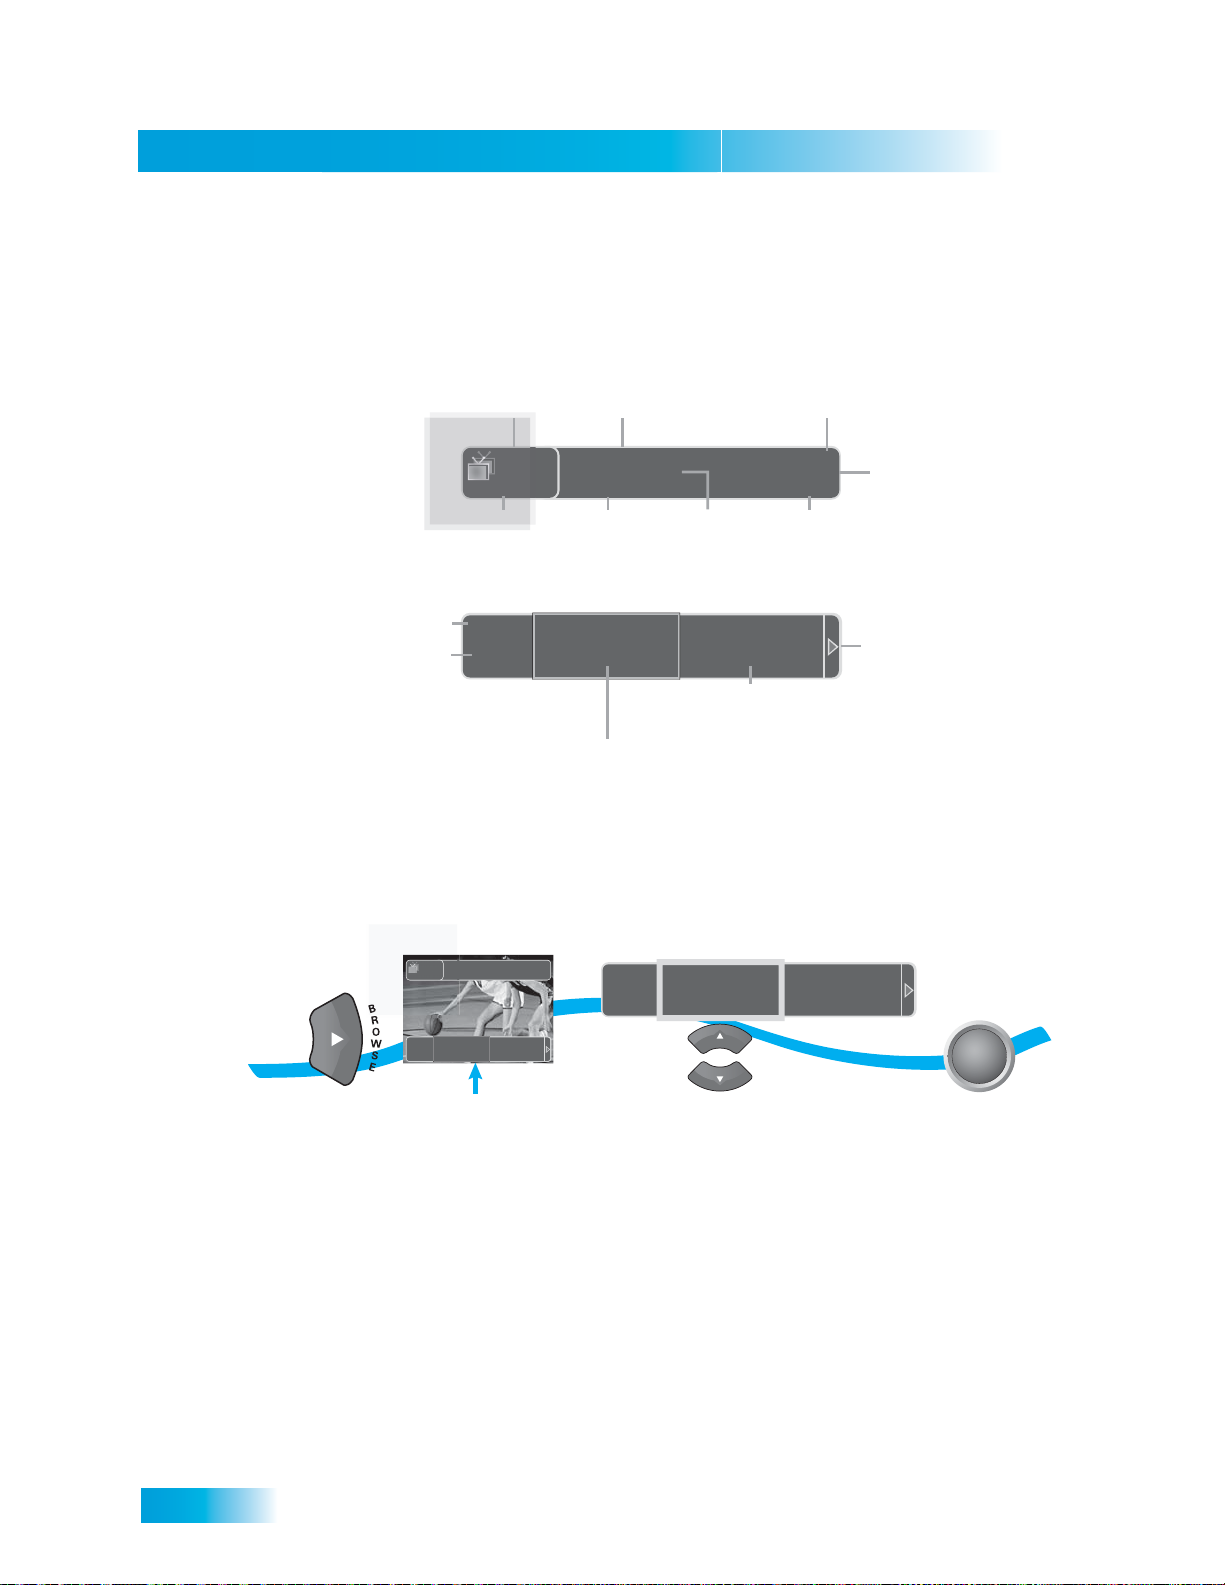
Chapter 3
Using the Browse Banner
USING THE BROWSE BANNER
Use the Browse Banner to see what other programs are on while not missin g the program
you are watching.
Current Date & Time
TUE 3/19
1
6:25 pm
Dual Mode
Receiver
Mode
Current
Program
Winnie the Pooh
6:00 pm - 9:30 pm
HBO2E
301
Current
Channel
Current
Program
Program
Rating
Time Left: 0:45
NR
List: Family
Active Favorites
List
Time Remaining
in Program
Time
Browse Date
Browse Channel
TUE 3/19
HBO2E
301
Winnie the Pooh
6:00 pm - 9:30 pm
NR
Flanders the Dog
9:30 pm - 12:00 am
NR
Indicates
future programs
can be viewed
Browse Next Program,
Program Time and Rating
Browse Current Program,
Program Time and Rating
When the Browse Banner is open, you will see the Program Banner information on the
current program at the top of the screen, and on the left side of the Browse Banner at the
bottom of the screen. At the bottom right of the screen is information on the program that
is coming on next on the same channel.
2
Hoop Dreams
6:00 pm - 9:30 pm
NR
Flanders the Dog
9:30 pm - 12:00 am
NR
3
SELECT
1
1
Dual Mode
TUE 3/19
HBO-E
TUE 3/19
6:25 pm
300
Hoop Dreams
6:00 pm - 9:30 pm
HBO2E
301
Leslie's Hockey Tips
6:00 pm - 9:30 pm
NR
Flanders the Dog
9:30 pm - 12:00 am
NR
List: Family
NR
TUE 3/19
300
HBO-E
30
While watching a
program, press
BROWSE
Use the UP or DOWN
ARROWS to
browse current
programs
Press SELECT
Page 85

USING THEMES AND SEARCH
Use the Themes and Search Feature to find exactly what you want to watch. This section
shows you how to use Themes to find your favorite programs by type (for example,
movies, sports, news), or by keyword (if you’re looking for a particular actor or
description).
You can list programs by the theme of their contents, (for example, just movies or just
sports). Use Themes and Search to quickly find programs based on:
•Theme. You can look for something to watch by the program’ s them e ( Movies, News,
Sports, etc.), which makes your search easier and your television viewing more
enjoyable.
• Sub-theme. This selection helps you narrow the type of program. The Sub-Theme
feature is different for each Theme category.
•Keyword. Use this selection if you want to be more specific (for example, acto r or
description). You can search fo r som e th ing to watch just by Keyword. This feature
also categorizes programs on over-the-air channels (if an over-the-air antenna is connected to the receiver as described on page 110). You can search for events two
ways:
Finding Programs to Watch
Using Themes and Search
– Select Title to search for the words that appear in the title of a program.
– Select Info to search for words tha t ar e in th e prog ra m des crip tio n or titl e.
Enter the Keyword(s) in the Search Criteria Field in one of two ways:
– Use the virtual keyboard.
– Use the letters on the NUMBER PAD.
Note: See page 23 for information on using these features.
31
Page 86
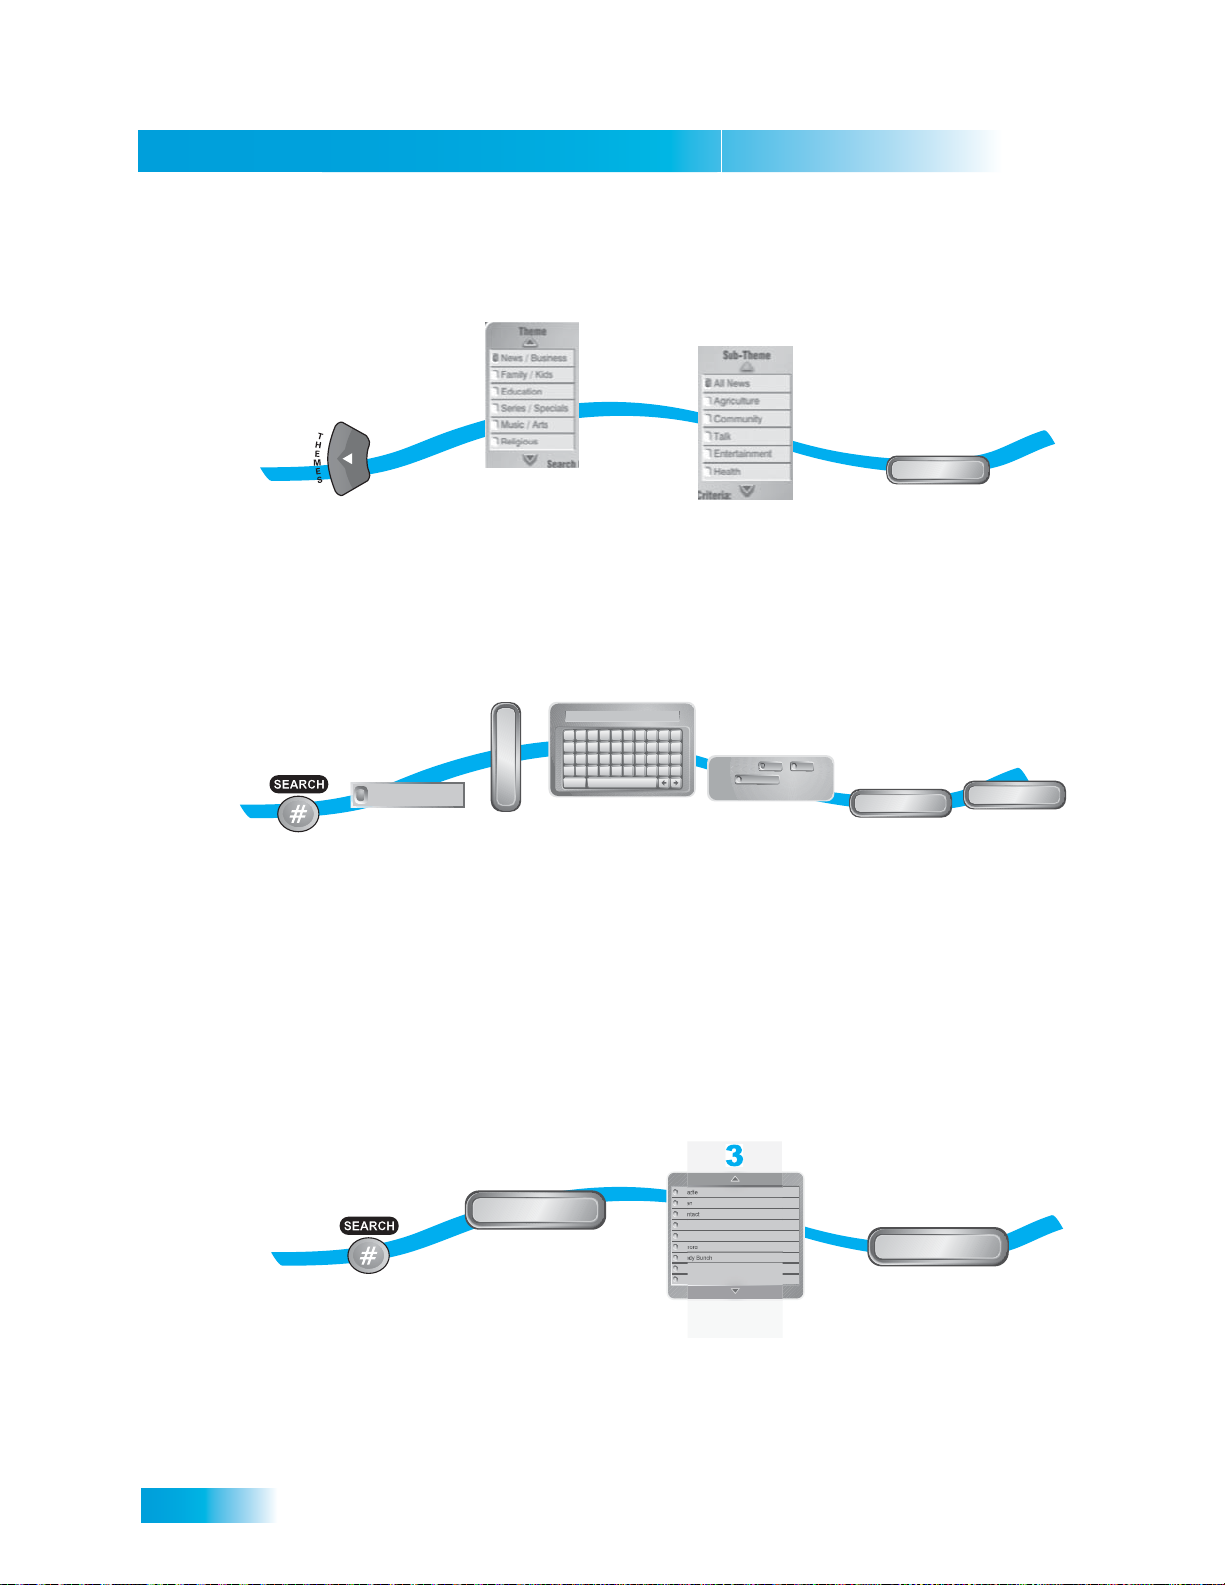
Chapter 3
Using Themes and Search
Using Themes
1
Press
THEMES
Using Keywords
2
Select
a theme
3
Select
a sub-theme
4
Get Results
Select
Get Results
1
Press
SEARCH
2
All Themes
Select
All Themes
3
K
E
Y
W
O
R
D
Select
Keyword
4
Cheers_
A B C D E F G H I J
K L M N O P Q R S T
U V W X Y Z ' - . &
1 2 3 4 5 6 7 8 9 0
Space
Back
Enter keyword
search criteria
5-6
or
Exact Match
Info
Title
Search by:
and (optional)
Select Title or Info
(and Exact Match if
necessary)
7
Done
Select
Done
8
Get Results
Get Results
Using History
After you have searched for programs or keywords, your receiver keeps a history. In Dual
Mode, TV1 and TV2 keep separate Search History informatio n. In Single Mode, only
TV1’s Search History is available. You can use Search History to research programming
instead of typing the information again.
Note: Use the Edit or Delete options to change or delete search keywords.
3
Charlie
Alien
Contact
ER
Pooh Bear
Clifford
Brady Bunch
Select item
from the list
4
Search
Select Search
1
Press
SEARCH
2
History
Select History
Select
32
Page 87
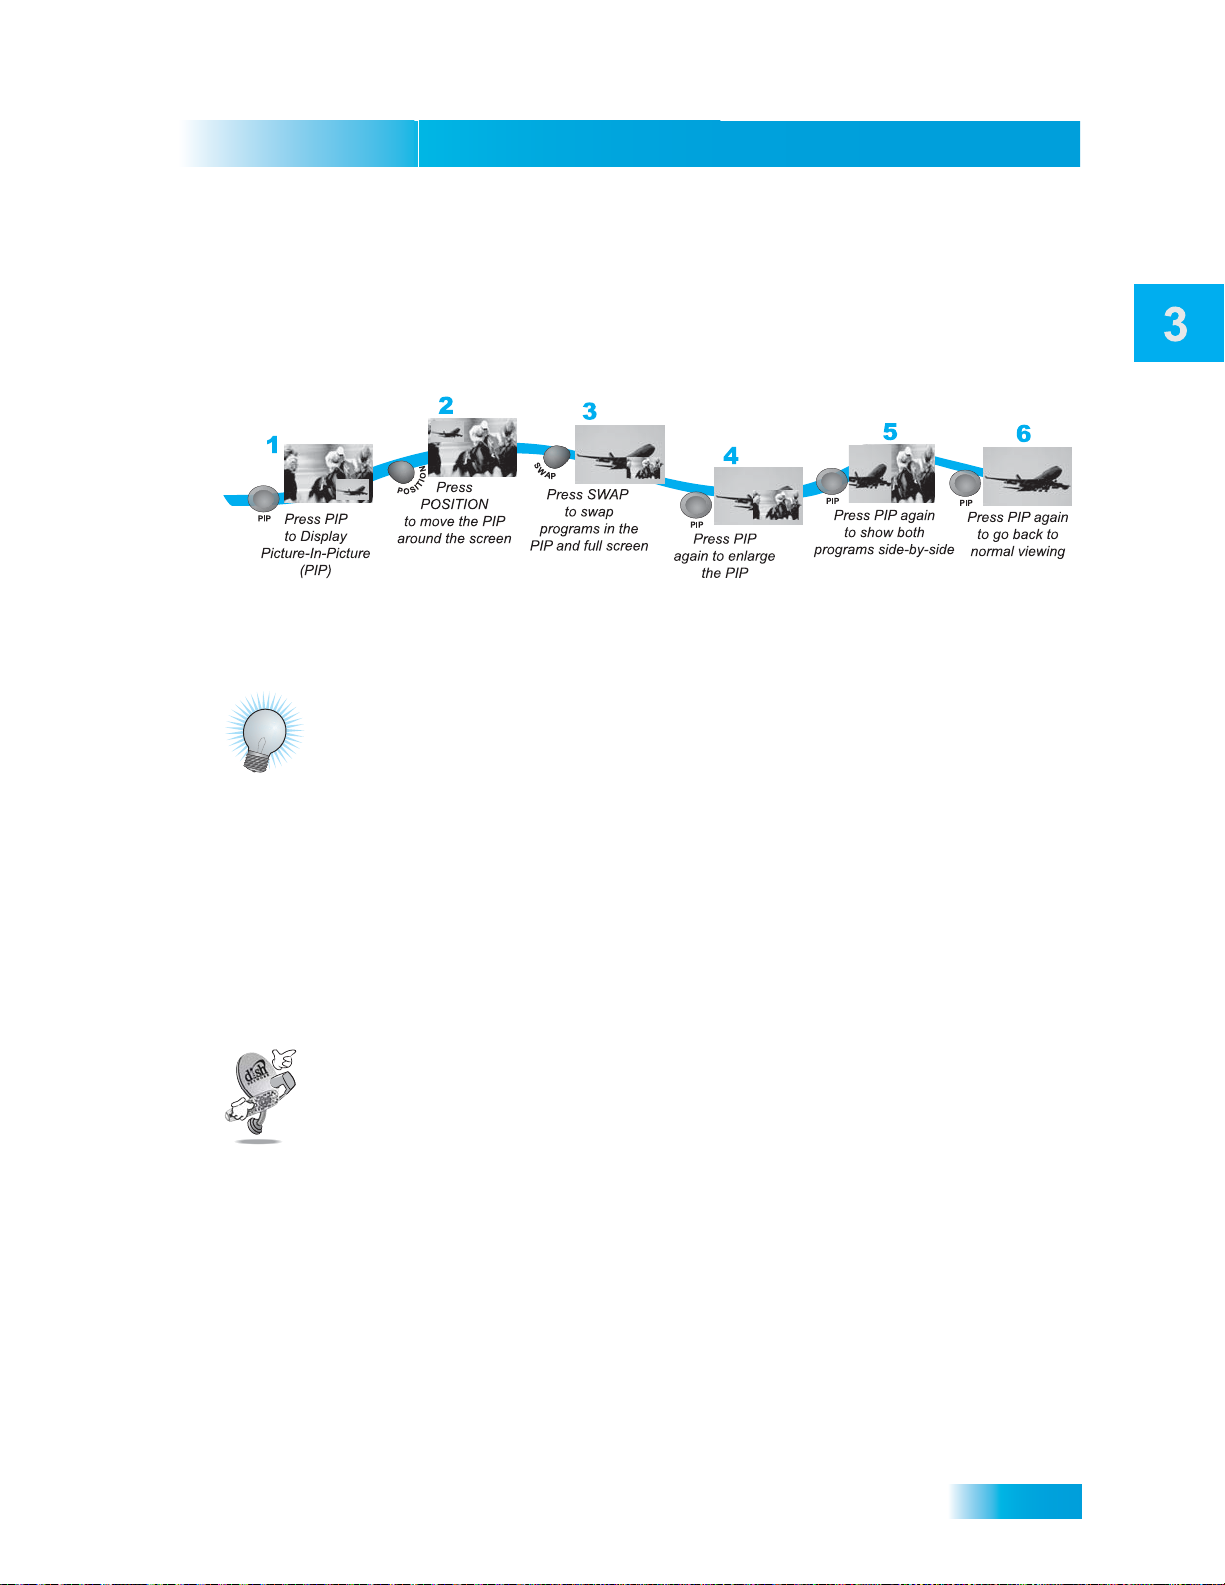
USING PICTURE-IN-PICTURE
Picture-In-Picture (PIP) lets you watch two programs at once while in Single Mode. The
following instructions describe how to use PIP (se e page 15 for inst ru ctio n s on ch an gin g
to Single Mode).
Finding Programs to Watch
Using Picture-In-Picture
TIPS
• Press INFO to get more information about the program you highlighted.
• Press VIEW LIVE TV to cancel almost any screen and retu rn to live TV.
• Press SWAP, without pressing PIP first, to switch between the two tuners in Single
Mode.
• Press POSITION (without pressing PIP first) to display side-by-side programs.
QUESTIONS
• How can I customize the Program Guide? You can set up a Favorites List as
described on page 41. You can ch ang e how th e Prog ram Guide is di splayed ( suc h as
size of text, or number of programming hours displayed) as described on page 94.
• Why does my Program Guide show only two days of programming? Your
receiver might not be connected to a signal from the 119°W satellite. Refer to Point
Dish and Check Switch on page 117 to see if you’re receiving the 119°W signal.
33
Page 88

Chapter 3
Questions
• Why are some of my channels missing?
– You may have locked or hidden the channels. See Chapter 6 - Locks on page 45
for information on locking and unlocking the receiver.
– You may have the wrong list showing in the Program Guide. Press GUIDE to ope n
the Program Guide. Press GUIDE again to select the next Favorites List. Press
GUIDE repeatedly to scan through all the available lists. See Favorites Lists on
page 39 for more information.
• Which remote do I use?
– Dual Mode: Use Remote Control 1 for the (nearby TV) and Remote Control 2 for
the remote TV.
– Single Mode: Both remotes control the receiver.
• Why isn’t PIP working? Y our re ceiver is probably in Dual Mode. Press MODE on the
front panel to put the receiver in Single Mo de if you’d like to use PIP. See page 15 for
instructions on Single Mode.
34
Page 89
Pay Per Programs
Available pay per programs
What you’ll find in this chapter:
• PAY-PER-VIEW
• DISH ON DEMAND
35
Page 90
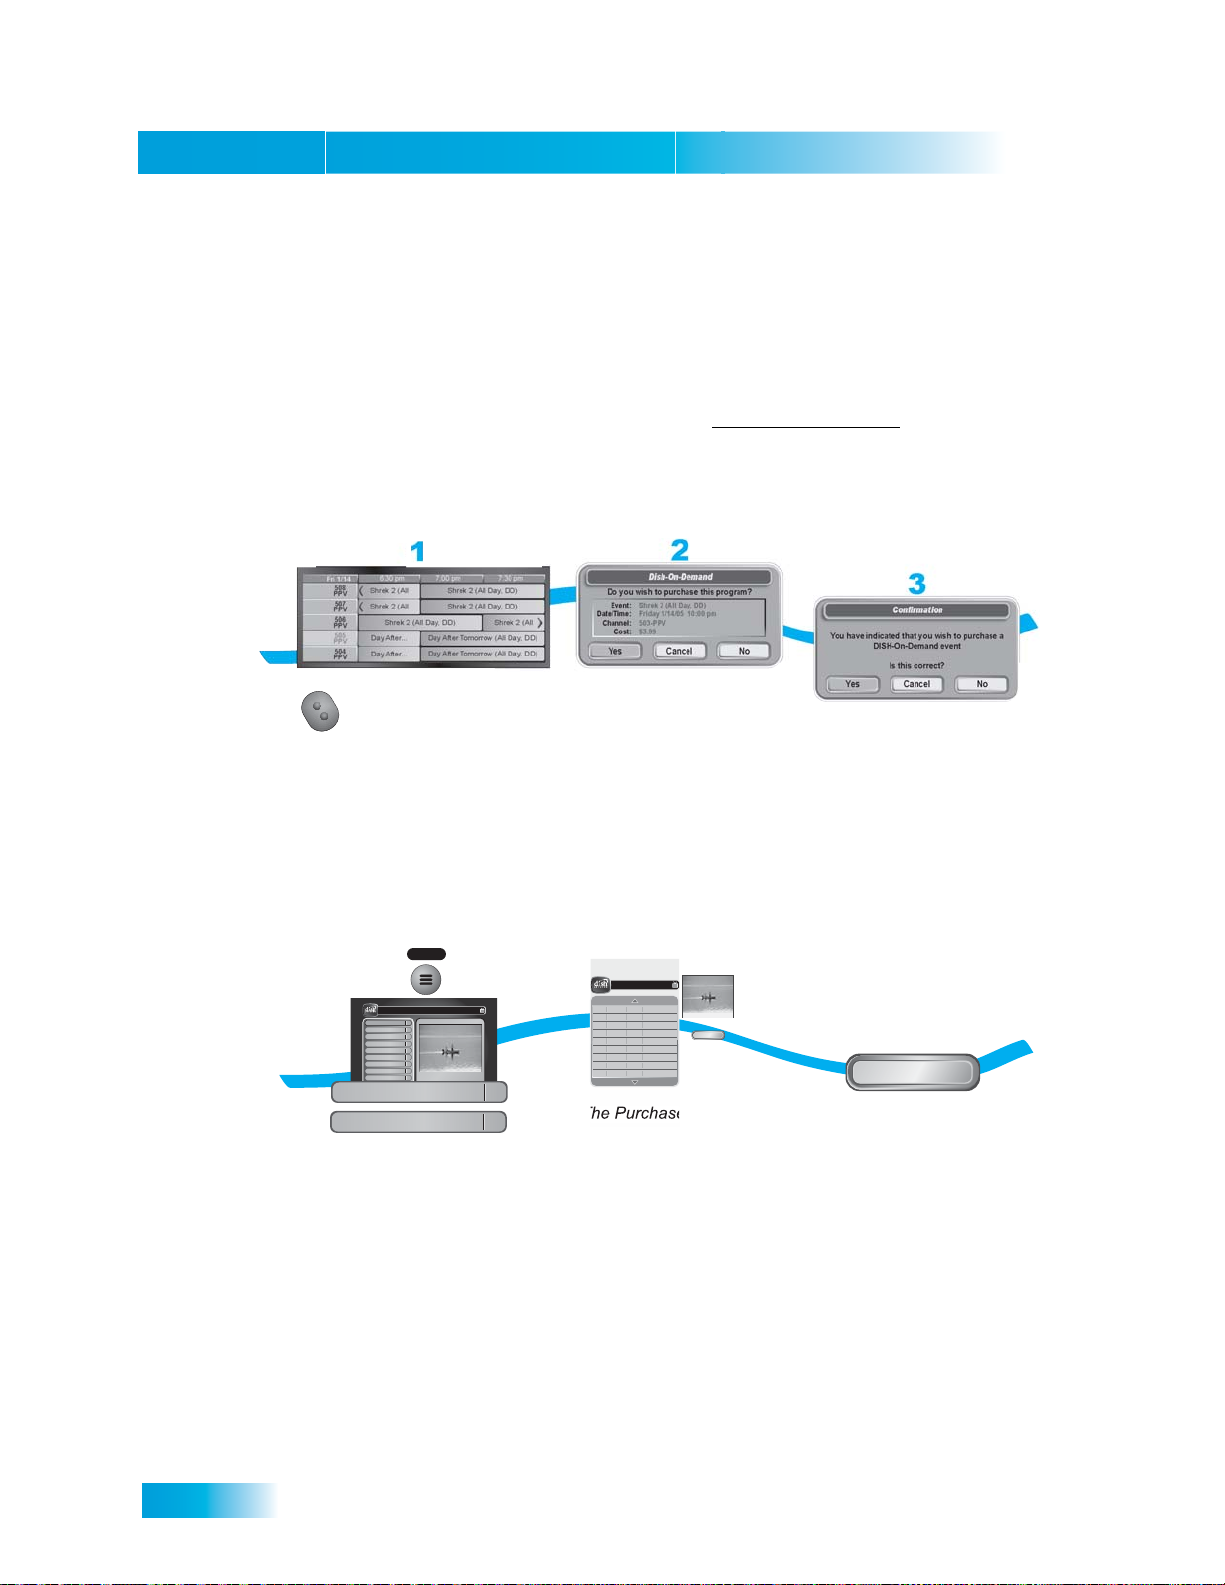
Chapter 4
Pay-Per-View
PAY-PER-VIEW
Buying a Pay-Per-View Program
To buy Pay-Per-View programs using your remote control, you must connect the receiver
to an active phone line. After you buy a Pay-Per-View program, you can watch it on all of
the receivers on your DISH Network account. Using the remote co ntrol, you can orde r the
exact same program for each receiver but you pay fo r the program only once. However,
replays of programs are separate events. Go to dishnetwork.com/ppv
for a description of
the types of Pay-Per-View events.
6:30 pm 7:00 pm 7:30 pm
Fri 1/14
508
Shrek 2 (All
PPV
507
Shrek 2 (All
PPV
506
Shrek 2 (All Day, DD)
PPV
NHL
505
Day After...
PPV
Hockey
504
Day After...
PPV
GUIDE
Press GUIDE and
select a Pay-Per-View
program from the
Program Guide
Shrek 2 (All Day, DD)
Shrek 2 (All Day, DD)
Day After Tomorrow (All Day, DD)
Day After Tomorrow (All Day, DD)
Shrek 2 (All
Select Yes to
buy the program
Confirmation
You have indicated that you wish to purchase a
DISH-On-Demand event
Is this correct?
Yes Cancel No
Select Yes to confirm you want
to buy the program
Note: Once you confirm an order for a Pay-Per-View program, you cannot cancel the
order and you will be billed for it.
Reviewing Pay-Per-View Purchases
1
MENU
Purchase History
Past & Pending Tue 1/11
1
2
3
4
5
6
7
8
0
114 E!114 E!
Celebrity Homes
5:30 pm - 7:00 pm NR
Thursday, January 20
6:25 pm
Main Menu
Program Guide
Themes & Search
Customer Support
Multimedia
Locks
System Setup
Daily Schedule
Preferences
Cancel
1
System Setup
Purchase History
Press MENU and select
6
5
01/17 12:00pm $3.99 Shrek 2
01/17 2:00pm $3.99 White Chicks
The Purchase History
screen will display
System Setup, then Purchase History
DISH ON DEMAND
DISH On Demand is DISH Network’s Video On Demand service. Enjoy Movies On
Demand and other exciting DISH On Demand programs. With Movies On Demand, you
have immediate access to the newest movies on DISH Network. You can even use your
DVR buttons (PAUSE, FWD, and BACK) to control your viewing experience.
1
5:18pm
114 E!
Done
2
Done
Select Done
36
Page 91
Pay Per Programs
Tips
The following are details about this important feature:
• You can repeatedly watch a rented program for the period of time (for example, 24
hours) listed. Rented programs cannot be saved to the My Recordings list.
• The Play List shows you how much time you have remaining on your DISH On
Demand Programs.
• You can use Pay-Per-View Locks and Ratings Locks to control the programs your
family views. See Using Locks on page 43.
• Be sure to keep Updates and Inactivity Standby enabled so that your receiver always
has the latest DISH On Demand programs. See Updates on page 96.
• You can review what you have rented during the last 30-60 days by looking in
Purchase History.
• The programs you rent will appear on your DISH Network bill.
• For more information, go to dishnetwork.com/ondemand
To order a DISH On Demand program:
1 Press the DVR button to open DISH On Demand.
2 Select Movies & More.
3 Use the LEFT and RIGHT ARROW buttons to scroll through the featured movies or look
for programs in View All.
4 Select the program you want to watch.
5 Select Rent.
Note: When you confirm an order for a DISH On Demand program, you cannot cancel the
order and you will be billed for it.
TIPS
• You can set up the receiver to record Pay-Per-View programs. See page 65 for more
details. You cannot record DISH On Demand programs.
• You can prevent others from purchasing Pay-Per-View programs by using locks (see
page 47).
• Keep an active phone line connected to your receiver so you can order Pay-Per-View
programs with your remote control.
37
Page 92

Chapter 4
Questions
SYSTEM INFO
QUESTIONS
• How can I order an event for all my receivers?
– Order on each receiver, one at a time with the remote control. Make sure an active
phone line is connected to each receiver.
– Order the event over the phone 1-877-DISH-PPV (347-4778). Charges may
apply.
– Order the event online at www.dishnetwork.com/ppv
– Order the event over the phone at 1-800-333-DISH. Charges may apply.
• I ordered a Pay-Per-View but can only see it on one receiver. Some Pay-Per-View
programs are restricted to one receiver per account.
• Will I be charged more than once for ord ering the same Pay-Per-View on two or
more receivers? If you’re using the remote control, you won’t be charged more than
once as long as it is the same exact event (for example, at the same time or All Day
events).
• Why doesn’t my Program Guide show any Pay-Per-View channels? You may be
using a Favorites List that doesn’t include Pay-Per-View channels. Press GUIDE to
open the Program Guide and then press GUIDE again until you see All Chan in the
upper left corner of the Program Guide. See Chapter 5 - Favor ites Lists on page 39 for
more information on using Favorites Lists. You may have Pay-Per-View channels
locked and hidden. See Chapter 6 - Locks on page 43.
• Why are some Pay-Per-View programs blacked out? Sporting events and other
programs are sometimes blacked out bec ause of local restrictions.
• Why did my all-day Pay-Per-View program shut off while I was watching it? The
all-day events run from 3 AM to 3 AM (Mountain Time).
38
Page 93
Favorites Lists
Setting Up Your Favorites Lists
What you’ll find in this chapter:
• WHAT ARE FAVORITES LISTS?
• C
REATING OR CHANGING FAVORITES LISTS
• NAMING FAVORITES LISTS
• USING FAVORITES LISTS
39
Page 94

Chapter 5
What are Favorites Lists?
WHAT ARE FAVORITES LISTS?
Favorites Lists are lists of your favorite channels. You can create and change the lists
yourself, adding and removing channels as you wish. Your favorite channels can be
grouped in as many as to four lists for TV1 and four lists for TV2 (in Dual Mode).
• When using a Favorites List, the Program Guide and Br owse Banner display only the
channels in that Favorites List. Also, when you use the remote control UP or DOWN
ARROW to change channels, the receiver skips channels that are not on the list.
Unlisted channels are still accessible by entering the channel number directly.
• The All Chan list contains all the channels, including channels not in your current
subscription. You cannot make any changes to the All Chan list.
• The All Sub list contains all the channels in your subscription. You cannot make any
changes to the All Sub list, except by changing your subscription.
• The All HD list contains all of the HD channels in your subscription.
• Each Favorites List has a unique color in the Program Guide. You can give each list a
name. When you first get the receiver, the four lists are named List 1, List 2, List 3,
and List 4. The lists are empty until you add channels to them.
• When you put the receiver in Single Mode, the Favorites Lists for only TV1 are
available. However, when you go back to Dual Mode, the Favorites Lists for TV2 are
available again.
• If you choose a program using Themes or by entering a channel number using the
remote control, the receiver tunes to the channel for that program whether or not that
channel is on the active Favorites List.
• Y ou can include over -the-air channels in your Favorites List s if an over-the-air antenna
is connected to the receiver. See page 110 for instructions on connecting an over-theair antenna.
40
Page 95
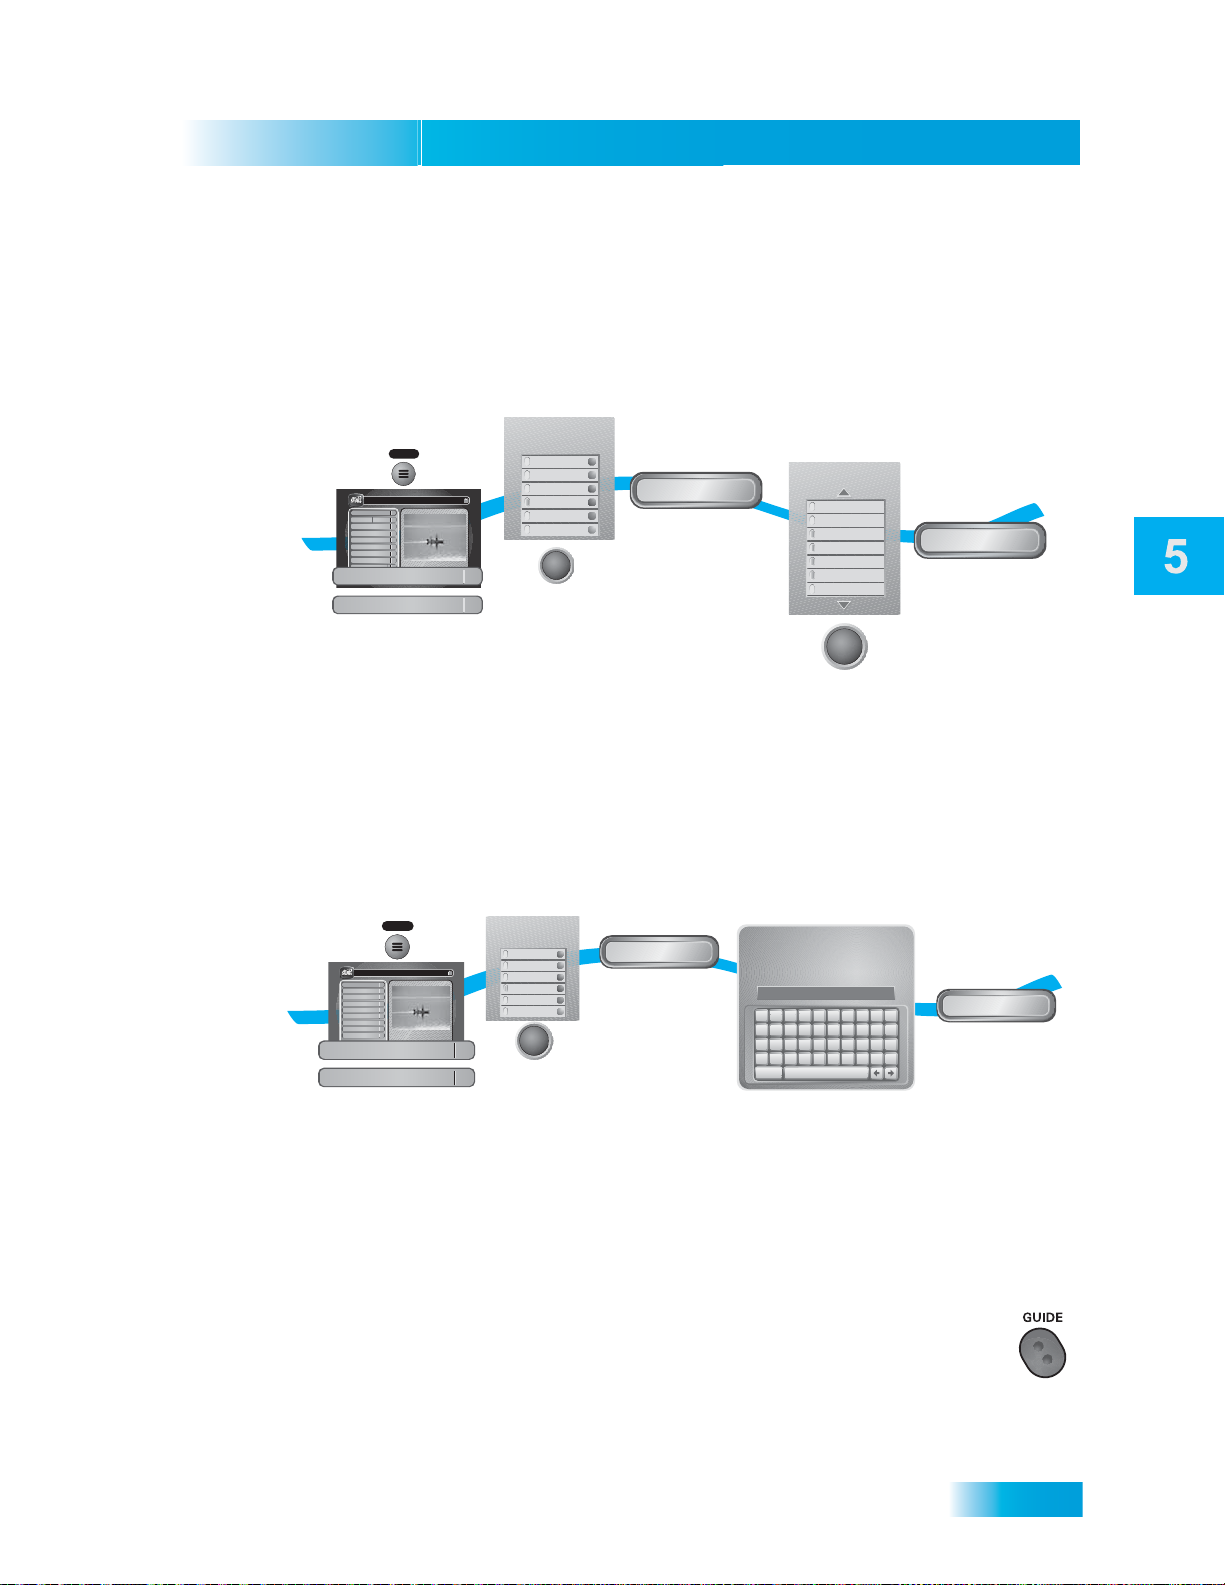
Creating or Changing Favorites Lists
1
2
3
4
5
Press MENU,
select Preferences,
then select Favorites
Select list
to change
Select Edit
Name
Enter the name
for the list
Select Done
MENU
All Chan
All Sub
All HD
List 1
List 2
List 3
Currently Active Favorites
All Chan
Edit Name
Done
A B C D E F G H I J
K L M N O P Q R S T
U V W X Y Z ' - . &
1 2 3 4 5 6 7 8 9 0
Space
Back
Family_
Use the Alpha-Numeric Pad on the
remote or the On Screen Keyboard
to edit Favorite List Name
Enter List Name:
Program Guide
1
Themes & Search
2
Customer Support
3
Multimedia
4
Locks
5
System Setup
6
Daily Schedule
7
Preferences
8
Cancel
0
1
Main Menu
Thursday, January 20
114 E!114 E!
6:25 pm
Celebrity Homes
5:30 pm - 7:00 pm NR
Preferences
8
Favorites
3
SELECT
CREATING OR CHANGING FAVORITES LISTS
You can create, add channels to, and remove channels from a Favorites List. When you
use your Favorites List only those channels in the list ar e shown in the Program Guide and
Browse Banner.
2
Currently Active Favorites
1
MENU
1
2
3
4
5
6
7
8
0
114 E!114 E!
Celebrity Homes
5:30 pm - 7:00 pm NR
Thursday, January 20
6:25 pm
Main Menu
Program Guide
Themes & Search
Customer Support
Multimedia
Locks
System Setup
Daily Schedule
Preferences
Cancel
Preferences
Favorites
Press the MENU,
select Preferences,
then Favorites
1
8
3
All Chan
All Chan
All Sub
All HD
List 1
List 2
List 3
SELECT
Select list to
create or change
3
Modify List
Select Modify List
4-7
Modify Selected List:
List 1
632 - MLB
631 - MLB
630 - MLB
629 - MLB
628 - MLB
627 - MLB
626 - MLB
SELECT
Add or delete channels
from the list
Favorites Lists
8
Done
Select Done
NAMING FAVORITES LISTS
You can name your Favorites Lists whatever you want, up to eight characters long.
USING FAVORITES LISTS
Press GUIDE to open the Program Guide. Press GUIDE again to select the next
Favorites List. Press GUIDE repeatedly to scan through all the available lists.
41
Page 96

Chapter 5
Tips
TIPS
• Two lists cannot have the same name. For example, on TV1, you cannot have two
lists named “Dad’s List.” However, TV1 and TV2 can have lists with the same names.
• While in the program guide, press GUIDE to switch Favorites Lists functions only if
you have added channels to the Favorites List. If you have not created a Favorites
List, pressing GUIDE switches the receiver between the All Chan, All Sub, and All HD
Lists.
• When you put the receiver in Single Mode, the Favorites Lists for TV2 are not
available. However, when you go back to Dual Mode, the Favorites Lists for TV2 are
available again.
• Locked and hidden channels do not display in Favorites Lists.
QUESTIONS
• Why are channels missing from the Program Guide?
– You might have a Favorites List that does not contain those channels. Press
GUIDE until the All Chan or All Sub list displays.
– You might have channels locked or hidden.
• Why are TV2’s Favorit es Lists miss ing? When the receiver is in Single Mod e, TV2’s
Favorites Lists are not available.
42
Page 97
Locks
Securing Your Receiver and Account
What you’ll find in this chapter:
• WHAT ARE LOCKS?
OCKING AND UNLOCKING YOUR RECEIVER
• L
• CREATING OR CHANGING RATINGS LOCKS
• CREATING OR CHANGING CHANNEL LOCKS
• LOCKING OR UNLOCKING PAY-PER-VIEW
HANNELS
C
• HIDING ADULT CONTENT OR LOCKED
HANNELS
C
• LOCKING OR UNLOCKING THE FRONT PANEL
43
Page 98
Chapter 6
What are Locks?
What are Locks?
Locks allow you to password-protect programming based on ratings, or on a channel-by-channel
basis. When you have locked the receiver:
• If you try to access a locked item or open the Locks menu, the receiver displays a message
asking you to enter the password.
• The receiver permits three attempts to enter the correct password. If you fail to enter the
correct password, the receiver does not allow you to try again for several minutes.
• If you enter the correct password, you can access the locked item or open the Locks menu.
• If you exit a locked item or close the Locks menu, you must enter the password to access the
item.
• If you want to enable the TV1 Out on the Modulator Setup screen (see page 88), you must
enter the password to continue.
• When the receiver is in Single Mode, TV2’s locks are not available. See Switching Between
Dual and Single Mode on page 15.
Locks for programming on the nearby TV (TV1) are set using the TV1 menus. Locks for
programming on the remote TVs (TV2) are set using the TV2 menus. Locks set for TV1
programming are separate from locks set for TV2 programming. The information in this chapter
applies to locks set by either TV1 or TV2 menus.
When you unlock programming delivered through the
output to your in-home cabling system, you are allowing all TVs connected to
your in-home cabling system to have access to this programming. In this ca se,
you must rely on the V-Chip technology and settings in the individual TVs to
prevent viewing of inappropriate programming. Consult your TV user’s guides
for instructions to set up V-Chip protection.
Locking the receiver is a two-step process:
1. Create the locks that you want.
2. Lock the receiver. When the receiver is locked, anyone who wants to access locked items
must enter the password.
HOME DISTRIBUTION
44
Page 99
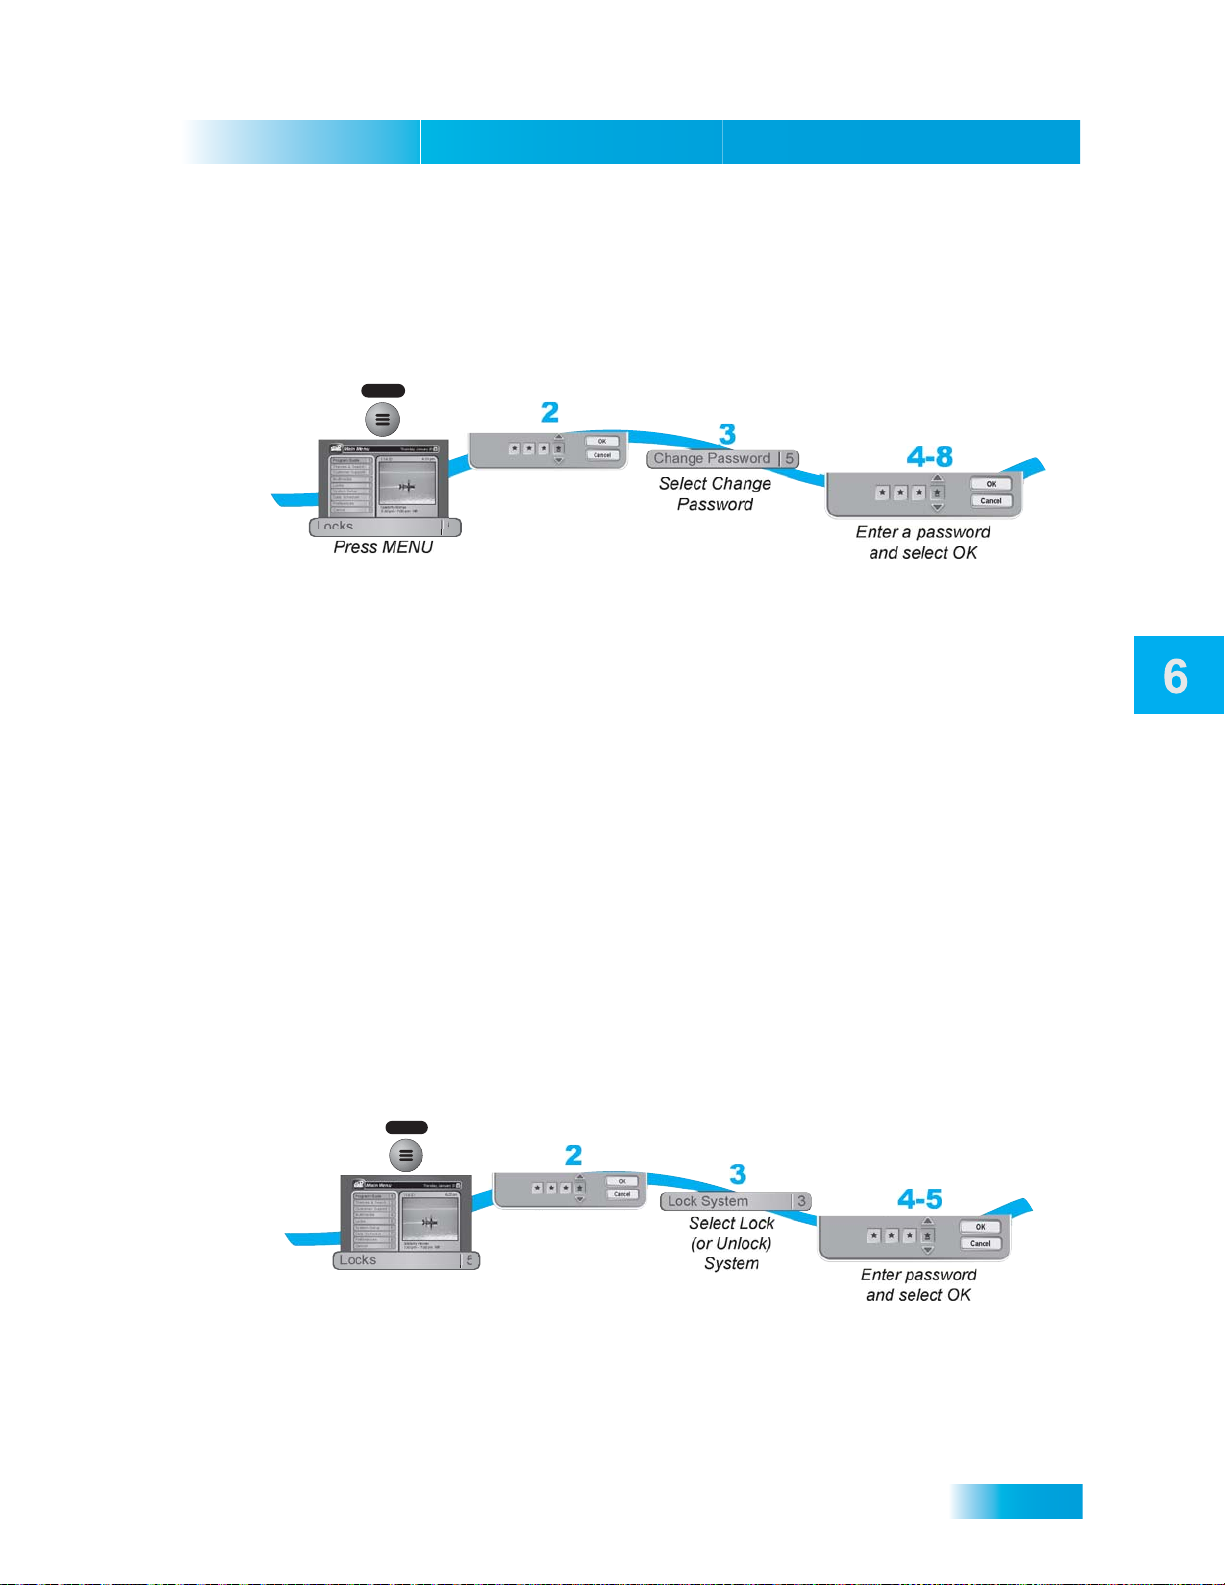
Locks
Creating or Changing a Password
Creating or Changing a Password
Set up your password before using the receiver locks.
1
MENU
Thursday, January 20
Main Menu
114 E!114 E!
Program Guide
1
Themes & Search
2
Customer Support
3
Multimedia
4
Locks
5
System Setup
6
Daily Schedule
7
Preferences
8
Celebrity Homes
Cancel
0
5:30 pm - 7:00 pm NR
Locks
and select Locks
1. Press MENU and select Locks.
2. If the receiver is locked, enter the password using the NUMBER PAD. The receiver displays
stars (*) as you enter the digits of the password. Select OK.
3. Select Change Password.
4. Enter the current password using the NUMBER PAD. Select OK.
5. Press SELECT.
6. Enter the new password using the NUMBER PAD. Select OK.
7. Enter the new password again for confirmation, using the NUMBER PAD. The receiver
displays stars (*) as you enter the digits of the password. Select OK.
8. Memorize the new password. From now on, enter this password to lock or unlock the receiver.
If you forget your password, you will need to speak with a Customer Service Representative.
Enter password
if requested
5
Locking and Unlocking Your Receiver
You must lock the receiver for any receiver locks you set to take effect. Locking the receiver also
locks TV1’s modulator output (see page 88). T o lock the r eceiver, you must first create a password
(see Creating or Changing a Password in the previous section). Be sure to refer to this section
whenever you set any lock on your receiver.
1
MENU
Thursday, January 20
Main Menu
Program Guide
Themes & Search
Customer Support
Multimedia
Locks
System Setup
Daily Schedule
Preferences
Cancel
Locks
Press MENU
and select Locks
1. Press MENU and select Locks.
2. If the receiver is locked, enter the password using the NUMBER PAD. The receiver displays
stars (*) as you enter the digits of the password. Select OK.
3. Select Lock System or Unlock System. If you are locking the receiver, the receiver displays a
message prompting you to enter a password.
1
2
3
4
5
6
7
8
0
114 E!114 E!
Celebrity Homes
5:30 pm - 7:00 pm NR
6:25 pm
Enter password
if requested
5
45
Page 100
Chapter 6
Creating or Changing Ratings Locks
4. Enter a password, using the NUMBER PAD. The receiver displays stars (*) as you enter the
digits of the password. Select OK.
5. Confirm the password by re-entering it. Select OK. All the locks you have set are now in effect.
Creating or Changing Ratings Locks
You can lock programs based on Motion Picture Association of America (MPAA) ratings (PG, PG
13, etc.) and expanded ratings (violence, language, etc.).
1
MENU
Thursday, January 20
Main Menu
114 E!114 E!
Program Guide
1
Themes & Search
2
Customer Support
3
Multimedia
4
Locks
5
System Setup
6
Daily Schedule
7
Preferences
8
Celebrity Homes
Cancel
0
5:30 pm - 7:00 pm NR
Locks
Press MENU
and select Locks
5
Enter
password
if requested
3
Ratings Locks
Select Ratings
Locks
1
4-6
Select locks based upon rating
Ratings Expanded Ratings
PG
PG 13
R
NC-17
NR/AO
Violence
Language
Nudity
Sexual Content
Select criteria for
the locks
7
Done
Select Done
1. Press MENU and select Locks.
2. If the receiver is locked, enter the password using the NUMBER PAD. The receiver displays
stars (*) as you enter the digits of the password. Select OK.
3. Select Ratings Locks.
4. Highlight the least restrictive rating that you want to block. Press SELECT to lock the
highlighted rating and all ratings more restrictive than it (for example, lockin g PG 13
automatically locks R and NC-17).
5. Select the expanded rating code(s), if you want to also lock these ratings.
6. To unlock a rating code, select the code.
7. Select Done. Make sure the receiver is locked as described on page 45.
46
 Loading...