


!
micro.clock
User Manual
v1.01a

of 2 8
Revision History:
v1.01a 12/14/18
corrected an error in the MultiJack DIP switch section
v1.01 3/21/18
corrected errors in setup menu description
v1.00 11/30/17
Initial Release !
Disaster Area Designs micro.clock Gen3

of 3 8
micro.clock User Manual
Thanks for purchasing a Disaster Area Designs micro.clock controller. The micro.clock is an ultra-compact pedalboard clock source
and tap tempo controller, designed to help you synchronize the pedals in your rig.
At its heart, the micro.clock has a master clock that operates at any tempo from 30 to 300 beats per minute. The micro.clock will send
out this clock source over MIDI, and will also generate tap tempo signals to interface with your non-MIDI pedals. The micro.clock is
capable of controlling most pedals and rack units that have a tap tempo input jack.
Let’s take a look at the micro.clock and see what it can do for your rig:
Disaster Area Designs micro.clock Gen3
Rotary Encoder
Blinks to show tempo
Tur n this to set the BPM or
change the current setting
Tap to edit subdivisions or
configure outputs
Hold to save the current
settings to a preset
LED Display
Shows current tempo or output
setting
Foot Switch
Tap to set tempo
Hold to advance to next preset
Tap Tempo Jack B (BLACK)
Send tap tempo to mode devices (N-O)
Send tap tempo to Boss pedals (N-C)
Open or close a remote contact (TOG)
MultiJack C (RED) - setup options are in parentheses
Send tap tempo to most devices (N-O)
Send tap tempo to Boss pedals (N-C)
Open or close a remote contact (TOG)
Send MIDI program changes and clock (MID)
Send MIDI but do not send clock (nCL)
Use a footswitch to tap tempo and start / stop clock (TAP)
Use a footswitch to go up or down through presets (PRE)
Send a control voltage on the jack tip (CVT)
Send a control voltage on the jack ring (CVR)
Send an expression voltage on the tip (EXP)
Send AND receive MIDI on the tip and ring (MIO)
Tap Tempo Jack A (WHITE)
Send tap tempo to mode devices (N-O)
Send tap tempo to Boss pedals (N-C)
Open or close a remote contact (TOG)
USB Port
Acts as USB MIDI device
DC Power Input
Standard 9V center negative
Requires at least 64mA
Don’t use higher than 9V

of 4 8
SETTING THE TEMPO:
Operating the micro.clock is simple — tap its footswitch in time with your music to set the tempo of its master clock. Any connected
MIDI clock compatible devices will automatically follow along at this tempo, and the micro.clock will generate a series of tap tempo
pulses to control your other tap tempo pedals. The micro.clock counts taps in groups of two, so you must tap at least twice to set a new
tempo.
To set the BPM without tapping, turn the clear knob on the micro.clock to specify the tempo in beats per minute. Once you have set the
tempo, the micro.clock will automatically adjust its outputs to keep all of your devices in time.
CHANGING SUBDIVISIONS
To change the tempo subdivisions for each output, tap the Edit Knob once to move through each output. When the desired output is
displayed, turn the Edit Knob to select the subdivision. Available divisions are Qu - Quarter Note, 8d - Dotted 8th, 8th — 8th Note, or
Trp - Triplet.
SENDING MIDI PROGRAMS
If the micro.clock is set up to send MIDI using its MultiJack, then it can send out program change messages when a new preset is
selected. The preset that is sent will always match the number of the micro.clock preset, from 0-99.
SAVING AND LOADING PRESETS
To save the current settings to a preset, hold the Edit Knob down. The micro.clock settings will be saved to the current preset slot.
To move to the next preset, hold the footswitch down. The next preset will load, and the outputs will activate to send out taps to your
devices.
To re-sync your devices without tapping in a new tempo, tap the footswitch ONCE and wait. After two seconds the micro.clock will send
out new taps to your devices to re-synchronize them. This is useful if you have some devices which “drift” or change tempo gradually
over time.
TEMPO DISPLAY
The micro.clock displays the current tempo in Beats Per Minute. Not all devices determine their tempo in the same way, so sometimes
you may experience differences between different pedals or devices - don’t worry! The micro.clock is sending everything the exact
same tempo, so even if their displays are off by a beat or two everything is okay.
Connecting the micro.clock
There are several ways to connect your devices:
Tap Tempo Outputs: Connect your device’s tap tempo input jack to one of the available tap tempo outputs on the micro.clock
using a standard mono patch cable. All three outputs are configured to control normally-open tap tempo
inputs, which is the most common type.
Disaster Area Designs micro.clock Gen3

of 5 8
If you are sending taps to a Boss pedal, then you should configure its output to normally-closed using the Setup menu.
If you are sending taps to the EXP jack of a Strymon pedal, then you will need to use a TRS cable and set its output to Pull-up
using the DIP switches inside the micro.clock.
If you are using a Strymon pedal that has been modified for tap by adding a jack (ex. El Capitan) then connect using a
standard mono cable and set its output pull-up to OFF using the DIP switches inside the micro.clock.
MIDI Output: Some pedals feature a MIDI connection using a 1/4” jack, including devices from Chase Bliss Audio,
Empress, Alexander, and Meris. The micro.clock can connect directly to these pedals using its red MultiJack. Open
the micro.clock and set the DIP switches for the MultiJack to ON-ON-ON and then connect to your pedal using the
correct type of cable. You will also need to set J C = MID, nCL, or MIO in the micro.clock Setup menu.
Use MID to send clock and program changes to Meris, Empress or Alexander pedals.
Use MIO to send clock and program changes to Chase Bliss pedals (be sure to use a TRS cable!)
Use nCL to send program changes only to Meris, Empress or Alexander pedals.
To connect to a pedal with a standard 5-pin MIDI jack, use the Disaster Area MJ-5P cable to adapt the
MultiJack to 5-pin.
Remote Switching: So maybe you have an amplifier with channel switching? Or a pedal with a remote switch or “favorite”
input? The micro.clock can handle that. Configure one or more of the micro.clock’s outputs as
TOG and then you can set your amp channels or favorite switch functions to change with your
micro.clock presets! Connect to your amp or pedal using a mono cable.
If your amplifier uses a TRS / stereo jack for function switching then you can use the center (BLACK) output
and a TRS cable to connect the A and B outputs to the same destination. The A output will control the RING
and the B output will control the TIP of the cable.
If you’re controlling a Strymon pedal, you’ll need to set your output’s DIP switch to enable the pull-up and to
connect with a TRS cable.
Disaster Area Designs micro.clock Gen3

of 6 8
Setting Up the micro.clock
The micro.clock is set up from the factory to control 3 tap tempo devices with normally-open connections, and to access 12 presets.
To change the device settings, power the micro.clock off and back on, then hold the Edit Knob down when the display scrolls
DISASTER AREA. The display should scroll SETUP, at which point it is safe to release the Edit Knob.
To navigate the Setup menu, rotate the Edit Knob to select the item to configure, then tap the Edit Knob to select. Turn the Edit Knob to
change the item, then press the Edit Knob again to return to the menu. When you are done making changes, hold the Edit Knob to
save your settings. The micro.clock will remember its settings when powered off. After you have saved your settings, power the
micro.clock off and on again to fully load in the new configuration.
Setup Menu Items:
PST: sets the maximum number of tempo presets the micro.clock can access, from 0 to 99.
PCH: sets the MIDI channel that the micro.clock will use to control an external MIDI device. OFF or 1-16.
T A: sets the configuration of tap output A. N-O (normally open), N-C (normally closed, for Boss devices, or TOG (remote switch)
T B: sets the configuration of tap output B. N-O (normally open), N-C (normally closed, for Boss devices, or TOG (remote switch)
J C: sets the configuration of MultiJack C. N-O, N-C, TOGG, MID output, nCL MIDI output without clock, TAP (tap footswitch),
FPRE (preset footswitch), CVT (control voltage on tip), CVR (control voltage on ring).
v LO: Controls the tempo / time that corresponds to a 0.0V output from the MultiJack in CvR or CvT modes, from 0 to 2000 ms.
v HI: Controls the tempo / time that corresponds to a 3.3V output from the MultiJack in CvR or CvT modes, from 0 to 2000 ms.
T DP: sets the resolution of the BPM control using the Edit Knob. 1.0 adjusts by +/- 1 BPM, 0.5 adjusts by +/- 0.5 BPM.
LEN: sets the amount of time the tap outputs will stay active for each tap. Larger values correspond to longer times.
Ranges from 0-6. Set this higher for devices like the Walrus ARP-87 or the Keeley Workstation series.
BRT: sets the brightness of the display and LEDs. Ranges from 0-9.
LED: sets the color of the tempo LED - RED, BLU, GRN, YEL, VIO, B-G, or WHT.
CH: sets the MIDI channel that the micro.clock will receive incoming messages. OFF disables the MIDI input, or 1-16.
RST: allows the user to factory-reset the controller. To use, tap the edit knob, then rotate the knob until CFG, PRST, or ALL is
displayed. Tap the Edit Knob to reset the selected values.!
Disaster Area Designs micro.clock Gen3
of 7 8
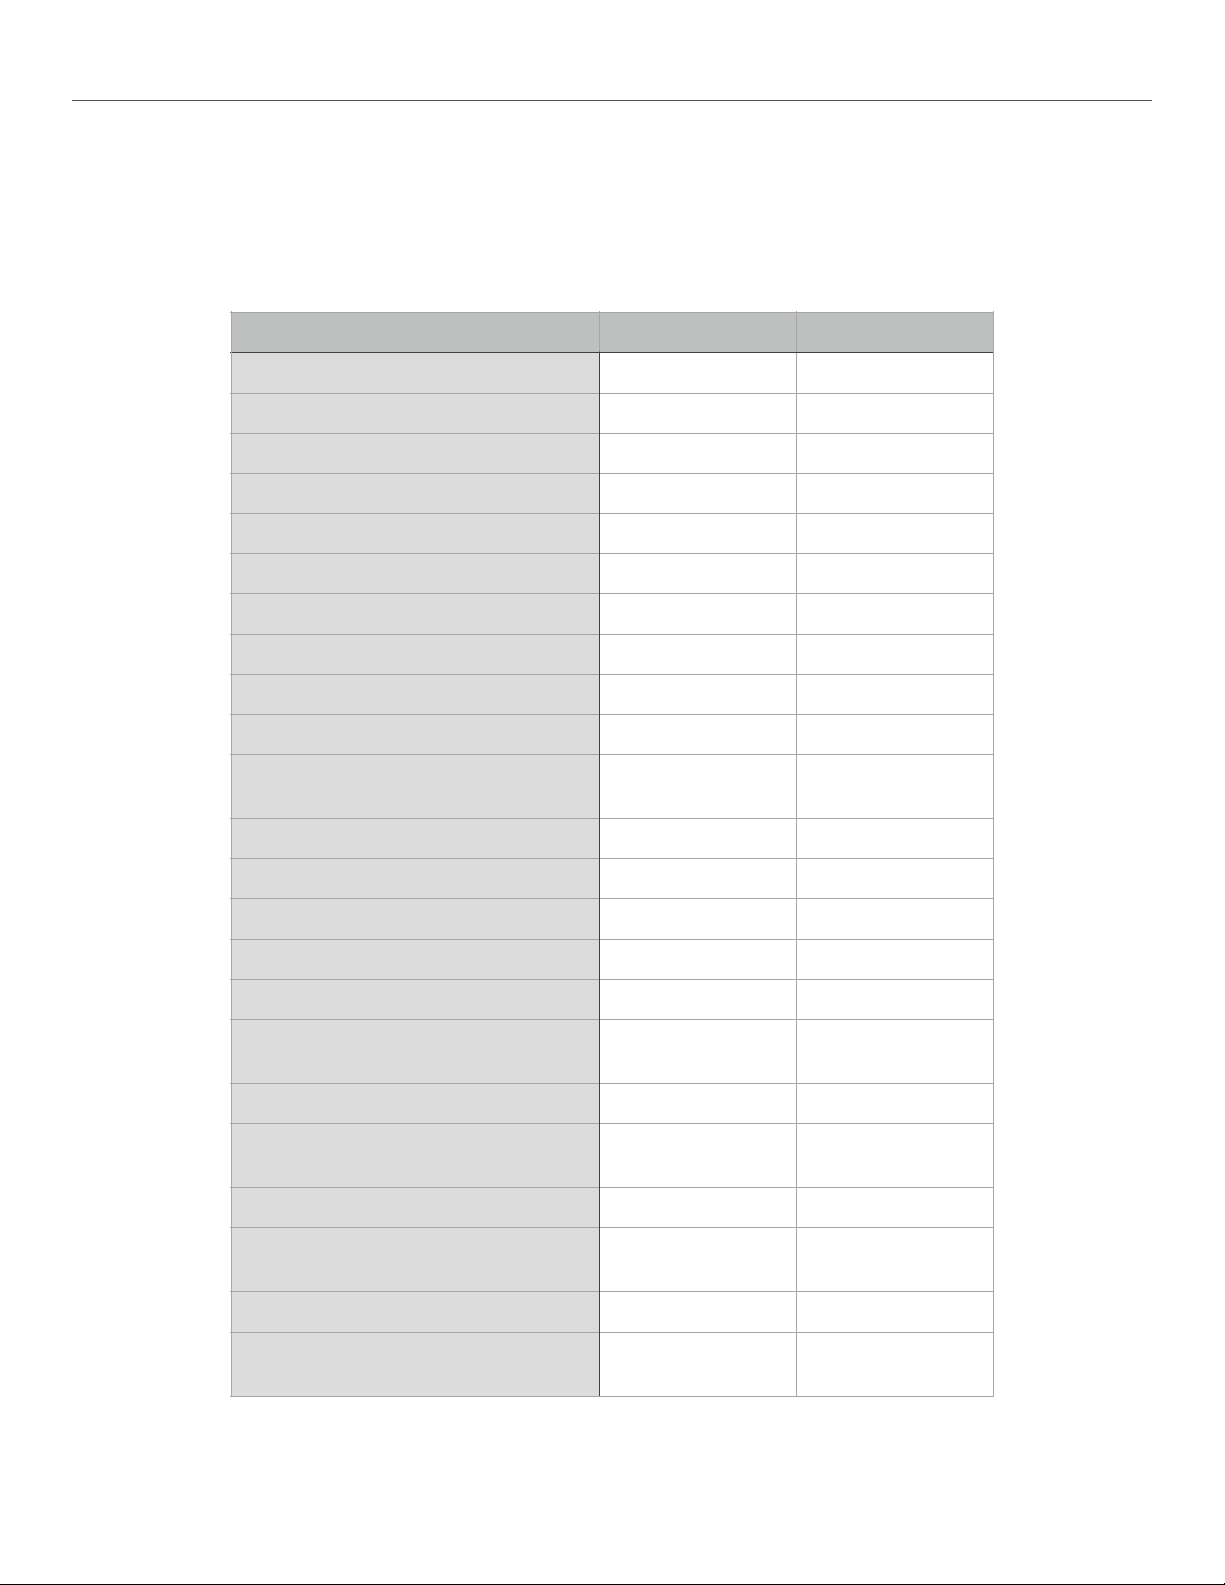
MultiJack Setup and DIP switches
The red jack of the micro.clock is our amazing MultiJack. This jacks are normally set up to function as tap tempo or remote switch
outputs, but they may also be set up to work as footswitch inputs our MIDI outputs, to send control voltages and more.
In order to configure these jacks, you will need to set them up in both the Setup Menu as well as setting the hardware DIP
switches in the micro.clock.
Disaster Area Designs micro.clock Gen3
Task
Setup Mode (J C)
DIP Switches
Send Tap Tempo
N-O
OFF-OFF-OFF
Send Tap Tempo to Boss
N-C
OFF-OFF-OFF
Control an amp or remote input
TOG
OFF-OFF-OFF
Send MIDI clock and programs
MID
ON-ON-ON
Send MIDI programs only
NCL
ON-ON-ON
Send MIDI clock and programs to
Chase Bliss
MIO
ON-ON-OFF
Send and receive MIDI
MIO
ON-ON-ON
Send control voltage to jack TIP
CvT
ON-OFF-ON
Send control voltage to jack RING
(Belle Epoch Deluxe)
CvR
ON-ON-OFF
Send expression voltage to jack tip
(does not change with tempo)
EXP
ON-OFF-ON
Use a remote footswitch to tap
tempo
TAP
ON-OFF-ON
Use a remote footswitch to change
presets
PRE
ON-OFF-ON

of 8 8
To configure the MultiJacks, launch the Setup Menu and navigate to J C. The following chart explains how to configure the setup mode
options and the DIP switches in the pedal. Please note that these DIP switch settings only refer to the LEFT bank of DIP switches, as
viewed from the inside of the pedal with the jack nuts facing up.
Pull-Up DIP Switch Settings:
Some pedals require an active voltage to be present on the tap tempo jack, such as the smaller Strymon pedals. In order to use these
pedals, use the RIGHT bank of DIP switches to activate the pull-ups for the desired channel. Switch 1 controls the red MultiJack,
switch 2 controls the black jack, and switch 3 controls the white jack.
If your pedal doesn’t work as expected, check the DIP switches! Most pedals should have these set to OFF, but small Strymon pedals
need them to be ON.
MIDI Input and Output
While the micro.clock can generate MIDI clock and program change messages on its own, it can also function as part of a larger MIDI
system thanks to its MIDI input and USB MIDI ports.
To use the micro.clock with a Disaster Area or other MIDI controller, change the CH setting in the Setup menu to match the channel
that your master controller sends. If you are connecting to a Disaster Area controller, set CH = 16. We also recommend you disable
the MIDI clock sending on your master controller, if possible. Disaster Area controllers should set CLK = OFF or TAP.
The micro.clock outputs MIDI from the red MultiJack. In order to use this jack for MIDI, set the left three DIP switches to ON-ON-ON
inside the micro.clock, then choose the MIDI option you’d like to use from the micro.clock setup menu in the J C submenu.
MID: micro.clock outputs MIDI from the tip of the MultiJack.
nCL: micro.clock outputs MIDI from the tip of the MultiJack but no MIDI clock messages are sent, only MIDI program changes.
MIO: micro.clock outputs MIDI from the RING of the MultiJack, and accepts MIDI from the TIP of the MultiJack. This mode will allow
you to connect a ring-active pedal such as a Chase Bliss Audio device with a simple TRS cable, or to connect to the MultiJack of a
DPC-8EZ to send tempo and program changes on a single TRS cable.
If CH is set to OFF, the micro.clock MIDI thru will be disabled.
The micro.clock responds to the following MIDI messages:
Program Change 0-127: Change preset 0-127
Continuous Controller 93: Tap Tempo
MIDI Beat Clock: No action
MIDI Stop: No action
MIDI Continue: No action
External MIDI Clock
The micro.clock cannot receive external MIDI clock. Please consider using the Disaster Area Designs SMARTClock if you need to
receive MIDI clock from your devices.
Disaster Area Designs micro.clock Gen3
 Loading...