


DMC-6 Gen3
DMC-8 Gen3
User Manual
v1.05e
2" of 23"
Revision History:
v1.05 - way too many changes to list here. Let’s just say there’s a lot.
v1.02c
*added Hologram Dream Sequence device
*added Memory Protect option in Setup
*added 6-channel configuration for Expression input jack
*v1.02b
*added MIDI notes / ACCESS mode
*fixed issue with expression not sending to E and F devices
v1.02a
*Added MultiJack Toggle device
*Added TOGG option to MultiJack setup
*Fixed minor errors with preset name editing
v1.01d
*Corrected a typo in the Eventide config section
*Fixed an issue with the expression input + latching freeze setup
v1.01c
*Fixed an issue with adjusting BPM in 0.5 increments
*Fixed an issue with selecting USB HOST or MIDI if clock is enabled
*Fixed an issue with naming banks and preset zero
v1.01b
* Added bank names + config
v1.01a
*Fixed an issue with loading names after FAVE is called
*Fixed DD500 tap
*Added Atomic AmpliFIRE device
v1.01 - 10/21/16
*Added USB Mode configuration - user may now select USB MIDI or HOST in setup menu.
v1.00
*Initial Release
Disaster Area Designs |
DMC-6 / DMC-8 Gen3 |

3" of 23"
DMC-6 / DMC-8 Gen3 Operation Manual
Firmware Revision 1.02c / released 12/30/16
1. Introduction
Thanks for purchasing a Disaster Area Designs DMC-6 / DMC-8 Gen3 controller. We’ve worked hard for the last two years developing and refining our MIDI controller technology, and we’ve incorporated suggestions from players all over the world. The Gen3 controllers have more features, more functions, and more connectivity than any of our previous controllers. In this manual we’ll cover the operating modes, setup, and use of the Gen3 controllers. Have fun!
The DMC-6 and DMC-8 Gen3 are compact MIDI controllers designed to interface with a wide variety of musical equipment. Up to six MIDI devices may be controlled by the Scrolling and Preset modes, for program selection and recall. The Preset mode may also control a seventh MIDI device with the capability for MIDI learning, such as the Disaster Area DPC-8EZ or SMARTSwitch.
If your MIDI device is equipped with a phrase looper / loop recorder mode, the DMC Gen3 may be able to control it. Looper modes for the Strymon Timeline, Line 6 M9 / M13, and Eventide H9 are supported at this time. Boss DD-500 and Pigtronix Infinity looper support is planned for a future update. Note: Using the looper disables one of the available MIDI devices in scrolling and preset modes.
The DMC Gen3 controllers can also serve as a pedalboard clock source. The Tap and Clock modes serve to select preset beats-per- minute (BPM) tempo and the DMC will send these clock signals out using a combination of MIDI and tap tempo output to a variety of compatible devices.
Disaster Area Designs |
DMC-6 / DMC-8 Gen3 |
4" of 23"
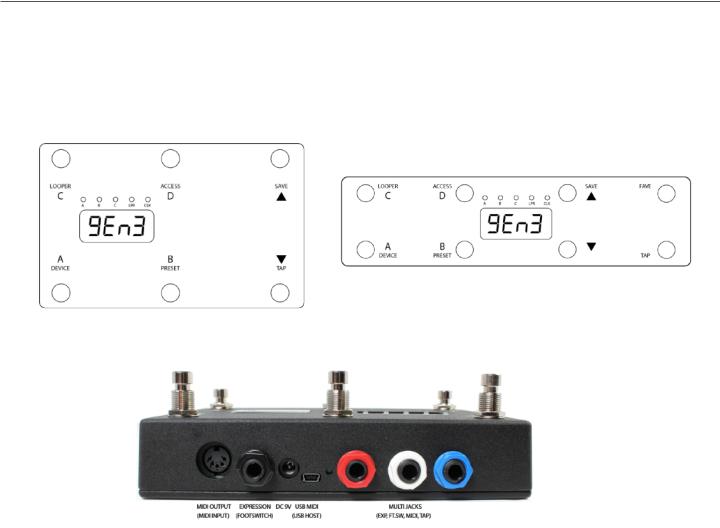
2. Controls and Connections
CONTROL PANEL
The DMC-6 Gen3 and DMC-8 Gen3 have the same basic controls: Buttons A, B, C, and D are located on the left side of the device, and the SAVE / UP and TAP / DOWN buttons are on the right side. The DMC-8 Gen3 has additional TAP and FAVE buttons at the far right side of the control panel. Please note that throughout this manual we will refer to the TAP / DOWN and the DOWN buttons interchangeably.
REAR PANEL
MIDI Output: |
Standard 5-pin MIDI output, connects to your first MIDI pedal input. |
MIDI Input: |
The MIDI output jack doubles as a MIDI input using a Disaster Area MIDI Y-cable (sold separately.) The MIDI input |
allows the DMC Gen3 to accept incoming MIDI messages and merge them in with its own data stream.
Expression Input: The black jack is a multi-function connector that can accept an expression pedal or a momentary footswitch. Consult the Expression section for more details.
DC 9V: Standard DC power supply input, 9V center negative. The DMC Gen3 requires approximately 80mA if used by itself. If an external USB HOST device is connected, the DMC will need to be supplied with enough current to power both itself and the USB device.
USB MIDI: |
The standard DMC firmware allows the USB port to function as a MIDI interface for your compatible PC, Mac, or iPad |
(using the Apple Camera Connection Kit.) The DMC will receive and send MIDI messages over USB for device control. |
|
USB HOST: |
If the USB Host firmware is installed, the DMC USB port may be used to send and receive MIDI messages to |
supported USB devices. |
|
Status Indicator: |
This is just a little LED that blinks to let you know the pedal is working. It also blinks at a slower rate to indicate that |
the pedal is in boot loader mode during a firmware update.
MultiJacks 1-3: The red, white, and blue connectors are our astounding MultiJacks! The MultiJacks can do all kinds of cool stuff, like receive expression or tap tempo, send taps to your devices, or even send MIDI to additional devices.
Disaster Area Designs |
DMC-6 / DMC-8 Gen3 |
5" of 23"
3. Getting Started with MIDI
MIDI might seem kind of intimidating or frustrating at first, but it’s really not too complicated. MIDI stands for Musical Instrument Digital Interface, and it was created way back in the 1980’s as a method for synthesizers to talk to each other. Today, we can use it for linking synths, effects units, computers, drum machines, samplers, pedals, and more.
MIDI units come in two basic types - controllers and devices. The DMC-6 / 8 Gen3 is a controller, so it sends out commands to the gear on your pedalboard. Your Timeline, BigSky, H9, etc. are devices, so they receive commands and change in response to them. With me so far? Good!
MIDI gear is linked by some kind of hardware connection, usually a five-pin cable with a big round plug on each end. Sometimes devices can accept MIDI over a USB connection or using a non-standard connector like a 1/4” plug. Generally you can link up multiple devices in a daisy-chain kind of like you'd do with regular pedals, by connecting the MIDI OUTPUT or THRU of the first device to the MIDI INPUT of the second device and so on. There are some devices that won’t re-transmit MIDI, or that will mangle / interfere / drop messages, so sometimes you have to get creative with your routing.
Each MIDI device receives commands on one or more MIDI channels, and the standard MIDI specification allows for up to 16 channels to be transmitted on the same cable. Sometimes, devices can receive on any channel they see (that’s called Omni) but usually they’ll be set to listen to only a single channel.
The DMC series are designed to transmit commands to lots of devices - up to seven at the same time, and we send out commands to each device on its own MIDI channel. Again, the same cable can carry all of those commands so that makes it a bit more convenient for us when we’re putting together a pedalboard or rack system.
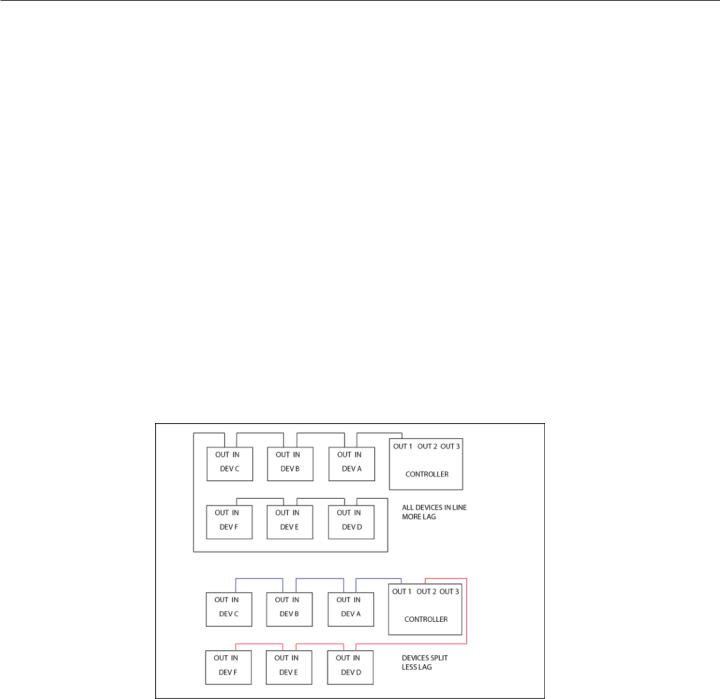
One important thing to consider - the more MIDI devices you have chained end-to-end, the greater the chance that your MIDI communication will be slow or unreliable. We call this “MIDI lag,” and it’s a bummer. To get around this, you can use a controller with multiple MIDI outputs or a hardware MIDI Thru box to split your MIDI signal to two or more short chains.
Please note that the order that you plug your MIDI devices in does not have to be the same as the order you plug their audio cables!
Disaster Area Designs |
DMC-6 / DMC-8 Gen3 |

6" of 23"
4. Setting up the DMC Gen3
Now that we have an idea of what MIDI is for, and what it can do, let’s get your rig set up!
The first thing you should do is connect your devices to the DMC Gen3 using MIDI cables. If you have a short MIDI chain (4 or fewer devices) then you should be able to daisy-chain your gear as shown in the first picture above (ALL DEVICES IN LINE.)
If you are connecting a device that doesn’t have a MIDI output then you may need to place it at the end of your MIDI chain. Some devices that have MIDI INPUT only include the Digitech Whammy, Source Audio Programmable EQ and Soundblox Pro, Alexander Super Radical and Oblivion, EHX 8-Step Program, Boss Slicer, etc. Other devices such as the Line 6 M5 / M9 / M13 have a MIDI OUTPUT jack but don’t pass through incoming MIDI and so can’t be used in the middle of a daisy-chain. You can either connect these at the end of your MIDI chain or use one of the DMC Gen3 MultiJack connectors as a second MIDI output for that device.
Once you have your cables connected, you should set up the DMC Gen3 using its setup menu. The setup menu is pretty comprehensive, and it has a lot of options. We’ll focus on the basics in this section, but you can consult the Setup Menu section at the end of the manual for the full details.
To enter the setup menu, power the DMC Gen3 on and wait until you see “Gen3” on the display, then hold the A and B buttons. When the display scrolls “SETUP” release the buttons. Once you are in the setup menu, tap the A and B buttons to select from the available menus and tap the SAVE button to enter / exit the menus. Once you’re inside a menu, you can tap the A and B button to change the menu options. When you’re done, hold SAVE to save the setup and start using the controller.
TAP TO ENTER / EXIT MENUS
HOLD TO SAVE AND EXIT SETUP
HOLD AT POWER ON TO ENTER SETUP
TAP TO MOVE / CHANGE
Here’s how to set up your devices: Enter setup as described above. The first menu you’ll see is PRST, which allows you to select the number of available banks in Preset Mode. It's set to 12 by default, and we'll leave it alone.
Tap the B button until you see DEV. This tells the controller how many MIDI devices you want to connect. By default it’s set to DevC, which tells the DMC that you have three devices hooked up. If you happen to have three, then you can skip the next part. Otherwise, tap the SAVE button to edit the DEV menu. Once inside, tap the A or B buttons until the correct number of devices is shown. If you have five devices, you should set this to DevE, if you have two then it should be DevB.
Once you have the correct number of devices set, tap SAVE to exit the DEV menu. Tap B until you see DevA. This is the Device Selection menu for the Device A. By default it’s set to control a Strymon Timeline, but you should set this to match the device you’ve got connected. Tap SAVE to edit this menu, and you’ll see the device name scroll on the display. Tap A or B to cycle through the available devices. Most are self-explanatory but there’s a list of all the devices at the end of the manual. Once the DevA device matches what you have connected, tap SAVE to exit this menu. Repeat for all of the devices you have hooked up. You can leave any devices that you don’t have connected alone, no need to change them.
There are a lot more setup options in the menu, but for now we will leave them set to defaults. Hold the SAVE button to store the configuration.
Disaster Area Designs |
DMC-6 / DMC-8 Gen3 |

7" of 23"
5. Setting up your MIDI Devices
Finally, you'll need to set up each of your devices in order to make sure that they operate correctly. Mainly you need to set them up to receive on the correct MIDI channels, but there are a few other parameters you may need to adjust to ensure full control.
STRYMON
Strymon devices need to be configured correctly in order to pass incoming data through to the next device in line. They also need to be set up in order to maintain bypass “trails” and to use the Timeline looper.
Strymon Timeline: |
Enter the Globals menu and configure as follows: |
|
|
MIDITH ON |
MIDIPA OFF |
|
MIDICT OFF |
MIDICH (Must match device selection - 1 for DevA, 2 for DevB, etc.) |
|
MIDICL ON |
MC SWP OFF |
|
LPEXIT PLAY |
BYPASS BUFBYP |
Strymon Mobius and BigSky: |
Enter the Globals menu and configure as follows: |
|
|
MIDITH ON |
MIDIPA OFF |
|
MIDICT OFF |
MIDICH (Must match device selection - 1 for DevA, 2 for DevB, etc.) |
|
BYPASS BUFBYP (recommended for BigSky, optional for Mobius) |
|
|
MIDICL ON Mobius, OFF BigSky |
|
EVENTIDE (H9, SPACE, TIMEFACTOR, MODFACTOR, PITCHFACTOR)
Eventide devices have a robust MIDI mapping capability, but none of their functions are set from the factory. In order for these devices to recognize the commands we send, a few parameters must be set in their MIDI menus.
If using H9 Control, navigate to Pedal -> MIDI Settings -> MIDI Channel
Set MIDI Receive Channel match device selection - 1 for DevA, 2 for DevB, etc.
Navigate to Pedal -> MIDI Settings -> Assign MIDI CC Messages.
Map Tap Tempo to MIDI CC 44
Map Performance Switch to MIDI CC 46
Map Toggle Tuner to MIDI CC 69
Map Activate to MIDI CC 42
Map Set Expression Pedal Value to CC 48
If using the MIDI menu on the device itself:
Navigate to RCV CHANNEL and set to match device selection - 1 for DevA, 2 for DevB, etc.
Navigate to the RCV CTL menu and set the following
TAP C44
HOTSW C46
ACTIVE C42
PEDAL C48
If you plan to use the looper on the H9 or Timefactor, set the following:
Looper - Record |
MIDI CC 87 |
Looper - Play |
MIDI CC 86 |
Looper - Stop |
MIDI CC 85 |
Looper - Empty |
MIDI CC 90 |
Looper - Flip Direction |
MIDI CC 94 |
Looper - Flip Octave |
MIDI CC 95 |
LINE 6 (M5, M9, M13)
Line 6 devices must have their MIDI channel assignments set to match device selection - 1 for DevA, 2 for DevB, etc. Enter the pedal’s PREFS menu, the MIDI settings are found on the second page. Additionally, ensure that the MNL SAVE / AUTOSAVE is set to MNL SAVE. This will prevent the DMC Gen3 from messing up the bypass states of your scenes.
Disaster Area Designs |
DMC-6 / DMC-8 Gen3 |
 Loading...