

Denver TDA-60 Instruction Manual
TDA-60
USB / MP3 / CD / DAB / FM Radio Portable Boombox
Instruction Manual
Thank you for choosing our product. We hope you enjoy using the device.
www.facebook.com/denverelectronics

Symbols in these Instructions for Use
Important information for your safety is specially marked. It is essential to comply with these instructions in order to
avoid accidents and prevent damage to the machine:
WARNING:
This warns you of dangers to your health and indicates possible injury risks.
CAUTION:
This refers to possible hazards to the machine or other objects.
NOTE: This highlights tips and information.
General Safety Instructions
Read the operating instructions carefully before putting the appliance into operation and keep the instructions
including the warranty, the receipt and, if possible, the box with the internal packing. If you give this device to other
people, please also pass on the operating instructions.
• To avoid the risk of fire or an electric shock, you should not expose the device to rain or moisture. Consequently do
not use the device in the immediate vicinity of water
- for example near a bath tub, a swimming pool or in a damp cellar.
• Do not use the device in extremely hot, cold, dusty or damp places.
• Only use the device for private use and the intended purpose. This device is not intended for commercial use.
• Ensure that the power cord is not kinked, trapped or brought into contact with heat sources.
• Ensure that the power cord does not present a tripping hazard.
• Never touch the power plug or the cable with wet hands.
• Only connect the device at a properly installed plug socket. Pay attention that the specified voltage corresponds to
the voltage of the plug socket.
• The power cord must always be easily accessible.
• Always insert the batteries correctly.
• Do not cover up any ventilation openings with objects such as newspapers, tablecloths, curtains, etc.
• This appliance shall not be exposed to dripping or splashing water and that no object filled with liquids such as vases
shall be placed on apparatus.
• Exposed ignition sources such as burning candles may not be placed onto the device.
• Never open the housing of the device. Incorrect repair scan constitute a considerable risk for the user. Should the
device become damaged, in particular the mains supply cable, do not operate the device any longer, but rather have it
repaired by an expert. Check the mains supply cable regularly for damage.
• For safety reasons a broken or damaged mains lead may only be replaced by an equivalent lead from the
manufacturer, our customer service department or qualified person.

• If the device is not used for a longer period, remove the plug connector from the plug socket or take out the batteries.
These symbols may be found on the machine and are intended to indicate the following:
The lightning symbol should advise the user of parts in the inside of the device which carry dangerously high voltage
levels.
The symbol with an exclamation mark should advise the user of important operation or maintenance instructions in the
accompanying documentation.
Devices bearing this symbol work with a “class 1 laser” for tracing the CD. The built-in safety switches should prevent
the user being exposed to dangerous laser light, which is invisible to the human eye, when the CD compartment is
opened.
These safety switches must not be bypassed or altered; otherwise there is a risk of being exposed to the laser beam.
Children and Frail Individuals
• In order to ensure your children’s safety, please keep all packaging (plastic bags, boxes, polystyrene etc.) out of their
reach.
WARNING!
Do not allow small children to play with the foil. There is a danger of suffocation!
• This device is not intended to be used by individuals(including children) who have restricted physical, sensory or
mental abilities and/or insufficient knowledge and/or experience, unless they are supervised by an individual who is
responsible for their safety or have received instructions on how to use the device.
• Children should be supervised at all times in order to ensure that they do not play with the device.
Special safety information
This device works with a class 1 laser.

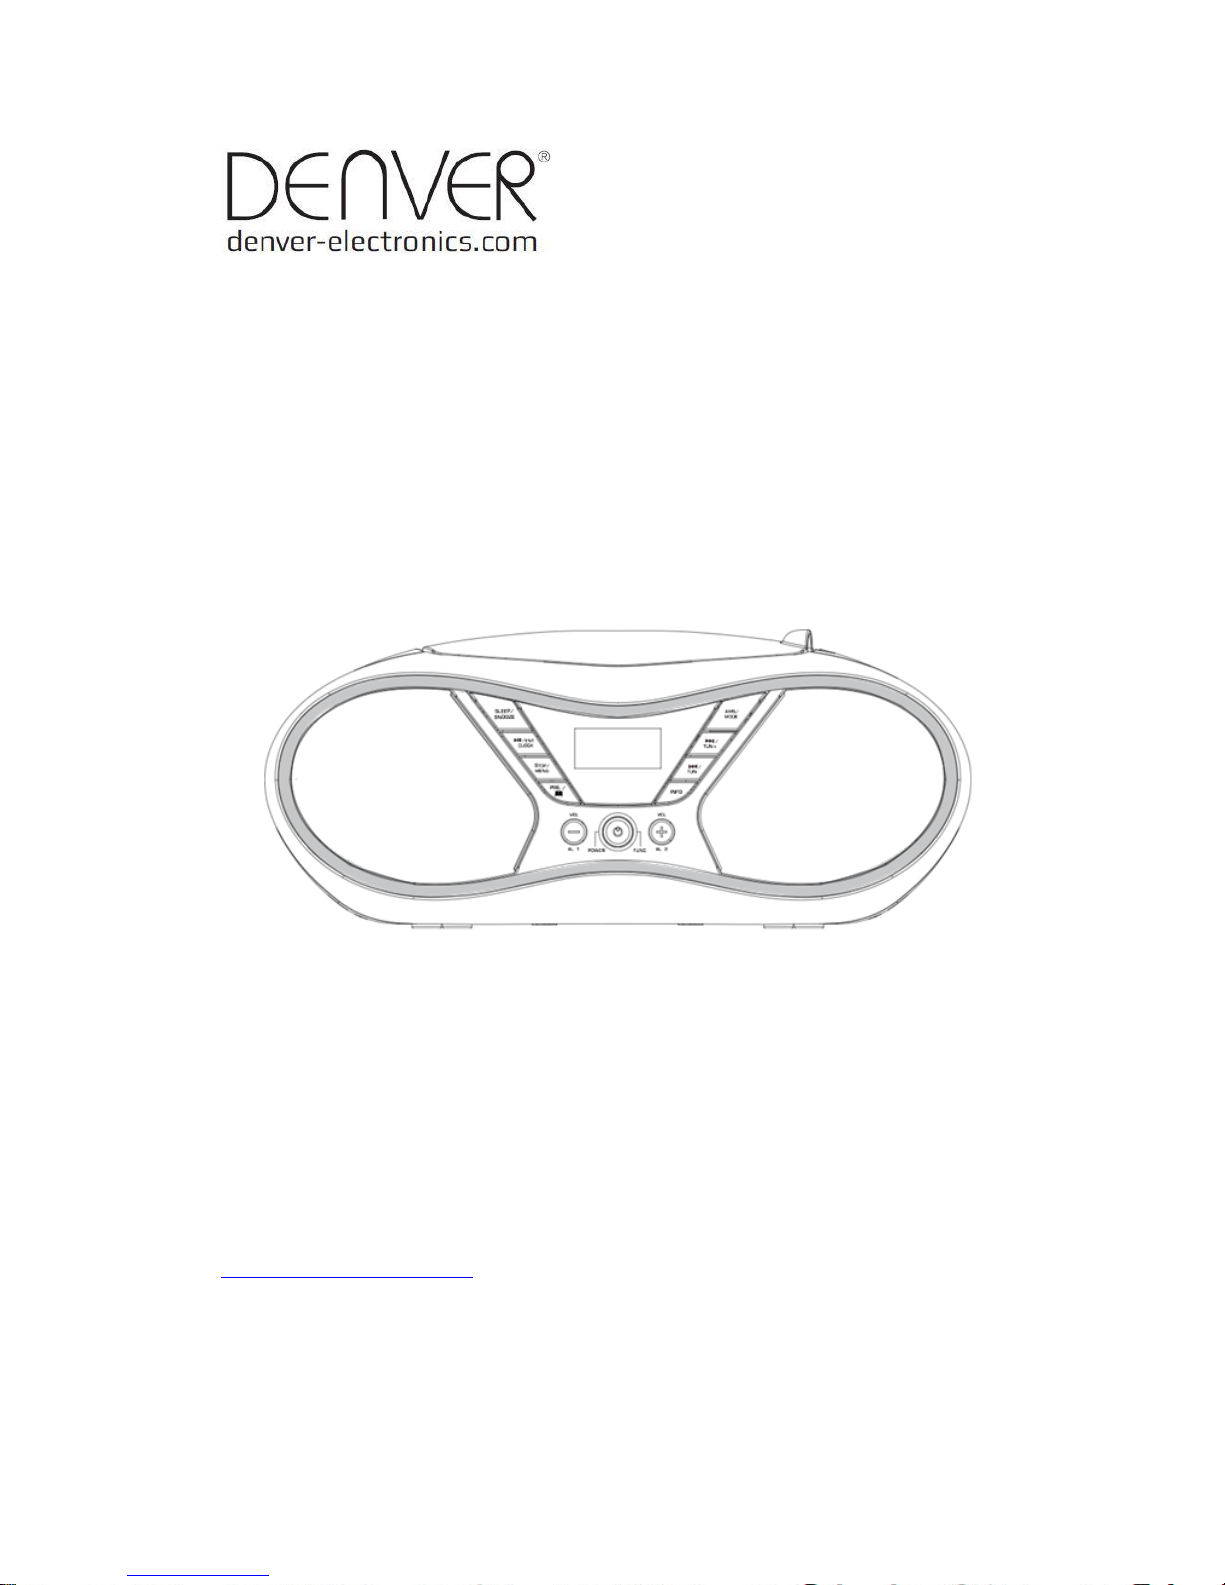
Overview of the Components
1. SLEEP / SNOOZE button 8. SPEAKER
2. ENTER / PLAY / PAUSE / CLOCK button 9. SKIP+ / TUNING+ button
3. STOP / MENU button 10. SKIP- / TUNING- button
4. PRE. / FOLDER button 11. INFO button
5. VOLUME- / ALARM 1 button 12. VOLUME+ / ALARM 2 button
6. LCD DISPLAY 13. STANDBY / FUNCTION button
7. AMS / MODE button
14. CD DOOR 17. USB JACK
15. HANDLE
16. FM ANTENNA
1
2
3
13
5
6
7
8
12
15
14
18
19
20
16
17
4
9
10
11

18. HEADPHONE JACK 20. AC SOCKET
19. AUX-IN JACK
Start-up of the device/introduction
• Select a suitable location for the device, such as a dry, flat, non-slip surface on which it is easy to operate the
machine.
• Ensure that the device is sufficiently ventilated.
• Remove the protective film from the display if it is still present.
• Press the “STANDBY / FUNCTION” button to turn on the device.
• Press the “STANDBY / FUNCTION” button for approx. 3 seconds to switch into the standby mode.
Power Supply
• Ensure that the voltage is the same as that indicated on the model identification plate.
• Connect the power cable supplied (see battery compartment if necessary) to a properly installed safety power socket
and the mains connector AC on the back of the machine.
Inserting the Batteries (not supplied)
1. Open the lid of the battery compartment.
2. Insert 6 batteries of type UM-2 (“C” size) 1.5 V. Please ensure that the polarity is correct (see the floor of the battery
compartment)!
3. Then close the battery lid.
NOTE:
When a mains cable is connected the batteries are automatically switched off.
CAUTION:
• Batteries can leak and lose battery acid. When not using the system for a long period of time, remove the batteries.
• Different battery types or new and used batteries must not be used together.
• Do not dispose of batteries with household waste. Return old batteries to the respective collection facilities or your
dealer.
WARNING:
The batteries shall not be exposed to excessive heat such as sunshine, fire or the like. Danger of explosion!
Setting the clock & date
The system must be in standby mode in order to set the clock.
1. Press and hold the “ENTER / PLAY / PAUSE / CLOCK” button for approx.2 seconds.
2. Use the “SKIP+ / TUNING+” & “SKIP- / TUNING-” buttons to set the time format “12 / 24hr”.
3. Press the “ENTER / PLAY / PAUSE / CLOCK” button to confirm time format.
4. Use the “SKIP+ / TUNING+” & “SKIP- / TUNING-” buttons to set the hours accordingly. The hour digits start
flashing.
 Loading...