

Page 1
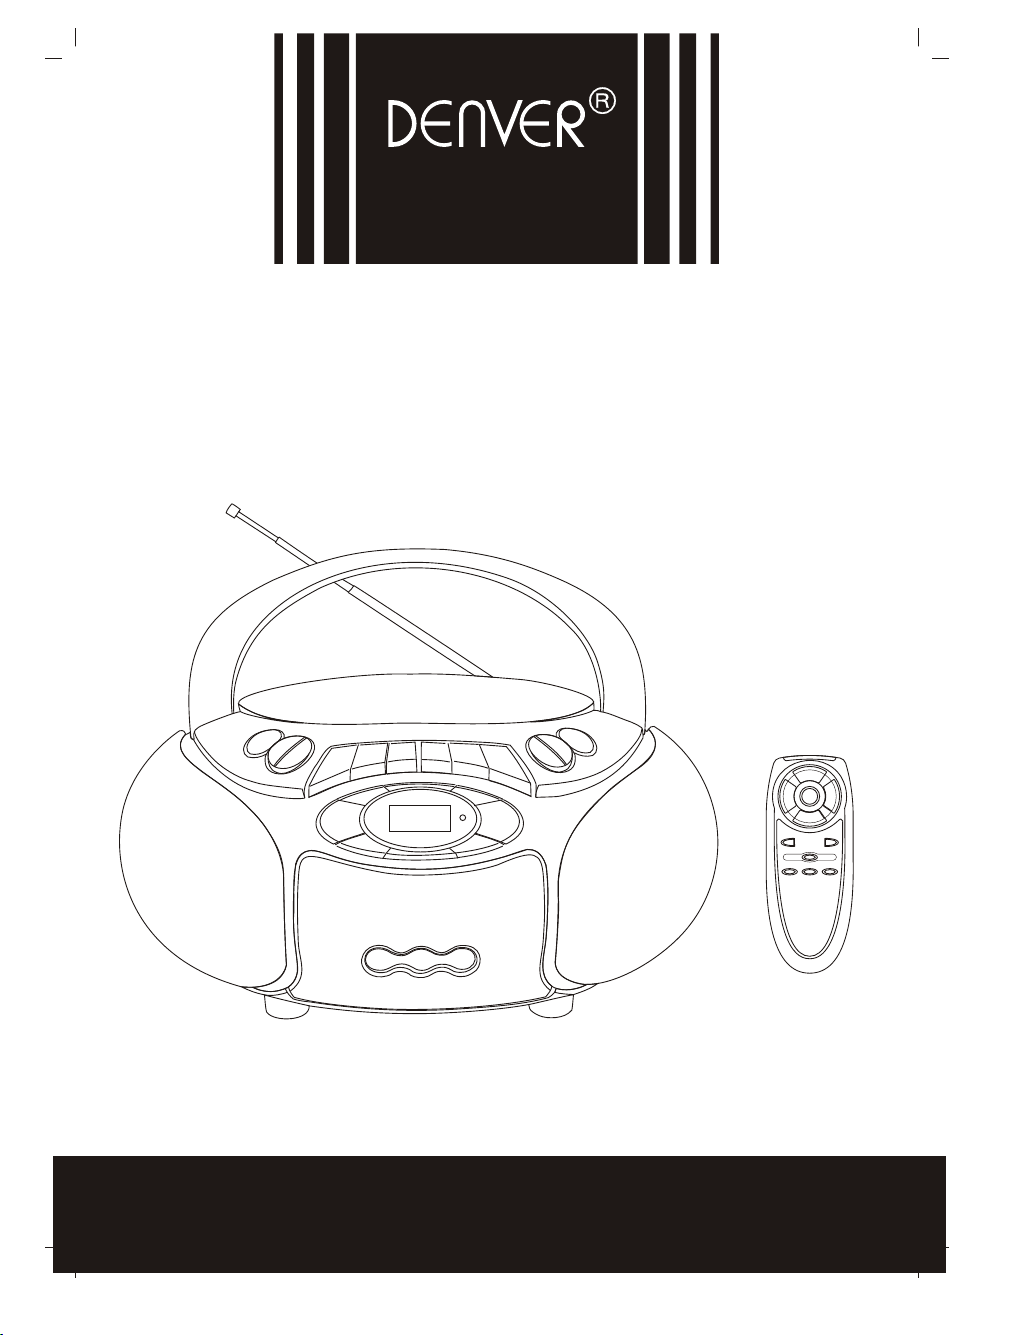
TCD-50
INSTRUCTION MANUAL
CD STEREO AM/FM RADIO CASSETTE RECORDER
Page 2
WARNING
TO REDUCE THE RISK OF FIRE OR ELECTRIC SHOCK, DO NOT EXPOSE
THIS APPLIANCE TO RAIN OR MOISTURE.
CAUTION
Use of controls or adjustments or performance of procedures
other thanthose specified herein may result in hazardous
radiation exposure.
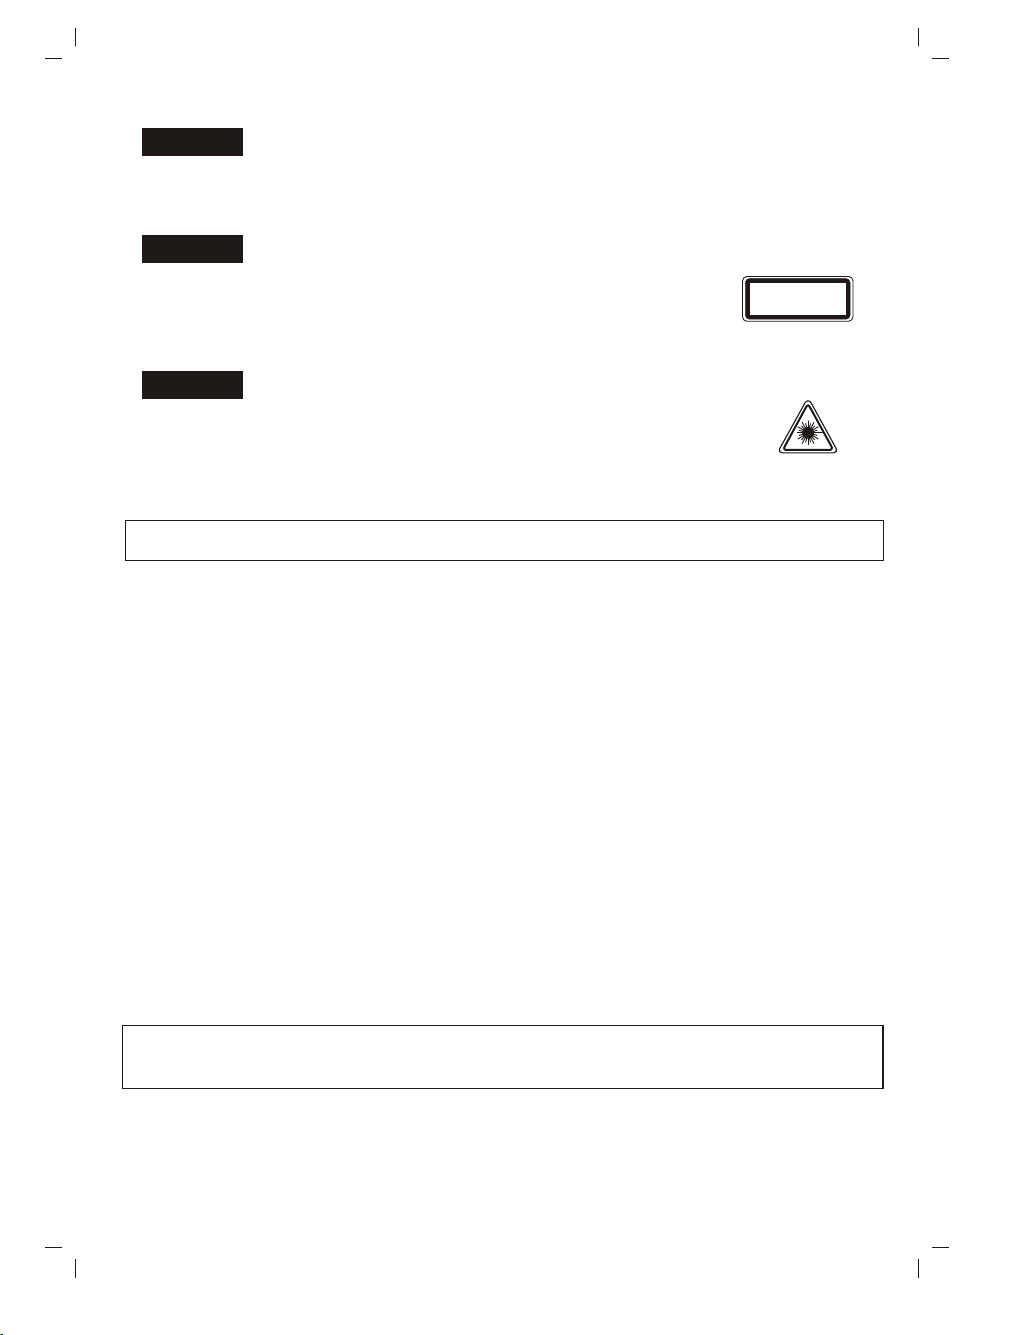
This Compact Disc player is classified as CLASS 1 LASER product.
CLASS 1 LASER PRODUCT
KLASSE 1 LASER PRODUKT
LUOKAN 1 LASER LAITE
KLASS 1 LASER APPARAT
CAUTION!
Invisible laser radiation when open and interlocks defeated. Avoid
exposure to beam.
FOR SAFE AND EFFICIENT OPERATION
- Do not damage the mains lead.
When not in use, disconnect the mains lead from the outlet. Grasp the plug, not the mains lead,
when disconnecting the unit.
- If water should enter the unit, electrical shock or a malfunction may result. Use in an area where
there is low humidity and little dust.
- Do not disassemble or alter the unit in any way.
- Do not use the unit in areas where extremes in temperature occur (below 5 C o re xceeding
¡£
35 C), or where it may be exposed to direct sunlight.
- Because of the CD player's extremely low noise and wide dynamic range, there is a tendency
to turn the volume on the amplifier higher than necessary. Doing so may produce an
excessively high output from the amplifier which can cause damage to your speakers. Please
be careful in this regard.
- Sudden changes in the surrounding temperature can cause dew to form on the optical
pickup lens inside the unit. Under this condition the unit may be unable to operate properly.
If this should occur, remove the disc and allow the player to adjust to the surrounding
temperature.
- This unit must be operated in a horizontal position.
- Please use the original CD software, and any copy discs are not recommendable for use.
¡£
- The apparatus shall not be exposed to dripping or splashing.
Do not install the equipment in a confined spaces, such as a book case or built-in cabinet.
THIS UNIT SHOULD NOT BE ADJUSTED OR REPAIRED BY ANYONE EXCEPT PROPERLY
QUALIFIED SERVICE PERSONNEL.
1
Page 3
POWER SUPPLY
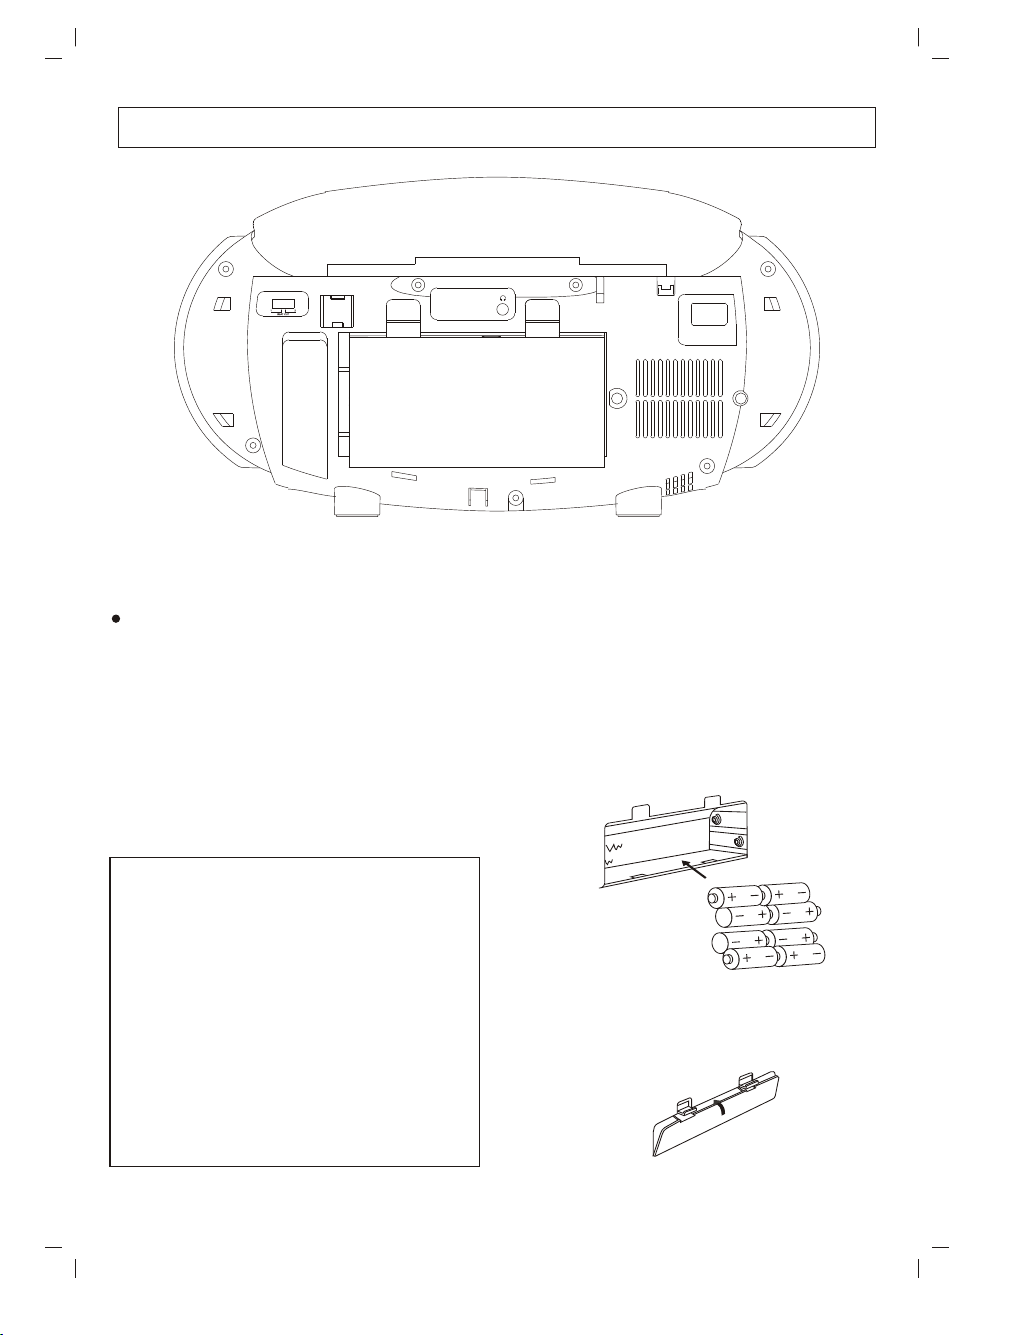
AC power operation
Connect one end of the mains lead to the (AC
~IN) socket and the other end to an AC outlet.
The unit is not disconnected from the mains
unless the mains lead is unplugged from the AC
outlet.
AC ~ IN
Battery power operation
1. Open the battery compartment lid by pushing
down on the tabs.
2. Install 8 x "D" size batteries (no t supplied).
Refe r to the polarity diagram in the battery
compartment o f the unit. Match the (+) and
( - ) marks o n t he diagram to t he ( +)a nd ( -)
m arks on the batteries.
CAUTION:
WHEN INSTALLING BATTERIES
To prevent battery electrolyte leakage, which
may result in injury and damage to the unit or
other objects , observe the following
precautions:
1. All batteries must be installed with the
proper polarity (see diagram in the
compartment of the unit).
2. Do not mix new with old or used batteries.
3. Only use batteries of the same type and
brand.
4. Remove the batteries when they are not to
be used for a long period time.
3. Replace the lid.
2
6
4
2
8
8 x "D" size batteries .
Replace lid.
5
3
1
7
Page 4
1
2 3
10
4
5
6
7
8
9
11
12
13
14
15
16
17
18 19
26
27
20
22 23 24 25
21
28
AC ~ IN
3
29
Page 5
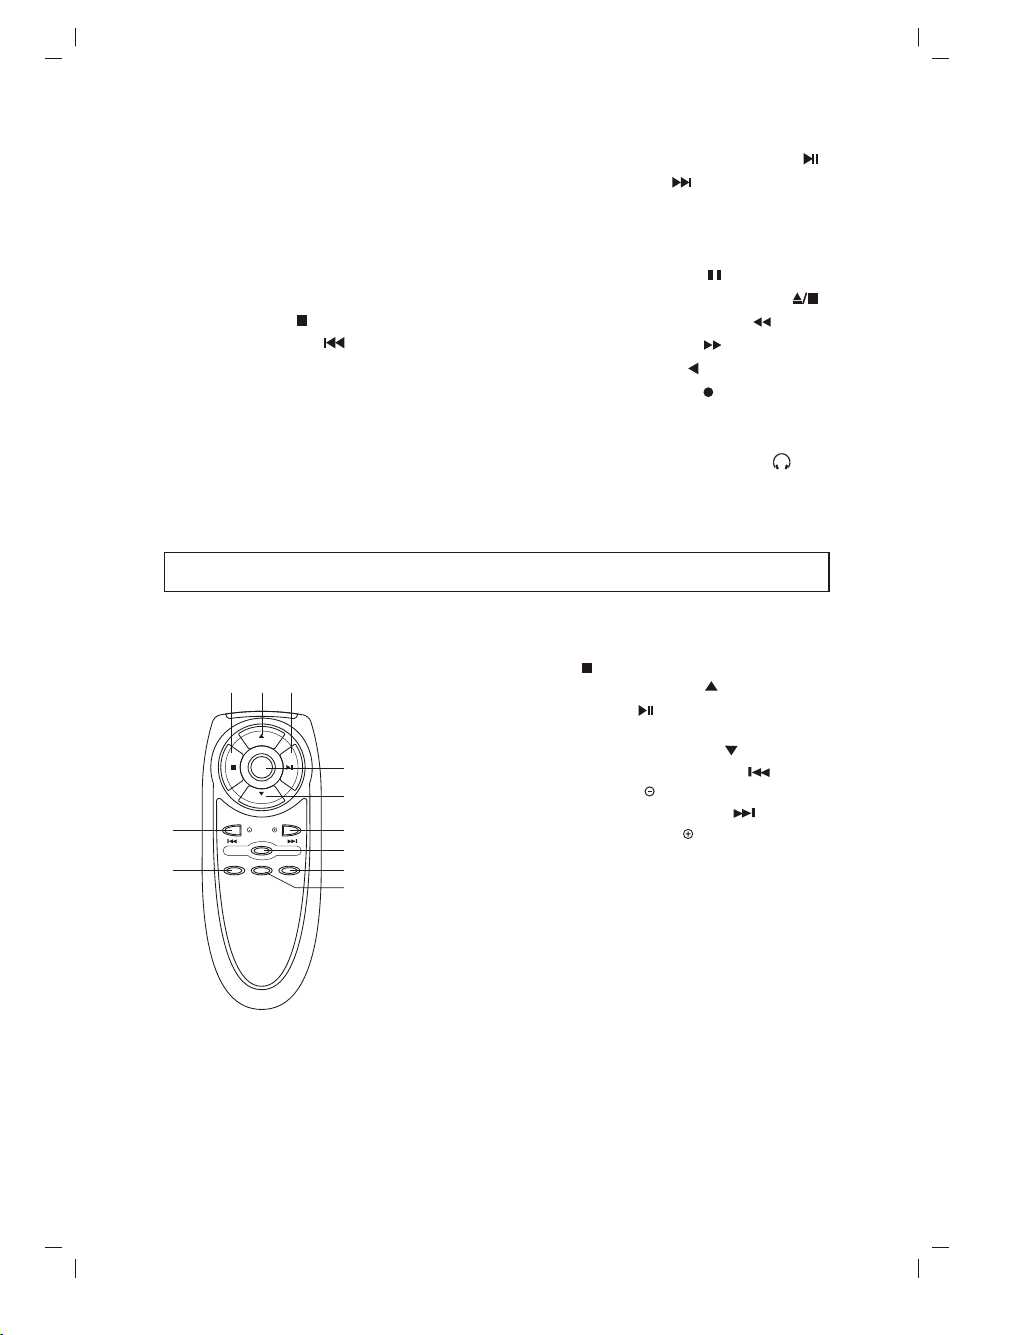
CONTROLS
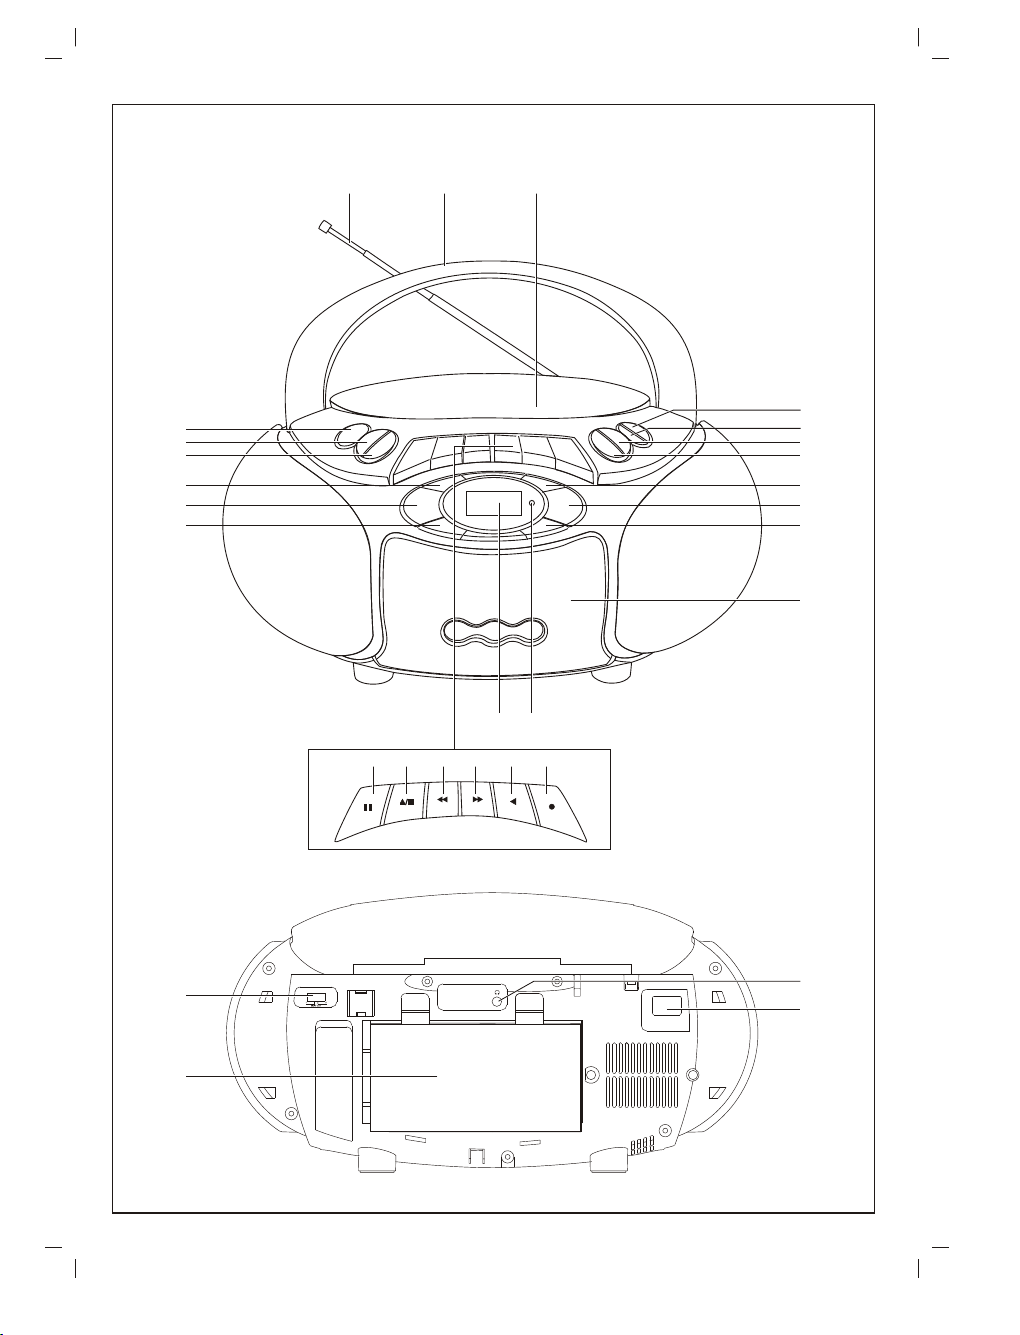
1. Telescopic aerial
2. Handle
3. CD Open (PUSH OPEN)
4. Power button (POWER)
5. Function button(CD/TAPE/RADIO)
6. Band button (AM/FM)
7. Memory button (MEMORY)
8. Stop button (STOP )
9. CD Skip button (SKIP - )
10. P-SCAN button (P-SCAN)
11. EQ button (EQ)
12. Volume control (VOL +)
13. Volume control (VOL - )
14. CD Repeat / FM ST./MONO button
(REPEAT / ST )
REMOTE CONTROL
Controls
1 2 3
U
M
L
O
E
V
EQ
V
O
E
L
M
U
BACK
FORWARD
6 7
9 10
FUNCTION
MEMORY
PROG.
TUNER
P.SCAN
CD/TAPE/
TUNER
AM/FM
4
5
8
11
15. Play/Pause button (PLAY/ PAUSE )
16. CD Skip button ( SKIP+)
17. Cassette compartment lid
18. CD/RADIO multi display
19. IR remote sensor ( REMOTE SENSOR )
20. Pause button(PAUSE )
21. Stop/Eject button (STOP/EJECT )
22. Fast forward button (F.FWD )
23. Rewind button (REW )
24. Play button (PLAY )
25. Record button (REC )
26. BEAT CUT switch
27. AC input socket (AC~IN)
28. Stereo headphones socket ( )
29. Battery compartment
1. Stop button ( )
2. Volume up button ( VOLUME )
3. Play/ Pause button ( )
4. Equalizer button ( EQ )
5. Volume down button ( VOLUME )
6. CD Fast backward search button ( )/
Tuning down button ( TUNER )
7. CD Fast forward search button ( )/
Tuning up button ( TUNER )
8. Function button ( FUNCTION CD/TAPE/TUNER)
9. Memory/Program button ( MEMORY/PROG. )
10. P.Scan button ( P.SCAN )
11. Band button ( AM/FM )
4
Page 6
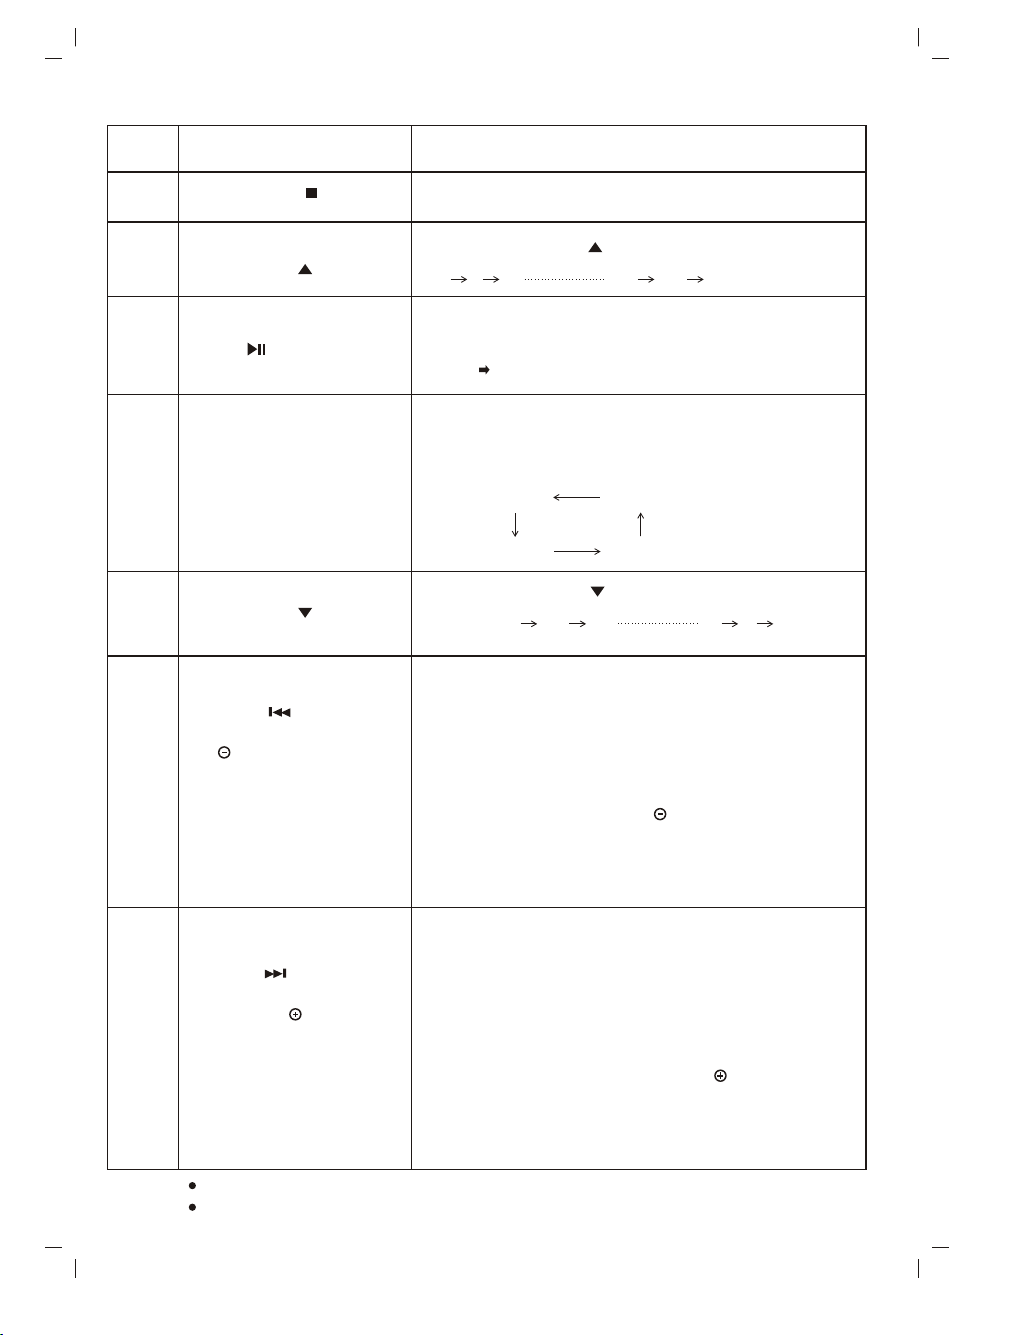
OPERATION OF REMOTE HANDSET
NO.
1. Stop button ( )
2. Volume up button
( VOLUME )
3. Play/ Pause button
( )
4. Equalizer button
( EQ )
5. Volume down button
( VOLUME )
6. CD Fast backward search
button ( )/
Tuning down button
( TUNER )
Button Name
Operation
Press the Stop key to the stop the disc playing.
Press the VOLUME key to Increase the volume.
0 1 2 23 24 MAXIMUM
CD Play back start and Pause (temporary stop)
function.
PLAY PAUSE in sequently during playing back.
There are 4 deferent equalizing mode, FLAT\ROCK\
POP and CLASSIC. The user can select one of them
by pressing the EQ key.
FLAT
ROCK POP
Press the VOLUME key to Increase the volume.
MAXIMUM 24 23 2 1 0
( A )
1. In CD mode, press BACK key to choose desired
track during the CD is stop.
2. Each press will change the track number by one.
( The chosen track number will flash.)
( B )
In tuner mode, when the TUNER key is pressed
for more than 0.5 seconds, scanning will start
automatically and the tuner will stop at the first
receivable broadcast station.
CLASSIC
7. Fast forward search
button ( )/
Tuning up button
( TUNER )
There are some discs which do not have all command signal.
While these discs playing, the above various play may not be operated
( A )
1. In CD mode, press FORWARD key to choose
desired track during the CD is stop.
2. Each press will change the track number by one.
( The chosen track number will flash.)
( B )
In tuner mode, when the TUNER key is pressed
for more than 0.5 seconds, scanning will start
automatically and the tuner will stop at the first
receivable broadcast station.
5
Page 7
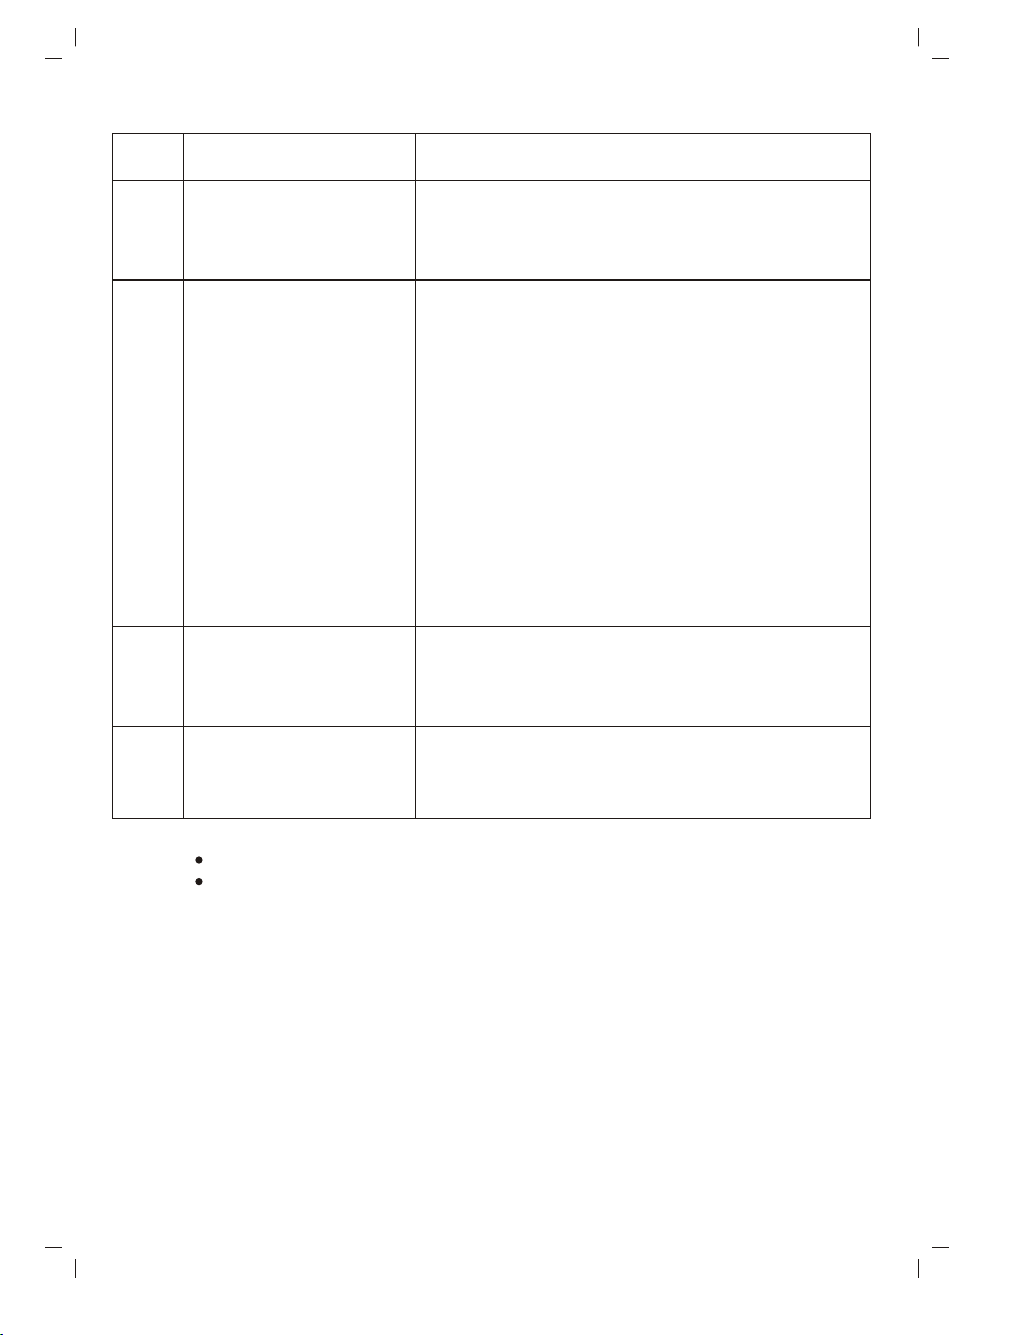
OPERATION OF REMOTE HANDSET (continued)
NO.
8. Function button
( FUNCTION
CD/TAPE/TUNER )
9. Memory/Program button
( MEMORY/PROG. )
10. P.Scan button ( P.SCAN )
Button Name
Operation
There are 3 deferent function mode, CD\TAPE and
TUNER. The user can select one of them by pressing
the FUNCTION key .
( A )
1. In CD mode, press MEMORY key one time to
make the "MEM" display flash during the CD
is stop.
2. Specify a track to play by pressing FORWARD
or BACK key.
3. Pressing MEMORY one time, then track is stored
into the program.
( B )
1. IN tuner mode, press MEMORY key one time,
to make the "MEM" display flash.
2. Press P.SCAN key to choose the desired channel.
3. Press MEMORY again, then the desired station is
stored in channel 1.
* Up to a maximum CD: 20 \ FM:20 \ AM:12
During tuner mode, press P.SCAN key to choose the
desired channel.
* Up to a maximum FM:20 \ AM:12
11. Band button ( AM/FM )
There are some discs which do not have all command signal.
While these discs playing, the above various play may not be operated.
During tuner mode, press BAND key to select the
desired reception band.
6
Page 8
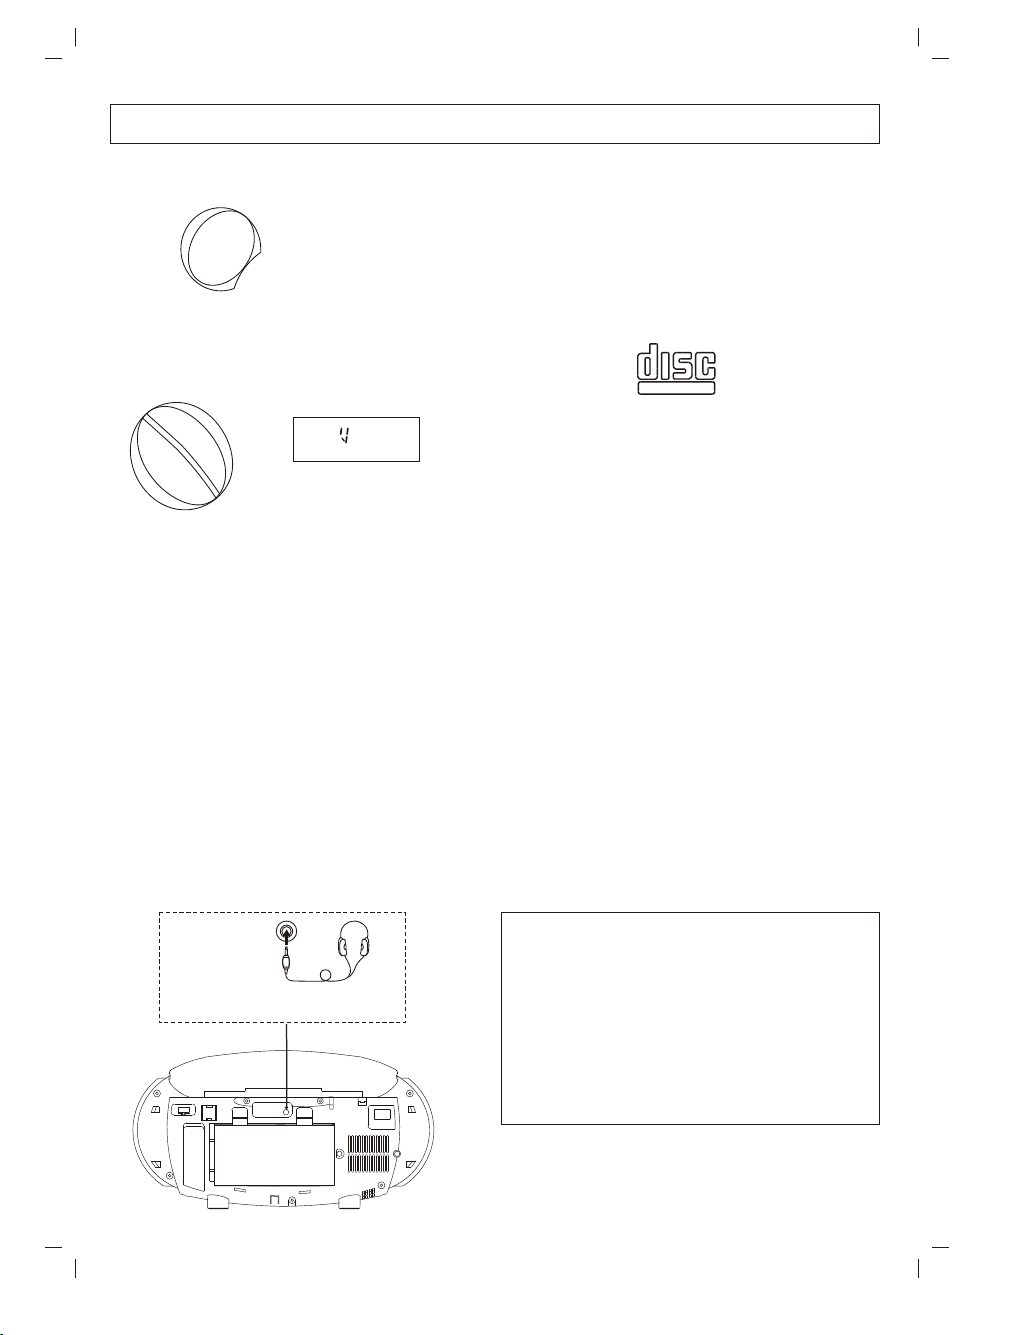
GENERAL OPERATION
To open and close the power
R
E
W
O
P
To control the sound
VOL
V
OL
.
+
.-
Press and release repeatedly
Display on LCD
o l 8 i
ST
MONO PS REP MEM TR CH
MHz
KHz
Press the VOLUME button to adjust the
sound.
DISPLAY NOTES:
- If a disc is loaded upside down, " Cd " will
be displayed.
- If no disc is loaded, " Cd " will be
displayed.
- Opening the CD compartment lid while a
is playing could scratch the disc. Always
the STOP button and wait for press the
disc to stop rotating before opening
compartment lid.CD
the
Using headphones
When the headphones are plugged in, the
speakers are automatically disconnected.
PHONES
Stereo headphone
(not included)
AC ~ IN
Compact discs
- Both 8cm and 12cm discs can be played in
this unit.
NOTE: Place only one disc at a time in the CD
compartment.
- Only discs bearing the logo as shown can be
played in this unit.
COMPACT
DIGITAL AUDIO
- Always place the compact disc in the CD
compartment with the label facing up.
Compact discs can be played on only one
side.
- Fingerprints and dust should be carefully
wiped off the disc's signal surface (opposite
the label side) with a soft cloth. Gently wipe
in a straight motion from the inside to the
outside of the disc.
- Discs should be returned to their case after
use to avoid serious scratches which could
cause the player to skip.
- Do not expose a disc to direct sunlight, high
humidity, or high temperatures for extended
periods of time to prevent warping the disc.
- Do not apply paper or write anything on the
surface of the disc.
- Do not use cleaners or antistatic sprays on
discs, such as those used for phonograph
recorder.
IMPORTANT NOTE:
If an abnormal display indication, audio
or an operating problem occurs, please
press
the POWER button to OFF position,
then disconnect themains lead and all
cables. Remove the batteries (see page 2).
Wait at least 5 seconds, then reconnect
all cables to
the mains lead
correct position. Reconnect
and reinstall the batteries.
7
Page 9
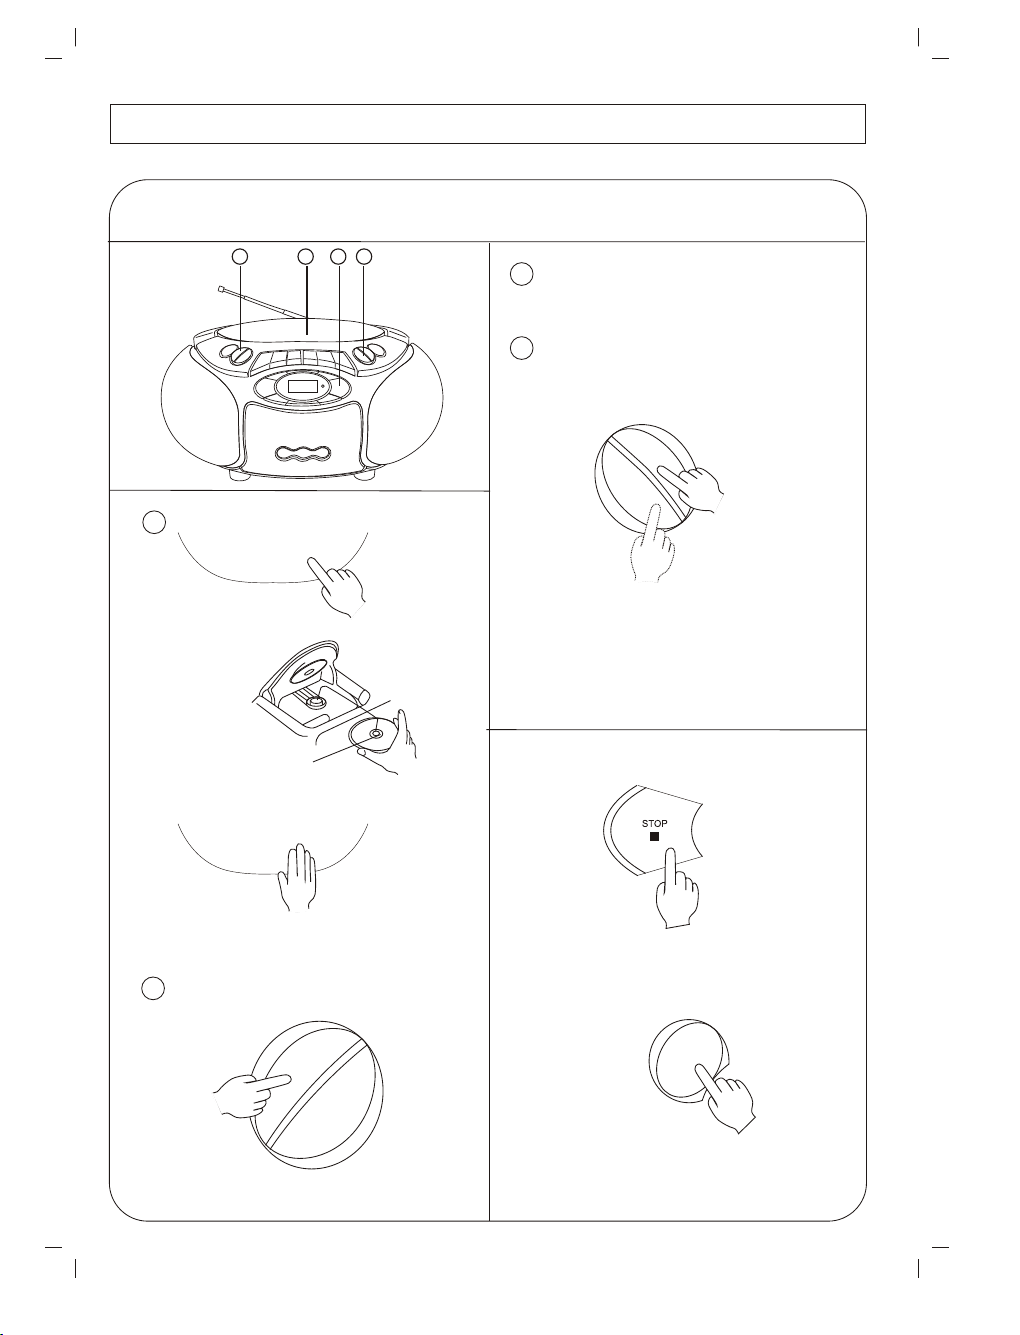
COMPACT DISC OPERATION
CD PLAY
1 3
42
3
Playback will start
automatically.
4
To control the sound.
V
O
L.+
VO
L
.-
1
PUSH OPEN
Push to open
Label facing up
PUSH OPEN
2 TO CD
Push down.
D
A
R
/
E
P
A
T
/
D
M
C
A
Press and release repeatedly
Press STOP.
O
I
M
F
/
R
E
W
O
P
To OFF
8
Page 10
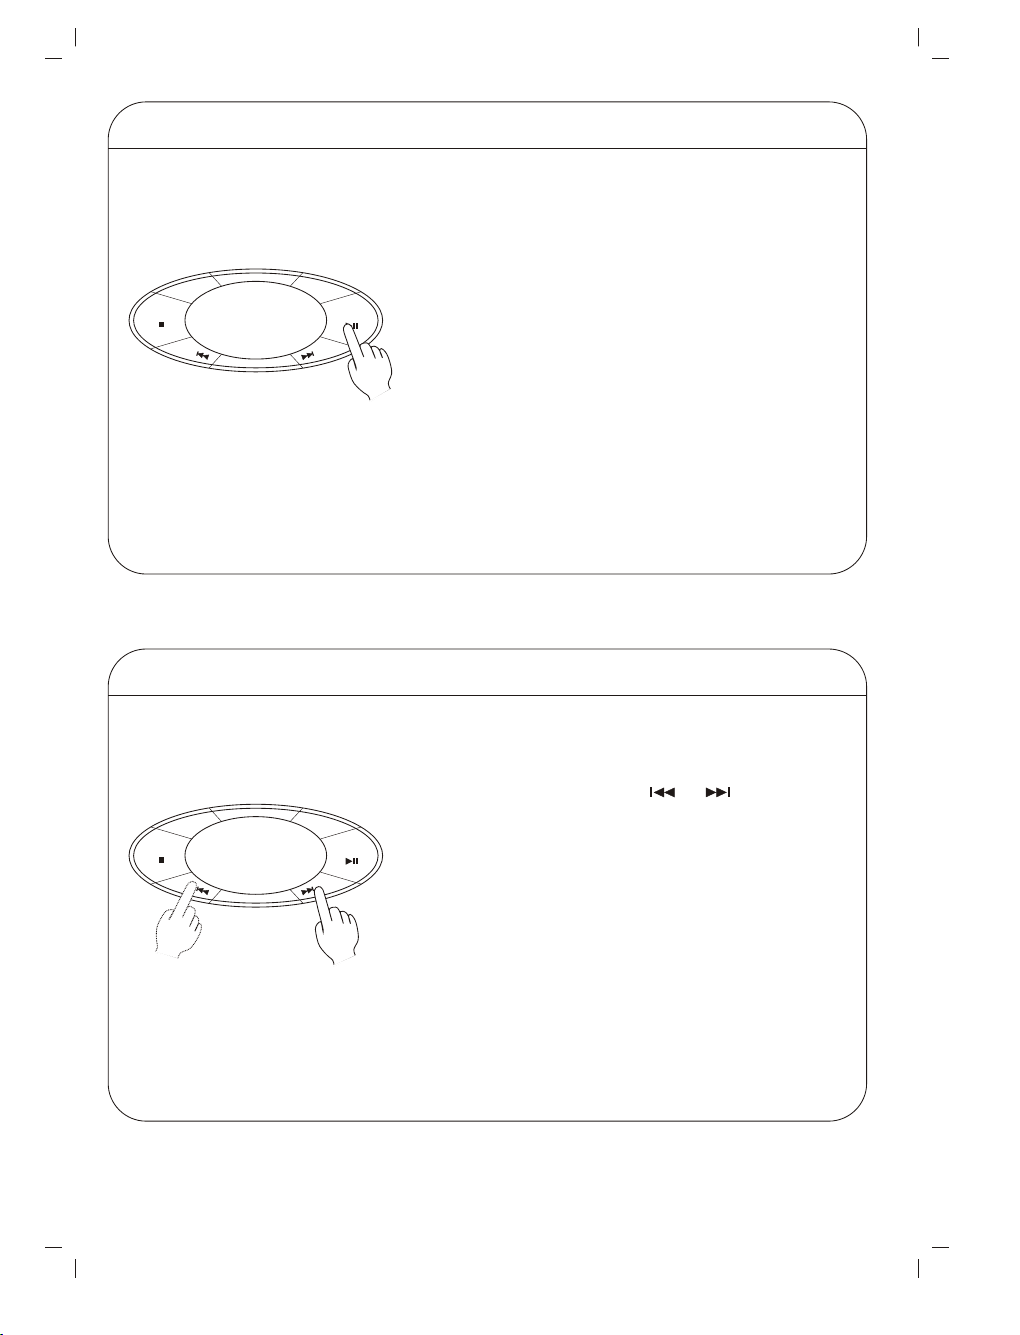
STOP
PAUSE
1. Press the PLAY/PAUSE button during play. Play
R
Y
R
O
M
E
M
S
K
I
P
-
E
P
E
A
T
/
S
T
PLAY/PAUSE
+
P
I
K
S
will temporarily stop, and PAUSE indicator will
show.
2. Press the PLAY/PAUSE button again to resume
play. Pause indicator will go off.
TRACK SKIP
R
E
P
E
A
T
/
S
T
PLAY/PAUSE
+
P
I
K
S
STOP
Y
R
O
M
E
M
S
K
I
P
-
Press and release repeatedly
1. Press and release the or SKIP button
repeatedly during play to quickly locate the
beginning of a track.
2. The CD track number display will show the
of the selected track. Play will number continue
from the beginning of the new track.continue
9
Page 11
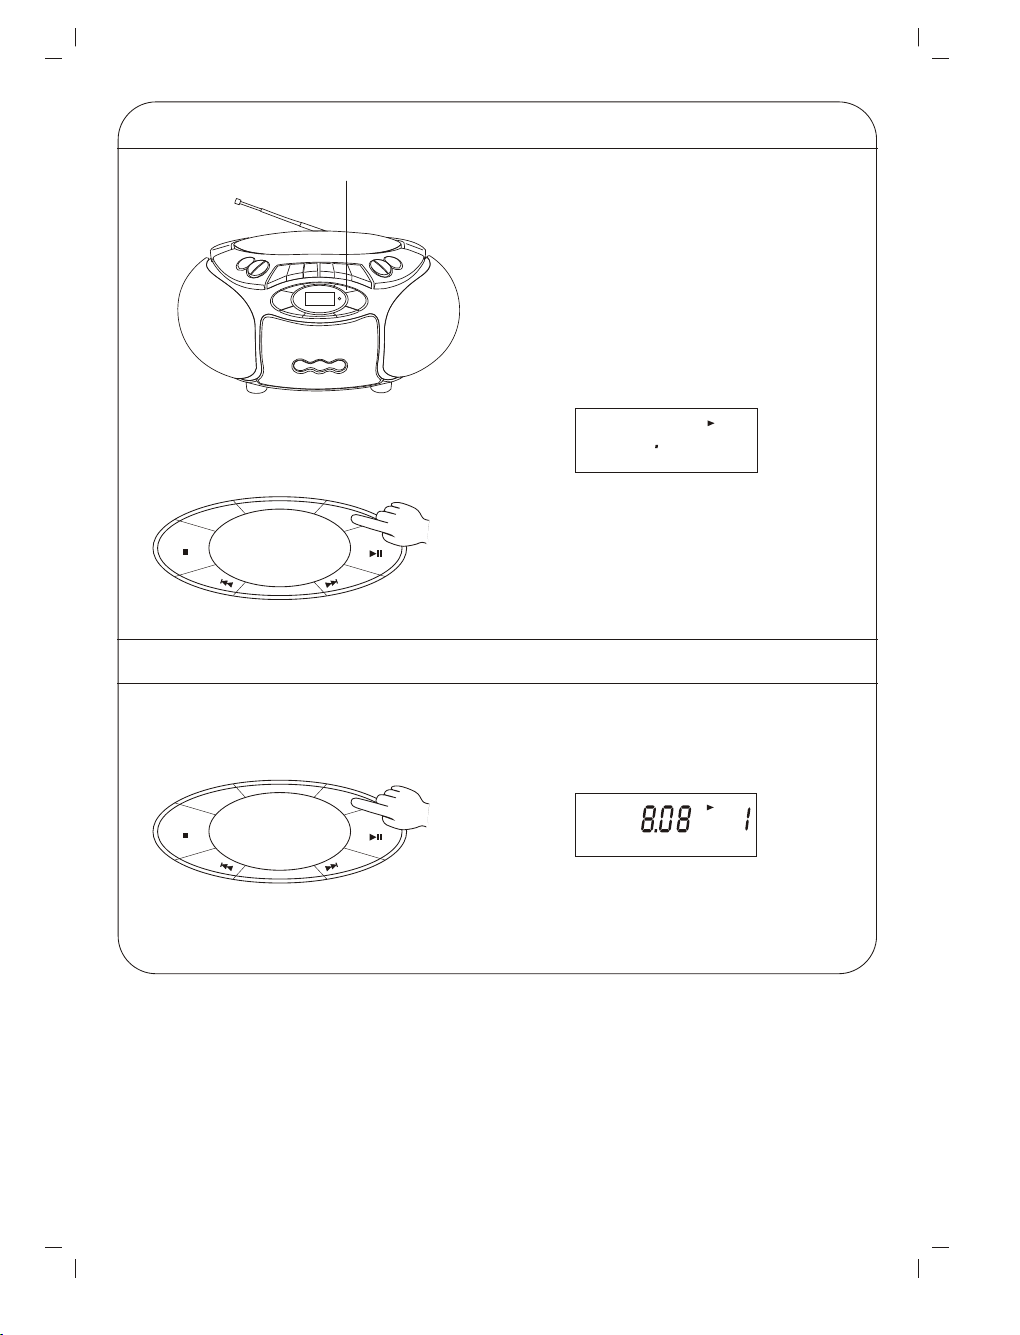
REPEAT
REPEAT PLAY
Press REPEAT
The REPEAT indicator will show.
To repeat the entire disc.
Press REPEAT before or during
play (or programmed play).
R
E
P
E
A
T
/
S
T
PLAY/PAUSE
+
P
I
K
S
STOP
Y
R
O
M
E
M
S
K
I
P
-
To cancel repeat play
Press REPEAT again
R
Y
R
O
M
E
M
STOP
S
K
I
P
-
The REPEAT indicator will go off.
E
P
E
A
T
/
S
T
PLAY/PAUSE
+
P
I
K
S
8 8 02 I
REP TR
TR
10
Page 12
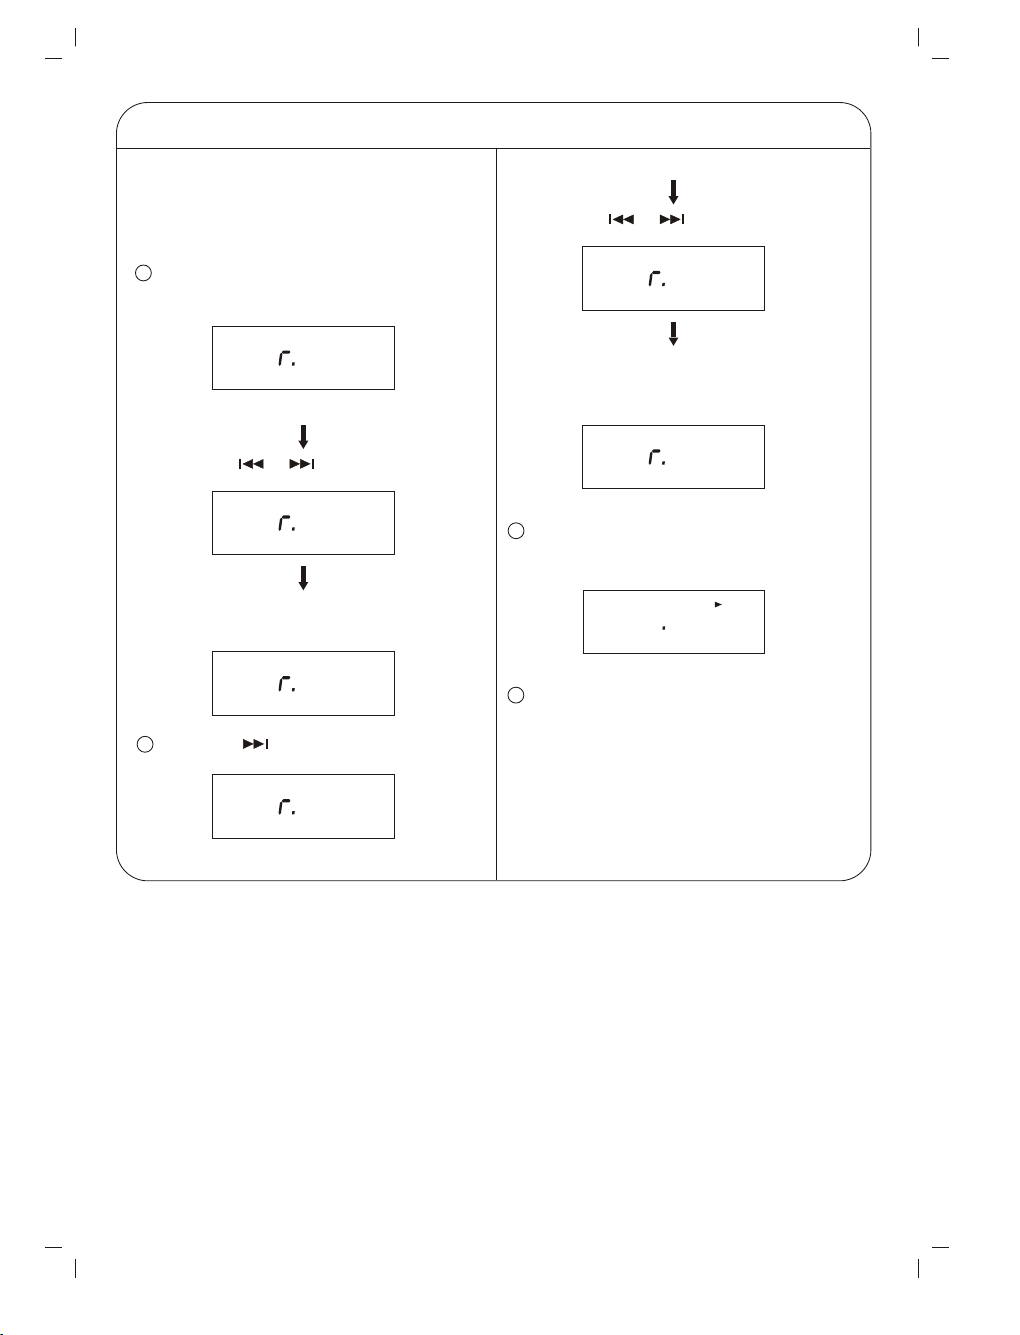
PROGRAMMED PLAY (Setting only by remote handset)
With programmed play, up to 20 tracks on
a disc can be memorized and played in any
order.
For example to program track 7, 12
1 In stop state, Press PROGRAM button,
the MEMORY indicator will flash.
Press the or SKIP button.
p 0
2
PS REP MEM TR CH
MONO
0i2
p 0
MONO PS REP MEM TR CH
Display on LCD
Press the or SKIP button.
p 0
MONO
Press MEMORY/PROGRAM button, the
MEMORY indicator will show.
p 0
MONO PS REP MEM TR CH
2 Press the SKIP button.
p 0
MONO PS REP MEM TR CH
Display on LCD
0 i
i
07
i
PS REP MEM TR CH
07
i
08
2
Press MEMORY/PROGRAM button, the
MEMORY indicator will show.
p 0
3 Press PLAY/PAUSE button and
programmed play starts automatically.
2
PS REP MEM TR CHMONO
0i2
i 0 i 7
MONO PS REP MEM TR CH
4 To cancel the programmed play, press
STOP button and then PROGRAM
button once.
11
Page 13
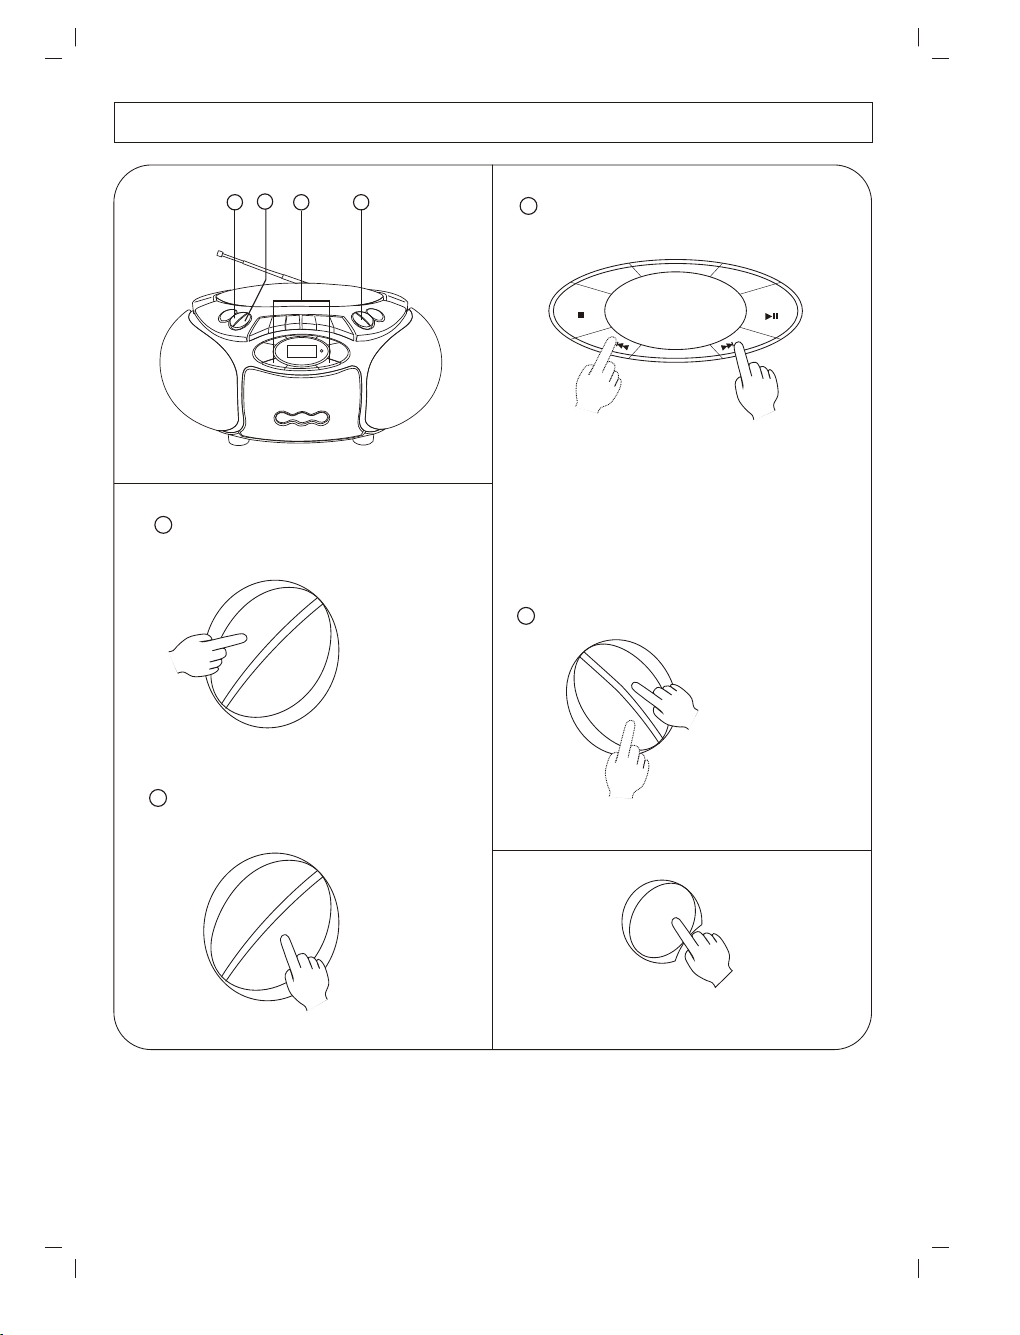
RADIO OPERATION
1
1 To RADIO.
A
T
/
D
C
2
4
3
3 Tune in a station.
R
E
P
E
A
T
/
S
T
PLAY/PAUSE
+
P
I
K
S
STOP
Y
R
O
M
E
M
S
K
I
P
-
In tuner mode, when the TUNING button
is pressed for more than 0.5 seconds,
scanning will start automatically and the
tuner will stop at the first receivable
broadcast station.
O
I
D
A
R
/
E
P
M
F
/
M
A
4 To control the sound.
VOL
.+
V
O
L
.-
2 Select a band.
A
R
/
E
P
A
T
/
D
C
A
Press and release repeatedly
O
I
D
M
F
/
M
R
E
W
O
P
To OFF
12
Page 14
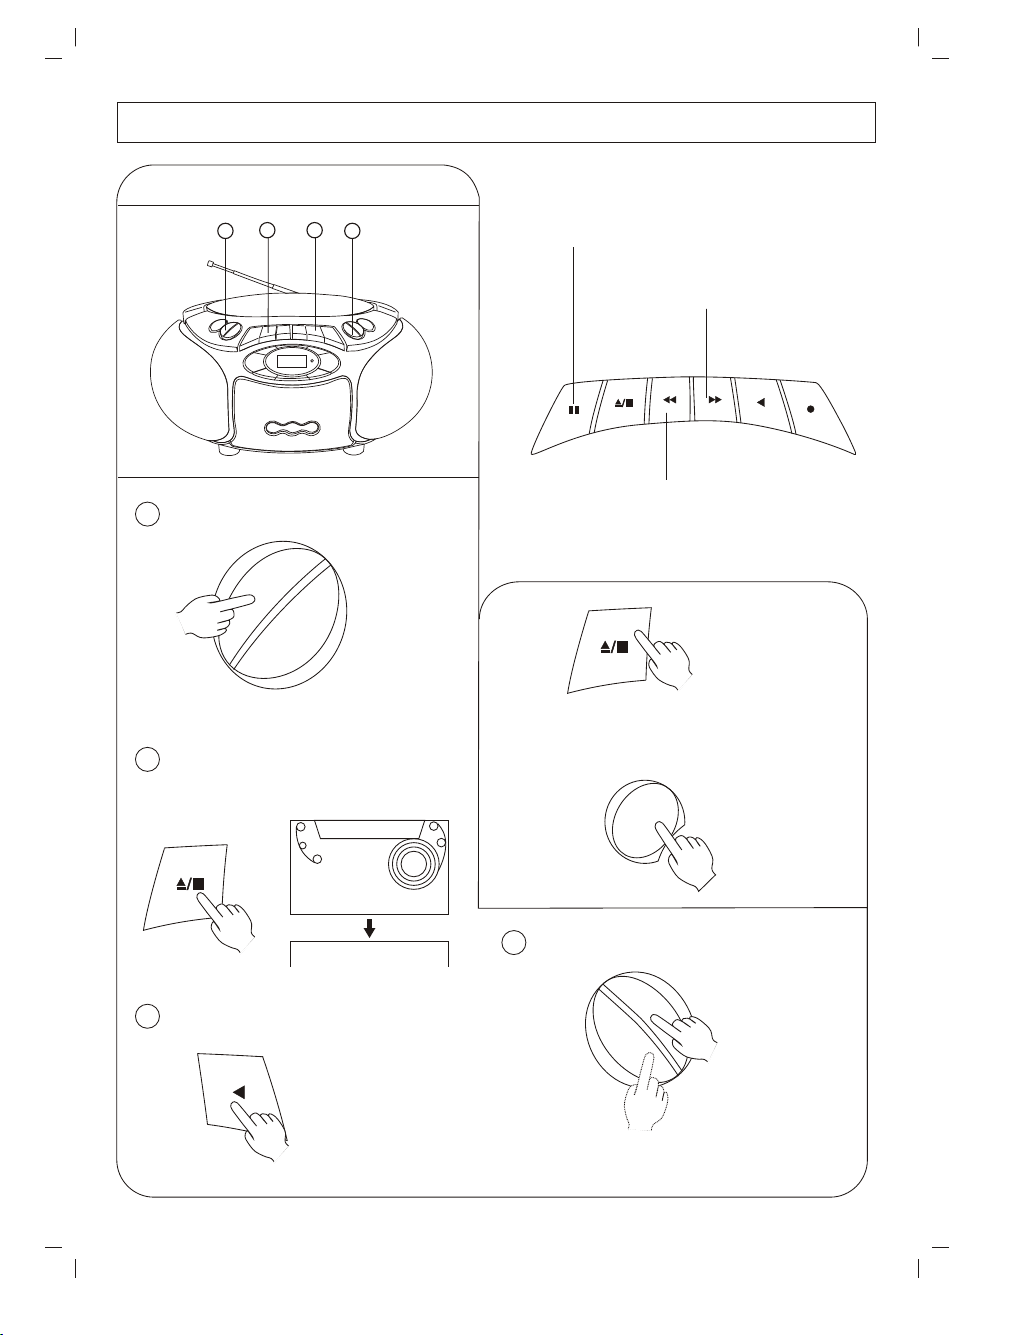
CASSETTE TAPE OPERATION
PLAYBACK
2 3
1
4
1 TO TAPE.
O
I
D
A
R
/
E
P
A
T
/
D
C
M
F
/
M
A
To TAPE
2 Press STOP/EJECT.
Insert cassette.
Press to temporarily stop the tape
during playback or recording. Press
it again to continue.
To quickly wind the
tape backward
To quickly wind the
tape forward
Press STOP/EJECT once to stop the tape.
Press again to remove the cassette.
R
E
W
O
P
3 Press PLAY.
To OFF
4 To control the sound.
VOL.+
VO
L.-
Press and release repeatedly
13
Page 15
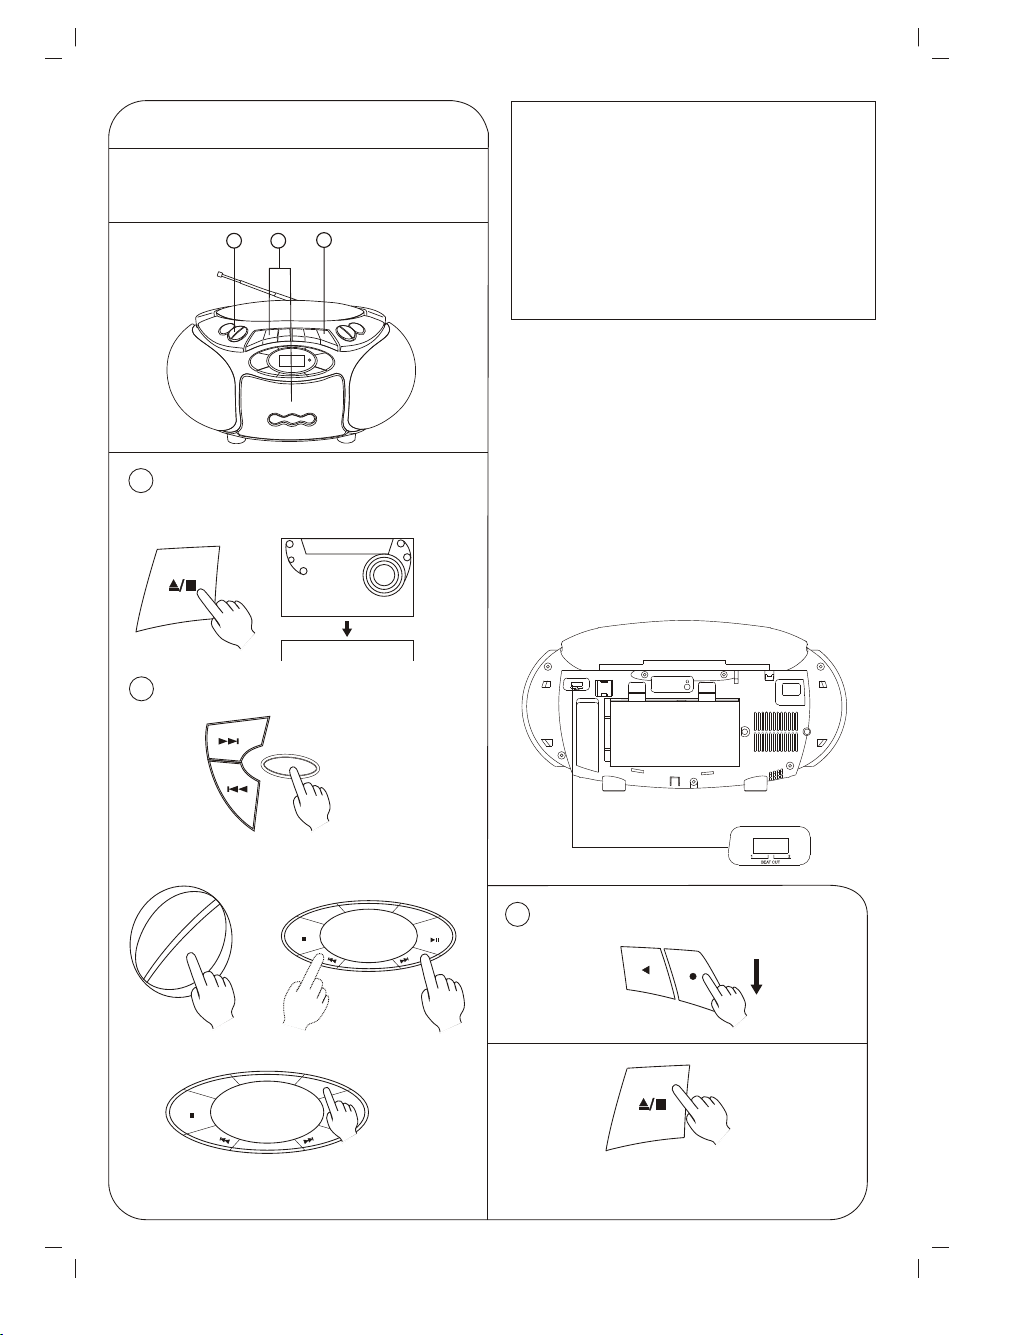
RECORDING
(A) Recording from
the built-in radio
2
3
1
WARNING
Recording copyright material without
permission of the copyright owners is
usually an infringement. If you wish to
re-record copyright material, permission
from the copyright owner is necessary.
OHAYO does not approve of, and cannot
be held responsible for, any unlawful of
this machine.
Automatic Level Control (ALC) recording
The ALC circuit adjusts the recording input
level automatically. No adjustments are
required.
1 Press STOP/EJECT.
Insert cassette.
2 TO RADIO.
FUNCTION
Select a band.
O
I
D
A
R
/
E
P
A
M
T
/
F
/
D
M
C
A
Tune in a station.
Y
R
O
M
E
M
STOP
S
K
I
P
-
BEAT CANCEL switch on AM
When recording a radio program, an irritating
"whistling" sound may sometimes be heard.
If this occurs, select position 1 or 2. Leave the
switch in the position that gives the best
results.
Back side of the unit
AC ~ IN
R
E
P
E
A
T
/
S
T
PLAY/PAUSE
+
P
I
K
S
3 Press REC.
R
Y
R
O
M
E
M
STOP
S
K
I
P
-
E
P
E
A
T
/
S
T
PLAY/PAUSE
+
P
I
K
S
Select FM mode (STEREO or MONO)
Press STOP/EJECT once to stop the tape.
Press again to remove the cassette.
14
Page 16
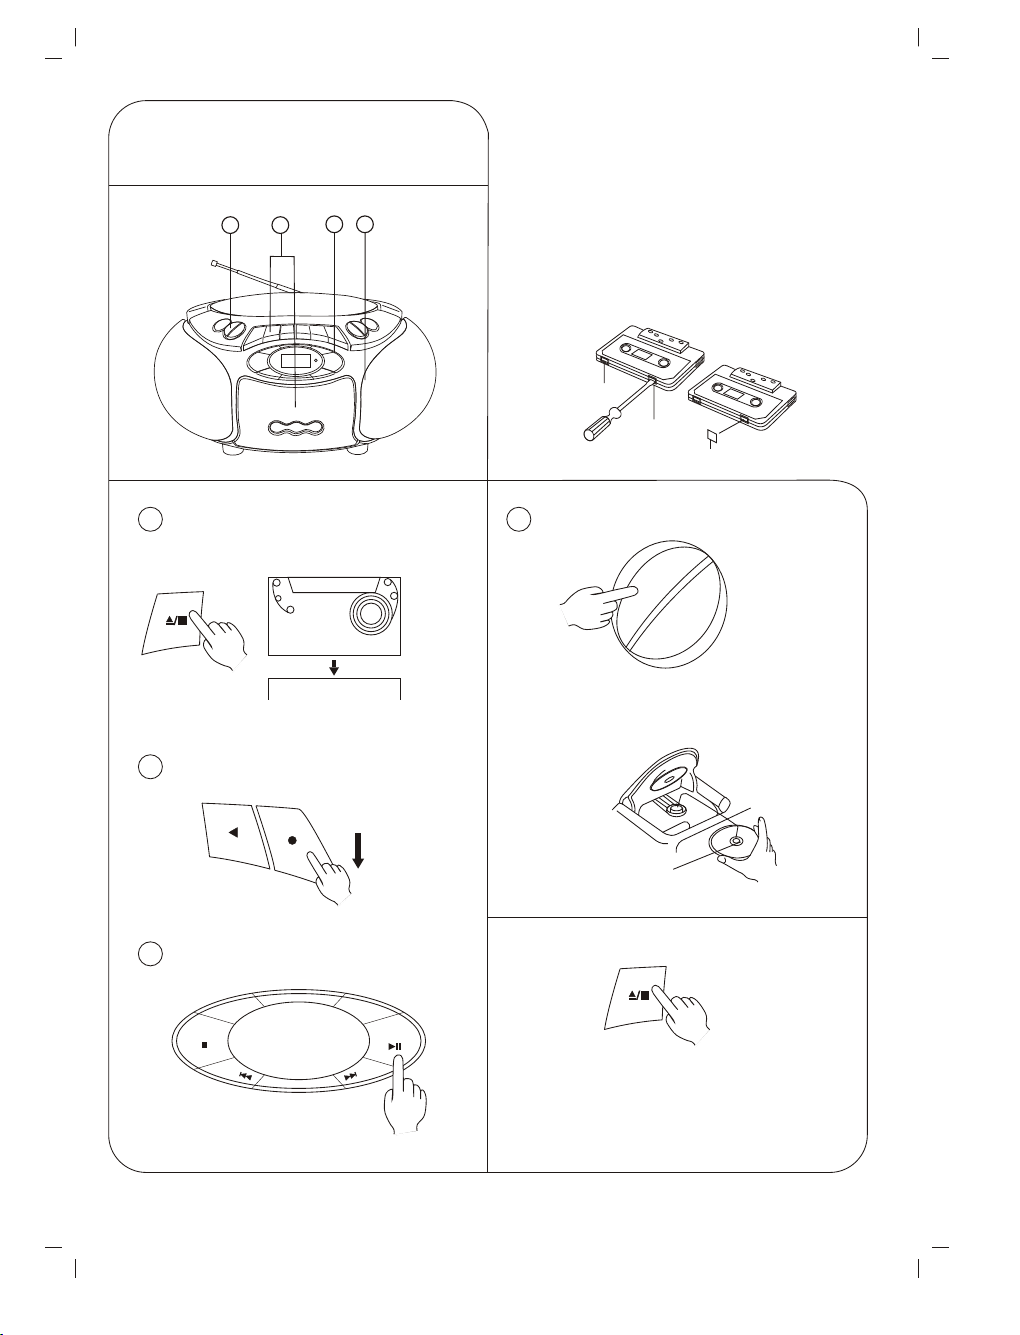
(C) Recording from
a compact disc
2
3 4
1
Safeguards against accidental erasure
To protect side A, break out tab (1). To
protect side B, break out tab (2).
NOTE:
A cassette with the erase guard tabs
removed cannot be erased or used for
recording and the REC button cannot be
depressed. To record or erase a protect
cassette, cover the tab openings with
adhesive taps (3).
A
2
B
1
3
1 Press STOP/EJECT.
Insert cassette.
3 Press REC.
4 Press PLAY/PAUSE.
R
E
P
E
A
T
/
S
T
PLAY/PAUSE
+
P
I
K
S
STOP
Y
R
O
M
E
M
S
K
I
P
-
2 To CD
O
I
D
A
R
/
E
P
A
M
T
/
F
/
D
M
C
A
PLAY/PAUSE button will be on in
CD mode.
Label facing up
Press STOP/EJECT once to stop the tape.
Press again to remove the cassette.
15
Page 17
MAINTENANCE
Cleaning the unit
Clean the outside of the unit with a clean soft
cloth, moistened with lukewarm water. Do not
use solvents such as benzene or thinner. These
will permanently damage the units finish.
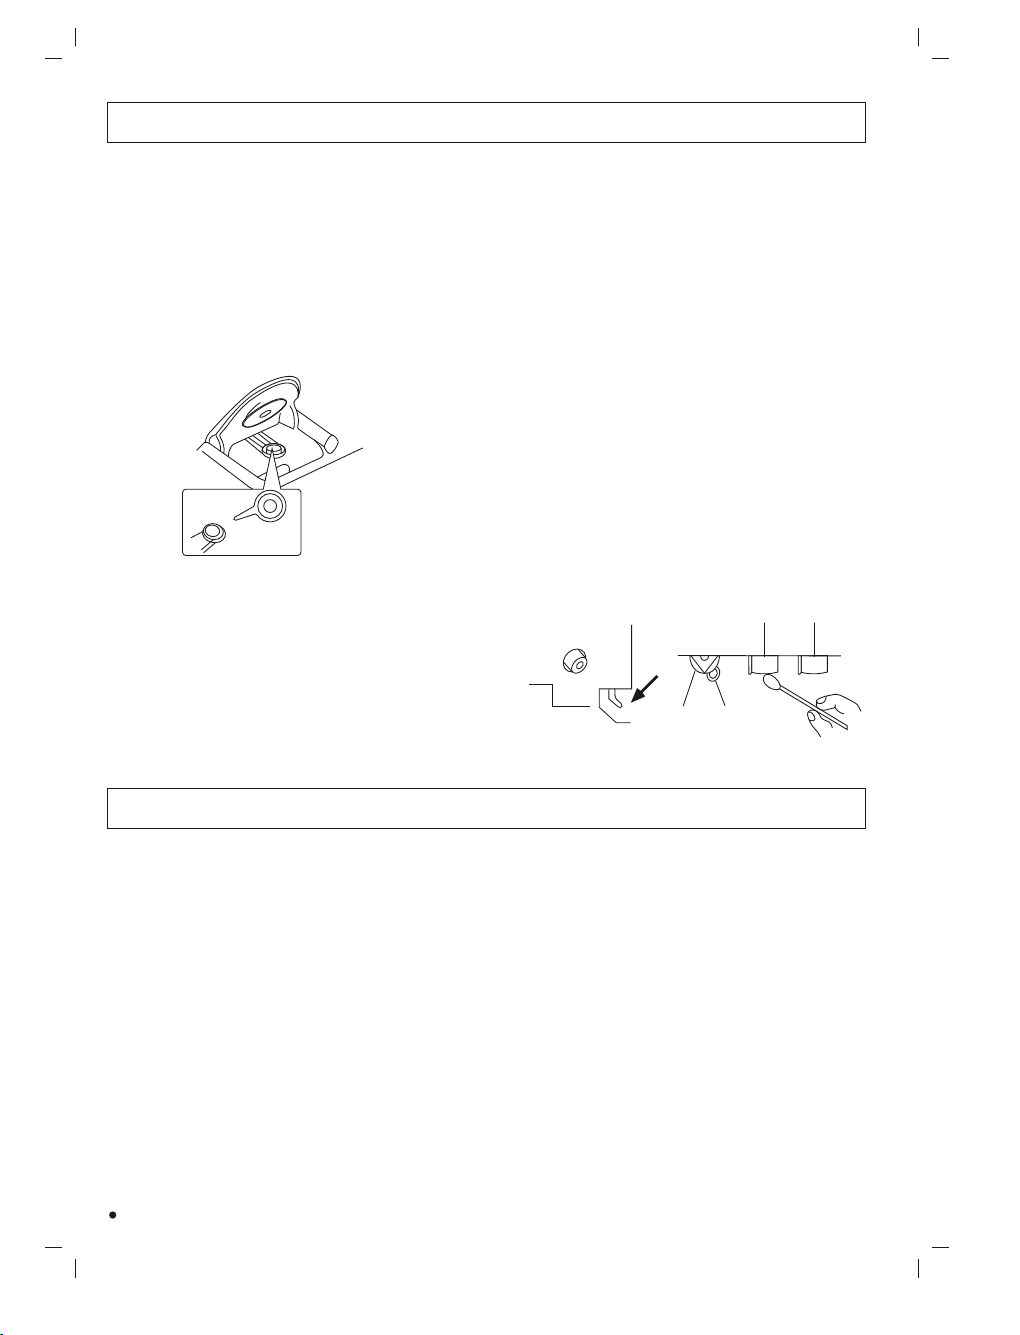
Cleaning the CD player lens
The lens should never be touched.
If dust is on t camera he leans, blow it off using a
lens blower. (Please consult your dealer.)
If trouble occurs...
To avoid the harzard of electric shock and
damage to the unit, have the unit bench tested
by an authorized OHAYO service station. Do not
remove the unit from its cabinet to attempt
repairs yourself.
Warning
- Do not block the ventilation hole.
- Do not expose to rain or moisture.
Cleaning the tape heads
When dust or reddish-brown oxide builds up on
the tape deck heads, pinch roller and capstan,
the following problems may result:
Poor sound quality during playback
Distorted, poor quality recordings
Erratic tape speed during recording or playback
To ensure playback and recording with good
quality sound, use a cleaning tape (available from
your local audio dealer) to clean the head block
of the deck after about every 10 hours of use.
1. Open the cassette compartment lid by pressing
(STOP/EJECT).
2. Press REC while pushing in the lever as
Illustration.
3. Moisten a cotton swab (1) with isopropyl
alcohol or special head cleaning fluid. Gently
rub the face of each head (2,3) with alcohol.
Also clean the capstan (5) and pinch roller (4).
OR
2
3
4 5
SPECIFICATIONS
(Cassette Section)
Recording system : AC bias, 4 track stereo
Erasing system : Magnet erase
Tape Speed : 4.75 cm/sec.
Fast forward and
rewind time : Approx 170 sec.(C-60 tape)
Frequency response: 80-10,000Hz (normal tape)
(CD Section)
Channels : 2 channels
S/N ratio 70 dB
Wow & Flutter Undetectable
Sampling frequency
Quantization :16
Pick up light source
Pick up wave length
Laser output : Continuous wave max.
Specifications subject to change without notice.
:
:
44.1 kHz
bits linear/ch
:
Semi-conductor laser
: 790mm
0.6mW
(Radio Section)
Tuning ranges : FM : 87.5-108MHz
AM : 522-1611KHz
Aerials : Built-in ferrite bar
and telescopic rod aerials
(General)
Power output : 70W (P.M.P.O.)
Speaker : 92mm x 2 (8 ohms)
Terminals-Output : Headphones
Power source : AC: 230V/50Hz
DC: 12V (8 x "D" size
batteries)
Dimensions : 344 x 181 x 255 mm
(W) x (H) x (D)
weight (approx) : 2.9kg (excluding batteries)
16
Page 18

TCD-50
 Loading...