

Page 1

DVD AUDIO-VIDEO / SUPER AUDIO CD PLAYER
DVD-3930CI
OPERATING INSTRUCTIONS
Page 2
I
¢ SAFETY PRECAUTIONS
CAUTION:
TO REDUCE THE RISK OF ELECTRIC SHOCK, DO NOT
REMOVE COVER (OR BACK). NO USER-SERVICEABLE PARTS
INSIDE. REFER SERVICING TO QUALIFIED SERVICE
PERSONNEL.
The lightning flash with arrowhead symbol, within an
equilateral triangle, is intended to alert the user to the presence
of uninsulated “dangerous voltage” within the product’s
enclosure that may be of sufficient magnitude to constitute a
risk of electric shock to persons.
The exclamation point within an equilateral triangle is intended
to alert the user to the presence of important operating and
maintenance (servicing) instructions in the literature
accompanying the appliance.
WARNING:
TO REDUCE THE RISK OF FIRE OR ELECTRIC SHOCK, DO NOT
EXPOSE THIS APPLIANCE TO RAIN OR MOISTURE.
ENGLISH
1. Read Instructions – All the safety and operating instructions should be read
before the product is operated.
2. Retain Instructions – The safety and operating instructions should be
retained for future reference.
3. Heed Warnings – All warnings on the product and in the operating
instructions should be adhered to.
4. Follow Instructions – All operating and use instructions should be followed.
5. Cleaning – Unplug this product from the wall outlet before cleaning. Do not
use liquid cleaners or aerosol cleaners.
6. Attachments – Do not use attachments not recommended by the product
manufacturer as they may cause hazards.
7. Water and Moisture – Do not use this product near water – for example,
near a bath tub, wash bowl, kitchen sink, or laundry tub; in a wet basement;
or near a swimming pool; and the like.
8. Accessories – Do not place this product on an unstable cart, stand, tripod,
bracket, or table. The product may fall, causing serious injury to a child or
adult, and serious damage to the product. Use only with a cart, stand,
tripod, bracket, or table recommended by the manufacturer, or sold with
the product. Any
mounting of the product should follow the
manufacturer’s instructions, and should use a
mounting accessory recommended by the
manufacturer.
9. A product and cart combination should be moved
with care. Quick stops, excessive force, and
uneven surfaces may cause the product and cart
combination to overturn.
10. Ventilation – Slots and openings in the cabinet are provided for ventilation
and to ensure reliable operation of the product and to protect it from
overheating, and these openings must not be blocked or covered. The
openings should never be blocked by placing the product on a bed, sofa,
rug, or other similar surface. This product should not be placed in a built-in
installation such as a bookcase or rack unless proper ventilation is provided
or the manufacturer’s instructions have been adhered to.
11. Power Sources – This product should be operated only from the type of
power source indicated on the marking label. If you are not sure of the type
of power supply to your home, consult your product dealer or local power
company. For products intended to operate from battery power, or other
sources, refer to the operating instructions.
12. Grounding or Polarization – This product may be equipped with a polarized
alternating-current line plug (a plug having one blade wider than the other).
This plug will fit into the power outlet only one way. This is a safety feature.
If you are unable to insert the plug fully into the outlet, try reversing the
plug. If the plug should still fail to fit, contact your electrician to replace
your obsolete outlet. Do not defeat the safety purpose of the polarized
plug.
13. Power-Cord Protection – Power-supply cords should be routed so that they
are not likely to be walked on or pinched by items placed upon or against
them, paying particular attention to cords at plugs, convenience
receptacles, and the point where they exit from the product.
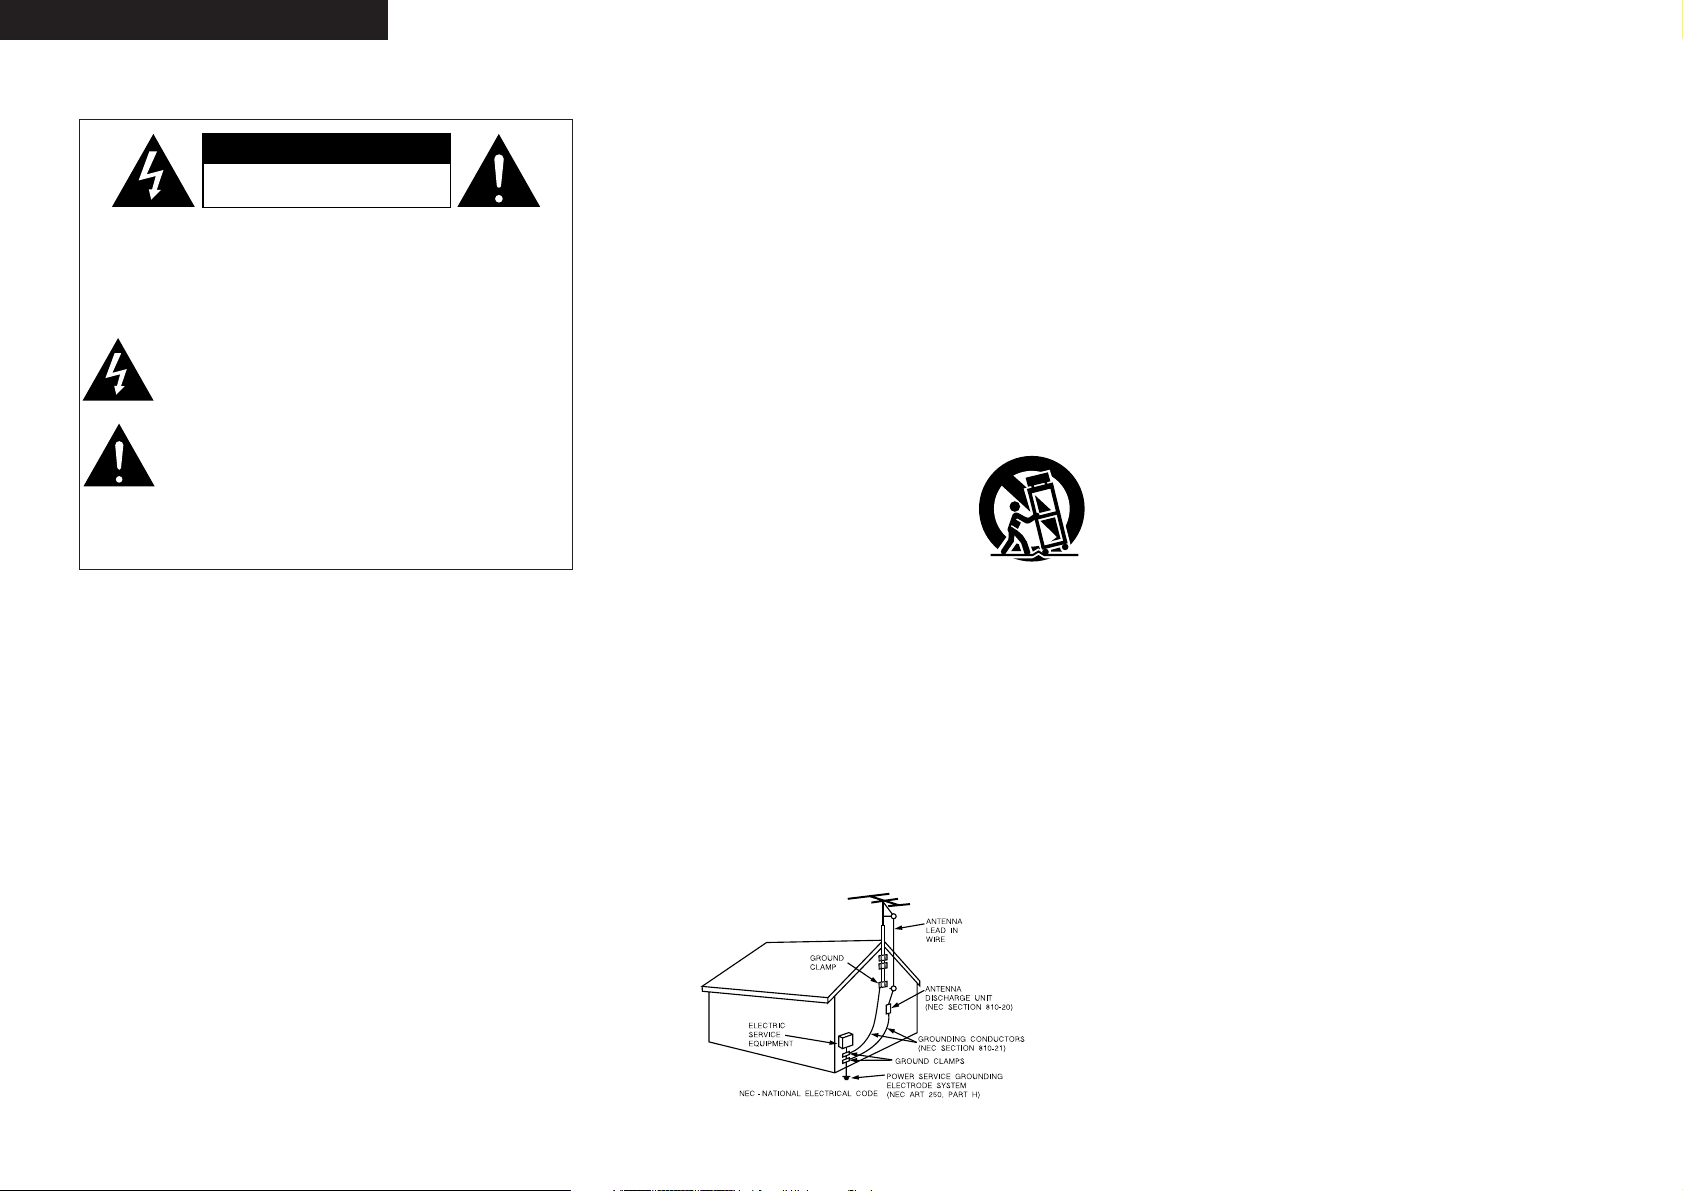
15. Outdoor Antenna Grounding – If an outside antenna or cable system is
connected to the product, be sure the antenna or cable system is grounded
so as to provide some protection against voltage surges and built-up static
charges. Article 810 of the National Electrical Code, ANSI/NFPA 70,
provides information with regard to proper grounding of the mast and
supporting structure, grounding of the lead-in wire to an antenna discharge
unit, size of grounding conductors, location of antenna-discharge unit,
connection to grounding electrodes, and requirements for the grounding
electrode. See Figure A.
16. Lightning – For added protection for this product during a lightning storm,
or when it is left unattended and unused for long periods of time, unplug it
from the wall outlet and disconnect the antenna or cable system. This will
prevent damage to the product due to lightning and power-line surges.
17. Power Lines – An outside antenna system should not be located in the
vicinity of overhead power lines or other electric light or power circuits, or
where it can fall into such power lines or circuits. When installing an
outside antenna system, extreme care should be taken to keep from
touching such power lines or circuits as contact with them might be fatal.
18. Overloading – Do not overload wall outlets, extension cords, or integral
convenience receptacles as this can result in a risk of fire or electric shock.
19. Object and Liquid Entry – Never push objects of any kind into this product
through openings as they may touch dangerous voltage points or short-out
parts that could result in a fire or electric shock. Never spill liquid of any
kind on the product.
20. Servicing – Do not attempt to service this product yourself as opening or
removing covers may expose you to dangerous voltage or other hazards.
Refer all servicing to qualified service personnel.
21. Damage Requiring Service – Unplug this product from the wall outlet and
refer servicing to qualified service personnel under the following
conditions:
a) When the power-supply cord or plug is damaged,
b) If liquid has been spilled, or objects have fallen into the product,
c) If the product has been exposed to rain or water,
d) If the product does not operate normally by following the operating
instructions. Adjust only those controls that are covered by the
operating instructions as an improper adjustment of other controls may
result in damage and will often require extensive work by a qualified
technician to restore the product to its normal operation,
e) If the product has been dropped or damaged in any way, and
f) When the product exhibits a distinct change in performance – this
indicates a need for service.
22. Replacement Parts – When replacement parts are required, be sure the
service technician has used replacement parts specified by the
manufacturer or have the same characteristics as the original part.
Unauthorized substitutions may result in fire, electric shock, or other
hazards.
23. Safety Check – Upon completion of any service or repairs to this product,
ask the service technician to perform safety checks to determine that the
product is in proper operating condition.
24. Wall or Ceiling Mounting – The product should be mounted to a wall or
ceiling only as recommended by the manufacturer.
25. Heat – The product should be situated away from heat sources such as
radiators, heat registers, stoves, or other products (including amplifiers)
that produce heat.
SAFETY INSTRUCTIONS
FIGURE A
EXAMPLE OF ANTENNA GROUNDING
AS PER NATIONAL
ELECTRICAL CODE
CAUTION:
USE OF CONTROLS OR ADJUSTMENTS OR PERFORMANCE OF
PROCEDURES OTHER THAN THOSE SPECIFIED HEREIN MAY RESULT
IN HAZARDOUS RADIATION EXPOSURE.
THIS PRODUCT SHOULD NOT BE ADJUSTED OR REPAIRED BY
ANYONE EXCEPT PROPERLY QUALIFIED SERVICE PERSONNEL.
¢ LASER SAFETY
CLASS II LASER PRODUCT
CAUTION:
VISIBLE AND INVISIBLE LASER RADIATION WHEN OPEN.
DO NOT STARE INTO BEAM.
LOCATION: INSIDE, NEAR THE DVD DRIVE MECHANISM.
CAUTION
RISK OF ELECTRIC SHOCK
DO NOT OPEN
Page 3
II
ENGLISH
¢NOTE ON USE
FCC INFORMATION (For US customers)
1. PRODUCT
This product complies with Part 15 of the FCC Rules. Operation is subject
to the following two conditions: (1) this product may not cause harmful
interference, and (2) this product must accept any interference received,
including interference that may cause undesired operation.
2. IMPORTANT NOTICE: DO NOT MODIFY THIS PRODUCT
This product, when installed as indicated in the instructions contained in this
manual, meets FCC requirements. Modification not expressly approved by
DENON may void your authority, granted by the FCC, to use the product.
3. NOTE
This product has been tested and found to comply with the limits for a Class
B digital device, pursuant to Part 15 of the FCC Rules. These limits are
designed to provide reasonable protection against harmful interference in a
residential installation.
This product generates, uses and can radiate radio frequency energy and, if
not installed and used in accordance with the instructions, may cause
harmful interference to radio communications. However, there is no
guarantee that interference will not occur in a particular installation. If this
product does cause harmful interference to radio or television reception,
which can be determined by turning the product OFF and ON, the user is
encouraged to try to correct the interference by one or more of the
following measures:
• Reorient or relocate the receiving antenna.
• Increase the separation between the equipment and receiver.
• Connect the product into an outlet on a circuit different from that to
which the receiver is connected.
• Consult the local retailer authorized to distribute this type of product or
an experienced radio/TV technician for help.
This Class B digital apparatus complies with Canadian ICES-003.
Cet appareil numérique de la classe B est conforme à la norme NMB-003
du Canada.
¢Copyrights
• It is prohibited by law to reproduce, broadcast, rent or play discs in public
without the consent of the copyright holder.
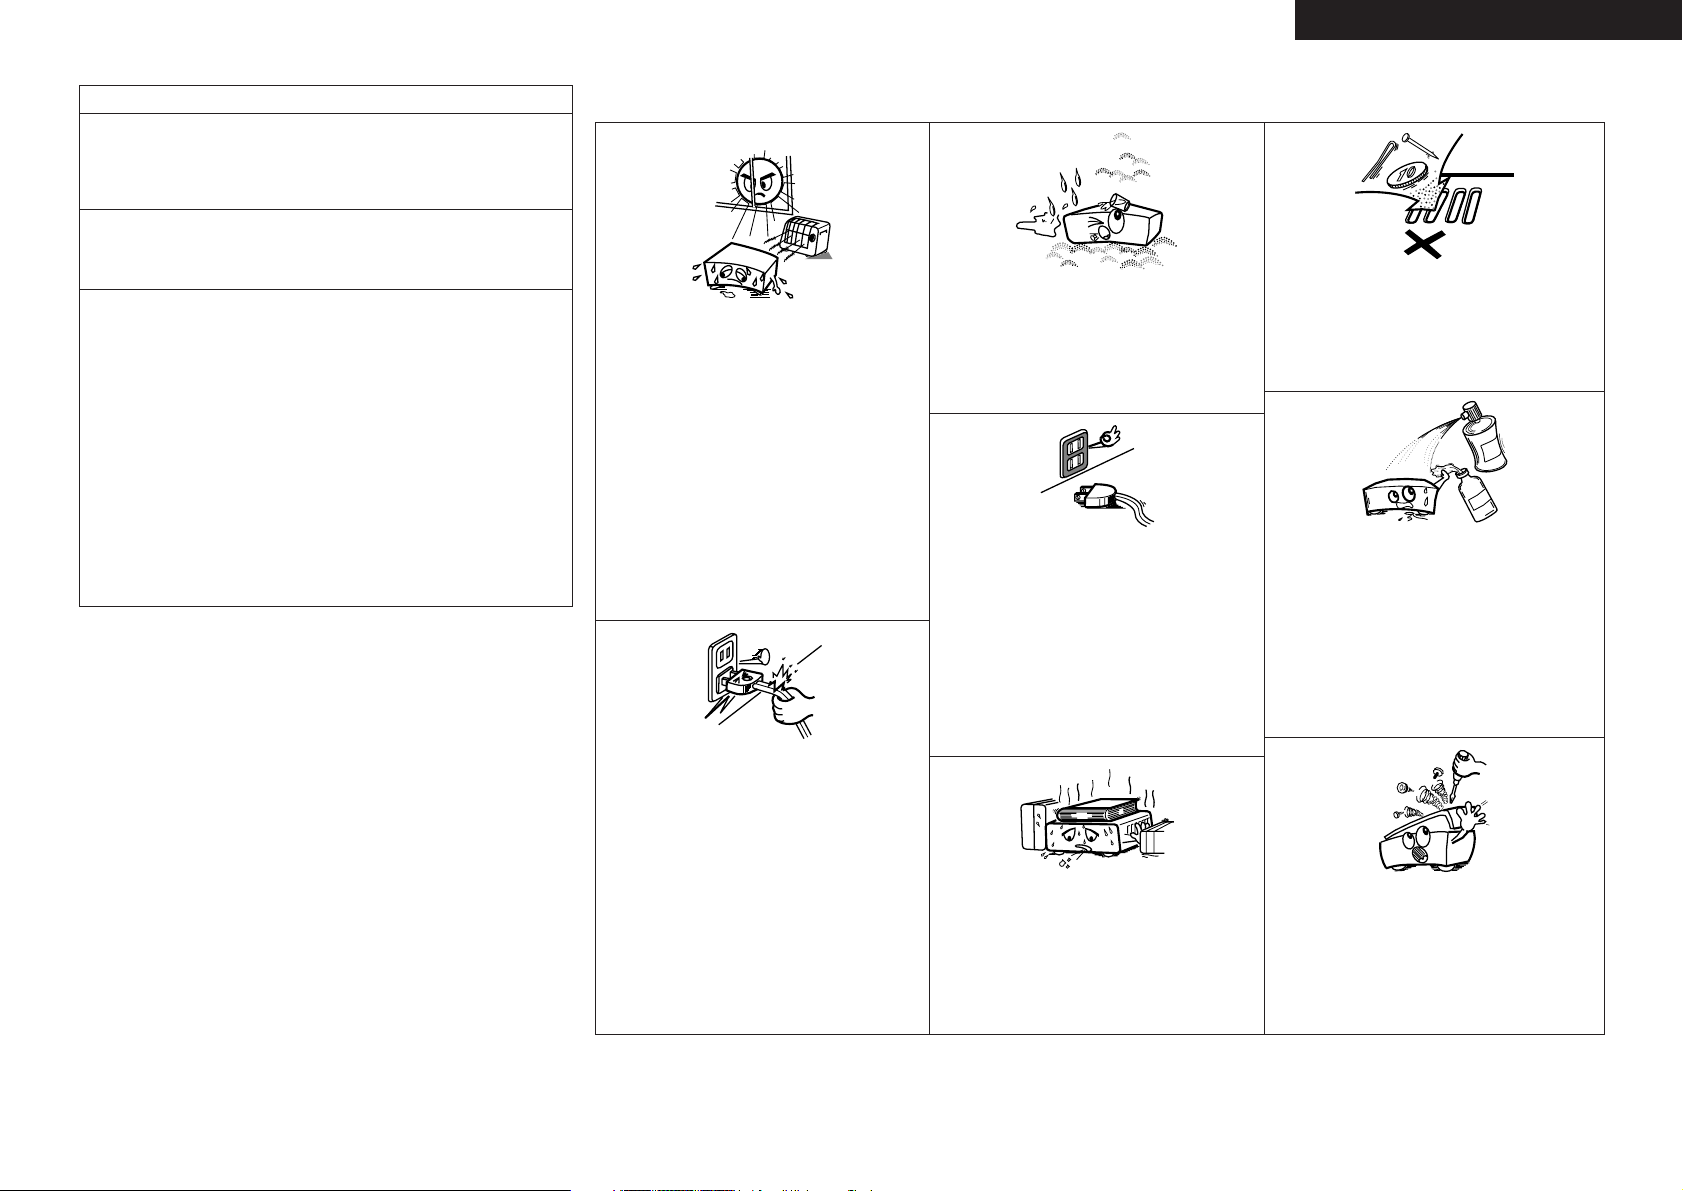
•Avoid high temperatures.
Allow for sufficient heat dispersion when installed
in a rack.
• Handle the power cord carefully.
Hold the plug when unplugging the cord.
• Keep the apparatus free from moisture, water, and
dust.
• Unplug the power cord when not using the
apparatus for long periods of time.
* (For apparatuses with ventilation holes)
• Do not obstruct the ventilation holes.
• Do not let foreign objects into the apparatus.
• Do not let insecticides, benzene, and thinner come
in contact with the apparatus.
• Never disassemble or modify the apparatus in any
way.
Page 4

Getting Started
ENGLISH
1
ENGLISH
Cable indications ············································································8
Connection to a TV·········································································9
Digital connection to an AV amplifier
with built-in decoder································································9, 10
Connection to a device with 2-channels of
analog audio inputs······································································10
Surround connections to a device with 5.1-channels of
analog audio inputs······································································10
DENON LINK connections····························································11
Connection to a device with an HDMI terminal··················11, 12
Digital connection to a recording device (MD recorder, etc.)
···12
Connecting the power supply cord ············································12
Contents
Getting Started
Thank you for purchasing this DENON DVD Audio-Video / Super Audio CD player. Please read the operation instructions thoroughly in order to
acquaint yourself with the DVD Audio-Video / Super Audio CD player and achieve maximum satisfaction from it.
Be sure to keep these instructions for future reference, should any questions or problems arise.
Accessories······················································································3
Before using ····················································································3
Cautions on installation·································································3
About discs
Discs usable on this set·····························································3, 4
Holding discs··················································································4
Loading discs ·················································································4
Cautions on loading discs ······························································4
Cautions on handling······································································5
Cautions on storing discs·······························································5
Cleaning discs ················································································5
About the remote control unit
Inserting the batteries ····································································5
Operating range of the remote control unit ···································5
Part names and functions
Front panel ·····················································································6
Display····························································································6
Rear panel ······················································································7
Remote control unit ·······································································7
Getting Started
Connections
Table of initial settings···························································13, 14
Operations for making the initial settings·································15
Language setting ··········································································16
Digital interface settings
Setting the HDMI RGB picture quality settings ···························17
Setting the HDMI audio ·······························································17
Setting the HDMI speaker settings ·······································17~19
Setting the HDMI auto format ·····················································19
Setting the DENON LINK·····························································19
Video setting
Setting the TV aspect ratio···························································20
Setting the TV type ······································································20
Setting the component video output ···········································20
Setting the AV Synchronized························································21
Setting the squeeze mode···························································21
Setting the progressive mode······················································21
Setting the horizontal display range ·············································22
Audio settings
Setting the audio channels···························································22
Setting the digital output······························································23
Setting the downsampling ···························································23
Setting the source direct························································23, 24
Setting the bass enhancer ···························································24
Setting the dynamic range compression ·····································24
Viewing restriction setting
Setting the viewing restriction level·············································25
Setting the password ···································································25
Setting the displaying the registration code ································26
Special settings
Setting the player mode·······························································26
Setting the captions ·····································································26
Setting the wallpaper ···································································26
Setting the screensaver ·······························································27
Setting the display········································································27
Setting the auto power mode ······················································27
Setting the slide switching time ··················································27
Making the initial settings
Using the pure direct mode·························································28
Making the settings for the picture output
from the HDMI terminal
Changing the signal format ··························································29
Changing the resolution ·························································29, 30
Performing keystone correction ·················································30
Performing keystone correction in the horizontal direction ·········30
Performing keystone correction in the vertical direction ·············30
Audio synchronization adjustment procedure ··························31
Adjusting the picture quality
Storing the picture quality settings in the memory ···············31, 32
Gamma correction········································································33
Other settings
Turning the power on···································································34
Loading discs ················································································34
Playing discs··················································································34
To stop playback···········································································34
To pause playback ········································································35
About DVD-Video discs································································35
Playing DVD-Video discs ······························································35
Using the top menu and DVD menu············································36
Switching the audio language (Multiple-Audio Function)·············36
Switching the subtitle language (Multiple-Subtitle Function)·······36
Switching the angle (Multiple-Angle Function) ····························36
About DVD-Audio discs ·······························································36
Switching between groups and tracks·········································37
Playing bonus groups ···································································37
Selecting still pictures ··································································37
About Super Audio CDs·······························································37
Setting the Super Audio CD playback area/layer ·························38
About Video and Music CDs························································38
Playing discs with playback control··············································38
About discs containing MP3 and WMA format files···········38, 39
About discs containing DivX®format files ·······························40
About discs containing still picture files····································40
Playing a disc containing files in JPEG format·····························40
Playing Picture CDs and Fujicolor CDs ········································41
Repeat and random play of MP3, WMA, JPEG and
DivX®files·····················································································42
Basic Operation
Page 5

Getting Started
ENGLISH
2
ENGLISH
Fast-forwarding/Fast-reversing ··················································42
Moving to the beginning ·····························································42
Searching using the NUMBER buttons········································42
Frame-by-frame playback
(for DVD-Video discs and Video CDs only)································43
Slow playback···············································································43
Repeat playback ·····································································43, 44
Repeating a section between two specific points
(A-B repeat playback) ···································································44
Programmed playback ·································································44
Playing in random order ······························································44
Operating using the on-screen display ································45, 46
Marking scenes you want to see again later·····························46
Adding marks ···············································································46
Calling out marked scenes···························································46
Zoomed play ·················································································47
Setting the video format ·····························································47
Adjusting the brightness of the display·····································47
Convenient operations
About the DENON LINK function················································48
Advanced AL24 Processing··························································48
Copyright protection technology················································48
Resetting························································································48
Registered trademarks·································································48
Troubleshooting············································································49
Specifications················································································50
Others
Page 6
Getting Started Getting Started
ENGLISH
3
ENGLISH
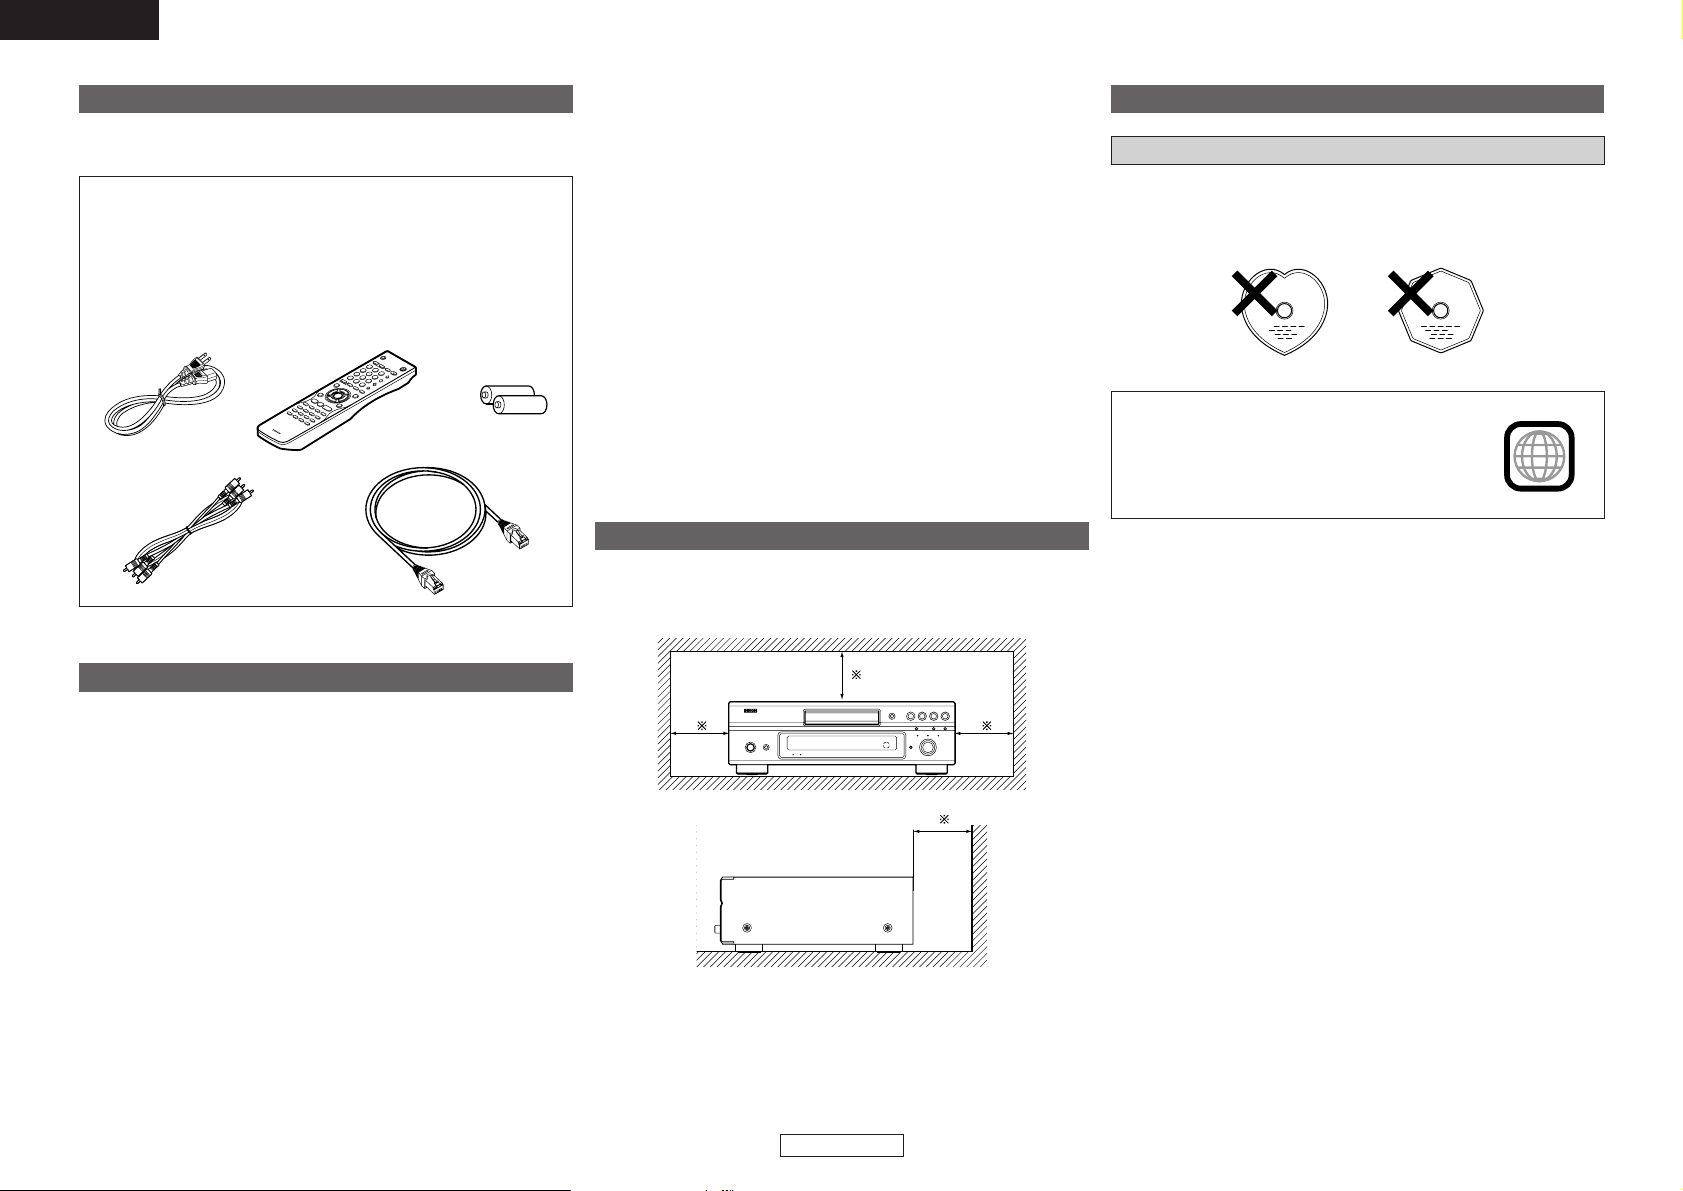
The discs playable on the DVD-3930CI are the discs shown on the
table at the right.
Do not use discs with special shapes, as they could damage the
player.
Accessories
Check that the following parts are attached in addition to the main
unit:
q Operating instructions .............................................................1
w Service station list....................................................................1
e Power supply cord (Cord length: Approx. 6.5 ft / 2 m)............1
r Remote control unit (RC-1038) ................................................1
t R6P/AA batteries .....................................................................2
y Audio/Video cable (Cable length: Approx. 4.9 ft / 1.5 m).........1
u
DENON LINK cable (Cable length: Approx.
4.9
ft / 1.5 m)
........1
rt
yu
e
Before using
Pay attention to the following before using this unit:
• Moving the unit.
To prevent short-circuits or damaged wires in the connection cables,
always unplug the power supply cord and disconnect the connection
cables between all other audio components when moving the unit.
• Cautions on using mobile phones.
Using a mobile phone near this unit may result in noise. If so, move
the mobile phone away from this unit when it is in use.
• Condensation (dew).
Water droplets may condense on internal operation parts if the set
is brought into a heated room from the cold outdoors or when the
room is heated rapidly. If this happens, the set may not operate
properly.
• Should condensation occur.
The condensation will evaporate in one hour or less, at which time
the system will function normally.
• Before turning the power operation button on.
Check once again that all connections are correct and that there are
not problems with the connection cables. Always set the power
operation button to the standby position before connecting and
disconnecting connection cables.
• Sufficiently ventilate the place of installation.
If the unit is left in a room full of the smoke from cigarettes, etc., for
long periods of time, the surface of the optical pickup could get dirty,
in which case it will not be able to read the signals properly.
• Store the operating instructions in a safe place.
After reading the operating instructions, store them in a safe place
as they could come in handy in the future.
• Whenever the power operation button is in the STANDBY state,
the unit is still connected to AC line voltage.
Please be sure to turn off the power operation button or unplug
the cord when you leave home for, say, a vacation.
• Note that the illustrations in these instructions may differ from
the actual unit for explanation purposes.
About discs
Discs usable on this set
Cautions on installation
Wall
Note
Note:
For heat dispersal, do not install this unit in a confined space
such as a bookcase or similar enclosure.
NOTE:
• DVD players and DVDs have specific region
numbers (assigned by country).
The disc’s region number must be the same as
the player’s or the disc cannot be played.
The DVD-3930CI has region number 1.
1
Page 7
12 cm
Getting Started Getting Started
ENGLISH
4
ENGLISH
*1 : Some DVD-Audio discs, DVD-Video discs and video CDs may be
designed to by the software producer to operate in ways other
than described in this manual.
*2 : This player can play DVD±R/DVD±RW discs recorded in video
format on DVD recorders. Depending on the recording
conditions, however, the disc may not be recognized or it may not
play normally (the picture or sound may be broken, etc.). Discs
that have not been finalized cannot be played.
*3 : DVD-RW discs can be played if they have been recorded in the
VR (Video Recording) mode and finalized.
*4 : Depending on the recording conditions, CD-R/CD-RW discs may
not play normally.
The discs described below cannot be played:
• DVDs with region numbers other than “1” or “ALL”
• DVD-ROM/RAM (For DVD-ROM discs, data files in DivX®3.11, 4.x,
5.x and 6 format can be played)
• CD-ROM (Data files in MP3, JPEG, WMA, and DivX®3.11, 4.x, 5.x
and 6 can be played)
• VSD/CVD/SVCD
• CDV (Only the audio part can be played)
• CD-G (Only the audio signals can be output)
• Photo CDs, etc.
• If a disc that cannot be played is loaded or the disc is loaded upsidedown, “0h00m00s” is displayed on the player’s display.
NOTE:
• Do not push the disc tray in by hand when the power is off. Doing
so could damage it.
Holding discs
Do not touch the signal surface.
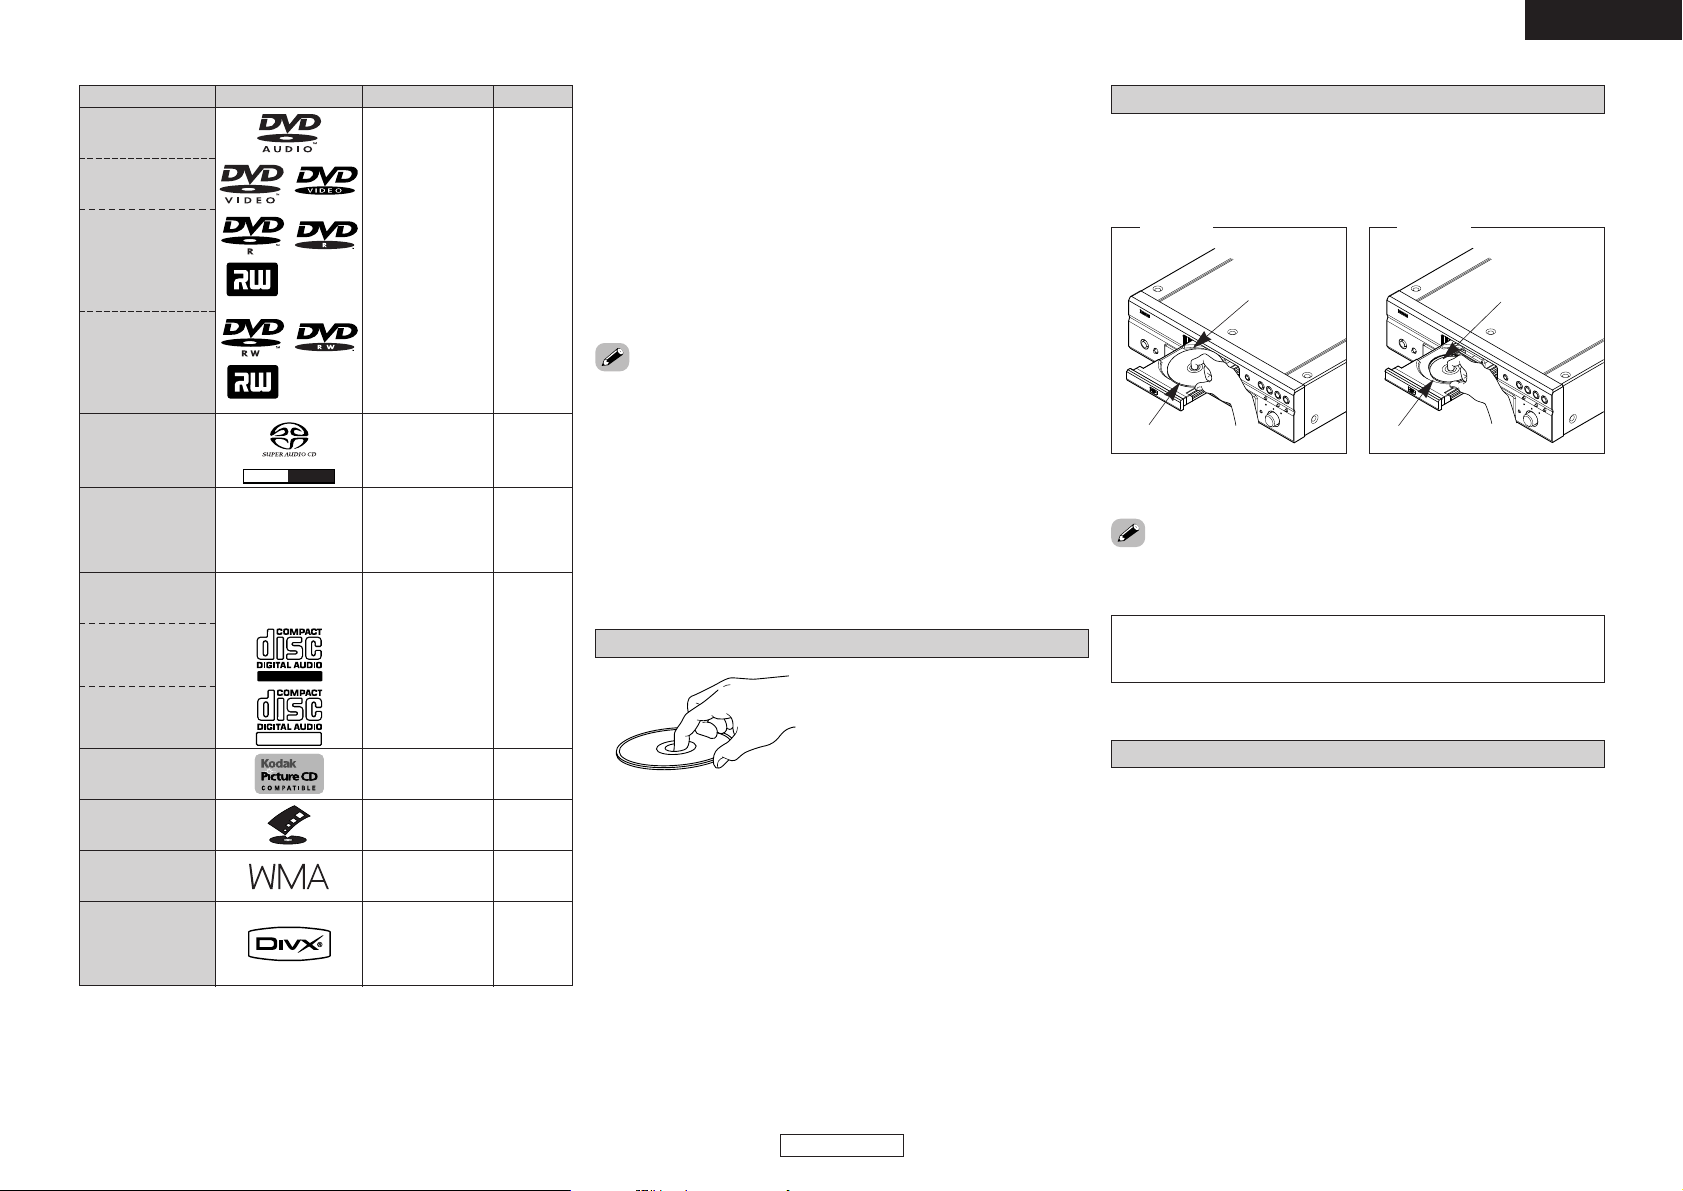
Loading discs
• Set the disc with the labeled side facing up.
• Make sure the disc tray is fully open when inserting the disc.
• Place the discs flatly, 12 cm discs in the outer tray guide (Figure 1),
8 cm discs in the inner tray guide (Figure 2).
• Place 8 cm discs in the inner tray guide without using an adapter.
Cautions on loading discs
• Only load one disc at a time. Loading two or more discs can damage
the set or scratch the discs.
• Do not use cracked or warped discs or discs that have been repaired
with adhesive, etc.
• Do not use discs on which the sticky part of cellophane tape or
labels is exposed or on which there are traces of where labels have
been removed. Such discs could get caught inside the player and
damage it.
Figure 1
Outer tray guide
12 cm discs
Figure 2
Inner tray guide
8 cm discs
DivX
®
Disc sizeSignal contentMark (logo)Playable discs
DVD-Audio
(*1)
Fujicolor CD
DVD-Video
(*1)
Video CD
(*1)
CD
CD-R
(*4)
CD-RW
(*4)
Picture CD
DVD-R/DVD+R
(*2)
DVD-RW
(*2) (*3)
DVD+RW (*2)
SUPER
AUDIO CD
WMA
Digital audio
+
Digital video
(MPEG2 format)
12 cm/
8 cm
Digital audio
+
Digital video
(MPEG1 format)
12 cm/
8 cm
Digital audio
MP3
Digital images
(JPEG format)
12 cm/
8 cm
V
C
Recordable
ReWritable
Digital images
(JPEG format)
12 cm
DVD+R
DVD+ReWritable
Digital audio
12 cm
Stereo
Multi-
chch
Digital images
(JPEG format)
12 cm
Digital audio
12 cm
Digital audio
+
Digital video
(MPEG4 format)
Page 8
Getting Started Getting Started
ENGLISH
5
ENGLISH
Approx. 23 feet / 7 m
30°
30°
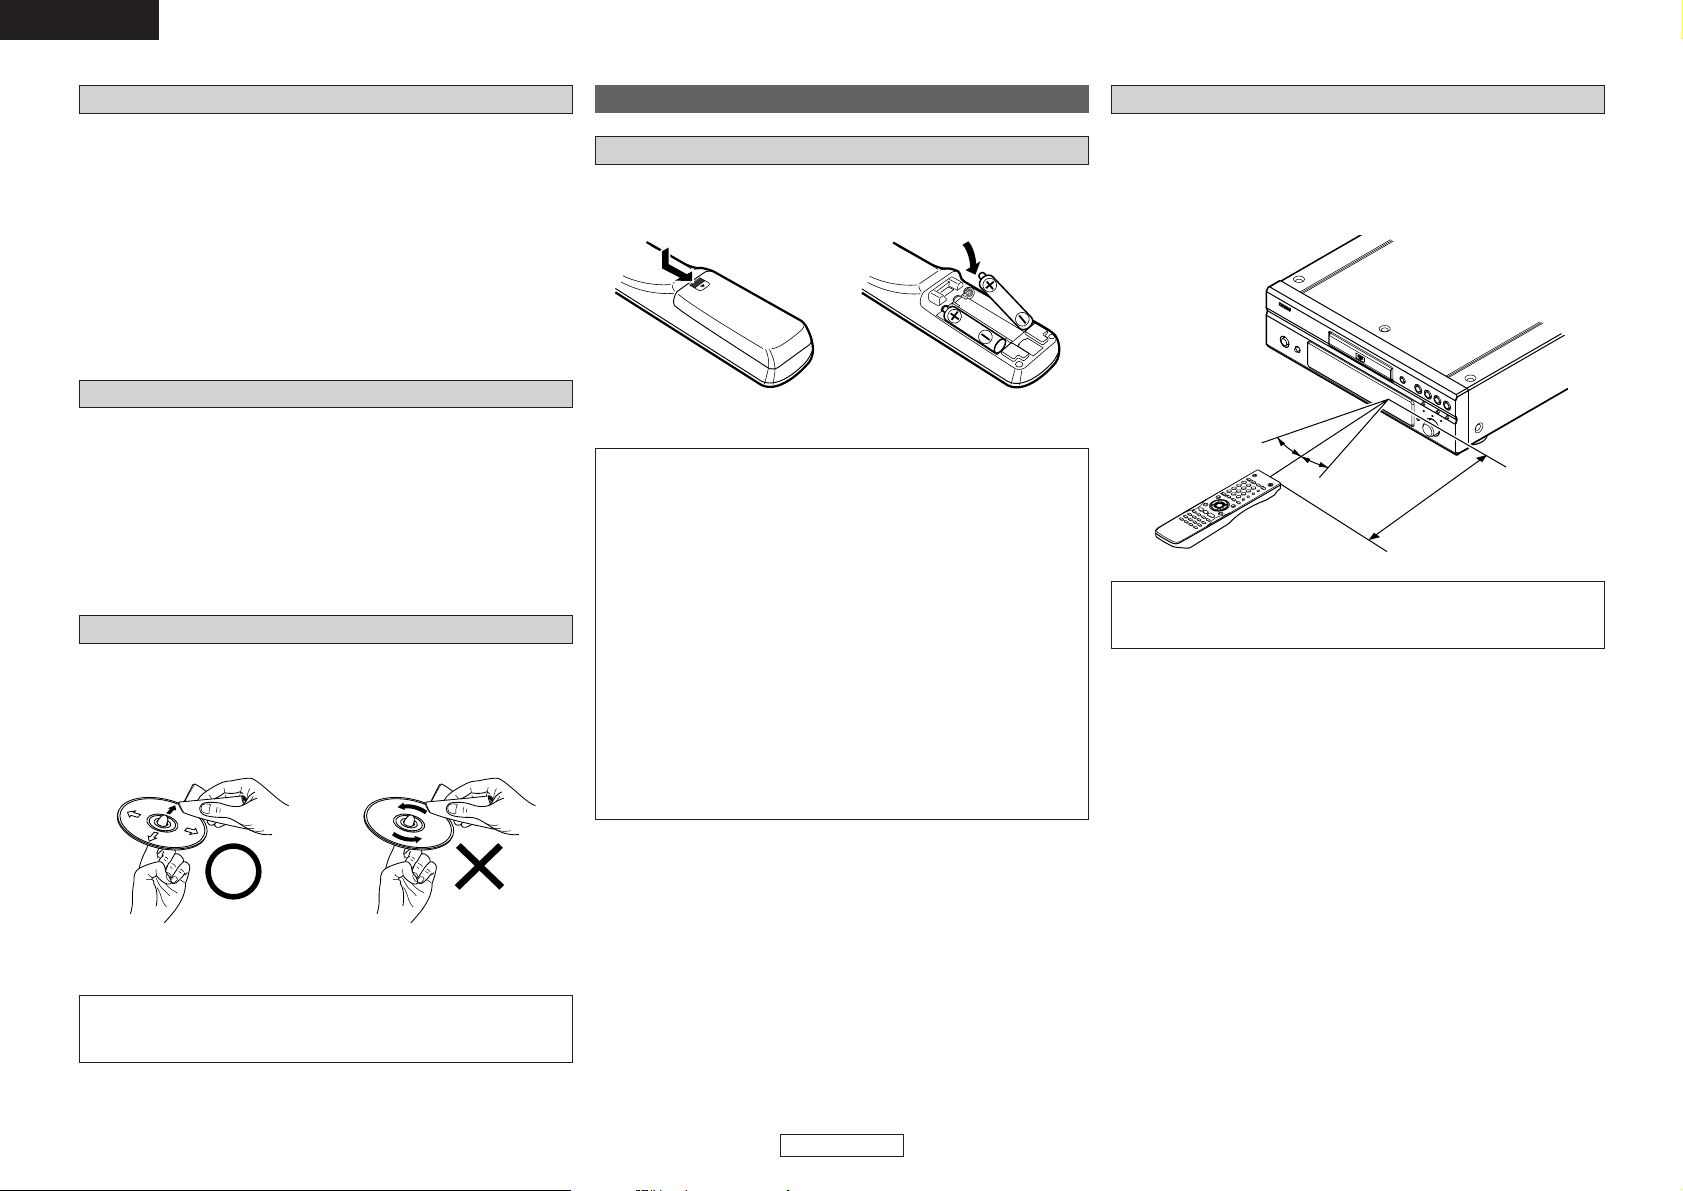
About the remote control unit
Inserting the batteries
q Remove the cover.
w Set two R6P/AA batteries in the
battery compartment in the
indicated direction.
e Set the cover back in place.
Operating range of the remote control unit
• Point the remote control unit at the remote sensor when operating
it.
• The remote control unit can be used from a distance of up to about
23 feet / 7 meters, at a horizontal angle of up to 30° with respect to
the sensor.
NOTE:
• It may be difficult to operate the remote control unit if the remote
sensor is exposed to direct sunlight or strong artificial light.
Notes on batteries:
• Replace the batteries with new ones if the set does not operate
even when the remote control unit is operated nearby the unit.
(The attached batteries are only for verifying operation.)
• When inserting the batteries, be sure to do so in the proper
direction, following the “<” and “>” marks in the battery
compartment.
•To prevent damage or leakage of battery fluid:
• Do not use a new battery together with an old one.
• Do not use two different types of batteries.
•Do not short-circuit, disassemble, heat or dispose of batteries
in flames.
• Remove the batteries from the remote if it will not be in use for
long periods.
• If the battery fluid should leak, carefully wipe the fluid off the
inside of the battery compartment and insert new batteries.
•When replacing the batteries, have the new batteries ready and
insert them as quickly as possible.
Cautions on handling
•Do not get fingerprints, oil or dirt on discs.
•Take special care not to scratch discs when removing them from
their cases.
• Do not bend or heat discs.
• Do not enlarge the hole at the center.
• Do not write on the labeled (printed) surface with ball-point pens,
pencils, etc., or stick new labels on discs.
•Water droplets may form on discs if they are moved suddenly from
a cold place (outdoors for example) to a warm place, but do not try
to dry them off using a hairdryer, etc.
Cautions on storing discs
• Be sure to remove discs after using them.
• Be sure to store discs in their cases to protect them from dust,
scratches, warping, etc.
• Do not store discs in the following places:
1. Places exposed to direct sunlight for long periods of time
2. Dusty or humid places
3. Places exposed to heat from heating appliances, etc.
Cleaning discs
• If there are fingerprints or dirt on discs, wipe them off before using
the disc. If not the sound quality could be reduced and the sound
may be broken.
• Use a commercially available disc cleaning set or a soft cloth to clean
discs.
Gently wipe the disc from the
inside towards the outside.
Do not wipe with a circular motion.
NOTE:
• Do not use record spray, antistatic agents, or benzene, thinner or
other solvents.
Page 9
Getting Started Getting Started
ENGLISH
6
ENGLISH
q w e rt y u i o !0 !1
!2
!5 !4 !3!7 !6!8!9@0
PROGRESSIVE
1 A-B
AUDIO VCD
SUPER DVD
GROUP TITLE TRACK CHAP ANGLE D.MIX PROG RAND TOTAL SING REM HDCD
WMA MP3 HDMI
MPEG JPEG
L.PCMP.PCM
DIGITAL
LFELFE
R
SRSR
CSL
SL
q w re
tyuio!0!1!2!3!5 !4
q
1 : Displayed during playback.
3 : Displayed when in the pause or frame-by-
frame play mode.
w
Displayed when “COMPONENT VIDEO OUT”
is set to “PROGRESSIVE”.
e
Various types of information on the disc, the
elapsed playing time, etc., are displayed here.
r
Displayed when HDMI video or audio signals
are being output.
Flashes when connection of the HDMI terminal
is being checked.
t
These indicate the channels being played.
L:Front left
C:Center
R:Front right
LFE : Subwoofer
SL : Surround left
S:Surround monaural
SR : Surround right
y
These indicate the format being played.
u
Displayed when playing HDCD-compatible
discs.
i
Indicates the time display mode.
o
Displayed during random playback.
!0
Displayed during program playback.
!1
Displayed when the audio signals can be downmixed.
!2
Displayed when playing discs containing
multiple angles.
!3
These indicate the type of the different
sections of the currently playing disc.
!4
Displayed during repeat playback.
!5
These indicate the type of the currently playing
disc.
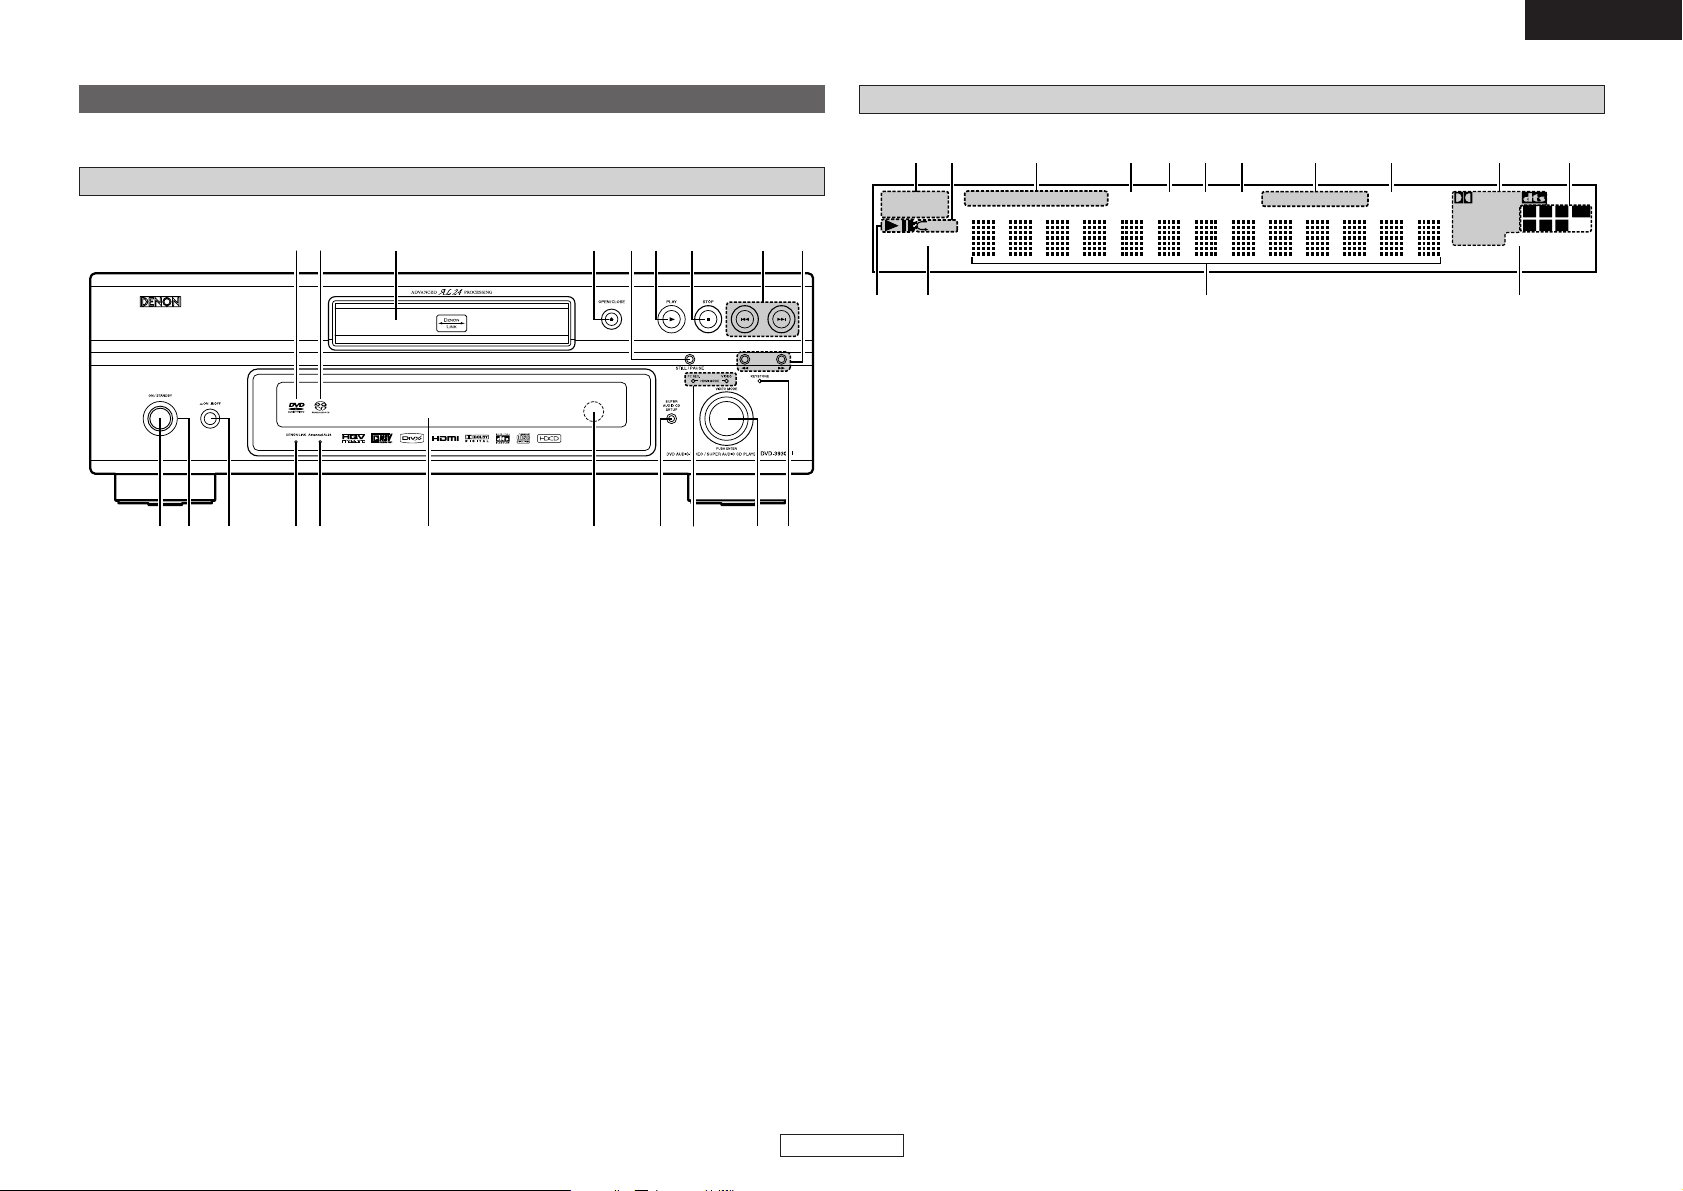
q
Power operation button
(ON/STANDBY) .........................................(34)
w
Power indicator.........................................(34)
e
Power switch (¢ON/£OFF).............(15, 34)
r
DENON LINK indicator .............................(48)
t
Advanced AL24 indicator .........................(48)
y
Display
u
Remote control sensor...............................(5)
i
SUPER AUDIO CD SETUP button............(38)
o
HDMI MODE PC RES/VIDEO indicator....(29)
!0
VIDEO MODE knob ...................................(29)
!1
KEYSTONE indicator ................................(30)
!2
Slow/Search buttons (6, 7) ............(42)
!3
Skip buttons (8, 9) .........................(41)
!4
STOP button (2)........................................(34)
!5
PLAY button (1)........................................(34)
!6
STILL/PAUSE button ................................(35)
!7
OPEN/CLOSE button (5) .........................(34)
!8
Disc Tray.......................................................(4)
!9
Super Audio CD indicator
@0
DVD-AUDIO/VIDEO indicator
Part names and functions
Front panel
For buttons not explained here, see the page indicated in parentheses ( ).
Display
Page 10
Getting Started Getting Started
ENGLISH
7
ENGLISH
wq e
r
t
y
u
i
o
!0
!1
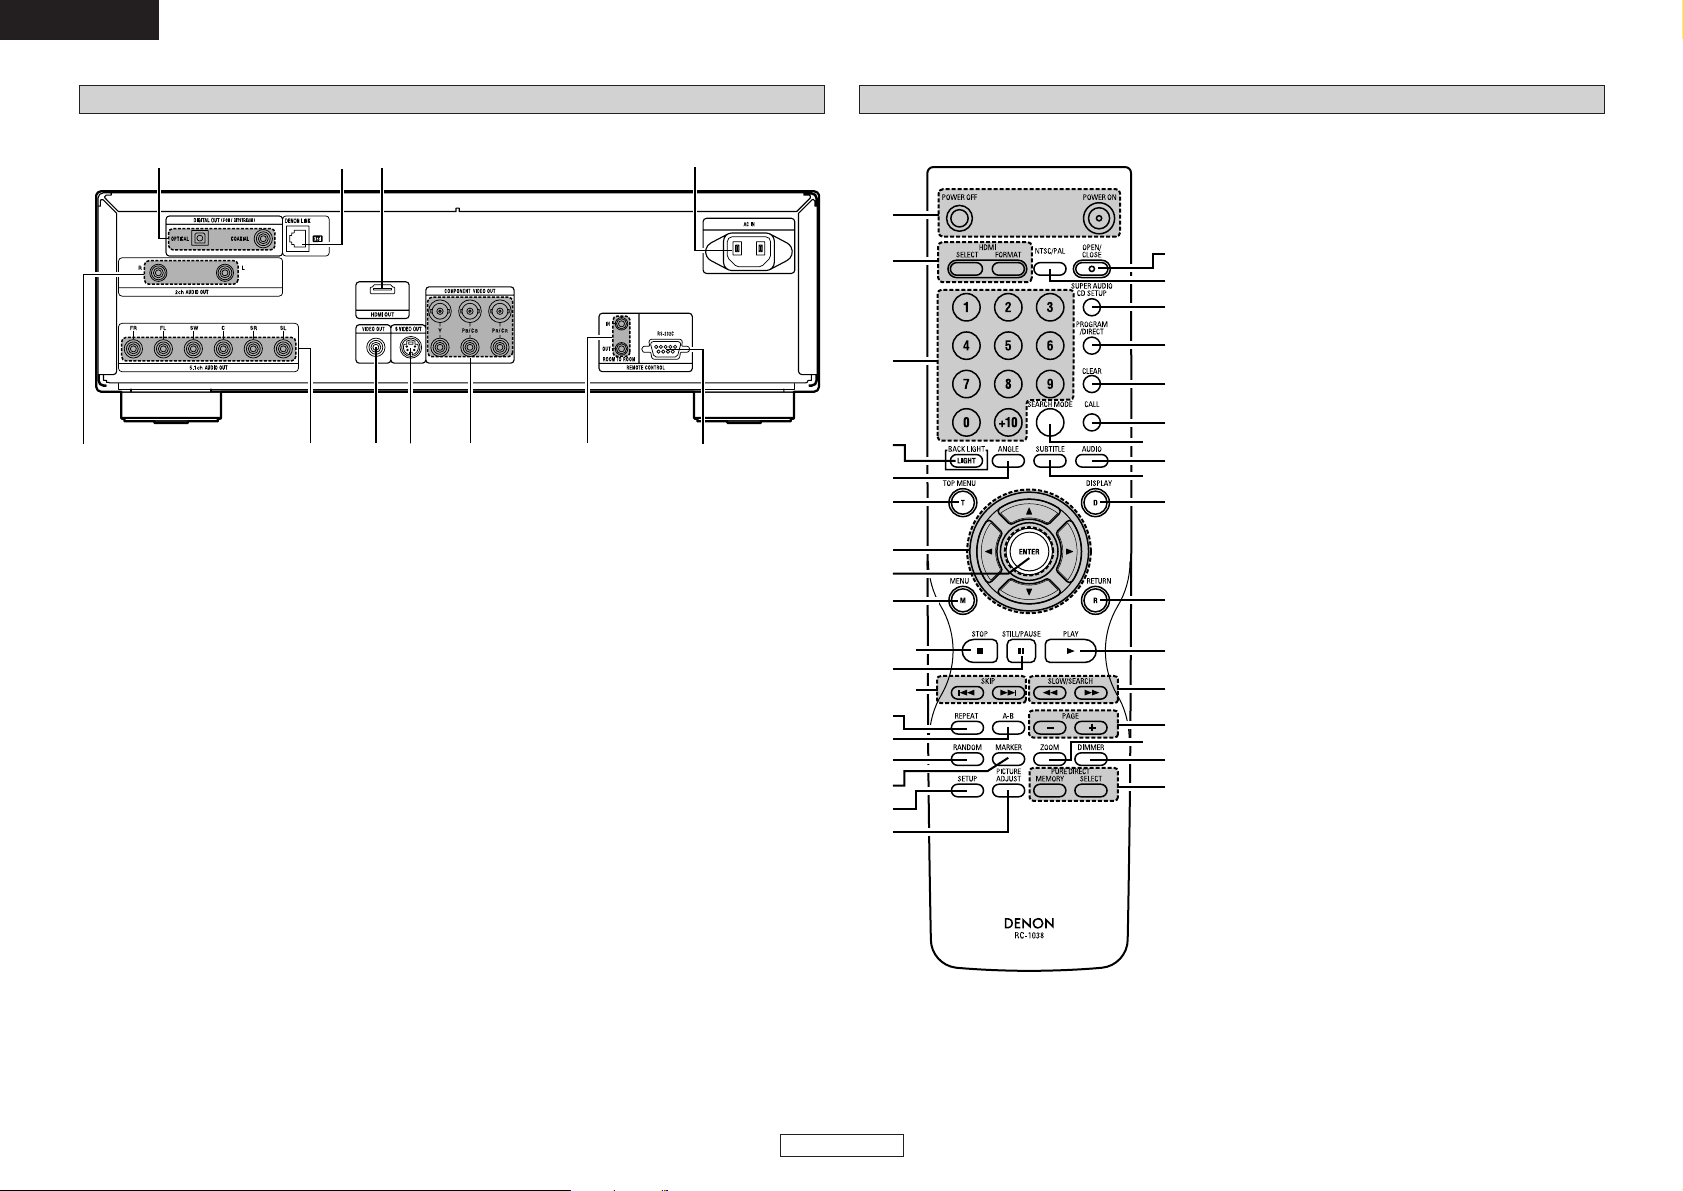
q
2ch AUDIO OUT terminals...................(9, 10)
w
5.1ch AUDIO OUT terminals ....................(10)
e
VIDEO OUT terminal...................................(9)
r
S-VIDEO OUT terminal...............................(9)
t
COMPONENT VIDEO OUT terminals ........(9)
y
ROOM TO ROOM IN/OUT jacks
Control terminal for system extension.
u
RS-232C input/output terminal
Control terminal for system extension.
i
AC inlet ......................................................(12)
o
HDMI OUT terminal ..................................(11)
!0
DENON LINK output terminal .................(11)
!1
DIGITAL OUT COAXIAL/
OPTICAL terminals................................(9, 12)
q
!9
@0
@1
@2
@3
@4
@8
@9
#1
#2
#5
#0
#4
@5
#3
@6
@7
w
e
r
t
y
u
!0
!2
!1
!3
!4
!5
!6
!7
!8
o
i
q
POWER ON/OFF buttons .........................(34)
w
HDMI SELECT/FORMAT buttons.............(29)
e
Number buttons (0 ~ 9, +10)..............(16, 36)
r
BACK LIGHT button
Press this to light the opal color button.
Press again this to put out light.
t
ANGLE button ...........................................(36)
y
TOP MENU button....................................(36)
u
Cursor buttons (
DD HH FF GG
) ........................(15)
i
ENTER button............................................(15)
o
MENU button ............................................(36)
!0
STOP button..............................................(34)
!1
STILL/PAUSE button ................................(35)
!2
SKIP buttons........................................(41, 42)
!3
REPEAT button..........................................(39)
!4
A-B button .................................................(44)
!5
RANDOM button.......................................(39)
!6
MARKER button ........................................(46)
!7
SETUP button............................................(15)
!8
PICTURE ADJUST button.........................(32)
!9
OPEN/CLOSE button ................................(34)
@0
NTSC/PAL button .....................................(47)
@1
SUPER AUDIO CD SETUP button............(38)
@2
PROGRAM/DIRECT button ......................(44)
@3
CLEAR button............................................(37)
@4
CALL button ..............................................(44)
@5
SEARCH MODE button.............................(37)
@6
AUDIO button............................................(36)
@7
SUBTITLE button ......................................(36)
@8
DISPLAY button...................................(39, 45)
@9
RETURN button.........................................(19)
#0
PLAY button...............................................(34)
#1
SLOW/SEARCH buttons...........................(42)
#2
PAGE buttons............................................(37)
#3
ZOOM button ............................................(41)
#4
DIMMER button ........................................(47)
#5
PURE DIRECT
MEMORY/SELECT buttons ......................(28)
Rear panel Remote control unit
Page 11
ENGLISH
8
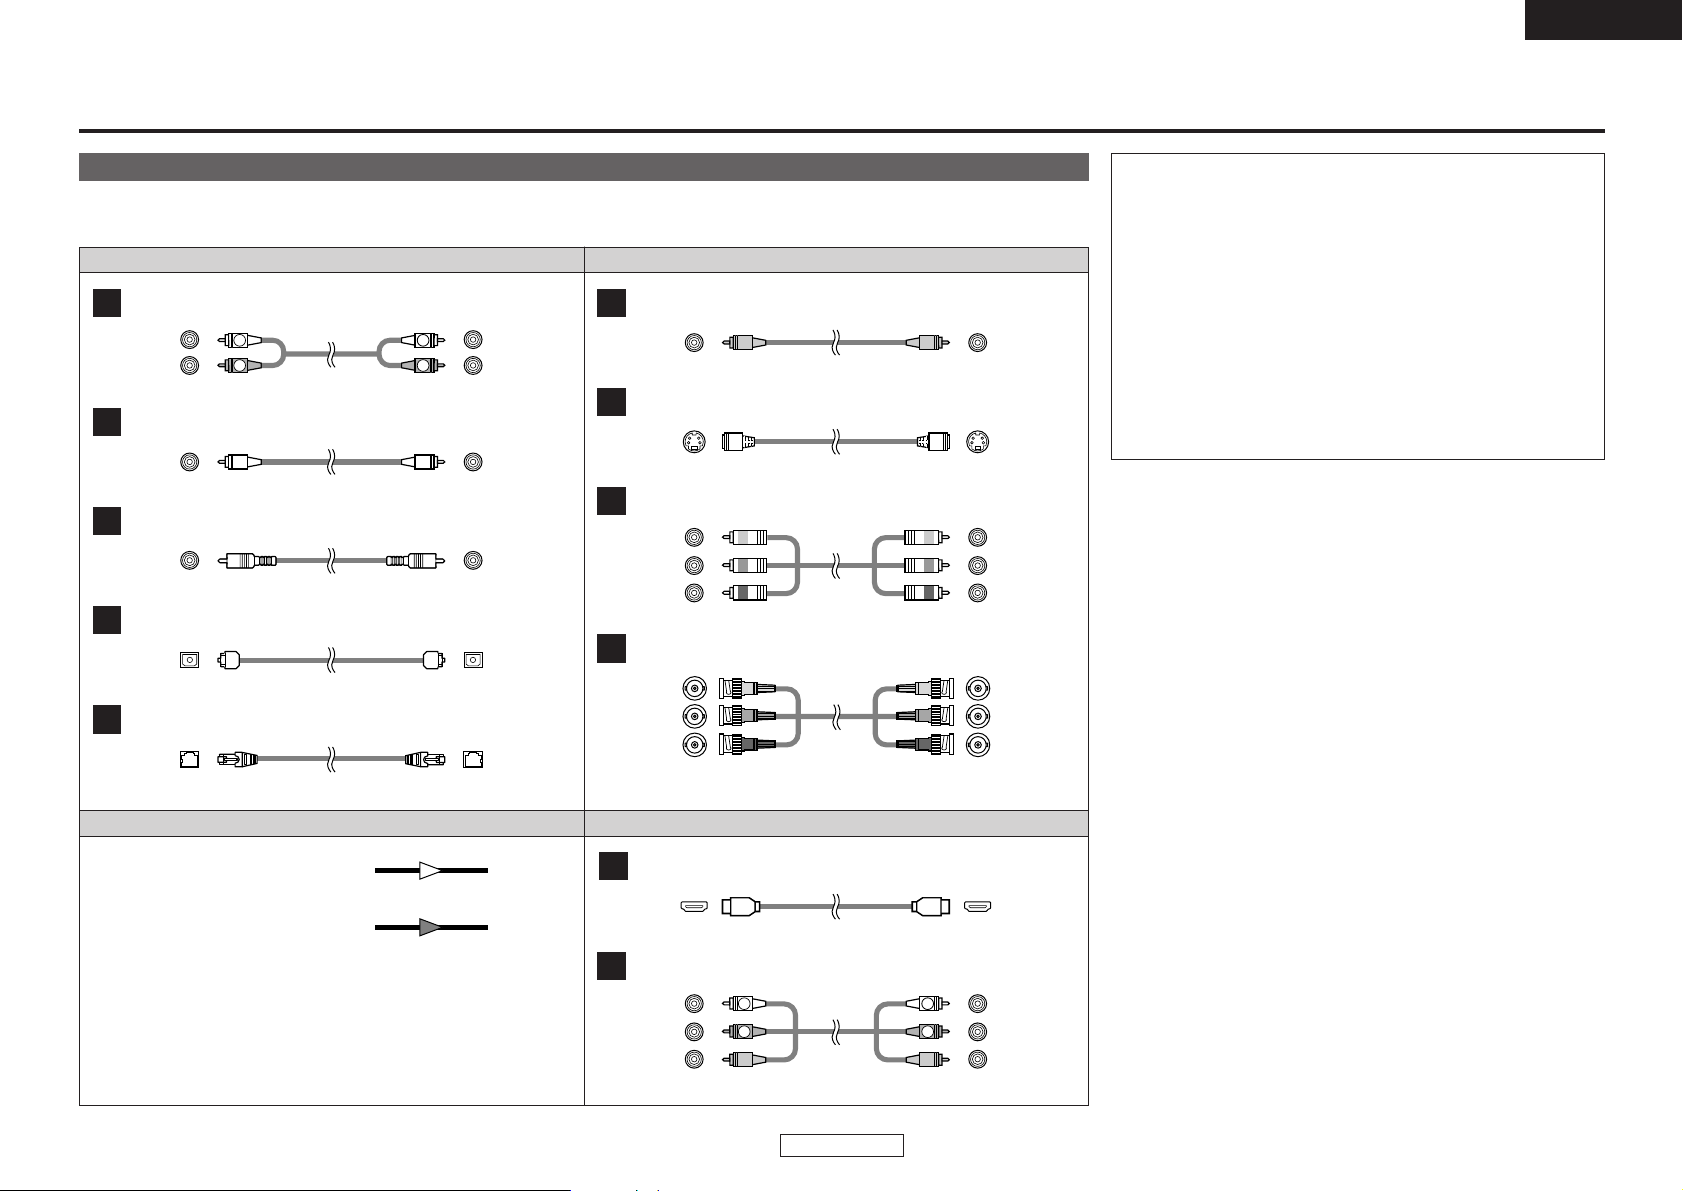
ENGLISH
Video cableAudio cable
Signal direction
Analog audio connections
A
R
L
R
L
Pin-plug cable
Analog audio connections
B
Pin-plug cable
Coaxial digital connections
C
Coaxial digital cable (75 Ω/ohms pin-plug cable)
Digital connections (Optical)
D
Optical fiber cable
Video connections
F
Video cable (75 Ω/ohms pin-plug cable)
S-Video connections
G
S-terminal cable
Component video connections (when pin-plug cable connected)
H
Component video cable
Audio signal
Video signal
OUT IN
OUT IN
Audio and Video cable
HDMI connections
J
HDMI cable
DENON LINK connections
E
DENON LINK cable (Included)
Audio/video cable (Included)
Analog audio/video connections
K
R
L
R
L
Connections
Cable indications
Connect using the connection cables shown below.
NOTE:
• Do not plug in the power supply cord until all connections have
been completed.
• When making connections, also refer to the operating
instructions of the other components.
• Be sure to connect the left and right channels properly (left with
left, right with right).
• Making connections with the power turned on could result in
noise or damage the speakers.
• Bunching the power supply cords and connection cables
together could result in humming or noise.
• Do not connect to the amplifier’s PHONO input terminal. Doing
so could result in damage.
• Install the player in a place where the surrounding temperature is
35°C or below.
Component video connections (when BNC cable connected)
I
Component video cable
Page 12
Connections Connections
ENGLISH
9
ENGLISH
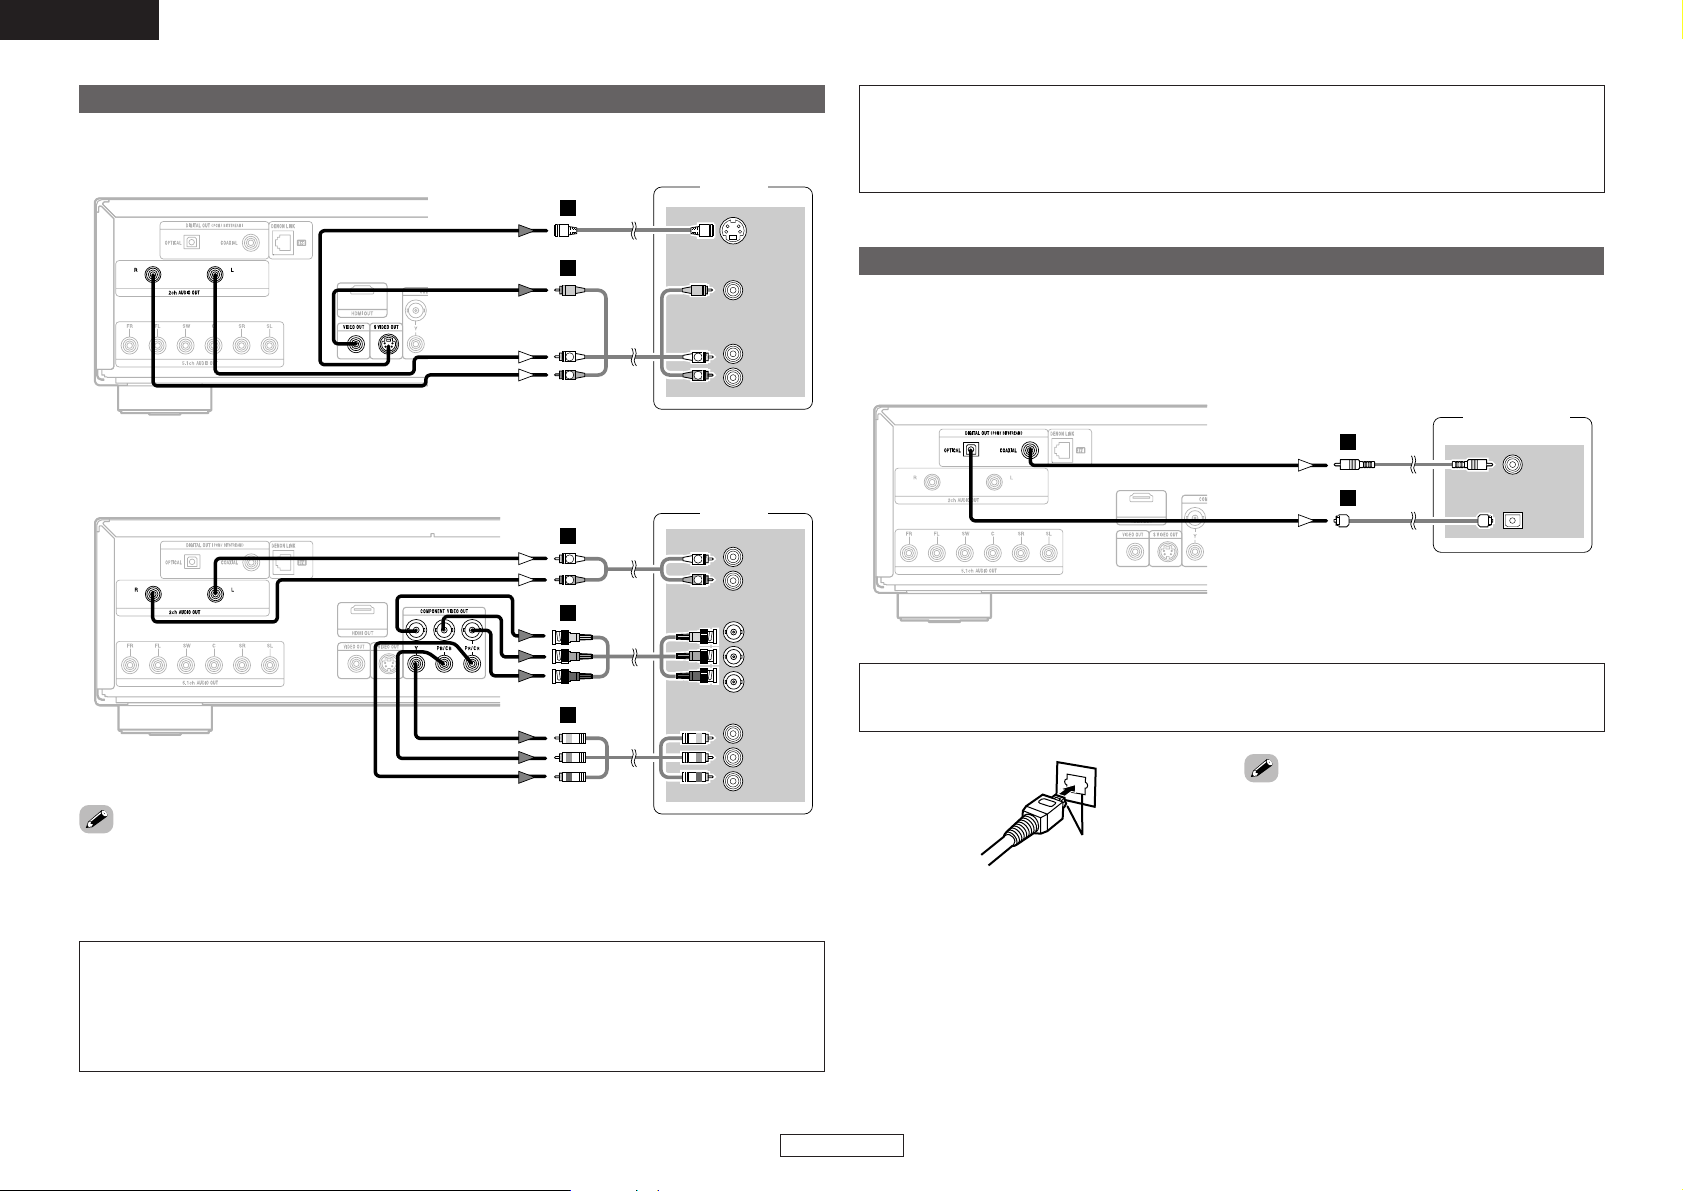
Connection to a TV
S VIDEO
IN
R
L
AUDIO IN
VIDEO
IN
or
R
LL
R
L
K
G
R
L
AUDIO IN
COMPONENT VIDEO IN
Y
P
B
PR
Y
P
B
PR
or
R
LL
R
L
A
H
I
¢ For a TV equipped with a video input or S-Video input terminal
¢ For a TV equipped with component video input terminals
Digital connection to an AV amplifier with built-in decoder
COAXIAL
IN
OPTICAL
IN
or
C
D
When playing DVDs recorded in Dolby Digital or DTS, the Dolby Digital or DTS bitstream is output from
the DVD-3930CI’s digital audio output terminal.
By connecting the DVD-3930CI to an AV amplifier equipped with a built-in Dolby Digital or DTS decoder
you can achieve sound with a power and sense of presence like that of a movie theater or concert hall.
Match the shapes
• If the TV to which the player is to be connected is compatible with progressive scan video, connect to
the component video input terminals.
• For TVs not compatible with the progressive mode, set “COMPONENT VIDEO OUT” at “VIDEO
SETUP” to “INTERLACED”.
• When using an optical fiber cable (commercially
available), insert its plug fully in the proper
direction.
NOTE:
• Connect the DVD-3930CI’s video output either directly to the TV or indirectly via an AV amplifier. Do
not connect it via a VCR (video cassette recorder).
Some discs include copy prohibit signals. If such discs are played via a VCR, the copy guard system
may disturb the picture.
NOTE:
• Playing a DVD recorded in DTS when connected to an AV amplifier (decoder) that is not DTS
compatible could result in noise that is unpleasant on the ears and could damage the speakers.
Monitor
AV amplifier
Monitor
CONSUMERS SHOULD NOTE THAT NOT ALL HIGH DEFINITION TELEVISION SETS ARE FULLY
COMPATIBLE WITH THIS PRODUCT AND MAY CAUSE ARTIFACTS TO BE DISPLAYED IN THE
PICTURE. IN CASE OF 525 OR 625 PROGRESSIVE SCAN PICTURE PROBLEMS, IT IS
RECOMMENDED THAT THE USER SWITCH THE CONNECTION TO THE “STANDARD DEFINITION”
OUTPUT. IF THERE ARE QUESTIONS REGARDING OUR TV SET COMPATIBILITY WITH THIS MODEL
525p AND 625p DVD PLAYER, PLEASE CONTACT OUR CUSTOMER SERVICE CENTER.
Page 13

Connections Connections
ENGLISH
10
ENGLISH
Bitstream output
PCM output
¢ Audio signals output from the DVD-3930CI’s digital audio output terminals
Audio recording format
With “DOWN SAMPLING” as initial setting
DVD-Audio
Linear PCM
Video CD
MPEG1
Music CD
44.1 kHz / 16 bit Linear PCM
MP3 CD
Linear PCM
or
Packed PCM
96 kHz / 16 ~ 24 bit
MP3 (MPEG-1 Audio Layer 3)
No output *1
48 kHz / 16 bit PCM
OFF
With copyright
protection
Without copyright
protection
ON
No output
DVD-Video
44.1/88.2/176.4 kHz /
16 ~ 24 bit
48/96/192 kHz /
16 ~ 24bit
48 kHz / 16 ~ 24 bit PCM
96 kHz / 16 ~ 24 bit PCM
No output *2
*1 : Only 48 kHz/16 bit sources output
*2 : Only 44.1 kHz/16 bit sources output
*3 : 176.4 kHz/192 kHz signals are converted to 88.2 kHz/96 kHz respectively.
*4 : When playing the CD layer, 44.1 kHz/16 bit linear PCM signal output
WMA CD
WMA (Windows Media Audio)
Super audio CD
DSD (Direct Stream Digital)
48 kHz / 16 ~ 24 bit
No output *1
44.1/88.2 kHz / 16 ~ 24 bit *3
48/96 kHz / 16 ~ 24bit *3
44.1 kHz / 16 bit PCM
48 kHz / 16 bit PCM
32/44.1/48 kHz / 16 bit PCM
No output *4
Disc type
No output *4
44.1 kHz / 16 bit PCM
32/44.1/48 kHz / 16 bit PCM
44.1 kHz / 16 bit PCM
Audio recording format
DVD-Video
Disc type
With “DIGITAL OUTPUT” as initial setting
Dolby Digital Dolby Digital bitstream
NORMAL PCM
DTS bitstreamDTS
2-channel PCM
(48 kHz / 16 bit)
Surround connections to a device with 5.1-channels of analog audio inputs
R
L
FRONT
R
SURROUND
L
CENTER
SUB-
WOOFER
R
L
R
L
R
LL
R
L
K
B
B
A
The multi-channel audio signals of Super Audio CDs and multi-channel audio signals recorded in packed
PCM format can be played.
Connection to a device with 2-channels of analog audio inputs
R
L
AUDIO IN
R
LL
R
L
K
• Bitstream:
These are signals that have been compressed
and converted to digital.
Depending on the decoder, they are decoded for
example into 5.1-channel multi-channel audio
signals.
• Linear PCM (LPCM):
These are audio signals that have been converted
to digital without being compressed (the signal
recording format used for music CDs).
While music CDs are recorded in 44.1 kHz/16 bit
format, DVDs are recorded in anything between
44.1 kHz/16 bit and 192 kHz/24 bit format, so
they generally offer higher sound quality than
music CDs.
• Packed PCM (PPCM):
These are compressed PCM signals providing
high sound quality with virtually no data loss
when restored to the original signals.
• When a DVD source containing PCM signals
recorded in multi-channel is played, the signals
are down-mixed to the 2-channels for output (the
DVD-3930CI’s “D.MIX” indicator lights).
For sources for which down-mixing is prohibited,
only the FL and FR channels are output.
NOTE:
• When connecting to a 2-channel audio stereo device, use the “2ch AUDIO OUT” terminals. If the
“5.1ch AUDIO OUT FL/FR” terminals are used, set “AUDIO SETUP” in “initial settings” to “2CH
(VSS OFF)”, “2CH (VSS1 ON)” or “2CH (VSS2 ON)” ( page 22). For software recorded in multichannel, analog signals that have been down-mixed into 2 channels are output. (For sources for
which down-mixing is prohibited, only the FL/FR signals are output.)
AV amplifier
Stereo component
Page 14
HDMI audio settingDevice to be connected
Connections Connections
ENGLISH
11
ENGLISH
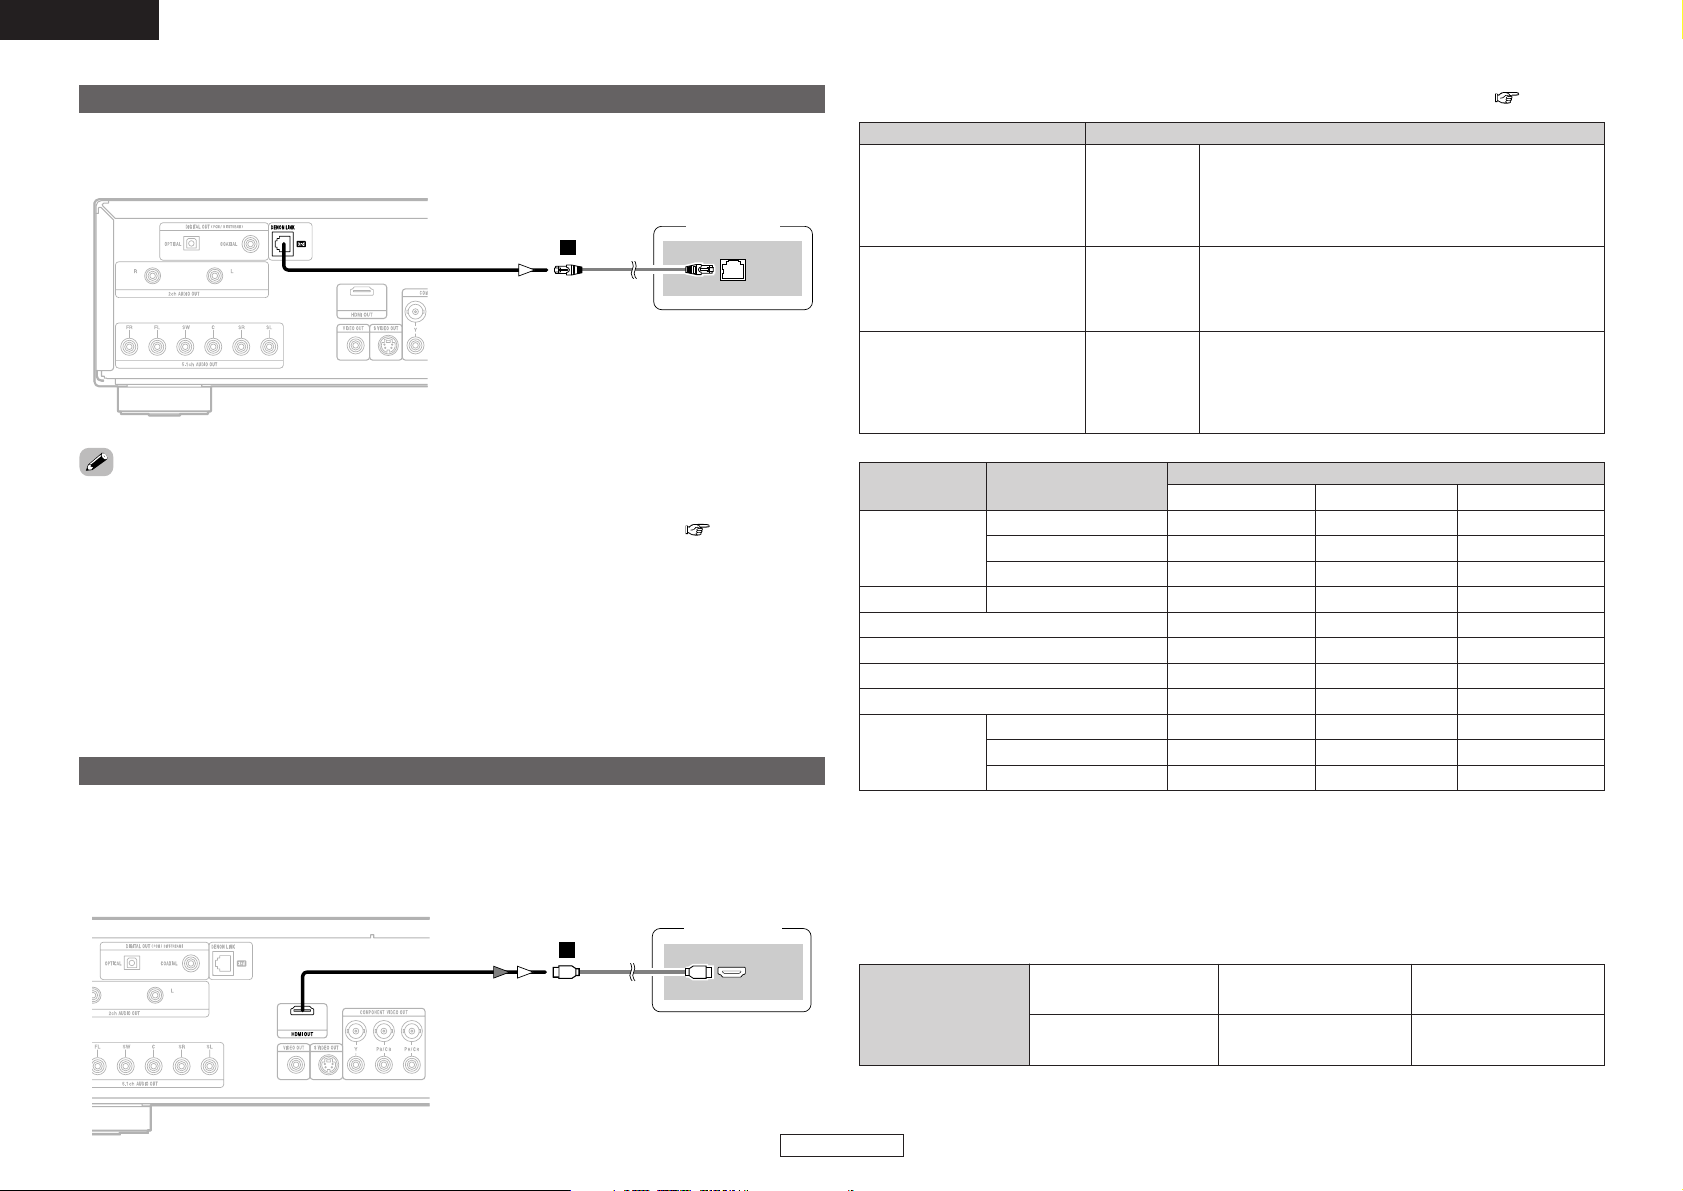
DENON LINK connections
DENON
LINK
E
When connected to a DENON LINK-compatible AV amplifier, the multi-channel signals of DVD-Audio
discs, Super Audio CDs, etc., can be transferred as such in digital format.
Connection to a device with an HDMI terminal
HDMI
IN
J
Connecting the DVD-3930CI to device with an HDMI terminal using an HDMI cable (sold separately)
enables digital transfer of both digital video signals and multi-channel audio signals.
HDMI audio
Audio recording formatDisc type
¢
Audio setting of device to be connected with an HDMI terminal ( page 17)
2CH
MULTI
(LPCM)
MULTI
(NORMAL)
The multi-channel audio signals are output from the analog
audio output and DENON LINK terminal.
Down-mixed 2-channel audio signals are output from the HDMI
output terminal.
The DTS or Dolby Digital signals can be decoded by the
connected TV or AV amplifier.
(The HDMI audio speaker setting, etc., cannot be made.)
Multi-channel audio signals are output from the HDMI terminal.
The HDMI audio speaker setting, etc., can be made.
Device compatible with DTS or
Dolby Digital decoding
Device compatible with 3 or
more channels of audio inputs
(not DTS or Dolby Digital
compatible)
Device compatible with 2channel audio input or device
not compatible with audio
input
DVD-Audio
Dolby Digital
DTS
PCM
LPCM or PPCM
Video CD
Music CD
MP3 CD
2-channel PCM Multi PCM
2CH MULTI (NORMAL) MULTI (LPCM)
2-channel PCM Multi PCMDVD-Video
Dolby Digital
DTS
2-channel PCM
WMA CD
Super audio CD
Multi PCM
Multi PCM
Multi PCM
2-channel PCM 2-channel PCM 2-channel PCM
2-channel PCM 2-channel PCM 2-channel PCM
2-channel PCM 2-channel PCM 2-channel PCM
2-channel PCM 2-channel PCM 2-channel PCM
No output No output No output
No output No output No output
2-channel PCM 2-channel PCM 2-channel PCM
Multi PCM
2-channel PCM
Stereo area
Multi area
CD layer
¢ For a TV, amplifier, etc.
Status of signal from
the DVD-3930CI’s HDMI
output terminal
DVI-D-compatible monitor
(Not HDCP compatible)
DVI-D-compatible monitor
(HDCP compatible)
HDMI-compatible monitor
¢ Connection with an HDMI/DVI-D conversion cable (adapter)
• HDMI video streams (video signals) are compatible with DVI-D.
The DVD-3930CI can be connected to a TV with a DVI-D terminal using an HDMI/DVI-D conversion
cable (adapter), but depending on the combination of devices in some cases no picture will be output.
• When using an HDMI/DVI-D conversion adapter, the picture may not be output properly due to poor
contact with the connected cable.
Only video signals output *
Neither video nor audio
signals output
Both video and audio
signals output
*The video signals are only output in RGB format.
• Digital transfer is possible up to 24 bit/2ch for 192/176.4 kHz, 24 bit/6ch for 96 kHz or less.
• When making DENON LINK connections, be sure to check the version of the AV amplifier to be
connected then make the “DENON LINK” setting at “initial settings” appropriately ( page 19). If two
DENON LINK terminals of different versions are interconnected, there may be no sound or only noise.
• When “DENON LINK” is set, downmixed audio signals are output from the DVD-3930CI’s analog audio
output terminals (L/R and FL/FR). When using the 5.1-channel analog audio terminals, set the “DENON
LINK” setting in the initial settings to “OFF”.
• The DVD-3930CI’s speaker settings are invalidated when the DENON LINK terminal is connected. (Make
the speaker settings on the AV amplifier to which the DVD-3930CI is connected.)
•With the DENON LINK 2nd connection, Super Audio CD’s multi and stereo signals are not output from
the DENON LINK terminal. Please use the analog audio output terminals.
Monitor or
AV amplifier
AV amplifier
Page 15
Connections Connections
ENGLISH
12
ENGLISH
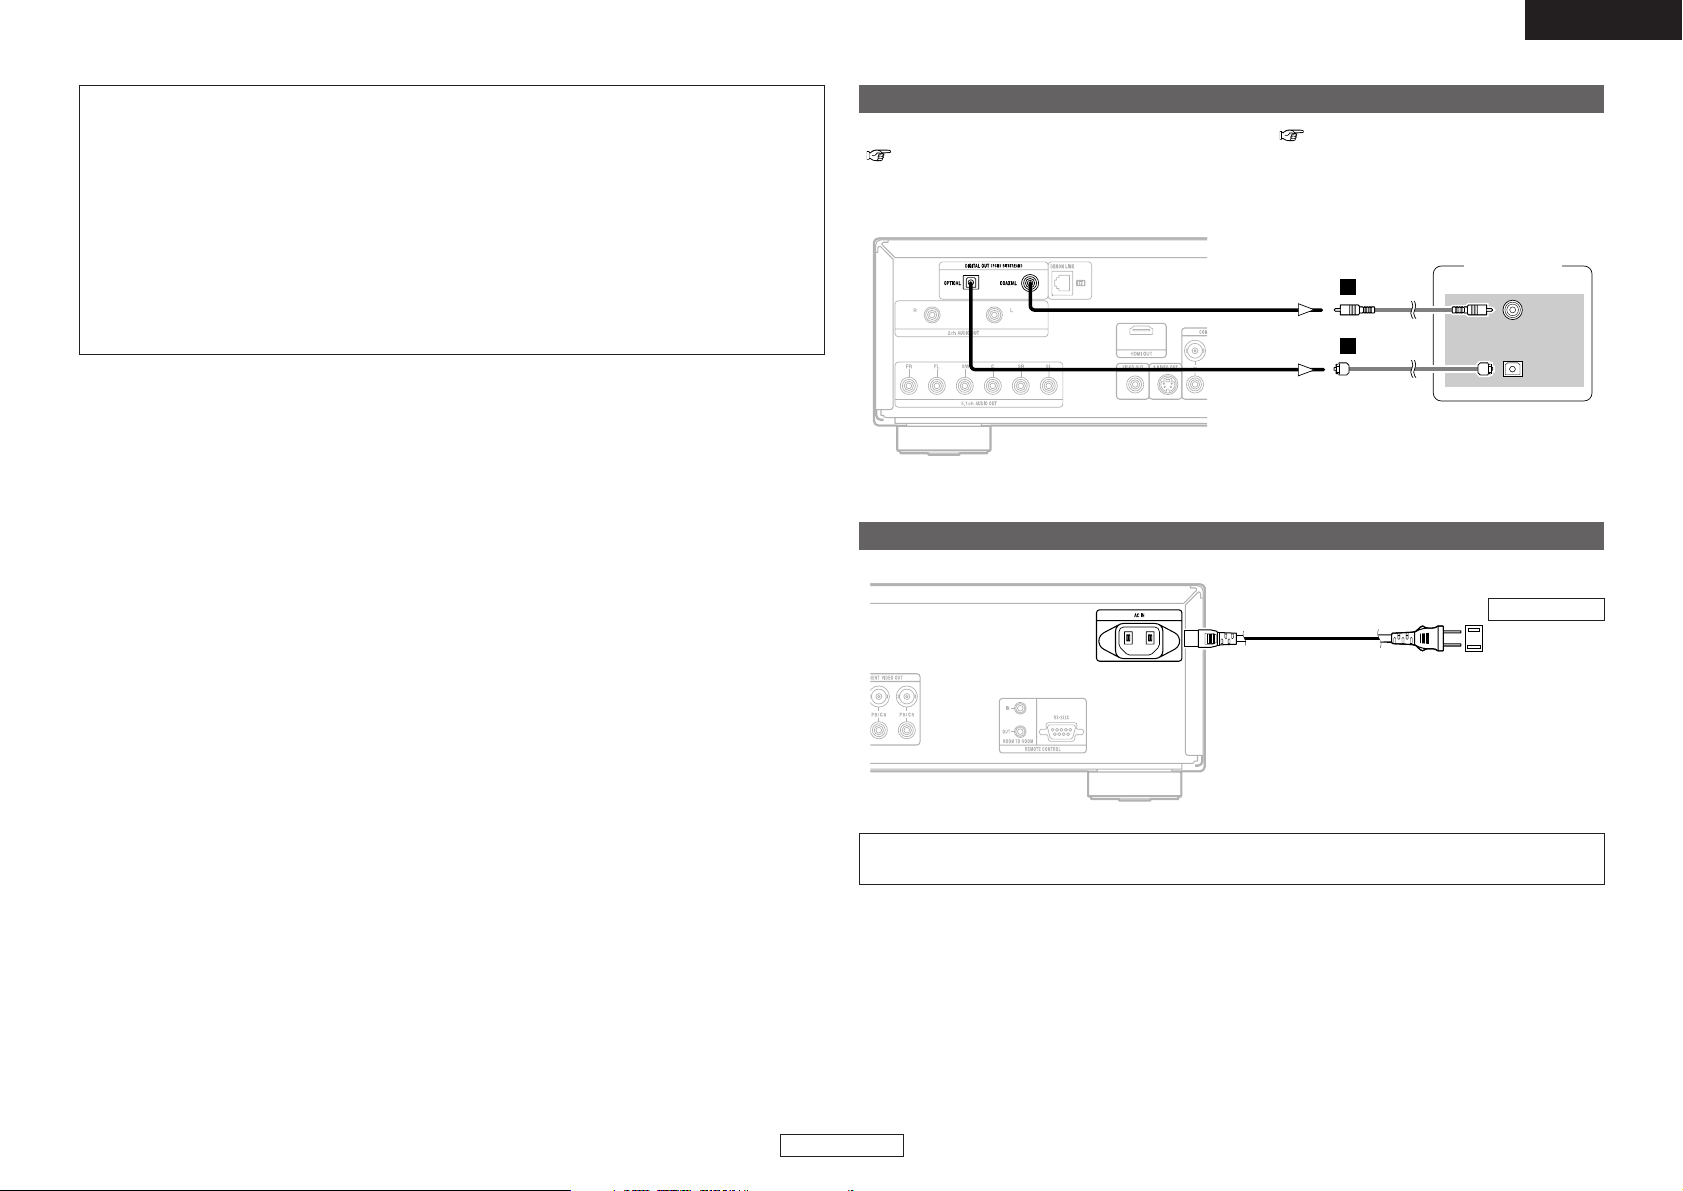
Digital connection to a recording device (MD recorder, etc.)
COAXIAL
IN
OPTICAL
IN
or
C
D
At “AUDIO SETUP”, set “DIGITAL OUTPUT” to “PCM” ( page 23), “DOWN SAMPLING” to “ON”
( page 23).
Playing a DVD without first making the correct settings could result in noise that is unpleasant on the ears
and could damage the speakers.
¢ Copyright protection system
In order to play the digital video and audio signals of DVD-Video and DVD-Audio discs using HDMI
connections, both the player and the TV, AV amplifier, etc., must be compatible with a copyright protection
system called “HDCP” (High-bandwidth Digital Content Protection system). HDCP is a copyright
protection technology consisting of data encrypting and authentication of the connected device.
The DVD-3930CI is HDCP compatible.
When a device that is not compatible with HDCP is connected, video signals will not be output normally.
For information on your TV, AV amplifier, etc., refer to its operating instructions.
Power supply cord
(Included)
NOTE:
• The audio signals of the multi and stereo areas of Super Audio CDs are not HDMI output.
• DVD-Audio discs that are copyright protected by CPPM can only be played on devices that are
mutually compatible with HDMI Ver. 1.1. (The DVD-3930CI is compatible with HDMI Ver. 1.1.)
• Some HDMI compatible devices can be used to control other devices via the HDMI terminal, but the
DVD-3930CI cannot be controlled via the HDMI terminal by other devices.
• The audio signals from the HDMI terminal (sampling frequency, bit length, etc.) may be restricted by
the connected device.
• Set the DVD-3930CI’s resolution according to the resolutions with which the connected TV or
monitor are compatible.
• Use a cable including the HDMI logo (HDMI certified product) for connection of the HDMI terminal.
Normal playback may not be possible if a cable that does not include the HDMI logo (non-HDMIcertified product) is used.
Connecting the power supply cord
AC 120 V, 60 Hz
AC outlet
NOTE:
• Insert the plugs securely. Incomplete connections will result in the generation of noise.
MD recorder
Page 16
PageItem you want to set (* indicates the setting upon purchase)Description
PageItem you want to set (* indicates the setting upon purchase)Description
PageItem you want to set (* indicates the setting upon purchase)Description
ENGLISH
ENGLISH
13
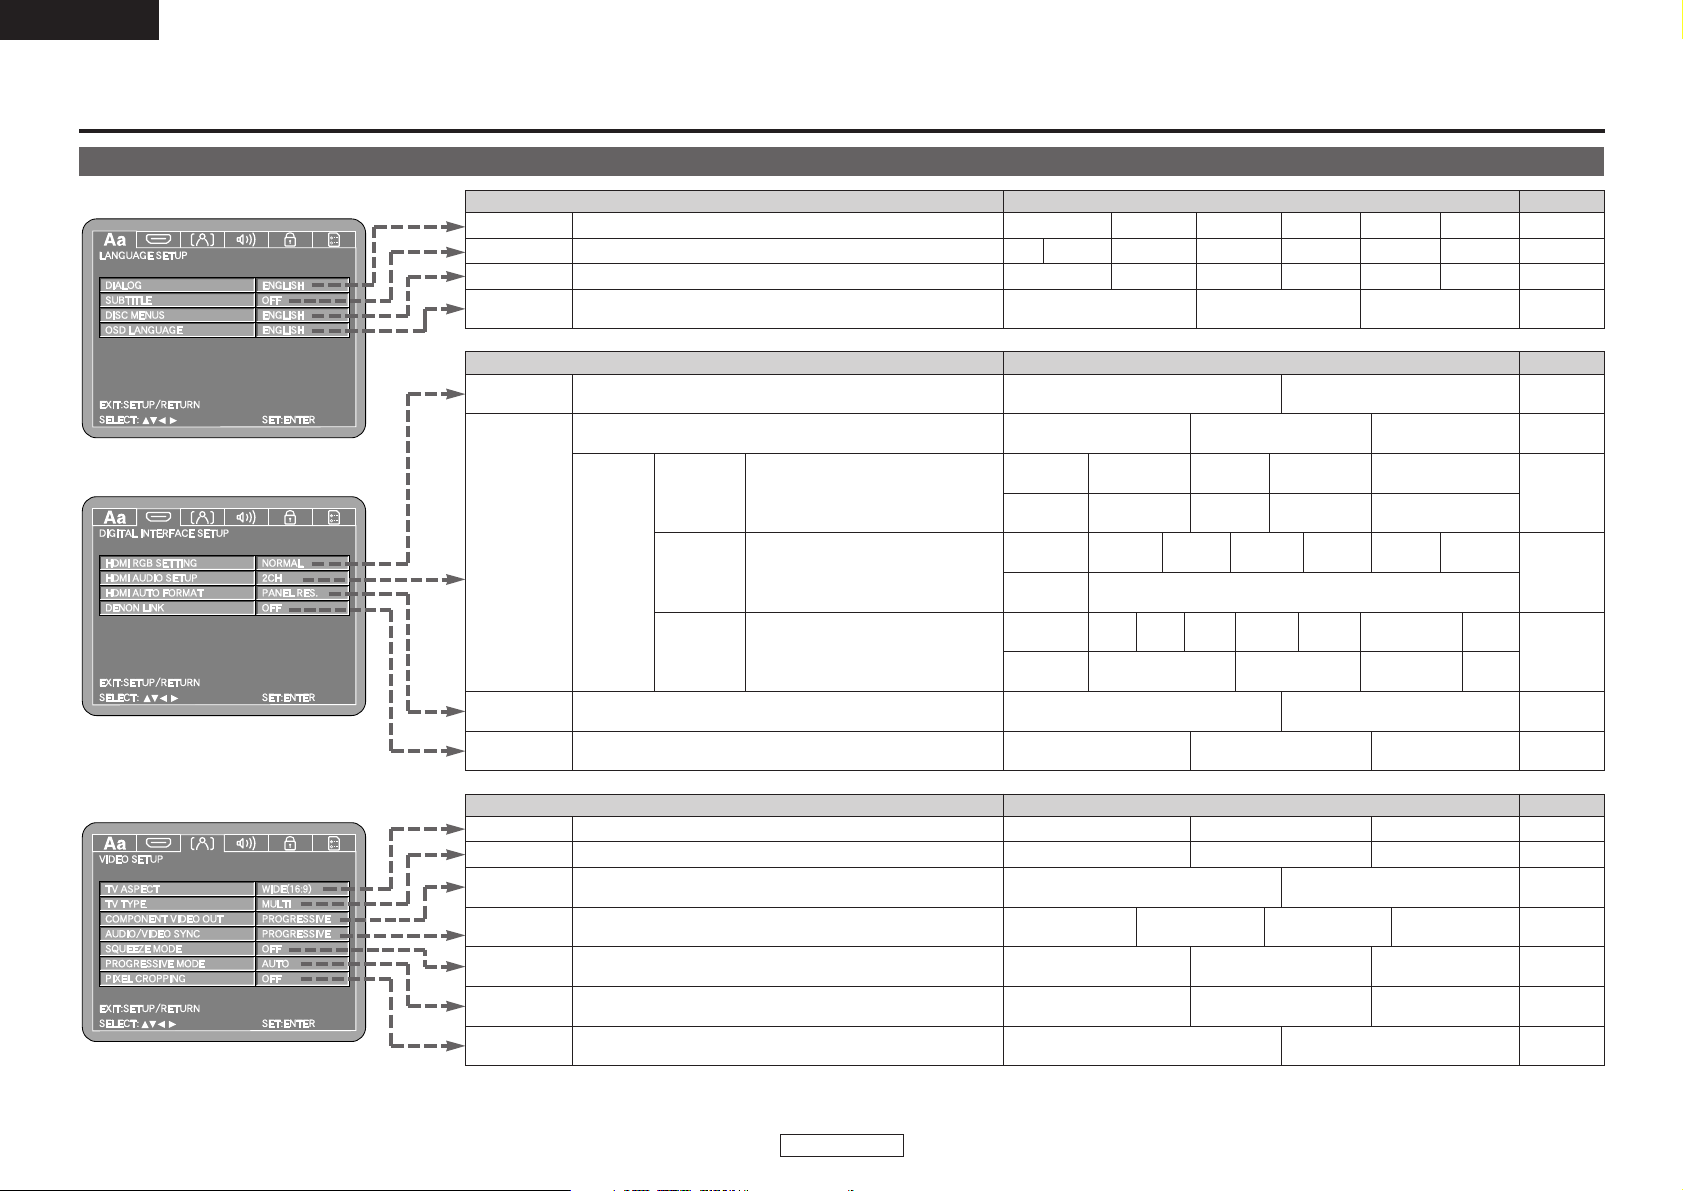
Language setting
DIALOG
Set the audio language to be output.
ENGLISH* FRENCH
16
Table of initial settings
SPANISH GERMAN JAPANESE OTHERS
ENGLISH* FRENCH SPANISH GERMAN JAPANESE OTHERS
FRENCH SPANISH GERMAN JAPANESE OTHERSSUB TITLE
Sets the language of the subtitles displayed on the TV screen. 16
16
OFF
*
ENGLISH
DISC MENUS
Sets the language of the menus (top menu, etc.), recorded on the disc.
OSD LANGUAGE
Sets the language of the initial settings screen and the messages
displayed on the TV screen (“PLAY”, etc.).
ENGLISH* FRANÇAIS ESPAÑOL
HDMI RGB
SETTING
17
HDMI AUDIO
SETUP
Use this procedure to set the audio signals output from the HDMI
terminal.
NORMAL* ENHANCED
HDMI
SPEAKER
SETUP
(Can only be
set when
“MULTI
(LPCM)” is
selected)
The properties and components of the
different channels are set automatically
for the combination of speakers being
used.
Set the volume of the different
speakers so that the test tones output
from them sound to have the same
volume.
SPEAKER
CONFIGURATION
CHANNEL
LEVEL
DELAY TIME
FRONT SP
LARGE* /
SMALL
CENTER SP
LARGE* / SMALL
/ (NONE)
SUBWOOFER SURROUND SP CROSSOVER
40 / 60 / 80* / 100 / 120Hz
TEST TONE FRONT LCH CENTER FRONT RCH
SURROUND
RCH
DISTANCE
0 ~ 60ft (12ft*)
(0 ~ 18m (3.6m*))
0 ~ 60ft (10ft*)
(0 ~ 18m (3.0m*))
0 ~ 60ft (12ft*)
(0 ~ 18m (3.6m*))
ON
HDMI AUTO
FORMAT
Use this procedure to make the settings for the “AUTO” function
selected with the HDMI FORMAT button on the remote control unit.
DENON LINK
PANEL RES.* MAX RES.
OFF* 2nd 3rd
Set the DENON LINK terminal’s output according to the DENON
LINK version of the connected AV amplifier.
Digital interface settings
16
Use this procedure to set the digital RGB image range (data range)
output from the HDMI terminal.
2CH* MULTI (NORMAL) MULTI (LPCM)
YES* / (NO)
OFF / AUTO /
MANUAL
0 ~ –10dB (0dB*)
METERS /
FEET*
FRONT
LCH
DEFAULT
This is a parameter for optimizing the
timing at which the sound is output from
the speakers and subwoofer according to
their distance from the listening position.
17, 18
18
19
19
17
TV ASPECT
Set this according to the screen of the connected TV.
4:3 PS 4:3 LB WIDE (16:9)*
TV TYPE
Set this according to the video format of the connected TV.
NTSC PAL MULTI*
PROGRESSIVE* INTERLACED HDMI
OTHERS
AUDIO / VIDEO
SYNC
Set the video output to synchronize the audio signal.
COMPONENT
VIDEO OUT
Use this procedure to set the DVD-3930CI’s component video
output format.
PROGRESSIVE* INTERLACED
SQUEEZE MODE
Use this procedure to set the output picture when “WIDE (16:9)” is
selected at “TV ASPECT”.
OFF* ON
PROGRESSIVE
MODE
Sets the optimum progressive mode for the image material.
AUTO* VIDEO1 VIDEO2
PIXEL
CROPPING
Set the horizontal display range with respect to the interlaced output.
OFF* ON
Video setting
20
21
21, 22
22
20
21
AUTO
19
SURROUND
LCH
SUBWOOFER
FRONT
RCH
CENTER
SURROUND
LCH
SURROUND
RCH
SUBWOOFER
20
Making the initial settings
LARGE* / SMALL
/ (NONE)
Page 17

PageItem you want to set (* indicates the setting upon purchase)Description
Description Item you want to set (* indicates the setting upon purchase) Page
Description Item you want to set (* indicates the setting upon purchase) Page
ENGLISH
ENGLISH
Making the initial settings Making the initial settings
14
DIGITAL
OUTPUT
Use this procedure to set the signal format of the digital audio
output.
NORMAL* PCM
DOWN
SAMPLING
Use this procedure to set the digital audio output when playing
DVDs recorded in linear PCM or packed PCM.
OFF* ON
SOURCE DIRECT
Use this procedure to making the setting for direct audio output of
the disc’s data without making the “SPEAKER SETUP” settings at
“AUDIO CHANNEL”.
OFF* 50kHz 100kHz
BASS
ENHANCER
Sets the subwoofer output for when playing 2-channel or other
sources without LFE signals.
OFF* ON
OFF* ON
COMPRESSION
Use this procedure to set the dynamic range of the output signals
when playing DVDs recorded in Dolby Digital.
Audio settings
AUDIO
CHANNEL
Set the audio output.
SPEAKER
SETUP
The properties and components of the
different channels are set automatically
for the combination of speakers being
used.
Set the volume of the different
speakers so that the volume of the test
tones output from them sounds the
same.
SPEAKER
CONFIGURATION
CHANNEL
LEVEL
DELAY TIME
CROSSOVER
40 / 60 / 80* / 100 / 120Hz
TEST TONE
FRONT
LCH
CENTER
FRONT
RCH
SURROUND
RCH
DISTANCE
ON
OFF / AUTO /
MANUAL
0 ~ –10dB (0dB*)
METERS /
FEET*
DEFAULT
This is a parameter for optimizing the
timing at which the sound is output from
the speakers and subwoofer according to
their distance from the listening position.
22
22
22
22
SW
+10dB
OFF* / ON
24
24
23, 24
23
23
RATING LEVEL
A password can be set to restrict (prohibit) the playing of adult DVDs
so that children or others cannot view them.
0
(LOCK ALL)
1234567
8
(NO LIMIT)*
PASSWORD
Use this procedure to change the password for the “RATING
LEVEL”.
REGISTRATION
Use this procedure to display the registration code for leasing or
purchasing DivX
®
VOD format video files using the DivX®VOD
(Video On Demand) service.
SHOW CODE
PLAYER MODE
Set the playback mode for playing the DVD-Video contents recorded
on DVD-Audio discs.
AUDIO* VIDEO
CAPTIONS
Use this procedure to set the output of the closed caption signals to
display captions using a caption decoder (commercially available).
OFF* ON
WALL PAPER
Use this procedure to set the picture to be displayed on the TV
screen when in the stop mode or when playing CDs.
PICTURE* BLACK GRAY
BLUE
SCREEN SAVER
The screensaver functions protects the TV screen from imprinting.
OFF* ON
DISPLAY
If the display is turned off with the pure direct or dimmer function,
a description of operations can be displayed for about 2 seconds.
OFF* ON
AUTO POWER
MODE
This function automatically sets the player’s power to the standby
mode if the player is left in the stop mode for about 30 minutes.
OFF* ON
SLIDE SHOW
Use this procedure to set the time after which the still picture (in
JPEG format) switches when playing still pictures.
5 ~ 15 sec (5 sec*)
CHANGE
25
25
26
27
26
26
26
27
27
27
Special settings
Viewing restriction setting
SURROUND
LCH
SUBWOOFER
MULTI CHANNEL* 2CH (VSS OFF) 2CH (VSS1 ON) 2CH (VSS2 ON)
FRONT SP
LARGE* /
SMALL
CENTER SP
LARGE* / SMALL
/ NONE
SUBWOOFER SURROUND SP
YES* / NO
LARGE* / SMALL
/ NONE
0 ~ 60ft (12ft*)
(0 ~ 18m (3.6m*))
0 ~ 60ft (10ft*)
(0 ~ 18m (3.0m*))
0 ~ 60ft (12ft*)
(0 ~ 18m (3.6m*))
FRONT
LCH
FRONT
RCH
CENTER
SURROUND
LCH
SURROUND
RCH
SUBWOOFER
Page 18

ENGLISH
ENGLISH
Making the initial settings Making the initial settings
15
4
5
Use [
DD HH
] to select the item you want to change, then
press [ENTER].
6
Use [
DD HH
] again to select the item to be set, then press
[ENTER].
7
Once the settings are completed, press [SETUP].
8
<POWER>
[
ENTER
]
[
RETURN
]
[
D H F G
]
[NUMBER] (0~9)
[
SETUP
]
Check that all the connections are proper.
Use [
FF GG
] to select the item to be set.
Before starting playback, make the initial settings according to
your usage conditions.
1
Press [SETUP].
• The initial settings screen is displayed.
4
5
¢ ON: The power indicator lights green.
£ OFF: The power indicator turns off.
Turn on the TV’s power and switch its video input so
that the DVD-3930CI’s image can be seen.
2
Press
<
POWER
>
.
3
6
7
Icon
Item you want to change
Item to be set
Operations for making the initial settings
• The initial settings are stored in the memory and remain in effect
until they are changed, even if the power is turned off.
• Some of the items can be changed while a disc is playing.
About the button names in this explanation
<>: Buttons on the main unit
[]: Buttons on the remote control unit
Button name only :
Buttons on the main unit and remote control unit
Page 19

LanguageCodeLanguageCodeLanguageCodeLanguageCode
ENGLISH
ENGLISH
Making the initial settings Making the initial settings
16
¢ Language code list
Use [
DD HH
] to select the item to be set, then press
[ENTER].
1
DIALOG:
Set the audio language to be output.
SUBTITLE:
Sets the language of the subtitles displayed on the TV screen.
DISC MENUS:
Sets the language of the menus (top menu, etc.), recorded on the
disc.
OSD LANGUAGE:
Sets the language of the initial settings screen and the messages
displayed on the TV screen (“PLAY”, etc.).
Use [
DD HH
] to select the language to be set, then press
[ENTER].
2
1
5271
5347
5350
5358
5360
5367
5447
5455
5464
5467
5471
5547
5551
5557
5560
5565
5566
5569
5647
5655
5669
5747
5757
5758
5759
5760
5761
5765
5767
5771
5847
5860
5861
5866
Afar
Abkhazian
Afrikaans
Ameharic
Arabic
Assamese
Aymara
Azerbaijani
Bashkir
Byelorussian
Bulgarian
Bihari
Bislama
Bengali; Bangla
Tibetan
Breton
Catalan
Corsican
Czech
Welsh
Danish
German
Bhutani
Greek
English
Esperanto
Spanish
Estonian
Basque
Persian
Finnish
Fiji
Faroese
French
4747
4748
4752
4759
4764
4765
4771
4772
4847
4851
4853
4854
4855
4860
4861
4864
4947
4961
4965
4971
5047
5051
5072
5158
5160
5161
5165
5166
5167
5247
5255
5256
5261
5264
6558
6559
6560
6561
6563
6564
6565
6566
6567
6568
6569
6647
6651
6653
6654
6655
6657
6658
6660
6661
6664
6665
6666
6669
6757
6764
6772
6855
6861
6961
7054
7161
7254
7267
Latvian; Lettish
Malagasy
Maori
Macedonish
Malayalam
Mongolian
Moldavian
Marathi
Malay
Maltese
Burmese
Nauru
Nepali
Dutch
Norwegian
Provençal
Oromo
Oriya
Panjabi
Polish
Pashto; Pushto
Portuguese
Quechua
Rhaeto-Romance
Kirundi
Romanian
Russian
Kinya-rwanda
Sanskrit
Sindhi
Sango
Serbo-Croatian
Singhalese
Slovak
5868
5953
5955
5957
5958
5960
5961
5964
5965
5966
5971
6047
6051
6058
6061
6149
6159
6164
6247
6258
6265
6266
6367
6459
6460
6461
6467
6469
6547
6550
6553
6554
6555
6557
Frisian
Irish
Gaelic (Scotland)
Galician
Guarani
Gujarati
Hausa
Hindi
Croatian
Hungarian
Armenian
International language
International language
Inupik
Indonesian
Icelandic
Italian
Hebrew
Japanese
Yiddish
Javanese
Georgian
Kazakh
Greenlandic
Cambodian
Kannada
Korean
Kashmiri
Kurdish
Kirghiz
Latin
Lingala
Laothian
Lithuanian
Slovenian
Samoan
Shona
Somali
Albanian
Serbian
Siswati
Sesotho
Sundanese
Swedish
Swahili
Tamil
Telugu
Tajik
Thai
Tigrinya
Turkmen
Tagalog
Setswana
Tonga
Turk ish
Tsonga
Tatar
Twi
Ukrainian
Urdu
Uzbek
Vietnamese
Volapük
Wolof
Xhosa
Yo ruba
Chinese
Zulu
Language setting ( )
• If “OTHERS” is selected, refer to the “Language code list”, and use
[NUMBER] (0 ~ 9) to input the code number.
• If you do not want to display the subtitles, select “OFF” at
“SUBTITLE”. For some discs it is not possible to turn off the
subtitles.
(Select “ENGLISH” under “SUBTITLE”)
Use [
FF GG
] to select “ ”.
Page 20

ENGLISH
ENGLISH
Making the initial settings Making the initial settings
17
Use [
DD HH
] to select the item to be set, then press
[ENTER].
2
Use [
DD HH
] to select “HDMI RGB SETTING”, then
press [ENTER].
1
NORMAL (Upon purchase):
Output as “16 (black)” to “235 (white)”.
Use this procedure to set the digital RGB image range (data range)
output from the HDMI terminal.
ENHANCED:
Output as “0 (black)” to “246 (white)”.
Depending on the TV you are using, the black colors may seem
to stand out when using HDMI connections. If so, set to
“ENHANCED”.
1
Use this procedure to set the audio signals output from the HDMI
terminal.
Use [
DD HH
] to select the item to be set, then press
[ENTER].
2
Use [
DD HH
] to select “HDMI AUDIO SETUP”, then
press [ENTER].
1
2CH (Upon purchase):
2-channel linear PCM audio signals are output.
MULTI (NORMAL):
Multi- (5.1-) channel audio signals are output.
Output signal
• Dolby Digital/DTS discs:
Bitstream signals are output
• Linear PCM / Packed PCM discs:
Linear PCM signals are output
MULTI (LPCM):
Multi- (5.1-) channel audio signals are output.
It is also possible to make the “SPEAKER CONFIGURATION”,
“CHANNEL LEVEL” and “DELAY TIME” settings ( page 17~19).
Output signal
• Dolby Digital/DTS discs:
Decoded Linear PCM signals output
• Linear PCM / Packed PCM discs:
Linear PCM signals are output
1
2
Use [
DD HH
] to select the speaker, then press [ENTER].
3
Use [
DD HH
] to select “MULTI (LPCM)”, then press
[ENTER].
1
LARGE (Upon purchase), SMALL:
Select “LARGE” if you have connected large speakers with strong
low frequency reproduction capabilities, “SMALL” if you have
connected small speakers that do not provide strong bass sound.
CROSSOVER:
For speakers set to “SMALL”, the sound with frequencies below
that of the crossover frequency are cut. This bass sound that has
been cut is output from the subwoofer or a speaker for which
“LARGE” is set.
• 40, 60, 80 (Upon purchase), 100, 120Hz:
Select according to the low frequency reproduction capabilities of
the connected speaker.
Use [
DD HH
] to select “SPEAKER CONFIGURATION”,
then press [ENTER].
2
HDMI SPEAKER SETUP:
It is not possible to select “NO” for the HDMI speaker setting.
At “HDMI AUDIO SETUP”, select “MULTI (LPCM)”. The “HDMI
SPEAKER SETUP” screen appears. Make the “SPEAKER
CONFIGURATION”, “CHANNEL LEVEL” and “DELAY TIME” settings.
¢ Speaker settings
The properties and components of the different channels are set
automatically for the combination of speakers being used.
Use [
DD HH
] to select the speaker type, then press
[ENTER].
4
Setting the HDMI RGB picture quality settings
• No effect when the HDMI terminal’s video setting is set to “YCbCr”
( page 29).
Setting the HDMI audio Setting the HDMI speaker settings
2
Digital interface settings ( )
Use [
FF GG
] to select “ ”.
Page 21

ENGLISH
ENGLISH
Making the initial settings Making the initial settings
18
1
2
3
Use [
DD HH
] to select “TEST TONE”, use [
FF GG
] again
to make the settings, then press [ENTER].
2
OFF:
No test tones are output.
At the HDMI speaker setting screen, use [
DD HH
] to
select “CHANNEL LEVEL”, then press [ENTER].
1
If “AUTO” is selected:
Use [
FF GG
] to adjust the volume.
• The volume can be adjusted between the range of 0 to –10 dB.
• The test tones are output automatically in the order shown
below.
3
-1
AUTO:
Adjust the volumes while listening to the test tones output
automatically from the different speakers.
MANUAL:
Switch the speaker from which the test tone is output manually as
you adjust the volumes.
If “MANUAL” is selected:
Use [
DD HH
] to select the speaker, use [
FF GG
] to adjust
the volume, the press [ENTER].
3
-2
¢ Channel level
Set the volume of the different speakers so that the test tones output
from them sound to have the same volume.
1
2
3
-1
3
-2
4
The display differs
depending on the
connected speaker.
•To return to the setting screen:
Press [RETURN].
•To return to the setting screen:
Press [RETURN].
FRONT LCH FRONT RCH
SUBWOOFER SURROUND LCH SURROUND RCH
CENTER
Page 22

DENON LINK settingAV amplifier’s DENON LINK version
ENGLISH
ENGLISH
Making the initial settings Making the initial settings
19
Use [
DD HH
] to select “DISTANCE”, use [
FF GG
] to set
“METERS” or “FEET”.
2
At the HDMI speaker setting screen, use [
DD HH
] to
select “DELAY TIME”, then press [ENTER].
1
Use [
DD HH
] to select the speaker, then use [
FF GG
] to set
the distance.
• The distance can be set within the range of 0 to 18 meters (60
feet).
The maximum difference in speaker distance for which
adjustment is possible is 4.5 meters (15 feet).
If you select “DEFAULT” and press [ENTER], the delay time
settings are restored to the values set when you purchased the
player.
3
¢ Delay time
This is a parameter for optimizing the timing at which the sound is
output from the speakers and subwoofer according to their distance
from the listening position.
Use [
DD HH
] to select the item to be set, then press
[ENTER].
2
Use [
DD HH
] to select “HDMI AUTO FORMAT”, then
press [ENTER].
1
PANEL RES. (Upon purchase):
The number of pixels of the connected HDMI device’s panel is
detected and the HDMI output resolution is selected automatically.
Use this procedure to make the settings for the “AUTO” function
selected with [HDMI FORMAT] ( page 29).
MAX RES.:
The maximum resolution that can be input to the connected HDMI
device is detected and the HDMI output resolution is selected
automatically.
1
2
Use [
DD HH
] to select the item to be set, then press
[ENTER].
2
Use [
DD HH
] to select “DENON LINK”, then press
[ENTER].
1
OFF (Upon purchase):
No digital audio signals are output from the DENON LINK terminal.
Select this when not connecting the DENON LINK terminal.
Set the DENON LINK terminal’s output according to the DENON LINK
version of the connected AV amplifier.
2nd:
The signals are output in DENON LINK 2nd Edition format.
The following digital audio signals can be transferred:
DVD-Audio, DVD-Video, music CD and video CD signals
3rd:
The signals are output in DENON LINK 3rd Edition format.
The following digital audio signals can be transferred:
Super Audio CD, DVD-Audio, DVD-Video, music CD and video CD
signals
1
2
2nd Edition
(“S.E.” is indicated near the terminal)
“2nd”
3rd Edition
(“3rd” is indicated near the terminal)
“3rd” (or 2nd)
1
2
3
Setting the HDMI auto format
Setting the DENON LINK
•To return to the setting screen:
Press [RETURN].
• The DENON LINK setting with respect to the DENON LINK version
of the connected AV amplifier is as shown below.
Page 23

ENGLISH
ENGLISH
Making the initial settings Making the initial settings
20
Use [
DD HH
] to select the item to be set, then press
[ENTER].
2
Use [
DD HH
] to select “TV ASPECT”, then press
[ENTER].
1
4:3 PS:
Select this if the screen’s vertical:horizontal ratio is 4:3.
Software recorded in wide screen format is played in the pan & scan
mode (with the left and right sides of the screen cut. Software for
which pan & scan is not specified, however, is played in the letter
box mode (with black bands at the top and bottom of the screen).
Set this according to the screen of the connected TV.
4:3 LB:
Select this if the screen’s vertical:horizontal ratio is 4:3.
Software recorded in wide screen format is played in the letter box
mode.
WIDE (16:9) (Upon purchase):
Select this when a wide-screen TV is connected.
Software recorded in wide screen format is played over the entire
screen.
1
Use [
DD HH
] to select the item to be set, then press
[ENTER].
2
Use [
DD HH
] to select “TV TYPE”, then press [ENTER].
1
NTSC:
Select this if the connected TV is of the NTSC type.
Set this according to the video format of the connected TV.
PAL:
Select this if the connected TV is of the PAL type.
MULTI (Upon purchase):
Select this if the connected TV is of both the NTSC and PAL types.
1
2
Use [
DD HH
] to select the item to be set, then press
[ENTER].
2
Use [
DD HH
] to select “COMPONENT VIDEO OUT”,
then press [ENTER].
1
PROGRESSIVE (Upon purchase):
Sets to the progressive format.
In this format there is less flickering than with the interlaced format.
Use this procedure to set the DVD-3930CI’s component video output
format.
INTERLACED:
Sets to the interlaced format.
1
2
Setting the TV aspect ratio
Setting the TV type Setting the component video output
• The picture will not be displayed properly if a video format different
from the connected TV’s type is set.
• When outputting video signals from the HDMI terminal, the video
signals output from the component video terminals are interlaced.
2
Video setting ( )
Use [
FF GG
] to select “ ”.
Page 24

ENGLISH
ENGLISH
Making the initial settings Making the initial settings
21
Use [
DD HH
] to select the item to be set, then press
[ENTER].
2
PROGRESSIVE (Upon purchase):
Synchronizes the sound with the progressive mode.
INTERLACED:
Synchronizes the sound with the interlaced mode.
HDMI:
Synchronizes the sound with the HDMI mode.
OTHERS:
Select this when you want to view progressive, interlaced and
HDMI pictures simultaneously.
The audio signals are set to the optimum timing for the respective
pictures. (They are not synchronized.)
To synchronize the audio signals, set to something other than
“OTHERS”.
1
2
Use [
DD HH
] to select “AUDIO/VIDEO SYNC”, then
press [ENTER].
1
Set the video output to synchronize the audio signal.
1
2
Use [
DD HH
] to select the item to be set, then press
[ENTER].
2
Use [
DD HH
] to select “SQUEEZE MODE”, then press
[ENTER].
1
Use this procedure to set the output picture when “WIDE (16:9)” is
selected at “TV ASPECT” ( page 20).
OFF (Upon purchase):
The picture is displayed over the entire 16:9 TV screen, regardless
of the original image size.
Use [
DD HH
] to select the item to be set, then press
[ENTER].
2
Use [
DD HH
] to select “PROGRESSIVE MODE”, then
press [ENTER].
1
AUTO (Upon purchase):
The material type (film or video) is automatically identified from the
disc and the mode is selected automatically.
Sets the optimum progressive mode for the image material.
VIDEO1:
This mode is suited for playing video material discs.
VIDEO2:
This mode is suited for playing video material discs and 30-frame
film material discs.
ON:
The picture is displayed in the center of the 16:9 TV screen with a
4:3 aspect ratio, regardless of the original image size.
Setting the AV Synchronized Setting the squeeze mode Setting the progressive mode
• No effect for interlaced video outputs.
AUTO:
When playing 4:3 images, the picture is displayed in the center of
the 16:9 TV screen with a 4:3 aspect ratio.
1
2
Page 25

ENGLISH
ENGLISH
Making the initial settings Making the initial settings
22
Use [
DD HH
] to select the item to be set, then press
[ENTER].
2
Use [
DD HH
] to select “PIXEL CROPPING”, then press
[ENTER].
1
OFF (Upon purchase):
Select this when a regular consumer TV is connected.
Set the horizontal display range with respect to the interlaced output.
ON:
When a professional monitor is connected, select this if the image’s
synchronization is disturbed.
1
2
Use [
DD HH
] to select the item to be set, then press
[ENTER].
2
Use [
DD HH
] to select “AUDIO CHANNEL”, then press
[ENTER].
1
MULTI CHANNEL (Upon purchase):
Select this when using 3 or more speakers. The “SPEAKER
CONFIGURATION”, “CHANNEL LEVEL” and “DELAY TIME”
setting screens appear.
Set the audio output.
2CH (VSS OFF):
Select this when using 2 speakers and a Dolby Pro Logic decoder
(Dolby Pro Logic compatible amplifier).
2CH (VSS1 ON):
This setting provides a natural surround effect in a system with 2
speakers connected.
1
Setting the horizontal display range
Setting the audio channels
• The procedure for making the “SPEAKER CONFIGURATION”,
“CHANNEL LEVEL” and “DELAY TIME” settings is the same as
when “MULTI (LPCM)” is selected at “HDMI AUDIO SETUP” (
page 17).
• When “ON” is selected for “SW+10dB” at “CHANNEL LEVEL”,
the volume of the sound output from the subwoofer can be set 10
dB higher.
2CH (VSS2 ON):
This settings provides a stronger surround effect in a system with 2
speakers connected than VSS1.
2
Audio settings ( )
Use [
FF GG
] to select “ ”.
¢ About V.S.S. (Virtual Surround Sound)
• Using the V.S.S. function lets you enjoy a surround effect with only
2 speakers (left and right).
• This function is only effective for DVDs recorded in Dolby Digital,
DTS, MPEG, LPCM with 2 or more channels.
• For some discs the effect may be weak or there may be no effect
at all.
• For some discs the sound may be distorted when using this
function. If so, set the V.S.S. function to “OFF”.
• Cancel other surround functions (for example, the TV’s surround
mode) when using this function.
• The effect is stronger if the listening position is approximately 3 to 4
times the distance of the space between the front speakers (or the
sideways width of the TV when using the TV’s speakers).
Page 26

ENGLISH
ENGLISH
Making the initial settings Making the initial settings
23
Use [
DD HH
] to select the item to be set, then press
[ENTER].
2
Use [
DD HH
] to select “DIGITAL OUTPUT”, then press
[ENTER].
1
NORMAL (Upon purchase):
Select this when an AV amplifier with built-in Dolby Digital or DTS
decoder is connected to the DVD-3930CI’s digital audio output
terminal.
When playing discs recorded in Dolby Digital or DTS, the
corresponding bitstream signals are output.
Use this procedure to set the signal format of the digital audio output.
PCM:
When playing discs recorded in Dolby Digital or DTS, the signals are
converted to 48 kHz/16 bit PCM (2-channel) before being output.
1
2
Use [
DD HH
] to select the item to be set, then press
[ENTER].
2
Use [
DD HH
] to select “DOWN SAMPLING”, then
press [ENTER].
1
OFF (Upon purchase):
For DVDs recorded in linear PCM or packed PCM without copyright
protection, 2-channel audio signals of up to 96 kHz are output as
linear PCM signals with no conversion. (192 kHz and 176.4 kHz
signals are converted to 96 kHz and 88.2 kHz, respectively.)
ON:
Linear PCM or packed PCM signals are converted to 48 kHz or less
for output.
Set to “ON” when using digital connections to an AV amplifier
that is not compatible with sampling frequencies of 192 kHz,
176.4 kHz, 96 kHz and 88.2 kHz.
1
2
Setting the digital output
Use this procedure to set the digital audio output when playing DVDs
recorded in linear PCM or packed PCM.
Setting the downsampling
• For DVDs containing multi-channel PCM signals, the signals are
down-mixed into the 2-channels and output in digital format. (For
sources for which down-mixing is prohibited, only the FL and FR
channels are output.)
• When playing linear PCM or packed PCM DVDs with copyright
protection, due to considerations for the copyright holder, digital
output is not possible for sources of 48 kHz/16 bit or more.
To play such sources, either set to “ON”, use DENON LINK or
analog connections ( page 9, 10).
• When playing discs recorded in linear PCM or packed PCM, the
signals are output in linear PCM format, regardless of this setting.
Use [
DD HH
] to select the item to be set, then press
[ENTER].
2
Use [
DD HH
] to select “SOURCE DIRECT”, then press
[ENTER].
1
OFF (Upon purchase):
Select this when playing using the “SPEAKER SETUP” and “BASS
ENHANCER” settings.
Set this to output the disc’s audio information as such without making
the “AUDIO CHANNEL”, “SPEAKER SETUP”.
With Super Audio CDs, the playback range can be restricted using this
setting.
1
50kHz, 100kHz:
Set this to output the disc’s audio information as such without
making the “SPEAKER SETUP” and “BASS ENHANCER” settings.
With Super Audio CDs, if the disc’s audio information is output as
such and if an amplifier or speakers not compatible with the high
frequencies is/are connected, the amplifier or speakers could be
damaged. Set to “50kHz” if the amplifier or speakers is/are not
compatible with the high frequencies, “100kHz” if it/they are. (For
sources other than Super Audio CDs, the disc’s audio information is
output as such, regardless of whether this is set to “50kHz” or
“100kHz”.)
2
Setting the source direct
Page 27

ENGLISH
ENGLISH
Making the initial settings Making the initial settings
24
Use [
DD HH
] to select the item to be set, then press
[ENTER].
2
Use [
DD HH
] to select “BASS ENHANCER”, then press
[ENTER].
1
OFF (Upon purchase):
No sound is output from the subwoofer.
Sets the subwoofer output for when playing 2-channel or other
sources without LFE signals.
ON:
Sound is output from the subwoofer.
Set “SUBWOOFER” at “SPEAKER CONFIGURATION” to “YES”.
1
2
Use [
DD HH
] to select the item to be set, then press
[ENTER].
2
Use [
DD HH
] to select “COMPRESSION”, then press
[ENTER].
1
OFF (Upon purchase):
The sound is played with the standard dynamic range.
ON:
Select this to achieve a powerful sound even when the volume is
low.
This setting is suited for use at night with the volume set low.
1
2
Setting the bass enhancer
Use this procedure to set the dynamic range of the output signals
when playing DVDs recorded in Dolby Digital.
Dynamic range:
This is the ratio between the softest sound that can be played
without being drowned out by the noise generated by the
equipment and the loudest sound that can be produced without
the sound breaking up.
Setting the dynamic range compression
• This setting is only effective for analog outputs.
• This setting is ineffective when “SOURCE DIRECT” is set to
“50kHz” or “100kHz”.
• When set to “50kHz” or “100kHz”, you can enjoy the DTS
recommended full range all-channel sound. (Note however that the
subwoofer volume increases by 5 dB, or by 15 dB for Super Audio
CDs.) In addition, the 6-channel sources of DVD-Audio discs
recorded in the all-channel full range frequency model can also be
played. In this case, make analog connections as described in the
disc’s instructions.
• When setting “50kHz” or “100kHz”, set all the speaker sizes to
“LARGE” and the subwoofer to “YES”.
• The “CHANNEL LEVEL” and “DELAY TIME” settings remain in
effect even when “50kHz” or “100kHz” is set.
Page 28

ENGLISH
ENGLISH
Making the initial settings Making the initial settings
25
Use [
DD HH
] to select the setting level, then press
[ENTER].
2
Use [
DD HH
] to select “RATING LEVEL”, then press
[ENTER].
1
0 (LOCK ALL):
This restricts playback of all DVDs.
1:
This restricts playback of adult and regular DVDs.
Select this when you only want to play DVDs for children.
2 ~ 7:
This restricts playback of adult DVDs.
Select this when you want to play both DVDs for children and
regular DVDs.
8 (NO LIMIT) (Upon purchase):
With this setting, all DVDs can be played.
Use [NUMBER] (0 ~ 9) to input the password (4 digits),
then press [ENTER].
The default setting for the password is “0000”.
3
1
Use [NUMBER] (0 ~ 9) to input the passwords (4 digits)
(password → new password → new password (reinput)),
then press [ENTER].
The default setting for the password is “0000”.
Use [
DD HH
] to select “PASSWORD”, use [GG] to select
“CHANGE”, then press [ENTER].
2
1
2
Use this procedure to change the password for the “RATING LEVEL”.
2
3
A password can be set to restrict (prohibit) the playing of adult DVDs
so that children or others cannot view them.
Setting the viewing restriction level
• If the discs includes viewing restriction levels, the password input
screen appears.
• If the discs does not include viewing restriction levels, viewing
cannot be restricted.
Setting the password
1
•Be careful not to forget the password.
If you do, reset it to the default setting set when the player was
purchased ( page 48).
Viewing restriction setting ( )
Use [
FF GG
] to select “ ”.
Page 29

ENGLISH
ENGLISH
Making the initial settings Making the initial settings
26
1
Use [
DD HH
] to select the playing mode, then press
[ENTER].
2
Use [
DD HH
] to select “PLAYER MODE”, then press
[ENTER].
1
AUDIO (Upon purchase):
DVD-Audio discs are played as such.
VIDEO:
The DVD-Video contents included on DVD-Audio discs are played.
Use [
DD HH
] to select the item to be set, then press
[ENTER].
2
Use [
DD HH
] to select “CAPTIONS”, then press
[ENTER].
1
OFF (Upon purchase), ON:
Select “OFF” if you do not want to display the captions on the
screen, “ON” if you want to display them.
1
2
2
Use [
DD HH
] to select the item to be set, then press
[ENTER].
2
Use [
DD HH
] to select “WALL PAPER”, then press
[ENTER].
1
PICTURE (Upon purchase), BLACK, GRAY, BLUE:
Set the wallpaper to “PICTURE”, “BLACK”, “GRAY” or “BLUE”.
1
2
1
2
•For details, go to the URL: http://www.divx.com/vod
Set the playback mode for playing the DVD-Video contents recorded
on DVD-Audio discs.
Setting the player mode
Use this procedure to set the output of the closed caption signals to
display captions using a caption decoder (commercially available).
Setting the captions
•A caption decoder is required in order to display captions.
• For DVDs including caption signals, the “ ”, “ ” or “ ”
mark is displayed.
Use this procedure to set the picture to be displayed on the TV screen
when in the stop mode or when playing CDs, etc.
Setting the wallpaper
Special settings ( )
Use [
FF GG
] to select “ ”.
Use [
GG
] to select “SHOWCODE”, then press [ENTER].
• The 8-digit registration code is displayed.
2
Use [
DD HH
] to select “REGISTRATION”.
1
Use this procedure to display the registration code for leasing or
purchasing DivX®VOD format video files using the DivX®VOD (Video
On Demand) service.
Setting the displaying the registration code
Page 30

ENGLISH
ENGLISH
Making the initial settings Making the initial settings
27
Use [
DD HH
] to select the item to be set, then press
[ENTER].
2
Use [
DD HH
] to select “SCREEN SAVER”, then press
[ENTER].
1
OFF (Upon purchase):
When this is set, the screensaver function does not work.
ON:
When this is set, the screensaver function is activated after about 5
minutes in the stop or pause mode.
Use [
DD HH
] to select the item to be set, then press
[ENTER].
2
Use [
DD HH
] to select “DISPLAY”, then press [ENTER].
1
OFF (Upon purchase), ON:
Set to “OFF” if you do not want the display to light, to “ON” if you
do want the display to light.
1
1
2
2
Use [
DD HH
] to select the item to be set, then press
[ENTER].
2
Use [
DD HH
] to select “AUTO POWER MODE”, then
press [ENTER].
1
OFF (Upon purchase), ON:
Select “OFF” if you do not want the power to be set to the standby
mode automatically, “ON” if you do want it to be set to the standby
mode.
1
Use [
DD HH
] to select the time to be set, then press
[ENTER].
2
Use [
DD HH
] to select “SLIDE SHOW”, then press
[ENTER].
1
5 (Upon purchase) ~ 15 sec:
The still picture switches after the selected time.
1
2
2
The screensaver functions protects the TV screen from imprinting.
Setting the screensaver
If the display is turned off with the pure direct or dimmer function, a
description of operations can be displayed for about 2 seconds.
Setting the display
This function automatically sets the player’s power to the standby
mode if the player is left in the stop mode for about 30 minutes.
Setting the auto power mode
Use this procedure to set the time after which the still picture (in
JPEG format) switches when playing still pictures.
Setting the slide switching time
NOTE:
• The screensaver does not function for discs containing MP3,
WMA, JPEG or DivX®files.
Page 31

ENGLISH
ENGLISH
28
[
ENTER
]
[
PURE DIRECT
SELECT]
[
D H
]
[
PURE DIRECT
MEMORY]
About the button names in this explanation
<>: Buttons on the main unit
[]: Buttons on the remote control unit
Button name only :
Buttons on the main unit and remote control unit
Other settings
In the stop mode, press [PURE DIRECT MEMORY].
• The pure direct memory screen appears.
1
Use [
DD HH
] to select “MODE 1” or “MODE 2”, then
press [ENTER].
2
Use [
DD HH
] to select the item you want to set, press
[ENTER], then use [
DD HH
] again to make the setting.
3
Press [PURE DIRECT MEMORY].
• The settings are stored at “MODE 1” or “MODE 2”.
4
Using the pure direct mode
Use this function to stop output of video signals, etc., and output only
the analog audio signals to achieve high quality sound.
DIGITAL OUTPUT:
• ON (Upon purchase), OFF:
Select whether or not to output signals to the digital audio output
terminals.
The DENON LINK digital output circuitry does not function.
VIDEO OUT:
• ON (Upon purchase), OFF:
Select whether or not to output video signals.
DISPLAY:
• ON (Upon purchase), OFF:
Select whether or not to light the DVD-3930CI’s display.
Press [PURE DIRECT SELECT] and select the setting
mode.
• The mode is indicated on the display.
5
NORMAL:
All signals are output.
MODE 1:
The player operates as per the settings stored at “MODE 1”.
MODE 2:
The player operates as per the settings stored at “MODE 2”.
ALL OFF:
Only the analog audio signals are output.
2
3
•With HDMI connections, no video or audio signals are output from
the HDMI terminals if “VIDEO OUT” is set to “OFF” in step 3 or if
the “ALL OFF” mode is selected in step 5.
Page 32

ENGLISH
ENGLISH
Other settings Other settings
29
[
HDMI
SELECT]
[
HDMI
FORMAT]
<VIDEO MODE>
About the button names in this explanation
<>: Buttons on the main unit
[]: Buttons on the remote control unit
Button name only :
Buttons on the main unit and remote control unit
Making the settings for the picture output from
the HDMI terminal
Changing the signal format
When operating from the remote control unit:
Use [HDMI SELECT] to select the signal format.
When operating from the main unit :
qq
Turn
<
VIDEO MODE
>
to display “HDMI SELECT” on
the display, then press
<
VIDEO MODE
>
.
ww
Turn
<
VIDEO MODE
>
to select the signal format, then
press
<
VIDEO MODE
>
.
HDMI OFF (Upon purchase):
Nothing is output from the HDMI terminal.
YCbCr:
Component format video signals and audio signals are output from
the HDMI terminal.
RGB:
RGB format video signals and audio signals are output from the
HDMI terminal.
PC RES.:
RGB format video signals with a resolution for use on computers
and audio signals are output from the HDMI terminal.
The output is set to 60 Hz, regardless of whether the disc being
played in NTSC or PAL.
Set to “YCbCr” or “RGB” if the TV or monitor connected to the
HDMI terminal is not compatible with computer resolutions.
• The “HDMI MODE VIDEO” indicator on the front panel lights when
“YCbCr” and “RGB” are selected, and the “HDMI MODE PC RES.”
indicator lights when “PC RES.” is selected.
• The picture may be disturbed even if the TV or monitor connected
to the HDMI terminal is compatible with computer resolutions.
• When outputting video signals from the HDMI terminal, the video
signals output from the component video terminals are interlaced.
Changing the resolution
¢ When the signal format is set to “YCbCr” or
“RGB”
AUTO:
The performance of the HDMI device connected to the HDMI
terminal is detected automatically and the resolution for its panel’s
pixel number or the maximum resolution that can be input is output.
The output resolution is set at “HDMI AUTO FORMAT” under
“digital interface setting” ( page 19).
“480p/576p” output when connected to a DVI device.
480/576i, 480/576P (Upon purchase), 720P, 1080i, 1080P:
The video signal from the HDMI terminal is converted to the
selected resolution for output.
The video output when “480/576i” is selected is 480i for NTSC,
576i for PAL.
The video output when “480/576P” is selected is 480P for NTSC,
576P for PAL.
• The resolution is the same for “YCbCr” and “RGB”.
When operating from the remote control unit:
Use [HDMI FORMAT] and select the resolution.
When operating from the main unit :
qq
Turn
<
VIDEO MODE
>
to display “HDMI FORMAT”
on the display, then press
<
VIDEO MODE
>
.
ww
Turn
<
VIDEO MODE
>
and select the resolution, then
press
<
VIDEO MODE
>
.
NOTE:
• The normal display reappears if no operation is performed for 3
seconds while making the selection using <VIDEO MODE>.
Page 33

Other settings Other settings
ENGLISH
30
ENGLISH
¢ When the signal format is set to “PC RES.”:
VGA (Upon purchase):
The signal is converted to a resolution of 640 x 480 (60 Hz).
XGA:
The signal is converted to a resolution of 1024 x 768 (60 Hz).
WXGA:
The signal is converted to a resolution of 1280 x 768 (60 Hz).
SXGA:
The signal is converted to a resolution of 1280 x 1024 (60 Hz).
• The image size changes when keystone correction is performed.
• The “KEYSTONE” indicator on the front panel lights when keystone
correction is set.
Performing keystone correction in the vertical
direction
Performing keystone correction in the horizontal
direction
Performing keystone correction
Keystone distortion occurs when the connected projector or screen is
at an angle. If so, correct.
Valid for progressive and HDMI outputs.
When turned clockwise:
When operating from the remote control unit:
Use [HDMI FORMAT] and select the resolution.
When operating from the main unit :
qq
Turn
<
VIDEO MODE
>
to display “HDMI SELECT” on
the display, then press
<
VIDEO MODE
>
.
ww
Turn
<
VIDEO MODE
>
and select the resolution, then
press
<
VIDEO MODE
>
.
Turn
<
VIDEO MODE
>
to display “KEYSTONE-H” on
the display, then press
<
VIDEO MODE
>
.
1
Turn
<
VIDEO MODE
>
to select the amount of
correction, then press
<
VIDEO MODE
>
.
The setting can be set to between –40 and +40.
2
When turned counterclockwise:
Turn
<
VIDEO MODE
>
to display “KEYSTONE-V” on
the display, then press
<
VIDEO MODE
>
.
1
Turn
<
VIDEO MODE
>
to select the amount of
correction, then press
<
VIDEO MODE
>
.
The setting can be set to between –30 and +30.
2
When turned clockwise:
When turned counterclockwise:
NOTE:
•The greater the amount of keystone correction, the greater the
loss of picture quality. For good picture quality, set the devices so
that the correction value can be kept to the minimum.
• The keystone correction is not reflected in the video output until the
<
VIDEO MODE>is pressed to set it. To fine-adjust, repeat step
2within
3 seconds of pressing <VIDEO MODE
>.
Page 34

Other settings Other settings
ENGLISH
31
ENGLISH
[
D H F G
]
[
ENTER
]
[
PICTURE
ADJUST]
About the button names in this explanation
<>: Buttons on the main unit
[]: Buttons on the remote control unit
Button name only :
Buttons on the main unit and remote control unit
Adjusting the picture quality
Storing the picture quality settings in the
memory
Press [PICTURE ADJUST].
Use [
FF GG
] to select one of memory positions “M1” to
“M5”, then press [ENTER].
1
2
Use [
FF GG
] to select one setting from “Adjust 1” to
“Adjust 4”.
For instructions on making “Adjust 4”, see “Gamma correction”
( page 33).
3
Press [
HH
], use [
FF GG
] again to select the item to be
adjusted, use [
DD HH
] to adjust, then press [ENTER].
• The settings are stored at the corresponding memory position.
4
Use this procedure to store picture quality settings you have adjusted
to suit your tastes at memory positions 1 to 5.
1
2
3
4
¢ To quit the picture quality adjustment mode:
Press [PICTURE ADJUST]again.
When “M1“ is selected
When ”Adjust 2”
is selected
When “CONTRAST“ is selected
Audio synchronization adjustment procedure
Use this procedure to set so that the video signal output method’s
video signal set at “AV Sync” ( page 21) under “Making the initial
settings” and the audio signal are synchronized.
Turn
<
VIDEO MODE
>
to display “AUDIO ADJUST” on
the display, then press
<
VIDEO MODE
>
.
1
Turn
<
VIDEO MODE
>
to select the time by which the
sound is to be delayed, then press
<
VIDEO MODE
>
.
The setting can be made between 0 and +200 msec in units of
10 msec. (The higher the value, the greater the delay of the
sound with respect to the picture.)
2
<VIDEO MODE>
Page 35

Adjustment range
(initial value)
DescriptionItem
ENGLISH
ENGLISH
–6 ~ +6 (0)
ON/OFF (OFF)
Adjust 4 Detailed adjustment of the picture’s brightness.
16 ~ 235
(G0=24/G1=32/G2=48
/G3=64/G4=80/G5=96
/G6=128/G7=160/
G8=192/G9=224)
Adjust 3
Other settings Other settings
32
¢ List of picture quality adjustment modes
0 ~ +12 (0)
–6 ~ +6 (0)
–6 ~ +6 (0)
–6 ~ +6 (0)
–5 ~ +5 (0)
–5 ~ +5 (0)
–6 ~ +6 (0)
0 ~ +11 (0)
0 ~ +3 (0)
0 IRE/7.5 IRE (7.5)
Adjust 1
Adjust 2
CONTRAST
BRIGHTNESS
SHARPNESS (medium range)
SHARPNESS (high range)
HUE (color tone)
WHITE LEVEL
BLACK LEVEL
CHROMA LEVEL
ENHANCER
DNR (Digital Noise Reduction)
MPEG NR (MPEG Noise Reduction)
SETUP LEVEL
G0 ~ G9 (gamma correction)
Adjusts the difference between the bright and dark parts of
the picture.
Adjust the brightness of the picture.
Adjusts the sharpness of the picture for the medium
frequency range. ( 1)
Adjusts the sharpness of the picture for the high frequency
range. ( 2)
Adjusts the balance between the green and red. ( 3)
Adjusts the white level.
Adjusts the black level. ( 2)
Adjusts the density of the colors.
Strengthens the contours of the picture. ( 2)
Reduces the overall level of noise on the picture.
Reduces the noise of the contours of letters and other such
parts.
Corrects for unnatural look in the black colors.
1: Does not affect the HDMI output.
2: Affects the progressive and HDMI output.
3: Does not effect the component output’s interlaced output.
¢ Picture quality adjustment setting memory list
DescriptionItem
STD
M1
M2
M3
M4
M5
STANDARD
MEMORY1
MEMORY2
MEMORY3
MEMORY4
MEMORY5
Upon purchase (initial value)
Picture quality settings can be stored
at “Adjust 1” to “Adjust 4”.
–7 ~ +7 (0)
–7 ~ +7 (0)
H.POSITION (horizontal direction)
V.POSITION (vertical direction)
Adjusts the left/right position. ( 2)
Adjusts the top/bottom position. ( 2)
Page 36

ENGLISH
ENGLISH
Other settings Other settings
33
[
D H F G
]
[
ENTER
]
[
CLEAR
]
About the button names in this explanation
<>: Buttons on the main unit
[]: Buttons on the remote control unit
Button name only :
Buttons on the main unit and remote control unit
Gamma correction
Make these adjustments using numerical tables or graphs.
To adjust using the numerical tables:
At “Adjust 4”, press [
HH
].
To adjust using the graphs:
At “Adjust 4”, press [ENTER].
Use [
FF GG
] to select the point to be adjusted, use [
DD HH
]
to adjust the brightness level, then press [ENTER].
• The settings are stored at the corresponding memory position.
It is not possible to set the level of the selected point to a value
overlapping those of the adjacent points.
(For example, if G3 is set to 64 and G5 is set to 96, G4 cannot be
set to values of 64 or less or 96 or greater.)
1
2
(Numerical table)
(Graph)
¢ To set back to the standard level:
Press [CLEAR].
Reference:
Horizontal axis: Brightness level of pictures recorded on disc
Vertical axis: Brightness level of pictures upon output from
the DVD-3930CI
When a bright point on the disc
side is adjusted to the “dark” side,
pictures whose bright sections are
normally hard to see become
easier to see.
When a dark point on the disc side
is adjusted to the “bright” side,
pictures whose dark sections are
normally hard to see become
easier to see.
Page 37

ENGLISH
ENGLISH
Basic Operation
34
Basic Operation
Turning the power on
Press
<
POWER
>
.
• “0h00m00s” is displayed if no disc is loaded.
¢ ON: The power indicator lights green.
£ OFF: The power indicator turns off.
The power indicator lights red if the standby mode is set by
pressing <ON/STANDBY>or [POWER OFF].
[
POWER OFF
]
5
2
1
<POWER>
5<ON/STANDBY> 1 2
About the button names in this explanation
<>: Buttons on the main unit
[]: Buttons on the remote control unit
Button name only :
Buttons on the main unit and remote control unit
¢ Turning the power off:
Press <POWER>again.
•When the power is turned off from the standby mode, it is set to the
standby mode when the power is turned back on.
NOTE:
• When in the standby mode, a very small amount of power is
consumed, even if all the indicators are turned off.
Loading discs
Press 5.
For instructions on loading discs, see page 4.
¢ To close the disc tray:
Press 5 again.
Playing discs
Press 1.
• The “1” indicator lights and playback starts.
• For details, refer to the disc’s instructions.
Some discs may be designed by the software producer to operate
in ways other than described in this manual.
To stop playback
Press 2.
• Playback stops and the wallpaper is displayed.
If “AUTO POWER MODE” at “OTHER SETUP” is set to “ON”
in the initial settings ( page 27), the power automatically
turns off and is set to the standby mode if the player is left in the
stop mode for about 30 minutes.
¢ About the resume function
If 2 is pressed during playback, the position at which the disc was
stopped is stored in the memory (“1” flashes on the display).
If 1 is pressed now, playback resumes from the point at which it was
stopped.
The resume function is canceled if the disc tray is opened or if 2 is
pressed again.
• The resume function operates for discs on which the elapsed time
is indicated on the display during playback.
• The resume function does not work when playing menus.
Page 38

ENGLISH
ENGLISH
Basic Operation Basic Operation
35
9
1
3
[
AUDIO
]
[
SUBTITLE
]
[
ENTER
]
[
D H F G
]
[
TOP MENU
]
[
ANGLE
]
[
MENU
]
[NUMBER] (0~9, +10)
1 9
<STILL/PAUSE>
About the button names in this explanation
<>: Buttons on the main unit
[]: Buttons on the remote control unit
Button name only :
Buttons on the main unit and remote control unit
To pause playback
Press
<
STILL/PAUSE
>
.
• The “3” indicator lights and the pause mode is set.
¢ To resume playback:
Press 1.
About DVD-Video discs
Titles and chapters:
DVD-Video discs are divided into several large sections (titles) and
small sections (chapter). These sections are all allotted numbers,
called the title numbers and chapter numbers.
Chapter 1 Chapter 2 Chapter 3 Chapter 1 Chapter 2
Title 1 Title 2
For example:
Playing DVD-Video discs
Some DVDs display menu screens.
Select the desired item, then start playback.
Use [
DD HH FF GG
] to select the item you want to see.
1
Press [ENTER].
• Playback starts.
2
e
Example: When “Orange” is selected
• While playing a DVD, press [TOP MENU] or [MENU] to return to the
menu screen.
•To display the next page of the menu, press
9.
Apple
Orange
Peach
Banana
Strawberry
Pineapple
TOP MENU
Orange
Page 39

ENGLISH
ENGLISH
Basic Operation Basic Operation
36
For DVDs containing multiple titles, the desired title can be selected
and played from the top menu.
Some DVDs also have special menus called “DVD menu”.
Press [TOP MENU] or [MENU] during playback.
Use [
DD HH FF GG
] or [NUMBER] (0 ~ 9, +10) to select the
desired title.
Step 3 can be skipped if you use [NUMBER] (0 ~ 9, +10).
1
2
Press [ENTER] or 1.
• Playback starts.
3
Using the top menu and DVD menu
Example: Top menu Example: DVD menu
The audio language can be switched when playing DVDs containing
multiple audio languages.
Press [AUDIO] during playback.
• The currently playing audio number is displayed.
Use [
DD HH
] to select the desired language.
The display turns off when [AUDIO] is pressed.
1
2
Switching the audio language
(Multiple-Audio Function)
The subtitle language can be switched when playing DVDs containing
multiple subtitle languages.
Press [SUBTITLE] during playback.
• The currently playing subtitle number is displayed.
Use [
DD HH
] to select the desired language.
The display turns off when [SUBTITLE] is pressed.
1
2
Switching the subtitle language
(Multiple-Subtitle Function)
The angle can be switched when playing DVDs containing multiple
angles.
Press [ANGLE] during playback.
• The currently playing angle number is displayed.
Use [
DD HH
] to select the desired angle.
The display turns off when [ANGLE] is pressed.
1
2
Switching the angle (Multiple-Angle Function)
About DVD-Audio discs
Groups and tracks:
DVD-Audio discs are divided into several large sections (groups)
and small sections (tracks). These sections are all allotted
numbers, called the group numbers and track numbers.
Track 1 Track 2 Track 3 Track 1 Track 2
Group 1 Group 2
For example:
TOP MENU DVD MENU
Apple
Orange
Peach
Banana
Strawberry
Pineapple
1. SUBTITLE
2. AUDIO
3. ANGLE
Page 40

ENGLISH
ENGLISH
Basic Operation Basic Operation
37
1
[
SEARCH
MODE]
[
CLEAR
]
[
RETURN
]
SUPER AUDIO
CD SETUP
[
PAGE +
]
[
D H F G
]
[
ENTER
]
[
PAGE –
]
[NUMBER] (0~9, +10)
SUPER AUDIO CD SETUP
1
About the button names in this explanation
<>: Buttons on the main unit
[]: Buttons on the remote control unit
Button name only :
Buttons on the main unit and remote control unit
Switching between groups and tracks Selecting still pictures
In the stop or play mode, press [SEARCH MODE] and
select the search mode.
• The mode switches each time the button is pressed and is
indicated at the bottom left of the screen, as shown below.
Use [NUMBER] (0 ~ 9, +10) input the number of the
group or track you want to play.
• Playback starts from the specified group or track.
1
2
GROUP 1/3 TRACK 3/10
• The search mode set by pressing [SEARCH MODE] is stored in the
memory until the disc tray is opened.
Some DVD-Audio discs contain special groups called “bonus groups”
which can only be played by inputting a password.
In the Stop mode, press [SEARCH MODE] and select
the “GROUP”.
• The ”GROUP” indicator lights.
Use [NUMBER] (0 ~ 9, +10) to input the bonus group
number.
1
2
Use [NUMBER] (0 ~ 9) to input the passwords (4
digits), then press [ENTER].
• Playback starts from the first track in the specified group.
In some cases the password is input from a menu screen. Follow
the instructions on the screen.
3
Playing bonus groups
¢ If you input the wrong password:
Press [CLEAR].
For DVD-Audio discs containing still pictures, the desired still picture
can be selected.
Press [PAGE +] or [PAGE –] during playback.
Some discs may be designed by the software producer so that
the image cannot be selected.
About Super Audio CDs
There are three types of Super Audio CDs.
qSingle layer disc
Single layer Super Audio CD with only an HD layer.
wDual layer disc
Super Audio CD with a double HD layer, offering extended
playing time and high sound quality.
eHybrid disc
Two-layer Super Audio CD with an HD layer and a CD layer. The
signals on the CD layer can be played on a regular CD player.
• About the HD layer
All Super Audio CDs contain an HD (High Density) layer with high
density Super Audio CD signals. This layer can contain a stereo
channel area, a multi-channel area, or both a stereo channel and
multi-channel area.
Types of Super Audio CDs
Single layer disc Dual layer disc Hybrid disc
HD layer HD layer CD layer HD layer
Page 41

ENGLISH
ENGLISH
Basic Operation Basic Operation
38
STEREO:
The 2-channel area of the HD layer is played.
MULTI (Upon purchase):
The multi-channel area of the HD layer is played.
Setting the Super Audio CD playback area/layer
Use this procedure to select the area/layer to be played once the disc
is loaded.
CD:
The CD layer is played.
Press SUPER AUDIO CD SETUP and select the area/layer.
• When playing discs that do not contain the selected area or layer,
the disc is played with the following order of priority: MULTI,
STEREO, CD.
About Video and Music CDs
Playing discs with playback control
On most video CDs with playback control, a menu screen is displayed.
Select the item you want to see then start playback.
Use [NUMBER] (0 ~ 9, +10) to select the item you want to
see.
• Playback starts.
Example:
¢ To return to the menu screen.
Press [RETURN] during playback.
About discs containing MP3 and WMA format
files
¢ Listening to CD-ROM, CD-R or CD-RW discs
containing MP3 files
There are many music distribution sites on the Internet allowing you
to download music files in MP3 format. When music files are
downloaded from such sites following the instructions provided at the
site then burned onto a CD-R/CD-RW disc, they can be played on the
DVD-3930CI.
¢ Listening to CD-ROM, CD-R or CD-RW discs
containing WMA files
The DVD-3930CI can play music files stored on CD-ROM/CD–R/CD–RW
discs in WMA (Windows Media®Audio) format.
WMA (Windows Media
®
Audio):
“Windows Media” and “Windows” are registered trademarks or
trademarks in the United States and other countries of the
Microsoft Corporation of the United States.
Audio codec of the Microsoft Corporation of the United States.
Load the disc onto which the music files in MP3 or
WMA format have been burned.
1
Use [
DD HH FF GG
] to select the folder you want to play,
then press [ENTER].
Use [
DD HH FF GG
] to select the file you want to play , then
press [ENTER] or 1.
• Playback starts.
2
3
Example: WMA screen
1
2
3
Example: MP3 screen
2
3
Tracks:
Video and music CDs are divided into several sections (tracks).
These sections are all allotted numbers, called the track numbers.
Track 1 Track 2 Track 3 Track 4 Track 5
For example:
Playback Control (Video CDs):
With video CDs for which “playback control” or the like is
indicated on the disc or jacket, the desired scene or information
can be selected from menu screens displayed on the TV.
1. Opening
2. 1st movement
3. 2nd movement
4. 3rd movement
5. Ending
Page 42

ENGLISH
ENGLISH
Basic Operation Basic Operation
39
1
[
RETURN
]
[
DISPLAY
]
[
D H F G
]
[RANDOM]
[REPEAT]
[
ENTER
]
1
About the button names in this explanation
<>: Buttons on the main unit
[]: Buttons on the remote control unit
Button name only :
Buttons on the main unit and remote control unit
¢ To change the file to be played:
Use [
DD HH FF GG
] to select the file, then press [ENTER].
¢ Playing in random order:
In the stop mode, press [RANDOM], then press [ENTER] or 1.
¢ To change the folder to be played:
Press [RETURN], then select the new folder.
¢ Playing in repeat order:
Press [REPEAT].
¢ Switching the time display:
Press [DISPLAY] during playback.
• When writing MP3/WMA files on a CD-R or CD-RW disc, set the
writing software’s format to “ISO9660 Level 1”. The files may not
play properly if they are recorded in other formats. Also note that
with some writing software it is not possible to record in ISO9660
format. For details, refer to the instructions of your writing software.
• The DVD-3930CI is compatible with the “MPEG-1 Audio Layer-3”
MP3 standard (sampling frequency (fs) of 32, 44.1 or 48 kHz).
Not compatible with other formats such as “MPEG-2 Audio Layer3”, “MPEG-2.5 Audio Layer-3”, “MP1”, “MP2”, “MP3 PRO”, etc.
• The DVD-3930CI is compatible with WMA files with sampling
frequencies (fs) of 32, 44.1 or 48 kHz.
• The DVD-3930CI is compatible with MP3 files with bit rates of 32 to
320 kbps, WMA files with bit rates of 64 to 160 kbps.
• Be sure to add the extensions “.MP3” or “.mp3” to MP3 files,
respectively.
Be sure to add the extensions “.WMA” or “.wma” to WMA files,
respectively.
• The DVD-3930CI can play [discs containing] up to 255 folders and
1000 files.
• When playing MP3 or WMA files, the signals are converted to PCM
for output from the digital output terminals.
• The DVD-3930CI can display folder and file names like titles. Up to
11 characters (letters of the English alphabet, numbers and the “_”
(underscore) sign) are displayed. Characters that cannot be
displayed are indicated by an “✽” (asterisk).
• Copyright-protected files cannot be played.
Note that depending on the software used for burning and other
conditions, some files may not play or display correctly.
• The positions of the folders or files may have been changed by the
writing software when burning the MP3/WMA files onto the CDR/CD-RW disc, so the files may not play in the expected order.
• The DVD-3930CI is not compatible with the ID3-Tag function.
• The DVD-3930CI is not compatible with packet-write software.
• The DVD-3930CI is not compatible with playlists.
FILE REPEAT FOLDER REPEAT
REPEAT OFF ALL REPEAT
Elapsed time per track Remaining time per track
(SINGLE ELAPSED) (SINGLE REMAIN)
Page 43

ENGLISH
ENGLISH
Basic Operation Basic Operation
40
About discs containing DivX®format files
CD and DVD discs containing digital images recorded in DivX
®
format can be played.
DivX
®
:
A digital video compression technology with DivX®video coding by
DivX Networks Inc.
Load a disc containing files in DivX®format.
Use [
DD HH FF GG
] to select the folder you want to play,
then press [ENTER].
1
2
Use [
DD HH FF GG
] to select the file you want to play , then
press [ENTER] or 1.
• Playback starts.
3
1
2
3
¢ To change the file to be played:
In the stop or resume mode, use [
DD HH FF GG
] to select the file again.
¢ Playing in random order:
In the stop mode, press [RANDOM], then press 1.
¢ To change the folder to be played:
In the stop or resume mode, press [RETURN], and select the folder
again.
¢ Playing in repeat order:
Press [REPEAT].
¢ Switching the time display:
Press [DISPLAY] during playback.
• The DVD-3930CI can play [discs containing] up to 255 folders and
1000 files.
• Note that depending on the software used for burning and other
conditions, some files may not play or display correctly.
• The DVD-3930CI is compatible with DivX®audio sampling
frequencies (fs) of 8 to 48 kHz.
• The DVD-3930CI is not compatible with motion compensation
technology (GMC) or PCM Audio.
Playing a disc containing files in JPEG format
Load a disc containing still picture files in JPEG
format.
Use [
DD HH FF GG
] to select the folder you want to play,
then press [ENTER].
1
2
About discs containing still picture files
Use this procedure to play JPEG format files recorded on CD-R/CDRW discs or Picture CDs or Fujicolor CDs as slideshows.
Use [
DD HH FF GG
] to select the file you want to play , then
press 1.
• Playback starts.
3
1
2
FILE REPEAT FOLDER REPEAT
REPEAT OFF ALL REPEAT
Elapsed time per track Remaining time per track
(SINGLE ELAPSED) (SINGLE REMAIN)
Page 44

ENGLISH
ENGLISH
Basic Operation Basic Operation
41
[
ENTER
]
[
D H F G
]
2
8
9
[
MENU
]
1
[
ZOOM
]
3
9
83
1 2
About the button names in this explanation
<>: Buttons on the main unit
[]: Buttons on the remote control unit
Button name only :
Buttons on the main unit and remote control unit
The DVD-3930CI can play Kodak Picture CDs and Fujifilm Fujicolor
CDs, so you can view the photographs recorded on them on your TV.
Picture CDs and Fujicolor CDs are part of a service for converting
photographs taken on conventional film cameras into digital data
and storing them on a CD.
For details on Picture CDs and Fujicolor CDs, contact a store
offering film development services.
Playing Picture CDs and Fujicolor CDs
Load a disc containing the still pictures.
• Once the disc is loaded, playback starts automatically.
• The still pictures are played continuously until 2 is pressed.
¢ To select the still picture to be played:
During playback, press 2 or [MENU] to display all the pictures, then
use [
DD HH FF GG
] to select the desired picture and press [ENTER].
¢ Cueing to the desired still picture:
Press 8 or 9 during playback.
8: The previous still picture is displayed.
9: The following still picture is displayed.
¢ Pausing playback:
Press 3.
Press 1 to resume playback.
¢ Rotating the still pictures:
In the play or still mode, use [
DD HH FF GG
] to rotate the still picture.
DD HH
: The still picture is flipped vertically.
FF
: The still picture is rotated 90° counterclockwise.
GG
: The still picture is rotated 90° clockwise.
¢ To play an image in the zoom mode:
In the pause mode, press [ZOOM]. (“ZOOM” is displayed on the TV
screen.)
• The magnification changes each time the button is pressed.
150% ➝ 200% ➝ 50% ➝ 100% ➝ 150%
When the still picture is enlarged, press [ENTER] (“MOVE” is
displayed on the TV screen), then use [
DD HH FF GG
] to move the
zoomed picture.
Pictures cannot be zoomed in the continuous playback (slideshow)
mode.
• The DVD-3930CI is compatible with picture data recorded in JPEG
format, but it is not guaranteed that all picture data in JPEG format
can be played.
•When burning JPEG files onto CD-R/CD-RW discs, do so with the
writing software set to “ISO9660 level 1”.
• Be sure to add the extension “.JPG” or “.JPE” to JPEG files. (JPEG
files written on Macintosh computers cannot be played.)
NOTE:
•Your recordings may be used for your personal enjoyment only,
and may not be used without the consent of the copyright holder
as per copyright laws.
• Do not play music CDs (CD-DA format) or CD-R/CD-RW discs
containing files other than files in MP3, WMA, DivX®or JPEG
format. Attempting to play some files may cause malfunction or
damage.
Page 45

ENGLISH
ENGLISH
Basic Operation
42
FOLDER REPEAT:
Playback starts from the selected file, and all the files in that folder
are played repeatedly.
Repeat and random play of MP3, WMA, JPEG
and DivX®files
ALL REPEAT:
Playback starts from the selected file, and all the files on the disc
are played repeatedly.
RANDOM:
Playback starts from the selected folder, and the other files in that
folder are played in random order.
FILE REPEAT:
The selected file is played repeatedly.
8
9
1
7
6
[NUMBER] (0~9, +10)
[
SEARCH
MODE]
8
91
76
About the button names in this explanation
<>: Buttons on the main unit
[]: Buttons on the remote control unit
Button name only :
Buttons on the main unit and remote control unit
Convenient operations
During playback, press [SEARCH MODE] and select the
setting mode (for DVD-Video and DVD-Audio discs).
For DVD-Video discs : TITLE CHAP
For DVD-Audio discs : GROUP TRACK
1
Use [NUMBER] (0 ~ 9, +10) to input the numberof the
chapter/track you want to play.
2
Fast-forwarding/Fast-reversing
During playback, press 6 or 7.
• The fast-forward/fast-backward speed increases each time one of
these buttons is pressed. The speed can be changed in 5 steps.
¢ Returning to normal playback:
Press 1.
• The search mode set by pressing [SEARCH MODE] is stored in the
memory until the disc tray is opened.
Moving to the beginning
During playback, press 8 or 9.
•A number of chapters/tracks equivalent to the number of times the
button is pressed is skipped.
• When pressed once in the backwards direction, playback returns
to the beginning of the currently playing chapter/track.
Searching using the NUMBER buttons
Page 46

ENGLISH
ENGLISH
Convenient operations Convenient operations
43
[
ENTER
]
3
1
[
PROGRAM/
DIRECT]
[
CLEAR
]
[
CALL
]
[RANDOM]
7
6
[
A-B
]
[REPEAT]
2
[NUMBER] (0~9, +10)
[
D H G
]
6
3
1 2 7
About the button names in this explanation
<>: Buttons on the main unit
[]: Buttons on the remote control unit
Button name only :
Buttons on the main unit and remote control unit
Frame-by-frame playback
(for DVD-Video discs and Video CDs only)
In the pause mode, press 3.
• The picture advances one frame each time the button is pressed.
¢ Returning to normal playback:
Press 1.
• For DVD-Audio discs, slow playback is only possible with the video
part.
• Reverse slow play is not possible with video CDs.
Slow playback
In the pause mode, press 6 or 7.
• The speed of slow playback increases each time one of the
buttons is pressed. The speed can be changed in 5 steps.
¢ Returning to normal playback:
Press 1.
• For DVD-Audio discs, frame-by-frame playback is only possible with
the video part.
Repeat playback
During playback, press [REPEAT].
• Each time the button is pressed, the repeat mode switches and
playback starts in the respective repeat mode.
For DVD-Video discs:
Normal playback
Indication on
display
“”
“”
Chapter played repeatedly
TITLE played repeatedly
Repeat play stopped
For DVD-Audio discs:
Normal playback
“”
“”
Track played repeatedly
Group played repeatedly
Repeat play stopped
Page 47

ENGLISH
ENGLISH
Convenient operations Convenient operations
44
For Video CDs / Super audio CDs / Music CDs discs:
Normal playback
“”
“”
Track played repeatedly
Entire disc repeated
Repeat play stopped
Press [A-B] during playback.
• This sets the starting point A.
• The “ ” indicator appears on the display.
1
Press [A-B] again.
•End point B is set and the A-B section is played repeatedly.
• The “ ” indicator appears on the display.
2
• For some discs, the repeat play and A-B repeat functions do not
work.
• The repeat play and A-B repeat functions may not work for discs on
which the elapsed playing time is not indicated on the DVD-3930CI’s
display during playback.
• During A-B repeat playback, the subtitles just before or after the AB section may not be displayed.
Repeating a section between two specific points
(A-B repeat playback)
¢ Returning to normal playback:
Press [A-B] until “A TO B CANCELED” appears on the display.
¢ To check the contents of the program:
Press 2 twice to stop the disc.
•The program screen is displayed.
In addition, when [CALL] is pressed while in the stop mode, the
programmed number is shown on the display.
¢ Clearing individual tracks from programs:
Video CDs, Super audio CDs and Music CDs:
In the stop mode, press [CLEAR].
• The last track set in the program is deleted each time the button is
pressed.
DVD-Audio:
At the program screen, press [GG], select the track to be programmed
using [
DD HH
], then press [CLEAR].
Programmed playback
For DVD-Audio discs, video CDs, music CDs and Super Audio CDs,
track numbers can be programmed to play in the desired order.
Programmed playback is not possible with DVD-Video discs.
In the stop mode, press [PROGRAM/DIRECT].
• The “PROG” indicator appears on the display.
1
Use [NUMBER]
(
0 ~ 9, +10
)
to input the number to be set.
• Up to 20 tracks can be programmed.
For DVD-Audio discs, use [
DD HH
] to select “group number” and
“track number”, then press [ENTER].
2
Press 1.
• Playback starts in the programmed order.
3
¢ To clear the entire program
Press [PROGRAM/DIRECT].
In the stop mode, press [RANDOM].
• The “RAND” indicator appears on the display.
1
Press 1.
• Random playback starts.
For DVD-Audio discs, the group selection screen is displayed.
Use [
DD HH
] to select “ALL” or “GROUP number”, then press
[ENTER]. (“✽” is displayed next to “group number”.)
All the groups are played in random order when “ALL” is
selected, and only the tracks within that group are played when
“group number” is selected.
2
• Random playback may not be possible for some discs.
¢ Returning to normal playback:
In the stop mode, press [RANDOM].
Playing in random order
For DVD-Audio discs, video CDs, music CDs and Super Audio CDs,
the tracks can played in random order.
Random playback is not possible with DVD-Video discs.
Page 48

ENGLISH
ENGLISH
Convenient operations Convenient operations
45
Operating using the on screen display
This function lets you display information about the disc (titles,
chapters, time, etc.) and specify the part you want to play.
Press [DISPLAY] during playback.
• The display on the TV screen switches each time the button is
pressed.
The items displayed differ from disc to disc.
1
[
ENTER
]
[
DISPLAY
]
[
D H F G
]
[NUMBER] (0~9, +10)
[MARKER]
[
CLEAR
]
About the button names in this explanation
<>: Buttons on the main unit
[]: Buttons on the remote control unit
Button name only :
Buttons on the main unit and remote control unit
For DVD-Video discs:
For DVD-Audio discs:
For Video CDs / Super audio CDs / Music CDs discs:
Use [
DD HH FF GG
] to select the item you want to change.
• The selected item is displayed in a yellow frame.
2
For video and music CDs, only the elapsed time switches.
Some Super Audio CDs contain text information. In such cases,
the album titles and artists are also displayed in the stop mode,
and the title of the currently playing track is also displayed in the
play mode.
For Super Audio CDs containing text information, the total
remaining time is displayed twice.
The second time, the text information is shown on the DVD3930CI’s display.
It may not be possible to display the disc information either for
discs on which the elapsed playing time is not indicated on the
DVD-3930CI’s display during playback.
Page 49

ENGLISH
ENGLISH
Convenient operations Convenient operations
46
Use [NUMBER] (0 ~ 9, +10) to input the number, then
press [ENTER].
• Playback starts from the specified point.
For some discs it is not possible to specify the time.
¢ Specifying groups, titles, tracks or chapters
Press [MARKER] during playback.
“” is displayed if there is no mark.
1
Use [
FF GG
] to select the marker, then press [ENTER] at
the point you want to mark.
•A number is displayed.
Up to 8 parts can be marked.
2
Marking scenes you want to see again later
Adding marks
• Depending on where the mark is placed, the subtitles may not be
displayed.
• The marks are stored in the memory until the power is turned off or
the disc is removed from the player.
Calling out marked scenes
Use [
FF GG
] to select the mark number, then press
[ENTER].
• Playback starts from the marked scene.
¢ To turn off the marker screen:
Press [MARKER].
Scenes you want to see again later can be marked so you can play
them any time.
1
2
¢ Clearing the selected mark number:
Use [
FF GG
] to select the mark number, then press [CLEAR].
• “ ” is displayed.
For DVD-Video discs:
Example: To specify 1h32m47s
Press [0] [1] [3] [2] [4] [7] [ENTER].
For Video CDs / Music CDs discs:
Example: To specify 1m26s
Press [0] [1] [2] [6] [ENTER].
For Super audio CDs:
Example: To specify 1h32m47s (92m47s)
Press [0] [9] [2] [4] [7] [ENTER].
¢ Specifying the elapsed time
Use [NUMBER] (0 ~ 9, +10) to input the time, then press
[ENTER].
• Playback starts from the specified point.
For some discs it is not possible to specify the time.
Page 50

ENGLISH
ENGLISH
Convenient operations Convenient operations
47
[
D H F G
]
[
DIMMER
]
[
ZOOM
]
[
NTSC/PAL
]
<1> <
9
>
About the button names in this explanation
<>: Buttons on the main unit
[]: Buttons on the remote control unit
Button name only :
Buttons on the main unit and remote control unit
Zoomed play Setting the video format
Press [ZOOM] while in the play or pause mode.
• The magnification changes each time the button is pressed.
1
Press [
DD HH FF GG
].
• The zoomed picture moves.
2
X 2.0 X 3.0 X 1.0
X 1.0 X 1.5 X 2.0 JUST
For DVD-Video / video-CD :
For DivX®:
Set this according to the video format of the connected TV.
Press [NTSC/PAL].
NTSC PAL MULTI
Adjusting the brightness of the display
Use this procedure to adjust the brightness of the DVD-3930CI’s
display.
The brightness can be switched in 3 steps. The display can also be
turned off.
Press [DIMMER].
• The brightness switches each time the button is pressed.
• The picture will not be displayed properly if a video format different
from the connected TV’s type is set.
• Zooming may not operate properly for certain scenes.
• The quality may be lower and the picture may be shaky when it is
zoomed.
• Zoomed play may not work properly for some discs.
• Zoomed play is not possible at the top menu or other menu screens.
Page 51

ENGLISH
ENGLISH
48
Others
“Advanced AL24 Processing” which greatly increases the amount of
information in the time axis area using unique high speed signal
detection and processing technology for the PCM signal (CD/DVD)
playback circuitry is provided for 2-channel output. In addition to
expansion of data to 24 bits, natural signal correction without marring
the original data is performed with upconversion sampling.
In addition, DENON’s original analog waveform reproduction
technology, “AL24 Processing PLUS”, is used for the 5.1-channel
audio output, resulting in high sound quality for all PCM signal
sources.
The “Advanced AL24” indicator lights on the display when Advanced
AL24 Processing is activated.
DENON LINK is a balanced transfer type digital link using high speed
transfer elements. Connecting the DENON LINK terminal to a DENON
AV amplifier equipped with a special terminal using a special cable
enables high speed, high quality transfer of digital audio signals with
little loss of signal quality, resulting in high quality sound production.
DENON LINK is an exclusive DENON digital interface, allowing digital
transfer of the 2 channels of 192 kHz/24 bit digital signals of DVDAudio discs and of PCM multi-channel signals. In addition, DENON
LINK 3rd Edition allows for full specification digital transfer of the
audio contents of Super Audio CDs.
The “DENON LINK” indicator lights on the display during DENON
LINK processing.
Copyright protection technologyAbout the DENON LINK function
Advanced AL24 Processing
This product incorporates copyright protection technology that is
protected by U.S. patents and other intellectual property rights.
Use of this copyright protection technology must be authorized by
Macrovision , and is intended for home and other limited viewing uses
only unless otherwise authorized by Macrovision. Reverse
engineering or disassembly is prohibited.
Registered trademarks
The DVD-3930CI is manufactured using the technologies listed below
(in random order).
• “NSV” is a trademark of Analog Devices, Inc.
• “HDMI, the HDMI long and High-Definition Multimedia Interface are
trademarks or registered trademarks of HDMI Licensing LLC.”
•“
®
, HDCD®, High Definition Compatible Digital®and
Microsoft®are either registered trademarks or trademarks of
Microsoft Corporation, Inc. in the United States and/or other
countries. HDCD system manufactured under license from
Microsoft Corporation, Inc. This product is covered by one or more
of the following: In the USA: 5,479,168, 5,638,074, 5,640,161,
5,808,574, 5,838,274, 5,854,600, 5,864,311, 5,872,531, and in
Australia: 669114. Other patents pending.
• Manufactured under license from Dolby Laboratories. “Dolby” and
the double-D symbol are trademarks of Dolby Laboratories.
• “DTS” and ”DTS Digital Surround” are registered trademarks of
Digital Theater Systems, Inc.
• “KODAK” is a trademark of Eastman Kodak Company.
• “FUJICOLOR CD” is a trademark of Fuji Photo Film Co, Ltd.
•“Windows Media™”, “Windows®”are a trademarks of Microsoft
Corporation, Inc.
• DivX, DivX Certified, and associated logos are trademarks of DivX,
Inc. and are used under licence.
Resetting
If the display is abnormal or the main unit or remote control unit do
not function, reset the DVD-3930CI using the procedure described
below.
In the stop mode, press
<1>
and
<
9
>
simultaneously.
Check that the “INITIALIZE” indicator turns off
from the TV screen, then release the buttons.
• This completes the resetting procedure.
1
2
• If the resetting procedure is not completed, start over from step 1.
Page 52

ENGLISH
ENGLISH
Others Others
49
If a problem should arise, first check the following:
1. Are all the connections correct ?
2. Is the set being operated as described in the Operating Instructions ?
If this unit is not operating properly, check the items listed in the table below. Should the problem persist,
there may be a malfunction. Disconnect the power immediately and contact your store of purchase.
PageCheckSymptom
Power does not turn on. • Plug the power supply cord into the power outlet. 12
Playback does not start even
when the
1 button is
pressed, or starts but stops
immediately.
• Condensation? (Let sit 1 or 2 hours)
•You are attempting to play a disc other than one with one of the marks on
page 3.
•Wipe the dirt off the disc or replace the disc.
3, 4
3
4
Picture does not appear. • Check the connections.
• Check whether “VIDEO OUT” in the pure direct settings is set to “OFF”
or “ALL OFF”.
• Set the TV’s input to “video”.
9 ~ 12
28
—
No sound is heard or the
sound is hard to hear.
• Check the connections.
• Set the proper inputs (TV, stereo, etc.).
• Check the “DIGITAL OUTPUT” and “COMPRESSION” settings.
• Digital signals are not output for Super Audio CDs. Use analog or DENON
LINK 3rd connections.
• No audio signals are output from the HDMI terminal if “VIDEO OUT” or
“DIGITAL OUTPUT” in the pure direct settings is set to “OFF” or “ALL OFF”.
• When HDMI connections are made with a device not compatible with
HDMI Ver. 1.1, the audio signals of DVD-Audio discs that are copyright
protected with CPPM are not output.
9 ~ 12
—
23, 24
10, 11
28
12
Menu playback does not work
for video CDs.
• Menu playback only works for video CDs with playback control. 38
Picture is disturbed when
fast-forwarded or fastreversed.
• The picture may be somewhat disturbed. This is normal. —
Buttons do not operate. • Some discs may prohibit certain operations. 34
Subtitles are not displayed. • Subtitles cannot be displayed for DVDs that do not contain subtitles.
• The subtitles are set to “off”. Set the subtitles.
—
16, 36
The audio (or subtitle)
language cannot be switched.
• The language cannot be switched unless the disc contains more than one
language.
•With some discs, the audio (or subtitle) language is switched not as
described in this manual but by using the DVD menu screen, etc.
—
36
PageCheckSymptom
The angle cannot be
switched.
• The angle cannot be switched unless the DVD contains more than one
angle.
In some cases, multiple angles are only provided for specific scenes.
36
Playback does not start when
a title is selected.
• Check the “Viewing restriction level” setting. 25
Yo u have forgotten the
password set for restricting
viewing. Reset all the initial
setting values to the values
set upon purchase.
• Use the following procedure to reset all the initial setting values to the
values set upon purchase.
In the stop mode, press the
1 and 9 buttons on the main unit
simultaneously.
(Check that the “INITIALIZE” indicator turns off from the TV screen.)
48
The audio or subtitle language
is not the language set in the
initial settings.
• The selected language is not set if the DVD does not contain sound or
subtitles in that language.
16
The picture is not displayed in
4:3 (16:9) aspect ratio.
• Set the “TV ASPECT” and “SQUEEZE MODE” items properly in function
of your TV.
• Either set the keystone correction setting to “0” or readjust.
20, 21
30
Menu screen messages are
not displayed in the desired
language.
• Check the “DISC MENUS” setting at “LANGUAGE SETUP” in the initial
settings.
16
Picture does not appear with
HDMI connections.
• Check the HDMI connections. (Check the lighting conditions of HDMIrelated indicators.)
• Check whether the compatible input formats of the connected monitor
device match the DVD-3930CI’s input format (HDMI FORMAT).
• Check whether “VIDEO OUT” in the pure direct settings is set to “OFF”
or “ALL OFF”.
11, 12
11, 12
28
The set cannot be operated
with the remote control unit.
• Insert the batteries in the proper direction, checking the < and > marks.
• Replace the batteries with new ones.
• Point at the remote control sensor when operating.
• Operate within a distance of 7 meters from the remote control sensor.
• Remove the obstacle.
5
5
5
5
—
Troubleshooting
Page 53

Others
ENGLISH
ENGLISH
Others
50
¢ Audio performance
Signal format: NTSC / PAL
Applicable discs: (1)DVD-Audio / DVD-Video discs
12 cm 1 side 1 layer, 12 cm 1 side 2 layers / 12 cm 2 sides 2 layers (1 side 1 layer)
08 cm 1 side 1 layer, 08 cm 1 side 2 layers / 08 cm 2 sides 2 layers (1 side 1 layer)
(2)Super Audio CDs
12 cm 1 layer / 12 cm 2 layer / 12 cm Hybrid
(3)Compact Disc (CD-DA / VIDEO CD) : 12 cm / 8 cm disc
S-Video output: Y output level : 1Vp-p (75 Ω/ohms) / C output level : 0.286 Vp-p
Output terminal : S-Video, 1 set
Video output: Output level : 1Vp-p (75 Ω/ohms) / Output terminal : Pin-jack, 1 set
Component video output: Y output level : 1Vp-p (75 Ω/ohms)
P
B/CB output level / PR/CR output level : 0.648 Vp-p (75 Ω/ohms)
Output terminal : BNC jack, 1set / Pin-jack, 1 set
HDMI output: Output terminal : 19-pin HDMI terminal, 1 set
Analog audio output: Output level : 2 Vrms (10 kΩ/kohms)
2 channels (L/R) output terminal : Pin-jack, 1 set
Multi channels (FL/FR/C/SL/SR/SW) : Pin-jack, 1 set
Audio output characteristics: (1)Frequency response
q DVD (linear PCM) : 2 Hz ~ 22 kHz (48 kHz Sampling)
: 2 Hz ~ 44 kHz (96 kHz Sampling)
: 2 Hz ~ 88 kHz (192 kHz Sampling)
w Super audio CD : 2 Hz ~ 100 kHz
e CD : 2 Hz ~ 20 kHz
(2)S/N : 120 dB
(3)Harmonic distortion : 0.0008 %
(4)Dynamic range : 110 dB
Digital audio output: Output terminal : Optical, 1 set / Coaxial, 1 set / DENON LINK, 1 set
¢ General
Power supply: AC 120 V, 60 Hz
Power consumption: 70 W (In the standby mode : Approx. 1W)
Maximum external dimensions: 434 (W) x 139 (H) x 407 (D) mm (17-3/32” x 5-15/32” x 16-1/32”)
(including protruding parts)
Mass: 11.5 kg (25.5 lbs)
¢ Remote control unit (RC-1038)
Remote control type: Infrared pulse
Batteries: R6P/AA Type (two batteries)
External dimensions: 58 (W) x 230 (H) x35 (D) mm (2-9/32” x 9-3/64” x 1-3/8”)
Mass: 190 g (0.42 lbs) (included batteries)
* For purposes of improvement, specifications and design are subject to change without notice.
Specifications
Page 54

Page 55

Page 56

Denon Brand Company, D&M Holdings Inc.
Printed in China 00D 511 4467 000
TOKYO, JAPAN
www.denon.com
 Loading...