

Page 1
COMPACT DISC PLAYER
DN-C110
Owner’s Manual
Bedienungsanleitung
Manuel de l’Utilisateur
Manuale delle istruzioni
Manual del usuario
Gebruiksaanwijzing
Bruksanvisning
Page 2
ITALIANO ESPAÑOL NEDERLANDS SVENSKAENGLISH DEUTSCH FRANCAIS
CAUTION
RISK OF ELECTRIC SHOCK
DO NOT OPEN
$-"44
-"4&3
130%6$5
SAFETY PRECAUTIONS
n
CAUTION:
TO REDUCE THE RISK OF ELECTRIC SHOCK, DO NOT REMOVE
COVER (OR BACK). NO USER-SERVICEABLE PARTS INSIDE.
REFER SERVICING TO QUALIFIED SERVICE PERSONNEL.
The lightning ash with arrowhead symbol, within an equilateral
triangle, is intended to alert the user to the presence of
uninsulated “dangerous voltage” within the product’s enclosure
that may be of sufcient magnitude to constitute a risk of
electric shock to persons.
The exclamation point within an equilateral triangle is intended
to alert the user to the presence of important operating
and maintenance (servicing) instructions in the literature
accompanying the appliance.
WARNING:
TO REDUCE THE RISK OF FIRE OR ELECTRIC SHOCK, DO NOT
EXPOSE THIS APPLIANCE TO RAIN OR MOISTURE.
Laser Class
n
CLASS 1 LASER PRODUCT
LUOKAN 1 LASERLAITE
KLASS 1 LASERAPPARAT
ADVARSEL: USYNLIG LASERSTRÅLING VED ÅBNING, NÅR
SIKKERHEDSAFBRYDERE ER UDE AF FUNKTION.
UNDGÅ UDSAETTELSE FOR STRÅLING.
VAROITUS! LAITTEEN KÄYTTÄMINEN MUULLA KUIN TÄSSÄ
KÄYTTÖOHJEESSA MAINITULLA TAVALLA SAATTAA
ALTISTAA KÄYTTÄJÄN TURVALLISUUSLUOKAN 1
YLITTÄVÄLLE NÄKYMÄMTTÖMÄLLE LASERSÄTEILYLLE.
VARNING: OM APPARATEN ANVÄNDS PÅ ANNAT SÄTT ÄN I DENNA
BRUKSANVISNING SPECIFICERATS, KAN ANVÄNDAREN
UTSÄTTAS FÖR OSYNLIG LASERSTRÅLNING SOM
ÖVERSKRIDER GRÄNSEN FÖR LASERKLASS 1.
ATTENZI ONE: QU ESTO APPAREC CHIO
E’ DOTATO DI DISPOSITIVO OTTICO CON
RAGGIO LASER.
L’USO IMPROPRIO DELL’APPARECCHIO
PUO’ CAUSARE PERICOLOSE ESPOSIZIONI
A RADIAZIONI!
CAUTION:
USE OF CONTROLS OR ADJUSTMENTS OR PERFORMANCE OF
PROCEDURES OTHER THAN THOSE SPECIFIED HEREIN MAY RESULT IN
HAZARDOUS RADIATION EXPOSURE.
THIS PRODUCT SHOULD NOT BE ADJUSTED OR REPAIRED BY ANYONE
EXCEPT PROPERLY QUALIFIED SERVICE PERSONNEL.
• DECLARATION OF CONFORMITY
We declare under our sole responsibility that this product, to which this
declaration relates, is in conformity with the following standards:
EN60065, EN55013, EN55020, EN61000-3-2 and EN61000-3-3.
Following the provisions of 2006/95/EC and 2004/108/EC Directive.
• ÜBEREINSTIMMUNGSERKLÄRUNG
Wir erklären unter unserer Verantwortung, daß dieses Produkt, auf das
sich diese Erklärung bezieht, den folgenden Standards entspricht:
EN60065, EN55013, EN55020, EN61000-3-2 und EN61000-3-3.
Entspricht den Verordnungen der Direktive 2006/95/EC und 2004/108/
EC.
• DECLARATION DE CONFORMITE
Nous déclarons sous notre seule responsabilité que l’appareil, auquel se
réfère cette déclaration, est conforme aux standards suivants:
EN60065, EN55013, EN55020, EN61000-3-2 et EN61000-3-3.
D’après les dispositions de la Directive 2006/95/EC et 2004/108/EC.
• DICHIARAZIONE DI CONFORMITÀ
Dichiariamo con piena responsabilità che questo prodotto, al quale la
nostra dichiarazione si riferisce, è conforme alle seguenti normative:
EN60065, EN55013, EN55020, EN61000-3-2 e EN61000-3-3.
In conformità con le condizioni delle direttive 2006/95/EC e 2004/108/EC.
QUESTO PRODOTTO E’ CONFORME
AL D.M. 28/08/95 N. 548
• DECLARACIÓN DE CONFORMIDAD
Declaramos bajo nuestra exclusiva responsabilidad que este producto al
que hace referencia esta declaración, está conforme con los siguientes
estándares:
EN60065, EN55013, EN55020, EN61000-3-2 y EN61000-3-3.
Siguiendo las provisiones de las Directivas 2006/95/EC y 2004/108/EC.
• EENVORMIGHEIDSVERKLARING
Wij verklaren uitsluitend op onze verantwoordelijkheid dat dit produkt,
waarop deze verklaring betrekking heeft, in overeenstemming is met de
volgende normen:
EN60065, EN55013, EN55020, EN61000-3-2 en EN61000-3-3.
Volgens de bepalingen van de Richtlijnen 2006/95/EC en 2004/108/EC.
• ÖVERENSSTÄMMELSESINTYG
Härmed intygas helt på eget ansvar att denna produkt, vilken detta intyg
avser, uppfyller följande standarder:
EN60065, EN55013, EN55020, EN61000-3-2 och EN61000-3-3.
Enligt stadgarna i direktiv 2006/95/EC och 2004/108/EC.
DMi D&M Installation Europe
Kingsbridge House, Padbury Oaks Longford
Middlesex UB7 0EH UK
I
Page 3
NOTE ON USE / HINWEISE ZUM GEBRAUCH / OBSERVATIONS RELATIVES A L’UTILISATION / NOTE SULL’USO /
n
NOTAS SOBRE EL USO / ALVORENS TE GEBRUIKEN / OBSERVERA ANGÅENDE ANVÄNDNINGEN
CAUTION:
• The ventilation should not be impeded by covering the ventilation openings with items,
such as newspapers, tablecloths, curtains, etc.
• No naked ame sources, such as lighted candles, should be placed on the unit.
• Observe and follow local regulations regarding battery disposal.
• Do not expose the unit to dripping or splashing uids.
• Do not place objects lled with liquids, such as vases, on the unit.
ACHTUNG:
• Die Belüftung sollte auf keinen Fall durch das Abdecken der Belüftungsöffnungen durch
Gegenstände wie beispielsweise Zeitungen, Tischtücher, Vorhänge o. Ä. behindert
werden.
• Auf dem Gerät sollten keinerlei direkte Feuerquellen wie beispielsweise angezündete
Kerzen aufgestellt werden.
• Bitte beachten Sie bei der Entsorgung der Batterien die örtlich geltenden
Umweltbestimmungen.
• Das Gerät sollte keiner tropfenden oder spritzenden Flüssigkeit ausgesetzt werden.
• Auf dem Gerät sollten keine mit Flüssigkeit gefüllten Behälter wie beispielsweise Vasen
aufgestellt werden.
ATTENTION:
• La ventilation ne doit pas être gênée en recouvrant les ouvertures de la ventilation avec
des objets tels que journaux, rideaux, tissus, etc.
• Aucune amme nue, par exemple une bougie, ne doit être placée sur l’appareil.
• Veillez à respecter les lois en vigueur lorsque vous jetez les piles usagées.
• L’appareil ne doit pas être exposé à l’eau ou à l’humidité.
• Ne pas poser d’objet contenant du liquide, par exemple un vase, sur l’appareil.
ATTENZIONE:
• Le aperture di ventilazione non devono essere ostruite coprendole con oggetti, quali
giornali, tovaglie, tende e così via.
• Non posizionate sull’unità amme libere, come ad esempio candele accese.
• Prestate attenzione agli aspetti legati alla tutela dell’ambiente nello smaltimento delle
batterie.
• L’apparecchiatura non deve essere esposta a gocciolii o spruzzi.
• Non posizionate sull’unità alcun oggetto contenente liquidi, come ad esempio i vasi.
PRECAUCIÓN:
• La ventilación no debe quedar obstruida por haberse cubierto las aperturas con objetos
como periódicos, manteles, cortinas, etc.
• No debe colocarse sobre el aparato ninguna fuente inamable sin protección, como velas
encendidas.
• A la hora de deshacerse de las pilas, respete la normativa para el cuidado del medio
ambiente.
• No exponer el aparato al goteo o salpicaduras cuando se utilice.
• No colocar sobre el aparato objetos llenos de líquido, como jarros.
WAARSCHUWING:
• De ventilatie mag niet worden belemmerd door de ventilatieopeningen af te dekken met
bijvoorbeeld kranten, een tafelkleed, gordijnen, enz.
• Plaats geen open vlammen, bijvoorbeeld een brandende kaars, op het apparaat.
• Houd u steeds aan de milieuvoorschriften wanneer u gebruikte batterijen wegdoet.
• Stel het apparaat niet bloot aan druppels of spatten.
• Plaats geen voorwerpen gevuld met water, bijvoorbeeld een vaas, op het apparaat.
OBSERVERA:
• Ventilationen bör inte förhindras genom att täcka för ventilationsöppningarna med föremål
såsom tidningar, bordsdukar, gardiner osv.
• Inga blottade brandkällor, såsom tända ljus, får placeras på apparaten.
• Tänk på miljöaspekterna när du bortskaffar batterier.
• Apparaten får inte utsättas för vätska.
• Placera inte föremål fyllda med vätska, t.ex. vaser, på apparaten.
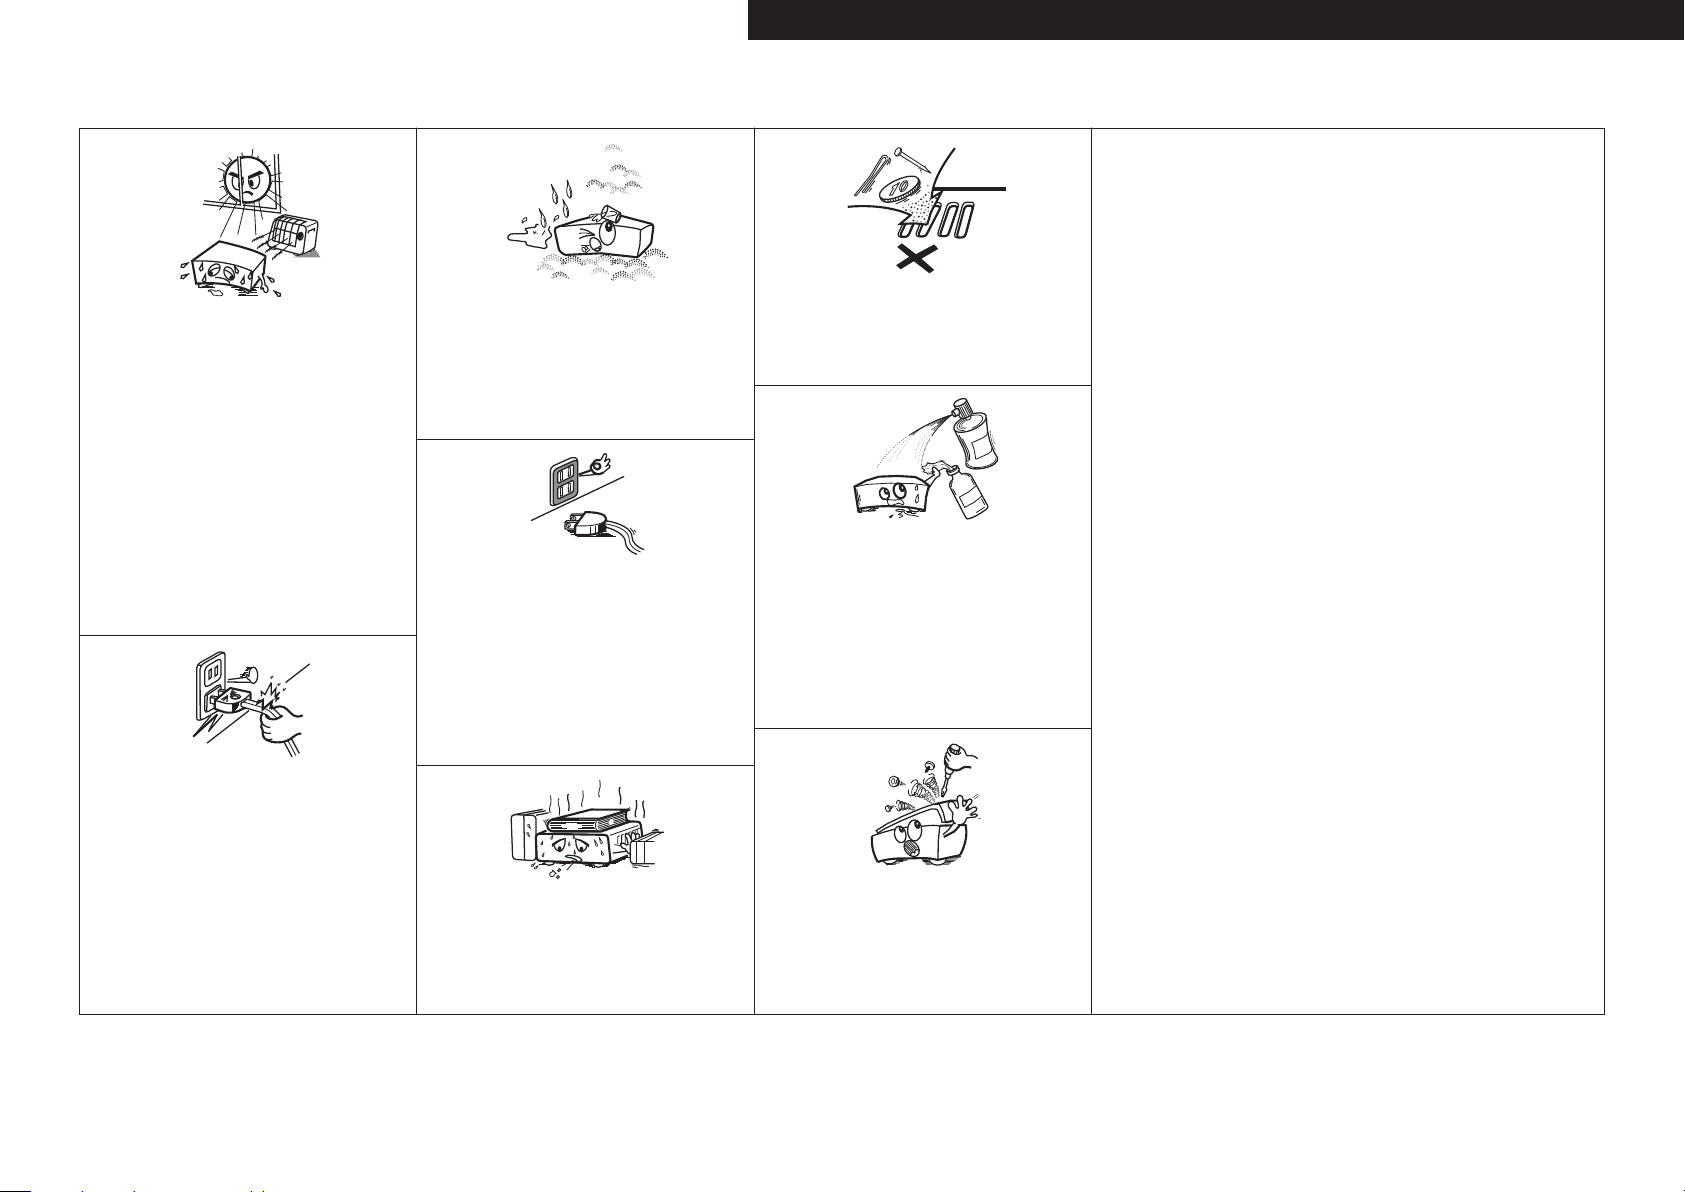
• Avoid high temperatures.
Allow for sufcient heat dispersion when installed in a rack.
• Vermeiden Sie hohe Temperaturen.
Beachten Sie, dass eine ausreichende Belüftung
gewährleistet wird, wenn das Gerät auf ein Regal gestellt
wird.
• Eviter des températures élevées.
Tenir compte d’une dispersion de chaleur sufsante lors de
l’installation sur une étagère.
• Evitate di esporre l’unità a temperature elevate.
Assicuratevi che vi sia un’adeguata dispersione del calore
quando installate l’unità in un mobile per componenti
audio.
• Evite altas temperaturas.
Permite la suciente dispersión del calor cuando está
instalado en la consola.
• Vermijd hoge temperaturen.
Zorg er bij installatie in een audiorack voor, dat de door
het toestel geproduceerde warmte goed kan worden
afgevoerd.
• Undvik höga temperaturer.
Se till att det nns möjlighet till god värmeavledning vid
montering i ett rack.
• Handle the power cord carefully.
Hold the plug when unplugging the cord.
• Gehen Sie vorsichtig mit dem Netzkabel um.
Halten Sie das Kabel am Stecker, wenn Sie den Stecker
herausziehen.
• Manipuler le cordon d’alimentation avec précaution.
Tenir la prise lors du débranchement du cordon.
• Manneggiate il cavo di alimentazione con attenzione.
Tenete ferma la spina quando scollegate il cavo dalla presa.
• Maneje el cordón de energía con cuidado.
Sostenga el enchufe cuando desconecte el cordón de
energía.
• Hanteer het netsnoer voorzichtig.
Houd het snoer bij de stekker vast wanneer deze moet
worden aan- of losgekoppeld.
• Hantera nätkabeln varsamt.
Håll i kabeln när den kopplas från el-uttaget.
• Keep the unit free from moisture, water, and dust.
• Halten Sie das Gerät von Feuchtigkeit, Wasser und Staub
fern.
• Protéger l’appareil contre l’humidité, l’eau et la poussière.
• Tenete l’unità lontana dall’umidità, dall’acqua e dalla
polvere.
• Mantenga el equipo libre de humedad, agua y polvo.
• Laat geen vochtigheid, water of stof in het apparaat
binnendringen.
• Utsätt inte apparaten för fukt, vatten och damm.
• Unplug the power cord when not using the unit for long
periods of time.
• Wenn das Gerät längere Zeit nicht verwendet werden soll,
trennen Sie das Netzkabel vom Netzstecker.
• Débrancher le cordon d’alimentation lorsque l’appareil
n’est pas utilisé pendant de longues périodes.
• Scollegate il cavo di alimentazione quando prevedete di
non utilizzare l’unità per un lungo periodo di tempo.
• Desconecte el cordón de energía cuando no utilice el
equipo por mucho tiempo.
Neem altijd het netsnoer uit het stopkontakt wanneer het
•
apparaat gedurende een lange periode niet wordt gebruikt.
• Koppla loss nätkabeln om apparaten inte kommer att
användas i lång tid.
* (For apparatuses with ventilation holes)
• Do not obstruct the ventilation holes.
• Decken Sie den Lüftungsbereich nicht ab.
• Ne pas obstruer les trous d’aération.
• Non coprite i fori di ventilazione.
• No obstruya los oricios de ventilación.
• De ventilatieopeningen mogen niet worden beblokkeerd.
• Täpp inte till ventilationsöppningarna.
• Do not let foreign objects into the unit.
Lassen Sie keine fremden Gegenstände in das Gerät kommen.
•
• Ne pas laisser des objets étrangers dans l’appareil.
• Non inserite corpi estranei all’interno dell’unità.
• No deje objetos extraños dentro del equipo.
• Laat geen vreemde voorwerpen in dit apparaat vallen.
• Se till att främmande föremål inte tränger in i apparaten.
• Do not let insecticides, benzene, and thinner come in
contact with the unit.
• Lassen Sie das Gerät nicht mit Insektiziden, Benzin oder
Verdünnungsmitteln in Berührung kommen.
• Ne pas mettre en contact des insecticides, du benzène et
un diluant avec l’appareil.
• Assicuratevi che l’unità non entri in contatto con insetticidi,
benzolo o solventi.
• No permita el contacto de insecticidas, gasolina y
diluyentes con el equipo.
• Voorkom dat insecticiden, benzeen of verfverdunner met
dit toestel in contact komen.
• Se till att inte insektsmedel på spraybruk, bensen och
thinner kommer i kontakt med apparatens hölje.
• Never disassemble or modify the unit in any way.
• Versuchen Sie niemals das Gerät auseinander zu nehmen
oder zu verändern.
• Ne jamais démonter ou modier l’appareil d’une manière
ou d’une autre.
• Non smontate né modicate l’unità in alcun modo.
• Nunca desarme o modique el equipo de ninguna
manera.
• Dit toestel mag niet gedemonteerd of aangepast worden.
• Ta inte isär apparaten och försök inte bygga om den.
ENGLISHDEUTSCHFRANCAISITALIANOESPAÑOLNEDERLANDSSVENSKA
II
Page 4
ITALIANO ESPAÑOL NEDERLANDS SVENSKAENGLISH DEUTSCH FRANCAIS
CAUTION:
To completely disconnect this product from the mains, disconnect the plug from the wall socket
outlet.
The mains plug is used to completely interrupt the power supply to the unit and must be within easy
access by the user.
VORSICHT:
Um dieses Gerät vollständig von der Stromversorgung abzutrennen, ziehen Sie bitte den Stecker aus
der Wandsteckdose.
Der Netzstecker wird verwendet, um die Stromversorgung zum Gerät völlig zu unterbrechen; er muss
für den Benutzer gut und einfach zu erreichen sein.
PRECAUTION:
Pour déconnecter complètement ce produit du courant secteur, débranchez la prise de la prise
murale.
La prise secteur est utilisée pour couper complètement l’alimentation de l’appareil et l’utilisateur doit
pouvoir y accéder facilement.
ATTENZIONE:
Per scollegare completamente questo prodotto dalla rete di alimentazione elettrica, scollegare la spina dalla
relativa presa a muro.
La spina di rete viene utilizzata per interrompere completamente l’alimentazione all’unità e deve essere
facilmente accessibile all’utente.
PRECAUCIÓN:
Para desconectar completamente este producto de la alimentación eléctrica, desconecte el enchufe
del enchufe de la pared.
El enchufe de la alimentación eléctrica se utiliza para interrumpir por completo el suministro de
alimentación eléctrica a la unidad y debe de encontrarse en un lugar al que el usuario tenga fácil
acceso.
WAARSCHUWING:
Om de voeding van dit product volledig te onderbreken moet de stekker uit het stopcontact worden
getrokken.
De netstekker wordt gebruikt om de stroomtoevoer naar het toestel volledig te onderbreken en moet
voor de gebruiker gemakkelijk bereikbaar zijn.
FÖRSIKTIHETSMÅTT:
Koppla loss stickproppen från eluttaget för att helt skilja produkten från nätet.
Stickproppen används för att helt bryta strömförsörjningen till apparaten, och den måste vara
lättillgänglig för användaren.
A NOTE ABOUT RECYCLING:
This product’s packaging materials are recyclable and can be reused. Please dispose of any
materials in accordance with the local recycling regulations.
When discarding the unit, comply with local rules or regulations.
Batteries should never be thrown away or incinerated but disposed of in accordance with the local
regulations concerning battery disposal.
This product and the supplied accessories, excluding the batteries, constitute the applicable
product according to the WEEE directive.
HINWEIS ZUM RECYCLING:
Das Verpackungsmaterial dieses Produktes ist zum Recyceln geeignet und kann wieder verwendet
werden. Bitte entsorgen Sie alle Materialien entsprechend der örtlichen Recycling-Vorschriften.
Beachten Sie bei der Entsorgung des Gerätes die örtlichen Vorschriften und Bestimmungen.
Die Batterien dürfen nicht in den Hausmüll geworfen oder verbrannt werden; bitte entsorgen Sie
die Batterien gemäß der örtlichen Vorschriften.
Dieses Produkt und das im Lieferumfang enthaltene Zubehör (mit Ausnahme der Batterien!)
entsprechen der WEEE-Direktive.
UNE REMARQUE CONCERNANT LE RECYCLAGE:
Les matériaux d’emballage de ce produit sont recyclables et peuvent être réutilisés. Veuillez
disposer des matériaux conformément aux lois sur le recyclage en vigueur.
Lorsque vous mettez cet appareil au rebut, respectez les lois ou réglementations en vigueur.
Les piles ne doivent jamais être jetées ou incinérées, mais mises au rebut conformément aux lois
en vigueur sur la mise au rebut des piles.
Ce produit et les accessoires inclus, à l’exception des piles, sont des produits conformes à la
directive DEEE.
NOTA RELATIVA AL RICICLAGGIO:
I materiali di imballaggio di questo prodotto sono riutilizzabili e riciclabili. Smaltire i materiali conformemente alle
normative locali sul riciclaggio.
Per lo smaltimento dell’unità, osservare le normative o le leggi locali in vigore.
Non gettare le batterie, né incenerirle, ma smaltirle conformemente alla normativa locale sui riuti chimici.
Questo prodotto e gli accessori inclusi nell’imballaggio sono applicabili alla direttiva RAEE, ad eccezione delle
batterie.
ACERCA DEL RECICLAJE:
Los materiales de embalaje de este producto son reciclables y se pueden volver a utilizar. Disponga de estos
materiales siguiendo los reglamentos de reciclaje de su localidad.
Cuando se deshaga de la unidad, cumpla con las reglas o reglamentos locales.
Las pilas nunca deberán tirarse ni incinerarse. Deberá disponer de ellas siguiendo los reglamentos de su localidad
relacionados con los desperdicios químicos.
Este producto junto con los accesorios empaquetados es el producto aplicable a la directiva RAEE excepto pilas.
EEN AANTEKENING MET BETREKKING TOT DE RECYCLING:
Het inpakmateriaal van dit product is recycleerbaar en kan opnieuw gebruikt worden. Er wordt verzocht om zich van
elk afvalmateriaal te ontdoen volgens de plaatselijke voorschriften.
Volg voor het wegdoen van de speler de voorschriften voor de verwijdering van wit- en bruingoed op.
Batterijen mogen nooit worden weggegooid of verbrand, maar moeten volgens de plaatselijke voorschriften
betreffende chemisch afval worden verwijderd.
Op dit product en de meegeleverde accessoires, m.u.v. de batterijen is de richtlijn voor afgedankte elektrische en
elektronische apparaten (WEEE) van toepassing.
OBSERVERA ANGÅENDE ÅTERVINNING:
Produktens emballage är återvinningsbart och kan återanvändas. Kassera det enligt lokala
återvinningsbestämmelser.
När du kasserar enheten ska du göra det i överensstämmelse med lokala regler och bestämmelser.
Batterier får absolut inte kastas i soporna eller brännas. Kassera dem enligt lokala bestämmelser för kemiskt avfall.
Denna apparat och de tillbehör som levereras med den uppfyller gällande WEEE-direktiv, med undantag av
batterierna.
III
Page 5
n Contents
Getting Started
Main Features ················································································· 1
Accessories ······················································································ 2
Cautions on Handling ····································································· 2
Discs ································································································· 2
Discs Usable on the DN-C110 ······················································· 2
Holding Discs ················································································ 2
Loading Discs ················································································ 2
Cautions on Loading Discs ···························································· 2
Cautions on Handling ···································································· 3
Cautions on Storing Discs ····························································· 3
Cleaning Discs ··············································································· 3
About the Remote Control Unit ···················································· 3
Inserting the Batteries ··································································· 3
Operating Range of the Remote Control Unit ······························· 3
Part Names and Functions ····························································· 4
Front Panel ····················································································· 4
Rear Panel ······················································································ 4
Display ··························································································· 4
Remote Control Unit ······································································ 5
Connections
Preparations ···················································································· 5
Cables Used for Connections ························································ 5
Analog Connections ······································································· 6
Digital Connections ········································································ 6
Connecting the Power Cord··························································· 6
Once Connections are Completed ················································ 6
Playback
Preparations ···················································································· 7
Turning the Power On ···································································· 7
Loading Discs ················································································ 7
Operations Possible During Playback ··········································· 7
Switching the Display’s Brightness··············································· 7
Listening with Headphones··························································· 7
CD Playback ···················································································· 8
Playing CDs···················································································· 8
Switching the Display ···································································· 8
Playing Repeatedly <Repeat Playback> ········································ 8
Repeated playback of parts you want to play
<A-B repeat play> ·········································································· 8
Playing Random Order <Random Playback> ································ 9
Playing Tracks in the Desired Order <Program playback> ············ 9
Playback of MP3 and WMA Files ··················································· 9
About the MP3 and WMA Formats That Can be Played ··············· 9
Playing MP3 and WMA Files ······················································· 10
Using the Timer Play Function ····················································· 11
Troubleshooting ······························································11
Specications····································································12
Index ························································································12
ENGLISH
Getting Started
Thank you for purchasing this DENON PROFESSIONAL CD Player. To
ensure proper operation, please read this owner’s manual carefully
before using the product.
After reading them, be sure to keep them for future reference.
Main Features
1. CompatiblewithMP3/WMAles
Handles playback of MP3/WMA les written to CD-R/CD-RW
discs.
b Playback may not be possible in parts if the disc’s write condition
is poor.
2. Uses a dot matrix display with 2 display lines
Use of a 16-character, 2-line display makes it easy to select MP3/
WMA tracks.
3. High-precision 24-bit D/A converter installed
Advanced segment type 24-bit D/A converter installed, which is
inherited from upscale models.
4. Construction that eliminates adverse effects on audio signals
To obtain stable CD drive performance, the CD drive mechanism
is mounted on a special chassis that features a centrally located,
high-rigidity construction. Power, audio and servo circuits boards
are separated, and boards are constructed to eliminate interference
between circuits as part of the high-grade model sound quality
design know-how invested in the DN-C110.
Getting Started
Connections Playback Troubleshooting
Specications
Page 6
ENGLISH
Figure 1
Figure 2
r t
e
Getting Started
Accessories
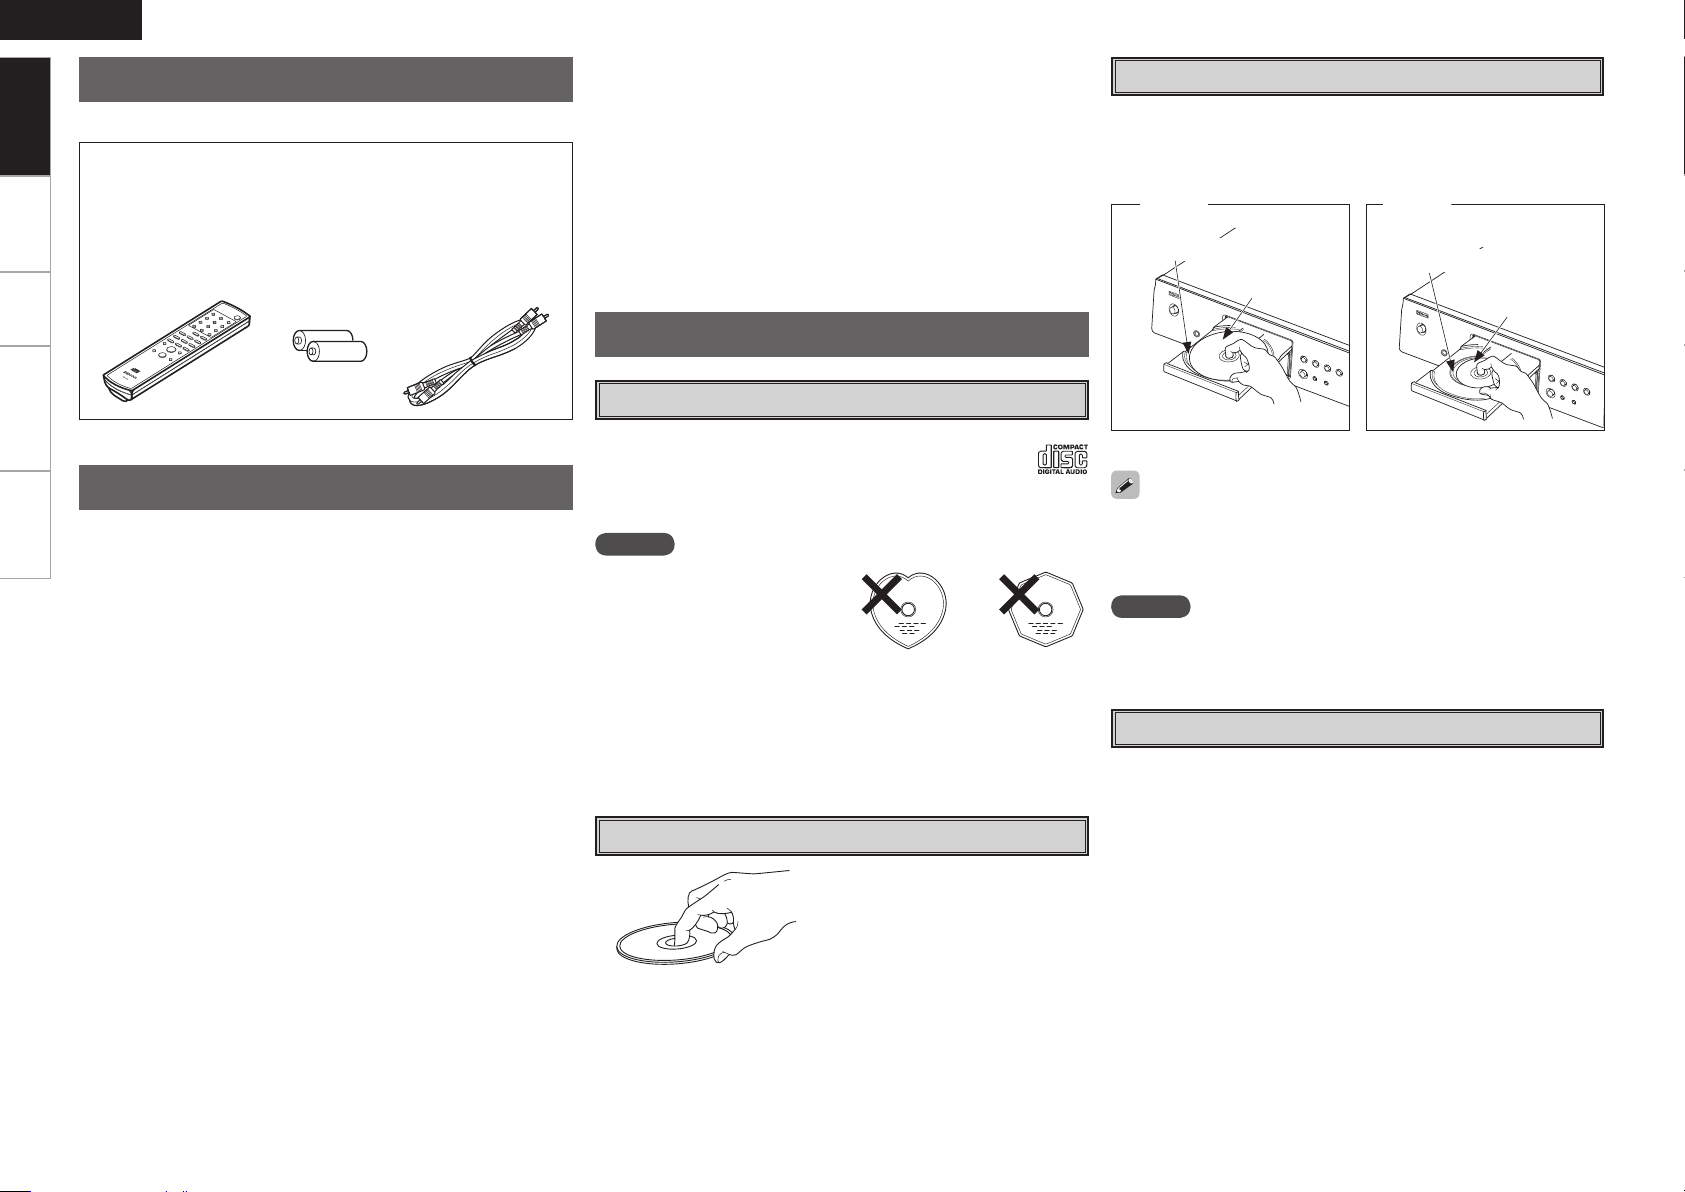
Check that the following parts are supplied with the product.
Connections Playback Troubleshooting Specications
q Owner’s manual ...................................................................... 1
w Service station list ................................................................... 1
e Remote control unit (RC-1132) ............................................... 1
r R03/AAA batteries ................................................................... 2
t Audio cable (Cord length: Approx. 1.0 m) .............................. 1
• Cautions on using mobile phones
Using a mobile phone near this unit may result in noise. If so, move
the mobile phone away from this unit when it is in use.
• Moving the unit
Turn off the power and unplug the power cord from the power
outlet.
Next, disconnect the connection cables to other system units
before moving the unit.
•
Note that the illustrations in these instructions may differ from the
actual unit for explanation purposes.
Discs
Discs Usable on the DN-C110
Loading Discs
• Set the disc with the labeled side facing up.
• Make sure the disc tray is fully open when inserting the disc.
• Place the discs atly, 12 cm discs in the outer tray guide (Figure 1),
8 cm discs in the inner tray guide (Figure 2).
Outer tray guide
12 cm disc
Inner tray guide
8 cm disc
Cautions on Handling
• Before turning the power switch on
Check once again that all connections are correct and that there are
no problems with the connection cables.
•
When traveling or leaving home for long periods of time, be sure to
unplug the power cord from the power outlet.
•Sufcientlyventilatetheplaceofinstallation
If the unit is left in a room full of the smoke from cigarettes, etc.,
for long periods of time, the surface of the optical pickup could get
dirty, in which case it will not be able to read the signals properly.
• About condensation
If there is a major difference in temperature between the inside of
the unit and the surroundings, condensation (dew) may form on
the operating parts inside the unit, causing the unit not to operate
properly.
If this happens, let the unit sit for an hour or two with the power
turned off and wait until there is little difference in temperature
before using the unit.
q Music CDs
Discs marked with the logotype below can be played in
this unit.
w CD-R/CD-RW
NOTE
• Discs with special shapes (heartshaped discs, octagonal discs,
etc.) cannot be played. Do not
attempt to play them, as doing so
can damage the product.
• Some discs and some recording formats may not be playable.
• Non-nalized discs cannot be played.
b What is nalization?
Finalization is the process that makes recorded CD-R/CD-RW discs
playable on compatible players.
Holding Discs
Do not touch the signal surface.
• Place 8 cm discs in the inner tray guide without using an adapter.
• “00 Tr 00 : 00” is displayed if a disc that cannot be played is
loaded.
• “NO DISC” is displayed if the disc is loaded upside-down or if no
disc is loaded.
NOTE
Do not push the disc tray in by hand when the power is turned off.
Doing so could damage the set.
Cautions on Loading Discs
• Only load one disc at a time. Loading two or more discs can damage
the unit or scratch the discs.
• Do not use cracked or warped discs or discs that have been repaired
with adhesive, etc.
• Do not use discs on which the sticky part of cellophane tape or
labels is exposed or on which there are traces of where labels have
been removed. Such discs can get caught inside the player and
damage it.
Page 7
Cautions on Handling
• Do not get ngerprints, oil or dirt on discs.
• Take special care not to scratch discs when removing them from
their cases.
• Do not bend or heat discs.
• Do not enlarge the hole at the center.
• Do not write on the labeled (printed) surface with ball-point pens,
pencils, etc., or stick new labels on discs.
• Water droplets may form on discs if they are moved suddenly from
a cold place (outdoors for example) to a warm place, but do not try
to dry them off using a hairdryer, etc.
Cautions on Storing Discs
About the Remote Control Unit
Inserting the Batteries
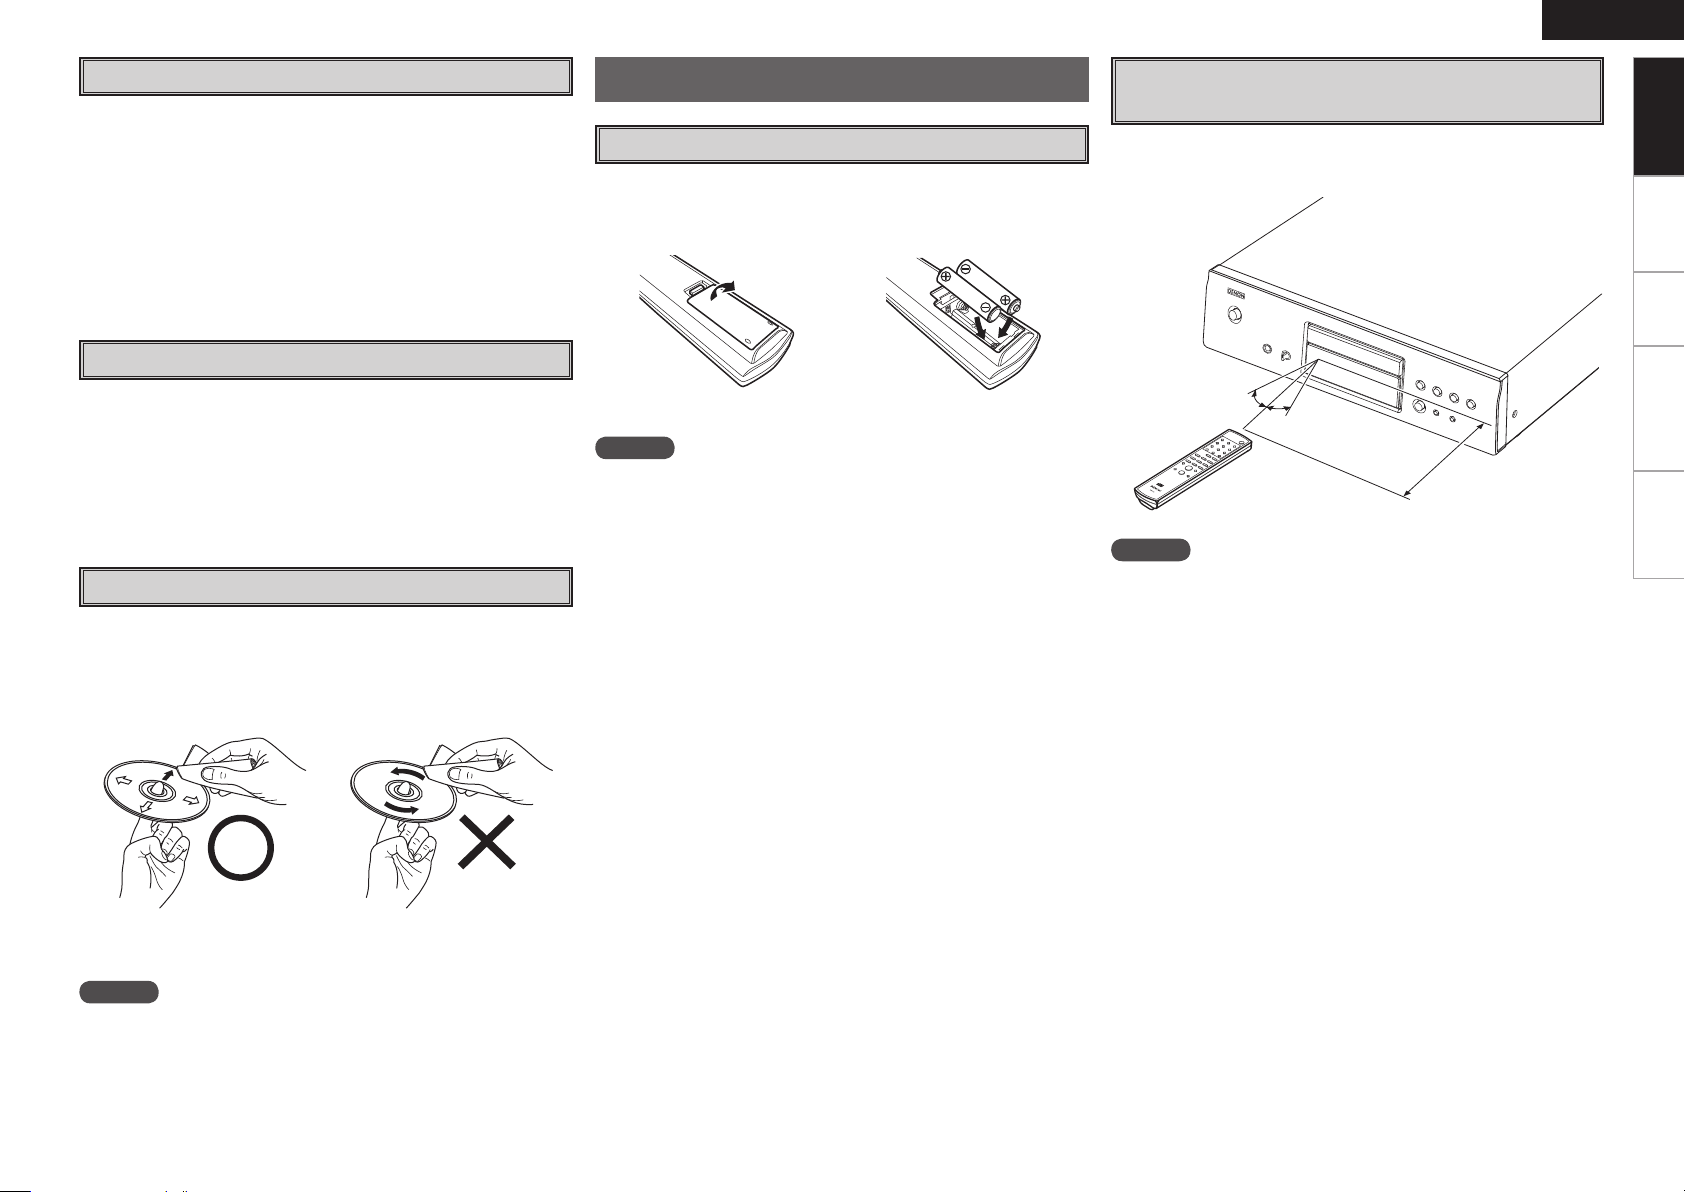
q Remove the remote control
unit’s rear cover.
w Set two R03/AAA batteries in
the battery compartment in the
indicated direction.
ENGLISH
Operating Range of the Remote Control
Unit
Point the remote control unit at the remote sensor when operating
it.
Getting Started
Connections Playback Troubleshooting
• Be sure to remove discs after using them.
• Be sure to store discs in their cases to protect them from dust,
scratches, warping, etc.
• Do not store discs in the following places:
1. Places exposed to direct sunlight for long periods of time
2. Dusty or humid places
3. Places exposed to heat from heating appliances, etc.
Cleaning Discs
• If there are ngerprints or dirt on discs, wipe them off before using
the disc. Fingerprints and dirt can impair sound quality and cause
interruptions in playback.
• Use a commercially available disc cleaning set or a soft cloth to
clean discs.
Gently wipe the disc from the
inside towards the outside.
Do not wipe with a circular
motion.
e Put the rear cover back on.
NOTE
• Replace the batteries with new ones if the set does not operate
even when the remote control unit is operated close to the unit.
• The supplied batteries are only for verifying operation.
• When inserting the batteries, be sure to do so in the proper direction,
following the “q” and “w” marks in the battery compartment.
• To prevent damage or leakage of battery uid:
• Do not use a new battery together with an old one.
• Do not use two different types of batteries.
• Do not attempt to charge dry batteries.
• Do not short-circuit, disassemble, heat or dispose of batteries in
ames.
• If the battery uid should leak, carefully wipe the uid off the inside
of the battery compartment and insert new batteries.
• Remove the batteries from the remote control unit if it will not be in
use for long periods.
30°
30°
Approx. 8 m
NOTE
The set may function improperly or the remote control unit may not
operate if the remote control sensor is exposed to direct sunlight,
strong articial light from an inverter type uorescent lamp or infrared
light.
Specications
NOTE
Do not use record spray, antistatic agents, or benzene, thinner or
other solvents.
Page 8
ENGLISH
q
w r yt u ie
Q1 Q0Q2 o
q w e r t y
w eq
Getting Started
Part Names and Functions
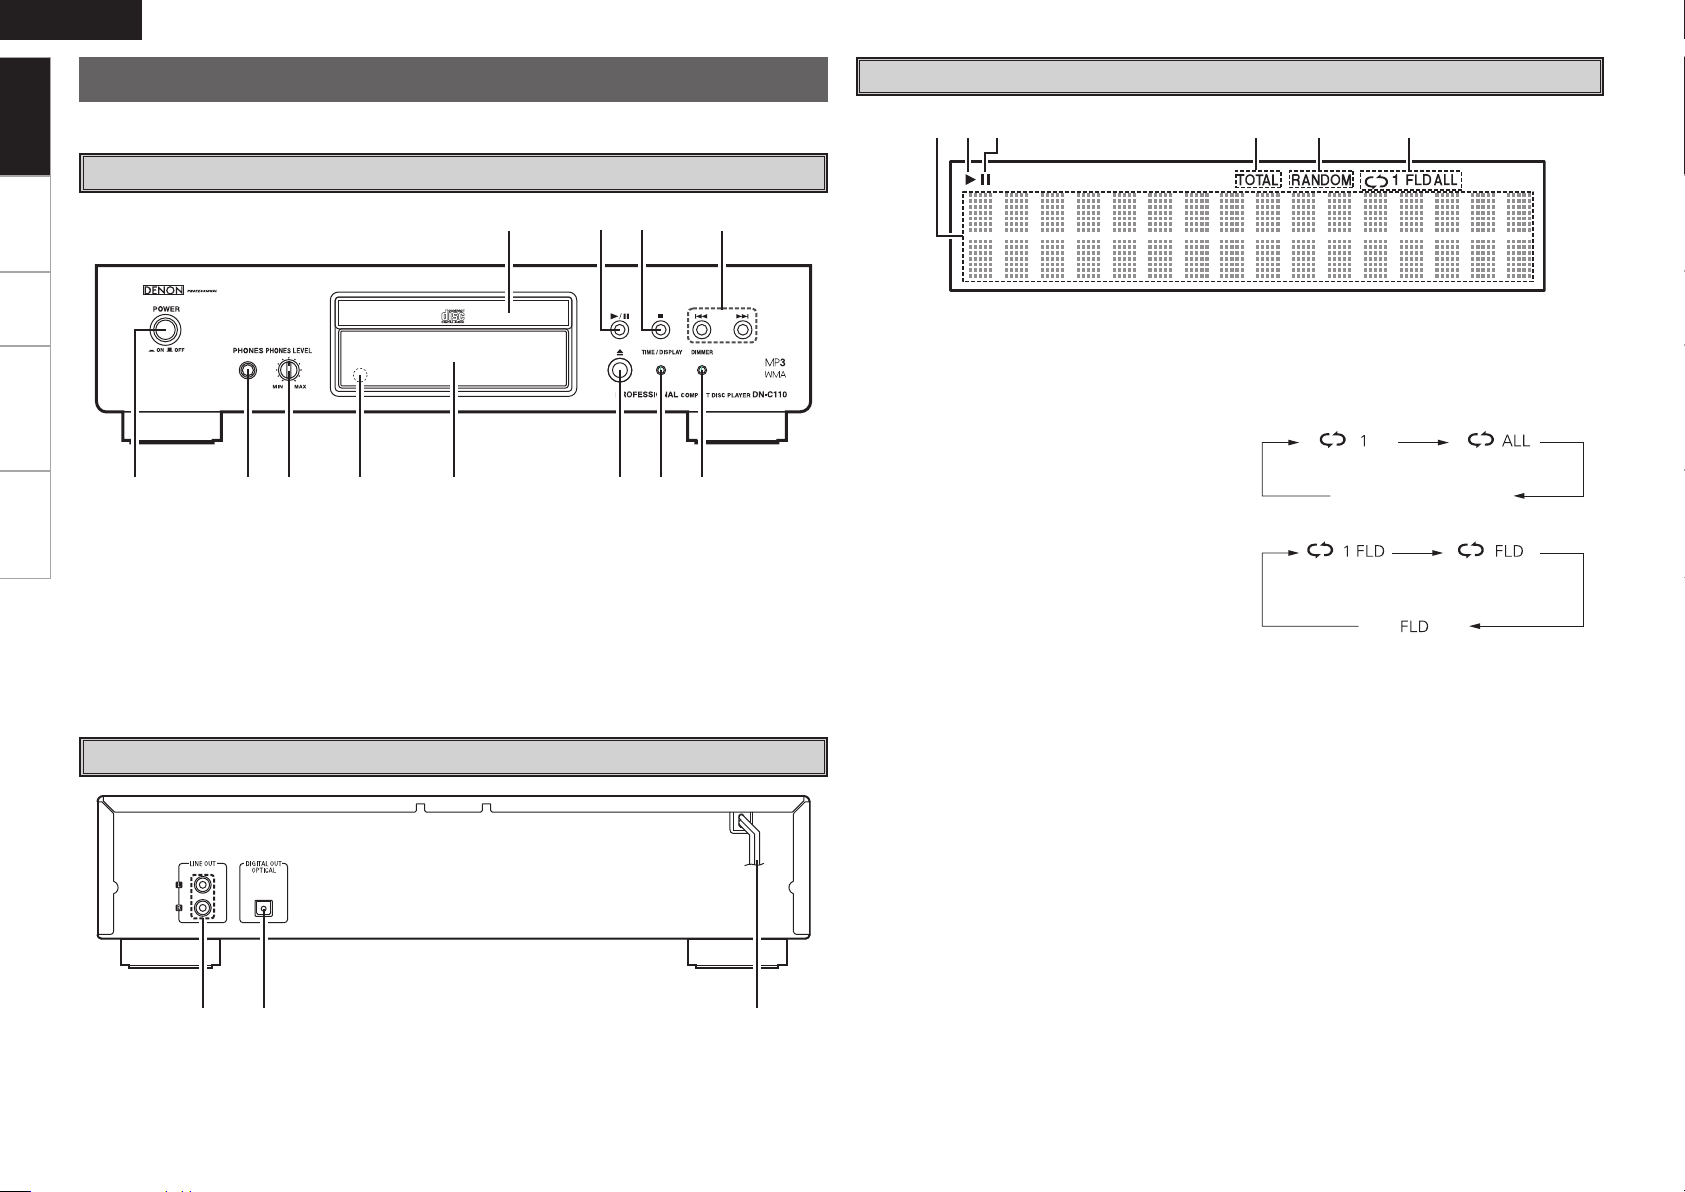
For buttons not explained here, see the page indicated in parentheses ( ).
Display
Connections Playback Troubleshooting
Specications
Front Panel
q Power switch (hON jOFF) ······················· (7)
w Headphones jack (PHONES) ························ (7)
e PHONES LEVEL knob ··································· (7)
r Remote control sensor ································· (3)
t Display
y Disc tray open/close button (5) ·················· (7)
u TIME/DISPLAY button ···························· (8, 10)
i DIMMER button ············································ (7)
o Revers-skip/Forward-skip buttons
(8, 9) ··············································· (8, 10)
Q0 Stop button (2) ············································· (8)
Q1 Play/Pause button (1/3) ······················ (7 ~ 10)
Q2 Disc tray ························································ (7)
q Information display
Various information is displayed here, depending
on the operation mode.
w Lights when a disc is playing.
e Lights when a disc is pausing.
r TOTAL indicator
Lights when the total number of tracks and total
time of the CD are displayed.
t Lights when in the random play mode.
y Lights when in the repeat play mode.
The display switches as follows each time the
REPEAT button on the remote control unit is
pressed.
• In modes other than the folder mode:
(All-track repeat)(1-track repeat)
Not displayed
• In the folder mode:
(1-track repeat)
(All-track repeat
between folders)
Rear Panel
q LINE OUT connectors ··································· (6)
w DIGITAL OUT OPTICAL connector ·············· (6)
e Power cord ···················································· (6)
Page 9
q
w
t
y
i
r
e
u
o
Q5
i
y
Q6
Q7
Q3
Q4
Q2
Q1
Q0
R
L
R
L
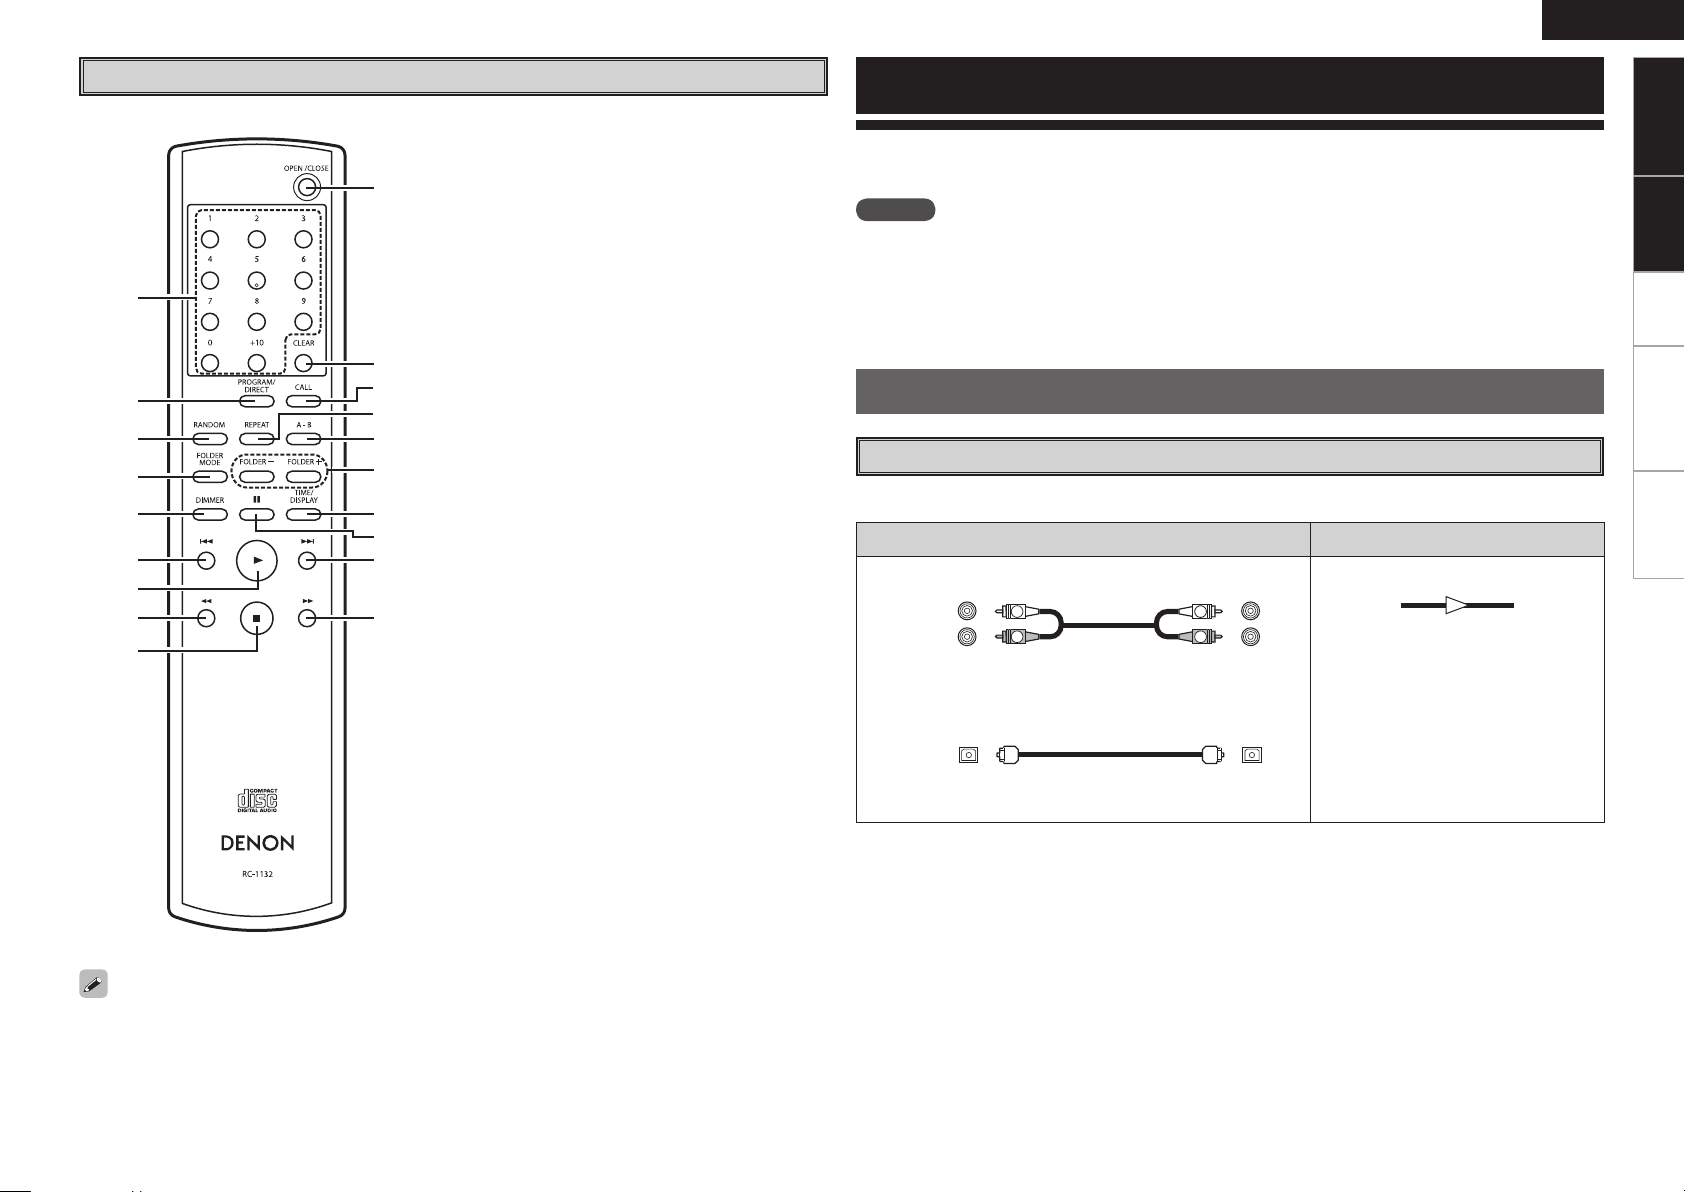
Remote Control Unit
q Number buttons ····································· (8, 10)
w PROGRAM/DIRECT button ·························· (9)
e RANDOM button··········································· (9)
r FOLDER MODE button ······························· (10)
t DIMMER button ············································ (7)
y Reverse-skip/Forward-skip buttons
(8, 9) ·············································· (8, 10)
u Play button (1) ····································· (7 ~ 10)
i Fast-reversing/Fast-forwarding buttons
(6, 7) ······················································ (8)
o Stop button (2) ············································· (8)
Q0 Pause button (3) ······································· (7, 8)
Q1 TIME/DISPLAY button ···························· (8, 10)
Q2 FOLDER +, – buttons ·································· (10)
Q3 Repeat A-B button (A-B) ······························ (8)
Q4 REPEAT button ········································ (8, 10)
Q5 CALL button ·················································· (9)
Q6 CLEAR button ··············································· (9)
Q7 OPEN/CLOSE button ···································· (7)
ENGLISH
Connections
Connections for all compatible audio signal formats are described in this owner’s manual. Please
select the types of connections suited for the equipment you are connecting.
NOTE
• Do not plug in the power cord until all connections have been completed.
• When making connections, also refer to the owner’s manual of the other components.
• Be sure to connect the left and right channels properly (left with left, right with right).
• Do not bundle power cords together with connection cables.
Doing so can result in humming or noise.
Preparations
Cables Used for Connections
Select the cables according to the equipment being connected.
Audio cables Signal direction
Analog connections (stereo)
Audio signal:
ConnectionsGetting Started
Playback Troubleshooting Specications
The skip buttons (8 and 9), +10 button and FOLDER +, – buttons operate continuously when held
in.
(White)
(Red)
Audio cable (supplied)
Optical digital connections
Optical cable (sold separately)
Output Input
Page 10
ENGLISH
R
L
R
L
"6%*0
3-
*/
"6%*0
"6%*0
015*$"-
*/
Getting Started Playback Troubleshooting Specications
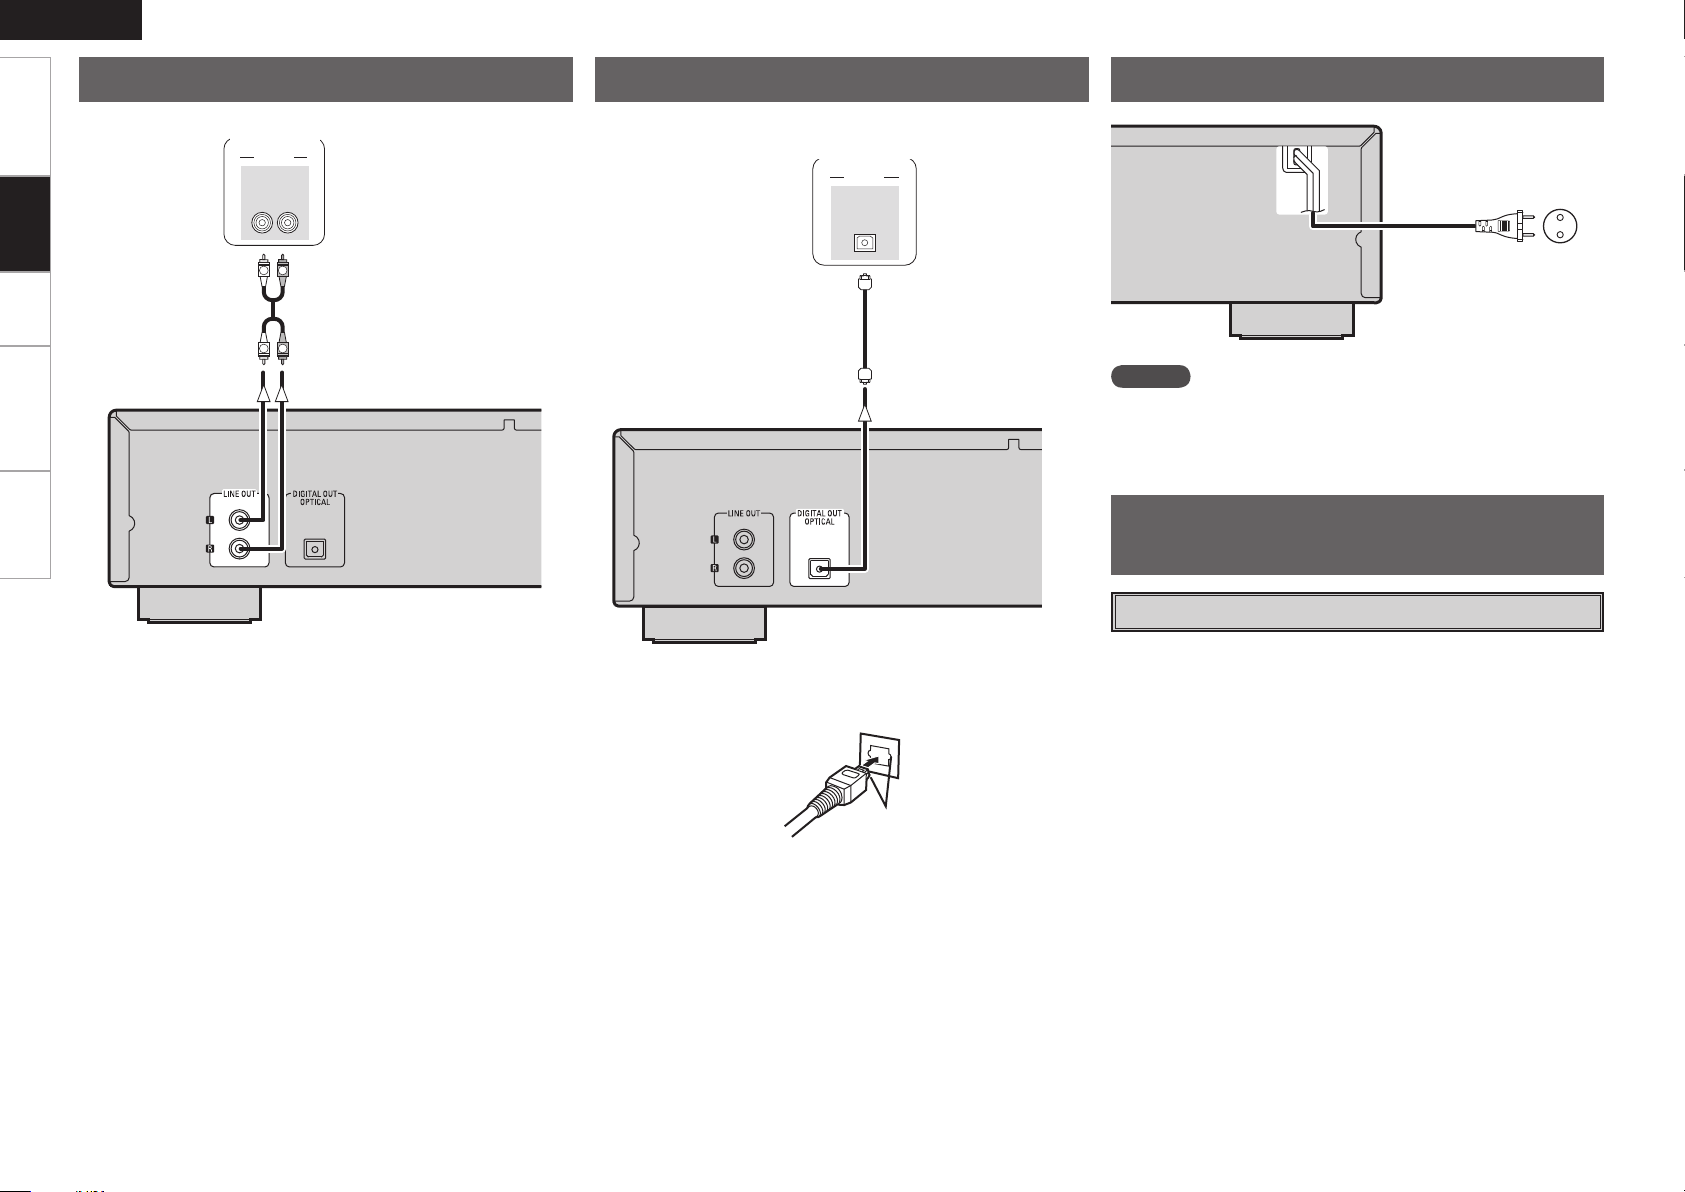
Analog Connections
Digital Connections
Connecting the Power Cord
Connections
Amplier
CD recorder /
MD recorder
To household power outlet
(AC 230 V, 50 Hz)
NOTE
• Insert the plugs securely. Incomplete connections will result in the
generation of noise.
• Do not unplug the power cord while the set is operating.
Once Connections are
Completed
Turning the Power On
n When connecting the optical digital output connector
with an optical transmission cable (sold separately)
(vpage 7)
Match the shapes then insert rmly all the way in.
Match the shapes
Page 11
<1/3>
<POWER>
<5>
DIMMER
<PHONES LEVEL>
[1]
DIMMER
[3]
[OPEN/CLOSE]
Playback
ENGLISH
Getting Started Connections Troubleshooting
Symbols used to indicate buttons in this manual
Button located on both the main unit
and the remote control unit
Button only on the main unit
Button only on the remote control unit
Disc tray
BUTTON
<BUTTON>
[BUTTON]
Preparations
Turning the Power On
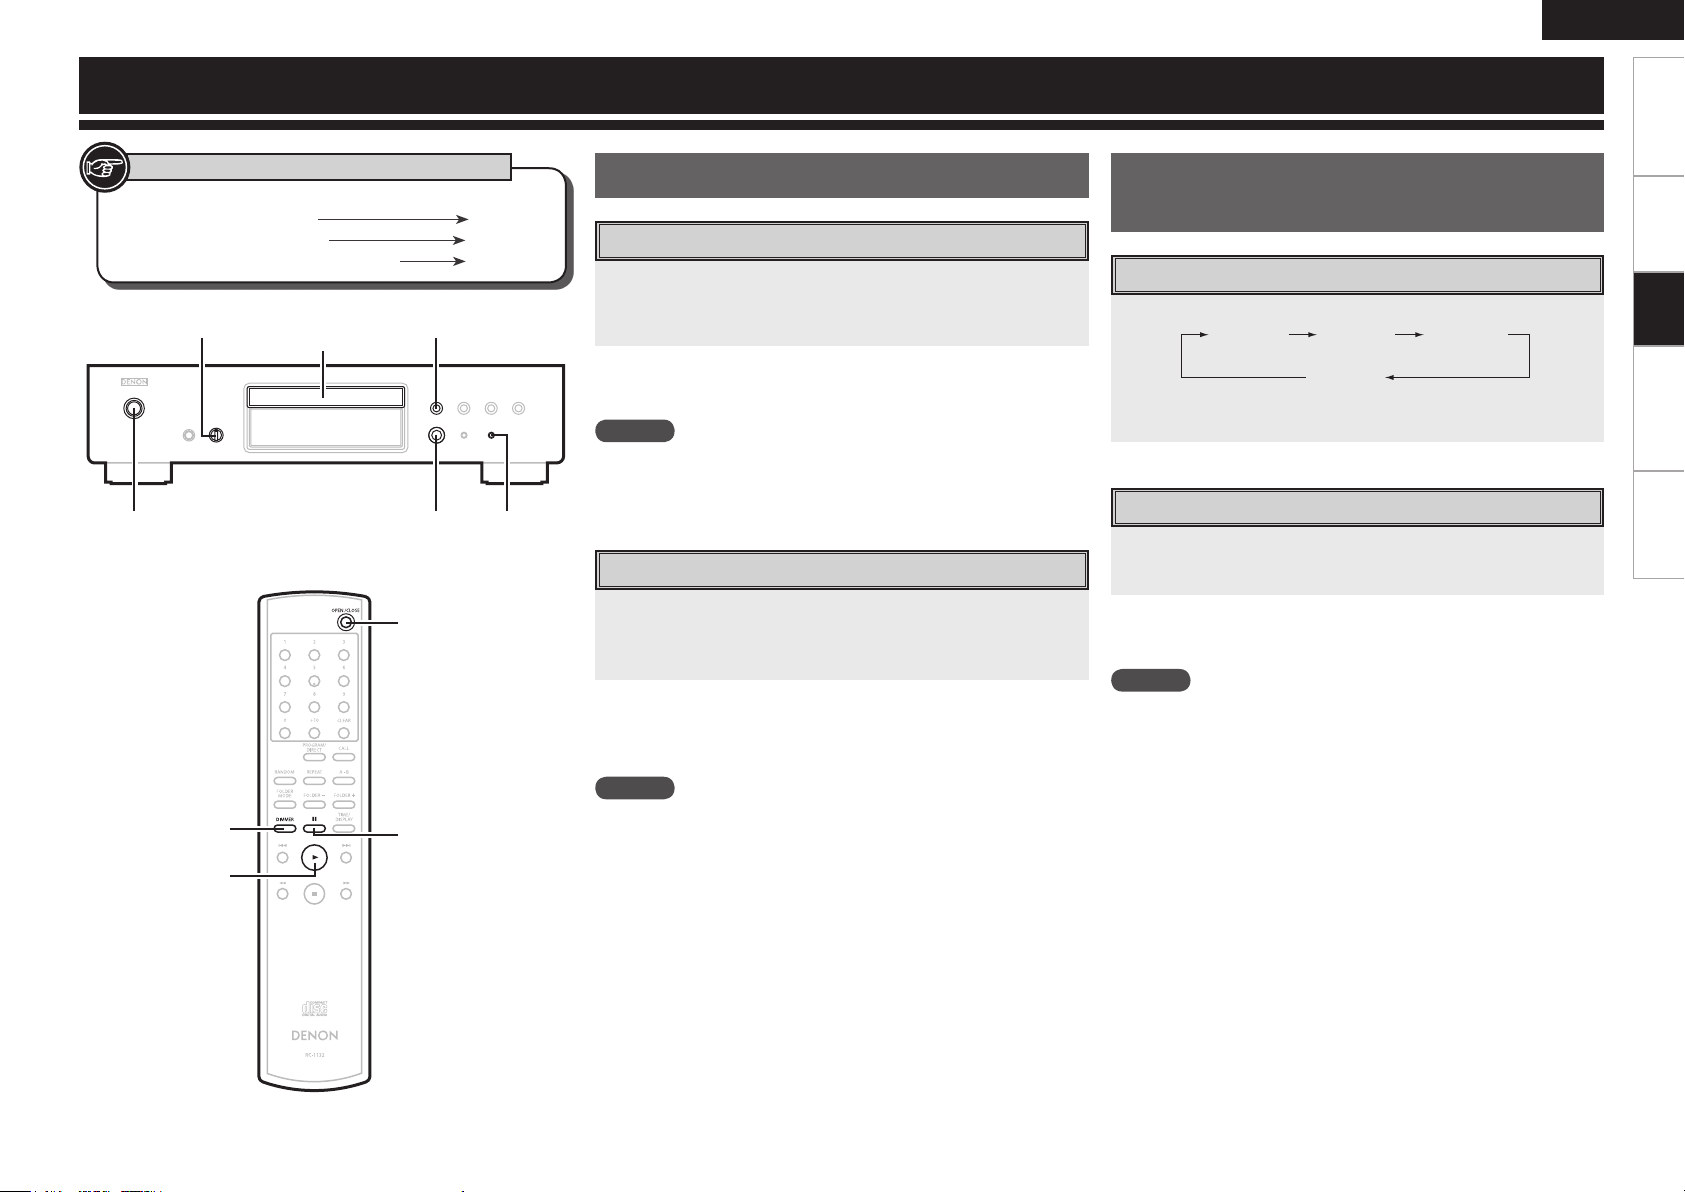
Press <POWER>.
• When a disc is loaded, playback starts automatically.
• If no disc is loaded “NO DISC” is displayed.
n Turning the Power Off
Press <POWER> again.
NOTE
• Be sure to stop playback before turning the power off.
• Make sure that the disc tray is completely shut before turning off
the power.
Loading Discs
In the stop mode, press <5> or [OPEN/CLOSE] to open
the disc tray.
b “Loading discs” (vpage 2).
n To close the disc tray
Press <5> or [OPEN/CLOSE] again.
b The disc tray also closes when <1/3>, [1] or [3] is pressed.
NOTE
Do not place any foreign objects in the disc tray. Doing so could
damage it.
Operations Possible During
Playback
Switching the Display’s Brightness
Press DIMMER.
Bright
b The display’s brightness switches each time the button is
pressed.
Listening with Headphones
Plug the headphones (sold separately) into the PHONES
jack.
n Adjusting the Volume
Turn <PHONES LEVEL>.
NOTE
Be careful not to set the volume too high when using headphones.
Dim Dark
OFF
Playback
Specications
Page 12
ENGLISH
<1/3>
8, 9
2
TIME/DISPLAY
[1]
[RANDOM]
[PROGRAM/
DIRECT]
[NUMBER]
8
[6]
[3]
TIME/DISPLAY
[CALL]
[A-B]
9
[7]
2
[REPEAT]
[CLEAR]
Getting Started Connections Troubleshooting Specications
Playback
Symbols used to indicate buttons in this manual
Button located on both the main unit
and the remote control unit
Button only on the main unit
Button only on the remote control unit
BUTTON
<BUTTON>
[BUTTON]
CD Playback
Playing CDs
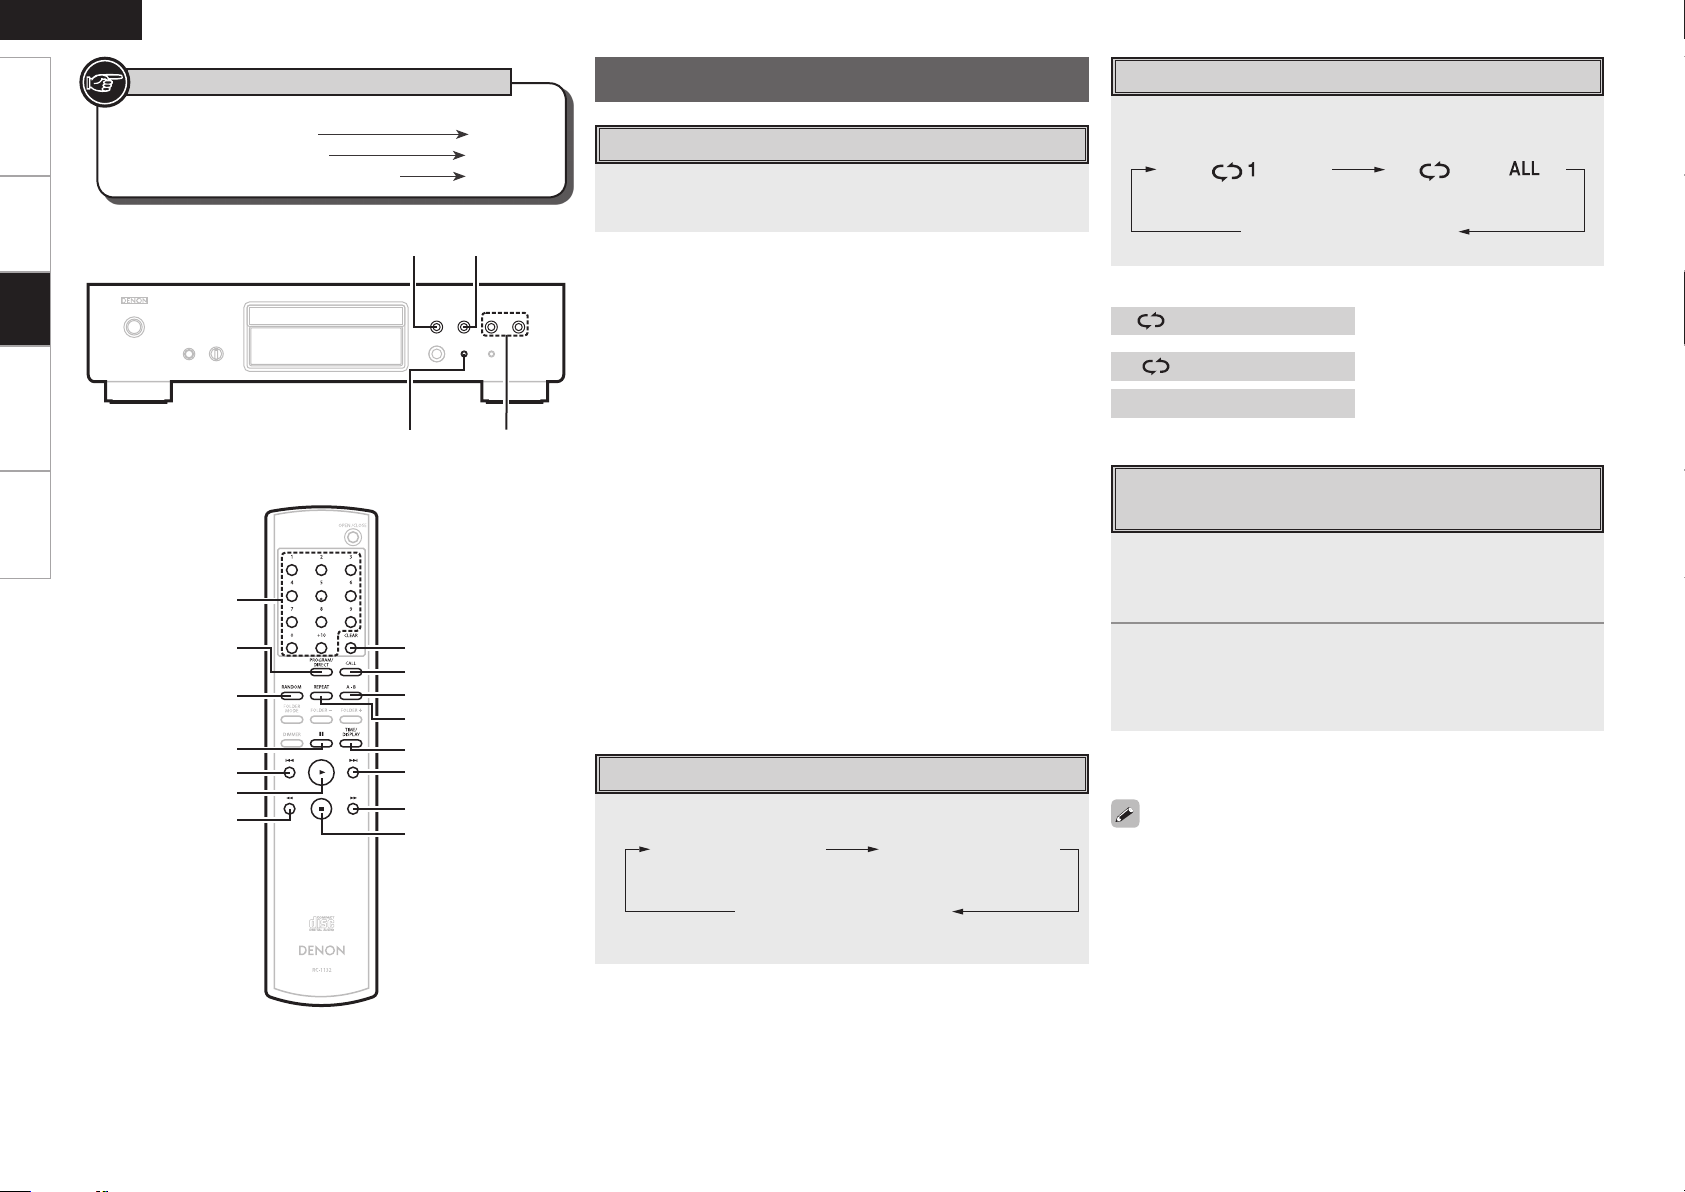
Press <1/3> or [1].
The “1” indicator lights and playback begins.
n Stopping Playback
Press 2.
n Stopping Playback Temporarily
Press <1/3> or [3].
The “3” indicator lights.
b To resume playback, press <1/3> or [1].
n Fast-Forwarding and Fast-Reversing (searching)
During playback, press and hold in [6, 7].
n Moving to the Beginning of Tracks (skipping)
During playback, press 8, 9.
b The disc is skipped the number of tracks equal to the number of
times the button is pressed.
b When pressed once in the return direction, playback returns to
the beginning of the currently playing track.
n
To Play the Desired Track
(Remote Control Unit Only)
Press
[NUMBER] (0
GExampleH : Track 4 : [4]
GExampleH : Track 12 : [+10], [2]
GExampleH : Track 20 : [+10], [+10], [0]
~
,
) to select the track.
9
+10
Playing Repeatedly <Repeat Playback>
Press [REPEAT].
Playback in the respective repeat mode starts.
Single-track repeat All-track repeat
Repeat off
(indicator turns off)
[Selectable items]
1
(Single-track repeat)
ALL
(All-track repeat)
Repeat off (indicator turns off)
: Only 1 track is played
repeatedly.
: All tracks are played repeatedly.
: Normal playback resumes.
Repeated playback of parts you want to
play <A-B repeat play>
During playback, press [A-B] at the point at which
1
you want to start repeating (point A).
The “REPEAT A-” display ashes.
During playback, press [A-B] at the point at which
2
you want to stop repeating (point B).
The “REPEAT A-B” is displayed and the A-B section is played
repeatedly.
Switching the Display
Press TIME/DISPLAY.
Elapsed time of
currently playing track
Remaining time for all
remaining tracks
b The display switches each time the button is pressed.
Remaining time of
currently playing track
n Stopping A-B repeat playback
Press [A-B].
A-B repeat playback is not possible during programmed playback or
random playback.
Page 13
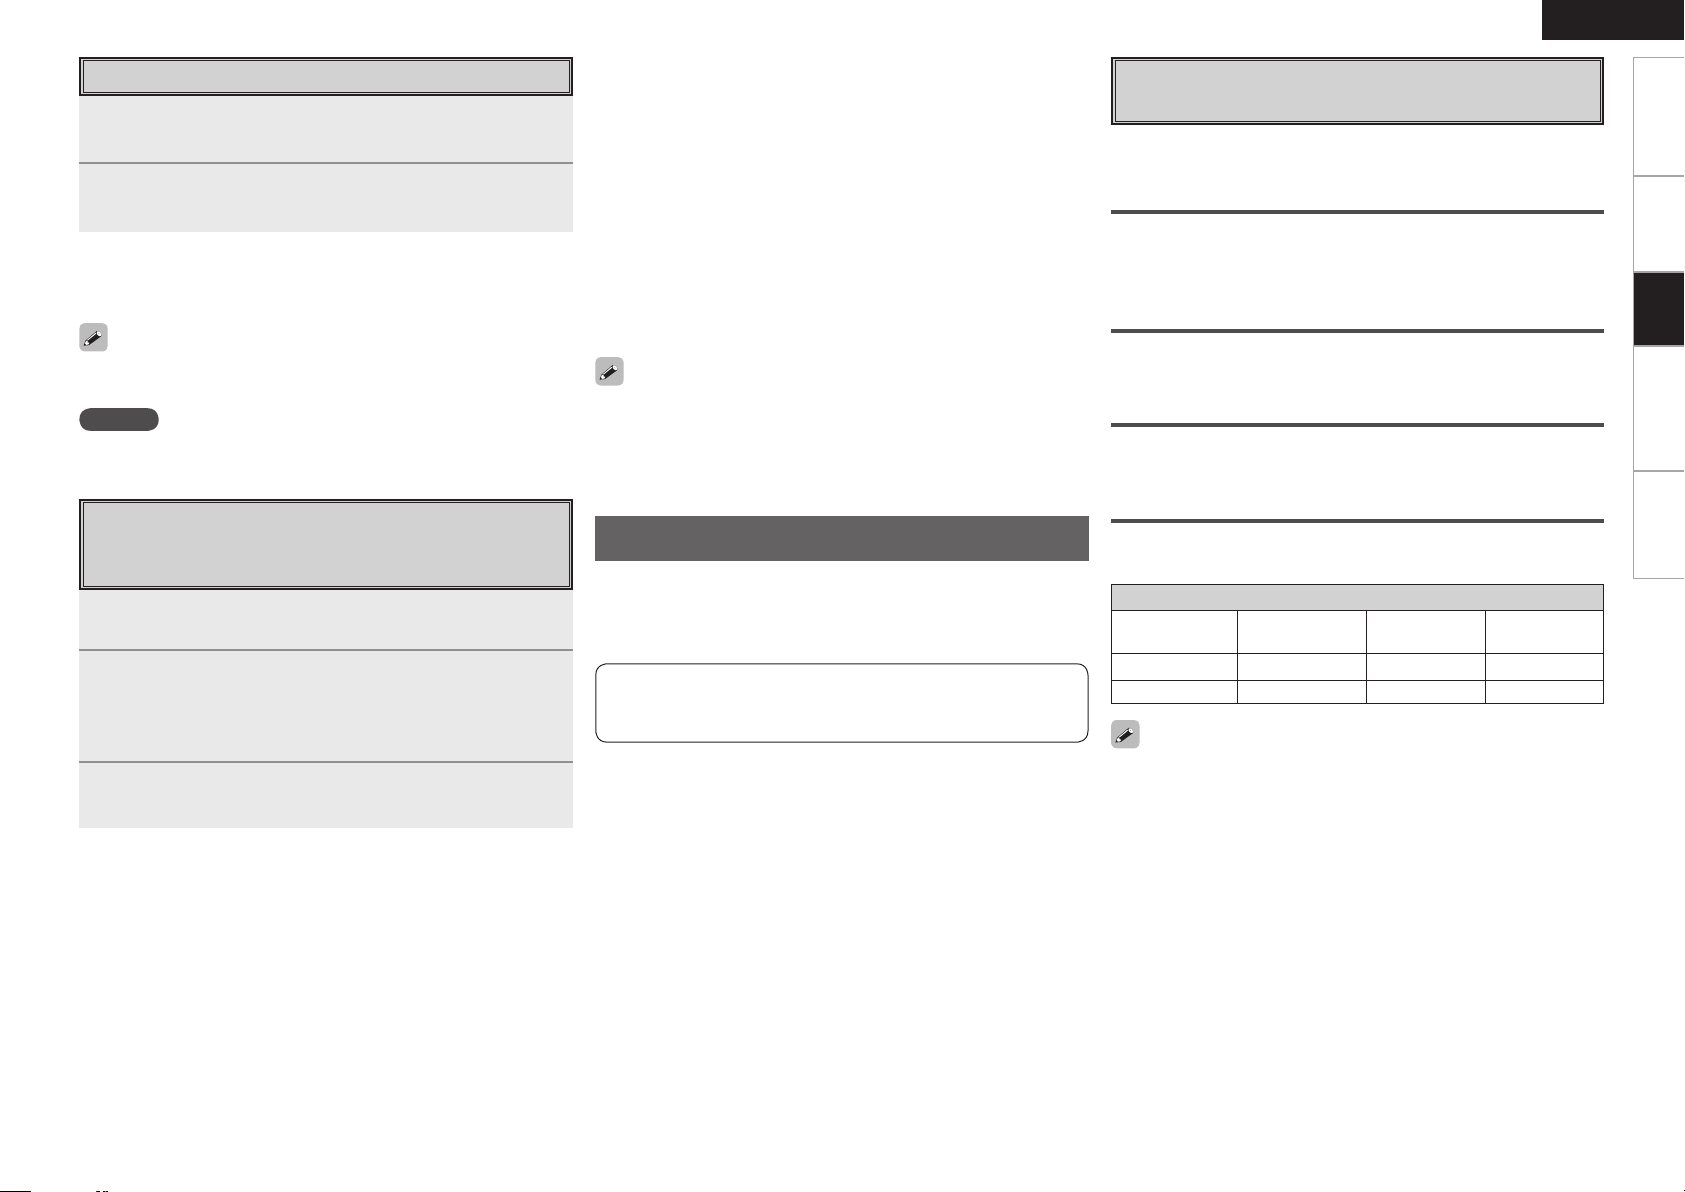
Playing Random Order <Random Playback>
In the stop mode, press [RANDOM].
1
The “RANDOM” indicator lights.
Press <1/3> or [1].
2
The tracks start playing in random order.
n Stopping Random Playback
In the stop mode, press [RANDOM].
The “RANDOM” indicator turns off.
When [REPEAT] is pressed during random playback, the tracks are
played in a different random order after this turn.
NOTE
Direct searching is not possible during random playback.
n Checking the order of the programmed tracks
In the stop mode, press [CALL].
The track numbers are displayed in the programmed order each
time the button is pressed.
n To clear the last track programmed
In the stop mode, press [CLEAR].
The last track programmed is cleared each time the button is
pressed.
n To clear one programmed track at a time
In the stop mode, press [CALL] to select the track to be cleared,
then press [CLEAR].
n Clearing the all programmed track
In the stop mode, press [PROGRAM/DIRECT].
• When [REPEAT] is pressed during program playback, the tracks are
played repeatedly in the programmed order.
• When [RANDOM] is pressed during program playback, the
programmed tracks are played in random order.
ENGLISH
About the MP3 and WMA Formats That
Can be Played
CD-R and CD-RW discs created in the format described below can
be played.
Writing software format
ISO9660 level 1
b When written in other formats, it may not be possible to play the
disc properly.
Maximumnumberofplayablelesandfolders
Folder: 255
File: 255
File format
MPEG-1 Audio Layer-3
WMA (Windows Media Audio)
Getting Started Connections Troubleshooting
Playback
Specications
Playing Tracks in the Desired Order
<Program playback>
Up to 25 tracks can be programmed.
In the stop mode, press [PROGRAM/DIRECT].
“PGM” is displayed.
1
Use [NUMBER] (0 ~ 9, +10) to select the traks.
2
GExampleH To program tracks 3, 12, 7 to play in that order:
Press [PROGRAM/DIRECT], [3], [+10], [2], [7].
Press <1/3> or [1].
Playback starts in the programmed order.
3
Playback of MP3 and WMA Files
There are many music distribution sites on the Internet allowing you
to download music les in MP3 or WMA (Windows Media® Audio)
format. The music (les) downloaded from such sites can be stored
on CD-R or CD-RW discs and played on the DN-C110.
“Windows Media” and “Windows” are registered trademarks or
trademarks in the United States and other countries of Microsoft
Corporation of the United States.
Tag data
ID3-Tag (Ver.1x)
META-Tag (Compatible with title, artist and album names)
PlayableMP3/WMAle
File format
MP3 32, 44.1, 48 kHz 32 ~ 320 kbps .MP3
WMA 32, 44.1, 48 kHz 64 ~ 160 kbps .WMA
• Be sure to give les the extension “.MP3” or “.WMA”. Files with any
other extensions or with no extensions cannot be played.
• Recordings you have made should only be used for your personal
enjoyment, and as per copyright laws may not be used in other
ways without permission of the copyright holder.
Sampling
frequency
Bit rate Extension
Page 14
ENGLISH
<1/3> 8, 9
TIME/DISPLAY
[1]
[FOLDER MODE]
[FOLDER –]
[NUMBER]
[FOLDER +]
[REPEAT]
TIME/DISPLAY
8
9
Getting Started Connections Troubleshooting Specications
Button located on both the main unit
and the remote control unit
Button only on the main unit
Button only on the remote control unit
Playback
Symbols used to indicate buttons in this manual
BUTTON
<BUTTON>
[BUTTON]
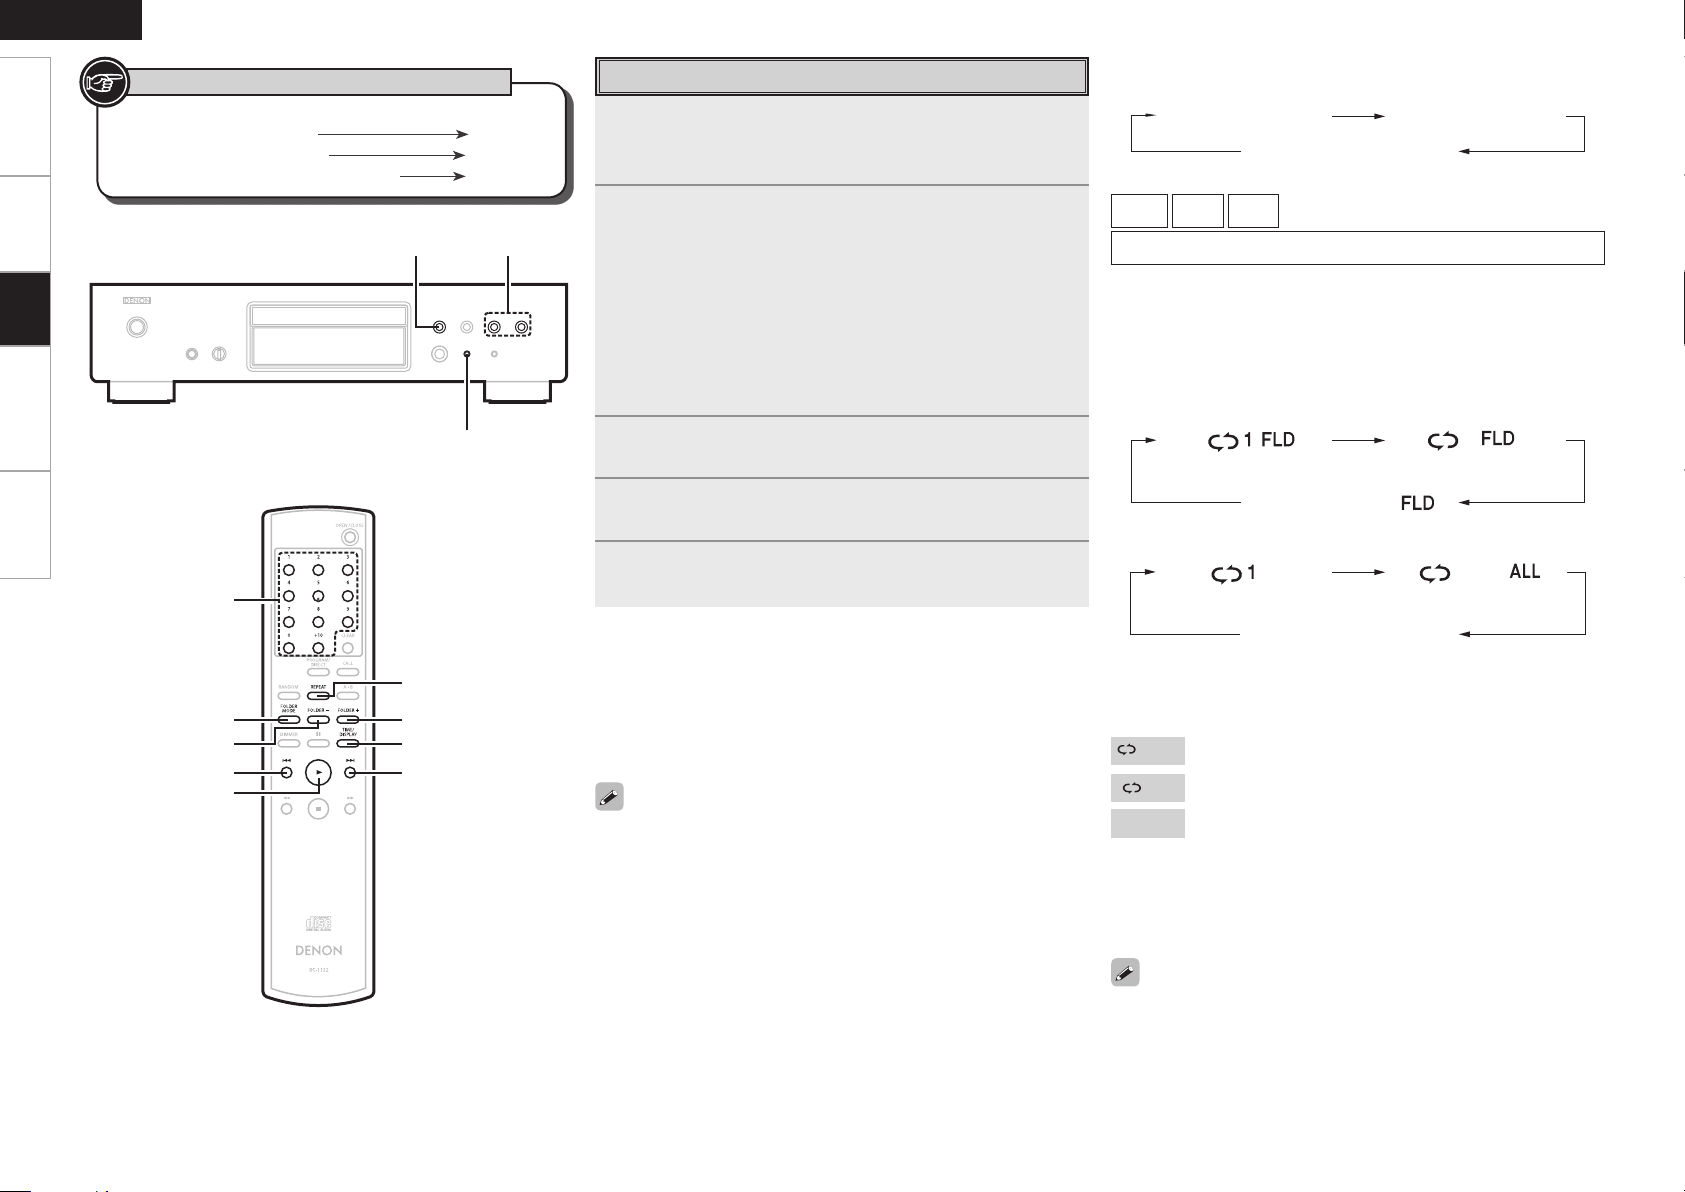
Playing MP3 and WMA Files
Load a CD-R or CD-RW disc containing music les in
1
the MP3 or WMA format into the disc tray (vpage
2).
Press [FOLDER MODE] and select “Folder Mode” or
2
“Disc Mode”.
GAbout the displayH
When “Folder Mode” is selected ∙∙∙∙∙ “FLD” indicator lights.
When “Disc Mode” is selected ∙∙∙∙∙∙∙∙ “FLD” indicator turns off.
Folder Mode :
All the files in the selected folder are played.
Disc Mode :
After the selected folder and files are played, all the files in all
the folders are played.
Use [FOLDER +, –] to select the folder to be played.
3
Use 8, 9 to select the le to be played.
4
Press <1/3> or [1].
5
n To switch the Folder or File During Playback
• Folder
Use [FOLDER +, –] to select the folder.
• File
Use 8, 9 to select the le, or use [NUMBER] (0 ~ 9, +10)
to select the le number.
b The le numbers are set automatically when the disc is loaded.
Copyright-protected les cannot be played.
(The “Not Support” is displayed.)
Note that depending on the software used for burning and other
conditions, some les may not play or display correctly.
n
Switching the Display
During playback, press TIME/DISPLAY.
File name display Title/artist display
Title/album display
b The characters that can be displayed are as follows:
A ~ Z a ~ z 0 ~ 9
! ” # $ % & : ; < > ? @ ¥ [ ] _ ` ¦ { } ^ ’ ( ) * + , - . / = (space)
n
To Play Repeatedly
Press [REPEAT].
Playback starts in the respective repeat mode.
b The selectable repeat modes differ in the “Folder Mode” and the
“Disc Mode”.
When “Folder Mode” is selected:
Single-track repeat Repeat of all the
When “Disc Mode” is selected:
Single-track repeat All-track repeat
[Selectable items]
When “Folder Mode” is selected:
1 FLD
: Only the selected track is played repeatedly.
FLD
: All the les in the selected folder are played repeatedly.
FLD
: Folder mode playback resumes.
When “Disc Mode” is selected:
“Playing Repeatedly <Repeat playback>” (vpage 8)
tracks in the folder
Repeat off
Repeat off
(indicator turns off)
n Setting random playback
“Playing Random Order <Random playback>” (vpage 9)
Programmed playback is not possible with MP3/WMA discs.
0
Page 15
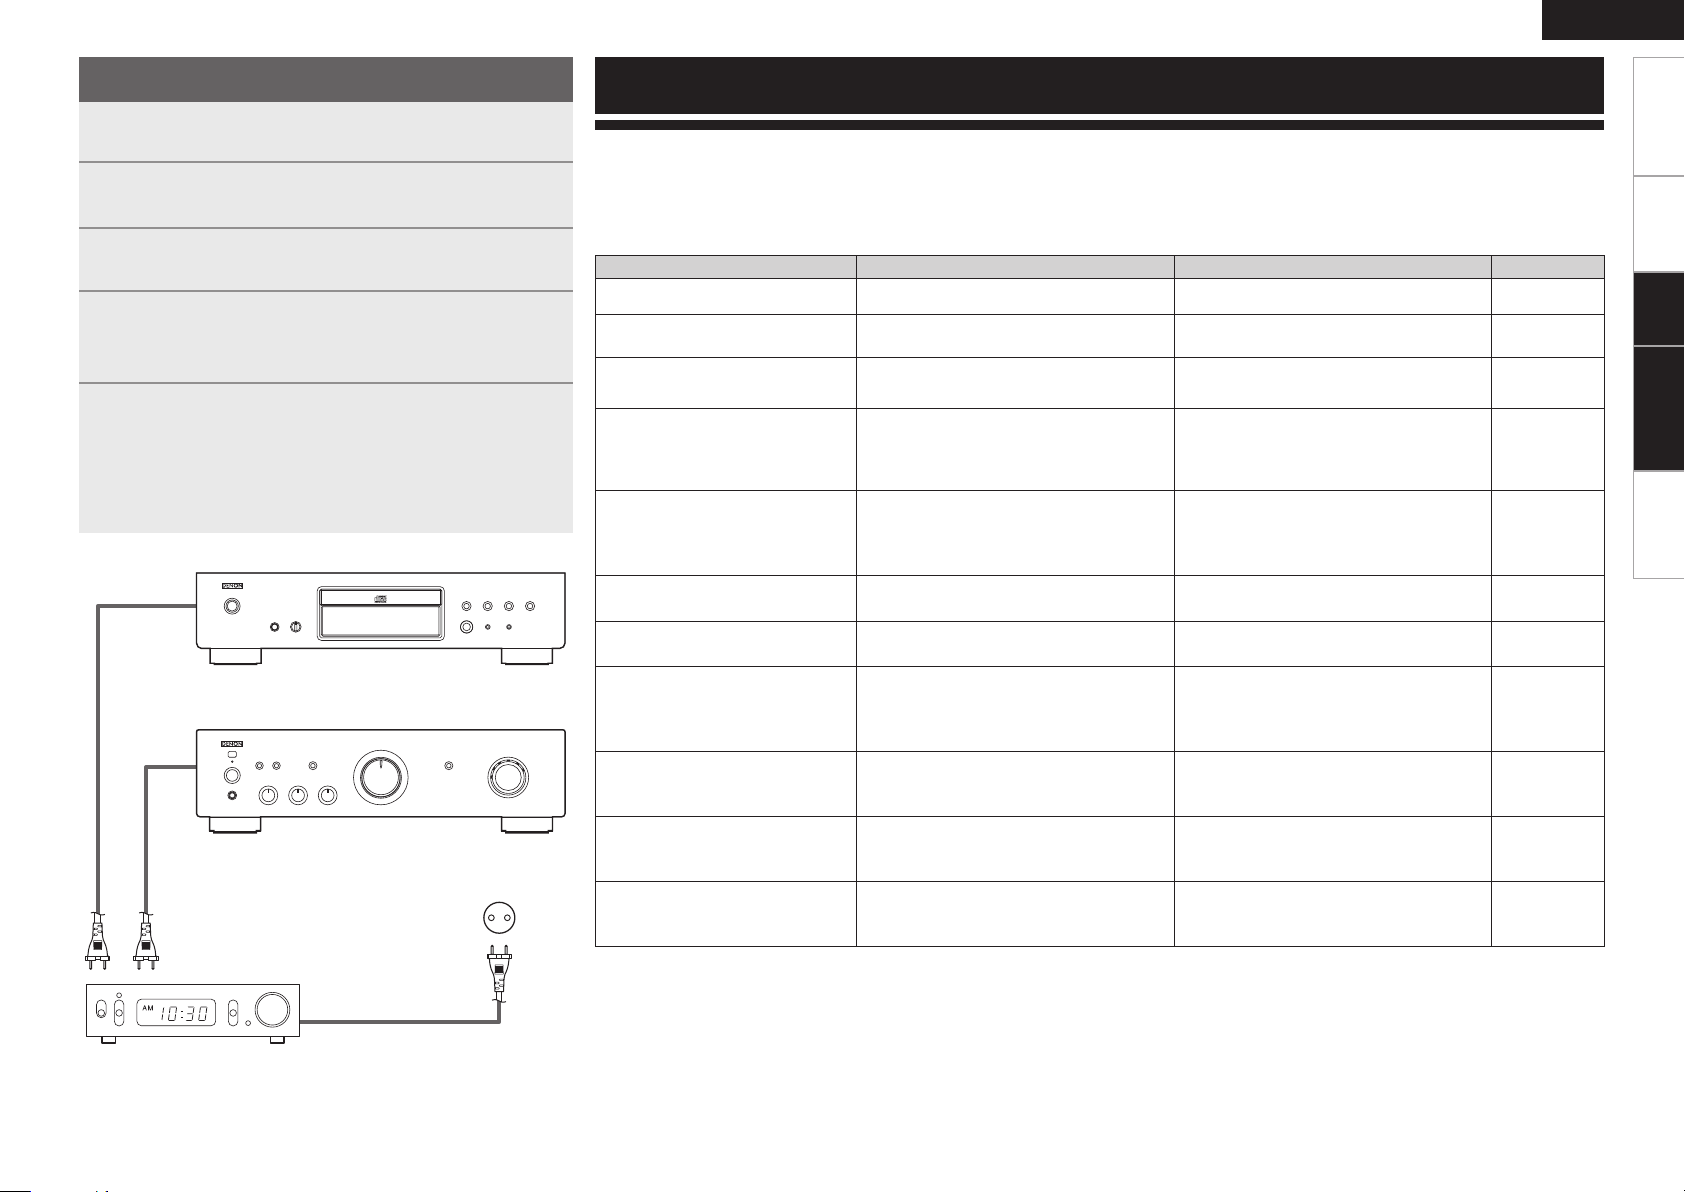
Using the Timer Play Function
Turn on the power of the connected components.
1
Switch the amplier’s function to input from the
2
connected main unit.
Load a disc in the player.
3
Set the audio timer for the desired times.
4
b Refer also to the owner’s manual of the audio timer.
Turn the timer “ON”.
The power of the components connected to the timer turns
5
off.
b When the set time is reached, the power of the different
components automatically turns on and playback starts from the
rst track.
DN-C110
Amplifier
AC outlet (Wall)
ENGLISH
Troubleshooting
Ifaproblemshouldarise,rstcheckthefollowing:
1. Are the connections correct?
2. Is the set being operated as described in the owner’s manual?
If this unit does not operate properly, check the items listed in the table below. Should the problem persist, there may be a malfunction.
In this case, disconnect the power immediately and contact your store of purchase.
Symptom Cause Countermeasure Page
Disc tray does not open. • The power is not on. • Turn on the power. 7
“NO DISC” is displayed even
though a disc is loaded.
“00 Tr 00 : 00” is displayed even
though a disc is loaded.
Playback does not start even when
the 1/3 button on the main unit
or the 1 button on the remote
control unit is pressed.
No sound is produced or sound is
distorted.
No digital signals are output. • The connection cables are not properly
Specic section of the disc cannot
be played properly.
Programmed playback is not
possible.
A CD-R or CD-RW disc cannot be
played.
Set does not operate properly when
remote control unit is operated.
“Not Support” is displayed when
playing les recorded in MP3 or
WMA format.
• The disc is not properly loaded.
• The loaded disc is not a CD. • Load a CD.
• The disc is dirty or scratched. • Wipe the dirt off the disc or replace the
• The output cables are not properly
connected to the amplier.
• The amplier’s function setting or
adjustments are not right.
connected.
• The disc is dirty or scratched. • Wipe the dirt off the disc or replace the
• The tracks have not been programmed
properly.
• Programmed playback is not possible
with MP3 and WMA les.
• The disc has not been nalized.
• The recording conditions are bad or the
quality of the disc itself it poor.
• The batteries are spent.
• The remote control unit is too far from
the set.
• You have selected a copyright-protected
WMA le or a le that cannot be played
normally.
• Reload the disc.
disc.
• Check the connections.
• Check the amplier’s function and
controls and adjust as necessary.
• Check the connections.
disc.
• Program properly.
• Use a CD.
• Finalize the disc then play it.
• Use a properly recorded disc.
• Replace the batteries with new ones.
• Move the remote control unit closer to
the set.
• Use the
different le.
8 or 9 button to select a
2, 3
2
3
6
–
6
3
9
9
2
2
3
3
10
Getting Started Connections
TroubleshootingPlayback
Specications
Timer device
Page 16
ENGLISH
Getting Started Connections Playback Troubleshooting
Specications Index
Audio performance
n
• Analog output
Channels: 2 channels
Playable frequency range:
S/N:
Dynamic range:
Harmonic distortion:
Wow
Output level:
Signal type:
Sampling frequency:
Usable discs: Compact Disc
• Digital output
Optical: –15 ~ –21 dBm
Emission wavelength: 660 nm
n
Power supply: AC 230 V, 50 Hz
Specications
Power consumption:
Maximum external dimensions:
Weight:
n
Power supply: R03/AAA Type (two batteries)
Maximum external dimensions:
Weight:
b For purposes of improvement, specications and design are subject to change without notice.
&utter: Below measurable limits
General
Remote control unit (RC-1132)
2 Hz ~ 20 kHz
105 dB
98 dB
0.003 % (1 kHz)
2.0 V (10 kΩ/kohms)
16-bit linear PCM
44.1 kHz
13 W
434 (W) x 107 (H) x 279 (D) mm
4.0 kg
49 (W) x 220 (H) x 21 (D) mm
106 g (including batteries)
A
A-B repeat play ······················································ 8
All-track repeat ······················································ 8
Analog Connections ·············································· 6
Audio cable ···························································5
B
Batteries ································································3
C
Cables Used for Connections ······························· 5
CD-R/CD-RW ·························································2
D
Digital Connections ··············································· 6
Disc Mode ··························································· 10
Display ··································································· 4
Display’s Brightness ·············································7
E
Extension ······························································· 9
F
Fast-Forwarding ·····················································8
Fast-Reversing ·······················································8
File format ·····························································9
Folder ··································································10
Folder Mode ························································10
P
Playing CDs ···························································8
Playing Random Order ·········································· 9
Playing Repeatedly ················································ 8
Playing Tracks in the Desired Order ······················9
Power Cord ····························································6
Program playback ··················································9
R
Random Playback ·················································· 9
Repeat Playback ···················································· 8
S
Searching ······························································8
Single-track repeat ················································ 8
Skipping·································································8
Stopping Playback ················································· 8
Stopping Playback Temporarily ····························· 8
T
Timer Play Function ············································· 11
W
WMA ···································································10
H
Headphones ·························································· 7
M
Moving to the Beginning of Tracks ······················· 8
MP3 ····································································· 10
Music CDs ·····························································2
O
Optical cable ·························································5
Page 17
TOKYO, JAPAN
www.denon.com
Professional Business Company, D&M Holdings Inc.
Printed in China 5411 10310 006D
 Loading...