

Page 1
1
ENGLISH
AVR-5800/AVC-A1SE UPGRADE OPERATING INSTRUCTION
Thank you for using the AVR5800/AVC-A1SE Upgrade Service.
When using the amplifier after upgrading it, please refer to these instructions as well as the operating instructions
included with the AVR5800/AVC-A1SE.
4
FEATURES
1. Lucasfilm THX Ultra2 Certified
Home THX is the unique collaboration between
Lucasfilm Ltd. and audio equipment
manufacturers. THX Ultra2 certification is the
highest performance level, and provides a
rigorous set of performance standards, along with
proprietary surround sound post-processing
technologies, designed to enhance the surround
soundtrack playback experience in the home
theater.
In addition to improvements to the power
amplifier with respect to previous THX Ultra
standards, two surround modes have been added:
the THX Ultra2 Cinema mode and the THX Music
mode.
2. DTS 96/24 compatibility
The AVR-5800/AVC-A1SE Upgrade is compatible with
sources recorded in DTS 96/24, a new multi-channel
digital signal format developed by Digital Theater
Systems Inc.
DTS 96/24 sources can be played in the multi-channel
mode on the AVR-5800/AVC-A1SE Upgrade with high
sound quality of 96 kHz/24 bits or 88.2 kHz/24 bits.
3. Dolby Pro Logic II decoder
Dolby Pro Logic II is a new format for playing
multichannel audio signals that offers
improvements over conventional Dolby Pro Logic.
It can be used to decode not only sources
recorded in Dolby Surround but also regular stereo
sources into five channels (front left/right, center
and surround left/right). In addition, various
parameters can be set according to the type of
source and the contents, so you can adjust the
sound field with greater precision.
4. Dolby Headphone Compatibility
This is a three-dimensional sound technology
developed jointly by Dolby Laboratories and Lake
Technoligy Ltd. of Australia for achieving surround
sound using regular headphones.
5. DENON Link
This terminal can be used to connect a Denon
DVD player for high quality digital multichannel
playback.
6. Digital Ext. In
This is a function for future system expansion
when using digital multichannel connections.
7. Auto Surround Mode
This function stores the surround mode last used
for an input signal in the memory and
automatically sets that surround mode the next
time that signal is input.
8. Audio Delay
This is a function for delaying the audio signal with
respect to the video signal. (0 to 200 msec)
9. Setup Lock
This is a function that locks the system setup and
surround parameter settings, etc., so that they
cannot be changed.
10. Delay Time
The maximum settable value has been changed
from 15 feet to 20 feet, the setting steps from 1
foot to 0.1 feet.
7
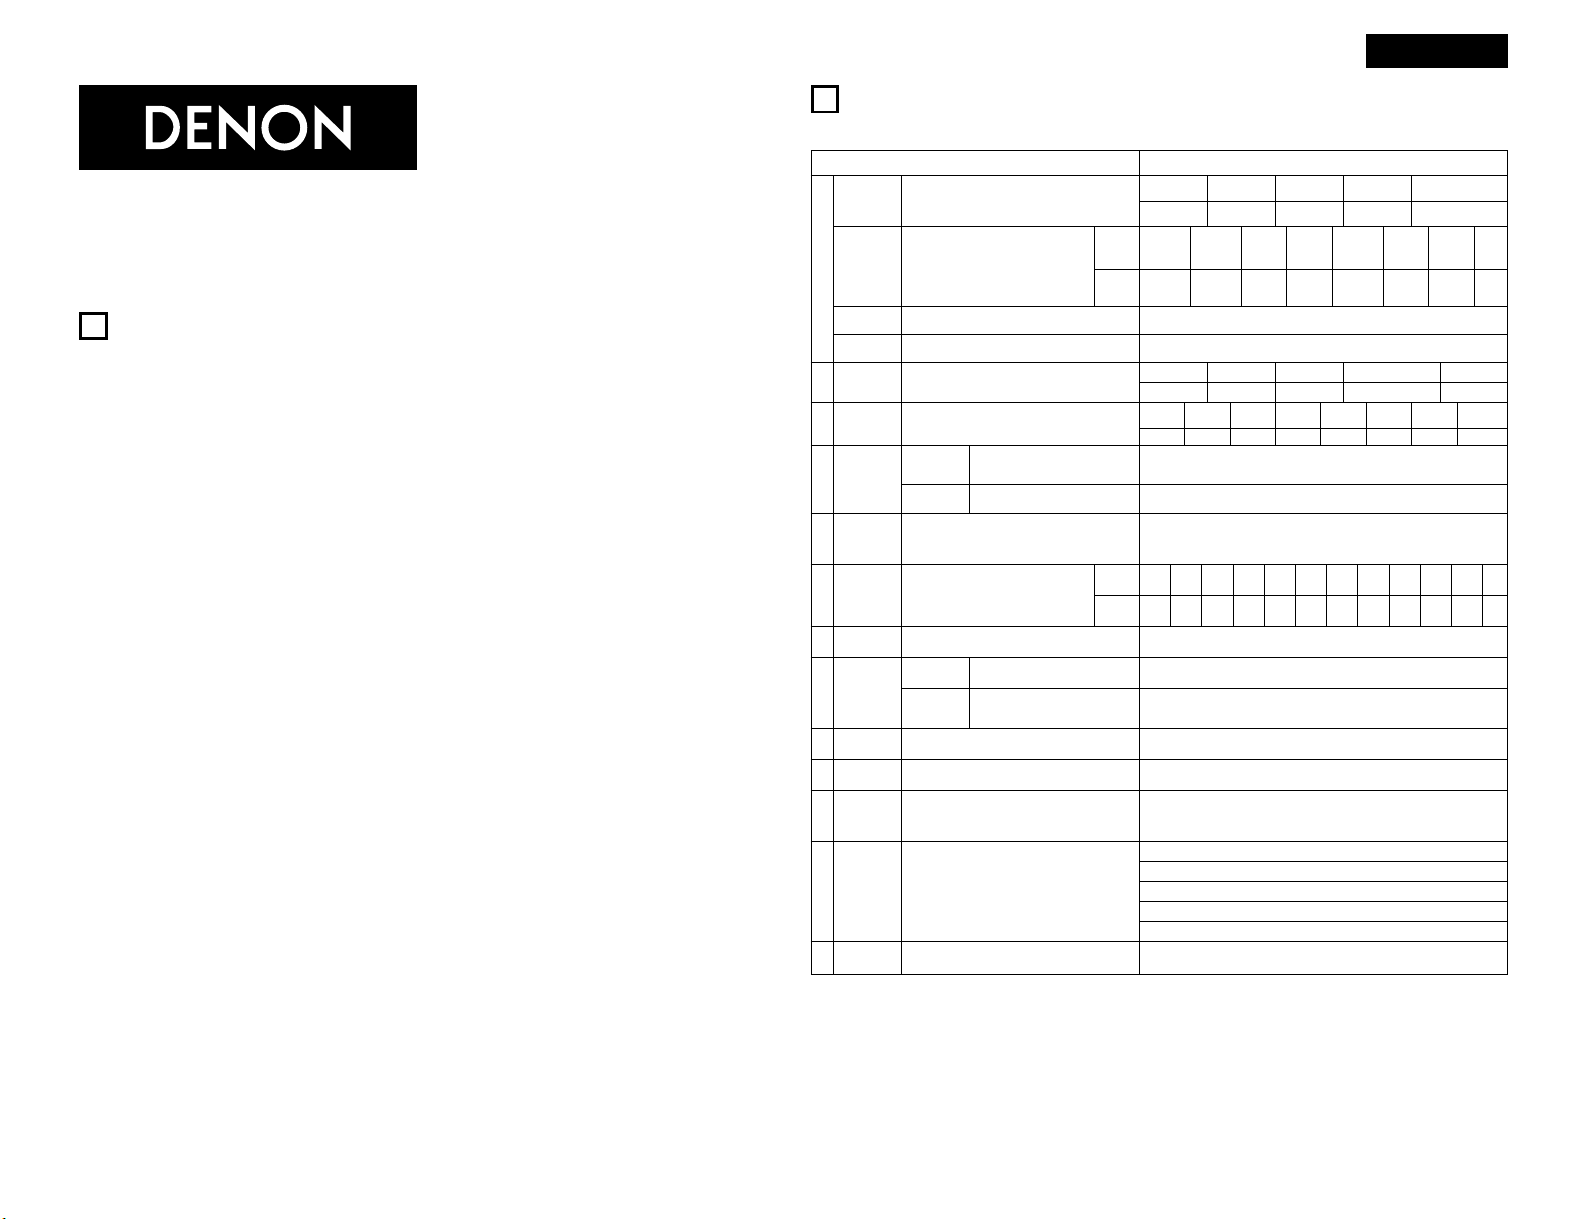
SETTING UP THE SYSTEM
• System setup items and default values (set upon shipment from the factory)
System setup Default settings
q
w
e
t
y
!1
Speaker
Configuration
Surround
Speaker Setting
Subwoofer
mode
Channel Level
Subwoofer
Peak Limit Lev
Digital In
Assignment
On Screen
Display
Input the combination of speakers in your system and their
corresponding sizes (Small for regular speakers, Large for fullsize, full-range) to automatically set the composition of the
signals output from the speakers and the frequency response.
Use this function when using multiple surround
speaker combinations for more ideal surround
sound. Once the combinations of surround
speakers to be used for the different surround
modes are preset, the surround speakers are
selected automatically according to the surround
mode.
This selects the subwoofer speaker for playing deep bass
signals.
This adjusts the volume of the signals output from the speakers
and subwoofer for the different channels in order to obtain
optimum effects.
This parameter is for detecting the maximum level of the low
bass signals output from the subwoofer channel in order to
protect the subwoofer from damage and prevent unpleasant
distorted sounds from being produced.
This assigns the digital input jacks for the different
input sources.
This sets whether or not to display the on-screen display that
appears on the monitor screen when the controls on the remote
control unit or main unit are operated (from MONITOR 1 outputs
only).
Surround
mode
Surround
speaker
Input
source
Digital
Inputs
Front Sp.
Small
Center Sp. Surround Sp.Sub Woofer
Small SmallYes
DOLBY/
DTS
SURROUND
THX/
THX 5.1
WIDE
SCREEN
5CH/7CH
STEREO
DSP
SIMULATION
EXT. IN-1 EXT. IN-2
—
AAAAAAA—
LFE —THX—
Front L & R Center Surround L & RSub Woofer
12 ft (3.6 m) 12 ft (3.6 m) 10 ft (3.0 m)12 ft (3.6 m)
Front L
Center
Front R
Surround
Back R
Surround
L
Subwoofer
0 dB 0 dB 0 dB 0 dB 0 dB 0 dB
Peak Limitter = OFF
CD DVD VDP TV
DBS/
SAT
VCR-1 VCR-2
TAPE-2
COAXIAL1COAXIAL2COAXIAL3OPTICAL1OPTICAL
2
OPTICAL
3
OPTICAL
4
OPTICAL
6
On Screen Display = ON
Surround Back Sp.
Small / 2spkrs
Delay Time
This parameter is for optimizing the timing with which the
audio signals are produced from the speakers and subwoofer
according to the listening position.
SBL & SBR
10 ft (3.0 m)
r
THX Audio
Setup
When using a THX Ultra2 compatible
subwoofer, set the subwoofer’s frequency
response.
THX Ultra2 Subwoofer = NO
Surround
Back L
0 dB
Surround
R
0 dB
TAPE-1
OPTICAL
5
VCR-3
COAXIAL
4
V. AUX
COAXIAL
5
—
—
Crossover
Frequency
Set the frequency (Hz) below which the bass sound of the
various speakers is to be output from the subwoofer.
FIXED —THX—
u
Multi Zone
Control
Variable
When using two surround back speakers,
set the distance of the two speakers.
The Distance Between SBL/SBR = 0 ft to 1 ft (0 m to 0.3 m)
Boundary Gain
compensation
Surround Back
Speaker Position
i
Audio Delay Adjust the time delay of the video and audio signals. Audio Delay = 0 ms
!3
Setup Lock
Set whether or not to lock the system setup settings so that
they cannot be changed.
Setup Lock = OFF
This sets the output level for the multi-zone
1 output jacks.
Set this to switch the surround back
channel’s power amplifier for use for multizone 2.
Multi Zone-1
Vol. Level
Power AMP
Assignment
Surround back
o
Auto Surround
Mode
Auto surround mode function setting. Auto Surround Mode = ON
!0
Digital Multi Ch
In
Digital multichannel input setting. DENON Link = OFF, Digital Ext. In = OFF
!2
Auto Tuner
Presets
(AVR-5800
only)
FM stations are received automatically and stored in the
memory.
A1 ~ A8 87.5/89.1/98.1/107.9/90.1/90.1/90.1/90.1 MHz
B1 ~ B8 520/600/1000/1400/1500/1710 kHz/90.1/90.1 MHz
C1 ~ C8 90.1 MHz
D1 ~ D8 90.1 MHz
E1 ~ E8 90.1 MHz
This upgrade adds the following functions and specifications:
Page 2
2
ENGLISH
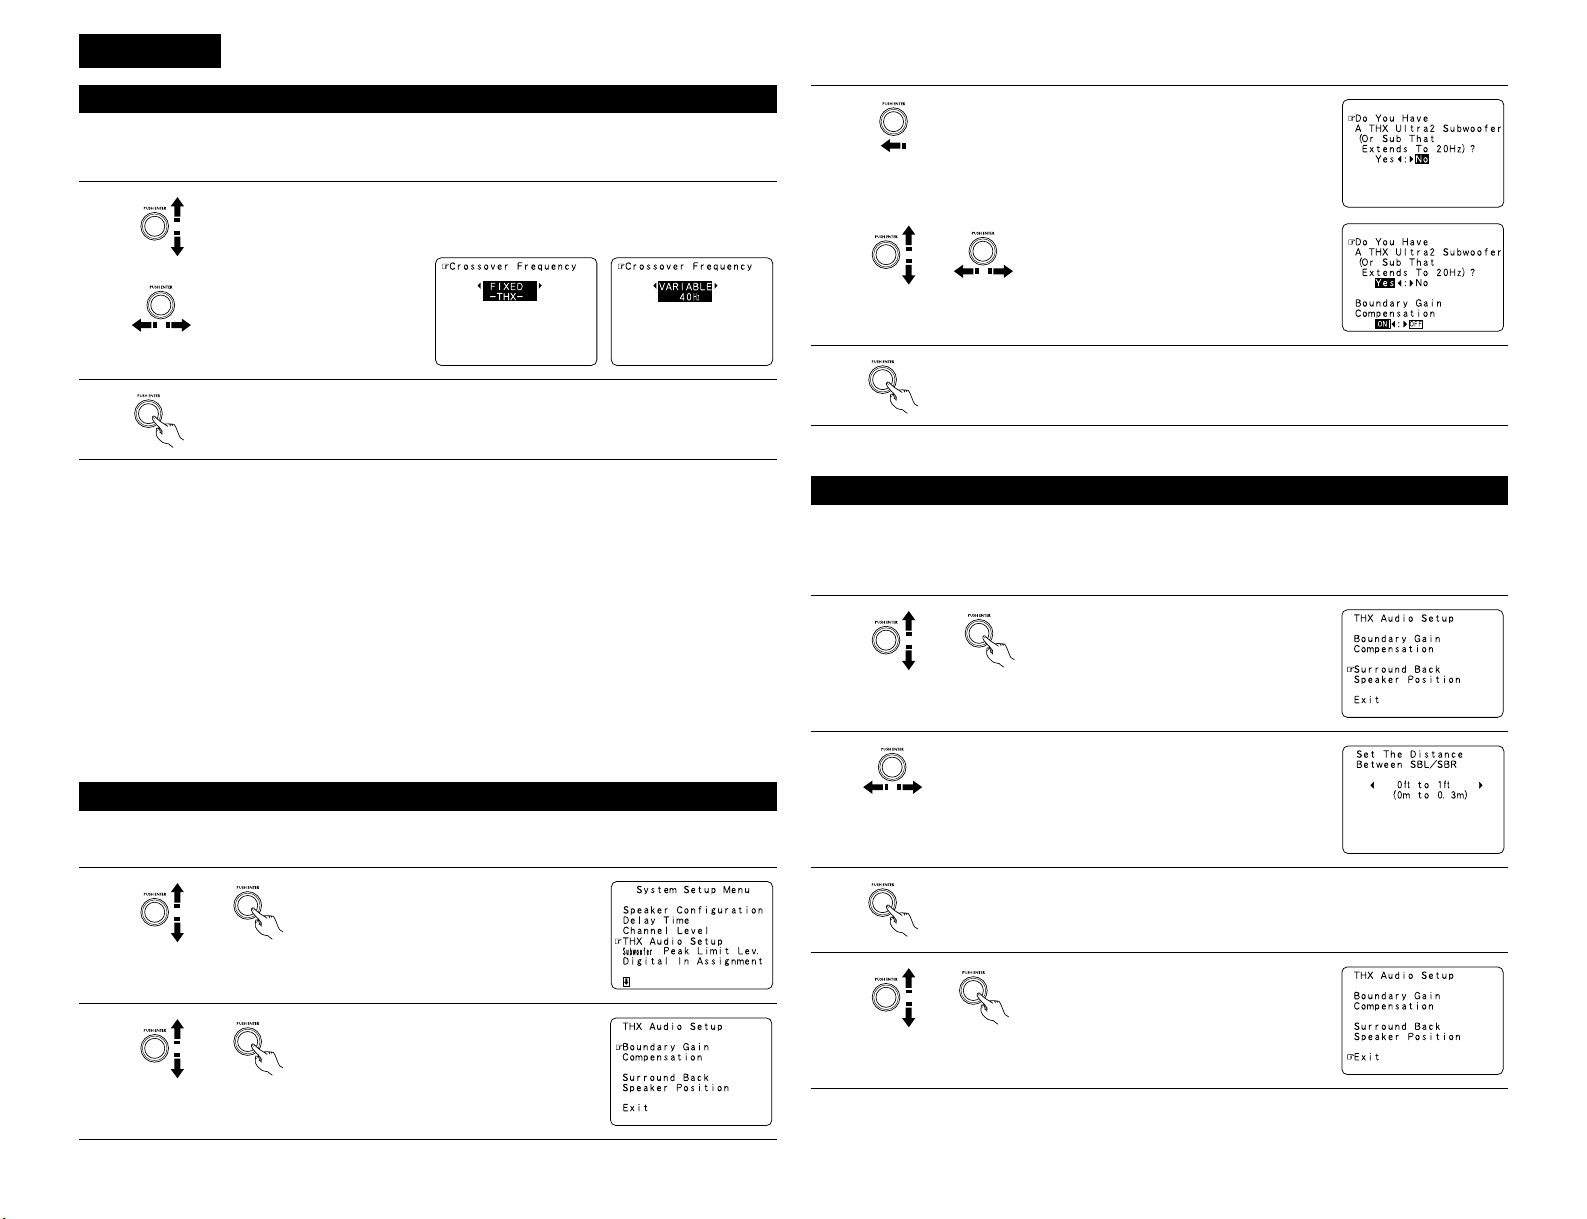
Setting the Crossover Frequency
1
Select the “Crossover Frequency” mode.
• Set the crossover frequency according to the speaker system being used.
• Select “Speaker Configuration” on the System Setup Menu screen, then press jog stick “ENTER” twice or
three times.
Select the Frequency.
2
Enter the setting.
The System Setup Menu reappears.
Crossover frequency
• Set the frequency (Hz) below which the bass sound of each main speakers is to output from the subwoofer
or from speakers which are set to “Large” (when not using a subwoofer) (crossover frequency).
• For speakers set to “Small”, sound with a frequency below the crossover frequency is cut, and instead the
cut bass sound is output from the subwoofer or speakers which are set to “Large”.
• This crossover frequency mode is valid when “Subwoofer” is set to “Yes” at “Speaker Configuration Setting”
or when speakers are set to “Small”.
FIXED –THX–:
Set to the THX rated 80 Hz crossover frequency.
VARIABLE 40, 60, 80, 100, 120 Hz:
Set as desired according to your speakers’ bass playback ability.
NOTES:
• The crossover frequency is set to 80 Hz in the HOME THX CINEMA mode.
• We recommend using with the crossover frequency set to “FIXED –THX–”, but depending on the speaker,
setting it to a different frequency may improve frequency response near the crossover frequency.
2
Select “Boundary Gain Compensation”, then
press jog stick “ENTER”.
Make these settings when “Yes” is selected for the subwoofer in the Speaker Configuration settings.
There is not displayed when “No” selected.
Settings for using a THX Ultra2 compatible subwoofer
1
Select “THX Audio Setup” on the System
Setup Menu screen, then press jog stick
“ENTER” to switch to the THX Audio Setup
screen.
3
When using a THX Ultra2 compatible subwoofer or
subwoofer that frequency response extends to 20 Hz, select
“Yes”. Otherwise select “No”.
4
Press jog stick “ENTER” to return to the THX Audio Setup
screen.
• When “Yes” is selected
“Boundary Gain Compensation” can be
selected and the compensation set to “OFF”.
• If the bass sound seems too strong
Set “Boundary Gain Compensation” to “ON”.
This activates a circuit that cuts the low
frequencies of 55 Hz and under. Select “ON”
or “OFF” according to how strong you like
the bass sound to be.
• When two surround back speakers have been set in the Speaker Configuration settings, set the distance of
the speakers. There is not displayed when “1spkr” selected.
• This setting is necessary to achieve the optimum effect in the THX Surround EX, THX Ultra2 Cinema and THX
Music modes. It is recommended that SBL/SBR speakers are placed together as close as possible.
Surround Back Speaker Position settings
1
Select “Surround Back Speaker Position” on
the THX Audio Setup screen, then press jog
stick “ENTER”.
2
Select the settings according to the distances of the two
surround back speakers.
3
Press jog stick “ENTER” to return to the THX Audio Setup
screen.
4
Select “Exit” then press jog stick “ENTER” to
return to the System Setup Menu screen.
Page 3
3
ENGLISH
This function allows you to adjust the time delay of the video and audio signals and store these settings for the
different input sources.
The setting is made while watching a DVD or other software, so it is not made here.
By default, this is not displayed when no digital signals are being input.
For instructions on making the setting, refer to page 8.
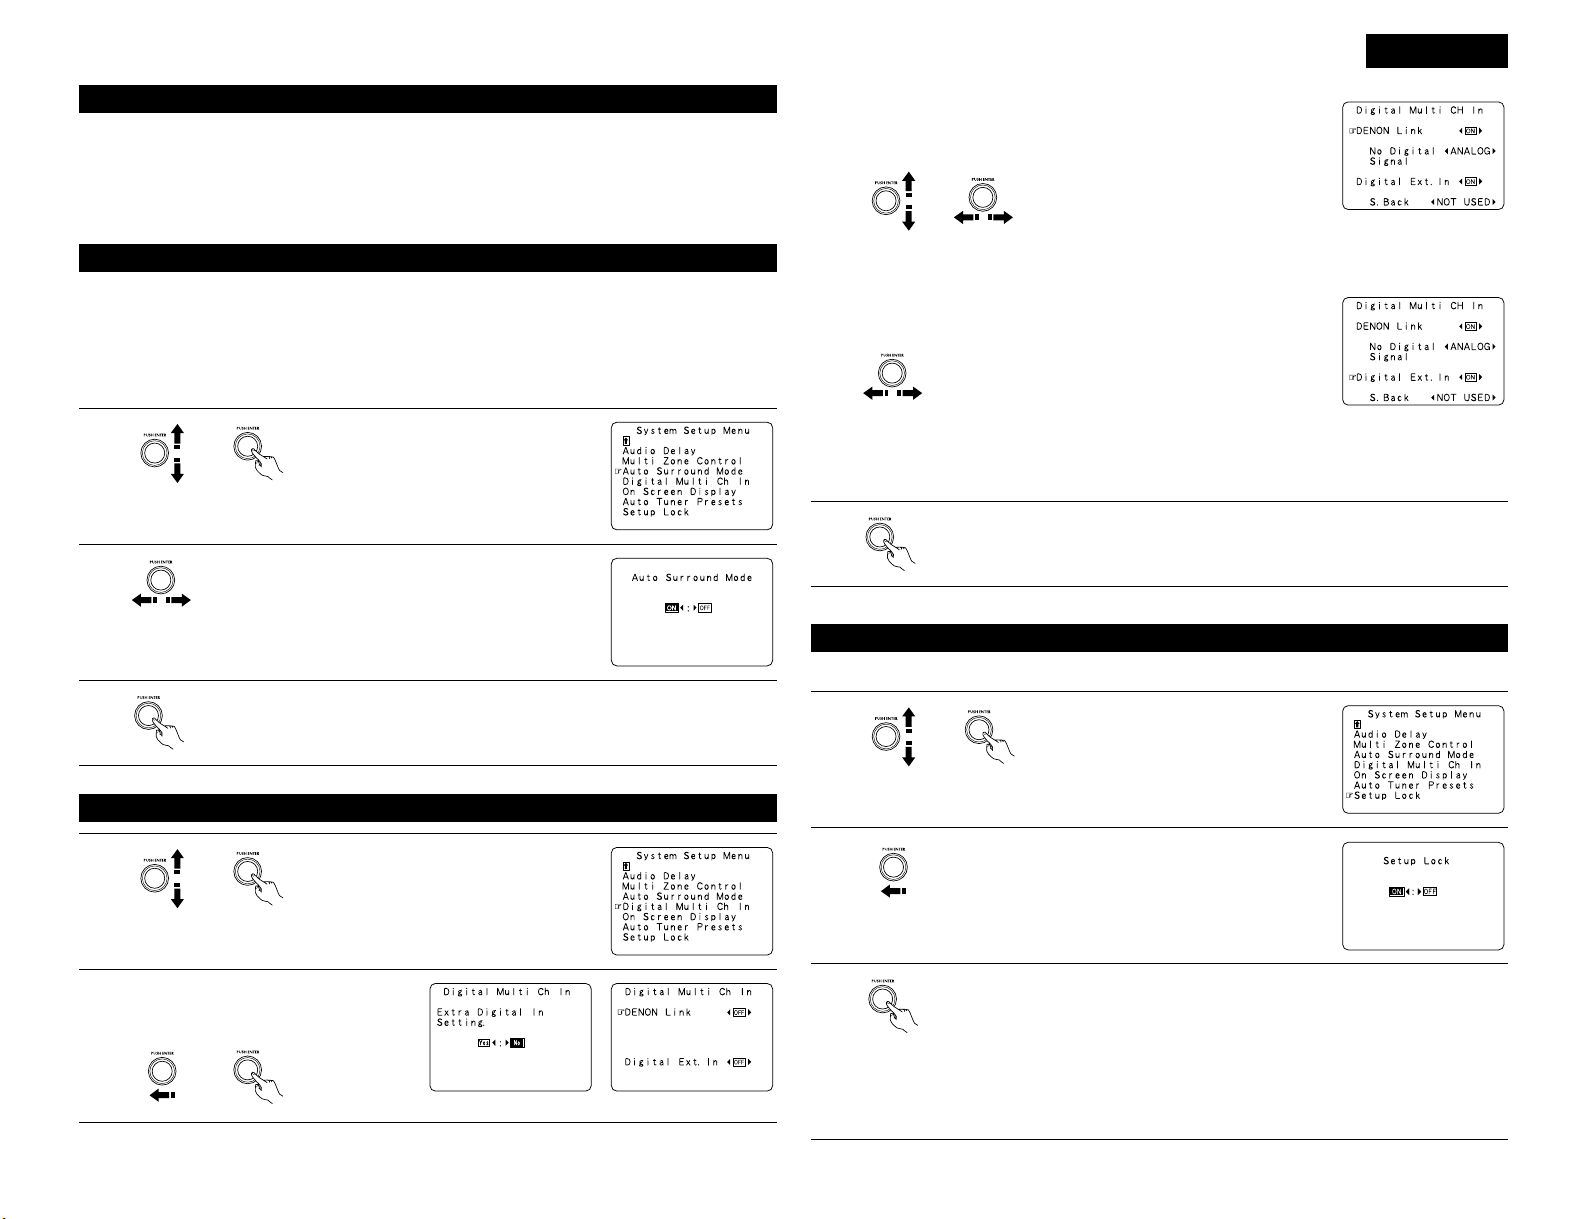
Adjusting the Audio Delay
Setting the Auto Surround Mode
The surround mode last used for the three types of input signals shown below is stored in the memory and the
signal is automatically played with that surround mode the next time it is input.
Note that the surround mode setting is also stored separately for the different input sources.
q Analog and PCM 2-channel signals
w 2-channel signals of Dolby Digital, DTS or other multichannel format
e Multichannel signals of Dolby Digital, DTS or other multichannel format
1
Select “Auto Surround Mode” on the System
Setup Menu screen, then press jog stick
“ENTER”.
2
Select “ON” if you want to use the auto surround mode,
“OFF” if you do not want to use it.
3
This is set for the Digital Ext. In input using the Coaxial 1 to 4 inputs.
When set to “ON”, the four terminals (Coaxial 1 to 4) are
assigned to the desired input source as a single digital
multichannel input.
When set to “OFF” the four terminals (Coaxial 1 to 4) are
assigned to individual input sources.
3
Enter the setting.
The System Setup Menu reappears.
Digital Ext. In setting :
Setting the Digital Multi CH In
1
Select “Digital Multi Ch In” on the System
Setup Menu screen, then press jog stick
“ENTER”.
Set this when connecting a Denon DVD player using the Denon Link
terminal.
Set to “ON” if you want to use the terminal,
“OFF” if you do not want to use it.
When set to “ON”, also set the playback
input when there is no digital signal.
ANALOG: The analog input of the input source assigned to Denon Link is
played.
EXT.-1: The EXT.IN-1 input is played.
EXT.-2: The EXT.IN-2 input is played.
DENON Link setting :
4
Enter the setting.
The System Setup Menu reappears.
The system setup settings can be locked so that they cannot be changed easily.
Protecting the settings
1
Select “Setup Lock” on the System Setup
Menu screen, then press jog stick “ENTER”
to switch to the Setup Lock screen.
2
Select “ON”, to lock the system setup settings.
3
Press jog stick “ENTER” to finalize the setting and exit the system setup mode.
When the setup lock function is activated, the settings listed below cannot be changed,
and “Setup Locked” is displayed when related buttons are operated.
• System setup settings
• Surround parameter settings
• Tone control settings
• Channel level settings (including test tones)
To unlock, press the System Setup button again and display the Setup Lock screen, then
select “OFF”.
2
To set, select “Yes” and press jog stick
“ENTER”.
When “ON” was selected at “Digitl Ext. In”, set the surround back channel input.
If you do not want to use the surround back channel ........NOT USED
If you do want to use the surround back channel, set according to the specifications of the connected
player.
Page 4
4
ENGLISH
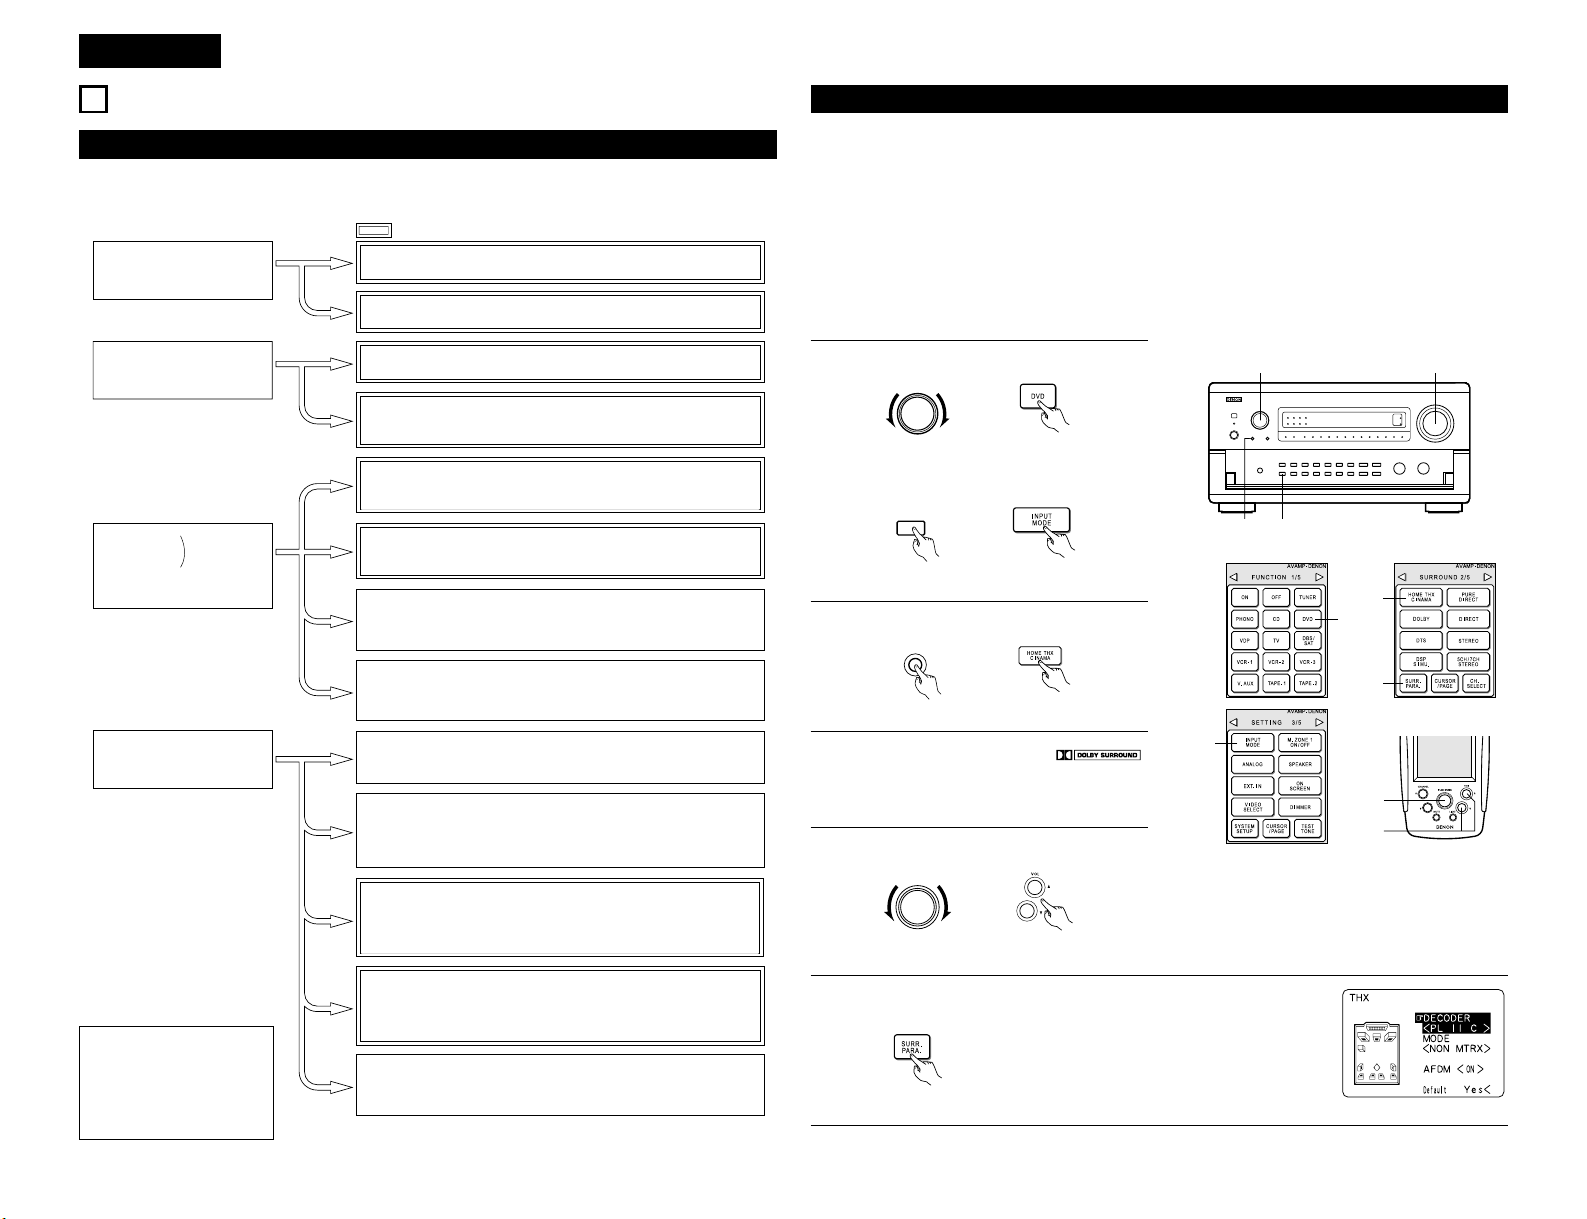
Playing modes for different sources
The AVR-5800/AVC-A1SE Upgrade is equipped with many surround modes. We recommend using the surround
modes as described below in order to achieve the maximum effect for the specific signal source.
• Though we recommend
selecting the surround
mode as described
above, other surround
modes can also be
selected.
2 ch sources recorded in
Dolby Surround
Sources recorded in stereo
Sources recorded in monaural
Sources recorded in
Dolby Digital Surround EX
•
Maximum performance for playing movies on the AVR-5800/AVC-A1SE Upgrade
.
•
This mode is optimized for playing sources recorded in Dolby Digital Surround EX.
Dolby Digital
or
DTS Surround
THX SURROUND EX
DOLBY DIGITAL EX
DTS-ES DSCRT 6.1, MTRX 6.1
• Effective for 2-channel sources recorded in Dolby Surround or for 7.1-channel
playback with 5.1-channel sources.
WIDE SCREEN
• These modes are suited for playing 5.1-channel sources in 7.1 channels.
Select the desired surround mode for the movie and music sources.
THX Ultra2 CINEMA* and THX MUSIC MODE*
• This mode is optimized for playing 5.1-channel movies.
• For sources recorded in Dolby Surround as well, this mode provides the
same power as with 5.1-channel sources.
HOME THX CINEMA (THX 5.1)
• This mode is optimized for playing 5.1-channel music.
• For Dolby surround recording sources, Dolby Pro-Logic II playback is
conducted.
DOLBY DIGITAL / DTS SURROUND / DTS 96/24
• By suspending all the video circuits, analog input music playback can be
played with optimum quality. (The video outputs do not operate.)
PURE DIRECT
• This surround mode plays stereo sources developed by Dolby Laboratories
in 5.1 channels.
• Select one of the three playback modes according to your tastes.
DOLBY PROLOGIC II
• Effective for achieving pure playback.
• If there is no need for tone control or distribution of the low frequencies in
function of the speaker configuration, select the DIRECT mode to achieve the
best sound quality.
DIRECT / STEREO
• Select these for 7.1-channel playback with sources recorded in stereo or
monaural.
• The effects are different for each of the surround modes.
Select the one most suited for the source being used.
DENON Original Surround Modes
5.1 ch sources
Sources recorded in DTS-ES
• This is the optimum mode for playing sources recorded in DTS-ES.
• When playing movies, setting this mode sometimes results in a more
natural sound. Select the mode as desired.
THX DSCRT 6.1, MTRX 6.1
is a 6.1-channel/7.1-channel surround mode.
• This is a surround mode for playing 6.1- or 7.1-channel stereo sources
developed by Digital Theater Systems.
• One of two playing modes, MUSIC (for music sources) or CINEMA
(for movie sources), can be selected according to your preferences.
DTS NEO:6
NOTE:
Surround modes indicated with an
asterisk (*) require the use of two
surround back speakers.
10
SURROUND
[1] Playing sources recorded in Dolby Surround in the Home THX Cinema surround mode
THX Surround EX / Home THX Cinema mode
When the HOME THX CINEMA button is pressed, the surround mode is set as follows according to the signal
that is played:
q THX Surround EX (THX Ultra2 Cinema)
w Home THX CINEMA
e THX 5.1
r THX DSCRT 6.1, THX MTRX 6.1
When the HOME THX CINEMA mode is set when a DVD is played, check the DVD player’s digital output setting
and change the setting to one for which Dolby Digital and DTS bit stream signals can be output (“bit stream”,
for example).
1
q Select the input source.
INPUT SELECTOR
(Main unit) (Remote control unit)
1-q
1-w
3
5, 7
6
4
1-w2
1-q
4
2
Select the Home THX Cinema mode.
HOME
THX CINEMA
(Main unit) (Remote control unit)
3
Play a program source with the
mark.
• For operating instructions, refer to the
manuals of the respective components.
w Set the input mode to “AUTO”.
INPUT
MODE
(Main unit) (Remote control unit)
4
Adjust volume.
MASTER VOLUME
(Main unit) (Remote control unit)
5
Display the Surround Parameter screen and set the parameters according to
the source.
(Remote control unit)
Page 5
5
ENGLISH
Surround parameters w
For instructions on setting the surround parameters, see page 4.
MODE/SB CH OUT:
Select the surround back channel playback method or surround mode.
THX Surround EX ........Dolby Digital signals are played in the THX Surround EX mode.
Ultra2 Cinema .............The signals are played in the THX Ultra2 Cinema mode.
Music Mode................The signals are played in the THX Music mode.
NON MTRX.................The same signals as those of the surround channels are output from the surround
back channels.
MTRX ON ...................The surround channel signals undergo digital matrix processing and are output
from the surround back channels.
SB OFF (OFF)..............No signal is played from the surround back channels.
ES MTRX ....................When playing DTS signals, the surround back signals undergo digital matrix
processing for playback.
ES DSCRT...................When a signal identifying the source as a discrete 6.1-channel source is included
in the DTS signals, the surround back signals included in the source are played.
AFDM (Auto Flag Detect Mode):
ON .......This function only works with software on which a special identification signal is recorded. This
software is scheduled to go on sale in the future.
This is a function for automatically playing in the 6.1-channel mode using the surround back
speakers if the software is recorded in THX Surround EX or DTS-ES or in the normal 5.1-channel
mode without using the surround back speakers when the software is not recorded in THX
Surround EX or DTS-ES.
OFF......Set the “OFF” mode to perform 6.1-channel playback with conventional 5.1-channel sources or
sources on which the identification signal described below is not recorded.
6
q Select the parameter.
(Remote control unit)
w Select the setting.
(Remote control unit)
7
Surround parameters q
DECODER:
Select the decoder to be used when playing 2-channel sources in the Home THX Cinema mode.
PL II C........The signals are decoded in the Dolby Pro Logic II Cinema mode before undergoing THX
processing.
PL II E ........The signals are decoded in the Dolby Pro Logic emulation mode before undergoing THX
processing.
NEO:6 C ....The signals are decoded in the NEO:6 Cinema mode before undergoing THX processing.
MODE/SB CH OUT:
Select the surround back channel playback method or surround mode.
NORMAL (ON)............This is the recommended play mode for using the surround back channel when
DTS NEO:6 is selected.
NORMAL (OFF) ..........This is the recommended play mode when Dolby Pro Logic II is selected. The
surround back channel is not played.
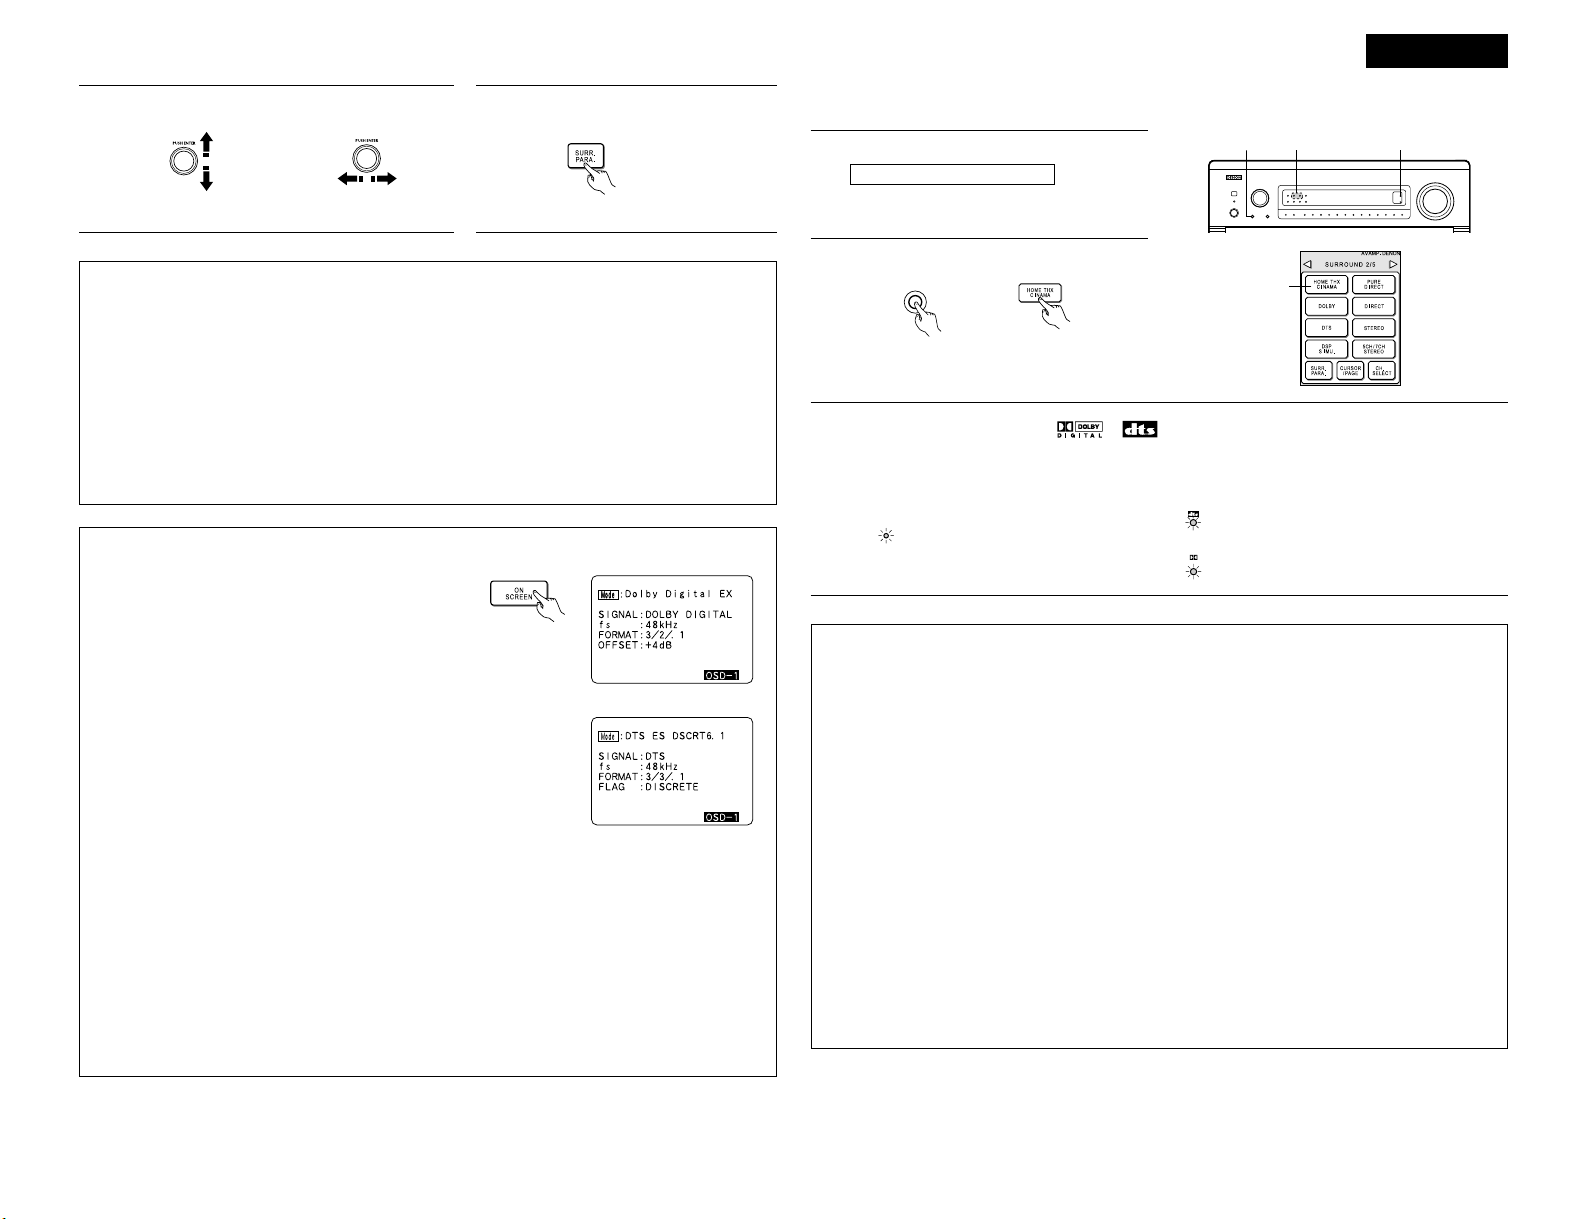
Checking the input signal
The input signal can be checked by pressing the remote
control unit’s ON SCREEN button.
SIGNAL: Displays the type of signal (DTS, DOLBY
DIGITAL, PCM, etc.).
fs: Displays the input signal’s sampling frequency.
FORMAT: Displays the input signal’s number of channels.
“Number of front channels/Number of
surround channels/LFE on/off”
“SURROUND” is displayed for 2-channel signal sources
recorded in Dolby Surround.
OFFSET: Displays the dialog normalization offset value.
FLAG: Displays the special identification signal recorded in the input
signal.
“MATRIX” is displayed when matrix processing is conducted
on the surround back channel, “DISCRETE” is displayed when
discrete processing is conducted.
Not displayed when no identification signal is recorded.
In addition, screen information is displayed in the following order when the OSD button is pressed
repeatedly:
OSD-1 Input signal
OSD-2 Input/output
OSD-3 Auto surround mode
OSD-3 ~ 7 Tuner preset stations
NOTE:
OSD-3: This is displayed when the auto surround mode is set to “ON” and the input mode is
set to “Auto”.
It is not displayed when the input mode is set to “Analog” or “EXT. IN-1,-2”.
OSD-3 ~ 7: AVR-5800 only.
(Remote control unit)
Selecting a digital input source
The Dolby Digital indicator lights when
playing Dolby Digital sources.
DIGITAL
When playing DTS sources, the DTS
indicator lights.
The surround back indicator lights
green when playing in the THX
SURROUND EX mode.
SURROUND
BACK CH
OUTPUT
[2] To play in the THX Surround EX/Home THX Cinema Surround mode for sources
recorded in Dolby Digital or DTS
1
Select the program source.
Perform step 1 under “Dolby Digital mode and
DTS Surround”.
2
Select the Home THX Cinema mode.
HOME
THX CINEMA
(Main unit) (Remote control unit)
3
Play a program source with the , mark.
For operating instructions, refer to the manuals of the respective components.
The channel status information during playback of Dolby Digital and DTS sources can be checked using
the “STATUS” button on the main unit.
2
32 3
Press the SURR.PARA. button to
complete the setting.
(Remote control unit)
Page 6
6
ENGLISH
1-w 2
1-q 3 3
1-q
1-w
2
2
4, 6
5
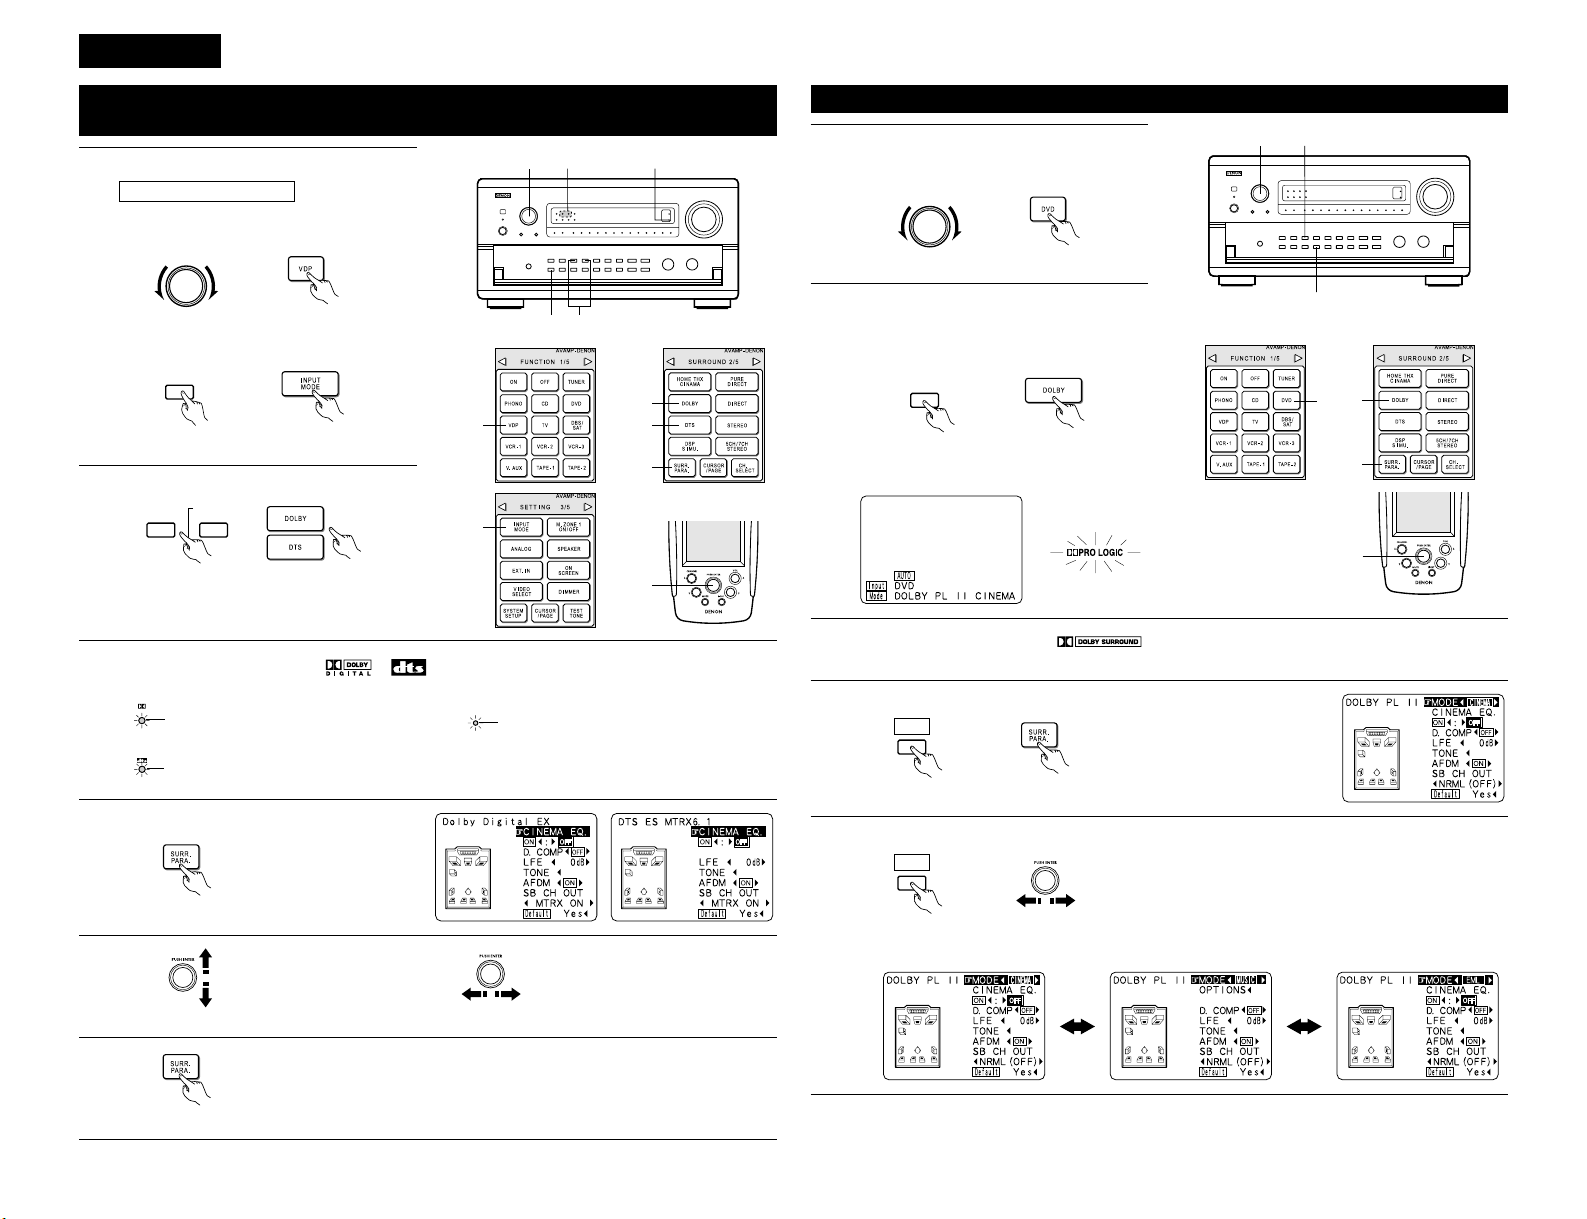
Dolby Digital mode (only with digital input) and DTS Surround
(only with digital input)
Playback with digital input
1
Select the input source.
q Select an input source set to digital
(COAXIAL/OPTICAL).
INPUT SELECTOR
(Main unit) (Remote control unit)
w Set the input mode to “AUTO”.
INPUT
MODE
(Main unit) (Remote control unit)
2
Select the Surround mode.
DOLBY
SURROUND
DTS
SURROUND
(Main unit) (Remote control unit)
3
Play a program source with the , mark.
4
Display the surround parameter menu.
(Remote control unit)
5
q Select the various
parameters.
(Remote control unit)
w Adjust the parameter settings.
(Remote control unit)
DIGITAL
• The DTS indicator lights when
playing DTS sources.
Light
Light
SIGNAL
DETECT
• The SIGNAL DETECT indicator
lights when playing sources on
which a special identification
signal is recorded.
Light
• The Dolby Digital indicator lights
when playing Dolby Digital
sources.
6
Press the SURR.PARA. button to complete the setting.
(Remote control unit)
5
Select the optimum mode for the source.
CINEMA /
MUSIC
(Main unit) (Remote control unit)
DOLBY PL II CINEMA
DOLBY PL
II MUSIC DOLBY PL II EMULATION
1
Select the function to which the component
you want to play is connected.
EX:
2
Select the Dolby Surround Pro Logic II mode.
Dolby Surround Pro Logic IImode
INPUT SELECTOR
(Main unit) (Remote control unit)
3
Play a program source with the mark.
• For operating instructions, refer to the manuals of the respective components.
Light
(Main unit)
(Remote control unit)
DOLBY
SURROUND
Select the DOLBY PRO LOGIC II mode using
the DOLBY SURROUND buttons.
• The Dolby Pro Logic indicator lights.
4, 5
1
2
2
1
4, 7
5, 6
4
Select the surround parameter mode.
CINEMA /
MUSIC
(Main unit) (Remote control unit)
Page 7
ENGLISH
7
6
q Select the various surround parameters.
• DEFAULT setting
NOTE:
• When making parameter settings, the display
will return to the regular condition several
seconds after the last button (main unit) was
pressed and the setting will be completed.
Surround parameters e
Pro Logic II Mode:
The Cinema mode is for use with stereo television
shows and all programs encoded Dolby Surround.
The Music mode is recommended as the standard
mode for autosound music systems (no video),
and is optional for A/V systems.
The Pro Logic Emulation mode offers the same
robust surround processing as original Pro Logic in
case the source contents is not of optimum quality.
Select one of the modes (“Cinema”, “Music” or
“EML”).
Panorama Control:
This mode extends the front stereo image to
include the surround speakers for an exciting
“wraparound” effect with side wall imaging.
Select “OFF” or “ON”.
Dimension Control:
This control gradually adjust the soundfield either
towards the front or towards the rear.
The control can be set in 7 steps from 0 to 6.
Center Width Control:
This control adjust the center image so it may be
heard only from the center speaker; only from the
left/right speakers as a phantom image; or from all
three front speakers to varying degrees.
The control can be set in 8 steps from 0 to 7.
(Remote control unit) (Remote control unit)
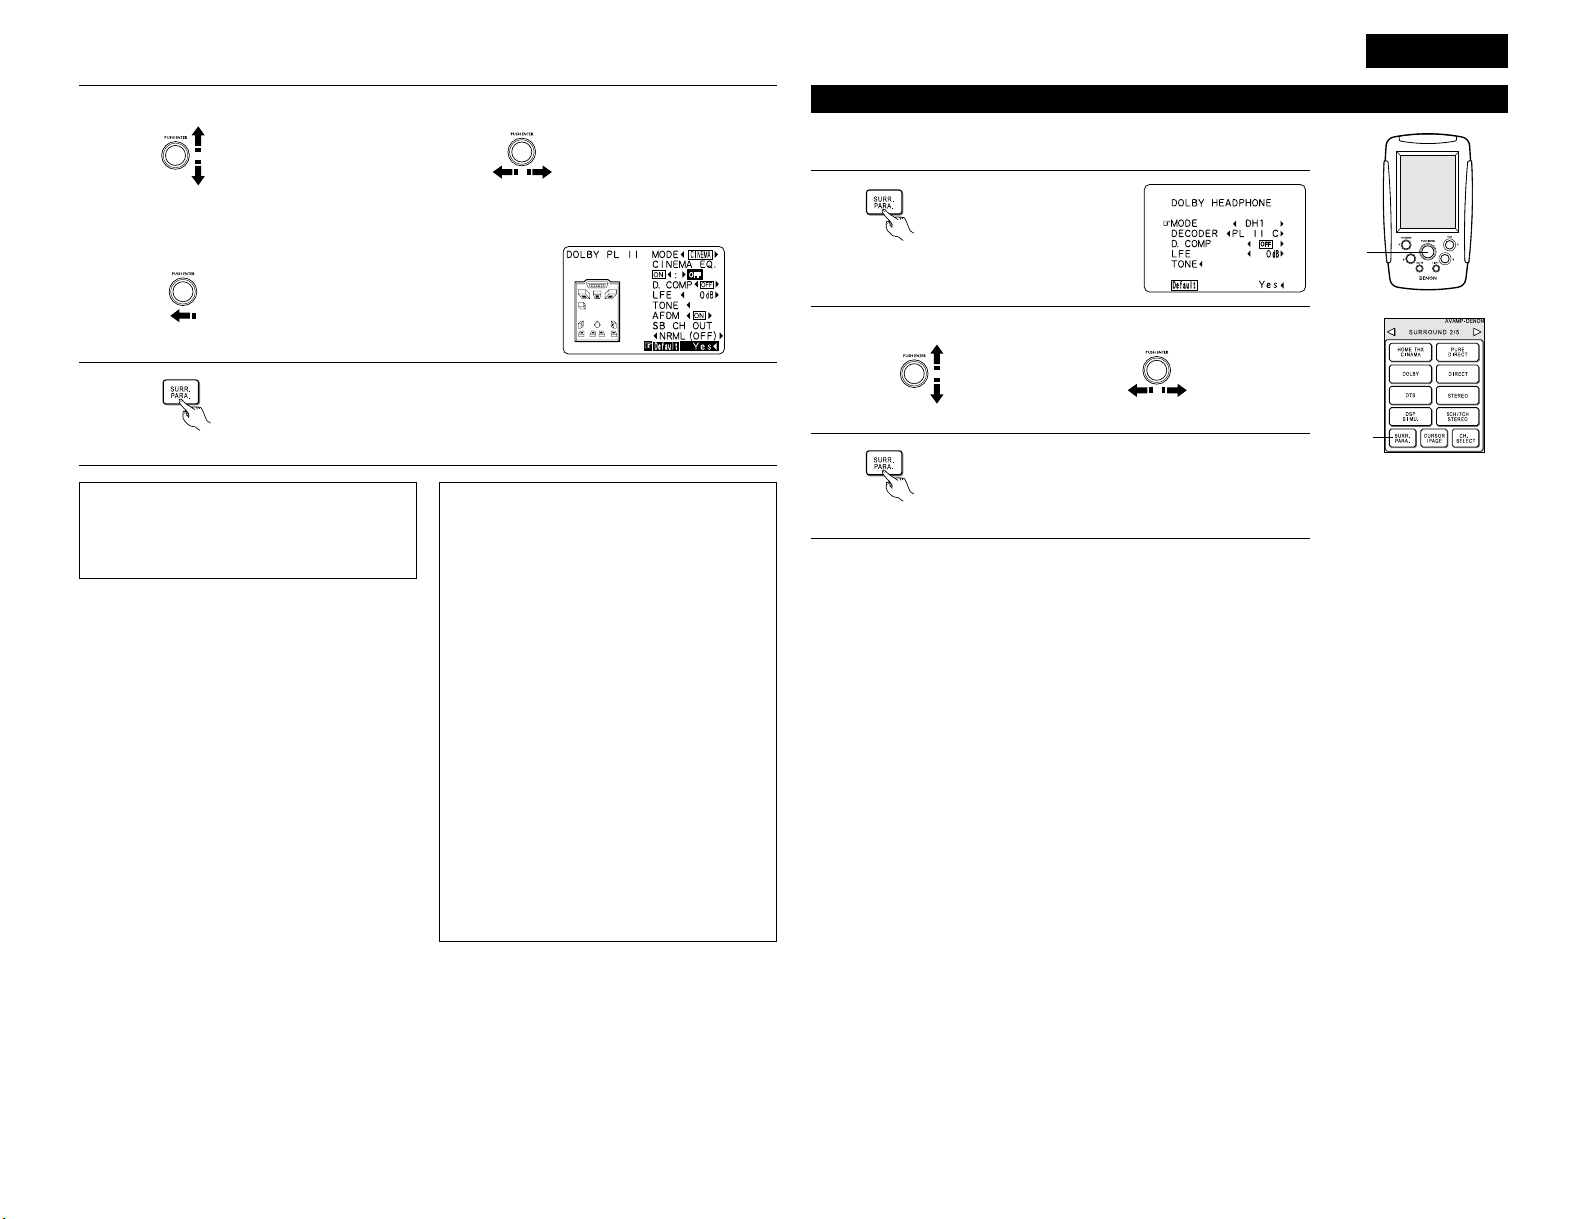
Dolby Headphone
The Dolby Headphone mode is set when headphones are connected to the
PHONES jack while in the DOLBY/DTS SURROUND mode.
1
When the SURR. PARA.
button is pressed, the
parameter selection screen
appears.
2
(Remote control unit)
1, 3
Parameters
MODE:
DH1.............Reference room (small room with weak reverberations)
DH2.............Live room (room with a bit stronger reverberations than DH1)
DH3.............Large room (larger room than DH1, offers a sense of distance and sound diffusion effects)
BYPASS.......Stereo sound.
DECODER:
Select this when playing analog, PCM or other 2-channel sources.
The signals are converted into multichannel signals using the decoders shown below and played in the Dolby
Headphone mode.
This is not displayed in the BYPASS mode.
PL II C .........Dolby Pro Logic
II Cinema mode
PL II M ........Dolby Pro Logic
II MusicMode
NEO:6 C......DTS NEO:6 Cinema mode
NEO:6 M.....DTS NEO:6 Music mode
OFF .............The signals are played in the Dolby Headphone mode as such (2 channels).
– Recording –
When RECOUT mode is set to “SOURCE”, with this amplifier signals encoded in the Dolby Headphone mode
can be output from the recording output terminals and recorded on another recorder.
1. The Dolby Headphone play mode is set when headphones are connected to the PHONES jack during
playback in the DOLBY/DTS surround mode.
2. When this is done, signals encoded in the Dolby Headphone mode are automatically output from the
recording output terminals (analog and digital) and can be recorded.
3. Select the parameters and set the desired mode, then record.
NOTE:
Do not disconnect the headphones during recording.
2
q Select the parameter.
(Remote control unit)
w Select the setting.
(Remote control unit)
3
Press the SURR.PARA. button to complete the setting.
(Remote control unit)
w Adjust the parameter setting.
Select “Default Yes
0“ then parameters set to default setting.
(Remote control unit)
7
Press the SURR.PARA. button to complete the setting.
(Remote control unit)
Page 8
1. CENTER IMAGE (0.0 to 0.5: default 0.2)
The center image parameter for adjusting the expansion of the center channel in the DTS NEO:6 MUSIC
mode has been added.
2. Subwoofer channel “OFF” setting
The subwoofer channel can now be set to “OFF” in all the surround modes.
“OFF” is set when the channel level is adjusted one step below -12 dB.
3. PURE DIRECT mode
The setting is now backed up.
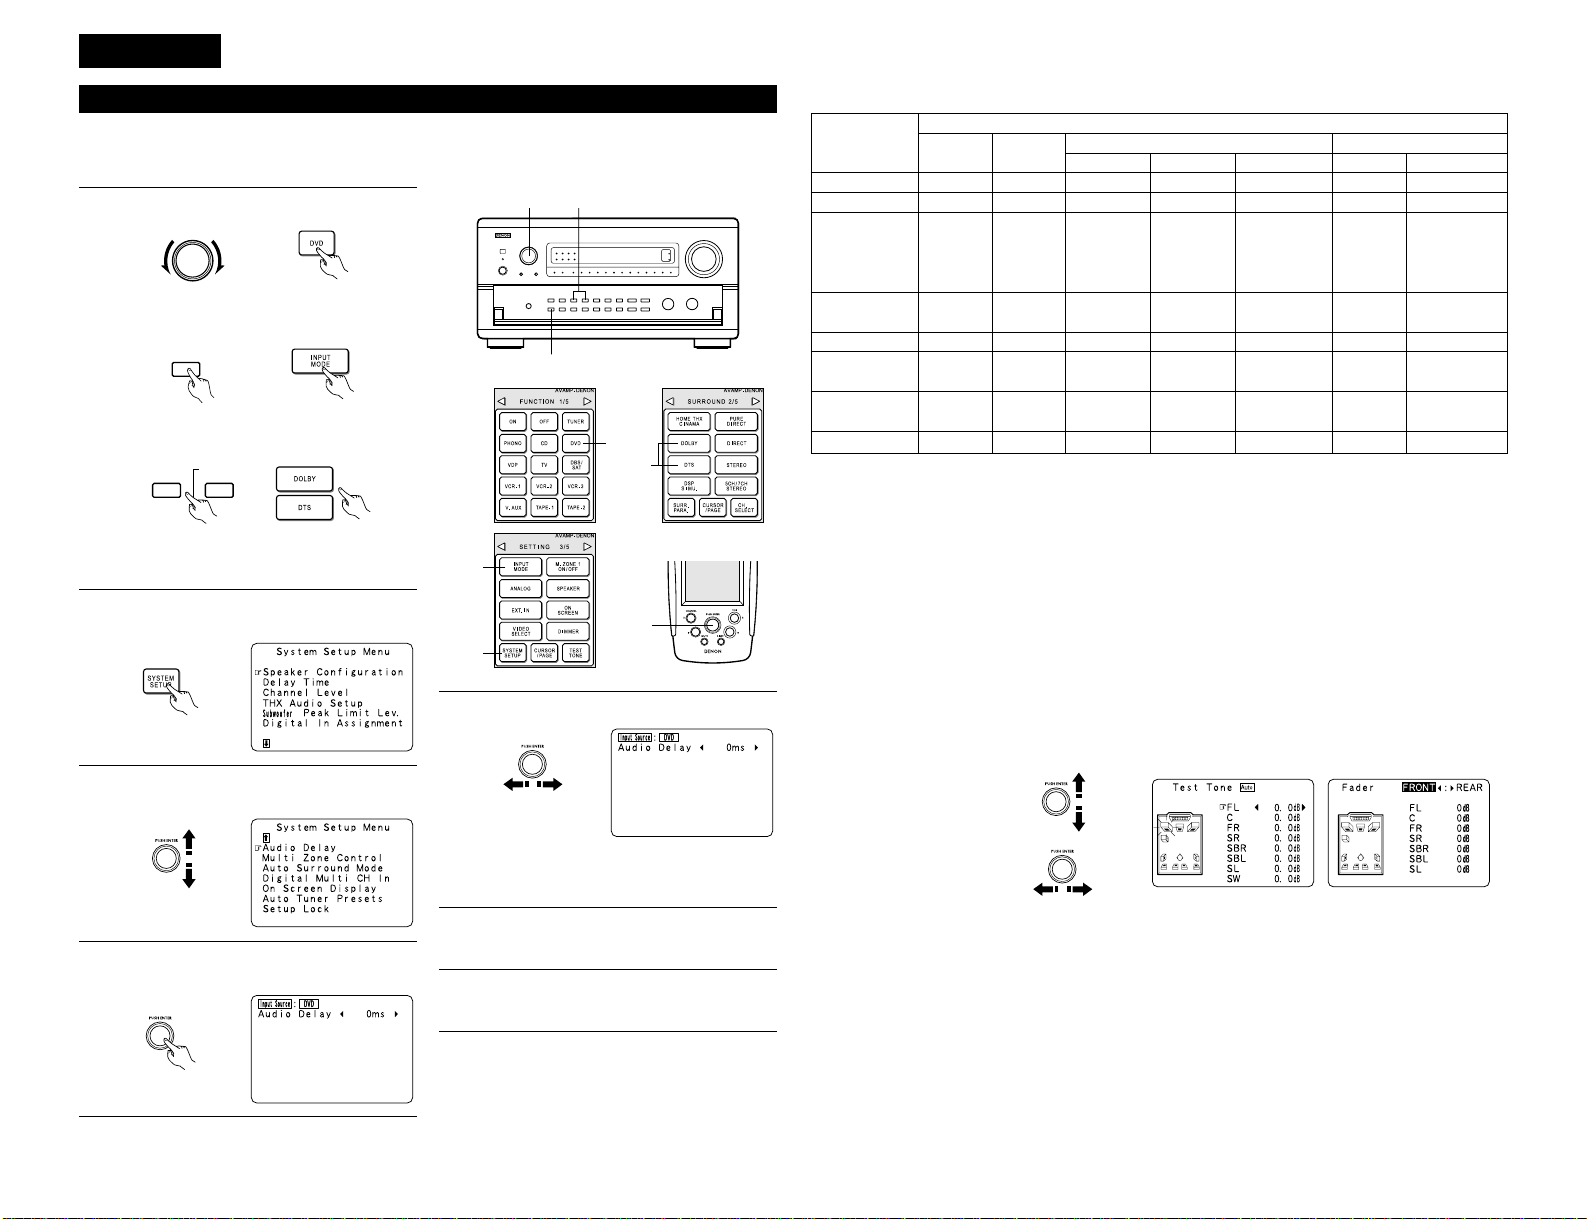
4. Channel level and fader adjustment
• Channel selection
• Level adjustment and
fader adjustment
8
ENGLISH
1-w
1-q 1-e
2, 7
1-q
1-w
1-e
3, 4,
5, 6
Adjusting the Audio Delay
1
q Select the input source.
INPUT SELECTOR
(Main unit) (Remote control unit)
w Set the input mode to “Auto”.
INPUT
MODE
(Main unit) (Remote control unit)
When watching a DVD or other video source, the picture on the monitor may seem delayed with respect to the
sound. In this case, adjust the audio delay to delay the sound and synchronize it with the picture.
The audio delay setting is stored separately for each input source.
e Select Dolby/DTS Surround.
DOLBY
SURROUND
DTS
SURROUND
(Main unit) (Remote control unit)
r Play a program source (DVD, etc.).
2
Press the SYSTEM SETUP button and display
the System Setup Menu screen.
(Remote control unit)
3
Select “Audio Delay” on the System Setup
Menu screen.
(Remote control unit)
4
Press jog stick “ENTER” to switch to the Audio
Delay adjustment screen.
(Remote control unit)
5
Set the delay time. (0 ms ~ 200 ms)
(Remote control unit)
With a movie source, for example, adjust so
that the movement of the actors’ lips is
synchronized with the sound.
6
Press jog stick “ENTER” to return to the
System Setup Menu screen.
7
Press the SYSTEM SETUP button to complete
the setting.
NOTE:
The audio delay setting does not apply when playing
in the EXT. IN mode or in the analog input direct mode
or stereo mode (only when the crossover frequency is
set to “FIXED - THX” or front speaker is set to
“Large”).
2 Differences in surround mode names depending on the input signals
Input signals
PURE DIRECT, DIRECT
STEREO
HOME THX CINEMA
DTS SURROUND
DTS NEO:6
DOLBY DIGITAL
DOLBY PRO LOGIC
II
DSP SIMULATION
C
C
THX
E
DTS NEO:6
E
DOLBY
PRO LOGIC
II
C
C
C
THX
E
DTS NEO:6
E
DOLBY
PRO LOGIC
II
C
C
C
✳
THX MTRX6.1
THX Ultra2 Cinema
THX Music Mode
THX5.1
✳
DTS ES MTRX
DTS SURROUND
E
E
E
C
C
C
✳
THX MTRX6.1
THX Ultra2 Cinema
THX Music Mode
THX5.1
✳
DTS ES MTRX
DTS 96/24
E
E
E
C
C
C
B
THX DSCRT6.1
THX MTRX6.1
B
DTS ES DSCRT6.1
DTS MTRX6.1
E
E
E
C
C
C
THX
E
DTS NEO:6
E
DOLBY
PRO LOGIC
II
C
C
C
✳
THX SURROUND EX
THX Ultra2 Cinema
THX Music Mode
THX5.1
E
E
✳
DOLBY DIGITAL EX
DOLBY DIGITAL
E
C
ANALOG LINEAR PCM DTS (5.1 ch)
DTS 96/24(5.1 ch)
DTS (6.1 ch) D. D. (2 ch) D. D. (5.1 ch)
DTS DOLBY DIGITALSurround Mode
C : Selectable
✳ : The surround mode name differs depending on the “MODE/SB CH OUT” surround parameter setting.
B : The surround mode name differs depending on the input signal.
E : Not selectable
2 Other changes
Digital transfer and multi-channel playback of DVD audio discs and other multi-channel sources is possible by
connecting the AVR5800/AVC-A1SE to a Denon DVD player equipped with a DENON Link connector using
the connection cable included with the DVD player.
With discs on which special copyright protection measures have been taken, however, the digital signals may
not be output from the DVD player. In this case, connect the DVD player’s analog multi-channel output to the
AVR5800/AVC-A1SE’s EXT.IN-1 or EXT.IN-2 terminals for playback.
Also refer to your DVD player’s operating instructions.
2 Playback using the DENON Link connector
Page 9

9
DEUTSCH
AVR-5800/AVC-A1SE UPGRADE-BEDIENUNGSANLEITUNG
Wir danken Ihnen für die Inanspruchnahme des AVR-5800/AVC-A1SE Upgrade-Services.
Beziehen Sie sich nach dem Upgrade des Verstärkers bezüglich der Benutzung sowohl auf diese als auch auf die
mit dem AVR-5800/AVC-A1SE mitgelieferte Bedienungsanleitung.
4
AUSSTATTUNGSMERKMALE
1. Lucasfilm THX Ultra2 zertifiziert
Home THX ist die einzigartige Zusammenarbeit
zwischen Lucasfilm Ltd. und Herstellern von
Audiogeräten. Die THX Ultra 2 Zertifikation ist die
höchste Qualitätsnorm und bietet eine Vielzahl
von rigorosen Leistungsstandards zusammen mit
eigenen Surroundklang-Nacharbeitungstechnologien
.
Dadurch wird die Surround-SoundtrackWiedergabe in Ihrem Heimkino zu einem immer
wieder unvergesslichen Erlebnis.
Neben Verbesserungen am Leistungsverstärker
im Vergleich zu früheren THX Ultra Standards,
wurden die Surround-Modi um zwei weitere Modi
ergänzt: Dem THX Ultra2 Kino-Modus und dem
THX Musik-Modus.
2. DTS 96/24-Kompatibilität
Der AVR-5800/AVC-A1SE Upgrade ist mit in DTS
96/24 aufgenommenen Quellen kompatibel; bei
DTS 96/24 handelt es sich um ein neues
Multikanal-Digitalsignal-Format, das von Digital
Theater Systems Inc. entwickelt wurde.
DTS 96/24-Quellen können im Multikanal-Betrieb
des AVR-5800/AVC-A1SE Upgrade mit einer
hohen Tonqualität von 96 kHz/24 Bits oder 88,2
kHz/24 Bits wiedergegeben werden.
3. Dolby Pro Logic II-Dekoder
Dolby Pro Logic II ist ein neues Format für die
Wiedergabe von Multikanal-Audiosignalen. Dieses
neue Format enthält Verbesserungen des
herkömmlichen Dolby Pro Logic. Es kann nicht nur
zum Entschlüsseln von in Dolby Surround
aufgenommenen Tonquellen, sondern auch zum
Entschlüsseln von normalen Stereotonquellen in
fünf Kanäle (vorne links/rechts, Mitte und
Surround links/rechts) verwendet werden.
Darüber hinaus können verschiedene Parameter
entsprechend der Art und des Inhaltes der
Tonquelle eingestellt werden, so dass sich das
Klangfeld mit einer höheren Präzision einstellen
lässt.
4. Dolby-Kopfhörer-Kompatibilität
(Dolby Headphone Compatibility)
Hierbei handelt es sich um eine dreidimensionale
Klangtechnologie, die gemeinsam von Dolby
Laboratories und Lake Technology Ltd. entwickelt
wurde.Aus Australien zum Erreichen von
Surroundklang mit herkömmlichen Kopfhörern.
5. DENON-Link
An diese Buchse kann ein Denon DVD-Player für
hochqualitative digitale Multikanalwiedergabe
angeschlossen werden.
6. Digitaler Ext.-Eingang
(Digital Ext. In)
Hierbei handelt es sich um eine Funktion für eine
spätere Systemerweiterung bei Benutzung
digitaler Multikanal-Anschlüsse.
7. Automatik-Surround-Modus
(Auto Surround Mode)
Diese Funktion legt den für einen Signaleingang
zuletzt verwendeten Surround-Modus im Speicher
ab und stellt diesen Surround-Modus beim
nächsten Eingang des entsprechenden
Signalmodus automatisch wieder ein.
8. Tonverzögerung (Audio Delay)
Diese Funktion verzögert das Audiosignal in
Bezug auf das Videosignal.(0 bis 200 msec)
9. Systemseinrichtungs-Sperre (Setup Lock)
Diese Funktion sperrt die Systemeinrichtung und
die Surround-Parameter usw., so dass diese nicht
geändert werden können.
10. Verzögerungszeit (Delay Time)
Der maximal einstellbare Wert ist von 15 Fuß auf
20 Fuß geändert worden, die Einstellschritte
wurden von 1 Fuß auf 0,1 Fuß geändert.
7
SYSTEM-EINRICHTUNG
• System-Einrichtungen und Standardwerte (werkseitig eingestellt)
System-Einrichtung Standard-Einstellung
q
w
e
t
y
!1
Speaker
Configuration
Surround
Speaker Setting
Subwoofer
mode
Channel Level
Subwoofer
Peak Limit Lev
Digital In
Assignment
On Screen
Display
Geben Sie die Kombination der Lautsprecher in Ihrem
System und deren entsprechende Größen (SMALL für
herkömmliche Lautsprecher, Large für große
Lautsprecher, Gesamtbereich) ein, um automatisch die
Zusammensetzung der Signale, die von den Lautsprechern
ausgegeben werden, und den Frequenzgang einzustellen.
Wenden Sie diese Funktion an, wenn Sie mehrere
Surround-Lautsprecher-Kombinationen für
perfekteren Surround-Klang zum Einsatz bringen.
Wenn die Kombinationen der SurroundLautsprecher, die für die verschiedenen SurroundModi verwendet werden sollen, einmal
eingegeben worden sind, werden die SurroundLautsprecher automatisch entsprechend des
Surround-Modus angewählt.
Dies wählt den Subwoofer-Lautsprecher zur Wiedergabe von
tiefen Baßsignalen an.
Hiermit wird die Lautstärke des Signalausgangs von den
Lautsprechern und dem Subwoofer für die verschiedenen
Kanäle eingestellt, um optimale Effekte zu erzielen.
Unterer Grenzwert Dieser Parameter dient der Erkennung des
maximalen Pegels des Niederbaß-Signalausgangs vom
Subwoofer-Kanal, um den Subwoofer vor Beschädigungen zu
schützen und verhindert darüber hinaus unangenehme
Tonverzerrungen.
Hier werden die digitalen Eingangsbuchsen den
verschiedenen Eingangsquellen zugeordnet.
This sets whether or not to display the on-screen display that
appears on the monitor screen when the controls on the remote
control unit or main unit are operated (from MONITOR 1 outputs
only).
Surround
-Modus
Surround-
Laut-
sprecher
Eingangs
-quelle
Digital-
Eingänge
Front Sp.
Small
Center Sp. Surround Sp.Sub Woofer
Small SmallYes
DOLBY/
DTS
SURROUND
THX/
THX 5.1
WIDE
SCREEN
5CH/7CH
STEREO
DSP
SIMULATION
EXT. IN-1 EXT. IN-2
—
AAAAAAA—
LFE —THX—
Front L & R Center Surround L & RSub Woofer
12 ft (3,6 m) 12 ft (3,6 m) 10 ft (3,0 m)12 ft (3,6 m)
Front L
Center
Front R
Surround
Back R
Surround
L
Subwoofer
0 dB 0 dB 0 dB 0 dB 0 dB 0 dB
Peak Limitter = OFF
CD DVD VDP TV
DBS/
SAT
VCR-1 VCR-2
TAPE-2
COAXIAL1COAXIAL2COAXIAL3OPTICAL1OPTICAL
2
OPTICAL
3
OPTICAL
4
OPTICAL
6
On Screen Display = ON
Surround Back Sp.
Small / 2spkrs
Delay Time
Dieser Parameter dient der Optimierung des Timings, mit dem
die Audio-Signale von den Lautsprechern und dem Subwoofer
entsprechend der Zuhörposition produziert werden.
SBL & SBR
10 ft (3,0 m)
r
THX Audio
Setup
Bei Anwendung eines THX Ultra2
kompatiblen Subwoofer-Frequenzganges
THX Ultra2 Subwoofer = NO
Surround
Back L
0 dB
Surround
R
0 dB
TAPE-1
OPTICAL
5
VCR-3
COAXIAL
4
V. AUX
COAXIAL
5
—
—
Crossover
Frequency
Stellen Sie die Frequenz (Hz) ein, unterhalb derer der Bass-Sound der
verschiedenen Lautsprecher vom Subwoofer ausgegeben werden soll.
FIXED —THX—
u
Multi Zone
Control
Variable
Stellen Sie die Entfernung bei der Benutzung
von zwei Surround-Lautsprechern auf die
Entfernung der beiden Lautsprecher ein.
The Distance Between SBL/SBR = 0 ft to 1 ft (0 m to 0,3 m)
Boundary Gain
compensation
Surround Back
Speaker Position
i
Audio Delay Stellen Sie die Zeitverzögerung der Video- und Audiosignale ein. Audio Delay = 0 ms
!3
Setup Lock
Stellen Sie hier ein, ob die Systemeinrichtungs-Einstellungen
gesperrt werden sollen, so dass sie nicht geändert werden
können, oder nicht.
Setup Lock = OFF
Hiermit wird der Ausgangspegel für die
Multi-Zonen 1 Ausgangsbuchsen eingestellt.
Führen Sie diese Einstellung aus, um den
Leistungsverstärker des hinteren
Surroundkanals für die Anwendung von
Multi-Zone 2 einzustellen.
Multi Zone-1
Vol. Level
Power AMP
Assignment
Surround back
o
Auto Surround
Mode
Einstellung der Automatik-Surround-Modus-Funktion. Auto Surround Mode = ON
!0
Digital Multi Ch
In
Einstellung des digitalen Multikanaleingangs. DENON Link = OFF, Digital Ext. In = OFF
!2
Auto Tuner
Presets
(Nur AVR-5800 )
UKW-Sender werden automatisch empfangen und im Speicher
festgehalten.
A1 ~ A8 87,5/89,1/98,1/107,9/90,1/90,1/90,1/90,1 MHz
B1 ~ B8 520/600/1000/1400/1500/1710 kHz/90,1/90,1 MHz
C1 ~ C8 90,1 MHz
D1 ~ D8 90,1 MHz
E1 ~ E8 90,1 MHz
Dieses Upgrade bietet Ihnen zusätzlich die folgenden Funktionen und technischen Daten:
Page 10

10
DEUTSCH
Einstellung der Überschneidungsfrequenz
1
Wählen Sie den “Crossover frequency”-Modus.
• Stellen Sie die Überschneidungsfrequenz entsprechend des verwendeten Lautsprechersystems ein.
• Wählen Sie im Systemsetup-Menübildschirm “Speaker Configuration” aus, drücken Sie anschließend am
Joystick “ENTER” zwei- oder dreimal.
Wählen Sie die Frequenz.
2
Geben Sie die Einstellung ein.
Es erscheint wieder das System-Einrichtungsmenü.
Führen Sie diese Einstellungen aus, wenn für den Subwoofer bei den Lautsprecher-Konfigurations-Einstellungen
“Yes” gewählt worden ist.
Hier wird nichts angezeigt, wenn “No” gewählt worden ist.
Einstellung zur Benutzung eines THX Ultra2 kompatiblen Subwoofers
1
Wählen Sie “THX Audio Setup” auf dem
Systemeinrichtungs-Menübildschirm und
drücken Sie Joystick “ENTER”, um zum
“THX Audio Setup” -Bild umzuschaiten.
3
Wählen Sie “Yes”, wenn Sie einen THX Ultra2 kompatiblen
Subwoofer oder Subwoofer benutzen, dessen
Frequenzgang 20 Hz überschreitet. Wählen Sie sonst “No”.
4
Drücken Sie auf dem Jogstick “ENTER”, um zum THX
Audio-Einrichtungsbildschirm zurückzukehren.
• Wenn “Yes” gewählt ist
“Boundary Gain Compensation” kann
ausgewählt und die Kompensation kann auf
“OFF” gestellt werden.
• Stellen Sie “Boundary Gain Compensation”
auf “ON”. Dadurch wird eine Schaltung
aktiviert, die die niedrigen Frequenzen von 55
Hz oder weniger schneidet. Wählen Sie
entweder “ON” oder “OFF” - je nachdem,
wie stark die Tiefen entsprechend Ihres
persönlichen Geschmacks sein sollen.
• Wenn in der Lautsprecher-Konfiguration zwei Lautsprecher eingestellt worden sind, müssen Sie die
Entfernung der beiden Lautsprecher einstellen. Hier wird nichts angezeigt, wenn “1spkr” ausgewählt worden ist.
• Diese Einstellung ist erforderlich, um den optimalen Effekt in den Modi THX Surround EX, THX Ultra2 Kino und
THX Musik zu erzielen.Es ist empfehlenswert, die SBL/SBR-Lautsprecher so nahe wie möglich zueinander
aufzustellen.
Einstellung der Position der hinteren Surround-Lautsprecher
1
Wählen Sie auf dem THX AudioEinrichtungsbildschirm “Surround Back
Speaker Position” und drücken Sie dann auf
dem Jogstick “ENTER”.
2
Wählen Sie die Einstellungen entsprechend der Entferungen
der beiden hinteren Surround-Lautsprecher.
3
Drücken Sie auf dem Jogstick “ENTER”, um zum THX
Audio-Einrichtungsbildschirm zurückzukehren.
Crossover frequency (Überschneidungsfrequenz)
• Stellen Sie die Frequenz (Hz) ein, unterhalb derer der Bass-Sound jedes einzelnen Hauptsprechers vom
Subwoofer oder von den Lautsprechern, die auf “Large” gestellt worden sind (wenn kein Subwoofer
verwendet wird) (Überschneidungsfrequenz) ausgegeben werden soll.
• Bei Lautsprechern, die auf “Small” gestellt worden sind, wird ein Ton mit einer Frequenz unterhalb der
Überschneidungsfrequenz beschnitten, und der beschnittene Bass-Sound wird vom Subwoofer oder von den
Lautsprechern, die auf “Large” gestellt worden sind, ausgegeben.
• Dieser Überschneidungsfrequenz-Betrieb wird gültig, wenn unter der “Speaker Configuration Setting” der
“Subwoofer” auf “Yes” gestellt worden ist oder wenn die Lautsprecher auf “Small” gestellt worden sind.
FIXED –THX–:
Stellen Sie diesen Punkt auf die für THX veranschlagte Überschneidungsfrequenz von 80 kHz.
VARIABLE 40, 60, 80, 100, 120 Hz:
Stellen Sie diesen Punkt je nach Wunsch entsprechend der Bass-Wiedergabefähigkeit Ihrer
Lautsprecher ein.
HINWEISE:
• Die Überschneidungsfrequenz ist im Modus HOME THX CINEMA auf 80 kHz eingestellt.
• Wir empfehlen eine Verwendung mit der auf “FIXED –THX–”, eingestellten Überschneidungsfrequenz, doch
je nach Lautsprecher kann die Einstellung auf eine andere Frequenz den Frequenzgang nahe der
Überschneidungsfrequenz verbessern.
2
Wählen Sie zunächst “Boundary Gain
Compensation” und drüchen Sie dann
Joystick “ENTER”.
4
Wählen Sie “Exit” und drücken Sie dann auf
dem Jogstick “ENTER”, um zum
Systemeinrichtungs-Menübildschirm
zurückzukehren.
Page 11

11
DEUTSCH
Diese Funktion erlaubt Ihnen die Einstellung der Zeitverzögerung der Video- und Audiosignale und die
Speicherung dieser Einstellungen für die verschiedenen Eingangsquellen.
Diese Einstellung wird während der Betrachtung einer DVD oder anderen Software durchgeführt; also nicht an
dieser Stelle.
Ursprünglich wird dies nicht angezeigt, wenn keine digitalen Signale eingegeben werden.
Eine Anleitung zur Durchführung der Einstellung finden Sie auf Seite 16.
Einstellen der Tonverzögerung
Einstellen des Automatik-Surround-Modus
Die Surroundmodi für die nachfolgend gezeigten letzten drei Arten von Eingangssignalen werden im Speicher
abgelegt und das Signal wird automatisch mit dem entsprechenden Surroundmodus wiedergegeben, wenn es
das nächste Mal eingegeben wird.
Beachten Sie, dass die Surroundmodus-Einstellung auch getrennt für die verschiedenen Eingangsquellen
gespeichert wird.
q Analoge und PCM2-Kanal-Signale
w 2-Kanal-Signale von Dolby Digital, DTS oder andere Multikanal-Formate
e Multikanal-Signale von Dolby Digital, DTS oder andere Multikanal-Formate
1
Wählen Sie auf dem Menübildschirm für die
Systemeinrichtung “Auto Surround Mode”
und drücken Sie dann auf dem Jogstick
“ENTER”.
2
Wählen Sie “ON”, wenn Sie den Automatik-SurroundModus anwenden möchten und “OFF”, wenn Sie von dieser
Funktion keinen Gebrauch machen wollen.
3
Diese Einstellung ist für den digitalen externen Eingang bei Benutzung der
Koaxialeingänge 1 bis 4.
Wenn Sie auf “ON” gestellt haben, werden die vier Buchsen
(Koaxial 1 bis 4) der gewünschten Eingangsquelle als ein
einzelner digitaler Multikanal-Eingang zugeordnet.
Wenn Sie auf “OFF” gestellt haben, werden die vier Buchsen
(Koaxial 1 bis 4) individuellen Eingangsquellen zugeordnet.
3
Geben Sie die Einstellung ein.
Es erscheint wieder das System-Einrichtungsmenü.
Einstellung für digitalen externen Eingang (Digital Ext. In) :
Einstellen des digitalen Multikanal-Eingangs
1
Wählen Sie auf dem Menübildschirm für die
Systemeinrichtung “Digital Multi Ch In” und
drücken Sie dann auf dem Jogstick “ENTER”.
Führen Sie diese Einstellung aus, wenn Sie einen Denon DVD-Player über
die Denon-Verbindungsbuchse anschließen wollen.
Stellen Sie auf “ON”, wenn Sie diese Buchse benutzen möchten, oder
wählen Sie “OFF”, wenn Sie sie nicht benutzen möchten.
Wenn Sie die Einstellung “ON” gewählt haben, müssen Sie auch den
Wiedergabeeingang einstellen, wenn kein digitales Signal anliegt.
ANALOG: Der analoge Eingang der Eingangsquelle, die der Denon-Link
zugeordnet ist wird wiedergegeben.
EXT.-1: Der EXT.IN-1-Eingang wird wiedergegeben.
EXT.-2: Der EXT.IN-2-Eingang wird wiedergegeben.
DENON Link-Einstellung:
4
Geben Sie die Einstellung ein.
Es erscheint wieder das System-Einrichtungsmenü.
Die Systemeinrichtungs-Einstellungen können gesperrt werden, damit sie nicht so einfach geändert werden können.
Schützen der Einstellungen
1
Wählen Sie auf dem SystemeinrichtungsMenübildschirm “Setup Lock” und drücken
Sie auf dem Jogstick “ENTER”, um zum
Bildschirm für die Einrichtungssperre
umzuschalten.
2
Wählen Sie “ON”, um die Systemeinrichtungs-Einstellungen
zu sperren.
3
Drücken Sie auf dem Jogstick “ENTER”, um die Einstellung zu finalisieren und um den
Systemeinrichtungs-Modus zu verlassen.
Wenn die Systemeinrichtungs-Sperrfunktion aktiviert ist, können die nachfolgend
aufgeführten Einstellungen nicht geändert werden und bei der Betätigung von Tasten, die
mit diesen Einstellungen in Verbindung stehen, wird “Setup Lock” angezeigt.
• Systemeinrichtungs-Einstellungen
• Surround-Parameter-Einstellungen
• Klangsteuerungs-Einstellungen
• Kanalpegel-Einstellungen (einschließlich Teststöne)
Drücken Sie zum Lösen der Sperre noch einmal die Systemeinrichtungstaste und lassen
Sie den Bildschirm für die Systemeinrichtungs-Sperre anzeigen. Wählen Sie dann “OFF”.
2
Wählen Sie für die Einstellung “Yes” und
drücken Sie “ENTER”.
Stellen Sie den hinteren Surround-Kanaleingang ein, wenn unter “Digital Ext. In” die Option “ON”
ausgewählt worden ist.
Wenn Sie den hinteren Surround-Kanal nicht verwenden möchten ..........NOT USED
Wenn Sie den hinteren Surround-Kanal verwenden möchten führen Sie die Einstellungen entsprechend
den technischen Daten des angeschlossenen Players durch.
Page 12

12
DEUTSCH
Wiedergeben von Modi für verschiedene Tonquellen
Der AVR-5800/AVC-A1SE Upgrade ist mit vielen Surround-Modi ausgestattet. Wir empfehlen Ihnen die
Anwendung der Surround-Modi wie nachfolgend beschrieben, um für die jeweilige Signalquelle den maximalen
Effekt zu erzielen.
• Obwohl wir empfehlen,
den Surround-Modus wie
oben beschrieben
auszuwählen, können Sie
sich natürlich auch für
andere Surround-Modi
entscheiden.
In Dolby Surround
aufgenommene 2-KanalTonquellen
In Stereoton aufgenommene
Tonquellen
In Einkanalton aufgenommene
Tonquellen
In Dolby Digital Surround EX
aufgenommene Tonquellen
•
Maximale Leistung für die Wiedergabe von Filmen auf dem AVR-5800/AVC-A1SE Upgrade.
•
Dieser Modus wurde für die Wiedergabe von in Dolby Digital Surround EX aufgenommene Tonquellen optimiert.
Dolby Digital
oder
DTS Surround
THX SURROUND EX
DOLBY DIGITAL EX
DTS-ES DSCRT 6.1, MTRX 6.1
• Effektiv für in Dolby Surround aufgenommene 2-Kanal-Tonquellen oder für
die 7,1-Kanal-Wiedergabe mit 5,1-Kanal-Tonquellen.
WIDE SCREEN
•
Diese Modi eignen sich für die Wiedergabe von 5.1-Kanalquellen und 7.1.-Kanälen.
Wählen Sie den gewünschten Surroundmodus für Film- und Musikquellen.
THX Ultra2 CINEMA* and THX MUSIC MODE*
• Dieser Modus eignet sich optimal für die Wiedergabe von 5,1-Kanal-Filmen.
• Für in Dolby Surround aufgenommene Tonquellen ist dieser Modus genauso
kraftvoll wie für 5,1-Kanal-Tonquellen.
HOME THX CINEMA (THX 5.1)
• Dieser Modus eignet sich optimal für die Wiedergabe von 5,1-Kanal-Filmen.
• Bei Dolby-Surround-Aufnahmen wird die Wiedergabe in Dolby Pro-Logic II
durchgeführt.
DOLBY DIGITAL / DTS SURROUND / DTS 96/24
•
Durch Unterbrechung aller Videoschaltungen kann analoge Musik mit optimaler
Qualität wiedergegeben werden. (Die Video-Ausgänge sind nicht in Funktion.)
PURE DIRECT
• Dieser Surroundmodus gibt von Dolby Laboratories entwickelte Stereoquellen
in 5.1 Kanälen wieder.
• Wählen Sie Ihrem Geschmack entsprechend einen der drei Wiedergabemodi.
DOLBY PROLOGIC II
• Effektiv zum Erzielen einer reinen Wiedergabe.
• Wenn weder eine Klangregelung noch eine Verteilung der Niederfrequenzen
in Funktion der Lautsprecher-Konfiguration erforderlich ist, wählen Sie zum
Erzielen bester Klangquelität den DIRECT-Modus an.
DIRECT / STEREO
• Wählen Sie diese Modi für die 7,1-Kanal-Wiedergabe von in Stereo- oder
Einkanalton aufgenommenen Tonquellen.
• Die Effekte sind für jeden einzelnen Surround-Modus unterschiedlich.
Wählen Sie den für die verwendete Tonquelle am geeignetesten Modus.
DENON’S Original-Surround-Modi
5,1-KanalTonquellen
In DTS-ES aufgenommene
Tonquellen
•
Dies ist der optimale Modus für die Wiedergabe von in DTS-ES aufgenommenen Tonquellen.
• Wenn Sie diesen Modus bei der Wiedergabe von Filmen einstellen, ist der
Klang natürlicher. Wählen Sie den Modus nach Belieben aus.
THX DSCRT 6.1, MTRX 6.1
ist ein 6,1-Kanal/7,1-Kanal-Surround-Modus.
• Dies ist der Surround-Modus für die von Digital Theater Systems entwickelte
Wiedergabe von 6.1 oder 7.1-Kanal-Stereotonquellen.
• Einer von zwei Wiedergabemodi – MUSIC (für Musikquellen) oder CINEMA
(für Filmquellen) kann entsprechend Ihres persönlichen Geschmacks ausgewählt werden.
DTS NEO:6
HINWEIS:
Für die Benutzung der mit einem
Sternchen (*) gekennzeichneten
Surroundmodi sind zwei hintere
Surround-Lautsprecher erforderlich.
10
SURROUND
[1] Wiedergabe von in Dolby Surround im Home THX Cinema Surround-Modus
aufgenommenen Tonquellen
THX Surround EX / Home THX Cinema-Modus
Wenn die HOME THX CINEMA-Taste gedrückt ist, wird der Surround-Modus entsprechend des
wiedergegebenen Signals wie folgt eingestellt:
q THX Surround EX (THX Ultra2 Cinema)
w Home THX CINEMA
e THX 5.1
r THX DSCRT 6.1, THX MTRX 6.1
Wenn bei der Wiedergabe einer DVD der HOME THX CINEMA-Modus eingestellt ist, müssen Sie die digitale
Ausgangseinstellung des DVD-Players überprüfen und eine Einstellung wählen, für die Dolby Digital- und DTSBitströme ausgegeben werden können (z.B. “bit stream”).
1
q Wählen Sie die Eingangsquelle an.
INPUT SELECTOR
(Hauptgerät) (Fernbedienungsgerät)
1-q
1-w
3
5, 7
6
4
1-w2
1-q
4
2
Wählen Sie den Home THX Cinema-Modus an.
HOME
THX CINEMA
(Hauptgerät) (Fernbedienungsgerät)
3
Starten Sie die Wiedergabe einer mit
markierten Programmquelle.
• Einzelheiten zum Betrieb entnehmen Sie
bitte den Betriebsanleitungen der
entsprechenden Komponenten.
w Stellen Sie den Eingangsmodus auf
“AUTO”.
INPUT
MODE
(Hauptgerät) (Fernbedienungsgerät)
4
Adjust volume.
MASTER VOLUME
(Hauptgerät) (Fernbedienungsgerät)
5
Lassen Sie den Surround-Parameter-Bildschirm
anzeigen und stellen Sie die Parameter
entsprechend der Tonquelle ein.
(Fernbedienungsgerät)
Page 13

13
DEUTSCH
Surround-Parameter w
Siehe für Anleitungen hinsichtlich der Einstellung der Surround-Parameter Seite 12.
MODE/SB CH OUT:
Select the surround back channel playback method or surround mode.
THX Surround EX........Dolby Digital-Signale werden im THX Surround EX-Modus wiedergegeben.
Ultra2 Cinema .............Die Signale werden im THX Ultra2 Cinema-Modus wiedergegeben.
Music Mode................Die Signale werden im THX MusicMode-Modus wiedergegeben.
NON MTRX .................Dieselben Signale wie die der Surround-Kanäle werden von den hinteren Surround-
Kanälen ausgegeben.
MTRX ON ...................Die Surroundkanal-Signale werden einer digitalen Matrixbearbeitung unterzogen
und von den hinteren Surround-Kanälen ausgegeben.
SB OFF (OFF)..............Von den hinteren Surround-Kanälen wird kein Signal wiedergegeben.
ES MTRX ....................Bei der Wiedergabe von DTS-Signalen werden die Signale der hinteren Surround-
Kanäle einer digitalen Matrixbearbeitung für die Wiedergabe unterzogen.
ES DSCRT...................Wenn ein Signal, das die Quelle als eine diskrete 6.1-Kanalquelle identifiziert, in
den DTS-Signalen enthalten ist, werden die Signale der hinteren Surround-
Lautsprecher wiedergegeben, die in der Quelle enthalten sind.
AFDM (Auto Flag Detect Mode):
ON .......Diese Funktion steht nur bei der Benutzung von Software zur Verfügung, auf die ein spezielles
Identifikationssignal aufgenommen worden ist. Diese Software kommt demnächst in den Handel.
Dies ist eine Funktion für die automatische Wiedergabe im 6.1-Kanalmodus bei Anwendung der
hinteren Surround-Lautsprecher, wenn die Software im THX Surround EX- oder DTS-ES-Modus
aufgenommen worden ist. Die Funktion kann auch angewendet werden, wenn die Software
ohne Verwendung der hinteren Surround-Lautsprecher im normalen 5.1-Kanalmodus
aufgenommen wurde, wenn die Software nicht im THX Surround EX- oder DTS-ES-Modus
aufgenommen worden ist.
OFF......Stellen Sie den “OFF”-Modus ein, um die 6.1-Kanalwiedergabe mit herkömmlichen 5.1-
Kanalquellen oder mit Quellen auszuführen, auf denen das nachfolgend beschriebene
Identifikationssignal nicht aufgenommen worden ist.
6
q Wählen Sie den
Parameter.
(Fernbedienungsgerät)
Drücken Sie die Taste SURR.PARA., um die
Einstellung abzuschließen.
(Fernbedienungsgerät)
7
Surround-Parameter q
DECODER:
Wählen Sie den Decoder aus, der bei der Wiedergabe von 2-Kanalquellen im Modus Home THX Cinema
verwendet werden soll.
PL II C........Die Signale werden im Modus Dolby Pro Logic II Cinema decodiert, bevor die THX-
Bearbeitung beginnt.
PL II E ........Die Signale werden in der Emulation Dolby Pro Logic decodiert, bevor die THX-Bearbeitung
beginnt.
NEO:6 C ....Die Signale werden im Modus NEO:6 Cinema decodiert, bevor die THX-Bearbeitung beginnt.
MODE/SB CH OUT:
Wählen Sie das Verfahren für die Wiedergabe der hinteren Surround-Kanäle oder den Surround-Modus.
NORMAL (ON)............Dies ist der empfohlene Wiedergabemodus für die Anwendung des hinteren
Surroundkanals, wenn DTS NEO:6 angewählt ist.
NORMAL (OFF) ..........Die ist empfohlene Wiedergabemodus bei der Auswahl von Dolby Pro Logiv II. Der
hintere Surrundkanal wird nicht wiedergegeben.
Überprüfung der Eingangssignale
Die Eingangssignale können überprüft werden, indem die
Taste ON SCREEN auf der Fernbedienung gedrückt wird.
SIGNAL: Zeigt die Art des Signals (DTS, DOLBY
DIGITAL, PCM usw.) an.
fs: Zeigt die Art der Signal-Abtastfrequenz an.
FORMAT: Zeigt die Kanalanzahl der Eingangssignals an.
“Anzahl der vorderen Kanäle/Anzahl der
umgebenden Kanäle/LFE an/aus”
Bei 2-Kanal-Signalquellen in Dolby Surround wird “SURROUND”
angezeigt.
OFFSET: Zeigt den Dialognormalisierungs-Ausschaltwert an.
FLAG: Zeigt das im Eingangssignal aufgenommene Spezial-
Identifikationssignal an.
Wenn die Matrixbearbeitung am rückwärtigen Surroundkanal
durchgeführt wird, wird “MATRIX” angezeigt; wenn eine
getrennte Bearbeitung durchgeführt wird, wird
“DISCRETE”angezeigt.
Wird nicht angezeigt, wenn kein Identifikationssignal aufgenommen worden ist.
Zusätzlich werden in der folgenden Reihenfolge Bildschirminformationen angezeigt, wenn die Taste OSD
wiederholt gedrückt wird:
OSD-1 Eingangssignal
OSD-2 Eingang/Ausgang
OSD-3 Autom. Surround-Modus
OSD-3 ~ 7 Gespeicherte Sender
HINWEIS:
OSD-3: Dies wird angezeigt, wenn der autom. Surround-Modus auf “ON” und der Eingangsmodus
auf “Auto” gestellt wird.
Dies wird nicht angezeigt, wenn der Eingangsmodus auf “Analog” oder “EXT. IN-1,-2”
gestellt wird.
OSD-3 ~ 7: Nur AVR-5800
(Fernbedienungsgerät)
Anwählen einer digitalen Eingangsquelle
Bei der Wiedergabe von Dolby DigitalTonquellen leuchtet die Dolby DigitalAnzeige.
DIGITAL
Bei der Wiedergabe von DTSTonquellen leuchtet die DTS-Anzeige.
Das LED des Surround-Gegenkanals
leuchtet bei der Wiedergabe im THX
SURROUND EX-Modus grün.
SURROUND
BACK CH
OUTPUT
[2] Wiedergabe im THX Surround EX/Home THX Cinema Surround-Modus für in Dolby
Digital oder DTS aufgenommene Tonquellen
1
Wählen Sie die Programmquelle an.
Führen Sie den Schritt 1 im Abschnitt “Dolby
Digital-Modus und DTS-Surround” aus.
2
Wählen Sie den Home THX Cinema-Modus an.
HOME
THX CINEMA
(Hauptgerät) (Fernbedienungsgerät)
3
Starten Sie die Wiedergabe einer mit , markierten Programmquelle.
Einzelheiten zum Betrieb entnehmen Sie bitte den Betriebsanleitungen der entsprechenden
Komponenten.
Die Kanalstatus-Informationen während der Wiedergabe von Dolby Digital- und DTS-Tonquellen können
mit Hilfe der sich am Hauptgerät befindlichen “STATUS”-Taste überprüft werden.
2
32 3
w Wählen Sie die
Einstellung.
(Fernbedienungsgerät)
Page 14

14
DEUTSCH
1-w 2
1-q 3 3
1-q
1-w
2
2
4, 6
5
Dolby Digital-Modus (nur mit Digital-Eingang) und DTS-Surround
(nur mit Digital-Eingang)
Wiedergabe mit einem Digital-Eingang
1
Wählen Sie die Eingangsquelle an.
q
Wählen Sie eine auf digital eingestellte
Eingangsquelle (COAXIAL/OPTICAL)
INPUT SELECTOR
(Hauptgerät) (Fernbedienungsgerät)
w Stellen Sie den Eingangsmodus auf
“AUTO”.
INPUT
MODE
(Hauptgerät) (Fernbedienungsgerät)
2
Wählen Sie den Surround-Modus an.
DOLBY
SURROUND
DTS
SURROUND
(Hauptgerät) (Fernbedienungsgerät)
3
Starten Sie die Wiedergabe einer mit , gekennzeichneten Programmquelle.
4
Lassen Sie sich das Surround-Parameter-Menü
anzeigen.
(Fernbedienungsgerät)
5
q Wählen Sie die
verschiedenen Parameter
aus.
(Fernbedienungsgerät)
w Nehmen Sie die
Parametereinstellungen vor.
(Fernbedienungsgerät)
DIGITAL
• Die DTS-Anzeige leuchtet bei der
Wiedergabe von DTS-Quellen.
Leuchtet
Leuchtet
SIGNAL
DETECT
• Die Anzeige SIGNAL DETECT
leuchtet, wenn Quellen
wiedergegeben werden, auf die
ein Spezial-Identifikationssignal
aufgenommen worden ist.
Leuchtet
• Die Dolby Digital-Anzeige leuchtet
bei der Wiedergabe einer Dolby
Digital-Quelle.
6
Drücken Sie die Taste SURR.PARA., um die Einstellung abzuschließen.
(Fernbedienungsgerät)
1
Wählen Sie die Funktion aus, an die die
Komponente, die Sie wiedergeben möchten,
angeschlossen ist.
Beispiel:
2
Wählen Sie den Dolby Surround Pro Logic IIModus.
Dolby Surround Pro Logic II-Modus
INPUT SELECTOR
(Hauptgerät) (Fernbedienungsgerät)
3
Starten Sie die Wiedergabe einer mit gekennzeichneten Programmquelle.
• Einzelheiten zum Betrieb entnehmen Sie bitte den Betriebsanleitungen der entsprechenden
Komponenten.
leuchtet
(Hauptgerät) (Fernbedienungsgerät)
DOLBY
SURROUND
Verwenden Sie die Tasten DOLBY SURROUND
zur Auswahl des Modus DOLBY PRO LOGIC
II.
• Die Dolby Pro Logic-Anzeige leuchtet.
4, 5
1
2
2
1
4, 7
5, 6
4
Wählen Sie den Modus Surround-Parameter.
CINEMA /
MUSIC
(Hauptgerät) (Fernbedienungsgerät)
5
Wählen Sie den optimalen Modus für die Quelle.
CINEMA /
MUSIC
(Hauptgerät) (Fernbedienungsgerät)
DOLBY PL II CINEMA
DOLBY PL
II MUSIC DOLBY PL II EMULATION
Page 15

15
DEUTSCH
6
q Wählen Sie die verschiedenen
Surround-Parameter aus.
• Einstellung DEFAULT
(Fernbedienungsgerät) (Fernbedienungsgerät)
Dolby Headphone
Der Dolby Headphone-modus ist eingestellt, wenn an die PHONES-Buchse bei
eingestelltem DOLBY/DTS SURROUND-Modus Kopfhörer angeschlossen sind.
1
Wenn die SURR. PARA.
Taste gedrückt ist, erscheint
der ParameterAuswahlbildschirm.
2
(Fernbedienungsgerät)
1, 3
Parameter
MODUS (MODE):
DH1.............Referenzraum (kleiner Raum mit schwachem Widerhall)
DH2.............Live-Raum (Raum mit etwäs stärkerem Widerhall als DH1)
DH3.............
Großer Raum (größerer Raum als DH1; liefert ein Gefühl von Entfernung sowie Klangdiffusionseffekte)
BYPASS.......Stereoklang.
DEKODER (DECODER):
Wählen Sie diese Einstellung bei der Wiedergabe von analogen, PCM- oder anderen 2-Kanal-Quellen.
Die Signale werden mit Hilfe der nachfolgend aufgeführten Dekoder in Multikanalsignale umgewandelt und im
Dolby Headphoner-Modus wiedergegeben.
Dies wird im BUPASS-modus nicht angezeigt.
PL II C .........Dolby Pro Logic
II Cinema-Modus
PL II M ........Dolby Pro Logic
II MusicMode-Modus
NEO:6 C......DTS NEO:6 Kino-Modus
NEO:6 M.....DTS NEO:6 Musik-Modus
OFF .............Die Signale werden im Dolby Headphone-Modus wiedergegeben wie (2 Kanäle).
– Aufnahme –
Wenn der RECOUT-Modus auf “SOURCE” gestellt ist, können mit diesem Verstärker im Dolby-Kopfhörer-
Modus kodierte Signale von den Aufnahme-Ausgangsbuchsen ausgegeben und auf einem anderen Rekorder
aufgenommen werden.
1. Der Dolby Kopfhörer-Wiedergabemodus wird eingestellt, wenn Kopfhörer während der Wiedergabe im
DOLBY/DTS-Surroundmodus an die PHONES-Buchse angeschlossen werden.
2. Danach werden die im Dolby Kopfhörer-Modus kodierten Signale von den Aufnahmeausgangsanschlüssen
(analog und digital) automatisch ausgegeben und können aufgenommen werden.
3. Wählen Sie die Parameter aus, stellen Sie den gewünschten Modus ein und machen Sie dann die Aufnahme.
HINWEIS:
Trennen Sie während der Aufnahme die Kopfhörer nicht ab.
2
q Wählen Sie den Parameter.
(Fernbedienungsgerät)
w Wählen Sie die Einstellung.
(Fernbedienungsgerät)
3
Drücken Sie die Taste SURR.PARA., um die Einstellung
abzuschließen.
(Fernbedienungsgerät)
HINWEIS:
• Beim Durchführen der Parametereinstellungen kehrt die Anzeige einige Sekunden, nachdem die letzte
Taste (Hauptgerät) gedrückt worden ist, zur regulären Displayanzeige zurück und die Einstellung wird
abgeschlossen.
Surround-Parameter e
Pro Logic II-Modus:
Der Cinema-Modus ist für Stereo-Fernsehsendungen und alle in Dolby Surround kodierten Programme
vorgesehen.
Für Autosound Music-Systeme (kein Bild) wird als Standard-Modus der Musik-Modus empfohlen. Dieser
Modus kann bei A/V-Systemen gewählt werden.
Der Pro Logic Emulationsmodus bietet dieselbe robuste Surround-Bearbeitung wie das ursprüngliche Pro
Logic, sofern die Qualität des Tonquelleninhaltes nicht optimal ist.
Wählen Sie einen der Modi (“Cinema”, “Music” oder “EML”).
Panorama-Regler:
Dieser Modus dehnt das vordere Stereobild aus, um die Surround-Lautsprecher für einen aufregenden
“wraparaound”-Effekt mit Seitenwand-Vorstellung einzubeziehen.
Wählen Sie “OFF” oder “ON”.
Abmessungssteuerung:
Hiermit wird das Klangfeld langsam entweder weiter nach vorn oder hinten verschoben. Der Regler kann in
7 Schritten von 0 bis 6 eingestellt werden.
Mittelbreiten-Regler:
möglicherweise nur vom Mittellautsprecher, von den linken/rechten Lautsprechern als Phantombild oder von
allen drei Frontlautsprechern zu hören ist, um die Grade zu variieren.
Der Regler kann in 8 Schritten von 0 bis 7 eingestellt werden.
Wählen “Default Yes 0”, um die Parameter auf die
Standardeinstellung zu setzen.
(Fernbedienungsgerät)
7
Drücken Sie die Taste SURR.PARA., um die Einstellung abzuschließen.
(Fernbedienungsgerät)
w Stellen Sie die Parameter-
Einstellungen ein.
Page 16

16
DEUTSCH
1-w
1-q 1-e
2, 7
1-q
1-w
1-e
3, 4,
5, 6
Einstellen der Tonverzögerung (Audio Delay)
1
q Wählen Sie die Eingangsquelle an.
INPUT SELECTOR
(Hauptgerät) (Fernbedienungsgerät)
w
Stellen Sie den Eingangsmodus auf “AUTO”.
INPUT
MODE
(Hauptgerät) (Fernbedienungsgerät)
Beim Betrachten einer DVD- oder Videoquelle, erscheint das Bild auf dem Bildschirm in Bezug auf den Ton
möglicherweise verzögert. Stellen Sie in einem solchen Fall die Tonverzögerung ein, um den Ton zu verzögern
und mit dem Bild zu synchronisieren.
Die Tonverzögerungs-Einstellung wird für jede einzelne Eingangsquelle separat gespeichert.
e Wählen Sie Dolby/DTS Surround.
DOLBY
SURROUND
DTS
SURROUND
(Hauptgerät) (Fernbedienungsgerät)
r Geben Sie eine Programmquelle (DVD
usw.) wieder.
2
Drücken Sie die SYSTEM SETUP-Taste
(Systemeinrichtung) und lassen Sie das
Systemseinrichtungs-Menü anzeigen.
(Fernbedienungsgerät)
3
Wählen Sie auf dem Menübildschirm für die
Systemeinrichtung “Audio Delay”.
(Fernbedienungsgerät)
4
Drücken sie auf dem Jogstick “ENTER”, um zum
Bildschirm für die Tonverzögerung umzuschalten.
(Fernbedienungsgerät)
5
Geben Sie die Verzögerungszeit ein. (0 ms – 200 ms)
(Fernbedienungsgerät)
Stellen Sie z.B. bei einer Filmquelle so ein, dass
die Lippenbewegungen der Schauspieler mit
dem Ton synchron sind.
6
Drücken Sie auf dem Jogstick “ENTER”, um zum
Systemeinrichtungs-Menü zurückzukehren.
7
Drücken Sie die Taste SYSTEM SETUP, um die
Einstellung abzuschließen.
HINWEIS:
Die Tonverzögerungs-Einstellung wirkt sich bei der
Wiedergabe im EXT. IN-Modus oder im analogen
Eingangs-Direktmodus oder im Stereomodus nicht
aus (nur wenn die Überschneidungsfrequenz auf
“FIXED – THX” oder vom Lautsprecher auf “Large”
gestellt ist).
2 Unterschiede bei den Bezeichnungen des Surround-Modus hängen von den
Eingangssignalen ab.
Eingangssignale
PURE DIRECT, DIRECT
STEREO
HOME THX CINEMA
DTS SURROUND
DTS NEO:6
DOLBY DIGITAL
DOLBY PRO LOGIC
II
DSP SIMULATION
C
C
THX
E
DTS NEO:6
E
DOLBY
PRO LOGIC
II
C
C
C
THX
E
DTS NEO:6
E
DOLBY
PRO LOGIC
II
C
C
C
✳
THX MTRX6.1
THX Ultra2 Cinema
THX Music Mode
THX5.1
✳
DTS ES MTRX
DTS SURROUND
E
E
E
C
C
C
✳
THX MTRX6.1
THX Ultra2 Cinema
THX Music Mode
THX5.1
✳
DTS ES MTRX
DTS 96/24
E
E
E
C
C
C
B
THX DSCRT6.1
THX MTRX6.1
B
DTS ES DSCRT6.1
DTS MTRX6.1
E
E
E
C
C
C
THX
E
DTS NEO:6
E
DOLBY
PRO LOGIC
II
C
C
C
✳
THX SURROUND EX
THX Ultra2 Cinema
THX Music Mode
THX5.1
E
E
✳
DOLBY DIGITAL EX
DOLBY DIGITAL
E
C
ANALOG LINEAR PCM DTS (5.1 ch)
DTS 96/24(5.1 ch)
DTS (6.1 ch) D. D. (2 ch) D. D. (5.1 ch)
DTS DOLBY DIGITALSurround-Modus
C :Wählbar
✳ : Unterschiede bei der Bezeichnung des Surround-Modus hängen von der Einstellung der Surround-
Parameter von “SB CH OUT” ab.
B : nterschiede bei der Bezeichnung des Surround-Modus hängen von den Eingangssignalen ab.
E : Nicht wählbar
1. CENTER IMAGE (0,0 bis 0,5: Grundeinstellung 0,2)
Der Mittenbild-Parameter wurde für die Erweiterungseinstellung des Mittelkanals im DTS NEO:6 MUSICModus hinzugefügt.
2. Subwoofer-Kanal “OFF”-Einstellung
Der Subwoofer-Kanal kann jetzt in jedem Surround-Modus auf “OFF” gestellt werden.
“OFF” wird eingestellt, wenn der Kanalpegel eine Stufe unter -12 dB eingestellt ist.
3. PURE DIRECT-Modus
Die Einstellung wird jetzt gesichert.
4. Kanalpegel und Fader-Einstellung
• Kanalwahl
• Pegeleinstellung und
Fader-Einstellung
2 Sonstige Änderungen
Die digitale Übertragung und Multikanal-Wiedergabe von DVD-Audiodiscs und anderen Multikanal-Quellen ist
möglich, indem der AVR-5800/AVC-A1SE mit Hilfe des mit dem DVD-Player mitgelieferten Anschlusskabels
an einen Denon DVD-Player angeschlossen wird, der mit einem Denon Link-Anschluss ausgestattet ist.
Bei der Verwendung von Discs, auf denen spezielle Urheberrechtsmaßnahmen getroffen worden sind,
werden die digitalen Signale möglicherweise jedoch nicht vom DVD-Player ausgegeben. Schließen Sie in
einem solchen Fall den analogen Multikanal-Ausgang des DVD-Player's für die Wiedergabe an die EXT.IN-1oder EXT.IN-2-Buchsen des AVR-5800/AVC-A1SEs an.
Beziehen Sie sich auch auf die Bedienungsanleitung Ihres DVD-Players.
2 Wiedergabe mit Hilfe des Denon Link-Anschlusses
Page 17

17
FRANCAIS
MODE D’EMPLOI DE LA MISE A JOUR POUR
AVR-5800/AVC-A1SE
Nous vous remercions d’utiliser le Service de mise à jour pour AVR-5800/AVC-A1SE.
Avant d’utiliser l’AVR-5800/AVC-A1SE après mise à jour, veuillez vous référez aux instructions de ce document
ainsi qu’à celles du Manuel d’utilisation livré avec l’appareil.
4
CARACTERISTIQUES
1. Certification de compatibilité avec les normes
Lucasfilm THX Ultra2
La norme “Home THX” est le résultat de la
collaboration unique entre la société Lucasfilm
Ltd. et les fabricants d’équipements audio. La
certification aux normes rigoureuses THX Ultra 2
permet de disposer du niveau de reproduction
audio actuel le plus élevée et de technologies
propriétaires de traitement de son surround en
sortie conçues pour améliorer les sensations
procurées par les pistes son surround du “home
cinéma”.
En plus des améliorations apportées à
l’amplificateur de puissance, qui respectent la
norme THX Ultra précédente, deux modes
surround ont été ajoutés: les modes THX Ultra2
Cinema et THX MusicMode.
2. Compatibilité du DTS 96/24
Le mise à jour pour AVR-5800/AVC-A1SE est
compatible avec des sources enregistrées en DTS
96/24, un nouveau format de signal multi-voies
développé par Digital Theater Systems, Inc.
Les sources en DTS 96/24 peuvent être lues en
mode multi-voies sur le mise à jour pour AVR5800/AVC-A1SE avec une haute qualité de son de
96 kHz/24 bits ou de 88.2 kHz/24 bits.
3. Décodeur Dolby Pro Logic
II
Le système Dolby Pro Logic II est un nouveau
format destiné à la reproduction de signaux audio
multivoies disposant de nombreux avantages sur
le système Dolby Pro Logic conventionnel. Il peut
servir à décoder non seulement des sources
enregistrées en Dolby Surround mais il peut aussi
transformer des sources stéréo normales en cinq
canaux (avant gauche/droit, centre et surround
gauche/droit). De plus, de nombreux paramètres
peuvent être réglés selon le type de source et son
contenu, de façon à permettre un réglage du son
de grande précision.
4. Compatibilité avec les Dolby Headphone
C’est une technologie de son à trois dimensions
développée conjointement par les sociétés Dolby
Laboratories et Lake Technology Ltd. Australie qui
permet d'obtenir un effet surround en utilisant un
casque ordinaire.
5. DENON Link
Cette borne peut être utilisée pour connecter un
lecteur DVD Denon et disposer d'une lecture à
canaux multiples numériques de grande qualité.
6. Digital Ext. In
C’est une fonction prévue pour futures
expansions du système qui utiliseront des
connexions numériques à canaux multiples.
7. Auto Surround Mode
Cette fonction mémorise le dernier mode
surround utilisé pour un signal d’entrée donné et
règle automatiquement ce mode surround quand
ce mode de signal est à nouveau reçu en entrée.
8. Audio Delay
C’est une fonction qui retarde le signal audio par
rapport au signal vidéo. (de 0 à 200 ms)
9. Setup Lock
C’est une fonction qui permet le verrouillage du
paramétrage système, des paramètres de réglage
surround, etc., de façon à ce qu’ils ne puissent
être modifiés.
10. Delay Time
La valeur de réglage maximum a été portée de 4,5
à 6,0 m (de 15 à 20 pieds) et les pas de réglage,
de 30 à 3 cm (de 1 à 0,1 pied).
7
INSTALLATION DU SYSTEME
• Articles d’installation de système et valeurs par défaut (réglées à la livraison de l’usine)
Installation de système Valeurs par défaut
q
w
e
t
y
!1
Speaker
Configuration
Surround
Speaker Setting
Subwoofer
mode
Channel Level
Subwoofer
Peak Limit Lev
Digital In
Assignment
On Screen
Display
Entrer la combinaison des enceintes de votre système et leurs
tailles correspondantes (SMALL pour enceintes normales, LARGE
pour pleine taille, pleine gamme) pour automatiquement régler la
composition des signaux sortis par les enceintes et la réponse en
fréquence.
Utiliser cette fonction en cas d’utilisation de
combinaison d’enceintes d’ambiance multiples pour
un son d’ambiance idéal. Après avoir préréglé les
combinaisons d’enceintes d’ambiance à utiliser pour
les différents modes d’ambiance, les enceintes
d’ambiance sont automatiquement sélectionnées en
fonction du mode d’ambiance.
Ceci sélectionne le subwoofer pour la lecture de signaux de profondes
graves.
Ceci règle le volume des signaux émis par les enceintes et le
subwoofer pour les différents canaux afin d’obtemir des effets
optimaux.
Ce paramètre sert à détecter le niveau maximum des faibles
signaux de graves émis par le canal de subwoofer pour le
protéger contre des dommages et éviter la production de sons
déformés désagréables.
Ceci affecte les prises d’entrées numériques pour
les différentes sources d’entrée.
This sets whether or not to display the on-screen display that
appears on the monitor screen when the controls on the remote
control unit or main unit are operated (from MONITOR 1 outputs
only).
Mode
d’ambiance
Enceinte
d’ambiance
Source
d’entrée
Entrée
numérique
Front Sp.
Small
Center Sp. Surround Sp.Sub Woofer
Small SmallYes
DOLBY/
DTS
SURROUND
THX/
THX 5.1
WIDE
SCREEN
5CH/7CH
STEREO
DSP
SIMULATION
EXT. IN-1 EXT. IN-2
—
AAAAAAA—
LFE —THX—
Front L & R Center Surround L & RSub Woofer
12 ft (3,6 m) 12 ft (3,6 m) 10 ft (3,0 m)12 ft (3,6 m)
Front L
Center
Front R
Surround
Back R
Surround
L
Subwoofer
0 dB 0 dB 0 dB 0 dB 0 dB 0 dB
Peak Limitter = OFF
CD DVD VDP TV
DBS/
SAT
VCR-1 VCR-2
TAPE-2
COAXIAL1COAXIAL2COAXIAL3OPTICAL1OPTICAL
2
OPTICAL
3
OPTICAL
4
OPTICAL
6
On Screen Display = ON
Surround Back Sp.
Small / 2spkrs
Delay Time
Ce paramètre sert à optimiser la synchronisation avec laquelle
sont produits les signaux audio des enceintes et du subwoofer
en fonction de la position d’écoute.
SBL & SBR
10 ft (3,0 m)
r
THX Audio
Setup
Quand un subwoofer possédant une
réponse en fréquence compatible avec la
norme THX Ultra2 est utilisé.
THX Ultra2 Subwoofer = NO
Surround
Back L
0 dB
Surround
R
0 dB
TAPE-1
OPTICAL
5
VCR-3
COAXIAL
4
V. AUX
COAXIAL
5
—
—
Crossover
Frequency
Régler la fréquence (Hz) à un niveau inférieur à celui du son
grave émis par les diverses enceintes à partir du subwoofer.
FIXED —THX—
u
Multi Zone
Control
Variable
Lorsque deux enceintes surround arrière
sont utilisées, cette fonction règle la
distance des deux enceintes.
The Distance Between SBL/SBR = 0 ft to 1 ft (0 m to o,3 m)
Boundary Gain
compensation
Surround Back
Speaker Position
i
Audio Delay Réglez le délai de retard entre les signaux vidéo et audio. Audio Delay = 0 ms
!3
Setup Lock
Utilisez cette fonction pour activez ou désactiver le verrouillage
du paramétrage des réglages système.
Setup Lock = OFF
Cette fonction règle le niveau de sortie des
jacks de sortie multi-zones 1.
Effectuez ce réglage pour commuter
l'amplificateur de puissance du canal
surround arrière pour une utilisation multizones 2.
Multi Zone-1
Vol. Level
Power AMP
Assignment
Surround back
o
Auto Surround
Mode
Réglage de la fonction du mode “Auto surround”. Auto Surround Mode = ON
!0
Digital Multi Ch
In
Réglage d'entrées numériques multicanaux. DENON Link = OFF, Digital Ext. In = OFF
!2
Auto Tuner
Presets
(AVR-5800
uniquement)
Les stations en FM sont automatiquement captées et
sauvegardées dans la mémoire.
A1 ~ A8 87,5/89,1/98,1/107,9/90,1/90,1/90,1/90,1 MHz
B1 ~ B8 520/600/1000/1400/1500/1710 kHz/90,1/90,1 MHz
C1 ~ C8 90,1 MHz
D1 ~ D8 90,1 MHz
E1 ~ E8 90,1 MHz
Cette mise à jour ajoute les fonctions et caractéristiques suivantes:
Page 18

18
FRANCAIS
Réglage de la fréquence de croisement
1
Sélectionner le mode “Crossover frequency” (fréquence de
croisement).
• Régler la fréquence de croisement en fonction du système d'enceintes utilisé.
• Sélectionnez “Speaker Configuration” dans l’écran de menu de réglage du système, puis appuyer sur la
manette “ENTER” deux ou trois fois.
Sélectionner la fréquence.
2
Entrer le réglage.
Le menu d’installation de système réapparaît.
Effectuez ces réglages lorsque “Yes” est sélectionné pour les réglages de configuration des enceintes.
Rien ne s’affiche lorsque “No” est sélectionné.
Réglages pour l’utilisation d’un subwoofer compatible THX Ultra2
1
Sélectionnez “THX Audio Setup” à l’écran
System Setup Menu et appuyer sur la
manette “ENTER” pour commuter à l’écren
“THX Audio Setup”.
3
Lorsqu'un subwoofer compatible THX Ultra2 ou avec
réponse en fréquence allant jusqu'à 20 Hz est utilisé,
sélectionnez “Yes”. Sinon, sélectionnez “No”.
4
Appuyer sur le levier de sélection “ENTER” pour retourner
à l’écran de paramétrage “THX Audio Setup”.
• Lorsque “Yes” est sélectionné:
“Boundary Gain Compensation”
(Compensation de gain en limites) peut être
sélectionné et la compensation réglée sur
“OFF”.
• Si le son des graves semble trop fort:
Réglez “Boundary Gain Compensation” sur
“ON”. Cela active un circuit qui coupe les
basses fréquences égales ou inférieures à 55
Hz. Sélectionnez “ON” ou “OFF” selon votre
préférence pour la puissance des graves.
• Lorsque deux enceintes surround arrière ont été ajoutées aux réglages de configuration des enceintes, cette
fonction s’utilise pour régler leur distance. Rien ne s’affiche lorsque le paramètre “1spkr” (1 enceinte) est
sélectionné.
• Ce réglage est nécessaire pour obtenir l’effet optimal en modes THX Surround EX, THX Ultra2 Cinema et THX
MusicMode. Il est recommandé que les enceintes surround AR G et D soient placées le plus près possible
l’une de l’autre.
Réglages de la position des enceintes surround arrière
1
Sélectionnez “Surround Back Speaker
Position” (Position des enceintes surround
AR) à l’écran de paramétrage THX Audio et
appuyez ensuite sur le levier de sélection
“ENTER”.
2
Sélectionnez les réglages selon les distances des deux
enceintes surround arrière.
3
Appuyez sur le levier de sélection “ENTER” pour retourner à
l’écran de paramétrage THX Audio Setup.
Crossover frequency (Fréquence de croisement)
• Régler la fréquence (Hz) en-dessous de laquelle le son grave de chaque enceinte principale doit être émis par
le subwoofer ou par les enceintes réglées sur “Large” (Grande) (lorsqu'un subwoofer n'est pas utilisé)
(fréquence de croisement).
• Pour les enceintes réglées sur “Small” (Petite), le son de fréquence inférieure la fréquence de croisement
est coupé et la place, le son grave est émis par le subwoofer ou les enceintes réglées sur “Large” (Grande).
• Ce mode de fréquence de croisement est valide lorsque “Subwoofer” est réglé sur “Yes” (Oui) dans le
“peaker Configuration Setting”ou lorsque les enceintes sont réglées sur “Small” (Petite).
FIXED –THX–:
Régler sur la fréquence de croisement THX nominale de 80 Hz.
VARIABLE 40, 60, 80, 100, 120 Hz:
Régler souhait selon la capacité de lecture des graves du système d'enceintes'.
REMARQUES:
• La fréquence de croisement est réglée à 80 Hz en mode cinéma domestique “HOME THX CINEMA”.
• Nous recommandons une utilisation avec la fréquence de croisement réglée sur “FIXED –THX–” (THX fixe),
mais selon le système d'enceintes, le réglage sur une fréquence différente peut améliorer la réponse en
fréquence proche de celle de croisement.
2
Sélectionner “Boundary Gain Compensation”,
puis appuyer sur la manette “ENTER”.
4
Sélectionnez “Exit” et appuyez ensuite sur le
levier de sélection “ENTER” pour retourner à
l'écran de menu de paramétrage du système.
Page 19

19
FRANCAIS
Cette fonction vous permet de régler la durée du délai entre les signaux vidéo et audio et d’enregistrer les
réglages pour les différentes sources d’entrée.
Le réglage s’effectue en regardant un DVD ou tout autre programme, donc il ne s’effectue pas à ce stade.
Par défaut, ce réglage ne s’affiche pas lorsque aucun signal numérique n’est présent en entrée.
Pour les instructions concernant ce réglage, veuillez vous référer à la page 24.
Réglage du délai audio
Réglage du mode Auto Surround
Le dernier mode surround utilisé pour les trois types de signal d’entrée illustrés ci-dessous est mémorisé et
activé automatiquement dès que le signal correspondant est présent en entrée.
Veuillez noter que le réglage du mode surround est aussi enregistré séparément pour chaque source d’entrée.
q Signaux analogiques et de canal PCM2
w Signaux à 2 canaux Dolby Digital, DTS ou autres format multicanaux
e Signaux multicanaux Dolby Digital, DTS ou d'autres format multicanaux
1
Sélectionnez “Auto Surround Mode” à l’écran
de menu de paramétrage système et appuyez
ensuite sur le levier de sélection “ENTER”.
2
Sélectionnez “ON” si vous souhaitez utiliser le mode Auto
surround, “OFF” si vous ne souhaitez pas l’utiliser.
3
Ce réglage s’effectue pour l’entrée “Digital Ext. In” qui utilisent les entrées
coaxiales 1 à 4.
Lorsque “ON” est choisi pour ce réglage, les quatre bornes
(Coaxiales de 1 à 4) sont attribuées à la source d’entrée
souhaitée comme entrée numérique multicanaux unique.
Lorsque “OFF” est choisi pour ce réglage, les quatre bornes
(Coaxiales de 1 à 4) sont attribuées aux sources d’entrée
individuelles.
3
Entrer le réglage.
Le menu d’installation de système réapparaît.
Réglage “Digital Ext. In” :
Réglage du mode “Digital Multi CH In”
1
Sélectionnez “Digital Multi Ch In” à l’écran de
menu de paramétrage système et appuyez
ensuite sur le levier de sélection “ENTER”.
Effectuez ce réglage pour connecter un lecteur DVD Denon qui utilise la
borne “DENON Link”.
Sélectionnez “ON” si vous souhaitez utiliser cette borne, “OFF” si vous ne
souhaitez pas l’utiliser.
Lorsque “ON” est choisi pour ce réglage, celui-ci règle aussi l’entrée de
lecture quand aucun signal numérique n’est présent.
ANALOG: L’entrée analogique de la source d’entrée attribuée à la
connexion “DENON Link” est jouée
EXT.IN-1: L’entrée EXT.IN-1 est jouée.
EXT.IN-2: L’entrée EXT.IN-2 est jouée.
Réglage du raccordement “DENON Link” :
4
Entrer le réglage.
Le menu d’installation de système réapparaît.
Le paramétrage du système peut être verrouillé de façon à ce qu’il ne puisse être modifié facilement.
Protection des réglages
1
Sélectionnez “Setup Lock” à l’écran de
menu de paramétrage système et appuyer
sur le levier de sélection “ENTER” pour
passer à l’écran de verrouillage du
paramétrage.
2
Sélectionnez “ON” pour verrouiller le paramétrage du
système.
3
Appuyez sur le levier de sélection “ENTER” pour terminer le réglage et quitter le mode de paramétrage
système.
Lorsque la fonction de verrouillage du paramétrage système est activée, les réglages
énumérés ci-dessous ne peuvent être modifiés et “Setup Locked” (Paramétrage verrouillé)
s’affiche lorsque les touches concernées sont sollicitées.
• Paramétrage système
• Réglages des paramètres surround
• Réglages des commandes de tonalité
• Réglages de niveau de canal (y compris les tonalités de test)
Pour déverrouiller le paramétrage système, pressez à nouveau sur la touche “System Setup” pour afficher
l'écran de verrouillage du paramétrage “Setup Lock” et sélectionnez ensuite “OFF”.
2
Pour régler, sélectionnez “Yes” et appuyez
sur “ENTER”.
Lors de la sélection sur “ON” pendant la réglage de “Digitl Ext. In”, réglez l’entrée du canal surround
arrière.
Si vous ne voulez pas utiliser le canal surround arrière ......NOT USED
Si vous voulez utiliser le canal surround arrière, réglez-le selon les caractéristiques du lecteur connecté.
Page 20

20
FRANCAIS
Modes de lectures pour sources différentes
La mise à jour pour AVR-5800/AVC-A1SE est équipé de plusieurs modes d’ambiance. Nous vous recommandons
d’utiliser les modes d’ambiance d’après les indications ci-après pour obtenir le meilleur effet pour chacun des
différents types de signaux de source.
• Il est quant même
possible d’utiliser un
mode autre que celui
recommandé.
2 canaux sources enregistrées en
Dolby Surround
Sources enregistrées en stéréo
Sources enregistrées en monaural
Sources enregistrées en
Dolby Digital Surround EX
•
Performance maximale pour la lecture de films sur l’mise à jour pour AVR-5800/AVC-A1SE.
•
Ce mode est optimisé pour la lecture de sources enregistrées en Dolby Digital Surround EX.
Dolby Digital
ou
DTS Surround
THX SURROUND EX
DOLBY DIGITAL EX
DTS-ES DSCRT 6.1, MTRX 6.1
• Efficace pour les sources à 2 canaux enregistrées en Dolby Surround ou en
lecture à 7.1 canaux avec des sources en 5.1 canaux.
WIDE SCREEN (Écran large)
• Ces modes conviennent à la lecture de sources à 5.1 canaux en 7.1 canaux.
Sélectionnez le mode surround souhaité pour les sources de lecture de film et de musique.
THX Ultra2 CINEMA* et THX MUSIC MODE*
• Ce mode est optimisé pour la lecture de film en 5.1 canaux.
• Pour les sources enregistrées en Dolby Surround, ce mode procure aussi la
même puissance qu’avec les sources à 5.1 canaux.
HOME THX CINEMA (THX 5.1)
• Ce mode est optimisé pour la lecture de musique en 5.1 canaux.
• Pour les sources enregistrées en Dolby Surround, le mode de lecture est
automatiquement réglé sur Dolby Pro Logic II.
DOLBY DIGITAL / DTS SURROUND / DTS 96/24
•
En suspendant tous les circuits vidéo, la lecture de musique à entrée analogique
peut être effectuée avec une qualité optimale. (Les sorties vidéo ne fonctionnent pas.)
PURE DIRECT
• Ce mode surround joue les sources stéréo à 5.1 canaux développées par les
laboratoires Dolby.
• Sélectionnez un des trois modes de lecture selon votre préférence.
DOLBY PROLOGIC II
• Efficace en lecture pure.
• Si aucune correction de tonalité ou de distribution de basses fréquences en
fonction de la configuration des enceintes n’est nécessaire, sélectionnez le
mode DIRECT pour obtenir la meilleure qualité de son.
DIRECT / STEREO
• Sélectionnez ces options pour la lecture à 7.1 canaux avec des sources
enregistrées en stéréo ou en monaural.
• Les effets sont différents pour chacun des modes d'ambiance.
Sélectionnez le mode le plus approprié par rapport à la source.
Modes d'ambiance originaux de DENON
Sources à 5.1
canaux
Sources enregistrées en DTS-ES
•
Mode optimum pour la lecture de sources enregistrées en DTS-ES
.
• Lors de la reproduction de films, le fait de régler ce mode procure parfois un
son plus naturel. Sélectionner le mode à votre convenance.
THX DSCRT 6.1, MTRX 6.1
est un mode d'ambiance à 6.1 canaux/7.1 canaux.
• C’est un mode d’ambiance pour la lecture de sources stéréo à 6.1 – ou 7.1
canaux mis au point par des systèmes de cinéma à domicile.
• Un des deux modes de lecture, MUSIC (pour les sources musicales); ou
CINEMA (pour les sources de films) peut être sélectionné selon vos préférences.
DTS NEO:6
REMARQUE:
Les modes Surround repérés par un
astérisque (*) nécessite l’utilisation
de deux enceintes surround arrière.
10
AMBIANCE
[1] Reproduction de sources enregistrée en Dolby Surround dans le mode d’ambiance
Home THX Cinema
Mode THX Surround EX / Home THX Cinema
Lorsque la touche HOME THX CINEMA est enfoncée, le mode d’ambiance est réglé comme suit selon le signal lu:
q THX Surround EX (THX Ultra2 Cinema)
w Home THX CINEMA
e THX 5.1
r THX DSCRT 6.1, THX MTRX 6.1
Lorsque le mode HOME THX CINEMA est réglé lors de la lecture d’un DVD, vérifier le réglage de sortie
numérique du lecteur de DVD et modifier le réglage pour lequel les signaux Dolby Digital ou bit stream DTS
peuvent être envoyés (“bit stream” par exemple).
1
q Sélectionner la source d’entrée.
INPUT SELECTOR
(Unité principale) (Unité de télécommande)
1-q
1-w
3
5, 7
6
4
1-w2
1-q
4
2
Sélectionner le mode Home THX Cinema.
HOME
THX CINEMA
(Unité principale) (Unité de télécommande)
3
Reproduire une source programme avec la
marque .
• Pour les instructions d’utilisation, se reporter
aux manuels des composants respectifs.
w Régler le mode d’entée à “AUTO”.
INPUT
MODE
(Unité principale) (Unité de télécommande)
4
Régler le volume.
MASTER VOLUME
(Unité principale) (Unité de télécommande)
5
Affichez l’écran de paramétrage surround et réglez les paramètres en
fonction de la source.
(Unité de télécommande)
Page 21

21
FRANCAIS
Paramètres d’ambiance w
Pour plus d’instructions sur le réglage des paramètres surround, veuillez vous reporter à la page 20.
MODE/SB CH OUT:
Sélectionnez la méthode de lecture du canal surround arrière ou le mode surround souhaité.
THX Surround EX........Les signaux Dolby Digital sont joués en mode THX Surround EX.
Ultra2 Cinema .............Les signaux sont joués en mode THX Ultra2 Cinéma.
Music Mode................Les signaux sont joués en mode THX MusicMode.
NON MTRX.................Les même signaux que ceux des canaux surround sont émis par les canaux
surround arrière.
MTRX ON ...................Les signaux de canaux surround sont soumis à un traitement matriciel numérique
et émis par les canaux surround arrière.
SB OFF (OFF)..............Aucun signal n’est joué par les canaux surround arrière.
ES MTRX ....................Lors de la lecture de signaux DTS, les signaux de canaux surround arrière sont
soumis à un traitement matriciel numérique pour la lecture.
ES DSCRT...................Lorsqu’un signal identifie la source comme étant une source séparée à 6.1 canaux
incluse dans les signaux DTS, les signaux incorporés dans la source sont aussi
joués.
AFDM (Auto Flag Detect Mode (Mode de détection automatique d'indicateur)) :
ON .......Cette fonction fonctionne uniquement avec les programmes comportant un signal d’identification
spécial. Ce type de programme sera prochainement disponible sur le marché.
C’est une fonction pour la lecture automatique en mode à 6.1 canaux qui utilise les enceintes
surround arrière si le programme a été enregistré en mode THX Surround EX, DTS-ES ou en
mode à 5.1 canaux normal sans utilisation des enceintes surround arrière lorsque le programme
n’est pas enregistré en THX Surround EX ou DTS-ES.
OFF......Réglez le mode sur “OFF” pour effectuer une lecture en 6.1 canaux avec des sources
conventionnelles à 5.1 canaux ou sur lesquelles le signal d'identification décrit ci-dessous n’a pas
été enregistré.
6
q Sélectionnez le paramètre.
(Unité de télécommande)
w Sélectionnez le réglage.
(Unité de télécommande)
7
Paramètres d’ambiance q
DECODER:
Sélectionnez le décodeur à utiliser pour la lecture de sources à 2 canaux en mode Home THX Cinema
(Cinéma domestique THX).
PL II C........Les signaux sont décodés en mode Cinéma Dolby Pro Logic II avant de subir le traitement
THX.
PL II E ........Les signaux sont décodés en mode Emulation Dolby Pro Logic II avant de subir le traitement
THX.
NEO:6 C ....Les signaux sont décodés en mode Cinéma NEO:6 avant de subir le traitement THX.
MODE/SB CH OUT:
Sélectionnez la méthode de lecture du canal surround arrière ou le mode surround souhaité.
NORMAL (ON)............C’est le mode lecture recommandé pour l’utilisation du canal surround arrière
lorsque “DTS NEO:6” est sélectionné.
NORMAL (OFF) ..........Ceci est le mode de lecture recommandé si Dolby Pro Logic II est sélecionné. Le
canal surround arrière n’est pas lu.
Vérification du signal d'entrée
Le signal d'entrée peut être vérifié en appuyant sur la
touche ON SCREEN de la télécommande.
SIGNAL: Affiche le type de signal (DTS, DOLBY
DIGITAL, PCM, etc.).
fs: Affiche la fréquence d'échantillonage du signal.
FORMAT: Affiche le nombre de voies du signal d'entrée.
“Numéro de voies avant/Numéro de voies surround/LFE
marche/arrêt” “SURROUND” est affiché pour les sources à
2-voies enregistrées en Dolby Surround.
OFFSET: Affiche la valeur de décalage de normalisation de dialogue.
FLAG: Affiche le signal d'identifiaction spécifique enregistré dans le
signal d'entrée.
“MATRIX” s'affiche lorsque le processus matrix est effectué
sur le canal surround arrière, “DISCRETE” s'aafiche lorsque le
processus numérique est effectué.
N'est pas affiché lorsqu'aucun signal d'identification n'est affiché.
De plus, des informations sont affichées à l'écran dans l'ordre suivant lorsque la touche ON SCREEN est
activée à plusieurs reprises:
OSD-1 Signal d'entrée
OSD-2 Entrée/Sortie
OSD-3 Mode Auto Surround
OSD-3 ~ 7 Stations préréglées du tuner
REMARQUE:
OSD-3: Ceci s’affiche lorsque le mode auto surround est réglé sur “ON” et que le mode
d’entrée est réglé sur “Auto”.
Ce message ne s’affiche pas si le mode d’entrée est réglé sur “Analog” ou sur “EXT.
IN-1,-2”.
OSD-3 ~ 7: AVR-5800 uniquement.
(Unité de télécommande)
Sélection d’une source d’entrée numérique
L’indicateur Dolby Digital s’allume pendant
la lecture de sources Dolby Digital.
DIGITAL
Lors de la lecture de sources DTS,
l’indicateur DTS s’allume.
Le témoin lumineux d’ambiance arrière
s’allume en vert lors de la lecture en
mode THX SURROUND EX.
SURROUND
BACK CH
OUTPUT
[2] Pour effectuer une lecture en mode THX Surround EX/Home THX Cinema pour des
sources enregistrées en Dolby Digital ou DTS.
1
Sélectionner la source programme.
Effectuer l’étape 1 sous “Mode Dolby Digital et
ambiance DTS”.
2
Sélectionner le mode Home THX Cinema.
HOME
THX CINEMA
(Unité principale) (Unité de télécommande)
3
Reproduire une source programme avec la marque .ou .
Pour les instructions d’utilisation, se reporter aux manuels des composants respectifs.
L’information sur l’état du canal pendant la lecture de sources Dolby Digital ou DTS peut être vérifiée à
l’aide de la touche “STATUS” de l’unité principale.
2
32 3
Appuyer sur la touche SURR.
PARA. pour terminer le réglage.
(Unité de télécommande)
Page 22

22
FRANCAIS
1-w 2
1-q 3 3
1-q
1-w
2
2
4, 6
5
Mode Dolby Digital (uniquement avec entrée numérique) et ambiance DTS
(uniquement avec entrée numérique)
Reproduire avec une entrée numérique
1
Sélectionner la source d’entrée.
q Sélectionner une source d’entrée réglée à
numérique (COAXIAL/ OPTICAL).
INPUT SELECTOR
(Unité principale) (Unité de télécommande)
w Régler le mode d’entée à “AUTO”.
INPUT
MODE
(Unité principale) (Unité de télécommande)
2
Sélectionner le mode d’ambiance.
DOLBY
SURROUND
DTS
SURROUND
(Unité principale) (Unité de télécommande)
3
Reproduire une source programme avec la marque .ou .
4
Afficher le menu de paramètre d’ambiance.
(Unité de télécommande)
5
q Sélectionner les divers
paramètres.
(Unité de télécommande)
w Ajuster le paramétrage.
(Unité de télécommande)
DIGITAL
• Le témoin DTS s’allume en cas de
reproduction de sources DTS.
S’allume
S’allume
SIGNAL
DETECT
• L’indicateur SIGNAL DETECT
s’allume lors de la lecture de
sources sur lesquelles un signal
d’identification spécial est
enregistré
S’allume
• Le témoin Dolby Digital s’allume en
cas de reproduction de sources
Dolby Digital.
6
Appuyer sur la touche SURR. PARA. pour terminer le réglage.
(Unité de télécommande)
5
Sélectionner le meilleur mode pour la souce.
CINEMA /
MUSIC
(Unité principale) (Unité de télécommande)
DOLBY PL II CINEMA
DOLBY PL
II MUSIC DOLBY PL II EMULATION
1
Sélectionner la fonction se rapportant au
composant que vous désirez écouter.
EX:
2
Sélectionner le mode Dolby Surround Pro Logic II.
Mode Dolby Surround Pro Logic
II
INPUT SELECTOR
(Unité principale) (Unité de télécommande)
3
Reproduire une source programme avec la marque .
• Pour les instructions d’utilisation, se reporter aux manuels des composants respectifs.
S’allume
(Unité principale) (Unité de télécommande)
DOLBY
SURROUND
Sélectionner le mode DOLBY PRO LOGIC II en
utilisant les touches DOLBY SURROUND.
• Le témoin Dolby Pro Logic s’allume.
4, 5
1
2
2
1
4, 7
5, 6
4
Sélectionner le mode de paramètrage d'ambiance sonore.
CINEMA /
MUSIC
(Unité principale) (Unité de télécommande)
Page 23

FRANCAIS
23
6
q Sélectionnez les différents paramètres surround.
• Réglage DEFAULT
(Unité de télécommande) (Unité de télécommande)
Dolby Headphone
Le mode “Dolby Headphone” est réglé lorsqu'un casque est connecté au jack
“PHONES” en mode DOLBY/DTS SURROUND.
1
Lorsque la touche “SURR.
PARA.” est pressée, l’écran
de sélection de paramètre
apparaît.
2
(Unité de télécommande)
1, 3
Paramètres
MODE:
DH1.............“Reference room” (petite pièce avec faibles réverbérations)
DH2.............“Live room” (pièce avec réverbérations légèrement plus prononcées que DH1)
DH3.............“Large room” (pièce plus grande que DH1, cette fonction offre des effets de sensation de
distance et de diffusion de sons)
BYPASS.......Son stéréo
DECODER:
Sélectionnez cette option pour la lecture de sources analogiques, PCM ou autres sources à 2 canaux.
Les signaux sont convertis en signaux multicanaux en utilisant les décodeurs illustrés ci-dessous et joués en
mode “Dolby Headphone”.
Ceci ne s’affiche pas en mode BYPASS.
PL II C .........Mode “Dolby Pro Logic
II Cinema”
PL II M ........Mode “Dolby Pro Logic
II MusicMode”
NEO:6 C......Mode DTS NEO:6 Cinema
NEO:6 M.....Mode DTS NEO:6 Music
OFF .............Les signaux sont joués tels quels en mode “Dolby Headphone” (à 2 canaux).
– Enregistrement –
Lorsque le mode RECOUT est réglé sur “SOURCE”, avec cet amplificateur, des signaux codés en mode Casque
Dolby peuvent être générés par les bornes de sortie d'enregistrement et enregistrés sur un autre enregistreur.
1. Le mode de lecture des casques Dolby est sélectionné lorsque les écouteurs sont connectés à la prise
PHONES pendant la lecture en mode surround DOLBY/DTS.
2. Dans ce cas, les signaux codés en mode de casques Dolby sont automatiquement envoyés par les bornes
de sortie d'enregistrement (analogiques et numériques) et peuvent être enregistrés.
3. Sélectionner les paramètres puis le mode souhaité et procéder à l'enregistrement.
REMARQUE:
Ne pas débrancher les écouteurs pendant l'enregistrement.
2
q Sélectionnez le paramètre.
(Unité de télécommande)
w Sélectionnez le réglage.
(Unité de télécommande)
3
Appuyer sur la touche SURR. PARA. pour terminer le
réglage.
(Unité de télécommande)
REMARQUE:
• Pendant le réglage des paramètres, l’affichage va revenir à son état d’origine plusieurs secondes après que
le dernier bouton (de l’unité principale) ait été enfoncé, ce qui terminera le réglage.
Paramètres d’ambiance e
Mode Pro Logic II:
Le mode Cinéma peut être utilisé pour les émissions de télévision en stéréo et tous les programmes
enregistrés en Dolby Surround.
Le mode Music est recommandé comme mode standard pour les systèmes musicaux à son automatique
(pas de vidéo) et optionnel pour le système A/V.
Le mode Pro Logic Emulation offre le même procédé de traitement du signal que celui servant au Pro Logic
original si le contenu de la source n’est pas de bonne qualité.
Sélectionner un des modes (“Cinema”, “Music” ou “EML”).
Commande de Panorama:
Ce mode étend l’image stéréo frontale pour inclure les enceintes d’ambiance ou un effet “wraparound”
excitant avec une exposition d’image latérale.
Sélectionner “OFF“ ou “ON“.
Commande de dimension:
Cette commande ajuste progressivement le champ sonore vers l’avant ou l’arrière.
La commande peut être réglée en 7 étapes de 0 à 6.
Commande de largeur centrale:
Cette commande ajuste l’image centrale de sorte qu’elle puisse être entendue uniquement de l’enceinte
centrale; uniquement des enceintes gauche/droite comme une image fantôme ou des trois enceintes
frontales pour varier les degrés d’enregistrement.
La commande peut être réglée en 8 étapes de 0 à 7.
w Ajustez le réglage des paramètres.
Sélectionnez “Default Yes
0” puis des paramètres réglés
par défaut.
(Unité de télécommande)
7
Appuyer sur la touche SURR. PARA. pour terminer le réglage.
(Unité de télécommande)
Page 24

Le transfert numérique et la lecture multi-canaux de disques DVD audio et d’autres sources multi-canaux sont
possibles si l’on connecte le AVR-5800/AVC-A1SE à un lecteur de DVD Denon équipé d’un connecteur de
liaison Denon en utilisant le câble de connexion fourni avec le lecteur de DVD.
Cependant, avec des disques sur lesquels des mesures de protection des droits d’auteurs spéciales ont été
prises, il se peut que les signaux numériques ne soient pas générés par le lecteur de DVD. Dans ce cas,
connectez la sortie analogique multi-canaux du lecteur DVD aux bornes EXT.IN-1 ou EXT.IN-2 du AVR5800/AVC-A1SE pour la lecture.
Référez-vous également aux instructions d’utilisation de votre lecteur de DVD.
24
FRANCAIS
1-w
1-q 1-e
2, 7
1-q
1-w
1-e
3, 4,
5, 6
Réglage du délai audio (Audio Delay)
1
q Sélectionner la source d’entrée.
INPUT SELECTOR
(Unité principale) (Unité de télécommande)
w Régler le mode d’entée à “AUTO”.
INPUT
MODE
(Unité principale) (Unité de télécommande)
Lors de la lecture d’un DVD ou de tout autre source vidéo, l’image sur le moniteur peut sembler en retard par
rapport au son. Dans ce cas, réglez le délai audio pour retarder le son et le synchroniser avec l’image.
Le réglage du délai audio est enregistré séparément pour chaque source d’entrée.
e Sélectionnez “Dolby/DTS Surround”.
DOLBY
SURROUND
DTS
SURROUND
(Unité principale) (Unité de télécommande)
r Lancez la lecture d’une source de
programme (DVD, etc.).
2
Pressez la touche “SYSTEM SETUP” et
affichez l’écran de menu de paramétrage du
système “System Setup Menu”.
(Unité de télécommande)
3
Sélectionnez “Audio Delay” à l’écran de menu
de paramétrage du système.
(Unité de télécommande)
4
Appuyer sur le levier de sélection “ENTER”
pour passer à l’écran de réglage du délai
automatique “Audio Delay”.
(Unité de télécommande)
5
Réglez la durée du délai (de 0 à 200 ms).
(Unité de télécommande)
Pour une source comme un film par exemple,
effectuez ce réglage pour que les mouvements
de lèvres des acteurs soit synchronisé avec le
son.
6
Appuyer sur le levier de sélection “ENTER”
pour retourner à l'écran de paramétrage du
système.
7
Appuyer sur la touche SYSTEM SETUP pour
terminer le réglage.
REMARQUE:
Le réglage du délai audio n’est pas utilisé pour la
lecture en modes “EXT. IN”, d’entrée analogique
directe ou stéréo (uniquement lorsque la fréquence
de croisement est réglée sur “FIXED – THX” (THX
fixe) ou les enceintes sur “Large”).
2 Les différences entre noms de mode d’ambiance dépendent des signaux d'entrée
Signaux d'entrée
PURE DIRECT, DIRECT
STEREO
HOME THX CINEMA
DTS SURROUND
DTS NEO:6
DOLBY DIGITAL
DOLBY PRO LOGIC
II
DSP SIMULATION
C
C
THX
E
DTS NEO:6
E
DOLBY
PRO LOGIC
II
C
C
C
THX
E
DTS NEO:6
E
DOLBY
PRO LOGIC
II
C
C
C
✳
THX MTRX6.1
THX Ultra2 Cinema
THX Music Mode
THX5.1
✳
DTS ES MTRX
DTS SURROUND
E
E
E
C
C
C
✳
THX MTRX6.1
THX Ultra2 Cinema
THX Music Mode
THX5.1
✳
DTS ES MTRX
DTS 96/24
E
E
E
C
C
C
B
THX DSCRT6.1
THX MTRX6.1
B
DTS ES DSCRT6.1
DTS MTRX6.1
E
E
E
C
C
C
THX
E
DTS NEO:6
E
DOLBY
PRO LOGIC
II
C
C
C
✳
THX SURROUND EX
THX Ultra2 Cinema
THX Music Mode
THX5.1
E
E
✳
DOLBY DIGITAL EX
DOLBY DIGITAL
E
C
ANALOG LINEAR PCM DTS (5.1 ch)
DTS 96/24(5.1 ch)
DTS (6.1 ch) D. D. (2 ch) D. D. (5.1 ch)
DTS DOLBY DIGITAL
Mode d’ambiance
C :Sélectionnable
✳ : Le nom du mode surround diffère suivant le réglage du paramètre surround “SB CH OUT”.
B : Le nom du mode surround diffère suivant le signal d'entrée.
E : Non sélectionnable
Printed in Japan 511 3890 005
16-11, YUSHIMA 3-CHOME, BUNKYOU-KU, TOKYO 113-0034, JAPAN
Telephone: (03) 3837-5321
1. CENTER IMAGE (0.0 à 0.5: valeur par défaut 0.2)
Le paramètre d’image centrale servant à régler l’expansion du canal central en mode DTS NEO:6 MUSIC
a été ajouté.
2. Réglage “OFF” du canal Subwoofer
Le canal subwoofer peut à présent être réglé sur “OFF” dans tous les modes surround.
“OFF” est réglé lorsque le niveau du canal est réglé un pas au-dessous de -12 dB.
3. Mode PURE DIRECT
Le réglage est maintenant sauvegardé.
4. Réglage du niveau de canal et du fondu
• Réglage de la sélection
de canal
• Niveau de réglage et de
fondu
2 Autres changements
2 Lecture en utilisant le connecteur de liaison Denon
 Loading...