

Page 1

Air always contains a certain amount of water in the form of vapour. This determines the
level of humidity in an atmosphere.
The capacity of the air to hold water vapour increases with temperature.
This is why in our homes, as soon as the temperature decreases, the vapour contained in the
air condenses, as is evident on the colder surfaces in the room, such as the windows, walls etc.
The purpose of a dehumidifier is to remove the excess moisture from the air, avoiding the
damage caused by condensation.
Experts have established that the optimum environmental conditions for our well being and for
the home are obtained between 40% and 60% relative humidity.
With temperatures near 5°C, you are recommended to heat the room even minimally.
With heating, the condensation formed by the water vapour on windows and other cold surfaces evaporates into the air to be collected by the dehumidifier.
Negative ions change the polarity of airborne particles, causing them to magnetically attract
together. As a result, they become too large to remain airborne, and fall out of the air that you
breathe in. Negative ions are present in our environment, wherever we feel the air clean and
fresh, especially around waterfalls, ocean sur f, rivers and mountains. It has been proven that
negative ions promote wellness, and, as such, provide additional benefits when there are more
negative ions than positive ones in the air we breathe.
12
Useful information on humidity
IMPORTANT INFORMATION FOR CORRECT DISPOSAL OF THE PRODUCT IN ACCORDANCE WITH EC
DIRECTIVE 2002/96/EC.
At the end of its working life, the product must not be disposed of as urban waste.
It must be taken to a special local authority differentiated waste collection centre or to a dealer providing this service.
Disposing of a household appliance separately avoids possible negative consequences for the
environment and health deriving from inappropriate disposal and enables the constituent materials to be recovered to obtain significant savings in energy and resources.As a reminder of
the need to dispose of household appliances separately, the product is marked with a crossedout wheeled dustbin.
Page 2
ENGLISH
13
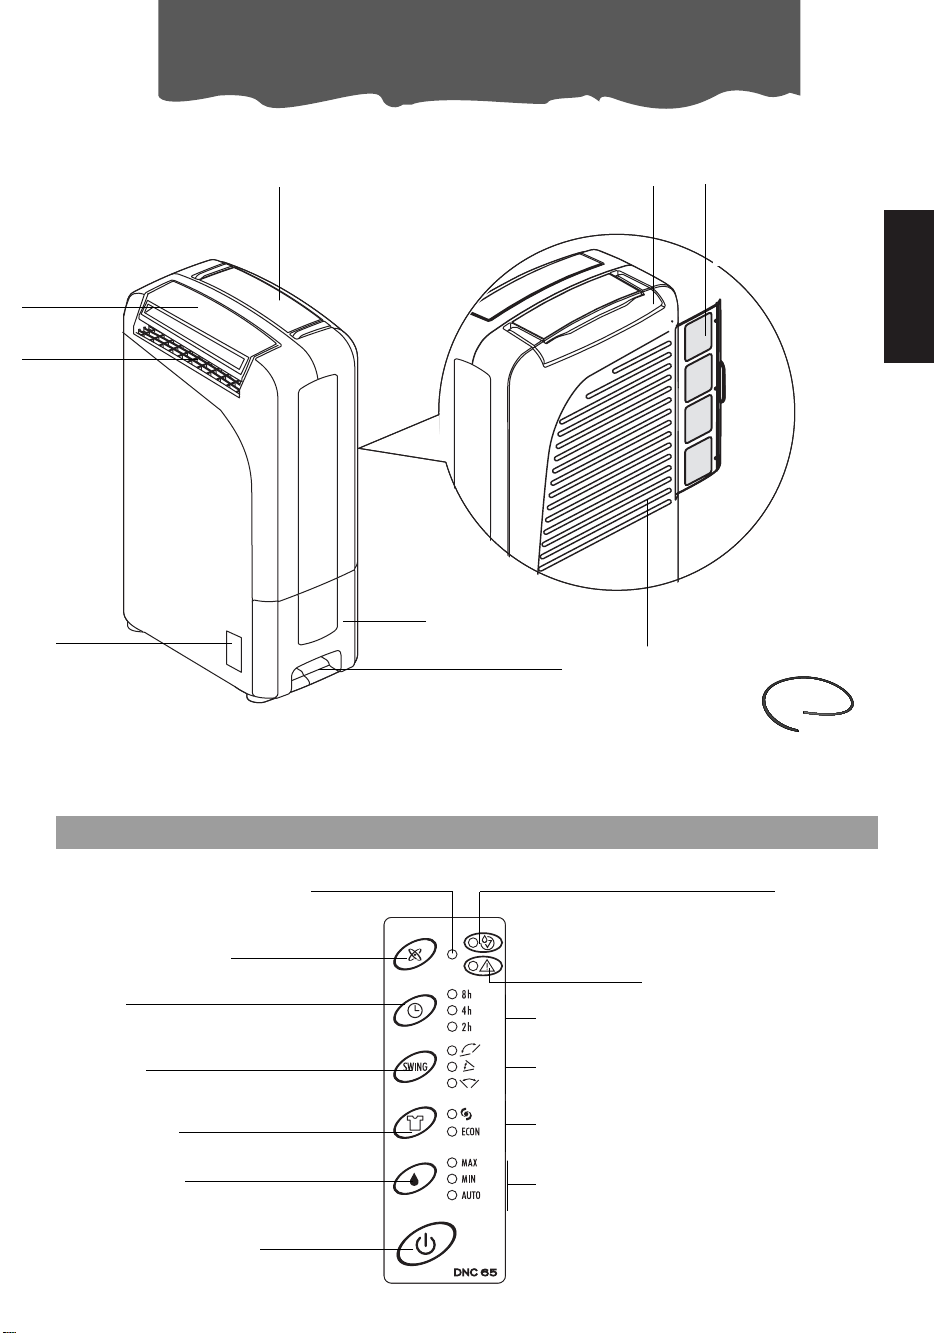
Description
Control panel
Filter Handle
Deflector
Air outlet
grille
Water level
viewing
window
Tank
Tank extraction grip
Air inlet grille
Ioniser button
Ioniser light
CONTROL PANEL
Tank full/tank absent light
Delayed shutdown button
Automatic deflector swing
button
Laundry drying
programmes button
Dehumidifier button
ON/OFF button
Alarm light
Delayed shutdown buttons (2-4-8 hours)
Maximum, minimum, medium
deflector swing light
Turbo or Economy programme light for
laundry drying function
Maximum, minimum and automatic
dehumidifying lights
condensate drain hose
Page 3

14
SAFETY WARNINGS
• Use this appliance only as described in this instruction manual.
As with all electrical equipment, whilst the instructions aim to cover as many eventualities as possible,
caution and common sense should be applied when operating and installing this appliance.
• This appliance is designed to dehumidify domestic rooms and dry laundry and must not be used for
other purposes.
• It is dangerous to modify or alter the characteristics of the appliance in any way.
• If the appliance requires repair, always contact a Service Centre authorised by the manufacturer.
Always insist on original spare parts. Repairs carried out by unauthorised personnel may be dangerous
and invalidate the guarantee.
• Never allow the appliance to be used by people (including children) with psychological, physical or sensory impairments or with insufficient experience and knowledge, unless closely supervised and instructed
by someone responsible for their safety. Always supervise children. Make sure they do not play with the
appliance.
• If the power cable is damaged, it must be replaced by the manufacturer, an authorised service centre
or a qualified electrician in order to eliminate all risk.
• The appliance must be connected to an efficient earth installation. Have your electrical circuit checked by
a qualified electrician.
• The use of an extension lead is not recommended, however if it is necessary then follow carefully the
extension lead’s instructions, and most importantly ensure that the extension lead is correctly rated in
accordance with the appliance being used and NEVER overloaded.
• Before cleaning or maintenance operations, always unplug the appliance from the power socket.
• Do not move the appliance by pulling the power cable.
• Never use the appliance in very damp rooms (laundries for example).
• Do not use the appliance on sloping sur faces.
• Keep the appliance at least 50 cm away from flammable substances (alcohol etc) or pressurised containers (e.g. aerosol cans).
• Do not rest heavy or hot objects on top of the appliance.
• Clean the air filter regularly.
• At the end of its working life, consign the appliance to a specialist collection centre.
• The materials used for packaging can be recycled. You are therefore recommended to dispose of them
in appropriate waste collection containers.
• Do not use the appliance outdoors.
• Do not obstruct the air intake or outlet.
• Do not insert fingers or other objects into the air intake or outlet openings. Do not insert metal objects
into the apertures.
• Danger! Rotating parts; contact with the internal fan could cause electric shock or injury.
• Do not drink the water collected from the appliance or use it as animal drinking water.
• Before moving the appliance, turn off the switch and empty the water in the tank. Water could leak out
and wet other objects, causing electric shocks or fire.
Assistance
Please refer to the guarantee leaflet enclosed for service and assistance details.
Important safeguards
Page 4

15
ENGLISH
Installation
Electrical connections
Before plugging the appliance into the mains socket, check that:
• The mains power supply corresponds to the power supply indicated on the rating plate.
• The power socket and electrical circuit are adequate for the appliance.
• The power socket matches the plug. If this is not the case, have the plug replaced by a qualified
electrician;
• The mains socket is adequately earthed.
Installation
Position the appliance in the room to
be dehumidified.
Please follow the minimum distances
between the appliance and furniture or
walls, as stated in fig. 1.
Failure to do so would obstruct ventilation, jeopardising correct operation of
the appliance.
When the appliance is functioning.
You should keep all doors and windows
closed while the appliance is in operation.
If doors and windows are opened, the
temperature and humidity in the room
may change and it could therefore
require longer to dehumidify the room.
With temperatures of less than 1 °C or
above 40 °C, dehumidification is automatically deactivated and the
appliance switches to fan only mode.
If the humidity is lower than 20%, the safety circuit triggers automatically and the dehumidifier
shuts down to avoid damage.
If the humidity in the room drops, the dehumidification capacity is automatically reduced.
Do not drop or tilt the appliance.
If the appliance falls over, place it upright immediately.
Even when the room is dehumidified, condensation and mould may form externally or in poorly
ventilated points, for example behind furniture.
fig.1
MIN. 20 cm
MIN. 20 cm
MIN. 60 cm
MIN. 50 cm
MIN. 20 cm
Page 5

16
Operation
How to dehumidify
1) Plug the appliance into a mains socket.
2) Press the ON/OFF button.
• Make sure the “tank full/tank missing” light is off. If it is on, position the tank correctly or
empty it.
• The deflector opens and the appliance comes on in automatic mode.
To turn the appliance off, press the POWER ON/OFF button.
IMPORTANT: Before unplugging from the mains, wait for the fan to stop. The fan remains in operation for about two minutes after the appliance is turned off to allow the heating element to
cool down.
Selecting the operating mode
Press the dehumidification button ( ). Each time you press the ( ) button, the relative light
comes on (AUTO, MIN, MAX).
Auto: to maintain a comfortable level of humidity.
Min: for silent operation.
Max: to dehumidify rapidly.
NB: The humidity level is maintained at around 55% in Auto mode and the appliance therefore comes on and goes off automatically.
(When a humidity of 55% is reached, the appliance switches into fan mode.)
How to dry laundry
Place the dehumidifier at least than 30 cm from the laundry to be dried.
NEVER place the dehumidifier under the laundry to be dried.
To dry the laundry, select the corresponding button. You can choose between two different programmes:
ECON economy function: Use this programme during the summer. The appliance operates
automatically with low energy consumption.
turbo mode: use this programme to dry garments rapidly and or during the winter.
Delayed shutdown timer
Before using this function, make sure the appliance is on.
Each time the TIMER button is pressed, the number of hours the appliance operates changes
(2-4-8 hours)
When the timer is set, even if the tank full light is flashing, after emptying and repositioning the
tank, the appliance continues to operate for the time left.
Page 6

ENGLISH
17
Operation
Ioniser
Before using this function, make sure the appliance is on.
Press the button. The light comes on and the appliance emits negative ions from the air
outlet grille.
Press the button again to interrupt negative ion emission. (The light goes off).
A large quantity of negative ions are produced, quantitatively similar to those present in envi-
ronments such as forests or waterfalls.
How to direct the air
Press the SWING button to set automatic swing of the deflector, choosing between three types
of swing:
1
st
press (air is delivered forwards and vertically)
2
nd
press (air is delivered forwards)
3
rd
press (air is delivered vertically).
Press the SWING button again to stop the deflector in its current position.
Page 7

18
Emptying the tank/
Continous external draining
When the tank is full, the appliance stops automatically and the tank full light lights up.
Empty the tank:
1 Extract the tank slowly using the designed grip, holding the appliance fir mly (fig. 2).
2 Position the handle of the tank vertically as shown (fig. 3).
3 Remove the lid (fig. 4).
4 Empty the tank (fig. 5).
5 Replace the lid and lower the handle.
6 Put the tank back in the appliance.
When the empty tank is put back, the appliance starts functioning according to the previous
settings. The tank full light goes off).
Important:
Do not remove the float inside the tank. The float is required to sense when tank is full. Replace
the lid correctly before returning the tank to the appliance.When you remove the tank, do not
touch internal parts of the dehumidifier. It could damage the appliance.
Push the tank into place carefully. If it knocks against the walls or is incorrectly inserted, the
appliance may not function. (The tank full light flashes.) Remove the tank then replace carefully in position.
Continuous external draining
If the appliance is to be operated for long periods but you are unable to empty the tank, it is
recommended to use the continuous drain facility.
1) Remove the rubber bung from the outlet tube (fig. 6).
2) Fasten the rubber hose to the outlet tube (fig. 7).
3) Make sure that the hose is not higher than the outlet tube, otherwise water will remain in the
tank; also check that the hose is not kinked (fig. 8).
N.B.: Keep the rubber bung. You will need it to plug the hose or close the outlet tube if you
revert to draining into the tank.
fig. 2 fig. 3 fig.4 fig.5
fig. 6 fig. 7 fig.8
Page 8

ENGLISH
19
Maintenance
• Always unplug the appliance from the power socket before performing any cleaning or
maintenance operations.
• Never put the machine in water or let the cord or plug get wet.
C
leaning the body
•
Wipe the appliance body with a damp cloth, then dry. Don’t use abrasives – they’ll scratch the
plastic surfaces.
• Never use alcohol or solvents to clean the appliance.
Cleaning the air filter
If the filter is dirty, air circulation is compromised and the efficiency of the dehumidifying and air purifying functions decreases.
It is therefore good practice to clean the filter at regular intervals.
The frequency depends on the duration and conditions of operation.
If the unit is used regularly, you are recommended to clean the
filter once a week.
Removing the filter
• Extract the filter using the handle (fig. 9).
•Use a vacuum cleaner to remove dust accumulations from
the filter. Never wash the filter in water.
Routine cleaning of the tank (once a month)
• Extract the tank and remove the lid as described previously. DO NOT remove the float!
• Rinse all the components with water two or three times.
Depending on where the dehumidifier is used, the inside of the tank may become dirty as
a result of dirt and dust contained in the air. If this is the case, wash in mild soapy water to
remove the most stubborn dirt”
If the appliance is not used for long periods
• After having unplugged the appliance from the power socket, empty the tank.
•Clean and reposition the filter.
• Cover the appliance to protect it from dust.
Maintenance/Cleaning
fig. 9
Page 9

20
Tr oubleshooting
Problems Cause Solution
The appliance does not
work
The appliance is operating
in dehumidifying mode
(light on), but the humidity
does not decrease
Alarm light on
•the appliance is not plugged in
•there is no current
•the tank is full of water
•the tank is incorrectly positioned
•the filter is blocked
•the temperature or humidity in the room is too low
•the area is too big
•too many sources of humidity in the room (pots of
boiling water, etc.)
•the air intake and outlet
grills are blocked.
•plug into the mains
•check the power supply
•empty the tank
•position the tank correctly
•Clean the filter
•in certain conditions, it is
normal for the appliance
not to dehumidify (in these
cases the room being
dehumidified should also
be heated)
•remove the obstructions
•Contact Customer Care
(see guarantee leaflet)
Check the following points before calling the Customer Care Helpline (see guarantee leaflet)
Page 10

21
ENGLISH
Power supply voltage See rating plate
Absorbed power “
Maximum power input “
Absorbed current “
Quantity of negative ions 10000/cm
3
ca
Humidistat yes
Fan speeds 2
Air filter yes
Dimensions WxHxD 324x187x483mm
Tank capacity 2 litres
Operating limits: Dehumidifying
• temperature 1° - 35°
•relative humidity 30 - 95%
Technical specifications
 Loading...