

Dell Wyse ThinOS C10LE, Wyse ThinOS D10D, Wyse ThinOS D10DP, Wyse ThinOS T10, Wyse ThinOS T10D Administrator's Manual
...
Administrators Guide
Dell® Wyse ThinOSTM
Products: C10LE, D10D, D10DP, R10L, T10, T10D, V10LE
Issue: 011614
PN: 883682-08 Rev. AF

Copyright Notices
© 2014, Dell Inc. All Rights Reserved.
This manual and the software and firmware described in it are copyrighted. You may not reproduce, transmit,
transcribe, store in a retrieval system, or translate into any language or computer language, in any form or by
any means, electronic, mechanical, magnetic, optical, chemical, manual or otherwise, any part of this
publication without express written permission.
End User License Agreement (“License”)
A copy of the End User License Agreement is included in the software and provided for your reference only.
The License at http://www.wyse.com/license as of the purchase date is the controlling licensing agreement. By
copying, using, or installing the software or the product, you agree to be bound by those terms.
Trademarks
The Dell, Wyse, and PocketCloud logos and Wyse and PocketCloud are trademarks of Dell Inc. Other product
names mentioned herein are for identification purposes only and may be trademarks and/or registered
trademarks of their respective companies. Specifications subject to change without notice.
Patents
This product and/or associated software are protected by copyright, international treaties, and various patents,
including the following U.S. patents: 6,836,885 and 5,918,039.
Restricted Rights Legend
You acknowledge that the Software is of U.S. origin. You agree to comply with all applicable international and
national laws that apply to the Software, including the U.S. Export Administration Regulations, as well as
end-user, end-use and country destination restrictions issued by U.S. and other governments. For additional
information on exporting the Software, see http://www.microsoft.com/exporting.
Ordering Information
For availability, pricing, and ordering information in the United States and Canada, call 1-800-438-9973 or visit
us at Dell.com. In all other countries, contact your sales representative.
FCC Statement
This equipment has been tested and found to comply with the limits for either Class A or Class B digital
devices, pursuant to Part 15 of the FCC Rules. These limits are designed to provide reasonable protection
against harmful interference in a residential installation. This equipment generates, uses, and can radiate radio
frequency energy and, if not installed and used in accordance with the instructions, may cause harmful
interference to radio communications. However, there is no guarantee that interference will not occur in a
particular installation. If this equipment does cause harmful interference to radio or television reception, which
can be determined by turning the equipment off and on, the user is encouraged to try to correct the
interference by one or more of the following measures:
• Reorient or relocate the receiving antenna.
• Increase the separation between the equipment and the receiver.
• Connect the equipment into an outlet on a circuit different from that to which the receiver is connected.
• Consult the dealer or an experienced radio/TV technician for help.
Shielded interconnect cables and shielded AC power cable must be employed with this equipment to insure
compliance with the pertinent RF emission limits governing this device. Changes or modifications not
expressly approved by the system’s manufacturer could void the user’s authority to operate the equipment.
CAUTION: Modifications made to the product, unless expressly approved by Dell Inc, could void the user’s
authority to operate the equipment.

Regulatory Compliance for Wyse Thin Clients
Basic EMC and Safety Requirements
Wyse thin clients are compliant with the regulatory requirements in the regions listed below.
U.S.A. - FCC Part 15 (class B), cUL 60950
Canada - IC ICES-003, CAN/CSA-C22 No. 60950
Europe - EN 55022 (class B), EN 55024
Canadian DOC Notices
Class A - This digital apparatus does not exceed the Class A limits for radio noise emissions from digital
apparatus set out in the Radio Interference Regulations of the Canadian Department of Communications.
Le présent appareil numérique n’émet pas de bruits radioélectriques dépassant les limites applicables aux
appareils numériques de la classe A prescrites dans le Réglement sur le brouillage radioélectrique édicté par le
Ministère des Communications du Canada.
Class B - This digital apparatus does not exceed the Class B limits for radio noise emissions from digital
apparatus set out in the Radio Interference Regulations of the Canadian Department of Communications.
Le présent appareil numérique n’émet pas de bruits radioélectriques dépassant les limites applicables aux
appareils numériques de la classe B prescrites dans le Réglement sur le brouillage radioélectrique édicté par le
Ministère des Communications du Canada.
Wireless Usage and Requirements
Radio transmitting type devices (RF module) are present in models with the wireless option. These devices
operate in the 2.4 GHz band (i.e. 802.11 A/B/G/N & Bluetooth).
As a general guideline, a separation of 20 cm (8 inches) between the wireless device and the body, for use of a
wireless device near the body (this does not include extremities) is typical. This device should be used more
than 20 cm (8 inches) from the body when wireless devices are on and transmitting.
Some circumstances require restrictions on wireless devices. Examples of common restrictions include:
• When in environments where you are uncertain of the sanction to use wireless devices, ask the applicable
authority for authorization prior to use or turning on the wireless device.
• Every country has different restrictions on the use of wireless devices. Since your system is equipped with
a wireless device, when traveling between countries with your system, check with the local Radio Approval
authorities prior to any move or trip for any restrictions on the use of a wireless device in the destination
country.
• Wireless devices are not user-serviceable. Do not modify them in any way. Modification to a wireless
device will void the authorization to use it. Please contact the manufacturer for service.
Device Power Supply
Use only the external power supply that comes with your thin client. For power and voltage ratings, see the
serial number label or regulatory label on your device. For power adapter replacement, contact your Service
Representative. For proper replacement compare the labels on both mobile thin client and power adapter to
ensure that their voltages match.
WARNING: Use of any other power adapter may damage your mobile thin client or the power adapter. The
damage caused by an improper power adapter is not covered by warranty.
Battery Information
Models Cx0, Dx0D, Rx0L, T10, and VX0 contain an internal button cell battery replaceable by Dell or one of our
Authorized Service Centers. For service, visit http://www.wyse.com/support/authorized-service-centers.
WARNING: There is a risk of explosion if the battery is replaced by an incorrect type. Always dispose of used
batteries according to the instructions accompanying the battery.
Perchlorate Materials - Special Handling May Be Required under California Code of Regulations, title 22. (Only
required within the U.S.A.)

This page intentionally blank.

Contents
1 Introduction 1
About this Guide 2
Finding the Information You Need in this Guide 2
Dell Technical Support 2
Related Documentation and Services 2
Dell Online Community 2
2 Getting Started: Quickly Learning the Basics 3
Connecting to a Remote Server 4
Manual Connection Procedures 5
Using Your Desktop 6
Configuring Thin Client Settings and Connection Settings 7
Connecting to a Printer 7
Connecting to a Monitor 7
Locking the Thin Client 7
Signing Off and Shutting Down 8
Additional Getting Started Details 9
Zero Desktop Features 9
Zero Interactive Desktop Guidelines 9
Zero Toolbar 10
List of Connections 11
Classic Desktop Features 12
Classic Interactive Desktop Guidelines 12
Shortcut Menu 13
Desktop Menu 14
Connect Manager 15
Login Dialog Box Features 16
Accessing System Information 17
3 Configuring Thin Client Settings Locally 19
Local Settings Menu 20
System Preferences 21
Display 23
Peripherals 25
Printer 28
Reset Features 32
Resetting to Factory Defaults Using G-Key Reset 32
Resetting to Factory Defaults Using Shutdown Reset 32
Resetting Display Settings Using V-Key Reset 32
Accessing Thin Client BIOS Settings 32
4 Configuring Connection Settings Locally 33
Global Connection Settings 34
Connectivity Menu 37
Network Setup 38
Enabling a Disabled Network Setup Dialog Box 44
Remote Connections 45
Central Configuration 48
Advanced Details on Configuring ICA and RDP Connections 50
Configuring ICA Connections 50
Configuring RDP Connections 54

vi Contents
5 Performing Diagnostics 57
System Tools 58
Network Tools 61
Using Ping 61
Using Trace Route 62
A Central Configuration: Automating Updates and Configurations 63
How to Set Up Automatic Updates and Configurations 64
Step 1: Prepare the Root Directory and Folder Structure on the Server 64
Step 2: Direct the Thin Client to the Server Using DHCP Options 65
Step 3: Reboot or Start the Thin Client 68
B CMOS Management 69
CMOS Central Management: Extracting CMOS Settings to the File Server for
Distribution 70
CMOS Local Management: Extracting CMOS Settings to a USB Key for Distribution 72
C Examples of Common Printing Configurations 73
Printing to Local USB or Parallel Printers 74
Using the Printer Setup Dialog Box for Local USB or Parallel Printers 74
Using INI Parameters for Local USB or Parallel Printers 74
Printing to Non-Windows Network Printers (LPD) 76
Using the Printer Setup Dialog Box for Non-Windows Network Printers (LPD) 76
Using INI Parameters for Non-Windows Network Printers (LPD) 77
Printing to Windows Network Printers (SMB) 78
Using the Printer Setup Dialog Box for Windows Network Printers (SMB) 78
Using INI Parameters for Windows Network Printers (SMB) 81
Using Your Thin Client as a Print Server (LPD) 83
Using the Printer Setup Dialog Box for Configuring LPD Services 83
Using INI Parameters for Configuring LPD Services 84
Configuring ThinPrint 85
Example 1: Defining an SMB Printer with Generic User Credentials in Plain
Text 81
Example 2: Defining an SMB Printer with Generic User Credentials that are
Encrypted 81
Example 3: Defining an SMB Printer to Use User Credentials Cached by ThinOS
(Advanced) 82
Tables 87

1 Introduction
Wyse thin clients running Wyse ThinOS™ firmware are designed solely for optimal thin
client security and performance. These extremely efficient purpose-built thin clients
are virus- and malware-immune and offer ultra-fast access to applications, files, and
network resources within Citrix, Microsoft, VMware and Dell vWorkspace environments,
and other leading infrastructures. ThinOS-based thin clients are self-managed, go from
power-on to fully productive in seconds, and with no published API, locally accessible
file system or browser, require no local antivirus software or firewall to protect against
viruses or malware.

2 Chapter 1
About this Guide
This guide is intended for administrators of thin clients running ThinOS. It provides
information and detailed system configurations to help you design and manage a
ThinOS environment.
Finding the Information You Need in this Guide
You can use either the Search window or Find toolbar to locate a word, series of words,
or partial word in an active PDF document. For detailed information on using these
features, refer to the Help in your PDF reader.
Dell Technical Support
To access Dell technical resources, visit http://www.wyse.com/support. If you still have
questions, you can submit your questions using the Self-Service Center at
http://support.wyse.com/selfservice.html or call Customer Support at 1-800-800-9973
(toll free in U.S. and Canada). Hours of operation are from 6:00 A.M. to 5:00 P.M. Pacific
Time, Monday through Friday.
To access international support, visit http://www.wyse.com/global.
Related Documentation and Services
Fact Sheets containing the features of hardware products are available on the Dell Web
site. Go to http://www.wyse.com/products and use the Cloud clients tab to locate and
download the Fact Sheet for your hardware product.
Sample User INI files are intended for administrators of thin clients running ThinOS.
These files are available from the Dell Web site (go to
http://www.wyse.com/manuals, search for sample.ini, click the reference guide link, and
then click the sample ini link to open and use the file download dialog box to save the
compressed file to a folder you want). These sample files are annotated to allow you to
use them as a “starter set” (that you can modify for your users needs) to quickly get
your file server up and running. For information on using the sample files, refer to the
Reference Guide: Wyse ThinOSTM INI Files.
Reference Guide: Wyse ThinOSTM INI Files is intended for administrators of thin clients
running ThinOS. It provides the detailed information you need to help you understand
and use the ThinOS INI files. It contains information on the different ThinOS INI files
you can use and the rules for constructing the files. It also provides the parameter
details you need (with working examples) to get the most out of your ThinOS INI files.
In addition, this guide also includes an appendix that contains all of the supported
connect options you can use for ICA and RDP connections. It is available at: http://
www.wyse.com/manuals.
Wyse Cloud Software is available on the Dell Web site at:
http://www.wyse.com/products/software.
Dell Online Community
Dell maintains an online community where users of our products can seek and
exchange information on user forums. Visit the Online Community forums at:
http://community.wyse.com/forum.

2 Getting Started: Quickly Learning
the Basics
Use the following information to quickly learn the basics and get started using your
thin client:
• "Connecting to a Remote Server"
• "Using Your Desktop"
• "Configuring Thin Client Settings and Connection Settings"
• "Connecting to a Printer"
• "Connecting to a Monitor"
• "Locking the Thin Client"
• "Signing Off and Shutting Down"
• "Additional Getting Started Details"
TIP: ThinOS is designed to be centrally managed and configured using INI files (to
automatically push updates and any desired default configuration to all supported thin
clients in your environment - see "Central Configuration: Automating Updates and
Configurations").
If no INI files are detected, you can use local dialog boxes (on each thin client) to make
available configurations. ThinOS will save many of these locally configured settings
(common settings such as resolution, mouse, keyboard, and so on) to persist after
reboot. However, once INI files are detected, rebooting causes ThinOS to become
stateless (ignoring locally configured settings after a reboot) and the settings contained
in the INI file will be used.

4 Chapter 2
Connecting to a Remote Server
TIP: On your initial connection to central configuration it is recommended that you
connect using a “wired connection” (plug in the network-connected ethernet cable to
your thin client before starting the thin client) to obtain the configurations desired by
the administrator. This “wired connection” will also provide any wireless configurations
provided by the administrator through the INI files.
If you must initially connect to central configuration through wireless, use the Wireless
tab in the Network Setup dialog box to enter the SSID and encryption configurations
required/set up by the network administrator (see "Network Setup").
Central Configuration - If you are set up for automatic detection (using INI files - see
Reference Guide: Wyse ThinOS
and connect to the configured remote services during the boot-up process. Simply
press the power button to turn on your thin client to see the Login dialog box. Enter
your User name, Password, and Domain, and then click Login. After authentication is
successful, your available connections are presented for use.
TIP: Although the thin client will default to the Classic Desktop for INI backward
compatibility, you can configure the thin client to display the Zero Desktop by using the
SysMode=VDI parameter in the INI files or by selecting the desktop option in a dialog
box (see "Using Your Desktop").
Manual Connection - If you are not yet set up for central configuration, you will see
the Zero Toolbar, where you can configure the initial server connection you want using
the Remote Connections dialog box before you can log in. See "Manual Connection
Procedures."
TM
INI Files), your thin client will automatically detect
You only need to complete this manual configuration once (or after reboot to factory
defaults). After the thin client “knows” the location of your server, it automatically
connects to the server for login when you start the thin client in the future. After you
confirm your environment is ready for deployment, you can create INI files for central
configuration.
Getting Started: Quickly Learning the Basics 5
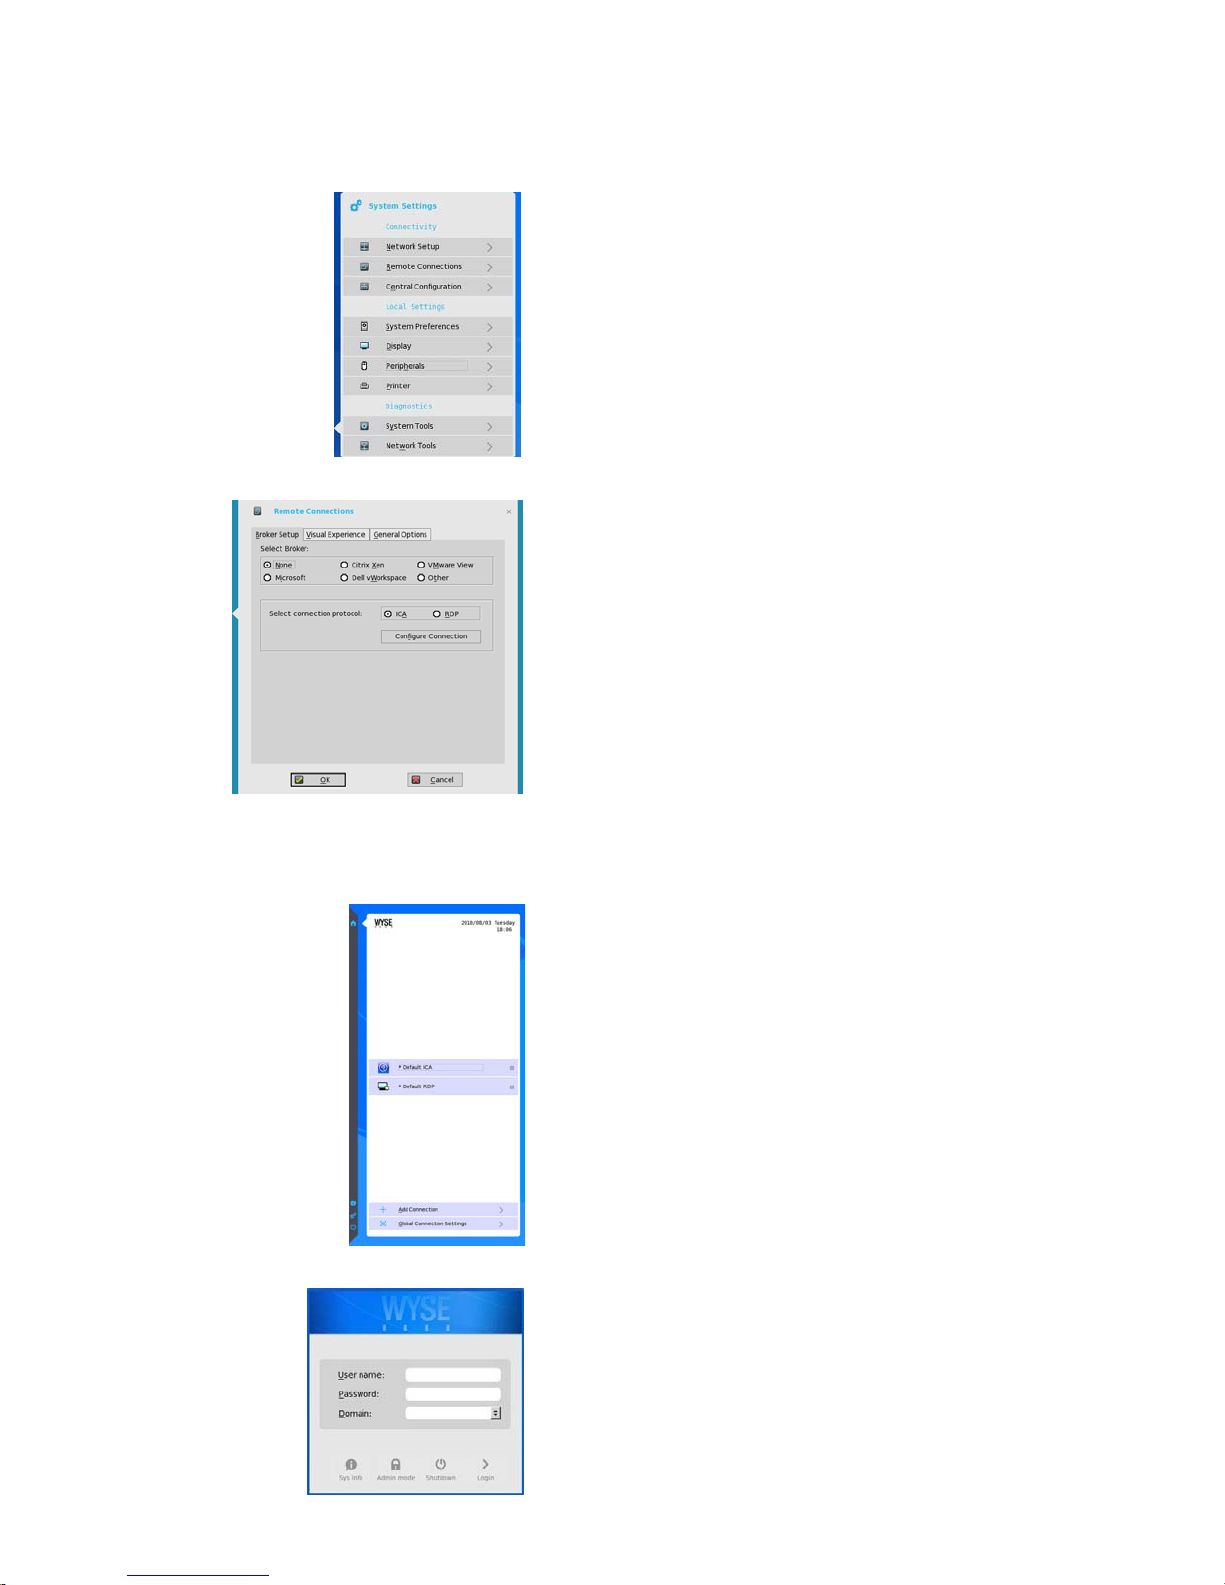
Manual Connection Procedures
1. Click the System Settings icon on the Zero Toolbar to
open the System Settings menu, and then click Remote
Connections to open the Remote Connections dialog
box.
2. Use the Broker Setup tab of the Remote Connections
dialog box to configure one of the following
connections:
• ICA or RDP connection (select None, select ICA or
RDP, click Configure Connection, and then follow
the wizard).
• A specific broker server connection (select
Microsoft, Citrix Xen, Dell vWorkspace, VMware
View, or Other and then enter the IP Address for the
server in the Broker Server box).
Note: For more details, see "Remote Connections."
3. Click OK, and then restart the thin client (click the
Shutdown icon on the Zero Toolbar to open and use
the Shutdown dialog box to restart the thin client).
(If You Configured an ICA or RDP Connection) After
thin client restart, click the Home icon on the Zero
Toolbar to open the list of available connections, click
the ICA or RDP connection you created, and then log
in.
(If You Configured a Specific Broker Server Connection)
After thin client restart, the Login dialog box appears
for your server.
Enter the User name, Password, and Domain and click
Login.
After authentication is successful, your Zero Toolbar is
presented with your assigned connections defined by
the broker server.
6 Chapter 2
Using Your Desktop
What you see after logging on to the server depends on the administrator
configurations.
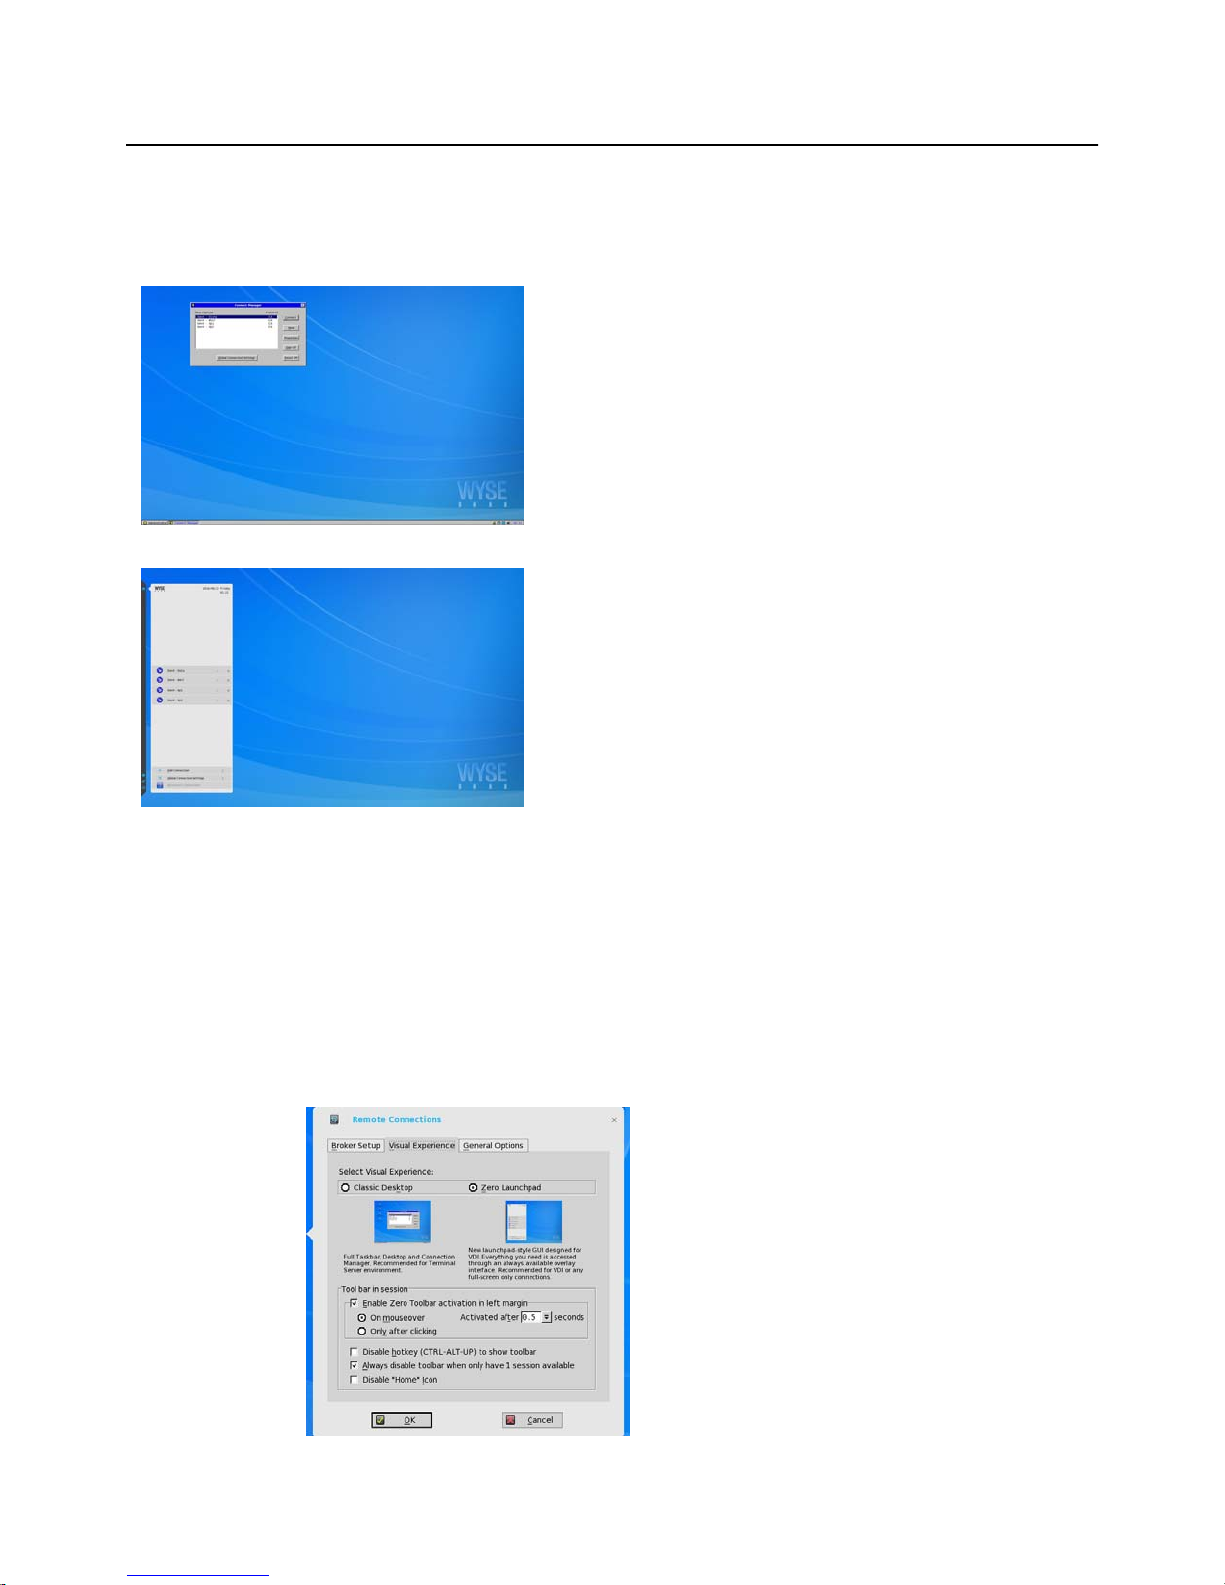
Users with a Classic Desktop - will see the classic ThinOS
desktop with full taskbar, desktop, and Connect Manager
familiar to ThinOS users. This option is the default
out-of-the-box experience and is recommended for
terminal server environments with published applications
and for backward compatibility with ThinOS 6.x versions.
For more information on using the Classic Desktop, see
"Classic Desktop Features."
Users with a Zero Desktop - will see the Zero Desktop
with the Zero Toolbar showing the assigned list of
connections from which to select. This option is
recommended for VDI and any full-screen only
connections.
For more information on using the Zero Desktop, see "Zero
Desktop Features."
In any desktop case, you can select the desktop option you want (Classic Desktop or
Zero Desktop) and create the connections you need using the Visual Experience tab on
the Remote Connections dialog box (see "Remote Connections").
To open the Remote Connections dialog box, do one of the following:
• Classic Desktop - Click User Name (User Name is the user who is logged-on and is
located at the bottom-left side of the taskbar), and then select System Setup >
Remote Connections.
• Zero Desktop - Click the System Settings icon on the Zero Toolbar, and then select
Remote Connections.

Getting Started: Quickly Learning the Basics 7
Configuring Thin Client Settings and Connection Settings
While the use of INI files is recommended to configure thin client settings and
connection settings available to users (see "How to Set Up Automatic Updates and
Configurations"), you can use dialog boxes on a thin client to:
• Set up your thin client hardware, look and feel, and system settings (see
"Configuring Thin Client Settings Locally").
• Configure connection settings (see "Configuring Connection Settings Locally").
Connecting to a Printer
To connect a parallel printer to your thin client through a USB port, you will need a
USB-to-printer adapter cable (not included). Before use, you may need to install the
driver for the printer by following the printer driver installation instructions. For
information on connecting to printers, refer to "Printer."
Connecting to a Monitor
Depending on your thin client model, connections to monitors can be made using
either a VGA (analog) monitor port, a DVI (digital) monitor port, or a DisplayPort (digital)
and the proper Dell monitor cables/splitters/adapters. For information on configuring
dual display settings, see "Display."
TIP: For dual-monitor supported thin clients using a DVI to DVI/VGA splitter, the VGA
monitor will be the primary monitor. For dual-monitor supported thin clients using a
DisplayPort, the DisplayPort monitor will be the primary monitor.
Locking the Thin Client
To help ensure that no one else can access your private information without
permission, ThinOS allows you to lock your thin client so that credentials are required
to unlock and use the thin client after you do one of the following:
• Unplug a signed-on smart card - If an administrator has set SCRemovalBehavior=1
for the Signing parameter in the INI files and you unplug the smart card that you
used to sign on to the thin client, then the thin client will lock. To unlock the thin
client for use, you must use the same smart card and your correct PIN. Note that
removing a signed-on smart card can also cause the thin client to log-off, if an
administrator has set the INI files to do so (in this case you must sign-on as usual to
use the thin client).
• Use LockTerminal from the Shortcut Menu and Shutdown dialog box - On the
Classic Desktop, click on the desktop and select Lock Terminal, or use the
Shutdown dialog box (see "Classic Desktop Features"). On the Zero Desktop, use the
Shutdown dialog box (see "Signing Off and Shutting Down"). To open the thin client
for use, you must use your correct password.
• Use the screen saver - If an administrator has set LockTerminal=2 for the
ScreenSaver parameter in the INI files and you use the screen saver, then the thin
client will lock. To open the thin client for use, you must use your correct password.
8 Chapter 2
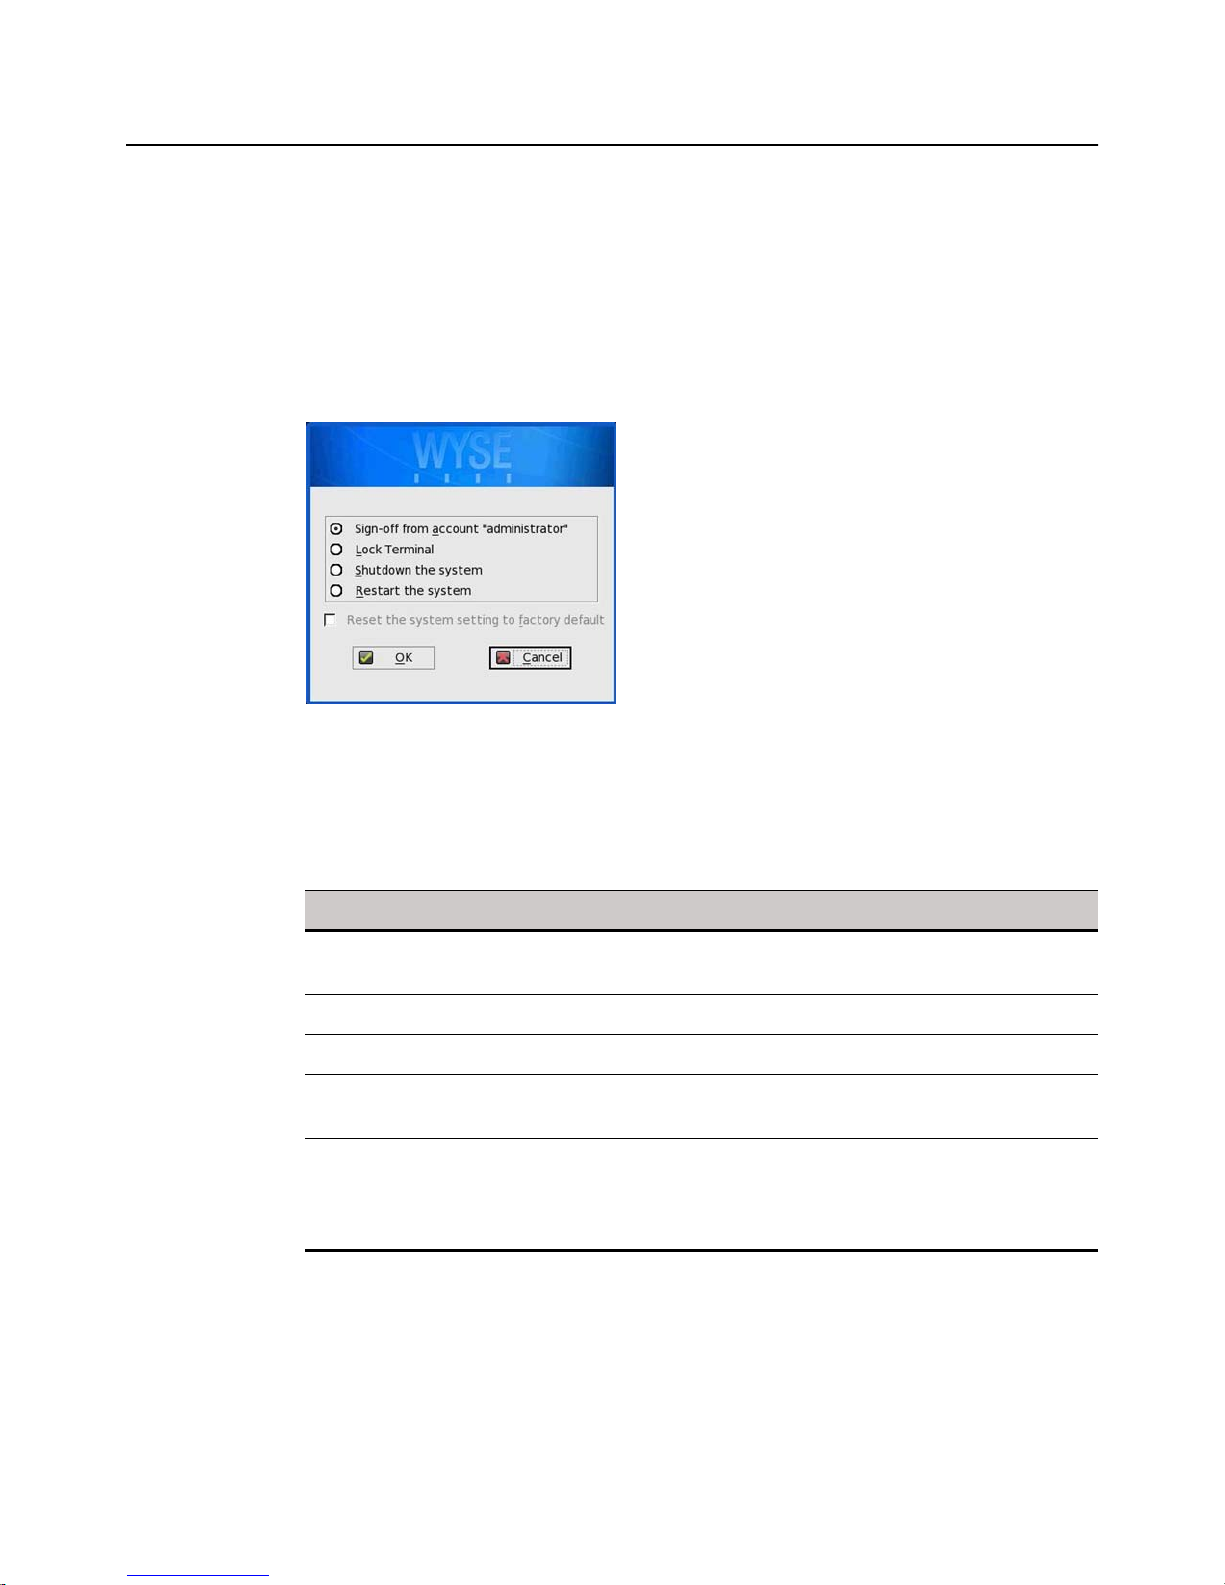
Signing Off and Shutting Down
Use the Shutdown dialog box to select the available option you want:
• Classic Desktop - Click Shutdown in the Connect Manager or Desktop Menu.
• Zero Desktop - Click the Shutdown icon on the Zero Toolbar.
TIP: You can also configure automatic behavior after all desktop sessions are closed by
using the Remote Connections dialog box (see "Remote Connections") or the
AutoSignoff parameter in a wnos.ini file (see "Central Configuration: Automating
Updates and Configurations").
TIP: You can also display the Shutdown dialog box from the Login dialog box by
pressing Ctrl+Alt+Delete.
Use the following guidelines (depending on user privilege, some options may not be
available for use):
Table 1 Shutdown dialog box options
Option What It Does
Sign-off from account Allows you to sign off from the current open account (the
Login dialog box appears and is ready for another user).
Lock Terminal Locks the thin client from use until you log in again.
Shutdown the system Turns off the thin client.
Restart the system Logs off the user account (the Login dialog box appears
after the thin client restarts).
Reset the system
setting to factory
default
Appears for high-privileged users/administrators only. This
option allows you to reset the thin client to factory
defaults (see "Resetting to Factory Defaults Using
Shutdown Reset").

Getting Started: Quickly Learning the Basics 9
Additional Getting Started Details
This section includes additional details on the following:
• "Zero Desktop Features"
• "Classic Desktop Features"
• "Login Dialog Box Features"
• "Accessing System Information"
Zero Desktop Features
This section includes information on:
• "Zero Interactive Desktop Guidelines"
• "Zero Toolbar"
• "List of Connections"
Zero Interactive Desktop Guidelines
The Zero Desktop has a default background with the Zero Toolbar at the left of the
screen. Table 2 lists Zero Desktop available shortcuts.
Table 2 Zero Desktop Shortcut Keys
Action Press
Display the Zero Toolbar Ctrl+Alt+UpArrow
Open a selection box for toggling
between the desktop and currently-active
connections
Lock the thin client Ctrl+Alt+LeftArrow
Keyboard shortcuts to menu commands Left-Alt+UnderlinedLetter
Capture the full desktop to the clipboard Print Screen
Capture the active window to the
clipboard
CAUTION: You can copy and paste between application sessions and between
sessions and the desktop, however, this function depends on session server
configurations.
Ctrl+Alt+DownArrow
or
Ctrl+Alt+RightArrow
NOTE: Right-Alt+UnderlinedLetter
combination is not currently supported
Alt+PrintScreen
TIP: In addition to the standard two-button mouse, the thin client supports a Microsoft
Wheel Mouse (used for scrolling). Other similar types of a wheel mouse may or may
not work.
To switch the left and right buttons, use the Peripherals dialog box (see "Peripherals").
10 Chapter 2
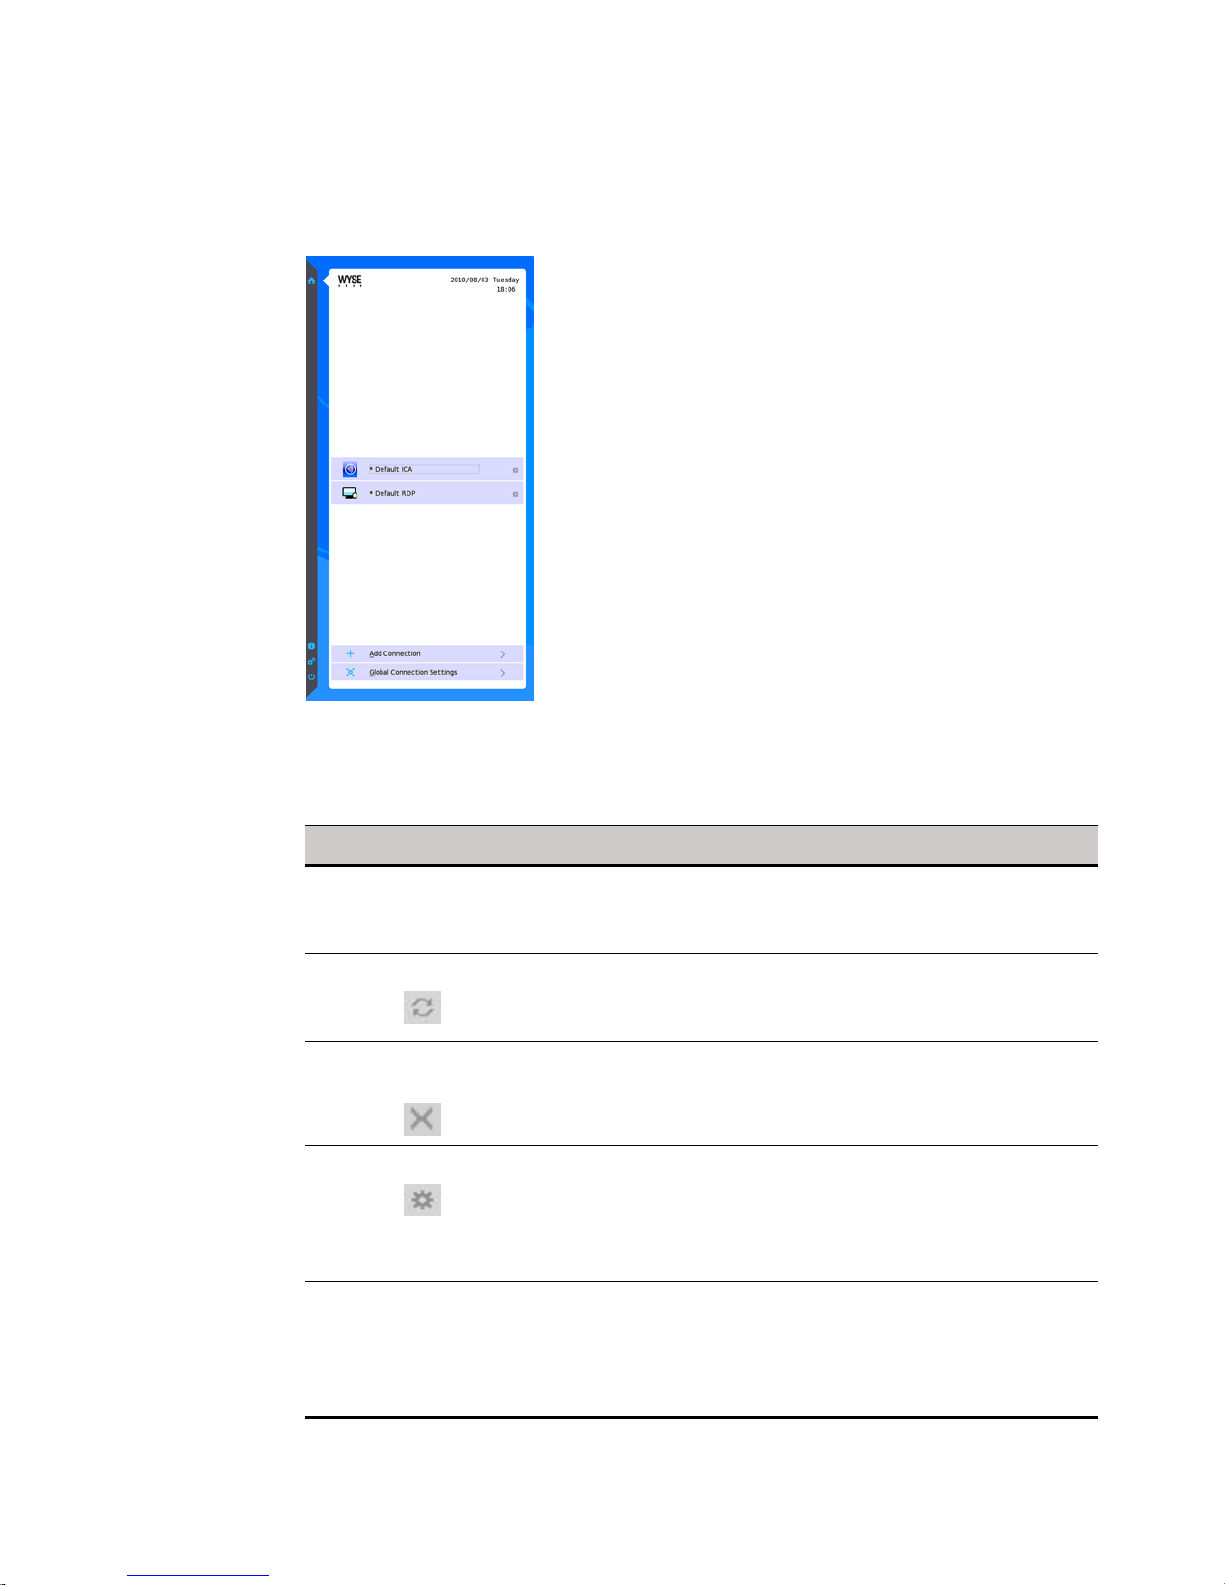
Zero Toolbar
The Zero Toolbar usually appears at the left edge of the Zero Desktop. However,
depending on administrator configurations, the toolbar can be removed or hidden
(shown only when a user moves the mouse pointer over the left edge of the desktop
screen).
TIP: Administrators can configure the toolbar settings using either a dialog box (see
"Remote Connections") or the SysMode parameter in the wnos.ini file (see Reference
Guide: Wyse ThinOS
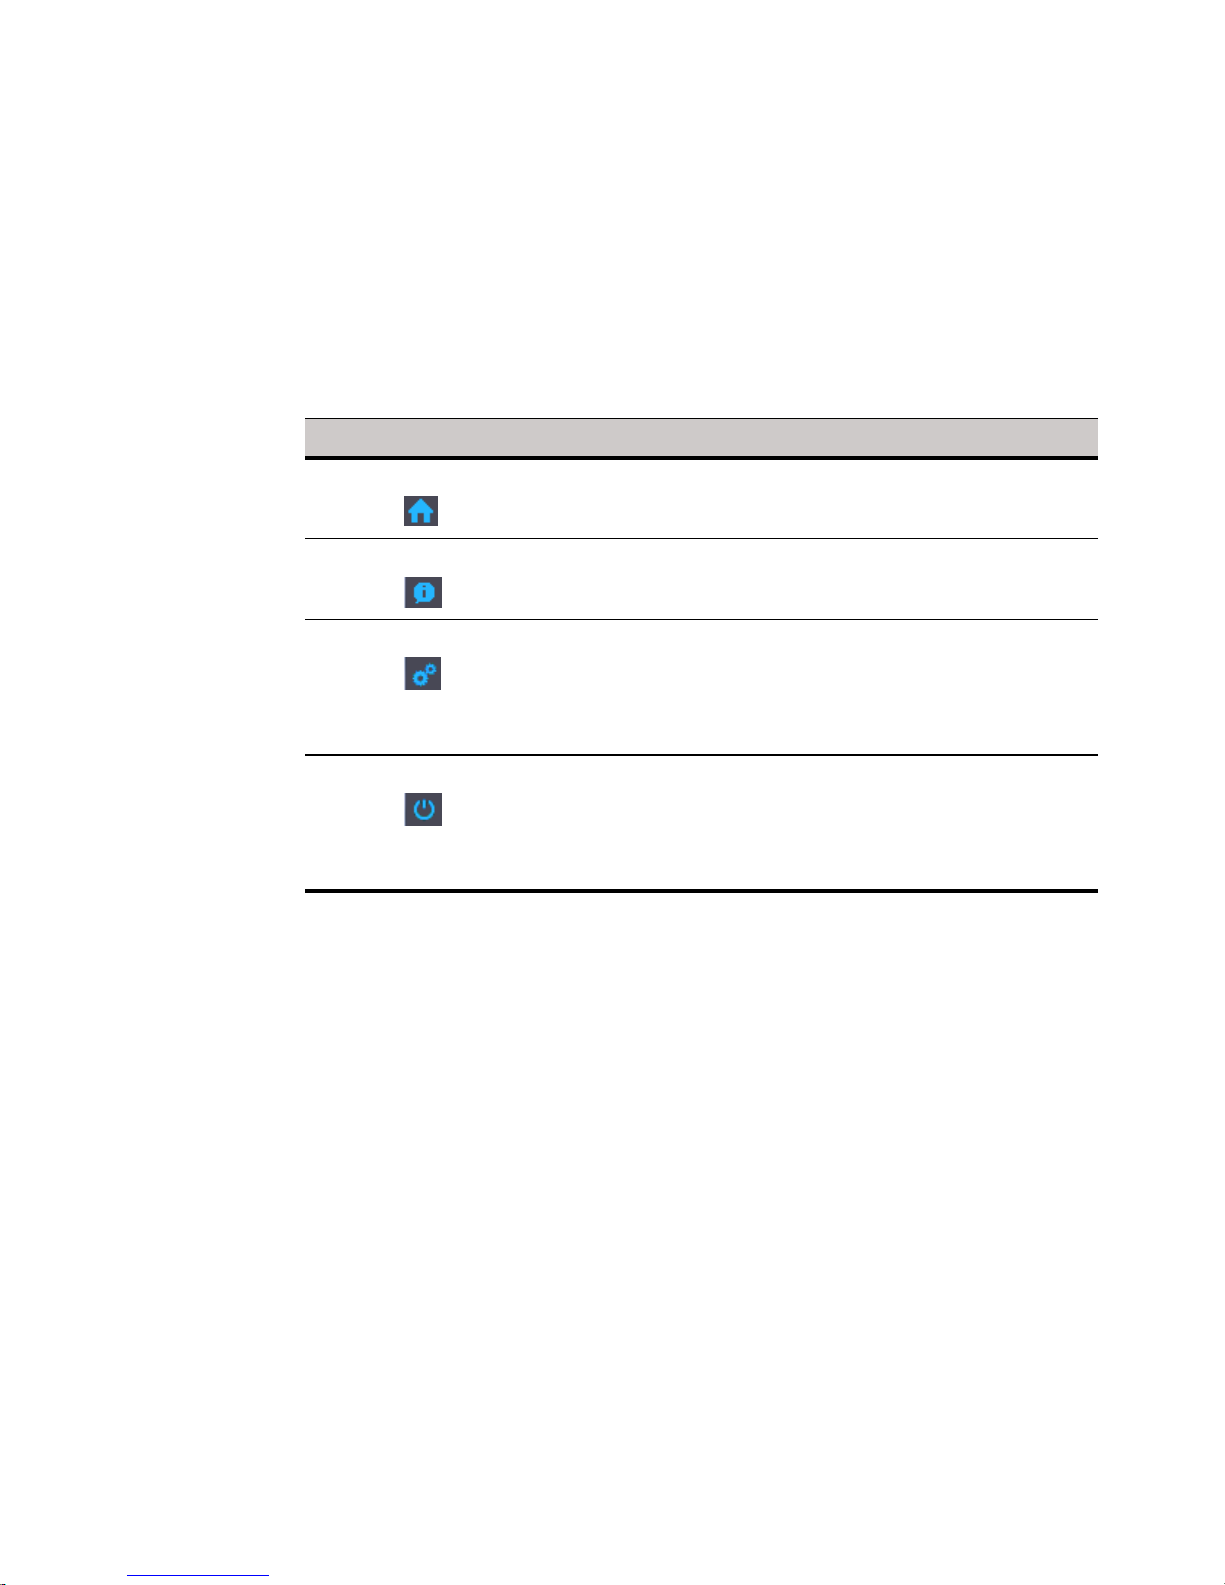
Table 3 Toolbar icons
System Information Displays thin client system information (see "Accessing
System Settings Opens the System Settings menu to configure thin client
TM
INI Files).
Icon What It Does
Home Opens the list of available connections (see "List of
Connections").
System Information").
system settings and perform diagnostics (see "Configuring
Connection Settings Locally," "Configuring Thin Client
Settings Locally," and "Central Configuration: Automating
Updates and Configurations").
Shutdown Terminal Click the Shutdown Terminal icon to use the Shutdown
options available on the thin client (see "Signing Off and
Shutting Down"). Note that the Shutdown Terminal icon
does not display on the toolbar when using the Admin
Mode button to configure system settings.
TIP: If configured to display (by an administrator), the current date and time are shown
on the Zero Toolbar. The thin client is capable of synchronizing its clock to time
provided by a Simple Network Time Protocol (SNTP) server.
Getting Started: Quickly Learning the Basics 11
List of Connections
On the Zero Toolbar, you can click the Home icon to open your list of assigned
connections (in some cases the list may contain only default connections).
Use the following guidelines (depending on user privilege level, some options may not
be available for use):
Table 4 Connection Options
Option What It Does
Name of the
connection
Restart icon Restarts the connection (useful when a connection is not
Quick Disconnect
icon
Edit icon Opens the Connection Settings dialog box (see
Configuring Global
Connection Settings
Opens the connection you want to use (all open
connections display a blue icon to the left of the
connection name in the list).
functioning properly or you need to reboot the
connection).
Closes the connection (the Close icon is grayed out for
connections that are not open).
"Advanced Details on Configuring ICA and RDP
Connections") to change the connection options
(depending on user privilege level, editing options may
not be available for use).
If you do not use INI files to provide global connection
settings, you can click Global Connection Settings to
open and use the Global Connection Settings dialog box
to configure settings that affect all of the connection in the
list (see "Global Connection Settings").

12 Chapter 2
Classic Desktop Features
This section includes information on:
• "Classic Interactive Desktop Guidelines"
• "Shortcut Menu"
• "Desktop Menu"
• "Connect Manager"
Classic Interactive Desktop Guidelines
The Classic Desktop has a Wyse default background with a horizontal taskbar at the
bottom of the screen.
Use the following guidelines:
• Icons representing available server connections and published applications are
displayed on the background. Hovering the mouse pointer over an icon pops-up
information about the connection. Right-clicking on an icon opens a Connection
Settings dialog box which displays additional information about the connection.
The number of icons that can be displayed on the desktop depends on the desktop
resolution and administrator configuration.
• A server connection/published application can be opened by double-clicking a
desktop icon or a user can navigate to the desktop icon they want by using tab key
and pressing Enter to initiate the connection.
• Right-clicking on the desktop provides a Shortcut Menu (see "Shortcut Menu").
• Clicking the User Name (User Name is the user who is logged-on and is located at
the bottom-left side of the taskbar), or clicking on the desktop, opens the Desktop
Menu (see "Desktop Menu").
TIP: If configured to display (by an administrator), the volume control is displayed in
the right corner of the taskbar and the current time and date are shown when the
cursor is placed on the time; the thin client is capable of synchronizing its clock to time
provided by a Simple Network Time Protocol (SNTP) server.
Table 5 lists Classic Desktop available shortcuts.
Table 5 Classic Desktop Shortcut Keys
Action Press
Toggle between window display
modes
Open a selection box for toggling
between the desktop, Connect
Manager, and currently-active
connections
Lock the thin client Ctrl+Alt+LeftArrow
Keyboard shortcuts to menu
commands
Ctrl+Alt+UpArrow
Ctrl+Alt+DownArrow
or
Ctrl+Alt+RightArrow
Left-Alt+UnderlinedLetter
NOTE: Right-Alt+UnderlinedLetter
combination is not currently supported
Capture a full desktop Print Screen
Capture the active window Alt+PrintScreen

Getting Started: Quickly Learning the Basics 13
CAUTION: You can copy and paste between application sessions and between
sessions and the desktop, however, this function depends on session server
configurations.
TIP: In addition to the standard two-button mouse, the thin client supports a Microsoft
Wheel Mouse (used for scrolling). Other similar types of a wheel mouse may or may
not work.
To switch the left and right buttons, use the System Preference dialog box (see "System
Preferences").
Shortcut Menu
Right-clicking on the desktop provides a Shortcut Menu with the following options:
• Administrator Mode - Allows administrators to configure various settings locally on
thin client.
• Hide all windows - Brings the full desktop to the foreground.
• Copy to clipboard - Copies an image of the full screen, current window, or event
log to the clipboard. The clipboard contents can then be pasted to an ICA or an RDP
session.
• Purge clipboard - Discards the contents of the clipboard in order to free up
memory.
• Lock Terminal - Puts the thin client in a locked state if the user has signed on to the
system with a password. The thin client can only be unlocked using the same
password.
• Group Sessions - Enables you to open more than three ICA or three RDP or three
ICA seamless sessions. The sessions will be displayed as a group on the taskbar.
• Write Event Log to USB - Writes the event log of the thin client to the last
connected USB device (see also "System Tools").
• Network Capture to USB - Captures network traces to the last connected USB
device (see also "System Tools").
• Trace Action - Captures (capture option) or plays back (playback option) the
network traces (see also "System Tools").
• Delay on Trace - Enables a time delay on traces (see also "System Tools").
• Trace to/from USB - Enables the capture of network information (a network trace of
all traffic coming in and out of the thin client) to a USB drive that is inserted into the
thin client (see also "System Tools").
14 Chapter 2
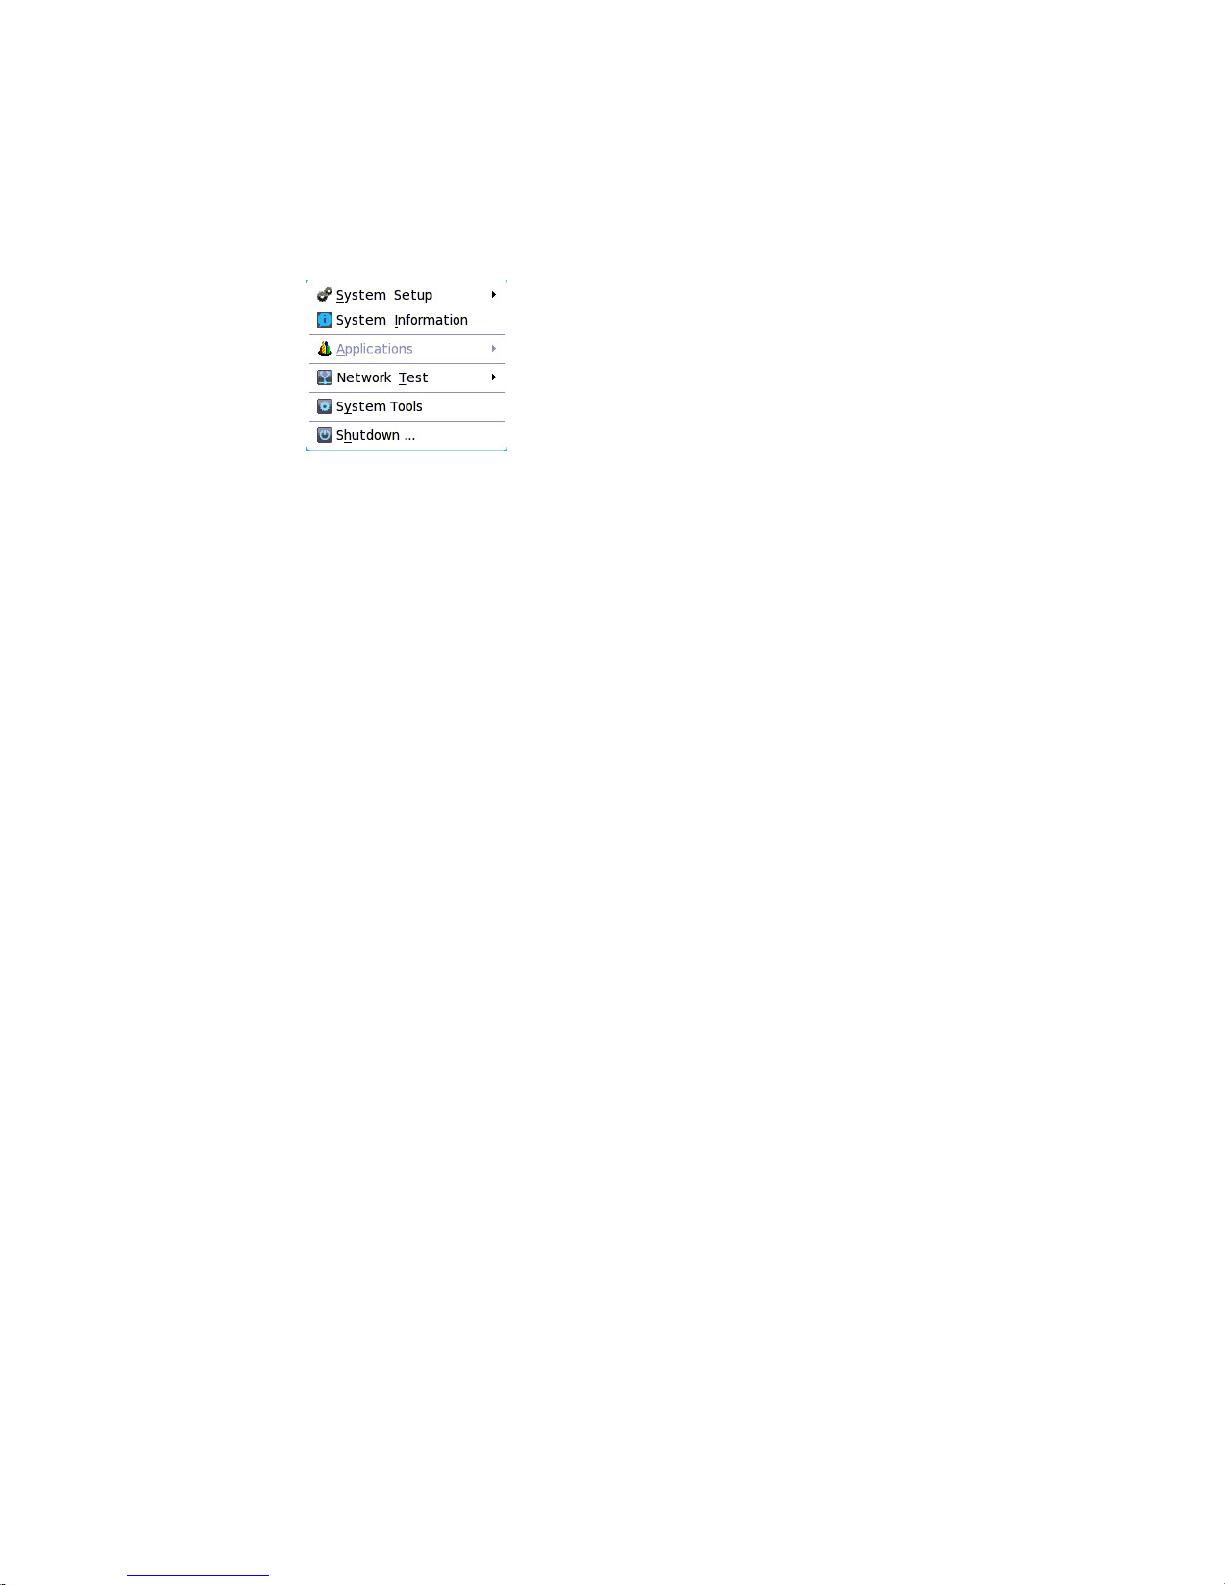
Desktop Menu
Clicking the User Name (User Name is the user who is logged-on and is located at the
bottom-left side of the taskbar), or clicking on the desktop, opens the Desktop Menu
with the following options (for High-privileged and Low-privileged users only):
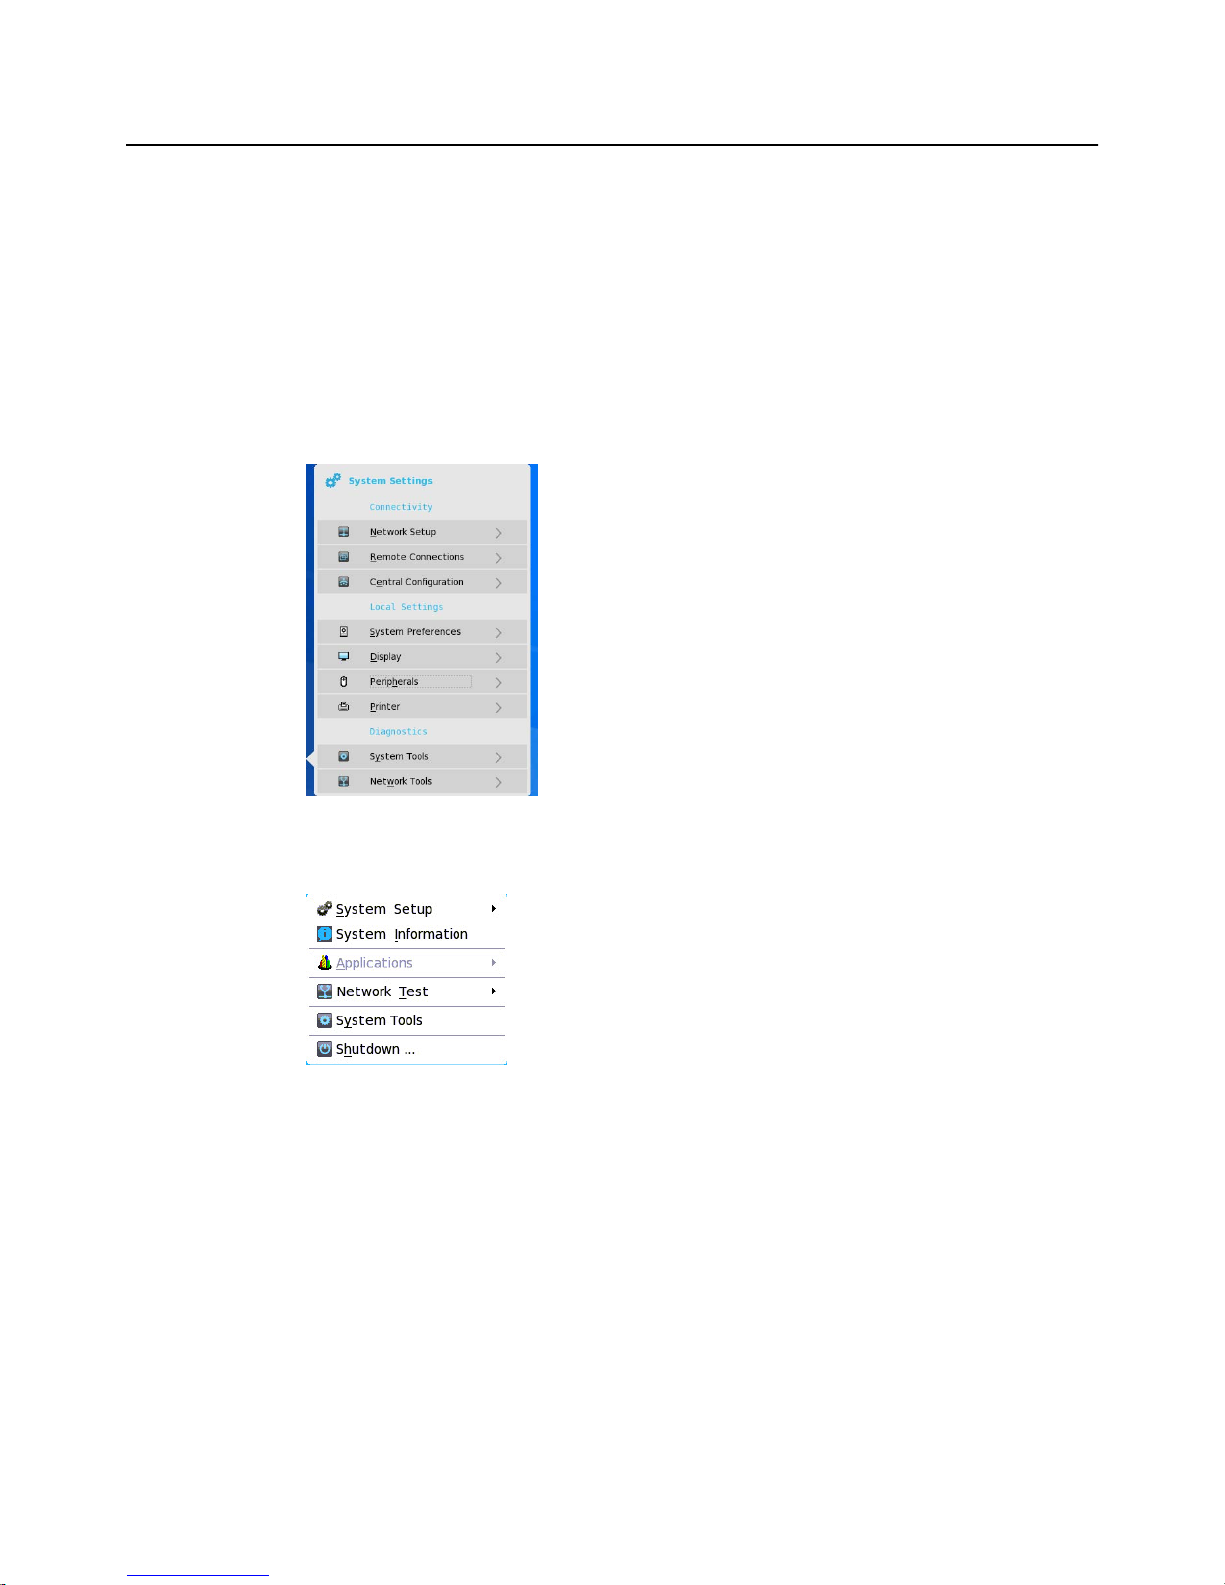
• System Setup - Provides access to the following local system setup dialog boxes:
• Network Setup - Allows selection of DHCP or manual entry of network settings,
as well as entry of locations of servers essential to thin client operation. This
menu selection is disabled for Low-privileged users. See "Network Setup."
• Remote Connections - Allows you to configure thin client network connections
including ICA, RDP, Citrix Xen, VMware View, and other broker server
connections. See "Remote Connections."
• Central Configuration - Allows you to configure thin client central connection
settings such as file server and optional WDM server settings. See "Central
Configuration."
• WAN Setup - Allows you to configure thin client WAN.
• System Preference - Allows user selection of thin client parameters that are a
matter of personal preference. See "System Preferences."
• Display - Allows you to configure the monitor resolution and refresh rate. See
"Display."
• Peripherals - Allows you to select the peripherals settings such as keyboard,
mouse, volume, and touch screen settings. See "Peripherals."
• Printer - Allows configuration of network printers and local printers that are
connected to the thin client. See "Printer."
• System Information - Provides thin client system information. See "Accessing
System Information."
• Applications - Contains a submenu of all locally configured applications and is
populated with published applications when a user is signed on using either PNLite
or PNAgent.
• Network Test - Opens a submenu from which the Ping and Trace Route tools can
be used to check the integrity of the network connection. See "Using Ping" and
"Using Trace Route."
• System Tools - Opens a submenu from which the wnos.ini and user.ini windows
can be opened to view the contents of the files. See "System Tools."
• Shutdown - Opens the Sign-off/Shutdown/Shutdown/Restart the System dialog
box. See "Signing Off and Shutting Down."
Getting Started: Quickly Learning the Basics 15
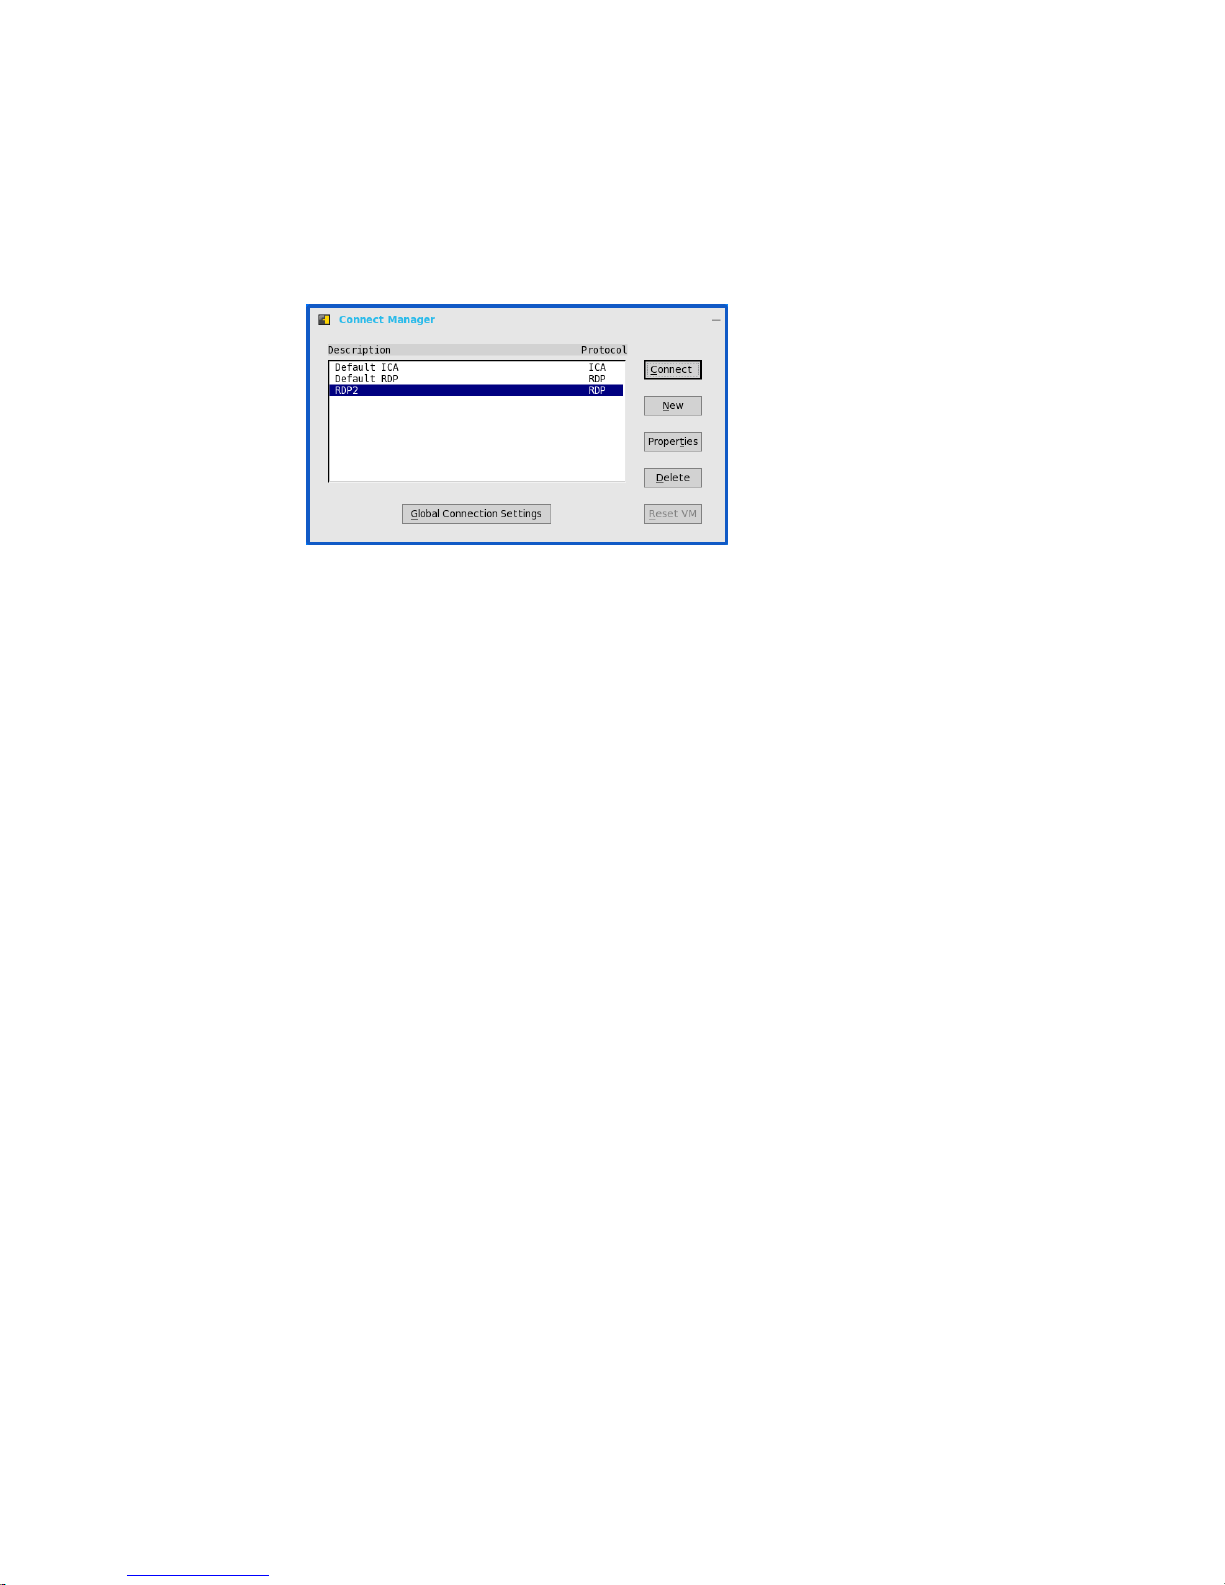
Connect Manager
Clicking Connect Manager on the taskbar opens the Connect Manager. The Connect
Manager has a list of connection entries and a set of command buttons available for
use with the connections. Note that non-privileged users cannot view the Connect
Manager.
The command buttons available depend on the privileges of the user and administrator
configuration; the following default examples are typical:
• High-privileged user - Includes Connect, New, Settings, and Sign-off.
• Low-privileged user - Includes Connect, Settings, and Sign-off.
• Stand-alone user - Includes Connect, New, Settings, and Delete.
TIP: If set by an administrator (enablelocal=yes in the user.ini/wnos.ini file),
High-privileged and Low-privileged users will have the Delete command button
available instead of the Sign-off command button).
The use associated with these command buttons also depends on user privilege. For
example, Settings allows a High-privileged user to view and edit connection
definitions, while it allows a Low-privileged user to only view connection definitions.
TIP: Guest user privileges are determined by an administrator.
The Connect Manager command buttons include:
• Connect - To make a connection, select a connection from the list and click
Connect.
• New - Clicking New opens the Connection Settings dialog box either directly or
through the Connection Protocol menu selection for creating a new connection
definition (for more information on the Connection Settings dialog box, refer to
"Advanced Details on Configuring ICA and RDP Connections"). The new
locally-defined connections are added to the connection list. Be aware of the
following information:
• High-privileged user - Typically, all locally-defined connection definitions are
temporary and are lost when the user logs off and when the thin client restarts
or is shut down. However, if configured by an administrator
(enablelocal=yes), locally-defined connection definitions can be saved in
these cases.
• Stand-alone user - Locally-defined connections are retained when the thin
client restarts or is shut down (there is no individual log-on). Network
configuration settings must be made locally.
• Properties - Clicking Properties opens the Connection Settings dialog box for the
selected connection (for more information on the Connection Settings dialog box,
refer to "Advanced Details on Configuring ICA and RDP Connections"). Be aware of
the following information:
• High-privileged user - Can view and edit the definitions for the
currently-selected connection. Edits are not permanently retained when the user
signs-off.
16 Chapter 2
• Low-privileged user - Cannot create or edit connections, but can view
connection definitions.
• Stand-alone user - Can permanently modify the persistent connections (except
when PNAgent/PNLite services are used).
• Sign-off - To sign-off from the thin client, click Sign-off.
• Delete - To delete a connection, select a connection from the list and click Delete.
• Reset VM - To reset a virtual connection, select a virtual connection from the list
and click Reset VM.
• Global Connection Settings - If you do not use INI files to provide global
connection settings, you can click Global Connection Settings to open and use the
Global Connection Settings dialog box to configure settings that affect all of the
connections in the list (see "Global Connection Settings").
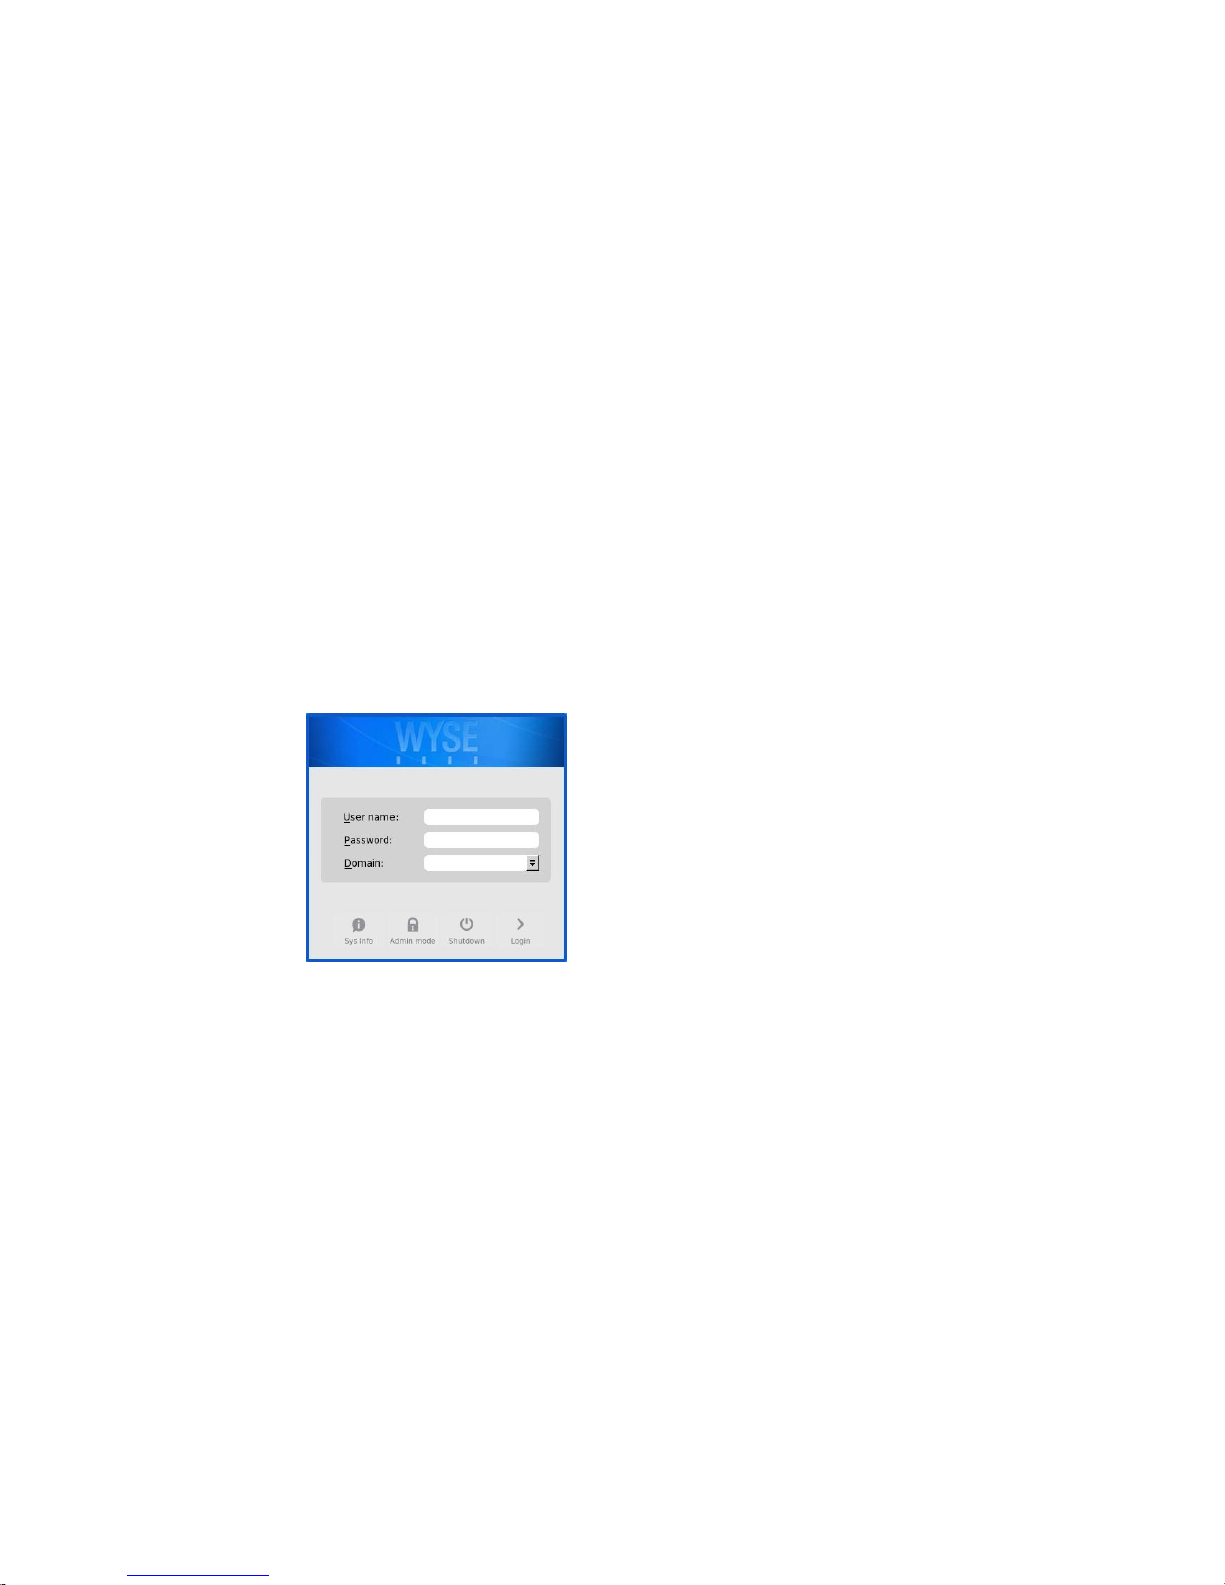
Login Dialog Box Features
While the Login dialog box allows you to log on to the server, it also allows you to:
• Obtain system information.
• Access Admin Mode to configure thin client settings.
• Change or reset your own password and unlock your account.
• Open the Shutdown dialog box by using CTRL+ALT+DELETE.
Use the following guidelines
• Sys Info - Click the Sys Info button to open the System Information dialog box and
view the thin client system information such as System Version, IP Address,
information on devices connected to your thin client, event logs, and so on (see
"Accessing System Information").
• Admin Mode - Click the Admin Mode button to configure various settings locally
on the thin client (not broker desktop configurations). For example, you can choose
to manually configure the Citrix Xen Broker Server URL (or override the URL that is
centrally defined by file servers) by using the Remote Connections dialog box as
described in "Remote Connections."
To exit Admin Mode:
· Classic Desktop - Use the Leave Administrator Mode option on the Shutdown
dialog box.
· Zero Desktop - Use the Leave Administrator Mode option on the Shutdown
dialog box, or use the Leave Administrator Mode icon (X) on the top right of the
System Settings menu.
TIP: By default the Admin Mode button is not displayed on the Log on dialog box. You
can display it by selecting the Show local admin button check box on the Shutdown
dialog box (see "Signing Off and Shutting Down").
CAUTION: By default there is no password needed for Admin Mode button use. You
can password protect the Admin Mode button (to require login credentials) by using
Getting Started: Quickly Learning the Basics 17
the AdminMode parameter in a wnos.ini file (see Reference Guide: Wyse ThinOSTM INI
Files).
• Shutdown - Click the Shutdown button to open and use the Shutdown dialog box
to sign-off, shut down, restart, reset the system setting to factory defaults, and so on
(see "Signing Off and Shutting Down").
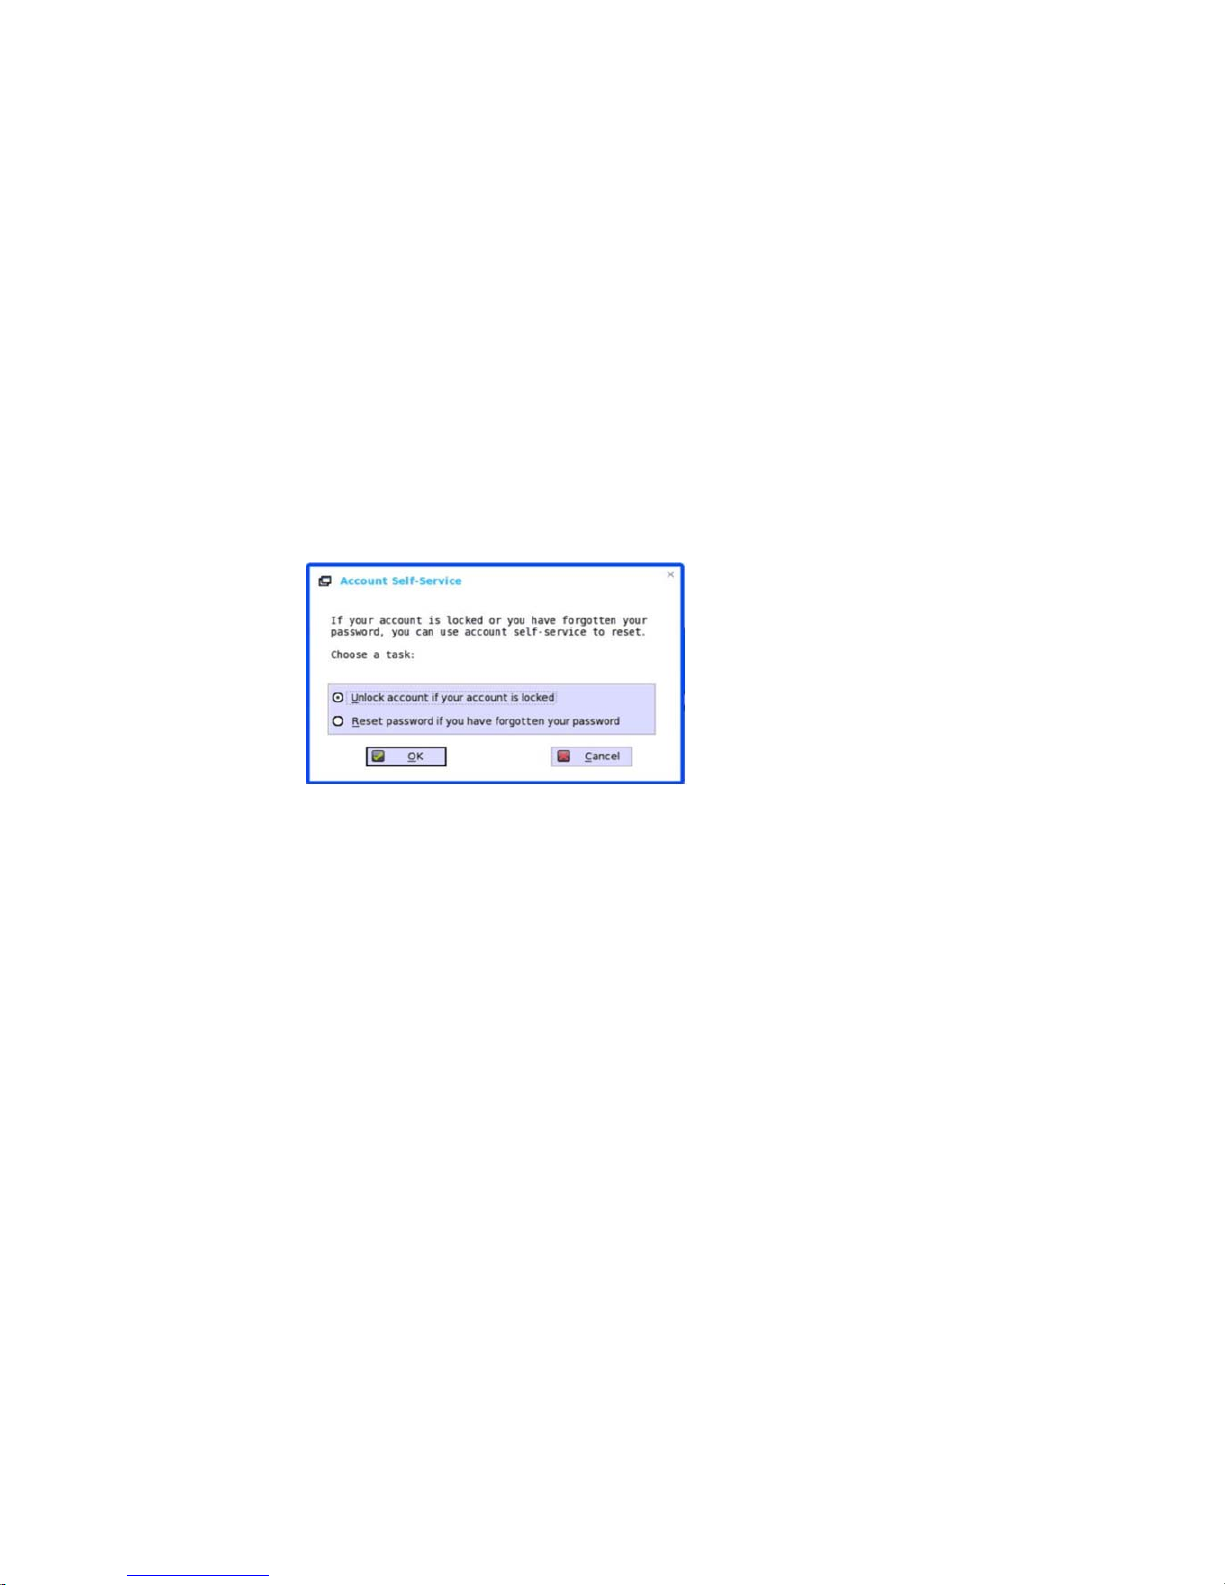
• Account Self-Service - Click the Account Self-Service icon (shown when
configured using the AccountSelfService option of the PasswordServer INI
parameter - see Reference Guide: Wyse ThinOSTM INI Files) to open and use the
Account Self-Service dialog box to change or reset your own password and unlock
your account.
Note that this process assumes that the security questions and answers have been
pre-registered by the user inside of their Windows environment. Users must use
HTTPS (not HTTP) for an account self-service server address (such as
https://IPAddress) in the Broker Setup tab (see "Remote Connections").
After answering the security questions, your new password will be set or your
account will be unlocked.
Accessing System Information
Use the System Information dialog box to view system information:
• Classic Desktop - Click System Information in the Desktop Menu.
• Zero Desktop - Click the System Information icon on the Zero Toolbar.
The System Information dialog box includes:
• General Tab - Displays general information such as System Version, Serial Number,
Boot From, Memory Size (Total and Free), Terminal Name, IP Address, Net Mask,
Gateway, and DHCP Lease.
• Devices Tab - Displays information about devices such as the CPU Speed, ROM Size,
Monitor, Parallel Ports, Ethernet Speed, Memory Speed, NAND Size, Resolution, Serial
Ports, and the thin client MAC Address.
NOTE: Clicking the Device Viewer button allows you to easily view recognized
devices (this screen will provide USB information—PIV,VID,etc—needed for
forcelocal= or forceredirect= INI parameters).
• Copyright/Patents Tab - Displays the software copyright and patent notices.
• Event Log Tab - Displays the thin client start-up steps (normally beginning from
System Version to Checking Firmware) or error Messages that are helpful for
debugging problems.
• Status Tab - Displays status information about TCP performance-related
parameters, CPU Busy, System Up Time, Wireless performance-related parameters,
Free Memory, and DHCP lease time remaining.
• IPv6 Tab - Displays IPv6 information such as Link-local Address, IPv6 Address, and
IPv6 Default Gateway. NOTE: This tab is displayed when IPv6 is enabled in the
General tab of the Network Setup dialog box (see "Network Setup").

18 Chapter 2
This page intentionally blank.

3 Configuring Thin Client Settings
Locally
You can configure available thin client settings on the thin client using the following
(depending on user privilege level, some dialog boxes and options may not be available
for use):
• "Local Settings Menu"
• "Reset Features"
TIP: While it is not recommended to use dialog boxes for configuring thin client
settings, they are available in case you want to temporarily override central default
configurations or you do not have the option to set up central configuration (smaller
environments). In general, it is recommended that you use central configuration to
enable you to automatically push updates and any desired default configuration to all
supported thin clients in your environment (see "Central Configuration: Automating
Updates and Configurations").
20 Chapter 3
Local Settings Menu
Local Settings menu items include:
• "System Preferences"
• "Display"
• "Peripherals"
• “Printer”
To access the Local Settings menu:
• Zero Desktop - click the System Settings icon on the Zero Toolbar (administrators
can also click the Admin Mode button on the Login dialog box).
• Classic Desktop - click User Name (User Name is the user who is logged-on and is
located at the bottom-left side of the taskbar), and select System Setup.
Configuring Thin Client Settings Locally 21
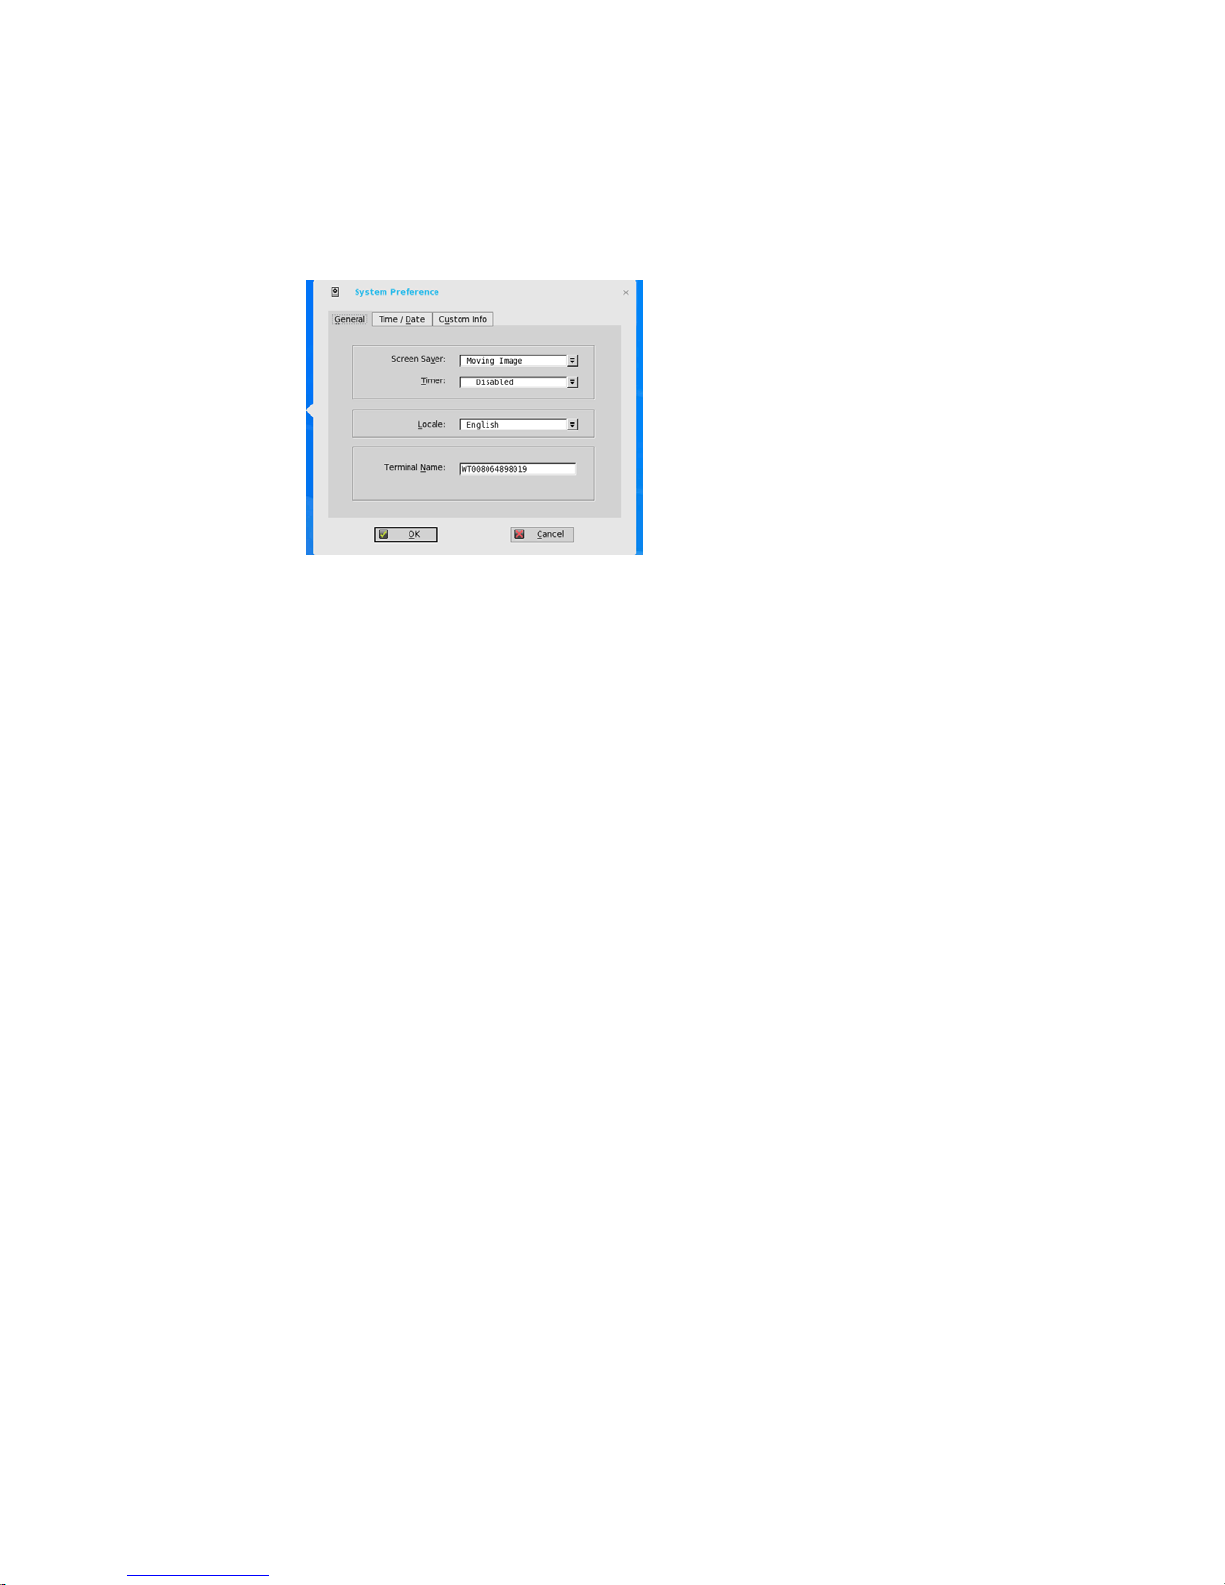
System Preferences
Use the System Preference dialog box (System Settings icon > System Preferences)
to select personal preferences such as screen saver, time/date, and custom information
settings.
Use the following guidelines for the General tab:
• Screen Saver - Allows you to select the type of screen saver you want. The default is
to Turn Off Screen. Other selections available include Flying Bubbles and Moving
Image (which are screen savers with the monitor remaining on).
• Timer - Select a time after which the screen saver is to be activated (either 1
minute, 5 minutes, 10 minutes, or default 20 minutes). When the thin client is left
idle for the specified idle time, the screen saver is initiated.
• Locale - Select a language to be activated for the user login-experience (either
French, German, or default English). Note that Locale changes the language for the
user login-experience screens only (displayed during boot-up and login) and not
the configuration or administrator screens.
Only the following messages are applicable for French and German locales:
• Username/Password/Domain
• System Information
• Shutdown the system, Restart the system, Reset the system setting to factory
default
• OK, Cancel
• Initiating devices
• Looking up IP address from DHCP, Note: Pressing CTRL-ESC keys will cancel out
of network check
• Retry DHCP for an IP address
• Waiting for network link…. (Please verify network cable is plugged into back of
unit)
• Check Cable, No Ethernet link
• Leave administrator mode
• Connecting...
• Sign off from account
• Lock Terminal, Unlock Password
• Terminal is locked, Invalid unlock password
• Terminal Name - Allows entry of a name for the thin client. The default is a
14-character string composed of the letters WT followed by the thin client Ethernet
MAC address. Some DHCP servers use this value to identify the IP address lease in
the DHCP Manager display.
22 Chapter 3
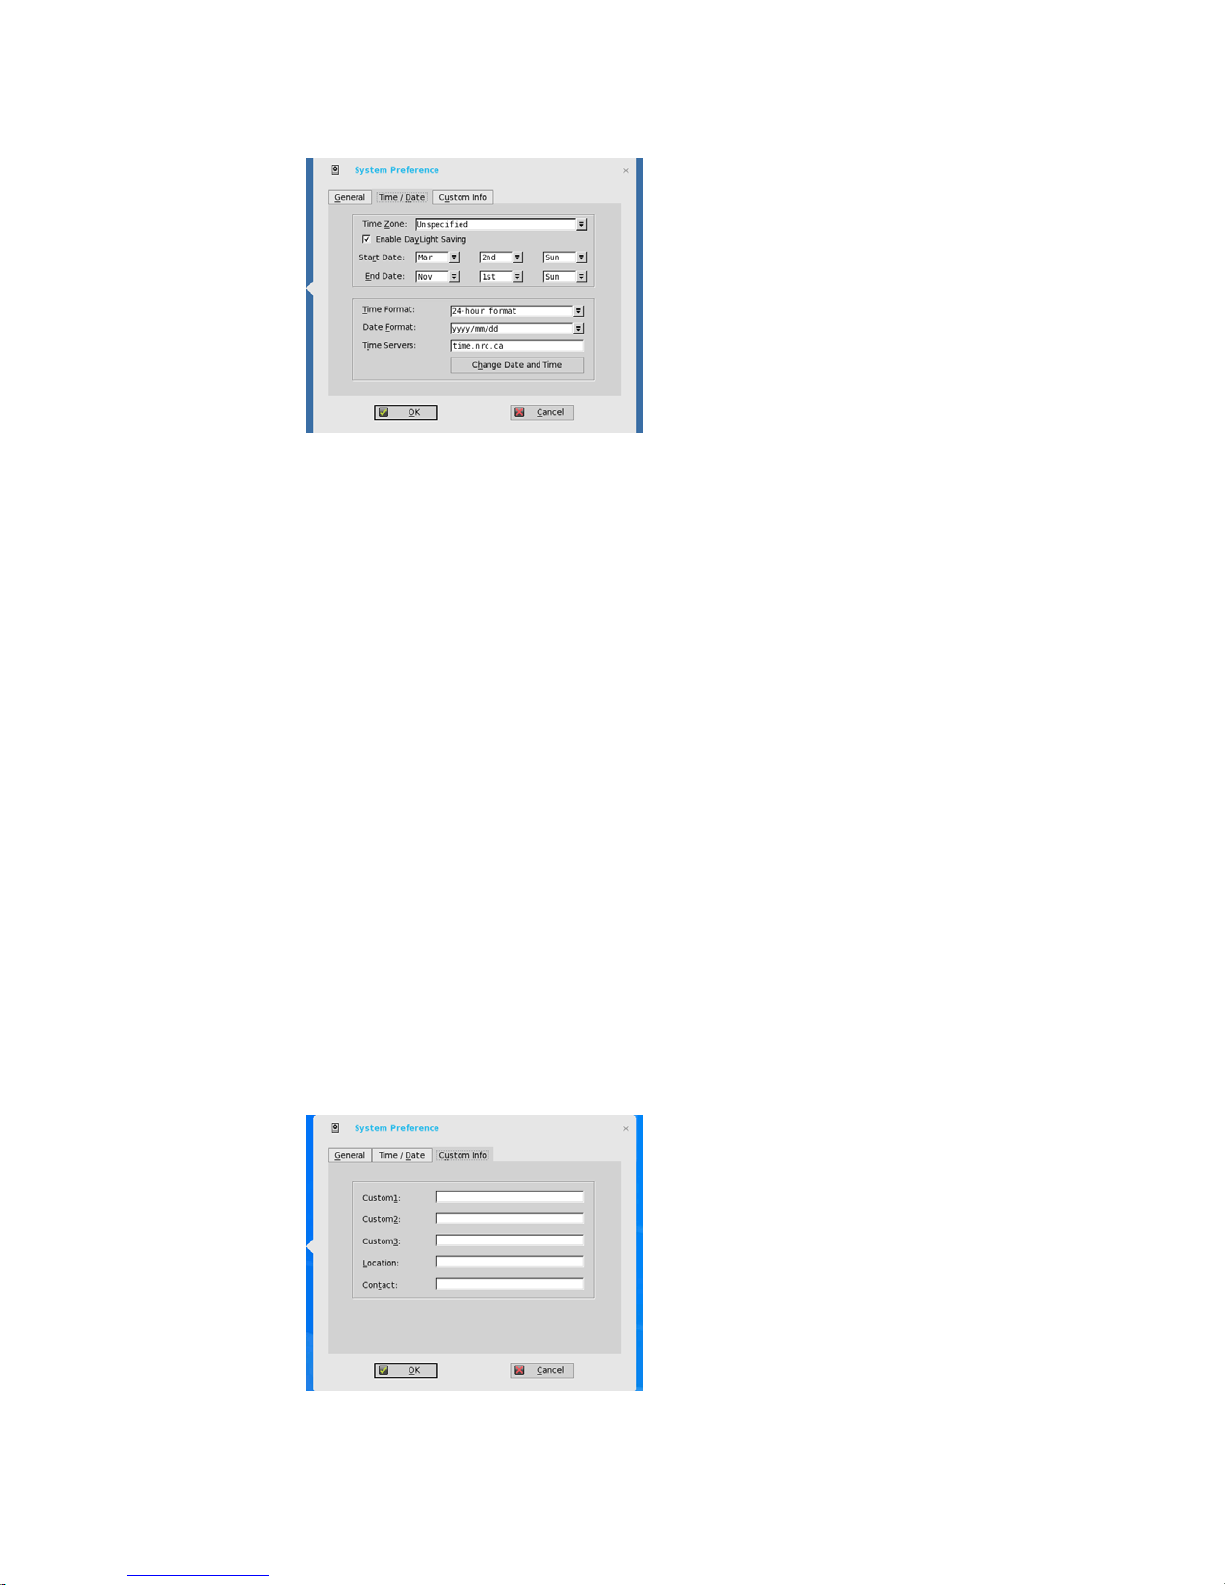
Use the following guidelines for the Time/Date tab:
• Time Zone - Allows you to select a time zone where the thin client operates
(default is Unspecified).
• Enable Daylight Saving - Allows you to enable the daylight saving settings. When
selected, the six boxes must be properly configured to define the daylight saving
starting (month/week/day) and ending (month/week/day) periods. Use the following
guidelines:
Month - Specifies the month in the year from January through December.
Week - Select 1 through 4 for the week in the month. Week Last denotes the last
week in the month.
Day - Specifies the day of the week from Monday through Sunday.
• Time Format - Allows you to select a 12 or 24 hour time format (default is 24-hour
format).
• Date Format - Allows you to select a yyyy/mm/dd (year/month/day) or dd/mm/
yyyy (day/month/year) date format (default is yyyy/mm/dd).
• Time Servers - List of IP addresses or host names with optional TCP port number of
Time Servers. Each entry with optional port number is specified as Name-or-IP:port,
where :port is optional. If not specified, port 80 is used. Locations can be supplied
through user profiles if user profiles are used. The Time Servers provide the thin
client time based on the settings of time zone and daylight saving information. If
DHCP is used, locations can be supplied through DHCP.
• Change Date and Time - Allows you to change date and time (for secure
environments requiring a solution to outside server access) When connecting to a
file server over HTTPS, the proper time must be defined on the thin client for SSL/
certification validation. Note that the year range is from 2000 to 2099.
Use the Custom Info tab to enter configuration strings for use by WDM software. The
configuration strings can contain information about the location, user, administrator,
and so on. Clicking OK transfers the custom field information you enter in the dialog
box to the Windows registry. The information is then available to the WDM Client
Manager. For more information on using Custom Fields and using WDM for remote
administration and upgrading thin client software, see the WDM documentation.
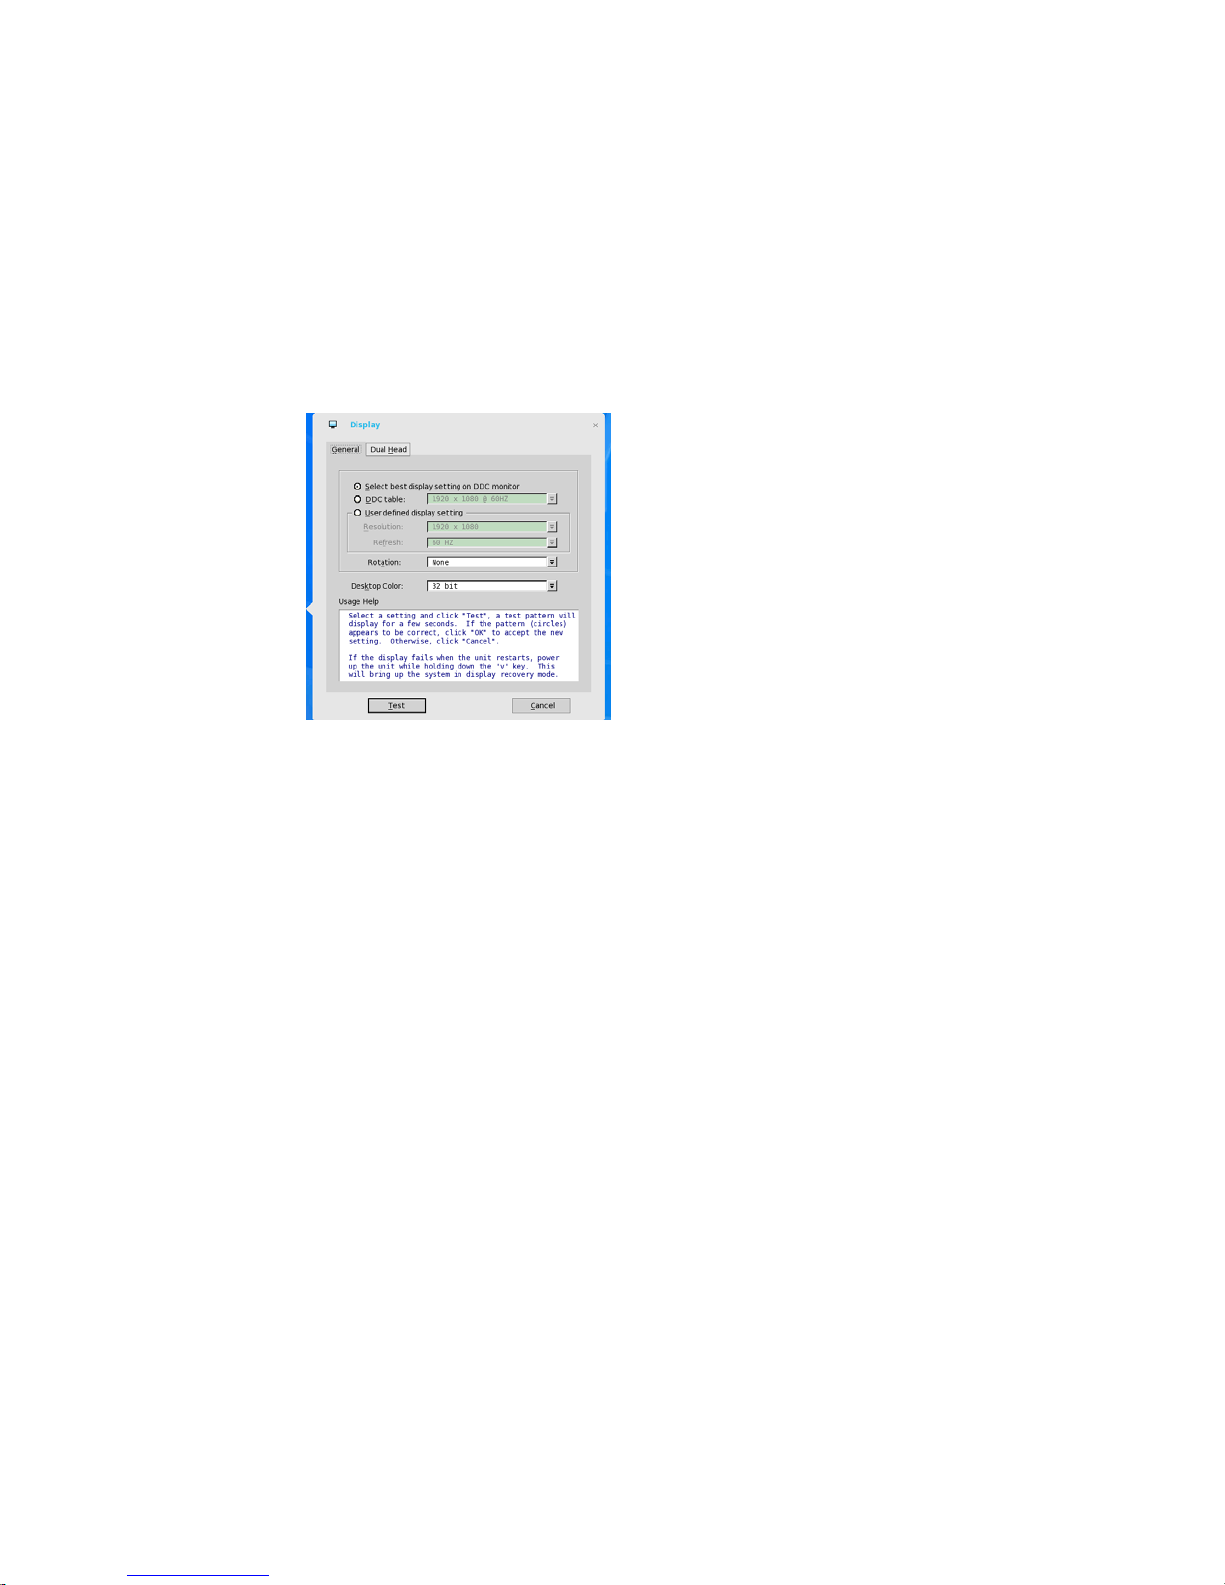
Display
Configuring Thin Client Settings Locally 23
Use the Display dialog box (System Settings icon > Display) to select the resolution
and refresh rate for the monitor used with the thin client. It also allows you to configure
the way two monitors display.
TIP: The number of icons that can be displayed on the desktop depends on the
desktop resolution and administrator configuration. On thin clients that only support 8
bit color, the 1280 x 1024 resolution will be used to display full screen connections. The
1280 x 1024 resolution will not be used to display the desktop, windowed connections,
or seamless connections.
Use the following guidelines for the General tab:
• Select best display setting on DDC monitor - If the monitor is VESA DDC2B
(Display Data Channel) compatible, selection of this option allows the thin client to
automatically select the best resolution and refresh rate. If your monitor is not DDC
compatible, a Monitor does not support Plug and Play message is displayed (click
OK to acknowledge the message and remove it from the screen).
• DDC table - If the monitor is VESA DDC2B (Display Data Channel) compatible,
selection of this option allows you to select the resolution and refresh rate you want
from the list.
• User defined display setting - Select this option and select the resolution and
refresh rate supported by your monitor (all combinations are allowed):
Resolutions include:
640 x 480 (not on T10D)
800 x 600 (not on T10D)
1024 x 768
1152 x 864
1280 x 720
1280 x 768 (not on T10)
1280 x 1024
1360 x 768 (not on T class)
1366 x 768
1368 x 768 (not on T class)
1400 x 1050
1440 x 900
1600 x 900
1600 x 1200
1680 x 1050
1920 x 1080
1920 x 1200
1920 x 1440 (R class only)
2560 x 1080 (Single monitor only; R class and D/Z class only)
2560 x 1440 (Single monitor only; R class only)
2560 x 1600 (Single monitor only; R class and D/Z class only)
 Loading...