

Dell Wyse Enhanced Ubuntu Linux T50 User Manual

Administrators Guide
Dell® Wyse Enhanced UbuntuTM Linux
Products: T50
Issue: 040414
PN: 883840-51 Rev. E

Copyright Notices
© 2014, Dell Inc. All Rights Reserved.
This manual and the software and firmware described in it are copyrighted. You may not reproduce, transmit,
transcribe, store in a retrieval system, or translate into any language or computer language, in any form or by
any means, electronic, mechanical, magnetic, optical, chemical, manual or otherwise, any part of this
publication without express written permission.
End User License Agreement (“License”)
A copy of the Dell End User License Agreement is included in the software and provided for your reference
only. The License at http://www.wyse.com/license as of the purchase date is the controlling licensing
agreement. By copying, using, or installing the software or the product, you agree to be bound by those terms.
Trademarks
The Dell, Wyse, and PocketCloud logos and Wyse and PocketCloud are trademarks of Dell Inc. Other product
names mentioned herein are for identification purposes only and may be trademarks and/or registered
trademarks of their respective companies. Specifications subject to change without notice.
Patents
This product and/or associated software are protected by copyright, international treaties, and various patents,
including the following U.S. patents: 6,836,885 and 5,918,039.
Restricted Rights Legend
You acknowledge that the Software is of U.S. origin. You agree to comply with all applicable international and
national laws that apply to the Software, including the U.S. Export Administration Regulations, as well as
end-user, end-use and country destination restrictions issued by U.S. and other governments. For additional
information on exporting the Software, see http://www.microsoft.com/exporting.
Ordering Information
For availability, pricing, and ordering information in the United States and Canada, call 1-800-438-9973 or visit
us at Dell.com. In all other countries, contact your sales representative.
FCC Statement
This equipment has been tested and found to comply with the limits for either Class A or Class B digital devices,
pursuant to Part 15 of the FCC Rules. These limits are designed to provide reasonable protection against
harmful interference in a residential installation. This equipment generates, uses, and can radiate radio
frequency energy and, if not installed and used in accordance with the instructions, may cause harmful
interference to radio communications. However, there is no guarantee that interference will not occur in a
particular installation. If this equipment does cause harmful interference to radio or television reception, which
can be determined by turning the equipment off and on, the user is encouraged to try to correct the
interference by one or more of the following measures:
• Reorient or relocate the receiving antenna.
• Increase the separation between the equipment and the receiver.
• Connect the equipment into an outlet on a circuit different from that to which the receiver is connected.
• Consult the dealer or an experienced radio/TV technician for help.
Shielded interconnect cables and shielded AC power cable must be employed with this equipment to insure
compliance with the pertinent RF emission limits governing this device. Changes or modifications not
expressly approved by the system’s manufacturer could void the user’s authority to operate the equipment.
CAUTION: Modifications made to the product, unless expressly approved by Wyse Technology, could void the
user’s authority to operate the equipment.

Regulatory Compliance for Thin Clients
Basic EMC and Safety Requirements
Wyse appliances are compliant with the regulatory requirements in the regions listed below.
U.S.A.—FCC Part 15 (class B), cUL 60950
Canada—IC ICES-003, CAN/CSA-C22 No. 60950
Europe—EN 55022 (class B); EN 55024
Canadian DOC Notices
Class A - This digital apparatus does not exceed the Class A limits for radio noise emissions from digital
apparatus set out in the Radio Interference Regulations of the Canadian Department of Communications.
Le présent appareil numérique n’émet pas de bruits radioélectriques dépassant les limites applicables aux
appareils numériques de la classe A prescrites dans le Réglement sur le brouillage radioélectrique édicté par le
Ministère des Communications du Canada.
Class B - This digital apparatus does not exceed the Class B limits for radio noise emissions from digital
apparatus set out in the Radio Interference Regulations of the Canadian Department of Communications.
Le présent appareil numérique n’émet pas de bruits radioélectriques dépassant les limites applicables aux
appareils numériques de la classe B prescrites dans le Réglement sur le brouillage radioélectrique édicté par le
Ministère des Communications du Canada.
Wireless Usage and Requirements
Radio transmitting type devices (RF module) are present in models with the wireless option. These devices
operate in the 2.4 GHz band (i.e. 802.11B/G/N LAN & Bluetooth).
As a general guideline, a separation of 20 cm (8 inches) between the wireless device and the body, for use of a
wireless device near the body (this does not include extremities) is typical. This device should be used more
than 20 cm (8 inches) from the body when wireless devices are on and transmitting.
Some circumstances require restrictions on wireless devices. Examples of common restrictions include:
• When in environments where you are uncertain of the sanction to use wireless devices, ask the applicable
authority for authorization prior to use or turning on the wireless device.
• Every country has different restrictions on the use of wireless devices. Since your system is equipped with a
wireless device, when traveling between countries with your system, check with the local Radio Approval
authorities prior to any move or trip for any restrictions on the use of a wireless device in the destination
country.
• Wireless devices are not user-serviceable. Do not modify them in any way. Modification to a wireless
device will void the authorization to use it. Please contact the manufacturer for service.
Device Power Supply
Use only the external power supply that comes with your thin client. For power and voltage ratings, see the
serial number label or regulatory label on your device. For power adapter replacement, contact your Wyse
Service Representative. For proper replacement compare the labels on both mobile thin client and power
adapter to ensure that their voltages match.
WARNING: Use of any other power adapter may damage your mobile thin client or the power adapter. The
damage caused by an improper power adapter is not covered by warranty.
Battery Information
Model Tx0 contains an internal button cell battery replaceable by Wyse or one of our Authorized Service
Centers. For service, visit http://www.wyse.com/support/authorized-service-centers.
WARNING: There is a risk of explosion if the battery is replaced by an incorrect type. Always dispose of used
batteries according to the instructions accompanying the battery.
Perchlorate Materials - Special Handling May Be Required under California Code of Regulations, title 22. (Only
required within the U.S.A.)

This page intentionally blank.

Contents
1 Introduction 1
About this Guide 1
Finding the Information You Need in this Guide 1
Dell Technical Support 1
Related Documentation and Services 1
Enhancing Your Experience with Dell Software 2
Dell Online Community 2
2 Getting Started: Quickly Learning the Basics 3
Logging In 3
Using Your Home Screen 4
Home Screen Keyboard Shortcuts 5
Configuring Thin Client Settings and Connections 6
Connecting to Network and Session Services 6
Connecting to a Printer 6
Connecting to a Monitor 7
Locking, Logging Out, Shutting Down, Restarting, and Suspending 7
Additional Getting Started Details 7
Viewing System Information 7
Using Wyse Terminal 8
Restoring Default Settings with WLoader Setup 8
Accessing Thin Client Boot Order Settings 9
Restoring the Complete Image 9
3 Configuring System Settings 11
Accessibility 12
Appearance 12
Background 13
Citrix Settings (Global Settings) 14
Network 14
Drive Mapping 15
Adding Drives 15
Editing and Deleting Drives 15
Hotkeys 16
Display 16
Firewall 17
Trusted Server Configuration 17
Date & Time 18
Device Settings 19
Terminal Name 19
Hosts 19
Ethernet Speed 20
Diagnostics 20
Display 21
Ericom PowerTerm® TEC (Managing Servers Available for Connections) 21
INI (Source) Settings 22
Import Certificates 23
Adding Certificates from a Remote Server 23
Adding Certificates from a Local Device 24
Keyboard 24

vi Contents
Language Support 25
Mixer 25
Mouse 26
Network Connections 26
Network Proxy 27
Printers 28
Installing a Network Printer 29
Installing a Local Printer 30
RDP Settings 31
RD Broker 31
Window 31
Screensaver 32
TCX Audio 32
TCX USB Virtualizer 33
User Administration 34
VNC Server 34
WDM 35
4 Configuring Connections 37
Citrix 38
Network 39
Connection 39
Window 39
Application 39
Login 40
Auto Reconnect 40
Firewall 40
Custom 41
Application 41
Auto Reconnect 41
Ericom PowerTerm® TEC 42
Network 42
Window 42
Connection 42
Setting 43
Remote Configuration 43
View 43
RDP 44
Network 44
Window 44
Login 44
Connection 45
Experience 45
Auto Reconnect 45
Application 46
Drive Mapping 46
Device Mapping 47
SSH 48
Network 48
Connection 48
Adding Share Names 46
Editing and Deleting Share Names 46
Adding Devices 47
Deleting Devices 47

Contents vii
VMware View Client 49
Network 49
Secure Preferences 49
Connection 49
Desktop 50
Login 50
VNC Viewer 51
Network 51
Connection 51
Window 51
Login 51
Web Browser 52
Network 52
Window 52
Auto Reconnect 52
A Central Configuration: Automating Configurations 53
How INI Files are Employed 54
How to Set Up Automatic Configuration 55
Step 1: Prepare the Root Directory and Folder Structure on the Server 55
Step 2: Direct the Thin Client to the Server 57
Using DHCP 57
Manually Configuring the Server Location 59
Step 3: Reboot the Thin Client 59

viii Contents
This page intentionally blank.

1 Introduction
Wyse Enhanced Ubuntu Linux combines the security, flexibility, and market-leading
usability of Ubuntu™ (trademark of Canonical Group Limited) with Dell’s cloud
computing optimizations in management and user experience. It is ideal for
organizations that want to run server-based, Web-based, or local applications
(including legacy applications) without the deployment and security concerns of a
non-standard Linux distribution.
About this Guide
This guide is intended for administrators of thin clients running Wyse Enhanced Ubuntu
Linux. It provides information and detailed system configurations to help you design
and manage a Wyse Enhanced Ubuntu Linux environment. Depending on your
hardware and software configurations, the figures you see may be different than the
example figures shown in this guide.
This guide supplements the standard Ubuntu documentation supplied by Canonical
Inc. and explains the differences, enhancements, and additional features provided by
Dell with the thin client. It does not attempt to describe the standard features found in
Ubuntu.
Ubuntu help can be accessed from the Ubuntu Support Web site at:
http://www.ubuntu.com/support.
Finding the Information You Need in this Guide
You can use either the Search window or Find toolbar to locate a word, series of words,
or partial word in an active PDF document. For detailed information on using these
features, refer to the Help in your PDF reader.
Dell Technical Support
To access Dell technical resources, visit http://www.wyse.com/support. If you still have
questions, you can submit your questions using the Self-Service Center at
http://support.wyse.com/selfservice.html or call Customer Support at 1-800-800-9973
(toll free in U.S. and Canada). Hours of operation are from 6:00 A.M. to 5:00 P.M. Pacific
Time, Monday through Friday.
To access international support, visit http://www.wyse.com/global.
Related Documentation and Services
Fact Sheets containing the features of hardware products are available on the Dell Web
site. Go to http://www.wyse.com/products and use the Cloud clients tab to locate and
download the Fact Sheet for your hardware product.
Reference Guide: Dell® Wyse Enhanced Ubuntu™ Linux INI Files is intended for
administrators of Wyse thin clients running Wyse Enhanced Ubuntu Linux. It provides
the detailed information you need to help you understand and use the Wyse Enhanced

2 Chapter 1
Ubuntu Linux INI files. It contains information on the different INI files you can use and
the rules for constructing the files. It also provides the parameter details you need (with
working examples) to get the most out of your INI files. It is available at:
http://www.wyse.com/manuals.
Dell Cloud Software is available on the Dell Web site at:
http://www.wyse.com/products/software.
Enhancing Your Experience with Dell Software
Dell provides several software products that are specifically designed to enhance your
thin client experience. Dell Thin Computing Software is available on the Dell Web site
at: http://www.wyse.com/products/software.
Dell Online Community
Dell maintains an online community where users of our products can seek and
exchange information on user forums. Visit the Dell Online Community forums at:
http://community.wyse.com/forum.

2 Getting Started: Quickly Learning
the Basics
Use the following information to quickly learn the basics and get started using your thin
client:
• "Logging In"
• "Using Your Home Screen"
• "Configuring Thin Client Settings and Connections"
• "Connecting to Network and Session Services"
• "Connecting to a Printer"
• "Connecting to a Monitor"
• "Locking, Logging Out, Shutting Down, Restarting, and Suspending"
• "Additional Getting Started Details"
TIP: While it can be used in environments without central configuration for basic
connectivity needs, Wyse Enhanced Ubuntu Linux is designed to be centrally managed
and configured using INI files. In general, it is recommended that you use central
configuration to enable you to automatically push any desired default configuration to
all supported thin clients in your environment (see "Central Configuration: Automating
Configurations").
Logging In
TIP: On your initial connection to central configuration it is recommended that you
connect using a “wired connection” (plug in the network-connected ethernet cable to
your thin client before starting the thin client) to obtain the configurations desired by
the administrator (connections, system settings, required certificates and so on). This
“wired connection” will also provide any wireless configurations provided by the
administrator through the INI files.
If you must initially connect to central configuration through wireless, use the Edit
Wireless Connection dialog box (click System Settings > Network Connections >
Wireless tab > Add) to create a wireless connection where you can enter the SSID and
encryption configurations required/set up by the network administrator (see "Network
Connections").
After your thin client starts, Administrators (high privilege) can log in to your Home
screen using the default user name admin and the default case-sensitive password
admin. It is highly recommended that you change the default password by using the
User Administration dialog box in System Settings (see "User Administration").
Note that Thinuser users (low privilege for locked mode end-user) can use the default
user name thinuser and the default case-sensitive password thinuser; Guest users (no
privileges Kiosk type setup) can use default user name guest and do not need a
password.
4 Chapter 2
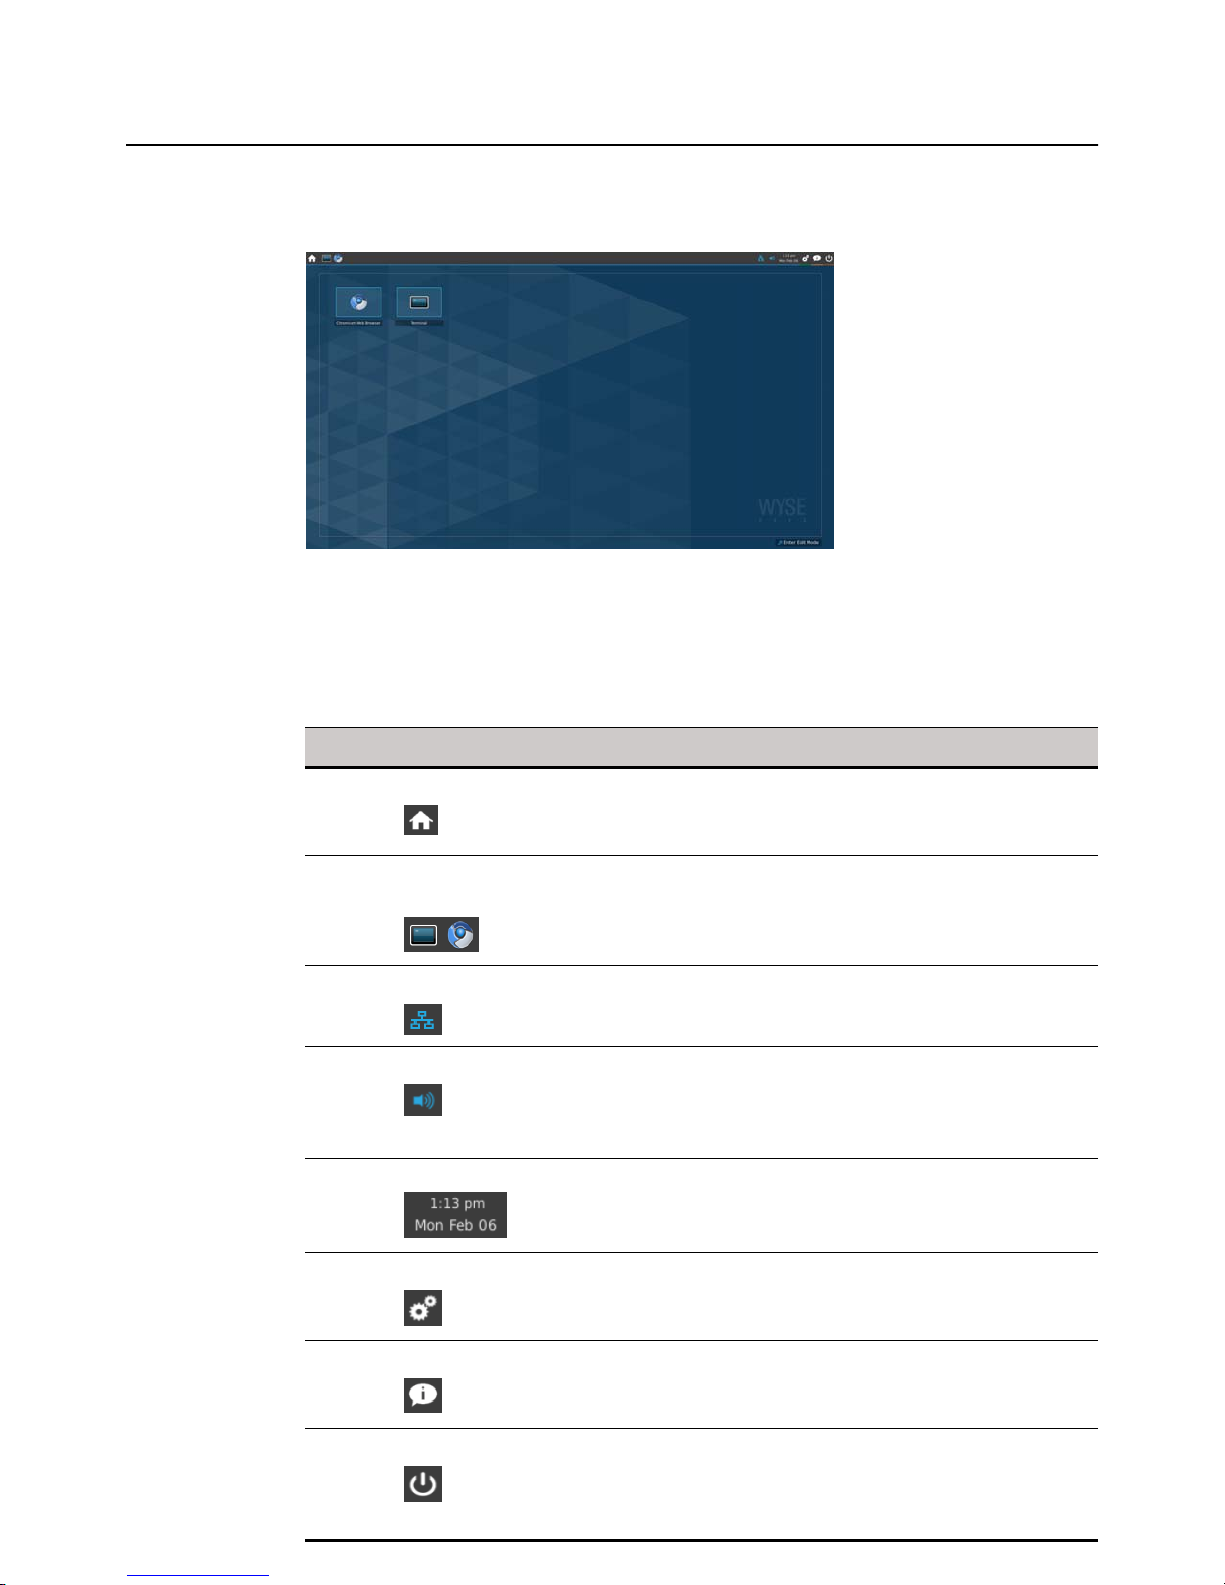
Using Your Home Screen
The Wyse Enhanced Ubuntu Linux Home screen is designed for efficiency and usability.
Use the following guidelines (depending on user privilege, some options may not be
available for use):
TIP: Each icon has a pop-up description for easy identification.
Table 1 Menu bar icons
Icon What It Does
Home Displays your Home screen (useful when many windows
are open and you want to quickly access your Home
screen).
Open Applications
and Connections
Network Manager Manages your wired and wireless network connections
Volume Controls the audio volume (use the slider, click Mute All or
Calendar Lists the time, day of the week, and date. You can click the
System Settings Sets up your thin client hardware, look and feel, and
Currently open application and connection icons are
displayed in the menu bar for convenient access.
(see "Connecting to Network and Session Services").
Unmute as needed; Note that for these settings to take
effect, sound must be supported and enabled on the
server used for ICA or RDP connections).
calendar to display the calendar window.
system settings (see "Configuring System Settings").
System Information Opens the System Information dialog box. Use this dialog
Quit Opens the Shutdown dialog box. Use this dialog box to
box to view system information about the thin client (see
"Viewing System Information").
lock, logout, shutdown, restart, or suspend your thin client
(see "Locking, Logging Out, Shutting Down, Restarting,
and Suspending").
Getting Started: Quickly Learning the Basics 5
The Home screen also contains:
• Right-click menu - Right-clicking the menu bar provides options to customize your
menu bar and panel. For example, the Customize Panel option allows you to move
your menu bar to the top, left, bottom, or right of your Home screen.
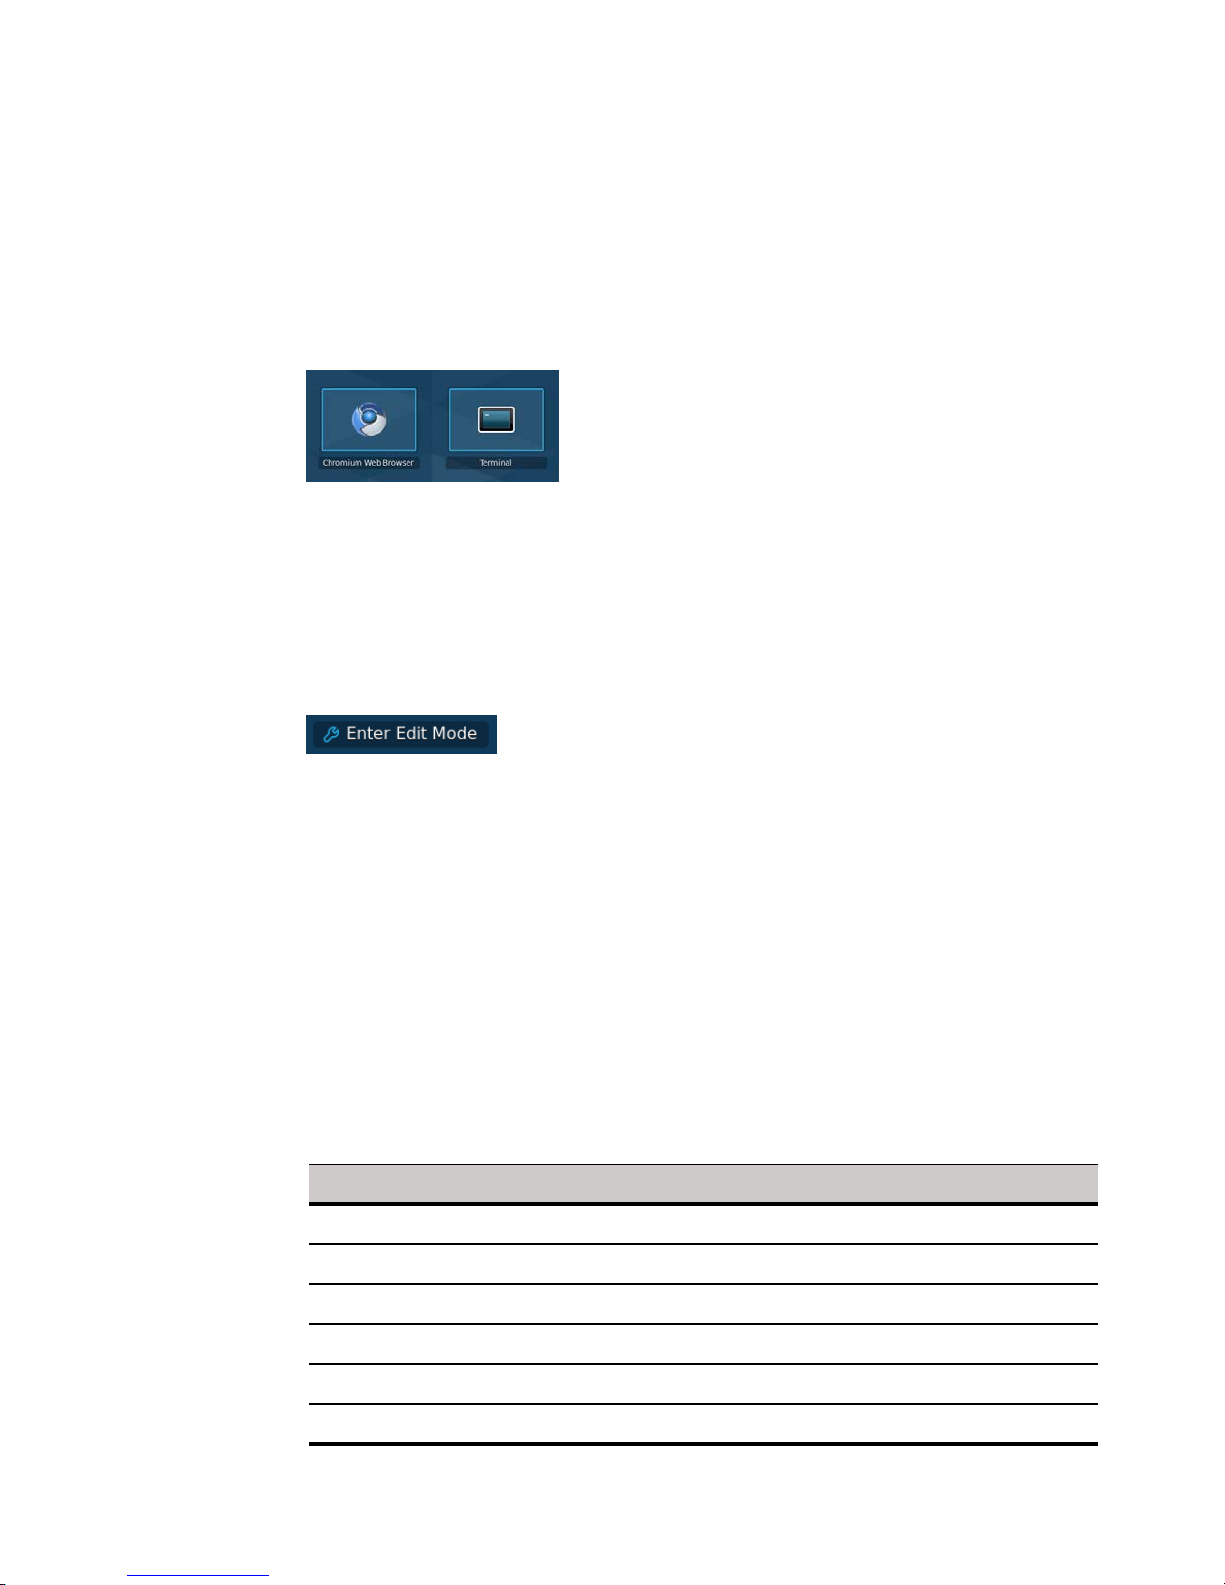
• Home Screen Application and Connection icons - Each application and
connection icon opens the connections made available by an administrator. For
example, a browser, the terminal emulator window (see "Using Wyse Terminal"), or
other available connections (see "Configuring Connections").
• Enter Edit Mode button - Enters the Home screen edit mode allowing you to
(depending on user privilege level, some edit mode features may not be available for
use; to exit edit mode, click the Exit Edit Mode icon):
· Edit connections - Click an icon and configure (see "Configuring Connections")
· Delete connections - Click the delete button of an icon and confirm.
· Add new connections - Click the Add Item icon, click the connection you want
to add, and then configure (see "Configuring Connections").
Home Screen Keyboard Shortcuts
Depending on the type of application window you are using (full screen, standard, or
seamless), you can use shortcut keys (see Table 2) to manage windows. Note that you
can also define shortcuts for launching applications (see "Keyboard").
TIP: The shortcut keys Alt+DownArrow (allows you to switch windows using a dialog
box) and Alt+Ctrl+DownArrow (minimizes or maximizes all windows) are useful for
navigating multiple remote sessions without having to log out.
CAUTION: If inside a session, some connection types will grab all the keystrokes and
the shortcuts may not always work. Be sure to check product release notes for the
latest details.
Table 2 Window-related Shortcut Keys
Window Action Press
Maximize window Alt+F10
Switch windows using a dialog box. Alt+DownArrow
Minimize/maximize all windows Alt+Ctrl+DownArrow
Move window with arrow keys Alt+F7 and press an arrow key
Resize window Alt+F8 and press an arrow key
Close the window Alt+F4

6 Chapter 2
Configuring Thin Client Settings and Connections
While the use of Wyse INI files is recommended to configure thin client settings and
connections available to users (see "Central Configuration: Automating
Configurations"), you can use dialog boxes on a thin client to:
• Set up your thin client hardware, look and feel, and system settings (see
"Configuring System Settings").
• Configure and add connections to your Home screen for use (see "Configuring
Connections").
Connecting to Network and Session Services
Use the Network Manager icon, located on the right side of the Menu bar, to display
information about the status of your network connection and to connect or
disconnect.
Use the following guidelines:
• Click the Network Manager icon to display the Wired Network and Wireless
Network menus. For example you can click the Network Manager icon, and then
select an available wired or wireless network to use.
• Right-click the Network Manager icon to display the Enable Networking, Enable
Wireless, Enable Notifications, Connection Information, and About options. For
example, you can right-click the Network Manager icon, and then click Enable
Wireless to remove the check and disable wireless.
• Hover your mouse pointer over the icon to view a message displaying the status (No
Network Connection, Wired Network Connection Active, and Wireless Network
Connection Active) and name of the network to which your thin client is connected.
For example, connecting your thin client to a wired network (by attaching the
network cable to your thin client) displays the Wired Network Connection Active
status.
For wireless connections (802.11b/g/n Wireless LAN), you can click the Wireless
Network Connection icon (or click the Network Manager icon) in the menu bar to see if
a wireless network connection is available. You can click an available wireless network
connection to open and use the Wireless Network Authentication dialog box. After
authentication, the wireless network is available for use.
TIP: For information on importing certificates that your network may require
(according to your administrator), see "Import Certificates."
Connecting to a Printer
To connect a printer to your thin client through a USB port, you will need a
USB-to-printer adapter cable (not included). Before use, you may need to install the
driver for the printer by following the printer driver installation instructions. For
information on connecting to printers, refer to "Printers."

Getting Started: Quickly Learning the Basics 7
Connecting to a Monitor
Depending on your thin client model, connections to monitors can be made using
either a VGA (analog) monitor port, a DVI (digital) monitor port, or a DisplayPort (digital)
and the proper Dell monitor cables/splitters/adapters. For information on configuring
dual display settings, see "Display."
TIP: For dual-monitor supported thin clients using a DVI to DVI/VGA splitter, the VGA
monitor will be the primary monitor. For dual-monitor supported thin clients using a
DisplayPort, the DisplayPort monitor will be the primary monitor.
Locking, Logging Out, Shutting Down, Restarting, and Suspending
After using your thin client, you can click the Quit icon and select one of the following
(depending on user privilege, some options may not be available for use; note also that
the shutdown screen is not configurable using INI parameters):
• Lock - Locks your thin client (display is blank after you click the icon). To unlock
your thin client, move the mouse, enter your credentials, and then click Unlock.
• Logout - Logs you out of your session (however, the thin client continues to run).
• Shutdown - Shuts down and turns off your thin client.
• Restart - Shuts down and restarts your thin client.
• Suspend - Places the thin client in Standby mode to preserve power. To exit Standby
mode, click the mouse, or press the space bar on the keyboard, or press the return
key on the keyboard.
Additional Getting Started Details
This section includes additional details on the following:
• "Viewing System Information"
• "Using Wyse Terminal"
• "Restoring Default Settings with WLoader Setup"
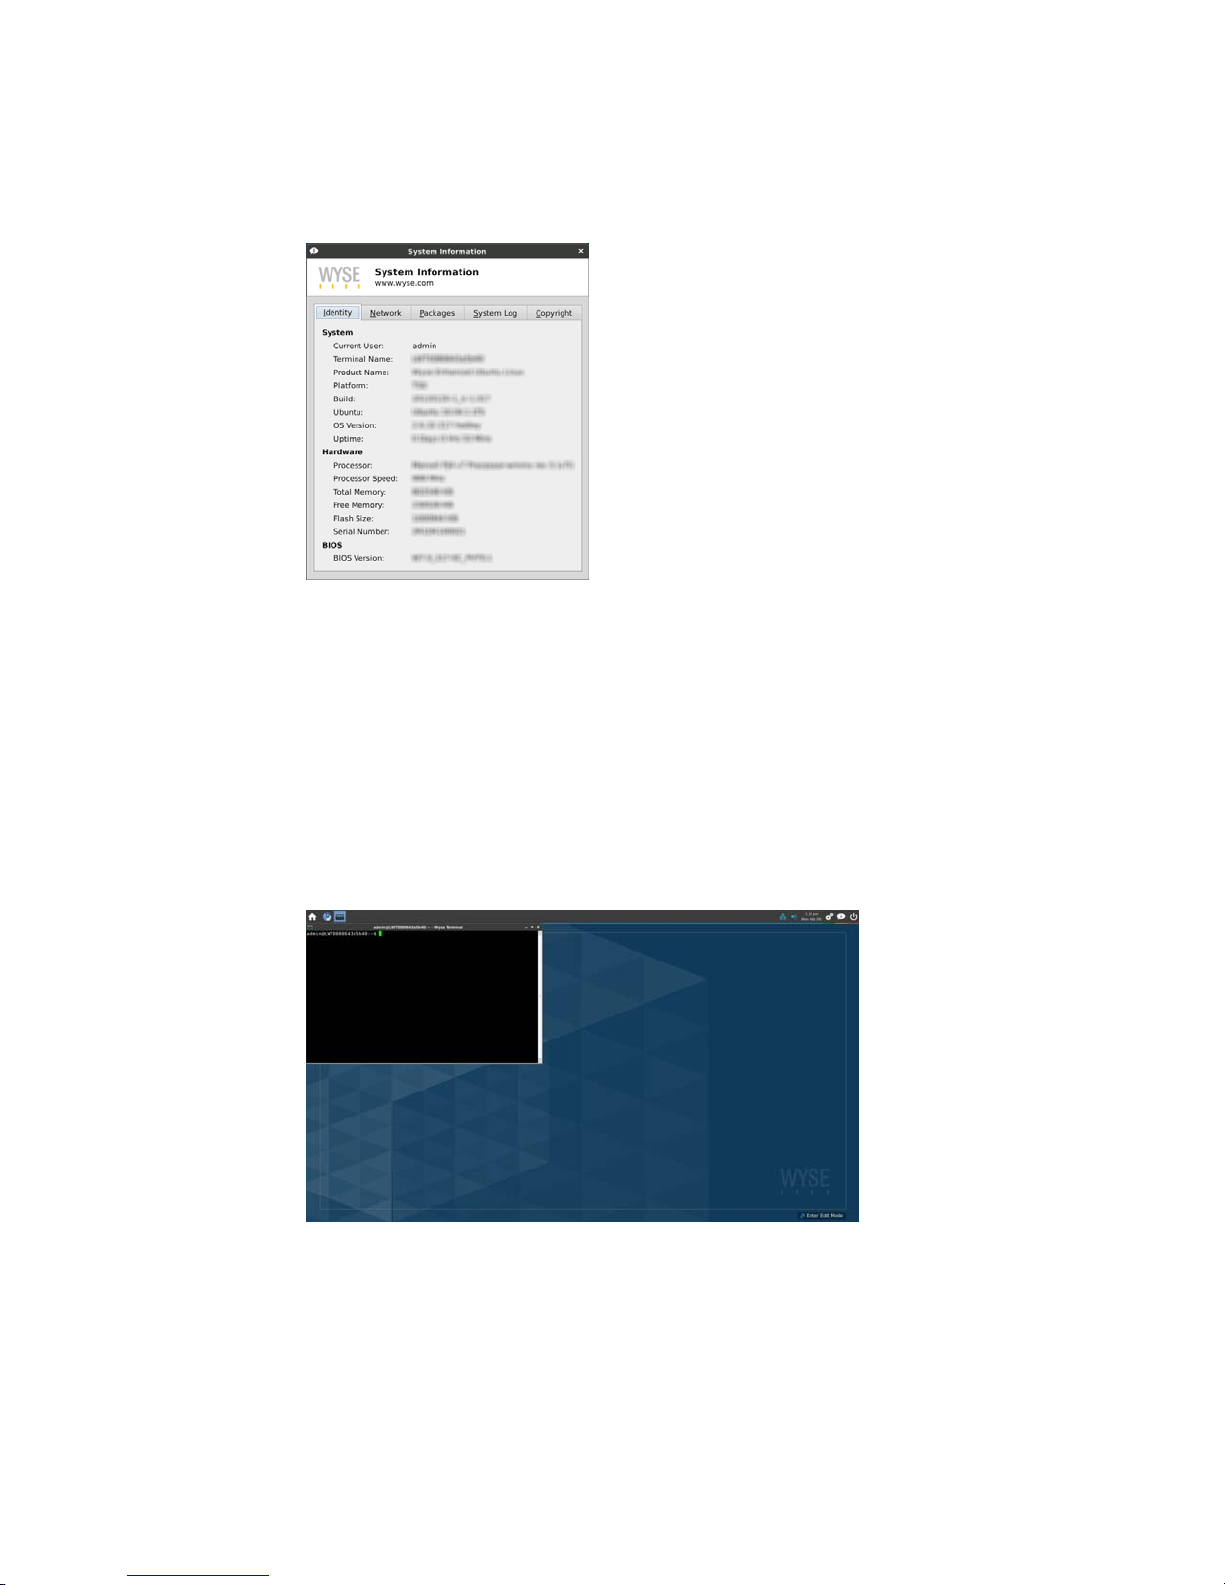
Viewing System Information
Use the System Information dialog box (click the System Information icon in the Menu
Bar) to view Identity, Network, Package, System Log, and Copyright information:
• Identity tab - Displays identity information such as Current User, Terminal Name,
Product Name, Platform, Build, Ubuntu, OS Version, Uptime, Processor, Processor
Speed, Total Memory, Free Memory, Flash Size, Serial Number, and BIOS Version.
• Network tab - Displays network information for ethernet (eth0) and wireless LAN
(wlan0) such as MAC Address, Network Speed, MTU, IP Address, IPv6 Address,
Subnet Mask, Gateway, Domain, Primary DNS, Secondary DNS, DHCP Server, Lease,
and Elapsed time.
• Packages tab - Displays the Package information, including packages names,
versions, and sizes that are installed on the thin client.
8 Chapter 2
• System Log tab - Displays the System Log information, including various messages
generated during the operation of the thin client.
• Copyright tab - Displays the software copyright and patent notices.
Using Wyse Terminal
Clicking the Terminal icon on the Home screen opens the Wyse Terminal emulator
window. Wyse Terminal allows you access to a text terminal and all its applications such
as command line interfaces (CLI) and text user interface applications. You can click the
Window menu (upper left window icon in the terminal window) to open and use
available menu options. You can type help and press Enter to display a verbose
message describing available options. NOTE: Terminal is for various low level
administrative purposes. It is available only to users with high privileges. It is
recommended for experienced administrators who have extensive knowledge of the
Linux system.
Restoring Default Settings with WLoader Setup
Depending on the default settings you want to restore on the thin client, you can use
the:
• WLoader Setup to restore various default values (see "Accessing Thin Client Boot
Order Settings")
• Recovery option to restore the complete image including removing any updated
packages (see "Restoring the Complete Image")

Getting Started: Quickly Learning the Basics 9
Accessing Thin Client Boot Order Settings
1. Power off the device.
2. Press and hold the Delete key while pressing and holding the Power button to
power on the device. When the Activity light (next to the Power button) blinks,
release the Power button. When the BIOS password prompt is displayed, release the
Delete key.
3. Type Fireport as the password to enter and use the WLoader Setup. For example,
you can use the Boot Order to select the boot option you want.
Restoring the Complete Image
1. Power off the device.
2. Press and hold the P key while pressing and holding the Power button to power on
the device. When the Activity light (next to the Power button) blinks, release the
Power button. When the BIOS password prompt is displayed, type Fireport as the
password.
3. When the one-time boot menu of options is displayed, select the Recovery option
and then press Enter (restores the complete image and removes any updated
package).

10 Chapter 2
This page intentionally blank.

3 Configuring System Settings
Clicking the System Settings icon in the Menu bar displays the following System
Settings options that you can configure locally on a thin client using dialog boxes
(depending on user privilege level, some dialog boxes and options may not be available
for use):
TIP: While it is not recommended to use dialog boxes for configuring thin client system
settings, they are available in case you want to temporarily override central default
configurations or you do not have the option to set up central configuration (smaller
environments). In general, it is recommended that you use central configuration to
enable you to automatically push any desired default configuration to all supported
thin clients in your environment (see "Central Configuration: Automating
Configurations").
In addition, the Wyse USB Firmware Tool also provides a simple USB imaging solution
for supported devices (see "Enhancing Your Experience with Dell Software").
• "Accessibility"
• "Appearance"
• "Background"
• "Date & Time"
• "Device Settings"
• "Diagnostics"
• "Display"
• "Ericom PowerTerm® TEC (Managing Servers Available for Connections)"
• "Citrix Settings (Global Settings)"
• "Import Certificates"
• "INI (Source) Settings"
• "Keyboard"
• "Language Support"
• "Mixer"
• "Mouse"
• "Network Connections"
• "Network Proxy"
• "Printers"
• "RDP Settings"
• "Screensaver"
• "TCX Audio"
• "TCX USB Virtualizer"
• "User Administration"
• "VNC Server"
• "WDM"
12 Chapter 3
Accessibility
Use the Accessibility dialog box (click Accessibility) to set Sticky Keys, Slow Keys, and
Bounce Keys options.
Appearance
Use the Appearance dialog box (click Appearance) to customize your Home screen
(Style, Icons, and Fonts).
Background
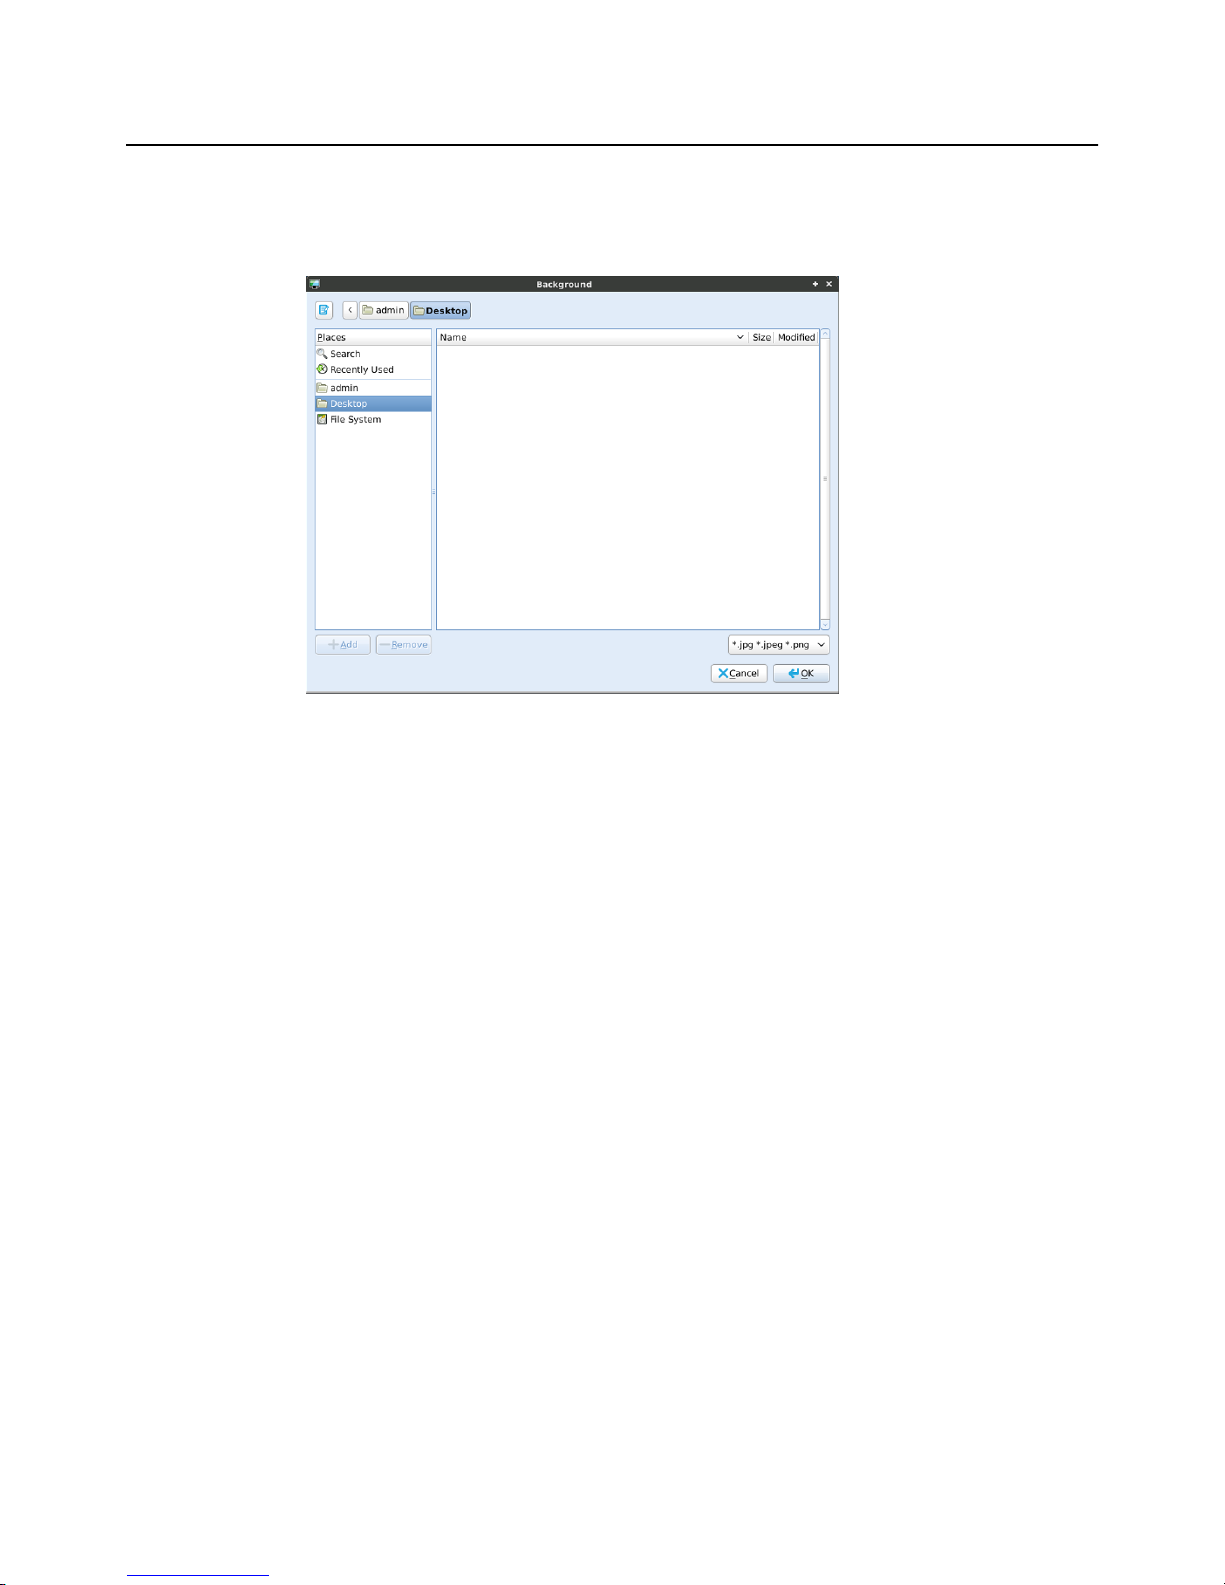
Configuring System Settings 13
Use the Background dialog box (click Background) to customize your desktop
background.
TIP: PNG files are recommended for most single monitor setups. However, on
dual-monitor setups, a JPG file is recommended (as there is some color variance due
to Y-Cable or DVI/VGA output when using PNG files).
 Loading...