

Page 1

Dell Wyse Configuration
(WCM) Manager
Release 1.3.0.0
Administrator’s Guide
Page 2

Notes
NOTE: A NOTE indicates important information that helps you make better use of
your computer.
____________________
© 2013 Dell Inc. All rights reserved.
®
Trademarks used in this text: Dell™, the Dell logo, vW orkspace
Inc. Microsoft
Embedded Standard 8, Windo ws Server
trademarks of Microsoft Corporation in the United States and/or other countries. Citrix
XenServer
in the United States and/or other countries. VMware
vSphere
countries. .
2013 - 10
®
,Windows® Embedded Standard 2009, Wi ndows® Embedded Standard 7, Windows®
®
and XenMotion® are either registered trademarks or trademarks of Citrix Systems, Inc.
®
are registered trademarks or trademarks of VMware, Inc. in the United States or other
®
, and Internet Explorer®, are either trademarks or registered
®
, Virtual SMP®, vMotion®, vCenter® and
, and Wys e® are trademarks of Dell
®
, Xen®,
Page 3

Contents
1 Introduction. . . . . . . . . . . . . . . . . . . . . . . . 7
Overview. . . . . . . . . . . . . . . . . . . . . . . . . . 7
Key Features
. . . . . . . . . . . . . . . . . . . . . . . . 8
What’s New . . . . . . . . . . . . . . . . . . . . . . . . 9
Supported Dell Wyse Thin Client Systems
Supported Operating Systems
. . . . . . . . . . . . . . 13
. . . . . . . 11
Dell Wyse Technical Support . . . . . . . . . . . . . . 13
Related Documentation and Services
. . . . . . . 13
Dell Wyse Online Community. . . . . . . . . . . . 14
2 Installing and Configuring Dell Wyse
Configuration Manager (WCM) . . . . . . . . 15
Pre-requisites to Install WCM. . . . . . . . . . . . . . 15
Downloading and Installing WCM
Downloading WCM
. . . . . . . . . . . . . . . . . 17
Installing WCM Server Application
Installing WCM Client
The WCM Environment
. . . . . . . . . . . . . . . . . 18
. . . . . . . . . . . 17
. . . . . . . . 17
. . . . . . . . . . . . . . . 18
Configuring the Repository Server
Configuring the Repository Server on a
Windows 2003/Windows 2003 R2 Server
. . . . . . . . . . . 19
. . . . . . 19
Contents 3
Page 4

Configuring the Repository Server on a
Windows 2008/Windows 2008 R2 Server
Configuring the Repository Server on a
Windows 7 System
. . . . . . . . . . . . . . . . . 24
. . . . . . 22
Discovery Settings for the WCM Server
DNS Service Record Lookup
DNS Hostname Lookup
. . . . . . . . . . . . . . . 30
. . . . . . . . . 26
. . . . . . . . . . . . 26
DHCP Option Tags Lookup . . . . . . . . . . . . . 32
Configuring the WCM Thin Client Systems . . . . . . . 36
Configuring the Dell Wyse Device Manager
(WDM) Server
. . . . . . . . . . . . . . . . . . . . . . 37
3 Using the Dell Wyse Configuration
Manager (WCM) GUI Application . . . . . . 39
About the WCM Application GUI . . . . . . . . . . . . 39
Creating New Configuration Files
Editing Existing Configuration Files
Configuration Details
Connections
. . . . . . . . . . . . . . . . . . 42
. . . . . . . . . . . . . . . . . . . . . 43
Device Configuration
OS Configuration
. . . . . . . . . . . . . . . . . . 63
. . . . . . . . . . . . 41
. . . . . . . . . . . 42
. . . . . . . . . . . . . . . . 53
4 Contents
Agent Settings
. . . . . . . . . . . . . . . . . . . . . . 69
Using Your Configuration Files
Setting Up Automatic Configuration
Setting Up Manual Configuration
. . . . . . . . . . . . . 70
. . . . . . . . 70
. . . . . . . . . . 71
Page 5

4 Using the Dell Wyse Configuration
Manager (WCM) Client . . . . . . . . . . . . . . 73
Launching the WCM Client . . . . . . . . . . . . . . . 73
Importing Thin Client Configurations
. . . . . . . . . . 73
Fallback Mechanism for Failed Download of
Configuration File
Exporting Thin Client Configurations
Using Configuration History
. . . . . . . . . . . . . . . . . . 74
. . . . . . . . . . 75
. . . . . . . . . . . . . . . 75
Manually Setting Debug Options on a Thin Client . . . 76
5 Typical Use Case Scenarios . . . . . . . . . . 77
Case 1 - Using a Single Configuration for Multiple
Thin Client Users. . . . . . . . . . . . . . . . . . . . . 77
Case 2 - Using Multiple Configuration Files for Multiple
Thin Client Users
Case 3 - Editing Specific Configuration Files for
Thin Client Users
Case 4 - Selecting Specific Configuration Files Using a
Thin Client on the Network
Case 5 - Applying Specific Configuration Files to a
Mobile Thin Client
. . . . . . . . . . . . . . . . . . . . . 78
. . . . . . . . . . . . . . . . . . . . . 78
. . . . . . . . . . . . . . . 79
. . . . . . . . . . . . . . . . . . . . 79
Case 6 - Applying Configuration Files for New or
Different Thin Client Users
. . . . . . . . . . . . . . . 80
Contents 5
Page 6

A Appendix . . . . . . . . . . . . . . . . . . . . . . . . 81
Troubleshooting Devices That Cannot Locate
Configuration Files. . . . . . . . . . . . . . . . . . . . 81
6 Contents
Page 7

1
Introduction
Dell Wyse Configuration Manager (WCM) is an innovative self-configuring
client technology for the cloud and Dell Wyse Enhanced Embedded virtual
desktop environments. WCM provides a simple solution to create and apply
configuration files to Dell Wyse thin clients running supported Microsoft
Windows Embedded operating systems.
WCM is mainly used by IT Administrators who create configuration files
using a simple standalone GUI or capture them from an already configured
Dell Wyse thin client running a supported Windows Embedded operating
system. The thin client system connects to the remote file folder location that
contains the configuration file and downloads the same to update the
configuration. WCM enables configuration of multitude of thin clients
without a management server.
This guide is intended for administrators of Wyse thin clients running
WES2009, WES7, WES7p, or WE8S. It provides the necessary information
for using the tool to create and apply configuration files to Wyse thin clients.
The supported Windows Embedded operating systems are:
• Wyse Embedded Standard 200 9 (WES2009)
• Wyse Enhanced Microsoft Windows Embedded Standard 7 (WES7)
• Wyse Enhanced Microsoft Windows Embedded Standard 7 p (WES7p)
• Wyse Enhanced Microsoft Windows Embedded 8 Standard(WE8S) (32bit and 64-bit)
Overview
WCM helps you to easily deploy thin client configurations either manually or
through a server environment and is an easy-to-use solution for supported
Windows Embedded thin clients from Dell Wyse.
WCM consists of two components:
Introduction 7
Page 8
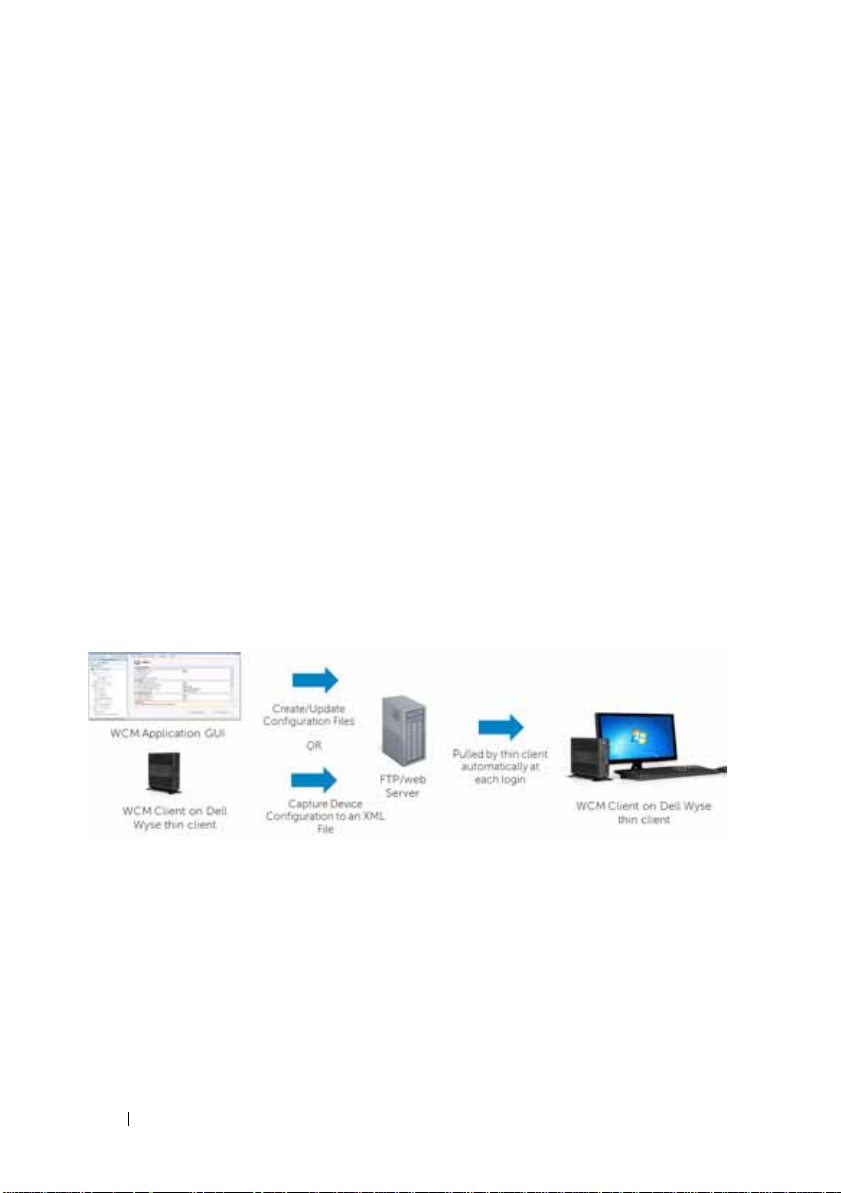
•
WCM Application GUI
configuration files as well as edit existing configuration files. These files
can be placed on an FTP server (for FTP) or on a Web server (Microsoft
IIS Web server for HTTP or HTTPS) in order to be deployed on thin
clients running the WCM Client.
•
WCM Client
the supported thin client systems by using the Dell Wyse Device Manager
(WDM). After you log in to the thin client system, the
downloads the latest configuration file and applies the configurations. As
an administrator, you can also use the WCM Client Control Panel applet
to export the current customized configurations of a thin client as a
configuration file, and to manually import configuration files into the thin
client.
You can deploy the WCM configuration files to your thin clients both
automatically and manually. For more information, see
Configuration, Setting Up Manual Configuration, and Importing Thin Client
Configurations
The following diagram describes the deploym ent of configuratio n fi les on a
WCM thin client.
— is a client component that is pre-installed or deployed in
.
— is a standalone GUI to create new
WCM Client
Setting Up Automatic
Key Features
The WCM has the following features:
• Provides granular control to deploy:
– Universal, or user-specific settings
– Stationary or mobile thin clients
– Local or remote devices
8 Introduction
Page 9

• Provides the ability to:
– Create configuration files from a standalone GUI or capture the
configuration from an alrea dy configured device
– Maintain history of configurations
– Update existing configurations or revert to previous configurations
–Use the
Embedded thin clients to function as a simple-to-use, dedicated kiosk
for one of the following:
•Citrix Clients
• VMware View Clients
•vWorkspace Clients
• Microsoft RDS/RDP Clients
• Internet Explorer
– Use the Generic Appliance mode for any user-specified application.
Appliance mode
to configure one or more Windows
What’s New
The new features in this release of WCM are:
• Support for thin clients running WE8S (32 bit and 64 bit)
• Support for Appliance Mode for any user-specified application (Generic
Appliance Mode)
• Support for configuring Quest vWorkspace clients
• Support for creating Internet Explorer URL shortcuts on the desktop for
the selected favorites
• Support for configuring an Exit button on the Citrix Enterprise Receiver
Appliance Mode in the Published Apps or Desktops dialog box. This
button enables you to exit from the Appliance Mode
Introduction 9
Page 10

• Support for
the user to exit, log off, shut down or restart from the client while in
Appliance Mode. This feature is also supported for other Citrix
XenDesktop and VMware Horizon View Appliance Mode applications with
some limitations. This release also supports the ability to configure the exit
buttons and shortcuts per user.
• Support to configure share drives from the WCM Client. You can add or
remove share drive connections and also map the remote machine drive by
using Share Drive.
• Single sign-on (SSO) for domain joined devices. This version of WCM
provides the single sign on feature for domain joined devices to connect
using RDP, VMware View, Citrix Xenapp.
• Support for Adobe Flash Player settings. You can use the WCM 1.3 Client
to configure Adobe Flash player for Citrix sessions.
–
Flash Remoting
the user device.
–
Server Http Cookies
HTTP cookies with the server-side in order to download HTTP
cookies from the server.
–
Server Side Content Fetching:
Flash Redirection downloads Adobe Flash content to the user device
and plays the content.
–
URL rewriting rules for client-side content fetching:
an attempt to obtain Flash content using the URL rewriting rules for
client-side content fetching setting which is a second generation Flash
Redirection feature.
• Removal of WebDAV dependency for both HTTP and HTTPS protocol to
download the configuration files or resource files.
• Ability to block or unblock the popups on a Citrix Session when
connecting to a full screen ICA session on the WCM Client.
• Support for RDP 8 settings.
Exit
button for all Appliance Modes applications. This allows
: Enables HDX Media Stream Flash Redirection on
: Enables synchronization of the client-side
By default, the HDX Media Stream
One can redirect
10 Introduction
Page 11

• WCM 1.3 client supports RDP8 and its new features. The settings given
below are supported for RDP8 functionality by WCM.
– Detect Connection Quality automatically
– Remote Desktop Gateway KDC proxy and Edit box option for KDC
Proxy Name
– Enable Workspace Reconnect
• Ability to configure Citrix Standard Receiver using the WCM Client.
• Enhanced speed of download and applying of configuration on the thin
client systems.
Supported Dell Wyse Thin Client Systems
WCM is supported on the following thin client systems that run:
• Wyse Enhanced MicrosoftWindows Embedded Standard 2009 build 684,
685, 686, 703, 704, 716, 718, 719, 720, 723, 716, 727 or later:
– C90LEW
–D90DW
– R90LW
– R90LEW
– R90LW Fiber-NIC Ready
–V90LEW
–X90cw
–X90mw
–X90LW
–X90LeW
–Z90DW
–Z90SW
Introduction 11
Page 12

• Wyse Enhanced MicrosoftWindows Embedded Standard 7 build 818, 827,
830, 832, 833, 846, 858 or later:
– C90LE7
–D90D7
–D90Q7
–R90L7
–R90LE7
–X90C7
–X90M7
– Z90D7
– Z90DE7
– Z90S7
– Z90Q7
• Wyse Enhanced MicrosoftWindows Embedded Standard 7p build 850 or
later:
–X90M7p
– Z90D7p
– Z90DE7p
• Wyse Enhanced Microsoft Windows Embedded 8 Standard build 904,
907, and 908:
–D90D8
–D90D8x
–D90Q8
– Z90D8
– Z90D8x
– Z90Q8
12 Introduction
Page 13

NOTE: If you have thin clients running earlier builds where the WCM Client was not
pre-installed on your thin client, you can:
- Re-image the thin clients with the latest firmware to include the WCM Client in
those builds.
- Use WDM to push the WCM Client package to each thin client.
- Install the WCM Client manually. Ensure that you disable the File Based Write
Filter on the thin client before installing the WCM Client.
Supported Operating Systems
WCM is supported on Dell Wyse thin clients running the following operating
systems:
• WE8S (32-bit and 64-bit)
•WES7P
•WES 7
• WES 2009
Dell Wyse Technical Support
To access Dell Wyse technical resources, visit http://www.wyse.com/support.
If you still have questions, you can submit your questions using the Dell
Wyse Self-Service Center at http://support.wyse.com/selfservice.html or call
Customer Support at 1-800-800-WYSE (toll fr ee in U.S. and Canada). Hours
of operation are from 6:00 A.M. to 5:00 P.M. Pacific Time, Monday through
Friday.
To access international support, visit http://www.wyse.com/global.
Related Documentation and Services
Fact Sheets containing features of har dware products are available on the Dell
Wyse Web site. Go to http://www.wyse.com/products and use the Cloud
clients tab to locate and download the Fact Sheet for your hardware product.
If you need to upgrade your Windows Embedded Standard ope rating s ystem,
contact Dell Wyse Customer Support at: http://www.wyse.com/support.
Introduction 13
Page 14

Dell Wyse Online Community
Wyse maintains an online community where users of our products can seek
and exchange information on user forums. Visit the W yse Online
Community forums at: http://community.wyse.com/forum.
14 Introduction
Page 15

2
Installing and Configuring Dell Wyse Configuration Manager (WCM)
This section provides information about installing and configuring WCM in
your environment. Depending on your environment and intended
deployment, you can choose one of the following:
•
Server Deployment
HTTP, or HTTPS servers and intend to create configuration files that thin
clients can access automatically to update themselves.
•
Manual Deployment
to create configuration files that thin client systems can access locally to
update themselves manually using the Import feature of the WCM Client
Control Panel applet on the thin client system.
Pre-requisites to Install WCM
The pre-requisites mentioned in this section are applicable to both manual
and server deployment modes.
To install WCM on a server, ensure that the server meets the following
requirements:
1
Ensure that the following hardware requirements are met on the server:
–
CPU
— A minimum of 1 GHz Intel or AMD X86. We recommend a
2.4 GHz Dual Core Intel or AMD X86 CPU.
–
RAM
— A minimum of 512 MB. We recommend 2GB.
–
Free Space
720 MB. The actual free space required depends on:\
• The number and size of the configuration files you store
• The number of thin client devices you manage
— if you want a server environment that uses FTP,
— if you want a non-server environment and intend
— A minimum of 500 MB. We recommend a free space of
Installing and Configuring Dell Wyse Configuration Man-
Page 16

2
Install the supported operating system on the server for the WCM
Application. The supported operating systems are:
– Windows 7 Professional Enterprise Edition
– Windows Server 2008
– Windows Server 2008 R2
– Windows Server 2003
– Windows Server 2003 R2
The supported operating system languages to install the WCM
Application are:
– Chinese Simplified
–English
–French
–German
–Japanese
–Spanish
–Russian
3
Install Microsoft .NET framework 3.5 or higher on the server .
4
Ensure that Internet Information Services (IIS) version 6.0, 7.0, or 7.5 is
installed.
5
Ensure that all required communication ports are available and open for
proper communication between servers, routers, and switches. The server
port requirements for FTP, HTTP, and HTTPS are:
– FTP – Port 21 with defaults
– HTTP – Port 80 with defaults
– HTTPS – Port 443 with defaults
NOTE: Steps 4 and 5 are not required for Manual Deployment.
16 Installing and Configuring Dell Wyse Configuration Manager (WCM)
Page 17

Downloading and Installing WCM
Downloading WCM
The WCM software package includes:
• The installer for WCM Server Application
• The installer for locally installing the WCM Client on an individual thin
client.
• Packages for r emotely deploying the WCM Client onto multiple thin
clients using Dell Wyse Device Manager (WDM).
To download the WCM software package:
1
Launch the internet browser and navigate to the Dell Wyse support site at
http://www.dellwyse.com/serviceandsupport/support/downloads.asp.
2
Select
Wyse Configuration Manager
Active
drop-down box.
3
Click
Search.
4
Click the latest version of the WCM build. The EULA page is displayed.
5
Select the
6
Navigate to the location where you want to save the .zip file that contains
the WCM installer.
7
After you download the .zip file, extract the contents.
The downloads for WCM are displayed.
I Agree
option and click
from the
Next.
Product Downloads
Installing WCM Server Application
To install the WCM server application, run the Wyse Configuration
Manager Application.msi file and follow the wizard to install the application.
The default location for installation is C:\Program
Files\Wyse\WCM\Application.
Installing and Configuring Dell Wyse Configuration Manager (WCM) 17
Page 18

Installing WCM Client
The WCM Client is included in supported Windows Embedded thin clients.
To update them you can:
• Install them manually on each thin client, as an administrator .
• Deploy them remotely, to multiple thin clients, using the Dell Wyse
Device Manager (WDM). Register the WCM Client into WDM and then
deploy it to multiple devices remotely. For more information on r egistering
the WCM Client into WDM, see the
To install the WCM Client manually:
1
Log in to the thin client system as an administrator.
2
Disable the file based write filter (FBWF).
3
Run the
follow the wizard to install the WCM client.
4
Restart the thin client system when prompted.
5
When the installation is complete, re-nable the FBWF. The WCM service
does not work when the FBWF is disabled as it does not download and
apply the XML configuration file.
Wyse Configuration Manager Agent_LaunchPad.exe
WDM Administrator’s Guide
file and
.
The WCM Environment
The WCM environment consists of the following components:
•
Repository Server
are copied and the WCM GUI is installed.
— This is the server where the WCM configuration files
NOTE: You can install the WCM GUI on a separate server and store the WCM
configuration files on a separate server.
•
DNS/DHCP Server
Name Server (DNS) or the Domain Host Configuration Protocol(DHCP).
DNS or DHCP settings are used by the WCM client to find the
Repository server with WCM configuration files. For more information,
see Discovery Settings for the WCM Server.
•
WCM Client Software on Thin Client Systems
clients with WCM Client software, which download the configuration
files from the repository server.
For WCM to work, you need to configure each of the components.
18 Installing and Configuring Dell Wyse Configuration Manager (WCM)
— This is the server where you configure the Domain
— These are the thin
Page 19

Configuring the Repository Server
Configuring the Repository Server on a Windows 2003/Windows 2003 R2 Server
1
Log in to the repository server as Administrator.
2
On the Start menu, go to
click
Add/Remove Windows Components.
3
Select
Application Server
Details
.
4
In the
Application Server
(IIS)
and click
5
In the
Internet Information Services (IIS)
Protocol (FTP) Service
WorldWide Web Service
6
Click OK to go back to the
go back to the
7
Click
Next
8
Navigate to
directory structure under them:
–Wyse
•WE8S
•WES
•WES7
Details
Windows Components Wizard
to install IIS.
C:\inetpub\ftproot\
Control Panel
in the
window, select
.
,
Internet Information Services Manager
.
Application Server
directory and create the following
Add or Remove Programs
Windows Components Wizard
Internet Information Services
window, select
window, and OK again to
.
File Transfer
and
and click
, and
Installing and Configuring Dell Wyse Configuration Manager (WCM) 19
Page 20

9
Launch IIS Manager, select
Virtual Directory
a
In the
Virtual Directory Creation Wizard
and click
b
Navigate to the physical location of the Wyse folder structure that you
Next
.
created in step 8. For example,
c
Click
Next
.
d
Enter the type of access to the folder such as
e
Click
Next
to complete the wizard. The virtual directory is created
Default Web Site,
on the menu.
C:\inetpub\ftproot\.
with the Wyse folder structure.
10
V erify the FTP virtual dir ectory structure under
Site
. It is automatically created.
a
Right-click
b
In the
Default FTP Site
and select
Default FTP Site Properties
window, click the
tab to verify the virtual directory.
11
Set up the ports for FTP, HTTP, and HTTPS.
Setting up the FTP port on a Windows 2003 Server
1
Launch IIS Manager, right click
2
Select
New FTP Site
click
Next.
3
Type
WCM
in
Description,
4
The default
Port
number is displayed as 21. Leave the default port
on the menu. In the
Default FTP
and click
Next.
number.
5
Under
Enter the IP address to use for this FTP site
and click
6
Leave the default settings for
7
Browse to the FTP Directory (
8
Enter access to the FTP Directory and click
Next.
FTP User Isolation
C:\inetpub\ftproot\
right click and select
, enter
WCM
under
New
Alias
Read, Write, Browse
FTP Site s
Properties
Default FTP
on the menu.
Home Directory
.
FTP Site Creation Wizard
leave the default value
and click
) and click
Next
to complete the setup
Next
Next.
.
etc.
.
20 Installing and Configuring Dell Wyse Configuration Manager (WCM)
Page 21

Setting up the HTTP and HTTPs Ports on a Windows 2003 Server
1
Launch IIS Manager, select
2
Select
New Web Site
click
Next.
3
Type
WCM
in
Description,
4
The default
Port
number is displayed as 80. Leave the default port
Default Web Site
on the menu. In the
and click
Next.
and right click.
Web Site Creation Wizard
number. This is the default HTTP port.
5
Under
Enter the IP address to use for this FTP site
and click
6
Browse to the website home directory
7
Enter access to the website home directory and click
setup
8
To configure the HTTPS port:
a
Next.
C:\inetpub\ftproot\
.
Right-click on the newly created website, and select
leave the default value
Next
menu.
b
In the
Properties
window, on the
Web Site
tab, enter the
443.
c
Click the
Communications
d
In the
(SSL)
e
Click
Directory Security
section.
Secure Communication
and click
Server Certificate
OK.
to create an SSL certificate, if you have not
tab and click
window, select
Edit
in the
Require secure channel
downloaded a certificate for the server. For more information on
creating an SSL certificate, see Microsoft KB article 228991 available
at http://support.microsoft.com/kb/228991.
and click
Next.
to complete the
Properties
on the
SSL port
Secure
as
Installing and Configuring Dell Wyse Configuration Manager (WCM) 21
Page 22

Configuring the Repository Server on a Windows 2008/Windows 2008 R2 Server
1
Log in to the repository server as administrator.
2
Launch the
Server Manager
3
Select
launch the
4
Select
option.
5
Click
6
Click
Role Services Wizard
7
Select the
8
Navigate to
create the following directory structure under them:
–Wyse
•WE8S
•WES
•WES7
9
Launch IIS Manager, right click
Directory
a
In the Add Virtual Directory window, enter
b
Navigate to the physical location of the Wyse folder structure that you
created in step 8. For example,
c
Click OK. The virtual directory is created with the Wyse folder
structure.
10
Verify the FTP virtual directory structure under
directory is automatically created.
11
Set up the ports for FTP, HTTP, and HTTPS.
Server Manager
by navigating to
.
Roles
on the left pane and click
Roles Wizard
Server Roles
Install
to install the Web Server (IIS).
Role Services
.
on the
on the
Roles Wizard
Roles
.
FTP
and
HTTP
options and click
C:\inetpub\ftproot\
on the menu.
StartAdministrative Tools
Add Roles
and select the
on the right pane to
Web Server (IIS)
pane in Server Manager to launch the
Install
.
or
C:\inetpub\ftproot\
Default Web Site
WCM
directories and
and select
under
Add Virtual
Alias
.
C:\inetpub\ftproot\.
defaultFTP
. The virtual
22 Installing and Configuring Dell Wyse Configuration Manager (WCM)
Page 23

Setting up the FTP Port on a Windows 2008 Server
1
Launch IIS Manager, right click
2
Select
3
In the
Bindings
Site Bindings
on the menu options.
window, click
defaultFTP
Add.
The
.
Add Site Binding
displayed.
a
Select
FTP
under
Type
.
b
The default
Port
number is displayed as 21. Leave the default port
number.
c
Click OK.
4
Click
Close
to exit from the
Setting up the HTTP and HTTPs Ports on a Windows 2008 Server
1
Launch IIS Manager, right click
2
Select
3
In the
Bindings
Site Bindings
on the menu options.
Site Bindings
Default Web Site
window, click
Add.
window.
.
The
Add Site Binding
displayed.
a
Select
http
under
Type
.
b
The default
Port
number is displayed as 80. Leave the default port
number.
c
Click OK.
d
For setting up the HTTPS port, select
e
The default
Port
number is displayed as
https
under
443
. Leave the default port
number.
f
Under
SSL certificate
, select the SSL certificate that you have
downloaded for the server. For more information on creating an SSL
certificate, see Microsoft KB article 228991 available at
http://support.microsoft.com/kb/228991.
Type
window is
window is
.
Installing and Configuring Dell Wyse Configuration Manager (WCM) 23
Page 24

Configuring the Repository Server on a Windows 7 System
1
Log in to the repository server as Administrator.
2
Click
Start Control Panel Programs and Features
3
Click
Turn Windows features on or off
dialog box.
4
Expand the
additional categories of the IIS features.
5
Select the following options under IIS:
–FTP Server
– Web Management Tools
–World Wide Web
6
Ensure that the
Services
7
Click OK to start the installation. After the installation completes, IIS is
installed with a default configuration on Window 7.
Setting up the FTP Port on a Windows 7 System
1
Launch the IIS Manager.
2
Under
3
In the
physical path as
4
Enter
5
Select the option
6
Select the
7
Select
8
Select
9
Grant the
Internet Information Services (IIS)
WebDAV Publishing
Common HTTP Features
Connections
FTP Site Window
All Unassigned
No SSL
Anonymous
Allow access to All Users
Read
, right click
, enter
C:\inetpub\ftproot
under IP Address, and 21 under Port.
Start FTP Site Automatically
radio button and click
and
Basic Authentication
and
Write
permissions and click
option under
is unchecked.
Sites
and click
FTP
under
, and click
.
to launch the
Add FTP Site
FTP site name
Next.
.
Next
.
.
.
Windows Features
option to display the
World Wide Web
, and enter the
Finish
.
.
24 Installing and Configuring Dell Wyse Configuration Manager (WCM)
Page 25

Setting up the HTTP and HTTPS Ports on a Windows 7 System
1
Launch the IIS Manager.
2
Under Connections, right click
Application
3
In the
–
Alias Name
–
Physical Path
4
Click
5
Expand Compression under the WCM Directory and uncheck the options
.
Add Application
window, enter the following details:
– WCM
– C:\Inetpub\wwwroot
OK
and go to the WCM Directory created under
Default Websites
and click on
Default Web Site
Enable Dynamic Content Compression and Enable Statis Content
Compression.
6
Click
Apply
and confirm the IIS installation by typing
http://localhost
your browser.
7
Navigate back to the IIS
8
Click
Create Domain Certificate
display the
9
Enter significant values for all the fields and click
Create Certificate
Online Certificate Authority
10
On the
Online Certification Authority
Certification Authority
11
Enter a user friendly name such as HTTPS and click
12
Go to
Default Web Site
13
Select
Bindings
on the menu options.
Home Page
and click
Server Certificates.
on the right side of the window to
window.
Next
to display the
Window.
box, select the
window, in the
Domain Certificate
Specify Online
Finish
on the IIS Manager and right click.
and click OK.
.
Add
.
in
Installing and Configuring Dell Wyse Configuration Manager (WCM) 25
Page 26

14
In the
Site Bindings
displayed.
a
Select
https
b
The default
number.
c
Under SSL certificate, select the SSL certificate that you have
downloaded for the system. For more information on creating an SSL
certificate, see Microsoft KB article 228991 available at
http://support.microsoft.com/kb/228991.
d
Click
OK.
15
Confirm the IIS installation by typing
window, click
under
Type
.
Port
number is displayed as
Add.
The
Add Site Binding
443
https://localhost
window is
. Leave the default port
in your browser.
Discovery Settings for the WCM Server
When the WCM client starts after log in it searches network services (DNS
and DHCP) for an FTP/HTTP/HTTPS server to download the file, or uses a
locally available file on the device. The process by which the configuration
files are obtained by the WCM agent on the thin client is in the following
order:
1
DNS Service Record Lookup
2
DNS Hostname Lookup
3
DHCP Option Tags
DNS Service Record Lookup
The DNS Service Record Lookup method (also known as SRV record) obtains
information about the WCM Repository Server and the configurations that
utilize DNS. For e xa mple, the i nforma t ion and parameters are obtained from
a DNS server. The method uses a Uniform Resource Locator (URL) for this
purpose. For example, a URL obtained from the DNS server. Due to the
restrictions on the data that can be specified for DNS service record and a
DNS hostname record, it is assumed that the authentication (username/log
in) used on the Repository Server is Anonymous.
26 Installing and Configuring Dell Wyse Configuration Manager (WCM)
Page 27

In the DNS service record lookup, an administrator can configure the DNS
server to provide the server and port number for a service that is referr ed to as
_WCM._tcp. Multiple configuration repository server/port values can be
provided. The WCM agent accesses them in order, according to the weight
and priority associated with each entry.
Since the DNS server may not supply a protocol string associated with each
server/port entry, the WCM agent determines the protocol based on the port
specified. F o r example, if port 80 is specified, the WCM agent determines
that the protocol being used is HTTP. If the DNS service record lookup for
_WCM._tcp <full domain> fails, the WCM agent attempts _WCM._tcp
<sub-domain> and so on upon further failures. For example, if the domain
name is x.y.z, the WCM agent issues a DNS service location lookup using the
following names in the order shown until the DNS server returns a valid
answer:
1
_ WCM._tcp.x.y.z
2 _ WCM._tcp.y.z
3 _ WCM._tcp.z
Configuring the DNS Service Lookup
For more information on installing DNS on a Windows 2003 Server, go to
http://support.microsoft.com/kb/814591.
For more information on installing DNS on a Windows 2008 Server, go to
http://technet.microsoft.com/en-us/library/cc725925.aspx.
To configure the DNS Service (SRV) lookup:
1
Open the DNS Manager after installing the DNS Server.
2
Under the
Domain,
right click and select
Other New Records
.
Installing and Configuring Dell Wyse Configuration Manager (WCM) 27
Page 28

3
In the
Resource Record Type
Create Record
28 Installing and Configuring Dell Wyse Configuration Manager (WCM)
.
dialog box, select
SRV Location
and click
Page 29

4
In the
New Resource Record
–
Service Name –
–
Protocol –
–
Port Number –
_WCM
_tcp
either 21, 80, or 443 depending on whether you choose
dialog box, enter the following values:
FTP, HTTP, or HTTPS protocols.
–
Host Offering this Service –
enter the hostname of the repository
server.
Installing and Configuring Dell Wyse Configuration Manager (WCM) 29
Page 30

5
Click OK.
DNS Hostname Lookup
If the WCM agent is unable to obtain a valid answer to DNS service record
lookup requests, it then attempts a DNS Hostname lookup.
An administrator can configure the DNS server to provide the server IP for a
host name. With the DNS Hostname record it is not possible to supply
protocol or port. Therefore, the retrieval module first uses the HTTPS on port
443. If this fails, the WCM agent then uses the HTTP on port 80. If the
lookup for host name WCM in the client’s domain fails, the WCM agent
then attempts to look for WCM for each sub-domain name. For example, if
the domain name is x.y.z, the WCM agent issues a DNS host name lookup
using the following names in the order shown until the DNS server returns a
valid answer:
30 Installing and Configuring Dell Wyse Configuration Manager (WCM)
Page 31

1
WCM.x.y.z
2 WCM.y.z
3 WCM.z
Configuring the DNS Hostname
To configure the DNS Hostname:
1
Under
DNS Host
, select
New Host
. The
New Host
dialog box is displayed
.
2
In the
New Host
dialog box, enter
wcm
under
Name
and provide the IP
address of the IIS Server.
Installing and Configuring Dell Wyse Configuration Manager (WCM) 31
Page 32

3
Click
Add Host.
DHCP Option Tags Lookup
When configuring the DHCP server for use with WCM, use the DHCP
option tags listed in Table 2-1.
Ensure that the DHCP option tags that you create are activated within the
DHCP scope. This can be done using the Scope Options dialog box on the
DHCP server (after you add them) or the Configure Options command
(before you add them). For details on your network environment and DHCP
layout, contact your network administrator.
Table 2-1. DHCP Option Tags
Option Tag Description Examples of Values to Use
6 Domain Name Server
(DNS). Optional, but
recommended. Can be
either an IP address or a
string .
32 Installing and Configuring Dell Wyse Configuration Manager (WCM)
IP Address example: 192.168.1.20
String example: MyDNSServer.com
Page 33

Table 2-1. DHCP Option Tags
Option Tag Description Examples of Values to Use
183 Defines protocol to be used
for downloading the
configuration file to the
client and any custom items
in the folder from the server
specified in DHCP Option
195. V alid protocols ar e FTP,
HTTP, and HTTPS. The
default protocol is FTP.
184 Server username. Optional
string. This is the username
to use when authenticating
to the server specified in
Option 195.
185 Server Password. Optional
string. Passwor d to use when
authenticating to the server
specified in Option 195. If
the server allows
Anonymous log in, you can
leave this option blank.
195 Server (ftp/http/https).
Optional IP Address or
string. Can be either the IP
Address or the fully
qualified domain name
(FQDN) of the Repository
server . If a name is given, the
name must be resolvable by
the DNS server(s) specified
in Option 6. If the option
provided by the server is
blank or the server provides
no value for the field, the
machine on which the
DHCP server resides is
assumed to be the server.
Use only one of the following values:
•FTP example:
•HTTP example:
•HTTPS example:
String example: MyServerUsername
String example: MyServerPassword
IP Address example: 192.168.100.7
String example: MyServer.com
FTP
HTTP
HTTPS
Installing and Configuring Dell Wyse Configuration Manager (WCM) 33
Page 34

Table 2-1. DHCP Option Tags
Option Tag Description Examples of Values to Use
196 Default configuration path
(ftp/http/https). Optional
string. The relative directory
starting from the root
directory must be given. If
196 is not defined and is left
blank:
•
FTP
: For FTP, the default
configuration path is
C:\inetpub\ftproot\Wyse\
WES7.
HTTP or HTTPS
•
HTTP or HTTPS, the
default configuration path
is the path specified by
the virtual directory in IIS;
usually wwwroot. For
example,
C:\inetpub\wwwroot\Wys
e\WES7.
: For
For custom configuration paths use
only one of the following string
values where Finance is your custom
defined path for DHCP Option 196:
FTP custom example:
C:\inetpub\ftproot\Wyse\WES7\Fin
ance
HTTP custom example:
C:\inetpub\ftproot\Wyse\WES7\Fin
ance
HTTPS custom example:
C:\inetpub\ftproot\Wyse\WES7\Fin
ance
Configuring DHCP Options
On the DHCP server, you need to add three Wyse vendor tags – 183, 195 &
196. Option Tag 183 defines the protocol to use with WCM. Valid protocols
are FTP, HTTP, and HTTPS. Option Tag 195 identifies the IP address of the
FTP server that the thin client system connects to. Option Tag 196 contains
the directory details of the configuration file that the thin client system
downloads.
Configuring DHCP Options on a Windows 2003 Server
1
Right-click
2
Expand
3
Highlight
The
My Computer
and select
Services and Applications.
DHCP
and click
Set Predefined Options.
Predefined Options and Values
Manage
.
screen is displayed.
34 Installing and Configuring Dell Wyse Configuration Manager (WCM)
Page 35

4
Click
Add
to add an option in the
5
Add the following details one at a time in the
Table 2-2. DHCP Options
Name Data Type Code Description
DNS Server String 6 DNS Server
WCM Protocol String 183 WCM Protocol
WCM Server
Username
WCM Server
Password
WCM Server String 195 WCM Server
WCM Path String 196 WCM Path
6
On the
String 184 WCM Server Username
String 185 WCM Server Password
Predefined Options and Values
Option Type
window.
Option Type
window:
screen, scroll down to verify that
the options have been added.
7
Select option tag 6 and enter the IP address of the DNS Server or the
name of the DNS Server.
8
Select option tag
183
, and enter the protocol you will be using on your
server.
9
Select option tag
195
and enter the IP address of your FTP, HTTP or
HTTPS server that contains the WCM configuration files and press
10
Select option tag
196
and enter the string “/ ” (forward slash) and press
OK. This sets the default path to ftproot/wyse/wes7 directory if you are
using FTP as the protocol or webroot/wyse/wes7 if using HTTP or HTTPS
as the protocol.
11
Select option tag
184
and enter the username to use when authenticating
to the server specified in step 9 (option tag 195). If the server allows
Anonymous log in, you can enter the value
12
Select option tag
185
and enter the password to use when authenticating
Anonymous
.
to the server specified in step 9 (option tag 195). If the server allows
Anonymous log in, leave this field blank.
OK.
Installing and Configuring Dell Wyse Configuration Manager (WCM) 35
Page 36

13
Add the options to the DHCP scope. Navigate back to
Computer Management screen, right click
Configure Options
14
Ensure to select options 183, 195, and 196. Press
Configuring DHCP Options on a Windows 2008 Server
1
Launch
2
Under
3
Select
4
Right click
Options window is displayed.
5
Select option tag 6 and enter the IP address of the DNS Server or the
name of the DNS Server.
6
Select option tag
server.
7
Select option tag
HTTPS server that contains the WCM configuration files and click
8
Select option tag
OK
FTP as the protocol or
protocol.
9
Select option tag
to the server specified in step 9 (option tag 195). If the server allows
Anonymous log in, enter the value
10
Select option tag
to the server specified in step 9 (option tag 195). If the server allows
Anonymous log in, leave this field blank.
11
Click
Server Manager
Roles
IPv4
and expand it.
Scope Options
. This sets the default path to the
OK.
.
, expand the
183
, and enter the protocol that you want to use on your
195
and enter the IP address of your FTP, HTTP or
196
and enter the string “/ ” (forward slash) and click
webroot/wyse/wes7
184
and enter the username to use when authenticating
185
and enter the password to use when authenticating
from the
DHCP Server
and select
Start
Anonymous
Scope Options
menu.
, select your server and expand it.
Configure Options
ftproot/wyse/wes7
if using HTTP or HTTPS as the
.
DHCP
OK
to save and exit.
directory if using
in the
and select
. The Scope
OK.
Configuring the WCM Thin Client Systems
To manually configure the DHCP options on thin client systems:
1
Log in as Administrator into the thin client systems and launch the WCM
from the Control Panel.
36 Installing and Configuring Dell Wyse Configuration Manager (WCM)
Page 37

2
Click
Advanced Options
–
Server
– The default DHCP option is 195. This is the server IP
Address or the fully qualified domain name (FQDN) of the server.
–
Path
– The default DHCP option is 196. This is the root path to the
server; ftp, http, or https.
–
Username
server username of the server specified in DHCP option 195.
–
Password
the server specified in DHCP option 195. If the server allows
Anonymous log in, leave this option blank.
–
Protocol
(ftp/http/https) used for downloading the configuration file (and any
custom items in the folder) from the server specified in DHCP option
195 (the default protocol is FTP)
3
Click
Save Settings.
NOTE: You must en sure that the DHCP options that you specify in the thin client
systems are identical to the options spe cified in the DHCP serve r. This is needed for
the discovery of the thin clients by the Repository Server.
– (Optional) The default DHCP option is 184. This is the
– The default DHCP option is 185. This is the password of
– The default DHCP option is 183. This is the protocol
and set the following values:
Configuring the Dell Wyse Device Manager (WDM) Server
If you are using the WDM Server to push the configuration files to the thin
clients, you need to edit the WES_ApplyConf.rsp, WES7_ApplyConf.rsp, or
WE8S_ApplyConf.rsp files for the WES2009, WES7 or WE8S thin client
systems respectively.
There are two ways in which you can push the configuration files to the thin
clients:
•
Through the Remote Path (RP) Command
repository path to that of WDM server and the thin client system picks up
the latest configuration from this path on every log in.
•
Through the Apply Configuration (AC) Command
enables the thin client system to download the configuration file from the
WDM server and apply it on every log in.
To register the RP Command package in the WDM server:
Installing and Configuring Dell Wyse Configuration Manager (WCM) 37
— This method sets the
— This method
Page 38

1
Create an XML file from the WCM Application GUI by enabling the
WDM
option under
2
Log in to the WDM Server system as an Administrator.
3
Place the XML file in the
Files\WDM\WDM_WCM\RP
Command\TestRP_WES\Wyse\WES\WESConfig.xml.
4
Register the
client system.
5
Restart the thin client system for the changes to take effect. You will notice
that the
WCM Client is disabled and populated with the WDM server details.
To register the AC Command:
1
Create an XML file from the WCM Application GUI by editing any of the
existing XML files.
2
Open the XML file in a text editor and change the <
<uiProtocol>local</uiProtocol>
3
Log in to the WDM Server system as an Administrator.
4
Place the XML file in the AC Command folder. For example,
Files\WDM\WDM_WCM\AC
Command\WES7_AC\WES7_AC\temp\WES7Config.xml.
5
Open the W
WE8S_ApplyConf.rsp
WDM in a text editor. For example,
Files\WDM\WDM_WCM\WES_ApplyConf\WES_ApplyConf.rsp
6
Under the
configuration XML file against the
"C:\temp\WES7Config.xml". This is the local path on the thin client
system to which the configuration file gets downloaded.
7
Save and close the file.
Your WDM server is now configured to push the configuration files to the
thin clients. You also need to configure the Agent Settings in the WCM
Application GUI to complete the setup. For more information, see
Settings
Administrator’s Guide.
. For more information on registering a .rsp package, see the WDM
.rsp
Remote/WDM
ES_ApplyConf.rsp, WES7_ApplyConf.rsp, or
Copy over new files
Agent Settings
RP Command
package in the WDM server and apply it on the thin
option in the
file from the location where you have installed
.
folder. For example,
Import Configuration
uiProtocol>
. Save the file.
C:\Program
section, enter the location of the
AC
command. For example: AC
C:\Program
screen of the
C:\Program
tag to
Agent
.
Use
38 Installing and Configuring Dell Wyse Configuration Manager (WCM)
Page 39

3
Using the Dell Wyse Configuration Manager (WCM) GUI Application
This chapter discusses in detail how to use the WCM GUI Application that is
installed on the Repository Server. You can create configuration files, edit
existing configuration files, and save the configuration files in a central
location. The thin client system connects to the central location and
downloads the respective configurations.
About the WCM Application GUI
The WCM Application GUI is installed and available on the repository server .
You must log in to the repository server as the administrator to launch and
access the WCM Application GUI. The GUI consists of the following
components:
•
Configuration Explorer
of the names of the areas you can configure for your configuration files.
The names of the areas that you can configure are displayed as a tree
structure with the main areas as the main nodes and the sub-areas as subnodes.
•
Toolbar
tab and can be used for the main nodes and sub-nodes in the
Configurations
identification.
•
Right-click Menus
You can right-click certain items on the
menu of the available tasks.
•Details Pane —
selected nodes and sub-nodes in the
of the GUI. You can modify these settings to create a new configuration
file or edit an existing configuration file.
•
Menu Bar
the WCM Application GUI.
— Contains icons that are located on top of the
tab. Each icon has a tool-tip description for easy
Displays the detailed configuration settings for the
— Provides the various menu options for you to effectively use
— Contains the
— Provides easy access to perform the various tasks.
Configurations
Configurations
Configurations
tab that consists
Configurations
tab to view the
tab on the right pane
Using the Dell Wy se Configuration Manager (WCM) GUI
Page 40

Table 3-1. Menu Options
Option Name Description
New You can select the operating system you want to use with your
new configuration file from this option. You can select from the
following options:
• Windows Embedded Standard 8 (WE8S)
• Windows Embedded Standard 7 (WES7)
• Windows Embedded Standard (WES 2009)
Open You can use this option to load an existing configuration file to
make modifications.
Save You can use the Save or Save As functions to save the
configuration files.
Options This has the following sub-options:
•
Append Settings
on (checked) and off (cleared). When
(default setting), the settings of the configuration file that you
are not changing are retained from the last saved configuration,
and only the new changes get appended. When
Settings
are not changing are set back to the default values.
Agent Settings
•
Settings dialog box to configure your default client agent
settings.
For more information, see Agent Settings.
Help You can use this to open Help and the About Dell Wyse
Configuration Manager dialog box displaying the software
version.
is OFF, the settings of the configuration file that you
– You can use this to switch
– You can click this to open and use the Agent
Append Settings
Append Settings
Append
is ON
40 Using the Dell Wyse Configuration Manager (WCM) GUI Application
Page 41

Creating New Configuration Files
You can use the WCM Application GUI to create new configuration files to
be applied to thin clients.
To create new configuration files:
1
Log in to the repository server or the system where you have installed
WCM and launch the WCM Application GUI.
2
Click one of the following options to create a new configuration file:
– New Windows Embedded Standard 8 Configuration (WE8S)
– New Windows Embedded Standard 7 Configuration (WES7)
– New Windows Embedded Standard Configuration (WES2009)
You can also choose the preceding options from the
3
In the
Configurations
and provide the corresponding values in the
For more information, see Configuration Details.
4
After providing the
name for the configuration file.
The path where the file is saved is dependent on the option you choose in
step 1 and the protocol you have chosen for the file transfer.
If you are using the Repository Server for automatic upgrades, then the
default folder locations are:
tab, check the options that you need to configure
Details
Configuration
details, click the Save menu and enter a
New
pane.
menu.
–
For FTP
• C:\inetpub\ftproot\Wyse\WES\WESConfig.xml
• C:\inetpub\ftproot\Wyse\WES7\WES7Config.xml
• C:\inetpub\ftproot\Wyse\WE8S\WE8SConfig.xml
–
For HTTP/H TTP S
• C:\inetpub\ftproot\Wyse\WES\WESConfig.xml
• C:\inetpub\ftproot\Wyse\WES7\WES7Config.xml
• C:\inetpub\ftproot\Wyse\WE8S\WE8SConfig.xml
Using the Dell Wyse Configuration Manager (WCM) GUI Application 41
:
:
Page 42

NOTE: The required names for each of the configuration files for each
platform should be WE8S - WE8SConfig.xml, WES7 - WES7Config.xml, and
WES2009 - WES2009Config.xml respectively. If the thin client system is a
domain user, then the name of the configuration file should be
administrator.xml to enable the domain user client systems to download the
configurations.
If you are using the WCM Client to import the files, then you can save the
configuration files in a local or remote folder location that is easily
accessible by the thin clients.
Editing Existing Configuration Files
To edit an existing configuration file:
1
Launch the WCM Application GUI and click the
Configuration
menu to open an existing configuration file.
2
Navigate to the location to select your configuration file. For more
information on the default location, see step 4 in Creating New
Configuration Files.
3
Modify the configuration details and click the
You can choose to save the file with the same name or with a different
name.
option in the Details pane. You can also click the
Open an Existing
Save
menu to save the file.
Open
Configuration Details
You need to configure the various configuration areas to create or modify the
configuration files to be deployed on the thin client systems.
The Configurations tab on the WCM Application GUI displays the
configuration areas with the corresponding details on the Details pane. The
configuration areas are broadly classified as:
• Connections
• Device Configuration
• OS Configuration
42 Using the Dell Wyse Configuration Manager (WCM) GUI Application
Page 43

To enter configuration details:
1
Select the configuration area in the
values in the
Details
pane for the selected area.
When you select any of the details in the
Configurations
Details
pane, the corresponding
tab, and enter the
description is displayed at the bottom of the screen.
2
After you enter the values for the details, ensure that you click
Changes
3
Click
NOTE: If you use a server environment (FTP, HTTP, or HTTPS) and intend to create
configuration files that thin clients can access automatically to update themselves,
ensure to name your file WESConfig.xml for WES2009, or WES7Config.xml for
WES7/WES7p, or WE8SConfig.xml for WE8S and place the file into the correct
folder according to the protocol you use. If the thin client system is a domain user,
then the name of the configuration file should be administrator.xml to enable the
domain user client systems to download the configurations.
to save your changes.
Discard Changes
to reset the values back to the defaults.
Apply
Connections
The Connections area enables you to set the configurations for the different
types of connections that the thin client can use to connect to the servers.
This area consists of:
•
RDP
— to configure the remote desktop protocol settings to connect to
any remote computer.
•
VMware View
VMware View Connection Server.
•
Citrix
— to configure the Citrix client to connect to the Citrix server.
•
vWorkspace
vWorkspace server in your environment.
— to configure the VMware View client to connect to the
— to configure the vWorkspace to connect to any Quest
RDP
The RDP settings are grouped under Basic Settings, Display , Local Resources,
Other RDP Settings, and Unrecognized Settings.
Using the Dell Wyse Configuration Manager (WCM) GUI Application 43
Page 44

Table 3-2. RDP Details
RDP Setting Description Expected Value
Basic Settings
Autostart Starts the RDP connection
automatically when you log
in to the thin client.
Connection Name Name of the Desktop
shortcut for the connection.
This is mandatory.
Domain Name Name of the domain to
which the thin client
connects. This is optional.
Host Name or IP
Address
User Name User name to be used for
Password Password to be used for
Single Sign On Enables single sign-on for
Display
Display Connection Bar Display a connection bar at
Multi-Monitor Support Enable multiple-monitor
RDP Window Screen
Size
Host name or the IP address
of the remote computer. This
is optional.
connecting to the RDP
session. This is optional.
connecting to the RDP
session. This is optional.
domain joined devices. You
can use this feature to
connect such devices using
RDP, VMware View or Citrix.
the top of the screen in the
full-screen mode.
support for the connection.
Size of the RDP screen on
the host system.
True or False.
Enter any name here.
Enter the domain name.
Enter the host name or the
IP address of the remote
computer.
Enter a user name.
Enter the password.
True or False.
True or False.
True or False.
Select an option from the
drop-down list.
44 Using the Dell Wyse Configuration Manager (WCM) GUI Application
Page 45

Table 3-2. RDP Details
RDP Setting Description Expected Value
Screen Color Depth (in
bits)
Screen Mode Ty pe The remote connection
Local Resources
Redirect Clipboard Enables the local clipboard
Redirect COM Ports Enables the local COM ports
Redirect DirectX Determines whether the
Redirect Drives Enables the local drives of
Redirect POS Devices Enables the Point of Service
Redirect Printer Enables the printer attached
(continued)
The color depth and quality
of the connection.
window mode.
on the thin client device to
be used in the remote
connection.
to be used in the remote
connection.
DirectX on the client system
is redirected and available in
the remote session when you
connect to a remote
computer by using the
Remote Desktop Connection
(RDC).
the thin client device to be
used in the remote
connection.
(POS) devices such as bar
code scanners or magnetic
readers that are attached to
the thin client device, to be
used in the remote
connection.
to the thin client device to be
used in the remote
connection.
Select an option from the
drop-down list.
Select an option from the
drop-down list.
True or False.
True or False.
True or False.
True or False.
True or False.
True or False.
Using the Dell Wyse Configuration Manager (WCM) GUI Application 45
Page 46

Table 3-2. RDP Details
RDP Setting Description Expected Value
Redirect Smart Card Enables the smart cards
Other RDP Settings Allows you to set up the
Unrecognized Settings If you have created specific
(continued)
attached to the local device
to be used in the remote
connection.
following details:
• Local and Program –
includes remote audio and
keyboard settings,
programs that start up on
connection, prompt for
credentials, negotiate
security layer, enable
compression, and enable
video playback options
• Experience – includes
performance options and
other desktop features to
be enabled.
• Advanced – includes server
details and remote desktop
gateway settings.
configuration settings in a
reference thin client system
and exported the
configuration file to the
Repository Server, and you
open that configuration file,
the Application GUI displays
the settings as unrecognized
settings.
True or False.
Click Apply Changes to
save the changes.
The Application GUI
preserves the original
settings without any
changes when you save the
configuration file.
46 Using the Dell Wyse Configuration Manager (WCM) GUI Application
Page 47

VMware View
The VMware View details are grouped under Basic Settings and Advanced
Settings.
Table 3-3. VMware View Details
VMware View Setting Description Expected Value
Basic Settings
AutoStart Starts the connection
automatically when you log
in to the thin client.
Desktop Name The desktop pool name in
the View Connection Server.
This is optional.
Display View Bar En ab le or disable the display
of the VMware View menu
bar in full-screen mode. This
is optional.
Server URL The V iew Connection Serv er
hostname or IP address. This
is required.
Domain The domain where the View
Connection Server is located.
This is optional.
User Name Log in name of the user for
the View Connection Server.
This is optional.
Password Password of the log in user
for the View Connection
Server. This is optional.
Advanced Settings
Auto Connect This re-establishes the
connection to the View
Connection Server. This is
optional.
True or False.
Enter the name.
True or False.
Enter the server URL or
the IP address.
Enter the domain name
Enter the user name.
Enter the password.
True or False.
Using the Dell Wyse Configuration Manager (WCM) GUI Application 47
Page 48

Table 3-3. VMware View Details
VMware View Setting Description Expected Value
Broker The hostname or the IP
Broker History The alternate or previously
Desktop Protocol The protocol used by the
Login as Current User Enable log in to the View
Screen Size The screen size of the View
SSL Configuration Determines how the client
(continued)
address of the View
Connection Broker. This is
optional.
used View Connection
Broker hostname or IP
address. This is optional.
VMware View client for the
connection.
Connection Server with the
Windows log in credentials
of the thin client device. This
now enables the single signon feature and you can use
this feature to connect to
domain joined devices usin g
RDP, VMware View or Citrix.
Connection Server window.
This is optional.
connects if it cannot verify a
secure connection to the
server. A secure connection
requires that the server URL
begins with https:// and a
certificate on the client.
Enter the hostname or IP
address.
Enter the previously used
hostname or IP address.
Select an option from the
drop-down list.
True or False.
Select an option from the
drop-down list.
Select an option from the
drop-down list.
48 Using the Dell Wyse Configuration Manager (WCM) GUI Application
Page 49

Citrix
The Citrix client details are grouped under Basic Settings and Advanced
Settings.
Table 3-4. Citrix Client Details
Citrix Setting Description Expected Value
Basic Settings
Autostart Automatically starts the
connection when you log in to
the thin client.
Citrix Server The host name or the IP
address of the Citrix server.
This is mandatory.
Domain Name The name of the domain
where the Citrix server is
hosted. This is optional.
User Name The user name to connect to
the Citrix session. This is
optional.
Password The password to connect to
the Citrix session. This is
optional.
Launch Application The default application to be
launched after logging in.
This is optional.
Published Server Type The Citrix server type that is
used for appliance mode
connections. This is optional.
Single Sign-on Enables single sign-on for
domain joined devices. You
can use this feature to
connect such devices using
RDP, VMware View or Citrix.
Application Display
True or False.
Enter the hostname or IP
address.
Enter the domain name.
Enter the user name.
Enter the password.
Enter the name of the
application.
Select an option from
the drop-down list.
True or False.
Using the Dell Wyse Configuration Manager (WCM) GUI Application 49
Page 50

Table 3-4. Citrix Client Details
Citrix Setting Description Expected Value
Desktop Display Displays the Citrix
Desktop Folder Name The folder name on the
Start Menu Display Enables the start menu
Start Menu Display
Folder
System Tray Display Displays the Citrix
Flash Player Redirection Settings
Use Flash Remoting Enables HDX MediaStream
Enable Server Side
Content Fetching
Use Server HTTP Cookies Enables synchronization of
URL Rewriting Rules for
Client-side Content
Fetching
(continued)
connection on your desktop.
This is optional.
desktop. This is optional.
display.
The folder on the Windows
start menu where the Citrix
connection is added.
connection icon in the system
tray.
Flash redirection on the thin
clients.
Enabling this setting causes
the Flash content to be
downloaded to the server and
then transmitted to the thin
clients.
the client-side HTTP cookies
with the server-side to
download HTTP cookies from
the server.
Rules to redirect the user
devices to other servers for
client-side content fetching.
True or False.
Enter a folder name.
True or False.
Enter the folder location.
True or False.
Select an option from
the drop-down list.
Select an option from
the drop-down list.
Enable or Disable.
Click to launch the Rule
Window to enter the
URL rewriting rules.
After you enter the rules,
they are separated by a
semi colon and the rule
name and description are
separated by a colon.
50 Using the Dell Wyse Configuration Manager (WCM) GUI Application
Page 51

Table 3-4. Citrix Client Details
Citrix Setting Description Expected Value
Server Options
Logon Methods The logon method to conne ct
Session Options
Audio Quality The audio quality for the
Color Depth The color quality of the
Display Dimensions The display resolution of the
Advanced Settings
Automatic Reconnection
at Logon
Logon - Connect to
Active and Disconnected
Sessions
(continued)
to the Citrix Server. This is
optional.
connection that controls the
multimedia bandwidth. This
is optional.
display for the connection.
This is optional.
remote connection. This is
optional.
Automatically reconnect to
existing sessions upon log on.
Connect to active and
disconnected sessions upon
logon if set to True.
Connect to only disconnected
sessions upon logon if set to
False.
Select an option from
the drop-down list.
The Default Logon
Method option uses the
method configured on
the Citrix server.
The Prompt User option
prompts you to enter the
log in credentials to
connect to the Citrix
server.
Select an option from
the drop-down list.
Select an option from
the drop-down list.
Select an option from
the drop-down list.
True or False.
True or False.
Using the Dell Wyse Configuration Manager (WCM) GUI Application 51
Page 52

Table 3-4. Citrix Client Details
Citrix Setting Description Expected Value
Menu - Connect to Active
and Disconnected
Sessions
Reconnect from Menu Reconnect to existing sessions
User Key Combos
Passthrough
(continued)
Connect to active and
disconnected sessions upon
logon if set to True and
provide the menu.
from the client menu.
To apply the Windows user
key combinations of a window.
True or False.
True or False.
Select an option from
the drop-down list.
vWorkspace
The vWorkspace details are listed under Basic Settings.
Table 3-5. vWorkspace Details
vWorkspace Setting Description Expected Value
Basic Settings
Autostart Starts the vWorkspace
connection automatically
when you log in to the thin
client.
Configuration File
Location
Location of the Quest
vWorkspace configuration
XML file. It could be on the
local system or a remote
system.
True or False.
NOTE: If you set this value
to True, you cannot set the
Appliance mode on for
vWorkspace or any of the
other options.
Local or Remote.
52 Using the Dell Wyse Configuration Manager (WCM) GUI Application
Page 53

Table 3-5. vWorkspace Details
vWorkspace Setting Description Expected Value
Connection(s) Full path or the URL where
(continued)
the Quest vWorkspace
configuration file is located.
If you select Local, then
enter the location of the
vWorkspace configuration
XML file on the local
machine
If you select Remote, then
enter the complete URL(s)
location of the Quest
vWorkspace configuration
XML file location on the
remote vWorkspace server.
NOTE: You can enter
multiple Remote XML file
locations but only one Local
location.
NOTE: You can use the existing Quest vW orkspace configuration XML file or c reate
it using the Quest vWorkspace AppPortal installed on any system.
Device Configuration
The Device Configuration area enables you to set the configurations for the
hardware connected to or located on the thin client devices.
This area includes:
•
Display
•
Mouse
•
Keyboard
Share - New Share
•
share locations.
•
Timezone
•
Ethernet
Wireless Profile
•
— to configure the display settings.
— to configure the mouse settings.
— to configure the keyboard settings.
— to configure the share drives and create new file
— to configure the timezone.
— to configure the ethernet settings.
— to configure wireless profiles.
Using the Dell Wyse Configuration Manager (WCM) GUI Application 53
Page 54

•
Audio
— to configure audio settings.
•
Power
— to configure power settings.
Display
Table 3-6. Display Setting Details
Display Setting Name Description Expected Value
Multi-Monitor Settings
Multiple Displays If the device has multiple
display units attached to it,
you can configure the
options.
Desktop Color Settings
Desktop Color The background color of the
thin client’s local desktop.
Desktop Wallpaper Settings
Desktop Wallpaper Path and name of the
wallpaper image file.
Select an option from the
drop-down list.
Click the arrow to enter the
custom, web, or system color
from the color bars.
Navigate to the location of the
image file and enter it.
NOTE: WES2009 thin client
systems support only .bmp type
images for their desktop
background and not .jpg type
images.
Desktop Wallpaper
Layout
Monitor1 and Monitor2 Display Settings
Layout of the desktop
wallpaper.
Select an option from the
drop-down list.
NOTE: Monitor2 display settings are applicable only if there are multiple monitors
attached to the device.
Default Display
Configuration
Color Depth (bits) Quality of the display. Select an option from the
The default configuration
for resolution, refresh rate,
and color depth.
True or False.
drop-down list.
54 Using the Dell Wyse Configuration Manager (WCM) GUI Application
Page 55

Table 3-6. Display Setting Details
Display Setting Name Description Expected Value
Display Orientation Orientation of the thin
client system’s display.
Display Position Position of the display on
the first monitor relative to
display on the other
monitor.
Display Resolution Screen resolutio n of the
display.
Is Primary Display If the monitor is used as a
primary display.
Refresh Rate (Hz) Refresh rate of the display. Select an option from the
(continued)
Select from Portrait or
Landscape.
Select an option from the
drop-down list.
Select an option from the
drop-down list.
True or False.
drop-down list.
Mouse
Table 3-7. Mouse Setting Details
Mouse Setting Name Description Expected Value
Basic Mouse Settings
Click Lock Enables you to highlight or
drag without holding down
the mouse button.
Click Lock Time The duration for which the
mouse or trackball button
should be held down before
the click is locked.
Double Click Speed The speed with which you
double click the mouse.
Right Click as Primary Set the right click as the
primary option.
Mouse Pointer Options
True or False.
Click the arrow and adjust the
timing on the scale provided.
Click the arrow and adjust the
speed on the scale provided.
True or False.
Using the Dell Wyse Configuration Manager (WCM) GUI Application 55
Page 56

Table 3-7. Mouse Setting Details
Mouse Setting Name Description Expected Value
Find Mouse Pointer To show the location of the
mouse pointer when the
CTRL key is pressed.
Hide Mouse Pointer To hide the location of the
mouse pointer when the
CTRL key is pressed.
Mouse Pointer Speed The speed of the mouse
pointer.
Pointer Trail Length The length of the pointer
trail.
Snap Mouse Pointer To automatically move the
mouse pointer to the default
button in a dialog box.
Mouse Vertical Scrolling
Scroll Lines The number of lines scrolled
at a time using vetical
scrolling.
(continued)
True or False.
True or False.
Click the arrow and adjust the
speed on the scale provided.
Click the arrow and adjust the
length of the trailer on the
scale provided.
True or False.
Click the arrow and adjust the
number on the scale provided.
Keyboard
Table 3-8. Keyboard Setting Details
Keyboard Setting Name Description Expected Value
Keyboard Options
Blink Rate The cursor blink rate. Click the down arrow and
adjust the blink rate on the
scale provided.
Input Languages The input language for the
keyboard.
Keyboard Layout The layout and language of
the keyboard according to
the language selected.
Select an option from the
drop-down list.
Select an option from the
drop-down list. This should be
the same as the input
language you have selected.
56 Using the Dell Wyse Configuration Manager (WCM) GUI Application
Page 57

Table 3-8. Keyboard Setting Details
Keyboard Setting Name Description Expected Value
Keyboard Preferences Enables you to set keyboard
hotkeys.
Keyboard Repeat
Delay
Keyboard Repeat Rate The rate at which a keyboar d
Menu Access Allows you to enable menu
The duration for which a key
can be pressed without the
letter being repeated as an
input.
character repeats.
access keys on the keyboard.
(continued)
True or False.
Select an option from the
drop-down list.
Click the down arrow and
adjust the repeat rate on the
scale provided.
True or False.
Share - New Share
Table 3-9. New Share Details
New Share Setting
Name
Share
Share Name Shared drive alphabet. For
Remote Path The path of the shared drive
User Name User name to connect to the
Password Passw ord to connect to the
Using the Dell Wyse Configuration Manager (WCM) GUI Application 57
Description Expected Value
Enter a drive letter suitable to
example, Y or S.
on the server. For example,
\\Server\Share if it is the
same domain. If the server is
on a different domain, then
enter the path as
Domain\User Name.
share.
share.
your network.
Enter the complete path of
the shared drive.
Enter the user name.
Enter the password.
Page 58

Timezone
Table 3-10. Timezone Details
Timezone Setting Name Description Expected Value
Timezone Options
Timezone Name Timezone of the thin client
device.
Bias The difference in minutes
between Co-ordinated
Universal Time (UTC) and
Local Time.
Daylight Bias The difference in minutes
that the clock changes at the
daylight saving time start
date.
Standard Bias The difference in minutes
that the time zone is offset
from the UTC.
Supports Daylight
Savings
Time Server The server that reads the
Timezone Keyname The name of the selec ted
Disable Dynamic
Daylight Time
Specifies if daylight savings
is supported by the selected
timezone.
actual time from a reference
clock and distributes this
information to the thin
client devices. The time
server may be a local
network time server or an
internet time server.
timezone.
T o disable daylight savings if
the selected timezone
supports daylight savings.
Select a timezone from the
drop-down list.
Automatically populated after
you select the timezone.
Automatically populated after
you select the timezone.
Automatically populated after
you select the timezone.
Automatically populated after
you select the timezone.
Enter the name of the time
server.
Automatically populated after
you select the timezone.
True or False.
58 Using the Dell Wyse Configuration Manager (WCM) GUI Application
Page 59

Ethernet
Table 3-11. Ethernet Details
Ethernet Setting Name Description Expected Value
DHCP Settings
Enable DHCP T o assign an IP address from
a DHCP server.
If set to False, you must
enter a static IP address.
Static IP Settings
IP Address A specific or static IP
address for the thin client
device. This is mandatory if
you set the Enable DHCP
to False.
Gateway Address The IP address of the
routing gateway for the thin
client device.
Subnet Address The subnet address for the
static IP address of the thin
client device.
DNS Addresses
DNS1 Address IP address of the primary
DNS server of the thin client
device.
DNS2 Address IP address of the secondary
DNS server of the thin client
device.
WINS Addresses
WINS1 Address IP address of the primary
WINS server of the thin
client device.
WINS2 Address IP address of the secondary
WINS server of the thin
client device.
True or False.
Enter an IP address.
Enter the IP address.
Enter the subnet address.
Enter the IP of the primary
DNS server.
Enter the IP of the secondary
DNS server.
Enter the IP of the primary
WINS server.
Enter the IP of the secondary
WINS server.
Using the Dell Wyse Configuration Manager (WCM) GUI Application 59
Page 60

Wireless Profile
T able 3-12. Profile Details
Profile Setting Name Description Expected Value
General Settings
Make Current Profile
Active
Radio State To change the WiFi radio
WLAN Profile
Connect to a Hidden
Network
Connection Mode To connect automatically or
Profile Name Name of the wireless profile. Enter a name for the profile.
SSID Name The Service Set Identifier of
WLAN Connection
Type
Security
Authentication Authentication method
Encryption Data encryption method
Key Phrase Network password or key.
To set the current profile
active.
state.
T o connect to a network that
does not broadcast its SSID.
let the user connect
manually.
the WiFi Network.
The WLAN connection
type.
required for connecting to
the WiFi network.
used to send the data over
the WiFi network.
This is required if encryption
and authentication are
enabled.
True or False.
On or Off.
True or False.
Auto or Manual.
Enter the SSID name.
Enter whether it is an
independent/ad-hoc WiFi
network (IBSS) or multiple
WiFi AP’s working as a single
network. (ESS).
Select an option from the
drop-down list.
Select an option from the
drop-down list.
Enter a value for the key.
60 Using the Dell Wyse Configuration Manager (WCM) GUI Application
Page 61

Table 3-12. Profile Details
Profile Setting Name Description Expected Value
Key Type The element that indicates
Shared Key Encrypted The protected element that
Use IEEE 802.1X This element indicates
(continued)
whether the shared key is a
network key or a pass phrase.
indicates whether a shared
key is encrypted.
whether 802.1X
authentication is used.
Network Key or Pass Phrase.
T rue or F alse. Set this property
to True only if you are going to
enter the password.
True or False.
Audio
Table 3-13. Audio Details
Audio Setting Name Description Expected Value
Audio Settings
Mute MIC T o mute the microphone on
the thin client device.
Mute Speakers To mute the speakers on the
thin client device.
Set MIC Volume To set the microphone
volume.
Set Speaker Volume To set the speaker volume. Set the volume on the scale
True or False.
True or False.
Set the volume on the scale
provided.
provided.
Using the Dell Wyse Configuration Manager (WCM) GUI Application 61
Page 62

Power
Table 3-14. Power Details
Power Setting Name Description Expected Value
Power Settings
Device Power Plan The general power plan of
the thin client device.
Power Settings on Ba ttery
Device Sleep Plan
System Standby for
WES2009 systems.
Dim Display
Turn off Hard Drives
for WES2009 systems.
Turn off Display The time limit after which
Power Settings when Plugged in
Device Sleep Plan
System Standby for
WES2009 systems.
Dim Display
Turn off Hard Drives
for WES2009 systems.
Turn off Display The time limit after which
The time limit after which
the device goes in to sleep
mode.
The time limit after which
the display is dimmed in
order to save the battery.
the display is turned off in
order to save the battery.
The time limit after which
the device goes in to sleep
mode.
The time limit after which
the display is dimmed when
the thin client device is
plugged in to the power
outlet.
the display is turned off
when the thin client device
is plugged in to the power
outlet.
Select from Balanced or
Power Saver.
Select an option from the
drop-down list.
Select an option from the
drop-down list.
Select an option from the
drop-down list.
Select an option from the
drop-down list.
Select an option from the
drop-down list.
Select an option from the
drop-down list.
62 Using the Dell Wyse Configuration Manager (WCM) GUI Application
Page 63

OS Configuration
The OS Configuration area enables you to set the configurations for various
settings on the operating system that includes:
•
Browser, F irewall, and Aero
settings.
•
Clocks
: to configure the clock settings. This is not applicable to WES2009
systems.
•
Other Settings
: to configure the
Browser, Firewall, and Aero
Table 3-15. Browser, Firewall, and Aero Details
Setting Name Description Expected Value
Internet Explorer Proxy Settings
Proxy The proxy bypass server. True or False.
Host Name or IP
Address
Pro xy Aut o Config The proxy auto
Pro xy Aut o Detect To automatically detect the
Pro xy Server Po rt The proxy bypass server
Internet Explorer Settings
The host name or IP address
of the proxy bypass server.
configuration file to
configure Internet Explorer.
proxy bypass server.
port.
: to configure browser , firewall, and aero r elated
Appliance Mode
settings.
If set to True, you need to
provide the details of the
Proxy Bypass Server.
Enter the IP address if you
have set the Proxy to True.
Enter the file name.
True or False.
Automatically sets to True if
Proxy is set to True and to
False if Proxy is set to False.
Defaults to 80. Leave the
default value or change the
port number as configured.
Using the Dell Wyse Configuration Manager (WCM) GUI Application 63
Page 64

Table 3-15. Browser, Firewall, and Aero Details
Setting Name Description Expected Value
AutoStart To automatically start
Internet Explorer in fullscreen mode.
Home Page The home page for the
Internet Explorer.
IE Favourites and
Trusted Sites
The list of all the favourite
and trusted Sites.
True or False.
NOTE: If you set this to True,
then you cannot set the
Appliance Mode for Internet
Explorer.
Enter the URL or the address
of the home page. Fo r
example, www.dellwyse.com.
Click the button to launch the
IE Favourites and Trusted
Sites window.
Click Add Row to add a record
to the grid.
Enter the details of the
favourites, trusted sites, and
shortcuts.
Click Apply and Exit.
NOTE: If you check Shortcut
for a particular URL, a shortcut
is created on the thin client
desktop.
Internet Zone Security
Level
Local Zone Security
Level
Restricted Zone
Security Level
Trusted Zone Security
Level
The security setting for
Internet Explorer in internet
zone.
The security setting for
Internet Explorer in the
local or intranet zone.
The security setting for
Internet Explorer in
restricted sites.
The security setting for
Internet Explorer in trusted
sites.
Select an option from the
drop-down list.
Select an option from the
drop-down list.
Select an option from the
drop-down list.
Select and option from the
drop-down list.
64 Using the Dell Wyse Configuration Manager (WCM) GUI Application
Page 65

Clocks
Table 3-16. Clock Details
Clock Setting Name Description Expected Value
Clock1 Settings
Clock To enable or disable the
clock.
Display Name The display name for the
clock.
Timezone Name The name of the timezone
to which the clock is to be
set.
Clock2 Settings
True or False.
Enter a display name.
Select an option from the
drop-down list.
NOTE: This option is not available for WES2009.
Clock To enable or disable the
seond clock.
Display Name The display name for the
seond clock.
Timezone Name The name of the timezone
to which the second clock is
to be set.
True or False.
Enter a display name.
Select an option from the
drop-down list.
Other Settings
You can enter the Appliance Mode settings in this area. Appliance mode
allows a supported thin client to be used as a dedicated device for a specific
application. You can log in to the device to be immediately presented with
your remote client log in, a local full-screen, Internet Explorer, or are logged
into a remote session. Appliance mode can be especially beneficial for kiosks,
digital displays, advertising displays, and dedicated usage.
NOTE: Appliance mode requires that WCM settings are not applied in Append
mode. To disable Append mode, open the Options menu and clear/uncheck Append
Settings.
Using the Dell Wyse Configuration Manager (WCM) GUI Application 65
Page 66

Table 3-17. Other Setting Details
Setting Name Description Expected Value
Appliance Mode Settings
Appliance Mode To turn the thin client
device into a dedicated
device for a remote
connection.
Exit from Appliance
Mode
Exit Key (+CTRL
+Shift)
Log Out Appliance
Mode
Restart Appliance
Mode
Shut Down Appliance
Mode
Generic Appliance Mode : You can configure the appliance mode for any specific
application of your choice.
To shut down from
appliance mode.
The key used along with
control and shift keys to ex it
from the appliance mode.
To log out from the
appliance mode.
To restart appliance mode. True or False.
To shut down the appliance
mode.
Off or any of the values from
the drop-down list.
NOTE: If you have set the
VMware View, Ctrix,
vWorkspace, RDP, or Internet
Explorer Autostart feature to
True, then you must set it to
False before selecting any
option from the drop-down list.
True or False.
Enter a key value from A-Z or
0-9.
True or False.
True or False.
66 Using the Dell Wyse Configuration Manager (WCM) GUI Application
Page 67

Table 3-17. Other Setting Details
Setting Name Description Expected Value
Appliance Command
Line
Appliance Mode
Name
Configuration Description
Description General description for the
The command line
parameter to be run to
launch the application in
appliance mode.
The name for the appliance
mode application.
configuration file.
(continued)
Enter the command line
parameter to run the
application of your choice. F or
example, if you want to run
Notepad or Calculator in the
appliance mode, enter
Notepad.exe or Calc.exe. If
you want to run a specific
application enter the
complete path from where the
application executable is to be
launched.
Enter a name for the
application.
Enter a general description for
the configuration file.
Appliance Mode is supported for:
• VMware View connections
• Citrix XenApp, XenDesktop, and Secure Gateway connections
• One or more RDP/RDS/Terminal Server connections
• Internet Explorer
• Quest vWorkspace
• Any locally installed application on the thin client. (Generic Appliance
Mode).
NOTE: Appliance Mode for Internet Explorer does not support Citrix sessions
launched from Internet Explorer.
An Exit button is now available for all Appliance Mode applications. This
allows you to exit, log out, shut down, or restart from the client while in
Appliance Mode.
Using the Dell Wyse Configuration Manager (WCM) GUI Application 67
Page 68

The Exit button is supported for Citrix XenDesktop, and VMware Horizon
View Appliance Mode applications with some limitations. You can also
configure the exit buttons and shortcuts as per user requirements.
Appliance Mode Workflow on Thin Client Devices
1
Boot the operating system on the thin client system.
2
Log in to the system.
3
The WCM automatically downloads the WCM XML configuration file
from the FTP or IIS Web Server or uses a locally stored file on the thin
client.
4
WCM applies the XML file settings including the Appliance mode.
5
Use the thin client system with the configured Appliance mode session.
6
Log off from the system or session.
After you log out from the system or session, you can again log in to the
system at a later point. In Appliance mode, you only need to press the
Ctrl-Alt-Del
keys to shut down the current session or restart the system
again.
Disabling or Stopping the Appliance Mode
You need to log in as Administrator to disable or log out of the Appliance
mode by using one of the following options:
•
Server deployed WCM XML files
WCM Application OS Configuration Other Settings
— Change the WCM XML file from
on the
deployment server.
•
By using the thin client
a
Hold down the
b Log in as an Administrator and while the WCM Appliance mode is
— On the thin client:
Shift
key while logging off the server.
downloading or applying the XML file, select the WCM splash
screen with your mouse and press the Esc key.
This disables Appliance mode in that session. You can then disable the
Write-Filter
and make the necessary changes.
68 Using the Dell Wyse Configuration Manager (WCM) GUI Application
Page 69

Agent Settings
You can use this option in the Options menu to configure your default client
agent settings. These settings are required if you are using Dell Wyse Device
Manager (WDM) to push the configuration files to your thin clients.
NOTE: You must configure the WDM Server if you want to use it to push the
configuration files to the thin clients. For more information, see
Wyse Device Manager (WDM) Se rver
To configure Agent Settings:
1
Log in to the Repository Server as Administrator and launch the WCM
Application GUI.
2
Select
Options Agent Settings
3
In the
Agent Settings
–
Protocol
–
Server IP
–Port —
–
Path
– User Name —
–Password —
4
Select one or more of the following options:
–
Import Configuration on Every Boot
configuration file everytime the thin client system reboots.
–
Use WDM
configuration file to the thin client.
–
Enable Balloon Tips
of download on the thin clients.
5
Click
— Select an option from the drop-down box.
— Enter the IP address of the Repository Server.
This is entered by default based on the protocol you choose.
— Enter the path of the configuration file. This is optional.
Apply
to save your settings.
dialog box, enter the following:
Enter the server username. This is optional.
Enter the server password. This is optional.
— if you want to use the WDM server to push the
— if you want a balloon tip to indicate the status
.
on the menu.
— if you want to download the
Configuring the Dell
Using the Dell Wyse Configuration Manager (WCM) GUI Application 69
Page 70

Using Your Configuration Files
After you create the configuration file, you must store the file in the location
you need, and then complete the procedures required to apply the
configurations to the thin clients systems.
You can deploy WCM configuration files to your thin clients:
• Automatically — For more information, see Setting Up Automatic
Configuration.
• Manually — For more information, see Setting Up Manual Configuration.
NOTE: Ensure that the File Based Write Filter of the thin client is enabled. The
WCM Client will not download and apply settings if the File Based Write Filter is
disabled.
Setting Up Automatic Configuration
For the thin client systems to access configuration files from a server and
update themselves automatically:
1
Place your configuration files on the server. On your server, you must set
up the correct folder. For more information on setting up the folder
structure, see step 8 under Configuring the Repository Server.
2
Direct your thin client systems to the server using the DNS SRV, DNS
Hostname, or DHCP Options. F or more information, see Discovery
Settings for the WCM Server and Configuring the WCM Thin Client
Systems.
Your thin client systems check at each boot up to see if updates are
available on your predefined server.
3
Reboot or log out from your thin client systems.
A system reboot generates the
system to download the configuration file from the repository server. If
updates are available, the updates are automatically installed. F or e xample,
new connections available to a user on the configuration file.
70 Using the Dell Wyse Configuration Manager (WCM) GUI Application
Discovery.ini
file, which redirects the
Page 71

Setting Up Manual Configuration
For the thin client systems to successfully access configuration files and
update themselves manually using the Import feature of the WCM Client on
the thin client:
1
Place your configuration files in a local or remote location that is accessible
by the thin client.
2
Import the configuration file by using the Import feature on the WCM
Client. For more information, see Importing Thin Client Configurations.
Using the Dell Wyse Configuration Manager (WCM) GUI Application 71
Page 72

72 Using the Dell Wyse Configuration Manager (WCM) GUI Application
Page 73

4
Using the Dell Wyse Configuration Manager (WCM) Client
This chapter discusses how to use the WCM Client that is installed on the
thin client systems. You can manually import configuration files, export
configuration files, view configuration history, and configure the DHCP
settings on the client system.
Launching the WCM Client
You need to log in to the thin client system as an Administrator to launch the
WCM Client.
The WCM Client does not have any shortcuts on the thin client desktop.
To launch the WCM Client, navigate to the Control Panel from the Start
menu and click the WCM icon.
The top panel of the application displays the details of the configuration file
that is currently being applied to the thin client system .
Importing Thin Client Configurations
To manually import the configuration file:
1
Launch the WCM Client from the control panel.
2
Click
Import Configuration
3
Select one of the following options:
–
Local
— if you have saved the configuration files locally on the thin
client system, a network drive, or on a USB drive and want to
download the configuration files . Browse to the location, select the
file, and click
–
Remote
server in a remote location. Follow the steps given below:
• Select the
• Enter the
Open
— if you have saved the configuration files on the repository
Protocol
Server IP
. The fields are displayed on the right panel.
.
from the drop-down list.
address of the repository server.
Using the Dell Wyse Configuration Manager (WCM) Client
Page 74

• The P ort is displayed by default. The default ports for FTP, HTTP,
and HTTPS are 21, 80, and 443 respectively.
• Enter the folder
Path
where the configuration file is saved in the
remote location if you have not used the default path.
• Enter the
NOTE: If you have been deploying your configuration files locally and
the Protocol is set to Local in the Agent Settings dialog box of the WCM
Application GUI and Import Configuration is set to Local in the Import
Configuration dialog box of the WCM Client, you can switch back to a remote
download of the configuration files. Y ou must set the Protocol to FTP, HTTP, or
HTTPS using the Agent Settings dialog box of the WCM Application GUI. You
must also ensure that you set the Import Configuration to Remote in the Import
Configuration dialog box of the WCM Client. You cannot switch back to a
remote download using only the Agent Settings dialog box of the WCM
Application GUI.
4
If you want the configuration file to be imported everytime the thin client
system boots, check the
NOTE: If the Import configuration on every boot option is selected, the WCM
remote repository is discovered in the following order of preference DNSSRV, DNS-Host, DHCP Options, Registry Settings in the remote settings. If
none of the above are configured, then the Import configuration on every boot
option is not implemented.
5
Click
Save Settings
6
Click
Import
client system immediately.
Username
and
Password
to access the Repository server .
Import configuration on every boot
option.
.
to apply the settings in the configuration file to the thin
Fallback Mechanism for Failed Download of Configuration File
If you have configured the DNS-SRV, DNS-Host, DHCP Options, and
Registry Settings in the remote settings, and the configuration file does not
download, then the fallback mechanism for each of the preceding
mechanisms is as follows:
1
For a device specific configuration or for a local user, if the
WE8SConfig.xml, or WES7Config.xml,
download from the remote path, check the configuration history for the
same named latest configuration and apply that file.
74 Using the Dell Wyse Configuration Manager (WCM) Client
or
WESConfig.xml
fails to
Page 75

2
For a domain-joined user, if the
the remote path, download the
or
WESConfig.xml
If that too fails to download, check the configuration history for the
WE8SConfig.xml, or WES7Config.xml,
configuration and apply that file.
3
If the
xml
fallback for each discovery method also fails, then the Factory
Default file is applied.
from the same remote path and apply that file.
administrator.xml
WE8SConfig.xml, or WES7Config.xml,
or
fails to download from
WESConfig.xml
latest
Exporting Thin Client Configurations
To export the configurations on a thin client system to a configuration file:
1
Launch the WCM Client from the control panel.
2
Click
Export Configuration
3
Enter the file name with a
WES2009) or
4
Use the
want to save the file (such as a USB drive).
5
Click
Export
client to the configuration file.
TestWES7.xml
Browse
command button to select the local location where you
to export and save the current configurations of the thin
.
.xml
extension. For example,
(for WES7) or
TestWES.xml
TestWES8.xml
(for
(for WE8S).
Using Configuration History
You can use the Configur ation History option to apply a configuration file
that was previously used on the thin client. This option is useful when a new
file did not get applied successfully.
To apply the configuration file:
1
Launch the WCM Client from the control panel.
2
Click
Configuration History
The five most recent and successfully imported configuration files are
displayed.
3
Select the configuration file you want to import from the list.
Using the Dell Wyse Configuration Manager (WCM) Client 75
.
Page 76

4
Click
Import
5
Click
Delete
downloaded the file from a remote server, then it does not delete the file
from the server.
NOTE: You cannot delete the factory default configuration file.
to apply the file to the thin client system immediately.
to delete a configuration file from the list. If you have
Manually Setting Debug Options on a Thin Client
The WCM Debugging dialog box allows you to manually set debug options
on the thin client. Setting the de bug options enables you to troubleshoot
issues with the thin client by reviewing the debug log file that is created if this
option is configured.
To set the debug options:
1
Launch the WCM Client from the control panel.
2
Click
Debug Settings
3
Select the
– File Logging —
–
4
Select the
– Level 1 (Informational) — Includes informational messages only.
– Level 2 (Errors) — Includes informational messages and error
– Level 3 (Debug) — Includes informational messages, error messages,
5
Click
Debug Mode
in the
wcmdebug
WES7
thin clients, or in
Users\Documents\Wyse
Verbose
DbgView
messages only.
and debugging messages.
— This option sends debug messages to the Microsoft
utility running locally on the thin client.
Debug Level
OK
to apply the debug settings.
to launch the
from one of the following options:
This is the default option and stores debug messages
file in
C:\Users\Public\Documents on WE8S
on
from one of the following options:
WCM Debugging
C:\Documents and Settings\All
WES2009
thin clients.
window.
and
76 Using the Dell Wyse Configuration Manager (WCM) Client
Page 77

5
Typical Use Case Scenarios
This section describes the typical use case scenarios that can be performed
using the Wyse Configuration Manager (WCM).
Case 1 - Using a Single Configuration for Multiple Thin Client Users
If you have multiple thin client systems with the same operating system
installed on them (WE8S,WES7, or WES2009), you can use a single
configuration to configure all the systems.
To perform this activity:
1
Log in as Administrator into any one of the thin client systems.
2
Ensure that the thin client system has the latest version of WCM Client
installed on it.
3
Configure the thin client using the operating system functions.
4
Launch the WCM Client from the control panel.
5
Click
Export Configuration
location on the repository server. For more information, see Exporting
Thin Client Configurations.
6
Ensure that the other thin client systems are able to connect to the
repository server.
For more information on configuring the repository and the DNS/DHCP
servers, see Configuring the Repository Server and Discovery Settings for
the WCM Server.
to export the configuration file to a remote
The thin client systems can connect to the Repository Server, download
the exported configuration file, and apply the configurations
automatically.
Typical Use Case Scenarios 77
Page 78

Case 2 - Using Multiple Configuration Files for Multiple Thin Client Users
If you have multiple thin client systems with the same operating system
installed on them (WE8S,WES7, or WES2009), you can cre ate multiple use r
specific configuration files and configure other thin clients running the same
operating system.
To perform this activity:
1
Log in as Administrator into the thin client systems.
2
Ensure that the thin client systems have the latest version of WCM Client
installed on them.
3
Configure multiple thin client systems using the Operating System
functions.
4
Use the
configuration files to a remote location on the Repository Server. For more
information, see Exporting Thin Client Configurations.
5
Ensure that you place the configuration files in user specific folders on the
Repository Server.
The other thin clients running WE8S, WES7, WES2009 run the WCM
Client to retrieve and apply user specific configuration files through the
network using their specified user log-in credentials.
Export Configuration
option on the WCM Client to export the
Case 3 - Editing Specific Configuration Files for Thin Client Users
If you have created user specific configuration files for thin client users, then
you can edit specific files and update the configurations as per the request of
the users and enable them to update their systems.
To perform this activity:
1
Log in as Administrator into the specific thin client system where you have
created a user specific configuration file.
2
Change the configuration of the system using the Operating System
functions.
78 Typical Use Case Scenarios
Page 79

3
Use the
changed configuration file to the user specific folder on the Repository
Server.
4
You can then log out and log in to the thin client system where you want
the changes, and retrieve the configuration file from the Repository Server
through the DNS/DHCP connection. For more information on
configuring the Repository and the DNS/DHCP servers, see Configuring
the Repository Server and Discovery Settings for the WCM Server.
Export Configuration
option on the WCM Client to export the
Case 4 - Selecting Specific Configuration Files Using a Thin Client on the Network
If you want to revert to any of the previous configurations for the thin client
system, perform the following steps:
1
Log in as Administrator into the thin client system.
2
Launch the WCM Client on the system.
3
Click
Configuration History
imported configuration files are displayed.
4
Select configuration file you want to import from the list.
5
Click
Import
6
You can check the
Import Configuration
log in to the system.
to apply the file to the thin client system immediately.
Import configuration on every boot
. The five most recent and successfully
option in the
screen to import the configuration everytime you
Case 5 - Applying Specific Configuration Files to a Mobile Thin Client
If you receive a user request to access a user specific configuration file from a
home network, perform the following steps:
1
Log in to the Repository Server as an administrator.
2
Navigate to the user specific folder location to access the configuration
file.
3
Place the file on a HTTP server in a demilitarized zone (DMZ).
Typical Use Case Scenarios 79
Page 80

A DMZ is a computer host or a small network inserted as a neutral zone
between a private network within the company and the public network
outside the company.
4
Instruct the user to log in and connect to the HTTP server through the
home network.
5
When the user logs in, the configuration settings are applied to the mobile
thin client from the HTTP server over the home network.
Case 6 - Applying Configuration Files for New or Different Thin Client Users
If you want to re-configure a thin client for a new or a different user, perform
the following steps:
1
Log in to the Repository Server as administrator and launch the WCM
GUI.
2
Edit the configuration settings in an existing file. For more information,
see Editing Existing Configuration Files.
3
Copy the configuration file to a USB key.
4
Log in as administrator into the thin client system that you want to reconfigure.
5
Launch the WCM Client on the thin client system and click the
Configuration
6
Insert the USB key to the thin client, select
of the configuration file.
7
Click
Import
desired configurations from the local USB key.
option.
Local,
and enter the USB path
to remove all the previous configurations and apply the
Import
80 Typical Use Case Scenarios
Page 81

A
Appendix
Troubleshooting Devices That Cannot Locate Configuration Files
To successfully troubleshoot devices that cannot locate their configuration
files, it is important to understand the DNS-based discovery process used by
the WCM agent on the device.
If you use the repository server to deploy your configuration files and your
thin clients access the configuration files automatically through FTP, HTTP,
or HTTPS, the process by which the configuration files are obtained by the
WCM agent on the thin client is in the following order:
1
DNS Service Lookup
option is implemented.
Lookup
2 DNS Hostname Lookup — Note that this is only if the remote
deployment option is implemented. F or more information, see For more
information, see
3
DHCP Options
Lookup.
4 Configured location where you placed the configuration file, which
could be either of the following:
– Local Location —
.
drive that you set in the Local option of the Import Configuration
screen in the WCM Client.
For more information, see
— Note that this is only if the remote deployment
For more information, see
DNS Service Record Lookup
— For more information, see DHCP Option Tags
such as a C: drive, local network folder, or USB
Importing Thin Client Configurations
DNS Service Record
.
.
–
Remote Location — such as a remote server location that you set in
the Remote option of the Import Configuration screen in the
WCM Client.
For more information, see
Importing Thin Client Configurations
Appendix 81
.
Page 82

5
L oca l Factor y Defau lt Fi les
configuration file are not successfully obtained from DNS, the WCM
agent tries the DHCP Options, and so on.
If there is no location set in the
client, or if the thin client cannot reach these locations, the thin client
uses the factory default
WESConfig.xml
updated to the folder on the thin client.
The local default configuration file location for the WES2009
(WESConfig.xml), WES7 (WES7Config.xml), WE8S (WE8SConfig)
files is
C:\Program Files\Wyse\WCM\Agent
file on the thin client. This is the latest configuration file
— If the values necessary to find the
Import Configuration
WESConfig.xml
, or
WES7Config.xml, or
.
screen on the thin
the
82 Appendix
 Loading...