

Page 1

53-1001809-01
January 31, 2010
Blade and Filler Panel
Replacement Procedure
Supporting PowerConnect B-DCX4-S Backbone, DCX Backbone, and
PowerConnect B-48000 Director
53-1001809-01
*53-1001809-01*
Page 2
Notes, Cautions, and Warnings
NOTE
CAUTION
CAUTION
DANGER
A NOTE indicates important information that helps you make better use of your computer.
See the safety and regulatory information that shipped with your system. For additional regulatory
information, see the Regulatory Compliance Homepage on www.dell.com at the following location:
www.dell.com/regulatory_compliance.
A CAUTION indicates potential damage to hardware or loss of data if instructions are not followed.
A DANGER indicates a potential for property damage, personal injury, or death.
____________________
Information in this document is subject to change without notice.
© 2009 Dell Inc. All rights reserved.
Reproduction of these materials in any manner whatsoever without the written permission of Dell Inc. is strictly forbidden.
Trademarks used in this text: Dell, the DELL logo, Inspiron, Dell Precision, Dimension, OptiPlex, Latitude, PowerEdge, PowerVault, PowerApp, Dell
OpenManage and the YOURS IS HERE
in the U.S. and other countries; Microsoft, Windows, Windows Server, MS-DOS and Windows Vista are either trademarks or registered trademarks
of Microsoft Corporation in the United States and/or other countries.
Other trademarks and trade names may be used in this document to refer to either the entities claiming the marks and names or their products.
Dell Inc. disclaims any proprietary interest in trademarks and trade names other than its own.
Regulatory Model Codes: Brocade DCX-4S, Brocade DCX
2 Blade and Filler Panel Replacement Procedure
logo are trademarks of Dell Inc.; Intel, Pentium, and Celeron are registered trademarks of Intel Corporation
53-1001809-01
Page 3

In this guide
NOTE
NOTE
•Introduction. . . . . . . . . . . . . . . . . . . . . . . . . . . . . . . . . . . . . . . . . . . . . . . . . . . . 3
•General precautions. . . . . . . . . . . . . . . . . . . . . . . . . . . . . . . . . . . . . . . . . . . . . 3
•ESD precautions. . . . . . . . . . . . . . . . . . . . . . . . . . . . . . . . . . . . . . . . . . . . . . . . 3
•Attention notices. . . . . . . . . . . . . . . . . . . . . . . . . . . . . . . . . . . . . . . . . . . . . . . . 4
•Port and application blades. . . . . . . . . . . . . . . . . . . . . . . . . . . . . . . . . . . . . . . 4
•Removal and replacement of a blade. . . . . . . . . . . . . . . . . . . . . . . . . . . . . . 17
•Removal and replacement of a filler panel . . . . . . . . . . . . . . . . . . . . . . . . . 23
Introduction
This document provides instructions for replacing blades and filler panels in the PowerConnect B-DCX4-S Backbone,
the PowerConnect B-DCX Backbone, and the PowerConnect B-48000 Director.
The FC8-16, FC8-32, FC-48, FC10-6, FR4-18i, and FA4-18 blades are compatible with the PowerConnect B-DCX, the
PowerConnect B-DCX-4S, and the PowerConnect B-48000. The FS8-18 encryption blade and the FX8-24 and
FCOE10-24 application blades are compatible only with the PowerConnect B-DCX and the PowerConnect B-DCX-4S.
For the PowerConnect B-DCX4-S, port, application, and encryption blades can be installed in slots 1, 2, 7, and 8. For
the PowerConnect B-DCX, port, application, and encryption blades can be installed in slots 1 through 4 and 9 through
12. For the PowerConnect B-48000, port and application blades can be installed in slots 1 through 4 and 7 through
10.
For supported mixed blade configurations, refer to the Brocade Director Migration Guide.
General precautions
When installing or servicing the PowerConnect B-DCX4-S, PowerConnect B-DCX, and PowerConnect B-48000, follow
these practices:
• Use correct tools.
• Use correct replacement parts.
• Keep all installation and service-related paperwork up to date, complete, and accurate.
ESD precautions
The PowerConnect B-DCX-4S, the PowerConnect B-DCX, and the PowerConnect B-48000 contain electrostatic
discharge (ESD) sensitive field-replaceable units (FRUs). When working with any FRU, use correct ESD procedures.
• Wear a wrist grounding strap connected to chassis ground or a bench ground.
• Store ESD-sensitive components in antistatic packaging.
Blade and Filler Panel Replacement Procedure 3
53-1001809-01
Page 4

Attention notices
ATTENTION
An attention notice indicates the possibility of damage to a program, device, or system, or to data. This is a sample of
an attention notice:
Do not bend a fiber cable to a radius less than 5 cm (2 in.); you can damage the cable. Tie wraps are not
recommended for optical cables because they can be easily overtightened, causing damage to the cable.
Port and application blades
Figure 1 through Figure 11 illustrate the port, application, and encryption blades, and their ports and LEDs. Blades
in these illustrations are shown in their vertical orientation as they would be installed in the PowerConnect B-DCX
and the PowerConnect B-48000. In the PowerConnect B-DCX-4S the blades are horizontally oriented, rotated 90
counter-clockwise from the vertical.
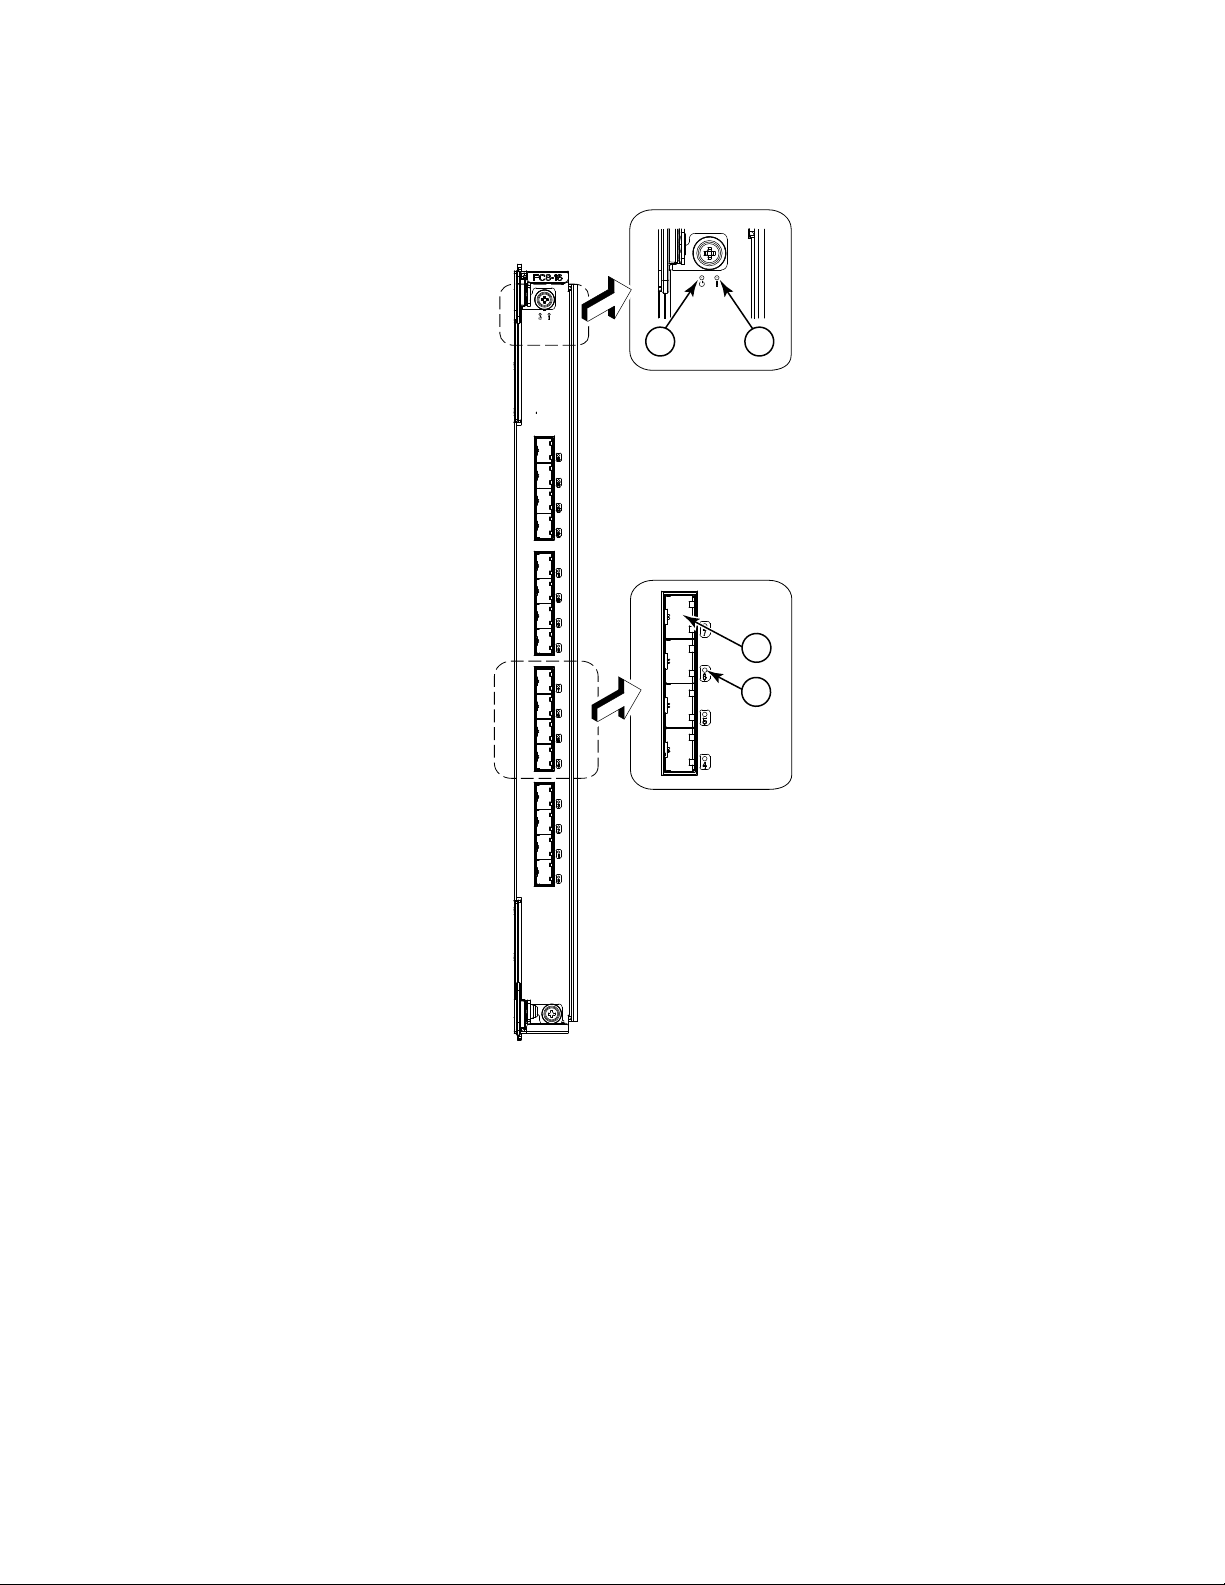
• Figure 1 illustrates the FC8-16 port blade.
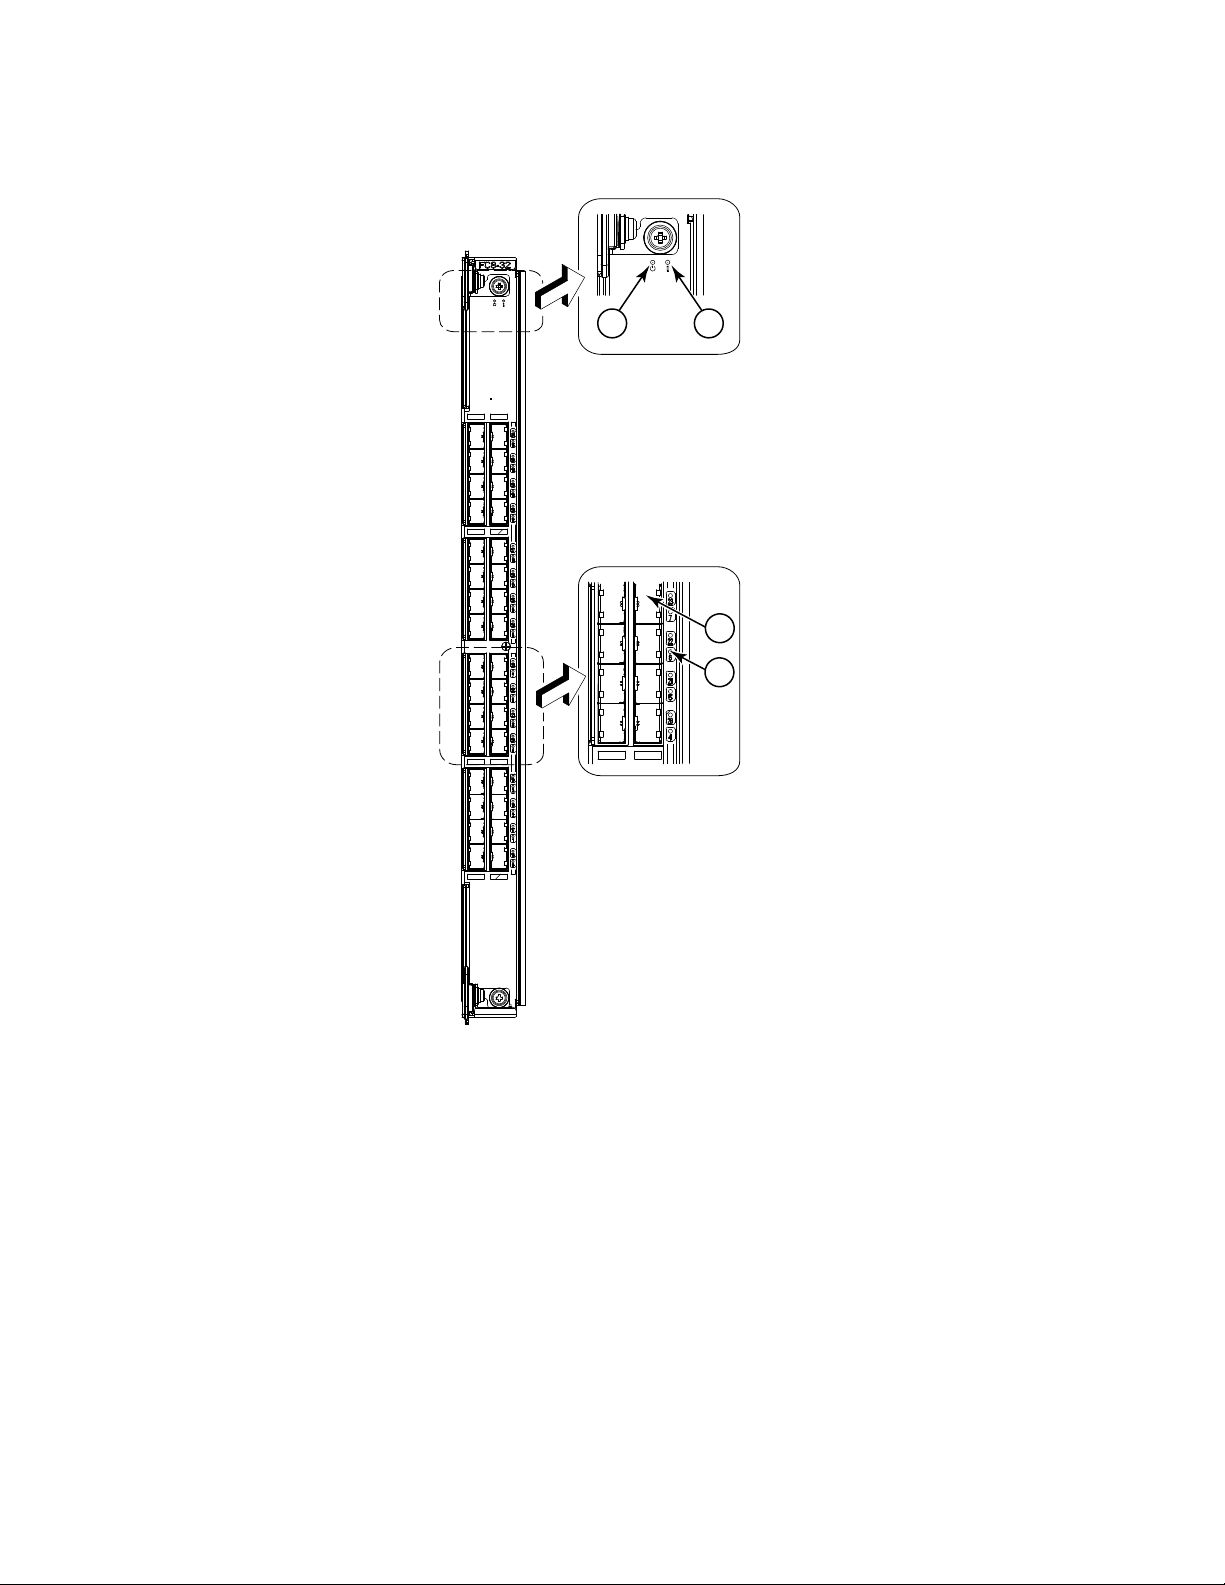
• Figure 2 illustrates the FC8-32 port blade.
• Figure 3 illustrates the FC8-48 port blade.
• Figure 4 illustrates the FC4-16 port blade.
• Figure 5 illustrates the FC4-32 port blade.
• Figure 6 illustrates the FC4-48 port blade.
• Figure 7 illustrates the FC10-6 port blade.
• Figure 8 illustrates the FC4-16IP application blade.
• Figure 9 illustrates the FR4-18i application blade.
• Figure 10 illustrates the FA4-18 application blade.
• Figure 11 illustrates the FS8-18 encryption blade.
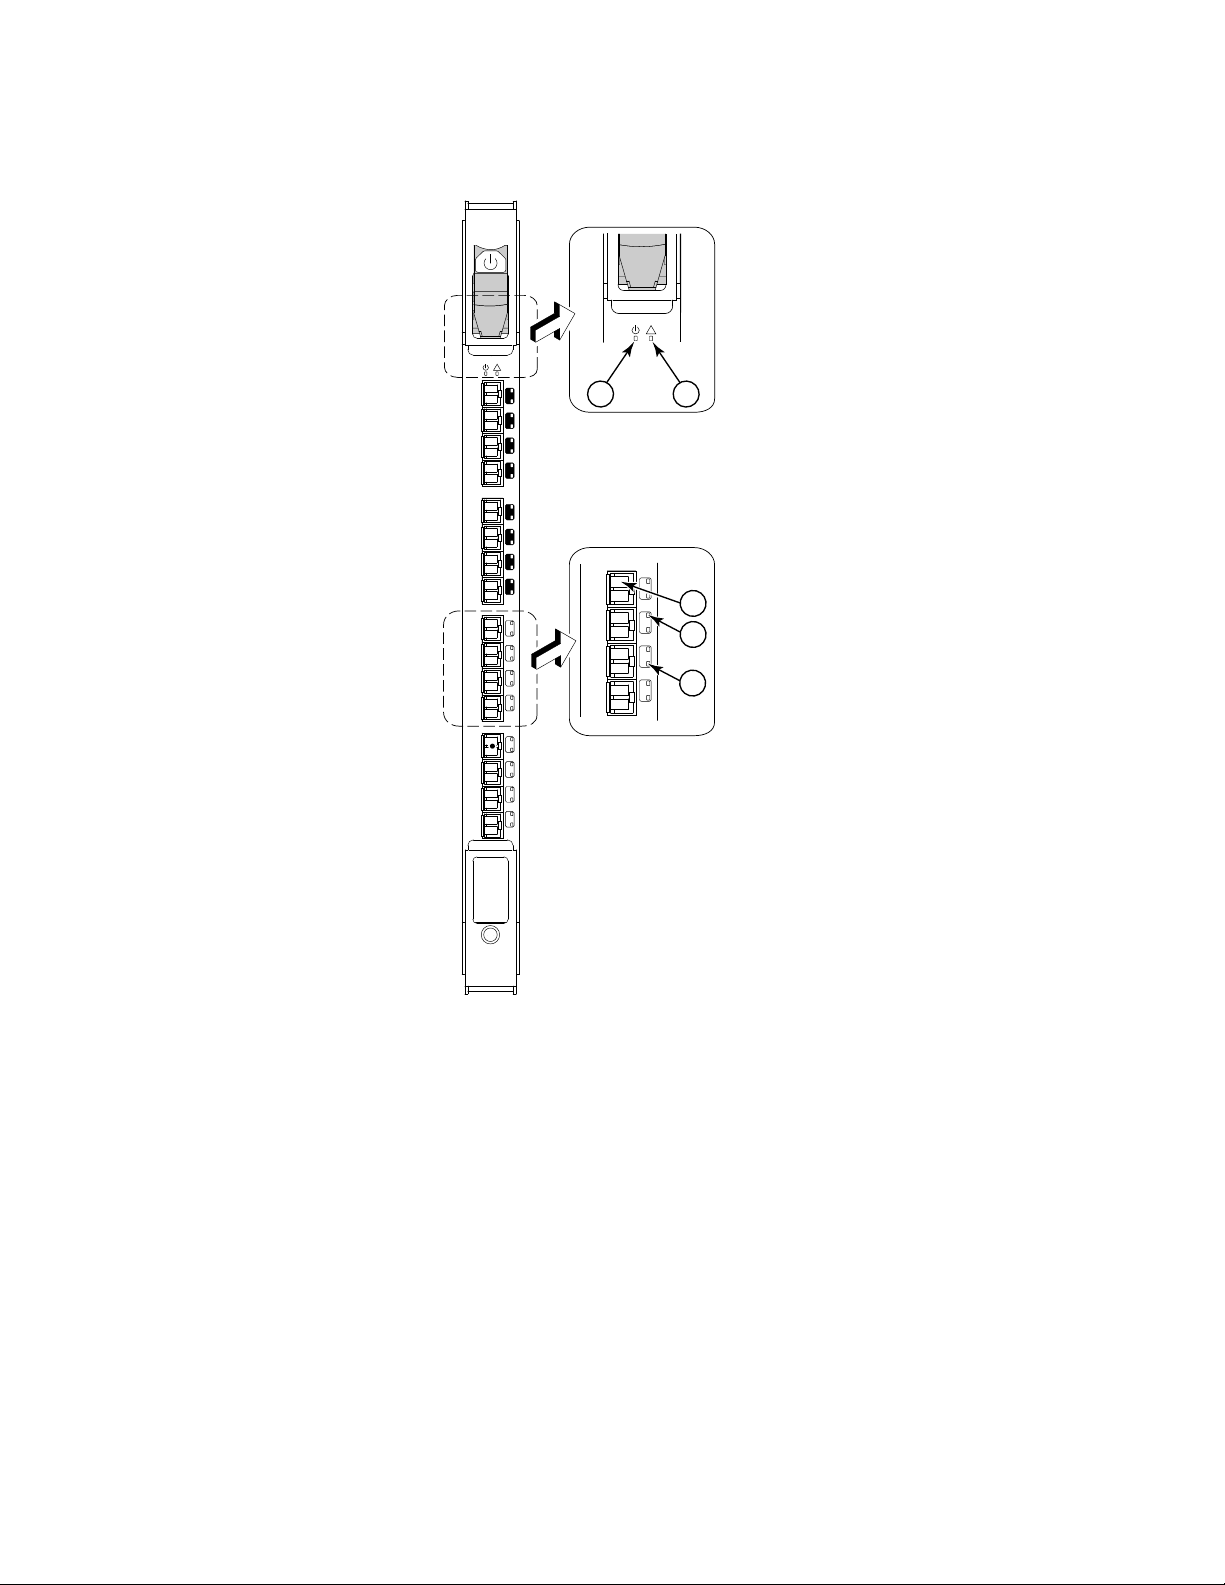
• Figure 12 illustrates the FX8-24 extension blade.
• Figure 13 illustrates the FCOE10-24 FCoE blade.
4 Blade and Filler Panel Replacement Procedure
53-1001809-01
Page 5
3
4
1
2
1 Power LED 3 Fibre Channel port
2 Status LED 4 Port Status LED
FIGURE 1 FC8-16 Port blade
Blade and Filler Panel Replacement Procedure 5
53-1001809-01
Page 6
1
3
4
2
1 Power LED 3 Fibre Channel port
2 Status LED 4 Port Status LED
FIGURE 2 FC8-32 Port blade
6 Blade and Filler Panel Replacement Procedure
53-1001809-01
Page 7

32
8
33
9
34
10
35
11
24
0
25
1
26
2
27
3
28
4
29
5
30
6
31
7
32
8
33
9
34
10
35
11
36
12
37
13
38
14
39
15
40
16
41
17
42
18
43
19
44
20
45
21
46
22
47
23
!
3
4
47
!
1
2
1 Power LED 3 Fibre Channel port
2 Status LED 4 Port Status LED
FIGURE 3 FC8-48 Port blade
Blade and Filler Panel Replacement Procedure 7
53-1001809-01
Page 8
7
6
5
4
3
2
1
0
15
14
13
12
11
10
9
8
!
FC4
16
7
6
5
4
!
1
3
4
5
2
1 Power LED 4 Port Speed LED
2 Status LED 5 Port Status LED
3 Fibre Channel port
FIGURE 4 FC4-16 Port blade
8 Blade and Filler Panel Replacement Procedure
53-1001809-01
Page 9

!
!
FC4
32
1
3
5
6
7
4
2
1 Power LED 5 Port Status LED (left port)
2 Status LED 6 Port Speed LED (right port)
3 Fibre Channel port 7 Port Status LED (right port)7
4 Port Speed LED (left port)
FIGURE 5 FC4-32 Port blade
Blade and Filler Panel Replacement Procedure 9
53-1001809-01
Page 10

24
0
25
1
26
2
27
3
28
4
29
5
30
6
31
7
32
8
33
9
34
10
35
11
36
12
37
13
38
14
39
15
40
16
41
17
42
18
43
19
44
20
45
21
46
22
47
23
!
32
8
33
9
34
10
35
11
!
1
3
4
2
1 Power LED 3 Fibre Channel port
2 Status LED 4 Port Status LED
FIGURE 6 FC4-48 Port blade
10 Blade and Filler Panel Replacement Procedure
53-1001809-01
Page 11
4
3
1
2
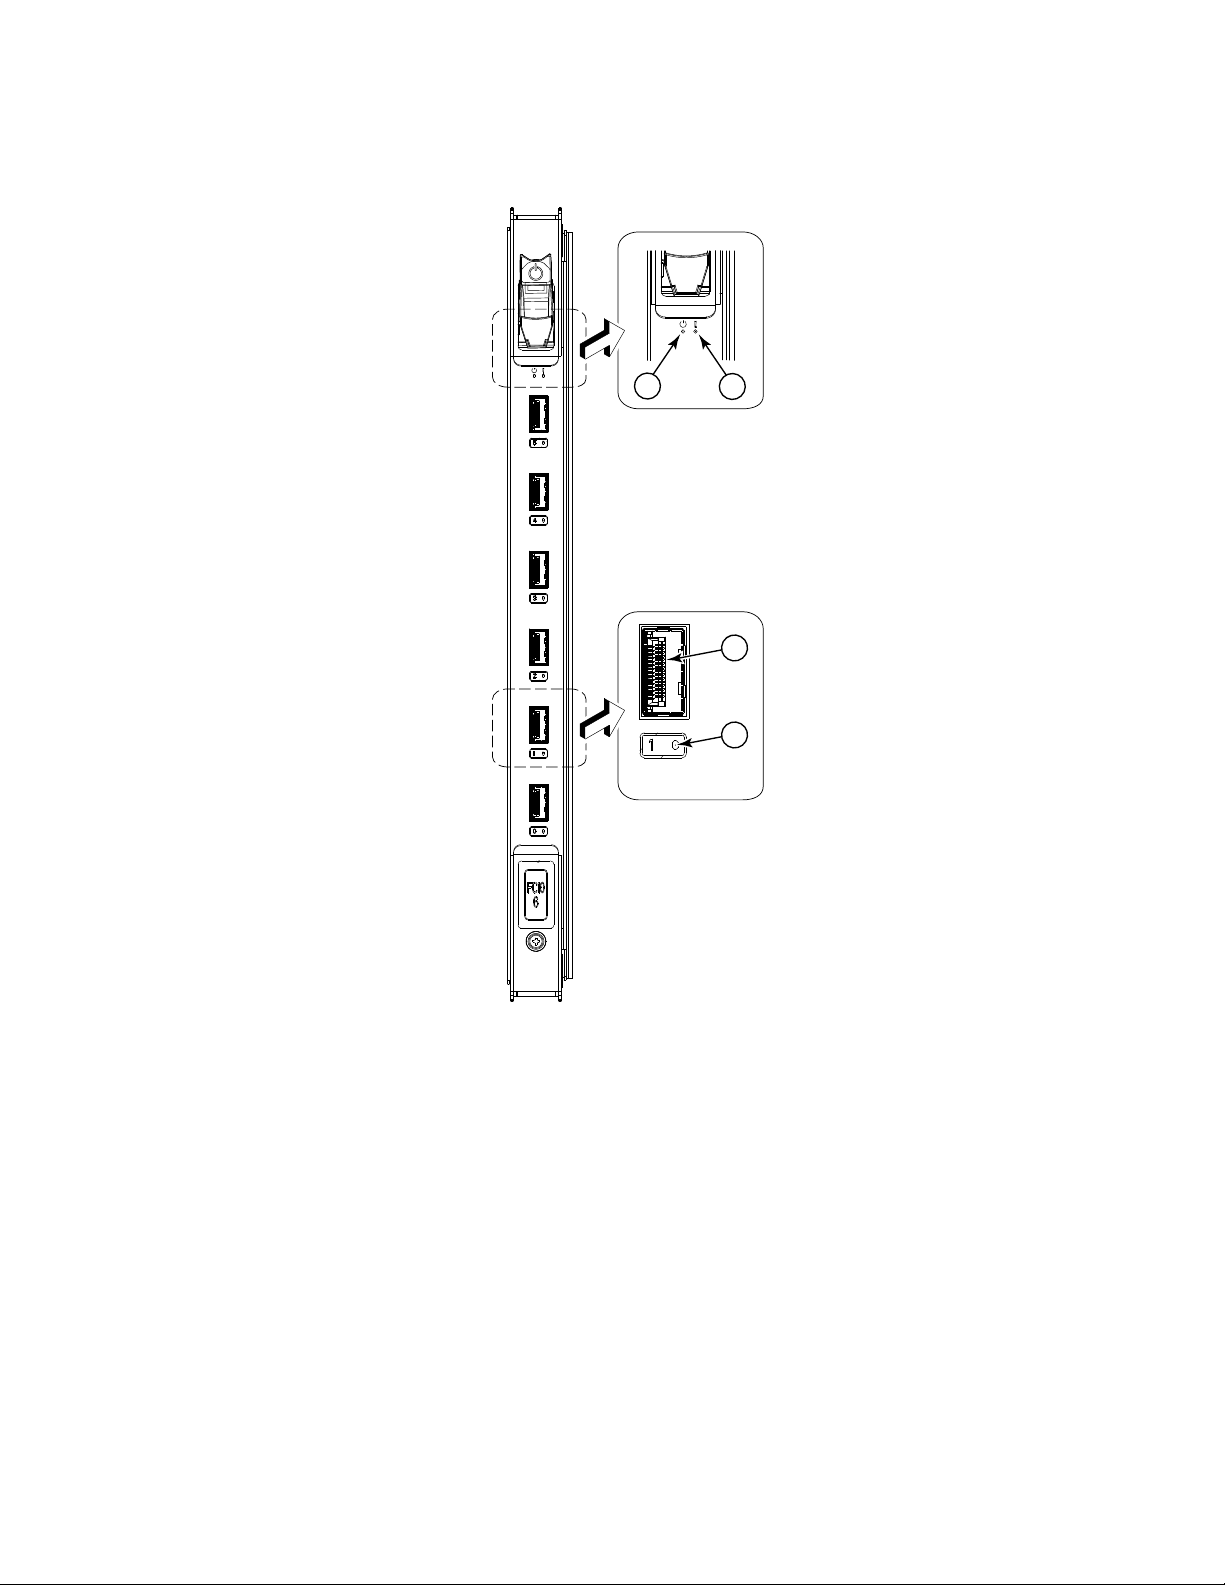
1 Power LED 3 Fibre Channel port
2 Status LED 4 Port Status LED
FIGURE 7 FC10-6 Port blade
Blade and Filler Panel Replacement Procedure 11
53-1001809-01
Page 12

7
6
5
4
3
2
1
0
!
FC4
16IP
7
6
5
4
3
2
1
0
GE
FC
7
6
5
4
FC
!
1
2
3
4
1 Power LED 3 Fibre Channel port
2 Status LED 4 Port Status LED
FIGURE 8 FC4-16IP Application blade
12 Blade and Filler Panel Replacement Procedure
53-1001809-01
Page 13

7
6
5
4
3
2
1
0
15
14
13
12
11
10
9
8
!
FR4
18i
GE1
GE0
!
1
2
7
6
5
4
3
4
1 Power LED 3 Fibre Channel port
2 Status LED 4 Port Status LED
FIGURE 9 FR4-18i Application blade
Blade and Filler Panel Replacement Procedure 13
53-1001809-01
Page 14

7
6
5
4
3
2
1
0
A0
A1
15
14
13
12
11
10
9
8
!
FA4
18
7
6
5
4
!
1
2
3
4
1 Power LED 3 Fibre Channel port
2 Status LED 4 Port Status LED
FIGURE 10 FA4-18 Application blade
14 Blade and Filler Panel Replacement Procedure
53-1001809-01
Page 15

1 Power LED 3 Fibre Channel port
2 Status LED 4 Port Status LED
FIGURE 11 FS8-18 Application blade
Blade and Filler Panel Replacement Procedure 15
53-1001809-01
Page 16

2
1
5
4
3
76
110 GbE ports 6Blade Power LED
2-3 1 GbE ports 7 Blade Status LED
4-5 FC ports
FIGURE 12 FX8-24 extension blade
16 Blade and Filler Panel Replacement Procedure
53-1001809-01
Page 17

ATTENTION
2
1
43
1 10 GbE FCoE ports 12-23 3 Power LED
2 10 GbE FCoE ports 0-11 4 Status LED
FIGURE 13 FCOE10-24 FCoE blade
Removal and replacement of a blade
This section describes how to remove and replace port, application, or encryption blades.
A filler panel should be removed only when being replaced with a port, application, or encr yption blade or a new filler
panel. Any slot that is not occupied by a blade should be occupied by a filler panel to ensure correct cooling of the
chassis and protection from dust.
Blade and Filler Panel Replacement Procedure 17
53-1001809-01
Page 18

For the PowerConnect B-DCX-4S, slots are numbered from 1 through 8, from bottom to top when facing the por t side.
NOTE
Port, application, and encryption blades can be installed in slots 1-2 and 7-8.
For the PowerConnect B-DCX and PowerConnect B-48000, slots are numbered from left to right when facing the port
side of the chassis. Port blades can be installed in slots 1 through 4 and 9 through 12 in the PowerConnect B-DCX
and in slots 1 through 4 and 7 through 10 in the PowerConnect B-48000.
Time and items required
The replacement procedure for each blade or filler panel takes less than 10 minutes. The following items are
required for the blade and filler panel replacement procedure:
• ESD (electrostatic discharge) grounding strap
• Workstation computer
• Replacement blade or filler panel
• Phillips screwdriver
• Small form-factor pluggable (SFP) or extended form-factor pluggable (XFP, FC10-6 port blade only) transceivers
(as needed)
• Optical cables (as needed)
For information about the SFP and XFP transceivers that are qualified for the PowerConnect B-DCX-4S, the
PowerConnect B-DCX, and the PowerConnect B-48000, go to
http://www.brocade.com/products/interop_and_compatibility.jsp.
Blades with ejectors or ejectors and slider switches
These blades have ejectors only:
• FC8-16 port blade (Figure 1)
• FC8-32 port blade (Figure 2)
• FC8-48 port blade (Figure 3)
• FC4-48 port blade (Figure 6)
• FS8-18 encryption blade (Figure 11)
• FX8-24 extension blade (Figure 12)
• FCOE10-24 FCoE blade (Figure 13)
Figure 14 illustrates how to remove or replace a sample blade with ejectors.
Figure 15 illustrates the blade orientation in a PowerConnect B-DCX-4S chassis.
These blades have ejectors and slider switches:
• FC4-16 port blade (Figure 4)
• FC4-32 port blade (Figure 5)
• FC10-6 port blade (Figure 7)
• FC4-16IP application blade (Figure 8)
• FR4-18i application blade (Figure 9)
• FA4-18 application blade (Figure 10).
18 Blade and Filler Panel Replacement Procedure
53-1001809-01
Page 19

Figure 16 illustrates how to remove or replace a sample blade with ejectors and slider switches.
ATTENTION
ATTENTION
Removing a blade
The instructions below refer to the top and bottom of each blade in the vertical orientation as used in the
PowerConnect B-DCX and the PowerConnect B-48000. For the PowerConnect B-DCX-4S, because the blades are
horizontally oriented, top should be read as left and bottom should be read as right.
Follow ESD precautions (“ESD precautions”).
1. Check the blade and port LEDs to identify possible problems with the blade (Figure 1 through Figure 13). A
failed blade can be identified by inspecting the LEDs on the front panel of each blade. The WWN bezel on the
nonport side of the PowerConnect B-DCX and the PowerConnect B-48000 also displays a power and status LED
for each blade. For the PowerConnect B-DCX-4S the power and status LEDs are on the front panel of each blade.
2. Establish a Telnet or console session to determine a failure and verify operation after replacement. Use the
switchShow command to view the status of blades. Refer to the Fabric OS Administrator’s Guide for information
about how to check the status of hardware components using the command line interface (CLI).
3. Check for adequate cable slack. Ensure there is plenty of cable slack to remove a blade without optical, power,
or Ethernet cable obstruction.
4. Ensure that you have the correct spare part (blade or filler panel).
Ensure that the part number on the unit being replaced matches the replacement part number. The
chassisShow command displays information about the blades, including part numbers (xx-xxxxxxx-xx), serial
numbers, and additional status.
5. Ensure that traffic is not flowing through the blade (port speed and port status LEDs should be off).
6. Note cable order. Identify each cable by its physical port.
7. Disconnect all cables and SFP or XFP transceivers from the blade.
8. For blades with ejectors only, unscrew the two thumb screws from the top and bottom ejectors on the blade
using the Phillips screwdriver. Unscrew the top thumb screw until it pops out. This initiates a hot-swap request.
Adjust the ejectors to the open position (Figure 14).
9. For blades with ejectors and slider switches, turn the blade off by sliding the slider switch in the top ejector
down, to the off position (Figure 16). This initiates a hot-swap request.
10. Wait for the power LED to turn off in response to the hot-swap request before removing the blade.
11. For blades with ejectors only, open the ejectors. Pull the blade out of the chassis using the ejectors.
For blades with ejectors and slider switches, unscrew the two thumb screws from the top and bottom ejectors on
the blade using the Phillips screwdriver. Lever both ejectors open simultaneously to approximately 45 degrees
and pull the blade out of the chassis.
12. If the blade is not being replaced by another blade, install a filler panel (refer to “Removal and replacement of a
filler panel” for instructions).
Blade and Filler Panel Replacement Procedure 19
53-1001809-01
Page 20

P
O
W
E
R
S
UPP
L
Y
1
2
0
0
-2
4
0
VAC
1
2
A 5
0
-
6
0
H
z
2
0
0
-2
4
0
VAC
1
2
A 5
0-60
H
z
P
O
W
E
R
S
UPP
L
Y
1
!
!
P
O
W
E
R
S
UPP
L
Y
2
!
!
P
OW
E
R
S
UPPL
Y
3
!
!
P
O
W
E
R
SUPPL
Y
4
!
!
!
!
F
C4
3
2
FC4
32
7
6
5
4
3
2
1
0
1
5
14
1
3
1
2
1
1
10
9
8
5
6
-
0
0
0
0
5
9
0-0
1
R
e
v
A
!
FC4
1
6
CP
4
Link
1
0/
1
0
0
M
b
/
s
A
cti
ve
CP
!
I O I O I RS - 232
CP4
Li
nk
10
/
1
00
M
b
/s
A
ct
i
v
e
CP
!
I O I O I RS - 232
7
6
5
4
3
2
1
0
1
5
1
4
1
3
1
2
1
1
1
0
9
8
5
6
-
0
0
0
0
5
9
0-0
1
R
e
v
A
!
FC4
1
6
1
2
3
4
5
6
7
8
9
10
2
4
0
2
5
1
2
6
2
2
7
3
2
8
4
2
9
5
3
0
6
3
1
7
3
2
8
3
3
9
3
4
1
0
3
5
1
1
3
6
1
2
3
7
1
3
3
8
1
4
3
9
1
5
4
0
1
6
4
1
1
7
4
2
1
8
4
3
1
9
4
4
2
0
4
5
2
1
4
6
2
2
4
7
2
3
!
1
2
3
4
1 Chassis
2 Blade (an FC4-48 blade is shown)
3 Upper ejector
4 Lower ejector
FIGURE 14 Removing and replacing a blade with ejectors only (FC4-48 shown) in a PowerConnect B-48000 (PowerConnect B-DCX
20 Blade and Filler Panel Replacement Procedure
similar)
53-1001809-01
Page 21

FIGURE 15 Port, application, or encryption blade (FC8-48 port blade shown) in a PowerConnect B-DCX-4S
Blade and Filler Panel Replacement Procedure 21
53-1001809-01
Page 22

ATTENTION
POWER
S
UP
PL
Y
1
2
0
0
-
2
4
0
V
A
C 1
2A
5
0
-
6
0 H
z
200
-
2
40 V
A
C 1
2A 50
-60
H
z
POWER
S
UP
PL
Y
1
!
!
PO
WE
R
S
UP
P
L
Y
2
!
!
POWER SUPP
L
Y
3
!
!
PO
W
ER S
U
P
P
L
Y
4
!
!
!
!
FC4
3
2
FC4
3
2
7
6
5
4
3
2
1
0
1
5
1
4
1
3
1
2
1
1
1
0
9
8
5
6
-
0
0
0
0
5
9
0
-
0
1
R
e
v
A
!
F
C4
1
6
C
P
4
L
i
nk
1
0/
1
00
M
b
/
s
Ac
t
i
v
e
C
P
!
I O I O I RS - 232
CP
4
Link
10/1
0
0
M
b
/
s
Ac
t
i
v
e
CP
!
I O I O I RS - 232
7
6
5
4
3
2
1
0
15
1
4
13
1
2
11
10
9
8
5
6
-
0
0
0
0
5
9
0
-
0
1
R
e
v
A
!
FC
4
1
6
1
2
3
4
5
6
7
8
9
10
7
6
5
4
3
2
1
0
1
5
1
4
1
3
1
2
1
1
1
0
9
8
5
6
-0
0
0
0
5
9
0
0
1
R
e
v
A
!
FC4
1
6
1
2
4
3
1 Chassis
2 Blade (an FC4-16 blade is shown)
3 On/Off Slider switch (in the Off position)
4Ejector
FIGURE 16 Removing and replacing a blade with ejectors and slider switches (FC4-16 shown) in a PowerConnect B-48000
Replacing a blade
The instructions below refer to the top and bottom of each blade in the vertical orientation as used in the
PowerConnect B-DCX and the PowerConnect B-48000. For the PowerConnect B-DCX-4S, because the blades are
horizontally oriented, top should be read as left and bottom should be read as right.
22 Blade and Filler Panel Replacement Procedure
(PowerConnect B-DCX similar)
53-1001809-01
Page 23

ATTENTION
Follow ESD precautions (“ESD precautions”).
ATTENTION
ATTENTION
1. Ensure that all packing material and safety appliances have been removed from the blade.
2. Orient the blade so that the ports are at the front of the chassis and the flat side of the blade is on the left.
3. For blades with ejectors only, adjust the ejectors to the open position, align the flat side of the blade inside the
upper and lower rail guides in the slot, and slide the blade into the slot until it is firmly seated (Figure 14).
For blades with ejectors and slider switches, open the ejectors to approximately 45 degrees, align the flat side of
the blade inside the upper and lower rail guides in the slot, and slide the blade into the slot, with slight pressure
to the left, until it is firmly seated (Figure 16).
4. For blades with ejectors only, adjust the ejectors to the closed position by pulling them away from the center of
the blade.
For blades with ejectors and slider switches, close the ejectors by pushing the handles toward the center of the
blade until the ejectors lock. The levering action of the handles seats the blade in the slot.
5. For blades with ejectors, tighten the upper and lower thumb screws using the Phillips screwdriver.
For blades with ejectors and sliders switches, tighten the thumb screw inside each handle using the Phillips
screwdriver.
6. For blades with ejectors and slider switches, turn the blade on by sliding the slider switch in the top ejector up,
covering the thumb screw.
7. Verify that the power LED on the blade is displaying a steady green light. If it does not turn on, ensure that the
blade is firmly seated.
8. Install the SFP or XFP (FC10-6 only) transceivers and cables in the blade.
9. Group and route the cables.
Removal and replacement of a filler panel
This section describes how to remove and replace the blade filler panel.
The instructions below refer to the top and bottom of a filler panel in the vertical orientation as used in the
PowerConnect B-DCX and the PowerConnect B-48000. For the PowerConnect B-DCX-4S, because the panels are
horizontally oriented, top should be read as left and bottom should be read as right.
A filler panel should be removed only when being replaced with a blade or a new filler panel. Any slot that is not
occupied by a blade should be occupied by a filler panel to ensure correct cooling of the chassis and protection from
dust.
Removing a filler panel
1. Unscrew the thumb screw at the bottom of the panel using the Phillips screwdriver.
2. Pull the filler panel out of the chassis (Figure 17).
Blade and Filler Panel Replacement Procedure 23
53-1001809-01
Page 24

FIGURE 17 Removing and replacing a blade filler panel for a PowerConnect B-DCX (PowerConnect B-48000 similar)
24 Blade and Filler Panel Replacement Procedure
53-1001809-01
Page 25

FIGURE 18 Removing and replacing a blade filler panel for a PowerConnect B-DCX4-S
Replacing a filler panel
1. Orient the filler panel (Figure 17 or Figure 18).
2. Slide the filler panel into the slot until it is firmly seated.
3. Tighten the thumb screw at the bottom of the panel.
Blade and Filler Panel Replacement Procedure 25
53-1001809-01
Page 26

26 Blade and Filler Panel Replacement Procedure
53-1001809-01
 Loading...