

Dell PowerConnect 5324 Owner's Manual

DellTM PowerConnectTM 5324 Systems
User’s Guide Addendum
1

Notes, Notices, and Cautions
NOTE: A NOTE indicates important information that helps you make better use of your computer.
NOTICE: A NOTICE indicates either potential damage to hardware or loss of data and tells you how to avoid the
problem.
CAUTION: A CAUTION indicates a potential for property damage, personal injury, or death.
www.dell.com | support.dell.com
____________________
Information in this document is subject to change without notice.
© 2006 Dell Inc. All rights reserved.
Reproduction in any manner whatsoever without the written permission of Dell Inc. is strictly forbidden.
Trademarks used in this text: Dell, Dell OpenManage, the DELL logo, and PowerConnect are trademarks of Dell Inc. Microsoft and Windows
are registered trademarks of Microsoft Corporation.
Other trademarks and trade names may be used in this document to refer to either the entities claiming the marks and names or their products.
Dell Inc. disclaims any proprietary interest in trademarks and trade names other than its own.
September 2006
2

New Features
This document in an addendum to the PowerConnect 5324 user guide and includes the following topics:
• Configuring LLDP
• Defining SNMP Parameters
• HTTP/HTTPS Upload/Download
• Defining STP Root Guard
• Configuring Multiple Spanning Tree
• Configuring QinQ
• Configuring Load Balancing
3

Configuring LLDP
The
Link Layer Discovery Protocol
management by discovering and maintaining network topologies over multi-vendor environments. LLDP
discovers network neighbors by standardizing methods for network devices to advertise themselves to other
system, and to store discovered information. Device discovery information includes:
• Device Identification
• Device Capabilities
• Device Configuration
The advertising device transmits multiple advertisement message sets in a single LAN packet. The multiple
advertisement sets are sent in the packet
www.dell.com | support.dell.com
port ID advertisement, as well as system name, system ID, system description, and system capability
advertisements.
The
LLDP Properties
To open the
Figure 1-1. LLDP Properties
LLDP Properties
page contains fields for configuring LLDP.
(LLDP) allows network managers to troubleshoot and enhance network
Page, click
Type Length Value
Security → LLDP → LLDP Properties
(TLV) field. LLDP devices must support chassis and
in the tree view
.
Enable LLDP —
Checked — Indicates that LLDP is enabled on the device.
Unchecked — Indicates that LLDP is disabled on the device. This is the default value.
4
Indicates if LLDP is enabled on the device. The possible field values are:

Updates Interval (5-32768) — Indicates that rate at which LLDP advertisement updates are sent. The
possible field range is 5 - 32768 seconds. The default value is 30 seconds.
Hold Time (2-10) —
Indicates the amount of time that LLDP packets are held before the packets are dis-
carded. The possible field range is 2 - 10 seconds. The field default is 4 seconds.
Reinitializing Delay (1-10) — Indicates the amount of time that passes between disabling LLDP and when
reinitializing begins. The possible field range is 1 - 10 seconds. The field default is 2 seconds.
Transmit Delay (1-8192) — Indicates the amount of time that passes between successive LLDP frame trans-
missions due to changes in the LLDP local systems MIB. The possible field value is
1 – 8192 seconds. The field default is 2 seconds.
Configuring LLDP Using CLI Commands
Table 1-1. LLDP Properties CLI Commands
CLI Command Description
lldp enable (global) Enables enable Link Layer Discovery
Protocol.
lldp hold-multiplier
lldp reinit-delay
lldp tx-delay
Seconds
number
Seconds
Specifies the time that the receiving
device should hold a Link Layer
Discovery Protocol (LLDP) packet
before discarding it.
Specifies the minimum time an LLDP
port will wait before reinitializing.
Specifies the delay between successive
LLDP frame tr.ansmissions.
The following is an example of the CLI commands:
Console(config)# interface ethernet g5
Console(config-if)# lldp enable
5

Defining LLDP Port Settings
The LLDP
number, the LLDP port number, and the type of port information advertised.
The
LLDP
Figure 1-2. Port Settings
www.dell.com | support.dell.com
Port Settings
Port Settings
→ Port Settings
page allows network administrators to define LLDP port settings, including the port
page contains fields for configuring LLDP. To open the
in the tree view
.
Port Settings
page, click
Security
→
Port
— Contains a list of ports on which LLDP is enabled.
State
— Indicates the port type on which LLDP is enabled. The possible field values are:
Tx Only
Rx Only
Tx & Rx
Disable
Use Default
— Enables transmitting LLDP packets only.
— Enables receiving LLDP packets only.
— Enables transmitting and receiving LLDP packets. This is the default value.
— Indicates that LLDP is disabled on the port.
— Indicates that information included in the TLVs is per the device defaults. The possible field
values are:
Checked
Unchecked
— Enables sending the device default LLDP advertisements.
— Indicates that the device LLDP advertisement settings are disabled, and LLDP
advertisement settings are user defined. This is the default value.
6

Optional TLVs
Available TLVs
Available TLVs
are:
Port Description
— Contains a list of optional TLVs advertised by the port. For the complete list, see the
field.
— Contains a list of available TLVs that can be advertised by the port. The possible field values
— Advertises the port description.
System Name
System Description
System Capabilities
Management IP Address
The
LLDP Port Table
→
LLDP → Port Settings → S
Figure 1-3. LLDP Port Table
Table 1-2. LLDP Port settings CLI Commands
CLI Command Description
clear lldp rx
lldp optional-tlv
… tlv5]
lldp enable [rx | tx | both] To enable Link Layer Discovery
— Advertises the system name.
— Advertises the system description.
— Advertises the system capabilities.
— Indicates the management IP address that is advertised from the interface.
page displays the LLDP Port Configuration. To open the
how All
interface
tlv1 [tlv2
in the tree view
Restarts the LLDP RX state machine
and clearing the neighbors table
Specifies which optional TLVs from the
basic set should be transmitted
Protocol (LLDP) on an interface.
.
LLDP Port Table
, click
Security
The following is an example of the CLI commands:
7

Console(config)# interface ethernet g5
Console(config-if)# lldp enable
www.dell.com | support.dell.com
8

Viewing Advertised Information
The LLDP
LLDP information. To open the
Information
Figure 1-4. Advertised Information
Advertised Information
Advertised Information
in the tree view.
page displays the information advertised by specific ports when advertising
page, click
Security → LLDP → Advertised
Port
— Displays the port number from which the advertised information is sent.
Device ID
Capabilities
System Name
System Description
Port Description
Management Address
— Displays the advertised device ID.
— Displays the advertised device capabilities.
— Displays the advertised system name.
— Displays the advertised system description.
— Displays the advertised port description.
— Displays the advertised management address.
9

Displaying the Advertised Information Table
To open the
the tree view
Figure 1-5. Advertised Information Table
www.dell.com | support.dell.com
Table 1-3. LLDP Advertised Information CLI Commands
CLI Command Description
show lldp local
interface
Advertised Information Table
.
ethernet
Displays LLDP information
advertised from a specific port.
, click
Security → LLDP → Advertised Information → Show All
in
10

The following is an example of the CLI commands:
Switch# show lldp local ethernet 1
Device ID: 0060.704C.73FF
Port ID: 1
Capabilities: Bridge
System Name: ts-7800-1
System description:
Port description:
Management address: 172.16.1.8
802.3 MAC/PHY Configuration/Status
Auto-negotiation support: Supported
Auto-negotiation status: Enabled
Auto-negotiation Advertised Capabilities: 100BASE-TX full duplex,
1000BASE-T full duplex
Operational MAU type: 1000BaseTFD
LLDP-MED capabilities: Network Policy, Location Identification
LLDP-MED Device type: Network Connectivity
LLDP-MED Network policy
Application type: Voice
Flags: Tagged VLAN
VLAN ID: 2
Layer 2 priority: 0
DSCP: 0
LLDP-MED Power over Ethernet
Device Type: Power Sourcing Entity
Power source: Primary Power Source
Power priority: High
Power value: 9.6 Watts
LLDP-MED Location
Coordinates: 54:53:c1:f7:51:57:50:ba:5b:97:27:80:00:00:67:01
11

Viewing the LLDP Neighbor Information
The
Neighbors Information
To open the
Figure 1-6. Neighbors Information
www.dell.com | support.dell.com
Neighbor Information
page contains information received from neighboring device LLDP advertisements.
page, click
Security →
LLDP
→
Neighbors Information
in the tree view
.
Port
— Displays the neighboring port number.
Device ID
Port ID
Capabilities
System Name
1
2
Displaying the Neighbor Information Table
1
2
— Displays the neighboring device ID.
— Displays the neighboring port ID
— Displays the neighboring device capabilities.
— Displays the neighboring system time.
Select a port.
Click
Apply Changes
Click
Security →
Click
Show All
. The port advertisement information is displayed.
LLDP
→
Neighbors Information
. The
Neighbor
Tabl e o p e n s :
12
in the tree view
.

Figure 1-7. Neighbors Table
Table 1-4. LLDP Neighbor Information CLI Commands
CLI Command Description
show lldp neighbors
interface
Displays information about
neighboring devices discovered using
Link Layer Discovery Protocol (LLDP)
The following is an example of the CLI commands:
Switch# show lldp neighbors
Port Device ID Port
ID
Hold
Time
Capabilities
System
Name
1 0060.704C.73FE 1 117 B ts-7800-2
1 0060.704C.73FD 1 93 B ts-7800-2
2 0060.704C.73F C 9 1 B, R ts-7900-1
3
0060.704C.73FB 1 92 W ts-7900-2
13

Defining SNMP Parameters
Simple Network Management Protocol (SNMP) provides a method for managing network devices. Devices
supporting SNMP run a local software (agent).
The SNMP agents maintain a list of variables, which are used to manage the device. The variables are defined in
the Management Information Base (MIB). The MIB contains the variables controlled by the agent. The SNMP
protocol defines the MIB specification format, as well as the format used to access the information over the
network.
Access rights to the SNMP agents are controlled by access strings. To communicate with the device, the
Embedded Web Server submits a valid community string for authentication. To open the SNMP page, click
System → SNMP
www.dell.com | support.dell.com
This section contains information for managing the SNMP configuration.
Defining SNMP Global Parameters
The
SNMP Global Parameters
the
SNMP Global Parameters
Figure 1-8. Global Parameters
in the tree view.
page permits enabling both SNMP and Authentication notifications. To open
page, click
System →
SNMP → Global Parameters
in the tree view.
14

Local Engine ID (10 - 64 Hex Characters)
— Indicates the local device engine ID. The field value is a
hexadecimal string. Each byte in hexadecimal character strings is two hexadecimal digits. Each byte can be
separated by a period or a colon. The Engine ID must be defined before SNMPv3 is enabled.
For stand-alone devices select a default Engine ID that is comprised of Enterprise number and the default MAC
address.
Use Default
— Uses the device generated Engine ID. The default Engine ID is based on the device MAC
address and is defined per standard as:
First 4 octets
— first bit = 1, the rest is IANA Enterprise number.
Fifth octet
Last 6 octets
SNMP
Notifications
Authentication Notifications
— Set to 3 to indicate the MAC address that follows.
— MAC address of the device.
— Enables or disables the router sending SNMP notifications.
— Enables or disables the router sending SNMP traps when authentication fails.
Enabling SNMP Notifications
1
Open the
2
Select
3
Click
SNMP Global Parameters
Enable
in the
SNMP Notifications
Apply Changes
.
page.
field.
SNMP notifications are enabled, and the device is updated.
Enabling Authentication Notifications
1
Open the
2
Select Enable in the
3
Click
SNMP Global Parameters
Authentication Notifications
Apply Changes
.
page.
field.
Enabling SNMP Notifications Using CLI Commands
The following table summarizes the equivalent CLI commands for viewing fields displayed in the
Parameters
page.
SNMP Global
Table 1-5. SNMP Notification Commands
CLI Command Description
snmp-server enable
traps
snmp-server trap
authentication
show snmp Checks the status of SNMP communications.
Enables the router to send Simple Network
Management Protocol traps.
Enables the router to send Simple Network
Management Protocol traps when authentication
fails.
15

Table 1-5. SNMP Notification Commands
CLI Command Description
snmp-server engine
ID local {
string
www.dell.com | support.dell.com
engineid-
| default}
Indicates the local device engine ID. The field
values is a hexadecimal string. Each byte in
hexadecimal character strings is two hexadecimal
digits. Each byte can be separated by a period or
colon. The Engine ID must be defined before
SNMPv3 is enabled.
16

The following is an example of the CLI commands:
Console (config)# snmp-server enable traps
Console (config)# snmp-server trap authentication
Console# show snmp
Community-String Community-Access View name IP address
---------------- ----------------- --------- ----------
public read only view-1 All
Community-String Group name IP address Type
---------------- ---------- ----------
Traps are enabled.
Authentication-failure trap is enabled.
Version 1,2 notifications
Target
Address
------- ---- --------- ------- ---- ------ --- -------
Type Community Version Udp
Port
Filter
name
----
To
Sec
Retries
Version 3 notifications
Target
Address
-------- ---- --------- -------- --------------- -------
System Contact: Robert
System Location: Marketing
Type Username Security
Level
Udp
Port
Filter
name
To
Sec
Retries
Defining SNMP View Settings
SNMP Views provides access or blocks access to device features or feature aspects. For example, a view can be
defined which states that SNMP group A has read only (R/O) access to Multicast groups, while SNMP group B
has read-write (R/W) access to Multicast groups. Feature access is granted via the MIB name, or MIB Object ID.
The Up and Down arrows allow navigating through the MIB tree, and MIB branches.
17
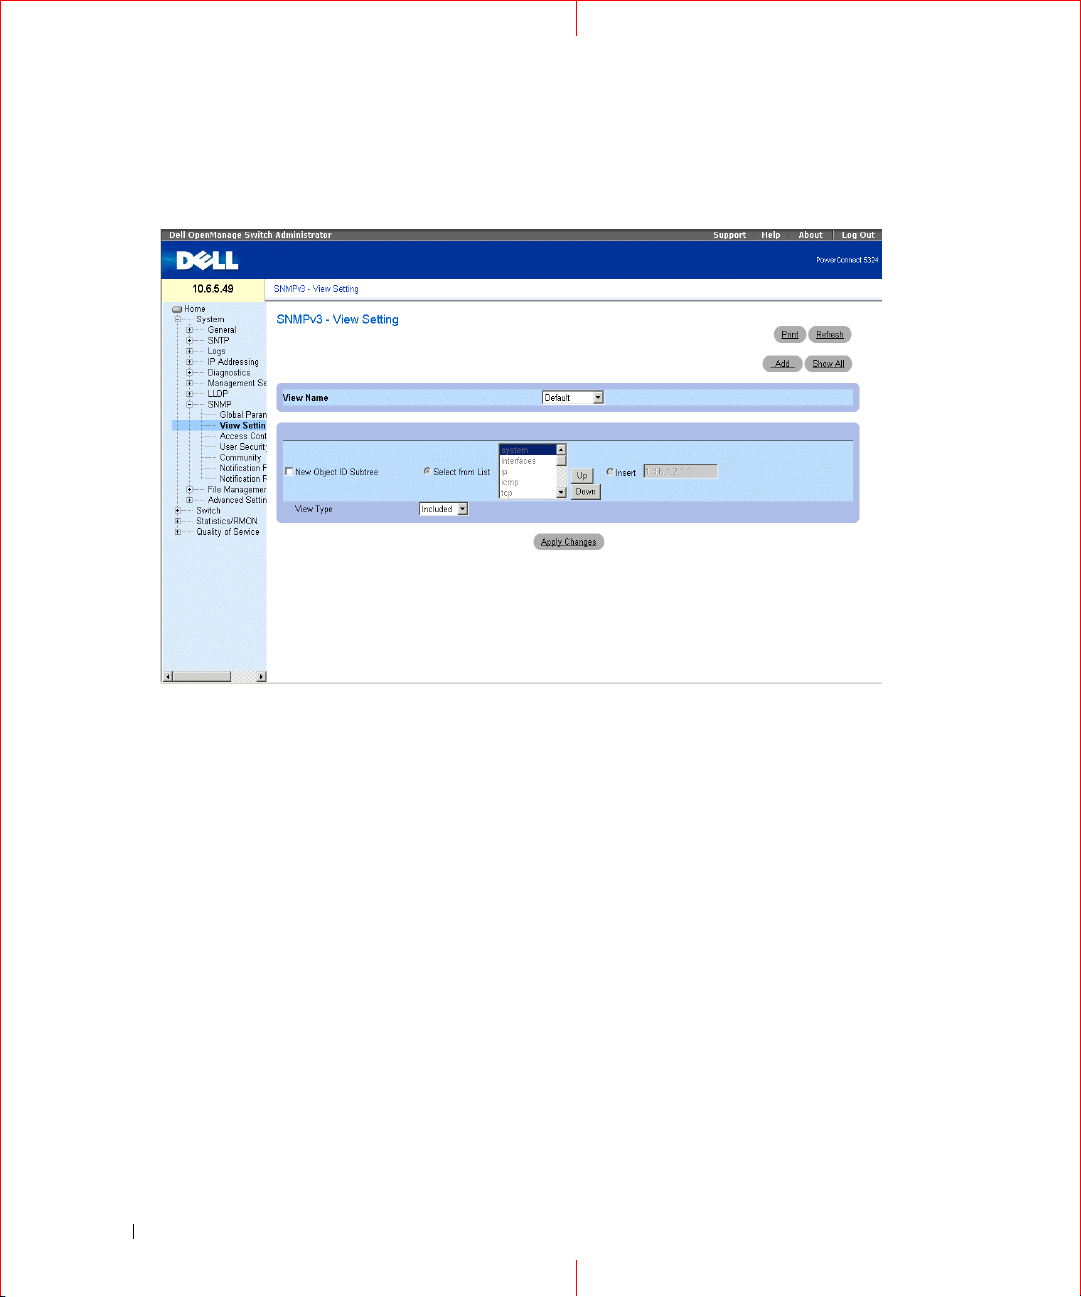
To open the
Figure 1-9. SNMPv3 View Settings
www.dell.com | support.dell.com
SNMPv3 View Settings
page, click
System
→ SNMP
→
View Settings
in the tree view.
View Name
— Contains a list of user-defined views. The view name can contain a maximum of 30 alphanumeric
characters. The possible field values are:
Default — Displays the default user-defined view.
DefaultSuper — Displays the default super user-defined view.
New Object ID Subtree
Selected from List
— Indicates the device feature OID included or excluded in the selected SNMP view.
— Select the device feature OID by using the Up and Down buttons to scroll through a list of
all device OIDs.
Insert
— Specify the device feature OID.
View Type
— Indicates if the defined OID branch will be included or excluded in the selected
Adding a View
1
Open the
2
Click
The
18
SNMPv3 View Settings
Add
.
Add a View
page opens.
page.
SNMP
view.

Figure 1-10. Add a View
3
Define the field.
4
Click
Apply Changes
SNMP
The
View is added, and the device is updated.
.
Displaying the View Table
1
Open the
2
Click
The
Figure 1-11. View Table
SNMPv3 View Settings
Show All
View Table
.
page opens.
page.
Defining SNMP Views Using CLI Commands
The following table summarizes the equivalent CLI commands for defining fields displayed in the
View Settings
Figure 1-12. SNMP View CLI Commands
CLI Command Description
snmp-server view
view-name oid-tree
{included | excluded}
page.
Creates or updates a view entry.
SNMPv3
19

Figure 1-12. SNMP View CLI Commands
CLI Command Description
show snmp views
viewname
[
]
Displays the configuration of views.
The following is an example of CLI commands:
Console (config)# snmp-server view user1 1 included
Console (config)# end
Console # show snmp views
www.dell.com | support.dell.com
Name OID Tree Type
------------- ----------------- --------
user1 iso included
Default iso included
Default snmpVacmMIB excluded
Default usmUser excluded
Default rndCommunityTable excluded
DefaultSuper iso included
20
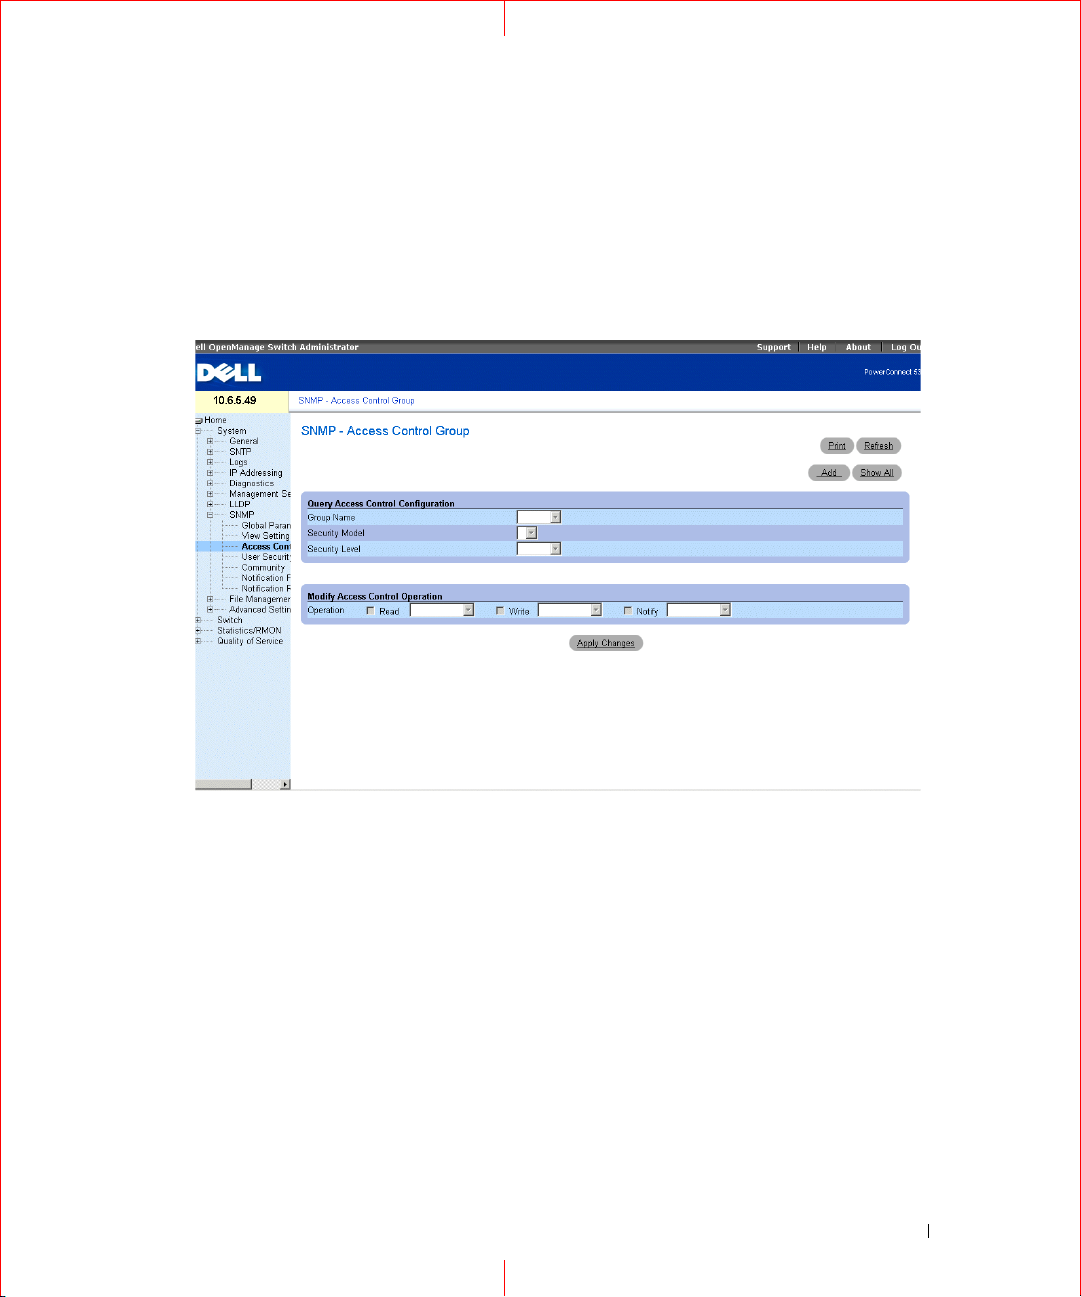
Defining SNMP Access Control
The
Access Control Add Group
access control privileges to SNMP groups. Groups allow network managers to assign access rights to specific
device features, or features aspects. To open the
Control
Figure 1-13. Access Control Group
in the tree view.
page provides information for creating SNMP groups, and assigning SNMP
Access Control Group
page, click
System→ SNMP → Access
Group Name
characters.
Security Model
SNMPv1
SNMPv2
SNMPv3
Security Level
field values are:
No Authentication
Authentication
authenticated.
Operation
— The user-defined group to whom access control rules are applied. The field range is up to 30
— SNMPv1 is defined for the group.
— SNMPv2 is defined for the group.
— SNMPv3 is defined for the group.
— The security level attached to the group. Security levels apply to SNMPv3 only. The possible
— Defines the group access rights. The possible field values are:
— Defines the SNMP version attached to the group. The possible field values are:
— Neither the Authentication nor the Privacy security levels are assigned to the group.
— Authenticates SNMP messages, and ensures the SNMP messages origin is
21

Read
— The management access is restricted to read-only, and changes cannot be made to the assigned
SNMP view.
Wri te
— The management access is read-write and changes can be made to the assigned SNMP view.
Notify
— Sends traps for the assigned SNMP view.
Defining SNMP Groups
1
Open the A
2
Click
The
www.dell.com | support.dell.com
Figure 1-14. Add an Access Control Group
ccess Control Group
Add
.
Add
an
Access Control Group
page.
page opens:
3
Define the fields in the
4
Click
Apply Changes
Add an Access Control Group
.
The group is added, and the device is updated.
Displaying the Access Table
1
Open the
2
Click
The Access Table opens.
22
Access Control Group
Show All
.
page.
page.
 Loading...